

Page 1

K ü h l s c h rank - fridge
frigorifero / frigorífico
GEBRAUCHSANWEISUNGEN
INSTRUCTION BOOK
LIBRETTO ISTRUZIONI
LIBRO DE INSTRUCCIONES
2222 222-22
ERN 2321
P
I
GB
D
ELECTROLUX HOME PRODUCTS OPERATIONS EUROPE
Page 2

2
WARNUNGEN UND WICHTIGE HINWEISE
Es ist sehr wichtig, daß diese Bedienungsanleitung mit dem betreffenden Gerät aufbewahrt wird. Sollte
dieses Gerät verkauft bzw. einer anderen Person gegeben werden, so ist es nötig, die Anleitung beizufügen, damit der neue Besitzer über den Betrieb des Gerätes bzw. die entsprechenden Warnungen.
Sollte dieses Gerät mit Magnet-Türverschluß als Ersatz für ein altes Gerät dienen, das noch mit einem
Schnappschloß ausgerüstet ist, so machen Sie bitte dieses Schloß unbrauchbar, bevor Sie das Gerät
beiseite stellen oder zum Müll geben. Sie verhindern damit, daß spielende Kinder sich selbst einsperren
und damit in Lebensgefahr kommen.
Diese Warnungen wurden zu Ihrem bzw. dem Schutz anderer erarbeitet. Wir bitten Sie daher, diese
aufmerksam zu lesen, bevor das Gerät in Betrieb genommen wird.
Sicherheit
• Dieses Gerät wurde hergestellt, um von
Erwachsenen benutzt zu werden. Es ist unbedingt darauf zu achten, daß Kinder es nicht
anfassen oder es als Spielzeug verwenden.
• Es ist gefährlich, die Eigenschaften dieses
Gerätes zu ändern.
• Vor der inneren bzw. äußeren Reinigung des
Gerätes sowie beim Auswechseln der Glühlampe
(bei damit ausgestatteten Geräten) das Gerät
spannungslos machen.
• Eis aus dem Gefrier- bzw. Frosterfach nicht
sofort essen, es könnte Kälte-Brandwunden
verursachen.
• Dieses Gerät ist schwer. Beim Versetzen bitte
darauf achten!
• Beachten Sie, dan während der Bewegung
des Gerätes der Kältemittelkreislauf nicht
beschädigt wird.
• Das Gerät darf nicht in unmittelbarer Nähe
von Heizkörpern oder Gasherden aufgestellt
werden.
• Ein Standort mit direkter Sonneneinstrahlung
sollte vermieden werden.
• Eine ausreichende Luftzirkulation an der
Geräterückseite muß gewährleistet sein.
Jegliche Beschädigung des Kühlkreislaufes
ist zu vermeiden.
• NUR FÜR GEFRIERSCHRÄNKE
(Einbaugeräte ausgenommen): ein optimaler
Aufstellungsort ist der Keller.
• Keine Elektrogeräte (z.B. Eismaschinen) in
das Gerät stellen.
Störungen - Kundendienst
• Sollte die Installation des Gerätes eine Änderung
der elektrischen Hausinstallation verlangen, so
darf diese nur von Elektro-Fachkräften durchgeführt werden.
• Eventuelle Reparaturen dürfen nur von einem
Kundendienst oder sonstigen autorisierten
Stellen durchgeführt werden.
• Es ist wichtig, daß nur Original-Ersatzteile verwendet werden.
• Dieses Gerät enthält im Kältekreislauf
Kohlenwasserstoff. Aus diesem Grund darf die
Wartung und das Nachfiillen ausschließlich von
autorisiertem Fachpersonal durchgeführt werden.
• Benutzen Sie nie Metallgegenstände um das
Gerät zu reinigen, da es beschädigt werden könnte.
• Tritt eine Störung oder ein Defekt ein, versuchen
Sie nicht, das Gerät selbst zu reparieren.
Elektrogeräte dürfen nur von Elektro-Fachkräften
repariert werden, da durch unsachgemäße
Reparaturen erhebliche Folgeschäden entstehen
können. Wenden Sie sich bitte an die nächste
Kundendienststelle.
Aufstellung
• Sich vergewissern, daß das Gerät nach der
Installation nicht auf dem Netzkabel steht.
Wichtig: Beschädigte Versorgungskabel müssen
durch ein Spezialkabel bzw. einen Spezialsatz
ersetzt werden, die beim Hersteller oder den
Kundendienststellen erhältlich sind.
• Während das Gerät in Betrieb ist, werden der
Verflüssiger und der Kompressor, die sich auf
der Rückseite des Gerätes befinden, heiß. Es ist
darauf zuachten, dass die Luft um das Gerät frei
zirkulieren kann, damit die Wärme abgeführt
werden kann. Eine ungenügende Luftzirkulation
kann einen unregelmässigen Betrieb bzw.
Schäden am Gerät verursachen. Achten Sie auf
die Installationsanweisungen.
• Teile, die heiß werden (z.B. Kompressorgehäuse,
Verflüssiger und zugehörige Rohre), sollen nicht
frei zugänglich sein. Wo es auch immer möglich
ist, soll das Gerät mit der Rückseite gegen eine
Wand gestellt werden.
Gedruckt auf Umweltschutzpapier
Page 3

32222 222-22
• Während des Transports kann es vorkommen,
daß das im Motorkompressor enthaltene Öl in
den Kältekreislauf abläuft. Man sollte mindestens
2 Std. warten, bevor das Gerät in Betrieb
genommen wird, damit das Öl in den Kompressor
zurückströmen kann.
Gebrauch
• Die Haushaltskühl- und Gefriergeräte sind nur
zur Einlagerung bzw. zum Einfrieren von
Nahrungsmitteln bestimmt.
• Die beste Leistung erzielt man bei
Raumtemperaturen von +18°C bis +43°C (Klasse
T); +18°C bis +38°C (Klasse ST); +16°C bis
+32°C (Klasse N); +10°C bis +32°C (Klasse SN);
die Geräteklasse ist auf dem Typschild
angegeben.
Zu beachten: Wird dieses Gerätes bei anderen
Umgebungstemperaturen betrieben als den in
der entsprechenden Klimaklasse angegebenen
Werten, sind folgende Hinweise zu beachten:
sinkt die Umgebungstemperatur unter den
angegebenen Mindestwert ab, könnte die
Lagertemperatur im Gefrierabteil nicht mehr
garantiert sein; es wird daher empfohlen, die
eingelagerten Lebensmittel so rasch als möglich
zu verbrauchen.
• Einaufgetautes Produkt darf nicht wieder
eingefroren werden.
• Für das Aufbewahren bzw. das Einfrieren der
Lebensmittel sind die Anweisungen des
Herstellers zu befolgen.
• In allen Kühl- und Gefriergeräten bedecken sich
im Laufe der Zeit alle kälteführenden Teile mit
einer Reif bzw. Eissicht. Diese Schicht wird je
nach Modell automatisch oder mit der Hand
abgetaut.
• Die Reifsicht niemals mit Metallgegenständen
abkratzen, das Gerät könnte beschädigt werden.
Dazu nur einen Plastikschaber verwenden.
• Zum Lösen der festgefrorenen Eisschalen keine
scharfkantigen oder spitzn Gegenstände
benutzen.
• Es sollten keine kohlensäurehaltigen Getränke in
das Gefrier- bzw. Frosterfach eingestellt werden,
sie könnten platzen.
Umweltnormen
Dieses Gerät enthält im Kühlkreislauf und in der
Isolierung kein ozonschädigendes Gas. Das
Gerät darf nicht mit dem Hausmüll entsorgt
werden. Eine Beschädigung des
Kältemittelkreislaufs, insbesondere des
Wärmetauschers auf der Rückseite des Gerätes,
muß verhindert werden. Auskunft über
Abholtermine oder Sammelplätze gibt die
örtliche Gemeindeverwaltung an. Die in diesem
Gerät verwendeten und mit dem Symbol
gekennzeichneten Materialien,sind
recyclingfähig.
Page 4

4
HINWEISE ZUR VERPACKUNGSENTSORGUNG
Verpackungen und Packhilfsmittel unserer ElektroGroßgeräte sind mit Ausnahme von Holzwerkstoffen
recyclingfähig und sollen grundsätzlich der
Wiederverwertung zugeführt werden.
Wir empfehlen Ihnen:
• Papier-, Pappe- und Wellpappeverpackungen
sollten in die entsprechenden Sammelbehälter
gegeben werden.
• Kunststoffverpackungsteile sollten ebenfalls in
die dafür vorgesehenen Sammelbehälter
gegeben werden. Solange solche in Ihrem
Wohngebiet noch nicht vorhanden sind, können
Sie diese Materialien zum Hausmüll geben.
Als Packhilfsmittel sind bei uns nur recyclingfähige
Kunststoffe zugelassen, z.B.:
In den Beispielen steht
PE für Polyäthylen** 02 = ^ PE-HD; 04 = ^ PE-LD
PP für Polypropylen
PS für Polystyrol
BESTANDTEILE AUS PLASTIK
Zur einfacheren Entsorgung und/oder Recycling ist
ein Großteil der Materialien dieses Gerätes
gekennzeichnet, um ihre Identifizierung zu
ermöglichen.
INHALT
Warnungen und wichtige Hinweise . . . . . . . . . . . . . . . . . . . . . . . . . . . . . . . . . . . . . . . . . . . . . . . . . .2
Hinweise zur Verpackungsentsorgung . . . . . . . . . . . . . . . . . . . . . . . . . . . . . . . . . . . . . . . . . . . . . . . .4
Gebrauch - Reinigung der Innenteile - Inbetriebnahme - Temperaturregelung - Hinweise zum . . . . . . .
richtigen Kühlen - Höhenverstellbare Abstellregale - Höhenverstellung der Türablage . . . . . . . . . . . . .5
Tips - Tips für das Kühlen - Regelmäßige Reinigung - Stillstandzeiten - Innenbeleuchtung . . . . . . . . .6
Wartung - Abtauen - Störungen - Technische Daten . . . . . . . . . . . . . . . . . . . . . . . . . . . . . . . . . . . . .7
Installation - Aufstellung - Elektrischer Anschluß . . . . . . . . . . . . . . . . . . . . . . . . . . . . . . . . . . . . . . . . .8
Installation - Montageanleitungen für den integrierten Einbau . . . . . . . . . . . . . . . . . . . . . . . . . . . . . . 9
41
8mm
PR167
A
B
PR168
PR167/1
D
B
Abra a porta do aparelho e a do móvel a 90° aprox.
Insira a esquadria (B) na guia (A). Mantenha juntas
a porta do aparelho e a do móvel e marque os furos
como indicado na figura. Retire as esquadrias e
realize uns furos de ø 2 mm a 8 mm do bordo
externo da porta. Posicione novamente a esquadria
por cima da guia e fixe com os parafusos anexos.
Para a eventual operação de alinhamento da porta
do móvel, utilize o jogo das aberturas ovaladas.
No fim da operação, é necessário verificar se a
porta do aparelho fecha correctamente.
Engate a cobertura (D) na guia (B).
02**
PE
05
PP
06
PS
SAN
PS
ABS
Page 5
5
Höhenverstellung der
Abstellregale
Zur Einlagerung von Lebensmittel-Packungen
verschiedener Größe, sind die Abstellregale der
Innentür höhenverstellbar.
Hierzu wie folgt vorgehen:
das Abstellregal stufenweise in Pfeilrichtung drücken
bis es frei wird; dann in der gewünschten Höhe
wieder anbringen.
Reinigung der Innenteile
Bevor Sie das Gerät in Betrieb nehmen, beseitigen
Sie den typischen «Neugeruch» am besten durch
Auswaschen der Innenteile mit lauwarmem Wasser
und einem neutralen Reinigungsmittel Sorgfältig
nachtrocknen.
Bitte keine Reinigungs- bzw. Scheuermittel
verwenden, die das Gerät beschädigen könnten.
Inbetriebnahme
Den Stecker in die Steckdose einsetzen. Kühl-
schranktür öffnen und Thermostatknopf von der
Stellung «O» (STOP) aus im Uhrzeigersinn drehen.
Das Gerät ist eingeschaltet. Den Stillstand des
Gerätes erhält man durch Drehen des
Thermostatknopfes auf das Symbol «O».
Temperaturregelung
Die Temperatur wird automatisch geregelt und kann
erhöht werden (wärmer) durch Drehen des Thermostatknopfes auf niedrigere Einstellungen oder
verringert (kälter) durch das Drehen auf höhere
Zahlen. Die richtige Einstellung erhält man, unter
Berücksichtigung folgender, die Innentemperatur
beeinflussender Faktoren:
• Raumtemperatur,
• Häufigkeit des Türöffnens,
Hinweise zum richtigen Kühlen
von Lebensmitteln und Getränken
Um die besten Leistungen des Kühlschrankes zu
erreichen, beachten Sie bitte folgendes:
•. Keine warmen Speisen oder dampfenden
Flüssigkeiten in den Kühlschrank einstellen.
•. Geruchverbreitende Lebensmittel müssen
abgedeckt oder eingewickelt werden.
•. Die Lebensmittel müssen so eingelagert werden,
daß die Kälte um sie frei zirkulieren kann.
GEBRAUCH
• Menge der eingelagerten Lebensmittel,
• Aufstellung des Gerätes.
Die mittlere Einstellung ist meistens die
geeignetste.
Wichtig
Höchste Kälteeinstellung bei hoher
Raumtemperatur und erheblicher
Lebensmittelmenge kann fortdauernden
Kühlschrank-Betrieb verursachen, dabei kann
sich eine Reif- oder Eisschicht an der hinteren
Innenwand bilden. In diesem Falle den
Thermostatknopf auf wärmere Temperaturen
stellen, damit das automatische Abtauen, mit
folglich geringerem Stromverbrauch,
gewährleistet werden kann.
D338
Höhenverstellbare Abstellregale
Der Abstand zwischen den verschiedenen
Abstellregalen kann je nach Wunsch geändert
werden. Dazu die Regale herausnehmen und auf
das gewünschte Niveau einsetzen.
Zur besseren Raumnutzung können die vorderen
Halbteile der Ablagen auf die rückwärtigen
hinaufgelegt werden.
40
Coloque as coberturas (B) nos buracos da
dobradiça sobre os extremos do perfil.
Separe as peças A, B, C, D, como indicado na
figura.
Apoie a guia (A) na parte interior da porta do móvel
em cima e em baixo como indicado na figura, e
marque a posição dos furos externos. Uma vez
preparados os furos, fixe a guia com os parafusos
anexos.
Engate a cobertura (C) na guia (A).
B
D726
A
B
PR266
C
D
50mm
A
20 mm
PR166
A
C
PR33
Page 6

6
TIPS
Tips für das Kühlen
Nachstehend einige praktische Ratschläge:
Fleisch (alle Sorten) in Plastikfolie einpacken und
auf die Glasplatte, die sich über der Gemüseschale
(über den Gemüseschalen) befindet, legen.
In dieser Lage kann das Fleisch längstens 1-2
Tage aufbewahrt werden.
Gekochte Nahrungsmittel, kalte Platten, usw.
zugedeckt aufbewahren. Sie können auf jeden
beliebigen Rost gelegt werden.
Obst und Gemüse: nach vorherigem Säubern und
Waschen in der Gemüseschale (in den
Gemüseschalen) aufbewahren.
Butter und Käse: in speziellen Behältern aufbe-
wahren oder in Alu- bzw. Plastikfolie einpacken, um
den Kontakt mit der Luft zu vermeiden.
Milch in Flaschen: gut verschlossen auf die Konsol
der Innentür stellen.
Wenn Bananen, Kartoffeln, Zwiebeln und
Knoblauch nicht verpackt sind, sollen sie nicht
in den Kühlschrank gegeben werden.
WARTUNG
Stillstandszeiten
Bei längerem Stillstand des Gerätes, müssen Sie
folgendermaßen vorgehen:
den Stecker aus der Steckdose ziehen;
alle Lebensmittel herausnehmen;
Gerät abtauen, Innenraum und Zubehörteile
reinigen;
die Türen offen lassen, um im Innern eine gute
Luftzirkulation zu gewährleisten und somit
Geruchsbildung zu vermeiden.
Innenbeleuchtung
Die Innenbeleuchtungslampe im Kühlabteil ist durch
folgende Arbeitsschritte zugänglich:
• Lösen Sie die Befestigungsschraube der
Lampenabdeckung.
• Heben Sie den beweglichen Teil ab, indem Sie
wie in der Abbildung gezeigt darauf drücken.
Sollte sich die Beleuchtung beim Öffnen
der Türe nicht einschalten, ist zu überprüfen, ob
die Glühbirne fest eingeschraubt ist; wenn die
Störung dennoch bestehen bleibt, die defekte
Glühbirne durch eine neue Birne gleicher
Leistung ersetzen.
Die maximale Leistung ist am Leuchtkörper
angegeben.
Regelmäßige Reinigung
Benutzen Sie nie Metallgegenstände um das Gerät
zu reinigen, da es beschädigt werden könnte. Den
Innenraum mit lauwarmem Wasser und Natron
reinigen.
Gut nachwaschen und sorgfältig trocknen.
Den Kondensator und den Motorkompressor mit
einer Bürste oder einem Staubsauger reinigen. Dies
begünstigt den guten Betrieb mit folglicher
Stromersparnis
Vor jeder Reinigungsarbeit immer den
Netzstecker aus der Steckdose ziehen.
Achtung: Dieses Gerät enthält im Kältekreislauf
Kohlenwasserstoff. Aus diesem Grund darf die
Wartung und das Nachfiillen ausschließlich von
autorisiertem Fachpersonal durchgeführt werden.
39
Faça escorregar o aparelho para dentro do
nicho. Empurre até o rebordo (A) entrar em
contacto com o móvel.
Apoie o aparelho no lado oposto ao da dobradiça da
porta. Fixe o aparelho com os 4 paratusos que Ihe
são fornecidos. Encaixe sob pressão, a grelha de ar
(C).
Coloque, pressionando, a cobertura das juntas entre
o aparelho e o móvel.
D724
E’ necessário que o nicho estaja equipado
com uma conduta de ventilação que tentha as
seguintes dimensões:
profundidade 50 mm
largura 540 mm
Instruções para encastrar
Altura (1) 1225 mm
Profundidade (2) 550 mm
Largura (3) 560 mm
Para um arejamento óptimo do aparelho é
obrigatório executar uma abertura, na base
onde o aparelho assenta. (der Fig.)
50 mm
min.
200 cm
2
200 cm
2
min.
D567
PR0
540
50
3
2
1
A
D022
D727
C
D
D411
Page 7

7
STÖRUNGEN
Falls das Gerät Störungen aufweisen sollte,
überprüfen Sie zuerst folgendes:
• Steckt der Netzstecker in der Steckdose?
• Befindet sich der Hauptschalter der elektrischen
Anlage in der richtigen Stellung?
• Ist die Stromzufuhr unterbrochen?
• Befindet sich der Thermostatknopf in richtiger
Stellung?
• Wasserpfütze auf dem Boden des Kühlfaches:
• Abtauwasserloch verstopft? (siehe Abschnitt
“Abtauen”)
Sollten Sie nach o.e. Prüfungen zu keinem Resultat
kommen, so wenden Sie sich bitte an unseren
nächsten Kundendienst.
Um ein rasches Beheben des Schadens zu
ermöglichen, ist es beim Anruf an den
Kundendienst notwendig, die Modell- und
Seriennummer anzugeben, die Sie dem
Garantieschein oder dem Typenschild (– linke
Seite – unten) entnehmen können.
Abtauen
Die sich auf dem Verdampfer des Kühlschrankes
bildende Reifschicht taut jedesmal in den Stillstandzeiten des Motorkompressors von selbst ab. Das
Tauwasser läuft durch eine Rinne in eine Plastikschale auf der Rückseite des Gerätes (über dem
Kompressor) und verdunstet dort.
Wir empfehlen, das in der Mitte der
Abtauwasserrinne des Kühlraumes befindliche
Ablaufloch für das Abtauwasser regelmäßig zu
reinigen, um zu vermeiden, daß das
Abtauwasser auf die eingelagerten Lebensmittel
tropft.Verwenden Sie den dafür vorgesehenen
Reiniger,der sich schon im Ablaufloch befindet.
D037
TECHNISCHE DATEN
Euro- Effizenz-Klasse
A
228
0,44
161
Nutzinhalt des Kühlschrankes in Liter
Energieverbrauch in kWh/24h
Energieverbrauch in kWh/Jahr
Die Technische Daten können Sie auf dem Typschild feststellen. Das Typschild befindet sich links unten an der
Seitewand.
38
Ligação eléctrica
Verifique, antes de ligar o aparelho, se a voltagem e
a frequência indicadas na placa sinalética
correspondem às da sua rede. Tolerância admitida
na voltagem nominal: ±6%. Para a adaptação do
aparelho a voltagens diferentes, é indispensável a
adjunção de um auto-transformador de uma
potência adequada.
Verifique se a tomada de corrente da parede está
em bom estado e apta a receber a ficha do fio de
alimentação do aparelho.
Esta última está conforme às normas em vigor e
possui uma entrada para a ligação à terra. Essa
ficha pode ser ligada a qualquer tomada de corrente
desde que esta tenha uma ponta de ligação à terra.
No caso em que a tomada não tenha a ligação à
terra, ligar o aparelho a uma instalação de ligação à
terra separada, conforme as normas em vigor,
consultando para isso um técnico especializado.
A Casa Construtora declina toda e qualquer
responsabilidade no caso de esta norma contra
os acidentes não ser cumprida e se verificarem
acidentes originados por deficiente ligação à
terra, ou falta dela.
- Este aparelho está conforme as seguintes
Directrizes Comunitárias:
- 87/308 de 2/6/87 respeitante à supressão das
interferências radio-eléctricas.
- 73/23 CEE 19/02/73 (Baixa Tensão) e sucessivas
modificações;
- 89/336 CEE 03/05/89 (Compatibilidade
Electromagnética) e sucessivas modificações.
INSTALAÇÃO
Se este aparelho, munido de fecho
magnético, veio substituir um outro que
tinha portas com fecho de mola,
aconselhamos a inutilizar este fecho, antes
do aparelho ser posto definitivamente de
lado. Esta precaução procura evitar que
crianças, brincando, se possam fechar no
aparelho o que seria altamente perigoso.
Colocação
Coloque o aparelho longe de qualquer fonte de calor
(aquecimento, fogões, ou raios solares demasiado
intensos).
O aparelho deve poder ser desligado da rede; uma
vez realizada a instalação, portanto, é necessário
que a ficha fique acessível.
Page 8

8
Elektrischer Anschluß
Bevor Sie den Stecker in die Steckdose einstecken,
überprüfen Sie bitte, daß die auf dem Typenschild
des Gerätes angegebene Spannung sowie
Frequenz mit dem Anschlußwert des Hauses
übereinstimmen. Eine Abweichung von ±6% von der
Nominalspannung ist zulässig. Für die Anpassung
des Gerätes an andere Spannungen muß ein
Spartransformator angemessener Leistung
vorgeschaltet werden.
Das Gerät muß unbedingt vorschriftsmäßig geerdet
werden. Zu diesem Zweck ist der Stecker des
Speisekabels mit dem dafür vorgesehenen Kontakt
versehen. Sollte die Netzleitung im Haus nicht mit
einer Erdleitung versehen sein, so muß das Gerät
an eine getrennte Erdleitung vorschriftsmäßig und
unter Hinzuziehung eines Fachmanns
angeschlossen werden.
Die Erzeugerfirma lehnt jede Verantwortung ab,
falls diese Unfallverhütungsvorschrift nicht
beachtet wird.
Dieses Gerät entspricht der folgende EWG
Richtlinie:
- 87/308 EWG vom 2.6.87 (DeutschlandAusführung) bzw. der ÖVE-Richtlinie Nr. F 61/84
(Österreich-Ausführung) bezüglich
Funkentstörung.
- 73/23 EWG vom 19/02/73 (Niederspannung)
und folgende Änderungen;
- 89/336 EWG vom 03/05/89
(Elektromagnetische Verträglichkeit) und
folgende Änderungen.
Achtung:
Es muß möglich sein, das Gerät vom Netz zu
trennen; nach der Installation muß sie Steckdose
daher zugänglich bleiben.
INSTALLATION
Aufstellung
Das Gerät sollte nicht in der Nähe von
Wärmequellen wie Heizkörpern oder Öfen
aufgestellt und vor direkter Sonneneinstrahlung
geschützt werden. Für den Einbau bitte den
entsprechenden Abschnitt durchlesen.
37
ASSISTÊNCIA TÉCNICA E PEÇAS DE
SUBSTITUIÇÃO
Se o aparelho não funcionar verifique:
• Se a ficha está bem introduzida na tomada e se
há corrente na rede.
• Se o botão do termóstato está na posição
correcta.
No caso de haver vibrações ou ruídos verifique se o
aparelho está em contacto com moveis que podem
transmitir ou ampliar ruídos e vibrações.
Verifique também se as tubagens do sistema
refrigerante não vibram. Se houver restos de água
no interior do frigorifico verifique se o orifício de
descarga não está obstruído.
Se depois de todas estas verificações o problema
persistir dirija-se ao seu vendedor ou o serviço de
assistência mais perto da sua residência.
Para obter uma assistência mais rápida indique
os dados da place de identificac,ão do aparelho
que se encontra no interior do electrodoméstico
na parede do fundo no lado esquerdo, e também
o modelo número de serie e certificado de
garantia.
DADOS TÉCNICOS
Classe de eficiência
A
228
0,44
161
Capacidade lìquida em litros do frigorìfico
Consumo energético en kWh/24h
Consumo energético en kWh/ano
Os dados técnicos são indicados na placa de matrícula que se encontra no lado esquerdo interno do apareho.
Page 9

9
Tür öffnen und Gerät gegenüber der Bandseite an
die Möbelseitenwand anrücken. Gerät mit den 4 beiliegenden Schrauben befestigen.
Belüttungsgitter (C) und Scharnierabdeckung (D)
aufstecken.
Montageanleitung für den
integrierten Einbau
Nischenmaße
Höhe (1) 1225 mm
Tiefe (2) 550 mm
Breite (3) 560 mm
Zur Transportsicherung wurde die Gerätetör an
beiden Anschlagseiten mit Scharnierstiften befestigt.
Je nach Türanschlag, Scharnierstift auf einer Seite
oben und unten entfernen.
Aus Gründen der Sicherheit muß eine
Mindestbelüftung gesichert sein, wie aus der
Abb.hervorgeht.
Achtung: Die Ventilations - Öffnungen
müssenimmer saubergehalten werden.
Ferner ist auch am hinteren Einbauschrankteil ein
Lüftungskamin mit filgenden Massen notwendig:
Tiefe 50 mm
Breite 540 mm
50 mm
min.
200 cm
2
200 cm
2
min.
D567
Gerät in die Nische einschieben bis die
Anschlagleiste (A) unten am Möbel anliegt.
A
D022
D727
C
D
PR0
540
50
3
2
1
36
MANUTENÇÃO
Antes de qualquer intervenção no
aparelho, aconselhamos que se desligue a
tomada de corrente.
Aviso
Este electrodoméstico contém hidrocarbonetos
no sistema de refrigeração; a manutenção e a
recarga deve ser, portanto, executada apenas
por técnicos autorizados.
Limpeza periódica
Lave as paredes e acessórios com água tépida e
bicarbonato de soda. Enxague e seque
cuidadosamente; limpe o condensador e o
motocompressor com uma escova ou um aspirador.
Esta operação vai melhorar o funcionamento com
conseguinte poupança de energia.
Paragem prolongada
No caso de se ausentar por um período prolongado,
desligue a tomada de corrente, esvazie, degele e
limpe o aparelho.
Mantenha as portas entre-abertas durante toda a
não utilização, para facilitar a circulação do ar no
interior e evitar a formação de cheiros
desagradáveis.
Lâmpada de iluminação
A lâmpada de iluminação do compartimento de
refrigeração pode ser alcançada da seguinte
maneira:
• desaperte os parafusos de fixação do difusor da
luz;
• desengate a parte móvel como indicado na
figura.
No caso em que, com a porta aberta, a
lâmpada não acender, controle que esteja
bem apertada; se o problema permanecer,
substitua a lâmpada por outra de igual
potência.
A potência està indicada no difusor.
Descongelação
A descongelação do refrigerador dá-se
automaticamente durante cada período de paragem
do compressor. A água proveniente do
descongelação é evacuada para um recipiente
situado na parte detrás do aparelho, por cima do
compressor, e onde ela se evapora.
Não se esqueça de limpar periodicamente o
orifício de escoamento de água do
descongelação que se encontra no centro da
goteira do compartimento refrigerador para
evitar que a água possa transbordar e cair sobre
os alimentos. Utilize para esse efeito a pequena
barra que se encontra no orifício.
D411
D037
Page 10

10
In die Befestigungs- und Scharnierlöcher
beiliegende Abdeckkappen (B) eindrücken.
Fugenabdeckprofiloben um die Winkeldicke
ausschneiden und zwischen Gerät und
Möbelseitenwand eindrücken.
Die Teile A, B, C, D abnehmen, wie in der Abb.
gezeigt wird.
Die Schiene (A) auf der Innenseite der Möbeltür
oben und unten auflegen (siehe Abb.) und die
Position der äußeren Bohrlöcher anzeichnen.
Nachdem die Löcher gebohrt wurden, die Schiene
mit den mitgelieferten Schrauben befestigen.
35
Conselhos para a refrigeração
Carne (de qualquer tipo): envolva esses alimentos
em sacos plásticos e coloque-as na divisão
imediatamente acima das caixas para legumes.
O período de conservação é de 1 a 2 dias, no
máximo.
Alimentos cozidos, pratos frios, etc: coloque-os,
bem cobertos, numa prateleira qualquer.
Frutas e legumes: nas caixas de legumes depois
de lavados.
Bananas, batatas, cebola e alho, se não forem
preparados, não se conservam no refrigerador.
CONSELHOS
Colocação das prateleiras da porta
Pode modificar a posição das prateleiras da porta.
Para isso proceda da seguinte forma:
Empurre gradualmente a prateleira no sentido que
indica a seta até desencaixa-la. Depois monte-a no
lugar desejado fazendo a operação inversa.
D338
Prateleiras amovíveis
Nas paredes do compartimento há calhas que
permitem colocar as prateleiras a diferentes alturas.
Para uma melhor utilização do espaço pode
sobreporse as meias prateleiras anteriores às meias
prateleiras posteriores.
PR249
D724
D726
PR266
A
C
B
B
D
50mm
A
20 mm
PR166
Page 11

11
Gerätetür und Möbeltür auf ca. 90° öffnen. Den
Winkel (B) in der Schiene (A) einsetzen. Gerätetür
und Möbeltür zusammenhalten und die Bohrlöcher
anzeichnen (siehe Abb.).Winkel abnehmen und die
Bohrlöcher mit Ø 2mm und einem Abstand von 8
mm von der Türaußenkante ausführen. Den Winkel
wieder auf der Schiene anbringen und mit den
mitgelieferten Schrauben befestigen.
8mm
PR167
A
B
PR168
PR167/1
D
B
Für eine allfällig notwendige Ausrichtung der
Möbeltür, den Spielraum der Langlöcher nutzen.
Nach Beendigung der Arbeiten den einwandfreien
Verschluß der Gerätetür überprüfen.
Die Abdeckung (D) in die Schiene (B) eindrücken,
bis sie einrastet.
PR33
C
A
Die Abdeckung (C) in die Schiene (A) eindrücken,
bis sie einrastet.
34
Limpeza das partes internas
Estando o aparelho convenientemente instalado,
antes de o utilizar, aconselhamos a sua limpeza
cuidadosa com água tépida e sabão neutro para
retirar o cheiro característico do “novo”.
Não utilize detergentes ou pós abrasivos,
que podem danificar os acabamentos.
Enxague e seque cuidadosamente.
Arranque
Terminada a operação de limpeza, ligue a ficha à
tomada de corrente, abra a porta e coloque o botão
do termóstato além da posição “0” (paragem). A
máquina está a funcionar.
Para parar o aparelho, coloque o botão do
termóstato na posição “0”.
Régulação da température
A temperatura no interior do refrigerador e do
congelador é regulada automaticamente e pode ser
aumentada (menos frio) rodando o botão para os
números mais altos. A posição correcta, de qualquer
modo, deve ser individuada considerando que a
temperatura no interior da caixa depende de vários
factores, tais como::
• a temperature ambiente;
• a frequência de abertura da porta;
• a qualidade das provisões guardadas no aparelho;
• a colocaçáo do refrigerador.
A posição intermédia é a mais indicada.
Importante
Assim que o termóstatoestiver regulado na
posição de frio máximo, com una temperatura
ambiente elevada e a caixa do aparelho cheia de
provisões, pode acontecer que o compressor
funcione em marcha contînua. Nesse caso darse-à formação de gelos no evaporador do
compartimento refrigerador. Para evitar este
inconveniente coloque o botão numa posição
menos fria de maniera a permitir a
descongelação automàtica e, por conseguinte,
um menor consumo de energia eléctrica.
Refrigeração dos alimentos
Para obter um melhor rendimento do seu aparelho:
reparta as provisões de maneira a que o ar possa
circular, facilmente, à volta delas;
• não introduza, na caixa, alimentos ainda quentes
ou líquidos em evaporação;
• cubra os alimentos, de especial modo se são
aromáticos;
USO E FUNCIONAMIENTO
Page 12

12
WARNINGS
It is most important that this instruction book should be retained with the appliance for future
reference. Should the appliance be sold or transferred to another owner, or should you move house
and leave the appliance, always ensure that the book is supplied with the appliance in order that the
new owner can be acquainted with the functioning of the appliance and the relevant warnings.
If this appliance featuring magnetic door seals is to replace an older appliance having a spring lock
(latch) on the door or lid, be sure to make that spring lock unusable before you discard the old
appliance. This will prevent it from becoming a death-trap for a child.
These warnings are provided in the interest of safety.You must read them carefully before installing or
using the appliance.
General Safety
• This appliance is designed to be operated by
adults. Children should not be allowed to tamper
with the controls or play with the product.
• It is dangerous to alter the specifications or
modify this product in any way.
• Before any cleaning or maintenance work is carried
out, be sure to switch off and unplug the appliance.
• This appliance is heavy. Care should be taken
when moving it
• Ice lollies can cause frost burns if consumed
straight from the appliance.
• Take utmost care when handling your
appliance so as not to cause any damages to
the cooling unit with consequent possible
fluid leakages.
• The appliance must not be located close to
radiators or gas cookers.
• Avoid prolonged exposure of the appliance to
direct sunlight.
• There must be adequate ventilation round the
back of the appliance and any damage to the
refrigerant circuit must be avoided.
• For freezers only (except built-in models): an
ideal location is the cellar or basement.
• Do not use other electrical appliances (such
as ice cream makers) inside of refrigerating
appliances.
Service/Repair
• Any electrical work required to install this
appliance should be carried out by a qualified
electrician or competent person
• This product should be serviced by an authorized
Service Centre, and only genuine spare parts
should be used.
• Under no circumstances should you attempt to
repair the appliance yourself. Repairs carried out
by inexperienced persons may cause injury or
more serious malfunctioning. Refer to your local
Service Centre, and always insist on genuine
spare parts.
• This appliance contains hydrocarbons in its
cooling unit; maintenance and recharging must
therefore only be carried out by authorized
technicians.
Use
• The domestic refrigerators and freezers are
designed to be used specifically for the storage
of edible foodstuffs only.
• Best performance is obtained with ambient
temperature between +18°C and +43°C (class T);
+18°C and +38°C (class ST); +16°C and +32°C
(class N); +10°C and +32°C (class SN).The
class of your appliance is shown on its rating
plate.
Warning: when the ambient temperature is not
included within the range indicated for the class
of this appliance, the following instructions must
be observed: when the ambient temperature
drops below the minimum level, the storage
temperature in the freezer compartment cannot
be guaranteed; therefore it is advisable to use the
food stored as soon as possible.
• Frozen food must not be re-frozen once it has
been thawed out.
• Manufacturers’ storage recommendations should
be strictly adhered to. Refer to relevant
instructions.
• The inner lining of the appliance consists of
channels through which the refrigerant passes. If
these should be punctured this would damage the
appliance beyond repair and cause food loss. DO
NOT USE SHARP INSTRUMENTS to scrape off
frost or ice. Frost may be removed by using a
plastic scraper. Under no circumstances should
solid ice be forced off the liner. Solid ice should be
allowed to thaw when defrosting the appliance.
33
ÍNSTALAÇÃO
Instalação
• Durante o normal funcionamento o condensador
e o compressor, colocados na parte de trás do
aparelho, aquecem sensivelmente. Por razões de
segurança a ventilação deve ser como indicado
na respectiva Figura.
Atenção: mantenha as aberturas para a
ventilação livres de qualquer obstrução.
• O aparelho aquece, sensivelmente, ao nível do
con-densador e do compressor. Certifique-se
que o ar circula, livremente, à volta do aparelho.
Uma ventila-ção insuficiente ocasionaria um mau
funcionamen-to, danos para o aparelho e perda
dos alimentos no seu interior. Siga as instruções
para a correcta instalação do aparelho.
• Assegure-se, quando instalar o aparelho, que este
não repousa sobre o cabo de alimentação eléctrica.
Importante: se o cabo de alimentação se danificar,
deverá ser substituído por um cabo especial ou por
um conjunto, disponíveis junto do construtor ou do
serviço de assistência técnica.
• Os componentes do aparelho que aquecem devido
ao seu funcionamento não devem estar expostos.
Sempre que possível as costas do aparelho devem
ficar encostadas a uma parede
• Desligue sempre a tomada de corrente antes de
proceder à limpeza ou qualquer operação de
manutenção do aparelho.
• Ao transportar o aparelho na horizontal, pode
acontecer que o óleo contido no compressor
escorra para o circuito refrigerante. É portanto
aconselhável esperar pelo menos duas horas antes
de ligar o aparelho à corrente.
Protecão do ambiente
Este aparelho não contem, no seu circuito
refrigerante e nas suas matérias isolantes, gases
nocivos à camada de ozono.Mesmo assim este
aparelho deve, quando for destruido,receber os
cuidados convenientes, de acordo com as
disposições em vigor para a protecção do melo
ambiente. Os materiais utilizados neste
aparelho, marcados com o simbolo são
reciclàveis.
Advertencias e conselhos importantes . . . . . . . . . . . . . . . . . . . . . . . . . . . . . . . . . . . . . . . . . . . . . . . . . . .32
Uso / Limpieza las partes internas - Arranque - Régulação da témperatura - Refrigeração dos alimentos . .34
Uso / Prateleiras amovíveis - Colocação das pratelieras da porta - . . . . . . . . . . . . . . . . . . . . . . . . . . . . . . .
Conselhos / Conselhos para a congelação . . . . . . . . . . . . . . . . . . . . . . . . . . . . . . . . . . . . . . . . . . . . . . . . .35
Manutenção / Limpeza periódica - Paragem prolongada - Lâmpada de iluminação - Descongeção . . . . . .36
Assistência técnica e peças de substituição - Dados técnicos . . . . . . . . . . . . . . . . . . . . . . . . . . . . . . .37
Instalação / Colocação - Ligação eléctrica . . . . . . . . . . . . . . . . . . . . . . . . . . . . . . . . . . . . . . . . . . . . . . . . .38
Instalación / Instruções para encastrar . . . . . . . . . . . . . . . . . . . . . . . . . . . . . . . . . . . . . . . . . . . . . . . . . . . .39
Page 13

13
CONTENTS
Warnings . . . . . . . . . . . . . . . . . . . . . . . . . . . . . . . . . . . . . . . . . . . . . . . . . . . . . . . . . . . . . . . . . . . . . . . . . . .12
Use - Cleaning the interior - Operation - Temperature regulation - Fresh food refrigeration . . . . . . . . . . . . .14
Use - Movable shelves - Positioning the door shelves -Hints - Hints for refrigeration . . . . . . . . . . . . . . . . .15
Maintenance - Periods of no operation - Periodic cleaning - Interior light - Defrosting . . . . . . . . . . . . . . . .16
Customer service and spare parts - Technical information - Installation - Location - . . . . . . . . . . . . . .
Electrical connection . . . . . . . . . . . . . . . . . . . . . . . . . . . . . . . . . . . . . . . . . . . . . . . . . . . . . . . . . . . . . . . . . . .17
Door reversibility - Building-in instructions . . . . . . . . . . . . . . . . . . . . . . . . . . . . . . . . . . . . . . . . . . . . . . . . . . .18
• Do not place carbonated or fizzy drinks in the
freezer as it creates pressure on the container,
which may cause it to explode, resulting in
damage to the appliance. Do not use a
mechanical device or any artificial means to
speed up the thawing process other than those
recommended by the manufacturer. Never use
metal objects for cleaning your appliance as it
may get damaged.
Installation
• During normal operation, the condenser and
compressor at the back of the appliance heat up
considerably. For safety reasons, minimum
ventilation must be as shown in the instructions.
Attention: keep ventilation openings clear of
obstruction.
• Care must be taken to ensure that the appliance
does not stand on the electrical supply cable.
Important: if the supply cord is damaged, it must
be replaced by a special cord or assembly available from the manufacturer or its service agent.
• If the appliance is transported horizontally, it is
possible that the oil contained in the compressor
flows in the refrigerant circuit. It is advisable to
wait at least two hours before connecting the
appliance to allow the oil to flow back in the
compressor.
• There are working parts in this product which
heat up. Always ensure that there is adequate
ventilation as a failure to do this will result in
component failure and possible food loss. See
installation instructions.
• Parts which heat up should not be exposed.
Wherever possible the back of the product should
be against a wall.
Environment Protection
This appliance does not contain gasses which
could damage the ozone layer, in either its
refrigerant circuit or insulation materials.The
appliance shall not be discarded together with
the urban refuse and rubbish. Avoid damaging
the cooling unit, especially at the rear near the
heat exchanger. Information on your local
disposal sites may be obtained from municipal
authorities.The materials used on this appliance
marked by the symbol are recyclable.
32
ADVERTÊNCIAS E CONSELHOS IMPORTANTES
É muito importante que este manual de utilização acompanhe o aparelho para garantir uma futura utilização
correcta. Se o aparelho for vendido ou emprestado a uma outra pessoa, o manual de utilização deve, como
acima se faz notar, acompanhá-lo, de maneira que o utilizador possa ser informado do seu funcionamento,
das advertências e conselhos. Se este aparelho, munido de fecho magnético, veio substituir um outro que
tinha portas com fecho de mola, aconselhamos a inutilizar este fecho, antes do aparelho ser posto
definitivamente de lado. Esta precaução procura evitar que crianças, brincando, se possam fechar no
aparelho o que seria altamente perigoso.
Essas advertências têm por fim garantir a segurança dos utilizadores. Agradecemos, portanto, que leia o
manual atentamente, antes de instalar e utilizar o aparelho.
Segurança
• Este aparelho foi concebido para ser utilizado por
adultos. Deve, por isso, pô-lo ao abrigo das crianças
não consentindo que dele se sirvam como brinquedo.
•É perigoso modificar ou tentar modificar as
características deste aparelho.
• Este aparelho é pesado.Tenha o maior cuidado
quando o deslocar
• Não consuma certos produtos, tais como
gelados, imediatamente após terem saído do
aparelho; a temperatura muito baixa a que se
encontram pode provocar queimaduras.
• Este aparelho contém hidrocarbonetos no
circuito refrigerante; portanto, a manutenção
e a recarga devem ser efectuadas
exclusivamente por pessoal autorizado pelo
produtor.
• Preste a máxima atenção ao deslocar o
aparelho, para não danificar as partes do
circuito refrigerante, evitando assim possíveis
saídas de fluido.
• O aparelho não deve ser instalado perto de
elementos de aquecimento ou fogões de gás.
• Evite a exposição prolongada do aparelho aos
raios do sol.
• A parte de trás do aparelho deve receber uma
suficiente ventilação e deve ser evitado
qualquer dano ao circuito refrigerante.
• Somente para os congeladores (excepto os
de encaixe): a melhor colocação é na cave.
Assistência
• Se uma eventual modificação da instalação
eléctrica, na casa do utilizador, tiver de ser feita para
tornar possível a instalação do aparelho, deve, esta,
ser efectuada por pessoal qualificado.
• Este aparelho deve ser assistido por um Centro
de Assistência autorizado, sendo apenas
aplicadas peças de origem.
• Em caso de avaria, não tente você mesmo, reparar
o aparelho. As reparações executadas por pessoas
inexperientes, podem causar danos físicos e materiais (aumentando as avarias a serem reparadas).
Faça apelo ao seu Centro de Assistência mais
próximo e insista em peças genuínas.
Utilização
• Os frigoríficos e/ou congeladores domésticos
destinam-se, unicamente, à conservação e/ou
congelação de alimentos.
• Os melhores rendimentos são conseguidos com
temperaturas ambiente incluídas entre +18°C e
+43°C (Classe T); +18°C e +38°C (Classe ST);
+16°C e +32°C (Classe N); +10°C e +32°C
(Classe SN); a classe a que pertence o aparelho
é indicada na placa de matrícula (posta na cela
ao lado do compartimento dos legumes).
Atenção: com temperaturas ambiente não
incluídas nas indicadas para a classe climática a
que pertence o produto, é preciso cumprir as
indicações seguintes: quando a temperatura
ambiente descer abaixo do valor mínimo, pode
não ser garantida a temperatura de conservação
no compartimento congelador; portanto,
aconselha-se a consumar rapidamente os
alimentos nele contidos.
• Um produto descongelado não deve, em
nenhum caso, voltar a ser congelado.
• Siga as indicações do fabricante para a
conservação e/ou congelação dos alimentos.
• O revestimento interior do aparelho em composto
de pequenos tubos por onde passa o refrigerante.
Se estes tubos forem danificados o aparelho ficará
irremediavelmente avariado, provocando a perda
dos alimentos no seu interior. NÃO UTILIZE
OBJECTOS PONTEAGUDOS para raspar o gelo
acumulado.Esse gelo pode ser raspado utilizando a
espátula. Para eliminar grandes quantidades de
gelo acumulado, é aconselhável deixá-lo derreter.
Veja as instruções para a descongelação.
• Não coloque no compartimento/congelador a baixa
temperatura, garrafas ou latas com bebidas
gaseificadas dado que se cria uma pressão elevada
no interior da garrafa e/ou lata havendo o perigo de
este explodir. Desta explosão resultariam danos
graves para o aparelho.
Imprimido en papel reciclado
Page 14

14
Cleaning the interior
Before using the appliance for the first time, wash
the interior and all internal accessories with lukewarm water and some neutral soap so as to remove
the typical smell of a brand-new product, then dry
thoroughly.
Do not use detergents or abrasive
powders, as these will damage the finish.
Operation
Insert the plug into the wall socket.
Open the refrigerator door and turn the thermostat
knob, clockwise, beyond the «O» (STOP) position.
The appliance will start to operate.
To stop operation, simply turn the thermostat knob to
position «O»
USE
Temperature regulation
The temperature is automatically regulated and can
be increased to achieve a higher temperature
(warmer) by rotating the thermostat knob toward
lower settings or reduced (colder) rotating the knob
towards higher settings.
However, the exact setting should be chosen
keeping in mind that the temperature inside the
refrigerator depends on:
• room temperature;
• how often the door is opened;
• the quantity of food stored;
• location of appliance.
A medium setting is generally the most suitable.
Important
If the ambient temperature is high or the
appliance is fully loaded, and the appliance is
set to the lowest temperatures, it may run
continuously causing frost to form on the rear
wall. In this case the dial must be set to a higher
temperature to allow automatic defrosting and
therefore reduced energy consumption.
Fresh food refrigeration
To obtain the best performance:
• do not store warm food or evaporating liquids in
the refrigerator;
• do cover or wrap the food, particularly if it has a
strong flavour.
• Position food so that air can circulate freely round it.
31
PR167/1
D
B
Inserire a scatto il coperchietto (D) sulla guida (B)
Aprire la porta dell’apparecchiatura e quella del
mobile a 90° ca. Inserire la squadretta (B) nella
guida (A). Tenere insieme la porta dell’apparecchiatura e quella del mobile e segnare i fori come
indicato in figura.
Togliere le squadrette e fare dei fori di Ø 2 mm a 8
mm dal bordo esterno della porta. Posizionare
nuovamente la squadretta sopra le guida e fissare
con le viti in dotazione.
8mm
PR167
A
B
PR168
Per l’eventuale operazione di allineamento della
porta del mobile, utilizzare il gioco dei fori asolati.
Al termine delle operazioni è necessario controllare
l’esatta chiusura della porta dell’apparecchiatura.
Per un sollecito intervento è importante, all’atto
della chiamata, indicare il tipo di difetto, il
modello di apparecchiatura (Mod.), il numero di
prodotto (Prod. No.) e il numero di fabbricazione
(Ser. No.), rilevati dal certificato di garanzia o
dalla targhetta matricola posta all’interno
dell’apparecchiatura.
CENTRI ASSISTENZA
Page 15

15
Positioning the door shelves
To permit storage of food packages of various sizes,
the door shelves can be placed at different heights.
To make these adjustments proceed as follows:
Gradually pull the shelf in the direction of the arrows
until it comes free, then reposition as required.
HINTS
Hints for refrigeration
Useful hints:
Meat (all types): wrap in polythene bags and place
on the glass shelf above the vegetable drawer.
For safety, store in this way only one or two days
at the most.
Cooked foods, cold dishes, etc..: these should be
covered and may be placed on any shelf.
Fruit and vegetables: these should be thoroughly
cleaned and placed in the special drawer(s)
provided.
Butter and cheese: these should be placed in
special airtight containers or wrapped in aluminium
foil or polythene bags to exclude as much air as
possible.
Milk bottles: these should have a cap and should
be stored in the bottle rack on the door.
Bananas, potatoes, onions and garlic, if not
packed, must not be kept in the refrigerator.
Movable shelves
The walls of the refrigerator are equipped with a
series of runners so that the shelves can be
positioned as desired.
For better use of space, the front half-shelves can lie
over the rear ones.
D338
Inserire a scatto il coperchietto (C) sulla guida (A)
30
Applicare a pressione il coprifuga, tra
apparecchiatura e mobile.
Applicare i coperchietti (B) sulle alette dei coprifuga
e nei fori per le cerniere.
Appoggiare la guida (A) sulla parte interna della
porta del mobile sopra e sotto come indicato in
figura e segnare la posizione dei fori esterni. Dopo
aver preparato i fori fissare la guida con le viti in
dotazione.
Separare i pezzi A, B, C, D come da figura
D724
B
D726
A
C
PR266
50mm
A
B
D
20 mm
PR166
A
PR33
C
Page 16

16
Defrosting
Frost is automatically eliminated from the evaporator
of the refrigerator compartment every time the motor
compressor stops, during normal use. The defrost
water drains out through a trough into a special
container at the back of the appliance, over the
motor compressor, where it evaporates.
It is important to periodically clean the defrost
water drain hole in the middle of the refrigerator
compartment channel to prevent the water
overflowing and dripping onto the food inside.
Use the special cleaner provided, which you will
find already inserted into the drain hole.
MAINTENANCE
Unplug the appliance before carrying out any
maintenance operation.
Warning
This appliance contains hydrocarbons in its
cooling unit; maintenance and rechanging must
therefore only be carried out by authorized
technicians.
Periods of non-operation
When the appliance is not in use for long periods,
take the following precautions:
remove the plug from the wall socket;
remove all food;
defrost and clean the interior and all accessories;
leave the door ajar to allow air to circulate to prevent
unpleasant smells.
Interior light
The light bulb inside the refrigerator compartment
can be reached as follows:
1. unscrew the light cover securing screw.
2. unhook the moving part as shown in the figure.
If the light does not come on when the door
is open, check that it is screwed into place
properly. If it still does not light up, change
the bulb.
The rating is shown on the light bulb
cover.
Periodic cleaning
Clean the inside with warm water and bicarbonate of
soda.
Rinse and dry thoroughly.
Clean the condenser (black grill) and the
compressor at the back of the appliance with a
brush or a vacuum cleaner.This operation will
improve the performance of the appliance and save
electricity consumption.
29
Istruzioni per l’incasso
integrale
Dimensioni del vano
Altezza (1) 1225 mm
Profondità (2) 550 mm
Larghezza (3) 560 mm
La porta dell’apparecchiatura è fissata per
mezzo di perni, per il trasporto.Togliere il perno
superiore e inferiore, conformemente al senso di
apertura della porta.
Per motivi si sicurezza la ventilazione deve essere
come indicato in figura.
Attenzione: mantenere le aperture per la
ventilazione libere da ogni ostruzione.
Inoltre é necessario che la nicchia sia provvista di
un camino d’areazione con le seguenti misure:
profondità: 50 mm
larghezza: 540 mm
Inserire l’apparecchiatura nel vano appoggiandola
alla parete interna corrispondente al lato di apertura
della porta.
Accostare l’apparecchiatura al fianco opposto alla
cerniera porta. Fissare l’apparecchiatura con le 4 viti
in dotazione. Applicare la griglia di aerazione (C) e il
coperchio copricerniera (D) inserendoli a scatto.
PR0
540
50
3
2
1
A
D022
50 mm
min.
200 cm
2
200 cm
2
min.
D567
D727
C
D
D411
D037
Page 17

17
INSTALLATION
Location
The appliance should be installed well away from
sources of heat such as radiators, boilers, direct
sunlight etc.
Electrical connection
Before plugging in, ensure that the voltage and
frequency shown on the serial number plate
correspond to your domestic power supply. Voltage
can vary by ±6% of the rated voltage.
For operation with different voltages, a suitably sized
auto-transformer must be used.
The appliance must be earthed.
The power supply cable plug is provided with a
contact for this purpose.
If the domestic power supply socket is not earthed,
connect the appliance to a separate earth in
compliance with current regulations, consulting a
specialist technician.
ATTENTION!
It must be possible to disconnect the appliance from
the mains power supply; the plug must therefore be
easily accessible after installation.
TECHNICAL INFORMATION
Energy Efficiency Class
A
228
0,44
161
Fridge Net Capacity lt.
Energy Consumption kWh/24h
Energy Consumption kWh/Year
The Technical info are on the rating plate situated on the left inside the appliance.
CUSTOMER SERVICE AND SPARE PARTS
If the appliance is not functioning properly, check
that:
• the plug is firmly in the wall socket and the mains
power switch is on;
• there is an electricity supply (find out by plugging
in another appliance);
• the thermostat knob is in the correct position.
• If there are water drops on the bottom of the
cabinet, check that the defrost water drain
opening is not obstructed (see “Defrosting”
section).
• If your appliance is still not working properly after
making the above checks, contact the nearest
service centre.
To obtain fast service, it is essential that when you
apply for it you specify the model and serial number
of your appliance which can be found on the
guarantee certificate or on the rating plate located
inside the appliance, on the bottom left-hand side.
28
Collegamento elettrico
Assicurarsi, prima di inserire la spina nella presa
di corrente, che la tensione e la frequenza
riportate sulla targhetta matricola corrispondano
a quelle dell’impianto domestico.
È ammessa una oscillazione di ±6% sulla tensione
nominale.
Per il funzionamento a tensioni diverse si dovrà
utilizzare un autotrasformatore di potenza adeguata.
Importante
E’ indispensabile collegare l’apparecchio ad una
efficiente presa di terra.
A tale scopo la spina del cavo di alimentazione é
dotata dell’apposito contatto. Qualora la presa di
corrente dell’impianto domestico non sia collegata a
terra, allacciare l’apparecchiatura ad un impianto di
terra a parte conformemente alle norme in vigore
consultando in proposito un tecnico specializzato.
La Casa Costruttrice declina ogni responsabilità
qualora questa norma antinfortunistica non
fosse rrispettata.
Questa apparecchiatura è conforme alle
seguenti Direttive Comunitarie
- 87/308/CEE del 2/6/87 relativa alla
soppressione dei disturbi radio.
- 73/23/CEE del 19/02/73 (Bassa Tensione) e
successive modificazioni;
- 89/336/CEE del 03/05/89 (Compatibilità
Elettromagnetica) e successive modificazione
INSTALLAZIONE
Posizionamento
Collocare l’apparecchiatura lontana da fonti di
calore, quali: termosifoni, stufe da riscaldamento,
esposizione diretta ai raggi solari ecc.
Attenzione
L’apparecchio de
ve poter essere scollegato dalla
rete; é quindi necessario che la spina rimanga
accessibile ad installazione avvenuta.
Page 18

18
Instructions for totally built-in appliances
The Manufacturer declines all responsibility if
the above safety precautions are not observed.
This appliance complies with the following
E.E.C. Directives:
- 87/308 EEC of 2/6/87 relative to radio interference
suppression.
- 73/23 EEC of 19.2.73 (Low Voltage Directive) and
subsequent modifications;
- 89/336 EEC of 3.5.89 (Electromagnetic
Compatibility Directive) and subsequent
modifications.
Door reversibility
The appliance’s door have been locked in position
for transport by means of pins on both sides.
According to the door opening direction, remove
relevant pins at the top and at the bottom.
Building-in instructions
Dimensions of housing
High (1) 1225 mm
Depth (2) 550 mm
Width (3) 560 mm
For safety reasons, minimum ventilation must be as
shown in Fig.
Attention: keep ventilation openings clear of
obstruction.
It is necessary that the niche is provided with a
conduct of ventilation having the following
dimensions:
Depth 50 mm
Width 540 mm
27
SE QUALCOSA NON VA
Qualora l’apparecchiatura presentasse qualche
disfunzione, è bene controllare:
• che la spina sia ben inserita nella presa di
corrente;
• che non manchi l’energia elettrica
• che la manopola del termostato si trovi in
posizione intermedia.
Inoltre:
• se l’apparecchiatura è eccessivamente rumorosa
verificare che i fianchi non siano a contatto con
mobili o schienali che possono causare rumore o
vibrazioni;
• se vi sono tracce di acqua sul fondo dello
scomparto, verificare che il foro di deflusso
dell’acqua derivante dallo sbrinamento non sia
ostruito.
Dopo le verifiche di cui sopra, se la disfunzione
dovesse permanere, è bene chiamare il Centro di
Assistenza Tecnica più vicino.
DATI TECNICI
Classe di efficienza
A
228
0,44
161
Capacità netta in litri del frigorifero
Consumo energetico in kWh/24h
Consumo energetico in kWh/annuo
I dati tecnici sono riportati sulla targhetta matricola posizionata sul lato sinistro interno dell’apparecchiatura.
540
min.
200 cm
50
3
2
2
1
50 mm
D567
min.
200 cm
2
PR0
Page 19

19
D726
B
Apply covers (B) on joint cover lugs and into hinge
holes.
Press in the joint covers between the appliance and
the kitchen unit.
D724
Open the door and push the appliance against the
side of the kitchen unit opposite to that of appliance
hinges.
Fasten the appliance with 4 screws provided in the
kit included with the appliance. Snap vent grille (C)
and hinge cover (D) into position.
D727
C
D
Slide the appliance into the recess, pushing it
against the wall on the handle side.
A
D022
26
Lampada di illuminazione
La lampada di illuminazione dello scomparto
refrigerante é accessibile tramite le seguenti
operazioni.
1. Svitare la vite di fissaggio della plafoniera.
2. Sganciare la parte mobile esercitando una
pressione (vedi figura).
Qualora, a porta aperta, la lampada non si
accendesse, controllare che sia avvitata
bene; se il difetto rimane sostituire la
lampada con una di pari potenza (la
potenza massima é riportata sul diffusore
luce).
MANUTENZIONE
Staccare la spina dalla presa di corrente prima di
eseguire qualsiasi operazione.
Attenzione:
Questa apparecchiatura contiene idrocarburi nel
circuito refrigerante; pertanto la manutenzione e
la ricarica devono essere effettuate
esclusivamente da personale autorizzato
dall’azienda.
Pulizia periodica
Non usare mai oggetti metallici per pulire l’apparecchiatura; essa potrebbe venir danneggiata.
Pulire l’interno con acqua tiepida e bicarbonato di
soda. Risciacquare e asciugare accuratamente.
Pulire il condensatore e il motocompressore con una
spazzola o un aspirapolvere. Questa operazione
migliorerà il funzionamento con conseguente
risparmio di energia.
Periodi di inattività
Durante i periodi in cui l’apparecchiatura non è in
funzione osservare le seguenti precauzioni:
staccare la spina dalla presa di corrente; togliere
tutti gli alimenti; sbrinare e pulire l’interno e tutti gli
accessori;
lasciare le porte socchiuse per facilitare la
circolazione di aria all’interno in modo da evitare la
formazione di odori sgradevoli.
Sbrinamento
Sull’evaporatore dello scomparto refrigerante la
brina viene eliminata automaticamente ad ogni
arresto del compressore. L’acqua derivante dallo
sbrinamento, tramite un apposito convogliatore,
viene raccolta in una bacinella, posta nella parte
posteriore sopra il compressore, dove evapora.
Si raccomanda di pulire periodicamente il foro di
scarico dell’acqua di sbrinamento, posto nella
parte centrale dell’apposito convogliatore dello
scomparto frigorifero, utilizzando l’apposito
«pulitore» che si trova nel foro, per evitare che
l’acqua di sbrinamento cada sui cibi.
D411
D037
Page 20

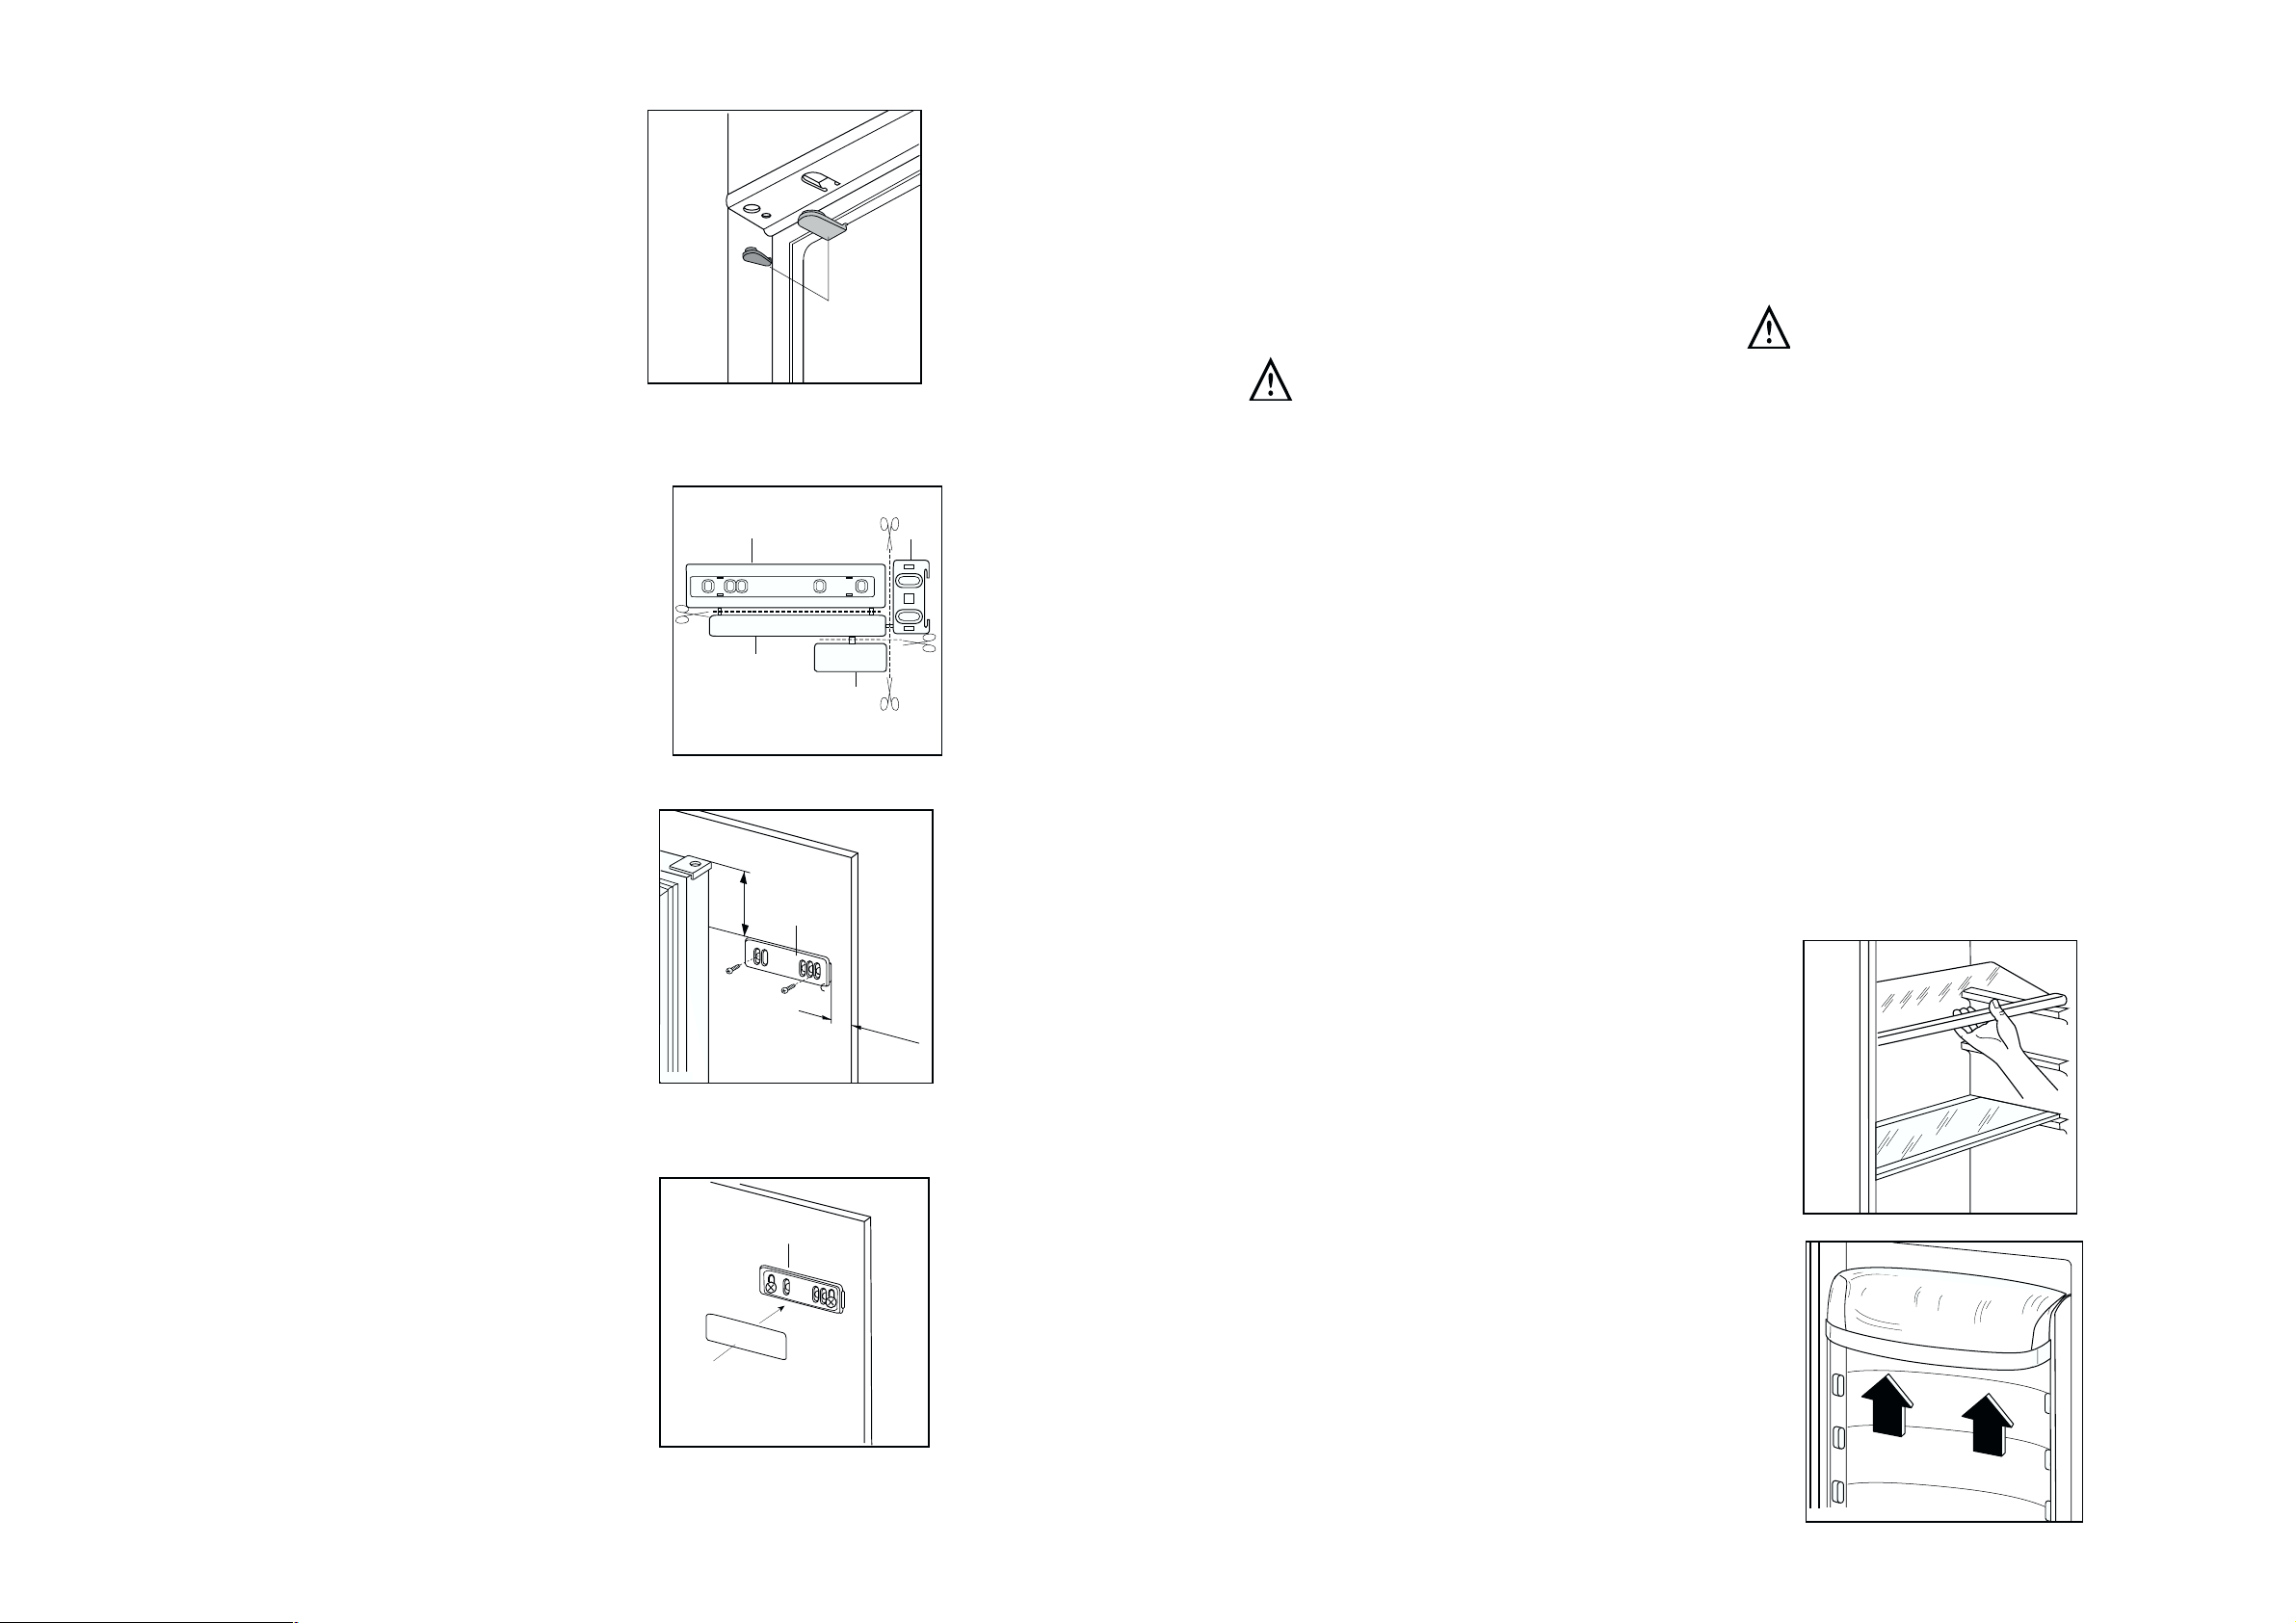
Place guide (A) on the inside part of the furniture
door, up and down as shown in the figure and mark
the position of external holes. After having drilled
holes, fix the guide with the screws supplied.
Separate parts A, B, C, D as shown in the figure
Fix cover (C) on guide (A) until it clips into place.
20
Open the appliance door and the furniture door at
90°. Insert the small square (B) into guide (A). Put
together the appliance door and the furniture door
and mark the holes as indicated in the figure.
Remove the squares and drill holes with ø 2 mm at 8
mm from the outer edge of the door. Place the small
square on the guide again and fix it with the screws
supplied.
25
Posizionamento delle mensole
Per permettere lo stoccaggio d’alimenti di diverse
dimensioni, si possono posizionare le mensole ad
altezze differenti. Operare come segue: Spingere la
mensola nel senso della freccia fino a quando non si
libera e posizionarla all’altezza desiderata.
Ripiani mobili
Sulle pareti della cella sono ricavate delle guide che
consentono il posizionamento dei ripiani a diverse
altezze, secondo la necessità.
Per un migliore utilizzo dello spazio, i semiripiani
anteriori possono sovrapporsi a quelli posteriori.
D338
CONSIGLI
Consigli per la refrigerazione
Carne (di tutti i tipi): va avvolta in sacchetti di
plastica e posta sul vetro sopra il cassetto verdura.
In questa posizione si potrà conservare per uno
o due giorni al massimo.
Cibi cotti piatti freddi, ecc. devono essere ben
coperti e possono essere disposti su qualsiasi
griglia.
Frutta e verdura: saranno messe, previa pulitura,
nel/ nei cassetto/i previsto/i a tale scopo.
Burro e formaggio devono essere conservati negli
appositi contenitori o avvolti in fogli di plastica o
alluminio per evitare il contatto con l’aria.
Latte in bottiglia: ben chiuse poste nel
portabottiglie.
Banane, patate, cipolla ed aglio, se non sono
confezionati, non vanno messi in frigorifero.
PR266
A
C
50mm
B
D
A
20 mm
PR166
PR33
PR167
A
C
8mm
A
B
Page 21

21
PR168
PR167/1
D
B
Should the lining up of the furniture door be
necessary, use the clearance of slots.
At the end of operations, it is necessary to check if
the door of the furniture closes properly.
Fix cover (D) on guide (B) until it clips into place.
24
Pulizia delle parti interne
Prima dell’uso e del collegamento elettrico pulire
tutte le parti interne con acqua tiepida e sapone
neutro allo scopo di togliere il caratteristico odore di
nuovo indi asciugare accuratamente.
Non usare detersivi nè polveri abrasive
che sono dannose alle finiture.
Funzionamento
Inserire la spina nella presa di corrente. Aprire la
porta del frigorifero e ruotare in senso orario la
manopola del termostato oltre la posizione «O»
(arresto). L’apparecchiatura è in funzione.
Regolazione della temperatura
La temperatura è regolata automaticamente e può
essere aumentata (meno freddo) ruotando la
manopola verso i numeri più bassi oppure diminuita
(più freddo) ruotandola verso i numeri più alti. La
posizione corretta, comunque, va individuata
tenendo conto che la temperatura interna dipende
da questi fattori:
1. temperatura ambiente;
2. frequenza di apertura delle porte;
3. quantità di alimenti conservati;
4. collocazione dell’apparecchio.
La posizione intermedia è la più indicata.
Importante
Sulle posizioni di massimo freddo, con temperatura ambiente elevata, ed una notevole quantità
di alimenti, il funzionamento può essere
continuo, con formazione di brina o ghiaccio
sulla parete posteriore della cella. In tal caso è
necessario ruotare la manopola su una posizione di minor freddo, in modo da consentire lo
sbrinamento automatico e, di conseguenza, un
minor consumo di energia elettrica.
USO
Refrigerazione dei cibi e delle bevande
Per utilizzare nel modo migliore lo scomparto
refrigerante è necessario:
non introdurre nella cella vivande calde o liquidi in
evaporazione; coprire o avvolgere gli alimenti,
specie se contengono aromi;
disporre gli alimenti in modo che l’aria possa
circolare liberamente attorno ad essi.
Page 22

AVVERTENZE E CONSIGLI IMPORTANTI
È molto importante che questo libretto istruzioni sia conservato assieme all’apparecchiatura per
qualsiasi futura consultazione. Se l’apparecchiatura dovesse essere venduta o trasferita ad un’altra
persona, assicurarsi che il libretto venga fornito assieme, in modo che il nuovo utente possa essere
messo al corrente del funzionamento della macchina e delle avvertenze relative.
Queste avvertenze sono state redatte per la Vostra sicurezza e per quella degli altri. Vi preghiamo,
dunque, di volerle leggere attentamente prima d’installare e di utilizzare l’apparecchiatura.
Sicurezza generale
•
Qualora questa apparecchiatura, munita di
chiusura magnetica, venisse usata in
sostituzione di una con chiusura a scatto,
consigliamo di rendere quest’ultima inservibile.
Cio’ eviterà che i bambini, giocando, vi
rimangano intrappolati, con grave pericolo per la
loro vita.
•
Togliere la spina dalla presa di corrente prima di
procedere a qualsiasi operazione di pulizia e
manutenzione (come nel caso di sostituzione
della lampadina, sulle apparecchiature che ne
sono provviste).
•
Quest’apparecchiatura è stata progettata per
essere utilizzata da persone adulte. Fare
attenzione, quindi, che i bambini non si avvicinino
con l’intento di giocarvi.
•
È pericoloso modificare o tentare di modificare
le caratteristiche di quest’ apparecchiatura.
•
Questa apparecchiatura contiene idrocarburi nel
circuito refrigerante; pertanto la manutenzione e
la ricarica deve essere effettuata esclusivamente
da personale autorizzato dall’azienda.
•
Prestare la massima cura nella
movimentazione per non dannegiare parti del
circuito refrigerante onde evitare possibili
fuoriuscite di fluido.
•
L’apparecchiatura non deve essere collocata
nelle vicinanze di termosifoni o cucine a gas.
•
Evitate ogni esposizione prolungata
dell’apparecchiatura ai raggi solari.
•
La parte posteriore dell’apparecchiatura deve
ricevere una sufficiente circolazione d’aria e
deve essere evitato qualsiasi danno al
circuito refrigerante.
•
Solo per i congelatori (esclusi incassati): una
collocazione ottimale è la cantina.
•
Non introdurre apparecchi elettrici all’interno
dell’apparecchiatura (ad es. gelatiera)
Assistenza / Riparazioni
•
Ogni eventuale modifica che si rendesse
necessaria all’impianto elettrico domestico, per
poter installare l’apparecchiatura, dovrà essere
eseguita solo da personale abilitato.
•
Mai riparare l’apparecchiatura da soli. Le
riparazioni effettuate da persone non competenti
possono provocare dei danni. Contattare il
Centro di Assistenza più vicino ed esigere solo
ricambi originali
.
Uso
•
I frigoriferi e/o congelatori domestici sono
destinati unicamente alla conservazione e/o
congelazione degli alimenti.
•
Le migliori prestazioni si hanno con temperature
dell’ambiente comprese tra +18°C e +43°C
(Classe T); + 18°C e +38°C (Classe ST); +16°C
e +32°C (Classe N); +10°C e +32°C (Classe
SN); la classe di appartenenza é riportata sulla
targa matricola ubicata nella cella a fianco del
vano verdura.
Attenzione: al di fuori delle temperature
ambiente indicate dalla classe climatica di
appartenenza di questo prodotto, si devono
osservare le seguenti indicazioni: quando la
temperatura ambiente scende al di sotto del
valore minimo può non essere garantita la
temperatura di conservazione nel vano
congelatore; pertanto si consiglia di consumare
al più presto gli alimenti in esso contenuti .
•
In tutte le apparecchiature ci sono delle superfici
che si coprono di brina. A seconda del modello,
tale brina può essere eliminata automaticamente
(sbrinamento automatico) oppure manualmente.
Non tentare mai di togliere la brina con un
oggetto appuntito, si rischierebbe di danneggiare
irrimediabilmente l’evaporatore. Utilizzare a tale
scopo una paletta di plastica.
•
Non mettere mai nello scompartimento a bassa
temperatura (congelatore o conservatore) bibite
gassate: possono esplodere.
•
Non introdurre mai liquidi o alimenti caldi e non
riempire fino all’orlo i recipienti muniti di
coperchio.
•
Non usare alcun dispositivo meccanico o altro
mezzo artificiale per accelerare il processo di
sbrinamento tranne quelli qui raccomandati.
•
Non usare mai oggetti metallici per pulire
l’apparecchiatura; essa potrebbe venir
danneggiata.
22
23
INDICE
Protezione dell’ambiente
Questa apparecchiatura non contiene, nel
circuito refrigerante e nell’isolamento, gas
refrigeranti nocivi per l’ozono. L’apparecchiatura
non deve essere smaltita con rifiuti urbani e
rottami. Deve essere evitato il danneggiamento
del circuito refrigerante, soprattutto nella parte
posteriore vicino allo scambiatore. Informazioni
sui centri di raccolta vengono forniti dall’autorità
comunale. I materiali usati in questa
apparecchiatura contrassegnati dal simbolo
sono riciclabili.
Installazione
•
Durante il normale funzionamento il
condensatore ed il compressore, che sono posti
sul retro dell’apparecchiatura, si riscaldano
sensibilmente. Assicurarsi quindi che
l’installazione venga eseguita come da istruzioni
riportate sul libretto. Un’aerazione insufficiente
comporterà sicuramente un cattivo
funzionamento e dei danni all’apparecchiatura.
•
Assicurarsi, dopo aver installato
l’apparecchiatura, che essa non appoggi sul cavo
di alimentazione.
Importante: se il cavo di alimentazione si
danneggiasse, dovrà essere sostituito da uno
speciale cavo o assieme disponibili presso il
costruttore o il servizio di assistenza tecnica.
•
Se l’apparecchiatura viene trasportata in
posizione orizzontale è possibile che l’olio
contenuto nel compressore defluisca nel circuito
refrigerante. Lasciare l’apparecchiatura in
posizione verticale almeno 2 ore prima di
metterla in funzione per dar modo all’olio di
refluire nel compressore.
•
L’apparecchiatura non deve essere collocata
nelle vicinanze di termosifoni o cucine a gas.
•
Evitate ogni esposizione prolungata
dell’apparecchiatura ai raggi solari.
•
La parte posteriore dell’apparecchiatura deve
ricevere una sufficiente circolazione d’aria e deve
essere evitato qualsiasi danno al circuito
refrigerante.
Avvertenze e consigli importanti . . . . . . . . . . . . . . . . . . . . . . . . . . . . . . . . . . . . . . . . . . . . . . . . . . . . .22
Uso / Pulizia -Funzionamento -Regolazione della temperatura -Refrigerazione dei cibi e delle bevande 24
Uso / Ripiani mobili - Posizionamento delle mensole - Consigli / Consigli per la refrigerazione . . . . . . .25
Manutenzione / Pulizia periodica - Periodi di inattività - Lampada di illuminazione - Sbrinamento . . . . .26
Se qualcosa non va / Dati tecnici . . . . . . . . . . . . . . . . . . . . . . . . . . . . . . . . . . . . . . . . . . . . . . . . . . . . .27
Installazione / Posizionamento -Collegamento elettrico . . . . . . . . . . . . . . . . . . . . . . . . . . . . . . . . . . . . .28
Installazione / Incasso . . . . . . . . . . . . . . . . . . . . . . . . . . . . . . . . . . . . . . . . . . . . . . . . . . . . . . . . . . . . . . .29
Centri Assistenza . . . . . . . . . . . . . . . . . . . . . . . . . . . . . . . . . . . . . . . . . . . . . . . . . . . . . . . . . . . . . . . . . .31
 Loading...