

Electrolux EPWD15IW1, EPWD15IW2, EPWD15IW3, EPWD15KG1, EPWD15MB1 Installation Guide
...
KiT COMPONENTS:
• 1 Pedestal Installation Instructions.
A 2 Front brackets.
B 2 Rear brackets.
C 14 #10 (16 x .500) screws.
COMPONENTES DEL KIT:
• 1 libro de instrucciones de instalaci6n
A 2 soportes delanteros.
B 2 soportes traseros.
C 14 tomillos n. ° 10 (16 x .500).
COMPOSANTS DU
NECESSAIRE:
= 1 instructionsd'installation
A 2 supports avant.
B 2 supports arriere.
C 14visn ° 10(16x.500).
A
C
Tools needed:
Herramientas necesarias:
Outils n6cessaires:
OR
0
Universal wrench
supplied with washer
Llave universal proper-
cionada con la lavadora
Cle iniverselle fournie
avec la laveuse
OU
Adjustable wrench
Llave ajustable
Cle & molette
OR
0
OU
9/16" or 14 mm box wrench
Llave de cube de
9/16 poo 14 mm
Cle polygonale de
9/16 po eu de 14 mm
\,
AND
Y
ET
Phillips screwdriver
Destornillador Phillips
Tburnevis Phillips
AND
Y
ET
Carpen[er's level
Nivel de carpin[ero
Niveau de charpen[ier
A) Preparing washer or dryer for mount-
ing on pedestal
1. If washer or dryer is new and has not been installed yet, skip
to step 4.
2. If dryer is already installed, disconnect dryer from electrical
and gas connections and exhaust venting. On models with
Steam Option, turn off cold water supply and disconnect wa-
ter supply hose to dryer.
3. If washer is already installed, disconnect washer from electri-
cal connection. Turn off hot and cold water supply and dis-
connect hot and cold water supply hoses from water supply
outlets. Disconnect drain hose from drain pipe.
4. Protect floor with cardboard or other covering. Using two or
more persons, carefully tip the washer or dryer onto its back.
Take care not to damage hoses and/or electrical cords as you
lay the unit back.
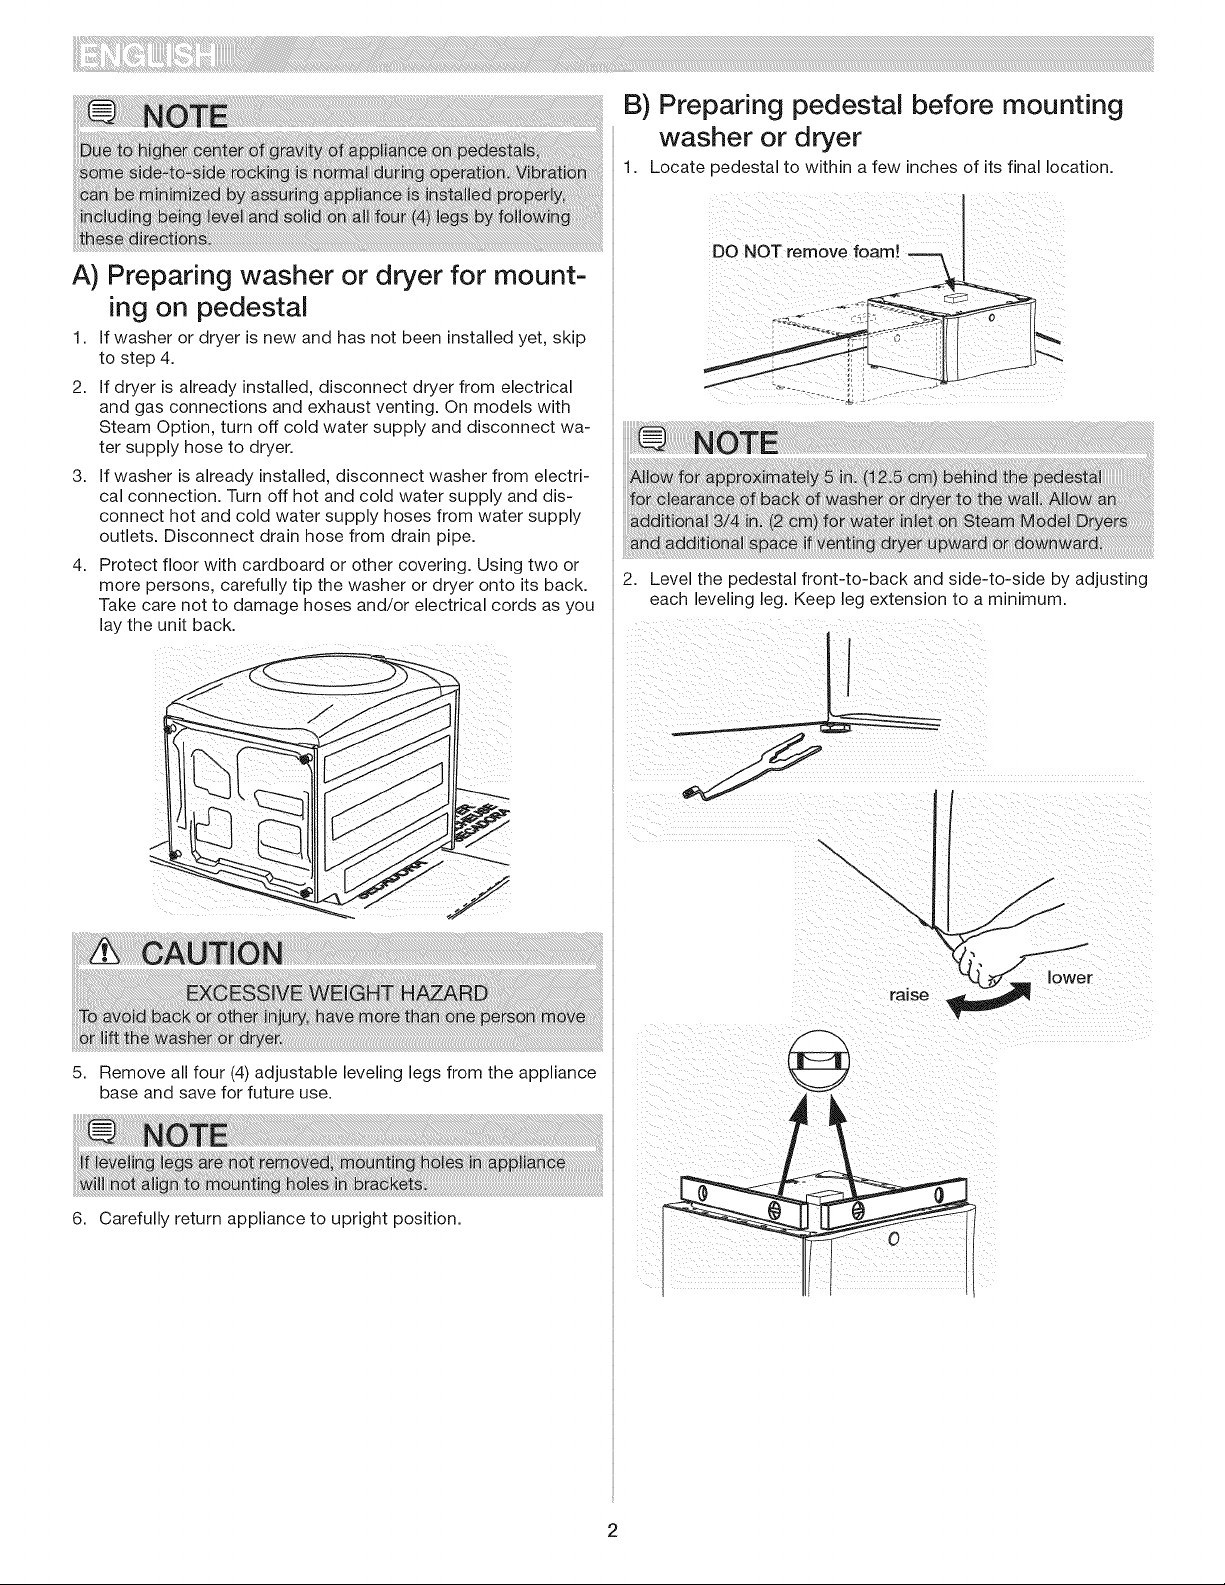
B) Preparing pedestal before mounting
washer or dryer
1. Locate pedestal to within a few inches of its final location.
2. Level the pedestal front-to-back and side-to-side by adjusting
each leveling leg. Keep leg extension to a minimum.
5. Remove all four (4) adjustable leveling legs from the appliance
base and save for future use.
6. Carefully return appliance to upright position.
\
\
lower

3. Rock the pedestal from corner-to-corner to check for stability.
Repeat leveling and rocking until all four (4)feet are sturdy on
the floor and pedestal is level.
4. Without turning the rubber foot, lock each pedestal leg in
place by tightening its lock nut tight against the pedestal base.
lock nut
3. Install 2 screws through each rear bracket into aligning pedes-
tal holes.
C3a (WASHER} C3b (DRYER}
D) Mounting washer or dryer
Using two or more persons, slightly tip the washer or dryer
back and lift it onto the pedestal. Still tipped, slide the appli-
ance back against the rear brackets and gently set down the
front so the appliance is between the front and rear brackets.
C) Attaching mounting hardware
1. Attach each front clip to outer-most set of holes with 2 screws.
®
2. Insert "C" tab of each rear bracket into the widest slots on rear
of pedestal. Orient bracket outward for washer mounting (image
C2a). Orient bracket inward for dryer mounting (image C2b).
C2a (WASHER}
outward
tab--_._.:>__---slot
2.
Adjust the appliance side-to-side to align its mounting holes
with the pedestal's bracket holes.
3.
Install 2 screws through each rear bracket into the base of the
washer (image D3a) or dryer (image D3b).
D3a (WASHER}
4. With the pedestal drawer open for better access, installa screw
through each front bracket intothe base of the washer or dryer.
D3b (DRYER}
,owar
E) Installing or re-installing washer or dryer
1. Slide appliance/pedestal into place.
2. Check for levelness and rock all four (4) legs again. Repeat
until level and solid.
3. Refer to Washer or Dryer Installation Instructions for complete de-
tails on installing water, drain, electrical, gas, or exhaust venting.
 Loading...