

Page 1

EOM4P46TX
KOMFP46TX
DE Backofen Benutzerinformation 2
EN Oven User Manual 41
ES Horno Manual de instrucciones 77
FR Four Notice d'utilisation 116
IT Forno Istruzioni per l’uso 155
Page 2
WIR DENKEN AN SIE
Vielen Dank für Ihren Kauf eines Electrolux-Geräts. Sie haben ein Produkt gewählt, das
jahrzehntelange professionelle Erfahrung und Innovation mit sich bringt. Das ausgeklügelte und
stilvolle Produkt wurde für Sie entwickelt. So können Sie jedes Mal, wenn Sie das Produkt
verwenden, sicher sein, dass Sie großartige Ergebnisse erzielen werden.
Willkommen bei Electrolux.
Besuchen Sie uns auf unserer Website, um:
Anwendungshinweise, Prospekte, Informationen zu Fehlerbehebung, Service und
Reparatur zu erhalten:
www.electrolux.com/support
Registrieren Sie Ihr Produkt, um einen erstklassigen Service zu erhalten:
www.registerelectrolux.com
Um Zubehör, Verbrauchsmaterial und Original-Ersatzteile für Ihr Gerät zu kaufen:
www.electrolux.com/shop
Für weitere Rezepte, Tipps und Fehlerbehebung laden Sie die App My Electrolux
Kitchen herunter.
KUNDENDIENST UND SERVICE
Verwenden Sie immer Original-Ersatzteile.
Halten Sie folgende Angaben bereit, wenn Sie sich an einen autorisierten Kundendienst
wenden: Modell, PNC, Seriennummer.
Die Daten finden Sie auf dem Typenschild.
Warnungs-/Sicherheitshinweise
Allgemeine Informationen und Empfehlungen
Informationen zum Umweltschutz
Änderungen vorbehalten.
INHALTSVERZEICHNIS
1. SICHERHEITSHINWEISE............................3
1.1 Sicherheit von Kindern und
schutzbedürftigen Personen..................3
1.2 Allgemeine Sicherheit......................4
2. SICHERHEITSANWEISUNGEN..................5
2.1 Montage...........................................5
2.2 Elektrischer Anschluss.....................6
2.3 Gebrauch.........................................7
2.4 Reinigung und Pflege...................... 8
2.5 Pyrolysereinigung............................ 9
2.6 Innenbeleuchtung............................ 9
2.7 Wartung........................................... 9
2/196
2.8 Entsorgung.................................... 10
3. MONTAGE................................................. 10
3.1 Montage.........................................10
3.2 Befestigung des Ofens am Möbel..11
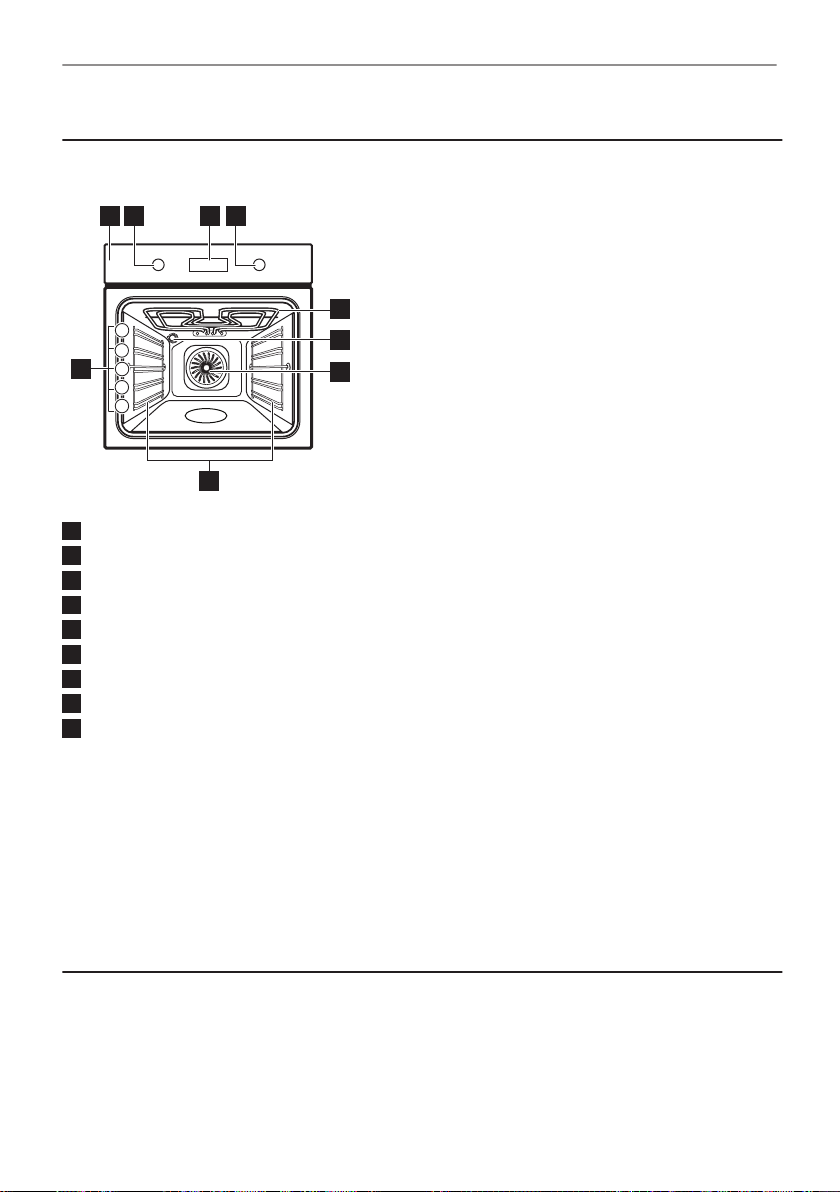
4. GERÄTEBESCHREIBUNG....................... 12
4.1 Gesamtansicht...............................12
4.2 Zubehör......................................... 12
5. EIN- UND AUSSCHALTEN DES
BACKOFENS.................................................12
5.1 Versenkbare Knöpfe......................12
5.2 Bedienfeld......................................13
Page 3

SICHERHEITSHINWEISE
6. VOR DER ERSTEN VERWENDUNG........ 14
6.1 Erste Reinigung............................. 14
6.2 Erstes Vorheizen........................... 14
7. TÄGLICHER GEBRAUCH.........................14
7.1 Einstellung: Ofenfunktionen...........15
7.2 Ofenfunktionen.............................. 15
7.3 Hinweise zu: Feuchte Umluft.........16
7.4 Einstellung: Koch-Assistent........... 16
7.5 Koch-Assistent...............................17
8. UHRFUNKTIONEN.................................... 22
8.1 Uhrfunktionen................................ 22
8.2 Einstellung: Uhrfunktionen.............22
9. VERWENDUNG: ZUBEHÖR..................... 24
9.1 Einsetzen des Zubehörs................24
10. ZUSATZFUNKTIONEN............................25
10.1 Verriegelung................................ 25
10.2 Automatische Abschaltung.......... 26
10.3 Kühlgebläse.................................26
11. TIPPS UND HINWEISE............................26
11.1 Feuchte Umluft............................ 26
12. REINIGUNG UND PFLEGE.....................30
13. FEHLERSUCHE.......................................36
14. ENERGIEEFFIZIENZ............................... 37
15. MENÜSTRUKTUR................................... 39
16. UMWELTTIPPS....................................... 40
1. SICHERHEITSHINWEISE
11.2 Feuchte Umluft -
Empfohlenes Zubehör......................... 28
11.3 Gartabellen für Prüfinstitute.........29
12.1 Hinweise zur Reinigung...............31
12.2 Entfernen: Einhängegitter ...........31
12.3 Benutzung:
Pyrolytische Reinigung........................ 32
12.4 Erinnerungsfunktion Reinigen......33
12.5 Aus- und Einbau: Tür...................33
12.6 Austausch: Lampe.......................35
13.1 Was zu tun ist, wenn …...............36
13.2 Servicedaten................................37
14.1 Produktinformationen und
Produktinformationsblatt*.....................37
14.2 Energiesparen............................. 38
15.1 Menü............................................39
Lesen Sie vor der Montage und dem Gebrauch des Geräts
zuerst die Bedienungsanleitung. Bei Verletzungen oder
Schäden infolge nicht ordnungsgemäßer Montage oder
Verwendung übernimmt der Hersteller keine Haftung.
Bewahren Sie die Anleitung zum Nachschlagen an einem
sicheren und zugänglichen Ort auf.
1.1 Sicherheit von Kindern und schutzbedürftigen Personen
• Das Gerät kann von Kindern ab 8 Jahren und Personen mit
eingeschränkten physischen, sensorischen oder geistigen
Fähigkeiten oder mit mangelnder Erfahrung/mangelndem
Wissen benutzt werden, wenn sie durch eine für ihre
Sicherheit zuständige Person beaufsichtigt werden oder von
dieser Person Anweisungen erhalten haben, wie das Gerät
3/196
Page 4

SICHERHEITSHINWEISE
sicher zu bedienen ist und welche Gefahren bei nicht
ordnungsgemäßer Bedienung bestehen. Kinder unter 8
Jahren und Personen mit schweren Behinderungen oder
Mehrfachbehinderung sollten vom Gerät ferngehalten
werden, wenn sie nicht ständig beaufsichtigt werden.
• Kinder sollten beaufsichtigt werden, um sicherzustellen,
dass sie nicht mit dem Gerät.
• Halten Sie sämtliches Verpackungsmaterial von Kindern
fern und entsorgen Sie es ordnungsgemäß.
• WARNUNG: Das Gerät und die zugänglichen Geräteteile
werden während des Betriebs heiß. Halten Sie Kinder und
Haustiere von dem Gerät fern, wenn es in Betrieb oder in
der Abkühlphase ist.
• Falls Ihr Gerät mit einer Kindersicherung ausgestattet ist,
empfehlen wir, diese einzuschalten.
• Kinder dürfen keine Reinigung und Wartung des Geräts
ohne Beaufsichtigung durchführen.
1.2 Allgemeine Sicherheit
• Dieses Gerät ist nur zum Kochen bestimmt.
• Dieses Gerät ist für den Hausgebrauch in einem
Einfamilienhaus in Innenräumen bestimmt.
• Dieses Gerät darf in Büros, Hotelzimmern, Gästezimmern in
Pensionen, Bauernhöfen und anderen ähnlichen
Unterkünften verwendet werden, wenn diese Nutzung das
(durchschnittliche) Nutzungsniveau im Haushalt nicht
überschreitet.
• Die Montage des Geräts und der Austausch des Kabels
muss von einer Fachkraft vorgenommen werden.
• Verwenden Sie das Gerät nicht, bevor es in den
Einbauschrank gesetzt wird.
• Vor Wartungsarbeiten ist das Gerät von der elektrischen
Stromversorgung zu trennen.
• Wenn das Netzkabel beschädigt ist, muss es vom
Hersteller, seinem autorisierten Kundenservice oder einer
4/196
Page 5
SICHERHEITSANWEISUNGEN
gleichermaßen qualifizierten Person ausgetauscht werden,
um Gefahren durch elektrischen Strom zu vermeiden.
• WARNUNG: Vergewissern Sie sich, dass das Gerät
ausgeschaltet ist, bevor Sie die Lampe austauschen, um
einen Stromschlag zu vermeiden.
• WARNUNG: Das Gerät und die zugänglichen Geräteteile
werden während des Betriebs heiß. Seien Sie vorsichtig und
berühren Sie niemals die Heizelemente.
• Verwenden Sie stets Topfhandschuhe, um Zubehör oder
Geschirr zu herauszunehmen oder zu verstauen.
• Ziehen Sie die Einhängegitter zuerst vorne und dann hinten
von den Seitenwänden weg. Setzen Sie die Einhängegitter
in umgekehrter Reihenfolge ein.
• Reinigen Sie das Gerät nicht mit einem Dampfstrahlreiniger.
• Benutzen Sie zum Reinigen der Glastür keine scharfen
Scheuermittel oder Metallschwämmchen; sie könnten die
Glasfläche verkratzen und zum Zersplittern der Scheibe
führen.
• Entfernen Sie vor der pyrolytischen Reinigung alle
Zubehörteile und übermäßige Ansammlungen/
Ablagerungen aus dem Garraum.
2. SICHERHEITSANWEISUNGEN
2.1 Montage
WARNUNG!
Die Montage des Geräts darf nur von einer qualifizierten Fachkraft durchgeführt
werden.
• Entfernen Sie das gesamte Verpackungsmaterial.
• Montieren Sie ein beschädigtes Gerät nicht und benutzen Sie es nicht.
• Halten Sie sich an die mitgelieferte Montageanleitung.
• Seien Sie beim Umsetzen des Gerätes vorsichtig, da es sehr schwer ist. Tragen Sie stets
Sicherheitshandschuhe und festes Schuhwerk.
• Ziehen Sie das Gerät nicht am Griff.
• Montieren Sie das Gerät an einem sicheren und geeigneten Ort, der den
Montageanforderungen entspricht.
• Die Mindestabstände zu anderen Geräten und Küchenmöbeln sind einzuhalten.
• Überprüfen Sie vor der Montage des Gerätes, ob sich die Ofentür ohne Kraftanwendung
öffnen lässt.
5/196
Page 6
SICHERHEITSANWEISUNGEN
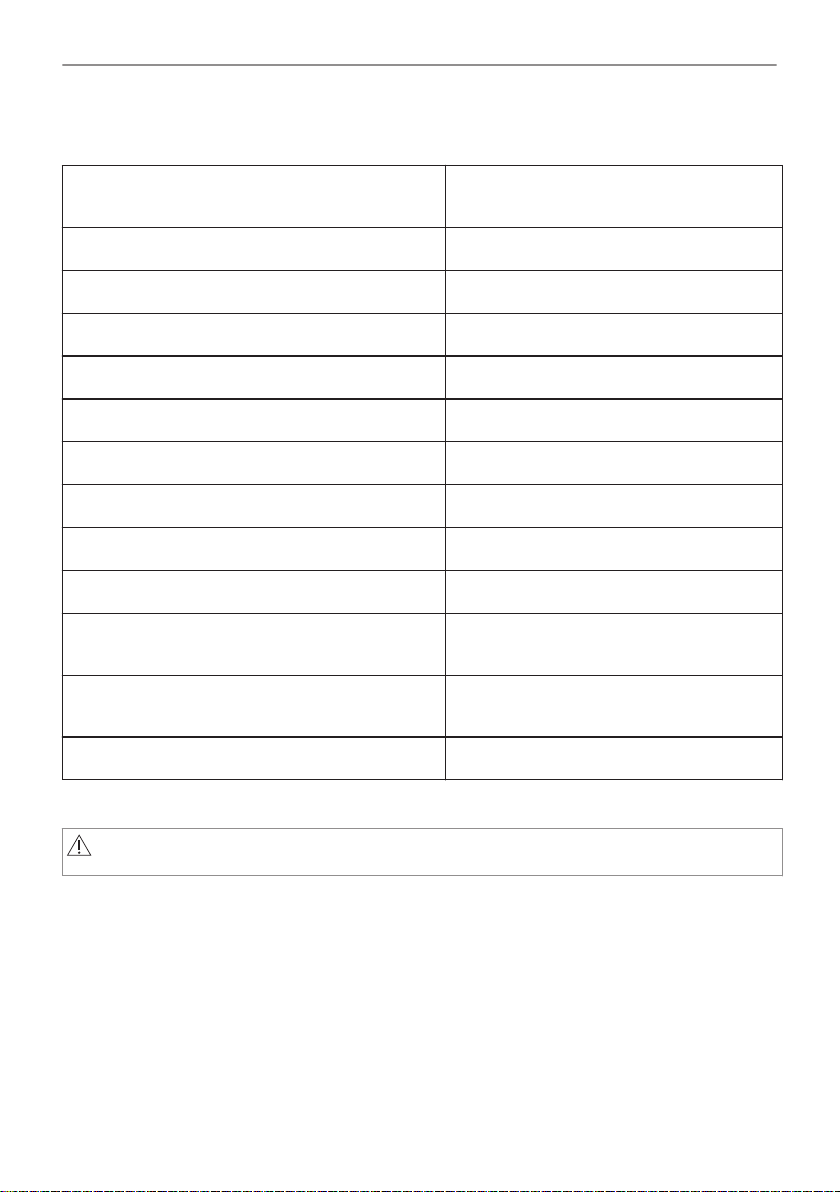
• Das Gerät ist mit einem elektrischen Kühlsystem ausgestattet. Es muss mit der elektrischen
Stromversorgung betrieben werden.
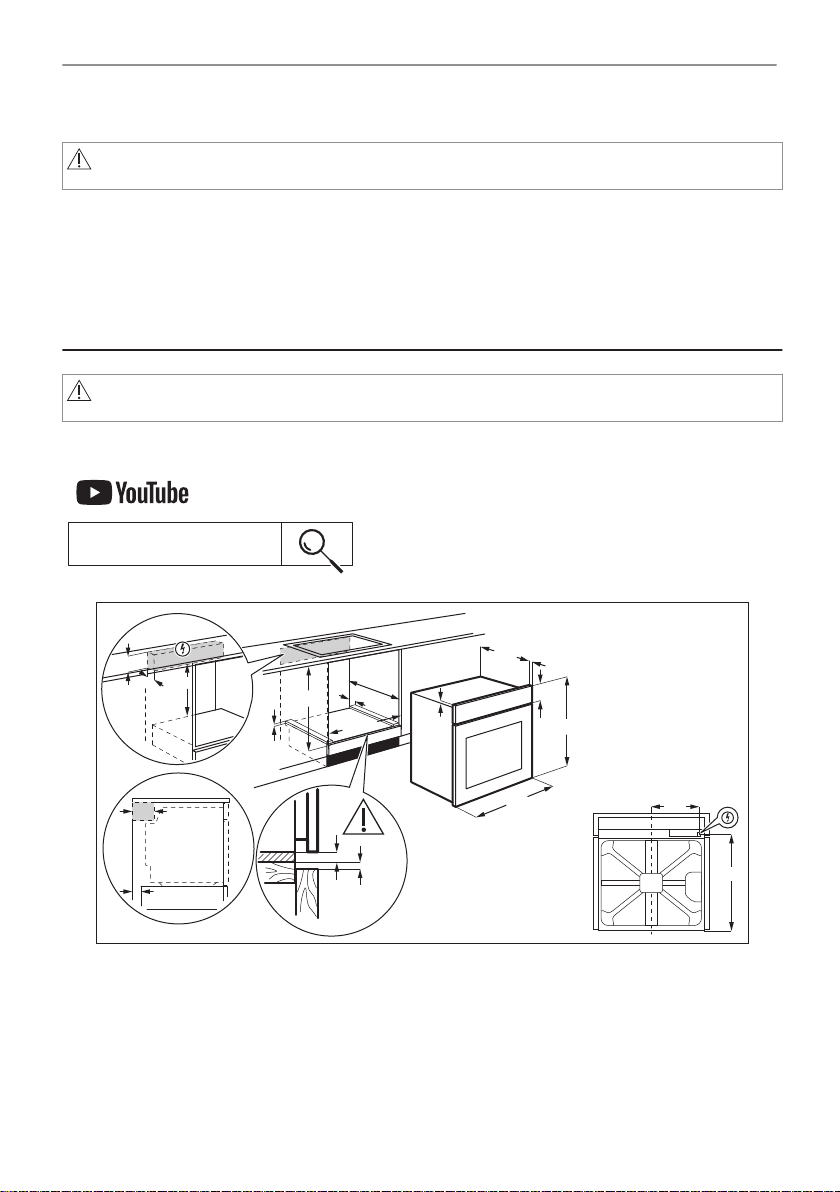
Mindesthöhe des Einbaumöbels (Mindesthöhe des
Schranks unter der Arbeitsplatte)
Schrankbreite 560 mm
Schranktiefe 550 (550) mm
Höhe der Gerätevorderseite 589 mm
Höhe der Geräterückseite 571 mm
Breite der Gerätevorderseite 595 mm
Breite der Geräterückseite 559 mm
Gerätetiefe 569 mm
Geräteeinbautiefe 548 mm
Tiefe bei geöffneter Tür 1022 mm
Mindestgröße der Belüftungsöffnung. Öffnung auf
der Rückseite unten
Länge des Netzanschlusskabels. Das Kabel befin‐
det sich in der rechten Ecke auf der Rückseite
Befestigungsschrauben 4x25 mm
580 (600) mm
560x20 mm
1500 mm
2.2 Elektrischer Anschluss
WARNUNG!
Brand- und Stromschlaggefahr.
• Alle elektrischen Anschlüsse sind von einem geprüften Elektriker vorzunehmen.
• Das Gerät muss geerdet sein.
• Stellen Sie sicher, dass die Daten auf dem Typenschild mit den elektrischen Nennwerten
der Netzspannung übereinstimmen.
• Schließen Sie das Gerät nur an eine ordnungsgemäß installierte Schutzkontaktsteckdose
an.
• Verwenden Sie keine Mehrfachsteckdosen oder Verlängerungskabel.
• Achten Sie darauf, Netzstecker und Netzkabel nicht zu beschädigen. Falls das Netzkabel
des Geräts ersetzt werden muss, lassen Sie diese Arbeit durch unseren autorisierten
Kundendienst durchführen.
6/196
Page 7
SICHERHEITSANWEISUNGEN
• Achten Sie darauf, dass das Netzkabel die Gerätetür oder die Nische unter dem Gerät nicht
berührt oder in ihre Nähe gelangt, insbesondere wenn das Gerät eingeschaltet oder die Tür
heiß ist.
• Alle Teile, die gegen direktes Berühren schützen, sowie die isolierten Teile müssen so
befestigt werden, dass sie nicht ohne Werkzeug entfernt werden können.
• Stecken Sie den Netzstecker erst nach Abschluss der Montage in die Steckdose. Stellen Sie
sicher, dass der Netzstecker nach der Montage noch zugänglich ist.
• Falls die Steckdose lose ist, schließen Sie den Netzstecker nicht an.
• Ziehen Sie nicht am Netzkabel, wenn Sie das Gerät von der Stromversorgung trennen
möchten. Ziehen Sie stets am Netzstecker.
• Verwenden Sie nur geeignete Trenneinrichtungen: Überlastschalter, Sicherungen
(Schraubsicherungen müssen aus dem Halter entfernt werden können),
Fehlerstromschutzschalter und Schütze.
• Die elektrische Installation muss eine Trenneinrichtung aufweisen, mit der Sie das Gerät
allpolig von der Stromversorgung trennen können. Die Trenneinrichtung muss mit einer
Kontaktöffnungsbreite von mindestens 3 mm ausgeführt sein.
• Schließen Sie die Gerätetür ganz, bevor Sie den Netzstecker in die Steckdose stecken.
• Das Gerät wird mit einem Netzstecker und Netzkabel geliefert.
Einsetzbare Kabeltypen für Einbau oder Austausch in Europa:
H07 RN-F, H05 RN-F, H05 RRF, H05 VV-F, H05 V2V2-F (T90), H05 BB-F
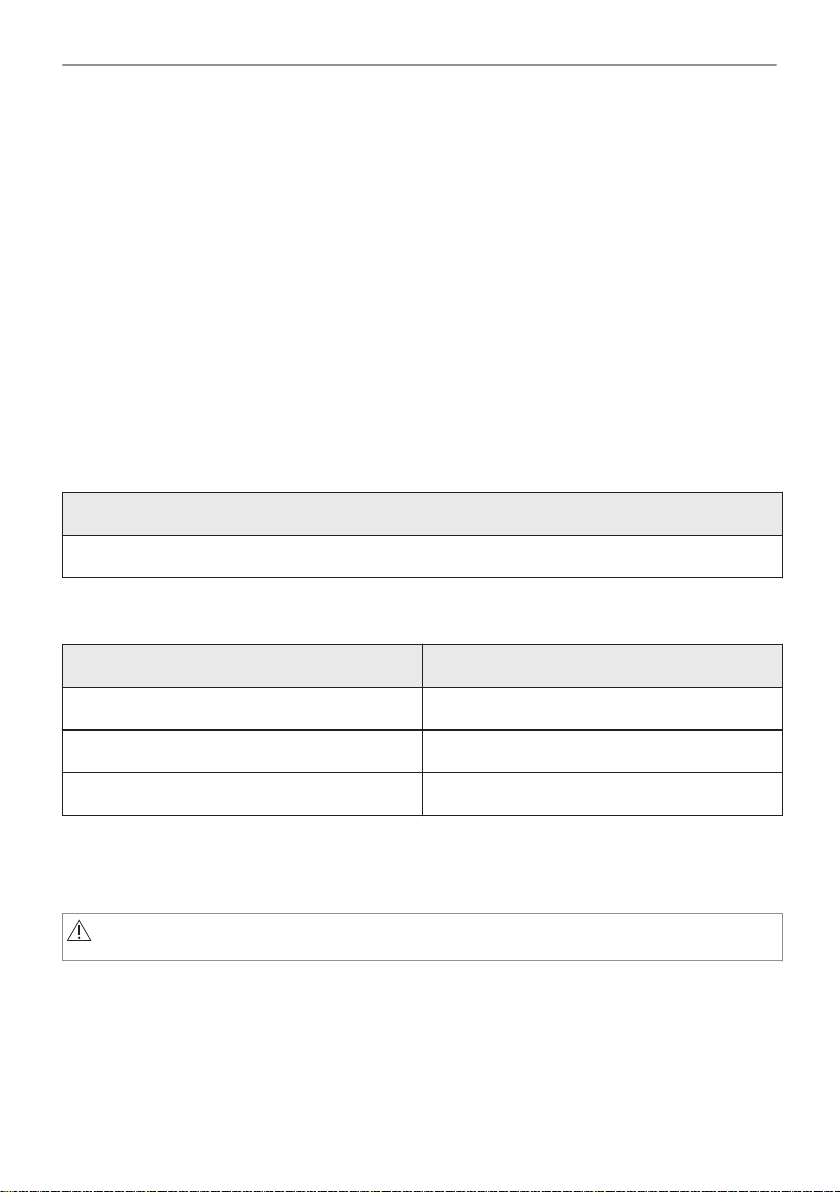
Für den Kabelabschnitt siehe die Gesamtleistung auf dem Typenschild. Sie können auch die
Tabelle heranziehen:
Gesamtleistung (W) Kabelquerschnitt (mm²)
maximal 1380 3 x 0.75
maximal 2300 3 x 1
maximal 3680 3 x 1.5
Das Erdkabel (grün/gelb) muss 2 cm länger sein als die Phasen- und Nullleiter (blaue und
braune Kabel).
2.3 Gebrauch
WARNUNG!
Verletzungs-, Verbrennungs-, Stromschlag- oder Explosionsgefahr.
• Nehmen Sie keine technischen Änderungen am Gerät vor.
• Vergewissern Sie sich, dass die Lüftungsöffnungen nicht blockiert sind.
• Lassen Sie das Gerät während des Betriebs nicht unbeaufsichtigt.
• Schalten Sie das Gerät nach jedem Gebrauch aus.
• Gehen Sie beim Öffnen der Tür vorsichtig vor, wenn das Gerät in Betrieb ist. Es kann heiße
Luft freigesetzt werden.
• Benutzen Sie das Gerät nicht mit nassen Händen oder wenn es mit Wasser Kontakt hat.
7/196
Page 8
SICHERHEITSANWEISUNGEN
• Üben Sie keinen Druck auf die offene Tür aus.
• Verwenden Sie das Gerät nicht als Arbeits- oder Abstellfläche.
• Öffnen Sie die Gerätetür vorsichtig. Die Verwendung von Zutaten mit Alkohol kann eine
Mischung aus Alkohol und Luft verursachen.
• Lassen Sie beim Öffnen der Tür keine Funken oder offenen Flammen mit dem Gerät in
Kontakt kommen.
• Platzieren Sie keine entflammbaren Produkte oder Gegenstände, die mit entflammbaren
Produkten benetzt sind, im Gerät, auf dem Gerät oder in der Nähe des Geräts.
WARNUNG!
Risiko von Schäden am Gerät.
• Um Beschädigungen und Verfärbungen der Emailbeschichtung zu vermeiden:
– Stellen Sie feuerfestes Geschirr oder andere Gegenstände nicht direkt auf den Boden
des Geräts.
– Legen Sie keine Alufolie direkt auf den Boden des Garraums.
– Füllen Sie kein Wasser in das heiße Gerät.
– Lassen Sie nach Abschluss des Garvorgangs kein feuchtes Geschirr oder feuchte
Speisen im Gerät stehen.
– Gehen Sie beim Herausnehmen oder Einsetzen des Zubehörs sorgfältig vor.
• Verfärbungen der Emaille- oder Edelstahlbeschichtung haben keine Auswirkung auf die
Leistung des Geräts.
• Verwenden Sie eine tiefe Pfanne für feuchte Kuchen. Fruchtsäfte verursachen Flecken, die
dauerhaft sein können.
• Kochen Sie immer bei geschlossener Gerätetür.
• Ist das Gerät hinter einer Möbelfront (wie etwa einer Tür) installiert, achten Sie darauf, dass
die Tür während des Gerätebetriebs nicht geschlossen wird. Hinter einer geschlossenen
Möbelfront können sich Hitze und Feuchtigkeit ansammeln und das Gerät, das Gehäuse
oder den Boden beschädigen. Schließen Sie die Möbelfront nicht, bevor das Gerät nach
dem Gebrauch völlig abgekühlt ist.
2.4 Reinigung und Pflege
WARNUNG!
Verletzungs-, Brandgefahr sowie Risiko von Schäden am Gerät.
• Schalten Sie das Gerät immer aus und ziehen Sie den Netzstecker aus der Steckdose,
bevor Reinigungsarbeiten durchgeführt werden.
• Vergewissern Sie sich, dass das Gerät abgekühlt ist. Es besteht die Gefahr, dass die
Glasscheiben brechen.
• Ersetzen Sie die Türglasscheiben umgehend, wenn sie beschädigt sind. Wenden Sie sich
an einen autorisierten Kundendienst.
• Gehen Sie beim Aushängen der Tür vorsichtig vor. Die Tür ist schwer!
• Reinigen Sie das Gerät regelmäßig, um eine Verschlechterung des Oberflächenmaterials zu
verhindern.
• Reinigen Sie das Geräts mit einem weichen, feuchten Tuch. Verwenden Sie ausschließlich
Neutralreiniger. Benutzen Sie keine Scheuermittel, scheuernde Reinigungsschwämmchen,
Lösungsmittel oder Metallgegenstände.
• Falls Sie ein Backofenspray verwenden, befolgen Sie die Sicherheitsanweisungen auf
seiner Verpackung.
8/196
Page 9
SICHERHEITSANWEISUNGEN
2.5 Pyrolysereinigung
WARNUNG!
Im Pyrolyse-Modus besteht Verletzungs- und Brandgefahr und es können
chemische Emissionen (Dämpfe) austreten.
• Entfernen Sie vor der pyrolytischen Selbstreinigung und vor der Erstinbetriebnahme
Folgendes aus dem Ofeninnenraum:
– Alle größeren Lebensmittelrückstände, Öl- und Fettablagerungen.
– Alle zum Gerät dazugehörigen herausnehmbaren Teile (Bleche, Einhängegitter) sowie
Töpfe, Pfannen, Bleche und Utensilien mit Antihaftbeschichtung usw.
• Lesen Sie die Anleitung zur Pyrolyse sorgfältig durch.
• Halten Sie Kinder während der Pyrolyse vom Gerät fern.
Das Gerät wird sehr heiß, und aus den vorderen Kühlungsöffnungen tritt heiße Luft aus.
• Die pyrolytische Reinigung erfolgt bei sehr hoher Temperatur und kann Dämpfe von
Lebensmittelrückständen und Gerätematerialen freisetzen. Beachten Sie unbedingt
Folgendes:
– Sorgen Sie während und nach der Pyrolyse für eine gute Belüftung.
– Sorgen Sie während und nach dem ersten Gebrauch mit der Höchsttemperatur für eine
gute Belüftung.
• Einige Vögel und Reptilien können im Gegensatz zu den Menschen sehr empfindlich auf die
während des Reinigungsvorgangs freigesetzten Dämpfe von Pyrolyse-Backöfen reagieren.
– Bringen Sie Tiere (besonders Vögel) für die Zeit während und nach der Pyrolyse und
nach der ersten Anwendung der Höchsttemperatur in einen gut belüfteten Bereich.
• Kleine Tiere reagieren auch während des laufenden Reinigungsprogramms empfindlich auf
die lokalen Temperaturschwankungen in der Nähe von Pyrolyse-Backöfen.
• Antihaftbeschichtungen auf Töpfen, Pfannen, Blechen und Kochutensilien usw. können
durch die hohen Temperaturen während der pyrolytischen Reinigung beschädigt werden
und geringfügige Mengen an gesundheitsschädlichen Dämpfen freisetzen.
• Die von den Pyrolyse-Backöfen/Speiseresten freigesetzten Dämpfe sind ungefährlich für
Menschen, einschließlich Kinder und Personen mit Gesundheitsbeschwerden.
2.6 Innenbeleuchtung
WARNUNG!
Stromschlaggefahr.
• Bezüglich der Lampe(n) in diesem Gerät und separat verkaufter Ersatzlampen: Diese
Lampen müssen extremen physikalischen Bedingungen in Haushaltsgeräten standhalten,
wie z.B. Temperatur, Vibration, Feuchtigkeit, oder sollen Informationen über den
Betriebszustand des Gerätes anzeigen. Sie sind nicht für den Einsatz in anderen Geräten
vorgesehen und nicht für die Raumbeleuchtung geeignet.
• Dieses Produkt enthält eine Lichtquelle der Energieeffizienzklasse G.
• Verwenden Sie nur Lampen mit der gleichen Leistung .
2.7 Wartung
• Wenden Sie sich zur Reparatur des Geräts an den autorisierten Kundendienst.
• Dabei dürfen ausschließlich Originalersatzteile verwendet werden.
9/196
Page 10
www.youtube.com/electrolux
www.youtube.com/aeg
How to install your AEG/Electrolux
Oven - Column installation
589
595
±1
114
18
min. 550
20
6
600
3
6
min. 560
21548
80
520
60
60
20
198
518
(*mm)
MONTAGE
2.8 Entsorgung
WARNUNG!
Verletzungs- und Erstickungsgefahr.
• Informationen zur Entsorgung des Geräts erhalten Sie von Ihrer Gemeindeverwaltung.
• Trennen Sie das Gerät von der Stromversorgung.
• Schneiden Sie das Netzkabel in der Nähe des Geräts ab, und entsorgen Sie es.
• Entfernen Sie das Türschloss, um zu verhindern, dass sich Kinder, oder Haustiere im Gerät
einschließen.
3. MONTAGE
WARNUNG!
Siehe Kapitel Sicherheitshinweise.
3.1 Montage
10/196
Page 11
min. 550
20
589
114
18
580
min. 560
9
595
±1
21548
70
60
520
60
20
198
518
(*mm)
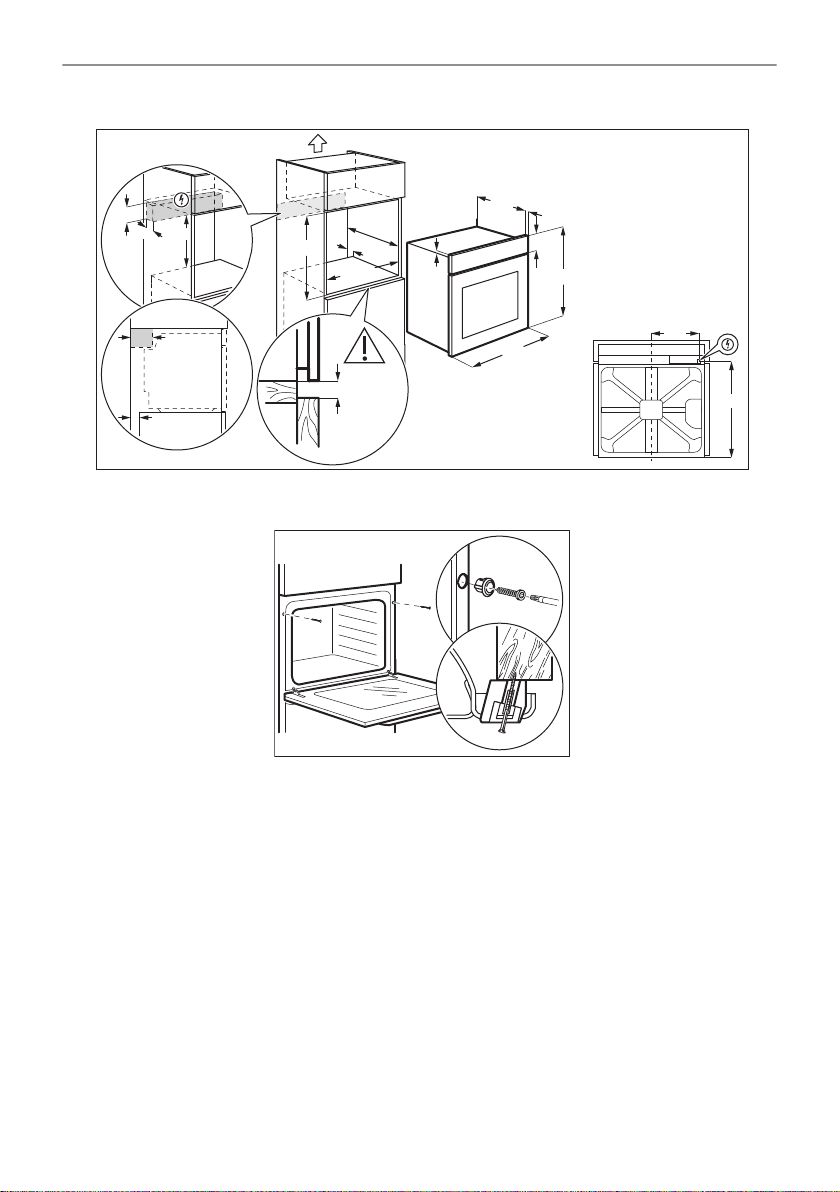
3.2 Befestigung des Ofens am Möbel
MONTAGE
11/196
Page 12
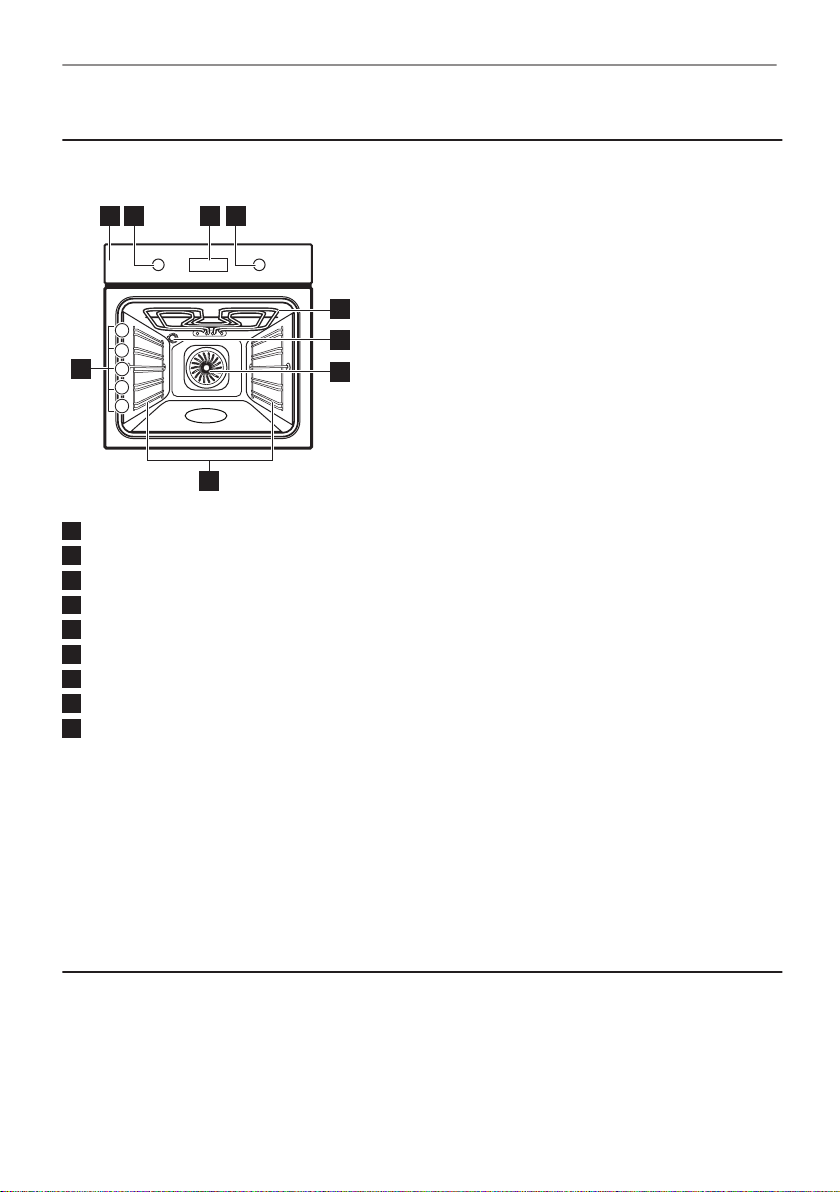
6
5
9
7
8
5
4
1
2
3
31 42
GERÄTEBESCHREIBUNG
4. GERÄTEBESCHREIBUNG
4.1 Gesamtansicht
Bedienfeld
1
Einstellknopf für die Ofenfunktionen
2
Anzeige
3
Einstellknopf
4
Heizelement
5
Lampe
6
Ventilator
7
Einschubschienen, herausnehmbar
8
Einschubebenen
9
4.2 Zubehör
• Kombirost
Für Kochgeschirr, Kuchenformen, Braten.
• Brat- und Fettpfanne
Zum Backen und Braten oder als Pfanne zum Aufsammeln von Fett.
• AirFry: Backblech
Zum Braten von Lebensmitteln mit weniger Öl oder ohne Backpapier.
5. EIN- UND AUSSCHALTEN DES BACKOFENS
5.1 Versenkbare Knöpfe
Drücken Sie zum Benutzen des Geräts den Knopf. Der Knopf kommt dann heraus.
12/196
Page 13
EIN- UND AUSSCHALTEN DES BACKOFENS
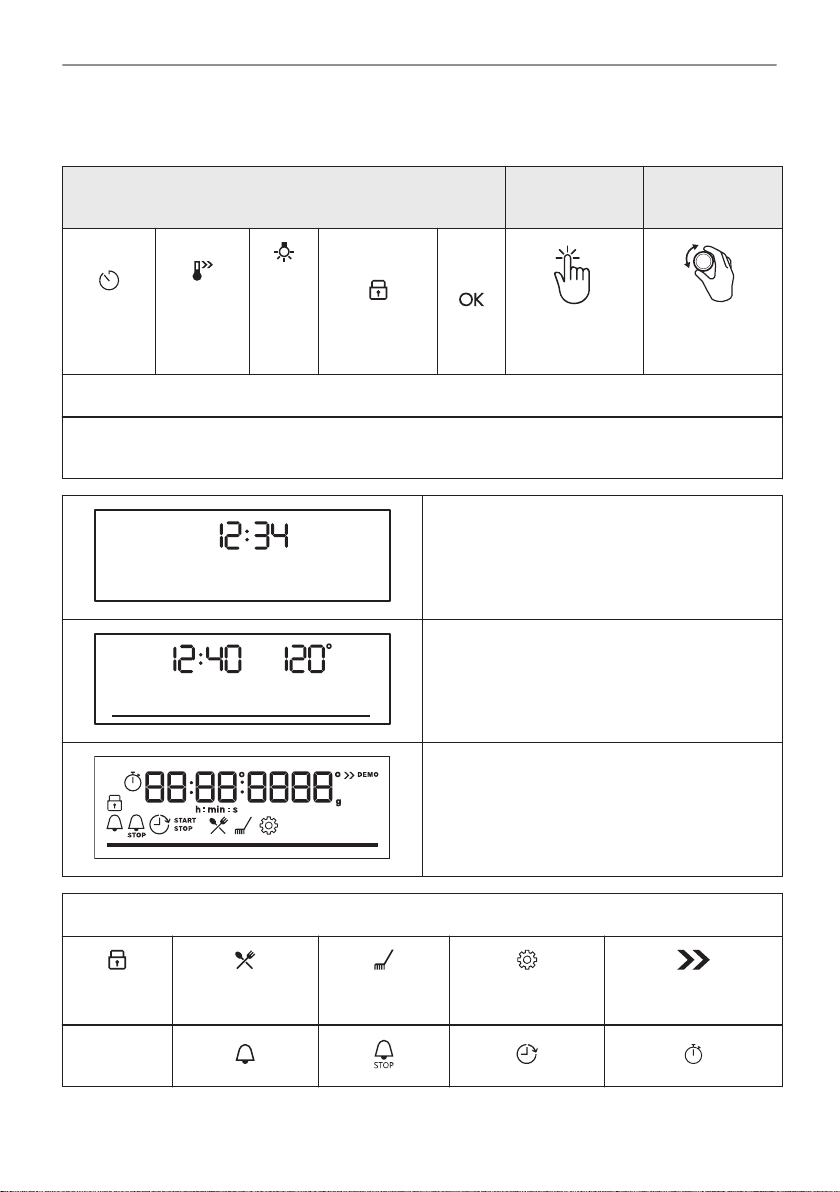
5.2 Bedienfeld
Sensorfelder des Bedienfelds Drücken Sie
Kurzzeit‐
wecker
Wählen Sie eine Ofenfunktion, um den Backofen einzuschalten.
Drehen Sie den Knopf für die Ofenfunktionen in die Aus-Position, um den Backofen auszuschal‐
ten.
Schnell‐
aufhei‐
zung
Back‐
ofen‐
be‐
leuch‐
tung
Verriegelung
Wenn sich der Einstellknopf für die Ofenfunkti‐
onen in der Aus-Position befindet, schaltet das
Display in den Standby-Modus.
Wenn Sie kochen, zeigt das Display die einge‐
stellte Temperatur, Uhrzeit und andere verfüg‐
bare Optionen an.
Display mit der maximalen Anzahl wählbarer
Funktionen.
Drehen Sie
den Knopf
Verriege‐
lung
Timer-An‐
zeigen:
Koch-Assistent
Display-Anzeigen
Reinigung
Einstellungen
Schnellaufheizung
13/196
Page 14
VOR DER ERSTEN VERWENDUNG
Fortschrittsbalken - für Temperatur oder Zeit.
6. VOR DER ERSTEN VERWENDUNG
WARNUNG!
Siehe Kapitel Sicherheitshinweise.
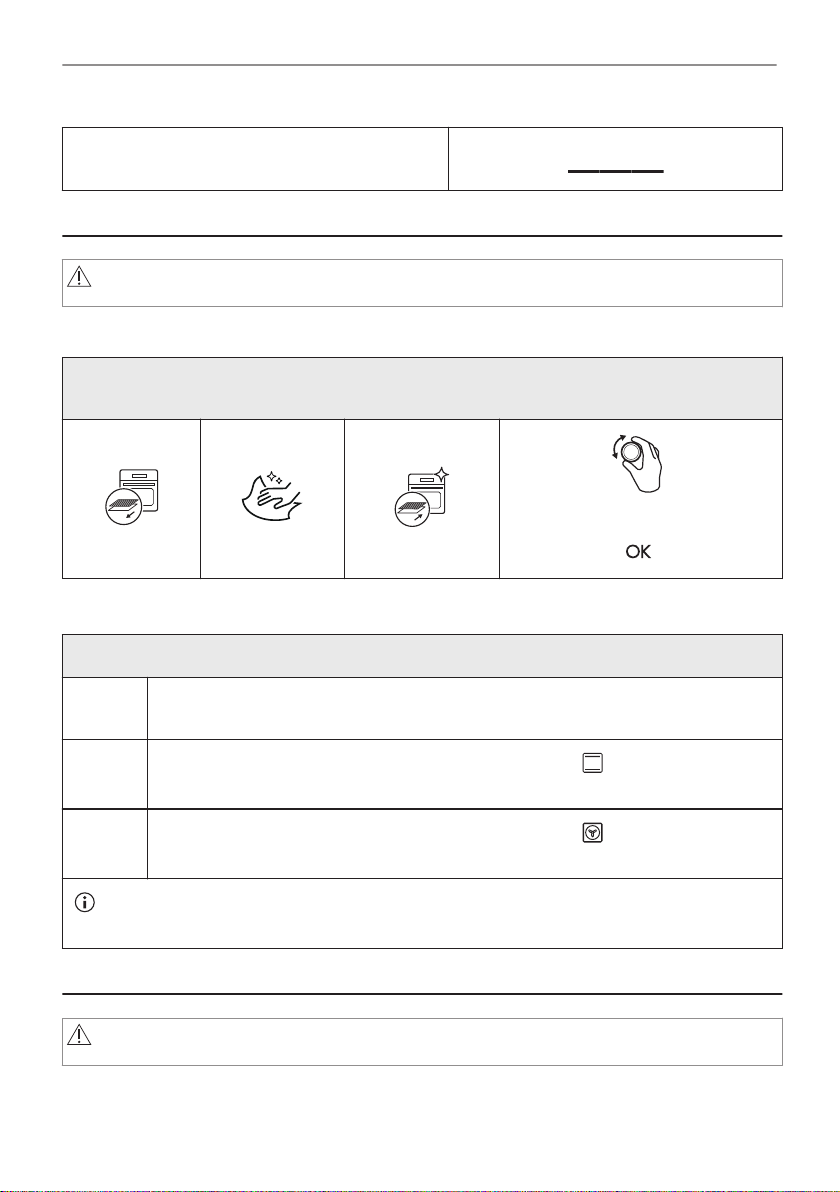
6.1 Erste Reinigung
Reinigen Sie den leeren Backofen vor der ersten Inbetriebnahme und stellen Sie die Uhrzeit
ein:
00:00
Stellen Sie die Zeit ein. Drücken Sie
.
6.2 Erstes Vorheizen
Heizen Sie den leeren Ofen vor der ersten Inbetriebnahme vor.
Schritt1Nehmen Sie die Zubehörteile und die herausnehmbaren Einhängegitter aus dem
Schritt
2
Schritt
3
Der Ofen kann während des Vorheizens Geruch und Rauch verströmen. Stellen Sie sicher,
dass der Raum belüftet ist.
Ofen.
Stellen Sie die Höchsttemperatur für folgende Funktion ein: .
Lassen Sie den Ofen 1 Stunde lang eingeschaltet.
Stellen Sie die Höchsttemperatur für folgende Funktion ein: .
Lassen Sie den Ofen 15 Min. lang eingeschaltet.
7. TÄGLICHER GEBRAUCH
WARNUNG!
Siehe Kapitel Sicherheitshinweise.
14/196
Page 15
TÄGLICHER GEBRAUCH
7.1 Einstellung: Ofenfunktionen
Beginnen Sie mit dem Kochen
Schritt 1 Schritt 2
Stellen Sie eine Backofenfunktion ein. Stellen Sie die Temperatur ein.
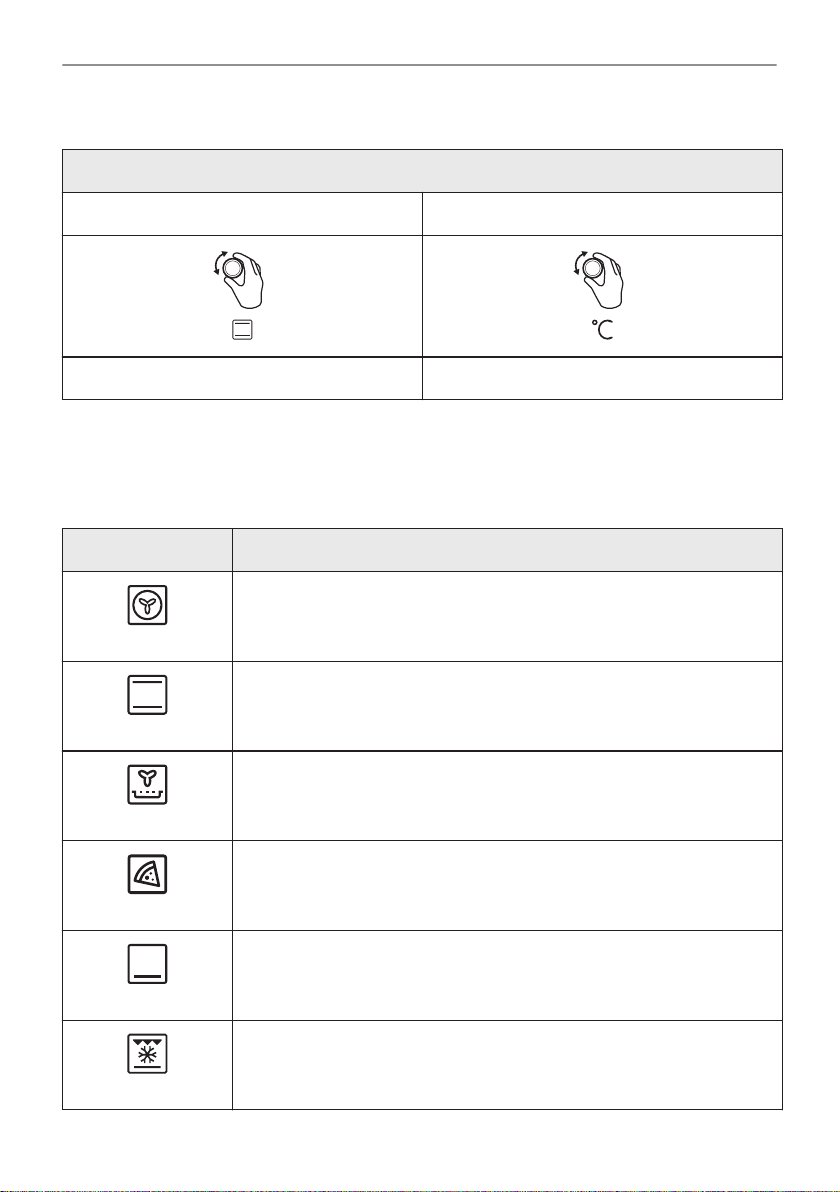
7.2 Ofenfunktionen
Standard-Ofenfunktionen
Ofenfunktion Gerät
Zum Backen auf bis zu drei Einschubebenen gleichzeitig und zum Dörren
von Lebensmitteln. Stellen Sie eine 20 - 40 °C niedrigere Backofentempe‐
Heißluft
ratur als bei Ober-/Unterhitze ein.
Ober-/Unterhitze
AirFry
Pizzastufe
Unterhitze
Tiefkühlgerichte
Zum Backen und Braten von Speisen auf einer Einschubebene.
Zum Frittieren von Speisen ohne Öl.
Zum Backen von Pizza. Für ein intensives Überbacken und einen knuspri‐
gen Boden.
Zum Backen von Kuchen mit knusprigen Böden und zum Einkochen von
Lebensmitteln.
Lässt Fertiggerichte (z. B. Pommes frites, Kroketten oder Frühlingsrollen)
schön knusprig werden.
15/196
Page 16
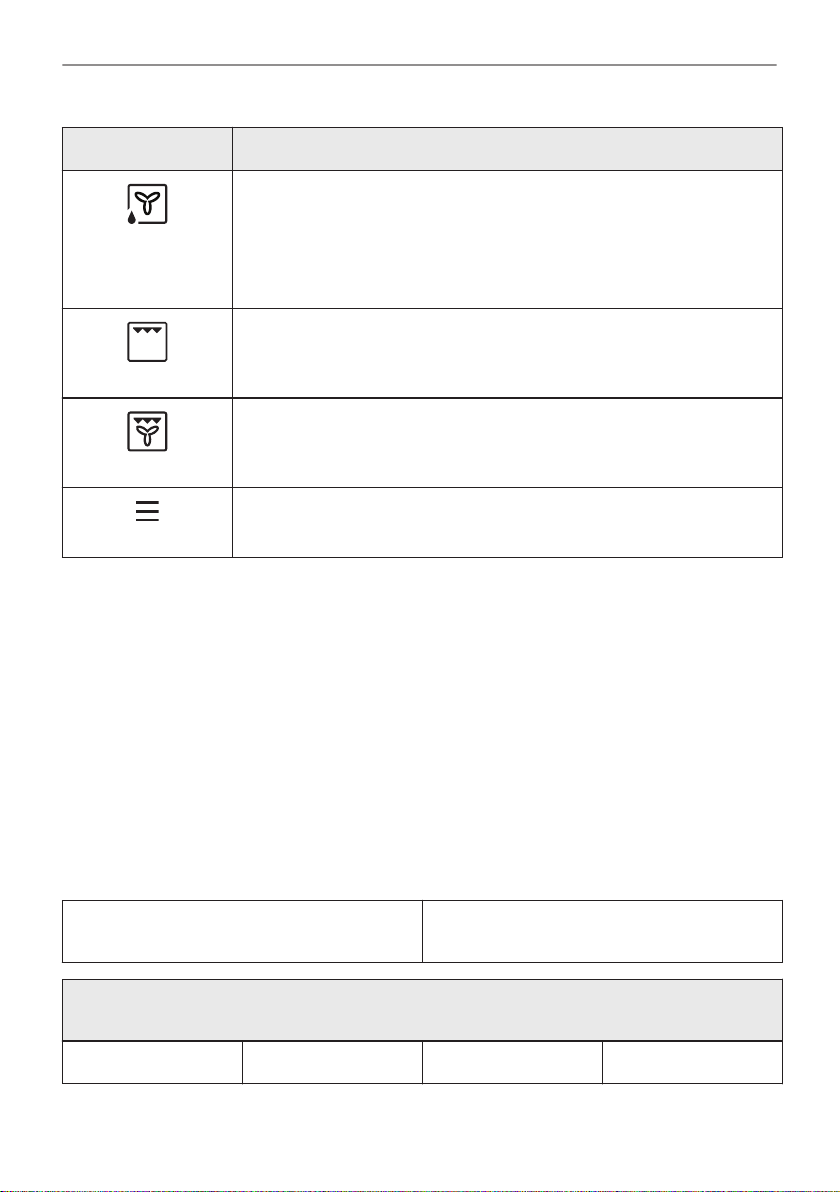
TÄGLICHER GEBRAUCH
Ofenfunktion Gerät
Diese Funktion ist entwickelt worden, um während des Kochvorgangs
Energie zu sparen. Wenn Sie diese Funktion nutzen, kann die Temperatur
Feuchte Umluft
Grill
Heißluftgrillen
Menü
7.3 Hinweise zu: Feuchte Umluft
Diese Funktion wurde zur Bestimmung der Energieeffizienzklasse und den Anforderungen an
die umweltgerechte Gestaltung EU 65/2014 und EU 66/2014 verwendet. Tests nach EN
60350-1.
Die Backofentür sollte während des Garvorgangs geschlossen bleiben, damit die Funktion nicht
unterbrochen wird. So wird gewährleistet, dass der Backofen mit der höchsten Energieeffizienz
arbeitet.
Wenn Sie diese Funktion verwenden, schaltet sich die Backofenbeleuchtung automatisch nach
30 Sekunden aus.
Näheres zum Garen finden Sie im Kapitel „Tipps und Hinweise“, Feuchte Umluft. Allgemeine
Empfehlungen zum Energiesparen finden Sie im Kapitel „Energieeffizienz“, Energiesparen.
im Garraum von der eingestellten Temperatur abweichen. Es wird die
Restwärme genutzt. Die Wärmeleistung kann geringer sein. Weitere Infor‐
mationen zu folgenden Themen finden Sie im Kapitel „Täglicher Ge‐
brauch“: Feuchte Umluft.
Zum Grillen dünner Lebensmittel und zum Toasten von Brot.
Zum Braten großer Fleischstücke oder von Geflügel mit Knochen auf ei‐
ner Ebene. Zum Gratinieren und Überbacken.
Aufrufen des Menüs: Koch-Assistent, Reinigung, Einstellungen.
7.4 Einstellung: Koch-Assistent
Jedes Gericht in diesem Untermenü hat eine empfohlene Funktion und Temperatur. Sie
können die Zeit und Temperatur während des Garvorgangs einstellen.
Einige der Speisen können Sie auch mit der
folgenden Funktion zubereiten:
Koch-Assistent - Verwenden Sie diese Funktion, um ein Gericht schnell mit den Standard‐
einstellungen zuzubereiten:
Schritt 1 Schritt 2 Schritt 3 Schritt 4
16/196
• Gewichtsautomatik
Page 17
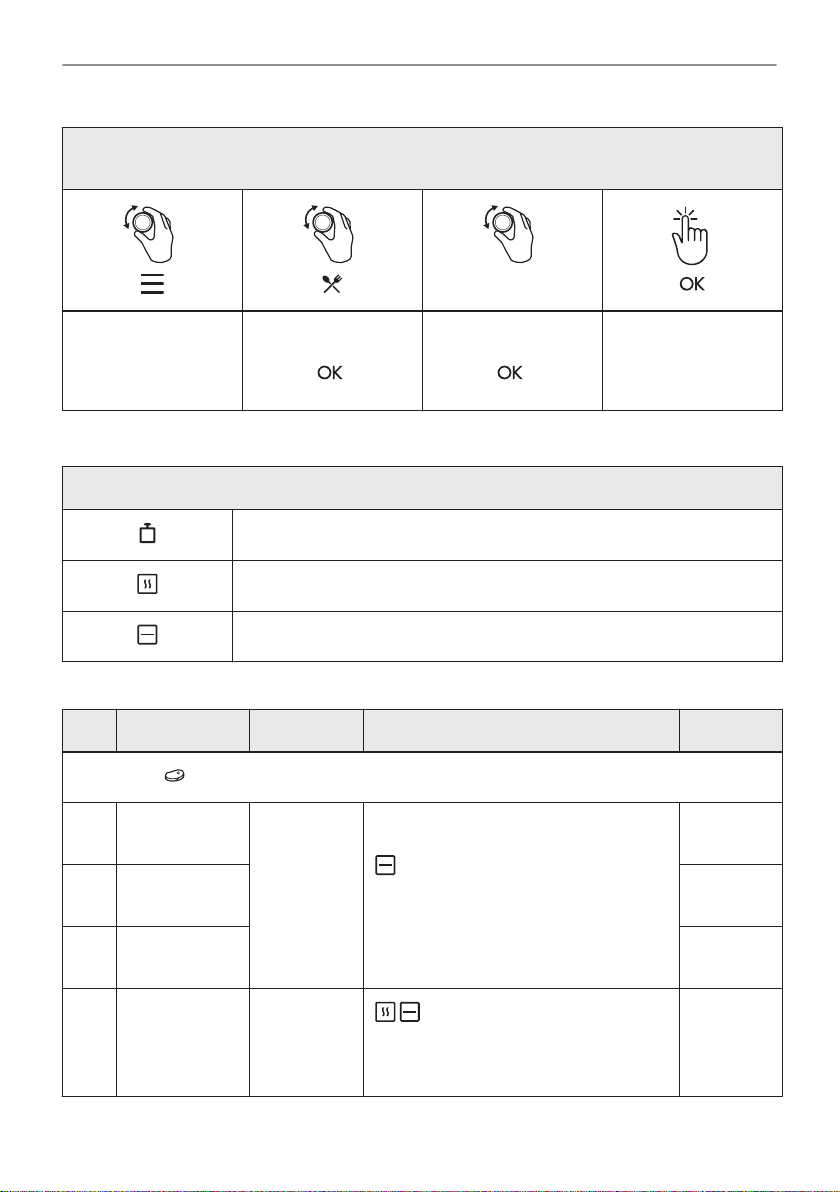
TÄGLICHER GEBRAUCH
Koch-Assistent - Verwenden Sie diese Funktion, um ein Gericht schnell mit den Standard‐
einstellungen zuzubereiten:
P1 - P45
Öffnen Sie das Menü. Wählen Koch-Assis‐
tent. Drücken Sie
.
Wählen Sie das Ge‐
richt. Drücken Sie
.
Geben Sie das Ge‐
richt in den Backofen.
Bestätigen Sie die
Einstellung.
7.5 Koch-Assistent
Legende
Gewichtsautomatik verfügbar.
Heizen Sie den Backofen vor, bevor Sie mit dem Kochen beginnen.
Einschubebene.
Wenn die Funktion beendet ist, prüfen Sie, ob das Gericht fertig ist.
Speise Gewicht Einschubebene / Zubehör Dauer
Rindfleisch
P1 Roastbeef,
blutig
P2 Roastbeef, ro‐
sa
P3 Roastbeef,
durch
1 - 1,5 kg; 4
- 5 cm dicke
Stücke
2; Backblech
Braten Sie das Fleisch einige Minuten in
einer heißen Pfanne. Setzen Sie es in
den Backofen ein.
40 Min.
50 Min.
60 Min.
P4 Steak, rosa 180 - 220 g
pro Stück; 3
cm dicke
Scheiben
3; Bräter auf Kombirost
Braten Sie das Fleisch einige Minuten in
einer heißen Pfanne. Setzen Sie es in
den Backofen ein.
15 Min.
17/196
Page 18
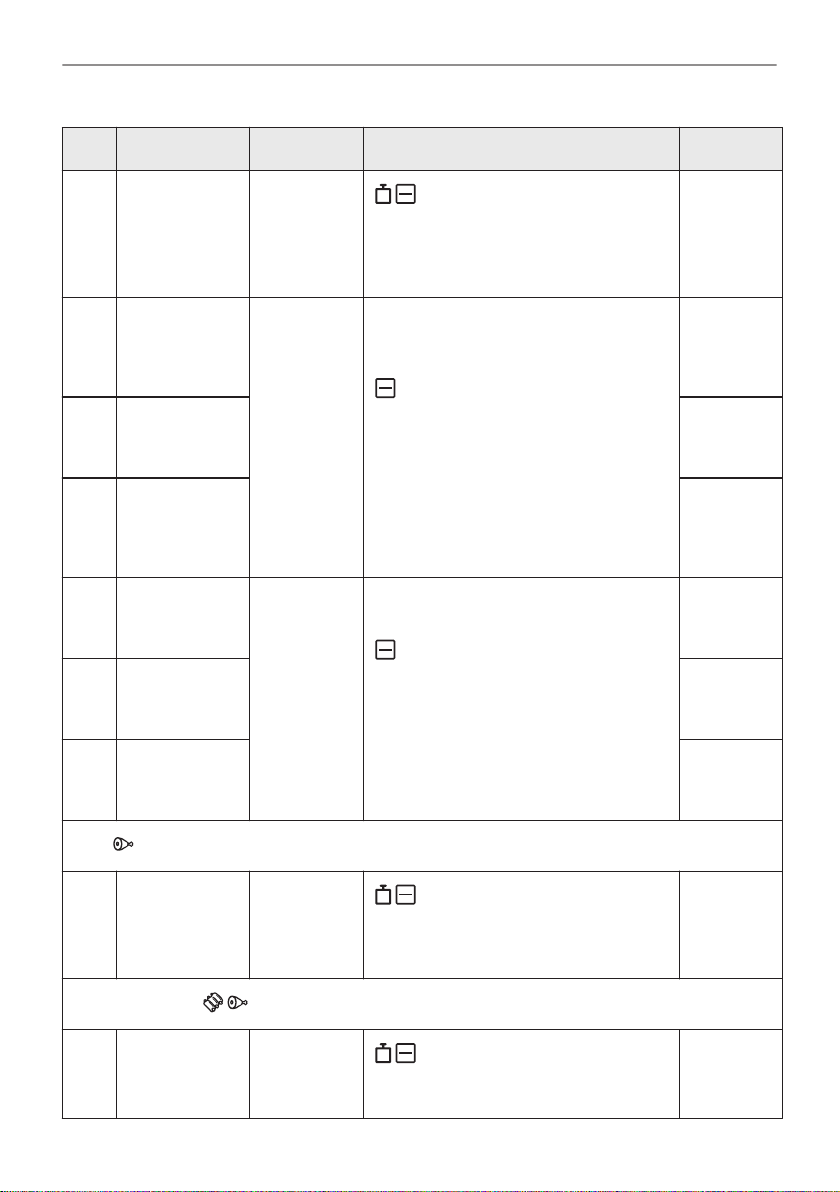
TÄGLICHER GEBRAUCH
Speise Gewicht Einschubebene / Zubehör Dauer
P5 Rinderbraten/
geschmort
(Prime Rib,
obere runde,
dicke Flanke)
P6 Roastbeef,
blutig (Nieder‐
temperaturGaren)
P7 Roastbeef, ro‐
sa (Niedertem‐
peratur-Garen)
P8 Roastbeef,
durch (Nieder‐
temperaturGaren)
P9 Filet, blutig
(Niedertempe‐
ratur-Garen)
P10 Filet, rosa
(Niedertempe‐
ratur-Garen)
P11 Filet, fertig
(Niedertempe‐
ratur-Garen)
1,5 - 2 kg
1 - 1,5 kg; 4
- 5 cm dicke
Stücke
0,5 - 1,5 kg;
5 - 6 cm di‐
cke Stücke
2; Bräter auf Kombirost
Braten Sie das Fleisch einige Minuten in
einer heißen Pfanne. Flüssigkeit hinzu‐
geben. Setzen Sie es in den Backofen
ein.
2; Backblech
Verwenden Sie Ihre Lieblingsgewürze
oder einfach Salz und frisch gemahlenen
Pfeffer. Braten Sie das Fleisch einige Mi‐
nuten in einer heißen Pfanne. Setzen Sie
es in den Backofen ein.
2; Backblech
Verwenden Sie Ihre Lieblingsgewürze
oder einfach Salz und frisch gemahlenen
Pfeffer. Braten Sie das Fleisch einige Mi‐
nuten in einer heißen Pfanne. Setzen Sie
es in den Backofen ein.
120 Min.
75 Min.
85 Min.
130 Min.
75 Min.
90 Min.
120 Min.
Kalb
P12 Kalbsbraten
(z. B. Schulter)
Schweinefleisch
P13 Schweinebra‐
ten oder
Schulter
18/196
0,8 - 1,5 kg;
4 cm dicke
Stücke
1,5 - 2 kg
2; Bräter auf Kombirost
Verwenden Sie Ihre Lieblingsgewürze.
Flüssigkeit hinzugeben. Braten zuge‐
deckt.
2; Bräter auf Kombirost
Wenden Sie das Fleisch nach der Hälfte
der Gardauer.
80 Min.
120 Min.
Page 19
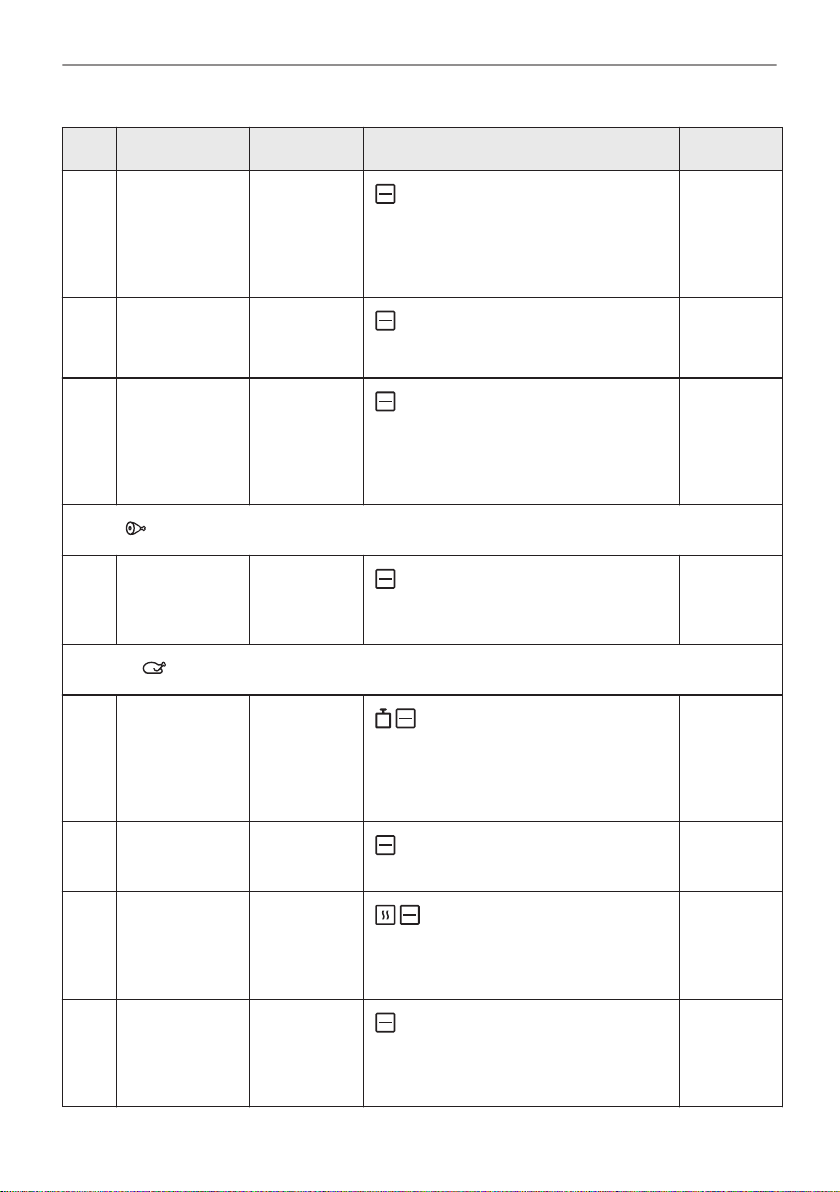
TÄGLICHER GEBRAUCH
Speise Gewicht Einschubebene / Zubehör Dauer
P14 Pulled Pork
(Niedertempe‐
ratur Garen)
P15 Lende, frisch 1 - 1,5 kg; 5
P16 Rippchen 2 - 3 kg; ver‐
Lamm
P17 Lammkeule
mit Knochen
Geflügel
P18 Hähnchen,
ganz
1,5 - 2 kg
- 6 cm dicke
Stücke
wenden Sie
rohe, 2 - 3
cm dünne
Rippchen
1,5 - 2 kg; 7
- 9 cm dicke
Stücke
1 - 1,5 kg;
frisch
2; Backblech
Verwenden Sie Ihre Lieblingsgewürze.
Wenden Sie das Fleisch nach der Hälfte
der Garzeit, um eine gleichmäßige Bräu‐
nung zu erzielen.
2; Bräter auf Kombirost
Verwenden Sie Ihre Lieblingsgewürze.
3; tiefe Pfanne
Flüssigkeit hinzufügen, um den Boden
eines Gerichts zu bedecken. Wenden
Sie das Fleisch nach der Hälfte der Gar‐
dauer.
2; Bräter auf Backblech
Flüssigkeit hinzugeben. Wenden Sie das
Fleisch nach der Hälfte der Gardauer.
2; Auflaufform auf Backblech
Verwenden Sie Ihre Lieblingsgewürze.
Das Hähnchen nach der Hälfte der Gar‐
zeit wenden, um eine gleichmäßige
Bräunung zu erzielen.
215 Min.
55 Min.
90 Min.
130 Min.
60 Min.
P19 Halbes Hähn‐
chen
P20 Hähnchen‐
brust
P21 Hähnchen‐
schenkel,
frisch
0,5 - 0,8 kg
180 - 200 g
pro Stück
-
3; Backblech
Verwenden Sie Ihre Lieblingsgewürze.
2; Auflaufform auf Kombirost
Verwenden Sie Ihre Lieblingsgewürze.
Braten Sie das Fleisch einige Minuten in
einer heißen Pfanne.
3; Backblech
Wenn Sie die Hähnchenschenkel zuerst
marinieren, stellen Sie die niedrigere
Temperatur ein und garen Sie sie länger.
40 Min.
25 Min.
30 Min.
19/196
Page 20
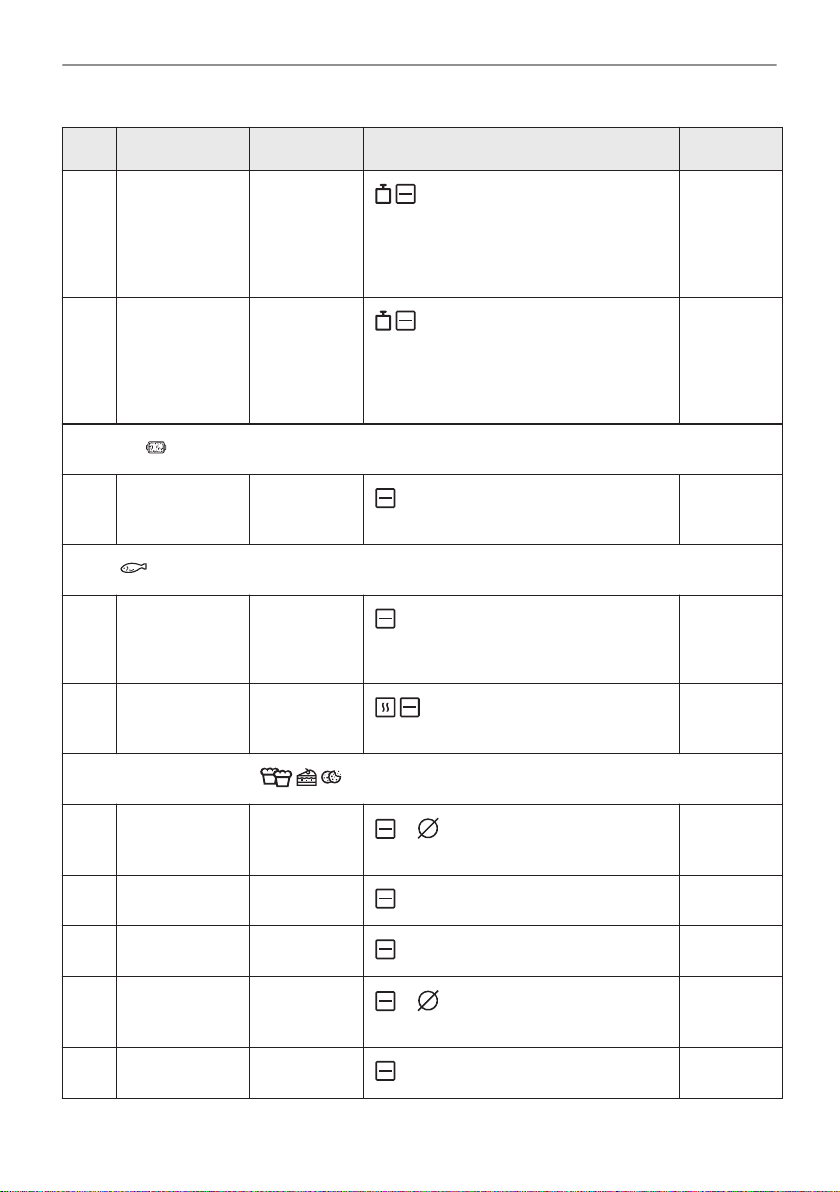
TÄGLICHER GEBRAUCH
Speise Gewicht Einschubebene / Zubehör Dauer
P22 Ente, ganz 2 - 3 kg
P23 Gans, ganz 4 - 5 kg
Sonstige
P24 Hackbraten 1 kg
Fisch
P25 Ganzer Fisch,
gegrillt
P26 Fischfilet -
0,5 - 1 kg
pro Fisch
2; Bräter auf Kombirost
Verwenden Sie Ihre Lieblingsgewürze.
Legen Sie das Fleisch in den Bräter. Die
Ente nach der Hälfte der Garzeit wen‐
den.
2; tiefe Pfanne
Verwenden Sie Ihre Lieblingsgewürze.
Legen Sie das Fleisch auf das tiefe
Backblech. Die Gans nach der Hälfte der
Garzeit wenden.
2; Kombirost
Verwenden Sie Ihre Lieblingsgewürze.
2; Backblech
Fisch mit Butter füllen und Ihre Lieblings‐
gewürze und Kräuter verwenden.
3; Auflaufform auf Kombirost
Verwenden Sie Ihre Lieblingsgewürze.
100 Min.
110 Min.
60 Min.
30 Min.
20 Min.
Süßes Backen/Desserts
P27 Käsekuchen -
P28 Apfelkuchen -
P29 Apfelkuchen -
P30 Apfelkuchen -
P31 Brownies 2 kg
20/196
2; Springform 28 cm auf Kombi‐
rost
3; Backblech
2; Kuchenform auf Kombirost
1; 22 cm Kuchenform auf Kom‐
birost
3; tiefe Pfanne
90 Min.
45 Min.
40 Min.
60 Min.
30 Min.
Page 21
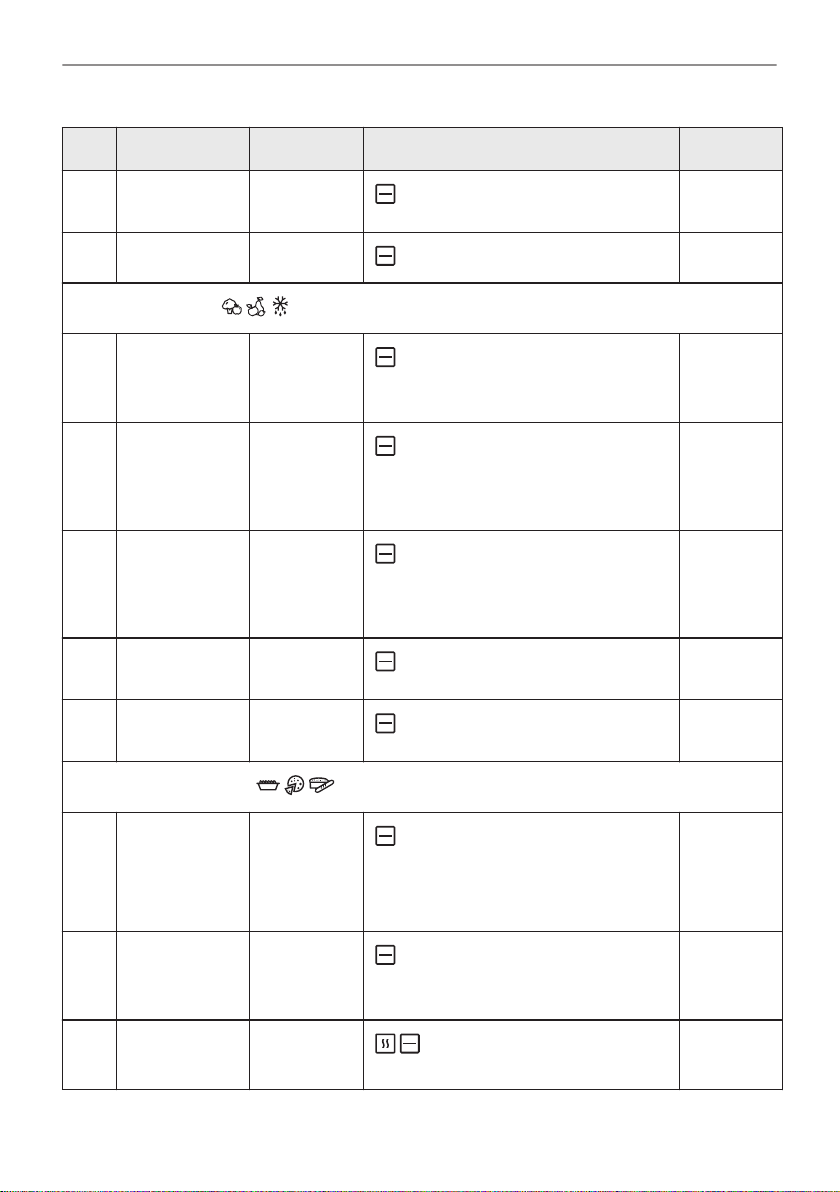
TÄGLICHER GEBRAUCH
Speise Gewicht Einschubebene / Zubehör Dauer
P32 Schokoladen‐
muffins
P33 Brotkuchen -
Gemüse / Beilagen
P34 Ofenkartof‐
feln
P35 Wegdes 1 kg
P36 Gegrilltes Ge‐
müse
P37 Kroketten, ge‐
froren
P38 Pommes fri‐
tes, gefroren
-
1 kg
1 - 1,5 kg
0,5 kg
0,75 kg
3; Muffin-Blech auf Kombirost
2; Brotpfanne auf Kombirost
2; Backblech
Die ganzen Kartoffeln mit der Haut auf
das Backblech geben.
3; Backblech mit Backpapier ausge‐
kleidet
Verwenden Sie Ihre Lieblingsgewürze.
Kartoffeln in Stücke schneiden.
3; Backblech mit Backpapier ausge‐
kleidet
Verwenden Sie Ihre Lieblingsgewürze.
Gemüse in Stücke schneiden.
3; Backblech
3; Backblech
25 Min.
50 Min.
50 Min.
35 Min.
30 Min.
25 Min.
25 Min.
Gratins, Brot und Pizza
P39 Fleisch-/
Gemüsela‐
sagne mit tro‐
ckenen Nu‐
delplatten
P40 Kartoffelgra‐
tin (rohe Kar‐
toffeln)
P41 Pizza frisch,
dünn
1 - 1,5 kg
1 - 1,5 kg
2; Auflaufform auf Kombirost
1; Auflaufform auf Kombirost
Drehen Sie das Gericht nach der Hälfte
der Garzeit um.
-
2; Backblech mit Backpapier aus‐
gekleidet
45 Min.
50 Min.
15 Min.
21/196
Page 22
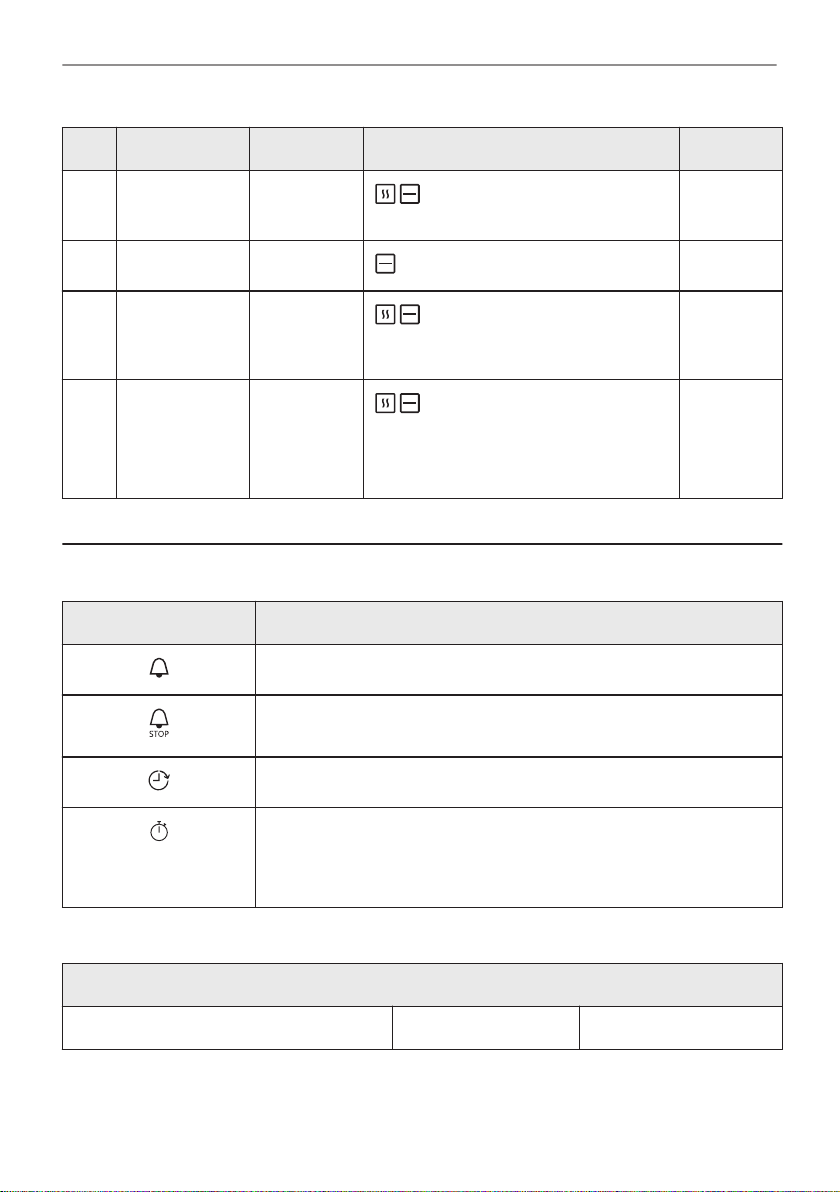
UHRFUNKTIONEN
Speise Gewicht Einschubebene / Zubehör Dauer
P42 Pizza frisch,
dick
P43 Quiche -
P44 Baguette/
Ciabatta/
Weißbrot
P45 Alle Getreide/
Roggen/dunk‐
les Brot, alle
Getreide in
Kastenform
-
0,8 kg
1 kg
8. UHRFUNKTIONEN
8.1 Uhrfunktionen
Uhrfunktion Verwendung
Kurzzeit-Wecker. Nach Ablauf der Zeit ertönt der Signalton.
Garzeitdauer. Nach Ablauf des Timers ertönt ein akustisches Signal
und die Ofenfunktion stoppt.
2; Backblech mit Backpapier aus‐
gekleidet
2; Backform auf Kombirost
3; Backblech mit Backpapier aus‐
gekleidet
Für Weißbrot mehr Zeit nötig.
2; Backblech mit Backpapier aus‐
gekleidet / Kombirost
25 Min.
45 Min.
30 Min.
60 Min.
Zeitvorwahl. Verzögerung des Starts und/oder Endes des Kochens.
Uptimer. Max. 23 Std. 59 Min. Diese Funktion wirkt sich nicht auf den
Betrieb des Backofens aus.
Um den Uptimer ein- oder auszuschalten, wählen Sie: Menü, Einstel‐
lungen.
8.2 Einstellung: Uhrfunktionen
Einstellung: Uhrzeit
Schritt 1 Schritt 2 Schritt 3
22/196
Page 23
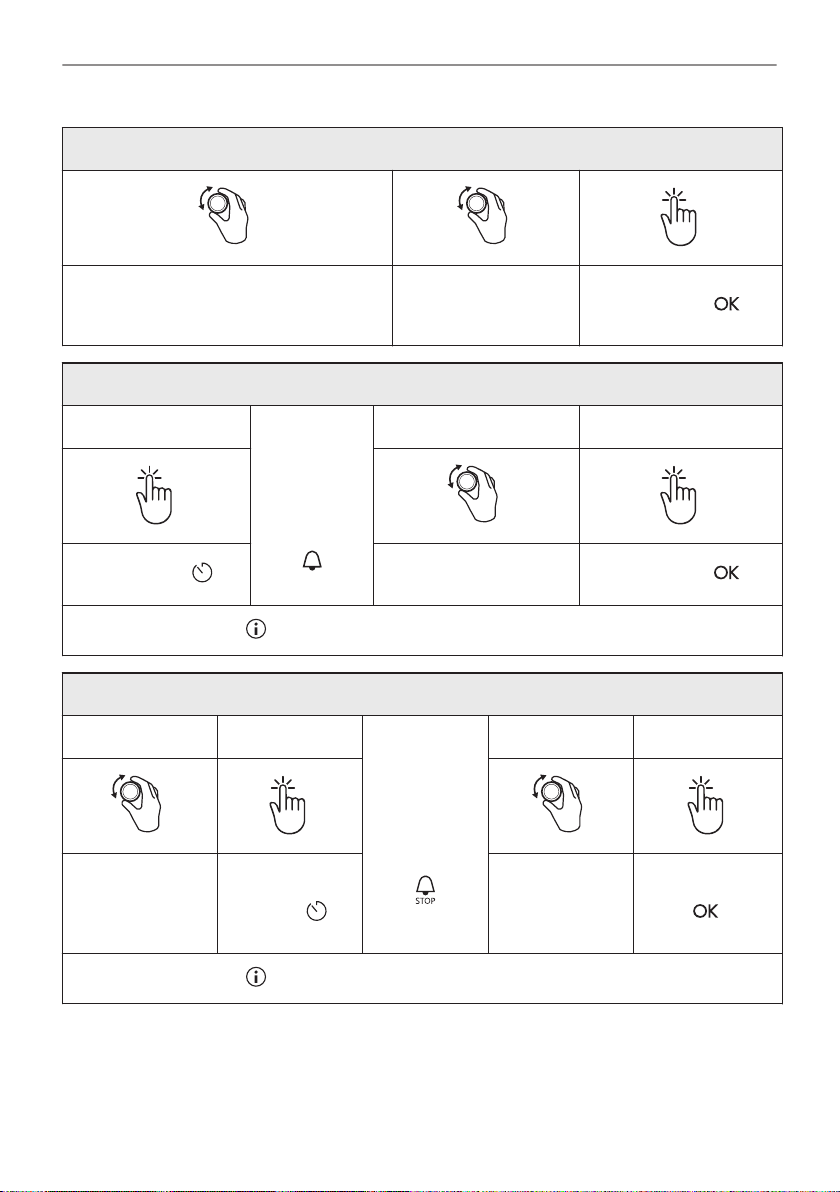
Einstellung: Uhrzeit
UHRFUNKTIONEN
Um die Uhrzeit zu ändern, rufen Sie das
Menü auf und wählen Sie Einstellungen,
Schritt 1
Drücken Sie: .
Schritt 1 Schritt 2
Wählen Sie eine
Ofenfunktion und
stellen Sie die
Temperatur ein.
Tageszeit.
Einstellung: Kurzzeit-Wecker
Im Display
wird Folgen‐
des ange‐
zeigt:
0:00 ange‐
zeigt.
Der Countdown des Timers startet umgehend.
Einstellung: Garzeitdauer
Drücken Sie wie‐
derholt: .
Stellen Sie die Uhrzeit
ein.
Schritt 2 Schritt 3
Stellen Sie Kurzzeit-We‐
cker
Schritt 3 Schritt 4
Im Display
wird Folgen‐
des ange‐
zeigt:
0:00 ange‐
zeigt.
Stellen Sie die
Gardauer ein.
Drücken Sie: .
Drücken Sie: .
Drücken Sie:
.
Der Countdown des Timers startet umgehend.
23/196
Page 24
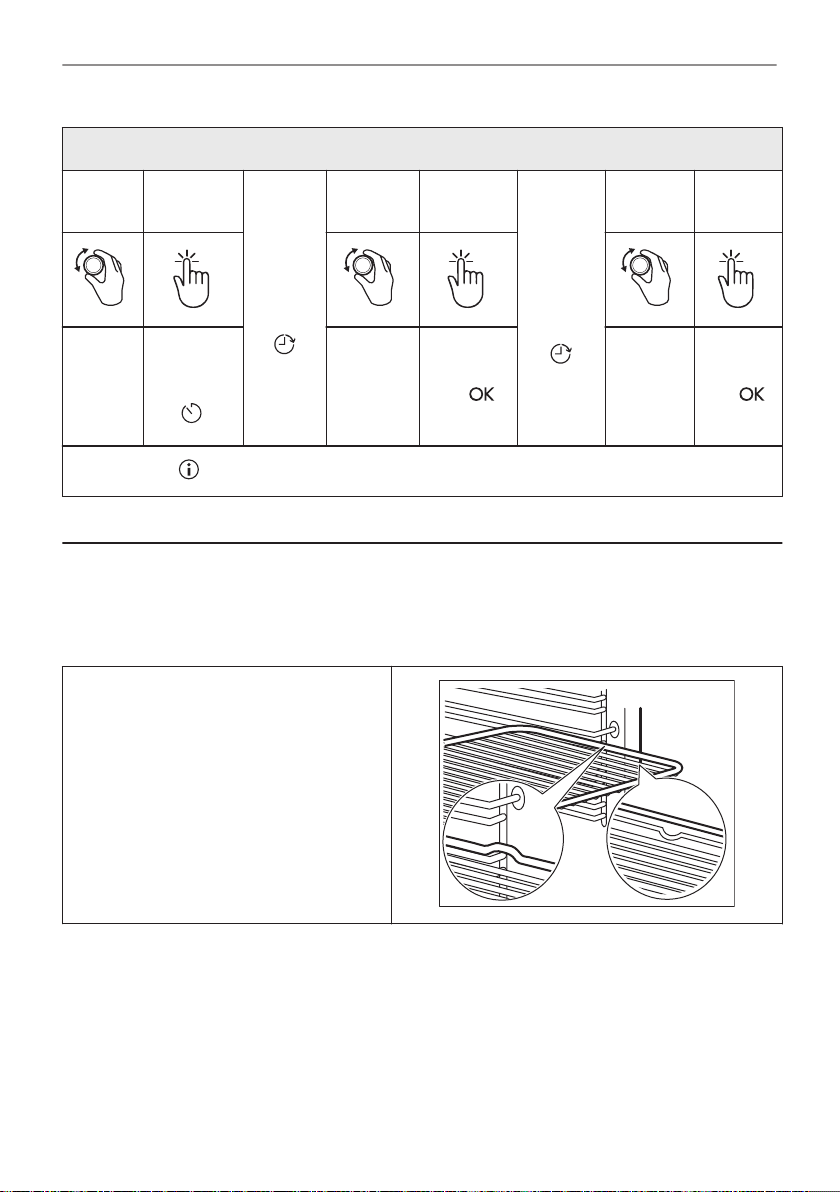
VERWENDUNG: ZUBEHÖR
Einstellung: Zeitvorwahl
Schritt1Schritt 2
Wählen
Sie die
Ofen‐
funkti‐
on.
Drücken
Sie wie‐
derholt:
.
Der Countdown des Timers beginnt zu der eingestellten Startzeit.
Das
Display
zeigt
die Uhr‐
zeit an
START
Schritt 3 Schritt 4
Stellen
Sie die
Startzeit
ein.
Drücken
Sie: .
Im Dis‐
play wird
Folgen‐
des an‐
gezeigt:
--:--
STOPP
Schritt 5 Schritt 6
Stellen
Sie die
Endzeit
ein.
Drücken
Sie: .
9. VERWENDUNG: ZUBEHÖR
9.1 Einsetzen des Zubehörs
Die kleine Einkerbung auf der Oberseite erhöht die Sicherheit. Die Vertiefungen sind auch
Kippsicherungen. Durch den umlaufend erhöhten Rand des Rosts ist das Kochgeschirr gegen
Abrutschen vom Rost gesichert.
Kombirost:
Schieben Sie den Rost zwischen die Füh‐
rungsschienen der Einhängegitter mit den
Füßen nach unten zeigend.
24/196
Page 25
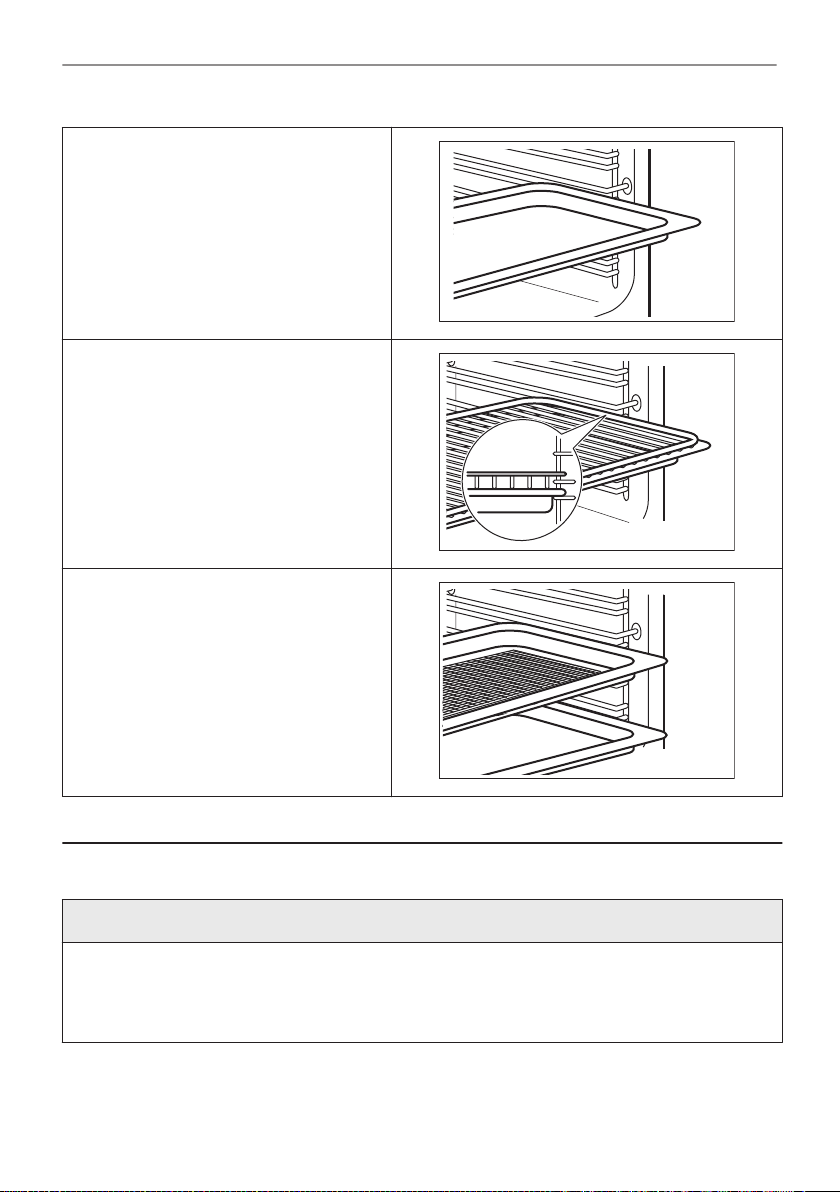
Auflaufpfanne:
Schieben Sie das Backblech zwischen die
Führungsstäbe der Einhängegitter.
Kombirost, Auflaufpfanne:
Schieben Sie das Backblech zwischen die
Führungsstäbe der Einhängegitter und
dem Kombirost auf die Führungsstäbe da‐
rüber.
AirFry:
Setzen Sie das Blech in die dritte Ein‐
schubebene ein.
Setzen Sie das Backblech in die erste Ein‐
schubebene ein.
ZUSATZFUNKTIONEN
10. ZUSATZFUNKTIONEN
10.1 Verriegelung
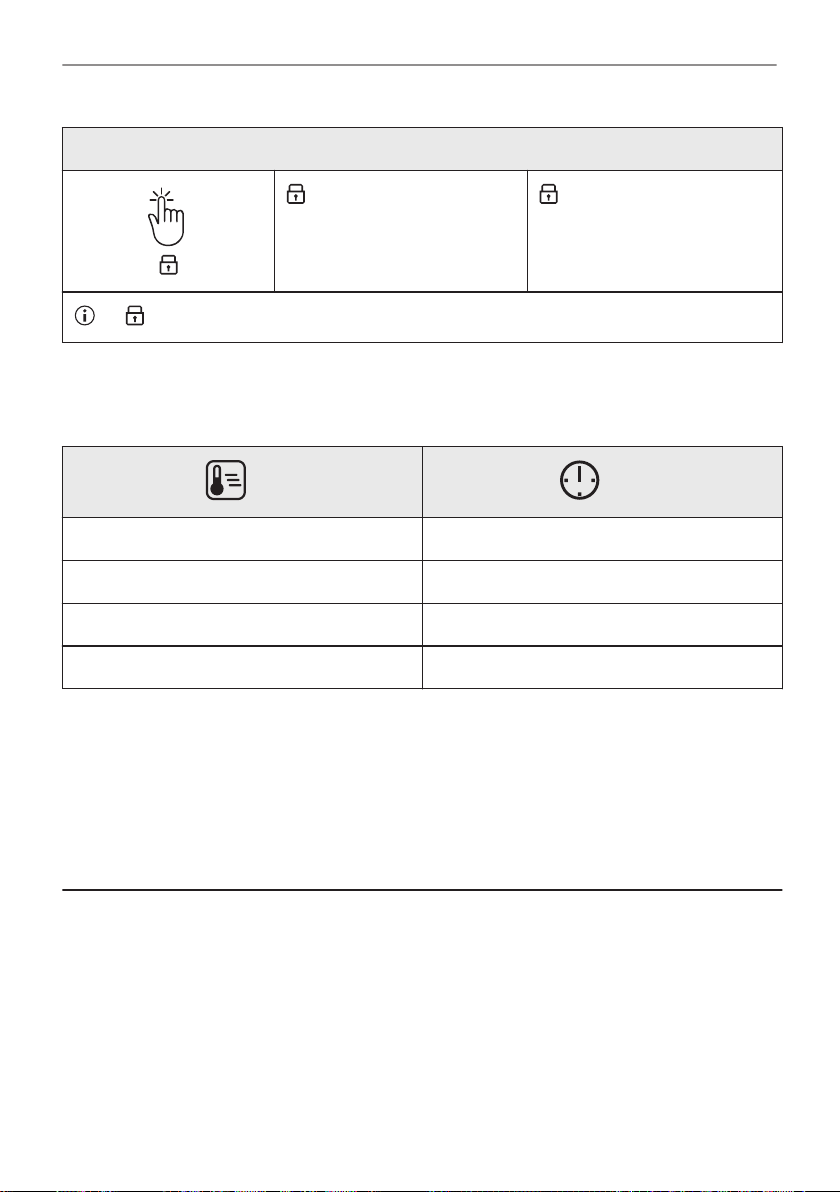
Diese Funktion verhindert ein versehentliches Verstellen der Ofenfunktion.
Einschalten, wenn der Backofen in Betrieb ist – das eingestellte Garen wird fortgesetzt und das
Bedienfeld ist verriegelt.
Einschalten, wenn der Backofen ausgeschaltet ist – der Backofen kann nicht eingeschaltet wer‐
den, das Bedienfeld ist verriegelt.
25/196
Page 26
TIPPS UND HINWEISE
Diese Funktion verhindert ein versehentliches Verstellen der Ofenfunktion.
– gedrückt halten, um die
Funktion einzuschalten.
Ein Signal ertönt.
3 x – blinkt, wenn die Verriegelung eingeschaltet ist.
– gedrückt halten, um sie
auszuschalten.
10.2 Automatische Abschaltung
Der Backofen wird aus Sicherheitsgründen nach einiger Zeit ausgeschaltet, wenn eine
Ofenfunktion eingeschaltet ist und Sie die Einstellungen nicht ändern.
(°C) (Std.)
30 - 115 12.5
120 - 195 8.5
200 - 245 5.5
250 - max. 3
Die Abschaltautomatik funktioniert nicht mit den Funktionen: Backofenbeleuchtung,
Zeitvorwahl.
10.3 Kühlgebläse
Wenn der Backofen in Betrieb ist, wird das Kühlgebläse automatisch eingeschaltet, um die
Ofenoberflächen zu kühlen. Wenn Sie den Backofen ausschalten kann das Kühlgebläse weiter
laufen, bis der Ofen abgekühlt ist.
11. TIPPS UND HINWEISE
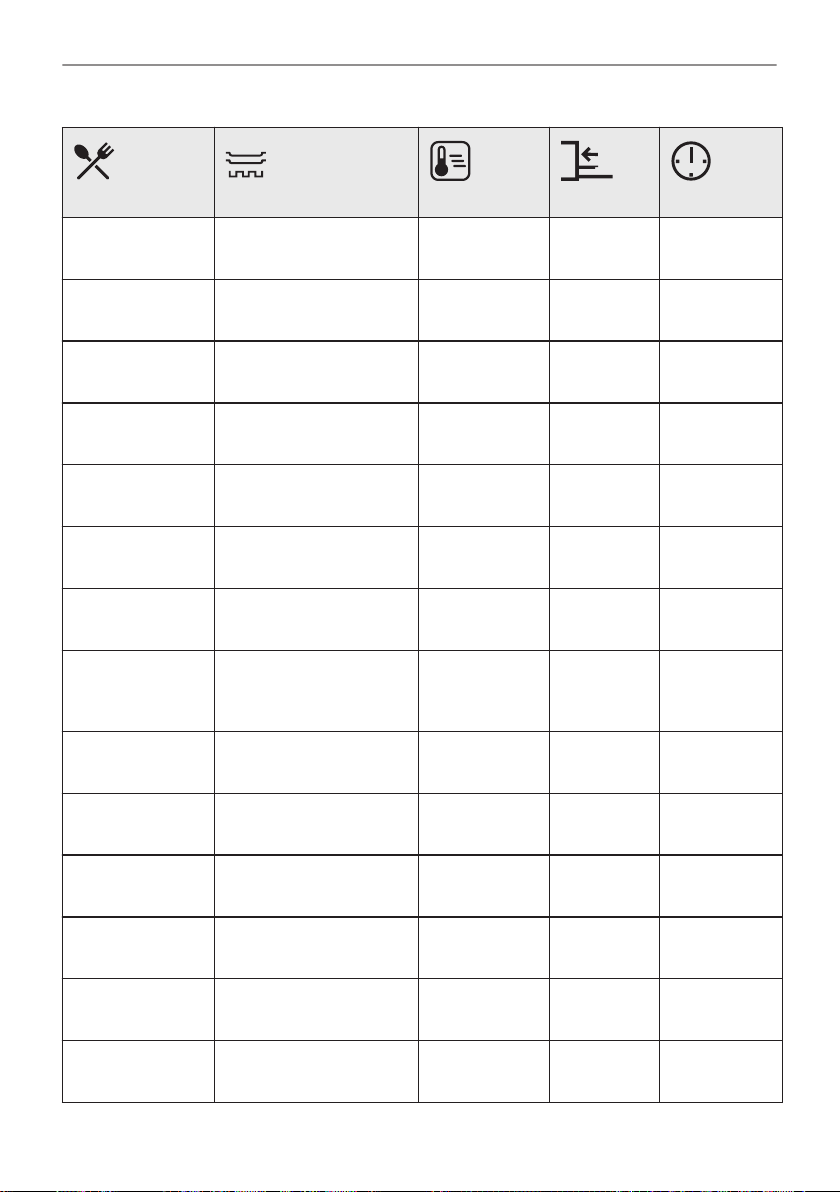
11.1 Feuchte Umluft
Beachten Sie für beste Ergebnisse die unten in der Tabelle aufgeführten Empfehlungen.
26/196
Page 27
TIPPS UND HINWEISE
(°C) (Min.)
Brötchen, süß, 16
Stück
Brötchen, 9 Stück Backblech oder tiefes
Pizza, gefroren,
0,35 kg
Biskuitrolle Backblech oder tiefes
Brownie Backblech oder tiefes
Soufflé, 6 Stück Keramikförmchen auf
Biskuitboden Biskuitform auf Kombi‐
Englischer Sand‐
wichkuchen à la
Victoria
Fisch, pochiert,
0,3 kg
Fisch, ganz, 0,2kgBackblech oder tiefes
Backblech oder tiefes
Blech
Blech
Kombirost 220 2 10 - 15
Blech
Blech
Kombirost
rost
Backform auf Kombirost 170 2 40 - 50
Backblech oder tiefes
Blech
Blech
180 2 20 - 30
180 2 30 - 40
170 2 25 - 35
175 3 25 - 30
200 3 25 - 30
180 2 15 - 25
180 3 20 - 25
180 3 25 - 35
Fischfilet, 0,3 kg Pizzapfanne auf Kombi‐
Fleisch, pochiert,
0,25 kg
Schaschlik, 0,5
kg
Plätzchen, 16
Stück
rost
Backblech oder tiefes
Blech
Backblech oder tiefes
Blech
Backblech oder tiefes
Blech
180 3 25 - 30
200 3 35 - 45
200 3 25 - 30
180 2 20 - 30
27/196
Page 28
TIPPS UND HINWEISE
(°C) (Min.)
Makronen, 24
Stück
Muffins, 12 Stück Backblech oder tiefes
Kleingebäck, pi‐
kant, 20 Stück
Mürbeteigplätz‐
chen, 20 Stück
Törtchen, 8 Stück Backblech oder tiefes
Gemüse, po‐
chiert, 0,4 kg
Vegetarisches
Omelett
Mediterranes Ge‐
müse, 0,7 kg
Backblech oder tiefes
Blech
Blech
Backblech oder tiefes
Blech
Backblech oder tiefes
Blech
Blech
Backblech oder tiefes
Blech
Pizzapfanne auf Kombi‐
rost
Backblech oder tiefes
Blech
180 2 25 - 35
170 2 30 - 40
180 2 25 - 30
150 2 25 - 35
170 2 20 - 30
180 3 35 - 45
200 3 25 - 30
180 4 25 - 30
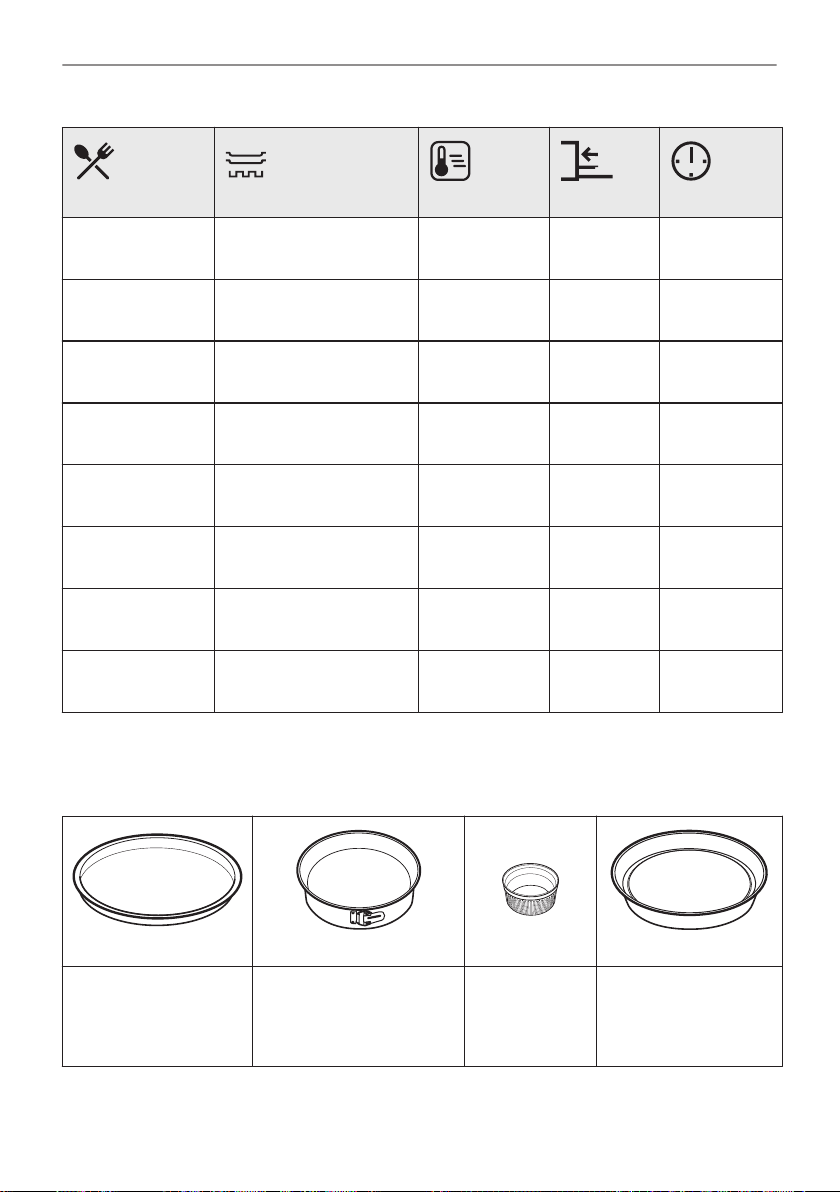
11.2 Feuchte Umluft - Empfohlenes Zubehör
Verwenden Sie die dunklen und nicht reflektierenden Formen und Behälter. Sie haben eine
bessere Wärmeabsorption als helle Farbe und reflektierende Schüsseln.
Pizzapfanne
Dunkel, nicht reflektie‐
rend
28 cm Durchmesser
28/196
Backform
Dunkel, nicht reflektierend
26 cm Durchmesser
Förmchen
Keramikform
8 cm Durch‐
messer, 5 cm
Höhe
Tortenbodenform
Dunkel, nicht reflektie‐
rend
28 cm Durchmesser
Page 29
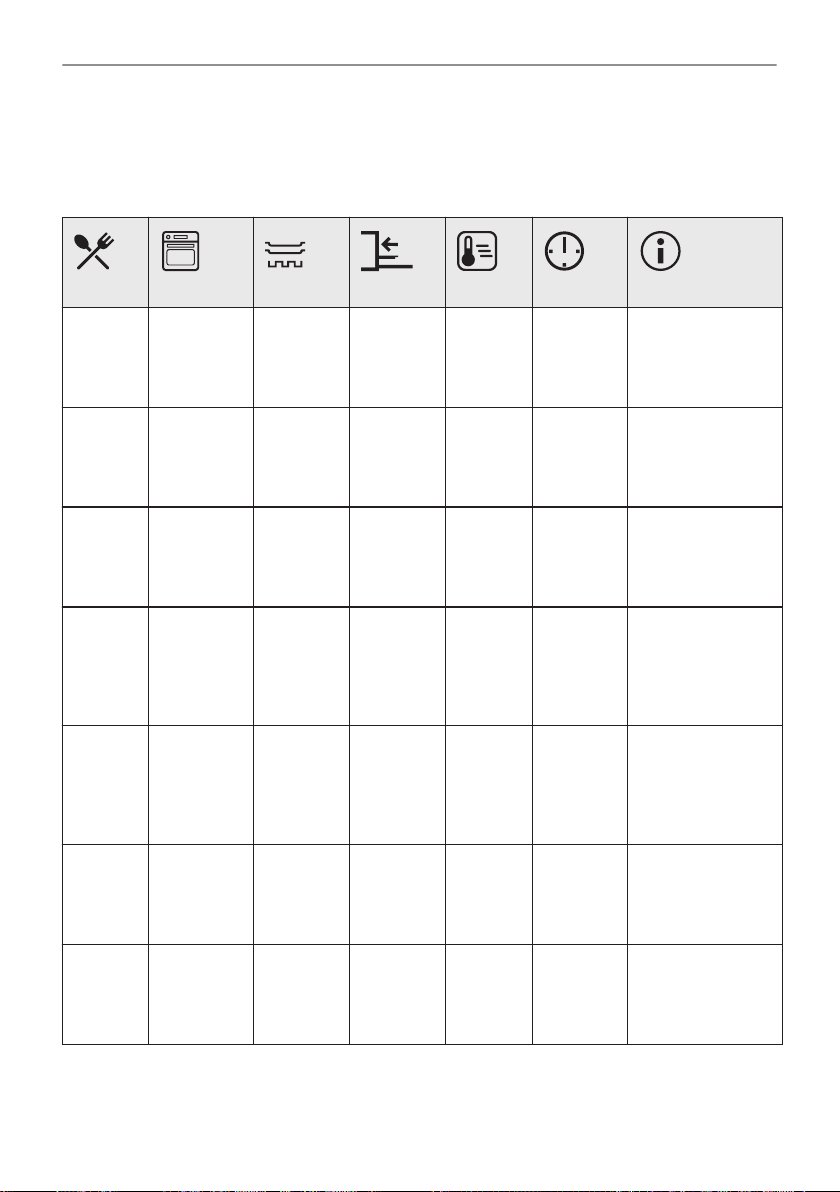
11.3 Gartabellen für Prüfinstitute Informationen für Prüfinstitute
Tests gemäß IEC 60350-1.
TIPPS UND HINWEISE
(°C) (Min.)
Tört‐
chen, 20
pro
Blech
Tört‐
chen, 20
pro
Blech
Tört‐
chen, 20
pro
Blech
Apfelku‐
chen, 2
Formen
à Ø 20
cm
Apfelku‐
chen, 2
Formen
à Ø 20
cm
Biskuit,
Kuchen‐
form Ø
26 cm
Ober-/
Unterhitze
Heißluft Back‐
Heißluft Back‐
Ober-/
Unterhitze
Heißluft Kombirost 2 160 70 - 90 -
Ober-/
Unterhitze
Back‐
blech
blech
blech
Kombirost 2 180 70 - 90 -
Kombirost 2 170 40 - 50 Backofen 10 Mi‐
3 170 20 - 30 -
3 150 -
160
2 und 4 150 -
160
20 - 35 -
20 - 35 -
nuten vorheizen.
Biskuit,
Kuchen‐
form Ø
26 cm
Heißluft Kombirost 2 160 40 - 50 Backofen 10 Mi‐
nuten vorheizen.
29/196
Page 30
REINIGUNG UND PFLEGE
(°C) (Min.)
Biskuit,
Kuchen‐
form Ø
26 cm
Mürbe‐
teigge‐
bäck
Mürbe‐
teigge‐
bäck
Mürbe‐
teigge‐
bäck
Toast, 4
- 6
Stück
Hambur‐
ger aus
Rind‐
fleisch,
6 Stück,
0,6 kg
Heißluft Kombirost 2 und 4 160 40 - 60 Backofen 10 Mi‐
Heißluft Back‐
Heißluft Back‐
Ober-/
Unterhitze
Grill Kombirost 4 Max. 2 - 3 Mi‐
Grill Kombirost
blech
blech
Back‐
blech
und Fett‐
pfanne
3 140 -
150
2 und 4 140 -
150
3 140 -
150
4 Max. 20 - 30 Kombirost in die
20 - 40 -
25 - 45 -
25 - 45 -
nuten auf
der ers‐
ten Seite,
2 - 3 Mi‐
nuten auf
der zwei‐
ten Seite
nuten vorheizen.
Backofen 3 Minu‐
ten vorheizen.
vierte und Fett‐
pfanne in die drit‐
te Einschubebene
des Backofens
einschieben.
Wenden Sie das
Gericht nach der
Hälfte der Gar‐
dauer.
Backofen 3 Minu‐
ten vorheizen.
12. REINIGUNG UND PFLEGE
WARNUNG!
Siehe Kapitel Sicherheitshinweise.
30/196
Page 31
12.1 Hinweise zur Reinigung
2
1
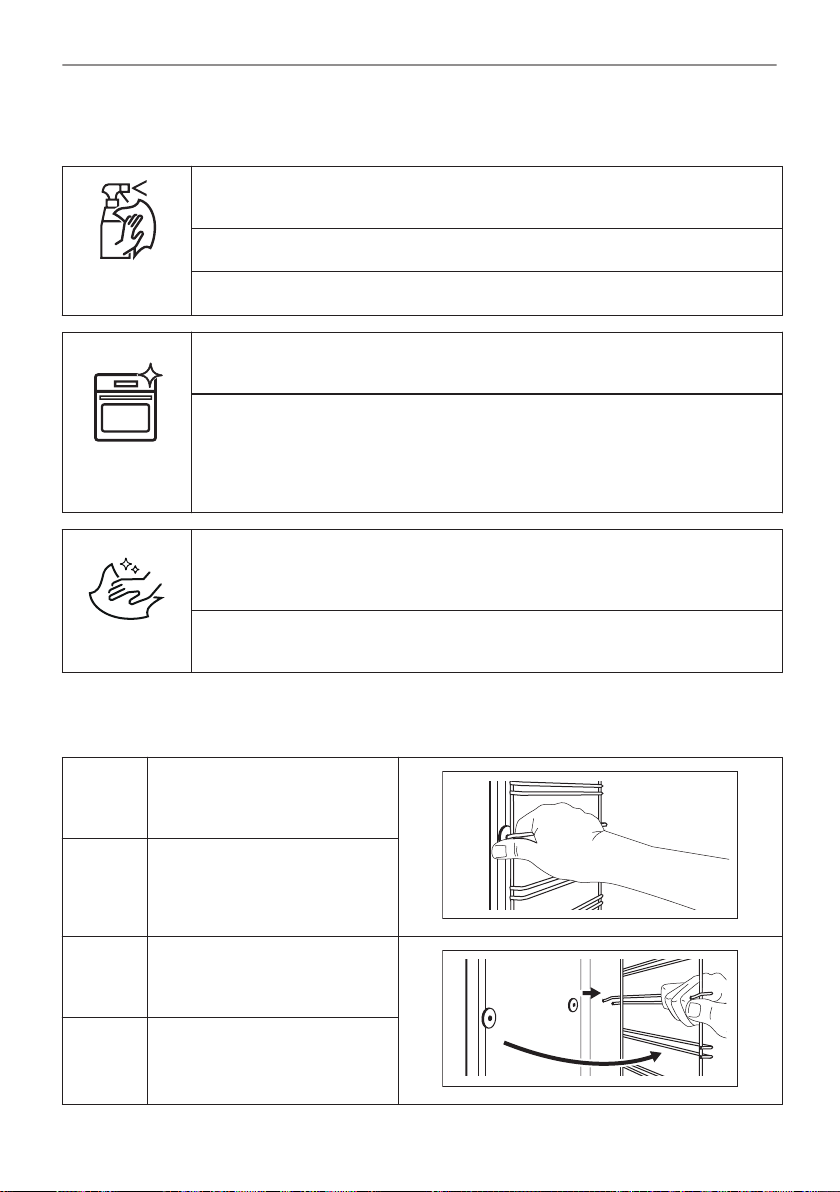
Feuchten Sie ein weiches Tuch mit warmem Wasser und etwas mildem Reini‐
gungsmittel an, und reinigen Sie damit die Vorderseite des Backofens.
Reinigen Sie die Metalloberflächen mit einer Reinigungslösung.
Reinigungs‐
mittel
Täglicher Ge‐
brauch
Reinigen Sie Flecken mit einem milden Reinigungsmittel.
Reinigen Sie den Garraum nach jedem Gebrauch. Fettansammlungen oder an‐
dere Speisereste könnten einen Brand verursachen.
Es kann sich Feuchtigkeit im Ofen oder an den Glasscheiben der Tür nieder‐
schlagen. Um die Kondensation zu reduzieren, schalten Sie den Backofen im‐
mer 10 Minuten vor dem Garen ein. Lassen Sie die Speisen nicht länger als 20
Minuten im Backofen stehen. Trocknen Sie den Garraum nach jedem Gebrauch
mit einem weichen Tuch ab.
Reinigen Sie alle Zubehörteile nach jedem Gebrauch und lassen Sie sie trock‐
nen. Feuchten Sie ein weiches Tuch mit warmem Wasser und einem milden
Reinigungsmittel an. Reinigen Sie die Zubehörteile nicht im Geschirrspüler.
REINIGUNG UND PFLEGE
Zubehör
Reinigen Sie das Zubehör mit Antihaftbeschichtung nicht mit Scheuermitteln
oder scharfkantigen Gegenständen.
12.2 Entfernen: Einhängegitter
Entfernen Sie Einhängegitter zur Reinigung des Backofens.
Schritt1Schalten Sie den Backofen aus
Schritt2Ziehen Sie das Einhängegitter
Schritt3Ziehen Sie das Einhängegitter
Schritt4Setzen Sie die Einhängegitter
und warten Sie, bis er abge‐
kühlt ist.
vorne von der Seitenwand weg.
hinten von der Seitenwand weg
und nehmen Sie es heraus.
in umgekehrter Reihenfolge ein.
31/196
Page 32
REINIGUNG UND PFLEGE
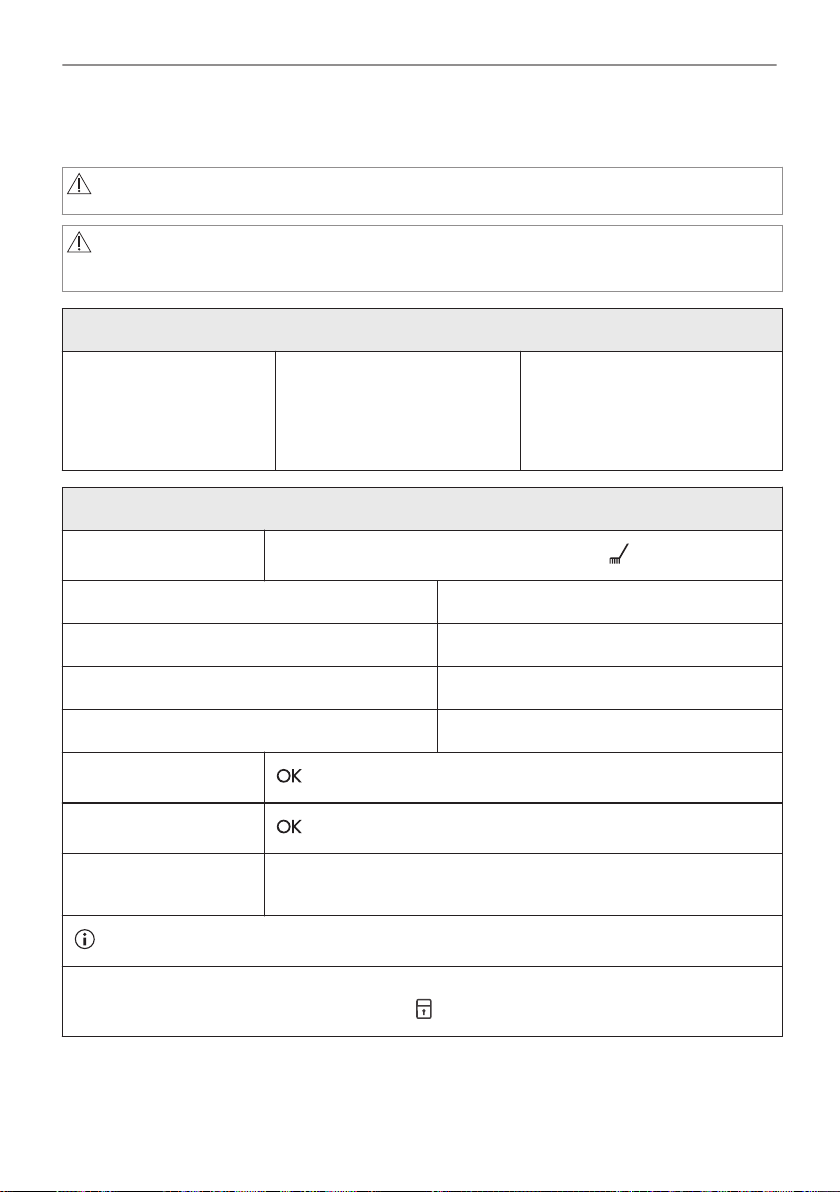
12.3 Benutzung: Pyrolytische Reinigung
Reinigen Sie den Backofen mit Pyrolytische Reinigung.
WARNUNG!
Es besteht das Risiko von Verbrennungen.
VORSICHT!
Befinden sich weitere Geräte in demselben Küchenmöbel, verwenden Sie diese
nicht während dieser Funktion. Andernfalls kann der Backofen beschädigt werden.
Vor dem Pyrolytische Reinigung:
Schalten Sie den Back‐
ofen aus und warten Sie,
bis er abgekühlt ist.
Schritt 1
Option Dauer
C1 - Leichte Reinigung 1 Std.
C2 - Normale Reinigung 1 Std. 30 Min.
C3 - Gründliche Reinigung 2 Std. 30 Min.
Schritt 2
Schritt 3
Schritt 4 Drehen Sie nach der Reinigung den Knopf für die Backofenfunktio‐
Während der Reinigung ist die Backofenlampe ausgeschaltet.
Entfernen Sie alle Zubehörteile
aus dem Backofen.
Pyrolytische Reinigung
Menü eingeben: Reinigung .
- drücken, um das Reinigungsprogramm auszuwählen.
- Drücken, um die Reinigung zu starten.
nen in die Aus-Position.
Reinigen Sie den Backofenboden
und die innere Türglasscheibe
mit warmem Wasser, einem wei‐
chen Tuch und einem milden
Reinigungsmittel.
Sobald der Backofen die eingestellte Temperatur erreicht hat, wird die Tür verriegelt. Bis die Tür
entriegelt wird, zeigt das Display Folgendes an: .
32/196
Page 33
REINIGUNG UND PFLEGE
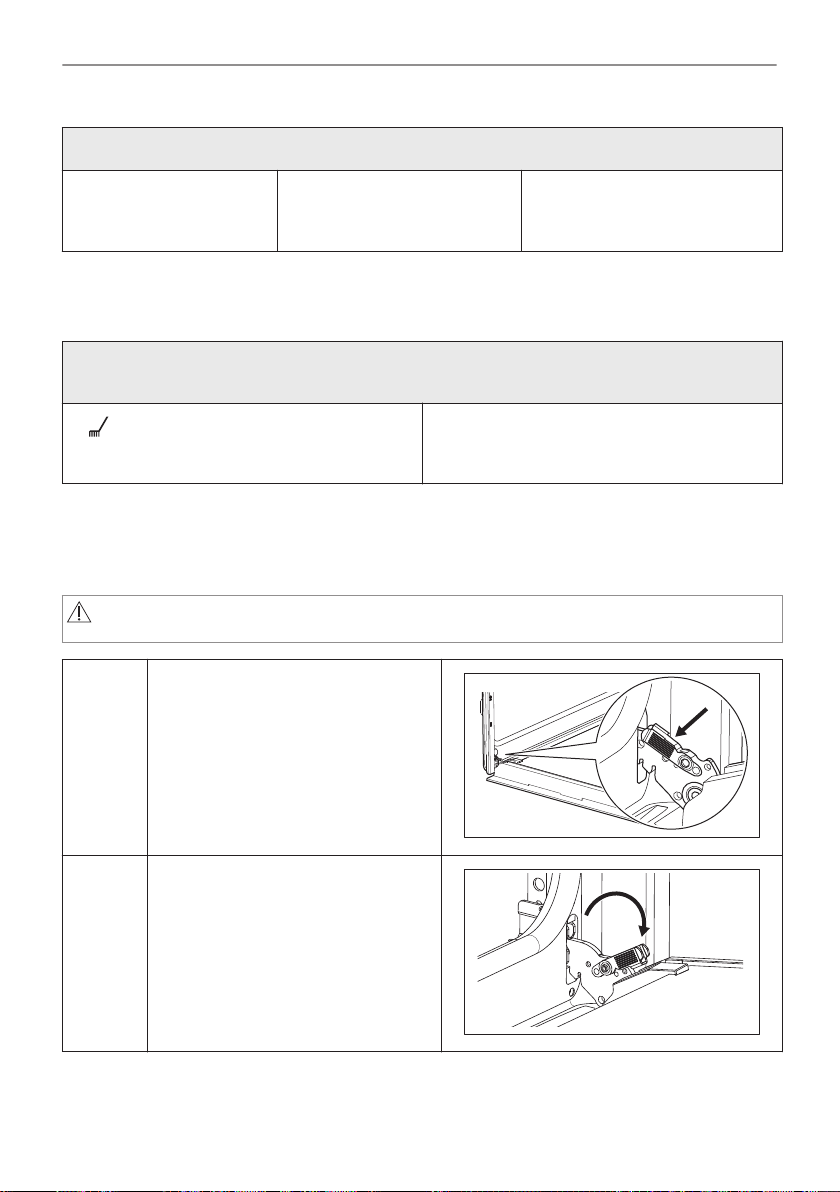
Nach Abschluss der Reinigung:
Schalten Sie den Back‐
ofen aus und warten Sie,
bis er abgekühlt ist.
Reinigen Sie den Garraum mit
einem weichen Tuch.
Entfernen Sie die Rückstände
vom Garraumboden.
12.4 Erinnerungsfunktion Reinigen
Der Backofen erinnert Sie daran, wann er mit der pyrolytischen Reinigung gereinigt werden
blinkt 5 Sekunden nach jedem Kochvor‐
gang im Display.
muss.
Zum Ausschalten der Erinnerung geben Sie die
Menü ein und wählen Sie Einstellungen, Erin‐
nerungsfunktion Reinigen.
12.5 Aus- und Einbau: Tür
Die Backofentür hat drei Glasscheiben. Sie können die Backofentür und die internen
Glasscheiben entfernen, um sie zu reinigen. Lesen Sie die gesamte Anleitung „Aus- und
Einbauen der Tür“, bevor Sie die Glasscheiben entfernen.
VORSICHT!
Verwenden Sie den Backofen nicht ohne die Glasscheiben.
Schritt1Öffnen Sie die Backofentür vollstän‐
dig und halten Sie beide Scharniere
fest.
Schritt2Heben und ziehen Sie die Verriege‐
lungen an, bis sie einrasten.
33/196
Page 34
1
2
B
REINIGUNG UND PFLEGE
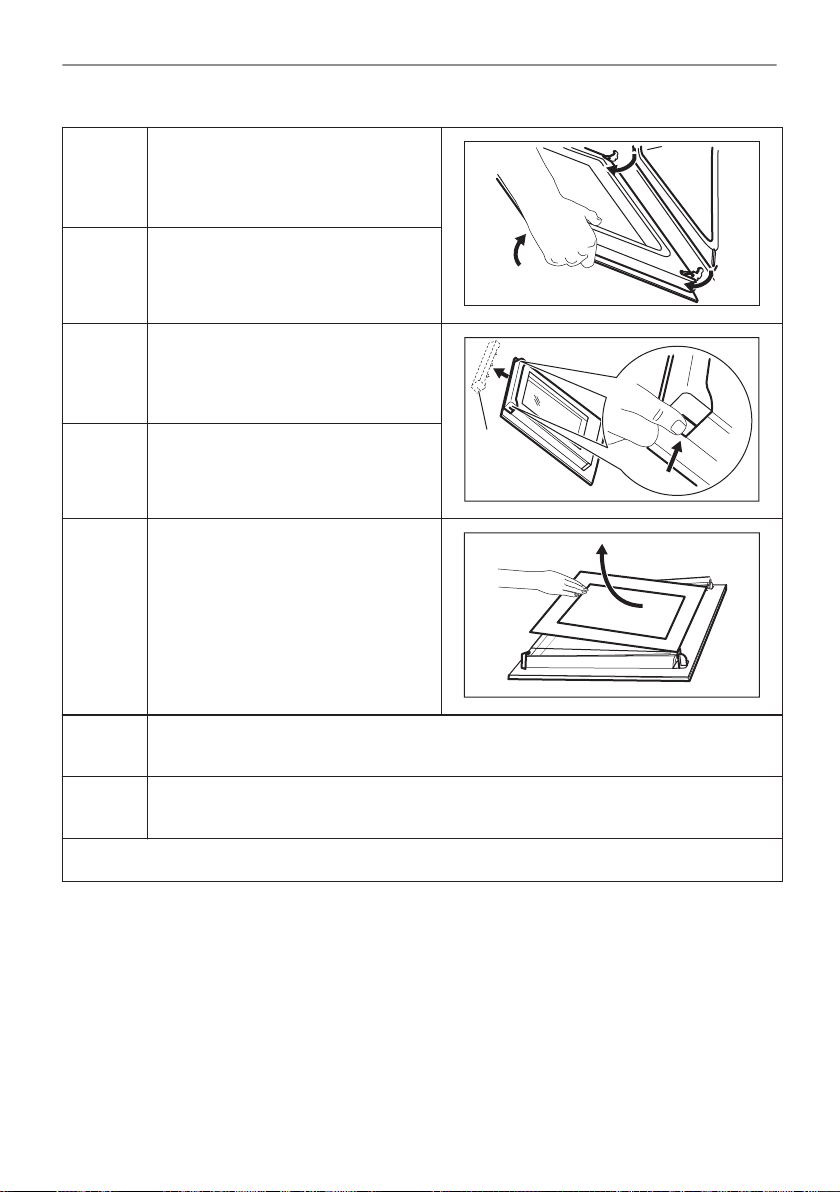
Schritt3Schließen Sie die Backofentür halb
Schritt4Legen Sie die Tür auf einer stabilen
Schritt5Fassen Sie die Türabdeckung (B) an
Schritt6Ziehen Sie die Türabdeckung nach
Schritt7Halten Sie die Glasscheiben der Tür
bis zur ersten Öffnungsstellung. An‐
schließend heben und ziehen Sie die
Tür aus der Aufnahme heraus.
Oberfläche auf ein weiches Tuch.
der Oberkante der Tür an beiden Sei‐
ten an. Drücken Sie sie nach innen,
um den Klippverschluss zu lösen.
vorn, um sie abzunehmen.
an der Oberkante fest und ziehen Sie
sie vorsichtig einzeln heraus. Begin‐
nen Sie mit der oberen Glasscheibe.
Achten Sie darauf, dass die Glas‐
scheiben vollständig aus den Halte‐
rungen gezogen werden.
Schritt
8
Schritt
9
Wenn die Tür korrekt installiert ist, hören Sie beim Schließen der Verriegelungen ein Klicken.
Reinigen Sie die Glasscheiben mit Wasser und Spülmittel. Trocknen Sie die Glas‐
scheiben sorgfältig. Reinigen Sie die Glasscheiben nicht im Geschirrspüler.
Setzen Sie nach der Reinigung die Glasscheiben und die Backofentür ein.
34/196
Page 35
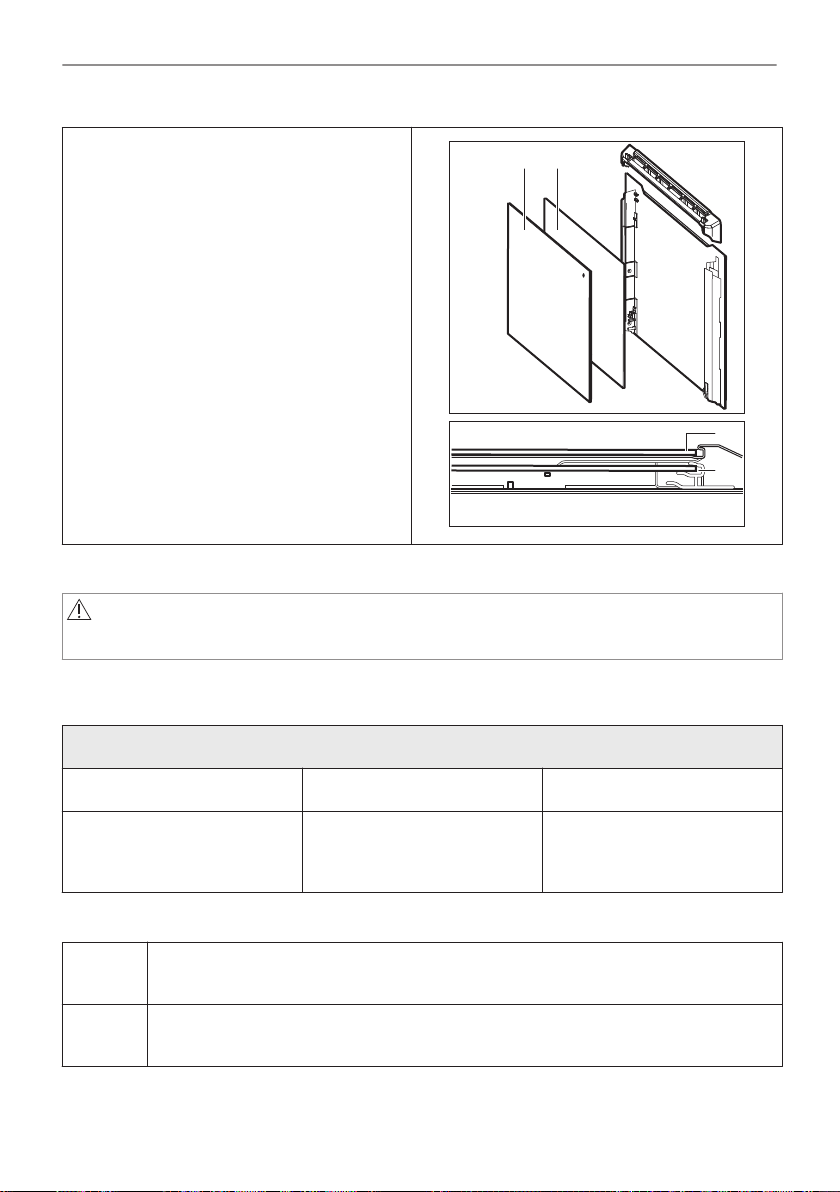
Achten Sie beim Wiedereinsetzen der Glas‐
A B
A
B
scheiben (A und B) auf die richtige Reihenfol‐
ge. Überprüfen Sie das Symbol/den Aufdruck
auf der Seite der Glasscheibe. Jede Glas‐
scheibe sieht anders aus, um den Aus- und
Einbau zu erleichtern.
Bei korrektem Einbau macht die Türabde‐
ckung ein Klickgeräusch.
Stellen Sie sicher, dass Sie die mittlere Glas‐
platte korrekt in der Aufnahme installieren.
12.6 Austausch: Lampe
WARNUNG!
Stromschlaggefahr.
Die Lampe kann heiß sein.
REINIGUNG UND PFLEGE
Halten Sie die Halogenlampe stets mit einem Tuch, um zu verhindern, dass Fettrückstände auf
der Lampe einbrennen.
Bevor Sie die Lampe austauschen:
Schritt 1 Schritt 2 Schritt 3
Schalten Sie den Backofen
aus. Warten Sie, bis der Ofen
kalt ist.
Trennen Sie den Ofen von der
Netzversorgung.
Breiten Sie ein Tuch auf dem
Garraumboden aus.
Hintere Lampe
Schritt1Drehen Sie die Glasabdeckung und nehmen Sie sie ab.
Schritt2Reinigen Sie die Glasabdeckung.
35/196
Page 36
FEHLERSUCHE
Schritt3Ersetzen Sie die Lampe durch eine geeignete, bis 300 °C hitzebeständige Lampe.
Schritt4Bringen Sie die Glasabdeckung an.
13. FEHLERSUCHE
WARNUNG!
Siehe Kapitel Sicherheitshinweise.
13.1 Was zu tun ist, wenn …
In allen Fällen, die nicht in dieser Tabelle aufgeführt sind, wenden Sie sich bitte an einen
autorisierten Kundendienst.
Der Backofen schaltet sich nicht ein oder heizt nicht auf
Störung Prüfen Sie, ob Folgendes zutrifft ...
Der Backofen kann nicht eingeschaltet oder
bedient werden.
Der Backofen heizt nicht auf. Die ist Abschaltautomatik ausgeschaltet.
Der Backofen heizt nicht auf. Die Backofen-Tür ist geschlossen.
Der Backofen heizt nicht auf. Die Sicherung ist nicht durchgebrannt.
Der Backofen heizt nicht auf. Die Kindersicherung ist ausgeschaltet.
Komponenten
Störung Prüfen Sie, ob Folgendes zutrifft ...
Die Lampe ist ausgeschaltet. Feuchte Umluft - ist eingeschaltet.
Die Lampe funktioniert nicht. Die Lampe ist durchgebrannt.
Fehlercodes
Im Display erscheint … Prüfen Sie, ob Folgendes zutrifft ...
Der Backofen ist ordnungsgemäß an die Span‐
nungsversorgung angeschlossen.
36/196
Page 37
Fehlercodes
ENERGIEEFFIZIENZ
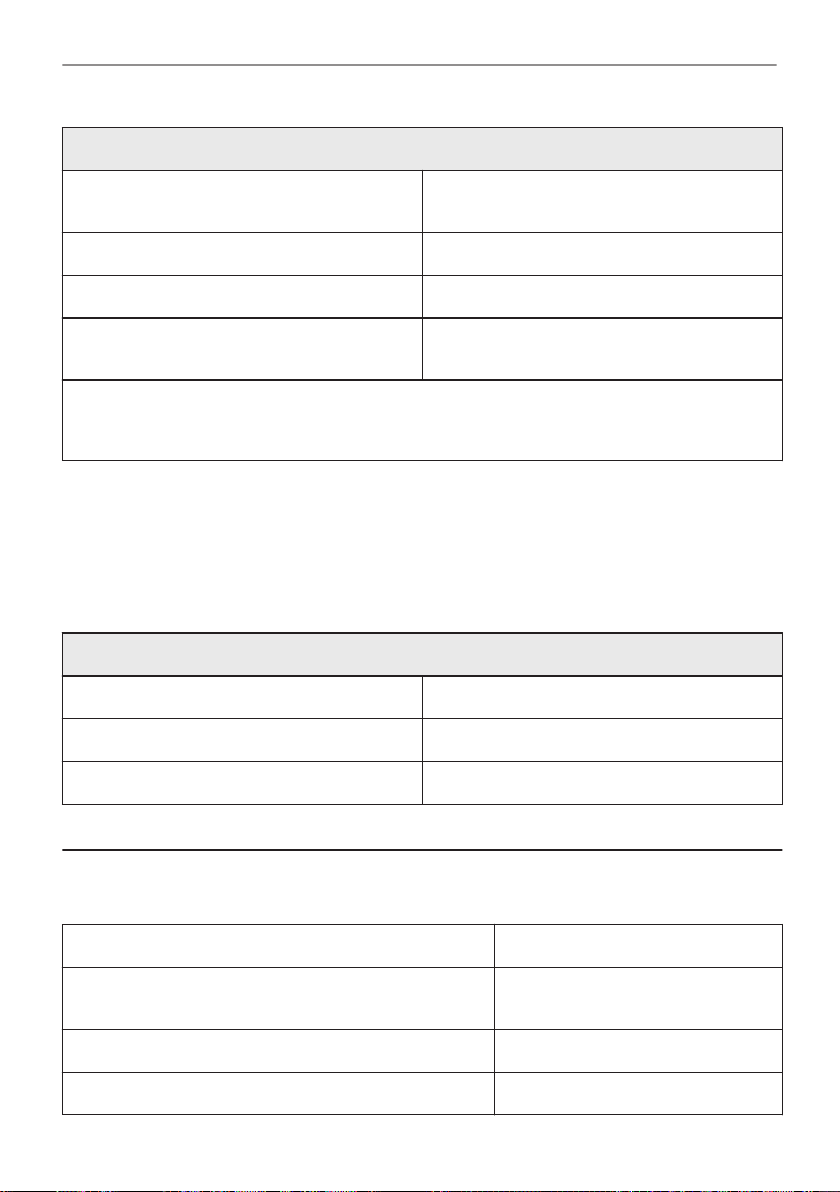
Err C3 Die Backofen-Tür ist geschlossen und die Tür‐
Err F102 Die Backofen-Tür ist geschlossen.
Err F102 Die Türverriegelung nicht defekt ist.
00:00 angezeigt. Es gab einen Stromausfall. Stellen Sie die Uhr‐
Wenn das Display einen Fehlercode anzeigt, der nicht in dieser Tabelle enthalten ist, schalten Sie
die Haussicherung aus und wieder ein, um den Ofen neu zu starten. Wenn der Fehlercode erneut
angezeigt wird, wenden Sie sich an einen autorisierten Kundendienst.
verriegelung ist nicht beschädigt.
zeit ein.
13.2 Servicedaten
Wenn Sie das Problem nicht selbst lösen können, wenden Sie sich an Ihren Händler oder einen
autorisierten Kundendienst.
Die vom Kundendienst benötigten Daten finden Sie auf dem Typenschild. Das Typenschild
befindet sich auf dem vorderen Rahmen des Garraums. Entfernen Sie das Typenschild nicht
vom Garraum.
Wir empfehlen Ihnen, die Daten hier zu notieren:
Modell (MOD.): .........................................
Produktnummer (PNC) .........................................
Seriennummer (S.N.) .........................................
14. ENERGIEEFFIZIENZ
14.1 Produktinformationen und Produktinformationsblatt*
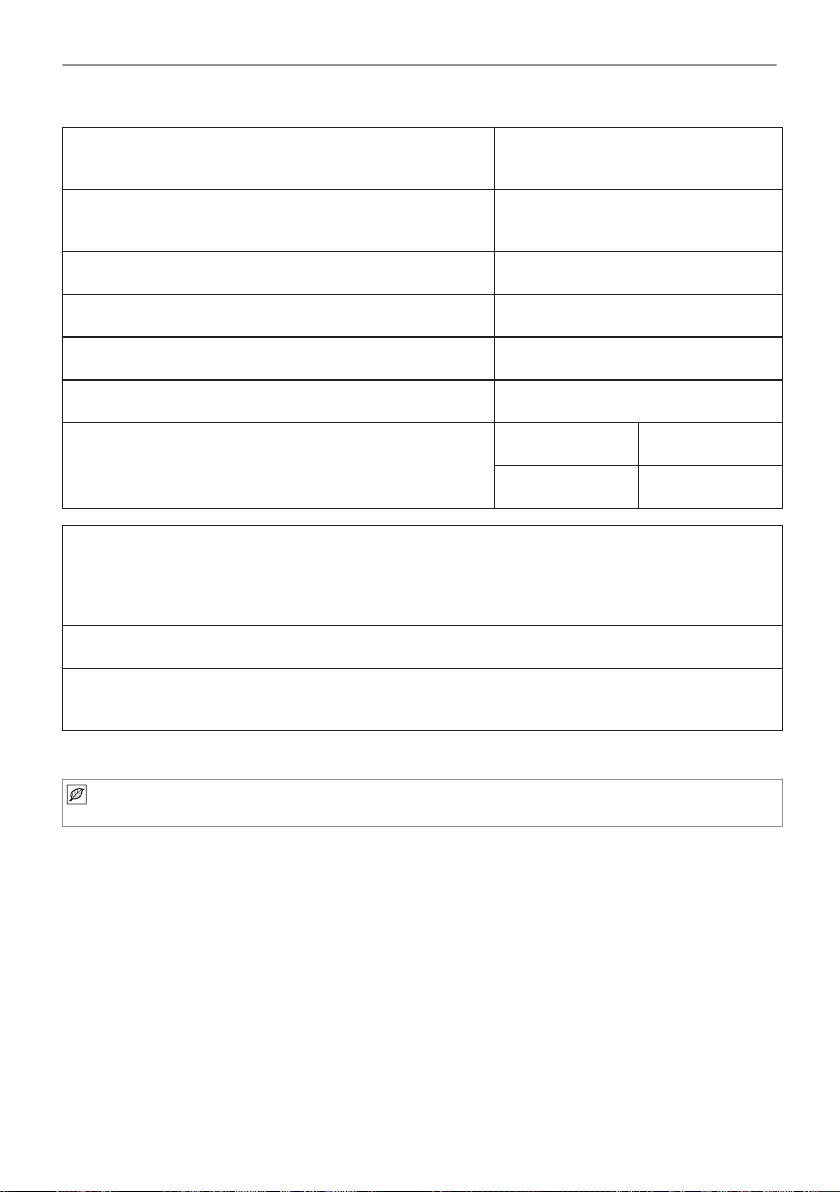
Name des Lieferanten Electrolux
Modellbezeichnung
Energieeffizienzindex 81.2
Energieeffizienzklasse A+
EOM4P46TX 949498236
KOMFP46TX 949498234
37/196
Page 38
ENERGIEEFFIZIENZ
Energieverbrauch mit einer Standardbeladung, konventi‐
oneller Modus
Energieverbrauch mit einer Standardbeladung, UmluftModus
Anzahl der Garräume 1
Wärmequelle Strom
Volumen 72 l
Art des Backofens Eingebauter Backofen
Masse
* Für die Europäische Union gemäß EU-Richtlinien 65/2014 und 66/2014.
Für die Republik Weißrussland gemäß STB 2478-2017, Anhang G; STB 2477-2017, Anlagen A
und B
Für die Ukraine gemäß 568/32020.
Die Energieeffizienzklasse gilt nicht für Russland.
EN 60350-1 - Elektrische Kochgeräte für den Hausgebrauch - Teil 1: Stufen, Backöfen, Dampf‐
öfen und Grills – Methoden zur Leistungsmessung.
0.93 kWh/Programm
0.69 kWh/Programm
EOM4P46TX 30.4 kg
KOMFP46TX 30.5 kg
14.2 Energiesparen
Der Backofen verfügt über Funktionen, mit deren Hilfe Sie beim täglichen Kochen
Energie sparen können.
Achten Sie darauf, dass die Backofentür während des Ofenbetriebs geschlossen ist. Die
Backofentür darf während des Garvorgangs nicht zu oft geöffnet werden. Halten Sie die
Türdichtung sauber und stellen Sie sicher, dass sie sich fest in der richtigen Position befindet.
Verwenden Sie Kochgeschirr aus Metall, um mehr Energie zu sparen.
Heizen Sie, wenn möglich, den Backofen nicht vor.
Wenn Sie mehrere Speisen gleichzeitig zubereiten, halten Sie die Unterbrechungen beim
Backen so kurz wie möglich.
Garen mit Heißluft
Nutzen Sie, wenn möglich, die Garfunktionen mit Heißluft, um Energie zu sparen.
Restwärme
Ventilator und Lampe funktionieren weiter. Sobald Sie den Backofen ausschalten, wird im
Display die Restwärme angezeigt. Die Restwärme kann zum Warmhalten von Speisen genutzt
werden.
Beträgt die Garzeit mehr als 30 Minuten, reduzieren Sie die Ofentemperatur 3 - 10 Min. vor
Ablauf des Garvorgangs. Die Restwärme im Backofen wird weiterhin garen.
38/196
Page 39
MENÜSTRUKTUR
Nutzen Sie die Restwärme, um andere Speisen aufzuwärmen.
Warmhalten von Speisen
Wählen Sie die niedrigste Temperatureinstellung, wenn Sie die Restwärme zum Warmhalten
von Speisen nutzen möchten. Die Restwärmeanzeige oder Temperatur werden auf dem
Display angezeigt.
Garen bei ausgeschalteter Backofenbeleuchtung
Schalten Sie die Lampe während des Garvorgangs aus. Schalten Sie sie nur ein, wenn Sie sie
benötigen.
Feuchte Umluft
Diese Funktion soll während des Garvorgangs Energie sparen.
Bei Verwendung dieser Funktion schaltet sich die Lampe automatisch nach 30 Sekunden aus.
Sie können die Lampe wieder einschalten, aber dadurch werden die erwarteten
Energieeinsparungen reduziert.
15. MENÜSTRUKTUR
15.1 Menü
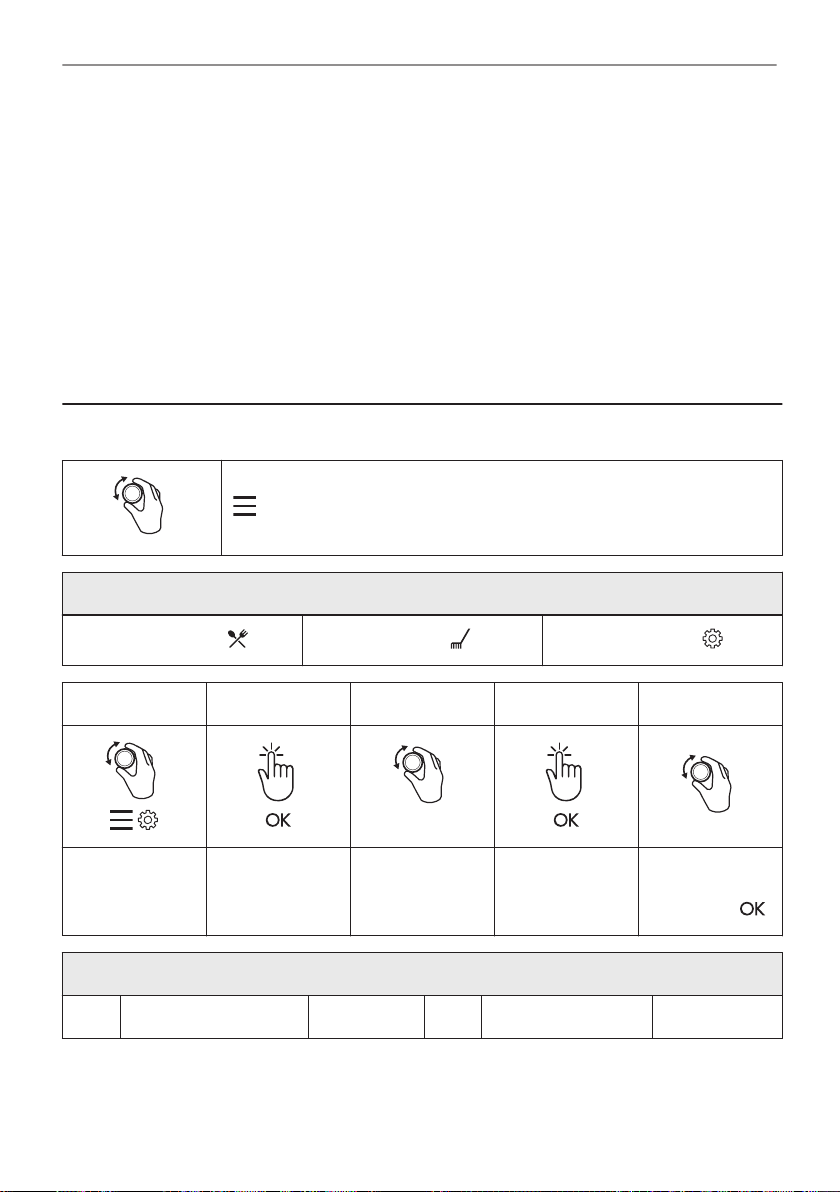
- Wählen Sie , um die Menü einzugeben.
Menü Struktur
Koch-Assistent
Schritt 1 Schritt 2 Schritt 3 Schritt 4 Schritt 5
Wählen Sie Me‐
nü, Einstellun‐
gen.
O1 Uhrzeit Ändern O2 Helligkeit 1 - 5
Bestätigen Sie
die Einstellung.
Reinigung
O1 - O11
Wählen Sie die
Einstellung.
Einstellungen
Einstellungen
Bestätigen Sie
die Einstellung.
Stellen Sie den
Wert ein und
drücken Sie .
39/196
Page 40
MENÜSTRUKTUR
Einstellungen
O3 Tastentöne 1 - Signalton
O5 Uptimer Ein / Aus O6 Backofenbeleuch‐
O7 Schnellaufheizung Ein / Aus O8 Erinnerungsfunktion
O9 DEMO Aktivi‐
O11 Gerät auf Werksein‐
stellungen zurückset‐
zen
2 - Klicken
3 - Aus‐
schalten
erungscode:
2468
Ja / Nein
O4 Lautstärke 1 - 4
Ein / Aus
tung
Ein / Aus
Reinigen
O10 Softwareversion Prüfen
16. UMWELTTIPPS
Recyceln Sie Materialien mit dem Symbol . Entsorgen Sie die Verpackung in den
entsprechenden Recyclingbehältern. Recyceln Sie zum Umwelt- und Gesundheitsschutz
elektrische und elektronische Geräte. Entsorgen Sie Geräte mit diesem Symbol nicht mit
dem Hausmüll. Bringen Sie das Gerät zu Ihrer örtlichen Sammelstelle oder wenden Sie sich an
Ihr Gemeindeamt.
40/196
Page 41
CONTENTS
WE’RE THINKING OF YOU
Thank you for purchasing an Electrolux appliance. You’ve chosen a product that brings with it
decades of professional experience and innovation. Ingenious and stylish, it has been designed
with you in mind. So whenever you use it, you can be safe in the knowledge that you’ll get great
results every time.
Welcome to Electrolux.
Visit our website to:
Get usage advice, brochures, trouble shooter, service and repair information:
www.electrolux.com/support
Register your product for better service:
www.registerelectrolux.com
Buy Accessories, Consumables and Original spare parts for your appliance:
www.electrolux.com/shop
For more recipes, hints, troubleshooting download My Electrolux Kitchen app.
CUSTOMER CARE AND SERVICE
Always use original spare parts.
When contacting our Authorised Service Centre, ensure that you have the following data
available: Model, PNC, Serial Number.
The information can be found on the rating plate.
Warning / Caution-Safety information
General information and tips
Environmental information
Subject to change without notice.
CONTENTS
1. SAFETY INFORMATION...........................42
1.1 Children and vulnerable people
safety................................................... 42
1.2 General Safety...............................43
2. SAFETY INSTRUCTIONS......................... 44
2.1 Installation......................................44
2.2 Electrical connection......................45
2.3 Use................................................ 46
2.4 Care and cleaning..........................47
2.5 Pyrolytic cleaning...........................47
2.6 Internal lighting.............................. 48
2.7 Service...........................................48
2.8 Disposal.........................................48
3. INSTALLATION......................................... 48
3.1 Building in...................................... 48
3.2 Securing the oven to the cabinet... 49
4. PRODUCT DESCRIPTION........................ 50
4.1 General overview...........................50
4.2 Accessories................................... 50
5. HOW TO TURN OVEN ON AND OFF....... 50
5.1 Retractable knobs..........................50
41/196
Page 42

SAFETY INFORMATION
5.2 Control panel................................. 51
6. BEFORE FIRST USE.................................52
6.1 Initial cleaning................................52
6.2 Initial preheating............................ 52
7. DAILY USE................................................ 52
7.1 How to set: Heating functions........52
7.2 Heating functions...........................53
7.3 Notes on: Moist Fan Baking...........54
7.4 How to set: Assisted Cooking........54
7.5 Assisted Cooking...........................55
8. CLOCK FUNCTIONS.................................60
8.1 Clock functions.............................. 60
8.2 How to set: Clock functions........... 60
9. HOW TO USE: ACCESSORIES................62
9.1 Inserting accessories.....................62
10. ADDITIONAL FUNCTIONS..................... 63
10.1 Lock............................................. 63
10.2 Automatic switch-off.....................63
10.3 Cooling fan...................................64
11. HINTS AND TIPS.....................................64
11.1 Moist Fan Baking.........................64
1. SAFETY INFORMATION
11.2 Moist Fan Baking -
recommended accessories..................65
11.3 Cooking tables for test institutes..66
12. CARE AND CLEANING...........................67
12.1 Notes on cleaning........................68
12.2 How to remove: Shelf supports ...68
12.3 How to use: Pyrolytic Cleaning....69
12.4 Cleaning Reminder......................70
12.5 How to remove and install: Door..70
12.6 How to replace: Lamp..................72
13. TROUBLESHOOTING.............................72
13.1 What to do if.................................72
13.2 Service data.................................73
14. ENERGY EFFICIENCY............................74
14.1 Product Information and Product
Information Sheet*...............................74
14.2 Energy saving..............................74
15. MENU STRUCTURE................................75
15.1 Menu............................................75
16. ENVIRONMENTAL CONCERNS.............76
Before the installation and use of the appliance, carefully read
the supplied instructions. The manufacturer is not responsible
for any injuries or damage that are the result of incorrect
installation or usage. Always keep the instructions in a safe
and accessible location for future reference.
1.1 Children and vulnerable people safety
• This appliance can be used by children aged from 8 years
and above and persons with reduced physical, sensory or
mental capabilities or lack of experience and knowledge if
they have been given supervision or instruction concerning
the use of the appliance in a safe way and understand the
hazards involved. Children of less than 8 years of age and
persons with very extensive and complex disabilities shall
42/196
Page 43

SAFETY INFORMATION
be kept away from the appliance unless continuously
supervised.
• Children should be supervised to ensure that they do not
play with the appliance.
• Keep all packaging away from children and dispose of it
appropriately.
• WARNING: The appliance and its accessible parts become
hot during use. Keep children and pets away from the
appliance when in use and when cooling down.
• If the appliance has a child safety device, it should be
activated.
• Children shall not carry out cleaning and user maintenance
of the appliance without supervision.
1.2 General Safety
• This appliance is for cooking purposes only.
• This appliance is designed for single household domestic
use in an indoor environment.
• This appliance may be used in, offices, hotel guest rooms,
bed & breakfast guest rooms, farm guest houses and other
similar accommodation where such use does not exceed
(average) domestic usage levels.
• Only a qualified person must install this appliance and
replace the cable.
• Do not use the appliance before installing it in the built-in
structure.
• Disconnect the appliance from the power supply before
carrying out any maintenance.
• If the mains power supply cable is damaged, it must be
replaced by the manufacturer, its Authorised Service Centre
or similarly qualified persons to avoid an electrical hazard.
• WARNING: Ensure that the appliance is switched off before
replacing the lamp to avoid the possibility of electric shock.
43/196
Page 44
SAFETY INSTRUCTIONS
• WARNING: The appliance and its accessible parts become
hot during use. Care should be taken to avoid touching
heating elements.
• Always use oven gloves to remove or insert accessories or
ovenware.
• To remove the shelf supports first pull the front of the shelf
support and then the rear end away from the side walls.
Install the shelf supports in the opposite sequence.
• Do not use a steam cleaner to clean the appliance.
• Do not use harsh abrasive cleaners or sharp metal scrapers
to clean the glass door since they can scratch the surface,
which may result in shattering of the glass.
• Before pyrolytic cleaning, remove all accessories and
excessive deposits/spills from the oven cavity.
2. SAFETY INSTRUCTIONS
2.1 Installation
WARNING!
Only a qualified person must install this appliance.
• Remove all the packaging.
• Do not install or use a damaged appliance.
• Follow the installation instructions supplied with the appliance.
• Always take care when moving the appliance as it is heavy. Always use safety gloves and
enclosed footwear.
• Do not pull the appliance by the handle.
• Install the appliance in a safe and suitable place that meets installation requirements.
• Keep the minimum distance from other appliances and units.
• Before mounting the appliance, check if the oven door opens without restraint.
• The appliance is equipped with an electric cooling system. It must be operated with the
electric power supply.
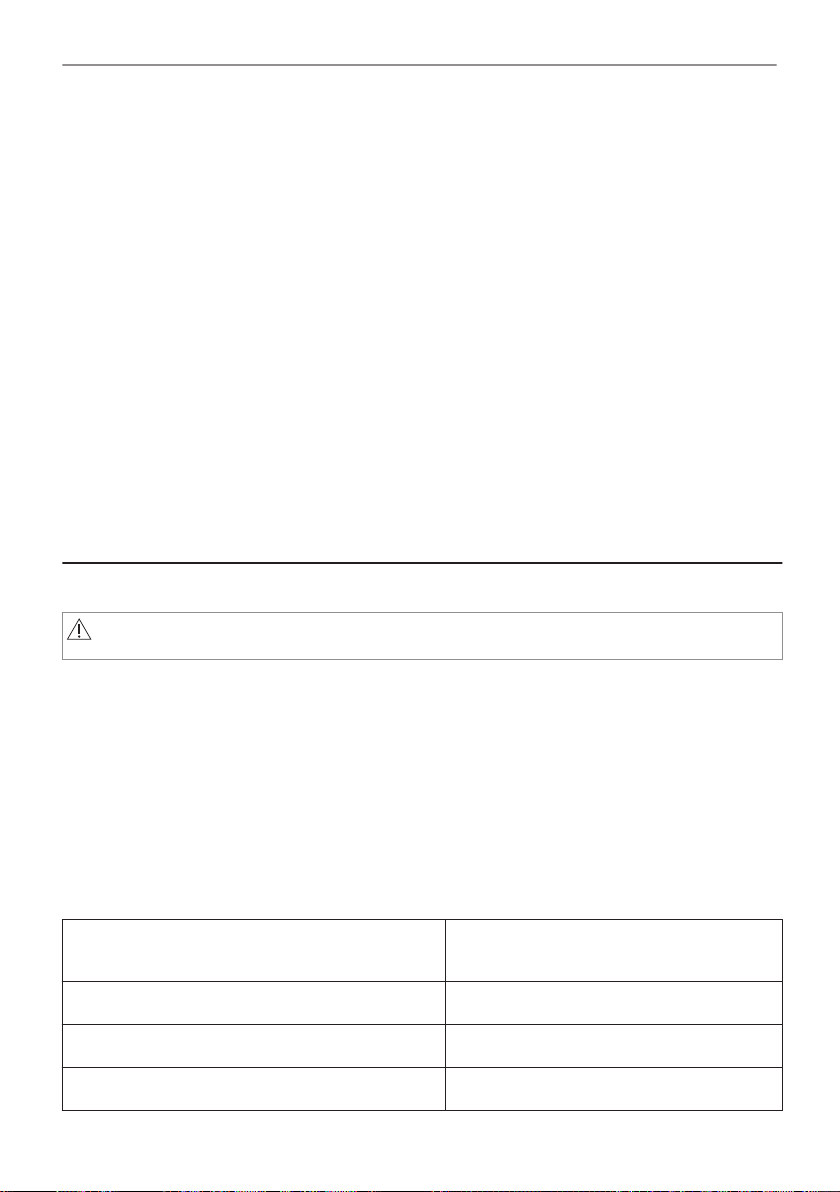
Cabinet minimum height (Cabinet under the work‐
top minimum height)
Cabinet width 560 mm
Cabinet depth 550 (550) mm
Height of the front of the appliance 589 mm
44/196
580 (600) mm
Page 45
SAFETY INSTRUCTIONS
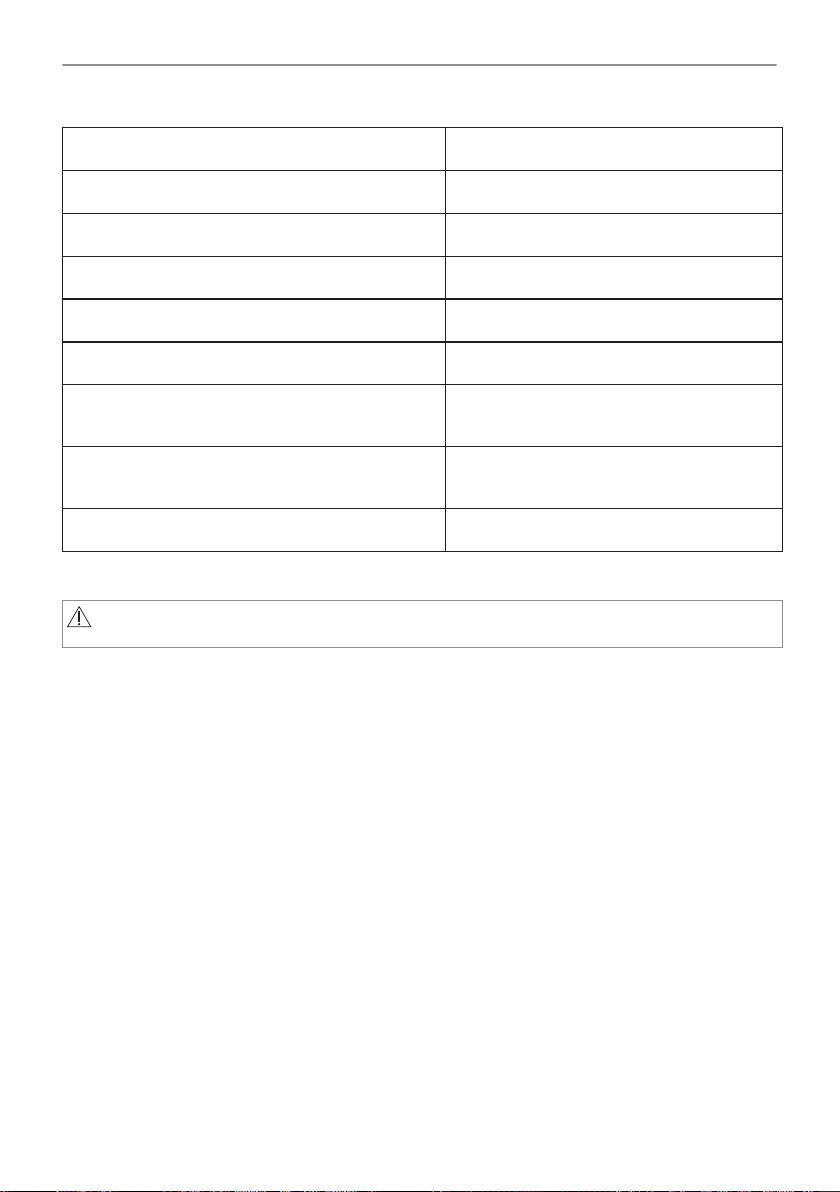
Height of the back of the appliance 571 mm
Width of the front of the appliance 595 mm
Width of the back of the appliance 559 mm
Depth of the appliance 569 mm
Built in depth of the appliance 548 mm
Depth with open door 1022 mm
Ventilation opening minimum size. Opening placed
on the bottom rear side
Mains supply cable length. Cable is placed in the
right corner of the back side
Mounting screws 4x25 mm
560x20 mm
1500 mm
2.2 Electrical connection
WARNING!
Risk of fire and electric shock.
• All electrical connections should be made by a qualified electrician.
• The appliance must be earthed.
• Make sure that the parameters on the rating plate are compatible with the electrical ratings
of the mains power supply.
• Always use a correctly installed shockproof socket.
• Do not use multi-plug adapters and extension cables.
• Make sure not to cause damage to the mains plug and to the mains cable. Should the mains
cable need to be replaced, this must be carried out by our Authorised Service Centre.
• Do not let mains cables touch or come near the appliance door or the niche below the
appliance, especially when it operates or the door is hot.
• The shock protection of live and insulated parts must be fastened in such a way that it
cannot be removed without tools.
• Connect the mains plug to the mains socket only at the end of the installation. Make sure
that there is access to the mains plug after the installation.
• If the mains socket is loose, do not connect the mains plug.
• Do not pull the mains cable to disconnect the appliance. Always pull the mains plug.
• Use only correct isolation devices: line protecting cut-outs, fuses (screw type fuses removed
from the holder), earth leakage trips and contactors.
• The electrical installation must have an isolation device which lets you disconnect the
appliance from the mains at all poles. The isolation device must have a contact opening
width of minimum 3 mm.
• Fully close the appliance door before you connect the mains plug to the mains socket.
45/196
Page 46
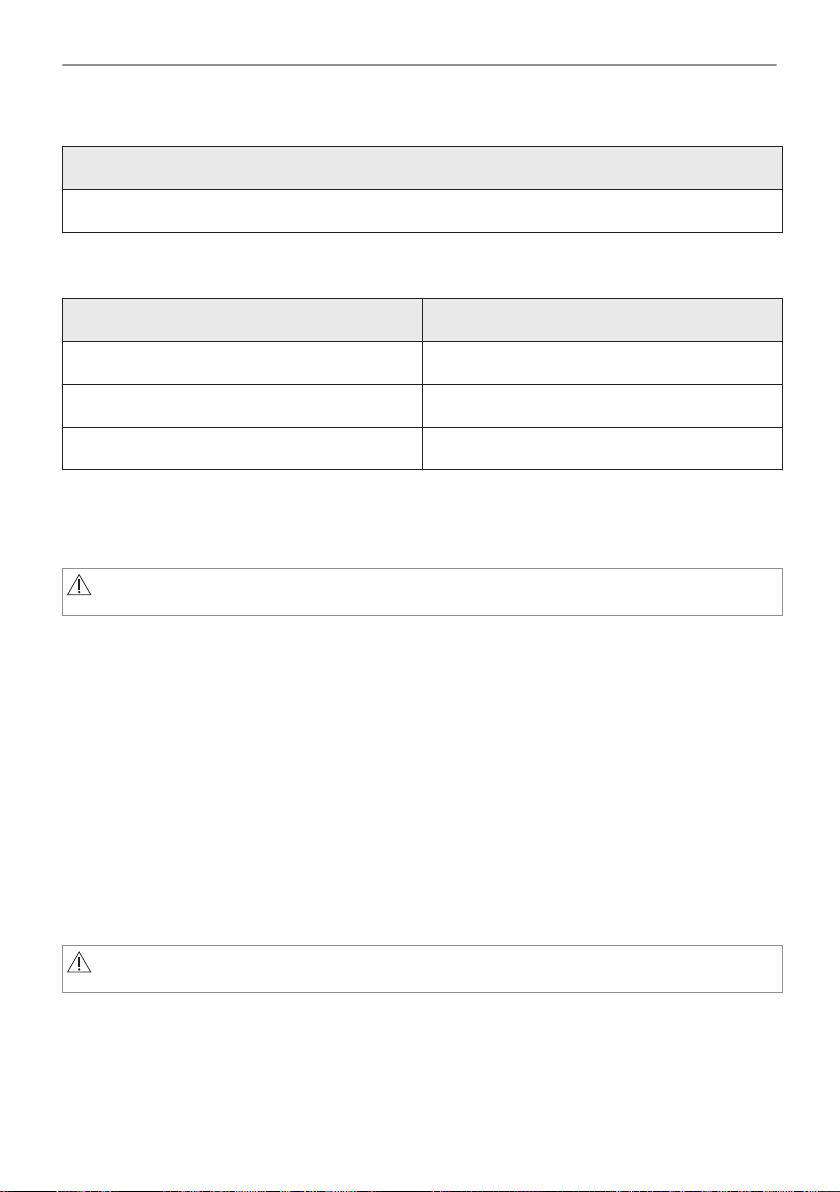
SAFETY INSTRUCTIONS
• This appliance is supplied with a main plug and a main cable.
Cable types applicable for installation or replacement for Europe:
H07 RN-F, H05 RN-F, H05 RRF, H05 VV-F, H05 V2V2-F (T90), H05 BB-F
For the section of the cable refer to the total power on the rating plate. You can also refer to the
table:
Total power (W) Section of the cable (mm²)
maximum 1380 3 x 0.75
maximum 2300 3 x 1
maximum 3680 3 x 1.5
The earth cord (green / yellow cable) must be 2 cm longer than phase and neutral cables (blue
and brown cables).
2.3 Use
WARNING!
Risk of injury, burns and electric shock or explosion.
• Do not change the specification of this appliance.
• Make sure that the ventilation openings are not blocked.
• Do not let the appliance stay unattended during operation.
• Deactivate the appliance after each use.
• Be careful when you open the appliance door while the appliance is in operation. Hot air can
release.
• Do not operate the appliance with wet hands or when it has contact with water.
• Do not apply pressure on the open door.
• Do not use the appliance as a work surface or as a storage surface.
• Open the appliance door carefully. The use of ingredients with alcohol can cause a mixture
of alcohol and air.
• Do not let sparks or open flames to come in contact with the appliance when you open the
door.
• Do not put flammable products or items that are wet with flammable products in, near or on
the appliance.
WARNING!
Risk of damage to the appliance.
• To prevent damage or discoloration to the enamel:
– do not put ovenware or other objects in the appliance directly on the bottom.
– do not put aluminium foil directly on the bottom of cavity of the appliance.
– do not put water directly into the hot appliance.
– do not keep moist dishes and food in the appliance after you finish the cooking.
46/196
Page 47
SAFETY INSTRUCTIONS
– be careful when you remove or install the accessories.
• Discoloration of the enamel or stainless steel has no effect on the performance of the
appliance.
• Use a deep pan for moist cakes. Fruit juices cause stains that can be permanent.
• Always cook with the appliance door closed.
• If the appliance is installed behind a furniture panel (e.g. a door) make sure the door is never
closed when the appliance operates. Heat and moisture can build up behind a closed
furniture panel and cause subsequent damage to the appliance, the housing unit or the floor.
Do not close the furniture panel until the appliance has cooled down completely after use.
2.4 Care and cleaning
WARNING!
Risk of injury, fire, or damage to the appliance.
• Before maintenance, deactivate the appliance and disconnect the mains plug from the mains
socket.
• Make sure the appliance is cold. There is the risk that the glass panels can break.
• Replace immediately the door glass panels when they are damaged. Contact the Authorised
Service Centre.
• Be careful when you remove the door from the appliance. The door is heavy!
• Clean regularly the appliance to prevent the deterioration of the surface material.
• Clean the appliance with a moist soft cloth. Use only neutral detergents. Do not use abrasive
products, abrasive cleaning pads, solvents or metal objects.
• If you use an oven spray, follow the safety instructions on its packaging.
2.5 Pyrolytic cleaning
WARNING!
Risk of Injury / Fires / Chemical Emissions (Fumes) in Pyrolytic Mode.
• Before carrying out a Pyrolitic self-cleaning function or the First Use please remove from the
oven cavity:
– any excess food residues, oil or grease spills / deposits.
– any removable objects (including shelves, side rails etc., provided with the product)
particularly any non-stick pots, pans, trays, utensils etc.
• Read carefully all the instructions for Pyrolytic cleaning.
• Keep children away from the appliance while the Pyrolytic cleaning operates.
The appliance becomes very hot and hot air is released from the front cooling vents.
• Pyrolytic cleaning is a high temperature operation that can release fumes from cooking
residues and construction materials, as such consumers are strongly advised to:
– provide good ventilation during and after each Pyrolytic cleaning.
– provide good ventilation during and after the first use at maximum temperature
operation.
• Unlike all humans, some birds and reptiles can be extremely sensitive to potential fumes
emitted during the cleaning process of all Pyrolytic Ovens.
– Remove any pets (especially birds) from the vicinity of the appliance location during and
after the Pyrolytic cleaning and first use maximum temperature operation to a well
ventilated area.
• Small pets can also be highly sensitive to the localized temperature changes in the vicinity of
all Pyrolytic Ovens when the Pyrolytic self cleaning program is in operation.
47/196
Page 48
www.youtube.com/electrolux
www.youtube.com/aeg
How to install your AEG/Electrolux
Oven - Column installation
INSTALLATION
• Non-stick surfaces on pots, pans, trays, utensils etc., can be damaged by the high
temperature Pyrolytic cleaning operation of all Pyrolytic Ovens and can be also a source for
low level harmful fumes.
• Fumes released from all Pyrolytic Ovens / Cooking Residues as described are not harmful to
humans, including children, or persons with medical conditions.
2.6 Internal lighting
WARNING!
Risk of electric shock.
• Concerning the lamp(s) inside this product and spare part lamps sold separately: These
lamps are intended to withstand extreme physical conditions in household appliances, such
as temperature, vibration, humidity, or are intended to signal information about the
operational status of the appliance. They are not intended to be used in other applications
and are not suitable for household room illumination.
• This product contains a light source of energy efficiency class G.
• Use only lamps with the same specifications.
2.7 Service
• To repair the appliance contact the Authorised Service Centre.
• Use original spare parts only.
2.8 Disposal
WARNING!
Risk of injury or suffocation.
• Contact your municipal authority for information on how to dispose of the appliance.
• Disconnect the appliance from the mains supply.
• Cut off the mains electrical cable close to the appliance and dispose of it.
• Remove the door catch to prevent children or pets from becoming trapped in the appliance.
3. INSTALLATION
WARNING!
Refer to Safety chapters.
3.1 Building in
48/196
Page 49
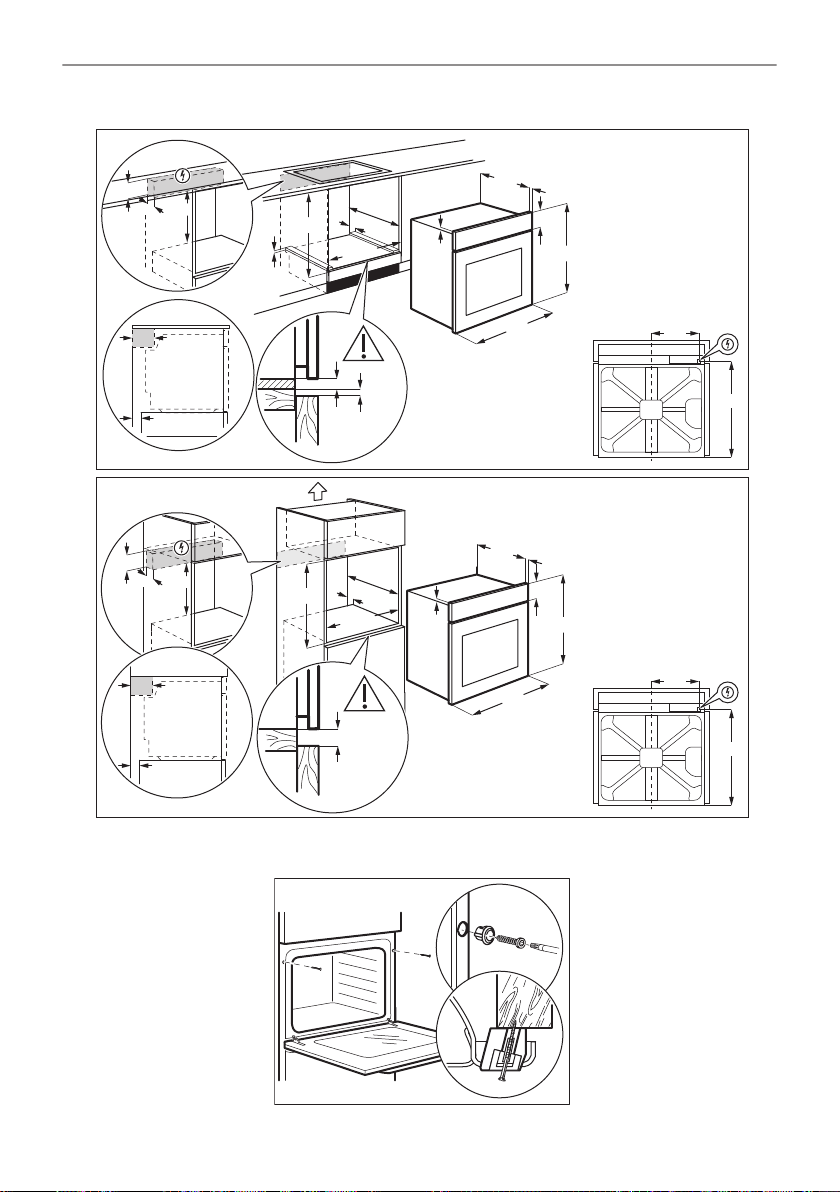
589
595
±1
114
18
min. 550
20
6
600
3
6
min. 560
21548
80
520
60
60
20
198
518
(*mm)
min. 550
20
589
114
18
580
min. 560
9
595
±1
21548
70
60
520
60
20
198
518
(*mm)
INSTALLATION
3.2 Securing the oven to the cabinet
49/196
Page 50
6
5
9
7
8
5
4
1
2
3
31 42
PRODUCT DESCRIPTION
4. PRODUCT DESCRIPTION
4.1 General overview
Control panel
1
Knob for the heating functions
2
Display
3
Control knob
4
Heating element
5
Lamp
6
Fan
7
Shelf support, removable
8
Shelf positions
9
4.2 Accessories
• Wire shelf
For cookware, cake tins, roasts.
• Grill- / Roasting pan
To bake and roast or as pan to collect fat.
• AirFry: Baking tray
To fry food with less oil or without baking paper.
5. HOW TO TURN OVEN ON AND OFF
5.1 Retractable knobs
To use the appliance press the knob. The knob comes out.
50/196
Page 51
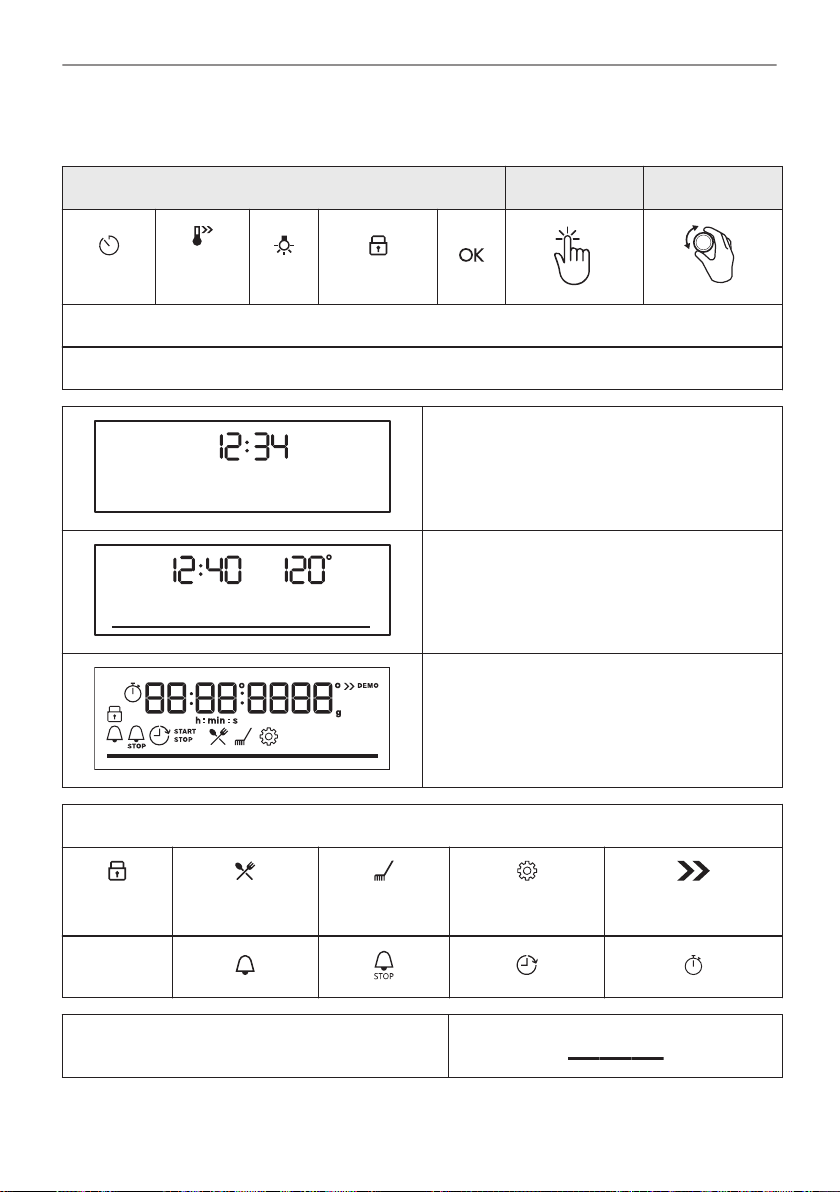
5.2 Control panel
Control panel sensor fields Press Turn the knob
HOW TO TURN OVEN ON AND OFF
Timer
Select a heating function to turn on the oven.
Turn the knob for the heating functions to the off position to turn the oven off.
Fast Heat
Up
Light
Lock
When the knob for the heating functions is in
the off position, the display goes to standby.
When you cook, the display shows the set tem‐
perature, time of day and other available op‐
tions.
The display with the maximum number of func‐
tions set.
Display indicators
Lock
Timer indi‐
cators:
Progress bar - for temperature or time.
Assisted Cook‐
ing
Cleaning
Settings
Fast Heat Up
51/196
Page 52
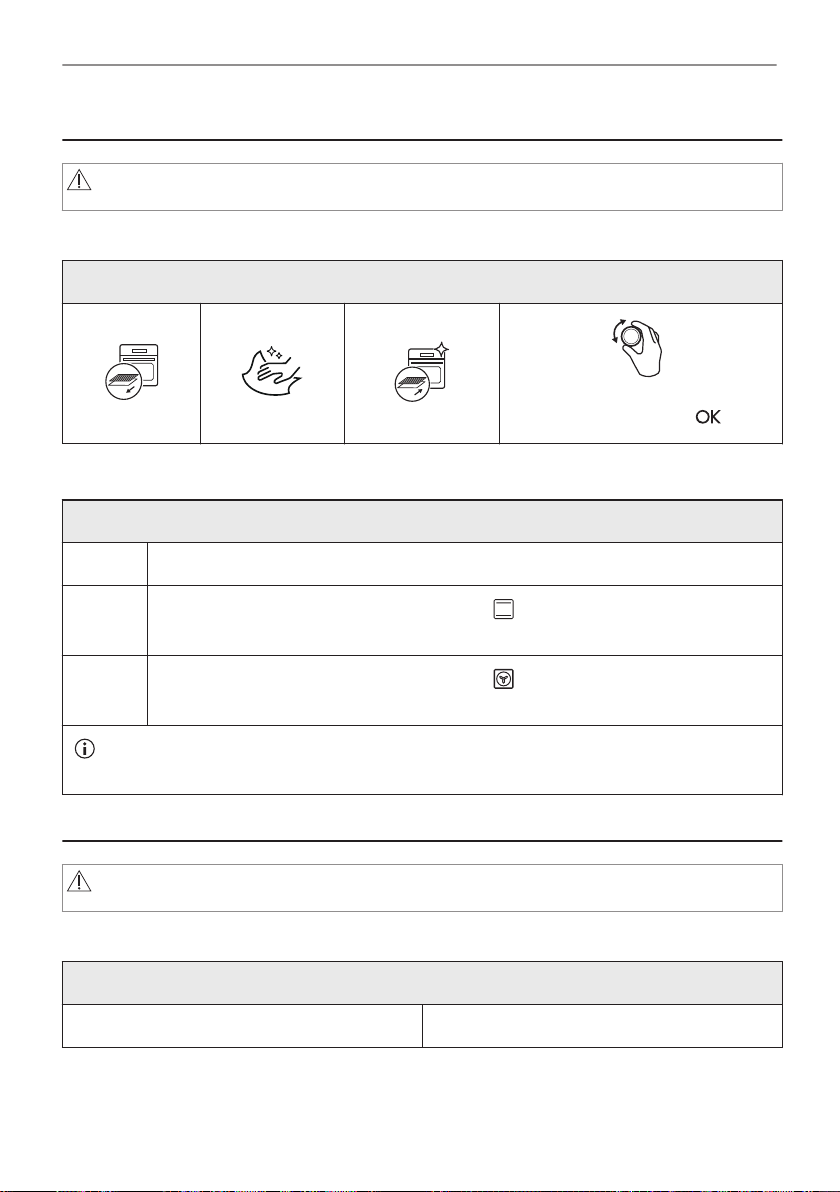
BEFORE FIRST USE
6. BEFORE FIRST USE
WARNING!
Refer to Safety chapters.
6.1 Initial cleaning
Before the first use clean the empty oven and set the time:
Set the time. Press .
6.2 Initial preheating
Preheat the empty oven before the first use.
Step 1 Remove all accessories and removable shelf supports from the oven.
00:00
Step 2
Step 3
The oven can emit an odour and smoke during preheating. Make sure that the room is ventila‐
ted.
Set the maximum temperature for the function: .
Let the oven operate for 1 h.
Set the maximum temperature for the function: .
Let the oven operate for 15 min.
7. DAILY USE
WARNING!
Refer to Safety chapters.
7.1 How to set: Heating functions
Start cooking
Step 1 Step 2
52/196
Page 53
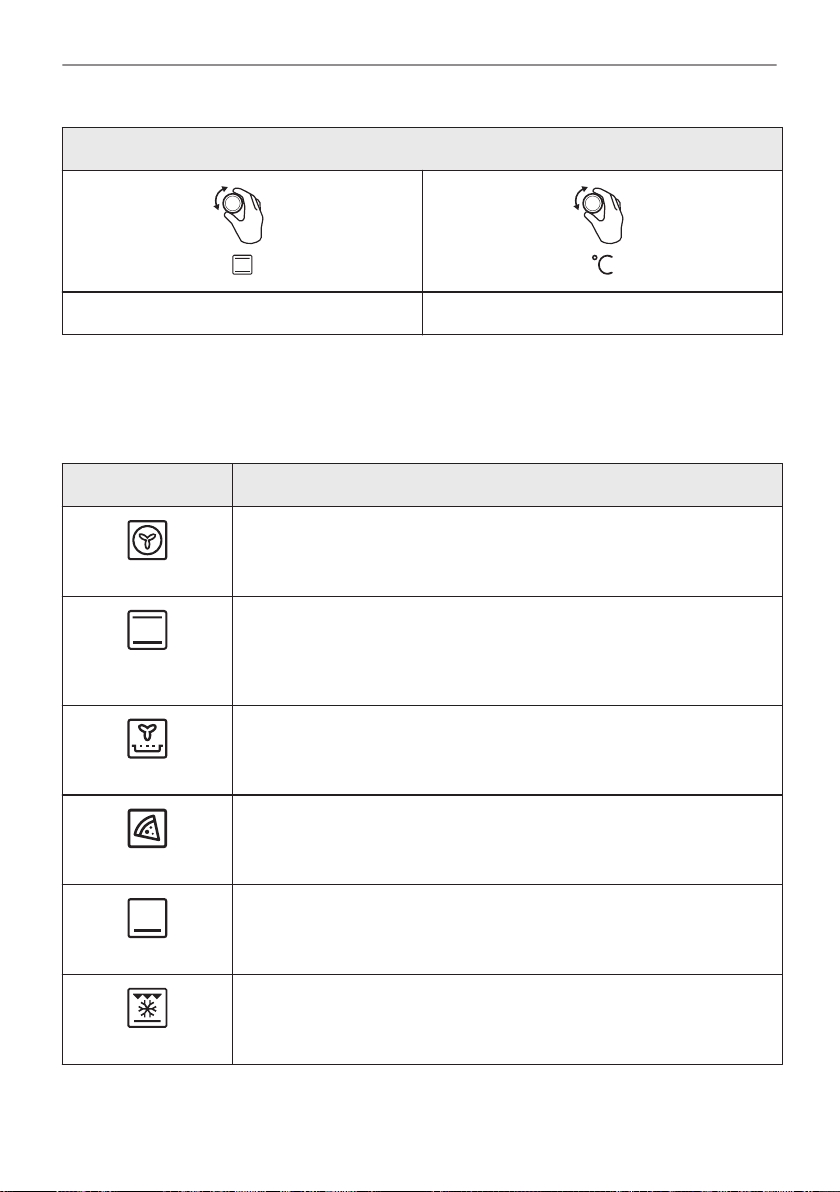
Set a heating function. Set the temperature.
7.2 Heating functions
Standard heating functions
Heating function Application
To bake on up to three shelf positions at the same time and to dry food.
Set the temperature 20 - 40 °C lower than for Conventional Cooking.
True Fan Cooking
To bake and roast food on one shelf position.
DAILY USE
Start cooking
Conventional
Cooking
AirFry
Pizza Function
Bottom Heat
Frozen Foods
To fry food without oil.
To bake pizza. To make intensive browning and a crispy bottom.
To bake cakes with crispy bottom and to preserve food.
To make convenience food (e.g., french fries, potato wedges or spring
rolls) crispy.
53/196
Page 54
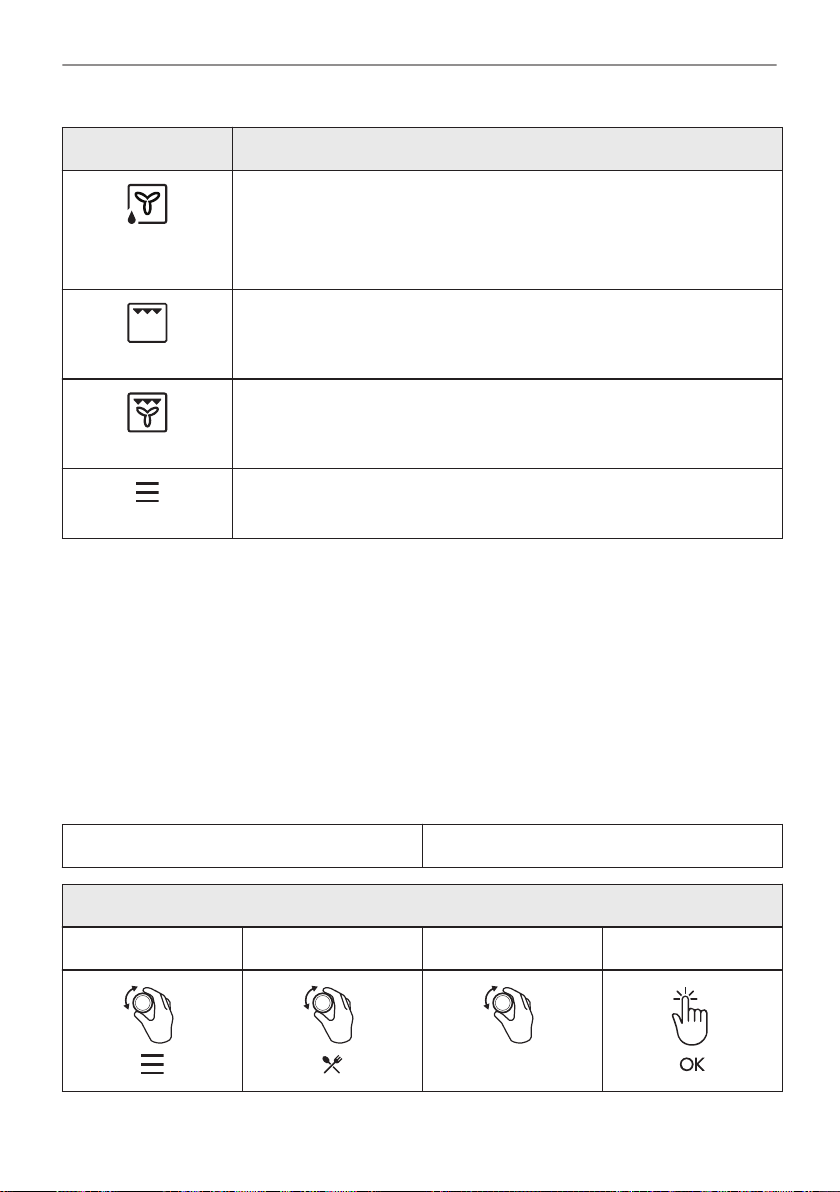
DAILY USE
Heating function Application
This function is designed to save energy during cooking. When you use
this function, the temperature in the cavity may differ from the set temper‐
Moist Fan Baking
Grill
Turbo Grilling
Menu
7.3 Notes on: Moist Fan Baking
This function was used to comply with the energy efficiency class and ecodesign requirements
according to EU 65/2014 and EU 66/2014. Tests according to EN 60350-1.
The oven door should be closed during cooking so that the function is not interrupted and the
oven operates with the highest energy efficiency possible.
When you use this function the lamp automatically turns off after 30 sec.
For the cooking instructions refer to "Hints and tips" chapter, Moist Fan Baking. For general
energy saving recommendations refer to "Energy Efficiency" chapter, Energy Saving.
ature. The residual heat is used. The heating power may be reduced. For
more information refer to "Daily Use" chapter, Notes on: Moist Fan Bak‐
ing.
To grill thin pieces of food and to toast bread.
To roast large meat joints or poultry with bones on one shelf position. To
make gratins and to brown.
To enter the Menu: Assisted Cooking, Cleaning, Settings.
7.4 How to set: Assisted Cooking
Every dish in this submenu has a recommended function and temperature. You can adjust the
time and the temperature during cooking.
For some of the dishes you can also cook with: • Weight Automatic
Assisted Cooking - use it to prepare a dish quickly with default settings:
Step 1 Step 2 Step 3 Step 4
P1 - P45
54/196
Page 55
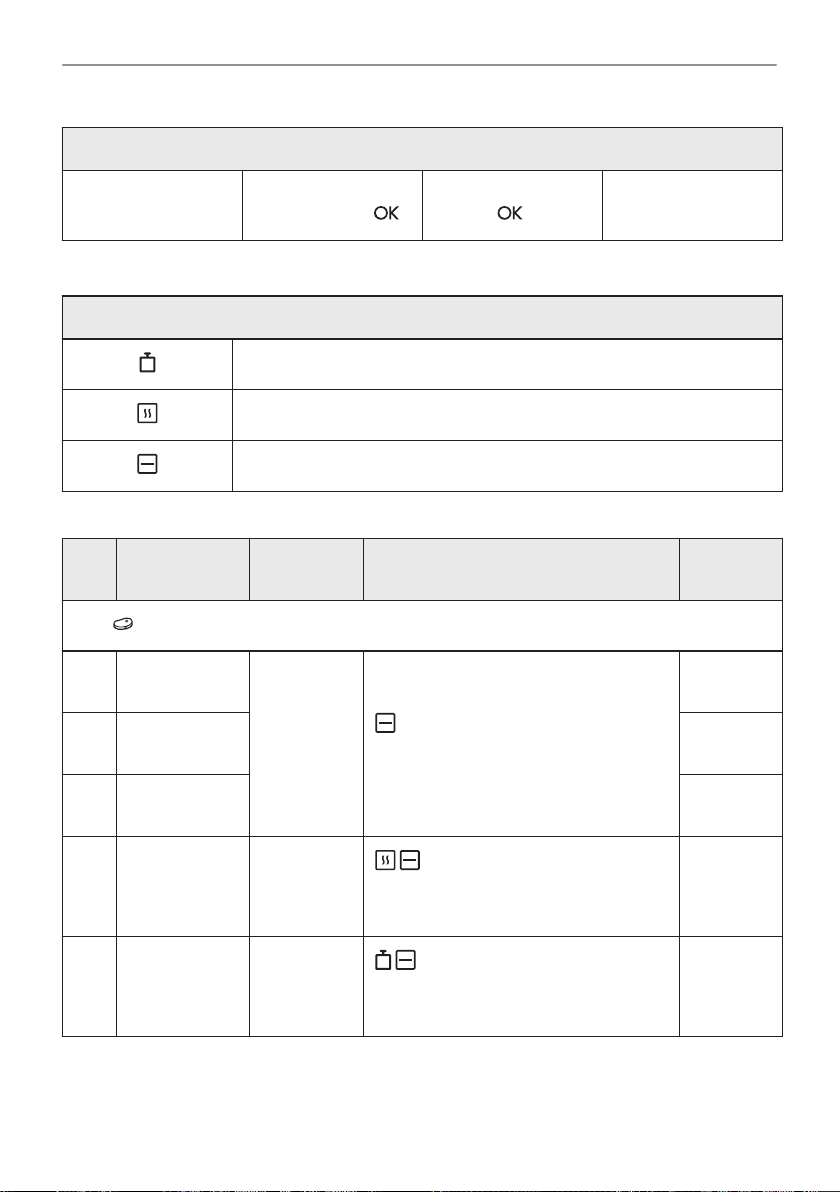
Assisted Cooking - use it to prepare a dish quickly with default settings:
DAILY USE
Enter the menu. Select Assisted
Cooking. Press .
Select the dish. Press.Insert the dish to the
oven. Confirm setting.
7.5 Assisted Cooking
Legend
Weight Automatic available.
Preheat the oven before you start cooking.
Shelf level.
When the function ends check if the food is ready.
Dish Weight Shelf level / Accessory Duration
Beef
P1 Roast Beef,
rare
P2 Roast Beef,
medium
P3 Roast Beef,
well done
1 - 1,5 kg; 4
- 5 cm thick
pieces
2; baking tray
Fry the meat for a few minutes on a hot
pan. Insert to the oven.
time
40 min
50 min
60 min
P4 Steak, medi‐um180 - 220 g
P5 Beef roast /
braised (prime
rib, top round,
thick flank)
per piece; 3
cm thick sli‐
ces
1,5 - 2 kg
3; roasting dish on wire shelf
Fry the meat for a few minutes on a hot
pan. Insert to the oven.
2; roasting dish on wire shelf
Fry the meat for a few minutes on a hot
pan. Add liquid. Insert to the oven.
15 min
120 min
55/196
Page 56
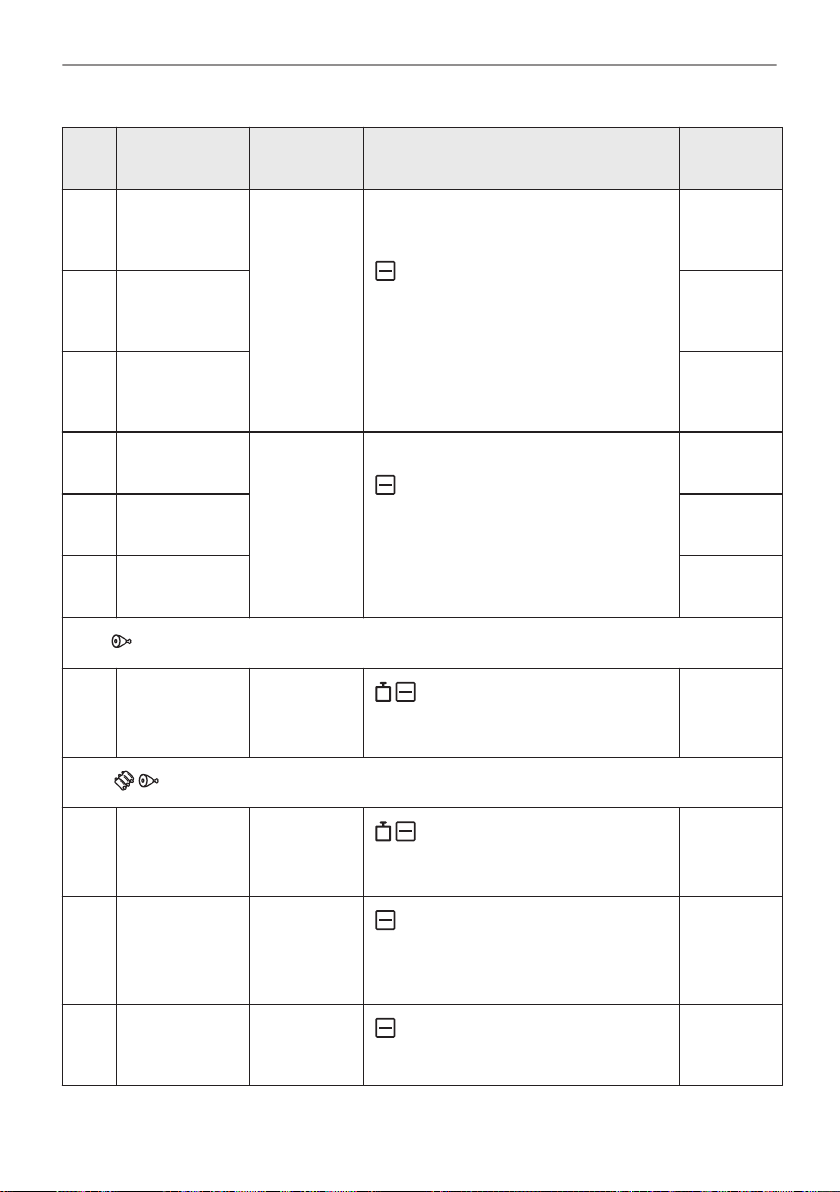
DAILY USE
Dish Weight Shelf level / Accessory Duration
P6 Roast Beef,
rare (slow
cooking)
P7 Roast Beef,
medium (slow
cooking)
P8 Roast Beef,
well done
(slow cooking)
P9 Fillet, rare
(slow cooking)
P10 Fillet, medium
(slow cooking)
P11 Fillet, done
(slow cooking)
Veal
P12 Veal roast
(e.g. shoulder)
1 - 1,5 kg; 4
- 5 cm thick
pieces
0,5 - 1,5 kg;
5 - 6 cm
thick pieces
0,8 - 1,5 kg;
4 cm thick
pieces
2; baking tray
Use your favourite spices or simply salt
and fresh grounded pepper. Fry the meat
for a few minutes on a hot pan. Insert to
the oven.
2; baking tray
Use your favourite spices or simply salt
and fresh grounded pepper. Fry the meat
for a few minutes on a hot pan. Insert to
the oven.
2; roasting dish on wire shelf
Use your favourite spices. Add liquid.
Roast covered.
time
75 min
85 min
130 min
75 min
90 min
120 min
80 min
Pork
P13 Pork roast
neck or
shoulder
P14 Pulled pork
(slow cooking)
P15 Loin, fresh 1 - 1,5 kg; 5
56/196
1,5 - 2 kg
1,5 - 2 kg
- 6 cm thick
pieces
2; roasting dish on wire shelf
Turn the meat after half of the cooking
time.
2; baking tray
Use your favourite spices. Turn the meat
after half of the cooking time to get an
even browning.
2; roasting dish on wire shelf
Use your favourite spices.
120 min
215 min
55 min
Page 57
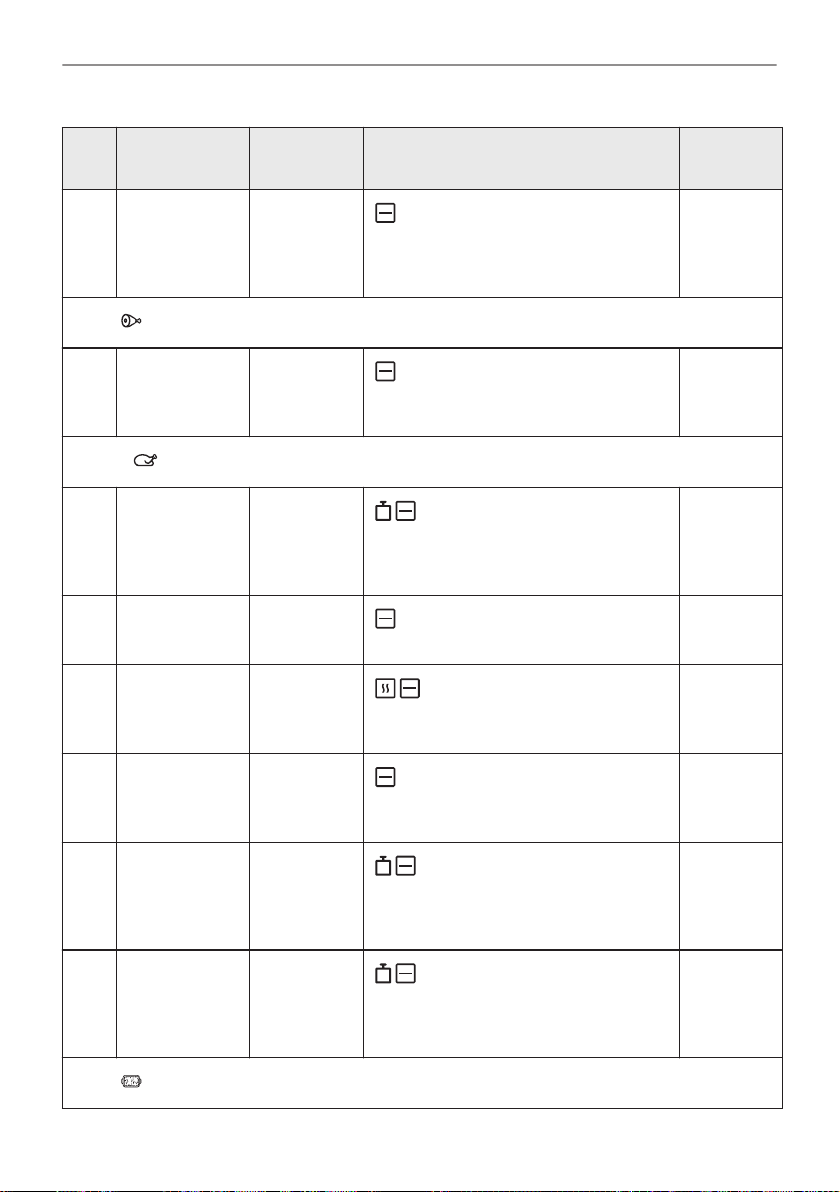
DAILY USE
Dish Weight Shelf level / Accessory Duration
P16 Spare Ribs 2 - 3 kg; use
Lamb
P17 Lamb leg with
bones
Poultry
P18 Whole chick‐en1 - 1,5 kg;
P19 Half chicken 0,5 - 0,8 kg
P20 Chicken
breast
raw, 2 - 3
cm thin
spare ribs
1,5 - 2 kg; 7
- 9 cm thick
pieces
fresh
180 - 200 g
per piece
3; deep pan
Add liquid to cover the bottom of a dish.
Turn the meat after half of the cooking
time.
2; roasting dish on baking tray
Add liquid. Turn the meat after half of the
cooking time.
2; casserole dish on baking tray
Use your favourite spices. Turn the
chicken after half of the cooking time to
get an even browning.
3; baking tray
Use your favourite spices.
2; casserole dish on wire shelf
Use your favourite spices. Fry the meat
for a few minutes on a hot pan.
time
90 min
130 min
60 min
40 min
25 min
P21 Chicken legs,
fresh
P22 Duck, whole 2 - 3 kg
P23 Goose, whole 4 - 5 kg
Other
-
3; baking tray
If you marinated chicken legs first, set
lower temperature and cook them longer.
2; roasting dish on wire shelf
Use your favourite spices. Put the meat
on roasting dish. Turn the duck after half
of the cooking time.
2; deep pan
Use your favourite spices. Put the meat
on deep baking tray. Turn the goose af‐
ter half of the cooking time.
30 min
100 min
110 min
57/196
Page 58
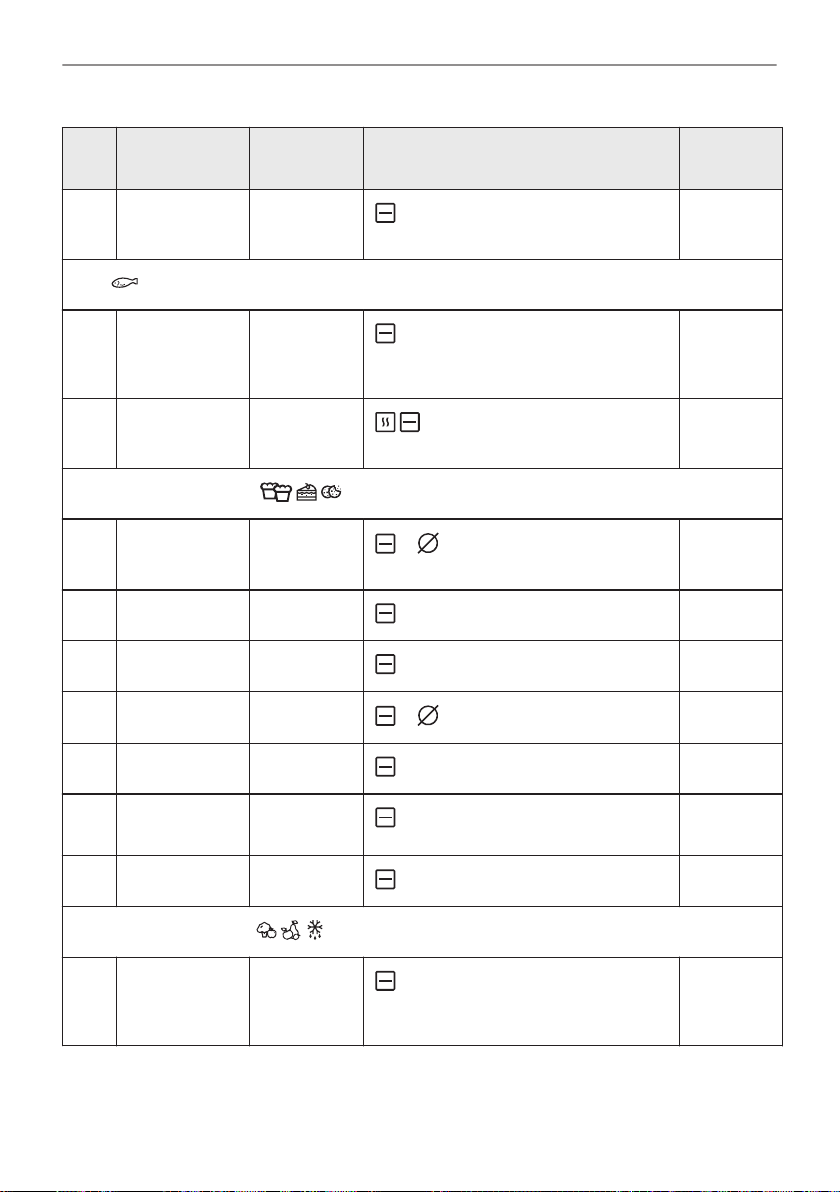
DAILY USE
Dish Weight Shelf level / Accessory Duration
P24 Meat loaf 1 kg
Fish
P25 Whole fish,
grilled
P26 Fish fillet -
Sweet baking / desserts
P27 Cheesecake -
P28 Apple cake -
P29 Apple tart -
P30 Apple pie -
0,5 - 1 kg
per fish
2; wire shelf
Use your favourite spices.
2; baking tray
Fill the fish with butter and use your fa‐
vourite spices and herbs.
3; casserole dish on wire shelf
Use your favourite spices.
2; 28 cm springform tin on wire
shelf
3; baking tray
2; pie form on wire shelf
1; 22 cm pie form on wire shelf
time
60 min
30 min
20 min
90 min
45 min
40 min
60 min
P31 Brownies 2 kg
P32 Chocolate
muffins
P33 Loaf cake -
Vegetable / Side dishes
P34 Baked pota‐
toes
58/196
-
1 kg
3; deep pan
3; muffin tray on wire shelf
2; loaf pan on wire shelf
2; baking tray
Put the whole potatoes with skin on bak‐
ing tray.
30 min
25 min
50 min
50 min
Page 59
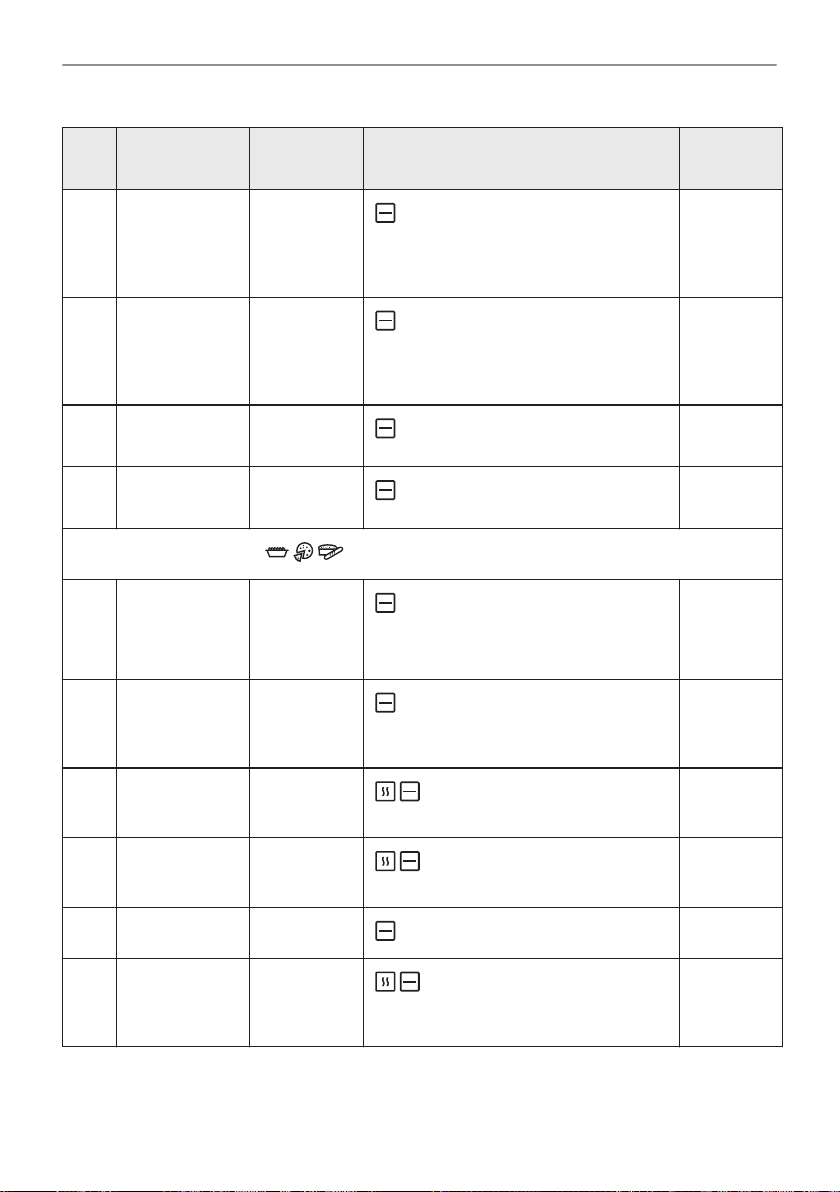
DAILY USE
Dish Weight Shelf level / Accessory Duration
P35 Wegdes 1 kg
P36 Grilled mixed
vegetables
P37 Croquets, fro‐
zen
P38 Pommes, fro‐
zen
Gratins, bread and pizza
P39 Meat / vegeta‐
ble lasagna
with dry noo‐
dle plates
P40 Potato gratin
(raw potatoes)
1 - 1,5 kg
0,5 kg
0,75 kg
1 - 1,5 kg
1 - 1,5 kg
3; baking tray lined with baking pa‐
per
Use your favourite spices. Cut potatoes
into pieces.
3; baking tray lined with baking pa‐
per
Use your favourite spices. Cut the vege‐
tables into pieces.
3; baking tray
3; baking tray
2; casserole dish on wire shelf
1; casserole dish on wire shelf
Rotate the dish after half of the cooking
time.
time
35 min
30 min
25 min
25 min
45 min
50 min
P41 Pizza fresh,
thin
P42 Pizza fresh,
thick
P43 Quiche -
P44 Baguette /
Ciabatta /
White bread
0,8 kg
-
-
2; baking tray lined with baking
paper
2; baking tray lined with baking
paper
2; baking tin on wire shelf
3; baking tray lined with baking
paper
More time needed for white bread.
15 min
25 min
45 min
30 min
59/196
Page 60
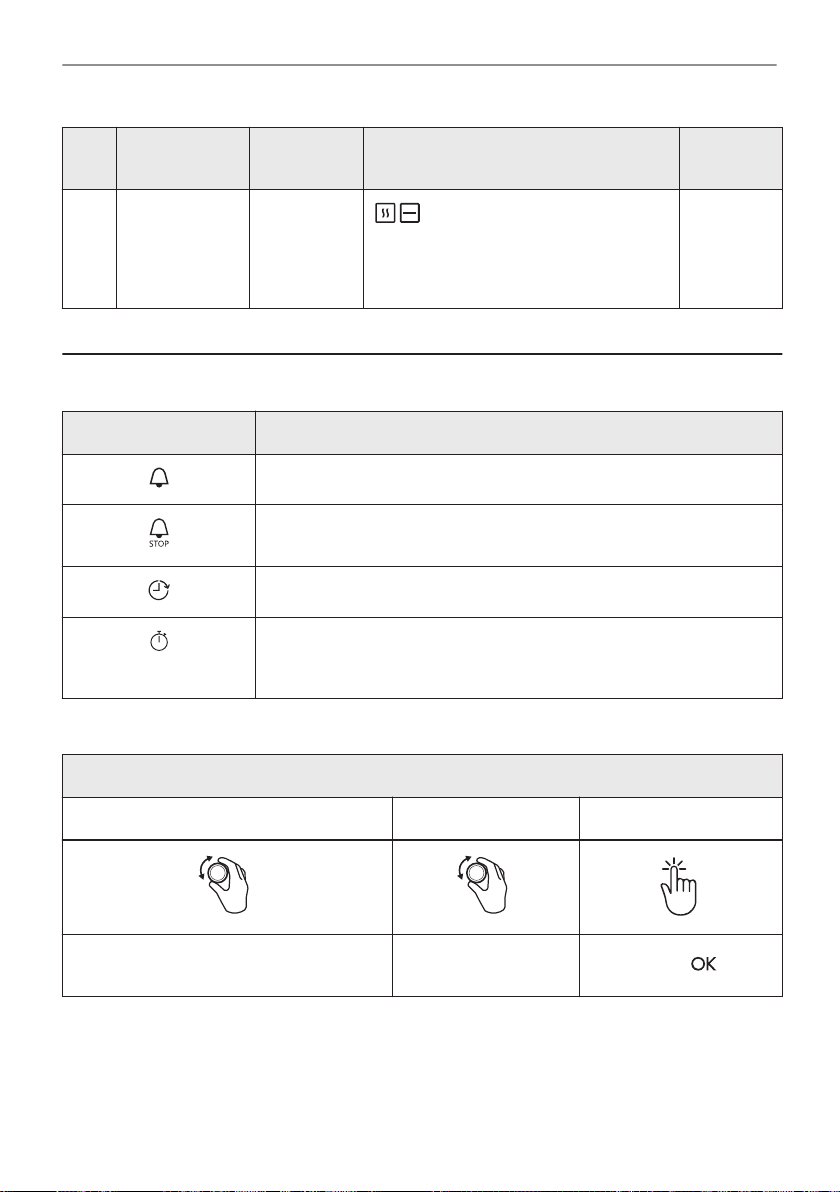
CLOCK FUNCTIONS
Dish Weight Shelf level / Accessory Duration
P45 All grain /
rye / dark
bread all
grain in loaf
pan
1 kg
2; baking tray lined with baking
paper / wire shelf
time
60 min
8. CLOCK FUNCTIONS
8.1 Clock functions
Clock Function Application
Minute minder. When the timer ends, the signal sounds.
Cooking time. When the timer ends, the signal sounds and the heating
function stops.
Time Delay. To postpone the start and / or end of cooking.
Uptimer. Maximum is 23 h 59 min. This function has no effect on the
operation of the oven.
To turn on and off the Uptimer select: Menu, Settings.
8.2 How to set: Clock functions
Step 1 Step 2 Step 3
To change the time of day enter the menu
and select Settings, Time of day.
60/196
How to set: Time of day
Set the clock.
Press: .
Page 61
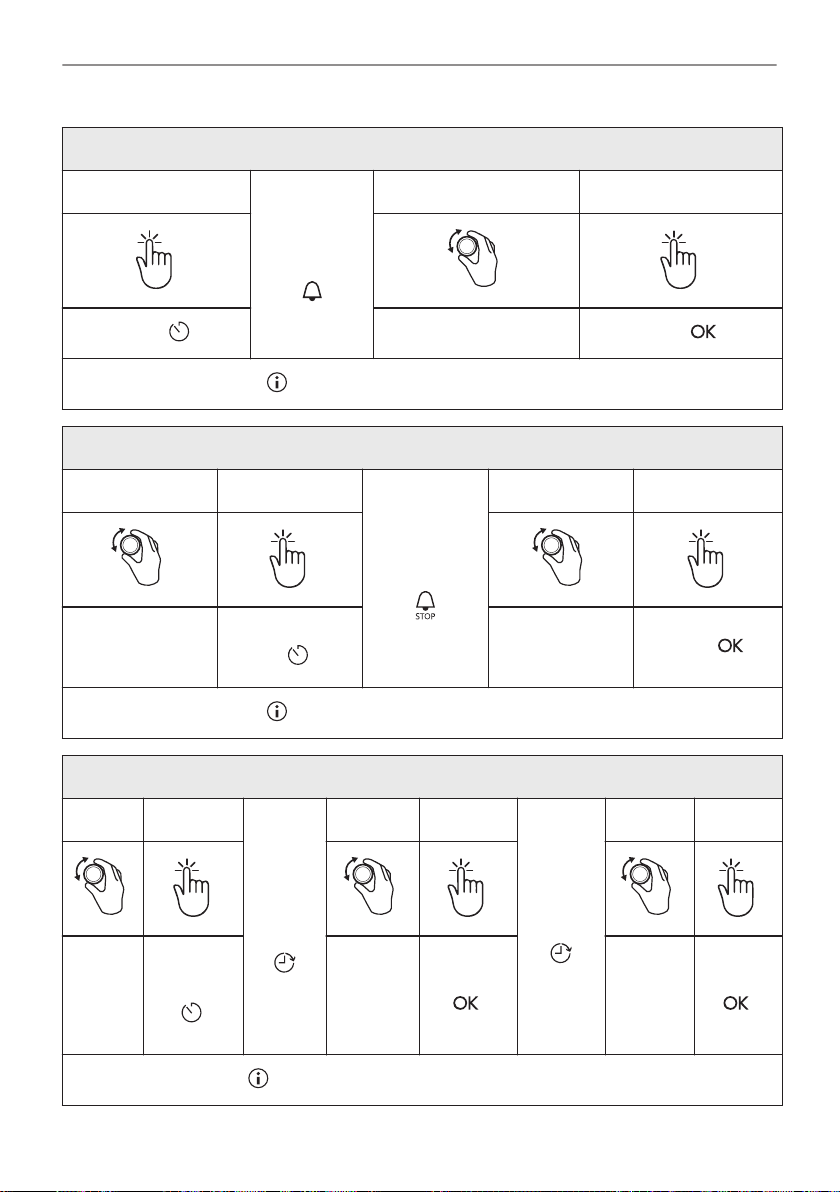
How to set: Minute minder
CLOCK FUNCTIONS
Step 1
Press: .
Step 1 Step 2
Choose a heating
function and set
the temperature.
Step 2 Step 3
The display
shows:
0:00
Set the Minute minder
Timer starts counting down immediately.
How to set: Cooking time
The display
shows:
0:00
Press repeated‐
ly: .
Timer starts counting down immediately.
Press: .
Step 3 Step 4
Set the cooking
time.
Press: .
Step 1 Step 2
Select
the
heating
func‐
tion.
Press re‐
peatedly:
How to set: Time Delay
Step 3 Step 4
The dis‐
play
shows:
the time
of day
START
.
Timer starts counting down at a set start time.
Set the
start
time.
Press:
The dis‐
play
shows:
--:--
STOP
.
Step 5 Step 6
Set the
end
time.
Press:
.
61/196
Page 62
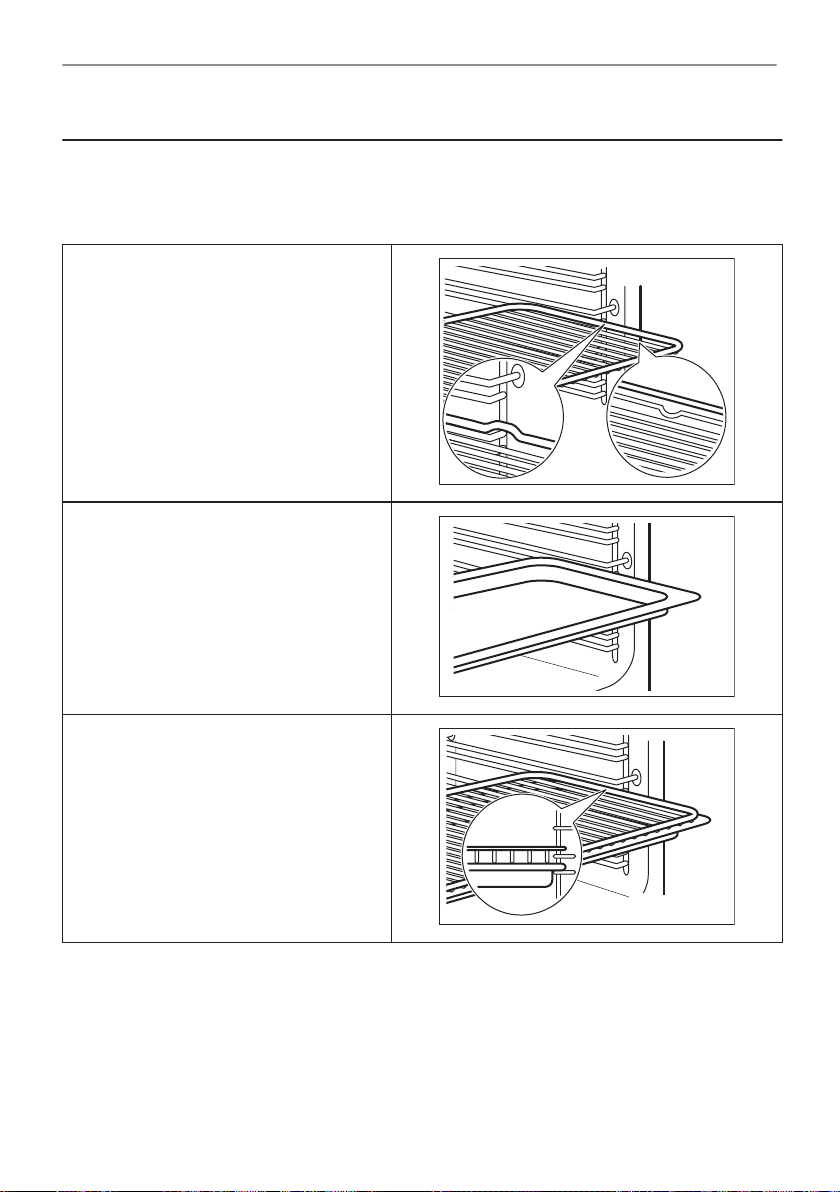
HOW TO USE: ACCESSORIES
9. HOW TO USE: ACCESSORIES
9.1 Inserting accessories
A small indentation at the top increases safety. The indentations are also anti-tip devices. The
high rim around the shelf prevents cookware from slipping of the shelf.
Wire shelf:
Push the shelf between the guide bars of
the shelf support and make sure that the
feet point down.
Deep pan:
Push the tray between the guide bars of
the shelf support.
Wire shelf, Deep pan:
Push the tray between the guide bars of
the shelf support and the wire shelf on the
guide bars above.
62/196
Page 63
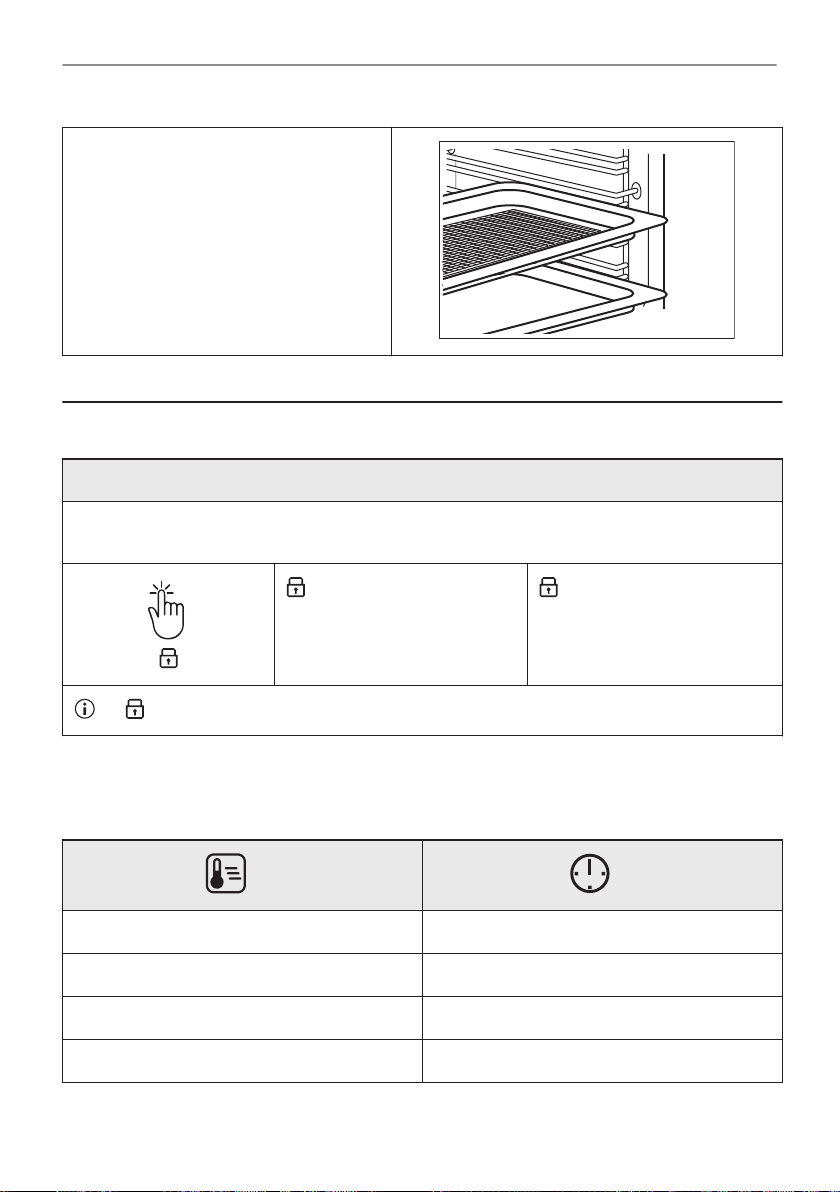
ADDITIONAL FUNCTIONS
AirFry:
Place the tray on the third shelf position.
Place the baking tray on the first shelf po‐
sition.
10. ADDITIONAL FUNCTIONS
10.1 Lock
This function prevents an accidental change of the oven function.
Turn it on when the oven works - the set cooking continues, the control panel is locked.
Turn it on when the oven is off - the oven cannot be turned on, the control panel is locked.
- press and hold to turn on
the function.
A signal sounds.
3 x - flashes when the lock is turned on.
- press and hold to turn it off.
10.2 Automatic switch-off
For safety reasons the oven turns off after some time, if a heating function works and you do
not change any settings.
(°C) (h)
30 - 115 12.5
120 - 195 8.5
200 - 245 5.5
250 - maximum 3
The Automatic switch-off does not work with the functions: Light, Time Delay.
63/196
Page 64
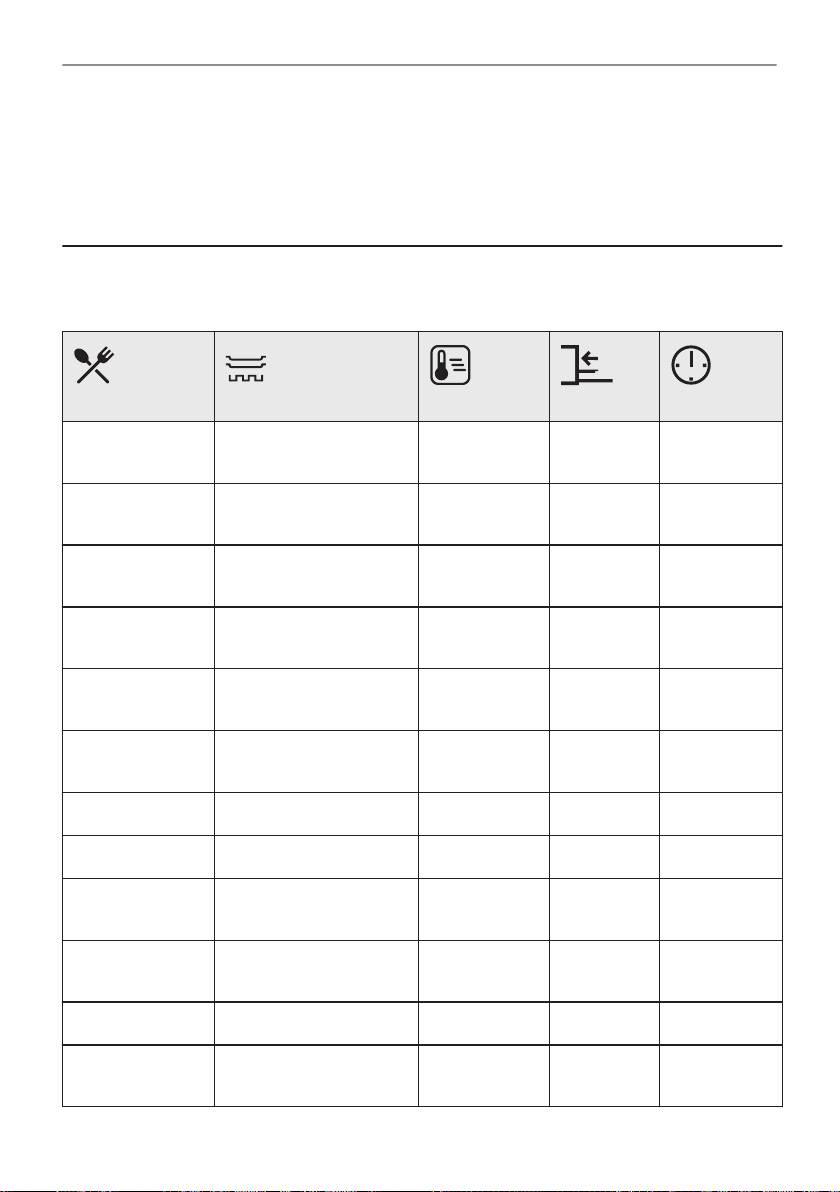
HINTS AND TIPS
10.3 Cooling fan
When the oven operates, the cooling fan turns on automatically to keep the surfaces of the
oven cool. If you turn off the oven, the cooling fan can continue to operate until the oven cools
down.
11. HINTS AND TIPS
11.1 Moist Fan Baking
For the best results follow suggestions listed in the table below.
(°C) (min)
Sweet rolls, 16
pieces
Rolls, 9 pieces baking tray or dripping
Pizza, frozen,
0.35 kg
Swiss Roll baking tray or dripping
Brownie baking tray or dripping
Soufflè, 6 pieces ceramic ramekins on
Sponge flan base flan base tin on wire shelf 180 2 15 - 25
Victoria sandwich baking dish on wire shelf 170 2 40 - 50
Poached fish, 0.3kgbaking tray or dripping
Whole fish, 0.2 kg baking tray or dripping
baking tray or dripping
pan
pan
wire shelf 220 2 10 - 15
pan
pan
wire shelf
pan
pan
180 2 20 - 30
180 2 30 - 40
170 2 25 - 35
175 3 25 - 30
200 3 25 - 30
180 3 20 - 25
180 3 25 - 35
Fish fillet, 0.3 kg pizza pan on wire shelf 180 3 25 - 30
Poached meat,
0.25 kg
64/196
baking tray or dripping
pan
200 3 35 - 45
Page 65
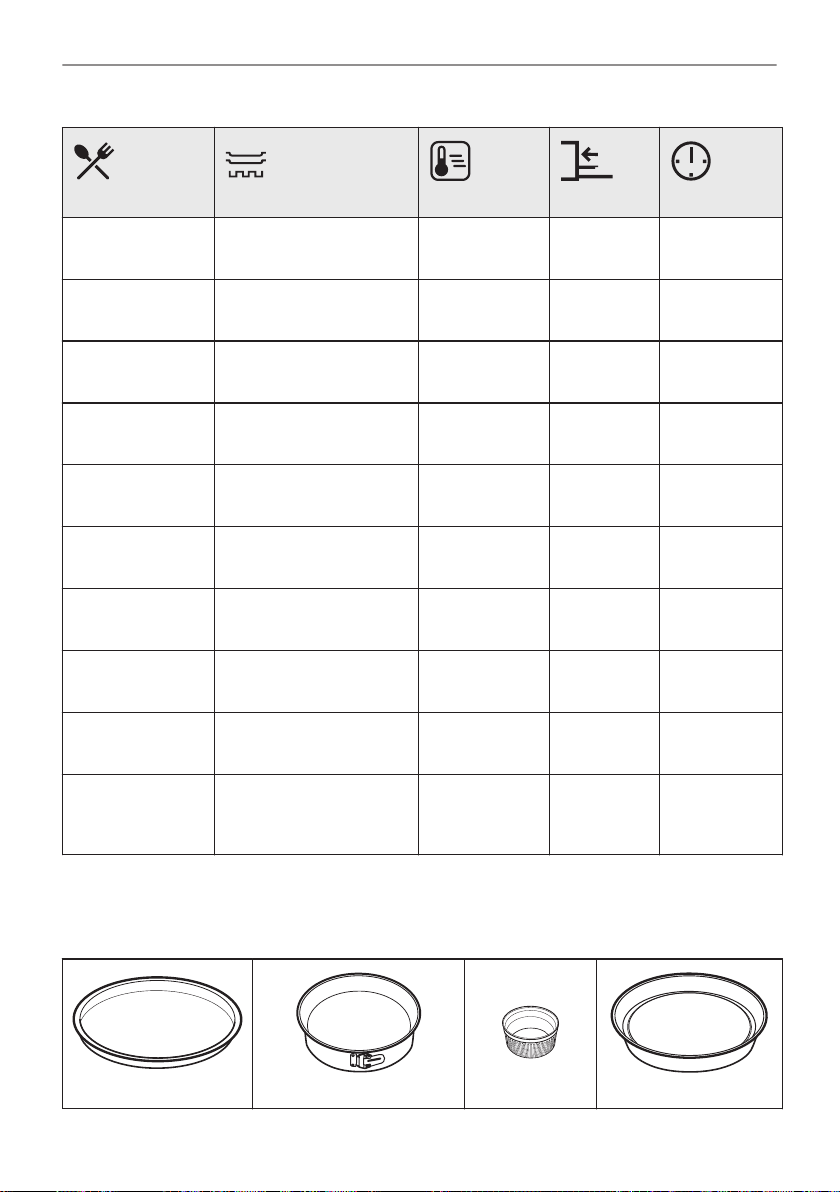
HINTS AND TIPS
(°C) (min)
Shashlik, 0.5 kg baking tray or dripping
Cookies, 16
pieces
Macaroons, 24
pieces
Muffins, 12
pieces
Savory pastry, 20
pieces
Short crust bis‐
cuits, 20 pieces
Tartlets, 8 pieces baking tray or dripping
Vegetables,
poached, 0.4 kg
Vegetarian ome‐
lette
Mediterranean
vegetables, 0.7
kg
pan
baking tray or dripping
pan
baking tray or dripping
pan
baking tray or dripping
pan
baking tray or dripping
pan
baking tray or dripping
pan
pan
baking tray or dripping
pan
pizza pan on wire shelf 200 3 25 - 30
baking tray or dripping
pan
200 3 25 - 30
180 2 20 - 30
180 2 25 - 35
170 2 30 - 40
180 2 25 - 30
150 2 25 - 35
170 2 20 - 30
180 3 35 - 45
180 4 25 - 30
11.2 Moist Fan Baking - recommended accessories
Use the dark and non-reflective tins and containers. They have better heat absorption than the
light colour and reflective dishes.
Pizza pan
Baking dish
Ramekins
Flan base tin
65/196
Page 66
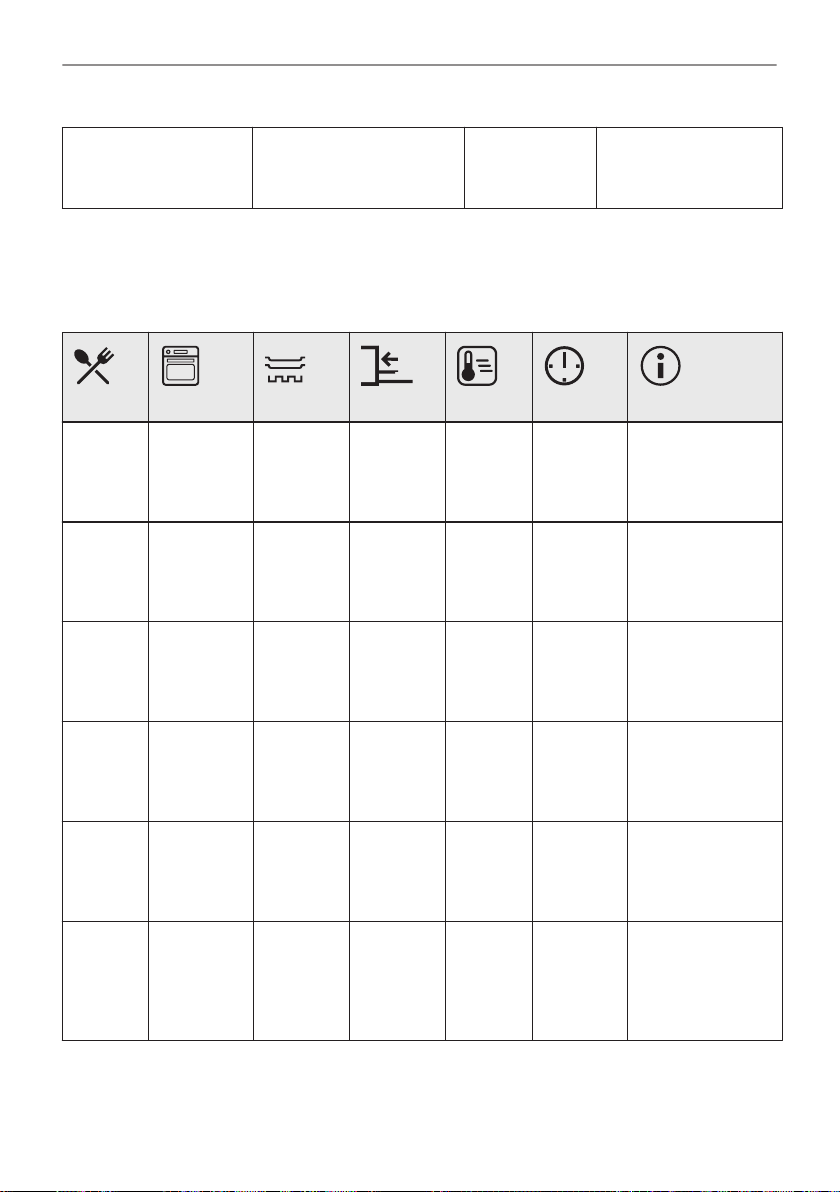
HINTS AND TIPS
Dark, non-reflective
28 cm diameter
Dark, non-reflective
26 cm diameter
11.3 Cooking tables for test institutes Information for test institutes
Tests according to IEC 60350-1.
Small
cakes,
20 per
tray
Small
cakes,
20 per
tray
Small
cakes,
20 per
tray
Conven‐
tional
Cooking
True Fan
Cooking
True Fan
Cooking
Baking
tray
Baking
tray
Baking
tray
3 170 20 - 30 -
3 150 -
2 and 4 150 -
Ceramic
8 cm diameter,
5 cm height
(°C) (min)
20 - 35 -
160
20 - 35 -
160
Dark, non-reflective
28 cm diameter
Apple
pie, 2
tins Ø20
cm
Apple
pie, 2
tins Ø20
cm
Sponge
cake,
cake
mould
Ø26 cm
66/196
Conven‐
tional
Cooking
True Fan
Cooking
Conven‐
tional
Cooking
Wire shelf 2 180 70 - 90 -
Wire shelf 2 160 70 - 90 -
Wire shelf 2 170 40 - 50 Preheat the oven
for 10 minutes.
Page 67
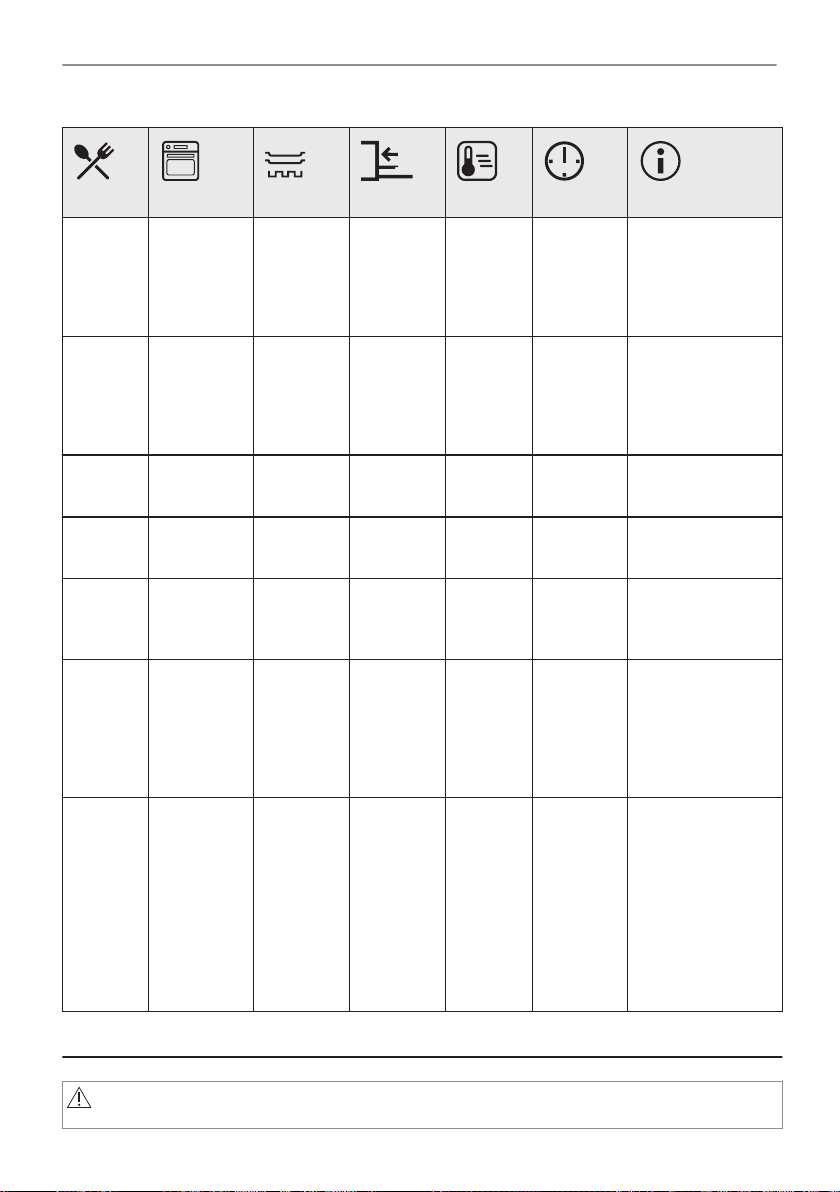
CARE AND CLEANING
(°C) (min)
Sponge
cake,
cake
mould
Ø26 cm
Sponge
cake,
cake
mould
Ø26 cm
Short
bread
Short
bread
Short
bread
Toast, 4
- 6
pieces
True Fan
Cooking
True Fan
Cooking
True Fan
Cooking
True Fan
Cooking
Conven‐
tional
Cooking
Grill Wire shelf 4 max. 2 - 3 mi‐
Wire shelf 2 160 40 - 50 Preheat the oven
Wire shelf 2 and 4 160 40 - 60 Preheat the oven
Baking
tray
Baking
tray
Baking
tray
3 140 -
150
2 and 4 140 -
150
3 140 -
150
20 - 40 -
25 - 45 -
25 - 45 -
nutes first
side; 2 - 3
minutes
second
side
for 10 minutes.
for 10 minutes.
Preheat the oven
for 3 minutes.
Beef
burger,
6
pieces,
0.6 kg
Grill Wire shelf
and drip‐
ping pan
4 max. 20 - 30 Put the wire shelf
12. CARE AND CLEANING
WARNING!
Refer to Safety chapters.
on the fourth level
and the dripping
pan on the third
level of the oven.
Turn the food half‐
way through the
cooking time.
Preheat the oven
for 3 minutes.
67/196
Page 68
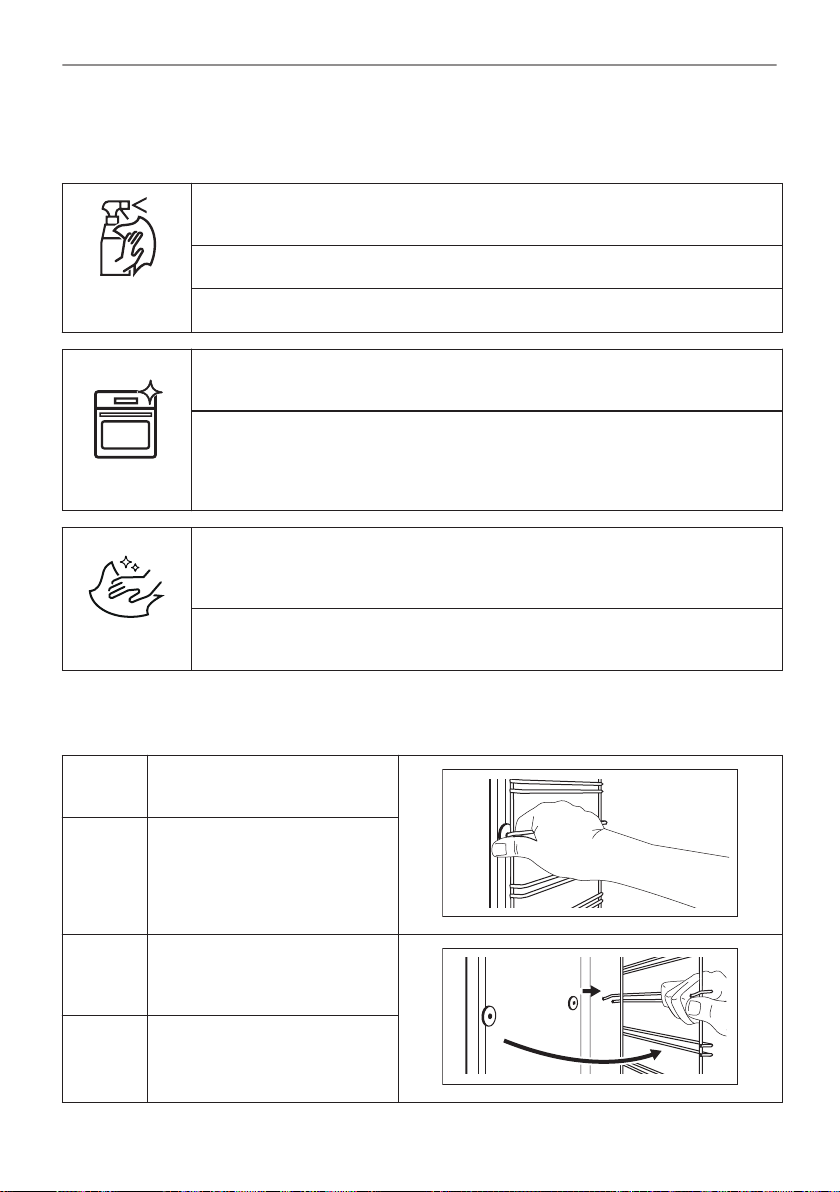
2
1
CARE AND CLEANING
12.1 Notes on cleaning
Clean the front of the oven with a soft cloth with warm water and a mild deter‐
gent.
Use a cleaning solution to clean metal surfaces.
Cleaning
Agents
Everyday Use
Clean stains with a mild detergent.
Clean the cavity after each use. Fat accumulation or other residue may cause
fire.
Moisture can condense in the oven or on the door glass panels. To decrease
the condensation, let the oven work for 10 minutes before cooking. Do not store
the food in the oven for longer than 20 minutes. Dry the cavity with a soft cloth
after each use.
Clean all accessories after each use and let them dry. Use a soft cloth with
warm water and a mild detergent. Do not clean the accessories in a dishwash‐
er.
Accessories
Do not clean the non-stick accessories using abrasive cleaner or sharp-edged
objects.
12.2 How to remove: Shelf supports
Remove the shelf supports to clean the oven.
Step 1 Turn off the oven and wait until
Step 2 Pull the front of the shelf sup‐
Step 3 Pull the rear end of the shelf
Step 4 Install the shelf supports in the
68/196
it is cold.
port away from the side wall.
support away from the side wall
and remove it.
opposite sequence.
Page 69
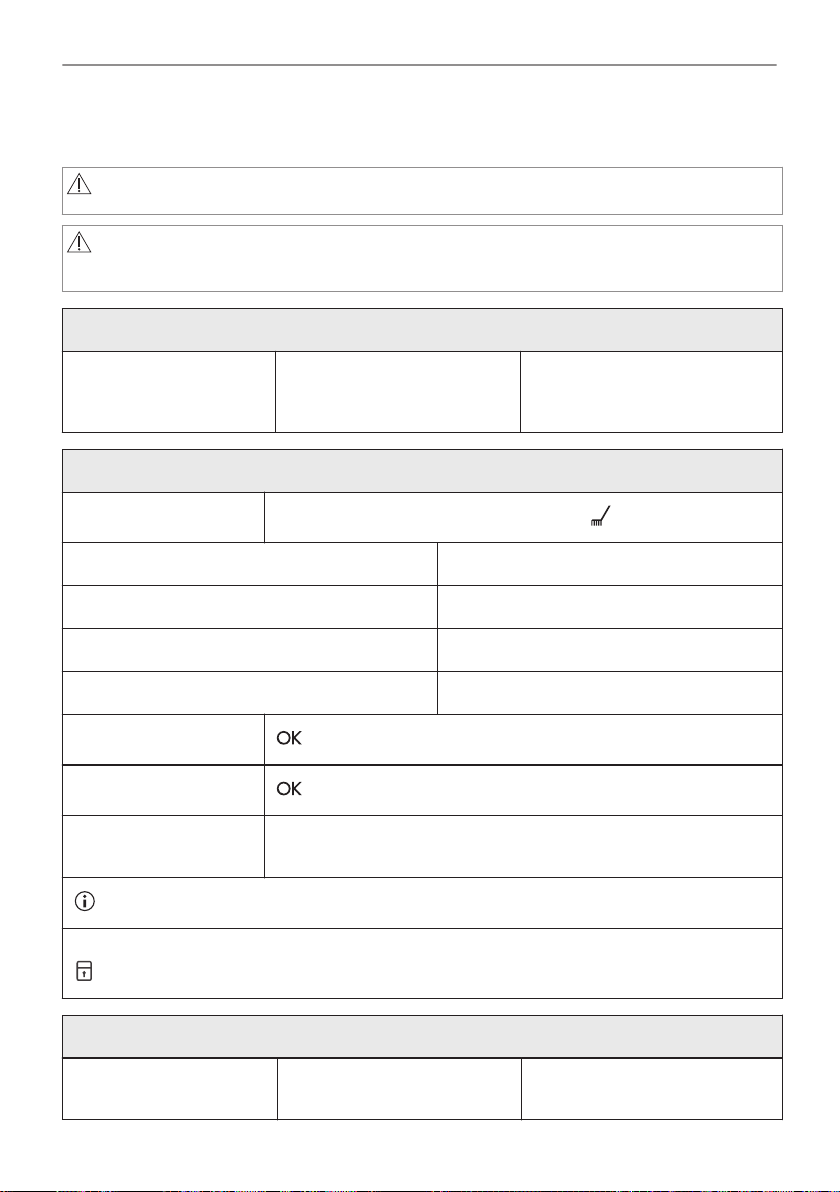
12.3 How to use: Pyrolytic Cleaning
Clean the oven with Pyrolytic Cleaning.
WARNING!
There is a risk of burns.
CAUTION!
If there are other appliances installed in the same cabinet, do not use them at the
same time as this function. It can cause damage to the oven.
Before the Pyrolytic Cleaning:
CARE AND CLEANING
Turn off the oven and wait
until it is cold.
Step 1
Option Duration
C1 - Light cleaning 1 h
C2 - Normal cleaning 1 h 30 min
C3 - Thorough cleaning 2 h 30 min
Step 2
Step 3
Step 4 After cleaning, turn the knob for the heating functions to the off posi‐
During the cleaning the oven lamp is off.
When the oven is at the set temperature, the door locks. Until the door unlocks the display shows:
.
Remove all accessories. Clean the oven floor and the in‐
ner door glass with warm water,
a soft cloth and a mild detergent.
Pyrolytic Cleaning
Enter menu: Cleaning .
- press to select the cleaning programme.
- press to start the cleaning.
tion.
Turn off the oven and wait
until it is cold.
When the cleaning ends:
Clean the cavity with a soft
cloth.
Remove the residue from the
bottom of the cavity.
69/196
Page 70
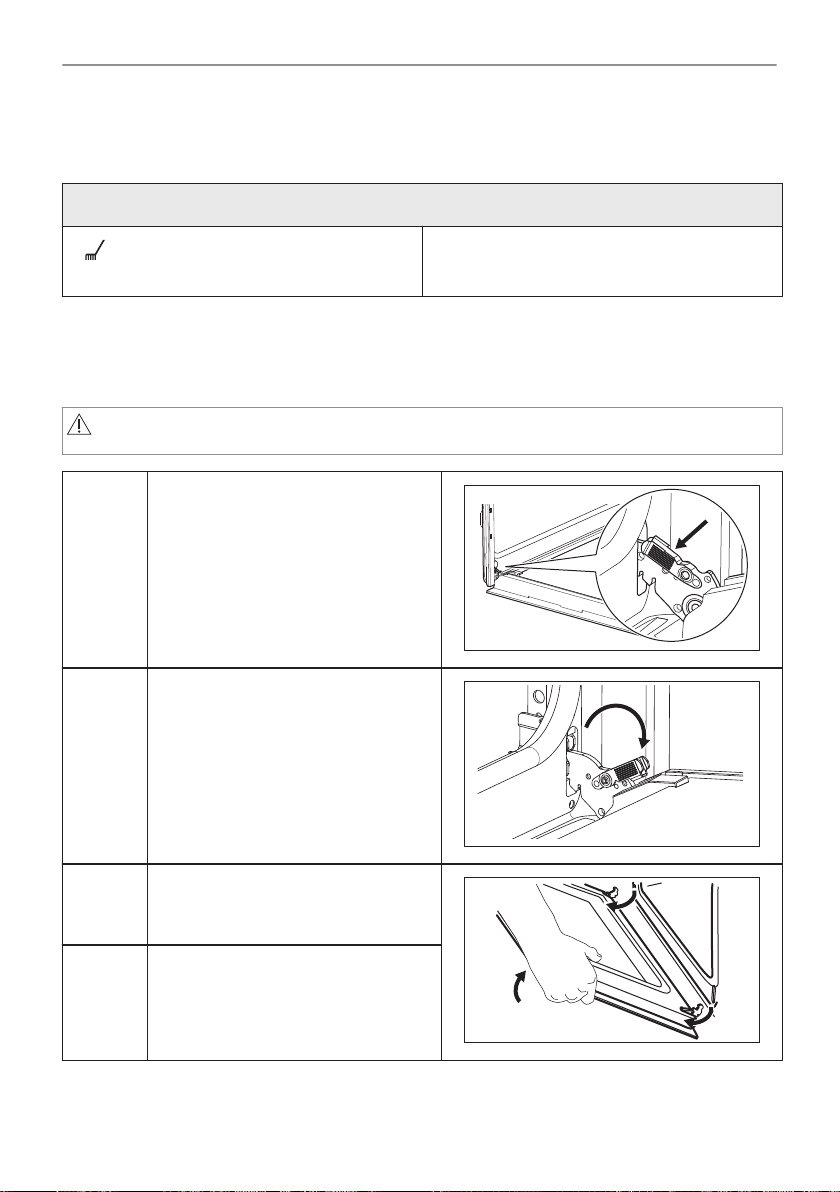
CARE AND CLEANING
12.4 Cleaning Reminder
The oven reminds you when to clean it with pyrolytic cleaning.
flashes in the display for 5 sec after each
cooking session.
To turn off the reminder enter the Menu and
select Settings, Cleaning Reminder.
12.5 How to remove and install: Door
The oven door has three glass panels. You can remove the oven door and the internal glass
panels to clean them. Read the whole "Removing and installing door" instruction before you
remove the glass panels.
CAUTION!
Do not use the oven without the glass panels.
Step 1 Open the door fully and hold both
Step 2 Lift and pull the latches until they
hinges.
click.
Step 3 Close the oven door halfway to the
Step 4 Put the door on a soft cloth on a sta‐
70/196
first opening position. Then lift and
pull to remove the door from its seat.
ble surface.
Page 71
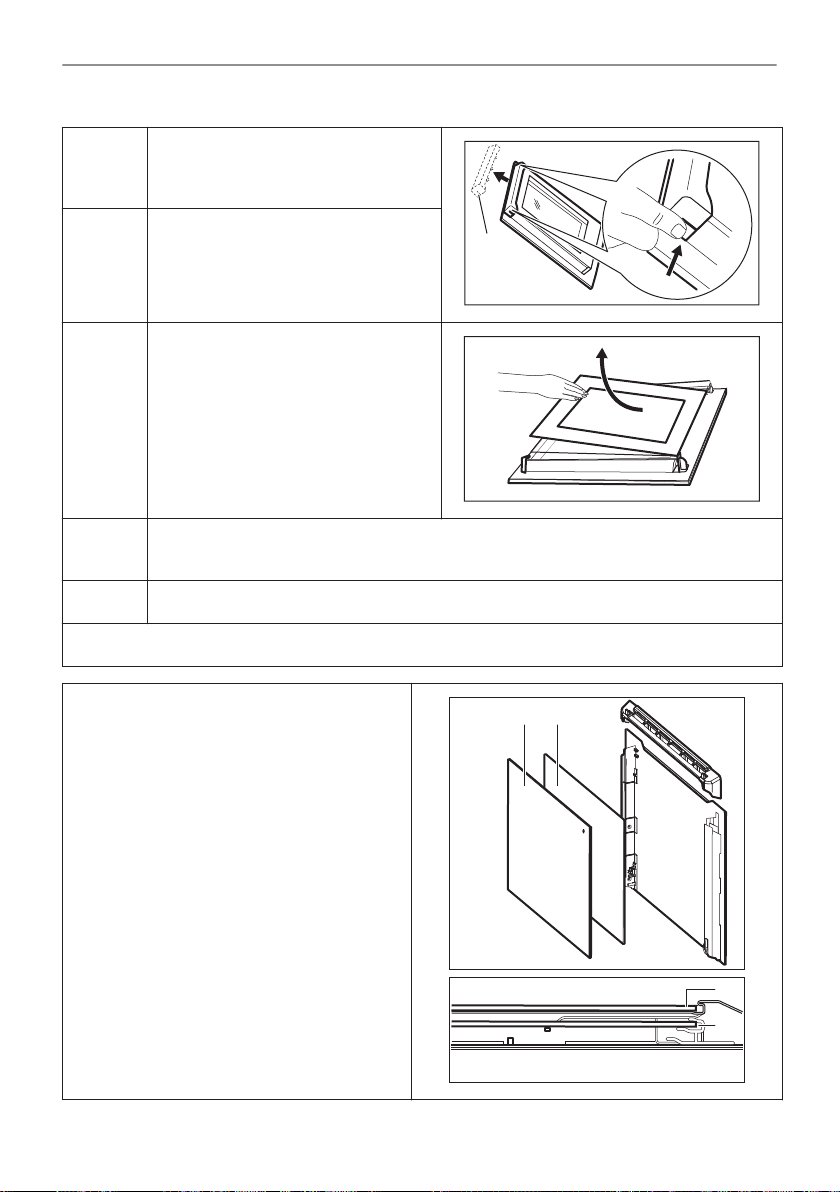
1
2
B
A B
A
B
CARE AND CLEANING
Step 5 Hold the door trim (B) on the top edge
Step 6 Pull the door trim to the front to re‐
Step 7 Hold the door glass panels by their
Step 8 Clean the glass panels with water and soap. Dry the glass panels carefully. Do not
Step 9 After cleaning, install the glass panels and the oven door.
If the door is installed correctly, you will hear a click when closing the latches.
Make sure that you put the glass panels (A
and B) back in the correct sequence. Check
for the symbol / printing on the side of the
glass panel, each of the glass panels looks
different to make the disassembly and as‐
sembly easier.
When installed correctly the door trim clicks.
Make sure that you install the middle panel of
glass in the seats correctly.
of the door at the two sides and push
inwards to release the clip seal.
move it.
top edge and carefully pull them out
one by one. Start from the top panel.
Make sure the glass slides out of the
supports completely.
clean the glass panels in the dishwasher.
71/196
Page 72
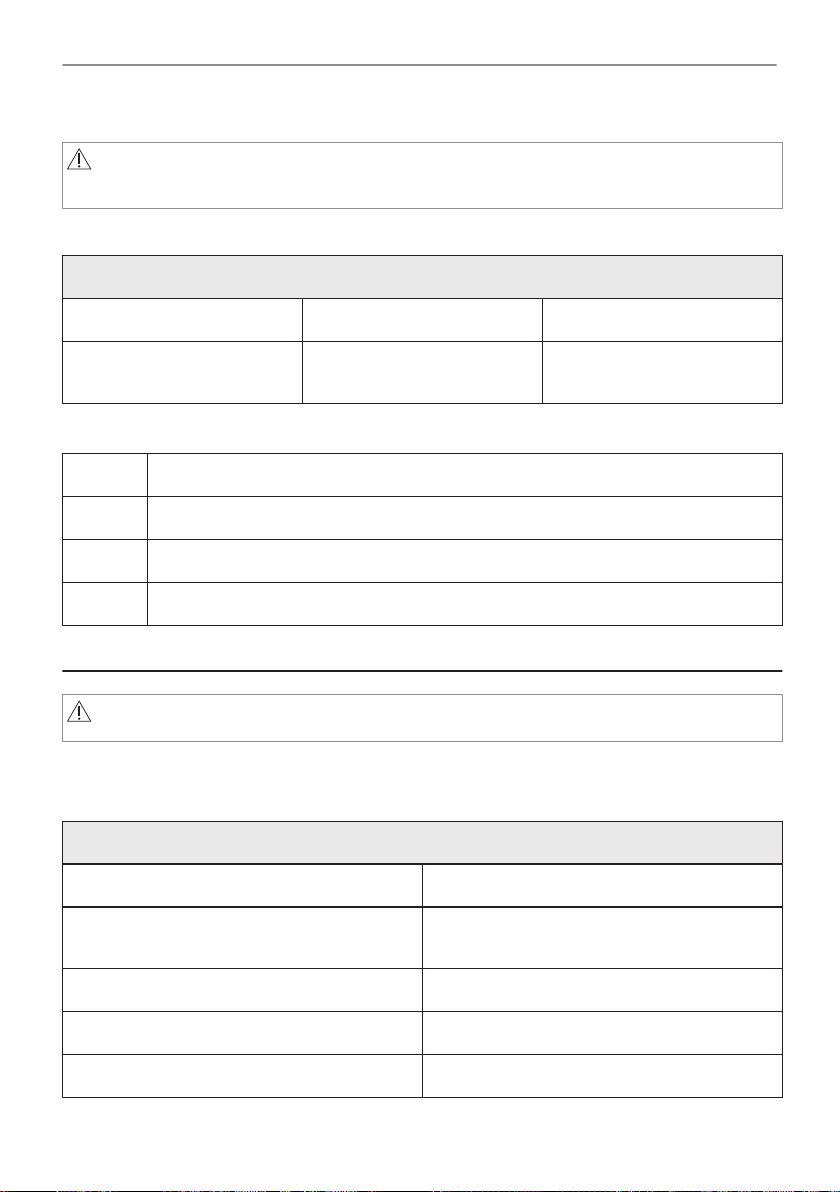
TROUBLESHOOTING
12.6 How to replace: Lamp
WARNING!
Risk of electric shock.
The lamp can be hot.
Always hold the halogen lamp with a cloth to prevent grease residue from burning on the lamp.
Before you replace the lamp:
Step 1 Step 2 Step 3
Turn off the oven. Wait until
the oven is cold.
Disconnect the oven from the
mains.
Put a cloth on the bottom of
the cavity.
Back lamp
Step 1 Turn the glass cover to remove it.
Step 2 Clean the glass cover.
Step 3 Replace the lamp with a suitable 300 °C heat-resistant lamp.
Step 4 Install the glass cover.
13. TROUBLESHOOTING
WARNING!
Refer to Safety chapters.
13.1 What to do if...
In any cases not included in this table please contact with an Authorised Service Centre.
The oven does not turn on or does not heat up
Problem Check if...
You cannot activate or operate the oven. The oven is correctly connected to an electrical
supply.
The oven does not heat up. The automatic switch-off is deactivated.
The oven does not heat up. The oven door is closed.
The oven does not heat up. The fuse is not blown.
72/196
Page 73
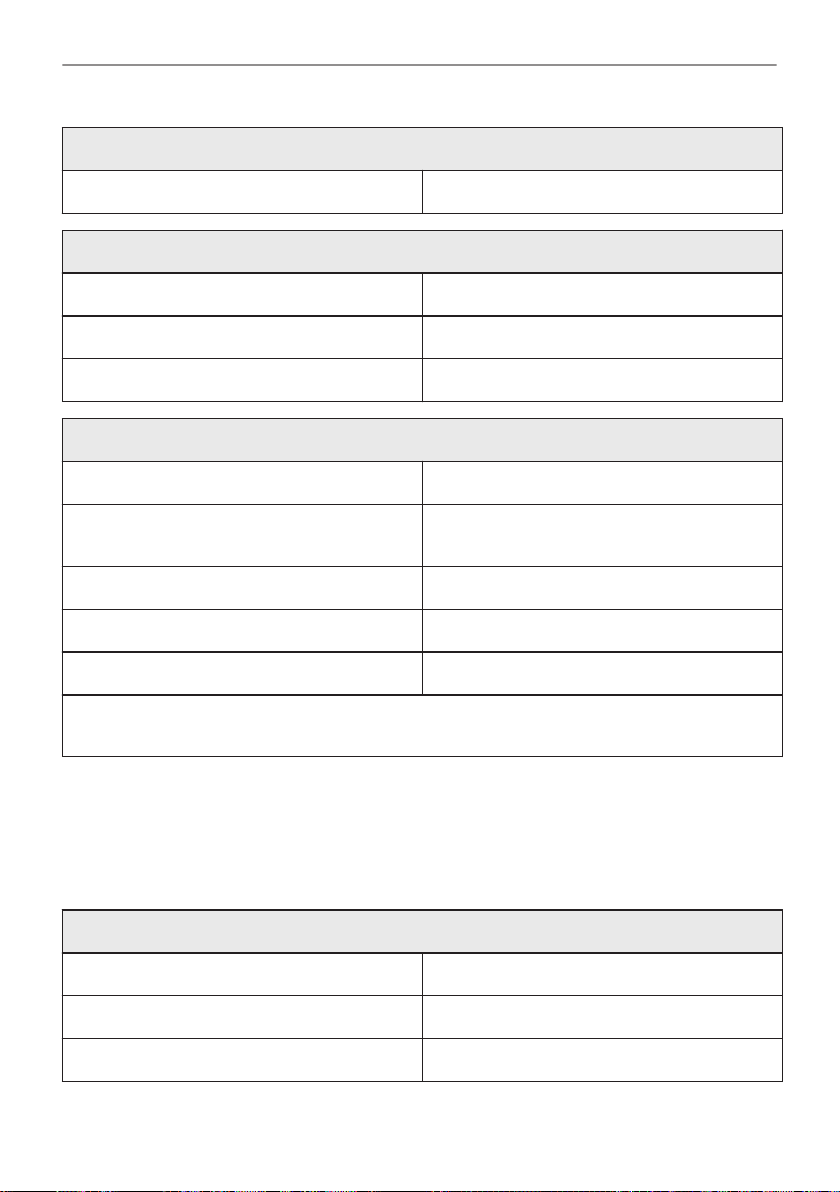
TROUBLESHOOTING
The oven does not turn on or does not heat up
The oven does not heat up. The Child Lock is off.
Components
Problem Check if...
The lamp is turned off. Moist Fan Baking - is turned on.
The lamp does not work. The lamp is burnt out.
Error codes
The display shows... Check if...
Err C3 The oven door is closed or the door lock is not
Err F102 The oven door is closed.
Err F102 The door lock is not broken.
00:00 There was a power cut. Set the time of day.
If the display shows an error code that is not in this table turn the house fuse off and on to restart
the oven. If the error code recurs contact an Authorised Service Centre.
broken.
13.2 Service data
If you cannot find a solution to the problem yourself, contact your dealer or an Authorised
Service Centre.
The necessary data for the service centre is on the rating plate. The rating plate is on the front
frame of the oven cavity. Do not remove the rating plate from the oven cavity.
We recommend that you write the data here:
Model (MOD.) .........................................
Product number (PNC) .........................................
Serial number (S.N.) .........................................
73/196
Page 74
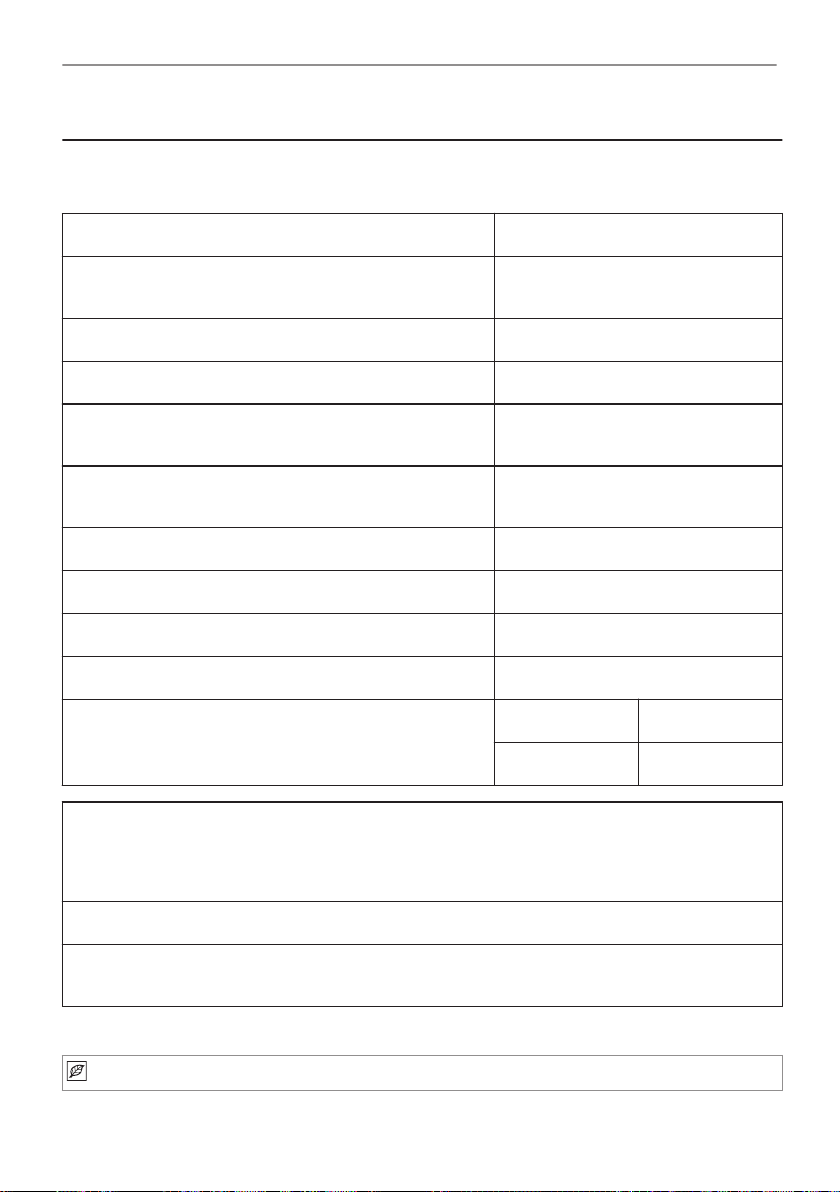
ENERGY EFFICIENCY
14. ENERGY EFFICIENCY
14.1 Product Information and Product Information Sheet*
Supplier's name Electrolux
Model identification
Energy Efficiency Index 81.2
Energy efficiency class A+
Energy consumption with a standard load, conventional
mode
Energy consumption with a standard load, fan-forced
mode
Number of cavities 1
Heat source Electricity
Volume 72 l
Type of oven Built-In Oven
Mass
* For European Union according to EU Regulations 65/2014 and 66/2014.
For Republic of Belarus according to STB 2478-2017, Appendix G; STB 2477-2017, Annexes A
and B.
For Ukraine according to 568/32020.
EOM4P46TX 949498236
KOMFP46TX 949498234
0.93 kWh/cycle
0.69 kWh/cycle
EOM4P46TX 30.4 kg
KOMFP46TX 30.5 kg
Energy efficiency class is not applicable for Russia.
EN 60350-1 - Household electric cooking appliances - Part 1: Ranges, ovens, steam ovens and
grills - Methods for measuring performance.
14.2 Energy saving
The oven has features which help you save energy during everyday cooking.
74/196
Page 75
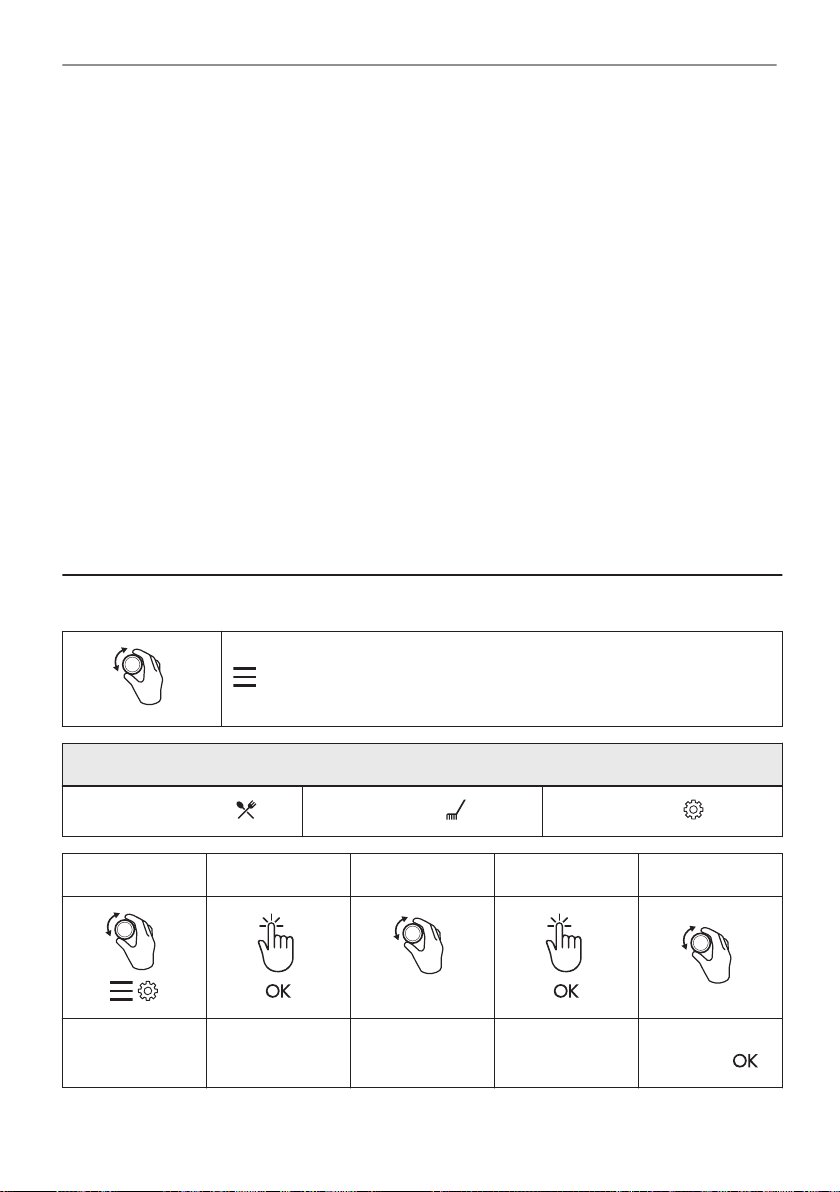
MENU STRUCTURE
Make sure that the oven door is closed when the oven operates. Do not open the oven door too
often during cooking. Keep the door gasket clean and make sure it is well fixed in its position.
Use metal cookware to improve energy saving.
When possible, do not preheat the oven before cooking.
Keep breaks between baking as short as possible when you prepare a few dishes at one time.
Cooking with fan
When possible, use the cooking functions with fan to save energy.
Residual heat
The fan and lamp continue to operate. When you turn off the oven, the display shows the
residual heat. You can use that heat to keep the food warm.
When the cooking duration is longer than 30 min, reduce the oven temperature to minimum 3 10 min before the end of cooking. The residual heat inside the oven will continue to cook.
Use the residual heat to warm up other dishes.
Keep food warm
Choose the lowest possible temperature setting to use residual heat and keep a meal warm.
The residual heat indicator or temperature appears on the display.
Cooking with the lamp off
Turn off the lamp during cooking. Turn it on only when you need it.
Moist Fan Baking
Function designed to save energy during cooking.
When you use this function the lamp automatically turns off after 30 sec. You may turn on the
lamp again but this action will reduce the expected energy savings.
15. MENU STRUCTURE
15.1 Menu
- select to enter the Menu.
Menu structure
Assisted Cooking
Step 1 Step 2 Step 3 Step 4 Step 5
Select the Menu,
Settings.
Confirm setting.
Cleaning
O1 - O11
Select the set‐
ting.
Settings
Confirm setting.
Adjust the value
and press .
75/196
Page 76
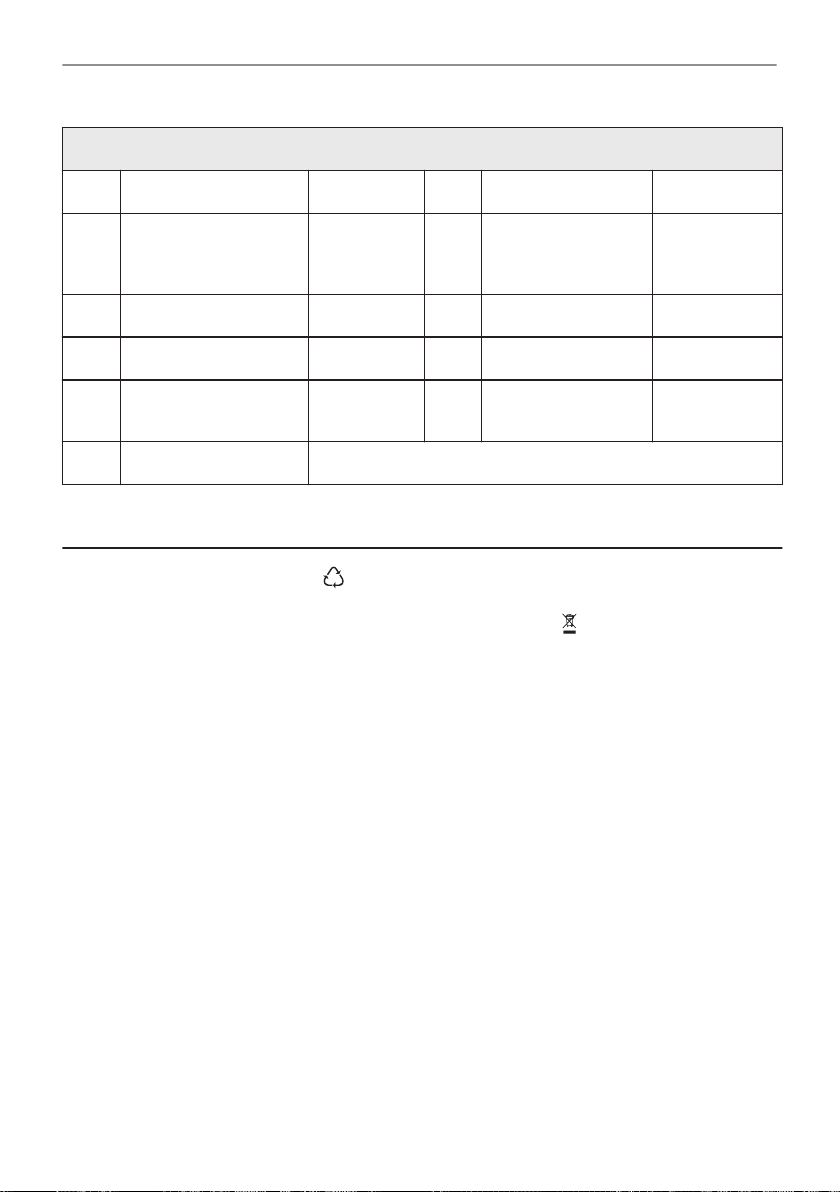
MENU STRUCTURE
Settings
O1 Time of day Change O2 Display brightness 1 - 5
O3 Key tones 1 - Beep
2 - Click
3 - Sound off
O5 Uptimer On / Off O6 Light On / Off
O7 Fast Heat Up On / Off O8 Cleaning Reminder On / Off
O9 Demo mode Activation
code: 2468
O11 Reset all settings Yes / No
O4 Buzzer volume 1 - 4
O10 Software version Check
16. ENVIRONMENTAL CONCERNS
Recycle materials with the symbol . Put the packaging in relevant containers to recycle it.
Help protect the environment and human health by recycling waste of electrical and electronic
appliances. Do not dispose of appliances marked with the symbol with the household waste.
Return the product to your local recycling facility or contact your municipal office.
76/196
Page 77
CONTENIDO
PENSAMOS EN USTED
Gracias por adquirir un electrodoméstico Electrolux. Ha elegido un producto que lleva décadas
de experiencia e innovación profesionales. Ingenioso y elegante, ha sido diseñado pensando
en usted. Así pues, cada vez que lo utilice, puede tener la seguridad de que obtendrá siempre
excelentes resultados.
Le damos la bienvenida a Electrolux.
Visite nuestro sitio web para:
Obtener consejos, folletos, soluciones a problemas e información de servicio y
reparación:
www.electrolux.com/support
Registrar su producto para recibir un mejor servicio:
www.registerelectrolux.com
Comprar accesorios, artículos de consumo y piezas de recambio originales para su
aparato:
www.electrolux.com/shop
Para más recetas, consejos y resolución de problemas, descargue la aplicación My
Electrolux Kitchen.
ATENCIÓN AL CLIENTE Y SERVICIO
Le recomendamos que utilice recambios originales.
Cuando se ponga en contacto con nuestro Centro de servicio técnico, asegúrese de tener los
siguientes datos disponibles: Modelo, código numérico del producto (PNC), número de serie.
La información se encuentra en la placa de características.
Advertencia / Precaución - Información sobre seguridad
Información general y consejos
Información relativa al medioambiente
Salvo modificaciones.
CONTENIDO
1. INFORMACIÓN SOBRE SEGURIDAD..... 78
1.1 Seguridad de niños y personas
vulnerables.......................................... 78
1.2 Instrucciones generales de
seguridad.............................................79
2. INSTRUCCIONES DE SEGURIDAD......... 80
2.1 Instalación......................................80
2.2 Conexión eléctrica......................... 81
2.3 Uso................................................ 82
2.4 Mantenimiento y limpieza.............. 83
2.5 Limpieza Pirolítica..........................83
2.6 Iluminación interna.........................84
2.7 Asistencia tecnica..........................84
2.8 Eliminación.................................... 84
3. INSTALACIÓN...........................................85
3.1 Empotrado..................................... 85
3.2 Fijación del horno al mueble..........86
4. DESCRIPCIÓN DEL PRODUCTO.............87
4.1 Resumen general.......................... 87
77/196
Page 78

INFORMACIÓN SOBRE SEGURIDAD
4.2 Accesorios..................................... 87
5. CÓMO ENCENDER Y APAGAR EL
HORNO.......................................................... 87
5.1 Mandos escamoteables.................87
5.2 Panel de mandos...........................88
6. ANTES DEL PRIMER USO....................... 89
6.1 Limpieza inicial.............................. 89
6.2 Precalentamiento inicial.................89
7. USO DIARIO.............................................. 89
7.1 Cómo ajustar: Funciones
de cocción............................................89
7.2 Funciones de cocción....................90
7.3 Notas sobre: Horneado húmedo
+ ventilador.......................................... 91
7.4 Cómo ajustar: Cocción asistida..... 91
7.5 Cocción asistida.............................92
8. FUNCIONES DEL RELOJ......................... 97
8.1 Funciones de reloj......................... 97
8.2 Cómo ajustar: Funciones de reloj..97
9. INSTRUCCIONES DE USO:
ACCESORIOS............................................... 99
9.1 Inserción de accesorios.................99
10. FUNCIONES ADICIONALES.................100
10.1 Bloqueo......................................100
10.2 Desconexión automática........... 100
10.3 Ventilador de enfriamiento.........101
11. CONSEJOS............................................101
11.1 Horneado húmedo + ventilador. 101
11.2 Horneado húmedo + ventilador -
accesorios recomendados.................103
11.3 Tablas de cocción para organismos
de control...........................................103
12. MANTENIMIENTO Y LIMPIEZA............105
12.1 Notas sobre la limpieza............. 106
12.2 Cómo quitar: Carriles de apoyo 106
12.3 Instrucciones de uso:
Limpieza pirolítica..............................107
12.4 Aviso de limpieza.......................108
12.5 Cómo quitar e instalar: Puerta...108
12.6 Cómo cambiar: Bombilla............110
13. SOLUCIÓN DE PROBLEMAS...............111
13.1 Qué hacer si.............................. 111
13.2 Datos de servicio....................... 112
14. EFICACIA ENERGÉTICA......................112
14.1 Información del producto y hoja de
información del producto*..................112
14.2 Ahorro energético...................... 113
15. ESTRUCTURA DEL MENÚ...................114
15.1 Menú..........................................114
16. ASPECTOS MEDIOAMBIENTALES.....115
1. INFORMACIÓN SOBRE SEGURIDAD
Antes de instalar y utilizar el aparato, lea atentamente las
instrucciones facilitadas. El fabricante no se hace responsable
de lesiones o daños producidos como resultado de una
instalación o un uso incorrectos. Conserve siempre estas
instrucciones en lugar seguro y accesible para futuras
consultas.
1.1 Seguridad de niños y personas vulnerables
• Este aparato puede ser utilizado por niños de 8 años en
adelante y personas cuyas capacidades físicas, sensoriales
o mentales estén disminuidas o que carezcan de la
78/196
Page 79

INFORMACIÓN SOBRE SEGURIDAD
experiencia y conocimientos suficientes para manejarlo,
siempre que cuenten con las instrucciones o la supervisión
sobre el uso del electrodoméstico de forma segura y
comprendan los riesgos. Es necesario mantener alejados
del aparato a los niños de menos de 8 años, así como a las
personas con minusvalías importantes y complejas, salvo
que estén bajo supervisión continua.
• Es necesario vigilar a los niños para que no jueguen con el
aparato.
• Mantenga todo el material de embalaje fuera del alcance de
los niños y deséchelo de forma adecuada.
• ADVERTENCIA: El horno y las piezas accesibles se
calientan mucho durante el funcionamiento. Mantenga a los
niños y las mascotas alejados del aparato cuando esté en
uso y cuando se enfríe.
• Si este aparato tiene un bloqueo de seguridad para niños,
debe activarlo.
• La limpieza y mantenimiento de usuario del producto no
podrán ser realizados por niños sin supervisión.
1.2 Instrucciones generales de seguridad
• Este aparato está diseñado exclusivamente para cocinar.
• Este aparato está diseñado para uso doméstico en
interiores.
• Este aparato se puede utilizar en oficinas, habitaciones de
hotel, habitaciones de Bed&Breakfast, casas de campo y
otros alojamientos similares donde dicho uso no exceda (en
promedio) los niveles de uso doméstico.
• Solo un electricista cualificado puede instalar este aparato y
sustituir el cable.
• No utilice el aparato antes de instalarlo en la estructura
empotrada.
• Desenchufe el aparato de la red eléctrica antes de realizar
tareas de mantenimiento.
79/196
Page 80

INSTRUCCIONES DE SEGURIDAD
• Si el cable de alimentación sufre algún daño, el fabricante,
su servicio técnico autorizado o un profesional tendrán que
cambiarlo para evitar riesgos.
• ADVERTENCIA: Asegúrese de que el aparato está
apagado antes de cambiar la bombilla para evitar el riesgo
de descarga eléctrica.
• ADVERTENCIA: El horno y las piezas accesibles se
calientan mucho durante el funcionamiento. Preste mucha
atención para no tocar las resistencias.
• Utilizar siempre guantes o manoplas para horno para retirar
o introducir accesorios o recipientes.
• Para retirar los carriles de apoyo, tire primero del frontal del
carril y, a continuación, separe el extremo trasero de las
paredes laterales. Instale los carriles de apoyo en el orden
inverso.
• No utilice un limpiador a vapor para limpiar el aparato.
• No utilice productos de limpieza abrasivos ásperos ni
rascadores de metal afilado para limpiar el cristal de las
tapas abisagradas de la placa si no quiere arañar su
superficie, lo que podría hacer que el cristal se hiciese
añicos.
• Antes de la limpieza pirolítica, retirar todos los accesorios y
cualquier depósito/derrames que haya en el interior del
horno.
2. INSTRUCCIONES DE SEGURIDAD
2.1 Instalación
ADVERTENCIA!
Sólo un técnico cualificado puede instalar el aparato.
• Retire todo el embalaje.
• No instale ni utilice un aparato dañado.
• Siga las instrucciones de instalación suministradas con el aparato.
• Tenga cuidado al mover el aparato, porque es pesado. Utilice siempre guantes de
protección y calzado cerrado.
• No tire nunca del aparato sujetando el asa.
• Instale el aparato en un lugar seguro y adecuado que cumpla los requisitos de instalación.
80/196
Page 81
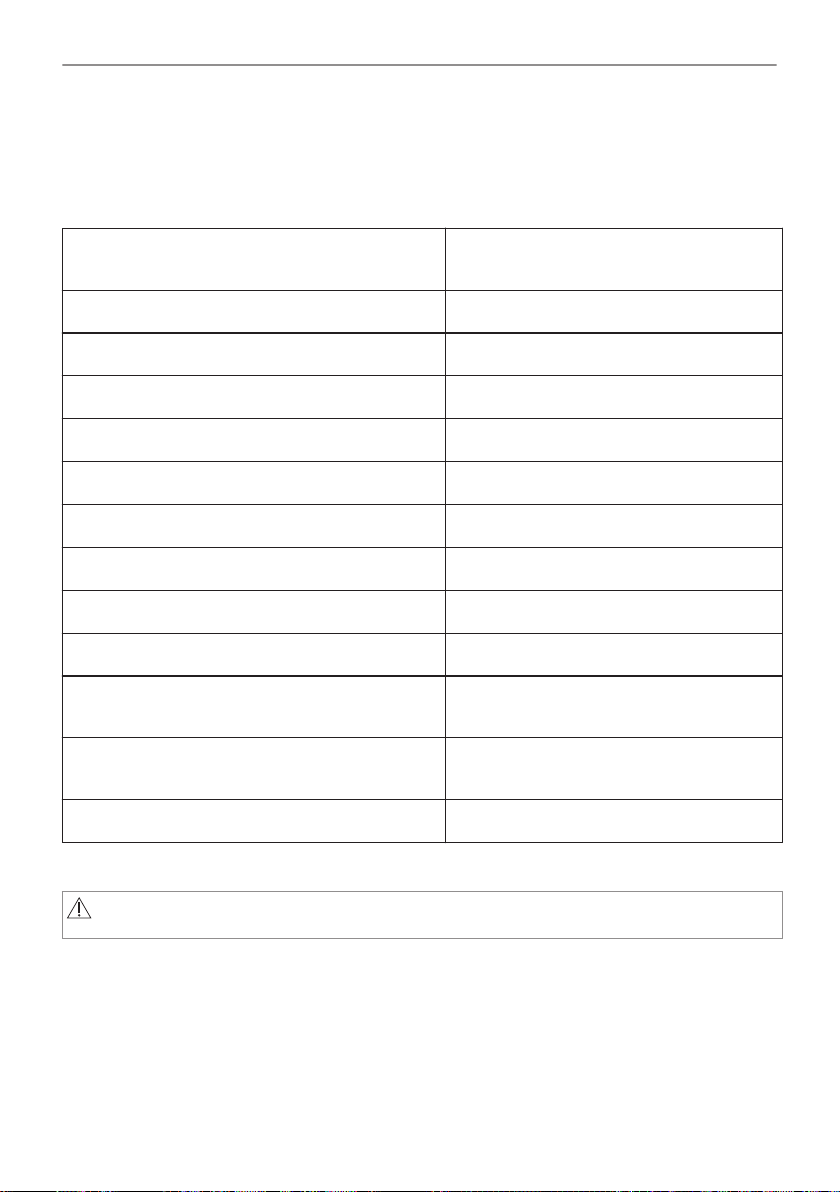
INSTRUCCIONES DE SEGURIDAD
• Respete siempre la distancia mínima entre el aparato y los demás electrodomésticos y
mobiliario.
• Antes de montar el aparato, compruebe si la puerta del horno se abre sin limitaciones.
• El aparato está equipado con un sistema de refrigeración eléctrica. Debe utilizarse con la
fuente de alimentación eléctrica.
Altura mínima del armario (Altura mínima del ar‐
mario debajo de la encimera)
Ancho del armario 560 mm
Profundidad del armario 550 (550) mm
Altura de la parte frontal del aparato 589 mm
Altura de la parte trasera del aparato 571 mm
Anchura de la parte frontal del aparato 595 mm
Anchura de la parte trasera del aparato 559 mm
Fondo del aparato 569 mm
Fondo empotrado del aparato 548 mm
Fondo con la puerta abierta 1022 mm
Tamaño mínimo de la abertura de ventilación.
Abertura situada en la parte trasera inferior
Longitud del cable de alimentación. El cable está
en la esquina derecha de la parte trasera
Tornillos de montaje 4x25 mm
580 (600) mm
560x20 mm
1500 mm
2.2 Conexión eléctrica
ADVERTENCIA!
Riesgo de incendios y descargas eléctricas.
• Todas las conexiones eléctricas deben realizarlas electricistas cualificados.
• El aparato debe conectarse a tierra.
• Asegúrese de que los parámetros de la placa de características son compatibles con los
valores eléctricos del suministro eléctrico.
• Utilice siempre una toma con aislamiento de conexión a tierra correctamente instalada.
• No utilice adaptadores de enchufes múltiples ni cables prolongadores.
81/196
Page 82
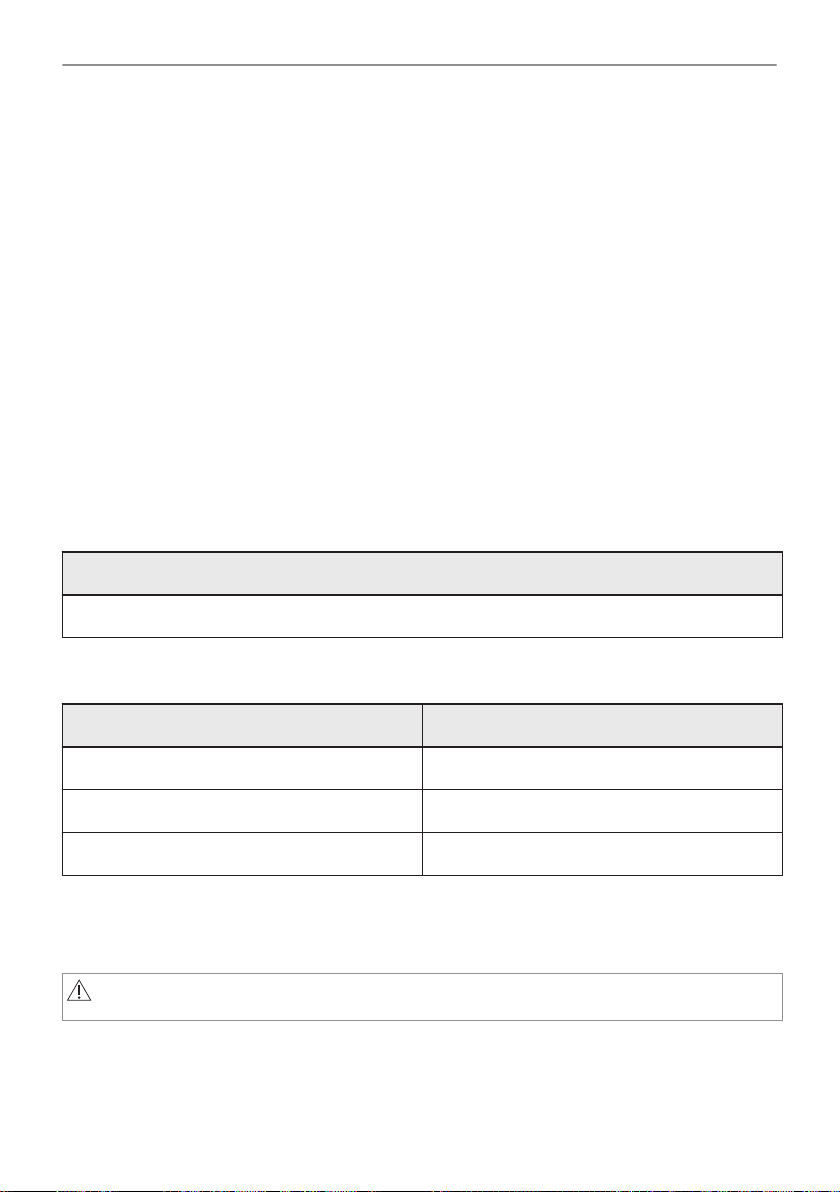
INSTRUCCIONES DE SEGURIDAD
• Asegúrese de no provocar daños en el enchufe ni en el cable de red. Si es necesario
cambiar el cable de alimentación del aparato, debe hacerlo el centro de servicio técnico
autorizado.
• Evite que el cable de red toque o entre en contacto con la puerta del aparato o con el hueco
por debajo del aparato, especialmente mientras funciona o si la puerta está caliente.
• Los mecanismos de protección contra descargas eléctricas de componentes con corriente y
aislados deben fijarse de forma que no puedan aflojarse sin utilizar herramientas.
• Conecte el enchufe a la toma de corriente únicamente cuando haya terminado la
instalación. Asegúrese de tener acceso al enchufe del suministro de red una vez finalizada
la instalación.
• Si la toma de corriente está floja, no conecte el enchufe.
• No desconecte el aparato tirando del cable de conexión a la red. Tire siempre del enchufe.
• Use únicamente dispositivos de aislamiento apropiados: línea con protección contra los
cortocircuitos, fusibles (tipo tornillo que puedan retirarse del soporte), dispositivos de fuga a
tierra y contactores.
• La instalación eléctrica debe tener un dispositivo de aislamiento que permita desconectar el
aparato de todos los polos de la red. El dispositivo de aislamiento debe tener una apertura
de contacto con una anchura mínima de 3 mm.
• Cierre completamente la puerta del aparato antes de enchufar el cable de alimentación a la
toma de corriente.
• El aparato se suministra con enchufe y cable de red.
Tipos de cables aplicables para su instalación o cambio para Europa:
H07 RN-F, H05 RN-F, H05 RRF, H05 VV-F, H05 V2V2-F (T90), H05 BB-F
Para la sección del cable, consulte la potencia total de la placa de características. También
puede consultar la tabla:
Potencia total (W) Sección del cable (mm²)
máximo 1380 3 x 0.75
máximo 2300 3 x 1
máximo 3680 3 x 1.5
El cable de tierra (cable verde/amarillo) debe ser 2 cm más largo que los cables de fase y
neutro (cables azul y marrón).
2.3 Uso
ADVERTENCIA!
Riesgo de lesiones, quemaduras y descargas eléctricas o explosiones.
• No cambie las especificaciones de este aparato.
• Asegúrese de que las aberturas de ventilación no están bloqueadas.
• No deje el aparato desatendido durante el funcionamiento.
• Apague el aparato después de cada uso.
82/196
Page 83
INSTRUCCIONES DE SEGURIDAD
• Tenga cuidado al abrir la puerta del aparato mientras funciona. Puede liberarse aire
caliente.
• No utilice el aparato con las manos mojadas ni con agua en contacto.
• No ejerza presión sobre la puerta abierta.
• No utilice el aparato como superficie de trabajo ni para depositar objetos.
• Abra la puerta del aparato con cuidado. El uso de ingredientes con alcohol puede provocar
una mezcla de alcohol y aire.
• No deje que los chispas ni las llamas abiertas entren en contacto con el aparato cuando
abra la puerta.
• No coloque productos inflamables o artículos mojados con productos inflamables dentro,
cerca o sobre el aparato.
ADVERTENCIA!
Podría dañar el aparato.
• Para evitar daños o decoloraciones en el esmalte:
– no coloque recipientes ni otros objetos directamente en la base.
– no coloque papel de aluminio directamente en la parte inferior del interior del aparato.
– no ponga agua directamente en el aparato caliente.
– no deje platos húmedos ni alimentos en el aparato una vez finalizada la cocción.
– tenga cuidado al retirar o instalar los accesorios.
• La pérdida de color del esmalte o el acero inoxidable no afecta al rendimiento del aparato.
• Utilice una bandeja honda para pasteles húmedos. Los jugos de las frutas provocan
manchas permanentes.
• Cocina siempre con la puerta del aparato cerrada.
• Si el aparato se instala detrás de un panel de un mueble (por ejemplo una puerta)
asegúrese de que la puerta nunca esté cerrada mientras funciona el aparato. El calor y la
humedad pueden acumularse detrás de un panel del armario cerrado y provocar daños al
aparato, el alojamiento o el suelo. No cierre del panel del armario hasta que el aparato se
haya enfriado completamente después de su uso.
2.4 Mantenimiento y limpieza
ADVERTENCIA!
Existe riesgo de lesiones, incendios o daños al aparato.
• Antes de proceder con el mantenimiento, apague el aparato y desconecte el enchufe de la
red.
• Asegúrese de que el aparato esté frío. Los paneles de cristal pueden romperse.
• Cambie inmediatamente los paneles de cristal de la puerta que estén dañados. Póngase en
contacto con el servicio técnico autorizado.
• Tenga cuidado al desmontar la puerta del aparato. ¡La puerta es muy pesada!
• Limpie periódicamente el aparato para evitar el deterioro del material de la superficie.
• Limpie el aparato con un paño suave humedecido. Utilice solo detergentes neutros. No
utilice productos abrasivos, estropajos duros, disolventes ni objetos metálicos.
• Si utiliza aerosoles de limpieza para hornos, siga las instrucciones de seguridad del envase.
2.5 Limpieza Pirolítica
ADVERTENCIA!
Riesgo de lesiones / Incendios / Emisiones químicas (humos) en el modo pirolítico.
83/196
Page 84
INSTRUCCIONES DE SEGURIDAD
• Antes de realizar una autolimpieza pirolítica o la función de Primer uso, elimine de la
cavidad del horno:
– cualquier resto de comida, aceite o grasa.
– todos los objetos desmontables (incluidos estantes, carriles laterales, etc. suministrados
con el producto), en especial todos los recipientes, sartenes, bandejas, utensilios, etc.
antiadherentes.
• Lea atentamente todas las instrucciones de la limpieza pirolítica.
• Mantenga a los niños alejados del aparato cuando se realiza la limpieza pirolítica.
El aparato alcanza altas temperaturas y se libera aire caliente de las salidas de ventilación
delanteras.
• La limpieza pirolítica es una operación a alta temperatura que puede liberar humos de los
residuos de cocción y de los materiales de fabricación, por lo que recomendamos
encarecidamente a los consumidores:
– asegurar una correcta ventilación durante y después de cada limpieza pirolítica.
– asegurar una correcta ventilación durante y después del primer uso a máxima
temperatura.
• A diferencia de los seres humanos, algunas aves y algunos reptiles pueden ser muy
sensibles a los posibles humos emitidos durante la limpieza de todos los hornos pirolíticos.
– Retire cualquier mascota (especialmente pájaros) de las proximidades del aparato
durante y después de la limpieza pirolítica y use primero la temperatura máxima para
una zona bien ventilada.
• Las mascotas de pequeño tamaño también pueden ser muy sensibles a los cambios de
temperatura localizados cerca de los hornos mientras se realiza el programa de
autolimpieza pirolítica.
• Las superficies antiadherentes de recipientes, sartenes, bandejas, utensilios, etc., pueden
dañarse por las altas temperaturas de la limpieza pirolítica y también pueden ser fuente de
humos dañinos de baja intensidad.
• Los humos emitidos por todos los hornos pirolíticos y residuos de cocción descritos no son
dañinos para las personas, incluidos los niños, o personas con problemas médicos.
2.6 Iluminación interna
ADVERTENCIA!
Riesgo de descarga eléctrica.
• En cuanto a la(s) bombilla(s) de este producto y las de repuesto vendidas por separado:
Estas bombillas están destinadas a soportar condiciones físicas extremas en los aparatos
domésticos, como la temperatura, la vibración, la humedad, o están destinadas a señalar
información sobre el estado de funcionamiento del aparato. No están destinadas a utilizarse
en otras aplicaciones y no son adecuadas para la iluminación de estancias domésticas.
• Este producto contiene una fuente luminosa de la clase de eficiencia energética G.
• Utilice solo bombillas de las mismas características .
2.7 Asistencia tecnica
• Para reparar el aparato, póngase en contacto con el centro de servicio autorizado.
• Utilice solamente piezas de recambio originales.
2.8 Eliminación
ADVERTENCIA!
Existe riesgo de lesiones o asfixia.
84/196
Page 85
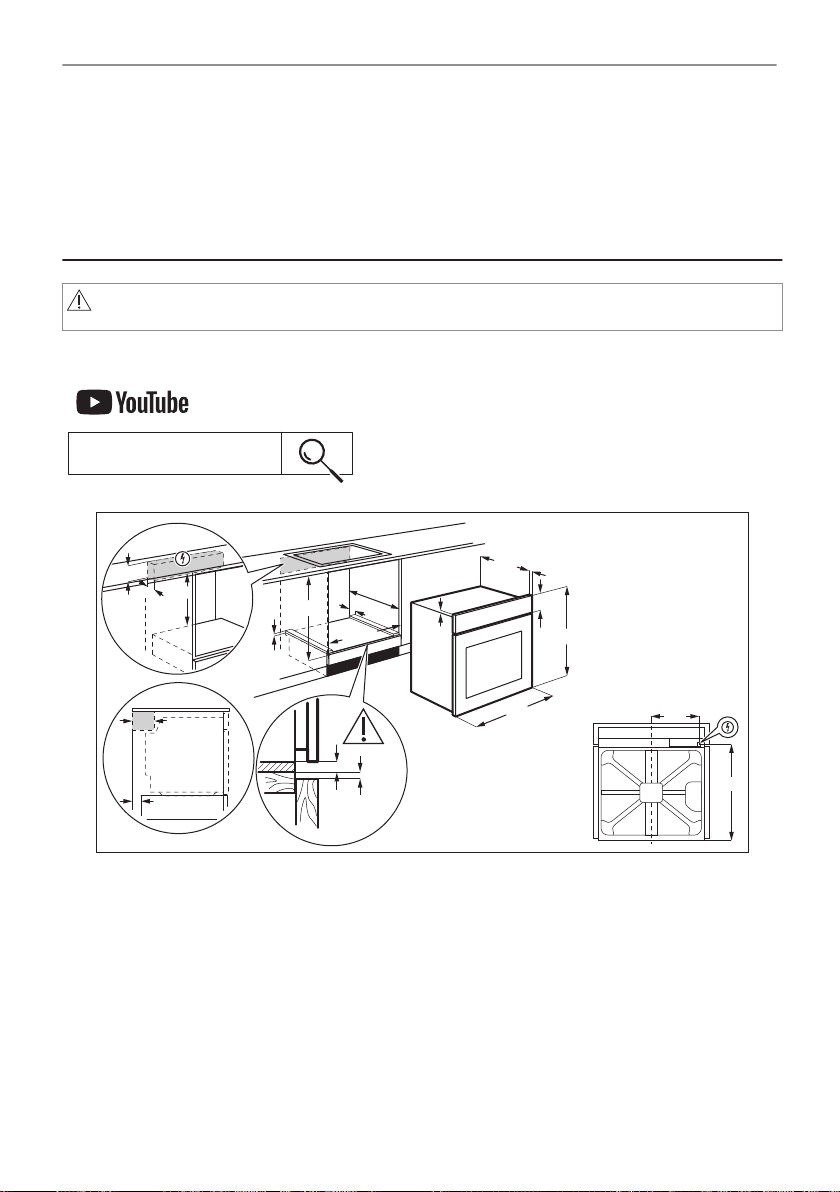
www.youtube.com/electrolux
www.youtube.com/aeg
How to install your AEG/Electrolux
Oven - Column installation
589
595
±1
114
18
min. 550
20
6
600
3
6
min. 560
21548
80
520
60
60
20
198
518
(*mm)
INSTALACIÓN
• Contacte con las autoridades locales para saber cómo desechar correctamente el aparato.
• Desconecte el aparato de la red.
• Corte el cable eléctrico cerca del aparato y deséchelo.
• Retire el pestillo de la puerta para evitar que los niños o las mascotas queden atrapados en
el aparato.
3. INSTALACIÓN
ADVERTENCIA!
Consulte los capítulos sobre seguridad.
3.1 Empotrado
85/196
Page 86
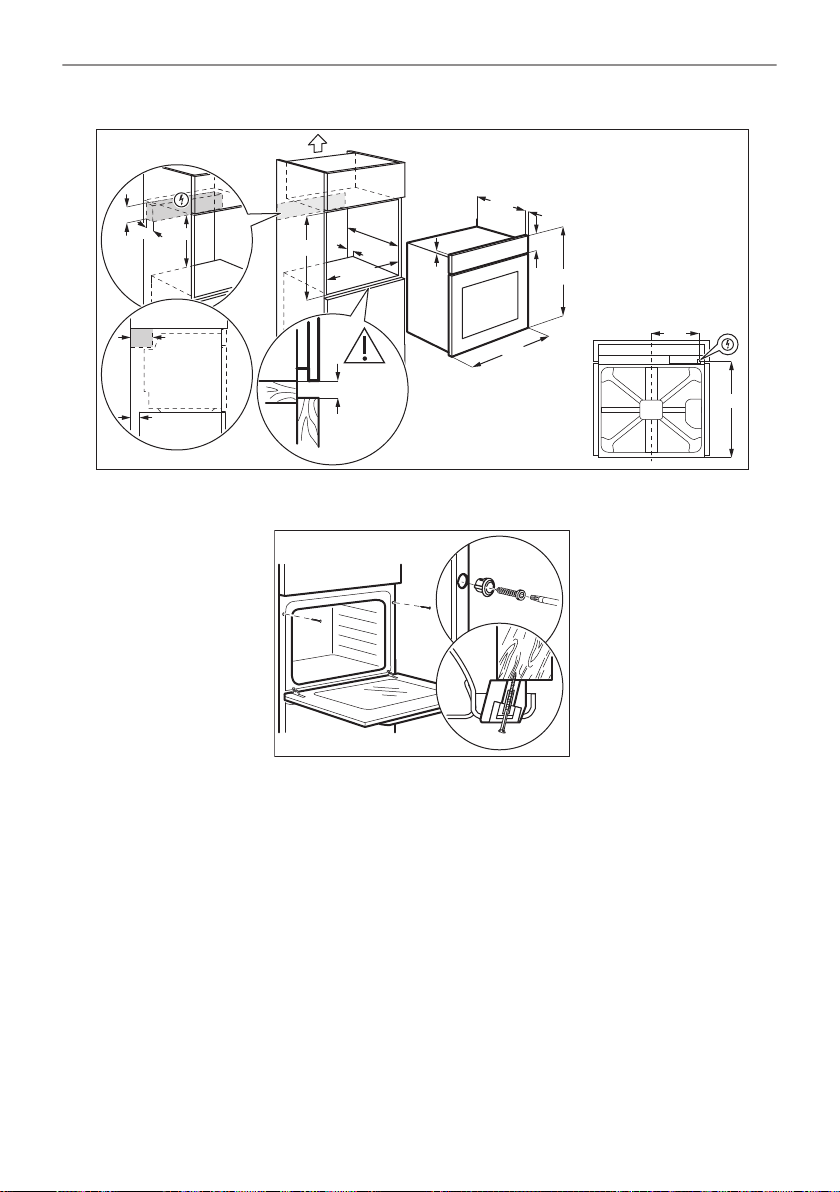
min. 550
20
589
114
18
580
min. 560
9
595
±1
21548
70
60
520
60
20
198
518
(*mm)
INSTALACIÓN
3.2 Fijación del horno al mueble
86/196
Page 87
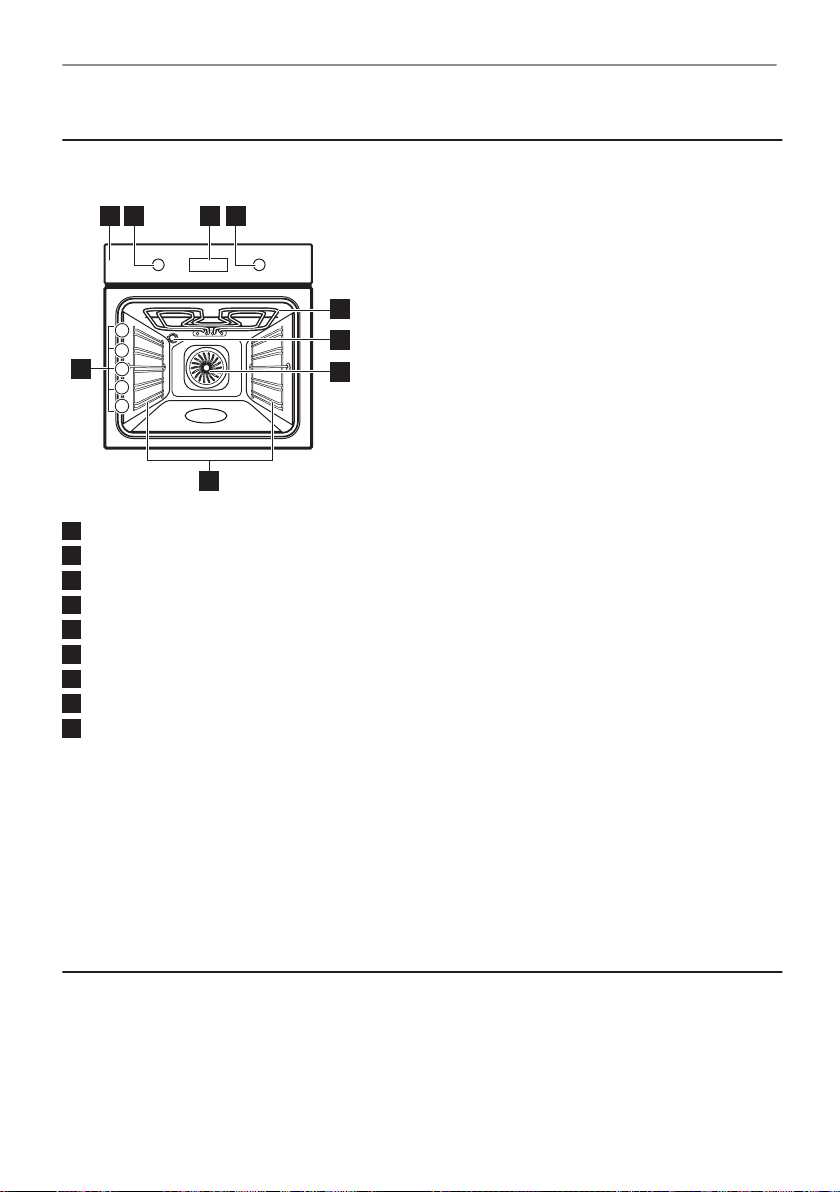
6
5
9
7
8
5
4
1
2
3
31 42
DESCRIPCIÓN DEL PRODUCTO
4. DESCRIPCIÓN DEL PRODUCTO
4.1 Resumen general
Panel de mandos
1
Mando de las funciones de cocción
2
Pantalla
3
Mando de control
4
Resistencia
5
Bombilla
6
Ventilador
7
Soporte de parrilla extraíble
8
Posiciones de las parrillas
9
4.2 Accesorios
• Parrilla
Para utensilios de cocina, moldes de pastelería, asados.
• Parrilla/sartén para asar
Para hornear y asar o como bandeja para grasa.
• AirFry: Bandeja
Para freír los alimentos con menos aceite o sin papel de hornear.
5. CÓMO ENCENDER Y APAGAR EL HORNO
5.1 Mandos escamoteables
Para usar el aparato, presione el mando. El mando sale del alojamiento.
87/196
Page 88
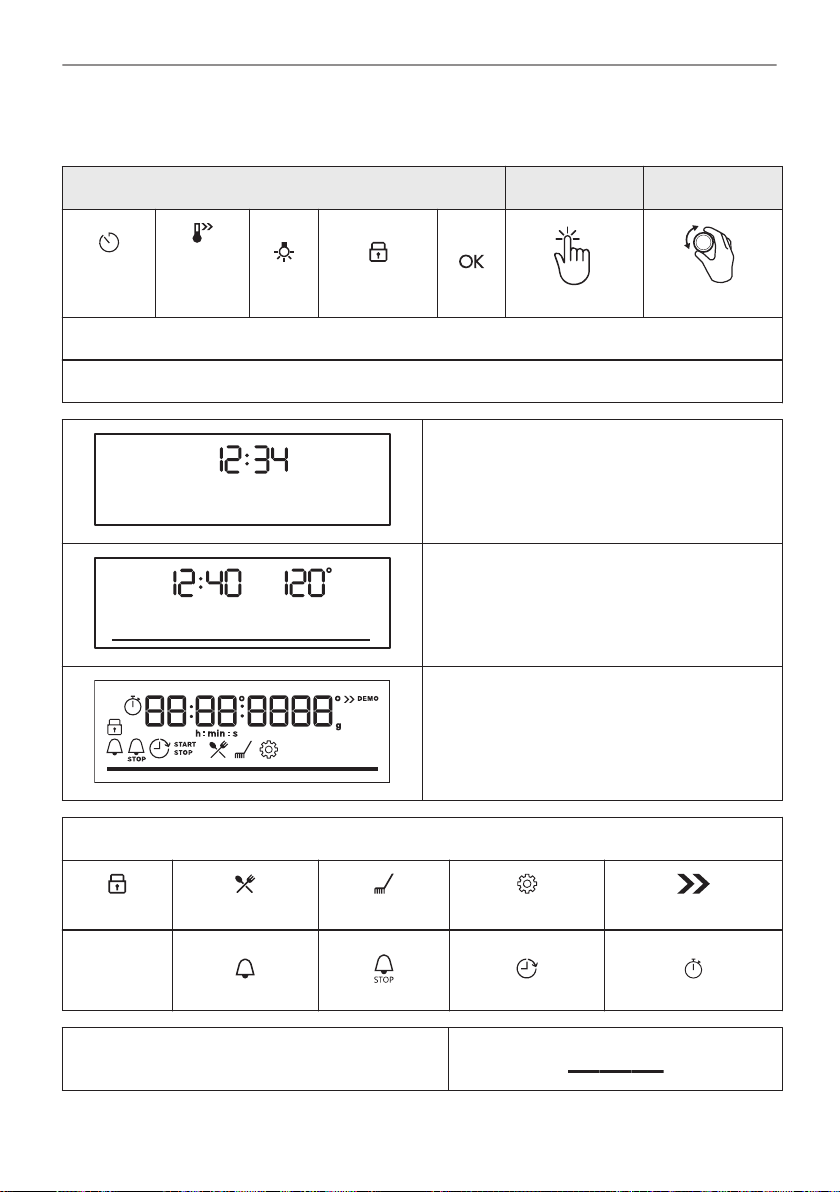
CÓMO ENCENDER Y APAGAR EL HORNO
5.2 Panel de mandos
Sensores del panel de control Pulse Gire el mando
Tempori‐
zador
Seleccione una función de cocción para encender el horno.
Gire el mando de las funciones de cocción hasta la posición de apagado para apagar el horno.
Calenta‐
miento
rápido
Luz
Bloqueo
Cuando el mando de las funciones de cocción
se encuentra en la posición de apagado, la
pantalla cambia al modo de espera.
Al cocinar, la pantalla muestra la temperatura,
la hora y otras opciones disponibles.
Pantalla con el máximo número de funciones
seleccionadas.
Indicadores de pantalla
Bloqueo
Indicado‐
res de tem‐
porizador:
Barra de progreso - para la temperatura o el
88/196
Cocción asistida
tiempo.
Limpieza
Ajustes
Calentamiento rápido
Page 89
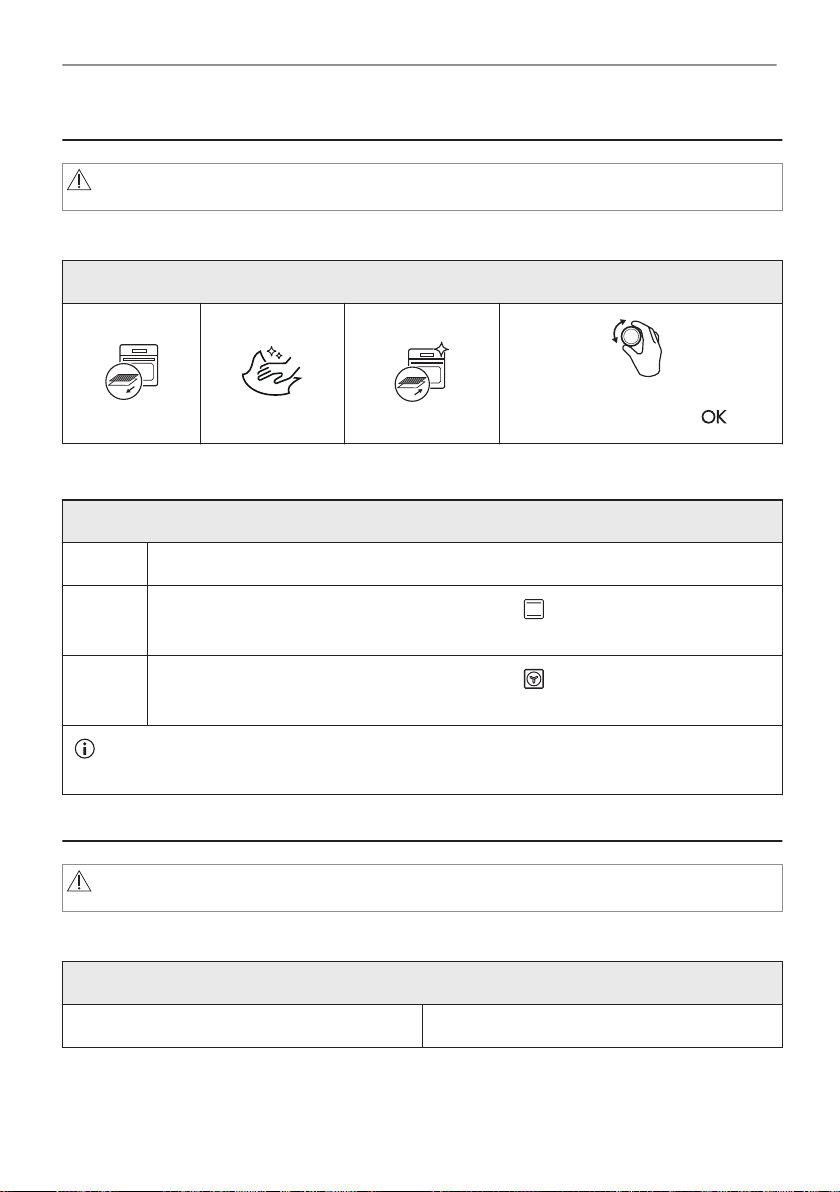
ANTES DEL PRIMER USO
6. ANTES DEL PRIMER USO
ADVERTENCIA!
Consulte los capítulos sobre seguridad.
6.1 Limpieza inicial
Antes del primer uso, limpie el horno vacío y ajuste el tiempo:
Ajuste la hora. Pulse .
6.2 Precalentamiento inicial
Precaliente el horno vacío antes de utilizarlo por primera vez.
Paso 1 Retire todos los accesorios y carriles de apoyo extraíbles del horno.
00:00
Paso 2
Paso 3
El horno puede emitir olores y humos durante el precalentamiento. Asegúrese de que la sala
esté ventilada.
Seleccione la temperatura máxima para la función: .
Deje funcionar el horno 1 hora.
Seleccione la temperatura máxima para la función: .
Deje funcionar el horno 15 minutos.
7. USO DIARIO
ADVERTENCIA!
Consulte los capítulos sobre seguridad.
7.1 Cómo ajustar: Funciones de cocción
Empezar a cocinar
Paso 1 Paso 2
89/196
Page 90
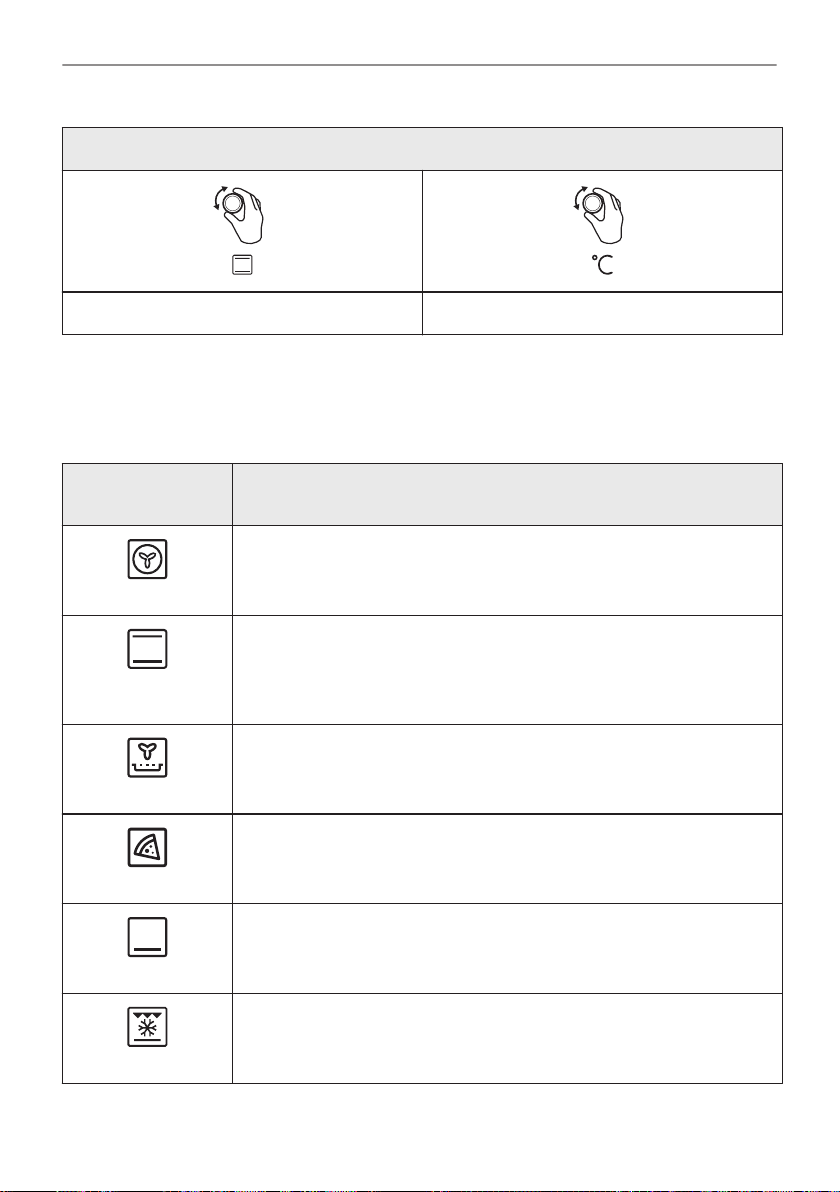
USO DIARIO
Empezar a cocinar
Seleccione una función de cocción. Ajuste la temperatura.
7.2 Funciones de cocción
Funciones de cocción estándar
Función de coc‐
ción
Aire caliente
Cocción conven‐
cional
AirFry
Función Pizza
Calor inferior
Congelados
Aplicación
Para hornear en hasta tres posiciones de parrilla a la vez y para secar ali‐
mentos. Ajuste la temperatura entre 20 y 40°C menos que para Cocción
convencional.
Para hornear y asar alimentos en una posición de parrilla.
Para freír alimentos sin aceite.
Para hornear pizza. Para obtener un dorado más intenso y una base más
crujiente.
Para hornear pasteles con base crujiente y conservar alimentos.
Para productos precocinados (por ejemplo, patatas fritas, porciones de
patata o rollitos de primavera) crujientes.
90/196
Page 91
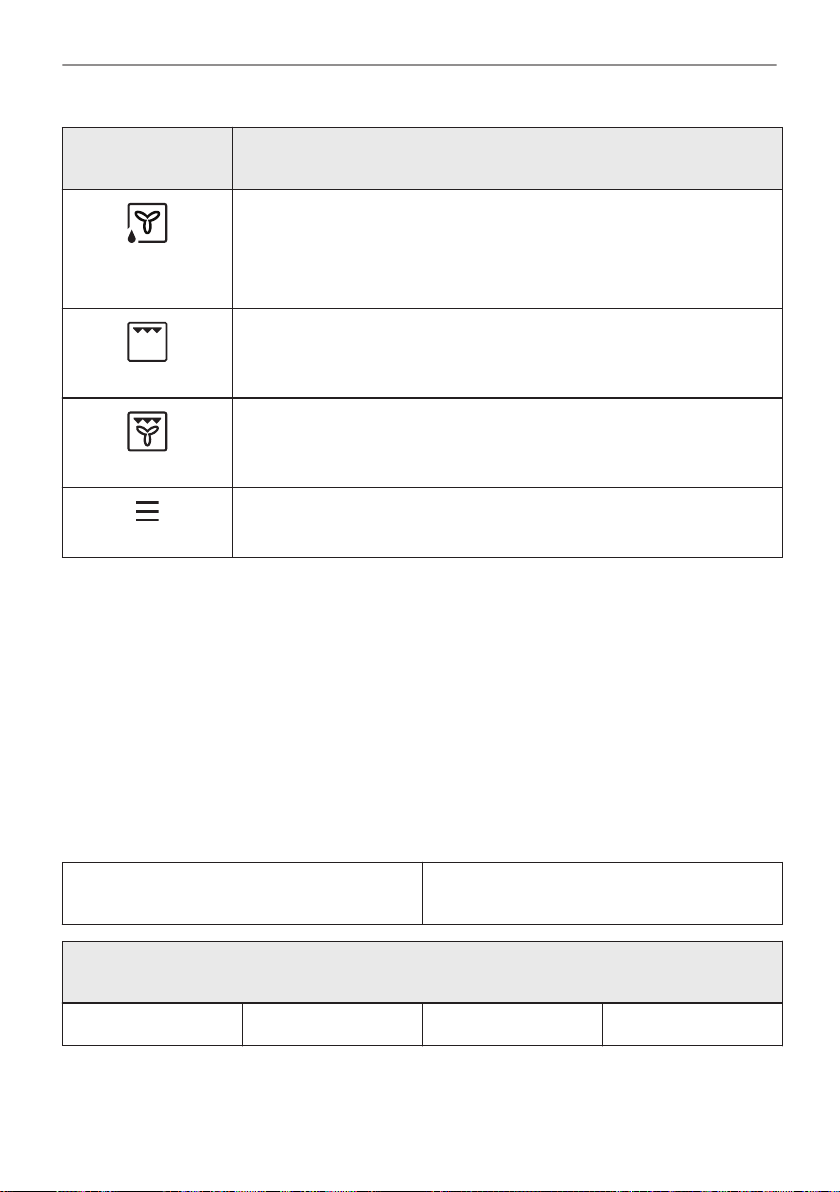
USO DIARIO
Función de coc‐
ción
Horneado húmedo
+ ventilador
Grill
Grill turbo
Menú
Aplicación
Función diseñada para ahorrar energía durante la cocción. Cuando se uti‐
liza esta función, la temperatura del horno puede diferir de la temperatura
programada. Se utiliza el calor residual. La potencia calorífica puede re‐
ducirse. Para más información, consulte el capítulo “Uso diario”, Notas
sobre: Horneado húmedo + ventilador.
Para asar al grill alimentos de poco espesor y tostar pan.
Asado con aire caliente para piezas de carne más grandes o aves con
hueso en un nivel. Para gratinar y dorar.
Para acceder al menú: Cocción asistida, Limpieza, Ajustes.
7.3 Notas sobre: Horneado húmedo + ventilador
Esta función se utilizaba para cumplir con los requisitos de eficiencia energética y diseño
ecológico según EU 65/2014 y EU 66/2014. Pruebas conforme a EN 60350-1.
La puerta del horno debe estar cerrada durante la cocción para que no se interrumpa la función
y el horno funcione con la máxima eficiencia energética posible.
Cuando se utiliza esta función, la lámpara se apaga automáticamente después de 30 s.
Consulte las instrucciones de cocción en el capítulo “Consejos”, Horneado húmedo +
ventilador. Para recomendaciones generales sobre ahorro energético, consulte el capítulo
“Eficiencia energética”, ahorro energético.
7.4 Cómo ajustar: Cocción asistida
Para cada plato de este submenú se recomienda una función y temperatura. Puede ajustar la
hora y la temperatura durante la cocción.
Para algunos de los platos, también puede co‐
cinar con:
Cocción asistida - utilícelo para preparar rápidamente un plato con los ajustes predetermi‐
nados:
Paso 1 Paso 2 Paso 3 Paso 4
• Peso automático
91/196
Page 92
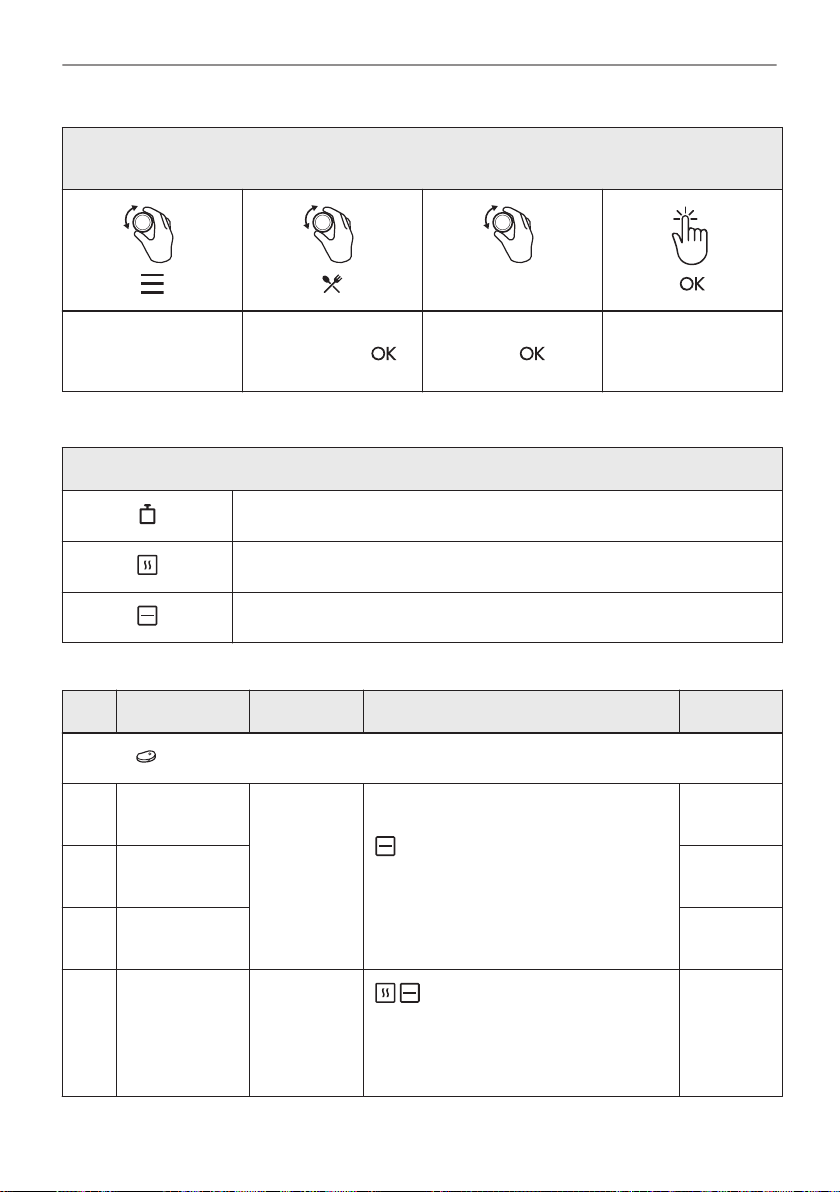
USO DIARIO
Cocción asistida - utilícelo para preparar rápidamente un plato con los ajustes predetermi‐
nados:
P1 - P45
Acceda al menú. Seleccionar Cocción
asistida. Pulse .
Seleccione el plato.
Pulse .
Introduzca el plato en
el horno. Confirmar
ajuste.
7.5 Cocción asistida
Leyenda
Peso automático disponible.
Precaliente el horno antes de empezar a cocinar.
Nivel del estante.
Cuando termine la función, compruebe si la comida está lista.
Plato Peso Nivel/accesorio de la parrilla Duración
Vacuno
P1 Rosbif, poco
hecho
P2 Rosbif, al
punto
P3 Rosbif, muy
hecho
1 - 1,5 kg;
piezas de 4
- 5 cm
2 bandeja de hornear
Fría la carne durante unos minutos en
una sartén caliente. Introdúzcalo en el
horno.
40 min
50 min
60 min
P4 Bistec, en su
punto
92/196
180 - 220 g
por pieza;
rodajas de 3
cm de gro‐
sor
3 fuente de asado encendida pa‐
rrilla
Fría la carne durante unos minutos en
una sartén caliente. Introdúzcalo en el
horno.
15 min
Page 93
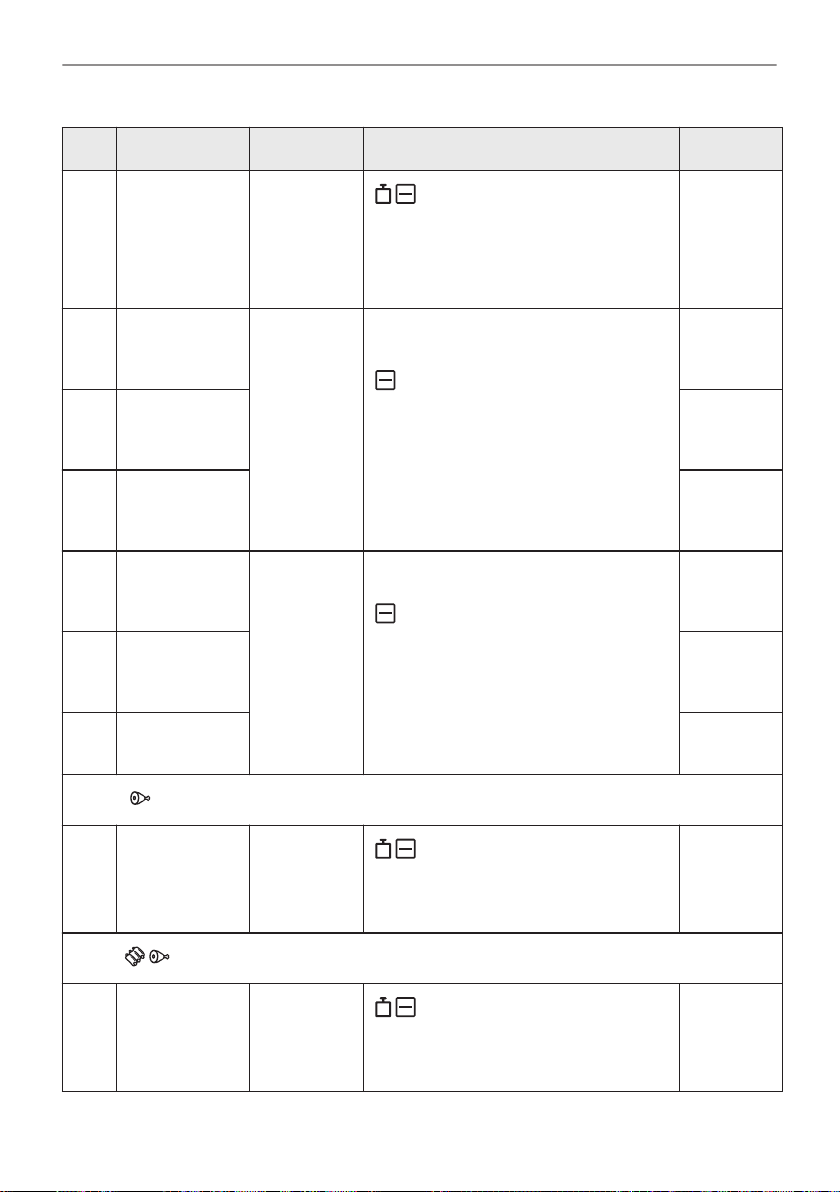
USO DIARIO
Plato Peso Nivel/accesorio de la parrilla Duración
P5 Asado de ter‐
nera/estofado
(costillas de
cebado, redon‐
do superior,
flanco grueso)
P6 Rosbif, poco
hecho (coc‐
ción lenta)
P7 Rosbif, al
punto (cocción
lenta)
P8 Rosbif, muy
hecho (coc‐
ción lenta)
P9 Filete poco
hecho (coc‐
ción lenta)
P10 Filete, en su
punto (cocción
lenta)
P11 Filete hecho
(cocción lenta)
1,5 - 2 kg
1 - 1,5 kg;
piezas de 4
- 5 cm
0,5 - 1,5 kg;
trozos de 5 6 cm
2 fuente de asado encendida pa‐
rrilla
Fría la carne durante unos minutos en
una sartén caliente. Añada líquido. Intro‐
dúzcalo en el horno.
2; bandeja
Use sus condimentos favoritos o simple‐
mente sal y pimienta con molienda fres‐
ca. Fría la carne durante unos minutos
en una sartén caliente. Introdúzcalo en el
horno.
2 bandeja de hornear
Use sus condimentos favoritos o simple‐
mente sal y pimienta con molienda fres‐
ca. Fría la carne durante unos minutos
en una sartén caliente. Introdúzcalo en el
horno.
120 min
75 min
85 min
130 min
75 min
90 min
120 min
Ternera
P12 Asado de ter‐
nera (por
ejemplo, el
hombro)
Cerdo
P13 Cerdo asado
en el cuello o
en el hombro
0,8 - 1,5 kg;
piezas de 4
cm de gro‐
sor
1,5 - 2 kg
2 fuente de asado encendida pa‐
rrilla
Use sus especias favoritas. Añada líqui‐
do. Asado cubierto.
2 fuente de asado encendida pa‐
rrilla
Después de la mitad del tiempo de coc‐
ción, voltee la carne.
80 min
120 min
93/196
Page 94
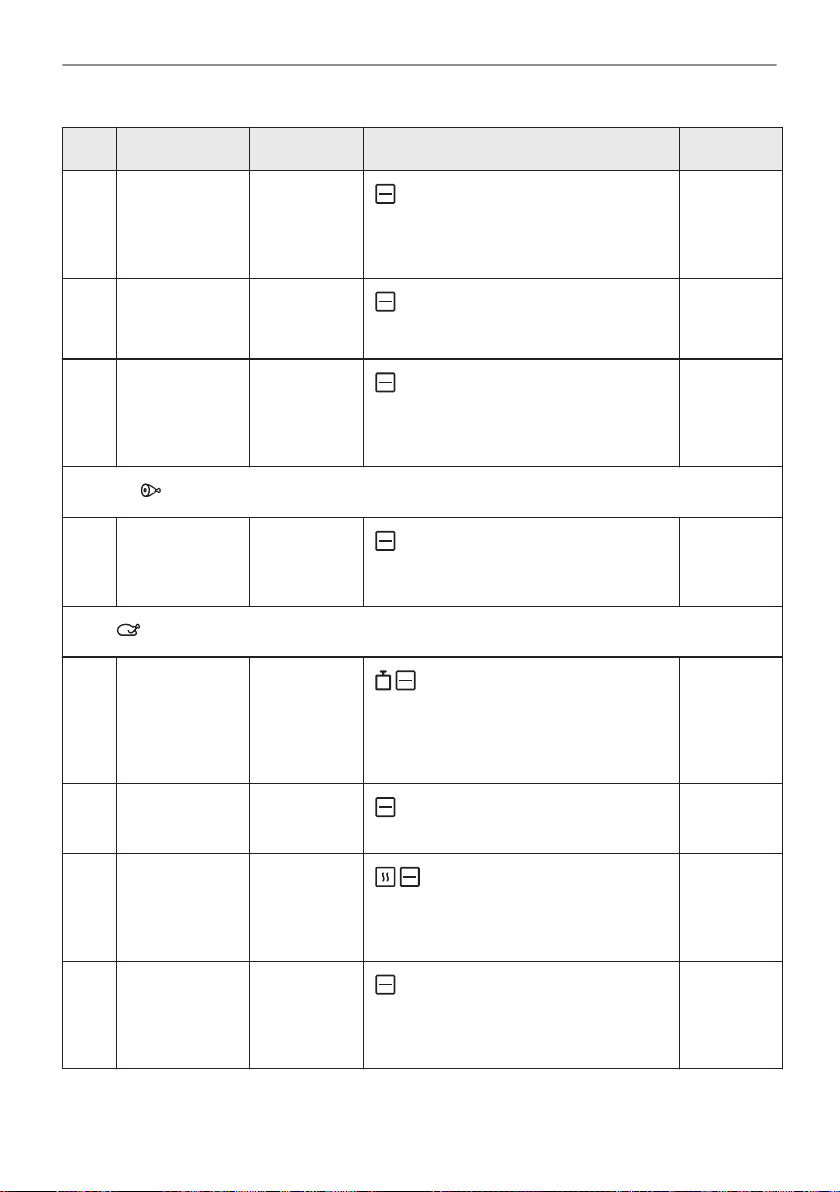
USO DIARIO
Plato Peso Nivel/accesorio de la parrilla Duración
P14 Cerdo desmi‐
gado (cocción
lenta)
P15 Lomo, fresco 1 - 1,5 kg;
P16 Costillas 2 - 3 kg; uti‐
Cordero
P17 Pierna de cor‐
dero con hue‐
so
Aves
P18 Pollo entero 1 - 1,5 kg;
1,5 - 2 kg
trozos de 5 -
6 cm
lice repues‐
tos finos de
2 - 3 cm
1,5 - 2 kg;
piezas de 7
- 9 cm
fresco
2 bandeja de hornear
Use sus especias favoritas. Dé la vuelta
a la carne a la mitad del tiempo de coc‐
ción para dorar uniformemente.
2; fuente de asado en laparrilla
Use sus especias favoritas.
3 bandeja honda
Añada líquido para cubrir la base de un
plato. Después de la mitad del tiempo de
cocción, voltee la carne.
2; fuente de asado en la bandeja
Añada líquido. Después de la mitad del
tiempo de cocción, voltee la carne.
2 cazuela sobre bandeja de hor‐
near
Use sus especias favoritas. Dele la vuel‐
ta al pollo a la mitad del tiempo de coc‐
ción para obtener un dorado uniforme.
215 min
55 min
90 minutos
130 min
60 min
P19 Medio pollo 0,5 - 0,8 kg
P20 Pechuga de
pollo
P21 Muslos de po‐
llo, frescos
94/196
180 - 200 g
por pieza
-
3 bandeja de hornear
Use sus especias favoritas.
2 cazuela sobre parrilla
Use sus especias favoritas. Fría la carne
durante unos minutos en una sartén ca‐
liente.
3 bandeja de hornear
Si se marchan las patas de pollo marina‐
das, ajuste la temperatura más baja y
cocínelas más tiempo.
40 min
25 min
30 min
Page 95
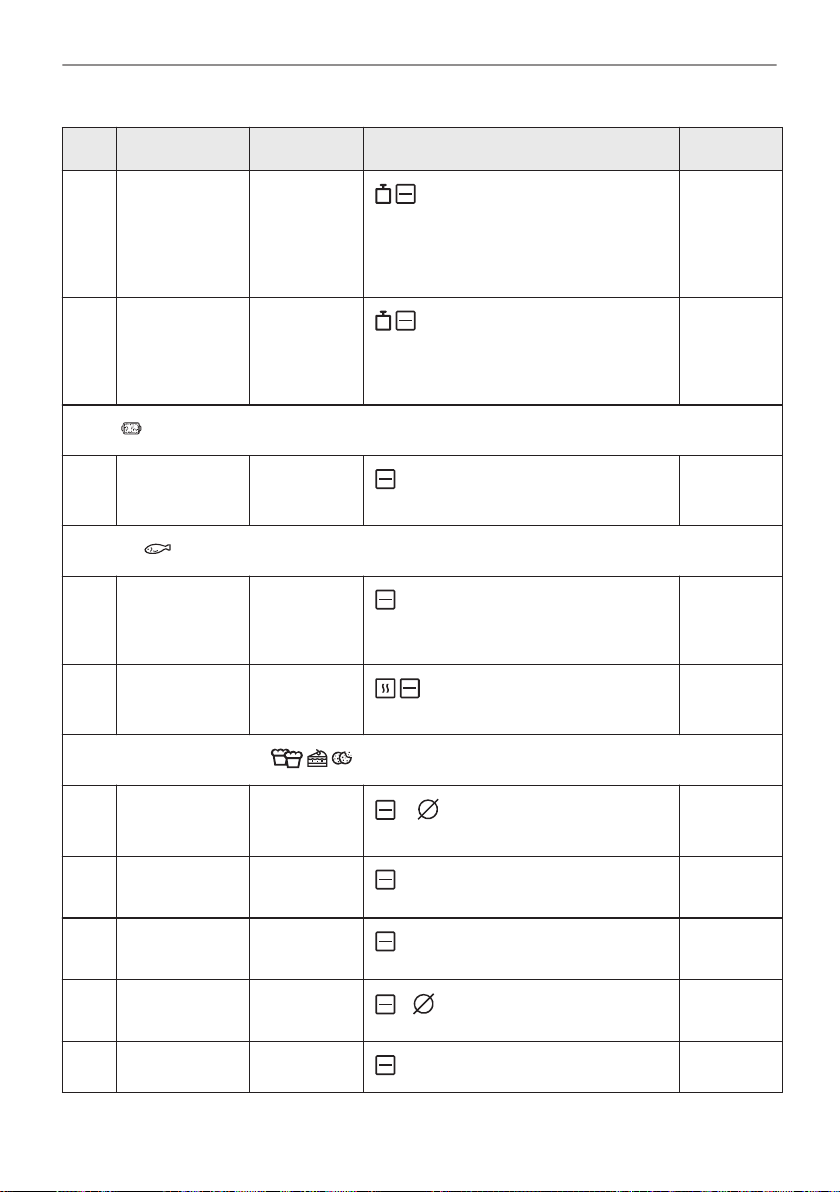
USO DIARIO
Plato Peso Nivel/accesorio de la parrilla Duración
P22 Pato entero 2 - 3 kg
P23 Ganso entero 4 - 5 kg
Otros
P24 Pastel de car‐
ne
Pescado
P25 Pescado ente‐
ro, al grill
P26 Filete de pes‐
cado
Horneado/postres dulces
1 kg
0,5 - 1 kg
por pescado
-
2 fuente de asado encendida pa‐
rrilla
Use sus especias favoritas. Coloque la
carne en la fuente. Dé la vuelta al pato a
la mitad del tiempo de cocción.
2; bandeja honda
Use sus especias favoritas. Coloque la
carne en la bandeja honda. Dele la vuel‐
ta a la mitad del tiempo de cocción.
2; parrilla
Use sus especias favoritas.
2 bandeja de hornear
Llene el pescado con mantequilla y utili‐
ce sus especias y hierbas favoritas.
3 cazuela sobre parrilla
Use sus especias favoritas.
100 min
110 min
60 min
30 min
20 minutos
P27 Tarta de que‐
so
P28 Tarta de man‐
zana
P29 Tarta de man‐
zana
P30 Pastel de
manzana
P31 Brownies 2 kg
-
-
-
-
2; molde desmontable de 28 cm
en la parrilla
3; bandeja
2; forma de pastel en la parrilla
1 pastel de 22 cm en parrilla
3 bandeja honda
90 minutos
45 minutos
40 minutos
60 minutos
30 minutos
95/196
Page 96
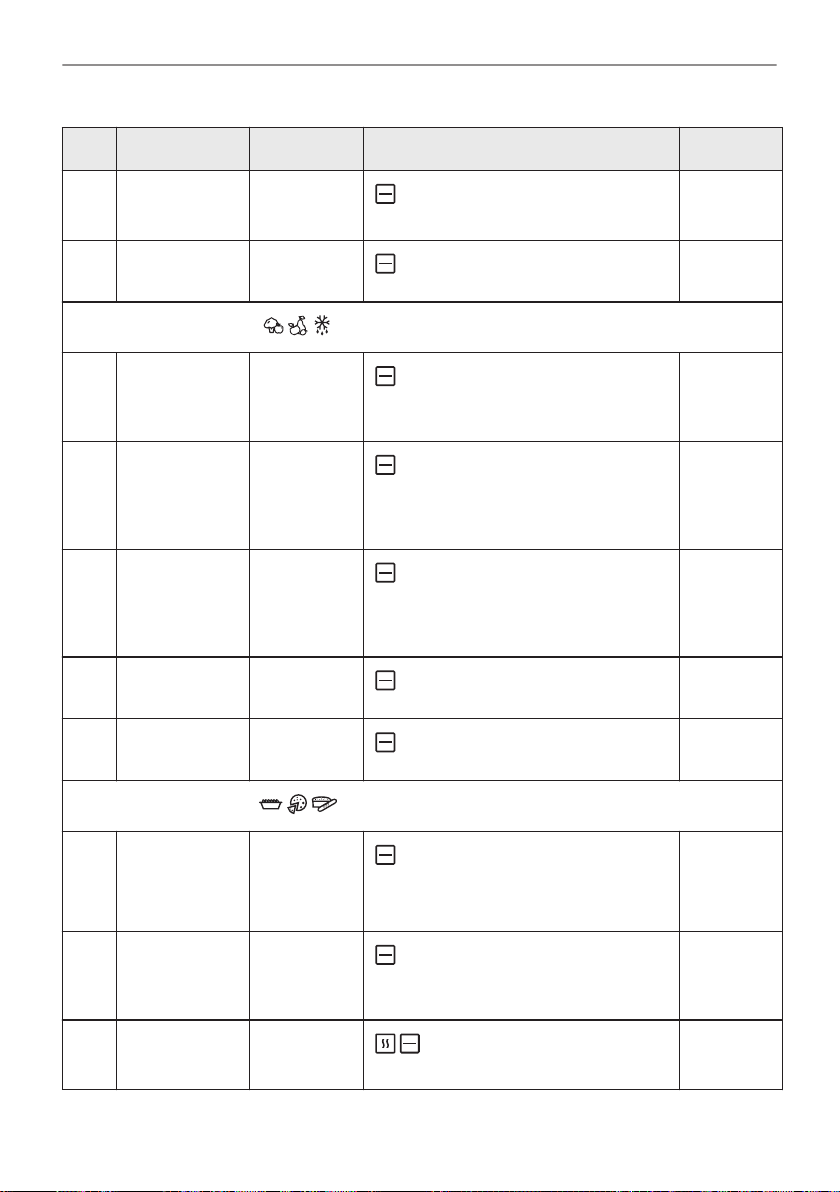
USO DIARIO
Plato Peso Nivel/accesorio de la parrilla Duración
P32 Magdalenas
de chocolate
P33 Pastel de ho‐
gaza
Verduras / Guarniciones
P34 Patatas al
horno
P35 Aros 1 kg
P36 Verduras al
grill
P37 Croquetas
congeladas
P38 Pomos con‐
gelados
-
-
1 kg
1 - 1,5 kg
0,5 kg
0,75 kg
3 bandeja para magdalenas encendi‐
da parrilla
2; molde de pan en la parrilla
2; bandeja
Ponga las patatas enteras con piel en la
bandeja.
3 bandeja de hornear forrado con
papel de hornear
Use sus especias favoritas. Corte las pa‐
tatas en trozos.
3 bandeja de hornear forrado con
papel de hornear
Use sus especias favoritas. Corte las
verduras en trozos.
3; bandeja
3; bandeja
25 minutos
50 minutos
50 minutos
35 min
30 minutos
25 minutos
25 minutos
Gratinados, pan y pizza
P39 Lasaña de
carne/verdura
con platos de
fideos secos
P40 Patatas grati‐
nadas (patatas
crudas)
P41 Pizza fresca y
fina
96/196
1 - 1,5 kg
1 - 1,5 kg
-
2 cazuela sobre parrilla
1 cazuela sobre parrilla
Gire el plato transcurrida la mitad del
tiempo de cocción.
2 bandeja de hornear forrado
con papel de hornear
45 minutos
50 minutos
15 minutos
Page 97
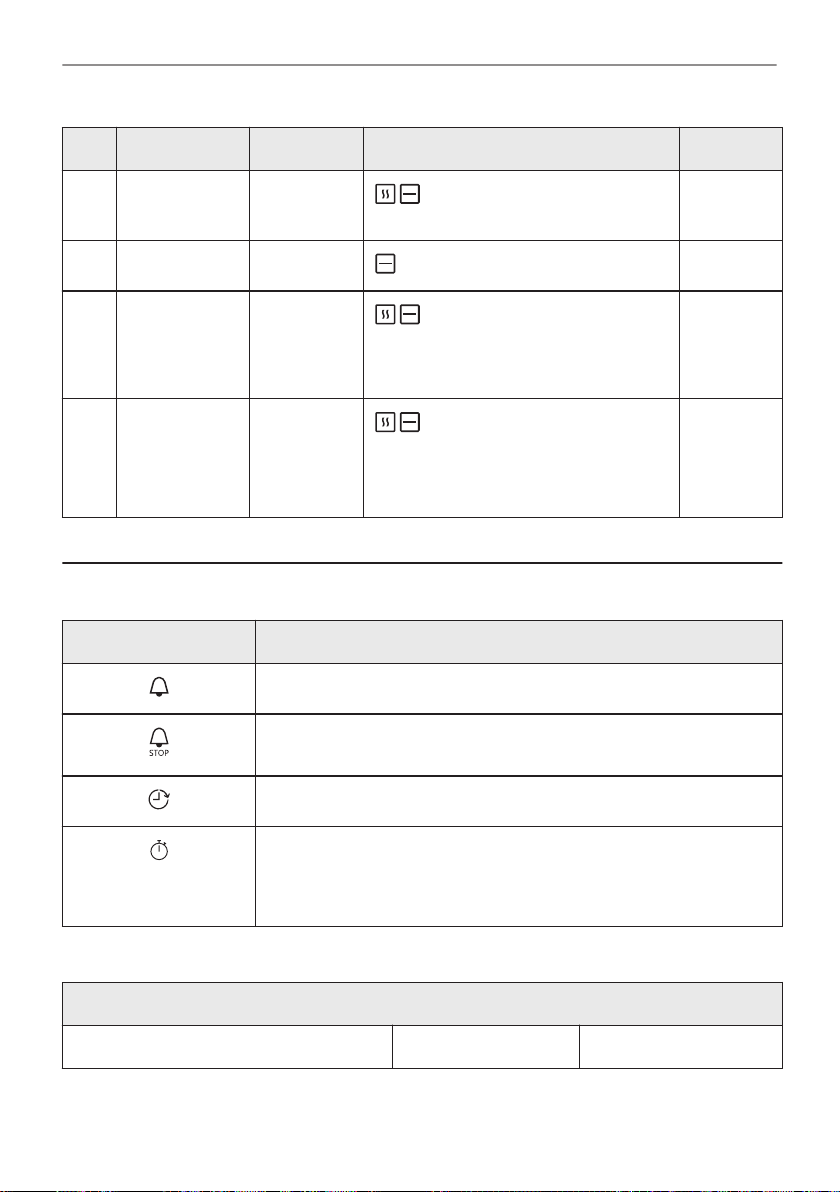
FUNCIONES DEL RELOJ
Plato Peso Nivel/accesorio de la parrilla Duración
P42 Pizza fresca,
gruesa
P43 Quiche -
P44 Baguette /
chapata / pan
blanco
P45 Todo el gra‐
no / centeno /
pan oscuro
de grano en
molde de pan
0,8 kg
1 kg
-
2; bandeja forrada con papel de
hornear
2; molde de hornear en la parrilla
3 bandeja de hornear forrado
con papel de hornear
Se necesita más tiempo para el pan
blanco.
2; bandeja forrada con papel de
hornear/parrilla
8. FUNCIONES DEL RELOJ
8.1 Funciones de reloj
Función de reloj Aplicación
Avisador. Al finalizar el tiempo, sonará la señal acústica.
Tiempo de cocción. Cuando el temporizador finaliza, suena la señal y
la función de cocción se detiene.
25 minutos
45 minutos
30 minutos
60 minutos
Tiempo de retardo. Para posponer el inicio y/o fin de la cocción.
Tiempo de funcionamiento. El máximo es 23 h 59 min. Esta función no
influye en el funcionamiento del horno.
Para encender y apagar Tiempo de funcionamiento seleccione: Menú,
Ajustes.
8.2 Cómo ajustar: Funciones de reloj
Cómo ajustar: Hora
Paso 1 Paso 2 Paso 3
97/196
Page 98
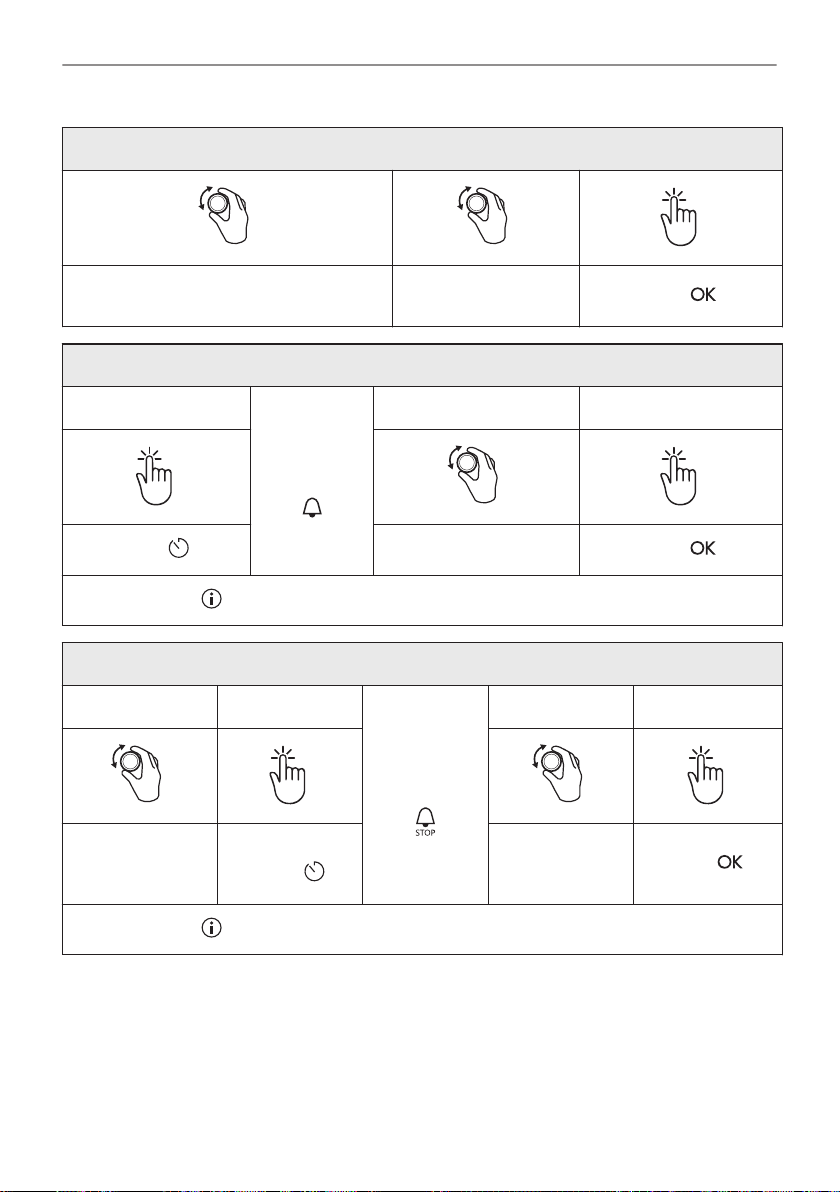
FUNCIONES DEL RELOJ
Cómo ajustar: Hora
Para cambiar la hora, acceda al menú y
seleccione Ajustes, Hora.
Cómo ajustar: Avisador
Paso 1
La pantalla
muestra:
0:00
Pulse: .
El temporizador comienza la cuenta atrás inmediatamente.
Cómo ajustar: Tiempo de cocción
Paso 1 Paso 2
Elija una función
de cocción y la
temperatura.
Pulse repetida‐
mente: .
Ajuste el reloj
Paso 2 Paso 3
Ajustar la Avisador
La pantalla
muestra:
0:00
Pulse: .
Pulse: .
Paso 3 Paso 4
Ajuste el tiempo
de cocción.
Pulse: .
98/196
El temporizador comienza la cuenta atrás inmediatamente.
Page 99
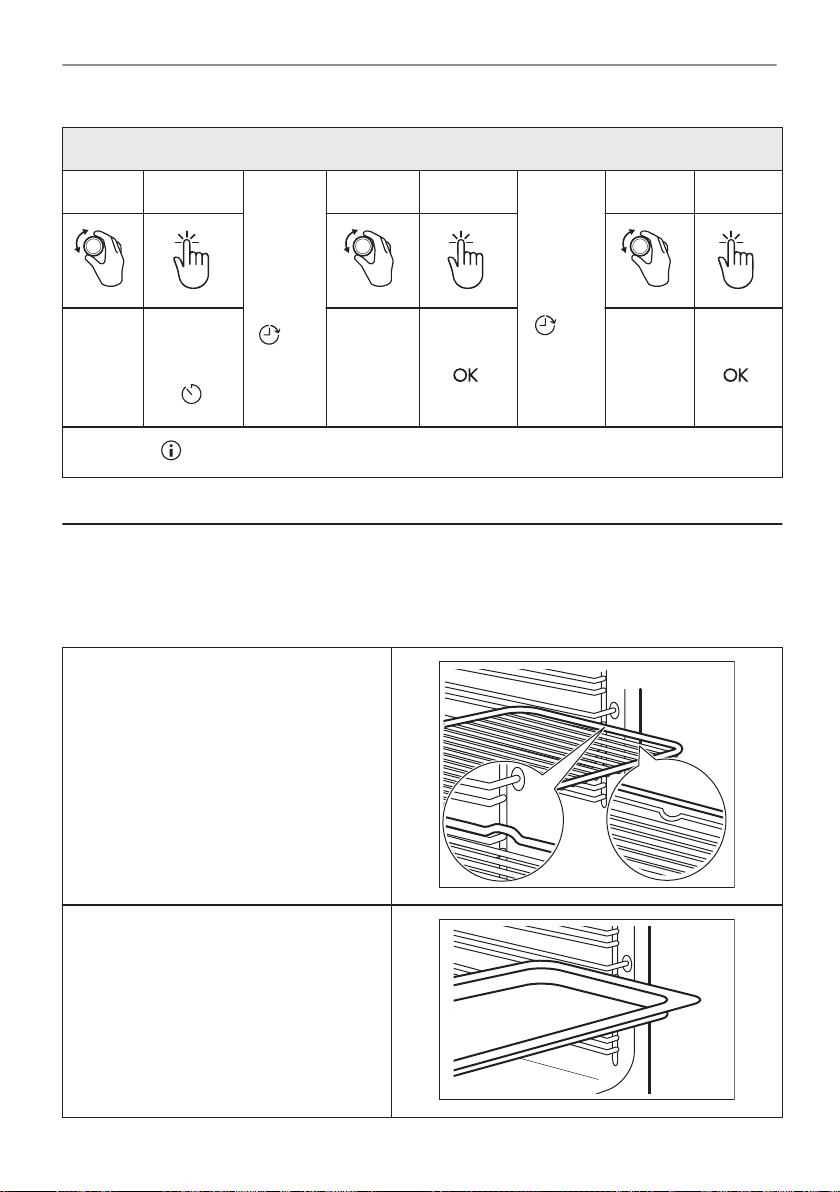
INSTRUCCIONES DE USO: ACCESORIOS
Cómo ajustar: Tiempo de retardo
Paso 1 Paso 2
Selec‐
cione la
función
de coc‐
ción.
Pulse re‐
petida‐
mente:
El temporizador empieza a contar hacia atrás a una hora programada.
La pan‐
talla
mues‐
tra: la
hora
CIO
.
Paso 3 Paso 4
INI‐
Ajuste la
hora de
inicio.
Pulse:
Paso 5 Paso 6
La pan‐
talla
muestra:
--:--
PA‐
RAR
.
Ajuste la
hora de
fin.
Pulse:
.
9. INSTRUCCIONES DE USO: ACCESORIOS
9.1 Inserción de accesorios
Una pequeña muesca en la parte superior aumenta la seguridad. Las hendiduras también son
dispositivos antivuelco. El borde elevado que rodea la bandeja evita que los utensilios de
cocina resbalen de la parrilla.
Parrilla:
Inserte la parrilla entre las guías del carril y
asegúrese de que las hendiduras apuntan
hacia abajo.
Bandeja honda:
Introduzca la bandeja entre las guías del
carril de apoyo.
99/196
Page 100
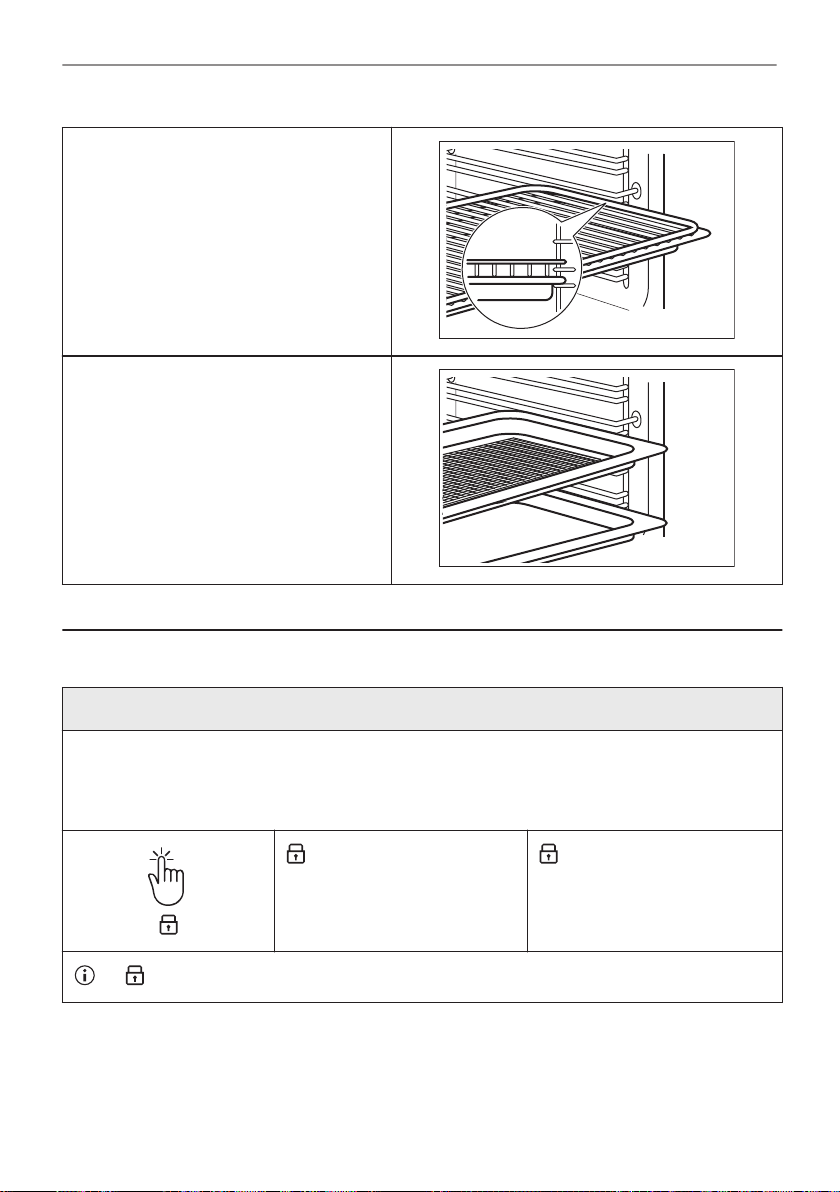
FUNCIONES ADICIONALES
Parrilla, Bandeja honda:
Posicione la bandeja entre las guías del
carril de apoyo y la parrilla en las guías de
encima.
AirFry:
Coloque la bandeja en la tercera posición.
Coloque la bandeja en el primer nivel.
10. FUNCIONES ADICIONALES
10.1 Bloqueo
Esta función impide que se produzca accidentalmente un cambio de la función de horno.
Enciéndala cuando el horno funcione: la cocción ajustada continúa, el panel de control está blo‐
queado.
Enciéndala cuando el horno está apagado; el horno no se puede encender, el panel de control
está bloqueado.
- mantenga pulsado para ac‐
tivar la función.
Suena una señal.
3 x - parpadea cuando se enciende el bloqueo.
- mantenga pulsado para
apagarla.
10.2 Desconexión automática
Por motivos de seguridad, el horno se desactiva transcurrido un tiempo si una función de
cocción está en funcionamiento y no se modifica ningún ajuste.
100/196
 Loading...