

Page 1

user manual
EOD5331
Oven
Page 2

We were thinking of you
when we made this product
Page 3
3
IMPORTANT SAFETY INFORMATION
These warnings are provided in the interests of your
safety. Ensure that you understand them all before
installing or using the appliance. Your safety is of
paramount importance. If you are unsure about any of
the information in this book contact the Customer Care
Department.
INSTALLATION
The appliance
must
be installed according to the
instructions supplied. The installation work must be
undertaken by a qualified electrician or competent
person.
The appliance should be serviced by an authorised
Service Engineer and only genuine approved spare
parts should be used.
The appliance
must
be installed in an adequately
ventilated room.
It is imperative that the appliance is left in the base to
protect both the appliance and the floor.
This appliance is heavy and care
must
be taken when
moving it.
Do not
attempt to lift or move this appliance by the
handles.
All packaging, both inside and outside the appliance
must
be removed befor e the appliance is used.
It is dangerous to alter the specifications or modify the
appliance in any w ay.
After installation please dispose of the packaging with
due regard for safety and the environment. Your local
authority can arrange this.
CHILD SAF ET Y
Do not
allow children to play with any part of the
packaging.
Do not
allow chil dren to sit o r climb on the dro p down
doors.
This appliance is not intended for use by children and
other persons whose physical, sensory or mental
capabilities or lack of experience and knowledge
prevents them from using the appliance safely without
supervision or instruction by a responsible person to
ensure that they can use the appliance safely.
Children should be supervised to ensure that they do
not play with the appliance.
Warning: Accessible parts may be hot during use.
Young children should be ke pt away.
DURING USE
This appliance is not intended to be operated by
means of an external timer or separate remote control
system.
This appliance has been designed for domestic use to
cook edible foodstuffs only and
must not
be used for
any other purposes.
Take great care when heating fats and oils as they will
ignite if they become too
hot
.
Never place plastic or any other material which may
melt in or on the oven.
Always support the grill pan when it is in the withdrawn
or partially withdraw n position.
Always use oven gloves to remove and place food in
the oven.
During use the appliance becomes hot. Care should
be taken to avoid touching heating elements inside the
oven.
Ensure that all vents are not obstructed to ensure
ventilation of the oven cavity.
Never line any pa rt of the appliance with foil.
Always
stand back from the appliance when opening
the doors to allow any build up of steam or heat to
release.
Never leave the appliance unattended when the oven
door is open.
Do not
place sealed cans or aerosols inside the oven.
They may explode if they are heated.
Ensure that all control knobs are in the OFF posi tion
when not in use.
Do not
stand on the appliance or on the open oven
doors.
Do not
hang towels, dishcloths or clothes from the
appliance or its handles.
Do not
use this appliance if it is in contact with water.
Never
operate it with wet hands.
CLEANING AND MAINTENANCE
For hygiene and safety reasons this appliance should be
kept clean at all times. A build-up of fats or other
foodstuffs could result in a fire especially in the grill pan.
Do not
leave the cookware containing foodstuffs, e.g. fat
or oil in the appliance in case it is inadvertently switched
on.
Always allow the appliance to cool before switching off at
the wall prior to carrying out any cleaning / maintenance
work.
Only clean this appliance in accordance with the
instructions given in this book.
Never use steam or high pressure steam cleaners to
clean th e a pp lianc e.
AT THE END OF THE APPLIANCE'S LIFE
The symbol on the product or on its packaging
indicates that this product may not be treated as
household waste. Instead it shall be handed over to
the applicable collection point for the recycling of
electrical and electronic equipment. By ensuring this
product is disposed of correctly, you will help prevent
potential negative consequences for the environment
and human health, which could otherwise be caused
by inappropriate waste handling of this product. For
more detailed information about recycling of this
product, please contact your local city office, your
household waste disposal service or the shop where
you purchased the product.
Page 4
4
CONTENTS
FOR THE USER
Impo r tant Safety I n formation
3
Description Of The Appliance
5
Getting To Know Your Appliance 6
Before Using The Appliance 7
Rating Plate 7
Preparing To Use Your Appliance 7
The Cooling Fan F or The Controls 7
Control Panel Indicator Neon(s) 7
Condensation And Steam 7
Cookware 7
Grill And Oven Furniture 7
Electronic Timer
8
The Dual Grill
11
Using The Dual Grill 11
Things To Note 11
The Grill Pan and Handle 11
Hints And Tips 12
Grilling Chart 12
The Top Oven
13
Using The Top Oven 13
Things To Note 13
To Fit The Top Oven Shelf 13
Hints And Tips 14
The Main Oven
15
Usin g The Main Oven 15
Things To Note 15
To Fit The Main Oven Shelves 15
Hints And Tips 16
Oven Cooking Chart
17
Roasting Chart
18
Defrost Feature
19
Using Defrost Feature 19
Things To Note 19
Hints And Tips 19
Care and Cleaning
20
Cleaning Mate rials 20
Cleaning The Outside Of The Appliance 20
Removing and Replacing Wirework Runners 20
Cleaning Inside The Ovens 21
Cleaning Th e Door(s) 22
Cleaning Th e Grill And Oven Furniture 23
Replacing An Oven Light Bulb 24
Something Not Working
25
Service and Spare Parts
26
Guarantee C onditio ns
27
FOR THE INSTALLER
Technical Details
28
Installation Instructions
29
Warnings 29
Things To Note 29
Choice Of Electrical Connection 30
Preparing C abinet For Fitting Of Oven 30
Recommended Cabinet Dimensions 31
How To Finish Unpacking 32
To Remove Cover Of Mains Terminal 32
Connecting To The Mains Terminal 33
Checkin g Electrical Connections 33
Connecting To A Hob Or Cooker Point 33
Fitting Into The Cabinet 34
To help you the following symbols will be found in the
text.
Hints and Tips
Safety Instructions
Please read the instruction book carefully before use
and retain for future refe ren ce.
Page 5
5
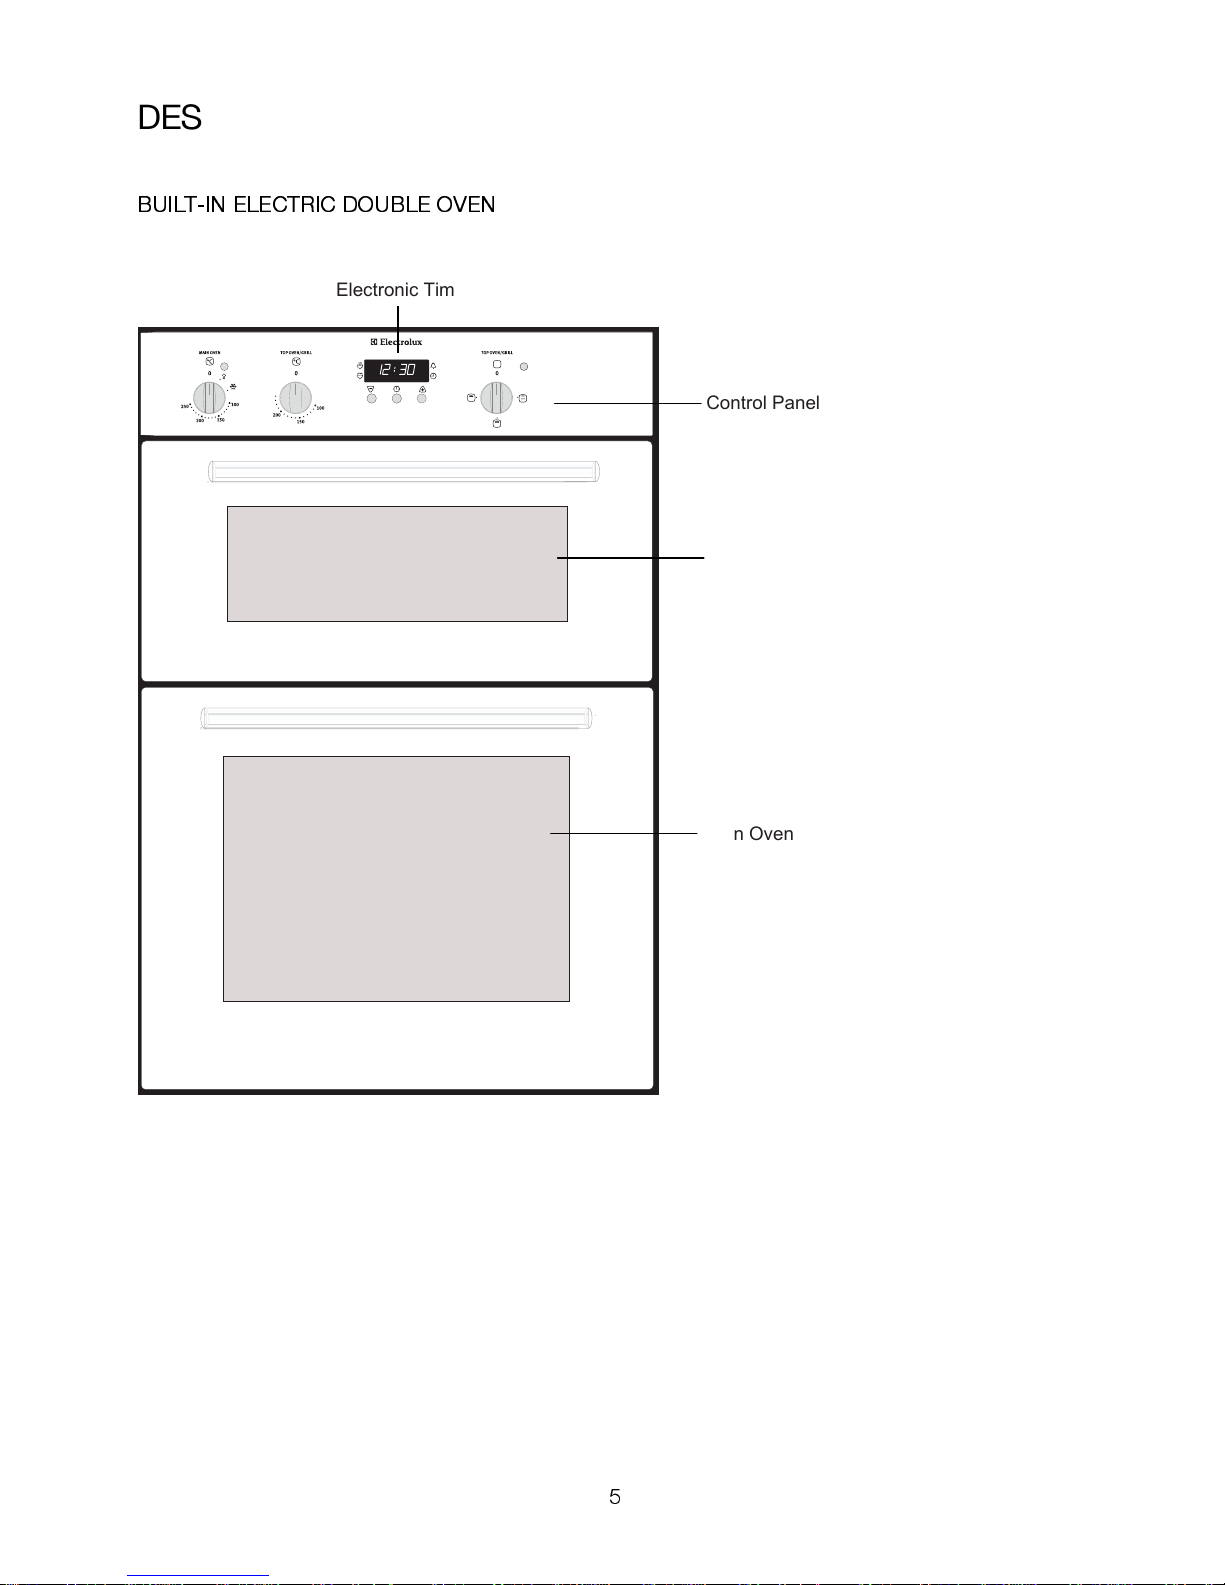
DESCRIPTION OF THE APPLIANCE
BUILT-IN ELECTRIC DOUBLE OVEN
Main Oven
Control Panel
Electronic Timer
Top Oven/Grill
Page 6
6
GETTING TO KNOW YOUR APPLIANCE
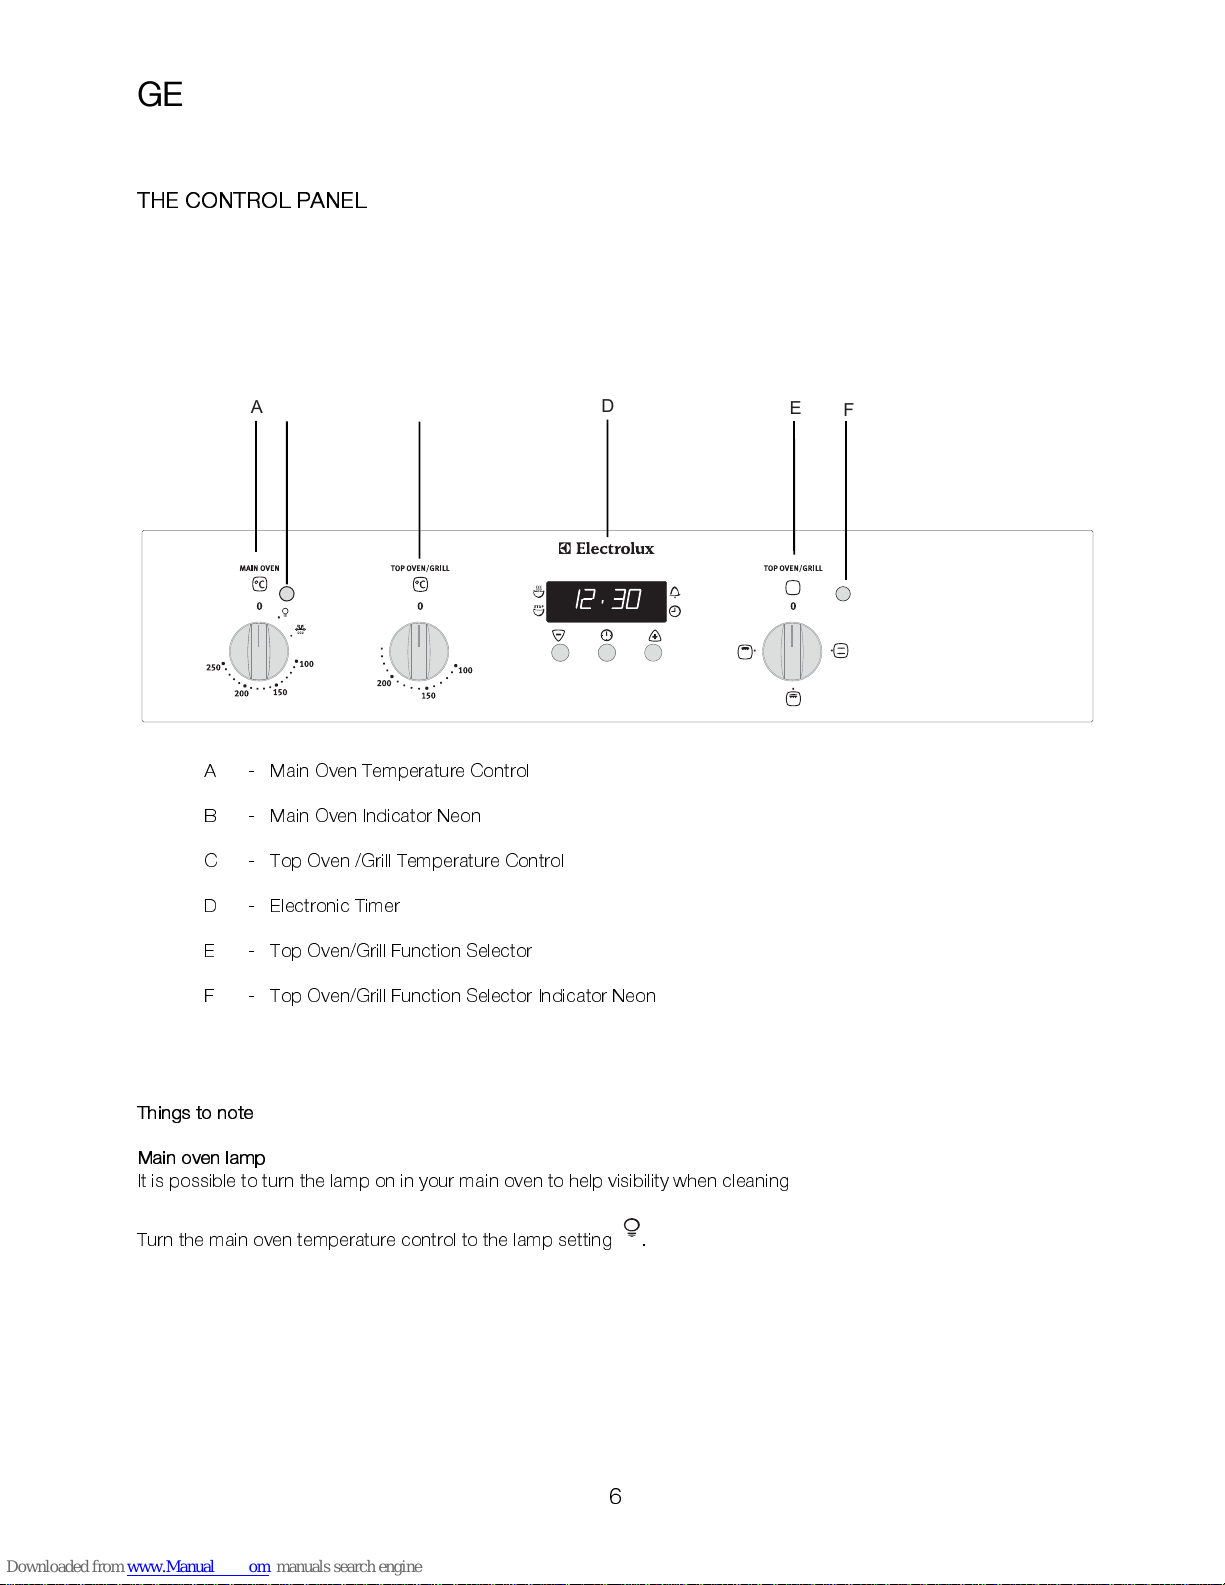
THE CONTROL PANEL
B
C
E
D
A
F
A - Main Oven Temperature Control
B - Main Oven Indicator Neon
C - Top Oven /Grill Temp erature Control
D - Electronic Timer
E - Top Oven/Grill Function Se lector
F - Top Oven/Grill Fu nction Selector Indicator Neon
Things to note
Main oven lamp
It is possible to turn the lamp on in your main oven to help visibility when cleaning
Turn the main oven temperature control to the lamp setting
.
Page 7
7
BEFORE USING THE APPLIANCE
RATING PLATE
This is situated on the lower front frame of the
appliance and can be seen upon opening the door.
Alter nativ ely the rating p late ma y also be found o n the
back or top of some models (whe re applicable).
The appliance must be protected by a suitably rated
fuse or circuit breaker. The rating of the appliance is
given on the rating plate.
Do not remove the rating plate from the appliance as
this may invalidate the guarantee.
PREPARING TO USE Y O UR APPL I A NC E
Wipe over the base of the oven(s) with a soft cloth and
hot soapy water and wash the furniture before use. We
suggest that you run the oven elements for 10 – 15
minutes at 220°C to burn off any residue from their
surfaces. The procedure should be repeated with the
grill for approximately 5 – 10 minutes.
During this period and odour may be emitted, it is
therefore advisable to open a window for ventilation.
THE COOLING FAN FOR THE CONTROLS
The cooling fan comes on immediately when the grill is
switched on and after a short time when the oven is in
use. It runs on after the controls are switched off until
the appliance has cooled. During the initial period the
cooling fan may turn ON and OFF, this is quite normal.
Always allow the cooling fan to cool the
appliance down before switching off at the wall
prior to carrying out any cleaning or
maintenance work.
CONTROL PANEL I N DI CA TO R NEO N( S )
The indicator neon will operate when the grill (where
applicable) or oven(s) is switched on. The indicator
neon will glow. It may turn on and off during use to
show that the setting is being maintained. If the neon
does not operate as the instructions indicate the
controls have been incorrectly set. Return all controls
to zero and reset following the instructions for the
required setting.
CONDENSATION AND STEAM
When food is heated it produces steam similar to a
boiling kettle. The vents allow some of this steam to
escape. However, always stand back from the
appliance when opening the door(s) to allow any build
up of steam or heat to release.
If the steam comes into contact with a cool surface on
the outside of the appliance, e.g. a trim, it will
condense and produce water droplets. This is quite
normal and is not caused by a fault on the appliance.
To prevent discolouration, regularly wipe away
condensation and also soilage from surfaces.
COOKWARE
Baking trays, dishes etc., should not be placed directly
against the grid covering the fan at the back of the
oven.
Do not
use baking trays larger than 30cm x 35cm (12”
x 14”) as they will restrict the circulation of heat and
may affect performan ce.
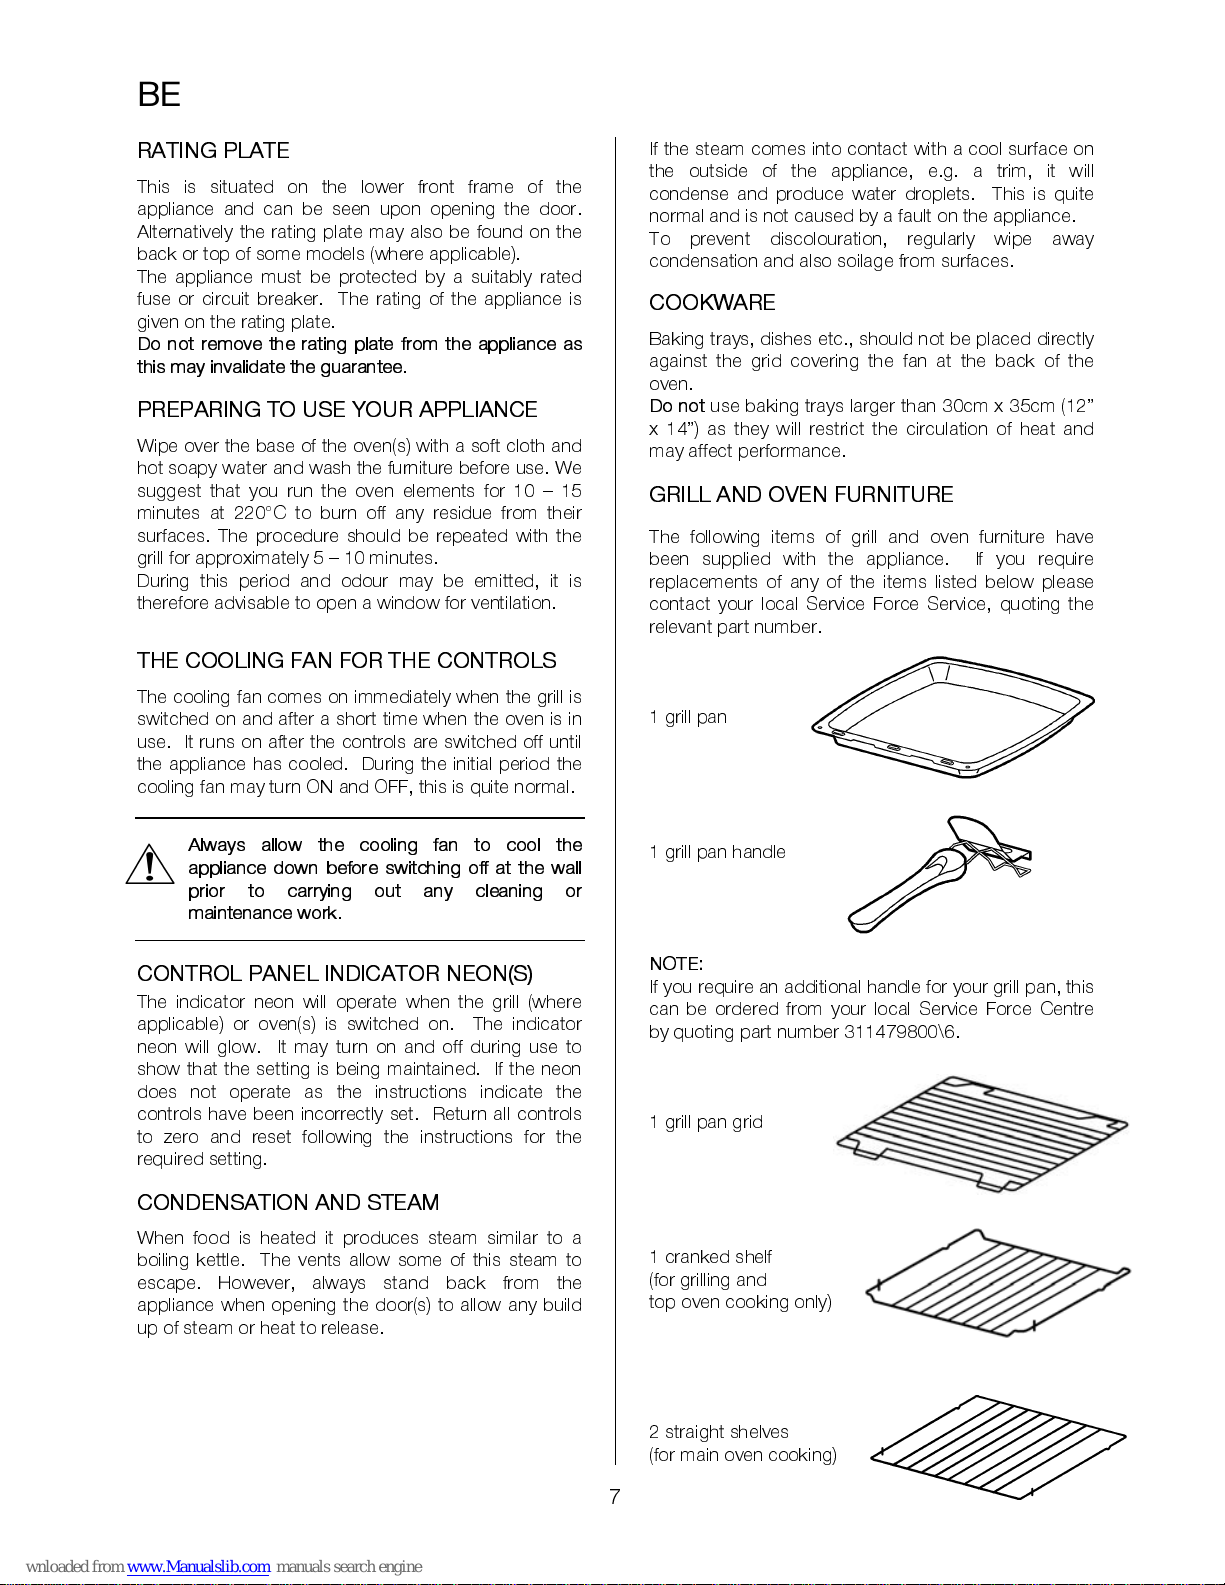
GRILL AND OVEN FURNITURE
The following items of grill and oven furniture have
been supplied with the appliance. If you require
replacements of any of the items listed below please
contact your local Service Force Service, quoting the
relevant part number.
1 grill pan
1 grill pan handle
NOTE:
If you require an additional handle for your grill pan, this
can be ordered from your local Service Force Centre
by quoting part numbe r 311479800\6.
1 grill pan grid
1 cranked shelf
(for grilling and
top oven cooking o nly)
2 straight shelves
(for main oven cooking)
Page 8
8
ELECTRONIC TIMER
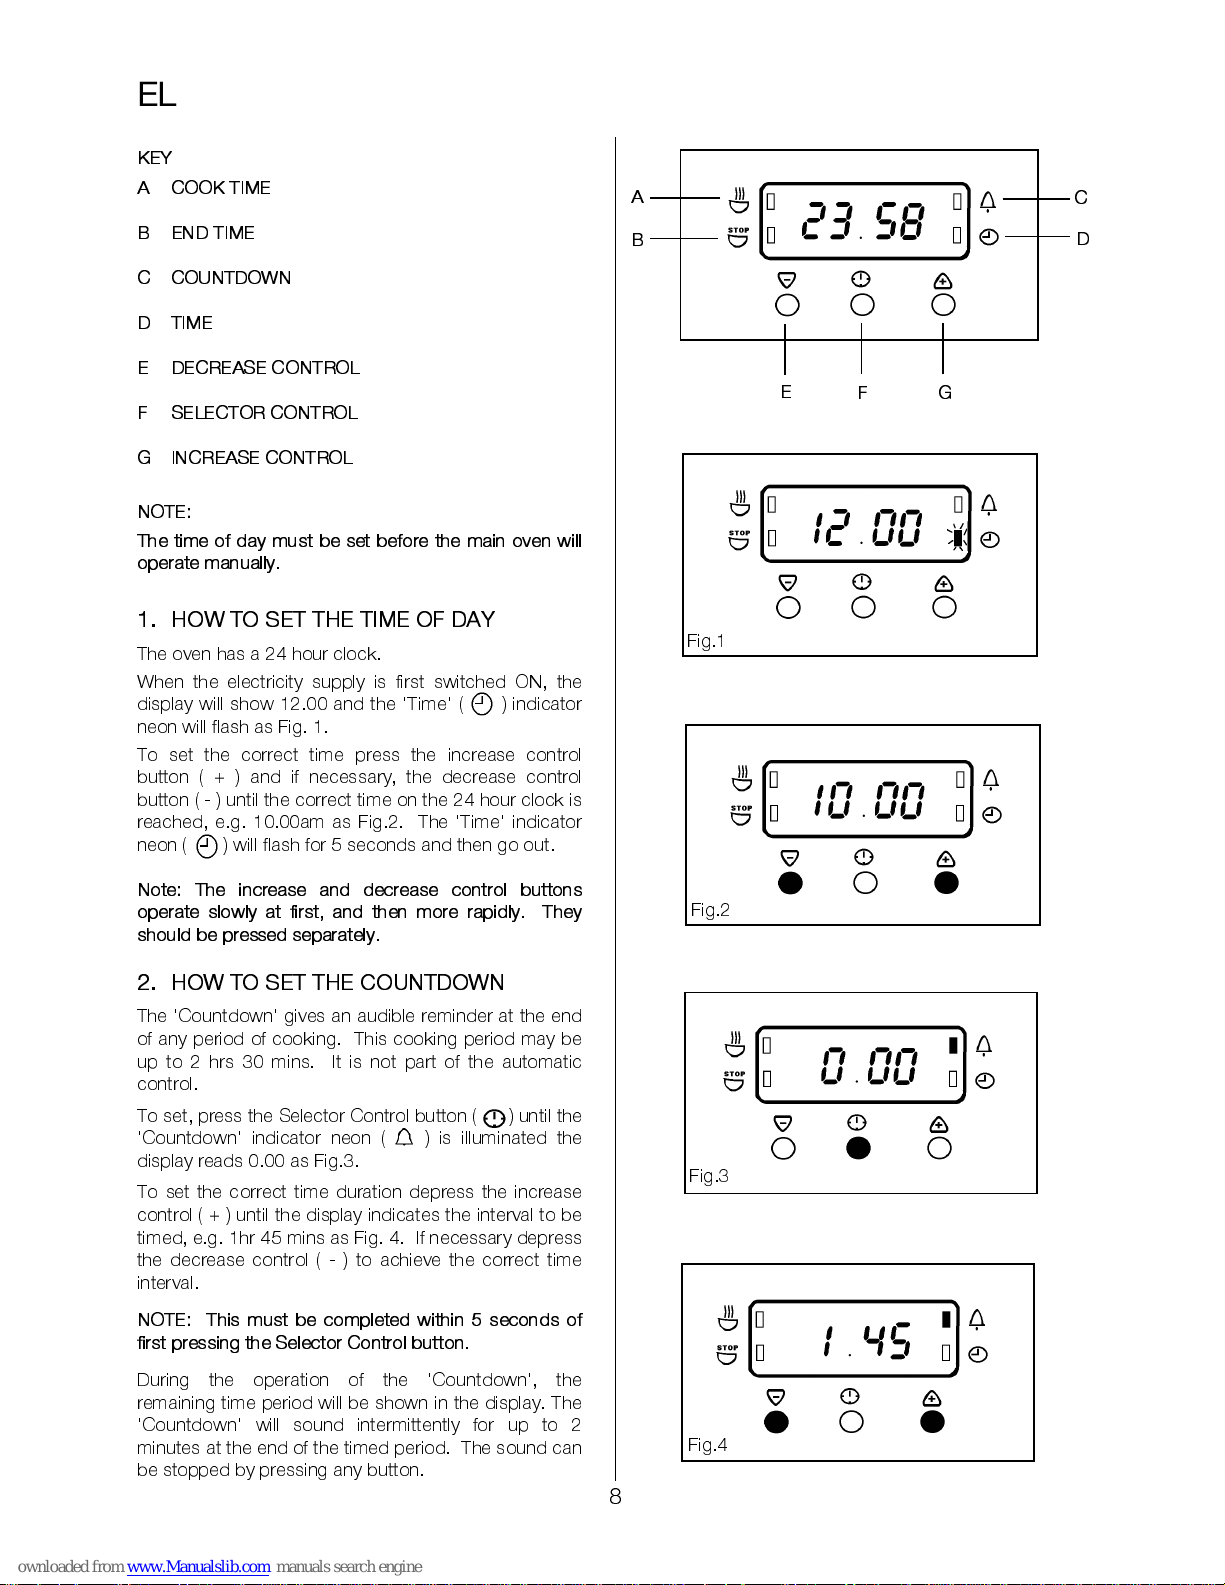
KEY
A COOK TIME
B END TIME
C COUNTDOWN
D TIME
E DECREASE CONTROL
F SELECTOR CONTROL
G INCREASE CONTROL
NOTE:
The time of day must be set before the main oven will
operate manually.
1. HOW TO S E T TH E T I M E OF DAY
The oven has a 24 hour clock.
When the electricity supply is first switched ON, the
display will show 12.00 and the 'Time' ( ) indicator
neon will flash as Fig. 1.
To set the correct time press the increase control
button ( + ) and if necessary, the decrease control
button ( - ) until the correct time on the 24 hour clock is
reached, e.g. 10.00am as Fig.2. The 'Time' indicator
neon ( ) will flash for 5 seconds and then go out.
Note: The increase and decrease control buttons
operate slowly at first, and then more rapidly. They
should be pressed separately.
2. HOW TO S E T TH E CO UN T DO WN
The 'Countdown' gives an audible reminder at the end
of any period of cooking. This cooking period may be
up to 2 hrs 30 mins. It is not part of the automatic
control.
To set, press the Selector Control button ( ) until the
'Countdown' indicator neon ( ) is illuminated the
display reads 0.00 as Fig.3.
To set the correct time duration depress the increase
control ( + ) until the display indicates the interval to be
timed, e.g. 1hr 45 mins as Fig. 4. If necessary depress
the decrease control ( - ) to achieve the correct time
interval.
NOTE: This must be completed within 5 seconds of
first pressing the Selector Control button.
During the operation of the 'Countdown', the
remaining time period will be shown in the display. The
'Countdown' will sound intermittently for up to 2
minutes at the end of the timed period. The sound can
be stopped by pressing any button.
G
F E
D
C
B
A
Fig.1
Fig.3
Fig.4
Fig.2
Page 9
9
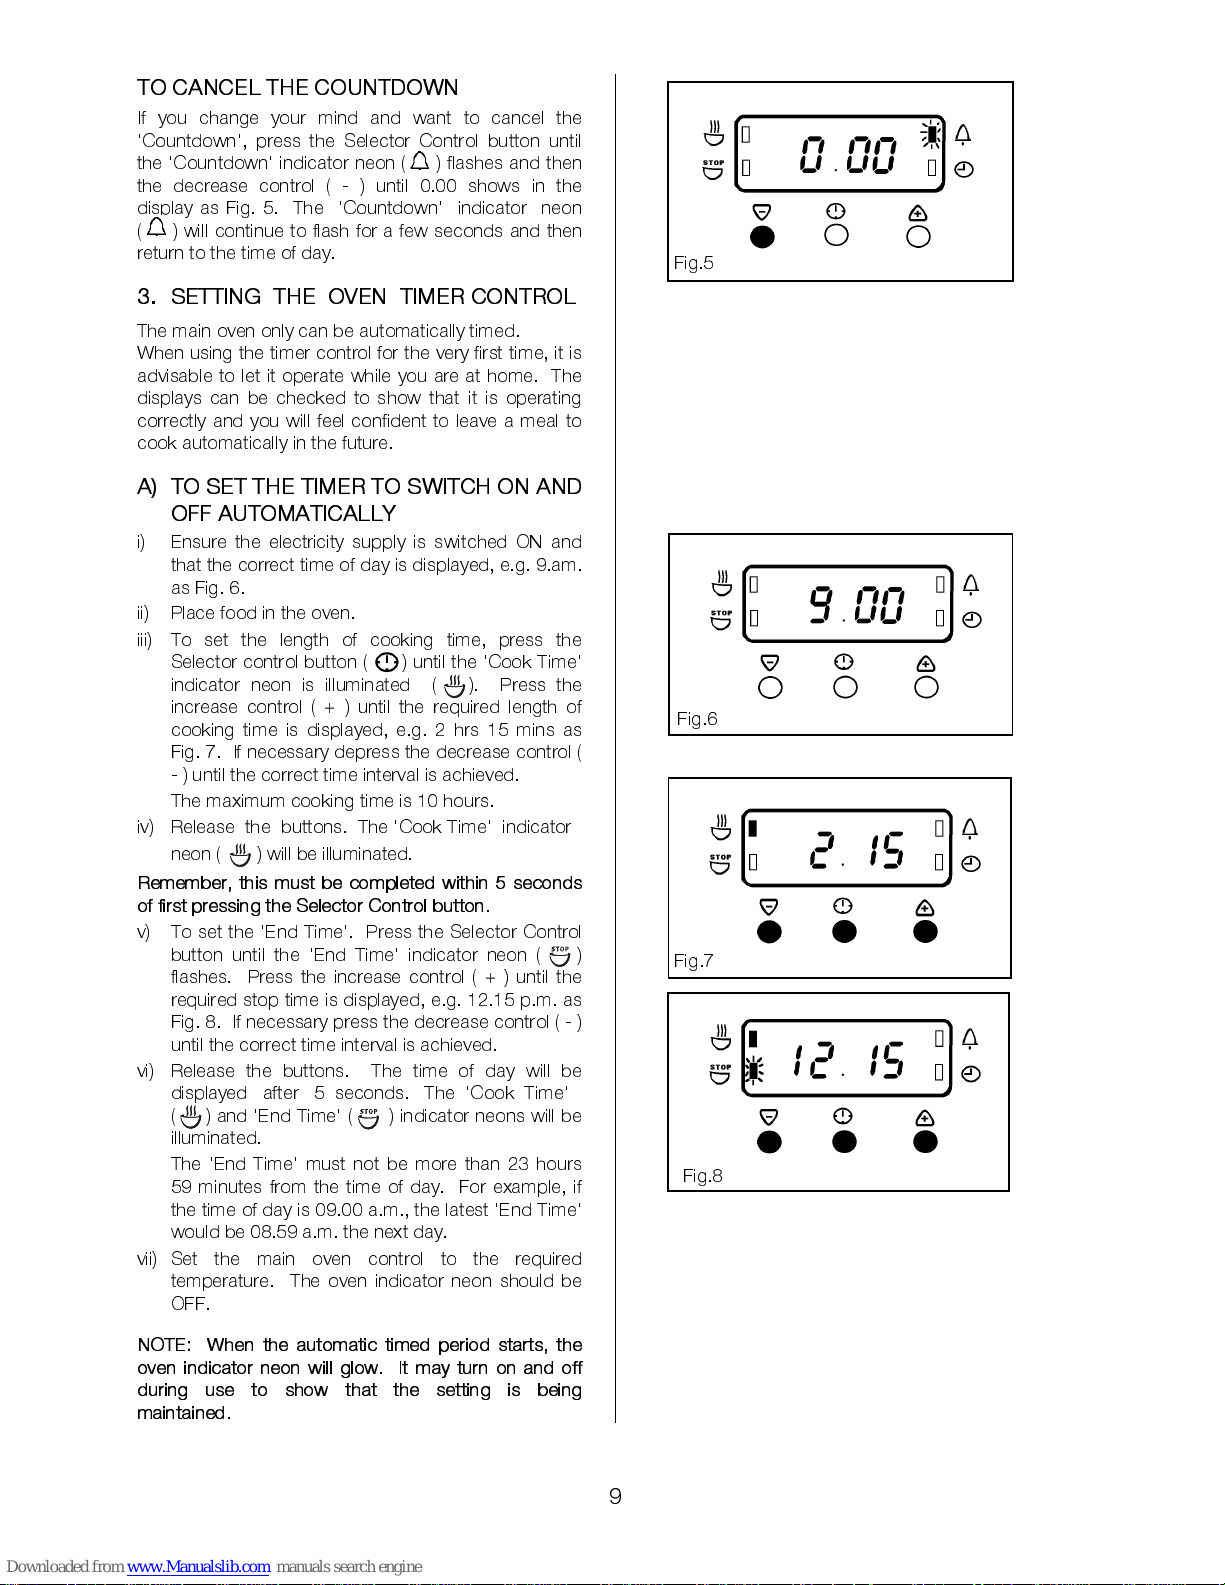
TO CANCEL THE COUNTDOWN
If you change your mind and want to cancel the
'Countdown', press the Selector Control button until
the 'Countdown' indicator neon ( ) flashes and then
the decrease control ( - ) until 0.00 shows in the
display as Fig. 5. The 'Countdown' indicator neon
( ) will continue to flash for a few seconds and then
return to the time of day.
3. S E TT I N G THE OV EN TI MER CON TRO L
The main oven only can be automatically timed.
When using the timer control for the very first time, it is
advisable to let it operate while you are at home. The
displays can be checked to show that it is operating
correctly and you will feel confident to leave a meal to
cook automatically in the future.
A) TO SET THE TI M ER TO SWIT C H ON AN D
OFF AUTOM A TI CA L L Y
i) Ensure the electricity supply is switched ON and
that the correct time of day is displayed, e.g. 9.am.
as Fig. 6.
ii) Place food in the oven.
iii) To set the length of cooking time, press the
Selector control button ( ) until the 'Cook Time'
indicator neon is illuminated ( ). Press the
increase control ( + ) until the required length of
cooking time is displayed, e.g. 2 hrs 15 mins as
Fig. 7. If necessary depress the decrease control (
- ) until the correct time interval is achieved.
The maximum cooking time is 10 hours.
iv) Release the buttons. The 'Cook Time' indicator
neon ( ) will be illuminated.
Remember, this must be completed within 5 seconds
of first pressing the Selector Control button.
v) To set the 'End Time'. Press the Selector Control
button until the 'End Time' indicator neon ( )
flashes. Press the increase control ( + ) until the
required stop time is displayed, e.g. 12.15 p.m. as
Fig. 8. If necessary press the decrease control ( - )
until the correct time interva l is achieved.
vi) Release the buttons. The time of day will be
displayed after 5 seconds. The 'Cook Time'
( ) and 'End Time' ( ) indicator neons will be
illuminated.
The 'End Time' must not be more than 23 hours
59 minutes from the time of day. For example, if
the time of day is 09.00 a.m., the latest 'E nd Time'
would be 08.59 a.m. the next day.
vii) Set the main oven control to the required
temperature. The oven indicator neon should be
OFF.
NOTE: When the automatic timed period starts, the
oven indicator neon will glow. It may turn on and off
during use to show that the setting is being
maintained.
Fig.5
Fig.6
Fig.7
Fig.8
Page 10
10
B) TO SET THE TIMER TO SWITCH OFF
ONLY
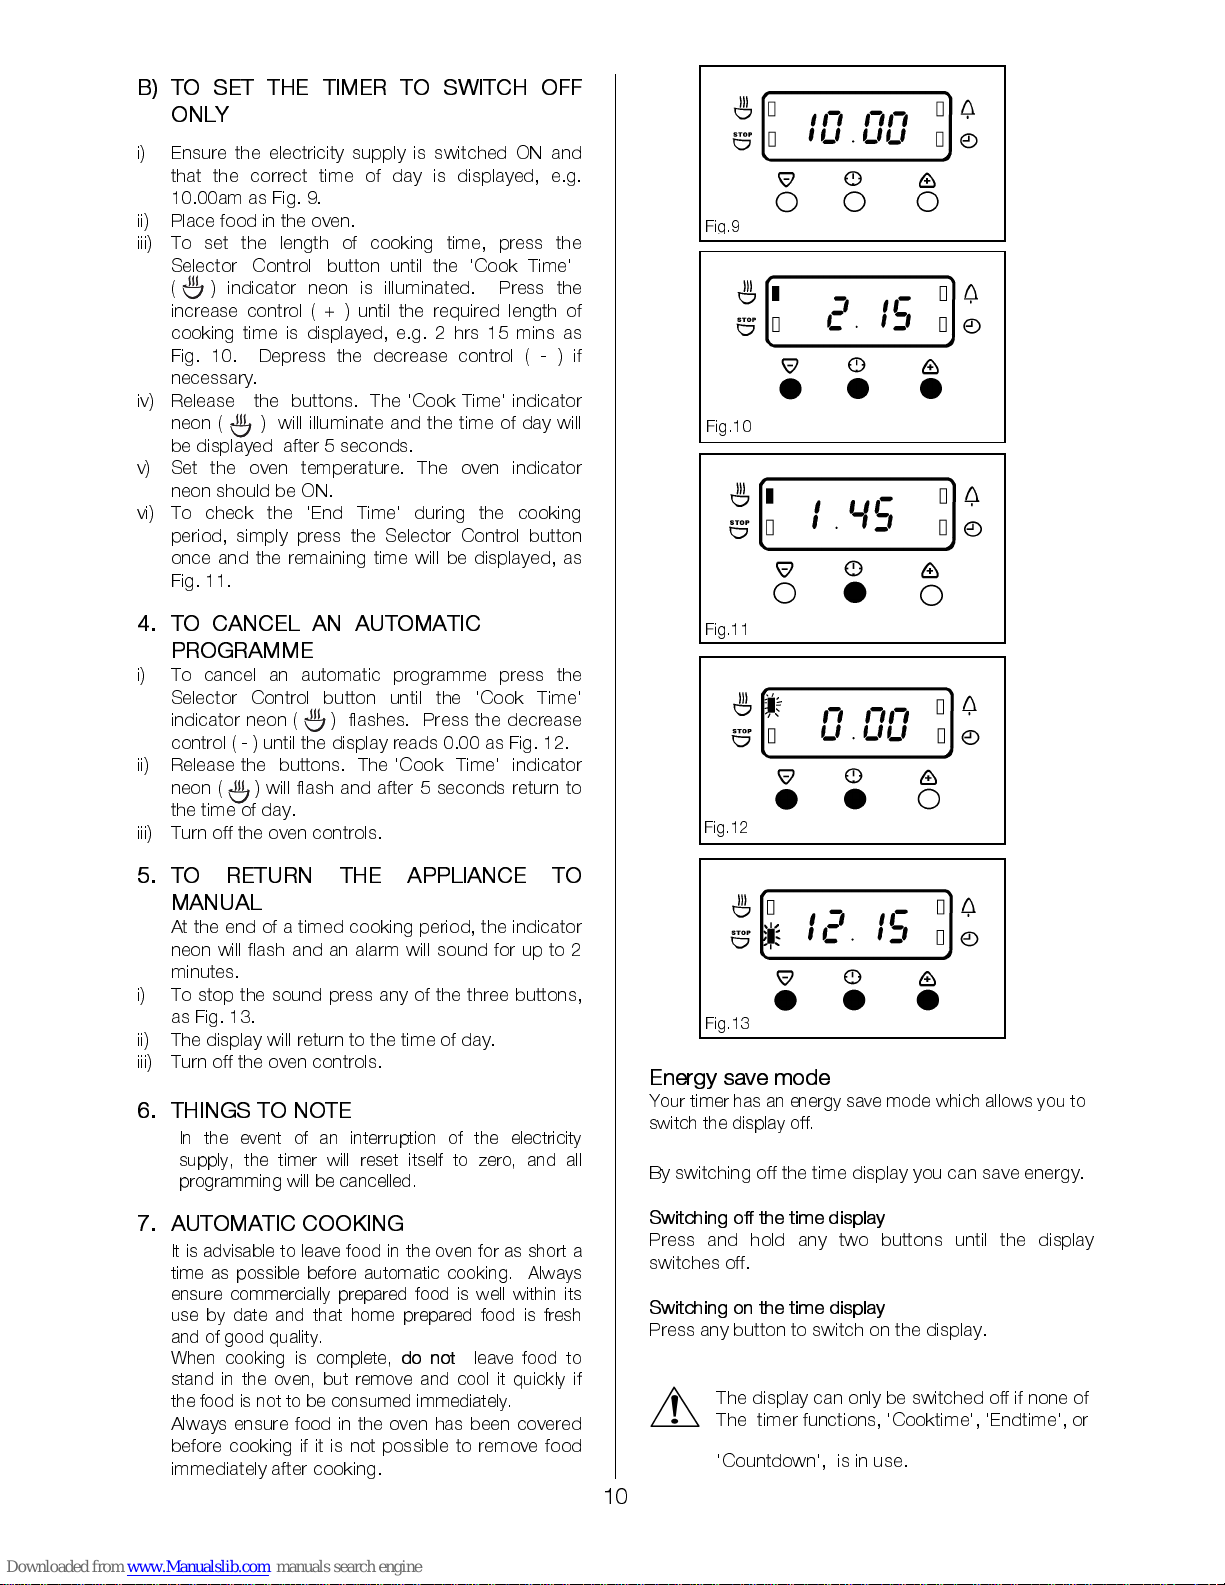
i) Ensure the electricity supply is switched ON and
that the correct time of day is displayed, e.g.
10.00am as Fig. 9.
ii) Place food in the oven.
iii) To set the length of cooking time, press the
Selector Control button until the 'Cook Time'
( ) indicator neon is illuminated. Press the
increase control ( + ) until the required length of
cooking time is displayed, e.g. 2 hrs 15 mins as
Fig. 10. Depress the decrease control ( - ) if
necessary.
iv) Release the buttons. The 'Cook Time' indicator
neon ( ) will illuminate and the time of day will
be displayed after 5 seconds.
v) Set the oven temperature. The oven indicator
neon should be ON.
vi) To check the 'End Time' during the cooking
period, simply press the Selector Control button
once and the remaining time will be displayed, as
Fig. 11.
4. TO CANCEL AN AUTOMATIC
PROGRAMME
i) To cancel an automatic programme press the
Selector Control button until the 'Cook Time'
indicator neon ( ) flashes. Press the decrease
control ( - ) until the display reads 0.00 as Fig. 12.
ii) Release the buttons. The 'Cook Time' indicator
neon ( ) will flash and after 5 seconds return to
the time of day.
iii) Turn off the oven controls.
5. TO RETURN THE APPLIANCE TO
MANUAL
At the end of a timed cooking period, the indicator
neon will flash and an alarm will sound for up to 2
minutes.
i) To stop the sound press any of the three buttons,
as Fig. 13.
ii) The display will return to the time of day.
iii) Turn off the oven controls.
6. THINGS TO NOTE
In the event of an interruption of the electricity
supply, the timer will reset itself to zero, and all
programming will be cancelled.
7. AUTOMATIC COOKING
It is advisable to leave food in the oven for as short a
time as possible before automatic cooking. Always
ensure commercially prepared food is well within its
use by date and that home prepared food is fresh
and of good quality.
When cooking is complete,
do not
leave food to
stand in the oven, but remove and cool it quickly if
the food is not to be consumed immediately.
Always ensure food in the oven has been covered
before cooking if it is not possible to remove food
immediately after cooking.
Energy save mode
Your timer has an energy save mode which allows you to
switch the display off.
By switching off the time display you can save energy.
Switching off the time display
Press and hold any two buttons until the display
switches off.
Switching on the time display
Press any button to switch on the display.
The display can only be switch ed off if none of
The timer functions, 'Cooktime', 'Endtime', or
'Countdown', is in use.
Fig.9
Fig.10
Fig.11
Fig.12
Fig.13
Page 11
11
THE DUAL GRILL
CAUTION – Accessible parts may be hot when
the grill is in use. Young children should be kept
away.
The grill is a dual circuit grill which means that the full
area of the grill can be used, or for economy purposes,
the centre section only can be used when cooking
smaller quantities of food.
USING THE DUAL GRILL
•
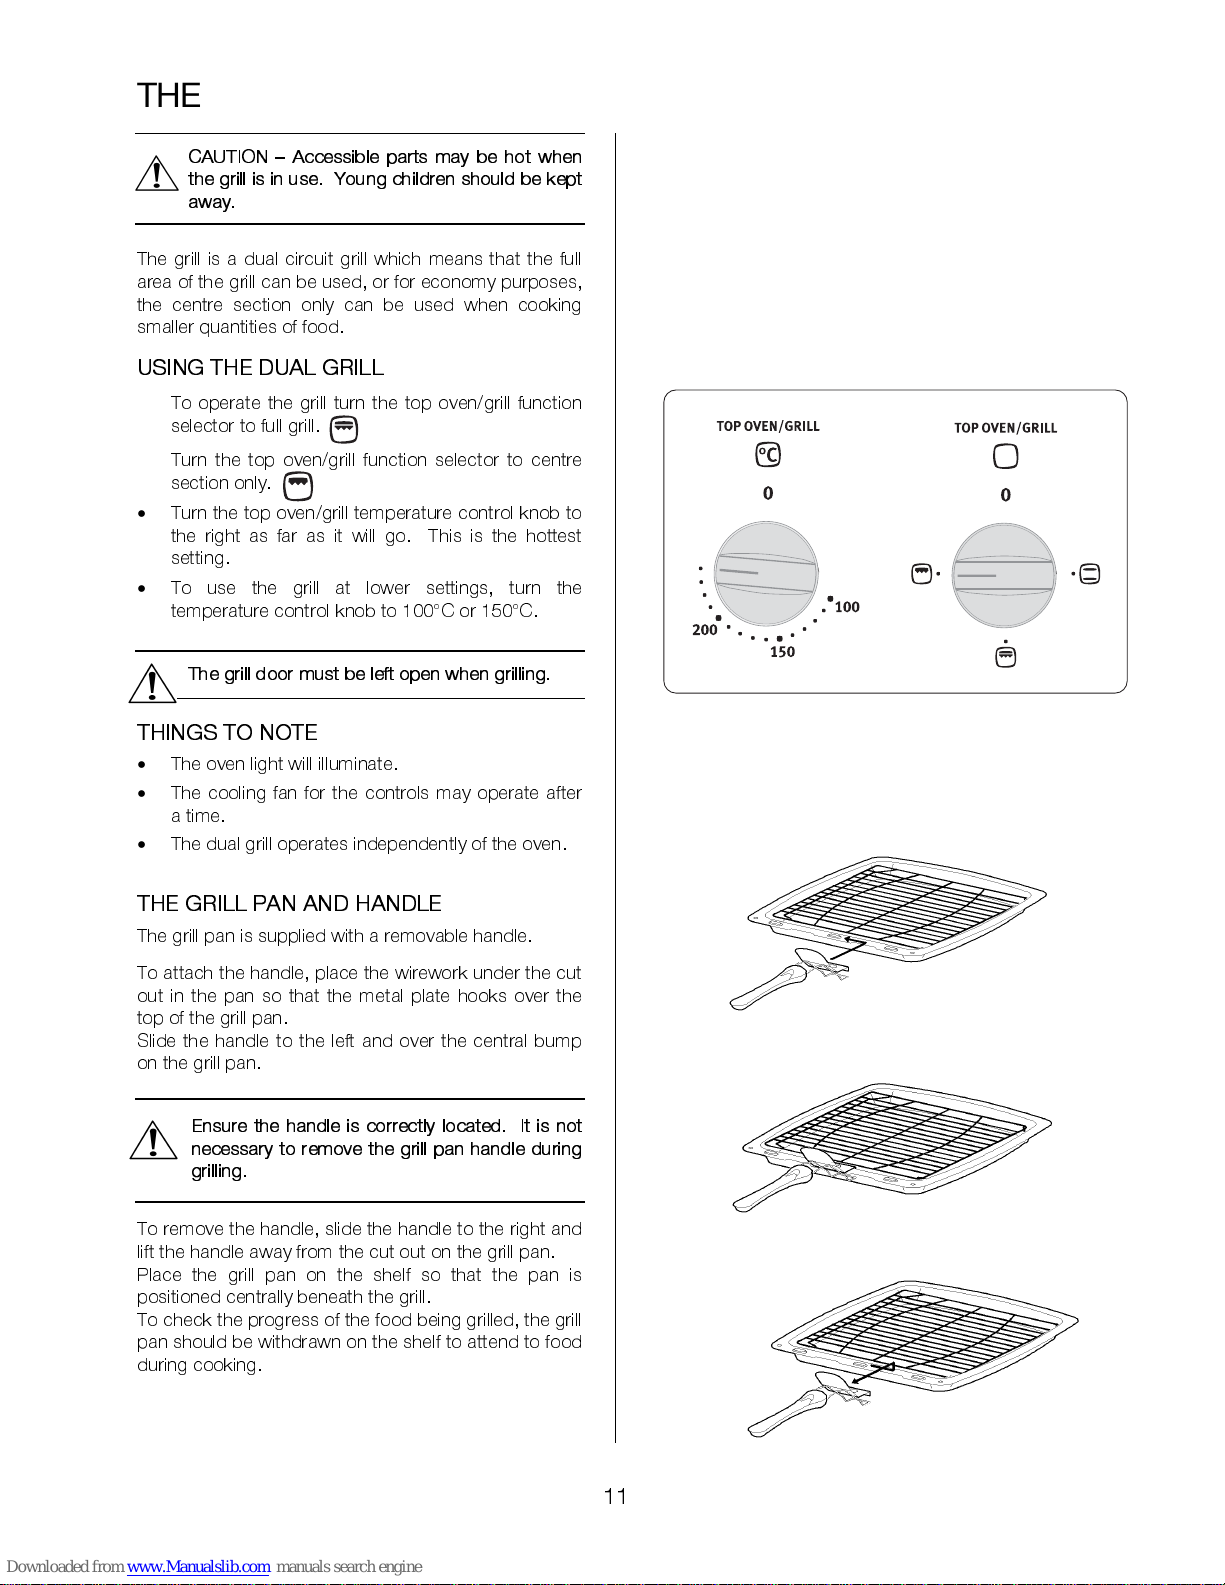
To operate the grill turn the top oven/grill function
selector to full grill.
•
Turn the top oven/grill function selector to centre
section only.
•
Turn the top oven/grill temperature control knob to
the right as far as it will go. This is the hottest
setting.
•
To use the grill at lower settings, turn the
temperature control knob to 100°C or 150°C.
The grill door must be left open when grillin g.
THINGS TO NO TE
•
The oven light will illumina te.
•
The cooling fan for the controls may operate after
a time.
•
The dual grill operates independently of the oven.
THE GRILL PAN AN D HA ND L E
The grill pan is supplied w ith a removable handle.
To attach the handle, place the wirework under the cut
out in the pan so that the metal plate hooks over the
top of the grill pan.
Slide the handle to the left and over the central bump
on the grill pan.
Ensure the handle is correctly located. It is not
necessary to remove the grill pan handle during
grilling.
To remove the handle, slide the handle to the right and
lift the handle away from the cut out on the grill pan.
Place the grill pan on the shelf so that the pan is
positioned centrally beneath the grill.
To check the pro gre ss of th e food be ing grilled, the grill
pan should be withdrawn on the shelf to attend to food
during cooking.
Page 12
12
HINTS AND TI PS
•
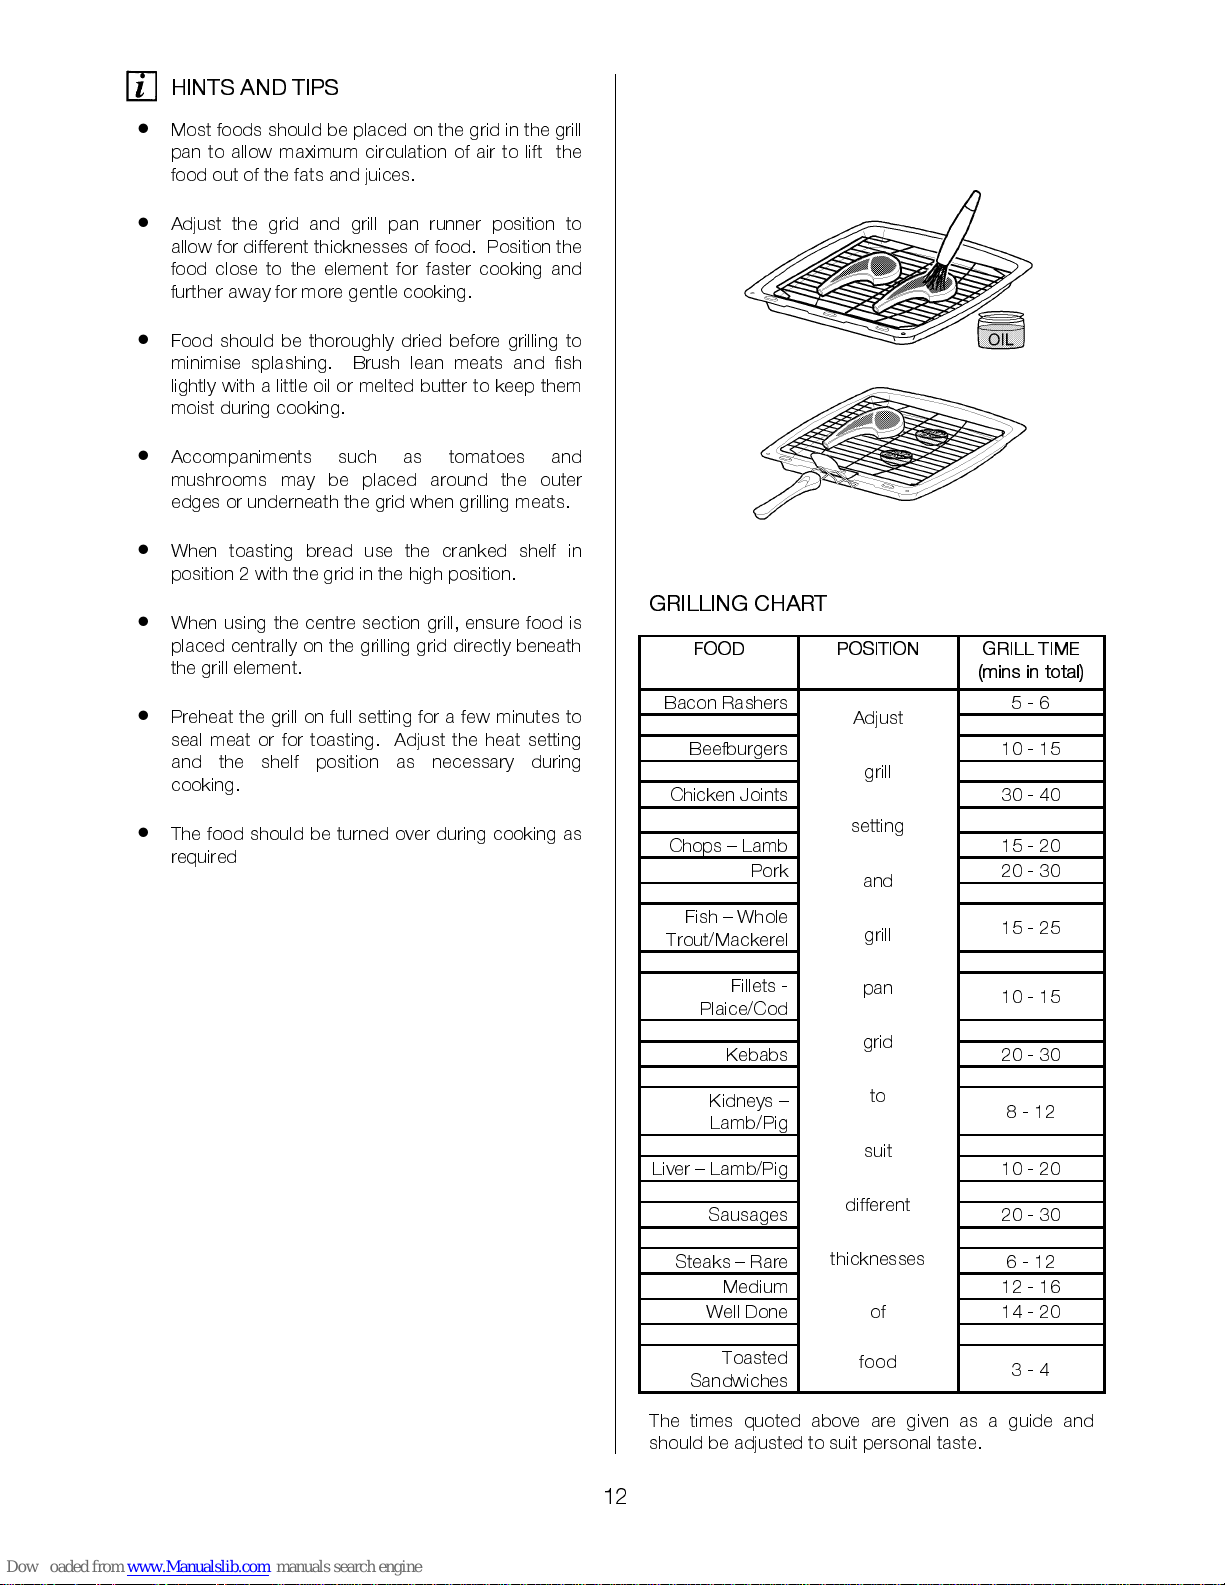
Most foods should be placed on the grid in the grill
pan to allow maximum circulation of air to lift the
food out of the fats and juices.
•
Adjust the grid and grill pan runner position to
allow for different thicknesses of food. Position the
food close to the element for faster cooking and
further away for more gentle cooking.
•
Food should be thoroughly dried before grilling to
minimise splashing. Brush lean meats and fish
lightly with a little oil or melted butter to keep them
moist during cooking.
•
Accompaniments such as tomatoes and
mushrooms may be placed around the outer
edges or underneath the grid when grilling meats.
•
When toasting bread use the cranked shelf in
position 2 with the grid in the high po sition.
•
When using the centre section grill, ensure food is
placed centrally on the grilling grid directly beneath
the grill element.
•
Preheat the grill on full setting for a few minutes to
seal meat or for toasting. Adjust the heat setting
and the shelf position as necessary during
cooking.
•
The food should be turned over during cooking as
required
GRILLING CHART
FOOD POSITION GRILL TIME
(mins in total)
Bacon Rashers
5 - 6
Beefburgers
10 - 15
Chicken Joints
30 - 40
Chops – Lamb
15 - 20
Pork
20 - 30
Fish – Whole
Trout/Mackerel
15 - 25
Fillets -
Plaice/Cod
10 - 15
Kebabs
20 - 30
Kidneys –
Lamb/Pig
8 - 12
Liver – Lamb/Pig
10 - 20
Sausages
20 - 30
Stea ks – Ra re
6 - 12
Medium
12 - 16
Well Done
14 - 20
Toasted
Sandwiches
Adjust
grill
setting
and
grill
pan
grid
to
suit
different
thicknesses
of
food
3 - 4
The times quoted above are given as a guide and
should be adjusted to suit personal taste.
Page 13
13
THE TOP OVEN
The top oven is the smaller of the two ovens. It is
heated by elements in the top and bottom of the oven.
It is designed for cooking smaller quantities of food. It
gives especially good results if used to cook fruit
cakes, sweet or savoury flans or quiche.
The top oven is also ideal for use as a warming
compartment to warm dishes and keep food hot. Use
the top oven when you want to warm plates. Use the
lowest setting on the top oven temperature control.
USING THE TOP OVEN
•
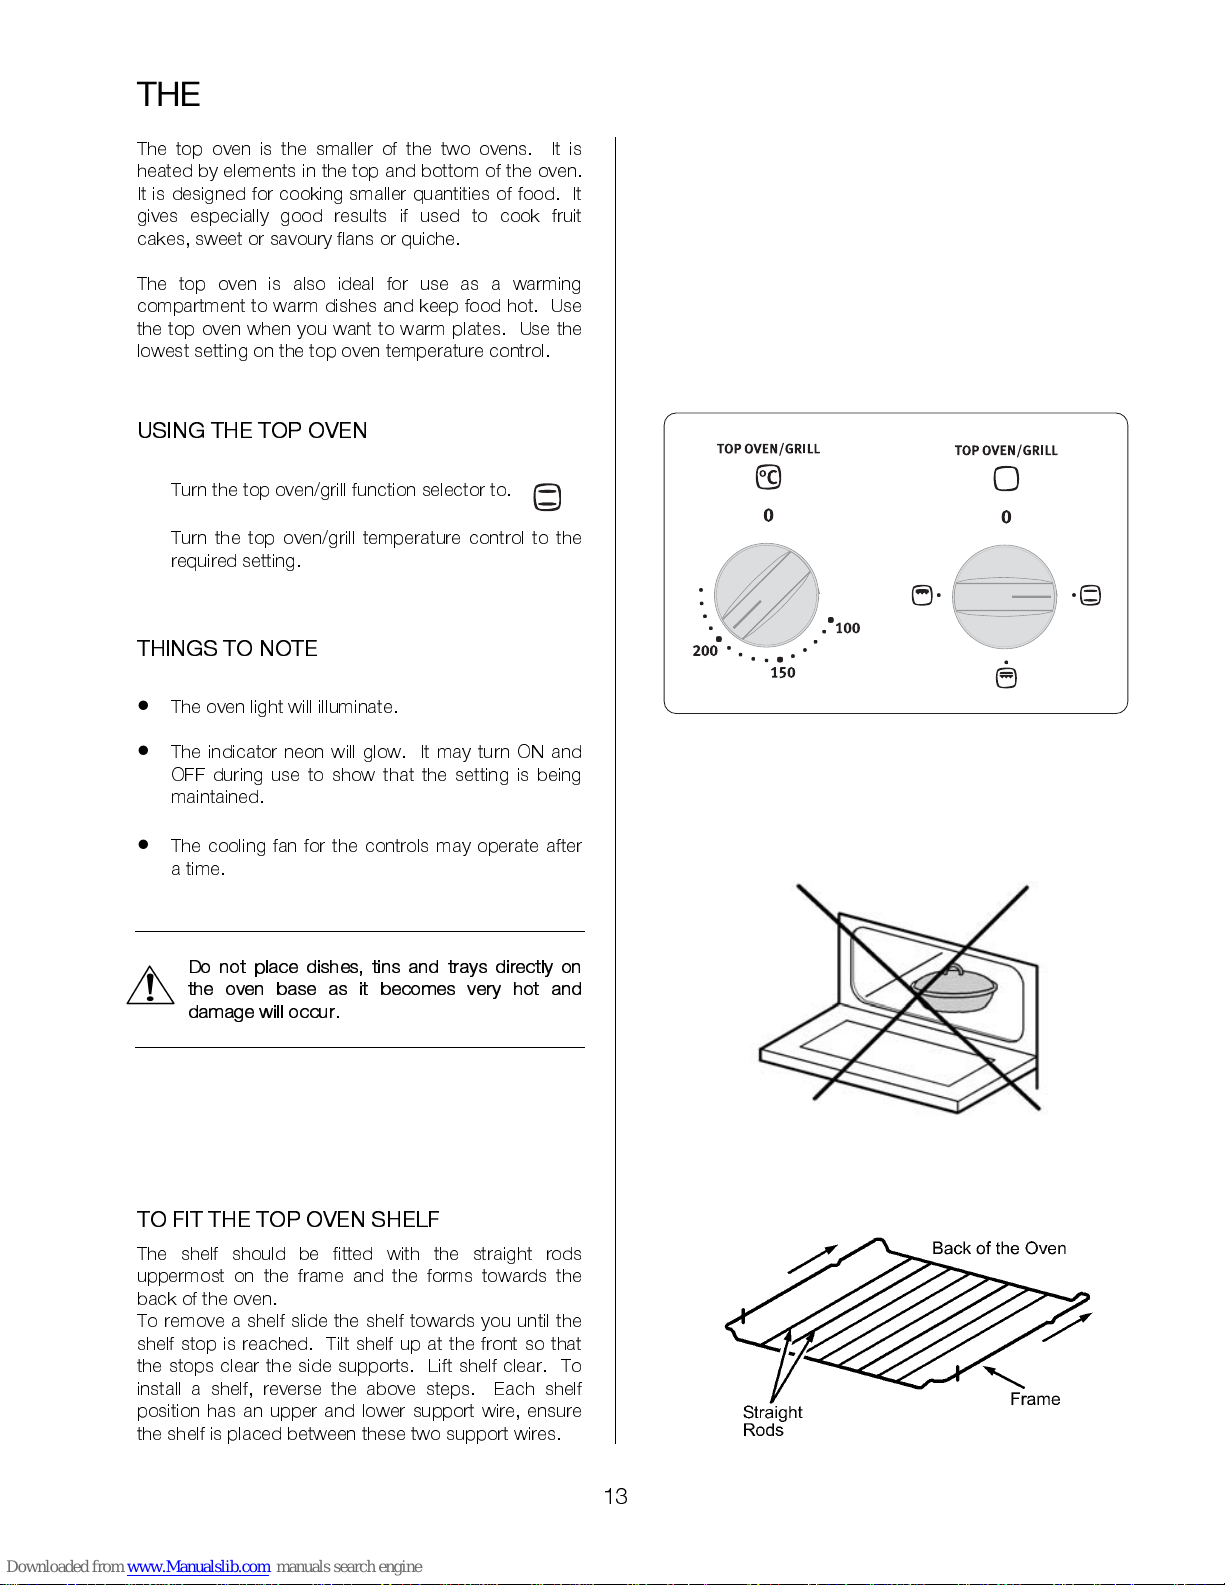
Turn the top oven/grill function selector to.
•
Turn the top oven/grill temperature control to the
required setting.
THINGS TO NO TE
•
The oven light will illumina te.
•
The indicator neon will glow. It may turn ON and
OFF during use to show that the setting is being
maintained.
•
The cooling fan for the controls may operate after
a time.
Do not place dishes, tins and trays directly on
the oven base as it becomes very hot and
damage will occur.
TO FIT THE TO P O VE N SHE L F
The shelf should be fitted with the straight rods
uppermost on the frame and the forms towards the
back of the oven.
To remove a shelf slide the shelf towards you until the
shelf stop is reached. Tilt shelf up at the front so that
the stops clear the side supports. Lift shelf clear. To
install a shelf, reverse the above steps. Each shelf
position has an upper and lower support wire, ensure
the shelf is placed between these two support wires.
Page 14
14
HINTS AND TI PS
•
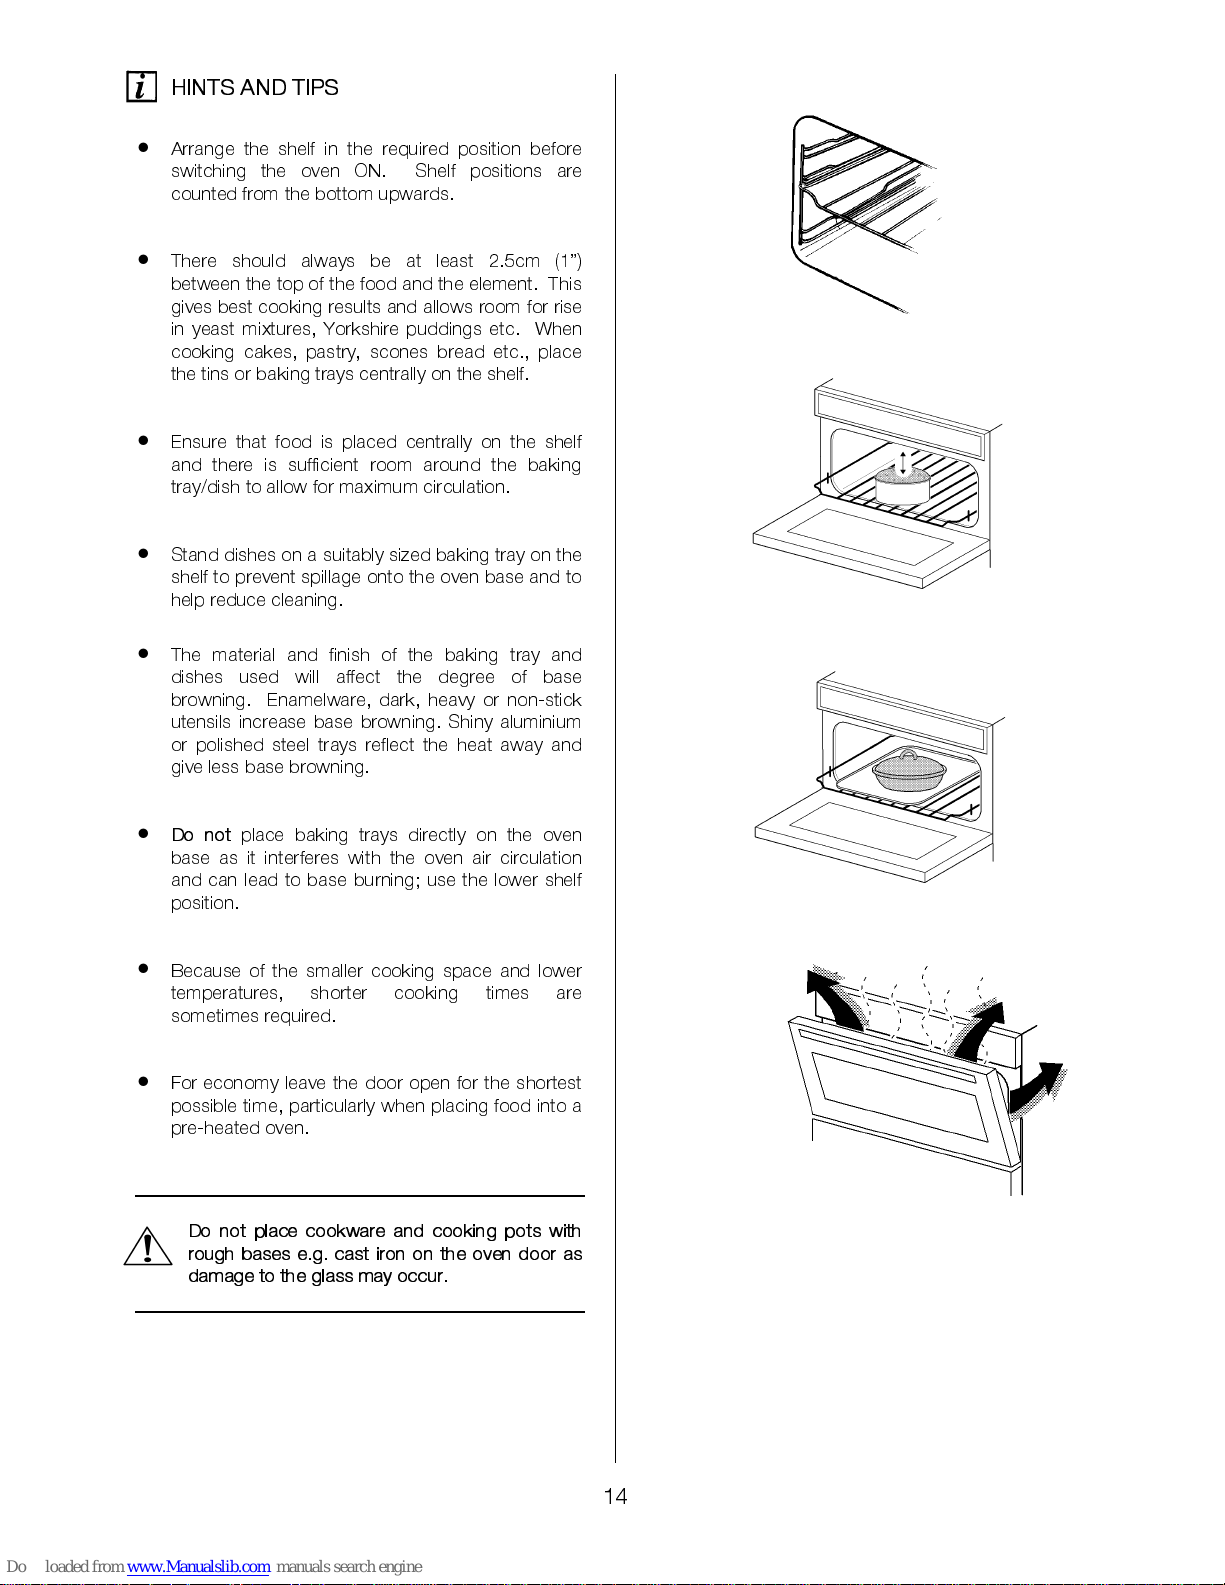
Arrange the shelf in the required position before
switching the oven ON. Shelf positions are
counted from the bottom upwards.
•
There should always be at least 2.5cm (1”)
between the top of the food and the element. This
gives best cooking results and allows room for rise
in yeast mixtures, Yorkshire puddings etc. When
cooking cakes, pastry, scones bread etc., place
the tins or baking trays centr a lly on the shelf.
•
Ensure that food is placed centrally on the shelf
and there is sufficient room around the baking
tray/dish to allow for maximum circulation.
•
Stand dishes on a suitably sized baking tray on the
shelf to prevent spillage onto the oven base and to
help reduce cleaning.
•
The material and finish of the baking tray and
dishes used will affect the degree of base
browning . Enamelware, dark, heavy or non-stick
utensils increase base browning. Shiny aluminium
or polished steel trays reflect the heat away and
give less base browning.
•
Do not
place baking trays directly on the oven
base as it interferes with the oven air circulation
and can lead to base burning; use the lower shelf
position.
•
Because of the smaller cooking space and lower
temperatures, shorter cooking times are
sometimes required.
•
For economy leave the door open for the shortest
possible time, particularly when placing food into a
pre-heated oven.
Do not place cookware and cooking pots with
rough bases e.g. cast iron on the oven door as
damage to the glass may occur.
Page 15
15
THE MAIN OVEN
The fan oven is particularly suitable for cooking larger
quantities of food.
The advantages of fan oven cooking are:
PREHEATING
The fan oven quickly reaches its temperature, so it is
not usually necessary to preheat the oven. Without
preheating however, you may find you need to add an
extra 5 – 10 minutes on the recommended cooking
times. For recipes needing high temperatures, e.g.
bread, pastries, scones, soufflés etc., best results are
achieved if the oven is preheated first. For best results
when cooking frozen or cooked chilled ready meals
always preheat the oven first.
COOK IN G T EM PE RATU RE S
Fan oven cooking generally requires lower
temperatures than conventional cooking. Follow the
temperatures recommended in the cooking chart. As
a guide reduce temperatures by about 20C° - 25°C for
your own recipes, using a conventional oven.
BATCH BAKING
The fan oven cooks evenly on all shelf levels, especially
useful when batch ba king.
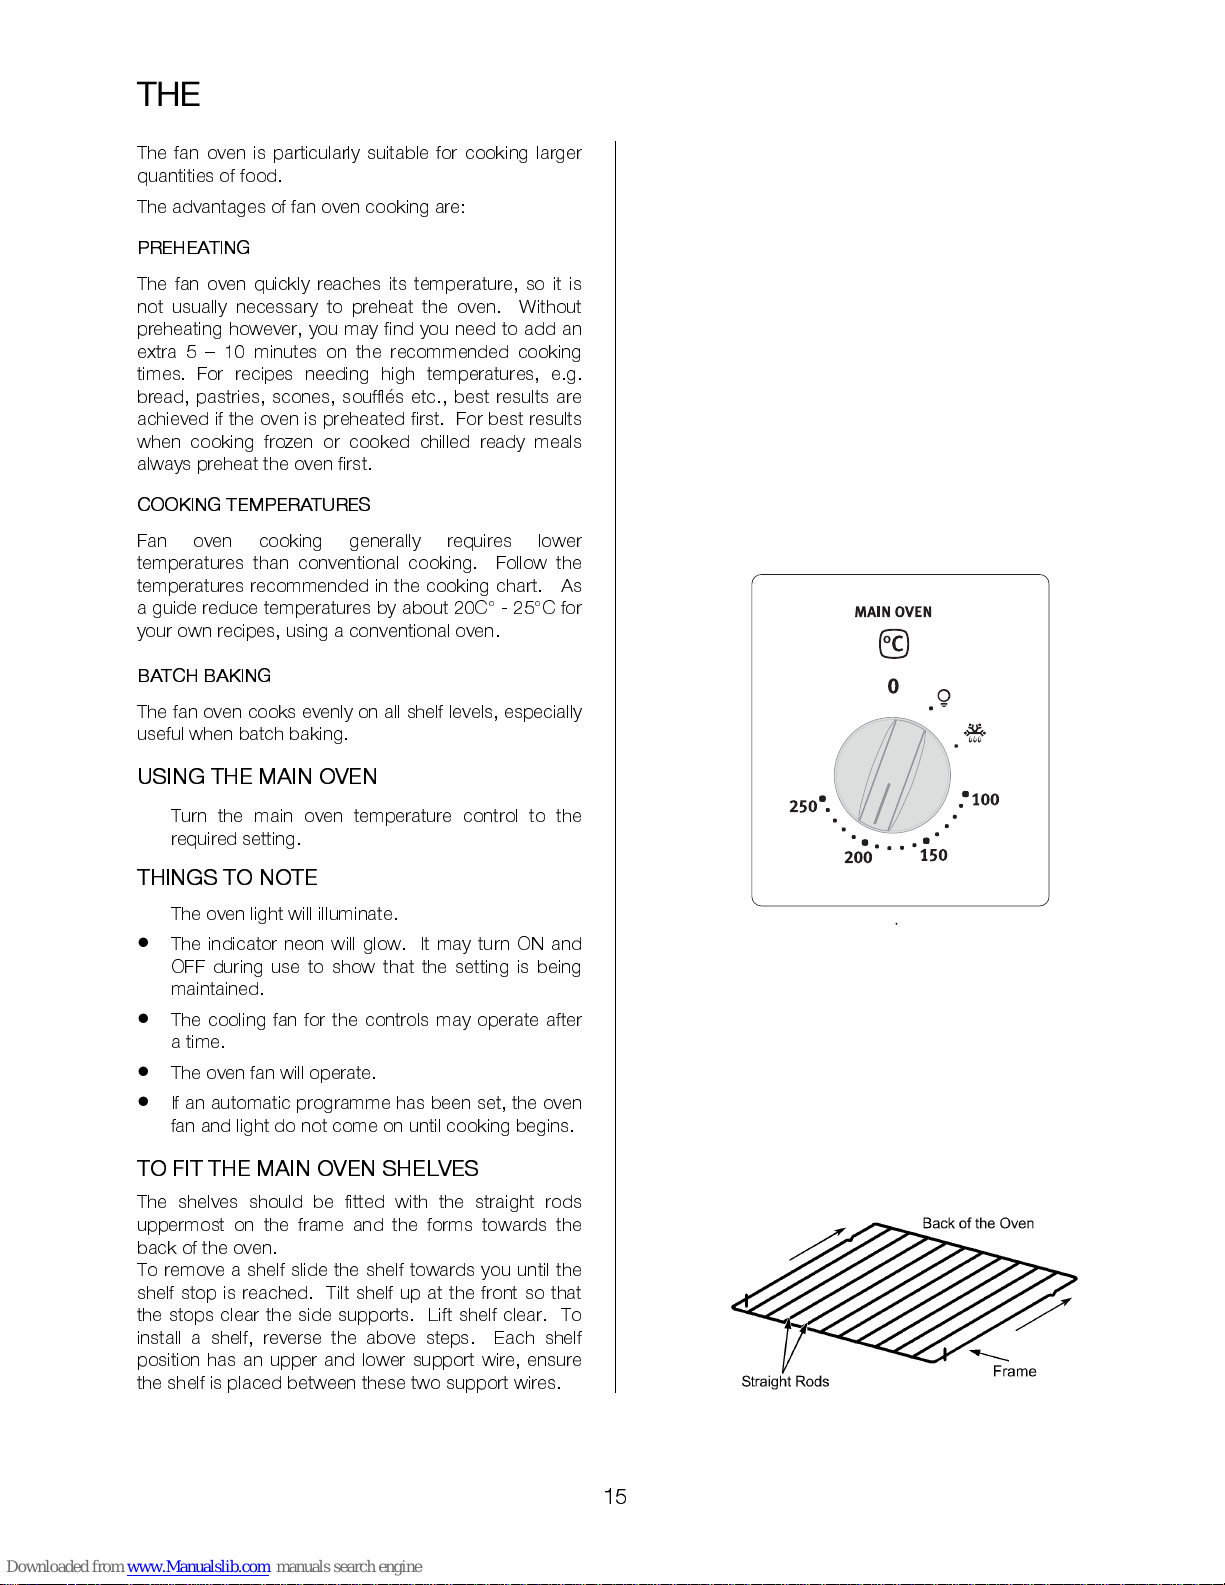
USING THE MA IN OVEN
•
Turn the main oven temperature control to the
required setting.
THINGS TO NO TE
•
The oven light will illumina te.
•
The indicator neon will glow. It may turn ON and
OFF during use to show that the setting is being
maintained.
•
The cooling fan for the controls may operate after
a time.
•
The oven fan will ope rate.
•
If an automatic programme has been set, the oven
fan and light do not come on until cooking begins.
TO FIT THE MAIN OVEN SHELVES
The shelves should be fitted with the straight rods
uppermost on the frame and the forms towards the
back of the oven.
To remove a shelf slide the shelf towards you until the
shelf stop is reached. Tilt shelf up at the front so that
the stops clear the side supports. Lift shelf clear. To
install a shelf, reverse the above steps. Each shelf
position has an upper and lower support wire, ensure
the shelf is placed between these two support wires.
Page 16
16
HINTS AND TI PS
•
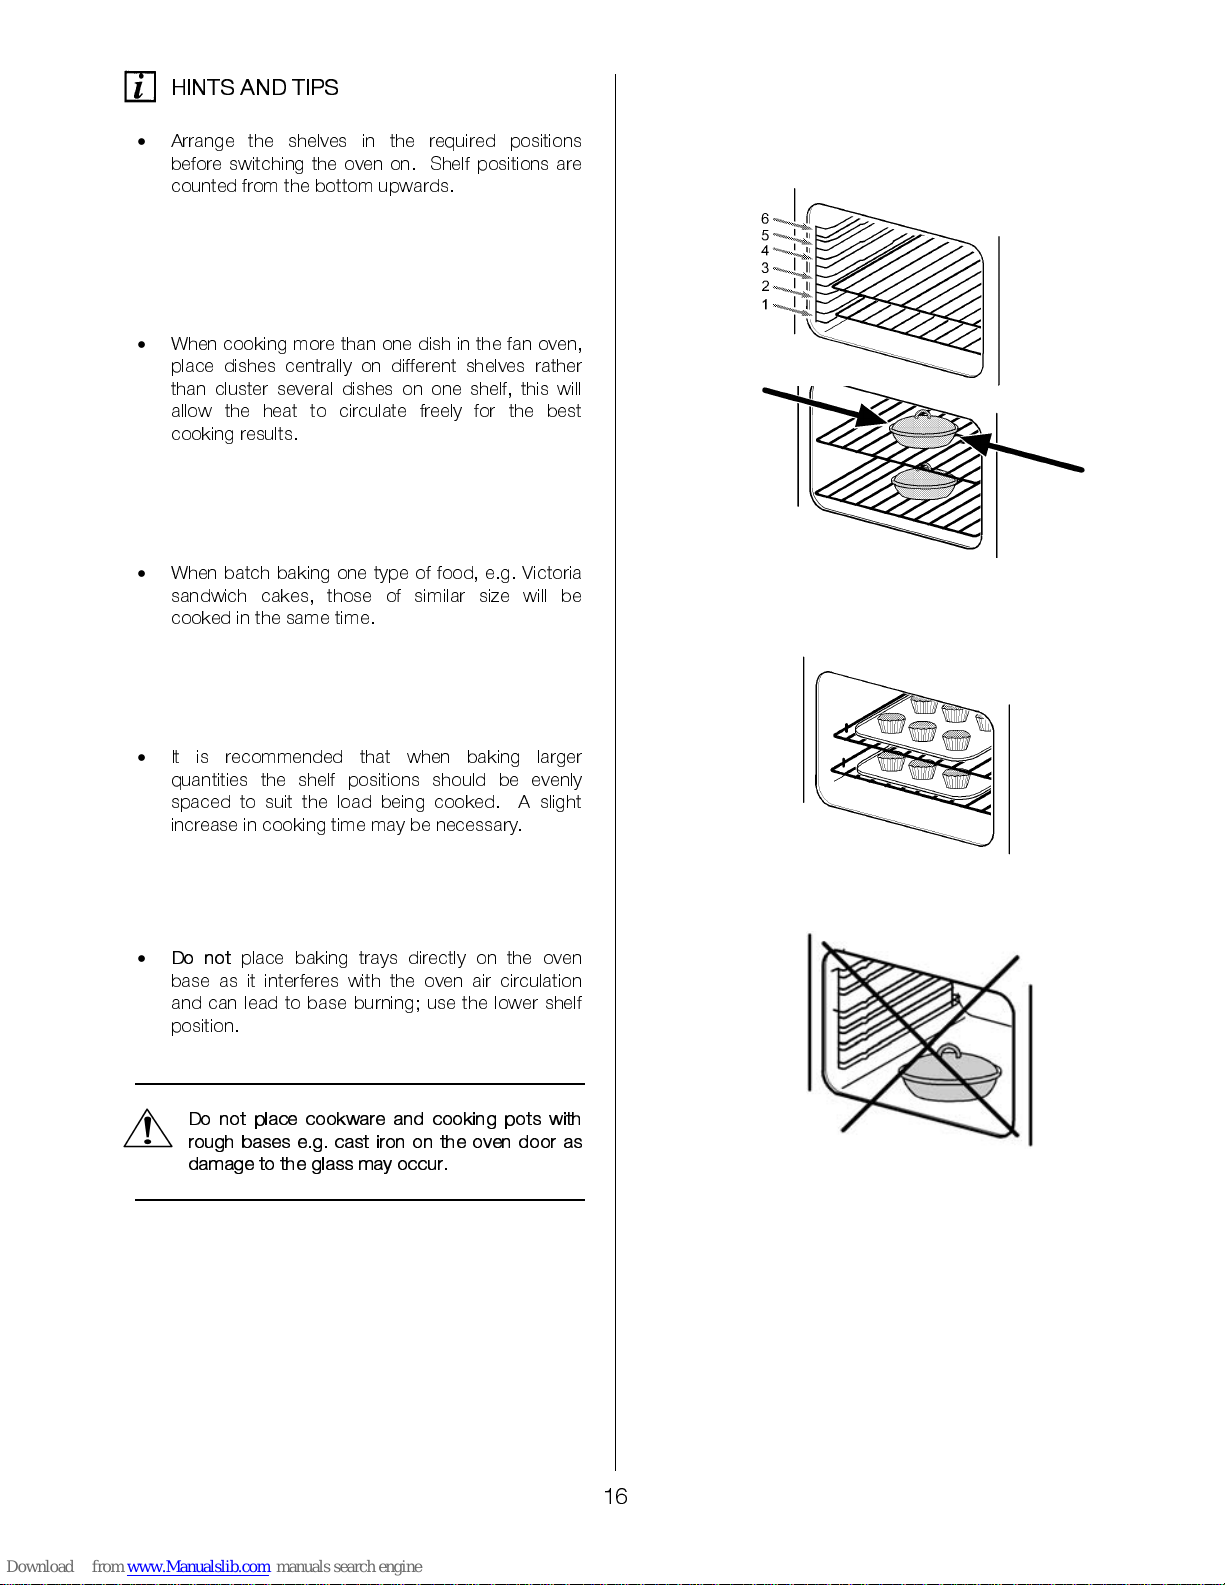
Arrange the shelves in the required positions
before switching the oven on. Shelf positions are
counted from the bottom upwards.
•
When cooking more than one dish in the fan oven,
place dishes centrally on different shelves rather
than cluster several dishes on one shelf, this will
allow the heat to circulate freely for the best
cooking results.
•
When batch baking one type of food, e.g. Victoria
sandwich cakes, those of similar size will be
cooked in the same time.
•
It is recommended that when baking larger
quantities the shelf positions should be evenly
spaced to suit the load being cooked. A slight
increase in cooking time may be necessary.
•
Do not
place baking trays directly on the oven
base as it interferes with the oven air circulation
and can lead to base burning; use the lower shelf
position.
Do not place cookware and cooking pots with
rough bases e.g. cast iron on the oven door as
damage to the glass may occur.
Page 17
17
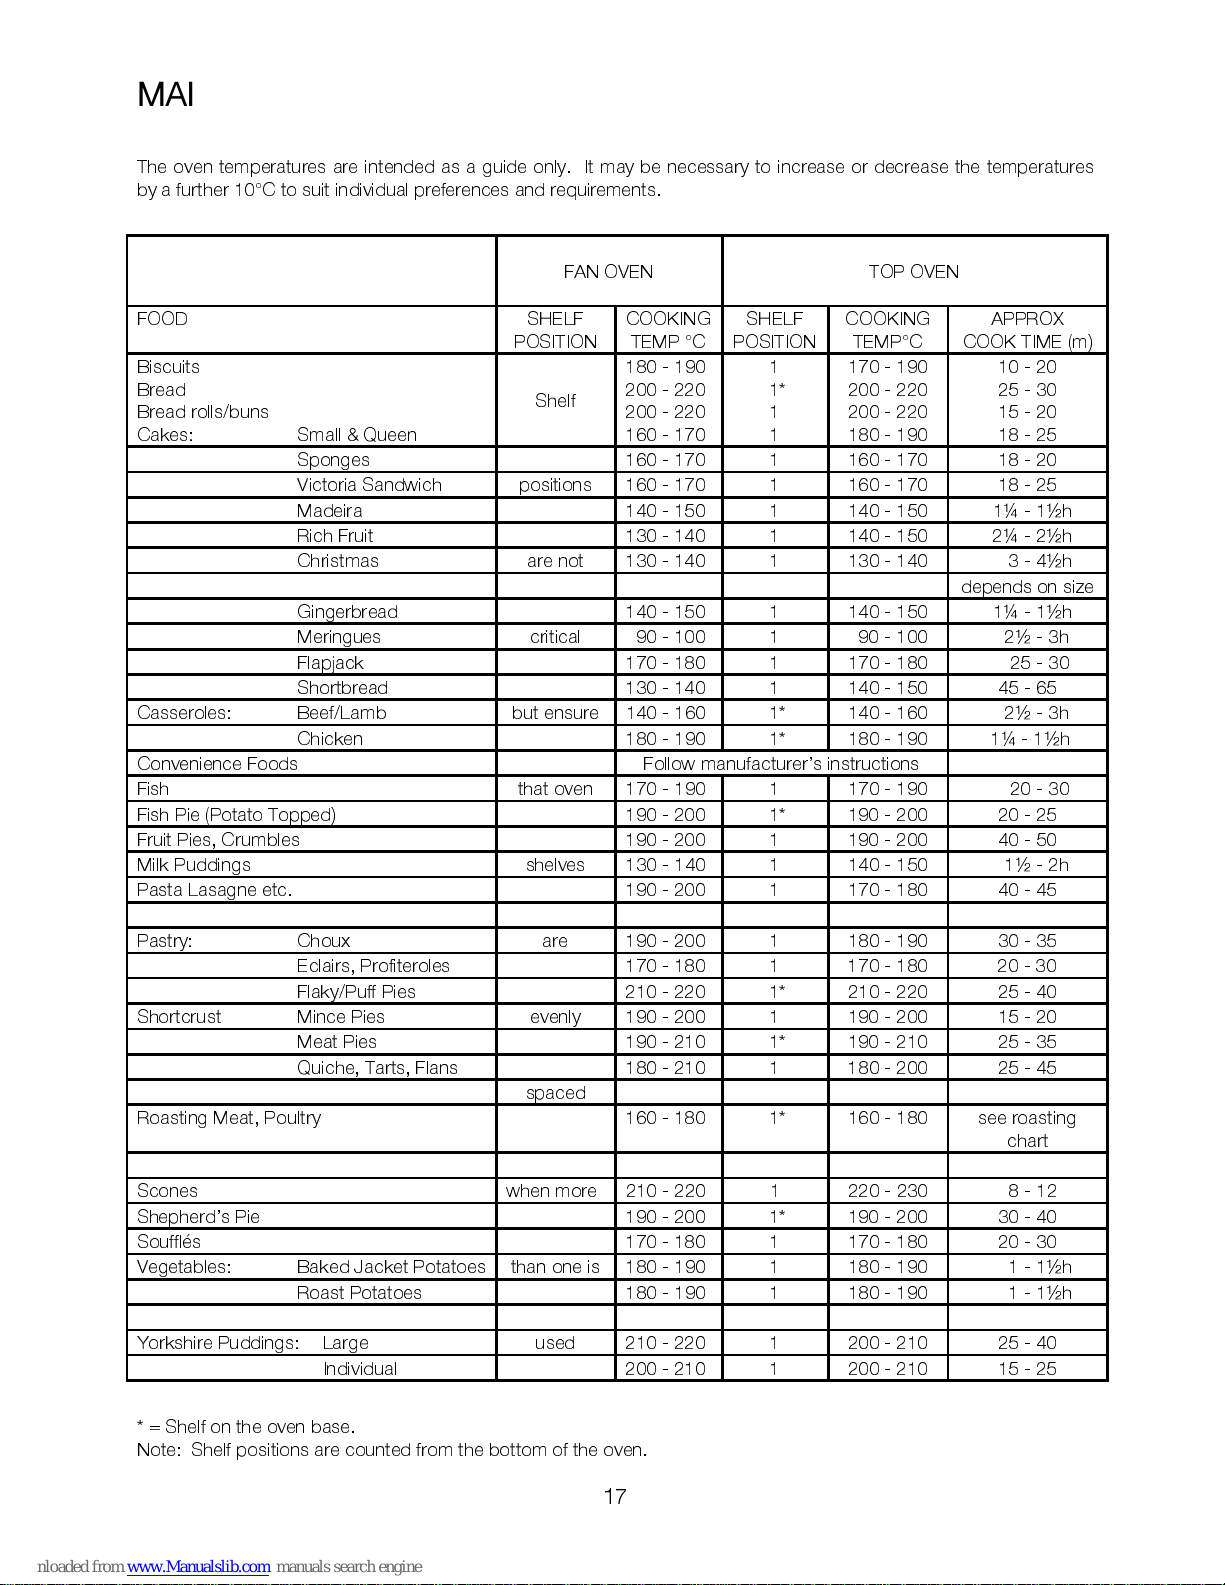
MAIN OVEN COOKING CHART
The oven temperatures are intended as a guide only. It may be necessary to increase or decrease the temperatures
by a further 10°C to suit individual preferences and requirements.
FAN OVEN
TOP OVEN
FOOD SHELF
POSITION
COOKING
TEMP °C
SHELF
POSITION
COOKING
TEMP°C
APPROX
COOK TIME (m)
Biscuits
Bread
Bread rolls/buns
Cakes: Small & Queen
Shelf
180 - 190
200 - 220
200 - 220
160 - 170
1
1*
1
1
170 - 190
200 - 220
200 - 220
180 - 190
10 - 20
25 - 30
15 - 20
18 - 25
Sponges 160 - 170 1 160 - 170 18 - 20
Victoria Sandwich positions 160 - 170 1 160 - 170 18 - 25
Madeira 140 - 150 1 140 - 150 1¼ - 1½h
Rich Fruit 130 - 140 1 140 - 150 2¼ - 2½h
Christmas are not 130 - 140 1 130 - 140 3 - 4½h
depen ds on size
Gingerbread 140 - 150 1 140 - 150 1¼ - 1½h
Meringues critical 90 - 100 1 90 - 100 2½ - 3h
Flapjack 170 - 180 1 170 - 180 25 - 30
Shortbread 130 - 140 1 140 - 150 45 - 65
Casseroles: Beef/Lamb but ensure 140 - 160 1* 140 - 160 2½ - 3h
Chicken 180 - 190 1* 180 - 190 1¼ - 1½h
Convenienc e Foods Follow manufacturer’s instructions
Fish that oven 170 - 190 1 170 - 190 20 - 30
Fish Pie (Potato Topped) 190 - 200 1* 190 - 200 20 - 25
Fruit Pies, Crumbles 190 - 200 1 190 - 200 40 - 50
Milk Puddings shelves 130 - 140 1 140 - 150 1½ - 2h
Pasta Lasagne etc. 190 - 200 1 170 - 180 40 - 45
Pastry: Choux are 190 - 200 1 180 - 190 30 - 35
Eclairs, Profiteroles 170 - 180 1 170 - 180 20 - 30
Flaky/Puff Pies 210 - 220 1* 210 - 220 25 - 40
Shortcrust Mince Pies evenly 190 - 200 1 190 - 200 15 - 20
Meat Pies 190 - 210 1* 190 - 210 25 - 35
Quiche, Tarts, Flans 180 - 210 1 180 - 200 25 - 45
spaced
Roasting Meat, Poultry 160 - 180 1* 160 - 180 see roasting
chart
Scones when more 210 - 220 1 220 - 230 8 - 12
Shepherd’s Pie 190 - 200 1* 190 - 200 30 - 40
Soufflés 170 - 180 1 170 - 180 20 - 30
Vegetables: Baked Jacket Potatoes than one is 180 - 190 1 180 - 190 1 - 1½h
Roast Potatoes 180 - 190 1 180 - 190 1 - 1½h
Yorkshire Puddings: Large used 210 - 220 1 200 - 210 25 - 40
Individual 200 - 210 1 200 - 210 15 - 25
* = Shelf on the oven base.
Note: Shelf positions are counted from the bottom of the oven.
Page 18
18
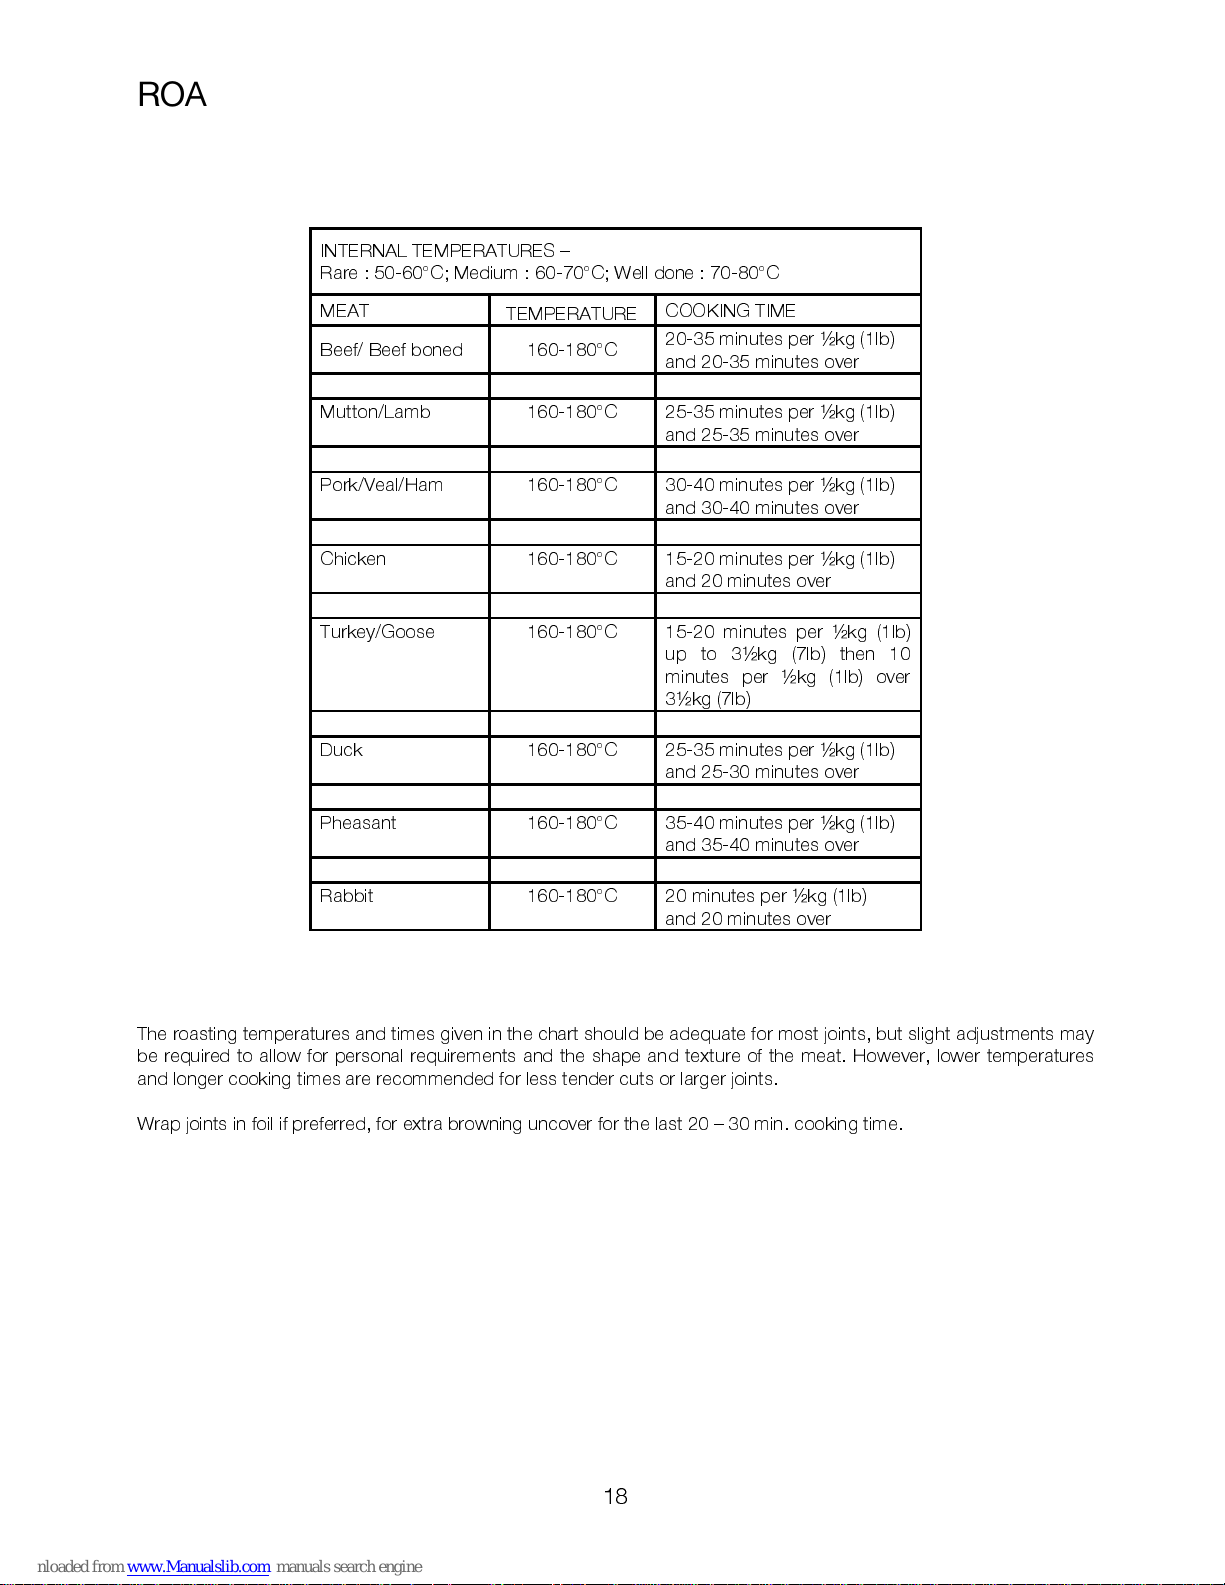
ROASTING CHART
INTERNAL TEMPERATURES –
Rare : 50-60°C; Medium : 60-7 0 °C; Well done : 70-80°C
MEAT
TEMPERATURE
COOKING TIME
Beef/ Beef boned 160-180°C
20-35 minutes per ½kg (1lb)
and 20-35 minutes over
Mutton/Lamb 160-180°C 25-35 minutes per ½kg (1lb)
and 25-35 minutes over
Pork/Veal/Ham 160-180°C 30-40 minutes per ½kg (1lb)
and 30-40 minutes over
Chicken 160-180°C 15-20 minutes per ½kg (1lb)
and 20 minutes over
Turkey/Goose 160-180°C 15-20 minutes per ½kg (1lb)
up to 3½kg (7lb) then 10
minutes per ½kg (1lb) over
3½kg (7lb)
Duck 160-180°C 25-35 minutes per ½kg (1lb)
and 25-30 minutes over
Pheasant 160-180°C 35-40 minutes per ½kg (1lb)
and 35-40 minutes over
Rabbit 160-180°C 20 minutes per ½kg (1lb)
and 20 minutes over
The roasting temperatures and times given in the chart should be adequate for most joints, but slight adjustments may
be required to allow for personal requirements and the shape and texture of the meat. However, lower temperatures
and longer co oking times are recommended for less tender cuts or larger joints.
Wrap joints in foil if preferred, for extra browning unco ver for the last 20 – 30 min. cooking time.
Page 19
19
DEFROST FEATURE
This main oven function defrosts most foods faster
than some conventional methods. It is particularly
suitable for delicate frozen foods which are to be
served cold e.g. cream filled gateaux, cakes covered
with icings or frostings, cheesecakes, biscuits, scones,
etc.
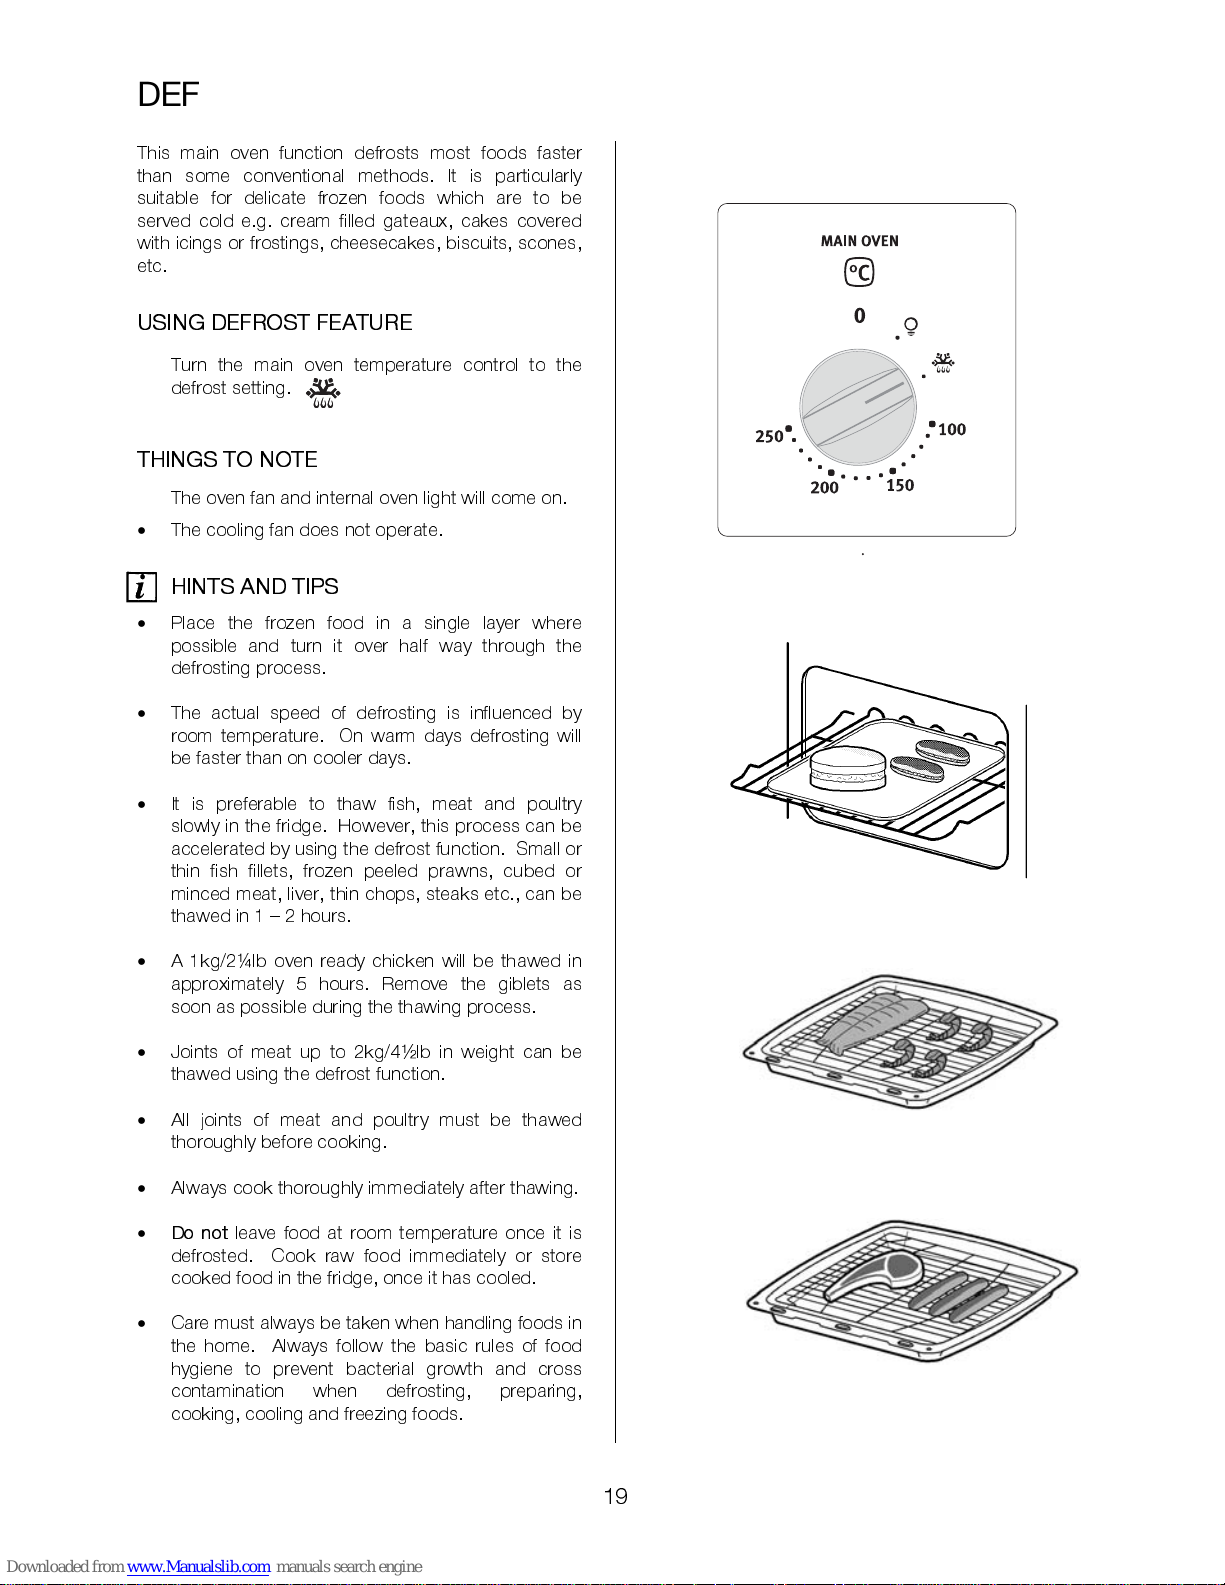
USING DEFR OST F EATURE
•
Turn the main oven temperature control to the
defrost setting.
THINGS TO NO TE
•
The oven fan and int ernal oven light will come on.
•
The cooling fan d oes n o t operate.
HINTS AND TI PS
•
Place the frozen food in a single layer where
possible and turn it over half way through the
defrosting process.
•
The actual speed of defrosting is influenced by
room temperature. On warm days defrosting will
be faster than on cooler days.
•
It is preferable to thaw fish, meat and poultry
slowly in the fridge. However, this process can be
accelerated by using the defrost function. Small or
thin fish fillets, frozen peeled prawns, cubed or
minced meat, liver, thin chops, steaks etc., can be
thawed in 1 – 2 hours.
•
A 1kg/2¼lb oven ready chicken will be thawed in
approximately 5 hours. Remove the giblets as
soon as possible during the thawing process.
•
Joints of meat up to 2kg/4½lb in weight can be
thawed using the defrost fu nction.
•
All joints of meat and poultry must be thawed
thoroughly before cooking.
•
Always cook thoroughly immediately after thawing.
•
Do not
leave food at room temperature once it is
defrosted. Cook raw food immediately or store
cooked food in the fridge, once it has cooled.
•
Care must always be taken when handling foods in
the home. Always follow the basic rules of food
hygiene to prevent bacterial growth and cross
contamination when defrosting, preparing,
cooking, cooling and freezing foods.
Page 20
20
CARE AND CLEANING
Before cleaning always allow the cooling fan to
cool the appliance down before switching off at
the electricity supply.
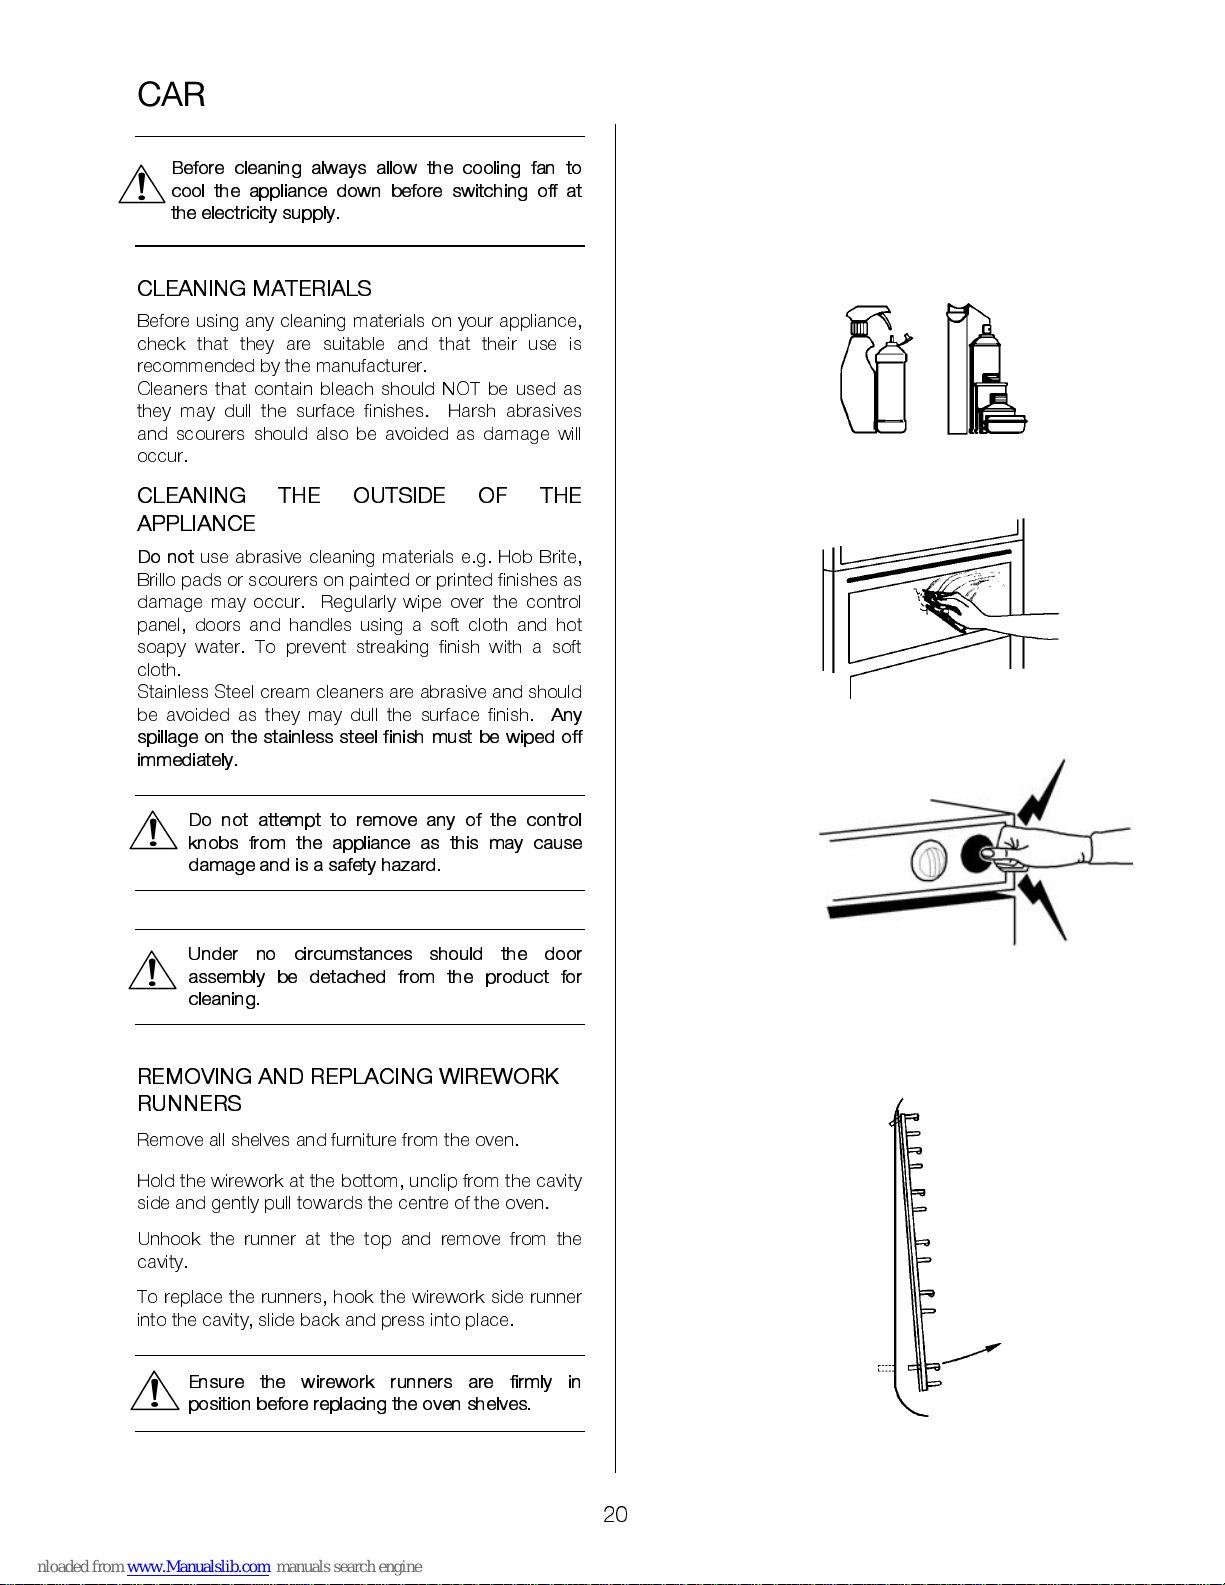
CLEANING MATERIALS
Before using any cleaning materials on your appliance,
check that they are suitable and that their use is
recommended by the manufacturer.
Cleaners that contain bleach should NOT be used as
they may dull the surface finishes. Harsh abrasives
and scourers should also be avoided as damage will
occur.
CLEANING THE OUTSIDE OF THE
APPLIANCE
Do not
use abrasive cleaning materials e.g. Hob Brite,
Brillo pads or scourers on pain ted or printed finishes as
damage may occur. Regularly wipe over the control
panel, doors and handles using a soft cloth and hot
soapy water. To prevent streaking finish with a soft
cloth.
Stainless Steel cream cleaners are abrasive and should
be avoided as they may dull the surface finish.
Any
spillage on the stainless steel f inish must be w iped off
immediately.
Do not attempt to remove any of the control
knobs from the appliance as this may cause
damage and is a safety hazard.
Under no circumstances should the door
assembly be detached from the product for
cleaning.
REMOVING AND REPL AC I NG W IREW ORK
RUNNERS
Remove all shelves and furniture from the oven.
Hold the wirework at the bottom, unclip from the cavity
side and gently pull towards the centre of the oven.
Unhook the runner at the top and remove from the
cavity.
To replace the runners, hook the wirework side runner
into the cavity, slide back and press into place.
Ensure the wirework runners are firmly in
position before replacing th e oven shel ves.
Page 21
21
CLEANING INSIDE THE OVENS
The grill/top oven and main oven compartments are
coated with a special Stayclean coating. They should
not be cleaned manually.
The vitreous enamel main oven base and grill
compartment base can be cleaned using normal oven
cleaners with care. Ensure that the manufacturers
instructions are followed and that all parts are well
rinsed afterwards.
Aerosol cleaners must not come into contact
with elements, the door seal, or any painted
finishes as this may cause damage.
HINTS AND TI PS
Aerosol cleaners must not be used on Stayclean
surfaces.
Stayclean surfaces destroy splashes of food and fats
when the oven temperature is raised to around 220°C.
It is a good idea to run the oven for an hour or two per
week to en sure conti nued good perform ance from th e
Stayclean finish.
Slight discolouration and polishing of the Stayclean
surfaces may occur in time. This
DOES NO T
affect the
Stayclean prope rties in any way.
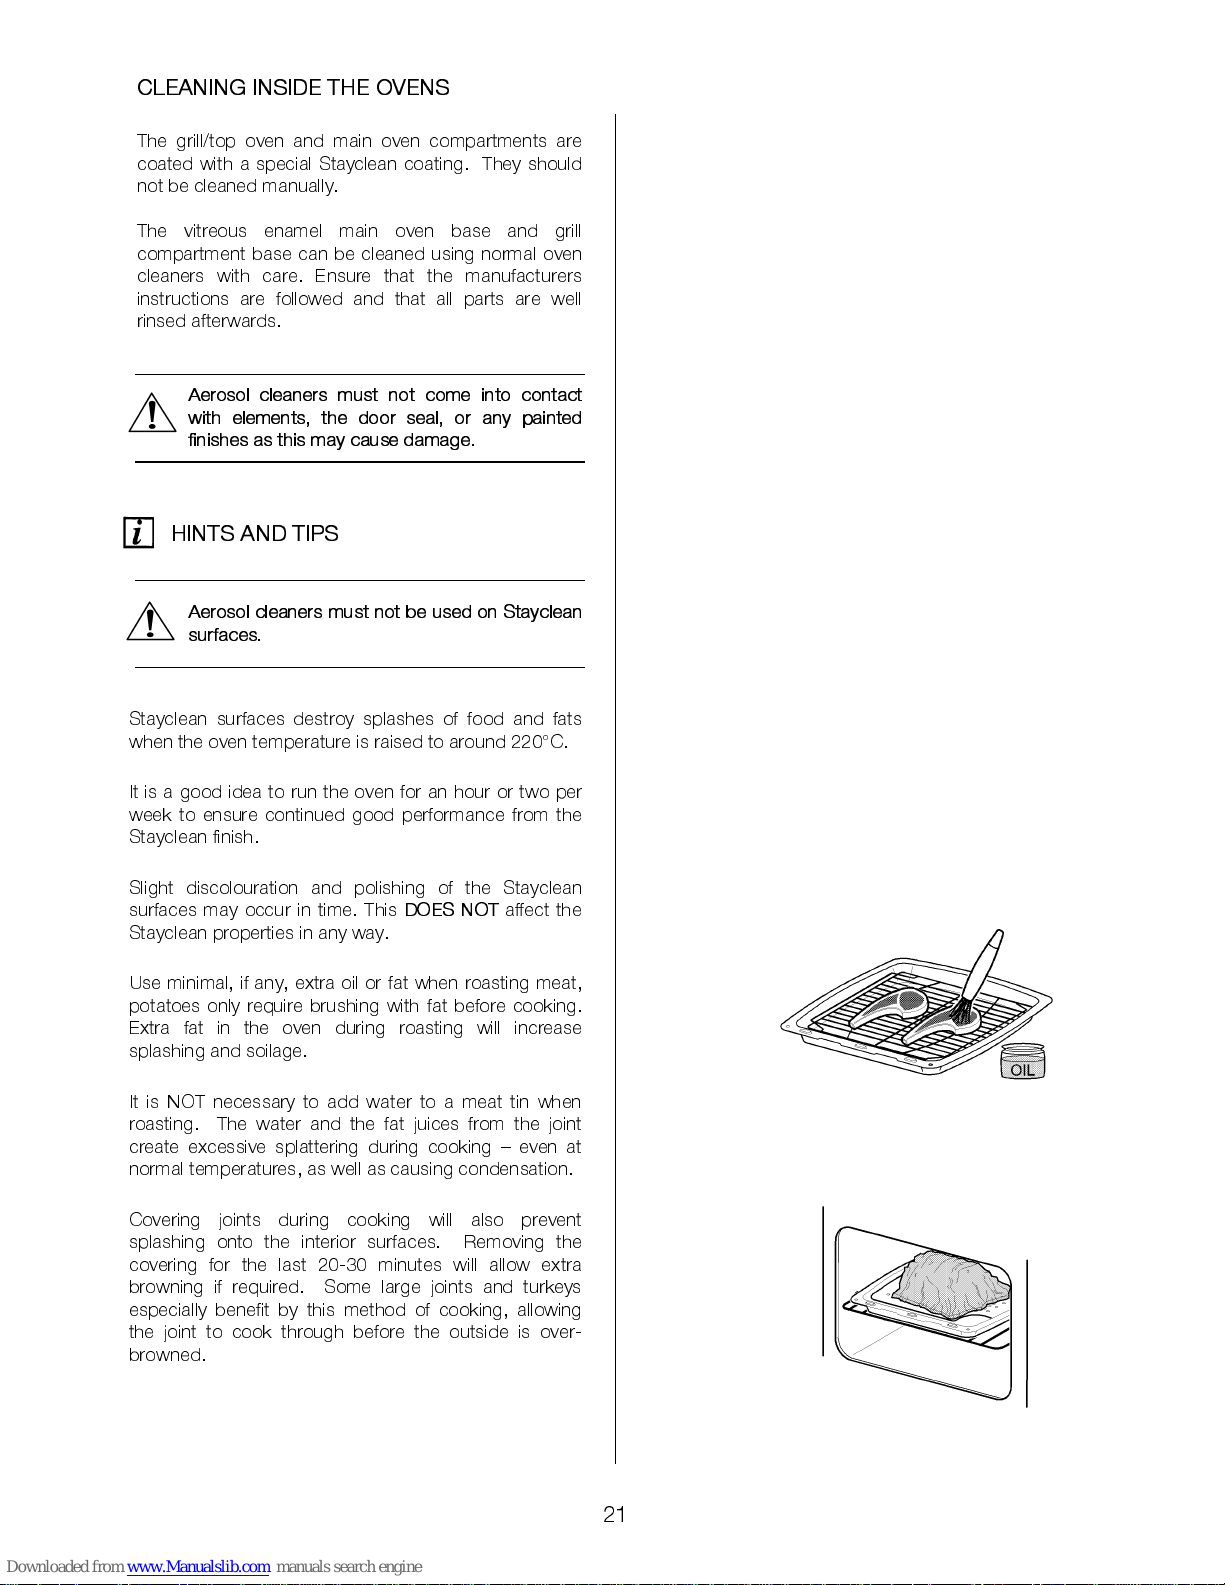
Use minimal, if any, extra oil or fat when roasting meat,
potato es onl y require brushing with fa t before cooking.
Extra fat in the oven during roasting will increase
splashing and soilage.
It is NOT necessary to add water to a meat tin when
roasting. The water and the fat juices from the joint
create excessive splattering during cooking – even at
normal temperatures, as well as causing condensation.
Covering joints during cooking will also prevent
splashing onto the interior surfaces. Removing the
covering for the last 20-30 minutes will allow extra
browning if required. Some large joints and turkeys
especially benefit by this method of cooking, allowing
the joint to cook through before the outside is over-
browned.
Page 22
22
CLEANING THE DOOR(S)
To prevent damaging or weakening the door
glass panels avoid the use of the following:
•
House h o ld de te r g en ts an d ble a c he s
•
Impregnated pads unsuitable for non-stic k
saucepans
•
Brillo/Ajax pads or steel wool pads
•
Chemical oven pads or aerosols
•
Rust removers
•
Bath/Sink stain removers
The outer oven door glass panels are removable for
cleaning.
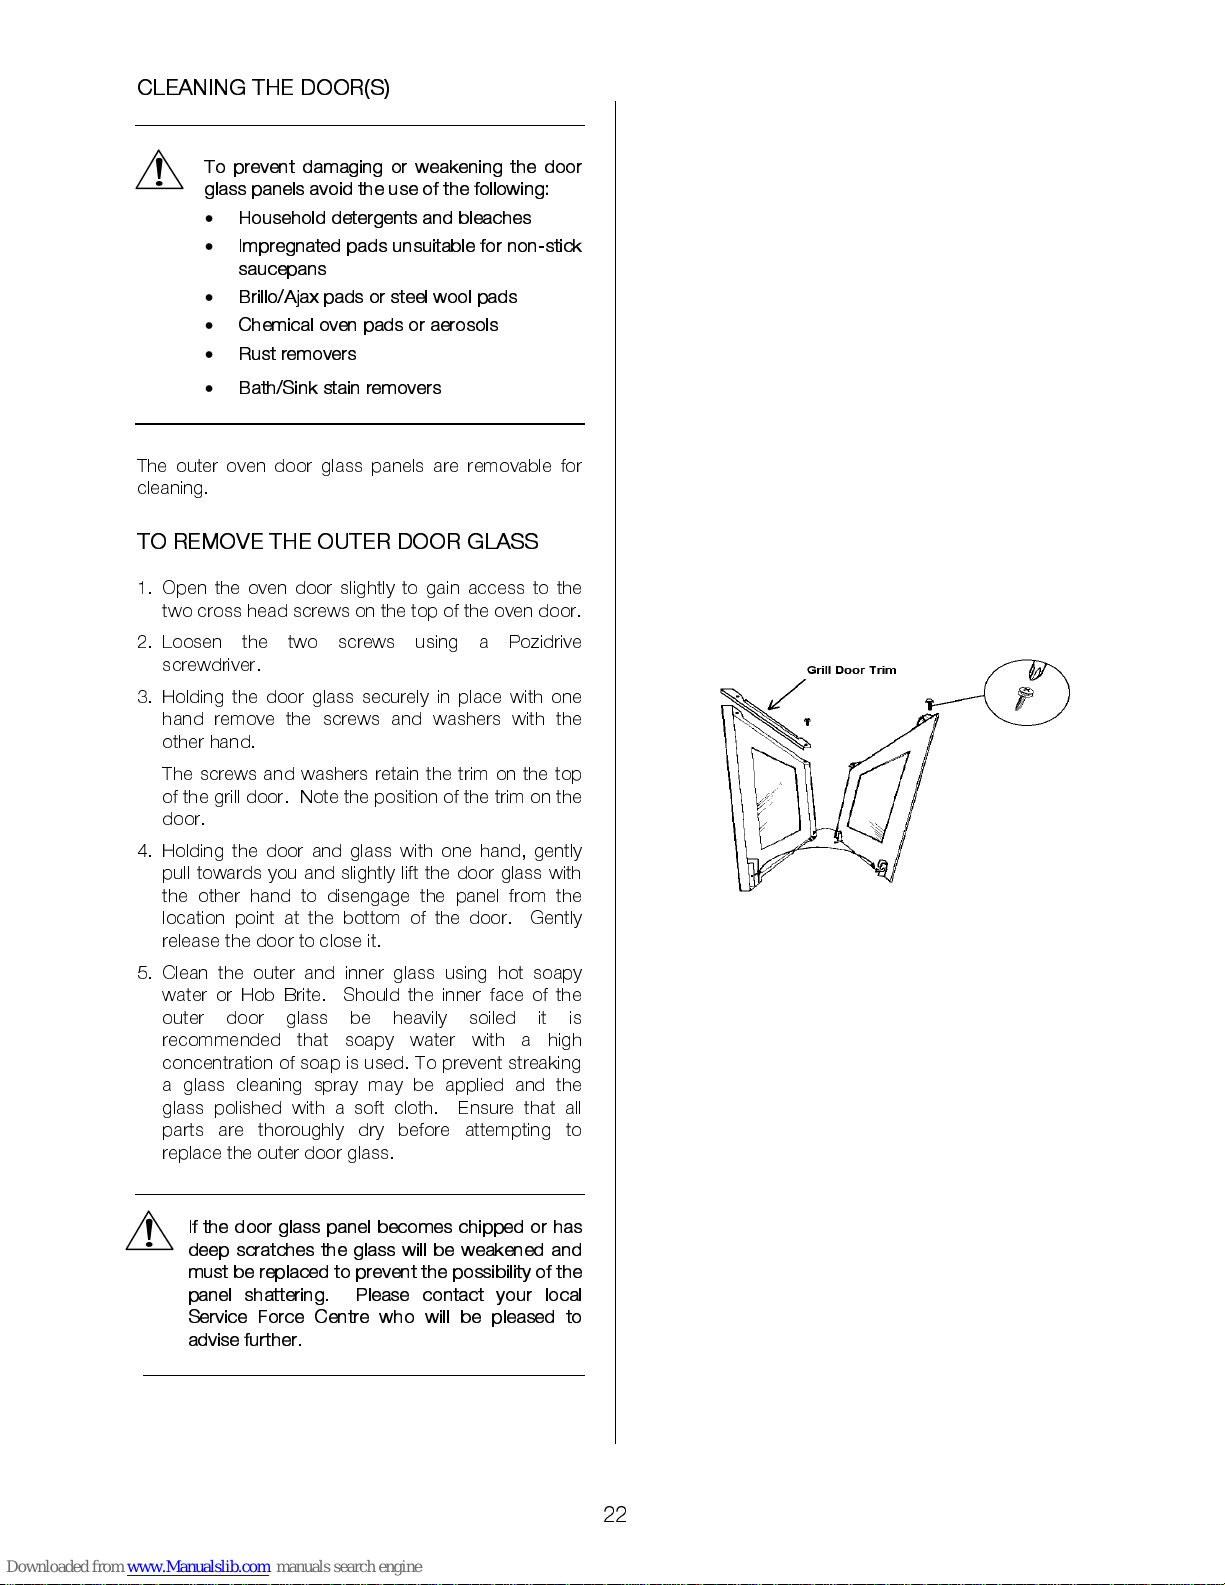
TO REMOVE THE OUTER DOOR GLASS
1. Open the oven door slightly to gain access to the
two cross head screws on the top of the oven door.
2. Loosen the two screws using a Pozidrive
screwdriver.
3. Holding the door glass securely in place with one
hand remove the screws and washers with the
other hand.
The screws and washers retain the trim on the top
of the grill door. Note the position of the trim on the
door.
4. Holding the door and glass with one hand, gently
pull towards you and slightly lift the door glass with
the other hand to disengage the panel from the
location point at the bottom of the door. Gently
release the door to close it.
5. Clean the outer and inner glass using hot soapy
water or Hob Brite. Should the inner face of the
outer door glass be heavily soiled it is
recommended that soapy water with a high
concentration of soap is used. To prevent streaking
a glass cleaning spray may be applied and the
glass polished with a soft cloth. Ensure that all
parts are thoroughly dry before attempting to
replace the outer door glass.
If the door glass panel becomes chipped or has
deep s crat ches t he gl ass will be w eakened and
must be replaced to prevent the possibility of the
panel shattering. Please contact your local
Service Force Centre who will be pleased to
advise further.
Page 23
23
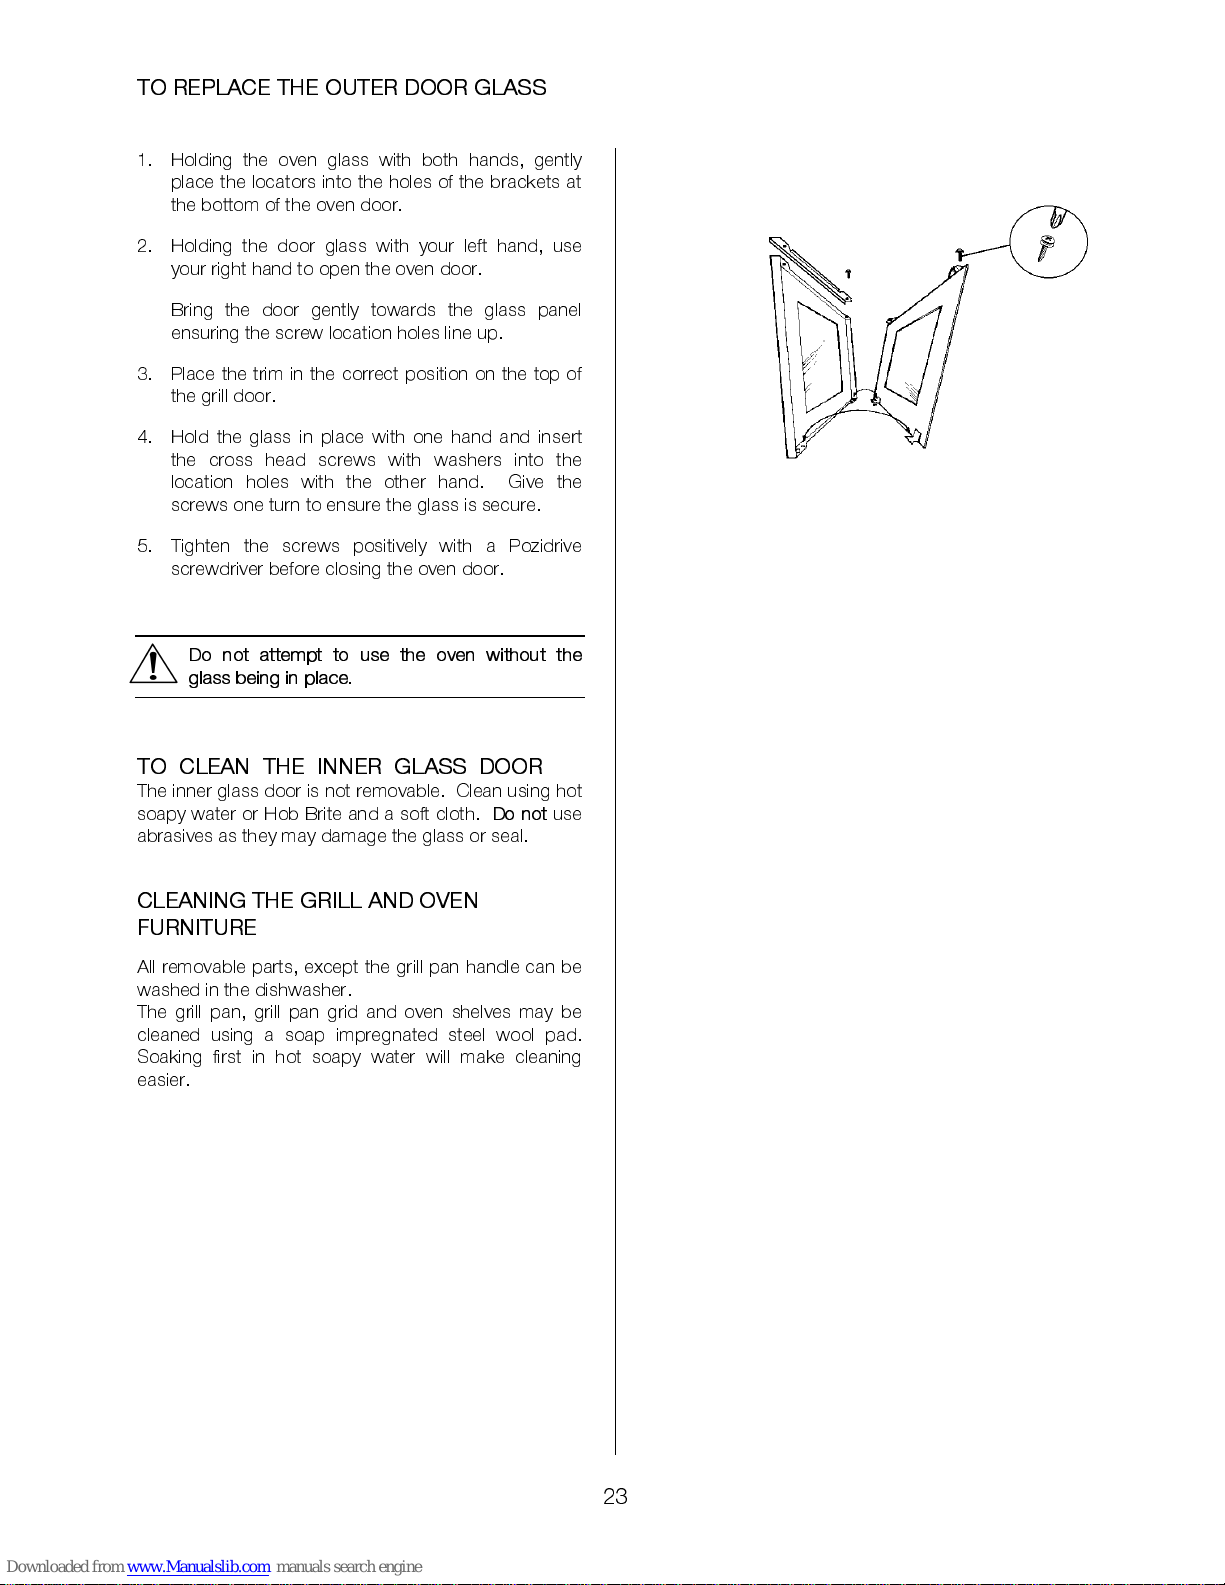
TO REPLACE TH E OU T ER DO OR GLA SS
1. Holding the oven glass with both hands, gently
place the locators into the holes of the brackets at
the bottom of the oven door.
2. Holding the door glass with your left hand, use
your right hand to open the oven door.
Bring the door gently towards the glass panel
ensuring the screw location holes line up.
3. Place the trim in the correct position on the top of
the grill door.
4. Hold the glass in place with one hand and insert
the cross head screws with washers into the
location holes with the other hand. Give the
screws one turn to ensure the glass is secure.
5. Tighten the screws positively with a Pozidrive
screwdriver before closing the oven door.
Do not attempt to use the oven without the
glass being in place.
TO CLEAN THE INNER GLASS DOOR
The inner glass door is not removable. Clean using hot
soapy water or Hob Brite and a soft cloth.
Do not
use
abrasives as they may damage the glass or seal.
CLEANIN G T HE GRI L L AND O V EN
FURNITURE
All removable parts, except the grill pan handle can be
washed in the dishwash er.
The grill pan, grill pan grid and oven shelves may be
cleaned using a soap impregnated steel wool pad.
Soaking first in hot soapy water will make cleaning
easier.
Page 24
24
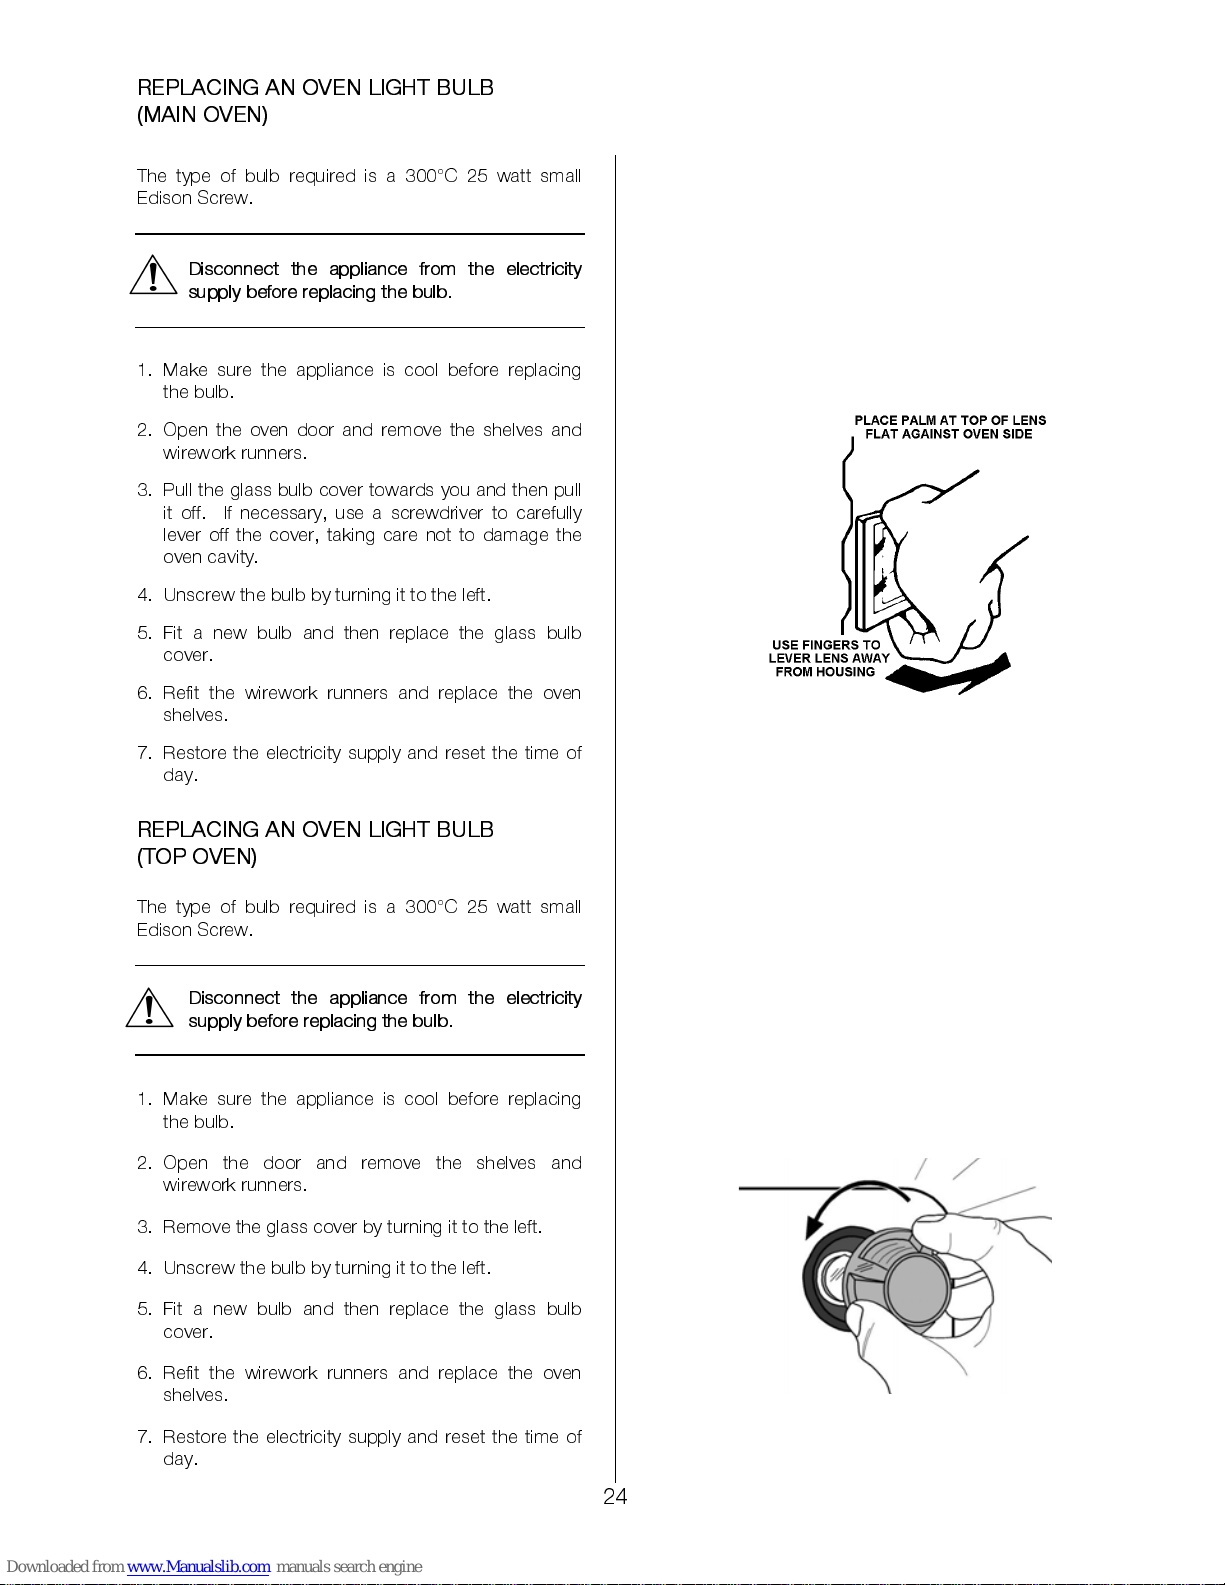
REPLACING AN O V EN LI G H T B UL B
(MAIN OVEN)
The type of bulb required is a 300°C 25 watt small
Edison Screw.
Disconnect the appliance from the electricity
supply before replacin g the bu lb.
1. Make sure the appliance is cool before replacing
the bulb.
2. Open the oven door and remove the shelves and
wirework runners.
3. Pull the glass bulb cover towards you and then pull
it off. If necessary, use a screwdriver to carefully
lever off the cover, taking care not to damage the
oven cavity.
4. Unscrew the bulb by turning it to the left.
5. Fit a new bulb and then replace the glass bulb
cover.
6. Refit the wirework runners and replace the oven
shelves.
7. Restore the electricity supply and reset the time of
day.
REPLACING AN O V EN LI G H T B UL B
(TOP OVEN)
The type of bulb required is a 300°C 25 watt small
Edison Screw.
Disconnect the appliance from the electricity
supply before replacin g the bul b.
1. Make sure the appliance is cool before replacing
the bulb.
2. Open the door and remove the shelves and
wirework runners.
3. Remove the glass cover by turning it to th e left.
4. Unscrew the bulb by turning it to the left.
5. Fit a new bulb and then replace the glass bulb
cover.
6. Refit the wirework runners and replace the oven
shelves.
7. Restore the electricity supply and reset the time of
day.
Page 25
25
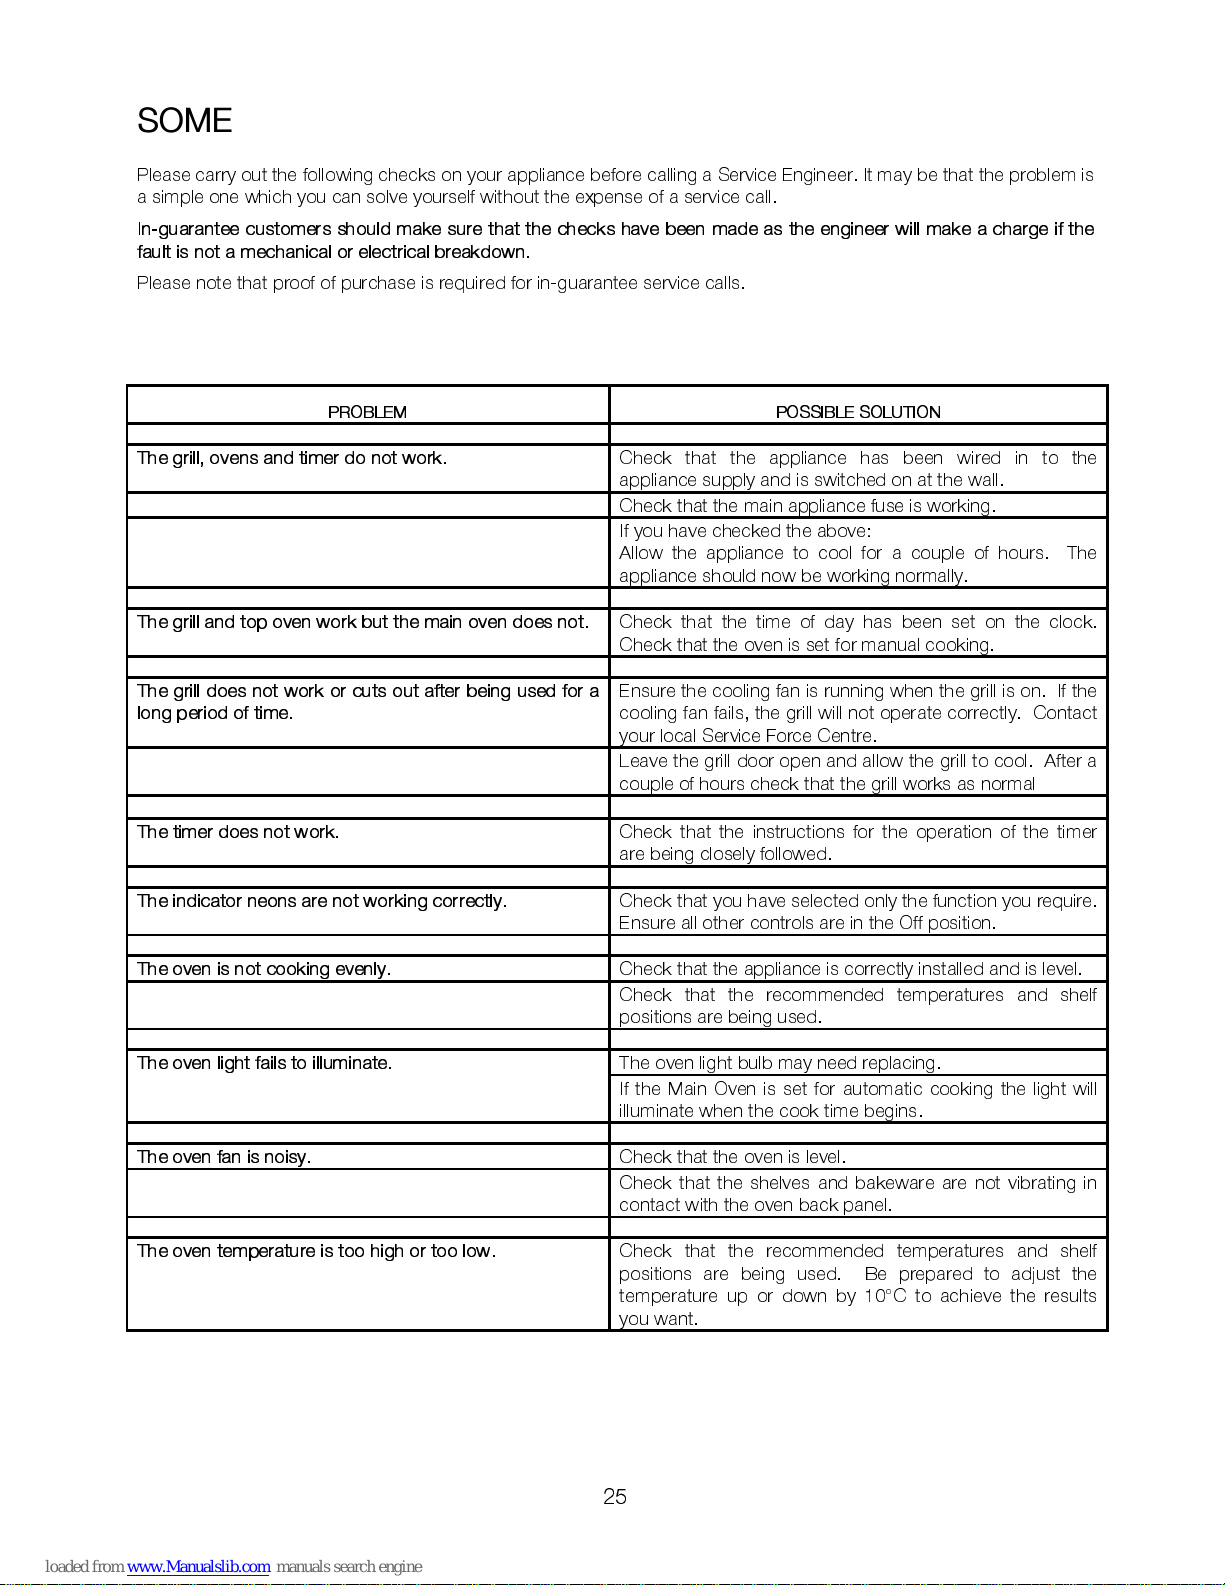
SOMETHING NOT WORKING
Please carry out the following checks on your appliance before calling a Service Engineer. It may be that the problem is
a simple one which you c an solve yourself without the expense of a service call.
In-guarantee customers should make sure that the checks have been made as the engineer will make a charge if the
fault is not a mechanical or electri cal brea k down.
Please note that proof of purchase is required for in-guarantee service calls.
PROBLEM POSSIBLE SOLUTION
The grill, ovens and timer do not work.
Check that the appliance has been wired in to the
appliance supply and is switched on at the wall.
Check that the main app liance fuse is working.
If you have checked the a b ove:
Allow the appliance to cool for a couple of hours. The
appliance should now be working normally.
The grill and top oven work b ut the main oven does n ot.
Check that the time of day has been set on the clock.
Check that the oven is set for manual cooking.
The grill does not work or cuts out after being used for a
long period of time.
Ensure the cooling fan is running when the grill is on. If the
cooling fan fails, the grill will not operate correctly. Contact
your local Service Force Centre.
Leave the grill door open and allow the grill to cool. After a
couple of hours che ck that the grill works as normal
The timer does not work.
Check that the instructions for the operation of the timer
are being closely followe d.
The indicator neons ar e not wor king co rre ctly.
Check that you have selected only the function you require.
Ensure all other controls are in the Off position.
The oven is not cooking evenly.
Check that the appliance is correctly installed and is level.
Check that the recommended temperatures and shelf
positions are being used.
The oven light bulb may nee d replacing.
The oven light fails to illuminate.
If the Main Oven is set for automatic cooking the light will
illuminate when the cook time begins.
The oven fan is noisy.
Check that the oven is level.
Check that the shelves and bakeware are not vibrating in
contact with the oven back panel.
The oven temperature is too high or too low.
Check that the recommended temperatures and shelf
positions are being used. Be prepared to adjust the
temperature up or down by 10°C to achieve the results
you want.
Page 26
26
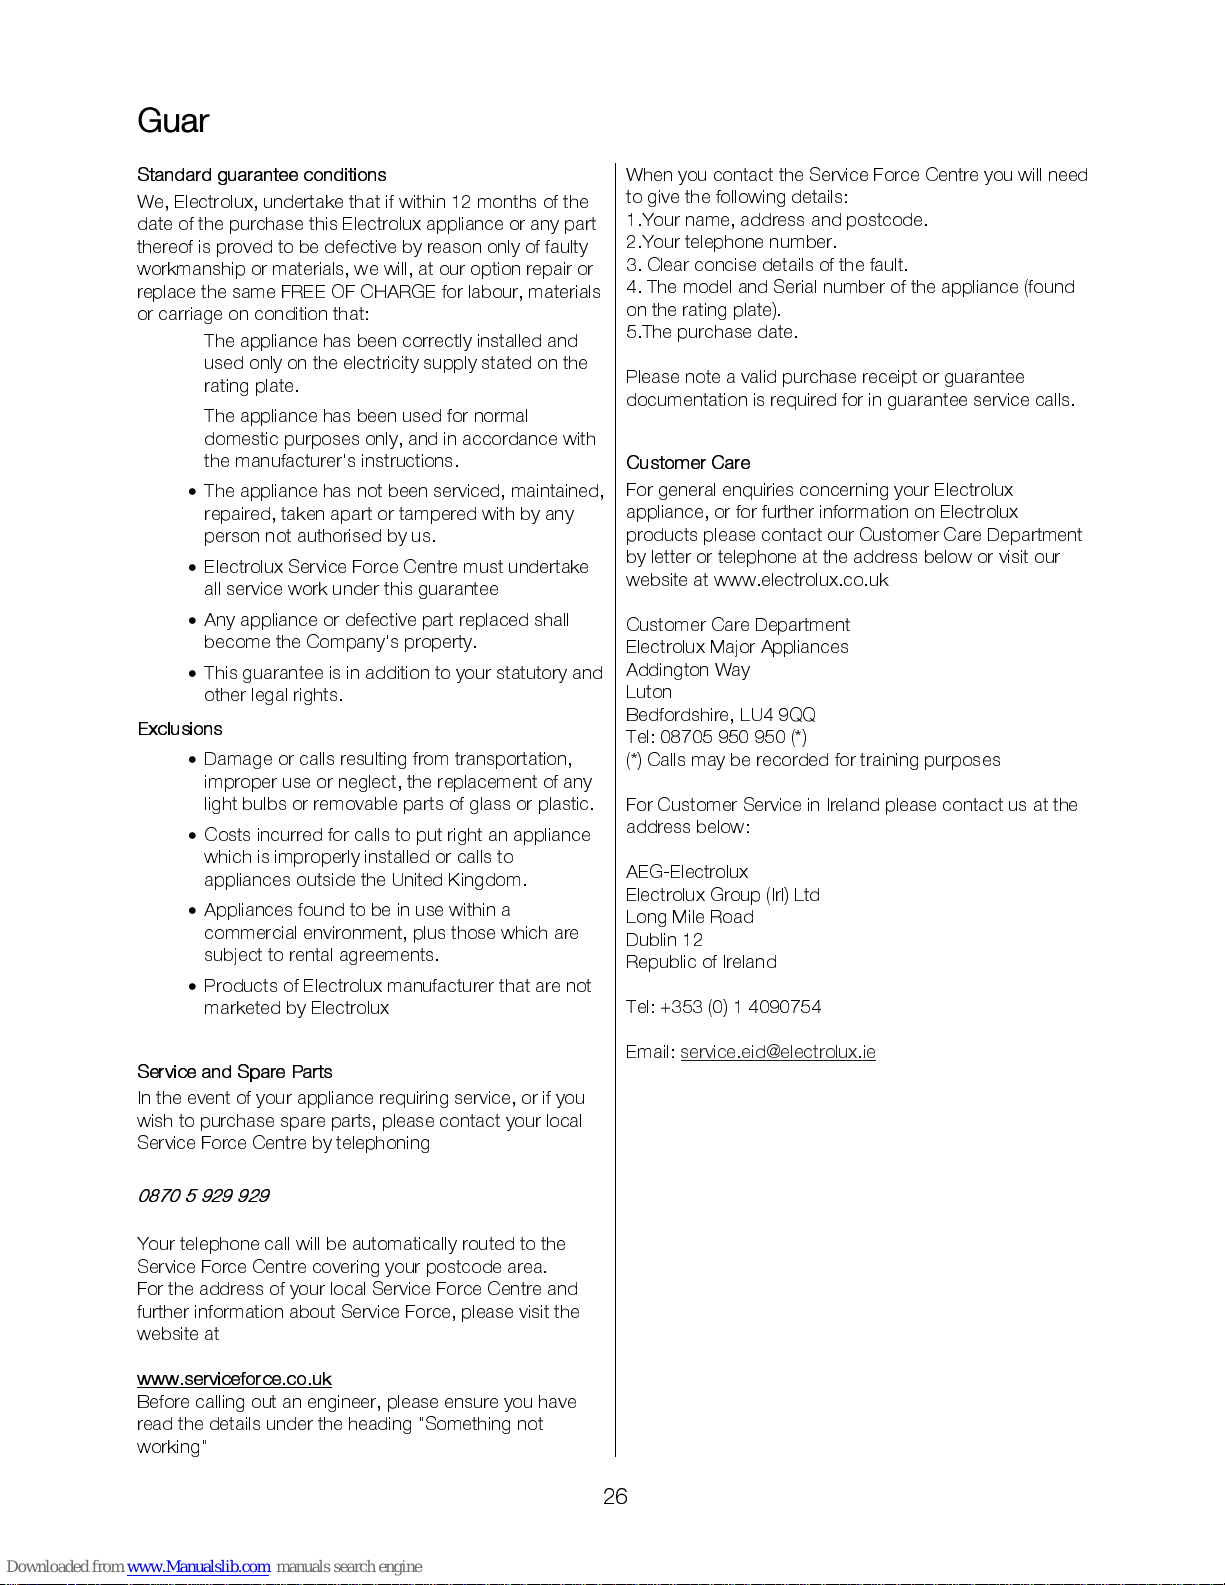
Guarantee / Customer care
Standard guarantee con ditions
We, Electrolux, undertake that if within 12 months of the
date of the purchase this Electrolux appliance or any part
thereof is proved to be defective by r eason only of faulty
workmanship or m aterials, we will, at our option repair or
replace the same FR EE OF CHARGE for labour, materials
or carriage on condition that:
•
The appliance has been correctly installe d and
used only on the electricity supply stated on the
rating plate.
•
The appliance has been used for normal
domestic purposes only, and in accordance with
the manufacture r's instructions.
•
The appliance has not been serviced, maintained,
repaired, taken apart or tampered with by any
person not authorised by us.
•
Electrolux Service Force Centre must undertake
all service work under this guarantee
•
Any appliance o r defective part replaced shall
become the Company's p roperty.
•
This guarantee is in addition to your statutory and
other legal rights.
Exclusions
•
Damage or calls resulting from transportation,
improper use or neglect, the replacement of any
light bulbs or removable parts of glass or plastic.
•
Costs incurred for calls to put right an appliance
which is improperly installed or calls to
appliances outside the United Kingdom.
•
Appliances found to b e in us e within a
commercial environment, plus those which are
subject to rental agreements.
•
Products of Electrolux manufacturer that are not
marketed by Electrolux
Service and Spare Parts
In the event of your applian ce requiring service, or if you
wish to purchase spare p arts, please contact your local
Service Force Centre by telephoning
0870 5 929 929
Your telephone call will be automatically routed to the
Service Force Centre covering your postcod e area.
For the address of your local Service Force Centre and
further information about Service Force, please visit the
website at
www.serviceforce.co.uk
Before calling out an engineer, please ensure you have
read the details under the heading "Something not
working"
When you contact the Service Force Centre you will need
to give the following details:
1.Your name, address and postcode.
2.Your telephone number.
3. Clear concise details of the fault.
4. The model and Serial number of the appliance (found
on the rating plate).
5.The purchase date.
Please note a valid pur c hase receipt or guarantee
documentation is required for in guarantee service calls.
Customer Care
For general enquiries concerning your Electrolux
appliance, or for fu rther information on Electrolux
products please contact our Customer Care Dep artment
by letter or telephone at the address below or visit our
website at www.electrolux.co.uk
Customer Care Department
Electrolux Major Appliances
Addington Way
Luton
Bedfordshire, LU4 9QQ
Tel: 08705 950 950 (*)
(*) Calls may be record ed for training purposes
For Customer Service in Ireland please contact us at the
address be low:
AEG-Electrolux
Electrolux Group (Irl) Ltd
Long Mile Road
Dublin 12
Republic of Ireland
Tel: +353 (0) 1 4090754
Email: service.eid@ele ctrolux.ie
Page 27
27
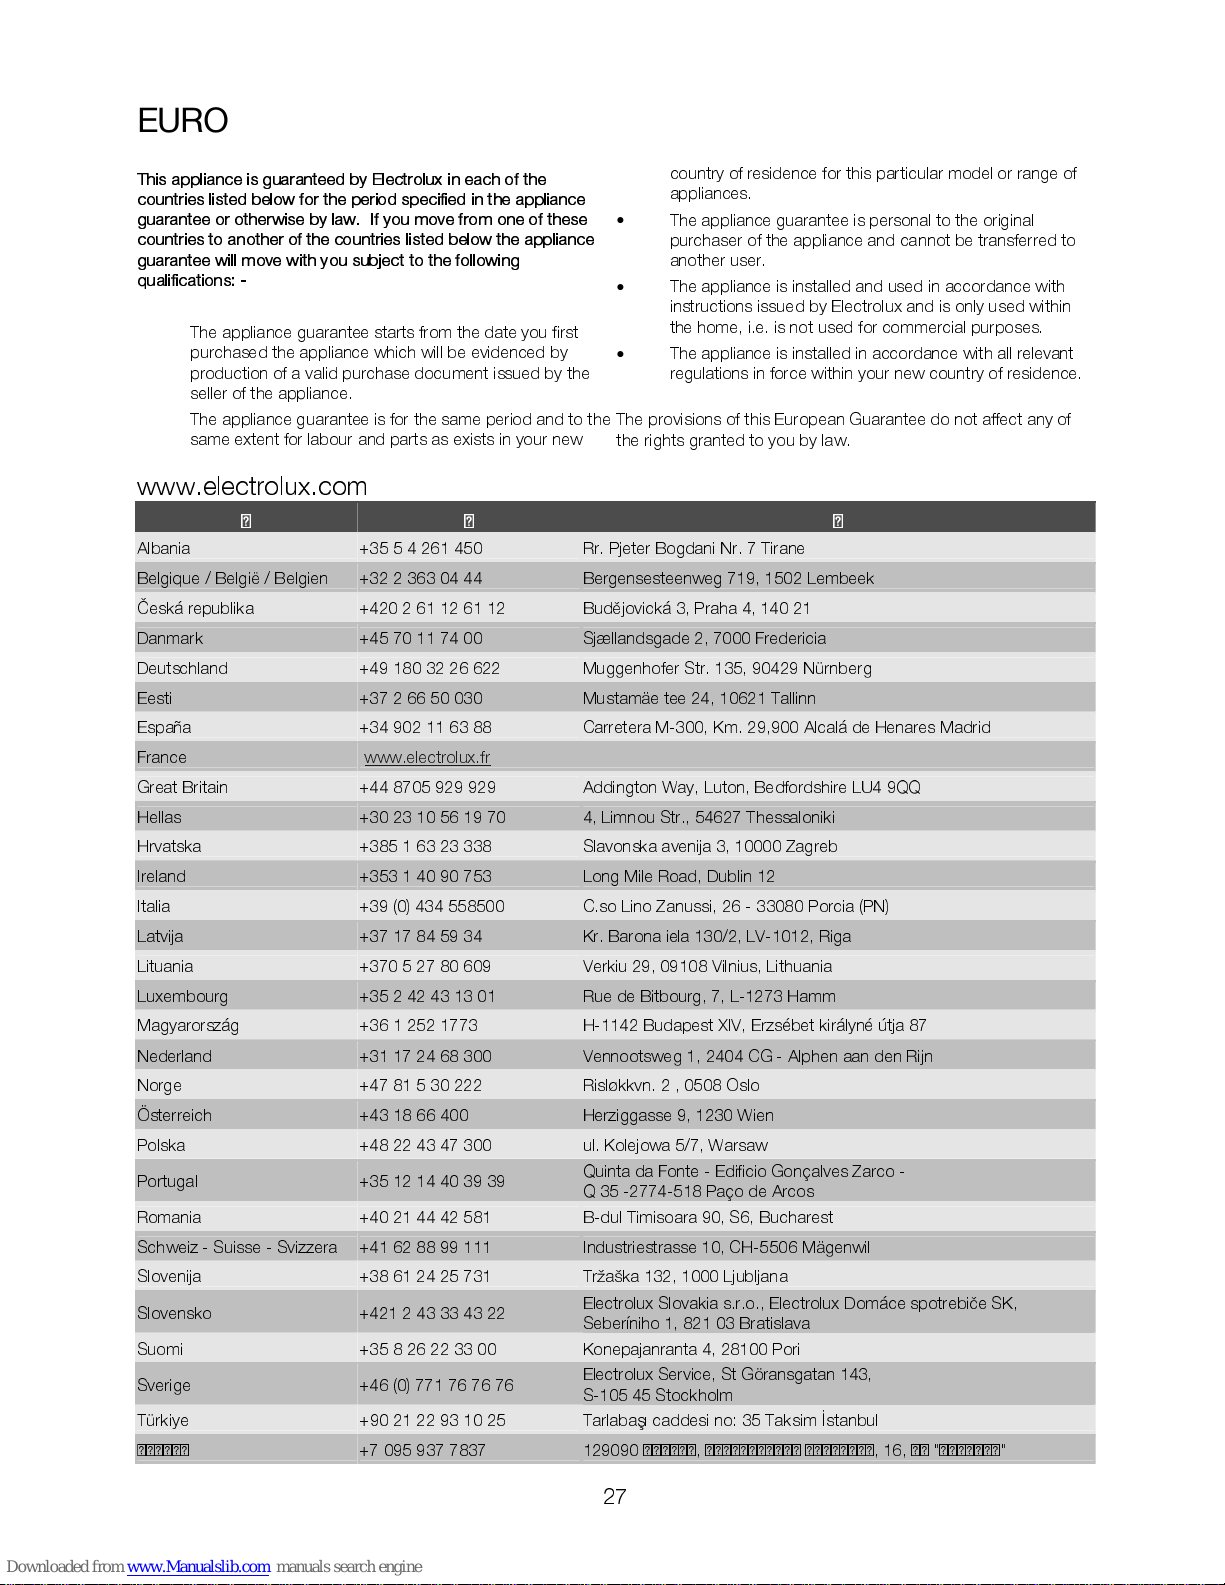
EUROPEAN GUARANTEE
This appliance is guaranteed by Electrolux in each of the
countries listed below for the period specified in the appliance
guarantee or otherwise by law. If you move from one of these
countries to another of the countries listed below the appliance
guarantee will move with you subject to the following
qualifications: -
•
The appliance guarantee starts from the date you first
purchased the appliance which will be evidenced by
production of a valid purchase document issued by the
seller of the applia nc e.
•
The appliance guarantee is for the sam e period and to the
same extent for labour and parts as exists in your new
country of residence for this particular mo del or r ange of
appliances.
•
The appliance guarantee is per sonal to the ori ginal
purchaser of the appliance and cannot be transferred to
another user.
•
The appliance is installed and used in accordance with
instructions issued by Electrolux and is only used within
the home, i.e. is not used for commercial purposes.
•
The appliance is installed in accordance with all relevant
regulations in force within your new country of residence.
The provisions of this European Guarantee do not affect any of
the rights granted to you by law.
www.electrolux.com
Albania +35 5 4 261 450 Rr. Pjeter Bogdani Nr. 7 Tirane
Belgique / België / Belgie n +32 2 363 04 44 Bergensesteenweg 719, 1502 Lembeek
Česká republika +420 2 61 12 61 12 Budějovická 3, Praha 4, 140 21
Danmark +45 70 11 74 00 Sjællandsgade 2, 7000 Fredericia
Deutschland +49 180 32 26 622 Muggenhofer Str. 135, 90429 Nürnberg
Eesti +37 2 66 50 030 Mustamäe te e 24, 10621 Tallinn
España +34 902 11 63 88 Carretera M-300, Km. 29,900 Alcalá de Henares Madrid
France www.electrolux.fr
Great Britain +44 8705 9 29 929 Addington Way, Luton, Bedfordshire LU4 9QQ
Hellas +30 23 10 56 19 70 4, Limnou Str., 54627 Thessaloniki
Hrvatska +385 1 63 23 338 Slavonska avenija 3, 10000 Zagreb
Ireland +353 1 40 90 753 Long Mile Road, Dublin 12
Italia +39 (0) 434 558500 C.so Lino Zanussi , 26 - 33080 Porc ia (PN)
Latvija +37 17 84 59 34 Kr. Barona iela 130/2, LV-1012, Riga
Lituania +370 5 27 80 609 Verkiu 29, 09108 Vilnius, Lithuania
Luxembourg +35 2 42 43 13 01 Rue de Bitbourg, 7, L-1273 Hamm
Magyarország +36 1 252 1773 H-1142 Budapest XIV, Erzsébet királyné útja 87
Nederland +31 17 24 68 300 Vennootsweg 1, 2404 CG - Alphen aan den Rijn
Norge +47 81 5 30 222 Risløkkvn. 2 , 0508 Oslo
Österreich +43 18 66 400 Herziggasse 9, 1230 Wien
Polska +48 22 43 47 300 ul. Kolejowa 5/ 7 , Warsaw
Portugal +35 12 14 40 39 39
Quinta da Fonte - Edificio Gonçalves Zarco -
Q 35 -2774-518 Paço de Arcos
Romania +40 21 44 42 581 B-dul Timisoara 90, S6, Bucharest
Schweiz - Suisse - Svizzera +41 62 88 99 111 Industriestrasse 10, CH-5506 Mägenwil
Slovenija +38 61 24 25 731 Tržaška 132, 1000 Ljubljana
Slovensko +421 2 43 33 43 22
Electrolux Slovakia s.r.o., Electrolux Domáce spotrebiče SK,
Seberíniho 1, 821 03 Bratislava
Suomi +35 8 26 22 33 00 Konepajanranta 4, 28100 Pori
Sverige +46 (0) 771 76 76 76
Electrolux Service, St Göransgatan 143,
S-105 45 Stockholm
Türkiye +90 21 22 93 10 25 Tarlabaşı caddesi no: 35 Taksim İstanbul
+7 095 937 7837 129090 , , 16, ""
Page 28
28
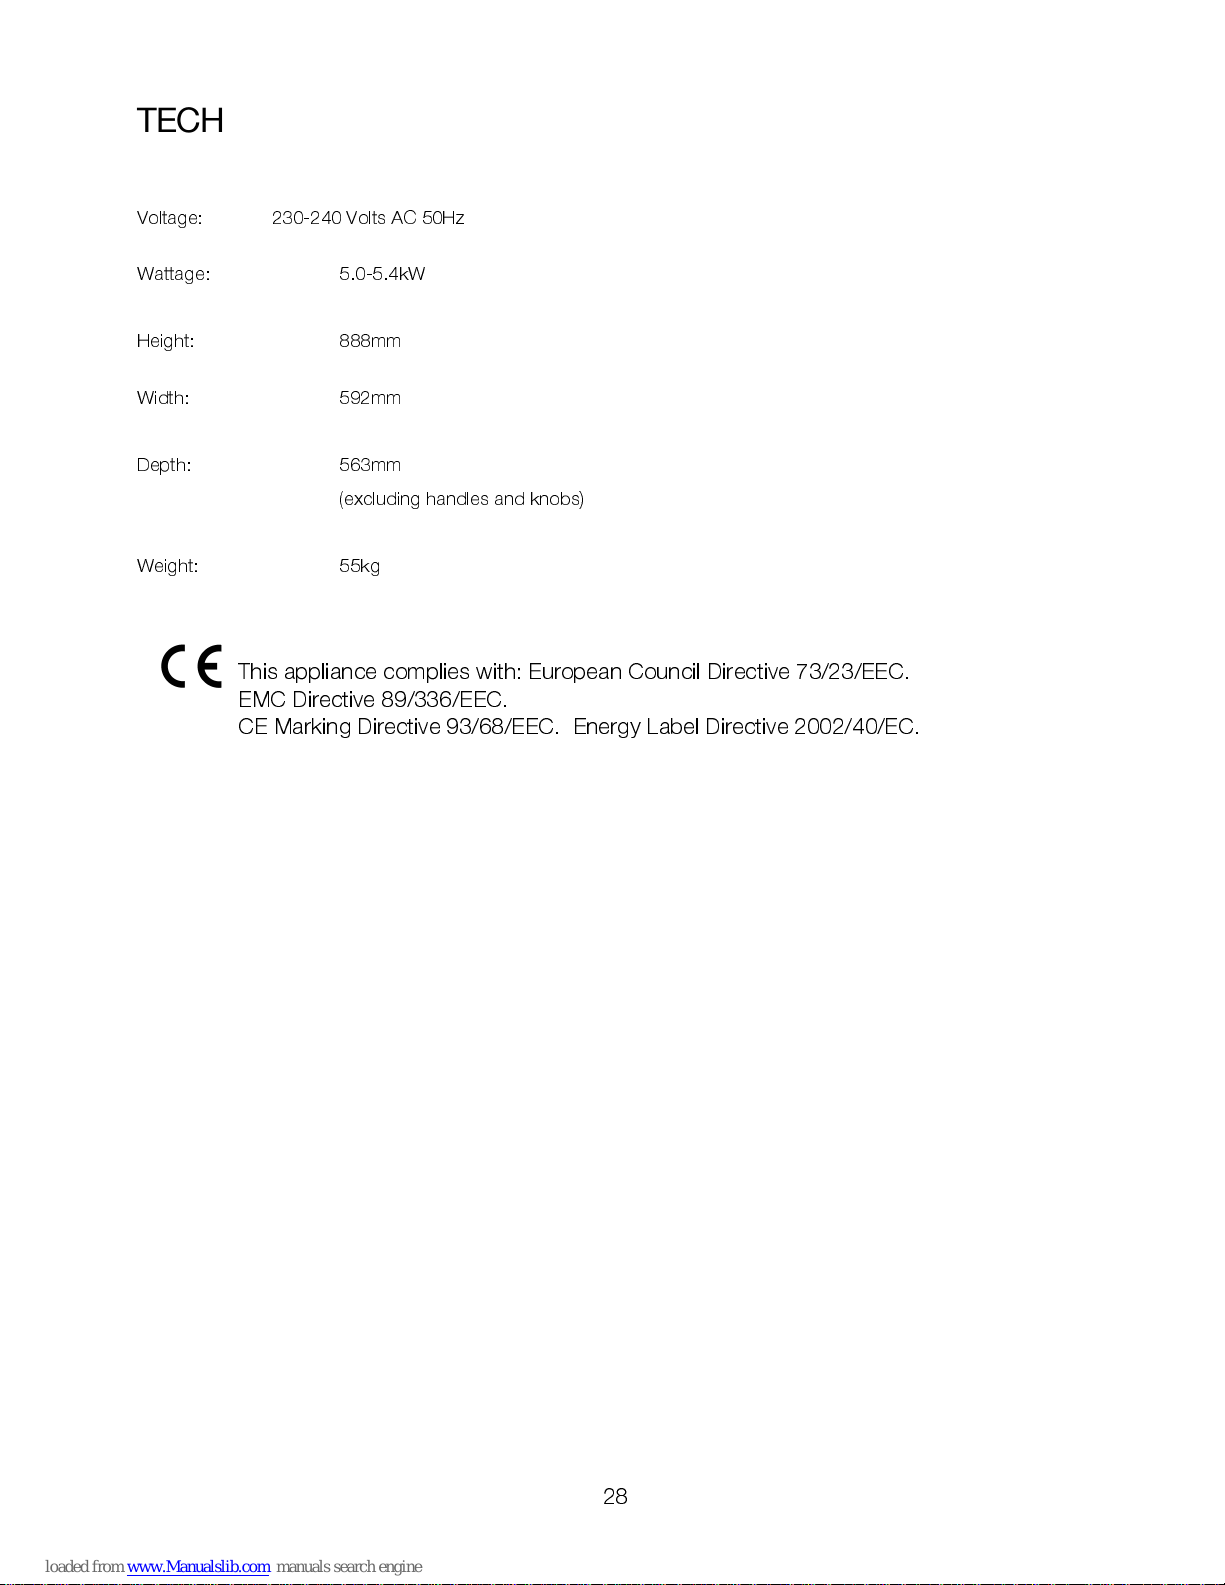
TECHNICAL DETAILS
Voltage: 230-240 Volts AC 50Hz
Wattage: 5.0-5.4kW
Height: 888mm
Width: 592mm
Depth: 563mm
(excluding handles and knobs)
Weight: 55kg
This appliance complies with: European Council Directive 73/23/EEC.
EMC Directive 89/336/EEC.
CE Marking Directive 9 3/68/EE C. Energy Label Directive 2002/40/E C.
Page 29
29
INSTALLATION INSTRUCTIONS
WARNINGS
•
This appliance must be installed by a qualified
electrician/competent person. Safety may be
impaired if installation is not carried out in
accordance with these instructions.
•
This appliance must be earth ed.
•
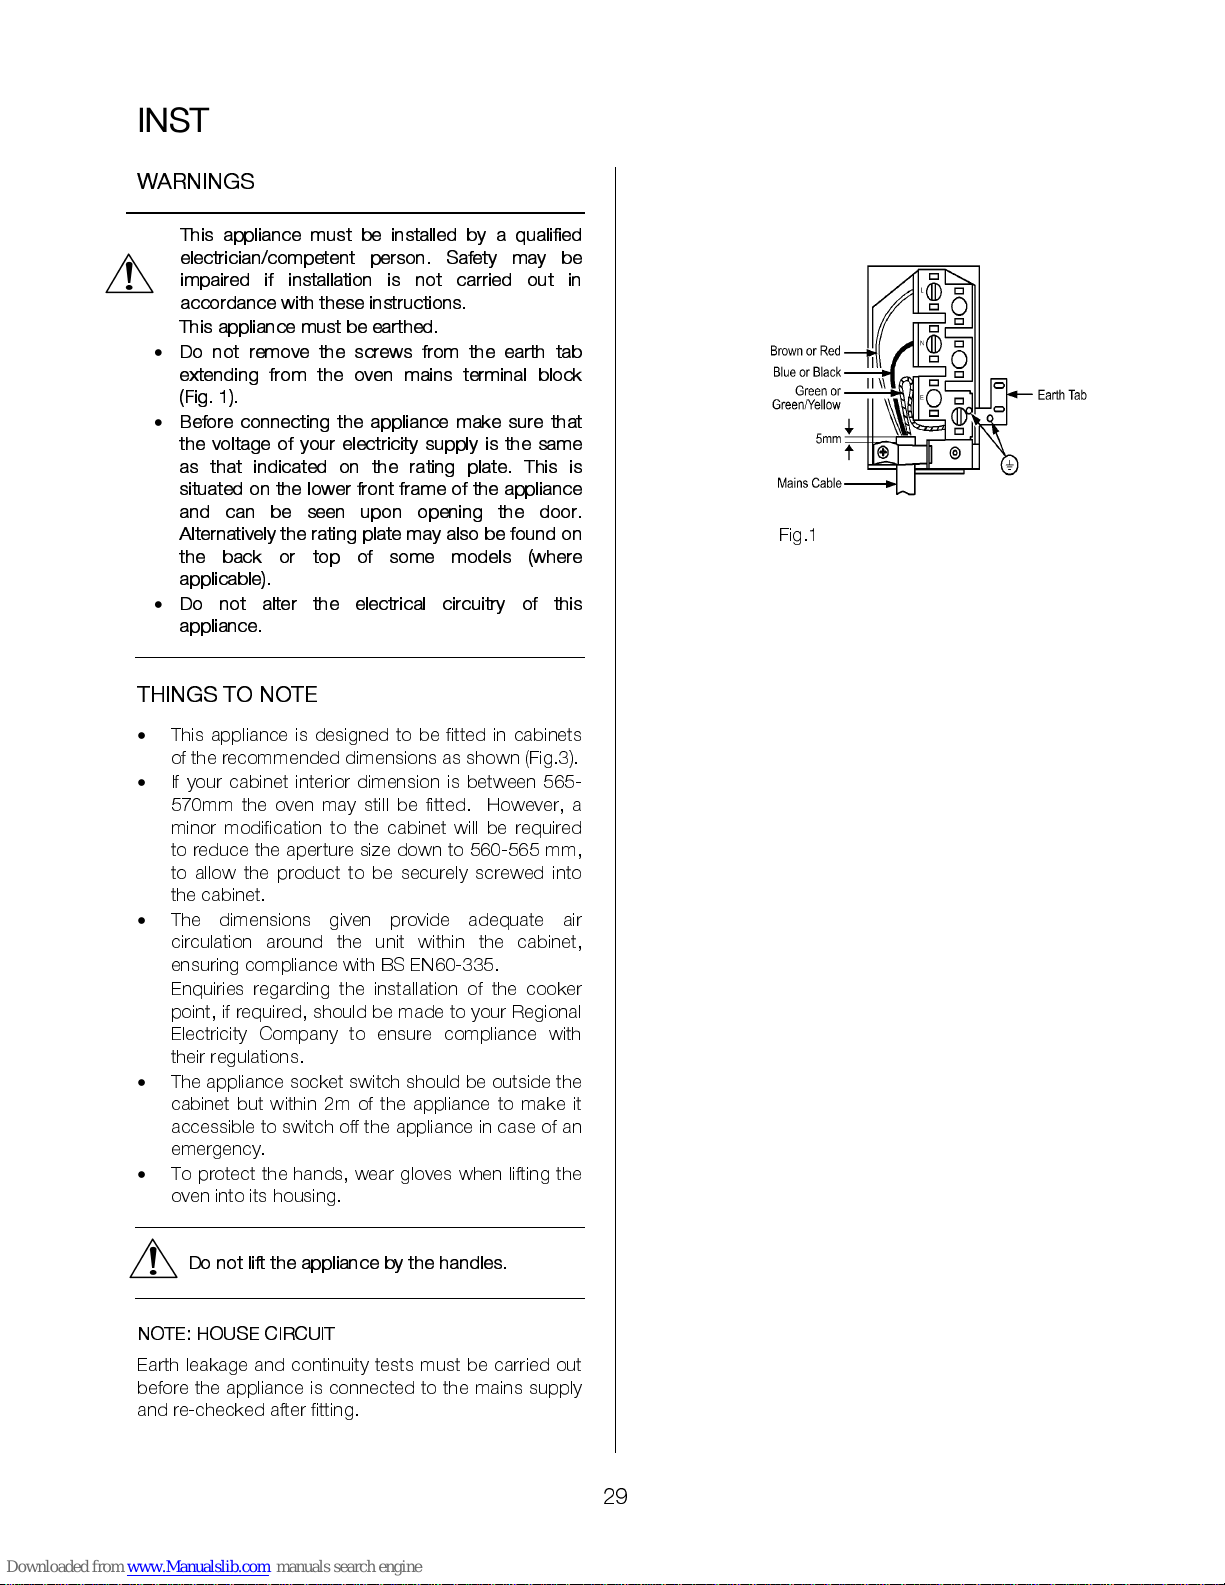
Do not remove the screws from the earth tab
extending from the oven mains terminal block
(Fig. 1).
•
Before connecting the appliance make sure that
the voltage of your electricity supply is the same
as that indicated on the rating plate. This is
situated on the lower front frame of the appliance
and can be seen upon opening the door.
Alternatively the rating plate may also be found on
the back or top of some models (where
applicable).
•
Do not alter the electrical circuitry of this
appliance.
THINGS TO NO TE
•
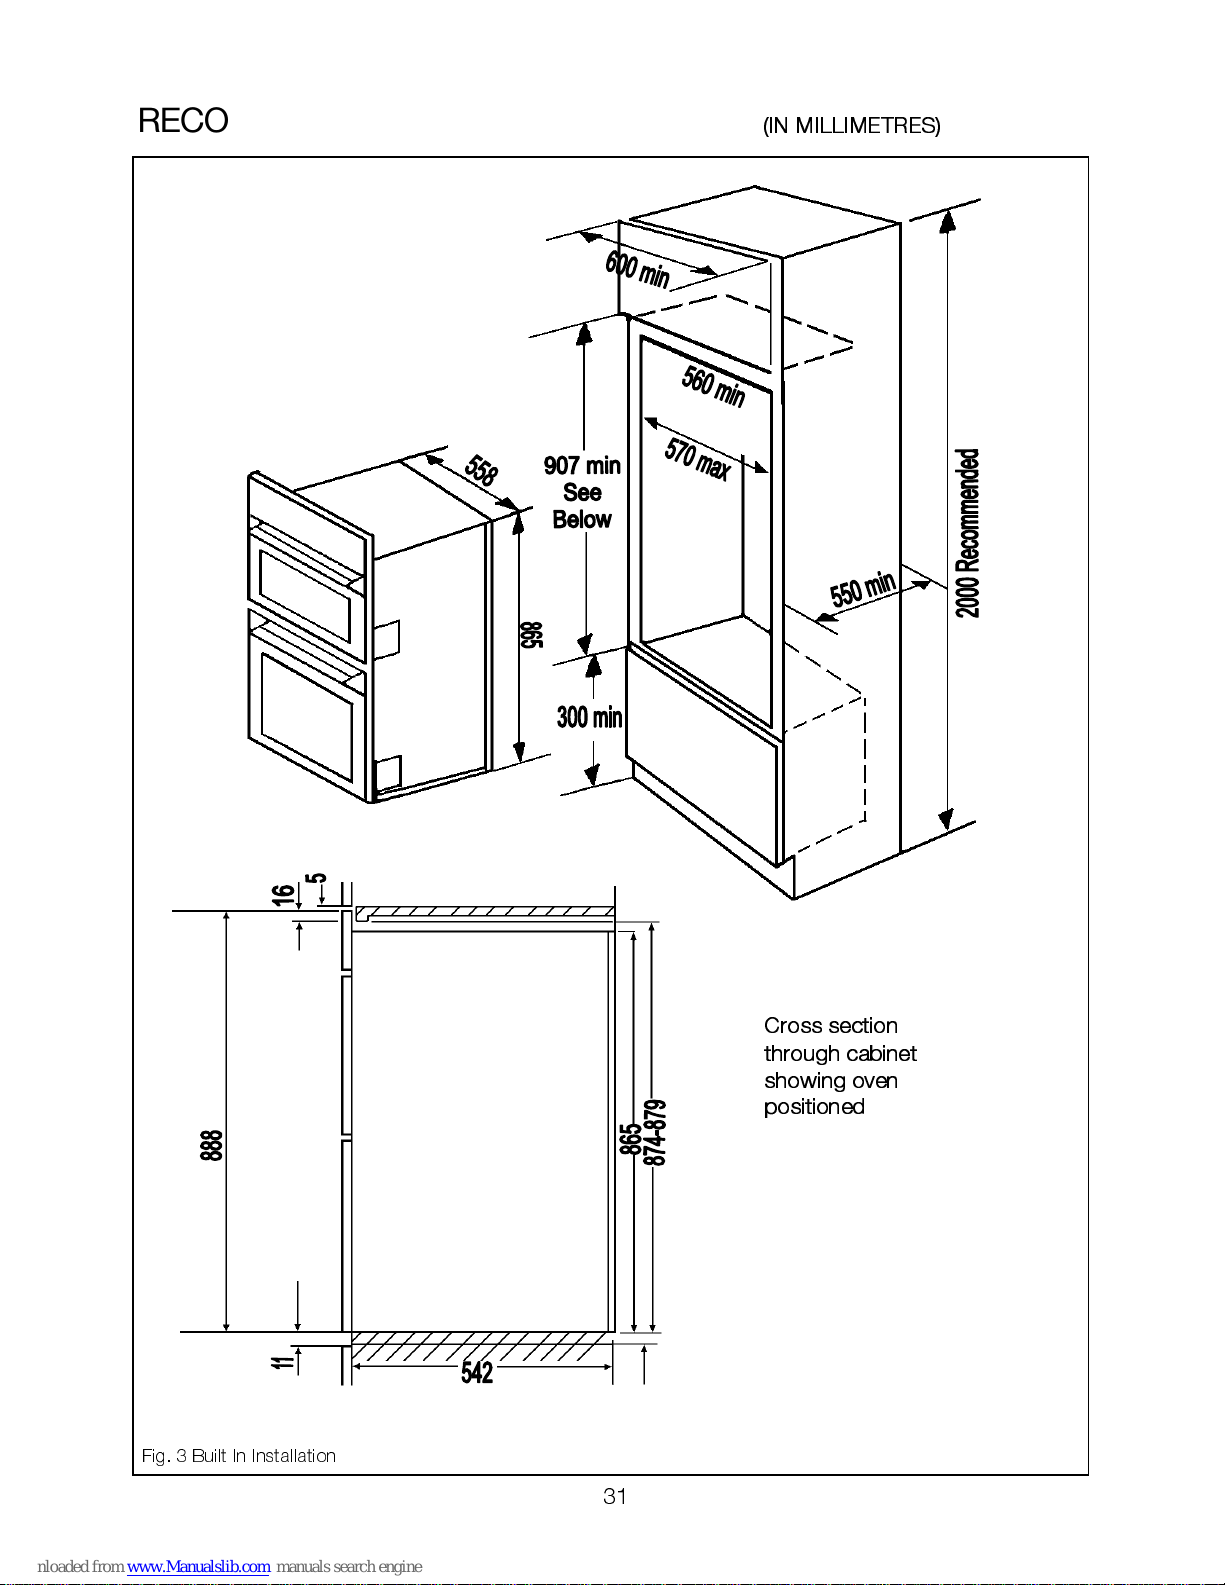
This appliance is designed to be fitted in cabinets
of the recommended dimensions as shown (Fig.3).
•
If your cabinet interior dimension is between 565-
570mm the oven may still be fitted. However, a
minor modification to the cabinet will be required
to reduce the aperture size down to 560-565 mm,
to allow the product to be securely screwed into
the cabinet.
•
The dimensions given provide adequate air
circulation around the unit within the cabinet,
ensuring compliance with BS EN60-335.
•
Enquiries regarding the installation of the cooker
point, if required, should be made to your Regional
Electricity Company to ensure compliance with
their regulations.
•
The appliance socket switch should be outside the
cabinet but within 2m of the appliance to make it
accessible to switch off the appliance in case of an
emergency.
•
To protect the hands, wear gloves when lifting the
oven into its housing.
Do not lift the appliance by the handles.
NOTE: HOUSE CIRCUIT
Earth leakage and continuity tests must be carried out
before the appliance is connected to the mains supply
and re-chec ked after fitting.
Fig.1
Page 30
30
CHOICE OF EL E CTR IC A L CONN E CTION
•
There are three possible ways to connect your
appliance. In each case the appliance should be
operated using at least 6mm
2
twin core and earth
PVC insulated. Please choose from the most
appropriate after reading the different methods:-
a) By connecting the appliance to a cooker point
(having a double pole isolating switch with at least
3mm contact separation in all poles and neutral)
and protected with a fuse or miniature circuit
breaker at your m a ins fuse box.
b) By connecting the appliance together with a hob
directly to a cooker point(s). Having a double pole
isolating switch with at least 3mm contact
separation in all poles and neutral.
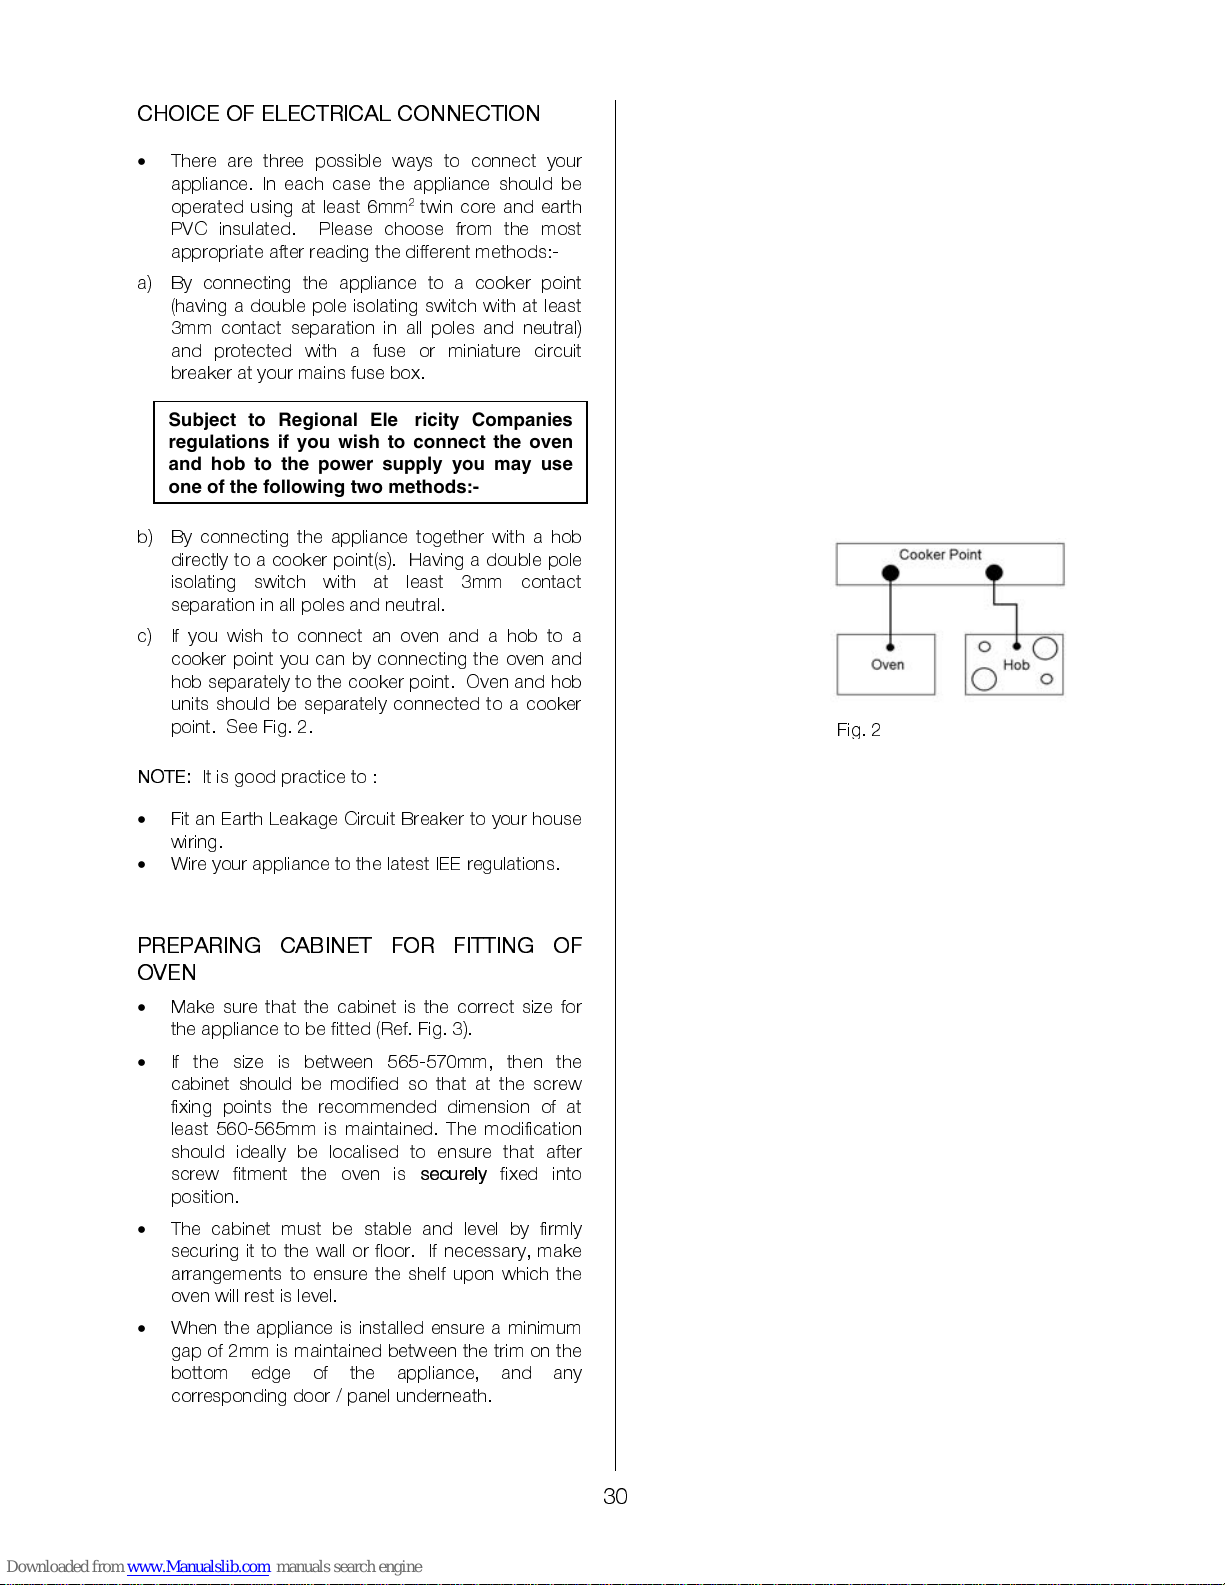
c) If you wish to connect an oven and a hob to a
cooker point you can by connecting the oven and
hob separately to the cooker point. Oven and hob
units should be separately connected to a cooker
point. See Fig. 2.
NOTE:
It is good practice to :
•
Fit an Earth Leakage Circuit Breaker to your house
wiring.
•
Wire your applian ce to the latest IEE regulations.
PREPARING CABINET FOR FITTING OF
OVEN
•
Make sure that the cabinet is the correct size for
the appliance to be fitted (Ref. Fig. 3).
•
If the size is between 565-570mm, then the
cabinet should be modified so that at the screw
fixing points the recommended dimension of at
least 560-565mm is maintained. The modification
should ideally be localised to ensure that after
screw fitment the oven is
securely
fixed into
position.
•
The cabinet must be stable and level by firmly
securing it to the wall or floor. If necessary, make
arrangements to ensure the shelf upon which the
oven will rest is level.
•
When the appliance is installed ensure a minimum
gap of 2mm is maintained between the trim on the
bottom edge of the appliance, and any
corresponding door / panel underneath.
Subject to Regional Electricity Companies
regulations if you wish to connect the oven
and hob to the power supply you may use
one of the following two methods:-
Fig. 2
Page 31
31
RECOMMENDED CABINET DIMENSIONS
(IN MILLIMETRES)
Fig. 3 Built In Installation
Cross section
throu gh cab i n e t
showi ng ove n
positioned
Page 32
32
HOW TO FINIS H UN PA CK ING
•
Place packed appliance next to the space in which
it will be installed.
•
Remove the appliance packing except for bottom
tray, which should be left in position until the
appliance is ready to be fitte d into its cabinet.
NOTE: It is imperative that the appliance is left in
the base to protect both the appliance and the
floor.
•
Ensure the user is given these operating
instructions.
Important: Switch off at the mains, miniature
circuit breaker and if appropriate, remove fuse
before commencing any electrical work.
TO REMOVE COV ER OF M AI N S TERM I NA L
From the rear of the appliance, remove mains input
terminal cover to gain access to terminal block.
•
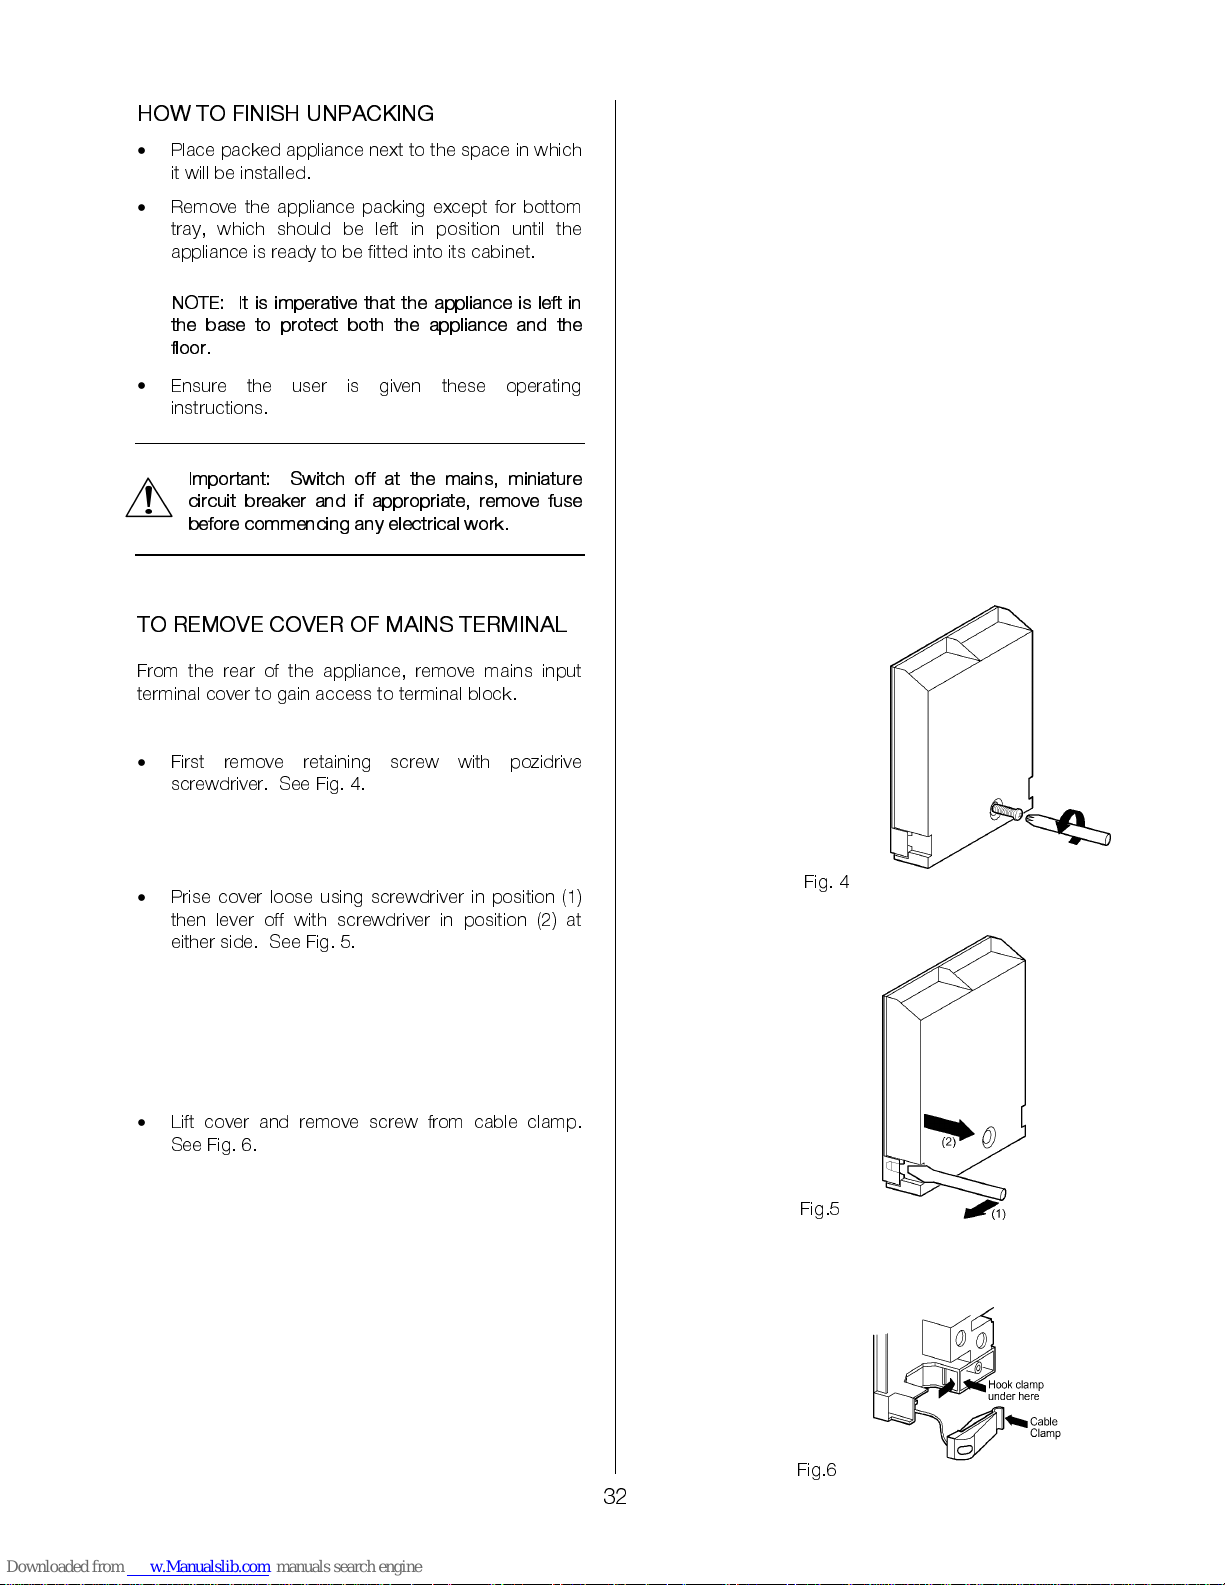
First remove retaining screw with pozidrive
screwdriver. See Fig. 4.
•
Prise cover loose using screwdriver in position (1)
then lever off with screwdriver in position (2) at
either side. See Fig. 5.
•
Lift cover and remove screw from cable clamp.
See Fig. 6.
Fig. 4
Fig.5
Fig.6
Page 33
33
CONNECTING TO THE MAINS TERMINAL
Warning: This applianc e must be earthe d.
•
We recommend you use a new length of 6mm
2
twin core and ea rthed cable to ensure your safety.
•
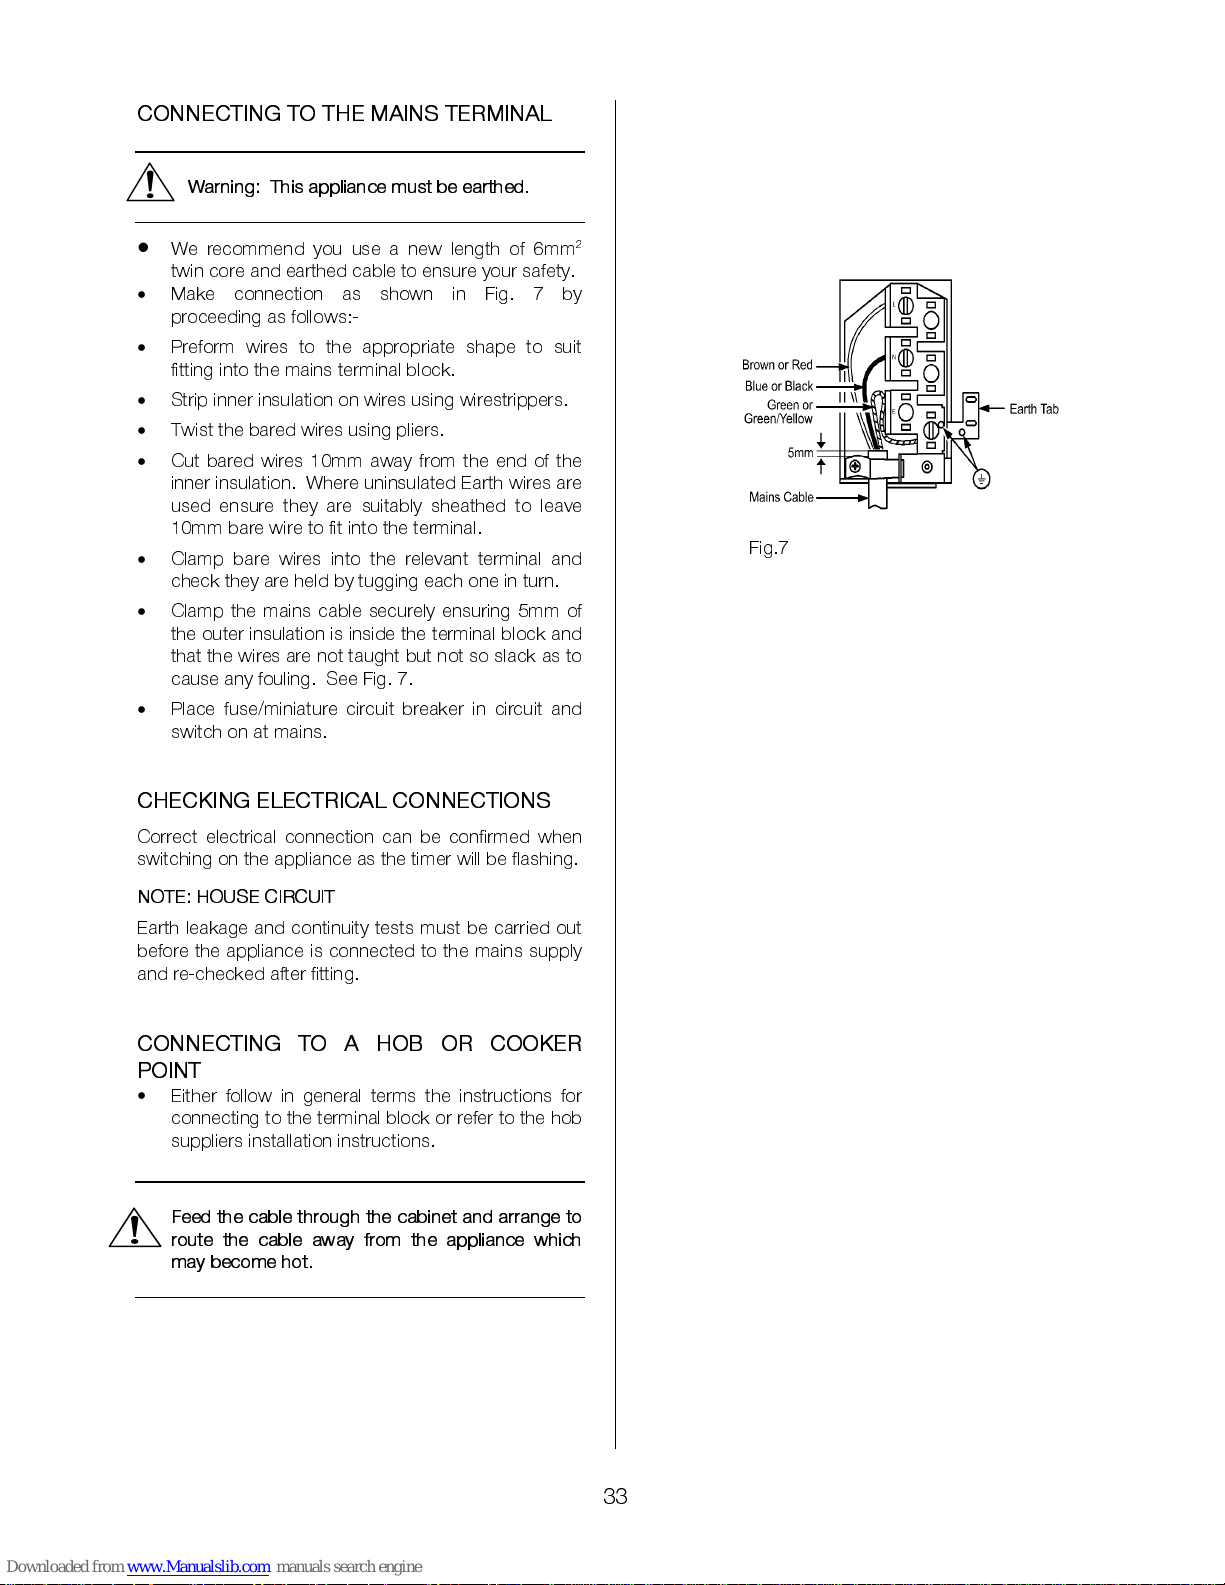
Make connection as shown in Fig. 7 by
proceeding as follows:-
•
Preform wires to the appropriate shape to suit
fitting into the mains terminal blo ck.
•
Strip inner insulation on wires using wirestrippers.
•
Twist the bared wires using pliers.
•
Cut bared wires 10mm away from the end of the
inner insulation. Where uninsulated Earth wires are
used ensure they are suitably sheathed to leave
10mm bare wire to fit into the terminal.
•
Clamp bare wires into the relevant terminal and
check they are he ld by tugging each one in turn.
•
Clamp the mains cable securely ensuring 5mm of
the outer insulation is inside the terminal block and
that the wires are not taught but not so slack as to
cause any fouling. See Fi g. 7.
•
Place fuse/miniature circuit breaker in circuit and
switch on at mains.
CHECKING ELECTRICAL CONNECTIO N S
Correct electrical connection can be confirmed when
switching on the applia nce as the timer will be flashing.
NOTE: HOUSE CIRCUIT
Earth leakage and continuity tests must be carried out
before the appliance is connected to the mains supply
and re-chec ked after fitting.
CONNECTING TO A HOB OR COOKER
POINT
•
Either follow in general terms the instructions for
connecting to the terminal block or refer to the hob
suppliers installation instructions.
Feed the cable through the cabinet and arrange to
route the cable away from the appliance which
may become hot.
Fig.7
Page 34
34
FITTIN G IN T O TH E CA B I NE T
IMPORTANT: Ensure that the oven is
switched off at the wall before any further
work is carried out.
•
Using a tape measure establish the internal width
of the cabinet. Refer to page 30 if greater than
565mm.
•
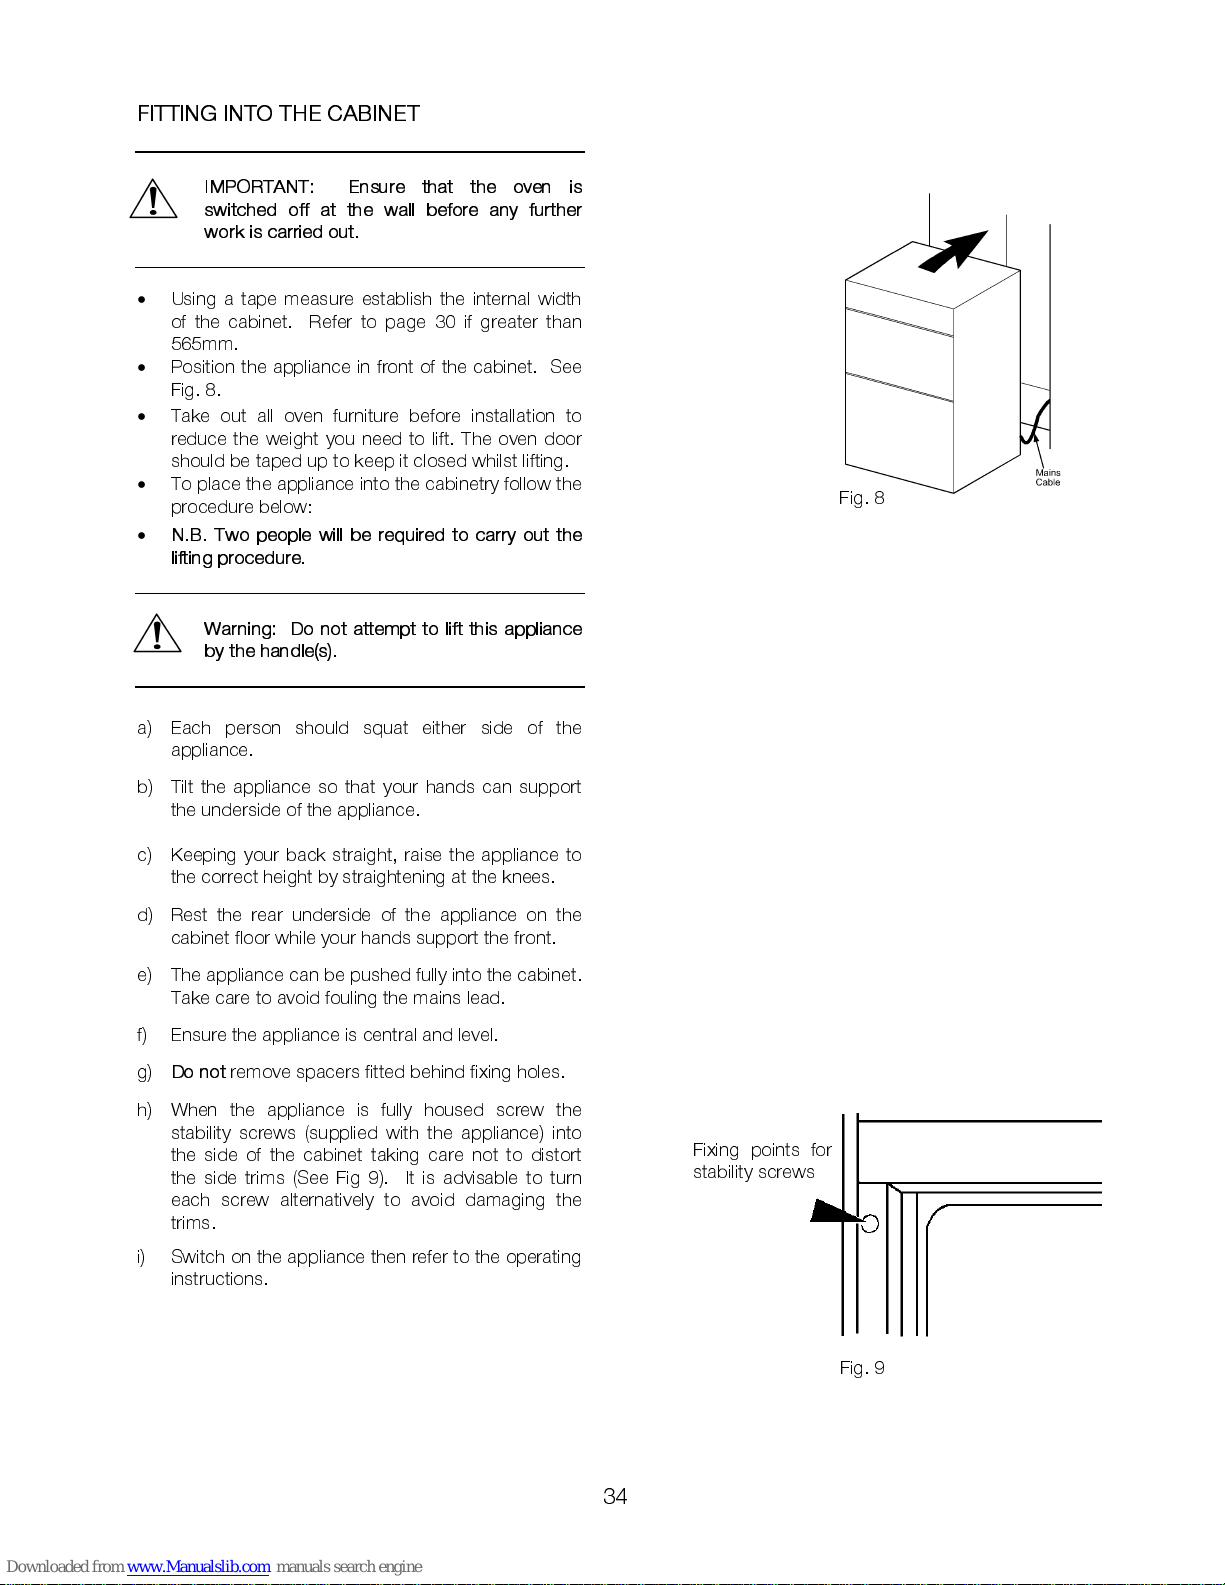
Position the appliance in front of the cabinet. See
Fig. 8.
•
Take out all oven furniture before installation to
reduce t he weight y ou need to l ift. T he oven door
should be taped up to keep it closed whilst lifting.
•
To place the appliance into the cabinetry follow the
procedure below:
•
N.B. Two people will be required to carry out the
lifting procedure.
Warning: Do not attempt to li ft this appliance
by the handle(s).
a) Each person should squat either side of the
appliance.
b) Tilt the appliance so that your hands can support
the underside of the appliance.
c) Keeping your back straight, raise the appliance to
the correct height by straightening at the knees.
d) Rest the rear underside of the appliance on the
cabinet floor while your hands support the front.
e) The appliance can be pushed fully into the cabinet.
Take care to avoid fouling the mains lead.
f) Ensure the appliance is central and level.
g)
Do not
remove spacers fitted behind fixing holes.
h) When the appliance is fully housed screw the
stability screws (supplied with the appliance) into
the side of the cabinet taking care not to distort
the side trims (See Fig 9). It is advisable to turn
each screw alternatively to avoid damaging the
trims.
i) Switch on the appliance then refer to the operating
instructions.
Fig. 9
Fixing points for
stability screws
Fig. 8
Page 35

Page 36

www.electrolux.com
www.electrolux.co.uk
311798300 - 092006
 Loading...