

Page 1
EOD3410A
.................................................. ...............................................
EN OVEN USER MANUAL
Page 2

CONTENTS
SAFETY INFORMATION . . . . . . . . . . . . . . . . . . . . . . . . . . . . . . . . . . . . . . . . . . . . . . . . . . . . . . . . . 3
PRODUCT DESCRIPTION . . . . . . . . . . . . . . . . . . . . . . . . . . . . . . . . . . . . . . . . . . . . . . . . . . . . . . . 6
BEFORE FIRST USE . . . . . . . . . . . . . . . . . . . . . . . . . . . . . . . . . . . . . . . . . . . . . . . . . . . . . . . . . . . 7
DAILY USE . . . . . . . . . . . . . . . . . . . . . . . . . . . . . . . . . . . . . . . . . . . . . . . . . . . . . . . . . . . . . . . . . . . 8
CLOCK FUNCTIONS . . . . . . . . . . . . . . . . . . . . . . . . . . . . . . . . . . . . . . . . . . . . . . . . . . . . . . . . . . 10
USING THE ACCESSORIES . . . . . . . . . . . . . . . . . . . . . . . . . . . . . . . . . . . . . . . . . . . . . . . . . . . . . 12
HELPFUL HINTS AND TIPS . . . . . . . . . . . . . . . . . . . . . . . . . . . . . . . . . . . . . . . . . . . . . . . . . . . . . 13
CARE AND CLEANING . . . . . . . . . . . . . . . . . . . . . . . . . . . . . . . . . . . . . . . . . . . . . . . . . . . . . . . . 19
WHAT TO DO IF… . . . . . . . . . . . . . . . . . . . . . . . . . . . . . . . . . . . . . . . . . . . . . . . . . . . . . . . . . . . . 22
INSTALLATION . . . . . . . . . . . . . . . . . . . . . . . . . . . . . . . . . . . . . . . . . . . . . . . . . . . . . . . . . . . . . . 23
GREAT BRITAIN & IRELAND - GUARANTEE/CUSTOMER SERVICE . . . . . . . . . . . . . . . . . . . . . . 25
ENVIRONMENT CONCERNS . . . . . . . . . . . . . . . . . . . . . . . . . . . . . . . . . . . . . . . . . . . . . . . . . . . . 26
WE’RE THINKING OF YOU
Thank you for purchasing an Electrolux appliance. You’ve chosen a product that brings with it
decades of professional experience and innovation. Ingenious and stylish, it has been designed with
you in mind. So whenever you use it, you can be safe in the knowledge that you’ll get great results
every time.
Welcome to Electrolux.
Visit our website for:
Get usage advice, brochures, trouble shooter, service information:
www.electrolux.com
Register your product for better service:
www.electrolux.com/productregistration
Buy Accessories, Consumables and Original spare parts for your appliance:
www.electrolux.com/shop
CUSTOMER CARE AND SERVICE
We recommend the use of original spare parts.
When contacting Service, ensure that you have the following data available.
The information can be found on the rating plate. Model, PNC, Serial Number.
Warning / Caution-Safety information
General information and tips
Environmental information
Subject to change without notice.
2
www.electrolux.com
Page 3

SAFETY INFORMATION
Before the installation and use of the appliance, carefully read the supplied instructions. The manufacturer is not responsible
if an incorrect installation and use causes
injuries and damages. Always keep the instructions with the appliance for future reference.
CHILDREN AND VULNERABLE
PEOPLE SAFETY
WARNING!
Risk of suffocation, injury or permanent disability.
• Do not let persons, children included,
with reduced physical sensory, reduced
mental functions or lack of experience
and knowledge use the appliance. They
must have supervision or instruction for
the operation of the appliance by a person who is responsible for their safety.
• Do not let children play with the appliance.
• Keep all packaging away from children.
• Keep children and pets away from the
appliance when it operates or when it
cools down. Accessible parts are hot.
• If the appliance has a child safety device,
we recommend that you activate it.
INSTALLATION
WARNING!
Only a qualified person must install
this appliance.
• Remove all the packaging.
• Do not install or use a damaged appliance.
• Obey the installation instruction supplied
with the appliance.
• Always be careful when you move the
appliance because it is heavy. Always
wear safety gloves.
• Do not pull the appliance by the handle.
• Keep the minimum distance from the
other appliances and units.
• Make sure that the appliance is installed
below and adjacent safe structures.
• The sides of the appliance must stay adjacent to appliances or to units with the
same height.
Electrical connection
WARNING!
Risk of fire and electrical shock.
• All electrical connections should be
made by a qualified electrician.
• The appliance must be earthed.
• Make sure that the electrical information
on the rating plate agrees with the power
supply. If not, contact an electrician.
• Always use a correctly installed shockproof socket.
• Do not use multi-plug adapters and extension cables.
• Make sure not to cause damage to the
mains plug and to the mains cable. Contact the Service or an electrician to
change a damaged mains cable.
• Do not let mains cables to come in touch
with the appliance door, specially when
the door is hot.
• The shock protection of live and insulated parts must be fastened in such a
way that it cannot be removed without
tools.
• Connect the mains plug to the mains
socket only at the end of the installation.
Make sure that there is access to the
mains plug after the installation.
• If the mains socket is loose, do not connect the mains plug.
• Do not pull the mains cable to disconnect the appliance. Always pull the
mains plug.
• Use only correct isolation devices: line
protecting cut-outs, fuses (screw type
fuses removed from the holder), earth
leakage trips and contactors.
• The electrical installation must have an
isolation device which lets you disconnect the appliance from the mains at all
poles. The isolation device must have a
contact opening width of minimum 3
mm.
ENGLISH 3
Page 4

USE
WARNING!
Risk of injury, burns or electric
shock or explosion.
• Use this appliance in a household environment.
• Do not change the specification of this
appliance.
• Make sure that the ventilation openings
are not blocked.
• Do not let the appliance stay unattended
during operation.
• Deactivate the appliance after each use.
• Internally the appliance becomes hot
when in operation. Do not touch the
heating elements that are in the appliance. Always use oven gloves to remove
or put in accessories or ovenware.
• Be careful, when you open the appliance
door while the appliance is in operation.
Hot air can release.
• Do not operate the appliance with wet
hands or when it has contact with water.
• Do not apply pressure on the open door.
• Do not use the appliance as a work surface or as a storage surface.
• Always keep the appliance door closed
when the appliance is in operation.
• Open the appliance door carefully. The
use of ingredients with alcohol can cause
a mixture of alcohol and air.
• Do not let sparks or open flames to
come in contact with the appliance when
you open the door.
• Do not put flammable products or items
that are wet with flammable products in,
near or on the appliance.
WARNING!
Risk of damage to the appliance.
• To prevent damage or discoloration to
the enamel:
– Do not put ovenware or other objects
in the appliance directly on the bottom.
– Do not put aluminium foil directly on
the bottom of the appliance.
– do not put water directly into the hot
appliance.
– do not keep moist dishes and food in
the appliance after you finish the cooking.
– be careful when you remove or install
the accessories.
• Discoloration of the enamel has no effect
on the performance of the appliance. It is
not a defect in the sense of the warranty
law.
• Use a deep pan for moist cakes. Fruit juices cause stains that can be permanent.
CARE AND CLEANING
WARNING!
Risk of injury, fire or damage to the
appliance.
• Before maintenance, deactivate the appliance and disconnect the mains plug
from the mains socket.
• Make sure the appliance is cold. There is
the risk that the glass panels can break.
• Replace immediately the door glass panels when they are damaged. Contact the
Service.
• Be careful when you remove the door
from the appliance. The door is heavy!
• Clean regularly the appliance to prevent
the deterioration of the surface material.
• Remaining fat or food in the appliance
can cause fire.
• Clean the appliance with a moist soft
cloth. Only use neutral detergents. Do
not use abrasive products, abrasive
cleaning pads, solvents or metal objects.
• If you use an oven spray, obey the safety
instructions on the packaging.
• Do not clean the catalytic enamel (if applicable) with any kind of detergent.
INTERNAL LIGHT
• The type of light bulb or halogen lamp
used for this appliance, is only for household appliances. Do not use it for house
lighting.
WARNING!
Risk of electrical shock.
• Before replacing the lamp, disconnect
the appliance from the power supply.
• Only use lamps with the same specifications.
4
www.electrolux.com
Page 5

DISPOSAL
WARNING!
Risk of injury or suffocation.
• Disconnect the appliance from the mains
supply.
• Cut off the mains cable and discard it.
• Remove the door catch to prevent children and pets to get closed in the appliance.
ENGLISH 5
Page 6
PRODUCT DESCRIPTION
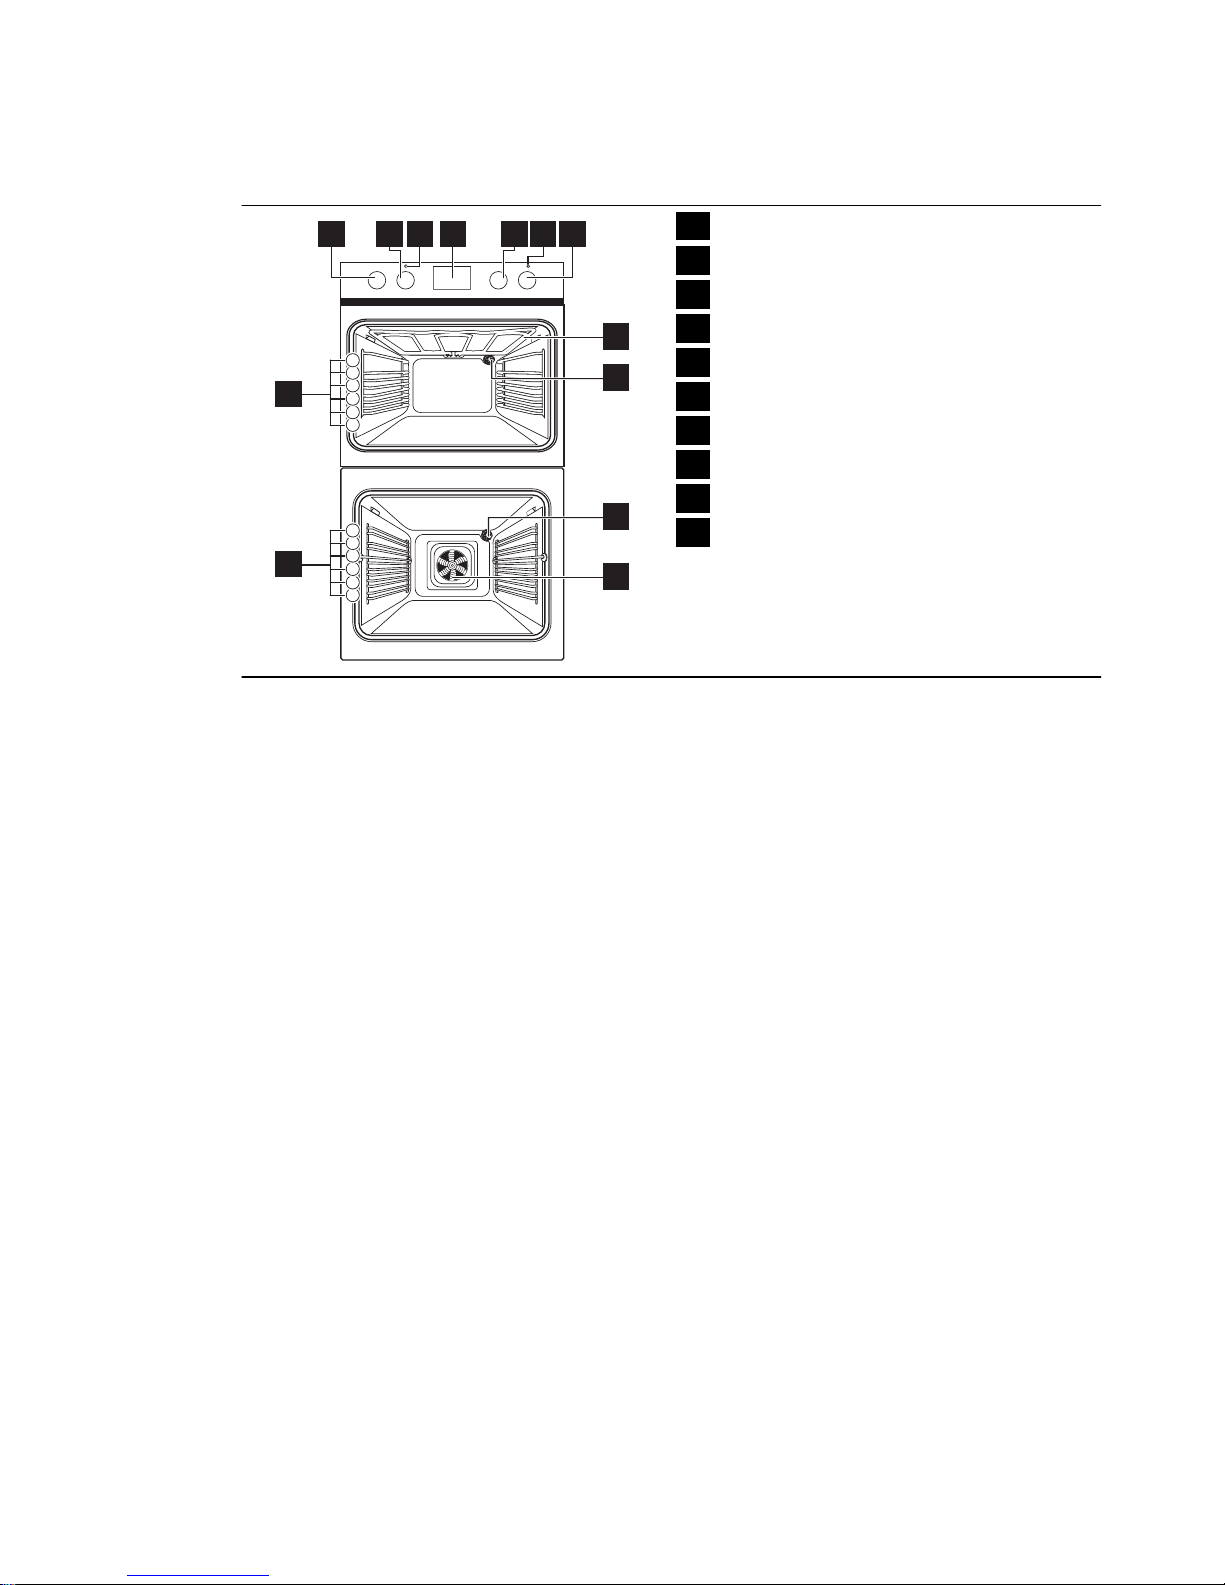
GENERAL OVERVIEW
1
1 2 4 5 6
2
3
4
5
6
7
9
8
8
10
1
2
3
4
5
6
10
33
1
Knob for the top oven functions
2
Knob for the top oven temperature
3
Temperature indicator
4
Electronic programmer
5
Knob for the main oven functions
6
Knob for the main oven temperature
7
Heating element
8
Oven lamp
9
Fan and heating element
10
Shelf positions
ACCESSORIES
•
Oven shelf
For cookware, cake tins, roasts.
•
Roasting pan grid
To put in the deep roasting pan.
• Deep roasting pan
To bake and roast or as a pan to collect
fat.
6
www.electrolux.com
Page 7
BEFORE FIRST USE
WARNING!
Refer to "Safety information" chapter.
INITIAL CLEANING
• Remove all accessories and removable
shelf supports (if applicable).
• Clean the appliance before first use.
Refer to the chapter "Care and
cleaning".
SETTING THE TIME
You must set the time before you
operate the oven.
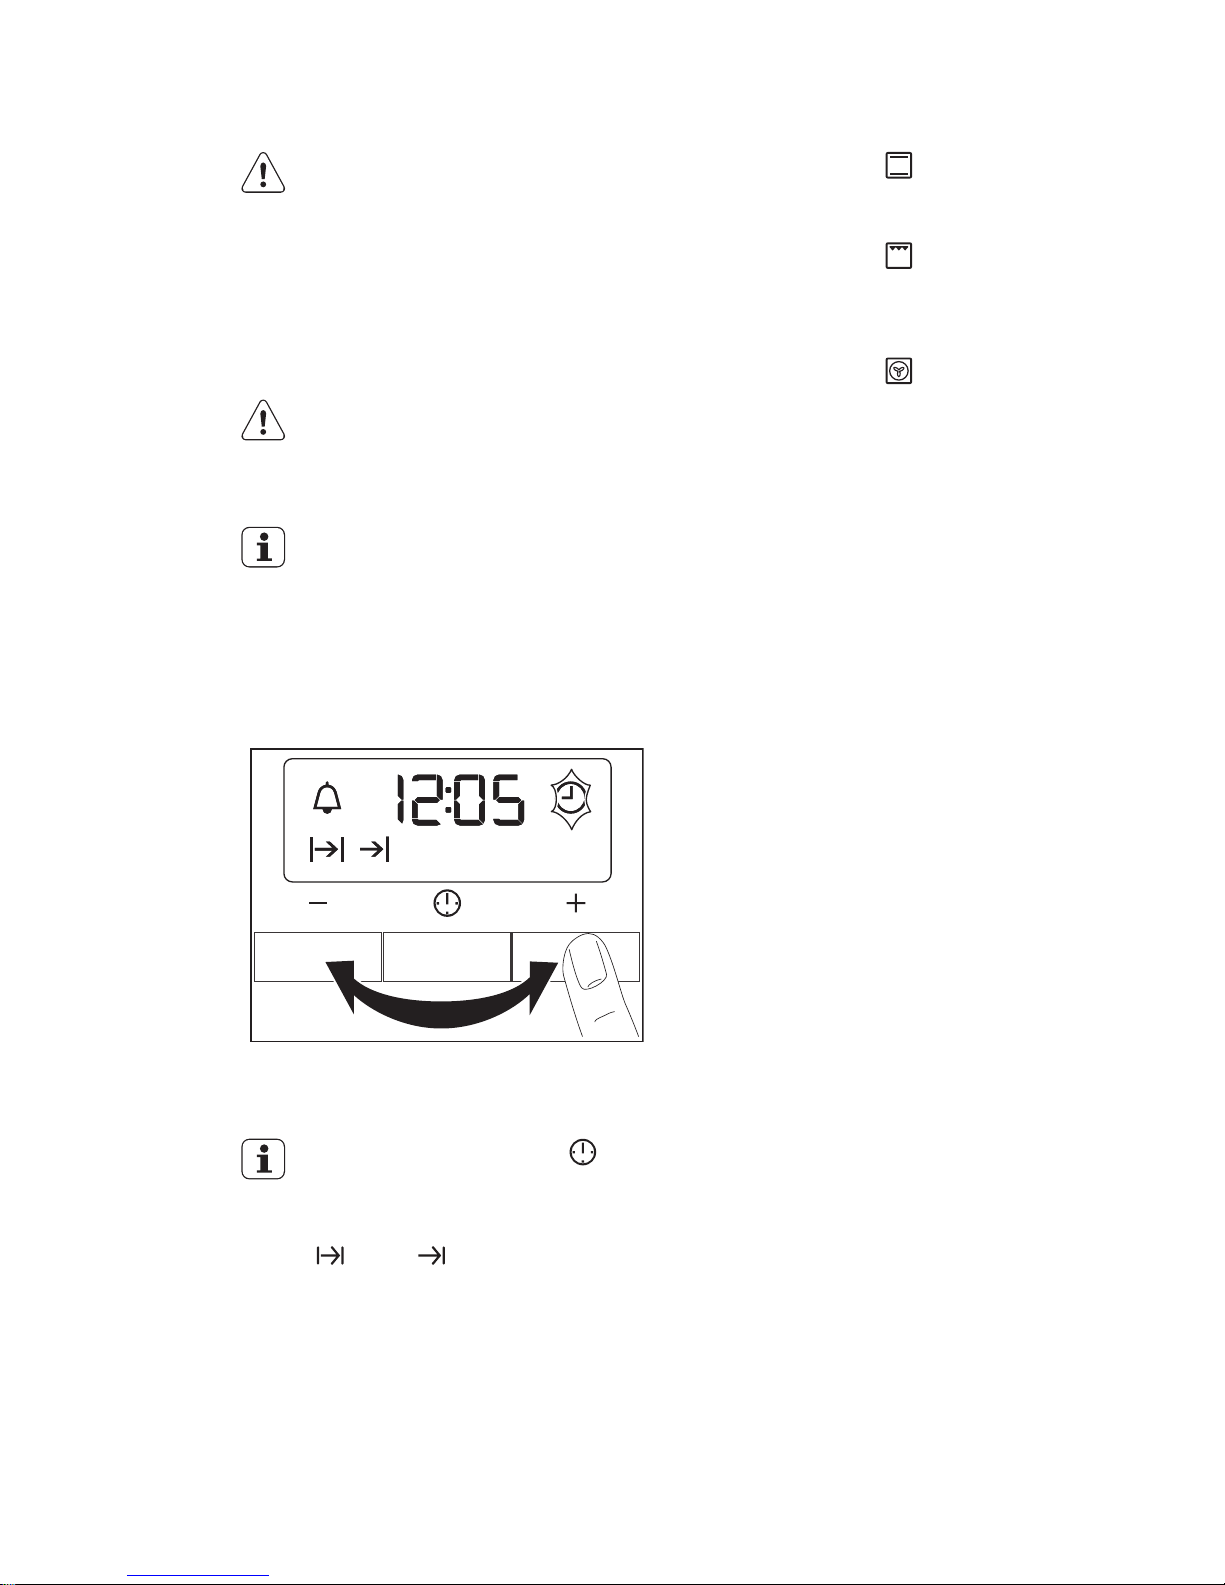
When you connect the appliance to the
electrical supply or after a power cut, the
indicator for the Time of Day function flashes.
Press the + or - button to set the correct
time.
After approximately five seconds, the flashing stops and the display shows the time of
day you set.
To change the time, press
again and again until the indicator
for the Time of Day function flashes. You must not set the Duration
or End function at the same
time.
To use the appliance, push the knob. The
knob comes out.
PREHEATING
Preheat the empty appliance to burn off the
remaining grease.
1.
Set the function and the maximum
temperature.
2.
Let the appliance operate for one hour.
3.
Set the function and the maximum
temperature.
4.
Let the appliance operate for ten minutes.
5.
Set the function and the maximum
temperature.
6.
Let the appliance operate for ten mi-
nutes.
Accessories can become hotter than usually. The appliance can emit an odour and
smoke. This is normal. Make sure that the
airflow is sufficient.
ENGLISH 7
Page 8
DAILY USE
WARNING!
Refer to "Safety information" chapter.
COOLING FAN
When the appliance operates, the cooling
fan switches on automatically. If you switch
off the appliance, the cooling fan continues
to operate until the appliance cools down.
ACTIVATING AND
DEACTIVATING THE TOP OVEN
1.
Turn the knob for the top oven functions to an oven function.
2.
Turn the knob for the top oven temperature to a temperature.
The temperature indicator comes on
while the temperature in the appliance
increases.
3.
To deactivate the appliance, turn the
knob for the top oven functions and
the knob for the top oven temperature
to the Off position.
ACTIVATING AND
DEACTIVATING THE MAIN
OVEN
1.
Turn the knob for the main oven func-
tions to an oven function.
2.
Turn the knob for the main oven tem-
perature to a temperature.
The temperature indicator comes on
while the temperature in the appliance
increases.
3.
To deactivate the appliance, turn the
knob for the main oven functions and
the knob for the main oven tempera-
ture to the Off position.
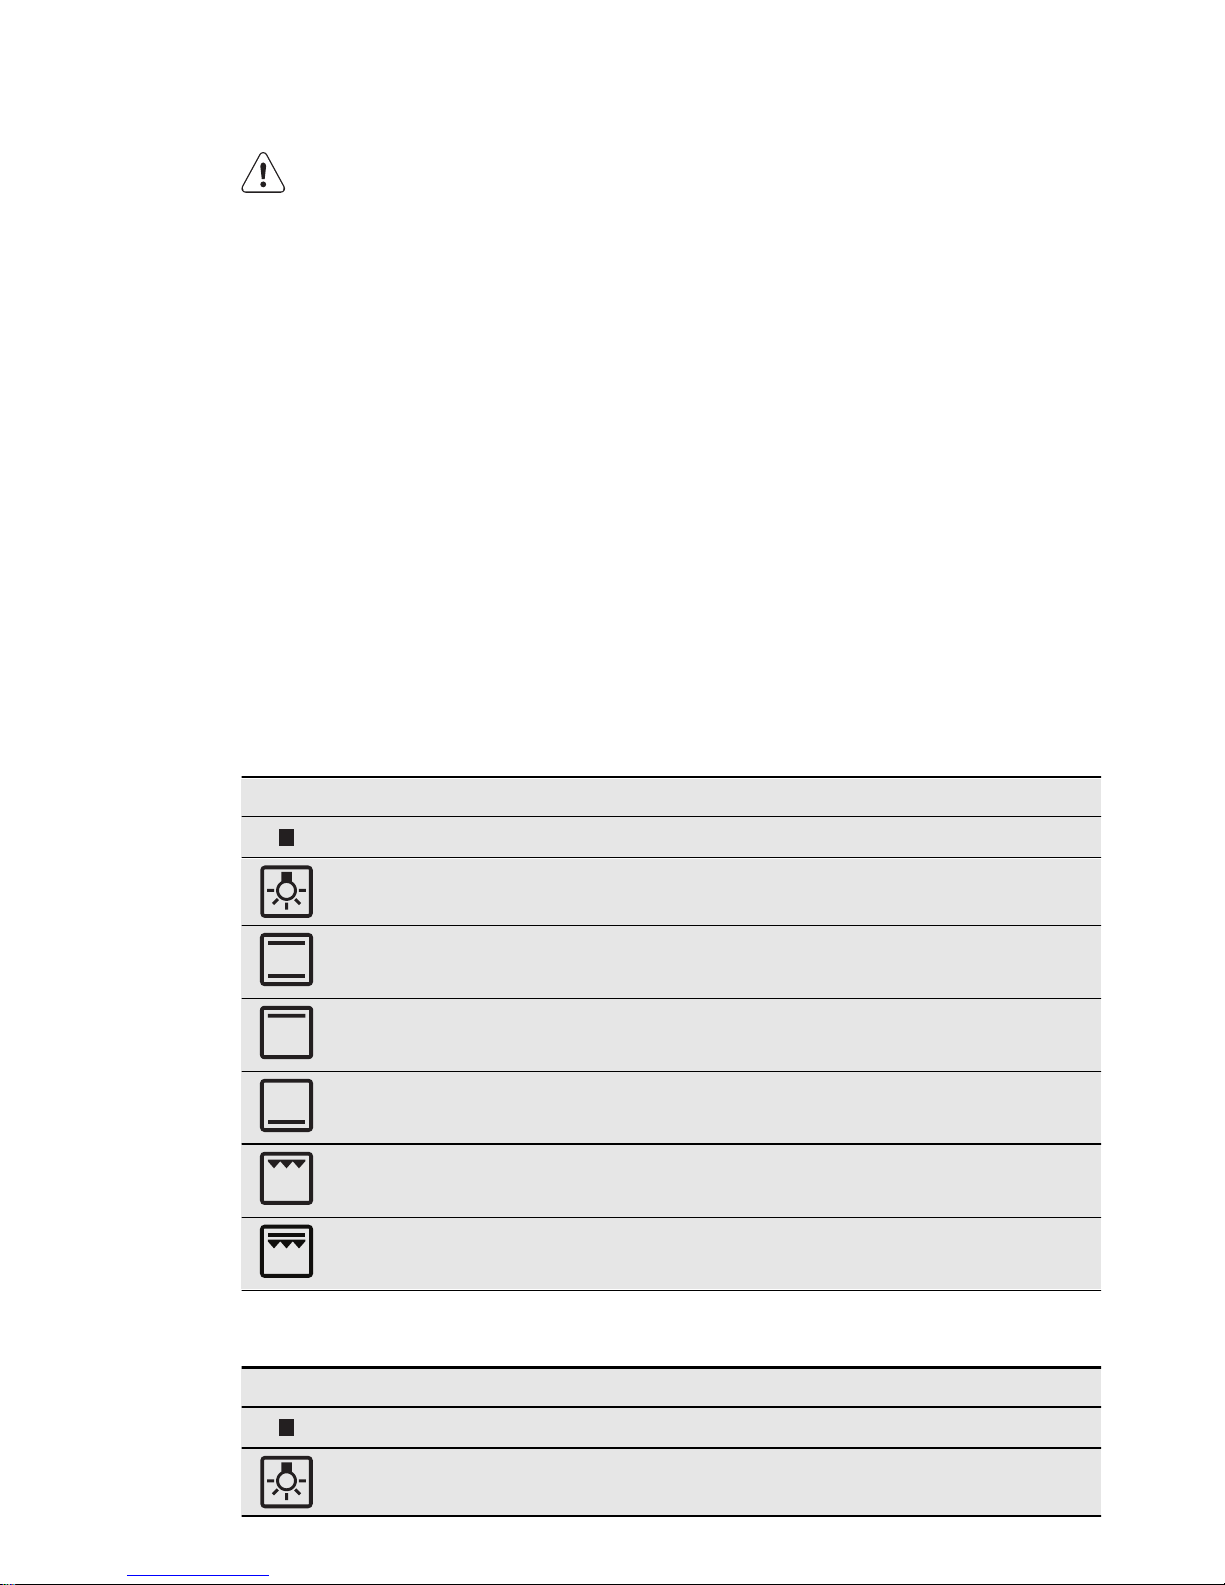
TOP OVEN FUNCTIONS
Oven function Application
OFF position The appliance is OFF.
Light To light up the oven interior.
Conventional
Cooking
To bake and roast on one level
Top Heat Tor brown bread, cakes and pastries and for bakes.
Bottom Heat
To bake cakes with crispy or crusty bases and to
preserve food.
Economy Grill
To grill flat food items in small quantities in the middle
of the grill. To make toasts.
Full Grill
To grill flat food items in large quantities. To make
toasts.
MAIN OVEN FUNCTIONS
Oven function Application
OFF position The appliance is OFF.
Light To light up the oven interior.
8
www.electrolux.com
Page 9

Oven function Application
Ultra Fan
To roast or roast and bake the food that requires the
same cooking temperature, using more than one
shelf, without flavour transference.
Defrost To defrost frozen food.
ENGLISH 9
Page 10
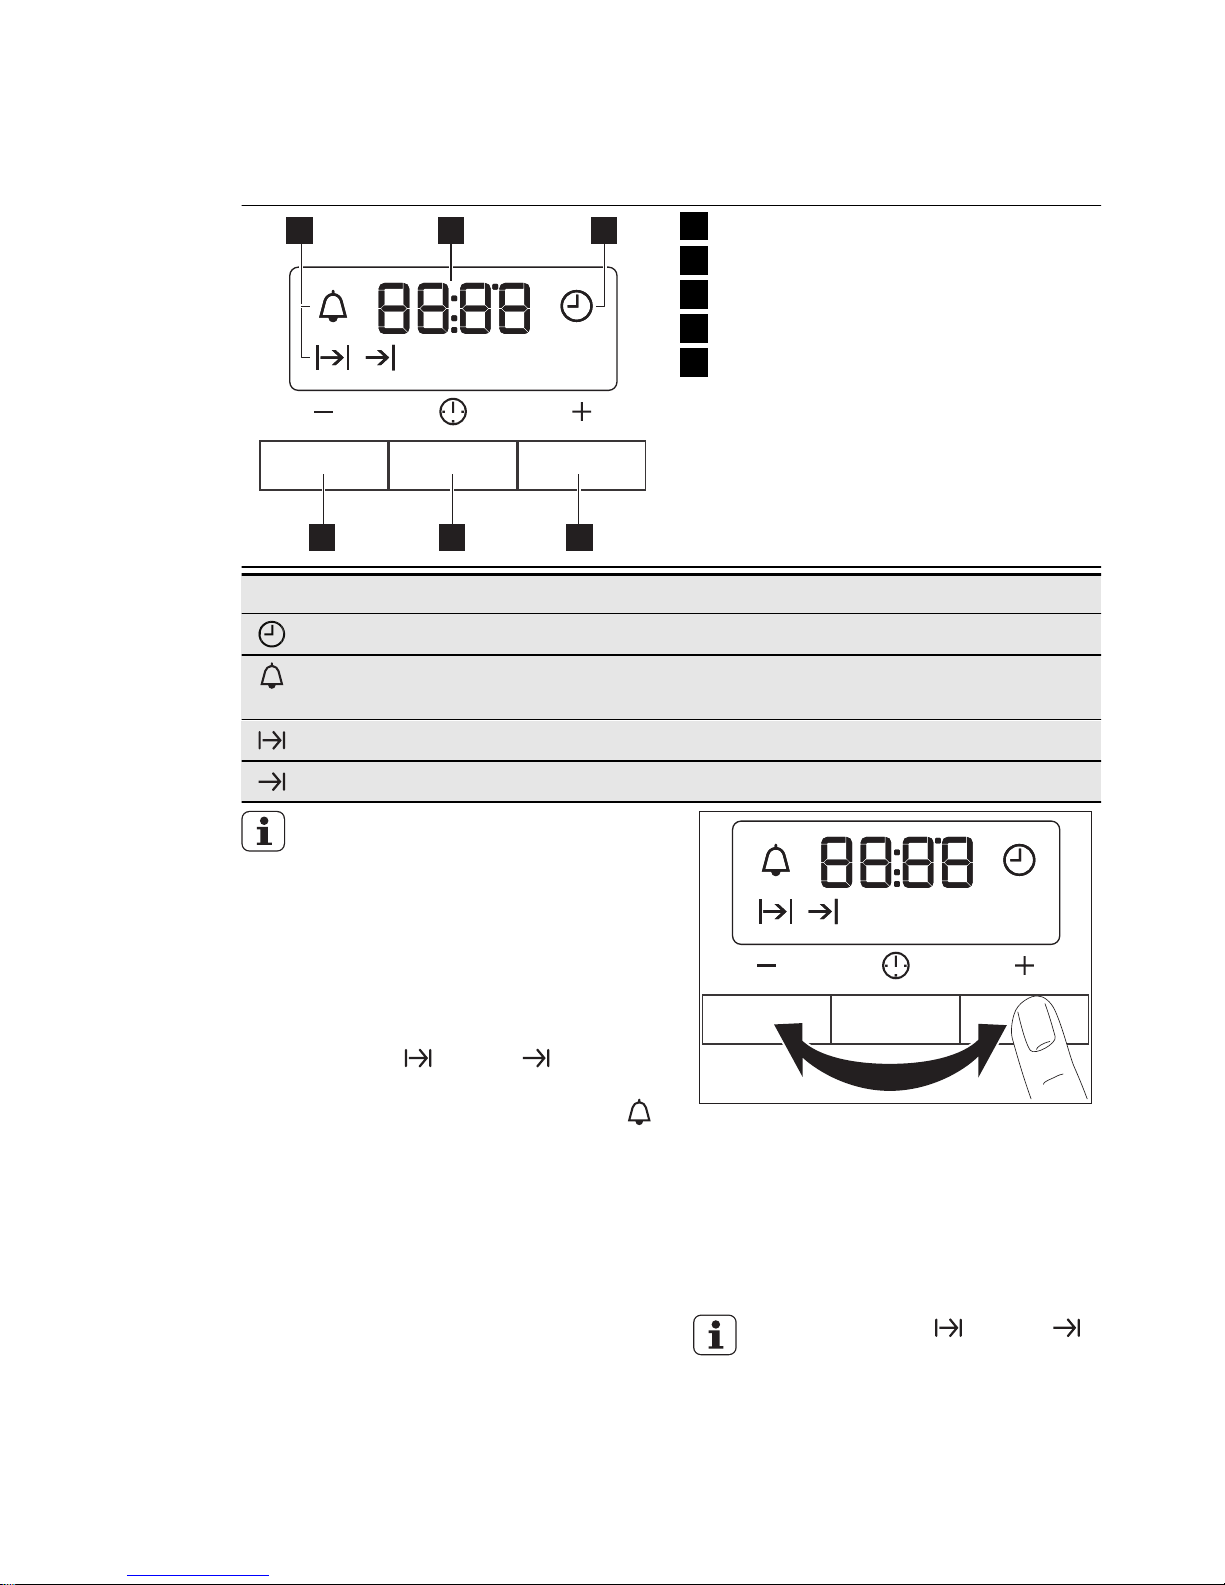
CLOCK FUNCTIONS
ELECTRONIC PROGRAMMER
hr min
1 2 1
345
1
Function indicators
2
Time display
3
Button +
4
Selection button
5
Button -
Clock function Application
Time of day To set, change or check the time of day.
Minute Minder To set a countdown time. This function has no effect on
the operation of the oven.
Duration To set how long the appliance must operate.
End To set when the appliance must be deactivated.
You can use Duration and End at
the same time to set the time when
the appliance must be activated
and then deactivated. First set Duration, then End.
SETTING THE CLOCK
FUNCTIONS
1.
For Duration and End , set an
oven function and temperature. This is
not necessary for the Minute Minder
.
2.
Press the Selection button again and
again until the indicator for the necessary clock function flashes.
hr minhr min
3.
Press + or - to set the necessary clock
function.
The display shows the indicator for the
clock function you set. When the set
time ends, the indicator flashes and an
acoustic signal sounds for two mi-
nutes.
With the Duration and End
functions, the appliance deactivates automatically.
4.
Press a button to stop the signal.
5.
Turn the knob for the oven functions
and the knob for the temperature to
the off position.
10
www.electrolux.com
Page 11

CANCELLING THE CLOCK
FUNCTIONS
1.
Press the Selection button again and
again until the necessary function indicator flashes.
2.
Press and hold the button -.
The clock function goes out after some
seconds.
ENGLISH 11
Page 12
USING THE ACCESSORIES
WARNING!
Refer to "Safety information" chapter.
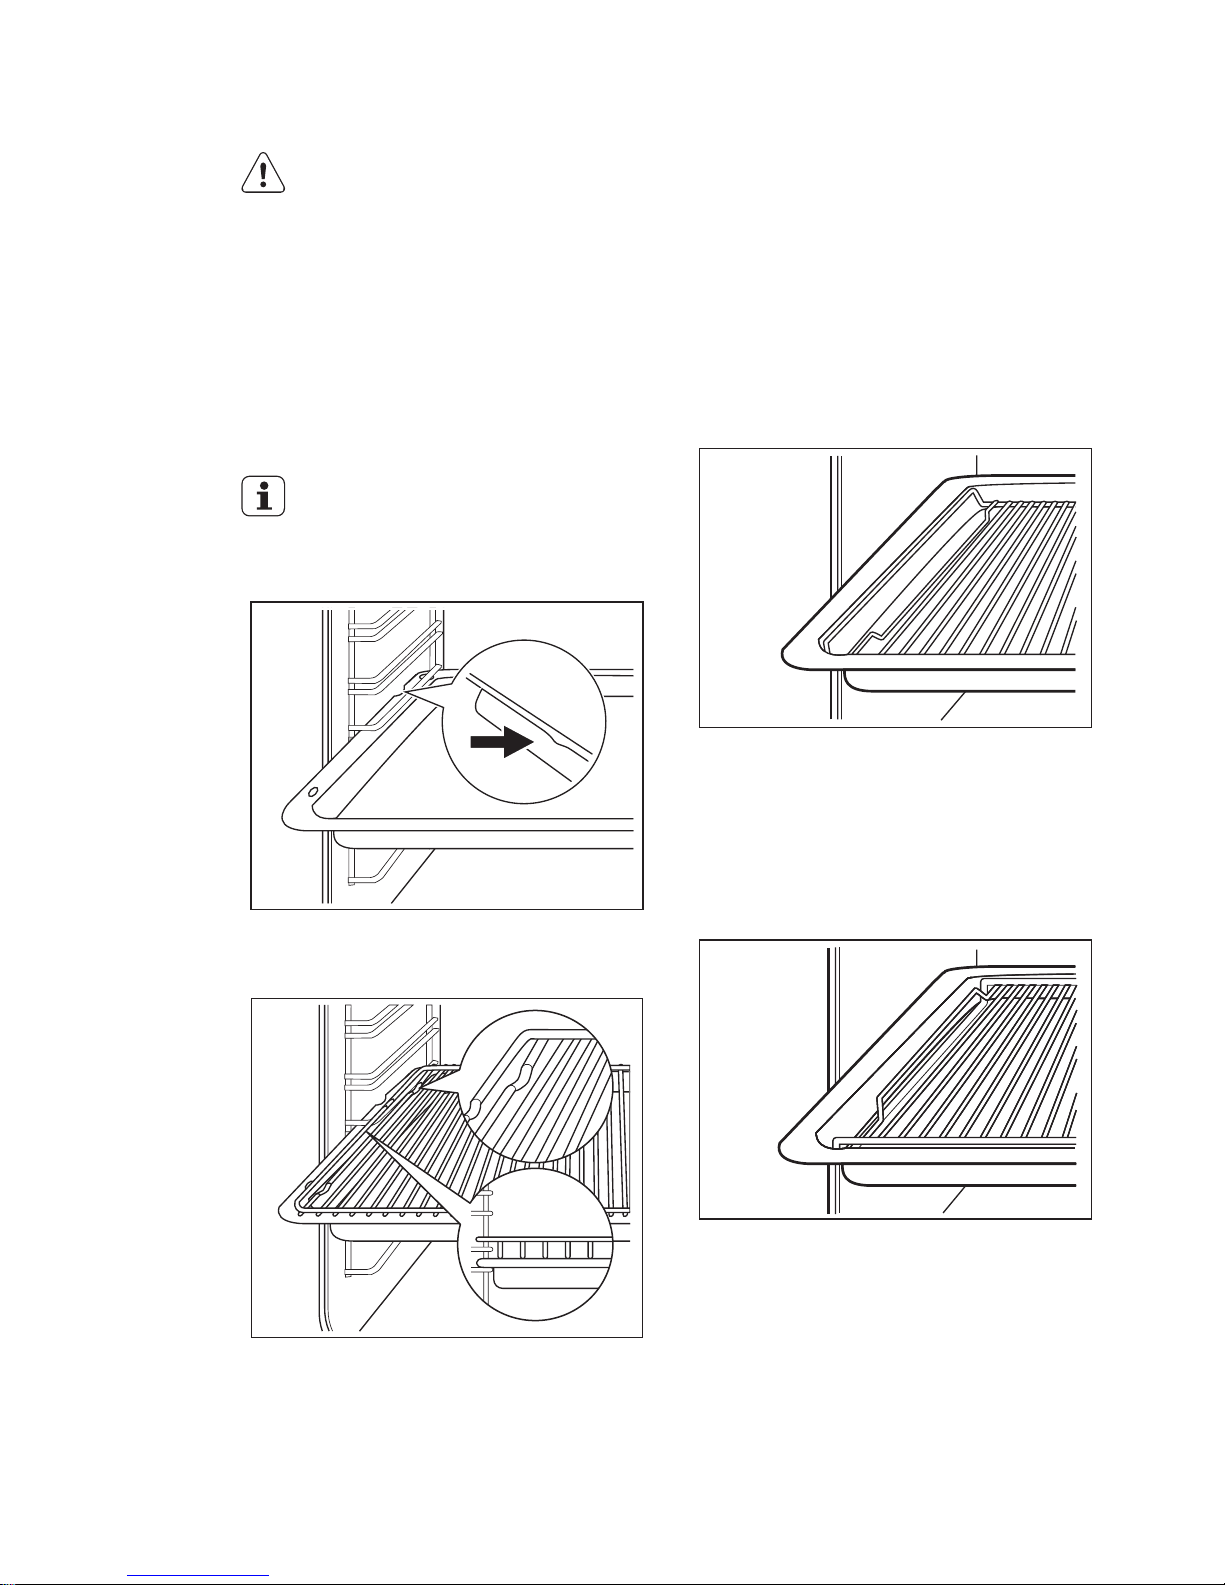
INSERTING THE OVEN
ACCESSORIES
Put in the slide-in accessories so that the
double side edges are at the back of the
oven and point down to the bottom. Push
the slide-in accessories between the guidebars of one of the oven levels.
The deep roasting pan and the
oven shelf have double side edges.
These edges and the shape of the
guide-bars causes the anti-tilt safety for the oven accessories.
Inserting the oven shelf and deep
roasting pan together
Put the oven shelf on the deep roasting
pan. Push the deep roasting pan between
the guide-bars of one of the oven levels.
GRILLING SET
The grilling set includes the roasting pan
grid and the deep roasting pan.
You can use the roasting pan grid in two
positions: turned up or down.
To roast larger pieces of meat or
poultry on one level:
1.
Put the roasting pan grid in the deep
roasting pan. The supports of the
roasting pan grid must point up.
2.
Put the deep roasting pan in the appli-
ance and on the necessary shelf level.
To grill flat dishes in large quantities
and to toast:
1.
Put the roasting pan grid in the deep
roasting pan. The supports of the
roasting pan grid must point down.
2.
Put the deep roasting pan in the appli-
ance and on the necessary shelf level.
12
www.electrolux.com
Page 13
HELPFUL HINTS AND TIPS
WARNING!
Refer to "Safety information" chapter.
The temperature and baking times
in the tables are guidelines only.
They depend on the recipes, quality and quantity of the ingredients
used.
CAUTION!
Use a deep baking tray for very
moist cakes. Fruit juices can cause
permanent stains on the enamel.
TOP OVEN
The top oven is the smaller of the two
ovens. It has 6 shelf levels. Use is to cook
smaller quantities of food. It gives especially good results when used to cook fruitcakes, sweets and savoury flants or quiche.
MAIN OVEN
The main oven is particularly suitable for
cooking larger quantities of food.
BAKING
General instructions
• Your new oven may bake or roast differently to the appliance you had before.
Adapt your usual settings (temperature,
cooking times) and shelf levels to the values in the tables.
• With longer baking times, the oven can
be switched off about 10 minutes before
the end of baking time, to use the residual heat.
When you use frozen food, the trays in
the oven can twist during baking.
When the trays get cold again, the distortion will be gone.
How to use the Baking Tables
• We recommend to use the lower temperature the first time.
• If you cannot find the settings for a special recipe, look for the one that is almost
the same.
• Baking time can be extended by 10-15
minutes, if you bake cakes on more than
one level.
• Cakes and pastries at different heights
do not always brown equally at first. If
this occurs, do not change the temperature setting. The differences equalize
during the baking procedure.
Tips on baking
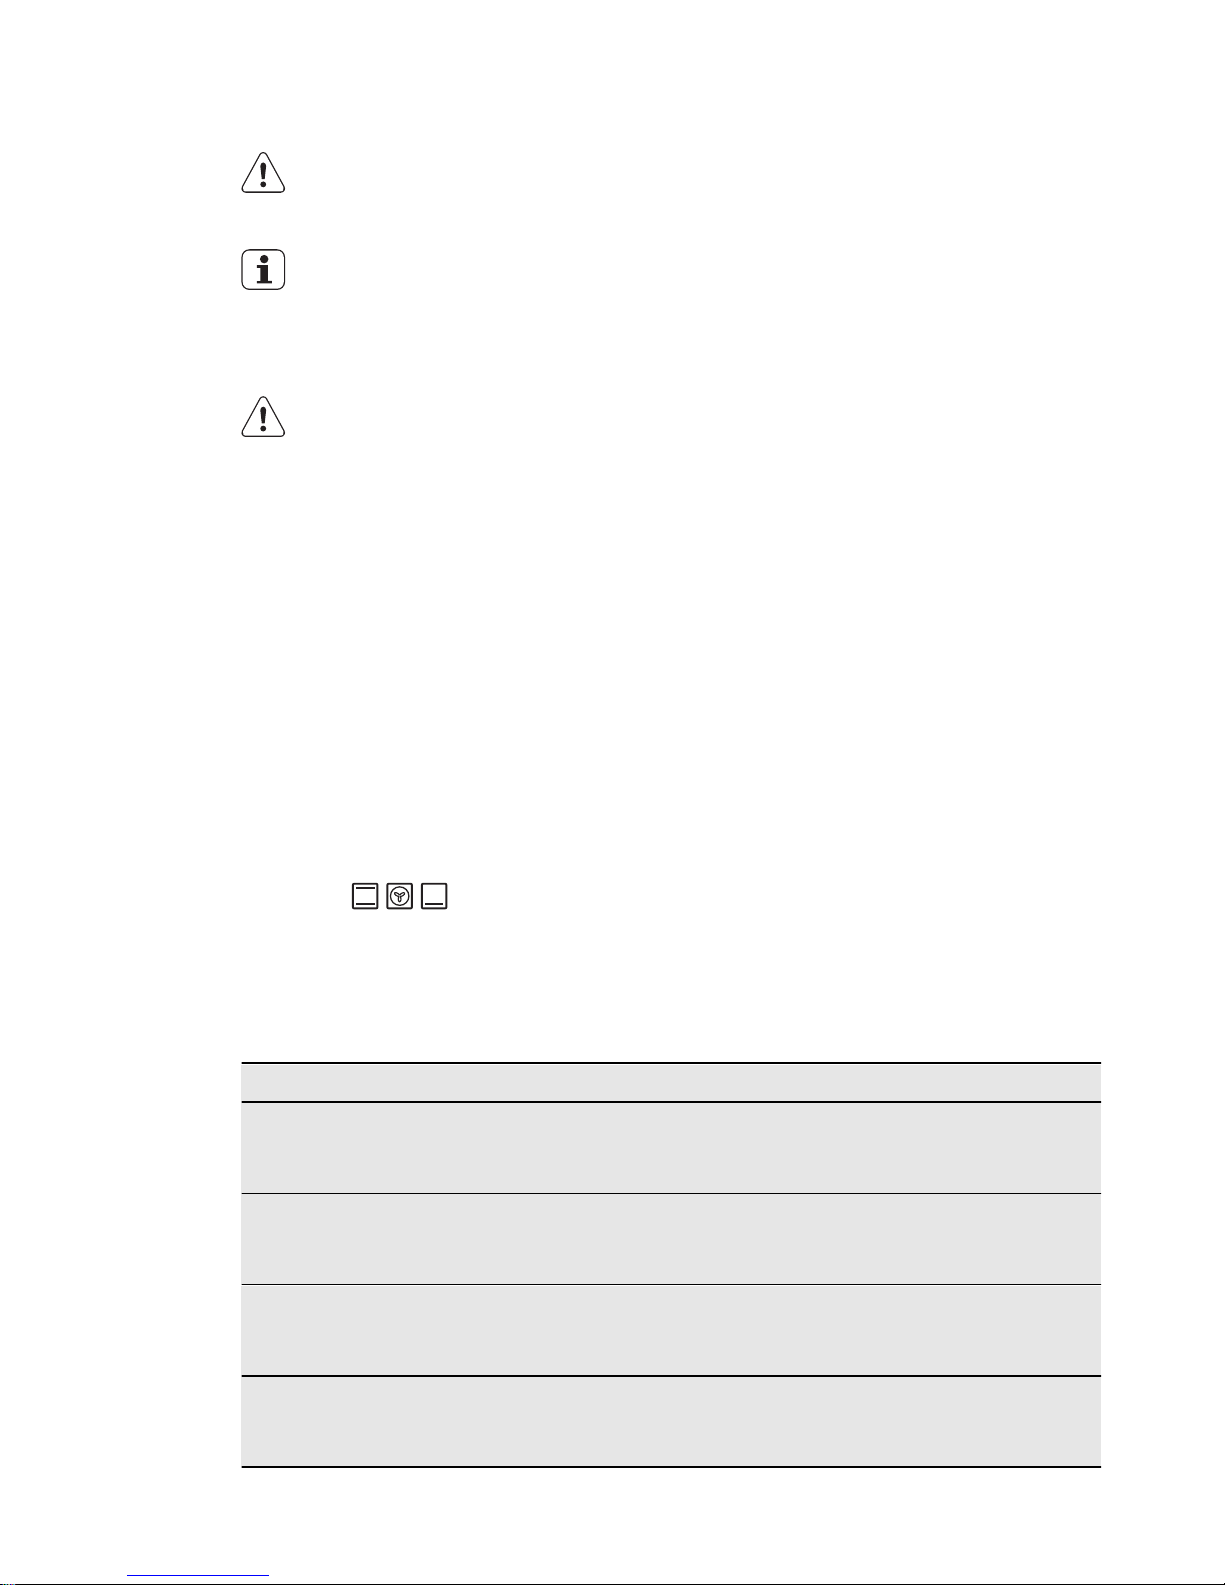
Baking results Possible cause Remedy
The cake is not
browned sufficiently below
Incorrect oven level Put the cake on a lower oven level
The cake sinks (becomes soggy, lumpy, streaky)
Oven temperature too
high
Use a lower setting
The cake sinks (becomes soggy, lumpy, streaky)
Baking time is too short Set a longer baking time
Do not set higher temperatures
to decrease baking times
The cake sinks (becomes soggy, lumpy, streaky)
Too much liquid in the
mixture
Use less liquid. Look at the mixing
times, specially when you use mixing machines
ENGLISH 13
Page 14
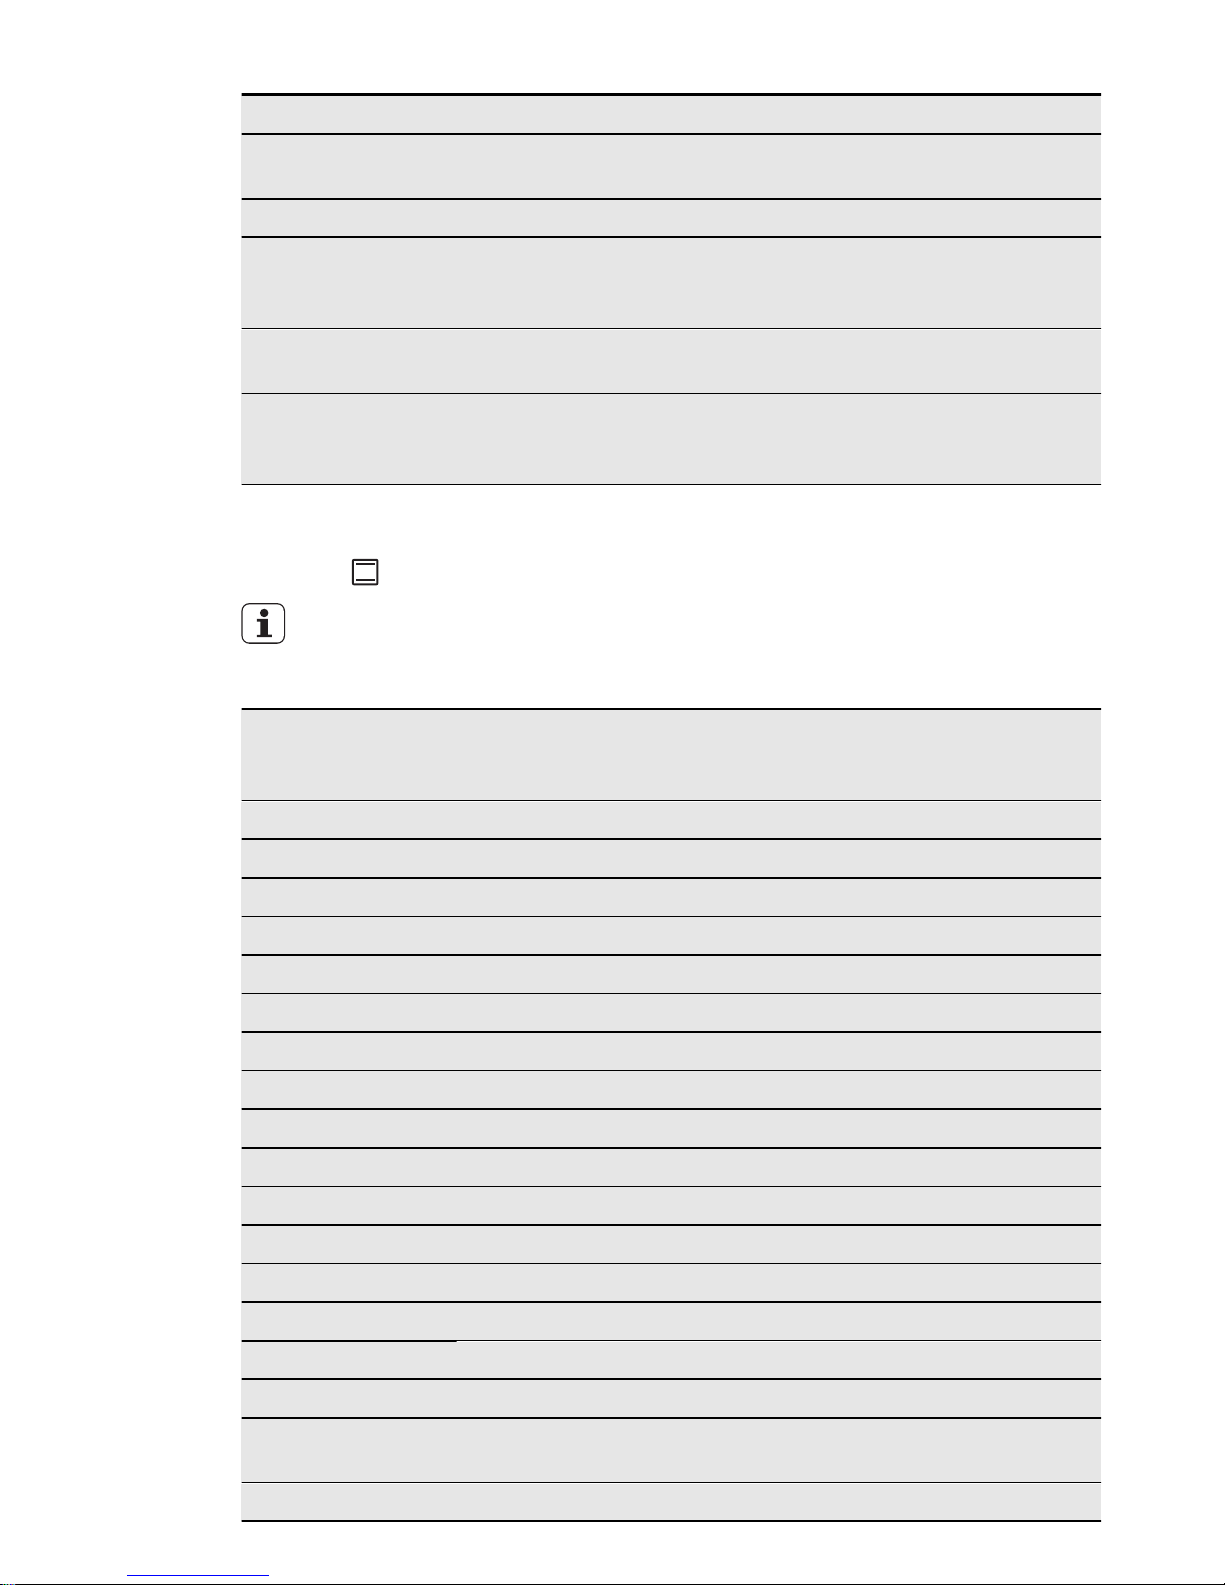
Baking results Possible cause Remedy
Cake is too dry
Oven temperature too
low
Set a higher oven temperature
Cake is too dry Baking time too long Set a shorter baking time
Cake does not
brown equally
Oven temperature too
high and baking time
too short
Set a lower oven temperature and a
longer baking time
Cake does not
brown equally
No equal mixture Put the mixture equally on the bak-
ing tray
Cake does not
cook in the baking
time set
Temperature too low Use a slightly higher oven tempera-
ture setting
TOP OVEN
BAKING
Shelf Positions are not critical but
ensure that oven shelves are evenly
spaced when more than one is
used (e.g. shelf positions 1 and 3)
Food
Temperature
[°C]
Approx Cook
Time
(mins)
Shelf Position
Biscuits 170 - 190 10 - 20 1
Bread 200 - 220 30 - 35 1
Bread rolls/buns 200 - 220 10 - 15 1
Cakes:
- Small & Queen 170 - 180 18 - 25 1
- Sponges 160 - 175 20 - 30 1
- Victoria Sandwich 160 - 170 18 - 25 1
- Madeira 140 - 150 75 - 90 1
- Rich Fruit 140 - 150 120 - 150 1
- Gingerbread 140 - 150 75 - 90 1
- Meringues 90 - 100 150 - 180 1
- Flapjack 160 - 170 25 - 30 1
- Shortbread 130 - 150 45 - 65 1
Casseroles:
- Beef/Lamb 150 - 170 150 - 180 1
- Chicken 160 - 180 75 - 90 1
Convenience
Foods
Follow manufacturer´s instructions.
Fish 170 - 190 20 - 30 1
14
www.electrolux.com
Page 15

Food
Temperature
[°C]
Approx Cook
Time
(mins)
Shelf Position
Fish Pie (Potato
Topped)
190 - 200 20 - 30 1
Fruit Pies, Crumbles
190 - 200 30 - 50 1
Milk Puddings 150 - 170 90 - 120 1
Pasta Lasagne etc. 170 - 180 40 - 50 1
Pastry:
- Choux 180 - 190 30 - 40 1
- Eclairs, Profiteroles
180 - 190 30 - 40 1
- Flaky/Puff Pies 210 - 220 30 - 40 1
Shortcrust:
- Mince Pies 190 - 200 15 - 20 1
- Meat Pies 190 - 210 25 - 35 1
- Quiche, Tarts,
Flans
180 - 200 25 - 50 1
Scones 220 - 230 8 - 12 1
Shepard´s Pie 190 - 200 30 - 40 1
Soufflés 180 - 190 20 - 30 1
Vegetables:
- Baked Jacket Potatoes
180 - 190 60 - 90 1
- Roast Potatoes 180 - 190 60- 90 1
Yorkshire Pudding:
- Large 200 - 210 25 - 40 1
- Individual 210 - 220 15 - 25 1
Roasting Meat,
Poultry
See roasting chart.
MAIN OVEN
BAKING
Shelf Positions are not critical but
ensure that oven shelves are evenly
spaced when more than one is
used (e.g. shelf positions 1 and 3)
Food
Temperature
[°C]
Approx Cook Time
(mins)
Biscuits 180 - 190 10 - 20
ENGLISH 15
Page 16

Food
Temperature
[°C]
Approx Cook Time
(mins)
Bread 190 - 210 30 - 35
Cakes:
- Small & Queen 160 - 170 18 - 25
- Sponges 160 - 170 20 - 25
- Madeira 140 - 160 60 - 75
- Rich Fruit 130 - 140 120 - 150
- Christmas 130 - 140 180 - 270
Fish 160 - 180 20 - 30
Fruit Pies, Crumbles 170 - 180 30 - 50
Milk Puddings 140 - 160 60 - 90
Pastry:
- Choux 180 - 190 30 - 40
- Shortcrust 180 - 190 25 - 35
- Flaky 180 - 190 30 - 40
- Puff Follow manufacturer´s instructions; Reduce the temperature for Fan oven by 20°C
Plate Tarts 180 - 190 25 - 45
Quiches/Flans 170 - 180 25 - 45
Scones 210 - 230 8 - 12
Roasting: Meat and Poultry
160 - 180 see Roasting Chart
ROASTING
Roasting dishes
• Use heat-resistant ovenware to roast
(please read the instructions of the manufacturer).
• Large roasting joints can be roasted directly in the deep roasting pan or on the
oven shelf above the deep roasting pan.
(If present)
• Roast lean meats in a roasting tin with a
lid. This well keep the meat more succulent.
• All types of meat, that can be browned
or have crackling, can be roasted in the
roasting tin without the lid.
MAIN OVEN
ROASTING
Meat Temperature [°C] Cooking Time
Beef/ Beef boned
160 - 180
20-35 minutes per ½ kg
(1lb) and 20-35 minutes
over
Mutton/ Lamb
160 - 180
20-35 minutes per ½ kg
(1lb) and 20-35 minutes
over
16
www.electrolux.com
Page 17
Meat Temperature [°C] Cooking Time
Pork/ Veal/ Ham
160 - 180
30-40 minutes per ½ kg
(1lb) and 30-40 minutes
over
Chicken
160 - 180
15-20 minutes per ½ kg
(1lb) and 20 minutes over
Turkey/ Goose
160 - 180
15-20 minutes per ½ kg
(1lb) and 20 minutes over
Duck
160 - 180
25-35 minutes per ½ kg
(1lb) and 25-30 minutes
over
Pheasant
160 - 180
35-40 minutes per ½ kg
(1lb) and 35-40 minutes
over
Rabbit
160 - 180
20 minutes per ½ kg (1lb)
and 20 minutes over
GRILLING
Always use the grilling function with
maximum temperature setting
Always grill with the oven door
closed
Always pre-heat the empty oven
with the grill functions for 5 minutes.
• Set the shelf in the shelf level as
recommended in the grilling table.
• Always set the pan to collect the
fat into the first shelf level.
• Grill only flat pieces of meat or
fish.
TOP OVEN
GRILLING
Adjust shelf position and grill pan
grid to suit different thicknesses of
food
Food
Grill Time
(mins in total)
Bacon Rashers 5- 6
Beefburgers 10 - 20
Chicken Joints 20 - 40
Chops
- Lamb 15 - 25
- Pork 20 - 25
Fish - Whole
Trout/ Makarel
10 -12
Fillets - Plaice/Cod 4 - 6
Kebabs 12 - 18
ENGLISH 17
Page 18

Food
Grill Time
(mins in total)
Kidneys - Lamb/Pig 6 - 10
Sausages 20 - 30
Steaks
- Rare 4 - 6
- Medium 6 - 8
- Well Done 12 - 15
Toasted Sandwiches 3 - 4
DEFROSTING
• Put the food out of the packaging and
set it on a plate on the oven shelf.
• Do not cover with a plate or bowl. This
can extend the time to defrost very
much.
• Put the oven shelf in the first shelf level
from the bottom.
Information on acrylamides
Important! According to the newest
scientific knowledge, if you brown food
(specially the one which contains starch),
acrylamides can pose a health risk. Thus,
we recommend that you cook at the lowest
temperatures and do not brown food too
much.
18
www.electrolux.com
Page 19
CARE AND CLEANING
WARNING!
Refer to "Safety information" chapter.
• Clean the front of the appliance with a
soft cloth with warm water and cleaning
agent.
• To clean metal surfaces use a usual
cleaning agent
• Clean the oven interior after each use.
Thus you can remove dirt more easily
and it does not burn on.
• Clean stubborn dirt with a special oven
cleaner.
• Clean all oven accessories (with a soft
cloth with warm water and cleaning
agent) after each use and let them dry.
• If you have nonstick accessories, do not
clean them using an aggressive agents,
sharp edged objects or dishwasher. It
can destroy nonstick coating!
Stainless steel or aluminium appliances:
Clean the oven door with a wet
sponge only. Dry it with a soft
cloth.
Do not use steel wool, acids or
abrasive materials as they can
damage the oven surface. Clean
the oven control panel with the
same precautions
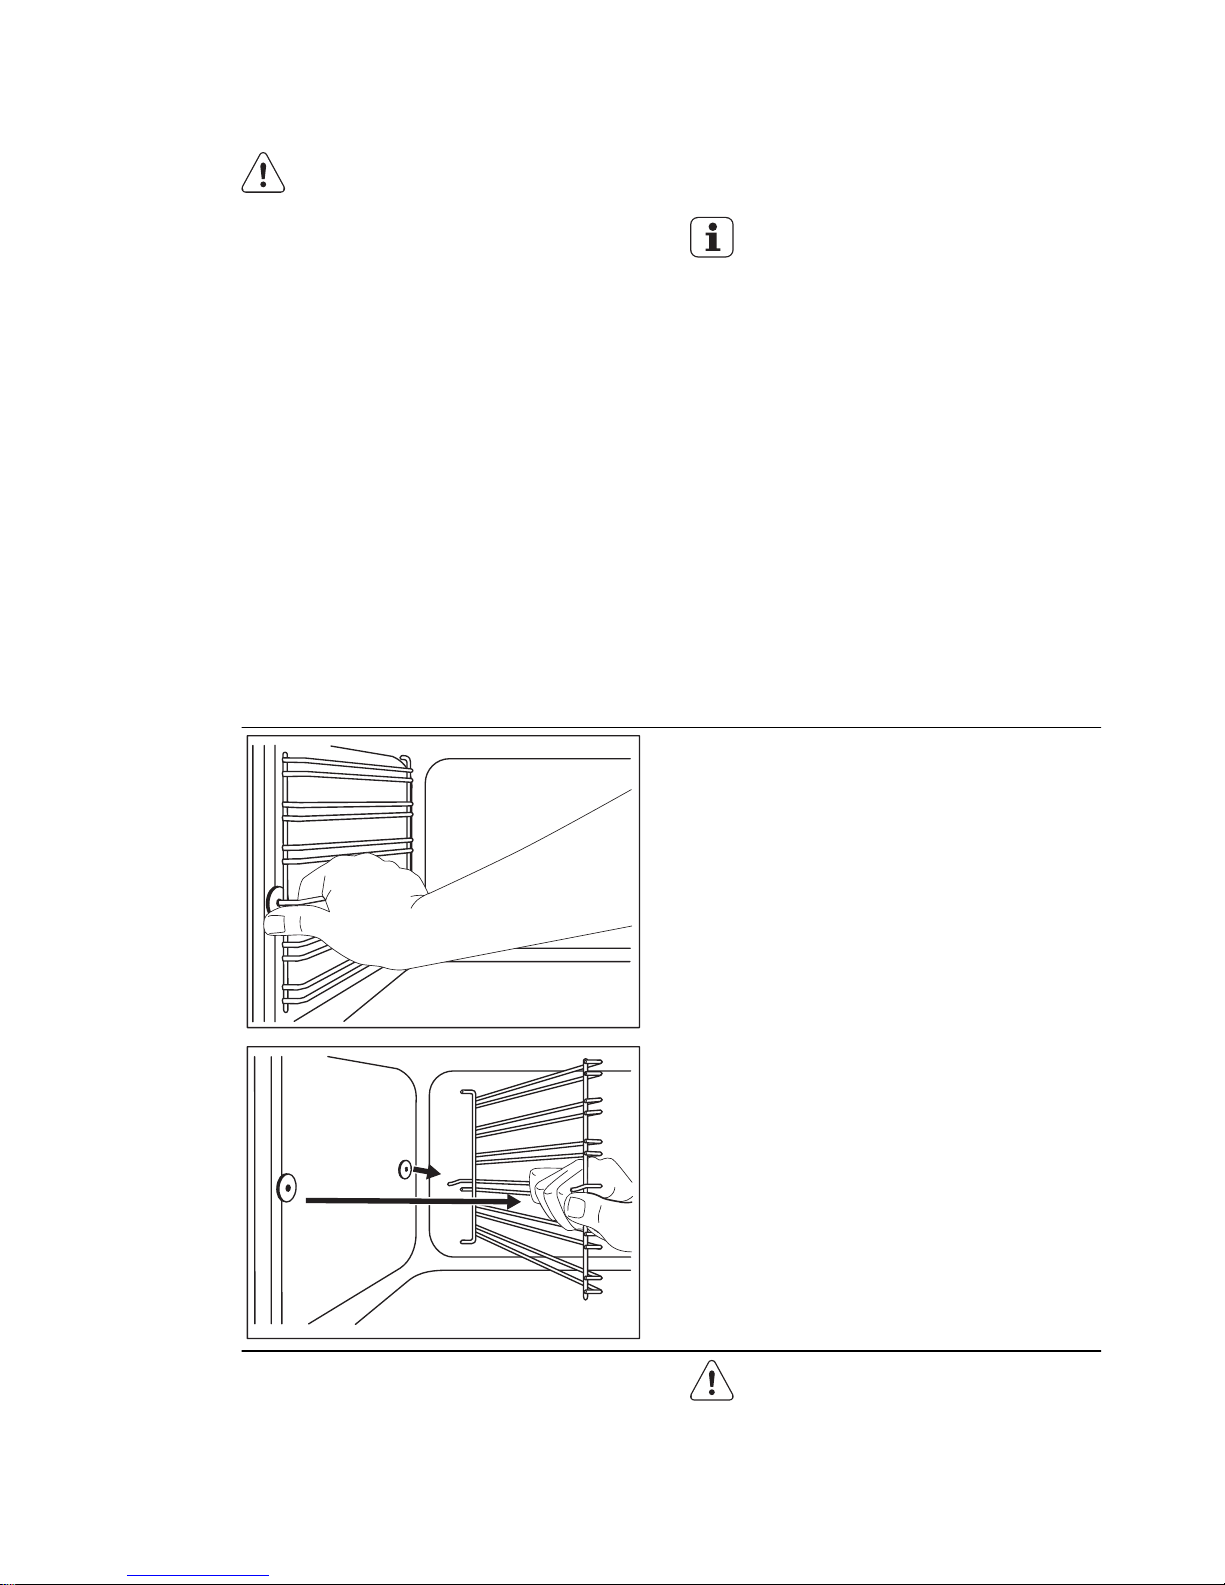
SHELF SUPPORTS
You can remove the shelf supports to clean
the side walls.
Removing the shelf supports
1.
Pull the front of the shelf support away
from the side wall.
1
2
2.
Pull the rear end of the shelf support
away from the side wall and remove it.
Installing the shelf supports
Install the shelf supports in the opposite sequence.
Valid with telescopic runners:
The retaining pins on the telescopic
shelf runners must point to the
front!
ENGLISH 19
Page 20
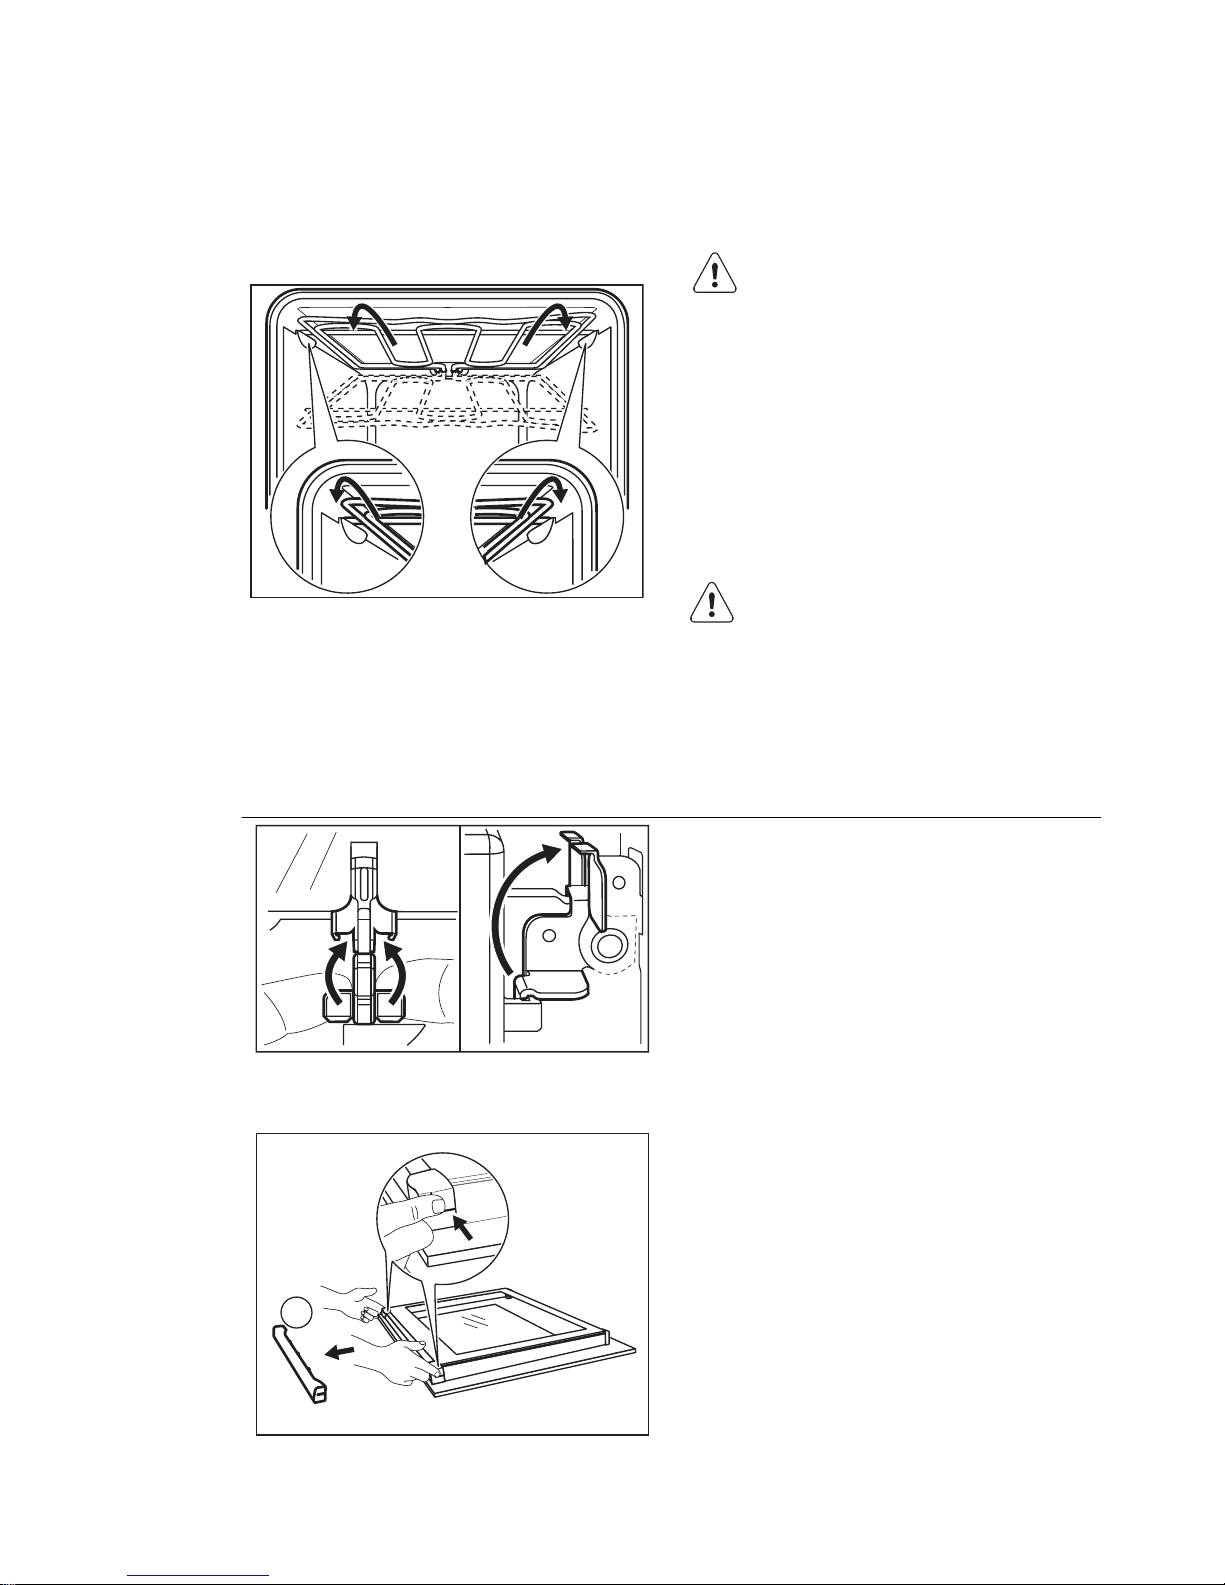
OVEN CEILING
You can fold down the heating element on
the oven ceiling to clean the oven ceiling
easily.
Folding down the heating element
1.
Remove the shelf support rails.
2.
Hold the heating element with the two
hands at the front
3.
Pull it forwards against the spring pressure and out along the support on
both sides.
4.
The heating element folds down.
The oven ceiling is ready to clean.
Installing the heating element
1.
Install the heating element in opposite
sequence.
Install the heating element correctly
on the two sides above the support
on the inner wall of the oven.
2.
Insert shelf support rails.
OVEN DOOR AND GLASS
PANELS
You can remove the oven door and the internal glass panels to clean them. The
number of glass panels is different for different models.
CAUTION!
Be careful when you remove the
door from the appliance. The door
is heavy.
Removing the door and the glass panels
A
A
1.
Open the oven door as far as it goes.
2.
Lift up clamping levers (A) on the two
door hinges fully.
3.
Close the oven door until the first position (angle approx. 45°).
4.
Hold the oven door with one hand on
each side and pull it away from the
oven at an up angle.
5.
Put the door with the outer side down
on a soft cloth on a stable surface.
This is to prevent scratches.
B
6.
Hold the door trim (B) on the top edge
of the door at the two sides and push
inwards to release the clip seal.
7.
Pull the door trim to the front to remove it.
20
www.electrolux.com
Page 21
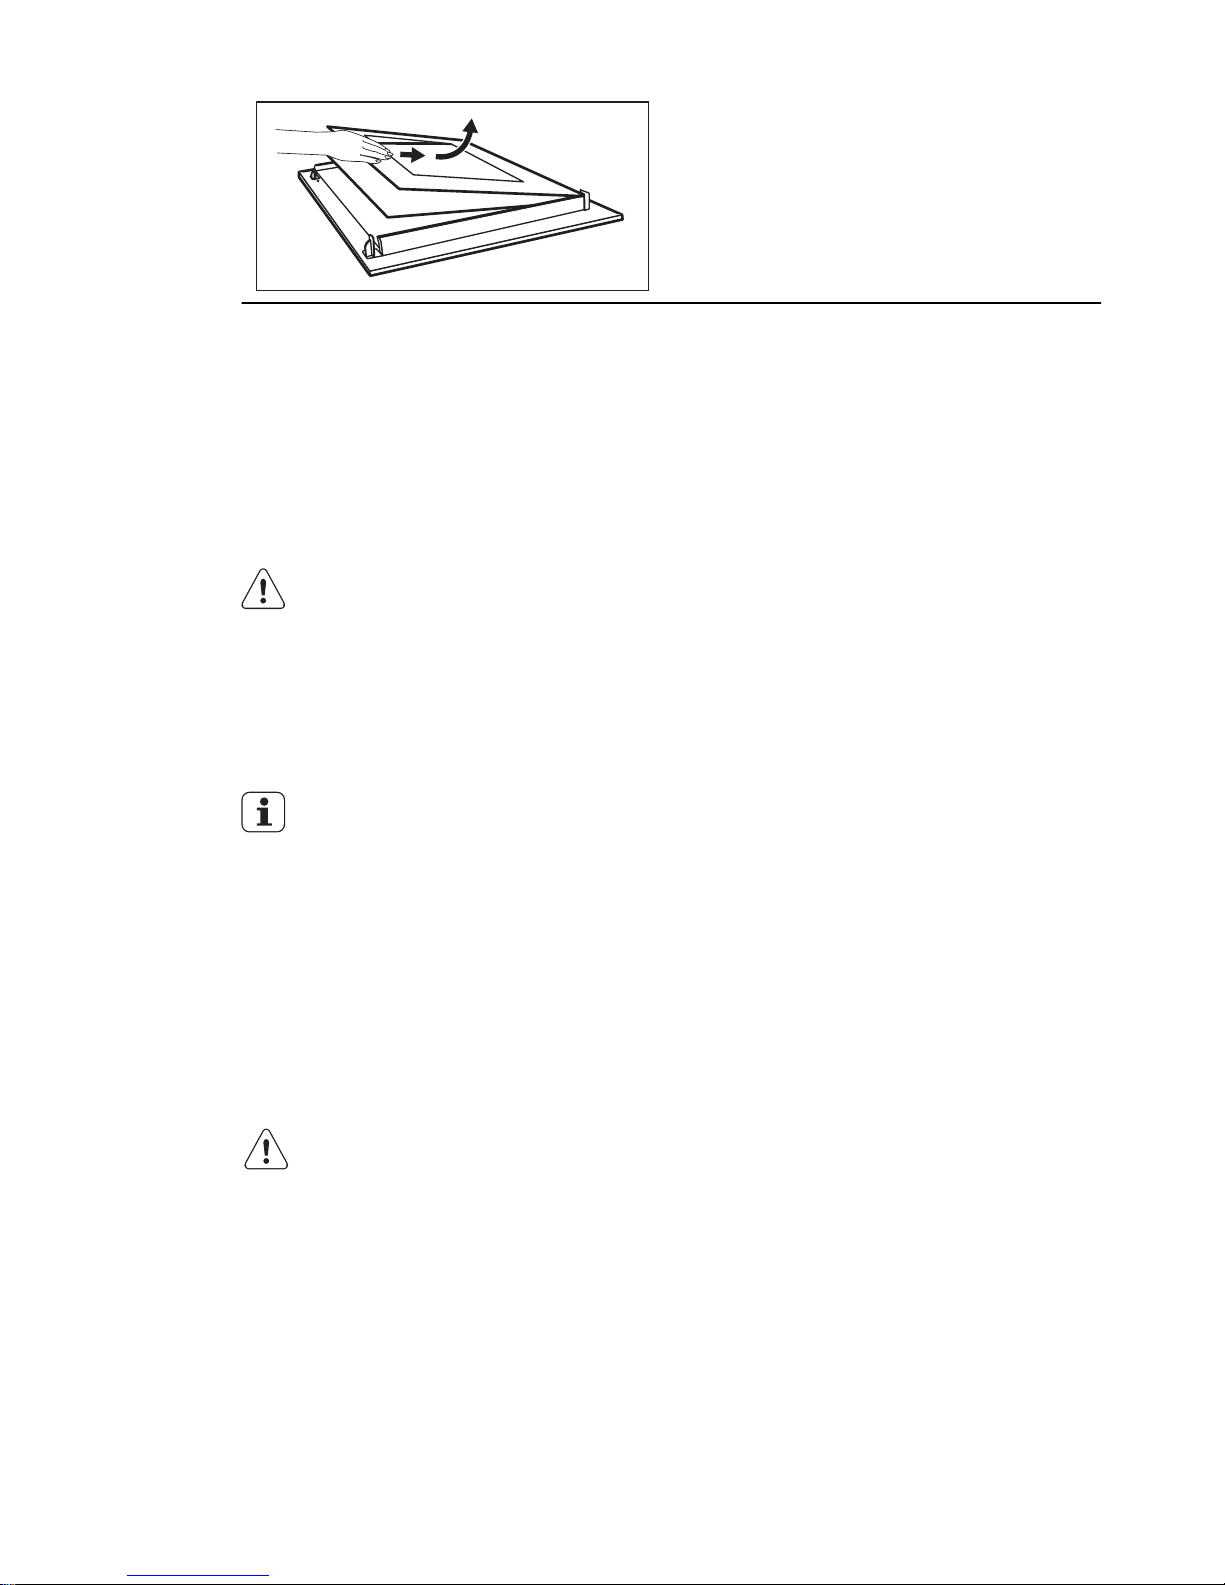
8.
Hold the door glass panels on their
top edge one by one and pull them
upwards out of the guide
9.
Clean the glass panel with water and
soap. Dry the glass panel carefully.
Installing the door and the
glass panels
When the cleaning is completed, install the
glass panels and the oven door. Do the
above steps in the opposite sequence. Install the smaller panel first, then the larger.
OVEN LAMP
WARNING!
There is a danger of electrical
shock!
Before you change the oven lamp:
• Switch off the oven.
• Remove the fuses in the fuse box or
switch off the circuit breaker.
Put a cloth on the bottom of the
oven for protection of the oven light
and glass cover.
Replacing the oven lamp
1.
You can find the lamp glass cover at
the back of the cavity.
Turn the lamp glass cover counterclockwise to remove it.
2.
Clean the glass cover.
3.
Replace the oven lamp with applicable
300°C heat-resistant oven lamp.
Use the same oven lamp type.
4.
Install the glass cover.
ENGLISH 21
Page 22
WHAT TO DO IF…
WARNING!
Refer to "Safety information" chapter.
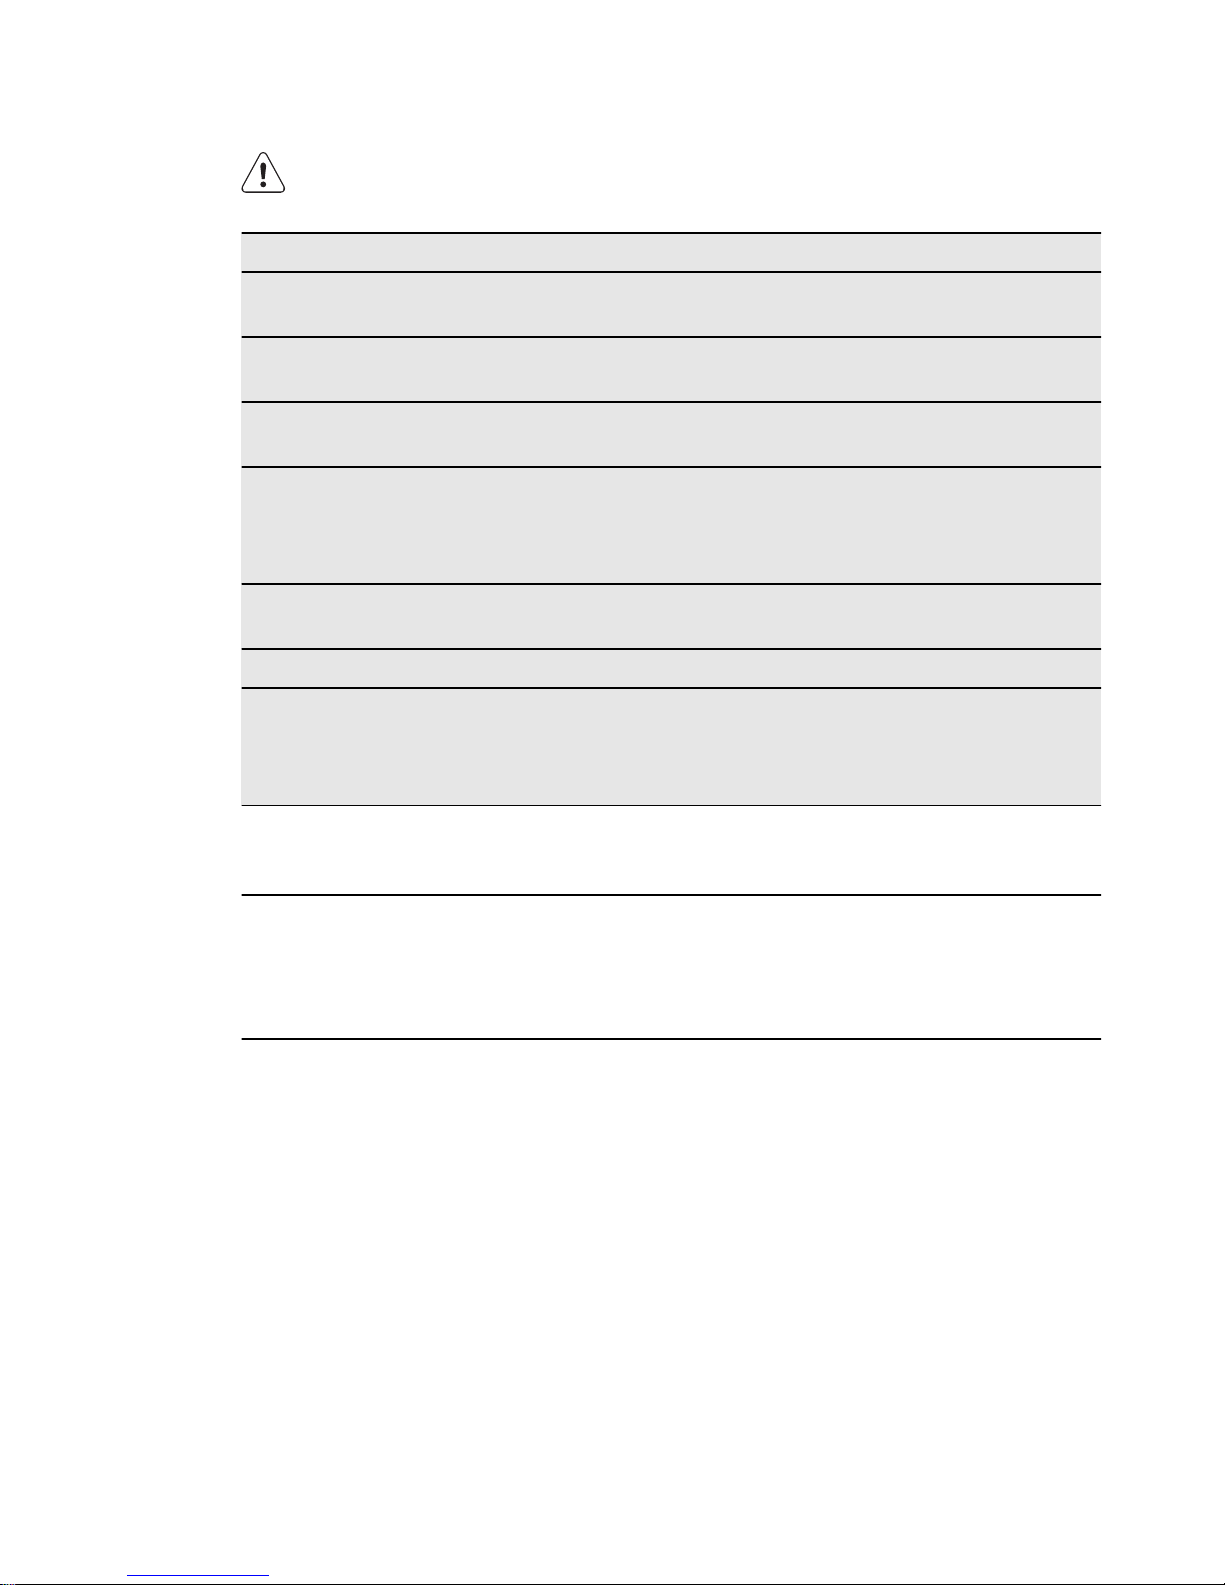
Problem Possible cause Remedy
The oven does not heat
up.
The appliance is deactivated.
Activate the appliance.
The oven does not heat
up.
The clock is not set. Set the clock.
The oven does not heat
up.
The necessary settings are
not set.
Make sure that the settings are correct.
The oven does not heat
up.
The fuse in the fuse box is
released.
Do a check of the fuse. If
the fuse is released more
than one time, contact a
qualified electrician.
The oven lamp does not
operate.
The oven lamp is defective.
Replace the oven lamp.
The display shows 12.00 There was a power cut. Set the clock.
Steam and condensation
settle on the food and in
the oven.
You left the dish in the
oven for too long.
Do not keep the dishes in
the oven for longer than
15-20 minutes after the
cooking ends.
If you cannot find a solution to the problem
yourself, contact your dealer or the service
centre.
The necessary data for the service centre is
on the rating plate. The rating plate is on
the front frame of the appliance cavity.
We recommend that you write the data here:
Model (MOD.) .........................................
Product number (PNC) .........................................
Serial number (S.N.) .........................................
22
www.electrolux.com
Page 23
INSTALLATION
WARNING!
Refer to "Safety information" chapter.
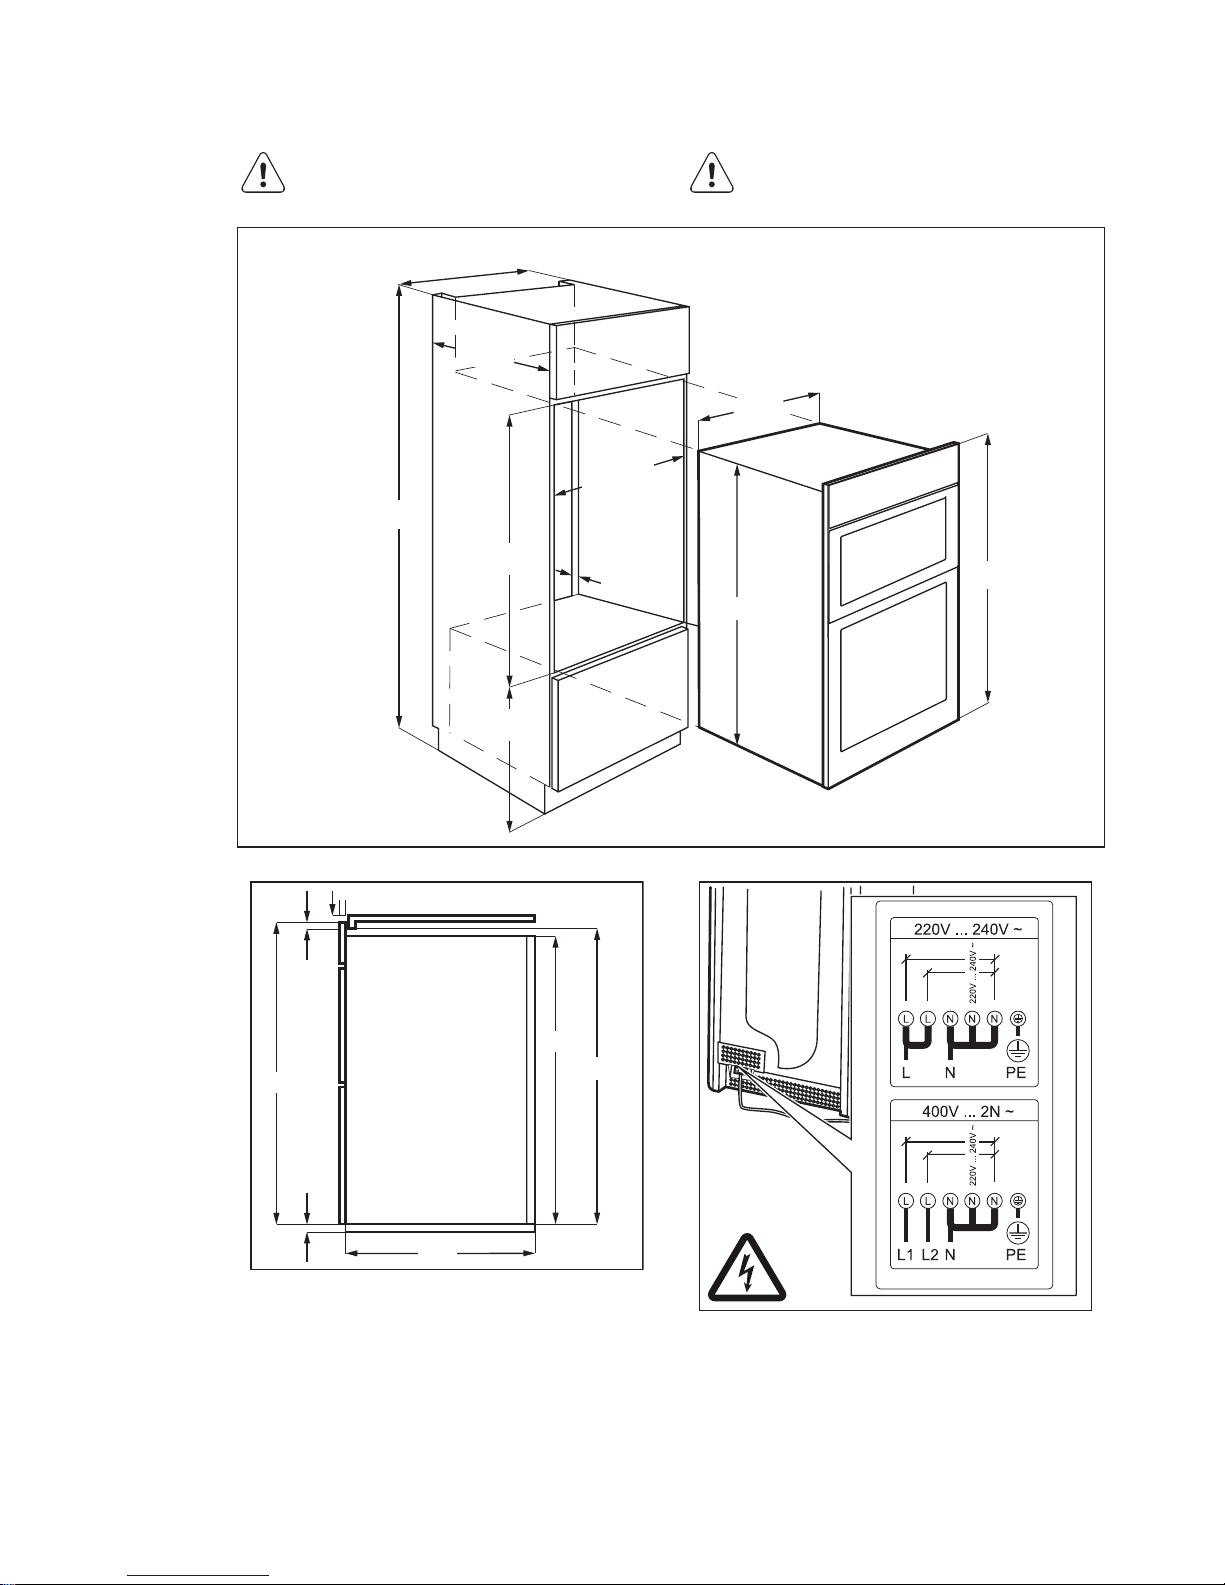
The built-in unit must meet the stability requirements of DIN 68930.
min. 600
min. 907
min. 300
20
min. 550
min. 2000
888
866
538
min. 560
max. 570
874-879
866
888
16
5
548
11
ENGLISH 23
Page 24
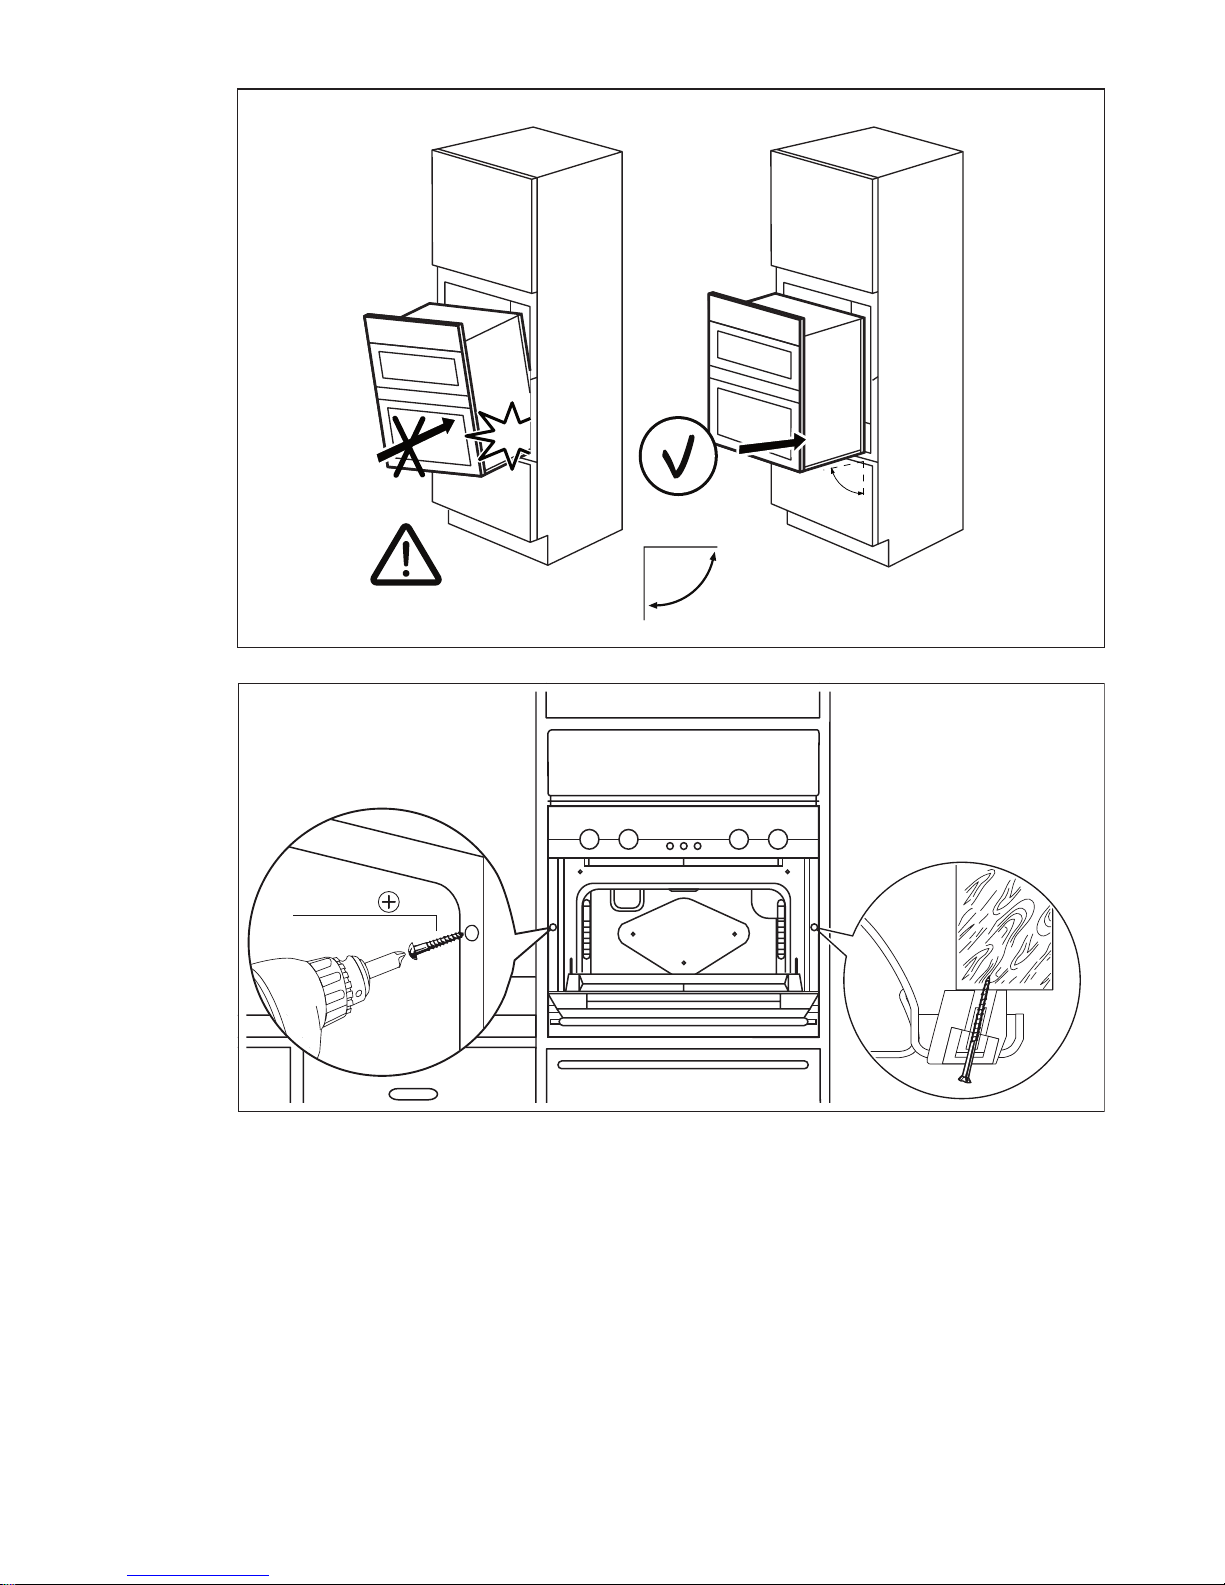
90
0
2x 3,5x25
24
www.electrolux.com
Page 25

GB
IE GREAT BRITAIN & IRELAND - GUARANTEE/
CUSTOMER SERVICE
Standard guarantee conditions: We,
Electrolux, undertake that if within 12
months of the date of the purchase this
Electrolux appliance or any part thereof is
proved to be defective by reason only of
faulty workmanship or materials, we will, at
our option repair or replace the same FREE
OF CHARGE for labour, materials or carriage on condition that:
• Appliance has been correctly installed
and used only on the electricity supply
stated on the rating plate.
• Appliance has been used for normal domestic purposes only, in accordance
with manufacturer's instructions.
• Appliance hasn't been serviced, maintained, repaired, taken apart or tampered with by person not authorised by
us.
• Electrolux Service Force Centre must undertake all service work under this guarantee
• Any appliance or defective part replaced
shall become the Company's property.
• This guarantee is in addition to your statutory and other legal rights.
Exclusions
• Damage, calls resulting from transport,
improper use, neglect, light bulbs, removable parts of glass, plastic.
• Costs for calls to put right appliance
which is improperly installed, calls to appliances outside United Kingdom.
• Appliances found to be in use within a
commercial environment, plus those
which are subject to rental agreements.
• Products of Electrolux manufacturer that
are not marketed by Electrolux
Service and Spare Parts.Please contact
your local Service Force Centre: 08445 616
616(Call will be routed to Service Force
Centre covering your postcode area). For
address of local Service Force Centre and
further information, please visit:
www.serviceforce.co.uk Before calling
out an engineer, please ensure you have
read the details under the heading "What to
do if... / Troubleshooting". When you contact the Service Force Centre you will need
to give the following details: Your name,
address and postcode, your telephone
number, clear concise details of the fault,
model and serial number of the appliance
(found on the rating plate), the purchase
date. Please note a valid purchase receipt
or guarantee documentation is required for
in guarantee service calls.
Customer Care.Please contact our Customer Care Department: Electrolux Major
Appliances, Addington Way, Luton, Bedfordshire, LU4 9QQ or visit our website at
www.electrolux.co.uk
Customer Care
Department,
Tel: (Calls may be recorded for training purposes)
Electrolux 08445 613 613
AEGElectrolux
08445 611 611
ZanussiElectrolux
08445 612 612
For Customer Service in The
Republic of Ireland please
contact us at the address
below:
Electrolux Group (Irl) Ltd, Long Mile Road,
Dublin 12, Republic of Ireland
Tel: +353 (0)1 4090751, Email: serv[email protected]
ENGLISH 25
Page 26

ENVIRONMENT CONCERNS
Recycle the materials with the symbol
.
Put the packaging in applicable containers
to recycle it.
Help protect the environment and human
health and to recycle waste of electrical
and electronic appliances. Do not dispose
appliances marked with the symbol
with
the household waste. Return the product
to your local recycling facility or contact
your municipal office.
26
www.electrolux.com
Page 27

ENGLISH 27
Page 28
www.electrolux.com/shop 892950106-B-022012
 Loading...