

Page 1

EOC6851
................................................ .............................................
EN STEAM OVEN USER MANUAL 2
PL PIEKARNIK PAROWY INSTRUKCJA OBSŁUGI 43
Page 2

www.electrolux.com
2
CONTENTS
1. SAFETY INFORMATION . . . . . . . . . . . . . . . . . . . . . . . . . . . . . . . . . . . . . . . . . . . . . . . . . . . 3
2. SAFETY INSTRUCTIONS . . . . . . . . . . . . . . . . . . . . . . . . . . . . . . . . . . . . . . . . . . . . . . . . . . 4
3. PRODUCT DESCRIPTION . . . . . . . . . . . . . . . . . . . . . . . . . . . . . . . . . . . . . . . . . . . . . . . . . 7
4. BEFORE FIRST USE . . . . . . . . . . . . . . . . . . . . . . . . . . . . . . . . . . . . . . . . . . . . . . . . . . . . . . 7
5. CONTROL PANEL . . . . . . . . . . . . . . . . . . . . . . . . . . . . . . . . . . . . . . . . . . . . . . . . . . . . . . . 8
6. DAILY USE . . . . . . . . . . . . . . . . . . . . . . . . . . . . . . . . . . . . . . . . . . . . . . . . . . . . . . . . . . . . . 9
7. CLOCK FUNCTIONS . . . . . . . . . . . . . . . . . . . . . . . . . . . . . . . . . . . . . . . . . . . . . . . . . . . . 14
8.
AUTOMATIC PROGRAMMES . . . . . . . . . . . . . . . . . . . . . . . . . . . . . . . . . . . . . . . . . . . . . . 15
9. USING THE ACCESSORIES . . . . . . . . . . . . . . . . . . . . . . . . . . . . . . . . . . . . . . . . . . . . . . . 15
10.
ADDITIONAL FUNCTIONS . . . . . . . . . . . . . . . . . . . . . . . . . . . . . . . . . . . . . . . . . . . . . . . . 20
11. HELPFUL HINTS AND TIPS . . . . . . . . . . . . . . . . . . . . . . . . . . . . . . . . . . . . . . . . . . . . . . . 22
12.
CARE AND CLEANING . . . . . . . . . . . . . . . . . . . . . . . . . . . . . . . . . . . . . . . . . . . . . . . . . . . 34
13. WHAT TO DO IF… . . . . . . . . . . . . . . . . . . . . . . . . . . . . . . . . . . . . . . . . . . . . . . . . . . . . . . 40
14.
TECHNICAL DATA . . . . . . . . . . . . . . . . . . . . . . . . . . . . . . . . . . . . . . . . . . . . . . . . . . . . . . 41
15. INSTALLATION . . . . . . . . . . . . . . . . . . . . . . . . . . . . . . . . . . . . . . . . . . . . . . . . . . . . . . . . . 41
WE’RE THINKING OF YOU
Thank you for purchasing an Electrolux appliance. You’ve chosen a product that brings with it
decades of professional experience and innovation. Ingenious and stylish, it has been designed
with you in mind. So whenever you use it, you can be safe in the knowledge that you’ll get great
results every time.
Welcome to Electrolux.
Visit our website for:
Get usage advice, brochures, trouble shooter, service information:
www.electrolux.com
Register your product for better service:
www.electrolux.com/productregistration
Buy Accessories, Consumables and Original spare parts for your appliance:
www.electrolux.com/shop
CUSTOMER CARE AND SERVICE
We recommend the use of original spare parts.
When contacting Service, ensure that you have the following data available.
The information can be found on the rating plate. Model, PNC, Serial Number.
Warning / Caution-Safety information
General information and tips
Environmental information
Subject to change without notice.
Page 3

1. SAFETY INFORMATION
Before the installation and use of the appliance, carefully
read the supplied instructions. The manufacturer is not
responsible if an incorrect installation and use causes injuries and damages. Always keep the instructions with
the appliance for future reference.
1.1 Children and vulnerable people safety
WARNING!
Risk of suffocation, injury or permanent disability.
• This appliance can be used by children aged from 8
years and above and persons with reduced physical,
sensory or mental capabilities or lack of experience and
knowledge if they are supervised by an adult or a person who is responsible for their safety.
• Do not let children play with the appliance.
• Keep all packaging away from children.
• Keep children and pets away from the appliance when
it operates or when it cools down. Accessible parts are
hot.
• If the appliance has a child safety device, we recommend that you activate it.
• Cleaning and user maintenance shall not be made by
children without supervision.
ENGLISH 3
1.2 General Safety
• Internally the appliance becomes hot when in operation. Do not touch the heating elements that are in the
appliance. Always use oven gloves to remove or put in
accessories or ovenware.
• Do not use a steam cleaner to clean the appliance.
• Before maintenance cut the power supply.
Page 4

www.electrolux.com
4
• Do not use harsh abrasive cleaners or sharp metal
• Excess spillage must be removed before the pyrolytic
• Only use the core temperature sensor recommended
• To remove the shelf supports first pull the front of the
scrapers to clean the glass door since they can scratch
the surface, which may result in shattering of the glass.
cleaning. Remove all parts from the oven.
for this appliance.
shelf support and then the rear end away from the side
walls. Install the shelf supports in the opposite sequence.
2.
SAFETY INSTRUCTIONS
2.1 Installation
WARNING!
Only a qualified person must install this appliance.
• Remove all the packaging.
• Do not install or use a damaged appli-
ance.
• Obey the installation instruction sup-
plied with the appliance.
• Always be careful when you move the
appliance because it is heavy. Always
wear safety gloves.
• Do not pull the appliance by the handle.
• Keep the minimum distance from the
other appliances and units.
• Make sure that the appliance is installed
below and adjacent safe structures.
• The sides of the appliance must stay
adjacent to appliances or to units with
the same height.
Electrical connection
WARNING!
Risk of fire and electrical shock.
• All electrical connections should be
made by a qualified electrician.
• The appliance must be earthed.
• Make sure that the electrical information
on the rating plate agrees with the power supply. If not, contact an electrician.
• Always use a correctly installed shockproof socket.
• Do not use multi-plug adapters and extension cables.
• Make sure not to cause damage to the
mains plug and to the mains cable.
Contact the Service or an electrician to
change a damaged mains cable.
• Do not let mains cables to come in
touch with the appliance door, specially
when the door is hot.
• The shock protection of live and insulated parts must be fastened in such a
way that it cannot be removed without
tools.
• Connect the mains plug to the mains
socket only at the end of the installation. Make sure that there is access to
the mains plug after the installation.
• If the mains socket is loose, do not
connect the mains plug.
• Do not pull the mains cable to disconnect the appliance. Always pull the
mains plug.
• Use only correct isolation devices: line
protecting cut-outs, fuses (screw type
fuses removed from the holder), earth
leakage trips and contactors.
Page 5

• The electrical installation must have an
isolation device which lets you disconnect the appliance from the mains at all
poles. The isolation device must have a
contact opening width of minimum 3
mm.
• Fully close the appliance door, before
you connect the mains plug to the
mains socket.
2.2 Use
WARNING!
Risk of injury, burns or electric
shock or explosion.
• Use this appliance in a household environment.
• Do not change the specification of this
appliance.
• Make sure that the ventilation openings
are not blocked.
• Do not let the appliance stay unattended during operation.
• Deactivate the appliance after each
use.
• Be careful, when you open the appliance door while the appliance is in operation. Hot air can release.
• Do not operate the appliance with wet
hands or when it has contact with water.
• Do not apply pressure on the open
door.
• Do not use the appliance as a work
surface or as a storage surface.
• Always keep the appliance door closed
when the appliance is in operation.
• Open the appliance door carefully. The
use of ingredients with alcohol can
cause a mixture of alcohol and air.
• Do not let sparks or open flames to
come in contact with the appliance
when you open the door.
• Do not put flammable products or items
that are wet with flammable products
in, near or on the appliance.
WARNING!
Risk of damage to the appliance.
• To prevent damage or discoloration to
the enamel:
– do not put ovenware or other objects
in the appliance directly on the bottom.
ENGLISH 5
– do not put aluminium foil directly on
the bottom of the appliance.
– do not put water directly into the hot
appliance.
– do not keep moist dishes and food in
the appliance after you finish the cooking.
– be careful when you remove or install
the accessories.
• Discoloration of the enamel has no effect on the performance of the appliance. It is not a defect in the sense of
the warranty law.
• Use a deep pan for moist cakes. Fruit
juices cause stains that can be permanent.
Steam Cooking
WARNING!
Risk of burns and damage to the
appliance.
• Do not open the appliance door during
steam cooking. Steam can release.
2.3 Care and Cleaning
WARNING!
Risk of injury, fire or damage to
the appliance.
• Before maintenance, deactivate the appliance and disconnect the mains plug
from the mains socket.
• Make sure the appliance is cold. There
is the risk that the glass panels can
break.
• Replace immediately the door glass
panels when they are damaged. Contact the Service.
• Be careful when you remove the door
from the appliance. The door is heavy!
• Clean regularly the appliance to prevent
the deterioration of the surface material.
• Remaining fat or food in the appliance
can cause fire.
• Clean the appliance with a moist soft
cloth. Only use neutral detergents. Do
not use abrasive products, abrasive
cleaning pads, solvents or metal objects.
• If you use an oven spray, obey the safety instructions on the packaging.
Page 6

www.electrolux.com
6
• Do not clean the catalytic enamel (if ap-
Pyrolytic cleaning
• Before carrying out a Pyrolitic self-
• Read carefully all the instructions for
• Keep children away from the appliance
• Pyrolitic cleaning is a high temperature
• Unlike all humans, some birds and rep-
plicable) with any kind of detergent.
WARNING!
Risk of fire and burns.
cleaning function or the First Use function please remove from the oven cavity:
– Any excess food residues, oil or
grease spills / deposits.
– Any removable objects (including
shelves, side rails etc., provided with
the product) particularly any nonstick pots, pans, trays, utensils etc.
Pyrolytic cleaning.
while the Pyrolytic cleaning is in operation. The appliance becomes very hot.
operation that can release fumes from
cooking residues and construction materials, as such consumers are strongly
advised to:
– Provide good ventilation during and
after each Pyrolytic cleaning.
– Provide good ventilation during and
after the first use at maximum temperature operation.
– Remove any pets (especially birds)
from the vicinity of the appliance location during and after the Pyrolytic
cleaning and first use maximum temperature operation to a well ventilated
area.
tiles can be extremely sensitive to potential fumes emitted during the cleaning process of all Pyrolytic Ovens.
• Small pets can also be highly sensitive
to the localized temperature changes in
the vicinity of all Pyrolytic Ovens when
the Pyrolytic self cleaning program is in
operation.
• Non-stick surfaces on pots, pans,
trays, utensils etc., can be damaged by
the high temperature Pyrolytic cleaning
operation of all Pyrolytic Ovens and can
be also a source for low level harmful
fumes.
• Fumes released from all Pyrolytic
Ovens / Cooking Residues as described are not harmful to humans, including infants or persons with medical conditions.
2.4 Internal light
• The type of light bulb or halogen lamp
used for this appliance, is only for
household appliances. Do not use it for
house lighting.
WARNING!
Risk of electrical shock.
• Before replacing the lamp, disconnect
the appliance from the power supply.
• Only use lamps with the same specifications.
2.5 Disposal
WARNING!
Risk of injury or suffocation.
• Disconnect the appliance from the
mains supply.
• Cut off the mains cable and discard it.
• Remove the door catch to prevent children and pets to get closed in the appliance.
Page 7

3. PRODUCT DESCRIPTION
1 2
12
5
4
3
11
2
1
10
9
8
Electronic programmer
1
Water drawer
2
Socket for the core temperature sen-
3
sor
Grill
4
Oven lamp
5
Fan
6
Shelf support, removable
7
7
Draining pipe
8
Water outlet valve
9
Rating plate
10
Shelf positions
3
4
5
6
11
Steam inlet
12
3.1 Oven accessories
• Wire shelf
For cookware, cake tins, roasts.
• Baking tray
For cakes and biscuits.
Grill- / Roasting pan
•
To bake and roast or as pan to collect
fat.
Core temperature sensor
•
To measure how far the food is cooked.
• Telescopic runners
For shelves and trays.
• Dietary baking dish
For the steam cooking functions.
ENGLISH 7
4. BEFORE FIRST USE
WARNING!
Refer to the Safety chapters.
4.1 Initial cleaning
• Remove all accessories and removable
shelf supports (if applicable).
• Clean the appliance before first use.
Refer to the chapter "Care and
cleaning".
4.2 First connection
When you connect the appliance to the
mains, or after a power cut, you must set
the language, display contrast, display
brightness and time of day.
1.
Touch or to set the value.
2.
Touch OK to confirm.
4.3 Preheating
Preheat the empty appliance to burn off
the remaining grease.
1.
Set the function and the maximum
temperature.
2.
Let the appliance operate for 45 minutes.
3.
Set the function and the maximum
temperature.
4.
Let the appliance operate for 15 mi-
nutes.
Accessories can become hotter than usually. The appliance can emit an odour and
smoke. This is normal. Make sure that the
airflow is sufficient.
Page 8

www.electrolux.com
8
5. CONTROL PANEL
Electronic programmer
1 10
2 43 8 95 6 7
Use the sensor fields to operate the appliance
Number
1
2
3
4
5
6
Sensor
field
11
Function Comment
On / off To activate and deactivate the appli-
ance.
Heating Functions or Assisted Cooking
To choose a heating function or an Assisted Cooking function. To have access to the necessary function, touch
the field once or twice when the appliance is activated. To activate or deactivate the light, touch the field for 3 seconds.
Home key To go back one level in the menu. To
show the main menu, touch the field for
3 seconds.
Temperature
selection
To set the temperature or show the current temperature in the appliance. To
activate or deactivate the Fast Heat Up
function, touch the field for 3 seconds.
Favourite Programme
To save and have access to your favourite programmes.
Up key To move up in the menu.
7
Down key To move down in the menu.
Time and additional functions
To set different functions. When a heating function operates, touch the sensor
field to set the timer, Child Safety, Fa-
8
vourite Programme memory, Heat +
Hold or Set + Go or to change the settings of the core temperature sensor
(for selected models only).
9
10
Minute Minder To set the Minute Minder .
OK To confirm the selection or setting.
Page 9
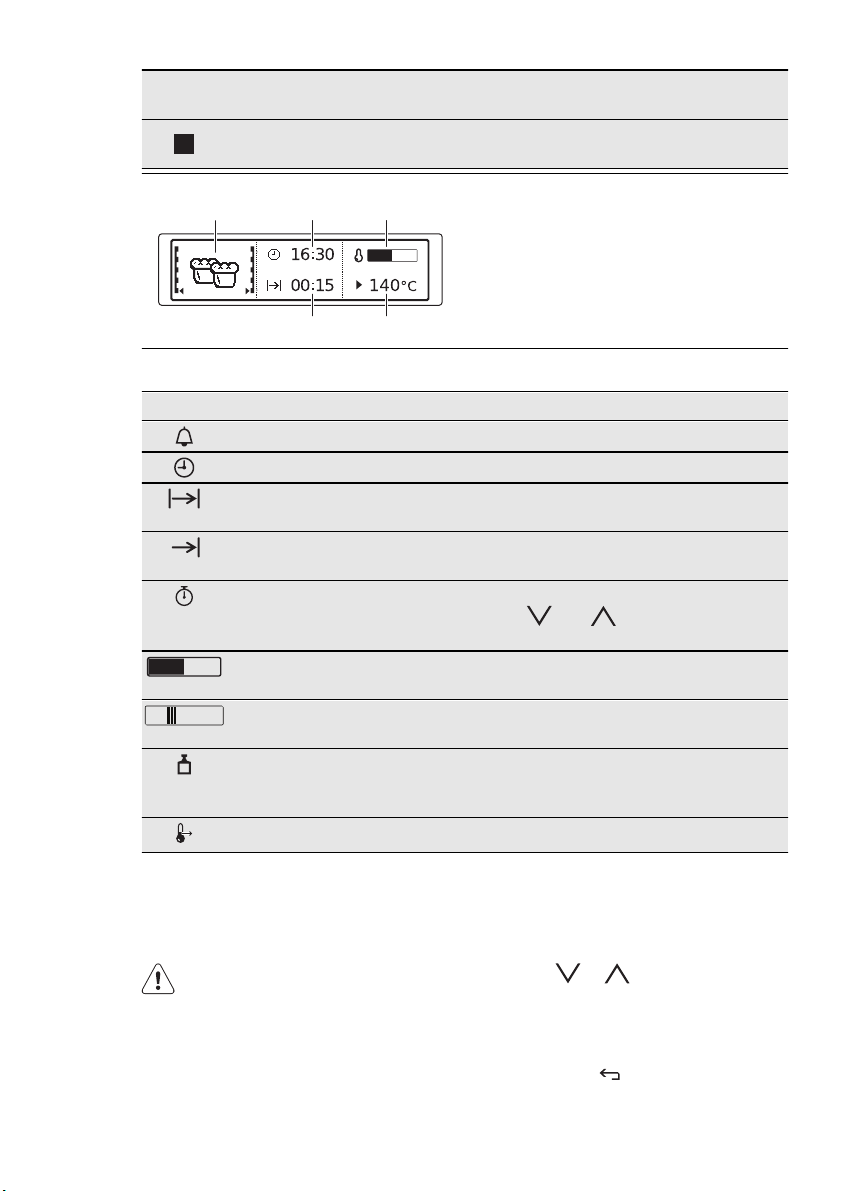
ENGLISH 9
A
Sensor
field
—
Function Comment
Display Shows the current settings of the appli-
B C
Number
11
Display
DE
Other indicators in the display
Symbol Function
Minute Minder The function operates.
Time of day The display shows the time of day.
Duration The display shows the necessary time for cook-
ing.
End Time The display shows when the cooking time is
completed.
Time Indication The display shows how long a heating function
operates. Press
have the time go back to zero.
Heat-up indicator The display shows the temperature in the appli-
ance.
Fast Heat Up indicator
The function operates. This function decreases
the heat-up time.
Weight Automatic The display shows that the automatic weight
system operates or that you can change the
weight.
Heat + Hold The function operates.
ance.
A)
Heating function
B)
Time of day
C)
Heat-up indicator
D)
Temperature
E)
Duration and End Time functions
and at the same time to
6. DAILY USE
WARNING!
Refer to the Safety chapters.
6.1 Navigating the menus
Operation of the menus:
1.
Activate the appliance.
2.
Press or to select the menu
option.
3.
Press OK to move to submenu or ac-
cept setting.
At every point you can get back to the
main menu with
Page 10

www.electrolux.com
10
6.2 The menus in overview
Main menu
Submenus for: Basic Settings
Symbol Menu item Application
Heating Functions Contains a list of heating functions.
Assisted Cooking
Favourite Programme
Contains a list of automatic cooking programmes.
Contains a list of favourite cooking programmes created by the user.
Pyrolysis Pyrolytic cleaning.
Basic Settings You can use it to set other settings.
Specials
Contains a list of additional heating functions.
Symbol Submenu Description
Set Time of Day Sets the current time on the clock.
Time Indication
SET + GO
Heat + Hold
When ON, the display shows the current
time when you deactivate the appliance.
When ON, you can activate the functions
when you activate the heating function.
When ON, you can activate this function
when you activate the heating function.
Extra time Activates and deactivates the function.
Display Contrast Adjusts the display contrast by degrees.
Display Brightness Adjusts the display brightness by degrees.
Set Language Sets the language for the display.
Buzzer Volume
Adjusts the volume of press-tones and signals by degrees.
Activates and deactivates the tone of the
Key Tones
touch fields. It is not possible to deactivate
the tone of the ON / OFF touch field.
Alarm/Error Tones Activates and deactivates the alarm tones.
Cleaning Assistant Guides you through the cleaning procedure.
Cleaning Reminder Reminds you when to clean the appliance.
Service
Shows the software version and configuration.
Factory Settings Resets all settings to factory settings.
Page 11
6.3 Heating functions
Submenu for: Heating Functions
Heating function Application
True Fan Cooking To bake maximum on three shelf positions at
the same time. When you use this function,
decrease the oven temperature by 20 - 40 °C
from the standard temperatures you use for
Conventional Cooking .
True Fan + Steam To steam dishes. Use this function to de-
crease the length of the cooking time and to
preserve the vitamins and nutrients in the
food. To use, select the function and set the
temperature between 130 °C to 230 °C.
Pizza Setting To cook pizza, quiche or pie with steam.
Conventional Cooking To bake and roast on one level.
ENGLISH 11
Slow Cook To prepare especially tender, succulent
roasts.
Bottom Heat To bake cakes with crispy or crusty bottoms
and to preserve food.
ECO Roasting The ECO functions let you optimize the ener-
gy consumption during cooking. It is necessary to set the cooking time first.
Frozen Foods To make convenience food such as chips,
wedges or spring rolls crispy.
Grilling To grill flat food in the middle of the grill and
to toast bread.
Fast Grilling To grill flat food in large quantities and to
toast bread.
Turbo Grilling To roast larger meat joints or poultry with
bones on one shelf position. Also to gratinate
and to brown.
Steam Regenerating To reheat already cooked food directly on a
plate.
Submenu for: Specials
Heating function Application
Bread Baking To bake bread with steam.
Page 12
www.electrolux.com
12
Heating function Application
Au Gratin To prepare dishes such as lasagna or pota-
to gratin. Also to gratinate and to brown.
Dough Proving To raise the yeast dough before baking.
Plate Warming To preheat a plate for serving.
Preserving To preserve vegetables in glasses and liquid
Drying To dry sliced fruit such as apples, plums or
Keep Warm To keep cooked food warm.
Defrost To defrost frozen food.
6.4 Activating a heating function
1.
Activate the appliance.
2.
Select the Heating Functions menu.
Press OK to confirm.
3.
Set the heating function. Press OK to
confirm.
4. Set the temperature. Press OK to
confirm.
Press once or twice to go directly to the Heating Functions
menu (when the appliance is activated).
6.5 Steam cooking
The water drawer cover is in the
control panel.
1.
Press the cover to open the water
drawer.
2.
Fill the water drawer with 900 ml of
water.
The water supply is sufficient for approximately 55 - 60 minutes.
Do not put water directly into the
steam generator.
Use only water. Do not use filtered
(demineralised) or distilled water.
Do not use other liquids. Do not
put flammable or alcoholic liquids
into the water drawer.
(e.g. mixed pickles).
peaches and vegetables such as tomatoes,
zucchini or mushrooms.
3.
Push the water drawer to its initial po-
sition.
4.
Activate the appliance.
5.
Prepare the food in the correct cook-
ware.
6.
Select the steam heating function and
temperature.
7.
If necessary, set the function Duration
or End Time .
The signal sounds at the end of the
cooking time.
8.
Deactivate the appliance.
Let the appliance dry fully with the
door open.
9.
Empty the water tank after the steam
cooking is completed.
WARNING!
Wait a minimum of 60 minutes after each use of the steam cooking
in order to prevent hot water from
exiting the water outlet valve.
6.6 Tank Empty indicator
The display shows Water required and an
acoustic signal sounds when the tank is
empty and must be refilled.
For more information refer to "Steam
Cooking".
Page 13
6.7 Tank Full indicator
When the display shows Water tank full ,
you can use the steam cooking.
An acoustic signal sounds when the tank
is full.
If you put too much water into
the tank, the safety outlet
moves the excess water to the
bottom of the oven.
Remove the water with a sponge
or cloth.
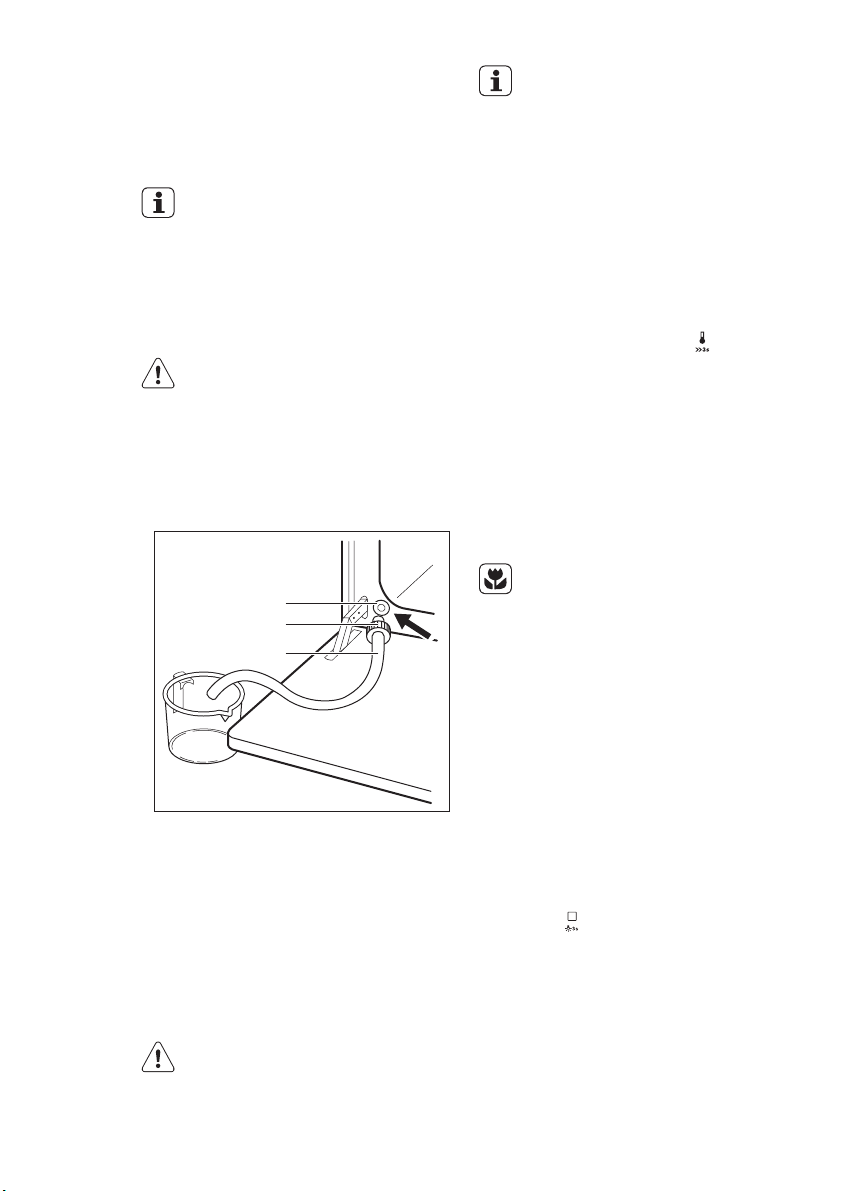
6.8 Emptying the water tank
Make sure that the appliance is
cool before you start to empty the
water tank.
1.
Prepare the draining pipe (C), included in the same package with the
user manual. Put the connector (B)
onto one of the ends of the draining
pipe.
A
B
C
2.
Put the second end of the draining
pipe (C) into a container. Put it at a
lower position than the outlet valve
(A).
3.
Open the oven door and put the connector (B) into the outlet valve (A).
4.
Push the connector again and again
when you empty the water tank.
5.
Remove the connector from the valve
when the water stops flowing.
WARNING!
Do not use the drained water to fill
the water tank again.
ENGLISH 13
The tank can have some water
when the display shows Water required . Wait until the water flow
from the water outlet valve stops.
6.9 Heat-up indicator
When you activate a heating function, the
bar on the display comes on. The bar
shows that the temperature increases.
6.10 Fast Heat Up indicator
This function decreases the heat-up time.
To activate the function, hold
onds. You will see the heat-up indicator
alternates.
for 3 sec-
6.11 Residual heat
When you deactivate the appliance, the
display shows the residual heat. You can
use the heat to keep the food warm.
6.12 Energy saving
The appliance contains features which help you save energy during everyday cooking:
Residual heat:
•
– When the heating function or pro-
gramme operates, the heating elements are deactivated 10 % earlier
(the lamp and fan continue to operate). For this feature to operate, the
cooking time must be longer than 30
minutes or you must use the clock
functions ( Duration , End Time ).
– When the appliance is off, you can
use the heat to keep food warm. The
display shows the remaining temperature.
• Cooking with the lamp off - Touch
and hold
the lamp during cooking.
• Eco functions - refer to " Heating
Functions ".
for 3 seconds to deactivate
Page 14

www.electrolux.com
14
7. CLOCK FUNCTIONS
7.1 Clock functions
Symbol Function Description
Minute Minder
Duration
End Time
If you set the time for a clock function, the
time starts to count down after 5 seconds.
If you use the clock functions Duration
the appliance deactivates the
heating elements after 90 % of the
set time. The appliance uses the
residual heat to continue the
cooking procedure until the time
ends (3 - 20 minutes).
Setting the clock functions
1.
Set a heating function.
2.
Press again and again until the
display shows the necessary clock
function and the related symbol.
3.
Press or to set the necessary
time. Press OK to confirm.
When the time ends, an acoustic signal sounds. The appliance deactivates. The display shows a message.
4.
Press a sensor field to stop the signal.
and End Time ,
To set a countdown (max 2 h 30 min). This function
has no effect on the operation of the appliance. You
can also activate it when the appliance is off. Use
to activate the function. Press or to set the
minutes and OK to start.
To set how long the appliance has to be in operation (max. 23 h 59 min).
To set the switch-off time for a heating function
(max. 23 h 59 min).
•
With Duration
Time
heating function and the temperature first. Then you can set
the clock function. The appliance deactivates automatically.
•
You can use Duration
End Time
if you want to automatically activate and deactivate the appliance at a given time later.
• When you use the Core temperature sensor (if applicable),
the Duration
you must set the
functions do not operate.
and End
and
at the same time
and End Time
7.2 Heat + Hold
The Heat + Hold function keeps prepared
food warm at 80 °C for 30 minutes. It activates after the baking or roasting procedure ends.
• You can activate or deactivate
the function in the Basic Settings menu.
• Conditions for the function:
– The set temperature is more
than 80 °C.
– The function Duration is set.
Activating the function
1.
Activate the appliance.
2.
Select the heating function.
3.
Set the temperature above 80 °C.
Page 15

4.
Press again and again until the
display shows Heat + Hold . Press
OK to confirm.
When the function ends, an acoustic signal sounds.
The Heat + Hold function operates for 30
minutes.
The Heat + Hold function stays on if you
change the heating functions.
7.3 Extra Time
The Extra Time function makes the heating function continue after the Duration
ends.
8. AUTOMATIC PROGRAMMES
ENGLISH 15
• Applicable for all heating functions with
Duration or Weight Automatic.
• Not applicable for heating functions
with CT Sensor .
Activating the function:
1.
When the cooking time ends, an
acoustic signal sounds. Press a sensor field.
2.
The display shows the message for
Extra Time for five minutes.
3.
Press to activate (or to cancel).
4.
Set the length of the Extra Time .
Press OK to confirm.
8.1 Assisted Cooking with
Recipe Automatic
This appliance has a set of recipes you
can use. Recipes are fixed and you cannot change them.
Activating the function:
1.
Activate the appliance.
2.
Select the Assisted Cooking menu.
Press OK to confirm.
3.
Select the category and dish. Press
OK to confirm.
4.
Select Recipe Automatic . Press OK
to confirm.
When you use the Manual function, the appliance uses automatic
settings. You can change them as
with other functions.
8.2 Assisted Cooking with
Weight Automatic
This function automatically calculates the
roasting time. To use it, it is necessary to
input the food weight.
Activating the function:
1.
Activate the appliance.
2.
Select Assisted Cooking . Press OK
to confirm.
3.
Select the category and dish. Press
OK to confirm.
4.
Select the Weight Automatic . Press
OK to confirm.
5.
Touch or to set the food
weight. Press OK to confirm.
The automatic programme starts. You
can change the weight at any time. Press
or to change the weight. When
the time ends, an acoustic signal sounds.
Press a sensor field to deactivate the signal.
With some programmes turn over
the food after 30 minutes. The
display shows a reminder.
9. USING THE ACCESSORIES
WARNING!
Refer to the Safety chapters.
9.1 Core temperature sensor
The core temperature sensor measures
the core temperature of the meat. When
Page 16
www.electrolux.com
16
the meat is at the set temperature, the
appliance deactivates.
There are two temperatures to be set:
• The oven temperature.
• The core temperature.
1.
2.
3.
Only use the core temperature
sensor supplied with the appliance or genuine replacement
parts.
Put the tip of the core temperature
sensor into the centre of the meat.
Activate the appliance.
Put the core temperature sensor plug
into the socket on the front of the appliance.
The display shows the core temperature sensor symbol.
4.
Press or in less than 5 seconds to set the core temperature.
5.
Set the oven function and, if necessary, the oven temperature.
The appliance calculates an approximate end time. The end time is different for different quantities of food, the
set oven temperature (minimum 120
°C) and the operating mode. The appliance calculates the end time in approximately 30 minutes.
6.
Make sure that the core temperature
sensor stays in the meat and in the
core temperature sensor socket during the cooking.
7.
If necessary, you can set a new core
temperature during the cooking. To
do this, touch
8.
When the meat is at the set core tem-
.
perature, an acoustic signal sounds.
The appliance deactivates automatically.
Touch a sensor field to stop the signal.
9.
Remove the core temperature sensor
plug from the socket . Remove the
meat from the appliance.
WARNING!
The core temperature sensor is
hot. There is a risk of burns. Be
careful when you remove the tip
and plug of the core temperature
sensor.
9.2 Telescopic runners
°C
1.
Pull out the right and left hand telescopic runners.
Page 17
°C
ENGLISH 17
2.
Put the wire shelf on the telescopic
runners and carefully push them into
the appliance.
Make sure you push back the tele-
scopic runners fully in the appliance
before you close the oven door.
Keep the installation instructions
for the telescopic runners for future use.
With telescopic runners you can put in
and remove the shelves more easily.
CAUTION!
Do not clean the telescopic runners in the dishwasher. Do not lubricate the telescopic runners.
9.3 Accessories for steam
cooking
The dietary baking dish for steam cooking
functions
• Glass bowl (A)
•Lid (B)
• Injector tube (C)
Page 18

www.electrolux.com
18
• Injector for direct steam cooking (D)
• Steel grill (E)
C
The dish consists of a glass bowl, a lid
with a hole for the injector tube (C) and a
steel grill to put at the bottom of the baking dish.
The injector and the injector tube. “C” is
the injector tube for steam cooking, “D” is
the injector for direct steam cooking.
C
D
Page 19
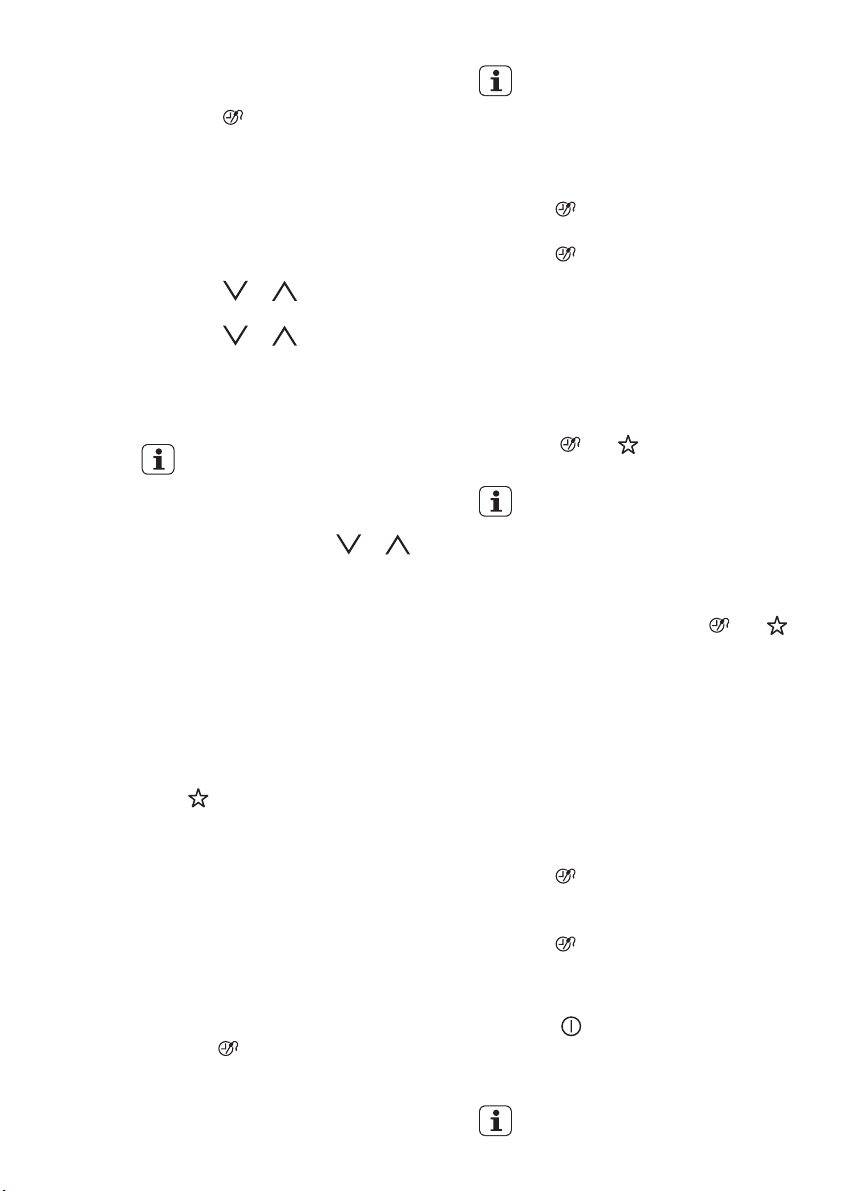
Steam cooking in a dietary baking dish
Put the food onto the steel grill in the baking dish and put the lid on it. Put the injector tube into the special hole in the lid of
the dietary baking dish. Put the baking
dish onto the second shelf position from
the bottom. Put the other end of the injector tube into the steam inlet (refer to
“Product Description” chapter).
Make sure that you do not crush the injector tube or let it touch a heating element on the top of the oven. Set the oven
for the steam cooking function.
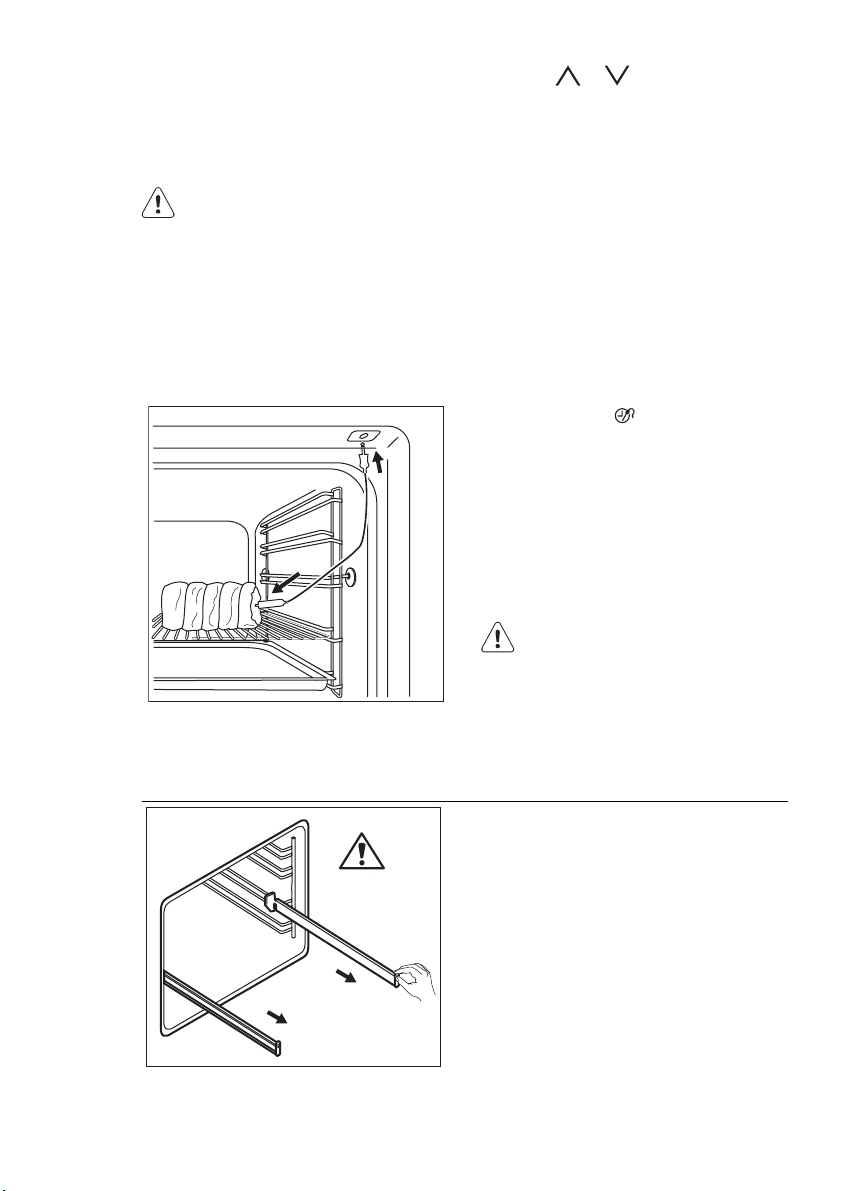
Direct steam cooking
Put the food onto the steel grill in the baking dish. Add some water. Put the injector
(D) into the injector tube (C). Connect the
other end into the steam inlet.
When you cook food such as chicken,
duck, turkey, kid or large fish, put the injector (D) directly into the empty part of
the meat. Make sure that you do not
cause a blockage of the holes.
ENGLISH 19
Do not use the lid of the dish.
Be careful when you use the injector
when the oven operates. Always use oven
Put the baking dish onto the first or second shelf position from the bottom. Make
sure that you do not crush the injector
tube or let it touch a heating element on
the top of the oven. Set the oven for the
steam cooking function.
For more information about steam cooking, refer to the cooking tables for steam
cooking in the chapter “Hints and Tips”.
The injector tube is specially made
for cooking and does not contain
dangerous materials.
gloves to touch the injector when the
oven is hot. Always remove the injector
from the oven when you do not use a
steam function.
Page 20

www.electrolux.com
20
Do not put the hot baking dish on cold /
wet surfaces.
Do not put cold liquids in the baking dish
when it is hot.
Do not use the baking dish on a hot cooking surface.
10. ADDITIONAL FUNCTIONS
10.1 Favourite Programme
menu
You can save your favourite settings, like
duration, temperature or heating function.
They are available in the Favourite Pro-
Do not clean the baking dish with abrasives, scourers and powders.
gramme menu. You can save 20 programmes.
Saving a programme
1.
Activate the appliance.
Page 21
2.
Set a heating function or an Assisted
Cooking function.
3.
Touch again and again until the
display shows SAVE . Press OK to
confirm.
4.
The display shows the first free memory position.
Press OK to confirm.
5.
Enter the name of the programme.
The first letter flashes.
Touch
or to change the letter.
Press OK.
6.
Touch or to move the cursor
to the right or to the left. Press OK.
The next letter flashes. Do steps 5
and 6 again as necessary.
7.
Press and hold OK to save.
Useful information:
• You can overwrite a memory position.
When the display shows the first free
memory position, touch
or and
press OK to overwrite an existing programme.
• You can change the name of a programme in the menu Edit Programme
Name .
Activating the programme
1.
Activate the appliance.
2.
Select the Favourite Programme
menu. Press OK to confirm.
3.
Select your favourite programme
name. Press OK to confirm.
Press
to go to Favourite Programme
directly.
10.2 Function Lock
The Function Lock prevents an accidental
change of the heating function. You can
activate the Function Lock only when the
appliance operates.
Activating the Function Lock :
1.
Activate the appliance.
2.
Set a heating function or setting.
3.
Press again and again until the
display shows Function Lock.
4.
Press OK to confirm.
ENGLISH 21
If the appliance has the Pyrolytic
cleaning function and the function
operates, the door is locked and
the symbol of a key comes on in
the display.
Deactivating the Function Lock :
1.
Press . The display shows a message.
2.
Press and then OK to confirm.
10.3 Child Lock
The Child Lock prevents an accidental
operation of the appliance .
Activating and deactivating the Child
Lock function:
1.
Activate the appliance.
2.
Touch and at the same time
until the display shows a message.
If the appliance has the Pyrolytic
cleaning function and the function
operates, the door is locked.
A message comes on in the display when you touch a sensor
field.
To unlock the appliance, touch
and
at the same time again until the display
shows a message.
10.4 SET + GO
The SET + GO function lets you set a
heating function (or programme) and use
it later with one press of the sensor field.
Activating the function:
1.
Activate the appliance.
2.
Set the heating function.
3.
Press again and again until the
display shows Duration .
4.
Set the time.
5.
Press again and again until the
display shows SET + GO .
6.
Press OK to confirm.
To start SET + GO , press any sensor field
(except for
starts.
When the heating function ends, an
acoustic signal sounds.
). The set heating function
Useful information:
Page 22

www.electrolux.com
22
• When the heating function operates,
the Function Lock is on.
• You can activate and deactivate the
SET + GO function in the Basic Settings menu.
10.5 Automatic switch-off
For safety reasons the appliance deactivates after some time:
• If an oven function operates.
• If you do not change the oven temperature.
Oven tempera-
Switch-off time
ture
30 °C - 115 °C 12.5 h
120 °C - 195 °C 8.5 h
200 °C - 245 °C 5.5 h
250 °C - maxi-
3.0 h
mum °C
11. HELPFUL HINTS AND TIPS
The automatic switch-off works
with all functions, except Light ,
Duration and End Time .
10.6 Cooling fan
When the appliance operates, the cooling
fan activates automatically to keep the
surfaces of the appliance cool. If you deactivate the appliance, the cooling fan
continues to operate until the temperature
in the appliance cools down.
10.7 Safety thermostat
Incorrect operation of the appliance or defective components can cause dangerous
overheating. To prevent this, the oven has
a safety thermostat which interrupts the
power supply. The oven activates again
automatically when the temperature
drops.
• The appliance has five shelf levels.
Count the shelf levels from the bottom
of the appliance floor.
• The appliance has a special system
which circulates the air and constantly
recycles the steam. With this system
you can cook in a steamy environment
and keep the food soft inside and crusty outside. It decreases the cooking
time and energy consumption to a minimum.
• Moisture can condense in the appliance
or on the door glass panels. This is normal. Always stand back from the appliance when you open the appliance
door while cooking. To decrease the
condensation, operate the appliance for
10 minutes before cooking.
• Clean the moisture after each use of
the appliance.
• Do not put the objects directly on the
appliance floor and do not put aluminium foil on the components when you
cook. This can change the baking results and cause damage to the enamel.
11.1 Baking cakes
• Do not open the oven door before 3/4
of the set cooking time is up.
• If you use two baking trays at the same
time, keep one empty level between
them.
11.2 Cooking meat and fish
• Use a deep pan for very fatty food to
prevent the oven from stains that can
be permanent.
• Leave the meat for approximately 15
minutes before carving so that the juice
does not seep out.
• To prevent too much smoke in the oven
during roasting, add some water into
the deep pan. To prevent the smoke
condensation, add water each time after it dries up.
11.3 Cooking times
Cooking times depend on the type of
food, its consistency, and volume.
Page 23

ENGLISH 23
Initially, monitor the performance when
you cook. Find the best settings (heat setting, cooking time, etc.) for your cook-
ware, recipes and quantities when you
use this appliance.
11.4 Baking and roasting table
CAKES
Conventional
TYPE OF
DISH
Whisked
Cooking
Shelf
position
Temp
[°C]
2 170 3 (2 and 4) 160 45 - 60 In a cake
recipes
Shortbread
2 170 3 (2 and 4) 160 20 - 30 In a cake
dough
Buttermilk
1 170 2 165 80 - 100 In a 26 cm
cheesecake
Apple cake
2 170 2 (left and
(Apple pie)
Strudel 3 175 2 150 60 - 80 In a baking
Jam-tart 2 170 2 (left and
Sponge
2 170 2 150 40 - 50 In a 26 cm
cake
Christmas
2 160 2 150 90 - 120 In a 20 cm
cake / Rich
fruit cake
Plum cake 1 175 2 160 50 - 60
Small cakes
3 170 3 150 -
- one level
Small cakes
- - 2 and 4 140 -
- two levels
Small cakes
- - 1, 3 and 5 140 -
- three levels
Biscuits /
3 140 3 140 pastry
stripes - one
level
Biscuits /
- - 2 and 4 140 pastry
stripes - two
levels
True Fan Cook-
ing
Shelf po-
sition
Temp
[°C]
160 80 - 100 In two 20 cm
right)
165 30 - 40 In a 26 cm
right)
160
150
150
150
150
Cooking
time
Notes
[min]
mould
mould
cake mould
cake moulds
on a wire
shelf
tray
cake mould
cake mould
cake mould
In a bread tin
20 - 30 In a baking
1)
tray
25 - 35 In a baking
1)
tray
30 - 45 In a baking
1)
tray
25 - 45 In a baking
tray
35 - 40 In a baking
tray
1)
1)
1)
Page 24

www.electrolux.com
24
TYPE OF
DISH
Biscuits /
pastry
Conventional
Cooking
Shelf
position
Temp
[°C]
- - 1, 3 and 5 140 -
True Fan Cook-
ing
Shelf po-
sition
Temp
[°C]
150
Cooking
time
Notes
[min]
35 - 45 In a baking
tray
stripes three levels
Meringues one level
Meringues two levels
3 120 3 120 80 - 100 In a baking
tray
- - 2 and 4 120 80 - 100 In a baking
1)
tray
Buns 3 190 3 190 12 - 20 In a baking
1)
tray
Eclairs - one
level
Eclairs - two
levels
3 190 3 170 25 - 35 In a baking
tray
- - 2 and 4 170 35 - 45 In a baking
tray
Plate tarts 2 180 2 170 45 - 70 In a 20 cm
cake mould
Rich fruit
cake
Victoria
sandwich
1)
Preheat for 10 minutes.
1 160 2 150 110 -
120
In a 24 cm
cake mould
1 170 2 160 30 - 50 In a 20 cm
cake mould
1)
BREAD AND PIZZA
TYPE OF
DISH
Conventional
Cooking
Shelf
position
Temp
[°C]
True Fan Cook-
ing
Shelf po-
sition
Temp
[°C]
Cooking
time
[min]
Notes
White bread 1 190 1 190 60 - 70 1 - 2 pieces,
500 gr per
1)
piece
Rye bread 1 190 1 180 30 - 45 In a bread tin
Bread rolls 2 190 2 (2 and 4) 180 25 - 40 6 - 8 rolls in a
baking tray
Pizza 1 230 -
250
1 230 -
250
10 - 20 In a baking
tray or a deep
1)
pan
Scones 3 200 3 190 10 - 20 In a baking
1)
tray
1)
Preheat for 10 minutes.
1)
Page 25

ENGLISH 25
FLANS
TYPE OF
DISH
Conventional
Cooking
Shelf
position
Temp
[°C]
True Fan Cook-
ing
Shelf po-
sition
Temp
[°C]
Cooking
time
[min]
Notes
Pasta flan 2 200 2 180 40 - 50 In a mould
Vegetable
2 200 2 175 45 - 60 In a mould
flan
Quiches 1 180 1 180 50 - 60
Lasagne 2 180 -
190
Cannelloni 2 180 -
190
1)
Preheat for 10 minutes.
2 180 -
190
2 180 -
190
25 - 40
25 - 40
In a mould
In a mould
In a mould
MEAT
TYPE OF
DISH
Conventional
Cooking
Shelf
position
Temp
[°C]
True Fan Cook-
ing
Shelf po-
sition
Temp
[°C]
Cooking
time
[min]
Notes
Beef 2 200 2 190 50 - 70 On a wire shelf
Pork 2 180 2 180 90 - 120 On a wire shelf
Veal 2 190 2 175 90 - 120 On a wire shelf
English roast
2 210 2 200 50 - 60 On a wire shelf
beef, rare
English roast
2 210 2 200 60 - 70 On a wire shelf
beef, medium
English roast
2 210 2 200 70 - 75 On a wire shelf
beef, well
done
Shoulder of
pork
Shin of pork 2 180 2 160 100 -
2 180 2 170 120 -
150
With rind
2 pieces
120
Lamb 2 190 2 175 110 -
Leg
130
Chicken 2 220 2 200 70 - 85 Whole
Turkey 2 180 2 160 210 -
Whole
240
Duck 2 175 2 220 120 -
Whole
150
1)
1)
1)
Page 26
www.electrolux.com
26
Conventional
TYPE OF
DISH
Cooking
Shelf
position
Temp
[°C]
Goose 2 175 1 160 150 -
True Fan Cook-
ing
Shelf po-
sition
Temp
[°C]
Cooking
time
[min]
Notes
Whole
200
Rabbit 2 190 2 175 60 - 80 Cut in pieces
Hare 2 190 2 175 150 -
Cut in pieces
200
Pheasant 2 190 2 175 90 - 120 Whole
FISH
TYPE OF
DISH
Trout / Sea
Conventional
Cooking
Shelf
position
Temp
[°C]
2 190 2 175 40 - 55 3 - 4 fish
True Fan Cook-
ing
Shelf po-
sition
Temp
[°C]
Cooking
time
[min]
Notes
bream
Tuna fish /
2 190 2 175 35 - 60 4 - 6 fillets
Salmon
11.5 Grilling
Preheat the empty oven for 10 minutes, before cooking.
Quantity Grilling Cooking time [min]
TYPE OF DISH Pieces [g] Shelf po-
sition
Fillet steaks 4 800 4 max. 12 - 15 12 - 14
Beef steaks 4 600 4 max. 10 - 12 6 - 8
Sausages 8 - 4 max. 12 - 15 10 - 12
Pork chops 4 600 4 max. 12 - 16 12 - 14
Chicken (cut in
2 1000 4 max. 30 - 35 25 - 30
2)
Kebabs 4 - 4 max. 10 - 15 10 - 12
Breast of chick-
4 400 4 max. 12 - 15 12 - 14
en
Hamburger 6 600 4 max. 20 - 30 -
Fish fillet 4 400 4 max. 12 - 14 10 - 12
Toasted sand-
4 - 6 - 4 max. 5 - 7 -
wiches
Toast 4 - 6 - 4 max. 2 - 4 2 - 3
Temp
[°C]
1st side 2nd side
Page 27

ENGLISH 27
11.6 Turbo Grilling
Beef
TYPE OF DISH Quantity
Roast beef or fillet, rare
Roast beef or fillet, medium
Roast beef or fillet, well done
1)
Preheat the oven.
per cm of
thickness
per cm of
thickness
per cm of
thickness
Shelf posi-
tion
1
1
1
Pork
TYPE OF DISH Quantity
Shoulder, neck,
ham joint
1 - 1.5 kg 1 160 - 180 90 - 120
Shelf posi-
tion
Chop, spare rib 1 - 1.5 kg 1 170 - 180 60 - 90
Meat loaf 750 g - 1 kg 1 160 - 170 50 - 60
Pork knuckle
(precooked)
750 g - 1 kg 1 150 - 170 90 - 120
Tempera-
ture [°C]
190 - 200
180 - 190
170 - 180
Tempera-
ture [°C]
1)
1)
1)
Time [min]
5 - 6
6 - 8
8 - 10
Time [min]
Veal
TYPE OF
DISH
Quantity Shelf posi-
tion
Temperature
[°C]
Time [min]
Roast veal 1 kg 1 160 - 180 90 - 120
Knuckle of
1.5 - 2 kg 1 160 - 180 120 - 150
veal
Lamb
TYPE OF
DISH
Leg of lamb,
Quantity Shelf posi-
tion
Temperature
[°C]
Time [min]
1 - 1.5 kg 1 150 - 170 100 - 120
roast lamb
Saddle of
1 - 1.5 kg 1 160 - 180 40 - 60
lamb
Poultry
TYPE OF
DISH
Poultry portions
Quantity Shelf posi-
tion
200 - 250 g
1 200 - 220 30 - 50
each
Temperature
[°C]
Time [min]
Page 28

www.electrolux.com
28
TYPE OF
DISH
Chicken , half 400 - 500 g
Quantity Shelf posi-
tion
1 190 - 210 35 - 50
Temperature
[°C]
Time [min]
each
Chicken, pou-
1 - 1.5 kg 1 190 - 210 50 - 70
lard
Duck 1.5 - 2 kg 1 180 - 200 80 - 100
Goose 3.5 - 5 kg 1 160 - 180 120 - 180
Turkey 2.5 - 3.5 kg 1 160 - 180 120 - 150
Turkey 4 - 6 kg 1 140 - 160 150 - 240
Fish (steamed)
TYPE OF
DISH
Quantity Shelf posi-
tion
Temperature
[°C]
Time [min]
Whole fish 1 - 1.5 kg 1 210 - 220 40 - 60
11.7 Defrosting
TYPE OF
DISH
[g]
Defrosting
time [min]
Chicken 1000 100 - 140 20 - 30
Meat 1000 100 - 140 20 - 30 Turn halfway through.
Meat 500 90 - 120 20 - 30 Turn halfway through.
Trout 150 25 - 35 10 - 15 -
Strawberries 300 30 - 40 10 - 20 -
Butter 250 30 - 40 10 - 15 -
Cream 2 x 200 80 - 100 10 - 15
Gateau 1400 60 60 -
Further de-
frosting time
[min]
Notes
Place the chicken on
an upturned saucer
placed on a large
plate. Turn halfway
through.
Cream can also be
whipped when still
slightly frozen in pla-
ces.
Page 29

ENGLISH 29
11.8 Preserving
Soft fruit
PRESERVE
Temperature
[°C]
Cooking time
until simmering
[min]
Further cooking
time at 100 °C
[min]
Strawberries, blueberries, raspberries, ripe goose-
160 – 170 35 – 45 –
berries
Stone fruit
PRESERVE
Pears, quinces,
plums
Temperature
[°C]
Cooking time
until simmering
[min]
160 – 170 35 – 45 10 – 15
Further cooking
time at 100 °C
[min]
Vegetables
PRESERVE
Carrots
Temperature
[°C]
1)
160 – 170 50 – 60 5 – 10
Cooking time
until simmering
[min]
Further cooking
time at 100 °C
[min]
Cucumbers 160 – 170 50 – 60 –
Mixed pickles 160 – 170 50 – 60 5 – 10
Kohlrabi, peas, asparagus
1)
After you deactivate the appliance, leave the preserve in the oven.
160 – 170 50 – 60 15 – 20
11.9 Drying
Cover the oven shelves with baking
parchment.
VEGETABLES
TYPE OF
DISH
Shelf position
1 level 2 levels
Temperature
[°C]
Time [hr]
Beans 3 1/4 60 - 70 6 - 8
Peppers 3 1/4 60 - 70 5 - 6
Vegetables for
soup
3 1/4 60 - 70 5 - 6
Mushrooms 3 1/4 50 - 60 6 - 8
Herbs 3 1/4 40 - 50 2 - 3
Page 30

www.electrolux.com
30
FRUIT
Plums 3 1/4 60 - 70 8 - 10
Apricots 3 1/4 60 - 70 8 - 10
Apple slices 3 1/4 60 - 70 6 - 8
Pears 3 1/4 60 - 70 6 - 9
11.10 True Fan + Steam
CAKES AND PASTRIES
TYPE OF DISH
Apple cake 2 160 60 - 80 In a 20 cm cake
Tarts 2 175 30 - 40 In a 26 cm cake mould
Fruit cake 2 160 80 - 90 In a 26 cm cake mould
Sponge cake 2 160 35 - 45 In a 26 cm cake mould
Panettone 2 150 - 160 70 - 100 In a 20 cm cake
Plum cake 2 160 40 - 50
Small cakes 3 (2 and 4) 150 - 160 25 - 30 In a baking tray
Biscuits 3 (2 and 4) 150 20 - 35 In a baking tray
Sweet buns 2 180 - 200 12 - 20
Brioches 3 (2 and 4) 180 15 - 20
1)
TYPE OF
DISH
Shelf position
1 level 2 levels
Shelf po-
sition
Preheat the oven for 10 minutes.
Temp [°C]
Temperature
Cooking
time
[min]
[°C]
In a bread tin
In a baking tray
In a baking tray
Time [hr]
Notes
mould
mould
1)
1)
1)
1)
1)
FLANS
TYPE OF DISH
Shelf posi-
tion
Temp
[°C]
Cooking
time
[min]
Notes
Vegetables filled 1 170 - 180 30 - 40 In a mould
Lasagne 2 170 - 180 40 - 50 In a mould
Potato gratin 1 (2 and 4) 160 - 170 50 - 60 In a mould
Page 31

ENGLISH 31
MEAT
TYPE OF
DISH
[g]
Shelf
position
Temp
[°C]
Cooking
time
[min]
Notes
Roast pork 1000 2 180 90 - 110 On a wire shelf
Veal 1000 2 180 90 - 110 On a wire shelf
Roast beef 1000
rare 2 210 45 - 50 On a wire shelf
medium 2 200 55 - 65 On a wire shelf
well done 2 190 65 - 75 On a wire shelf
Lamb 1000 2 175 110 - 130 Leg
Chicken 1000 2 200 55 - 65 Whole
Turkey 4000 2 170 180 - 240 Whole
Duck 2000 - 2500 2 170 -
120 - 150 Whole
180
Goose 3000 1 160 -
150 - 200 Whole
170
Rabbit 2 170 -
60 - 90 Cut in pieces
180
FISH
TYPE OF
DISH
[g]
Shelf po-
sition
Temp
[°C]
Cooking
time
[min]
Notes
Trout 1500 2 180 25 - 35 3 - 4 fish
Tuna 1200 2 175 35 - 50 4 - 6 fillets
Hake – 2 200 20 - 30 –
PIZZA SETTING
Preheat an empty oven for 10 minutes before cooking.
TYPE OF
FOOD
Pizza (thin
crust)
Pizza (with a lot
of topping)
Mini pizza 1 200 - 220 15 - 20 In a baking tray
Apple cake 1 150 - 170 50 - 70
Tart 1 170 - 190 35 - 50
Shelf posi-
tion
Temp [°C]
Cooking time
[min]
1 200 - 220 15 - 25 In a baking tray
1 200 - 220 20 - 30 In a baking tray
In a 20 cm cake
In a 26 cm cake
Notes
mould
mould
Page 32

www.electrolux.com
32
TYPE OF
FOOD
Shelf posi-
tion
Temp [°C]
Cooking time
[min]
Notes
Onion tart 2 200 – 220 20 – 30 In a baking tray
STEAM REGENERATING
Preheat an empty oven for 10 minutes before cooking.
TYPE OF DISH Shelf position Temp [°C]
Cooking time
[min]
Casserole / Gratin 2 130 15 - 25
Pasta and sauce 2 130 10 - 15
Side dishes (e.g. rice,
potatoes, pasta)
2 130 10 - 15
One-plate dishes 2 130 10 - 15
Meat 2 130 10 - 15
Vegetables 2 130 10 - 15
BREAD BAKING
Preheat an empty oven for 10 minutes before cooking.
TYPE OF
FOOD
White bread 1000 2 180 - 190 45 - 60
Rolls 500 2 (2 and 4) 190 - 210 20 - 30
Rye bread 1000 2 180 - 200 50 - 70
Focaccia — 2 190 - 210 20 - 25
[g]
Shelf posi-
tion
Temp [°C]
Cooking
time [min]
Notes
1 - 2 pieces,
500 g for
each piece
6 - 8 rolls in
a baking tray
1 - 2 pieces,
500 g for
each piece
In a baking
tray
11.11 Cooking in the dietary baking dish with True Fan + Steam
VEGETABLES
TYPE OF DISH Shelf position Temperature [°C]
Broccoli florets 2 130 20 - 25
Aubergine 2 130 15 - 20
Cauliflower florets 2 130 25 - 30
Tomatoes 2 130 15
Asparagus white 2 130 25 - 35
Cooking time
[min]
Page 33

ENGLISH 33
TYPE OF DISH Shelf position Temperature [°C]
Cooking time
[min]
Asparagus green 2 130 35 - 45
Courgette slices 2 130 20 - 25
Carrots 2 130 35 - 40
Fennel 2 130 30 - 35
Kohlrabi 2 130 25 - 30
Pepper strips 2 130 20 - 25
Celery slices 2 130 30 - 35
MEAT
TYPE OF DISH Shelf position Temperature [°C]
Cooking time
[min]
Cooked ham 2 130 55 - 65
Poached chicken
2 130 25 - 35
breast
Kasseler (smoked
2 130 80 - 100
loin of pork)
FISH
TYPE OF DISH Shelf position Temperature [°C]
Cooking time
[min]
Trout 2 130 25 - 30
Salmon filet 2 130 25 - 30
SIDE DISHES
TYPE OF DISH Shelf position Temperature [°C]
Cooking time
[min]
Rice 2 130 35 - 40
Unpeeled pota-
2 130 50 - 60
toes, medium
Boiled potatoes,
2 130 35 - 45
quartered
Polenta 2 130 40 - 45
11.12 Core temperature sensor table
TYPE OF DISH Core temperature [°C]
Roast veal 75 - 80
Veal knuckle 85 - 90
English roast beef, rare 45 - 50
English roast beef, medium 60 - 65
Page 34

www.electrolux.com
34
TYPE OF DISH Core temperature [°C]
English roast beef, well done 70 - 75
Shoulder of pork 80 - 82
Shin of pork 75 - 80
Lamb 70 - 75
Chicken 98
Hare 70 - 75
Trout / Sea bream 65 - 70
Tuna fish / Salmon 65 - 70
12. CARE AND CLEANING
WARNING!
Refer to the Safety chapters.
• Clean the front of the appliance with a
soft cloth with warm water and a cleaning agent.
• To clean metal surfaces use a usual
cleaning agent.
• Clean the oven interior after each use.
Then you can remove dirt more easily
and it does not burn on.
• Clean stubborn dirt with a special oven
cleaner.
• Clean all oven accessories after each
use and let them dry. Use a soft cloth
with warm water and a cleaning agent.
• If you have nonstick accessories, do
not clean them using aggressive
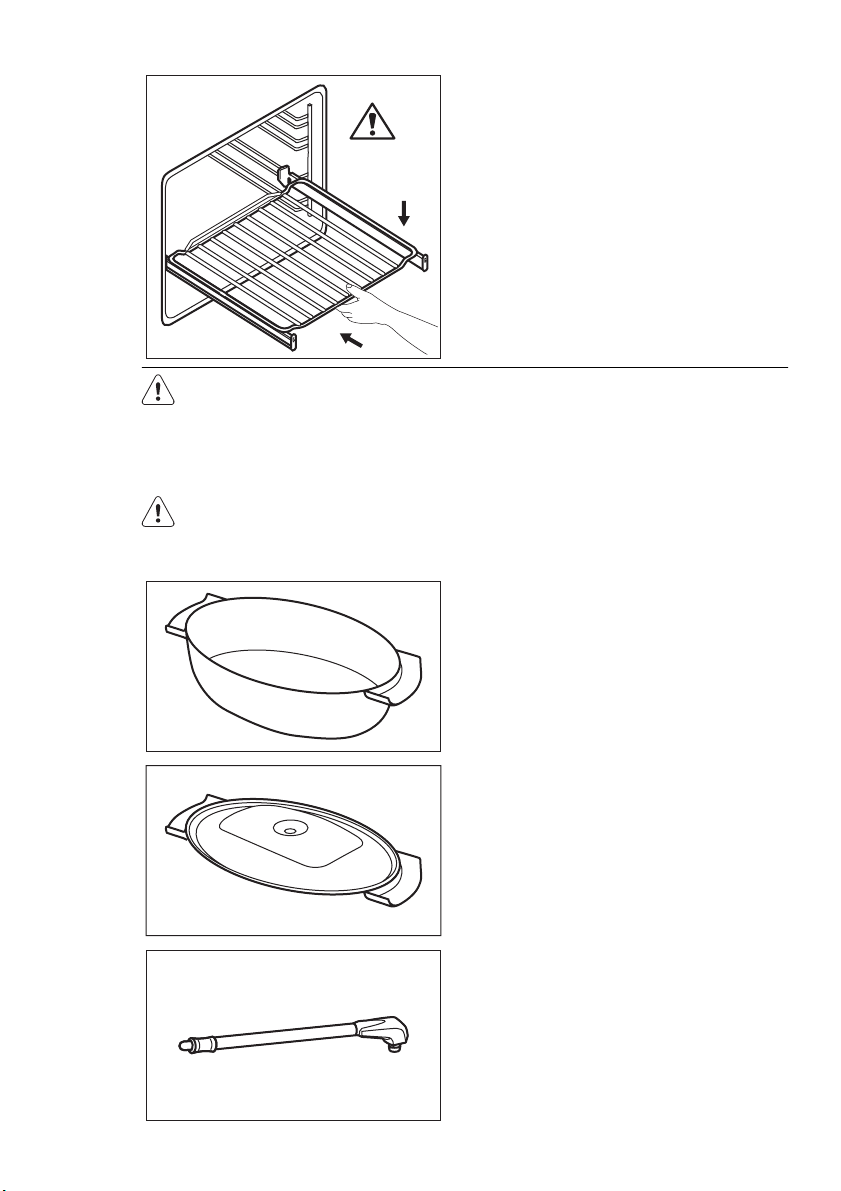
Removing the shelf supports
agents, sharp-edged objects or a dishwasher. It can destroy nonstick coating.
Stainless steel or aluminium
appliances:
Clean the oven door with a wet
sponge only. Dry it with a soft
cloth.
Do not use steel wool, acids or
abrasive materials, as they can
cause damage to the oven surface. Clean the oven control panel
with the same precautions.
12.1 Shelf supports
You can remove the shelf supports to
clean the side walls.
1.
Pull the front of the shelf support away
from the side wall.
Page 35

ENGLISH 35
2.
Pull the rear end of the shelf support
away from the side wall and remove
it.
1
2
Installing the shelf supports
Install the shelf supports in the opposite
sequence.
The rounded ends of the shelf
supports must point to the front.
12.2 Pyrolysis
CAUTION!
If a hob is installed with the appliance, do not use it at the same
time as the Pyrolysis function. It
can cause damage to the appliance.
For steam models only: before
you start the cleaning procedure,
make sure that the water tank is
completely empty. Refer to “Emptying the water tank”.
Remove all accessories from the
appliance.
The cleaning procedure cannot start:
• If you do not remove the shelf support
runners or telescopic shelf runners (if
present).
• If you do not close the appliance door
correctly.
• If you do not unplug the core temperature sensor (if present).
When the Pyrolysis starts the appliance door is locked. After the
function finishes the door is
locked for the cool down phase.
Some of the appliance functions
are not available during the cool
down phase.
WARNING!
When the Pyrolysis finishes the
appliance is very hot. Let it cool
down. There is a risk of burns
Pyrolysis :
1.
Remove the worst of the residual dirt
manually.
2.
Activate the appliance and choose
the Pyrolysis function in the main
menu. Press OK to confirm.
3.
Touch or to set the length
for the procedure:
– Quick - 1h for a low degree of dirt
– Normal - 1h 30 min for a usual de-
gree of dirt
– Intense - 2h 30 min for a high de-
gree of dirt
4.
Press OK to confirm.
12.3 Oven lamp
WARNING!
Be careful when you change the
oven lamp. There is a risk of electrical shock.
Before you change the oven lamp:
• Deactivate the oven.
• Remove the fuses in the fuse box or
deactivate the circuit breaker.
Put a cloth on the bottom of the
oven to prevent damage to the
oven light and glass cover.
Always hold the halogen lamp
with a cloth to prevent grease residue from burning on the lamp.
1.
Turn the glass cover counterclockwise to remove it.
2.
Clean the glass cover.
3.
Replace the oven light bulb with an
applicable 300 °C heat-resistant oven
light bulb.
Use the same oven lamp type.
4.
Install the glass cover.
Page 36

www.electrolux.com
36
12.4 Cleaning the water tank
After some time, you can have lime deposits in your oven. To prevent this, clean
the parts of the oven that generate the
steam. Empty the tank after each steam
cooking.
1.
2.
60 - 120 mg /
over 180 mg /
12.5 Cleaning the oven door
The oven door has four glass panels. You
can remove the oven door and the internal glass panels to clean them.
3.
Activate the oven and set the True
WARNING!
Do not put water into the water
tank during the cleaning procedure.
During the cleaning procedure,
some water can drip from the
steam inlet onto the cavity of the
oven. Put a dripping pan on the
shelf level directly below the
steam inlet to prevent water from
falling onto the bottom of the oven
cavity.
Fill in the water tank with 900 ml of
water and 50 ml of citric acid (five
teaspoons). Deactivate the oven and
wait for approximately 60 minutes.
Activate the oven and set the True
Fan + Steam function. Set the temperature 230 °C. Deactivate it after 25
minutes and let it cool down for 15
minutes.
Fan + Steam function. Set the temperature between 130 and 230 °C.
Deactivate it after 10 minutes. Let it
cool down and continue with the removal of the tank contents (refer to
"Emptying the water tank").
4.
Rinse the water tank and clean the
remaining lime residue in the oven
with a cloth.
5.
Clean the drain pipe by hand in warm
water with soap. To prevent damage,
do not use acids, sprays or similar
cleaning agents.
Types of water
• Soft water with low lime content the manufacturer recommends this because it decreases the quantity of
cleaning procedures.
• Tap water - you can use it if your domestic water supply has purifier or water sweetener.
• Hard water with high lime content it does not have an effect on the performance of the appliance but it increases the quantity of cleaning procedures.
CALCIUM QUANTITY TABLE INDICATED FROM W.H.O.
(World Health Organization)
Calcium de-
posit
Water hard-
ness
(French de-
grees)
Water hard-
ness
(German de-
grees)
Water classi-
fication
0 - 60 mg / l 0 - 6 0 - 3 Sweet of soft
l
120 - 180
mg / l
l
CAUTION!
Do not use the appliance without
the glass panels.
6 - 12 3 - 7
12 - 18 8 - 10
over 18 over 10 Very hard
Medium hard-
ness
Hard or calca-
reous
The oven door can close if you try
to remove the glass panels before
you remove the oven door.
Run decalci-
fication ev-
ery
75 cycles - 2.5
months
50 cycles - 2
months
40 cycles - 1.5
months
30 cycles - 1
month
Page 37
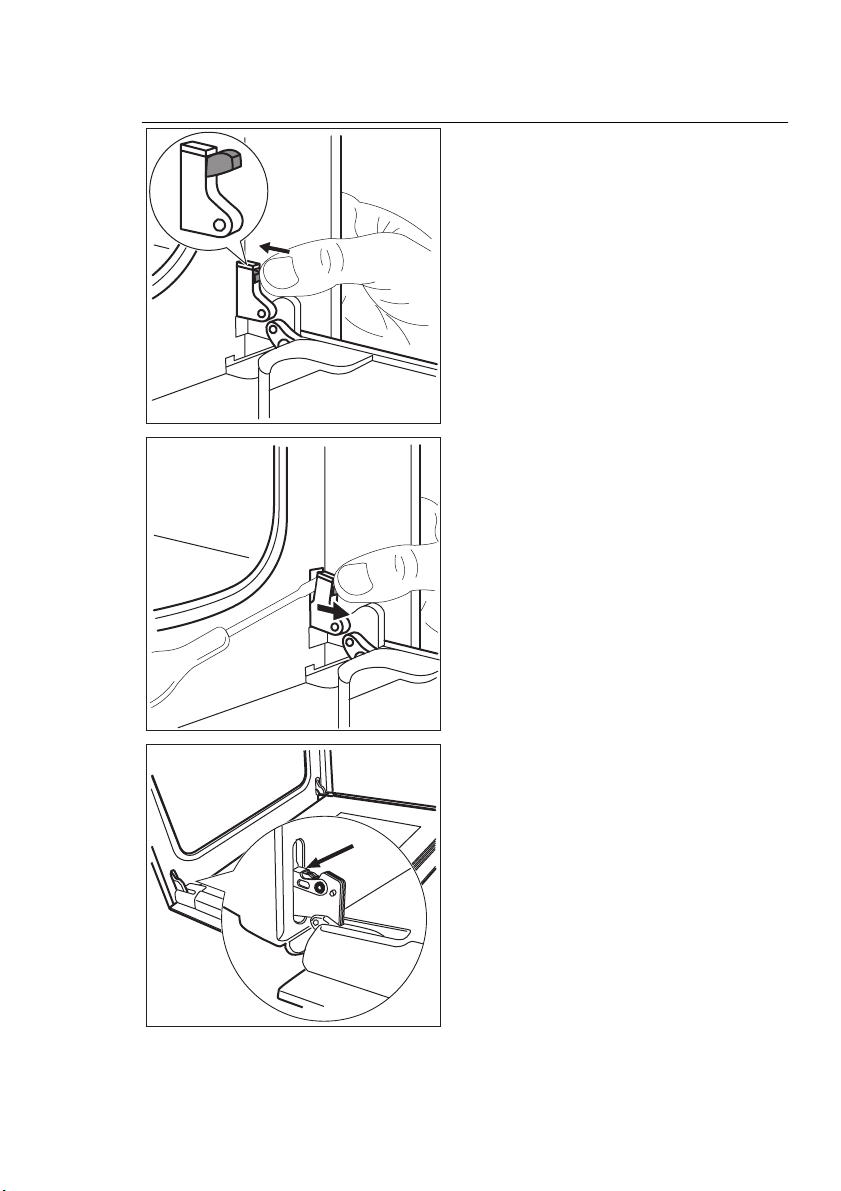
Removing the oven door and the glass panel
1.
Fully open the door and identify the
hinge to the right side of the door.
2.
Push the tightening component until it
pulls back.
3.
Hold the pushed component with
one hand. Use a screwdriver with the
other hand to lift and turn the right
side hinge lever.
ENGLISH 37
4.
Identify the hinge to the left side of
the door.
Page 38

www.electrolux.com
38
5.
Lift and turn the lever on the left
hinge.
6.
Close the oven door to the first opening position (halfway). Then pull forward and remove the door from its
seat.
7.
Put the door on a soft cloth on a stable surface.
8.
Release the locking system to remove the glass panels.
Page 39

9.
90°
10.
11.
2
1
Installing the door and the glass panels
ENGLISH 39
Turn the two fasteners by 90° and remove them from their seats.
Carefully lift (step 1) and remove (step
2) the glass panels one by one. Start
from the top panel.
Clean the glass panels with water
and soap. Dry the glass panels carefully.
AB C
When the cleaning is completed, install
the glass panels and the oven door. Do
the above steps in the opposite sequence.
Make sure that you put the glass panels
(A, B and C) back in the correct sequence. The middle panel (B) has a decorative frame. The screen-printing zone
must face the inner side of the door.
Make sure that after the installation the
surface of the glass panel frame (B) on the
screen-printing zones is not rough when
you touch it.
Make sure that you install the top panel in
the seats correctly.
Page 40

www.electrolux.com
40
13. WHAT TO DO IF…
WARNING!
Refer to the Safety chapters.
Problem Possible cause Remedy
The appliance does
not heat up.
The appliance does
not heat up.
The appliance does
not heat up.
The appliance does
not heat up.
The appliance does
not heat up.
There is water inside
the appliance.
The steam cooking
does not operate.
The steam cooking
does not operate.
It takes more than
three minutes to
empty the water
tank or the water
leaks from the
steam inlet opening.
Steam and condensation settle on the
food and in the appliance.
The display shows
F111.
The lamp does not
operate.
The appliance is deactiva-
Activate the appliance.
ted.
The clock is not set. Set the clock.
The necessary settings are
not set.
Make sure that the settings
are correct.
The Child Lock is activated. Refer to "Deactivating the
Child Lock".
The fuse is released. Make sure that the fuse is
the cause of the malfunction. If the fuse releases
again and again, contact an
authorized electrician.
There is too much water in
the tank.
Deactivate the appliance
and remove the water with a
cloth or sponge.
There is no water in the
Fill the water tank.
tank.
Lime obstructs the hole. Check the steam inlet open-
ing. Remove the lime.
There are lime deposits in
the appliance.
Check the water tank. Refer
to “Cleaning the water
tank”.
You left the dish in the appliance for too long.
Do not keep the dishes in
the appliance for longer
than 15 — 20 minutes after
the cooking ends.
You did not correctly install
the CT Sensor into the
socket.
Put the plug of core temperature sensor as far as possible into the socket.
The lamp is defective. Replace the lamp.
Page 41

Problem Possible cause Remedy
The display shows
“Demo”. The appliance does not heat
up. The fan does
not operate.
If you cannot find a solution to the problem yourself, contact your dealer or the
service centre.
We recommend that you write the data here:
Model (MOD.) .........................................
Product number (PNC) .........................................
Serial number (S.N.) .........................................
14. TECHNICAL DATA
The test mode is activated.
The necessary data for the service centre
is on the rating plate. The rating plate is
on the front frame of the appliance cavity.
ENGLISH 41
1.
Deactivate the appliance.
2.
Touch and hold until
the appliance activates
and deactivates.
3.
Touch and hold and
at the same time until an acoustic signal
sounds and “d” goes
out.
Voltage 230 V
Frequency 50 Hz
15. INSTALLATION
WARNING!
Refer to the Safety chapters.
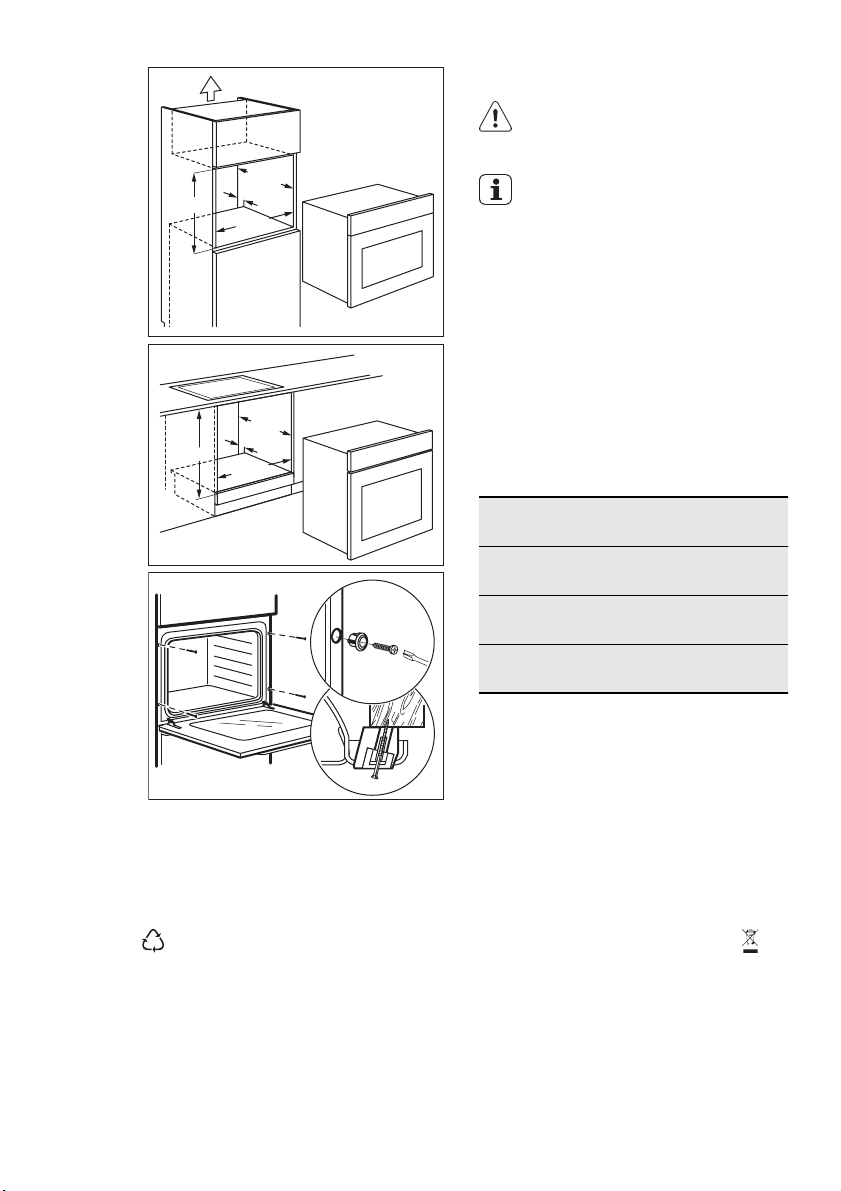
15.1 Building In
558
573
548
20
589
594
5
Page 42
www.electrolux.com
42
590
600
min. 550
20
min. 560
min. 550
20
min. 560
15.2 Electrical installation
WARNING!
Only a qualified person must do
the electrical installation.
The manufacturer is not responsible if you do not follow the safety
precautions from the chapter
"Safety Information".
This appliance is supplied with a main
plug and a main cable.
15.3 Cable
Cable types applicable for installation or
replacement: H07 RN-F, H05 RN-F, H05
RRF, H05 VV-F, H05 V2V2-F (T90), H05
BB-F.
For the section of the cable refer to the
total power (on the rating plate) and to the
table:
Total power
maximum 1380W3 x 0.75 mm²
Section of the ca-
ble
A
B
16. ENVIRONMENT CONCERNS
Recycle the materials with the symbol
. Put the packaging in applicable
containers to recycle it.
Help protect the environment and human
health and to recycle waste of electrical
maximum 2300W3 x 1 mm²
maximum 3680W3 x 1.5 mm²
The earth cord (green / yellow cable) must
be 2 cm longer than phase and neutral
cables (blue and brown cables).
and electronic appliances. Do not dispose
appliances marked with the symbol
with the household waste. Return the
product to your local recycling facility or
contact your municipal office.
Page 43

POLSKI 43
SPIS TREŚCI
1. INFORMACJE DOTYCZĄCE BEZPIECZEŃSTWA . . . . . . . . . . . . . . . . . . . . . . . . . . . . . . . . . . . . . . . . . . . 44
2. WSKAZÓWKI DOTYCZĄCE BEZPIECZEŃSTWA . . . . . . . . . . . . . . . . . . . . . . . . . . . . . . . . . . . . . . . . . . . 45
3. OPIS URZĄDZENIA . . . . . . . . . . . . . . . . . . . . . . . . . . . . . . . . . . . . . . . . . . . . . . . . . . . . . . . . . . . . . . . . . . . 48
4. PRZED PIERWSZYM UŻYCIEM . . . . . . . . . . . . . . . . . . . . . . . . . . . . . . . . . . . . . . . . . . . . . . . . . . . . . . . . . 48
5. PANEL STEROWANIA . . . . . . . . . . . . . . . . . . . . . . . . . . . . . . . . . . . . . . . . . . . . . . . . . . . . . . . . . . . . . . . . . 49
6. CODZIENNA EKSPLOATACJA . . . . . . . . . . . . . . . . . . . . . . . . . . . . . . . . . . . . . . . . . . . . . . . . . . . . . . . . . . 51
7. FUNKCJE ZEGARA . . . . . . . . . . . . . . . . . . . . . . . . . . . . . . . . . . . . . . . . . . . . . . . . . . . . . . . . . . . . . . . . . . . 55
8. PROGRAMY AUTOMATYCZNE . . . . . . . . . . . . . . . . . . . . . . . . . . . . . . . . . . . . . . . . . . . . . . . . . . . . . . . . . 56
9. KORZYSTANIE Z AKCESORIÓW . . . . . . . . . . . . . . . . . . . . . . . . . . . . . . . . . . . . . . . . . . . . . . . . . . . . . . . . 57
10. DODATKOWE FUNKCJE . . . . . . . . . . . . . . . . . . . . . . . . . . . . . . . . . . . . . . . . . . . . . . . . . . . . . . . . . . . . . . . 62
11. PRZYDATNE RADY I WSKAZÓWKI . . . . . . . . . . . . . . . . . . . . . . . . . . . . . . . . . . . . . . . . . . . . . . . . . . . . . . 63
12. KONSERWACJA I CZYSZCZENIE . . . . . . . . . . . . . . . . . . . . . . . . . . . . . . . . . . . . . . . . . . . . . . . . . . . . . . . 76
13. CO ZROBIĆ, GDY… . . . . . . . . . . . . . . . . . . . . . . . . . . . . . . . . . . . . . . . . . . . . . . . . . . . . . . . . . . . . . . . . . . . 82
14. DANE TECHNICZNE . . . . . . . . . . . . . . . . . . . . . . . . . . . . . . . . . . . . . . . . . . . . . . . . . . . . . . . . . . . . . . . . . . 83
15. INSTALACJA . . . . . . . . . . . . . . . . . . . . . . . . . . . . . . . . . . . . . . . . . . . . . . . . . . . . . . . . . . . . . . . . . . . . . . . . 83
Z MYŚLĄ O TOBIE
Dziękujemy za zakup urządzenia Electrolux. Jest ono owocem dziesięcioleci doświadczeń i innowacji. To
pomysłowe i stylowe urządzenie zaprojektowano z myślą o Tobie. Użytkując je masz zawsze pewność uzyskania
wspaniałych efektów.
Witamy w świecie marki Electrolux!
Odwiedź naszą witrynę internetową, aby uzyskać:
Wskazówki dotyczące użytkowania, broszury, pomoc w rozwiązywaniu problemów oraz informacje
dotyczące serwisu:
www.electrolux.com
Zarejestruj swój produkt, aby uprościć jego obsługę serwisową:
www.electrolux.com/productregistration
Kupuj akcesoria, materiały eksploatacyjne i oryginalne części zamienne do swojego urządzenia:
www.electrolux.com/shop
OBSŁUGA KLIENTA
Zalecamy stosowanie oryginalnych części zamiennych.
Kontaktując się z serwisem, należy przygotować poniższe dane.
Informacje można znaleźć na tabliczce znamionowej. Model, numer produktu, numer seryjny.
Ostrzeżenie/przestroga – informacje dotyczące bezpieczeństwa.
Informacje i wskazówki ogólne
Informacje dot. ochrony środowiska
Producent zastrzega sobie możliwość wprowadzenia zmian bez wcześniejszego powiadomienia.
Page 44

www.electrolux.com
44
1. INFORMACJE DOTYCZĄCE BEZPIECZEŃSTWA
Przed instalacją i rozpoczęciem eksploatacji urządzenia należy do‐
kładnie przeczytać dołączoną instrukcję obsługi. Producent nie od‐
powiada za uszkodzenia i obrażenia ciała spowodowane niepra‐
widłową instalacją i eksploatacją. Należy zachować instrukcję wraz
z urządzeniem do wykorzystania w przyszłości.
1.1 Bezpieczeństwo dzieci i osób o ograniczonych
zdolnościach ruchowych, sensorycznych lub umysłowych
OSTRZEŻENIE!
Występuje zagrożenie uduszeniem lub odniesieniem obrażeń
mogących skutkować trwałym kalectwem.
• Urządzenie mogą obsługiwać dzieci po ukończeniu ósmego ro‐
ku życia oraz osoby o ograniczonych zdolnościach fizycznych,
sensorycznych lub umysłowych bądź nieposiadające odpowied‐
niej wiedzy i doświadczenia, jeśli będą one nadzorowane przez
dorosłą osobę lub osobę odpowiedzialną za ich bezpieczeń‐
stwo.
• Nie należy pozwalać, aby dzieci bawiły się urządzeniem.
• Wszystkie opakowania należy przechowywać poza zasięgiem
dzieci.
• Dzieci i zwierzęta nie powinny zbliżać się do pracującego lub
stygnącego urządzenia. Łatwo dostępne elementy urządzenia
mocno się nagrzewają.
• Jeśli urządzenie jest wyposażone w blokadę uruchomienia, zale‐
ca się jej włączenie.
• Czyszczeniem i konserwacją nie mogą zajmować się dzieci bez
nadzoru dorosłych.
1.2 Ogólne zasady bezpieczeństwa
• Podczas pracy urządzenia jego wnętrze mocno się nagrzewa.
Nie dotykać elementów grzejnych w urządzeniu. Podczas wy‐
jmowania i wkładania akcesoriów lub naczyń należy zawsze
używać rękawic kuchennych.
• Nie używać do czyszczenia urządzenia myjki parowej.
Page 45
POLSKI 45
• Przed przystąpieniem do konserwacji urządzenia należy odłą‐
czyć je od zasilania.
• Do czyszczenia szyb w drzwiach nie należy używać ściernych
środków czyszczących ani ostrych, metalowych myjek, ponie‐
waż mogą one porysować powierzchnię, co może skutkować
pęknięciem szkła.
• Przed włączeniem funkcji czyszczenia pirolitycznego należy
usunąć nadmiar zanieczyszczeń. Wyjąć wszystkie akcesoria z
piekarnika.
• Należy stosować wyłącznie termosondę zalecaną dla danego
modelu urządzenia.
• Aby wymontować prowadnice blach, należy odciągnąć najpierw
ich przednią, a następnie tylną część od bocznych ścianek. Za‐
montować prowadnice blach w odwrotnej kolejności.
2.
WSKAZÓWKI DOTYCZĄCE BEZPIECZEŃSTWA
Podłączenie do sieci elektrycznej
2.1 Instalacja
OSTRZEŻENIE!
Urządzenie może zainstalować wyłącz‐
nie wykwalifikowana osoba.
• Usunąć wszystkie elementy opakowania.
• Nie instalować ani nie używać uszkodzonego
urządzenia.
• Postępować zgodnie z instrukcją instalacji do‐
starczoną wraz z urządzeniem.
• Zachować ostrożność podczas przenoszenia
urządzenia, ponieważ jest ono ciężkie. Za‐
wsze używać rękawic ochronnych.
• Nigdy nie ciągnąć urządzenia za uchwyt.
• Zachować minimalne odstępy od innych urzą‐
dzeń i mebli.
• Należy zadbać o to, aby meble itp. znajdujące
się obok urządzenia i nad nim spełniały odpo‐
wiednie wymogi bezpieczeństwa.
• Boki urządzenia powinny sąsiadować z urzą‐
dzeniami lub meblami o tej samej wysokości.
OSTRZEŻENIE!
Występuje zagrożenie pożarem i pora‐
żeniem prądem elektrycznym.
• Wykwalifikowany elektryk powinien wykonać
wszystkie połączenia elektryczne.
• Urządzenie musi być uziemione.
• Należy upewnić się, że informacje o podłącze‐
niu elektrycznym podane na tabliczce znamio‐
nowej są zgodne z parametrami instalacji za‐
silającej. W przeciwnym razie należy skontak‐
tować się z elektrykiem.
• Należy zawsze używać prawidłowo zamonto‐
wanych gniazd elektrycznych z uziemieniem.
• Nie stosować rozgałęźników ani przedłużaczy.
• Należy zwrócić uwagę, aby nie uszkodzić
wtyczki ani przewodu zasilającego. Wymianę
uszkodzonego przewodu zasilającego należy
zlecić przedstawicielowi serwisu lub wykwalifi‐
kowanemu elektrykowi.
• Przewody zasilające nie mogą dotykać drzwi
urządzenia, zwłaszcza gdy drzwi są mocno
rozgrzane.
• Zarówno w przypadku elementów znajdują‐
cych się pod napięciem, jak zaizolowanych
części zabezpieczenie przed porażeniem prą‐
Page 46

www.electrolux.com
46
• Podłączyć wtyczkę do gniazda elektrycznego
• Jeśli gniazdo elektryczne jest obluzowane, nie
• Przy odłączaniu urządzenia nie ciągnąć za
• Konieczne jest zastosowanie odpowiednich
• W instalacji elektrycznej należy zastosować
• Przed podłączeniem wtyczki przewodu zasila‐
2.2 Przeznaczenie
• Z urządzenia należy korzystać w warunkach
• Nie zmieniać parametrów technicznych urzą‐
• Upewnić się, że otwory wentylacyjne są droż‐
• Nie pozostawiać włączonego urządzenia bez
• Wyłączać urządzenie po każdym użyciu.
• Podczas pracy urządzenia należy zachować
• Nie obsługiwać urządzenia mokrymi rękami
• Nie opierać się na otwartych drzwiach urzą‐
• Nie używać urządzenia jako powierzchni robo‐
dem należy zamocować w taki sposób, aby
nie można go było odłączyć bez użycia narzę‐
dzi.
dopiero po zakończeniu instalacji. Należy za‐
dbać o to, aby po zakończeniu instalacji urzą‐
dzenia wtyczka przewodu zasilającego była
łatwo dostępna.
wolno podłączać do niego wtyczki.
przewód zasilający. Zawsze ciągnąć za wtycz‐
kę.
wyłączników obwodu zasilania: wyłączników
automatycznych, bezpieczników topikowych
(typu wykręcanego – wyjmowanych z opraw‐
ki), wyłączników różnicowo-prądowych (RCD)
oraz styczników.
wyłącznik obwodu umożliwiający odłączenie
urządzenia od zasilania na wszystkich biegu‐
nach. Wyłącznik obwodu musi mieć rozwarcie
styków wynoszące minimum 3 mm.
jącego do gniazda elektrycznego należy cał‐
kowicie zamknąć drzwi urządzenia.
OSTRZEŻENIE!
Zagrożenie odniesieniem obrażeń, opa‐
rzeniem lub wybuchem.
domowych.
dzenia.
ne.
nadzoru.
ostrożność przy otwieraniu jego drzwi. Może
dojść do uwolnienia gorącego powietrza.
lub jeśli ma ono kontakt z wodą.
dzenia.
czej ani miejsca do przechowywania przed‐
miotów.
• Gdy urządzenie jest wyłączone, jego drzwi po‐
winny być zamknięte.
• Należy ostrożnie otwierać drzwi urządzenia.
Stosowanie składników zawierających alkohol
może spowodować powstanie mieszanki alko‐
holu i powietrza.
• Podczas otwierania drzwi urządzenia nie wol‐
no zbliżać do niego iskrzących przedmiotów
ani otwartego płomienia.
• Nie umieszczać w urządzeniu, na nim ani w
jego pobliżu łatwopalnych substancji ani
przedmiotów nasączonych łatwopalnymi sub‐
stancjami.
OSTRZEŻENIE!
Występuje ryzyko uszkodzenia urzą‐
dzenia.
• Aby zapobiec uszkodzeniu lub odbarwieniu
się emalii:
– nie należy kłaść naczyń ani innych przed‐
miotów bezpośrednio na dnie urządzenia;
– nie należy kłaść folii aluminiowej bezpośred‐
nio na dnie urządzenia;
– Nie należy wlewać wody bezpośrednio do
rozgrzanego urządzenia.
– Nie należy pozostawiać wilgotnych naczyń
ani potraw w urządzeniu po zakończeniu pie‐
czenia.
– Należy zachować ostrożność podczas wy‐
jmowania i wkładania akcesoriów.
• Odbarwienie emalii nie ma wpływu na działa‐
nie urządzenia. Nie stanowi to wady w rozu‐
mieniu warunków gwarancji.
• Do pieczenia wilgotnych ciast należy używać
głębokiej blachy. Sok z owoców może trwale
zaplamić emalię.
Pieczenie parowe
OSTRZEŻENIE!
Występuje zagrożenie poparzeniem i
uszkodzenia urządzenia.
• Nie otwierać drzwi urządzenia podczas pie‐
czenia parowego. Może dojść do uwolnienia
pary.
2.3 Konserwacja i czyszczenie
OSTRZEŻENIE!
Występuje zagrożenie odniesieniem ob‐
rażeń, pożarem lub uszkodzeniem urzą‐
dzenia.
Page 47

• Przed przystąpieniem do konserwacji należy
wyłączyć urządzenie i wyjąć wtyczkę przewo‐
du zasilającego z gniazda elektrycznego.
• Upewnić się, że urządzenie ostygło. Występu‐
je zagrożenie pęknięcia szyb w drzwiach urzą‐
dzenia.
• W przypadku pęknięcia szyb należy je nie‐
zwłocznie wymienić. Należy skontaktować się
z punktem serwisowym.
• Przy zdejmowaniu drzwi urządzenia należy
zachować ostrożność. Drzwi są ciężkie!
• Aby zapobiec uszkodzeniu powierzchni urzą‐
dzenia, należy regularnie ją czyścić.
• Pozostałości tłuszczu lub potraw w urządzeniu
mogą stać się przyczyną pożaru.
• Czyścić urządzenie za pomocą wilgotnej
szmatki. Stosować wyłącznie neutralne środki
czyszczące. Nie używać produktów ściernych,
myjek do szorowania, rozpuszczalników ani
metalowych przedmiotów.
• W przypadku stosowania aerozolu do piekar‐
ników należy przestrzegać wskazówek doty‐
czących bezpieczeństwa umieszczonych na
opakowaniu.
• Nie używać do czyszczenia emalii katalitycz‐
nej (jeśli dotyczy) żadnych detergentów.
Czyszczenie pirolityczne
OSTRZEŻENIE!
Zagrożenie poparzeniem.
• Przed włączeniem funkcji czyszczenia piroli‐
tycznego lub przed pierwszym użyciem urzą‐
dzenia należy usunąć z komory piekarnika:
– Duże resztki żywności, rozlany olej lub
tłuszcz.
– Wszystkie dające się usunąć przedmioty
(ruszty, prowadnice itp. dostarczone wraz
z urządzeniem), w szczególności garnki,
patelnie, tace i inne przybory kuchenne
z powłoką zapobiegającą przywieraniu.
• Należy dokładnie zapoznać się z instrukcją
czyszczenia pirolitycznego.
• Podczas czyszczenia pirolitycznego dzieciom
nie wolno przebywać w pobliżu urządzenia.
Urządzenie bardzo mocno się nagrzewa.
• Czyszczenie pirolityczne jest procesem prze‐
biegającym w wysokiej temperaturze, podczas
którego resztki żywności oraz materiały, z któ‐
rych wykonano urządzenie, mogą uwalniać
opary. W związku z tym:
POLSKI 47
– Podczas czyszczenia pirolitycznego oraz
po jego zakończeniu należy dokładnie prze‐
wietrzyć pomieszczenie.
– Podczas pierwszego nagrzewania urządze‐
nia do maksymalnej temperatury oraz po
zakończeniu nagrzewania należy zapewnić
dobrą wentylację pomieszczenia.
– Podczas czyszczenia pirolitycznego oraz
po jego zakończeniu w pobliżu urządzenia
nie powinny przebywać zwierzęta domowe
(szczególnie ptaki); na początku wybrać
najwyższą temperaturę, pamiętając o ko‐
nieczności zapewnienia dobrej wentylacji
pomieszczenia.
• W przeciwieństwie do ludzi, niektóre ptaki
oraz gady są bardzo wrażliwe na opary, które
mogą uwalniać się podczas czyszczenia piro‐
litycznego.
• Ponadto niewielkie zwierzęta domowe mogą
być wrażliwe na miejscowe zmiany temperatu‐
ry, które występują w pobliżu piekarników
z funkcją czyszczenia pirolitycznego podczas
działania tej funkcji.
• Wysoka temperatura występująca podczas
czyszczenia pirolitycznego może uszkodzić
powierzchnie garnków, patelni, tac i innych
przyborów kuchennych z powłoką zapobiega‐
jącą przywieraniu; ponadto powłoki te mogą
być źródłem oparów o niewielkim stopniu tok‐
syczności.
• Opary uwalniane podczas czyszczenia piroli‐
tycznego lub wypalania resztek potraw klasyfi‐
kuje się jako nieszkodliwe dla ludzi – w tym
dla noworodków lub osób z problemami zdro‐
wotnymi.
2.4 Wewnętrzne oświetlenie
piekarnika
• Żarówka zwykła lub halogenowa zastosowana
w tym urządzeniu jest przeznaczona wyłącz‐
nie do urządzeń domowych. Nie należy uży‐
wać jej do oświetlania pomieszczeń.
OSTRZEŻENIE!
Niebezpieczeństwo porażenia prądem.
• Przed przystąpieniem do wymiany żarówki na‐
leży odłączyć urządzenie od źródła zasilania.
• Używać wyłącznie żarówek tego samego ty‐
pu.
Page 48

www.electrolux.com
48
2.5 Utylizacja
OSTRZEŻENIE!
Występuje zagrożenie odniesieniem ob‐
rażeń lub uduszeniem.
• Odłączyć urządzenie od źródła zasilania.
3. OPIS URZĄDZENIA
1 2
12
5
4
3
11
2
1
10
9
8
Sterowanie elektroniczne
1
Szuflada na wodę
2
Gniazdo termosondy
3
Grill
4
Oświetlenie piekarnika
5
Wentylator
6
Prowadnice blach, wyjmowane
7
Rurka odpływowa
8
7
• Odciąć przewód zasilający i wyrzucić go.
• Wymontować zatrzask drzwi, aby uniemożli‐
wić zamknięcie się dziecka lub zwierzęcia w
urządzeniu.
Zawór spustowy wody
9
Tabliczka znamionowa
10
Poziomy piekarnika
11
Otwór wlotowy pary
3
4
5
6
12
3.1 Akcesoria piekarnika
• Ruszt
Do ustawiania naczyń, foremek do ciast oraz
do pieczenia mięs.
• Blacha do pieczenia ciasta
Do pieczenia ciast i ciastek.
• Blacha do pieczenia/opiekania mięsa
Do pieczenia mięsa lub ciasta oraz do zbiera‐
nia skapującego tłuszczu.
• Termosonda
Do mierzenia stopnia upieczenia potrawy.
• Prowadnice teleskopowe
Do umieszczania rusztów i blach.
• Naczynie do potraw dietetycznych
Do użycia z funkcjami pieczenia parowego.
4. PRZED PIERWSZYM UŻYCIEM
OSTRZEŻENIE!
Patrz rozdział dotyczący bezpieczeń‐
stwa.
4.1 Czyszczenie wstępne
• Wyjąć wszystkie akcesoria i wyjmowane pro‐
wadnice blach (jeśli dotyczy).
• Przed pierwszym użyciem należy wyczyścić
urządzenie.
Patrz rozdział „Konserwacja i czyszcze‐
nie”.
4.2 Pierwsze podłączenie
Podłączając urządzenie do źródła zasilania lub
po zaniku zasilania, należy ustawić język, kon‐
trast wyświetlacza, jasność wyświetlacza oraz
aktualną godzinę.
1.
Dotknąć lub , aby ustawić odpo‐
wiednią wartość.
Page 49

2.
Dotknąć OK, aby potwierdzić.
4.3 Nagrzewanie wstępne
Należy wstępnie nagrzać puste urządzenie w ce‐
lu wypalenia pozostałości smaru.
1.
Ustawić funkcję i temperaturę maksy‐
malną.
2.
Pozostawić włączone urządzenie na 45 mi‐
nut.
5. PANEL STEROWANIA
Sterowanie elektroniczne
1 10
2 43 8 95 6 7
Urządzenie obsługuje się dotykając pól czujników.
Numer
Pole czujni‐
ka
1
POLSKI 49
3.
Ustawić funkcję i temperaturę maksy‐
malną.
4.
Pozostawić włączone urządzenie na 15 mi‐
nut.
Akcesoria mogą rozgrzać się mocniej niż zwykle.
Z urządzenia może wydobywać się nieprzyjemny
zapach i dym. Jest to normalne zjawisko. Należy
zapewnić wystarczający dopływ świeżego powie‐
trza.
11
Funkcja Uwagi
Wł./wył. Włączanie i wyłączanie urządzenia.
Funkcje pieczenia
lub Gotowanie
wspomagane
2
Wybór funkcji pieczenia lub funkcji Gotowanie
wspomagane . Aby uzyskać dostęp do po‐
trzebnej funkcji, należy po włączeniu urządze‐
nia dotknąć jednokrotnie lub dwukrotnie pola
czujnika. Aby włączyć lub wyłączyć oświetle‐
nie, należy dotknąć i przytrzymać pole czujni‐
ka przez 3 sekundy.
3
głównego
Przycisk menu
Powrót do poprzedniego poziomu menu. Aby
wyświetlić menu główne, należy dotknąć pole
czujnika i przytrzymać je przez 3 sekundy.
Wybór temperatu‐ryUstawianie temperatury lub wyświetlanie aktu‐
alnej temperatury w urządzeniu. Aby włączyć
4
lub wyłączyć funkcję Szybkie nagrzewanie ,
należy dotknąć i przytrzymać pole czujnika
przez 3 sekundy.
5
6
Program ulubiony Zapisywanie i dostęp do ulubionych progra‐
mów.
Strzałka w górę Służy do przemieszczania się w górę menu.
Page 50

www.electrolux.com
50
7
Pole czujni‐
ka
Funkcja Uwagi
Strzałka w dół Służy do przemieszczania się w dół menu.
Numer
Godzina i dodat‐
kowe funkcje
8
9
10
11
Wyświetlacz
—
A
Minutnik Ustawianie funkcji Minutnik .
OK Potwierdzenie wyboru lub ustawienia.
Wyświetlacz Pokazuje aktualne ustawienia urządzenia.
B C
DE
Inne wskaźniki na wyświetlaczu
Symbol Funkcja
Minutnik Funkcja jest włączona.
Aktualny czas Wyświetlacz wskazuje aktualną godzinę.
Czas Wyświetlacz wskazuje wymagany czas pieczenia.
Koniec Wyświetlacz wskazuje czas zakończenia pieczenia.
Wskazanie czasu Wyświetlacz wskazuje czas działania funkcji pieczenia.
Nacisnąć jednocześnie
Wskaźnik nagrzewa‐
Wyświetlacz wskazuje temperaturę w urządzeniu.
nia
Wskaźnik funkcji
Szybkie nagrzewanie
Funkcja jest włączona. Ta funkcja zapewnia krótszy
czas nagrzewania.
Automatyka wagowa Wskazanie informuje, że system automatycznego waże‐
nia jest włączony lub że można zmienić ciężar.
Pieczenie+utrzym.
Funkcja jest włączona.
temp.
Ustawianie różnych funkcji. Gdy działa funkcja
pieczenia, należy dotknąć pola czujnika, aby
ustawić zegar, blokadę uruchomienia, pamięć
Program ulubiony , funkcję Pieczenie+utrzym.
temp. , funkcję Ustaw + Start lub zmienić usta‐
wienia termosondy (tylko w wybranych mode‐
lach).
A)
Funkcja pieczenia
B)
Aktualny czas
C)
Wskaźnik nagrzewania
D)
Temperatura
E)
Funkcje Czas i Koniec
i , aby wyzerować czas.
Page 51

6. CODZIENNA EKSPLOATACJA
POLSKI 51
OSTRZEŻENIE!
Patrz rozdział dotyczący bezpieczeń‐
stwa.
6.1 Obsługa menu
Obsługa menu:
1.
Włączyć urządzenie.
2.
3.
W dowolnej chwili można powrócić do menu
głównego, naciskając przycisk
6.2 Przegląd menu
Menu główne
Symbol Pozycja menu Zastosowanie
Funkcje pieczenia Zawiera listę funkcji pieczenia.
Gotowanie wspomagane
Program ulubiony
Piroliza Czyszczenie pirolityczne.
Ustawienia podstawowe Umożliwia konfigurację innych ustawień.
Specjalne
Podmenu dla opcji menu: Ustawienia podstawowe
Symbol Podmenu Opis
Ustaw aktualną godzinę Ustawianie aktualnej godziny na zegarze.
Wskazanie czasu
USTAW + START
Pieczenie+utrzym. temp.
Wydłużenie czasu Włączanie i wyłączanie funkcji.
Zawiera listę automatycznych programów piecze‐
nia.
Zawiera listę ulubionych programów pieczenia ut‐
worzonych przez użytkownika.
Zawiera listę dodatkowych funkcji pieczenia.
Gdy opcja jest WŁĄCZONA, po wyłączeniu urzą‐
dzenia na wyświetlaczu widoczna jest aktualna go‐
dzina.
Gdy opcja jest WŁĄCZONA, można uruchomić te
funkcje przy włączaniu funkcji pieczenia.
Gdy opcja jest WŁĄCZONA, można uruchomić tę
funkcję przy włączaniu funkcji pieczenia.
Nacisnąć lub , aby wybrać opcję
menu.
Nacisnąć OK, aby przejść do podmenu lub
zaakceptować ustawienie.
.
Kontrast wyświetlacza Stopniowa regulacja kontrastu wyświetlacza.
Jasność wyświetlacza Stopniowa regulacja jasności wyświetlacza.
Język Wybór języka komunikatów na wyświetlaczu.
Głośność sygnału
Stopniowa regulacja głośności dźwięku przycisków
oraz sygnałów.
Page 52
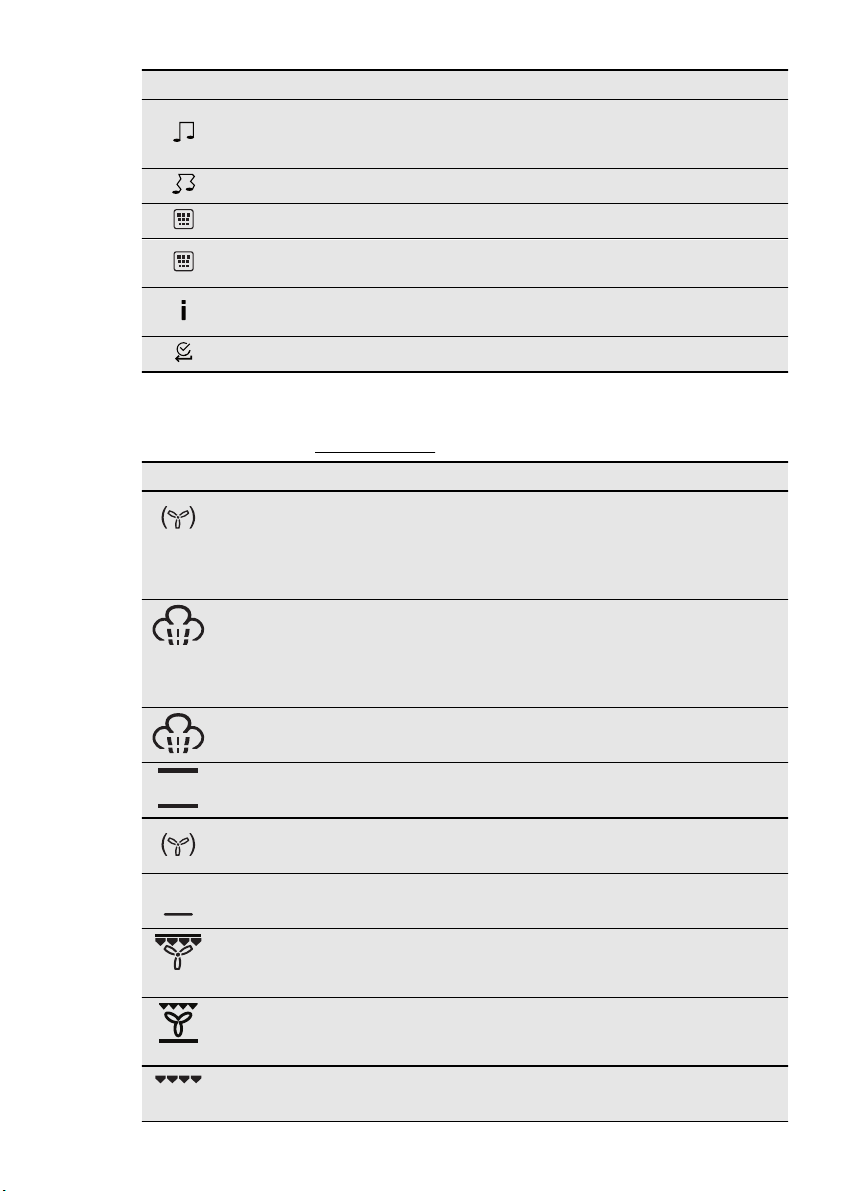
www.electrolux.com
52
6.3 Funkcje pieczenia
Podmenu dla opcji menu: Funkcje pieczenia
Funkcja pieczenia Zastosowanie
Symbol Podmenu Opis
Włączanie i wyłączanie dźwięku pól dotykowych.
Dźwięki przycisków
Nie można wyłączyć dźwięku towarzyszącego do‐
tknięciu pola WŁ./WYŁ.
Alarm/sygnał błędu Włączanie i wyłączanie sygnałów alarmowych.
Pomoc w czyszczeniu Ułatwia przeprowadzenie procedury czyszczenia.
Przypominanie o czyszcz.
Serwis
Przypominanie o konieczności wyczyszczenia
urządzenia.
Wyświetlanie informacji o wersji oprogramowania i
konfiguracji.
Ustawienia fabryczne Przywracanie ustawień fabrycznych.
Termoobieg Do równoczesnego pieczenia na maksymalnie trzech
poziomach. Korzystając z tej funkcji należy zmniej‐
szyć temperaturę o 20-40°C w stosunku do standar‐
dowej temperatury ustawianej dla funkcji Pieczenie
tradycyjne .
Termoobieg + para Służy do pieczenia na parze. Funkcja umożliwia skró‐
cenie czasu pieczenia oraz zachowanie witamin i
składników odżywczych w potrawie. Aby użyć tej
funkcji, należy po jej wybraniu ustawić temperaturę w
zakresie od 130°C do 230°C.
Pizza Do pieczenia pizzy, quiche i placków z wykorzysta‐
niem pary.
Pieczenie tradycyjne Do pieczenia mięsa lub ciasta na jednym poziomie.
Termoobieg (niska temp.) Do przyrządzania szczególnie delikatnych, soczys‐
tych pieczeni.
Grzałka dolna Do pieczenia ciast na kruchym lub chrupkim spodzie
oraz do pasteryzowania żywności.
Pieczenie ekonomiczne Funkcje EKO umożliwiają zmniejszenie zużycia ener‐
gii podczas procesu pieczenia. Konieczne jest
wcześniejsze ustawienie czasu pieczenia.
Potrawy mrożone Do pieczenia gotowych potraw, takich jak frytki, pie‐
czone ziemniaki czy sajgonki, w celu nadania im
chrupkości.
Grill Do grillowania płaskich potraw na środku grilla i do
opiekania pieczywa.
Page 53

Funkcja pieczenia Zastosowanie
Szybki grill Do grillowania potraw płaskich w dużych ilościach i
do opiekania pieczywa.
POLSKI 53
Turbo grill Do pieczenia na jednym poziomie większych kawał‐
ków mięsa lub drobiu z kością. Również do zapieka‐
nia i przyrumieniania.
Regeneracja Do podgrzewania już przygotowanej żywności bezpo‐
średnio na talerzu.
Podmenu dla opcji menu: Specjalne
Funkcja pieczenia Zastosowanie
Chleb Do pieczenia chleba z wykorzystaniem pary.
Zapiekanki Do przyrządzania takich potraw, jak lasagne czy
zapiekanka ziemniaczana. Również do zapiekania i
przyrumieniania.
Wyrastanie ciasta Do wspomagania wyrastania ciasta drożdżowego
przed pieczeniem.
Podgrzewanie talerzy Do podgrzewania talerzy przed podaniem na stół.
Pasteryzowanie Do pasteryzacji warzyw w zalewie w słoikach (np.
pikli).
Suszenie Do suszenia pokrojonych owoców, np. jabłek, śli‐
wek lub brzoskwini, oraz warzyw, np. pomidorów,
cukinii lub grzybów.
Podtrzymywanie temp. Do podtrzymywania temperatury ugotowanych po‐
traw.
Rozmrażanie Do rozmrażania potraw.
6.4 Włączanie funkcji pieczenia
1. Włączyć urządzenie.
2. Wybrać menu Funkcje pieczenia . Potwierdź
OK.
3. Ustawić funkcję pieczenia. Potwierdź OK.
4. Ustawić temperaturę. Potwierdź OK.
Nacisnąć jednokrotnie lub dwukrotnie
, aby przejść bezpośrednio do menu
Funkcje pieczenia (gdy urządzenie jest
włączone).
6.5 Pieczenie parowe
Pokrywa szuflady na wodę znajduje się
w panelu sterowania.
1.
Nacisnąć pokrywę, aby otworzyć szufladę
na wodę.
2.
Wlać około 900 ml wody do szuflady na wo‐
dę.
Taka ilość wody wystarcza na około 55-60
minut.
Nie wolno wlewać gorącej wody bezpo‐
średnio do generatora pary.
Używać wyłącznie wody. Nie używać
wody filtrowanej (demineralizowanej)
ani destylowanej. Nie używać innych
cieczy. Nie wlewać do szuflady na wodę
łatwopalnych cieczy ani cieczy zawiera‐
jących alkohol.
3.
Wsunąć szufladę na wodę do pierwotnego
położenia.
Page 54

www.electrolux.com
54
4.
5.
6.
7.
8.
9.
6.6 Informacja o pustym zbiorniku
Gdy zbiornik jest pusty i konieczne jest uzupeł‐
nienie wody, na wyświetlaczu pojawia się komu‐
nikat Brak wody i emitowany jest sygnał dźwię‐
kowy.
Więcej informacji na ten temat znajduje się w
rozdziale „Pieczenie parowe”.
6.7 Informacja o pełnym zbiorniku
Gdy na wyświetlaczu widoczny jest komunikat
Zbiornik na wodę pełny. , można korzystać z
funkcji pieczenia parowego.
Gdy zbiornik jest pełny, emitowany jest sygnał
dźwiękowy.
6.8 Opróżnianie zbiornika na wodę
1.
Włączyć urządzenie.
Przygotować potrawę w odpowiednim na‐
czyniu.
Wybrać funkcję pieczenia parowego i usta‐
wić temperaturę.
W razie potrzeby ustawić funkcję Czas
lub Koniec .
Po upływie czasu pieczenia rozlegnie się
sygnał dźwiękowy.
Wyłączyć urządzenie.
Pozostawić otwarte drzwi urządzenia, aby
umożliwić jego całkowite wyschnięcie.
Opróżniać zbiornik na wodę po każdym pie‐
czeniu parowym.
OSTRZEŻENIE!
Odczekać co najmniej 60 minut po za‐
kończeniu pieczenia parowego, aby
uniknąć wypływania gorącej wody przez
zawór spustowy wody.
Po nalaniu do zbiornika zbyt dużo wo‐
dy, jej nadmiar przelewa się przez otwór
bezpieczeństwa na dno piekarnika.
Wytrzeć wodę gąbką lub ściereczką.
Przed opróżnieniem zbiornika należy
upewnić się, że urządzenie ostygło.
Przygotować rurkę odpływową (C), która
znajduje się w opakowaniu z instrukcją ob‐
sługi. Założyć złączkę (B) na jeden z koń‐
ców rurki odpływowej.
A
B
C
2.
Umieścić drugi koniec rurki odpływowej (C)
w pojemniku. Umieścić pojemnik poniżej za‐
woru spustowego (A).
3.
Otworzyć drzwi piekarnika i umieścić złącz‐
kę (B) w zaworze spustowym (A).
4.
Naciskać wielokrotnie złączkę podczas op‐
różniania zbiornika.
5.
Po usunięciu wody wyjąć złączkę z zaworu.
OSTRZEŻENIE!
Nie używać raz wykorzystanej wody do
ponownego napełnienia zbiornika.
Gdy na wyświetlaczu widoczny jest ko‐
munikat Brak wody , w zbiorniku nadal
może znajdować się pewna ilość wody.
Należy zaczekać, aż woda przestanie
wypływać z zaworu spustowego.
6.9 Wskaźnik nagrzewania
Po włączeniu funkcji pieczenia na wyświetlaczu
pojawia się pasek. Pasek sygnalizuje wzrost
temperatury piekarnika.
6.10 Wskaźnik funkcji Szybkie
nagrzewanie
Ta funkcja zapewnia krótszy czas nagrzewania.
Aby włączyć tę funkcję, należy przytrzymać
przez 3 sekundy. Wskaźnik nagrzewania zmieni
wygląd.
6.11 Ciepło resztkowe
Po wyłączeniu urządzenia na wyświetlaczu po‐
kazywany jest poziom ciepła resztkowego. Ciep‐
ło resztkowe można wykorzystać do utrzymania
temperatury potraw.
Page 55

6.12 Oszczędzanie energii
Urządzenie wyposażono w funkcje
umożliwiające oszczędzanie energii
podczas codziennego pieczenia:
• Ciepło resztkowe:
– Gdy działa funkcja lub program pieczenia,
grzałki wyłączają się po upływie 90% czasu
pieczenia (oświetlenie i wentylator nadal
działają). Aby możliwe było działanie tej
funkcji, czas pieczenia musi być dłuższy niż
7. FUNKCJE ZEGARA
7.1 Funkcje zegara
Symbol Funkcja Opis
Minutnik
Czas
Koniec
Po ustawieniu czasu dla funkcji zegara odlicza‐
nie czasu rozpoczyna się po upływie 5 sekund.
Gdy używane są funkcje zegara Czas
i Koniec , urządzenie wyłą‐
cza grzałki po upływie 90% ustawione‐
go czasu. Urządzenie wykorzystuje
ciepło resztkowe, kontynuując proces
pieczenia do końca ustawionego czasu
(od 3 do 20 minut).
Ustawianie funkcji zegara
1.
Ustawić funkcję pieczenia.
2.
Nacisnąć kilka razy , aż na wyświetlaczu
pojawi się żądana funkcja zegara i odpo‐
wiedni symbol.
3.
Nacisnąć lub , aby ustawić żądany
czas. Potwierdź OK.
Gdy upłynie czas pieczenia, zostanie wy‐
emitowany sygnał dźwiękowy. Urządzenie
wyłączy się. Na wyświetlaczu pojawi się ko‐
munikat.
POLSKI 55
30 minut lub konieczne jest użycie funkcji
zegara ( Czas , Koniec ).
– Gdy urządzenie jest wyłączone, ciepło
resztkowe można wykorzystać do podtrzy‐
mywania temperatury potraw. Na wyświet‐
laczu pokazywana jest aktualna temperatu‐
ra.
• Pieczenie z wyłączonym oświetleniem – do‐
tknąć i przytrzymać
wyłączyć oświetlenie podczas pieczenia.
• Funkcje eko – patrz „ Funkcje pieczenia ”.
przez 3 sekundy, aby
Służy do odliczania ustawionego czasu (maksymalnie 2 go‐
dziny i 30 minut). Funkcja nie ma wpływu na działanie urzą‐
dzenia. Można ją włączyć również wtedy, gdy urządzenie
jest wyłączone. Włączyć funkcję za pomocą
. Nacisnąć
lub , aby ustawić minuty, a następnie nacisnąć OK,
aby rozpocząć odliczanie.
Służy do ustawiania czasu działania urządzenia (maksymal‐
nie 23 godziny i 59 minut).
Służy do ustawiania czasu wyłączenia funkcji pieczenia
(maksymalnie 23 godziny i 59 minut).
4.
Nacisnąć pole czujnika, aby wyłączyć syg‐
nał.
•
Korzystając z funkcji Czas
niec
funkcję pieczenia i temperaturę. Na‐
stępnie można ustawić funkcję zega‐
ra. Urządzenie wyłączy się automa‐
tycznie.
• Można jednocześnie używać opcji
Czas
dzenie ma włączyć i wyłączyć się au‐
tomatycznie w późniejszym czasie.
• Podczas stosowania termosondy (je‐
śli jest w wyposażeniu), funkcje Czas
należy najpierw ustawić
i Koniec , jeśli urzą‐
i Koniec nie działają.
i Ko‐
7.2 Pieczenie+utrzym. temp.
Funkcja Pieczenie+utrzym. temp. umożliwia
utrzymywanie temperatury gotowej potrawy na
poziomie 80°C przez 30 minut. Funkcja włącza
się po zakończeniu procesu pieczenia.
Page 56

www.electrolux.com
56
• Funkcję można włączyć lub wyłączyć
w menu Ustawienia podstawowe .
• Warunki działania funkcji:
– Ustawiona temperatura musi prze‐
kraczać 80°C.
– Ustawiona jest funkcja Czas .
Włączanie funkcji
1.
Włączyć urządzenie.
2.
Wybrać funkcję pieczenia.
3.
Ustawić temperaturę powyżej 80°C.
4.
Nacisnąć kilkakrotnie , aż na wyświetla‐
czu pojawi się wskazanie Pieczenie+utrzym.
temp. . Potwierdź OK.
Gdy funkcja zakończy działanie, zostanie wyemi‐
towany sygnał dźwiękowy.
Funkcja Pieczenie+utrzym. temp. działa przez 30
minut.
W przypadku zmiany funkcji pieczenia funkcja
Pieczenie+utrzym. temp. pozostaje nadal włą‐
czona.
8. PROGRAMY AUTOMATYCZNE
7.3 Wydłużenie czasu
Funkcja Wydłużenie czasu przedłuża działanie
funkcji pieczenia po upływie czasu ustawionego
w ramach funkcji Czas .
• Dotyczy to wszystkich funkcji pieczenia z
funkcją Czas lub Automatyka wagowa.
• Funkcja nie działa, gdy włączona jest czujka
temperatury .
Włączanie funkcji:
1.
Gdy upłynie czas pieczenia, zostanie wy‐
emitowany sygnał dźwiękowy. Nacisnąć po‐
le czujnika.
2.
Na wyświetlaczu na pięć minut pojawi się
komunikat funkcji Wydłużenie czasu .
3.
Nacisnąć , aby włączyć (lub , aby
anulować).
4.
Ustawić czas działania funkcji Wydłużenie
czasu . Potwierdź OK.
8.1 Funkcja Gotowanie wspomagane
z opcją Automatyczne przepisy
Urządzenie umożliwia wybranie zaprogramowa‐
nych przepisów. Przepisy są zapisane w pamięci
i nie można ich zmieniać.
Włączanie funkcji:
1.
Włączyć urządzenie.
2.
Wybrać menu Gotowanie wspomagane .
Potwierdź OK.
3.
Wybrać kategorię i potrawę. Potwierdź OK.
4.
Wybrać opcję Automatyczne przepisy . Po‐
twierdź OK.
Korzystając korzystania z funkcji Wybór
ręczny urządzenie wykorzystuje usta‐
wienia automatyczne. Można je zmienić
podobnie jak inne funkcje.
8.2 Funkcja Gotowanie wspomagane
z opcją Automatyka wagowa
Ta funkcja automatycznie oblicza czas piecze‐
nia. Aby jej użyć, należy wprowadzić ciężar pro‐
duktu.
Włączanie funkcji:
1.
Włączyć urządzenie.
2.
Wybrać menu Gotowanie wspomagane .
Potwierdź OK.
3.
Wybrać kategorię i potrawę. Potwierdź OK.
4.
Wybrać opcję Automatyka wagowa . Po‐
twierdź OK.
5.
Dotknąć lub , aby ustawić ciężar
potrawy. Potwierdź OK.
Rozpocznie się program automatyczny. W do‐
wolnej chwili można zmienić ciężar. Nacisnąć
lub , aby zmienić ciężar. Gdy upłynie
czas pieczenia, zostanie wyemitowany sygnał
dźwiękowy. Nacisnąć pole czujnika, aby wyłą‐
czyć sygnał.
Korzystając z niektórych programów na‐
leży po 30 minutach obrócić potrawę.
Na wyświetlaczu pojawi się przypom‐
nienie.
Page 57

9. KORZYSTANIE Z AKCESORIÓW
POLSKI 57
OSTRZEŻENIE!
Patrz rozdział dotyczący bezpieczeń‐
stwa.
9.1 Termosonda
Termosonda mierzy temperaturę wewnątrz mię‐
sa. Gdy mięso osiągnie ustawioną temperaturę,
urządzenie wyłącza się.
Do ustawienia są dwie wartości temperatur:
• Temperatura piekarnika.
• Temperatura wewnątrz produktu.
Należy stosować wyłącznie termosondę
w komplecie z urządzeniem lub orygi‐
nalnych części zamiennych.
1.
Umieścić końcówkę termosondy wewnątrz
mięsa.
2.
Włączyć urządzenie.
3.
Umieścić wtyczkę termosondy w gnieździe
znajdującym z przodu urządzenia.
Na wyświetlaczu pojawi się symbol termo‐
sondy.
4.
W ciągu 5 sekund nacisnąć lub ,
aby ustawić temperaturę wewnątrz produk‐
tu.
5.
Ustawić funkcję piekarnika i w razie potrze‐
by temperaturę piekarnika.
Urządzenie obliczy przybliżony czas zakoń‐
czenia pieczenia. Czas zakończenia piecze‐
nia może przyjmować różną wartość zależ‐
nie od wielkości potrawy, ustawionej tempe‐
ratury piekarnika (minimum 120°C) oraz try‐
bu pracy. Urządzenie oblicza czas zakoń‐
czenia pieczenia w ciągu około 30 minut.
6.
Należy upewnić się, że podczas pieczenia
termosonda pozostaje w mięsie, a jej wtycz‐
ka jest podłączona do gniazda w urządze‐
niu.
7.
W razie potrzeby można ustawić inną tem‐
peraturę wewnątrz produktu podczas pie‐
czenia. W tym celu należy dotknąć
8.
Gdy mięso osiągnie ustawioną temperaturę,
zostanie wyemitowany sygnał dźwiękowy.
Urządzenie wyłączy się automatycznie.
Dotknąć pola czujnika, aby wyłączyć sygnał.
9.
Wyjąć wtyczkę termosondy z gniazda. Wy‐
jąć mięso z urządzenia.
OSTRZEŻENIE!
Termosonda jest gorąca. Występuje za‐
grożenie poparzeniem. Należy zacho‐
wać ostrożność podczas wyjmowania
końcówki i wtyczki termosondy.
.
Page 58

www.electrolux.com
58
9.2 Prowadnice teleskopowe
°C
°C
1.
Wyciągnąć prawą i lewą prowadnicę tele‐
skopową.
2.
Umieścić ruszt na prowadnicach teleskopo‐
wych i ostrożnie wsunąć do wnętrza urzą‐
dzenia.
Przed zamknięciem drzwi piekarnika należy
całkowicie wsunąć prowadnice teleskopo‐
we do wnętrza urządzenia.
Należy zachować instrukcję instalacji
prowadnic teleskopowych do wglądu w
przyszłości.
Prowadnice teleskopowe ułatwiają wkładanie i
wyjmowanie półek.
UWAGA!
Nie myć prowadnic teleskopowych w
zmywarce. Nie smarować prowadnic te‐
leskopowych.
9.3 Akcesoria do pieczenia parowego
Naczynie do potraw dietetycznych przeznaczone
do użycia z funkcjami pieczenia parowego
• Szklana miska (A)
Page 59

POLSKI 59
•Pokrywka (B)
•Rurka dyszy (C)
• Dysza do bezpośredniego pieczenia parowe‐
go (D)
• Stalowy ruszt (E)
C
Naczynie składa się ze szklanej miski, pokrywki
w otworem na rurkę dyszy (C) oraz stalowego ru‐
sztu do umieszczenia na dnie naczynia.
Page 60
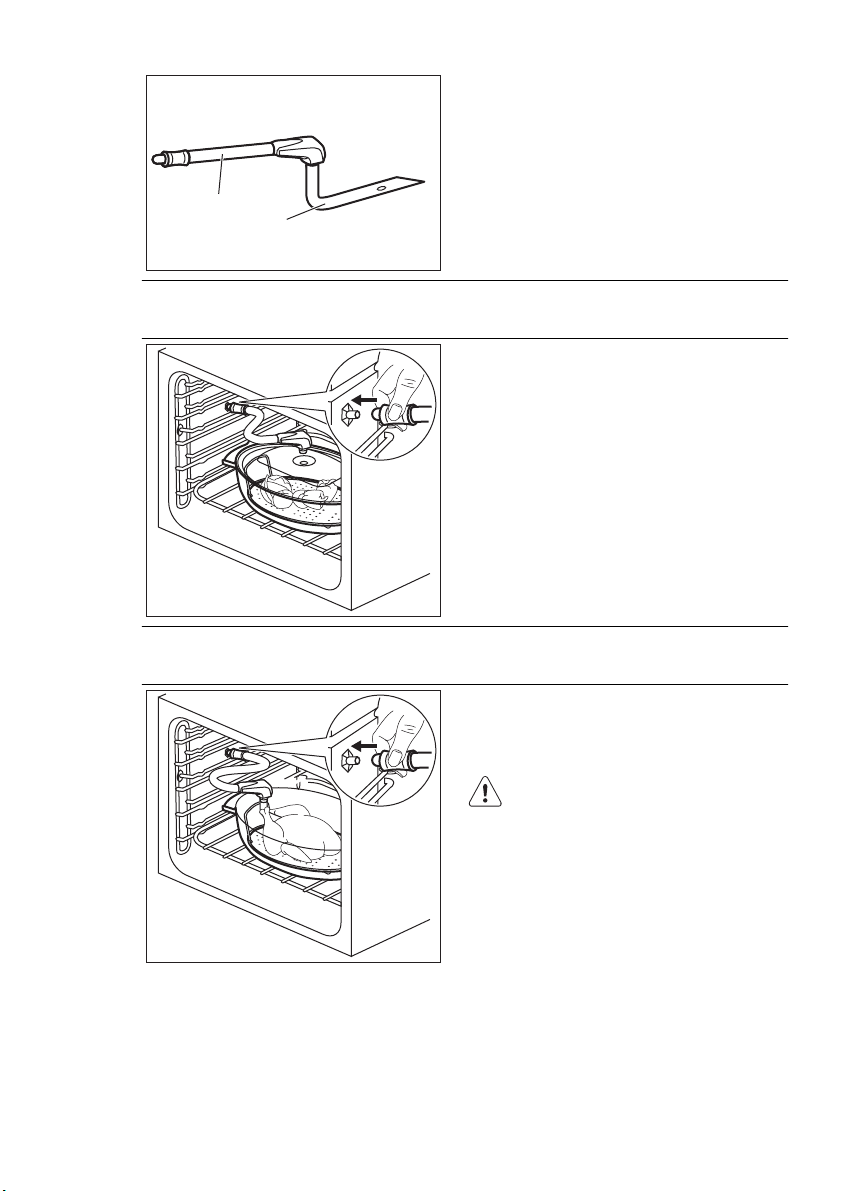
www.electrolux.com
60
Pieczenie parowe w naczyniu do potraw dietetycznych
Dysza i rurka dyszy. Literą „C” oznaczono rurkę
dyszy do pieczenia parowego, a literą „D” – dy‐
szę do bezpośredniego pieczenia parowego.
C
D
Umieścić potrawę na stalowym ruszcie w naczy‐
niu do pieczenia i przykryć je pokrywką. Umieś‐
cić rurkę dyszy w specjalnym otworze w pokryw‐
ce naczynia do potraw dietetycznych. Umieścić
naczynie do pieczenia na drugim poziomie od
dołu. Umieścić drugi koniec rurki dyszy w otwo‐
rze wlotowym pary (patrz rozdział „Opis urządze‐
nia”).
Uważać, aby nie przygnieść rurki dyszy. Nie mo‐
że ona również dotykać grzałki w górnej części
piekarnika. Ustawić funkcję pieczenia parowego.
Bezpośrednie pieczenie parowe
Umieścić potrawę na stalowym ruszcie w naczy‐
niu do pieczenia. Dodać niewielką ilość wody.
Połączyć dyszę (D) z rurką dyszy (C). Umieścić
drugi koniec rurki w otworze wlotowym pary.
Nie przykrywać naczynia pokrywką.
Piekąc potrawy takie, jak kurczak, kaczka, indyk
czy duża ryba, należy umieścić dyszę (D) bezpo‐
średnio w pustej przestrzeni w mięsie. Uważać,
aby nie zatkać otworów.
Page 61
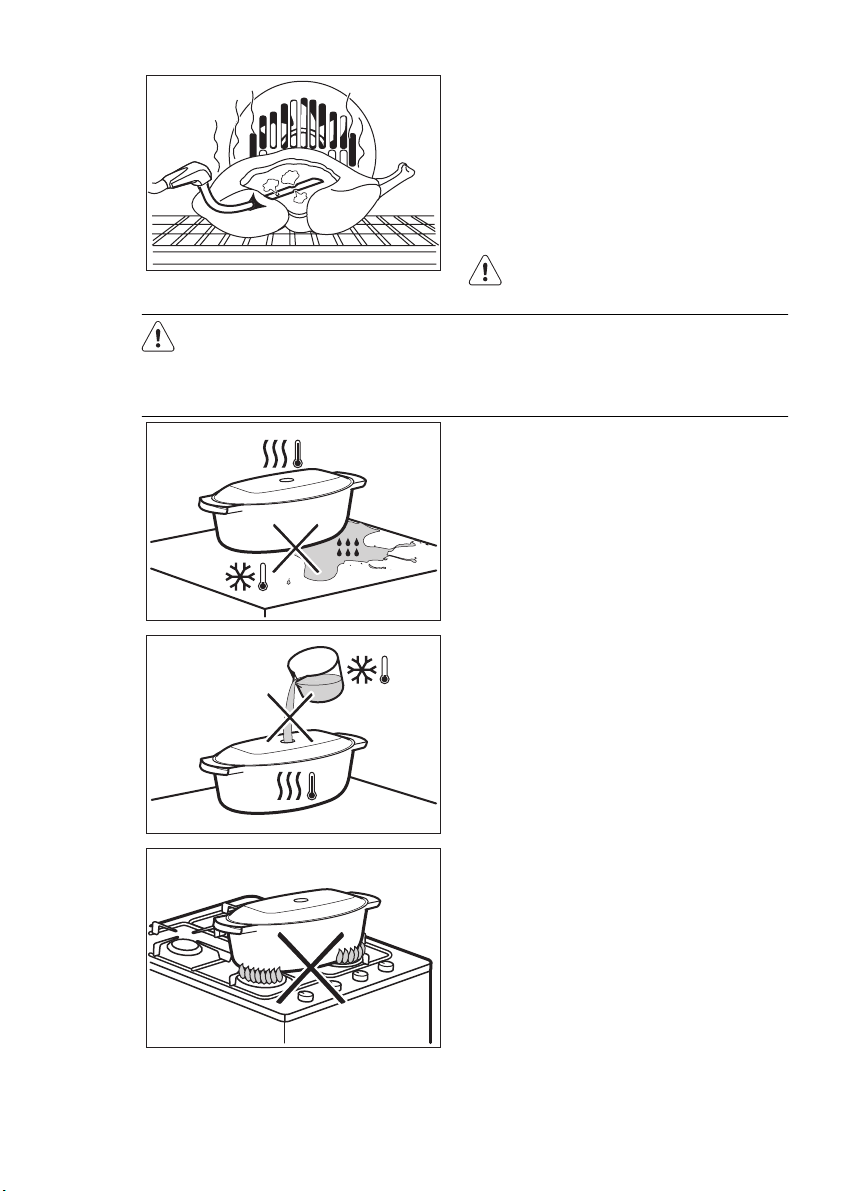
Zachować ostrożność, używając dyszy podczas
pracy piekarnika. Aby dotknąć dyszy, gdy piekar‐
POLSKI 61
Umieścić naczynie do pieczenia na pierwszym
lub drugim poziomie od dołu. Uważać, aby nie
przygnieść rurki dyszy. Nie może ona również
dotykać grzałki w górnej części piekarnika. Usta‐
wić funkcję pieczenia parowego.
Więcej informacji na temat pieczenia parowego
znajduje się w tabelach pieczenia dla funkcji pie‐
czenia parowego w rozdziale „Wskazówki i pora‐
dy”.
Rurka dyszy jest specjalnie przeznaczo‐
na do użycia w piekarniku i nie zawiera
szkodliwych substancji.
nik jest gorący, należy założyć rękawice kuchen‐
ne. Jeśli nie używa się funkcji pieczenia parowe‐
go, należy wyjąć dyszę z piekarnika.
Nie stawiać gorącego naczynia do pieczenia na
zimnych/mokrych powierzchniach.
Nie wlewać zimnych płynów do gorącego naczy‐
nia do pieczenia.
Nie stawiać naczynia do pieczenia na rozgrzanej
powierzchni płyty grzejnej.
Page 62

www.electrolux.com
62
10. DODATKOWE FUNKCJE
Nie używać do czyszczenia naczynia ściernych
środków czyszczących, szorstkich myjek ani
proszków do czyszczenia.
10.1 Menu Program ulubiony
Istnieje możliwość zapisania w pamięci swoich
ulubionych ustawień, takich jak czas pieczenia,
temperatura czy funkcja pieczenia. Są one do‐
stępne w menu Program ulubiony . Można zapi‐
sać w pamięci 20 programów.
Zapisywanie programu
1.
Włączyć urządzenie.
2.
Ustawić funkcję pieczenia lub funkcję Goto‐
wanie wspomagane .
3.
Dotknąć kilkakrotnie , aż na wyświetla‐
czu pojawi się wskazanie ZAPISZ . Po‐
twierdź OK.
4.
Na wyświetlaczu pojawi się pierwsza wolna
pozycja pamięci.
Potwierdź OK.
5.
Wprowadzić nazwę programu. Pierwsza li‐
tera będzie migać.
Dotknąć
Nacisnąć OK.
6.
Dotknąć lub , aby przesunąć kur‐
sor w prawo lub w lewo. Nacisnąć OK.
Zacznie migać następna litera. W razie po‐
trzeby powtórzyć czynności 5 i 6.
7.
Nacisnąć i przytrzymać OK, aby zapisać.
• Można zastąpić zapełnione pozycje pamięci.
Gdy na wyświetlaczu widoczna jest pierwsza
wolna pozycja pamięci, dotknąć
nacisnąć OK, aby zastąpić istniejący program.
• Można zmienić nazwę programu w menu Edy‐
cja nazwy programu .
lub , aby zmienić literę.
Przydatne informacje:
lub i
Włączanie programu
1.
Włączyć urządzenie.
2.
Wybrać menu Program ulubiony . Potwierdź
OK.
3.
Wybrać nazwę ulubionego programu. Po‐
twierdź OK.
Nacisnąć
, aby przejść bezpośrednio do po‐
zycji Program ulubiony .
10.2 Blokada panelu
Funkcja Blokada panelu chroni przed przypadko‐
wą zmianą funkcji pieczenia. Funkcję Blokada
panelu można włączyć tylko podczas pracy urzą‐
dzenia.
Włączanie funkcji Blokada panelu :
1.
Włączyć urządzenie.
2.
Ustawić funkcję pieczenia lub wybrać żąda‐
ne ustawienie.
3.
Nacisnąć kilkakrotnie , aż na wyświetla‐
czu pojawi się wskazanie Blokada panelu .
4.
Potwierdzić OK.
Jeśli urządzenie wyposażono w funkcję
czyszczenia pirolitycznego i jeśli funkcja
ta jest włączona, wówczas drzwi będą
zamknięte, a na wyświetlaczu będzie
widoczny symbol klucza.
Wyłączanie funkcji Blokada panelu :
1.
Nacisnąć . Na wyświetlaczu pojawi się
komunikat.
2.
Nacisnąć , a następnie OK w celu po‐
twierdzenia.
Page 63

10.3 Blokada uruchomienia
Blokada uruchomienia chroni przed przypadko‐
wym uruchomieniem urządzenia.
Włączanie i wyłączanie funkcji blokady
uruchomienia:
1.
Włączyć urządzenie.
2.
Dotknąć jednocześnie i , aż na wy‐
świetlaczu pojawi się komunikat.
Jeśli urządzenie jest wyposażone w
funkcję czyszczenia pirolitycznego i jest
ona włączona, drzwi zostaną zabloko‐
wane.
Po dotknięciu pola czujnika na wyświet‐
laczu pojawi się odpowiedni komunikat.
Aby wyłączyć blokadę, należy dotknąć jedno‐
cześnie
komunikat.
i , aż na wyświetlaczu pojawi się
10.4 USTAW + START
Funkcja USTAW + START umożliwia ustawienie
funkcji (lub programu) pieczenia i użycie jej w pó‐
źniejszym czasie za jednym dotknięciem pola
czujnika.
Włączanie funkcji:
1.
Włączyć urządzenie.
2.
Ustawić funkcję pieczenia.
3.
Nacisnąć kilkakrotnie , aż na wyświetla‐
czu pojawi się wskazanie Czas .
4.
Ustawić czas.
5.
Nacisnąć kilkakrotnie , aż na wyświetla‐
czu pojawi się wskazanie USTAW +
START .
6.
Potwierdź OK.
Aby uruchomić funkcję USTAW + START , nale‐
ży nacisnąć dowolne pole czujnika (z wyjątkiem
). Zostanie uruchomiona ustawiona funkcja
pieczenia.
Gdy funkcja pieczenia zakończy działanie, zosta‐
nie wyemitowany sygnał dźwiękowy.
Przydatne informacje:
POLSKI 63
• Gdy działa funkcja pieczenia, włączona jest
funkcja Blokada panelu .
• Funkcję USTAW + START można włączyć lub
wyłączyć w menu Ustawienia podstawowe .
10.5 Automatyczne wyłączenie
Ze względów bezpieczeństwa urządzenie wyłą‐
cza się samoczynnie po pewnym czasie:
• Jeśli włączona jest funkcja piekarnika.
• Jeśli użytkownik nie zmieni temperatury pie‐
karnika.
Temperatura piekar‐
Czas wyłączenia
nika
30°C – 115°C 12,5 godz.
120°C – 195°C 8,5 godz.
200°C – 245°C 5,5 godz.
250°C – temperatura
3,0 godz.
maksymalna
Samoczynne wyłączenie działa ze
wszystkimi funkcjami piekarnika z wyjąt‐
kiem funkcji: Oświetlenie piekarnika ,
Czas i Koniec .
10.6 Wentylator chłodzący
Podczas pracy urządzenia wentylator chłodzący
włącza się automatycznie, aby utrzymać po‐
wierzchnie urządzenia w niskiej temperaturze.
Po wyłączeniu urządzenia wentylator chłodzący
kontynuuje działanie do czasu schłodzenia urzą‐
dzenia.
10.7 Termostat bezpieczeństwa
Nieprawidłowe działanie urządzenia lub uszko‐
dzone podzespoły mogą spowodować niebez‐
pieczne przegrzanie urządzenia. Aby temu zapo‐
biec, piekarnik wyposażono w termostat bezpie‐
czeństwa, który w razie potrzeby wyłącza zasila‐
nie. Po obniżeniu temperatury piekarnik automa‐
tycznie włączy się ponownie.
11. PRZYDATNE RADY I WSKAZÓWKI
• Potrawy można umieszczać w urządzeniu na
pięciu różnych poziomach. Poziomy umie‐
szczania potraw liczy się od dołu.
• Urządzenie wyposażono w specjalny układ
obiegu powietrza oraz stałej recyrkulacji pary.
System ten, dzięki obecności pary, umożliwia
Page 64

www.electrolux.com
64
• Wewnątrz urządzenia lub na szklanych
• Wycierać nadmiar wilgoci po każdym użyciu
• Podczas pieczenia nie należy kłaść przedmio‐
11.1 Pieczenie ciast
• Drzwi piekarnika nie należy otwierać przed
• Jeśli wykorzystywane są dwie blachy do pie‐
przygotowanie delikatnych potraw z chrupiącą
skórką. Zmniejsza on do minimum czas pie‐
czenia i zużycie energii.
drzwiach może skraplać się wilgoć. Jest to
normalne zjawisko. Otwierając drzwi podczas
pieczenia, należy zawsze odsunąć się od
urządzenia. Aby ograniczyć zjawisko skrapla‐
nia pary wodnej, należy uruchamiać urządze‐
nie na 10 minut przed rozpoczęciem piecze‐
nia.
urządzenia.
tów bezpośrednio na dnie urządzenia ani nie
zakrywać jego elementów folią aluminiową.
Może to wpłynąć na efekty pieczenia i spowo‐
dować uszkodzenie emaliowanej powłoki.
upływem co najmniej 3/4 ustawionego czasu
pieczenia.
czenia jednocześnie należy pozostawić jeden
pusty poziom między nimi.
11.2 Pieczenie mięsa i ryb
• Do pieczenia bardzo tłustych potraw należy
używać głębokiej blachy, aby nie dopuścić do
trwałego zabrudzenia piekarnika.
• Po upieczeniu mięsa należy odczekać około
15 minut przed jego pokrojeniem, aby nie wy‐
ciekły soki.
• Aby uniknąć nadmiaru dymu w piekarniku
podczas pieczenia, należy do głębokiej blachy
wlać nieco wody. Aby zapobiec gromadzeniu
się dymu, należy dolewać wody po trochu, za
każdym razem, gdy wyparuje.
11.3 Czasy pieczenia
Czasy pieczenia zależą od rodzaju potrawy, jej
konsystencji oraz ilości.
W początkowym okresie należy kontrolować wy‐
niki pieczenia. Pozwoli to odnaleźć najlepsze us‐
tawienia (mocy grzania, czasu pieczenia itp.) dla
posiadanych naczyń, przepisów i ilości potraw
pieczonych przy użyciu omawianego urządzenia.
11.4 Tabela pieczenia
CIASTA
Pieczenie tradycyjne Termoobieg
RODZAJ PO‐
TRAWY
Ciasta uciera‐
Poziom
piekarnika
2 170 3 (2 i 4) 160 45 - 60 W foremce do
Tem‐
peratu‐
ra (°C)
Poziom pie‐
karnika
peratu‐
ra (°C)
ne
Kruche ciasto 2 170 3 (2 i 4) 160 20 - 30 W foremce do
Sernik 1 170 2 165 80 - 100 W 26 cm forem‐
Ciasto z jabł‐
kami (szarlot‐
2 170 2 (po lewej i
po prawej)
ka)
Strudel 3 175 2 150 60 - 80 Na blasze do
Tarta z dże‐
mem
2 170 2 (po lewej i
po prawej)
Czas pie‐
Tem‐
czenia
Uwagi
(min)
ciasta
ciasta
ce do ciasta
160 80 - 100 W dwóch 20 cm
foremkach do
ciasta ustawio‐
nych na rusz‐
1)
cie
pieczenia ciasta
165 30 - 40 W 26 cm forem‐
ce do ciasta
Page 65

POLSKI 65
RODZAJ PO‐
TRAWY
Pieczenie tradycyjne Termoobieg
Poziom
piekarnika
Tem‐
peratu‐
ra (°C)
Poziom pie‐
karnika
peratu‐
ra (°C)
Tem‐
Czas pie‐
czenia
(min)
Uwagi
Biszkopt 2 170 2 150 40 - 50 W 26 cm forem‐
ce do ciasta
Keks/ciasto
owocowe
Ciasto ze śliw‐
kami
Małe ciastecz‐
ka – jeden po‐
ziom
Małe ciastecz‐
ka – dwa po‐
ziomy
Małe ciastecz‐
ka – trzy po‐
ziomy
Ciasteczka/
ciasta przekła‐
2 160 2 150 90 - 120 W 20 cm forem‐
ce do ciasta
1)
1 175 2 160 50 - 60 W formie do
1)
chleba
3 170 3 150 -
160
- - 2 i 4 140 150
- - 1, 3 i 5 140 150
3 140 3 140 -
150
20 - 30 Na blasze do
pieczenia cias‐
1)
ta
25 - 35 Na blasze do
pieczenia cias‐
1)
ta
30 - 45 Na blasze do
pieczenia cias‐
1)
ta
25 - 45 Na blasze do
pieczenia ciasta
dane – jeden
poziom
Ciasteczka/
ciasta przekła‐
- - 2 i 4 140 150
35 - 40 Na blasze do
pieczenia ciasta
dane – dwa
poziomy
Ciasteczka/
ciasta przekła‐
- - 1, 3 i 5 140 150
35 - 45 Na blasze do
pieczenia ciasta
dane – trzy po‐
ziomy
Bezy – jeden
poziom
Bezy – dwa
poziomy
3 120 3 120 80 - 100 Na blasze do
pieczenia ciasta
- - 2 i 4 120 80 - 100 Na blasze do
pieczenia cias‐
1)
ta
Drożdżówki 3 190 3 190 12 - 20 Na blasze do
pieczenia cias‐
1)
ta
Eklery – jeden
poziom
Eklery – dwa
poziomy
3 190 3 170 25 - 35 Na blasze do
pieczenia ciasta
- - 2 i 4 170 35 - 45 Na blasze do
pieczenia ciasta
Page 66

www.electrolux.com
66
RODZAJ PO‐
TRAWY
Pieczenie tradycyjne Termoobieg
Poziom
piekarnika
Tem‐
peratu‐
ra (°C)
Poziom pie‐
karnika
peratu‐
ra (°C)
Tem‐
Czas pie‐
czenia
(min)
Uwagi
Tarty płaskie 2 180 2 170 45 - 70 W 20 cm forem‐
ce do ciasta
Ciasto owoco‐
we
Biszkopt królo‐
wej Wiktorii
1)
Nagrzewać wstępnie przez 10 minut.
1 160 2 150 110 - 120 W 24 cm forem‐
ce do ciasta
1 170 2 160 30 - 50 W 20 cm forem‐
ce do ciasta
1)
CHLEB I PIZZA
RODZAJ PO‐
TRAWY
Pieczenie tradycyjne Termoobieg
Poziom
piekarnika
Tem‐
peratu‐
ra (°C)
Poziom pie‐
karnika
peratu‐
ra (°C)
Tem‐
Czas pie‐
czenia
(min)
Uwagi
Biały chleb 1 190 1 190 60 - 70 1–2 bochenki po
1)
500 g
Chleb żytni 1 190 1 180 30 - 45 W formie do
chleba
Bułki 2 190 2 (2 i 4) 180 25 - 40 6–8 bułek na bla‐
sze do pieczenia
1)
ciasta
Pizza 1 230 -
250
1 230 -
250
10 - 20 Na blasze do
pieczenia ciasta
lub głębokiej bla‐
1)
sze
Drożdżówki 3 200 3 190 10 - 20 Na blasze do
pieczenia cias‐
1)
ta
1)
Nagrzewać wstępnie przez 10 minut.
ZAPIEKANKI
RODZAJ PO‐
TRAWY
Zapiekanka
Pieczenie tradycyjne Termoobieg
Poziom
piekarnika
Tempe‐
ratura
(°C)
Poziom pie‐
karnika
peratu‐
ra (°C)
2 200 2 180 40 - 50 W formie
Tem‐
Czas pie‐
czenia
(min)
makaronowa
Zapiekanka
2 200 2 175 45 - 60 W formie
warzywna
Quiche 1 180 1 180 50 - 60
Uwagi
W formie
1)
Page 67

POLSKI 67
Pieczenie tradycyjne Termoobieg
RODZAJ PO‐
TRAWY
Poziom
piekarnika
Tempe‐
ratura
(°C)
Lasagne 2 180 -
190
Cannelloni 2 180 -
190
1)
Nagrzewać wstępnie przez 10 minut.
Poziom pie‐
karnika
2 180 -
2 180 -
peratu‐
ra (°C)
Tem‐
190
190
Czas pie‐
czenia
(min)
25 - 40
25 - 40
Uwagi
W formie
W formie
1)
1)
MIĘSO
RODZAJ PO‐
TRAWY
Pieczenie tradycyjne Termoobieg
Poziom
piekarnika
Tempe‐
ratura
(°C)
Poziom pie‐
karnika
peratu‐
Tem‐
ra (°C)
Czas pie‐
czenia
(min)
Uwagi
Wołowina 2 200 2 190 50 - 70 Na jednym rusz‐
cie
Wieprzowina 2 180 2 180 90 - 120 Na jednym rusz‐
cie
Cielęcina 2 190 2 175 90 - 120 Na jednym rusz‐
cie
Angielska pie‐
czeń wołowa,
2 210 2 200 50 - 60 Na jednym rusz‐
cie
lekko wypie‐
czona
Angielska pie‐
czeń wołowa,
2 210 2 200 60 - 70 Na jednym rusz‐
cie
średnio wypie‐
czona
Angielska pie‐
czeń wołowa,
2 210 2 200 70 - 75 Na jednym rusz‐
cie
dobrze wypie‐
czona
Łopatka wie‐
2 180 2 170 120 - 150 Ze skórą
przowa
Goleń wie‐
2 180 2 160 100 - 120 2 sztuki
przowa
Jagnięcina 2 190 2 175 110 - 130 Udziec
Kurczak 2 220 2 200 70 - 85 W całości
Indyk 2 180 2 160 210 - 240 W całości
Kaczka 2 175 2 220 120 - 150 W całości
Gęś 2 175 1 160 150 - 200 W całości
Królik 2 190 2 175 60 - 80 W kawałkach
Page 68
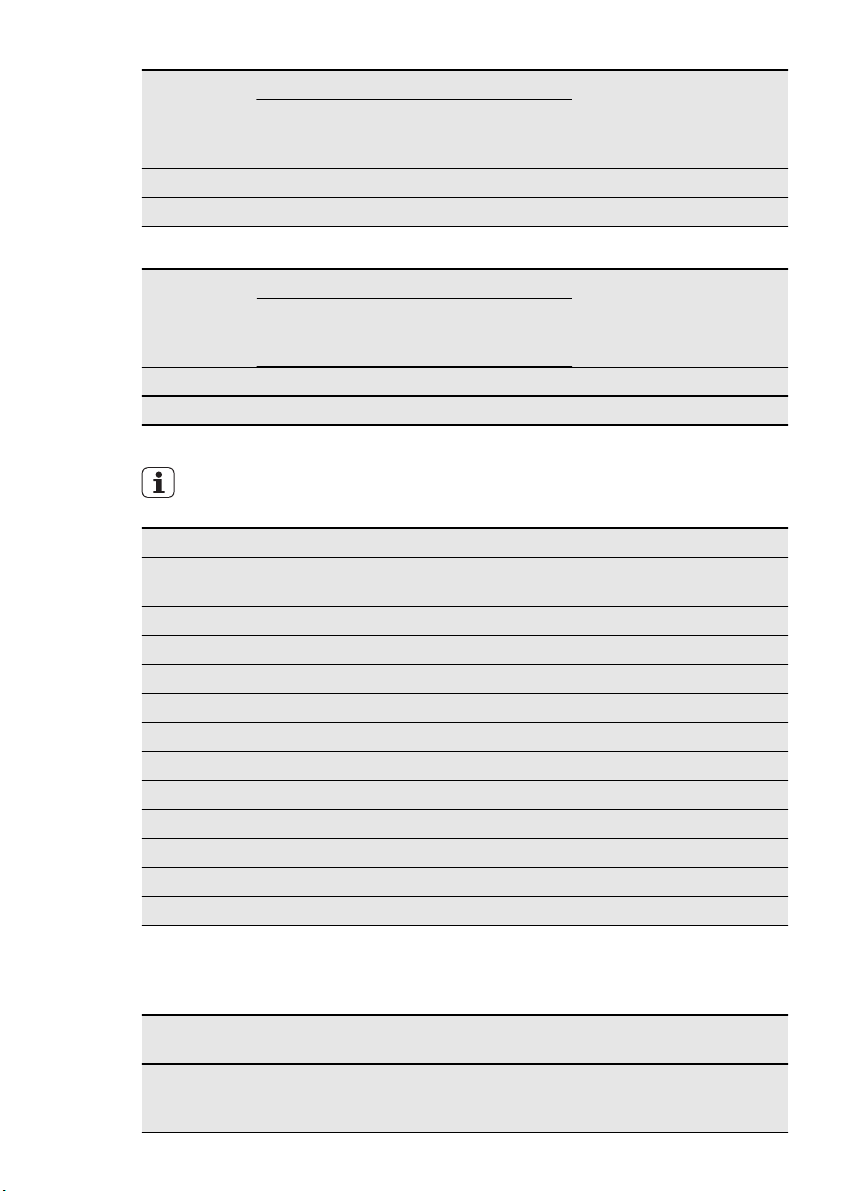
www.electrolux.com
68
RODZAJ PO‐
TRAWY
Pieczenie tradycyjne Termoobieg
Poziom
piekarnika
Tempe‐
ratura
(°C)
Poziom pie‐
karnika
peratu‐
Tem‐
ra (°C)
Czas pie‐
czenia
(min)
Uwagi
Zając 2 190 2 175 150 - 200 W kawałkach
Bażant 2 190 2 175 90 - 120 W całości
RYBA
RODZAJ PO‐
TRAWY
Pieczenie tradycyjne Termoobieg
Poziom
piekarnika
Tempe‐
ratura
(°C)
Poziom pie‐
karnika
peratu‐
ra (°C)
Tem‐
Czas pie‐
czenia
(min)
Uwagi
Pstrąg/dorada 2 190 2 175 40 - 55 3–4 ryby
Tuńczyk/łosoś 2 190 2 175 35 - 60 4–6 filetów
11.5 Grill
Przed rozpoczęciem pieczenia należy
nagrzewać wstępnie pusty piekarnik
przez 10 minut.
Ilość Grill Czas pieczenia (min)
RODZAJ POTRA‐WYKawałki (g) Poziom pie‐
karnika
Steki 4 800 4 maks. 12-15 12-14
Befsztyki 4 600 4 maks. 10-12 6-8
Kiełbaski 8 - 4 maks. 12-15 10-12
Kotlety wieprzowe 4 600 4 maks. 12-16 12-14
Kurczak (połówki) 2 1000 4 maks. 30-35 25-30
Kebaby 4 - 4 maks. 10-15 10-12
Pierś z kurczaka 4 400 4 maks. 12-15 12-14
Hamburger 6 600 4 maks. 20-30 Filet rybny 4 400 4 maks. 12-14 10-12
Zapiekane kanapki 4-6 - 4 maks. 5-7 Tosty 4-6 - 4 maks. 2-4 2-3
Tempera‐
tura (°C)
1. strona 2. strona
11.6 Turbo grill
Wołowina
RODZAJ POTRA‐
WY
Pieczeń wołowa lub
filet, lekko wypieczo‐
ne
Ilość
na każdy cm
grubości
Poziom piekar‐
nika
1
Temperatura
(°C)
190 - 200
1)
Czas (min)
5 - 6
Page 69

POLSKI 69
RODZAJ POTRA‐
WY
Pieczeń wołowa lub
filet, średnio wypie‐
czone
Pieczeń wołowa lub
filet, dobrze wypie‐
czone
1)
Rozgrzać wstępnie piekarnik.
Ilość
na każdy cm
grubości
na każdy cm
grubości
Poziom piekar‐
nika
1
1
Temperatura
(°C)
180 - 190
170 - 180
1)
1)
Czas (min)
6 - 8
8 - 10
Wieprzowina
RODZAJ POTRA‐
WY
Łopatka, karkówka,
szynka
Ilość
1 - 1,5 kg 1 160 - 180 90 - 120
Poziom piekar‐
nika
Temperatura
(°C)
Czas (min)
Kotlet, żeberka 1 - 1,5 kg 1 170 - 180 60 - 90
Klops 750 g - 1 kg 1 160 - 170 50 - 60
Golonka wieprzowa
(obgotowana)
750 g - 1 kg 1 150 - 170 90 - 120
Cielęcina
RODZAJ PO‐
TRAWY
Ilość Poziom piekarni‐kaTemperatura
(°C)
Czas (min)
Pieczeń cielęca 1 kg 1 160 - 180 90 - 120
Gicz cielęca 1,5 - 2 kg 1 160 - 180 120 - 150
Jagnięcina
RODZAJ PO‐
TRAWY
Udziec jagnięcy,
Ilość Poziom piekarni‐kaTemperatura
Czas (min)
(°C)
1 - 1,5 kg 1 150 - 170 100 - 120
pieczeń jagnięca
Comber jagnięcy 1 - 1,5 kg 1 160 - 180 40 - 60
Drób
RODZAJ PO‐
TRAWY
Ilość Poziom piekarni‐kaTemperatura
(°C)
Czas (min)
Kawałki drobiu po 200 - 250 g 1 200 - 220 30 - 50
Kurczak, połów‐kapo 400 - 500 g 1 190 - 210 35 - 50
Kurczak, pularda 1 - 1,5 kg 1 190 - 210 50 - 70
Kaczka 1,5 - 2 kg 1 180 - 200 80 - 100
Gęś 3,5 - 5 kg 1 160 - 180 120 - 180
Indyk 2,5 - 3,5 kg 1 160 - 180 120 - 150
Page 70

www.electrolux.com
70
RODZAJ PO‐
TRAWY
Ilość Poziom piekarni‐kaTemperatura
(°C)
Czas (min)
Indyk 4 - 6 kg 1 140 - 160 150 - 240
Ryba (gotowanie na parze)
RODZAJ PO‐
TRAWY
Ilość Poziom piekarni‐kaTemperatura
(°C)
Czas (min)
Cała ryba 1 - 1,5 kg 1 210 - 220 40 - 60
11.7 Rozmrażanie
RODZAJ PO‐
TRAWY
(g)
Kurczak 1000 100 - 140 20 - 30
Mięso 1000 100 - 140 20 - 30
Mięso 500 90 - 120 20 - 30
Pstrąg 150 25 - 35 10 - 15 Truskawki 300 30 - 40 10 - 20 Masło 250 30 - 40 10 - 15 -
Śmietana 2 x 200 80 - 100 10 - 15
Tort 1400 60 60 -
Czas rozmra‐
żania (min)
Dalszy czas roz‐
mrażania (min)
Uwagi
Położyć kurczaka na od‐
wróconym spodku i umieś‐
cić na dużym talerzu. Ob‐
rócić po upływie połowy
czasu.
Obrócić po upływie połowy
czasu.
Obrócić po upływie połowy
czasu.
Także lekko zmrożona
śmietana daje się dobrze
ubić.
11.8 Pasteryzowanie
Owoce jagodowe
PASTERYZOWANIE Temperatura (°C)
momentu zagotowa‐
nia (min)
Truskawki, jagody
Czas gotowania do
leśne, maliny, dojrzały
160 – 170 35 – 45 –
agrest
Owoce pestkowe
Czas gotowania do
PASTERYZOWANIE Temperatura (°C)
momentu zagotowa‐
nia (min)
Gruszki, pigwy, śliwki 160 – 170 35 – 45 10 – 15
Dalsze gotowanie
w temperaturze
100°C (min)
Dalsze gotowanie
w temperaturze
100°C (min)
Page 71

POLSKI 71
Warzywa
PASTERYZOWANIE Temperatura (°C)
Marchew
1)
160 – 170 50 – 60 5 – 10
Czas gotowania do
momentu zagotowa‐
nia (min)
Dalsze gotowanie
w temperaturze
100°C (min)
Ogórki 160 – 170 50 – 60 –
Pikle 160 – 170 50 – 60 5 – 10
Kalarepa, groch,
szparagi
1)
Po wyłączeniu urządzenia należy pozostawić przetwory w piekarniku.
160 – 170 50 – 60 15 – 20
11.9 Suszenie
Umieścić pergamin na ruszcie piekarnika.
WARZYWA
RODZAJ PO‐
TRAWY
Fasola 3 1/4 60 - 70 6 - 8
Papryka 3 1/4 60 - 70 5 - 6
Warzywa na zu‐
pę
Grzyby 3 1/4 50 - 60 6 - 8
Zioła 3 1/4 40 - 50 2 - 3
Poziom piekarnika
1 poziom 2 poziomy
Temperatura
(°C)
3 1/4 60 - 70 5 - 6
Czas (godz.)
OWOCE
RODZAJ PO‐
TRAWY
Poziom piekarnika
1 poziom 2 poziomy
Temperatura
(°C)
Czas (godz.)
Śliwki 3 1/4 60 - 70 8 - 10
Morele 3 1/4 60 - 70 8 - 10
Krojone jabłka 3 1/4 60 - 70 6 - 8
Gruszki 3 1/4 60 - 70 6 - 9
11.10 Termoobieg + para
CIASTA I CIASTKA
RODZAJ POTRA‐WYPoziom pie‐
karnika
Temperatura
(°C)
Ciasto z jabłkami 2 160 60 - 80 W 20 cm foremce do cias‐
Tarty 2 175 30 - 40 W 26 cm foremce do ciasta
Czas pie‐
czenia
(min)
Uwagi
1)
ta
Page 72

www.electrolux.com
72
RODZAJ POTRA‐WYPoziom pie‐
karnika
Temperatura
(°C)
Czas pie‐
czenia
(min)
Uwagi
Ciasto owocowe 2 160 80 - 90 W 26 cm foremce do ciasta
Biszkopt 2 160 35 - 45 W 26 cm foremce do ciasta
Panettone 2 150 - 160 70 - 100 W 20 cm foremce do cias‐
1)
ta
Ciasto ze śliwkami 2 160 40 - 50
W formie do chleba
1)
Małe ciasteczka 3 (2 i 4) 150 - 160 25 - 30 Na blasze do pieczenia
ciasta
Ciastka 3 (2 i 4) 150 20 - 35 Na blasze do pieczenia
ciasta
Drożdżówki 2 180 - 200 12 - 20 Na blasze do pieczenia
1)
ciasta
Maślane bułeczki 3 (2 i 4) 180 15 - 20 Na blasze do pieczenia
1)
ciasta
1)
Nagrzewać wstępnie piekarnik przez 10 minut.
ZAPIEKANKI
RODZAJ POTRA‐WYPoziom pie‐
karnika
Z nadzieniem wa‐
1 170 - 180 30 - 40 W formie
Tempera‐
tura (°C)
Czas pie‐
czenia (min)
Uwagi
rzywnym
Lasagne 2 170 - 180 40 - 50 W formie
Zapiekanka ziem‐
1 (2 i 4) 160 - 170 50 - 60 W formie
niaczana
MIĘSO
RODZAJ PO‐
TRAWY
Pieczeń wie‐
(g)
1000 2 180 90 - 110 Na ruszcie
Poziom
piekarnika
Tempera‐
tura (°C)
Czas pie‐
czenia (min)
Uwagi
przowa
Cielęcina 1000 2 180 90 - 110 Na ruszcie
Pieczeń wołowa 1000
lekko wypieczo‐
2 210 45 - 50 Na ruszcie
na
średnio wypie‐
2 200 55 - 65 Na ruszcie
czona
dobrze wypie‐
2 190 65 - 75 Na ruszcie
czona
Jagnięcina 1000 2 175 110 - 130 Udziec
Kurczak 1000 2 200 55 - 65 W całości
Page 73

POLSKI 73
RODZAJ PO‐
TRAWY
(g)
Poziom
piekarnika
Tempera‐
tura (°C)
Czas pie‐
czenia (min)
Uwagi
Indyk 4000 2 170 180 - 240 W całości
Kaczka 2000 - 2500 2 170 - 180 120 - 150 W całości
Gęś 3000 1 160 - 170 150 - 200 W całości
Królik 2 170 - 180 60 - 90 W kawałkach
RYBY
RODZAJ PO‐
TRAWY
(g)
Poziom pie‐
karnika
Tempera‐
tura (°C)
Czas pie‐
czenia
(min)
Uwagi
Pstrąg 1500 2 180 25 - 35 3-4 ryby
Tuńczyk 1200 2 175 35 - 50 4-6 filetów
Morszczuk – 2 200 20 - 30 –
PIZZA
Przed rozpoczęciem pieczenia należy
nagrzewać wstępnie piekarnik przez 10
minut.
RODZAJ POTRA‐WYPoziom pie‐
karnika
Pizza (na cienkim
spodzie)
Pizza (z dużą iloś‐
cią dodatków)
1 200 - 220 15 - 25
1 200 - 220 20 - 30
Mini pizza 1 200 - 220 15 - 20
Ciasto z jabłkami 1 150 - 170 50 - 70
Tarta 1 170 - 190 35 - 50
Tarta cebulowa 2 200 – 220 20 – 30
Temperatura
(°C)
Czas pieczenia
(min)
Uwagi
Na blasze do pie‐
czenia
Na blasze do pie‐
czenia
Na blasze do pie‐
czenia
W 20 cm foremce
do ciasta
W 26 cm foremce
do ciasta
Na blasze do pie‐
czenia
REGENERACJA
Przed rozpoczęciem pieczenia należy
nagrzewać wstępnie piekarnik przez 10
minut.
RODZAJ POTRAWY Poziom piekarnika Temperatura (°C)
Casserole/zapiekanki 2 130 15 - 25
Makaron z sosem 2 130 10 - 15
Przystawki (np. ryż, ziem‐
niaki, makaron)
2 130 10 - 15
Czas pieczenia
(min)
Page 74

www.electrolux.com
74
RODZAJ POTRAWY Poziom piekarnika Temperatura (°C)
Dania na jednym talerzu 2 130 10 - 15
Mięso 2 130 10 - 15
Warzywa 2 130 10 - 15
Czas pieczenia
(min)
CHLEB
Przed rozpoczęciem pieczenia należy
nagrzewać wstępnie piekarnik przez 10
minut.
RODZAJ PO‐
TRAWY
Biały chleb 1000 2 180 - 190 45 - 60
Bułki 500 2 (2 i 4) 190 - 210 20 - 30
Chleb żytni 1000 2 180 - 200 50 - 70
Focaccia — 2 190 - 210 20 - 25
(g)
Poziom pie‐
karnika
Temperatura
(°C)
Czas piecze‐
nia (min)
Uwagi
1-2 bochenki,
po 500 g każdy
6-8 bułek na
blasze do pie‐
czenia
1-2 bochenki,
po 500 g każdy
Na blasze do
pieczenia
11.11 Pieczenie w naczyniu do potraw dietetycznych przy użyciu funkcji
Termoobieg + para
WARZYWA
RODZAJ POTRAWY Poziom piekarnika Temperatura ( °C) Czas pieczenia (min)
Różyczki brokułów 2 130 20 - 25
Bakłażan 2 130 15 - 20
Różyczki kalafiora 2 130 25 - 30
Pomidory 2 130 15
Białe szparagi 2 130 25 - 35
Zielone szparagi 2 130 35 - 45
Krojona cukinia 2 130 20 - 25
Marchew 2 130 35 - 40
Koper 2 130 30 - 35
Kalarepa 2 130 25 - 30
Papryka (pokrojona
w paski)
Pokrojony seler 2 130 30 - 35
2 130 20 - 25
Page 75

POLSKI 75
MIĘSO
RODZAJ POTRAWY Poziom piekarnika Temperatura ( °C) Czas pieczenia (min)
Gotowana szynka 2 130 55 - 65
Gotowana pierś z
2 130 25 - 35
kurczaka
Peklowany i lekko
2 130 80 - 100
wędzony karczek
wieprzowy
RYBY
RODZAJ POTRAWY Poziom piekarnika Temperatura ( °C) Czas pieczenia (min)
Pstrąg 2 130 25 - 30
Filet z łososia 2 130 25 - 30
PRZYSTAWKI
RODZAJ POTRAWY Poziom piekarnika Temperatura ( °C) Czas pieczenia (min)
Ryż 2 130 35 - 40
Ziemniaki w mundur‐
2 130 50 - 60
kach, średniej wiel‐
kości
Gotowane ziemniaki,
2 130 35 - 45
pokrojone na ćwiartki
Polenta 2 130 40 - 45
11.12 Tabela temperatur dla termosondy
RODZAJ POTRAWY
Pieczeń cielęca 75 - 80
Gicz cielęca 85 - 90
Pieczeń wołowa, lekko wypieczona 45 - 50
Pieczeń wołowa, średnio wypieczona 60 - 65
Pieczeń wołowa, dobrze wypieczona 70 - 75
Łopatka wieprzowa 80 - 82
Goleń wieprzowa 75 - 80
Jagnięcina 70 - 75
Kurczak 98
Zając 70 - 75
Pstrąg/dorada 65 - 70
Tuńczyk/łosoś 65 - 70
Temperatura wewnątrz produk‐
tu (°C)
Page 76
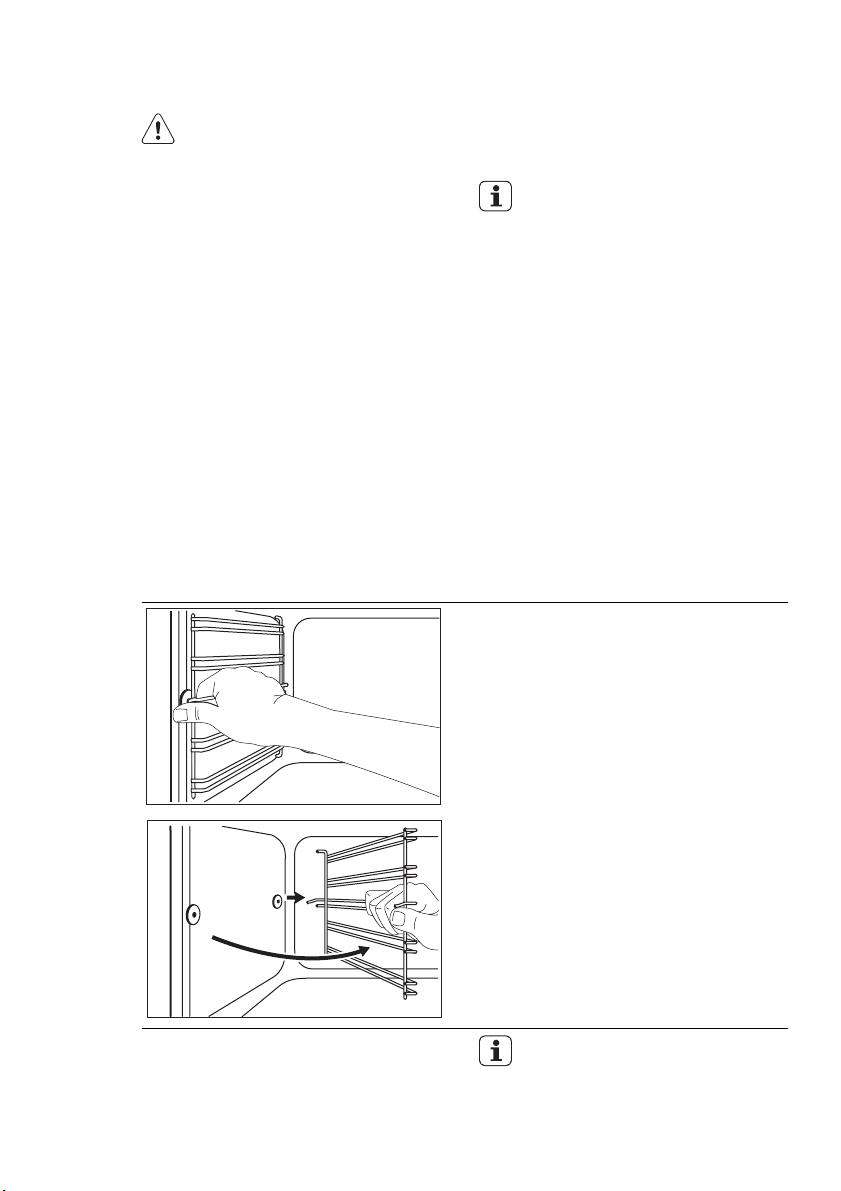
www.electrolux.com
76
12. KONSERWACJA I CZYSZCZENIE
OSTRZEŻENIE!
Patrz rozdział dotyczący bezpieczeń‐
stwa.
• Przód urządzenia należy myć miękką ście‐
reczką zwilżoną ciepłą wodą z dodatkiem pły‐
nu do mycia naczyń.
• Do czyszczenia powierzchni metalowych nale‐
ży używać zwykłego płynu do mycia naczyń.
• Po każdym użyciu należy oczyścić wnętrze
piekarnika. Dzięki temu można łatwiej usunąć
zabrudzenia i uniknąć ich przypalenia.
• Trudne do usunięcia zabrudzenia należy usu‐
wać za pomocą specjalnego środka do czy‐
szczenia piekarników.
• Po każdym użyciu akcesoriów piekarnika na‐
leży je wyczyścić i pozostawić do wyschnię‐
cia. Do czyszczenia należy użyć miękkiej ście‐
reczki zwilżonej ciepłą wodą z dodatkiem pły‐
nu do mycia naczyń.
• Akcesoriów nieprzywierających nie wolno
czyścić agresywnymi środkami, ostrymi przed‐
Demontaż prowadnic blach
miotami ani myć w zmywarce. Może to spo‐
wodować uszkodzenie powłoki nieprzywiera‐
jącej.
Urządzenia wykonane ze stali nie‐
rdzewnej lub aluminium:
Drzwi piekarnika należy czyścić wyłącz‐
nie za pomocą wilgotnej gąbki. Osuszyć
miękką ściereczką.
Nie należy używać myjek stalowych,
kwasów ani produktów ściernych, po‐
nieważ mogą one uszkodzić powierzch‐
nię piekarnika. Panel sterowania piekar‐
nika należy czyścić stosując się do tych
samych zaleceń.
12.1 Prowadnice blach
W celu wyczyszczenia bocznych ścianek można
wymontować prowadnice blach.
1.
Odciągnąć przednią część prowadnic blach
od bocznej ścianki.
1
2
Montaż prowadnic blach
Zamontować prowadnice blach w odwrotnej ko‐
lejności.
2.
Odciągnąć tylną część prowadnic blach od
bocznej ścianki i wyjąć je.
Zaokrąglone końce prowadnic blach
muszą być skierowane do przodu.
Page 77
POLSKI 77
12.2 Piroliza
UWAGA!
Jeśli wraz z urządzeniem zainstalowana
jest płyta grzejna, nie należy jej używać
podczas działania funkcji Piroliza . Mog‐
łoby to spowodować uszkodzenie urzą‐
dzenia.
Dotyczy tylko modeli parowych: przed
rozpoczęciem procedury czyszczenia
należy upewnić się, że zbiornik na wodę
jest całkowicie opróżniony. Patrz „Opró‐
żnianie zbiornika na wodę”.
Wyjąć wszystkie akcesoria z urządze‐
nia.
Procedura czyszczenia nie rozpocznie się:
• Jeśli nie wyjęto z piekarnika prowadnic blach
lub teleskopowych prowadnic blach (jeśli są w
wyposażeniu).
• Jeśli drzwi urządzenia nie są dobrze zamknię‐
te.
• Jeśli nie odłączono czujki temperatury (gdy
jest na wyposażeniu).
W chwili uruchomienia funkcji Piroliza
drzwi urządzenia zostają zablokowane.
Po zakończeniu działania funkcji, w fa‐
zie schładzania, drzwi pozostają zablo‐
kowane. Podczas fazy schładzania nie‐
które funkcje urządzenia są niedostęp‐
ne.
OSTRZEŻENIE!
Po zakończeniu działania funkcji Piroli‐
za urządzenie jest bardzo gorące. Nale‐
ży odczekać, aż urządzenie wystygnie.
Występuje zagrożenie poparzeniem.
Piroliza :
1.
Usunąć ręcznie największe zabrudzenia.
2.
Włączyć urządzenie i wybrać funkcję Piroli‐
za w menu głównym. Nacisnąć OK w celu
potwierdzenia.
3.
Dotknąć lub , aby ustawić czas
trwania procedury czyszczenia:
– Krótka – w przypadku nieznacznego za‐
brudzenia (1 godz.)
– Normalna – w przypadku zwykłego za‐
brudzenia (1 godz. 30 min)
– Intensyw. – w przypadku silnego zabru‐
dzenia (2 godz. 30 min)
4.
Nacisnąć OK w celu potwierdzenia.
12.3 Oświetlenie piekarnika
OSTRZEŻENIE!
Zachować ostrożność podczas wymia‐
ny żarówki oświetlenia piekarnika. Wy‐
stępuje zagrożenie porażeniem prą‐
dem.
Przed wymianą żarówki oświetlenia piekarnika:
• Wyłączyć piekarnik.
• Wykręcić bezpieczniki ze skrzynki bezpieczni‐
ków lub wyłączyć wyłącznik obwodu.
Na dnie piekarnika umieścić szmatkę,
aby zapobiec uszkodzeniu żarówki i
szklanego klosza.
Aby uniknąć zabrudzenia żarówki halo‐
genowej tłuszczem, należy chwytać ją
przez szmatkę.
1.
Obrócić szklany klosz w kierunku przeciw‐
nym do ruchu wskazówek zegara, aby go
zdjąć.
2.
Wyczyścić klosz.
3.
Wymienić żarówkę na nową, odpowiednią
do piekarnika, odporną na działanie wyso‐
kich temperatur do 300°C.
Użyć żarówki tego samego typu.
4.
Zamontować klosz.
12.4 Czyszczenie zbiornika wody
OSTRZEŻENIE!
Nie wlewać wody do zbiornika wody
podczas procedury czyszczenia.
Podczas procedury czyszczenia z otwo‐
ru wylotowego pary może wyciekać do
komory piekarnika pewna ilość wody.
Umieścić ociekacz na poziomie piekar‐
nika znajdującym się bezpośrednio pod
otworem wlotowym pary, aby zapobiec
ściekaniu wody na dno komory piekarni‐
ka.
Po pewnym czasie w piekarniku może dojść do
nagromadzenia się kamienia. Aby zapobiec temu
zjawisku, należy czyścić elementy piekarnika wy‐
twarzające parę. Opróżniać zbiornik po każdym
użyciu funkcji pieczenia parowego.
1.
Wlać do zbiornika 900 ml wody i dodać 50
ml kwasku cytrynowego (pięć łyżeczek).
Wyłączyć piekarnik i odczekać około 60 mi‐
nut.
2.
Włączyć piekarnik i wybrać funkcję Termoo‐
bieg + para . Ustawić temperaturę 230°C.
Page 78
www.electrolux.com
78
3.
4.
5.
Zawartość wap‐
powyżej 180 mg/
12.5 Czyszczenie drzwi piekarnika
W drzwiach piekarnika znajdują się cztery szyby.
Drzwi piekarnika i wewnętrzne szyby można wy‐
montować w celu ich wyczyszczenia.
Po upływie 25 minut wyłączyć piekarnik i
odczekać 15 minut, aby ostygł.
Włączyć piekarnik i wybrać funkcję Termoo‐
bieg + para . Ustawić temperaturę od 130°C
do 230°C. Wyłączyć urządzenie po upływie
10 minut. Zaczekać, aż piekarnik ostygnie,
a następnie opróżnić zbiornik (patrz „Opró‐
żnianie zbiornika na wodę”).
Opłukać zbiornik na wodę i za pomocą
szmatki usunąć z piekarnika pozostałości
kamienia.
Umyć ręcznie rurkę odpływową w ciepłej
wodzie z dodatkiem mydła. Aby uniknąć
uszkodzenia elementów urządzenia, nie na‐
leży używać substancji zawierających kwas,
preparatów w sprayu ani podobnych środ‐
ków czyszczących.
Rodzaje wody
• Miękka woda z niewielką zawartością wapnia
– zaleca się używanie tego rodzaju wody, po‐
nieważ pozwala ona ograniczyć częstotliwość
czyszczenia urządzenia.
• Woda wodociągowa – można jej używać, je‐
żeli domowa instalacja doprowadzająca wodę
jest wyposażona w urządzenia oczyszczające
lub zmiękczające wodę.
• Twarda woda o dużej zawartości wapnia – nie
ma żadnego wpływu na działanie urządzenia,
ale trzeba je częściej czyścić.
TABELA ZAWARTOŚCI WAPNIA OPRACOWANA PRZEZ WHO
(Światowa Organizacja Zdrowia)
nia
Twardość wody
(stopnie francu‐
skie)
Twardość wody
(stopnie niemiec‐
kie)
Klasyfikacja wo‐dyOdkamienianie
0-60 mg/l 0 - 6 0 - 3 Miękka
60-120 mg/l 6 - 12 3 - 7 Średnio twarda
120-180 mg/l 12 - 18 8 - 10 Twarda
l
UWAGA!
Nie używać urządzenia bez szyb.
ponad 18 ponad 10 Bardzo twarda
Jeśli drzwi nie zostaną uprzednio zde‐
montowane, mogą się gwałtownie za‐
mknąć podczas wyjmowania z nich
szyb.
co
75 cykli - 2,5
miesiąca
50 cykli - 2 mie‐
siąca
40 cykli - 1,5
miesiąca
30 cykli - 1 mie‐
siąc
Page 79

Demontaż drzwi i szyby piekarnika
POLSKI 79
1.
Otworzyć całkowicie drzwi i znaleźć zawias
po prawej stronie drzwi.
2.
Nacisnąć element mocujący, tak aby prze‐
sunął się do tyłu.
3.
Przytrzymać naciśnięty element jedną ręką.
Drugą ręką, za pomocą śrubokręta, unieść i
obrócić dźwignię zawiasu po prawej stro‐
nie.
4.
Znaleźć zawias po lewej stronie drzwi.
Page 80
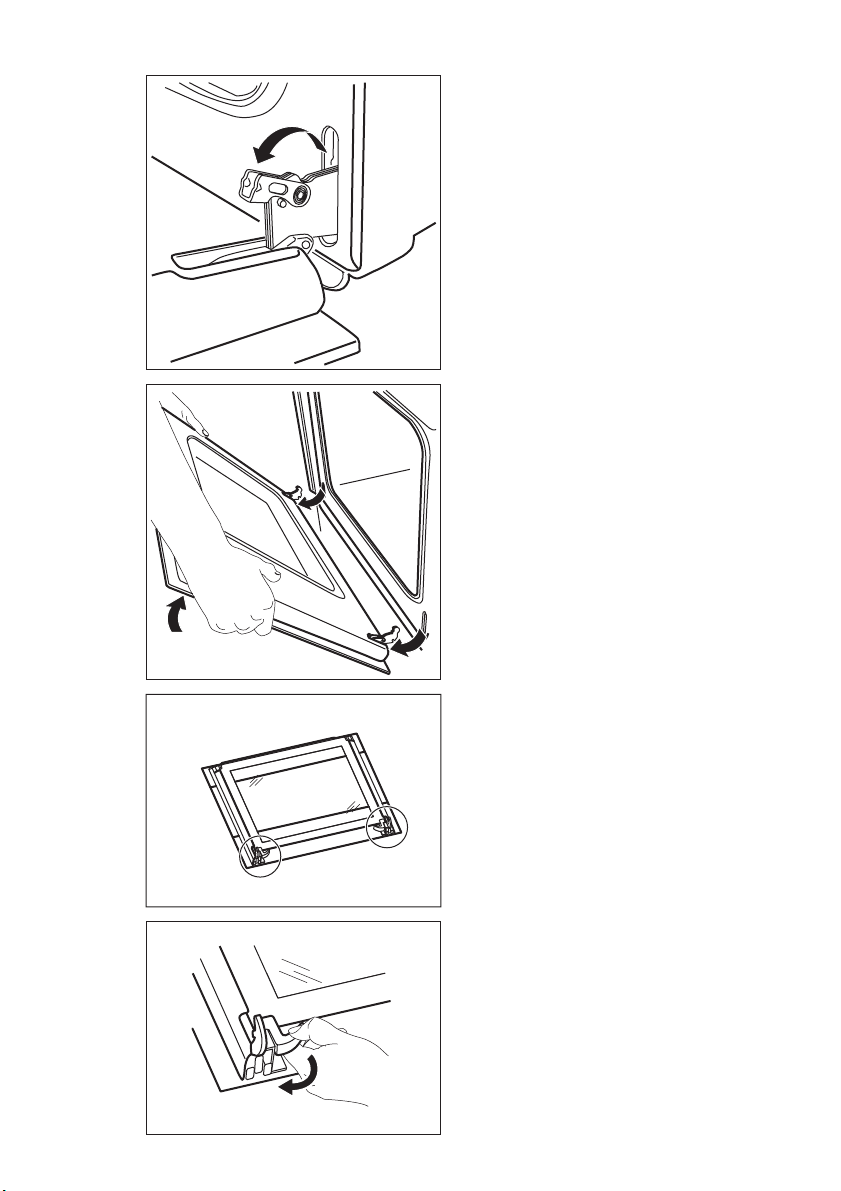
www.electrolux.com
80
5.
Podnieść i obrócić dźwignię przy lewym za‐
wiasie.
6.
Przymknąć drzwi piekarnika do pierwszej
pozycji otwarcia (do połowy). Następnie po‐
ciągając drzwi do siebie, wyjąć je z moco‐
wania.
7.
Umieścić drzwi na stabilnej powierzchni
przykrytej miękką szmatką.
8.
Zwolnić system blokujący w celu wymonto‐
wania szyb.
Page 81

1
Montaż drzwi i szyb
90°
2
POLSKI 81
9.
Obrócić oba elementy mocujące o 90° i wy‐
jąć je z mocowań.
10.
Ostrożnie unieść (krok 1) i pojedynczo wy‐
jąć (krok 2) szyby. Zacząć od górnej szyby.
11.
Umyć szyby wodą z dodatkiem mydła. Do‐
kładnie wytrzeć szyby do sucha.
AB C
Po umyciu należy najpierw zamontować szyby, a
następnie drzwi piekarnika. Wykonać powyższe
czynności w odwrotnej kolejności.
Umieścić szyby (A, B i C) na swoim miejscu w
odpowiedniej kolejności. Środkowa szyba (B) ma
ozdobne obramowanie. Nadruk na szybie powi‐
nien być skierowany ku wewnętrznej stronie
drzwi. Należy upewnić się, czy po zamontowaniu
szyby powierzchnia jej obramowania (B) w miejs‐
cu nadruku nie jest szorstka w dotyku.
Upewnić się, że górna szyba została osadzona
prawidłowo.
Page 82

www.electrolux.com
82
13. CO ZROBIĆ, GDY…
OSTRZEŻENIE!
Patrz rozdział dotyczący bezpieczeń‐
stwa.
Problem Prawdopodobna przyczyna Środek zaradczy
Urządzenie nie nagrze‐
wa się.
Urządzenie nie nagrze‐
wa się.
Urządzenie nie nagrze‐
wa się.
Urządzenie nie nagrze‐
wa się.
Urządzenie nie nagrze‐
wa się.
W urządzeniu pozostała
woda.
Funkcja pieczenia paro‐
wego nie działa.
Funkcja pieczenia paro‐
wego nie działa.
Opróżnianie zbiornika
wody zajmuje więcej niż
trzy minuty lub woda
wycieka z otworu wloto‐
wego pary.
Na potrawach i w urzą‐
dzeniu osiada skroplo‐
na para wodna.
Na wyświetlaczu wi‐
doczne jest wskazanie
F111.
Nie działa oświetlenie. Żarówka jest przepalona. Wymienić żarówkę.
Urządzenie jest wyłączone. Włączyć urządzenie.
Nie jest ustawiony aktualny czas. Ustawić aktualny czas.
Nie wprowadzono wymaganych
ustawień.
Włączona jest blokada urucho‐
mienia.
Sprawdzić, czy wprowadzono
prawidłowe ustawienia.
Patrz „Wyłączanie blokady uru‐
chomienia”.
Zadziałał bezpiecznik. Sprawdzić, czy przyczyną nie‐
prawidłowego działania jest bez‐
piecznik. Jeżeli nadal będzie na‐
stępowało wyzwalanie bezpiecz‐
nika, należy skontaktować się z
wykwalifikowanym elektrykiem.
Do zbiornika wlano zbyt dużo
wody.
Wyłączyć urządzenie i usunąć
wodę za pomocą ściereczki lub
gąbki.
W zbiorniku nie ma wody. Napełnić zbiornik na wodę.
Kamień zatyka otwór. Sprawdzić otwór wlotowy pary.
Usunąć kamień.
W urządzeniu osadził się kamień. Sprawdzić zbiornik na wodę.
Patrz „Czyszczenie zbiornika
wody”.
Potrawa pozostawała zbyt długo
w urządzeniu.
Nie należy pozostawiać potraw
w urządzeniu dłużej niż przez 15
– 20 minut po zakończeniu pie‐
czenia.
Nie podłączono prawidłowo czuj‐
ki temperatury do gniazda.
Włożyć wtyczkę termosondy jak
najgłębiej do gniazda.
Page 83

Problem Prawdopodobna przyczyna Środek zaradczy
Na wyświetlaczu wi‐
doczne jest wskazanie
„Demo”. Urządzenie nie
nagrzewa się. Nie dzia‐
ła wentylator.
Jeżeli rozwiązanie problemu we własnym zakre‐
sie nie jest możliwe, należy skontaktować się ze
sprzedawcą lub punktem serwisowym.
Dane niezbędne dla punktu serwisowego znajdu‐
ją się na tabliczce znamionowej. Tabliczka zna‐
Zaleca się wpisanie danych w tym miejscu:
Model (MOD.) .........................................
Numer produktu (PNC) .........................................
Numer seryjny (S.N.) .........................................
14. DANE TECHNICZNE
Włączony jest tryb testowy.
mionowa znajduje się na przednim obramowaniu
komory urządzenia.
POLSKI 83
1.
Wyłączyć urządzenie.
2.
Dotknąć i przytrzymać ,
aż urządzenie włączy się
i ponownie wyłączy.
3.
Dotknąć i przytrzymać jed‐
nocześnie
i , aż roz‐
legnie się sygnał dźwiękowy
i symbol „d” zniknie z wy‐
świetlacza.
Napięcie 230 V
Częstotliwość 50 Hz
15. INSTALACJA
OSTRZEŻENIE!
Patrz rozdział dotyczący bezpieczeń‐
stwa.
15.1 Zabudowa urządzenia
548
558
573
5
20
589
594
Page 84

www.electrolux.com
84
590
600
min. 550
20
min. 560
min. 550
20
min. 560
15.2 Instalacja elektryczna
OSTRZEŻENIE!
Instalację elektryczną musi wykonać
wykwalifikowana osoba.
Producent nie ponosi odpowiedzialności
za nieprzestrzeganie zaleceń dotyczą‐
cych bezpieczeństwa, które zawarto w
rozdziale „Informacje dotyczące bezpie‐
czeństwa”.
Urządzenie wyposażono w przewód zasilający
oraz wtyczkę.
15.3 Przewód
Rodzaje przewodów przeznaczonych do monta‐
żu lub wymiany: H07 RN-F, H05 RN-F, H05
RRF, H05 VV-F, H05 V2V2-F (T90), H05 BB-F.
Dobór przekroju przewodu należy przeprowadzić
na podstawie mocy całkowitej podanej na tab‐
liczce znamionowej oraz w tabeli:
Całkowity pobór
mocy
maksimum 1380W3 x 0,75 mm²
Przekrój przewodu
A
16. OCHRONA ŚRODOWISKA
Materiały oznaczone symbolem
poddać utylizacji. Opakowanie urządzenia
włożyć do odpowiedniego pojemnika w celu
przeprowadzenia recyklingu.
Należy zadbać o ponowne przetwarzanie
odpadów urządzeń elektrycznych i
elektronicznych, aby chronić środowisko
należy
maksimum 2300W3 x 1 mm²
B
maksimum 3680W3 x 1,5 mm²
Przewód ochronny (żółto-zielony) musi być o 2
cm dłuższy od przewodu fazowego i neutralnego
(niebieski i brązowy).
naturalne oraz ludzkie zdrowie. Nie wolno
wyrzucać urządzeń oznaczonych symbolem
razem z odpadami domowymi. Należy zwrócić
produkt do miejscowego punktu ponownego
przetwarzania lub skontaktować się z
odpowiednimi władzami miejskimi.
Page 85

POLSKI 85
Page 86

www.electrolux.com
86
Page 87

POLSKI 87
Page 88

www.electrolux.com/shop
397270202-F-032013
 Loading...