

Electrolux EI30GF45QSB, EI30GF45QSA, EI30GF45QSC, EI30GF45QSD, EI30GF45QSE Owner’s Manual
...
Electrolux
oor_o0
EN GAS RANGF USF AND CARE GUIDE
Fin
ing Information
Table of contents
Finding information .............................................. 2
important Safety instructions .......................... 3=6
Features ............................................................. 7=8
Oven Cooking ................................................. 9-10
Surface Cooking ................................................. 11
Before Setting Surface Controls ....................... 12
Setting Surface Controls ................................... 13
Getting Started .................................................... 14
Setting Oven Controls .................................. 15=29
• Preheat .......................................................... 15
• Bake ............................................................... 16
• Cook time ....................................................... 17
• Delay start .................................................... 18
• Convection bake ............................................ 19
• Convection convert ........................................ 20
• Convection roast ............................................ 21
• Broil .......................................................... 22-23
• Keep warm ..................................................... 24
• Cakes breads ................................................. 24
• Probe cook ............................................... 25-26
• Slow cook ....................................................... 27
• My favorite ..................................................... 28
• Sabbath mode ................................................ 29
Setting the Warmer Drawer ......................... 30-31
Setting Your Preferences ............................. 32-33
• Setting clock ................................................... 32
• Setting 12 or 24 hour mode ........................... 32
Changing between °F or °C ........................... 32
User preference offset .................................... 32
Setting 12hr energy saving mode .................. 33
Setting audio mode ........................................ 33
Factory default reset ...................................... 33
Setting Self=Clean Cycle .............................. 34-35
Care & Cleaning ............................................ 36-41
• Cleaning recommendations ........................... 36
• Special door care instructions ........................ 37
• Changing oven lights ..................................... 37
• Removing and replacing the oven door ... 38-39
iiiiiiiiiiiiiiiiiiiiiiiiiiiiiiiiiiiiiiiiiiiiiiiiiiiiiiiiiiiiiiiiiiiiiiiiiiiiiiiiiiiiiiiiiiiiiiiiiiiiiiiiiiiiiiiiiiiiiii_i!iiiiiiiiiiiiiiiiiiiiiiiiiiiiiiiiiii_
iiiiiiiiiiiiiiiiiiiiiiiiiiiiiiiiiiiiiiiiiiiiiiiiiiiiiiiiiiiiiiiiiiiiiiiiiiiiiiiiiiiiiiiiiiiiiiiiiiiiiiiiiiiiiiiiiiiiiiiiiiiii_i!iiiiiiiiiiiiiiiiiiiiiiiiiiiiiiiiiiiiiiiiiiii_
• Cleaning cooktop, burner grates, caps and
heads ....................................................... 39-40
• Removing and replacing the drawer .............. 41
Solutions to Common Problems ................. 42-44
Notes .............................................................. 45=46
Warranty .............................................................. 47
Please read & save this guide
Thank you for choosing Electrolux, the new
premium brand in home appliances. This Use &
Care Guide is part of our commitment to customer
satisfaction and product quality throughout the
service life of your new appliance.
We view your purchase as the beginning of a
relationship. To ensure our ability to continue
serving you, please use this page to record
important product information.
Keep a record for quick
reference
Purchase date
Electrolux model number
Electrolux serial number
Serial plate location
Questions?
For toll-free telephone support in the U.S. and
Canada:
1-877-4ELECTROLUX (1-877-435-3287)
For online support and Internet production information
visit http://www.electroluxappliances.com
@2014 Etectrolux Home Products, Inc. All rights reserved. Printed in U.S.A..
important Safety instructions ......3
Wh at yo u need to know about safet y inst ructio ns iiiiiiiiiiiiiiiiiiiiiiiiiiiiiiiiiiiiiiiiiiiiiiiiiiiiiiiiiiiiiiiiiiiiiiiiiiiiiiii
Warningand Important Instructions appearing inthis guide are not meant to cover all possible conditions iiiiiiiiiiiiiiiiiiiiiiiiiiiiiiiiiiiiiiiiiiiiiiiiiiiiiiiiiiiiiiiiiiiiiiiiiiiiiiii
and situations that may occur. Common sense, caution and care must be exercised when installing, iiiiiiiiiiiiiiiiiiiiiiiiiiiiiiiiiiiiiiiiiiiiiiiiiiiiiiiiiiiiiiiiiiiiiiiiiiiiiiii
maintainingoroperatingamicrowave, iiiiiiiiiiiiiiiiiiiiiiiiiiiiiiiiiiiiiiiiiiiiiiiiiiiiiiiiiiiiiiiiiiiiiiiiiiiiiiii
ALWAYS contact your dealer, distributor, service agent or manufacturer about problems or conditions iiiiiiiiiiiiiiiiiiiiiiiiiiiiiiiiiiiiiiiiiiiiiiiiiiiiiiiiiiiiiiiiiiiiiiiiiiiiiiii
you do notunderstand, iiiiiiiiiiiiiiiiiiiiiiiiiiiiiiiiiiiiiiiiiiiiiiiiiiiiiiiiiiiiiiiiiiiiiiiiiiiiiiii
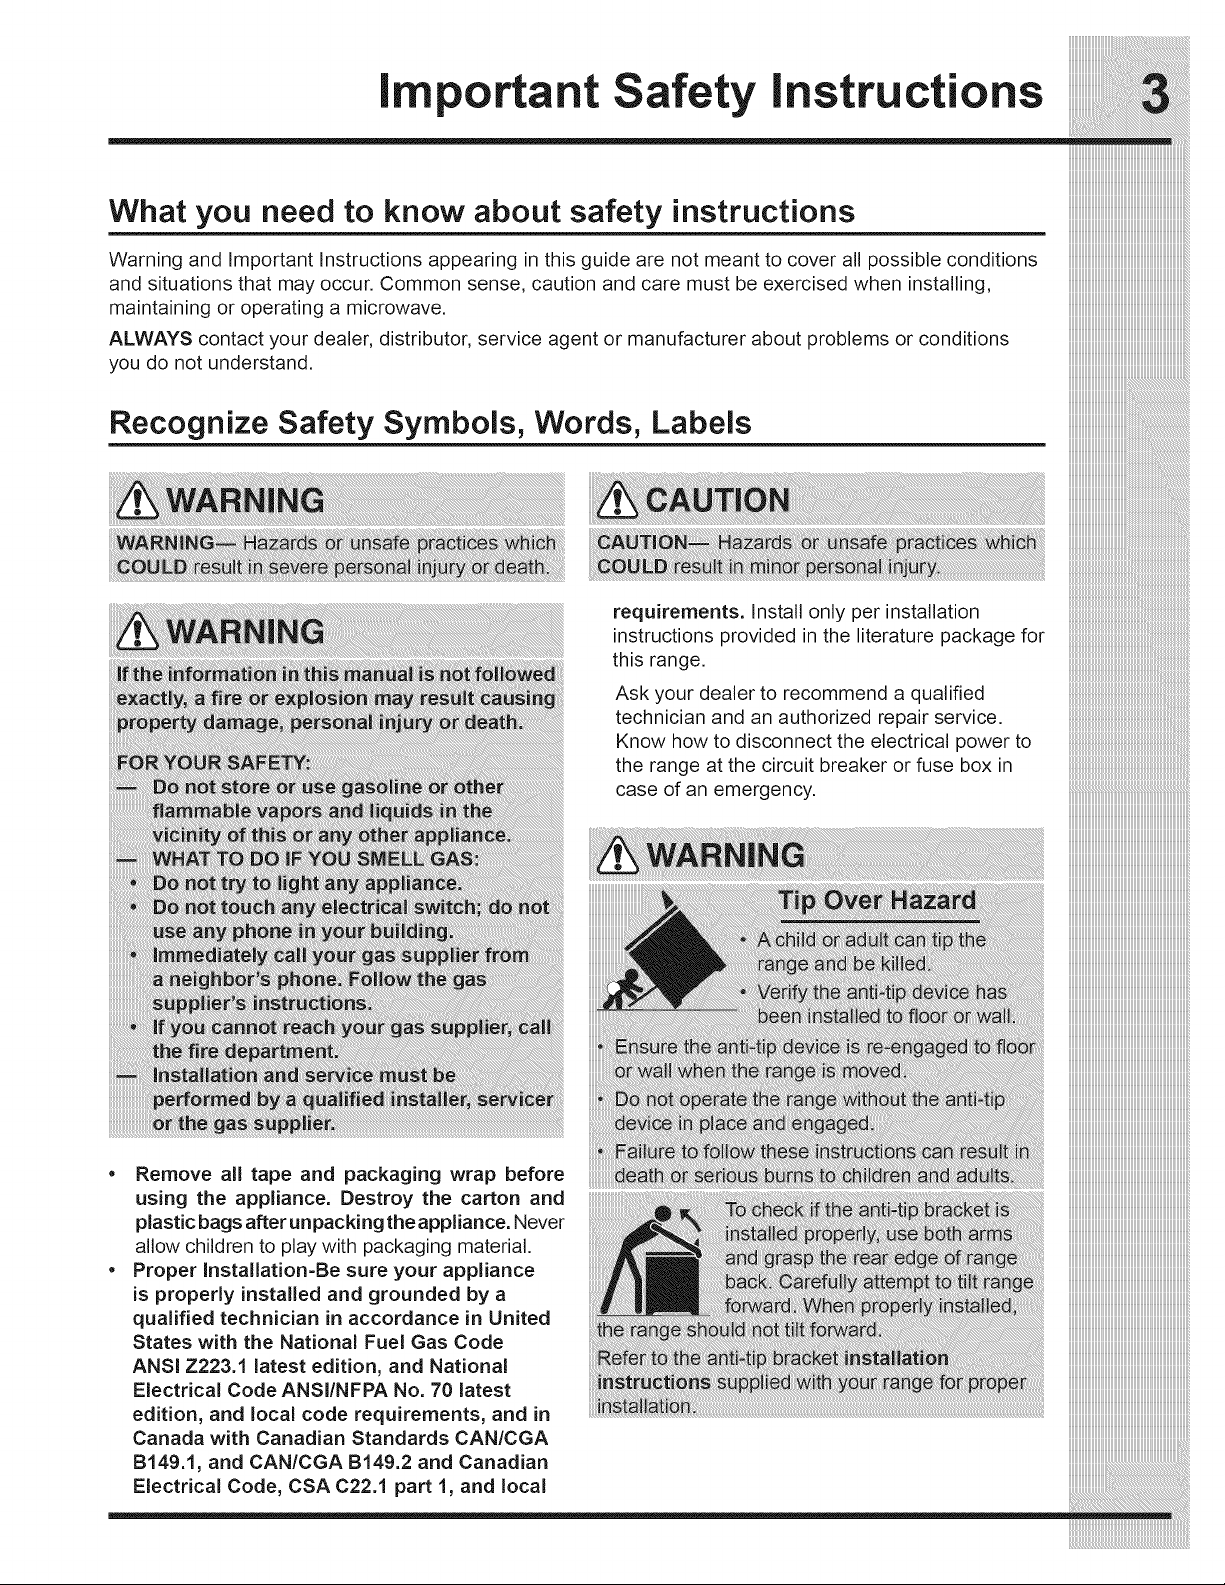
Recognize Safety Symbols, Words, Labels
requirements. Install only per installation
instructions provided in the literature package for
this range.
Ask your dealer to recommend a qualified
technician and an authorized repair service.
Know how to disconnect the electrical power to
the range at the circuit breaker or fuse box in
case of an emergency.
Remove all tape and packaging wrap before
using the appliance. Destroy the carton and
plastic bags after unpacking the appliance. Never
allow children to play with packaging material.
Proper Installation-Be sure your appliance
is properly installed and grounded by a
qualified technician in accordance in United
States with the National Fuel Gas Code
ANSI Z223.1 latest edition, and National
Electrical Code ANSI/NFPA No. 70 latest
edition, and local code requirements, and in
Canada with Canadian Standards CAN/CGA
B149.1, and CAN/CGA B149.2 and Canadian
Electrical Code, CSA O22.1 part 1, and local

important Safety instructions
User ServicingmDo not repair or replace
any part of the appliance unless specifically
recommended in the manuals. All other
iiiiiiiiiiiiiiiiiiiiiiiiiiiiiiiiiiiiiiiiiiiiiiiiiiiiiiiiiiiiiiiiiiiiiiiiiiiiiii
servicing should be done only by a qualified
technician to reduce the risk of personal injury
and damage to the appliance.
Never modify or alter the construction of
a range by removing leveling legs, panels,
wire covers, anti-tip brackets/screws, or any
other part of the product.
iiiiiiiiiiiiiiiiiiiiiiiiiiiiiiiiiiiiiiiiiiiiiiiiiiiiiiiiiiiiiiiiiiiiiiiiii
Storage in or on AppliancemFlammable
materials should not be stored in an oven,
near surface units or in the drawer (if
equipped). This includes paper, plastic and
cloth items, such as cookbooks, plasticware
and towels, as well as flammable liquids. Do not
store explosives, such as aerosol cans, on or
near the appliance. Flammable materials may
explode and result in fire or property damage.
Do not leave children alone. Children should
not be left alone or unattended in the area
where an appliance is in use. They should
never be allowed to sit or stand on any part of
the appliance.
DO NOT TOUCH SURFACE BURNERS,
AREAS NEAR THESE BURNERS, OVEN
HEATING ELEMENTS OR iNTERiOR
SURFACES OF THE OVEN OR WARMER
DRAWER (if equipped). Both surface burners
and oven heating elements may be hot even
though surface burner flames are not visible
or oven elements are dark in color. Areas near
surface burners may become hot enough
to cause burns. During and after use, do
not touch, or let clothing or other flammable
materials touch these areas until they have had
sufficient time to cool. Among these areas are
the cooktop, surfaces facing the cooktop, the
oven vent openings and surfaces near these
openings, oven door and window.
* Wear ProperApparel_Loose-fitting or
hanging garments should never be worn
while using the appliance. Do not let clothing
or other flammable materials contact hot
surfaces.
* Do Not Use Water or Flour on Grease
Fires_Smother the fire with a pan lid, or use
baking soda, a dry chemical or foam-type
extinguisher.
* When heating fat or grease, watch it closely.
Fat or grease may catch fire if allowed to
become too hot.
* Use Only Dry Potholders_Moist or damp
potholders on hot surfaces may result in
burns from steam. Do not let the potholders
touch hot heating surface units or interior oven
elements. Do not use a towel or other bulky
cloth instead of a potholder.
* Do Not Heat Unopened Food Containers_
Build up of pressure may cause the
container to burst and result in injury.
* Remove the oven door from any unused
appliance if it is to be stored or discarded.
* IMPORTANTmDo not attempt to operate the
oven during a power failure. If the power
fails, always turn the oven off. If the oven
is not turned off and the power resumes, the
oven may begin to operate again. Food left
unattended could catch fire or spoil.
important Safety instructions
IMPORTANT INSTRUCTIONS
FOR USING YOUR COOKTOP
Know which knob controls each surface
burner. Place a pan of food on the burner before
turning it on, and turn the burner off before
removing the pan.
Always turn the knob to the full LITE position
when igniting top burners. Visually check that
burner has lit. Then adjust the flame so it does
not extend beyond the edge of the utensil.
Use Proper Pan Size--This appliance is
equipped with one or more surface burners
of different sizes. Select utensils having flat
bottoms large enough to cover the surface
burner. The use of undersized utensils will
expose a portion of the surface heating unit
to direct contact and may result in ignition of
clothing. Proper relationship of utensil to the
surface unit will also improve efficiency.
* Utensil Handles Should Be Turned Inward
and Should Not Extend Over Adjacent
Surface Burners--To reduce the risk of burns,
ignition of flammable materials, and spillage
due to unintentional contact with the utensil.
The handle of the utensil should be positioned
so that it is turned inward, and does not extend
over adjacent surface burners.
* Never Leave Surface Burners Unattended--
Boilovers cause smoking and greasy spillovers
that may ignite, or a pan that has boiled dry may
melt.
* Protective liners--Do not use aluminum
foil to line oven bottom or any other part of
the appliance. Only use aluminum foil as
recommended for baking if used as a cover
placed on the food. Any other used of protective
liners or aluminum foil may result in a risk of
electric shock or fire or a short circuit.
* Glazed Cooking Utensils--Only certain types
of glass, glass/ceramic, ceramic, earthenware,
or other glazed utensils are suitable for
cooktop service without breaking due to the
sudden change in temperature. Check the
manufacturer's recommendations for cooktop
use.
Air curtain or other overhead range hoods,
which operate by blowing a downward air
flow on to a range, shall not be used in
conjunction with gas ranges other than when
the hood and range have been designed,
tested and listed by an independent test
laboratory for use in combination with each
other.
Do not use Searing Grill on the cooktop.
The searing grill is not designed for use on the
cooktop. Doing so may result in a fire.
Do Not Use Decorative Surface burner
Covers. If a burner is accidentally turned on,
the decorative cover will become hot and
possibly melt. Burns will occur if the hot covers
are touched. Damage may also be done to the
cooktop or burners because the covers may
cause overheating. Air will be blocked from the
burner and cause combustion problems.
iiiiiiiiii_iiiiiiiiiiiiiiiiiiiiiiiiiiiiiiiiiiiiiiiiiiiiiiiiiiiiiiiiiiiiiiiiiiiiii
iiiiiiiiiiiiiii_iiiiiiiiiiiiiiiiiiiiiiiiiiiiiiiiiiiiiiiiiiiiiiiiiiiiiiiiiiiiiiii
iiiiiiiiiiiiiiiiii_iiiiiiiiiiiiiiiiiiiiiiiiiiiiiiiiiiiiiiiiiiiiiiiiiiiiiiiiiiiiii
iiiiiiiiiiiiiiiiiiiiiiiiii_iiiiiiiiiiiiiiiiiiiiiiiiiiiiiiiiiiiiiiiiiiiiiiiiiiiiii_
iiiiiiiiiiiiiiiiiiiiiiiiiiiiiiiiiiiiiiiiiiiiiiiiiiiiiiiiiiiiiiiiiiiiiiiiiiiiiiiiiii
important Safety instructions
iMPORTANT INSTRUCTIONS
FOR USING YOUR OVEN
• Use Care When Opening Door or Drawer--
Stand to the side of the appliance when opening
the door of a hot oven. Let hot air or steam
escape before you remove or replace food in
the oven/warmer drawer.
Keep Oven Vent Ducts Unobstructed. The
oven is vented at the front above the oven door
or through the rear of cooktop. Touching the
surfaces in this area when the oven is operating
may cause severe burns. Also, do not place
plastic or heat-sensitive items on or near the
oven vent. These items could melt or ignite.
• Placement of Oven/Warmer Drawer (if
equipped) Racks. Always place oven racks in
desired location while oven/drawer (if equipped)
is cool. Remove all utensils from the rack
before removing rack. If rack must be moved
while oven is hot, use extreme caution. Use
potholders and grasp the rack with both hands
to reposition. Do not let potholders contact the
hot oven element or interior of the oven/warmer
drawer (if equipped).
• Do not use a broiler pan without its insert.
The broiler pan and grid allow dripping fat to
drain and be kept away from the high heat of the
broiler.
• Do not cover your broiler or warmer drawer
(if equipped) grid with aluminum foil.
Exposed fat and grease could ignite.
Do not touch a hot light bulb with a damp
cloth. Doing so could cause the bulb to break.
Disconnect the appliance or turn off the power
to the appliance before removing and replacing
light bulb.
IMPORTANT INSTRUCTIONS
FOR CLEANING YOUR
RANGE
• Clean the range regularly to keep all parts
free of grease that could catch fire. Exhaust
fan ventilation hoods and grease filters
should be kept clean. Do not allow grease to
accumulate. Greasy deposits in the fan could
catch fire. Refer to the hood manufacturer's
instructions for cleaning.
• Cleaners/aerosols--Always follow the
manufacturer's recommended directions for use.
Be aware that excess residue from cleaners
and aerosols may ignite causing damage and/or
injury.
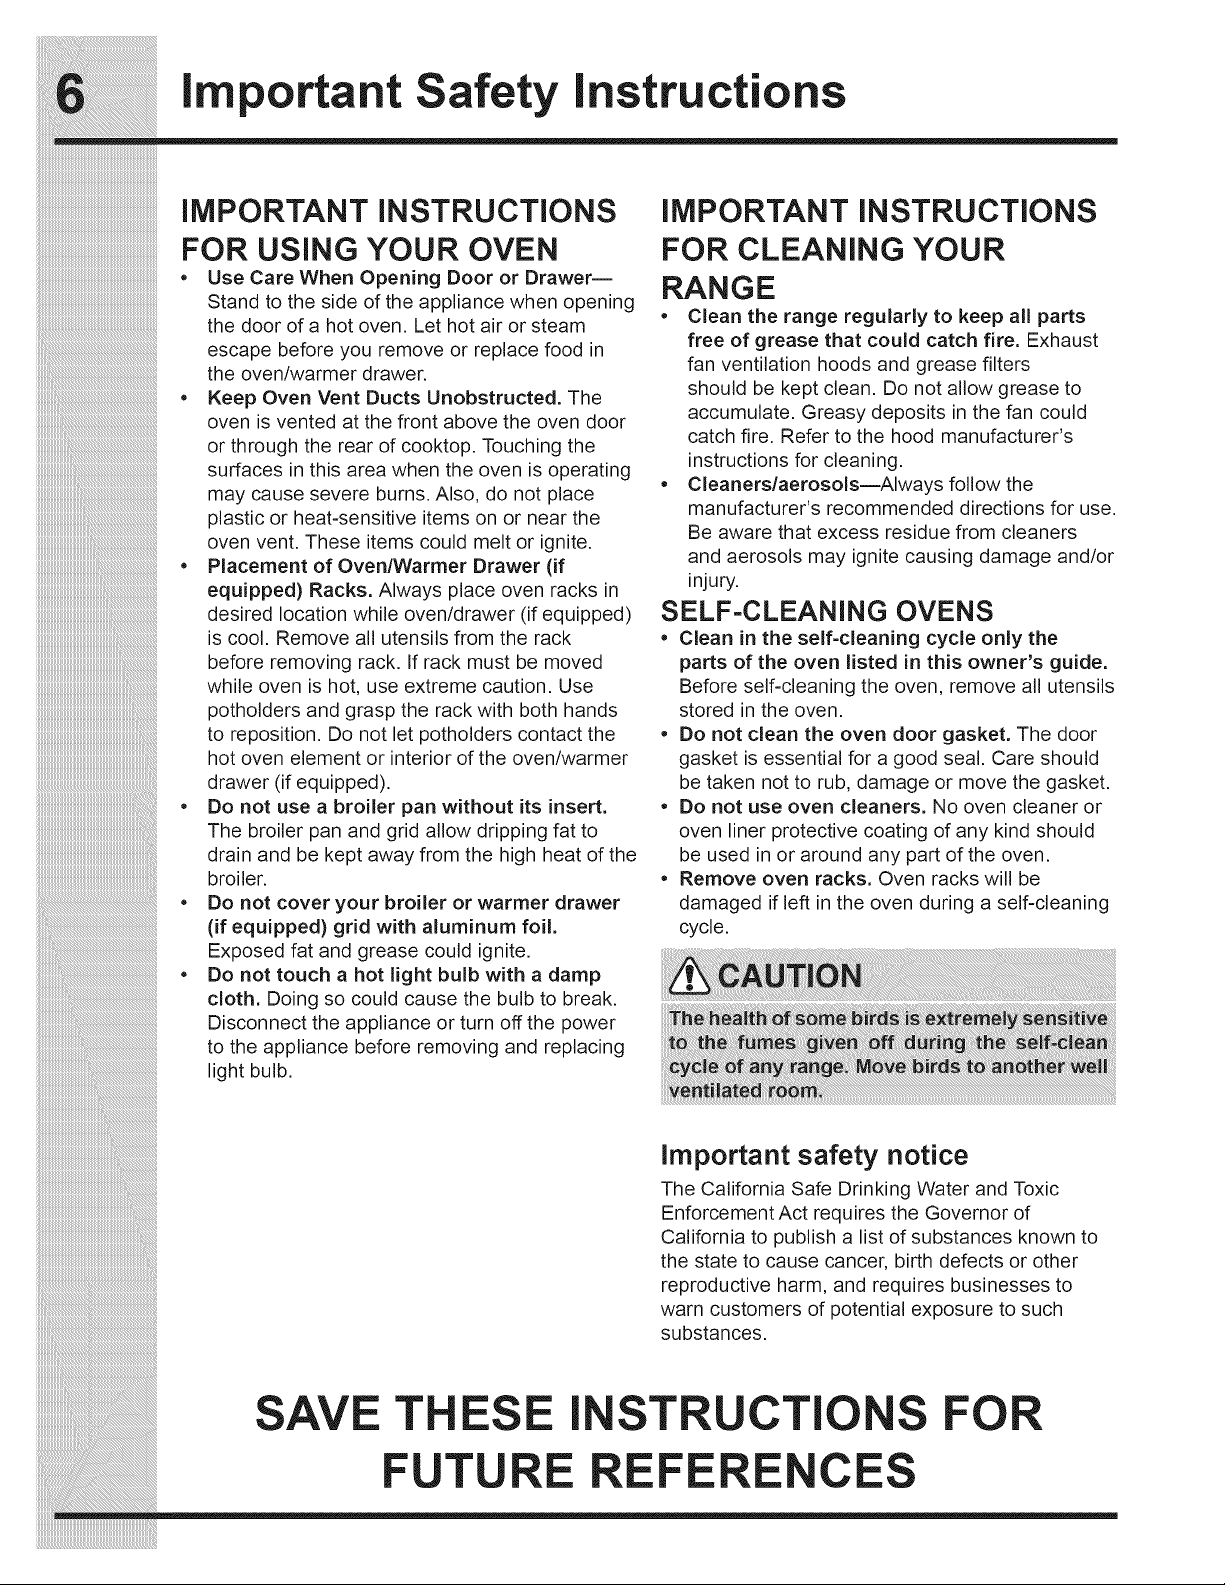
SELF-CLEANING OVENS
• Clean in the self-cleaning cycle only the
parts of the oven listed in this owner's guide.
Before self-cleaning the oven, remove all utensils
stored in the oven.
, Do not clean the oven door gasket. The door
gasket is essential for a good seal. Care should
be taken not to rub, damage or move the gasket.
, Do not use oven cleaners. No oven cleaner or
oven liner protective coating of any kind should
be used in or around any part of the oven.
• Remove oven racks. Oven racks will be
damaged if left in the oven during a self-cleaning
cycle.
Important safety notice
_i_i_i_i_i_i_i_i_i_i_i_i_i_i_i_i_i_i_i_i_i_i_i_i_i_i_i_i_i_i_i_i_i_i_i_i_i_i_i_i_i_i_i_i_i_i_i_i_i_i_i_i_i_i_i_i__!__________________________________________
iiiiiiiiiiiiiiiiiiiiiiiiiiiiiiiiiiiiiiiiiiiiiiiiiiiiiiiiiiiiiiiiiiiiiiiiiiiiiiiiiiiiiiiiiiiiiiiiiiiiiiiiiiiiiiiiiiiiiii_i!iiiiiiiiiiiiiiiiiiiiiiiiiiiiiiiiiiiiiiiiiiiiiiiiiiiii_
iiiiiiiiiiiiiiiiiiiiiiiiiiiiiiiiiiiiiiiiiiiiiiiiiiiiiiiiiiiiiiiiiiiiiiiiiiiiiiiiiiiiiiiiiiiiiiiiiiiiiiiiiiiiiiiiiiiiiiiiiiiii_i!iiiiiiiiiiiiiiiiiiiiiiiiiiiiiiiiiiiiiiiiiiii_
The California Safe Drinking Water and Toxic
Enforcement Act requires the Governor of
California to publish a list of substances known to
the state to cause cancer, birth defects or other
reproductive harm, and requires businesses to
warn customers of potential exposure to such
substances.
SAVE T ESE INST UCTIO
FUT E EFE CES
FO
Range features
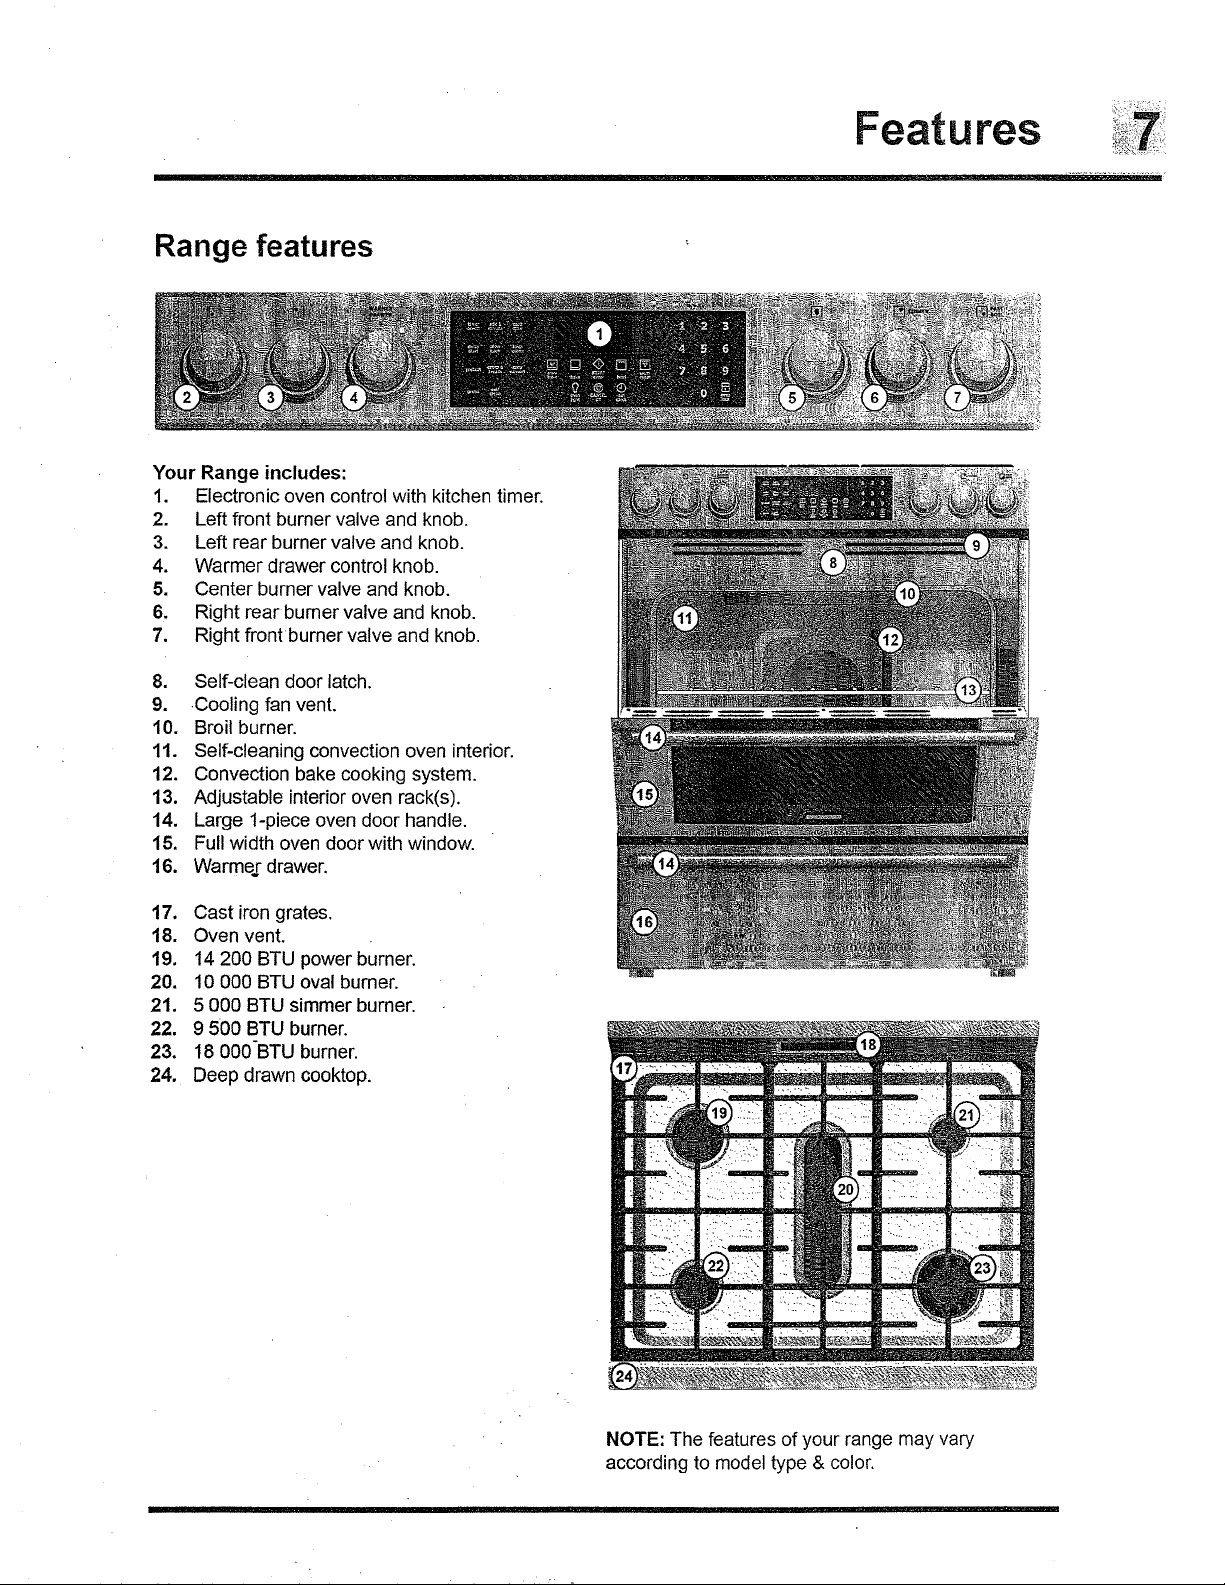
Your Range includes:
1. Electronic oven control with kitchen timer.
2. Left front burner valve and knob.
3. Left rear burner valve and knob.
4. Warmer drawer control knob.
5. Center burner valve and knob.
6. Right rear bumer valve and knob.
7. Right front burner valve and knob.
=
Self-clean door latch.
9.
,Cooling fan vent.
10.
Broil burner.
11.
Self-cleaning convection oven interior.
12.
Convection bake cooking system.
13.
Adjustable interior oven rack(s).
14.
Large 1-piece oven door handle.
15.
Full width oven door with window.
16.
Warmer drawer.
Features
17. Cast irongrates.
18. Oven vent.
19. 14 200 BTU power burner.
20. 10 000 BTU oval burner.
21. 5 000 BTU simmer burner.
22, 9 500 BTU burner.
23. 18 000-BTU burner.
24. Deep drawn cooktop.
NOTE: The features of your range may vary
according to model type & color,
Features
1 2 3
delay slow keep
start cook warm
preheat Cakes & conv _
probe dean
breads convert conv
se_f 0
1. Timer
2. Add 1 minute
3. Cook time
4. Delay start
5. Slow cook
6. Keep warm
7. Preheat
8. Cakes & breads
9. Convection convert
10. Probe
11. Self clean
12. Convection bake
13. Bake
14. Start
15. Broil
16. Convection roast
17. Oven light
18. Cancel
19. Set clock
20. Numeric key pads
21. Oven door lock
bake bake
oven
|ight
4 5 6
START
enter
@
CANCEL
off
broil
®
set
clock
COnY
roast
Bake 170°F/77QC 550°F / 288°C
ConY Bake 170°F i77°C 550°F/288°0
Keep Warm t700F / 77°C 170°F/77°C
Timer 1 min 1i hr 59 min
Clock 24 hr 0i00 hr 23 hr 59 min
COok time 24 hr 1 rain 11 hr 59 rain
7 8 9
0
oven
lock
_i_i_i_i_i_i_i_i_i_i_i_i_i_i_i_i_i_i_i_i_i_i_i_i_i_i_i_i_i_i_i_i_i_i_i_i_i_i_i_i_i_i_i_i_i_i_i_i_i_i_i_i_i_i_i_i__!__________________________________________
iiiiiiiiiiiiiiiiiiiiiiiiiiiiiiiiiiiiiiiiiiiiiiiiiiiiiiiiiiiiiiiiiiiiiiiiiiiiiiiiiiiiiiiiiiiiiiiiiiiiiiii@i!iiiiiiiiiiiiiiiiiiiiiiiiiiiiiiiiiiiiiiiiiiiiiiiiiiiii_
Delay start24 hr 0:00 hr 23 hr 59 min

Oven Cooking
Oven vents location
The oven is vented in
the center rear on the
cooktop. When the
oven is on, warm air
is released through
the vent. This venting
is necessary for proper
air circulation in the
oven and good baking
results. Do not block
oven vent.
Oven Vent
Air circulation in the oven
Types of oven racks
Your appliance may be equipped with one or more of
the oven rack types shown; Flat Handle Oven Rack,
Fully Extendable Luxury-Glide TMOven Rack and
Offset Oven Rack.
Flat oven racks may be used for most cooking needs
and may be placed in most oven rack positions.
_ _atovenrack
If using 1 rack, place in center of oven. If using
multiple racks, stagger cookware as shown.
For best air circulation and baking results allow
2-4" (5-10 cm) around the cookware for proper air
circulation and be sure pans and cookware do not
touch each other, the oven door, sides or back of
the oven cavity. The hot air must circulate around
the pans and cookware in the oven for even heat to
reach around the food.
1 Oven Rack
The fully extendable Luxury-Glide TMoven rack allows
you toeffortlessly extend your food away from the oven.
extendable
Luxury-Glide TM
oven rack
To maximize cooking space the Offset Oven Rack
can be used in the lowest rack position to roast large
cuts of meat and poultry.
Offset oven rack
iiiiiiiiiiiiiiiiiiiiiiiiiiiiiiiiiiiiiiiiiiiiiiiiiiiiiiiiiiiiiiiiiiiiiiiiiiiiiiiiiii
iiiiiiiiiiiiiiiiiiiiiiiiiiiiiiiiiiiiiiiiiiiiiiiiiiiiiiiiiiiiiiiiiiiiiiiiiiiiiiiiiii
iiiiiiiiiiiiiiiiiiiiiiiiiiiiiiiiiiiiiiiiiiiiiiiiiiiiiiiiiiiiiiiiiiiiiiiiiiiiiiiiiii
iiiiiiiiiiiiiiiiiiiiiiiiiiiiiiiiiiiiiiiiiiiiiiiiiiiiiiiiiiiiiiiiiiiiiiiiiiiiiiiiiii
iiiiiiiiiiiiiiiiiiiiiiiiiiiiiiiiiiiiiiiiiiiiiiiiiiiiiiiiiiiiiiiiiiiiiiiiiiiiiiiiiii
iiiiiiiiiiiiiiiiiiiiiiiiiiiiiiiiiiiiiiiiiiiiiiiiiiiiiiiiiiiiiiiiiiiiiiiiiiiiiiiiiii
iiiiiiiiiiiiiiiiiiiiiiiiiiiiiiiiiiiiiiiiiiiiiiiiiiiiiiiiiiiiiiiiiiiiiiiiiiiiiiiiiii
iiiiiiiiiiiiiiiiiiiiiiiiiiiiiiiiiiiiiiiiiiiiiiiiiiiiiiiiiiiiiiiiiiiiiiiiiiiiiiiiiii
iiiiiiiiiiiiiiiiiiiiiiiiiiiiiiiiiiiiiiiiiiiiiiiiiiiiiiiiiiiiiiiiiiiiiiiiiiiiiiiiiii
iiiiiiiiiiiiiiiiiiiiiiiiiiiiiiiiiiiiiiiiiiiiiiiiiiiiiiiiiiiiiiiiiiiiiiiiiiiiiiiiiii
iiiiiiiiiiiiiiiiiiiiiiiiiiiiiiiiiiiiiiiiiiiiiiiiiiiiiiiiiiiiiiiiiiiiiiiiiiiiiiiiiii
iiiiiiiiiiiiiiiiiiiiiiiiiiiiiiiiiiiiiiiiiiiiiiiiiiiiiiiiiiiiiiiiiiiiiiiiiiiiiiiiiii
:::::::::::::::::::::::::::::::::::::::::::::::::::::::::::::::::::::::::::::::::::
iiiiiiiiiiiiiiiiiiiiiiiiiiiiiiiiiiiiiiiiiiiiiiiiiiiiiiiiiiiiiiiiiiiiiiiiiiiiiiiiiii
Multiple Oven Racks
Oven Cooki
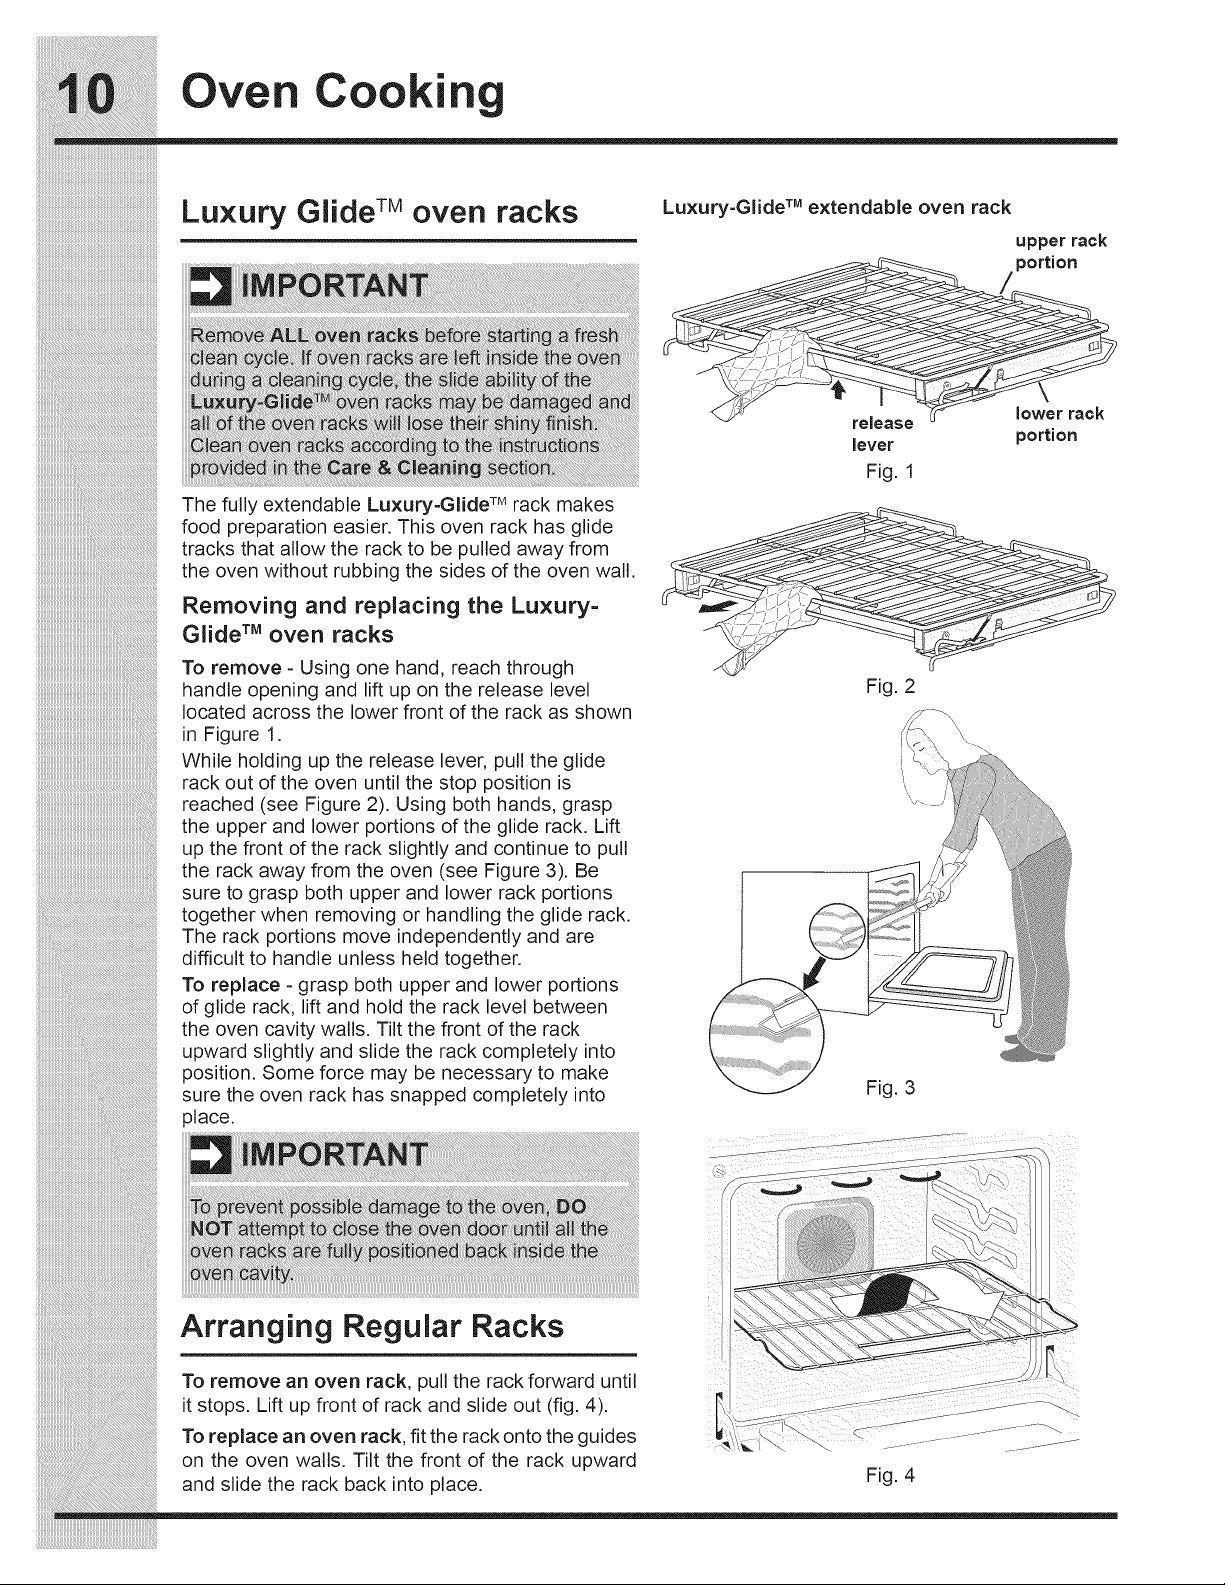
Luxury Glide TM oven racks
The fully extendable Luxury-Glide TM rack makes
food preparation easier. This oven rack has glide
tracks that allow the rack to be pulled away from
the oven without rubbing the sides of the oven wall.
Removing and replacing the Luxury=
Glide TM oven racks
To remove - Using one hand, reach through
handle opening and lift up on the release level
located across the lower front of the rack as shown
in Figure 1.
While holding up the release lever, pull the glide
rack out of the oven until the stop position is
reached (see Figure 2). Using both hands, grasp
the upper and lower portions of the glide rack. Lift
up the front of the rack slightly and continue to pull
the rack away from the oven (see Figure 3). Be
sure to grasp both upper and lower rack portions
together when removing or handling the glide rack.
The rack portions move independently and are
difficult to handle unless held together.
To replace - grasp both upper and lower portions
of glide rack, lift and hold the rack level between
the oven cavity walls. Tilt the front of the rack
upward slightly and slide the rack completely into
position. Some force may be necessary to make
sure the oven rack has snapped completely into
place.
Luxury=Glide TM extendable oven rack
release
lever portion
Fig. 1
Fig. 2
Fig. 3
upper rack
lower rack
Arranging Regular Racks
To remove an oven rack, pull the rack forward until
it stops. Lift up front of rack and slide out (fig. 4).
To replace an oven rack, fit the rack onto the guides
on the oven walls. Tilt the front of the rack upward
and slide the rack back into place,
Fig. 4
Surface Cooking
iiiiiiiiiiiiiiiiiiiiiiiiiiiiiiiiiiiiiiiiiiiiiiiiiiiiiiiiiiiiiiiiiiiiiiiiiiiiiiii_
iiiiiiiiiiiiiiiiiiiiiiiiiiiiiiiiiiiiiiiiiiiiiiiiiiiiiiiiiiiiiiiiiiiiiiiiiiiiiiii_
iiiiiiiiiiiiiiiiiiiiiiiiiiiiiiiiiiiiiiiiiiiiiiiiiiiiiiiiiiiiiiiiiiiiiiiiiiiiiiii_
Surface cooking utensils Flame size iiiiiiiiiiiiiiiiiiiiiiiiiiiiiiiiiiiiiiiiiiiiiiiiiiiiiiiiiiiiiiiiiiiiiiiiiiiiiiii;;
Formostcooking, startonthe highestcontrol iiiiiiiiiiiiiiiiiiiiiiiiiiiiiiiiiiiiiiiiiiiiiiiiiiiiiiiiiiiiiiiiiiiiiiiiiiiiiiii!:;
setting and then turn to a Iowerone to complete iiiiiiiiiiiiiiiiiiiiiiiiiiiiiiiiiiiiiiiiiiiiiiiiiiiiiiiiiiiiiiiiiiiiiiiiiiiiiiii::
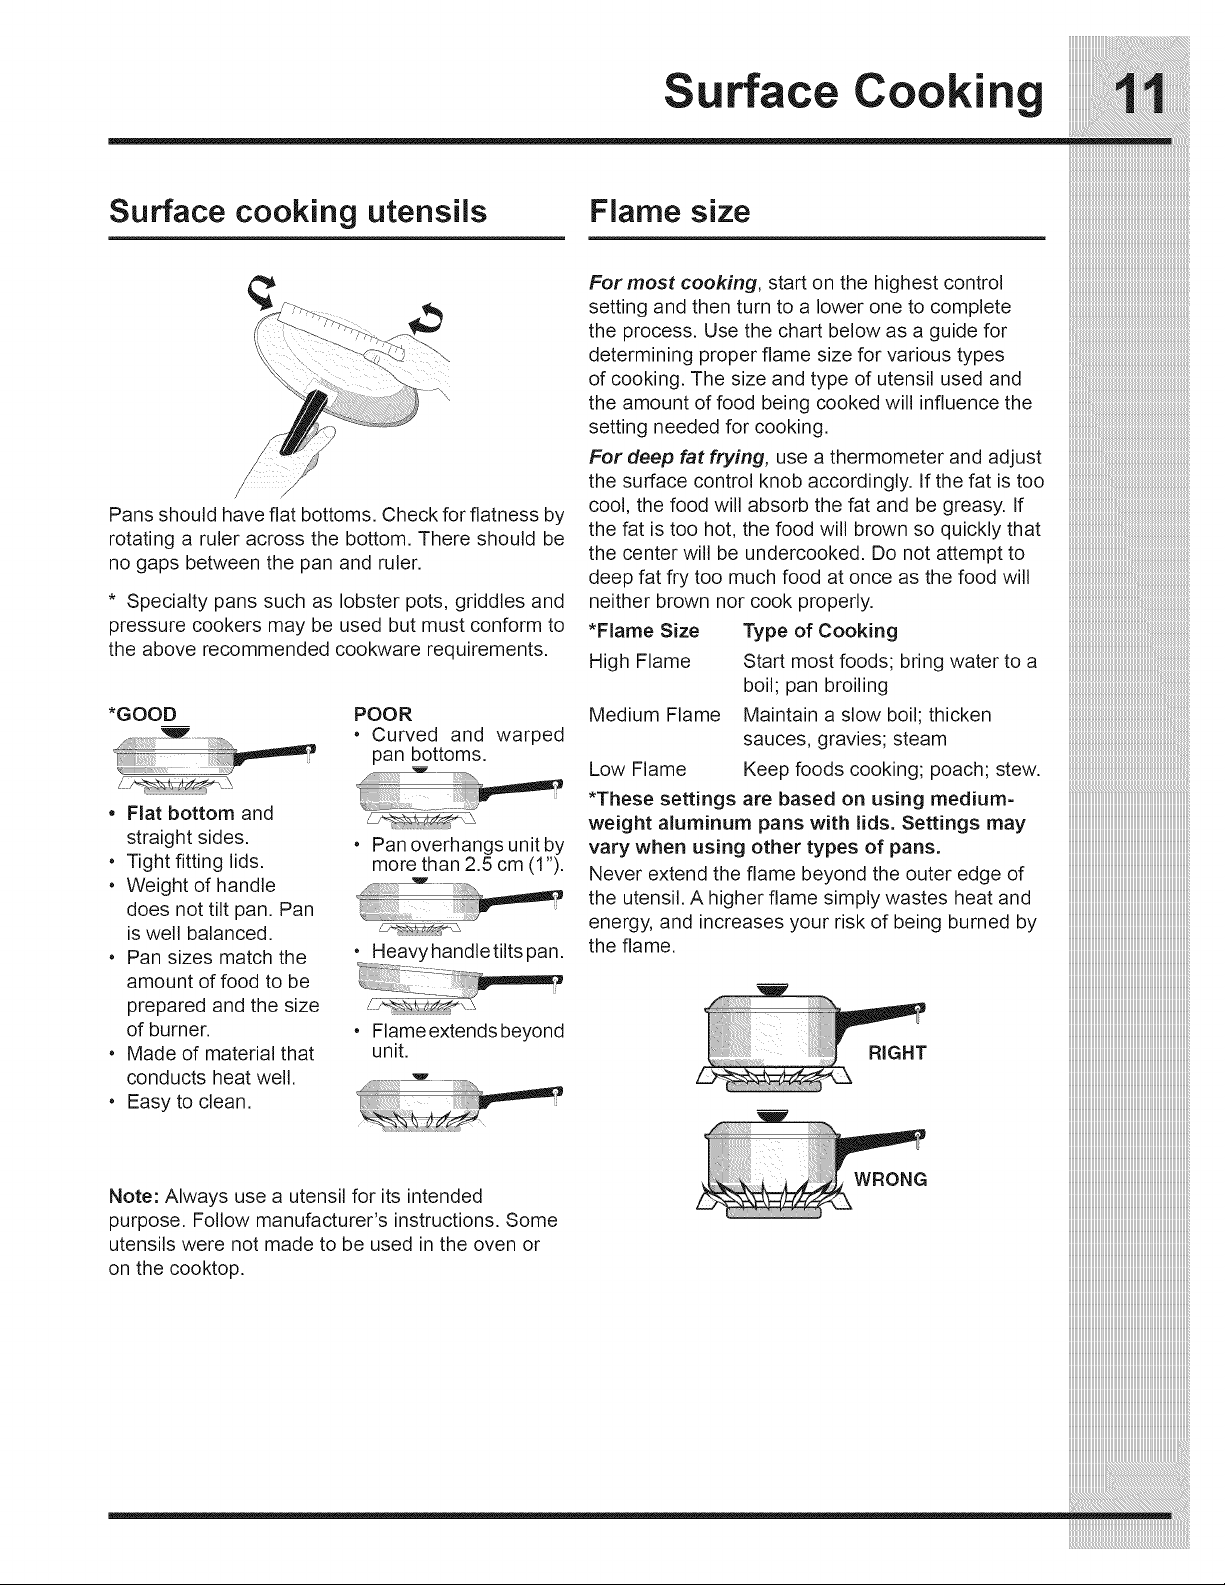
Pans should have flat bottoms. Check for flatness by
rotating a ruler across the bottom. There should be
no gaps between the pan and ruler.
* Specialty pans such as lobster pots, griddles and
pressure cookers may be used but must conform to
the above recommended cookware requirements.
*GOOD
o Flat bottom and
straight sides.
• Tight fitting lids.
• Weight of handle
does not tilt pan. Pan
is well balanced.
• Pan sizes match the
amount of food to be
prepared and the size
of burner.
• Made of material that
conducts heat well.
• Easy to clean.
POOR
• Curved and warped
pan bottoms.
I
• Pan overhangs unit by
more than 2.5 cm (1").
• Heavyhandletilts pan.
• Flame extends beyond
unit.
the process. Use the chart below as a guide for _!JJJJJJJJJJJJJJJJJJJJJJJJJJJJJJJJJJJJJJJJJJJJJJJJJJJJJJJJJJJJJJJJJJJJJJJJJJJJJ
determining proper flame size for various types
of cooking. The size and type of utensil used and
the amount of food being cooked will influence the
setting needed for cooking.
For deep fat frying, use a thermometer and adjust
the surface control knob accordingly. If the fat is too
cool, the food will absorb the fat and be greasy. If
the fat is too hot, the food will brown so quickly that
the center will be undercooked. Do not attempt to
deep fat fry too much food at once as the food will
neither brown nor cook properly.
*Flame Size Type of Cooking
High Flame Start most foods; bring water to a
boil; pan broiling
Medium Flame Maintain a slow boil; thicken
sauces, gravies; steam
Low Flame Keep foods cooking; poach; stew.
*These settings are based on using medium-
weight aluminum pans with lids. Settings may
vary when using other types of pans.
Never extend the flame beyond the outer edge of
the utensil. A higher flame simply wastes heat and
energy, and increases your risk of being burned by
the flame.
w
iiiU_1:i_i_i_i_i_i_i_i_i_i_i_i_i_i_i_i_i_i_i_i_i_i_i_i_i_i_i_i_i_i_i_i_i_i_i_i_i_i_i_i_i_i_i_i_i_i_i_i_i_i_i_i_i_i_i_i_i_i_i_i_i_i_i_i_i_i_i_i_i_i_i_i_i_i_i_i
Note: Always use a utensil for its intended
purpose. Follow manufacturer's instructions. Some
utensils were not made to be used in the oven or
on the cooktop.
iiiiiiiiiiiiiiiiiiiiiiiiiiiiiiiiiiiiiiiiiiiiiiiiiiiiiiiiiiiiiiiiiiiiiiiiiiiiiii
Before Settin urface Controls
PLACEMENT OF BURNER CAPS
To prevent flare-ups and avoid creation of harmful
by=products, do not use the cooktop without all
burner caps properly installed to insure proper
ignition and gas flame size.
It is very important to be sure that all surface
burner caps and burner grates are properly
installed and in the correct locations BEFORE
operating the cooktop burners.
Remember:
• Always keep surface burner caps in place
whenever using a surface burner.
• When placing the burner caps, be sure that all
burner caps are seated firmly and rest level on
top of burner heads.
• For proper flow of gas and ignition of burners
DO NOT allow spills, food, cleaning agents or
any other material to enter the gas orifice port
opening.
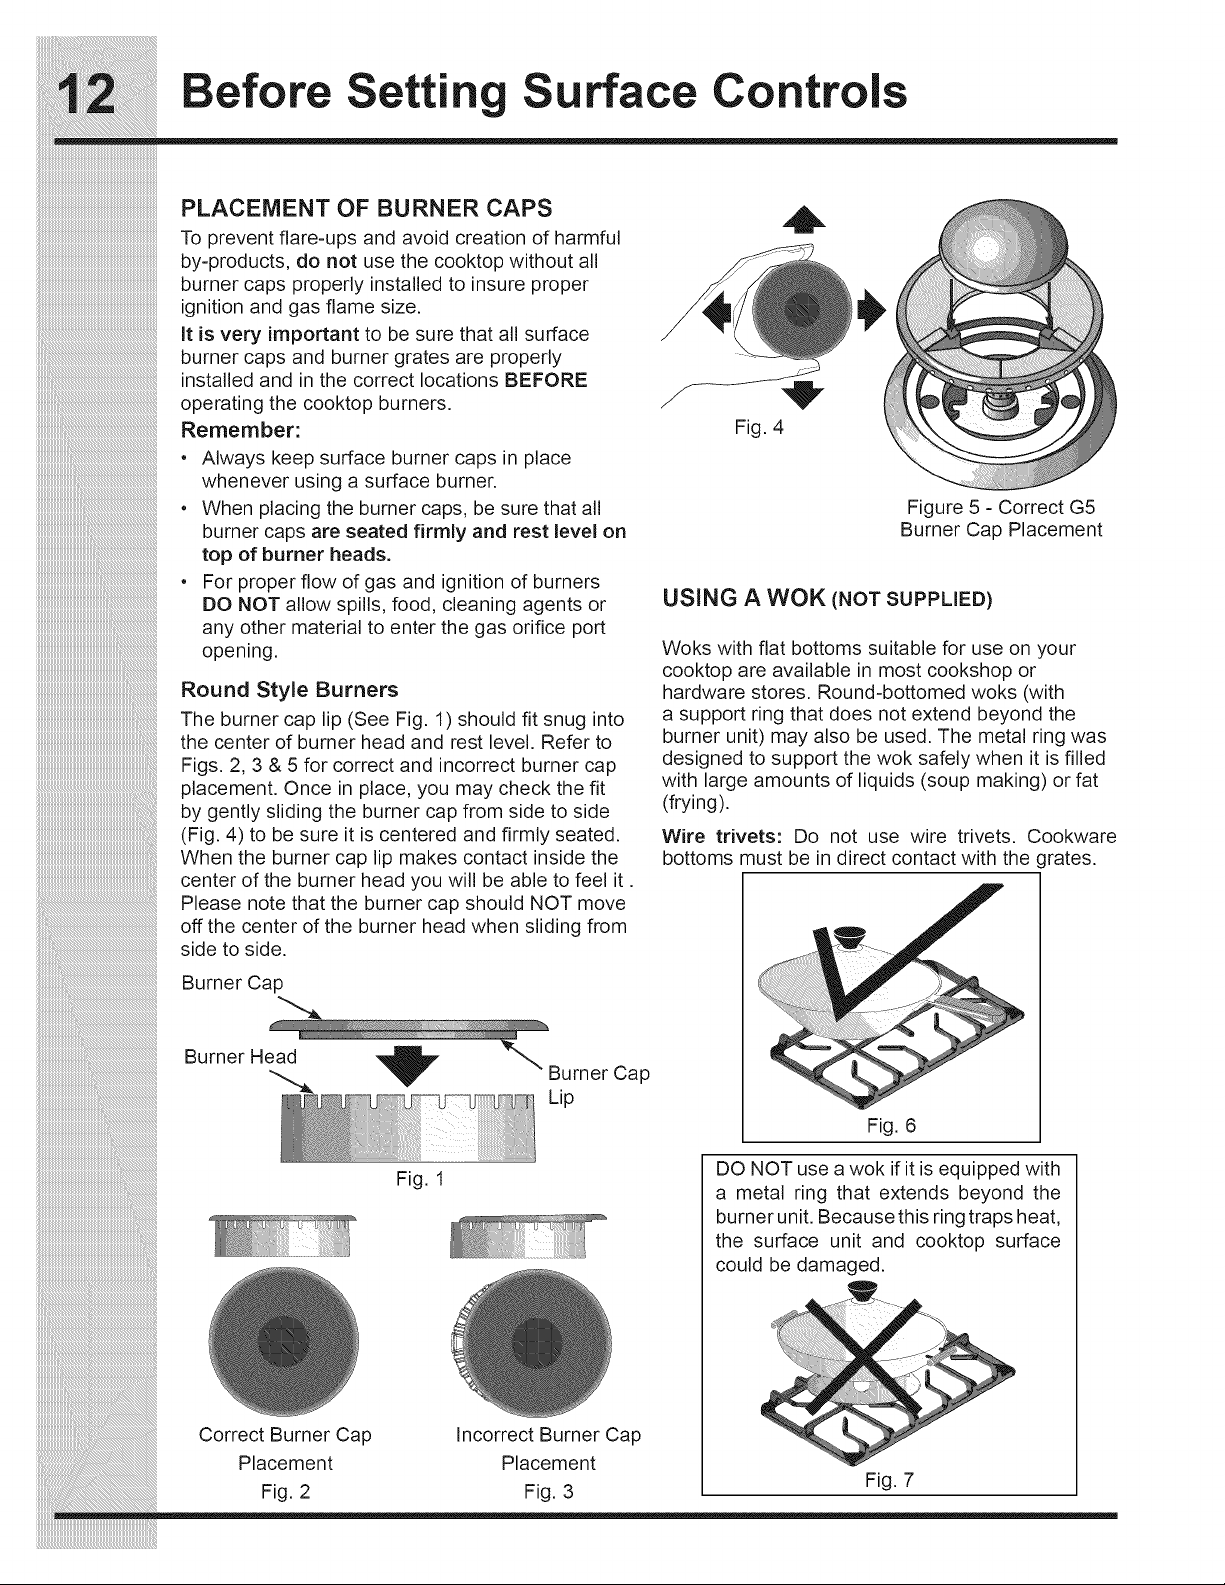
Round Style Burners
The burner cap lip (See Fig. 1) should fit snug into
the center of burner head and rest level. Refer to
Figs. 2, 3 & 5 for correct and incorrect burner cap
placement. Once in place, you may check the fit
by gently sliding the burner cap from side to side
(Fig. 4) to be sure it is centered and firmly seated.
When the burner cap lip makes contact inside the
center of the burner head you will be able to feel it.
Please note that the burner cap should NOT move
off the center of the burner head when sliding from
side to side.
USING A WOK (NOT SUPPLIED)
Woks with flat bottoms suitable for use on your
cooktop are available in most cookshop or
hardware stores. Round-bottomed woks (with
a support ring that does not extend beyond the
burner unit) may also be used. The metal ring was
designed to support the wok safely when it is filled
with large amounts of liquids (soup making) or fat
(frying).
Wire trivets: Do not use wire trivets. Cookware
bottoms must be in direct contact with the grates.
Fig. 4
Figure 5 - Correct G5
Burner Cap Placement
Burner Cap
Burner He_ ,_ _" Burner Cap
Lip
_i_i_i_i_i_i_i_i_i_i_i_i_i_i_i_i_i_i_i_i_i_i_i_i_i_i_i_i_i_i_i_i_i_i_i_i_i_i_i_i_i_i_i_i_i_i_i_i_i_i_i_i_i_i_i_i__!__________________________________________
iiiiiiiiiiiiiiiiiiiiiiiiiiiiiiiiiiiiiiiiiiiiiiiiiiiiiiiiiiiiiiiiiiiiiiiiiiiiiiiiiiiiiiiiiiiiiiiiiiiiiiiiiiiiiiiiiiiiiii_i!iiiiiiiiiiiiiiiiiiiiiiiiiiiiiiiiiiiiiiiiiiiiiiiiiiiii_
Correct Burner Cap Incorrect Burner Cap
Placement Placement
Fig. 2 Fig. 3
Fig. 1
DO NOT use a wok if it is equipped with
a metal ring that extends beyond the
burner unit. Because this ring traps heat,
the surface unit and cooktop surface
could be damaged.
Fig. 6
Fig. 7
Setti ur ace Controls
Setting surface controls
Your cooktop may be equipped with any
combination of the following burners:
Simmer Burner: best used for simmering delicate
sauces, etc.
Standard Burner: used for most all surface cooking
needs.
Large Burner: best used when bringing large
quantities of liquid to temperature and when
preparing larger quantities of food.
Regardless of size, always select a utensil
that is suitable for the amount and type of food
being prepared. Select a burner and flame size
appropriate to the pan. Never allow flames to
extend beyond the outer edge of the pan.
Your cooktop is also equipped with 270° rotation
flame control valves. These valves provide
enhanced control of the burner flame. Each burner
lights automatically from an electric ignitor when its
control knob is turned to the LITE position.
To operate the surface burner:
1. Place cooking utensil on burner.
2. Push in and turn the Surface Control knob to
,,_v_,(LITE). Note: All electronic ignitors will click
at the same time. However, only the burner you
are turning on will ignite.
3. Visually check that the burner has lit.
4. Turn the control knob to the desired flame size. The
control knobs do not have to be set at a particular
mark. Use the guides and adjust the flame as
needed. DO NOT cook with the Surface Control
knob in the _ position. (The electronic ignitorwill
continue to click if left in the ;_,i_:_,position, causing
premature wear.)
,o,_d
Burner control knob
Using the griddle
The griddle is intended for direct food cooking
and can be used on both sides. Do not use pans
or other cookware on the griddle. Doing so could
damage the finish. Center the griddle over the
bridge burner.
i!i!i!i! i!!i!ii
Inthe event of an electrical power outage, the surface
burners can be lit manually. To light a surface burner,
hold a lit match to the burner head, then slowly turn
the Surface Control knob to _. Use caution when
lighting surface burners manually.
Started
Setting Clock at Power Up
You will be prompted to enter the time of day in the
event of a power failure or when you first provide
electric power to your appliance.
When your appliance is first powered up, 12:00
will flash in the display.
Press CLOCK Q. Enter the time of day using
the numeric key pads and press START to set.
If an invalid time of day is entered, the control will
triple beep. Re-enter a valid time of day and press
START. If CANCEL is pressed your clock will start
with the time set for 12:00.
Setting Timer
The timer provided with the oven control serve as
extra reminders in the kitchen. When the time runs
out the active timer will beep, and "End" will be
displayed.
The following time settings apply to the timers:
• Min. time: 1 minute
• Max. time: 11 hours 59 minutes
Preheat Temperature Display
Once a cooking feature has been started, the
control will display the actual oven temperature
while preheating. Once the oven reaches the oven
set temperature, only the oven set temperature will
be displayed.
The preheat temperature display is available with
the following cooking modes:
• Bake
• Convection Bake
• Cakes & Breads
The minimum temperature displayed is 100°F/38°C.
To Set Add 1 Minute Feature
The ADD 1 MINUTE pad is used to set the Add 1
Minute feature. When the pad is pressed, 1 minute
is added to the Timer feature if this feature is
already active. If the Timer feature is not active and
the pad is pressed, the Timer feature will become
active and will begin counting down from 1 minute.
For further information on how to set the Timer
feature see Timer instructions above.
See example below to set the timer for 5 minutes:
1. Press TIMER on=off
2. Enter5 minutes 5
3. Press START
To cancel after setting the timer, press the TIMER
on=off key again.
timer
on-off
Setting Oven Lockout
The Oven Lockout feature automatically locks the
oven door and prevents the oven from being turned
on. It does not disable the clock, Timer or the
interior oven lights.
See example below to lock the ovens.
To lock, press and hold OVEN LOCK
for 3 seconds.
To unlock, press and hold OVEN
LOCK for 3 seconds.
DOOR LOCKED will flash in the display until the
door has finished locking. Once the door has been
locked the door lock indicator will turn on. DOOR
LOCKED will then stay displayed.
Do not attempt to open the oven door while the
door lock indicator is flashing.
3sec
1_3sec

p
reheat
The Preheat feature will bring the oven up to
the set cooking temperature, A reminder tone
will sound indicating when the set temperature
is reached and to place the food in the oven,
Preheating is not necessary when roasting or
cooking casseroles.
The following temperature settings apply to the
preheat feature:
• Auto-suggest (default) setting: 380°F/177°O
• Min. preheat setting: 17001= / 77°C
• Max. preheat setting: 580°F / 288°0
Setting preheat
Settin Oven Controls
iiiiiiiiiiiiiiiiiiiiiiiiiiiiiiiiiiiiiiiiiiiiiiiiiiiiiiiiiiiiiiiiiiiiiiiiiiiiiiiiiiiiiiiiiiiiiiii_?_:_:_:_:_:_:_:_:_:_:_:_:_:_:_:_:_:_:_:_:_:_:_:_:_:_:_:_:_i_i
See example below to set a preheat to start
immediately at the default temperature.
1. Press PREHEAT
If needed, use numeric keypads to enter a
different oven temperature.
2. Press START (_
"PRE" and the actual oven temperature shown in
the display will alternate as the oven heats and
reaches set temperature.
When the oven is finished preheating, the controls
will beep to remind you to place food in the oven.
The preheat feature will perform like the Bake
feature and continue to maintain the oven set
temperature until cancelled.
preheat
For best results
• Single oven rack cooking ONLY.
• Use in oven rack positions 2 or 3.
 Loading...