

Electrolux E30EW8CEPS3, E30EW8CEPS1, E30EW85EPS4, E30EW85EPS3, E30EW85EPS2 Owner’s Manual
...
4
se _ Care Guide
f__,_i/t_/n D ou b/e W _11 0 v e n
318 200 938 (0501)Rev, A
MAKEA RECORDFOBIIFUTUREUSE
m [] m [] [] m [] m [] m [] [] m [] [] m [] [] [] m m []
Brand
Purchase Date
ModeU Number
Serial Number
m [] m [] [] m [] m [] m [] [] m [] [] m [] [] [] m m []
For toll-free tebphone support in the U.S. and Canada:
1o877-4ELECTROLUX (1-877-435-3287)
For on-line support and internet product information:
www.emectrolux°com
2004 Electrolux Home Products, inc.
Post Office Box 212378, Augusta, Georgia 30917, USA
All rights reserved. Printed in the USA
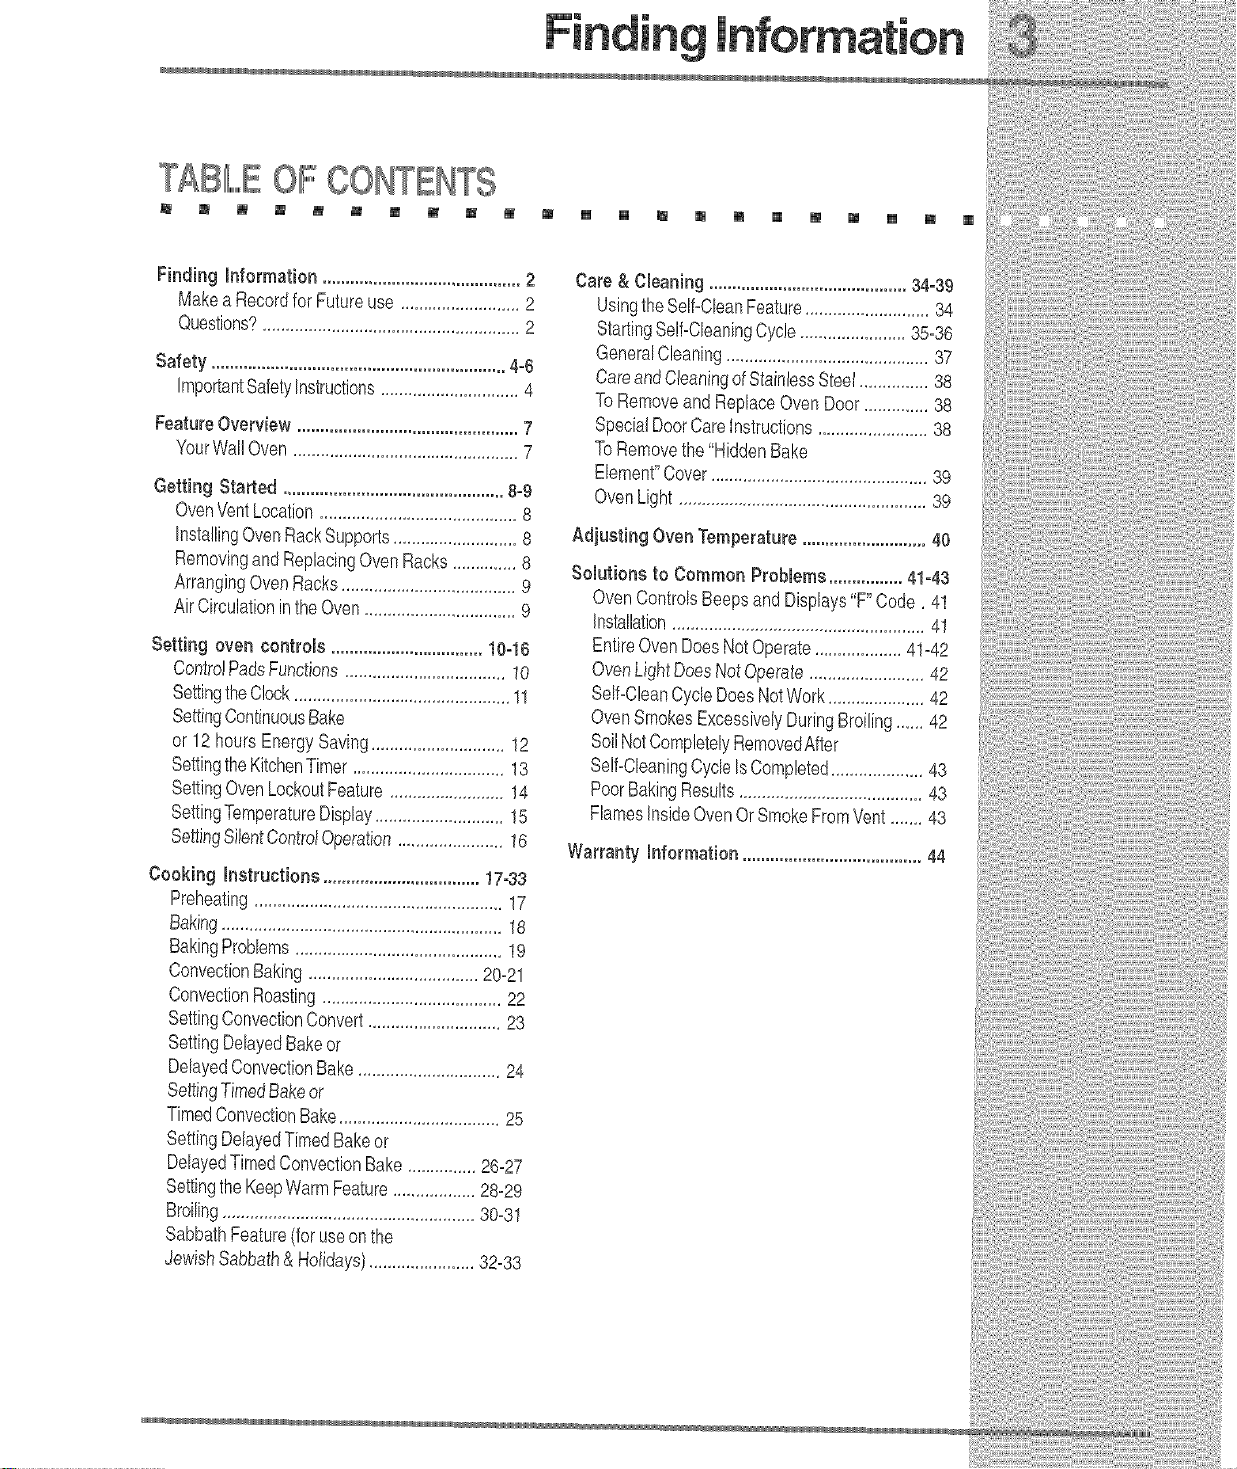
Finding Information ...........................................2
Makea RecordforFutureuse..........................2
Questions?........................................................2
Safety ................................................................4-6
ImportantSafety'Instructions..............................4
FeatureOverview................................................7
YourWallOven.................................................7
Getting Started ................................................8-9
OvenVentLocation...........................................8
InstallingOvenRackSupports...........................8
RemovingandReplacingOvenRacks..............8
ArrangingOvenRacks......................................9
AirCirculationintheOven.................................9
Setting oven controls .................................10-10
Centre!PadsFunctions...................................10
SettingtheClock...............................................11
SettingContinuousBake
or 12hoursEnergySaving.............................12
SettingtheKitchenTimer.................................13
SettingOvenLockoutFeature.........................14
SettingTemperatureDisplay............................15
SettingSibntControlOperation.......................16
Cooking hstructione ..................................17-33
Preheating......................................................17
Baking.............................................................18
BakingProblems.............................................19
ConvectionBaking.....................................20-21
ConvectionRoasting.......................................22
SettingConvectionConvert.............................23
SettingDelayedBakeor
DelayedConvectionBake...............................24
SettingTimedBakeor
TimedConvectionBake...................................25
SettingDelayedTimedBakeor
DelayedTimedConvectionBake...............26-27
SettingtheKeepWarmFeature..................28-29
Broi%g.......................................................30-31
SabbathFeature(foruseonthe
JewishSabbath& Holidays).......................32-33
Care & C_eaning...........................................34-39
UsingtheSelhCleanFeature...........................34
StartingSeI?CleaningCycle.......................35-36
GeneralCleaning............................................37
CareandCleaningofStainlessSteel...............38
ToRemoveandReplaceOvenDoor..............38
SpecialDoorCareInstructions........................38
ToRemovethe"HiddenBake
Element"Cover...............................................39
OvenLight......................................................39
Adjusting OvenTemperature...........................40
Solutions to Common Problems................41-43
OvenCorttrolsBeepsandDisplays"F"Cede, 41
Installation.......................................................41
EntireOvenDoesNotOperate...................41-42
OvenLightDoesNotOperate.........................42
Self-CleanCycJeDoesNetWork.....................42
OvenSmokesExcessivelyDuringBroiling......42
SoilNotCompletelyRemovedAfter
Sel?CleaningCycleIsCompleted....................43
PoorBakingResults........................................43
FlamesInsideOvenOrSmokeFromVent.......43
Warranty Information .......................................44
IIIM ANTS£FE IIINS U ONS
[] [] [] [] [] [] [] [] [] [] [] [] [] [] [] [] [] []
Please read aUUsafety instructions before using your new ElectroUux wall oven,
o Remove aH tape and packaging wrap before using the appliance. Destroy the
carton and plastic bags after unpacking the appliance. Never allow children to play
with packaging material, Do not remove the wiring label and other literature attached to the
back of the wall oven, Do not remove model/serial number plate,
Proper installation--Be sure your appJiance is properly installed and grounded by a
quaJified electrician or installer in accordance with the NationaJ Electrical Code
ANSm/NFPA No. 70 (U.S.A.) or CSA C22.1, PART 1(Canada)--latest editions and toca!
code requirements. Install only per installation instructions provided in the literature
package for this appliance,
Ask your dealer to recommend a qualified technician and an authorized repair service, Know how
to disconnect the electrical power to the appliance at the circuit breaker or fuse box in case of
an emergency,
[] [] [] []
EJectronic controllers can be damaged by cold temperatures. When
you use your appliance for the first time, or if it has not been used for a long period of
time, make sure that it has been exposed to a temperature above 0°C/32°F for at teast
3 hours before connecting it to the power suppJy.
User Servicing--Do not repair or reptace any part of the appliance unless specifically
recommended in the manuaJs. All other servicing should be done only by a qualified
technician to reduce the risk of personal injury and damage to the appliance,
o Never modify or alter the construction of the appliance by removing panets, wire
covers, or any other part of the product.
Remove the oven door from any unused appliance if it is to be stored or discarded,
Stepping, leaning, sitting or pulling down on the door of this appliance
can result in serious injuries and may also cause damage to the appliance. Do not allow
children to climb or play around the appliance,
Storage in or on Appliance--Flammable materials should not be stored in an oven.
This includes paper, plastic and cloth items, such as cookbooks, plasticware and towels, as
well as flammable liquids, Do not store explosives, such as aerosol cans, in or near the
appliance,
Do not use the oven for storage.
Do not store items of interest to children in the cabinets above an
appliance. Children climbing on the oven can be seriously injured.
_To reducetheriskoftippingoftheappliance,Theappliancemustbe
securedbyproperlyinstallthemountingbrackets,Tocheckifbracketsareinstalledproperly
opentheovendoorandverifythatthemountingbracketsareengagedseeinstallation
instructions,
oDonotJeavechildrenaJone--Childrenshouldnot beleftaJoneor unattendedin
theareawhereanappJianceisin use.Theyshouldneverbeallowedtositorstandon
anypartoftheappliance,
oDONOTTOUCHmNTERmOROVENELEMENTSORmNTERmORSURFACESOFTHEWALL
OVENUNTmLTHEYHAVECOOLED.Theovenheatingelementsmaybehoteventhoughthe
elementsaredarkincolor,Areasneartheelementsmaybecomehotenoughtocauseburns,
Duringandafteruse,donottouch,orletclothingorotherflammablematerialstouchthese
areasuntiltheyhavehadsufficienttimetocool,Amongtheseareasaretheovenvent
openings,thesurfacesneartheseopenings,ovendoorandwindow,
oWearProperApparel--Loose-fittingor hanginggarmentsshouJdneverbe worn
whileusingtheappliance.Donotletclothingorotherflammablematerialscontacthot
surfaces,
NeveruseyourappJiancefor warmingorheatingtheroom.
oDoNotUseWateror FJouron GreaseFires--Smotherthefire withapantid,or use
bakingsoda,adrychemica!orfoam-typeextinguisher.
oWhenheatingfator grease,watchit ctosely.Fatorgreasemaycatchfireifallowedto
becometoohot,
oUseOnJyDryPotholders--Moistordamppotholdersonhotsurfacesmayresultin
burns from steam. Do not let the pot holders touch the hot heating elements, Do not use a
towel or other bulky cloth instead of a pot holder
Do Not Heat Unopened Food Containers--Build-up of pressure may cause the
container to burst and resutt in injury.
IMPORTANTINSTRUCTIONSFORUSINGYOUROVEN
Use Care When Opening an Oven Door--Stand to the side of the appliance when opening
the door of a hot oven, Let hot air or steam escape before you remove or replace food inthe
oven,
o Keep Oven Vent Ducts Unobstructed. The wall oven is vented at the upper control panel or
at the center trim depending of the model, Touching the surfaces in this area when the wall
oven is operating may cause severe burns, Also, do not place plastic or heat-sensitive items
near the oven vent, These items could melt or ignite,
Placement of Oven Racks. Always place oven racks in desired location while oven is cool,
Remove all utensils from the rack before removing rack, Ifrack must bemoved while oven is
hot, use extreme caution, Use pot holders and grasp the rack with both hands to reposition,
Do not let pot holders contact the hot oven element or interior of the oven,
o Do not use the broiter pan without its insert. The broiler pan and insert allow dripping fat
to drain and be kept away from the high heat of the broiler,
IIIM ANTS£FE IIINS U ONS
[] [] [] [] [] [] [] [] [] [] [] [] [] [] [] [] [] [] [] [] [] []
* Do not cover the broiler pan insert or oven bottom with aluminum foil. Exposed fat and
grease could ignite,
Do not touch a hot oven light buJb with a damp cloth. Doing so could cause the bulb to
break, Disconnect the appliance or shut off the power to the appliance before removing and
replacing the bulb,
iMPORTANTINSTRUCTNONSFORCLEANINGYOUR
Ctean the appliance regulaHy to keep aH parts free of grease that could ignite.
Exhaust fan ventilation hoods and grease filters should be kept clean, Do not allow grease
to accumulate, Greasy deposits in the fan could ignite, Refer to the hood manufacturer's
SELF CLEANmNG OVENS
Clean in the self-cleaning cycJe onJy the parts of the appliance Jisted in this Owner's
Guide. Before using the self°cleaning cycle of the appliance, remove the broiler pan, oven racks
and any utensils stored in the appliance, Also the side rails of the oven racks must beremoved
for the self-clean function to operate,
Do not clean the oven door gasket. The door gasket is essential for a good seal, Care should
be taken not to rub, damage or move the gasket,
Do not use oven cleaners. No oven cleaner or oven liner protective coating of any kind should
be used in or around any part of the appliance
The health of some birds is extremely sensitive to the fumes given off during
the self°clean cycle of any wall oven, Move birds to another well ventilated room,
Peal:ure uverview
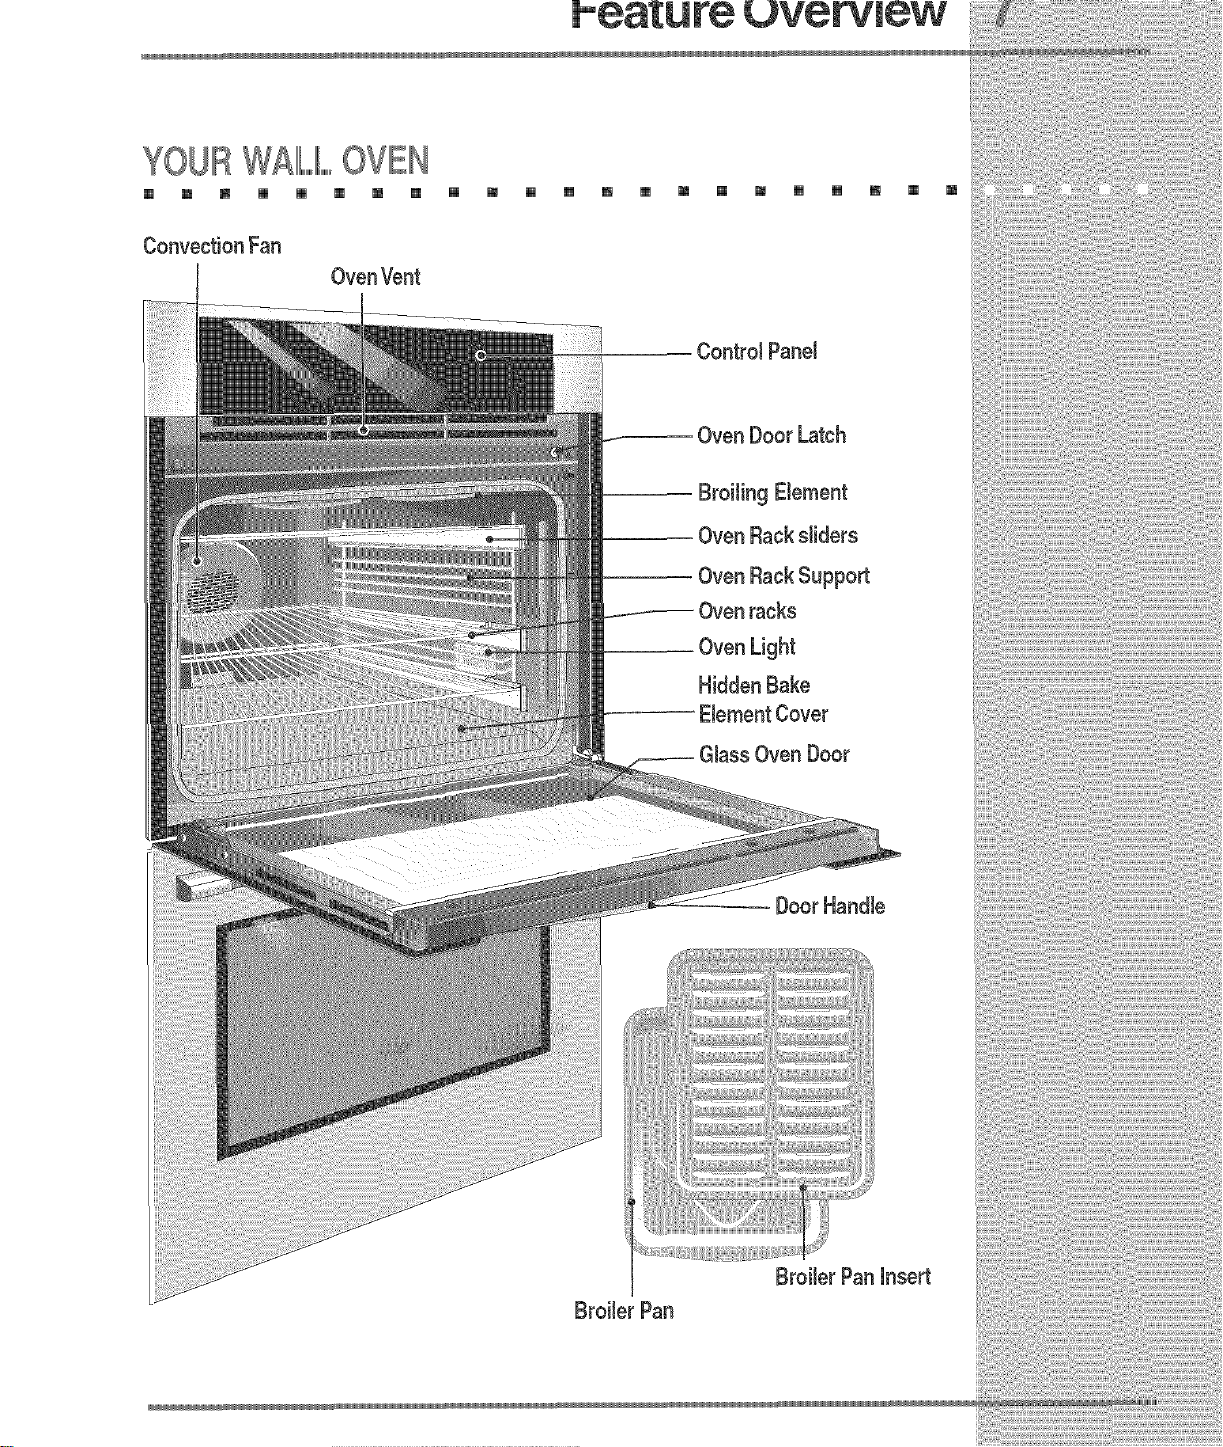
YOURW£11LIILOVEN
[] m m [] [] [] m [] [] m [] [] m [] m [] m [] [] m [] m
Convection Fan
OvenDoor Latch
BEIFO $E ING OVENCON OIIIL,,,S
[] [] [] [] [] [] [] [] [] [] [] [] [] [] [] [] [] [] [] [] [] []
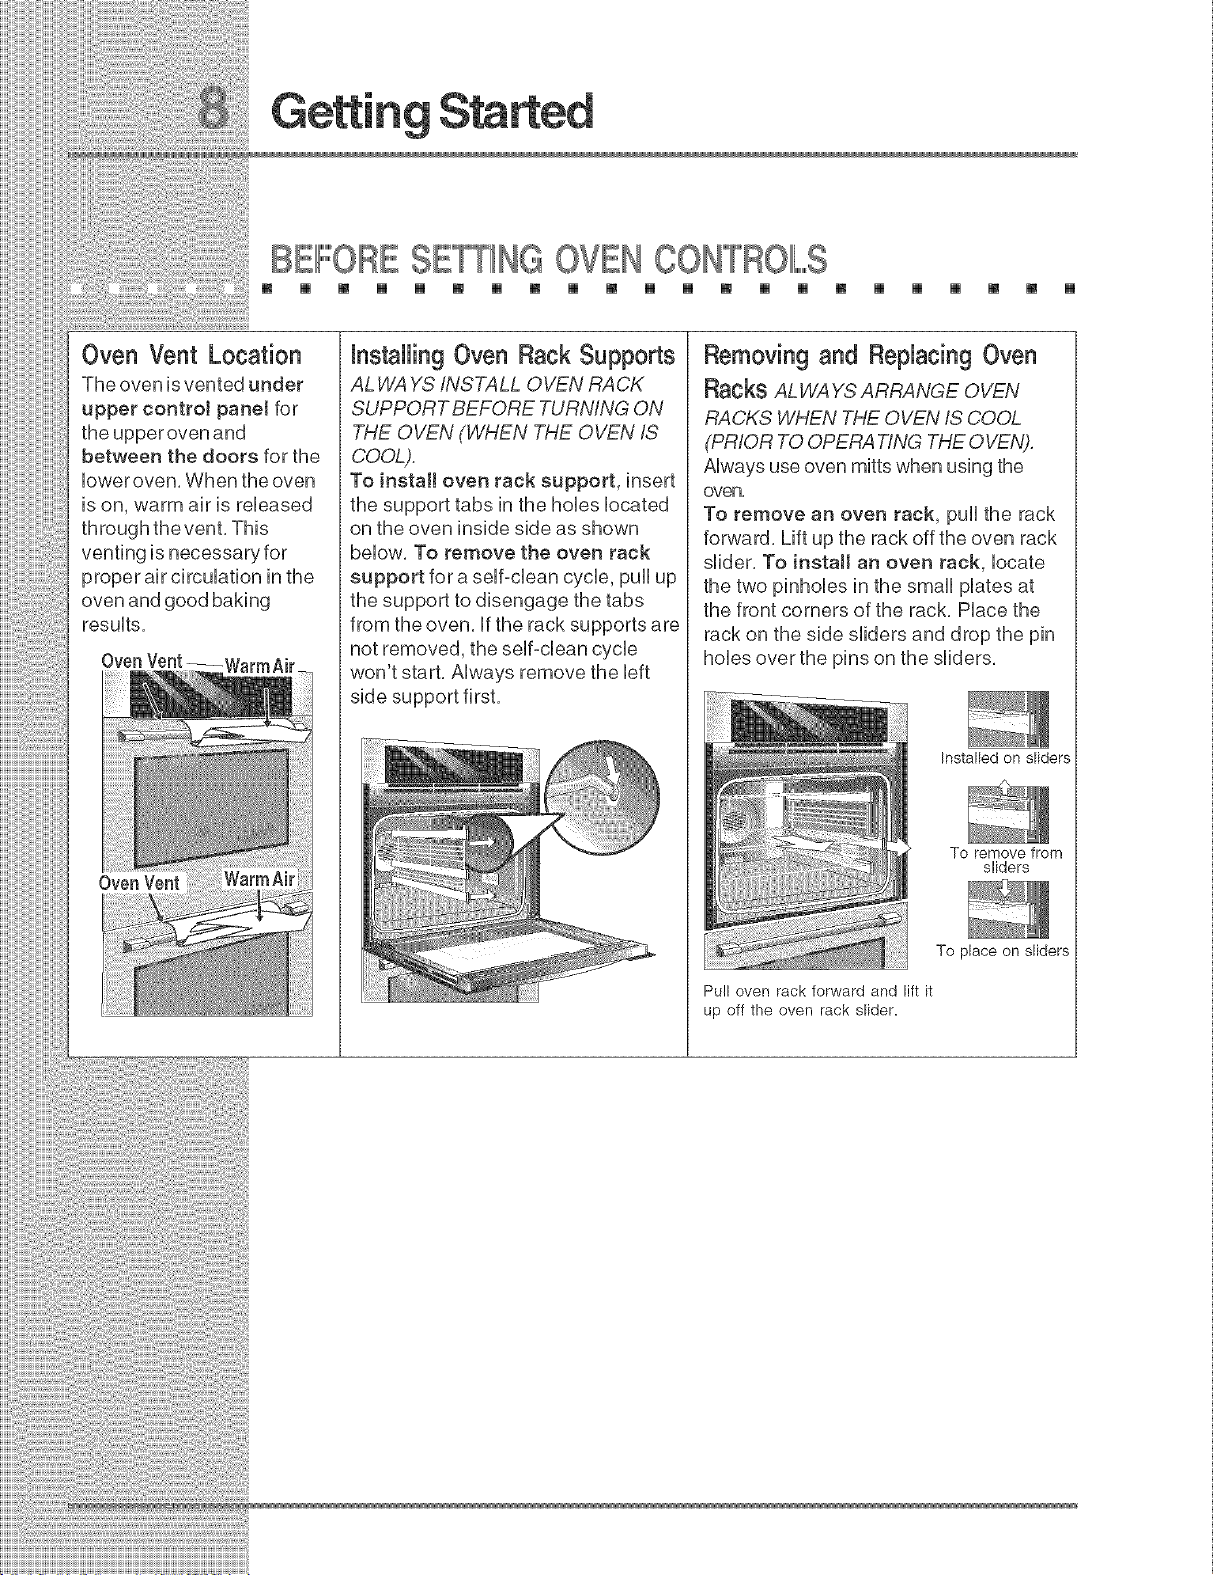
Oven Vent Location
The oven is vented under
upper controJ panel for
between the doors for the
lower oven. When the oven
is on, warm air is released
through the vent. This
venting is necessary for
proper air circulation in the
oven and good baking
results.
OvenVent_,
OvenVent
NnstallingOven Rack Supports
ALWA YS /#/STALL OVEN RACK
SUPPORT BEFORE TURNING ON
THE OVEN (WHEN THE OVEN iS
COOL).
To install oven rack support, insert
the support tabs in the hobs located
on the oven inside side as shown
below. To remove the oven rack
support for a self-clean cycle, pull up
the support to disengage the tabs
from the oven. if the rack supports are
not removed, the self-clean cycle
won't start. Always remove the left
side support first.
Removing and Replacing Oven
Racks AL WAYS ARRANGE OVEN
RACKS WHEN THE OVEN IS COOL
(PRIOR TO OPERA TING THE OVEN).
Always use oven mitts when using the
oven,
To remove an oven rack, pull the rack
forward. Lift up the rack off the oven rack
slider. To install an oven rack, locate
the two pinholes in the small plates at
the front corners of the rack. Place the
rack on the side sliders and drop the pin
hobs over the pins on the sliders.
Instalbd on sliders
To remove from
sliders
Pull oven rack forward and lift it
up off the oven rack slider.
To place on sliders
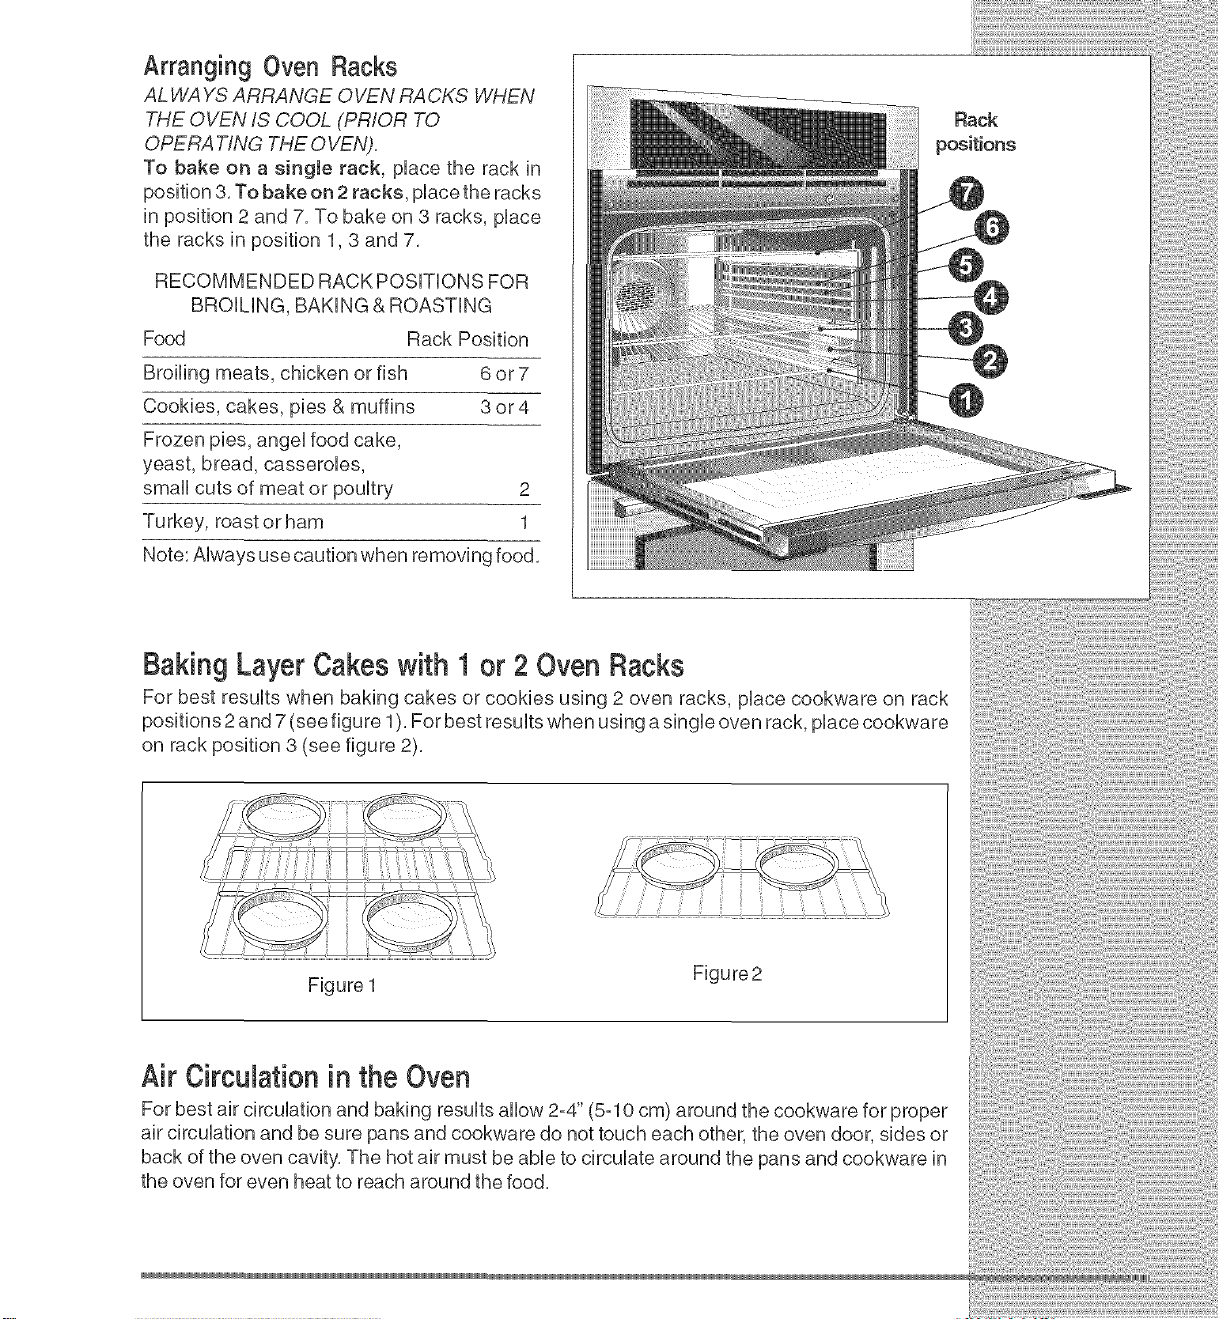
Arranging Oven Racks
AL WAYS ARRANGE OVEN RACKS WHEN
THE OVEN IS COOL (PRIOR TO
OPERA TING THE OVEN).
To bake on a eingJe rack, pUacethe rack in
position 3. To bake on 2 racks, pUacethe racks
in position 2 and 7. To bake on 3 racks, pUace
the racks in position 1,3 and 7.
RECOMMENDED RACK POSBONS FOR
BROiLiNG, BAKING & ROASTING
Food Rack Position
Broiling meats, chicken or fish 6 or 7
Cookies, cakes, pies & muffins 3 or4
Frozen pies, angeUfood cake,
yeast, bread, casserobs,
small cuts of meat or pouUtry 2
Turkey, roast orham 1
Note: AUwaysuse caution when removing food.
o
Baking Layer Cakeswith 1 or 2 Oven Racks
For best results when baking cakes or cookies using 2 oven racks, place cookware on rack
positions 2 and 7 (see figure 1). For best results when using a single oven rack, place cookware
on rack position 3 (see figure 2).
Figure 1
Figure2
Air Circulation inthe Oven
For best air circulation and baking results allow 2=4"(5=10cm) around the cookware for proper
air circulation and be sure pans and cookware do not touch each other, the oven door, sides or
back of the oven cavity, The hot air must be able to circulate around the pans and cookware in
the oven for even heat to reach around the food,
CON OIIIL,,,,,PADIFUNCT ONS
[] [] [] [] [] [] [] [] [] [] [] [] [] [] [] [] [] [] [] [] [] []
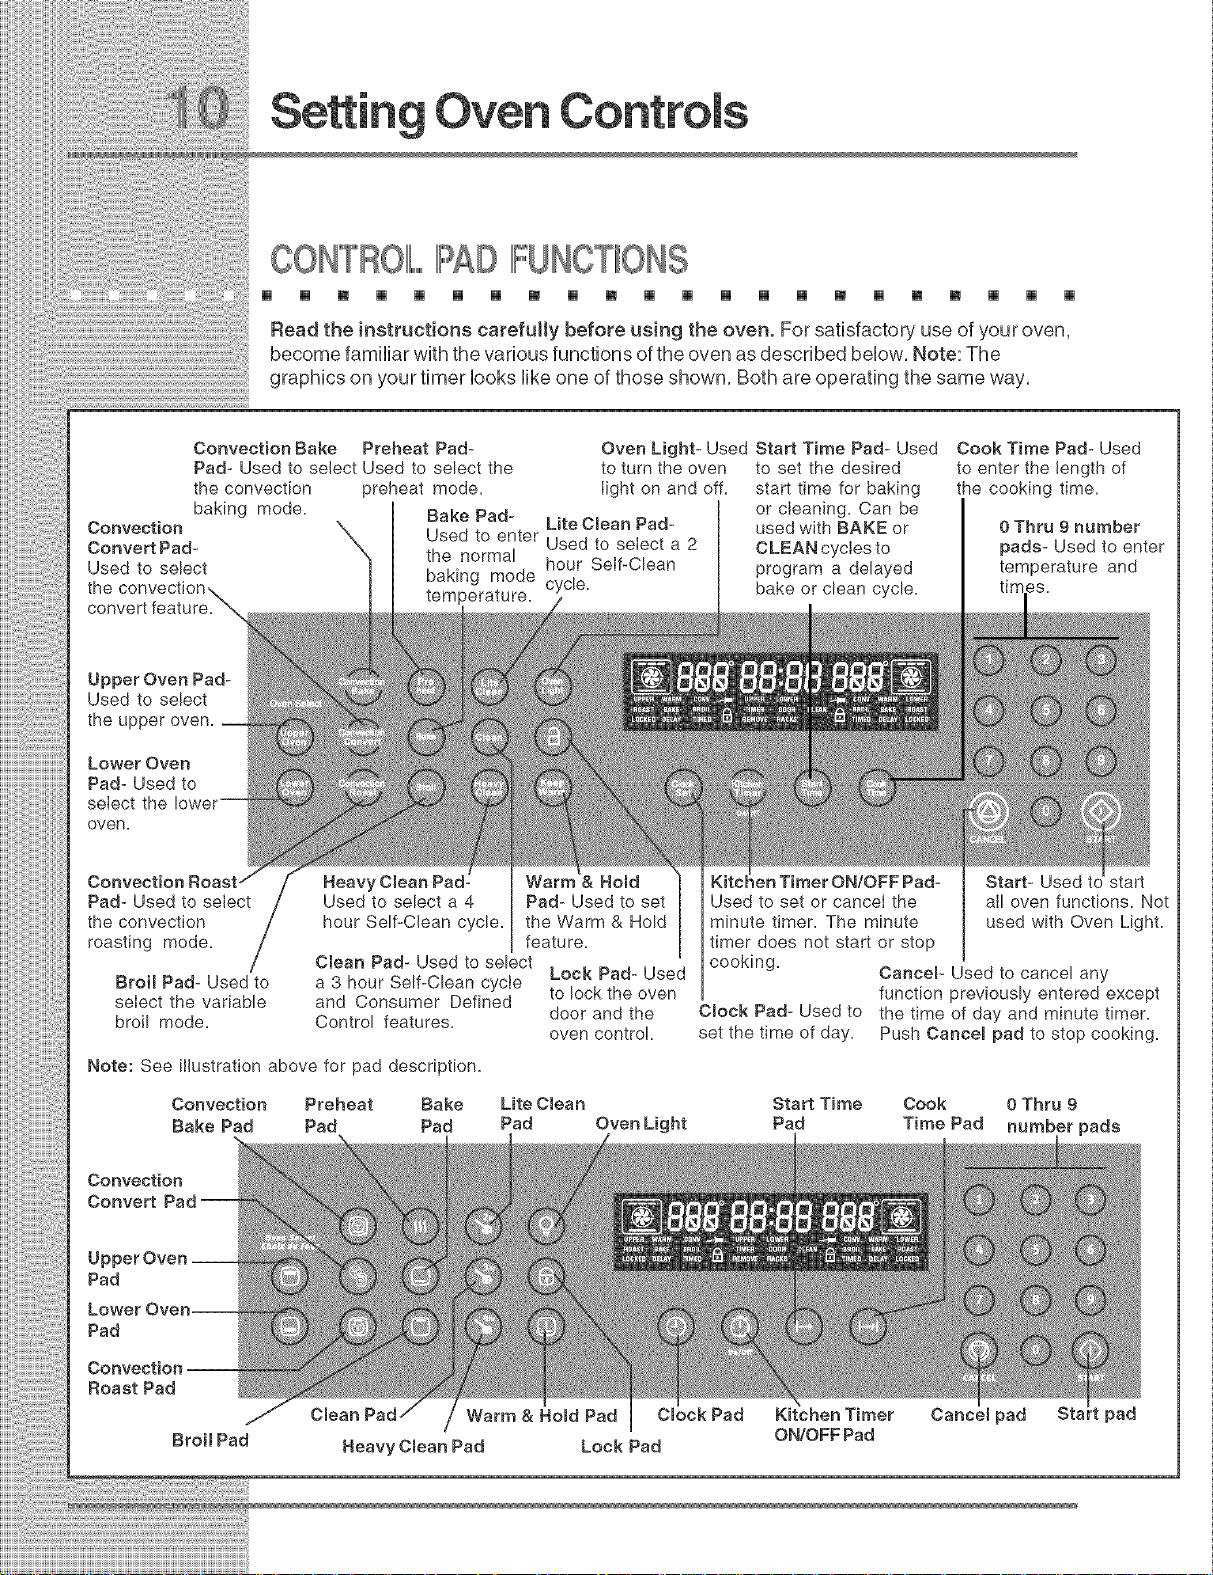
Read the instructions carefully before using the oven. For satisfactory use of your oven,
become familiar with the various functions of the oven as described below. Note: The
graphics on your timer looks like one of those shown. Both are operating the same way.
Convection Bake
Pad- Used to select Used to select the
the convection
baking mode.
Convection
Convert Pad-
Used to select
Upper Oven Pad-
Used to select
the upper oven.
Lower Oven
Pad- Used to
select the
oven.
Pad- Used to select
the convection
roasting mode. /
Broil Pad- Used to
select the variable
broil mode.
Note: See illustration above for pad description.
Convection Preheat
Bake Pad Pad
Preheat Pad- Oven Light- Used Start Time Pad- Used Cook Time Pad- Used
preheat mode. Iight on and off. start time for baking the cooking time.
Bake Pad- Lite Cmean Pad- used with BAKE or
Used to enter Used to select a 2 CLEANcycIesto
the normal hour Self-Clean program a delayed
baking mode cycle, bake or clean cycle.
temperature.
Used to select a 4 Pad- Used to set
hour Self-Clean cycle, the Warm & Hold
Clean Pad- Used to select
a 3 hour Self-Clean cycle Lock Pad- Used
and Consumer Defined to lock the oven
Control features, door and the
Bake Lite C_ean
Pad Pad Oven Light
& Ho_d
feature.
oven control.
to turn the oven to set the desired to enter the length of
or cleaning. Can be
_enTimer ON/OFF Pad-
Used to set or cancel the
minute timer. The minute
timer does not start or stop
cooking.
Cmock Pad- Used to
set the time of day.
Start Time Cook 0 Thru 9
Pad Time Pad number pads
Cancer Used to cancel any
function previously entered except
the time of day and minute timer.
Push Cancem pad to stop cooking.
0 Thru 9 number
pads- Used to enter
temperature and
Start- Used
alI oven functions. Not
used with Oven Light.
Convection
Convert
Pad
Pad
Roast Pad
Broil Pad
Cmean Warm & HerodPad Cmock Pad
Heavy CmeanPad Lock Pad
/
Kitchen Timer
ON/OFF Pad
Cance_ pad Sta pad
Oven
9E ING THE ClIILOGK
[] [] [] [] [] [] [] [] [] [] [] [] [] [] [] [] [] [] [] [] [] []
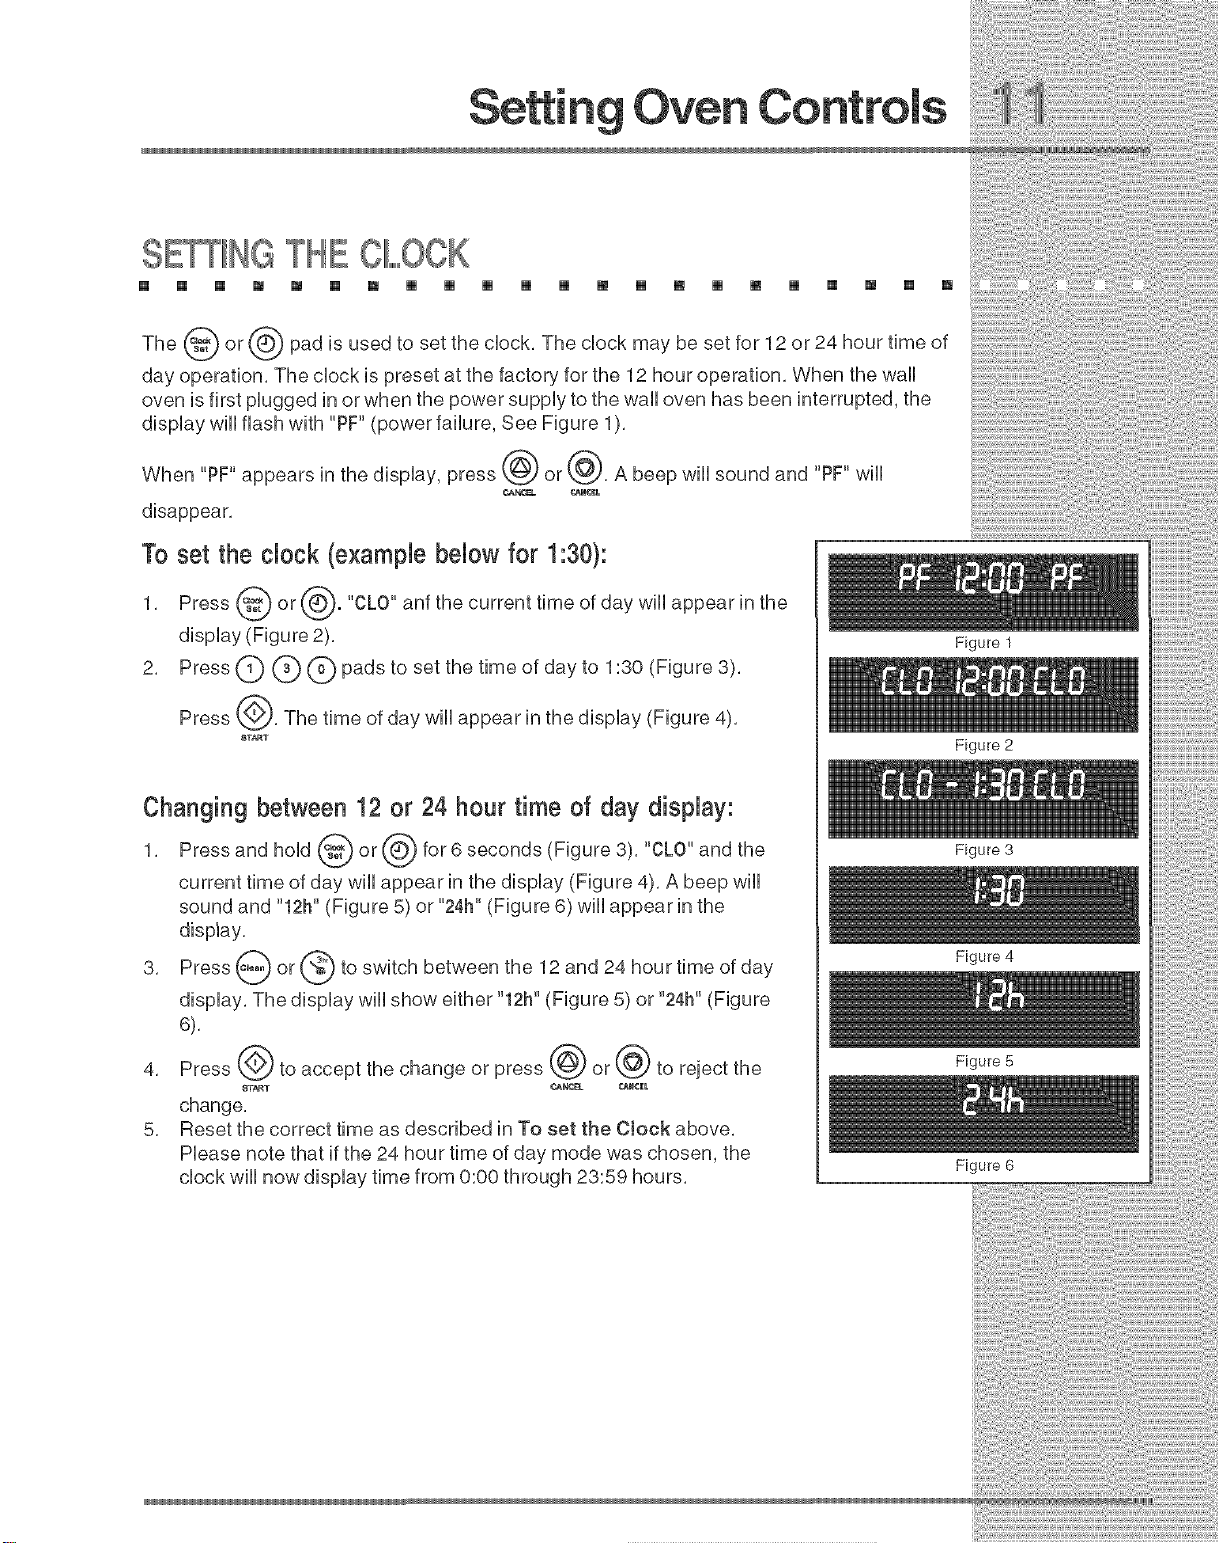
The (_W) or (,Q) pad is used to set the clock. The clock may be set for 12 or 24 hour time of
day operation. The clock is preset at the factory for the 12 hour operation. When the wall
oven is first plugged in or when the power supply to the wall oven has been interrupted, the
display wiii flash with "PF"(power failure, See Figure 1).
When "PF" appears in the display, press @ or @. A beep will sound and "PF" will
disappear.
CA_Y4S_L _NCEB
To set the clock (example below for 1:30):
1. Press @ or @. "CLO" anf the current time of day wHiappear in the
display (Figure 2).
2. Press (_ (_ (_) pads to set the time of day to 1:30 <Figure 3>.
Press @. The time of day wHiappear in the dispiay (Figure 4).
8TA_T
Changing between 12 or 24 hour time of day display:
1. Pressandhondor(6}for6seconds<Figure31."CLO"andthe
current time of day wili appear in the dispiay (Figure 4). A beep wili
sound and "12h" (Figure 5) or "24h" (Figure 6) wili appear in the
display.
3. Press _ or @ to switch between the 12 and 24 hour time of
dispiay. The dispiay wili show either "12h" (Figure 5) or "24h" (Figure
6).
day
Figure 1
Figure 2
:i::ii:ii:ii:ii:ii:ii:ii:ii:ii:ii:ii:ii:ii:ii:ii:ii:ii:ii:
Figure 3
Figure 4
4. Press @ to accept the change or press @ or @ to reject the
change.
5. Reset the correct time as described in To set the Clock above.
Piease note that if the 24 hour time of day mode was chosen, the
chockwili now dispiay time from 0:00 through 23:59 hours.
Figure 5
Figure 6

SE IIINGOONTIIINUOUSBAKE OR 12 HOUR
ENERGYSAVIIING
[] [] [] [] [] [] [] [] [] [] [] [] [] [] [] [] [] [] []
[] []
Figure 1
Figure 2
Figure 3
Figure 4
The _"°°
Saving features. The oven control has a factory preset builtoin 12 Hour Energy Saving feature
that will shut off the oven if the oven control is left on for more than 11 hours and 59 minutes.
The oven can be programmed to override this feature for Continuous Baking.
or and or pads control the Continuous Bake or 12 Hour Energy
G@
To set the control for Continuous Bake or 12Hour Energy
Saving
1. Press and hoUd_L_Yor for 6 seconds. 'oo.oo wHUappear, "TINEF_"
will flash and a beep will be heard (Figure 1).After 6 seconds a beep will
sound and "12h" (Figure 2) or "==h" (Figure 3) appears in the display.
2. Press _ or _ to switch between the 12 Hour Energy Saving and
continuous bake features. Note: "12h"in the display indicates the control
is set for the 12 Hour Energy Saving mode and "==h" indicates the
control is set for the Continuous Bake feature (Figures 2 and 3).
3. Press _._ to accept the change (Figure 4; display will return to time
of day) or press _ or_.} to reject the change.
o_ o_le_
m [] [] [] [] [] [] [] [] [] [] [] [] [] [] [] [] [] [] [] [] []
The _ or
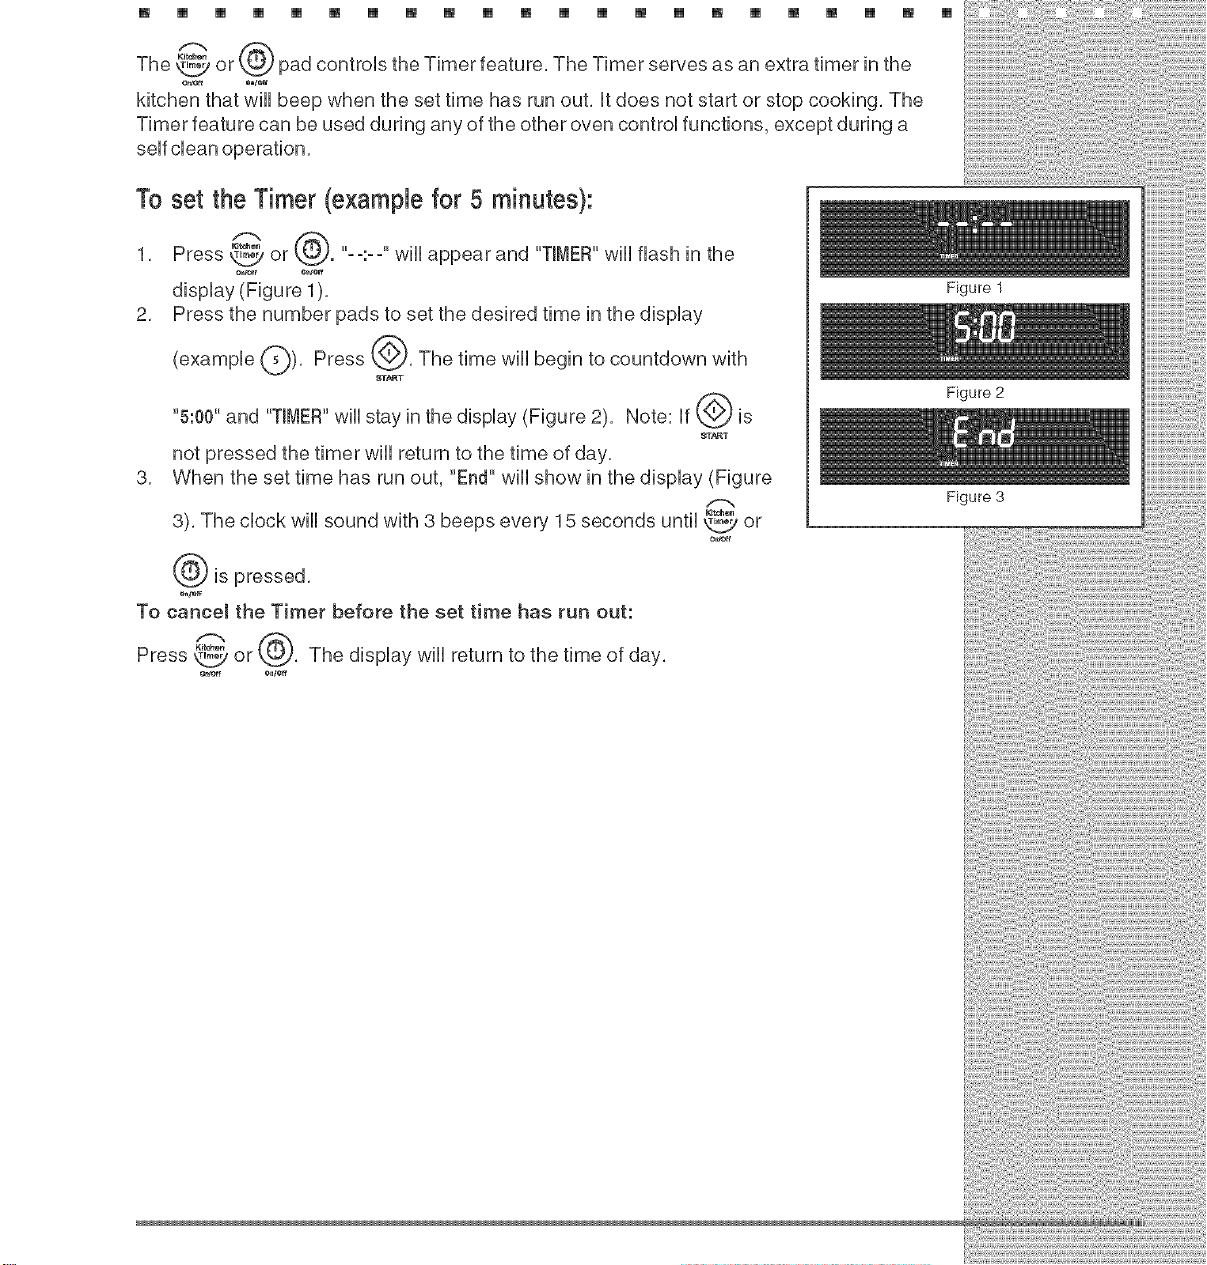
pad controls_'_°° the Timer feature, The Timer serves as an extra timer in the
kitchen that wHUbeep when the set time has run out, Utdoes not start or stop cooking, The
Timer feature can be used during any of the other oven controUfunctions, except during a
To set the Timer (example for 5 minutes):
1, Press _ or k_. "o-:-o"wHUappear and "TIMER"wHUflash in the
dispUay(Figure 1),
2, Press the number pads to set the desired time in the dispUay
(exampUe Q), Press ___, The time wHUbegin to countdown with
"5:00" and "TIMER"wHUstay in the dispUay(Figure 2), Note: If _ is
not pressed the timer will return to the time of day,
3, When the set time has run out, "End" will show in the display (Figure
3), The clock will sound with 3 beeps ever}, 15 seconds until _ or
is pressed,
To cancel the Timer before the set time has run out:
8T_T
_T_T
er_-ff
Figure 1
Figure 2
Figure 3
Press _ or , The display will return to the time of day,
OtCeff *_,t*tf
$E IHG OVENLOCKOUTIIFEATU
[] [] [] [] [] [] [] [] [] [] [] [] [] [] [] [] [] [] [] [] []
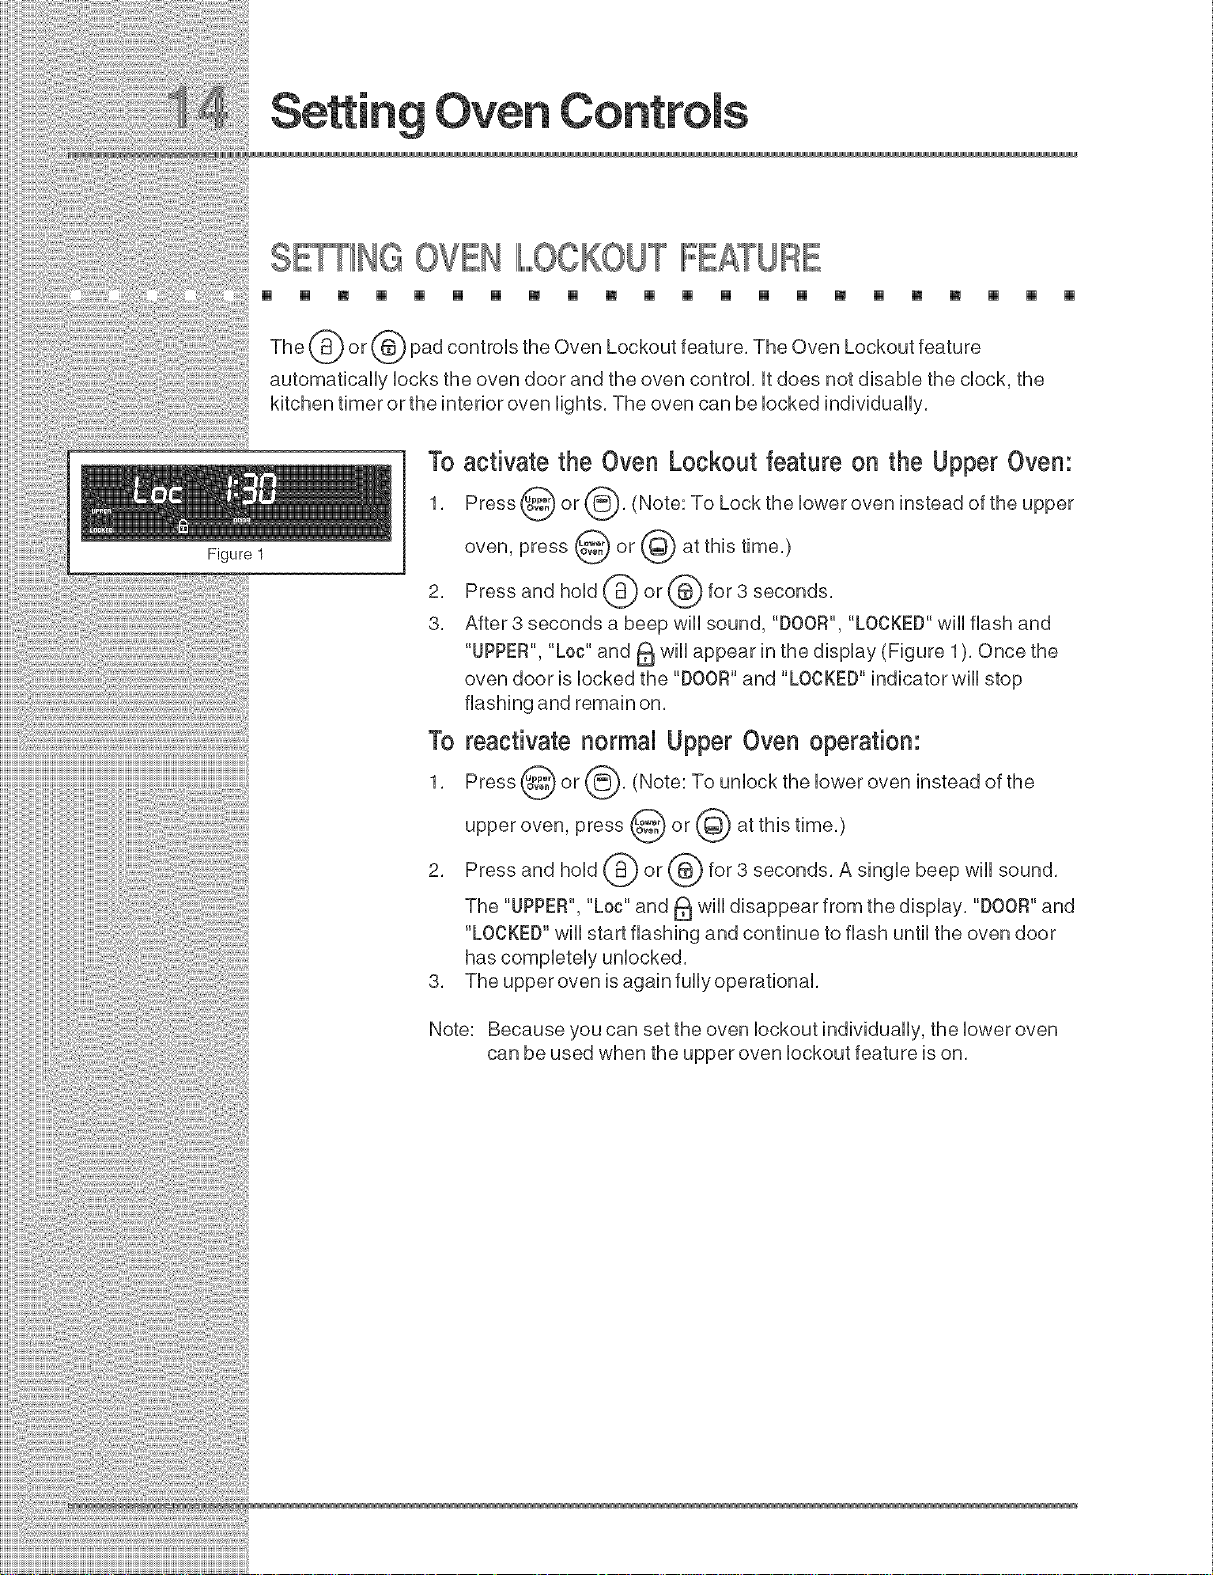
The (_) or (_@,)pad controls the Oven Lockout feature, The Oven Lockout feature
automatically locks the oven door and the oven control, it does not disable the clock, the
kitchen timer or the interior oven lights, The oven can be locked individually,
To activate the Oven Lockoutfeature on the Upper Oven:
1, Press @ or @, (Note: To Lock the lower oven instead of the upper
Figure 1
oven, press @ or @ at this time,)
2, Press and hold @ or @ for 3 seconds,
3, After 3 seconds a beep will sound, "DOOR", "LOCKED"will flash and
"UPPER", "Loc" and _ will appear in the display (Figure 1), Once the
oven door is locked the "DOOR" and "LOCKED" indicator will stop
To reactivate normal Upper Oven operation:
1, Press @ or @, (Note: To unlock the lower oven instead of the
upper oven, press @ or @ at this time,)
2, Press and hold @ or @ for 3 seconds, A single beep will sound,
The "UPPER","Loc" and _ will disappear from the display, "DOOR"and
"LOCKED"will start flashing and continue to flash until the oven door
3, The upper oven is again fullyoperational,
Note: Because you can set the oven lockout individually, the lower oven
can be used when the upper oven lockout feature is on,
 Loading...