

Electrolux DX303 Dimension & Installation Manual
dimension & installation guide
built-under dishwasher – DX303
IMPORTANT
• These instructions are a guide only. For complete
installation instructions, refer to the manual provided with
the product.
• If you do not follow the installation instructions your
dishwasher will not be properly installed. The product
warranty does not cover incomplete or improper
installation. You will be charged a service fee for any service
call to rectify improper or incomplete installation.
• These instructions apply to built-under applications only.
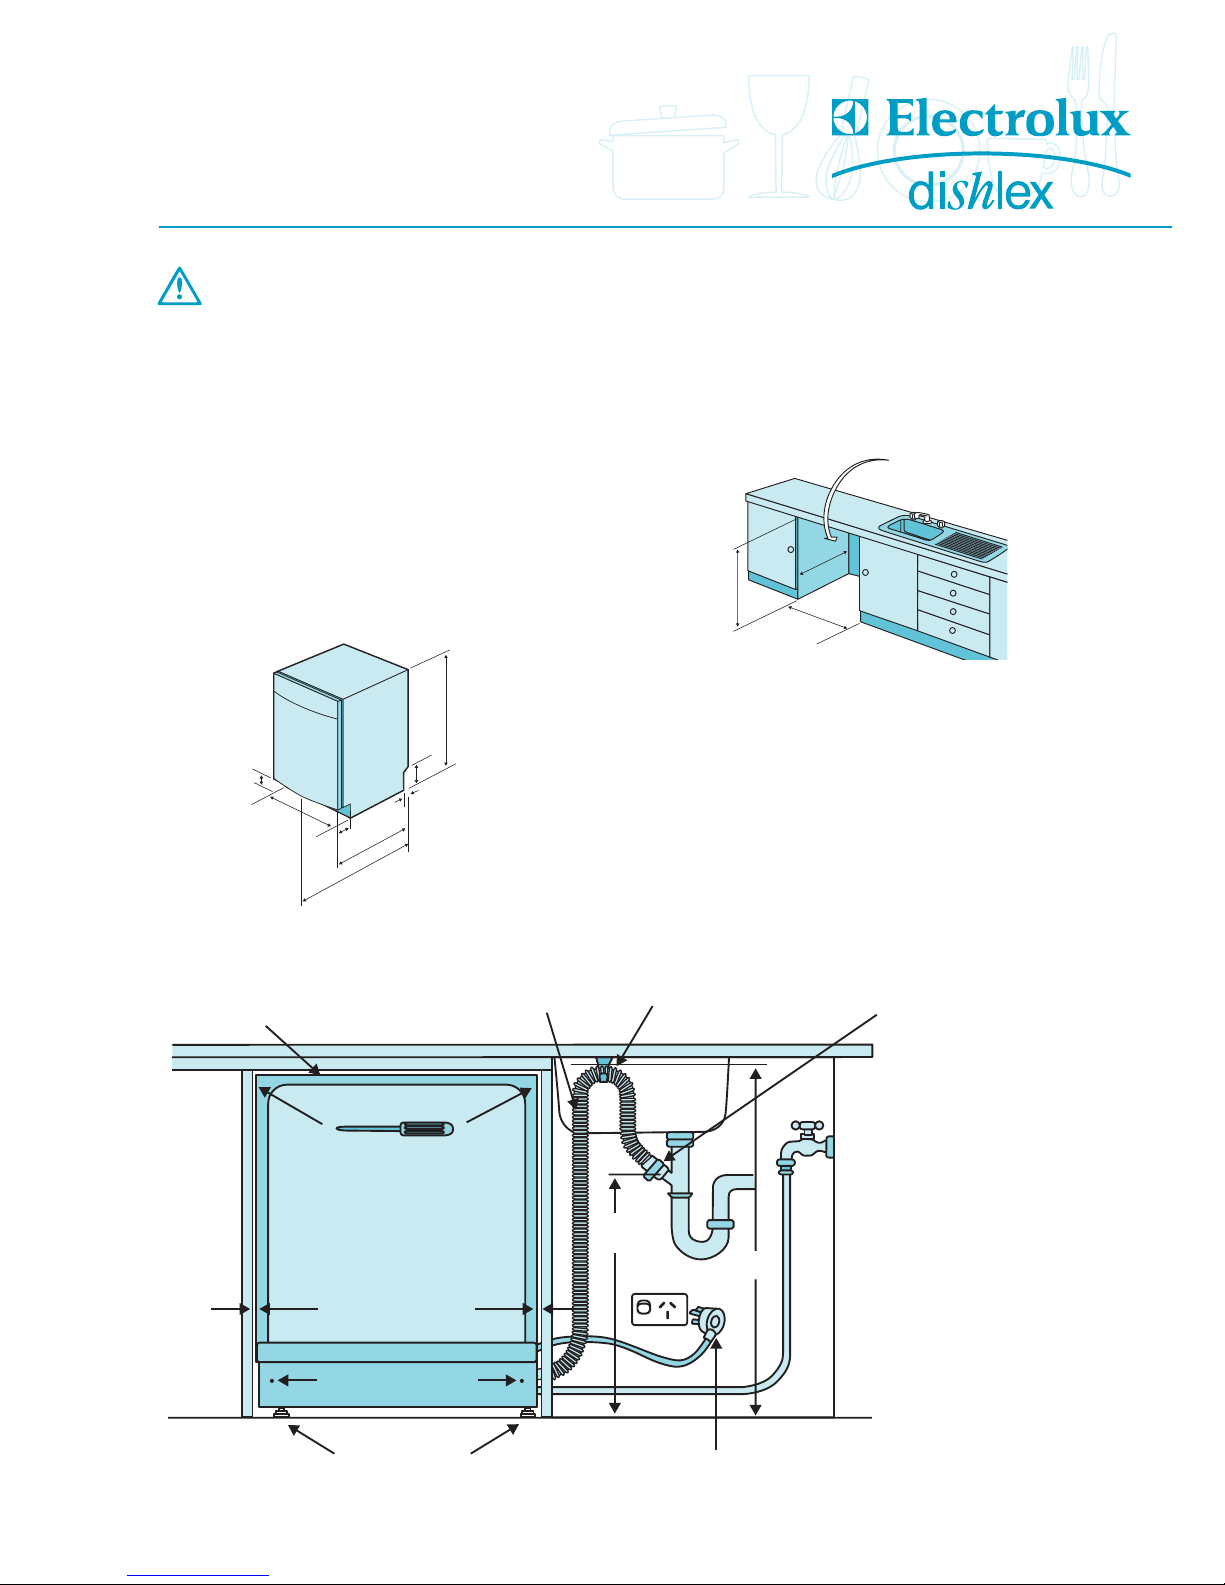
DISHWASHER DIMENSIONS
The dimensions shown below are in millimetres.
The height of 820mm is with the levelling legs
screwed in all the way.
TYPICAL BUILT-UNDER INSTALLATION
CUPBOARD OPENING DIMENSIONS
The dimensions shown below are in millimetres. The opening
allows for some clearance so that the dishwasher can be
pushed into place.
Note: if the opening is greater than 600mm wide then a suitable
width filler piece should be secured to the cupboard before
installing the dishwasher.
820mm
180mm
50mm
100mm
595mm
120mm
555mm edge of door
585mm centre of doo
r
825m
m min.
88
0m
m
m
ax
.
585m
m
600
m
m
m
in
.
D
o
not
i
nstall tap
s
o
r
po
w
er
p
oints
in this sp
a
ce
1000mm max
Secure dishwasher with
brackets and screws provided
Gap on both sides
should be equal and no greater
than 3mm maximum per side
Kickplate fixing screws
If floor is not level, adjust
levelling legs to suit
600mm max 300mm min
POWER SUPPLY
230/240V–10Amps
TAP CONNECTION
If cold-water pressure is
in excess of 800kPa, a
pressure-reducing valve
should be used.
Check for leaks.
INLET WATER SUPPLY
Water flow rate 10L/minute min
Water temperature 60°C max
Water pressure cold water:
800kPa max - 50kPa min
Water pressure hot water:
350kPa max - 50kPa min
Cold water recommended
(Refer page 3 for further information)
The hose should not be
extended by more than
2 metres or water pump-out
problems may occur
There should be a minimum
2mm gap between the top of
the dishwasher and
underside of bench top
Fix drain hose max of
10mm below the top of
the dishwasher
Remove entire plastic
membrane from sink trap
spigot & fit drain hose to
spigot with clamp
DISHWASHER
POWER OUTLET
SINK
page 1

dimension & installation guide
built-under dishwasher – DX303
page 2
LEVELLING
Good levelling is essential for correct closure and sealing of
the door.
When the appliance is correctly levelled, the door will not
catch or rub on either side of the cabinet.
Leave a space of 2mm between the top of the dishwasher
and the underside of the kitchen counter.
SECURING THE DISHWASHER
Secure the dishwasher
by screwing it firmly in position under the bench or to the
cupboard beside it (refer to diagram on previous page). Use
the angular brackets supplied which are fitted into the slots on
top of the dishwasher (more detail is shown in the caution note
below). Tighten the machine in position (upwards or sideways)
by using the screws supplied (3.5 x 16mm). Tighten the screws
so that the dishwasher cannot tip forward and cause damage
when the door is open and the baskets are fully loaded.
CAUTION
The dishwasher must be secured to the underside of
the worktop or to adjacent cupboards by using the
brackets supplied.
Failure to do this can cause injury or damage.
Under no circumstances may holes be drilled
through the sides of the dishwasher since this could
damage the hydraulic components.
CAUTION
Carefully follow the instructions on the template
enclosed with the product for building the
dishwasher under a counter.
No further openings for venting of the dishwasher
are required, but only to let the water fill and drain
hose and power supply cable to pass through.
The height of the recess where the dishwasher is to be installed
can vary between 825mm and 885mm from the floor since the
dishwasher is fitted with adjustable feet (max. 60mm).
Leave a space of 2mm between the top of the dishwasher and
the underside of the kitchen counter.
FITTING THE STEAM PROTECTION
Fit the steam protection onto the front part of the worktop,
using the screws provided.
Check if the dishwasher
is levelled
600mm
825-880mm
600mm
 Loading...