

Page 1
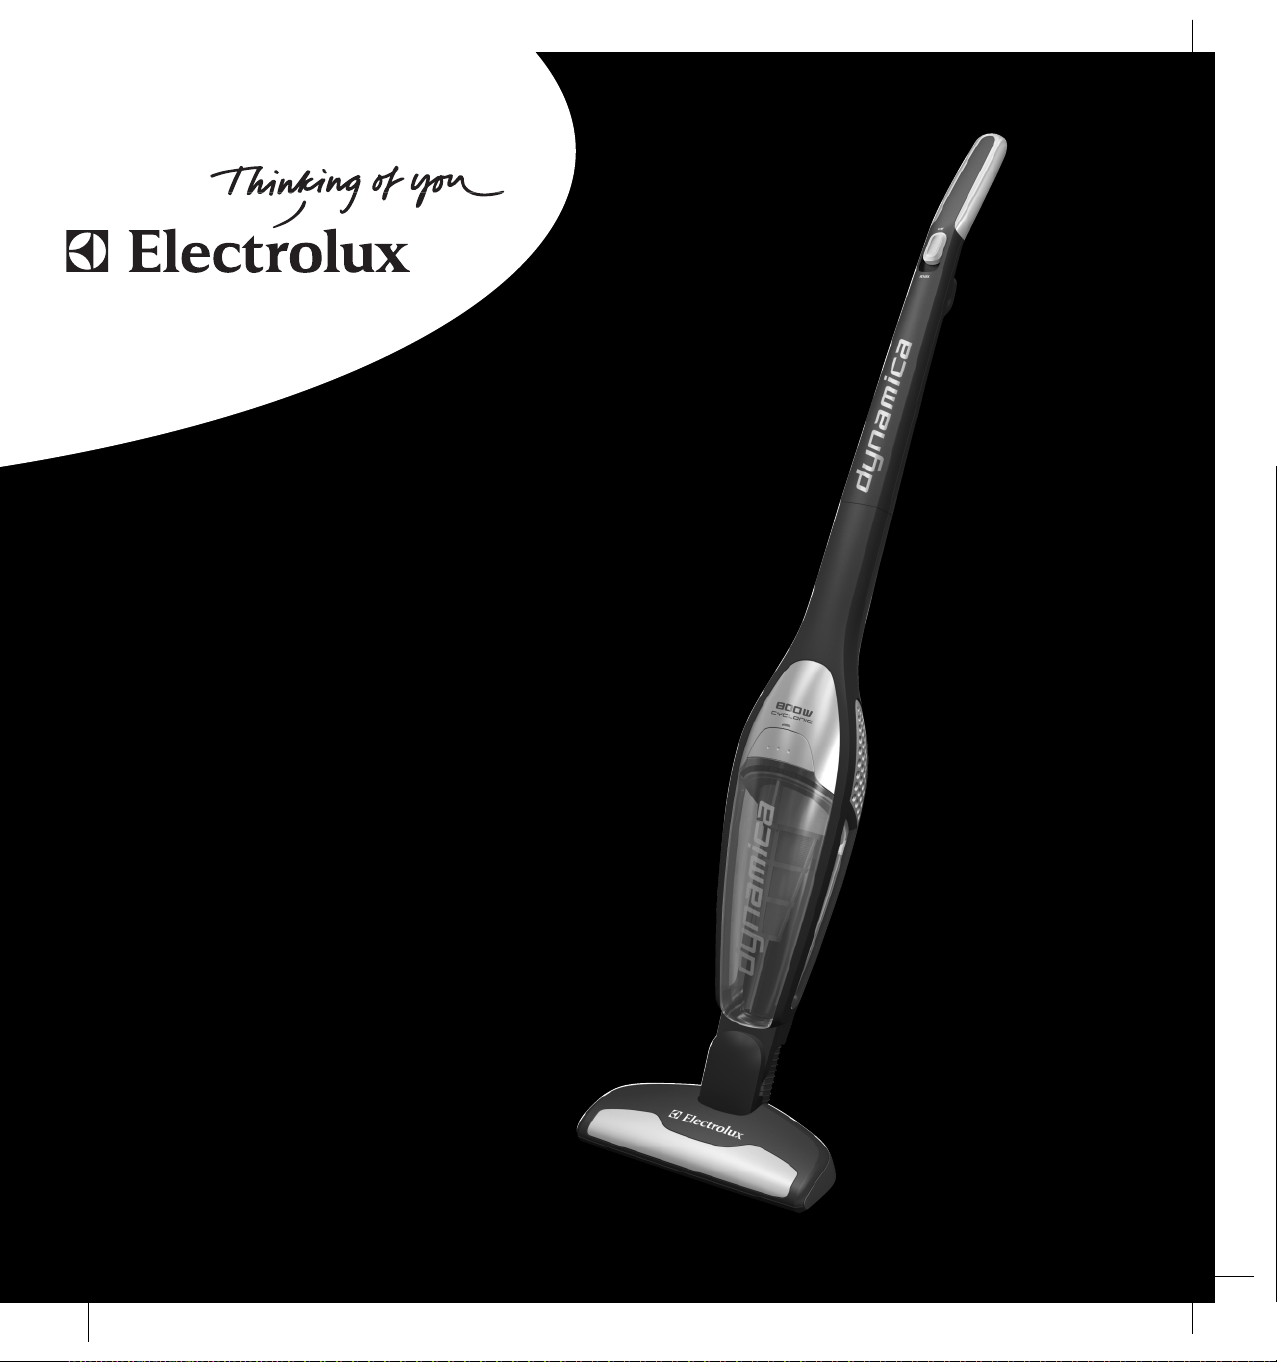
USER MANUAL
DYNAMICA
Page 2
GB
Before starting
1
4
• Unpack all details and check that the
package includes all accessories relating
to your Dynamica.
• Read the Instructions for use carefully.
• Pay special attention to Safety advice
chapter.
Enjoy your Electrolux Dynamica!
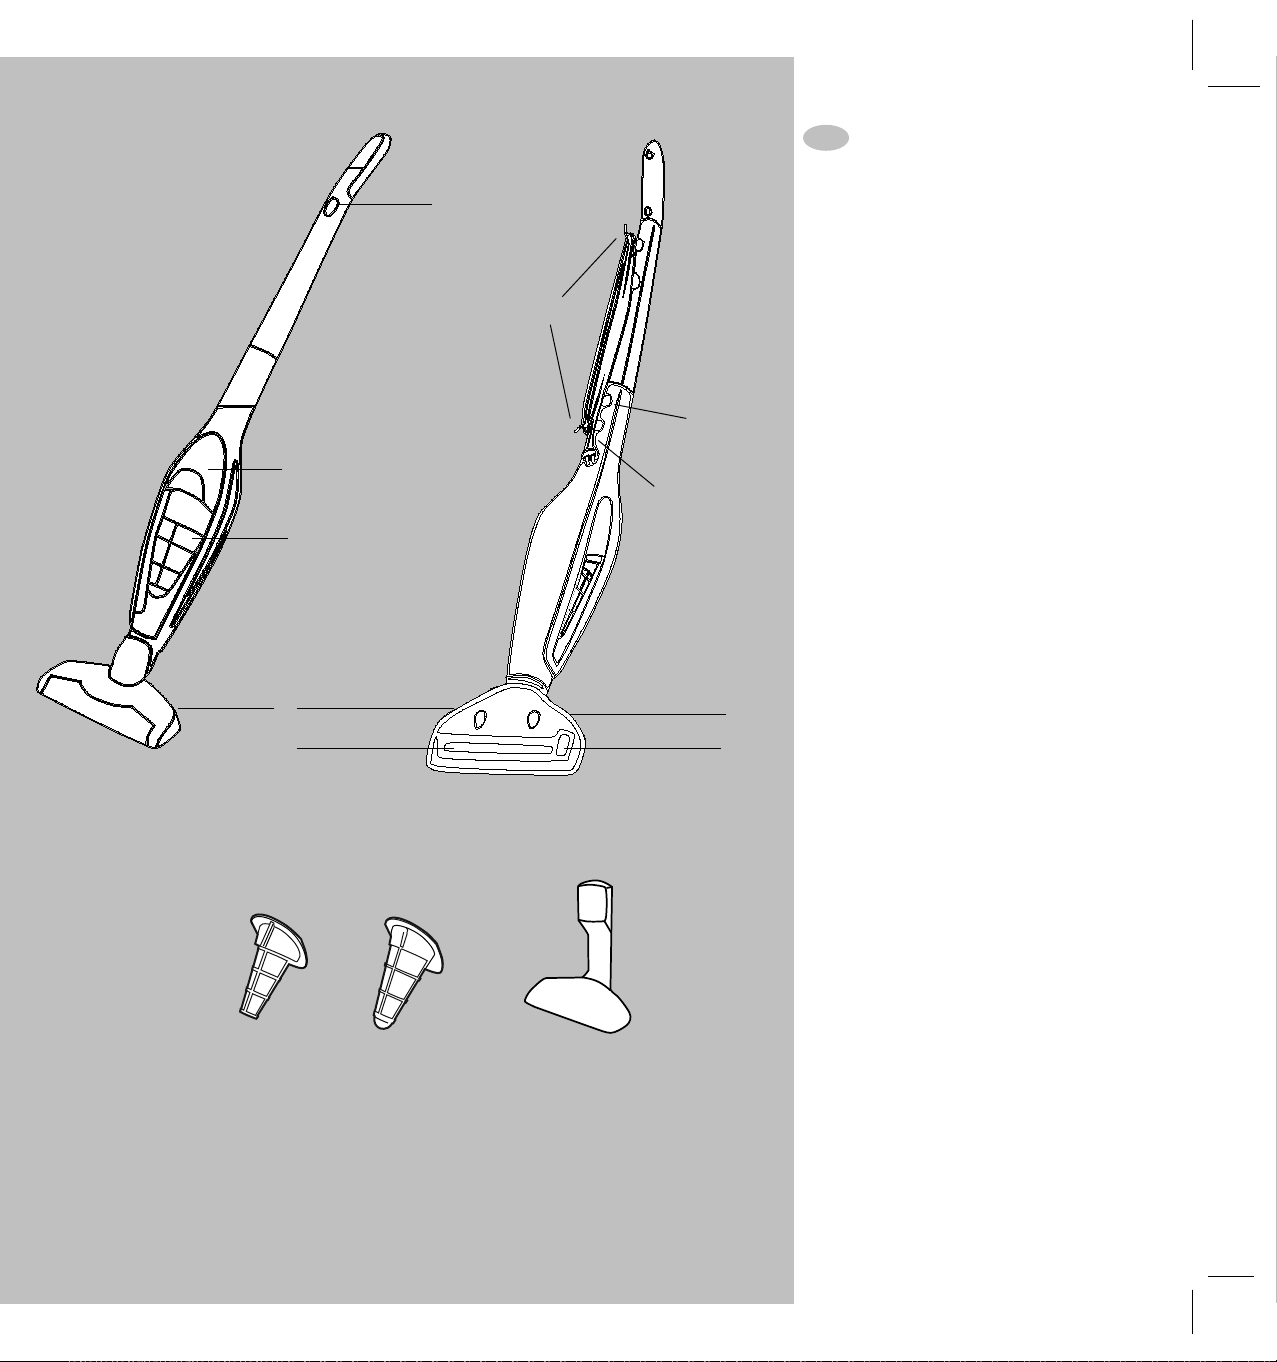
Features / Accessories
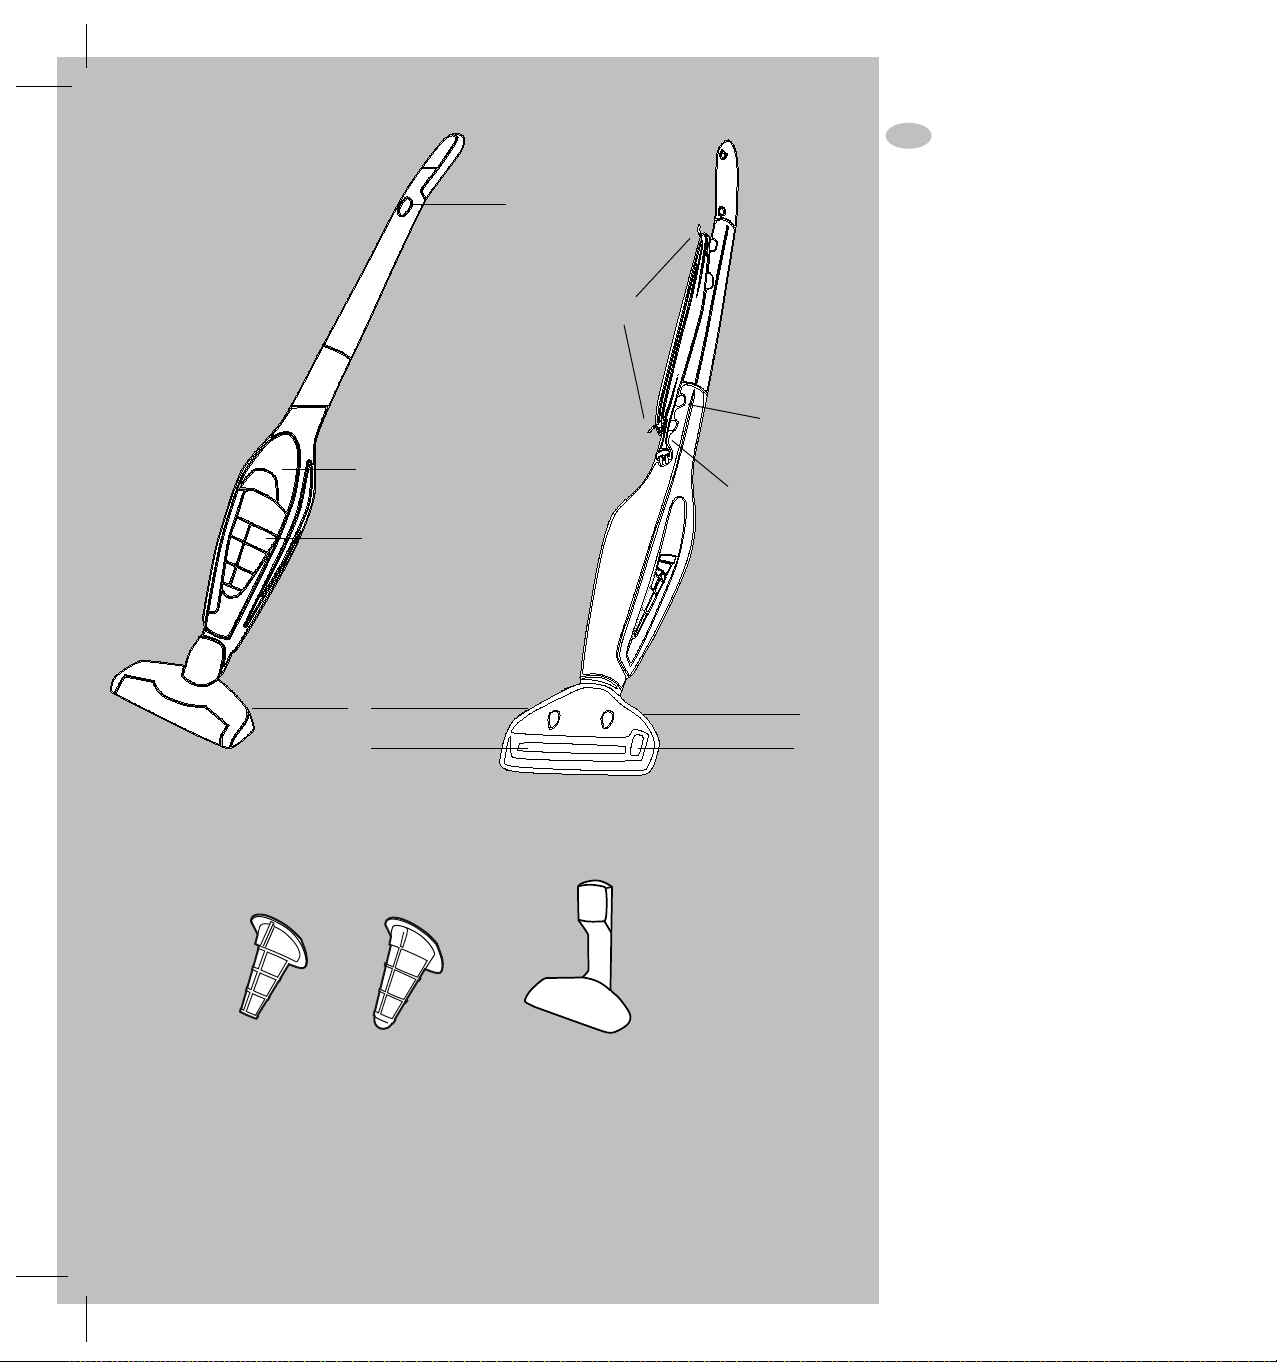
1. On / off button
5
2
6
3
2. Container release button
3. Dust container
4. Cable hook
5. Locking screw
6. Cable
7. Power nozzle
8. Brush roll
9. Brush roll release button
10. Hatch cover for brush roll
11. Fine filter (inner filter)
12. Pre filter ( outer filter)
13. Parking stand
7
8
11
12
13
9
10
1
Page 3
GB
Safety precautions
This vacuum cleaner should only be used for
normal vacuuming in a domestic
environment. This appliance is not intended
for use by persons (including children) with
reduced physical, sensory or mental
capabilities, or lack of experience and
knowledge, unless they have been given
supervision or instruction concerning use of
the appliance by a person responsible for
their safety.
Children should be supervised to ensure that
they do not play with the appliance.
Never vacuum:
• In wet areas.
• Close to flammable gases etc.
• Without the filter to avoid damaging the
cleaner.
• When housing shows visible signs of
damage.
Never vacuum:
• Sharp objects.
• Water or other Liquids
• Hot or cold cinders, lit cigarette butts,
etc.
• Fine dust, for example from plaster,
concrete, flour, hot or cold ashes.
The above may cause serious damage to the
motor – damage which is not covered by the
warranty.
Electrical safety precautions
• Regularly check that the cable is not
damaged. Never use the vacuum cleaner if
the cable is damaged.
• If the supply cord is damaged, it must be
replaced by Electrolux service agent or
similarly qualified person in order to avoid a
hazard.
• Damage to the machine’s cable is not
covered by the warranty.
• Never pull or lift the vacuum cleaner by the
cable.
• Disconnect the plug from the mains before
cleaning or maintenance of the vacuum
cleaner.
• All servicing and repairs must be carried out
by an authorised Electrolux service centre.
• Be sure to keep the vacuum cleaner in a
dry place.
2
Page 4
1b
GB
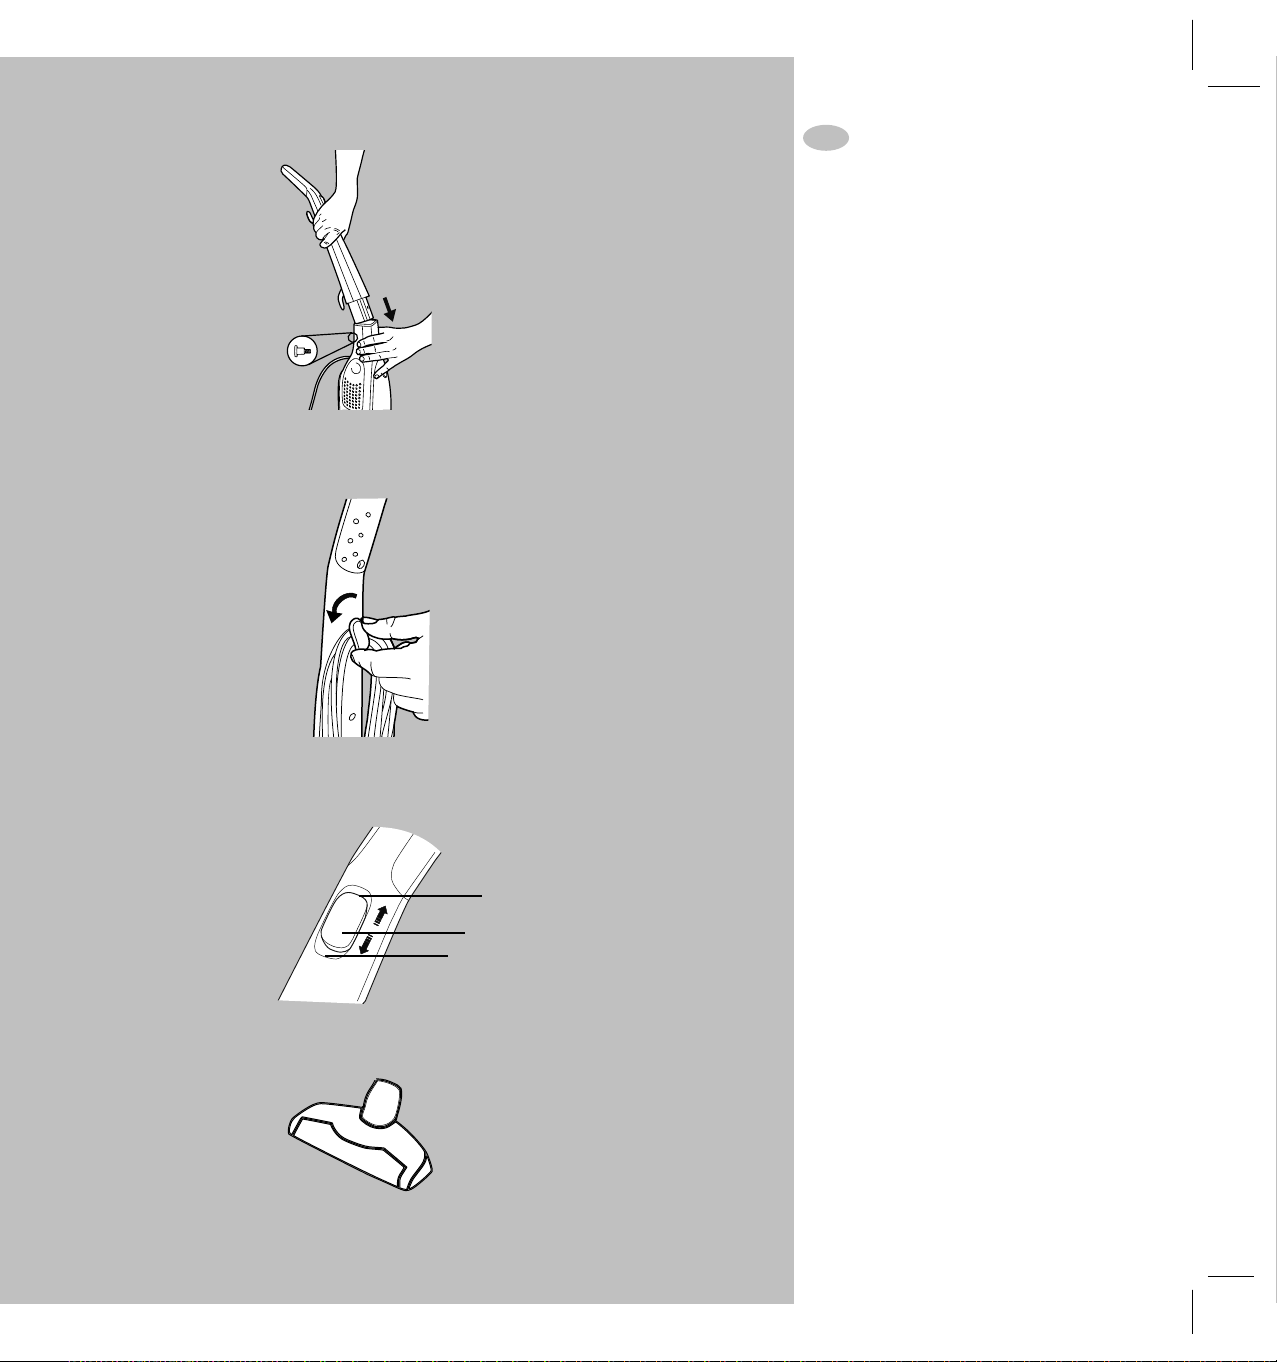
Unpacking and assembly (1)
• Check that all parts are in the box.
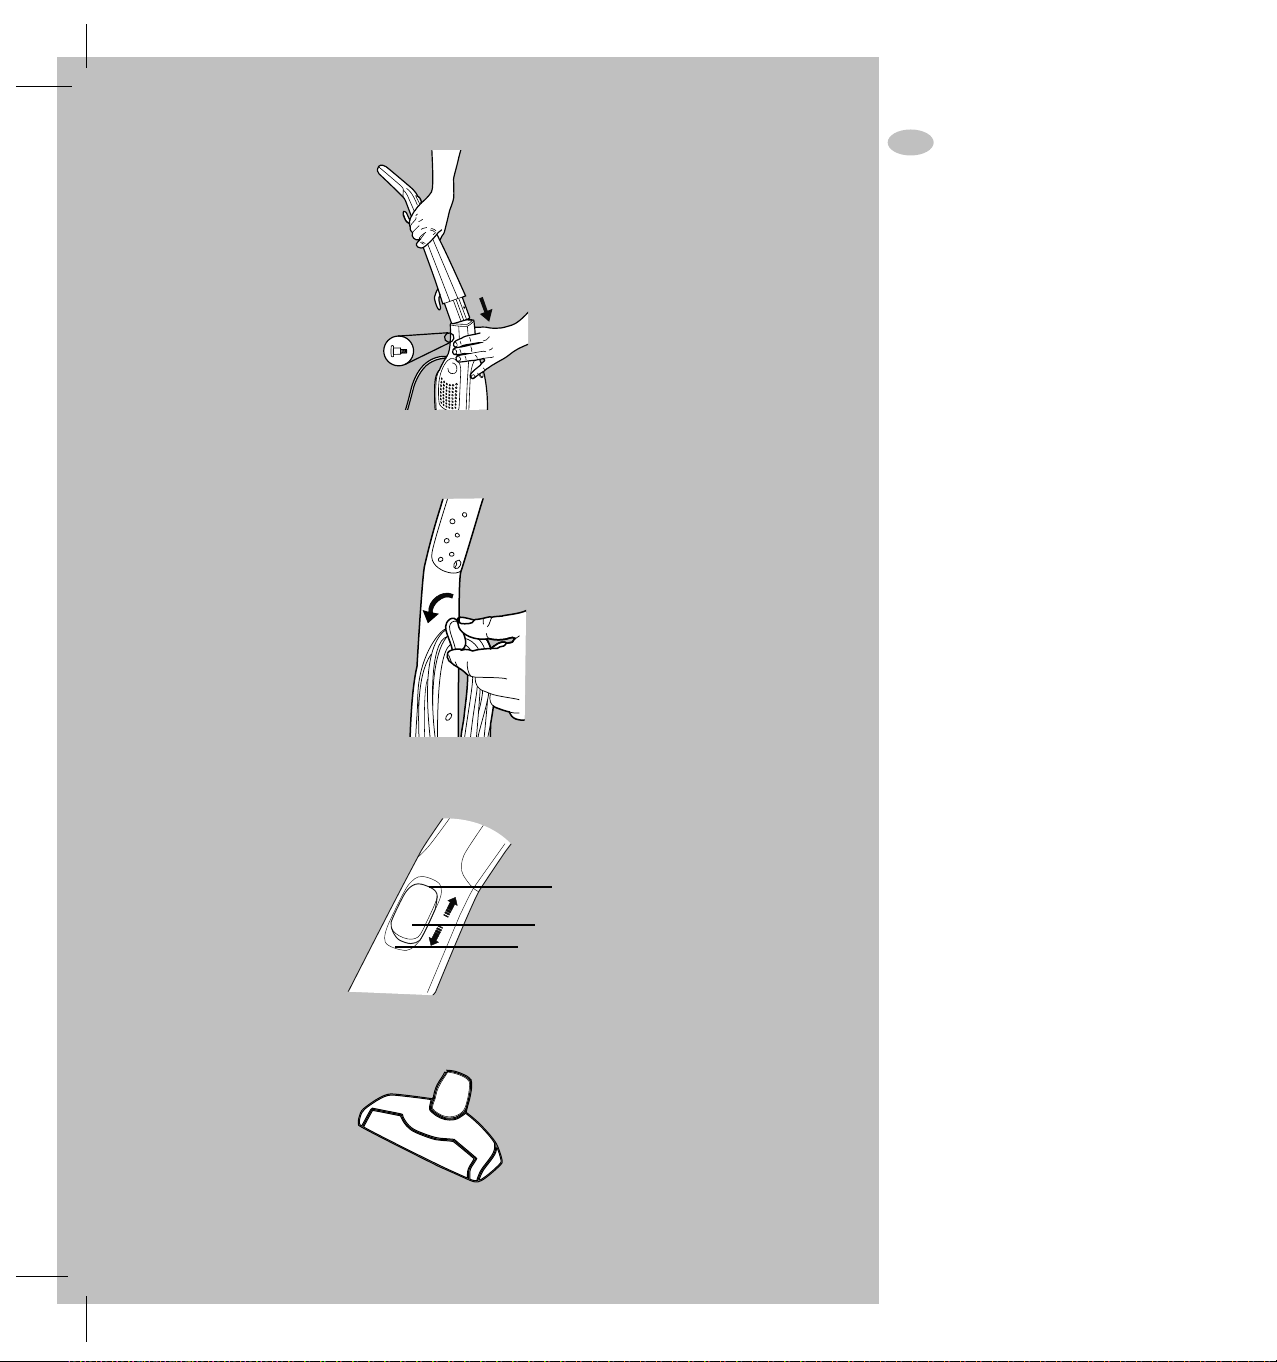
• Carefully insert the upper stick into the
lower main body (1a). Make sure that the
cable does not jam.
1a
• Secure the upper stick by tightening the
locking screw (1b).
• Fit the floor nozzle towards the vacuum
cleaner.
Starting to vacuum clean
• Release the cable by rotating the upper
1
cable holder (2), and plug the cable.
• Start / Stop (3)
1; Off
2; Medium power
3; Maximum power
Floor nozzles (4)
Power nozzle
Use for carpets or hard floor.
2
1
1
2
2
3
3
4
3
Page 5
GB
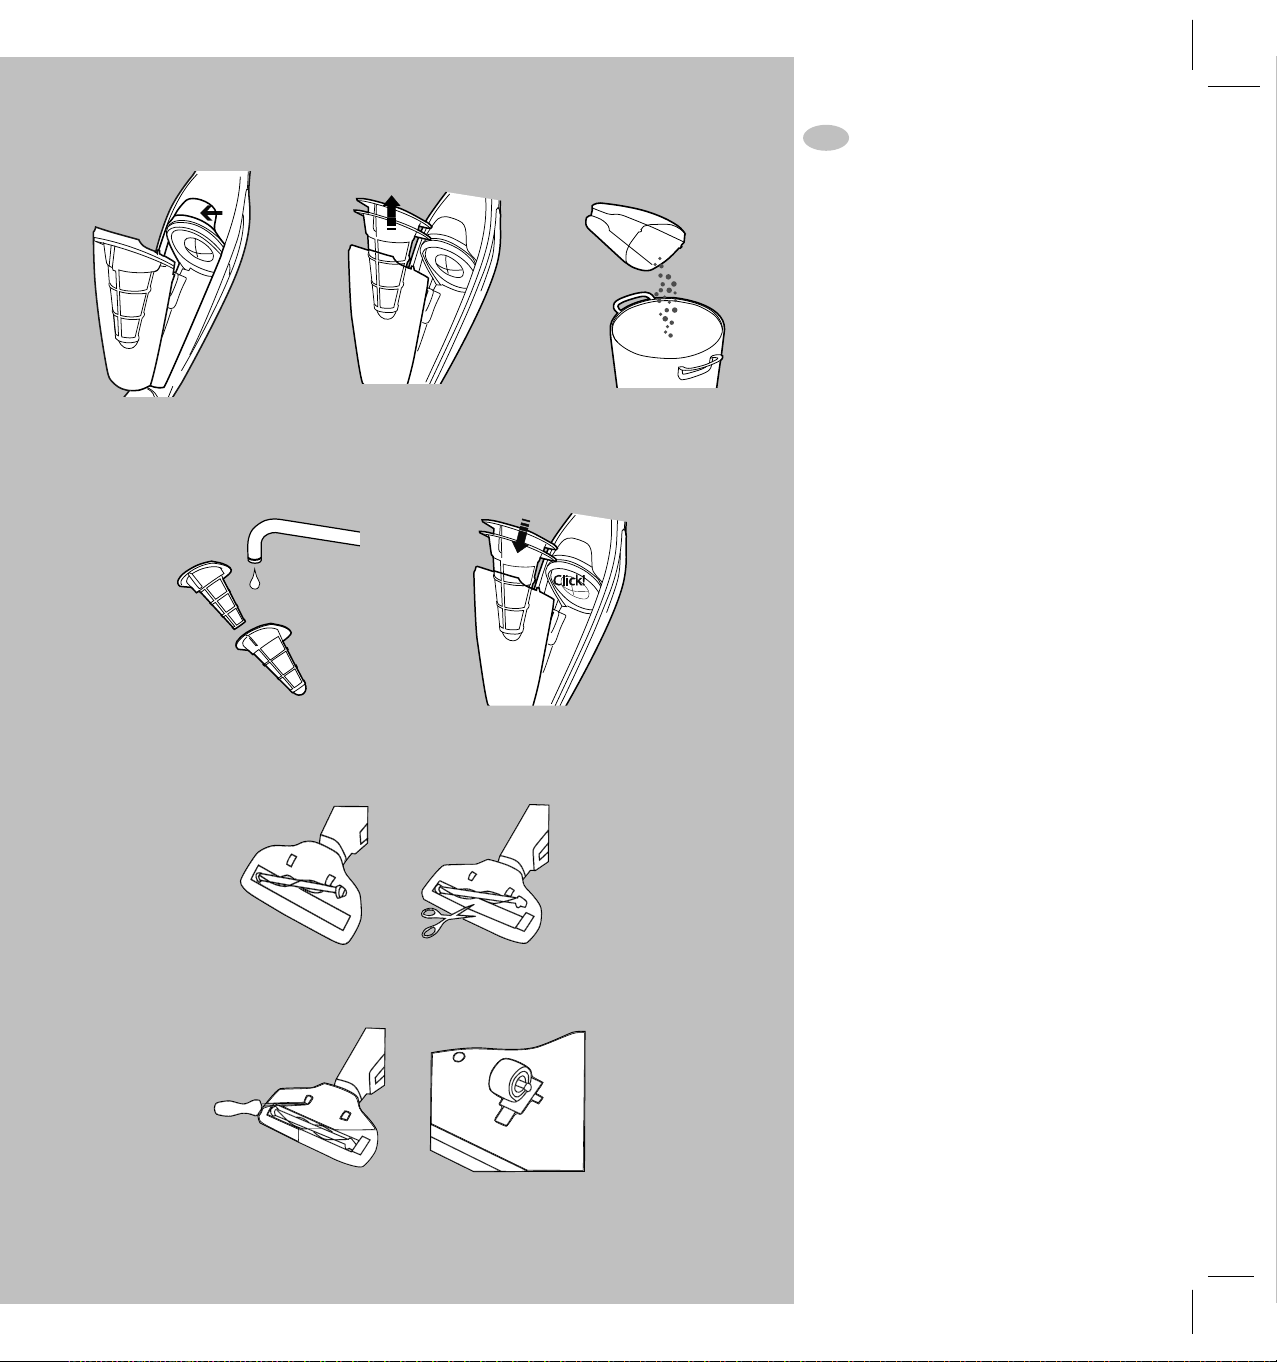
Cleaning the filters and dust container
Dynamica's dust container must be emptied
regularly, plus dust container and filters need to
be cleaned to maintain a high suction power.
Clean the filters every third emptying or when
Dynamica has low suction power Make sure
parts are dry before reassembling.
5 Release the whole dust container by
pushing the release button.
6 Take out both filters.
7 Empty thecontentinto a wastepaper basket.
8 Separate filters Shake them clean or
5
6
7
rinse separately using warm water.
Make sure filters are dry before
reassembling in reverse order.
9 Put the filters back and press back the
dust container in reverse order.
Cleaning the brush roll
If the brush roll becomes blocked or jammed,
a protection circuit will block the power
supply to the motor. Then clean the brush.
10 Push the brush roll release button. The
hatch cover will come slightly free and
the brush roll can now be removed.
11 Carefully use a sharp object to remove
hair or threads. Replace the brush roll
8
9
and make sure that it fits into its guiding
tracks, and that it can spin freely.
Replace the hatch cover.
10
Cleaning the wheels
12 If the wheels needs to be cleaned,
remove them carefully by using a small
screwdriver.
13 Remove objects that have become
jammed in the wheel shafts.
Reassemble the wheels by pressing
them back into their tracks.
11
12
13
4
Page 6

GB
Troubleshooting
The vacuum cleaner does not start
• Check that the cable is connected to
the mains.
• Check that the plug and cable are not
damaged.
• Check for a blown fuse.
Poor suction or the vacuum cleaner stops
• Is the dust container full?
• Is the nozzle or air channel blocked?
• Is the filter blocked or needs to be
cleaned?
If water has entered the vacuum cleaner
It will be necessary to replace the motor at
an authorised Electrolux service centre.
Damage to the motor caused by the
penetration of water is not covered by the
warranty.
Customer Information
Electrolux decline all responsibility for all
damages a rising from any improper use or
in cases of tampering with the appliance .
This product is designed with the
environment in mind. All plastic parts are
marked for recycling purposes .
If you can not find filter or accessories to your
Electrolux vacuum cleaner, please visit our website
at www.electrolux.com .
5
Page 7
VIE
Trước khi sử dụng
1
4
• Mở bao gói tất cả các chi tiết máy và kiểm tra đảm
bảo tất cả cá c linh kiện liên qua n đến máy hút bụi
Dynamica của quý khá c h đều có đầy đủ.
• Đọc kỹ hướng dẫn sử dụng.
• Lưu ý đặc biết tới phần Hướng Dẫn An Toàn trong
sách hướng dẫn sử dụng.
Chúc quý khách hài lòng khi sử dụng máy hút bụi
Electrolux Dynamica!
Chi tiết / Linh kiện
5
2
6
3
1. Nút bật/tắt.
2. Nút mở ngăn chứa bụi.
3. Ngăn chứa bụi.
4. Móc quấn dây điện.
5. Đinh ốc khóa.
6. Dây điện.
7. Bàn hút mạnh.
8. Thanh lăn.
9. Nút tháo thanh lăn.
10. Miếng che thanh lăn.
11 Bộ lọc mịn (bộ lọc trong).
12. Bộ lọc ban đầu (bộ lọc ngoài).
13. Vị trí đặt máy hút bụi theo chiều đứng
7
8
11
12
13
9
10
6
Page 8

VIE
Chỉ dẫn an toàn
Chỉ sử dụng máy hút bụi cho mục đích thông thường
trong gia đình. Máy không được thiết kế cho người sử
dụng (kể cả trẻ em) là người bị giảm thiểu chức năng vận
động, chức năng cảm giác hay tâm thần hoặc thiếu kinh
nghiệm hay kiến thức, trừ khi có người giám sát và
hướng dẫn thật kỹ càng việc sử dụng máy nhằm tránh
những nguy hiểm có thể xảy ra.
Trẻ em cần được giám sát để đảm bảo chúng không
nghịch phá máy.
Không được hút bụi
• Ở nơi ẩm ướt.
• Gần khu vực có khí dễ cháy, v.v..
• Khi không có bộ lọc nhằm tránh làm hỏng máy.
• Khi ống dẫn có dấu hiệu hư hỏng.
Không được hút bụi
• Các vật sắc nhọn.
• Nước và các c hất lỏng khác.
• Xỉ than nóng hay nguội, tàn thuốc lá, v.v..
• Bụi mịn, chẳng hạn từ thạch cao, xi măng, bột, tro
nóng hay nguội.
Các vật thể t rê n có thể gây hư hỏng nghiêm trọng cho
mô-tơ và hư hỏng này không nằm trong điều kiện bảo
hành.
Chỉ dẫn an toàn về điện
• Thường xuyên kiểm t ra đảm bảo dây điện không bị
hư hỏng. Không được sử dụng máy hút bụi khi dây
điện bị hư.
• Nếu dây điện bị hỏng, nó phải được thay thế bởi
nhân viên của Trung tâm dịch vụ được ủy quyền bởi
Electrolux hoặc người có tay nghề tương đương
nhằm tránh nguy hiểm.
• Hư hỏng đối với dây điện không nằm trong điều kiện
bảo hành máy.
• Không kéo hoặc nhấc máy hút bụi bằng dây điện.
• Rút phích cắm ra khỏi nguồn trước khi vệ sinh hoặc
bảo trì máy.
• Tất cả các hoạt động bảo hành và sửa chữa phải
được tiến hành bởi Trung tâm dịch vụ được ủy
quyền của Electrolux.
• Cất máy hút bụi ở nơi khô ráo.
7
Page 9
1b
VIE
Mở bao gói và lắp ráp (1)
• Kiểm tra đảm bảo các linh kiện đều đầy đủ.
• Cẩn thận lắp phần cán phía trên vào phần thân máy
phía dưới (1a). Đảm bảo dây điện không bị mắc kẹt.
• Cố địch phần cán phía trên bằng cách vặn đinh ốc
1a
khóa (1b).
• Lắp bàn hút sàn vào máy.
Bắt đầu sử dụng máy
• Tháo dây điện bằng cách xoay khóa giữ phía trên (2)
1
rồi cắm điện.
• Khởi động / Dừng (3)
1; Tắt
2 ; Lực hút trung bình
3 ; Lực hút tối đa
Bàn hút sàn (4)
Bàn hút mạnh
Dùng cho sàn trải thảm hoặc sản cứng.
2
1
1
2
2
3
3
4
8
Page 10
VIE
Sử dụng ống nối* :
Lắp bàn hút sàn vào ống nối (5) để hút bụi phía dưới gầm
giường và bàn ghế trong nhà.
Ống dẫn và các phụ kiện*
Tháo bàn hút và lắp dây đeo vai vào quanh chỗ nối bàn
hút và phần cán phía trên máy như trong hình (6).Vặn
chặt ống dẫn vào chỗ nối bàn hút và lắp các phụ kiện
khác vào.
5
6
7
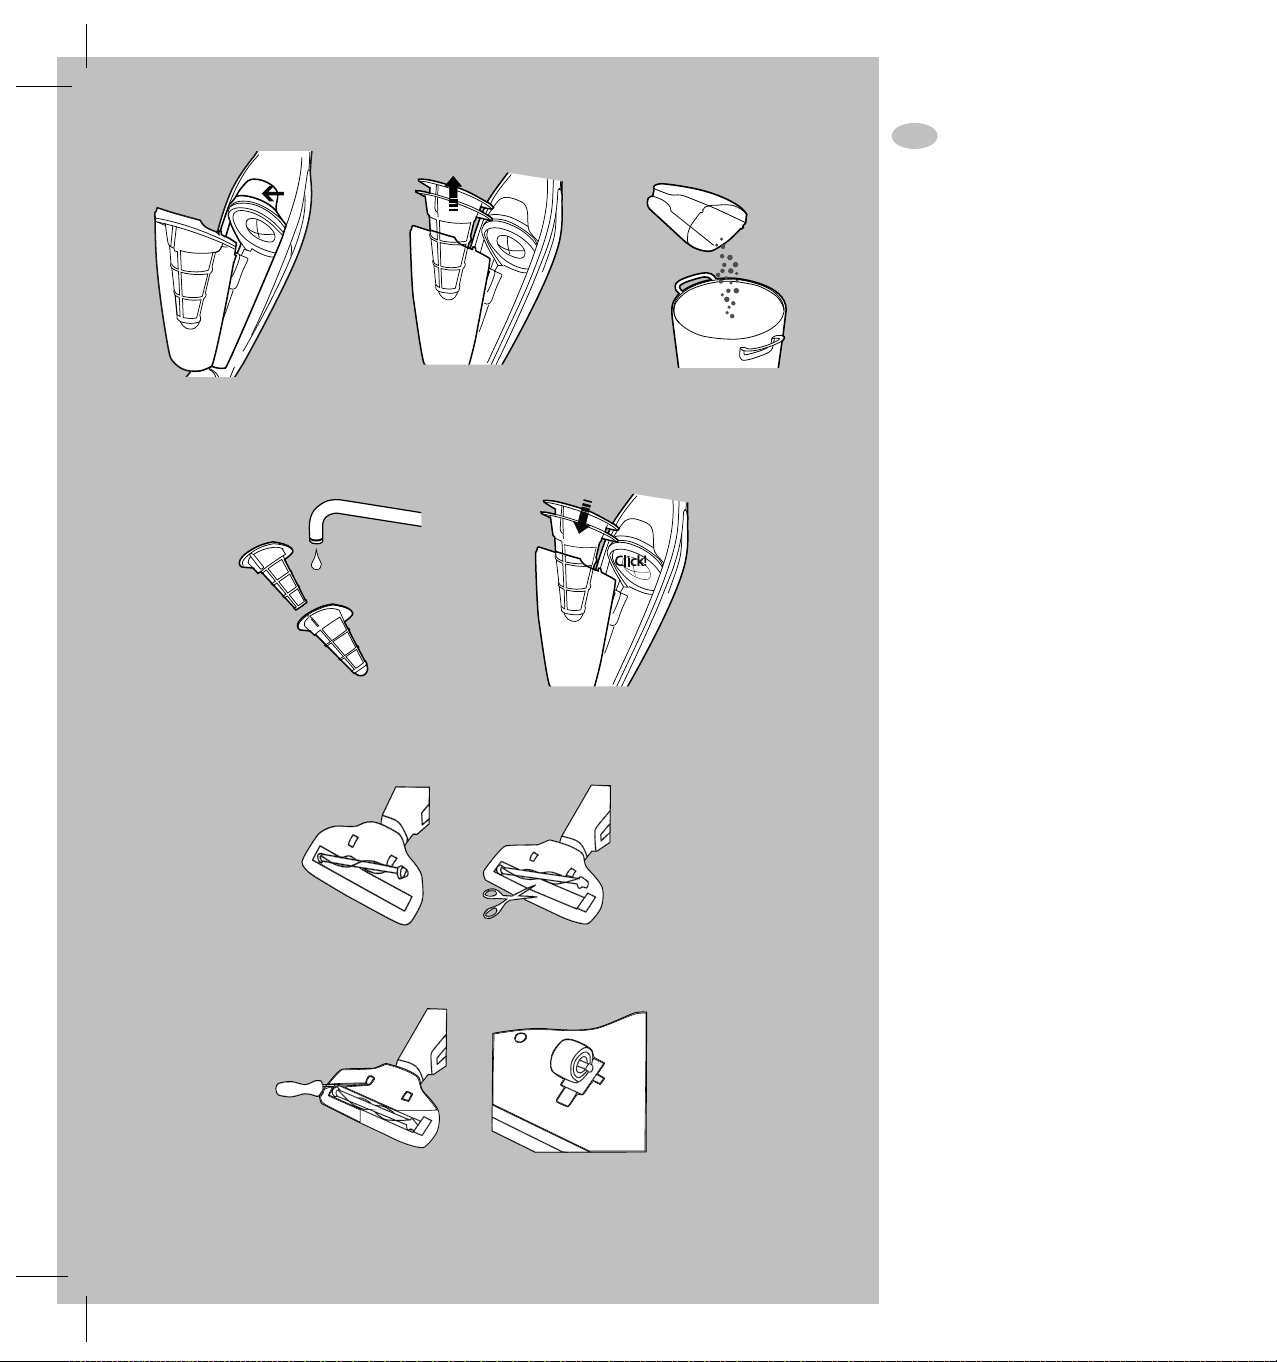
Vệ sinh bộ lọc và ngăn chứa bụi
Ngăn chứa bụi của máy hút bụi Dynamic a phải được làm
sạch thường xuyên, thê m nữa, các bộ lọc và ngăn chứa
bụi cần được là m sạch để đảm bảo khả năng hút tốt. Vệ
sinh bộ lọc sau mỗi ba lần làm sạch ngăn chứa bụi hoặc
khi lực hút bụi của máy hút bụi Dynamica bị giảm thấp.
Đảm bảo các chi tiết máy đều khô ráo trước khi lắp ráp
trở lại.
5 Tháo toàn bộ ngăn chứa bụi bằng cách ấn nút mở.
6 Lấy cả hai bộ lọc ra.
7 Lấy hết bụi bẩn bên trong cho vào giỏ rác.
8 Tách các bộ lọc . Lắc cho sạch bụi hoặc súc sạch
bằng nước ấm. Đảm bảo các bộ lọc đều khô ráo
8
9
đước khi lắp ráp lại vào máy theo thứ tự ngược l ại.
9 Đặt các bộ lọc vào vị trí cũ và ấn ngược ngăn chứa
bụi theo thứ tự ngược lại.
Vệ sinh thanh lăn
Nếu thanh lăn bị khóa hoặc bị kẹt, một mạch điện bảo vệ
sẽ ngăn cản dòng điện đến mô-tơ. Khi đó hãy làm vệ sinh
thanh lăn.
10 Ấn nút tháo thanh lăn. Miếng che sẽ hơi lỏng ra và
lúc này có thể tháo thanh lăn.
10
11
11 Dùng vật sắc cẩn thật gỡ tóc hay các sợi bị mắc vào.
Lắp thanh lăn trở lại vị trí cũ và đảm bảo nó khớp
vào các đường rãnh và có thể quay bình thường. Lắp
lại miếng che.
Vệ sinh bánh xe
12 Nếu các bánh xe cần được vệ si nh, dùng một tuốc-
nơ-vít nhỏ tháo chúng ra.
13 Loại bỏ các vật thể gây cản trở mắc vào càng xe.
Lắp lại bánh xe bằng cách ấn chúng trở lại các rãnh.
12
13
9
Page 11

VIE
Sự cố vận hành máy
Máy hút bụi không khởi động
• Kiểm tra xem dâ y điện có nối vào thân máy.
• Kiểm tra dây điện và phích cắm có bị hư hỏng.
• Kiểm tra cầu c hì có bị đứt.
Hút yếu hoặc máy ngừng lại
• Ngăn chứa bụi có bị đầy không ?
• Bàn hút bụi hoặc ống thông khí có bị tắc ?
• Các bộ lọc có bị tắc hay cần được vệ sinh ?
Khi nước rơi vào trong máy
Cần phải thay mô-t ơ tại Trung tâm dịch vụ được ủy
quyền của Electrolux. Hư hỏng với mô-tơ do sự xâm
nhập của nước không nằm trong các điều kiện bảo hành.
Thông tin dành cho khách hàng
Electrolux không chịu trách nhiệm cho bất kỳ hư hỏng
nào phát sinh do sử dụng không đúng cách hay do can
thiệp vào các bộ phận của máy.
Thiết bị được thiết kế vì sự an toàn của môi t rường. Tất
cả các chi t iết nhựa đều có thể được tái chế.
Nếu quý khách không thể tìm thấy bộ lọc cũng như các
phụ kiện khác phù hợp với máy hút bụi của mình, vui
lòng tham khảo websit e của chúng tôi:
www.electrolux.com
10
Page 12

CHS
1
4
5
2
6
3
11
7
8
11
12
13
9
10
Page 13

CHS
12
Page 14

1b
CHS
1a
1
13
2
1
1
2
2
3
3
4
Page 15

CHS
5
8
10
6
9
11
7
12
13
14
Page 16

CHS
15
Page 17

RI
Sebelum memulai pemakaian
1
4
• Lepaskan semua kemasan dan periksa
apakah paket telah mencakup semua
aksesori terkait dengan Dynamica anda.
• Bacalah petunjuk penggunaan dengan
seksama.
• Berikan perhatian khusus pada bab
advis mengenai Keselamatan
Selamat menikmati Electrolux Dynamica anda!
5
2
6
3
7
8
9
10
1 Tombol On/off
2 Tombol pelepas wadah
3 Wadah debu
4 Kaitan kabel
5 Sekrup pengunci
6 Kabel
7 Nosel elektrik
8 Rol sikat
9 Tombol pelepas rol sikat
10 Tutup sungkup untuk rol sikat
11 Saringan halus (saringan dalam)
12 Saringan awal (saringan luar)
13 POSISI PARKIR
Fitur/Aksesori
11
12
13
16
Page 18

RI
Peringatan tentang keselamatan
Penghisap debu ini hanya untuk digunakan
untuk menghisap debu di lingkungan rumah
tangga. Alat ini tidak untuk digunakan oleh
orang-orang (termasuk anak-anak) dengan
kekurangan kemampuan fisik, sensorik,
atau mental, atau kurang pengalaman dan
pengetahuan, kecuali mereka telah diberi
pengawasan atau petunjuk mengenai
penggunaan alat oleh orang yang
bertanggung jawab atas keselamatannya.
Anak-anak harus diawasi agar mereka tidak
bermain-main dengan penghisap debu ini.
Jangan sekali-kali menghisap debu:
• Di tempat-tempat yang basah.
• Dekat gas yang mudah terbakar, dsb.
• Tanpa saringan untuk menghindari
kerusakan penghisap debu.
• Bila rumah penghisap debu
menunjukkan tanda-tanda kerusakan.
Jangan sekali-kali menghisap:
• Benda-benda tajam.
• Air atau cairan lainnya.
• Arang panas atau dingin, puntung rokok
menyala, etc.
• Debu halus, misalnya dari plester,
beton, tepung, abu panas atau dingin.
Hal di atas dapat menyebabkan kerusakan
serius pada motor - kerusakan mana tidak
dicakup dalam garansi.
17
Tindakan pengamanan kelistrikan:
• Periksalah secara berkala apakah kabel
listrik masih baik. Jangan menggunakan
penghisap debu bila kabelnya rusak.
• Bila kabel listrik rusak, kabel tersebut
hanya boleh diganti oleh agen servis
Electrolux atau orang berkualifikasi
setara untuk menghindari risiko bahaya.
• Kerusakan kabel listrik penghisap debu
tidak dicakup dalam garansi.
• Jangan sekali-kali menarik atau
mengangkat penghisap debu dengan
menarik kabelnya.
• Cabut steker penghisap debu dari
stopkontak sebelum membersihkan
atau melakukan perawatan pada
penghisap debu.
• Semua servis dan perbaikan hanya
boleh dilakukan oleh pusat servis resmi
Electrolux.
• Pastikan untuk menyimpan penghisap
debu di tempat yang kering.
Page 19

1b
RI
Melepaskan kemasan dan merangkai (1)
• Pastikan semua komponen ada dalam
kotak.
• Dengan hati-hati, masukkan tongkat
atas ke bagian badan bawah (1a).
1a
Pastikan kabel tidak tersangkut.
• Amankan tongkat atas dengan
mengencangkan mur pengunci (1b).
• Pasang nosel lantai ke arah penghisap
debu.
Mulai menghisap debu
1
• Lepaskan kabel dengan memutar
pegangan atas kabel (2), dan pasang
stekernya pada stopkontak.
• Start / Stop (3)
1; Off
2; Daya sedang
3; Daya maksimum
Nosel-nosel lantai (4)
Nosel daya tinggi
Digunakan untuk karpet atau lantai keras.
2
1
1
2
2
3
3
4
18
Page 20

RI
Penggunaan Pipa tambahan *:
Sambungkan nosel pada pipa tambahan (5)
untuk membersihkan bawah tempat tidur &
furnitur.
Selang & Aksesori *
Lepaskan nosel lantai dan pasang tali bahu*
di sekitar sambungan nosel dan tongkat atas,
sebagaimana ditunjukkan pada gambar (6).
Kencangkan selang ke arah sambungan
nosel dan sambungkan aksesori*.
Membersihkan saringan dan wadah debu
5
6
7
8
9
Wadah debu Dynamica harus dibersihkan
secara berkala, plus wadah debu dan saringan
perlu dibersihkan untuk mempertahankan daya
hisap yang tinggi. Bersihkan saringan- saringan
setiap tiga kali pengosongan atau bila daya
hisap Dynamica telah turun. Pastikan
komponen-komponennya telah menjadi kering
sebelum dirakit kembali.
5 Lepaskan seluruh wadah debu dengan
menekan tombol pelepas.
6 Keluarkan kedua saringan.
7 Buang isinya ke dalam keranjang
sampah.
8 Pisahkan saringan. Guncangkan hingga
bersih atau bilas terpisah menggunakan
air hangat. Pastikan saringan telah
kering sebelum dipasang kembali
dengan urutan kebalikannya.
9 Pasang saringan-saringan kembali dan
tekan wadah debu dalam urutan
kebalikannya.
19
10
12
Membersihkan rol sikat
Bila rol sikat menjadi tersumbat atau macet,
suatu rangkaian pelindung akan
menghentikan aliran listrik ke motor.
Kemudian bersihkan sikat.
10 Tekan tombol pelepas rol sikat. Tutup
sungkup akan sedikit lepas dan
11
sekarang rol sikat dapat dilepaskan.
11 Dengan hati-hati gunakan benda tajam
untuk melepaskan rambut atau benang
yang tersangkut. Pasang kembali rol
sikat dan pastikan rol sikat tersebut bisa
terpasang pas pada alur panduannya,
dan pastikan bisa berputar bebas.
Pasang kembali tutup sungkup.
Membersihkan roda-roda
12 Bila roda-roda perlu dibersihkan,
lepaskan roda dengan hati-hati
13
menggunakan obeng kecil.
13 Lepaskan benda yang tersangkut pada
poros roda. Pasang roda kembali
dengan menekannya pada alurnya.
Page 21

RI
Penelusuran masalah
Penghisap debu tidak bisa menyala
• Pastikan steker penghisap debu sudah
terpasang pada stopkontak.
• Periksa untuk memastikan steker dan
kabel tidak rusak.
• Periksa apakah sekring putus.
Daya hisap buruk atau penghisap debu
berhenti bekerja
• Apakah wadah debu penuh?
• Apakah nosel atau saluran udara
tersumbat?
• Apakah saringan tersumbat atau perlu
dibersihkan?
Bila air masuk ke penghisap debu
Motor perlu diganti di pusat servis resmi
Electrolux. Kerusakan pada motor yang
disebabkan oleh air masuk tidak dicakup
dalam garansi.
Informasi bagi Konsumen
Electrolux menolak semua tanggung jawab
atas segala kerusakan yang timbul dari
penggunaan yang tidak wajar atau upaya
mengutak-atik penghisap debu.
Produk ini dirancang dengan
mempertimbangkan lingkungan hidup.
Semua komponen plastik telah ditandai
untuk tujuan daur ulang.
Bila anda tidak dapat menemukan saringan
atau aksesori untuk penghisap debu
Electrolux anda, silakan kunjungi situs kami
di www.electrolux.com.
20
Page 22

1
4
5
2
6
3
1
2
21
7
8
11
12
13
9
10
Page 23

22
Page 24

1b
1a
1
(3)
2
23
1
1
2
2
3
3
4
Page 25

5
6
7
5
6
7
8
9
8
9
10
11
10
11
12
13
12
13
24
Page 26

25
Page 27

TW
1
4
5
2
6
3
7
8
11
12
13
9
10
26
Page 28

TW
27
Page 29

1b
TW
1a
1
2
1
1
2
2
3
3
4
28
Page 30

TW
5
8
10
6
9
11
7
29
12
13
Page 31

TW
30
Page 32

Electrolux Floor Care and Small Appliances AB
105 45 Stockholm
www.electrolux.com
“Oh! How did you know? That’s exactly what I wanted!” That’s the kind of feeling that the designers at
Do you remember the last time you opened a gift that made you say
Electrolux seek to evoke in everyone who chooses or uses one of our products. We devote time, knowledge,
and a great deal of thought to anticipating and creating the kind of appliances that our customers really need
This kind of thoughtful care means innovating with insight. Not design for design’s sake, but design for the
user’s sake. For us, thoughtful design means making appliances easier to use and tasks more enjoyable to
perform, freeing our customers to experience that ultimate 21st century luxury, ease of mind.
Our aim is to make this ease of mind more available to more people in more parts of their everyday lives, all
over the world. So when we say we’re think ing of you, you know we mean just that.
The Thoughtful Design Innovator.
and want.
Electrolux. Thinking of you.
Share more of our thinking at www.electrolux.com
ZS30INT 02 01 01
 Loading...