

Page 1
EN Operating Instructions
Page 2

Thank you for having chosen an Electrolux CycloneXL vacuum cleaner. These Operating Instructions cover all CycloneXL models. This means
that with your specic model, some accessories/
features may not be included. In order to ensure
the best results, always use original Electrolux
accessories. They have been designed especially
for your vacuum cleaner.
2 3
Page 3
1 2
3 4
5 6
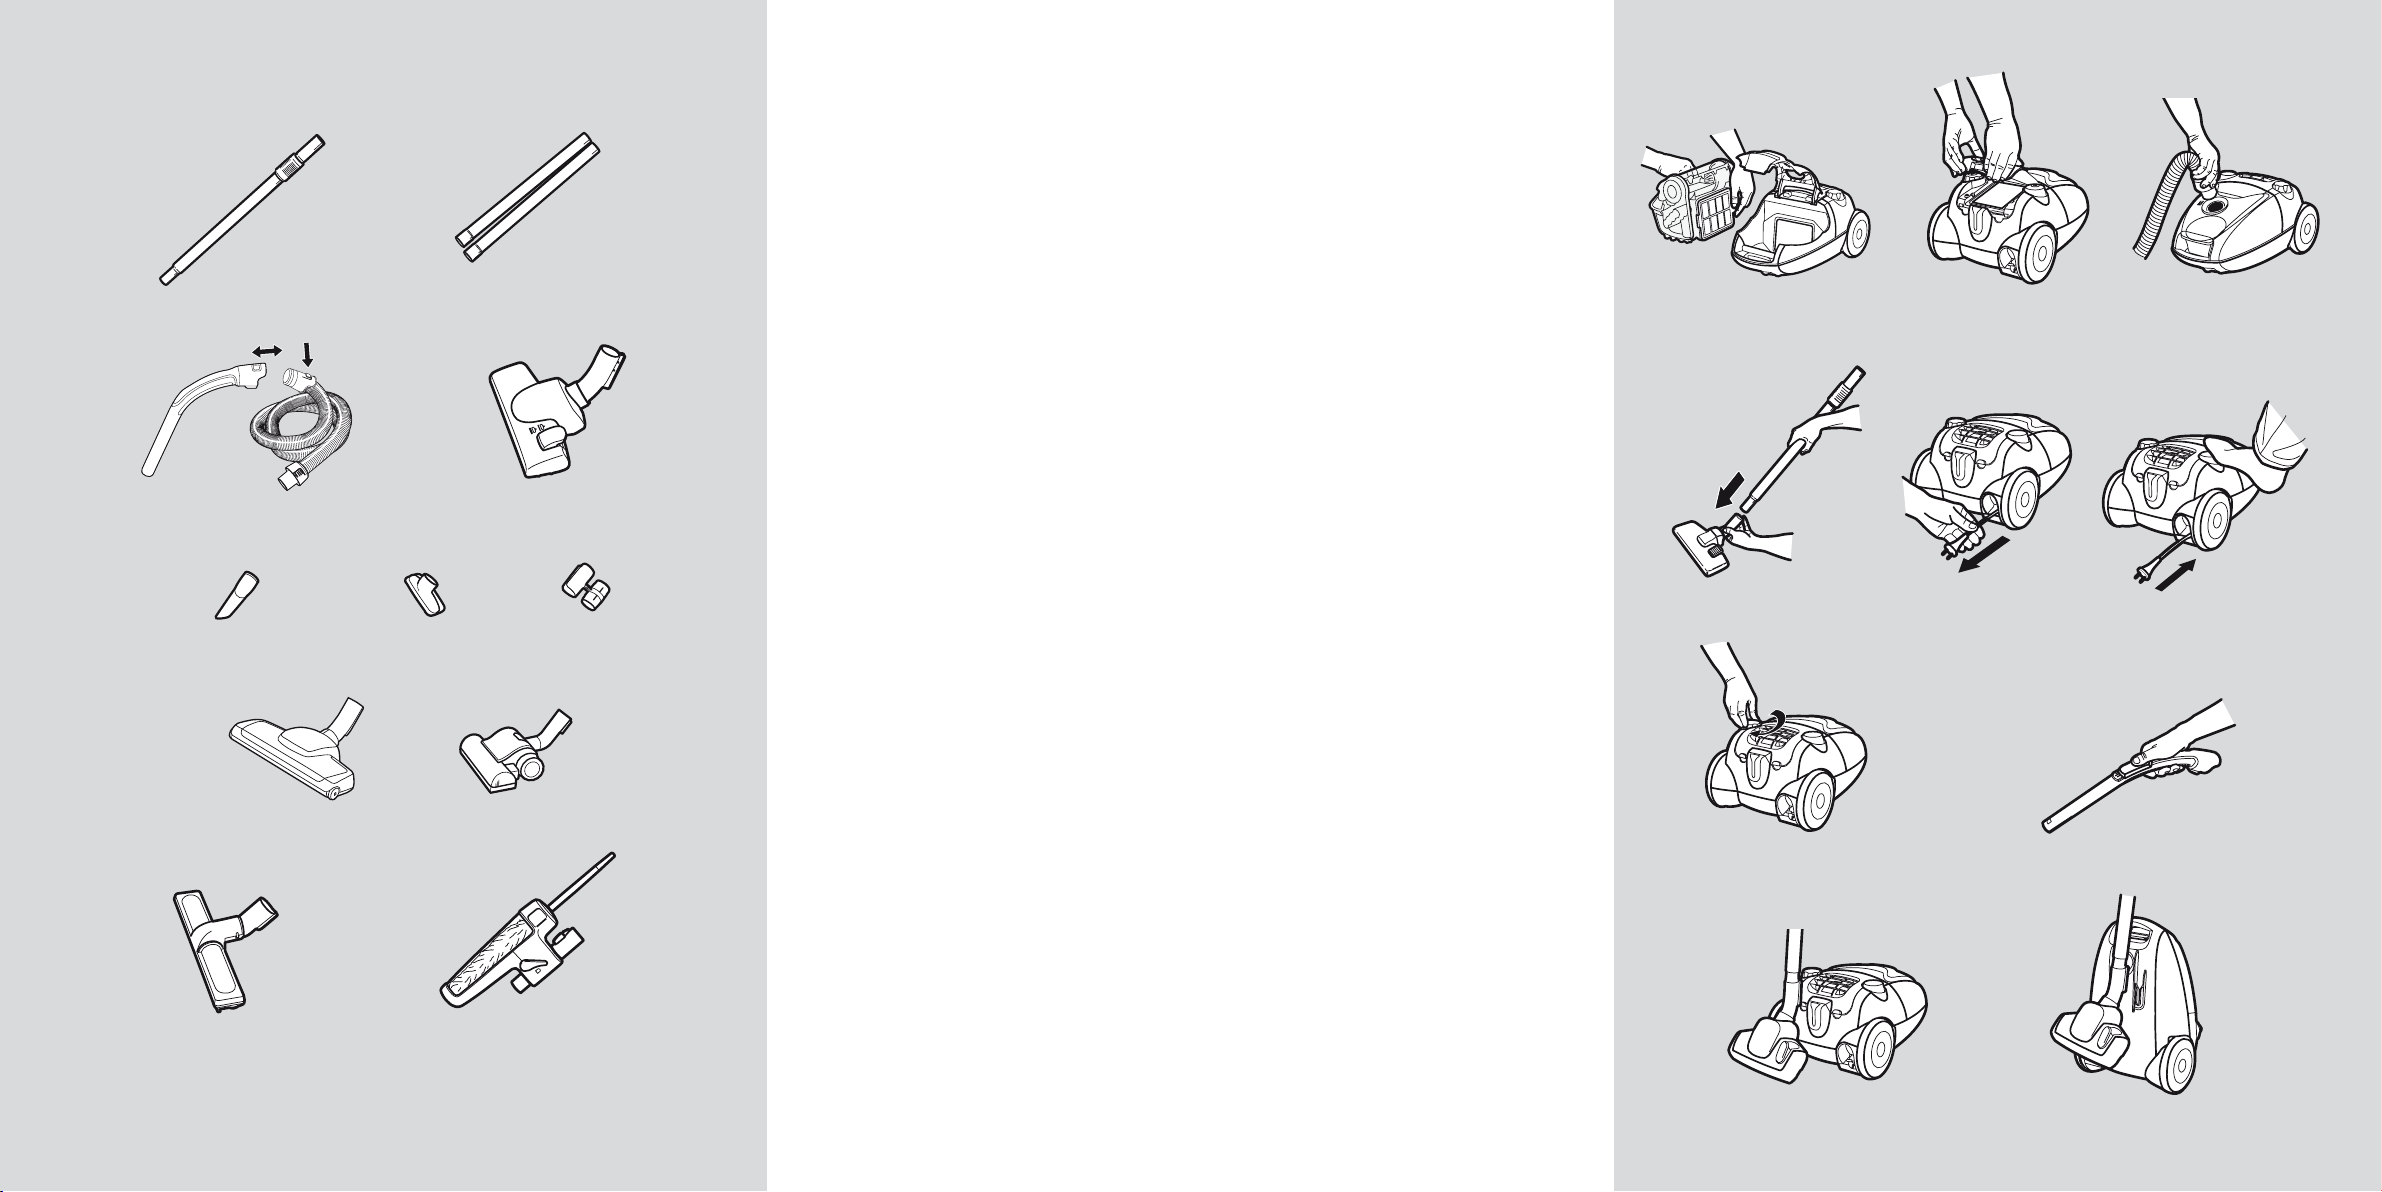
Accessories
1* Telescopic tube
2* Extension tubes
3 Hose handle + hose
4 Combination oor
nozzle
5 Crevice nozzle
6 Upholstery nozzle
7 Accessories clip
8* Turbo nozzle
9* Parquet nozzle
10* Feather duster
Safety precautions
CycloneXL should only be used by adults and only for
normal vacuuming in a domestic environment. The
vacuum cleaner features double insulation and does
not need to be earthed. Disconnect the plug from the
mains before cleaning or maintenance of the vacuum
cleaner. Be sure to keep the vacuum cleaner in a dry
place. All servicing and repairs must be carried out by
an authorised Electrolux service centre.
Never vacuum:
• In wet areas.
• Close to ammable gases etc.
• When housing shows visible signs of damage.
Never vacuum:
• Sharp objects, uids.
• Hot or cold cinders, lit cigarette butts, etc.
• Fine dust, for example from plaster, concrete, our,
hot or cold ashes.
The above may cause serious damage to the motor
7
– damage which is not covered by the warranty.
Electrical cable precautions:
Regularly check that the cable is not damaged. Never
use the vacuum cleaner if the cable is damaged.
Damage to the machine’s cable is not covered by the
warranty.
Before starting
11 Open the front cover on the machine and check
that the motor lter and the dust container lter
are in place. (See also Cleaning/replacing the
lters.)
12* Open the back lid on the machine and check that
the exhaust lter is in place.
13 Insert the hose until the catches click to engage
(press the catches to release the hose).
3 Insert the hose into the hose handle until the
catches click to engage (press the catches to
release the hose).
14 Attach the extension tubes* or telescopic tube*
to the hose handle and nozzle by pushing and
twisting together. (Twist and pull apart to dismantle.)
15 Extend the electric cable and connect it to the
mains. The vacuum cleaner is tted with a cable
winder. Once the electric cable has been extended, it stays in that position.
16 To rewind the cable, press the cord rewinder
pedal. The cable will then rewind.
17a Start the vacuum cleaner by rotaring the power
control in the direction of the “Max” position.
Increase suction power by rotaring the control
further up to “Max” position. Stop the vacuum
cleaner by rotaring in the opposite direction to
“O” position.
In order to achieve an optimal cyclone effect in the
cleaner, the power regulation should always be in the
“Max” position.
17b* Suction power can also be adjusted by using the
suction control on the hose handle.
18 Ideal parking position for pausing (18a) and
storing (18b).
11 12 13
14
15 16
8
9 10
17a
* Certain models only.
* Certain models only.
4 5
17b
18a 18b
Page 4

19 20
21 22
Getting the best results
Use the nozzles as follows:
Carpets: Use the combination oor nozzle with the
lever in position (19).
Hard oors: Use the combination oor nozzle with the
lever in position (20).
Wooden oors: Use the parquet nozzle* (21).
Upholstered furniture and fabrics: Use the upholstery
nozzle* (22) for sofas, curtains, lightweight fabrics etc.
Reduce suction power if necessary.
Frames, bookshelves, etc.: Use the feather duster* (23).
Crevices, corners, etc.: Use the crevice nozzle* (24).
Using the turbo nozzle*
25/26 Ideal for carpets and wall-to-wall carpeting to
remove stubborn u and pet hairs.
Note: Do not use the turbo nozzle on skin rugs or carpet
fringes. To avoid damaging the carpet, do not keep the
nozzle stationary whilst the brush is rotating. Do not pass
the nozzle across electric cables, and be sure to switch off
the vacuum cleaner immediately after use.
Emptying and cleaning the dust container
CycloneXL’s dust container must be emptied when it
is full.
27 Pull the release button at the rear of the vacuum
cleaner.
28 Lift the dust container out.
29 Open the lid of the dust container by pressing the
release button on the right.
30 Empty it over a wastepaper basket. Put the dust
container back (31) and press the rear part of the
container until it clicks into place.
32 Every now and then the dust container should be
cleaned. Remove lids at both ends and rinse the
container in water or machinewash it. Remove
particles that may be stuck in the cone.
27
28
29
23 24
25 26
* Certain models only.
* Certain models only
6 7
30
31
32
Page 5

Cleaning the motor lter and the dust container lter
CycloneXL has a motor lter and a dust container lter
that should be cleaned now and then.
33 Open the front lid and lift out the dust container.
34 Dust container lter: Remove the lter holder
from the dust container and carefully pull the
33
dirty dust container lter out of the holder.
35 Motor lter: Pull the lter upwards until coming
away from the groove.
36 Rinse the lters in lukewarm water and let them
dry. Reattach the clean lters. Replace the dust
container and then close the lid.
Cleaning/replacing the exhaust lter*
There are three types of exhaust lter:
• Micro lter* (Ref. No. EF 17)
• Hepa H12* non washable (Ref. No. EF H12)
34
35
36
• Hepa H12* washable (can be bought as an option,
Ref. No. EF H12W)
The filters must always be replaced with new ones and
cannot be washed (except the Hepa H12* washable).
37 Open the back lid and lift out the filter.
38 Insert a new lter and close the lid.
Cleaning the hose and nozzle
The vacuum cleaner stops automatically if the nozzle,
tube, hose or lters become blocked and when the
dust container is full. In such cases, disconnect from
mains and allow to cool for 20-30 minutes. Clear
blockage and/or replace lters, empty the dust container and restart.
Tubes and hoses
39 Use a cleaning strip or similar to clear the tubes
and hose.
40 Hose handle could be dismantled from hose if
cleaning is needed.
41 It may also be possible to remove the obstruction
in the hose by squeezing it. However, be careful
in case the obstruction is caused by glass or
needles caught inside the hose.
Note: The warranty does not cover any damage to the
hose caused by cleaning it.
Cleaning the oor nozzle
42 Be sure to frequently clean the combination oor
nozzle.
43* Press each wheel-hub and draw away the wheels.
Remove dust-balls, hair or other objects that may
be entangled.
44* Larger objects can be accessed by removing the
connection tube from the nozzle.
Cleaning the turbo nozzle*
45 Disconnect the nozzle from the vacuum cleaner
tube and remove entangled threads, etc. by
snipping them away with scissors. Use the hose
handle to clean the nozzle.
46a Disconnect the nozzle from the vacuum cleaner
tube and remove entangled threads, etc. by
snipping them away with scissors. Use the hose
handle to clean the nozzle.
46b In case the turbo nozzle stops working, open
the cleaning lid and remove any objects that
obstructs the turbine to rotate freely.
39
41
43
40
42
44
37
* Certain models only.
38
8 9
* Certain models only.
46a 46b
45
Page 6

Troubleshooting
• Check that the cable is connected to the mains.
• Check that the plug and cable are not damaged.
• Check for a blown fuse.
The vacuum cleaner stops
• Check whether the dust container is full. If so, empty
it.
• Is the nozzle, tube or hose blocked?
• Are the lters blocked?
Water has entered the vacuum cleaner
It will be necessary to replace the motor at an authorised Electrolux service centre. Damage to the motor
caused by the penetration of water is not covered by
the warranty.
Consumer information
Electrolux decline all responsibility for all damages
arising from any improper use of the appliance or in
cases of tampering with the appliance. This product
is designed with the environment in mind. All plastic
parts are marked for recycling purposes. For details see
our web site: www.electroluc.com
If the supply cord is damaged, it must be replaced by
the manufacturer, its service agent or similarly qualied person in order to avoid a hazard.
Young children should be supervised to ensure that
they do not play with the appliance. Close attention is
necessary when used near children.
The appliance is not intended for use by young children and inrm persons without supervisison.
The symbol on the product or on its
packaging indicates that this product may
not be treated as household waste. Instead
it shall be handed over to the applicable
collection point for the recycling of electrical
and electronic equipment. By ensuring this
product is disposed of correctly, you will help
prevent potential negative consequences for
the environment and human health, which
could otherwise be caused by inappropriate
waste handling of this product. For more
detailed information about recycling of this
product, please contact your local city office,
your household waste disposal service or the
shop where you purchased the product.
10 11
Page 7

2193025-01Share more of our thinking at www.electrolux.com
 Loading...