

Page 1
For quick access to manuals, how-to guides,
support and more through our photo
registration visit electrolux.com/register
Get the most out
of your appliance
COB520X
EN Oven User Manual
Page 2

www.electrolux.com2
CONTENTS
1. SAFETY INFORMATION....................................................................................3
2. SAFETY INSTRUCTIONS..................................................................................4
3. PRODUCT DESCRIPTION................................................................................ 7
4. CONTROL PANEL............................................................................................. 8
5. BEFORE FIRST USE......................................................................................... 9
6. DAILY USE......................................................................................................... 9
7. CLOCK FUNCTIONS....................................................................................... 11
8. USING THE ACCESSORIES........................................................................... 12
9. ADDITIONAL FUNCTIONS.............................................................................. 15
10. HINTS AND TIPS........................................................................................... 15
11. CARE AND CLEANING..................................................................................33
12. TROUBLESHOOTING....................................................................................36
13. ENERGY EFFICIENCY.................................................................................. 38
WE’RE THINKING OF YOU
Thank you for purchasing an Electrolux appliance. You’ve chosen a product that
brings with it decades of professional experience and innovation. Ingenious and
stylish, it has been designed with you in mind. So whenever you use it, you can
be safe in the knowledge that you’ll get great results every time.
Welcome to Electrolux.
Visit our website for:
Get usage advice, brochures, trouble shooter, service information:
www.electrolux.com/webselfservice
Register your product for better service:
www.registerelectrolux.com
Buy Accessories, Consumables and Original spare parts for your appliance:
www.electrolux.com/shop
CUSTOMER CARE AND SERVICE
Always use original spare parts.
When contacting our Authorised Service Centre, ensure that you have the
following data available: Model, PNC, Serial Number.
The information can be found on the rating plate.
Warning / Caution-Safety information
General information and tips
Environmental information
Subject to change without notice.
Page 3

1. SAFETY INFORMATION
Before the installation and use of the appliance, carefully
read the supplied instructions. The manufacturer is not
responsible for any injuries or damage that are the result
of incorrect installation or usage. Always keep the
instructions in a safe and accessible location for future
reference.
1.1 Children and vulnerable people safety
• This appliance can be used by children aged from 8
years and above and persons with reduced physical,
sensory or mental capabilities or lack of experience
and knowledge if they have been given supervision or
instruction concerning the use of the appliance in a
safe way and understand the hazards involved.
• Children between 3 and 8 years of age and persons
with very extensive and complex disabilities shall be
kept away from the appliance unless continuously
supervised.
• Children of less than 3 years of age should be kept
away from the appliance unless continuously
supervised.
• Do not let children play with the appliance.
• Keep all packaging away from children and dispose of
it appropriately.
• Keep children and pets away from the appliance when
it operates or when it cools down. Accessible parts
may become hot during use.
• If the appliance has a child safety device, it should be
activated.
• Children shall not carry out cleaning and user
maintenance of the appliance without supervision.
ENGLISH 3
1.2 General Safety
• Only a qualified person must install this appliance and
replace the cable.
Page 4

www.electrolux.com4
• WARNING: The appliance and its accessible parts
become hot during use. Care should be taken to avoid
touching heating elements.
• Always use oven gloves to remove or put in
accessories or ovenware.
• Before carrying out any maintenance, disconnect the
appliance from the power supply.
• WARNING: Ensure that the appliance is switched off
before replacing the lamp to avoid the possibility of
electric shock.
• Do not use the appliance before installing it in the
built-in structure.
• Do not use a steam cleaner to clean the appliance.
• Do not use harsh abrasive cleaners or sharp metal
scrapers to clean the glass door since they can
scratch the surface, which may result in shattering of
the glass.
• If the mains power supply cable is damaged, it must
be replaced by the manufacturer, its Authorised
Service Centre or similarly qualified persons to avoid
an electrical hazard.
• To remove the shelf supports first pull the front of the
shelf support and then the rear end away from the
side walls. Install the shelf supports in the opposite
sequence.
• Use only the food sensor (core temperature sensor)
recommended for this appliance.
2. SAFETY INSTRUCTIONS
2.1 Installation
WARNING!
Only a qualified person must
install this appliance.
• Remove all the packaging.
• Do not install or use a damaged
appliance.
• Follow the installation instructions
supplied with the appliance.
• Always take care when moving the
appliance as it is heavy. Always use
safety gloves and enclosed footwear.
• Do not pull the appliance by the
handle.
• Install the appliance in a safe and
suitable place that meets installation
requirements.
• Keep the minimum distance from
other appliances and units.
Page 5

• Before mounting the appliance, check
if the oven door opens without
restraint.
• The appliance is equipped with an
electric cooling system. It must be
operated with the electric power
supply.
• The built-in unit must meet the
stability requirements of DIN 68930.
Cabinet minimum
height (Cabinet un‐
der the worktop
minimum height)
Cabinet width 550 mm
Cabinet depth 605 (580) mm
Height of the front of
the appliance
Height of the back
of the appliance
Width of the front of
the appliance
Width of the back of
the appliance
Depth of the appli‐
ance
Built in depth of the
appliance
Depth with open
door
Ventilation opening
minimum size.
Opening placed on
the bottom rear side
Mains supply cable
length. Cable is
placed in the right
corner of the back
side
Mounting screws 4 x 12 mm
600 (600) mm
594 mm
576 mm
549 mm
548 mm
567 mm
546 mm
1017 mm
550 x 20 mm
1500 mm
2.2 Electrical connection
WARNING!
Risk of fire and electric
shock.
ENGLISH 5
• All electrical connections should be
made by a qualified electrician.
• The appliance must be earthed.
• Make sure that the parameters on the
rating plate are compatible with the
electrical ratings of the mains power
supply.
• Always use a correctly installed
shockproof socket.
• Do not use multi-plug adapters and
extension cables.
• Make sure not to cause damage to
the mains plug and to the mains
cable. Should the mains cable need to
be replaced, this must be carried out
by our Authorised Service Centre.
• Do not let mains cables touch or
come near the appliance door or the
niche below the appliance, especially
when it operates or the door is hot.
• The shock protection of live and
insulated parts must be fastened in
such a way that it cannot be removed
without tools.
• Connect the mains plug to the mains
socket only at the end of the
installation. Make sure that there is
access to the mains plug after the
installation.
• If the mains socket is loose, do not
connect the mains plug.
• Do not pull the mains cable to
disconnect the appliance. Always pull
the mains plug.
• Use only correct isolation devices: line
protecting cut-outs, fuses (screw type
fuses removed from the holder), earth
leakage trips and contactors.
• The electrical installation must have
an isolation device which lets you
disconnect the appliance from the
mains at all poles. The isolation
device must have a contact opening
width of minimum 3 mm.
• This appliance is supplied with a main
plug and a main cable.
2.3 Use
WARNING!
Risk of injury, burns and
electric shock or explosion.
• This appliance is for household use
only.
Page 6

www.electrolux.com6
• Do not change the specification of this
appliance.
• Make sure that the ventilation
openings are not blocked.
• Do not let the appliance stay
unattended during operation.
• Deactivate the appliance after each
use.
• Be careful when you open the
appliance door while the appliance is
in operation. Hot air can release.
• Do not operate the appliance with wet
hands or when it has contact with
water.
• Do not apply pressure on the open
door.
• Do not use the appliance as a work
surface or as a storage surface.
• Open the appliance door carefully.
The use of ingredients with alcohol
can cause a mixture of alcohol and
air.
• Do not let sparks or open flames to
come in contact with the appliance
when you open the door.
• Do not put flammable products or
items that are wet with flammable
products in, near or on the appliance.
WARNING!
Risk of damage to the
appliance.
• To prevent damage or discoloration to
the enamel:
– do not put ovenware or other
objects in the appliance directly
on the bottom.
– do not put aluminium foil directly
on the bottom of cavity of the
appliance.
– do not put water directly into the
hot appliance.
– do not keep moist dishes and
food in the appliance after you
finish the cooking.
– be careful when you remove or
install the accessories.
• Discoloration of the enamel or
stainless steel has no effect on the
performance of the appliance.
• Use a deep pan for moist cakes. Fruit
juices cause stains that can be
permanent.
• This appliance is for cooking
purposes only. It must not be used for
other purposes, for example room
heating.
• Always cook with the oven door
closed.
• If the appliance is installed behind a
furniture panel (e.g. a door) make
sure the door is never closed when
the appliance operates. Heat and
moisture can build up behind a closed
furniture panel and cause subsequent
damage to the appliance, the housing
unit or the floor. Do not close the
furniture panel until the appliance has
cooled down completely after use.
2.4 Care and cleaning
WARNING!
Risk of injury, fire, or
damage to the appliance.
• Before maintenance, deactivate the
appliance and disconnect the mains
plug from the mains socket.
• Make sure the appliance is cold.
There is the risk that the glass panels
can break.
• Replace immediately the door glass
panels when they are damaged.
Contact the Authorised Service
Centre.
• Be careful when you remove the door
from the appliance. The door is
heavy!
• Clean regularly the appliance to
prevent the deterioration of the
surface material.
• Clean the appliance with a moist soft
cloth. Use only neutral detergents. Do
not use abrasive products, abrasive
cleaning pads, solvents or metal
objects.
• If you use an oven spray, follow the
safety instructions on its packaging.
• Do not clean the catalytic enamel (if
applicable) with detergents.
2.5 Internal lighting
WARNING!
Risk of electric shock.
• The type of light bulb or halogen lamp
used for this appliance is for
household appliances only. Do not
use it for house lighting.
Page 7
• Before replacing the lamp, disconnect
1
2
3
4
5
2 3 5
8
14
11
9
10
641
12
7
13
the appliance from the power supply.
• Use only lamps with the same
specifications.
2.6 Service
• To repair the appliance contact the
Authorised Service Centre.
• Use original spare parts only.
2.7 Disposal
WARNING!
Risk of injury or suffocation.
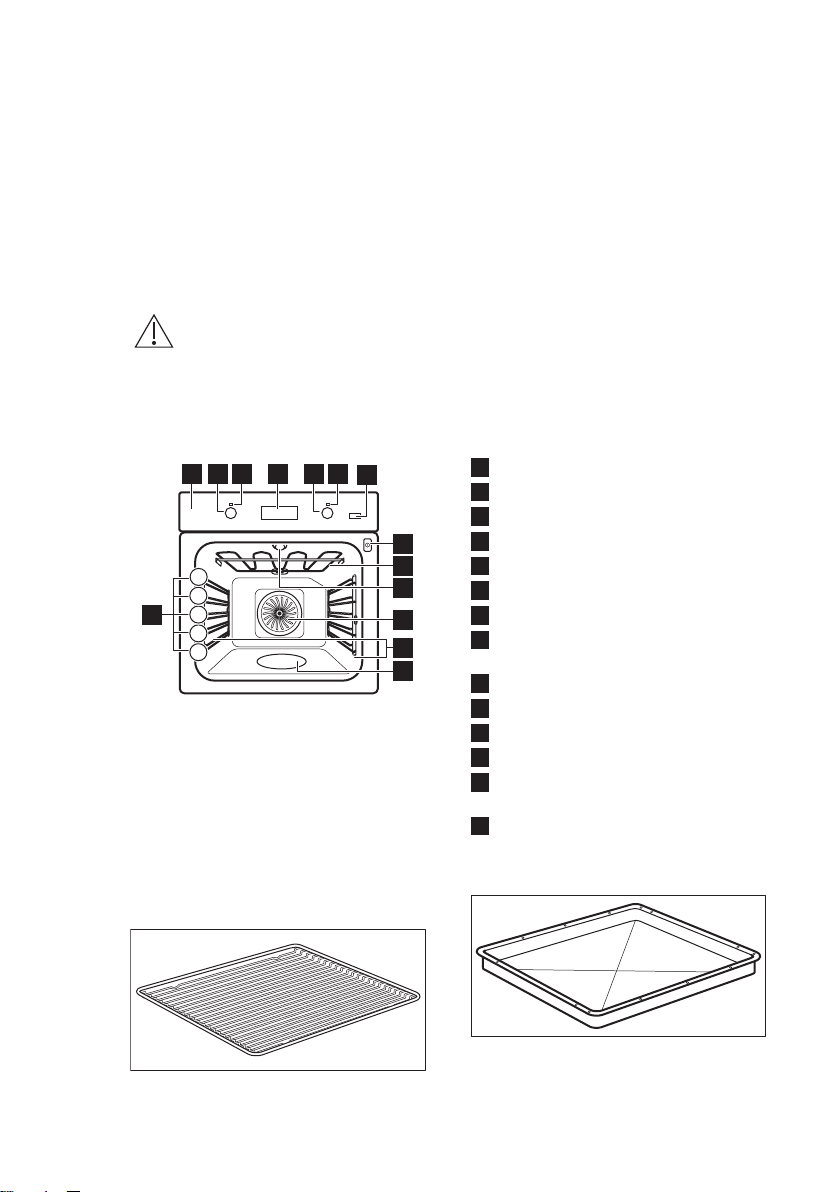
3. PRODUCT DESCRIPTION
3.1 General overview
ENGLISH 7
• Disconnect the appliance from the
mains supply.
• Cut off the mains electrical cable
close to the appliance and dispose of
it.
• Remove the door catch to prevent
children or pets from becoming
trapped in the appliance.
Control panel
1
Knob for the heating functions
2
Power lamp / symbol
3
Display
4
Control knob (for the temperature)
5
Temperature indicator / symbol
6
Plus Steam
7
Socket for the core temperature
8
sensor
Heating element
9
Lamp
10
Fan
11
Shelf support, removable
12
Cavity embossment - Aqua cleaning
13
container
Shelf positions
14
3.2 Accessories
Wire shelf
For cookware, cake tins, roasts.
Baking tray
For cakes and biscuits.
Page 8
≤ 5 kg
A B C D
www.electrolux.com8
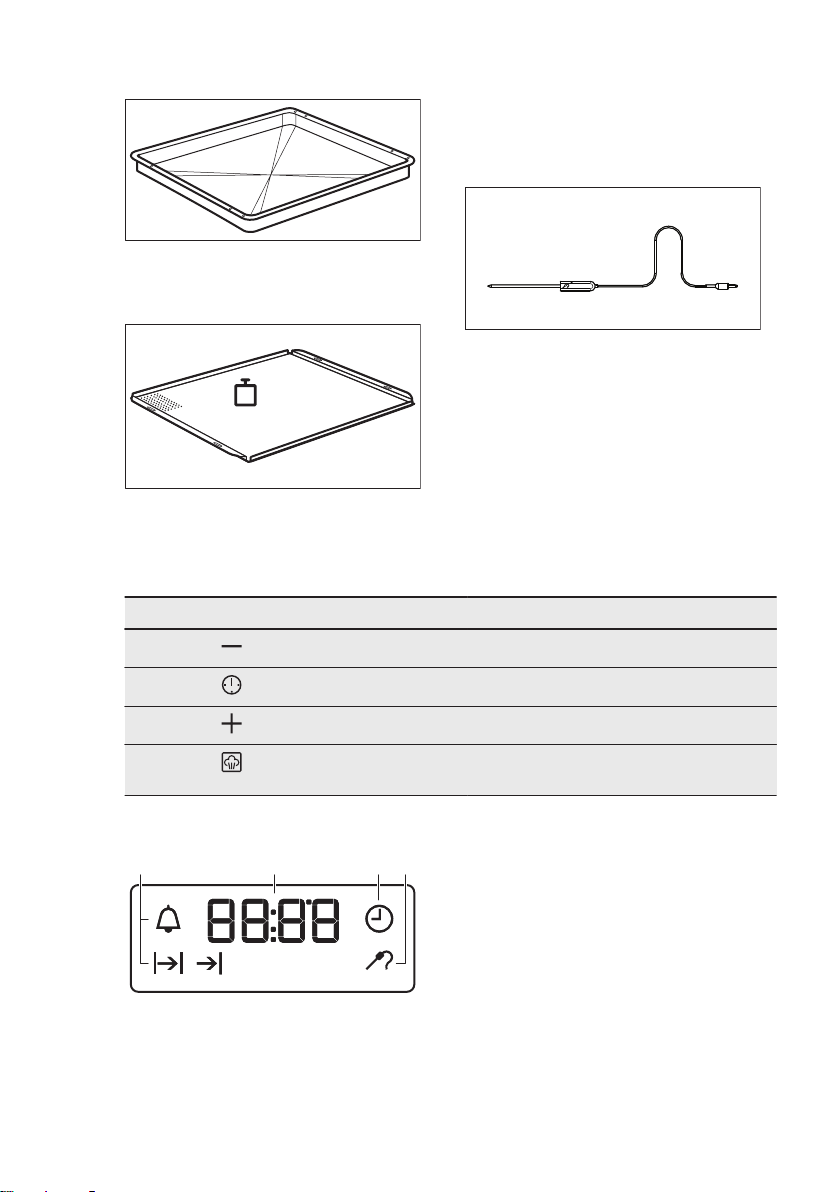
Grill- / Roasting pan
To bake and roast or as a pan to collect
fat.
Patisserie tray
4. CONTROL PANEL
4.1 Buttons
Sensor field / Button Function Description
For rolls, pretzels and small pastries.
Suitable for steam functions. The
discolouration of the surface has no
effect on the functions.
Food Sensor
To measure the temperature inside food.
MINUS To set the time.
4.2 Display
CLOCK To set a clock function.
PLUS To set the time.
PLUS STEAM To turn on the True Fan Cooking PLUS
function.
A. Clock functions
B. Timer
C. Clock function
D. Core temperature sensor indicator
Page 9
5. BEFORE FIRST USE
ENGLISH 9
WARNING!
Refer to Safety chapters.
To set the Time of day refer
to "Clock functions" chapter.
5.1 Initial Cleaning
Remove all accessories and removable
shelf supports from the oven.
6. DAILY USE
WARNING!
Refer to Safety chapters.
6.1 Retractable knobs
To use the appliance press the knob.
The knob comes out.
6.2 Setting a heating function
1. Turn the knob for the heating
functions to select a heating function.
2. Turn the control knob to select the
temperature.
The lamp turns on when the oven
operates.
3. To turn off the oven, turn the knob for
the heating functions to the off
position.
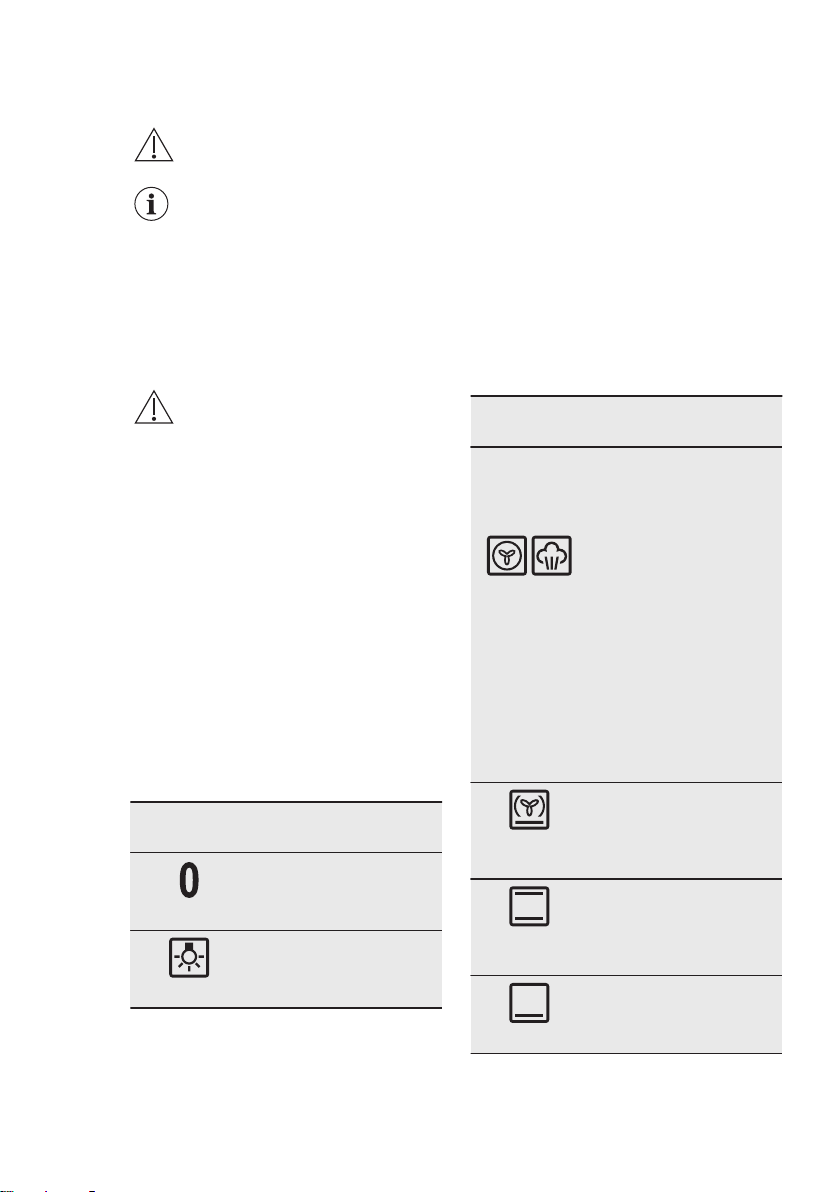
6.3 Heating functions
Oven func‐
tion
Off position
Light
Application
The oven is off.
To turn on the lamp.
Refer to "Care and cleaning" chapter.
Clean the oven and the accessories
before the first use.
Put the accessories and the removable
shelf supports back to their initial
position.
Oven func‐
tion
True Fan
Cooking /
True Fan
Cooking
PLUS / Aqua
Cleaning
Pizza Func‐
tion
Conventional
Cooking
Bottom Heat
Application
To bake on up to three
shelf positions at the
same time and to dry
food.
Set the temperature 20
- 40 °C lower than for
Conventional Cooking.
To add humidity during
the cooking. To get the
right colour and crispy
crust during baking. To
give more juiciness dur‐
ing reheating.
Refer to "Care and
cleaning" chapter for
more information about:
Aqua Cleaning.
To bake pizza. To make
intensive browning and
a crispy bottom.
To bake and roast food
on one shelf position.
To bake cakes with
crispy bottom and to
preserve food.
Page 10
www.electrolux.com10
Oven func‐
tion
Defrost
Moist Fan
Baking
Grill
Turbo Grilling
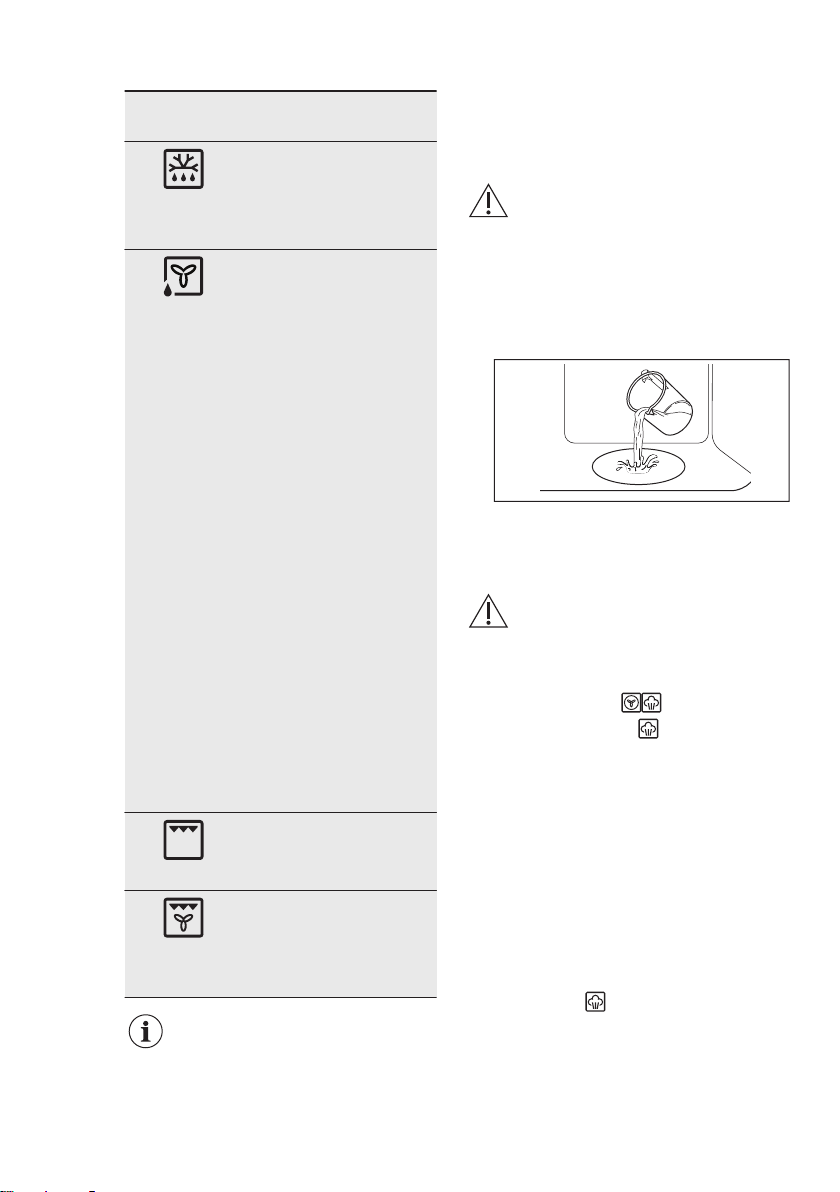
The lamp may turn off
automatically at a
temperature below 60 °C
during some oven functions.
Application
To defrost food (vegeta‐
bles and fruit). The de‐
frosting time depends
on the amount and size
of the frozen food.
This function is de‐
signed to save energy
during cooking. For the
cooking instructions re‐
fer to "Hints and tips"
chapter, Moist Fan Bak‐
ing. The oven door
should be closed during
cooking so that the
function is not interrup‐
ted and to ensure that
the oven operates with
the highest energy effi‐
ciency possible. When
you use this function,
the temperature in the
cavity may differ from
the set temperature.
The residual heat is
used. The heating pow‐
er may be reduced. For
general energy saving
recommendations refer
to "Energy Efficiency"
chapter, Energy Saving.
This function was used
to comply with the ener‐
gy efficiency class ac‐
cording to EN 60350-1.
To grill thin pieces of
food and to toast bread.
To roast large meat
joints or poultry with
bones on one shelf po‐
sition. To make gratins
and to brown.
6.4 Setting the function: True Fan Cooking PLUS
This function increases humidity during
cooking.
WARNING!
Risk of burns and damage to
the appliance.
Released humidity can cause burns.
After the function stops, carefully open
the door.
1. Fill the cavity embossment with tap
water.
The maximum capacity of the cavity
embossment is 250 ml.
Fill the cavity embossment with water
only when the oven is cold.
CAUTION!
Do not refill the cavity
embossment during
cooking or when the
oven is hot.
2. Set the function: .
3. Press: Plus Steam .
It works only with the function: True Fan
Cooking PLUS.
The indicator turns on.
4. Turn the control knob to set
temperature.
5. Preheat the empty oven for 10
minutes to create humidity.
6. Put food in the oven.
Refer to "Hints and tips" chapter.
Do not open the oven door during
cooking.
7. Turn the knob for the heating
functions to the off position, press
Plus Steam
The indicator turns off.
8. Remove water from the cavity
embossment.
to turn off the oven.
Page 11
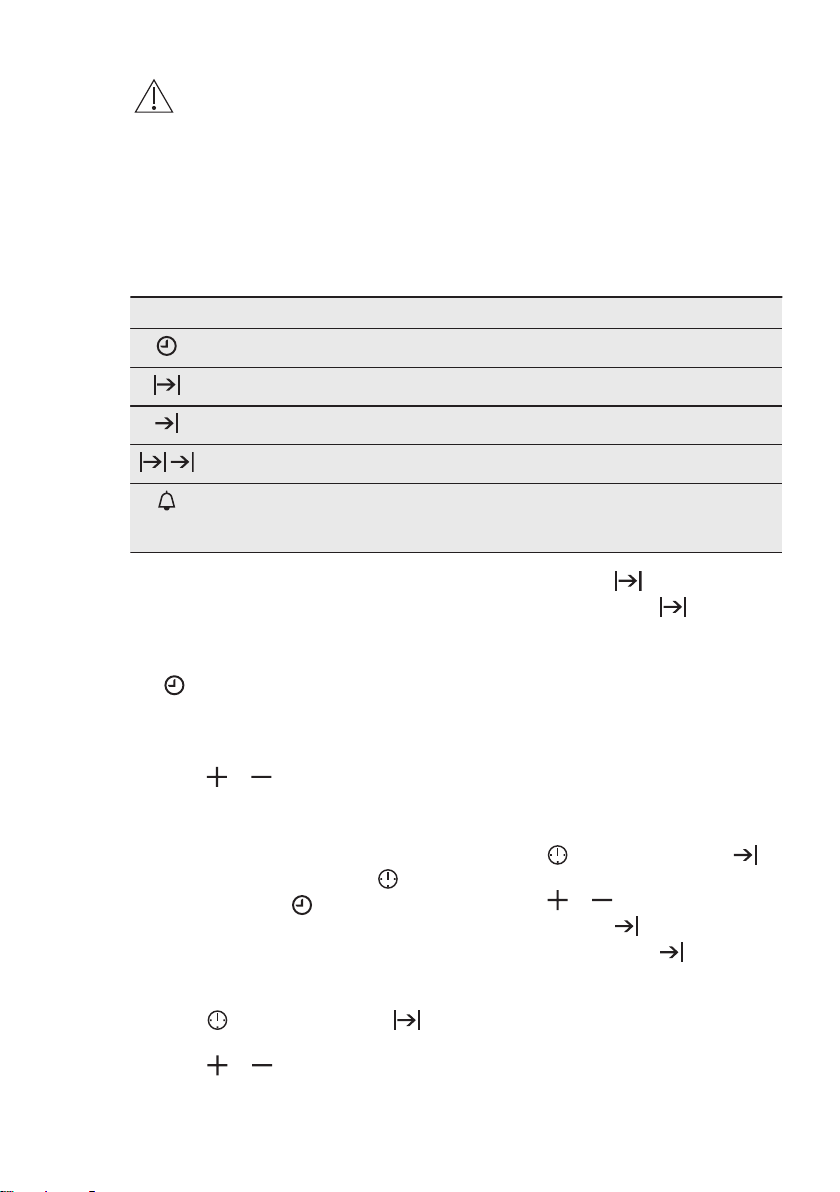
WARNING!
Make sure that the oven
is cold before you
remove the remaining
water from the cavity
embossment.
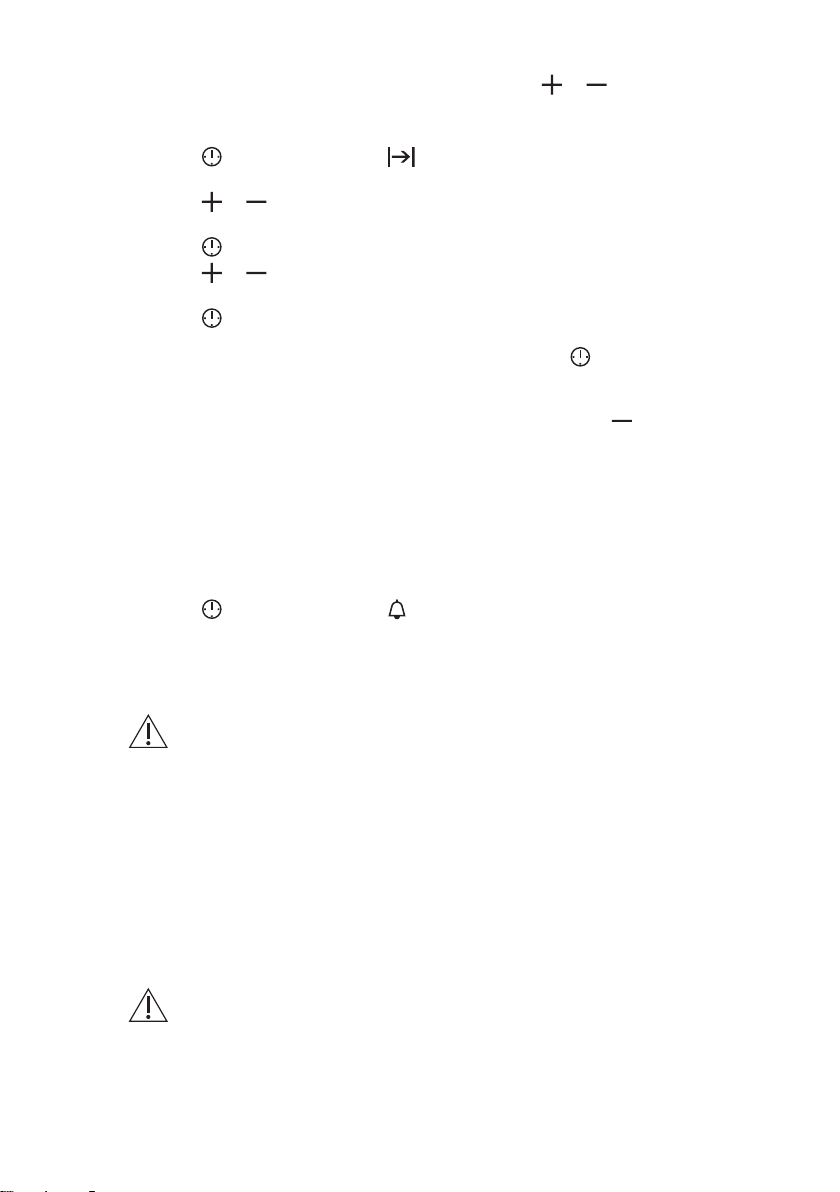
7. CLOCK FUNCTIONS
7.1 Clock functions table
Clock function Application
TIME OF DAY To set, change or check the time of day.
DURATION To set how long the appliance operates.
END To set when the appliance deactivates.
TIME DELAY To combine DURATION and END function.
MINUTE MIND‐ERTo set countdown time. This function has no effect on
ENGLISH 11
the operation of the appliance. You can set the MINUTE
MINDER at any time, also when the appliance is off.
7.2 Setting the time. Changing the time
You must set the time before you
operate the oven.
flashes when you connect the
The
appliance to the electrical supply, when
there was a power cut or when the timer
is not set.
Press the
time.
After approximately five seconds, the
flashing stops and the display shows the
time of day you set.
To change the time of day press
again and again until starts to flash.
or to set the correct
7.3 Setting the DURATION
1. Set an oven function and
temperature.
2. Press again and again until
starts to flash.
3. Press or to set the DURATION
time.
The display shows .
4. When the time ends, flashes and
an acoustic signal sounds. The
appliance deactivates automatically.
5. Press any button to stop the acoustic
signal.
6. Turn the knob for the oven functions
and the knob for the temperature to
the off position.
7.4 Setting the END
1. Set an oven function and
temperature.
2. Press again and again until
starts to flash.
3. Press or to set the time.
The display shows
4. When the time ends, flashes and
an acoustic signal sounds. The
appliance deactivates automatically.
5. Press any button to stop the signal.
6. Turn the knob for the oven functions
and the knob for the temperature to
the off position.
.
Page 12
www.electrolux.com12
7.5 Setting the TIME DELAY
1. Set an oven function and
temperature.
2. Press
starts to flash.
3. Press or to set the time for
DURATION.
4. Press .
5. Press
END.
6. Press to confirm.
Appliance turns on automatically later on,
works for the set DURATION time and
stops at the set END time. At the set time
an acoustic signal sounds.
7. The appliance deactivates
automatically. Press any button to
stop the signal.
8. Turn the knob for the oven functions
and the knob for the temperature to
the off position.
again and again until
or to set the time for
7.6 Setting the MINUTE
MINDER
1. Press again and again until
starts to flash.
2. Press or to set the necessary
time.
The Minute Minder starts automatically
after 5 seconds.
3. When the set time ends, an acoustic
signal sounds. Press any button to
stop the acoustic signal.
4. Turn the knob for the oven functions
and the knob for the temperature to
the off position.
7.7 Cancelling the clock
functions
1. Press the again and again until
the necessary function indicator
starts to flash.
2. Press and hold .
The clock function goes out after some
seconds.
8. USING THE ACCESSORIES
WARNING!
Refer to Safety chapters.
8.1 Core temperature sensor
The core temperature sensor measures
temperature inside the food. When the
food is at the set temperature, the oven
turns off.
There are two temperatures to be set:
• the oven temperature (minimum 120
°C),
• the food core temperature.
CAUTION!
Use only the core
temperature sensor supplied
and the original replacement
parts.
For the best cooking results:
• Ingredients should be at room
temperature.
• Core temperature sensor cannot be
used for liquid dishes.
• During cooking the core temperature
sensor must remain in the dish and
the plug in the socket.
• Use recommended food core
temperature settings. Refer to "Hints
and tips" chapter.
Food categories: meat, poultry and fish
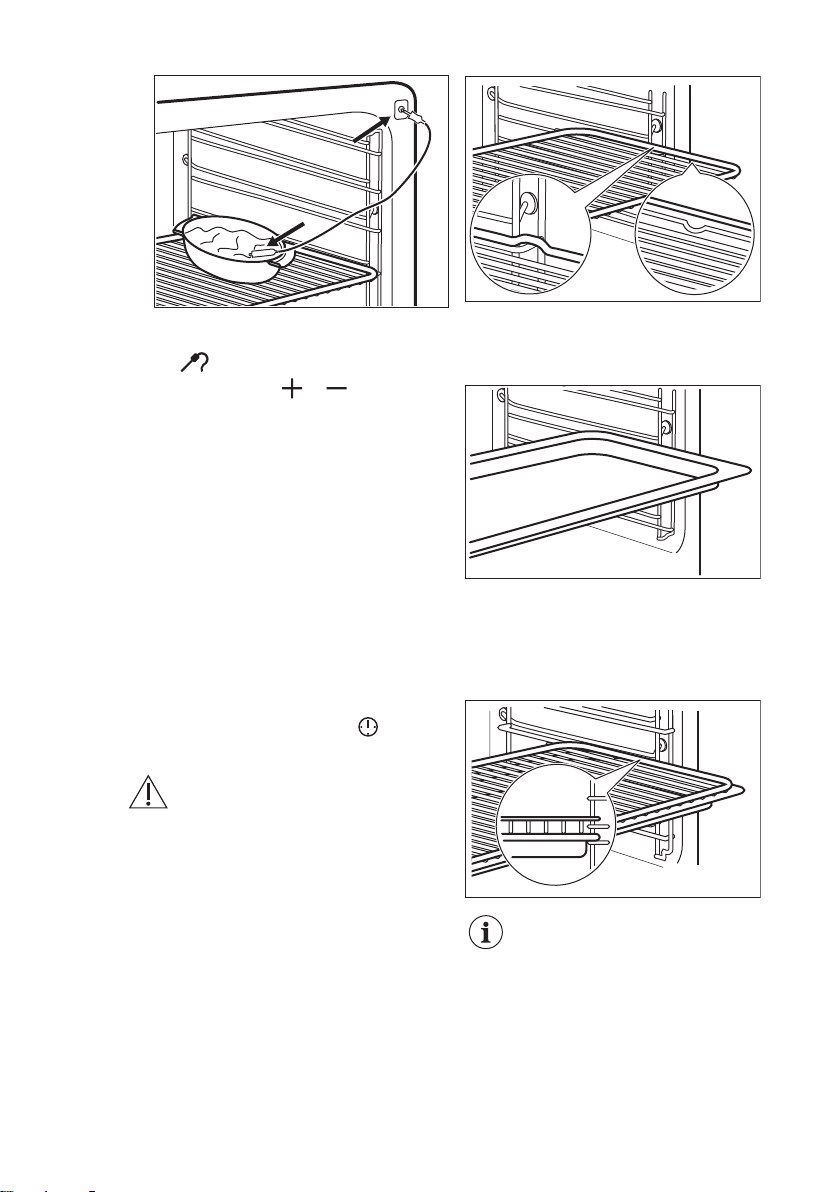
1. Insert the tip of the core temperature
sensor into the centre of meat or fish,
in the thickest part if possible. Make
sure that at least 3/4 of the core
temperature sensor is inside of the
dish.
Page 13
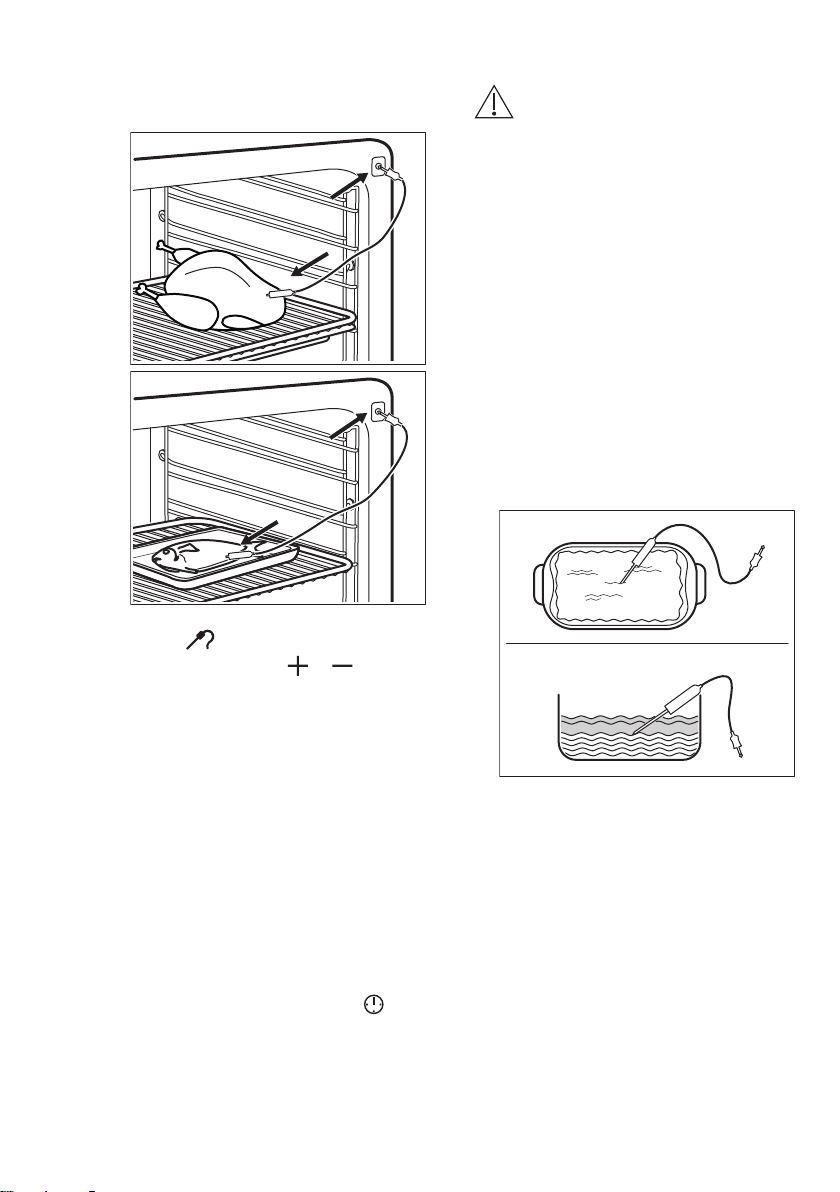
2. Put the plug of the core temperature
sensor into the socket located in the
front frame of the appliance.
The indicator for the core temperature
sensor flashes.
3. Press the button or to set the
core temperature. You can set the
temperature from 30 °C to 99 °C.
4. Set the oven function and
temperature.
When the dish is at the set core
temperature, an acoustic signal sounds
for 2 minutes. Press any button to stop
the signal.
5. Deactivate the appliance.
6. Remove the plug of the core
temperature sensor from the socket.
Remove the dish from the appliance.
If the dish is not cooked to your
satisfaction, do the above steps again
and set a higher core temperature.
You can change the temperature at any
time during the cooking. Press to
change the set core temperature.
ENGLISH 13
WARNING!
Be careful when you remove
the tip and plug of the core
temperature sensor. The
core temperature sensor is
hot. There is a risk of burns.
Food category: casserole
1. Place half of the ingredients in a
baking dish.
2. Insert the tip of the core temperature
sensor exactly in the centre of the
casserole. The core temperature
sensor should be stabilized in one
place during baking. Use a solid
ingredient to achieve that. Use the
rim of the baking dish to support the
silicone handle of the core
temperature sensor. The tip of the
core temperature sensor should not
touch the bottom of a baking dish.
3. Cover the core temperature sensor
with the remaining ingredients.
4. Put the plug of the core temperature
sensor into the socket located in the
front frame of the appliance.
Page 14
www.electrolux.com14
The indicator for the core temperature
sensor flashes.
5. Press the button or to set the
core temperature. You can set the
temperature from 30 °C to 99 °C.
6. Set the oven function and the oven
temperature.
When the dish is at the set core
temperature, an acoustic signal sounds
for 2 minutes. Press any button to stop
the signal.
7. Deactivate the appliance.
8. Remove the plug of the core
temperature sensor from the socket.
Remove the dish from the appliance.
If the dish is not cooked to your
satisfaction, do the above steps again
and set a higher core temperature.
You can change the temperature at any
time during the cooking. Press to
change the set core temperature.
WARNING!
Be careful when you remove
the tip and plug of the core
temperature sensor. The
core temperature sensor is
hot. There is a risk of burns.
Baking tray/ Deep pan:
Push the baking tray / deep pan between
the guide bars of the shelf support.
Wire shelf and baking tray / deep pan
together:
Push the baking tray / deep pan between
the guide bars of the shelf support and
the wire shelf on the guide bars above.
8.2 Inserting the accessories
Wire shelf:
Push the shelf between the guide bars of
the shelf support .
Small indentation at the top
increase safety. The
indentations are also anti-tip
devices. The high rim
around the shelf prevents
cookware from slipping of
the shelf.
Page 15
9. ADDITIONAL FUNCTIONS
1
2
ENGLISH 15
9.1 Cooling fan
When the oven operates, the cooling fan
turns on automatically to keep the
surfaces of the oven cool. If you turn off
the oven, the cooling fan can continue to
operate until the oven cools down.
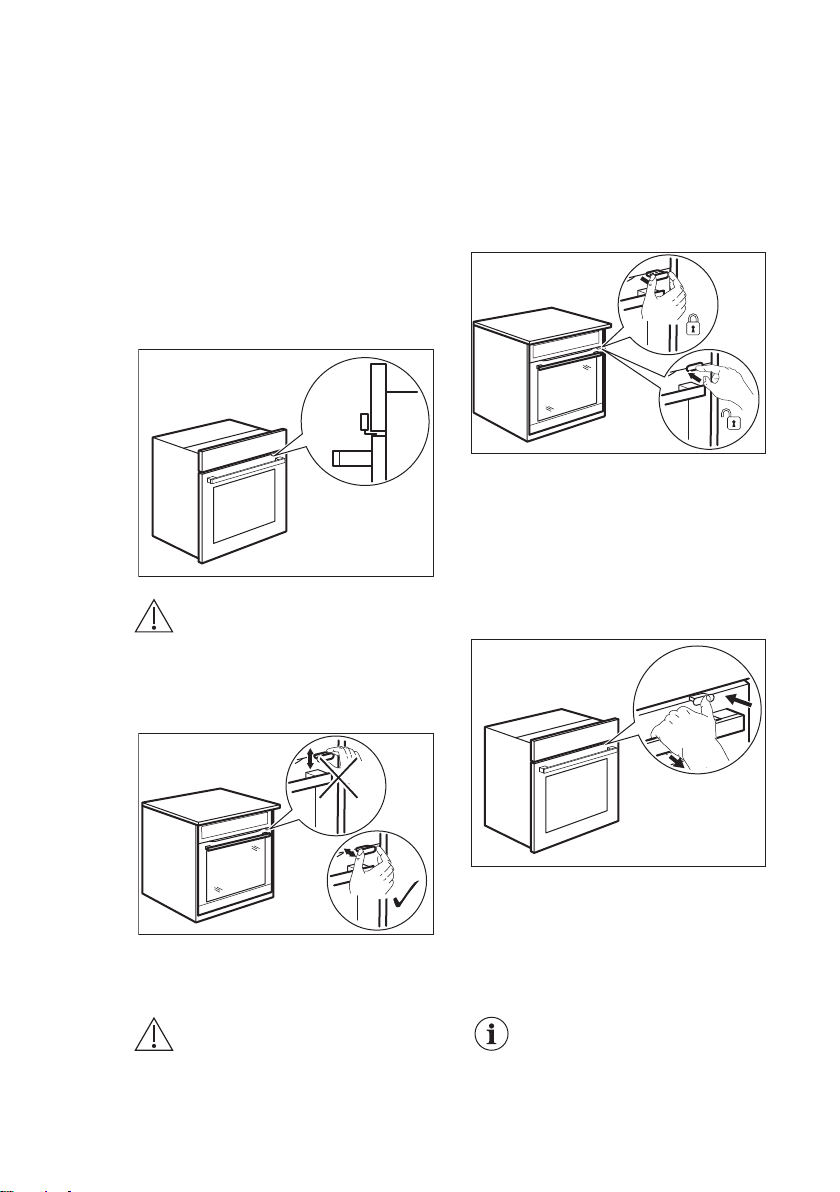
9.2 Mechanical door lock
The door lock is unlocked when you buy
the oven.
CAUTION!
Do not move the door lock
vertically.
Do not push the door lock
when you close the oven
door.
9.3 How to use mechanical door lock
1. To turn on the door lock pull the door
lock forward until it locks in place.
2. To turn off the door lock push the
door lock back into the panel.
9.4 Opening the door with
turned on mechanical door lock
You can open the door when the
mechanical door lock is turned on.
1. Push the door lock slightly.
2. Open the door by pulling it with the
handle.
10. HINTS AND TIPS
WARNING!
Refer to Safety chapters.
If you press the door lock until there is a
click, you turn off the door lock.
The temperature and baking
times in the tables are
guidelines only. They
depend on the recipes and
the quality and quantity of
the ingredients used.
Page 16
www.electrolux.com16
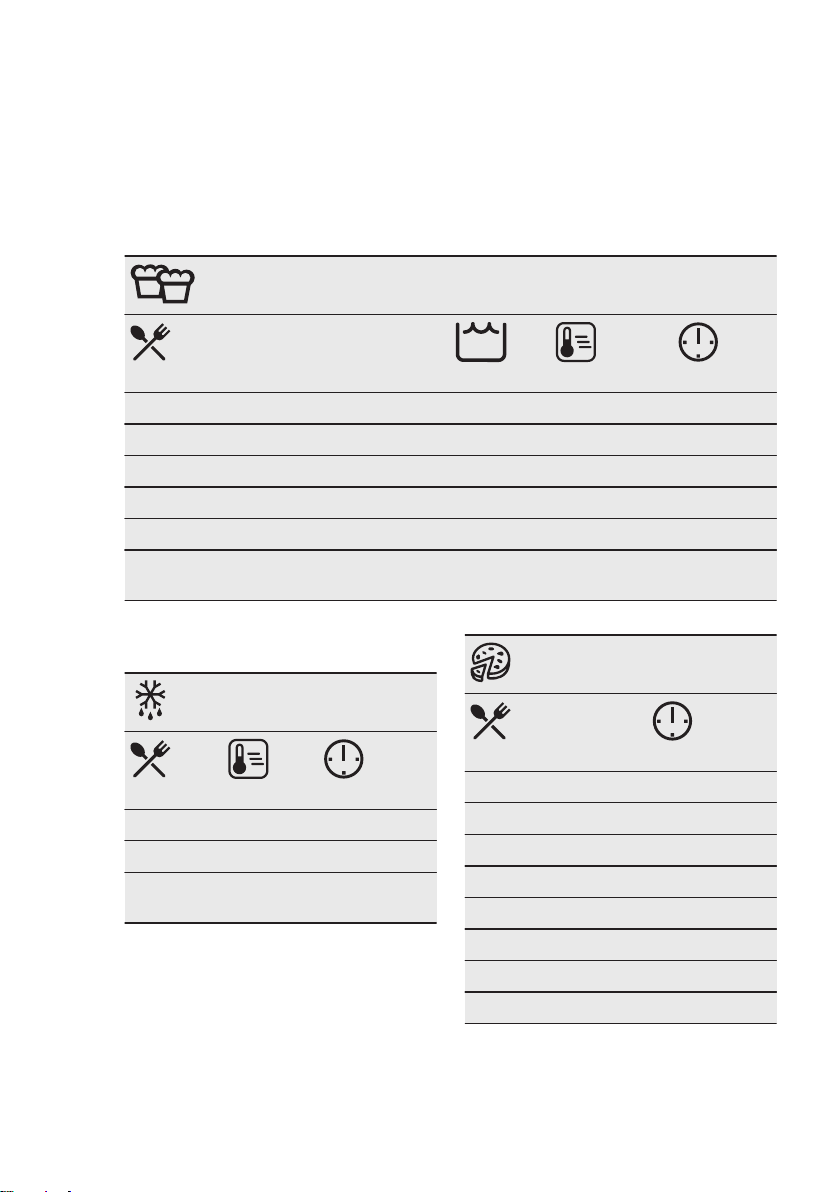
10.1 Cooking recommendations
Your oven may bake or roast differently
to the oven you had before. The tables
below show recommended settings for
temperature, cooking time and shelf
position for specific types of the food.
Use a baking tray.
CAKES / PASTRIES / BREADS
Cookies / Scones / Croissants 100 150 - 180 10 - 20
Focaccia 100 200 - 210 10 - 20
Pizza 100 230 10 - 20
Bread rolls 100 200 20 - 25
Bread 100 180 35 - 40
Plum cake / Apple pie / Cinnamon rolls,
baked in a cake mould
Use 150 ml of water unless specified
otherwise.
If you cannot find the settings for a
special recipe, look for the similar one.
10.2 True Fan Cooking PLUS
Use the second shelf position.
(ml) (°C) (min)
100 - 150 160 - 180 30 - 60
FOOD REGENERATION
FROZEN READY MEALS
(°C) (min)
Pizza 200 - 210 10 - 20
Croissants 170 - 180 15 - 25
Lasagne,
use 200 ml
Use 100 ml of water.
Set the temperature to 110 °C.
180 - 200 35 - 50
(min)
Bread rolls 10 - 20
Bread 15 - 25
Focaccia 15 - 25
Meat 15 - 25
Pasta 15 - 25
Pizza 15 - 25
Rice 15 - 25
Vegetables 15 - 25
Use 200 ml of water.
Use a glass baking dish.
Page 17

You can extend baking times by 10 – 15
minutes if you bake cakes on more than
ROASTING
(°C) (min)
Roast beef 200 50 - 60
Chicken 210 60 - 80
Roast pork 180 65 - 80
one shelf position.
Cakes and pastries at different heights
do not always brown equally. There is no
need to change the temperature setting if
an unequal browning occurs. The
differences equalize during baking.
Trays in the oven can twist during
baking. When the trays become cold
again, the distortions disappear.
10.3 Baking
Use the lower temperature the first time.
10.4 Tips on baking
Baking results Possible cause Remedy
The bottom of the cake
is not baked sufficient‐
ly.
The cake sinks and
becomes soggy or
streaky.
The cake is too dry. The oven temperature is
The cake bakes un‐
evenly.
The cake is not ready
in the baking time
specified in a recipe.
The shelf position is incor‐
rect.
The oven temperature is
too high.
The baking time is too
short.
too low.
The baking time is too
long.
The oven temperature is
too high and the baking
time is too short.
The cake batter is not
evenly distributed.
The oven temperature is
too low.
Put the cake on a lower shelf.
Next time set slightly lower
oven temperature.
Next time set a longer baking
time and lower oven tempera‐
ture.
Next time set higher oven tem‐
perature.
Next time set shorter baking
time.
Set lower oven temperature and
longer baking time.
Next time spread the cake bat‐
ter evenly on the baking tray.
Next time set a slightly higher
oven temperature.
ENGLISH 17
Page 18
www.electrolux.com18
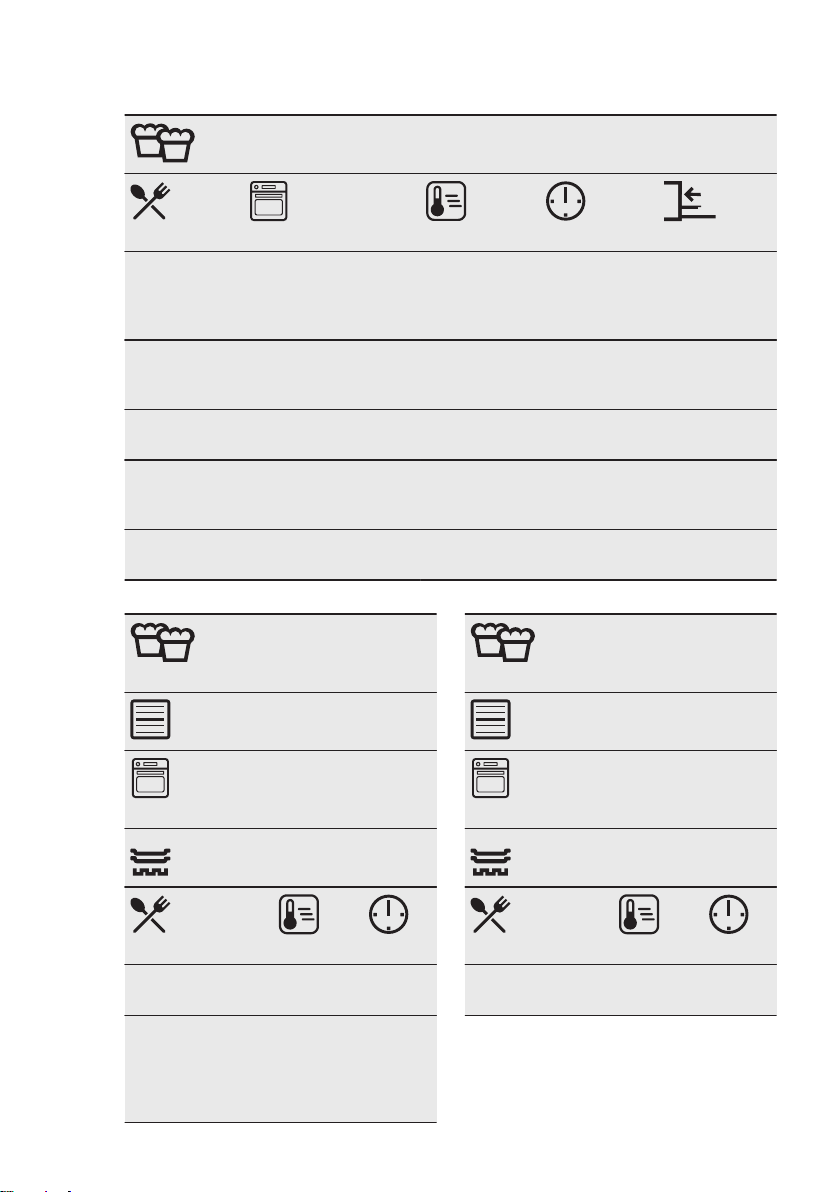
10.5 Baking on one shelf level
BAKING IN TINS
Flan base short pastry,
preheat the
empty oven
Flan base sponge cake
mixture
Ring cake /
Brioche
Madeira
cake / Fruit
cakes
Cheesecake Conventional Cook‐
BREADS
Use the third shelf position.
Use the function: True Fan
Cooking.
True Fan Cooking 170 - 180 10 - 25 2
True Fan Cooking 150 - 170 20 - 25 2
True Fan Cooking 150 - 160 50 - 70 1
True Fan Cooking 140 - 160 70 - 90 1
ing
CAKES / PASTRIES /
(°C)
(min)
170 - 190 60 - 90 1
CAKES / PASTRIES /
BREADS
Use the third shelf position.
Use the function: True Fan
Cooking.
Use a baking tray.
Cake with crum‐
ble topping
Fruit flans (made
of yeast dough /
sponge cake mix‐
ture), use a deep
pan
(°C) (min)
150 - 160 20 - 40
150 35 - 55
Use a baking tray.
Fruit flans made
of short pastry
(°C) (min)
160 - 170 40 - 80
Page 19
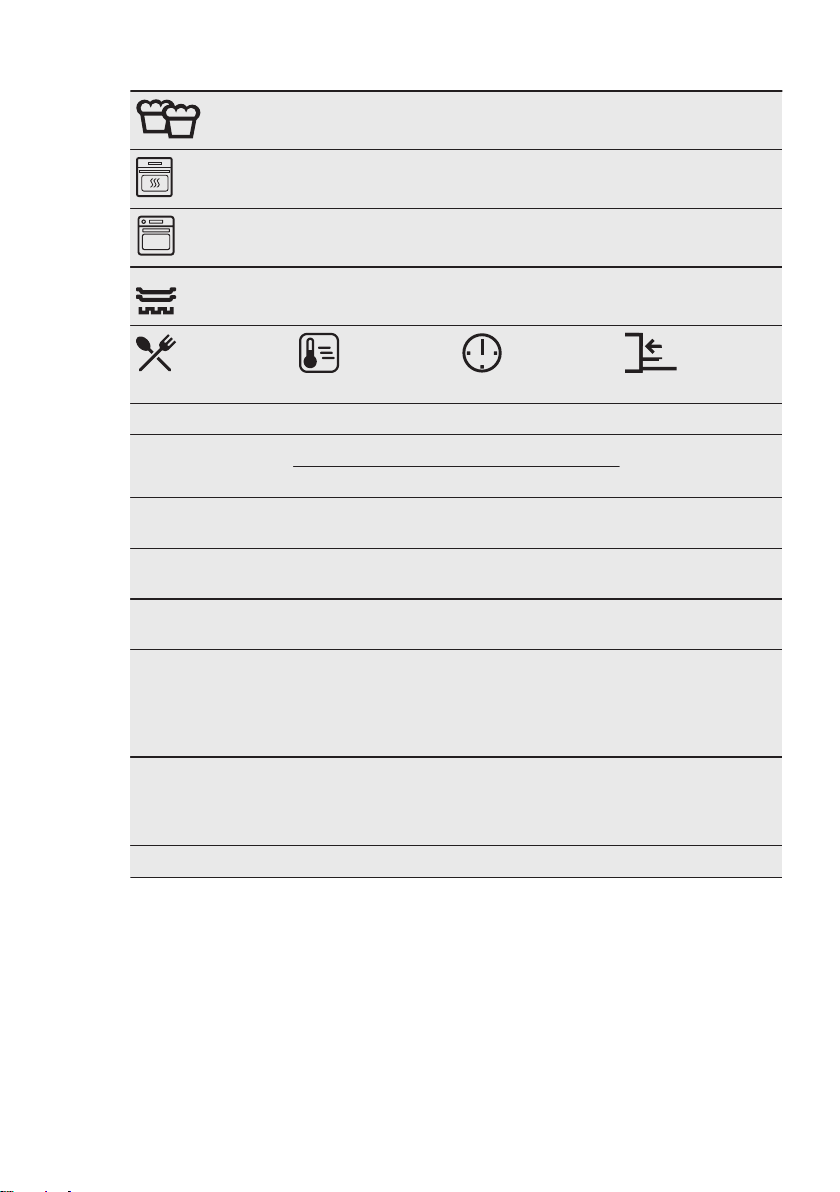
CAKES / PASTRIES / BREADS
Preheat the empty oven.
Use the function: Conventional Cooking.
Use a baking tray.
(°C) (min)
Swiss roll 180 - 200 10 - 20 3
Rye bread: first: 230 20 1
then: 160 - 180 30 - 60
Buttered almond
190 - 210 20 - 30 3
cake / Sugar cakes
Cream puffs /
190 - 210 20 - 35 3
Eclairs
Plaited bread /
170 - 190 30 - 40 3
Bread crown
Fruit flans (made of
170 35 - 55 3
yeast dough /
sponge cake mix‐
ture), use a deep
pan
Yeast cakes with
160 - 180 40 - 80 3
delicate toppings
(e.g. quark, cream,
custard)
Christstollen 160 - 180 50 - 70 2
ENGLISH 19
Page 20
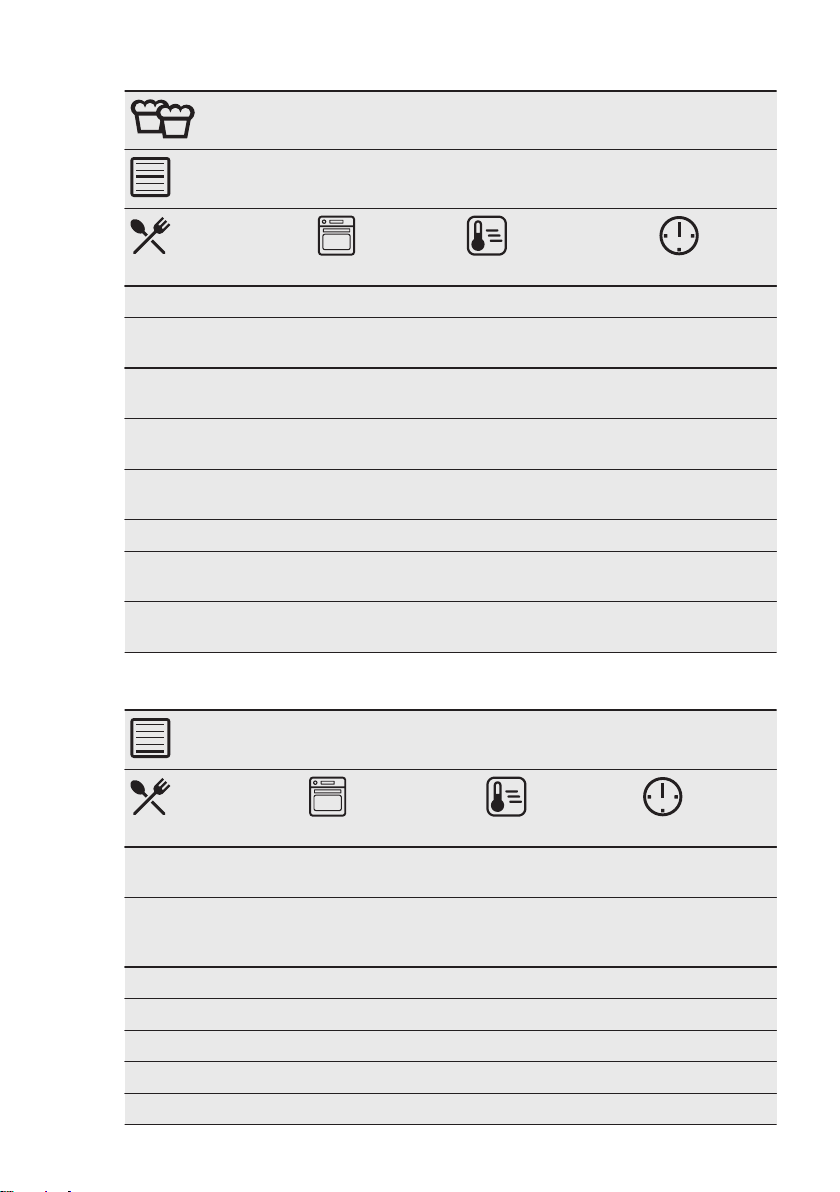
www.electrolux.com20
BISCUITS
Use the third shelf position.
(°C) (min)
Short pastry biscuits True Fan Cooking 150 - 160 10 - 20
Rolls, preheat the
empty oven
Biscuits made of
sponge cake mixture
Puff pastries, preheat
the empty oven
Biscuits made of yeast
dough
Macaroons True Fan Cooking 100 - 120 30 - 50
Pastries made of egg
white / Meringues
Rolls, preheat the
empty oven
True Fan Cooking 160 10 - 25
True Fan Cooking 150 - 160 15 - 20
True Fan Cooking 170 - 180 20 - 30
True Fan Cooking 150 - 160 20 - 40
True Fan Cooking 80 - 100 120 - 150
Conventional
Cooking
190 - 210 10 - 25
10.6 Bakes and gratins
Use the first shelf position.
(°C) (min)
Baguettes topped
with melted cheese
Vegetables au gratin,
preheat the empty
oven
Lasagne Conventional Cooking 180 - 200 25 - 40
Fish bakes Conventional Cooking 180 - 200 30 - 60
Stuffed vegetables True Fan Cooking 160 - 170 30 - 60
Sweet bakes Conventional Cooking 180 - 200 40 - 60
Pasta bake Conventional Cooking 180 - 200 45 - 60
True Fan Cooking 160 - 170 15 - 30
Turbo Grilling 160 - 170 15 - 30
Page 21
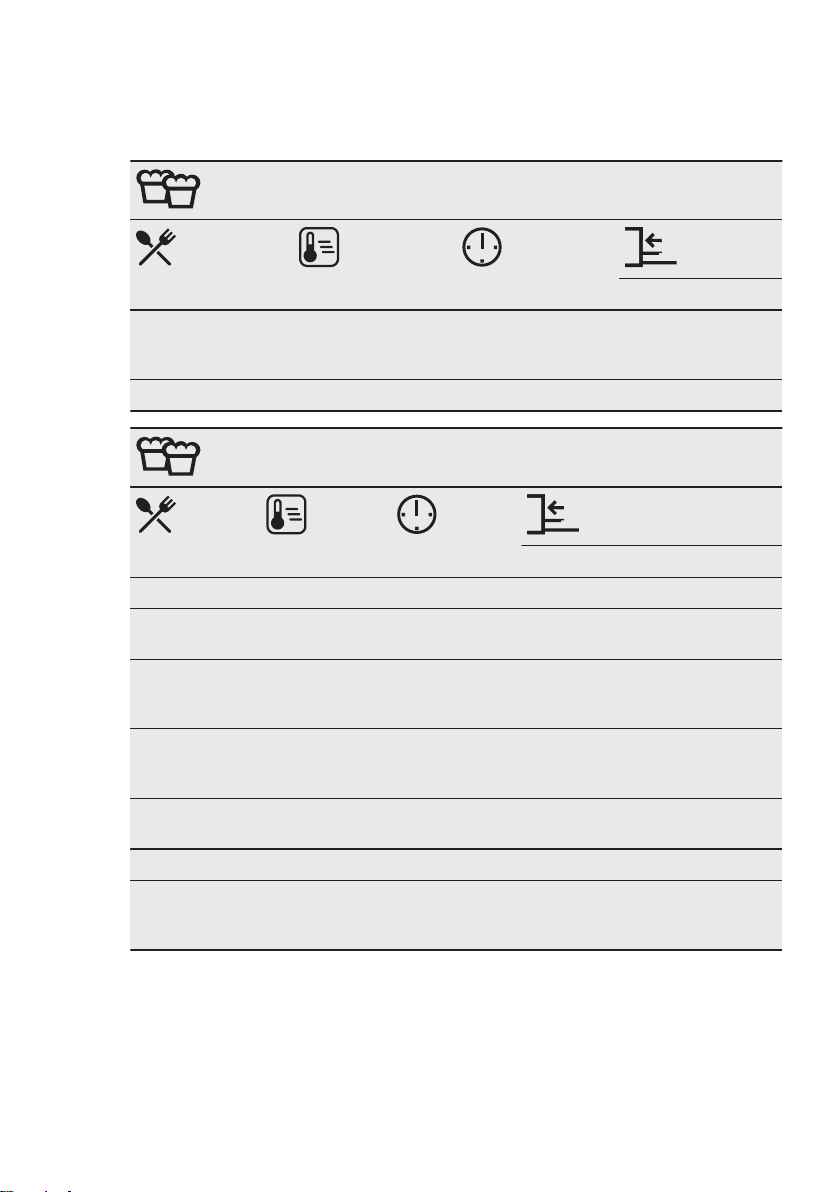
10.7 Multilevel Baking
Use the function: True Fan Cooking.
CAKES / PASTRIES
ENGLISH 21
Use the baking trays.
(°C)
Cream puffs /
Eclairs, preheat the
empty oven
Dry streusel cake 150 - 160 30 - 45 1 / 4
BISCUITS / SMALL CAKES / PASTRIES / ROLLS
Rolls 180 20 - 30 1 / 4 -
Short pastry
biscuits
Biscuits made
of sponge cake
mixture
Puff pastries,
preheat the
empty oven
Biscuits made
of yeast dough
Macaroons 100 - 120 40 - 80 1 / 4 -
Biscuits made
of egg white /
Meringues
160 - 180 25 - 45 1 / 4
(°C)
(min)
150 - 160 20 - 40 1 / 4 1 / 3 / 5
160 - 170 25 - 40 1 / 4 -
170 - 180 30 - 50 1 / 4 -
160 - 170 30 - 60 1 / 4 -
80 - 100 130 - 170 1 / 4 -
(min)
2 positions
2 positions 3 positions
10.8 Tips on Roasting
Use heat-resistant ovenware.
Roast lean meat covered.
Roast large meat joints directly in the tray
or on the wire shelf placed above the
tray.
Put some water in the tray to prevent
dripping fat from burning.
Turn the roast after 1/2 - 2/3 of the
cooking time.
Roast meat and fish in large pieces (1 kg
or more).
Page 22
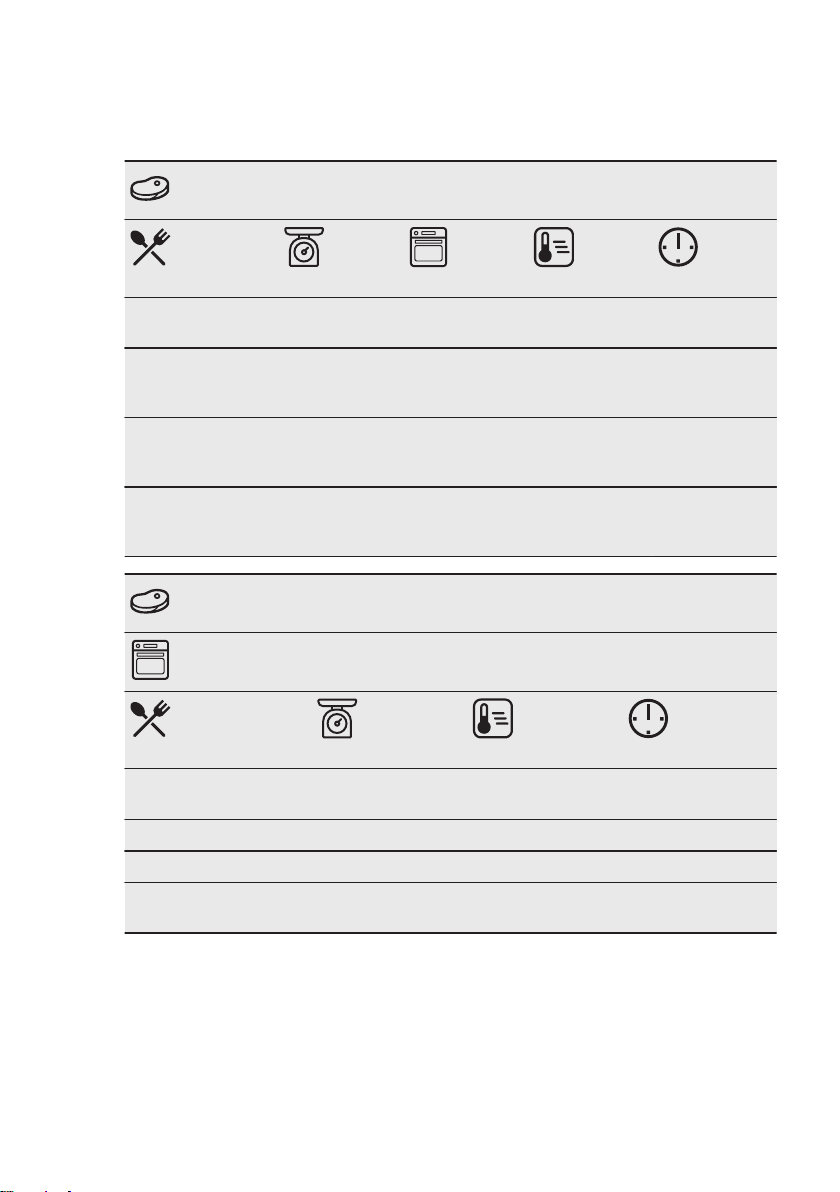
www.electrolux.com22
Baste meat joints with their own juice
several times during roasting.
BEEF
Pot roast 1 - 1.5 kg Conventional
Roast beef or fillet,
rare, preheat the
empty oven
Roast beef or fillet,
medium, preheat
the empty oven
Roast beef or fillet,
well done, preheat
the empty oven
PORK
per cm of
thickness
per cm of
thickness
per cm of
thickness
Cooking
Turbo Grilling 190 - 200 5 - 6
Turbo Grilling 180 - 190 6 - 8
Turbo Grilling 170 - 180 8 - 10
10.9 Roasting
Use the first shelf position.
(°C) (min)
230 120 - 150
Use the function: Turbo Grilling.
(kg)
Shoulder / Neck / Ham
joint
Chops / Spare rib 1 - 1.5 170 - 180 60 - 90
Meatloaf 0.75 - 1 160 - 170 50 - 60
Pork knuckle, pre‐
cooked
1 - 1.5 160 - 180 90 - 120
0.75 - 1 150 - 170 90 - 120
(°C) (min)
Page 23
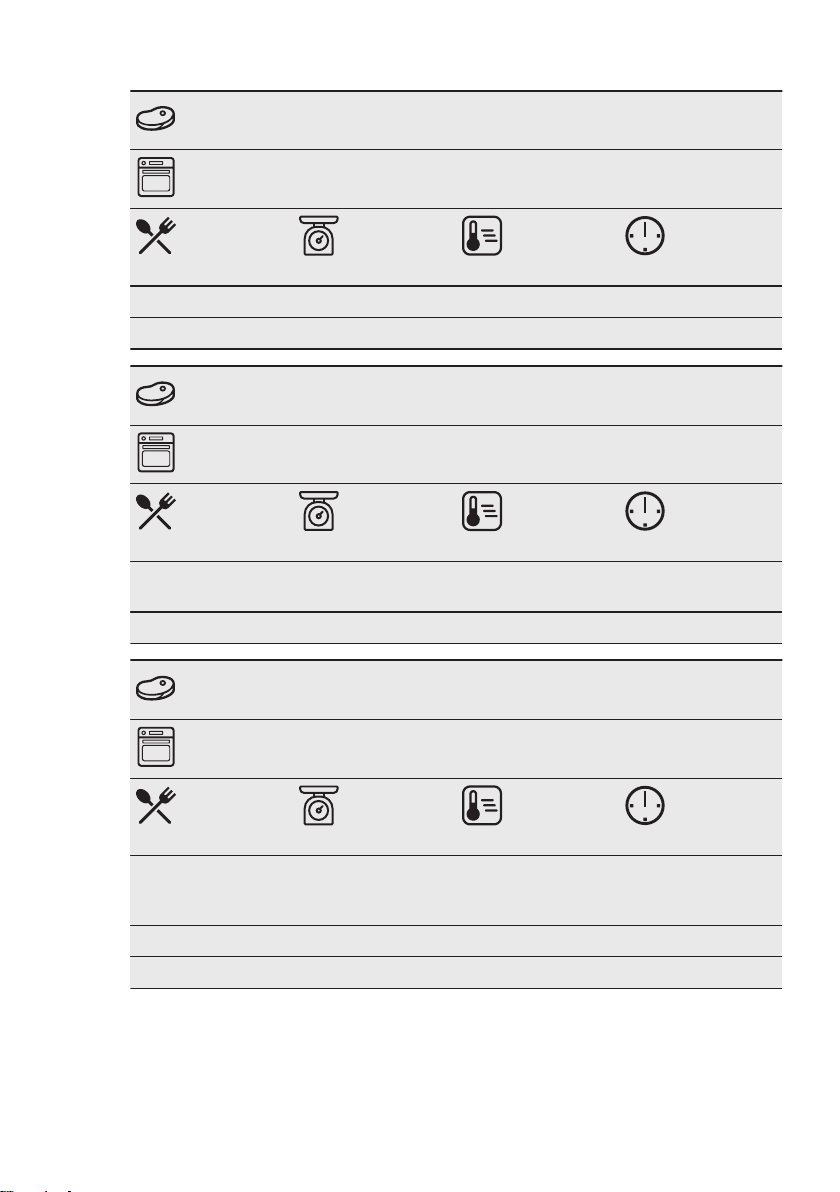
VEAL
Use the function: Turbo Grilling.
ENGLISH 23
(kg)
(°C) (min)
Roast veal 1 160 - 180 90 - 120
Veal knuckle 1.5 - 2 160 - 180 120 - 150
LAMB
Use the function: Turbo Grilling.
Lamb leg / Roast
(kg)
1 - 1.5 150 - 170 100 - 120
(°C) (min)
lamb
Lamb saddle 1 - 1.5 160 - 180 40 - 60
GAME
Use the function: Conventional Cooking.
Saddle / Hare leg,
(kg)
up to 1 230 30 - 40
(°C) (min)
preheat the empty
oven
Venison saddle 1.5 - 2 210 - 220 35 - 40
Haunch of venison 1.5 - 2 180 - 200 60 - 90
Page 24
www.electrolux.com24
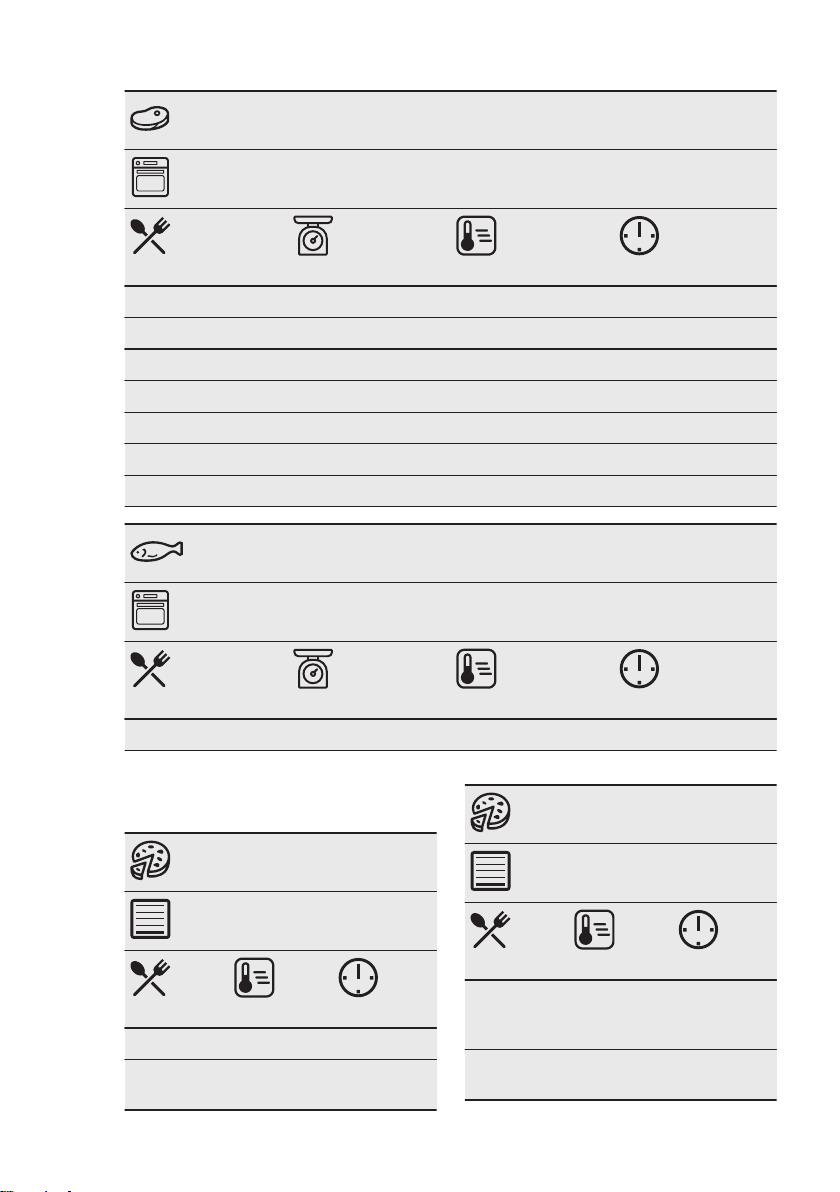
POULTRY
Use the function: Turbo Grilling.
(kg)
Poultry, portions 0.2 - 0.25 each 200 - 220 30 - 50
Chicken, half 0.4 - 0.5 each 190 - 210 35 - 50
Chicken, poulard 1 - 1.5 190 - 210 50 - 70
Duck 1.5 - 2 180 - 200 80 - 100
Goose 3.5 - 5 160 - 180 120 - 180
Turkey 2.5 - 3.5 160 - 180 120 - 150
Turkey 4 - 6 140 - 160 150 - 240
FISH (STEAMED)
Use the function: Conventional Cooking.
(kg)
Whole fish 1 - 1.5 210 - 220 40 - 60
(°C) (min)
(°C) (min)
10.10 Crispy baking with: Pizza
Function
PIZZA
PIZZA
Use the first shelf position.
(°C) (min)
Tarts 180 - 200 40 - 55
Spinach
flan
160 - 180 45 - 60
Use the first shelf position.
(°C) (min)
Quiche lor‐
raine /
Swiss flan
Cheese‐
cake
170 - 190 45 - 55
140 - 160 60 - 90
Page 25
ENGLISH 25
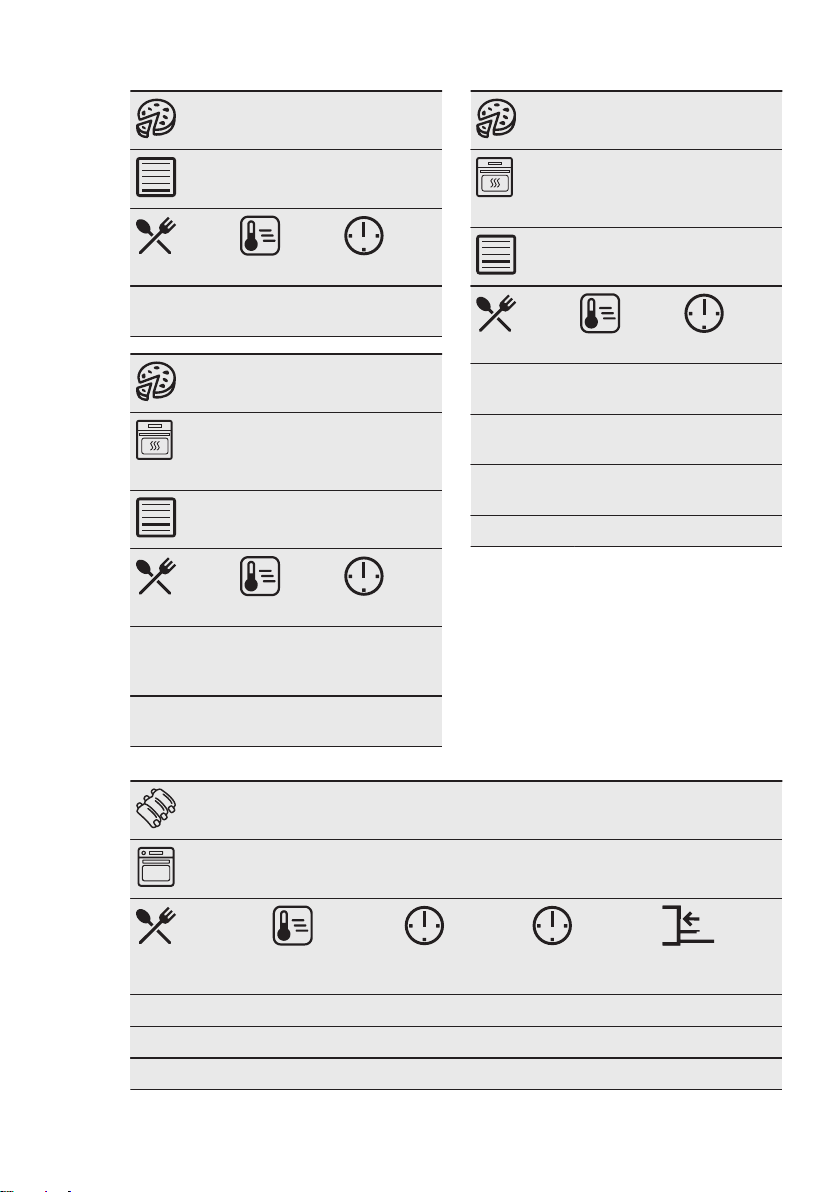
PIZZA
Use the first shelf position.
(°C) (min)
Vegetable
pie
PIZZA
Preheat the empty oven before
cooking.
Use the second shelf position.
Pizza, thin
crust, use a
deep pan
Pizza, thick
crust
160 - 180 50 - 60
(°C) (min)
200 - 230 15 - 20
180 - 200 20 - 30
PIZZA
Preheat the empty oven before
cooking.
Use the second shelf position.
(°C) (min)
Unleavened
bread
Puff pastry
flan
Flammku‐
chen
Pierogi 180 - 200 15 - 25
230 - 250 10 - 20
160 - 180 45 - 55
230 - 250 12 - 20
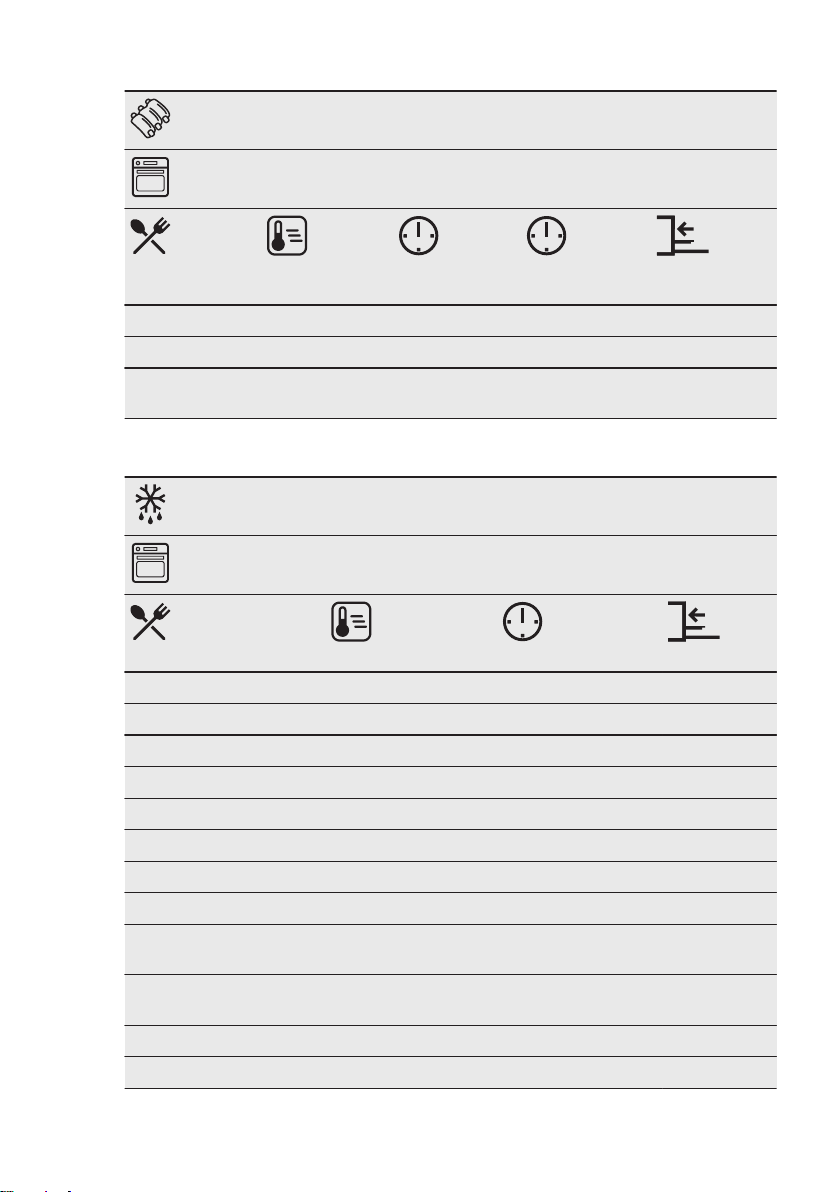
10.11 Grill
Preheat the empty oven before cooking.
Grill only thin pieces of meat or fish.
Put a pan on the first shelf position to
collect fat.
GRILL
Use the function: Grill
(°C) (min)
1st side
Roast beef 210 - 230 30 - 40 30 - 40 2
Beef fillet 230 20 - 30 20 - 30 3
Pork loin 210 - 230 30 - 40 30 - 40 2
(min)
2nd side
Page 26
www.electrolux.com26
GRILL
Use the function: Grill
(°C) (min)
Veal loin 210 - 230 30 - 40 30 - 40 2
Lamb saddle 210 - 230 25 - 35 20 - 25 3
Whole fish, 0.5
kg - 1 kg
210 - 230 15 - 30 15 - 30 3 / 4
1st side
(min)
2nd side
10.12 Frozen Foods
DEFROSTING
Use the function: True Fan Cooking.
(°C) (min)
Pizza, frozen 200 - 220 15 - 25 2
Pizza American, frozen 190 - 210 20 - 25 2
Pizza, chilled 210 - 230 13 - 25 2
Pizza snacks, frozen 180 - 200 15 - 30 2
French fries, thin 200 - 220 20 - 30 3
French fries, thick 200 - 220 25 - 35 3
Wedges / Croquettes 220 - 230 20 - 35 3
Hash browns 210 - 230 20 - 30 3
Lasagne / Cannelloni,
fresh
Lasagne / Cannelloni,
frozen
Baked cheese 170 - 190 20 - 30 3
Chicken wings 190 - 210 20 - 30 2
170 - 190 35 - 45 2
160 - 180 40 - 60 2
Page 27
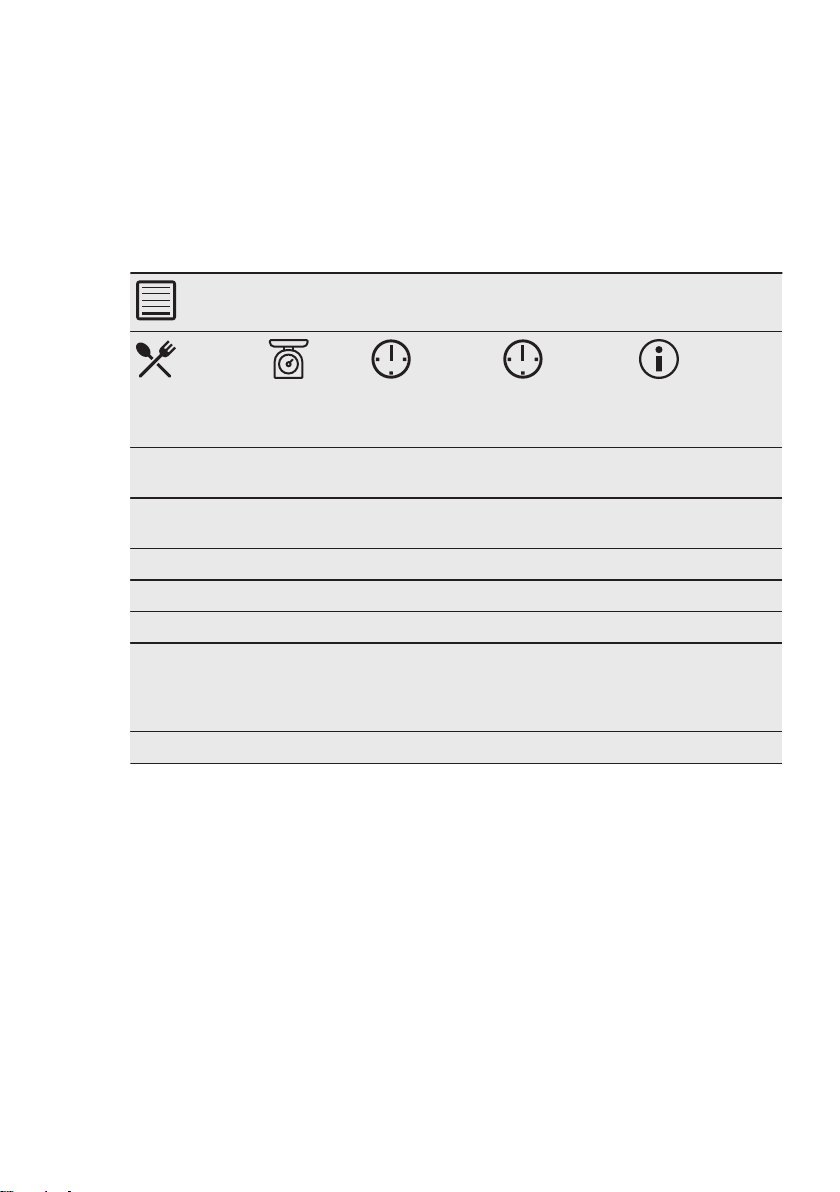
10.13 Defrost
Remove the food packaging and put the
food on a plate.
Do not cover the food, as this can extend
the defrost time.
For large portions of food place an
upturned empty plate on the bottom of
Use the first shelf position.
ENGLISH 27
the oven cavity. Put the food in a deep
dish and set it on top of the plate inside
the oven. Remove the shelf supports if
necessary.
(kg)
Chicken 1 100 - 140 20 - 30 Turn halfway
Meat, turn half‐
way through
Trout 0.15 25 - 35 10 - 15 -
Strawberries 0.3 30 - 40 10 - 20 -
Butter 0.25 30 - 40 10 - 15 -
Cream, whip
the cream when
still slightly fro‐
zen in places
Gateau 1.4 60 60 -
1 100 - 140 20 - 30 Turn halfway
2 x 0.2 80 - 100 10 - 15 Whip the cream
10.14 Preserving
Use only preserve jars of the same
dimensions available on the market.
Do not use jars with twist-off and bayonet
type lids or metal tins.
Use the first shelf position.
Put no more than six one-litre preserve
jars on the baking tray.
Fill the jars equally and close with a
clamp.
The jars cannot touch each other.
Put approximately 1/2 litre of water into
the baking tray to give sufficient moisture
in the oven.
(min)
Defrosting
time
(min)
Further de‐
frosting time
through.
through.
when still slightly
frozen in places.
When the liquid in the jars starts to
simmer (after approximately 35 - 60
minutes with one-litre jars), stop the oven
or decrease the temperature to 100 °C
(see the table).
Set the temperature to 160 - 170 °C.
Page 28
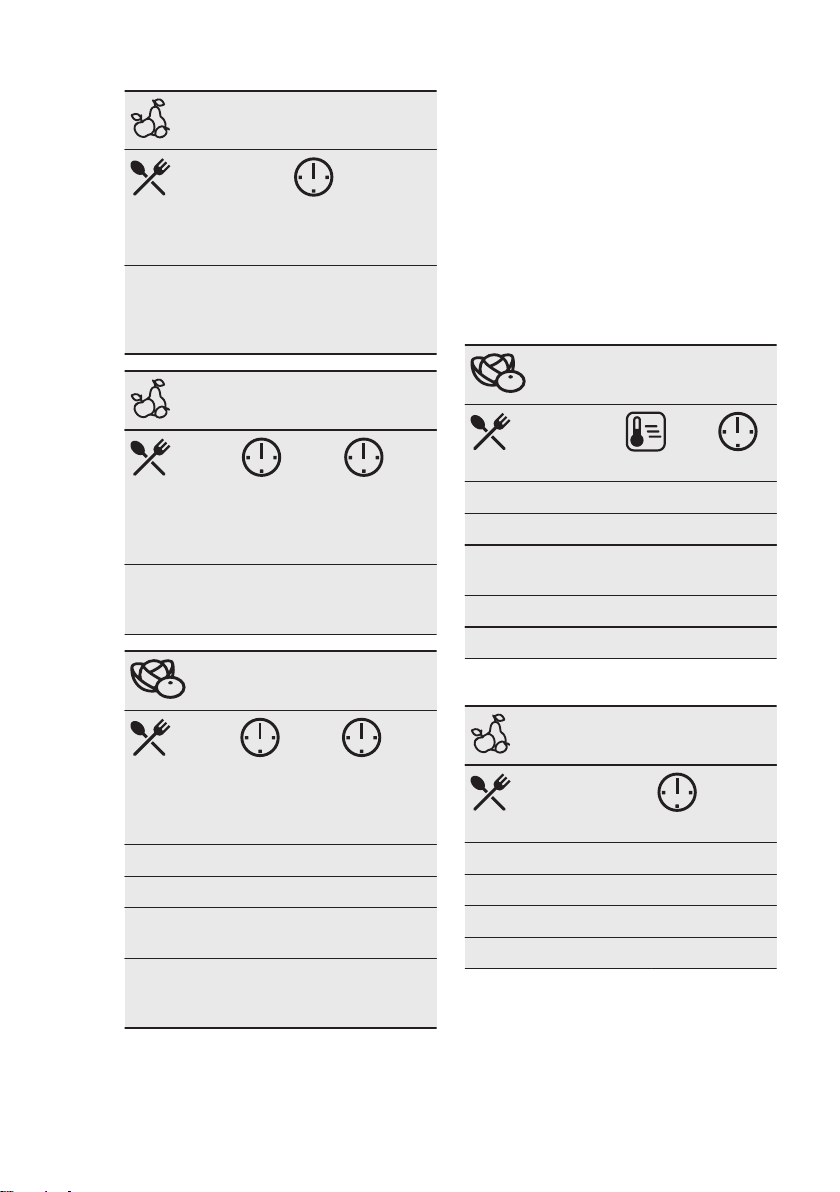
www.electrolux.com28
SOFT FRUIT
Strawberries / Blue‐
berries / Raspber‐
ries / Ripe goose‐
berries
STONE FRUIT
Peaches /
Quinces /
Plums
(min)
Cooking time
until simmering
35 - 45
(min)
Cooking
time until
simmering
35 - 45 10 - 15
(min)
Continue
to cook at
100 °C
10.15 Dehydrating - True Fan
Cooking
Cover trays with grease proof paper or
baking parchment.
For a better result, stop the oven halfway
through the drying time, open the door
and let it cool down for one night to
complete the drying.
For 1 tray use the third shelf position.
For 2 trays use the first and fourth shelf
position.
VEGETABLES
(°C) (h)
Beans 60 - 70 6 - 8
Peppers 60 - 70 5 - 6
Vegetables for
soup
Mushrooms 50 - 60 6 - 8
Herbs 40 - 50 2 - 3
60 - 70 5 - 6
VEGETABLES
(min)
Cooking
time until
simmering
Carrots 50 - 60 5 - 10
Cucumbers 50 - 60 -
Mixed pick‐
les
Kohlrabi /
Peas / As‐
paragus
50 - 60 5 - 10
50 - 60 15 - 20
(min)
Continue
to cook at
100 °C
Set the temperature to 60 - 70 °C.
FRUIT
(h)
Plums 8 - 10
Apricots 8 - 10
Apple slices 6 - 8
Pears 6 - 9
Page 29
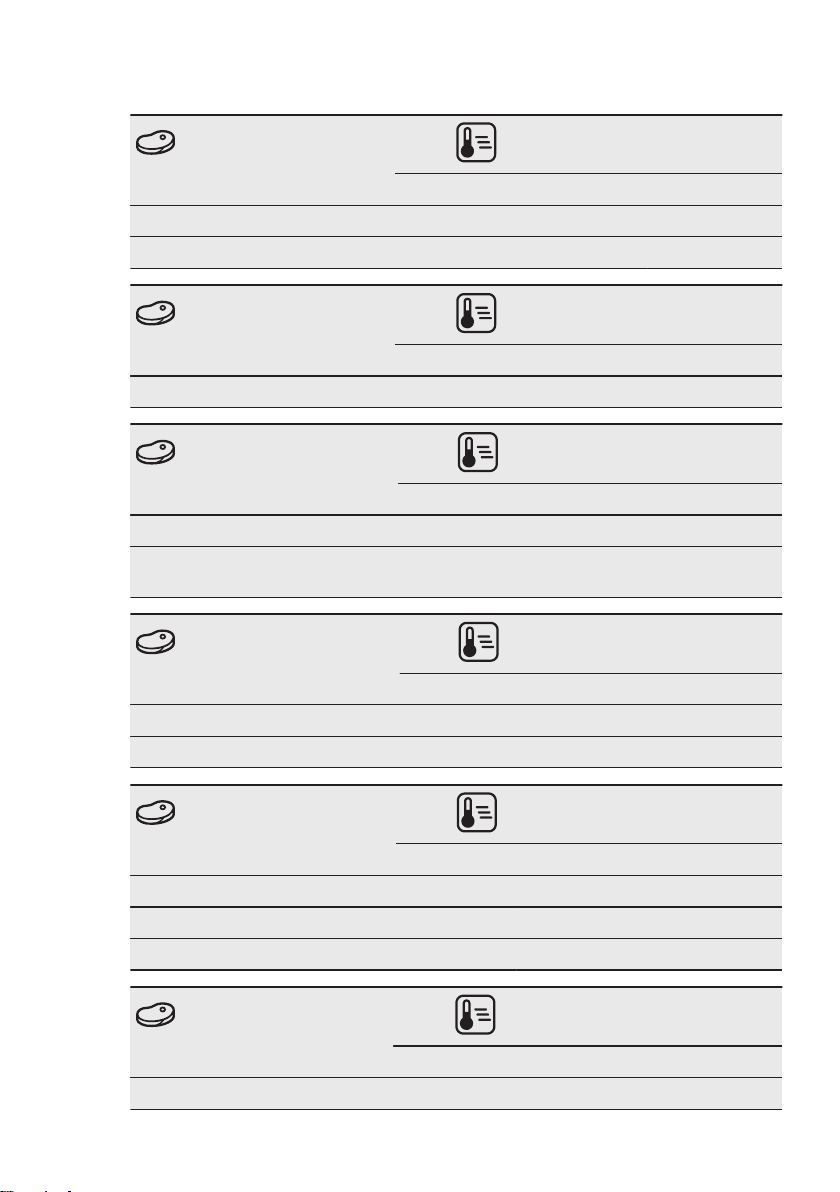
10.16 Food Sensor
BEEF Food core temperature (°C)
Rare Medium Well done
Roast beef 45 60 70
Sirloin 45 60 70
BEEF Food core temperature (°C)
Less Medium More
Meatloaf 80 83 86
PORK Food core temperature (°C)
Less Medium More
Ham / Roast 80 84 88
Saddle chop / Pork loin, smoked /
Pork loin, poached
75 78 82
ENGLISH 29
VEAL Food core temperature (°C)
Less Medium More
Roast veal 75 80 85
Veal knuckle 85 88 90
MUTTON / LAMB Food core temperature (°C)
Less Medium More
Mutton leg 80 85 88
Mutton saddle 75 80 85
Roast lamb / Lamb leg 65 70 75
GAME Food core temperature (°C)
Less Medium More
Hare saddle / Venison saddle 65 70 75
Page 30
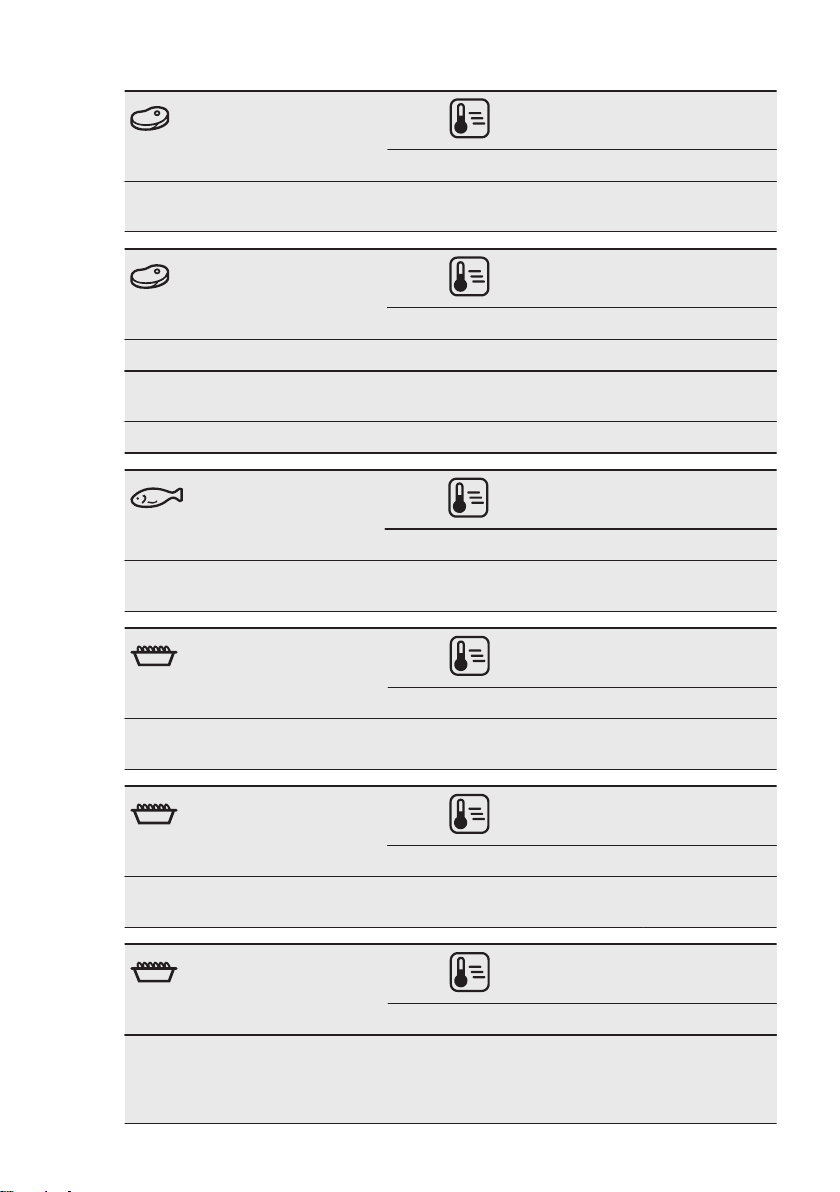
www.electrolux.com30
GAME Food core temperature (°C)
Less Medium More
Hare leg / Hare, whole / Venison
leg
70 75 80
POULTRY Food core temperature (°C)
Less Medium More
Chicken 80 83 86
Duck, whole / half / Turkey,
whole / breast
75 80 85
Duck, breast 60 65 70
FISH (SALMON,
TROUT, ZANDER)
Fish, whole / large / steamed /
Fish, whole / large / roasted
CASSEROLES - PRE‐
COOKED VEGETABLES
Zucchini casserole / Broccoli
casserole / Fennel casserole
CASSEROLES - SAVOU‐
RY
Cannelloni / Lasagne / Pasta
bake
Less Medium More
60 64 68
Less Medium More
85 88 91
Less Medium More
85 88 91
Food core temperature (°C)
Food core temperature (°C)
Food core temperature (°C)
CASSEROLES - SWEET Food core temperature (°C)
Less Medium More
White bread casserole with /
without fruit / Rice porridge cas‐
serole with / without fruit / Sweet
80 85 90
noodle casserole
Page 31
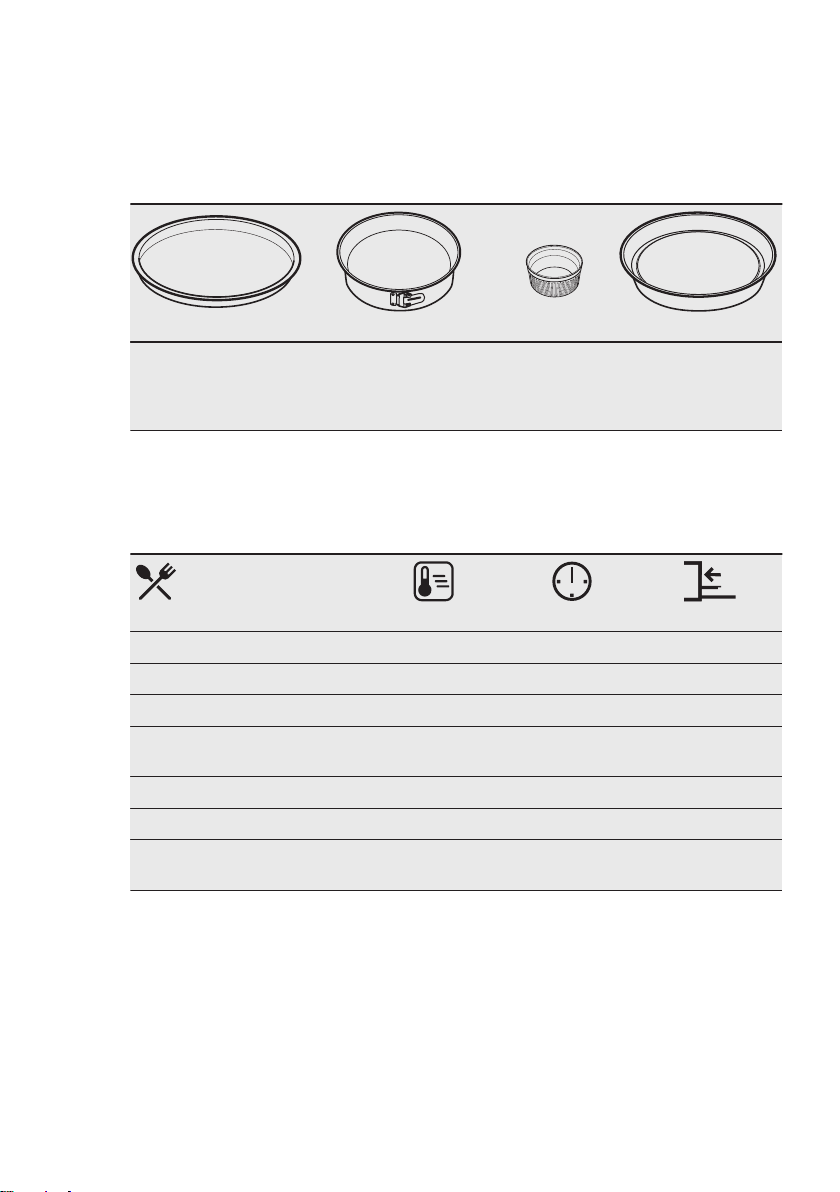
10.17 Moist Fan Baking recommended accessories
Use the dark and non-reflective tins and
containers. They have better heat
ENGLISH 31
absorption than the light colour and
reflective dishes.
Pizza pan
Dark, non-reflective
28 cm diameter
Baking dish
Dark, non-reflective
26 cm diameter
Ramekins
Ceramic
8 cm diame‐
ter, 5 cm
height
Flan base tin
Dark, non-reflective
28 cm diameter
10.18 Moist Fan Baking
For the best results follow suggestions
listed in the table below.
(°C) (min)
Bread sticks, 0.5 kg in total 190 - 200 50 - 60 3
Baked scallops in shells 180 - 200 30 - 40 4
Whole fish in salt, 0.3 - 0.5 kg 190 - 200 45 - 50 4
Whole fish in parchment, 0.3 - 0.5kg190 - 200 50 - 60 3
Amaretti (20; 0.5 kg in total) 170 - 180 40 - 50 3
Apple crumble 190 - 200 50 - 60 4
Chocolate muffins (20; 0.5 kg in to‐
tal)
160 - 170 35 - 45 3
10.19 Information for test institutes
Tests according to: EN 60350, IEC
60350.
Page 32
www.electrolux.com32
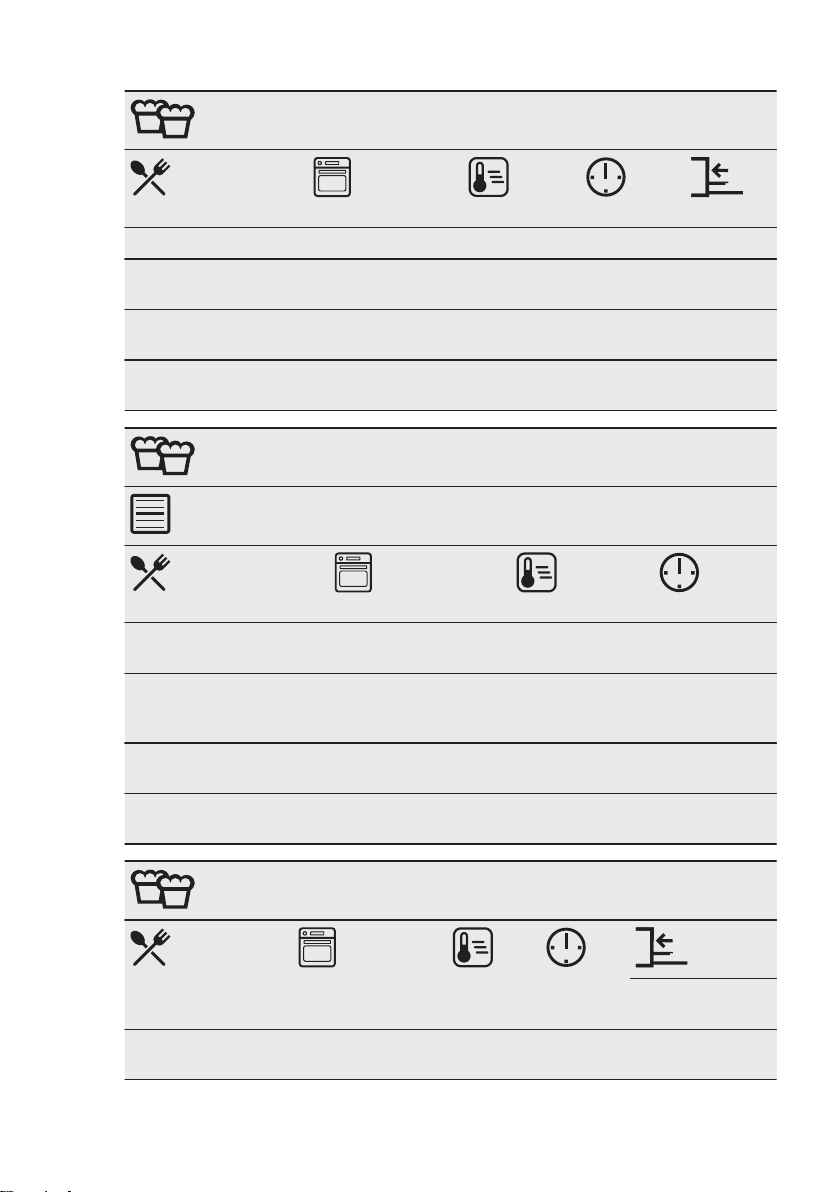
BAKING ON ONE LEVEL. Baking in tins
(°C) (min)
Fatless sponge cake True Fan Cooking 140 - 150 35 - 50 2
Fatless sponge cake Conventional
160 35 - 50 2
Cooking
Apple pie, 2 tins Ø20cmTrue Fan Cooking 160 60 - 90 2
Apple pie, 2 tins Ø20cmConventional
Cooking
BAKING ON ONE LEVEL. Biscuits
Use the third shelf position.
Short bread / Pastry
True Fan Cooking 140 25 - 40
strips
Short bread / Pastry
Conventional Cooking 160 20 - 30
strips, preheat the empty
oven
Small cakes, 20 per tray,
True Fan Cooking 150 20 - 35
preheat the empty oven
Small cakes, 20 per tray,
Conventional Cooking 170 20 - 30
preheat the empty oven
MULTILEVEL BAKING. Biscuits
180 70 - 90 1
(°C) (min)
Short bread / Pastry
strips
(°C) (min)
2 posi‐
tions
3 posi‐
tions
True Fan Cooking 140 25 - 45 1 / 4 1 / 3 / 5
Page 33
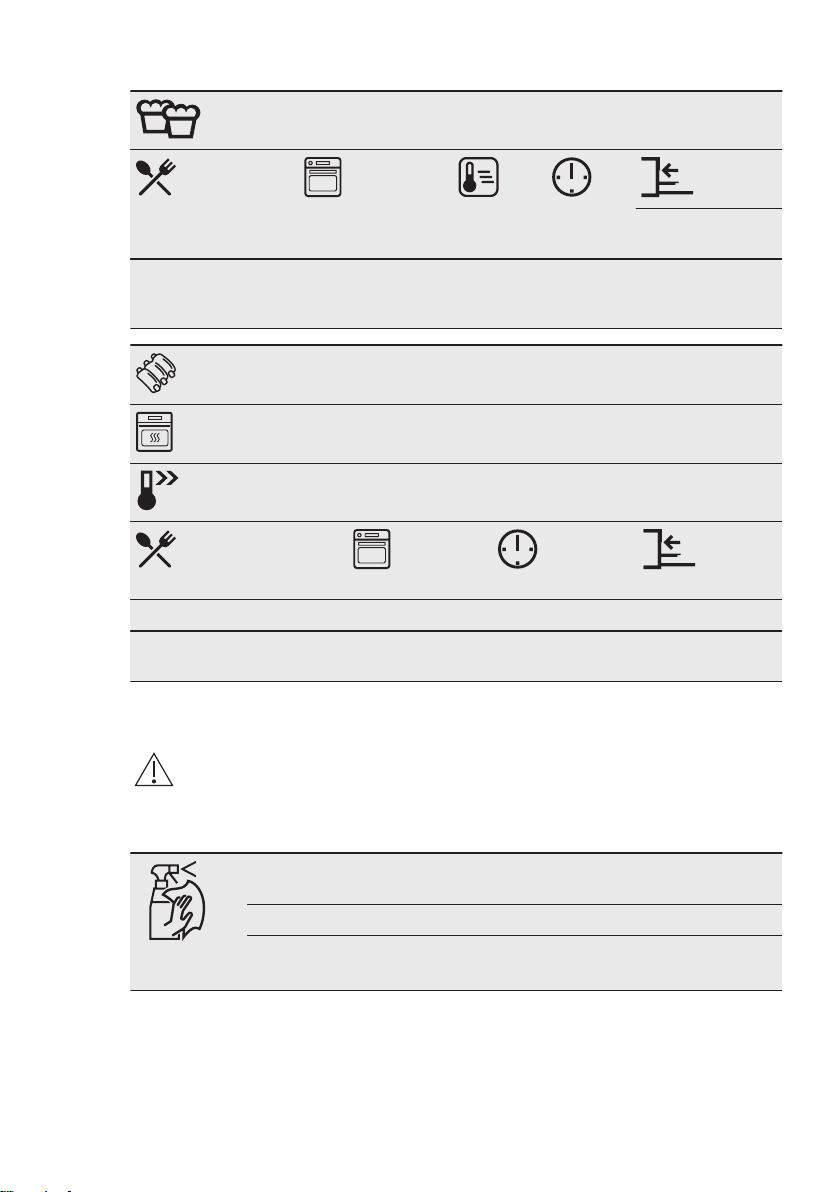
MULTILEVEL BAKING. Biscuits
ENGLISH 33
Small cakes, 20 per
tray, preheat the
empty oven
GRILL
Preheat the empty oven for 5 minutes.
Grill with the maximum temperature setting.
Toast Grill 1 - 3 5
Beef steak, turn halfway
through
True Fan Cooking 150 23 - 40 1 / 4 -
Grill 24 - 30 4
11. CARE AND CLEANING
WARNING!
Refer to Safety chapters.
(°C) (min)
(min)
2 posi‐
tions
3 posi‐
tions
11.1 Notes on cleaning
Clean the front of the oven with a soft cloth with warm water and a
mild cleaning agent.
To clean metal surfaces, use a dedicated cleaning agent.
Cleaning
Agents
Clean stubborn stains with a special oven cleaner.
Page 34
2
1
www.electrolux.com34
Clean the oven cavity after each use. Fat accumulation or other food
remains may cause fire. The risk is higher for the grill pan.
Dry the cavity with a soft cloth after each use.
Everyday
Use
Clean all accessories after each use and let them dry. Use a soft
cloth with warm water and a cleaning agent. Do not clean the acces‐
sories in a dishwasher.
Accessories
Do not clean the non-stick accessories using aggressive agents,
sharp-edged objects or in a dishwasher.
11.2 Cleaning the cavity embossment
The cleaning procedure removes
limestone residue from the cavity
embossment after cooking with steam.
For the function: True Fan
Cooking PLUS we
recommend to do the
cleaning procedure at least
every 5 - 10 cooking cycles.
1. Put 250 ml of white vinegar into the
cavity embossment at the bottom of
the oven.
Use maximum 6% vinegar without
any additives.
2. Let the vinegar dissolve the residual
limestone at the ambient temperature
for 30 minutes.
3. Clean the cavity with warm water and
a soft cloth.
11.3 How to remove: shelf
supports
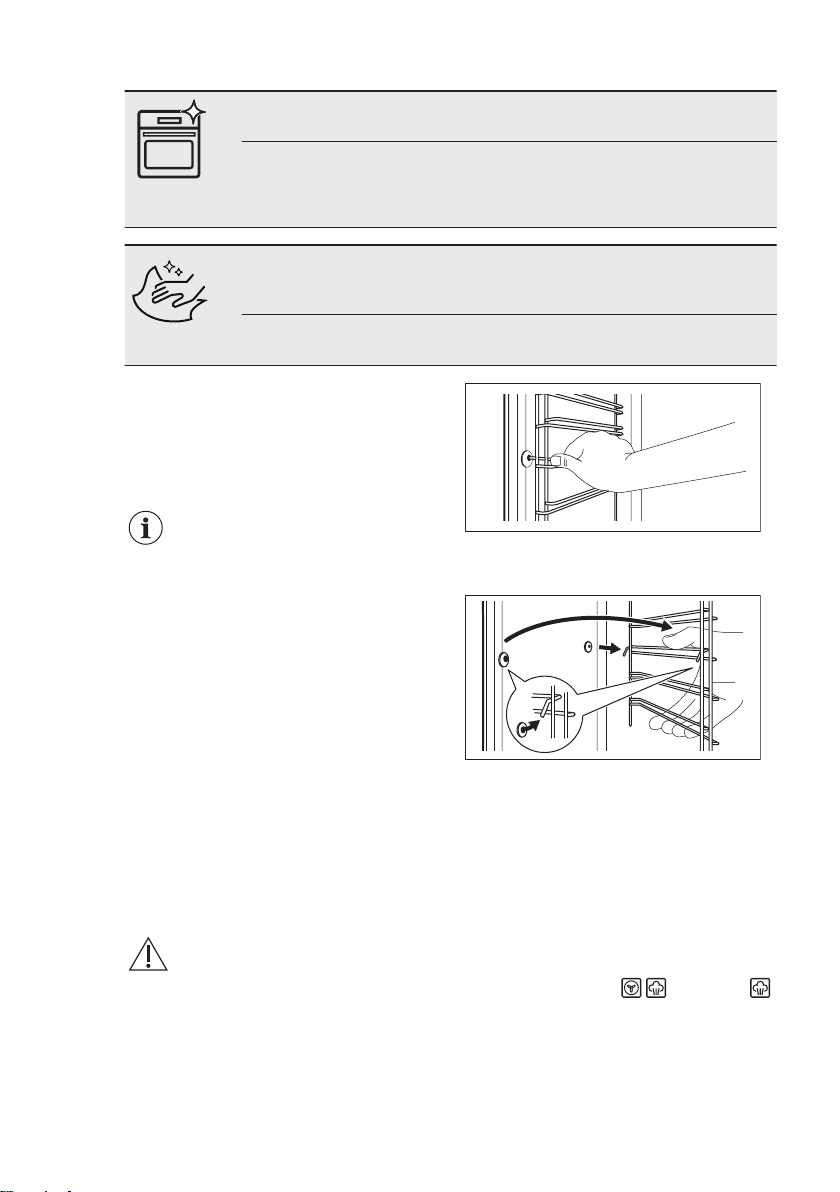
To clean the oven, remove the shelf
supports.
CAUTION!
Be careful when you remove
the shelf supports.
1. Pull the front of the shelf support
away from the side wall.
2. Pull the rear end of the shelf support
away from the side wall and remove
it.
Install the removed accessories in the
opposite sequence.
11.4 Aqua Cleaning
This cleaning procedure uses humidity to
help remove remaining fat and food
particles from the oven.
1. Put 200 ml of water into the cavity
embossment at the bottom of the
oven.
2. Set the function:
3. Set the temperature to 90 °C.
4. Let the oven operate for 30 minutes.
5. Turn off the oven.
6. When the oven is cold, dry the cavity
with a soft cloth.
and press .
Page 35
WARNING!
A
A
1
2
B
Make sure that the oven
is cold before you touch
it. There is a risk of
burns.
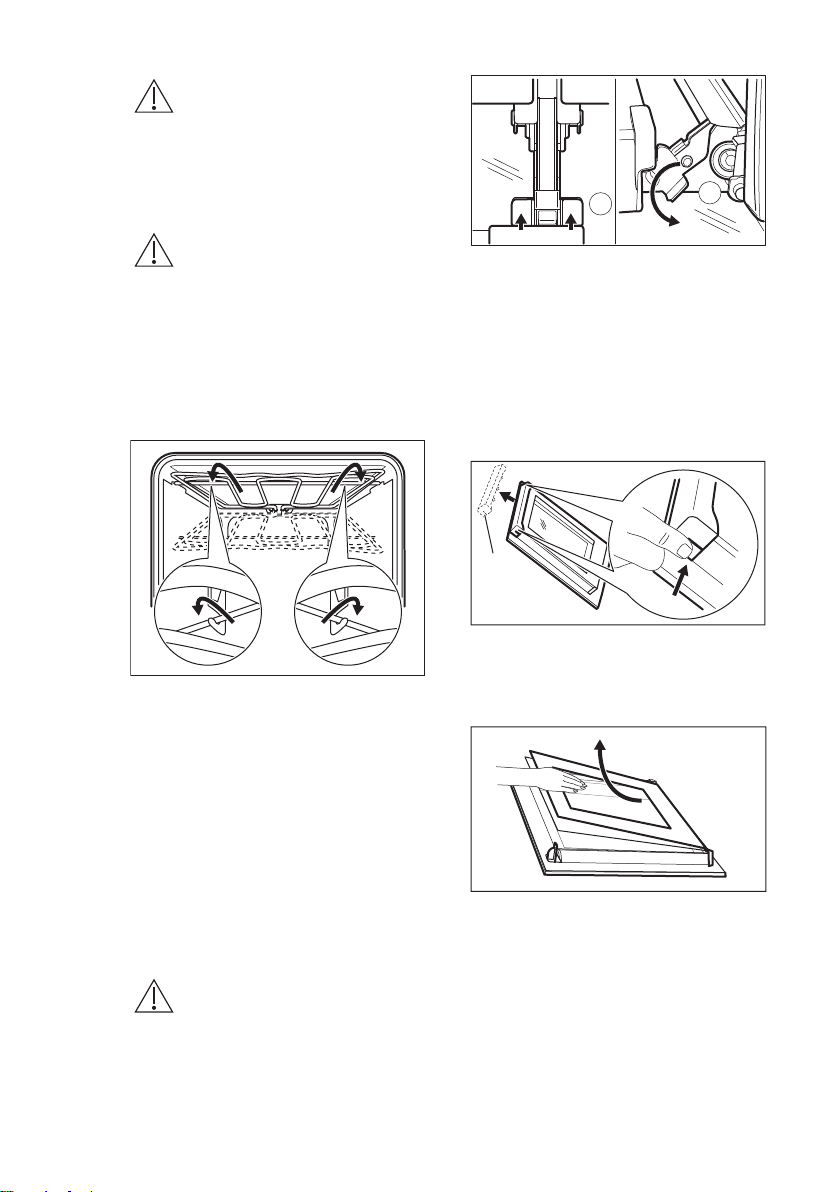
11.5 How to remove: grill
WARNING!
There is a risk of burns.
1. Turn off the oven. Make sure that the
oven is cold.
2. Remove the shelf supports.
3. Hold the grill with two hands at the
front.
4. Grab the grill corners. Pull it forwards
against the spring pressure and out
of two holders.
ENGLISH 35
Close the oven door to the first
3.
opening position (approximately 70°
angle).
4. Hold the door with one hand on each
side and pull it away from the oven at
an upwards angle.
5. Put the door with the outer side down
on a soft cloth on a stable surface.
6. Hold the door trim (B) on the top
edge of the door at the two sides and
push inwards to release the clip seal.
7. Pull the door trim to the front to
remove it.
The grill folds down.
5. Clean the oven ceiling with warm
water, a soft cloth and a mild
detergent. Let it dry.
6. Install the grill in the opposite
sequence.
7. Install the shelf supports.
8. Hold the door glass panels on their
top edge one by one and pull them
up out of the guide.
11.6 Removing and installing
the door
You can remove the door and the
internal glass panels to clean it. The
number of glass panels is different for
different models.
WARNING!
The door is heavy.
1. Open the door fully.
2. Fully press the clamping levers (A)
on the two door hinges.
9. Clean the glass panel with water and
soap. Dry the glass panel carefully.
When the cleaning is completed, do the
above steps in the opposite sequence.
Install the smaller panel first, then the
larger and the door.
Page 36
www.electrolux.com36
One of the hinge-arms
(normally the right one) is
free to move. Make sure,
that both hinge-arms are in
the same position
(approximately 70° angle).
WARNING!
Make sure that the glasses
are inserted in the correct
position otherwise the
surface of the door may
overheat.
2. Disconnect the oven from the mains.
3. Put a cloth on the bottom of the
cavity.
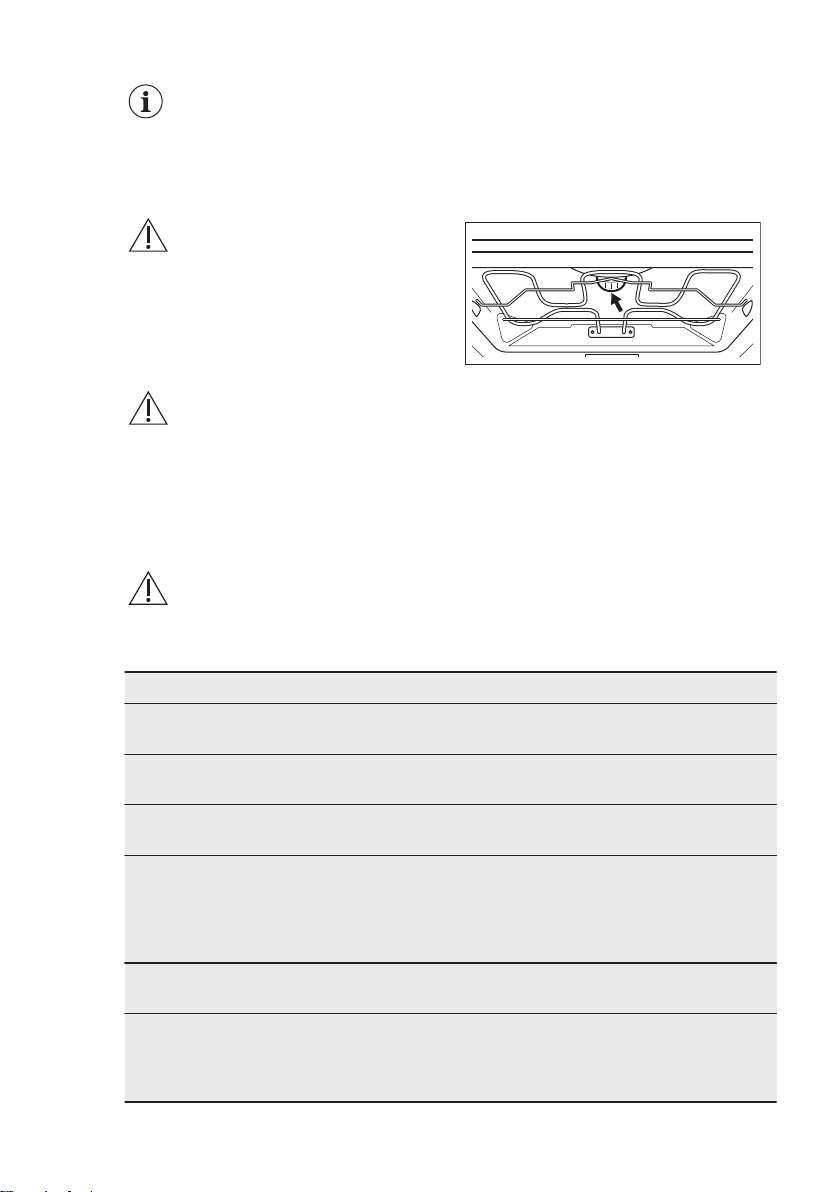
The top lamp
1. Turn the lamp glass cover to remove
it.
11.7 How to replace: Lamp
WARNING!
Risk of electric shock.
The lamp can be hot.
1. Turn off the oven. Wait until the oven
is cold.
12. TROUBLESHOOTING
WARNING!
Refer to Safety chapters.
12.1 What to do if...
Problem Possible cause Remedy
The oven does not heat
up.
The oven does not heat
up.
The oven does not heat
up.
The oven does not heat
up.
The lamp does not oper‐
ate.
The core temperature sen‐
sor does not operate.
The oven is deactivated. Activate the oven.
The clock is not set. Set the clock.
The necessary settings are
not set.
The fuse is blown. Make sure that the fuse is
The lamp is defective. Replace the lamp.
The plug of the core tem‐
perature sensor is not cor‐
rectly installed into the
socket.
2. Clean the glass cover.
3. Replace the lamp with a suitable 300
°C heat-resistant lamp.
4. Install the glass cover.
Make sure that the settings
are correct.
the cause of the malfunc‐
tion. If the fuse is blown
again and again, contact a
qualified electrician.
Put the plug of the core
temperature sensor as far
as possible into the socket.
Page 37

Problem Possible cause Remedy
Steam and condensation
settle on the food and in
the cavity of the oven.
There is no good cooking
performance using the
function: True Fan Cooking
PLUS.
There is no good cooking
performance using the
function: True Fan Cooking
PLUS.
You want to activate the
True Fan Cooking PLUS
function, but the Plus
Steam indicator does not
switch on.
You want to activate the
True Fan Cooking PLUS
function, but the Plus
Steam indicator does not
switch on.
The water in the cavity em‐
bossment does not boil.
The water comes out of
the cavity embossment.
You left the dish in the
oven for too long.
You did not turn on cor‐
rectly the function: True
Fan Cooking PLUS with
the Plus Steam.
You did not fill the cavity
embossment with water.
You did not select the
heating function that sup‐
port Plus Steam.
The Plus Steam does not
work.
The temperature is too low. Set the temperature at
There is too much water in
the cavity embossment.
Do not leave the dishes in
the oven for longer than 15
- 20 minutes after the
cooking process ends.
Refer to "Setting the func‐
tion: True Fan Cooking
PLUS".
Refer to "Setting the func‐
tion: True Fan Cooking
PLUS".
Refer to "Setting the func‐
tion: True Fan Cooking
PLUS".
Deactivate the appliance
with the house fuse or the
safety switch in the fuse
box and activate it again.
Refer to "Setting the func‐
tion: True Fan Cooking
PLUS".
least to 110 °C.
Refer to "Hints and tips"
chapter.
Deactivate the oven and
make sure that the appli‐
ance is cold. Wipe the wa‐
ter with a cloth or sponge.
Add the correct amount of
water to the cavity em‐
bossment. Refer to the
specific procedure.
ENGLISH 37
12.2 Service data
If you cannot find a solution to the
problem yourself, contact your dealer or
an Authorised Service Centre.
The necessary data for the service
centre is on the rating plate. The rating
plate is on the front frame of the oven
cavity. Do not remove the rating plate
from the oven cavity.
Page 38

www.electrolux.com38
We recommend that you write the data here:
Model (MOD.) .........................................
Product number (PNC) .........................................
Serial number (S.N.) .........................................
13. ENERGY EFFICIENCY
13.1 Product Information and Product Information Sheet*
Supplier's name Electrolux
Model identification
Energy Efficiency Index 81.2
Energy efficiency class A+
Energy consumption with a standard load, con‐
ventional mode
Energy consumption with a standard load, fanforced mode
Number of cavities 1
Heat source Electricity
Volume 71 l
Type of oven Built-In Oven
Mass 34.5 kg
COB520X 944184931,
944184981
0.99 kWh/cycle
0.69 kWh/cycle
* For European Union according to EU Regulations 65/2014 and 66/2014.
For Republic of Belarus according to STB 2478-2017, Appendix G; STB 2477-2017,
Annexes A and B.
For Ukraine according to 568/32020.
Energy efficiency class is not applicable for Russia.
EN 60350-1 - Household electric cooking appliances - Part 1: Ranges, ovens, steam
ovens and grills - Methods for measuring performance.
13.2 Energy saving
The oven contains features
which help you save energy
during everyday cooking.
Make sure that the oven door is closed
properly when the oven operates. Do not
open the door too often during cooking.
Keep the door gasket clean and make
sure it is well fixed in its position.
Use metal cookware to improve energy
saving.
When possible, do not preheat the oven
before cooking.
Keep breaks between baking as short as
possible when you prepare a few dishes
at one time.
Page 39

Cooking with fan
When possible, use the cooking
functions with fan to save energy.
Residual heat
When the cooking duration is longer than
30 minutes, reduce the oven temperature
to minimum 3 - 10 minutes before the
Keep food warm
Choose the lowest possible temperature
setting to use residual heat and keep a
meal warm.
Moist Fan Baking
Function designed to save energy during
cooking.
end of cooking. The residual heat inside
the oven will continue to cook.
Use the residual heat to warm up other
dishes.
14. ENVIRONMENTAL CONCERNS
ENGLISH 39
Recycle materials with the symbol .
Put the packaging in relevant containers
to recycle it. Help protect the
environment and human health by
recycling waste of electrical and
electronic appliances. Do not dispose of
appliances marked with the symbol
with the household waste. Return the
product to your local recycling facility or
contact your municipal office.
*
Page 40

www.electrolux.com/shop
867353320-B-372019
 Loading...