


B9971-5
User manual Built-In Electric Oven

Contents2
Contents
Operating Instructions 3
Safety instructions 3
Description of the Appliance 5
General Overview 5
The electronic oven controls 6
Oven Features 8
Oven accessories 8
Before Using for the first time 10
Setting the language 10
Activating the smell filter YES/NO 10
Setting the clock 11
Initial cleaning 11
Using the Oven 12
Menu operation in overview 12
Use of the oven functions 14
Switching the Oven On and Off 15
Inserting the oven accessories 17
Synchronised oven shelf runners 18
Inserting/Removing the Fat Filter 19
Meat Probe 20
Automatic programmes 22
Options 24
Clock Functions 32
Additional functions 36
Mechanical Door Lock 38
Cleaning and Care 39
Outside of the appliance 39
Oven interior 39
Accessories 39
Fat Filter 39
Non-stick accessories 40
Performing Pyrolytic cleaning 40
Reminder function for pyrolytic cleaning 41
Oven shelf runner 42
Cleaning the oven shelf runner 43
Oven lighting 43
Oven door 44
Oven door glass 46
What to do if … 49
Disposal 50
Service 51
Thank you for choosing one of our high-quality products.
To ensure optimal and regular performance of your appliance please read this instruc-
tion manual carefully. It will enable you to navigate all processes perfectly and most ef-
ficiently.
To refer to this manual any time you need to, we recommend you to keep it in a safe
place. And please pass it to any future owner of the appliance.
We wish you much joy with your new appliance.
The following symbols are used in this user manual:
1
Important information concerning your personal safety and information on how to
avoid damaging the appliance.
3 General information and tips
2 Environmental information

3Operating Instructions
Operating Instructions
1 Safety instructions
Electrical safety
• This appliance must be only connected by a registered electrician.
• In the event of a fault or damage to the appliance: Take the fuses out or switch off.
• Repairs to the appliance must only be carried out by qualified service engineers.
Considerable danger may result from improper repairs. If repairs become necessary,
please contact our Customer Services or your dealer.
Child Safety
• Never leave children unsupervised when the appliance is in use.
• The appliance is fitted with a child safety device.
Safety whilst using
• People (including children) who, because of their physical, sensory or mental capabilities or their inexperience or ignorance are not able to use the device safely, should not
use this device without supervision or instruction by a responsible person.
• This appliance is intended to be used for cooking, roasting and baking food in the
home.
• Take care when connecting electric appliances to sockets nearby. Do not allow con-
necting leads to come into contact with or to catch beneath the hot oven door.
• Warning: Risk of burns! The interior of the oven becomes hot during use.
• Using ingredients containing alcohol in the oven may create an alcohol-air mixture
that is easily ignited. In this case, open the door carefully. Do not have embers, sparks
or naked flames in the vicinity when opening the door.
3 Information on acrylamides
According to the latest scientific knowledge, intensive browning of food, especially in
products containing starch, can constitute a health risk due to acrylamides. Therefore we
recommend cooking at the lowest possible temperatures and not browning foods too
much.

Safety instructions4
How to avoid damage to the appliance
• Do not line the oven with aluminium foil and do not place baking trays, pots, etc. on
the oven floor, as the heat that builds up will damage the oven enamel.
• Fruit juices dripping from the baking tray will leave stains, which you will not be able
to remove. For very moist cakes, use a deep tray.
• Do not put any strain on the oven door when open.
• Never pour water directly into the oven when it is hot. This could cause damage to or
discolouration of the enamel.
• Rough handling, especially around the edges of the front panel, can cause the glass to
break.
• Do not store any flammable materials inside the oven. These could ignite when the
oven is switched on.
• Do not store any moist foods inside the oven. This could damage the oven enamel.
• After switching off the cooling fan, do not keep uncovered dishes in the oven. Mois-
ture may condense in the oven interior or on the glass doors and may get into the
units.
3 Note on enamel coating
Changes in the colour of the oven’s enamel coating as a result of use do not affect the
appliance’s suitability for normal and correct use. They therefore do not constitute a defect in the sense of the warranty law.
5Description of the Appliance
Description of the Appliance
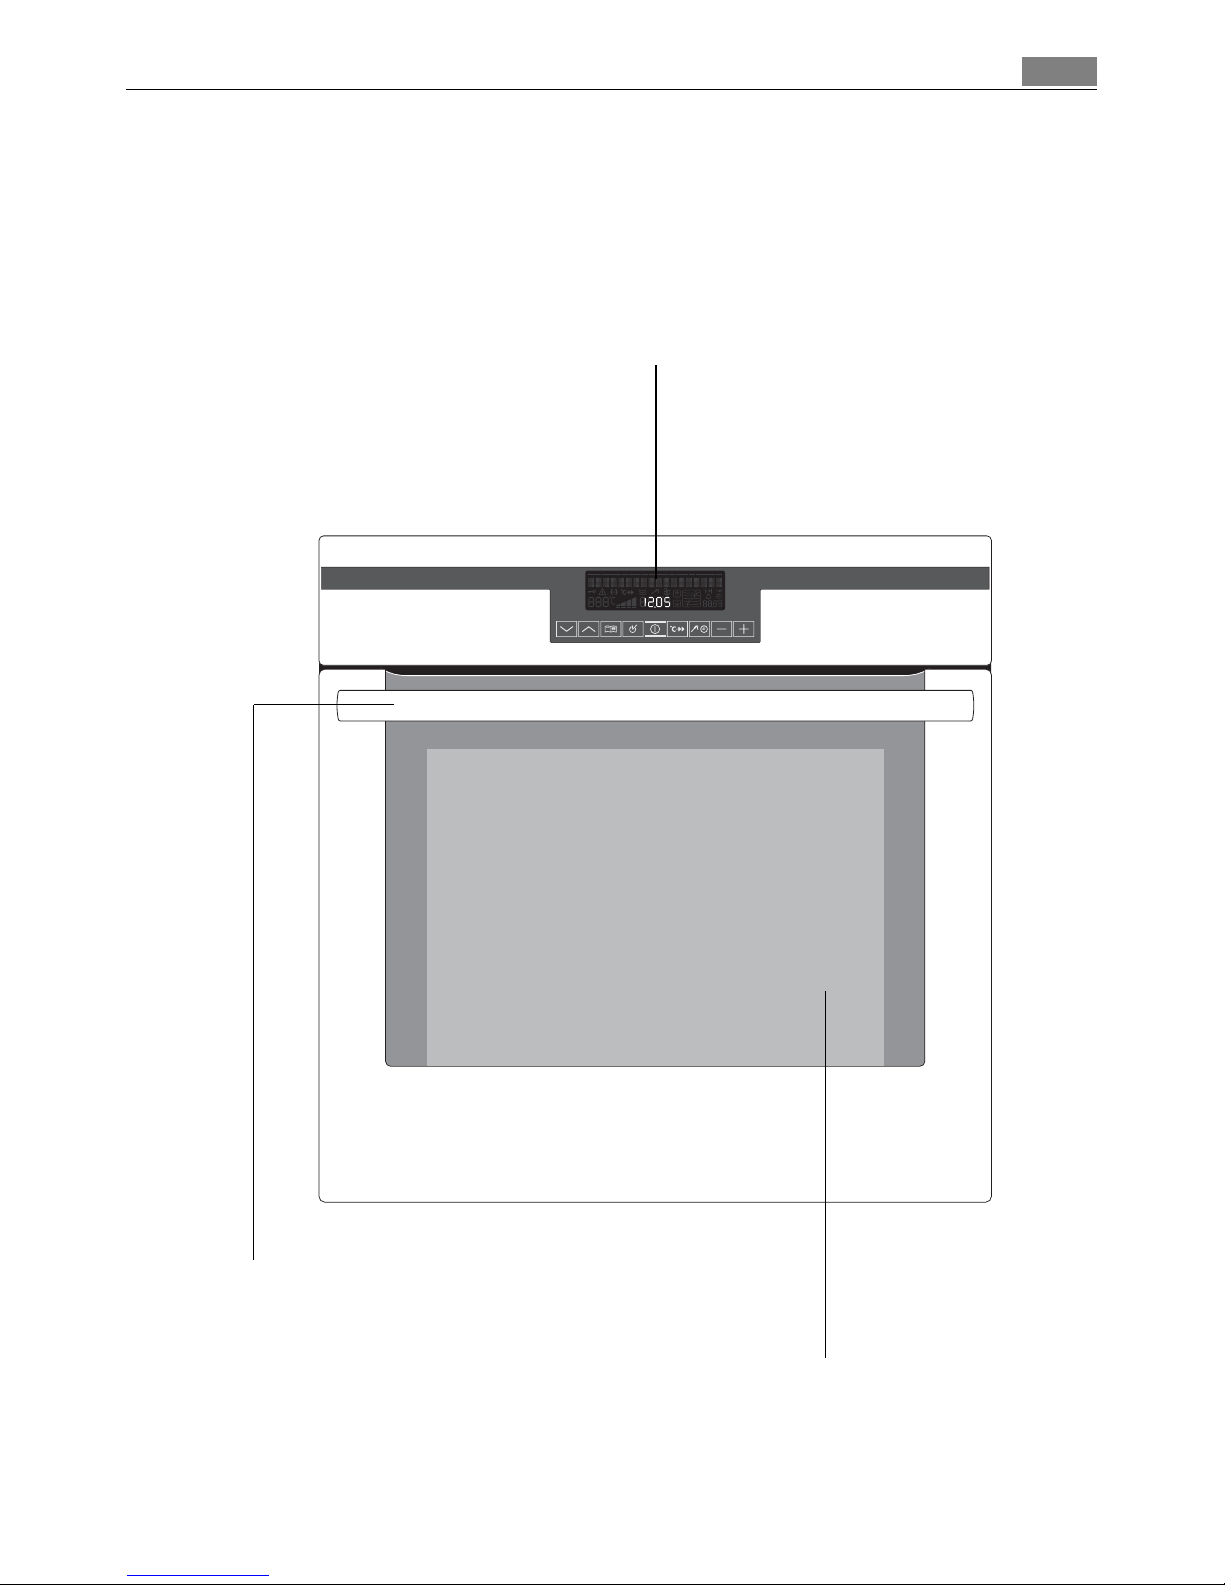
General Overview
Full glass door
Oven displays
and buttons
Door
handle
Description of the Appliance6
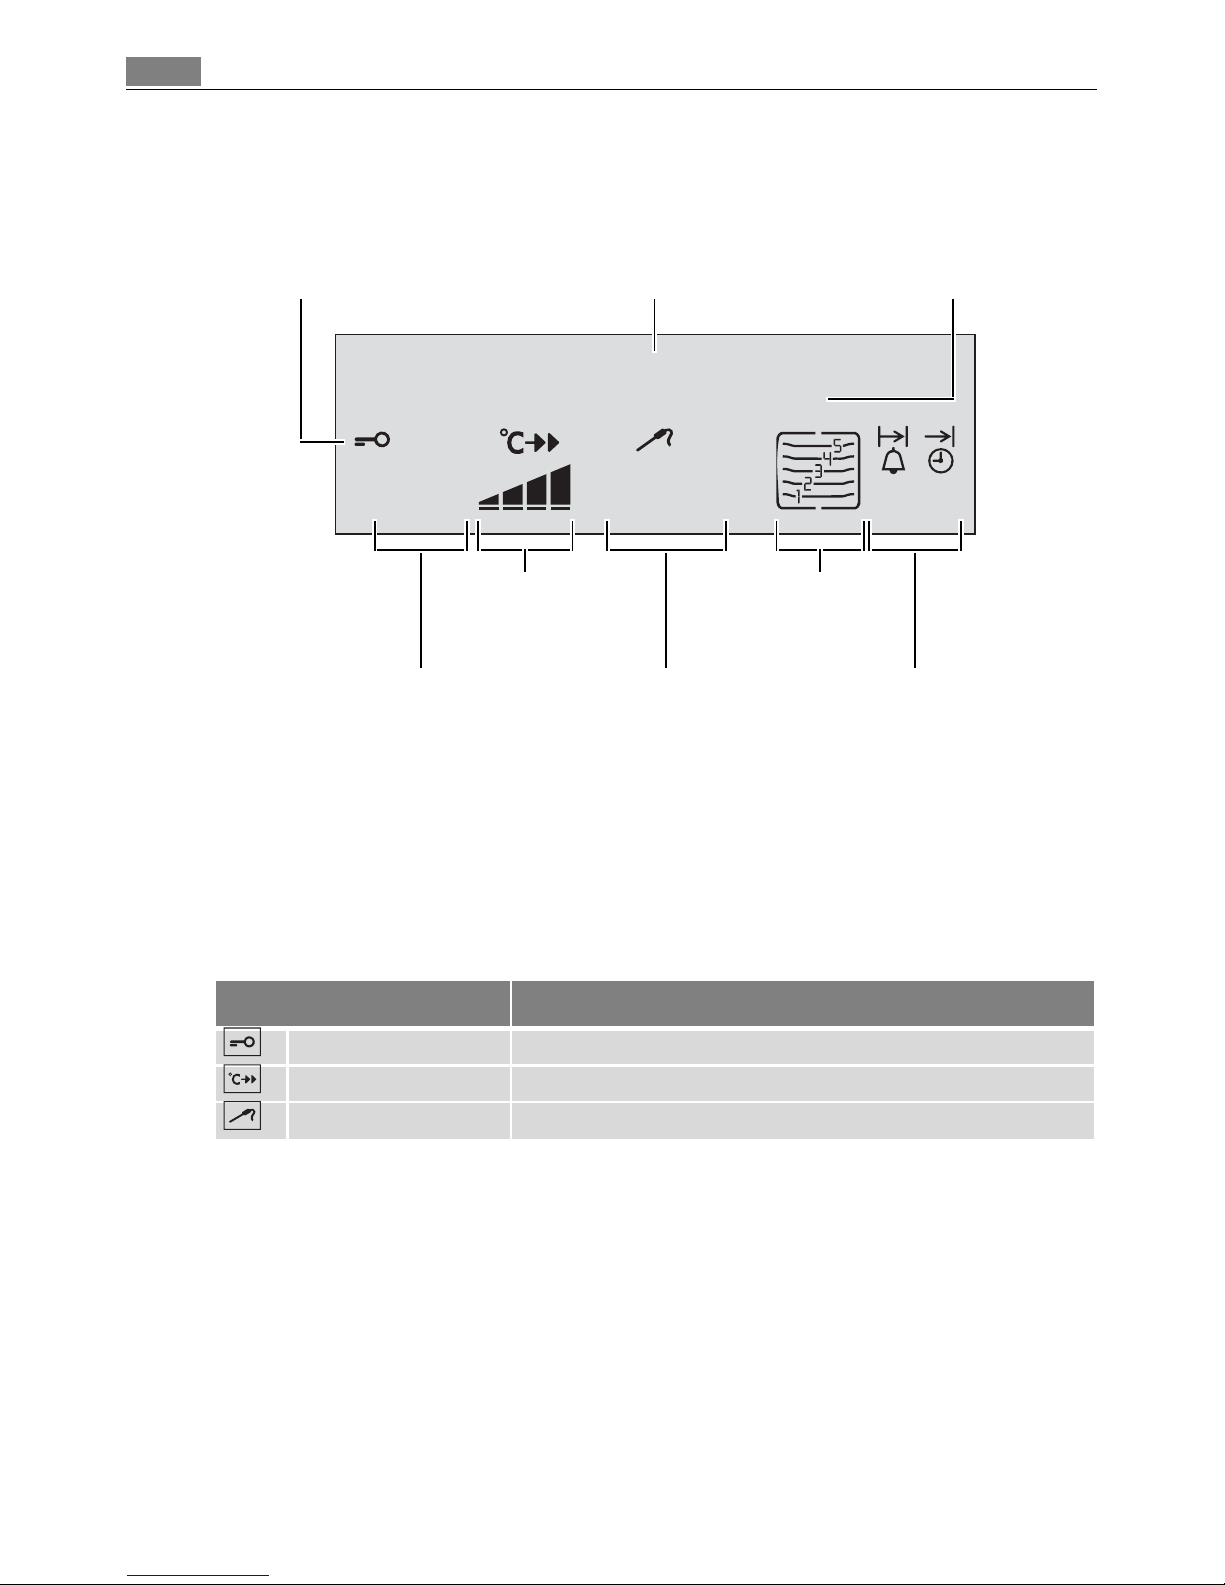
The electronic oven controls
Indicators
Menu status bar
In the menu status bar the current position within a menu is shown by a flashing bar.
When the menu status bar can no longer be seen in the display, the oven begins to heat
or the time set begins to count down.
If only every second bar in the menu status bar is lit, the smell filter is operating.
Symbol status bar
Symbol Function
Door lock The door is locked.
RAPID HEAT UP The RAPID HEAT UP is in operation.
MEATPROBE The MEATPROBE is installed.
TRUE FAN
150ûc 12.05
00.06
___________________
Symbol status bar Menu status bar Text line
Temperature Time
Meat core temperature
Clock functions
Period of operation
Heat indicator Shelf positions

7Description of the Appliance
Buttons
Button Function
w
To select oven functions.
To move up and down in the menu.
m
¸
To open the Options menu.
To close the Options menu (press and hold button).
¹
To confirm, change to the submenu.
º
To switch appliance on or off.
»
Switch RAPID HEAT UP on or off.
¼
To select between oven functions, clock functions and MEATPROBE.
-
To set values (e.g. temperature, time, weight or degree of cooking).
+
wm¸¹º»¼-+
Description of the Appliance8
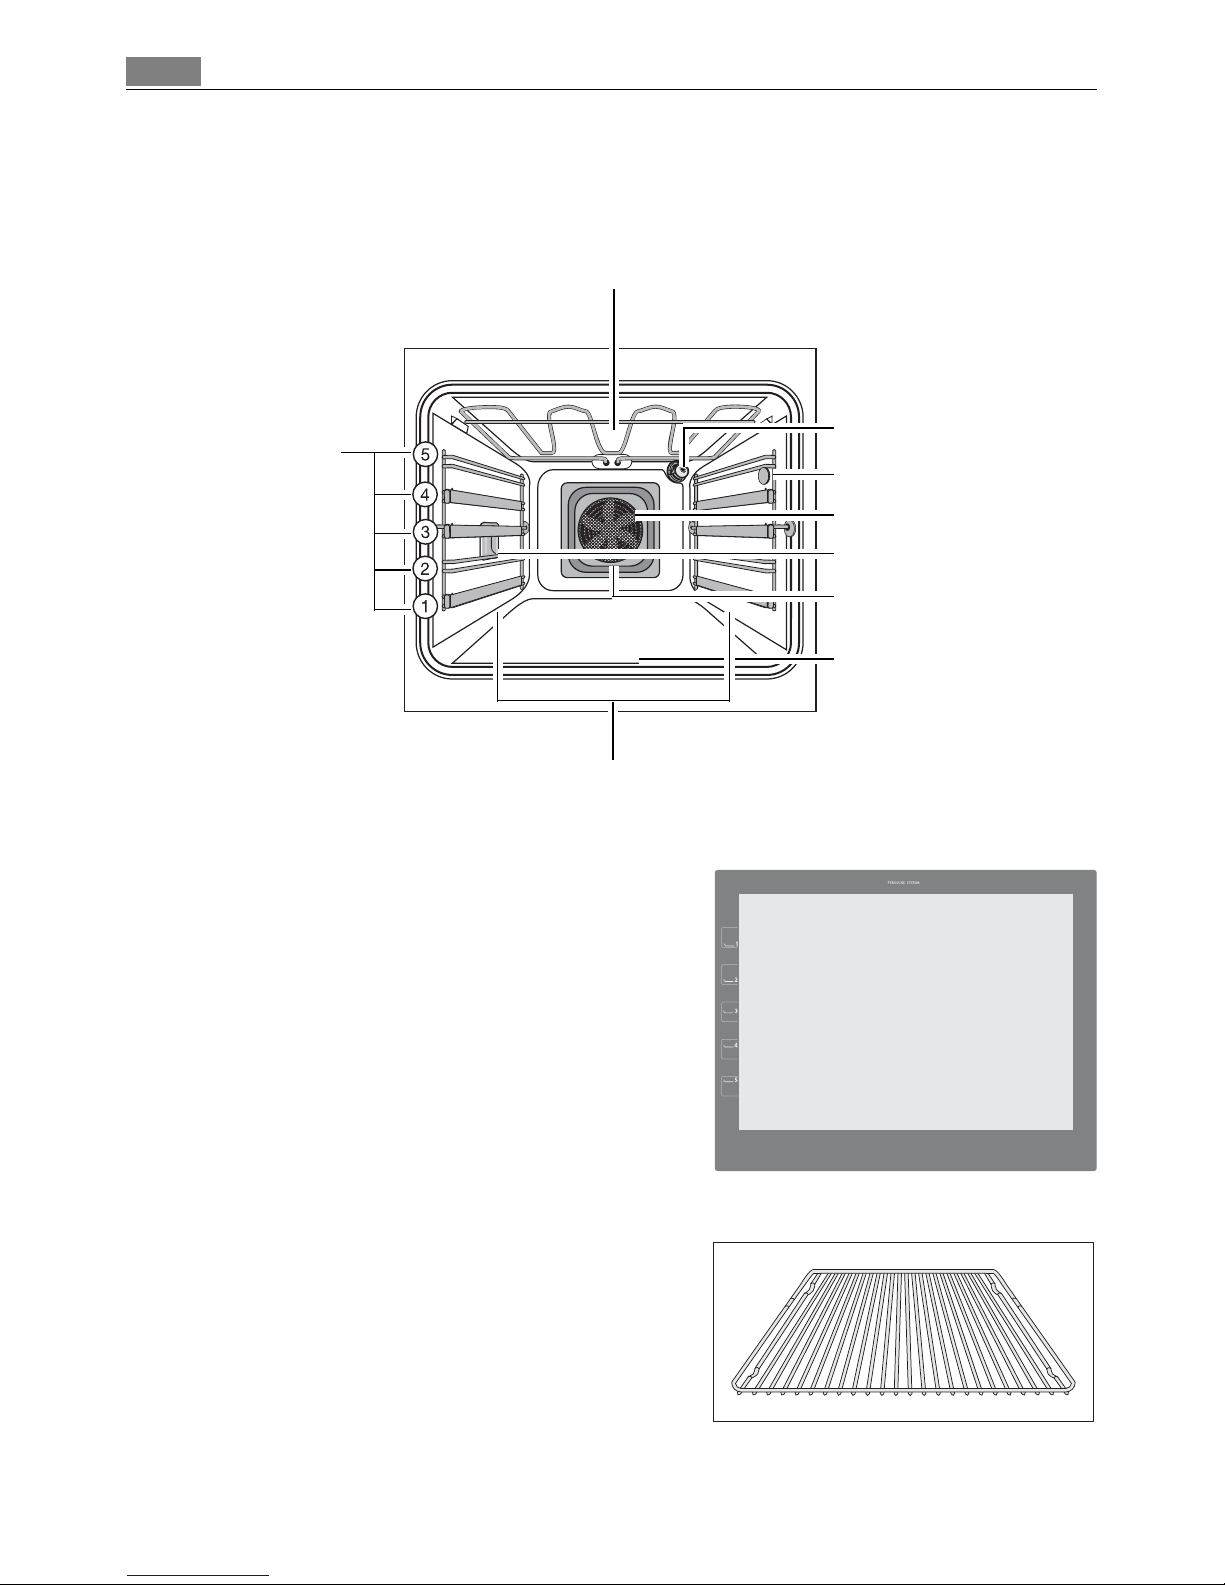
Oven Features
Inside of door
You will find the shelf position number on the
inside of the oven door.
Oven accessories
Oven shelf
For cookware, cake tins, roasts and grilled foods.
Top heat and heating elements
Oven lighting
Meat probe socket
Fat Filter
Oven lighting
Fan heating element
Fan
Bottom Heat
Shelf positions
Oven shelf runners,
removable
9Description of the Appliance
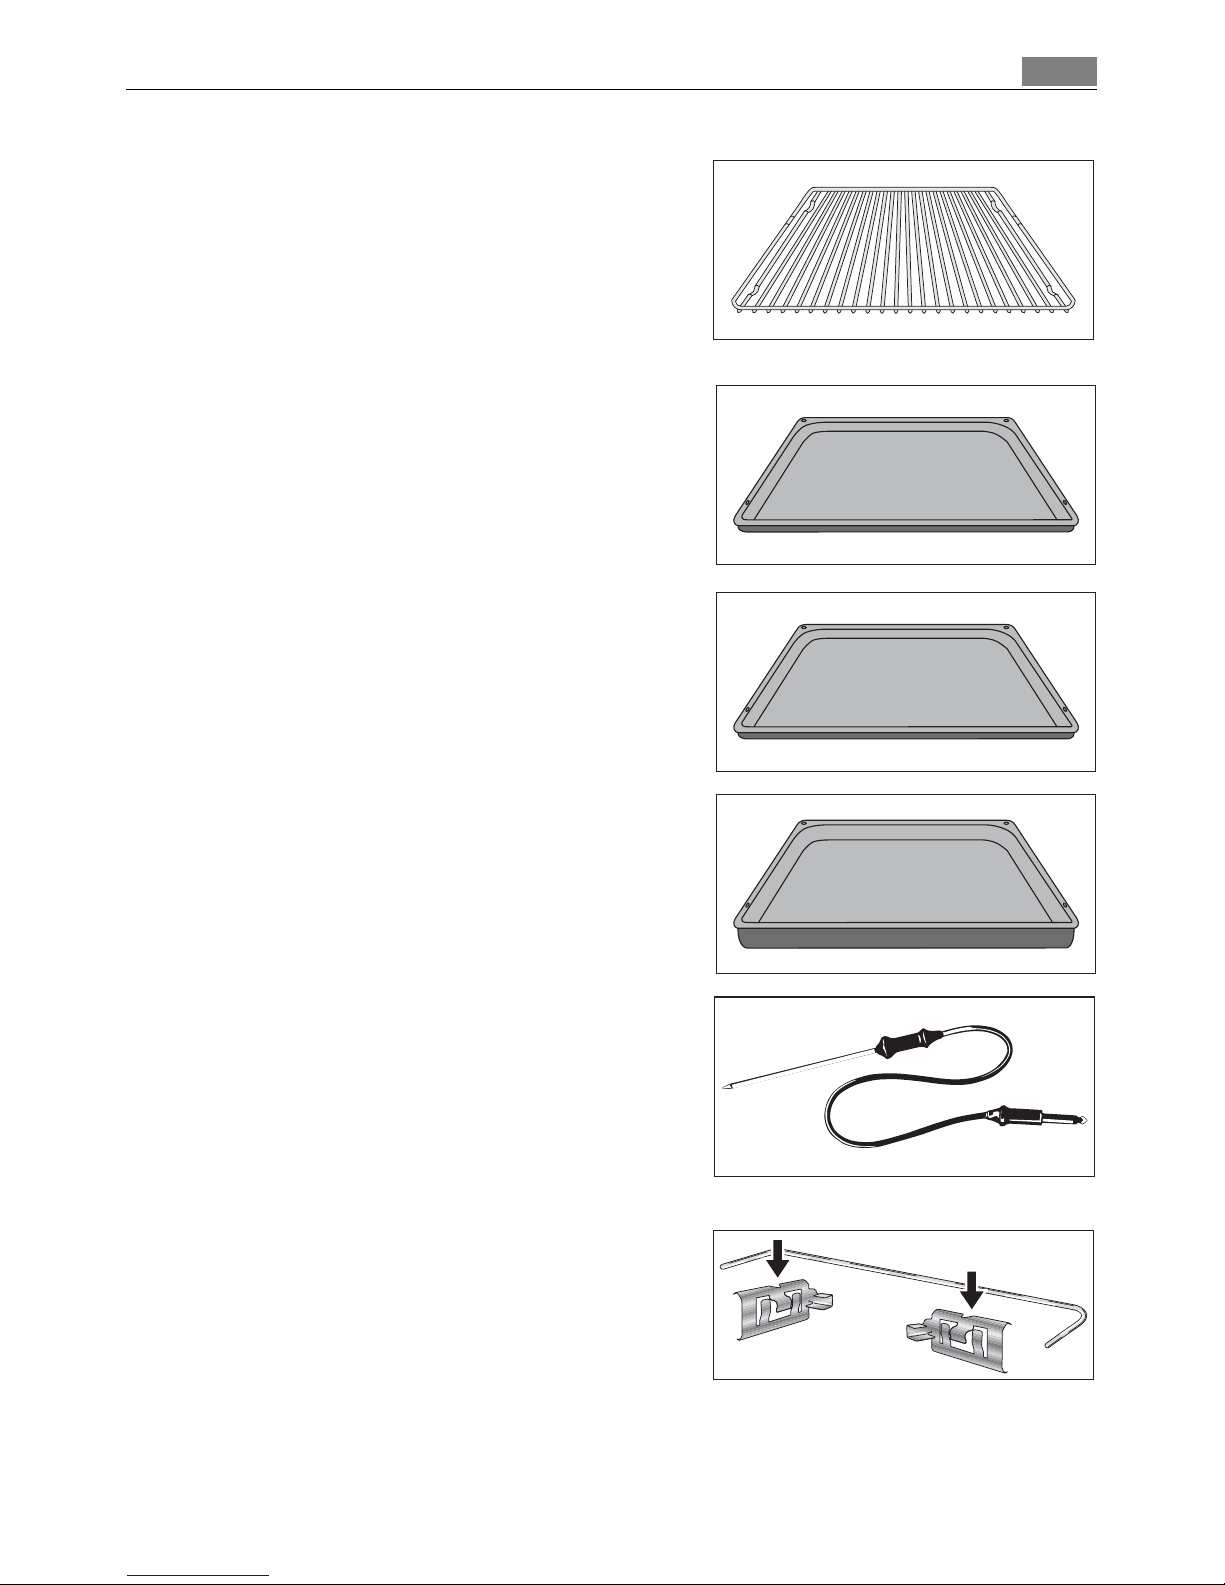
Oven shelf for non-stick
For cookware, cake tins, roasts and grilled foods.
Baking tray
For cakes and biscuits.
Non-stick baking tray
For cakes and biscuits.
Non-stick roasting tray
For baking and roasting or as a tray for collecting fat.
Meat probe
For determining exactly how far joints of meat
are cooked.
Synchronised oven shelf runners
Retaining clips with connecting clamp.

Before Using for the first time10
Before Using for the first time
Setting the language
1. When the appliance has been connected to the electrical supply, the
SPRACHE EINSTELLEN - LANGUAGE
MENU is shown in the display.
2. Using the arrow buttons or se-
lect the desired language.
3. Confirm selected language with the OK
button.
From now on the texts in the display
appear in the language set.
Activating the smell filter YES/NO
1. SMELL FILTER MENU lights up
2. Using the arrow buttons or select the desired setting.
3. Press the OK button.
In the display SAVED appears for a few seconds.
3 The catalytic effect of the filter limits odours to a great extent.
If the smell filter is activated, it automatically switches itself on when a baking or roasting process is started.
It switches itself off as soon as the baking or roasting cycle is finished.
LANGUAGE MENU
ý ý ý ýþ ýþ ý
ý ý
ý
ý
ý ý
888ûcþ þüþ1ü2.0ü0
ý
88.8ú8
wm¸¹º»¼-+
ENGLISH
ý ý ý ýþ ýþ ý
ý ý
ý
ý
ý ý
888ûcþ þüþ1ü2.0ü0
ý
88.8ú8
wPmP¸¹º»¼-+
SMELL FILTER MENU
ý ý ý ýþ ýþ ý
ý ý
ý
ý
ý ý
888ûcþ þüþ1ü2.0ü0
ý
88.8ú8
wm¸¹Pº»¼-+

11Before Using for the first time
Setting the clock
3 The time only has to be set if the appliance is disconnected from the power supply for a
long time.
1. TIME OF DAY lights up
In the clock display you see 12.00.
2. Use the or button to set the
current time.
3. Confirm using the SELECTION but-
ton.
The appliance is now ready to use.
3 If you would like to change one of these base settings at a later date, please refer to the
SETTINGS MENU section.
Initial cleaning
Clean the oven before using it for the first time.
1 Important: Do not use caustic or abrasive cleaning agents! These can damage the oven
surfaces.
3 For the metal surfaces, use commercially available cleaning agents.
1. Open the oven door.
The oven light is illuminated.
2. Remove all oven accessories, and clean them with warm water and washing up liquid.
3. Wash the oven in the same way, and wipe dry.
4. Wipe the front of the appliance with a damp cloth.
TIME OF DAY
ý ý ý ýþ ýþ ý
ý ý
ý
ý
ý ò
888ûcþ þüþ1ü2.2ü5
ý
88.8ú8
wm¸¹º»¼-P+P
ý ý ý ýþ ýþ ý
ý ý
ý
ý
ý ý
888ûcþ þüþ1ü2.2ü5
ý
88.8ú8
wm¸¹º»¼P-+
Using the Oven12
Using the Oven
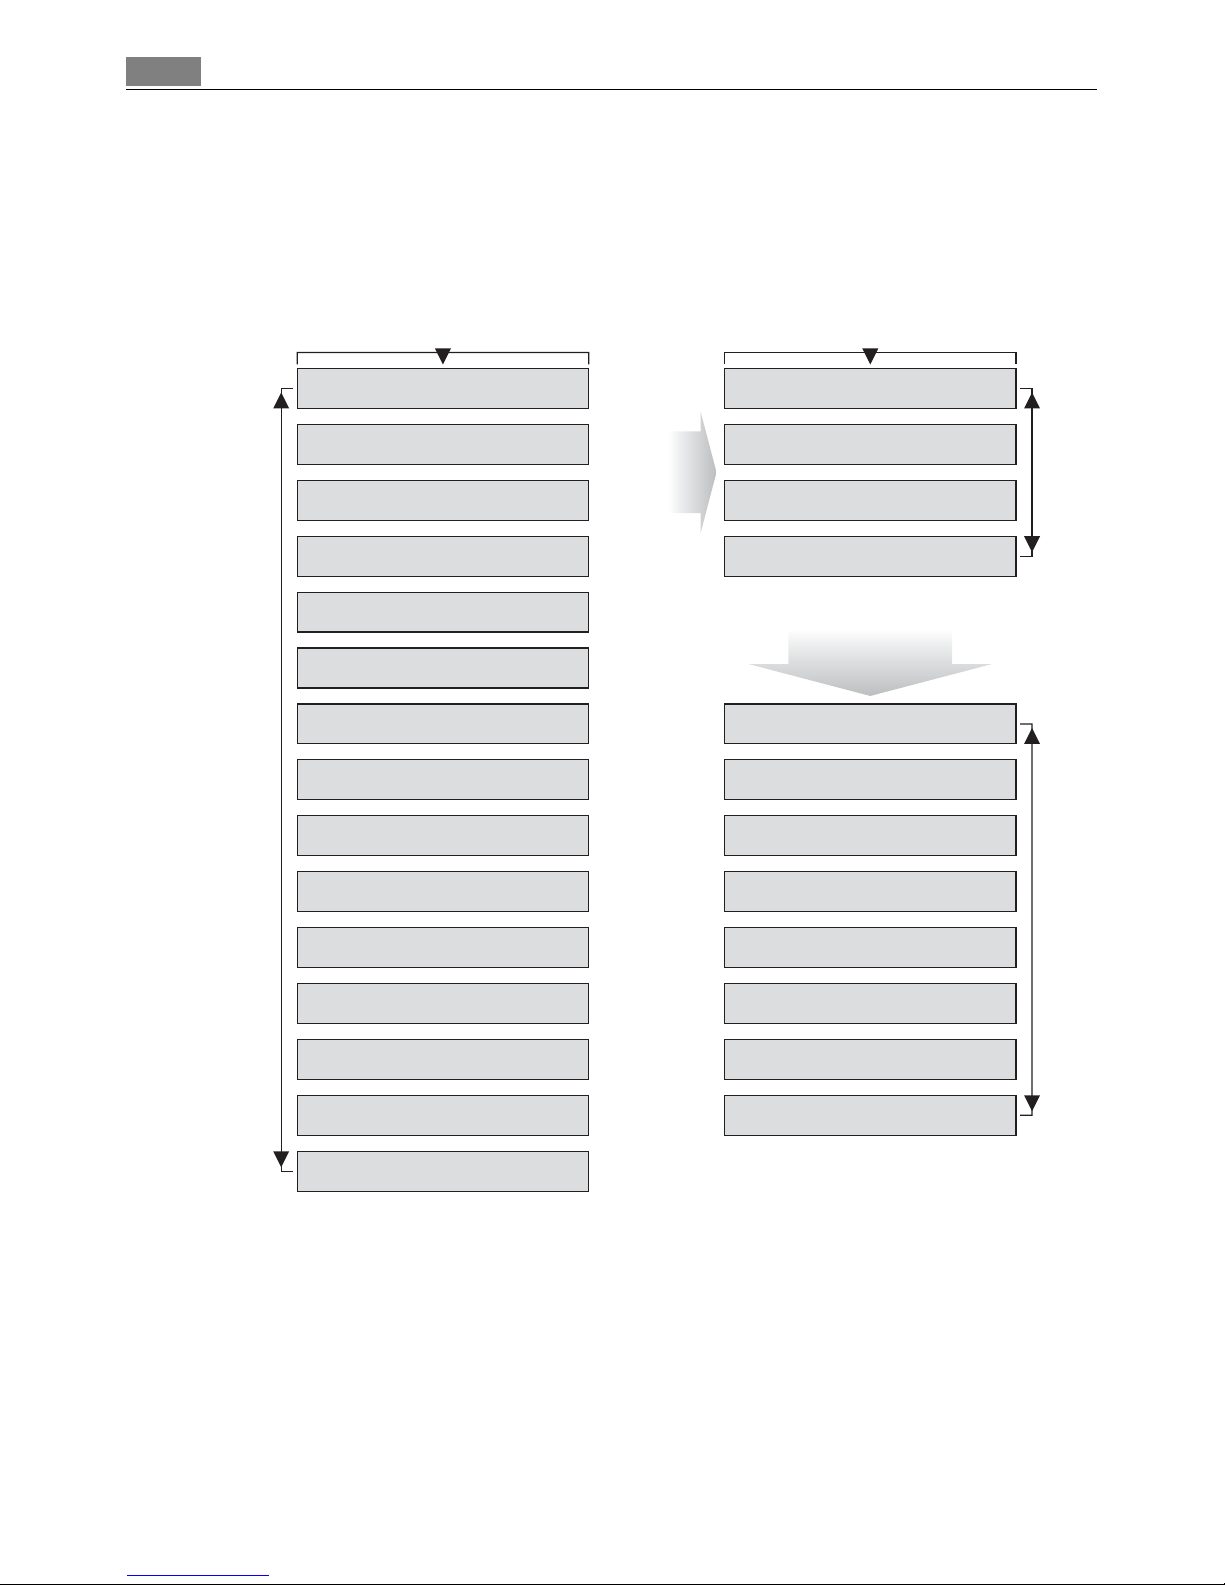
Menu operation in overview
3 The display only shows the menu options, that are possible to set with the function set.
TRUE FAN
FAN BAKING
SLOW COOK ONE
CONVENTIONAL
ROTITHERM
DUAL GRILL
SINGLE GRILL
KEEP WARM
DEFROST
BASE HEAT
POULTRY
PORK
BEEF
VEAL
GAME
RECIPE MENU
MEMORY MENU
CLEANING MENU
SETTINGS MENU
SMELL FILTER MENU
HEAT+HOLD MENU
EXTRA TIME MENU
RAPID HEAT UP MENU
RESIDUAL HEAT MENU
SOUND MENU
LANGUAGE MENU
FACTORY SETTINGS
Oven functions
menu
¸
w
m
w
m
w
m
¹
Options
menu

13Using the Oven
The Oven Functions menu
• When you switch the appliance on, you find yourself in the Oven Functions menu.
• Select the desired oven function using the arrow buttons or . In the menu sta-
tus bar, the current position within the menu is shown.
Setting an example oven function
1. Switch on the appliance using the ON/
OFF button.
2. Using the arrow buttons or se-
lect the oven function.
A suggested temperature appears in
the temperature display.
The oven starts to heat up.
3. With the or button, the tem-
perature can be raised or lowered.
3 When the temperature set is reached,
an audible signal sounds.
The Options menu
• Using the OPTION button, enter the Options menu.
• Select the desired option using the arrow buttons or . In the menu status bar,
the current position within the menu is shown .
• Use the OK button to change to the menu of the selected option.
The sub-menus
• Select the desired setting using the arrow buttons or or change to other sub-
menus using the OK button.
3 At the end of every menu there is the menu option BACK.
You use this to go back to the higher menu.
You can cancel a setting procedure by pressing and holding down the OPTION button.
You will then find yourself back in the Oven functions menu.
–—OVEN FUNCTIONS
ý ý ý ýþ ýþ ý
ý ý
ý
ý
ý ý
280ûcþ þüþ1ü2.2ü5
ý
88.8ú9
wm¸¹ºP»¼-+
____________________
CONVENTIONAL
ý ý ý ýþ ýþ ý
ý ý
ý
ý
ý ý
200ыcюЭЬЬЬю1ь2.2ь5
ý
00.0ü0
wPm¸¹º»¼-+
CONVENTIONAL
ý ý ý ýþ ýþ ý
ý ý
ý
ý
ý ý
180ыcюЭЬЬЬю1ь2.2ь6
ý
00.0ü1
wm¸¹º»¼-P+P
Using the Oven14
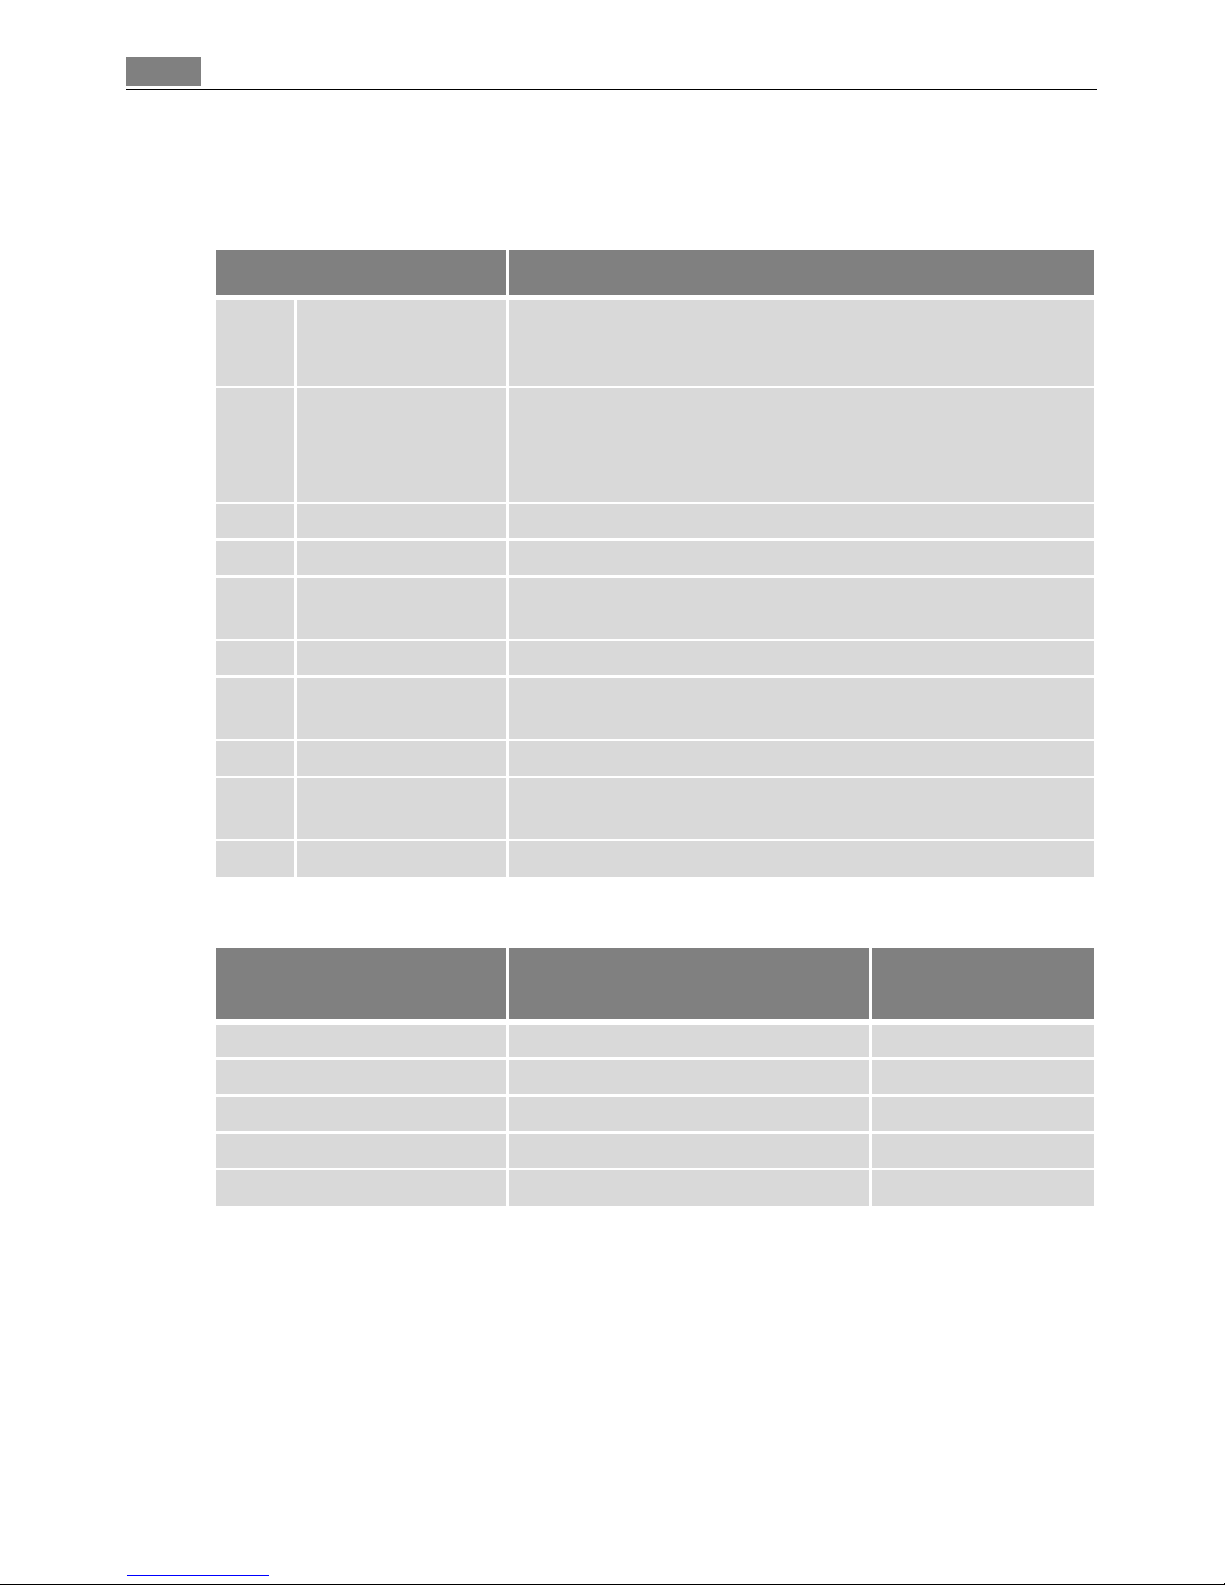
Use of the oven functions
The oven has the following functions:
Meat programmes
or
Oven function Application
TRUE FAN To bake on three oven levels maximum at the same time.
Decrease the oven temperatures 20-40 °C compared with Conventional.
FAN BAKING For baking on one level dishes that require more intensive
browning and a crispy base.
Set the oven temperatures 20-40 °C lower than when using
Conventional.
SLOW COOK For preparing especially tender succulent roasts.
CONVENTIONAL For baking and roasting on one oven level.
ROTITHERM For roasting larger joints of meat or poultry on one level.
The function is also suitable for gratinating and browning
DUAL GRILL For grilling flat food items in large quantities and for toasting.
SINGLE GRILL For grilling flat food items placed in the middle of the grill and
for toasting.
KEEP WARM To keep dishes warm.
DEFROST For defrosting e. g. flans and gateaux, butter, bread, fruit or
other frozen foods.
BASE HEAT For baking cakes with crispy or crusty bases.
Meat programmes
with weight input
Application Weight range
POULTRY Chicken, duck, goose 0.9 to 4.7 kg
PORK Roast pork, shoulder of pork 1.0 to 3.0 kg
BEEF Roast beef, pot roast 1.0 to 3.0 kg
VEAL Roast veal 1.0 to 3.0 kg
GAME Venison, rabbit 1.0 to 3.0 kg
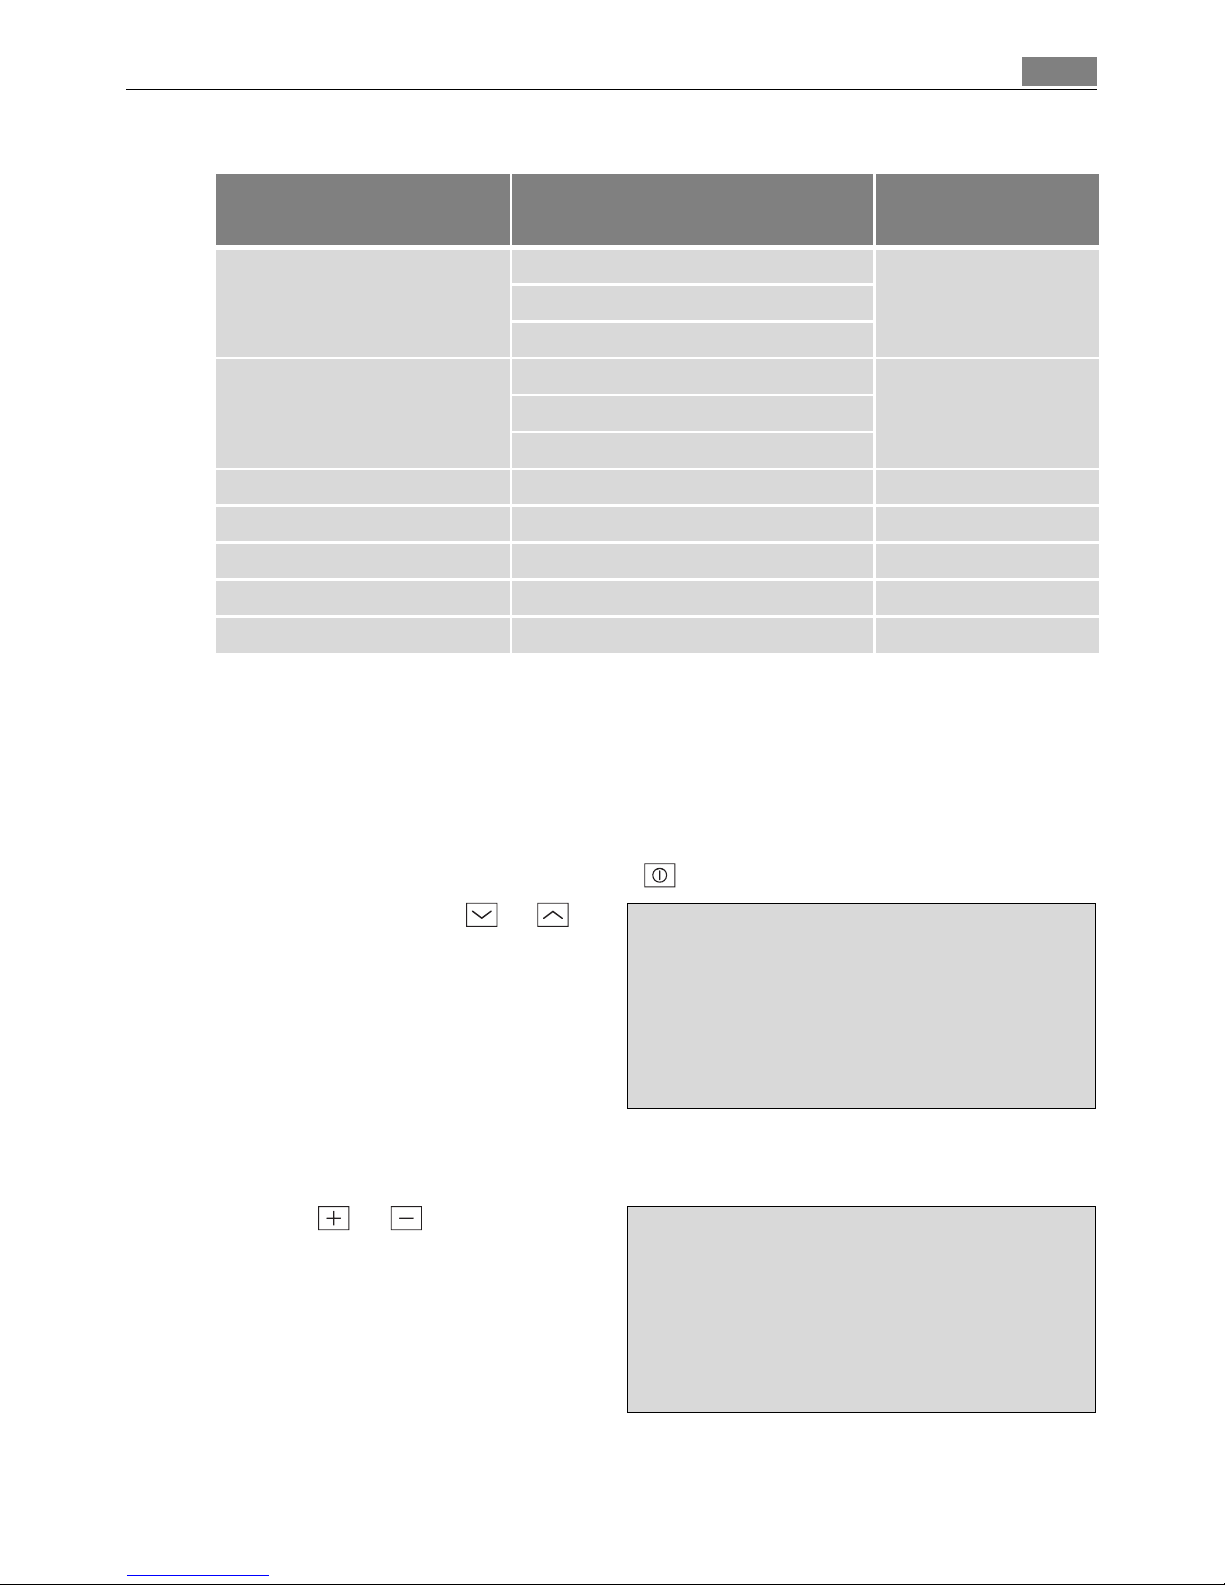
15Using the Oven
Usage, Tables, Tips and Recipes
You will find practical information on the various oven functions, programmes and automatic recipes in the accompanying booklet.
Switching the Oven On and Off
Selecting an oven function
1. Switch on the appliance using the ON/OFF button.
2. Using the arrow buttons or se-
lect the desired oven function.
A suggested temperature appears in
the temperature display.
The oven starts to heat up.
Changing the oven
temperature
Press the or button to raise or
lower the temperature.
3 When the selected temperature is
reached, a signal sounds.
Meat programmes with
meat probe plugged in
Degree of cooking Notes
TOP SIDE BEEF TOP SIDE BEEF RARE
-TOP SIDE BEEF MED.
TOP SIDE BEEF WELL
BEEF SCAN BEEF SCAN RARE Roast beef Scandinavi-
an style (no browning)
BEEF SCAN MED.
BEEF SCAN WELL
PORK JOINT - -
VEAL - -
LAMB JOINT - -
GAME - -
BONED POULTRY - -
____________________
CONVENTIONAL
ý ý ý ýþ ýþ ý
ý ý
ý
ý
ý ý
200ыcюЭЬЬЬю1ь2.2ь5
ý
00.0ü0
wPm¸¹º»¼-+
CONVENTIONAL
ý ý ý ýþ ýþ ý
ý ý
ý
ý
ý ý
180ыcюЭЬЬЬю1ь2.2ь6
ý
00.0ü1
wm¸¹º»¼-P+P

Using the Oven16
Switching off an oven function
Press the arrow buttons or repeatedly until OVEN FUNCTIONS appears in the display again.
Turning the appliance off completely
Switch appliance off by pressing
the ON/OFF button.
3 Cooling fan
The fan switches on automatically in order to keep the appliance’s surfaces cool. When
the oven is switched off, the fan continues to run to cool the appliance down, then
switches itself off automatically.
Heat indicator
Heating Up indicator
When the oven function has been
switched on, the bars that slowly light
up one after the other indicate how far
the oven has heated up.
Rapid Heat Up indicator
When the RAPID HEAT UP function has
been switched on, the bars that flash
one after the other indicate that RAPID
HEAT UP is operating.
–—OVEN FUNCTIONS
ý ý ý ýþ ýþ ý
ý ý
ý
ý
ý ý
280ûcþ þüþ1ü2.2ü5
ý
88.8ú9
wPmP¸¹º»¼-+
ý ý ý ýþ ýþ ý
ý ý
ý
ý
ý ý
280ûcþ þüþ1ü2.2ü5
ý
88.8ú9
wm¸¹ºP»¼-+
CONVENTIONAL
ý ý ý ýþ ýþ ý
ý ý
ý
ý
ý ý
180ыcююЭЮЬЬю1ь2.12
ý
00.ü07
wm¸¹º»¼-+
CONVENTIONAL
ý ý ý é ýþ ýþ ý
ý ý
ý
ý
ý ý
180ыcюЭЬЬЬю1ь2.1ь0
ý
00.0ü5
wm¸¹º»P¼-+
 Loading...