

Page 1

Electro-Harmonix
16 Second Digital Delay
- Description -
Congratulations on your purchase of the Electro-Harmonix 16 Second Digital Delay! An
anticipated reissue of the classic 16 Second Digital Delay, we redesigned the circuit with
modern components but kept the functionality the same as the original, improving on it
where needed.
The new 16 Second works in the more musical format of Bars, Beats and Tempo instead
of seconds. Now you can create loops by setting the number of bars and the tempo. After
recording a loop, you can play along with it, overdub as many layers as you like on top of
it, or punch in and out to fix performance mistakes. It’s also environmentally friendly:
after recording a loop, the 16 Second will automatically save the loop into its Magna
Storage and keep it there. You can turn the power off, come back the next day and Play
or Overdub the loop as if you never turned the 16 Second off. You can bring the 16
Second to a recording studio or even another continent and it will keep your loop safe in
its memory.
Special Features of the 16 Second Delay:
• Record for more than 4 minutes.
• Keep the loop in memory after power cycling.
• Change the Pitch and Tempo of the loop in ½ step increments, with a total
• Change the Tempo of the loop while the pitch remains constant.
• Reverse loops while Playing back. Overdub on top of the reversed loop.
• Use Loop Mode as well as Short Delay Mode to make it a true echo pedal.
• Add Sweep to your loops or use the 16 Second as a Flanger/Chorus.
• Separate control over the Dry Output, Effect Output and Clix Output signals.
• Analog Input Gain control with Signal and Clip LEDs.
• Maintain visual indication of the tempo with two LEDs that blink on the beat.
• Control with three Footswitches: Record, Play and Bypass.
• Connect an external Remote Foot Controller (sold separately) for hands-free
WARNING: Use only the 9VDC/500mA AC adapter the 16 Second comes
supplied with. Do not use any other AC adapters. Using other AC adapters,
even those made by Electro-Harmonix, could cause harm to the unit, the
adapter or you. The 16 Second does not use batteries.
range of 2 octaves.
operation.
16 Second Terminology -
Here is an introduction to some important terms that will often be used during the course
of this manual.
RECORDING: Occurs when you are recording a new loop. RECORDING LED is lit.
OVERDUBBING: When you record new audio over a loop that has already been
recorded. Both the RECORDING and PLAYING LEDs are lit.
PLAYING: Occurs when a loop is Played back. You are listening to the loop not
Recording or Overdubbing over the loop. PLAYING LED is lit.
LOOP Mode: Allows the 16 Second to be a Looping Recorder.
SHORT DELAY Mode: In this mode the 16 Second is a Delay/Echo.
TRUE BYPASS: In TRUE BYPASS, a computer controlled mechanical relay is used to
connect the input jack directly to the output jack. The I/O jacks are completely
disconnected from the 16 Second Delay circuitry.
DSP BYPASS: In DSP BYPASS, the audio goes into the A/D Converter, passes through
the DSP, and then out of the D/A Converter. The DRY OUT slider will affect the output
level in DSP Bypass.
CLIX: The Clix is a metronome that clicks on each beat, at the same tempo as the
internal tempo of the 16 Second Delay. Clix is useful when laying down loops and
overdubbing.
- Quick Start -
You’ve just bought a brand new 16 Second Delay! Let’s get into it right away by learning
how to:
• Record a 2-Bar Loop
• Change the Pitch and/or Tempo of the Loop
• Reverse a Loop
• Use the 16 Second as a Delay/Echo
How to Record a 2-Bar Loop:
1. Hit the BYPASS Footswitch so that both CLIX LEDs light.
2. Set the COARSE Slider to 2. This sets the Loop’s length to 2-Bars.
3. Set the FINE Slider half way. This will give you a mid tempo beat.
4. Set the LOOP Switch to C. This will let you continuously Overdub.
5. Set both the SPEED and DEPTH Sliders down all the way.
1
2
Page 2

6. Set the FEEDBACK Slider to the very top of its travel.
7. Set CLIX to the top. Now you will be able to hear the metronome Clix
during Recording.
8. Set the EFFECT OUT and DRY OUT Sliders to about half way.
9. Set the INPUT GAIN Slider so that the green LED lights up but the
orange LED does not.
10. Hit the RECORD Footswitch. Immediately you will hear the metronome
Clix and the RECORDING LED will blink rapidly. This means that the 16
Second Delay is giving you a 4-beat count-in before it starts to Record.
11. After the 4-beat count-in, begin playing. The 16 Second Delay will record
your loop.
12. After 2-bars (or 8-beats) the 16 Second will enter Overdub mode. The
PLAYING LED will light while the RECORDING LED remains lit and
you will hear what you just recorded.
13. Now you can Overdub or record over the original loop that you recorded.
14. To turn off the metronome Clix, move the CLIX Slider approximately half
way down.
How to Change the Pitch and/or Tempo of the Loop You Recorded:
1. If you are currently in Overdub Mode, hit the RECORD Footswitch to put
the 16 Second Delay into PLAYING Mode. The RECORDING LED
should go off, but the PLAYING LED will remain lit.
2. Set the FINE Switch to “P” so that both Pitch and Tempo will change with
the FINE Slider.
3. Slowly push the FINE Slider up to its top position. The loop’s pitch will
go lower and the tempo will slow down.
4. Slowly push the FINE Slider all the way down to its bottom position. The
pitch and tempo of the loop will increase. When the FINE Slider is at the
same position that the loop was recorded at, the FINE LED, above the
FINE Slider, will light up.
5. Now set the FINE Switch to the “T” position. Right away the pitch of the
loop should jump back to the original pitch it was recorded at but the
tempo is still faster. This effect works best when the tempo is near its
original tempo.
How to Reverse a Loop and then Overdub over it:
1. Put the 16 Second Delay into Playing Mode: If you are in Overdubbing
Mode, hit the RECORD Footswitch, if you are in Bypass, hit the PLAY
Footswitch.
2. Slide the Reverse Switch. The loop will now play in Reverse. If the loop is
at its original Pitch and Tempo, the FINE LED will blink rapidly to let you
know the loop has been Reversed.
3. Hit the RECORD Footswitch. The RECORDING LED will light, you are
now in Overdubbing Mode.
4. Important! Please note: when you Reverse a loop or change its Pitch or
Tempo, you must Overdub over the entire loop through one full cycle,
otherwise the 16 Second Delay will chop off the portion of the loop that
was not Overdubbed.
How to Use the 16 Second Digital Delay as a Delay/Echo:
1. Hit the BYPASS Footswitch to enter True Bypass Mode.
2. Move the LOOP Switch to the SHORT DELAY position.
3. Set the COARSE Slider to the 32-Bar position.
4. Set the FINE Slider about half way up.
5. Set the SPEED and DEPTH Sliders to the bottom.
6. Set the FEEDBACK Slider to approximately ¾ of the way up.
7. Set the CLIX LEVEL Slider to the bottom.
8. Set the EFFECT OUT and DRY OUT Sliders to about half way.
9. Set the INPUT GAIN Slider so that the green LED lights up but the
orange LED does not.
10. Hit the RECORD Footswitch to enter Short Delay Mode.
11. Move the FINE Slider for different delay times
12. Adjust the COARSE Slider for more dramatic changes in the delay time.
3
4
Page 3
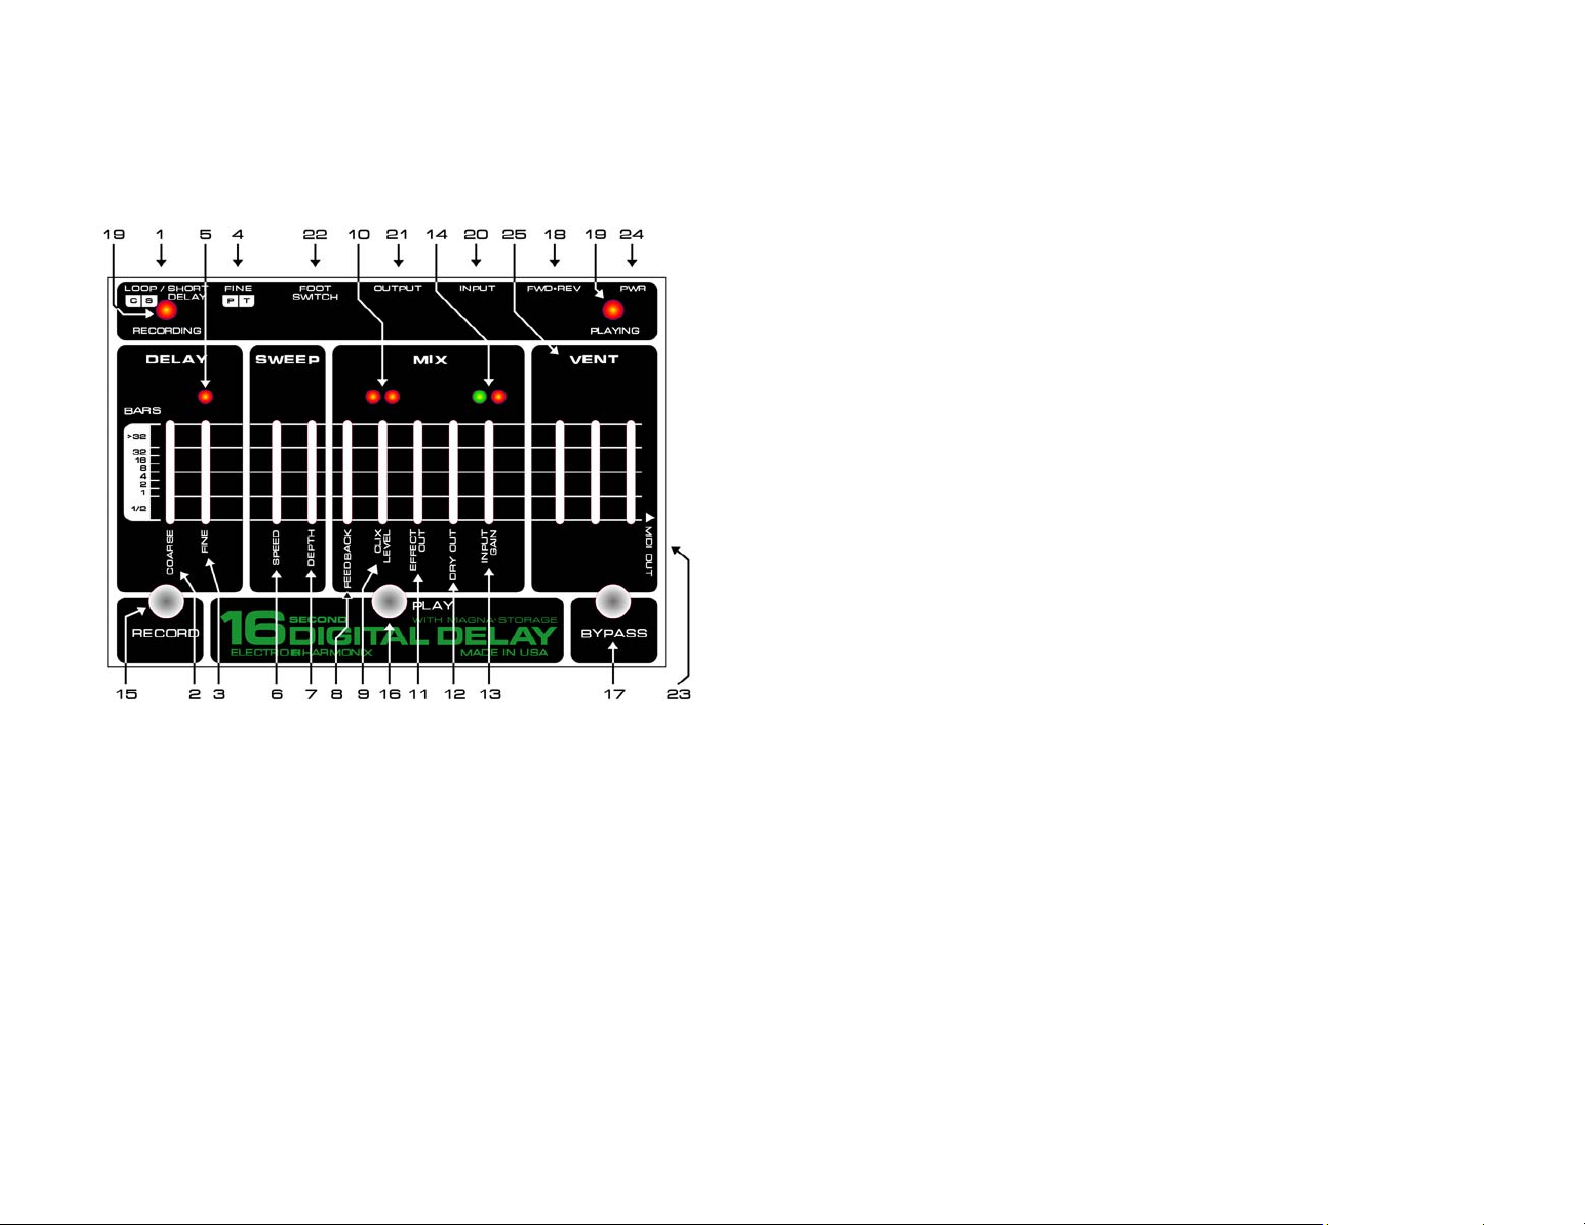
-Front Face of 16 Second Delay-
- Controls, Indicators & I/O-
The following descriptions detail all of the sliders, switches, LEDs (lights) and I/O jacks
on the 16 Second Delay:
1. LOOP / SHORT DELAY Slide Switch – This is a 3 position slide switch that selects
between two Loop Modes (C and S) and Short Delay Mode:
LOOP C: Continuous Loop Mode. The 16 Second will continually record and
play the loop.
LOOP S: Single Loop Mode. The 16 Second will record the loop once through
and then the 16 Second will automatically switch to Play mode and then play
the Loop continuously.
SHORT DELAY: In Short Delay Mode the 16 Second Delay works as a
dedicated echo/delay pedal with a delay time up to 1 second. When in Short
Delay mode, the 16 Second will also record while delaying. So if you switch to
either of the loop modes from Short Delay mode, the audio in the loop will be
up to the last 4 minutes that were recorded while in Short Delay mode. You can
also hear the loop you have been recording by hitting the Play Footswitch (16)
while in Short Delay mode.
2. COARSE Slider – In Loop Mode, the COARSE Slider sets the maximum loop
length. It is calibrated in bars, where each bar is 4 beats long. The position of the
COARSE Slider is only relevant at the instant that a new recording is started. Moving the
COARSE Slider after a loop has been recorded will have no effect on the loop. When in
the >32 position, the 16 Second Delay will continually record until you hit the Play
Footswitch to stop recording audio. In Short Delay Mode, the COARSE Slider selects
the range of delay time.
3. FINE Slider – In Loop Mode, the FINE Slider sets the tempo of the loop. The range
is from 60 bpm (topmost) to 240 bpm (bottommost). In Short Delay Mode, the FINE
Slider sets the delay time of the echo. In both modes, the tempo that the FINE Slider is
set to will be output as MIDI Clock on the MIDI OUT Jack (23).
4. FINE Switch - Varying the FINE Slider (3) while Playing back a loop will change the
Pitch and Tempo or just the Tempo of the loop. The FINE Switch chooses between these
two modes. If set to “P”, both the Pitch & Tempo of the loop will vary with the FINE
Slider. If set to “T”, the loop’s Tempo will vary but the Pitch of the loop will remain
constant.
5. FINE LED – This LED is located directly above the FINE Slider (3). After recording
a new loop, the FINE LED will glow solid. This tells you that the current position of the
FINE Slider (3) is at the same position that the loop in memory was recorded at. If you
move the FINE Slider, the FINE LED will turn off, if you move the FINE Slider back to
its original position, the LED will light again. If the FWD·REV Switch (18) is toggled
while the FINE Slider is in its original position, the FINE LED will blink. When entering
Overdub mode, after the FINE Slider has moved or the REVERSE switch has been
toggled, the 16 Second will need to cycle through the entire loop one time to save the
changes to the loop. You will see the FINE LED go solid after this one cycle through the
loop.
5
6
Page 4

6. SPEED Slider – Controls the rate of the Sweep effect. The rate of the Sweep effect
will be faster at the top most position of the SPEED Slider and slower at the bottom most
position. The Sweep effect will not be recorded with your loop.
7. DEPTH Slider – Controls the amount of the Sweep effect. The amount of Sweep will
increase as the DEPTH slider is raised to the top most position. The Sweep effect is off in
the bottom most position of the DEPTH slider.
8. FEEDBACK Slider – In Short Delay Mode, the FEEDBACK Slider sets the level of
the signal that is fed from the Output of the Delay Line to the Input of the Delay Line.
When the FEEDBACK Slider is set to the bottom most position, you will hear only one
echo. When the FEEDBACK Slider is set to the top position the echoes will repeat
infinitely. The FEEDBACK Slider works in a similar fashion in Loop Mode. When in
Overdub Mode (both the Recording and Playing LEDs are lit), each time the 16 Second
cycles through a loop, the loop will pass through the FEEDBACK Slider setting. So if the
FEEDBACK Slider is in the top position, the loop will go on indefinitely. If the
FEEDBACK Slider is set at 50%, each time the loop cycles through, the volume will
decrease by 50%. If you want to continually Overdub over a loop the FEEDBACK Slider
has to be set in the top most position. If you want to punch-in a new section of audio, the
FEEDBACK Slider will have to be set to the bottom most position. If the FEEDBACK
Slider is set somewhere in the middle of its range while in Loop Mode, the 16 Second can
act like a very long delay.
9. CLIX LEVEL Slider – Controls the output volume of the Clix metronome. The
volume of the Clix increases as the CLIX Slider is pushed up. When the CLIX Slider is
set at its bottom most position there will be no Clix output. In Short Delay Mode, the Clix
are always active but in Loop Mode, the Clix works a little differently. When recording a
new loop the Clix will be active and the CLIX Slider acts like a volume knob for the
metronome level. After initializing a new loop and the 16 Second is in Overdubbing
Mode, the CLIX slider becomes an On/Off switch for the metronome: if the CLIX slider
is located in the top 25% of its range, the Clix will be heard, if the CLIX slider is below
the top 25%, the Clix will be shut off. This enables you to hear the Clix only when you
need it. The Clix will not be active when the 16 Second is Playing a loop.
10. CLIX LEDs – The CLIX LEDs are located directly above the CLIX Slider (9). The
LED on the left blinks on each beat. The LED on the right lights only on the first beat of
each bar.
11. EFFECT OUT Slider – Controls the overall output volume of the effects. This
includes the loop and delays, the Sweep and the Clix metronome. The volume of the
effect will increase as the EFFECT OUT Slider is raised upward.
12. DRY OUT Slider – Controls the output volume of the input signal. Use the DRY
OUT Slider to mix in the right amount of your original signal. The volume of the input
signal will increase as the DRY OUT Slider is raised upward. This control is after the
INPUT GAIN Slider (13).
13. INPUT GAIN Slider – Controls the level of the input signal before it enters the
Analog to Digital Converter. The Input Gain increases as the slider is raised upward. At
the bottom position of the INPUT GAIN Slider you will have approximately 6 dB of
attenuation. At the top position of the INPUT GAIN Slider you will have approximately
36 dB of gain. Use the SIGNAL/CLIP LEDs to help you determine where to set the
INPUT GAIN Slider.
14. SIGNAL/CLIP LEDs – These LEDs are located directly above the INPUT GAIN
Slider (13). The Green LED on the left is the SIGNAL LED. It lights when signal is
present at the A/D Converter. The Amber LED on the right is the CLIP LED. It lights
when the signal clips the A/D Converter. Ideally you want the largest possible signal
entering the A/D Converter without clipping. One way to achieve the ideal signal level is
to raise the INPUT GAIN Slider until the CLIP LED starts to blink and then lower the
INPUT GAIN Slider slowly until the CLIP LED stops lighting.
15. RECORD Footswitch – In Loop Mode, the RECORD Footswitch is used to start and
stop Recording a new loop or to Overdub over a loop already in memory. In Short Delay
mode, the RECORD Footswitch toggles between Delay On and DSP Bypass.
16. PLAY Footswitch – In Loop Mode, the primary function of the PLAY Footswitch is
to put the 16 Second into Playing mode. While Recording a new loop, hitting the PLAY
Footswitch will place the 16 Second directly into Overdub or Playing Mode depending
on the setting of the LOOP Slide Switch (1). In Short Delay Mode, hitting the PLAY
Footswitch will take you out of echo mode and Play whatever was recorded in the past 4
minutes since entering Short Delay Mode, as long as at least one bar has been recorded.
Playing mode (only the PLAYING LED is lit) plays back the loop that was recorded.
You can then further tweak the loop to change the tempo and/or pitch, Reverse the loop
or add Sweep.
Important! Please note: Hitting the PLAY Footswitch while in Overdub Mode will start
the Recording of a new loop and you will lose the loop you had been working on.
7
8
Page 5

17. BYPASS Footswitch – Hitting the BYPASS Footswitch while in either Loop Mode
or Short Delay Mode, will switch the 16 Second into True Bypass Mode. Hitting the
BYPASS Footswitch again will bring you back into the mode you had been in before
hitting the BYPASS Footswitch. In True Bypass Mode, the Recording and/or Playing
LEDs will blink at the tempo set by the FINE Slider. The blinking of these LEDs reveals
two pieces of information:
1) By knowing which LEDs are blinking, you know which mode you will go
back into when you hit the BYPASS Footswitch.
2) The LEDs will show what the tempo is and where the first beat of each bar
is occurring. The Clix LEDs will continue blinking at the set tempo when
in True Bypass Mode but only the left LED will light. When you enter
True Bypass Mode, the loop will continue to play, though it will be
inaudible.
18. FWD·REV Slide Switch – The FWD·REV Switch will Reverse the loop while it is
Playing back. This switch has no function while Recording, Overdubbing or in Short
Delay Mode.
19. RECORDING and PLAYING LEDs – These two LEDs have various functions
depending on which are lit, how they are blinking, and if you are in Loop or Short Delay
Mode:
RECORDING LED PLAYING LED STATUS
ON OFF Recording a new loop
ON ON Overdubbing a loop
OFF ON Playing a loop
Blinking Rapidly OFF In Loop Mode: 4-Beat lead-in before
recording a new loop.
In Short Delay Mode: Indicates the
start of Echo Mode.
OFF OFF DSP Bypass or True Bypass
OFF Blinking on beat True Bypass while in Playing mode
Blinking on beat OFF True Bypass while in Short Delay mode
Blinking on beat Blinking on beat True Bypass while in Overdubbing mode
20. INPUT Jack – This ¼” jack is the audio input for the 16 Second. The Input
Impedance is 200 kΏ.
21. OUTPUT Jack – This ¼” jack is the audio output from the 16 Second. When the 16
Second is in True Bypass mode, the OUTPUT jack is connected directly to the INPUT
jack.
22. FOOTSWITCH Jack – There is an optional Electro-Harmonix FOOT
CONTROLLER for the 16 Second Delay, which can be purchased separately. The Foot
Controller allows you to use the 16 Second remotely. This gives access to special
switches that instantly turn On/Off the Sweep, Reverse and Feedback functions, and shift
the loop Up/Down one Octave, as well as having identical RECORD and PLAY
Footswitches from the main unit. Plug the Foot Controller directly into the
FOOTSWITCH Jack with a standard guitar cable. The power for the FOOT
CONTROLLER will come from the 16 Second Delay.
23. MIDI OUT Jack – The 16 Second Delay generates MIDI Clock, MIDI Start and
MIDI Stop commands.
MIDI CLOCK: The MIDI Clock signal is based on the 16 Second’s internal
tempo and is output through the MIDI OUT Jack at all times. The internal
tempo of the 16 Second Delay is determined by the FINE Slider. The MIDI
Clock signal can be used by any other device that accepts MIDI Clock. Hook
up your 16 Second’s MIDI OUT Jack to the MIDI In of another device using a
standard MIDI cable. You will then be able to sync a sequencer, drum machine,
or other MIDI devices to the 16 Second Delay. The 16 Second Delay does not
slave to MIDI Clock coming from another device.
MIDI START & STOP: When a loop is started by hitting the PLAY
Footswitch or a new one is created by hitting the RECORD Footswitch, a MIDI
Start command is sent out of the MIDI OUT Jack. When a loop is stopped by
hitting the PLAY Footswitch again, a MIDI Stop command is sent out of the
MIDI OUT Jack. These commands will start and stop a sequencer or drum
machine.
24. POWER Jack – Plug in the wall-wart that came supplied with the 16 Second into the
POWER Jack.
25. VENT Slots – Please do not obstruct the VENT slots. The 16 Second requires the
VENT Slots to breath.
9
10
Page 6

- Operation Notes -
Here are more in-depth descriptions of how to use the 16 Second Delay:
• Important Notes
• Bypass
• Recording a New Loop
• Clearing a Loop
• Overdubbing Over a Loop
• Playing a Loop
• Short Delay Mode
• Connecting to a Drum Machine or MIDI Sequencer
• Adding Sweep to Your Audio
Important! Please Note:
• The 16 Second can have only one loop in its memory at a time. Once you begin
recording a new loop, your previous loop will be erased.
• The loop is automatically stored into memory upon exiting either Recording or
Overdubbing Modes. If the power to the 16 Second is interrupted while in
either mode, the loop will be lost.
Bypass: The 16 Second Delay has two different forms of Bypass: True Bypass and DSP
Bypass.
• True Bypass can be entered and exited by hitting the BYPASS Footswitch.
The 16 Second Delay will always start up in True Bypass mode. The will
continue its cycle while in True Bypass.
• DSP Bypass can be entered in four ways:
1. While in Playing Mode, hit the PLAY Footswitch.
2. While in Recording Mode, hit the RECORD Footswitch, you will stop
recording the loop and enter DSP Bypass.
3. After start up, if you hit the BYPASS Footswitch, it will enter DSP
Bypass.
4. If you are in DSP Bypass and hit the BYPASS Footswitch, you will enter
True Bypass, if you hit the BYPASS Footswitch again you will go back
into DSP Bypass.
Recording a New Loop:
1. Put the Loop Slide Switch into either “C” or “S” modes. Recording Mode can
be entered in the following ways:
a) From True Bypass when no loop is in memory by hitting the RECORD
Footswitch.
b) From DSP Bypass at all times by hitting the RECORD Footswitch.
c) From Overdub Mode by hitting the PLAY Footswitch.
2. Once you enter Recording Mode, the loop that was currently in memory will be
erased and replaced by the new one you record. You also have the ability to
clear the memory without recording a new loop.
3. Upon entering Recording Mode, the RECORDING LED will blink rapidly; this
signifies that the 16 Second is counting the 4 beat lead-in. The 16 Second does
not begin recording until after the 4 beat lead-in is complete. So the 16 Second
will start recording on the 5
the CLIX LEVEL Slider and/or the EFFECT OUT Slider. If you hit the
RECORD Footswitch again while the RECORDING LED is blinking, the 16
Second will erase the loop that was in Magna Storage, stop the recording
process and enter DSP BYPASS.
4. Once the RECORDING LED goes solid, the 16 Second is recording audio.
5. The maximum length of the loop is determined by the setting of the COARSE
Slider when starting a new loop. If the COARSE Slider is set to 4, than your
loop will be a maximum of 4 bars long with each bar made up of 4 beats.
6. The tempo of the loop is set by the FINE Slider. Consequently the FINE Slider
will control the speed of the CLIX. It is suggested, for optimal recording of
your loop, that you do not move the FINE Slider while recording a new loop.
7. The 16 Second will exit RECORDING Mode automatically upon reaching the
number of bars set by the COARSE Slider. You can also exit RECORDING
mode by hitting the PLAY Footswitch. At anytime, after the first bar has been
recorded, the PLAY Footswitch can be hit to stop the loop. The loop length will
be quantized to the nearest bar when hitting the PLAY Footswitch. Use this
feature to create loops with odd bar lengths. For example if you set the
COARSE Slider to 4 but hit the PLAY Footswitch after recording 3 bars, your
loop will be 3 bars in length.
8. Upon exiting RECORDING Mode, the 16 Second will cycle back to the
beginning of the loop. Either it will enter OVERDUBBING or PLAYING
Mode depending on the LOOP Slide Switch setting.
9. Upon exiting RECORDING Mode and going into Playing Mode, the loop will
be saved into Magna Storage.
th
beat. If you do not hear the 4 beat lead-in, raise
11
12
Page 7

Clearing a Loop:
• In Either Loop Mode:
1. In general, to clear the loop, you have to begin recording a new loop.
2. When beginning a new loop, the RECORDING LED will blink rapidly to
signify the 4 beat lead-in. During the lead-in, hit the RECORD
Footswitch, the 16 Second will go into DSP Bypass and the memory will
be cleared.
• In Short Delay Mode:
1. Hit the RECORD Footswitch to enter echo mode.
2. After hitting the RECORD Footswitch, the RECORDING LED will blink
rapidly, during this time, hit the RECORD Footswitch again to clear the
memory. You will also enter DSP Bypass.
Overdubbing Over a Loop:
1. As long as the Loop Slide Switch is set to either “C” or “S”, you can enter
Overdubbing Mode in the following ways:
a) From Playing Mode, hit the RECORD Footswitch.
b) From Recording Mode, make sure the Loop Slide Switch is set to
“C” and hit the PLAY Footswitch.
c) From True Bypass, with both the RECORDING and PLAYING
LEDs blinking, hit the BYPASS Footswitch.
2. After entering Overdubbing Mode, both the RECORDING and PLAYING
LEDs will light up, solid. At this point you can begin laying new parts over the
loop you have already recorded.
3. If, before entering Overdubbing Mode, you had changed either the tempo, pitch
or direction of the loop, you will need to let the loop cycle completely through
before exiting Overdubbing Mode. If you attempt to exit Overdubbing Mode
before one full bar has been overdubbed, the 16 Second will enter DSP Bypass
Mode and the loop will remain unchanged. If you exit Overdubbing Mode
before the entire loop has cycled through, the loop will be truncated to the
nearest bar.
4. In Overdubbing Mode the CLIX LEVEL Slider becomes a switch. Either the
CLIX is On or OFF. If the CLIX LEVEL Slider is set anywhere in its top 25%
of its travel, the CLIX will be audible. If the CLIX LEVEL Slider is set to the
lower 75% of the range, the CLIX will be turned off.
5. You can exit Overdubbing Mode in three ways:
a) Hit the RECORD Footswitch and the 16 Second will enter Playing
Mode.
b) Hit the BYPASS Footswitch and the 16 Second will enter True
Bypass Mode. The RECORDING and PLAYING LEDs will blink to
the tempo, letting you know if you hit the BYPASS Footswitch again
you will re-enter Overdubbing Mode.
c) Hit the PLAY Footswitch and the 16 Second will enter Recording
Mode and start the 4-beat lead-in.
Playing a Loop:
1. If there is a loop stored in memory, it can be played back infinitely in Playing
Mode. Assuming there is a loop in memory, you can enter Playing Mode
through the following ways:
a) In True Bypass Mode, hit the PLAY Footswitch.
b) In DSP Bypass Mode, hit the PLAY Footswitch.
c) In Overdubbing Mode, hit the RECORD Footswitch.
d) In Recording Mode, with LOOP Switch set to “S”, hit the PLAY
Footswitch.
e) In Short Delay Mode, hit the PLAY Footswitch.
2. When you enter Playing Mode, the PLAYING LED will light solid. Each time
you hit the PLAY Footswitch to enter Playing Mode, the loop will playback
from the beginning of its cycle.
3. While in Playing Mode you can play over the loop though it will not record
what you play.
4. You can Reverse the Loop while in Playing Mode. Just flip the REVERSE
Slide Switch.
5. The Pitch and Tempo of the Loop can be adjusted while in Playing Mode.
Make sure the FINE Slide Switch is set to “P”, then move the FINE Slider to
change the pitch of the loop.
6. If you want to keep the Pitch of the loop constant, but change the Tempo, set
the FINE Slide Switch to the “T” position, then move the FINE Slider.
7. You can exit Playing Mode and enter the three following modes:
a) Hit the RECORD Footswitch and the 16 Second will enter
Overdubbing Mode.
b) Hit the BYPASS Footswitch and the 16 Second will enter True
Bypass Mode. The PLAYING LED will blink to the tempo.
c) Hit the PLAY Footswitch and the 16 Second will enter DSP Bypass
Mode.
13
14
Page 8

Short Delay Mode:
1. To start Short Delay Mode, set the LOOP Slide Switch to SHORT DELAY.
Then hit the RECORD Footswitch, the short delays will begin immediately.
2. Once you have entered Short Delay Mode, the loop that was in memory will be
erased.
3. Both the COARSE and FINE Sliders determine the total delay time. Moving
the COARSE Slider will move you through different ranges of delay time.
Moving the FINE Slider will give you a more exact delay time.
4. The CLIX will be active during Short Delay mode, if you do not want to hear
the CLIX, move the CLIX LEVEL Slider to its minimum position.
5. If you hit the PLAY Footswitch while in Short Delay Mode, the 16 Second will
enter Playing Mode and begin playing up to the last 4 minutes of audio that was
output by the 16 Second since starting Short Delay. If you move the LOOP
Slide Switch to either of the Loop modes you can treat this audio like any other
loop you might have recorded.
6. When you start Short Delay, the RECORDING LED will blink rapidly and
then after 4 beats go solid. When the RECORDING LED goes solid it signifies
that the 16 Second is now recording the audio that can be turned into a loop
after hitting the PLAY Footswitch.
7. You can exit Short Delay Mode and enter the following modes:
a) Hit the RECORD Footswitch and the 16 Second will enter DSP
BYPASS Mode.
b) Hit the BYPASS Footswitch and the 16 Second will enter True
Bypass Mode. The RECORDING LED will blink to the tempo.
c) Hit the PLAY Footswitch and the 16 Second will enter Playing
Mode, playing back up to the last 4 minutes that have been output by
the 16 Second, in a loop.
Connecting to a Drum Machine or MIDI Sequencer:
• The 16 Second Delay sends out MIDI Clock at all times.
• The MIDI Clock will be at the same tempo as the 16 Second’s internal tempo
which is set by the FINE Slider.
• The 16 Second Delay will only be a MIDI Clock Master, it cannot Slave to
MIDI Clock.
• Here’s how to connect your MIDI Drum Machine or Sequencer:
1. Connect one end of a standard MIDI cable to the MIDI OUT of the
16 Second Delay.
2. Connect the other end of the MIDI Cable to the MIDI IN of your
MIDI device.
3. Set your MIDI device to sync to external MIDI Clock and accept
MIDI commands.
4. When you hit the RECORD Footswitch to record a new loop, the 16
Second will send out a MIDI Start command so that the MIDI device
should begin playing automatically.
5. Whenever you hit the PLAY Footswitch to Start or Stop your loop,
the 16 Second will send out a MIDI Start and Stop command as well.
Adding Sweep to your Audio:
• At anytime you can add the Sweep effect to your loop or delay.
• The Sweep will not be recorded with your loop.
Electro-Harmonix
16 Second Digital Delay Software Update v2.0
- Description -
After numerous requests, Electro-Harmonix has updated the 16 Second Delay software to
include a mode that allows musicians to bypass the 4-Beat Count-In that starts every loop
of v1.0 software. Here is a list of changes included in v2.0:
• A new mode called Non-Quantize (NQ for short) that allows the user to record
a new loop immediately upon hitting the RECORD FSW. There will be no 4Beat count-in.
• When in NQ Mode, the loop length is determined by the length of time
between tapping the RECORD FSW twice or first tapping the RECORD FSW
and then the PLAY FSW. It will not quantize the loop length to the nearest beat
as it does in Quantize Mode.
• A small improvement was made to increase the total range of the FINE Slider
to 2 Octaves + 1 step.
- Operation Notes for New Software -
Recording a Non-Quantized Loop:
1. Put the Loop Slide Switch into either “C” or “S” modes.
2. Move the COARSE Slider to its top position: >32 Bars. This puts the 16
Second into NQ mode.
15
16
Page 9

3. Now start recording a new loop as you would have in the previous version of
the software, by hitting the RECORD FSW. You will notice that the
RECORDING LED goes solid immediately. That means you are recording.
4. To stop recording the loop and set the loop length, hit either the PLAY or
RECORD FSW. If you hit the RECORD FSW, the 16 Second will stop
recording and go silent. If you hit the PLAY FSW, it will stop recording and
immediately start playing back the loop, in either Overdub or Play mode.
5. Overdub and Play the loop as you would have if it had been a Quantized loop.
Using the Increased Range Fine Slider:
1. Place the FINE Slide Switch into the “P” position.
2. Place the FINE Slider exactly in the middle of its travel.
3. Record a loop.
4. Enter PLAYING Mode, so that the PLAYING LED is lit but the RECORDING
LED is off.
5. Move the FINE Slider down to its bottom position, the pitch of your loop
should go up exactly one octave as well as the tempo doubling.
6. Move the FINE Slider up to its top position. The pitch of your loop should go
down exactly one octave, compared to the pitch you recorded it at. The tempo
will be half.
7. If moving the FINE Slider to either extreme produced pitches of more or less
than one octave, try recording your loop over, with the FINE Slider in a slightly
different middle position.
Important! Please Note:
• Non-Quantize Mode is accessed by moving the COARSE Slider to its Top
position: >32 Bars. To get the 4-Beat count-in back, move the COARSE Slider
to any other position (i.e. ½ ~ 32 Bars) and you will be in Quantize mode. In
Quantize mode you will hear a 4-beat count-in when beginning a new loop and
the loop length will quantize to the nearest beat as it does in the original v1.0
software.
• The different methods for recording a new loop remain the same in NQ Mode
as they are in Quantize Mode. For example, if you are in Overdub mode (the
RECORDING and PLAYING LEDs are lit solid) and you hit the PLAY FSW,
you will immediately start recording a new loop.
• While in NQ Mode, the FINE Slider still controls the tempo of the 16 Second.
The MIDI Out Jack will continue to output MIDI Clock. If you bring up the
volume of the CLIX, you will hear the metronome beat while recording, just
like in Quantize mode. Push the CLIX Slider down to its bottom position if
you do not want to hear it.
• When using NQ Mode, it may take some practice to produce loops that sound
and feel in time. Placing the FINE Slider somewhere in the upper 50% of its
range (from the middle to uppermost positions) will make it easier to produce
clean sounding loops.
• For best results in obtaining very short loops (< 1 Sec) in NQ Mode, push the
FINE Slider down to its bottom position. The minimum loop length in NQ
Mode is 1 beat. The length of 1 beat, in seconds, is determined by the tempo set
by the FINE Slider. The 16 Second’s tempo range is 60 BPM (FINE Slider =
top position) to 240 BPM (FINE Slider = bottom position). The minimum loop
length is therefore 250 mS. Maximum loop length is over 4 minutes.
- Warranty Information -
Please complete and return the enclosed warranty card within 10 days of purchase. We
will repair the unit for free within one year of date of purchase. If you should need to
return your unit for service within the warranty period, please include a brief description
of the problem as well as your
name, address, telephone number, copy of your receipt,
and a check or money order for $5.00 shipping and handling to:
Electro-Harmonix
C/O New Sensor Corporation
32-33 47
th
Ave
Long Island City, NY 11101
Att: Service Department
Please make checks/money orders payable to New Sensor Corporation.
To hear demos by rock stars on all EH pedals visit us on the web at www.ehx.com.
Email us at info@ehx.com
17
18
 Loading...