

Page 1
ECM 2
High Performance Balanced Network Media Player
(with integrated DAC and Streamer)
Owner's Manual
Version 1.1
EN
ENGLISH
Page 2

ENG
Table of contents
Safety & precautions ............................................................................................. 4
The contents of the carton ...................................................................................... 4
Front panel ........................................................................................................... 4
Navigator controls ................................................................................................ 5
Rear panel connections ......................................................................................... 5
Remote control ...................................................................................................... 6
Installation .................................................................................................................. 7
Connecting audio/video..................................................................................... 7
•
Connecting to a network .................................................................................. 8
Analog audio output – balanced XLR ................................................ 7
•
Analog audio output – unbalanced RCA ........................................... 7
•
Digital audio output – HDMI ............................................................ 7
•
Digital audio output – S/PDIF............................................................ 7
•
Wired network connection............................................................... 8
•
Wireless network connecion ............................................................ 8
Connecting media storage ................................................................................. 8
•
USB discs ...................................................................................... 8
Local disc installation ........................................................................................ 9
•
How to install internal hard drive ..................................................... 9
Connecting digital audio iputs..................................................................... 10
Connecting trigger in/out ........................................................................... 10
Initial setup .............................................................................................. .10
Library ...................................................................................................................... 11
•
Library information ................................................................................. 11
•
Info page .............................................................................................. 12
•
Update library ....................................................................................... 12
•
Library scan status ................................................................................. 12
Managing sources ............................................................................................... 12
•
Internal storage ...................................................................................... 13
•
USB ...................................................................................................... 13
Screen navigation common controls ............................................................................ 14
Navigating the home screen ....................................................................... 15
• Navigating the libraries .......................................................................... 16
• Library grouping .................................................................................... 16
• Library display view ............................................................................... 16
• Searching ............................................................................................. 17
• Media info ............................................................................................ 17
• Other controls ........................................................................................ 17
• General Playback controls ....................................................................... 17
2
Page 3

Music library ............................................................................................................. 18
• Playback controls ................................................................................... 18
• Context menu ........................................................................................... 18
• Playbar: Music Library ............................................................................. 19
Internet Radio............................................................................................................... 20
• Playback controls .................................................................................... 20
• Context menu .......................................................................................... 20
• Playbar: Internet Radio ............................................................................. 20
Movies ........................................................................................................................ 21
• Playback controls ...................................................................................... 21
• Context menu ........................................................................................... 21
• Audio, subtitle and zoom selection ............................................................. 22
• Direct navigation....................................................................................... 22
ENG
• Playbar: Movies ....................................................................................... 22
Series............................................................................................................................ 22
• Series playback controls ............................................................................ 22
• Context menu ........................................................................................... 23
YouTube......................................................................................................................... 24
• Playback controls ...................................................................................... 24
• Playbar .................................................................................................... 24
Digital inputs ......................................................................................................... 24
Accessing the ECM from network ................................................................................... 25
•
Settings ........................................................................................................................ 27
Preferences ................................................................................................ 27
Network .................................................................................................... 28
Output Settings ........................................................................................... 28
Firmware ................................................................................................... 30
App for Andoid/iOS ................................................................................. 25
•
Mac ........................................................................................................ 26
•
Linux ....................................................................................................... 26
Enter firmware recovery........................................................................................... 30
Perform System recovery.......................................................................................... 30
Troubleshooting ..................................................................................................... 30
Technical specifications............................................................................................ 31
Important Notice
Product registration ................................................................................................ 33
If Service is needed .
IR remote control codes
.....................................................................................................
...............................................................................................
.............................................................................................
33
33
33
3
Page 4
ENG
Warning:
To avoid risk of fire or electric shock, do not expose this appliance to rain or moisture. Verify line
voltage before use. Do not remove cover. No user serviceable parts inside. Refer servicing to qualified
service personal. The warranty is void if the product is tampered with by non-authorised personnel.
Use only authorized Electrocompaniet service center.
The contents of the carton
• 1 pc.
• 1 pc.
• 1 pc.
• 1 pc.
• 2 pcs.
• 1 pc.
• 1 pc.
• 1 pc.
ECM 2 Balanced Network Media Player
AC main cord.
Antenna for wireless network.
IR Remote control
Batteries for remote control
Quick start guide
CD with the owner’s manual
Inspection card
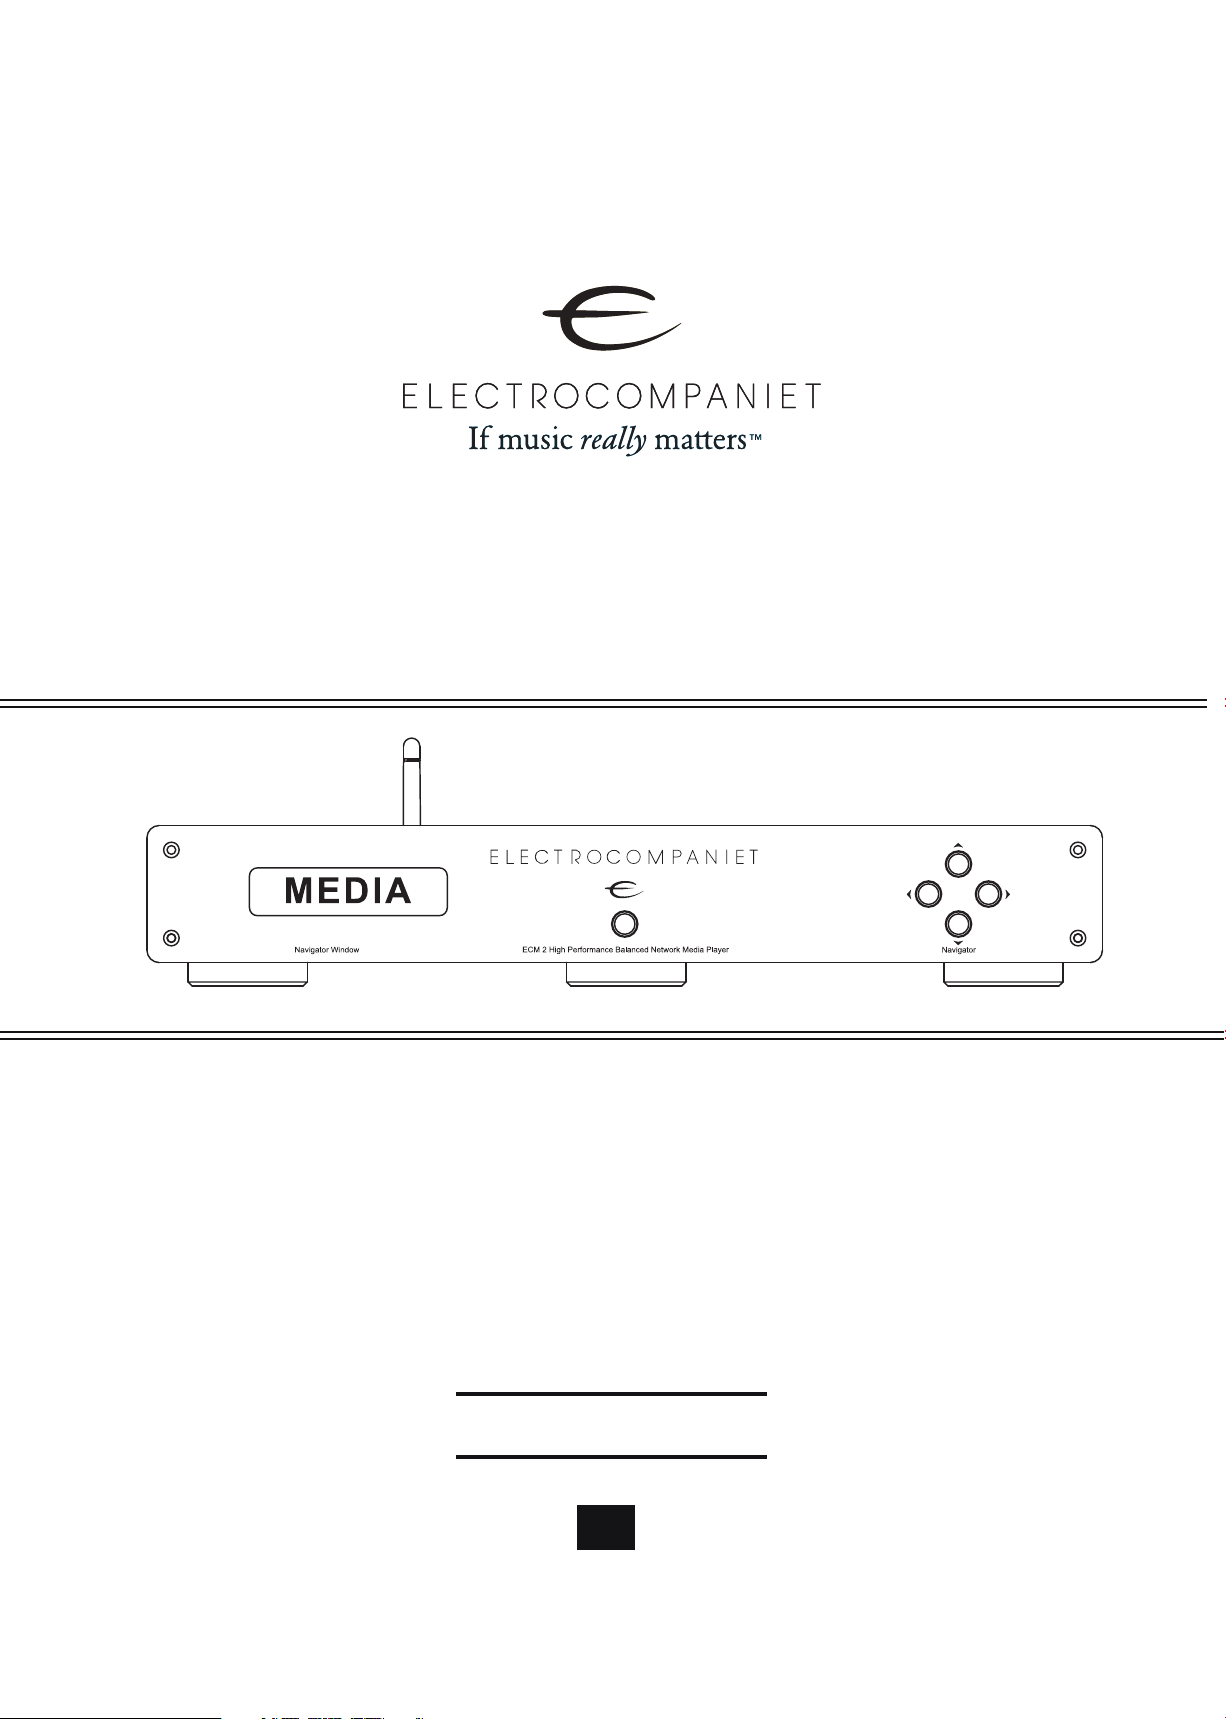
Front Panel
MEDIA
The front panel display will show the currently selected user mode of your ECM 2 Network Media Player.
The different user modes are:
MEDIA:
streamer and player. Use this mode to play music, watch videos or TV series. (Refer to the Home screen,
the Screen navigation and the Playback sections for detailed instructions on how to operate your ECM
in this mode.)
COAX1/COAX2/TOSLINK1/TOSLINK2:
The ECM 2 is in DAC mode and the active/selected input is indicated in the front panel display. In this
mode you can listen to connected digital audio sources to take advantage of the High End digital to
analog converter built into your ECM for optimal audio quality.
Your ECM 2 is in MEDIA mode. In this mode your ECM will act as a multiformat network media
Status display mode
The display mode shows the volume setting and sample rate for the selected input. The display enters into
“status” mode when the volume is operated or when there is a change in input selected or the sample
rate. After 5 seconds, the display will revert back to the INPUT mode.
In “status” mode the following information is displayed:
The first part shows the current sample rate at the input and the last number
shows the volume setting. Volume indication ranges between 0 to 100.
4
192kHz 100
Page 5
ENG
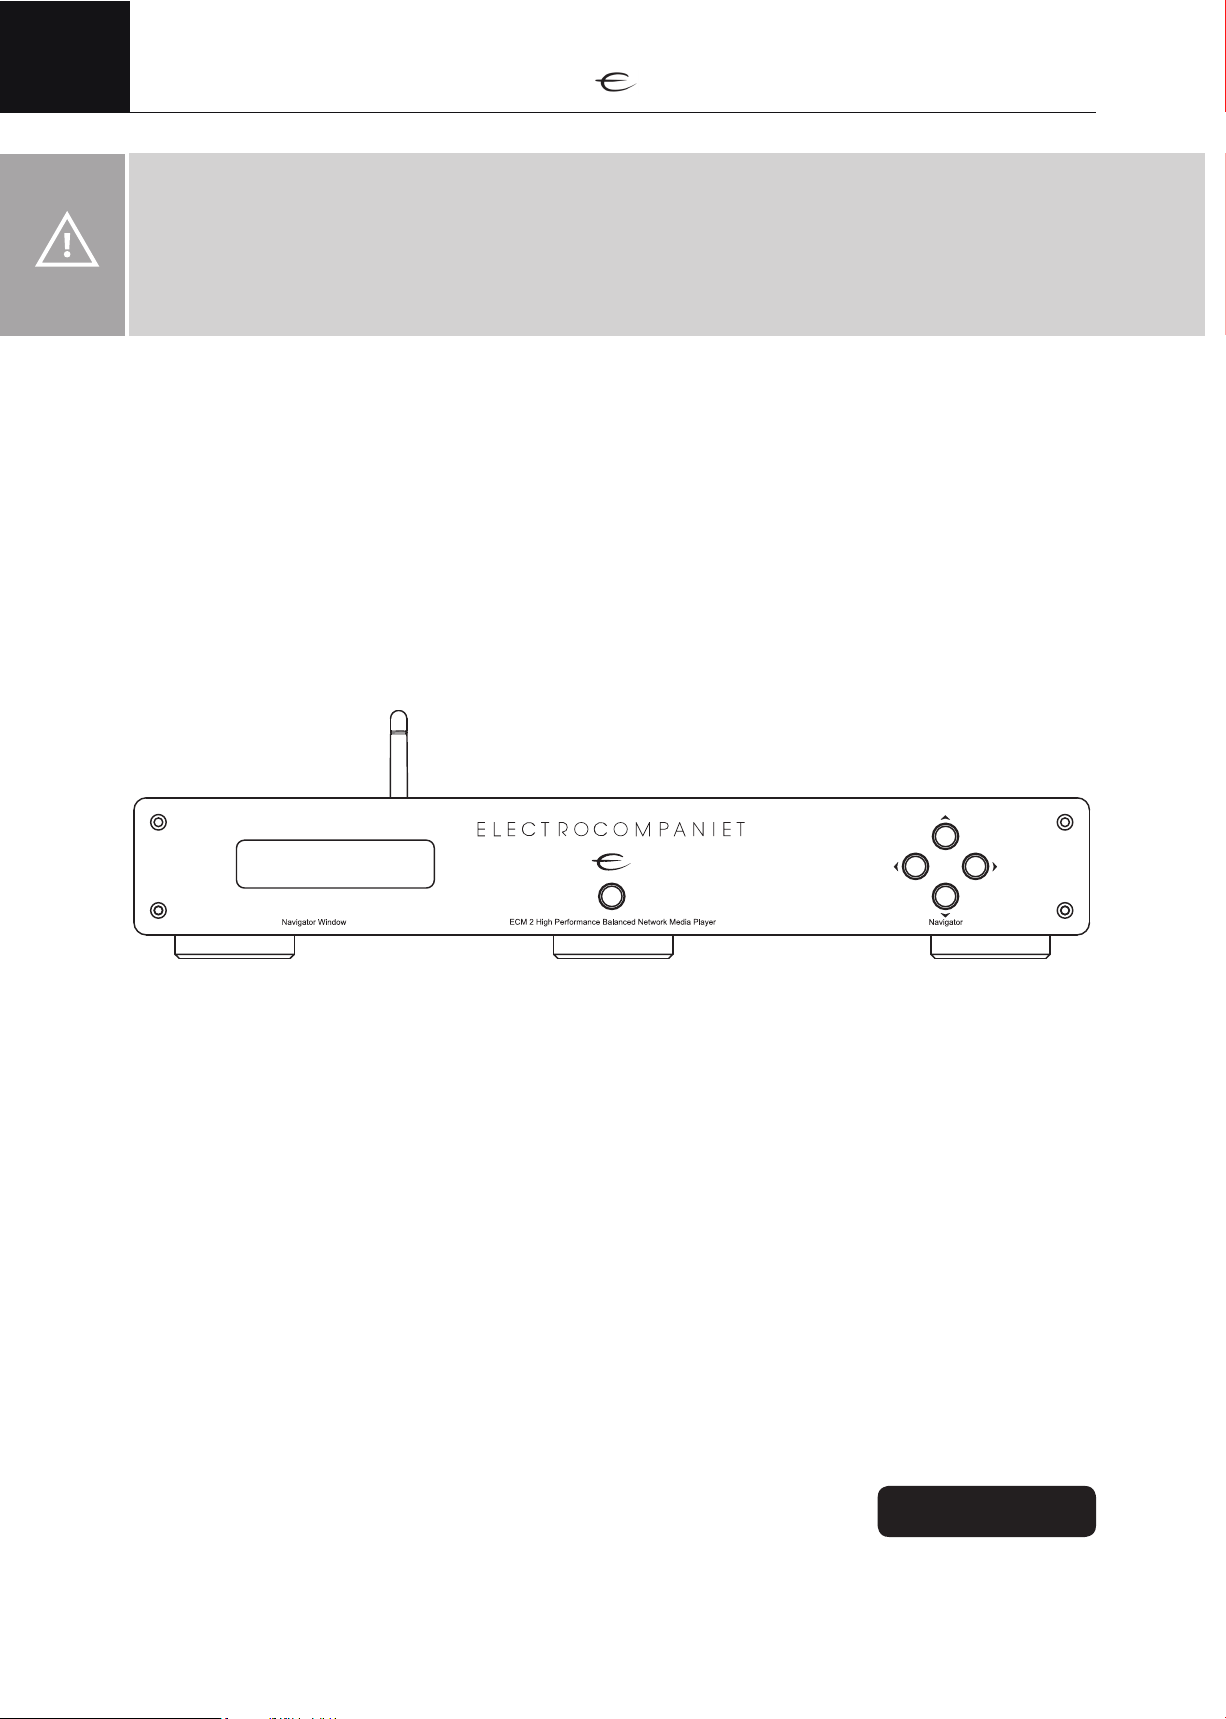
Navigator controls
MEDIA
4
56
The navigation controls are used for controlling volume and choosing between the different modes of the
ECM. (See page 2 for a more detailed explanation of the different user modes of the ECM)
1. TOP button - is used for increasing the volume of your ECM
2. BOTTOM button - is used for decreasing the volume of your ECM
3. RIGHT button - will change active user mode / input.
4. LEFT buttons - will change active user mode / input.
5. STANDBY - The standby button is used to put your ECM into, or wake from, standby. Pressing and
holding this button will restart your ECM. (Press and hold until display shows the message “RESTART”)
6. INFRARED SENSOR
The infrared sensor will detect commands from the included infrared remote control.
Please make sure that there is a direct line of sight between the infrared sensor and the infrared remote control.
(See page 4 for more information on using an infrared remote control with your ECM)
1
2
3
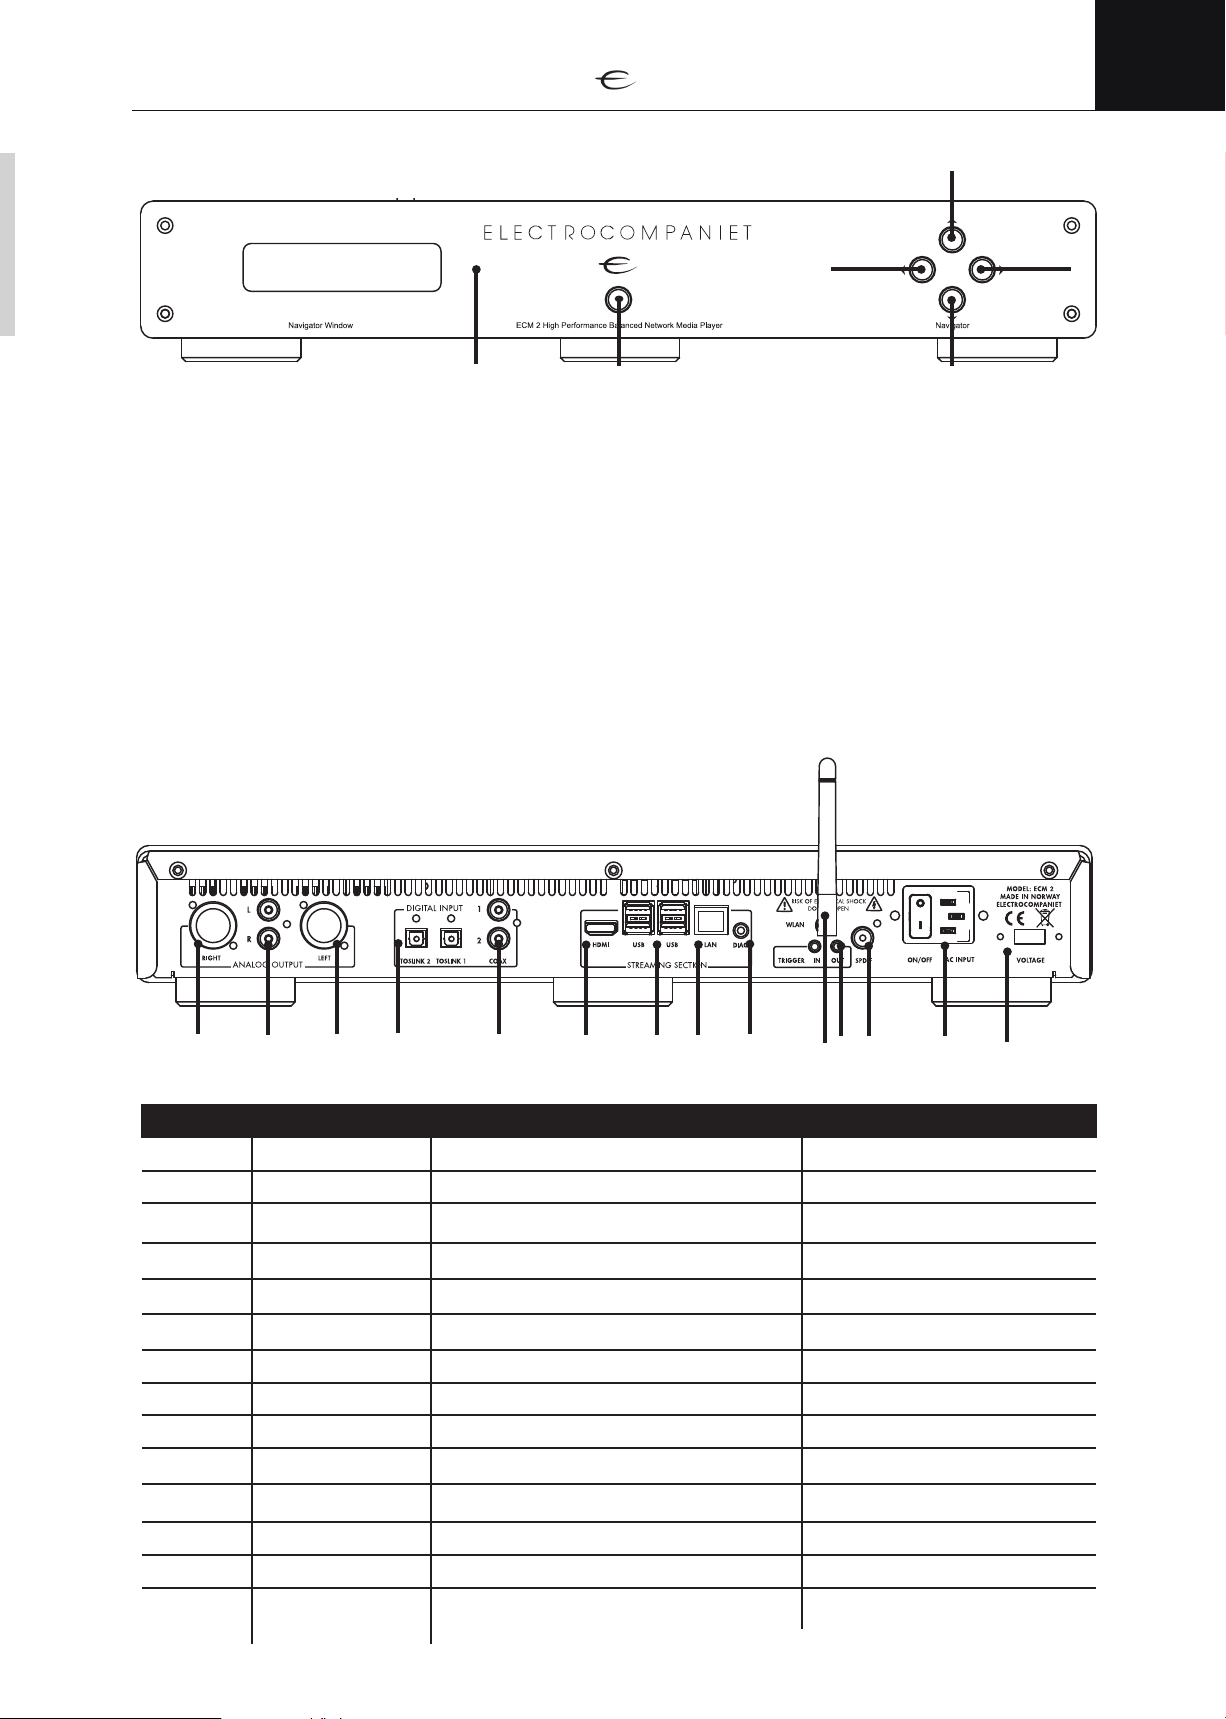
Rear panel connections
14
Connector Name Used for Connection type/Cable
1
2
3
4
5
6
7
8
9
10
13
12
Voltage Selecting input voltage 110/240V N/A
Power / AC Input Power button. Input power Supplied power cable
SPDIF coaxial digital audio output (SPDIF) RCA / 75-ohm coaxial cable
Trigger in/out 12V trigger control in-/output 3,5mm mono mini jack
Wi-fi connector Wireless antenna SMA
Diagnostic Production purposes only 3,5mm mono mini jack
LAN Network cable RJ 45/ Cat 5 or higher
4 x USB inputs External usb storages USB
HDMI output TV / projector connection HDMI
Coax inputs 1/2 coaxial digital audio input (SPDIF) RCA / 75-ohm coaxial cable
11
10
9
8
7
6
54 3
2
1
11
12
13
14
Toslink inputs 1/2 optical digital audio input TOSLINK / optical cable
XLR output left balanced audio connection XLR / balanced audio cable
Coax output 1/2 unbalanced audio connection RCA / unbalanced audio cable
XLR output right balanced audio connection XLR / balanced audio cable
5
Page 6
ENG
PAGE
A B C D E F
G H I J K L M N O
P Q R S T U V W X Y Z
. symb
symb
VOL
COAX1 COAX2 TLINK2TLINK1
21
3 54
6 87
9 1110
12 1413
15 16 17 18
19
20
2321
22
24
25 26 27 28
29
30
33
3231
34 35
36 37 38 39
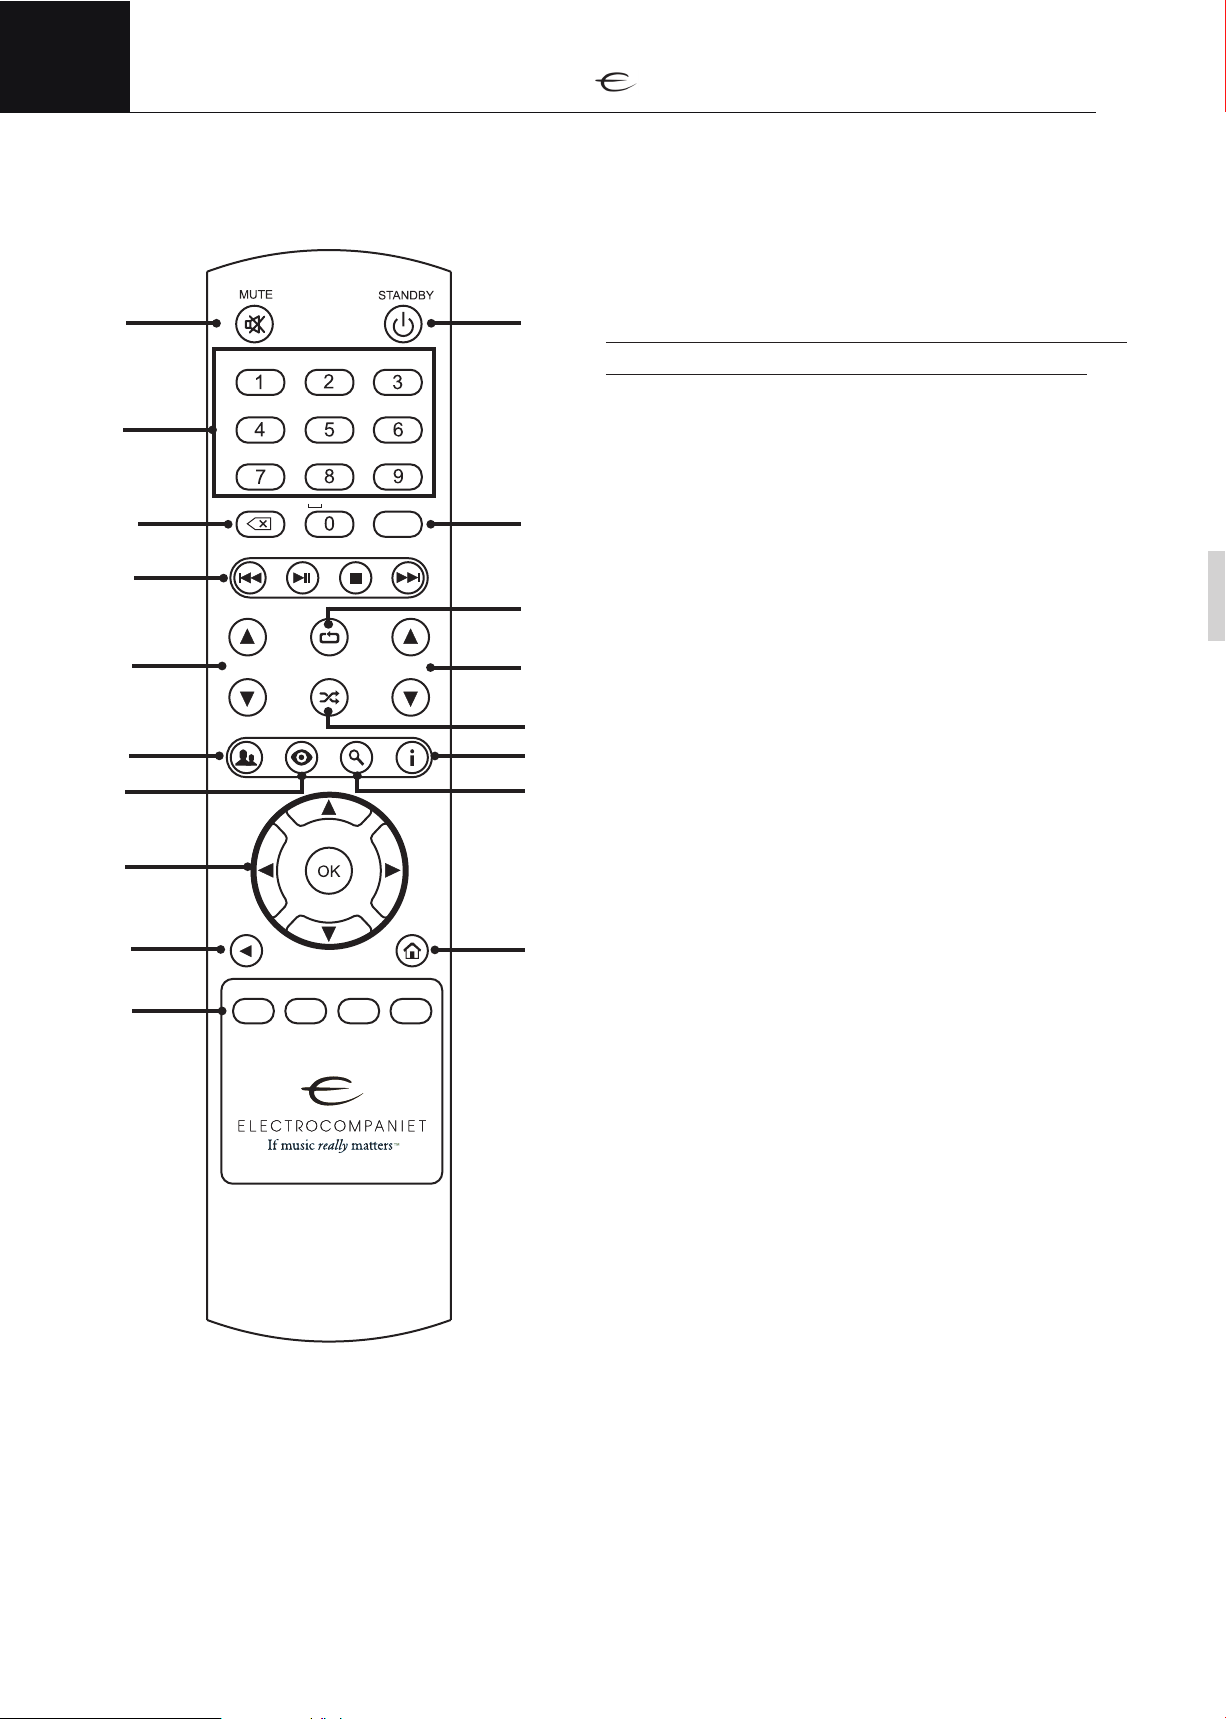
Remote control
1
2
3
4
5
6
7
8
9
. symb
G H I J K L M N O
P Q R S T U V W X Y Z
PAGE
A B C D E F
symb
DIM
VOL
11
12
13
14
15
16
17
18
1. Mute - on/off.
(Standby mode for other Electrocompaniet devices - hold
mute 1-2 sec. to set the device into a standby mode.)
2. Numeric keypad
3. Backspace
4. Media playback control
5. Page Up/Down
6. Group button
7. View button
8. Navigator. When using menus, the arrows move
the selector on the screen up. down left or right.
Press OK to conrm your selection.
9. Back
10. DAC input selector: COAX1/2, TOSLINK 1/2
11. Standby button
12. Dim - dimming the display.
13. Repeat
14. Volume up/down
15. Shuffle
16. Info
17. Search
18. Home
10
COAX1 COAX2 TLINK2TLINK1
Replacing batteries
Use 2pcs AAA or LR03 batteries.
Observe correct polarization when inserting batteries.
Please remove batteries when the remote is not used for a
prolonged period of time.
Using the remote
When using the remote control, the front end of the remote control should be pointed to the front panel of
your ECM. A free line of sight is required between the remote and the infrared sensor on the front panel.
6
Page 7
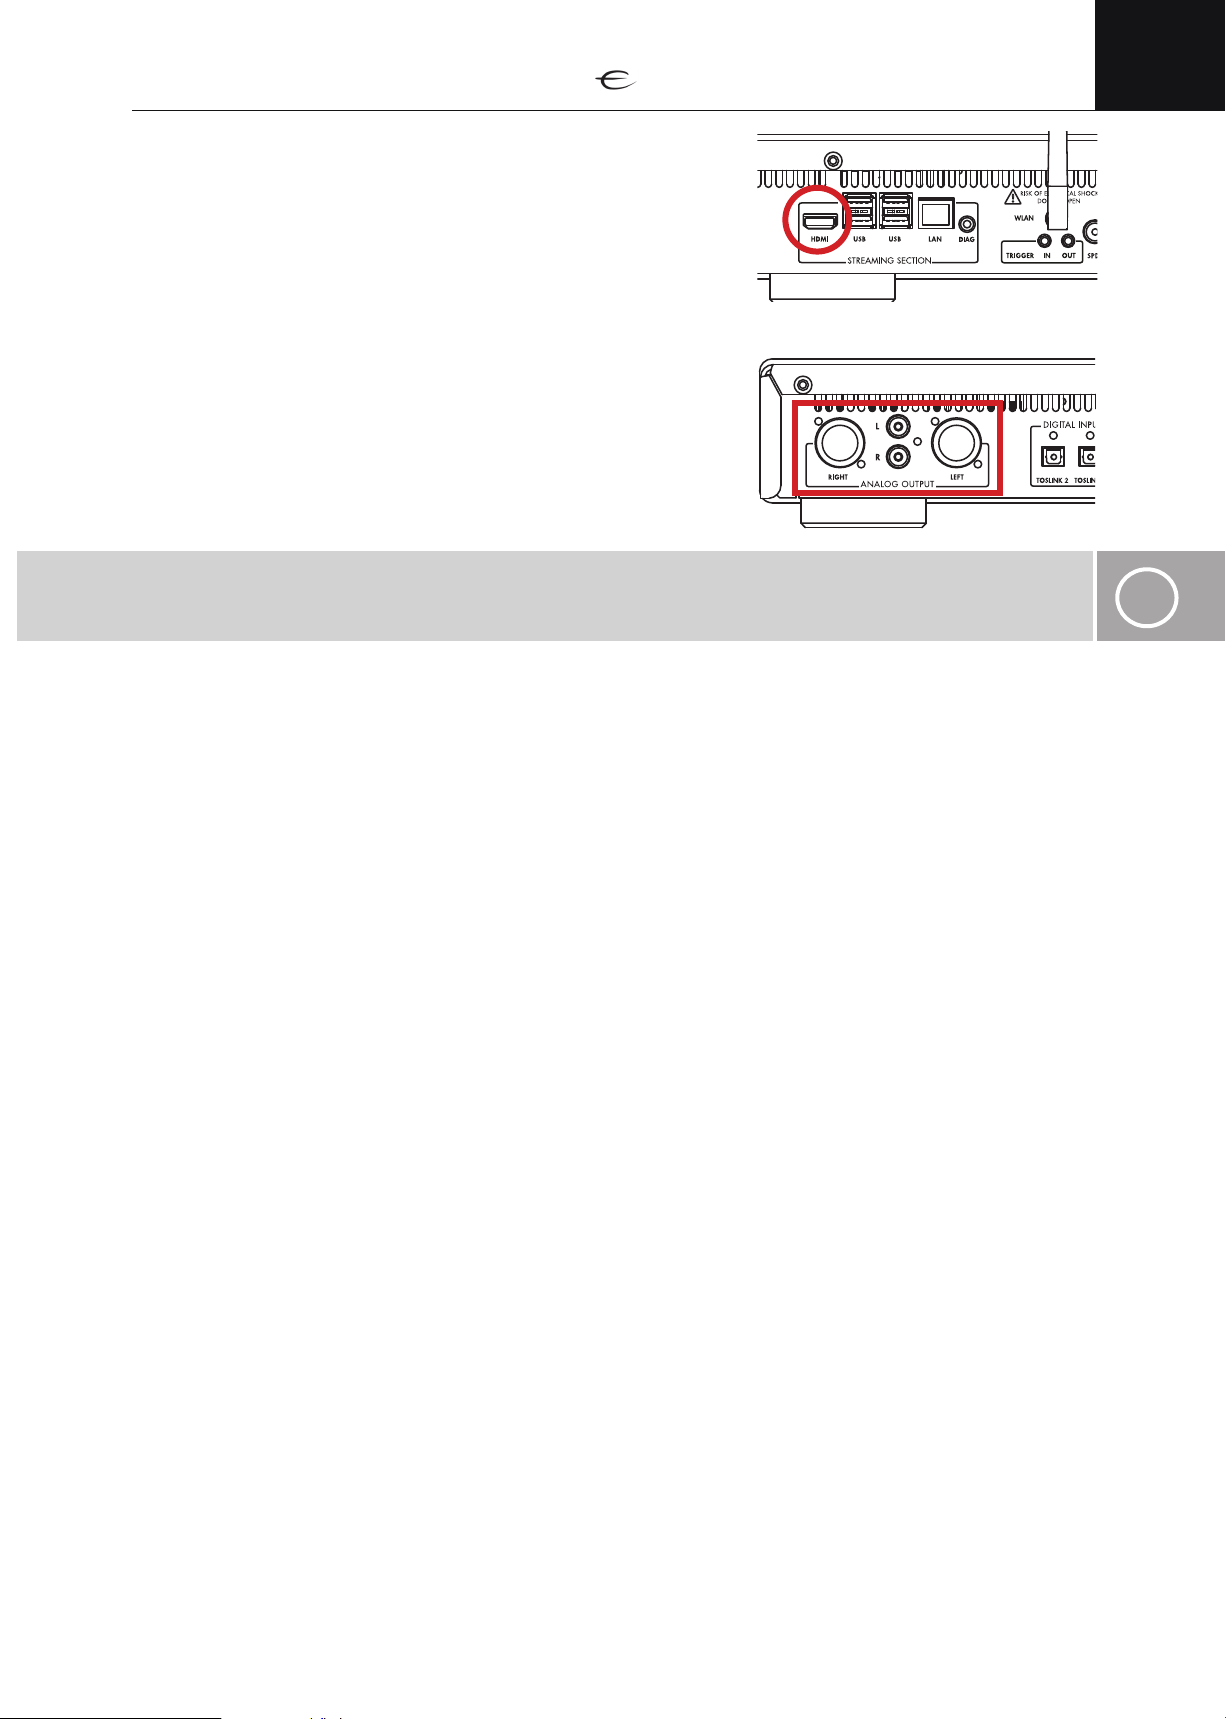
Installation
Connecting video
Connect your ECM to an appropriate display
(such as a TV or projector) using the HDMI output.
Connecting audio
Your ECM has 2 different audio output modes: Analog mode and
digital mode. Each audio output mode has 2 different connections
available.
NOTE:
Use analog audio output mode (preferably balanced XLR) for the best audio quality from your ECM.
ENG
i
Analog audio output – balanced XLR
Use the balanced XLR connectors if you have an amplifier equipped with balanced XLR audio inputs.
Connect the balanced XLR audio outputs from your ECM to the balanced XLR audio input on your ampli-
fier. Observe correct connection on right and left audio channel.
Analog audio output – unbalanced RCA
Use the unbalanced RCA connectors if your amplifier is not equipped with balanced XLR audio inputs.
Connect the unbalanced RCA audio outputs from your ECM to the unbalanced RCA audio input on your
amplifier. Observe correct connection on right and left audio channel.
Digital audio output – HDMI
Use the HDMI connector if you wish to connect to an A/V receiver equipped with an HDMI output (for
connecting a display) or if you plan to get audio out from your connected display. Please refer to the user
manual for your receiver or display for more information on how to enable HDMI audio and connecting
a display to your A/V receiver.
This connection supports multichannel audio when connected to equipment capable of decoding multi-
channel audio signals. (such as an A/V receiver) When connected directly to a TV or to a 2-channel audio
system, the ECM can down mix audio to a 2-channel PCM signal.
Digital audio output – S/PDIF
Use this connection if your A/V receiver does not have an HDMI output for connecting to a display.
Multichannel audio will be decoded and downmixed to 2 channel PCM when using this output.
NOTE:
DSD and HD audio formats are only supported on the analog and the S/PDIF outputs. Dolby Digital HD
and DTS HD formats are supported on the analogue and the S/PDIF outputs where they are decoded and
down mixed to 2 channel PCM.
7
Page 8
ENG
Installation
Connecting to a network
Your ECM requires a broadband internet connection for getting
media info, playing internet content and for software updates.
A network connection is also required for streaming content
from network attached storage (NAS) and network media share
locations. Your ECM provides two methods of connecting to a
network: Wired network connection (using an Ethernet cable) or
wireless network connection (using the built in wireless adapter).
• Connect an Ethernet cable to the LAN port of your ECM to connect to a wired network.
• Your ECM will automatically try to connect to your network when a network cable is detected.
(Please refer to the Wired network setup section for detailed instructions on how to manually
setup a wired network connection)
Wired network connection (Recommended)
• Connect the supplied wireless antenna to your ECM if you want to connect to a wireless network.
• Configure your wireless network connection in the network setup menu of your ECM
(Please refer to the Wireless network setup section for detailed instructions about how to connect
to a wireless network)
i
Wireless network connection
NOTE:
A wired connection is recommended whenever possible for speed and stability. The wireless network option
is not used if wired network access is detected.
Connecting media storage
Your ECM can play media from both internal and attached storage devices. The ECM can also play media
files from network sources such as network attached storage (NAS) devices and network media shares.
(Refer to the Network/NAS section under Managing sources for more information on how to access
media from network locations)
USB discs
• Your ECM supports playback of video and audio files stored on external USB disk drives or
USB thumb drives/memory sticks. (Please refer to section for supported file formats for a
complete list of supported file formats) You may connect USB discs or thumb drives to any of the
4 USB inputs on your ECM.
i
NOTE:
USB devices are read-only. The ECM will never write to your disk in order to prevent data corruption.
USB storage may be removed at all times.
8
Page 9
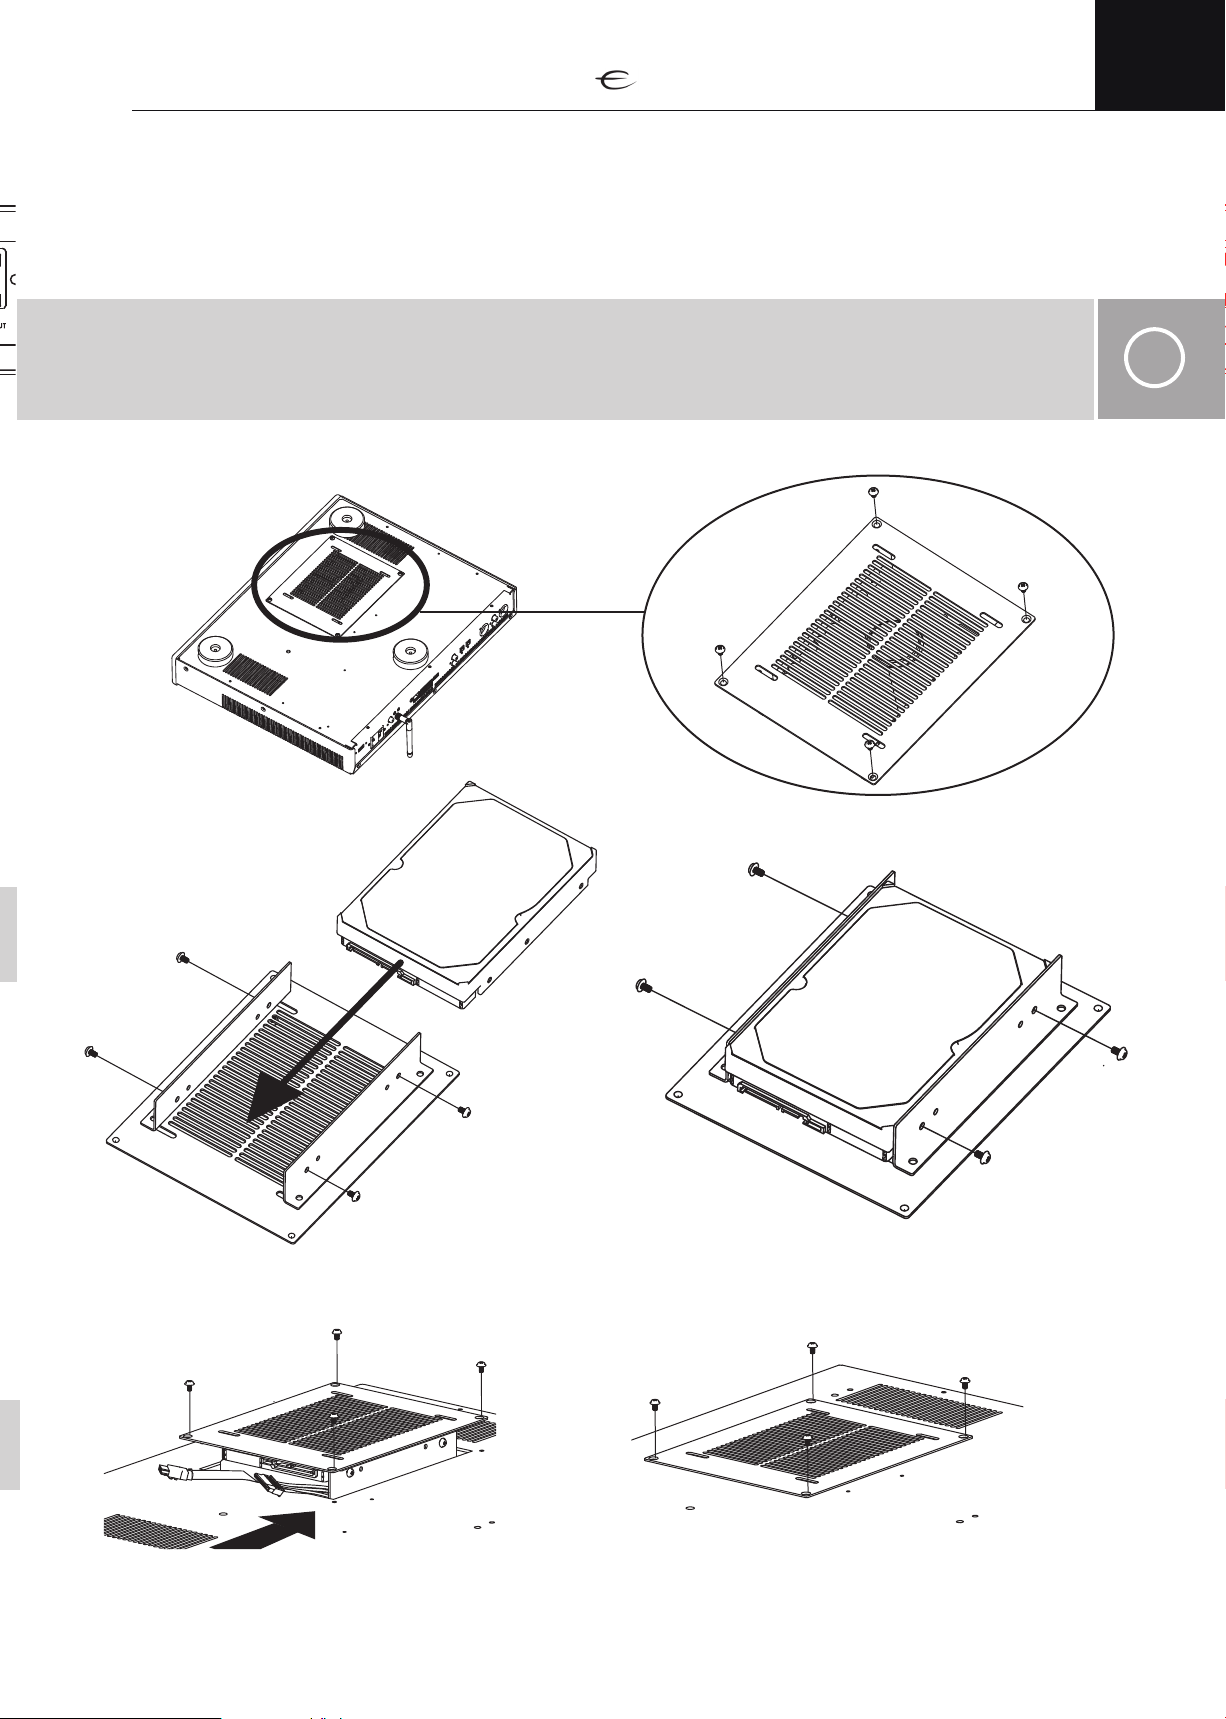
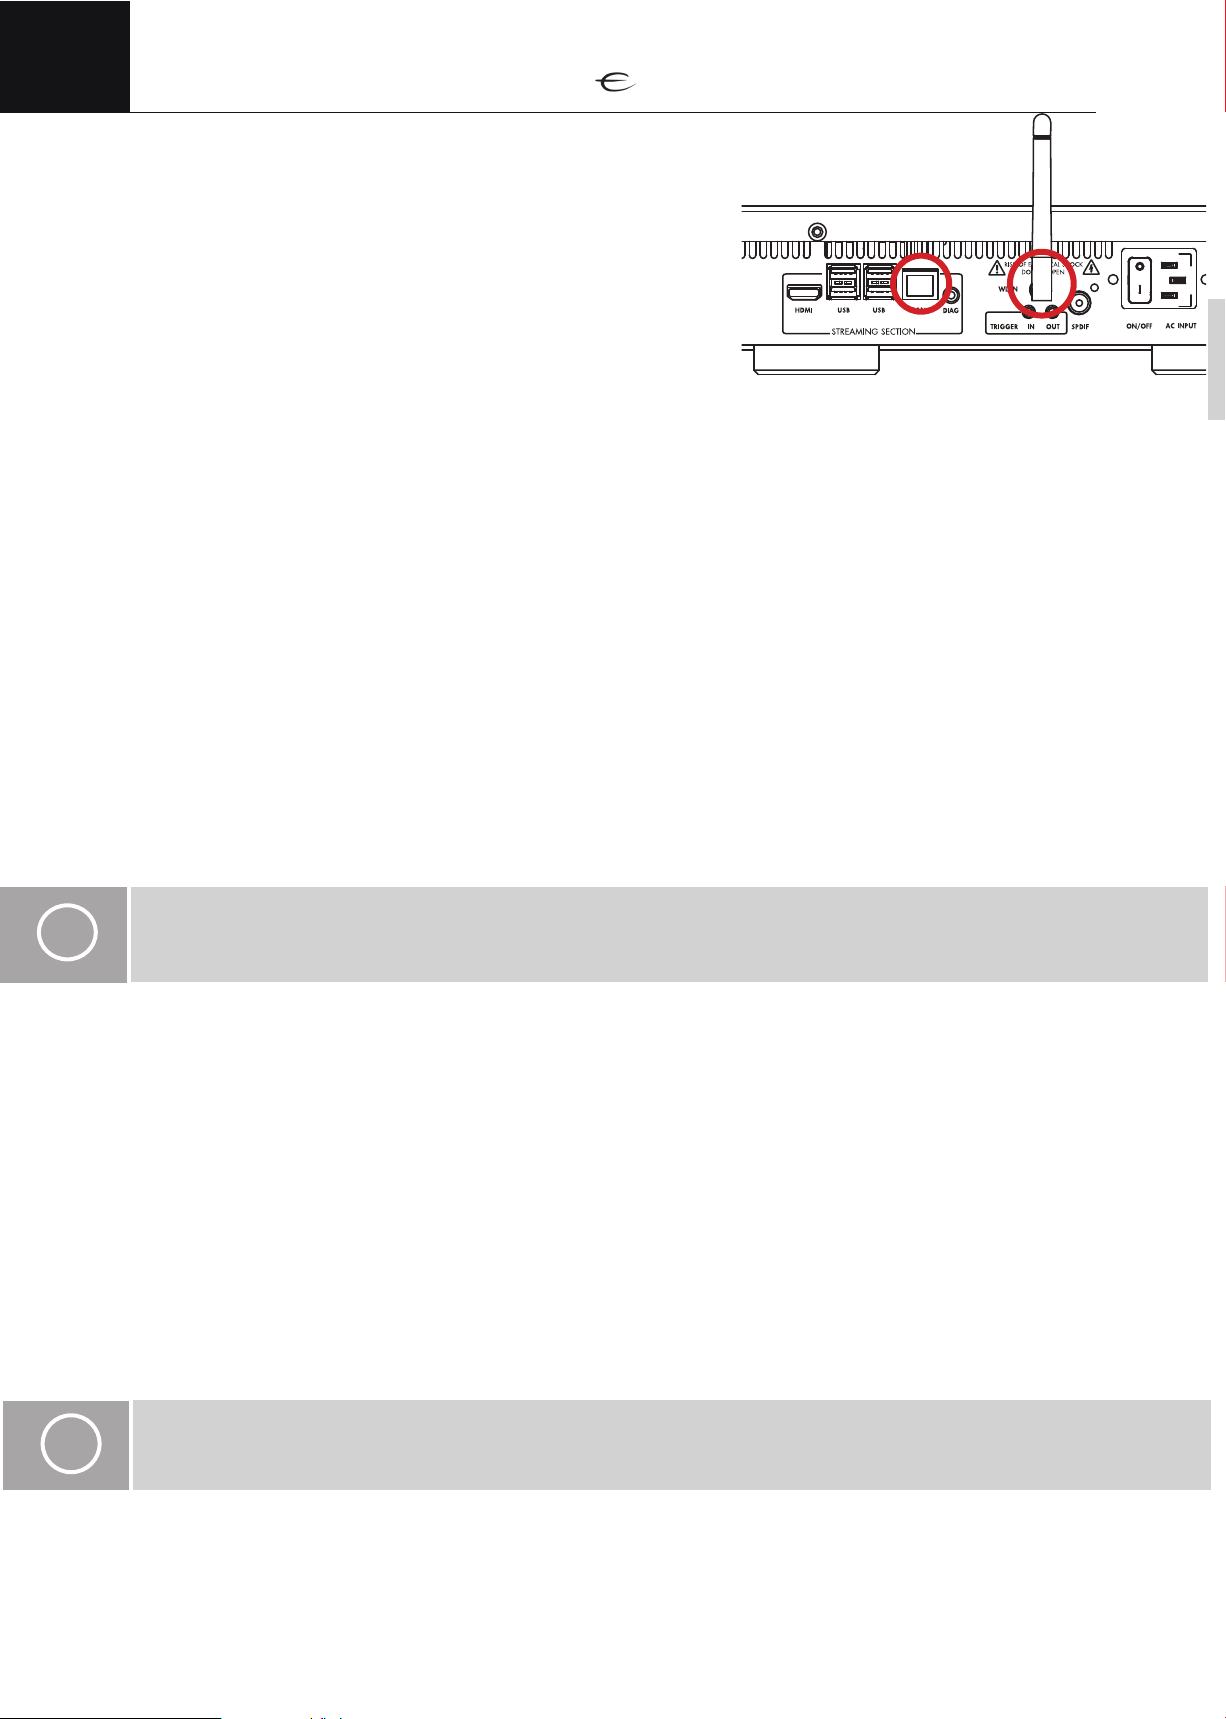
Installation
Local disc installation
Your ECM supports adding an internal hard drive or SSD for storing media files. A drive with a SATA interface
drive is required for this connection. Both 3,5” and 2,5” drives can be mounted.
All common filesystems are supported, including: NTFS, ExFAT, FAT, EXT4, HFS+
NOTE:
The disk will be formatted for use. All data on the drive will be lost. If the hard drive is installed it will be turned
off when not in use. This prevents vibrations from negatively influencing audio playback quality.
ECM have no limitations for internal disk capacity.
How to install internal hard drive
ENG
i
1. Flip the ECM 2 2. Remove screws and take out the HDD holder
3. Insert the HDD (3,5’’ or 2,5’’)
4. Tighten the screws
5. Connect the wires 6. Tighten the screws
9
Page 10
ENG
i
Installation
Connecting digital audio inputs
Your ECM is equipped with a high quality digital to analog converter (DAC) to give you the very best
audio quality from your digital media files.
The DAC section of your ECM is also equipped with 4 digital inputs for connecting external digital audio
sources such as: CD players, TV decoders/Set top boxes, etc.
Use these inputs to take advantage of superb analogue audio quality of your ECM, getting the best pos-
sible audio quality from all your digital sources.
Your ECM supports connecting up to 4 different digital audio sources. 2 RCA plugs (labeled COAX 1
and COAX 2) for connecting S/PDIF coaxial audio cable and 2 Toslink plugs (Labeled TOSLINK 1 and
TOSLINK 2) for connecting S/PDIF optical cable.
NOTE:
Audio from the digital inputs of your ECM will be available on the analogue outputs only.
The digital inputs supports PCM 96kHz/24bit on Toslink and PCM 192kHz/24bit on COAX.
Connecting trigger in/out
Your ECM is equipped with trigger input and trigger output ports. These ports can be used for automati-
cally putting your ECM and other equipment into, or wake up from, standby mode.
Use the trigger input port for connecting to a trigger output signal from other equipment. The ECM will
power up (leave standby mode) when a voltage in the range of 8V-20V (AC or DC) is detected on the
trigger input port, and will remain powered on for as long as the voltage is present on the trigger input port.
NOTE:
The ECM will only react to a change in the trigger signal.
When the detected trigger signal goes from low to high, ECM will wake from standby.
i
When the detected trigger signal goes from high to low, ECM will go into standby.
A low trigger signal is dened as less than 1V (AC or DC)
A high trigger signal is dened as more than 8V(AC or DC)
The voltage supplied to the trigger input must not exceed 20V (AC or DC)
A trigger signal is not mandatory to operate the ECM.
Use the trigger output to send the trigger signal to your amplifier, TV, projector or other equipment that
support triggers signals. This signal can be used to automatically switch on/off the connected equipment
when you turn on/off your ECM. Trigger output is 12V DC.
Use a 3,5mm mono jack plug for connecting to trigger input and trigger output.
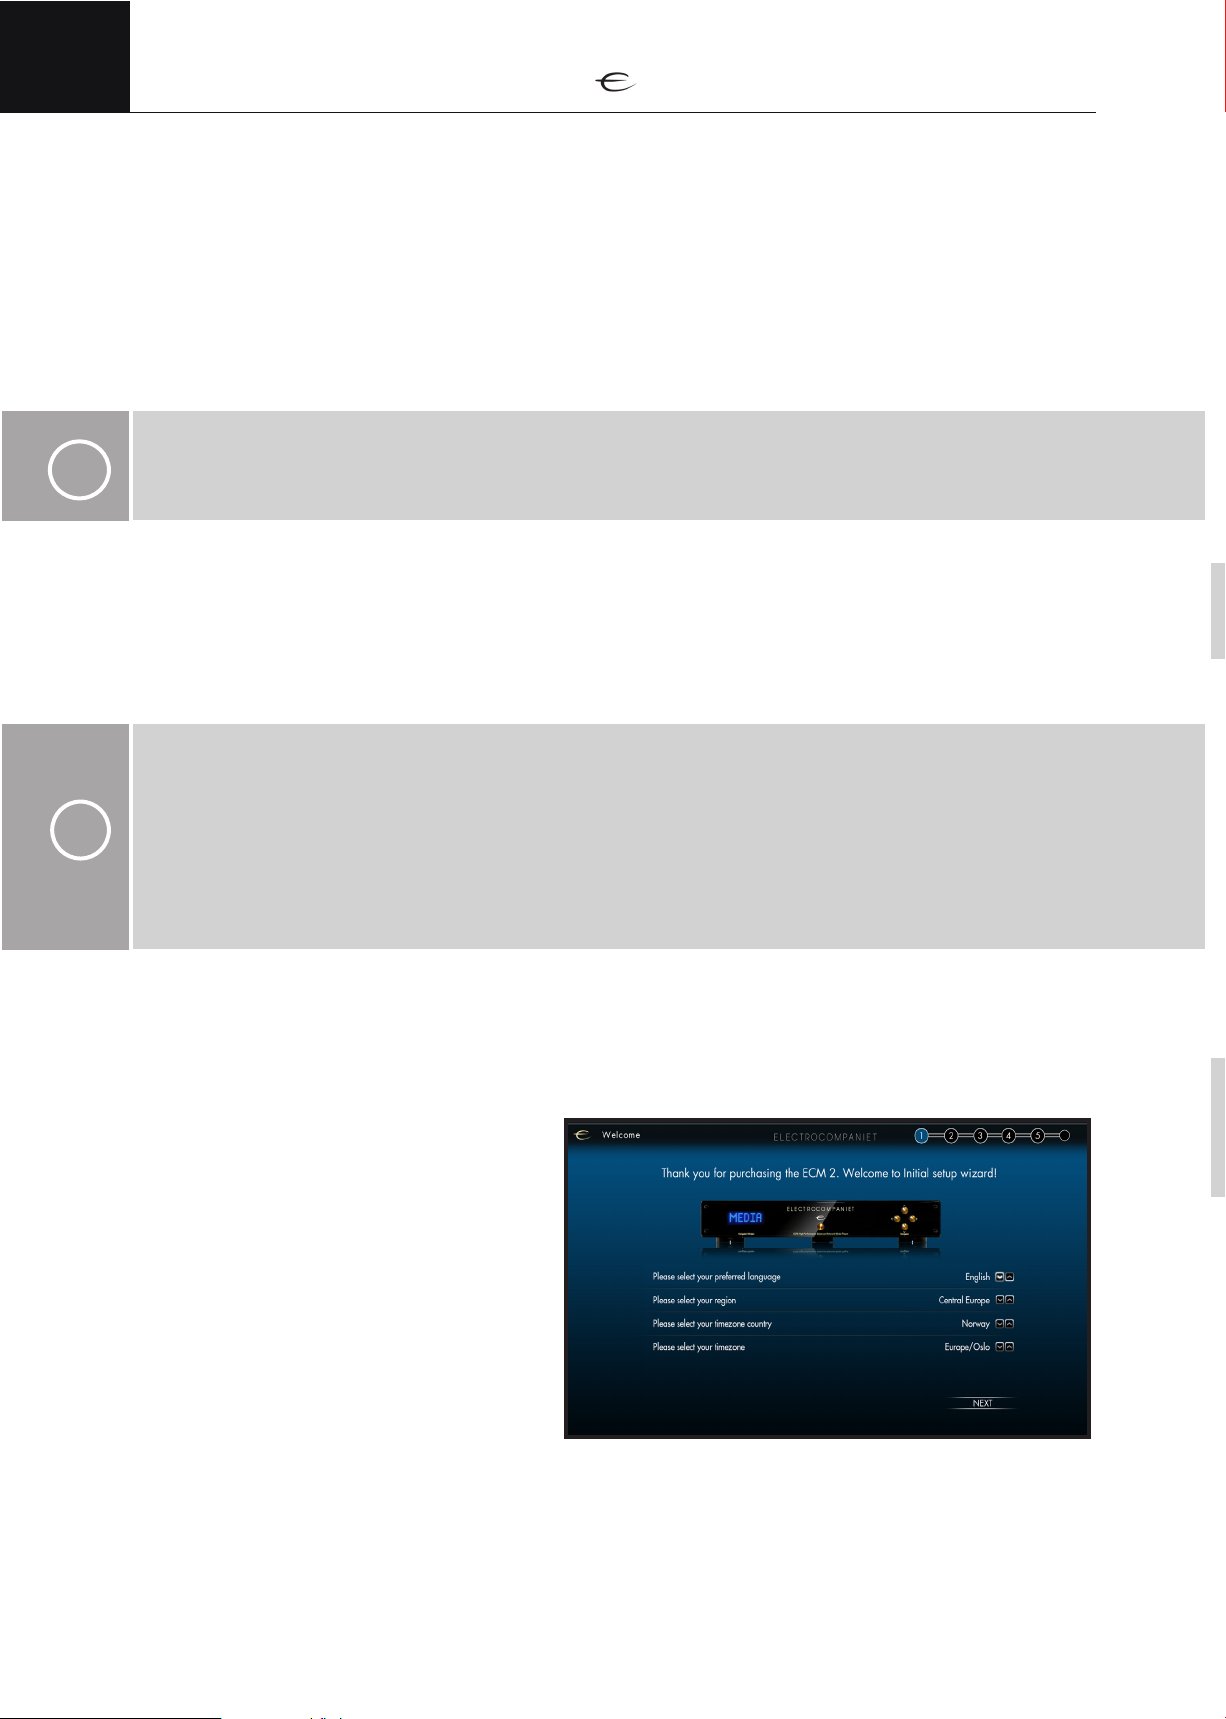
Initial setup screen
When your ECM is started for the first time,
a setup wizard will guide you through the
basic settings needed to set up your ECM
for optimal performance. The setup wizard
consists of a few easy steps and will only
take a couple of minutes to complete.
T
10
Page 11
Library
For easy navigation of your music and video collection,
your ECM will keep information about your music and
video files from different sources/locations in a library.
The library will hold information about artist, album,
track name, movie title, album/cover images, where
the files are stored, etc.
The library is split into 3 different sections: Music,
Videos and TV Shows. To make your music and video
files available to the ECM, your media files need to be
added to the correct library first.
NOTE:
The library will only hold information about your music/video files for easy navigating through your music/
video collection. It will not hold a copy of your files.
ENG
i
When adding files to the library, the ECM will connect to the internet to
collect information about the files added. The data collected will include
information about artists, albums, tracks, discography, movie titles, actors,
directors, thumbnail pictures etc.
Music added to the library needs to be correctly tagged for the ECM to
collect accurate information from the internet.
Video files added to the library needs to be accurately named for the ECM
to collect accurate information from the internet.
NOTE:
It is important that your media files are tagged / named correctly for the ECM to be able to collect accurate
information.If some of your media les are not recognized properly, please check that all music tags are
spelled correctly and have correct information. If movies or TV series are not recognized, please check lename spelling, try using the original title and add release year to the le name.
i
11
Page 12

ENG
i
Managing sources
Media files can be made available for playback on the ECM in 3 different ways: on local drive, on USB
attached external drive or on a network location such as a NAS (Network attached storage) or a network
media share.
NOTE:
If content (for example: a new song or music album) is added to any source (folders or discs) that is
already included in the ECM library, the library needs to be updated before the new content is available
for playback.
If content is removed from the ECM (les/folders deleted, sources disconnected), the library will still keep
information about the missing content until the library is updated or the content is made available again.
The removed content will be unavailable for playback.
To include media from a source in the library, please navigate to the Library menu of your ECM and then
choose the correct section (Music, Movies or TV Series) according to the type of media files you want to
include in the library. Add the media file sources as described for the different media locations below.
1.
Browse for a source. Press the “OK“ button to
3.
explore the folders.
Select “Library“
4.
2.
Choose Music, Movies or TV series
Hold the “OK“ button to add the source.
12
Page 13

Internal storage
The internal drive is automatically added as a source in your libraries. A drive unit HDD/SSD must be
installed in your ECM before you can add content. Please refer to the section “Local disc at page 9” for
detailed instruction on how to install a drive unit in your ECM.
After a drive unit is installed you can copy your media files to the drive through your network using the
file managing tool on your computer. (see page 25-26)
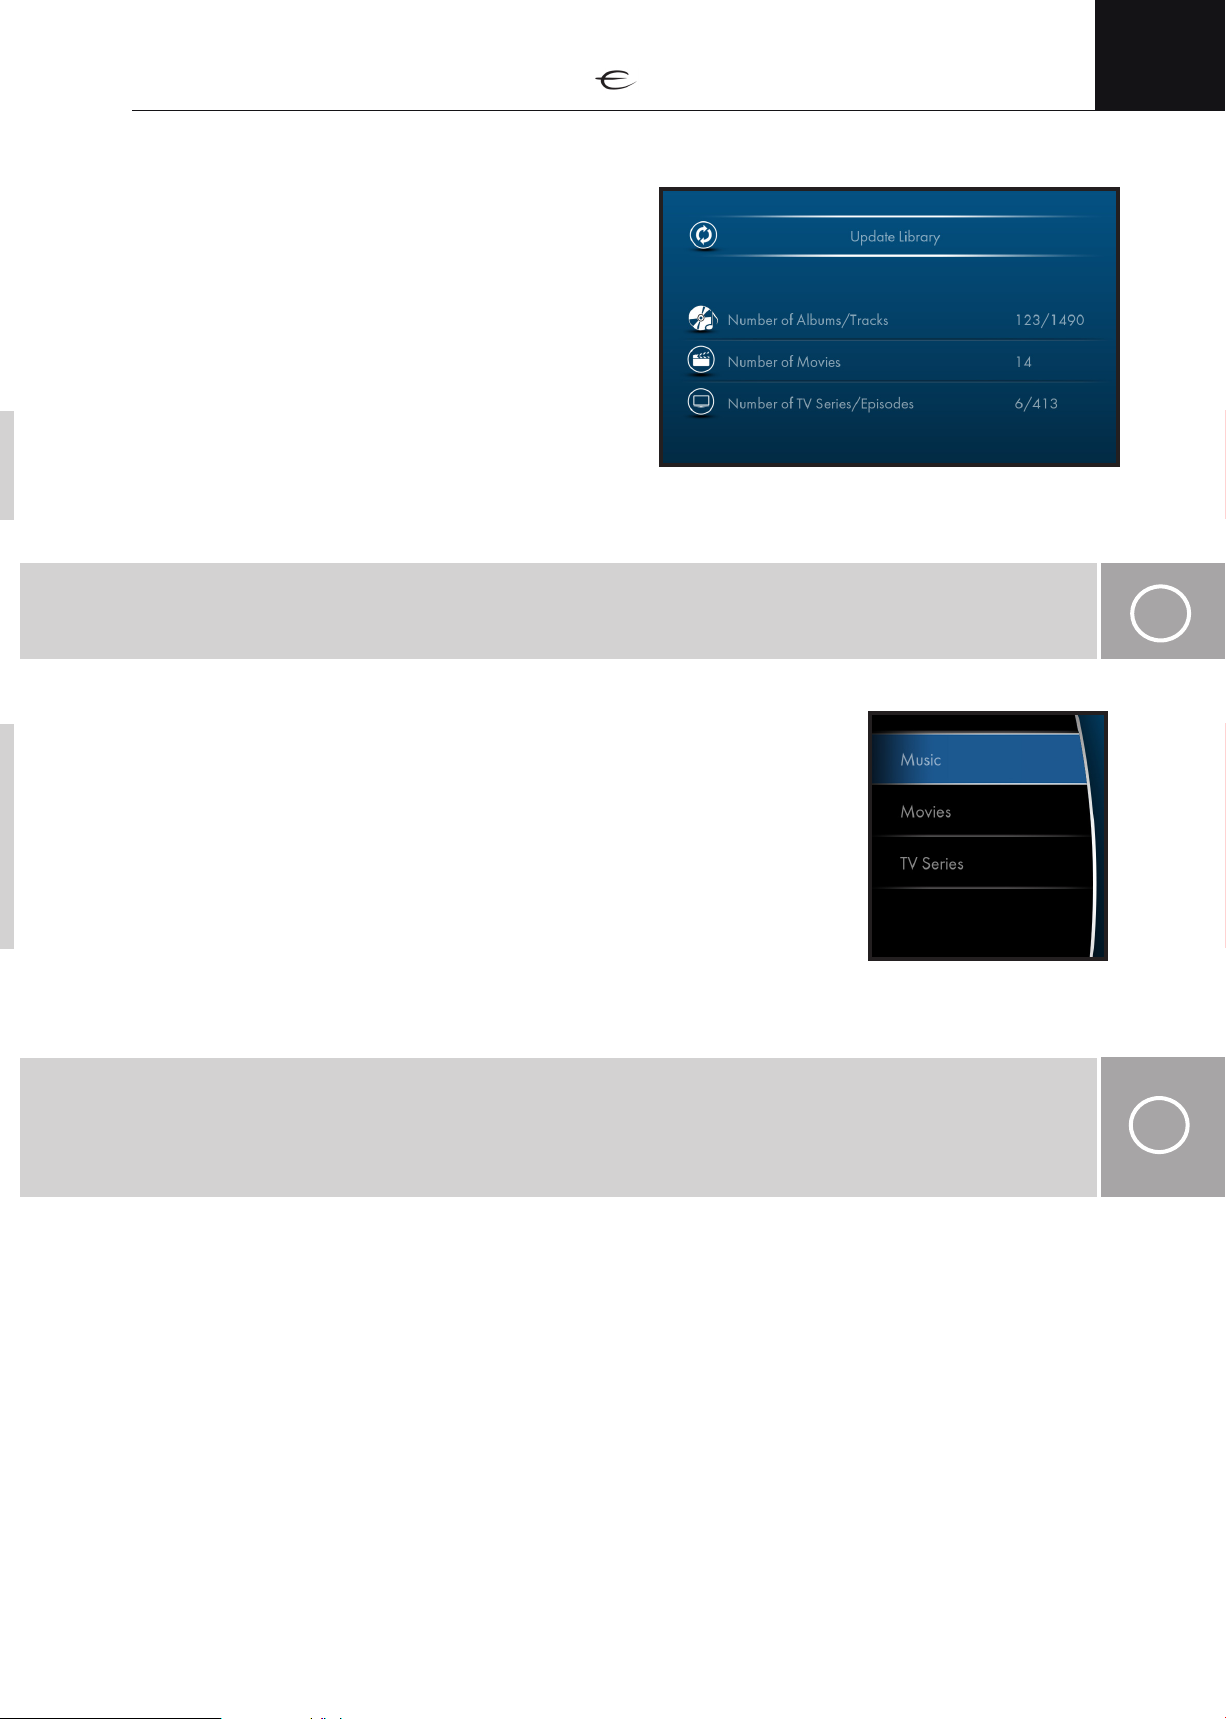
Info page
Entire overview of your library with the number of items in each library
Update library
Checks if files in the library have been changed, added or
removed. Modifies the database accordingly and runs a
cleaning utility.
Press “OK” for starting the library update process. This may
take a while depending on the size of your library. When
leaving the page by pressing “BACK” or “HOME“ buttons
the update process will progress in background until a complete update scan is finished.
The scan progress will be shown in the upper left corner of
your screen.
ENG
Library scan status
This line will show detailed information about the actually scan status when Update library is active.
The library scan progress is indicated in the top left corner during the scanning process.
13
Page 14

ENG
PAGE
A B C D E F
G H I J K L M N O
P Q R S T U V W X Y Z
. symb
DIM
symb
VOL
PAGE
A B C D E F
G H I J K L M N O
P Q R S T U V W X Y Z
. symb
symb
VOL
COAX1 COAX2 TLINK2TLINK1
21
3 54
6 87
9 1110
12 1413
15 16 17 18
19
20
2321
22
24
25 26 27 28
29
30
33
3231
34 35
Screen navigation
Screen navigation common controls
The navigator arrow buttons on the remote is used to navigate up, down, left and right on the different
pages of your ECM.
The “HOME“ button on the remote will always bring you back to the Home page of your ECM.
The “BACK“ button will take you back to the previous page from where you came.
The “OK“ button will activate the selected item on the screen. See further explanation of this button in
the sections below.
The “PAGE UP“ and “PAGE DOWN“ buttons will navigate one whole page up or down.
Text input:
When text input is needed, your ECM will display a virtual keyboard. This consist of a line
where all available characters, numbers etc. is displayed.
There are 2 ways to type in text and numbers when this is needed:
• Numeric keypad on remote:
Each of the numeric buttons on the remote also represents a selection of characters (displayed
in the text above the numeric key). To write a character, simply repeatedly and rapidly press
the corresponding numeric key until the desired character is shown in the search field. For
example: Pressing the one time gives the character “j”. Pressing the same button rapidly 2
times gives the character “k” and so on.
•
Navigator:
Use the up or down navigator arrows to select the character you want to insert. When the
desired character is displayed, press navigator arrow right to do the same for the next character
you want to input.
Use the up or down navigator arrows to select the character.
Press a “Backspace” button to delete the character.
COAX1 COAX2 TLINK2TLINK1
14
Page 15

Navigating the home screen
The home screen is the main screen of your ECM.
This screen consists of a main menu with the follow-
ing sections: “Audio”, “Video”, “Library”, “Input”
and “Settings”. Use the UP /DOWN arrow buttons
on the remote toselect a main menu section.
When a main menu section is selected, a list
of areas is displayed in the sub menu to the right
of the home menu. Press the RIGHT arrow button
to go into the sub menu of the selected main menu
section. Use the UP / DOWN arrow buttons to
select an area. Press “OK“ button on the remote
to enter the selected area. When you are in a sub
menu, you can press the LEFT navigation arrow button on remote if you want to go back to the main
menu and choose a different section.
ENG
Screen navigation
Main menu sections
Sub menu areas Description
Music library Browse your music library
Internet Radio Browse the internet radio stations.
Movies Browse your movie library
Series Browse your TV series library
You Tube Watch videos from YouTube
Manage your media ibrary
Toslink 1 Choose Toslink 1 input on DAC
Toslink 2 Choose Toslink 2 input on DAC
Coax 1 Choose COAX 1 input on DAC
Coax 2 Choose COAX 2 input on DAC
Preferences View and edit your preferences for the ECM
Library Add content to your ECM's library
Network View and edit your network settings
Output settings View and edit your Audio/Video output settings
Firmware View system info and perform factory reset
15
Page 16

ENG
Screen navigation
Navigating the libraries
This section explains how to navigate and change
layout and grouping of the libraries. The navigation controls also applies to the internet radio section and the YouTube section.
Use the navigator arrow buttons on the remote to
navigate up, down, left and right.
The “PAGE UP“ and “PAGE DOWN“ buttons will
navigate one whole page up or down.
Library grouping
When navigating the library, you can change the way the library is grouped by pressing the “GROUP“
button on the remote. For example: In the music library you can choose to display items grouped by artist,
by album or by genre. (Please refer to the table in the next section for information on available grouping
methods for the different libraries)
Library display view
The library can be displayed in different ways depending on what library you are currently browsing.
Available display view layouts are: List view, Tiles view and Fanart view.
Press the “VIEW“ button on the remote to change the display view layout. The last selected view mode
will be remembered for each screen.
The available display views for different library groupings are:
Library:
Music Library
Internet Radio
Movies Library
TV Show Libary
Available grouping: Available display view:
Album
Artist
Genre
Local
Top 100
Genre
Country
My Stations
Film
Actor
Genre
Show Tiles view
Actor
Genre
Tiles view
Fanart view
List view
Tiles view
List View
Tiles view
Fanart view
List view
Fanart view
List view
You Tube
Categories Tiles view
List View
16
Page 17

Screen navigation
A B C D E F
G H I J K L M N O
P Q R S T U V W X Y Z
. symb
DIM
symb
A B C D E F
G H I J K L M N O
P Q R S T U V W X Y Z
. symb
symb
21
3 54
6 87
9 1110
12 1413
15 16 17 18
Searching
A powerful search tool is available in the library. To start a search, simply press the “SEARCH“ button
on the remote. This will place a cursor in the search field and you may start typing on the virtual keyboard. You can search for any part of the information stored in the library. The search tool will automatically display all items with information matching the search string entered. Example: typing “ing” in
the search field will return the artist “Bruce Springsteen”, the album “Sailing to Philadelphia”, the album
featuring the song “Money for Nothing” and so on (as long as these items are in your collection). To
narrow the search results, simply keep typing more of the word(-s) you are searching for.
When searching in any of the libraries (Music Library, Movie Library, Series Library) the search results
are updated in real time as you type. When searching any of the internet based sections (Internet Radio
or You Tube) you have to type in your search word(-s) and then press the “OK“ button to perform the
search. When you are done searching, simply press the navigation arrow buttons to select the desired
item from the search result.
Media info
By pressing the “INFO” button on the remote when an item in the library (artist, album, song, movie title or
TV show) is selected, the ECM will bring up a page containing detailed information about the selected item.
ENG
Play queue
Long pressing the ”INFO” button on the remote will bring up the current play queue. Press the ”BACK”
button to exit the queue display. (Please refer to the different sections below for detailed explanation of
the play queue feature.)
Other controls
When an item is selected, press and hold the “OK“ button on the remote for about 1 second to bring
up a context menu.
The context menu provides additional options for the selected item. The context menu will be different
for different items / sections. Please refer to the different sections below for detailed explanations of the
context menus.
General Playback controls
Pressing the “PLAY/PAUSE“ button when any media (music/video/net radio/Spotify) is playing, will
pause the playback. When playback is paused, pressing this button will resume playback again. This
button does not have any function if no media is already playing or is paused.
Pressing “STOP“ button on the remote will always stop any ongoing media playback (even if playback
is paused) and will clear the queue.
Briefly pressing the “NEXT TRACK“ button on the remote will skip to next song in the queue. Pressing and
holding the “NEXT TRACK“ button (for at about 1 second) will fast forward in the song playing. Keep the
button depressed (or long press it again) until the desired forward speed is achieved (indicated on the
screen). Press the “PLAY/PAUSE“ button to resume normal playback speed.
Briefly pressing the “PREVIOUS TRACK“ button on the remote will skip to the previous song in the queue.
Pressing and holding the “PREVIOUS TRACK“ button (for at about 1 second) will rewind in the song
playing. Keep the button depressed (or long press it again) until the desired rewind speed is achieved
(indicated on the screen). Press the “PLAY/PAUSE“ button to resume normal playback speed.
Pressing the “REPEAT“ button will activate the repeat all function. If you have created a play queue (by
selecting the “Play from here” function) this will repeat the queue when playback comes to the end of
the queue, otherwise only the playing episode will be repeated. One more press on the button activates
the “repeat one” mode and only the current playing episode will repeat. A third press on the button will
turn repeat off.
Pressing the “SHUFFLE“ button on the remote will activate the shuffle function. The shuffle function will
randomly select the next episode to play from the queue if a queue is created.
17
Page 18

ENG
Music Library
Music library
Playback controls
The “OK“ button on the remote has two functions
depending on if the button is pressed briefly or if
you press and hold the button for at least 3 sec.
Pressing the “OK“ button briefly:
• If a song is the selected item on the screen:
This will make a queue of the complete list of songs displayed on the screen in the order which
they are displayed. Playback will start from the created queue at the position where the selected
song is in the queue.
The queue is stored as long as playback is not stopped or replaced by a new queue.
• If an album is the selected item on the screen: This will display the songs in the selected album.
• If an artist is the selected item on the screen: This will display the albums by the selected artist
• If a genre is selected item on the screen: This will display the folders sorted by genre.
Context menu
Long pressing the “OK“ button (press and hold for about 1 Second ) will bring up a context menu
on the screen with the following choices:
• Queue at end:
This will add the selected song, the selected album, all the songs by the selected artist or all the songs in
this genre to the end of the existing queue.
If no queue exists (playing or paused), the selected song, all the songs by the selected artist or all the
songs in this genre will make up a new queue and playback will start immediately.
• Play now:
This will replace any currently playing (or paused) queue with a new queue containing the selected
song, all the songs by the selected artist or all the songs in this genre. Playback of the new queue will
start immediately.
• Queue next:
This will add the selected song, the selected, all the songs by the selected artist or all the songs in this
genre to the top of the current playing queue to be played after the current song is finished.
If no queue exists (playing or paused), the selected song, the selected all the songs by the selected
artist or all the songs in this genre will make up a new queue and playback will start immediately.
Use the navigator to select an option
18
Page 19

Music Library
Briefly pressing the “NEXT TRACK“ button on the remote will skip to next song in the queue. Pressing and
holding the “NEXT TRACK“ button (for at about 1 second) will fast forward in the song playing. Keep the
button depressed (or long press it again) until the desired forward speed is achieved (indicated on the
screen). Press the “PLAY/PAUSE“ button to resume normal playback speed.
Briefly pressing the “PREVIOUS TRACK“ button on the remote will skip to the previous song in the queue.
Pressing and holding the “PREVIOUS TRACK“ button (for at about 1 second) will rewind in the song
playing. Keep the button depressed (or long press it again) until the desired rewind speed is achieved
(indicated on the screen). Press the “PLAY/PAUSE“ button to resume normal playback speed.
Pressing “REPEAT“ when music is playing will activate repeat for the current playing queue. Pressing the
button a second time will repeat the current playing song only and pressing the button a third time will
turn off the repeat function.
Pressing the “SHUFFLE“ button on the remote will activate the shuffle function. The shuffle function will
randomly select the next song to play from the currently playing queue after the currently playing song is
finished.
Playbar: Music Library
ENG
When playing music, the playbar is visible on the bottom of the screen. The playbar consists of the following:
43
1
1. Album art.
2. Progress bar
3. Song title
4. Artist name / Album name
5. Elapsed time / total time of song.
6. Shuffle status icon
7. Repeat status icon
2
7
5
8. Audio format.
9. Number of audio channels
10. Volume Mute On/off indicator
11. Volume level indicator
12. Sampling frequency / resolution
13. Audio bit rate (of the source file)
6 8 9
10
12
13
11
19
Page 20

ENG
Screen navigation
Internet Radio
Playback controls
As net radio is streaming live from the radio stations, only the play/pause and stop buttons are functional
playback controls in this section.
The “OK“ button on the remote has two functions depending on if the button is pressed briefly or if you
press and hold the button for at least 1 second:
Pressing the “OK“ button briefly will start streaming from the selected radio station.
Context menu
Long pressing the “OK“ button (press and hold for about 1 second) will bring up a context menu on the
screen with the following choices:
•Tune in: This will start streaming from the selected radio station
.
•Add to Favorites: This will add the selected radio station to the “Favorites” category which is a
list where you can store your favorite radio stations for fast and easy access.
When streaming from a radio station, the “PLAY/PAUSE“ button on the remote will pause streaming and
buffer content. Pressing the button again will resume playback from the position where playback was
paused.
Playbar: Internet Radio
When streaming from internet radio, the playbar is visible on the bottom of the screen.
The playbar consists of the following:
3
9
1
1. Radio station icon / thumbnail image.
2. Progress bar
3. Information text: Info from the radio station.
(Show name, song name, other information)
4. Elapsed time streaming from radio station.
2
4
20
5 6
5. Audio format.
6. Number of audio channels.
7. Volume Mute On/off indicator
8. Volume level indicator
9. Sampling frequency
7
8
Page 21

Movies
Movies
Playback controls
When browsing/navigating the movie library, the
“OK“ button on the remote has two functions depend-
ing on if the button is pressed briefly or if you press
and hold the button for at about 1 second:
Pressing the “OK“ button briefly:
• If a movie is the selected item on the screen and playback of the selected movie has previously been started
but was disrupted before the end of the file, you will be given the choice to resume from where the playback
was previously disrupted or to start playback from the beginning of the movie. Otherwise playback will start
from the beginning of the movie.
• If an actor is the selected item on the screen, a list of all the movies featuring that actor will be shown.
• If a genre is the selected item on the screen, a list of all the movies within this genre will be shown.
ENG
Context menu
If a movie is the selected item on the screen, long pressing the “OK“ button (press and hold for at about
2 second) will bring up a context menu on the screen with the following choices:
• Resume from…
Resume playback from where it was last interrupted.
This option is only available if the selected video was previously started but stopped before
video was finished.
• Watch: Play video from the beginning.
• Show trailer
Watch trailer for the selected video. (An active internet connection is required for
this option as the trailer will be streamed from the internet)
• Mark as watched/unwatched.
Select this option if you want to toggle the watched status for the selected video
A brief press on the “NEXT TRACK“ button on the remote will skip to next chapter (if any) in the currently
playing video.
Pressing and holding the “NEXT TRACK“ button (for at least 3 seconds) will fast forward in the video file
playing. Keep the button depressed (or long press again) until the desired forward speed is achieved
(indicated on the screen). Press the “PLAY/PAUSE“ button to resume normal playback speed.
A brief press on the “PREVIOUS TRACK“ button on the remote will skip to the previous chapter (if any) in
the currently playing video.
Pressing and holding the “PREVIOUS TRACK“ button (for at least 3 seconds) will rewind in the video file
playing. Keep the button depressed (or long press again) until the desired rewind speed is achieved (indi-
cated on the screen). Press the “PLAY/PAUSE“ button to resume normal playback speed.
Pressing “REPEAT“ when a video is playing will activate “repeat all” for the current playing movie.
Pressing the button a second time will activate “repeat one” for the current playing movie. As only the
current playing movie is in the queue, the “repeat all” and the “repeat one” will both repeat only the currently playing movie. Pressing the button a third time will turn off the repeat function.
21
Page 22

ENG
Movies
Audio, subtitle and zoom selection
Long pressing (press and hold for at least 1 second) the ”OK” button while a video file is playing will
bring up a context menu where you can choose between the different available audio tracks, subtitle tracks
and zoom levels. Use the navigator arrow buttons to choose the desired settings. Press the “OK“ button to
confirm your selections. Pressing the “BACK“ button will exit the without making any changes.
Direct navigation:
You can jump to a specified time within the currently playing video file. To do this, simply use the numeric
buttons to specify the desired time and press the “PLAY/PAUSE“ button to start playback from this location
in the video. If the “PLAY/PAUSE“ is not pressed within a short period of time, the ECM will abort the
direct navigation.
Playbar
While playing movies, the playbar is hidden by default. To show the playbar, press “INFO“ or “OK“ button on the remote.
The playbar consists of the following:
3
1
1. Movie art
2. Progress bar
3. Movie title
4. Elapsed time / total time of movie.
5. Video resolution
6. Video codec
2
4
7. Aspect ratio
8. Audio format
9. Number of audio channels
10. Volume Mute On/off indicator
11. Volume level indicator
12. Video bit rate
13. Audio bit rate
5 8 9
6 7
10
12
13
11
Series playback controls
When browsing/navigating the series library, the “OK“ button on the remote has two functions depending
on if the button is pressed briefly or if you press and hold the button for about 1 second.
Pressing the “OK“ briefly:
• If a series episode is the selected item on the screen and playback of the selected episode
has previously been started but was disrupted before the end of the file, you will be given the
choice to resume from where the playback was previously disrupted or to start playback from
the beginning of the episode file. Otherwise playback will start from the beginning of the episode.
• If a series show is the selected item on the screen, a list of seasons in the selected series will be
shown. If only one season is available a list of episodes will be shown instead.
• If an actor is the selected item on the screen, a list of all the series featuring that actor will be shown.
• If a genre is the selected item on the screen, a list of all the series in that genre will be shown.
22
Page 23

Context menu
If a series, season or episode is the selected item on the screen, long pressing the “OK“
button (press and hold for about 1 second) will bring up a context menu on the screen with the following choices:
• Mark as unwatched:
This will mark the episode or all the episodes of the selected season/show as unwatched in the library.
• Mark as watched:
This will mark the episode or all the episodes of the selected season/show as watched in the library.
• Watch: (only for episode)
This will start playback of the selected episode.
• Play from here: (only for episode)
This will create a queue beginning at the selected episode and through all the subsequently displayed episodes in
the displayed list on the screen. Playback will start from the selected episode.
A brief press on the “NEXT TRACK“ button on the remote will skip to next chapter (if any) in the currently playing series episode.
Pressing and holding the “NEXT TRACK“ button (for at least 2 seconds) will fast forward in the episode playing. Keep the button depressed (or long press again) until the desired forward speed is achieved (indicated
on the screen). Press the “PLAY/PAUSE“ button to resume normal playback speed.
ENG
A brief press on the “PREVIOUS TRACK“ button on the remote will skip to the previous chapter (if any)
in the currently playing series episode.
Pressing and holding the “PREVIOUS TRACK“ button (for at least 2 seconds) will rewind in the episode playing. Keep the button depressed (or long press again) until the desired rewind speed is achieved (indicated
on the screen). Press the “PLAY/PAUSE“ button to resume normal playback speed.
Pressing the “REPEAT“ button will activate the repeat all function. If you have created a play queue (by
selecting the “Play from here” function) this will repeat the queue when playback comes to the end of
the queue, otherwise only the playing episode will be repeated. One more press on the button activates
the “repeat one” mode and only the current playing episode will repeat. A third press on the button will
turn repeat off.
Pressing the “SHUFFLE“ button on the remote will activate the shuffle function. The shuffle function will
randomly select the next episode to play from the queue if a queue is created.
Playbar
While playing movies, the playbar is hidden by default. To show the playbar, press “INFO“ or “OK“ button on the remote.
The playbar consists of the following:
3
12
13
House
1
1. Episode image
2. Progress bar
3. Episode title
4. Elapsed time/total time of episode
5. Video resolution
6. Video codec
7. Aspect ratio
2
4
8. Audio format
9. Number of audio channels
10. Volume Mute On/off indicator
11. Volume level indicator
12. Video bit rate
13. Audio bit rate
6 7
5 8 9
23
10
11
Page 24

ENG
PAGE
A B C D E F
G H I J K L M N O
P Q R S T U V W X Y Z
. symb
DIM
symb
VOL
PAGE
A B C D E F
G H I J K L M N O
P Q R S T U V W X Y Z
. symb
symb
VOL
COAX1 COAX2 TLINK2TLINK1
21
3 54
6 87
9 1110
12 1413
15 16 17 18
19
20
2321
22
24
25 26 27 28
29
30
33
3231
34 35
36 37 38 39
YouTube
Playback controls
If the different YouTube categories are displayed on the screen, briefly pressing the “OK“ button will open
the selected category and display the YouTube videos within this category.
If a list of videos is displayed on the screen, briefly pressing the “OK“ button will start playback of the
selected video.
If a list of videos is displayed on the screen and the selected video has been started before without play-
ing to the end of the video, you will be given the choice to start from where playback was previously
interrupted or to start playing the video from the beginning.
If a list of videos is displayed on the screen, long pressing the “OK“ button (press and hold for at least 1
second) will bring up a context menu with the following choices:
• Watch:
Same as briefly pressing the “OK“ button. (see explanation above)
• All videos of…
Show a list of all the videos posted on YouTube by the user who posted the selected video.
• Show related:
Show YouTube videos that are similar to the selected video.
Pressing and holding the “NEXT TRACK“ button (for at least 1 second) will fast forward in the episode
playing. Keep the button depressed (or long press again) until the desired forward speed is achieved
(indicated on the screen). Press the “PLAY/PAUSE“ button to resume normal playback speed.
Pressing and holding the “PREVIOUS TRACK“ button (for at least 1 second) will rewind in the episode
playing. Keep the button depressed (or long press again) until the desired rewind speed is achieved (indi-
cated on the screen). Press the “PLAY/PAUSE“ button to resume normal playback speed.
Playbar
While playing the video, the playbar is hidden by default. To show the playbar, press “INFO“ or “OK“
button on the remote. The playbar consists of the following:
1. Episode image
2. Progress bar
3. Episode title
4. Elapsed time/total time of episode
5. Video definition (SD/HD)
6. Video codec
7. Aspect ratio
3
1
2
4
6 7
5 8 9
10
12
13
11
8. Audio format
9. Number of audio channels
10. Volume Mute On/off indicator
11. Volume level indicator
12. Video bit rate
13. Audio bit rate
COAX1 COAX2 TLINK2TLINK1
Digital inputs
Pressing any of the input buttons will start the DAC mode of your ECM with the chosen input as active.
Playback must be controlled at the connected digital source. Please refer to the manual of the connected
equipment for details on navigation and playback control.
NOTE:
i
Activating any of the digital inputs on your ECM will stop any ongoing media playback.
24
Page 25

Accessing the ECM from network
App for Andoid/iOS
An app to control your ECM is available in the Google Play store for android powered devices.
Search for Electrocompaniet ECM in the Google Play store or scan the QR code.
App for iOS will be available soon.
The app will let you browse your library and control playback on your ECM.
ENG
Tablet app Smart phone app
NOTE:
Your computer have to be connected to the same network as your ECM for access through network.
UPnP
Your ECM fully supports the UPnP protocols for sharing and communicating with other UPnP enabled
devices. Your ECM will act as a UPnP server.
Web interface
A simple web interface is available for controlling your ECM from any device with a web browser within
your network (such as a computer, a smart phone or a tablet etc.)
Open the web browser on your device and write the IP address of your ECM as the web address (URL).
Exploring internal storage
Exploring internal storage:
i
Windows:
You can access your ECM’s local storage (if you
have added a local drive) using the windows
explorer. Open the windows explorer on your computer and navigate to the Network section. Your
ECM should be available identified with the name
of the unit.
NOTE:
You can also access your ECM by typing the IP address, or the name of your unit, using the windows explorer.
For example: \\192.168.0.1 or \\ECM2. You can always check the IP addrress in Settings -> Information.
25
i
Page 26

ENG
Mac
Your ECM 2 will be automatically detected and shown under
the “SHARED” section in the left panel of Finder. Its name
will be the same as the system name, with any spaces and
special characters removed.
If it is not shown in the left pane, press the “All…” button under SHARED in order to show all neighbourhoods.
Then, select the “workgroup” neighbourhood, and find your
machine in the list.
In the event that automatic detection or connection fails,
manual connection can be established. In Finder’s menu
bar, select “Go” and then “Connect to Server… (OK)”. Here, fill in cifs://<ip address>, where <ip
address> is the IP Address as reported by the system in the Settings -> Network menu.
For advanced users, connection can also be established via
NFS. This will have to be performed manually by selecting
“Go” and then “Connect to Server… (OK)” from the finder.
Then, type in nfs://<ip address>/data/<share>, where
<share> is either Music, Movies or TVshows.
Troubleshooting
When no manual connection can be established, please verify that your machine and the ECM are
properly situated on the same network.
This can be verified by opening Network Utility and selecting the “Ping”. Here, fill in the IP address
of your system, reported in the Settings -> Network menu. Select the option “Send only <10> pings”.
The second to last line of the output should state “10 packets transmitted, 10 packets received, 0.0%
packet loss”. If this is not the case, please verify your network configuration.
In case of network issues, basic troubleshooting can be performed by pressing “Assist me…” from the
Network preference pane. If this does not solve your networking issues, please contact your networking
professional.
Linux
On Debian and Ubuntu systems with Gnome or Unity desktops, your ECM will automatically be
detected. In the file browser, select “Browse Network” under “Network” in the left pane. Simply find
and select your system from this list in order to connect to it.
In the event that automatic detection or connection fails, manual connection can be established. In the
menu of the file browser, select “Go” and then “Location”. Here, fill in cifs://<ip address>, where <ip
address> is the IP Address as reported by the system in the Settings -> Network menu.
Connection can also be established via NFS. This will have to be performed manually via the terminal.
The ECM exposes its shares on the following paths: data/Music, data/Movies and data/TVshows. For
example, “mount 192.168.1.123:/data/Music /mnt/music” will mount the music share of the ECM on
/mnt/music.
26
Page 27

Settings
Settings - Preferences General
•
Here you can change the units name from ECM 2 to a name of your choice.
(Settings will be applied automatically after a few seconds)
The setting enables to automatically play the next item in the current folder.
Press “OK“ for changing the setting.
Sort your music library by either album name or artist name.
Mark one of the arrows by using the right or left navigator arrow button and press to change.
Safe Search is a feature of YouTube Search that acts as an automated filter of
pornography and potentially offensive content.
Mark one of the arrows by using the right or left navigator arrow button and press
to change.
• Ignore remote control volume buttons
The setting avoids the unit reacting on your remote controls volume buttons.
Press “OK“ to turn this feature on or off.
Allows you to submit information about the music you play to Last.fm.
Press “OK“ to turn this feature on or off.
Enter your Last.fm user name and password here.
This setting will only be active if the above feature Submit songs to Last.fm
is enabled. A valid username and password for Last.fm is needed.
Allows you to submit information about the music you play to Libre.fm.
Press “OK“ to turn this feature on or off.
Enter your Libre.fm user name and password here.
This setting will only be active if the above feature Submit songs to Libre.fm is
enabled. A valid username and password for Libre.fm is needed.
Accounts
Localization
Name
• Play the next video automatically
• Sort audio albums by
• Enable YouTube Save Search
• Submit songs to Last.fm
• Last.fm username and password
• Submit songs to Libre.fm
• Libre.fm username and password
• Language
This setting will change the systems user interface language.
Mark one of the arrows by using the right or left navigator arrow button.
Press the “OK“ button to change language.
(Selected language will be applied automatically after a few seconds)
• Region
Allows you to select various formats for time and date.
• Time zone country
Allows you to select the time zone country you live.
• Time zone
Allows you to select the time zone you live available within your chosen country.
• Preferred audio language
Select the preferred audio language for your movies. The movie will start playing
with the preferred audio track if different audio tracks are supported and your
language is there.
• Preferred subtitle language
Select the preferred subtitle language for your movies. The movie will start playing
with the preferred subtitle language if different subtitle languages are supported.
ENG
27
Page 28

ENG
Settings
Settings - Network
Information
• Internet access
Status information about your Internet connection.
YES – Internet available
NO – no Internet connection available
• Wired connection
Status information, Mac address and IP address of your wired network connection.
• Wireless connection
Status information, Mac address and IP address of your wired network connection.
Configure wired
Select the networking type of your wired connection by pressing the “OK“ button. You can configure the
IP address, Gateeway, Subnet mask and DNS using on screen keyboard.
Configure wireless
Select the “Configure networking type” button and press “OK“ for establishing the wireless connection.
Choose preferable network from an on-screen pop-up menu and press the “OK” button. Follow the further
on-screen instructions.
Settings - Output Settings
Audio
This setup menu provides options to set/change your audio output settings.
(Please refer to Connecting audio section for detailed explanation about the
different audio output options provided with your ECM)
• Volume normalisation (volume adjustement)
When volume normalization is enabled the unit will read the ReplayGain tag in your
audio files and normalize the sound level accordingly. You can choose between
track levels and album levels.
• Audio output
Allows you to select between analogue/SPDIF and digital (HDMI) output. Choose
analogue/SPDIF if you plan to connect the balanced XLR outputs or the digital SPDIF
to your amplifier. Select HDMI if you connect digital to your home cinema receiver
or TV. For best audio and video performance connect your ECM using the balanced
analogue outputs to your amplifier and the HDMI output to your TV. Make sure analogue/SPDIF is selected in this case.
• Speaker configuration
Select the supported speaker configuration of your Home Cinema Receiver/ decoder.
Example: If your Home Cinema Receiver supports 5.1 channel and you have connected all 6 speakers you select 5.1 on your ECM. If you use 5 speakers without
subwoofer you select 5.0.
(Only selectable if Audio output is set to HDMI)
-Dolby Digital(AC3) capable receiver (Only selectable if Audio output is set to HDMI)
Select if you use a Dolby Digital(AC3) capable receiver.
-DTS capable receiver (Only selectable if Audio output is set to HDMI)
Select if you use a DTS capable receiver.
-AAC capable receiver (Only selectable if Audio output is set to HDMI)
Select if you use a AAC capable receiver.
28
Page 29

Settings
ENG
Settings - Output Settings
Video
Here you can change the output video resolution from your ECM. Refer to the user manual of your TV and
choose the output resolution from the ECM to match the preferred input resolution of your display. To display
the user interface and your movies in full HD use 1920x1080p. Usually no changes will be needed here as
the ECM will autodetect the preferred resolution of your display.
Available resolutions: 1920x1080p, 1680x1050, 1600x900, 1440x900, 1440x1050p, 1280x1024p,
1024x960p, 1280x800p, 1280x768p, 1280x720p, 1024x768p, 1024x600, 800x600, 800x480p, 640x480p
• Video calibration
These settings allow you to calibrate the User Interface
by adjusting the overscan. Use this tool if the image
being displayed is too large or too small to fit perfectly
to your display.
Simply adjust the screen so that the arrows are in the
top left and bottom right corners and that the entire
frame is visible on screen.
• Maximum YouTube resolution
Use this setting for limiting the resolution of a YouTube streamed video. If you prefer individual resolutions
on different contents choose Ask.
• Turn off display after
Allows you to set the amount of idle time required before the display is turned off.
NOTE:
When your audio output is set to HDMI, the display output will be muted instead of turned off.
• Screensaver after
Allows you to set the amount of idle time required before displaying the screensaver.
• Audio offset in milliseconds (lip-sync)
Adjusts the time the audio is delayed in relation to the video. This setting is useful if you experience that
the audio does not match the picture when watching videos.
Aspect Ratio
Allows you to choose how the video is displayed.
Hold the OK button during the video playback and then select the aspect ratio from context menu.
The Aspect ratio options:
•
Normal - Movie is displayed so that at least 1 dimension fills the screen. No cropping will occur.
Aspect ratio is unaffected.
•
Zoom - Movie is zoomed in, and the movie cropped so that there are no black bars on screen. Aspect
ratio is unaffected.
•
Stretch 4x3 - Movie is stretched to fill a 4x3 frame. Aspect ratio is changed.
•
Wide Zoom - Movie is stretched to fill a 14x9 frame. Aspect ratio is changed.
•
Stretch 16x9 - Movie is stretched to fill a 16x9 frame. Aspect ratio is changed.
•
Original Size - Movie is displayed so that the height (in pixels) displayed is the height of the movie
exactly. No zooming is performed. Aspect ratio is unaffected.
•
Custom - Movie is displayed using the Zoom and Pixel Ratio settings as defined in the video calibration.
i
29
Page 30

ENG
Settings - Firmware
Information
version on your ECM. This section also gives information about new available software versions
and provides the option to update your software version if a new version is available.
•
The information page will show information about the installed firmware and hardware
Reset
• Clear user preferences
reset to their default values.
This option clears the user preferences without verifying the system. All user settings will be
• Enter firmware recovery
Troubleshooting
Your ECM has a built in recovery mode, automaticly perform the following procedure to force the recovery mode:
1. Turn off power using the power switch on the back of your unit.
2. Turn power back on and wait until the Electrocompaniet logo is
displayed on the screen.
3. When the logo is displayed, but before the home screen is displayed: turn power off again.
4. When you turn power back on, the recovery mode will automati-
cally appear.
You will be given 4 choices:
Perform System recovery
System recovery will load the system as it was shipped from the
factory and update to latest version (if a wired internet connection is available). Your settings and library
will not be reset in this mode.
Perform factory reset
Factory reset will restore the system as it was shipped from the
factory and will wipe your stored settings and library (your media files will not be deleted) If a wired
internet connection is available, your ECM will update to the latest version. NOTE: all user settings and
library will be deleted, but no media files will be deleted.
Clear user settings
This option clears the user preferences without verifying the system. All user settings will be reset to their
default values.
Restart the system
This option will attempt to restart the system, wthout making any changes.
•
If you are experiencing problems with your ECM, please check and verify that all cables (Power cord,
Network cable, Audio cables, HDMI cable etc.) are securely plugged into your ECM and other connected
equipment such as display/TV, amplifier/receiver, network router etc. Also verify that all connected equip-
ment is turned on and the correct input is selected.
•
If you are having problems with your remote, please make sure the remote has a free line of sight to
the infrared receiver on ECM. Try replacing the batteries.
If the problem still persist after checking cables, remote and connected equipment. Please try to power off
the ECM using the switch at the back, next to the power inlet. Leave your ECM turned off for a couple of
minutes and turn the ECM back on.
•
If Internet is not working, please check the status at Setting ->Network ->Information.
•
If nothing helps, please contact your local dealer or go to http://www.electrocompaniet.no/Support/
to contact our support team.
30
Page 31

Technical specifications ECM 2
The following technical data were measured on randomized test objects and are typical data.
All measurements are made at 120V / 240V // 50Hz / 60Hz
No. of balanced analog outputs......................................................................................2
No. of unbalanced analog outputs...................................................................................2
Output Impedance............................................................................................300 Ohms
Noise floor (20 - 20 kHz)...................................................................................< -145 dB
Frequency response.......................................................................................0.5 - 48 kHz
THD+N.........................................................................................................< 0,0005 %
Upsampling rate.......................................................................................192 kHz, 24 bit
Digital/Analog conversion.........................................................................192 kHz, 24 bit
Supported audio formats........................................................All popular formats, including:
WAV/WAVE, MP3, AAC+, Vorbis, AC3, DTS, ALAC, FLAC, APE, WMA, up to 192kHz/24bit,
DSD, up to DSD128 (5.6MHz)
Supported video formats........................................................ All popular formats, including:
MPEG-2, MPEG-4, H.263, MPEG-4 AVC (H.264), up to 1080p with HD 192kHz/24bit audio
ENG
Video: 1xHDMI...........................................................................................Full HD 1080p
Digital inputs: 2x COAX/ 2x TOSlink..........................................................192 kHz, 24 bit
Network connection.......................................................................................Wi-Fi or LAN
Internet-based sources:.....................................................................YouTube, Internet Radio
Supported control interfaces: DLNA, UPnP, Android and iOS remote
Internal storage: docking, self installation
Playback method: memory-based with large buffer, asynchronous, gapless
Trigger low signal................................................................................................<1V (AC or DC)
Trigger high signal.............................................................................................. >8V(AC or DC)
Maximum trigger input level..................................................................................20V (AC or DC)
Trigger output level..........................................................................................................12V DC
Power consumption (no load or signal)...................................................................... 50 W
Standby.................................................................................................................0.5 W
Dimensions
Width ...........................................................................................465 mm / 18.3 inches
Depth ............................................................................................371 mm / 14.6 inches
Height ..................................................................................................78 mm / 3 inches
Weight..................................................................................................8.5 kg. / 18.7 lbs
*The manufacturer reserves the right to alter these specifications without further notice.
31
Page 32

ENG
Precautions
•
Before connecting the AC power cord to the appliance, make sure the voltage designation of the appliance corresponds to the local electrical supply. If you are unsure of your power supply, contact your local
power company. The acceptable power input range is AC ~100V-240V, 50/60Hz.
•
The player is still receiving power from the AC power source as long as it is connected to the wall outlet,
even if the player itself has been turned off.
•
Unplug the power cord if you are not going to use the product for an extended period of time. Hold the
power switch when unplugging. Do not pull on the cord.
•
The power switch is used as the mechanism for cutting off power, therefore make sure it is easy to unplug.
•
To ensure proper ventilation around this product, do not place this product on a sofa, bed or rug. When
installing this product on a wall or bookshelf, you need to provide appropriate space: we recommend leaving 4 inches (10 cm) of free space at the top, the sides and the rear.
•
High temperature will lead to abnormal operation of this unit. Do not expose this unit or batteries to direct
sunlight or near other heating objects.
•
When moving the player from a cold location to a warm one, or vice versa. Should this occur, the player may
not operate properly. In such a case please turn the unit on for 1-2 hours to facilitate moisture evaporation.
Important Safety Instructions
1) Read these instructions.
2) Keep these instructions.
3) Heed all warnings.
4) Follow all instructions.
5) Do not use this apparatus near water.
6) Clean only with dry cloth.
7) Do not block any ventilation openings. Install in accordance with the manufacturer’s instructions. Do not
install the unit in a small and closed rack or shelf.
8) Do not install near any heat sources such as radiators, heat registers, stoves, or other apparatus
(including amplifiers) that produce heat.
9) Do not defeat the safety purpose of the polarized or grounding-type plug. A polarized plug has two
blades with one wider than the other. A grounding type plug has two blades and a third grounding prong.
The wide blade or the third prong is provided for your safety. If the provided plug does not fit into your
outlet, consult an electrician for replacement of the obsolete outlet.
10) Protect the power cord from being walked on or pinched, particularly at plug, receptacle, and the point
where it exits from the apparatus.
11) Only use attachments/accessories specified by the manufacturer.
12) Unplug this apparatus during lightning storms or when unused for long periods of time.
13) Refer all servicing to qualified service personnel. Servicing is required when the apparatus has been
damaged in any way, such as power-supply cord or plug is damaged, liquid has been spilled or objects
have fallen into the apparatus, the apparatus has been exposed to rain or moisture, does not operate normally, or has been dropped.
14 ) Batteries (battery pack or batteries installed) shall not be exposed to excessive heat such as sunshine,
fire or the like.
32
Page 33

Important Notice
Proper ventilation is important. It is important that there is at least 3-5 cm (1-2inches) of air on the left/right
side of the ECM and 5-8 cm (2-3 inches) above. Never cover the ventilation area.
Product registration
Please consider registering your product with Electrocompaniet.
Registering will make sure you are informed about important information about your Electrocompaniet
product, including notifications when a new firmware version is available for your system.
Please go to http://members.electrocompaniet.no register your product.
If Service is needed
Your dealer will have all relevant information regarding the service centers in your area, and will ensure that
your unit is serviced with minimum delay. It is our general policy to have your unit returned to you within five
working days. This is an average time, and can vary locally, depending on the workload at that particular
service station. If, for some reason, there are no service facilities available in your country, please ship the
unit to the following address:
ENG
Electrocompaniet as,
Breivikveien 7,
N-4120 Tau,
Norway
Web: www.electrocompaniet.no
Service department: www.electrocompaniet.no/Support
The end user is responsible for all shipping charges, insurance, re-importation and duty charges.
When shipping a product to the factory for service, always include the following:
1. A sales slip or other proof of purchase if repair is claimed under warranty.
2. A proforma invoice with value of goods, stating that the ECM 2 is returned to Norway for repair.
3. An accompanying letter describing faults, symptoms, or problems with the unit.
4. Always ship the unit in its original carton and packaging material to prevent damage in transit.
Electrocompaniet will not cover damages incurred in transit. If you require further information concerning the
operation of the unit, or if you have any questions related to service, please do not hesitate to contact your
dealer or your national distributor.
User Manual Updates Online
An updated version of the User Manual may be available online at the Electrocompaniet web site.
Occasional updates are needed to reflect new features added to the player since the User Manual was
printed. As future firmware updates bring in new features and functions, the online version of the User
Manual will be updated accordingly.
Copyright Protection
Reverse engineering or disassembly is prohibited.
Please contact us for availability.
Part of the software is open-sourced under the GPL license.
33
Page 34

ENG
IR Remote control codes
RC5 codes are denoted as xx.yy where xx is 5 bit adress and yy is 6 bit command/data. All numbers
are in decimal.
RC6 codes are denoted as xxx.yyy. xxx is 8 bit adress. yyy is 8 bit command code. All numbers in
decimal. All RC6 codes are mode 0.
Key label Code Type Code Hex Comments
MUTE RC5 10.0D Same as on the integrated- and pre-amplifiers.
STANDBY RC6 EC.0C
1 RC6 EC.01
2 RC6 EC.02
3 RC6 EC.03
4 RC6 EC.04
5 RC6 EC.05
6 RC6 EC.06
7 RC6 EC.07
8 RC6 EC.08
9 RC6 EC.09
BACKSPACE RC6 EC.69
0 RC6 EC.00
DIM RC6 EC.10
PREV RC6 EC.21
PLAY RC6 EC.2C
STOP RC6 EC.31
NEXT RC6 EC.20
PAGE UP RC6 EC.6E
PAGE DOWN RC6 EC.6F
REPEAT RC6 EC.1D
SHUFFLE RC6 EC.1C
VOL UP RC5 10.10 Same as on the integrated- and pre-amplifiers.
VOL DOWN RC5 10.11 Same as on the integrated- and pre-amplifiers.
GROUP RC6 EC.64
VIEW RC6 EC.65
SEARCH RC6 EC.66
INFO RC6 EC.67
LEFT RC6 EC.5A
RIGHT RC6 EC.5B
UP RC6 EC.58
DOWN RC6 EC.59
OK RC6 EC.5C
BACK RC6 EC.5D
HOME RC6 EC.5E
COAX1 RC6 EC.12
COAX2 RC6 EC.13
TOSLink1 RC6 EC.0A
TOSLink2 RC6 EC.0B
SUBTITLE RC6 EC.4B
DISPLAY RC6 EC.48
ZOOM RC6 EC.F7
AUDIO RC6 EC.4E
TOP MENU RC6 EC.83
MENU RC6 EC.54
34
Page 35

ENG
35
Page 36

DEALER
StickER
HERE
LOCAL DEALER
To avoid risk of fire or electric shock, do not expose this appliance to rain or moisture.
Do not remove cover. No user serviceable parts inside.
Refer servicing to qualified service personal.
The warranty is void if the product is tampered with by non-authorised personnel.
Use only authorized Electrocompaniet service center.
www.electrocompaniet.no
Warning!
Verify line voltage before use.
Made in Norway
 Loading...