

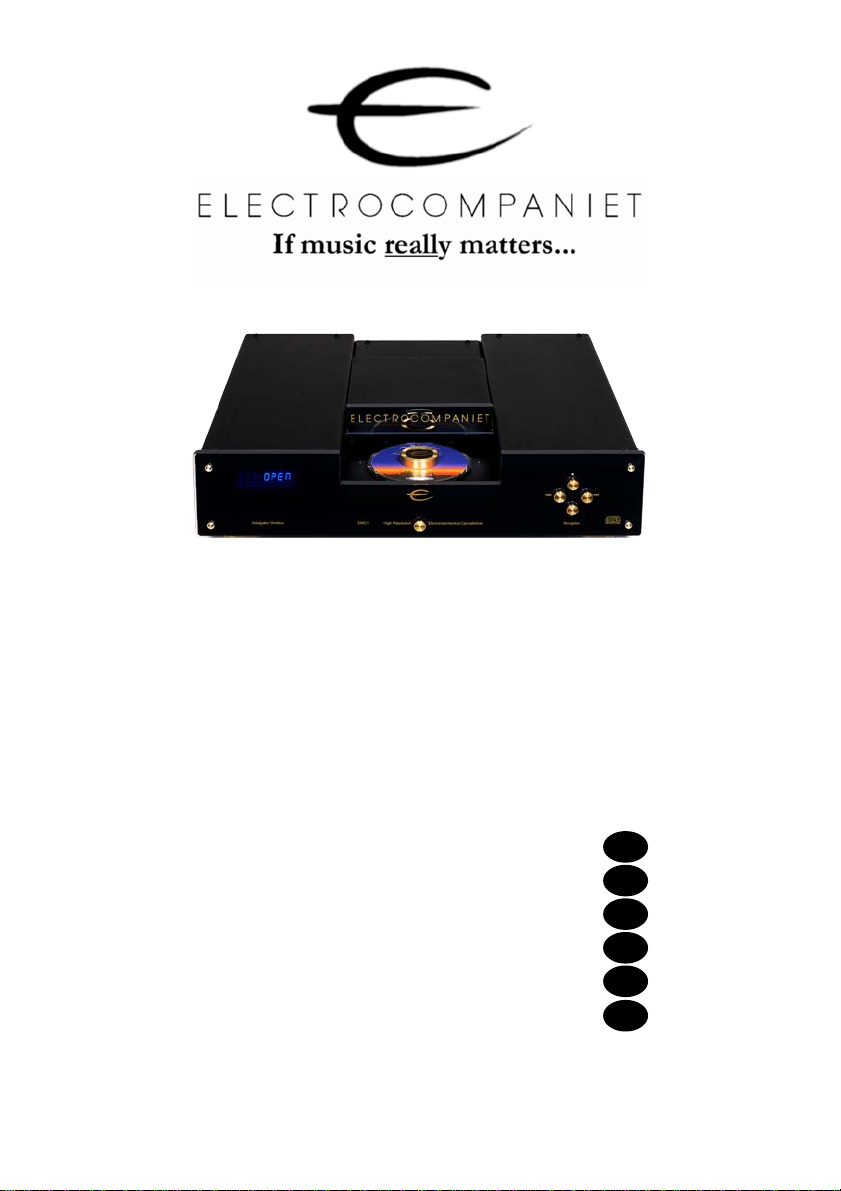
EMC 1
Owner’s Manual
Manual del usuario
Mode d’Emploi
Istruzioni per l’uso
Bruksanvisning
Bedienungsanleitung
UK
E
F
I
N
D


Owner’s Manual
EMC 1 Reference CD Player
Warning:
To avoid risk of fire or electric shock, do not expose this appliance to rain or moisture.
Verify line voltage before use.
Do not remove cov er. No user serviceable parts inside. Refer servicing to qualified service personnel.
The warranty is void if the product is tampered with by non-authorised personnel.
Use only authorised Electrocompaniet service center.

Welcome to the World of Electrocompaniet
We thank you for choosing an Electrocompaniet high-end product.
The Electrocompaniet EMC 1 will bring you many years of wonderful music reproduction
true to your favourite master recordings. Please take the time to read this manual to get
optimum performance from your new CD Player.
The Electrocompaniet Story
Electrocompaniet was founded in 1973 in Oslo, Norway, to manufactured an amplifier
designed by Per Abrahamsen. The design was based upon a new approach to transistor
amplifier design developed by Dr. Matti Otala and Jan Lohstro.
It had long been recognised that transistor amplifiers had a characteristic sound that many
audiophiles and music lovers found unnatural.
Dr. Otala and Mr. Lohstro analysed transistor amplifiers to determine what actually created
the “transistor sound” in general transistorised designs.
The results of their innovative design work were incorporated in the first Electrocompaniet
design - the legendary 25-watt amplifier.
It was the first commercial transistor amplifier to use this new design approach.
The amplifier was immediately recognised as dramatically more musical than any other
transistor amplifier at the time.
This design philosophy has been constantly updated through continuous research and
development. The philosophy prevails with all Electrocompaniet products.
Skilled technicians and craftsmen carefully create all Electrocompaniet products.
The products are extensively tested for maximum performance and reliability.
Electrocompaniet has always given the highest priority to extensive listening test for all its
designs. Every product designed by our engineers must meet a variety of exacting standards, set by a listening panel that is carefully selected to represent a cross- section of
musical taste and experience. Electrocompaniet designs go back and forth between the
design laboratory and the listening panel until both the engineers and the listeners are
satisfied with the end results.
Our quality products are sold throughout the world and provide the ultimate in listening
pleasure to discriminating music lovers.

Design Concept and Construction
The basic design philosophy of the EMC 1 CD transport is inspired by crucial knowledge
ported from the analogue turntable.
Principally, there is no difference between a record player and a CD player.
Both playback systems consist of: a motor, a pick-up and a tone arm. Phenomena such as
tone arm resonance’s found in analogue turntables are just as problematic in typical CD
Players.
To reduce or remove these phenomena plus other unwanted resonances,
Electrocompaniet has developed a proprietary mechanical filter, which has been frequency-adjusted by our listening panel in numerous listening tests. The mechanical filter
removes internal and external vibration components from entering the laser pick-up
assembly, resulting in a superior reproduction with tighter bass, bigger sound stage,
precision, high resolution and amazing detail.
The D/A converter is a sophisticated balanced 24-bit 96 KHz unit. Due to the higher
sampling frequency, the bandwidth is moved one octave up in frequency compared to
standard CD systems using 44,1 KHz sampling frequency.
All analogue circuits are fully balanced and symmetrical, similar to the design of our
amplifiers.
Four separate power supplies using Floating Transformer Technology (FTT) feed the digital
unit, the display, the drive mechanism and the analogue unit.

Unpacking the CD Player
Immediately upon receipt of the EMC 1 CD Player; inspect the carton for possible damage
during shipment. The carton and packaging have been designed to provide the safest
possible protection when transporting your CD Player.
Unpack the CD Player carefully. Save all packaging materials for future shipment.
The Content of the Carton
1 pcs Electrocompaniet EMC 1 CD Player
1 pcs AC power cord
1 pcs spare 1 Ampere Slow Blow Mains Fuse. (See page 11 for change of blown fuse)
1 pcs CD clamp
1 pcs Owner’s Manual
1 pcs self-adhesive felt ring for placement of the CD clamp when not in use
2 pcs Allen keys for securing of the Electro Mechanical Cancellation System
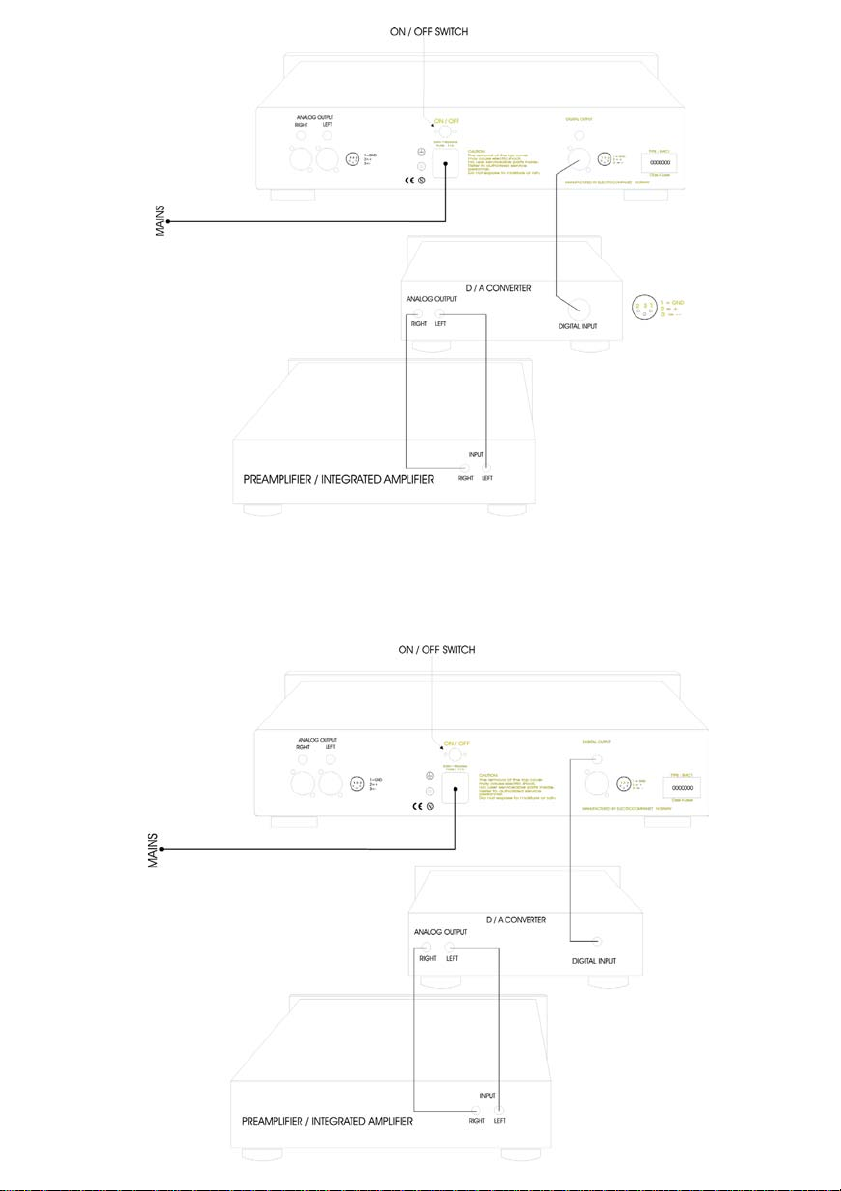
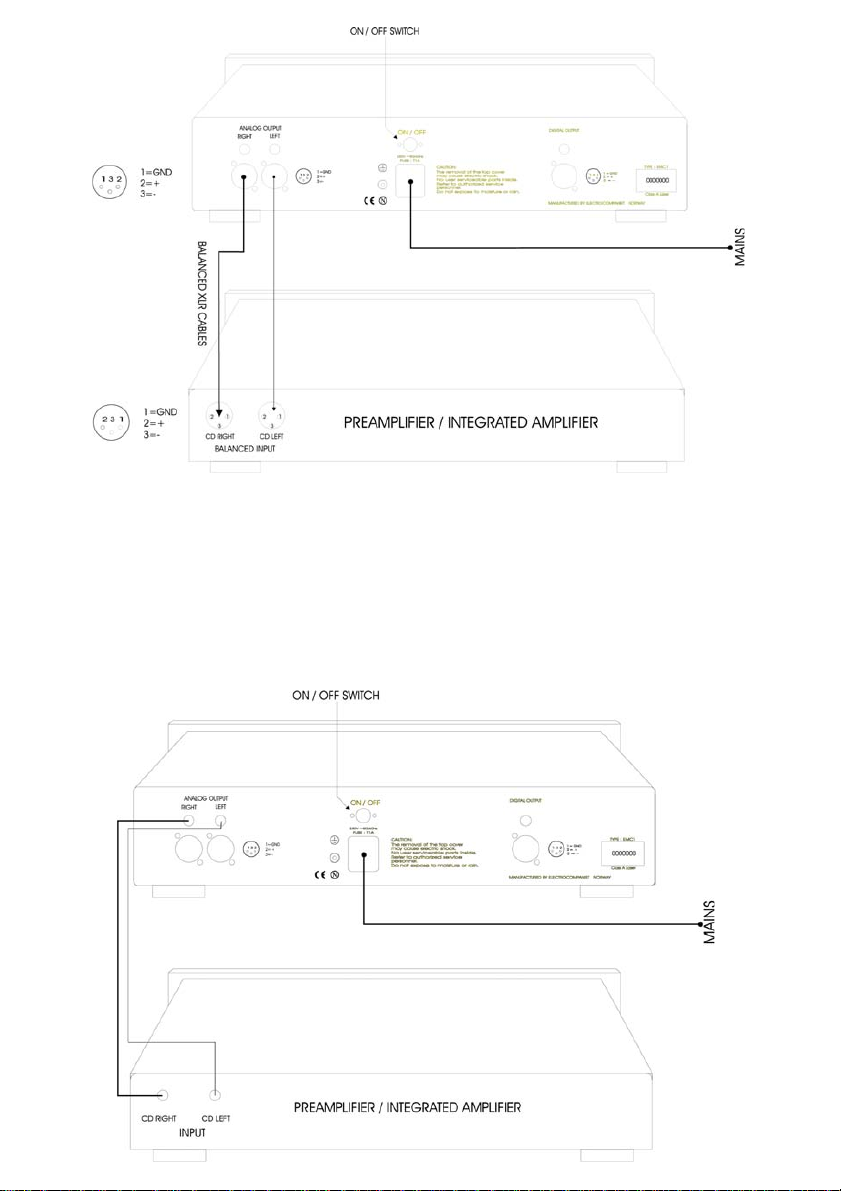
Set-up Procedure
Before connecting to Mains check that the mains voltage printed on the rear panel of the
CD Player corresponds to the line voltage in the territory were you intend to use the unit.
How to avoid damages
A good operating practice is to turn off all equipment before any connections or
disconnections are made. Do not under any circumstances connect or disconnect
equipment when power is turned on. The design of the RCA plug generates a huge
transient when inserted. Connecting or disconnecting equipment with the power on could
severely damage both speakers and amplifier(s).
How to avoid noise problems
The EMC 1 contains delicate circuits that are sensitive to magnetic strayfields.
The unit should not be place near mains transformers, TVs etc. Care should also be taken
regarding placement of the interconnect cables. Do not run interconnect cables in parallel
with mains cords and loudspeaker cables. Keep interconnect cables as short as possible.
1
For maximum performance, the
EMC 1 must be level.
Place the CD Player on a level
plane surface. Make all
connections on the rear panel.
2
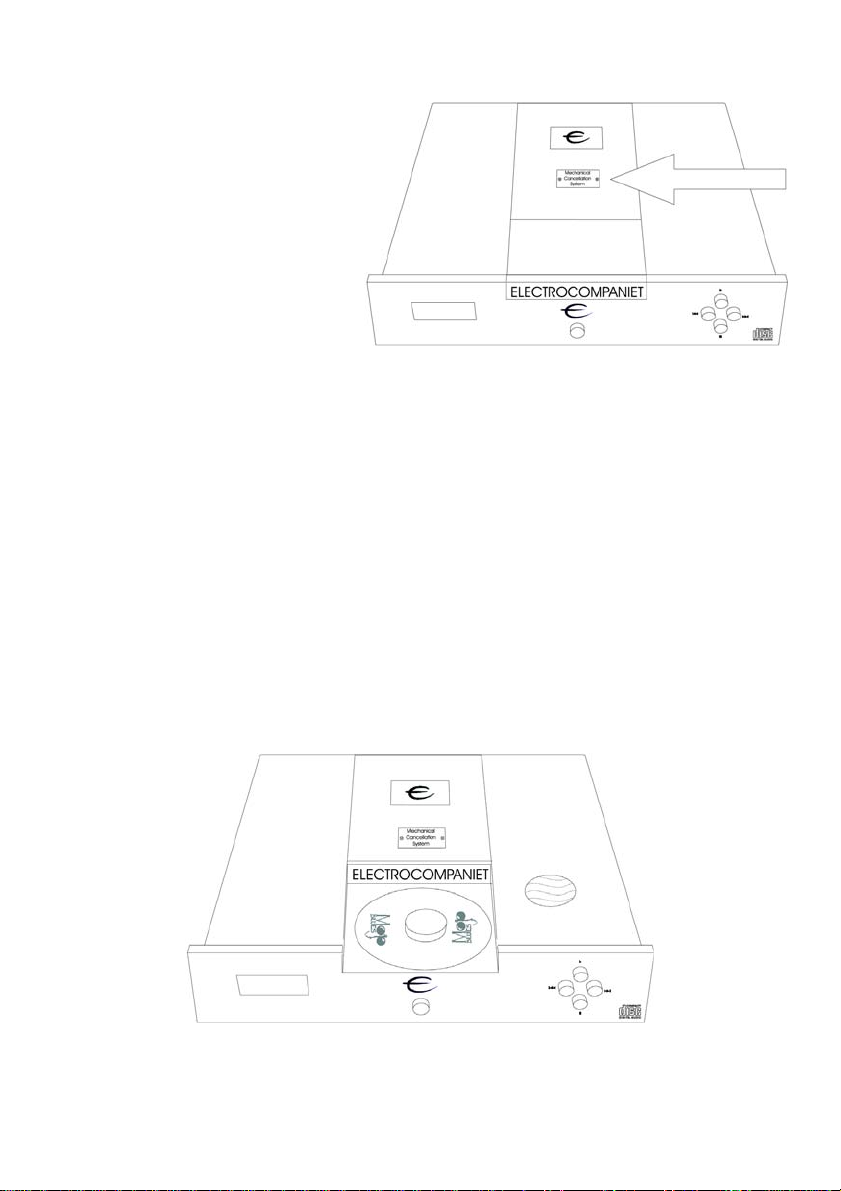
Unscrew the Allen screws
holding the gold sign marked
“Mechanical Cancellation
System” with the small Allen key.
Loosen the transport fixing
screw that is located underneath
the gold sign with the large Allen
key. Unscrew it counter
clockwise. Put the gold sign
back and tighten the small Allen
screws.
Important!
Keep the Allen keys and spirit level in a safe place for future use.
Always tighten the transport screw when moving the CD Player.
The damping scales in the EMC 1 weigh eight kilograms.
If not securely fastened, the CD Player will be severely damaged, resulting in void of warranty.
Do not over-tighten the transport screw.

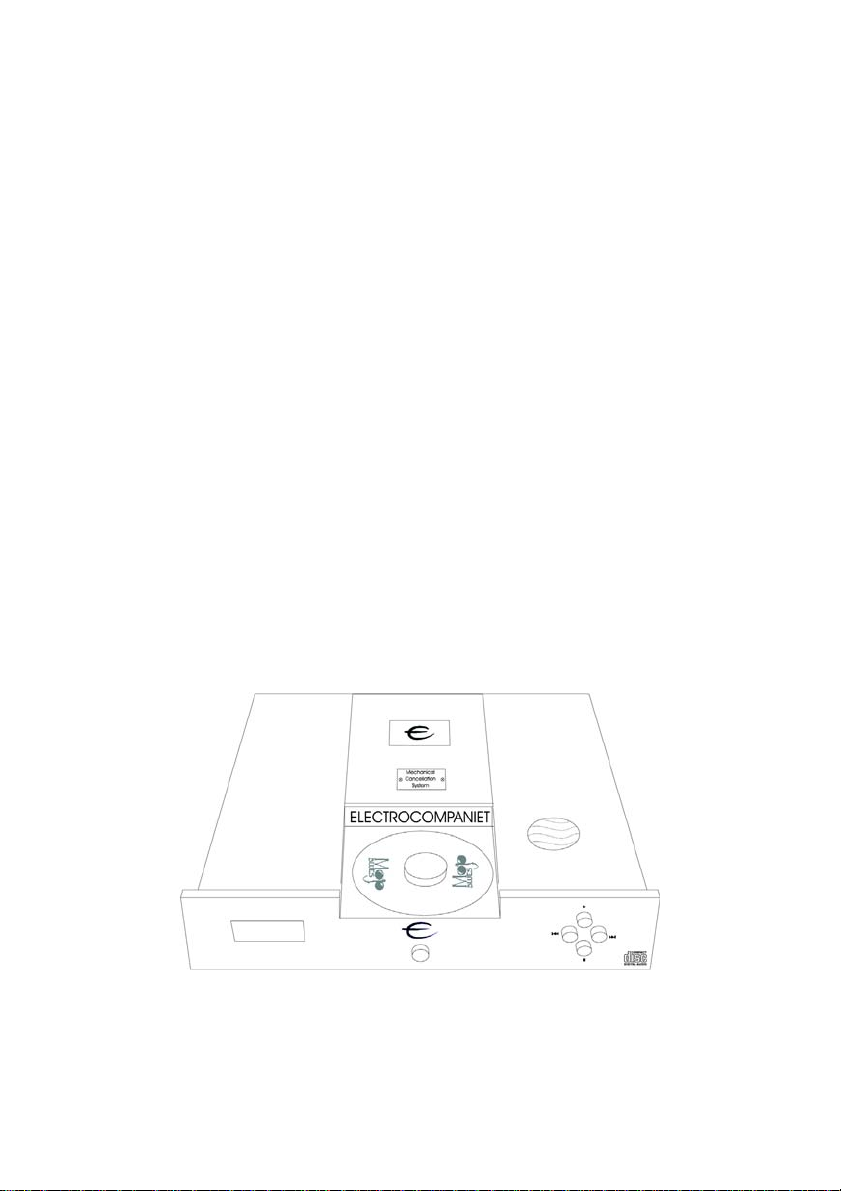
Front and Rear Panel Controls
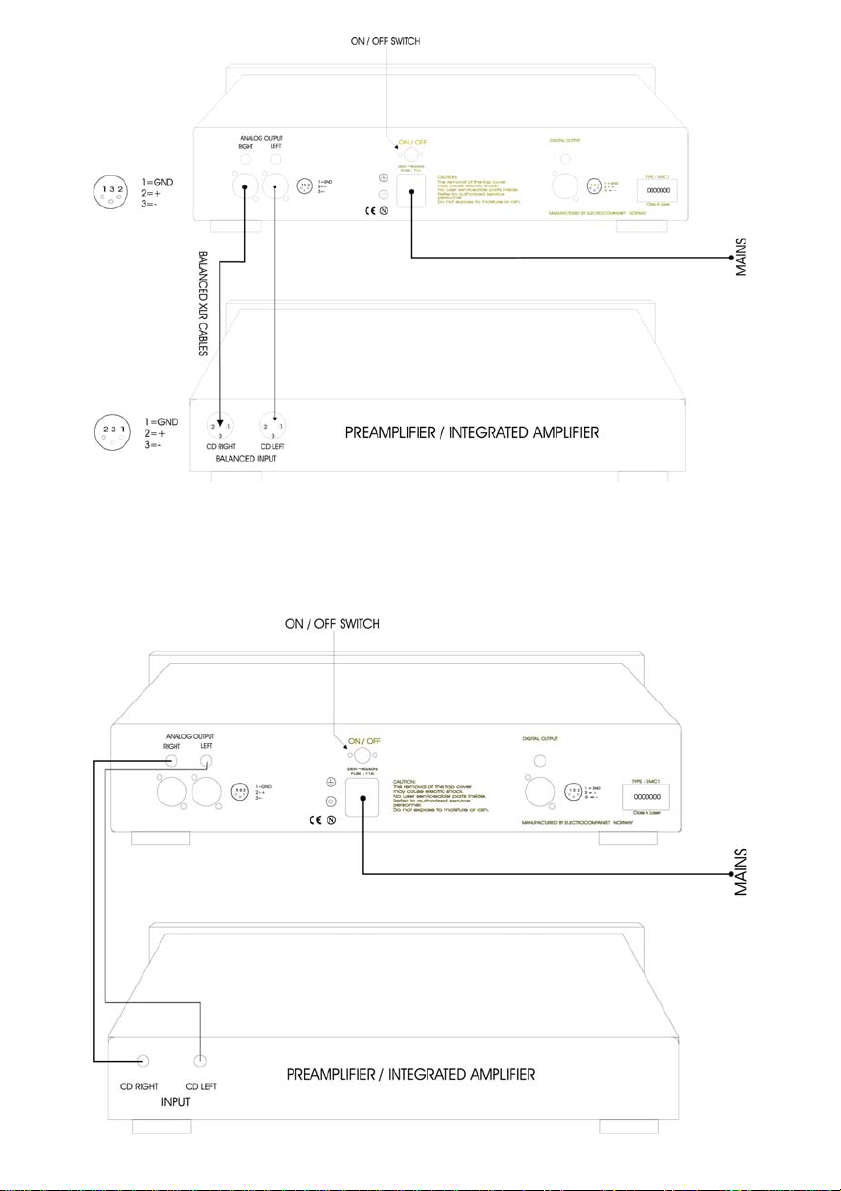
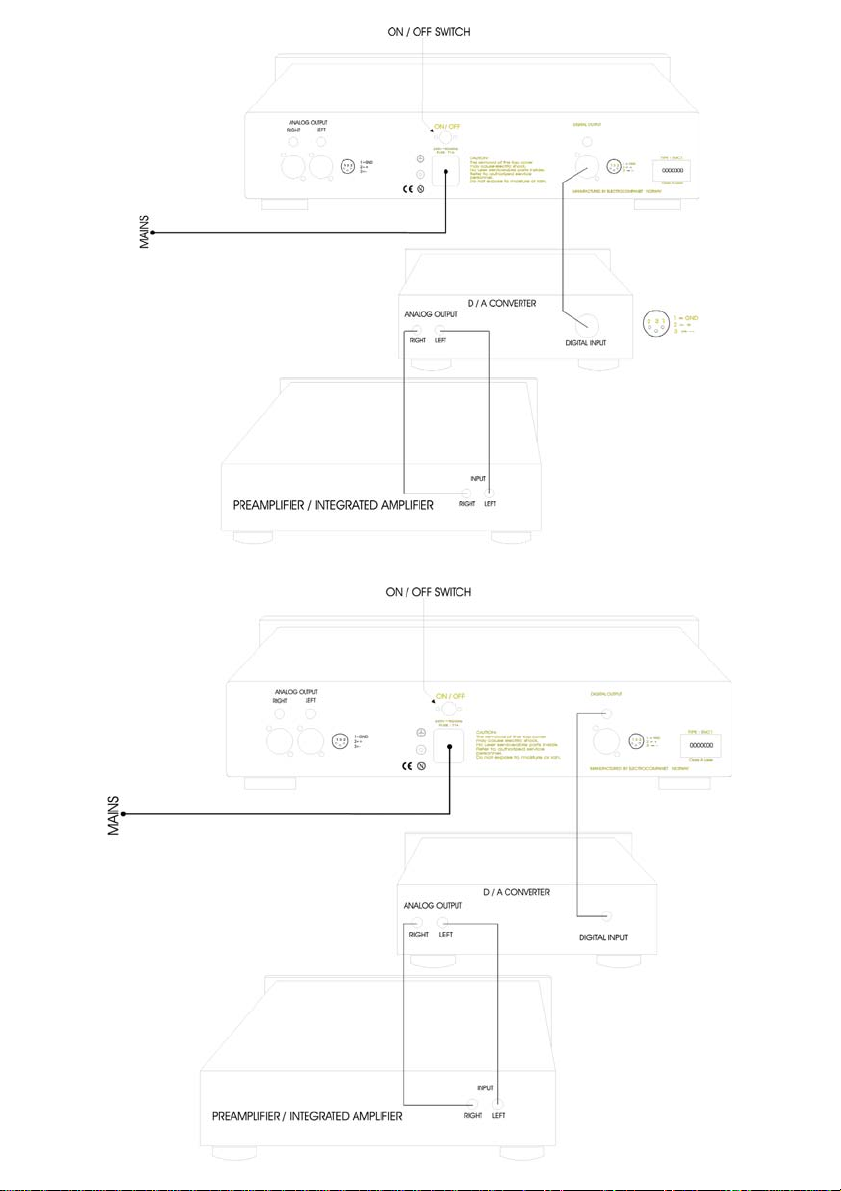
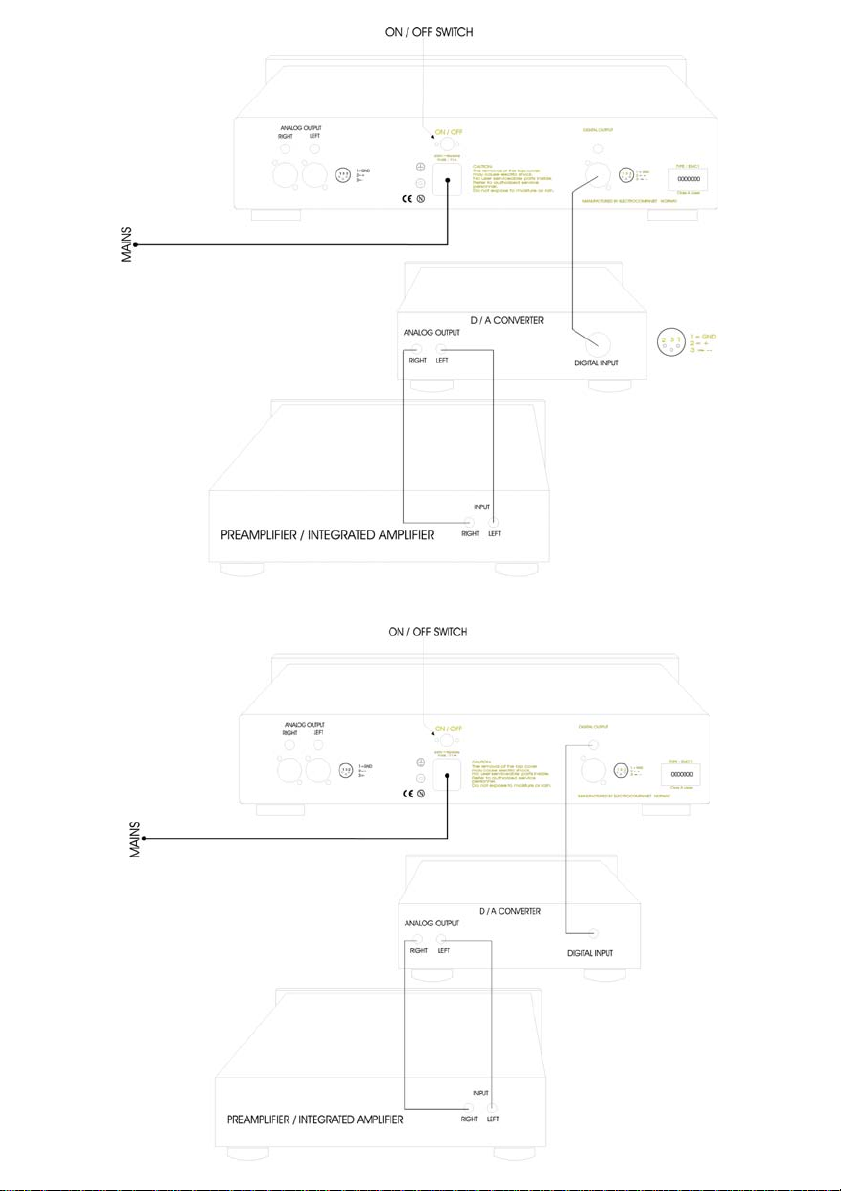
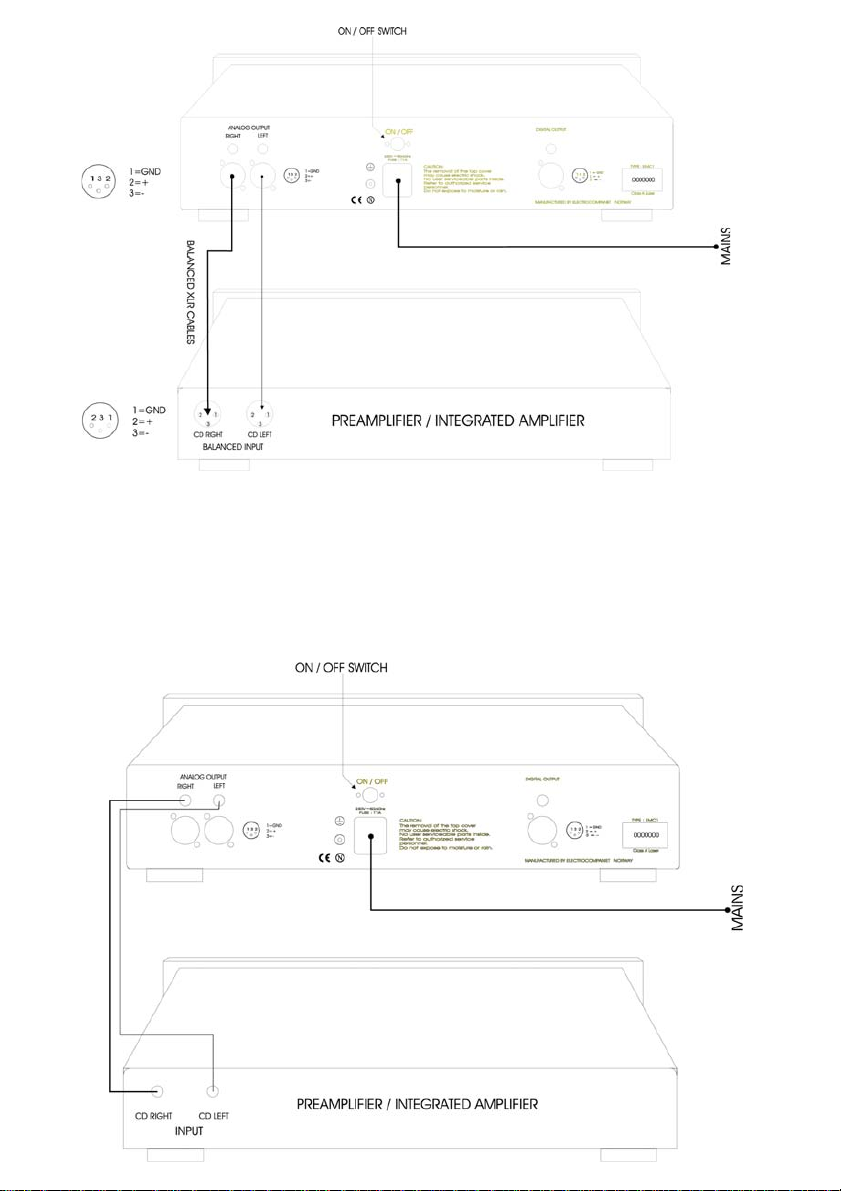
The power on/off button is localised just above the mains connector on the rear panel.
Generally, we recommend that you to use the Standby button located on the front panel, or
as an alternative, use the remote control.
The display will go dark. The e- sign on top of the unit will still be lit, indicating Standby mode.
When not using the EMC 1 for a long period, turn the mains switch off and disconnect the
unit from the mains outlet.
The four buttons on the right front panel have the following functions:
Top button = start/play
Right button = next
Left button = previous
Lower button = stop
How to Po wer up Your System
You should always power up your system in the following way:
Signal sources (CD Player, tuner etc.) and preamplifier first. Allow 30 seconds warm-up
before you turn on the power amplifier(s).
When turning off your system:
Start with the power amplifier(s), then the preamplifier, and finally the signal sources.
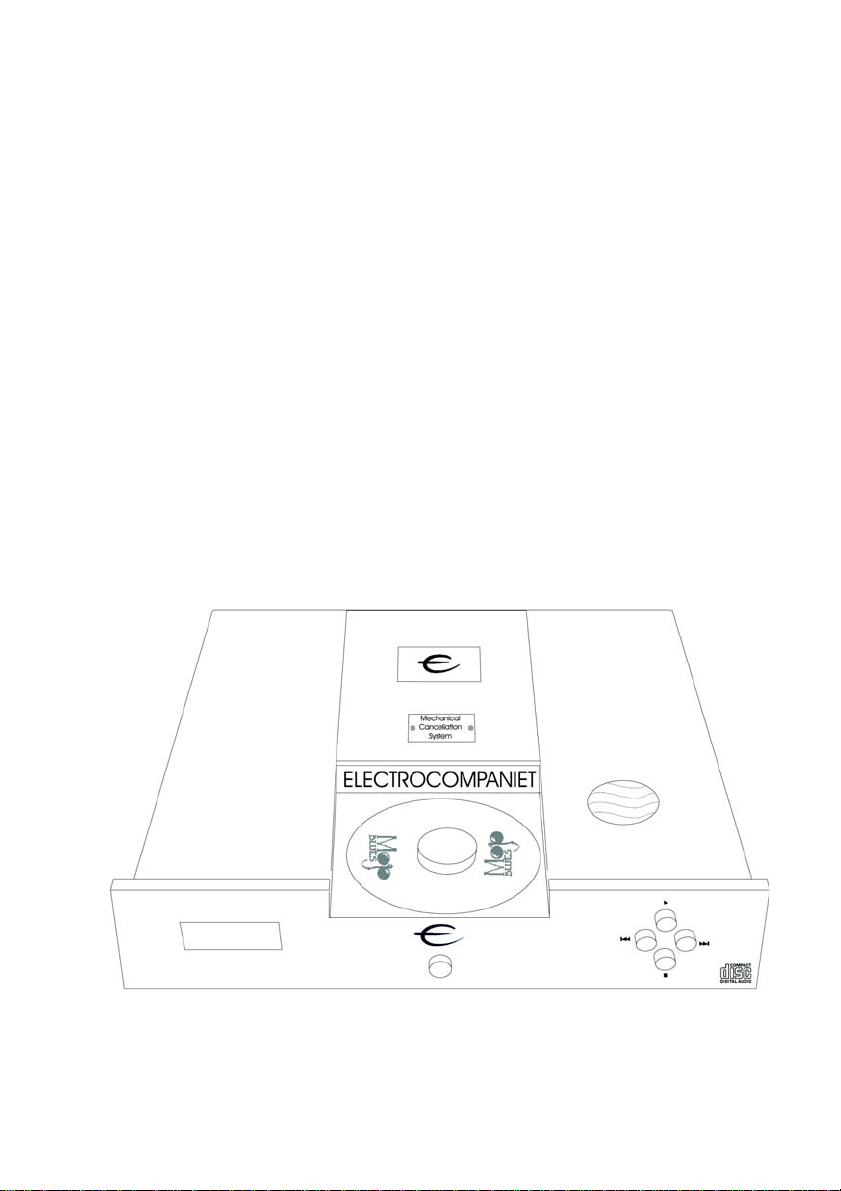
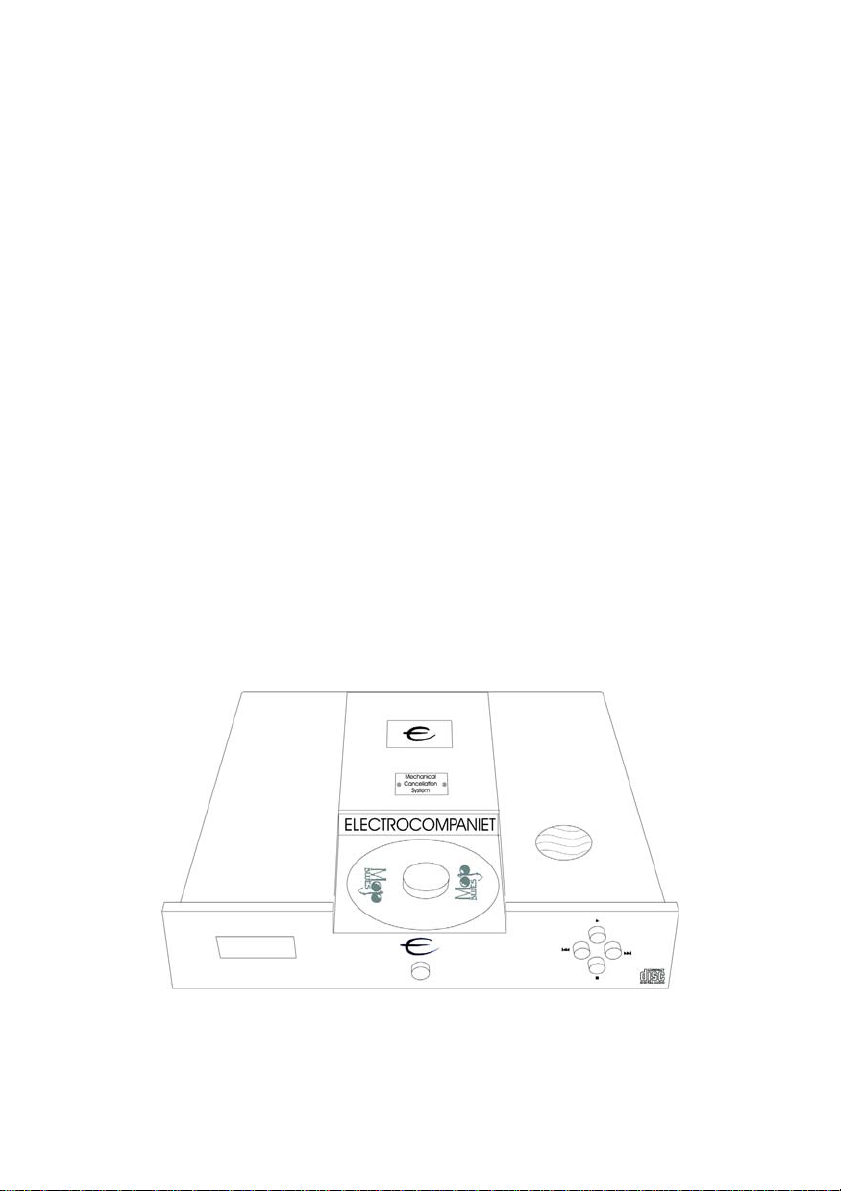
Loading a Disc
Load the disc by gently pushing the drawer marked “ELECTROCOMPANIET” towards the
rear of the unit. “Open” is shown on the display. Place the disc on the spindle. Then place
the CD-clamp on the spindle. The clamp now securely fastens the disc. Pull the cover all
the way home. The CD Player must first read and load vital information from the disc. This
process, indicated by a flashing display, takes approximately three seconds. Tracks and
total time are displayed. Press start/play and the first track starts to play. When changing a
disc, press the stop button on the front panel or on the remote control before opening the
drawer.
If the drawer is opened during playback, it will take the disc a few seconds to spin down.
Do not touch the disc until it has come to a complete standstill.
Warning:
The laser pick-up is located behind the spindle.
NEVER look directly into the laserbeam!!!
Under normal circumstances the laser needs no cleaning.
Do not use any kind of “cleaning CDs”!
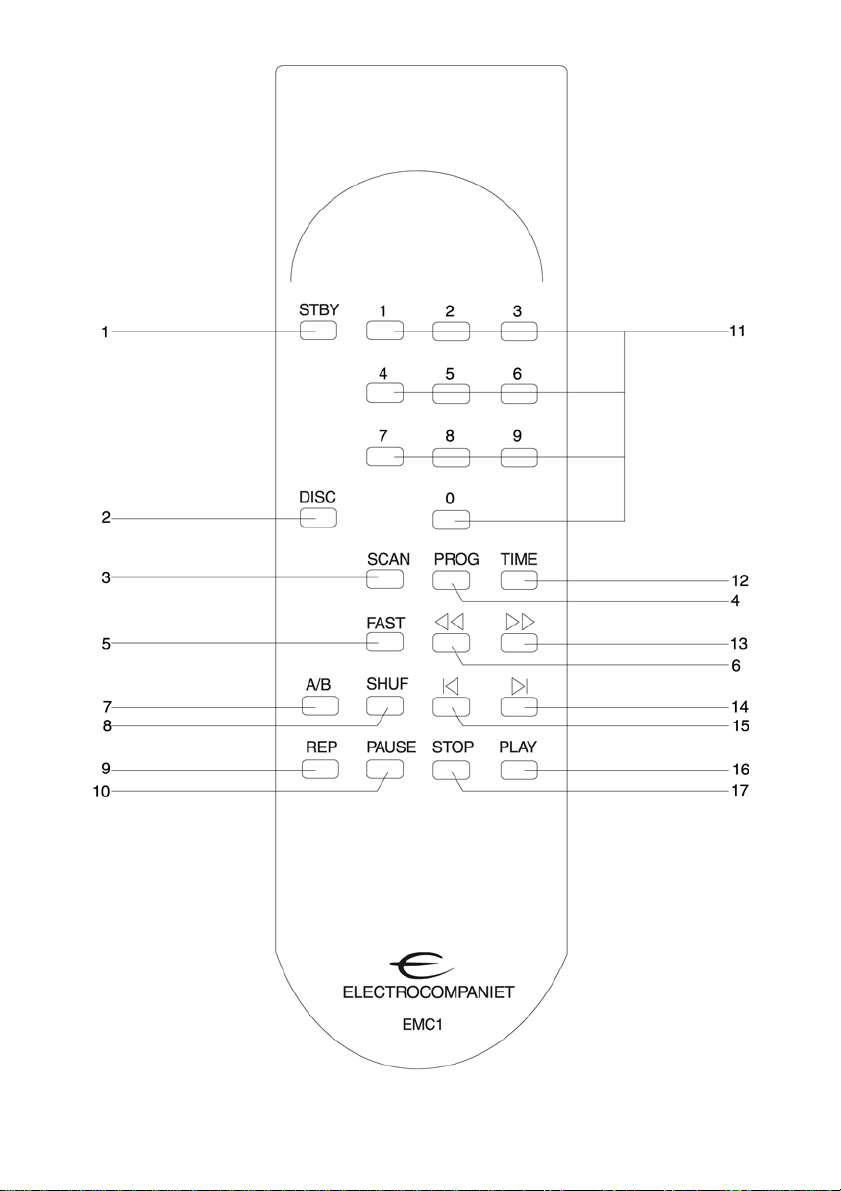

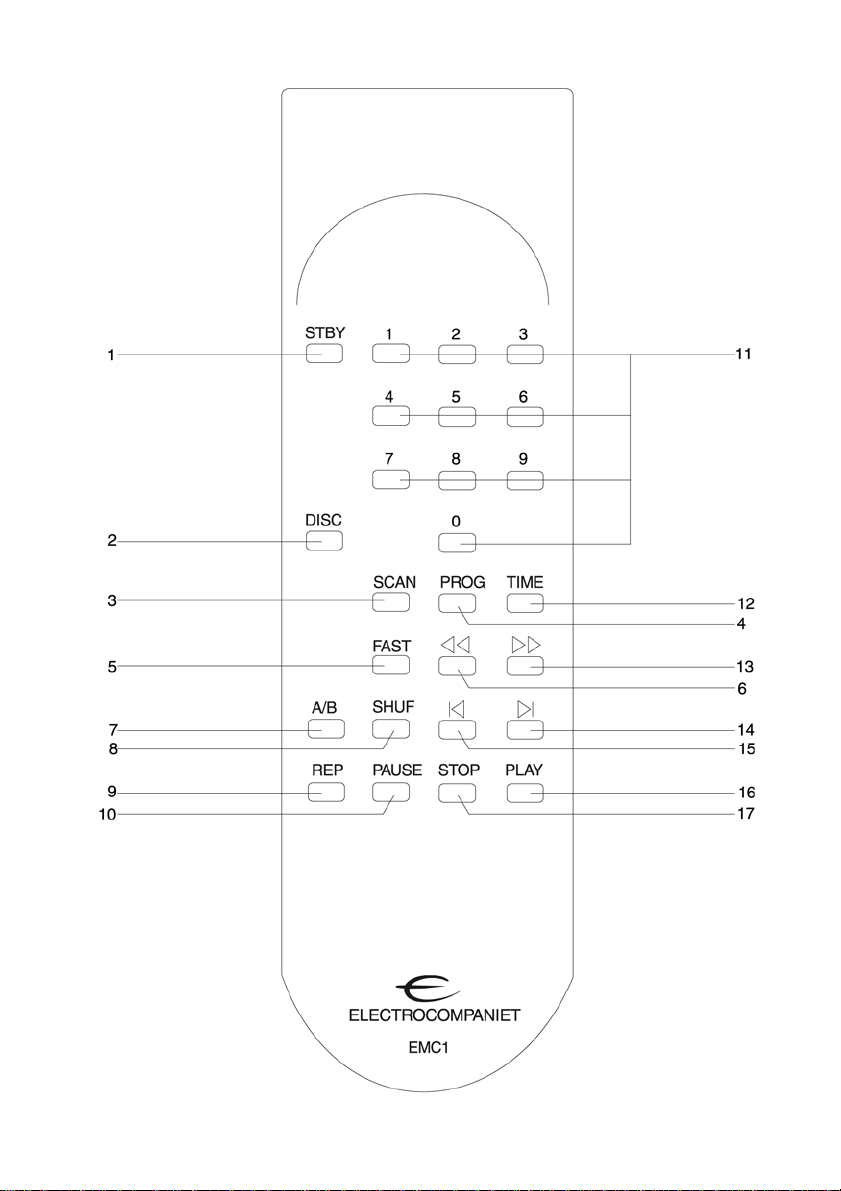
Remote control
1. STANDBY
2. DISC – No function.
3. SCAN – Play 10 seconds of each track.
4. PROG
a. Set the CD player in STOP MODE.
b. Select tracks with the numeric buttons (9), or step to the number using buttons
no. 14 or 15.
c. Press the PROG (4) button – the track is programmed.
Repeat b and c until all the tracks you wish to program is done.
After each track is programmed, the total playtime will be shown in the display.
If a track with number higher than 13 is programmed, the total playtime will not be
shown.
You can browse through the tracks with the buttons 14 and 15. On the tracks that
already are programmed, you will see a “P” shown in the display.
If you wish to remove a track from your program, choose the track number and
press PROG (4).
To monitor what is being programmed. Go back to STOP MODE.
Press PROG (4) – The display will now show the programmed tracks in the new
order.
The tracks are now stored in the order you programmed them and not in the
original numeric order.
If you press STOP (17) two times your program sequence will be erased.
5. FAST – press this button before you use the search buttons (6 or 13). The search
will go faster.
6. SEARCH BACKWARDS
7. A/B – Repeat a segment of the disc/track. Press the button once to mark the start
of the portion to be repeated. Press it again at the end of the desired sequence.
The selected area will play continuously until the STOP (17) button is pressed.
8. SHUF - The tracks will be played in a random order.
9. REP – Press this button once and all the tracks on the disc will be repeated.
The display will show “REPEAT”.
Press the button again, and it will only repeat the current track.
The display will show “REPEAT 1”
10. PAUSE – Pause on/off.
11. NUMERIC CONTROLS – Press these buttons to select a specific track on the disc.
For tracks 10 and above, the second digit of the number must be pressed within
one second.
12. TIME – Press once. In normal operation, the display will show the running time of a
track being played. Press the button once to check the time remaining for the track
in play. Press the button again to view the total playing time of the disc being
played.
13. SEARCH FORWARD
14. NEXT TRACK
15. PREVIOUS TRACK
16. PLAY
17. STOP
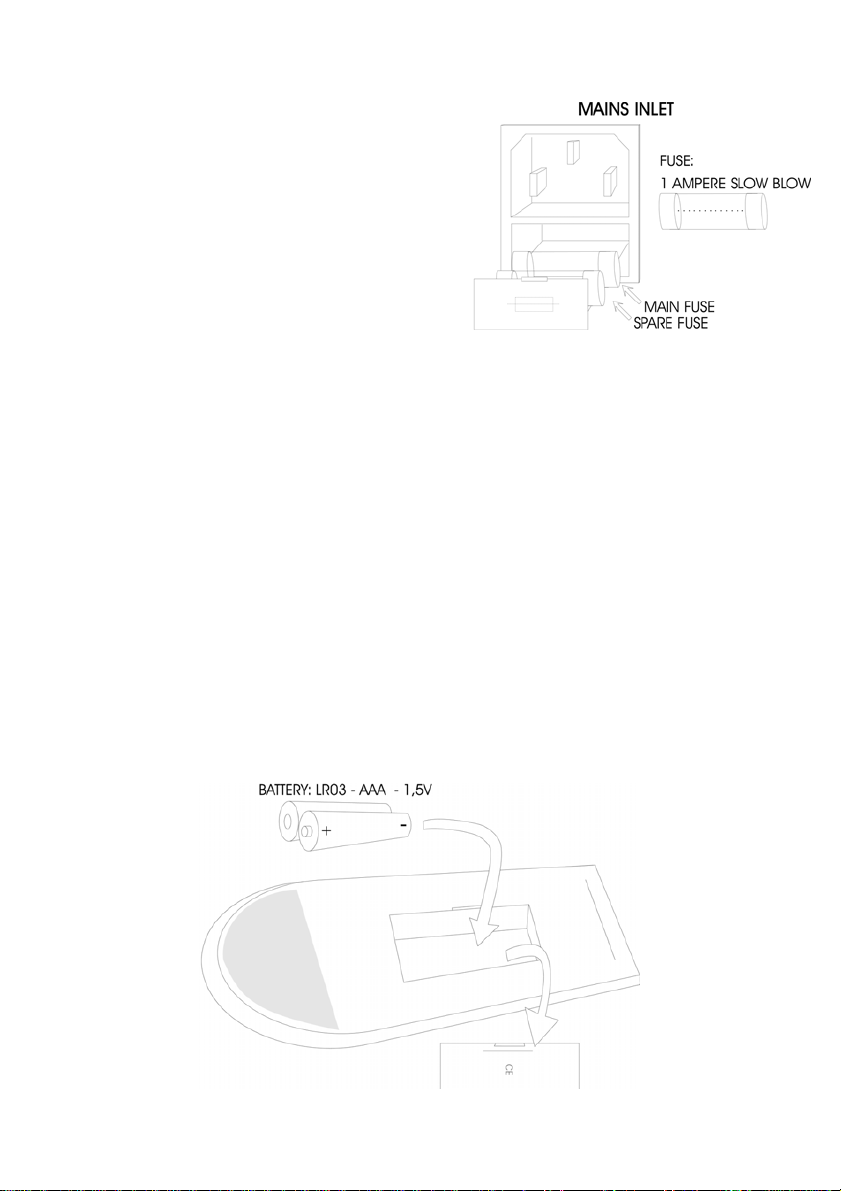
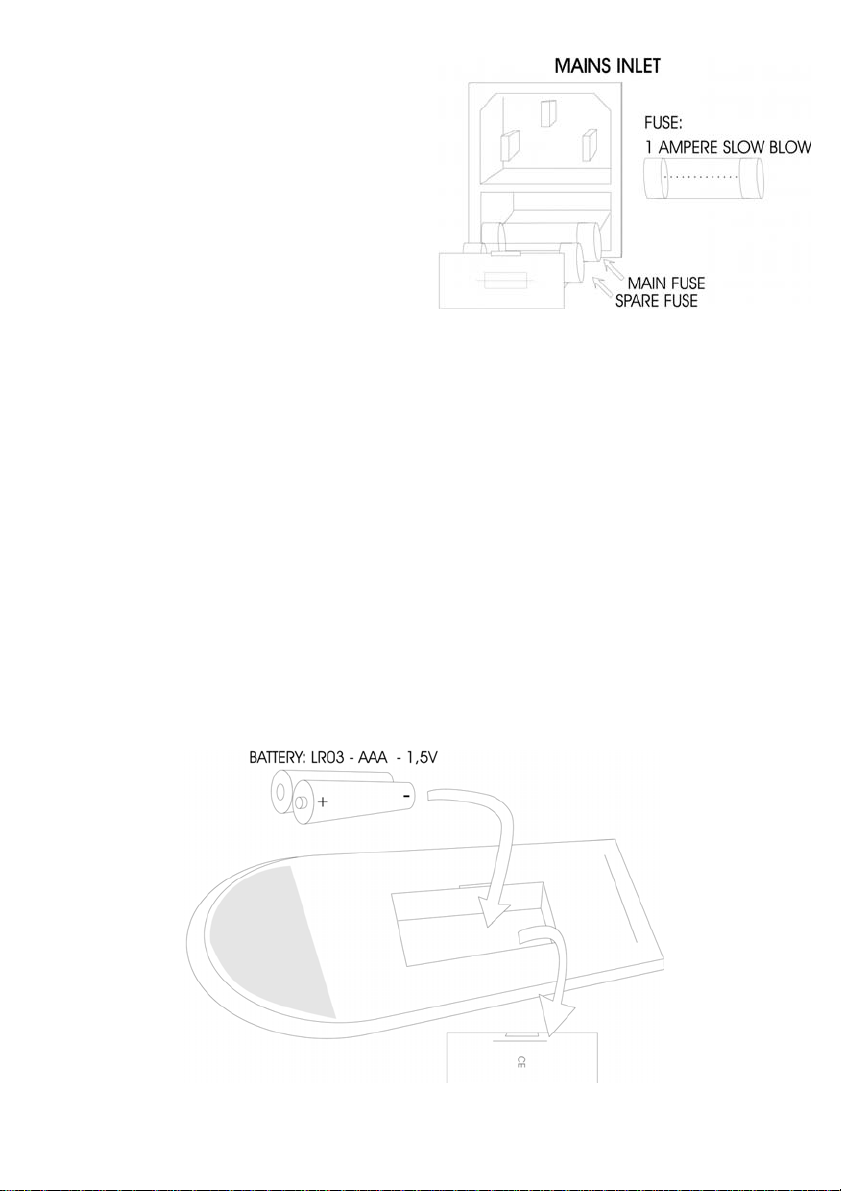
Replacing a blown Mains Fuse
Always remove the AC cord from the AC inlet.
The mains fuse is located in a small drawer
inside the AC inlet of the unit.
If, for some reason the fuse is blown, turn the
unit off, and remove the AC cord from the AC inlet.
Open the drawer with a small screwdriver and
remove the blown fuse.
The spare fuse is located inside a holder in
front of the mains fuse.
1. Remove and discard the blown fuse.
2. Remove the spare fuse gently by pushing
it sideways out of its holder.
3. Insert the spare fuse as the main fuse.
4. Push the drawer gently back to closed
position.
5. Re-insert the AC cord and turn the unit on.
Never replace the fuse with other
values than indicated on the unit!
Replacing Remote Control Batteries
Replace exhausted batteries by gently inserting your fingernail or small screwdriver in the
groove on the left side of the battery compartment cover. Lift the cover off, and insert a fresh
set of batteries as indicated by the diagram below. Be careful to follow the + and – polarity
indications at the bottom of the battery compartment.

Tec hnical Specifications EMC 1
Analog stage
Output level (unbalanced) 1,6 V
Output level (balanced) 3,2 V
Gain (unbalanced) 1.6 X (4 dB)
Gain (balanced) 3.2 X (10 dB)
Maximum output (balanced) > 14 V RMS
THD (1 V out, 1 kHz) < 0.002 %
Channel separation ( 1 V out, 1 kHz) > 90 dB
Equivalent input noise 4 uV
Output impedance 100 Ohm
Analog filter (-3 dB) 75 kHz
Digital stage
Dynamic range 100 dB
Signal to noise 100 dB
THD -100 dB
Frequency response 20 Hz - 20 kHz
Input / Output impedance (fixed) 75 Ohm
Sampling frequency in 32 - 48 kHz
Mains voltage 120V / 240V
Power consume 23 W
Dimensions
Width 483 mm (19 inches)
Depth 450 mm (17.7 inches)
Height 120 mm (4.7 inches)
Weight 20 kg (44 lbs..)
Specifications subject to change without notice.

Important Notice
For optimal sonic performance, the EMC 1 should be burned in for a minimum time of 72 hours.
The easiest way to burn in your EMC1 is to put a disc in REPEAT mode with the rest of
your system turned off.
In daily operation, switch off the CD Player by using the STANDBY button on either the
remote control or on the front panel.
If the CD Player has been switched off by the MAINS button on the rear panel, allow two
hours of warm-up to optimise sonic performance.
Due to high class A operation in all Electrocompaniet designs, it is normal for the CD
Player to feel warm. Proper ventilation is important. The CD player should by no means be
completely covered.
A good rule of thumb is to allow at least 3 – 5 cm (1 - 2 inches) of air sidewise, and 5 – 8
cm (2 - 3 inches) above the CD Player.
Please refer to Owner’s Manual for removal of the CD transport screw. The transport screw
must be removed for proper operation.
When moving the CD Player. Al wa ys re-insert and tighten the transport screw to avoid
severe damage to the unit!!!

Service Policy
If Service is needed
Your dealer will have all relevant information regarding the service centers in your area
and will ensure that your unit is serviced without delay.
It is our general policy to have your unit returned to you within 5 working days. This is an
average time, and could vary locally, depending on the work load at the service center.
If, for some reason, there are no service facilities available in your country, please ship the
unit to the following address:
Electrocompaniet A/S
Solheimsveien 36 1473 SKÅRER
Phone: +47 67 91 17 66 Fax: +47 67 91 17 60
E-mail: elcomp@electrocompaniet.no Web: http//www.electrocompaniet.no
The end- user is responsible for all shipping charges, insurance, reimportation and duty
charges. When shipping a product to the factory for service, always include the following:
1. A sales slip or other proof of purchase if repair is claimed under warranty.
2. A proforma invoice with value of goods, stating that the amplifier is returned to
Norway for repair.
3. An accompanying letter describing faults, symptoms, or problems with the unit.
4.Always ship the unit in its original carton and packaging material to prevent
damage in transit. Electrocompaniet will not cover damages incurred in transit.
PLEASE REMEMBER TO FASTEN THE TRANSPOR T FIXING SCREW!
If you require further information concerning the operation of the unit, or if you have any
questions related to service, please do not hesitate to contact your dealer or national
Electrocompaniet distributor.

MANUAL DEL USUARIO
Reproductor de CDs EMC 1
Advertencia: Para evitar el riesgo de incendios y descargas eléctricas, no exponga esta
unidad a la lluvia o a la humedad.
Verifique el voltaje.
No quite la cubierta. En el interior no hay piezas que deba reparar el usuario. Solicite las
reparaciones al personal de servicio capacitado.
La garantía quedará anulada si el producto es manipulado por personas no autorizadas.
Acuda solamente a servicios técnicos autorizados por Electrocompaniet.

Bienvenido al mundo de Electrocompaniet
Le agradecemos que haya elegido un producto de alta calidad de Electrocompaniet.
El EMC 1 de Electrocompaniet le concederá muchos años de una reproducción musical
maravillosa de acuerdo con sus grabaciones originales favoritas. Por favor, tómese tiempo
para leer este manual, así podrá obtener un resultado óptimo de su nuevo reproductor de CD.
La historia de Electrocompaniet
Electrocompaniet fue fundada en 1973 en Oslo, Noruega, para fabricar un amplificador de
transistor diseñado por Per Abrahamsen. El diseño estaba basado en un nuevo
acercamiento al diseño de un amplificador del Dr. Matti Otala y de Jan Lohstro. Se había
reconocido hacía mucho tiempo que los amplificadores tenían un sonido característico
que muchos amantes de la música encontraban poco natural. Otala y Lohstro analizaron
los amplificadores de transistor para determinar qué era lo que producía este “sonido de
transistor” en los diseños transistorizados. Los resultados de su innovador trabajo de
diseño fueron incorporados al primer diseño de Electrocompaniet, el legendario
amplificador de 25 vatios. Fue el primer amplificador de transistor comercial en utilizar
este nuevo diseño. Se reconoció que este amplificador era mucho más “musical” que
cualquier otro amplificador de transistor de la época.
La filosofía de diseño ha sido constantemente mejorada, gracias a investigaciones y
desarrollos continuos. Esta filosofía se conserva en todos los productos de
Electrocompaniet.
Técnicos y operarios capacitados fabrican cuidadosamente todos los productos
Electrocompaniet. Estos productos son siempre sometidos a duras pruebas para
garantizar una mejor actuación y fiabilidad.
Electrocompaniet siempre ha dado prioridad a las pruebas de audición en todos sus
productos. Cada producto diseñado por nuestros ingenieros tiene que alcanzar una serie
de estándares, fijados por un grupo de escucha, seleccionado cuidadosamente para
representar todos los gustos musicales. Los diseños de Electrocompaniet se analizan en
los laboratorios de diseño y en el grupo de escucha hasta que tanto los ingenieros como
los oyentes están satisfechos con el resultado final.
Nuestros productos de calidad se venden en todo el mundo y proporcionan el máximo
placer en la escucha a los más exigentes amantes de la música.

Diseño y construcción
La filosofía de diseño básica del reproductor de CDs EMC 1 está inspirada en el
conocimiento crucial aportado por el giradiscos analógico.
Principalmente no hay diferencia entre un tocadiscos y un reproductor de CDs. Ambos
sistemas de reproducción cuentan con un motor, un fonocaptor y una cápsula. Cier tos
fenómenos como la resonancia de la cápsula, que se ha encontrado en los giradiscos
analógicos son igual de problemáticos en los típicos reproductores de CDs.
Para reducir o evitar estos fenómenos y otras resonancias no deseadas,
Electrocompaniet ha desarrollado un filtro mecánico patentado, que ha sido ajustado a
la frecuencia según nuestro panel de escucha en varias pruebas. El filtro mecánico evita
que cualquier componente de vibración externa o interna entre en el bloque de lectura
láser, teniendo como resultado una reproducción superior con un bajo más preciso, una
escena sonora más amplia, mayor precisión, alta resolución y un detalle sorprendente.
El convertidor D/A es una sofisticada unidad balanceada, de 24-bit y 96KHz. Debido a su
alta frecuencia de muestreo, la frecuencia del ancho de banda se aumenta una octava
en comparación con los sistemas de CD estándar, que usan una frecuencia de muestreo
de 44.1 KHz.
Todos los circuitos analógicos están totalmente balanceados y son simétr icos, de forma
similar al diseño de nuestros amplificadores.
Cuatro fuentes separadas, con Floating Transformer Technology (FTT), alimentan la
unidad digital, el display, el mecanismo de reproducción y la unidad analógica.

Desempaquetado del reproductor de CDs
Inmediatamente después de la recepción del reproductor de CDs EMC 1, inspeccione el
embalaje, buscando posibles daños ocurridos durante el transporte. La caja y el embalaje han
sido diseñados para proporcionar la protección más segura durante el transporte de la unidad.
Desempaquete el reproductor de CDs con cuidado. Guarde todo el material de embalaje
para futuros transportes.
Contenido de la caja
1 reproductor de CDs EMC 1, de Electrocompaniet
1 cable de CA
1 fusible lento de 1 amperio (vaya a la página 12 para más información sobre cómo
cambiar un fusible fundido)
1 clamp (presor) para el CD
1 manual de instrucciones
1 almohadilla circular de fieltro autoadhesivo para el clamp cuando no esté siendo
utilizado
1 nivel para nivelar el reproductor de CDs
2 llaves Allen para asegurar el sistema de cancelación electromecánico
1 control remoto con pilas
Instalación
Asegúrese de que el voltaje de red señalado en el panel trasero del reproductor de CDs
corresponda con el voltaje del territorio donde usted desee instalar la unidad.
Cómo evitar daños
Una buena manera de actuar es apagar todo el equipo antes de realizar cualquier conexión o desconexión.
Bajo ninguna circunstancia conecte o desconecte algo estando el equipo encendido. El diseño de la clavija
RCA genera una enorme corriente cuando se conecta. El conectar o desconectar el equipo estando éste
encendido podría causar serios daños tanto en los alta v oces como en el amplificador.
Cómo evitar problemas de ruido
El EMC 1 contiene circuitos muy delicados que son muy sensibles a los campos magnéticos. La
unidad no deberá ser situada cerca de transformadores, aparatos de televisión, etc. También se
debería tener cuidado con la colocación de los cables interconectados. No sitúe cables
interconectados de forma paralela a los cables principales o a los cables de los altavoces.
Mantenga los cables interconectados todo lo cortos que le sea posible.
1. Para obtener el mejor resultado, el EMC 1
tiene que estar nivelado. Coloque el
reproductor de CDs en una superficie plana
y nivelada. Haga todas las conexiones del
panel trasero.
2. Desenrosque las tuercas Allen, con la
llave Allen pequeña sobre el signo dorado
“Mechanical Cancellation System”. Afloje la
tuerca situada debajo de este signo dorado
con la llave Allen grande. Desenrósquela
en el sentido de las agujas del reloj. Ponga
de nuevo el signo dorado en su sitio y
apriete las tuercas Allen pequeñas.
¡Importante!
Conserve las llaves Allen y el nivel en un sitio seguro para un posible uso futuro. Ajuste
siempre los tornillos de fijación de transporte cuando vaya a mover el reproductor de CDs.
El mecanismo de amortiguación del EMC 1 pesa ocho kilogramos.
Si la unidad no está bien ajustada, ésta resultará seriamente dañada, perdiéndose además la garantía.
Sin embargo, tampoco deberá ajustar demasiado las tuercas de transporte.
Almohadilla circular de fieltro
El clamp del CD del EMC 1 está realizado con materiales
magnéticos y podrían rayar el acabado de la cubierta del
reproductor de CDs si se pone directamente encima de éste.
Utilizando el círculo de fieltro proporcionado evitará estas marcas.

Controles de los paneles frontal y trasero
El botón de encendido y apagado está localizado justo encima del conector a red del
panel trasero. Generalmente recomendamos que use el botón Standby, situado en el
panel frontal, o como alternativa, use el mando a distancia.
El display se apagará. El signo E de encima de la unidad seguirá estando encendido,
indicando que ésta se encuentra en el modo Standby.
Cuando la unidad EMC 1 vaya a estar mucho tiempo sin ser utilizada, apague el
interruptor de red y desconéctela.
Los cuatro botones del panel frontal derecho tienen las siguientes funciones:
botón superior = play
botón derecho = next (siguiente)
botón izquierdo = previous (anterior)
botón inferior = stop
Cómo conectar el sistema
Siempre deberá conectar el sistema de la siguiente forma:
Conecte las fuentes de señales (reproductor de CDs, radio, etc.) y el preamplificador en
primer lugar. Deje que transcurran 30 segundos para que se calienten antes de encender
el amplificador.
Cuando apague el sistema:
Empiece por el amplificador, luego el preamplificador y, finalmente, las fuentes de señales.
Introducción de discos
Introduzca en disco compacto empujando la bandeja, con la marca
“ELECTROCOMPANIET” hacia la parte trasera de la unidad. Se podrá ver la palabra
“open” en el display. Sitúe el disco en el eje. A continuación coloque el clamp del CD en el
eje. El clamp está ahora sujetando el disco. Tire de la cubierta. El reproductor primero
tiene que leer y cargar cierta información del disco. Este proceso, cuyo desarrollo se
indica con el display parpadeando, necesita aproximadamente tres segundos para ser
llevado a cabo. A continuación podrá leer el número de canciones y la duración total del
disco en el display. Pulse start/play y podrá escuchar la primera canción. Cuando cambie
el disco, pulse primero el botón de stop del panel frontal o del mando a distancia antes de
abrir la bandeja. Si se abre la bandeja durante la escucha, el disco necesitará un par de
segundos para detenerse completamente. No toque el disco hasta que se haya parado del todo.
Advertencia:
El láser está situado detrás del eje. NUNCA mire directamente al rayo de láser. Bajo
circunstancias normales, el láser no necesita ningún cuidado ni limpieza. No utilice
ningún tipo de CDs limpiadores.

Control remoto
1. STANDBY
2. DISC- sin función
3. SCAN- reproducción de diez segundos de cada canción
4. PROG
a. Sitúe el reproductor de STOP MODE.
b. Seleccione las canciones que quiera programar con los botones numéricos (9), o
avance hasta los números deseados con los botones 14 y 15.
c. Pulse el botón PROG (4)- la canción estará programada.
Repita los pasos b y c hasta que haya programado todas las canciones que desee.
Después de que cada canción haya sido programada, podrá ver el tiempo total de
reproducción en el display. Si se programa una canción cuyo número sea superior 13, ya
no se podrá ver el tiempo total de reproducción.
Podrá cambiar de canción utilizando los botones 14 y 15. En las canciones que ya están
programadas, podrá ver una “P” en el display.
Si desea borrar una canción de su programación, elija el número y pulse PROG (4).
Para poder ver qué se está programando, vuelva al STOP MODE.
Pulse PROG (4)- El display mostrará ahora las canciones programadas en un nuevo
orden.
Las canciones estarán ahora en el orden en el que usted las ha programado, no en su
orden original
Si pulsa STOP (17) dos veces, borrará la secuencia de programación.
5. FAST- pulse este botón antes de utilizar los botones de búsqueda (6 ó 13). La
búsqueda será más rápida.
6. SEARCH BACKWARDS
7. A/B- para poder repetir un segmento del disco o de la canción. Pulse este botón una
vez para marcar dónde desea que comience en segmento a repetir. Púlselo de nuevo al
final de la secuencia deseada. El área seleccionada será reproducida de forma continua
hasta que se pulse el botón STOP (17).
8. SHUF- Las canciones serán reproducidas en un orden aleatorio.
9. REP- Pulse este botón una vez y se repetirán todas las canciones del disco. En el
display se iluminará la palabra “REPEAT”. Pulse el botón otra vez y sólo repetirá la
canción que esté siendo reproducida en ese momento. El display mostrará la palabra
“REPEAT 1”.
10. PAUSE- Para hacer una pausa y para reanudar la reproducción.
11. NUMERIC CONTROLS- pulse estos botones para seleccionar una determinada
canción del disco. Para canciones con un número mayor de 10, el segundo dígito tendrá
que ser pulsado en menos de un segundo.
12. TIME- Púlselo una vez. En una operaci ón normal, el display mostrará el tiempo de
reproducción de una canción. Pulse el botón una vez para comprobar el tiempo restante
de reproducción (de una canción). Pulse el botón otra vez para ver el tiempo total de
reproducción del CD.
13. SEARCH FORWARD
14. NEXT TRACK
15. PREVIOUS TRACK
16. PLAY
17.STOP

Cómo cambiar un fusible fundido
Retire siempre el cable de CA del enchufe.
El fusible de red está situado en un
pequeño cajetín dentro del enchufe de la unidad.
Si por alguna razón se fundiera el fusible, apague
la unidad, retire el cable de CA del enchufe.
Abra el cajetín con un destornillador pequeño
y retire el fusible fundido. El fusible de recambio
está situado dentro de un receptáculo delante
del fusible de red.
1. Retire y descarte el fusible fundido.
2. Retire el fusible de recambio empujando suavemente por los lados.
3. Inserte el fusible de recambio como el principal.
4. Cierre el cajetín suavemente.
5. Reinserte el cable de CA y encienda la unidad.
Nunca cambie un fusible por otro con otros valores que no sean los indicados en la
unidad.
Cómo cambiar las baterías del control remoto
Para cambiar las baterías agotadas, levante suavemente la tapa del compartimento en el
que están alojadas, insertando por ejemplo un pequeño destornillador en la parte
izquierda. Inserte un nuevo par de baterías como se indica en el siguiente diagrama.
Preste atención a las indicaciones sobre la polaridad, impresas en el compartimento para
las baterías.

Especificaciones técnicas de la unidad EMC 1
Nivel analógico
Nivel de salida (sin balancear) 1.6 V
Nivel de salida (balanceado) 3.2 V
Ganancia (sin balancear) 1.6 X (4dB)
Ganancia (balanceada) 3.2 X (10dB)
Salida máxima (balanceada) > 14 V RMS
THD (1 V, 1kHz) < 0.002 %
Separación de canales (1V, 1kHz) > 90dB
Ruido de entrada equivalente 4 uV
Impedancia de salida 100 Ohm
Filtro analógico (-3dB) 75 kHz
Nivel digital
Rango dinámico 100dB
Señal a ruido 100 dB
THD -100dB
Respuesta de frecuencia 20 Hz – 20kHz
Impedancia de entrada/salida (fija) 75 Ohm
Frecuencia de muestreo en 32 – 48 kHz
Voltaje 120V/ 240V
Consumo de energía 23 W
Dimensiones
Anchura 483mm (19 pulgadas)
Profundidad 450mm (17.7 pulgadas)
Altura 120mm (4.7 pulgadas)
Peso 20 kg (44 libras)
Las especificaciones están sujetas a cambios sin previo aviso

Importante
Para un resultado óptimo del sonido, la unidad EMC 1 deberá tener un tiempo mínimo de
rodaje de 72 horas.
La manera más fácil de hacer el rodaje de su unidad es poner un disco en el modo
REPEAT, con el resto de su sistema apagado.
En el uso diario, apague el reproductor de CDs utilizando el botón STANDBY en el control
remoto o en el panel delantero.
Si se ha apagado el reproductor utilizando el botón principal del panel trasero, permita
que pasen dos horas de calentamiento para optimizar el sonido.
Debido a la alta polarización en clase A de todos los diseños de Electrocompaniet, es
normal que la unidad esté caliente. Es importante que tenga una ventilación adecuada. El
reproductor de CDs no deberá estar, en ningún caso, completamente cubierto.
Una buena medida es dejar aproximadamente entre 3 y 5 centímetros (1-2 pulgadas) de
separación por los lados y de cinco a ocho centímetros (2-3 pulgadas) por encima.
Le referimos al manual del usuario para el retiro de los tornillos de fijación de transporte.
Éstos deberán ser retirados para que la unidad funcione correctamente.
Cuando mueva el reproductor, reinser te y ajuste siempre los tornillos de fijación de
transporte para evitar serios daños.
Electrocompaniet se complace en anunciar que pronto estará a su disposición un nuevo
control remoto. Este control remoto está especialmente recomendado para todos los
productos Electrocompaniet.

Si necesitara nuestros servicios
Su distribuidor tendrá toda la información necesaria acerca de los centros de servicio
técnico en su zona y se asegurará de que su unidad sea atendida sin demora.
Nuestra política general es que usted reciba su unidad en el transcurso de cinco días
laborables. Este es un tiempo medio y podría variar dependiendo de la zona donde usted
viva y de la sobrecarga de trabajo que pudiera tener el servicio técnico.
Si, por alguna razón, no hubiera facilidades en su país, envíenos la unidad a la siguiente
dirección:
Electrocompaniet A/S
Solheimsveien 36 1473 SKÅRER
Teléfono: +47 67 91 17 66 Fax: +47 67 91 17 60
E-mail: elcomp@electrocompaniet.no Web: http//www.electrocompaniet.no
El usuario correrá con los gastos de envío, de aseguradoras, de reimportación y de
aduana. Cuando envíe un producto a la fábrica para su reparación, incluya siempre lo
siguiente:
1. Una prueba de compra si el producto está en garantía.
2. Una factura simulada con el valor del material, afirmando que el amplificador está
siendo devuelto a Noruega para su reparación.
3. Una carta describiendo los fallos, síntomas o problemas de la unidad.
4. Envíe siempre la unidad utilizando el embalaje original para evitar posibles daños.
Electrocompaniet no cubrirá los daños que pudieran tener lugar durante el transporte.
¡RECUERDE AJUSTAR LOS TORNILLOS DE FIJACIÓN DE TRANSPORTE!
Si necesita más información referente al funcionamiento de la unidad, o si tiene alguna
pregunta sobre el servicio técnico, no dude en contactar con su vendedor o el distribuidor
nacional de Electrocompaniet.

Mode d’Emploi
EMC 1 Lecteur CD Référence
Précaution : Afin d’éviter tout risque de feu ou de choc électrique, ne pas exposer cet
appareil à la pluie ou à l’humidité.
Ne pas ouvrir l’appareil, ne contenant pas de fonctions pouvant être modifiées par
l’utilisateur. Service à effectuer uniquement par un personnel qualifié. La garantie devient
caduque dès que l’appareil a été ouvert par une personne non-autorisée. Faites intervenir
dans tous les cas un centre technique ELECTROCOMPANIET.

Bienvenue dans le monde ELECTROCOMPANIET
Nous vous remercions d’avoir choisi un produit audio haut de gamme
ELECTROCOMPANIET.
Le EMC 1 ELECTROCOMPANIET vous offrira de nombreuses années de reproduction
musicale merveilleusement conforme aux bandes MASTER de vos enregistrements
préférés. Prenez le temps de lire ce manuel afin d’obtenir les performances optimales de
votre lecteur CD.
L ’histoire ELECTR OCOMP ANIET
Electrocompaniet a été fondé en 1973 à Oslo, Norvège, afin de produire un amplificateur
imaginé par M. Per Abrahamsen. Le design était basé sur une nouvelle approche des
circuits transistorisés développée par le Dr. Matti Otala et M. Jan Lohstro.
Les amplificateurs transistorisés étaient déjà reconnus comme ayant une sonorité
caractéristique que beaucoup d’audiophiles et mélomanes ne considéraient pas comme
naturelle.
Dr. Otala et M. Lohstro analysèrent les amplificateurs transistorisés afin de déterminer ce
qui créait le “son transistor” en général avec de tels circuits.
Le résultat de leurs innovations fut intégré dans le premier produit ELECTROCOMPANIET
- le légendaire amplificateur 25 W, qui fut le premier à exploiter cette nouvelle approche.
L’amplificateur fut immédiatement reconnu comme étant beaucoup plus musical que
n’importe quel autre amplificateur à transistors de l’époque.
Cette philosophie des conceptions de circuits a constamment été développée à travers
une recherche continuelle, et est mise à contribution dans tous les produits
ELECTROCOMPANIET.
Nos techniciens et monteurs qualifiés produisent avec précaution tous les appareils
ELECTROCOMPANIET, qui sont ensuite testés individuellement en ce qui concerne leurs
performances et stabilité à long terme.
ELECTROCOMPANIET a toujours attribué la plus haute prior ité aux tests d’écoute
systématiques pour toutes les réalisations. Tous les produits créés par nos ingénieurs
doivent se conformer à une variété de standards définis par un panel d’auditeurs
soigneusement sélectionnés afin de représenter un large éventail d’expérience et de
goûts musicaux. Toutes les réalisations sont présentées par le laboratoire de recherche au
panel le nombre de fois nécessaires afin qu’aussi bien les auditeurs que les ingénieurs
soient parfaitement satisfaits du résultat final.
Nos produits de qualité sont vendus à travers le monde et offrent le “top-niveau” en
matière de plaisir d’écoute aux amateurs de musique.

Conception et construction
La philosophie à la base du transport EMC 1 a été inspirée par des connaissances
approfondies en matière de tables de lecture analogiques.
A certains égards, il n’y a pas de différences entre une table de lecture analogique et un
lecteur CD. Les deux systèmes de reproduction compor tent un moteur, un dispositif de
lecture et un bras. Les phénomènes tels que les résonances apparaissant dans le bras
d’une table de lecture analogique sont tout aussi problématiques dans les lecteurs CD.
Afin de réduire ou d’éliminer ce phénomène ainsi que d’autres résonances indésirables,
Electrocompaniet a conçu un filtre mécanique spécifique, à fréquence ajustée par notre
panel d’auditeurs lors de tests d’écoute répétés. Le filtre mécanique empêche les
vibrations internes et externes de pénétrer le dispositif de lecture laser, ce qui a pour
résultat une reproduction supérieure avec des basses plus solides, un espace sonore
plus grand, une précision et résolution optimum et une perception étonnante des détails.
Le convertisseur D/A est un dispositif sophistiqué 24 bit - 96 kHz symétrique. Grâce à la
fréquence d’échantillonnage plus élevée, la bande passante est élevée d’un octave vers
le haut par rapport aux systèmes CD traditionnels utilisant la fréquence usuelle de 44,1
kHz.
Tous les circuits audio analogiques sont totalement symétr iques, comme dans les
amplificateurs.
Quatre alimentations séparées basées sur la technologie à transformateur flottant (FTT)
fournissent l’énergie électrique nécessaire au circuit digital, à l’indicateur lumineux, à la
partie mécanique et à l’unité analogique.

Déballage du lecteur CD
Immédiatement après réception du lecteur EMC 1 : Inspectez le carton afin de détecter
d’éventuels dommages dus au transport. Le carton et matériel d’emballage ont été prévus
afin de fournir une protection maximum lors du transport de votre lecteur CD.
Déballez le lecteur avec précaution et gardez l’emballage en cas de transport futur.
Le contenu du carton
1 pc EMC 1 ELECTROCOMPANIET CD Player
1 pc cordon alimentation secteur
1 pc fusible “Slow Blow” 1 Ampère (voir plus loin pour le changement du fusible)
1 pc palet presseur magnétique
1 pc mode d’emploi
1 pc tissu rond autocollant pour poser le palet presseur à l’endroit désiré
1 pc niveau circulaire pour ajuster la position horizontale du lecteur
2 pcs clés “Allen” pour (dé)bloquer le système de suspension
Procédure de mise en place
En branchant l’alimentation secteur vérifiez que le voltage indiqué sur le panneau arrière
correspond bien à la tension secteur disponible à l’endroit où vous vous trouvez.
Eviter tous dommages possibles
Une bonne pratique consiste à éteindre tout l’équipement avant d’effectuer une nouvelle
connexion. Ne jamais connecter ou déconnecter d’équipement lorsque le système est
sous tension. Les connections RCA peuvent notamment générer une énorme transitoire
lors de la connexion. Ceci peut sérieusement endommager tout amplificateur et hautparleurs.
Eviter les problèmes de bruit
Le EMC 1 contient des circuits sensibles aux champs magnétiques. L’appareil ne devrait
pas se trouver proche de transformateurs de puissance ou par exemple d’un téléviseur. Il
faut aussi faire attention à l’emplacement des câbles de connexion, en évitant de les
placer parallèlement à des câbles d’alimentation secteur ou de haut-parleurs. Les câbles
de connexion devraient idéalement être les plus courts possibles.
1
Placer le lecteur horizontalement
sur une surface plane. Effectuer
les connections à l’arrière.
2
Dévisser les vis maintenant la
petite plaque indiquant “Mechanical
Cancellation System” avec la petite clé
Allen. Dé-serrer l’élément bloquant
le transport avec la plus grande clé
Allen.
Remettre ensuite la plaque dorée en
serrant les vis avec la petite clé Allen.
IMPORTANT !
Garder les clés Allen et le niveau pour toute utilisation future. Toujours bloquer la
suspension lorsque le lecteur doit être transporté. Le système de suspension pèse 8 Kg
et peut sérieusement endommager le lecteur si il n’est pas bloqué pendant le transport.
En cas de non-respect de ces prescriptions, la garantie devient caduque. Ne pas
utiliser trop de force lors du serrage de la suspension.
Le palet presseur du EMC 1 est
fait d’un matériau magnétique et peut
rayer la finition du lecteur si on le
place directement dessus. Le rond de
tissu fourni permet d’éviter
toutes marques sur l’appareil.

Panneau de contrôle et fonctions
Le bouton de mise sous tension on/off se trouve à l’arrière de l’appareil juste en dessus
de la connexion secteur. Généralement, nous recommandons l’utilisation du bouton
STANDBY se trouvant à l’avant et sur la télécommande, en laissant le lecteur en mode
STANDBY lorsqu’il n’est pas utilisé. En mode STANDBY, l’affichage à l’avant s’éteint.
Lorsque le lecteur n’est pas utilisé pendant une longue période, éteindre la mise sous
tension à l’arrière et débrancher la prise secteur.
Les quatre boutons à l’avant ont les fonctions suivantes :
Bouton du haut : Start / Play
Bouton de droite : Morceau suivant
Bouton gauche : Morceau précédant
Bouton du bas : Stop
Mise en marche du système
Votre système devrait toujours être mis en marche selon la procédure suivante : Sources
et préamplificateur d’abord. Attendre env. 30 sec. avant la mise en marche de
l’amplificateur de puissance. Lors de l’arrêt du système : Arrêter d’abord l’amplificateur de
puissance, ensuite le préamplificateur, et finalement les sources.
Chargement d’un CD
Charger le disque en poussant doucement vers l’arrière de l’unité le tiroir indiquant
“ELECTROCOMPANIET”. L’indicateur lumineux affiche alors “OPEN”. Placer le disque sur
l’axe. Placer ensuite le palet - presseur sur l’axe : celui-ci tient alors le CD en place. Tirer
alors le tiroir vers l’avant. Le lecteur doit d’abord lire et enregistrer des informations sur le
disque. Pendant ce temps d’environ 3 secondes, l’indicateur lumineux clignote. Le nombre
de morceaux et le temps total sont ensuite indiqués. Pousser alors Start/play : le premier
morceau commence. Lors du changement de disque, presser stop sur l’appareil ou sur la
télécommande avant d’ouvrir le tiroir.
Si le tiroir est ouvert pendant la lecture, le disque aura besoin de quelques secondes pour
s’arrêter. Ne pas toucher le disque avant arrêt total.
Attention :
Le laser est situé derrière l’axe.
Ne jamais regarder directement dans le rayon laser !
Le laser ne nécessite pas de nettoyage.
Ne pas utiliser de “CD de nettoyage” !


Télécommande
1. STANDBY
2. DISC - Pas de fonction
3. SCAN - Joue 10 secondes de chaque morceau
4 . PROG
a. Mettre le lecteur en MODE STOP.
b. Sélectionner les morceaux à l’aide des boutons numériques (9), ou en avançant
dans le programme à l’aide des boutons 14 ou 15.
c. Presser le bouton PROG (4) : Le morceau est programmé.
Répéter l’opération b et c jusqu’à ce que tous les morceaux choisis aient été
programmés. Après programmation de chaque morceau, l’indicateur lumineux
affiche le temps total.
Si un morceau avec un numéro supérieur à 13 est programmé, le temps total ne
sera pas affiché.
Vous pouvez choisir les morceaux avec les boutons 14 et 15. Les morceaux déjà
programmés apparaîtront à l’indicateur avec mention “P”.
Si vous désirez éliminer un morceau de votre programme, choisissez le morceau
en question et pressez PROG (4).
Afin de vérifier la programmation faite, retourner en MODE STOP.
Pressez PROG (4) : La programmation effectuée sera affichée dans l’ordre choisi.
Les Morceaux sont maintenant mémorisés dans l’ordre de la programmation, et
plus dans l’ordre numérique initial.
Si vous pressez STOP (17) deux fois, votre programmation sera effacée.
5. FAST - Pressez ce bouton avant de d’utiliser les fonctions recherche (6 ou 13).
Dans ce cas la recherche a lieu plus rapidement.
6. Recherche en arrière
7. A/B - Répétition d’un segment du disque ou d’un morceau. Pressez ce bouton une
fois pour choisir le début de la séquence choisie. Pressez le une deuxième fois à la
fin de la séquence. La sélection va être lue continuellement jusqu’à ce qu’on
presse le bouton STOP(17)
8. SHUF - Les morceaux vont être lus dans un ordre aléatoire.
9. REP - Pressez ce bouton une fois et tous les morceaux du disque vont être répétés.
L’indicateur affiche “REPEAT”.
Pressez le une deuxième fois, et le morceau en cours uniquement sera répété.
Dans ce cas l’indicateur affiche “REPEAT 1”.
10. PAUSE - marche / arrêt de la pause.
11. Boutons numériques - Pressez ces boutons afin de sélectionner un morceau sur
le disque. A partir du dixième morceau, presser le second chiffre dans la seconde
qui suit le premier.
12. Temps - Pressez une fois. En opération normale, l’indicateur lumineux va montrer
le temps total d’un morceau en cours. Une deuxième pression va donner le temps
restant du morceau en cours. Encore une pression donnera le temps total du
disque en cours.
13. Recherche en avant
14. Morceau suivant
15. Morceau précédant
16. Play = lecture
17. Stop = arrêt
Remplacement d’un fusible défectueux
Toujours sor tir le câble secteur de
sa prise sur l’appareil.
Le fusible général est situé dans un petit
tiroir dans la prise secteur de l’appareil.
Si le fusible a lâché pour une quelconque
raison, éteindre l’appareil et sortir la fiche
secteur.
Ouvrir le tiroir avec un petit tournevis,
et sortir le fusible.
Le fusible de rechange est situé devant le
fusible général
1. Enlever et jeter le fusible défectueux.
2. Sortir le fusible de rechange doucement
en le poussant en dehors de sa fixation.
3. Insérer le fusible de rechange à la place
de l’ancien.
4. Pousser le tiroir à sa place initiale.
5. Insérer à nouveau la fiche secteur et
mettre en marche l’appareil.
Remplacement des batteries de la télécommande
Remplacer les batteries usées en insérant doucement un ongle ou un petit tournevis dans
la fente située à gauche de la fermeture du compartiment batteries. Soulever la fermeture
et insérer de nouvelles batteries comme indiqué dans le schéma ci-dessous. Attention de
bien respecter les polarités + et - indiquées dans le fond du compartiment.
Ne jamais remplacer
le fusible par d’autres
caractéristiques que
celles mentionnées
sur l’appareil

Caractéristiques techniques du EMC 1
Partie analogique
Niveau de sortie (asymétrique) 1.6 V
Niveau de sortie (symétrique) 3.2 V
Gain (asymétrique) 1.6 x (4 dB)
Gain (symétrique) 3.2 x (10 dB)
Niveau max. de sortie (symétrique) > 14 V RMS
Distorsion par harmoniques totale (1V - 1 kHz) < 0.002 %
Séparation des canaux (1V - 1 kHz) > 90 dB
Bruit équivalent à l’entrée4 µV
Impédance de sortie 100 Ohm
Filtre analogique (-3 dB) 75 kHz
Partie digitale
Dynamique 100 dB
Rapport signal / bruit 100 dB
Distorsion par harmoniques totale -100 dB
Réponse en fréquence 20 Hz - 20 kHz
Impédance entrée / sortie (fixe) 75 Ohm
Fréquence d’échantillonnage entrée 32 - 48 kHz
Alimentation électrique 120 / 240 V
Consommation 23 W
Dimensions
Largeur 483 mm (19 pouces)
Profondeur 450 mm (17.7 pouces)
Hauteur 120 mm (4.7 pouces)
Poids 20 Kg (44 lbs)
Spécifications sujettes à modifications sans préavis.

Information importante
Le EMC 1 fournira des performances audio optimum après une utilisation minimum de 72
heures. Afin de roder l’appareil le plus rapidement possible, il suffit de lire un disque en
mode REPEAT avec le reste de l’équipement éteint.
Lors de l’utilisation quotidienne, éteindre le lecteur en le laissant en mode STANDBY, soit
via la télécommande ou avec le bouton sur la face avant.
Lorsque le lecteur a été complètement éteint avec le bouton à l’arrière, ou déconnecté, les
performances seront optimum après 2 heures de chauffe.
Tout comme les autres produits ELECTROCOMPANIET, le EMC 1 fonctionne en classe A
et dégage par conséquent une certaine chaleur. Une ventilation adéquate est donc
nécessaire. En aucun cas couvrir le lecteur CD.
Généralement, on laissera 3 - 5 cm (1-2 pouces) sur les côtés et 5 - 8 cm (2 - 3 pouces)
au-dessus.
Attention au blocage - déblocage du système de transport : voir mode d’emploi. La vis de
blocage doit être déserrée pour une utilisation correct. Lorsque le lecteur est transporté, il
faut toujours resserrer la vis afin d’éviter des dommages importants !!!
Electrocompaniet a le plaisir d’annoncer la création prochaine d’une nouvelle
télécommande. Cette télécommande est optimisée pour tous les produits télécommandés
Electrocompaniet.

Service après-vente
Si un service est requis
Votre vendeur aura toute l’information nécessaire concernant les centres de service dans
votre région et va faire le nécessaire pour que votre appareil soit vérifié dans les plus
brefs délais.
Notre politique en général est que votre appareil vous soit retourné dans les 5 jours
ouvrables. Ceci est bien entendu un temps moyen qui peut varier localement en fonction
des activités en cours auprès du centre de service.
Si pour une raison ou une autre il n’y a pas de centre de service dans votre pays, veuillez
SVP envoyer votre appareil à l’adresse suivante :
Electrocompaniet AS
Solheimsveien 36 N-1473 Skaarer
Tél ++47 67 91 17 66 Fax ++47 67 91 17 60
Email elcomp@electrocompaniet.no WEB www.electrocompaniet.no
Le propriétaire est responsable pour tous les frais de transport, assurance, réimportation
et frais de douane. Lorsque vous envoyez un appareil pour service à l’usine, il faut
toujours joindre les choses suivantes :
1. Une preuve d’achat (facture etc. ) dans le cas où la réparation est réclamée sous
garantie.
2. Une facture proforma mentionnant la valeur de la marchandise, indiquant que
l’appareil est envoyé en Norvège pour réparation.
3. Une lettre indiquant les défauts et symptômes en question.
4. Toujours envoyer l’appareil dans son carton et matériel d’emballage or iginal afin
d’éviter des dommages lors du transport. Electrocompaniet n’est pas responsable de
dommages ayant lieu pendant le transport.
Rappelez - vous : toujours bloquer le système de transport lors d’un quelconque envoi
de l’appareil !
Si vous avez besoin de plus d’informations concernant l’utilisation de votre appareil,
n’hésitez pas à contacter votre vendeur ou le distributeur national des produits
ELECTROCOMPANIET.

ISTRUZIONI PER L’USO
Manuale di istruzioni
LETTORE CD EMC 1
AVVERTENZA.
Questo apparecchio va tenuto al riparo dalla pioggia e dall’umidità, perché si possono
creare situazioni in cui l’apparecchio va in corto circuito. Questo apparecchio non contiene
parti che possano venire riparate o sostituite dall’utente. Interventi effettuati
sull’apparecchio da persone non autorizzate portano alla perdita della garanzia. La
garanzia è valida soltanto quando l’apparecchio è consegnato per l’assistenza a un
centro autorizzato dalla Electrocompaniet A/S.

Benvenuto nel mondo di Electrocompaniet A/S
La Electrocompaniet A/S vi ringrazia per avere scelto il suo Lettore CD EMC 1 e vi augura
di ascoltare con piacere riproduzioni fedeli delle vostre registrazioni preferite per molti
anni a venire. A questo fine siete gentilmente pregati di leggere attentamente questo
manuale di istruzioni, che vi consentirà di sapere come ottenere le migliori prestazioni dal
vostro nuovo Lettore CD.
Qualche cenno sulla Electrocompaniet A/S
La Electrocompaniet A/S venne fondata a Oslo, in Norvegia, nel 1973 con l’obiettivo di
realizzare un amplificatore HiFi secondo un progetto di Per Abrahamsen. Questo
amplificatore, basato su un principio che è nuovo per gli amplificatori a transistor, è stato
concepito e studiato da Matti Otala e Jan Lohstro.
I normali amplificatori a transistor sono noti per dare un suono che gli amanti della musica
ritengono non essere naturale.
Matti Otala e Jan Lohstro hanno indagato a fondo sulla causa di questo “suono non
naturale” che si verifica nei normali amplificatori a transistor e sulla base dei risultati
ottenuti dalle loro ricerche hanno elaborato una tecnologia innovativa. Questa tecnologia
è stata concretizzata nel primo amplificatore della Electrocompaniet A/S, quello che è
diventato il leggendario amplificatore da 25 watt.
Il 25 watt Electrocompaniet è stato il primo amplificatore a transistor prodotto in serie al
quale venne applicata la nuova tecnologia, tecnologia immediatamente apprezzata
perché capace di dare una musicalità molto più “drammatica” di quanto sia possibile
ottenere da qualsiasi altro amplificatore a transistor.
Il progetto innovativo derivato da questa nuova tecnologia è continuamente aggiornato
secondo le linee di un programma di ricerca e sviluppo. Questa “filosofia” viene applicata
a tutti i prodotti della Electrocompaniet A/S.
I test di ascolto sono determinanti per lo sviluppo dei nuovi prodotti della Electrocompaniet
A/S. I nuovi prodotti devono soddisfare diversi requisiti ben definiti ai quali li sottopone un
ben selezionato gruppo di esperti composto da musicisti, produttori discografici, tecnici del
suono e amanti della musica, un gruppo che ha grande esperienza e che rappresenta
una vasta gamma di gusti musicali.
I prototipi della Electrocompaniet A/S passano dal laboratorio alla sala di audizione e
viceversa fino a quando gli ingegneri che lavorano al loro sviluppo e il gruppo di esperti
sono completamente soddisfatti e sicuri che essi soddisfano i requisiti tecnici e acustici
che i prodotti della Electrocompaniet A/S devono avere.
Tutti i prodotti realizzati della Electrocompaniet A/S sono costr uiti da tecnici altamente
qualificati e vengono sottoposti a rigide procedure di collaudo che assicurano il massimo
delle prestazioni e la stabilità delle prestazioni stesse.
Oggi i prodotti della Electrocompaniet A/S sono venduti in tutto il mondo e offrono una
ottima ricezione acustica anche ai più raffinati amanti della musica.

Design, concetto e principi costruttivi dell’EMC 1
Dopo che l’amplificatore da 25 watt della Electrocompaniet A/S si era imposto come il
nuovo standard per gli amplificatori a transistor, vennero effettuate ricerche mirate a
trovare nuove soluzioni che potessero migliorare le tecniche elettroniche applicate
all’acustica. L’obiettivo era quello di trasferire le qualità naturali e musicali del suono ai
nuovi modelli. Gli ingegneri della Electrocompaniet A/S, addetti allo sviluppo dei prodotti,
non ritennero sufficiente ridurre i ben noti fenomeni di distorsione e scoprirono che la
distorsione avviene in forme diverse che si possono ancora sentire nei test di ascolto
anche quando i tipi di distorsione conosciuti vengono ridotti al minimo.
Alla base dell’EMC 1 stanno le esperienze che si fanno da decenni con il giradischi. In
sostanza, non c’è alcuna differenza tra un giradischi e un Lettore CD, tutti e due i sistemi
hanno un motore, una testina di lettura ed un braccio. La risonanza del braccio in un
giradischi è un fenomeno che trova l’equivalente in un Lettore CD e in tutti e due i casi si
tratta di un grande inconveniente.
Per ridurre o eliminare questa o altre risonanze indesiderate è stato studiato un “filtro
meccanico”. Questo filtro, la cui frequenza viene determinata attraverso tests di ascolto,
contrasta le sollecitazioni interne ed esterne, impedendo ai segnali indesiderati di
interferire nelle prestazioni di lettura della testina laser. I risultati che così si ottengono
consistono in bassi più controllati, più ampio palcoscenico sonoro, maggiore precisione,
migliore risoluzione e migliore riproduzione acustica dei dettagli.
Il convertitore D/A è una sofisticata unità da 24 bit 96 KHz, scelta per l’alta frequenza di
campionamento, il che ha permesso di elevare il limite di frequenza di una ottava rispetto
al limite di un normale Lettore CD da 44,1 KHz.
I circuiti analogici sono totalmente bilanciati e simmetrici, fatti secondo gli stessi princìpi
adottati per gli altri amplificatori della Electrocompaniet A/S.
Quattro alimentazioni separate che utilizzano la tecnologia Floating Transformer Technology (FTT) alimentano rispettivamente la sezione digitale, lo schermo, il meccanismo
propulsivo e la sezione analogica.

Disimballaggio del Lettore CD EMC 1
Dopo aver estratto e letto questo manuale di istruzioni, controllate le condizioni in cui si
trova la scatola di cartone (imballaggio esterno) per accertarvi che non abbia subito danni
durante il trasporto. Se si dovessero riscontrare danni, la denuncia andrà fatta al
trasportatore.
Estrarre con cautela il prodotto dall’imballaggio, che verrà conservato per poterlo usare in
occasione di eventuali trasporti futuri.
L’imballaggio è stato studiato per consentire il trasporto del prodotto nel modo più sicuro.
Contenuto della scatola di cartone:
1 Lettore CD EMC 1 Electrocompaniet A/S
1 Cavo di alimentazione alla rete
1 Manuale di istruzioni
1 Pressore per il CD
1 Feltro autoadesivo per appoggiare il pressore
del CD proteggendo lo chassis
1 Livella per mettere il Lettore CD in
posizione orizzontale
2 Chiavi a brugola del tipo Allen per bloccare il sistema di cancellazione delle
vibr azio ni durante il trasporto
Collegamento del Lettore CD EMC 1 alla rete di alimentazione
Controllate che l’apparecchio ricevuto sia dimensionato per una tensione di rete di 220/
230 Volt. Questa informazione si trova sul pannello posteriore del Lettore CD.
È buona norma spegnere qualsiasi apparecchiatura prima di collegare o scollegare altri
apparecchi. In nessun caso e per nessun motivo si devono inserire o disinserire altre
apparecchiature quando il Lettore CD EMC 1 è acceso.
ATTENZIONE. Al momento di inserire o disinserire altre apparecchiature, quando il
Lettore CD EMC 1 è acceso, la spina RCA/Phono genera transienti che possono
danneggiare sia gli altoparlanti che l’amplificatore.
Come evitare l’inquinamento acustico
Nel Lettore CD EMC 1 vi sono circuiti che possono essere sensibili ai campi magnetici,
per cui dovete stare attenti a non metterlo in vicinanza di trasformatori, ecc. Dovete stare
anche attenti al posizionamento dei cavi di segnale che non dovranno trovarsi in
posizione parallela ai cavi della rete di alimentazione o ai cavi che vanno agli altoparlanti.
I cavi di segnale dovranno essere il più corti possibile.
1. Mettete il Lettore CD su una superficie piana,
di preferenza nel posto dove verrà usato.
Effettuate tutti i collegamenti previsti sulla parte
posteriore.
2.Con la chiave piccola togliete le due viti che
fissano la placca dorata con la scritta
“Mechanical Cancellation System”. Usando la
chiave più grande svitate la vite a brugola che
assicura il meccanismo durante il trasporto e
che si trova nella cavità sotto la lacca.Svitatela
fino a quando sentite che si èstaccata dal
supporto.Riavvitate la placca dorata.
Conservate le chiavi Allen e la livella per futuri usi.
Ricordate che è importante fissare nuovamente la vite di blocco del meccanismo di
smorzamento quando si deve trasportare o cambiare posto al Lettore CD
Il peso del meccanismo di smorzamento del Lettore CD EMC 1 è di otto chili e può
danneggiare il lettore se non viene bloccato durante il trasporto. Quando stringete la vite,
non usate troppa forza.
Il pressore del CD è magnetico e
può graffiare il piano superiore
se vi viene messo sopra
direttamente.
Mettendovi sotto il feltro si può
evitare di produrre delle
graffiature sullo chassis

Interruttori e manopole
L’interruttore acceso/spento si trova al centro del pannello posteriore.
Suggeriamo di lasciare sempre acceso il Lettore CD (spegnendolo in caso di assenza
prolungata o durante i temporali), usando di norma il tasto STAND-BY che si trova sul
pannello frontale, oppure, in alternativa, usando il comando a distanza.
Il display sarà buio, mentre rimarrà acceso il logo.
I quattro interruttori sulla parte destra hanno le seguenti funzioni:
Interruttore in alto = start/play
Interruttore a destra = traccia seguente
Interruttore a sinistra= traccia precedente
Interruttore in basso = stop
Come mettere in funzione il Lettore CD
Procedete sempre secondo questa sequenza: prima di tutto accendete le fonti dei segnali
(CD, tuner, ecc.) e il preamplificatore. Aspettate che l’apparecchiatura si riscaldi per 30
secondi, prima di inserire l’amplificatore.
Quando si spegne l’apparecchio procedete invertendo la sequenza di cui sopra, quindi
spegnete per primo l’amplificatore, quindi il preamplificatore e da ultimo le fonti dei
segnali.
Spingete il coperchio scorrevole che porta la scritta “ELECTROCOMPANIET” verso il
fondo. Sul display appare la parola “Open”. Mettete il disco CD sul perno. Mettete quindi il
pressore del CD sul perno e tirate completamente il coperchio scorrevole. Il Lettore CD
comincia a leggere le informazioni che si trovano sul disco. Questa operazione dura 3 sec.
circa. Il display lampeggia per indicare che è in corso questa operazione e quindi mostra il
numero delle tracce ed il tempo complessivo di tutti i brani.
Premete quindi il bottone START/(play) ed ha inizio la riproduzione acustica della prima
traccia.
Quando si volete cambiare disco CD, vi suggeriamo di premere prima il bottone “Stop”,
posto sul pannello frontale oppure di agire sul comando a distanza per la stessa
operazione, prima di aprire il coperchio scorrevole.
Se il coperchio scorrevole viene aperto durante la riproduzione acustica, passano alcuni
secondi prima che il disco CD si fermi. Non bisogna toccare il disco prima che sia del tutto
fermo.
Nota!
La testina laser si trova sulla parte posteriore del perno. Non guardare MAI direttamente il
laser!
I prodotti della Electrocompaniet A/S rientrano nella Classe A superiore ed è normale
quindi che il Lettore CD EMC 1 si riscaldi. È perciò importante che ci sia una buona
ventilazione e che il Lettore CD non venga mai coperto. È buona norma fare in modo che
intorno al Lettore CD EMC 1 ci siano 3 - 5 cm di spazio libero sui fianchi e 5 - 8 cm al di
sopra.
In condizioni normali non è richiesta alcuna pulizia del laser.
Non usate “prodotti per pulire i CD”, di nessun genere!

Procedura da seguire
in caso serva assistenza
Mettetevi in contatto con il rivenditore dove avete comprato il Lettore CD che ha tutte le
informazioni che vi servono in merito ai centri di assistenza e che farà in modo che al
vostro apparecchio venga prestata l’assistenza necessaria senza ritardi. In circostanze
normali, potrete riavere il vostro Lettore CD entro 10-15 giorni lavorativi da quando è
arrivato al centro assistenza. Questo rappresenta comunque un periodo di tempo medio e
dipende dal carico di lavoro del centro di assistenza al quale vi sarete rivolto.
Se nelle vicinanze di dove abitate non c’è nessun centro di assistenza autorizzato, potrete
inviare il vostro Lettore CD al centro di assistenza della Electrocompaniet A/S al seguente
indirizzo:
Electrocompaniet A/S
Solheimsveien 36,1473 SKÅRER, Norvegia
Tel. +47. 6791 1766 - Fax +47. 6791 1760
E-mail:elcomp@electrocompaniet.noWeb: http/www.electrocompaniet.no
Le spese di trasporto, di assicurazione, di reimportazione ed eventuali diritti sono a vostro
carico. Quando inviate dei prodotti alla Electrocompaniet A/S per servizi di assistenza
ricordate sempre di allegare quanto segue:
1) Ricevuta di acquisto o altro documento comprovante l’acquisto, nel caso
l’apparecchiodovesse richiedere riparazioni in garanzia tale accertata dal centro
assistenza.
2) Qualche informazione sul danno, sui “sintomi” del danno e su come si è prodotto il
danno.
3) Il prodotto va sempre inviato nel suo imballaggio originale.
RICORDATEVI DI METTERE IL BLOCCO PER IL TRASPORTO AVVIT ANDO LA
VITE POSTA SOTTO ALLA PLACCA DORATA CON LA CHIAVE ALLEN GRANDE.
In nessun caso la Electrocompaniet A/S può ritenersi responsabile di danni occorsi
durante il trasporto.
Se desiderate altre informazioni sull’uso del Lettore CD o se avete domande in merito al
servizio di assistenza, mettetevi in contatto con il rivenditore della Electrocompaniet A/S a
voi più vicino.

Specificazioni tecniche del Lettore CD EMC 1
Tensione di rete 120V / 240V
Potenza 23 W
Analogico
Livello uscita (non-bilanciato) 1,6 V
Livello uscita (bilanciato) 3,2 V
Non-bilanciato (amplificatore) 1,6 x (4 dB)
Bilanciato (amplificatore) 3,2 x (10 dB)
THD (1 V in uscita, 1 KHz) < 0,002%
Segnale massimo in uscita (bilanciato) > 14V RMS
Separazione canali ( 1V in uscita, 1 KHz) > 90 dB
Rumore equivalente in entrata 4 mV
Impedenza in uscita 100 Ohm
Filtro analogico ( - 3 dB) 75 KHz
Digitale
Campo d’azione dinamico 100 dB
Segnale disturbo 100 dB
THD -100 dB
Limiti di Frequenza 20 Hz - 20 KHz
Impedenza Entrata / Uscita (fissa) 75 Ohm
Frequenza di campionamento 32 - 48 KHz
Dimensioni
Larghezza 483 mm
Profondità 450 mm
Altezza 120 mm
Peso 22,5 kg
La Electrocompaniet A/S si riserva il diritto di apportare cambiamenti senza preavviso.

Comando a distanza
1. STAND-BY
2. DISC - nessuna funzione
3. SCAN - riproduce 10 secondi di ogni traccia
4. PROG - Il lettore CD deve stare su STOP MODE
a. premete il numero della traccia desiderata con i tasti numerici, oppure cercatela
con i tasti 14 o 15.
b. premete PROG (4) e la traccia è programmata.
c. ripetete quanto in a. e b. fino a quando avete programmato le tracce che desiderate.
Dopo aver programmato ogni traccia, sul display appare il tempo complessivo di
riproduzione acustica.
Quando programmate una traccia con un numero maggiore di 13, il tempo complessivo non apparirà.
Potete andare avanti e indietro sul programma CD agendo sui tasti 14 e 15. Per le tracce
già programmate vedrete apparire sul display una “P” dopo il numero della traccia.
Se desiderate eliminare una traccia dal programma, evidenziate il numero della traccia e
premete PROG (tasto 4).
Se mettete su STOP MODE e premete PROG (4), sul display appariranno tutte le tracce
programmate secondo il nuovo ordine.
Le tracce verranno ora riprodotte secondo l’ordine della vostra programmazione, e non
secondo la programmazione originaria.
Se premete STOP (17) due volte, il programma verrà cancellato.
5. F AST - Premendo questo tasto prima di usare i tasti 6 o 13, la ricerca avverrà molto più rapidamente.
6. INDIETRO
7. A/B - Premendo una volta mettete un “punto di avvio” alla riproduzione acustica
(sul display apparirà A).
Premendo un’altra volta mettete un “punto di arrivo” alla riproduzione acustica (sul display
apparirà A-B). Il Lettore CD riproduce soltanto quanto si trova tra questi due “punti”. Il tratto
selezionato verrà riprodotto continuamente fino a quando non premete STOP (17)
8. SHUF - Riproduce a caso le tracce del Lettore CD (sul display apparirà SHUFFLE)
9. REP - Premendo una volta il Lettore ripete tutto il CD (sul display apparirà REP-
EAT).
Premendo ancora una volta, viene ripetuta la riproduzione acustica in questione (sul
display apparirà REPEAT 1)
10. PAUSE - Pausa acceso/spento.
11. Selezione numerica diretta della traccia. Premete questi tasti per selezionare una
traccia
specifica sul disco CD. Per le tracce con numero superiore a 9, le cifre vanno premute
rapidamente l’una dopo l’altra.
12. TIME - Premendo una volta, si vede quanto tempo del brano è già stato riprodotto
(sul display
apparirà TIME)
Premendo ancora una volta, si vede quanto tempo del CD c’è ancora da riprodurre
(sul display apparirà TOTAL REM TIME)
Premendo ancora una volta, si vede quanto tempo del CD è già stato riprodotto (sul
display apparirà TOTAL TIME)
13. AV ANTI
14. TRACCIA SEGUENTE
15. TRACCIA PRECEDENTE
16. AVVIO
17. STOP
Avviso importante
Per una riproduzione acustica ottimale il Lettore CD EMC 1 dovrà venire rodato per
almeno 72 ore. Il modo più semplice di rodarlo è quello di mettere un disco su REPEAT
scollegando tutto il resto del sistema audio.
Per le operazioni normali, mettete il Lettore CD su STANDBY usando o il controllo a
distanza o il pannello frontale.
Se il Lettore CD è stato spento agendo sul tasto MAINS che si trova sul pannello
posteriore, riaccendendo fate riscaldare il Lettore CD per un paio di ore al fine di ottenere
una tracci acustica ottimale.
Sostituzione del fusibile principale
Staccate sempre la spina della corrente.
Il fusibile principale è situato in un
cassettino all’interno dell’entrata della
corrente alternata.
Se per qualsiasi ragione il fusibile si
brucia,girate l’apparecchio e togliete il filo
della corrente alternata dall’apertura
Aprite il cassettino con un piccolo
cacciavite e togliete il fusibile bruciato.
Il fusibile di ricambio è situato in un
alloggiamento che sta di fronte al fusibile
principale
ALTERNATA
1.Togliete il fusibile br uciato
2.Prendete il fusibile di ricambio
spingendolo gentilmente fuori
dell’alloggiamento
3.Mettete il fusibile di ricambio al posto
di quello bruciato
4.Spingete gentilmente il cassetto e
chiudete
5.Reinserite la corrente
Sostituzione delle batterie del controllo a distanza
Con l’unghia o con un piccolo cacciavite rimuovete il coperchio, agendo sul solco che sta
sulla parte sinistra dell’alloggiamento e togliete le vecchie batterie. Mettete le batterie
nuove come indicato nel disegno qui sotto. Fate attenzione a rispettare le polarità + e come indicato sul fondo dell’alloggiamento batterie
BATTERIE: 2 x LR03 AAA - 1,5 V
Non usare mai fusibilicon
caratteristiche diverseda quelle
indicate
nell’apparecchio

BRUKSANVISNING
EMC 1 REFERANSE CD-SPILLER
Advarsel: Apparatet må ikke utsettes for regn eller fuktighet. Dette kan føre til kortslutning.
Apparatet inneholder ingen deler som kan repareres eller skiftes ut av brukeren. Garantien
gjelder ikke ved inngrep utfør t av brukeren i apparatet. Garantien gjelder kun ved innleve-
ring til et autorisert Electrocompanietservice-verksted.

Velkommen til Electrocompaniets verden
Takk for at du valgte en CD-spiller fra Electrocompaniet. Vi ønsker at du får mange år fylt av
lytteopplevelse og «High End» musikk gjengivelse fra ditt lydsystem.
Vennligst les nøye gjennom denne bruksanvisningen for å gjøre deg kjent med produktet
før tilkobling.
Historien om Electrocompaniet
Electrocompaniet ble grunnlagt i 1973 i Oslo for å produsere en HiFi forsterker konstruert
av Per Abrahamsen. Konstruksjonen var basert på et nytt prinsipp for transistorforsterkere
utviklet av Dr. Matti Otala og Jan Lohstro.
Transistorforsterkere var kjent for en karakteristisk lyd som audiofile musikkelskere syntes
låt unaturlig.
Dr. Otala og Herr Lohstro analyserte datidens transistorforsterkere for og finne årsaken til
den umusikalske ”Transistorlyden». Resultatet av deres nyskapende design ble imple-
mentert i den første Electrocompaniet forsterkeren, den nå legendariske 25 watt forsterkeren.
Dette produktet var den første serieproduserte transistorforsterkeren som utnyttet denne
nye teknikken, og ble straks kjent som dramatisk mer musikalsk enn alle andre transistorforsterker. Designfilosofien blir kontinuerlig oppdatert i Electrocompaniets forskning- og
utviklingsavdelingen. Filosofien danner grunnlaget for designet av alle Electrocompaniets
produkter .
Electrocompaniet har alltid lyttetester som høyeste prioritet ved utviklingen av nye produk-
ter. Samtlige produkter må tilfredsstille varierte og eksakte krav fra et lyttepanel av nøye
utvalgte musikere, plateprodusenter, lydteknikkere og musikkelskere. Disse personene
representerer en bredde i musikksmak og erfaringer.
Electrocompaniets prototyper går frem og tilbake mellom utviklingslaboratoriet og lytterom
til både utviklingsingeniørene og lyttepanelet er 100% fornøyd og sikre på at produktet
tilfredsstiller såvel de tekniske som de lydmessige krav et Electrocompaniet produkt må
ha.
Alle Electrocompaniet produkter er produsert av høyt kvalifiserte teknikere. Produktene
gjennomgår svært strenge testrutiner for å sikre maksimal ytelse og stabilitet.
Electrocompaniets produkter blir i dag solgt over hele verden, og tilbyr optimal lytteopplevelse.

EMC 1 DESIGNKONSEPT OG KONSTRUKSJON
Etter at Electrocompaniets 25 watt forsterker satte en ny standard for transistor forsterkere,
ble det iverksatt forskning for å finne ytterligere nye måter og gjøre audio-elektronikken
bedre. Målet var å overføre dens naturlige og musikalske lydkvalitet til nye modeller.
Electrocompaniets utviklingsingeniører var ikke fornøyd med å bare redusere kjente
forvrengnings-fenomener. Man oppdaget at forvrengning forekommer i mange former,- og
at forvrengning fortsatt var hørbar i lyttetester selv om de kjente typene av forvrengning var
redusert til minimum.
Utgangspunktet for EMC 1 ligger i de erfaringer som er høstet gjennom flere årtier med
platespilleren. Det er ingen prinsipiell forskjell mellom en platespiller og en CD- spiller.
Begge systemer har motor, pick-up og tonearm. Tilsvarende fenomener som tonearmresonans i en platespiller - er et like stort problem i en CD- spiller.
For å redusere/fjerne denne og andre uønskede resonanser har vi utviklet et ”mekanisk
filter”. Dette filteret, som er frekvensbestemt gjennom lyttetester, motvir ker interne og
eksterne påvirkninger av laserpick-upen slik at uønskede signaler ikke slipper inn i CDsystemet. Resultatet er strammere bass, større lydbilde, presisjon, veloppløst og detaljert
reproduksjon.
D/A konverteren er en balansert 24 bit 96 Hz enhet. Denne ble valgt på grunn av den høye
samplingsfrekvensen, som gjør at vi kan flytte grensefrekvensen en oktav høyer i frekvens
enn ved normale CD systemer på 44.1KHz.
De analoge kretsene er fullbalanserte og symmetriske, bygd etter de samme prinsipper
som våre forsterkere.
Fire separate strømforsyninger koblet som FTT (flytende transformator teknikk) føder
henholdsvis digitaldelen, displayet, drivverk og analog delen.

Utpakking av EMC-1 CD spiller
Etter å ha tatt ut og lest denne bruksanvisningen bør du inspisere ytterkartongen for
eventuelle skader under transport. Hvis den har synlige skader må det straks rettes krav
mot transportøren.
Pakk ut produktet forsiktig,- og ta vare på emballasjen for fremtidig transport.
Innpakningen er designet for tryggest mulig transport av produktet.
Kartongens innhold :
1 stk Electrocompaniet Referanse CD-spiller EMC 1.
1 stk Nettkabel
1 Bruksanvisning
1 stk CD klemme for feste av CD-plate
1 stk selvklebende filt for oppbevaring av CD-klemme og beskyttelse av kabinettet.
1 stk vater for justering av CD-spiller
2 stk umbrako-trekkerne for transportsikring av dempesystemet.
1 stk fjernkontroll med batterier
Oppkobling av EMC-1:
Sjekk at enheten du har mottatt er beregnet for 230 Volt nett spenning. Det er merket på
baksiden av CD-spilleren.
En god rutine er å slå av alt utstyret før du kobler noe til eller fra. Det bør ikke under noen
forhold dersom produktet er slått på, skje tilkobling eller frakobling.
Hvis du insisterer å til- / frakoble mens din forsterker er slått på, bør du være oppmerksom
på at konstruksjonen av RCA/ Phono pluggen genererer en stor transient ved til- / frakobling. Dette kan ødelegg både høyttalerne og forsterkeren.
Hvordan unngå støyproblemer:
EMC 1 inneholder kretsløp som kan være følsomme for magnetfelter. Apparatet bør ikke
plasseres i nærheten av transformatorer m.m. Du bør også ta hensyn til plasseringen av
signalkablene. Disse bør ikke ligge parallelt med nettledninger eller høyttaler-ledninger. De
bør være så k orte som mulig.
1
Sett CD-spilleren på et plant
underlag, fortrinnsvis der hvor den
skal brukes.
Gjør alle tilkoblinger på baksiden.
2
Skru ut de to skruene som holder
gull -skiltet merket med
”Mechanical cancelation System”.
Løs deretter opp transportskruen
som sitter nede i det store hullet
under skiltet. Skru den opp til du
kjenner at den er løs fra underdelen. Skru deretter gullskiltet
igjen.

Ta vare på umbrakotrekkerene, da det er viktig å feste transportskruen ved transport og
flytting av CD-spilleren.
Dempeloddet i EMC 1 veier åtte kilo og kan ødelegge spilleren hvis det ikke er festet
under transport. Bruk ikke stor kraft ved tilskruing.
Den vedlagte CD klemmen er magnetisk
og vil kunne skrape opp topplaten hvis den
legges direkte på denne.
Ved å bruke den vedlagte filt-ringen som
underlag unngår du riper i kabinettet.

1. XLR/Balansert kobling
2. Phono/Ubalansert kobling
3. Tilkobling av utvendig DAC via XLR-kontakter
4. Tilkobling av utvendig DAC via Phono-kontakter

Brytere og funksjonsknapper
Av/på bryteren er lokalisert i senter av bakplaten.
Vi anbefaler at CD-spilleren står på hele tiden, (slås helt av ved lengre fravær og i tordenvær), og at Standby-bryteren, som sitter midt i fronten brukes ved daglig bruk.
Displayet vil da bli mørkt og kun - symbolet lyser blått.
De fire brytere på høyre side har følgende funksjon:
Topp bryter = start (play)
Høyre bryter = neste spor
Venstre bryter = forrige spor
Nedre bryter = stopp
Hvordan slå på systemet
Du bør alltid slå på utstyret ditt i denne rekkefølgen: Signal kilder ( CD, tuner, etc.) og
forforsterker først. Tillatt 30 sekunder forvarming før du slår på effektforsterkeren.
Når du slår systemet av igjen bør du begynne med effektforsterkeren, deretter forforsterkeren og til slutt signalkildene.
CD-platen plasseres ved at man skyver skuffen som er merket med
”ELECTROCOMPANIET” bakover. Displayet vil da vise
spindelen. Plasser CD-klemmen opp på spindelen, og trekk lokket helt frem.
CD-spilleren starter ved å lese inn informasjon fra platen. Dette tar ca. tre sekunder.
Displayet blinker for å indikere dette. Deretter vises antall spor og totaltid i displayet. Trykk
”START” (play) og første spor avspilles.
Ved skifte av CD- plate anbefaler vi at ”STOPP”- knappen på fronten eller fjernkontrollen
aktiveres før lokket åpnes.
Hvis lokket åpnes under avspilling, vil det ta noen sekunder før CD-platen stanser.
Ikke rør platen før den har stanset.
”Open”.
Legg CD- platen på
ADVARSEL:
Laser sitter på baksiden av spindelen. Se ALDRI direkte inn i laseren!
Laserenheten er meget følsom. Ikke rør!
Laseroptikken må under normale omstendigheter rengjøres etter noen års bruk. Bruk
ALDRI en ”rense- CD”!

Fjernkontroll
1.STANDBY
2.DISC - ingen funksjon.
3.SCAN - Spiller 10 sekunder av hvert spor.
4.PROG - Spilleren må stå i STOP MODE.
a. T rykk ønsket spornummer, eller ”bla” med tastene 14 og 15.
b. T rykk PROGRAM - Sporet er programert.
Gjenta punkt a og b til du har programert de sporene du ønsker.
For hvert spor som blir programert, vil den totale spilletiden vises i displayet.
Om du har programert et spor med et nummer høyere en 13, vil ikke den totale
tiden vises.
Du kan ”bla” igjennom CD’en med tastene 14 og 15. På de sporene som er
programert, vil det vises en ”P” bak spornummeret i displayet.
Ønsker du og fjerne et spor fra programmet, velger du spor nummeret og trykker
PROGRAM.
Om du står i STOP MODE og trykker PROGRAM, vil displayet vise alle de
programmerte sporene i den nye rekkefølgen.
Sporene blir spilt av i den rekkefølgen du programmerer, og ikke den opprinnelige
rekkefølgen.
Trykker du på STOP to ganger, (eller når du allerede står i STOP stilling, vil
programmet slettes.)
5.FAST – T rykkes før du ”spoler” med knappene 6 og 13. Du vil da ”spole” fortere en
vanlig.
6.Spoler bakover
7. A/B – Trykk en gang, og du setter et ”startmerke” i sangen (A vises i displayet).
Tr ykk en gang til og et ”stoppmerke” blir satt på sangen, (A-B vises i displayet), og
CD-spilleren spiller nå bare mellom disse to ”merkene”.
8.SHUF - Spiller av sporene på CD’en i tilfeldig rekkefølge. (SHUFFLE vises i
displayet.)
9.REP – trykk en gang, og den repeterer hele CD’en (REPEAT vises i displayet).
Tr ykk en gang til, og det ”aktuelle” sporet repeteres (REPEAT 1 vises i displayet).
10.PAUSE av/på.
11.Direkte valg av spor. For spor nummer høyere en 9, må en trykke nummeret
fort etter hverandre.
12.TIME –Trykk 1: Viser hvor lang tid av sangen som er avspilt (TIME vises i
displayet)
Trykk 2: Viser hvor lang tid som er igjen av CD’en (TOTAL REM TIME vises i
displayet)
Trykk 3: Viser hvor lang tid CD’en har spilt. (TOT AL TIME vises i displayet)
13.Spole framover
14.Neste spor
15.Forrige spor
16.Start
17.Stopp
Utskifting av defekt sikring
Ta ut nettledningen fra kontakten bak
på apparatet.
I kontakten bak på apparatet er det en
liten skuff.
Bruk en liten skrutrekker for å åpne
skuffen.
Den defekte sikringen sitter lengst bak
av de to.
Bytt denne med reservesikringen som
sitter i den første holderen
Tr ykk skuffen inn, og plugg til nettledningen.
Bruk kun samme sikringsstørrelsen som står på
apparatet.
Skifte av batterier i fjernkontrollen
Vipp ut skuffen som sitter på undersiden av fjernkontrollen og ta ut de gamle batteriene.
Pass på + og - polariteten på batteriene. Trykk inn skuffen.

Tekniske Spesifikasjoner EMC 1
Analog del
Utgangsnivå (ubalansert) 1,6V
Utgangsnivå (balansert) 3,2V
Forsterkning (ubalansert) 1.6X (4 dB)
Forsterkning (balansert) 3.2X (10 dB)
Maks. utgangssignal (balansert) > 14V RMS
THD (1V ut, 1 kHz ) < 0.002%
Kanal separasjon (1V ut, 1 kHz) > 90 dB
Ekvivalent inngangsstøy4 uV
Utgangsimpedans 100 Ohm
Analog filter (-3dB) 75 kHz
Digital del
Dynamisk område 100 dB
Signal / støy forhold 100 dB
THD -100 dB
Frekvens område 20 Hz - 20 kHz
Inn / utgangsimpedans (fast) 75 Ohm
Sampling frekvens inn 32 - 48 kHz
Nettspenning 120V / 240V
Effektforbruk 23 W
Fysiske mål
Bredde 483 mm
Dybde 450 mm
Høyde 120 mm
Vekt 20 Kg
Electrocompaniet forbeholder seg retten til forandringer uten forvarsel.

VIKTIG INFORMASJON
For optimal lydgjengivelse bør EMC 1 spilles inn i minst 72 timer.
Vi anbefaler derfor at du setter en CD-plate på REPEATE med forsterkeren avslått.
Under daglig bruk kan standby-funksjonen brukes istedenfor nettbryter.
Hvis apparatet har vært avslått, må man beregne ca. to timers oppvarming.
På grunn av det høye klasse A driften i Electrocompaniets konstruksjoner er det normalt at
CD-spilleren blir varm. Det er viktig at CD-spilleren får god kjøling, og må derfor ikke
tildekkes. En god regel er å tillate 3 - 5 cm luftrom på begge sider av apparatet
Vi vil også henvise til bruksanvisningen vedr. transportsikringen, som må løses før bruk.

Service prosedyrer
Hvis det er behov for service
Din forhandler har all informasjon du trenger vedrørende ser viceverksteder, og garantere
at din enhet får service uten forsinkelse. Under normale forhold vil din CD-spiller bli
returnert i løpet av fem arbeidsdager. Dette kan variere avhengig av kapasiteten hos
verkstedet du benytter.
Hvis det ikke finnes et autorisert verksted i ditt nærmiljø, kan du sende CD-spilleren til
Electrocompaniets serviceverksted på følgende adresse:
Electrocompaniet A/S
Solheimsveien 36 1473 SKÅRER
Tlf.: 67 91 17 66 Fax: 67 91 17 60
E-post: elcomp@electrocompaniet.no Web: http//www.electrocompaniet.no
Electrocompaniet kan ikke under noen omstendigheter stilles ansvarlig for skader som har
oppstått under transport.
Du er selv ansvarlig for alle transport utgifter og forsikring. Når du sender et produkt til
Electrocompaniet for service. Husk alltid å legge ved følgende:
1) Kvittering eller annet kjøpsbevis dersom produktet kreves reparert under garanti.
2) Et kort notat om feilen, feilsymptomer og hvordan feilen oppsto.
3) Send alltid produktet i originalemballasjen.
HUSK TRANSPORT SIKRING !
Trenger du ytter ligere informasjon vedrørende bruk av produktet, eller har spørsmål
angående service, kontakt din lokale Electrocompaniet-forhandler.

BEDIENUNGSANLEITUNG
EMC 1 Referenz CD- Spieler
Hinweis: Das Gerät darf nicht Regen oder Feuchtigkeit ausgesetzt werden. Dies kann zu
Kurzschlüssen führen. Im Gerät befinden sich keine Teile, welche vom Benutzer repariert
oder ersetzt werden können. Garantie kann nur gewährleistet werden, wenn kein Eingriff
durch den Benutzer erfolgte und das Gerät in eine autorisierte ElectrocompanietServicewerkstatt geliefert wird.

Willkommen in der Electrocompaniet- Welt
Vielen Dank, daß Sie sich für einen CD- Spieler von Electrocompaniet entschieden haben.
Wir wünschen Ihnen Musikerlebnisse der besonderen Art und über viele Jahre Freude mit
dem Gerät.
Bitte lesen Sie diese Gebrauchsanweisung und machen Sie sich mit dem Gerät vertraut
bevor Sie es in Betrieb nehmen!
Die Geschichte Electrocompaniet“s
Electrocompaniet wurde 1973 in Oslo gegründet, um einen von Per Abrahamsen
entwickelten HiFi Verstärker zu produzieren. Die Konstruktion basierte auf einem neuen
Prinzip für Transistorverstärker, entwickelt von Dr. Matti Otala und Jan Lohstro.
Der Klang von Transistorverstärkern wurde bis dahin von den meisten audiophilen
Musikliebhabern als unnatürlich charakterisiert.
Dr. Otala und Herr Lohstro analysierten die Schaltungen in den bis dato bekannten
Transistorverstärkern um die Ursache für den ”unnatürlichen Transistor klang” zu finden.
Die Ergebnisse aus diesen Untersuchungen wurden zur Grundlage für den ersten
Electrocompaniet- Verstärker, dem heute legendären ”25 Watt Verstärker”.
Dieses Gerät war der erste in Serie hergestellte Transistorverstärker, welcher die neue
Technik nutzte und wurde schnell bekannt für seine im Vergleich zu allen anderen
Transistorverstärkern deutlich überlegene Musikalität. Die Philosophie und das Konzept
dieses Verstärkers wurde in der Forschungs- und Entwicklungsabteilung
Electrocompaniet‚s kontinuierlich weiterentwickelt und ist bis heute Grundlage bei allen
Electrocompaniet- Produkten.
Bei der Entwicklung neuer Electrocompaniet- Produkte hat der Hörtest immer die höchste
Priorität. Alle Produkte müssen die hohen Ansprüche einer genau ausgewählten Hörjury
erfüllen, welche aus Musikern, Plattenproduzenten, Tontechnikern und Musikliebhabern
besteht. Diese Personen repräsentieren einen breiten Musikgeschmack und sehr viel
Erfahrung.
Alle Prototypen bewegen sich solange zwischen Entwicklungslabor und Hörraum hin und
her, bis die Entwicklungsingenieure und Hörjury sicher sind, daß sowohl technisch wie
auch klanglich alle an Electrocompaniet Geräte gestellten Ansprüche zu 100% erfüllt
werden.
Alle Electrocompaniet- Produkte werden von qualifizierten Technikern hergestellt und
durchlaufen sehr strenge Testroutinen um maximale Leistung und Stabilität zu garantieren.
Electrocompaniet- Produkte werden heute in der ganzen Welt verkauft und bieten
Musikwiedergabe auf höchstem Niveau.

EMC 1 ENTWICKLUNGSKONZEPT UND KONSTRUKTION
Nachdem Electrocompaniets ”25 Watt Verstärker” einen neuen Standard für
Transistorverstärker gesetzt hatte, wurde die Forschung nach neuen Methoden, die Audio
Elektronik zu verbessern, fortgesetzt. Ziel war es, die Natürlichkeit und Musikalität auch auf
neue Modelle zu übertragen. Unsere Entwicklungsingenieure waren nicht zufrieden damit,
bekannte Verzerrungsprobleme nur zu reduzieren. Man entdeckte, daß Verzerrungen in
vielen Formen auftreten, und weiter hörbar waren, obwohl bekannte Typen von
Verzerrungen bereits auf ein Minimum reduziert waren.
Ausgangspunkt für die Entwicklung des EMC 1 waren über viele Jahre gesammelte
Erfahrungen mit Plattenspielern. Prinzipiell gibt es keinen großen Unterschied zwischen
Plattenspieler und CD- Spieler. Beide Systeme haben Motor, Pick- Up und Tonarm.
Probleme wie zum Beispiel Tonarmresonanzen bei einem Plattenspieler, treten in der
gleichen oder ähnlicher Form auch bei CD- Spielern auf.
Um unerwünschte Resonanzen zu entfernen oder zu reduzieren, entwickelten wir einen
”mechanischen Filter”. Dieser Filter wurde in aufwendigen und langwierigen Hörsitzungen
auf bestimmte Frequenzbereiche abgestimmt. Seine Aufgabe ist es, störenden internen
und externen Einwirkungen auf das Lasersystem und Laufwerk entgegenzuwirken, so das
Beeinträchtigungen des Musiksignals von vorn herein verhindert werden. Das Resultat ist
ein strammerer Bass, eine bessere Abbildung und Präzision sowie hochauflösende und
detailierte Reproduktion.
Zur Digital- Analog Wandlung wird ein balancierter 24 bit 96 Khz D/A Wandler verwendet.
Er wurde ausgewählt, da seine hohe Samplingrate es ermöglicht, die Grenzfrequenz des
Spielers, im Vergleich zu herkömmlichen CD- Spielern mit 44,1 Khz, um eine Octave zu
erhöhen.
Die analogen Kreise des CD- Spielers sind, genau wie auch alle Electrcompaniet- Geräte,
vollsymetrisch aufgebaut.
Vier separate Stromversorgungen, geschaltet in FFT- Technik, speisen Digitalteil, Display,
Laufwerk und Analogteil.

Auspacken des EMC 1 CD Spielers
Nachdem Sie die Gebrauchsanweisung ausgepackt und gelesen haben, sollten Sie die
Verpackung auf eventuelle Transportschäden untersuchen. Falls Sie Schäden am Inhalt
feststellen, setzen Sie sich bitte umgehend mit dem entsprechenden
Transpor tunternehmen in Verbindung. Bitte packen Sie das Gerät sehr vorsichtig aus und
heben Sie die Ver packung für einen späteren Transport auf. Die Verpackung wurde für
einen möglichst sicheren Transport des Gerätes entwickelt.
Verpackungsinhalt:
1 Stk. Electrocompaniet Reference CD-Spieler EMC 1.
1 Stk. Netzkabel
1 Gebrauchsanweisung
1 Stk. CD Klemme zur Befestigung der CD auf dem Laufwerk
1 Stk. selbstklebender Filz zum Ablegen der CD Klemme auf dem Spieler und zum
Schutz des Gehäuses vor Kratzern
1 Stk. ”Wasserwaage” oder ”Libelle” zum Ausrichten des CD- Spielers
2 Stk. Schraubenschlüssel für die Transpor tsicherung des Dämpfungssystems
Anschluß des EMC 1:
Bitte überprüfen Sie vor Anschluß des Gerätes, ob das Gerät auf 230 V Netzspannung
eingestellt wurde. Sie finden eine entsprechende Kennung auf der Rückseite des Gerätes.
Bitte schalten Sie alle Geräte aus, bevor Sie mit dem Anschluß Ihres CD- Spielers
beginnen. Sie sollten unter keinen Umständen Kabel wechseln oder Geräte an Ihre
Anlage anschließen, während der Verstärker zugeschaltet ist! Aufgrund der Konstruktion
von Cinch / RCA – Steckern kommt es beim Aufstecken leicht zu sehr starken Impulsen,
welche Ihre Lautsprecher und Ihren Verstärker zerstören können!
So verhindern Sie Störungen:
Der EMC 1 beinhaltet Schaltkreise, welche empfindlich auf Magnetfelder reagieren
können. Das Gerät sowie Signalkabel sollten nicht in der Nähe von starken Transformatoren usw. aufgestellt bzw. angeschlossen werden. Signalkabel sollten so kurz wie möglich
sein und nicht parallel zu Netz- oder Lautsprecherleitungen liegen.
1 Stellen Sie den CD- Spieler auf eine
gerade Unterlage, vorzugsweise
dorthin wo er benutzt werden soll.
Schließen Sie alle benötigten Kabel an.
2 Entfernen Sie die beiden kleinen
Schrauben, welche das Messingschild
mit der Aufschrift ”Mechanical
Cancelation System” halten, mit dem
mitgelieferten Schlüssel. Lösen Sie
danach die Transportschraube, welche
sich unter diesem Schild in der Öffnung
befindet soweit, daß sie sich leicht
bewegt. Die Schraube muß nicht
entfernt werden! Montieren Sie nun das
Schild wieder.

Achten Sie bitte auf den Schraubenschlüssel, da es sehr wichtig ist die Transportsicherung
wieder zu befestigen, wenn der Spieler in irgend einer Form transportiert wird.
Das Dämpfungsgewicht auf dem das Laufwerk gelagert ist wiegt ca. 8 kg und kann den
CD- Spieler sehr stark beschädigen, wenn es auf einem Transport nicht befestigt wird!
Ziehen Sie die Schraube jedoch nicht zu stark an!
Die mitgelieferte CD- Klemme ist magnetisch
und kann beim Ablegen auf dem CD- Spieler
Kratzspuren hinterlassen. Um das zu verhindern
können Sie die mitgelieferte selbstklebende Filzscheibe
verwenden.

1. XLR / Balancierter Anschluß
2. Cinch ( RCA ) / Unbalancierter Anschluß

3. Anschluß eines externen D/A
Wandlers über den XLR- Anschluß
4. Anschluß eines externen
D/A W andler s über den Cinc h / RCA- Anschluß

Schalter und Funktionsknöpfe
Der Hauptschalter des CD- Spielers befindet sich auf der Rückseite in der Mitte.
Wir empfehlen Ihnen für bestmöglichen Klang, das Gerät nicht komplett abzuschalten,
sondern für den täglichen Gebrauch nur den Standby– Schalter zu verwenden. Dieser
befindet sich in der Mitte vorn auf der Front. Befindet sich der CD- Spieler im Standby, ist
das Display dunkel und das -logo auf der Oberseite leuchtet blau. Klanglich wichtige
Baugruppen des CD- Spielers werden dann auf Betriebstemperatur gehalten und Sie
benötigen keine lange Vorwärmzeit um beste Ergebnisse zu erziehlen. Nutzen Sie den
Hauptschalter, wenn Sie zum Beispiel verreisen oder bei einem Gewitter.
Die vier Knöpfe auf der rechten Frontseite haben folgende Funktionen:
oberer Knopf = Start (play)
rechter Knopf = ein Titel vorspringen (next)
linker Knopf = ein Titel zurückspringen (back)
unterer Knopf = Stop
Anschalten des CD- Spielers
Wir empfehlen Ihnen, Ihre Geräte immer in folgender Reihenfolge anzuschalten:
Zuerst Signalquelle (CD, Tuner, etc.) und Vorverstärker sowie ca. 30 Sekunden später den
Endverstärker.
Wenn Sie das System abschalten, verfahren Sie in umgekehrter Reihenfolge.
Also zuerst den Endverstärker abschalten und danach Vorverstärker sowie die
Signalquellen.
Zum Einsetzen der CD schieben Sie die Abdeckung des Laufwerks (bedruckt mit der
Aufschrift ”ELECTROCOMPANIET”) ganz zurück. Im Display erscheint die Meldung
”Open”.
Klemme. Schließen Sie die Schublade wieder.
Der CD- Spieler startet und liest die Informationen über die CD. Dafür benötigt er ca. 3
Sekunden. Das Display blinkt kurz und zeigt danach die Gesamtabspielzeit und die
Anzahl der Titel auf der CD.
Drücken Sie ”START” und der erste Titel wird abgespielt.
Zum Wechseln der CD drücken Sie ”STOP” am Gerät oder auf der Fernbedienung und
öffnen die Schublade. Wenn Sie die Schublade öffnen, während eine CD abgespielt wird,
dauert es einige Sekunden, bevor die CD zum Stillstand kommt. Bitte berühren Sie die CD
nicht, solange sie sich noch dreht.
Legen Sie die CD auf die Spindel und fixieren Sie die CD mit der mitgelieferten
ACHTUNG:
Der Laserabtaster sitzt hinter der Spindel. Sehen Sie niemals direkt in den Laser!
Die Lasereinheit ist eine sehr empfindliche optoelektronische Einheit!
Bitte nicht berühren. Die Optik muß unter normalen Umständen erst nach einigen Jahren
gereinigt werden. Benutzen Sie niemals eine ”Reinigungs- CD”.

Fernbedienung
1. STANDBY
2. DISC – keine Funktion
3. SCAN – Anspielen der ersten 10 Sekunden jedes Titels
4. PROG – Programmieren einer selbstbestimmten Titelfolge ( Gerät muß im STOP
MODUS stehen ).
a. drüc ken Sie direkt die gewünschte Titelnummer ( 11 ) oder wählen Sie mit Taste 14 und 15.
b. Drücken Sie PROGRAM – der Titel ist programmiert.
Wiederholen Sie Punkt a und b bis Sie alle ge wünschten Titel programmiert haben.
Für jeden prog r ammierten Titel wird die totale Spielz eit im Displa y angez eigt. W enn Sie einen Titel
programmieren mit einer höheren Nummer als 13, wird die totale Spielzeit nicht mehr angezeigt.
Sie können mit den Tasten 14 und 15 durch die CD ”blättern”. Alle Titel, die bereits
programmiert sind, sind mit einem ”P” hinter der Titelnummer gekennzeichnet.
Wollen Sie einen Titel aus dem Programm entfernen, wählen Sie die Titelnummer
und drücken PROGRAM.
Steht das Gerät im STOP MODUS und Sie drücken PROGRAM, werden im Display
alle programmierten Titel in Reihenfolge angezeigt.
Die Titel werden in der programmierten Reihenfolge abgespielt und nicht in ihrer
ursprünglichen Reihenfolge.
Drücken Sie zweimal auf STOP wird die Programmierung gelöscht.
5. FAST – durch drücken dieser Taste können Sie den schnellen Vor- oder Rücklauf (6 und
13) nochmals beschleunigen.
6. schneller Rücklauf
7. A/B – mit dieser Funktion können Sie einen bestimmten Ausschnitt der CD oder
eines Titels permanent wiederholen. Drücken Sie einmal und setzen Sie eine Startmarke
( A wird im Display angezeigt ). Drücken Sie ein zweites mal, setzen Sie die
Stopmarke ( A-B wird angezeigt ) und der CD- Spieler wiederholt immer dieselbe
Stelle zwischen den beiden Marken.
8. SHUF – der CD- Spieler spielt die CD in zufälliger Reihenfolge. ( SHUFFLE wird im
Display angezeigt )
9. REP – drücken Sie einmal und der CD- Spieler wiederholt die komplette CD (
REPEAT wird im Display angezeigt ), drücken Sie zweimal und der aktuelle Titel
wird wiederholt (REPEAT 1 wird im Display angezeigt )
10.PAUSE an / aus
11.Zehnertastatur zur direkten Titelwahl- durch diese Tasten wechselt der CD- Spieler
direkt zum angewählten Titel / für eine Titelnummer größer als 9, drücken Sie die
Nummern kurz hinternander
12.TIME –
einmal drücken: Display zeigt die Gesamtlaufzeit des Titels
( TIME wird im Display angezeigt )
zweimal drücken: Display zeigt die Restlaufzeit der CD
( TOTAL REM TIME wird im Display angezeigt )
dreimal drücken: Display zeigt die Gesamtlaufzeit der CD
(TO T AL TIME wird im Display angezeigt)
13.schneller Vorlauf
14.Titelsprung vorwärts
15.Titelsprung rückwärts
16.Start
17.Stop
Austausch der Netzsicherung
Die Netzsicherung befindet sich auf der
Rückseite des Gerätes in einer kleinen
Plastikschublade unterhalb der Netzsteckdose.
Wenn Sie die Netzsicherung ersetzen müssen,
schalten Sie das Gerät bitte aus und entfernen
Sie das Netzkabel.
1.Öffnen Sie die kleine Schublade mit einem
kleinen Schraubenzieher
2.Entfernen Sie die defekte Sicherung.
3.Ersetzen Sie die defekte Sicherung durch die
Ersatzsicherung, welche sich in einem Halter
vor der Netzsicherung befindet (siehe auch
nebenstehendes Bild).
4.Drücken Sie die Schublade wieder zurück bis
sie einrastet.
5.Schließen Sie das Netzkabel an und
schalten Sie das Gerät ein.
Ersetzen Sie Sicherungen immer
nur durch den gleichen Typ und
Wert!
Austausch der Batterien in der Fernbedienung
Entfernen Sie die Klappe im Boden der Fernbedienung. Drücken Sie dafür, mit Hilfe eines
kleinen Schraubenziehers, die kleine Plastiklasche auf der einen Seite der Klappe zurück.
Nehmen Sie die alten Batterien heraus und setzen Sie die neuen Batterien wie unten
gezeigt ein. Achten Sie dabei auf die richtige Polarität (+ / -) und den richtigen Batterietyp.

Technische Daten EMC 1
Analogteil
Ausgangsspannung (unbalanciert) 1.6 V
Ausgangsspannung (balanciert) 3.2 V
Verstärkung (unbalanciert) 1.6X (4 dB)
Verstärkung (balanciert) 3.2X (10 dB)
THD (1 V, 1 kHZ) < 0.002 %
Max. Ausgangsspannung (balanciert) > 14 V RMS
Kanaltrennung (1 V, 1 kHz) > 90 dB
Equivalentes Eingangsrauschen 4 uV
Ausgangsimpedanz 100 Ohm
Analogfilter (-3dB) 75 kHz
Digitalteil
Dynamikumfang 100dB
Signal / Rauschabstand 100 dB
THD -100 dB
Frequenzbereich 20 - 20 kHz
Impedanz (fest) 75 Ohm
Samplingfrequenz Eingang 32 - 48 kHz
Netzspannung 120 V / 240 V
Leistungsaufnahme 23 W
Abmessungen
Breite 483 mm
Tiefe 450 mm
Höh e 120 mm
Gewicht 20 Kg
Technische Änderungen sind ohne Ankündigung jederzeit möglich.

Wichtige Information
Für optimale Musikwiedergabe benötigt der EMC-1 mindestens 72 Stunden Einspielzeit.
Wir empfehlen deshalb das Abspielen einer CD im Wiederholmodus (”REPEATE”),
während der Verstär ker abgeschaltet ist.
Im täglichen Gebrauch empfehlen wir außerdem die Benutzung des ”STANDBY”-
Schalters anstelle des Hauptschalters.
Wenn das Gerät abgeschaltet war, benötigt es ca. 2 Stunden Aufwärmzeit.
Aufgrund der Class-A Schaltungstechnik ist es normal, daß sich der CD- Spieler erwärmt.
Bitte decken Sie den CD- Spieler nicht ab. Er sollte 3 – 5 cm Luft auf beiden Seiten haben.
Wir möchten außerdem nochmals darauf hinweisen, daß die Transpor tsicherung vor Gebrauch
gelöst werden sollte um die volle Funktion des Dämpfungssystems zu garantieren.

Service
Wenn Sie Hilfe benötigen,
wenden Sie sich bitte zuerst an Ihren Händler. Er hat nor malerweise alle Informationen
über autorisierte Electrocompaniet- Servicewerkstätten und hilft Ihnen bei der Lösung des
Problems. Unter normalen Umständen sollte Ihr CD- Spieler innerhalb von 5 Arbeitstagen
repariert und zurückgeliefert sein. Dies ist jedoch auch abhängig von der Kapazität der
gewählten Werkstatt.
Sollten Sie keinen Händler in Ihrer näheren Umgebung finden, wenden Sie sich bitte an
den deutschen Ve rtrieb (Adresse siehe unten) oder direkt an Electrocompaniet:
Electrocompaniet A/S
Solheimsveien 36
1473 SKÅRER (Norway)
Tlf.: +47-67 91 17 66 Fax.: +47-67 91 17 60
E-post: elcomp@electrocompaniet.no Web: http//www.electrocompaniet.no
Deutscher Vertrieb:
MRV
Rühlstraße 21
91054 Erlangen (Germany)
Tlf.: +49-9131-52996 Fax: +49-9131-52997
E-post: MRV audio@aol.com
Electrocompaniet ist nicht verantwortlich für Schäden die während des Transportes
entstehen!
Sie sind verantwortlich für die Transport- und Versicherungskosten.
Wenn Sie ein Gerät an Electrocompaniet oder eine entsprechende Servicewerkstatt
einsenden, denken Sie bitte daran, folgendes beizulegen:
1) Quittung oder anderen Kaufbeweis, falls es sich um eine Garantiereparatur
handelt
2) Eine Karte mit der Beschreibung des Fehlers oder der Symptome.
3) Senden Sie das Gerät immer in der Originalverpackung!
DENKEN SIE BITTE AN DIE TRANSPORTSICHERUNG !
Wenn Sie weitergehende Fragen bezüglich Bedienung oder Service haben, wenden Sie
sich bitte an Ihren Electrocompaniet- Händler.

 Loading...