

Page 1

ELECRAFT KAT2 AUTOMATIC ANTENNA TUNER
Assembly and Operating Instructions
Revision F, August 3, 2012. Copyright © 2012, Elecraft; All Rights Reserved
Introduction
The KAT2 internal automatic antenna tuner (ATU) allows nearly any antenna to be connected directly to
the K2 and used on most if not all bands. The L-network configuration provides a wide impedancematching range, and can be used directly with coax-fed or end-fed wire antennas, or with balanced
feedlines via a balun. Unlike some internal auto-tuners, the KAT2 functions on receive as well as transmit.
This provides an increase in receive sensitivity and improves rejection of out-of-band signals.
The KAT2 uses latching relays to reduce current drain to nearly zero except when actually tuning. These
relays select appropriate combinations of inductance and capacitance, as well as either a capacitor-in or
capacitor-out L-network configuration. Tune-up is controlled by the KAT2's microprocessor, which also
supplies SWR or power information to be displayed on the K2's LCD. Once a match has been found, the L,
C, and other matching network data are stored in EEPROM so that the settings can be recalled immediately
on any band change. ATU parameters (L, C, SWR, etc.) can also be viewed using the menu.
Two antenna jacks are provided on the ATU, with the matching network data for both antennas stored on a
per-band basis. Once an initial match has been obtained for both antennas on a particular band, the operator
can tap the
fraction of a second to switch, it becomes practical to quickly try both antennas anytime the distant station
is weak, an advantage during contest operation.
Specifications
L - C Ranges L: approx. 0-20 µH in 256 steps; C: approx. 0-2400 pF in 256 steps
Network Type L-network (series L, shunt C); C switchable to transceiver or antenna side
SWR Range Matched Up to 10:1 typ. (varies with band; smaller range on lowest/highest bands)
Tuning time 1 to 5 seconds typical for initial tune-up; < 1/2 sec. to recall stored settings
SWR Display 1.0:1 to 9.9:1
Power Display 0-20 watts (approx.); forward and reflected power shown in 0.1-w increments
Current Drain Approx. 10-30 mA during TUNE; < 5 mA at all other times
Size 4.2" (L) x 1.6" (D) x 1.5" (H) (10.7 x 4.0 x 3.8 cm)
ANT 1/ 2 button on the front panel to switch between them. Since the relays take only a small
Elecraft • www.elecraft.com • 831-763-4211
Page 2

Parts Inventory
The table below lists all parts in the kit. If you have trouble identifying any of these items, consult the
K2 Owner's manual, which has photographs of similar parts.
Components on KAT2 Module
Ref. Description Qty.
C1 Capacitor, 10 pF, 500 V NPO disc 1
C2 Capacitor, 22 pF, 500 V NPO disc 1
C3 Capacitor, 39 pF, 500 V NPO disc 1
C4 Capacitor, 82 pF, 500 V NPO disc 1
C5 Capacitor, 150 pF, 500 V NPO disc 1
C6 Capacitor, 300 pF, 500 V silver mica, CDE FD301J03 1
C7 Capacitor, 620 pF, 500 V silver mica, CDE FD621J03 1
C8 Capacitor, 1200 pF, 500 V silver mica, CDE FD122J03 1
C20-27, C31-38,
C42, C45-47,
C50-C53, C57, C60
C58, C59 Capacitor, 0.1 µF, 25 V ("104") 2
C54 Capacitor, 100 pF, 200 V, NPO disc ("101") 1
C55 Ceramic trimmer, 5-30 pF 1
D1, D2 Diode, 1N5711 2
E1 Screw terminal, PC-mount, Keystone #8190 1
J1, J2 BNC jack, PC-mount 2
J4, J5 Conn., 16-pin female, .1" spcg., gold, Samtec ESW-116-23-G-S 2
J3 Not used (connections are soldered; see text) 0
K1-K18 DPDT latching relay 18
L1-L7 Toroidal inductor, T50-2 core (RED); see text 7
L8 Toroidal inductor, T50-1 core (BLUE); see text 1
P4, P5 Conn., 16-pin male, .1", gold, Samtec MTSW-116-22-G-S-420 2
R1, R2 Trimmer potentiometer, 100K 2
R6 Resistor, 47 Ω, 5%, 1/4-watt (yellow-violet-black) 1
R3 Resistor, 200 Ω, 5%, 1/4-watt (red-black-brown) 1
R5 Resistor, 470 Ω, 5%, 1/4-watt (yellow-violet-brown) 1
R4 Resistor, 3.3 K, 5%, 1/4-watt (orange-orange-red) 1
T1 Toroidal transformer, FT37-43 core (gray); see text 1
U1 IC, Microcontroller, 16C77 1
U2 IC, EEPROM, 25LC320 1
U3 IC, 6-volt regulator, 78L06 1
U4 IC, Op-amp, LM358 1
Z1 Ceramic resonator w/internal capacitors, 4.0 MHz 1
Capacitor, .001 µF, 25 V("102") Note: Two of these capacitors
may be physically smaller than the other capacitors even t
though they have value. If so, reserve those capacitors for use at
C45 and C60.
26
2
Page 3

Hardware and Miscellaneous
Ref. Description Qty.
HDWR Rubber insulator, 0.5” dia. (round, black), p/n 6135-017-BLK 6
HDWR Socket for U1, 40 pins, open frame 1
J7 Conn., 2-pin housing, 0.156", Digikey WM2111 1
HDWR Female crimp pin for J7, gold, Digikey WM2305 2
J8 Conn., 10-pin dual-row 0.1" housing, Digikey WM2522 1
HDWR Female crimp pin for J8, tin, Digikey WM2556 12
RF-P6 Conn., 2p male, 0.156”, gold, Digikey WM5224 1
HDWR #4 split lock washer 6
HDWR 4-40 x 1/4” ZN ST Phillips machine screw 4
HDWR Standoff, 3/16” dia. x 13/16”, 4-40 thd, RAF #1642-440-A 2
HDWR Binding post, black, 6-32 threaded, Keystone #7007 1
HDWR BNC connector cap, black plastic, 3/8" dia. x 1/2” long 1
MISC Enamel wire, #26 Thermaleze, GREEN 2 ft.
MISC Enamel wire, #26 Thermaleze, RED 10 ft.
MISC Insulated hookup wire, #24, solid 1 ft.
MISC Cable, 4-conductor + shield, Digikey W404-X-ND 2 ft.
MISC Coaxial cable, RG-174 1 ft.
MISC KAT2 Control board 1
MISC KAT2 L-C board 1
MISC Cable ties, 3” 4
i
Caution: Some components in this kit can be damaged by static discharge. Before
handling any transistors or integrated circuits, always put on an anti-static wrist strap or touch any
grounded, unpainted metal surface.
K2 Firmware Requirements
To use the KAT2 antenna tuner, you'll need K2 main processor firmware revision 1.04 or later. (The main
processor is U6 on the K2's control board.) Revision 1.05 or later is recommended, since it provides
additional ATU operating features (see Using the ATU). The latest K2 firmware revision can be ordered as
an upgrade (refer to our web page for details).
To check your main processor firmware revision, hold any button when powering up the K2. The number
shown at the left end of the display is the revision number. If you have an older version, contact Elecraft.
3
Page 4
ATU Control Board Assembly
i
A fine-point, temperature-controlled soldering iron (700-800 degrees F) is required
to assemble this kit, due to the high density of the PC board layout. A high-wattage iron
or one with a wide tip may damage components, pads, or traces. Use a minimum amount
of solder to avoid ground shorts.
i
To avoid difficulties in soldering adjacent components, install components only in
the order described below. Double-check all values before soldering, since removing
parts from double-sided PC boards can be difficult.
There are two identically-sized PC boards in the ATU kit. Locate the ATU Control board, which is
labeled "ATU CTRL" on the bottom. Set the L-C board aside for now.
Referring to the parts list (page 2), install R3, R4, and R5. Note: R6 (47 Ω) and R5 (470 Ω) have very
similar color codes. Be sure to install the 470-Ω resistor at R5 (yellow-violet-brown).
Install D1 and D2 (1N5711), observing proper orientation of the banded end of each diode.
Install the capacitors listed below. The capacitor markings are shown (e.g., "102" = .001 µF).
IMPORTANT: If two of the capacitors are physically smaller than the others even though they
have the same value, use them at C60 and C45.
__ C57 (102) __ C58 (104) __ C60 (102) __ C59 (104) __ C53 (102)
__ C52 (102) __ C45 (102) __ C46 (102) __ C47 (102) __ C54 (101)
__ C50 (102) __ C51 (102)
Ceramic resonator Z1 looks like a capacitor with three leads. It is not polarized, so it can be installed
in either orientation. Install Z1 near U1.
i
The IC socket to be installed in the next step is an open-frame type. A smaller IC (U4) will be
installed within an opening in this socket. Do not substitute any other socket type.
Install the 40-pin IC socket for U1, with the notched end of the socket oriented towards pin 1.
Install voltage regulator U3, which has a 3-lead package like a transistor.
(Note: Touch a grounded metal surface before handling the following components.) Install the two 8-
pin ICs, U2 (25LC320) and U4 (LM358), with the notched end of each IC oriented as indicated by its
component outline. Note that U4 fits within the opening in U1's 40-pin IC socket.
The two latching relays, K17 and K18, must be installed with their white-striped ends oriented as
indicated on the PC board. Do not bend the relay leads. Solder two diagonal corner pins on each relay
first, then re-heat the connections and press the relays flat on the board before soldering the remaining pins.
4
Page 5
Install BNC jacks J1 and J2. These connectors must be seated flat on the PC board and aligned
with the board's edge to allow for proper installation in the top cover. Solder one of the alignment pins
first, then re-heat the connection while pressing down on the jack. Once you're sure the connector is seated
correctly, solder the other pins.
Install screw terminal E1. (If E1 was supplied with a screw, remove it. The screw will not be used.)
Like J1 and J2, this component's alignment is critical. Use the same mounting technique.
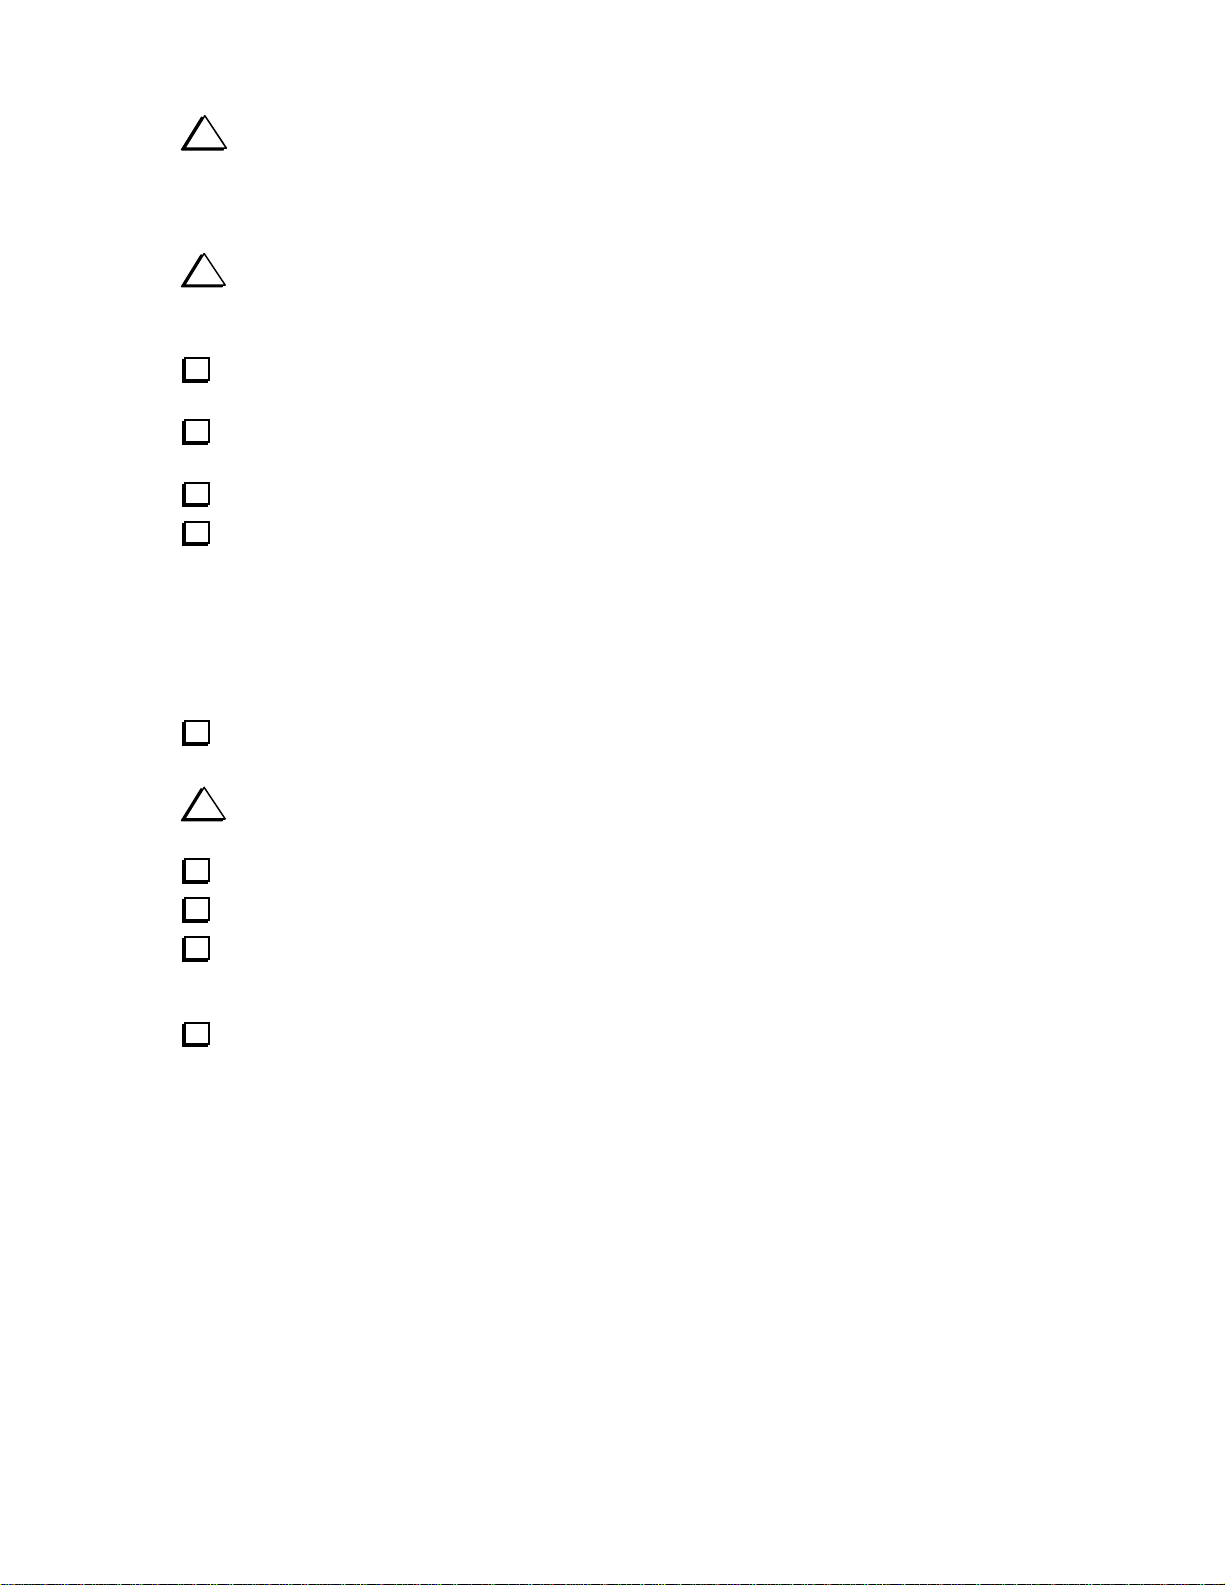
Transformer T1 is wound on a dark gray toroidal core (ferrite, 3/8" [9 mm] diameter). Cut two 10"
(25 cm) lengths of #26 enamel wire, one red and one green. Twist the two wires together loosely, crossing
over each other about 2 to 3 times per inch (once per cm). Then wind the twisted wires onto the core as
shown below, using 10 turns. Each pass through the core counts as one turn.
i
T1 must be wound exactly as shown, with leads 1 and 3 emerging from the back side of
the core and leads 2 and 4 from the front side.
4 (GRN)
2 (RED)
3 (GRN)
1 (RED)
Trim the leads of T1 to about 1/2" (12 mm) long. Completely remove the insulation from T1's leads
up to the edge of the core, using a solder pot or hot soldering iron tip. Do not attempt to burn off the
insulation using a match or lighter, as the flame may fuse the pairs of wire together, causing them to
become shorted. Another way to remove the insulation is to use fine sand paper.
Tin T1's leads with solder. If the leads do not tin easily, the insulation may not be fully removed.
Using an ohmmeter, measure between the red and green wires to make sure that they're not shorted.
Install T1 as indicated by its PC board outline near the right end of the board. Insert the leads into the
numbered holes as shown by the drawing of T1, above. Pull the leads taut on the bottom of the board.
Before soldering, use a magnifying glass to make sure that the entire portion of exposed lead is properly
tinned.
5
Page 6

Cut a 1-1/8" (2.9 cm) length of insulated, solid-conductor hookup wire. Remove exactly 1/4" (6 mm)
of insulation from each end. This jumper will form the 1-turn link winding of T1.
Insert one end of this wire through the center of T1 and into the pad labeled 5. Bend the wire down to
the right and insert the other end into the pad labeled 6. Pull the leads of the wire taut on the bottom of the
board, then solder.
Trimmer potentiometers R1 and R2 mount on the bottom of the ATU Control board. Press them down
as far as possible before soldering.
Set both trimmers fully clockwise as viewed from the bottom of the board.
Install trimmer capacitor C55 on the bottom of the board.
Note: The microprocessor and connectors J4 and J5 will be installed later.
ATU L-C Board Assembly
i
All L-C Board components should be mounted in the order given here. Any other assembly order
may make soldering or mechanical alignment difficult. Also, the components must be mounted as close as
possible to the board using short leads. Follow all instructions carefully.
Install .001 µF ("102") capacitors C20-C27 on the top of the L-C Board (the side with L1-L8 and C1-
C8). There should be no excess lead length above the board.
Install .001 µF capacitors C31-C35, C37-C38, and C42. Do not install C36 at this time.
Trim all capacitor leads on the bottom of the board to the shortest length possible.
Install relays K1-K16 on the bottom of the L-C Board as follows. First, position all 16 relays on the
board, without soldering. Align the white stripe on each relay with the striped end of its component outline.
(Note that the relays are in two rows that face in opposite directions.) Next, hold the relays in place using a
flat object such as a hard-cover book. Flip the PC board and flat object over together, then examine the
relays to make sure they are all still flat against the board.
Solder two diagonally-opposite corner pins on each relay. Look at all relays once more to verify
that they are not spaced any distance away from the board. Then solder all the remaining pins.
i
The following step is very important. Normally, relay pins need not be trimmed. But in this case
components will be mounted above the pins, so trimming them is necessary to prevent shorts. Trimming
must be done after soldering to prevent mechanical damage to the relay pins.
Trim all relays leads to the shortest possible length. Use flush-cut type diagonal cutters if available.
Note: Wear eye protection and aim the leads away from you when cutting. Trimming the leads over a waste
basket will eliminate cleanup.
6
Page 7
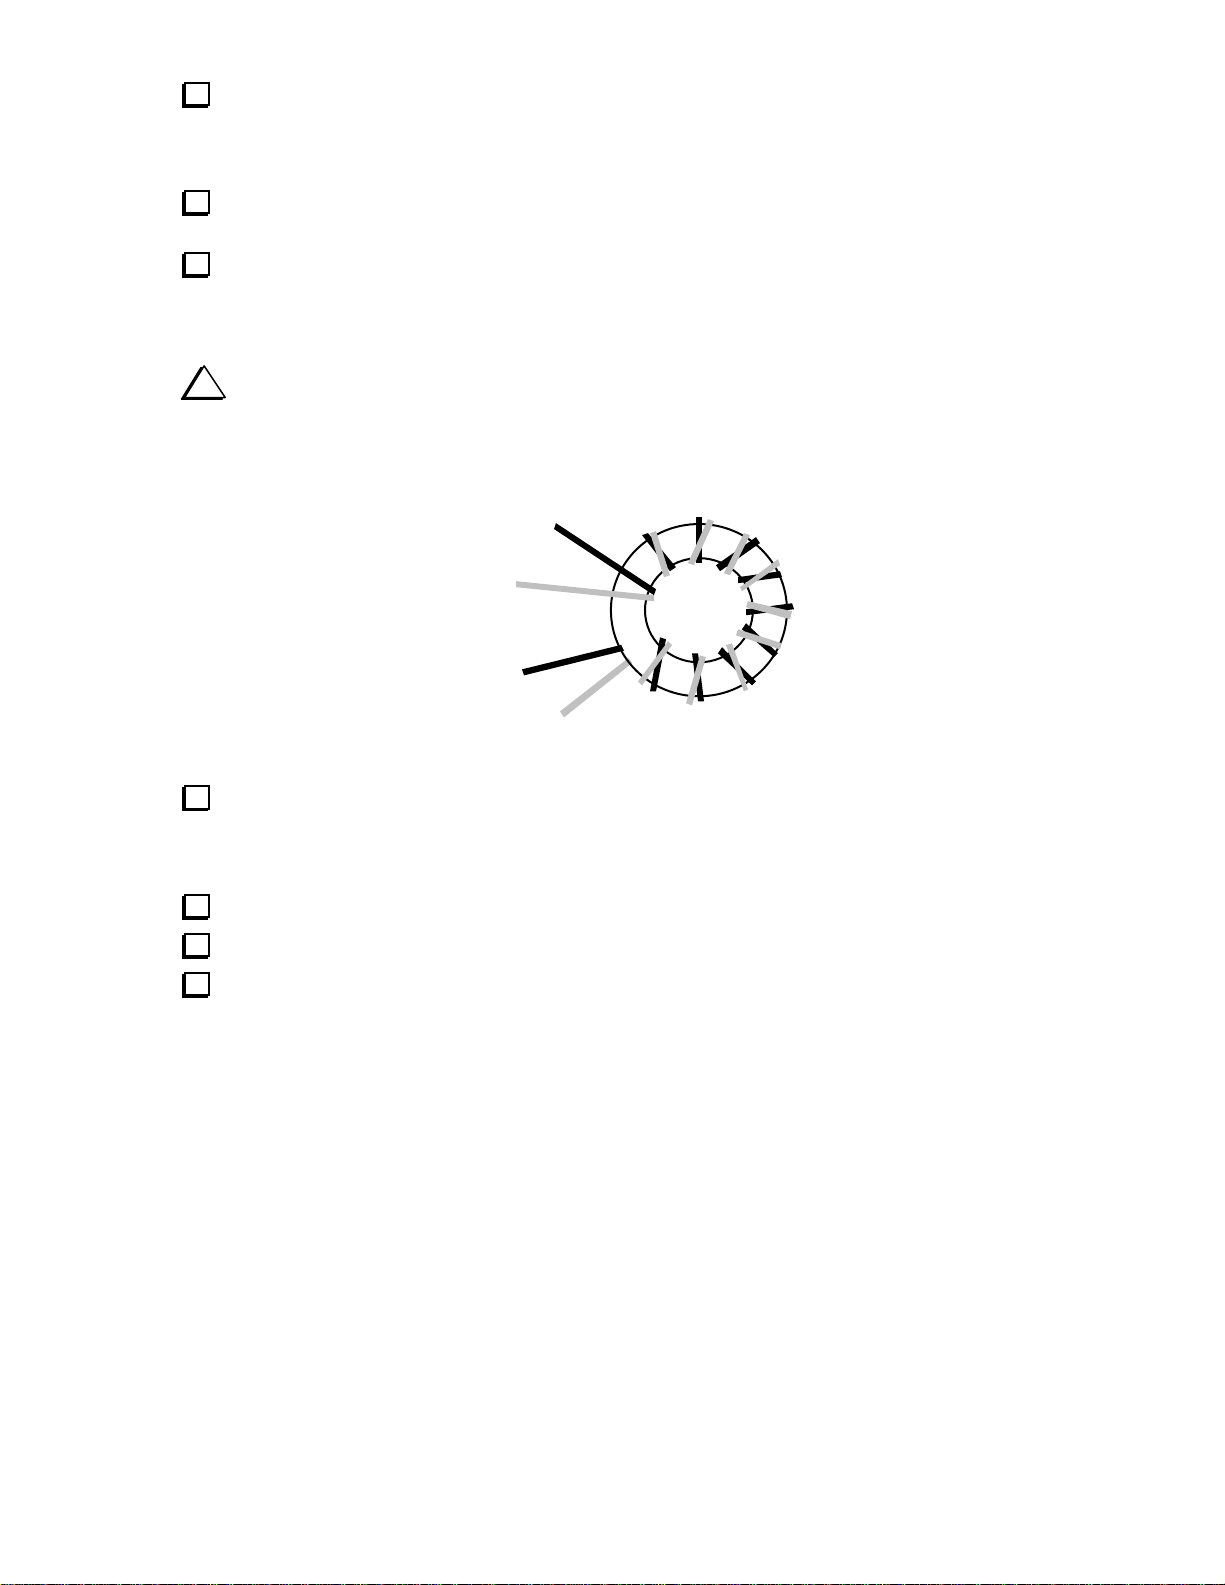
Refer to the drawing below during the following steps. This left end view shows how the L-C and
Control boards will appear when connected together. Relays K1 and K2 can be seen on the bottom of the
L-C board, along with 16-pin male connector P4. On the control board, J2 (BNC), R5, and R6 are visible,
as well as 16-pin female connector J4. The 13/16" standoffs are omitted for clarity.
L-C
P4
J4
Control
Locate the two 16-pin male connectors, P4 and P5. These connectors must be installed on the bottom
of the L-C board, between the two rows of relays (see above). Do not solder all pins of P4 and P5 at this
time. Instead, position the connectors, then solder only pins 1 and 16 on each connector. Make sure the
connectors are perpendicular to the board.
Install the two 16-pin female connectors, J4 and J5, on the top of the Control board as shown above.
Solder only pins 1 and 16 of each connector. Make sure the connectors are perpendicular to the board.
Plug the L-C board into the Control board as shown, mating P4 with J4 and P5 with J5. Be very
careful to avoid bending any pins on P4 and P5. Once the boards are properly mated, secure the L–C board
to the Control board standoffs temporarily using two 4-40 screws.
Press the two boards tightly together at both ends and in the middle. Once the 16-pin connectors
appear to be perpendicular to the boards and seated completely flat, solder all pins of P4, P5, J4, and J5.
Remove the screws holding the L-C board to the two standoffs. Then unplug the L-C board from the
Control board using the following method: Using a small screwdriver or Allen wrench, pry P4 upwards a
small amount, then pry P5 upwards a small amount, repeating this until the L-C board can be easily
unplugged. Do not pull the boards apart directly, as this may bend pins on P4 and P5.
Some pins on the bottom of the Control board must be trimmed to prevent shorting to the
K160RX option module. Trim the pins of the following components: E1, J5, C45, C46, C47, and J1
(signal pins only, not the large ground posts).
Carefully examine the entire ATU Control board for solder splashes or unsoldered pins (both sides).
Install C36 on the L-C board (.001 µF, "102").
7
Page 8
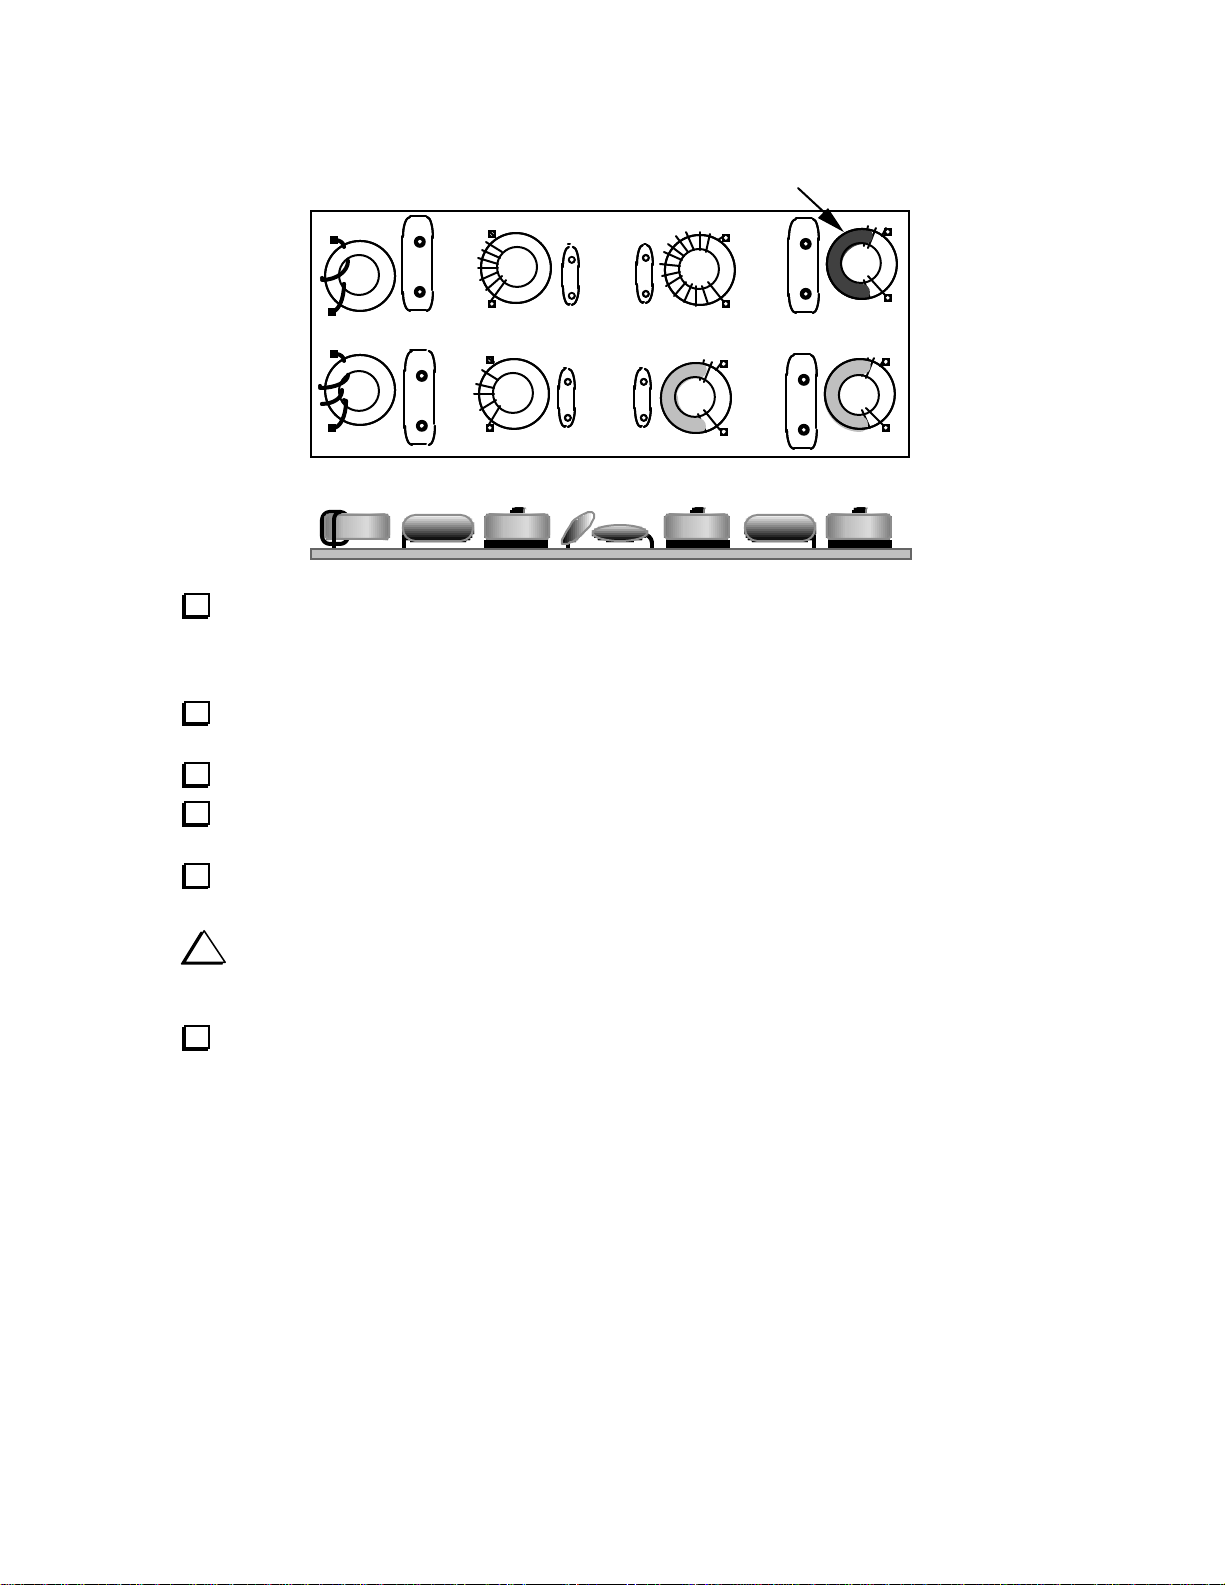
Refer to the drawing below during the following steps. The top view shows the approximate location of
the windings and pads for each inductor. The side view shows how capacitors C1-C8 and inductors L1-L8
must be mounted, including round rubber insulators for L3-L8.
BLUE CORE
L1
C5
C6 C8
L2 L7
Install C4 (82 pF) as shown above. Trim the leads to about 1/8" (3 mm) long, and bend them down at
right angles to the capacitor body. (Adjust the lead spacing to match the pads.) Insert the leads into the C4
pads just far enough to hold the capacitor in place. Do not insert the leads all the way through the board.
They could puncture the relay on the opposite side during soldering, causing a short.
Solder C4. Adjust the body of the capacitor so that it is parallel to the board and not overlapping the
location for C2 or L6. Also make sure it doesn’t touch any relay pins or pads.
Install C3 (39 pF) in the same manner as C4.
L4
C3C1
C2L3
C4
L5
C7
L8
L6
Install C1 (10 pF) and C2 (22 pF) as shown in the drawing, with the bodies of the capacitors tilted
over C3 and C4, respectively, at about a 45-degree angle.
Install C5 (150 pF), C6 (300), C7 (620) and C8 (1200). The bodies of these capacitors should be
parallel to the board and not interfering with adjacent components.
i
In the following steps, L1 through L8 will be wound and installed. There is no need to adjust the
windings to precisely match the inductances shown on the schematic. The inductances need only be
approximate, since for any given antenna match only a subset of the inductors will be used.
Cut a 2-1/8" (5.5 cm) length of insulated hookup wire. Remove 1/8" (3 mm) of insulation from each
end. Wind this wire onto a red toroid core as shown in the top view of the L-C board (2 turns).
8
Page 9

Position L1 and its winding so that you can insert the leads into the indicated square pads. Before
soldering, make sure that the insulated wire is positioned away from relay leads. Note: The toroid core may
remain somewhat loose within the winding after installation. This will not affect performance.
Cut a 2-7/8" (7.5 cm) length of hookup wire. Remove 1/8" (3 mm) of insulation from each end. Wind
this wire onto L2 (3 turns). Install L2 in the same manner as L1.
Wind L3 through L8 using red enamel wire and the number of turns listed below. Position the turns
as shown in the top view of the L-C Board. Note that L8 uses a blue core, while all others use red cores.
__ L3 (5 turns, 5" [12 cm]) __ L4 (7 turns, 6" [15 cm])
__ L5 (15 turns, 12" [30 cm]) __ L6 (22 turns, 17" [42 cm])
__ L7 (30 turns, 23" [58 cm]) __ L8 (31 turns, 24" [61 cm], BLUE core)
Trim the leads of all toroids to about 1/2" (12 mm). Completely remove the insulation to within about
1/8" (3 mm) of the core, using the same method used for T1. Tin the leads. If solder does not adhere well to
the leads, you may not have removed all of the insulation.
Install L3 as shown in the drawing. (Note: To avoid damage to the rubber insulators, they will be not
be installed until the next step.) Trim the leads so that when they are inserted into their holes, L3 sits
approximately 1/16" (2 mm) above the relay pads beneath.
Fold L3 up and place a rubber insulator underneath it. The insulator has a stem in the center that goes
through the core to hold it in place. Fold the toroid and insulator back down flat on the board. Inspect the
windings to make sure they don't touch any adjacent relay pads.
Install L4-L8 in the same manner as L3.
Examine the L-C board for solder splashes or unsoldered pins (both sides).
Locate the two 13/16" long (20.5 mm) standoffs. Install one standoff at each end of L-C board using
a 4-40 x 1/4" screw and one split lock washer between the standoff and the pc board. Refer to the end view
below.
COM PON ENT SIDE
9
Page 10

Cable Assemblies
The drawing below shows the two cable assemblies that connect the ATU to the K2. A four-conductor
shielded cable is used for control signals (J3 to J8), and an RG-174 coax cable is used for RF (J7). J8 will
be connected to the K2's Control board. J7 will be connected to the RF board, near the low-pass filters.
J3
GREEN
BLACK
RED
WHITE
BARE
GND
BARE (nc)
WHITE
RED
BLACK
GREEN
J8
J7
ARROW
A C
B
10
J8
J7
RETAINER
Page 11

Cut one 15" (38 cm) length of the 4-conductor cable. Remove 3/4" (2 cm) of the gray jacket from
each end of the cable using a razor blade. Be very careful not to nick the conductors.
Carefully cut away the exposed portion of the foil shield. Once the wires are visible, examine them
for nicks. If any of the wires are nicked, cut all of the wires off and repeat the previous step.
Grip one of the insulated wires near the end using long-nose pliers, then strip off about 1/8" (3 mm)
of the insulation using a wire-stripping tool. (If you don’t have a wire-stripping tool, gently roll the wire
across a razor blade to cut the insulation to the indicated length.) Similarly, strip the remaining insulated
wires at both ends of the cable. Tin the ends of each wire.
Solder the five wires at one end of the cable to the ATU Control board pads indicated in the
illustration on the previous page. Make sure the bare wire's strands are tightly twisted together before
soldering. Note: The wires are not shown at their actual lengths in the drawing.
At the other end of the cable, cut the bare wire off.
Two sizes of crimp pins are supplied with the kit. The smaller pins are used at J8. (12 are supplied,
two of which are spares.) Attach crimp pins to each of the four insulated wires as shown in Detail A. The
insulated part of the wire can be held in place by squeezing together the tabs at the end. A second pair of
tabs is provided to hold the wire itself in place. Solder the wire to these tabs, using only the amount of
solder needed to make a clean connection. Excess solder may prevent insertion of the pin into the housing.
Locate the 10-pin housing for J8, and study the J8 detail drawings before attempting to assemble the
connector. Detail B shows the proper orientation of the crimp pins as they are inserted into the housing.
Detail C shows the retainer tabs on the crimp pins. When a crimp pin is correctly inserted, its retainer will
be visible through a hole in the side of the housing. The two rows of crimp pins face opposite directions.
You'll find an arrow on the housing near one of the small holes. Insert the green wire's crimp pin into
the associated large hole at the other end of the housing. Refer again to Details B and C.
Insert the remaining wires (with crimp pins) into the locations indicated. To provide good retention of
the connector when plugged in, you should also install crimp pins into each unused location of J8 as shown.
Check continuity of all connections between J8 (10-pin housing) and J3 (KAT2 control board end).
Cut the RG-174 coaxial cable in half to obtain two approx. 6" (15 cm) lengths. (Save one as a spare.)
Remove 3/4" (2 cm) of insulation from each end of the coax, taking care not to nick the braid. Separate the
strands of the braid, then twist about 2/3 of the strands together tightly. Trim off the remaining strands.
Remove about 1/8" (3 mm) of insulation from the center conductor at each end. Tin the wires.
Solder the braid and center conductor at one end of the coax cable to the pads labeled RF and GND.
These pads can be found at the right end of the ATU Control board as shown in the illustration.
Referring to the detail drawing of J7, attach and solder large crimp pins to the braid and center
conductor at the other end of the coax. (Use the same technique used for J8.)
Insert the two crimp pins into the 2-pin housing (J7) as shown in the drawing. Once each crimp pin is
snapped into place, its retainer tab must be visible in a small hole in the connector.
11
Page 12

The K2’s AUX RF connector (RF-P6) is the same type used for the internal battery connector (RFP3). To avoid damage to the ATU or to the K2, add some type of unique marking to RF-P6 and to its
mating ATU connector (J7). Use model paint, nail polish, or some other permanent medium.
i
Before handling the microprocessor in the following step, touch an unpainted, grounded surface or
put on a grounded wrist-strap.
Install U1, the PIC16C77 microprocessor, into its socket on the ATU Control board. The notched or
dimpled end of U1 goes to the left (towards R6). Make sure all pins are fully mated and that none are bent.
Plug the L-C board into the Control board as you did earlier, mating P4 with J4 and P5 with J5. Be
very careful to avoid bending any pins on P4 and P5. Press the two boards together along their full length.
Secure the Control board to the L-C board standoffs using two 4-40 screws and two #4 split lock
washers. These lock washers go between the screw heads and the PC board, not
board and standoffs as on the L-Cboard.
between the PC
Turn the K2 ON and use the
"i0.20", which shows the K2 drawing 200 mA or 0.2 amps). Write this number down. Then turn the K2 off
and disconnect the power supply and/or battery.
Remove the six screws identified below from the K2 top cover. Note: screws #3 and 4 must be
removed from the side panels, leaving two 2-D fasteners attached to the top cover. This is very
important since leaving these 2-D fasteners on the side panels would interfere with routing of the ATU
cables in later steps. If you remove the top cover in the future, always remove only the screws shown.
DISPLAY button to check the receive-mode current drain (for example,
12
34
56
Remove the top cover by lifting it from the back end. Disconnect the speaker and battery cables.
12
Page 13

i
Check the orientation of J8 carefully as described below before turning on power. Some
components could be damaged if power is applied with J8 plugged in incorrectly. If you have the
KIO2 serial interface option installed, J8 must be connected to P1 on the KIO2's "AUX2" junction
board rather than directly into the K2 Control board (see KIO2 manual).
Connect J8 (from the ATU Control board) to P4 (on the K2 Control board). The green wire (indicated
by the arrow on J8) corresponds to pin 2 of P4, and that end of J8 should be closest to the top edge of the
K2 Control board. Make sure that J8 is mated with all 10 pins of P4.
Mark the arrow end of J8 using model paint, nail polish, or an adhesive label with "UP" written on it.
Preliminary Tests
i
Do not transmit during these tests. Keep the ATU RF connector (J7) disconnected.
If you have the KIO2 serial interface option installed, you should disconnect it from the K2 control
board until KAT2 testing is complete. The KAT2 and KIO2 can then both be connected to the
control board using the small junction board supplied with the KIO2.
Connect a power supply or battery to the K2 and turn on power. If you see or smell smoke, turn
power OFF immediately. Check all connections and refer to the Troubleshooting section if necessary.
Tap DISPLAY to check the receive-mode current drain. The reading should be the same as you saw
earlier without the ATU module connected, or at most 20 mA higher. (Since current drain resolution is only
20 mA, it could appear to be 20 mA higher even though the actual increase is just a few milliamps.) An
increase of more than this could indicate a short on the ATU Control board.
Tap MENU and scroll through the entries until you find ATU. If the ATU Control board is
functioning, you'll see a parameter on the right end of the LCD. Hold EDIT to modify the parameter. If you
see two dashes (--) instead of the ATU parameter, refer to Troubleshooting.
Using the VFO knob, scroll through the ATU menu parameters. You may hear relays turning on and
off as you select various entries. You should see CALn, CALP, CALS, AUTO, ALT, POUT, etc.
Each menu entry will be explained in the Using the ATU section.
Set the ATU parameter to L0. You should hear a relay switch when you move from L0 to L1, then
to L2, etc., up through L8. The same should be true for C0 through C8, as well as N1 and N2. If you
don't hear any relays switching, see Troubleshooting.
Set the ATU parameter to AUTO and exit the menu.
Turn power off and back on. Use the menu to verify that the ATU parameter is still set to AUTO. If
not, U2 on the ATU (the EEPROM) may be installed backwards or have an unsoldered or shorted pin.
Tap the ANT 1/2 button, which is below the DISPLAY button. You should hear a relay switching,
and when antenna 2 is selected the ANT 2 annunciator will turn on. Leave the antenna set to ANT 1.
Turn off the K2 and disconnect the power supply.
13
Page 14

Disconnect the ATU control cable (J8) from the K2 Control board.
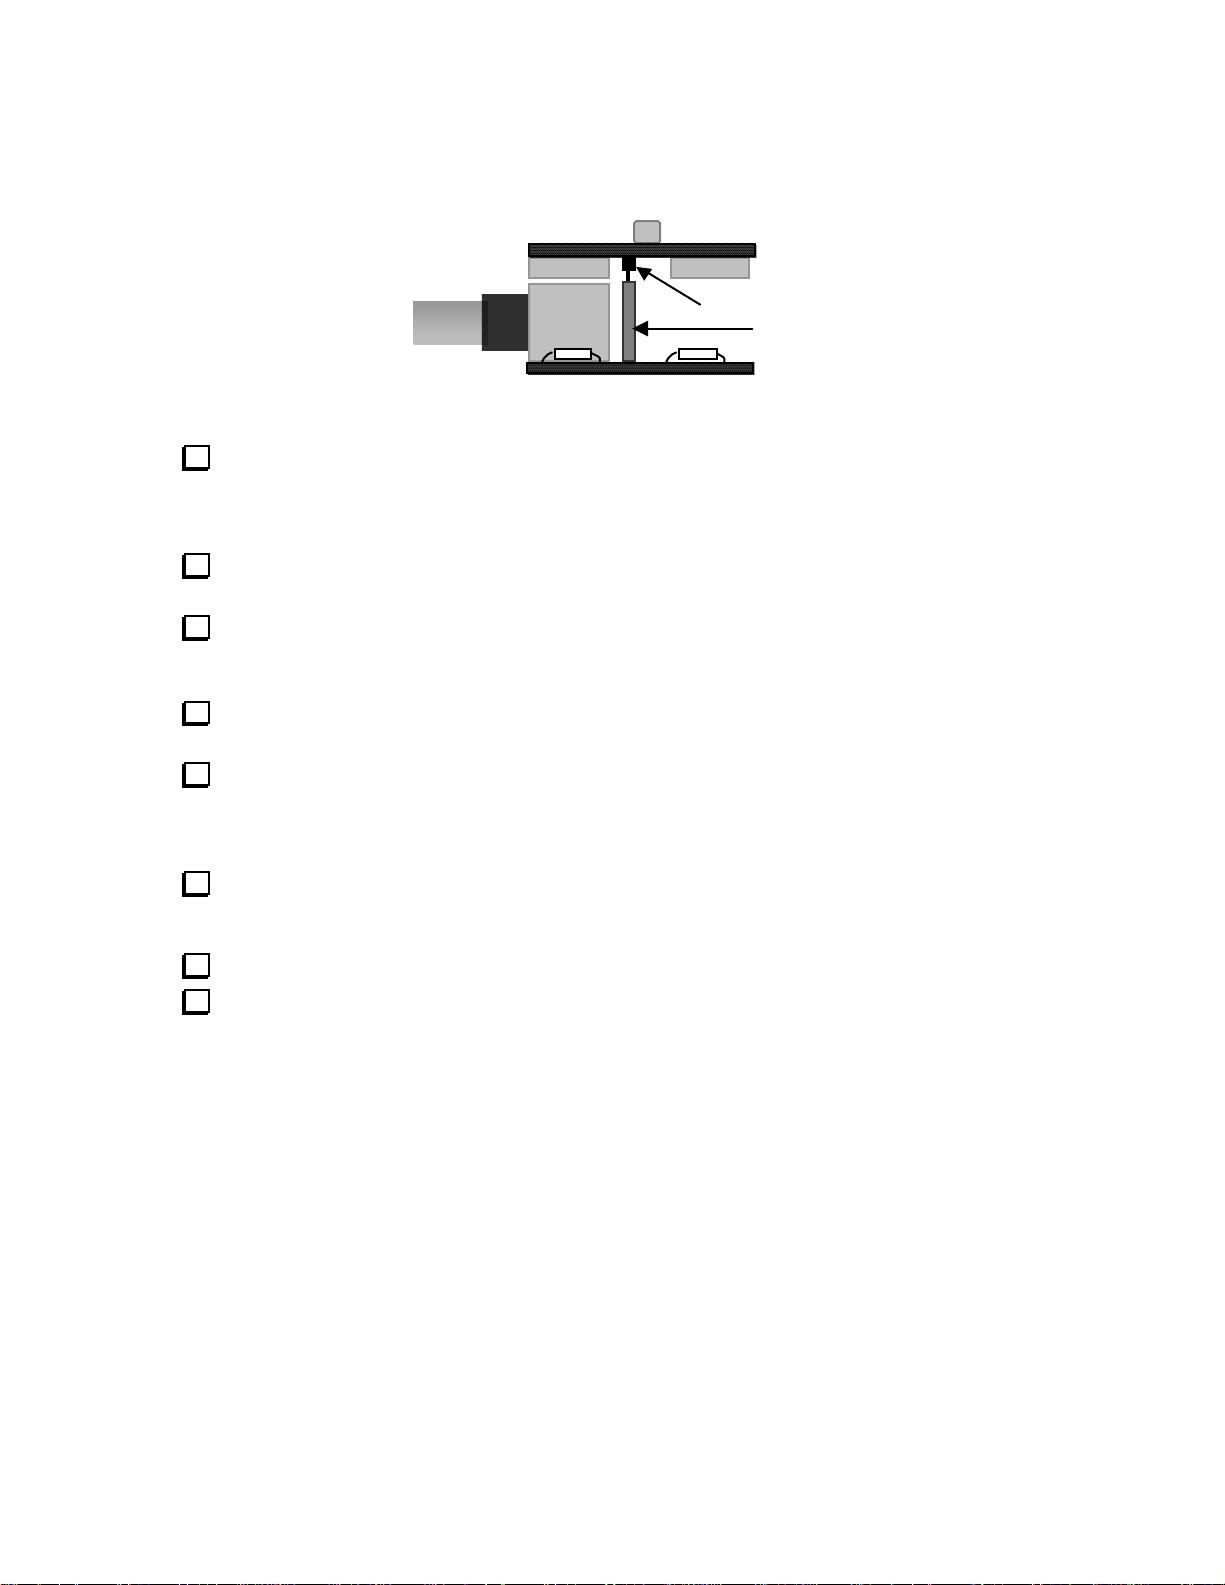
ATU Module Installation
The ATU is installed in the top cover as shown below. Refer to this drawing during the following steps.
C55
R2 (REFL)
R1 (FWD)
J7
J8
14
Page 15

If you have the 160-meter module installed (K160RX), remove its retaining screw and unplug the
module. Do not remove the RX Antenna connector or detach the 160-meter module from the heat sink.
Remove the K2's heat sink (6 screws, two 4-40 nuts, and the nuts on the antenna and key jacks), being
careful to save all of the hardware, including the PA transistor thermal insulators. The insulators may
remain attached to the heat sink, or they may fall off when the heat sink is removed.
Install and solder the 2-pin male connector at P6 on the K2 RF board, as shown by its outline on the
right-hand edge. (P6 is labeled AUX RF. Do not confuse P6 with P3, which is labeled AUX 12V.) P6 must
be oriented so that its plastic polarizing tab is towards the front panel of the K2.
Carefully examine all hardware associated with the PA transistors, Q7 and Q8, on the bottom of the
RF board. If any of the plastic hardware or the thermal insulators appears to be melted or damaged, you
should order the K2 PA Hardware Kit from Elecraft. Note: Do not bend the PA transistors upwards
any farther than necessary, as this may weaken their leads.
Re-install the heat sink using the method described in the K2 Owner's Manual. Do not over-tighten
any of the hardware.
Using a DMM on its lowest resistance scale, measure resistance from the collector of each PA
transistor (Q7, Q8) to ground. If you see a reading of less than 100 Ω, the heat sink may be shorted to one
of the transistor tabs. Remove the heat sink and correct the short before proceeding.
Re-install and secure the 160-meter module if applicable.
Cover the K2's main antenna jack (J4) with the black plastic BNC connector cap. This cap serves as a
reminder that the main antenna jack should not be used once the ATU is installed. Only the ATU's two
antenna jacks should be used.
If you have the K2 internal battery installed, you must remove the battery bracket temporarily in order
to install the ATU. (There is no need to remove the battery switch.) Before removing the battery bracket,
disconnect the (+) terminal lug and cover the terminal with tape.
Locate the ATU's ground binding post. The 6-32 threaded part of the binding post must fit easily
through the hole labeled GND on the K2 top cover. Some K2s may have the wrong size hole at this
location. If the shaft of the binding post does not fit, carefully enlarge the hole using a small flat-blade
screwdriver, file, or other small tool. (The binding post will be installed in a later step.)
Install the ATU module in the top cover in the location shown (previous page). The bottom of the
ATU Control board should be visible. Push the ATU module down into the top cover as far as it will go.
This will prevent any possibility of the module touching components on the 160-meter module.
Secure the ATU module to the top cover using the large lock washers and nuts supplied with the BNC
connectors. The threads on the connectors are plastic and can be easily stripped. Tighten them hand-
tight first, then turn them a small additional amount only (about 1/8 turn).
If applicable, re-install the internal battery, along with its cushioning material, bracket, and hardware.
(Lost hardware may be found sticking to the speaker magnet.)
15
Page 16

Route the ATU control cable approximately as shown in the drawing. If you will not be installing the
battery option at this time, leave a loop of the cable in the indicated position. Secure the ATU control cable
to the speaker and/or battery wiring using at least three of the supplied nylon cable ties.
Thread the binding post into the ground connector, E1 on the ATU control board, through the top
cover's GND hole. Tighten E1 using the large hex wrench supplied with the K2 as a lever. Insert either end
of the hex wrench into the wire-hole in the binding post, and tighten it until the serrated edge of the binding
post digs into the paint. Use an ohmmeter to verify that the binding post shows a very low resistance (< 1 Ω
to the top cover. If the resistance is high, carefully scrape some of the paint away by hand.
i
Check the orientation of J7 and J8 carefully as described below before turning on power.
Connect the ATU RF cable (J7) to the K2 RF board at P6 (AUX RF). The notch in J7's connector
housing must grip the locking tab of P6. Both the locking tab and notch should face the K2 front panel.
Make sure you have not plugged J7 into the internal battery connector on the RF board (P3), and
that the shield wire in J7 is closest to the side of the K2 when J7 is plugged into P6 on the K2 RF
Board.”
(indicated by the arrow on J8) corresponds to pin 2 of P4, and that end of J8 should be closest to the top
edge of the K2 Control board. Make sure that J8 is mated with all 10 pins of P4.
Connect the ATU's control cable (J8) to P4 on the K2 Control board (AUX I/O). The green wire
Examine both ends of the ATU's control and RF cables for shorted or loose wires.
Bridge Null Adjustment (C55)
Connect a 50-Ω dummy load rated at 5 watts or higher to the ATU's Ant. 1 jack.
Connect a power supply to the K2 and turn on power. (Do not install the top cover at this time.)
Select the 40 meter band (7000-7300 kHz). Set the K2's POWER control for about 5 watts.
If the ANT 2 annunciator is ON, tap the ANT 1/ 2 button to turn it OFF. This will select antenna 1.
Using the menu, change the ATU mode to CALn (Null). Exit the menu before proceeding.
Turn the FWD and REFL potentiometers on the ATU module fully clockwise (R1 and R2). Set C55
so that its adjustment slot is parallel to the K2's rear panel.
Note: When TUNE is activated in the following step, the display will show reflected voltage in millivolts
(e.g., 075 ATU). If C55 is not yet close to the proper position, you'll see HI instead of a number. You
should be able to get a reading of 010 or lower when C55 is properly adjusted.
Locate a small insulated-handle screwdriver, and prepare to adjust C55 on the ATU module. Hold in
the TUNE button and release it when you see the display change. Adjust C55 for an indication as close as
possible to 000. Tap or hold TUNE again to cancel the CALn display and return to receive mode.
You should find a 000 indication (approx.) over a small range of C55's rotation. Position C55 at
approximately the middle of this range, repeating the previous step as needed. (Note: Due to stray
capacitance on the L-C board, you may not see a 000 indication if you try to use CALn on higher bands.)
16
Page 17

Set up your DMM to read DC volts (20 or 30 volt scale).
On the bottom of the KAT2 control board, locate a pad labeled "B". Just to the left of this pad you'll
see the round pad for pin 1 of U4 (LM358). (You'll know you have the right round pad if it's part of a group
of 8 pads, 7 of which are square.) Touch your DMM's (+) probe to this pad. Connect your DMM's (-) probe
to any ground point on the K2.
In receive mode, the voltage at this test point must be 0 volts. If not, trace backwards through the
circuit to find where the voltage is coming from.
Go into TUNE mode briefly. At 5 watts, the voltage should be between 3 and 4 volts. If it is much
lower or higher than this, you probably have a wiring error in the SWR bridge. Remove the KAT2 control
board from the L-C board and check the wiring of T1. Make sure T1's leads are properly stripped.
Once you have the correct voltage indicated at U4 pin 1 in TUNE mode, install the 47-ohm resistor at
R6 (yellow-violet black). The two pads for R6 can be found looking at the bottom of the KAT2 control
board. First, locate a pad at one end of the board labeled "6V". The pads for R6 are above and below the
"6V" label. R6 can be installed on either side of the board (the component outline is located on the top, the
side with the microprocessor, etc.).
Power Calibration (R1 and R2)
Connect a known accurate wattmeter between the ATU's Ant. 1 jack and a 50-Ω dummy load. Use
short, low-loss coax cables. (An alternative to using an external wattmeter is to use an RF probe and DMM
connected to the dummy load. The reading shown on the DMM's DC volts display can be converted to
power using the formula P = V* V/ R, where R = 50. Example: 15.8 V on the DMM = about 5 watts.)
Select the 40 meter band (7000-7300 kHz). Set the K2's POWER control for 5.0 watts.
Tap the ANT 1/2 button if necessary to make sure that the ANT 2 annunciator is OFF.
Using the menu, change the ATU mode to CALP (calibrate power). Exit the menu.
Note: The ATU's power display shows both forward (F) and reflected (r) power, e.g. 5.0F 0.0r
(5.0 watts forward, 0.0 watts reflected). After calibration, accuracy will typically be +/- 0.5 watts.
Locate a small flat-blade screwdriver and prepare to adjust R1 on the ATU module. Hold in the
TUNE button and release it when you see power displayed. Adjust R1 for a power indication that matches
the reading of the external wattmeter. Hold TUNE again to return to receive mode.
Repeat the previous step as needed until the ATU reads the same as the external wattmeter.
Set R2 to exactly the same position as R1 (visually). This will provide adequate reflected-power
reading accuracy. You can position R2 more accurately by measuring the resistance from the wiper (center
terminal) to ground. Rotate R2 until its wiper-to-ground resistance closely matches that of R1.
Using the menu, change the ATU mode to CALS (calibrate SWR). Exit the menu. Verify that the
SWR is about 1:1 on each band using TUNE. Make sure that ANT 1 is selected on each band. Due to stray
capacitance, the SWR may not be exactly 1.0:1 on the highest bands; this will not affect performance.
17
Page 18

Final Assembly
Turn off the K2. If you have the 160-meter option installed: make sure it is pressed into its socket and
is secured to its standoff. If the capacitors on the module stick up above the toroids, fold them down at an
angle. Also, the ground lug on the receive antenna jack must be rotated down towards the K2's RF board.
Re-install the top cover, being careful to route the ATU, battery, and speaker cables so that they do
not come too close to the transmitter or synthesizer areas of the K2 RF board (back right and front left,
respectively). Also, make sure the ATU RF cable is not pinched between panels at the back of the K2.
Secure the top cover with six screws.
Using The ATU
Caution: Never touch an exposed antenna wire when transmitting. If you ever feel an RF burn or
shock when touching the K2 chassis, key, or microphone, see Antenna Considerations.
Basic ATU Operation (AUTO Mode)
To get started with the KAT2:
• Use the K2 menu to select ATU AUTO mode, then exit the menu.
• Connect one or two antennas to the ATU's antenna jacks.
• Tap the
• Reduce power to 2-3 watts using the POWER control to maximize the life of the ATU relays
(this may also be done automatically, as explained later)
• Hold TUNE. SWR will be displayed while the ATU matches the transmitter to the load (1-5 sec typ.).
• Watch the display for the final SWR reading. The ATU itself will terminate TUNE mode.
• Set power output back to the desired level.
• If you move significantly off frequency you may need to tune-up the antenna again.
• ATU settings are stored in EEPROM, then recalled instantly when you change bands or antennas.
ANT 1/ 2 button to select Antenna 1 or Antenna 2. The antenna switch works in all modes.
Displaying Forward and Reflected Power (POUT Mode)
The wattmeter in the ATU, once calibrated, is much more useful than the K2's standard RF detector. It will
provide accurate readings even when the load is not 50 ohms. Since the ATU's wattmeter output is fed back
to the K2, your POWER control settings will now be more accurate, too.
To use the wattmeter:
• Change the ATU mode from AUTO to POUT. The antenna tuner’s L and C settings will not change.
(If you have revision 1.05 or later of the K2 main microcontroller firmware, you can hold DISPL AY
and TUNE together to force the ATU into POUT mode.)
• Hold TUNE; forward and reflected power will be displayed until you hold TUNE again to cancel.
• If the actual power output is lower than you set with the POWER control, you may have the POWER
control set higher than the K2 is capable of on the present band. Always set POWER to a level at or
below the maximum that the K2 can achieve. Use lower power when running from a battery.
18
Page 19

Displaying
To display SWR following any auto-tune:
• Use the menu to change the ATU mode from AUTO to X.X-1 (the most recent SWR reading).
Example: 1.5-1 is the same as 1.5:1. The antenna tuner’s L and C settings will not change.
• Hold TUNE; the present SWR will be displayed until you hold TUNE again to cancel.
Bypassing the Matching Network (CALS and CALP Modes)
You can use the ATU as an SWR bridge or wattmeter only, with the matching network disabled. You
might want to do this if you're using an external antenna tuner or a resonant antenna.
To bypass the matching network, use CALS (for SWR display) or CALP (for power display). In both
cases, the L and C in the matching network will be set to approximately zero. There is some stray L and C
present that will slightly affect SWR readings on the higher bands.
As an alternative to CALS or CALP, you can tune up the ATU into a 50-ohm dummy load on each band
using AUTO mode. This will cancel out most or all of the stray inductance and capacitance so that you
can connect your external tuner or resonant antenna. After tuning up on all bands, put the ATU into
POUT or SWR (x.x-1) mode (described earlier). The matching network settings will not change.
Important ATU Operating Tips
• To maximize life of the ATU’s relays and avoid HI CUR warnings, we recommend reducing
power to 3 watts before using TUNE in AUTO mode (antenna tune-up). This is done for you
automatically if you have K2 firmware revision 1.05 or later; see below.
• Two antennas can be compared very quickly using the
• If the tuner doesn't get the SWR quite to 1:1, you can try holding TUNE a second time.
However, a 1:1 SWR is not necessary for good performance. See Antenna Considerations.
• If you switch between the various ATU modes frequently, you may wish to assign the
ATU menu entry to PF1 or PF2 (see the K2 Owner's Manual for details).
• If you tap DISPLAY to show the voltage/current display, then hold TUNE, you'll see the transmit-mode
battery voltage and current drain, not SWR or power output. The ATU settings will not change.
• You can still use the RX antenna switch on the 160-m option module, which is independent of the ATU.
• The ATU menu entry can be used to display the current values of L, C, network type, and other data.
See ATU Modes for a full listing of all status displays.
SWR (x.x-1 Mode)
ANT 1/ 2 button once they're both tuned.
If you have K2 Main Microcontroller firmware revision 1.05 (or later):
• TUNE mode automatically reduces power to 3 watts if you had the POWER control set higher
than this. After auto-tune, the power level is restored to your POWER control setting. During tune-up,
the bargraph will show 3 bars as a reminder that power has been reduced.
• Holding DISPLAY and TUNE together forces the ATU to display forward/reflected power
even if the tuner is in AUTO (or ALT) mode. This is useful when you want to simply check power
output without doing an auto-tune.
19
Page 20

Antenna Considerations
An antenna tuner will not improve your antenna–it can only tune out the antenna's reactance. In general,
use the longest, highest antenna you can put up, and keep the antenna away from power lines and buildings.
The KAT2 will work with a wide variety of antennas, some of which are covered below.
A good ground system will provide efficient radiation, better antenna loading characteristics, less RF on the
chassis, and safer operation. Use a minimum of two radials cut for each band, or at least one or two very
long radials. House plumbing and electrical wiring will provide an adequate ground in some cases, but
tuned radials are always preferred
Do I Need a 1:1 SWR?
No. This is a common misconception. For example, if the SWR is 2:1, the loss in transmitted signal
strength will be around 0.5 dB. Of course the KAT2 always tries to hit 1:1, and with most antennas it will
find an SWR below 1.5:1 on most bands. But even if the SWR ends up at 3:1, the difference in on-air
signals will often be undetectable. If the SWR is higher than 3:1 you may want to try ALT mode (see
Hard-to-match Antennas).
Resonant and Multi-Band Antennas
The KAT2 will tune up nearly any antenna cut for 40 or 80 meters on all bands. With multi-band antennas
such as beams or verticals, the KAT2 will typically improve the match on each band used. It will also allow
operation on additional bands. However, when you tune-up a beam on one of these "no extra charge"
bands, it is likely to become a no-gain or low-gain antenna with an unpredictable radiation pattern.
One useful trick with coax-fed antennas is to short the center conductor and braid together and treat the
coax as if it were a random wire. This will often allow beams and quads to be used down to 160 meters.
Random-Length Antennas
Nearly any piece of wire over about 30 feet long and end-fed can be tuned up on 80-10 meters, and
probably 160 meters as well. Results will vary depending on the actual length of the antenna and whether
you have a useful ground system. Watch for RF problems, which are more likely with end-fed antennas,
especially if they’re exactly a half-wavelength long or any multiple thereof on a given band.
The KAT2 also works well with loops. An untuned loop of wire 30 feet long (or longer), formed into any
shape, can be matched on most of the higher bands. Loops can be very narrow-banded if they're small in
relation to frequency, so you may need to re-tune after relatively small frequency excursions. Use ALT
mode if necessary (see Hard-to-match Antennas, below).
If possible, put up two wire antennas (especially for Field Day, etc.). You can then do quick comparison
tests as often as necessary using
units may be observed on some signals.
ANT 1/ 2. With two orthogonal long-wires, differences of one to three S-
20
Page 21

Hard-to-match Antennas (ALT Mode)
You may find that a particular antenna just can't be matched using AUTO mode. This is especially likely
with electrically short antennas, such as mobile whips. In this case, try the ALT tuning mode. ALT can
take longer because it tries more L/C combinations, but it may be the only choice in difficult cases. If you
experience an RF burn or feedback problems, ALT tuning mode won't help. Instead, you may need a balun
or RF isolation choke (see below). Also try increasing the length of the ground radials and/or antenna.
Note: Avoid connecting a heavy whip antenna fitted with a BNC plug directly to the ATU. The whip
will stress the BNC connector, and could even damage the ATU's Control board. Instead, mount the whip
on a metal plate, tripod, etc. Connect it to the ATU's antenna jack with hookup wire rather than coax if it's
only a few feet away. A good ground will dramatically improve the performance of a short whip.
Using Baluns and RF Isolation Chokes
A balun is a device that converts a balanced antenna or feedline to unbalanced (one side grounded) to work
with your ATU. A balun can also perform an impedance transformation and/or help isolate the antenna
from the tuner to reduce RF pickup. You may need a balun if: (1) you're using balanced feedline; (2)
you're having trouble matching an antenna on one or more bands; (3) you notice RF feedback or get an RF
burn. A low-loss, broad-band, 4:1 balun is a good choice, and may solve all three problems. A 9:1 balun is
often used with 450 or 600-Ω open-wire line, but since the tuner can handle a wide range of impedances,
4:1 may work just as well. A 1:1 balun will also work in most cases. All baluns exhibit some loss, but the
loss may be negligible if the balun is used properly.
ATU Modes
The table below lists all ATU modes, and what is displayed when TUNE is pressed in each mode. AUTO
mode is used most of the time, and occasionally ALT or POUT. (With K2 firmware rev. 1.05 or later,
you can hold DISPLAY and TUNE together to force POUT mode.) The other modes are primarily used
for calibration and troubleshooting. If you see LO P in any mode that displays SWR, power is too low to
obtain a stable SWR reading. You should increase the POWER setting if this occurs.
When you switch between CALS mode and AUTO mode, you may hear a few relays switching, since in
CALS mode (as well as CALP and CALN) the L and C relays are all reset (L and C are zero). You'll
also hear relays switching if you select the L0-L8, C0-C8, N1, or N2 modes (see Troubleshooting).
In AUTO and ALT modes the ATU terminates TUNE automatically.
Mode Description
CALn Used for C55 calibration; L/C = 0 mVDC NETx 1=Cin, 2=Cout (present band/ant.) SWR
CALP Used for calibration of R1; L/C = 0 Power Txxx L-C-net combinations tried SWR
CALS SWR bridge only; L/C = 0 SWR Exxx 0-199 = error (see Troubleshooting) SWR
AUTO Normal auto-tune mode SWR INIT Turning power off/on resets all data SWR
ALT Alternate auto-tune mode SWR Fx.xx KAT2 firmware revision, e.g. F1.00 SWR
POUT Forward/Reverse power display Power L0-L8 Individual inductor selection SWR
x.x-1 SWR from most recent tune-up SWR C0-C8 Individual capacitor selection SWR
Lxx.x Inductance, µH (present band/ant.) SWR N1 Selects Cin network (L/C = 0) SWR
Cx.xx Capacitance, nF (present band/ant.) SWR N2 Selects Cout network (L/C = 0) SWR
TUNE
Mode Description
TUNE
21
Page 22

Troubleshooting
If current drain is too high or the ATU menu parameter shows "--", verify orientation of all connections between
the ATU module and the K2. You may have a connector shifted by one position, an unsoldered crimp pin, etc. Check
both boards for shorts to ground, solder bridges, and unsoldered connections. Verify that the microcontroller is fully
seated in its socket and is not plugged in backwards. Finally, do the voltage checks listed at the end of this section.
If you can't get a reading of 010 or lower using CALn, or if readings seem way off, examine all components and
connections in the SWR bridge, especially T1's windings (which may be reversed or not making contact). Make sure
you don't have the center conductor and shield exchanged at J7. Check continuity of wires in the control cable (J8).
If the SWR doesn't read 1.0:1 with a 50-Ω load (or other calibrated load), it's probably due to stray reactances (see
Bypassing the Matching Network). C55's setting may also affect SWR accuracy.
If you see an error message in the ATU menu (Exxx, where xxx is between 001 and 199), chances are the EEPROM
(U2) is defective or is installed backwards, or you may have a defective microcontroller.
If tuning is erratic or you see frequent HI-CUR warnings, you may have high RF voltages on the K2 chassis. First,
try reducing power to 1 to 2 watts. If this cures the problem, you may need to improve your ground system, move the
antenna farther away, or use a balun. If reducing power doesn't help, or if tuning is erratic even with a 50-Ω dummy
load, you may have a communication problem between the ATU and K2. Check the value of R5 (470 Ω) and C57 (.001
µF). If these are correct, try removing the SSB adapter's microcontroller (if applicable), then re-test. If this cures the
problem, contact Elecraft. If not, check each of the following components, any of which could cause problems with the
AuxBus line if they were the wrong value: K2CTRL-R6 (470 Ω), K2CTRL-C12 (.001 µF), K2RF-R64 (470 Ω), K2RFC140 (.001 µF), SSB-R12 (470 Ω), SSB-C30 (820 pF), NB-R6 (470 Ω), NB-C9 (.001 µF).
If you receive a "distorted audio" signal report when using SSB, you could have any of the RF problems listed
above, or your microphone may be sensitive to RF. Some mics have a DTMF generator IC that can be activated by
stray RF. Try disabling this IC. You may be able to simply disconnect the DC supply voltage to the mic at the Front
Panel mic configuration connector. Also try grounding the mic jack.
If a particular tune-up that you believe should work fails repeatedly, write down the ATU parameters after the
TUNE attempt, including SWR, L, C, NET, Exxx, Txxx, and the ATU firmware revision. Send this data to Elecraft for
analysis. Also try ATU INI T.
If the tuner is unable to achieve a low SWR on some bands, even with several different antennas, you could have a
single defective relay or component on the L-C board. Start by slowly scrolling through ATU parameters L0 through
L8, C0 through C8, N1, and N2. At each setting you should hear relays switching. If you find one that doesn't, this
may pinpoint a bad relay. You can also check each L and C relay using resistance measurements. For example, when
you select L1, pins 4 and 7 of K1 should be shorted, and with all other Lx settings these pins should be open. When you
select C1, pins 2 and 9 of K9 should be open, and with all other Cx settings, these pins should be shorted. L0 and C0
turn off all L and C relays. If the relays are all working but you suspect an inductor or capacitor, you can test each L
and C by noting their effect on SWR, one at a time. Start on 10 meters. Connect a 50-ohm dummy load to one of the
antenna jacks, select L0, hold TUNE, and note the SWR reading. Then select L1 and hold TUNE again; the SWR
should change by a small amount. L2 should have a larger effect, etc. When the inductance selections cause the SWR
to go off the scale (9.9), switch to a lower band (say 30 meters), go back to L0, then test the remaining inductors.
Similarly, you can test all 8 capacitors, starting on 10 meters with C0, C1, etc. You'll know you have found the bad
component if it has too large or small an effect (or no effect) on SWR, in relation to the others tested.
DC Voltages
All pins of U1 through U4 should measure close to 0 volts (in receive mode), with the following exceptions: U1 pins 1,
11, 20, 32, and 39: 6 V; U1 pin 40, 5.7 V; U2 pins 1, 3, 7, 8: 6 V; U3 IN, supply voltage; U3 OUT, 6 V; U4 pin 8, 6 V.
Tolerance on all measurements is +/- 0.3 V.
22
Page 23

Circuit Details, KAT2 L-C Board
The L-C board provides eight series inductors and eight parallel capacitors, configured as an L-network. The
capacitance can be placed at the transmitter or antenna end of the network via a relay on the Control board (see next
page). Each inductor and capacitor has its own DPDT relay, with the individual sections of each relay placed in parallel
for reliability. The relays are selected under control of the ATU's microcontroller. Latching relays are used so that they
will not consume any power except when the operator is actually tuning. The relays are switched one at a time to keep
switching current low and to provide acoustically and electrically quiet operation. This results in somewhat longer tune
times.
For additional reliability, the connectors used between the L-C and control boards have gold-plated contacts, and
redundant pins are used for RF signals. Bypass capacitors are used on relay control lines to prevent RF signals from
reaching the microcontroller.
L-C Board Schematic
L8 is wound on T50-1 core (blue). All others are wound on T50-2 core (red).
*
L-NET OUT
L1 L2
.08µH .16µH
K1
3
24
9
7
8
K2
3
24
9
7
8
L3 L4
X
.32µH
K3 K5
3
24
9
7
8
K4
3
24
9
7
8
L5 L6
Y
3
24
9
7
8
L7 L8
K6
3
24
9
7
8
K7
3
24
9
8
*
10.4 µH.64 µH 1.3 µH 2.6 µH 5.2 µH
L-NET IN
K8
3
24
7
9
7
8
C1_2
C1
10
K9
3
7
8
K10
24
9
7
C3_4
C2
22
3
24
9
8
C3 C4
39 82
K11
3
7
8
K12
24
9
7
C5_6 C7_8
3
24
9
8
P4
123456789 123456789
.001
C20
C23
C22
C21
10 10K210
10
1111
K1
K13
NOTE: K1-K18 are single-coil latching relays, shown in the RESET position.
Pins 5 and 6 of each relay are used as tie points but are not internally connected.
= On bottom of PC board. All relays on the L-C board are on the bottom.
10 11 12 13 14 15 16 10 11 12 13 14 15 16
C5_6
10 10
1111
K4
K14
X
K9
C1_2
.001 .001 .001
C24
C25
C26
C27
10
10
K3
RELAY COMMON
K10
C31
C42
C32
.001
C33
C34
23
K13
C5
150
3
7
8
C3_4
K14
24
9
10 10
11
K5 K6 K7
K11
C6
300
3
7
8
K15
24
9
P5
Y
10 10
11
K12 K15 K16
C7_8
10 10
11
C7
620
3
24
9
7
8
10
1
K8
Elecraft
By
W. Burdick
E. Swartz
C8
1200
K16
3
24
9
7
8
C35
C36
C37
C38
10
1
KAT2 ATU L-C Board
Rev. Sht.
Date
F 11/27/00
1 of 2
Page 24

Circuit Details, KAT2 Control Board
T1, D1, D2 (etc.) form a directional coupler for SWR and power measurements. This type of bridge is much more
accurate than the K2's standard RF detector (D9) in the presence of non-50-ohm loads. The bridge output is buffered by
op-amp U4 and routed to the K2 control board, overriding the signal from D9. The bridge outputs are also connected to
A-to-D inputs on the microcontroller, U1. U1 measures these voltages and converts them to SWR or power readings,
using averaging and linearization techniques to improve accuracy. The EEPROM (U2) stores network and SWR data
for each band and antenna. K17 selects either a capacitor-in or capacitor-out network configuration, while K18 controls
the antenna switch. U1 "sleeps" at all times except during actually antenna tune-up, so it generates no receiver noise.
Control Board Schematic
Antenna Switch
C47
.001
1
2
3
4
Elecraft
By
W. Burdick
E. Swartz
J1
K18
2439
Antenna 1
8
7
J2
Antenna 2
L-NET IN
J5
10 11 12 13 14 15 16
8
/CS
VCC
7
/HOLD
SDO
6
/WP
SCK
5
VSS
SDI
U2
25LC320
KAT2 ATU Control Board
Rev. Sht.
Date
11/27/00
2 of 2
F
6V
J3
Aux I/O
RF
GND
GND POST
FWD
54321
U4A
LM358
R6
47
FWD
SWR Bridge
65
T1
E1
D1
1N5711
C50
.001
C52
.001
U4B
5
+
6
-
NOT USED
AUXBUS
12V
6V
8
1
4
231
4
C54
100
R3
D2
200
1N5711
R1
R2
100K
7
+
-
L-NET OUT
C57
.001
3
2
R5
470
G
C58
0.1
C55
5-30pF
R4
3.3K
C51
.001
REFL
C53
.001
123456789 123456789
6V
6V
C60
U3
IN
LM78L06
OUT
.001
C59
REFL
0.1
L-NET IN
(Sheet 1)
24
9
K17
C TX/ANT Select
CAP COMMON
J4
10 11 12 13 14 15 16
nc nc
A
40
RB7
MCLR
1
35
RB3
RB4
RB5
RB6
RA0
RA1
RA2
5
B
VDD
RB0
RB1
RB2
RE1
RA4
RA3
RA5
RE0
10
U1
16C77
MCU
L-NET OUT
3
7
8
C45
K18
.001
K17
11
10 10
RELAY
COMMON
C46
.001
30
RD4
RD5
RD6
RD7
VSS
RE2
RC7
RC0
VDD
VSS
OSC1
OSC2
15
25
RC6
RC1
4.0MHz
21
RD3
RC4
RC5
RC2
RC3
RD0
RD1 RD2
20
Z1
= On bottom of PC board.
24
 Loading...