


EPIR3

EPIR3GSM Alarm System

Contents
Technical Specications .............................................................................................................................4
Components of the EPIR3 security system .............................................................................................. 5
1. 7-STEP START GUIDE ..............................................................................................................................6
OVERVIEW ............................................................................................................................................................................. 6
2. QUICK START GUIDE ............................................................................................................................... 9
2.1. How and where to x the holder to the wall .......................................................................................................... 9
2.2. Prepare the SIM card ................................................................................................................................................ 12
2.3. How to insert the SIM card ...................................................................................................................................... 13
2.4. Plug the power supply connector into the device ............................................................................................... 15
2.5. Place the device into the holder ............................................................................................................................. 15
2.6. Slide the device down to x it ................................................................................................................................. 15
2.7. Insert the plug into the mains socket ....................................................................................................................15
2.8. How to check the detector is working ................................................................................................................... 15
2.9. About the back-up battery and how to replace it ............................................................................................... 16
2.10. How to program EPIR3 system .............................................................................................................................. 17
2.11. How to arm and disarm the system .......................................................................................................................24
2.12. A 15 second delay allows you to leave the premises .......................................................................................... 25
2.13. Receiving an alarm call .............................................................................................................................................25
2.14. In case of mains power failure ................................................................................................................................ 26
2.15. Receiving an SMS text message when temperature exceeds the set values ...............................................26
2.16. Additional capabilities.............................................................................................................................................. 27
3. HOW TO MANAGE THE WIRELESS DEVICES ......................................................................................... 27
3.1. How to pair a wireless device with the system ...................................................................................................29
3.2. How to remove a wireless device from the system ............................................................................................33
3.3. EKB3W wireless keypad overview ......................................................................................................................... 35
3.4. EWK1 and EWK2 wireless keyfob overview .........................................................................................................43

Contents
4. HOW TO PROGRAM THE SYSTEM USING YOUR MOBILE PHONE .........................................................45
5. HOW TO PROGRAM THE SYSTEM USING EKB3W WIRELESS KEYPAD ................................................ 59
6. TROUBLESHOOTING .............................................................................................................................84
7. ADDITIONAL INFORMATION FOR ADVANCED USERS ..........................................................................85
7.1. How to connect a wired siren or a LED indicator to the wired output .............................................................85
7.2. How to connect a sensor to the wired zone .........................................................................................................89
7.3. Automatic system arming/disarming ....................................................................................................................94
7.4. Zones ..........................................................................................................................................................................94
7.5. Tampers ......................................................................................................................................................................97
7.6. Programmable (PGM) outputs ................................................................................................................................ 97
7.7. Siren ............................................................................................................................................................................99
7.8. Alarm indications and notications .................................................................................................................... 101
7.9. System notications ..............................................................................................................................................102
7.10. Back-up battery, mains power supply status monitoring and memory ........................................................105
7.11. Monitoring station ..................................................................................................................................................106
7.12. Event Log .................................................................................................................................................................. 1 16
7.13. System conguration using ELDES Conguration Tool software ...................................................................116
7.14. How to reset the system to default settings .....................................................................................................119
7.15. How to upgrade the rmware locally via USB connection ..............................................................................119
7.16. How to upgrade the rmware remotely via GPRS connection .......................................................................120
7.17. Service Mode ........................................................................................................................................................... 122
7.18. ELDES Cloud Services .............................................................................................................................................122
8. RELATED PRODUCTS .......................................................................................................................... 123
Copyright © “ELDES UAB”, 2015. All rights reserved.
It is forbidden to copy and distribute information in this document without advance written authorisation from ELDES UAB. We reserve the right to update or modify this document and/or related products
without warning. The EPIR3 GSM Alarm System complies with the essential requirements and relevant
provisions of Directive 1999/5/EC. The declaration of conformity may be viewed at www.eldes.lt
EPIR3 User Manual v1.4
3EN
3

Protecting your home and property with the EPIR3 alarm system
Where and how to use the alarm system
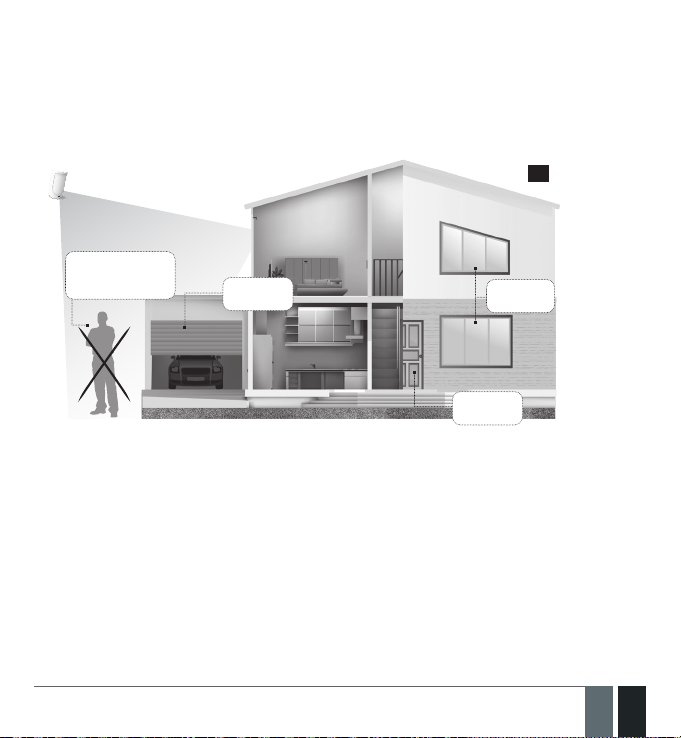
The EPIR3 is a convenient, easy to use, remote control security system for houses, cottages, country homes, garages and other buildings.
It uses an internal SIM card (not supplied by ELDES) and an infra red sensor, and communicates with your mobile
phone so you can:
• Protect your property while you are away from home
• Listen to what is happening in your property following a security alert
• Switch the system on or o from anywhere in the world at no cost
• Receive SMS text messages updating you on the system status
• Include up to ten users to receive system status messages and/or security alerts
• Receive SMS text messages updating you on the temperature of the surrounding area
In addition, the EPIR3 system has a built-in wireless module for system extension capabilities. The wireless module easily allows you to pair ELDES-made wireless devices to the system. For more details, please, refer to section
3. HOW TO MANAGE THE WIRELESS DEVICES.
IMPORTANT Please read the user manual before operating the system. The user manual will show you how
to install and operate the EPIR3 alarm security system safely and easily. You’ll nd a quick start guide in section
1 and 2. To learn how to take advantage of additional functions, see sections 3, 4, 5 and 7.
Technical Specications
Supply voltage .........................................................11-15V 500mA max
Current used in idle state .......................................up to 50mA
Back-up battery voltage, capacity .......................8.4V; 250mAh
Back-up battery type .............................................Ni-Mh
GSM modem frequency ..........................................850/900/1800/1900 Mhz
Dimensions ..............................................................124x67x58mm (4.88x2.64x2.28in)
Operating temperature range...............................-10…+40 °C
Humidity ...................................................................0-90% RH @ 0... +40°C (0-90% RH @ +32... +104°F)
Back-up battery operating time ...........................up to 24 hours*
Detection angle .......................................................90°
Maximum motion detection range ......................10m (32.81ft)
Wireless band .........................................................ISM868/ISM915
Wireless communication range ............................up to 30m (98.43ft) in premises;
up to 150m (492.13ft) in open areas
Maximum number of wireless devices ................16
Communications .....................................................SMS, Voice Calls, GPRS Network
Supported protocols ...............................................Ademco Contact ID, EGR100, Kronos, Cortex SMS
BELL+: siren output commuted values ...............Current - 150mA max.; voltage - 15V (EPIR3 on external power
supply) / 7V (EPIR3 on back-up battery)
* - with ELDES Cloud Services disabled; with wireless transmitter-receiver module disabled
4
4 EN
EPIR3 User Manual v1.4
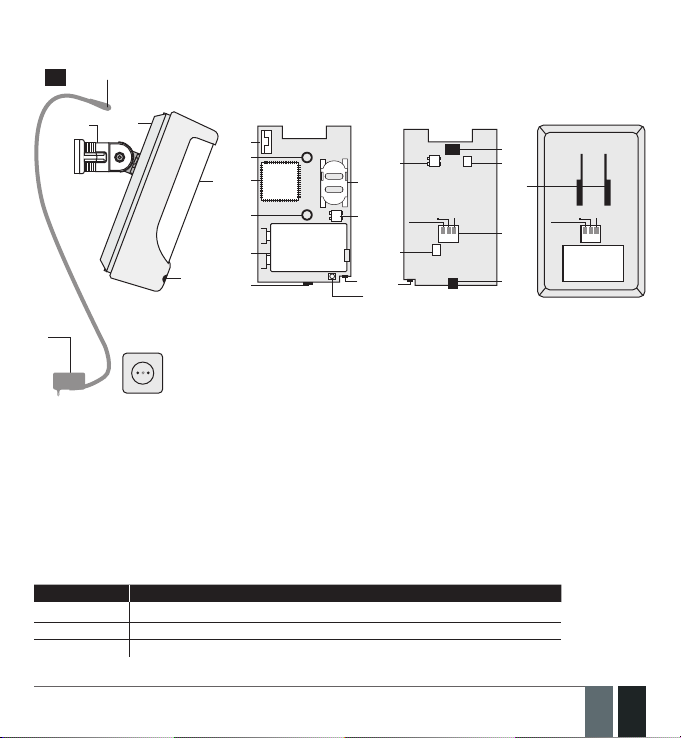
Components of the EPIR3 security system
5
1
3
1
4
16
12
GSM
10
2
12
9
13
11
19
8
14
INSIDE VIEW
13 17
Z2
BELL-/COM
BELL+
18
14
6
BACK SIDE
3
7
Z2
BELL-/COM
BELL+
15
8
1. EPIR3 holder for xing on the wall
2. Lens for movement detector
3. Power supply socket
4. AC/DC power supply
5. Power supply connection lead
6. Reset button to restore default parameters
7. Holder to x the unit in place
8. Mini-USB connector to allow programming via your PC
9. Holder for SIM card
10. GSM module
11. Back-up battery in case of mains power supply
failure
Connector Description
12. Motion detector to sense possible intruders
13. TAMPER button to alert you if anyone interferes
with the unit
14. Microphone to allow you to listen in to an incident
using your mobile phone
15. Wired zone for wired sensor and output for siren or
indicator connection
16. Built-in GSM antenna
17. Fuse F1 model - MINISMDC050F 0.5A
18. Fuse F2 model - MINISMDC020F 0.2A
19. LED indicator
BELL- / COM Siren output negative terminal / output terminal / common return terminal
Z2 Security zone terminal
BELL+ Siren output positive terminal
EPIR3 User Manual v1.4
5
5EN
1. 7-STEP START GUIDE
OPEN
OPEN
OVERVIEW
This section tells you how to install the EPIR3 system quickly by following the very basic instructions consisting of
only 7 steps. For step-by-step device programming using software, please refer to section 2. QUICK START GUIDE.
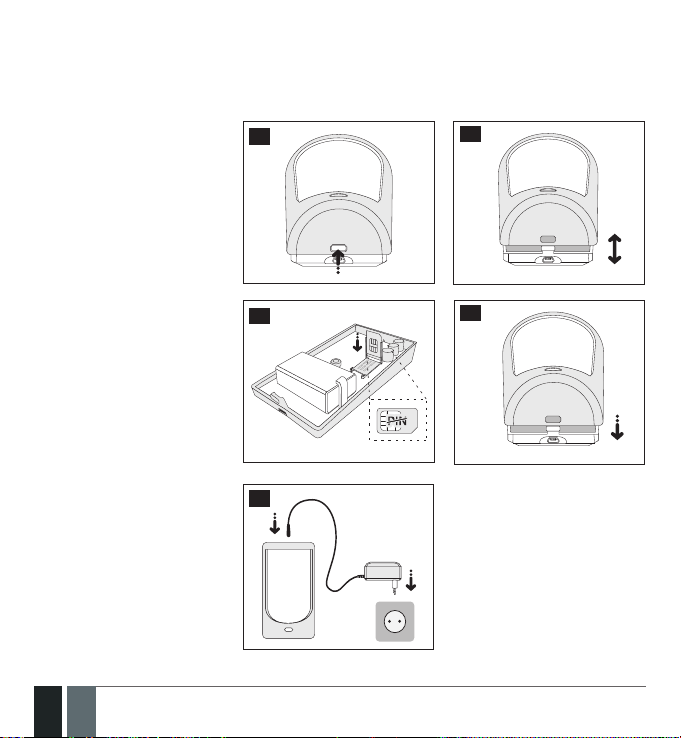
1. Remove the front cover of the
device.
2
3
2. Open the SIM card holder by rst
sliding the cover to the right then
hinging it upwards. Then insert
the SIM card with disabled PIN
code request into the holder.
Ensure that gold contacts are
face down when SIM card cover is
ipped back down and slide the
SIM card cover back to lock the
SIM card in place. Close the front
cover afterwards.
3. Plug the power supply connector into the device and insert the
plug into the mains socket
6
6 EN
4
6
5
EPIR3 User Manual v1.4
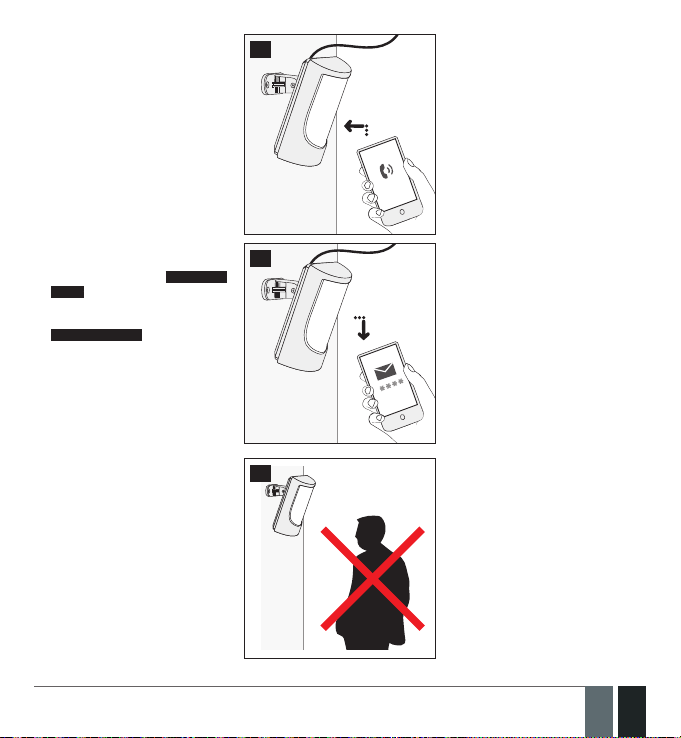
4. Wait for 1 minute for the device
OPEN
to start up. Then using your
mobile phone dial the phone
number of the SIM card inserted
in the device and wait until the
phone call is automatically rejected by the device. The device
will reply you with SMS text message conrming that your phone
number has been successfully
stored in the device memory
7
5. Using your mobile phone type
an SMS text message containing
the following text: 0000 PSW
XXXX (replace XXXX with any
4-digit combination). The result
should look something like this:
0000 PSW 2583. Now send this
SMS text message to your device’s phone number and wait
for a reply conrming that the
SMS password has been successfully changed.
6. Your system is now ready to be
armed and disarmed. Before
arming the system, ensure that
you are not standing in front of
the device.
EPIR3 User Manual v1.4
8
9
7
7EN
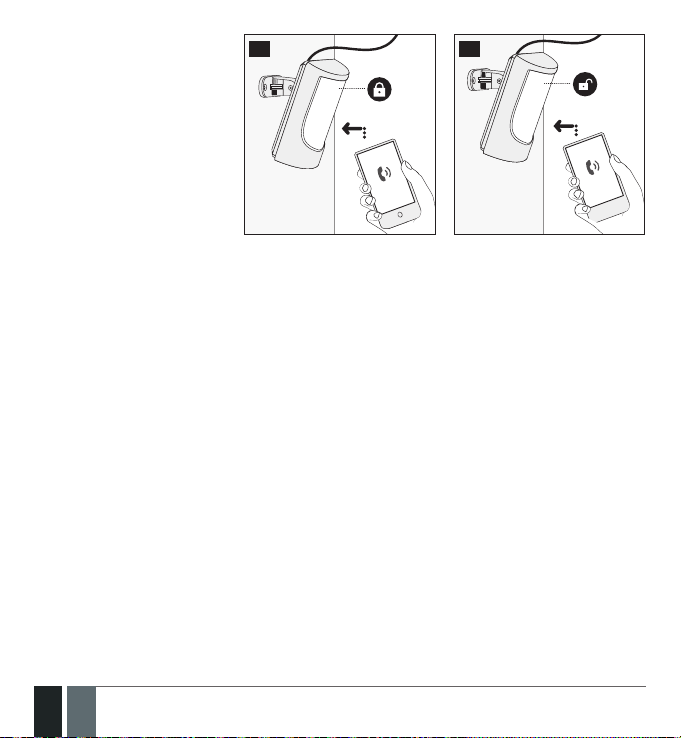
7. To arm your system dial the
x1
device SIM card’s phone number and wait until it rings three
times and then drops the call.
This means the system is now
successfully armed. To disarm
the system, dial the SIM card
and wait until it rings once and
then drops the call. The system
is now successfully disarmed. In
both cases be sure to wait until
the system automatically drops
your call. Again in both cases
the user will receive a short SMS
text message each time the
system is successfully armed or
disarmed.
10
x3
11
x1
8
8 EN
EPIR3 User Manual v1.4
x1
QUICK START GUIDE
2. QUICK START GUIDE
OVERVIEW
This section tells you how to install the EPIR3 system quickly and easily and covers all the procedures required for
full system operation. The alarm system functions via the GSM network, so you will rst need to purchase a SIM
card so you can ‘talk’ to and program your device via your mobile phone. Due to the dual element technology of
a built-in PIR sensor, the device features the pet immunity against the animals of up to 40 kg weight in order to
prevent them from causing false alarms while moving within the secured premises.
Your EPIR3 system has a built-in wireless module providing expansion capabilities to your system by pairing additional ELDES wireless devices to it. However, the EPIR3 system can operate fully without any wireless devices
paired to it.
This section does not cover the procedures for adding wireless devices to the system. If you intend to use the
wireless devices with your EPIR3 system, follow the instructions for setting up the EPIR3 in this section then refer
to section 3: HOW TO MANAGE THE WIRELESS DEVICES.
Step-by-step system installation
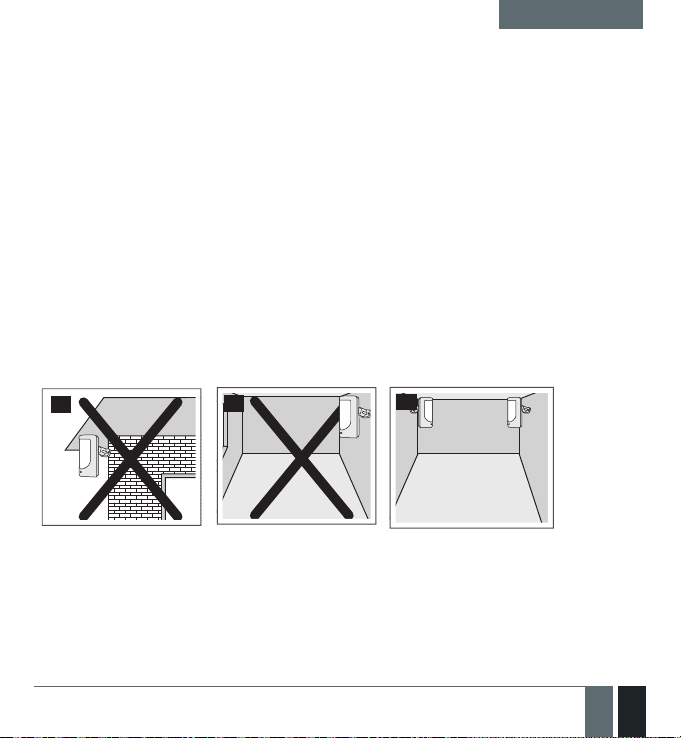
2.1. How and where to x the holder to the wall
The system should be installed indoors, in stationary environment ONLY. Choose a location where unauthor-
ised entry is most likely.
12
To prevent false alarms, avoid installing the unit in the following locations:
• With the lens facing direct sunshine, for instance in front of windows
• Places with high temperature uctuations, such as near replaces, boilers, ovens etc.
• Anywhere with high dust or air ow
• In an area surrounded by metal or thick walls where the GSM connection may be lost
EPIR3 User Manual v1.4
13
14
9
9EN
QUICK START GUIDE
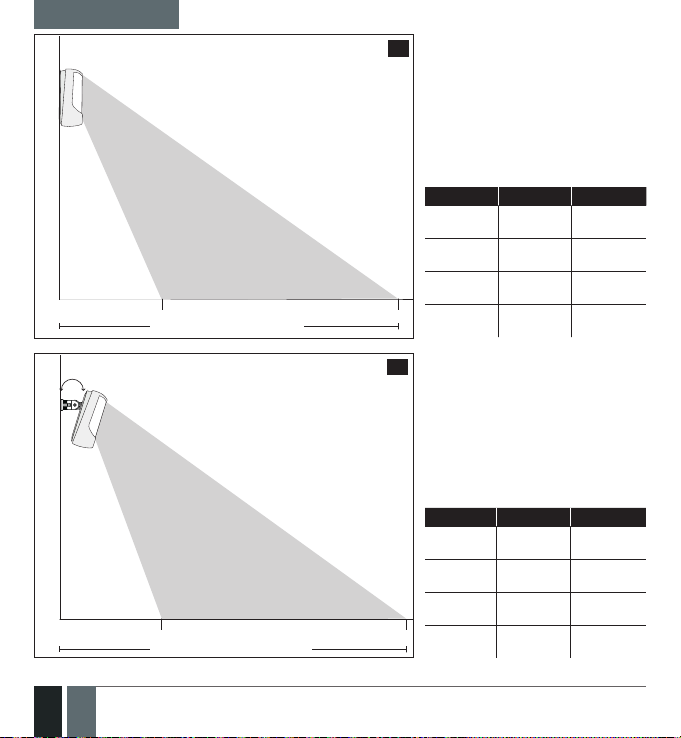
angle 0º
Height
Blind area, X1
angle - 10º
Height
Blind area, X1
Maximum detection distance, X2
Secured area
Secured area
Maximum detection distance, X2
15
height X1 X2
2,5m
(8.20ft)
2,3m
(7.55ft)
2,1m
(6.89ft)
1,5m
(4.92ft)0m(0ft)
16
height X1 X2
2,5m
(8.20ft)
2,3m
(7.55ft)
2,1m
(6.89ft)
1,5m
(4.92ft)0m(0ft)
3,5m
(11.48ft)
3m
(9.84ft)
1,5m
(4.92ft)
2,5m
(8.20ft)
2,5m
(8.20ft)8m(26.25ft)
1,5m
(4.92ft)8m(26.25ft)
11m
(36.09ft)
11m
(36.09ft)
11m
(36.09ft)
11m
(36.09ft)
10m
(32.81ft)
4,5m
(14.76ft)
10
10 EN
EPIR3 User Manual v1.4
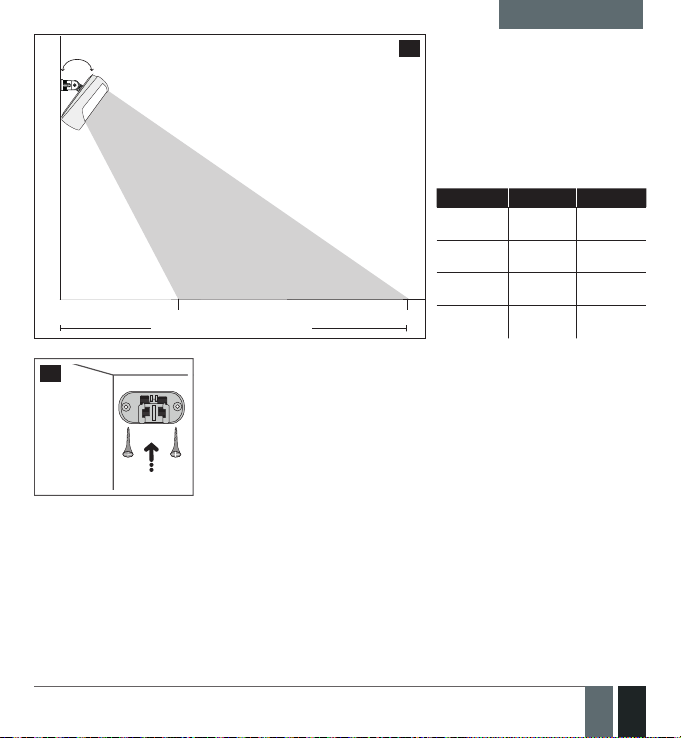
angle - 20º
QUICK START GUIDE
17
Height
18
EPIR3 User Manual v1.4
Secured areaBlind area, X1
Maximum detection distance, X2
After a suitable location for your
EPIR3 is chosen, x the holder
to the wall using the screws
supplied.
height X1 X2
2,5m
(8.20ft)2m(6.56ft)5m(16.4ft)
2,3m
(7.55ft)
2,1m
(6.89ft)1m(3.28ft)
1,5m
(4.92ft)
1,5m
(4.92ft)
0m
(0ft)
4.5m
(14.76ft)
4.5m
(14.76ft)
3m
(9.84ft)
11
11EN
QUICK START GUIDE
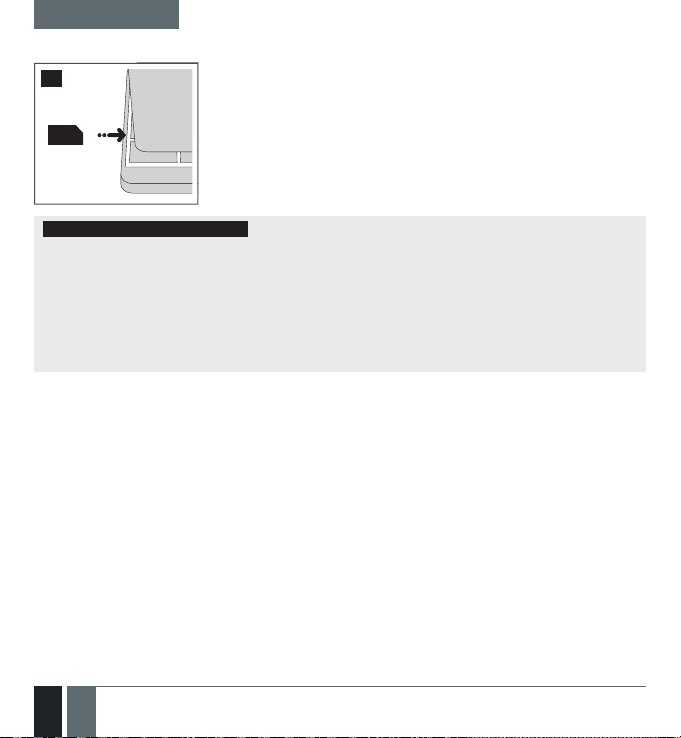
2.2. Prepare the SIM card
6
19
3
IMPORTANT RECOMMENDATIONS
• We advise you to choose the same GSM SIM provider for your system as for your mobile phone. This will
ensure the fastest, most reliable SMS text message delivery service and phone call connection.
• For maximum system reliability we recommend you do NOT use a Pay As You Go SIM card. Otherwise, in
the event of insucient credit balance on the SIM card, the system would fail to make a phone call or send
messages.
• We also recommend you to disable call forwarding, voice mail/text message reports on missed/
busy calls. Please contact your GSM provider for more details on these services and how to disable them.
Place the SIM card in your mobile phone and disable the PIN
code by following the appropriate menus on your mobile
phone. This will help ensure
that when you install the SIM
card in the EPIR3 it will operate correctly.
12
12 EN
EPIR3 User Manual v1.4
OPEN
OPEN
QUICK START GUIDE
2.3. How to insert the SIM card
The SIM card must be prepared as described in section 2.2. Prepare the SIM card before being inserted into
the device.
20
To insert the SIM card, rst remove the front cover of the device (containing the detector lens)
22
21
23
OPEN
Open the SIM card holder by rst sliding the cover to the right then
hinging it upwards.
EPIR3 User Manual v1.4
13
13EN
OPEN
OPEN
QUICK START GUIDE
24
Then insert the SIM card into the holder. Insert SIM card so that gold contacts are face down when SIM card cover is ipped back down.
26
Fit the front cover
For more information see the diagram of the EPIR3 and the description of components on page <5>.
25
14
14 EN
EPIR3 User Manual v1.4
QUICK START GUIDE
27
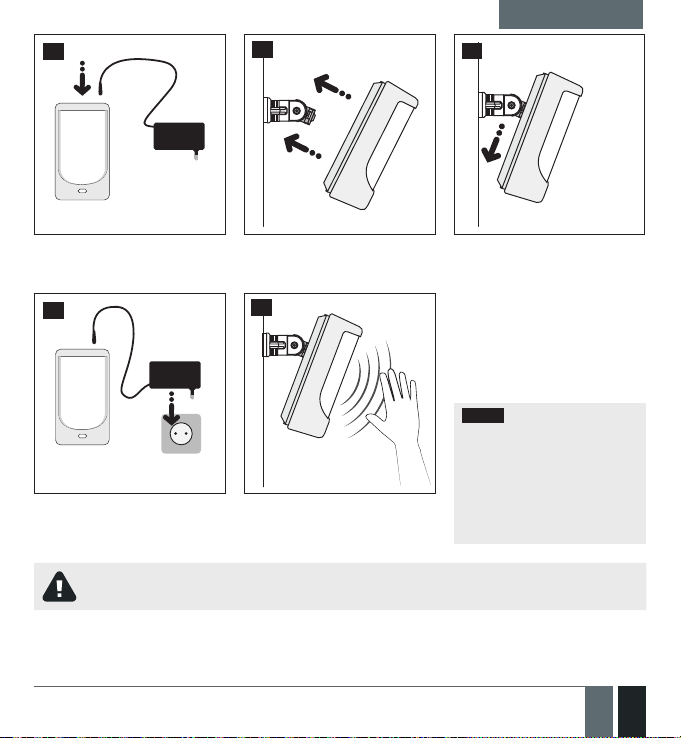
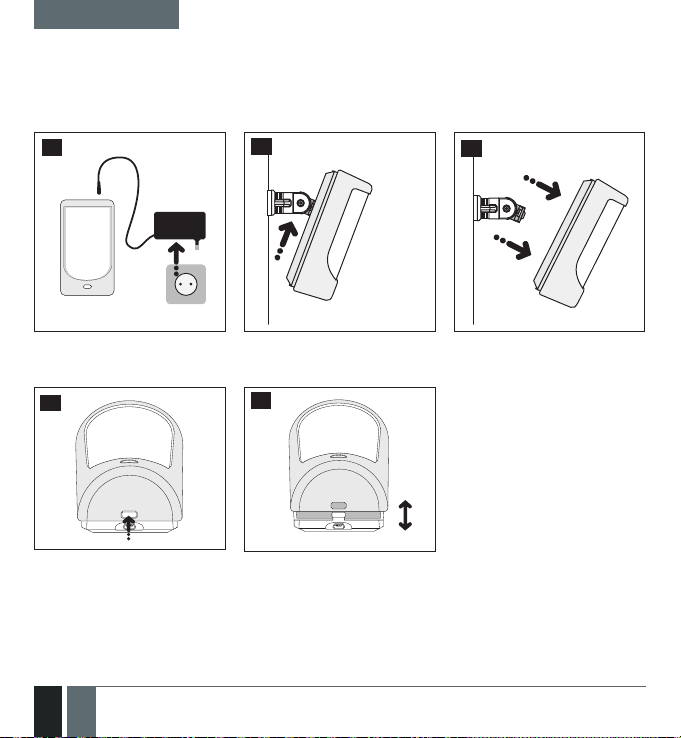
2.4. Plug the power supply
connector into the device
30
2.7. Insert the plug into the
mains socket
If the LED indicator blinks fast (a few times a second), the SIM card may not be inserted properly or
the PIN code may not have been disabled.
28
2.5. Place the device into the
holder
31
2.8. How to check the detector
is working
29
2.6. Slide the device down to
x it
The system will start in 1 - 2 minutes. To test that the system is
working, when the red LED is
switched o move your hand in
front of the EPIR3 lens. The system
will detect the motion and the LED
will light up for a few seconds.
NOTE: Ensure that the device
is properly xed into the holder,
otherwise it will prevent from
using the back tamper switch
for supervision of the enclosure‘s back side. For more in-
formation see the diagram of
the EPIR3 and the description of
components on page <5>.
EPIR3 User Manual v1.4
15
15EN
OPEN
OPEN
QUICK START GUIDE
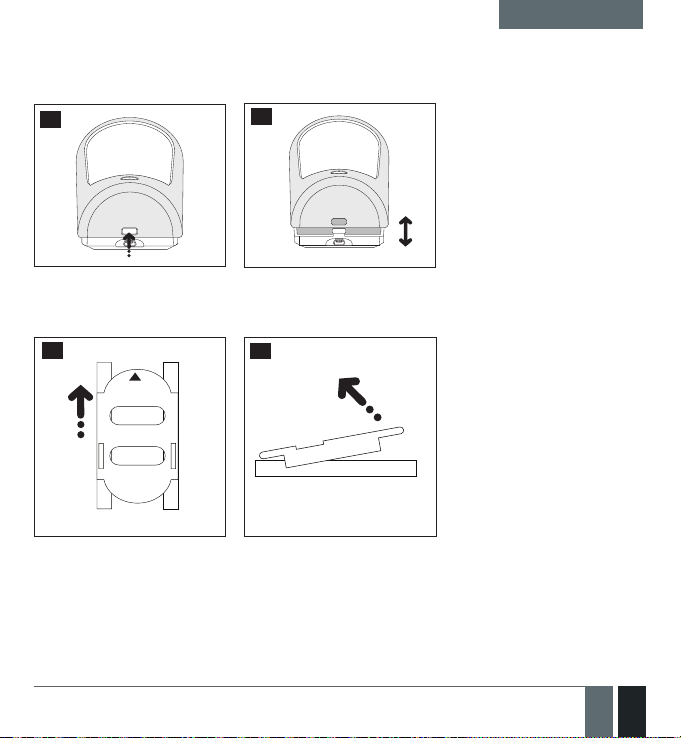
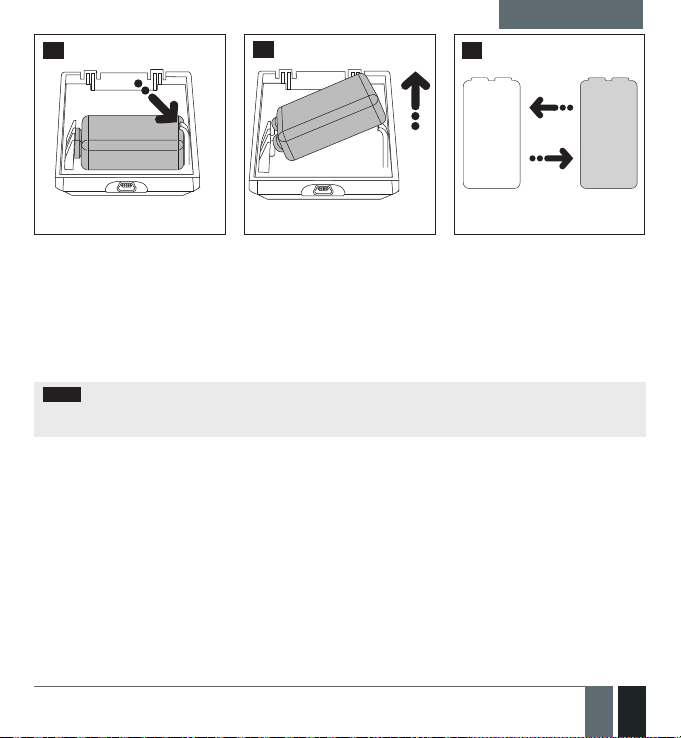
2.9. About the back-up battery and how to replace it
The back-up battery should last for at least two years. Its lifespan will largely depend on the surrounding temperature and the frequency of disruptions to the mains power. During mains failure the battery should power the
system for up to twenty-four hours.
How to replace the battery:
32
33
34
1. Unplug the power supply from
the mains electricity socket.
35
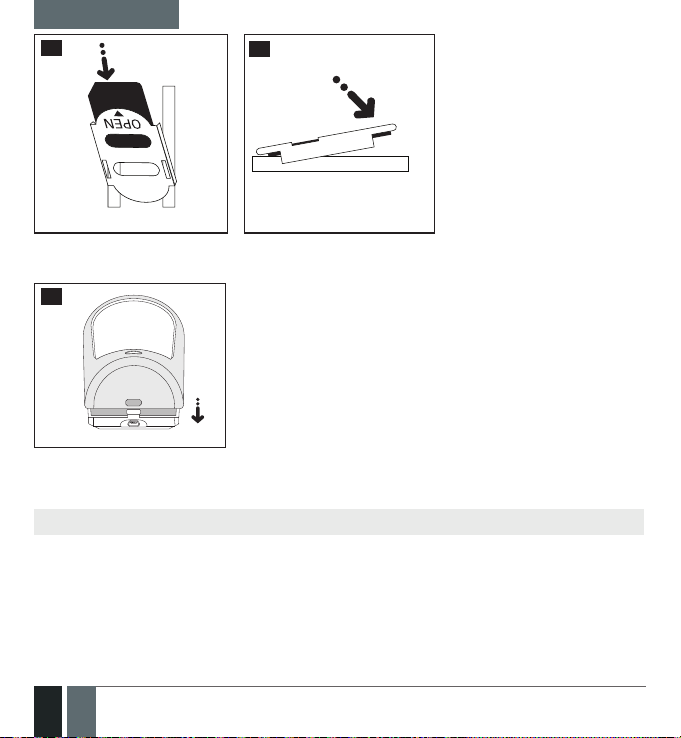
4. Remove the front cover of the device (containing the detector lens)
16
16 EN
2. Slide the EPIR3 up. 3. Remove the EPIR3 from its
36
holder.
EPIR3 User Manual v1.4
QUICK START GUIDE
37
5. Gently push the plastic battery
holder to the right side and hold
2.10. How to program EPIR3 system
Before you continue, you need to program your EPIR3 system. We recommend that you program the EPIR3 system
using your PC and ELDES Conguration Tool software as it’s the quickest, easiest way and oers more options for
your system, such as exible SMS text message management.
NOTE If you wish to program the EPIR3 system by SMS text message, please refer to section 4. HOW TO
PROGRAM THE SYSTEM USING YOUR MOBILE PHONE. If not, please proceed to section 2.10.1 Down-
load ELDES Conguration Tool software.
38
6. Pull up the battery 7. Replace the battery with the
39
type specied in the technical
specications.
EPIR3 User Manual v1.4
17
17EN
QUICK START GUIDE
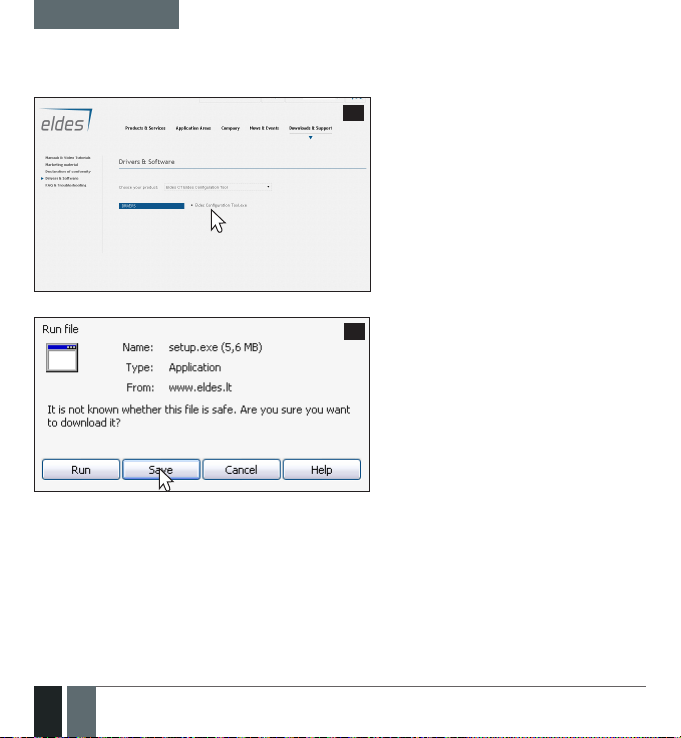
2.10.1. Download ELDES Conguration Tool software.
Visit www.eldes.lt , you will nd a link to the Conguration Tool under the menu option
Downloads and Support → Drivers and Software → Eldes CT Eldes Conguration Tool
40
Once you are at Conguration Tool section,
left-click on the ELDES Conguration Tool
v3.x.xx (setup.exe).
41
In the newly popped-up window left-click
on the Save button.
18
18 EN
EPIR3 User Manual v1.4
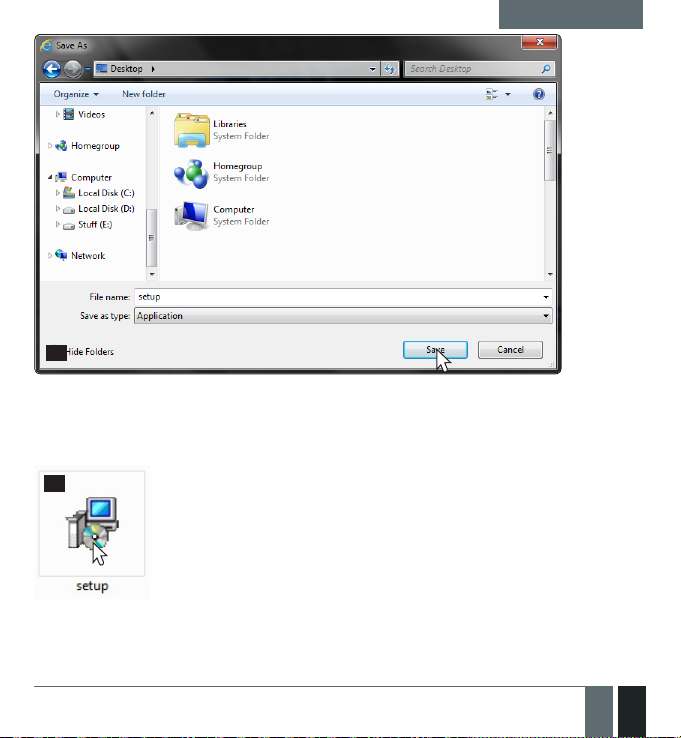
42
Specify a location for setup le and left-click on the Save button.
We recommend placing the le on your desktop.
2.10.2. Install ELDES Conguration Tool software.
43
Double left-click on the
downloaded setup file to run
it.
QUICK START GUIDE
EPIR3 User Manual v1.4
19
19EN
QUICK START GUIDE
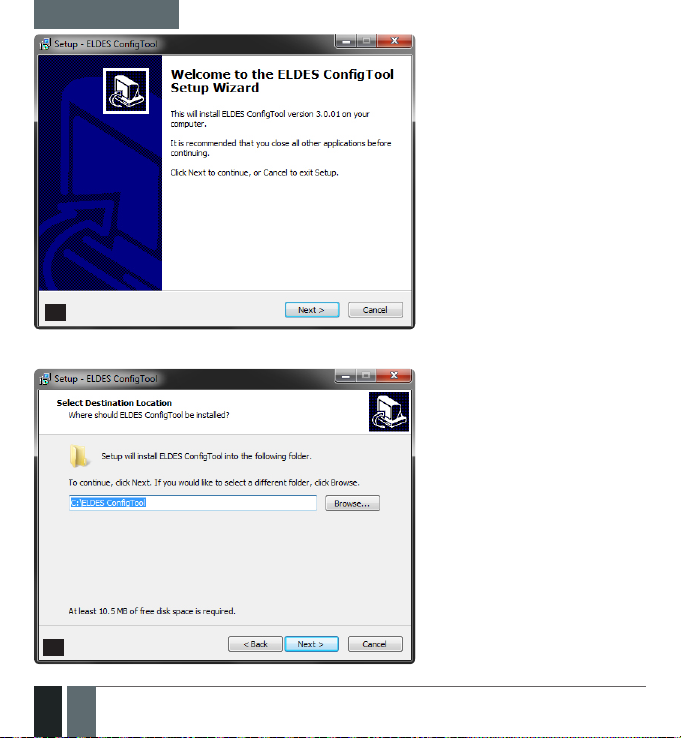
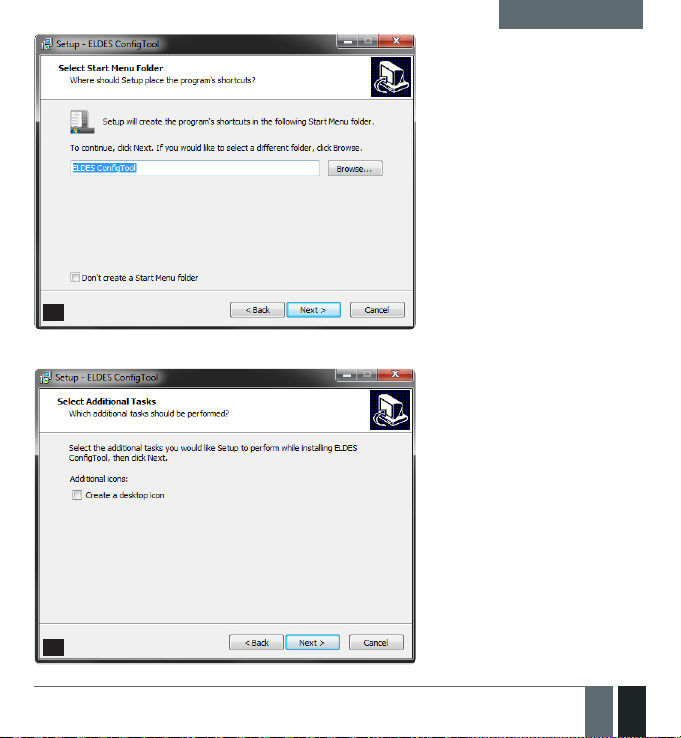
44
45
20
20 EN
In the newly popped-up window leftclick on the Next button to continue.
In the next window left-click on the
Next button to continue.
EPIR3 User Manual v1.4
QUICK START GUIDE
46
47
EPIR3 User Manual v1.4
In the following window left-click on
the Next button to continue.
In the next window left-click on the
Next button to continue.
21EN
21
QUICK START GUIDE
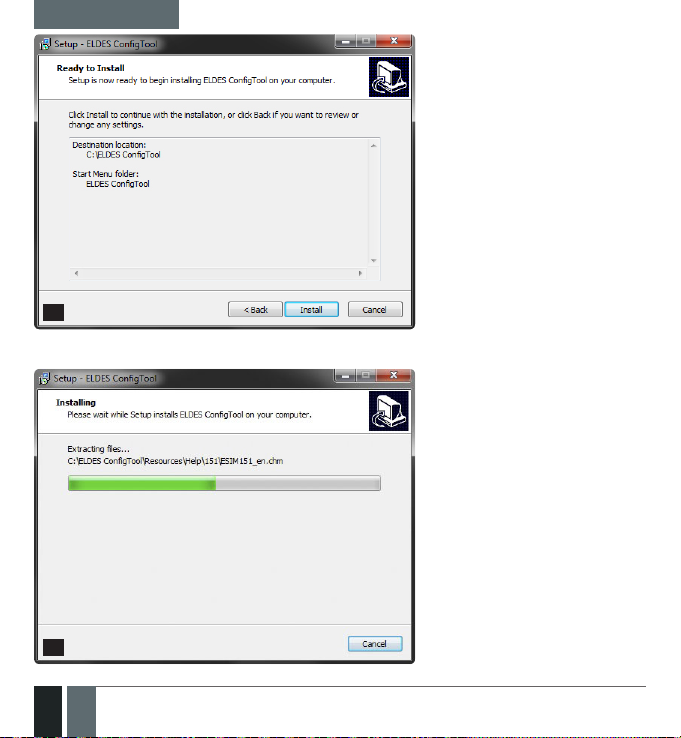
48
In the following window left-click on the
Install button to begin the installation
process.
49
22
22 EN
Wait for the installation progress to
complete and do not click on any button.
EPIR3 User Manual v1.4
QUICK START GUIDE
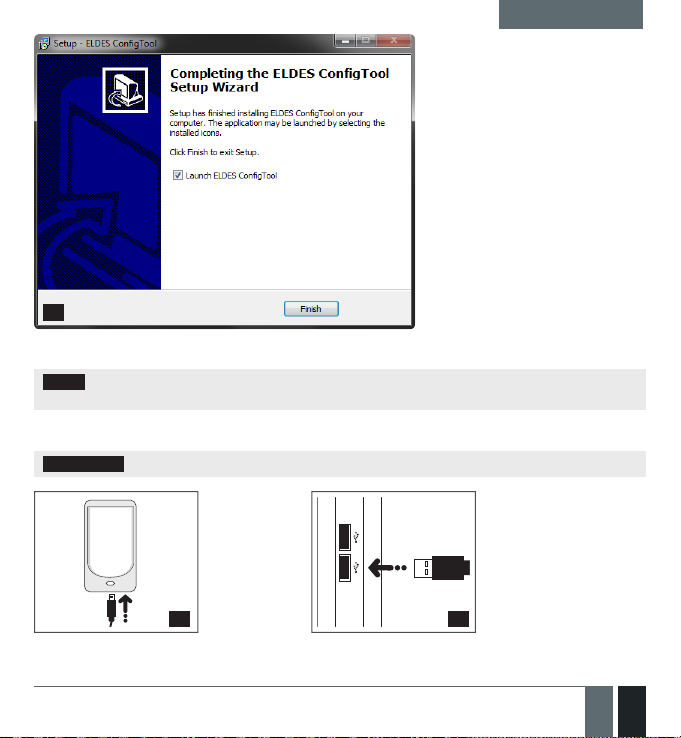
After the successful installation, the
following window will pop-up. Leftclick on the Finish button in order to
end the installation and launch ELDES
50
NOTE: You do not have to repeat the installation process the next time when you want to run ELDES Cong-
uration Tool software again.
2.10.3. Connect EPIR3 to your PC via the USB cable
IMPORTANT: Before connecting EPIR3 to your PC via the USB cable, rst ensure the EPIR3 is powered up.
Plug the
mini-USB
connector
51 52
into EPIR3.
Conguration Tool software afterwards.
Plug the USB
connector
into your PC.
EPIR3 User Manual v1.4
23
23EN
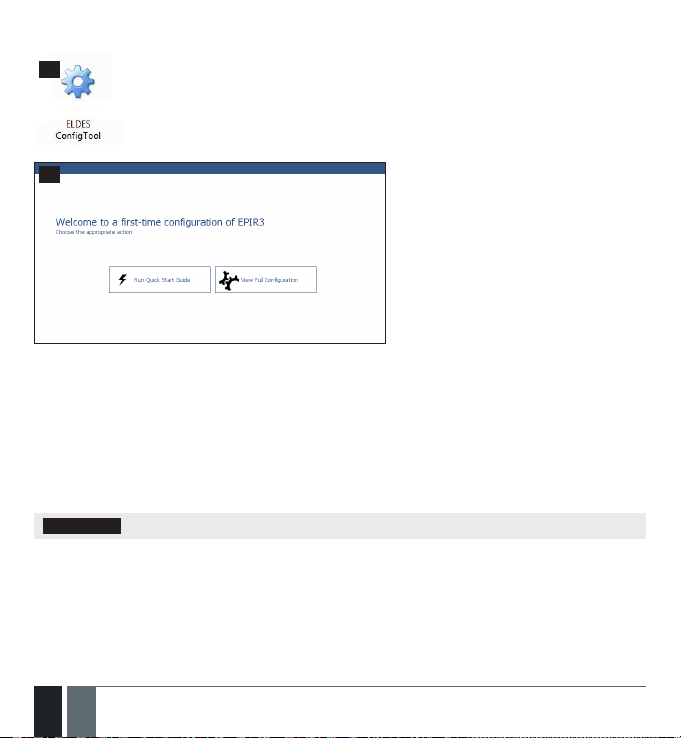
2.10.4. Run ELDES Conguration Tool software.
53
Run the software anytime you want
by double left-clicking on the ELDES
CongTool shortcut located on the
desktop.
54
On successful rst-time connection, a
Welcome to rst-time conguration of
EPIR3 window will show up. Left-click on the
Run Quick Start Guide button and follow the
step-by-step instructions to program the
EPIR3 system. After completing all steps,
your system will be ready for use.
2.11. How to arm and disarm the system
To arm your system dial the SIM card and wait until it rings three times and then drops the call. This means the
system is now successfully armed.
To disarm the system, dial the SIM card and wait until it rings once and then drops the call. The system is now
successfully disarmed.
In both cases be sure to wait until the system automatically drops your call. Again in both cases the user will receive a short SMS text message each time the system is successfully armed or disarmed.
IMPORTANT: Dialling the SIM card is free of charge as the system drops your call in both cases.
24
24 EN
EPIR3 User Manual v1.4
Before arming the system it is necessary to close all doors and windows in the secured area and move yourself
away from the movement detection eld.
Alternatively, you can arm/disarm your EPIR3 system by sending an SMS text message (see section 4. HOW TO
PRO GRAM THE SYSTEM USING YOUR MOBILE PHONE) as well as using a wireless keypad EKB3W (see section
3.3.3. How to arm the system by EKB3W and 3.3.4. How to disarm and turn o alarm by EKB3W) or a
wireless keyfob EWK1/EWK2 (see section 3.4.1. How to arm the system by EWK1 or EWK2 and 3.4.2 How
to disarm and turn o alarm by EWK1 or EWK2).
55
Don’t stand in
movement sensor
detection zone
2.12. A 15 second delay allows you to leave the premises
When you arm the system via your phone, a keyfob or a keypad, the system will give you a 15 second delay before
it activates, giving you time to leaving the premises. You can change the time delay at any time (see ELDES Con-
guration Tool software’s Help section).
The red LED on the detector lens will start to blink, indicating the time delay is in operation and you must leave
room. The red light will go o after 15 seconds when the system will be armed.
2.13. Receiving an alarm call
When the detector is armed and motion is detected in the room, the system will send a SMS text message to User
1 and then ring the user until the call is answered. If the call is not answered after several rings (predetermined
by your mobile phone operator) the system will hang up. If the call is not picked up by User 1, the system will ring
all the pre-programmed numbers in order of priority starting with User 2 until a user picks up or the call expires.
If the rst user is “busy” or “out of radio coverage”, the system will also ring the next pre-programmed number.
When a call is answered, the system will activate the remote microphone so you can listen to what is happening
Close all
doors
windows
Close all
doors
Close all
EPIR3 User Manual v1.4
25
25EN

in the building.
You can also program the system to send an SMS text message to all users (see ELDES Conguration Tool soft-
ware’s Help section).
NOTE: Due to the dual element technology of a built-in PIR sensor, the device features the pet immunity against
the animals of up to 40kg weight in order to prevent them from causing false alarms while moving within the secured premises.
2.14. In case of mains power failure
The system will automatically switch to the back–up battery supply in case of mains power failure. At this time you
will receive an SMS text message warning message after 30 seconds. When the mains power has been restored
you will also receive an SMS text message after 30 seconds. Likewise the system will warn you by when the backup battery is getting low, just before the system is switched o.
2.15. Receiving an SMS text message when temperature exceeds the set values
The system comes equipped with a feature intended for temperature measurement in the surrounding area. This
feature allows to monitor the temperature and receive a notication by SMS text message, identied as the Temperature Info SMS, to user phone number when the set temperature MIN or MAX thresholds are exceeded. For this
purpose you may use the system’s built-in temperature sensor or one of the temperature sensors incorporated in
the wireless device (if any). The following wireless devices contain a built-in temperature sensor:
• EWP2–wirelessPIRsensor(motiondetector).
• EWD2-wirelessmagneticdoorcontact/shocksensor/oodsensor.
• EWS3–wirelessindoorsiren.
• EWS2–wirelessoutdoorsiren.
• EWF1-wirelesssmokedetector.
• EWF1CO-wirelesssmokeandCOdetector.
• EW2 - wireless zoneand PGM output expansionmodulesupports the temperaturemeasurement featureas
well. However, an external temperature sensor (-s) must be connected to EW2 for this purpose.
By default, temperature measurement feature is disabled. To enable it, please refer to ELDES Conguration Tool
software. To set the MIN and MAX temperature thresholds, please refer to section 4. HOW TO PROGRAM THE
SYSTEM USING YOUR MOBILE PHONE or ELDES Conguration Tool software.
NOTE: The supported temperature range of EPIR3 is -10... +40°C and measured at +/-2°C accuracy. When temper-
ature sensor of a wireless device is selected, the operating temperature range of the wireless device corresponds
the supported temperature range.
26
26 EN
EPIR3 User Manual v1.4

2.16. Additional capabilities
You can also use your mobile to request information about the system, the power supply and the network quality.
Plus you can listen in to what’s happening in the secured location through a remote microphone. See section 3
for more details.
EPIR3 system comes equipped with built-in wireless module allowing to enhance your security system with
the addition ELDES wireless PIRs (Passive Infrared Sensors), sirens, magnetic door and window sensors or expansion modules. See section 3. HOW TO MANAGE THE WIRELESS DEVICES for more details.
3. HOW TO MANAGE THE WIRELESS DEVICES
IMPORTANT: Before you continue, rst follow the entire section 2. QUICK START GUIDE and prepare the sys-
tem for use as described.
OVERVIEW
Your EPIR3 has a built-in wireless module. This section tells you how to pair and remove a wireless device using
your PC and ELDES Conguration Tool as well as briey describing every available wireless device which can oper-
ate together with your EPIR3 system.
It is possible to connect up to 16 wireless devices to the EPIR3 system. This includes the following:
• EWP2 – wireless PIR sensor (motion detector).
• EWD2 - wireless magnetic door contact/shock sensor/ood sensor.
• EWS3 – wireless indoor siren.
• EWS2 – wireless outdoor siren.
• EWK1 and EWK2/EWK2A – wireless keyfob.
• EKB3W – wireless LED keypad.
• EW2 – wireless zone and PGM output expansion module (up 8 devices supported).
• EWF1 - wireless smoke detector.
• EWF1CO - wireless smoke and CO detector.
• EWR2 - wireless signal repeater.
You can also attach more devices which are not part of the ELDES wireless range by using expansion module EW2
with 4 zones and 2 programmable outputs
Main features of built-in wireless module:
• Up to 16 ELDES wireless devices per one EPIR3 unit;
• Two-way wireless communication;
• Supervised communication link with congurable self-test period;
• Maximum wireless connection range is 150m (492.13ft) in open areas, within a building wireless range will
be up to 30m (98.43ft), depending on building construction.
For more details on technical specications and installation of the wireless devices, please refer to RADIO SYS-
EPIR3 User Manual v1.4
27
27EN

TEM INSTALLATION AND SIGNAL PENETRATION manual and the latest user manual of the wireless device
located at www.eldes.lt/download
The wireless devices can operate at a range of up to 30m (98.43ft) from the alarm system unit while inside the
building and at up to 150m (492.13ft) range in open areas. The wireless connection is two-way and operates in
one of four available channels in ISM868 / ISM915 non-licensed band.
EKB3W, EW2, EWP2, EWS2, EWS3, EWF1, EWF1CO:
• First360attemptsafterthedevicestartup(reset)-every10seconds.
• Therestofattempts-every1minute.
EWD2:
• First360attemptsafterthedevicestartup(reset)-every10seconds.
• Therestofattempts-every2minutes.
Once the wireless device is paired, it will attempt to exchange data with EPIR3 system. Due to battery saving
reasons, all ELDES wireless devices operate in sleep mode. The data exchange will occur instantly if the wireless
device is triggered (zone alarm or tamper alarm) or periodically when the wireless device wakes up to transmit the
supervision signal, based on Test Time value, to the system as well as to ac cept the queued up command (if any)
from the system. By increasing the Test Time period, EWS2/EWS3 siren response time will decrease. Example:
The alarm occurred at 09:15:25 and the system queued up the command for EWS3 siren to start sounding. By
default, Test Time value of EWS3 siren is 7 seconds, therefore EWS3 siren will sound at 09:15:32.
By default, the Test Time period is as follows (customizable):
• EKB3W: every 60 seconds.
• EW2, EWP2, EWF1, EWF1CO, EWD2: every 30 seconds
• EWS2, EWS3: every 7 seconds.
To set a dierent Test Time value, please refer to ELDES Conguration Tool software.
NOTE: Test Time aects the wireless device pairing process due to the alarm system listening for the incoming
data from the wireless device. The system pairs with the wireless device only when the rst data packet is received.
NOTE FOR EKB3W: In comparison with other ELDES wireless devices, EKB3W keypad features some exceptions
regarding the wireless communication. For more details on EKB3W keypad wireless communication and back-light
timeout, please refer to 3.3.1. Sleep mode, how to wake up EKB3W and view system alarms or faults.
Wireless signal status monitoring
If the wireless signal is lost due to poor signal strength or low battery power on a certain wireless device and does
not restore within 1-hour period, the system will cause an alarm. This event is identied as Wireless Signal Loss.
By default, indicated as No wireless signal from wless-dev wless-id Tamper x in the SMS text message (wless-dev
= wireless device model; wless-id = 8-character wireless device ID code; x = tamper number). The user will also
be notied by SMS text message as soon as the wireless signal is restored. The default 1-hour period for wireless
signal loss detection is a EN 50131-1 Grade 2 requirement.
In addition, ELDES Conguration Tool software indicates a timer of the last Test Time signal delivered by a paired
28
28 EN
EPIR3 User Manual v1.4
and unpaired wireless device. The software will also warn you if the delivery of the Test Time signal is delayed for
a time period 3 times longer than the Test Time period of a paired wireless device. In case the Test Time signal
delivery of an unpaired wireless device is delayed for more than 1,5 minute, a warning will follow and the icon of
such wireless device will be removed from the software’s interface in 10 seconds.
3.1. How to pair a wireless device with the system
IMPORTANT: Before you continue, rst ensure the EPIR3 is powered up and connected to your PC via the
USB cable.
1. Turn on the wireless device by following the instructions provided in the user manual of the wireless device.
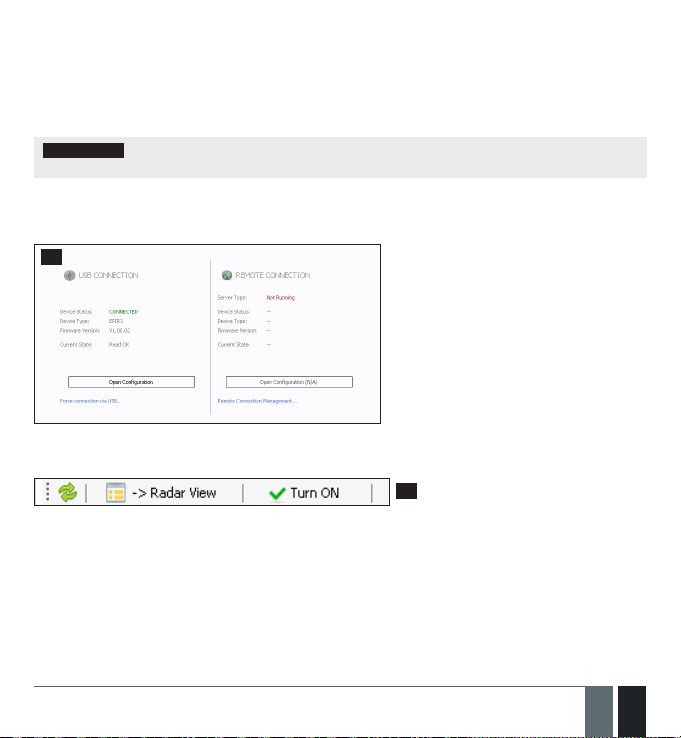
2. Run ELDES Conguration Tool software and left-click on the USB CONNECTION / Open Conguration button.
56
3. Open Wireless Device Management section and click on the Turn ON button in order to activate the system’s
wireless transmitter-receiver.
57
By default, this section uses a list view to show ELDES wireless devices visible to EPIR3 within its wireless signal range
EPIR3 User Manual v1.4
29
29EN
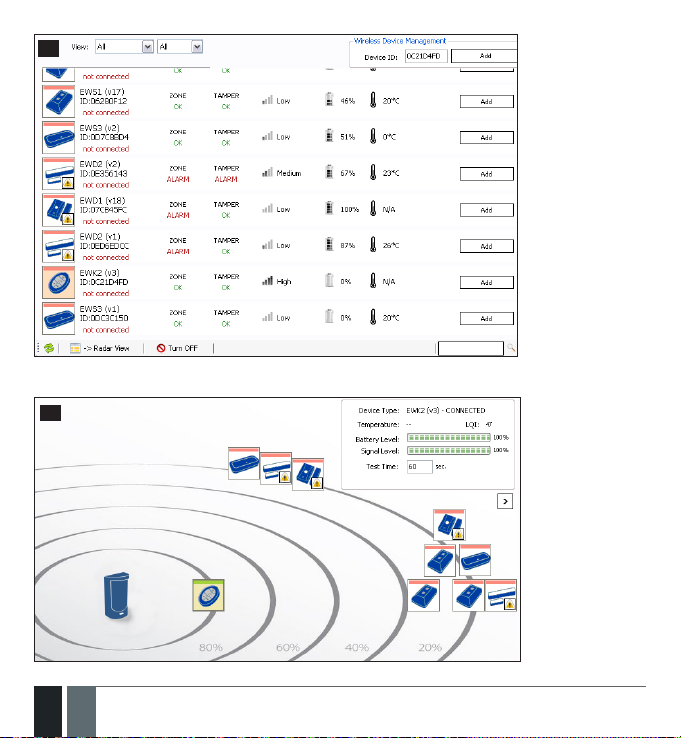
58
Alternatively, you can switch to radar view by clicking on the Radar View button.
59
30
30 EN
EPIR3 User Manual v1.4
 Loading...