

Page 1

WW 2000 I
Bedienungsanleitung
Wärmewellenheizgerät
Operating Instructions
Heat wave radiator
Mode d’emploi
Chauffage rayonnant
Istruzioni per l’uso
Pannello radiante elettrico
Οδηγίες χρήσης Θερμαντήρας
θερμοκυμάτων
Art.-Nr.. 23.384.30 I.-Nr.: 11011
Anleitung_WW_2000_I_SPK7__ 03.05.12 12:36 Seite 1
Page 2
2
1
2
3
9
4
1
2
3
4
5
10
5
7
6
8
Anleitung_WW_2000_I_SPK7__ 03.05.12 12:36 Seite 2
Page 3
3
2
C
1
00 cm
>20cm
>20cm
40 cm
40 cm
3
F
4
E
8
A
Anleitung_WW_2000_I_SPK7__ 03.05.12 12:36 Seite 3
Page 4

D
4
Achtung!
Beim Benutzen von Geräten müssen einige
Sicherheitsvorkehrungen eingehalten werden, um
Verletzungen und Schäden zu verhindern. Lesen Sie
diese Bedienungsanleitung / Sicherheitshinweise
deshalb sorgfältig durch. Bewahren Sie diese gut
auf, damit Ihnen die Informationen jederzeit zur
Verfügung stehen. Falls Sie das Gerät an andere
Personen übergeben sollten, händigen Sie diese
Bedienungsanleitung / Sicherheitshinweise bitte mit
aus. Wir übernehmen keine Haftung für Unfälle oder
Schäden, die durch Nichtbeachten dieser Anleitung
und den Sicherheitshinweisen entstehen.
1. Sicherheitshinweise
앬 Vor der Inbetriebnahme die Bedienungsanleitung
unbedingt beachten! Das Gerät darf nur wie darin
beschrieben verwendet werden. Jede andere
Verwendung ist unzulässig.
앬 Anleitung gut aufbewahren und ggf. an Dritte
weiter geben.
앬 Überprüfen Sie, ob das Gerät in einem einwand-
freien Zustand geliefert wurde. Bei eventuellen
Beschädigungen Gerät nicht anschließen.
앬 Gerät ist nur zur Erwärmung der Raumluft in
geschlossenen Räumen geeignet.
앬 Nicht für gewerbliche Zwecke geeignet.
앬 Netzleitung bei Betrieb nicht über heiße Geräte-
teile führen.
앬 Gerät nie öffnen und Spannung führende Teile
berühren – Lebensgefahr!
앬 Niemals Gerät mit nassen Händen bedienen .
앬 Gerät so aufstellen, dass der Netzstecker jeder-
zeit zugänglich ist.
앬 Ist das Gerät längere Zeit außer Betrieb, Netz-
stecker ziehen!
앬 Gerät darf nicht in Räumen in denen feuerge-
fährliche Stoffe (z.B. Lösungsmittel usw.) oder
Gase verwendet oder gelagert werden betrieben
werden.
앬 Leicht entflammbare Stoffe oder Gase vom Gerät
fernhalten.
앬 Nicht in feuergefährdeten Räumen (z.B. Holz-
schuppen) betreiben.
앬 Heizgerät nur mit vollständig ausgerollter Netz-
leitung betreiben.
앬 Nicht geeignet zur Installation an festverlegten
Elektroleitungen.
앬 Keine Fremdkörper in Geräteöffnungen einführen
– Gefahr von Stromschlag und Gerätebeschädigung.
앬 Kinder und Personen unter Medikamenten- oder
Alkoholeinfluss sind vom Gerät fernzuhalten.
앬 Wartungsarbeiten und Reparaturen dürfen nur
vom autorisierten Fachpersonal ausgeführt
werden.
앬 Vor jedem Betrieb ist das Gerät insbesondere das
Netzkabel auf Beschädigungen zu prüfen. Bei
Beschädigungen wenden Sie sich an einen
Elektrofachmann oder den in Ihrem Land
zuständigen Kundendienst (in Deutschland ISC
GmbH).
앬 Eine Deckenmontage ist unzulässig.
앬 Wasser oder andere Flüssigkeiten dürfen niemals
auf oder in das Gerät gelangen – Lebensgefahr!
앬 Das Gerät nur an eine geerdete Netzsteckdose
anschließen.
앬 Gerät nicht unmittelbar über oder unter einer
Steckdose installieren.
앬 Decken Sie den Heizer niemals ab, da es zu
Hitzestau und dadurch zu Schäden am Gerät oder
Bränden kommen kann (Abb. 4).
앬 Gerät nicht in der Tierhaltung bzw. Tieraufzucht
verwenden.
앬 Gehäuse kann sich bei längerem Betrieb stark
erwärmen. Das Gerät so aufstellen, dass ein
zufälliges Berühren ausgeschlossen ist.
앬 Gerät niemals auf langflorigen Teppichen
aufstellen.
앬 Das Gerät darf von Kindern oder gebrechlichen
Personen nur unter Aufsicht bedient werden.
Kleine Kinder dürfen das Gerät nicht als Spielzeug
benutzen.
앬 Es sind zum Gehäuse Mindestabstände von
20 cm seitlich, 100 cm nach oben, 40 cm nach
unten (bei Wandmontage) und 100 cm nach
vorne einzuhalten.
앬 Dieses Gerät ist nicht dafür bestimmt, durch Per-
sonen (einschließlich Kinder) mit eingeschränkten
physischen, sensorischen oder geistigen Fähigkeiten oder mangels Erfahrung und/oder mangels
Wissen benutzt zu werden, es sei denn, sie werden durch eine für ihre Sicherheit zuständige Person beaufsichtigt oder erhielten von ihr Anweisungen, wie das Gerät zu benutzen ist. Kinder sollten
beaufsichtigt werden, um sicherzustellen, dass sie
nicht mit dem Gerät spielen.
앬 Die Montage im Badezimmer ist nicht zulässig.
앬 Das Heizgerät nicht in unmittelbarer Nähe einer
Badewanne, Dusche oder eines
Schwimmbeckens benutzen.
앬 Das Heizgerät ist so anzubringen, dass Schalter
und andere Regler nicht von einer sich in der
Badewanne oder unter der Dusche befindlicher
Person berührt werden können.
Anleitung_WW_2000_I_SPK7__ 03.05.12 12:36 Seite 4
Page 5

D
5
WARNUNG
Lesen Sie alle Sicherheitshinweise und
Anweisungen. Versäumnisse bei der Einhaltung der
Sicherheitshinweise und Anweisungen können
elektrischen Schlag, Brand und/oder schwere
Verletzungen verursachen zur Folge haben.
Bewahren Sie alle Sicherheitshinweise und
Anweisungen für die Zukunft auf.
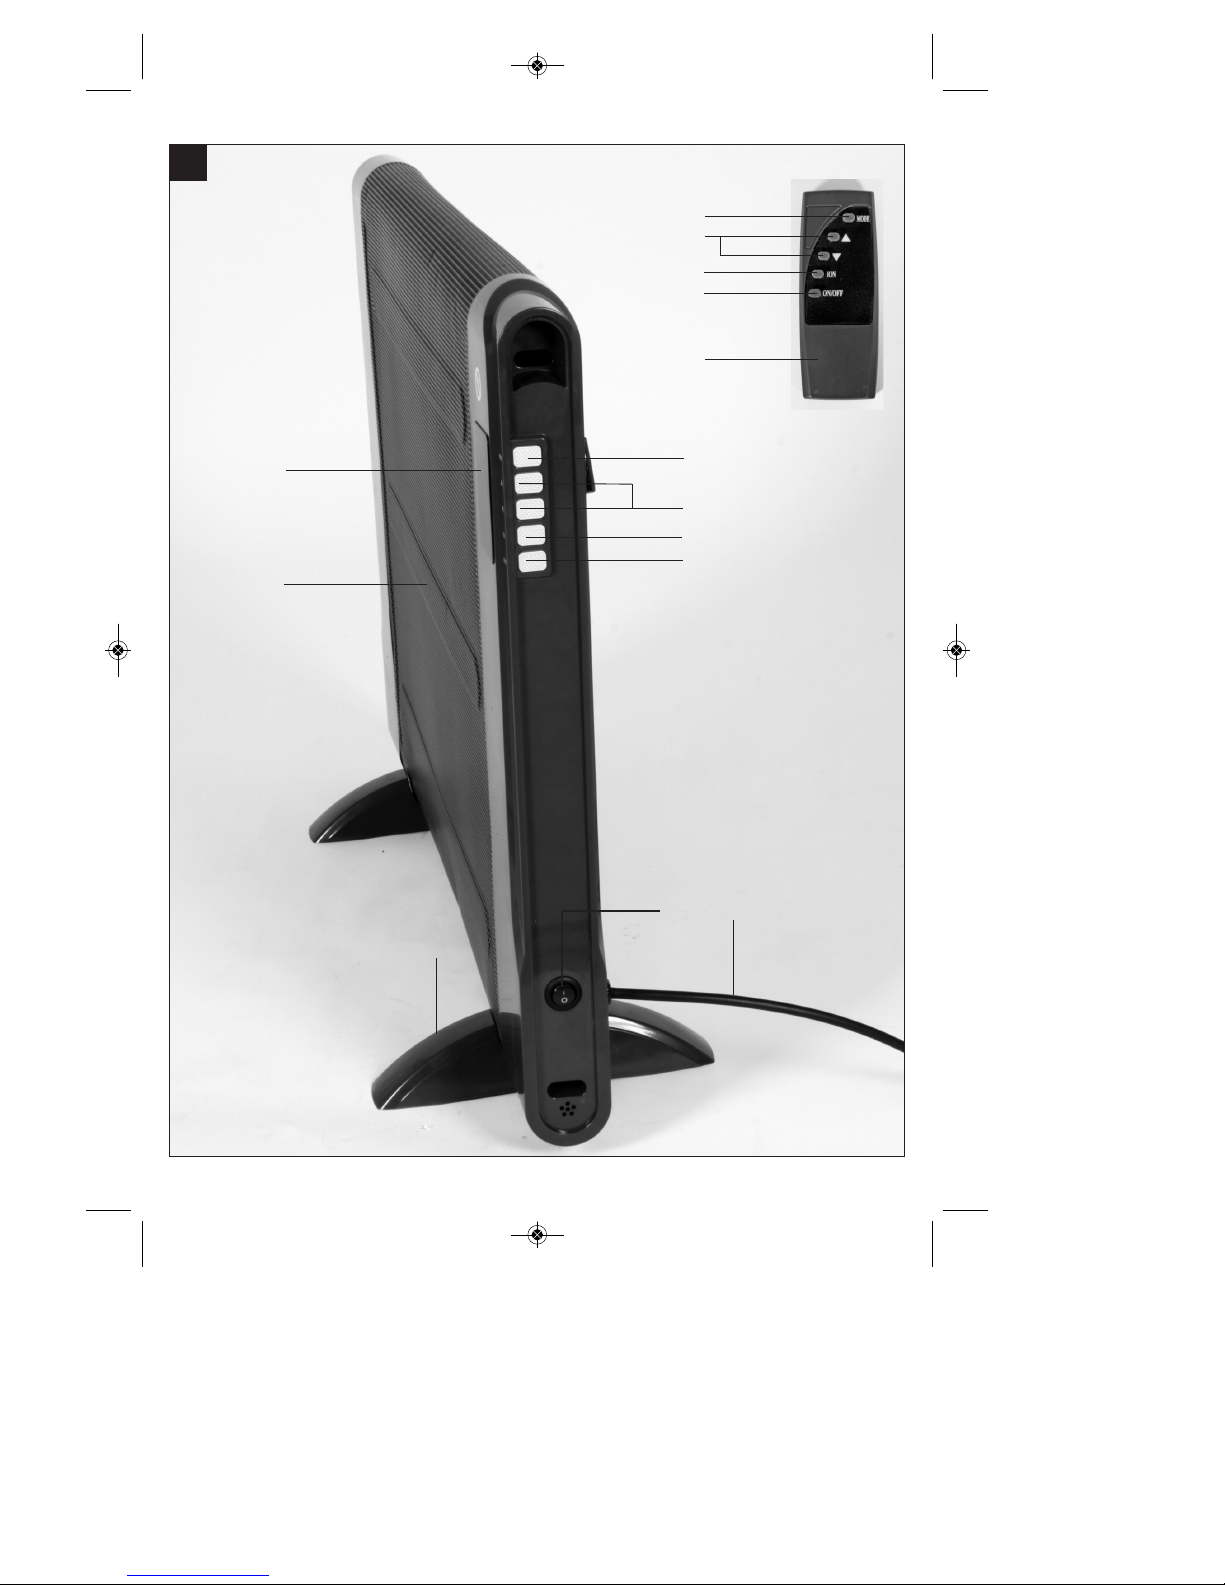
2. Gerätebeschreibung (Abb. 1)
1 LED-Display
2 Taste „Funktionseinstellung“
3 Tasten „▲“ (höher) / „▼“ (niedriger)
4 Taste Ionisator Ein/Aus
5 Taste Ein/Standby
6 Hauptschalter Ein/Aus
7 Netzleitung
8 Standfuß
9 Schutzgitter
10 Fernbedienung
3. Bestimmungsgemäße Verwendung
Das Gerät ist zum Heizen in geschlossenen,
trockenen Räumen bestimmt. Es gibt Wärme hauptsächlich über Wärmestrahlung direkt an Gegenstände und Personen ab, die sich vor dem Gerät befinden.
Das Gerät kann frei im Raum stehend oder an einer
Wand montiert verwendet werden. Die Mindestabstände sind einzuhalten. Das Gerät darf nur in senkrechter Stellung und komplett montiert betrieben
werden.
Das Gerät darf nur nach seiner Bestimmung verwendet werden. Jede weitere darüber hinausgehende
Verwendung ist nicht bestimmungsgemäß. Für daraus hervorgerufene Schäden oder Verletzungen
aller Art haftet der Benutzer/Bediener und nicht der
Hersteller.
4. Technische Daten:
Nennspannung: 220 - 240 V ~ 50 Hz
Heizleistung: 2000 W (1200 W / 2000 W)
Einstellbereich Thermostat: 5 – 36 °C
Negative Ionen: ≥ 3x10⁶n/cm
3
Schutzart: IP X0
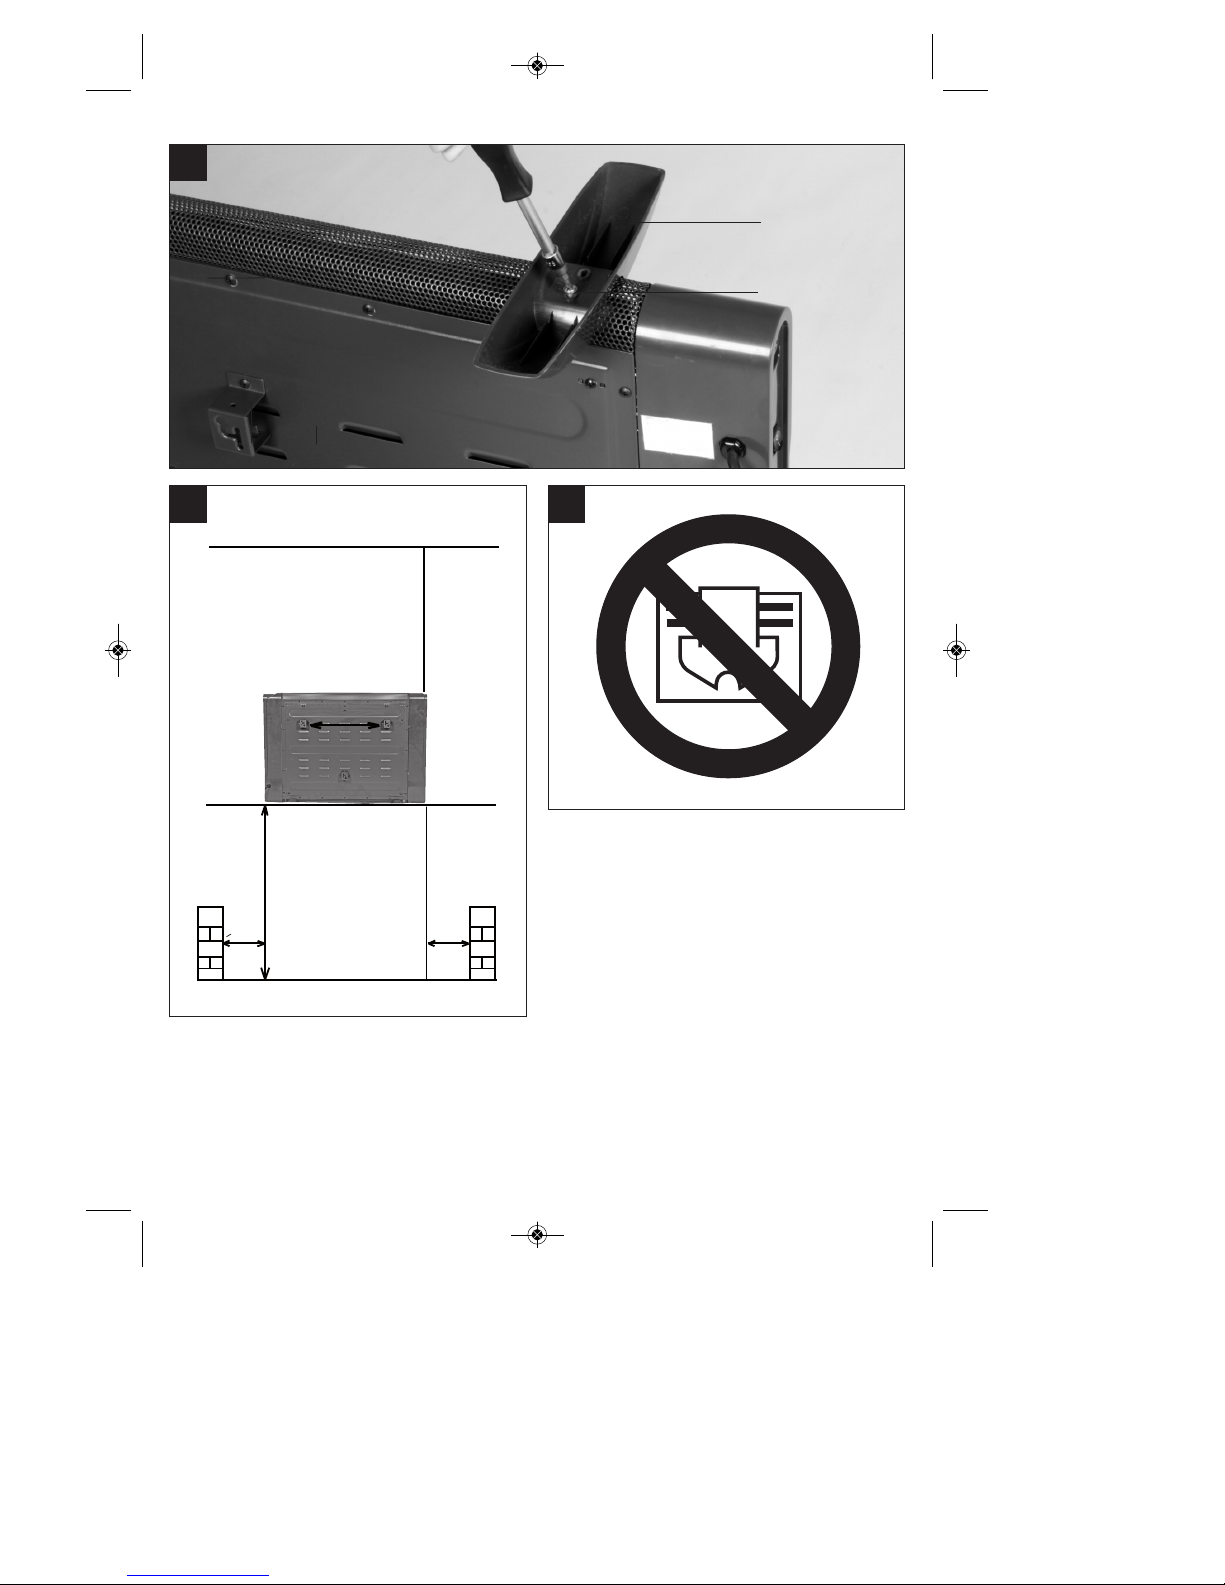
5. Montage
5.1 Standmontage (Abb. 2)
Beachten Sie Punkt 1 - Sicherheitshinweise.
Achtung! Um Beschädigungen zu vermeiden, Heizgerät zur Standfußmontage auf eine weiche Unterlage (z.B. Teppich) legen.
Montieren Sie die beiden Standfüße (8) mit je zwei
Schrauben (A) am Gehäuse.
5.2 Wandmontage (Abb. 3)
Beachten Sie Punkt 1 - Sicherheitshinweise.
앬 Bei Wandmontage die Standfüße nicht montieren.
Achtung! Stellen Sie sicher, dass sich im Bereich der
Bohrlöcher keine elektrischen Leitungen oder andere
Installationen (z.B. Wasserrohre) befinden. Achten
Sie auf festen, waagerechten Sitz des Gerätes an
der Wand. Verwenden Sie nur geeignetes
Befestigungsmaterial an einer tragfähigen Wand.
Die mitgelieferten Dübel und Schrauben sind
geeignet für: Beton, Naturstein im dichtem Gefüge,
Vollziegel, Kalksand-Vollstein, Vollstein aus
Leichtbeton und Porenbeton (Gasbeton). Beachten
Sie unbedingt die Mindestabstände (Abb. 3 und
Punkt 1 – Sicherheitshinweise).
1. Abb. 3: Markieren Sie in einer Höhe von 85 cm
waagerecht im Abstand von 40 cm zwei Löcher an
der Wand. Bohren Sie mit einem Ø 6mm Bohrer die
beiden Löcher und setzen Sie die Dübel ein. Die
beiden Schrauben werden soweit in die Dübel
gedreht, dass die Wandhalterungen eingehängt
werden können.
2. Hängen Sie das Gerät mit den Wandhaltern an
den beiden Schrauben ein. Ziehen Sie es bis zum
Anschlag nach unten, dann nach links und
schließlich bis zum Anschlag nach unten bis das
Gerät sicher hängt.
Anleitung_WW_2000_I_SPK7__ 03.05.12 12:36 Seite 5
Page 6

D
6
6. Inbetriebnahme
Achtung! Vor Inbetriebnahme überprüfen, ob die
vorhandene Spannung mit der angegebenen Spannung auf dem Datenschild übereinstimmt.
앬 Beachten Sie die unter Punkt 1 angeführten
Sicherheitshinweise.
앬 Bei Erstinbetriebnahme oder nach längerer Be-
triebspause kann es zu einer kurzzeitigen Geruchsbildung kommen. Dies ist kein Fehler.
Alle Funktionen können sowohl mit den Drucktastern
auf dem Gerät als auch mit der Fernbedienung
geschaltet werden. Für die Fernbedienung sind 2 St.
Batterien Typ „AAA“ zu verwenden. Beachten Sie
beim Batteriewechsel unbedingt die richtige Polarität.
Verbrauchte Batterien sind ordnungsgemäß zu
entsorgen
6.1 Gerät einschalten
Mit dem Hauptschalter Ein/Aus (Abb. 1 / Pos. 6) wird
das Gerät vollständig vom Stromnetz getrennt.
Schalten Sie als Erstes den Hauptschalter ein bzw.
als Letztes aus wenn Sie das Gerät nicht mehr
benötigen.
Nach einschalten des Hauptschalters ist das Gerät
auf Standby. Mit der Ein-/Standby Taste (Abb. 1 /
Pos. 5) kann das Gerät eingeschaltet bzw. auf
Standby geschaltet werden.
6.2 Heizbetrieb
Durch drücken der Ein-/Standby Taste (Abb. 1/Pos.
5) wird das Gerät eingeschaltet, die geringste
Heizleistung ist eingestellt, die aktuelle
Gerätetemperatur im Bereich des integrierten
Temperaturfühlers und zwei Balken erscheinen am
Display.
Durch drücken der Taste „▲“ wird die höchste
Heizleistung eingeschaltet und vier Balken
erscheinen am Display. Durch drücken der Taste „▼“
wird auf die geringste Heizleistung zurückgeschaltet.
6.3 Zeitvorwahl (Timer)
Hinweis: Es kann eine Ausschaltzeit von 1 – 24h
eingestellt werden.
Heizbetrieb wie oben beschrieben einstellen.
Drücken Sie die „Mode“ Taste. Ein „Uhr“-Symbol
erscheint und die aktuell eingestellte Zeit blinkt am
Display. Durch drücken der Taste „▲“ kann die
Zeitvorwahl erhöht werden. Durch drücken der Taste
„▼“ kann die Zeitvorwahl verringert werden. Zum
Ausschalten der Zeitvorwahl noch einmal die „Mode“
Taste drücken und die Taste „▼“ solange drücken
bis „00“ erscheint oder die Ein-/Standby Taste
drücken.
6.4 Solltemperatur einstellen
Hinweis: Es kann eine Solltemperatur von 5 – 36°C
eingestellt werden.
Heizbetrieb wie oben beschrieben einstellen.
Drücken Sie die „Mode“ Taste 2x. Ein
„Thermometer“-Symbol erscheint und die aktuell
eingestellte Temperatur blinkt am Display. Durch
drücken der Taste „▲“ kann die Solltemperatur
erhöht werden. Durch drücken der Taste „▼“ kann
die Solltemperatur verringert werden.
6.5 Ionisator einschalten
Der Ionisator wird mit der Taste (4) ein- und
ausgeschaltet. Bei eingeschalteten Ionisator
erscheint ein Symbol im Display.
6.6 Überhitzungsschutz
Bei übermäßiger Erwärmung schaltet sich das Gerät
automatisch ab. Ist dies der Fall, Gerät ausschalten,
Netzstecker ziehen und einige Minuten abkühlen
lassen. Nach Beseitigung der Ursache (z.B.
abgedecktes Luftgitter) kann das Gerät wieder
eingeschaltet werden.
7. Wartung und Reinigung
앬 Vor Beginn von Reinigungs- und Wartungsar-
beiten muss das Gerät ausgeschaltet, vom Stromnetz getrennt und abgekühlt sein.
앬 Wartungs- und Reparaturarbeiten ausschließlich
von einer autorisierten Elektrowerkstatt oder der
ISC GmbH durchführen lassen.
앬 Die Netzleitung muss regelmäßig auf Defekte oder
Beschädigungen geprüft werden. Eine beschädigte Netzleitung darf nur vom Elektrofachmann
oder der ISC GmbH unter Berücksichtigung der
einschlägigen Bestimmungen ausgetauscht
werden.
앬 Zur Reinigung des Gehäuses ein leicht feuchtes
Tuch verwenden.
앬 Verunreinigungen durch Staub mit einem
Staubsauger entfernen.
Anleitung_WW_2000_I_SPK7__ 03.05.12 12:36 Seite 6
Page 7

D
7
8. Lagerung
Das Heizgerät ist an einem trockenen Ort, möglichst
abgedeckt einzulagern.
9. Ersatzteilbestellung
Bei der Ersatzteilbestellung sollten folgende
Angaben gemacht werden:
앬 Typ des Gerätes
앬 Artikelnummer des Gerätes
앬 Ident- Nummer des Gerätes
앬 Ersatzteil- Nummer des erforderlichen Ersatzteils
Aktuelle Preis und Infos finden Sie unter
www.isc-gmbh.info
10. Entsorgung und Wiederverwertung
Das Gerät befindet sich in einer Verpackung um
Transportschäden zu verhindern. Diese Verpackung
ist Rohstoff und ist somit wieder verwendbar oder
kann dem Rohstoffkreislauf zurückgeführt werden.
Das Gerät und dessen Zubehör bestehen aus
verschiedenen Materialien, wie z.B. Metall und
Kunststoffe. Führen Sie defekte Bauteile der
Sondermüllentsorgung zu. Fragen Sie im
Fachgeschäft oder in der Gemeindeverwaltung nach!
Anleitung_WW_2000_I_SPK7__ 03.05.12 12:36 Seite 7
Page 8

Caution:
When using the appliance, a few safety precautions
must be observed to avoid injuries and damage.
Please read the complete operating instructions and
safety regulations with due care. Keep this manual in
a safe place, so that the information is available at all
times. If you give the appliance to any other person,
hand over these operating instructions and safety
regulations as well. We cannot accept any liability for
damage or accidents which arise due to a failure to
follow these instructions and the safety instructions.
1. Safety instructions
n Read the operating instructions before using the
appliance for the first time. The appliance may
only be used as described therein. All other
usages are not permitted.
n Keep the instructions in a safe place and give
them to third parties if necessary.
n Check that the appliance has been delivered in
perfect condition. If it has suffered any damage,
do not connect the appliance to the power supply.
n This appliance is only suitable for heating air in
enclosed spaces.
n Not suitable for commercial purposes.
n Do not lay the power cable over parts of the
appliance which get hot.
n Never open the appliance or touch live parts –
danger of death!
n Never use the appliance with wet hands.
n Position the appliance in such a way that the
mains plug is accessible at all times.
n If the appliance is not used for a lengthy period of
time, disconnect it from the mains supply.
n Do not use the appliance in rooms in which
inflammable materials (for example solvents, etc.)
or gases are used or stored.
n Keep highly inflammable substances and gases
away from the appliance.
n Do not use in areas where there is a fire risk (for
example wooden sheds).
n Only use the heater with its mains lead fully
extended.
n Not suitable for installation on permanently
installed electrical cables.
n Do not insert any foreign objects in the
appliance’s openings – danger of electric shock
and damage to the appliance.
n Keep children and people on medication or under
the influence of alcohol away from the appliance.
n Maintenance and repair work may only be carried
out by authorized trained personnel.
n Check the appliance, particularly the mains lead,
for signs of damage every time before use. In
case of damage, contact a qualified electrician or
customer services in the country where you are
situated (in Germany, ISC GmbH)
n Ceiling suspension is not permitted.
n Water or other fluids must never come into
contact with the appliance - Danger of death!
n Only connect the appliance to an earthed socket.
n Do not install the appliance directly above or
directly below a socket.
n Never cover the heater, as this can lead to a build
up of heat which may damage the appliance, or
lead to fire (Fig. 4).
n Do not use the appliance for animal husbandry or
livestock breeding.
n If the appliance is used for a lengthy time the
housing can become very hot. Position the
appliance in such a way as to prevent accidental
contact.
n Never position the appliance on deep pile
carpets.
n Children or infirm persons may use the appliance
only under supervision. Children are not allowed
to use the appliance as a toy.
n The housing must have a minimum separating
distance of: 20 cm at the sides, 100 cm above, 40
cm below (applies for wall mounting) and 100 cm
at the front.
n This appliance has not been designed for use by
people (including children) with limited physical,
sensory or mental capacities or those with no
experience and/or knowledge unless they are
supervised by a person who is responsible for
their safety or they have received instructions
from such a person in how to use the appliance
safely. Children must always be supervised in
order to ensure that they do not play with the
appliance.
n Mounting the appliance in the bathroom is not
permitted.
n The heater may not be used near a bath, shower
or swimming pool.
n The heater should be installed so that switches
and other controllers could not be touched by
someone in the bath or shower.
CAUTION:
Read all safety regulations and instructions. Any
errors made in following the safety regulations and
instructions may result in an electric shock, fire and/or
serious injury.
Keep all safety regulations and instructions in a
safe place for future use.
GB
8
Anleitung_WW_2000_I_SPK7__ 03.05.12 12:36 Seite 8
Page 9
2. Layout (Fig. 1)
1 LED display
2 Function setting button
3 ▲ button (higher) / ▼ button (lower)
4 Ionizer On/Off button
5 On/Standby button
6 On/Off main switch
7 Power cable
8 Foot
9 Protective grille
10 Remote control
3. Intended use
The equipment is designed exclusively for use as an
additional heater in dry, closed rooms. It primarily
emits heat by radiation straight on to objects and
people who are in front of the appliance.
The appliance can be used indoors in a free standing
position or mounted on a wall. Maintain all minimum
distances. The appliance may only be used
completely assembled and standing vertically.
The appliance may only be used for the tasks it is
designed to handle. Any other use is deemed to be a
case of misuse. The user/operator and not the
manufacturer will be liable for any damage or injuries
caused as a result thereof.
4. Technical data:
Rated voltage: 220 - 240 V ~ 50 Hz
Heat output: 2000 W (1200 W / 2000 W)
Adjustment range of thermostat: 5 – 36 °C
Negative ions: ≥ 3x10⁶n/cm
3
Protection type: IP X0
5. Assembly
5.1 Free-standing installation (Fig. 2)
Observe section 1 “Safety regulations“.
Caution: To prevent damage when attaching the feet
to the heater, place the heater upside down on a soft
surface (e.g. a carpet).
Fit the two feet (8) to the housing, each with two
screws (A).
5.2 Wallmounting (Fig. 3)
Observe section 1 “Safety regulations“.
n Do not attach the feet if the appliance is to be
mounted on the wall.
Caution: Make sure that there are no electric cables
or other installations (for example water pipes) near
the drill holes. Ensure that the bracket is firmly and
horizontally fitted to the wall. Use only suitable
fastening material on a suitably stable wall.
The supplied dowels and screws are suitable for the
following: concrete, natural stone with a dense
structure, solid brick, solid limestone bricks, solid
lightweight concrete bricks and aerated concrete.
It is essential to observe the minimum distances
(Fig. 3 and point 1 – Safety information).
1. Fig. 3: Mark two holes on the wall at a height of 85
cm and a horizontal distance of 40 cm apart. Use
a Ø 6mm drill bit to drill the two holes and insert
the dowels. Turn the two screws into the dowels
far enough to enable the wall brackets to be hung
in place.
2. Hang the equipment by the wall brackets on the
two screws. Pull it down as far as it will go, then to
the left and finally once again in downwards until
the equipment hangs securely.
6. Starting up
Caution: Before using the appliance for the first time,
check that the voltage supply is the same as the
voltage details set out on the rating plate.
n Read the safety regulations in section 1.
n When the appliance is used for the first time or
after a long period of rest it may emit an odor for a
short time. This is not a fault.
All functions can be activated with the push buttons
on the appliance as well as with the remote control.
For the remote control, use 2 size AAA batteries.
Make sure that the poles are not reversed when you
change the batteries. Used batteries must be
disposed of properly
GB
9
Anleitung_WW_2000_I_SPK7__ 03.05.12 12:36 Seite 9
Page 10

6.1 Switching on the appliance
With the main ON/OFF switch (Fig. 1/Item 6) the
appliance is cut off completely from the power supply.
Switch the main switch on first, and off last when you
no longer need the appliance.
After the main switch is switched on, the equipment
will be in standby mode. With the On/Standby button
(Fig. 1 / Item 5) you can switch the equipment on or to
standby mode.
6.2 Heating mode
If the On/Standby button (Fig. 1/Item 5) is pressed,
the equipment will be switched on, the lowest heat
output will be set, and on the display will appear the
current equipment temperature in the area of the
integrated temperature sensor and two bars.
If the "▲" button is pressed, the highest heat output
will be switched on and four bars will appear on the
display. If the "▼" button is pressed, the equipment
will be reset to the lowest heat output.
6.3 Timer function
Note: An OFF time from 1 – 24h can be set.
Set heating mode as described above. Press the
"Mode" button. A "clock" symbol will appear and the
currently set time will flash on the display. The
selected time can be increased by pressing the "▲"
button. The selected time can be decreased by
pressing the "▼" button. To switch off the time
selection, press the "Mode" button again and press
and hold the "▼" until "00" appears, or press the
On/Standby button.
6.4 Setting the desired temperature
Note: A desired temperature from 5 – 36°C can be
set.
Set heating mode as described above. Press the
"Mode" button twice. A "thermometer" symbol will
appear and the currently set temperature will flash on
the display. The selected temperature can be
increased by pressing the "▲" button. The selected
temperature can be decreased by pressing the "▼"
button.
6.5 Switching on the ionizer
The ionizer is switched on and off with the button (4).
A symbol appears on the display when the ionizer is
ON.
6.6 Overheating guard
In case of excessive heating, the appliance shuts
down automatically. If this occurs, turn off the
appliance, disconnect the mains plug and wait a few
minutes for the appliance to cool. After eliminating the
cause (e.g. a covered air grille), the appliance can be
switched on again.
7. Maintenance and cleaning
n Before carrying out any cleaning and
maintenance work the appliance must be turned
off, disconnected from the power supply and
cooled down.
n Maintenance and repair work may only be carried
out by an authorized electrical servicing
contractor or ISC GmbH.
n Check the mains lead at regular intervals for signs
of defects or damage. A damaged mains lead
may only be replaced by an electrician or ISC
GmbH in compliance with the relevant
regulations.
n Use a damp cloth to clean the casing.
n Remove dust pollution with a vacuum cleaner.
8. Storage
The heater has to be stored in a dry place, covered if
possible.
9. Ordering spare parts
Please provide the following information on all orders
for spare parts:
n Model/type of the appliance
n Article number of the appliance
n ID number of the appliance
n Part number of the required spare part
For our latest prices and information please go to
www.isc-gmbh.info
GB
10
Anleitung_WW_2000_I_SPK7__ 03.05.12 12:36 Seite 10
Page 11

10. Disposal and recycling
The appliance is supplied in packaging to prevent it
from being damaged in transit. The raw materials in
this packaging can be reused or recycled. The
appliance and its accessories are made of various
types of material, such as metal and plastic. Defective
components must be disposed of as special waste.
Ask your dealer or your local council.
GB
11
Anleitung_WW_2000_I_SPK7__ 03.05.12 12:36 Seite 11
Page 12
Attention !
Lors de l’utilisation d’appareils, il faut respecter
certaines mesures de sécurité afin d’éviter des
blessures et dommages. Veuillez donc lire
attentivement ce mode d’emploi/ces consignes de
sécurité. Veillez à le conserver en bon état pour
pouvoir accéder aux informations à tout moment. Si
l’appareil doit être remis à d’autres personnes, veillez
à leur remettre aussi ce mode d’emploi/ces
consignes de sécurité. Nous déclinons toute
responsabilité pour les accidents et dommages dus
au non-respect de ce mode d’emploi et des
consignes de sécurité.
1. Consignes de sécurité
n Avant la mise en service, prenez absolument
connaissance du mode d’emploi ! L’appareil doit
uniquement être utilisé comme décrit ici ! Toute
autre application est interdite.
n Conservez bien ces instructions et donnez-les à
un tiers en cas de besoin.
n Contrôlez si l’appareil a bien été livré dans un état
irréprochable. En cas d’endommagement
quelconque, ne connectez pas l’appareil au
secteur.
n L’appareil convient uniquement au réchauffement
de l’air ambiant dans une pièce fermée.
n Ne convient pas à l’emploi industriel.
n Ne faites pas passer le câble réseau pendant le
fonctionnement au-dessus de pièces brûlantes
de l’appareil.
n N’ouvrez jamais l’appareil et ne touchez pas non
plus les pièces conductrices de tension –
Danger de mort !
n Ne manipulez jamais l’appareil avec les mains
mouillées.
n Disposez l’appareil de manière à toujours avoir
accès à la fiche secteur.
n Si l’appareil reste hors circuit pendant une
période prolongée, retirez la fiche secteur !
n Cet appareil ne doit pas être mis en service dans
des salles dans lesquelles des substances
dangereuses (par ex. des solvants) ou des gaz
sont utilisés ou entreposés.
n Maintenez à distance de l’appareil les matières
ou gaz inflammables.
n Ne le mettez pas en service dans des salles à
risque d’incendie (par ex. où il y a des copeaux
de bois).
n Mettez l’appareil de chauffage en service
uniquement avec le câble secteur complètement
déroulé.
n Non approprié pour le raccordement à des lignes
électriques posées fixement.
n N’introduisez aucun corps étranger – danger de
décharge électrique et d’endommagement de
l’appareil.
n Les enfants et personnes sous prise de
médicaments ou sous l’effet de l’alcool doivent
être maintenues à l’écart de l’appareil.
n Les travaux de maintenance et les réparations
doivent uniquement être effectuées par un
personnel spécialisé autorisé.
n Avant chaque mise en marche, il faut vérifier si
l’appareil, plus particulièrement le câble secteur,
est endommagé. En cas d’endommagement,
adressez-vous à un(e) électricien(ne) ou au
service après vente compétent de votre pays (en
Allemagne ISC GmbH).
n Il est interdit de monter l’appareil au plafond.
n L’eau ou d’autres liquides ne doivent jamais
couler sur ou dans l’appareil – danger de mort !
n Raccordez l’appareil uniquement à une prise de
courant reliée à terre.
n N’installez pas l’appareil juste au-dessus ou au-
dessous d’une prise de courant.
n Ne recouvrez jamais le chauffage, cela peut
entraîner une surchauffe et donc des dommages
de l’appareil, voire un incendie. (figure 4).
n Ne pas utiliser l’appareil pour le gardiennage
et/ou l’élevage d’animaux.
n Le corps de l’appareil peut fortement s’échauffer
en cas de longue durée de fonctionnement.
Positionnez l’appareil de telle manière que
personne ne puisse le toucher accidentellement.
n Ne disposez jamais l’appareil sur des tapis à
longs poils.
n Les enfants ou personnes fragiles sont
uniquement autorisées à utiliser cet appareil sous
surveillance. Il est interdit aux petits enfants de
jouer avec cet appareil.
n Il faut garder un écart minimum par rapport au
boîtier de 20 cm latéralement, 100 cm vers le
haut, 40 cm mm vers le bas (en cas de montage
mural) et 100 cm mm vers l’avant.
n Cet appareil ne convient pas aux personnes (y
compris les enfants) qui en raison de leurs
capacités physiques, sensorielles ou
intellectuelles ou leur manque d’expérience et/ou
de connaissances ne peuvent pas l’utiliser de
manière sûre, à moins d’être surveillées et de
recevoir les instructions relatives à l’utilisation de
l’appareil par une personne responsable de leur
sécurité. Surveillez les enfants pour vous assurer
qu’ils ne jouent pas avec l’appareil.
n Le montage dans la salle de bain est interdit.
n N’utilisez pas l’appareil de chauffage à proximité
immédiate d’une baignoire, d’une douche ou d’un
bassin de piscine.
F
12
Anleitung_WW_2000_I_SPK7__ 03.05.12 12:36 Seite 12
Page 13

n Installez l’appareil de chauffage de sorte que
l’interrupteur et d’autres régulateurs ne puissent
pas être touchés par la personne se trouvant
dans la baignoire ou sous la douche.
AVERTISSEMENT
Veuillez lire toutes les consignes de sécurité et
instructions. Tout non-respect des consignes de
sécurité et instructions peut provoquer une décharge
électrique, un incendie et/ou des blessures graves.
Conservez toutes les consignes de sécurité et
toutes les instructions pour l’avenir.
2. Description de l’appareil (fig. 1)
1 Affichage LED
2 Touche « Réglage des fonctions »
3 Touches «▲ » (augmente) / « ▼ »
(diminue)
4 Touche ionisateur marche/arrêt
5 Touche marche/standby
6 Interrupteur principal marche/arrêt
7 Câble réseau
8 Pied d'appui
9 Grille de protection
10 Télécommande
3. Utilisation conforme à l’affectation
L’appareil est uniquement conçu pour servir de
chauffage supplémentaire dans des endroits secs et
fermés. Il émet de la chaleur principalement par
rayonnement thermique directement sur les objets et
les personnes qui se trouvent devant l’appareil.
L’appareil peut être posé tous côtés libres dans la
pièce ou contre un mur ! Il faut respecter les espaces
minimums. L’appareil peut être exploité uniquement
en position verticale et complètement monté.
L’appareil doit uniquement être utilisé conformément
à son affectation ! Chaque utilisation allant au-delà de
cette affectation est considérée comme non
conforme. Pour les dommages en résultant ou les
blessures de tout genre, le producteur décline toute
responsabilité et l’opérateur/l’exploitant est
responsable.
4. Caractéristiques techniques:
Tension nominale : 220 - 240 V ~ 50 Hz
Puissance de chauffage : 2000 W (1200 W / 2000 W)
Plage de réglage du thermostat : 5 – 36 °C
Ions négatifs : ≥ 3x10⁶n/cm
3
Type de protection : IP X0
5. Montage
5.1 Montage standard (figure 2)
Respectez le point 1 - consignes de sécurité.
Attention ! Afin d’éviter les endommagements, posez
l’appareil de chauffage sur un support souple (par ex.
un tapis) pour un montage sur pied.
Montez les deux pieds d'appui (8) sur le boîtier en
utilisant deux vis (A) pour chaque pied.
5.2 Montage mural (fig. 3)
Respectez le point 1 - consignes de sécurité.
n Ne montez pas les pieds pour un montage mural.
Attention ! Assurez-vous qu’aucun câble ni aucune
installation ne se trouve dans la zone des forures (p.
ex. des conduits d’eau). Veillez à bien fixer l’appareil
au mur en position horizontale. Utilisez exclusivement
le matériel de fixation adapté à un mur porteur.
Les chevilles et vis jointes conviennent : au béton, à la
pierre naturelle à grainure fine, à la brique pleine, à la
brique pleine silico-calcaire, à la brique pleine en
béton léger et au béton cellulaire (béton-gaz).
Respectez obligatoirement les distances minimales
(fig. 3 et point 1 – Consignes de sécurité).
1. Fig. 3: faites deux marques pour deux trous sur le
mur à une hauteur de 85 cm à l'horizontale et
avec un écart de 40 cm entre les deux. Percez les
deux trous avec un foret de 6 mm de diamètre et
insérez les chevilles. Il faut visser les deux vis de
façon à ce que l'on puisse y accrocher les
supports muraux.
2. Accrochez l'appareil avec les supports muraux
sur les deux vis. Tirez-le jusqu'à la butée vers le
bas, puis vers la gauche et pour finir jusqu'à la
butée vers le bas jusqu'à ce que l'appareil soit
bien accroché.
F
13
Anleitung_WW_2000_I_SPK7__ 03.05.12 12:36 Seite 13
Page 14

6. Mise en service
Attention ! Contrôlez, avant la mise en service, si la
tension présente correspond bien à celle indiquée sur
la plaque de données de l’appareil.
n Veuillez respecter les consignes de sécurité du
point 1.
n Lors de la première mise en service ou après un
arrêt prolongé de l’appareil, il est possible qu’une
odeur se dégage brièvement. Ceci n’est pas une
défaillance.
Toutes les fonctions peuvent être commutées aussi
bien avec les boutons-poussoirs sur l’appareil
qu’avec la télécommande. Utilisez deux piles de type
« AAA » pour la télécommande. Respectez
absolument la polarité en changeant de piles. Les
piles usées doivent être éliminées dans les règles de
l’art
6.1 Mettre l’appareil en circuit
L’interrupteur principal marche/arrêt (fig. 1 / pos. 5)
sépare complètement l’appareil du réseau électrique.
Connectez en premier l’interrupteur et déconnectezle en dernier lorsque vous n’avez plus besoin de
l’appareil.
Après avoir allumé l'interrupteur principal, l'appareil
se met en standby. L'appareil peut être allumé ou
encore être mis en standby à l'aide de la touche
marche/standby (fig. 1/pos. 5).
6.2 Fonction chauffage
En appuyant sur la touche marche/standby (fig. 1/pos.
5), l'appareil s'allume, il se règle sur la puissance de
chauffe la plus faible, la température actuelle de
l'appareil dans la zone de la sonde de température
intégrée et deux traits apparaissent sur l'affichage.
En appuyant sur la touche « ▲ », l'appareil se met sur
la puissance de chauffe la plus forte et quatre traits
apparaissent sur l'affichage. En appuyant sur la
touche « ▼ », on revient à la puissance de chauffe la
plus faible.
6.3 Présélection du temps (minuterie)
Remarque : on peut programmer un temps d'arrêt de
1 à 24h.
Régler le chauffage comme décrit ci-dessus.
Appuyez sur la touche « Mode ». Le symbole d'une «
horloge » apparaît et le temps programmé
actuellement clignote sur l'affichage. En appuyant sur
la touche «▲ », on augmente la présélection du
temps. En appuyant sur la touche « ▼ », on diminue
la présélection du temps. Pour désactiver la
présélection du temps, appuyez à nouveau sur la
touche « Mode » et sur la touche « ▼ » jusqu'à ce que
« 00 » apparaissent ou éteignez complètement
l'appareil à l'aide de la touche marche/arrêt.
6.4 Réglage de la température de consigne
Remarque : il est possible de programmer une
température de consigne de 5 à 36 °C.
Régler le chauffage comme décrit ci-dessus.
Appuyez 2x sur la touche « Mode ». Le symbole d'un
« thermomètre » apparaît et la température actuelle
réglée clignote sur l'écran. En appuyant sur la touche
«▲ », on augmente la température de consigne. En
appuyant sur la touche « ▼ », on diminue la
température de consigne.
6.5 Allumer l'ionisateur
L’ionisateur s'allume et s'éteint à l'aide de la touche
(4). Lorsque l'ionisateur est allumé, un symbole
apparaît sur l'affichage.
6.6 Protection contre la surchauffe
En cas d’échauffement excessif, l’appareil se
déconnecte automatiquement. Si c’est le cas, mettez
l’appareil hors circuit, tirez la fiche de contact et
laissez refroidir quelques minutes. Après élimination
de l’origine (par ex. grille d’aération recouverte)
l’appareil peut être mis à nouveau en circuit.
7. Maintenance et nettoyage
n Avant d’entamer des travaux de nettoyage et de
maintenance, l’appareil doit être mis hors circuit,
déconnecté du réseau de courant et refroidi.
n Faites effectuer les travaux de maintenance et de
réparation exclusivement par un atelier de travaux
électriques dûment autorisé ou par l’entreprise
ISC GmbH.
n Le câble réseau doit être régulièrement contrôlé
pour détecter d’éventuels défauts ou
endommagements. Un câble réseau endommagé
doit uniquement être remplacé par un(e)
spécialiste électricien(ne) ou par l’entreprise ISC
GmbH en prenant en considération les
prescriptions pertinentes.
n Pour nettoyer le boîtier, utilisez un chiffon
légèrement humide.
n Enlevez les impuretés dues à la poussière avec
un aspirateur.
F
14
Anleitung_WW_2000_I_SPK7__ 03.05.12 12:36 Seite 14
Page 15

8. Stockage
L’appareil de chauffage doit être rangé dans un
endroit sec et si possible couvert.
9. Commande de pièces de rechange
Pour les commandes de pièces de rechange,
veuillez indiquer les références suivantes:
n Type de lʼappareil
n No. dʼarticle de lʼappareil
n No. dʼidentification de lʼappareil
n No. de pièce de rechange de la pièce requise
Vous trouverez les prix et informations actuelles à
lʼadresse www.isc-gmbh.info
10. Mise au rebut et recyclage
Lʼappareil se trouve dans un emballage permettant
dʼéviter les dommages dus au transport. Cet
emballage est une matière première et peut donc
être réutilisé ultérieurement ou être réintroduit dans
le circuit des matières premières.
Lʼappareil et ses accessoires sont en matériaux
divers, comme par ex. des métaux et matières
plastiques. Eliminez les composants défectueux
dans les systèmes dʼélimination des déchets
spéciaux. Renseignez-vous dans un commerce
spécialisé ou auprès de lʼadministration de votre
commune!
F
15
Anleitung_WW_2000_I_SPK7__ 03.05.12 12:36 Seite 15
Page 16

Attenzione!
Nell’usare gli apparecchi si devono rispettare alcune
avvertenze di sicurezza per evitare lesioni e danni.
Quindi leggete attentamente queste istruzioni per
l’uso/avvertenze di sicurezza. Conservate bene le
informazioni per averle a disposizione in qualsiasi
momento. Se date l’apparecchio ad altre persone,
consegnate anche queste istruzioni per
l’uso/avvertenze di sicurezza insieme all’apparecchio.
Non ci assumiamo alcuna responsabilità per incidenti
o danni causati dal mancato rispetto di queste
istruzioni e delle avvertenze di sicurezza.
1. Avvertenze di sicurezza
n Prima della messa in esercizio rispettate
assolutamente le istruzioni per l’uso!
L’apparecchio deve essere usato solo come
descritto nelle istruzioni. Non è consentito alcun
altro utilizzo.
n Conservate bene le istruzioni e consegnatele
eventualmente a terzi.
n Controllate che l’apparecchio sia stato
consegnato in perfetto stato. In caso di eventuali
danni non collegate l’apparecchio alla presa di
corrente.
n L’apparecchio è adatto soltanto per il
riscaldamento dell’aria in locali chiusi.
n Non adatto per scopi professionali.
n Durante il funzionamento non fate passare il cavo
di alimentazione su parti dell’apparecchio che
diventano calde.
n Non aprite mai l’apparecchio e non toccate parti
che conducono corrente – Pericolo di morte!
n Non usate mai l’apparecchio con le mani
bagnate.
n Posizionate l’apparecchio in modo che la spina
sia sempre accessibile.
n Staccate la spina dalla presa di corrente se
l’apparecchio non viene utilizzato per un periodo
tempo prolungato!
n L’apparecchio non deve essere usato in ambienti
nei quali vengono usate o tenute sostanze (ad es.
solventi, ecc.) o gas infiammabili.
n Tenete lontani dall’apparecchio sostanze o gas
facilmente infiammabili.
n Non usate l’apparecchio in locali con pericolo di
incendio (per es. rimesse in legno).
n Usate il radiatore solo con il cavo di
alimentazione completamente srotolato.
n L’apparecchio non è adatto per l’installazione su
cavi elettrici fissi.
n Non inserite corpi estranei nelle aperture
dell’apparecchio – pericolo di scossa elettrica e di
danni all’apparecchio.
n I bambini e le persone sotto l’influsso di
medicinali o alcol devono essere tenuti lontani
dall’apparecchio.
n I lavori di manutenzione e le riparazioni devono
essere eseguiti solo da personale specializzato
autorizzato.
n Prima di ogni impiego si deve verificare che
l’apparecchio, in particolare il cavo di
alimentazione, non sia danneggiato. In caso di
anomalie rivolgetevi ad un elettricista
specializzato o al servizio di assistenza clienti
responsabile per il vostro paese (In Germania
ISC GmbH).
n Il montaggio al soffitto non è consentito.
n L’acqua o altri liquidi non devono mai venire a
contatto con l’apparecchio o penetrare al suo
interno – Pericolo di morte!
n Collegate l’apparecchio solo ad una presa di
corrente messa a terra.
n Non montate l’apparecchio direttamente al di
sopra o al di sotto di una presa di corrente.
n Non coprite mai il pannello radiante, poiché
potrebbe verificarsi un ristagno di calore e
potrebbero quindi derivarne danni all’apparecchio
o incendi (Fig. 4).
n Non utilizzate l’apparecchio in allevamenti ovvero
in zootecnica.
n In caso di utilizzo prolungato il rivestimento si può
riscaldare molto. Installate l’apparecchio in modo
che venga escluso un contatto casuale.
n Non mettete mai l’apparecchio su tappeti a pelo
lungo.
n L’apparecchio deve essere utilizzato da bambini e
da persone anziane solo sotto vigilanza. I bambini
piccoli non devono usare l’apparecchio come un
giocattolo.
n Si devono rispettare le distanze minime dal
rivestimento di 20 cm sul lato, 100 cm verso l’alto,
40 cm verso il basso (per montaggio a parete) e
100 cm sul davanti.
n Questo apparecchio non è destinato ad essere
usato da persone (bambini compresi) con
capacità fisiche, sensoriali o mentali limitate o
che manchino di esperienza e/o conoscenze, a
meno che non vengano sorvegliati da una
persona responsabile per la loro sicurezza o
abbiano ricevuto da questa istruzioni su come
usare l’apparecchio. I bambini devono essere
sorvegliati per assicurarsi che non giochino con
l’apparecchio.
n Non è consentito il montaggio in bagno.
n Non utilizzate l’apparecchio nelle immediate
vicinanze di una vasca da bagno, doccia o
piscina.
I
16
Anleitung_WW_2000_I_SPK7__ 03.05.12 12:36 Seite 16
Page 17

n L’apparecchio deve essere montato in modo tale
che gli interruttori e i regolatori non possano
essere toccati se ci si trova all’interno di una
vasca o sotto la doccia.
ATTENZIONE
Leggete tutte le avvertenze di sicurezza e le
istruzioni. Dimenticanze nel rispetto delle avvertenze
di sicurezza e delle istruzioni possono causare
scosse elettriche, incendi e/o gravi lesioni.
Conservate tutte le avvertenze e le istruzioni per
eventuali necessità future.
2. Descrizione dell’apparecchio (Fig. 1)
1 Display a LED
2 Tasto "Impostazione funzioni"
3 Tasti „▲“ (aumento) / „▼“ (riduzione)
4 Tasto ionizzatore ON/OFF
5 Tasto ON / stand-by
6 Interruttore principale ON/OFF
7 Cavo di alimentazione
8 Base di appoggio
9 Griglia di protezione
10 Telecomando
3. Utilizzo proprio
L’apparecchio è concepito per il riscaldamento
supplementare di ambienti asciutti e chiusi. Emette
calore direttamente su oggetti e persone che si
trovano di fronte all’apparecchio, principalmente per
irraggiamento termico.
L’apparecchio può essere usato in posizione standalone o montato ad una parete. Si devono rispettare
le distanze minime. L’apparecchio deve essere fatto
funzionare solo se completamente montato e in
posizione verticale.
L’apparecchio deve essere usato solamente per lo
scopo a cui è destinato. Ogni altro tipo di uso che
esuli da quello previsto non è conforme.
L’utilizzatore/l’operatore, e non il costruttore, è
responsabile dei danni e delle lesioni di ogni tipo che
ne risultino.
4. Caratteristiche tecniche
Tensione nominale: 220 - 240 V ~ 50 Hz
Potere calorifico: 2000 W (1200 W / 2000 W)
Campo di regolazione termostato: 5 – 36 °C
Ioni negativi: ≥ 3x10⁶n/cm
3
Tipo di protezione: IP X0
5. Montaggio
5.1 Montaggio in piedi (Fig. 2)
Osservate il punto 1 - Avvertenze di sicurezza.
Attenzione! Per evitare danni, posizionate il radiatore
su un supporto morbido (per es. un tappeto) per il
montaggio in piedi.
Montate le due basi di appoggio (8) ciascuna con due
viti (A) all'involucro.
5.2 Montaggio alla parete (Fig. 3)
Osservate il punto 1 - Avvertenze di sicurezza.
n Nel caso di montaggio alla parete non montate le
gambe.
Attenzione! Accertatevi che nella zona dei fori non ci
siano cavi elettrici o altre installazioni (per es.
tubazioni dell’acqua). Fate attenzione che
l’apparecchio sia ben fissato alla parete e allineato in
orizzontale. Utilizzate solo materiale di fissaggio
adatto e usate una parete portante.
I tasselli e le viti forniti sono adatti per: calcestruzzo,
pietra naturale dalla struttura compatta, mattoni pieni,
mattoni pieni di arenaria calcarea, mattoni pieni di
calcestruzzo leggero e calcestruzzo cellulare
(poroso). Rispettate assolutamente le distanze
minime (Fig. 3 e punto 1 - Avvertenze di sicurezza).
1. Fig. 3: Segnate due fori sulla parete ad un'altezza
di 85 cm in posizione orizzontale ad una distanza
di 40 cm. Eseguite i due fori con una punta per
trapano Ø 6mm e inserite i tasselli. Avvitate le due
viti nei tasselli fino a quando i supporti per parete
possono essere agganciati.
2. Agganciate l'apparecchio con i supporti per
parete alle due viti. Tiratelo verso il basso fino alla
battuta, poi verso sinistra e poi in basso fino alla
battuta fino a quando l'apparecchio sia ben
agganciato.
I
17
Anleitung_WW_2000_I_SPK7__ 03.05.12 12:36 Seite 17
Page 18

6. Messa in esercizio
Attenzione! Prima della messa in esercizio verificate
che la tensione disponibile corrisponda alla tensione
indicata sulla targhetta di identificazione.
n Osservate le avvertenze di sicurezza descritte al
punto 1.
n Durante la prima messa in esercizio o dopo una
prolungata pausa di esercizio è possibile
percepire brevemente un odore. Non si tratta di
un’anomalia.
Tutte le funzioni possono essere comandate sia con i
pulsanti sull’apparecchio che con il telecomando. Per
il telecomando si devono utilizzare 2 batterie di tipo
„AAA“. Nel sostituire le batterie rispettate
assolutamente la giusta polarità. Le batterie usate
devono essere smaltite in modo appropriato.
6.1 Accensione dell’apparecchio
Con l’interruttore principale ON/OFF (Fig. 1/Pos. 5)
l’apparecchio viene completamente scollegato dalla
rete elettrica. Inserite l’interruttore principale per
primo e disinseritelo per ultimo quando avete finito di
utilizzare l’apparecchio.
Dopo aver inserito l'interruttore principale,
l'apparecchio è in stand-by. Con il tasto ON/Stand-by
(Fig. 1 / Pos. 5) è possibile accendere l'apparecchio
ovvero metterlo in stand-by.
6.2 Funzionamento di riscaldamento
Premendo il tasto ON/Stand-by (Fig. 1 / Pos. 5)
l'apparecchio si accende con l'impostazione minima
di riscaldamento, sul display appaiono la temperatura
dell'apparecchio nel campo del sensore della
temperatura integrato e due barrette.
Premendo il tasto "▲“, si imposta la potenza di
riscaldamento massima e appaiono quattro barrette
sul display. Premendo il tasto "▼“, si ritorna alla
potenza di riscaldamento minima.
6.3 Preselezione tempo (timer)
Avvertenza: è possibile impostare un tempo di
disinserimento di 1 - 24 h.
Impostate l'esercizio di riscaldamento come descritto
sopra. Premete il tasto "Mode". Appare il simbolo di
un "Orologio" e il tempo attuale impostato lampeggia
sul display. Premendo il tasto "▲“, è possibile
aumentare il valore del timer. Premendo il tasto "▼“, è
possibile diminuire il valore del timer. Per disinserire il
timer, premere ancora una volta il tasto "Mode" e
premere il tasto "▼“ fino a quando non appare "00"
oppure premere il tasto ON/Stand-by.
6.4 Impostare la temperatura nominale
Avvertenza: è possibile impostare una temperatura
nominale di 5 - 36 °C.
Impostate l'esercizio di riscaldamento come descritto
sopra. Premete 2x il tasto "Mode". Appare il simbolo
di un "Termometro" e la temperatura attuale impostata
lampeggia sul display. Premendo il tasto "▲“, è
possibile aumentare la temperatura nominale.
Premendo il tasto "▼“, è possibile diminuire la
temperatura nominale.
6.5 Inserire lo ionizzatore
Lo ionizzatore viene inserito e disinserito con il tasto
(4). Quando lo ionizzatore è inserito, appare un
simbolo sul display.
6.6 Protezione dal surriscaldamento
In caso di riscaldamento eccessivo, l’apparecchio si
disinserisce automaticamente. In questo caso,
disinserite l’apparecchio, staccate la spina dalla
presa di corrente e lasciate raffreddare per qualche
minuto. Dopo aver eliminato la causa (per es. griglia
dell’aria coperta) l’apparecchio può essere reinserito.
7. Manutenzione e pulizia
n Prima di iniziare lavori di pulizia e manutenzione
si deve disinserire l’apparecchio, staccarlo dalla
rete elettrica e lasciarlo raffreddare.
n Fate eseguire i lavori di manutenzione e di
riparazione esclusivamente da un officina
elettrica autorizzata o dalla ISC GmbH.
n Si deve controllare regolarmente che il cavo di
alimentazione non presenti difetti o danni. Un
cavo di alimentazione danneggiato deve essere
sostituito soltanto da un elettricista specializzato
o dalla ISC GmbH, rispettando le disposizioni in
vigore.
n Per la pulizia del rivestimento usate un panno
leggermente umido.
n Eliminate i depositi di polveri con un
aspirapolvere.
I
18
Anleitung_WW_2000_I_SPK7__ 03.05.12 12:36 Seite 18
Page 19

8. Conservazione
L’apparecchio deve essere conservato in un luogo
asciutto, possibilmente coperto.
9. Ordinazione dei pezzi di ricambio
In caso di ordinazione di pezzi di ricambio è
necessario indicare quanto segue:
n tipo di apparecchio
n numero di articolo dell’apparecchio
n numero di identificazione dell’apparecchio
n numero del pezzo di ricambio richiesto
Per i prezzi e le informazioni attuali si veda
www.isc-gmbh.info
10. Smaltimento e riciclaggio
L’apparecchio si trova in una confezione per evitare i
danni dovuti al trasporto. Questo imballaggio
rappresenta una materia prima e può perciò essere
utilizzato di nuovo o riciclato. L’apparecchio e i suoi
accessori sono fatti di materiali diversi, per es. metallo
e plastica. Consegnate i pezzi difettosi allo
smaltimento di rifiuti speciali. Per informazioni
rivolgetevi ad un negozio specializzato o
all’amministrazione comunale!
I
19
Anleitung_WW_2000_I_SPK7__ 03.05.12 12:36 Seite 19
Page 20

Προσοχή!
Κατά τη χρήση των συσκευών πρέπει, προς
αποφυγή τραυματισμών και ζημιών, να τηρούνται
και να λαμβάνονται ορισμένα μέτρα ασφαλείας.
Διαβάστε για το λόγο αυτό προσεκτικά τις Οδηγίες
χρήσης / Υποδείξεις ασφαλείας. Φυλάξτε τις καλά
για να έχετε τις πληροφορίες πάντα στη διάθεσή
σας. Εάν παραδώσετε τη συσκευή σε άλλα άτομα,
δώστε μαζί και αυτές τις Οδηγίες χρήσης /
Υποδείξεις ασφαλείας. Δεν αναλαμβάνουμε καμία
ευθύνη για ατυχήματα ή βλάβες που οφείλονται σε
μη τήρηση αυτών των Οδηγιών χρήσης και των
Υποδείξεων ασφαλείας.
1. Υποδείξεις ασφαλείας
n Πριν τη θέση σε λειτουργία να ακολουθείτε
οπωσδήποτε τις Οδηγίες χρήσης! Επιτρέπεται η
χρήση της συσκευή, μόνο με τον τρόπο που
αναφέρεται στις Οδηγίες χρήσης. Απαγορεύεται
οποιαδήποτε άλλη χρήση.
n Να φυλάξετε καλά αυτές τις Οδηγίες χρήσης
και να τις παραδώσετε ενδεχομένως σε τρίτα
πρόσωπα.
n Να ελέγχετε εάν παραδόθηκε η συσκευή σε
άψογη κατάσταση. Σε περίπτωση ενδεχόμενων
βλαβών, μη συνδέσετε τη συσκευή.
n Η συσκευή είναι κατάλληλη μόνο για τη
θέρμανση του αέρα εσωτερικών χώρων.
n Δεν είναι κατάλληλη για επαγγελματική χρήση.
n Κατά τη λειτουργία μην περνάτε το καλώδιο
πάνω από πολύ θερμά τμήματα της συσκευής.
n Ποτέ μην ανοίγετε τη συσκευή και μην αγγίζετε
τα εξαρτήματα που βρίσκονται υπό τάση –
Κίνδυνος θάνατος!
n Ποτέ μη χειρίζεστε τη συσκευή με υγρά χέρια.
n Να τοποθετείτε τη συσκευή έτσι, ώστε να έχετε
πάντα πρόσβαση στο καλώδιο.
n Εάν δεν χρησιμοποιηθεί η συσκευή για
μεγαλύτερο χρονικό διάστημα, να βγάζετε το
φις από την πρίζα!
n Δεν επιτρέπεται η λειτουργία της συσκευής σε
χώρους στους οποίους χρησιμοποιούνται ή
αποθηκεύονται εύφλεκτες ύλες (π.χ. διαλύτες
κλπ.) ή αέρια.
n Να κρατάτε τις εύφλεκτες ύλες ή τα αέρια
μακριά από τη συσκευή.
n Μη χρησιμοποιείτε τη συσκευή σε εύφλεκτους
χώρους (π.χ. ξύλινες αποθήκες).
n Να λειτουργείτε τη συσκευή μόνο με πλήρως
ξετυλιγμένο καλώδιο.
n Δεν είναι κατάλληλη για σύνδεση σε μόνιμα
τοποθετημένους ηλεκτρικούς αγωγούς.
n Μην εισάγετε ξένα αντικείμενα στις οπές της
συσκευής – Κίνδυνος ηλεκτροπληξίας και
βλάβης της συσκευής.
n Να κρατάτε μακριά από τη συσκευή τα παιδιά
και άτομα που βρίσκονται υπό την επιρροή
φαρμάκων ή οινοπνευματωδών ποτών.
n Οι εργασίες συντήρησης και επισκευής
επιτρέπεται να εκτελούνται μόνο από
εντεταλμένο και εξειδικευμένο προσωπικό.
n Πριν από κάθε λειτουργία να ελέγχετε την
συσκευή και ιδιαίτερα το καλώδιο για βλάβες. Σε
περίπτωση βλάβης επικοινωνήστε με έναν
ηλεκτρολόγο ή με το για τη χώρα σας αρμόδιο
σέρβις πελατών (για τη Γερμανία ISC GmbH).
n Δεν επιτρέπεται η τοποθέτηση στην οροφή.
n Δεν επιτρέπεται ποτέ να πάει νερό πάνω στη
συσκευή ή να διεισδύει νερό μέσα στη συσκευή
– Κίνδυνος θάνατος!
n Να συνδέετε τη συσκευή μόνο σε γειωμένη
πρίζα δικτύου.
n Η εγκατάσταση της συσκευής να μη γίνεται
άμεσα επάνω ή κάτω από μία πρίζα.
n Ποτέ μη σκεπάζετε τον θερμαντήρα, διότι δεν
αποκλείεται μποτιλιάρισμα θέρμανσης και κατά
συνέπεια βλάβη της συσκευής ή πυρκαγιά (εικ.
4).
n Μη χρησιμοποιείτε τη συσκευή για ζώα ή για την
εκτροφή ζώων.
n Το περίβλημα μπορεί να θερμανθεί πολύ μετά
από λειτουργία μεγαλύτερης διάρκειας. Να
τοποθετείτε τη συσκευή έτσι, ώστε να
αποκλείεται η αθέλητη επαφή μαζί της.
n Ποτέ μην τοποθετείτε τη συσκευή σε χαλί με
μακριές τρίχες.
n Η συσκευή επιτρέπεται να χρησιμοποιηθεί από
παιδιά ή όχι απόλυτα υγιή πρόσωπα μόνο υπό
επίβλεψη. Δεν επιτρέπεται η χρήση της
συσκευής από μικρά παιδιά σαςν να ήταν
παιχνίδι.
n Να τηρείτε ελάχιστη απόσταση του
περιβλήματος 20 cm προς τις πλευρές, 100 cm
προς τα επάνω, 40 cm προς τα κάτω (σε
περίπτωση τοποθέτησης σε τοίχο) και 100 cm
προς τα μπροστά.
n Αυτή η συσκευή δεν προορίζεται για άτομα
(συμπεριλαμβανομένων και παιδιών) με
περιορισμένες σωματικές, αισθητικές ή
πνευματικές ικανότητες ή ελλείψει πείρας ή/και
ελλείψει γνώσεων, εκτός εάν επιτηρούνται από
άτομο αρμόδιο για την ασφάλεια ή εάν έλαβαν
οδηγίες για το πώς πρέπει να χρησιμοποιηθεί η
συσκευή. Τα παιδιά να επιβλέπονται για να είναι
σίγουρο πως δεν παίζουν με τη συσκευή.
n Δεν επιτρέπεται τοποθέτηση σε λουτρό.
n Μη χρησιμοποιείτε αυτή τη συσκευή θέρμανσης
κοντά σε μπανιέρα, ντους ή κοντά σε πισίνα.
n Ο θερμαντήρας να τοποθετηθεί έτσι ώστε
άτομα που βρίσκονται στη μπανιέρα ή στη
GR
20
Anleitung_WW_2000_I_SPK7__ 03.05.12 12:36 Seite 20
Page 21

ντουζιέρα να μην μπορούν να έρθουν σε επαφή
με τον διακόπτη ή με άλλους ρυθμιστές..
ΠΡΟΕΙΔΟΠΟΙΗΣΗ:
Διαβάστε όλες τις Υποδείξεις ασφαλείας και
τις Οδηγίες. Σε περίπτωση παραλήψεων κατά την
τήρηση των Υποδείξεων ασφαλείας μπορούν να
προκαλέσουν ηλεκτροπληξία, πυρκαγιά και/ή
σοβαρούς τραυματισμούς.
Φυλάξτε για μελλοντική χρήση όλες τις
Υποδείξεις ασφαλείας και τις οδηγίες.
2. ΠΡΟΕΙΔΟΠΟΙΗΣΗ:
1 Οθόνη LED
2 Πλήκτρο "Ρύθμιση λειτουργίας"
3 Πλήκτρα „▲“ (μεγαλύτερη ένταση) / „▼“
(μικρότερη ένταση)
4 Πλήκτρο
ενεργοποίησης/απενεργοποίησης ιονιστή
5 Πλήκτρο ενεργοποίηση/ετοιμότητα
6 Γενικός διακόπτης
ενεργοποίηση/απενεργοποίηση
7 Αγωγός σύνδεσης με το δίκτυο
8 Βάση
9 Πλέγμα ασφαλείας
3. Ενδεδειγμένη χρήση
H συσκευή προορίζεται για θέρμανση σε κλειστούς,
στεγνούς χώρους. Μεταδίδει θερμότητα κατά κύριο
λόγο μέσω ακτινοβολίας απευθείας προς
αντικείμενα και πρόσωπα που βρίσκονται μπροστά
στη συσκευή.
Η συσκευή μπορεί να τοποθετηθεί ελεύθερα στη
μέση τοιυ χώρου ή και στον τοίχο. Να τηρούνται οι
ελάχιστες αποστάσεις. Η συσκευή επιτρέπεται να
λειτουργεί μόνο σε κάθετη θέση και εφόσον είναι
πλήρως συναρμολογημένη.
Η συσκευή επιτρέπεται να χρησιμοποιείται μόνο για
τον σκοπό για τον οποίο προορίζεται. Κάθε πέραν
τούτου χρήση δεν είναι ενδεδειγμένη. Για ζημιές ή
τραυματισμούς παντός είδους που οφείλονται σε μη
ενδεδειγμένη χρήση ευθύνεται ο χρήστης /
χειριστής και όχι ο κατασκευαστής.
4. Τεχνικά χαρακτηριστικά:
Ονομαστική τάση: 220 - 240 V ~ 50 Hz
Θερμαντική ισχύς: 2000 W (1200 W / 2000 W)
Πεδίο ρύθμισης θερμοστάτη: 5 – 36 °C
Αρνητικά ιόντα: ≥ 3x10⁶n/cm
3
Είδος προστασίας: IP X0
5. Τοποθέτηση
5.1 Όρθια τοποθέτηση (εικ. 2)
Προσέξτε τις υποδείξεις ασφαλείας – εδάφιο 1.
Προσοχή! Προς αποφυγή βλαβών, τοποθετήστε τον
θερμαντήρα με βάση σε μαλακιά επιφάνεια (π.χ. σε
χαλί).
Συναρμολογήστε τα δύο πόδια (8) με ανά δύο βίδες
(Α) στο περίβλημα.
5.2 Τοποθέτηση σε τοίχο (εικ. 3)
Προσέξτε τις υποδείξεις ασφαλείας – εδάφιο 1.
n Σε περίπτωση τοποθέτησης σε τοίχο μην
τοποθετήσετε τα πόδια.
Προσοχή! Σιγουρευτείτε πως στα σημεία των οπών
δεν υπάρχουν ηλεκτρικοί αγωγοί ή άλλες
εγκαταστάσεις (π.χ. αγωγοί νερού). Προσέξτε η
συσκευή να τοποθετηθεί σταθερά και οριζόντια στον
τοίχο. Nα χρησιμοποιείτε μόνο κατάλληλα υλικά
στερέωσης σε κατάλληλο για το βάρος τοίχο.
Τα συμπαραδιδόμενα ούπα και οι βίδες είναι
κατάλληλα/ες για: Μπετόν, φυσική πυκνή πέτρα,
γεμάτο τούβλο, ασβεστόλιθος, τούβλο από ελαφρό
σκυρόδεμα και αεριοσκυρόδεμα. Να προσέξετε
οπωσδήποτε τις ελάχιστες αποστάσεις (εικ. 3 και
εδάφιο 1 – Υποδείξεις ασφαλείας).
1. Εικ. 3: Σε ύψος 85 cm σε οριζόντια απόσταση 40
cm σημειώστε δύο τρύποεσς στον τοίχο. Με τρυπάνι
Ø 6mm ανοίξτε τις δύο τρύπες και βάλτε μέσα τα
ούπα. Οι δύο ροδέλες βιδώνονται στα ούπα τόσο
βαθιά, ώστε να μπορούν να κρεμαστούν τα
στηρίγματα του τοίχου.
2. Κρεμάστε τη συσκευή με τα δύο στηρίγματα
τοίχου στις δύο βίδες. Τραβήξτε το μέχρι το τέρμα
προς τα κάτω, κατόπιν προς τα αριστερά και τέλος
μέχρι το τέρμα προς τα κάτω, μέχρι να κρέμεται η
συσκευή με απόλυτη ασφάλεια.
GR
21
Anleitung_WW_2000_I_SPK7__ 03.05.12 12:36 Seite 21
Page 22

6. Θέση σε λειτουργία
Προσοχή! Πριν τη θέση σε λειτουργία να
ελέγξετε, εάν συμφωνεί η υπάρχουσα τάση με
την τάση που αναφέρεται στην πινακίδα
στοιχείων της συσκευής.
n Προσέξτε τις Υποδείξεις ασφαλείας στο εδάφιο
1.
n Κατά την πρώτη λειτουργία ή μετά από
μεγαλύτερο διάλειμμα λειτουργίας μπορεί να
δημιουργηθεί παροδικά μία οσμή. Το γεγονός
αυτό δεν αποτελεί ελάττωμα.
Όλες οι λειτουργίες μπορούν να ενεργοποιηθούν
τόσο με τα πλήκτρα επί της συσκευής όσο και με το
τηλεκοντρόλ. Για τον τηλεχειρισμό να
χρησιμοποιείτε 2 μπαταρίες τύπου „ΑΑΑ“. Προσέξτε
οπωσδήποτε τη σωστή πόλωση κατά την αλλαγή
μπαταριών. Να διαθέτετε τις παλιές μπαταρίες
σωστά στα απορρίμματα.
6.1 Ενεργοποίηση της συσκευής.
Με το γενικό διακόπτη
ενεργοποίησης/απενεργοποίησης (εικ. 1 / αρ. 6)
διακόπτεται τελείως η παροχή ρεύματος από το
δίκτυο προς τη συσκευή. Πρώτα από όλαανάψτε το
γενικό διακόπτη ή σβήστε τον τελευταίο εάν δεν
χρειάζεστε πλέον τη συσκευή.
Όταν ξαναανάψετε τον γενικό διακόπτη η συσκευή
βρίσκεται σε θέση ετοιμότητας. Μ το πλήκτρο
ενεργοποίησης/απενεργοποίησης (εικ. 1 /αρ. 5)
μπορείτε να ενεργοποιήσετε τη συσκευή ή να την
ρυθμίσετε σε θέση ετοιμότητας.
6.2 Θερμαντική λειτουργία
Με πίεση του πλήκτρου
ενεργοποίησης/απενεργοποίησης (εικ. 1/αρ. 5)
ενεργοποιείται η συσκευή, έχει ρυθμιστεί η
χαμηλότερη θερμαντική απόδοση και στην οθόνη
παρουσιάζεται η θερμοκρασία της συσκευής στο
πεδίο του ενσωματωμένου σένσορα θερμοκρασίας
και δύο μπάρες.
Πιέζοντας το πλήκτρο „▲“ ενεργοποιείτε την
μεγαλύτερη θερμαντική βαθμίδα και στην οθόνη
προβάλλονται τέσσερις μπάρες. Με πίεση του
πλήκτρου „▼“ επισρέφετε και ρυθμίζετε την
χαμηλότερη θερμαντική απόδοση.
6.3 Προεπιλογή ώρας (χρονοδιακόπτης)
Υπόδειξη: Μπορείτε να ρυθμίσετε διάρκεια
απενεργοποίησης από 1-24 ώρες.
Ρυθμίστε τη θερμαντική λειτουργία όπως
περιγράψαμε πιο πάνω. Πιέστε το πλήκτρο „Mode“.
Προβάλλεται το σύμβολο ρολογιού και στην οθόνη
αναβοσβήνει η ισχύουσα ώρα. Πιέζοντας το πλήκτρο
„▲“ αυξάνετε τον αριθμό της προεπιλεγμένης ώρας.
Πιέζοντας το πλήκτρο „▼“ μειώνετε τον αριθμό της
προεπιλεγμένης ώρας. Για την απενεργοποίηση της
προεπιλογής της ώρας πιέστε άλλη μία φορά το
πλήκτρο „Mode“ και το πλήκτρο „▼“ μέχρι να
προβληθεί „00“ ή πιέστε το πλήκτρο
ενεργοποίησης/ετοιμότητας.
6.4 Ρύθμιση της επιθυμούμενης θερμοκρασίας
Υπόδειξη: Μπορείτε να ρυθμίσετε μία θερμοκρασία
από 5 – 36°C.
Ρυθμίστε τη θερμαντική λειτουργία όπως
περιγράψαμε πιο πάνω. Πιέστε το πλήκτρο „Mode“ 2
φορές. Θα προβληθεί το σύμβολο θερμομέτρου και
στην οθόνη θα αναβοσβήνει η ισχύουσα
προεπιλεγμένη θερμοκρασία. Πιέζοντας το πλήκτρο
„▲“ αυξάνετε τον αριθμό της προεπιλεγμένης
επιθυμούμενης θερμοκρασίας. Πιέζοντας το
πλήκτρο „▼“ αυξάνετε τον αριθμό της
προεπιλεγμένης επιθυμούμενης θερμοκρασίας.
6.5 Ενεργοποίηση ιονιστή
Ο ιονιστής ενεργοποιείται και απενεργοποιείται με
το πλήκτρο (4). Όταν έχει ενεργοποιηθεί ο ιονιστής
προβάλλεται στην οθόνη ένα σύμβολο.
6.6 Ασφάλεια από υπερθέρμανση
Σε περίπτωση υπερβολικής θέρμανσης η συσκευή
απενεργοποιείται αυτόματα. Στην περίπτωση αυτή
απενεργοποιήστε τη συσκευή, βγάλτε το βύσμα
σύνδεσης με το δίκτυο απ΄οτην πρίζα και αφήστε τη
συσκευή να κρυώσει μερικά λεπτά. Αφού εντοπίσετε
και την αιτία (π.χ. σκεπασμένο πλέγμα αέρα) και
αποκαταστήσετε τη σωστή λειτουργία, μπορείτε να
επαναενεργοποιήσετε τη συσκευή.
7. Συντήρηση και καθαρισμός
n Πριν την αρχή εργασιών καθαρισμού και
συντήρησης να απενεργοποιηθεί η συσκευή, να
διακοπεί η παροχή ρεύματος και να έχει κρυώσει
η συσκευή.
n Όλες οι εργασίες συντήρησης και επισκευής να
εκτελούνται αποκλειστικά και μόνο από
συμβεβλημένο ηλεκτρολογικό συνεργείο ή από
την ISC GmbH.
n Να ελέγχεται τακτικά το καλώδιο για
ελαττώματα και βλάβες. Ένα ελαττωματικό
καλώδιο επιτρέπεται να αντικατασταθεί μόνο
από ηλεκτρολόγο ή από την ISC GmbH,
λαμβανομένων υπόψη των ισχυουσών
προδιαγραφών.
n Για τον καθαρισμό της συσκευής να
χρησιμοποιήσετε ένα ελαφρά νωπό πανί.
n Καθαρίστε τη σκόνη με ηλεκτρική σκούπα.
GR
22
Anleitung_WW_2000_I_SPK7__ 03.05.12 12:36 Seite 22
Page 23

8. Φύλαξη
Ο θερμαντήρας να φυλάσσεται σε στεγνό χώρο΄και
εάν γίνεται να καλύπτεται.
9. Παραγγελία ανταλλακτικών
Κατά την παραγγελία ανταλλακτικών να αναφέρετε
τα εξής:
n Τύπος της συσκευής
n Αριθμός είδους της συσκευής
n Αριθμός ταύτισης της συσκευής
n Αριθμός ανταλλακτικού
Θα βρείτε τις ισχύουσες τιμές και πληροφορίες
στην ιστοσελίδα www.isc-gmbh.info
10. Διάθεση στα απορρίμματα και
επαναχρησιμοποίηση
Η συσκευή βρίσκεται σε μία συσκευασία προς
αποφυγή ζημιών κατά τη μεταφορά Αυτή η
συσκευασία αποτελείται από πρώτες ύλες και έτσι
μπορεί να επαναχρησιμοποιηθεί ή να ανακυκλωθεί.
Η συσκευή και τα εξαρτήματά της αποτελούνται από
διάφορα υλικά, όπως π.χ. μέταλλο και πλαστικά
υλικά. Να παραδίδετε τα ελαττωματικά εξαρτήματα
σε κέντρα συλλογής ειδικών απορριμμάτων.
Ενημερωθείτε στα ειδικά καταστήματα ή στην
διοίκηση της κοινότητας!
GR
23
Anleitung_WW_2000_I_SPK7__ 03.05.12 12:36 Seite 23
Page 24

24
k erklärt folgende Konformität gemäß EU-Richtlinie und
Normen für Artikel
t explains the following conformity according to EU
directives and norms for the following product
p déclare la conformité suivante selon la directive CE et les
normes concernant l’article
C dichiara la seguente conformità secondo la direttiva UE e
le norme per l’articolo
N verklaart de volgende overeenstemming conform EU
richtlijn en normen voor het product
m declara la siguiente conformidad a tenor de la directiva y
normas de la UE para el artículo
O declara a seguinte conformidade, de acordo com a
directiva CE e normas para o artigo
l attesterer følgende overensstemmelse i medfør af
EU-direktiv samt standarder for artikel
U förklarar följande överensstämmelse enl. EU-direktiv och
standarder för artikeln
q vakuuttaa, että tuote täyttää EU-direktiivin ja standardien
vaatimukset
. tõendab toote vastavust EL direktiivile ja standarditele
j vydává následující prohlášení o shodě podle směrnice
EU a norem pro výrobek
X potrjuje sledečo skladnost s smernico EU in standardi za
izdelek
W vydáva nasledujúce prehlásenie o zhode podľa smernice
EÚ a noriem pre výrobok
A a cikkekhez az EU-irányvonal és Normák szerint a
következő konformitást jelenti ki
P deklaruje zgodność wymienionego poniżej artykułu z
następującymi normami na podstawie dyrektywy WE.
e декларира съответното съответствие съгласно
Директива на ЕС и норми за артикул
H paskaidro šādu atbilstību ES direktīvai un standartiem
G apibūdina šį atitikimą EU reikalavimams ir prekės
normoms
Q declară următoarea conformitate conform directivei UE
şi normelor pentru articolul
z δηλώνει την ακόλουθη συμμόρφωση σύμφωνα με την
Οδηγία ΕΚ και τα πρότυπα για το προϊόν
B potvrđuje sljedeću usklađenost prema smjernicama EU
i normama za artikl
f potvrđuje sljedeću usklađenost prema smjernicama EU
i normama za artikl
4 potvrđuje sledeću usklađenost prema smernicama EZ i
normama za artikal
T следующим удостоверяется, что следующие
продукты соответствуют директивам и нормам ЕС
1 проголошує про зазначену нижче відповідність
виробу директивам та стандартам ЄС на виріб
5 ја изјавува следната сообрзност согласно
ЕУ-директивата и нормите за артикли
Z Ürünü ile ilgili AB direktifleri ve normları gereğince
aşağıda açıklanan uygunluğu belirtir
L erklærer følgende samsvar i henhold til EU-direktivet
og standarder for artikkel
E Lýsir uppfyllingu EU-reglna og annarra staðla vöru
Konformitätserklärung
ISC GmbH · Eschenstraße 6 · D-94405 Landau/Isar
Wärmewellenheizgerät WW 2000 I (Einhell)
Standard references: EN 60335-1; EN 60335-2-30; EN 62233; EN 55014-1; EN 55014-2;
EN 61000-3-2; EN 61000-3-3;
Landau/Isar, den 09.02.2012
First CE: 2012 Archive-File/Record: NAPR004703
Art.-No.: 23.384.30 I.-No.: 11011 Documents registrar: Landauer Josef
Subject to change without notice Wiesenweg 22, D-94405 Landau/Isar
Weichselgartner/General-Manager Liu/Product-Management
2006/42/EC
2004/26/EC
Emission No.:
2000/14/EC_2005/88/EC
Annex IV
Notified Body:
Notified Body No.:
Reg. No.:
Annex V
Annex VI
Noise: measured LWA= dB (A); guaranteed LWA= dB (A)
P = KW; L/Ø = cm
Notified Body:
x
x
x
87/404/EC_2009/105/EC
2005/32/EC_2009/125/EC
2006/95/EC
2006/28/EC
2004/108/EC
2004/22/EC
1999/5/EC
97/23/EC
90/396/EC_2009/142/EC
89/686/EC_96/58/EC
2011/65/EC
Anleitung_WW_2000_I_SPK7__ 03.05.12 12:36 Seite 24
Page 25

25
k Nur für EU-Länder
Werfen Sie Elektrowerkzeuge nicht in den Hausmüll!
Gemäß europäischer Richtlinie 2002/96/EG über Elektro- und Elektronik-Altgeräte und Umsetzung in
nationales Recht müssen verbrauchte Elektrowerkzeuge getrennt gesammelt werden und einer
umweltgerechten Wiederverwertung zugeführt werden.
Recycling-Alternative zur Rücksendeaufforderung:
Der Eigentümer des Elektrogerätes ist alternativ anstelle Rücksendung zur Mitwirkung bei der
sachgerechten Verwertung im Falle der Eigentumsaufgabe verpflichtet. Das Altgerät kann hierfür auch
einer Rücknahmestelle überlassen werden, die eine Beseitigung im Sinne der nationalen
Kreislaufwirtschaftsund Abfallgesetze durchführt. Nicht betroffen sind den Altgeräten beigefügte
Zubehörteile und Hilfsmittel ohne Elektrobestandteile.
t For EU countries only
Never place any electric tools in your household refuse.
To comply with European Directive 2002/96/EC concerning old electric and electronic equipment and its
implementation in national laws, old electric tools have to be separated from other waste and disposed of
in an environment-friendly fashion, e.g. by taking to a recycling depot.
Recycling alternative to the demand to return electrical devices:
As an alternative to returning the electrical device, the owner is obliged to cooperate in ensuring that the
device is properly recycled if ownership is relinquished. This can also be done by handing over the used
device to a returns center, which will dispose of it in accordance with national commercial and industrial
waste management legislation. This does not apply to the accessories and auxiliary equipment without
any electrical components which are included with the used device.
p Uniquement pour les pays de l'Union Européenne
Ne jetez pas les outils électriques dans les ordures ménagères.
Selon la norme européenne 2002/96/CE relative aux appareils électriques et systèmes électroniques
usés et selon son application dans le droit national, les outils électriques usés doivent être récoltés à
part et apportés à un recyclage respectueux de l'environnement.
Possibilité de recyclage en alternative à la demande de renvoi :
Le propriétaire de lʼappareil électrique est obligé, en guise dʼalternative à un envoi en retour, à contribuer
à un recyclage effectué dans les règles de lʼart en cas de cessation de la propriété. Lʼancien appareil
peut être remis à un point de collecte dans ce but. Cet organisme devra lʼéliminer dans le sens de la Loi
sur le cycle des matières et les déchets. Ne sont pas concernés les accessoires et ressources fournies
sans composants électroniques.
Anleitung_WW_2000_I_SPK7__ 03.05.12 12:36 Seite 25
Page 26

26
C Solo per paesi membri dell'UE
Non gettate gli utensili elettrici nei rifiuti domestici.
Secondo la Direttiva europea 2002/96/CE sui rifiuti di apparecchiature elettriche ed elettroniche e
l'applicazione nel diritto nazionale gli elettroutensili usati devono venire raccolti separatamente e smaltiti
in modo ecologico.
Alternativa di riciclaggio alla richiesta di restituzione
Il proprietario dellʼapparecchio elettrico è tenuto in alternativa, invece della restituzione, a collaborare in
modo che lo smaltimento venga eseguito correttamente in caso ceda lʼapparecchio. Lʼapparecchio
vecchio può anche venire consegnato ad un centro di raccolta che provvede poi allo smaltimento
secondo le norme nazionali sul riciclaggio e sui rifiuti. Non ne sono interessati gli accessori e i mezzi
ausiliari senza elementi elettrici forniti insieme ai vecchi apparecchi.
z ªfiÓÔ ÁÈ· ¯ÒÚ˜ Ù˘ ∂∂
ªЛ ВЩ¿ЩВ ЛПВОЩЪИО¤˜ Ы˘ЫОВ˘В˜ ЫЩ· ФИОИ·О¿ ·ФЪЪ›ММ·Щ·.
™‡МКˆУ· МВ ЩЛУ √‰ЛБ›· 2002/96/∂∫ БИ· МВЩ·¯ВИЪИЫМ¤УВ˜ ЛПВОЩЪИО¤˜ О·И ЛПВОЩЪФУИО¤˜ Ы˘ЫОВ˘¤˜ О·И
БИ· ЩЛУ МВЩ·ЩЪФ‹ ЫВ ∂ıУИОfi ¢›О·ИФ Ъ¤ВИ У· Ы˘БОВУЩЪТУФУЩ·И ¯ˆЪИЫЩ¿ Щ· ЛПВОЩЪИО¿ ВЪБ·ПВ›· О·И
У· ·У·О˘ОПТУФУЩ·И.
∂У·ПП·ОЩИО‹ П‡ЫЛ ·У·О‡ОПˆЫЛ˜ ·УЩ› ВИЫЩЪФК‹˜
√ И‰ИФОЩ‹ЩЛ˜ ЩЛ˜ ЛПВОЩЪИО‹˜ Ы˘ЫОВ˘‹˜ ˘Ф¯ЪВФ‡Щ·И ВУ·ПП·ОЩИО¿, ·УЩ› У· ВИЫЩЪ¤„ВИ ЩЛ Ы˘ЫОВ˘‹, У·
Ы˘М‚¿ПВИ ЫЩЛУ ЫˆЫЩ‹ ‰И¿ıВЫЛ ЫВ ВЪ›ЩˆЫЛ Ф˘ ‰ВУ ¯ЪВИ¿˙ВЩ·И П¤ФУ ЩЛ Ы˘ЫОВ˘‹. ∏ МВЩ·¯ВИЪИЫМ¤УЛ
Ы˘ЫОВ˘‹ МФЪВ› У· ·Ъ·¯ˆЪЛıВ› ЫВ АЛЪВЫ›· ·fiЫ˘ЪЫЛ˜ Л ФФ›· ı· ВОЩ¤П¤ЫВИ ЩЛУ ‰И¿ıВЫЛ ЩФ˘
ЪФ˚fiУЩФ˜ Ы‡МКˆУ· МВ ЩИ˜ ВıУИО¤˜ ЪФ‰И·БЪ·К¤˜ ·У·О‡ОПˆЫЛ˜ О·И ·ФЪЪИММ¿ЩˆУ. ¢ВУ
Ы˘МВЪИП·М‚¿УФУЩ·И Щ· ВН·ЪЩ‹М·Щ· ‹ ‚ФЛıЛЩИО¿ ВН·ЪгЩЛМ·Щ· ЩˆУ МВЩ·¯ВИЪИЫМ¤УˆУ Ы˘ЫОВ˘ТУ ¯ˆЪ›˜
ЛПВОЩЪИО¿ ЩМ‹М·Щ·.
Anleitung_WW_2000_I_SPK7__ 03.05.12 12:36 Seite 26
Page 27

27
Technische Änderungen vorbehalten
Technical changes subject to change
Sous réserve de modifications
Con riserva di apportare modifiche tecniche
√ О·Щ·ЫОВУ·ЫЩ‹˜ ‰И·ЩЛЪВ› ЩФ ‰ИО·›ˆМ· ЩВ¯УИОТУ ·ПП·БТУ
Anleitung_WW_2000_I_SPK7__ 03.05.12 12:36 Seite 27
Page 28

28
Der Nachdruck oder sonstige Vervielfältigung von Dokumentation und
Begleitpapieren der Produkte, auch auszugsweise ist nur mit ausdrücklicher Zustimmung der ISC GmbH zulässig.
The reprinting or reproduction by any other means, in whole or in part,
of documentation and papers accompanying products is permitted only
with the express consent of ISC GmbH.
La réimpression ou une autre reproduction de la documentation et des
documents dʼaccompagnement des produits, même incomplète, nʼest
autorisée quʼavec lʼagrément exprès de lʼentreprise ISC GmbH.
La ristampa o lʼulteriore riproduzione, anche parziale, della
documentazione o dei documenti dʼaccompagnamento dei prodotti è
consentita solo con lʼesplicita autorizzazione da parte della ISC GmbH.
z
∏ ·У·Щ‡ˆЫЛ ‹ ¿ППЛ ·У··Ъ·БˆБ‹ ЩВОМЛЪИТЫВˆУ О·И Ы˘УФ‰В˘ЩИОТУ
К˘ПП·‰›ˆУ ЩˆУ ЪФ˚fiУЩˆУ ЩЛ˜ ВЩ·ИЪВ›·˜, ·ОfiМЛ О·И ЫВ
·ФЫ¿ЫМ·Щ·, ВИЩЪ¤ВЩ·И МfiУФ МВЩ¿ ·fi ЪЛЩ‹ ¤БОЪИЫЛ ЩЛ˜
ВЩ·ИЪВ›·˜ ISC GmbH.
Anleitung_WW_2000_I_SPK7__ 03.05.12 12:36 Seite 28
Page 29

29
Anleitung_WW_2000_I_SPK7__ 03.05.12 12:36 Seite 29
Page 30

30
Anleitung_WW_2000_I_SPK7__ 03.05.12 12:36 Seite 30
Page 31

31
t
GUARANTEE CERTIFICATE
Dear Customer,
In the unlikely event that your device develops a fault, we are truly sorry for this, and suggest that you please
contact our service department at the address shown on this guarantee card, or contact the nearest authorised
DIY store. Please note the following terms, under which guarantee claims can be made:
1. These guarantee terms cover additional guarantee rights and do not affect your statutory warranty rights.
We do not charge you for this guarantee.
2. Our guarantee only covers problems caused by material or manufacturing defects, and it is restricted to the
rectification of these defects or replacement of the device. Please note that our devices have not been
designed for use in commercial, trade or industrial applications. Consequently, the guarantee is invalidated
if the equipment is used in commercial, trade or industrial applications or for other equivalent activities. The
following are also excluded from our guarantee: compensation for transport damage, damage caused by
failure to comply with the installation/assembly instructions or damage caused by unprofessional
installation, failure to comply with the operating instructions (e.g. connection to the wrong mains voltage or
current type), misuse or inappropriate use (such as overloading of the device or use of non-approved tools
or accessories), failure to comply with the maintenance and safety regulations, ingress of foreign bodies into
the device (e.g. sand, stones or dust), effects of force or external influences (e.g. damage caused by the
device being dropped) and normal wear resulting from proper operation of the device. This applies in
particular to rechargeable batteries for which we nevertheless issue a guarantee period of 12 months.
The guarantee is rendered null and void if any attempt is made to tamper with the device.
3. The guarantee is valid for a period of 2 years starting from the purchase date of the device. Guarantee
claims should be submitted before the end of the guarantee period within two weeks of the defect being
noticed. No guarantee claims will be accepted after the end of the guarantee period. The original guarantee
period remains applicable to the device even if repairs are carried out or parts are replaced. In such cases,
the work performed or parts fitted will not result in an extension of the guarantee period, and no new
guarantee will become active for the work performed or parts fitted. This also applies when an on-site
service is used.
4. In order to assert your guarantee claim, please send your defective device postage-free to the address
shown below, or contact the nearest authorised DIY store. Please enclose either the original or a copy of
your sales receipt or another dated proof of purchase. Please keep your sales receipt in a safe place, as it is
your proof of purchase. It would help us if you could describe the nature of the problem in as much detail as
possible. If the defect is covered by our guarantee then your device will either be repaired immediately and
returned to you, or we will send you a new device.
Anleitung_WW_2000_I_SPK7__ 03.05.12 12:36 Seite 31
Page 32

32
p
BULLETIN DE GARANTIE
Chère Cliente, Cher Client,
Nos produits sont soumis à un contrôle de qualité très strict. Si cet appareil devait toutefois ne pas fonctionner
impeccablement, nous en serions désolés. Dans un tel cas, nous vous prions de bien vouloir prendre contact
avec notre service après-vente à l‘adresse indiquée sur le bulletin de garantie ou vous adresser au marché de la
construction le plus poche. Pour faire valoir une demande de garantie, ce qui suit est valable :
1. Les conditions de garantie règlent les prestations de garantie supplémentaires. Vos droits de garantie
légaux ne sont en rien altérés par la garantie présente. Notre prestation de garantie est gratuite.
2. La prestation de garantie s’applique exclusivement aux défauts occasionnés par des vices de fabrication ou
de matériau et est limitée à l’élimination de ces défauts ou encore au remplacement de l’appareil. Veillez au
fait que nos appareils, conformément à leur affectation, n’ont pas été construits pour être utilisés dans un
environnement professionnel, industriel ou artisanal. Un contrat de garantie ne peut avoir lieu dès lors que
l’appareil est utilisé à des activités dans des entreprises professionnelles, artisanales ou industrielles ou
toute autre activité du même genre. Sont également exclus de notre garantie : les prestations de substitution
de dommages dus aux transports, les dommages occasionnés par le non-respect des instructions de
montage ou en raison d’une installation non conforme, du non-respect du mode d’emploi (comme par
exemple le raccordement à une mauvaise tension réseau ou à un mauvais type de courant), les applications
abusives ou non conformes (comme par exemple une surcharge de l’appareil ou encore l’emploi
d’accessoires non homologués), le non-respect des prescriptions de maintenance et de sécurité,
l’infiltration de corps étrangers dans l’appareil (comme par exemple du sable, des pierres ou de la
poussière), l’emploi de la force ou l’influence extérieure (comme par exemple les dommages dus à une
chute), ainsi que l’usure normale conforme à l’utilisation. Ceci est particulièrement valable pour les
accumulateurs pour lesquels nous offrons toutefois une période de garantie de 12 mois.
Le droit à la garantie disparaît dès lors que des interventions ont lieu sur l’appareil.
3. Le délai de garantie s’élève à 2 ans et commence à la date de l’achat de l’appareil. Les demandes de
garanties doivent être présentées avant écoulement du délai de garantie, dans les deux semaines suivant le
moment auquel le défaut a été reconnu. Toute reconnaissance de demande de garantie après écoulement
du délai de garantie est exclue. La réparation ou l’échange de l’appareil n’entraîne nullement une
prolongation de la durée de garantie. Elle ne fait pas non plus commencer un nouveau délai de garantie, en
raison de cette prestation, pour l’appareil ou pour toute autre pièce de rechange intégrée. Ceci est
également valable lorsqu’un service après-vente sur place a été consulté.
4. Pour faire reconnaître votre demande de garantie, veuillez nous envoyer l’appareil défectueux franco de port
à l’adresse indiquée ci-dessous ou vous adresser au marché de la construction le plus proche. Ajoutez à
l’envoi l’original du bon d’achat ou de tout autre preuve de l’achat datée. Veuillez donc toujours bien
conserver le bon d’achat en guise de preuve ! Décrivez la raison de la réclamation le plus précisément
possible. Si le défaut de l’appareil est compris dans notre prestation de garantie, nous vous retournerons
sans délai un appareil réparé ou encore un nouveau.
Anleitung_WW_2000_I_SPK7__ 03.05.12 12:36 Seite 32
Page 33

33
C
CERTIFICATO DI GARANZIA
Gentili clienti,
i nostri prodotti sono soggetti ad un rigido controllo di qualità. Se l’apparecchio non dovesse tuttavia funzionare
correttamente, ci scusiamo e vi preghiamo di rivolgervi al nostro servizio di assistenza clienti all’indirizzo
indicato in questa scheda di garanzia o al centro fai-da-te competente più vicino. Per la rivendicazione dei diritti
di garanzia vale quanto segue:
1. Queste condizioni di garanzia regolano ulteriori prestazioni di garanzia. La presente garanzia non tocca i
vostri diritti al ricorso di garanzia previsti dalla legge. Le nostre prestazioni di garanzia sono per voi gratuite.
2. La prestazione di garanzia riguarda esclusivamente le anomalie riconducibili a difetti del materiale o di
produzione ed è limitata all’eliminazione di queste anomalie o alla sostituzione dell’apparecchio. Tenete
presente che i nostri apparecchi non sono stati costruiti per l’impiego professionale, artigianale o industriale.
Un contratto di garanzia non viene concluso quando l’apparecchio viene usato in imprese commerciali,
artigianali o industriali, o con attività equivalenti. Dalla nostra garanzia sono escluse inoltre le prestazioni di
risarcimento per danni dovuti al trasporto o danni causati dalla mancata osservanza delle istruzioni per il
montaggio o per installazione non corretta, dalla mancata osservanza delle istruzioni per l’uso (come per es.
collegamento a tensione di rete o tipo di corrente non corretto), dall’uso improprio o illecito (come per es.
sovraccarico dell’apparecchio o utilizzo di utensili o accessori non consentiti), dalla mancata osservanza
delle norme di sicurezza e di manutenzione, dalla penetrazione di corpi estranei nell’apparecchio (come per
es. sabbia, pietre o polvere), dall’impiego della forza o dall’influsso esterno (come per es. danni dovuti a
caduta) e dall’usura normale e dovuta all’impiego. Ciò vale particolarmente per batterie, per esse
concediamo tuttavia 12 mesi di garanzia
Il diritti di garanzia decadono quando sono già effettuati interventi sull’apparecchio.
3. Il periodo di garanzia è 2 anni e inizia alla data d’acquisto dell’apparecchio. I diritti di garanzia devono
essere fatti valere prima della scadenza del periodo di garanzia, entro due settimane dopo avere accertato il
difetto. È esclusa la rivendicazione di diritti di garanzia dopo la scadenza del relativo periodo. La riparazione
o la sostituzione dell’apparecchio non comporta una proroga del periodo di garanzia e con questa
prestazione per l’apparecchio o per pezzi di ricambio eventualmente installati non inizia un nuovo periodo di
garanzia. Questo vale anche nel caso si ricorra ad un servizio sul posto.
4. Per la rivendicazione dei vostri diritti di garanzia inviate l’apparecchio difettoso franco di porto all’indirizzo
sotto indicato o rivolgetevi al centro fai-da-te compentene più vicino. Allegate lo scontrino di cassa in
originale o un’altra prova d’acquisto che riporti la data. Conservate bene perciò lo scontrino di cassa come
prova! Indicate il motivo di reclamo nel modo più dettagliato possibile. Se il difetto dell’apparecchio rientra
nella nostra prestazione di garanzia, ricevete l’apparecchio riparato o un apparecchio nuovo a stretto giro di
posta.
Anleitung_WW_2000_I_SPK7__ 03.05.12 12:36 Seite 33
Page 34

34
z
ΕΓΓΥΗΣΗ
Αξιότιμη πελάτισα, αξιότιμε πελάτη,
Τα προϊόντα μας υπόκεινται σε αυστηρούς ελέγχους ποιότητας. Εάν παρ΄όλα αυτά κάποτε δεν
λειτουργήσουν άψογα, λυπούμαστε πολύ και σας παρακαλούμε να αποτανθείτε προς το τμήμαμας
Εξυπηρέτησης Πελατών, στη διεύθυνση που αναφέρετε σε αυτή την εγγύηση. Ευχαρίστως σας βοηθούμε
και τηλεφωνικώς στον αριθμό που αναφέρετε πιο κάτω. Για την κατίσχυση των αξιώσεων εγγύησης ισχύουν
τα εξής:
1. Αυτοί οι όροι εγγύησης ρυθμίζουν πρόσθετες παροχές εγγύησης. Από την εγγύηση αυτή δεν θίγονται οι
νόμιμες αξιώσεις σας για εγγύηση. Η παροχή της εγγύησής μας είναι για σας δωρεάν.
2. Η εγγύηση καλύπτει αποκλειστικά και μόνο βλάβες που οφείλονται σε ελαττώματα υλικών ή παραγωγής
και περιορίζονται στην αποκατάσταση αυτών των ελαττωμάτων ή την αντικατάσταση της συσκευής.
Παρακαλούμε να προσέξετε πως οι συσκευές μας δεν προορίζονται για τη βιομηχανία, τη βιοτεχνία και
την επαγγελματική χρήση. Για το λόγο αυτό δεν υφίσταται σύμβαση εγγύησης σε περίπτωση χρήσης της
συσκευής στη βιομηχανία, βιοτεχνία, για επαγγελματικό ή άλλο παρόμοιο σκοπό. Από την εγγύησή μας
αποκλείονται πέραν τούτου αποζημιώσεις για βλάβες μεταφοράς, βλάβες οφειλόμενες σε μη τήρηση
της Οδηγίας συναρμολόγησης, ή σε εσφαλμένη εγκατάσταση, μη τήρηση της Οδηγίας χρήσης (π.χ.
σύνδεση σε λάθος τάση δικτύου ή είδος ρεύματος), καταχρηστική ή όχι ορθή χρήση (π.χ. υπερφόρτωση
ή χρήση μη εγκεκριμένων ανταλλακτικών εργαλείων ή εξαρτημάτων), μη τήρηση των Υποδείξεων
συντήρησης και ασφαλείας, είσοδος ξένων αντικειμένων στη συσκευή (όπως π.χ. άμμος ή σκόνη),
χρήση βίας ή εξωτερική επίδραση (όπως π.χ. βλάβες από πτώση) καθώς και βλάβες που οφείλονται σε
κοινή φθορά. Αυτό ισχύει ιδιαίτερα για συσσωρευτές για τους οποίους παρ΄όλα αυτά παρέχουμε εγγύηση
12 μηνών.
Η αξίωση εγγύησης εκπίπτει σε περίπτωση που έγιναν ήδη ξένες επεμβάσεις στη συσκευή.
3. Η διάρκεια της εγγύησης ανέρχεται σε 2 έτη και αρχίζει από την ημερομηνία αγοράς της συσκευής. Οι
αξιώσεις εγγύησης πρέπει να κατισχυθούν πριν την πάροδος της προθεσμάις της εγγύησης εντός δύο
εβδομάδων από την διαπίστωση του ελαττώματος. Αποκλείεται η κατίσχυση αξιώσεων εγγύησης μετά
την πάροδο της προθεσμίας της εγγύησης. Η επισκευή ή η αντικατάσταση της συσκευής δεν
συνεπάγεται ούτε την επέκταση της διάρκειας της εγγύησης ούτε την έναρξη νέας προθεσμίας
εγγύησης για τη συσκευή ή τα ενδεχομένως τοποθετηθέντα εξαρτήματα. Το ίδιο ισχύει και σε περίπτωση
σέρβις επί τόπου.
4. Για την κατίσχυση της αξίωσης της εγγύησης σας παρακαλούμε να μας αποστείλετε τη συσκευή, χωρίς
επιβάρυνσή μας με ταχυδρομικά τέλη, στην πιο κάτω αναφερόμενη διεύθυνση. Μη ξεχάσετε να
επισυνάψετε το πρωτότυπο της απόδειξης αγοράς ή άλλο ισχύον αποδεικτικό αγοράς. Για το λόγο αυτό
σας παρακαλούμε να φυλάξετε καλά την απόδειξη του ταμείου! Παρακαλούμε επίσης να μας
περιγράψετε την αιτία για την διαμαρτυρία σας όσο πιο αναλυτικά γίνεται. Εάν το ελάττωμα της
συσκευής σας καλύπτεται από την εγγύησή μας, είτε θα σας επιστραφεί ταχύτατα η επισκευασμένη
συσκευή σας, είτε θα λάβετε μία νέα συσκευή.
Φυσικά επισκευάζουμε ευχαρίστως έναντι αμοιβής και ελαττώματα στη συσκευή σας που δεν καλύπτονται ή
δεν καλύπτονται πλέον από την εγγύηση. Για το σκοπό αυτό σας παρακαλούμε να αποστείλετε τη συσκευή
σας στη διεύθυνση του τμήματος μας για Εξυπηρέτηση Πελατών.
Anleitung_WW_2000_I_SPK7__ 03.05.12 12:36 Seite 34
Page 35

35
k
GARAN
TIEURKUNDE
Sehr geehrte Kundin, sehr geehrter Kunde,
unsere Produkte unterliegen einer strengen Qualitätskontrolle. Sollte dieses Gerät dennoch einmal nicht einwandfrei funktionieren, bedauern wir dies sehr und bitten Sie, sich an unseren Servicedienst unter der auf dieser Garantiekarte angegebenen Adresse zu wenden. Gern stehen wir Ihnen auch telefonisch über die unten
angegebene Servicerufnummer zur Verfügung. Für die Geltendmachung von Garantieansprüchen gilt Folgendes:
1. Diese Garantiebedingungen regeln zusätzliche Garantieleistungen. Ihre gesetzlichen Gewährleistungsansprüche werden von dieser Garantie nicht berührt. Unsere Garantieleistung ist für Sie kostenlos.
2. Die Garantieleistung erstreckt sich ausschließlich auf Mängel, die auf Material- oder Herstellungsfehler zurückzuführen sind und ist auf die Behebung dieser Mängel bzw. den Austausch des Gerätes beschränkt.
Bitte beachten Sie, dass unsere Geräte bestimmungsgemäß nicht für den gewerblichen, handwerklichen
oder industriellen Einsatz konstruiert wurden. Ein Garantievertrag kommt daher nicht zustande, wenn das
Gerät in Gewerbe-, Handwerks- oder Industriebetrieben sowie bei gleichzusetzenden Tätigkeiten eingesetzt wird.
Von unserer Garantie sind ferner Ersatzleistungen für Transportschäden, Schäden durch Nichtbeachtung
der Montageanleitung oder aufgrund nicht fachgerechter Installation, Nichtbeachtung der Gebrauchsanleitung (wie durch z.B. Anschluss an eine falsche Netzspannung oder Stromart), missbräuchliche oder unsachgemäße Anwendungen (wie z.B. Überlastung des Gerätes oder Verwendung von nicht zugelassenen
Einsatzwerkzeugen oder Zubehör), Nichtbeachtung der Wartungs- und Sicherheitsbestimmungen, Eindringen von Fremdkörpern in das Gerät (wie z.B. Sand, Steine oder Staub), Gewaltanwendung oder
Fremdeinwirkungen (wie z. B. Schäden durch Herunterfallen) sowie durch verwendungsgemäßen, üblichen
Verschleiß ausgeschlossen. Dies gilt insbesondere für Akkus, auf die wir dennoch eine Garantiezeit von
12 Monaten gewähren
Der Garantieanspruch erlischt, wenn an dem Gerät bereits Eingriffe vorgenommen wurden.
3. Die Garantiezeit beträgt 2 Jahre und beginnt mit dem Kaufdatum des Gerätes. Garantieansprüche sind vor
Ablauf der Garantiezeit innerhalb von zwei Wochen, nachdem Sie den Defekt erkannt haben, geltend zu
machen. Die Geltendmachung von Garantieansprüchen nach Ablauf der Garantiezeit ist ausgeschlossen.
Die Reparatur oder der Austausch des Gerätes führt weder zu einer Verlängerung der Garantiezeit noch
wird eine neue Garantiezeit durch diese Leistung für das Gerät oder für etwaige eingebaute Ersatzteile in
Gang gesetzt. Dies gilt auch bei Einsatz eines Vor-Ort-Services.
4. Für die Geltendmachung Ihres Garantieanspruches übersenden Sie bitte das defekte Gerät portofrei an die
unten angegebene Adresse. Fügen Sie den Verkaufsbeleg im Original oder einen sonstigen datierten Kaufnachweis bei. Bitte bewahren Sie deshalb den Kassenbon als Nachweis gut auf! Beschreiben Sie uns bitte
den Reklamationsgrund möglichst genau. Ist der Defekt des Gerätes von unserer Garantieleistung erfasst,
erhalten Sie umgehend ein repariertes oder neues Gerät zurück.
Selbstverständlich beheben wir gegen Erstattung der Kosten auch gerne Defekte am Gerät, die vom Garantieumfang nicht oder nicht mehr erfasst sind. Dazu senden Sie das Gerät bitte an unsere Serviceadresse.
iSC GmbH • Eschenstraße 6 • 94405 Landau/Isar (Deutschland)
Telefon: +49 [0] 180 5 120 509 • Telefax +49 [0] 180 5 835 830 (Festnetzpreis: 14 ct/min, Mobilfunkpreise maximal: 42 ct/min)
Außerhalb Deutschlands fallen stattdessen Gebühren für ein reguläres Gespräch ins dt. Festnetz an.
E-Mail: info@isc-gmbh.info
• Internet: www.isc-gmbh.info
Anleitung_WW_2000_I_SPK7__ 03.05.12 12:36 Seite 35
Page 36

EH 04/2012 (01)
Name:
Service Hotline: 01805 120 509 · www.isc-gmbh.info · Mo-Fr. 8:00-18:00 Uhr
(Festnetzpreis: 14 ct/min, Mobilfunkpreise maximal: 42 ct/min; Außerhalb Deutschlands fallen stattdessen Gebühren für ein reguläres Gespräch ins dt. Festnetz an.)
Straße / Nr.:
PLZ Ort
Mobil:
Telefon:
Retouren-Nr. iSC:
Kaufbeleg-Nr. / Datum:
Garantie:
JA
NEIN
Welcher Fehler ist aufgetreten (genaue Angabe): Art.-Nr.: I.-Nr.:
Sehr geehrte Kundin, sehr geehrter Kunde,
bitte beschreiben Sie uns die von Ihnen festgestellte Fehlfunktion Ihres Gerätes als Grund Ihrer Beanstandung möglichst genau. Dadurch können wir
für Sie Ihre Reklamation schneller bearbeiten und Ihnen schneller helfen. Eine zu ungenaue Beschreibung mit Begriffen wie „Gerät funktioniert nicht“
oder „Gerät defekt“ verzögert hingegen die Bearbeitung erheblich.
Service Hotline kontaktieren oder bei iSC-Webadresse anmelden - es wird Ihnen eine Retourennummer zugeteilt l Ihre Anschrift eintragen l Fehlerbeschreibung
und Art.-Nr. und I.-Nr. angeben l Garantiefall JA/NEIN ankreuzen sowie Kaufbeleg-Nr. und Datum angeben und eine Kopie des Kaufbeleges beilegen
Anleitung_WW_2000_I_SPK7__ 03.05.12 12:36 Seite 36
 Loading...