

Page 1
TPR 200/2 ohne RCD-Plug
Radial Tile Cutting Machine
Artikel-Nr.: 4301250
Ident-Nr.: 01025
Page 2

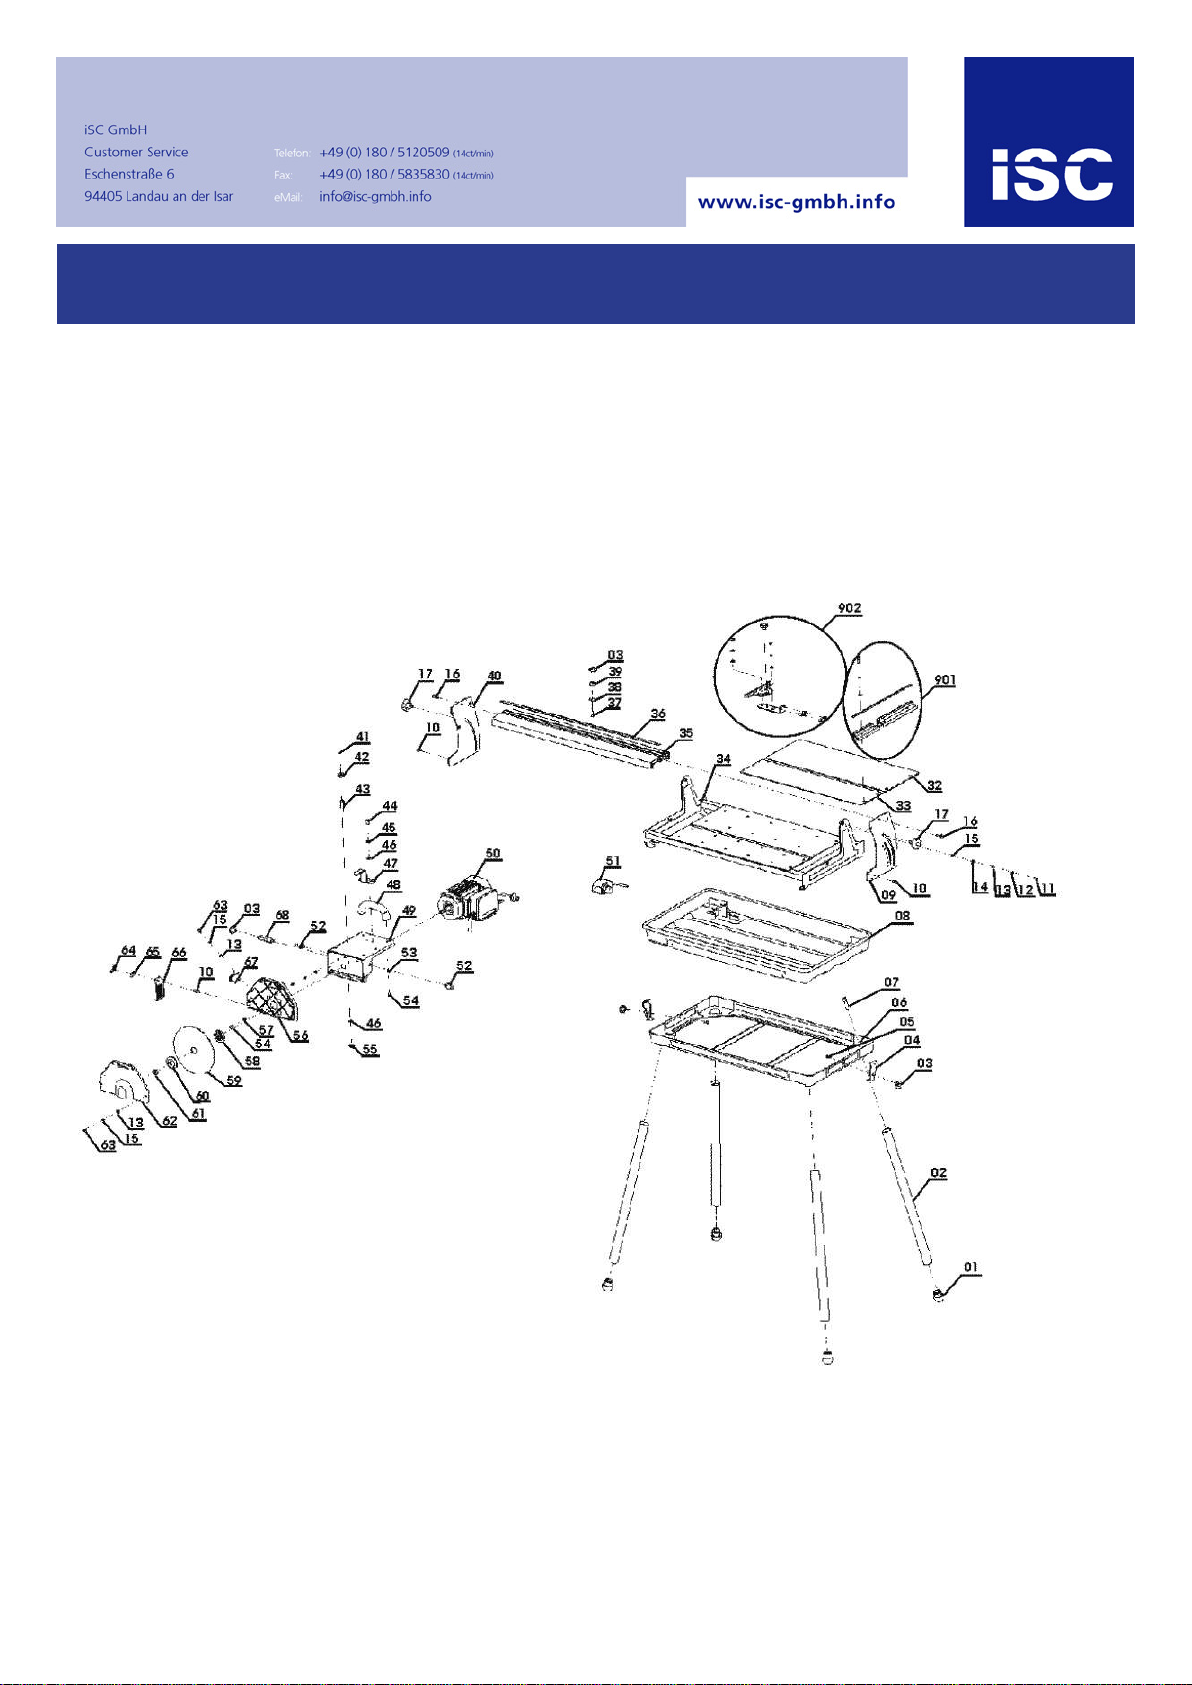
Komponenten / Ersatzteile
Position Artikel-Nr. Beschreibung
2 430125002002 Leg
3 430125002003 Knob
4 430125002004 Fixing Bracket
8 430125002008 tray
17 430125002017 Locking Knob
36 430125002036 Scale Label
42 430125002042 Ball Bearing
50 430125002050 motor 800W
51 430125002051 water pump
58 430125002058 Inner Flange
901 430125002901 support
902 430125002902 angle
0 430125002903 Arbeitstisch+Gummiablage
0 430125002904 Sägeblattschutz+Kette
0 430125002075 on/off switch 6 (4)A 250V
Page 3
Art.-Nr.: 43.012.50 I.-Nr.: 01025
Bedienungsanleitung
Fliesenschneidmaschine
Operating Instructions
Tile Cutting Machine
Mode d’emploi
Machine à découper les carreaux
Gebruiksaanwijzing
Tegelsnijmachine
Istruzioni per l’uso della
Taglierina per marmette
Betjeningsvejledning
Flise klippemaskine
Naputak za uporabu
Rezač keramičkih ploča
Használati utasítás
Csempevágógép
Instrukcja obsługi
Przecinarka do płytek ceramicznych
TPR 200/2
Anleitung TPR 200-2 SPK1 27.06.2005 9:33 Uhr Seite 1
®
Page 4
2
1
2
6
3
8
7
6
12
5
4
3
2
1
11
10
12
37
37
19
4
15
14
3
13
38
39
37
40
9
18
Anleitung TPR 200-2 SPK1 27.06.2005 9:33 Uhr Seite 2
Page 5

3
7
10
8
5
28
27
16
9
5
5
2
6
9
29
11 12
7
17
10
6
35
Anleitung TPR 200-2 SPK1 27.06.2005 9:33 Uhr Seite 3
Page 6
4
13
34
36
31
Anleitung TPR 200-2 SPK1 27.06.2005 9:33 Uhr Seite 4
Page 7

5
Schutzhandschuhe tragen
Augenschutz tragen
Ꮯ
Gehörschutz tragen
Staubschutz tragen
1. Gerätebeschreibung (Abb. 1/2)
11. Untergestell
12. Diamanttrennscheibe
13. Wanne
14. Arbeitstisch
15. Winkelanschlag
16. Anschlagschiene
17. Führungsschiene
18. Trennscheibenschutz
19. Handgriff
10. Sterngriffschraube für Winkeleinstellung
11. Sterngriffschraube für Transportsicherung
12. Untergestellrahmen
13. Kühlwasserpumpe
14. Schlauch
15. Motor
2. Lieferumfang
앬 Fliesenschneider
앬 Wanne(3)
앬 Kühlwasserpumpe (13)
앬 Winkelanschlag (5)
앬 Untergestell (1)
3. Bestimmungsgemäße Verwendung
Die Fliesenschneidmaschine kann für übliche
Schneidarbeiten an kleinen und mittelgroßen Fliesen
(Kacheln, Keramik oder ähnlichem) entsprechend
der Maschinengröße verwendet werden. Sie ist
insbesondere für Heim- und Handwerk konzipiert.
Das Schneiden von Holz und Metall ist nicht erlaubt.
Die Maschine darf nur nach Ihrer Bestimmung
verwendet werden. Jede weitere darüber hinaus-
gehende Verwendung ist nicht bestimmungsgemäß.
Für daraus hervorgehende Schäden oder
Verletzungen aller Art haftet der Benutzer/Bediener
und nicht der Hersteller. Es dürfen nur für die
Maschine geeignete Trennscheiben verwendet
werden. Die Verwendung von Sägeblättern ist
untersagt. Bestandteil der bestimmungsgemäßen
Verwendung ist auch die Beachtung der Sicherheitshinweise, sowie der Montageanleitung und der
Betriebshinweise in der Bedienungsanleitung.
Personen, die die Maschine bedienen und warten
müssen mit dieser vertraut und über mögliche
Gefahren unterrichtet sein. Darüberhinaus sind die
geltenden UVV-Vorschriften genauestens zu
beachten. Sonstige allgemeine Regeln in arbeitsmedizinischer und sicherheitstechnischen Bereichen
sind zu beachten. Veränderungen an der Maschine
schließen eine Haftung des Herstellers und daraus
entstehenden Schäden gänzlich aus. Trotz
bestimmungsgemäßer Verwendung können
bestimmte Restrisikofaktoren nicht vollständig
ausgeräumt werden. Bedingt durch Konstruktion und
Aufbau der Maschine können folgende Punkte
auftreten:
앬 Berührung der Diamanttrennscheibe im nicht ab-
gedeckten Bereich.
앬 Eingreifen in die laufende Diamanttrennscheibe.
앬 Herausschleudern eines fehlerhaften Diamant-
aufsatzes der Trennscheibe.
앬 Von Werkstücken und Werkstückteilen.
앬 Gehörschäden bei Nichtverwendung des nötigen
Gehörschutzes.
4. Wichtige Hinweise
4.1. Allgemein
Bitte lesen Sie die Gebrauchsanweisung sorgfältig
durch und beachten Sie deren Hinweise. Machen Sie
sich anhand dieser Gebrauchsanweisung mit dem
Gerät, dem richtigen Gebrauch sowie den
Sicherheitshinweisen (siehe Beiblatt) vertraut.
4.2. Zusätzliche Sicherheitshinweise
앬 Maschine auf ebenen, rutschfesten Boden
stellen. Die Maschine darf nicht wackeln.
앬 Vergewissern Sie sich, dass die Spannung auf
dem Datenschil mit der vorhandenen Spannung
übereinstimmt. Dann erst Stecker ans Stromnetz
anschließen.
D
Anleitung TPR 200-2 SPK1 27.06.2005 9:33 Uhr Seite 5
Page 8

D
앬 Schutzbrille aufsetzen.
앬 Gehörschutz tragen.
앬 Schutzhandschuhe tragen.
앬 Rissige Diamanttrennscheiben nicht mehr
verwenden und auswechseln.
앬 Achtung: Trennscheibe läuft nach!
앬 Diamanttrennscheibe nicht durch seitlichen
Druck abbremsen.
앬 Achtung: Diamanttrennscheibe muss immer mit
Wasser gekühlt werden.
앬 Vor dem Wechseln der Trennscheibe
Netzstecker ziehen.
앬 Nur geeignete Diamanttrennscheiben
verwenden.
앬 Maschine niemals unbeaufsichigt in Räumen mit
Kindern stehen lassen.
앬 Vor der Kontrolle des elektr. Motorraumsystems
den Netzstecker ziehen.
5. Technische Daten:
Motorleistung: 800 W
Motordrehzahl: 3000 min.
-1
Wechselstrommotor 230 V ~ 50 Hz
Isolierstoffklasse Klasse B
Schutzart IP 54
Länge des Schnittes: 520 mm
Länge Jolly: 520 mm
Schnitthöhe 90°: max. 30 mm
Schnitthöhe 45°: max. 25 mm
Schneidetisch:
-Abmessungen 570 mm x 385 mm
Diamanttrennscheibe ø 200 x ø 25,4
Geräuschemissionswerte
앬 Das Geräusch dieser Maschine wird nach DIN
EN ISO 3744; EN ISO 11201 gemessen.
Das Geräusch am Arbeitsplatz kann 85 db (A)
überschreiten. In diesem Fall sind Schallschutzmaßnahmen für den Benutzer erforderlich.
(Gehörschutz tragen!)
Betrieb Leerlauf
Schalldruckpegel LPA 94 dB(A) 76 dB(A)
Schalleistungspegel LWA 107 dB(A) 89 dB(A)
6. Vor Inbetriebnahme
앬 Die Maschine muss standsicher aufgestellt
werden, d. h. auf einer Werkbank, dem
serienmäßigen Untergestell o. ä. festschrauben.
앬 Vor Inbetriebnahme müssen alle Abdeckungen
uns Sicherheitsvorrichtungen ordnungsgemäß
montiert sein.
앬 Die Trennscheibe muss frei laufen können.
앬 Überzeugen Sie sich vor dem Anschließen der
Maschine, dass die Daten auf dem Typenschild
mit den Netzdaten übereinstimmen.
7. Aufbau und Bedienung
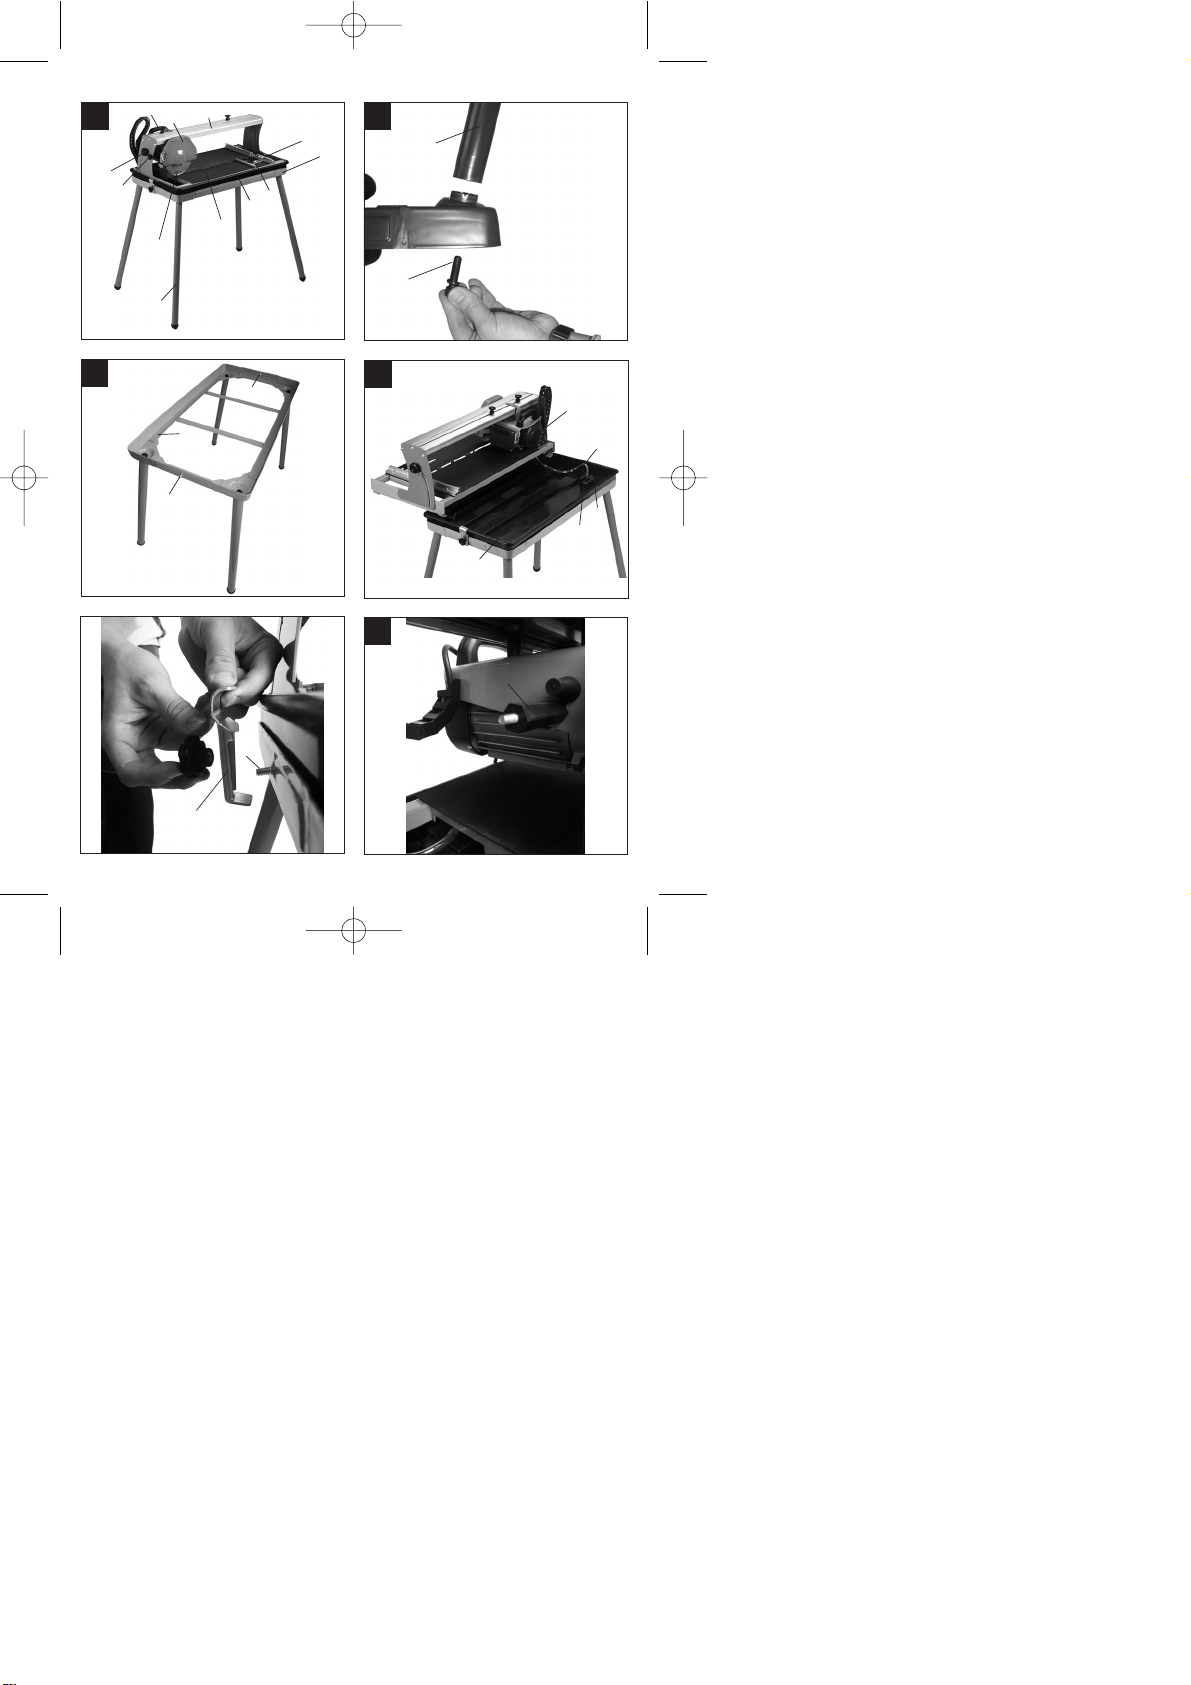
7.1 Montage Untergestell und Kühlwasserpumpe
(Abb. 1-6)
앬 Standbeine (18) mit den 4 Schrauben (19) an
dem Untergestellrahmen anschrauben.
앬 Untergestell aufstellen
앬 Die beiden Schrauben (37) für die Wannenfixier-
ung von Innen durch die Vierkantlöcher stecken
und Wanne (3) in den Untergestellrahmen (12)
legen.
앬 Kühlwasserpumpe (13) in der Halterung (38)
fixieren. Fliesenschneider in die Wanne stellen
und Wannenfixierung (39) anschrauben.
앬 Sterngriffschraube (11) und Distanzstück (40)
herausschrauben und aufbewahren.
앬 Wanne mit Wasser auffüllen bis die Kühlwasser-
pumpe (13) völlig mit Wasser bedeckt ist.
7.2 Ein/Ausschalter (Abb. 7)
앬 Zum Einschalten auf die „1“ des Ein-
/Ausschalters (16) drücken.
앬 Vor Beginn des Schneidevorgangs ist
abzuwarten bis die Trennscheibe die max.
Drehzahl erreicht hat und die Kühlwasserpumpe
(13) das Wasser zur Trennscheibe befördert hat.
앬 Zum Ausschalten auf die „0“ des Schalters (16)
drücken.
7.3 90° Schnitte (Abb. 8/9)
앬 Sterngriffschraube (27) lockern
앬 Winkelanschlag (5) auf 90° stellen und
Sterngriffschraube (27) wieder festziehen.
앬 Schrauben (28) wieder anziehen um den
Winkelanschlag (5) zu fixieren.
앬 Maschinenkopf (29) am Handgriff (9) nach hinten
schieben.
앬 Fliese an die Anschlagschiene (6) an den
Winkelanschlag (5) anlegen.
앬 Fliesenschneider einschalten.
6
Anleitung TPR 200-2 SPK1 27.06.2005 9:33 Uhr Seite 6
Page 9

앬 Achtung: Abwarten, bis das Kühlwasser die
Trennscheibe (2) erreicht hat.
앬 Maschinenkopf (29) langsam und gleichmäßig
am Handgriff (9) nach vorne durch die Fliese
ziehen.
앬 Nach Schnittende den Fliesenschneider wieder
ausschalten.
7.4 45° Diagonalschnitt (Abb. 10)
앬 Winkelanschlag (5) auf 45° einstellen
앬 Schnitt wie unter 7.3 erklärt, durchführen.
7.5 45° Längsschnitt, „Jollyschnitt“ (Abb. 11)
앬 Sterngriffschraubn (10) lockern
앬 Führungsschiene (7) nach links auf 45° der
Winkelskala (17) neigen.
앬 Stergriffschraube (10) wieder festziehen.
앬 Schnitt wie unter 7.3 erklärt, durchführen.
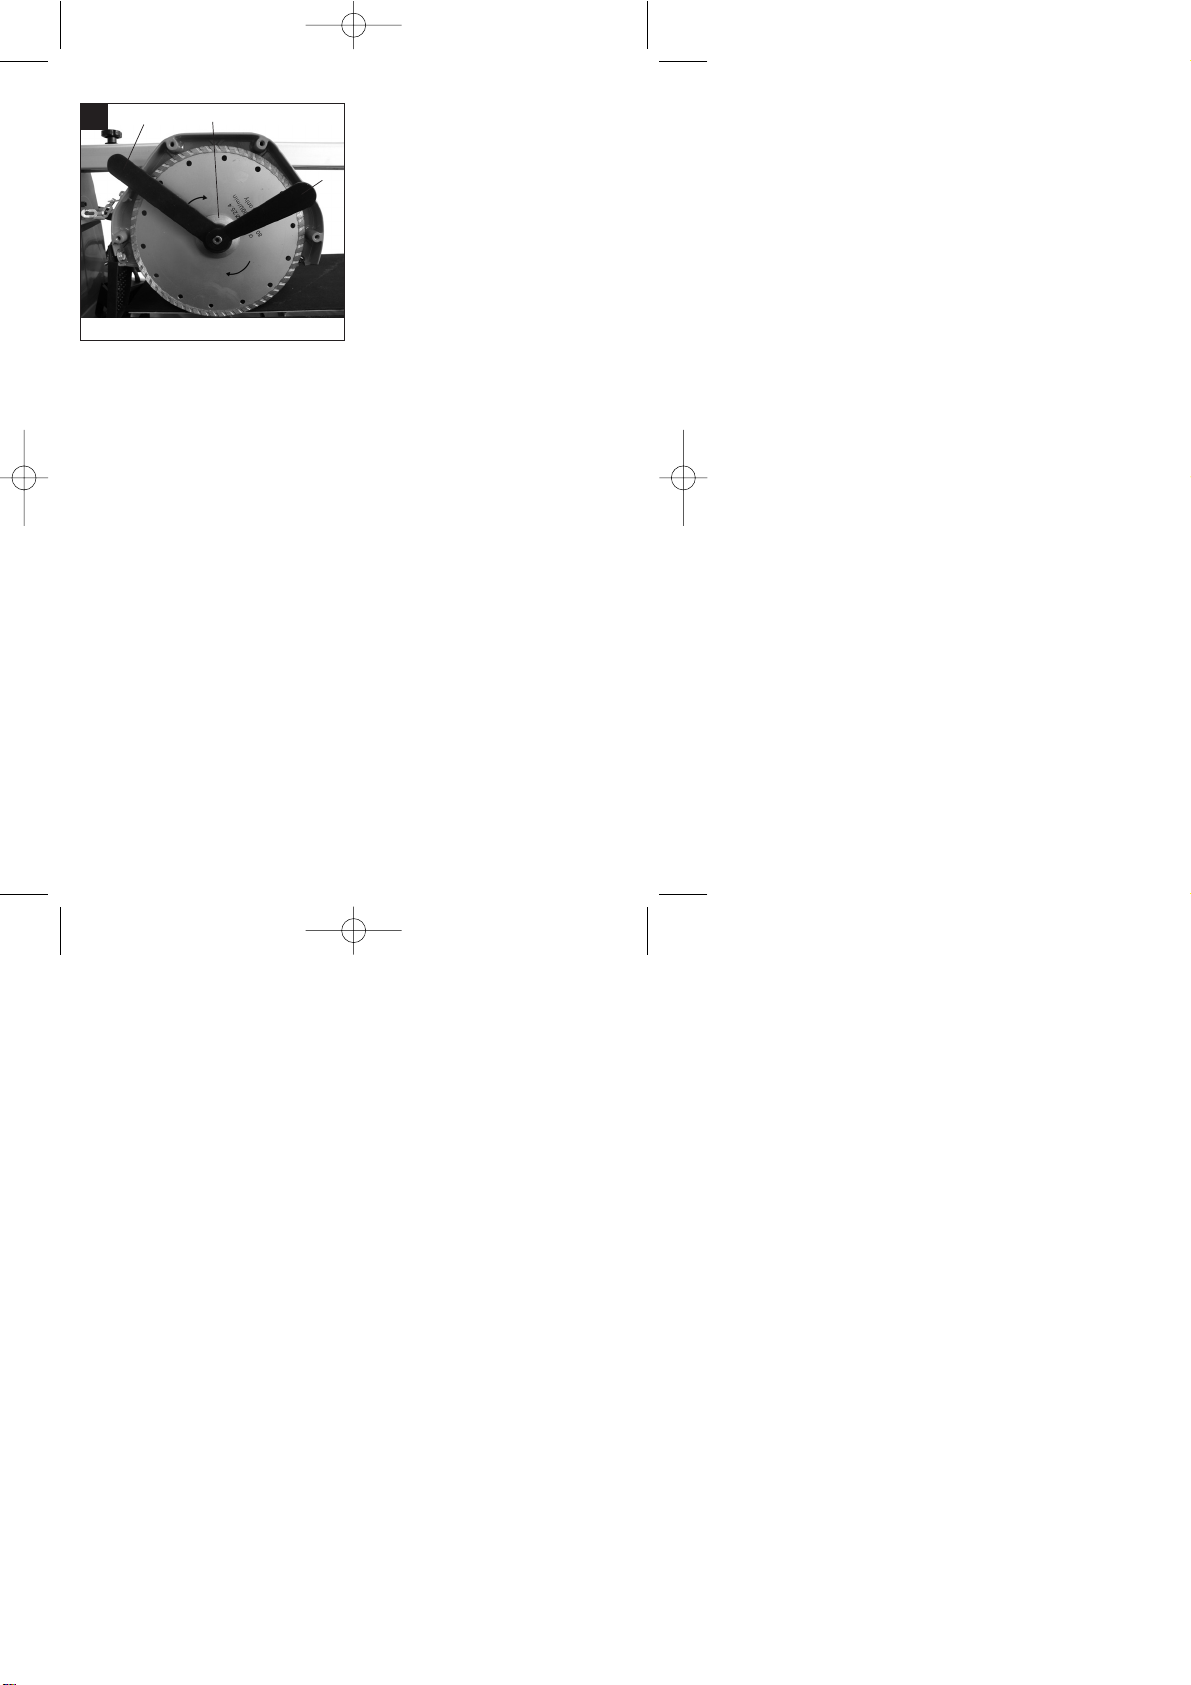
7.6 Diamanttrennscheibe wechseln (Abb. 13/13)
앬 Netzstecker ziehen
앬 Die vier Schrauben (35) lösen und
Sägeblattschutz (8) abnehmen.
앬 Mit dem Schlüssel (34) die Flanschmutter in
Laufrichtung der Trennscheibe (2) lösen.
(Achtung: Linksgewinde) Dabei Schlüssel (31)
an der Motorwelle ansetzen und gegenhalten.
앬 Außenflansche (36) und Trennscheibe (2)
abnehmen.
앬 Aufnahmeflansch vor der Montage der neuen
Trennscheibe sorgfältig reinigen.
앬 Die neue Trennscheibe in umgekehrter
Reihenfolge wieder einsetzen und festziehen.
Achtung: Laufrichtung der Trennscheibe
beachten!
앬 Sägeblattschutz (8) wieder montieren.
8. Wartung
앬 Staub und Verschmutzung sind regelmäßig von
der Maschine zu entfernen. Die Reinigung ist am
besten mit einem Lappen oder Pinsel
durchzuführen.
앬 Alle beweglichen Teile sind in periodischen
Zeitabständen nachzuschmieren.
앬 Benutzen Sie zur Reinigung des Kunststoffes
keine ätzenden Mittel.
앬 Die Wanne (3) und Kühlmittelpumpe (13) ist
regelmäßig von Verschmutzungen zu reinigen,
da ansonsten die Kühlung der Diamanttrennscheibe (2) nicht gewährleistet ist.
9. Ersatzteilbestellung
Bei der Ersatzteilbestellung sollten folgende
Angaben gemacht werden:
앬 Typ des Gerätes
앬 Artikelnummer des Gerätes
앬 Ident- Nummer des Gerätes
앬 Ersatzteil- Nummer des erforderlichen Ersatzteils
Aktuelle Preise und Infos finden Sie unter
www.isc-gmbh.info
7
D
Anleitung TPR 200-2 SPK1 27.06.2005 9:33 Uhr Seite 7
Page 10

8
Wear safety gloves
Wear safety goggles
Ꮯ
Wear ear-muffs
Wear a dust mask
1. Description of the machine (Fig. 1/2)
11. Base frame
12. Diamond wheel
13. Trough
14. Work table
15. Angle stop
16. Rail fence
17. Guide rail
18. Safety hood for the cutting wheel
19. Handle
10. Star grip screw for setting the angle
11. Star grip screw for securing during transportation
12. Base frame
13. Cooling water pump
14. Hose
15. Motor
2. Items supplied
앬 Tile cutting machine
앬 Trough (3)
앬 Cooling water pump (13)
앬 Angle stop (5)
앬 Base frame (1)
3. Intended use
The tile cutting machine is designed for the standard
cutting of small and medium-size tiles (glazed tiles,
ceramic tiles or similar) which can be accommodated
by the size of the machine. It is designed for DIY
applications and craft businesses in particular. It
should never be used for the cutting of wood or
metal. The machine should be used exclusively
for its intended purpose. No other use is permitted
and the manufacturer will not accept liability for any
damages or injury resulting from any such use;
responsibility rests with the user/operator in any such
case. Only use cutting wheels which are suitable for
the machine. Saw blades should never be used.
Compliance with the safety instructions, the
assembly instructions, and advice and instructions
on operation contained in the operating instructions
also falls under the terms of intended use. All
persons operating or carrying out maintenance work
on the machine must be acquainted with the above
and be aware of all potential dangers.
In addition, strict compliance with the accident
prevention regulations in force in your area, as well
as all other general rules of health and safety at
work, is imperative. The manufacturer’s liability shall
be deemed void if the machine is modified in any
way and the manufacturer shall therefore accept no
liability for any damages arising as a result of
modifications. Even if the machine is used as
intended, certain residual risk factors cannot be
completely eliminated. For reasons of design and the
construction of the machine, the following
eventualities are possible:
앬 Contact with the diamond cutting wheel where it
is not covered.
앬 Contact with the diamond cutting wheel while it is
turning.
앬 Defective diamond tips flying off the cutting
wheel.
앬 Workpieces or parts of workpieces kicking back.
앬 Damage to hearing if the ear-muffs specified are
not used.
4. Important instructions
4.1. General
Please read this manual carefully and pay particular
attention to the instructions contained within it. Use
this information to get to know the machine, its
correct operation and safety regulations (see
supplementary sheet) before using for the first time.
4.2. Additional safety instructions
앬 Set up the machine on a level, non-slip floor.
Make sure that the machine does not wobble.
앬 Check that the voltage on the rating plate is the
same as your supply voltage. Only then are you
to insert the power plug in the socket-outlet.
앬 Wear safety goggles.
앬 Wear ear-muffs.
GB
Anleitung TPR 200-2 SPK1 27.06.2005 9:33 Uhr Seite 8
Page 11

9
앬 Wear safety gloves.
앬 Never use cracked diamond cutting wheels.
Replace immediately.
앬 Caution! The cutting wheel runs on after the
machine is switched off!
앬 Never apply side pressure to the diamond cutting
wheel in order to bring it to a halt.
앬 Caution! The diamond cutting wheel must be
cooled with water at all times.
앬 Always pull out the power plug before changing
the cutting wheel.
앬 Use only suitable diamond cutting wheels.
앬 Never leave the machine unattended in rooms
with children.
앬 Always pull out the power plug before examining
the electric motor compartment system.
5. Technical data
Motor rating 800 W
Motor speed 3000 rpm
A.c. motor 230 V ~ 50 Hz
Insulation material class Class B
Insulation IP54
Cut length 520 mm
Jolly length 520 mm
Cut height 90° max. 30 mm
Cut height 45° max. 25 mm
Cutting table:
Dimensions 570 x 385 mm
Diamond cutting wheel ø 200 x ø 25.4
Noise emission levels
앬 The noise emitted by this saw is measured in
accordance with EN ISO 3744; EN ISO 11201
The noise at the workplace may exceed 85 db
(A). The user will require noise protection
measures if this is the case. (Wear ear-muffs!)
With-load No-Load
operation operation
Sound pressure level 94 dB(A) 76 dB(A)
Sound power level 107 dB(A) 89 dB(A)
6. Before using for the first time
앬 The machine must be set up so that it stands
firmly, i.e. it must be securely screwed to a work
bench, the base frame supplied in delivery, or
similar.
앬 All covers and safety devices must be correctly
attached before the machine is used for the first
time.
앬 The cutting wheel must rotate smoothly.
앬 Check that the voltage on the rating plate is the
same as your supply voltage before you connect
the machine to the power supply.
7. Assembly and operation
7.1 Assembly (Fig. 1-6)
앬 Fasten the feet (18) to the base frame (12) with
the 4 screws (19).
앬 Turn the sub-frame upright.
앬 Insert the two screws (37) for the trough fixture
through the square holes and place the trough
(3) in the base frame (12).
앬 Fasten the cooling water pump (13) to the mount
(38). Place the tile cutter into the trough and
screw on the trough fixture (39).
앬 Unscrew and remove the star handle screw (11)
and spacer (40) and keep them in a safe place.
앬 Fill the trough with water until the cooling water
pump is completely immersed.
7.2 ON/OFF switch (Fig. 7)
앬 To switch on, press the “1” on the ON/OFF
switch (16).
앬 Before you begin cutting, wait until the cutting
wheel has reached maximum speed and the
cooling water pump (13) has started supplying
the cutting wheel with water.
앬 To switch off, press the “0” on the switch (16).
7.3 90° Cutting (Fig. 8/9)
앬 Loosen the star grip screw (27).
앬 Set the angle stop (5) to 90° and retighten the
star grip screw (27).
앬 Retighten the screws (28) to fasten the angle
stop (5).
앬 Move the machine head (29) to the far end with
the handle (9).
앬 Position the tile against the rail fence (6) on the
angle stop (5).
앬 Switch on the tile cutting machine.
앬 Caution: Always wait until the cooling water has
reached the cutting wheel (2) first.
앬 Move the machine head (29) slowly and
smoothly forward through the tile with the handle
GB
Anleitung TPR 200-2 SPK1 27.06.2005 9:33 Uhr Seite 9
Page 12

10
(9).
앬 Switch off the tile cutting machine after
completion of cutting.
7.4 45° Diagonal cut (Fig. 10)
앬 Set the angle stop (5) to 45°.
앬 Cut as described in 7.3.
7.5 45° Lengthwise cut, “jolly cut” (Fig.11)
앬 Loosen the star grip screw (10).
앬 Tilt the guide rail (7) to the left to 45° on the
angle scale (17).
앬 Retighten the star grip screw (10).
앬 Cut as described in 7.3.
7.6 Changing the diamond cutting wheel
(Fig. 12/13)
앬 Pull out the power plug.
앬 Unscrew the four screws (35) and remove the
safety hood (8) for the blade.
앬 Using the wrench (34), loosen the flange nut in
the direction of rotation of the cutting wheel (2).
(Caution: Left-hand screw-thread.) To do so,
place the wrench (31) on the motor shaft and
apply counterpressure.
앬 Remove the outer flange (36) and cutting wheel
(2).
앬 Clean the mounting flange thoroughly before
fitting the new cutting wheel.
앬 Fit the new cutting wheel by following the above
procedures in reverse and then tighten.
Caution: Pay attention to the direction of rotation
of the cutting wheel!
앬 Mount the safety hood (8) for the blade again.
8. Maintenance
앬 Clean off all dust and soiling from the machine at
regular intervals, preferably with a cloth or a
brush.
앬 Lubricate all moving parts at regular intervals.
앬 Do not use any aggressive cleaning agents to
clean plastic parts.
앬 Clean off any soiling on the trough (3) and
cooling agent pump (13) at regular intervals,
otherwise the diamond cutting wheel (2) may not
be cooled as required.
9. Ordering of replacement parts
When ordering replacement parts, please provide the
following information:
앬 Machine type
앬 Article number of the machine
앬 Identification number of the machine
앬 Replacement part number of the part to be
replaced
For our latest prices and information please go to
www.isc-gmbh.info
GB
Anleitung TPR 200-2 SPK1 27.06.2005 9:33 Uhr Seite 10
Page 13

Portez des gants de protection
Porter un dispositif de
protection des ye
ux
Ꮯ
Porter un protège-oreilles
Porter un masque de protection
contre la poussière
1. Description de l’appareil (fig. 1/2)
1. Bâti
2. Meule de tronçonnage diamantée
3. Cuve
4. Table de travail
5. Butée angulaire
6. Rail de butée
7. Rail de guidage
8. Dispositif de protection de la meule de
tronçonnage
9. Poignée
10. Vis en étoile pour le réglage de l’angle
11. Vis en étoile pour la protection pendant le
transport
12. Cadre du support
13. Pompe d’eau de refroidissement
14. Tuyau flexible
15. Moteur
2. Etendue des fournitures
앬 Machine à découper les carreaux
앬 Cuve(3)
앬 Pompe d’eau de refroidissement (13)
앬 Butée angulaire (5)
앬 Bâti (1)
3. Utilisation conforme aux fins
La machine à découper les carreaux convient aux
travaux de coupe habituels sur les petits et moyens
carreaux (carreaux, céramique ou matériaux
semblables) en fonction de la taille de la machine.
Elle est particulièrement conçue pour le bricolage et
l’artisanat. Le découpage de bois et de métal n’est
pas permis. Utilisez la machine exclusivement
pour le but pour lequel elle a été conçue. Toute
autre utilisation n’est pas conforme aux fins.
L’utilisateur/opérateur - et non le fabricant - est tenu
responsable pour des dégâts et des blessures
résultant d’une utilisation non conforme. Employez
uniquement des meules de tronçonnage appropriées
pour la machine. Il est interdit d’utiliser toutes sortes
de lames de scie. Le respect des consignes de
sécurité et des instructions de montage ainsi que des
informations de service dans le mode d’emploi est
également partie intégrale d’une utilisation conforme
aux fins. Les personnes qui manient et entretiennent
la machine, doivent se familiariser avec celle-ci et
s’informer sur les risques éventuels.
En outre, les règlements de prévoyance contre les
accidents doivent être strictement respectés. D’autre
part, il faut suivre les autres règles générales à
l’égard de médecine du travail et de sécurité. Des
transformations effectuées sur la machine excluent
entièrement la responsabilité du fabricant pour des
dégâts en résultant.
En dépit d’une utilisation selon les règles, il n’est pas
possible d’écarter complètement certains facteurs de
risques restants. Dûes à la construction et à la
conception de la machine, les problèmes suivants
peuvent apparaître:
앬 Toucher la meule de tronçonnage diamantée
dans la partie non couverte.
앬 Mettre la main dans la meule de tronçonnage
diamantée fonctionnante.
앬 Ejection de la garniture diamantée défectueuse
de la meule de tronçonnage.
앬 Ejection de pièces à travailler ou de morceaux de
pièces à travailler.
앬 Baisse de l’ouïe dûe à la non-utilisation du
protège-oreilles nécessaire.
4. Notes importantes
4.1. Généralités
Prière de lire attentivement le mode d’emploi et d’en
suivre les instructions. Familiarisez-vous avec la
machine, le bon emploi et les consignes de sécurité
(cf. supplément de l’instruction) à l’aide de ce mode
d’emploi.
F
11
Anleitung TPR 200-2 SPK1 27.06.2005 9:33 Uhr Seite 11
Page 14

F
12
Attention!
Pour des raisons de sécurité, il est interdit aux
enfants et aux moins de 16 ans ainsi qu’aux
personnes n’ayant pas pris connaissance de ce
mode d’emploi, d’utiliser la machine à découper les
carreaux.
4.2. Consignes de sécurité supplémentaires
앬 Placer la machine sur une surface plane et
antiglissante. La machine ne doit pas branler.
앬 S’assurer que la tension indiquée sur la plaque
signalétique est identique à celle sur place.
Brancher seulement maintenant.
앬 Mettre des lunettes de sécurité.
앬 Porter un casque anti-bruit.
앬 Porter des gants de protection.
앬 Ne plus utiliser de meules de tronçonnage
diamantées fissurées. Les échanger.
앬 Il est interdit d’employer des meules de
tronçonnage segmentées.
앬 Attention: La meule de tronçonnage continue à
marcher après l’arrêt de la machine!
앬 Ne pas freiner la meule de tronçonnage
diamantée en exercant une pression latérale.
앬 Attention: la meule de tronçonnage diamantée
doit toujours être refroidie à l’eau.
앬 Retirer la fiche de la prise de courant avant de
remplacer la meule de tronçonnage.
앬 Utiliser uniquement des meules de tronçonnage
diamantées appropriées.
앬 Ne jamais laisser la machine sans surveillance
dans des locaux où se trouvent des enfants.
앬 Garder la machine hors de portée des enfants.
앬 Débrancher la machine avant de contrôler le
système électrique du compartiment du moteur.
5. Caractéristiques techniques:
Puissance du moteur 800 W
Vitesse de rotation du moteur 3000 min.
-1
Moteur à courant alternatif 230 V ~ 50 Hz
Classe d’isolation Classe B
Type de protection IP 54
Longueur de coupe 520 mm
Longueur Jolly 520 mm
Hauteur de coupe 90° max. 30 mm
Hauteur de coupe 45° max. 25 mm
Tablette de coupe:
Dimensions 570 mm x 385 mm
Meule de tronnçonnage
diamantée ø 200 x 25,4
Valeurs des émissions de bruit
앬 Le bruit de cette scie est mesuré confermément
à EN ISO 3744; EN ISO 11201. La
bruit peut dépasser 85 db (A) sur le lieu de
travail. Dans ce cas, des mesures
d’insonorisation doivent êtres prises pour
l’utilisateur (portez un protège-oreilles!).
Service Marche à vide
Niveau de pression
acoustique LPA 94 dB (A) 76 dB (A)
Niveau de puissance
acoustique LWA 107 dB (A) 89 dB (A)
6. Avant la mise en service
앬 La machine doit être implantée de façon stable,
elle doit donc être vissée sur un établi, le bâti de
série ou sur un dispositif semblable.
앬 Avant la mise en service, montez tous les capots
et dispositifs de sécurité selon les règles de l’art.
앬 La meule de tronçonnage doit fonctionner sans
gêne.
앬 Avant de raccorder la machine, vérifiez bien que
les données sur la plaque signalétique
correspondent à celles du réseau.
7. Montage et maniement
7.1 Montage (fig. 1-6)
앬 Vissez les pieds d’appui (18) au cadre du support
(12) à l’aide des 4 vis (19).
앬 Mettez le support en place
앬 Introduisez les deux vis (37) pour la fixation de la
cuve de l’intérieur dans les trous carrés et placez
la cuve (3) dans le cadre du support (12).
앬 Fixez la pompe d’eau de refroidissement (13)
dans le support (38). Placez le coupe-carreaux
dans la cuve et vissez la fixation de la cuve (39).
앬 Dévissez la vis à poignée en étoile (11) et la
pièce d’écartement (40) et conservez-les.
앬 Remplissez la cuve d’eau jusqu’à ce que la
pompe d’eau de refroidissement soit
Anleitung TPR 200-2 SPK1 27.06.2005 9:33 Uhr Seite 12
Page 15

13
complètement recouverte d’eau.
7.2. Interrupteur Marche/Arrêt (fig. 7)
앬 Pour mettre la machine en circuit, appuyez sur le
„1“ de l’interrupteur Marche/Arrêt (16).
앬 Avant de commencer à couper, attendez que la
meule de tronçonnage ait atteint la vitesse de
rotation maximale et que la pompe d’eau de
refroidissement (13) ait transporté l’eau à la
meule de tronçonnage.
앬 Pour mettre la machine hors circuit, appuyez sur
le „0“ de l’interrupteur (16).
7.3 Coupes à 90° (fig. 8/9)
앬 Relâchez la vis en étoile (27).
앬 Réglez la butée angulaire (5) sur 90° et resserrez
la vis en étoile (27).
앬 Resserrez les vis (28) pour fixer la butée
angulaire (5).
앬 Faites glisser la tête de machine (29) vers
l’arrière à l’aide de la poignée (9).
앬 Placez le carreau sur le rail de butée (6) de la
butée angulaire (5).
앬 Mettez la machine à découper les carreaux en
circuit.
앬 ATTENTION! Attendez que l’eau de
refroidissement ait atteint la meule de
tronçonnage (2).
앬 Utilisez la poignée (9) pour faire passer
lentement et régulièrement la tête de machine
(29) vers l’avant à travers le carreau.
앬 Après avoir terminé la coupe, remettez la
machine à découper les carreaux hors circuit.
7.4 Coupe diagonale à 45° (fig. 10)
앬 Réglez la butée angulaire (5) sur 45°.
앬 Exécutez la coupe comme décrit au point 7.3.
7.5 Coupe longitudinale à 45° - „Coupe Jolly“
(fig.11)
앬 Relâchez les vis en étoile (10).
앬 Inclinez le rail de guidage (7) vers la gauche à
45° de l’échelle d’angle (17).
앬 Resserrez la vis en étoile (10).
앬 Exécutez la coupe comme décrit au point 7.3.
7.6 Changement de la meule de tronçonnage
diamantée (fig. 12/13)
앬 Retirez la fiche de la prise de courant.
앬 Desserrez les quattre vis (35) et retirez le capot
de protection de la lame de scie (8).
앬 Desserrez l’écrou à bride dans le sens de
rotation de la meule de tronçonnage (2) à l’aide
de la clé (34). (Attention: filetage à gauche)
Placez, ce faisant, la clé (31) sur l’arbre de
moteur et exercez un contre-maintien.
앬 Retirez les brides extérieures (36) et la meule de
tronçonnage (2).
앬 Nettoyez soigneusement la bride-support avant
de monter la nouvelle meule de tronçonnage.
앬 Procédez dans l’ordre inverse pour remettre la
nouvelle meule de tronçonnage en place et
resserrez-la.
Attention: respectez le sens de rotation de la
meule de tronçonnage!
앬 Montez de nouveau le capot de protection de la
lame de scie (8).
8. Entretien
앬 Débarrassez à intervalles réguliers la machine
de toute poussière et salissures. Le nettoyage
se fait de préférence à l’aide d’un chiffon ou d’un
pinceau.
앬 N’employez pas d’agents caustiques pour
nettoyer la matière plastique.
앬 Graissez tous les éléments mobiles à intervalles
réguliers.
앬 Enlevez régulièrement les encrassements de la
cuve (3) et de la pompe d’eau de
refroidissement (13) sinon le refroidissement de
la meule de tronçonnage diamantée (2) n’est
pas assuré.
9. Commande de pièces détachées
Il faut indiquer les données suivantes en cas de
commande de pièces de rechange :
앬 le type de l’appareil
앬 le numéro d’article de l’appareil
앬 le numéro d’identification de l’appareil
앬 le numéro de la pièce de rechange nécessaire
Vous trouverez les prix et informations actuelles à
l’adresse www.isc-gmbh.info
F
Anleitung TPR 200-2 SPK1 27.06.2005 9:33 Uhr Seite 13
Page 16

14
Beschermende
handschoenen dragen
Oogbeschermer dragen
Ꮯ Gehoorbeschermer dragen
Stofmasker dragen
1. Beschrijving van het toestel (fig. 1/2)
11. Onderstel
12. Diamantsnijschijf
13. Kuip
14. Werktafel
15. Hoekaanslag
16. Aanslagrail
17. Geleiderail
18. Beschermkap van de snijschijf
19. Handgreep
10. Schroef met stervormige handgreep voor
hoekafstelling
11. Schroef met stervormige handgreep als
transportborgelement
12. Onderstelframe
13. Koelwaterpomp
14. Slang
15. Motor
2. Omvang van de levering
앬 Tegelsnijmachine
앬 Kuip (3)
앬 Koelwaterpomp (13)
앬 Hoekaanslag (5)
앬 Onderstel (1)
3. Doelmatig gebruik
De tegelsnijmachine kan worden gebruikt voor
gewone snijwerkzaamheden aan kleine of
middelgrote tegels (ceramiek of dgl.) conform de
grootte van de machine. Ze is vooral bedoeld voor
doe-het-zelvers en handwerk. Het snijden van hout
en metaal is niet toegestaan. De machine mag
slechts voor werkzaamheden worden gebruikt
waarvoor zij bedoeld is. Elk verder gaand gebruik
is niet doelmatig. Voor eventueel daaruit
voortvloeiende schade of verwondingen is de
gebruiker/bediener, niet de fabrikant, aansprakelijk.
Alleen de voor de machine gepaste snijschijven
mogen worden gebruikt. Het gebruik van zaagbladen
is verboden. Het naleven van de
veiligheidsvoorschriften alsook van de montage- en
bedrijfsvoorschriften van deze gebruiksaanwijzing
hoort eveneens tot het doelmatig gebruik. Personen,
die de machine bedienen en onderhouden, moeten
met haar vertrouwd en op de hoogte zijn van
eventuele gevaren. Bovendien dienen de geldende
voorschriften ter voorkoming van ongevallen strikt te
worden opgevolgd. Andere algemene regels qua
arbeidsgeneeskunde en veiligheid dienen in acht te
worden genomen. Wijzigingen aan de machine
sluiten een aansprakelijkheid van de fabrikant en
daaruit voortvloeiende schade helemaal uit. Ondanks
een doelmatig gebruik kunnen bepaalde resterende
risicofactoren niet volledig uit de weg worden
geruimd. Ten gevolge van de constructie en de
opbouw van de machine kunnen zich de volgende
punten voordoen:
앬 Raken van de diamantschijf in het niet afgedekt
zaagbereik.
앬 Grijpen in de draaiende diamantschijf.
앬 Wegspringen van een defect diamantopzetstuk
van de diamantschijf.
앬 Van werkstukken en werkstukdelen.
앬 Gehoorschade bij niet-gebruik van de nodige
gehoorbeschermer.
4. Belangrijke aanwijzingen
4.1. Algemeen
Lees deze gebruiksaanwijzing zorgvuldig en volg de
aanwijzingen ervan op. Maakt u zich aan de hand
van deze gebruiksaanwijzing vertrouwd met het
toestel, het juiste gebruik alsook met de
veiligheidsvoorschriften (zie bijlage).
Let op!
Om veiligheidsredenen mogen kinderen en jongeren
onder 16 jaar alsook personen die niet vertrouwd zijn
met deze gebruiksaanwijzing de tegelsnijmachine
NL
Anleitung TPR 200-2 SPK1 27.06.2005 9:33 Uhr Seite 14
Page 17

15
niet gebruiken.
4.2. Aanvullende veiligheidsvoorschriften
앬 Machine op effen slipvaste grond plaatsen.
De machine mag niet wiebelen.
앬 Vergewis u zich ervan dat de spanning vemeld
op het kenplaatje overeenkomt met de
voorhanden zijnde spanning. Dan pas de stekker
aansluiten op het stroomnet.
앬 Veiligheidsbril dragen.
앬 Gehoorbeschermer dragen.
앬 Veiligheidshandschoenen dragen.
앬 Diamantschijven vol scheuren niet meer
gebruiken. Ze moeten worden vervangen.
앬 Let op: diamantschijf blijft nog een tijdje draaien
totdat ze tot stilstand komt!
앬 De diamantschijf geenszins afremmen door er
zijdelings tegen te duwen.
앬 Let op! Diamantsnijschijf moet altijd met water
worden gekoeld.
앬 Netstekker uittrekken alvorens de snijschijf te
verwisselen.
앬 Gebruik alleen gepaste diamantschijven.
앬 Machine nooit zonder toezicht in vertrekken laten
staan waarin kinderen aanwezig zijn.
앬 Machine ontoegankelijk voor kinderen bewaren.
앬 Vóór de controle van het elektrisch systeem van
de motorkamer netstekker uittrekken.
5. Technische gegevens
Motorvermogen 800 W
Motortoerental 3000 t/min.
Wisselstroommotor 230 V ~ 50 Hz
Isoleerstofklasse Klasse B
Bescherming type IP 54
Snijlengte 520 mm
Lengte jolly 520 mm
Snijhoogte 90° max. 30 mm
Snijhoogte 45° max 25 mm
Snijtafel:
- afmetingen 570 mm x 385 mm
Diamantschijf ø 200 x ø 25,4
Geluidsemissiewaarden
앬 Het geluid van deze snijmachine wordt gemeten
volgens EN ISO 3744; EN ISO 11201
aanhangsel. Het geluid kan aan de werkplaats
85 dB (A) overschrijden. In dit geval zijn
geluidswerende maatregelen voor de gebruiker
noodzakelijk (gehoorbeschermer dragen).
Bedrijf Stationair
Geluidsdrukniveau LPA 94 dB(A) 76 dB(A)
Geluidsvermogen LWA 107 dB(A) 89 dB(A)
6. Vóór inbedrijfstelling
앬 De machine moet worden opgesteld zodat ze
veilig staat, d.w.z. ze moet op een werkbank, het
standaardonderstel of dgl. worden
vastgeschroefd.
앬 Vóór inbedrijfstelling moeten alle afdekkingen en
veiligheidsinrichtingen naar behoren zijn
gemonteerd.
앬 De snijschijf moet vrij kunnen draaien.
앬 Controleer of de gegevens vermeld op het
kenplaatje overeenkomen met de gegevens van
het stroomnet alvorens de machine aan te
sluiten.
7.1 Montage (fig. 1-6)
앬 Standbenen (18) vastschroeven op het
onderstelframe (12) d.m.v. de 4 schroeven (19).
앬 Onderstel opstellen
앬 De beide schroeven (37) voor het bevestigen
van de kuip (3) van binnen de vierkante gaten in
steken en kuip het onderstelframe (12) in
plaatsen.
앬 Koelwaterpomp (13) in de houder (38) fixeren.
Tegelsnijmachine de kuip in plaatsen en
kuipfixering (39) vastschroeven.
앬 Stergreepschroef (11) en afstandsstuk (40)
afschroeven en bewaren.
앬 Kuip met water vullen tot de koelwaterpomp
helemaal onder water staat.
7.2 Aan-/uitschakelaar (fig. 7)
앬 Om de machine aan te zetten drukt u op „1“ van
de AAN- / UIT-schakelaar (16).
앬 Voordat u met het snijden begint dient u te
wachten tot de snijschijf het maximumtoerental
heeft bereikt en de koelwaterpomp (13) water
naar de snijschijf heeft gebracht.
NL
Anleitung TPR 200-2 SPK1 27.06.2005 9:33 Uhr Seite 15
Page 18

16
앬 Om de machine uit te zetten drukt u op „0“ van
de schakelaar (16).
7.3 90° sneden (fig. 8/9)
앬 Schroef met stervormige handgreep (27)
losdraaien.
앬 Hoekaanslag (5) op 90° afstellen en schroef met
stervormige handgreep (27) terug aanhalen.
앬 Schroeven (28) opnieuw aanhalen teneinde de
hoekaanslag (5) vast te zetten.
앬 Machinekop (29) aan de handgreep (9) naar
achteren schuiven.
앬 Tegel tegen de aanslagrail (6) aan de
hoekaanslag (5) schuiven.
앬 Tegelsnijmachine inschakelen.
앬 Let op: Afwachten tot het koelwater de snijschijf
(2) heeft bereikt.
앬 Machinekop (29) langzaam en gelijkmatig aan de
handgreep (9) door de tegel heen naar voren
trekken.
앬 Aan het einde van de snede de tegelsnijmachine
opnieuw uitschakelen.
7.4 45° Diagonale snede (fig. 10)
앬 Hoekaanslag (5) op 45° afstellen.
앬 Snede uitvoeren zoals beschreven onder 7.3.
7.5 45° Langssnede „jollysnede“ (fig. 11)
앬 Schroef met stervormige handgreep (10)
losdraaien.
앬 Geleiderail (7) naar links schuin zetten op 45°
van de schaal (17) met hoekmaten.
앬 Schroef met stervormige handgreep (10)
opnieuw aanhalen.
앬 Snede uitvoeren zoals beschreven onder 7.3.
7.6 Verwisselen van diamantsnijschijf (fig. 12/13)
앬 Netstekker trekken
앬 De 4 schroeven (35) losdraaien en beschermkap
(8) van het zaagblad verwijderen.
앬 De flensmoer in draairichting van de snijschijf (2)
losdraaien m.b.v. de sleutel (34). (Let op: linkse
schroefdraad) Daarbij sleutel (31) op de motoras
aanzetten en tegenhouden.
앬 Buitenflenzen (36) en snijschijf (2) afnemen.
앬 Montageflens zorgvuldig schoonmaken alvorens
de nieuwe snijschijf te monteren.
앬 De nieuwe snijschijf in omgekeerde volgorde
monteren en aanhalen.
Let op: Draairichting van de snijschijf in acht
nemen!
앬 Beschermkap (8) van het zaagblad opnieuw
monteren.
8. Onderhoud
앬 Machine regelmatig van stof en verontreini-
gingen ontdoen. Voor het schoonmaken gebruikt
u best een doek of borstel.
앬 Gebruik voor het schoonmaken van de kunststof
geen bijtende middelen.
앬 Alle beweegbaare onderdelen dienen regelmatig
bijgesmeerd te worden.
앬 De kuip (3) en de koelmiddelpomp (13)
regelmatig van vuil ontdoen omdat anders de
koeling van de diamantsnijschijf (2) niet
verzekerd is.
9. Bestellen van wisselstukken
Gelieve bij het bestellen van wisselstukken volgende
gegevens te vermelden:
앬 Type van het toestel
앬 Artikelnummer van het toestel
앬 Ident-nummer van het toestel
앬 Wisselstuknummer van het benodigd stuk
Actuele prijzen en info vindt u terug onder www.iscgmbh.info
NL
Anleitung TPR 200-2 SPK1 27.06.2005 9:33 Uhr Seite 16
Page 19

I
17
Portare guanti protettivi
Portare il dispositivo proteggiocchi
Ꮯ Portare il dispositivo proteggiudito
Portare il dispositivo proteggipolvere
1. Descrizione dell’utensile (Fig. 1/2)
1. Basamento
2. Disco diamantato
3. Vaschetta
4. Tavolo da lavoro
5. Guida ad angolo
6. Battuta
7. Barra di guida
8. Coprilama
9. Impugnatura
10. Manopola a crociera per regolazione
dell’inclinazione
11. Manopola a crociera per il bloccaggio per il
trasporto
12. Telaio del basamento
13. Pompa dell’acqua di raffreddamento
14. Tubo flessibile
15. Motore
2. Elementi forniti
앬 Tagliapiastrelle
앬 Vaschetta (3)
앬 Pompa dell’acqua di raffreddamento (13)
앬 Guida ad angolo (5)
앬 Basamento (1)
3. Utilizzo regolamentare
Il tagliapiastrelle può venire usato per i normali lavori
di taglio su piastrelle di piccole o medie dimensioni
(piastrelle in ceramica o simili) in modo
corrispondente alle dimensioni dell’elettroutensile.
Essa è stata oltremodo realizzata sia per l’artigiano
sia per il do-it-yourselfer. Non è consentito tagliare
legno e metallo. La macchina la si può usare
soltanto per i lavori a cui essa è destinata. Ogni
altro esorbitante utilizzo non è conforme al
regolamento.
L’utente/l’operatore, e non il costruttore, è
responsabile di tutti i danni o lesioni di ogni sorta da
esso derivanti.
Si devono usare soltanto dei dischi troncatori adatti
all’uso con questa macchina. È vietato impiegare
dischi di taglio per seghe. Parte costituente l’utilizzo
regolamentare è anche l’osservanza delle
avvertenze sulla sicurezza, nonché le istruzioni per il
montaggio e le avvertenze sul funzionamento
integrate nelle istruzioni d’uso. Le persone,
manovranti e manutenzionanti la macchina, devono
saperla usare ed essere al corrente dei pericoli
incombenti. Oltracciò si devono minuziosamente
osservare le vigenti disposizioni UVV. Si devono
osservare le ulteriori regole generali degli ambiti
medico-lavorativi e tecnico-precauzionali. I
cambiamenti effettuati alla macchina escludono
totalmente la responsabilità, ed i risultanti danni, da
parte del costruttore. Nonostante la macchina venga
regolarmente utilizzata, non sono completamente
esclusi certi pericoli e rischi. Per via della costruzione
e della configurazione può succedere quanto in
seguito specificato:
앬 toccare colla mano il disco troncatore nella
superficie scoperta,
앬 mettere la mano sul disco troncatore diamantato
rotante,
앬 scaraventamento all’esterno di un’applicazione
diamantata del disco troncatore difettosa,
앬 di pezzi da lavorare e loro frazioni.
앬 danni all’udito, se sprovvisti dei necessari
dispositivi proteggiudito.
4. Avvertenze importanti
4.1. Generalità
Si prega di leggere alla lettera le istruzioni d’uso,
osservando le avvertenze contenutevi. Con l’aiuto di
queste istruzioni per l’uso informatevi bene su ciò
che riguarda l’apparecchio, l’ uso corretto e le
avvertenze di sicurezza (vedi allegato).
Anleitung TPR 200-2 SPK1 27.06.2005 9:33 Uhr Seite 17
Page 20

I
18
Attenzione!
Per ragioni di sicurezza non è consentito l’uso della
Taglierina per marmette sia ai bambini e giovani di
età inferiore agli anni 16, sia a persone che non
abbiano esatta nozione delle presenti istruzioni
d’uso.
4.2. Ulteriori avvertenze di sicurezza
앬 Porre l’attrezzo su fondo piano e antiscivolo.
L’attrezzo non deve vacillare.
앬 Verificare che la tensione di rete sulla targhetta
dei dati corrisponda a quella disponibile. Solo
dopo collegare la spina alla rete elettrica.
앬 Mettersi gli occhiali protettivi.
앬 Portare il dispositivo proteggiudito.
앬 Portare i guanti protettivi.
앬 Non usare più i dischi troncatori screpolati, e
ricambiarli.
앬 Attenzione: il disco troncatore decelera
lentamente!
앬 Non frenare il disco troncatore diamantato
esercitando su di esso una pressione laterale.
앬 Attenzione: il disco diamantato deve venire
sempre raffreddato a umido.
앬 Avanti di ricambiare il disco troncatore, staccare
la spina dalla presa di rete.
앬 Utilizzare soltanto dischi troncatori adatti.
앬 Non lasciare mai l’attrezzo insorvegliato in
ambienti con dentro dei bambini.
앬 Non rendere l’attrezzo accessibile ai bambini.
앬 Prima di controllare la sezione elettrica nel vano
del motore, staccare la spina dalla presa di rete.
5. Dati tecnici
Potenza del motore: 800 W
Numero giri del motore: 3000 min
-1
Motore a corrente alternata: 230 V ~ 50 Hz
Isolamento: Classe B
Protezione: IP 54
Lunghezza taglio: 520 mm
Lunghezza jolly: 520 mm
Altezza taglio 90° max. 30 mm
Altezza taglio 45° max. 25 mm
Banco di taglio:
Dimensioni: 570 mm x 385 mm
Disco troncatore diamantato: 200 x 25,4
Valori dell’emissione del rumore
앬 Il rumore di questa sega viene rilevato a norma
EN ISO 3744; EN ISO 11201 appendice. Il
rumore sul posto di lavoro può superare 85 dB
(A). In tal caso sono necessarie misure di
protezione contro il rumore per l’operatore.
(Portare il dispositivo proteggiudito!)
Operante Corsa
a vuoto
Livello intensità
acustica LPA 94 dB (A) 76 dB (A)
Livello potenza
acustica LWA 107 dB (A) 89 dB (A)
6. Prima della messa in esercizio
앬 La macchina deve venire installata in posizione
stabile, cioè su un banco di lavoro, sul
basamento di serie o un dispositivo simile.
앬 Prima della messa in esercizio devono essere
regolarmente montate tutte le coperture ed i
dispositivi di sicurezza.
앬 Il disco deve potersi muovere liberamente.
앬 Prima di inserire la spina nella presa di corrente
assicuratevi che i dati sulla targhetta di
identificazione corrispondano a quelli di rete.
7. Struttura e funzionamento
7.1 Montaggio (Fig. 1-6)
앬 Avvitate le gambe (18) al telaio del basamento
(12) mediante le 4 viti (19).
앬 Installate il basamento
앬 Inserite entrambe le viti (37) per fissare la
vaschetta dall’interno attraverso i fori quadrati e
poggiate la vaschetta (3) nel telaio del
basamento (12).
앬 Fissate la pompa dell’acqua di raffreddamento
(13) al supporto (38). Mettete la taglierina nella
vaschetta e avvitate con dispositivi di fissaggio
(39).
앬 Svitate la manopola a crociera (11) e il
distanziale (40) e conservateli.
앬 Riempite la vaschetta di acqua finché la pompa
dell’acqua di raffreddamento ne sia
completamente coperta.
Anleitung TPR 200-2 SPK1 27.06.2005 9:33 Uhr Seite 18
Page 21

I
19
7.2 Interruttore ON/OFF (Fig. 7)
앬 Per accendere premete sull’ „1“ dell’interruttore
ON/OFF (16).
앬 Prima di iniziare l’operazione di taglio si deve
aspettare che il disco abbia raggiunto il numero
max. di giri e che la pompa dell’acqua di
raffreddamento (13) abbia trasportato l’acqua
verso il disco.
앬 Per spegnere premete sullo „0“ dell’interruttore
(16).
7.3 Tagli a 90° (Fig. 8/9)
앬 Allentare la vite con manopola a crociera (27)
앬 Posizionare la guida ad angolo (5) su 90° e
avvitare di nuovo la vite con manopola a crociera
(27).
앬 Avvitare di nuovo le viti (28) per bloccare la
guida ad angolo (5).
앬 Con l’impugnatura (9) spingere all’ indietro la
testa della macchina (29).
앬 Posizionare la piastrella sulla guida di arresto (6)
della guida ad angolo (5).
앬 Accendere il tagliapiastrelle.
앬 Attenzione: attendere che l’acqua di
raffreddamento abbia raggiunta il disco (2).
앬 Con l’impugnatura (9) tirare lentamente e
regolarmente la testa della macchina (29) in
avanti attraverso la piastrella.
앬 Dopo aver eseguito il taglio spegnere il
tagliapiastrelle.
7.4 Taglio diagonale a 45° (Fig. 10)
앬 Regolare la guida ad angolo (5) su 45°.
앬 Eseguire il taglio come spiegato al punto 7.3.
7.5 Taglio longitudinale, „taglio Jolly“ a 45°
(Fig. 11)
앬 Allentare la vite con manopola a crociera (10)
앬 Inclinare la guida (7) verso sinistra su 45° della
scala per inclinazione (17).
앬 Serrare di nuovo la vite con la manopola a
crociera (10).
앬 Eseguire il taglio come spiegato al punto 7.3.
7.6 Sostituire il disco diamantato (Fig. 12/13)
앬 Staccare la spina dalla presa di corrente.
앬 Allentare le 4 viti (35) e togliere il coprilama (8).
앬 Allentare con la chiave (34) il dado della flangia
nel senso di rotazione del disco (2).
(Attenzione: filetto sinistro) Mettete la chiave
(31) sull’albero motore e bloccatelo.
앬 Togliere le flange esterne (36) e il disco (2).
앬 Prima del montaggio del nuovo disco pulire
accuratamente le sedi a flangia
앬 Rimontare il nuovo disco nell’ordine inverso e
serrarlo.
Attenzione: Rispettare il senso di rotazione del
disco!
앬 Rimontare il coprilama (8).
8. Manutenzione
앬 La macchina deve venire pulita regolarmente
dalla polvere e dallo sporco. È consigliabile
eseguire la pulizia con un panno o un pennello.
앬 Non usate delle sostanze caustiche per la
pulizia.
앬 Lubrificare periodicamente tutte le parti mobili
della sega.
앬 La vaschetta (3) e la pompa per il refrigerante
(13) devono venire pulite regolarmente, altrimenti
non viene garantito il raffreddamento del disco
diamantato (2).
9. Commissione dei pezzi di ricambio
Volendo commissionare dei pezzi di ricambio, si
dovrebbe dichiarare quanto segue:
앬 modello dell’apparecchio
앬 numero dell’articolo dell’apparecchio
앬 numero d’ident. dell’apparecchio
앬 numero del pezzo di ricambio del ricambio
necessitato.
Per i prezzi e le informazioni attuali si veda www.iscgmbh.info
Anleitung TPR 200-2 SPK1 27.06.2005 9:33 Uhr Seite 19
Page 22

DK
20
Brug beskyttelseshandsker
Benyt sikkerhedsbriller
eller -skærm
Ꮯ
Benyt høreværn
Benyt støvmask
1. Beskrivelse af maskinen (fig. 1/2)
11. Understel
12. Diamantkapskive
13. Trug
14. Arbejdsbord
15. Vinkelanslag
16. Ansatsskinne
17. Føreskinne
18. Kapskiveskærm
19. Håndtag
10. Stjernegrebsskrue til vinkelindstilling
11. Stjernegrebsskrue til transportsikring
12. Stelramme
13. Kølevandspumpe
14. Slange
15. Motor
2. Med i leveringen
앬 Fliseskærer
앬 Trug (3)
앬 Kølevandspumpe (13)
앬 Vinkelansats (5)
앬 Understel (1)
3. Formålsbestemt anvendelse
Fliseskæremaskinen kan anvendes til almindelige
skærearbejder på små og mellemstore fliser (kakler,
keramik og lign.) svarende til maskinens størrelse.
Maskinen er især beregnet til gør-det-selv folk og
håndværkere. Det er ikke tilladt at save træ og metal
med maskinen. Saven må kun benyttes til de
formål, den er beregnet til. Hvis saven anvendes til
andre formål, er der tale om misbrug. Brugeren og
ikke producenten bærer ansvaret for eventuelle
skader og alle former for kvæstelser som følge heraf.
Der må kun anvendes skæreskiver, der egner sig til
maskinen. Det er forbudt at benytte savblade af
nogen som helst art. Korrekt anvendelse af saven
betyder også, at sikkerhedsinstruktionerne samt
vejledningen m.h.t. samlingen og anvendelsen af
saven i instruktionsbogen overholdes. De personer,
der arbejder med saven og vedligeholder den, skal
kende den og være instrueret om den mulige risiko
ved at benytte den. Derudover skal de gældende
bestemmelser til forebyggelse af ulykker overholdes
nøje. Der skal også tages højde for andre
eksisterende generelle retningslinjer m.h.t.
arbejdsmiljø og sikkerhed. Hvis der foretages
ændringer på maskinen, bortfalder ethvert ansvar for
eventuelle skader som følge heraf fra producentens
side. Også ved korrekt anvendelse af saven kan
bestemte restrisikofaktorer ikke udelukkes
fuldstændigt. Det drejer sig som følge af maskinens
konstruktion og opbygning især om følgende:
앬 Berøring af diamantskæreskiven uden for det
afskærmede område.
앬 Snitsår som følge af kontakt med den roterende
diamantskæreskive.
앬 Udslyngning af fejlbehæftet diamantbelægning
fra skæreskiven.
앬 Af arbejdsemner og dele heraf.
앬 Høreskader som følge af manglende anvendelse
af høreværn.
4. Vigtigt
4.1. Generelt
Læs instruktionsbogen omhyggeligt igennem og
overhold instruktionerne. Brug denne
betjeningsvejledning til at gøre dig fortrolig med
maskinen og hvordan, den anvendes korrekt.
Ligeledes skal du mærke dig
sikkerhedsanvisningerne (se medfølgende blad).
OBS!
Af hensyn til sikkerheden må personer under 16 år
samt andre, der ikke kender denne instruktionsbog,
ikke arbejde med flisesavemaskinen.
Anleitung TPR 200-2 SPK1 27.06.2005 9:33 Uhr Seite 20
Page 23

DK
21
4.2. Ekstra sikkerhedsanvisninger
앬 Opstil maskinen på et plant og skridsikkert gulv.
Maskinen må ikke vippe.
앬 Sørg for, at spændingen på dataskiltet svarer til
den forhåndenværende spænding.
앬 Benyt sikkerhedsbriller.
앬 Benyt høreværn
앬 Tag beskyttelseshandsker på.
앬 Hvis en diamantskæreskive revner, skal den
skiftes ud.
앬 Der må ikke benyttes skæreskiver, der er opdelt i
segmenter.
앬 Vær opmærksom på, at saven roterer videre
efter afbrydelse af strømmen.
앬 Skæreskiven må ikke bremses ved at presse
den fra siden.
앬 Vigtigt: Diamantkapskiven skal altid afkøles med
vand.
앬 Træk stikket ud af stikkontakten før udskiftning af
skæreskiven.
앬 Der må kun benyttes egnede skæreskiver på.
앬 Lad aldrig saven stå uden opsyn i lokaler med
børn.
앬 Sørg for, at maskinen er utilgængelig for børn.
앬 Træk stikket ud af stikkontakten inden kontrol af
det elektriske system i motorrummet.
5. Tekniske specifikationer
Motorens effekt: 800 W
Omdrejningshastighed: 3000 o/min.
-1
Vekselstrømsmotor 230 V ~ 50 Hz
Isoleringsmaterialets klasse: Klasse B
Afsikring: IP 54
Savningens længde: 520 mm
Jollyens længde: 520 mm
Savehøjde 90° max. 30 mm
Savehøjde 45° max. 25 mm
Savbordet:
Dimensioner: 570 x 385 mm
Diamantskæreskive: Ø 200 x 25,4
Støjemission
앬 Støjen fra saven måles ifølge EN ISO 3744;
EN ISO 11201 tillæg.
Saven kan frembringe en støj på over 85 dB (A)
under arbejdet. I så fald skal der sørges for
støjafskærmning for brugeren (Brug høreværn!).
Drift Tomgang
Lydtryksniveau LPA 94 dB(A) 76 dB(A)
Lydeffektniveau LWA 107 dB(A) 89 dB(A)
6. Før maskinen tages i brug
앬 Maskinen skal stilles op, så den står sikkert, dvs.
at den skal skrues fast til en arbejdsbænk, det
tilhørende understel eller lign.
앬 Før maskinen tages i brug, skal alle afdækninger
og sikkerhedsanordninger være rigtigt
påmonterede.
앬 Kapskiven skal kunne køre frit.
앬 Før du tænder for maskinen, skal du sikre dig, at
oplysningerne på mærkepladen svarer til
oplysningerne for strømforsyningen.
7. Opstilling og betjening
7.1 Samling (fig. 1-6)
앬 Skru bordbenene (18) på rammen af understellet
(12) med de 4 skruer (19).
앬 Stil understellet op.
앬 Stik de to skruer (37) til bakkefikseringen
gennem firkanthullerne indefra, og læg bakken
(3) i understellets ramme (12).
앬 Fikser kølevandspumpen (13) i
holdeanordningen (38). Stil fliseskæreren i
bakken, og skru bakkefikseringen (39) på.
앬 Skru stjernegrebsskruen (11) og afstandsstykket
(40) ud, og gem dem.
앬 Fyld bakken op med vand, indtil
kølevandspumpen er dækket helt af vand.
7.2 Tænd/sluk-knap (fig. 7)
앬 For at tænde skal du trykke på „1“ på afbryderen
(16).
앬 Før skærearbejdet påbegyndes skal du vente på,
at kapskiven har nået det maksimale
omdrejningstal, og kølevandspumpen (13) har
transporteret vandet til kapskiven.
앬 For at slukke skal du trykke på „0“ på afbryderen
(16).
Anleitung TPR 200-2 SPK1 27.06.2005 9:33 Uhr Seite 21
Page 24

DK
22
7.3 90° snit (fig. 8/9)
앬 Løsn stjernegrebsskruen (27).
앬 Vinkelansats (5) sættes til 90°, og
stjernegrebsskruen (27) strammes til igen.
앬 Skruerne (28) strammes til igen for at fiksere
vinkelansatsen (5).
앬 Maskinhovedet (29) på håndtaget (9) skubbes
bagud.
앬 Flise lægges på ansatsskinnen (6) op ad
vinkelansatsen (5).
앬 Tænd for fliseskæreren.
앬 Vigtigt: Vent, indtil kølevandet har nået
kapskiven (2).
앬 Tag fat i håndtaget og træk maskinhovedet (29)
langsomt og jævnt fremad gennem flisen.
앬 Efter at skærearbejdet er afsluttet, skal du slukke
for fliseskæreren.
7.4 45° Diagonalsnit (fig. 10)
앬 Indstil vinkelansats (5) til 45°
앬 Foretag snit som beskrevet i 7.3.
7.5 45° Langsgående snit, „Jolly-snit“ (fig. 11)
앬 Løsn stjernegrebsskruen (10)
앬 Lad føringsskinnen (7) hælde 45° i forhold til
vinkelskalaen (17).
앬 Stram stjernegrebsskruen (10) til igen.
앬 Foretag snit som beskrevet i 7.3.
7.6 Udskift diamantkapskiven (fig. 12/13)
앬 Træk netstikket ud
앬 Løsn de 4 skruer (35), og tag savbladsværnet (8)
af.
앬 Ved hjælp af nøglen (34) løsnes flangemøtrikken
i kapskivens (2) løberetning. (Vigtigt:
venstregevind) Imens sætter du nøglen (31) ind
på motorakslen for at holde imod.
앬 Yderflangen (36) og kapskiven (2) tages af.
앬 Holderflangen rengøres grundigt, før den nye
kapskive sættes på.
앬 Den nye kapskive sættes i igen i omvendt
rækkefølge og spændes fast.
Vigtigt: Bemærk kapskivens løberetning!
앬 Savbladsværnet (8) sættes på igen.
8. Vedligeholdelse
앬 Støv og snavs skal regelmæssigt fjernes fra
maskinen. Rengøring foretages bedst med en
klud eller blød børste.
앬 Undgå brug af ætsende midler til rengøring af
kunststofdele.
앬 Alle bevægelige dele skal smøres med jævne
mellemrum.
앬 Trug (3) og kølemiddelpumpe (13) skal
regelmæssigt rengøres for snavs, da køling af
diamantkapskiven (2) ellers ikke vil fungere
effektivt.
9. Bestilling af reservedele
Ved bestilling af reservedele skal følgende oplyses:
앬 Savens type.
앬 Savens artikelnummer.
앬 Savens identifikationsnummer.
앬 Nummeret på den nødvendige reservedel.
Aktuelle priser og øvrige oplysninger finder du på
internetadressen www.isc-gmbh.info
Anleitung TPR 200-2 SPK1 27.06.2005 9:33 Uhr Seite 22
Page 25

HR
23
Nosite zaštitne rukavice
Nosite zaštitne naočale
Ꮯ
Nosite zaštitne slušalice
Nosite masku protiv prašine
1. Opis uredjaja (slike 1/2)
11. Postolje
12. Dijamantna rezna ploča
13. Posuda
14. Radni stol
15. Kutni graničnik
16. Šipka graničnika
17. Vodilica
18. Štitnik rezne ploče
19. Ručka
10. Vijak sa zvjezdastom glavom za podešavanje
kuta
11. Vijak sa zvjezdastom glavom za osiguranje
prilikom transporta
12. Okvir donjeg postolja
13. Crpka za rashladnu vodu
14. Crijevo
15. Motor
2. Opseg isporuke
앬 Rezač keramičkih ploča
앬 Posuda (3)
앬 Crpka za rashladnu vodu (13)
앬 Kutni graničnik (5)
앬 Postolje (1)
3. Namjenska upotreba
Rezač keramičkih ploča se može upotrijebiti za
obično rezanje malih i srednjih pločica (kalj,
keramika i slično) u skladu s veličinom stroja.
Koncipiran je osobito za radove u kući i obrt.
Rezanje drva i metala nije dozvoljeno. Stroj se smije
koristiti samo shodno namjeni. Svaka druga i
dodatna upotreba nije namjenska. Za štete ili
svakojake ozljede koje nastaju usljed takve
nenamjenske upotrebe odgovara korisnik/radnik, a
ne proizvodjač. Smiju se koristiti samo rezne ploče
koje su prikladne za stroj. Uporaba listova pile je
zabranjena. Sastavni dio namjenske upotrebe je
takodjer poštivanje sigurnosnih uputa, te naputak za
montažu i upute za rad u naputku za uporabu.
Osobe koje rade na stroju i koje ga održavaju moraju
biti upoznati s njim i poučeni o mogućim
opasnostima. Osim toga, važeći propisi za
sprečavanje nesreća se najstrože moraju uvažiti.
Treba poštivati ostala opća pravila iz radne medicine
i sigurnosne tehnike. Izmjene na stroju u cijelosti
isključuju odgovornost proizvodjača, i za štete koje
nastaju usljed toga. I u slučaju namjenske upotrebe
se ne mogu u potpunosti ukloniti odredjeni rizici.
Uvjetovano konstrukcijom i sastavom stroja se
mogu pojaviti slijedeći rizici:
앬 diranje dijamantne rezne ploče u nepokrivenom
predijelu
앬 diranje dijamantne rezne ploče dok se okreće
앬 izbacivanje neispravnog komada dijamantne
obloge rezne ploče
앬 izradaka i dijelova izratka
앬 oštećenje sluha kada se ne koristi
potrebnazaštita za uši.
4. Važne upute
4.1. Opće
Molimo da pažljivo pročitate naputak za upotrebu i
da se držite uputa iz njega. Na osnovu naputka za
upotrebu upoznajte se s uredjajem, ispravnom
upotrebom, te sigurnosnim uputama (vidi prilog).
4.2. Dodatne sigurnosne upute
앬 Postavite stroj na ravan, nesklizak pod. Stroj se
ne smije klimati.
앬 Uvjerite se da napon na označnoj pločici
odgovara naponu prisutne mreže. Tek nakon
toga priključite utikač na strujnu mrežu.
앬 Stavite zaštitne naočale.
앬 Nosite zaštitne slušalice.
앬 Nosite zaštitne rukavice.
앬 Napuknute dijamantne rezne ploče više ne
Anleitung TPR 200-2 SPK1 27.06.2005 9:33 Uhr Seite 23
Page 26

HR
24
upotrebljavajte, zamijenite ih.
앬 Pažnja: Rezna ploča se nakon isključivanja
pogona još okreće!
앬 Ne zaustavljajte dijamantnu reznu ploču
pritiskajući je sa strane.
앬 Pažnja: Dijamantna rezna ploča se uvijek mora
hladiti vodom.
앬 Prije zamjenjivanja rezne ploče izvadite utikač iz
utičnice.
앬 Koristite samo odgovarajuće dijamantne rezne
ploče.
앬 Nikada ne ostavljajte stroj bez nadzora u
prostorijama gdje su djeca.
앬 Prije kontrole elektr. sustava motora izvadite
utikač iz utičnice.
5. Tehnički podaci:
Snaga motora: 800 W
Broj okretaja motora: 3000 min.
-1
Motor naizmjenične struje 230 V ~ 50 Hz
Klasa izolacijskih materijala Klasa B
Vrsta zaštite IP54
Duljina reza: 520 mm
Duljina jolly reza: 520 mm
Visina reza 90° max. 30 mm
Visina reza 45° max. 25 mm
Stol za rezanje:
-Dimenzije 570 mm x 385 mm
Dijamantna rezna ploča Ø 200 x Ø 25,4
Vrijednosti emisije buke
앬 Šum ove pile se mjeri po EN ISO 3744; EN ISO
11201 aneks.
Šum na radnom mjestu može biti veći od 85 db
(A). U tom slučaju su potrebne mjere zvučne
zaštite za korisnika.
(Nosite zaštitne slušalice!)
u radu u praznom hodu
Razina zvučnog tlaka
LPA 94 dB(A) 76 dB(A)
Razina zvučne snage
LWA 107 dB(A) 89 dB(A)
6. Prije puštanja u funkciju
앬 Stroj se mora postaviti tako da stoji čvrsto, t.j.
mora se vijcima pričvrstiti za radni stol ili za
postolje koje je dio serijske opreme ili sl.
앬 Prije puštanja u funkciji svi poklopci i sigurnosne
naprave moraju biti uredno montirani.
앬 Rezna ploča se mora slobodno okretati.
앬 Prije priključivanja stroja uvjerite se da su podaci
na označnoj pločici u skladu s podacima
prisutne mreže.
7. Sastav i rukovanje
7.1 Montaža (sl. 1-6)
앬 Nogare (18) pričvrstite s 4 vijka (19) na okvir
postolja (12).
앬 Namjestite postolje.
앬 Oba vijka (37) za fiksiranje posude utaknite
iznutra kroz četverokutne rupe, a posudu (3)
položite u okvir postolja (12).
앬 Pumpu za rashladnu vodu (13) fiksirajte u držaču
(38). Rezač keramičkih obloga stavite u posudu i
vijcima pričvrstite držač posude (39).
앬 Izvadite zvjezdasti vijak (11) i distancu (40) te ih
sačuvajte.
앬 Posudu napunite vodom tako da pumpa za
rashladnu vodu bude potpuno prekrita vodom.
7.2 Prekidač (slika 7)
앬 Za uključivanje pritisnite „1“ prekidača (16).
앬 Prije započinjanja rezanja treba sačekati dok
rezna ploča nije dostigla maksimalan broj
okretaja, a pumpa (13) opskrbila reznu ploču
rashladnom vodom.
앬 Za isključivanje pritisnite „0“ prekidača (16).
7.3 Rezovi od 90° (slike 8/9)
앬 Popustite vijak sa zvjezdastom glavom (27)
앬 Postavite kutni graničnik (5) na 90° i zategnite
vijak sa zvjezdastom glavom (27).
앬 Zategnite vijke (28) radi fiksiranja kutnog
graničnika (5).
앬 Gurnite glavu stroja (29) na ručci (9) unazad.
앬 Prislonite pločicu uz šipku (6) na kutni graničnik
(5).
앬 Uključite rezač keramičkih ploča.
앬 Pažnja: Sačekajte dok rashladna voda nije došla
do rezne ploče (2).
앬 Povucite glavu stroja (29) polako i ravnomjerno
na ručci (9) unaprijed kroz pločicu.
앬 Nakon završenog reza isključite rezač
keramičkih ploča.
Anleitung TPR 200-2 SPK1 27.06.2005 9:33 Uhr Seite 24
Page 27

HR
25
7.4 Dijagonalni rez od 45° (slika 10)
앬 Postavite kutni graničnik (5) na 45°
앬 Izvedite rez kao što je opisano pod točkom 7.3.
7.5 Uzdužni rez od 45°, „jolly“ rez (slika 11)
앬 Popustite vijak sa zvjezdastom glavom (10)
앬 Nagnite vodilicu (7) ulijevo na 45° kutne ljestvice
(17).
앬 Zategnite vijak sa zvjezdastom glavom (10).
앬 Izvedite rez kao što je opisano pod točkom 7.3.
7.6 Zamjenjivanje dijamantne rezne ploče
(slike 12/13)
앬 Izvadite utikač iz utičnice
앬 Popustite 4 vijka (35) i skinite štitnik rezne ploče
(8).
앬 Ključem (34) popustite prirubnu maticu u pravcu
okretanja rezne ploče (2). (Pažnja: lijevi navoj)
Pritom stavite ključ (31) na osovinu motora i
poduprite.
앬 Skinite vanjske prirubnice (36) i reznu ploču (2).
앬 Prije montaže nove rezne ploče dobro očistite
priključnu prirubnicu.
앬 Ugradite novu reznu ploču u obratnom
redoslijedu i zategnite je.
Pažnja: Pazite na smjer okretanja rezne ploče!
앬 Montirajte štitnik rezne ploče (8).
8. Održavanje
앬 Stroj se redovno mora očistiti od prašine i
onečišćenja. Čišćenje se najbolje obavlja krpom
i četkicom.
앬 Svi pokretni dijelovi se u redovnim intervalima
moraju podmazivati.
앬 Za čišćenje plastike ne rabite nagrizajuća
sredstva.
앬 Posuda (3) i pumpa za rashladno sredstvo (13)
se redovno moraju očistiti, u suprotnom slučaju
nije osigurano hladjenje dijamantne rezne ploče
(2).
9. Naručivanje rezervnih dijelova
Prilikom naručivanja rezervnih dijelova su potrebni
sljedeći podaci:
앬 Tip uredjaja
앬 Broj artikla uredjaja
앬 Ident. broj uredjaja
앬 Broj potrebnog rezervnog dijela
Aktualne cijene i informacije potražite na web-adresi
www.isc-gmbh.info
Anleitung TPR 200-2 SPK1 27.06.2005 9:33 Uhr Seite 25
Page 28

Védôkesztyěket hordani
Szemvédôt hordani
Ꮯ
Zajcsökkentô fülvédôt hordani
Porvédômaszkot hordani
1. A készülék leírása (ábra 1/2)
1. Állvány
2. Gyémánt szétválasztótárcsa
3. Kád
4. Munkaasztal
5. Szögletütközô
6. Ütközôsín
7. Vezetôsín
8. Szétválasztótárcsavédô
9. Fogantyú
10. Csillag markolat alakú csavar a szöglet
beállításához
11. Csillag markolat alakú csavar a
szállításbiztosításhoz
12. Állványkeret
13. Hětôvízszivattyú
14. Tömlô
15. Motor
2. A szállítás kiterjedése
앬 Csempevágó
앬 Kád (3)
앬 Hětôvízszivattyú (13)
앬 Szögletütközô (5)
앬 Állvány (1)
3. Rendeltetésszerû használat
A csempevágógépet, a gép nagyságának megfelelô
kis és közepes csempéken (Kályhacserép, kerámia
vagy hasonlóak) történô szokásos vágási munkákra
lehet alkalmazni. Különösen a barkácsolásra és a
kisiparra lett tervezve. Tilos a fa és a fém vágása. A
gépet csak a rendeltetése szerint szabad alkalmazni.
Ezt túlhaladó használat, nem számít
rendeltetésszerûnek. Ebbôl adódó bármilyen kárért
vagy bármilyen fajta sérülésért a használó/kezelô
felelôs és nem a gyártó. Csak a gépnek megfelelô
szétválasztótárcsákat szabad használni. Tilos a
fûrészlapok használata. A rendeltetésszerûi
alkalmazás része a biztonsági utasítások, valamint a
használati utasításban levô összeszerelési és
üzemeltetési utasítások figyelembe vétele is.
A gépet kezelô és karbantartó személyeknek a gép
használatában jártasnak és a lehetséges
veszélyekkel kapcsolatban kioktatottnak muszáj
lenniük. Ezen kívül pontosan be kell tartani az
érvényes balesetvédelmi elôírásokat. Figyelembe
kell venni a munkaegészségügy és
biztonságtechnika terén fennálló egyébb általános
szabályokat. A gépen történô változtatások, a gyártó
szavatolását, és az ebbôl adódó károk megtérítését,
teljesen kizárják. Bizonyos fennmaradt
rizikótényezôket rendeltetésszerû használat esetén
sem lehet teljes mértékben kizárni. A gép
konstrukciója és felépítése által a következô pontok
következhetnek be:
앬 a gyémánt szétválasztótárcsa megérintése a
nem lefedett vágásikörben.
앬 a forgó gyémánt szétválasztótárcsához való
nyúlás.
앬 a szétválasztótárcsának egy hibás
gyémántrátétének a kivetése.
앬 a munkadarabok és munkadarabrészek.
앬 a szükséges zajcsökkentô füllvédô
használatának mellôzésekor a hallás
károsodása.
4. Fontos utasítások
4.1. Álltalános
Kérjük olvassa el figyelmesen a használati utasítást
és vegye figyelembe az abban foglalt utasításokat.
Ismerkedjen meg ez a használati utasítás alapján a
készülékkel, a helyes használatával, valamint a
biztonsági utasításokkal (lásd a mellékletet).
H
26
Anleitung TPR 200-2 SPK1 27.06.2005 9:33 Uhr Seite 26
Page 29

4.2. Kiegészítô biztonsági utasítások
앬 A gépet egy egyenes, nem csúszós talajra
állítani. A gépnek nem szabad ingadoznia.
앬 Bizonyosodjon meg arról, hogy az adattbálán
megadott feszültség egyezik a meglevô
feszültséggel. Csak ezután csatlakoztassa a
dugót az áramhálózatra.
앬 Tegye fel a védôszemüveget.
앬 Hordja a zajcsökkentô füllvédôt.
앬 Hordja a védôkesztyěket.
앬 Ne használjon megrepedezett gyémánt
szétválasztótárcsákat és cserélje ôket ki.
앬 Figyelem: a szétválasztótárcsa utánfut!
앬 Ne fékezze le a gyémánt szétválasztótárcsákat
oldali ellennyomás által.
앬 Figyelem: a gyémánt szétválasztótárcsát mindig
muszáj vízzel hěteni.
앬 A szétválasztótárcsa kicserélése elôtt kihúzni a
hálózati dugót.
앬 Csakis megfelelô gyémánt szétválasztótárcsákat
használni.
앬 Ne hagyja a gépet sohasem felügyelet nélkül
termekben, ahol gyerekek is vannak.
앬 Húzza ki a hálózati dugót, mielôtt leellenôrizné
az elektr. motortérszisztémát.
5. Technikai adatok:
Motorteljesítmény: 800 W
Motorfordulatszám: 3000perc
-1
Váltakozóáramú motor 230 V ~ 50 Hz
Szigetelôanyagosztály Osztály B
Védelmi rendszer IP 54
Vágás hossza: 520 mm
Hossz Jolly: 520 mm
Vágási magasság 90°: max. 30 mm
Vágási magasság 45°: max. 25 mm
Vágóasztal:
-Méretek 570 mm x 385 mm
Gyémánt szétválasztótárcsa ø 200 x ø 25,4
Zajkibocsátási értékek
앬 Ennek a készüléknek a zajszintjét a DIN EN ISO
3744; EN ISO 11201 szerint mérik. A
munkahelyen a zajkifejtés túllépheti a 85 db-t
(A). Ebben az esetben a használó részére
zajvédô intézkedésekre van szükség.
(Zajcsökkentô fülvédôt hordani!)
Üzemeltetés Üresmenet
Hangnyomásmérték LPA 94 dB(A) 76 dB(A)
Hangteljesítménymérték LWA 107 dB(A) 89 dB(A)
6. Üzembe helyezés elôtt
앬 A gépet stabilan kell felállítani, ez annyit jelent,
hogy egy munkapadra, a szériaszerěi állványra
vagy hasonlóra rá kell feszesen csavarozni.
앬 Az üzembe helyezés elôtt minden fedônek és
biztonsági berendezésnek szabályszerěen kell
felszerelve lennie.
앬 A szétválasztótárcsának szabadon kell futnia.
앬 A gép hozzákapcsolása elôtt ellenôrizze le, hogy
a gép típustábláján levô adatok a hálózati
adatokkal megegyeznek-e.
7. Összeszerelés és kezelés
7.1 Összeszerelés (Ábrák 1-6)
앬 Az állólábakat (18) a 4 csavarokkal (19) az alsó
állványkeretre (12) csavarozni
앬 Felállítani az alsó állványt.
앬 Átdugni mind a két kádfixáló csavart (37) belülről
a négyélű lyukon és befektetni a kádat (3) az
alsó állványkeretbe (12).
앬 A hűtővízszivattyút (13) fixálni a tartóban (38).
Beleállítani a csempevágot a kádba és
rácsavarozni a kádfixálót (39).
앬 Kicsavarozni és megőrizni a csillagmarkolat
alakú csavart (11) és a távolságtartó darabot
(40).
앬 Vízzel addig feltölteni a kádat, amig a
hűtővízszivattyút teljesen be nem fedi a víz.
7.2 Be/Kikapcsoló (Ábra 7)
앬 Bekapcsoláshoz a Be-/Kikapcsoló (16) "1" –ére
nyomni.
앬 A vágási folyamat elkezdése elôtt meg kell várni
mig a szétválasztótárcsa el nem érte a
maximális fordulatszámát és a hětôvízszivattyú
(13) el nem szállította a vízet a
szétválasztótárcsához.
H
27
Anleitung TPR 200-2 SPK1 27.06.2005 9:33 Uhr Seite 27
Page 30

앬 Kikapcsoláshoz a kapcsoló (16) "0"-ára nyomni.
7.3 90° vágások (Ábra 8/9)
앬 Meglazítani a csillag markolat alakú csavart (27)
앬 A szögletütközôt (5) 90°-ra állítani és a csillag
markolat alakú csavart (27) ismét feszesre húzni.
앬 A szögletütközô (5) fixálásához a csavarokat (28)
ismét meghúzni.
앬 A gépfejet (29) a fogantyúnál (9) fogva hátratolni.
앬 Ráfektetni a csempét az ütközôsínen (6) a
szögletütközôre (5).
앬 Bekapcsolni a csempevágót.
앬 Figyelem: Megvárni, amig a hětôvíz a
szétválasztótárcsát (2) el nem érte.
앬 A gépfejet (29) lassan és egyenletesen a
fogantyúnál (9) fogva a csempén keresztül húzni.
앬 A vágás végén ismét kikapcsolni a
csempevágót.
7.4 45° diagonálisvágás (Ábra 10)
앬 A szögletütközôt (5) 45°-ra beállítani.
앬 A vágást a 7.3 alatt elmagyarázottak szerint
elvégezni.
7.5 45° Hosszvágás, "Jollyvágás" (Ábra 11)
앬 Meglazítani a csillag markolat alakú csavart (10)
앬 A vezetôsínt (7) balra, a szögletskála (17) 45°-ára
dönteni.
앬 Ismét feszesre húzni a csillag markolat alakú
csavart (10).
앬 A vágást a 7.3 alatt elmagyarázottak szerint
elvégezni.
7.6 A gyémánt szétválasztotárcsa kicserélése
(Ábra 12/13)
앬 Kihúzni a hálózati dugót
앬 Megereszteni a négy csavart (35) és levenni a
fěrészlapvédôt (8).
앬 A kulccsal (34) a szétválasztótárcsa (2) futási
irányába megereszteni a karimaanyát. (Figyelem:
balmenet) Ennél rárakni a kulcsot (31) a
motortengelyre és ellentartani.
앬 Levenni a külsôkarimát (36) és a
szétválasztótárcsát (2).
앬 Az új szétválasztótárcsa felszerelése elôtt
gondossan megtisztítani a befogadókarimát.
앬 Az új szétválasztó tárcsát az ellenkezô
sorrendben ismét berakni és feszesre húzni.
Figyelem: Figyelembe venni a szétválasztó
tárcsa futási irányát!
앬 Ismét felszerelni a fěrészlapvédôt (8).
ung der Trennscheibe beachten!
앬 Sägeblattschutz (8) wieder montieren.
8. Karbantartás
앬 A port és a szennyezôdéseket a géprôl
rendszeresen el kell távolítani. A tisztítást
legjobban egy ronggyal vagy egy ecsettel lehet
elvégezni.
앬 Minden mozgatható részt períodikus
idôszakaszokban utánna kell kenni
앬 A měanyag tisztítására ne használjon maró
hatású szereket
앬 A kádat (3) és a hětôszerszivattyút (13)
rendszeressen meg kell tisztítani a
szennyezôdésektôl, mert különben nincs
garantálva a gyémánt szétválasztótárcsának (2)
a hětése.
9. Pótalkatrészek megrendelése
A pótalkatrészek megrendelésénél a következô
adatokat kell megadni
앬 A készülék típusát
앬 A kászülék cikkszámát
앬 A készülék ident-számát
앬 A szükséges pótalkatrész pótalkatrész-számát
Aktuális árak és inforációk a www.isc-gmbh.info
alatt találhatóak.
H
28
Anleitung TPR 200-2 SPK1 27.06.2005 9:33 Uhr Seite 28
Page 31

Nosić rękawice ochronne
Nosić okulary ochronne
Ꮯ
Nosić słuchawki ochronne
Nosić maskę przeciwpyłową
1. Opis urządzenia (rys. 1 / 2)
1. Stojak
2. Diamentowa ściernica tnąca
3. Wanienka
4. Stół aluminiowy
5. Ogranicznik kątowy
6. Szyna zderzakowa
7. Prowadnica
8. Osłona ściernicy tnącej
9. Rączka
10. Pokrętło ze śrubą do ustawiania kąta
11. Pokrętło ze śrubą do zabezpieczenia
transportowego
12. Rama stojaka
13. Pompka wody chłodzącej
14. Wąż
15. Silnik
2. Zakres dostawy
앬 Przecinarka do płytek ceramicznych
앬 Wanienka (3)
앬 Pompka wody chłodzącej (13)
앬 Ogranicznik kątowy (5)
앬 Stojak (1)
3. Zastosowanie zgodne z
przeznaczeniem
Przecinarka do płytek ceramicznych może być
stosowana do typowych czynności cięcia małych i
średnich płytek ceramicznych (kafli, glazury itp.) o
wymiarach odpowiadających wielkości maszyny.
Została zaprojektowana z myślą o użytkowaniu
przez rzemieślników i majsterkowiczów. Nie wolno
używać jej do cięcia drewna i metali. Maszynę wolno
używać tylko zgodnie z jej przeznaczeniem. Każde
inne, wychodzące poza ten zakres zastosowanie
jest niezgodne z przeznaczeniem. Za wynikające
stąd szkody i okaleczenia wszelkiego rodzaju
odpowiada użytkownik lub obsługujący, a nie
producent. Wolno stosować tylko ściernice tnące
przewidziane dla tej maszyny. Zabrania się
stosowania brzeszczotów pił. Do zgodnego z
przeznaczeniem stosowania należy również
przestrzeganie wskazówek dotyczących
bezpieczeństwa oraz instrukcji montażu i
wskazówek eksploatacyjnych w instrukcji obsługi.
Osoby, które obsługują i konserwują urządzenie,
muszą się z nimi zapoznać oraz należy je pouczyć o
możliwych niebezpieczeństwach. Poza tym należy
jak najdokładniej przestrzegać obowiązujących
przepisów w sprawie zapobiegania wypadkom
(BHP). Należy stosować się do pozostałych
ogólnych zasad z dziedziny medycyny pracy i
techniki bezpieczeństwa. Przeróbki dokonane w
obrębie maszyny całkowicie wykluczają
odpowiedzialność producenta za spowodowane na
skutek tego szkody. Pomimo zgodnego z
przeznaczeniem stosowania nie można całkowicie
wyeliminować określonych czynników ryzyka
resztkowego. Ze względu na konstrukcję i budowę
maszyny mogą wystąpić następujące
niebezpieczeństwa:
앬 Dotknięcie diamentowej ściernicy tnącej w
nieosłoniętym obszarze.
앬 Sięgnięcie do pracującej diamentowej ściernicy
tnącej.
앬 Wyrzucenie przez siłę odśrodkową wadliwego
diamentowego segmentu ostrza ściernicy tnącej.
앬 Odrzucenie przedmiotu obrabianego lub części
przedmiotu obrabianego.
앬 Uszkodzenia słuchu w wypadku niestosowania
słuchawek ochronnych.
4. Ważne wskazówki
4.1. Informacje ogólne
Prosimy o dokładne przeczytanie instrukcji obsługi i
przestrzeganie zawartych w niej zaleceń. Prosimy
zapoznać się na podstawie poniższej instrukcji z
urządzeniem, jego prawidłowym użytkowaniem oraz
wskazówkami dotyczącymi bezpieczeństwa (patrz
załączona ulotka).
PL
29
Anleitung TPR 200-2 SPK1 27.06.2005 9:33 Uhr Seite 29
Page 32

4.2. Dodatkowe wskazówki dotyczące
bezpieczeństwa
앬 Ustawić maszynę na równym i nieśliskim podłożu.
Maszyna nie może się kiwać.
앬 Należy się upewnić, czy wartość napięcia
sieciowego w gniazdku zgadza się z danymi na
tabliczce znamionowej. Dopiero potem podłączyć
wtyczkę do gniazdka sieciowego.
앬 Założyć okulary ochronne.
앬 Nosić słuchawki ochronne.
앬 Stosować rękawice ochronne.
앬 Nie używać diamentowych ściernic tnących z
widocznymi pęknięciami, należy je wymienić.
앬 Uwaga: ciernica tnąca zatrzymuje się z
opóźnieniem!
앬 Nie wolno hamować diamentowej ściernicy tnącej
przez nacisk z boku.
앬 Uwaga: Diamentowa ściernica tnąca wymaga
ciągłego chłodzenia wodą.
앬 Przed wymianą diamentowej ściernicy tnącej
wyciągnąć wtyczkę z gniazdka sieciowego.
앬 Używać tylko właściwych diamentowych ściernic
tnących.
앬 Nie wolno pozostawiać maszyny bez nadzoru w
pomieszczeniach, w których przebywają dzieci.
앬 Przed kontrolą napędu elektrycznego zawsze
wyciągnąć z wtyczkę z gniazdka sieciowego.
5. Dane techniczne:
Moc silnika: 800 W
Prędkość obrotowa silnika: 3000 obr/min
Silnik prądu przemiennego 230 V ~ 50 Hz
Stopień izolacji klassa B
Klasa ochronności IP 54
Długość cięcia: 520 mm
Długość uciosu: 520 mm
Wysokość cięcia 90°: max. 30 mm
Wysokość cięcia 45°: max. 25 mm
Podstawa przecinarki:
Wymiary: 570 mm x 385 mm
Diamentowa ściernica tnąca ø 200 x ø 25,4
Wartości emisji hałasu
앬 Hałas emitowany przez opisywaną maszynę
został zmierzony wg normy DIN EN ISO 3744; EN
ISO 11201. Hałas w miejscu pracy może
przekroczyć 85 dB (A). W tym wypadku
konieczne jest stosowanie przez użytkownika
środków wytłumiających hałas. (Nosić słuchawki
ochronne!)
Użytkowanie Bieg jałowy
Poziom ciśnienia akust. LPA 94 dB(A) 76 dB(A)
Poziom mocy akustycznej LWA 107 dB(A) 89 dB(A)
6. Przed uruchomieniem
앬 Maszynę należy ustawić stabilnie, tzn. przykręcić
na stałe śrubami do stołu warsztatowego lub
stałego stojaka itp.
앬 Przed uruchomieniem należy prawidłowo
zamontować wszystkie osłony i elementy
zabezpieczające.
앬 ciernica tnąca musi się swobodnie obracać.
앬 Sprawdzić przed podłączeniem maszyny, czy
dane na tabliczce znamionowej zgadzają się z
wartością napięcia w sieci zasilającej.
7. Montaż i obsługa
7.1 Montaż stojaka i pompki wody chłodzącej
(rys. 2-4)
앬 Przykręcić nóżki (18) śrubami (19) do ramy
stojaka (12).
앬 Ustawić stojak (patrz rys. 5).
앬 Wstawić wanienkę (3) do ramy stojaka (12).
앬 Włożyć pompkę wody chłodzącej (13) do
wanienki (3).
앬 Nalać wody do wanienki, aż pompka (13) będzie
całkowicie zanurzona w wodzie.
앬 Wstawić całą przecinarkę płytek ceramicznych do
wanienki (3) (patrz rys. 2).
앬 Wykręcić pokrętło ze śrubą (11) (zabezpieczenie
transportowe!).
7.2 Włącznik/wyłącznik (rys. 7)
앬 W celu włączenia maszyny wcisnąć "1" na
włączniku/wyłączniku (16).
앬 Przed rozpoczęciem cięcia należy odczekać, aż
ściernica tnąca rozpędzi się do maksymalnej
prędkości obrotowej i pompka wody chłodzącej
(13) zacznie tłoczyć wodę do ściernicy tnącej.
앬 W celu włączenia maszyny wcisnąć "0" na
włączniku/wyłączniku (16).
PL
30
Anleitung TPR 200-2 SPK1 27.06.2005 9:33 Uhr Seite 30
Page 33

7.3 Cięcie pod kątem 90° (rys. 8/9)
앬 Poluzować pokrętło ze śrubą (27).
앬 Ustawić ogranicznik kątowy (5) na 90° i z
powrotem dokręcić pokrętło ze śrubą (27).
앬 Ponownie dokręcić śruby (28), w celu ustalenia
ogranicznika kątowego (5).
앬 Przesunąć do tyłu głowicę maszyny (29) przy
pomocy rączki (9).
앬 Ułożyć płytkę na szynie zderzakowej (6) i na
ograniczniku kątowym (5).
앬 Włączyć przecinarkę płytek ceramicznych.
앬 Uwaga: Odczekać, aż woda chłodząca dopłynie
do ściernicy tnącej (2).
앬 Powoli i równomiernie przesuwać do przodu
głowicę maszyny (29) przy pomocy rączki (9),
przecinając w ten sposób płytkę.
앬 Po przecięciu płytki wyłączyć przecinarkę.
7.4 Cięcie po przekątnej pod kątem 45° (rys. 10)
앬 Ustawić ogranicznik kątowy (5) na 45°
앬 Wykonać cięcie w sposób opisany w punkcie 7.3.
7.5 Cięcie wzdłużne pod kątem 45°, "uciosowe"
(rys. 11)
앬 Poluzować pokrętło ze śrubą (10)
앬 Skręcić prowadnicę (7) w lewo pod kątem 45° na
skali kątowej (17).
앬 Ponownie dokręcić pokrętło ze śrubą (10).
앬 Wykonać cięcie w sposób opisany w punkcie 7.3.
7.6 Wymiana diamentowej ściernicy tnącej (rys.
12/13)
앬 Wyciągnąć wtyczkę kabla zasilającego z
gniazdka.
앬 Odkręcić cztery śruby (35) i zdjąć osłonę ściernicy
tnącej (8).
앬 Kluczem (34) odkręcić nakrętkę kołnierzową w
kierunku obrotów ściernicy tnącej (2)
(Uwaga: lewy gwint).
앬 Zdjąć kołnierz zewnętrzny (36) i ściernicę tnącą
(2).
앬 Przed montażem nowej ściernicy tnącej starannie
oczyścić kołnierz zewnętrzny.
앬 Założyć nową ściernicę tnącą, wykonując te
same czynności w odwrotnej kolejności oraz
mocno dokręcić.
Uwaga: Uważać na kierunek obrotów ściernicy
tnącej!
앬 Zamontować z powrotem osłonę ściernicy tnącej
(8).
8. Konserwacja
앬 Regularnie usuwać z urządzenia pył i
zanieczyszczenia. Do czyszczenia najlepiej
używać ściereczki albo pędzelka.
앬 Okresowo należy smarować wszystkie części
ruchome.
앬 Do czyszczenia tworzywa sztucznego nie używać
środków o działaniu żrącym.
앬 Wanienka (3) i pompka wody chłodzącej (13)
wymagają systematycznego czyszczenia, w
przeciwnym razie chłodzenie diamentowej
ściernicy tnącej (2) będzie utrudnione.
9. Zamawianie części zamiennych
Zamawiając części zamienne, należy
podaćnastępujące informacje:
앬 Typ urządzenia
앬 Nr wyrobu
앬 Nr identyfikacyjny urządzenia
앬 Nr wymaganej części zamiennej
Aktualne ceny i informacje znajdą Państwo na stonie
www.isc-gmbh.info
PL
31
Anleitung TPR 200-2 SPK1 27.06.2005 9:33 Uhr Seite 31
Page 34

32
Anleitung TPR 200-2 SPK1 27.06.2005 9:33 Uhr Seite 32
ISC GmbH
Eschenstraße 6
D-94405 Landau/Isar
erklärt folgende Konformität gemäß EU-Richtlinie
D
und Normen für Artikel
declares conformity with the EU Directive
and standards marked below for the article
déclare la conformité suivante selon la
F
directive CE et les normes concernant l’article
verklaart de volgende conformiteit in overeen-
stemming met de EU-richtlijn en normen voor
het artikel
declara la siguiente conformidad a tenor de la
E
directiva y normas de la UE para el artículo
declara a seguinte conformidade de acordo
P
com a directiva CE e normas para o artigo
förklarar följande överensstämmelse enl. EU-
S
direktiv och standarder för artikeln
ilmoittaa seuraavaa Euroopan unionin direkti-
ivien ja normien mukaista yhdenmukaisuutta
tuotteelle
erklærer herved følgende samsvar med EU-
direktiv og standarder for artikkel
заявляет о соответствии товара
следующим директивам и нормам EC
izjavljuje sljedeću uskladjenost s odredbama i
normama EU za artikl.
declarå urmåtoarea conformitate cu linia direc-
toare CE μi normele valabile pentru articolul.
Konformitätserklärung
ürün ile ilgili olarak AB Yönetmelikleri ve
Normlar∂ gere©ince aμa©∂daki uygunluk aç∂kla
mas∂n∂ sunar.
‰ЛПТУВИ ЩЛУ ·ОfiПФ˘ıЛ Ы˘МКˆУ›· Ы‡МКˆУ· МВ
ÙËÓ √‰ËÁ›· ∂∂ Î·È Ù· ÚfiÙ˘Ô ÁÈ· ÙÔ ÚÔ˚fiÓ
dichiara la seguente conformità secondo la
I
direttiva UE e le norme per l’articolo
attesterer følgende overensstemmelse i
henhold til EU-direktiv og standarder for
produkt
prohlašuje následující shodu podle směrnice
EU a norem pro výrobek.
a következő konformitást jelenti ki a termékek-
H
re vonatkozó EU-irányvonalak és normák
szerint
pojasnjuje sledečo skladnost po smernici EU
in normah za artikel.
deklaruje zgodność wymienionego poniżej
artykułu z następującymi normami na
podstawie dyrektywy WE.
vydáva nasledujúce prehlásenie o zhode podľa
smernice EÚ a noriem pre výrobok.
деклаpиpа следното съответствие съгласно
диpективите и ноpмите на ЕС за пpодукта.
заявляє про відповідність згідно з Директивою
ЄС та стандартами, чинними для даного товару.
Fliesenschneidmaschine TPR 200/2
98/37/EG
x
x
73/23/EWG_93/68/EEC
97/23/EG
89/336/EWG_93/68/EEC
x
90/396/EWG
87/404/EWG
R&TTED 1999/5/EG
2000/14/EG:
95/54/EG:
97/68/EG:
89/686/EWG
EN 61029-1: 2000+A11+A12; EN 12418: 2000; IEC 61029-1: 1990; IEC 61029-2-7:
1993; EN 60825-1: 1994+A1+A2; EN 55014: 2000+A1+A2; EN 55014-2; 1997+A1;
Art.-Nr.: 43.012.50 I.-Nr.: 01025 Archivierung: 4301250-2-4155050
Subject to change without notice
EN 61000-3-3: 1995+A1; EN 61000-3-2: 2000
Landau/Isar, den 22.06.2005
Weichselgartner
Leiter QS Konzern
Pfister
Tech. Supvervisor
Page 35

33
GARANTIEURKUNDE
Auf das in der Anleitung bezeichnete Gerät geben wir 2 Jahre
Garantie, für den Fall, dass unser Produkt mangelhaft sein sollte.
Die 2-Jahres-Frist beginnt mit dem Gefahrenübergang oder der
Übernahme des Gerätes durch den Kunden. Voraussetzung für
die Geltendmachung der Garantie ist eine ordnungsgemäße
Wartung entsprechend der Bedienungsanleitung sowie die bestimmungsgemäße Benutzung unseres Gerätes.
Selbstverständlich bleiben Ihnen die gesetzlichen Gewährleistungsrechte innerhalb dieser 2 Jahre erhalten. Die Garan-
tie gilt für den Bereich der Bundesrepublik Deutschland oder der
jeweiligen Länder des regionalen Hauptvertriebspartners als Ergänzung der lokal gültigen gesetzlichen Vorschriften. Bitte beachten Sie Ihren Ansprechpartner des regional zuständigen Kundendienstes oder die unten aufgeführte Serviceadresse.
ISC GmbH · International Service Center
Eschenstraße 6 · D-94405 Landau/Isar (Germany)
Info-Tel. 0180-5 120 509 • Telefax 0180-5 835 830
Service- und Infoserver: http://www.isc-gmbh.info
Technische Änderungen vorbehalten
Technical changes subject to change
Sous réserve de modifications
Technische wijzigingen voorbehouden
Salvo modificaciones técnicas
Salvaguardem-se alterações técnicas
Förbehåll för tekniska förändringar
Oikeus teknisiin muutoksiin pidätetään
Der tages forbehold för tekniske ændringer
Tekniske endringer forbeholdes
Con riserva di apportare modifiche tecniche
Technikai változások jogát fenntartva
Technické změny vyhrazeny
Tehnične spremembe pridržane.
Zadržavamo pravo na tehnične izmjene.
Technické změny vyhradené
Zastrzega się wprowadzanie zmian technicznych
Se rezervå dreptul la modificåri tehnice.
Сохpaняeтcя прaво на тeхничeскиe изменения
Зaпазва се правото за технически промени
√ ηٷÛÎÂÓ·ÛÙ‹˜ ‰È·ÙËÚ› ÙÔ ‰Èη›ˆÌ·
ЩВ¯УИОТУ ·ПП·БТУ
Teknik de©iμiklikler olabilir
Anleitung TPR 200-2 SPK1 27.06.2005 9:33 Uhr Seite 33
Page 36

34
Garanciaokmány
Ebben az utasitásban megnevezett készülékre 2 év jótállást nyujtunk, arra az
esetre, ha a termékünk hiányos lenne. A 2-éves-határidô a kárveszély
átszállása vagy a készülék vevô általi átvétele által kezdôdik.
A jótállás érvényesítésének a feltétele a készülékünknek a használati
utasításnak megfelelô szabályszerě karbantartása úgymint rendeltetészerěi
használata.
Magától értetôdô, hogy ez a 2 év alatt a törvény szerinti szavatossági jogai
fennmaradnak.
A jótállás a Németországi Szövetségi Köztársaság területére érvényes vagy a
regionális fô forgalmazó partner országaiban kiegészítésként a helyi érvényes
törvényi elôírásokhoz. Kérjük vegye figyelembe a regionálisan illetékes
vevôszolgáltatásnál levô kontaktszemélyt vagy az alul megadott servízcímet.
CERTYFIKAT GWARANCJI
Na opisywane w instrukcji obsługi urządzenie udzielamy 2-letniej gwarancji, na
wypadek wadliwości naszego produktu. 2-letni okres gwarancyjny zaczyna
obowiązywać w momencie przejścia ryzyka lub przejęcia urządzenia przez
klienta.
Warunkiem skorzystania z uprawnień gwarancyjnych jest prawidłowa
konserwacja urządzenia, zgodnie z instrukcją obsługi oraz użytkowanie zgodne
z przeznaczeniem.
Oczywiście w okresie tych 2 lat przysługują Państwu również uprawnienia
gwarancyjne w ramach ustawowej rękojmi.
Gwarancja obowiązuje na terenie Republiki Federalnej Niemiec lub w kraju
generalnego przedstawiciela handlowego, jako uzupełnienie obowiązujących
lokalnie przepisów ustawowych. Prosimy zwrócić się do odpowiedzialnego
pracownika w regionalnym dziale obsługi klienta lub pod podany poniżej adres
serwisu technicznego.
GARANTIE
Op het in de handleiding genoemde toestel geven wij 2 jaar garantie voor het
geval dat ons product gebreken mocht vertonen. De periode van 2 jaar gaat in
met de gevaarovergang of de overname van het toestel door de klant.
De garantie kan enkel worden geclaimd op voorwaarde dat het toestel naar
behoren is onderhouden en gebruikt conform de handleiding.
Vanzelfsprekend blijven u de wettelijke garantierechten binnen deze 2 jaar
behouden.
De garantie geldt voor het grondgebied van de Bondsrepubliek Duitsland of van
de respectievelijke landen van de regionale hoofdverdeler als aanvulling van de
ter plaatse geldende wettelijke voorschriften. Gelieve zich tot uw contactpersoon
van de regionaal bevoegde klantendienst of tot het hieronder vermelde
serviceadres te wenden.
CERTIFICATO DI GARANZIA
Per l’apparecchio indicato nelle istruzioni concediamo una garanzia di 2 anni,
nel caso il nostro prodotto dovesse risultare difettoso. Questo periodo di 2 anni
inizia con il trapasso del rischio o la presa in consegna dell’apparecchio da parte
del cliente. Le condizioni per la validità della garanzia sono una corretta
manutenzione secondo le istruzioni per l’uso così come un utilizzo appropriato
del nostro apparecchio.
Naturalmente in questo periodo di 2 anni continuiamo ad assumerci gli
obblighi di responsabilità previsti dalla legge.
La garanzia vale per il territorio della Repubblica Federale Tedesca o dei
rispettivi paesi del principale partner di distribuzione di zona a completamento
delle norme di legge in vigore sul posto. Rivolgersi all’addetto del servizio
assistenza clienti incaricato della rispettiva zona o all’indirizzo di assistenza
clienti riportato in basso.
WARRANTY CERTIFICATE
The product described in these instructions comes with a 2 year warranty
covering defects. This 2-year warranty period begins with the passing of risk or
when the customer receives the product.
For warranty claims to be accepted, the product has to receive the correct
maintenance and be put to the proper use as described in the operating
instructions.
Your statutory rights of warranty are naturally unaffected during these 2
years.
This warranty applies in Germany, or in the respective country of the
manufacturer’s main regional sales partner, as a supplement to local
regulations. Please note the details for contacting the customer service center
responsible for your region or the service address listed below.
GARANTIBEVIS
I tilfælde af, at vort produkt skulle være fejlbehæftet, yder vi 2 års garanti på det
i vejledningen nævnte produkt. Garantiperioden på 2 år begynder, når risikoen
går over på køber, eller når produktet overdrages til kunden.
For at kunne støtte krav på garantien er det en forudsætning, at produktet er
blevet ordentligt vedligeholdt i henhold til betjeningsvejledningens anvisninger,
samt at produktet er blevet anvendt korrekt i overensstemmelse med dets
formål.
Lovmæssige forbrugerrettigheder er naturligvis stadigvæk gældende
inden for garantiperioden på de 2 år.
Garantien gælder som supplement til lokalt gældende bestemmelser i det land,
hvor den regionale hovedforhandler har sit sæde. Vi henviser endvidere til din
kontaktperson hos den regionalt ansvarlige kundeservice eller til nedenstående
serviceadresse.
GARANTIE
Nous fournissons une garantie de 2 ans pour l’appareil décrit dans le mode
d’emploi, en cas de vice de notre produit. Le délai de 2 ans commence avec la
transmission du risque ou la prise en charge de l’appareil par le client.
La condition de base pour le faire valoir de la garantie est un entretien en bonne
et due forme, conformément au mode d’emploi, tout comme une utilisation de
notre appareil selon l’application prévue.
Vous conservez bien entendu les droits de garantie légaux pendant ces 2
ans.
La garantie est valable pour l’ensemble de la République Fédérale d’Allemagne
ou des pays respectifs du partenaire commercial principal en complément des
prescriptions légales locales. Veuillez noter l’interlocuteur du service aprèsvente compétent pour votre région ou l’adresse mentionnée ci-dessous.
GARANCIJSKI LIST
Za uredjaj opisan u uputama dajemo 2 godine jamstva u slučaju eventulanog
nedostatka na našem proizvodu. Rok od 2 godine započinje s prijelazom rizika
ili s preuzimanjem uredjaja od strane kupca.
Pretpostavka za ostvarivanje prava jamstva je pravilno održavanje u skladu s
uputama za uporabu, kao i svrsishodno korištenje našeg uredjaja.
Razumljivo je da zadržavate zakonsko pravo jamstva unutar te 2 godine.
Jamstvo važi za područje Savezne Republike Njemačke ili dotičnih zemalja
regionalnog glavnog trgovačkog partnera kao dopuna lokalno važećih
zakonskih propisa. Molimo Vas da obratite pažnju na Vašu kontakt osobu
nadležne servisne službe u regiji ili na dolje navedenu adresu servisa.
Anleitung TPR 200-2 SPK1 27.06.2005 9:33 Uhr Seite 34
Page 37

35
D Nur für EU-Länder
Werfen Sie Elektrowerkzeuge nicht in den Hausmüll!
Gemäß europäischer Richtlinie 2002/96/EG über Elektro- und Elektronik-Altgeräte und Umsetzung in
nationales Recht müssen verbrauchte Elektrowerkzeuge getrennt gesammelt werden und einer
umweltgerechten Wiederverwertung zugeführt werden.
Recycling-Alternative zur Rücksendeaufforderung:
Der Eigentümer des Elektrogerätes ist alternativ anstelle Rücksendung zur Mitwirkung bei der sachgerechten Verwertung im Falle der Eigentumsaufgabe verpflichtet. Das Altgerät kann hierfür auch einer
Rücknahmestelle überlassen werden, die eine Beseitigung im Sinne der nationalen Kreislaufwirtschaftsund Abfallgesetzes durchführt. Nicht betroffen sind den Altgeräten beigefügte Zubehörteile und Hilfsmittel
ohne Elektrobestandteile.
For EU countries only
Never place any electric tools in your household refuse.
To comply with European Directive 2002/96/EC concerning old electric and electronic equipment and its
implementation in national laws, old electric tools have to be separated from other waste and disposed of
in an environment-friendly fashion, e.g. by taking to a recycling depot.
Recycling alternative to the demand to return electrical devices:
As an alternative to returning the electrical device, the owner is obliged to cooperate in ensuring that the
device is properly recycled if ownership is relinquished. This can also be done by handing over the used
device to a returns center, which will dispose of it in accordance with national commercial and industrial
waste management legislation. This does not apply to the accessories and auxiliary equipment without
any electrical components which are included with the used device.
F Uniquement pour les pays de l'Union Européenne
Ne jetez pas les outils électriques dans les ordures ménagères.
Selon la norme européenne 2002/96/CE relative aux appareils électriques et systèmes électroniques
usés et selon son application dans le droit national, les outils électriques usés doivent être récoltés à
part et apportés à un recyclage respectueux de l'environnement.
Possibilité de recyclage en alternative à la demande de renvoi :
Le propriétaire de l’appareil électrique est obligé, en guise d’alternative à un envoi en retour, à contribuer
à un recyclage effectué dans les règles de l’art en cas de cessation de la propriété. L’ancien appareil
peut être remis à un point de collecte dans ce but. Cet organisme devra l’éliminer dans le sens de la Loi
sur le cycle des matières et les déchets. Ne sont pas concernés les accessoires et ressources fournies
sans composants électroniques.
Anleitung TPR 200-2 SPK1 27.06.2005 9:33 Uhr Seite 35
Page 38

Enkel voor EU-landen
Elektrisch gereedschap hoort niet bij het huisvuil thuis.
Volgens de Europese richtlijn 2002/96/EG op afgedankte elektrische en elektronische toestellen en
omzetting in nationaal recht dienen afgedankte elektrische gereedschappen afzonderlijk te worden
verzameld en milieuvriendelijk te worden gerecycleerd.
Recyclagealternatief i.p.v. het verzoek het toestel terug te sturen:
In plaats van het elektrische toestel terug te sturen is alternatief de eigenaar van het toestel gehouden
mee te werken aan de adequate recyclage als het eigendom wordt opgegeven. Hiervoor kan het
afgedankte toestel eveneens bij een inzamelplaats worden afgegeven waar het toestel wordt verwijderd
als bedoeld in de wetgeving in zake afvalverwerking en recyclage. Dit geldt niet voor toebehoorstukken
en hulpmiddelen zonder elektrische componenten die bij de afgedankte toestellen zijn bijgevoegd.
I Solo per paesi membri dell'UE
Non gettate gli utensili elettrici nei rifiuti domestici.
Secondo la Direttiva europea 2002/96/CE sui rifiuti di apparecchiature elettriche ed elettroniche e
l'applicazione nel diritto nazionale gli elettroutensili usati devono venire raccolti separatamente e smaltiti
in modo ecologico.
Alternativa di riciclaggio alla richiesta di restituzione
Il proprietario dell’apparecchio elettrico è tenuto in alternativa, invece della restituzione, a collaborare in
modo che lo smaltimento venga eseguito correttamente in caso ceda l’apparecchio. L’apparecchio
vecchio può anche venire consegnato ad un centro di raccolta che provvede poi allo smaltimento
secondo le norme nazionali sul riciclaggio e sui rifiuti. Non ne sono interessati gli accessori e i mezzi
ausiliari senza elementi elettrici forniti insieme ai vecchi apparecchi.
Gælder kun EU-lande
Smid ikke el-værktøj ud som almindeligt husholdningsaffald.
I henhold til EF-direktiv 2002/96 om elektroaffald og dets omsættelse til national lovgivning skal brugt
el-værktøj indsamles adskilt og indleveres på genbrugsstation.
Recycling-alternativ til tilbagesendelse af brugt vare:
Ejeren af det elektroniske apparat er forpligtet til – som et alternativ i stedet for tilbagesendelse – at
medvirke til, at relevante dele af apparatet genanvendes ifølge miljøforskrifterne i tilfælde af overdra
gelse af ejerskab til tredjeperson. Det brugte apparat kan også overdrages til et deponeringssted, som vil
varetage bortskaffelsen af apparatets dele i overensstemmelse med nationale bestemmelser vedrørende
skrotning og genbrug. Ikke omfattet heraf er tilbehørsdele og hjælpemidler, som ikke indeholder
elektroniske komponenter.
Samo za zemlje Europske zajednice
Elektroalate ne bacajte u kućno smeće.
U skladu s europskom odredbom 2002/96/EG o starim električnim i elektroničkim uredjajima i njezinom
primjenom u okviru državnog prava, istrošeni elektroalati moraju se odvojeno sakupiti i zbrinuti na
ekološki način u svrhu recikliranja.
Alternativa s recikliranjem u odnosu na zahtjev za povrat uredjaja:
Vlasnik elektrouredjaja alternativno je obvezan da umjesto povrata robe u slučaju odricanja vlasništva
sudjeluje u stručnom zbrinjavanju elektrouredjaja. Stari uredjaj može se u tu svrhu prepustiti i stanici za
preuzimanje rabljenih uredjaja koja će provesti uklanjanje u smislu državnog zakona o recikliranju i
otpadu. Zakonom nisu obuhvaćeni dijelovi pribora ugradjeni u stare uredjaje i pomoćni materijali bez
električnih elemenata.
36
Anleitung TPR 200-2 SPK1 27.06.2005 9:33 Uhr Seite 36
Page 39

H Csak EU-országok
Ne dobja az elektromos szerszámokat a házi hulladék közé.
A villamos készülékekkel és elektromos-öregkészülékekkel kapcsolatos 2002/96/EG-i europai
irányvonalaknak valamint ezeknek a nemzeti jogban történő realizálásának megfelően az elhasznált
villamos szerszámokat külön kell gyüjteni és egy környezetbaráti újraértékesítéshez juttatni.
Újrahasznosítás-alternatíva a viszzaküldési felhíváshoz:
Az elektromos készülék tulajdonosa kötelezve van, a tulajdon feladása esetében, a visszaküldés helyett
alternatív egy szakszerű értékesítésre. Ehhez az öreg készüléket egy visszavevő helynek lehet
átengedni, amely a nemzetközi iparkörfolyamat és hulladéktörvény értelmében elvégzi a
megsemmisítést. Ez nem érrinti az öreg készülékekhez mellékelt villamosalkatrészek nélküli
tartozékrészeket és segítőeszközöket.
Tylko dla krajów UE
Zabrania się wyrzucania elektronarzędzi na śmieci.
Zgodnie z Europejską Dyrektywą 2002/96/WE o przeznaczonych na złomowanie elektronarzędziach i
sprzęcie elektronicznym oraz jej konwersji na prawo krajowe, elektronarzędzia należy zbierać osobno i
oddać do punktu zbiórki surowców wtórnych.
Recykling jako alternatywa wobec obowiązku zwrotu urządzenia:
Alternatywnie do obowiązku zwrotu urządzenia elektrycznego po zakończeniu jego użytkowania,
właściciel jest zobowiązany do współuczestnictwa w jego prawidłowej utylizacji. Wycofane z
eksploatacji urządzenie można oddać również do punktu zbiórki surowców wtórnych, który
przeprowadzi utylizację zgodnie z krajowymi przepisami o odpadach i wykorzystaniu surowców
wtórnych. Nie dotyczy to osprzętu należącego do wyposażenia urządzenia i środków pomocniczych nie
zawierających elementów elektrycznych.
37
Anleitung TPR 200-2 SPK1 27.06.2005 9:33 Uhr Seite 37
Page 40

38
Anleitung TPR 200-2 SPK1 27.06.2005 9:33 Uhr Seite 38
Page 41

39
Anleitung TPR 200-2 SPK1 27.06.2005 9:33 Uhr Seite 39
Page 42

EH 06/2005
Anleitung TPR 200-2 SPK1 27.06.2005 9:33 Uhr Seite 40
Der Nachdruck oder sonstige Vervielfältigung von Dokumentation und
Begleitpapieren der Produkte, auch auszugsweise ist nur mit ausdrücklicher Zustimmung der ISC GmbH zulässig.
The reprinting or reproduction by any other means, in whole or in part,
of documentation and papers accompanying products is permitted only
with the express consent of ISC GmbH.
La réimpression ou une autre reproduction de la documentation et des
documents d’accompagnement des produits, même incomplète, n’est
autorisée qu’avec l’agrément exprès de l’entreprise ISC GmbH.
Nadruk of andere reproductie van documentatie en geleidepapieren
van de producten, geheel of gedeeltelijk, enkel toegestaan mits uitdrukkelijke toestemming van ISC GmbH.
La ristampa o l’ulteriore riproduzione, anche parziale, della documentazione o dei documenti d’accompagnamento dei prodotti è consentita
solo con l’esplicita autorizzazione da parte della ISC GmbH.
Eftertryk eller anden form for mangfoldiggørelse af skriftligt materiale,
ledsagepapirer indbefattet, som omhandler produkter, er kun tilladt
efter udtrykkelig tilladelse fra ISC GmbH.
Przedruk lub innego rodzaju powielanie dokumentacji wyrobów oraz
dokumentów towarzyszących, nawet we fragmentach dopuszczalne
jest tylko za wyraźną zgodą firmy ISC GmbH.
Az termékek dokumentációjának és kisérô okmányainak az utánnyomása és sokszorosítása, kivonatosan is csak az ISC GmbH kifejezett
beleegyezésével engedélyezett.
Naknadno tiskanje ili slična umnožavanja dokumentacije i pratećih
papira ovih proizvoda, čak i djelomično kopiranje, moguće je samo uz
izričito dopuštenje tvrtke ISC GmbH.
Перепечатывание или прочие виды размножения документации и
сопроводительных листов продукции фирмы, полностью или
частично, разрешено производить только с однозначного
разрешения ISC GmbH.
 Loading...