

k
Originalbetriebsanleitung
Heckenschere
t
Original operating instructions
Hedge Trimmer
p
Mode d’emploi d’origine
taille-haies
C
Istruzioni per l’uso originali
tagliasiepi
lL
Original betjeningsvejledning
hekksaks
U
Original-bruksanvisning
Häcksax
Bf
Originalne upute za uporabu
škara za rezanje živice
4
Originalna uputstva za upotrebu
Makaza za rezanje živice
j
Originální návod k obsluze
Plotové nůžky
W
Originálny návod na obsluhu
Nožnice na živý plot
Art.-Nr.: 34.035.97 I.-Nr.: 11020
RG-EH 6053
Anleitung_RG_EH_6053_SPK1:_ 11.05.2010 13:07 Uhr Seite 1

2
Vor Inbetriebnahme Bedienungsanleitung und
Sicherheitshinweise lesen und beachten
Read and follow the operating instructions and safety information
before using for the first time.
Avant la mise en service, lisez le mode dʼemploi et les consignes
de sécurité et respectez-les.
Prima della messa in esercizio leggete e osservate le istruzioni
per lʼuso e le avvertenze di sicurezza.
Betjeningsvejledningen og sikkerhedsanvisningerne skal læses,
inden maskinen tages i brug. Alle anvisninger skal følges.
Läs igenom och beakta bruksanvisningen och säkerhetsanvisningarna
före användning.
Bf Prije puštanja u rad pročitajte i pridržavajte se ovih uputa za uporabu
i sigurnosnih napomena.
4 Prije puštanja u pogon pročitajte i uvažite uputstva za upotrebu i
napomene bezbednosti.
j Před uvedením do provozu si přečíst návod k obsluze a bezpečnostní
předpisy a oboje dodržovat.
W Pred uvedením do prevádzky si prečítajte a dodržiavajte návod na
obsluhu a bezpečnostné pokyny.
Anleitung_RG_EH_6053_SPK1:_ 11.05.2010 13:07 Uhr Seite 2
3
1
2 3
4 5a
1
7
8 10 10
2 3 4
5
46
9
E
E
Anleitung_RG_EH_6053_SPK1:_ 11.05.2010 13:08 Uhr Seite 3
4
5b 5c
5d 6a
6b 7
10
10
A
DCEB
Anleitung_RG_EH_6053_SPK1:_ 11.05.2010 13:08 Uhr Seite 4
5
9
10 11
12 13
8
1 2 3
4
5 5
8
Anleitung_RG_EH_6053_SPK1:_ 11.05.2010 13:08 Uhr Seite 5

Achtung!
Beim Benutzen von Geräten müssen einige
Sicherheitsvorkehrungen eingehalten werden, um
Verletzungen und Schäden zu verhindern. Lesen Sie
diese Bedienungsanleitung / Sicherheitshinweise
deshalb sorgfältig durch. Bewahren Sie diese gut
auf, damit Ihnen die Informationen jederzeit zur
Verfügung stehen. Falls Sie das Gerät an andere
Personen übergeben sollten, händigen Sie diese
Bedienungsanleitung / Sicherheitshinweise bitte mit
aus. Wir übernehmen keine Haftung für Unfälle oder
Schäden, die durch Nichtbeachten dieser Anleitung
und den Sicherheitshinweisen entstehen.
1. Sicherheitshinweise
Die entsprechenden Sicherheitshinweise finden Sie
im beiliegenden Heftchen!
WARNUNG
Lesen Sie alle Sicherheitshinweise und
Anweisungen. Versäumnisse bei der Einhaltung der
Sicherheitshinweise und Anweisungen können
elektrischen Schlag, Brand und/oder schwere
Verletzungen verursachen.
Bewahren Sie alle Sicherheitshinweise und
Anweisungen für die Zukunft auf.
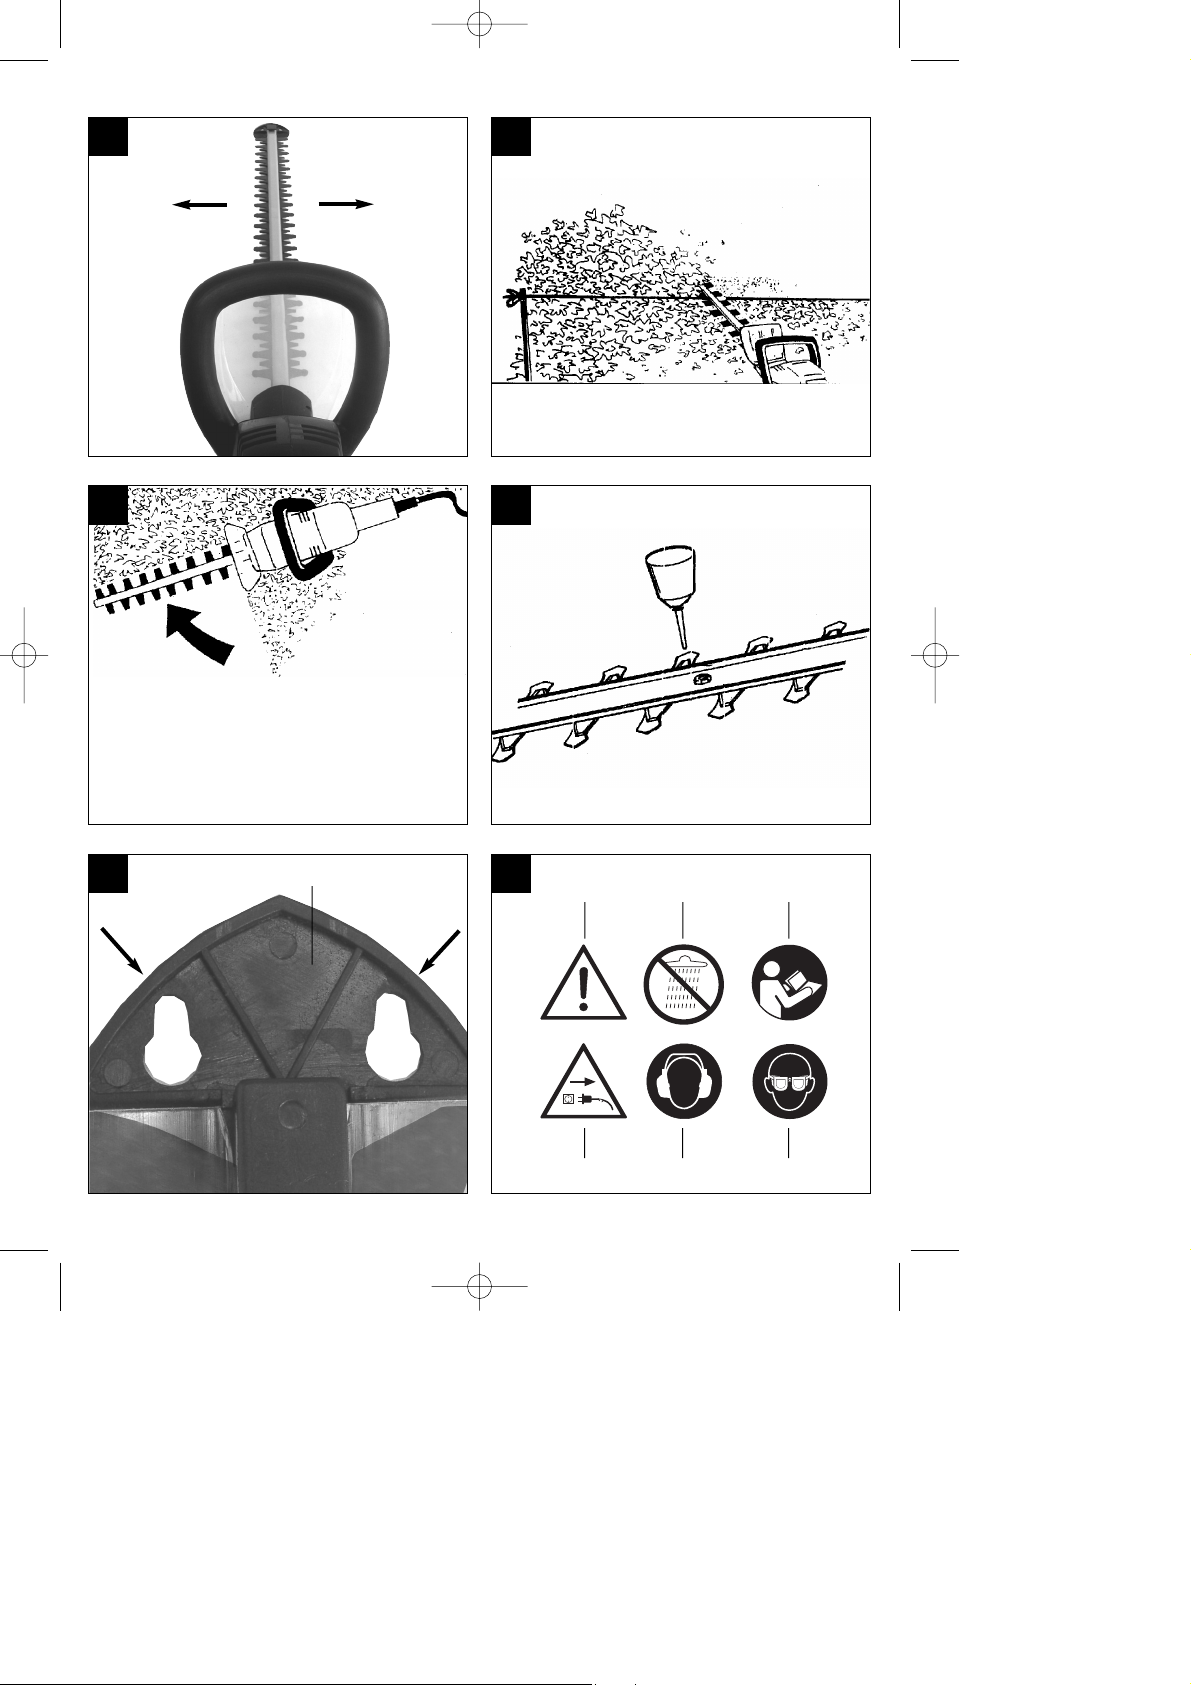
Erklärung des Hinweisschildes auf dem Gerät
(siehe Bild 13)
1. Warnung
2. Nicht dem Regen aussetzen! Vor Regen und
Nässe schützen.
3. Vor Inbetriebnahme Gebrauchsanweisung lesen.
4. Stecker sofort vom Netz trennen, wenn die
Leitung beschädigt oder durchtrennt wurde.
5. Augenschutz und Gehörschutz tragen
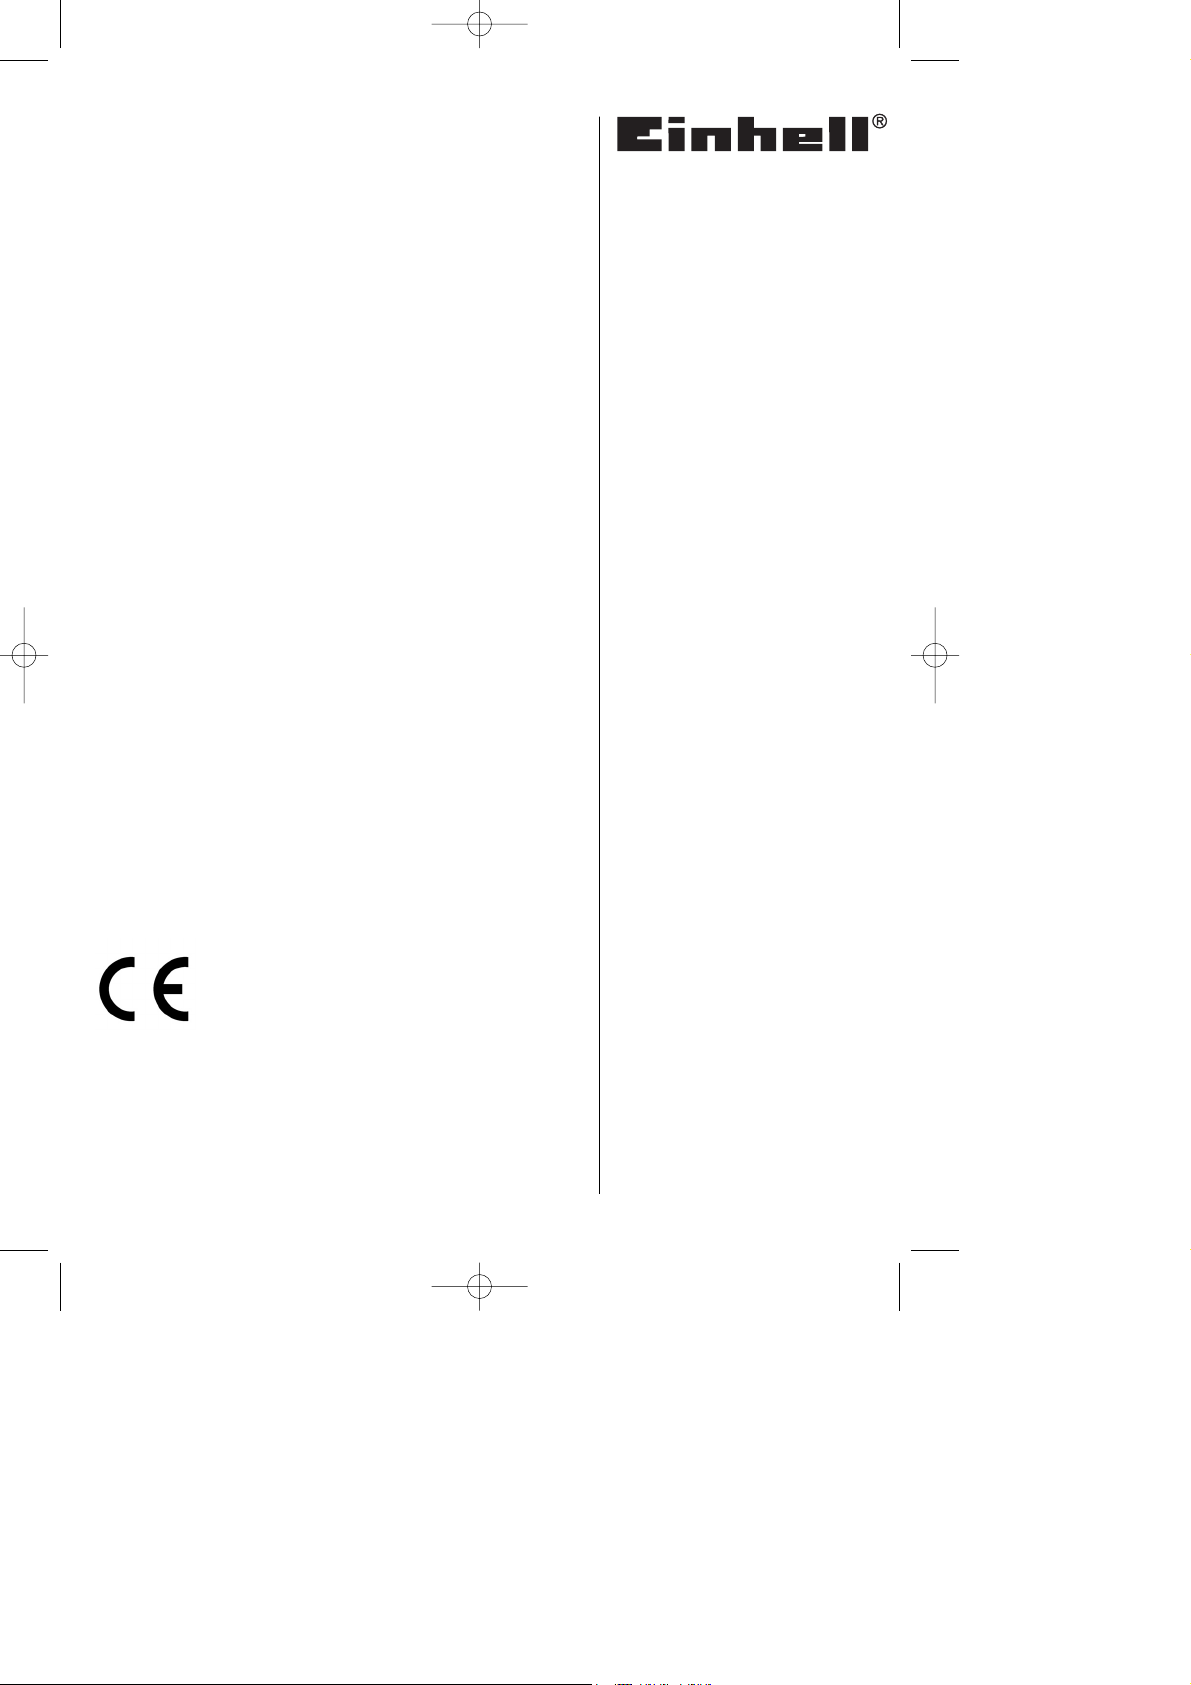
2. Gerätebeschreibung (Bild 1)
1. Schwert
2. Handschutz
3. Führungsgriff mit Schalttaste
4. Handgriff mit Schalttaste oben und unten
5. Kabelzugentlastung
6. Netzleitung
7. Schwertschutz
8. Stoßschutz
9. Schnittgutsammler
10. Befestigungsschrauben für Schnittgutsammler
Achtung! Ein Betreiben der Heckenschere ohne
Handschutz ist nicht zulässig.
3. Lieferumfang
Originalbetriebsanleitung
Sicherheitshinweise
Heckenschere mit angebrachtem Handschutz
Schnittgutsammler
Öffnen Sie die Verpackung und nehmen Sie das
Gerät vorsichtig aus der Verpackung.
Entfernen Sie das Verpackungsmaterial sowie
Verpackungs-/ und Transportsicherungen (falls
vorhanden).
Überprüfen Sie, ob der Lieferumfang vollständig
ist.
Kontrollieren Sie das Gerät und die Zubehörteile
auf Transportschäden.
Bewahren Sie die Verpackung nach Möglichkeit
bis zum Ablauf der Garantiezeit auf.
ACHTUNG
Gerät und Verpackungsmaterial sind kein
Kinderspielzeug! Kinder dürfen nicht mit
Kunststoffbeuteln, Folien und Kleinteilen
spielen! Es besteht Verschluckungs- und
Erstickungsgefahr!
4. Bestimmungsgemäße Verwendung
Achtung! Diese Heckenschere ist zum Schneiden von
Hecken, Büschen und Sträuchern geeignet. Die max.
Schnittkapazität muss beachtet werden, siehe
technische Daten.
Das Gerät darf nur nach seiner Bestimmung
verwendet werden. Jede weitere darüber
hinausgehende Verwendung ist nicht
bestimmungsgemäß. Für daraus hervorgerufene
Schäden oder Verletzungen aller Art haftet der
Benutzer/Bediener und nicht der Hersteller.
Bitte beachten Sie, dass unsere Geräte
bestimmungsgemäß nicht für den gewerblichen,
handwerklichen oder industriellen Einsatz konstruiert
wurden. Wir übernehmen keine Gewährleistung,
wenn das Gerät in Gewerbe-, Handwerks- oder
Industriebetrieben sowie bei gleichzusetzenden
Tätigkeiten eingesetzt wird.
6
D
Anleitung_RG_EH_6053_SPK1:_ 11.05.2010 13:08 Uhr Seite 6
7
D
5. Technische Daten
Netzanschluss 230 V ~ 50 Hz
Leistungsaufnahme 600 W
Schnittlänge 530 mm
Schwertlänge 600 mm
Zahnabstand 20 mm
Schnitte/min 3200
max. Schnittstärke 15 mm
Schalldruckpegel L
pA
84,7 dB(A)
Schalleistungspegel L
WA
99 dB(A)
Unsicherheit K 2,5 dB(A)
Vibration a
hv
6,5 m/s
2
Unsicherheit K 1,5 m/s
2
Gewicht 4,0 kg
Zusätzliche Informationen für Elektrowerkzeuge
Warnung!
Der angegebene Schwingungsemissionswert ist nach
einem genormten Prüfverfahren gemessen worden
und kann sich, abhängig von der Art und Weise, in
der das Elektrowerkzeug verwendet wird, ändern
und in Ausnahmefällen über dem angegebenen
Wert liegen.
Der angegebene Schwingungsemissionswert kann
zum Vergleich eines Elektrowerkzeuges mit einem
anderen verwendet werden.
Der angegebene Schwingungsemissionswert kann
auch zu einer einleitenden Einschätzung der Beeinträchtigung verwendet werden.
Beschränken Sie die Geräuschentwicklung und
Vibration auf ein Minimum!
Verwenden Sie nur einwandfreie Geräte.
Warten und reinigen Sie das Gerät regelmäßig.
Passen Sie Ihre Arbeitsweise dem Gerät an.
Überlasten Sie das Gerät nicht.
Lassen Sie das Gerät gegebenenfalls über-
prüfen.
Schalten Sie das Gerät aus, wenn es nicht
benutzt wird.
Tragen Sie Handschuhe.
Restrisiken
Auch wenn Sie dieses Elektrowerkzeug vorschriftsmäßig bedienen, bleiben immer Restrisiken bestehen. Folgende Gefahren können im
Zusammenhang mit der Bauweise und Ausführung dieses Elektrowerkzeuges auftreten:
1. Lungenschäden, falls keine geeignete Staubschutzmaske getragen wird.
2. Gehörschäden, falls kein geeigneter Gehörschutz
getragen wird.
3. Gesundheitsschäden, die aus Hand-ArmSchwingungen resultieren, falls das Gerät über
einen längeren Zeitraum verwendet wird oder
nicht ordnungsgemäß geführt und gewartet wird.
Warnung! Dieses Elektrowerkzeug erzeugt während
des Betriebs ein elektromagnetisches Feld. Dieses
Feld kann unter bestimmten Umständen aktive oder
passive medizinische Implantate beeinträchtigen. Um
die Gefahr von ernsthaften oder tödlichen Verletzungen zu verringern, empfehlen wir Personen mit medizinischen Implantaten ihren Arzt und den Hersteller
vom medizinischen Implantat zu konsultieren, bevor
die Maschine bedient wird.
6. Vor Inbetriebnahme
Überzeugen Sie sich vor dem Anschließen, dass die
Daten auf dem Typenschild mit den Netzdaten
übereinstimmen.
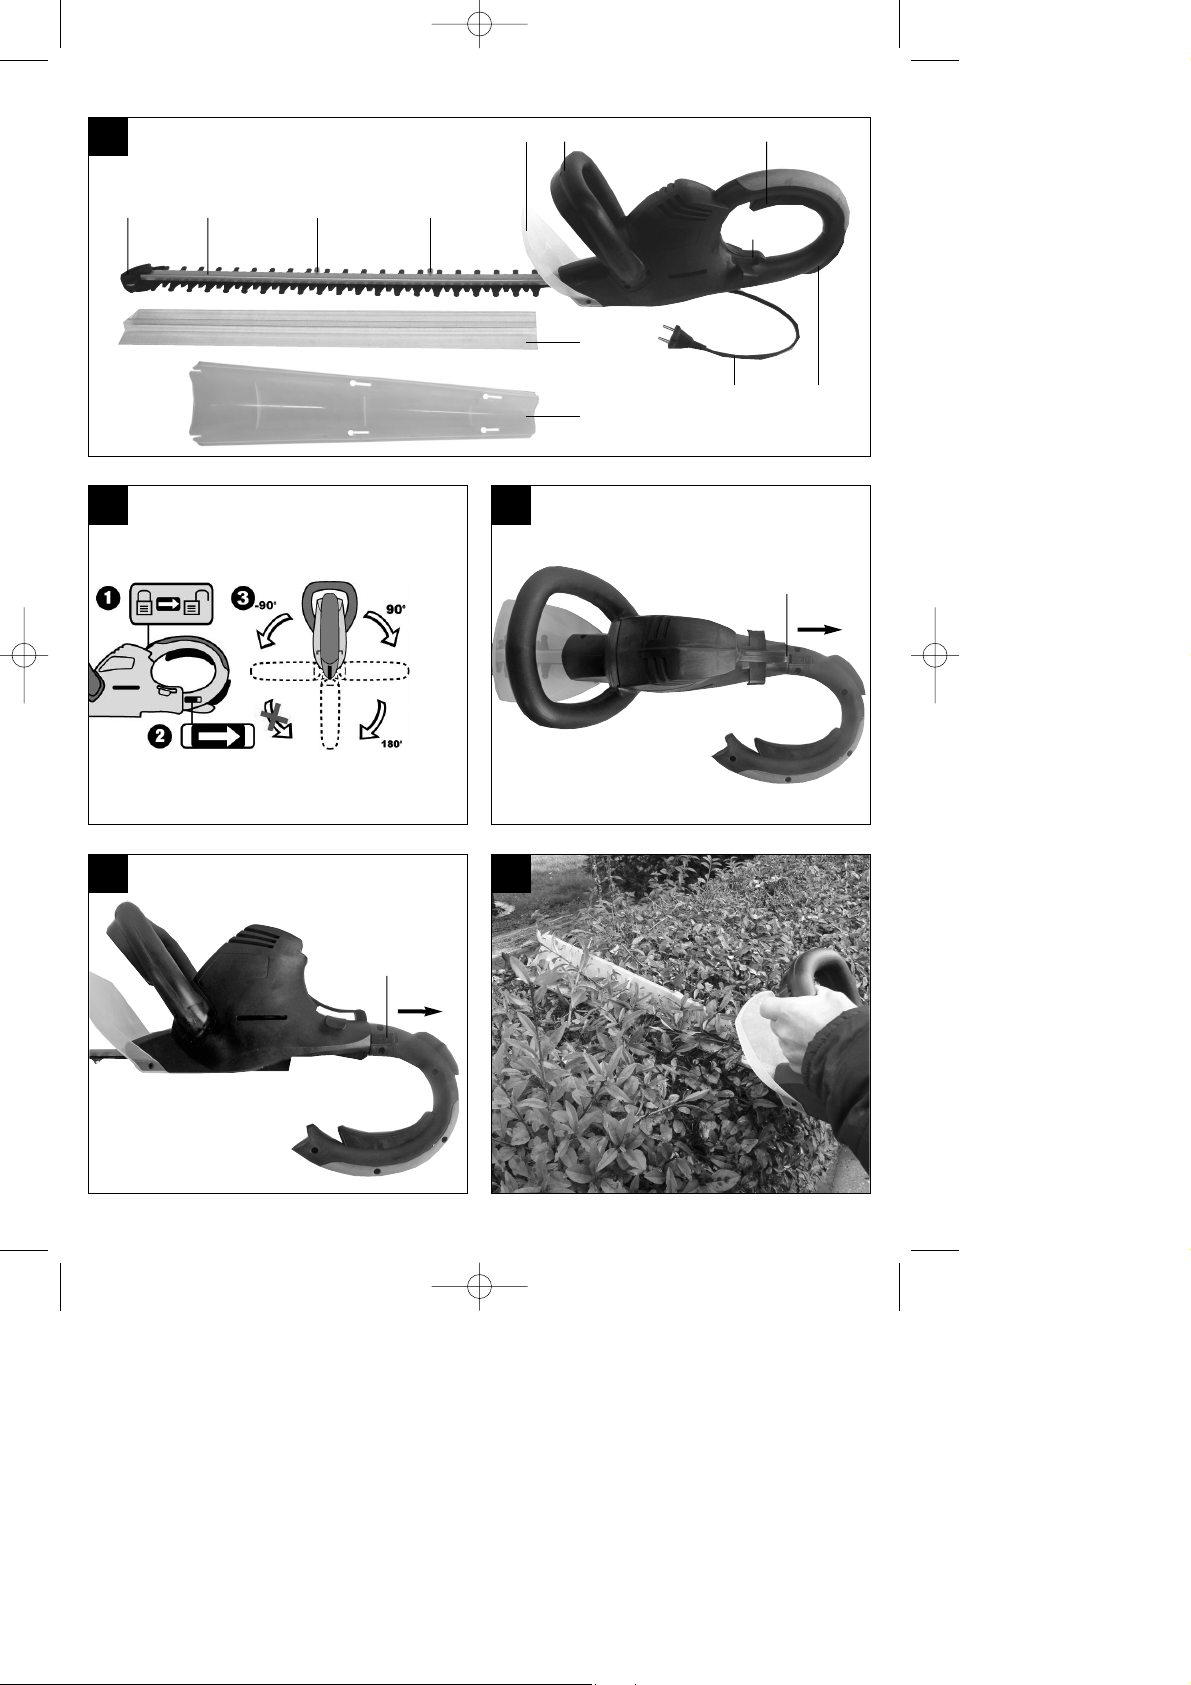
Drehbarer hinterer Handgriff (Bild 2-4)
Die Heckenschere ist mit einem drehbaren hinteren
Handgriff ausgestattet. Er kann nach links um 90° und
nach rechts sowohl um 90° als auch um 180° gedreht
werden. Dazu muss zuerst der obere Schieber
(Bild 2/Pos. 1) in Pfeilrichtung nach hinten geschoben
werden. Anschließend den Schieber (E) in
Pfeilrichtung ziehen und den Handgriff drehen. Bei
Drehung nach links rastet der Griff bei 90° ein (Bild 3).
Bei Drehung nach rechts rastet der Griff bei 90° und
bei 180°ein (Bild 4).
Zum Zurückdrehen des Handgriffes muss der
Schieber (E) wieder in Pfeilrichtung gezogen werden.
Nachdem der Handgriff wieder in der Normalstellung
ist, muss der obere Schieber zum Arretieren nach
vorne geschoben werden.
Zur Durchführung von Vertikalschnitten sollte der
Handgriff um 90°, bei Überkopfschnitten um 180°
gedreht werden.
Anleitung_RG_EH_6053_SPK1:_ 11.05.2010 13:08 Uhr Seite 7

8
D
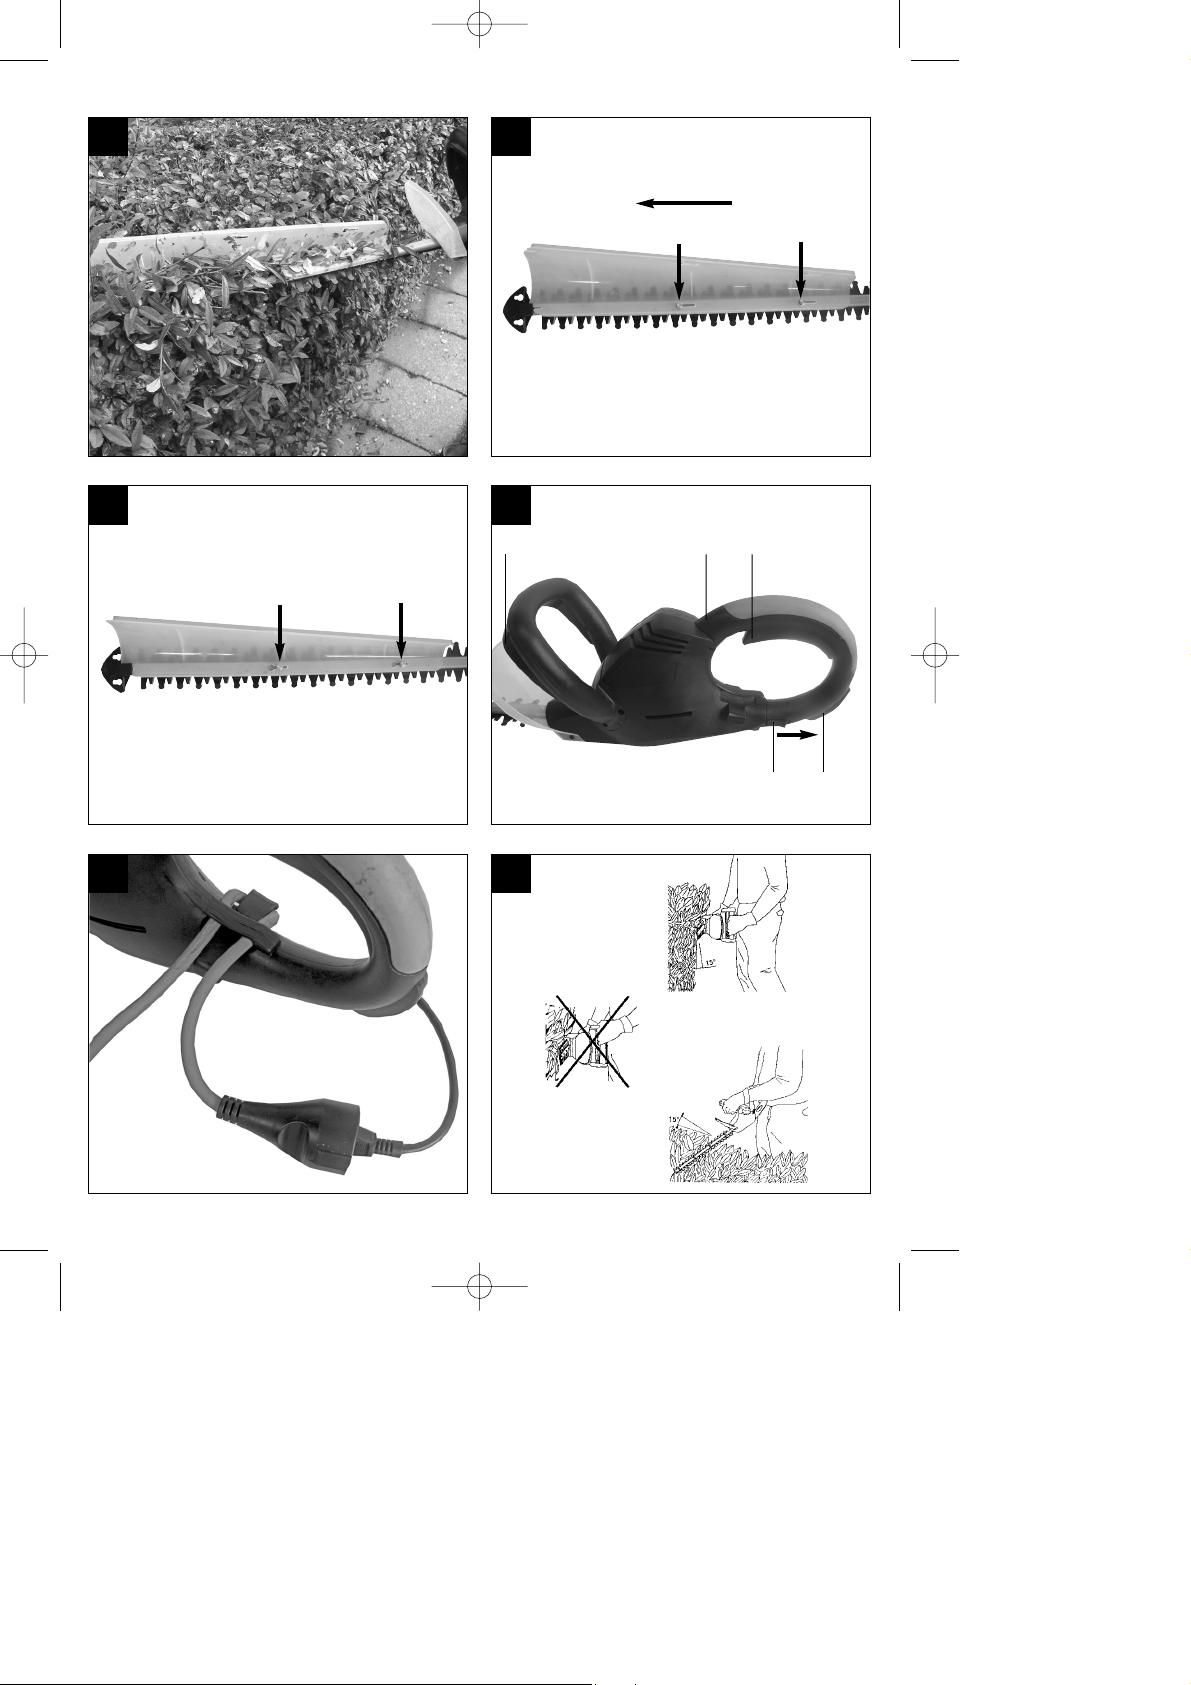
Montage des Schnittgutsammlers (Bild 5a-5d)
Bei waagrechten Schnitten wird empfohlen, den
Schnittgutsammler zu montieren. Dieser ermöglicht
einen einfachen Abtransport des Schnittgutes. Die
Heckenoberfläche bleibt somit sauber (Bild 5a/5b).
Setzen Sie den Schnittgutsammler auf die
Schwertschiene (Bild 5c). Anschließend schieben Sie
den Schnittgutsammler bis zum Anschlag in Richtung
Schwertspitze. Achten Sie dabei darauf, dass die
vordere Spitze des Schnittgutsammlers in die
Schwertspitze geschoben wird. Ziehen Sie anschließend die Befestigungsschrauben (10) fest (Bild 5d).
Der Schnittgutsammler kann sowohl rechts als auch
links montiert werden.
7. Bedienung
Die Heckenscheren ist mit einer ZweihandSicherheitsschaltung ausgestattet. Sie arbeitet nur,
wenn mit der einen Hand der Schalter am
Führungshandgriff (Bild 6a / Pos. A) und mit der
anderen Hand wahlweise der obere Schalter am
Handgriff (Bild 6a / Pos. B) oder der Schalter unter
dem Handgriff (Bild 6a / Pos. C) gedrückt werden.
Wird ein Schaltelement losgelassen, bleiben die
Schneidmesser stehen.
Bitte achten Sie dabei auf den Auslauf der
Schneidmesser.
Prüfen Sie bitte die Funktion der Schneidmesser.
Die beidseitig schneidenden Messer sind
gegenläufig und garantieren dadurch eine hohe
Schneidleistung und ruhigen Lauf.
Befestigen Sie vor dem Gebrauch das
Verlängerungskabel in der Kabelzugentlastung
(siehe Bild 6b).
Für den Betrieb im Freien sind dafür zugelassene
Verlängerungsleitungen zu benutzen.
Arbeitshinweise
Außer Hecken kann eine Heckenschere auch für
den Schnitt von Sträuchern und Gebüsch
eingesetzt werden.
Die beste Schneidleistung erreichen Sie, wenn
die Heckenschere so geführt wird, dass die
Messerzähne in einem Winkel von ca. 15° zur
Hecke gerichtet sind (siehe Bild 7).
Die beidseitig schneidenden gegenläufigen
Messer ermöglichen ein Schneiden in beiden
Richtungen (siehe Bild 8).
Um eine gleichmäßige Heckenhöhe zu erreichen,
wird das Spannen eines Fadens als Richtschnur
entlang der Heckenkante empfohlen. Die überstehenden Zweige werden abgeschnitten (siehe Bild
9). Achten Sie darauf, dass die Messer nicht mit
dem Faden in Berührung kommen.
Die Seitenflächen einer Hecke werden mit bogen-
förmigen Bewegungen von unten nach oben geschnitten (siehe Bild 10).
8. Austausch der Netzanschlussleitung
Wenn die Netzanschlussleitung dieses Gerätes beschädigt wird, muss sie durch den Hersteller oder
seinen Kundendienst oder eine ähnlich qualifizierte
Person ersetzt werden, um Gefährdungen zu
vermeiden.
9. Reinigung, Wartung und
Ersatzteilbestellung
Ziehen Sie vor allen Reinigungsarbeiten den
Netzstecker.
9.1 Reinigung
Halten Sie Schutzvorrichtungen, Luftschlitze und
Motorengehäuse so staub- und schmutzfrei wie
möglich. Reiben Sie das Gerät mit einem sauberen Tuch ab oder blasen Sie es mit Druckluft bei
niedrigem Druck aus.
Wir empfehlen, dass Sie das Gerät direkt nach
jeder Benutzung reinigen.
Reinigen Sie das Gerät regelmäßig mit einem
feuchten Tuch und etwas Schmierseife.
Verwenden Sie keine Reinigungs- oder Lösungsmittel; diese könnten die Kunststoffteile des Gerätes angreifen. Achten Sie darauf, dass kein
Wasser in das Geräteinnere gelangen kann.
9.2 Wartung
Um stets beste Leistungen zu erhalten, sollten die
Messer regelmäßig gereinigt und geschmiert werden. Entfernen Sie die Ablagerungen mit einer
Bürste und tragen Sie einen leichten Ölfilm auf
(siehe Bild 11).
Im Geräteinneren befinden sich keine weiteren zu
wartenden Teile.
Zur Aufbewahrung kann die Heckenschere mit
passenden Schrauben und Dübeln an der Wand
befestigt werden (siehe Bild 12).
Anleitung_RG_EH_6053_SPK1:_ 11.05.2010 13:08 Uhr Seite 8
9.3 Ersatzteilbestellung:
Bei der Ersatzteilbestellung sollten folgende
Angaben gemacht werden;
Typ des Gerätes
Artikelnummer des Gerätes
Ident-Nummer des Gerätes
Ersatzteilnummer des erforderlichen Ersatzteils
Aktuelle Preise und Infos finden Sie unter
www.isc-gmbh.info
10. Lagerung
Lagern Sie das Gerät und dessen Zubehör an einem
dunklen, trockenen und frostfreiem sowie für Kinder
unzugänglichem Ort. Die optimale Lagertemperatur
liegt zwischen 5 und 30 ˚C. Bewahren Sie das Elektrowerkzeug in der Originalverpackung auf.
11. Entsorgung und Wiederverwertung
Das Gerät befindet sich in einer Verpackung um
Transportschäden zu verhindern. Diese Verpackung
ist Rohstoff und ist somit wieder verwendbar oder
kann dem Rohstoffkreislauf zurückgeführt werden.
Das Gerät und dessen Zubehör bestehen aus verschiedenen Materialien, wie z.B. Metall und Kunststoffe. Führen Sie defekte Bauteile der Sondermüllentsorgung zu. Fragen Sie im Fachgeschäft oder in
der Gemeindeverwaltung nach!
12. Störungen
Gerät läuft nicht:
Überprüfen Sie, ob das Netzkabel ordnungsgemäß
angeschlossen ist und prüfen Sie die Netzsicherungen. Falls das Gerät trotz vorhandener Spannung
nicht funktioniert, senden Sie es bitte an die angegebene Kundendienstadresse.
9
D
Anleitung_RG_EH_6053_SPK1:_ 11.05.2010 13:08 Uhr Seite 9

Important!
When using the equipment, a few safety precautions
must be observed to avoid injuries and damage.
Please read the complete operating instructions and
safety regulations with due care. Keep this manual in
a safe place, so that the information is available at all
times. If you give the equipment to any other person,
hand over these operating instructions and safety
regulations as well. We cannot accept any liability for
damage or accidents which arise due to a failure to
follow these instructions and the safety instructions.
1. Safety regulations
The corresponding safety information can be found
in the enclosed booklet.
CAUTION!
Read all safety regulations and instructions.
Any errors made in following the safety regulations
and instructions may result in an electric shock, fire
and/or serious injury.
Keep all safety regulations and instructions in a
safe place for future use.
Explanation of the plate (see Fig. 13)
1. Warning
2. Do not expose to rain! Do not expose the hedge
trimmer to rain or wet conditions.
3. Read the operating instructions before using for
the first time.
4. Pull the plug from the power supply
immediately if the cable gets damaged or
severed.
5. Wear goggles and ear muffs.
2. Layout (see Fig. 1)
1. Cutter rail
2. Hand guard
3. Steady grip with button switch
4. Handle with button switch at the top and bottom
5. Cable grip
6. Power cable
7. Cutter guard
8. Impact guard
9. Cuttings collector
10. Fixing screw
Important! You must never use the hedge
trimmer without hand guard.
3. Items supplied
Original operating instructions
Safety instructions
Hedge trimmer with fitted hand protection
Cuttings collector
Open the packaging and take out the equipment
with care.
Remove the packaging material and any
packaging and/or transportation braces (if
available).
Check to see if all items are supplied.
Inspect the equipment and accessories for
transport damage.
If possible, please keep the packaging until the
end of the guarantee period.
IMPORTANT
The equipment and packaging material are not
toys. Do not let children play with plastic bags,
foils or small parts. There is a danger of
swallowing or suffocating!
4. Proper use
Important. This hedge trimmer is suitable for cutting
hedges, bushes and shrubs. Observe the maximum
permissible cutting capacity; see technical data.
The machine is to be used only for its prescribed
purpose. Any other use is deemed to be a case of
misuse. The user / operator and not the
manufacturer will be liable for any damage or injuries
of any kind caused as a result of this.
Please note that our equipment has not been
designed for use in commercial, trade or industrial
applications. Our warranty will be voided if the
machine is used in commercial, trade or industrial
businesses or for equivalent purposes.
10
GB
Anleitung_RG_EH_6053_SPK1:_ 11.05.2010 13:08 Uhr Seite 10

5. Technical data
Voltage 230V ~ 50Hz
Power consumption 600 W
Cutting length 530 mm
Cutter rail length 600 mm
Tooth spacing 20 mm
max. cutting ø 15 mm
Cuts/min 3200
Sound pressure level L
pA
84.7 dB(A)
Sound power level L
WA
99 dB(A)
K uncertainty 2.5 dB(A)
Vibration a
hv
6.5 m/s
2
K uncertainty 1.5 m/s
2
Weight 4,0 kg
Additional information for electric power tools
Warning!
The specified vibration value was established in
accordance with a standardized testing method. It
may change according to how the electric equipment
is used and may exceed the specified value in
exceptional circumstances.
The specified vibration value can be used to compare
the equipment with other electric power tools.
The specified vibration value can be used for initial
assessment of a harmful effect.
Keep the noise emissions and vibrations to a
minimum.
Only use appliances which are in perfect working
order.
Service and clean the appliance regularly.
Adapt your working style to suit the appliance.
Do not overload the appliance.
Have the appliance serviced whenever
necessary.
Switch the appliance off when it is not in use.
Wear protective gloves.
Residual risks
Even if you use this electric power tool in
accordance with instructions, certain residual
risks cannot be rules out. The following hazards
may arise in connection with the equipment’s
construction and layout:
1. Lung damage if no suitable protective dust mask
is used.
2. Damage to hearing if no suitable ear protection is
used.
3. Health damage caused by hand-arm vibrations if
the equipment is used over a prolonged period or
is not properly guided and maintained.
Warning! The electric power tool generates an
electromagnetic field during operation. Under certain
circumstances this field may actively or passively
impede medical implants. To reduce the risk of
serious or fatal injuries, we recommend persons with
medical implants to consult their doctor and the
manufacturer of the medical implant prior to using the
equipment.
6. Before starting the equipment
Before you connect the equipment to the mains
supply make sure that the data on the rating plate
are identical to the mains data.
Rotary rear handle (Figures 2-4)
The hedge shears are fitted with a rear rotary handle.
This can be turned counter-clockwise through 90°
and clockwise through both 90° and 180°. For this
purpose the top slide (Fig. 2/Pos. 1) must be pushed
backwards in the direction indicated by the arrow.
Then pull the slide (E) in the direction indicated by
the arrow and turn the handle. If you turn it counterclockwise the handle will lock at an angle of 90° (Fig.
3). If you turn it clockwise the handle will lock at an
angle of 90° and 180° (Figure 4). Pull the slide (E) in
the direction indicated by the arrow again to return
the handle to its original position. When the handle is
back in its standard position the top slide (E) must be
pushed forward to lock it.
For vertical cutting the handle should be set to 90°
and for overhead cutting it should be set to 180°.
Fitting the cuttings collector (Figure 5a-5d)
For horizontal cutting we recommend that you fit the
cuttings collector. This enables you to remove the
cuttings easily. The surface of the hedge thus
remains clear (Figure 5a/5b). Position the cuttings
collector on the cutter rail (Figure 5c). Then push the
cuttings collector as far as possible towards the tip of
the cutter rail. Ensure that the front tip of the cuttings
collector is pushed into the tip of the cutter rail. Then
tighten the fastening screws (10) securely (Figure
5d). The cuttings collector can be fitted on either the
right or left side.
11
GB
Anleitung_RG_EH_6053_SPK1:_ 11.05.2010 13:08 Uhr Seite 11

7. Using for the first time and operation
The hedge trimmer comes with a two-hand safety
switch. It only works if the switch on the guide handle
(Fig. 6a / Item A) is pressed with one hand and either
the switch on top of the handle (Fig. 6a / Item B) or
the switch below the handle (Fig. 6a / Item C) is
pressed with the other hand.
Releasing any of the switches will bring the hedge
trimmer to a stop.
In so doing, please check the running of the
blades.
쎲 Please check that the blades function correctly.
The blades cut on both sides and run in opposite
directions to each other, for guaranteed high
cutting performance and quiet operation.
쎲 Fasten the extension cable to the cable holder
before starting to use the machine (see Fig. 6b).
쎲 For use in the open air you must only use
extension cables certified for the purpose.
Tips on use
쎲 The hedge trimmer can be used not only for
trimming hedges but for trimming shrubs and
bushes as well.
쎲 For optimum trimming performance, guide the
blade teeth at an angle of approx. 15° to the
hedge (see Fig. 7).
쎲 Since the blades cut on both sides and run in
opposite directions to each other, you can trim in
both directions (see Fig. 8).
쎲 It is recommended to tie a guide line of string or
the like along the hedge so that you cut the hedge
to a level height. Cut off all branches which
protrude beyond the guide line (see Figure 9).
Ensure that the blades do not come into contact
with the string.
쎲 The sides of the hedge should be trimmed with
arc-type movements from below upwards (see
Fig. 10).
8. Replacing the power cable
If the power cable for this equipment is damaged, it
must be replaced by the manufacturer or its aftersales service or similarly trained personnel to avoid
danger.
9. Cleaning, maintenance and ordering
of spare parts
Always pull out the mains power plug before starting
any cleaning work.
9.1 Cleaning
쎲 Keep all safety devices, air vents and the motor
housing free of dirt and dust as far as possible.
Wipe the equipment with a clean cloth or blow it
with compressed air at low pressure.
쎲 We recommend that you clean the device
immediately each time you have finished using it.
쎲 Clean the equipment regularly with a moist cloth
and some soft soap. Do not use cleaning agents
or solvents; these could attack the plastic parts
of the equipment. Ensure that no water can seep
into the device.
9.2 Maintenance
쎲 Um stets beste Leistungen zu erhalten, sollten
die Messer regelmäßig gereinigt und geschmiert
werden. Entfernen Sie die Ablagerungen mit
einer Bürste und tragen Sie einen leichten Ölfilm
auf (siehe Bild 11).
쎲 There are no parts inside the equipment which
require additional maintenance.
쎲 Zur Aufbewahrung kann die Heckenschere mit
passender Schraube und Dübel an der Wand
befestigt werden (siehe Bild 12).
9.3 Ordering replacement parts:
Please quote the following data when ordering
replacement parts:
Type of machine
Article number of the machine
Identification number of the machine
Replacement part number of the part required
For our latest prices and information please go to
www.isc-gmbh.info
10. Storage
Store the equipment and accessories out of children’s
reach in a dark and dry place at above freezing
temperature. The ideal storage temperature is
between 5 and 30 °C. Store the electric tool in its
original packaging.
12
GB
Anleitung_RG_EH_6053_SPK1:_ 11.05.2010 13:08 Uhr Seite 12

11. Disposal and recycling
The unit is supplied in packaging to prevent its being
damaged in transit. This packaging is raw material
and can therefore be reused or can be returned to
the raw material system.
The unit and its accessories are made of various
types of material, such as metal and plastic.
Defective components must be disposed of as
special waste. Ask your dealer or your local council.
12. Faults
The machine does not start: Check that the power
cable is correctly connected and check the mains
fuses. If the machine still does not work even with
connected voltage, please send it to the specified
customer services address.
13
GB
Anleitung_RG_EH_6053_SPK1:_ 11.05.2010 13:08 Uhr Seite 13

Attention !
Lors de lʼutilisation dʼappareils, il faut respecter
certaines mesures de sécurité afin dʼéviter des
blessures et dommages. Veuillez donc lire
attentivement ce mode dʼemploi/ces consignes de
sécurité. Veillez à le conserver en bon état pour
pouvoir accéder aux informations à tout moment. Si
lʼappareil doit être remis à dʼautres personnes, veillez
à leur remettre aussi ce mode dʼemploi/ces
consignes de sécurité. Nous déclinons toute
responsabilité pour les accidents et dommages dus
au non-respect de ce mode dʼemploi et des
consignes de sécurité.
1. Consignes de sécurité:
Vous trouverez les consignes de sécurité
correspondantes dans le cahier en annexe.
AVERTISSEMENT !
Veuillez lire toutes les consignes de sécurité et
instructions.
Tout non-respect des consignes de sécurité et
instructions peut provoquer une décharge électrique,
un incendie et/ou des blessures graves.
Conservez toutes les consignes de sécurité et
instructions pour une consultation ultérieure.
Explication de la plaque indicatrice (cf. fig. 13)
1. Avertissement
2. N’exposez pas à la pluie ! Protéger de la pluie et
de l’humidité..
3. Avant la mise en service, lisez le mode dʼemploi.
4. Déconnectez immédiatement la fiche du réseau
dès lorsque le câble est endommagé ou coupé.
5. Portez des protections pour les yeux et lʼouïe
2. Description de lʼappareil
(cf. figure 1)
1. Lame
2. Protège-main
3. Poignée de guidage avec touche de commutatio
4. Poignée avec touche de commutation en haut
et en bas
5. Déchargeur pour câble
6. Conduite réseau
7. Coquille
8. Pare-chocs
9. Collecteur dʼherbe coupée
10. Vis de fixation
Attention ! Il nʼest pas autorisé dʼemployer le
taille-haie sans protège-main.
3. Volume de livraison
Mode d’emploi d’origine
Consignes de sécurité
Taille-haies avec protège-main fixé
Collecteur d’herbe coupée
Ouvrez l’emballage et prenez l’appareil en le
sortant avec précaution de l’emballage.
Retirez le matériel d’emballage tout comme les
sécurités d’emballage et de transport (s’il y en a).
Vérifiez si la livraison est bien complète.
Contrôlez si l’appareil et ses accessoires ne sont
pas endommagés par le transport.
Conservez l’emballage autant que possible
jusqu’à la fin de la période de garantie.
ATTENTION
L’appareil et le matériel d’emballage ne sont pas
des jouets ! Il est interdit de laisser des enfants
jouer avec des sacs et des films en plastique et
avec des pièces de petite taille. Ils risquent de
les avaler et de s’étouffer !
4. Utilisation conforme à lʼaffectation
Attention ! Ce taille-haies convient à tailler des haies,
des buissons et des broussailles. La capacité de
coupe maxi. doit être respectée, voir les
caractéristiques techniques.
La machine doit exclusivement être employée
conformément à son affectation. Chaque utilisation
allant au-delà de cette affectation est considérée
comme non conforme. Pour les dommages en
résultant ou les blessures de tout genre, le
producteur décline toute responsabilité et
lʼopérateur/lʼexploitant est responsable.
Veillez au fait que nos appareils, conformément à
leur affectation, nʼont pas été construits, pour être
utilisés dans un environnement professionnel,
industriel ou artisanal. Nous déclinons toute
responsabilité si lʼappareil est utilisé
professionnellement, artisanalement ou dans des
sociétés industrielles, tout comme pour toute activité
équivalente.
14
F
Anleitung_RG_EH_6053_SPK1:_ 11.05.2010 13:08 Uhr Seite 14

5. Caractéristiques techniques
Branchement secteur 230 V ~ 50 Hz
Puissance absorbée 600 W
Longueur de coupe 530 mm
Longueur de lame 600 mm
Ecart des dents 20 mm
max. Epaisseur de coupe 15 mm
Coupes/min. 3200
Niveau de pression acoustique L
pA
84,7 dB(A)
Niveau de puissance acoustique L
WA
99 dB(A)
Insécurité K 2,5 dB(A)
Vibration a
hv
6,5 m/s
2
Insécurité K 1,5 m/s
2
Poids 4,0 kg
Informations supplémentaires sur les outils
électriques
Avertissement !
La valeur d’émission de vibration a été mesurée selon
une méthode d’essai normée et peut être modifiée,
en fonction du type d’emploi de l’outil électrique ; elle
peut dans certains cas exceptionnels être supérieure
à la valeur indiquée.
La valeur d’émission de vibration indiquée peut être
utilisée pour comparer un outil électrique à un autre.
La valeur d’émission de vibration indiquée peut
également être utilisée pour estimer l’altération au
début.
Limitez le niveau sonore et les vibrations à un
minimum !
Utilisez exclusivement des appareils en excellent
état.
Entretenez et nettoyez l’appareil régulièrement.
Adaptez votre façon de travailler à l’appareil.
Ne surchargez pas l’appareil.
Faites contrôler l’appareil le cas échéant.
Mettez l’appareil hors circuit lorsque vous ne
l’utilisez pas.
Portez des gants.
Risques résiduels
Même en utilisant cet outil électrique
conformément aux prescriptions, il reste
toujours des risques résiduels. Les dangers
suivants peuvent apparaître en rapport avec la
construction et le modèle de cet outil électrique :
1. Lésions des poumons si aucun masque antipoussière adéquat n’est porté.
2. Déficience auditive si aucun casque anti-bruit
approprié n’est porté.
3. Atteintes à la santé issues des vibrations mainbras, si l’appareil est utilisé pendant une longue
période ou s’il n’a pas été employé ou entretenu
dans les règles de l’art.
Avertissement ! Cet appareil électrique produit un
champ électromagnétique pendant son
fonctionnement. Dans certaines conditions, ce
champ peut altérer le fonctionnement d’implants
médicaux actifs ou passifs. Afin de réduire les risques
de blessures graves ou mortelles, nous
recommandons aux personnes qui possèdent un
implant médical de consulter leur cabinet médical et
leur producteur d’implants médicaux avant de
commander la machine.
6. Avant la mise en service
Assurez-vous, avant de connecter la machine, que
les données se trouvant sur la plaque de
signalisation correspondent bien aux données du
réseau.
Poignée arrière rotative (figure 2-4)
Le taille-haies est doté dʼune poignée arrière rotative.
Elle peut être tournée vers la gauche de 90° et vers
la droite de 90° comme de 180°. Il faut pour y arriver
pousser tout dʼabord le coulisseau supérieur en
arrière (figure 2/1). Ensuite, tirez le coulisseau (E)
dans le sens de la flèche et tournez la poignée.
En la tournant vers la gauche, la poignée sʼencrante
à 90° (figure 3).
Lorsquʼelle tourne vers la droite, la poignée
sʼencrante à 90° et à 180° (figure 4).
Pour faire retourner la poignée, il faut repousser une
nouvelle fois le coulisseau (E) dans le sens de la
flèche. Une fois que la poignée est à nouveau en
position normale, il faut pousser le coulisseau
supérieur vers lʼavant pour lʼarrêter.
Pour effectuer des coupes verticales, tournez la
poignée de 90°, pour les coupes au-dessus de la
tête, de 180°.
15
F
Anleitung_RG_EH_6053_SPK1:_ 11.05.2010 13:08 Uhr Seite 15
Montage du collecteur d’herbe coupée (figure
5a-5d)
Il est recommandé de monter le collecteur d’herbe
coupée pour les coupes à l’horizontale. Il permet
d’évacuer facilement les restes coupés. La surface
des haies reste ainsi propre (figure 5a/5b). Placez le
collecteur d’herbe coupée sur le rail de la lame (figure
5c). Ensuite, glisser le collecteur d’herbe coupée
jusqu’à la butée en direction de la pointe de la lame.
Veillez ce faisant, à ce que la pointe avant du
collecteur d’herbe coupée soit poussée dans la
pointe de la lame. Vissez ensuite les vis de fixation à
fond (10) (figure 5d). Le collecteur d’herbe coupée
peut se monter à droite comme à gauche.
7. Mise en service et commande
Le taille-haies est doté dʼun interrupteur de sécurité
deux mains. Il fonctionne uniquement lorsque lʼon
appuie dʼune main sur lʼinterrupteur sur le guidon
(figure 6a / rep.A) et de lʼautre au choix sur
lʼinterrupteur supérieur sur la poignée (figure 6a /
rep. B) soit sur lʼinterrupteur sous la poignée (figure
6a / rep. C).
Si lʼun des organes de commande est relâché, les
lames sʼarrêtent.
Veuillez veiller à la sortie des lames.
쎲 Contrôlez le fonctionnement des lames. Les
lames coupantes des deux côtés fonctionnent en
sens contraire lʼune de lʼautre et garantissent de
la sorte une grande puissance de coupe et une
course calme.
쎲 Fixez - avant lʼutilisation - le câble de rallonge
dans le déchargeur pour câble (cf. fig. 6b).
쎲 Il faut utiliser les rallonges dûment homologuées
pour le fonctionnement à lʼair libre.
Consignes de travail
쎲 Outre les haies, il est possible de tailler aussi
des buissons et broussailles avec une taillehaies.
쎲 La meilleure performance de coupe sera atteinte
en guidant le taille-haie de telle manière que les
dents des lames se trouvent dans un angle
dʼenv. 15° tourné vers la haie (cf. fig 7).
쎲 Les lames contrarotatives coupant des deux
côtés permettent de couper dans les deux sens
(cf. fig. 8).
쎲 Pour obtenir une hauteur de haie régulière, il est
recommandé de tendre un fil comme repère le
long de l’arête de la haie. Les branches qui
dépassent sont coupées (cf. fig. 9). Veillez à ce
que les lames ne rentrent pas en contact avec le
fil.
쎲 Les surfaces latérales dʼune haie doivent être
coupées dʼun mouvement du bas vers le haut en
forme dʼarcs (voir figure 10).
8. Remplacement de la ligne de
raccordement réseau
Si la ligne de raccordement réseau de cet appareil
est endommagée, il faut la faire remplacer par le
producteur ou son service après-vente ou par une
personne de qualification semblable afin dʼéviter tout
risque.
9. Nettoyage, maintenance et
commande de pièces de rechange
Retirez la fiche de contact avant tous travaux de
nettoyage.
9.1 Nettoyage
Maintenez les dispositifs de protection, les fentes
à air et le carter de moteur aussi propres (sans
poussière) que possible. Frottez lʼappareil avec
un chiffon propre ou soufflez dessus avec de lʼair
comprimé à basse pression.
Nous recommandons de nettoyer lʼappareil
directement après chaque utilisation.
Nettoyez lʼappareil régulièrement à lʼaide dʼun
chiffon humide et un peu de savon. Nʼutilisez
aucun produit de nettoyage ni détergeant ; ils
pourraient endommager les pièces en matières
plastiques de lʼappareil. Veillez à ce quʼaucune
eau nʼentre à lʼintérieur de lʼappareil.
9.2 Maintenance
쎲 Pour toujours obtenir une meilleure performance,
les lames doivent être régulièrement nettoyées
et graissées. Supprimez les dépôts à lʼaide dʼune
brosse et enduisez-la dʼun léger film dʼhuile (voir
figure 11).
쎲 Aucune pièce à lʼintérieur de lʼappareil nʼa besoin
de maintenance.
쎲 Pour le stockage, on peut fixer le taille-haies au
mur avec les vis et cheville adéquates (voir
figure 12).
16
F
Anleitung_RG_EH_6053_SPK1:_ 11.05.2010 13:08 Uhr Seite 16
9.3 Commande de pièces de rechange :
Pour les commandes de pièces de rechange,
veuillez indiquer les références suivantes:
Type de lʼappareil
No. dʼarticle de lʼappareil
No. dʼidentification de lʼappareil
No. de pièce de rechange de la pièce requise
Vous trouverez les prix et informations actuelles à
lʼadresse www.isc-gmbh.info
10. Stockage
Entreposez l’appareil et ses accessoires dans un
endroit sombre, sec et à l’abri du gel tout comme
inaccessible aux enfants. La température de
stockage optimale est comprise entre 5 et 30 °C.
Conservez l’outil électrique dans l’emballage
d’origine.
11. Mise au rebut et recyclage
Lʼappareil se trouve dans un emballage permettant
dʼéviter les dommages dus au transport. Cet
emballage est une matière première et peut donc
être réutilisé ultérieurement ou être réintroduit dans
le circuit des matières premières.
Lʼappareil et ses accessoires sont en matériaux
divers, comme par ex. des métaux et matières
plastiques. Eliminez les composants défectueux
dans les systèmes dʼélimination des déchets
spéciaux. Renseignez-vous dans un commerce
spécialisé ou auprès de lʼadministration de votre
commune !
12. Dérangements
Lʼappareil ne démarre pas : Vérifiez que le câble
électrique est correctement branché et contrôlez les
fusibles. Dans le cas où lʼappareil ne fonctionne pas
alors que la tension est présente, renvoyez celui-ci
au service après-vente, à lʼadresse indiquée.
17
F
Anleitung_RG_EH_6053_SPK1:_ 11.05.2010 13:08 Uhr Seite 17

Attenzione!
Nellʼusare gli apparecchi si devono rispettare diverse
avvertenze di sicurezza per evitare lesioni e danni.
Quindi leggete attentamente queste istruzioni per
lʼuso/le avvertenze di sicurezza. Conservate bene le
informazioni per averle a disposizione in qualsiasi
momento. Se date lʼapparecchio ad altre persone,
consegnate queste istruzioni per lʼuso/le avvertenze
di sicurezza insieme allʼapparecchio. Non ci
assumiamo alcuna responsabilità per incidenti o
danni causati dal mancato rispetto di queste
istruzioni e delle avvertenze di sicurezza.
1. Avvertenze sulla sicurezza
Le relative avvertenze di sicurezza si trovano
nellʼopuscolo allegato.
AVVERTIMENTO!
Leggete tutte le avvertenze di sicurezza e le
istruzioni.
Dimenticanze nel rispetto delle avvertenze di
sicurezza e delle istruzioni possono causare scosse
elettriche, incendi e/o gravi lesioni.
Conservate tutte le avvertenze e le istruzioni per
eventuali necessità future.
Spiegazione della targhetta (vedi Fig. 13)
1. Avvertimento
2. Evitate l’esposizione alla pioggia! Proteggere
dalla pioggia e dall’umidità.
3. Leggere le istruzioni per lʼuso prima della messa
in esercizio.
4. Staccare subito la spina dalla presa di corrente
se il cavo è danneggiato o tagliato.
5. Indossare occhiali protettivi e cuffie antirumore.
2. Descrizione dellʼapparecchio
(vedi Fig. 1)
1. Braccio
2. Dispositivo salvamano
3. Impugnatura di comando con tasto di
commutazione
4. Impugnatura con tasto di commutazione
superiore e inferiore
5. Dispositivo di eliminazione della trazione dal
cavo
6. Cavo di alimentazione
7. Protezione braccio
8. Protezione antiurto
9. Raccoglitore dei rametti tagliati
10. Viti di fissaggio
Attenzione! È vietato lʼuso delle cesoie per siepi
senza il dispositivo salvamano.
3. Elementi forniti
Istruzioni per l’uso originali
Avvertenze di sicurezza
Cesoia per siepi con dispositivo salvamano
applicato
Raccoglitore del materiale tagliato
Aprite l’imballaggio e togliete con cautela
l’apparecchio dalla confezione.
Togliete il materiale d’imballaggio e anche i fermi
di trasporto / imballo (se presenti).
Controllate che siano presenti tutti gli elementi
forniti.
Verificate che l’apparecchio e gli accessori non
presentino danni dovuti al trasporto.
Se possibile, conservate l’imballaggio fino alla
scadenza della garanzia.
ATTENZIONE
L’apparecchio e il materiale d’imballaggio non
sono giocattoli! I bambini non devono giocare
con sacchetti di plastica, film e piccoli pezzi!
Sussiste pericolo di ingerimento e
soffocamento!
4. Utilizzo proprio
Attenzione! Queste cesoie per siepi sono adatte per
tagliare siepi, cespugli ed arbusti. Fate attenzione alla
capacità max. di taglio, si vedano le caratteristiche
tecniche.
Lʼapparecchio deve venire usato solamente per lo
scopo a cui è destinato. Ogni altro tipo di uso che
esuli da quello previsto non è un uso conforme.
Lʼutilizzatore/lʼoperatore, e non il costruttore, è
responsabile dei danni e delle lesioni di ogni tipo che
ne risultino.
Tenete presente che i nostri apparecchi non sono
stati costruiti per lʼimpiego professionale, artigianale
o industriale. Non ci assumiamo alcuna garanzia
quando lʼapparecchio viene usato in imprese
commerciali, artigianali o industriali, o in attività
equivalenti.
18
I
Anleitung_RG_EH_6053_SPK1:_ 11.05.2010 13:08 Uhr Seite 18

5. Caratteristiche tecniche
Allacciamento alla rete 230 V ~ 50 Hz
Potenza assorbita 600 W
Lunghezza di taglio 530 mm
Lunghezza del braccio 600 mm
Distanza dei denti 20 mm
Spessore max. di taglio 15 mm
Tagli/min 3200
Livello di pressione acustica L
pA
84,7 dB(A)
Livello di potenza acustica L
WA
99 dB(A)
Incertezza K 2,5 dB(A)
Vibrazioni a
hv
6,5 m/s
2
Incertezza K 1,5 m/s
2
Peso 4,0 kg
Ulteriori informazioni per elettroutensili
Avvertimento!
Il valore di emissione di vibrazioni indicato è stato
misurato secondo un metodo di prova normalizzato e
può variare a seconda del modo in cui l’elettroutensile
viene utilizzato e, in casi eccezionali, può essere
superiore al valore riportato.
Il valore di emissione di vibrazioni indicato può essere
usato per il confronto tra elettroutensili di marchi
diversi.
Il valore di emissione di vibrazioni può essere
utilizzato anche per una valutazione preliminare dei
rischi.
Limitate al minimo lo sviluppo di rumore e le
vibrazioni!
Utilizzate soltanto apparecchi in perfetto stato.
Eseguite regolarmente la manutenzione e la
pulizia dell’apparecchio.
Adattate il vostro modo di lavorare
all’apparecchio.
Non sovraccaricate l’apparecchio.
Fate eventualmente controllare l’apparecchio.
Spegnete l’apparecchio se non lo utilizzate.
Indossate i guanti.
Rischi residui
Anche se questo elettroutensile viene utilizzato
secondo le norme, continuano a sussistere
rischi residui. In relazione alla struttura e al
funzionamento di questo elettroutensile
potrebbero presentarsi i seguenti pericoli:
1. Danni all’apparato respiratorio nel caso in cui non
venga indossata una maschera antipolvere
adeguata.
2. Danni all’udito nel caso in cui non vengano
indossate cuffie antirumore adeguate.
3. Danni alla salute derivanti da vibrazioni manobraccio se l’apparecchio viene utilizzato a lungo,
non viene tenuto in modo corretto o se la
manutenzione non è appropriata.
Avvertimento! Questo elettroutensile sviluppa un
campo elettromagnetico durante l’esercizio. In
determinate circostanze questo campo può
danneggiare dispositivi medici impiantati attivi o
passivi. Per ridurre il rischio di lesioni gravi o mortali,
consigliamo alle persone con dispositivi medici
impiantati di consultare il proprio medico e il
produttore del dispositivo prima di utilizzare
l’apparecchio.
6. Prima della messa in esercizio
Prima di inserire la spina nella presa di corrente
assicuratevi che i dati sulla targhetta di
identificazione corrispondano a quelli di rete.
Impugnatura posteriore ruotabile (Fig. 2-4)
Le cesoie per siepi dispongono di unʼimpugnatura
posteriore ruotabile. Essa può essere ruotata verso
sinistra di 90° e verso destra sia di 90° che di 180°.
Per fare ciò spingete prima allʼindietro la sicura
superiore nel senso della freccia (Fig. 2/1). Poi tirate
la sicura (E) nel senso della freccia e ruotate
lʼimpugnatura.
Ruotando lʼimpugnatura verso sinistra essa si blocca
a 90° (Fig. 3).
Ruotando lʼimpugnatura verso destra essa si blocca
a 90° ed a 180° (Fig. 4).
Per riportare lʼimpugnatura nella posizione di
partenza la sicura (E) deve essere tirata di nuovo
nella direzione della freccia. Dopo che lʼimpugnatura
è stata rimessa nella posizione normale la sicura
superiore deve essere spinta in avanti per bloccarla.
Per lʼesecuzione di tagli verticali lʼimpugnatura
dovrebbe essere ruotata di 90° e di 180° in caso di
tagli al di sopra dellʼaltezza della testa.
19
I
Anleitung_RG_EH_6053_SPK1:_ 11.05.2010 13:08 Uhr Seite 19

Montaggio del raccoglitore del materiale tagliato
(Fig. 5a-5d)
In caso di tagli orizzontali si consiglia di montare il
raccoglitore del materiale tagliato. Esso consente di
trasportare facilmente il materiale tagliato. La
superficie della siepe rimane così pulita (Fig. 5a/5b).
Mettete il raccoglitore del materiale tagliato sulla
guida del braccio (Fig. 5c). Spingete quindi il
raccoglitore fino alla battuta in direzione della punta
del braccio. Fate attenzione che la punta anteriore del
raccoglitore del materiale tagliato venga spinta nella
punta del braccio. Quindi serrate saldamente le viti di
fissaggio (10) (Fig. 5d). Il raccoglitore del materiale
tagliato può essere montato sia a destra che a
sinistra.
7. Messa in esercizio e uso
Le cesoie per siepi sono dotate di un interruttore di
sicurezza a due mani. Funzionano solo se con una
mano si tiene premuto lʼinterruttore sullʼimpugnatura
di guida (Fig. 6a/Pos. A) e con lʼaltra a scelta
lʼinterruttore superiore sullʼimpugnatura (Fig. 6a/Pos.
B) o lʼinterruttore sotto lʼimpugnatura (Fig. 6a/Pos. C).
Se si molla un interruttore le lame delle cesoie si
fermano.
In questo fate attenzione allʼestremità delle lame.
쎲 Controllate in funzionamento delle lame. Le lame
a doppio taglio sono controrotanti e garantiscono
così alte prestazioni e un movimento regolare.
쎲 Prima dellʼuso fissate il cavo di prolunga nel
dispositivo di eliminazione della trazione (vedi
Fig. 6b).
쎲 Per lʼesercizio allʼaperto si devono usare i cavi di
prolunga omologati a questo scopo.
Avvertenze per lʼuso
쎲 Le cesoie per siepi possono anche essere usate
per tagliare cespugli ed arbusti.
쎲 Le migliori prestazioni di taglio si ottengono se le
cesoie vengono tenute in modo tale che i denti
delle lame si trovino ad un angolo di ca. 15°
rispetto alla siepe (vedi Fig. 7).
쎲 Le lame controrotanti a doppio taglio consentono
di tagliare in ambedue le direzioni (vedi Fig. 8).
쎲 Per ottenere un’altezza omogenea della siepe si
consiglia di tendere un filo all’altezza voluta come
linea di riferimento. I rami che sporgono vengono
tagliati (vedi Fig. 9). Fate attenzione che la lama
non entri in contatto con il filo.
쎲 Le superfici laterali di una siepe vengono tagliati
dallʼalto verso il basso con movimenti a
semicerchio (vedi Fig. 10).
8. Sostituzione del cavo di
alimentazione
Se il cavo di alimentazione di questo apparecchio
viene danneggiato deve essere sostituito dal
produttore, dal suo servizio di assistenza clienti o da
una persona al pari qualificata al fine di evitare
pericoli.
9. Pulizia, manutenzione e ordinazione
dei pezzi di ricambio
Prima di qualsiasi lavoro di pulizia staccate la spina
dalla presa di corrente.
9.1 Pulizia
Tenete il più possibile i dispositivi di protezione, le
fessure di aerazione e la carcassa del motore
liberi da polvere e sporco. Strofinate
lʼapparecchio con un panno pulito o soffiatelo con
lʼaria compressa a pressione bassa.
Consigliamo di pulire lʼapparecchio subito dopo
averlo usato.
Pulite lʼapparecchio regolarmente con un panno
asciutto ed un poʼ di sapone. Non usate
detergenti o solventi perché questi ultimi
potrebbero danneggiare le parti in plastica
dellʼapparecchio. Fate attenzione che non possa
penetrare dellʼacqua nellʼinterno dellʼapparecchio.
9.2 Manutenzione
Le lame dovrebbero venire pulite e lubrificate
regolarmente per ottenere sempre le migliori
prestazioni. Togliete i depositi con una spazzola e
applicate una sottile pellicola di olio (vedi Fig. 11).
Allʼinterno dellʼapparecchio non si trovano altre
parti sottoposte ad una manutenzione qualsiasi.
Le cesoie per siepi possono essere tenute
appese alla parete con la vite ed il tassello adatto
(vedi Fig. 12).
20
I
Anleitung_RG_EH_6053_SPK1:_ 11.05.2010 13:08 Uhr Seite 20

9.3 Ordinazione di pezzi di ricambio:
Volendo commissionare dei pezzi di ricambio, si
dovrebbe dichiarare quanto segue:
modello dellʼapparecchio
numero dellʼarticolo dellʼapparecchio
numero dʼident. dellʼapparecchio
numero del pezzo di ricambio del ricambio
necessitato.
Per i prezzi e le informazioni attuali si veda
www.isc-gmbh.info
10. Conservazione
Conservate l’apparecchio e i suoi accessori in un
luogo buio, asciutto, al riparo dal gelo e non
accessibile ai bambini. La temperatura ottimale per la
conservazione è compresa tra i 5 e i 30 °C.
Conservate l’elettroutensile nell’imballaggio originale.
11. Smaltimento e riciclaggio
Lʼapparecchio si trova in una confezione per evitare i
danni dovuti al trasporto. Questo imballaggio
rappresenta una materia prima e può perciò essere
utilizzato di nuovo o riciclato.
Lʼapparecchio e i suoi accessori sono fatti di
materiali diversi, per es. metallo e plastica.
Consegnate i pezzi difettosi allo smaltimento di rifiuti
speciali. Per informazioni rivolgetevi ad un negozio
specializzato o allʼamministrazione comunale!
12. Anomalie
Lʼutensile non funziona: controllate che il cavo di
alimentazione sia collegato correttamente e
controllate i fusibili di rete. Nel caso in cui lʼutensile
non funzioni pur in presenza di tensione, speditelo
allʼindirizzo riportato dellʼassistenza clienti.
21
I
Anleitung_RG_EH_6053_SPK1:_ 11.05.2010 13:08 Uhr Seite 21

Vigtigt!
Ved brug af el-værktøj er der visse
sikkerhedsforanstaltninger, der skal respekteres for
at undgå skader på personer og materiel. Læs derfor
betjeningsvejledningen / sikkerhedsanvisningerne
grundigt igennem. Opbevar betjeningsvejledningen
et praktisk sted, så du altid kan tage den frem efter
behov. Husk at lade betjeningsvejledningen /
sikkerhedsanvisningerne følge med værktøjet, hvis
du overdrager det til andre. Vi fraskriver os ethvert
ansvar for skader på personer eller materiel, som
måtte opstå som følge af, at anvisningerne i denne
betjeningsvejledning, navnlig vedrørende sikkerhed,
tilsidesættes.
1. Sikkerhedshenvisninger
Sikkerhedsanvisninger findes i vedlagte hæfte
ADVARSEL!
Læs alle sikkerhedsanvisninger og øvrige
anvisninger.
Følges anvisningerne, navnlig
sikkerhedsanvisningerne, ikke nøje som beskrevet,
kan elektrisk stød, brand og/eller svære kvæstelser
være følgen.
Alle sikkerhedsanvisninger og øvrige
anvisninger skal gemmes.
Skiltets betydning (se fig. 13)
1. Advarsel
2. Må ikke udsættes for regn! Beskyttes mod regn
og fugt.
3. Læs betjeningsvejledningen før ibrugtagning.
4. Tag straks stikket ud af stikkontakten, hvis
ledningen beskadiges eller skæres over.
5. Brug øjen- og høreværn.
2. Oversigt over apparatet (se fig. 1)
1. Sværd
2. Håndbeskyttelse
3. Manøvregreb med afbryderknap
4. Håndtag med afbryderknap foroven og forneden
5. Aflastningsbøjle til ledning
6. Netledning
7. Sværdbeskyttelse
8. Stødværn
9. Affaldsopsamler
10. Fastspændingsskruer
Vigtigt! Det er ikke tilladt at arbejde med
hækkeklipperen uden håndbeskyttelse.
3. Pakkens indhold
Original betjeningsvejledning
Sikkerhedsanvisninger
Hækkeklipper med påsat håndbeskyttelse
Affaldsopsamler
Åbn pakken, og tag forsigtigt maskinen ud af
emballagen.
Fjern emballagematerialet samt emballage-/og
transportsikringer (hvis sådanne forefindes).
Kontroller, at der ikke mangler noget.
Kontroller maskine og tilbehør for
transportskader.
Opbevar så vidt muligt emballagen indtil
garantiperiodens udløb.
VIGTIGT
Maskinen og emballagematerialet er ikke legetøj!
Børn må ikke lege med plastikposer, folier og
smådele! Fare for indtagelse og kvælning!
4. Formålsbestemt anvendelse
Vigtigt! Denne hækkeklipper er konstrueret til klipning
af hække, krat og buske. Den maks. skærekapacitet
skal respekteres, se tekniske data.
Saven må kun anvendes i overensstemmelse med
dens tiltænkte formål. Enhver anden form for
anvendelse er ikke tilladt. Vi fraskriver os ethvert
ansvar for skader, det være sig på personer eller
materiel, som måtte opstå som følge af, at maskinen
ikke er blevet anvendt korrekt. Ansvaret bæres alene
af brugeren/ejeren.
Bemærk, at vore produkter ikke er konstrueret til
erhvervsmæssig, håndværksmæssig eller industriel
brug. Vi fraskriver os ethvert ansvar, såfremt
produktet anvendes i erhvervsmæssigt,
håndværksmæssigt, industrielt eller lignende
øjemed.
22
DK/N
Anleitung_RG_EH_6053_SPK1:_ 11.05.2010 13:08 Uhr Seite 22

5. Tekniske data
Nettilslutning 230 V ~ 50 Hz
Optagen effekt 600 W
Skærlængde 530 mm
Sværdlængde 600 mm
Tandafstand 20 mm
Maks. snittykkelse 15 mm
Snit/min 3200
Lydtryksniveau L
pA
84,7 dB(A)
Lydeffektniveau L
WA
99 dB(A)
Usikkerhed K 2,5 dB(A)
Vibration a
hv
6,5 m/s
2
Usikkerhed K 1,5 m/s
2
Vægt 4,0 kg
Supplerende information om el-værktøj
Advarsel!
Det angivne svingningsemissionstal er målt ud fra en
standardiseret prøvningsmetode og kan – afhængig
af den måde, el-værktøjet anvendes på – ændre sig
og i undtagelsestilfælde ligge over den angivne
værdi.
Det angivne svingningsemissionstal kan anvendes til
at sammenligne et el-værktøj med et andet.
Det angivne svingningsemissionstal kan også
anvendes til en indledende skønsmæssig vurdering
af den negative påvirkning.
Støjudvikling og vibration skal begrænses til et
minimum!
Brug kun intakte og ubeskadigede maskiner.
Vedligehold og rengør maskinen med jævne
mellemrum.
Tilpas arbejdsmåden efter maskinen.
Overbelast ikke maskinen.
Lad i givet fald maskinen underkaste et eftersyn.
Sluk maskinen, når den ikke benyttes.
Bær handsker.
Tilbageværende risici
Også selv om du betjener el-værktøjet
forskriftsmæssigt, er der stadigvæk nogle
risikofaktorer at tage højde for. Følgende farer
kan opstå, alt efter el-værktøjets type og
konstruktionsmåde:
1. Lungeskader, såfremt der ikke bæres egnet
støvmaske.
2. Høreskader, såfremt der ikke bæres egnet
høreværn.
3. Helbredsskader, som følger af hånd-armvibration, såfremt værktøjet benyttes over et
længere tidsrum eller ikke håndteres og
vedligeholdes forskriftsmæssigt.
Advarsel! Dette el-værktøj frembringer et
elektromagnetisk felt under driften. Dette felt kan
under visse omstændigheder indvirke på aktive eller
passive medicinske implantater. For at reducere
faren for alvorlige eller dødelige kvæstelser anbefaler
vi, at personer med medicinske implantater
konsulterer deres læge og producenten af
implantatet, inden maskinen tages i brug.
6. Før ibrugtagning
Inden maskinen sluttes til strømforsyningsnettet, skal
du kontrollere, at mærkepladens angivelser svarer til
strømforsyningsnettets data.
Drejeligt håndtag bagpå (fig. 2-4)
Hækkeklipperen er udstyret med et drejeligt håndtag
bagpå. Det kan drejes 90° mod venstre og både 90°
og 180° mod højre.
Inden håndtaget drejes, skal den øverste skyder
presses bagud i pilens retning (fig. 2/1). Træk
herefter skyderen (E) i pilens retning, og drej
håndtaget.
Ved drejning mod venstre går håndtaget i indgreb
ved 90° (fig. 3).
Ved drejning mod højre går håndtaget i indgreb ved
90° og ved 180° (fig. 4).
For at dreje håndtaget tilbage skal skyderen (E)
trækkes i pilens retning igen. Når håndtagetigen er i
normal stilling, skal den øverste skyder presses frem
for at fiksere.
For udførelse af vertikale snit skal håndtaget drejes
90°, ved snit over hovedhøjde drejes det 180°.
Påsætning af affaldsopsamler (fig. 5a-5d)
Det anbefales at påsætte affaldsopsamleren ved
vandret førte snit. Hermed borttransporteres det
afklippede hækkemateriale nemt. Hækkens overflade
holdes dermed fri (fig. 5a/5b). Sæt affaldsopsamleren
på sværdskinnen (fig. 5c). Bagefter skubber du
affaldsopsamleren i retning mod sværdspidsen, indtil
anslag nås. Sørg for, at den forreste spids af
affaldsopsamleren skubbes ind i sværdspidsen.
Spænd herefter fastgørelsesskruerne (10) fast (fig.
5d). Affaldsopsamleren kan monteres til højre eller
venstre.
23
DK/N
Anleitung_RG_EH_6053_SPK1:_ 11.05.2010 13:08 Uhr Seite 23

7. Ibrugtagning og betjening
Hækkeklipperen er udstyret med en tohåndssikkerhedsafbryder. Den arbejder kun, når
afbryderen på manøvrehåndtaget (fig. 6a / pos. A)
trykkes ind med den ene hånd, og den øverste
afbryder på håndtaget (fig. 6a / pos. B) eller
afbryderen under håndtaget (fig. 6a / pos. C) trykkes
ind med den anden hånd.
Slippes en af afbryderne, standser skæreknivene.
Vær her opmærksom på skæreknivenes udløb.
쎲 Afprøv skæreknivene. Knivene skærer i begge
sider med modsat omløbsretning, hvilket giver en
høj skæreydelse og en rolig driftsgang.
쎲 Sæt forlængerledningen fast i aflastningsbøjlen
(se fig. 6b), inden hækkeklipperen tages i brug.
쎲 Til udendørs arbejde skal benyttes særlige
forlængerledninger.
Anvisninger til arbejdet
쎲 Ud over klipning af hække kan en hækkeklipper
også anvendes til klipning af krat og buske.
쎲 Den bedste skæreydelse opnås, hvis
hækkeklipperen føres på en sådan måde, at
tænderne på knivene står i en vinkel på ca. 15° i
forhold til hækken (se fig. 7).
쎲 Knivene skærer i begge sider med modsat
omløbsretning, hvilket gør det muligt at klippe i
begge retninger (se fig. 8).
쎲 For at få en lige højde på hækken anbefales det
at spænde en snor ud langs hækkens kant, som
så fungerer som lodmærke. Grenværk som rager
op over, klippes af (se fig. 9). Pas på, at knivene
ikke rammer snoren.
쎲 Hækkens sideflader klippes i buebevægelser
nedefra og op (se fig. 10).
8. Udskiftning af nettilslutningsledning
Hvis produktets nettilslutningsledning beskadiges,
skal den skiftes ud af producenten eller dennes
kundeservice eller af person med lignende
kvalifikationer for at undgå fare for personskade.
9. Rengøring, vedligeholdelse og
reservedelsbestilling
Træk stikket ud af stikkontakten inden
vedligeholdelsesarbejde.
9.1 Rengøring
Hold så vidt muligt beskyttelsesanordninger,
luftsprækker og motorhuset fri for støv og snavs.
Gnid maskinen ren med en ren klud, eller foretag
trykluftudblæsning med lavt tryk.
Vi anbefaler, at maskinen rengøres hver gang
efter brug.
Rengør af og til maskinen med en fugtig klud og
lidt blød sæbe. Undgå brug af rengørings- eller
opløsningsmiddel, da det vil kunne ødelægge
maskinens kunststofdele. Pas på, at der ikke kan
trænge vand ind i maskinens indvendige dele.
9.2 Vedligeholdelse
쎲 Knivene skal regelmæssigt renses og smøres for
at bevare den høje skæreydelse. Fjern
aflejringerne med en børste, og smør et tyndt lag
olie på (se fig. 11).
쎲 Der findes ikke yderligere dele, som skal
vedligeholdes inde i maskinen.
쎲 Hækkeklipperen kan hænges op på væggen
med skrue og dyvel (se fig. 12).
9.3 Reservedelsbestilling:
Ved bestilling af reservedele skal følgende oplyses:
Savens type.
Savens artikelnummer.
Savens identifikationsnummer.
Nummeret på den nødvendige reservedel.
Aktuelle priser og øvrige oplysninger finder du på
internetadressen www.isc-gmbh.info
10. Opbevaring
Maskinen og dens tilbehør skal opbevares på et
mørkt, tørt og frostfrit sted uden for børns rækkevidde.
Den optimale lagertemperatur ligger mellem 5 og
30˚C. Opbevar el-værktøjet i den originale emballage.
24
DK/N
Anleitung_RG_EH_6053_SPK1:_ 11.05.2010 13:08 Uhr Seite 24

11. Bortskaffelse og genanvendelse
Maskinen er pakket ind for at undgå transportskader.
Emballagen består af råmaterialer og kan således
genanvendes eller indleveres på genbrugsstation.
Maskinen og dens tilbehør består af forskellige
materialer, f.eks. metal og plast. Defekte
komponenter skal kasseres ifølge miljøforskrifterne
og må ikke smides ud som almindeligt
husholdningsaffald. Hvis du er i tvivl: Spørg din
forhandler, eller forhør dig hos din kommune!
12. Forstyrrelser
Maskinen kører ikke: Kontroller, om netledningen er
rigtigt tilsluttet, og tjek netsikringerne. Hvis maskinen
ikke fungerer, selv om spænding er til stede, skal du
indsende den til den angivne kundeservice.
25
DK/N
Anleitung_RG_EH_6053_SPK1:_ 11.05.2010 13:08 Uhr Seite 25

Obs!
Innan maskinen kan användas måste särskilda
säkerhetsanvisningar beaktas för att förhindra olyckor
och skador. Läs därför noggrant igenom denna
bruksanvisning och dessa säkerhetsanvisningar.
Förvara dem på ett säkert ställe så att du alltid kan
hitta önskad information. Om maskinen ska överlåtas
till andra personer måste även denna bruksanvisning
och dessa säkerhetsanvisningar medfölja. Vi övertar
inget ansvar för olyckor eller skador som har uppstått
om denna bruksanvisning eller
säkerhetsanvisningarna åsidosätts.
1. Säkerhetsanvisningar:
Gällande säkerhetsanvisningar finns i det bifogade
häftet.
VARNING!
Läs alla säkerhetsanvisningar och instruktioner.
Försummelser vid iakttagandet av
säkerhetsanvisningarna och instruktionerna kan
förorsaka elstöt, brand och/eller svåra skador.
Förvara alla säkerhetsanvisningar och
instruktioner för framtiden.
Förklaring av symboler (se bild 13)
1. Varning
2. Utsätt inte maskinen för regn! Skydda mot regn
och fuktig omgivning.
3. Läs igenom bruksanvisningen före driftstart.
4. Dra omedelbart ut stickkontakten ur uttaget om
ledningen har skadats eller kapats.
5. Bär ögonskydd och hörselskydd
2. Beskrivning av maskinen (se bild 1)
1. Svärd
2. Handskydd
3. Styrhandtag med strömbrytare
4. Handtag med brytare upptill och nedtill
5. Kabeldragavlastning
6. Nätkabel
7. Svärdskydd
8. Stötskydd
9. Uppsamlare
10. Fästskruvar
Obs! Det är förbjudet att använda häcksaxen
utan handskydd.
3. Leveransomfattning
Original-bruksanvisning
Säkerhetsanvisningar
Häcksax med monterat handskydd
Uppsamlare
Öppna förpackningen och ta försiktigt ut
produkten ur förpackningen.
Ta bort förpackningsmaterialet samt
förpacknings- och transportsäkringar (om
förhanden).
Kontrollera att leveransen är komplett.
Kontrollera om produkten eller tillbehörsdelarna
har skadats i transporten.
Spara om möjligt på förpackningen tills
garantitiden har gått ut.
VARNING!
Produkten och förpackningsmaterialet är ingen
leksak! Barn får inte leka med plastpåsar, folie
eller smådelar! Risk för att barn sväljer delar och
kvävs!
4. Ändamålsenlig användning
Obs! Denna häcksax är endast avsedd för klippning
av häckar, buskar och plantor. Beakta den maximala
klippkapaciteten, se tekniska data.
Maskinen får endast användas till sitt avsedda
ändamål. Användningar som sträcker sig utöver detta
användningsområde är ej ändamålsenliga. För
materialskador eller personskador som resulterar av
sådan användning ansvarar användaren/operatören
själv. Tillverkaren påtar sig inget ansvar.
Tänk på att våra produkter endast får användas till
ändamålsenligt syfte och inte har konstruerats för
yrkesmässig, hantverksmässig eller industriell
användning. Vi ger därför ingen garanti om
produkten ska användas inom yrkesmässiga,
hantverksmässiga eller industriella verksamheter
eller vid liknande aktiviteter.
26
S
Anleitung_RG_EH_6053_SPK1:_ 11.05.2010 13:08 Uhr Seite 26

5. Tekniska data
Nätanslutning 230 V ~ 50 Hz
Effektförbrukning 600 W
Snittlängd 530 mm
Svärdlängd 600 mm
Tandavstånd 20 mm
snitt/min 3200
Max. klippkapacitet 15 mm
Ljudtrycksnivå L
pA
84,7 dB(A)
Ljudeffektnivå L
WA
99 dB(A)
Osäkerhet K 2,5 dB(A)
Vibration a
hv
6,5 m/s
2
Osäkerhet K 1,5 m/s
2
Vikt 4,0 kg
Extra information för elverktyg
Varning!
Vibrationsemissionsvärdet som anges har mätts upp
med en standardiserad provningsmetod och kan
variera beroende på vilket sätt som elverktyget
används. I undantagsfall kan det faktiska värdet
avvika från det angivna värdet.
Vibrationsemissionsvärdet som anges kan användas
om man vill jämföra olika elverktyg.
Vibrationsemissionsvärdet som anges kan även
användas för en första bedömning av inverkan från
elverktyget.
Begränsa uppkomsten av buller och vibration till
ett minimum!
Använd endast intakta maskiner.
Underhåll och rengör maskinen regelbundet.
Anpassa ditt arbetssätt till maskinen.
Överbelasta inte maskinen.
Lämna in maskinen för översyn vid behov.
Slå ifrån maskinen om den inte används.
Bär handskar.
Kvarstående risker
Kvarstående risker föreligger alltid även om
detta elverktyg används enligt föreskrift.
Följande risker kan uppstå på grund av
elverktygets konstruktion och utförande:
1. Lungskador om ingen lämplig dammfiltermask
används.
2. Hörselskador om inget lämpligt hörselskydd
används.
3. Hälsoskador som uppstår av hand- och
armvibrationer om maskinen används under
längre tid eller om det inte hanteras och
underhålls enligt föreskrift.
Varning! Detta elverktyg genererar ett
elektromagnetiskt fält under drift. Under vissa
omständigheter kan detta fält påverka aktiva eller
passiva medicinska implantat. För att reducera risken
för allvarliga eller dödliga personskador,
rekommenderar vi att personer med medicinska
implantat kontaktar sin läkare och tillverkaren av det
medicinska implantatet innan maskinen används.
6. Innan du använder maskinen
Innan du ansluter maskinen måste du övertyga dig
om att uppgifterna på typskylten stämmer överens
med nätets data.
Vridbart bakre handtag (bild 2-4)
Häcksaxen är utrustad med ett vridbart bakre
handtag. Detta kan vridas åt vänster med 90° samt
åt höger med såväl 90° som 180°.
Innan du kan vrida på handtaget måste du skjuta
den övre spärren bakåt i pilens riktning (bild 2/1).
Dra sedan i spärren (E) i pilens riktning och vrid runt
handtaget.
Efter att handtaget vridits runt åt vänster snäpper det
fast vid 90° (bild 3).
Efter att handtaget vridits runt åt höger snäpper det
fast vid 90° eller 180° (bild 4).
Innan handtaget kan vridas tillbaka måste spärren
(E) dras tillbaka i pilens riktning. Efter att handtaget
har ställts i normalt läge på nytt, måste den övre
spärren skjutas framåt så att den spärras.
För vertikal häckklippning bör handtaget ha ställts på
90°. Vid klippning över huvudhöjd ska häcksaxen
vridas runt till 180°.
Montera uppsamlaren (bild 5a-5d)
Vid vågräta snitt rekommenderar vi att uppsamlaren
monteras. Häckklippet kan då lätt tas bort. Därmed
kan häckens ovansida hållas ren (bild 5a/5b). Sätt
uppsamlaren på svärdskenan (bild 5c). Skjut därefter
uppsamlaren mot svärdspetsen tills det tar emot. Se
till att den främre spetsen av uppsamlaren skjuts in i
svärdspetsen. Dra sedan åt fästskruvarna (10) (bild
5d). Uppsamlaren kan monteras på såväl höger som
vänster sida.
27
S
Anleitung_RG_EH_6053_SPK1:_ 11.05.2010 13:08 Uhr Seite 27

7. Driftstart och användning
Häcksaxen är utrustad med en
tvåhandssäkerhetsbrytare. Häcksaxen fungerar
endast om den ena handen trycker in knappen vid
styrhandtaget (bild 6a/ pos. A) samtidigt som den
andra handen aktiverar den övre brytaren vid
handtaget (bild 6a/ pos. B) eller brytaren under
handtaget (bild 6a/ pos. C).
Om en brytare släpps kommer knivarna att stannar.
Tänk på att knivarna slår ut vid drift.
쎲 Kontrollera skärknivarnas funktion. Knivarna som
är slipade på båda sidorna rör sig mot varandra
och garanterar därmed hög kapacitet och jämn
klippning.
쎲 Fäst förlängningssladden i
kabeldragavlastningen (se bild 6b) innan du
börjar klippa.
쎲 Använd endast förlängningsladdar som är
godkända för utomhusbruk.
Användningstips
쎲 Förutom häckar kan även buskar och plantor
klippas med en häcksax.
쎲 Bästa klippningsresultat får du om du för
häcksaxen framåt med en vinkel på ca 15°
mellan knivarna och häcken (se bild 7).
쎲 Tack vare att knivarna klipper åt bägge hållen
kan du själv avgöra i vilken riktning du vill klippa
(se bild 8).
쎲 För att vara säker på att få en jämn höjd
rekommenderar vi att du spänner ett snöre längs
häckens kant. Du kan då helt enkelt klippa av
grenarna som skjuter ut ovanför snöret (se bild 9).
Se till att knivarna inte kommer i kontakt med
snöret.
쎲 Klipp häckens sidor med svängande rörelser
nedifrån och upp (se bild 10).
8. Byta ut nätkabeln
Om nätkabeln till denna produkt har skadats måste
den bytas ut av tillverkaren, kundtjänst eller av en
annan person med liknande behörighet eftersom det
annars finns risk för personskador.
9. Rengöring, Underhåll och
reservdelsbeställning
Dra alltid ut stickkontakten inför alla
rengöringsarbeten.
9.1 Rengöra maskinen
앬 Håll skyddsanordningarna,
ventilationsöppningarna och motorkåpan i så
damm- och smutsfritt skick som möjligt. Torka av
maskinen med en ren duk eller blås av den med
tryckluft med svagt tryck.
앬 Vi rekommenderar att du rengör maskinen efter
varje användningstillfälle.
앬 Rengör maskinen med jämna mellanrum med en
fuktig duk och en aning såpa. Använd inga
rengörings- eller lösningsmedel. Dessa kan skada
maskinens plastdelar. Se till att inga vätskor
tränger in i maskinens inre.
9.2 Underhåll
앬 För att alltid garantera bästa kapacitet bör du
alltid se till att knivarna är rena och smorda. Ta
bort avlagringar med en borste och stryk på en
tunn oljefilm (se bild 11).
앬 I maskinens inre finns inga delar som kräver
underhåll.
앬 Häcksaxen kan hängas upp på väggen med hjälp
av passande skruv och plugg (se bild 12).
9.3 Reservdelsbeställning
Lämna följande uppgifter vid beställning av
reservdelar:
앬 Maskintyp
앬 Maskinens artikel-nr.
앬 Maskinens ident-nr.
앬 Reservdelsnummer för erforderlig reservdel
Aktuella priser och ytterligare information finns på
www.isc-gmbh.info
10. Förvaring
Förvara produkten och dess tillbehör på en mörk, torr
och frostfri plats samt otillgängligt för barn. Den bästa
förvaringstemperaturen är mellan 5 och 30˚C.
Förvara elverktyget i originalförpackningen.
28
S
Anleitung_RG_EH_6053_SPK1:_ 11.05.2010 13:08 Uhr Seite 28

11. Skrotning och återvinning
Produkten ligger i en förpackning som fungerar som
skydd mot transportskador. Denna förpackning
består av olika material som kan återvinnas. Lämna
in förpackningen till ett insamlingsställe för
återvinning.
Produkten och tillbehören består av olika material
som t ex metaller och plaster. Lämna in defekta
komponenter till ett godkänt insamlingsställe i din
kommun. Hör efter med din kommun eller med
försäljaren i din specialbutik.
12. Störningar
Maskinen startar ej: Kontrollera att nätkabeln har
anslutits rätt och kontrollera säkringarna i elnätet.
Om maskinen inte fungerar, trots att spänning finns i
nätet, ska den skickas in till kundtjänst (se adress).
29
S
Anleitung_RG_EH_6053_SPK1:_ 11.05.2010 13:08 Uhr Seite 29

Pažnja!
Kod korištenja uređaja morate se pridržavati
sigurnosnih propisa kako biste spriječili ozljeđivanja i
štete. Zbog toga pažljivo pročitajte ove upute za
uporabu / sigurnosne napomene. Dobro ih sačuvajte
tako da Vam informacije u svako doba budu na
raspolaganju. Ako biste ovaj uređaj trebali predati
drugim osobama, proslijedite im i ove upute za
uporabu / sigurnosne napomene. Ne preuzimamo
odgovornost za štete koje bi nastale zbog
nepridržavanja ovih uputa za uporabu i sigurnosnih
napomena.
1. Sigurnosne upute:
Odgovarajuće sigurnosne upute pronaći ćete u
priloženoj knjižici.
UPOZORENJE!
Pročitajte sve sigurnosne napomene i upute.
Propusti kod pridržavanja sigurnosnih napomena i
uputa mogu uzrokovati el. udar, požar i/ili teška
ozljeđivanja.
Sačuvajte sve sigurnosne napomene i upute za
buduće korištenje.
Tumačenje natpisa na pločici (vidi sliku 13)
1. Upozorenje
2. Ne izlažite uređaj kiši! Zaštitite od kiše i vlage.
3. Prije puštanja u pogon pročitajte upute za
uporabu.
4. Utikač odmah izvucite iz mreže ako je vod
oštećen ili prekinut.
5. Nositi zaštitu za oči i za uši
2. Opis uredjaja (vidi sliku 1)
1. sablja
2. zaštita ruke
3. Ručka za vođenje s tipkom za uključivanje
4. Ručka s tipkom za uključivanje gore i dolje
5. mehanizam za rasterećenje kabela
6. mrežni kabel
7. zaštita sablje
8. zaštita od udaraca
9. sakupljač piljevine
10. vijci za pričvršćivanje
Pažnja! Nije dopušten rad sa škarama za rezanje
živice bez zaštite za ruke.
3. Sadržaj isporuke
Originalne upute za uporabu
Sigurnosne napomene
Škare za živicu sa zaštitom za šaku
Sakupljač odrezanog bilja
Otvorite pakovinu i pažljivo izvadite uređaj.
Uklonite ambalažu kao i dijelove za sigurnost
pakiranja / za sigurnost tijekom transporta (ako
postoje).
Provjerite je li sadržaj isporuke cjelovit.
Prekontrolirajte postoje li na uređaju i dijelovima
pribora transportna oštećenja.
Po mogućnosti sačuvajte pakovinu do isteka
jamstvenog roka.
POZOR
Uređaj i materijal pakovine nisu igračke za djecu!
Djeca se ne smiju igrati plastičnim vrećicama,
folijama i sitnim dijelovima! Postoji opasnost da
ih progutaju i tako se uguše!
4. Namjenska uporaba
Pozor! Ove škare za živicu prikladne su za rezanje
živica, grmlja i žbunja. Morate se pridržavati maks.
kapaciteta rezanja, vidi tehničke podatke.
Stroj se smije koristiti samo u skladu s namjenom.
Svaka drukčija uporaba izvan ovih okvira nije
namjenska. Za štete ili ozljeđivanja bilo koje vrste
koje bi iz toga proizašle ne odgovara proizvođač
nego korisnik.
Molimo da obratite pažnju na to da naši uređaji nisu
konstruirani za korištenje u komercijalne svrhe kao ni
u obrtu i industriji. Ne preuzimamo jamstvo ako se
uređaj koristi u obrtničkim ili industrijskim pogonima
i sličnim djelatnostima.
30
HR/
BIH
Anleitung_RG_EH_6053_SPK1:_ 11.05.2010 13:08 Uhr Seite 30

5. Tehnički podaci
Mrežni priključak 230 V~ 50 Hz
Potrošnja snage 600 W
Duljina rezanja 530 mm
Duljina noža 600 mm
Razmak zubaca 20 mm
Debljina reza maks. 15 mm
Rezova/min 3200
Razina zvučnog tlaka L
pA
84,7 dB(A)
Intenzitet buke L
WA
99 dB(A)
Nesigurnost K 2,5 dB(A)
Vibracija a
hv
6,5 m/s
2
Nesigurnost K 1,5 m/s
2
Težina 4,0 kg
Dodatne informacije u vezi elektroalata
Upozorenje!
Navedena vrijednost emisije vibracija izmjerena je
prema normiranom postupku ispitivanja i može se,
ovisno o načinu korištenja elektroalata, promijeniti a u
izuzetnim slučajevima može biti i veća od navedene
vrijednosti.
Navedena vrijednost emisije vibracija može se
koristiti u svrhu usporedbe elektroalata jedne tvrtke s
elektroalatom neke druge tvrtke.
Navedena vrijednost emisije vibracija može se
također koristiti za početnu procjenu ugrožavanja
zdravlja.
Ograničite stvaranje buke i vibracija na
minimum!
Koristite samo besprijekorne uređaje.
Redovito čistite i održavajte uređaj.
Svoj način rada prilagodite uređaju.
Nemojte preopterećivati uređaj.
Po potrebi predajte uređaj na kontrolu.
Isključite uređaj kad ga ne koristite.
Nosite zaštitne rukavice.
Ostali rizici
Čak i kad se ovi elektroalati koriste propisno,
uvijek postoje neki drugi rizici.
Sljedeće opasnosti mogu nastati vezi s
izvedbom i konstrukcijom elektroalata:
1. Oštećenja pluća ako se ne nosi prikladna maska
za zaštitu od prašine.
2. Oštećenja sluha ako se ne nosi prikladna zaštita
za sluh.
3. Zdravstveni problemi koji nastaju kao posljedica
vibracija na šaku-ruku u slučaju da se uređaj
koristi tijekom dužeg vremena ili se nepropisno
koristi i održava.
Upozorenje! Ovaj elektroalat stvara za vrijeme rada
elektromagnetsko polje. Ovo polje može pod
određenim okolnostima ugrožavati aktivne ili pasivne
medicinske implantate. Da bi se smanjila opasnost od
ozbiljnih ili smrtnih ozljeda, preporučujemo da osobe
s medicinskim implantatima prije rada sa strojem
konzultiraju svojeg liječnika ili proizvođača
medicinskog implantata.
6. Prije puštanja u pogon
Prije priključivanja provjerite odgovaraju li podaci na
tipskoj pločici podacima o mreži.
Zakretna stražnja ručka (slika 2-4)
Škare za živicu imaju zakretnu stražnju ručku. Ona
se moďe okretati za 90° ulijevo, a udesno za 90° kao
i za 180°. U tu svrhu prvo se gornji kliza‹ mora
gurnuti prema natrag u smjeru strelice (slika 2/1).
Zatim se kliza‹ (E) povu‹e u smjeru strelice i okrene
se ru‹ka. Kod okretanja ulijevo ru‹ka dosjedne pod
90° (slika 3). Kod okretanja udesno ru‹ka dosjedne
pod 90° i 180° (slika 4).
Za vračanje ru‹ke u po‹etni poloďaj kliza‹ (E) se mora
ponovno povuči u smjeru strelice. Kad ru‹ka dodje
ponovno u normalan poloďaj, za aretaciju gurnite
gornji kliza‹ prema naprijed.
Za izvodjenje vertikalnog rezanja ručku treba
zakrenuti za 90°, a kod rezanja iznad glave za 180°.
Montaža sakupljača odrezanog bilja (slika 5a-5d)
Preporučuje se da kod vodoravnih rezova montirate
sakupljač odrezanog bilja. On omogućava
jednostavno uklanjanje odrezanog bilja. Površina
živice na taj način ostaje čista (slika 5a/5b). Stavite
sakupljač odrezanog bilja na sablju (slika 5c). Zatim
gurajte sakupljač odrezanog bilja do kraja u smjeru
vrha sablje. Pritom pazite da prednji vrh sakupljača
gurnete u vrh sablje. Na kraju pritegnite vijke za
pričvršćivanje (10) (slika 5d). Sakupljač odrezanog
bilja može se montirati lijevo ili desno.
31
HR/
BIH
Anleitung_RG_EH_6053_SPK1:_ 11.05.2010 13:08 Uhr Seite 31

7. Puštanje u pogon i rukovanje
Škare za živicu opremljene su dvoručnom
sigurnosnom sklopkom. Ona radi samo kad se
jednom rukom pritisne tipka za uključenje na ručki
za vodjenje (slika 6a / poz. A), a drugom rukom se
pritisne gornja sklopka na ručki (slika 6a / poz. B) ili
sklopka ispod ručke (slika 6a / poz. C).
Pusti li se jedan element za uključivanje, nož se
zaustavlja.
Molimo da pritom obratite pažnju na
samozaustavljanje noževa.
쎲 Provjerite funkcioniranje noževa. Noževi koji režu
s obje strane kreću se u suprotnim smjerovima i
na taj način jamče visok učinak rezanja i miran
rad.
쎲 Prije uporabe produžni kabel pričvrstite u
mehanizam za sprečavanje zatezanja kabela
(vidi sliku 6b).
쎲 Za rad na otvorenom potrebno je koristiti za to
dopuštene produžne kablove.
Upute za rad
쎲 Osim živice škare se mogu koristiti i za rezanje
grmlja i žbunja.
쎲 Najbolji učinak rezanja postići ćete ako škare za
živicu vodite tako da zupci noža budu usmjereni
na živicu pod kutem od oko 15° (vidi sliku 7).
쎲 Noževi koji režu obostrano u suprotnim
smjerovima omogućuju rezanje u oba smjera
(vidi sliku 8).
쎲 Da biste postigli ravnomjernu visinu živice,
preporučujemo da za orijentaciju napnete konac
duž živice. Grane koje strše odrezat ćete (vidi
sliku 9). Pazite na to da nož ne dođe u kontakt s
koncem.
쎲 Bočne površine živice režu se polukružnim
pokretima odozdo prema gore (vidi sliku 10).
8. Zamjena mrežnog priključka
Ako se ošteti mrežni priključni vod ovog uređaja,
zamijeniti ga mora proizvođač ili njegova servisna
služba ili slična kvalificirana osoba, kako bi se
izbjegle opasnosti.
9. Čišćenje, održavanje i narudžba
rezervnih dijelova
Prije svih radova čišćenja izvucite mrežni utikač.
9.1 Čišćenje
Zaštitne naprave, otvore za zrak i kućište motora
držite što čišćima od prašine i prljavštine. Istrl
jajte uredjaj čistom krpom ili ga ispušite
komprimiranim zrakom pod niskim tlakom.
Preporučujemo da uredjaj očistite nakon svake
uporabe.
Redovito čistite uredjaj vlažnom krpom i s malo
sapunice. Ne koristite sredstva za čišćenje ni
otapala; ona mogu oštetiti plastične dijelove
uredjaja. Pripazite na to da u unutrašnjost
uredjaja ne dospije voda.
9.2 Održavanje
쎲 Da biste uvijek ostvarili najbolji učinak stroja,
redovito morate čistiti i održavati noževe.
Četkom uklonite naslage i nanesite tanki sloj ulja
(vidi sliku 11).
쎲 U unutrašnjosti uredjaja nalaze se dijelovi koje
treba održavati.
쎲 U svrhu čuvanja škare za živicu mogu se
odgovarajućim vijkom i tiplom pričvrstiti na zid
(vidi sliku 12).
9.3 Narudžba rezervnih dijelova:
Prilikom naručivanja rezervnih dijelova su potrebni
slijedeći podaci:
Tip uredjaja
Broj artikla uredjaja
Ident. broj uredjaja
Broj potrebnog rezervnog dijela
Aktualne cijene i informacije potražite na web-adresi
www.isc-gmbh.info
10. Skladištenje
Uređaj i njegov pribor spremite na tamno i suho
mjesto zaštićeno od smrzavanja, kojem djeca nemaju
pristup. Optimalna temperatura skladištenja je
između 5 i 30 ˚C. Elektroalat čuvajte u originalnoj
pakovini.
32
HR/
BIH
Anleitung_RG_EH_6053_SPK1:_ 11.05.2010 13:08 Uhr Seite 32

11. Zbrinjavanje i recikliranje
Uredjaj se nalazi u pakovanju koje ga štiti od
oštećenja prilikom transporta. Ovo pakovanje je
sirovina i zato se može ponovno upotrijebiti ili poslati
na reciklažu.
Uredjaj i njegov pribor izradjeni su od različitih
materijala kao npr. metala i plastike. Neispravne
sastavne dijelove otpremite na mjesta za
zbrinjavanje posebnog otpada. Informacije potražite
u specijaliziranoj trgovini ili nadležnoj općinskoj
upravi.
12. Smetnje
Uredjaj ne radi: Provjerite je li mrežni kabel ispravno
priključen i provjerite mrežne osigurače. U slučaju da
unatoč postojećem naponu uredjaj ne funkcionira,
molimo da ga pošaljete na navedenu adresu
servisne službe.
33
HR/
BIH
Anleitung_RG_EH_6053_SPK1:_ 11.05.2010 13:08 Uhr Seite 33

Pažnja!
Kod korišćenja uređaja morate se pridržavati propisa
o bezbednosti kako biste sprečili povrede i štete.
Stoga pažljivo pročitajte ova uputstva za
upotrebu/bezbednosne napomene. Dobro ih
sačuvajte tako da Vam informacije u svako doba
budu na raspolaganju. Ako biste ovaj uređaj trebali da
predate drugim licima, prosledite im i ova uputstva za
upotrebu / bezbednosne napomene. Ne preuzimamo
garanciju za štete koje bi nastale zbog nepridržavanja
ovih uputstava za upotrebu i bezbednosnih
napomena.
1. Sigurnosna uputstva:
Odgovarajuća sigurnosna uputstva pronaći ćete u
priloženoj knjižici.
UPOZORENJE!
Pročitajte sve bezbednosne napomene i
uputstva.
Propusti kod pridržavanja bezbednosnih napomena i
uputstava mogu da prouzroče el.udar, požar i/ili teške
povrede.
Sačuvajte sve bezbednosne napomene i
uputstva za buduće korišćenje.
Objašnjenje natpisa na pločici (vidi sliku 13)
1. Upozorenje
2. Ne izlažite uređaj kiši! Štitite ga od kiše i vlage.
3. Pre puštanja u pogon pročitajte uputstva
zaupotrebu
4. Utikač izvucite iz mreže ako je vod oštećen ili
prekinut
5. Nosite zaštitu za oči i uši
2. Opis uređaja (slika 1)
1. Sablja
2. Zaštita ruke
3. Ručka za vođenje s tasterom za uključivanje
4. Ručka s tasterom za uključivanje gore i dole
5. Mehanizam za rasterećenje kabla
6. Mrežni kabl
7. Zaštita sablje
8. Zaštita od udarca
9. Sakupljač odrezanih komada
10. Zavrtnji za pričvršćivanje sakupljača odrezanih
komada
Pažnja! Rad s makazama za živicu bez zaštite
ruku nije dozvoljen.
3. Sadržaj isporuke
Originalna uputstva za upotrebu
Bezbednosne napomene
Makaze za živicu sa zaštitom za šaku
Sakupljač odrezanog bilja
Otvorite pakovanje i pažljivo izvadite uređaj.
Uklonite materijal za pakovanje kao i delove za
bezbednost pakovanja / bezbednost tokom
transporta (ako postoje).
Proverite da li je sadržaj isporuke potpun.
Prekontrolišite da li na uređaju i delovima pribora
ima transprotnih oštećenja.
Po mogućnosti sačuvajte pakovanje do isteka
garantnog roka.
PAŽNJA
Uređaj i materijal za pakovanje nisu dečje
igračke! Deca ne smeju da se igraju plastičnim
kesama, folijama i sitnim delovima! Postoji
opasnost da ih progutaju i tako se uguše!
4. Namenska upotreba
Pažnja! Ove makaze za živicu namenjene su za
rezanje živice, grmova i žbunova. Morate poštovati
maks. kapacitet rezanja, pogledajte tehničke
podatke.
Mašina sme da se koristi samo prema svojoj nameni.
Svako drugačije korišćenje nije u skladu s namenom.
Za štete ili povrede bilo koje vrste koje iz toga
proizlaze odgovoran je korisnik, a ne proizvođač.
Molimo da obratite pažnju na to da naši uređaji nisu
konstruisani za korišćenje u komercijalne svrhe kao
ni u zanatu i industriji. Ne preuzimamo garanciju ako
se uređaj koristi u zanatskim ili industrijskim
pogonima i sličnim delatnostima.
34
RS
Anleitung_RG_EH_6053_SPK1:_ 11.05.2010 13:08 Uhr Seite 34

5. Tehnički podaci
Mrežni kabl 230 ~ 50 Hz
Potrošnja snage 600 W
Dužina rezanja 530 mm
Dužina noža 600 mm
Rezovi/min 3200
Razmak zubaca 20 mm
Maks. debljina reza 15 mm
Nivo zvučnog pritiska L
pA
84,7 dB(A)
Intenzitet buke L
WA
99 dB(A)
Nesigurnost K 2,5 dB(A)
Vibracije a
hv
6,5 m/s
2
Nesigurnost K 1,5 m/s
2
Težina 4,0 kg
Dodatne informacije u vezi električnih alata
Upozorenje!
Navedena vrednost emisije vibracija izmerena je
prema normiranom postupku kontrole i može da se,
zavisno od načina korišćenja električnih alata,
promeni, a u iznimnim slučajevima može biti i veća od
navedene vrednosti.
Pomenuta vrednost emisije vibracija može se koristiti
u svrhu uspoređivanja električnog alata jedne firme s
električnim alatom neke druge firme.
Navedena vrednost emisije vibracija može takođe da
se koristi za početnu procenu ugrožavanja zdravlja.
Ograničite stvaranje buke i vibracija na
minimum!
Koristite samo besprekorne uređaje.
Redovno održavajte i čistite uređaj.
Prilagodite svoj način rada uređaju.
Ne preopterećujte uređaj.
Prema potrebi pošaljite uređaj na kontrolu.
Ako uređaj ne upotrebljavate, onda ga isključite.
Nosite zaštitne rukavice.
Ostali rizici
Čak i kada se ovi električni alati koriste propisno,
uvek postoje i neki drugi rizici. Sledeće
opasnosti mogu nastati u vezi s izvedbom i
konstrukcijom električnog alata:
1. Oštećenja pluća, ako se ne nosi odgovarajuća
maska za zaštitu od prašine.
2. Oštećenja sluha, ako se ne nosi odgovarajuća
zaštita za sluh.
3. Zdravstvene poteškoće koje nastanu kao
posledica vibracija na šaku-ruku, ako se uređaj
koristi tokom dužeg vremena ili se nepropisno
koristi i održava.
Upozorenje! Ovaj električni alat stvara za vreme
rada elektromagnetsko polje. To polje može da pod
određenim okolnostima ugrožava aktivne ili pasivne
medicinske implantate. Da bi se smanjila opasnost od
ozbiljnih ili smrtonosnih povreda, preporučamo da
lica sa medicinskim implantatima pre rada s mašinom
konsultuju svog lekara ili proizvođača medicinskog
implantata.
6. Pre puštanja u rad
Pre priključivanja uređaja proverite odgovaraju li
podaci na tipskoj pločici podacima o mreži.
Obrtna ručka odostraga (slika 2 - 4)
Makaze za živicu opremljene su obrtnom ručkom na
zadnjoj strani. Ona može da se obrne ulevo za 90° i
udesno isto tako za 90° kao i za 180°. Zbog toga
mora da se pomakne gornji zasun (slika 2/poz. 1) u
smeru strelice. Na kraju povucite zasun (E) u smeru
strelice i obrnite ručku. Obrtanjem ulevo ručka se
uglavi na 90° (slika 3). Obrtanjem udesno ručka se
uglavi na 90° i na 180° (slika 4).
Za vraćanje ručke zasun (E) mora da se opet povuče
u smeru strelice. Nakon što se ručka opet nađe u
normalnom položaju gornji zasun mora se u svrhu
aretacije pomeriti napred.
Za obavljanje vertikalnih rezova trebate obrnuti
ručku za 90°, kod rezanja iznad glave obrnite je za
180°.
Montaža sakupljača odrezanog bilja (slika 5a-5d)
Kod vodoravnih rezova preporučamo da montirate
sakupljač odrezanog bilja. On omogućuje
jednostavno uklanjanje odrezanog bilja. Površina
živice na taj način ostaje čista (slika 5a/5b). Stavite
sakupljač odrezanog bilja na sablju (slika 5c). Zatim
gurajte sakupljač odrezanog bilja do kraja u pravcu
vrha sablje. Pri tom pazite na to da prednji vrh
sakupljača odrezanog bilja gurnete u vrh sablje. Na
kraju pritegnite zavrtnje za pričvršćivanje (10) (slika
5d). Sakupljač odrezanog bilja može da se montira
levo ili desno.
35
RS
Anleitung_RG_EH_6053_SPK1:_ 11.05.2010 13:08 Uhr Seite 35

7. Rukovanje
Makaze za živicu opremljene su dvoručnim
sigurnosnim sklopom za uključivanje. One će raditi
samo ako jednom rukom pritisnete prekidač na ručki
za vođenje (slika 6a / poz. A), a drugom rukom po
želji gornji prekidač na ručki (slika 6a / poz. B) ili
prekidač ispod ručke (slika 6a / poz. C).
Ako se element za uključivanje pusti, sečivo se
zaustavlja.
Molimo da pripazite pri tom na zaustavljanje
sečiva.
앬 Proverite funkcioniranje noževa. Noževi koji režu
s obe strane kreću se u suprotnim smerovima i
na taj način osiguravaju visok učinak rezanja i
miran rad.
앬 Pre upotrebe pričvrstite produžni kabl u
mehanizmu za sprečavanje zatezanja kabla (vidi
sliku 6b).
앬 Za rad na otvorenom upotrebljavajte za to
dozvoljene produžne kablove.
Napomene za rad
앬 Sem živice, makaze mogu da se koriste i za
rezanje grmlja i žbunja.
앬 Najbolji učinak rezanja postići ćete ako makaze
za živicu vodite tako da zupci noža budu
upravljeni na živicu pod uglom od oko 15° (vidi
sliku 7).
앬 Noževi koji režu obostrano u suprotnim
smerovima omogućuju rezanje u oba smera
(slika 8).
앬 Da biste postigli ravnomernu visinu živice,
preporučamo da za orijentaciju napnete konac
uzduž živice. Grane koje strše biće odrezane (vidi
sliku 9). Pazite na to da sečivo ne dođe u kontakt
sa koncem.
앬 Bočne površine živice režu se polukružnim
pokretima odozdo prema gore (vidi sliku 10).
8. Zamena mrežnog priključnog voda
Ako se ošteti mrežni priključni vod ovog uređaja,
mora da ga zameni proizvođač ili njegova servisna
služba ili kvalifikovano lice, kako bi se izbegle
opasnosti.
9. Čišćenje, održavanje i narudžba
rezervnih dijelova
Prije svih radova čišćenja izvucite mrežni utikač.
9.1 Čišćenje
앬 Zaštitne naprave, otvore za zrak i kućište motora
držite što čišćima od prašine i prljavštine.
Istrljajte uredjaj čistom krpom ili ga ispušite
komprimiranim zrakom pod niskim tlakom.
앬 Preporučujemo da uredjaj očistite nakon svake
uporabe.
앬 Redovito čistite uredjaj vlažnom krpom i s malo
masnog sapuna. Ne koristite sredstva za
čišćenje ni otapala; ona mogu oštetiti plastične
dijelove uredjaja. Pripazite na to da u
unutrašnjost uredjaja ne dospije voda.
9.2 Održavanje
앬 Da biste uvek ostvarili najbolji učinak mašine,
redovno morate da čistite i održavati noževe.
Naslage prljavštine uklonite četkom i nanesite
tanki sloj ulja (vidi sliku 11).
앬 U unutrašnjosti uredjaja nema dijelova koje treba
održavati.
앬 Za čuvanje, makaze za rezanje žice mogu das se
pričvrste na zid odgovarajućim zavrtnjima i
čivijama (vidi sliku 12).
9.3 Naručivanje rezervnih dijelova
Prilikom naručivanja rezervnih dijelova treba navesti
sljedeće podatke:
tip uredjaja
broj artikla uredjaja
identifikacijski broj uredjaja
kataloški broj potrebnog rezervnog dijela
Aktuelne cene i informacije potražite na sajtu
www.isc-gmbh.info
10. Skladištenje
Uređaj i njegov pribor spremite na tamno i suvo
mesto zaštićeno od smrzavanja, kojem deca nemaju
pristup. Optimalna temperatura za čuvanje je između
5 i 30 ˚C. Električni alat čuvajte u originalnom
pakovanju.
36
RS
Anleitung_RG_EH_6053_SPK1:_ 11.05.2010 13:08 Uhr Seite 36

11. Zbrinjavanje i reciklovanje
Uredjaj se nalazi u pakovanju koje ga štiti od
oštećenja tokom transporta. Ovo pakovanje je
sirovina i zato može ponovno da se upotrebi ili
pošalje na reciklovanje. Uredjaj i njegov pribor
izradjeni su od različitih materijala kao npr. metala i
plastike. Neispravne sastavne delove otpremite na
mesta za zbrinjavanje posebnog otpada. Informacije
potražite u specijalizovanoj trgovini ili nadležnoj
opštinskoj upravi.
12. Smetnje
Uređaj ne radi: proverite da li je mrežni kabl
propisno priključen i proverite mrežne osigurače.
Ako uređaj uprkos postojećem naponu ne
funkcionira, pošaljite ga pomenutoj servisnoj službni.
37
RS
Anleitung_RG_EH_6053_SPK1:_ 11.05.2010 13:08 Uhr Seite 37

38
CZ
Pozor!
Při používání přístrojů musí být dodržována určitá
bezpečnostní opatření, aby se zabránilo zraněním a
škodám. Přečtěte si proto pečlivě tento návod k
obsluze/bezpečnostní pokyny. Dobře si ho/je uložte,
abyste měli tyto informace kdykoliv po ruce. Pokud
předáte přístroj jiným osobám, předejte s ním
prosím i tento návod k obsluze/bezpečnostní
pokyny. Nepřebíráme žádné ručení za škody a úrazy
vzniklé v důsledku nedodržování tohoto návodu k
obsluze a bezpečnostních pokynů.
1. Bezpečnostní pokyny:
Příslušné bezpečnostní pokyny naleznete v přiložené
brožurce.
VAROVÁNÍ!
Přečtěte si všechny bezpečnostní pokyny a
instrukce.
Zanedbání při dodržování bezpečnostních pokynů a
instrukcí mohou mít za následek úder elektrickým
proudem, požár a/nebo těžká zranění.
Všechny bezpečnostní pokyny a instrukce si
uložte pro budoucí použití.
Vysvětlivky ke štítku (viz obr. 13)
1. Varování
2. Nevystavovat dešti! Chránit před dešťem a
vlhkem.
3. Před uvedením do provozu si přečíst návod k
obsluze.
4. Při poškození nebo přestřižení přípojného vedení
ihned vytáhnout síťovou zástrčku.
5. Nosit ochranu zraku a sluchu.
2. Popis přístroje (viz obr. 1)
1. Lišta
2. Ochrana rukou
3. Vodicí rukojeť se spínacím tlačítkem
4. Rukojeť se spínacím tlačítkem nahoře a dole
5. Odlehčení od tahu kabelu
6. Síťové vedení
7. Ochrana lišty
8. Ochrana proti nárazu
9. Sběrač ostříhaného materiálu
10. Upevňovací šrouby
Pozor! Používání plotových nůžek bez
ochrany rukou je nepřípustné.
3. Rozsah dodávky
Originální návod k obsluze
Bezpečnostní pokyny
Nůžky na živé ploty s namontovanou ochranou
rukou
Sběrač stříhaného materiálu
Otevřete balení a přístroj opatrně vyjměte z
balení.
Odstraňte obalový materiál a ochrany balení /
dopravní pojistky (jsou-li k dispozici).
Překontrolujte, zda je rozsah dodávky úplný.
Zkontrolujte přístroj a příslušenství, zda nebyly při
přepravě poškozeny.
Balení si pokud možno uložte až do uplynutí
záruční doby.
POZOR
Přístroj a obalový materiál nejsou dětská hračka!
Děti si nesmějí hrát s plastovými sáčky, fóliemi a
malými díly! Hrozí nebezpečí spolknutí a
udušení!
4. Použití podle účelu určení
Pozor! Nůžky na živé ploty jsou vhodné ke stříhání
živých plotů, keřů a křoví. Max. kapacita stříhání musí
být dodržena, viz Technická data.
Stroj smí být používán pouze podle svého účelu
určení. Každé další toto překračující použití
neodpovídá použití podle účelu určení. Za z toho
vyplývající škody nebo zranění všeho druhu ručí
uživatel/obsluhující osoba a ne výrobce.
Dbejte prosím na to, že naše přístroje nebyly podle
svého účelu určení konstruovány pro živnostenské,
řemeslnické nebo průmyslové použití. Nepřebíráme
žádné ručení, pokud je přístroj používán v
živnostenských, řemeslných nebo průmyslových
podnicích a při srovnatelných činnostech.
Anleitung_RG_EH_6053_SPK1:_ 11.05.2010 13:08 Uhr Seite 38

39
CZ
5. Technická data
Připojení na síť 230 V ~ 50 Hz
Příkon 600 W
Délka střihu 530 mm
Délka lišty 600 mm
Zubová mezera 20 mm
Max. tloušťka střihu 15 mm
Počet střihů/min 3200
Hladina akustického tlaku L
pA
84,7 dB(A)
Hladina akustického výkonu L
WA
99 dB(A)
Nejistota K 2,5 dB(A)
Vibrace a
hv
6,5 m/s
2
Nejistota K 1,5 m/s
2
Hmotnost 4,0 kg
Dodatečné informace pro elektrické přístroje
Varování!
Uvedená emisní hodnota vibrací byla změřena podle
normované zkušební metody a může se měnit v
závislosti na druhu a způsobu použití elektrického
přístroje, a ve výjimečných případech se může
nacházet nad uvedenou hodnotou.
Uvedená emisní hodnota vibrací může být použita ke
srovnání jednoho elektrického přístroje s jinými
přístroji.
Uvedená emisní hodnota vibrací může být také
použita k úvodnímu posouzení negativních vlivů.
Omezte tvorbu hluku a vibrace na minimum!
Používejte pouze přístroje v bezvadném stavu.
Pravidelně provádějte údržbu a čištění přístroje.
Přizpůsobte Váš způsob práce přístroji.
Nepřetěžujte přístroj.
V případě potřeby nechte přístroj zkontrolovat.
Přístroj vypněte, pokud ho nepoužíváte.
Noste rukavice.
Zbývající rizika
I přesto, že obsluhujete elektrický přístroj podle
předpisů, existují vždy
zbývající rizika. V souvislosti s konstrukcí a
provedením elektrického přístroje se mohou
vyskytnout následující nebezpečí:
1. Poškození plic, pokud se nenosí žádná vhodná
ochranná maska proti prachu.
2. Poškození sluchu, pokud se nenosí žádná
vhodná ochrana sluchu.
3. Poškození zdraví, které je následkem vibrací na
ruce a paže, pokud se přístroj používá delší dobu
nebo není řádně veden a udržován.
Varování! Tento elektrický přístroj produkuje během
provozu elektromagnetické pole. Toto pole může za
určitých okolností ovlivňovat aktivní nebo pasivní
lékařské implantáty. Aby se zabránilo vážným nebo
smrtelným poraněním, doporučujeme osobám s
lékařskými implantáty konzultovat před používáním
přístroje svého lékaře a výrobce lékařského
implantátu.
6. Před uvedením do provozu
Před připojením se přesvědčte, zda údaje na
typovém štítku souhlasí s údaji sítě.
Otočná zadní rukojeť (Obrázek 2-4)
Nůžky na živý plot jsou vybaveny otočnou zadní
rukojetí. Lze ji otočit doleva o 90° a doprava jak o
90° tak i o 180°. K tomuto musí být nejprve horní
zarážka posunuta ve směru šipky dozadu (Obrázek
2/1). Poté zarážku (E) zatáhnout ve směru šipky a
rukojeť otočit. Při otáčení doleva se rukojeť zajistí při
90° (Obrázek 3). Při otáčení doprava se rukojeť
zajistí při 90° a při 180° (Obrázek 4).
Při otáčení rukojeti nazpět musí být zarážka (E) opět
zatažena ve směru šipky. Poté co je rukojeť opět v
normální poloze, musí být horní zarážka pro aretaci
posunuta dopředu.
Na provádění vertikálních střihů by měla být rukojeť
otočena o 90°, u střihů nad hlavou o 180°.
Anleitung_RG_EH_6053_SPK1:_ 11.05.2010 13:08 Uhr Seite 39

40
CZ
Montáž sběrače stříhaného materiálu (obr. 5a5d)
U vodorovných střihů se doporučuje namontovat
sběrač stříhaného materiálu. Ten umožňuje
jednoduché odklízení stříhaného materiálu. Povrch
nůžek tak zůstane čistý (obr. 5a/5b). Nasaďte sběrač
stříhaného materiálu na střihací lištu (obr. 5c). Poté
nasuňte sběrač stříhaného materiálu až na doraz ve
směru ke špičce střihací lišty. Dbejte přitom na to, aby
byla přední špička sběrače stříhaného materiálu
zasunuta do špičky lišty. Nakonec pevně utáhněte
upevňovací šrouby (10) (obr. 5d). Sběrač stříhaného
materiálu může být namontován jak na pravé, tak na
levé straně.
7. Uvedení do provozu a obsluha
Plotové nůžky jsou vybaveny dvouručním
bezpečnostním spínáním. To pracuje pouze tehdy,
když je jednou rukou stisknut spínač na vodicí
rukojeti (obr. 6a/pol. A) a druhou rukou podle volby
horní spínač na rukojeti (obr. 6a/pol. B) nebo spínač
pod rukojetí (obr. 6a/pol. C).
Pokud je jeden ze spínacích prvků uvolněn, nože se
zastaví.
Prosím dbejte přitom na doběh nožů.
쎲 Překontrolujte prosím funkci nožů. Oboustranně
stříhající nože jsou protiběžné a zaručují tak
vysoký střihací výkon a klidný chod.
쎲 Před použitím upevněte prodlužovací kabel v
odlehčení od tahu (viz obr. 6b).
쎲 Pro provoz na volném prostranství musí být
používána k tomu schválená prodlužovací
vedení.
Pracovní pokyny
쎲 Kromě stříhání živých plotů můžou být plotové
nůžky použity také ke stříhání keřů a křovin.
쎲 Nejlepšího střihacího výkonu dosáhnete, pokud
jsou plotové nůžky vedeny tak, že jsou zuby
nožů nasměrovány v cca 15° úhlu k plotu (viz
obr. 7).
쎲 Oboustranně stříhající protiběžné nože umožňují
stříhání v obou směrech (viz obr. 8).
쎲 Aby se dosáhlo rovnoměrné výšky živého plotu,
doporučuje se napnout provázek jako ukazatel
směru podél hrany živého plotu. Přesahující větve
se odstřihnou (viz obr. 9). Dbejte na to, aby se
nože nedostaly do kontaktu s provázkem.
쎲 Boční strany živého plotu se stříhají obloukovými
pohyby zespoda nahoru (viz obr. 10).
8. Výměna síťového napájecího
vedení
Pokud je síťové napájecí vedení poškozeno, musí být
nahrazeno výrobcem nebo jeho zákaznickým
servisem nebo kvalifikovanou osobou, aby se
zabránilo nebezpečím.
9. Čištění, údržba a objednání
náhradních dílů
Před všemi čisticími pracemi vytáhněte síťovou
zástrčku.
9.1 Čištění
앬 Udržujte bezpečnostní zařízení, větrací otvory a
kryt motoru tak prosté prachu a nečistot, jak jen
to je možné. Otřete přístroj čistým hadrem nebo
ho profoukněte stlačeným vzduchem při nízkém
tlaku.
앬 Doporučujeme přímo po každém použití přístroj
vyčistit.
앬 Pravidelně přístroj čistěte vlhkým hadrem a
trochou mazlavého mýdla. Nepoužívejte žádné
čisticí prostředky nebo rozpouštědla, mohlo by
dojít k poškození plastových částí přístroje.
Dbejte na to, aby se dovnitř přístroje nedostala
voda.
9.2 Údržba
앬 Abyste získali vždy co nejlepší výkon, je třeba
nože pravidelně čistit a mazat. Kartáčkem
odstraňte usazeniny a naneste jemný olejový film
(viz obr. 11).
앬 Uvnitř přístroje se nevyskytují žádné další, údržbu
vyžadující, díly.
앬 Na uložení mohou být plotové nůžky pomocí
vhodného šroubu a hmoždinky upevněny na zdi
(viz obr. 12).
9.3 Objednání náhradních dílů:
Při objednávce náhradních dílů je třeba uvést
následující údaje:
앬 Typ přístroje
앬 Číslo výrobku přístroje
앬 Identifikační číslo přístroje
앬 Číslo náhradního dílu požadovaného náhradního
dílu
Aktuální ceny a informace naleznete na
www.isc-gmbh.info
Anleitung_RG_EH_6053_SPK1:_ 11.05.2010 13:08 Uhr Seite 40

10. Skladování
Skladujte přístroj a jeho příslušenství na tmavém,
suchém a nezamrzajícím místě a mimo dosah dětí.
Optimální teplota skladování leží mezi 5 a 30 ˚C.
Uložte elektrický přístroj v originálním balení.
11. Likvidace a recyklace
Přístroj je uložen v balení, aby bylo zabráněno
poškození při přepravě. Toto balení je surovina a tím
znovu použitelné nebo může být dáno zpět do
cirkulace surovin.
Přístroj a jeho příslušenství jsou vyrobeny z
rozdílných materiálů, jako např. kov a plasty.
Defektní součástky odevzdejte k likvidaci zvláštních
odpadů. Zeptejte se v odborné prodejně nebo na
místním zastupitelství!
12. Poruchy
Přístroj neběží: překontrolujte, zda je síťový kabel
řádně připojen o zkontrolujte jištění sítě. Pokud
přístroj i přes existující napětí nefunguje, zašlete ho
prosím na uvedenou adresu zákaznického servisu.
41
CZ
Anleitung_RG_EH_6053_SPK1:_ 11.05.2010 13:08 Uhr Seite 41

Pozor!
Pri používaní prístrojov sa musia dodržiavať
príslušné bezpečnostné opatrenia, aby bolo možné
zabrániť prípadným zraneniam a vecným škodám.
Preto si starostlivo prečítajte tento návod na obsluhu
/ bezpečnostné pokyny. Následne ich starostlivo
uschovajte, aby ste mali vždy k dispozícii potrebné
informácie. V prípade, že budete prístroj požičiavať
tretím osobám, prosím odovzdajte im spolu
s prístrojom tento návod na obsluhu/ bezpečnostné
pokyny. Nepreberáme žiadne ručenie za nehody ani
škody, ktoré vzniknú nedodržaním tohto návodu na
obsluhu a bezpečnostných pokynov.
1. Bezpečnostné pokyny:
Príslušné bezpečnostné pokyny nájdete v priloženej
brožúrke.
VÝSTRAHA!
Prečítajte si všetky bezpečnostné predpisy a
pokyny.
Nedostatky pri dodržovaní bezpečnostných
predpisov a pokynov môžu mať za následok úraz
elektrickým prúdom, vznik požiaru a/alebo ťažké
poranenia.
Všetky bezpečnostné predpisy a pokyny si
odložte pre budúce použitie.
Vysvetlenie štítku (pozri obr. 13)
1. Výstraha
2. Nevystavovať dažďu! Chrániť pred dažďom
a vlhkom.
3. Pred uvedením do prevádzky si prečítajte návod
na obsluhu.
4. Zástrčku okamžite vytiahnuť zo siete, keď je
poškodené alebo prerezané vedenie.
5. Používajte ochranu očí a ochranu sluchu.
2. Popis prístroja (pozri obr. 1)
1. Strihacia lišta
2. Ochrana rúk
3. Vodiaca rukoväť so spínačom
4. Rukoväť so spínačom hore a dole
5. Odľahčenie káblového ťahu
6. Sieťové vedenie
7. Ochrana noža
8. Ochrana proti nárazu
9. Zachytávač strihaného materiálu
10. Upevňovacie skrutky
Pozor! Používanie záhradníckych nožníc bez
ochrany rúk je zakázané.
3. Obsah dodávky
Originálny návod na obsluhu
Bezpečnostné predpisy
Záhradnícke nožnice s namontovanou ochranou
rúk
Zachytávač strihaného materiálu
Otvorte balenie a opatrne vyberte prístroj von z
balenia.
Odstráňte obalový materiál ako aj
obalové/transportné poistky (pokiaľ sú
obsiahnuté).
Skontrolujte, či obsah dodávky kompletný.
Skontrolujte, či nedošlo k poškodeniu prístroja
a príslušenstva transportom.
Pokiaľ možno, uschovajte si obal až do konca
záručnej doby.
POZOR
Prístroj a obalový materiál nie sú hračky! Deti sa
nesmú hrať s plastovými vreckami, fóliami ani
malými dielmi! Hrozí nebezpečenstvo prehltnutia
a udusenia!
4. Správne použitie prístroja
Pozor! Tieto záhradnícke nožnice sú vhodné na
strihanie živých plotov, kríkov a krovín. Je potrebné
dodržať max. kapacitu strihu, pozri technické údaje.
Prístroj smie byť použitý len na ten účel, na ktorý bol
určený. Každé iné odlišné použitie prístroja sa
považuje za nespĺňajúce účel použitia. Za škody
alebo zranenia akéhokoľvek druhu spôsobené
nesprávnym používaním ručí používateľ /
obsluhujúca osoba, nie však výrobca.
Prosím zohľadnite skutočnosť, že správny spôsob
prevádzky našich prístrojov nie je na profesionálne,
remeselnícke ani priemyselné použitie.
Nepreberáme žiadne záručné ručenie, ak sa prístroj
bude používať v profesionálnych, remeselníckych
alebo priemyselných prevádzkach ako aj na činnosti
rovnocenné s takýmto použitím.
42
SK
Anleitung_RG_EH_6053_SPK1:_ 11.05.2010 13:08 Uhr Seite 42

43
SK
5. Technické údaje
Sieťové pripojenie 230 V ~ 50 Hz
Príkon 600 W
Dĺžka strihania 530 mm
Dĺžka strihacej lišty 600 mm
Odstup zubov 20 mm
Max. sila strihania 15 mm
Počet rezov/min. 3200
Hladina akustického tlaku L
pA
84,7 dB(A)
Hladina akustického výkonu L
WA
99 dB(A)
Faktor neistoty K 2,5 dB(A)
Vibrácia a
hv
6,5 m/s
2
Faktor neistoty K 1,5 m/s
2
Hmotnosť 4,0 kg
Dodatočné informácie pre elektrické prístroje
Výstraha!
Uvedená emisná hodnota vibrácií bola nameraná
podľa normovaného skúšobného postupu a môže sa
meniť v závislosti od druhu a spôsobu použitia
elektrického náradia a vo výnimočných prípadoch sa
môže nachádzať nad uvedenou hodnotou.
Uvedená emisná hodnota vibrácií sa môže použiť za
účelom porovnania elektrického prístroja s inými
prístrojmi.
Uvedená emisná hodnota vibrácií sa môže taktiež
použiť za účelom východiskového posúdenia
vplyvov.
Obmedzte tvorbu hluku a vibráciu na minimum!
Používajte len prístroje v bezchybnom stave.
Pravidelne vykonávajte údržbu a čistenie
prístroja.
Prispôsobte spôsob práce prístroju.
Prístroj nepreťažujte.
V prípade potreby nechajte prístroj skontrolovať.
Prístroj vypnite, pokiaľ ho nepoužívate.
Používajte rukavice.
Zvyškové riziká
Aj napriek tomu, že budete elektrický prístroj
obsluhovať podľa predpisov, budú existovať
zvyškové riziká. V súvislosti s konštrukciou a
vyhotovením elektrického prístroja môže dôjsť k
výskytu týchto nebezpečenstiev:
1. Poškodenie pľúc, pokiaľ sa nenosí žiadna
vhodná ochranná maska proti prachu.
2. Poškodenie sluchu, pokiaľ sa nenosí žiadna
vhodná ochrana sluchu.
3. Poškodenie zdravia, ktoré je následkom vibrácie
rúk a ramien, pokiaľ sa prístroj bude používať
dlhšiu dobu alebo sa nevedie a neudržuje
správnym spôsobom.
Výstraha! Tento elektrický prístroj vytvára behom
prevádzky elektromagnetické pole. Toto pole môže
v určitých prípadoch ovplyvňovať aktívne alebo
pasívne medicínske implantáty. Aby sa znížilo
nebezpečenstvo vážnych alebo smrteľných zranení,
odporúčame osobám s medicínskymi implantátmi
konzultovať pred používaním prístroja svojho lekára
a výrobcu medicínskeho implantátu.
6. Pred uvedením do prevádzky
Presvedčte sa pred zapojením prístroja do siete
o tom, či údaje na typovom štítku prístroja súhlasia
s údajmi elektrickej siete.
Otočná zadná rukoväé (obr. 2-4)
Záhradnícke noďnice na živý plot sú vybavené
oto‹nou zadnou rukoväéou. Rukoväé je moďné
oto‹ié doľava o 90° a smerom doprava o 90° ako aj
o 180°. Pri otá‹aní rukoväte sa musí horná aretácia
posunúé v smere äípky dozadu (obr. 2/1). Potom
aretáciu (E) vytiahnite v smere äípky a oto‹te
rukoväéou. Pri oto‹ení doľava sa zafixuje rukoväé pri
90° (obr. 3). Pri oto‹ení doprava sa zafixuje rukoväé
pri 90° a pri 180° (obr. 4).
Pri otá‹aní rukoväte do pôvodnej polohy sa musí
aretácia ( E) opäé potiahnué v smere äípky. Po
oto‹ení rukoväte do normálnej polohy sa musí horná
aretácia opäé posunúé v smerom dopredu, aby sa
rukoväé zafixovala.
Pri vykonávaní vertikálnych rezov by sa mala rukoväť
otočiť o 90°, pri vykonávaní rezov nad hlavou by sa
mala rukoväť otočiť o 180°.
Anleitung_RG_EH_6053_SPK1:_ 11.05.2010 13:08 Uhr Seite 43

44
SK
Montáž zachytávača strihaného materiálu (obr.
5a-5d)
Pri kolmých rezoch sa odporúča, aby sa namontoval
zachytávač strihaného materiálu. Zachytávač
strihaného materiálu umožňuje jednoduché
odvádzanie strihaného materiálu. Povrch živého plota
tak ostane čistý (obr. 5a/5d). Nasaďte zachytávač
strihaného materiálu na strihaciu lištu (obr. 5c).
Následne zasuňte zachytávač strihaného materiálu
až na doraz v smere k špičke strihacej lišty. Dbajte na
to, aby sa predný špic zachytávača strihaného
materiálu zasunul do špičky strihacej lišty. Nakoniec
dotiahnite upevňovacie skrutky (10) (obr. 5d).
Zachytávač strihaného materiálu sa môže
namontovať na ľavej ako aj na pravej strane.
7. Uvedenie do prevádzky a obsluha
Záhradnícke nožnice sú vybavené obojručným
bezpečnostným vypínaním. Prístroj pracuje len
vtedy, ak sa stlačí jednou rukou spínač na vodiacej
rukoväti (obr. 6a/ pol. A) a druhou rukou voliteľne
buď spínač na rukoväti (obr. 6a/ pol. B) alebo spínač
pod rukoväťou (obr. 6a/ pol. C).
Keď pustíte jeden zo spínacích prvkov, tak sa
strihacie nože zastavia.
Dbajte na pritom na dobiehanie strihacích nožov
po vypnutí.
앬 Skontrolujte prosím funkciu strihacích nožov.
Obojstranne režúce nože bežia proti sebe
a zaručujú tak vysoký rezací výkon
a rovnomerný chod.
앬 Upevnite pred použitím predlžovací kábel do
káblového držiaka na odľahčenie ťahu kábla
(pozri obr. 6b).
앬 Pri práci vonku sa smú používať len také
predlžovacie vedenia, ktoré sú určené na
použitie vo vonkajšom prostredí.
Pracovné pokyny
앬 Okrem strihania živého plotu sa smú
záhradnícke nožnice používať na strihanie kríkov
a krovín.
앬 Najlepší strihací výkon sa dosiahne vtedy, keď
sa záhradnícke nožnice vedú tak, aby boli zuby
nožov v tu (pozri obr. 7).
앬 Obojstranne strihajúce protichodné nože
umožňujú strihanie v obidvoch smeroch (pozri
obr. 8).
앬 Aby sa dosiahla rovnomerná výška živého plota,
odporúča sa napnutie vlákna (špagátu) ako
smerovej šnúry pozdĺž hrany živého plota.
Vyčnievajúce vetvy sa odstrihnú (pozri obr. 9).
Dbajte na to, aby sa nože nedostali do kontaktu s
vláknom.
앬 Postranné plochy živého plotu sa strihajú
oblúkovými pohybmi vedenými smerom zdola
nahor (pozri obr. 10).
8. Výmena sieťového prípojného
vedenia
V prípade poškodenia sieťového prípojného vedenia
prístroja sa musí vedenie vymeniť výrobcom alebo
jeho zákazníckym zastúpením alebo podobne
kvalifikovanou osobou, aby sa zabránilo rizikám.
9. Čistenie, údržba a objednanie náh
radných dielov
Pred všetkými údržbovými a čistiacimi prácami
vytiahnite kábel zo siete.
9.1 Čistenie
앬 Udržujte ochranné zariadenia, vzduchové otvory
a ebo ho vyčistite vyfúkaním stlačeným
vzduchom pri nastavení na nízky tlak.
앬 Odporúčame, aby ste prístroj čistili spravidla
vždy po každom použití.
앬 Čistite prístroj pravidelne pomocou vlhkej utierky
aostriedky alebo riedidlá; tieto prostriedky by
mohli napadnúť umelohmotné diely prístroja.
Dbajte na to, aby sa do vnútra prístroja
nedostala voda.
9.2 Údržba
앬 Aby bolo možné vždy dosahovať výborné
výkony, je potrebné nože pravidelne čistiť
a mazať. Odstráňte usadeniny pomocou kefky
a naneste na nože jemný olejový film (pozri obr.
11).
앬 Vo vnútri prístroja sa nenachádzajú žiadne
ďalšie diely vyžadujúce údržbu.
앬 Pri skladovaní sa môžu záhradnícke nožnice
upevniť pomocou vhodnej skrutky a kolíka na
stenu (pozri obr. 12).
Anleitung_RG_EH_6053_SPK1:_ 11.05.2010 13:08 Uhr Seite 44

45
SK
9.3 Objednávanie náhradných dielov:
Pri objednávaní náhradných dielov je potrebné
uviesť nasledovné údaje;
앬 Typ prístroja
앬 Výrobné číslo prístroja
앬 Identifikačné číslo prístroja
앬 Číslo potrebného náhradného dielu
Aktuálne ceny a informácie nájdete na stránke
www.isc-gmbh.info
10. Skladovanie
Skladujte prístroj a jeho príslušenstvo na tmavom,
suchom a nezamŕzajúcom mieste mimo dosahu detí.
Optimálna teplota pre skladovanie je medzi 5 až 30
°C. Skladujte tento elektrický prístroj v originálnom
balení.
11. Likvidácia a recyklácia
Prístroj sa nachádza v obale za účelom zabránenia
poškodeniu pri transporte. Tento obal je vyrobený
zo suroviny a tým pádom je ho možné znovu použiť
alebo sa môže dať do zberu na recykláciu surovín.
Prístroj a jeho príslušenstvo sa skladajú z rôznych
materiálov, ako sú napr. kovy a plasty. Poškodené
súčiastky odovzdajte na vhodnú likvidáciu
špeciálneho odpadu. Informujte sa v odbornej
predajni alebo na miestnych úradoch!
12. Poruchy
Prístroj nebeží: Skontrolujte, či je napájací kábel
riadne pripojený do siete a na uvedenú adresu
centra služieb pre zákazníkov.
Anleitung_RG_EH_6053_SPK1:_ 11.05.2010 13:08 Uhr Seite 45

46
k erklärt folgende Konformität gemäß EU-Richtlinie und
Normen für Artikel
t explains the following conformity according to EU
directives and norms for the following product
p déclare la conformité suivante selon la directive CE et les
normes concernant l’article
C dichiara la seguente conformità secondo la direttiva UE e
le norme per l’articolo
N verklaart de volgende overeenstemming conform EU
richtlijn en normen voor het product
m declara la siguiente conformidad a tenor de la directiva y
normas de la UE para el artículo
O declara a seguinte conformidade, de acordo com a
directiva CE e normas para o artigo
l attesterer følgende overensstemmelse i medfør af
EU-direktiv samt standarder for artikel
U förklarar följande överensstämmelse enl. EU-direktiv och
standarder för artikeln
q vakuuttaa, että tuote täyttää EU-direktiivin ja standardien
vaatimukset
. tõendab toote vastavust EL direktiivile ja standarditele
j vydává následující prohlášení o shodě podle směrnice
EU a norem pro výrobek
X potrjuje sledečo skladnost s smernico EU in standardi za
izdelek
W vydáva nasledujúce prehlásenie o zhode podľa smernice
EÚ a noriem pre výrobok
A a cikkekhez az EU-irányvonal és Normák szerint a
következő konformitást jelenti ki
P deklaruje zgodność wymienionego poniżej artykułu z
następującymi normami na podstawie dyrektywy WE.
e декларира съответното съответствие съгласно
Директива на ЕС и норми за артикул
H paskaidro šādu atbilstību ES direktīvai un standartiem
G apibūdina šį atitikimą EU reikalavimams ir prekės
normoms
Q declară următoarea conformitate conform directivei UE
şi normelor pentru articolul
z δηλώνει την ακόλουθη συμμόρφωση σύμφωνα με την
Οδηγία ΕΚ και τα πρότυπα για το προϊόν
B potvrđuje sljedeću usklađenost prema smjernicama EU
i normama za artikl
f potvrđuje sljedeću usklađenost prema smjernicama EU
i normama za artikl
4 potvrđuje sledeću usklađenost prema smernicama EZ i
normama za artikal
T следующим удостоверяется, что следующие
продукты соответствуют директивам и нормам ЕС
1 проголошує про зазначену нижче відповідність
виробу директивам та стандартам ЄС на виріб
5 ја изјавува следната сообрзност согласно
ЕУ-директивата и нормите за артикли
Z Ürünü ile ilgili AB direktifleri ve normları gereğince
aşağıda açıklanan uygunluğu belirtir
L erklærer følgende samsvar i henhold til EU-direktivet
og standarder for artikkel
E Lýsir uppfyllingu EU-reglna og annarra staðla vöru
Konformitätserklärung
ISC GmbH · Eschenstraße 6 · D-94405 Landau/Isar
Heckenschere RG-EH 6053 (Einhell)
Standard references: EN 60745-1; EN 60745-2-15; EN 774; EN 50366;
EN 55014-1; EN 55014-2; EN 61000-3-2; EN 61000-3-3
Landau/Isar, den 18.03.2010
First CE: 10 Archive-File/Record: 3403599-06-4175500-09
Art.-No.: 34.035.97 I.-No.: 11020 Documents registrar: Alexander Scheifl
Subject to change without notice Wiesenweg 22, D-94405 Landau/Isar
Weichselgartner/General-Manager Gao/Product-Management
x
2009/105/EC
2006/95/EC
2006/28/EC
2005/32/EC
2004/108/EC
2004/22/EC
1999/5/EC
97/23/EC
90/396/EC
89/686/EC_96/58/EC
x
x
x
2006/42/EC
2004/26/EC
Emission No.:
2000/14/EC_2005/88/EC
Annex IV
Notified Body:
Notified Body No.:
Reg. No.:
Annex V
Annex VI
Noise: measured LWA= 92,6 dB (A); guaranteed LWA= 96 dB (A)
P = kW; L/Ø = cm
Notified Body:
Anleitung_RG_EH_6053_SPK1:_ 11.05.2010 13:08 Uhr Seite 46

47
k Nur für EU-Länder
Werfen Sie Elektrowerkzeuge nicht in den Hausmüll!
Gemäß europäischer Richtlinie 2002/96/EG über Elektro- und Elektronik-Altgeräte und Umsetzung in
nationales Recht müssen verbrauchte Elektrowerkzeuge getrennt gesammelt werden und einer
umweltgerechten Wiederverwertung zugeführt werden.
Recycling-Alternative zur Rücksendeaufforderung:
Der Eigentümer des Elektrogerätes ist alternativ anstelle Rücksendung zur Mitwirkung bei der sachgerechten Verwertung im Falle der Eigentumsaufgabe verpflichtet. Das Altgerät kann hierfür auch einer
Rücknahmestelle überlassen werden, die eine Beseitigung im Sinne der nationalen Kreislaufwirtschaftsund Abfallgesetze durchführt. Nicht betroffen sind den Altgeräten beigefügte Zubehörteile und Hilfsmittel
ohne Elektrobestandteile.
t For EU countries only
Never place any electric tools in your household refuse.
To comply with European Directive 2002/96/EC concerning old electric and electronic equipment and its
implementation in national laws, old electric tools have to be separated from other waste and disposed of
in an environment-friendly fashion, e.g. by taking to a recycling depot.
Recycling alternative to the demand to return electrical devices:
As an alternative to returning the electrical device, the owner is obliged to cooperate in ensuring that the
device is properly recycled if ownership is relinquished. This can also be done by handing over the used
device to a returns center, which will dispose of it in accordance with national commercial and industrial
waste management legislation. This does not apply to the accessories and auxiliary equipment without
any electrical components which are included with the used device.
p Uniquement pour les pays de l'Union Européenne
Ne jetez pas les outils électriques dans les ordures ménagères.
Selon la norme européenne 2002/96/CE relative aux appareils électriques et systèmes électroniques
usés et selon son application dans le droit national, les outils électriques usés doivent être récoltés à
part et apportés à un recyclage respectueux de l'environnement.
Possibilité de recyclage en alternative à la demande de renvoi :
Le propriétaire de lʼappareil électrique est obligé, en guise dʼalternative à un envoi en retour, à contribuer
à un recyclage effectué dans les règles de lʼart en cas de cessation de la propriété. Lʼancien appareil
peut être remis à un point de collecte dans ce but. Cet organisme devra lʼéliminer dans le sens de la Loi
sur le cycle des matières et les déchets. Ne sont pas concernés les accessoires et ressources fournies
sans composants électroniques.
Anleitung_RG_EH_6053_SPK1:_ 11.05.2010 13:08 Uhr Seite 47

48
C Solo per paesi membri dell'UE
Non gettate gli utensili elettrici nei rifiuti domestici.
Secondo la Direttiva europea 2002/96/CE sui rifiuti di apparecchiature elettriche ed elettroniche e
l'applicazione nel diritto nazionale gli elettroutensili usati devono venire raccolti separatamente e smaltiti
in modo ecologico.
Alternativa di riciclaggio alla richiesta di restituzione
Il proprietario dellʼapparecchio elettrico è tenuto in alternativa, invece della restituzione, a collaborare in
modo che lo smaltimento venga eseguito correttamente in caso ceda lʼapparecchio. Lʼapparecchio
vecchio può anche venire consegnato ad un centro di raccolta che provvede poi allo smaltimento
secondo le norme nazionali sul riciclaggio e sui rifiuti. Non ne sono interessati gli accessori e i mezzi
ausiliari senza elementi elettrici forniti insieme ai vecchi apparecchi.
Gælder kun EU-lande
Smid ikke el-værktøj ud som almindeligt husholdningsaffald.
I henhold til EF-direktiv 2002/96 om elektroaffald og dets omsættelse til national lovgivning skal brugt
el-værktøj indsamles adskilt og indleveres på genbrugsstation.
Recycling-alternativ til tilbagesendelse af brugt vare:
Ejeren af det elektroniske apparat er forpligtet til – som et alternativ i stedet for tilbagesendelse – at
medvirke til, at relevante dele af apparatet genanvendes ifølge miljøforskrifterne i tilfælde af overdra
gelse af ejerskab til tredjeperson. Det brugte apparat kan også overdrages til et deponeringssted, som vil
varetage bortskaffelsen af apparatets dele i overensstemmelse med nationale bestemmelser vedrørende
skrotning og genbrug. Ikke omfattet heraf er tilbehørsdele og hjælpemidler, som ikke indeholder
elektroniske komponenter.
B
Samo za zemlje Europske zajednice
f
Elektroalate ne bacajte u kućno smeće.
U skladu s europskom odredbom 2002/96/EG o starim električnim i elektroničkim uredjajima i njezinom
primjenom u okviru državnog prava, istrošeni elektroalati moraju se odvojeno sakupiti i zbrinuti na
ekološki način u svrhu recikliranja.
Alternativa s recikliranjem u odnosu na zahtjev za povrat uredjaja:
Vlasnik elektrouredjaja alternativno je obvezan da umjesto povrata robe u slučaju odricanja vlasništva
sudjeluje u stručnom zbrinjavanju elektrouredjaja. Stari uredjaj može se u tu svrhu prepustiti i stanici za
preuzimanje rabljenih uredjaja koja će provesti uklanjanje u smislu državnog zakona o recikliranju i
otpadu. Zakonom nisu obuhvaćeni dijelovi pribora ugradjeni u stare uredjaje i pomoćni materijali bez
električnih elemenata.
U Endast för EU-länder
Kasta inte elverktyg i hushållssoporna.
Enligt det europeiska direktivet 2002/96/EG om avfall som utgörs av eller innehåller elektriska eller
elektroniska produkter och dess tillämpning i den nationella lagstiftningen, måste förbrukade elverktyg
källsorteras och lämnas
Återvinnings-alternativ till begäran om återsändning:
Som ett alternativ till återsändning är ägaren av elutrustningen skyldig att bidraga till ändamålsenlig
avfallshantering för det fall att utrustningen ska skrotas. Efter att den förbrukade utrustningen har läm
nats in till en avfallsstation kan den omhändertas i enlighet med gällande nationella lagstiftning om återvinning och avfallshantering. Detta gäller inte för tillbehörsdelar och hjälpmedel utan elektriska komponenter vars syfte har varit att komplettera den förbrukade utrustningen.
Anleitung_RG_EH_6053_SPK1:_ 11.05.2010 13:08 Uhr Seite 48

49
j Pouze pro členské země EU
Nedávejte elektrické nářadí do domácího odpadu.
Podle Evropské směrnice 2002/96/EG o starých elektrických a elektronických přístrojích (WEEE) a podle
národního práva musí být použité elektrické nářadí odděleně skladováno a odevzdáno k ekologické
recyklaci.
Alternativa recyklace k zaslání zpět:
Vlastník elektrického přístroje je alternativně namísto zaslání zpět povinen ke spolupráci při odborné
recyklaci v případě, že se rozhodne přístroj zlikvidovat. Starý přístroj může být v tomto případě také
odevzdán do sběrny, která provede likvidaci ve smyslu národního zákona o hospodářském koloběhu a
zákona o odpadech. Toto neplatí pro ke starým přístrojům přiložené části příslušenství a pomocné
prostředky bez elektrických součástí.
W Len pre krajiny EÚ
Neodstraňujte elektrické prístroje ako domový odpad.
Podľa Európskej smernice 2002/96/ES o odpade z elektrických a elektronických zariadení (OEEZ) a v
súlade s národnými právnymi predpismi sa musia použité elektronické prístroje odovzdať do triedeného
zberu a musí sa zabezpečiť špecifické spracovanie a recyklácia.
Recyklačná alternatíva k výzve na spätný odber výrobku:
Vlastník elektrického prístroja je alternatívne namiesto spätnej zásielky povinný spolupracovať pri riadnej
recyklácii prístroja voj môže byť za týmto účelom taktiež prenechaný zbernému miestu, ktoré vykoná
odstránenie v zmysle národného zákona o recyklácii a ckých komponentov.
4 Samo za zemlje EU
Ne bacajte elektro-alate u kućno smeće!
Shodno evropskoj smernici 2002/96/EG o starim električnim i elektronskim uredjajima i primeni
državnog prava, istrošeni elektro-alati mora da se odvojeno sakupe i eliminišu na ekološki primeren
način u stanici za recikliranje.
Alternativa recikliranju prema zahtevima za povrat uredjaja:
Vlasnik elektro-uredjaja alternativno je obavezan da umesto povrata robe u slučaju predaje vlasništva
učestvuje u stručnom eliminisanju elektro-uredjaja. Stari uredjaj može da se u tu svrhu prepusti i stanici
za preuzimanje rabljenih uredjaja koja će provesti odstranjivanje u smislu državnog zakona o reciklaži i
otpadu. Zakonom nisu obuhvaćeni delovi pribora ugradjeni u stare uredjaje i pomoćni materijali bez
električnih elemenata.
Anleitung_RG_EH_6053_SPK1:_ 11.05.2010 13:08 Uhr Seite 49

50
Der Nachdruck oder sonstige Vervielfältigung von Dokumentation und
Begleitpapieren der Produkte, auch auszugsweise ist nur mit ausdrücklicher Zustimmung der ISC GmbH zulässig.
The reprinting or reproduction by any other means, in whole or in part,
of documentation and papers accompanying products is permitted only
with the express consent of ISC GmbH.
La réimpression ou une autre reproduction de la documentation et des
documents dʼaccompagnement des produits, même incomplète, nʼest
autorisée quʼavec lʼagrément exprès de lʼentreprise ISC GmbH.
La ristampa o lʼulteriore riproduzione, anche parziale, della
documentazione o dei documenti dʼaccompagnamento dei prodotti è
consentita solo con lʼesplicita autorizzazione da parte della ISC GmbH.
Eftertryk eller anden form for mangfoldiggørelse af skriftligt materiale,
ledsagepapirer indbefattet, som omhandler produkter, er kun tilladt
efter udtrykkelig tilladelse fra ISC GmbH.
Eftertryck eller annan duplicering av dokumentation och medföljande
underlag för produkter, även utdrag, är endast tillåtet med uttryckligt
tillstånd från ISC GmbH.
Bf
Naknadno tiskanje ili slična umnožavanja dokumentacije i pratećih
papira ovih proizvoda, čak i djelomično kopiranje, moguće je samo uz
izričito dopuštenje tvrtke ISC GmbH.
4
Potpuno ili delimično štampanje ili umnožavanje dokumentacije i
službenih papira koji su priloženi proizvodu dozvoljeno je samo uz
izričitu saglasnost firme ISC GmbH.
j
Dotisk nebo jiné rozmnožování dokumentace a průvodních
dokumentů výrobků, také pouze výňatků, je přípustné výhradně se
souhlasem firmy ISC GmbH.
W
Kopírovanie alebo iné rozmnožovanie dokumentácie a sprievodných
podkladov produktov, a to aj čiastočné, je prípustné len s výslovným
povolením spoločnosti ISC GmbH.
Anleitung_RG_EH_6053_SPK1:_ 11.05.2010 13:08 Uhr Seite 50

51
Technische Änderungen vorbehalten
Technical changes subject to change
Sous réserve de modifications
Con riserva di apportare modifiche tecniche
Der tages forbehold för tekniske ændringer
Förbehåll för tekniska förändringar
Bf Zadržavamo pravo na tehnične izmjene.
4 Zadržavamo pravo na tehničke promen
j Technické změny vyhrazeny
W Technické změny vyhradené
Anleitung_RG_EH_6053_SPK1:_ 11.05.2010 13:08 Uhr Seite 51

52
Anleitung_RG_EH_6053_SPK1:_ 11.05.2010 13:08 Uhr Seite 52

53
Anleitung_RG_EH_6053_SPK1:_ 11.05.2010 13:08 Uhr Seite 53

54
t
GUARANTEE CERTIFICATE
Dear Customer,
All of our products undergo strict quality checks to ensure that they reach you in perfect condition. In the unlikely
event that your device develops a fault, please contact our service department at the address shown on this
guarantee card. Of course, if you would prefer to call us then we are also happy to offer our assistance under
the service number printed below. Please note the following terms under which guarantee claims can be made:
1. These guarantee terms cover additional guarantee rights and do not affect your statutory warranty rights.
We do not charge you for this guarantee.
2. Our guarantee only covers problems caused by material or manufacturing defects, and it is restricted to the
rectification of these defects or replacement of the device. Please note that our devices have not been
designed for use in commercial, trade or industrial applications. Consequently, the guarantee is invalidated
if the equipment is used in commercial, trade or industrial applications or for other equivalent activities. The
following are also excluded from our guarantee: compensation for transport damage, damage caused by
failure to comply with the installation/assembly instructions or damage caused by unprofessional
installation, failure to comply with the operating instructions (e.g. connection to the wrong mains voltage or
current type), misuse or inappropriate use (such as overloading of the device or use of non-approved tools
or accessories), failure to comply with the maintenance and safety regulations, ingress of foreign bodies
into the device (e.g. sand, stones or dust), effects of force or external influences (e.g. damage caused by
the device being dropped) and normal wear resulting from proper operation of the device. This applies in
particular to rechargeable batteries for which we nevertheless issue a guarantee period of 12 months.
The guarantee is rendered null and void if any attempt is made to tamper with the device.
3. The guarantee is valid for a period of 2 years starting from the purchase date of the device. Guarantee
claims should be submitted before the end of the guarantee period within two weeks of the defect being
noticed. No guarantee claims will be accepted after the end of the guarantee period. The original guarantee
period remains applicable to the device even if repairs are carried out or parts are replaced. In such cases,
the work performed or parts fitted will not result in an extension of the guarantee period, and no new
guarantee will become active for the work performed or parts fitted. This also applies when an on-site
service is used.
4. In order to assert your guarantee claim, please send your defective device postage-free to the address
shown below. Please enclose either the original or a copy of your sales receipt or another dated proof of
purchase. Please keep your sales receipt in a safe place, as it is your proof of purchase. It would help us if
you could describe the nature of the problem in as much detail as possible. If the defect is covered by our
guarantee then your device will either be repaired immediately and returned to you, or we will send you a
new device.
Of course, we are also happy offer a chargeable repair service for any defects which are not covered by the
scope of this guarantee or for units which are no longer covered. To take advantage of this service, please send
the device to our service address.
Anleitung_RG_EH_6053_SPK1:_ 11.05.2010 13:09 Uhr Seite 54

55
p
BULLETIN DE GARANTIE
Chère Cliente, Cher Client,
Nos produits sont soumis à un contrôle de qualité très strict. Si cet appareil devait toutefois ne pas fonctionner
impeccablement, nous en serions désolés. Dans un tel cas, nous vous prions de bien vouloir prendre contact
avec notre service après-vente à l‘adresse indiquée sur le bulletin de garantie. Nous restons également
volontiers à votre disposition au numéro de téléphone de service indiqué plus bas. Pour faire valoir une
demande de garantie, ce qui suit est valable :
1. Les conditions de garantie règlent les prestations de garantie supplémentaires. Vos droits de garantie
légaux ne sont en rien altérés par la garantie présente. Notre prestation de garantie est gratuite.
2. La prestation de garantie s’applique exclusivement aux défauts occasionnés par des vices de fabrication ou
de matériau et est limitée à l’élimination de ces défauts ou encore au remplacement de l’appareil. Veillez au
fait que nos appareils, conformément à leur affectation, n’ont pas été construits pour être utilisés dans un
environnement professionnel, industriel ou artisanal. Un contrat de garantie ne peut avoir lieu dès lors que
l’appareil est utilisé à des activités dans des entreprises professionnelles, artisanales ou industrielles ou
toute autre activité du même genre. Sont également exclus de notre garantie : les prestations de
substitution de dommages dus aux transports, les dommages occasionnés par le non-respect des
instructions de montage ou en raison d’une installation non conforme, du non-respect du mode d’emploi
(comme par exemple le raccordement à une mauvaise tension réseau ou à un mauvais type de courant),
les applications abusives ou non conformes (comme par exemple une surcharge de l’appareil ou encore
l’emploi d’accessoires non homologués), le non-respect des prescriptions de maintenance et de sécurité,
l’infiltration de corps étrangers dans l’appareil (comme par exemple du sable, des pierres ou de la
poussière), l’emploi de la force ou l’influence extérieure (comme par exemple les dommages dus à une
chute), ainsi que l’usure normale conforme à l’utilisation. Ceci est particulièrement valable pour les
accumulateurs pour lesquels nous offrons toutefois une période de garantie de 12 mois.
Le droit à la garantie disparaît dès lors que des interventions ont lieu sur l’appareil.
3. Le délai de garantie s’élève à 2 ans et commence à la date de l’achat de l’appareil. Les demandes de
garanties doivent être présentées avant écoulement du délai de garantie, dans les deux semaines suivant
le moment auquel le défaut a été reconnu. Toute reconnaissance de demande de garantie après
écoulement du délai de garantie est exclue. La réparation ou l’échange de l’appareil n’entraîne nullement
une prolongation de la durée de garantie. Elle ne fait pas non plus commencer un nouveau délai de
garantie, en raison de cette prestation, pour l’appareil ou pour toute autre pièce de rechange intégrée. Ceci
est également valable lorsqu’un service après-vente sur place a été consulté.
4. Pour faire reconnaître votre demande de garantie, veuillez nous envoyer l’appareil défectueux franco de
port à l’adresse indiquée ci-dessous. Ajoutez à l’envoi l’original du bon d’achat ou de tout autre preuve de
l’achat datée. Veuillez donc toujours bien conserver le bon d’achat en guise de preuve ! Décrivez la raison
de la réclamation le plus précisément possible. Si le défaut de l’appareil est compris dans notre prestation
de garantie, nous vous retournerons sans délai un appareil réparé ou encore un nouveau.
Bien entendu, nous sommes prêts également à réparer les appareils défectueux contre remboursement des
frais, dès lors que l’appareil n’est plus ou pas garanti. Pour ce faire, veuillez envoyer l’appareil à notre adresse
de service après-vente.
Anleitung_RG_EH_6053_SPK1:_ 11.05.2010 13:09 Uhr Seite 55

56
C
CERTIFICATO DI GARANZIA
Gentili clienti,
i nostri prodotti sono soggetti ad un rigido controllo di qualità. Se l’apparecchio non dovesse tuttavia funzionare
correttamente, ci scusiamo e vi preghiamo di rivolgervi al nostro servizio di assistenza clienti all’indirizzo
indicato in questa scheda di garanzia. Siamo a vostra disposizione anche telefonicamente al numero del
servizio assistenza sotto indicato. Per la rivendicazione dei diritti di garanzia vale quanto segue:
1. Queste condizioni di garanzia regolano ulteriori prestazioni di garanzia. La presente garanzia non tocca i
vostri diritti al ricorso di garanzia previsti dalla legge. Le nostre prestazioni di garanzia sono per voi gratuite.
2. La prestazione di garanzia riguarda esclusivamente le anomalie riconducibili a difetti del materiale o di
produzione ed è limitata all’eliminazione di queste anomalie o alla sostituzione dell’apparecchio. Tenete
presente che i nostri apparecchi non sono stati costruiti per l’impiego professionale, artigianale o
industriale. Un contratto di garanzia non viene concluso quando l’apparecchio viene usato in imprese
commerciali, artigianali o industriali, o con attività equivalenti. Dalla nostra garanzia sono escluse inoltre le
prestazioni di risarcimento per danni dovuti al trasporto o danni causati dalla mancata osservanza delle
istruzioni per il montaggio o per installazione non corretta, dalla mancata osservanza delle istruzioni per
l’uso (come per es. collegamento a tensione di rete o tipo di corrente non corretto), dall’uso improprio o
illecito (come per es. sovraccarico dell’apparecchio o utilizzo di utensili o accessori non consentiti), dalla
mancata osservanza delle norme di sicurezza e di manutenzione, dalla penetrazione di corpi estranei
nell’apparecchio (come per es. sabbia, pietre o polvere), dall’impiego della forza o dall’influsso esterno
(come per es. danni dovuti a caduta) e dall’usura normale e dovuta all’impiego. Ciò vale particolarmente per
batterie, per esse concediamo tuttavia 12 mesi di garanzia
Il diritti di garanzia decadono quando sono già effettuati interventi sull’apparecchio.
3. Il periodo di garanzia è 2 anni e inizia alla data d’acquisto dell’apparecchio. I diritti di garanzia devono
essere fatti valere prima della scadenza del periodo di garanzia, entro due settimane dopo avere accertato
il difetto. È esclusa la rivendicazione di diritti di garanzia dopo la scadenza del relativo periodo. La
riparazione o la sostituzione dell’apparecchio non comporta una proroga del periodo di garanzia e con
questa prestazione per l’apparecchio o per pezzi di ricambio eventualmente installati non inizia un nuovo
periodo di garanzia. Questo vale anche nel caso si ricorra ad un servizio sul posto.
4. Per la rivendicazione dei vostri diritti di garanzia inviate l’apparecchio difettoso franco di porto all’indirizzo
sotto indicato. Allegate lo scontrino di cassa in originale o un’altra prova d’acquisto che riporti la data.
Conservate bene perciò lo scontrino di cassa come prova! Indicate il motivo di reclamo nel modo più
dettagliato possibile. Se il difetto dell’apparecchio rientra nella nostra prestazione di garanzia, ricevete
l’apparecchio riparato o un apparecchio nuovo a stretto giro di posta.
Naturalmente effettuiamo a pagamento anche riparazioni sull’apparecchio che non rientrano o non rientrano più
nella garanzia. A tale scopo inviate l’apparecchio all’indirizzo del servizio assistenza.
Anleitung_RG_EH_6053_SPK1:_ 11.05.2010 13:09 Uhr Seite 56

57
GARANTIBEVIS
Kære kunde!
Vore produkter er underlagt streng kvalitetskontrol. Hvis produktet alligevel på et tidspunkt skulle udvise fejl,
beklager vi naturligvis dette og beder dig kontakte vores kundeservice på adressen, som står angivet på dette
garantibevis. Du kan naturligvis også ringe til os på det nedenfor angivne servicenummer. For indfrielse af
garantikrav gælder følgende:
1. Nærværende garanti fastsætter betingelserne for udvidede garantiydelser. Garantibestemmelser fastsat
ved lov berøres ikke af nærværende garanti. Vores garantiydelse er gratis.
2. Garantiydelsen omfatter udelukkende mangler, som kan føres tilbage til materiale- eller produktionsfejl, og
begrænser sig til afhjælpning af disse resp. levering af erstatningsprodukt. Bemærk, at vore produkter ikke
er konstrueret til erhvervsmæssig, håndværksmæssig eller industriel brug. Garantiaftale kan derfor ikke
anses for indgået, såfremt produktet anvendes i erhvervsmæssigt, håndværksmæssigt, industrielt eller
lignende øjemed. Endvidere dækker garantien ikke erstatningsydelser for transportskader, skader som
følge af tilsidesættelse af montagevejledningens anvisninger eller som følge af usagkyndig installation,
tilsidesættelse af brugsanvisningen (f.eks. tilslutning til forkert netspænding eller strømtype), misbrug eller
usagkyndig anvendelse (f.eks. overbelastning eller brug af værktøj eller tilbehør, som ikke er godkendt),
tilsidesættelse af vedligeholdelses- og sikkerhedsforskrifter, indtrængen af fremmedlegemer i apparatet
(f.eks. sand, sten eller støv), brug af vold eller eksterne påvirkninger udefra (f.eks. fordi produktet tabes)
samt skader, der hidrører fra almindelig slitage. Dette gælder især batterier, som vi dog alligevel yder 12
måneders garanti på
Garantien mister sin gyldighed, hvis der allerede er blevet foretaget indgreb i apparatet.
3. Garantiperioden udgør 2 år at regne fra købsdatoen. Garantikrav skal gøres gældende inden for to uger,
efter at defekten er blevet konstateret. Garantikrav kan ikke gøres gældende efter garantiperiodens udløb.
Reparation eller udskiftning af apparatet medfører ikke forlængelse af garantiperioden, heller ikke for
eventuelt indbyggede reservedele. Dette gælder også servicearbejder, der foretages på stedet.
4. For at kunne gøre garantikrav gældende skal du sende det defekte produkt portofrit til nedenstående
adresse. Original købskvittering eller lignende dateret dokumentation skal vedsendes. Købskvitteringen
skal gemmes som dokumentation! Beskriv venligst så nøjagtigt som muligt grunden til din reklamation. Er
defekten omfattet af garantien, vil produktet omgående blive repareret og returneret, eller du vil modtage et
helt nyt.
Mod betaling udbedrer vi naturligvis også gerne defekter på produktet, som ikke/ikke længere er omfattet af
garantien. Du skal blot indsende produktet til vores serviceadresse.
Anleitung_RG_EH_6053_SPK1:_ 11.05.2010 13:09 Uhr Seite 57

58
U
GARANTIBEVIS
Bästa kund,
Våra produkter genomgår en sträng kvalitetskontroll. Om denna produkt mot förmodan inte fungerar på rätt sätt,
beklagar vi detta och ber dig att kontakta vår serviceavdelning under adressen som anges på garantikortet. Vi
står även gärna till tjänst på telefon under servicenumret som anges nedan. Följande punkter gäller för att du
ska kunna göra anspråk på garantin:
1. I dessa garantivillkor regleras extra garantitjänster. Garantianspråk som regleras enligt lag påverkas inte av
denna garanti. Våra garantitjänster är gratis för dig.
2. Garantitjänsterna täcker endast in sådana brister som kan härledas till material- eller fabrikationsfel och är
begränsade till arbetsuppgifter som syftar till att åtgärda dessa brister eller byta ut produkten. Tänk på att
våra produkter endast får användas till ändamålsenligt syfte och inte har konstruerats för yrkesmässig,
hantverksmässig eller industriell användning. Ett garantiavtal sluts därför ej om produkten ska användas
inom yrkesmässiga, hantverksmässiga eller industriella verksamheter eller vid liknande aktiviteter. Vår
garanti omfattar dessutom inte ersättning för transport skador, skador som kan härledas till missaktade
monterings anvisningar eller ej föreskriven installation, åsidosatt bruksanvisning (t ex anslutning till felaktig
nätspänning eller strömart), missbruk eller ej ändamålsenliga användningar (t ex överbelastning av
produkten eller användning av ej godkända insatsverktyg eller tillbehör), åsidosatta underhålls- och
säkerhetsbestämmelser, främmande partiklar som har trängt in i produkten (t ex sand, sten eller damm),
yttre våld eller yttre påverkan (t ex skador om produkten har fallit ned) samt normalt och användningsbundet
slitage. Detta gäller särskilt för batterier som täcks av en 12 månaders garanti.
Anspråk på garanti upphör att gälla om ingrepp redan har gjorts i produkten.
3. Garantitiden uppgår till 2 år och gäller från datumet när produkten köptes. Medan garantitiden fortfarande
gäller ska anspråk på garanti ställas inom två veckor efter att defekten fastställdes. Det är inte möjligt att
ställa anspråk på garanti efter att garantitiden har löpt ut. Garantitiden förlängs inte när produkten repareras
eller byts ut, dessutom medför sådana arbeten inte att en ny garantitid börjar gälla för produkten eller för ev.
reservdelar som har monterats in. Detta gäller även vid hembesök.
4. För att du ska kunna ställa anspråk på garantin ska den defekta produkten skickas in i tillräckligt frankerat
skick till adressen som anges nedan. Bifoga kvittot i original eller ett annat daterat köpebevis. Förvara därför
kassakvittot på en säker plats! Beskriv orsaken till reklamationen så noggrant som möjligt. Om defekten i
produkten täcks av våra garantitjänster, får du genast en reparerad eller ny apparat av oss.
Givetvis kan vi även, mot debitering, åtgärda skador som antingen inte täcks av garantin eller som har uppstått
efter garantitidens slut. Skicka in produkten till nedanstående serviceadress.
Anleitung_RG_EH_6053_SPK1:_ 11.05.2010 13:09 Uhr Seite 58

59
Bf
JAMSTVENI LIST
Poštovani kupče,
naši proizvodi podliježu strogoj kontroli kvalitete. Žao nam je ako bi ipak došlo do toga da uređaj ne funkcionira
besprijekorno i zamolili bismo Vas da se u tom slučaju obratite na adresu naše servisne službe navedenu ispod
ovog jamstva. Također smo Vam na raspolaganju na dolje navedenom telefonskom broju servisne službe. Za
traženje jamstvenog zahtjeva vrijedi sljedeće:
1. Ovi jamstveni uvjeti reguliraju dodatne jamstvene usluge. Ovo jamstvo ne zadire u Vaše zakonsko pravo
zahtjeva za ostvarenje jamstvenih usluga. Realizacija jamstvenih usluga je besplatna.
2. Jamstvena usluga obuhvaća isključivo nedostatke nastale zbog greške na materijalu ili tijekom proizvodnje i
ograničen je na uklanjanje tih nedostataka odnosno zamjenu uređaja. Molimo da obratite pažnju na to da
naši uređaji nisu konstruirani za korištenje u komercijalne svrhe niti u obrtu i industriji. Prema tome, ugovor o
jamstvu ne može se ostvariti ako se uređaj koristi u obrtničkim ili industrijskim pogonima kao i u sličnim
djelatnostima. Nadalje su iz jamstva isključene usluge zamjene proizvoda u slučaju transportnih oštećenja,
šteta zbog nepridržavanja uputa za montažu ili zbog nestručne instalacije, nepridržavanja uputa za uporabu
(kao npr. zbog priključka na pogrešni mrežni napon ili vrstu struje), zbog zloporaba ili nestručnih primjena
(kao npr. preopterećenje uređaja ili korištenje nedopuštenih alata ili pribora), u slučaju nepridržavanja uputa
za održavanje i sigurnosnih odredbi, zbog prodiranja stranih tijela u uređaj (npr. pijeska, kamenja ili
prašine), nasilne primjene ili vanjskih utjecaja (kao npr. oštećenja zbog pada) kao i zbog uobičajenog
trošenja tijekom korištenja. To naročito vrijedi za baterije za koje ipak dajemo jamstvo od 12 mjeseci.
Zahtjev za jamstvo prestaje biti valjan ako su na uređaju već izvršeni neki zahvati.
3. Jamstveni rok iznosi 2 godine a započinje s datumom kupnje uređaja. Jamstveni zahtjevi ostvaruju se prije
isteka jamstvenog roka unutar dvije godine nakon što ste uočili kvar. Ostvarenje jamstvenog zahtjeva nakon
isteka jamstvenog roka je isključeno. Popravkom ili zamjenom uređaja ne produljuje se jamstveni rok niti se
tom uslugom ostvarujenovi jamstveni rok za uređaj ili ostale ugrađene rezervne dijelove. To također vrijedi i
kod korištenja servisa na licu mjesta.
4. Da biste ostvarili svoj jamstveni zahtjev, molimo Vas da nam pošaljete neispravan uređaj bez plaćanja
poštarine na dolje navedenu adresu. Priložite originalni računa za kupnju uređaja ili neki drugi dokaz o
kupnji s datumom. Molimo Vas da zbog tog razloga dobro sačuvate račun kao dokaz! Što točnije opišite
razlog reklamacije. Ako naša jamstvena usluga obuhvaća kvar nastao na Vašem uređaju, odmah ćemo
Vam vratiti popravljeni ili novi uređaj.
Razumljivo je da ćemo za naknadu troškova ukloniti i kvarove koje jamstvena usluga ne obuhvaća. U tom
slučaju pošaljite uređaj na adresu našeg servisa.
Anleitung_RG_EH_6053_SPK1:_ 11.05.2010 13:09 Uhr Seite 59

60
4
GARANCIJSKI LIST
Poštovani kupče,
naši proizvodi podvrgavaju se strogoj kontroli kvalitete. Žao nam je ako bi se ipak desilo da uređaj ne
funkcioniše besprekorno i zamolili bismo Vas da se u tom slučaju obratite na adresu naše servisne službe
navedenu ispod ove garancije. Takođe smo Vam na raspolaganju na dole navedenom telefonskom broju
servisne službe. Kod zahteva za realizovanje garancije vredi sledeće:
1. Ovi garantni uslovi regulišu dodatne garancije. Ova garancija ne dotiče Vaše zakonsko pravo zahteva za
ostvarenje garancije. Realizacija garancije je besplatna.
2. Garancija obuhvata isključivo nedostatke koji nastanu zbog pogreške na materijalu ili tokom proizvodnje i
ograničen je na odstranjivanje tih nedostataka odnosno zamenu uređaja. Molimo da obratite pažnju na to
da naši uređaji nisu konstruisani za korišćenje u komercijalne svrhe, niti u obrtu i industriji. Prema tome
ugovor o garanciji ne može da se ostvari, ako se uređaj koristi u obrtničkim ili fabričkim pogonima, kao i u
sličnim delatnostima. Nadalje su iz garancije isključene usluge zamene proizvoda u slučaju transportnih
oštećenja, šteta zbog nepridržavanja uputstava za montažu ili zbog nestručne instalacije, nepridržavanja
uputstava za upotrebu (kao npr. zbog priključka na pogrešan mrežni napon ili vrstu struje), zbog
zloupotreba ili nestručnih primena (kao npr. preopterećenje uređaja ili korišćenje nedozvoljenih alata ili
pribora), u slučaju nepridržavanja uputstava za održavanje i bezbednosnih odredaba, zbog prodiranja
stranih tela u uređaj (npr. peska, kamenja ili prašine), nasilne primene ili spoljnih uticaja (kao npr. oštećenja
zbog pada) kao i zbog uobičajenog habanja tokom korišćenja. To naročito vredi za baterije za koje ipak
dajemo garanciju od 12 meseci.
Zahtev za garanciju prestaje važiti ako su na uređaju već izvršeni neki zahvati.
3. Garantni rok iznosi 2 godine a počinje sa datumom kupnje uređaja. Garantni zahtjevi ostvaruju se pre isteka
garantnog roka unutar dve godine nakon što ste uočili kvar. Realizacija garantnog zahteva nakon isteka
garantnog roka je isključeno. Popravkom ili zamenom uređaja ne produžava se garantni rok niti se tom
uslugom realizuje novi jamstveni rok za uređaj ili ostale ugrađene rezervne delove. To također važi i kod
korišćenja servisa na licu mesta.
4. Da biste ostvarili svoj garantni zahtev, molimo Vas da nam pošaljete neispravan uređaj bez plaćanja
poštarine na dole navedenu adresu. Priložite original računa za kupnju uređaja ili neki drugi dokaz o kupnji s
datumom. Molimo Vas da iz tog razloga dobro sačuvate račun kao dokaz! Što tačnije opišite razlog
reklamacije. Ako naša garancija obuhvata kvar koji je nastao na Vašem uređaju, odmah ćemo Vam vratiti
popravljen ili novi uređaj.
Podrazumeva se da ćemo za nadoknadu troškova ukloniti i one kvarove koje garancija ne obuhvata. U tom
slučaju pošaljite uređaj na adresu našeg servisa.
Anleitung_RG_EH_6053_SPK1:_ 11.05.2010 13:09 Uhr Seite 60

61
j
ZÁRUČNÍ LIST
Vážená zákaznice, vážený zákazníku,
naše výrobky podléhají přísné kontrole kvality. Pokud i přesto tento přístroj bezvadně nefunguje, velice toho
litujeme a prosíme Vás, abyste se obrátili na náš zákaznický servis, jehož adresa je uvedena na tomto záručním
listu. Rádi Vám budeme k dispozici také telefonicky na níže uvedeném servisním čísle. Pro uplatňování nároků
na záruku platí následující:
1. Tyto záruční podmínky upravují dodatečný záruční servis. Vašich zákonných nároků na záruku se tato
záruka netýká. Náš záruční servis je pro Vás bezplatný.
2. Záruční servis se vztahuje výhradně na nedostatky, které lze odvodit z vad materiálu nebo výrobních vad a
je také omezen pouze na odstranění těchto nedostatků, resp. výměnu přístroje. Dbejte prosím na to, že
naše přístroje nebyly podle svého účelu určení konstruovány pro živnostenské, řemeslnické nebo
průmyslové použití. Záruční smlouva tak není realizována, pokud byl přístroj používán v živnostenských,
řemeslných nebo průmyslových podnicích a při srovnatelných činnostech. Z naší záruky je dále vyloučeno
poskytnutí náhrady za dopravní škody, škody způsobené nedodržováním montážního návodu nebo z
důvodů neodborné instalace, nedodržování návodu k použití (jako např. připojení na chybné síťové napětí
nebo druh proudu), nedovoleného nebo neodborného používání (jako např. přetížení přístroje nebo použití
neschválených vložných nástrojů nebo příslušenství), nedodržování pokynů pro údržbu a bezpečnostních
pokynů, vniknutí cizích těles do přístroje (jako např. písek, kameny nebo prach), použití násilí nebo
poškození v důsledku cizích vlivů (jako např. škody způsobené pádem), jakož také běžného opotřebení
způsobeného používáním. To platí obzvláště pro akumulátory, na které přesto poskytujeme záruční lhůtu 12
měsíců.
Nárok na záruku zaniká, pokud bylo do přístroje již zasahováno.
3. Záruční doba činí 2 roky a začíná datem koupě přístroje. Nároky na záruku před vypršením záruční doby je
třeba uplatňovat během dvou týdnů od zjištění defektu. Uplatňování nároků na záruku po vypršení záruční
doby je vyloučeno. Oprava nebo výměna přístroje nevede k prodloužení záruční doby, ani k zahájení nové
záruční doby za provedený výkon pro přístroj nebo pro případné zamontované náhradní díly. Toto platí také
v případě servisu v místě Vašeho bydliště.
4. Při uplatňování Vašeho nároku na záruku zašlete prosím přístroj bez poštovného na níže uvedenou adresu.
Přiložte originál prodejního dokladu nebo jiného datovaného potvrzení o koupi. Pokladní lístek si proto
dobře uložte jako důkaz! Popište nám prosím pokud možno přesně důvod reklamace. Je-li defekt přístroje v
našem záručním servisu obsažen, obdržíte obratem opravený nebo nový přístroj.
Samozřejmě rádi za úhradu nákladů odstraníme defekty na přístroji, které nespadají nebo již nespadají do
rozsahu záruky. K tomu nám přístroj prosím zašlete na naši servisní adresu.
Anleitung_RG_EH_6053_SPK1:_ 11.05.2010 13:09 Uhr Seite 61

62
W
ZÁRUČNÝ LIST
Vážená zákazníčka, vážený zákazník,
naše výrobky podliehajú prísnej kontrole kvality. V prípade, že nebude prístroj napriek tomu bezchybne
fungovať, je nám to veľmi ľúto a prosíme Vás, aby ste sa obrátili na našu servisnú službu na adrese uvedenej
na tomto záručnom liste. Radi Vám budeme k dispozícii taktiež telefonicky na uvedenom servisnom telefónnom
čísle. Pri uplatňovaní nárokov na záručné plnenie platia nasledujúce podmienky:
1. Tieto záručné podmienky upravujú dodatočné záručné plnenie. Vaše zákonné nároky na záruku nie sú
touto zárukou dotknuté. Naše záručné plnenie je pre Vás zadarmo.
2. Záručné plnenie sa vzťahuje výlučne len na nedostatky, ktoré sú spôsobené chybami materiálu alebo
výrobnými chybami, a je obmedzené na odstránenie týchto nedostatkov resp. výmenu prístroja. Prosím,
dbajte na to, že naše prístroje neboli svojim určením konštruované na profesionálne, remeselnícke ani
priemyselné použitie. Táto záručná zmluva sa preto neuzatvára, ak sa prístroj bude používať
v profesionálnych, remeselníckych alebo priemyselných prevádzkach ako aj na činnosti rovnocenné s
takýmto použitím. Z našej záruky sú okrem toho vylúčené náhradné plnenie za škody pri transporte, škody
spôsobené nedodržaním návodu na montáž alebo na základe neodbornej inštalácie, nedodržaním návodu
na použitie (ako napr. pripojením na nesprávne sieťové napätie alebo druh prúdu), zneužívaním alebo
nesprávnym používaním (ako napr. preťaženie prístroja alebo použitie neprípustných pracovných nástrojov
alebo príslušenstva), nedodržaním pokynov pre údržbu a bezpečnostných pokynov, vniknutím cudzích
telies do prístroja (ako napr. piesok, kamene alebo prach), použitím násilia alebo cudzieho pôsobenia
(napr. škody spôsobené pádom), a taktiež je vylúčené bežné opotrebenie primerané použitiu. To sa týka
predovšetkým akumulátorov, na ktoré napriek tomu garantujeme záručnú dobu 12 mesiacov.
Nárok na záruku zaniká, ak už boli na prístroji svojvoľne uskutočnené zásahy.
3. Doba záruky je 2 roky a začína sa dátumom nákupu prístroja. Nároky na záruku sa musia uplatniť pred
koncom uplynutia záručnej doby do dvoch týždňov od zistenia nedostatku. Uplatnenie nárokov na záruku
po uplynutí záručnej doby je vylúčené. Oprava alebo výmena prístroja nevedie k predľženiu záručnej doby
ani nedochádza na základe tohto plnenia ku vzniku novej záručnej doby pre prístroj ani pre akékoľvek
inštalované náhradné diely. To platí taktiež pri nasadení miestneho servisu.
4. Pre uplatnenie nároku na záruku nám prosím zašlite defektný prístroj oslobodený od poštovného na dole
uvedenú adresu. Priložte predajný doklad v origináli alebo iný doklad o zakúpení s dátumom. Prosím,
starostlivo si preto uschovajte pokladničný blok ako doklad o zakúpení! Prosím, popíšte nám čo
najpresnejšie dôvod reklamácie. Ak spadá defekt prístroja pod naše záručné plnenie, dostanete obratom
naspäť opravený alebo nový prístroj.
Samozrejme Vám radi opravíme závady na prístroji na vaše náklady, ak tieto závady nespadajú alebo už
nespadajú do rozsahu záruky. Prosím, pošlite nám v takom prípade prístroj na našu servisnú adresu.
Anleitung_RG_EH_6053_SPK1:_ 11.05.2010 13:09 Uhr Seite 62

63
k
GARANTIEURKUNDE
Sehr geehrte Kundin, sehr geehrter Kunde,
unsere Produkte unterliegen einer strengen Qualitätskontrolle. Sollte dieses Gerät dennoch einmal nicht einwandfrei funktionieren, bedauern wir dies sehr und bitten Sie, sich an unseren Servicedienst unter der auf dieser Garantiekarte angegebenen Adresse zu wenden. Gern stehen wir Ihnen auch telefonisch über die unten
angegebene Servicerufnummer zur Verfügung. Für die Geltendmachung von Garantieansprüchen gilt Folgendes:
1. Diese Garantiebedingungen regeln zusätzliche Garantieleistungen. Ihre gesetzlichen Gewährleistungsansprüche werden von dieser Garantie nicht berührt. Unsere Garantieleistung ist für Sie kostenlos.
2. Die Garantieleistung erstreckt sich ausschließlich auf Mängel, die auf Material- oder Herstellungsfehler zurückzuführen sind und ist auf die Behebung dieser Mängel bzw. den Austausch des Gerätes beschränkt.
Bitte beachten Sie, dass unsere Geräte bestimmungsgemäß nicht für den gewerblichen, handwerklichen
oder industriellen Einsatz konstruiert wurden. Ein Garantievertrag kommt daher nicht zustande, wenn das
Gerät in Gewerbe-, Handwerks- oder Industriebetrieben sowie bei gleichzusetzenden Tätigkeiten eingesetzt wird.
Von unserer Garantie sind ferner Ersatzleistungen für Transportschäden, Schäden durch Nichtbeachtung
der Montageanleitung oder aufgrund nicht fachgerechter Installation, Nichtbeachtung der Gebrauchsanleitung (wie durch z.B. Anschluss an eine falsche Netzspannung oder Stromart), missbräuchliche oder unsachgemäße Anwendungen (wie z.B. Überlastung des Gerätes oder Verwendung von nicht zugelassenen
Einsatzwerkzeugen oder Zubehör), Nichtbeachtung der Wartungs- und Sicherheitsbestimmungen, Eindringen von Fremdkörpern in das Gerät (wie z.B. Sand, Steine oder Staub), Gewaltanwendung oder
Fremdeinwirkungen (wie z. B. Schäden durch Herunterfallen) sowie durch verwendungsgemäßen, üblichen
Verschleiß ausgeschlossen. Dies gilt insbesondere für Akkus, auf die wir dennoch eine Garantiezeit von
12 Monaten gewähren
Der Garantieanspruch erlischt, wenn an dem Gerät bereits Eingriffe vorgenommen wurden.
3. Die Garantiezeit beträgt 2 Jahre und beginnt mit dem Kaufdatum des Gerätes. Garantieansprüche sind vor
Ablauf der Garantiezeit innerhalb von zwei Wochen, nachdem Sie den Defekt erkannt haben, geltend zu
machen. Die Geltendmachung von Garantieansprüchen nach Ablauf der Garantiezeit ist ausgeschlossen.
Die Reparatur oder der Austausch des Gerätes führt weder zu einer Verlängerung der Garantiezeit noch
wird eine neue Garantiezeit durch diese Leistung für das Gerät oder für etwaige eingebaute Ersatzteile in
Gang gesetzt. Dies gilt auch bei Einsatz eines Vor-Ort-Services.
4. Für die Geltendmachung Ihres Garantieanspruches übersenden Sie bitte das defekte Gerät portofrei an die
unten angegebene Adresse. Fügen Sie den Verkaufsbeleg im Original oder einen sonstigen datierten Kaufnachweis bei. Bitte bewahren Sie deshalb den Kassenbon als Nachweis gut auf! Beschreiben Sie uns bitte
den Reklamationsgrund möglichst genau. Ist der Defekt des Gerätes von unserer Garantieleistung erfasst,
erhalten Sie umgehend ein repariertes oder neues Gerät zurück.
Selbstverständlich beheben wir gegen Erstattung der Kosten auch gerne Defekte am Gerät, die vom Garantieumfang nicht oder nicht mehr erfasst sind. Dazu senden Sie das Gerät bitte an unsere Serviceadresse.
iSC GmbH • Eschenstraße 6 • 94405 Landau/Isar (Deutschland)
Telefon: +49 [0] 180 5 011 843 • Telefax +49 [0] 180 5 835 830 (Festnetzpreis: 14 ct/min, Mobilfunkpreise maximal: 42 ct/min)
Außerhalb Deutschlands fallen stattdessen Gebühren für ein reguläres Gespräch ins dt. Festnetz an.
E-Mail: info@isc-gmbh.info
• Internet: www.isc-gmbh.info
Anleitung_RG_EH_6053_SPK1:_ 11.05.2010 13:09 Uhr Seite 63

EH 05/2010 (01)
Anleitung_RG_EH_6053_SPK1:_ 11.05.2010 13:09 Uhr Seite 64
Service Hotline kontaktieren oder bei iSC-Webadresse anmelden - es wird Ihnen eine Retourennummer zugeteilt l Ihre Anschrift eintragen l Fehlerbeschreibung
und Art.-Nr. und I.-Nr. angeben l Garantiefall JA/NEIN ankreuzen sowie Kaufbeleg-Nr. und Datum angeben und eine Kopie des Kaufbeleges beilegen
Sehr geehrte Kundin, sehr geehrter Kunde,
bitte beschreiben Sie uns die von Ihnen festgestellte Fehlfunktion Ihres Gerätes als Grund Ihrer Beanstandung möglichst genau. Dadurch können wir
für Sie Ihre Reklamation schneller bearbeiten und Ihnen schneller helfen. Eine zu ungenaue Beschreibung mit Begriffen wie „Gerät funktioniert nicht“
oder „Gerät defekt“ verzögert hingegen die Bearbeitung erheblich.
Welcher Fehler ist aufgetreten (genaue Angabe): Art.-Nr.: I.-Nr.:
PLZ Ort
Straße / Nr.:
Garantie:
JA
NEIN
Kaufbeleg-Nr. / Datum:
Name:
Service Hotline: 01805 011 843 · www.isc-gmbh.info · Mo-Fr. 8:00-20:00 Uhr
(Festnetzpreis: 14 ct/min, Mobilfunkpreise maximal: 42 ct/min; Außerhalb Deutschlands fallen stattdessen Gebühren für ein reguläres Gespräch ins dt. Festnetz an.)
Mobil:
Telefon:
Retouren-Nr. iSC:
 Loading...