

Page 1
E-BH 950
Bedienungsanleitung
Bohrhammer
Operating Instructions
Hammer Drill
Mode d’emploi
Marteau perforateur
Gebruiksaanwijzing
boorhamer
Istruzioni per l’uso
Trapano battente
Bruksanvisning
Borrhammare
Navodila za uporabo
Udarni vrtalnik
Návod na obsluhu
Vŕtacie kladivo
Art.-Nr.: 44.720.70 I.-Nr.: 01013
Anleitung E-BH 950 SPK 7 06.04.2004 12:23 Uhr Seite 1
Page 2

Bitte Seite 2-5 ausklappen
Please fold out page 2-5
Veuillez déplier les page 2-5
Gelieve blz. 2-5 uit te vouwen
Aprite le pagine dalla 2-5
Fäll ut sidorna 2-5
Prosím nalistujte stranu 2-5
Prosím otvorte strany 2-5
Anleitung E-BH 950 SPK 7 06.04.2004 12:23 Uhr Seite 2
Page 3
3
1
2 3
Anleitung E-BH 950 SPK 7 06.04.2004 12:23 Uhr Seite 3
Page 4
4
5
6
b
c
7
b
d
a
a
6
▲
4
Anleitung E-BH 950 SPK 7 06.04.2004 12:23 Uhr Seite 4
Page 5
5
D
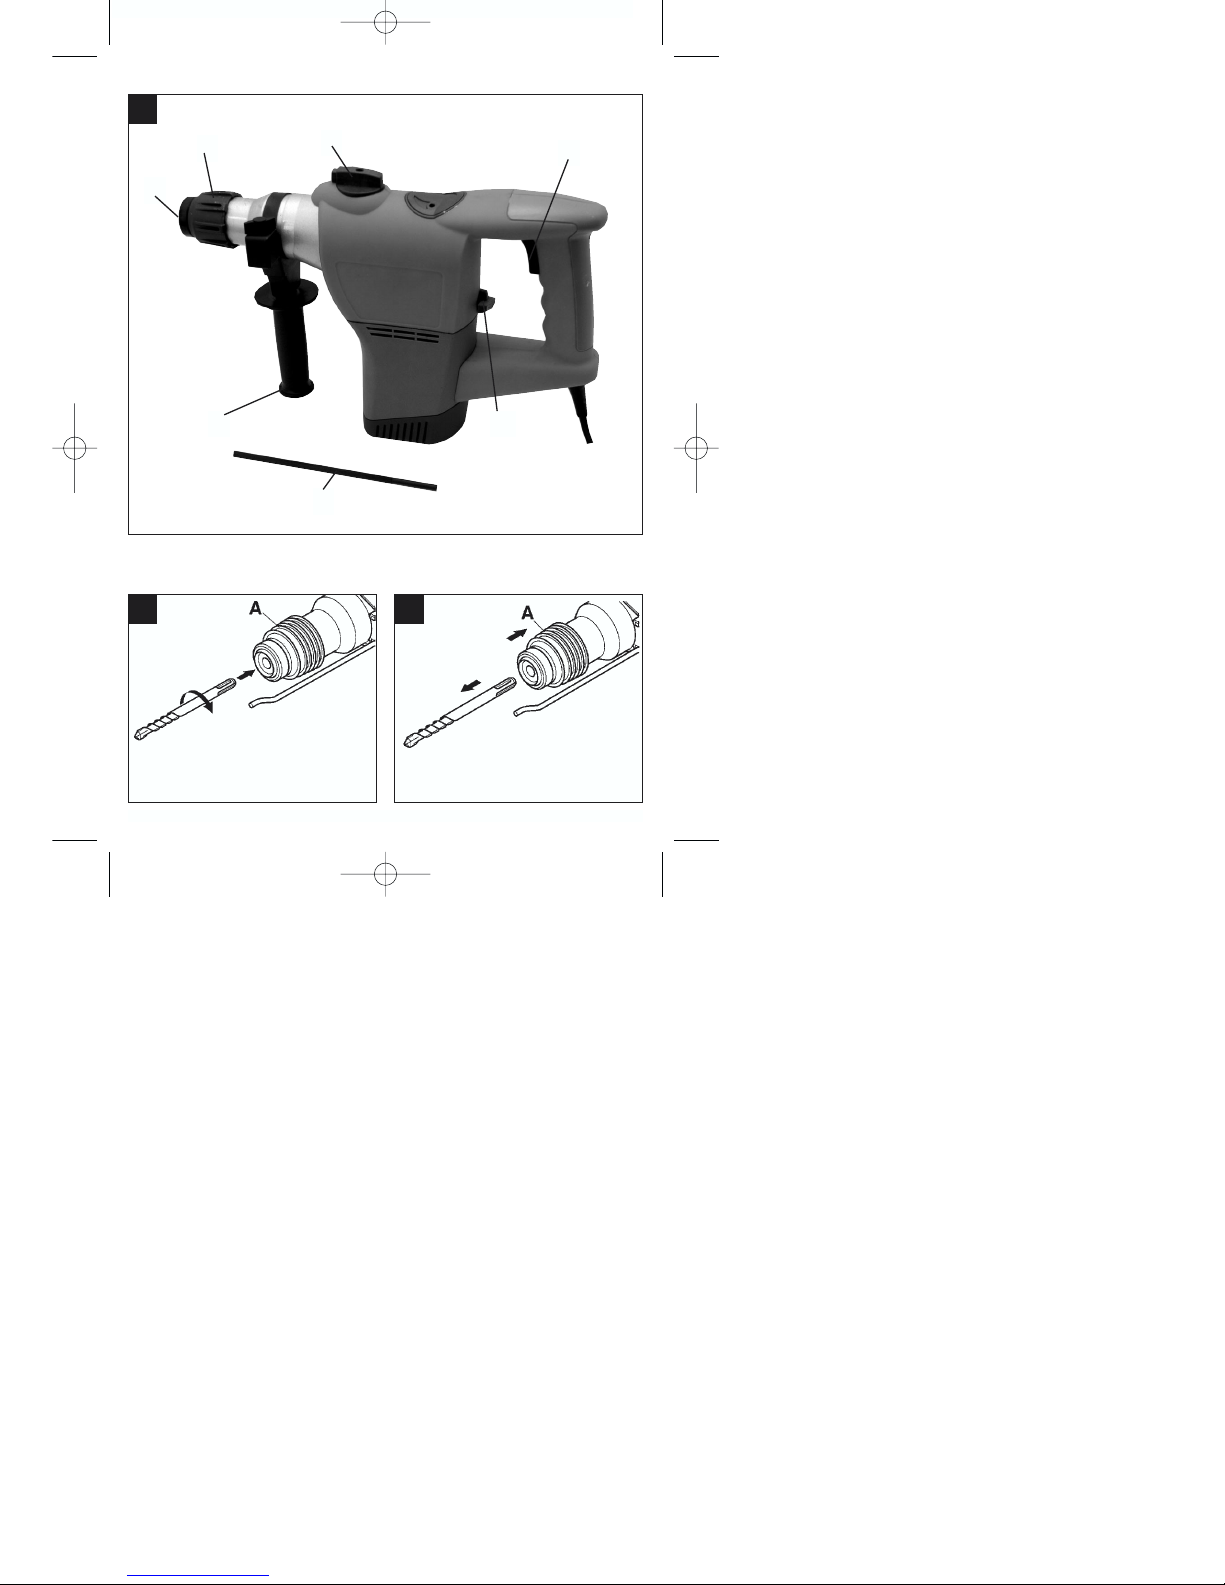
1. Gerätebeschreibung (Abb.1)
1Staubschutz
2 Verriegelungshülse
3 Ein-Aus-Schalter
4 Zusatzgriff
5 Tiefenanschlag
6 Schlagstop
7 Drehstop
2. Technische Daten
Spannung: 230 V ~ 50 Hz
Leistungsaufnahme: 950 Watt
Leerlaufdrehzahl: 700 min
-1
Schlagzahl: 3675 min
-1
Bohrleistung (max.): Beton/Stein 32 mm
Gewicht: 5,9 kg
Vibrationspegel: 11,51 m/s
2
Schalldruckpegel: 94 dB(A)
Schalleistungspegel: 106 dB(A)
Schutzklasse: / II
Geräusch- und Vibrationsmeßwerte ermittelt entsprechend EN 50144-2-6. Der Bohrhammer ist nicht für
die Verwendung im Freien, entsprechend Artikel 3
der Richtlinie 2000/14/EG vorgesehen.
3. Sicherheitshinweise
Die entsprechenden Sicherheitshinweise finden
Sie im beiliegenden Heftchen!
4. Vor Inbetriebnahme
Einsatzstelle nach verdeckt liegenden elektri-
schen Leitungen, Gas- und Wasserrohren mit
einem Leitungssuchgerät untersuchen.
Vor Anschluß an das Stromnetz darauf achten,
daß die Netzspannung mit der Angabe auf dem
Leistungsschild übereinstimmt.
4.1 Bestimmungsgemäße Verwendung
Das Gerät ist bestimmt zum Hammerbohren in Beton, Gestein und Ziegel und für Meißelarbeiten unter
Verwendung des entsprechenden Bohrers oder
Meißels.
4.2 Werkzeug einsetzen und wechseln (Abb. 2)
Werkzeug vor dem Einsetzen reinigen und mit
Maschinenfett leicht fetten.
Verriegelungshülse (A) zurückziehen und halten.
Staubfreies Werkzeug drehend in die Werkzeug-
aufnahme bis zum Anschlag einschieben. Das
Werkzeug verriegelt sich selbst.
Verriegelung durch Ziehen am Werkzeug prüfen.
4.3 Werkzeug entnehmen (Abb. 3)
Verriegelungshülse (A) zurückziehen, halten und
Werkzeug entnehmen.
5. Inbetriebnahme (Abb. 1 - Pos. 3)
5.1 Ein- Ausschalten
Einschalten: Betriebsschalter (3) drücken
Ausschalten: Betriebsschalter (3) loslassen.
5.2 Zusatzgriff (Abb. 1 - Pos. 4)
Bohrhammer aus Sicherheitsgründen nur mit
dem Zustzgriff verwenden.
Eine sichere Körperhaltung beim Arbeiten erhalten
Sie durch Drehen des Zusatzgriffes. Zusatzgriff entgegen dem Uhrzeigersinn lösen und drehen.
Danach Zusatzgriff wieder festziehen.
5.3 Tiefenanschlag (Abb. 1 - Pos. 5)
Flügelschraube am Zusatzhandgriff lösen und den
geraden Teil des Tiefenanschlages in die Bohrung
des Zusatzhandgriffes einsetzen. Tiefenanschlag
einstellen und Flügelschraube wieder anziehen.
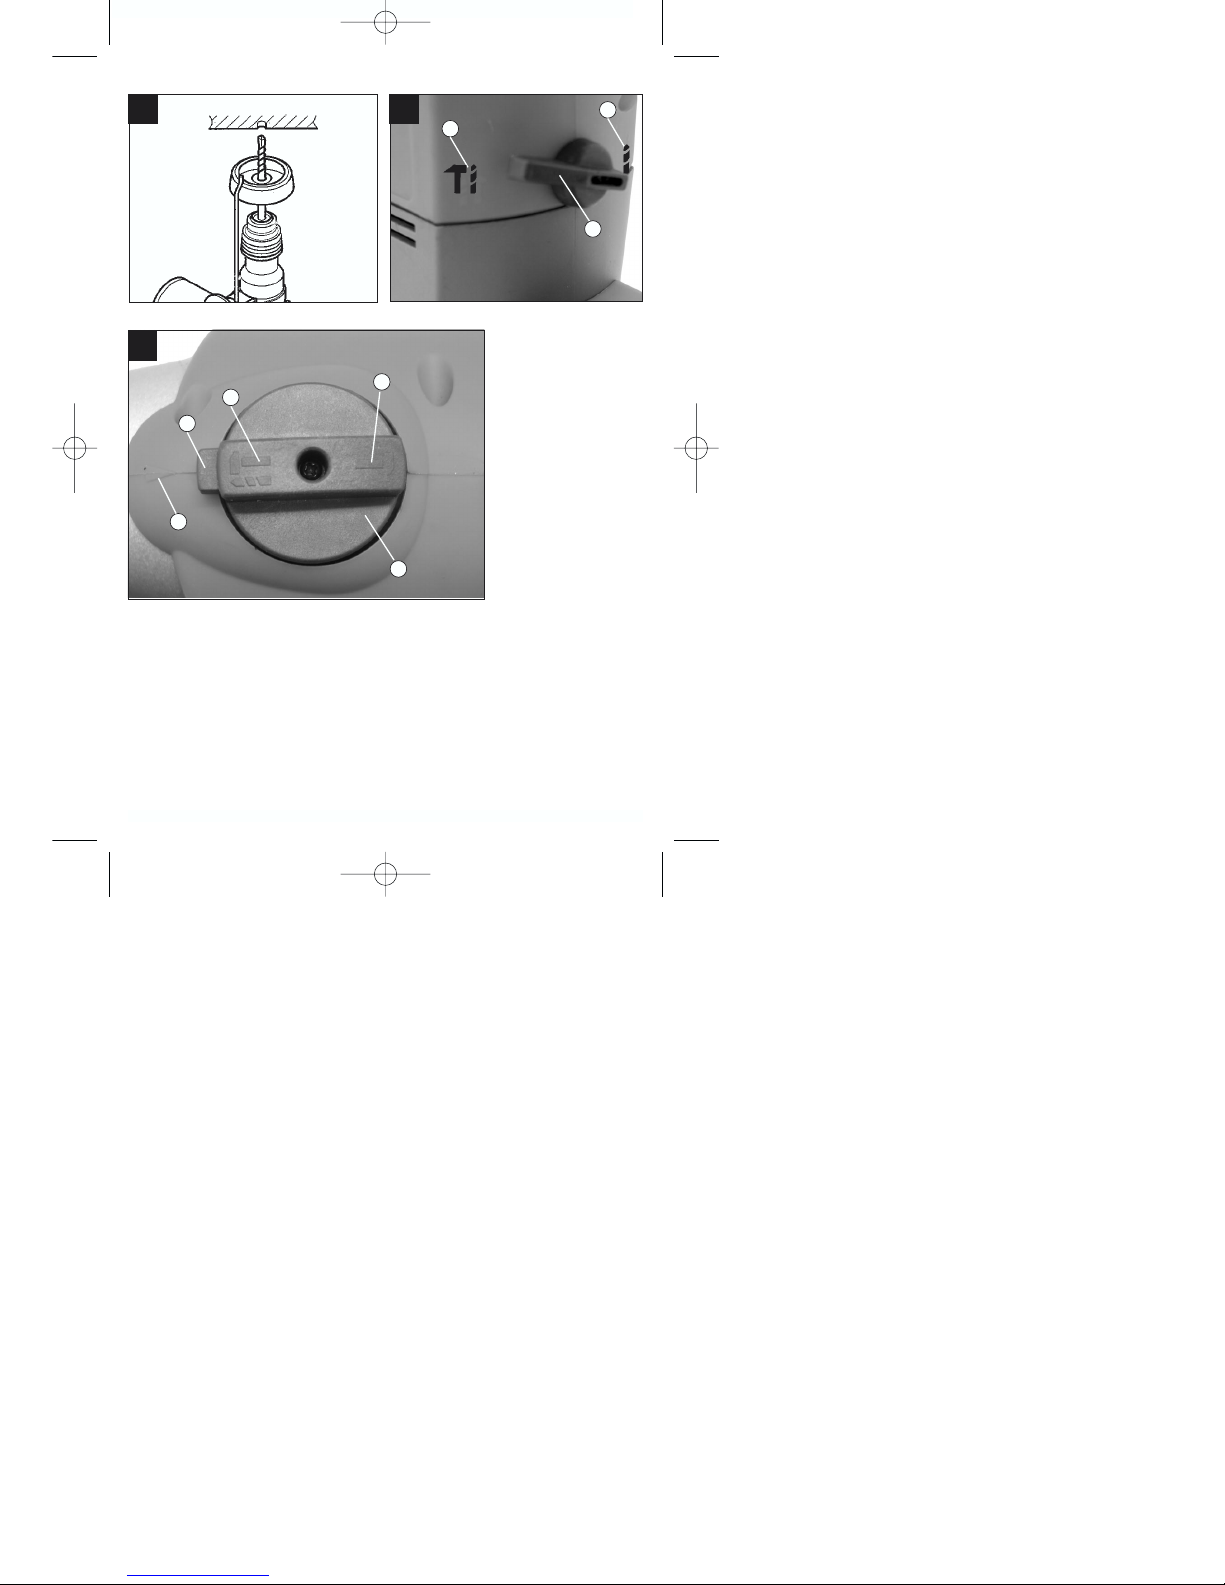
5.4 Staubaufnahme-Vorrichtung (Abb. 4)
Vor Bohrhammerarbeiten senkrecht über dem Kopf,
Staubaufnahme-Vorrichtung über den Bohrer schieben.
5.5 Schlagstop (Abb. 5)
Zum sanften Anbohren ist der Bohrhammer mit
einem Schlagstop ausgestattet.
Schalthebel (6) nach rechts auf Position (b)
drehen, um das Schlagwerk auszuschalten.
Um das Schlagwerk wieder einzuschalten muß
der Schalthebel (6) wieder zurück auf Position (a)
gedreht werden.
5.6 Drehstop (Abb. 6)
Für Meißel arbeiten kann die Drehfunktion des
Bohrhammers ausgeschaltet werden.
Hierzu den Knopf (d) am Stellhebel (7) drücken
und den Stellhebel (7) mit dem auf den Pfeil
(a) am Maschinengehäuse drehen.
Um die Drehfunktion wieder einzuschalten muß
der Knopf (d) am Stellhebel (7) gedrückt werden
Anleitung E-BH 950 SPK 7 06.04.2004 12:23 Uhr Seite 5
Page 6

und der Stellhebel mit dem auf den Pfeil (a)
auf gedreht werden.
Achtung:
Zum Hammerbohren benötigen Sie nur eine geringe
Anpreßkraft. Ein zu hoher Anpreßdruck belastet unnötig den Motor. Bohrer regelmäßig prüfen.
Stumpfen Bohrer nachschleifen oder ersetzen.
6. Wartung
Vor allen Arbeiten am Gerät Netzstecker ziehen!
Halten Sie Ihr Gerät immer sauber.
Benutzen Sie zur Reinigung des Kunststoffes
keine ätzenden Mittel.
Um Staubablagerungen zu vermeiden sollten die
Lüftungsschlitze nach Arbeitsende, durch
Druckluft (max. 3 bar) gereinigt werden.
Kohlebürsten regelmäßig kontrolieren (ver-
schmutzte bzw. verschlissene Kohlebürsten
führen zu übermäßiger Funkenbildung und zu
Drehzahlstörungen).
7. Ersatzteilbestellung
Die folgenden Verschleißteile erhalten Sie bei der
Fa. ISC GmbH.
Ersatzkohlen 44.720.70.01.001
Schalter 44.720.70.01.002
6
D
Anleitung E-BH 950 SPK 7 06.04.2004 12:23 Uhr Seite 6
Page 7
7
GB
1. Layout (Fig. 1)
1 Dust guard
2 Locking sleeve
3 On/Off switch
4 Additional handle
5 Drilling depth stop
6 Hammer stop
7 Rotation stop
2. Technical data
Mains voltage: 230 V ~ 50 Hz
Power: 950 Watt
Idle speed: 700 min
-1
Hammer rate: 3675 min
-1
Drilling capacity (max.): Concrete/Stone 32 mm
Weight: 5,9 kg
Vibration: 11,51 m/s
2
Sound pressure level: 94 dB(A)
Sound power level: 106 dB(A)
Protection class: / II
The noise and vibrations from this tool were measured in accordance with EN 50144-2-6. This hammer
drill is not intended for use outdoors as defined in
Article 3 of the Directive 2000/14/EC.
3. Safety rules
The corresponding safety information can be
found in the enclosed booklet.
4. Preparations
Use a detector to localize pipes and/or cables in
walls with concealed electric, water or gas lines.
Before you plug in the machine, check that your
mains voltage is the same as that marked on the
rating plate.
4.1 Proper use
The tool is designed for drilling with hammer action in
concrete, rock and brick, as well as for chiseling
work, always using the correct drill or chisel bit.
4.2 Fitting and changing a bit (Fig. 2)
Clean the bit and coat it with a little machine
grease before you insert it.
Pull back the locking sleeve (A) and hold in this
position.
Insert the dust-free bit with a twist as far as it
goes into the chuck. The bit will automatically be
locked in place.
Pull on the bit to check that it is secure.
4.3 Removing a bit (Fig. 3)
Pull back the locking sleeve (A), hold and pull out the
bit.
5. Starting up (Fig. 1 - Pos. 3)
5.1 Switching on/off
Switching on: Press On/Off switch (3).
Switching off: Release On/Off switch (3).
5.2 Additional handle (Fig. 1 - Pos. 4)
For safety reasons you should always use the
hammer drill with the additional handle.
For a secure posture during work you should turn the
additional handle. Twist the additional handle anticlockwise and turn.
Then fix the additional handle by twisting again.
5.3 Depth stop (Fig. 1 – Item 5)
Slacken the thumb screw on the additional handle
and insert the straight part of the depth stop into the
hole in the additional handle. Set the depth stop and
retighten the thumb screw.
5.4 Dust collector (Fig. 4)
Before you start any hammer drilling work directly
over your head, slide the dust collector on the bit.
5.5 Hammer stop (Fig. 5)
The hammer drill comes with a hammer stop for
smooth pre-drilling.
Turn the lever switch (6) to the right to position
(b) to switch off the hammer mechanism.
To turn the hammer mechanism back on you
have to turn the lever switch (6) back to position
(a).
5.6 Rotation stop facility (6)
The rotation function of the hammer drill can be switched off for chiseling jobs.
To do so, press the button (d) on the lever selec-
tor (7) and turn the lever selector (7) so that the
mark (c) coincides with the arrow (a) on the
machine housing.
To reactivate the rotating function you must again
press the button (d) on the selector lever (7) and
turn the lever selector (7) so that the mark (b)
coincides again with the arrow (a).
Anleitung E-BH 950 SPK 7 06.04.2004 12:23 Uhr Seite 7
Page 8

Important:
You only need to apply minimal pressure for hammer
drilling. Do not apply too much pressure as this will
put unnecessary strain on the motor. Check the
hammer drill at regular intervals.
Re-sharpen or replace bits whenever blunt.
6. Maintenance
Always unplug the machine before starting any
maintenance work!
Keep your machine clean at all times.
Do not use aggressive agents to clean plastic
parts.
To prevent dust from collecting in the air vents,
clean them with compressed air (max. 3 bar)
each time you finish working with the machine.
Check the carbon brushes at regular intervals
(dirty or worn carbon brushes cause excessive
sparking and interference in speed).
7. Ordering of replacement parts
The following replacement parts are available from
ISC GmbH.
Replacement carbon brushes 44.720.70.01.001
Switch 44.720.70.01.002
8
GB
Anleitung E-BH 950 SPK 7 06.04.2004 12:23 Uhr Seite 8
Page 9

9
F
1. Description de l’appareil (fig. 1)
1 Protection contre la poussière
2 Douille de verrouillage
3 Interrupteur Marche/Arrêt
4 Poignée supplémentaire
5 Butée de profondeur
6 Stop de frappe
7 Stop de rotation
2. Caractéristiques techniques
Tension: 230 V ~ 50 Hz
Puissance absorbée: 950 Watt
Vitesse de rotation de marche à vide : 700 tr/min
Nombre de frappes : 3675 tr/min
Capacité de perçage (max.) : Béton/pierre 32 mm
Poids : 5,9 kg
Niveau de vibration : 11,51 m/s
2
Niveau de pression acoustique : 94 dB(A)
Niveau de puissance acoustique : 106 dB(A)
Catégorie de protection : / II
Valeurs de mesure du bruit et des vibrations
recueillies conformément à EN 50144-2-6. Ce
marteau perforateur ne convient pas à l’emploi à l’air
libre conformément à l’article 3 de la directive
2000/14/CE.
3. Consignes de sécurité
Vous trouverez les consignes de sécurité correspondantes dans le cahier en annexe
4. Avant la mise en service
Vérifiez si des conduites électriques, de gaz ou
d’eau ne sont pas cachées dans l’endroit où vous
désirez travailler, en vous aidant d’un appareil de
recherche de conduites.
Avant de connecter au réseau, vérifiez si la tensi
on du secteur correspond bien à celle indiquée
sur la plaque signalétique.
4.1 Utilisation conforme à l’affectation
L’appareil est fait pour perforer à percussion dans le
béton, la pierre et la tuile, et pour forer à marteau en
utilisant le foret ou le burin correspondant.
4.2 Mise en place et changement des outils
(fig. 2)
Avant de l’employer, nettoyez l’outil et graissez-le
légèrement de graisse à machine.
Tirez la douille de verrouillage vers l’arrière (A) et
maintenez-la ainsi.
Poussez l’outil dégagé de poussière en le
tournant dans le porte-outils jusqu’à la butée.
L’outil se verrouille lui-même.
Contrôlez qu’il s’est bien verrouillé en le tirant.
4.3 Retirez l’outil (fig. 3)
Tirez la douille de verrouillage vers l’arrière (A),
maintenez-la tirée et retirez l’outil.
5. Mise en service (fig. 1 - Pos. 3)
5.1 Mise en / hors service
Mise en circuit : Appuyez sur l’interrupteur (3)
Mise hors circuit : Relâchez l’interrupteur (3).
5.2 Poignée supplémentaire (fig. 1 - Pos. 4)
Utilisez le marteau perforateur uniquement avec
sa poignée supplémentaire, pour des raisons de
sécurité.
Vous obtiendrez une tenue corporelle bien sûre en
tournant la poignée supplémentaire. Desserrez la
poignée supplémentaire en la tournant dans le sens
contraire aux aiguilles d’une montre.
Fixez ensuite à nouveau la poignée supplémentaire.
5.3 Butée en profondeur (fig. 1- pos. 5)
Desserrez la vis à oreilles sur la poignée supplémentaire et placez la pièce droite de la butée en profondeur dans le trou de la poignée supplémentaire.
Réglez la butée en profondeur et resserrez la vis à
oreilles
5.4 Dispositif de logement de poussière (fig. 4)
Avant de travailler avec votre marteau perforateur
placé verticalement au-dessus de votre tête, placez
le dispositif de logement de poussière au-dessus du
foret.
5.5 Stop de frappe (fig. 5)
Pour commencer légèrement un trou, le marteau
perforateur est équipé d’un stop de frappe.
Tournez le levier de réglage (6) à droite en
position (b) pour mettre l’outil de percussion
hors circuit.
Pour remettre l’outil de percussion en circuit, le
levier de réglage (6) doit être retourné à nouveau
sur sa position (a).
5.6 Stop rotation (fig. 6)
Pour le burinage, la fonction de rotation du marteau
perforateur peut être mise hors circuit.
Anleitung E-BH 950 SPK 7 06.04.2004 12:23 Uhr Seite 9
Page 10

Pour ce faire, appuyez sur le bouton (d) du levier
de réglage (7) et tournez-le avec le (c) sur la
flèche (a) du caisson de la machine.
Pour remettre la fonction de rotation en circuit, il
faut, de la même manière, appuyer sur le bouton
(d) du levier de réglage (7) et le tourner avec le
(b) sur la flèche (a).
Attention :
Pour perforer à percussion, vous n’avez besoin que
d’une force de pression minime. Si vous appuyez
trop, le moteur est surchargé. Contrôlez régulièrement le foret. Faites réaffûter les forets épointés ou
remplacez-les.
6. Maintenance
Avant tout travail sur l’appareil, retirez la fiche de
contact de la prise !
Gardez l’appareil en bon état de propreté.
N’utilisez pas de produit corrosif pour nettoyer les
matières plastiques.
Pour éviter des dépôts de poussière, il faut net
toyer la fente d’aération à l’aide d’air comprimé
(max. 3 bars) après le travail.
Contrôlez régulièrement les balais de charbon (
des balais de charbon encrassés ou usés
entraînent une formation exagérée d’étincelles et
le disfonctionnement de la vitesse de rotation).
7. Commande de pièces de rechange
Les pièces d’usure suivantes sont disponibles
auprès de l’entreprise ISC GmbH.
Charbons de rechange 44.720.70.01.001
Interrupteur 44.720.70.01.002
10
F
Anleitung E-BH 950 SPK 7 06.04.2004 12:23 Uhr Seite 10
Page 11
11
NL
1. Beschrijving van het toestel (fig. 1)
1 Stofwering
2 Vergrendelingshuls
3 AAN / UIT-schakelaar
4 Extra handgreep
5 Diepteaanslag
6 Klopstop
7 Draaistop
2. Technische gegevens
Spanning : 230 V ~ 50 Hz
Opgenomen vermogen : 950 W
Nullasttoerental : 700 t/min.
Slagfrequentie : 3675 t/min.
Boorcapaciteit (max.) : beton / steen 32 mm
Gewicht : 5,9 kg
Trilniveau : 11,51 m/s
2
Geluidsdrukniveau : 94 dB (A)
Geluidsvermogen : 106 dB (A)
Bescherming klasse : / II
Geluids- en trilmeetwaarden bepaald conform EN
50144-2-6. De boorhamer is niet bedoeld voor
gebruik in open lucht conform artikel 3 van de richtlijn
2000/14/EG.
3. Veiligheidsvoorschriften
De overeenkomstige veiligheidsinstructies vindt
u in de bijgaande brochure.
4. Vóór inbedrijfstelling
Met een leidingdetector nagaan, of op die plaats
waar u de boorhamer gebruikt elektrische
leidingen, gasleidingen of waterbuizen verborgen
zijn.
Voor de aansluiting op het stroomnet controleren
of de netspanning overeenkomt met de spanning
vermeld op het kenplaatje van het toestel.
4.1 Reglementair gebruik
Het toestel is bedoeld voor het hamerboren in beton,
gesteente en bakstenen alsook voor beitelwerk mits
gebruikmaking van de overeenkomstige boor of beitel.
4.2 Gereedschap inzetten en verwisselen (fig. 2)
Gereedschap voor het inzetten schoonmaken en
lichtjes invetten met machinevet.
Vergrendelingshuls (A) achteruit trekken en
asthouden.
Stofvrij gereedschap al draaiend de gereed-
schapshouder in tot tegen de aanslag schuiven. Het
gereedschap wordt automatisch vergrendeld.
Vergrendeling controleren door aan het gereed
schap te trekken.
4.3 gereedschap ontnemen (fig. 3)
Vergrendelingshuls (A) achteruit trekken, vasthouden
en gereedschap uitnemen.
5. Inbedrijfstelling (fig. 1, pos. 3)
5.1 Aan- / uitzetten
Aanzetten: bedrijfsschakelaar (3) indrukken
Uitzetten: bedrijfsschakelaar (3) loslaten.
5.2 Extra handgreep (fig. 1, pos. 4)
Boorhamer om veiligheidsredenen enkel met de
extra handgreep gebruiken.
Een veilige lichaamshouding tijdens het werk krijgt u
door draaien van de extra handgreep. Extra handgreep tegen de wijzers van de klok in loszetten en
draaien.
Vervolgens extra handgreep terug aanhalen.
5.3 Diepteaanslag (fig. 1, pos. 5)
Vleugelschroef op de extra handgreep loszetten en
het rechte deel van de diepteaanslag het boorgat
van de extra handgreep in zetten. Diepteaanslag
afstellen en vleugelschroef terug aanhalen.
5.4 Stofvangring (fig. 4)
Voor werkzaamheden met de boorhamer direct
boven uw hoofd schuift u de stopvangring over de
boor.
5.5 Klopstop (fig. 5)
Voor het zacht aanzetten is de boorhamer voorzien
van een klopstop.
Schakelhefboom (6) naar rechts naar de stand
(b) draaien teneinde de klopfunctie uit te
schakelen.
Om de klopfunctie terug in te schakelen draait u
de schakelhefboom (6) opnieuw terug naar stand
(a).
5.6 Draaistop (fig. 6)
Voor werkzaamheden met de beitel kan de draaifunctie van de boorhamer worden uitgeschakeld.
Te dien einde de knop (d) op de stelhefboom (7)
indrukken en de stelhefboom (7) met de (c)
naar de pijl (a) op het huis van de machine
draaien.
Om de draaifunctie terug te activeren dient u
eveneens de knop (d) op de stelhefboom (7) in te
Anleitung E-BH 950 SPK 7 06.04.2004 12:23 Uhr Seite 11
Page 12

drukken en de stelhefboom dan met de (b) op
de pijl (a) te draaien.
Let op:
Voor het klopboren heeft u slechts een geringe aandrukkracht nodig. Door een te hoge
aandrukkracht wordt de motor onnodig belast.
Boor regelmatig controleren.
Een botte boor bijslijpen of vervangen.
6. Onderhoud
Voor alle werkzaamheden aan het toestel de net
stekker uit het stopcontact trekken !
Hou uw toestel altijd schoon.
Gebruik voor het schoonmaken van de kunststof
geen bijtende middelen.
Om een afzetting van stof te voorkomen is het
aan te bevelen de ventilatiespleten aan het einde
van het werk door perslucht (maxi. 3 bar) schoon
te blazen.
Koolborstels regelmatig controleren (vervuilde of
versleten koolborstels leiden tot bovenmatige
vorming van vonken en beïnvloeden nadelig het
toerental).
7. Bestellen van wisselstukken
De volgende slijtstukken zijn verkrijgbaar bij de firma
ISC GmbH :
Reservekolen 44.720.70.01.001
Schakelaar 44.720.70.01.002
12
NL
Anleitung E-BH 950 SPK 7 06.04.2004 12:23 Uhr Seite 12
Page 13

13
I
1. Descrizione dell’utensile (Fig. 1)
1 protezione antipolvere
2 mandrino di serraggio
3 interruttore di ON/OFF
4 impugnatura supplementare
5 asta di profondità
6 arresto della funzione di percussione
7 arresto della funzione di perforazione
2. Caratteristiche tecniche
Tensione: 230 V ~ 50 Hz
Potenza assorbita: 950 Watt
Numero di giri a vuoto: 700 min
-1
Numero di colpi: 3675 min
-1
Campo di foratura (max.): calcestruzzo/pietra 32 mm
Peso: 5,9 kg
Livello vibrazioni: 11,51 m/s
2
Livello di pressione acustica: 94 dB(A)
Livello di potenza acustica: 106 dB(A)
Grado di protezione: / II
I valori delle emissioni acustiche e delle vibrazioni
sono stati accertati secondo la norma EN 50144-2-6.
Il trapano battente non è stato concepito per l’impiego all’aperto secondo l’art. 3 della Direttiva
2000/14/CE.
3. Avvertenze di sicurezza
Le relative avvertenze di sicurezza si trovano
nell’opuscolo allegato.
4. Prima della messa in esercizio
Controllate che nel punto in cui intendete esegui-
re il foro non ci siano cavi e condutture nascoste
del gas e dell’acqua.
Prima di inserire la spina nella presa di corrente
fate attenzione che la tensione di rete corrisponda alle indicazioni sulla targhetta di identificazione.
4.1 Uso corretto
L’apparecchio è concepito per la trapanazione a percussione in calcestruzzo, pietra e laterizio e per
lavori di scalpello usando i relativi trapani o punte.
4.2 Inserimento e sostituzione della punta (Fig. 2)
Pulite ed ingrassate l’utensile con grasso per
macchine prima di usarlo.
Tirate indietro il mandrino di bloccaggio (A) e
tenetelo in questa posizione.
Inserite la punta priva di polvere nella sua sede
ruotandola fino alla battuta. La punta viene bloccata automaticamente.
Controllate il serraggio tirando la punta.
4.3 Estrazione dell’utensile Fig. 3)
Tirate indietro il mandrino di bloccaggio (A), tenetelo
in questa posizione e togliete la punta.
5. Messa in esercizio (Fig. 1 - Pos. 3 )
5.1 Accensione/spegnimento
Accensione: premete l’interruttore di esercizio (3)
Spegnimento: mollate l’interruttore di esercizio
(3)
5.2 Impugnatura addizionale (Fig. 1 - Pos. 4 )
Per motivi di sicurezza usate il trapano battente solo
con l’impugnatura addizionale.
Ruotando l’impugnatura addizionale ottenete una
posizione di lavoro sicura. Allentate l’impugnatura
addizionale e ruotatela in senso antiorario.
Poi serrate di nuovo l’impugnatura.
5.3 Asta di profondità (Fig. 1 - Pos. 5 )
Allentate la vite ad alette sull’impugnatura addizionale ed inserite la parte diritta dell’asta di profondità nel
foro dell’impugnatura addizionale. Regolate l’asta di
profondità e serrate di nuovo la vite ad alette.
5.4 Dispositivo di raccolta della polvere (Fig. 4)
Prima di eseguire lavori con il trapano battente spingete dall’alto il dispositivo di raccolta della polvere
inserendolo dalla punta.
5.5 Funzione di arresto della percussione (Fig. 5)
Il trapano battente è dotato di una funzione di arresto
delle percussioni per iniziare a forare.
Ruotate la leva di commutazione (6) verso destra
in posizione (b) per disattivare la funzione di
percussione.
Per riattivare la funzione di percussione si deve
riportare la leva di commutazione (6) in posizione
(a) .
5.6 Funzione di arresto della perforazione (Fig. 6)
Per lavorare con lo scalpello si può disattivare la funzione di rotazione del trapano battente.
A tal fine premete il pulsante (d) sulla leva di
regolazione (7) e girate quest’ultima con (c)
sulla freccia (a) sul rivestimento dell’apparecchio.
Per riattivare la funzione di rotazione si deve pre-
mere il pulsante (d) sulla leva di regolazione (7)
e girare quest’ultima con (b) sulla freccia (a).
Attenzione:
Per la trapanazione a percussione avete bisogno
solo di una leggera pressione. Una pressione eccessiva rappresenta una sollecitazione che danneggia il
Anleitung E-BH 950 SPK 7 06.04.2004 12:23 Uhr Seite 13
Page 14

motore. Controllate regolarmente le punte del trapano. Sostituite o rettificate le punte consumate.
6. Manutenzione
Staccate la spina dalla presa di corrente prima di
ogni operazione all’utensile.
Tenete sempre pulito l’utensile.
Non usate sostanze caustiche per la pulizia della
parte in plastica.
Per evitare depositi di polvere si devono pulire le
fessure di aerazione con un getto di aria compressa (max. 3 bar) al termine del lavoro.
Controllate regolarmente le spazzole al carbone
(se le spazzole sono sporche o consumate si ha
un’eccessiva formazione di scintille e problemi
con il numero dei giri).
7. Ordinazione dei pezzi di ricambio
I seguenti pezzi di ricambio possono essere ordinati
presso la ditta ISC GmbH.
Spazzole di carbone di ricambio 44.720.70.01.001
Commutatore 44.720.70.01.002
14
I
Anleitung E-BH 950 SPK 7 06.04.2004 12:23 Uhr Seite 14
Page 15
15
S
1. Maskinbeskrivning (bild 1)
1 Dammskydd
2 Chuckhylsa
3 Strömbrytare
4 Stödhandtag
5 Djupanslag
6 Slagstopp
7 Vridstopp
2. Tekniska data
Spänning: 230 V ~ 50 Hz
Upptagen effekt: 950 W
Tomgångsvarvtal: 700 min
-1
Slagtal: 3675 min
-1
Borrkapacitet (max.): Betong/sten 32 mm
Vikt: 5,9 kg
Vibrationsnivå: 11,51 m/s
2
Ljudtrycksnivå: 94 dB(A)
Ljudeffektnivå: 106 dB(A)
Skyddsklass: / II
Buller- och vibrationsvärden uppmätta enligt EN
50144-2-6. Borrhammaren är inte avsedd för
användning utomhus i enlighet med stycke 3 i direktivet 2000/14/EG.
3. Säkerhetsanvisningar
Gällande säkerhetsanvisningar finns i det bifogade häftet.
4. Före användning
Kontrollera med en kabeldetektor att området där
du ska borra är fritt från dolda gas- och vattenrör
samt elektriska ledningar.
Kontrollera innan du ansluter borrhammaren till
elnätet att nätspänningen stämmer överens med
uppgifterna på märkskylten.
4.1 Ändamålsenlig användning
Maskinen är avsedd för hammarborrning i betong,
sten och tegel, och för bilningsarbeten med passande borr eller mejsel.
4.2 Sätta in och byta verktyg (bild 2)
Rengör verktyget och fetta in det med en aning
maskinfett innan du sätter in det.
Dra tillbaka chuckhylsan (A) och håll fast.
Vrid in det dammfria verktyget i verktygsfästet till
stopp. Verktyget spärras fast automatiskt.
Dra i verktyget för att kontrollera att det sitter fast.
4.3 Ta ut verktyg (bild 3)
Dra tillbaka chuckhylsan (A), håll fast och dra ut
verktyget.
5. Användning (bild 1 - pos. 3)
5.1 Koppla in / ifrån
Inkoppling: Tryck in strömbrytaren (3).
Frånkoppling: Släpp strömbrytaren (3).
5.2 Stödhandtag (bild 1 - pos. 4)
Av säkerhetsskäl ska du alltid använda borrhammaren tillsammans med stödhandtaget.
Vrid runt stödhandtaget så att du kan hålla maskinen
säkert medan du jobbar. Om du vill lossa på
stödhandtaget kan du vrida det i motsols riktning.
Dra därefter åt stödhandtaget på nytt.
5.3 Djupanslag (bild 1 - pos. 5)
Lossa på vingskruven vid stödhandtaget och sätt in
djupanslagets raka del i stödhandtagets borrhål. Ställ
in djupanslaget och dra åt vingskruven på nytt.
5.4 Dammuppsamlare (bild 4)
Skjut dammfångaren över borren om du ska använda borrhammaren vertikalt över huvudet.
5.5 Slagstopp (bild 5)
Borrhammaren är utrustad med ett slagstopp för
mjuk uppstart vid borrning.
Vrid reglaget (6) åt höger till läge (b) för att
koppla ifrån slagverket.
Vrid tillbaka reglaget (6) till läge (a) för att
koppla in slagverket på nytt.
5.6 Vridstopp (bild 6)
Inför bilning kan borrhammarens vridfunktion kopplas
ifrån.
Tryck in knappen (d) på reglaget (7) och vrid runt
reglaget (7) med (c) till pilen (a) på
maskinkåpan.
För att koppla in vridfunktionen på nytt, tryck in
knappen (d) på reglaget (7) och vrid reglaget med
(b) på pilen (a).
Obs!
Vid hammarborrning behöver du inte pressa maskinen särskilt mycket. En alltför hög anliggningskraft
belastar bara motorn onödigt mycket. Kontrollera
borren i regelbundna intervaller.
Anleitung E-BH 950 SPK 7 06.04.2004 12:23 Uhr Seite 15
Page 16

16
S
Slipa eller byt ut slöa borr.
6. Underhåll
Dra alltid ut stickkontakten inför arbeten på
maskinen.
Se till att borrhammaren alltid är ren.
Använd inga frätande medel när du rengör
plastdelarna.
För att undvika dammavlagringar bör du rengöra
ventilationsöppningarna med tryckluft (max. 3 bar)
efter att du har avslutat jobbet.
Kontrollera kolborstarna i regelbundna intervaller
(smutsiga eller slitna kolborstar leder till
överdriven gnistbildning och varvtalsstörningar).
7. Reservdelsbeställning
Följande slitagedelar kan erhållas från ISC GmbH.
Reservkol 44.720.70.01.001
Brytare 44.720.70.01.002
Anleitung E-BH 950 SPK 7 06.04.2004 12:23 Uhr Seite 16
Page 17

17
CZ
1. Popis přístroje (obr. 1)
1. Ochrana proti prachu
2. Zajišt’ovací pouzdro
3. Za-/vypínač
4. Přídavná rukojet’
5. Hloubkový doraz
6. Vypnutí příklepu
7. Vypnutí otáčení
2. Technická data
Napětí: 230 V ~ 50 Hz
Příkon: 950 W
Otáčky naprázdno: 700 min
-1
Počet úderů: 3675 min
-1
Vrtací výkon (max): beton/kámen 32 mm
Hmotnost: 5,9 kg
Hladina vibrací: 11,51 m/s
2
Hladina akustického tlaku: 94 dB(A)
Hladina akustického výkonu: 106 dB(A)
Ochranná třída: / II
Hodnoty hluku a vibrací změřeny podle EN 50144-2-
6. Přístroj není konstruován pro užití na volném prostranství příslušně podle článku 3 směrnice
2000/14/EG.
3. Bezpečnostní pokyny
Příslušné bezpečnostní pokyny naleznete v
přiložené brožurce.
4. Před uvedením do provozu
Pomocí přístroje na hledání vedení překontrolovat, zdali se na místě použití nenacházejí skrytá
elektrická vedení, plynové a vodovodní trubky.
Před připojením na sít’ dbát na to, aby sít’ové
napětí souhlasilo s údaji na výkonovém štítku.
4.1 Použití podle účelu určení
Přístroj je určen k úderovému vrtání v betonu, kamenu a cihlách a pro sekací práce za použití
příslušného vrtáku nebo sekáče.
4.2 Nasadit a vyměnit nástroj (obr. 2)
Nástroj před vložením vyčistit a mazacím strojním tukem lehce namazat.
Zajišt’ovací pouzdro (A) odsunout zpět a držet.
Prachu prostý nástroj zasunout otáčivým pohy-
bem až na doraz do upínání nástroje. Nástroj se
zablokuje sám.
Zablokování překontrolovat zatažením za
nástroj.
4.3 Odstranění nástroje (obr. 3)
Zajišt’ovací pouzdro (A) stáhnout zpět, držet a
nástroj vyndat.
5. Uvedení do provozu (obr. 1)
5.1 Za-/vypnout
Zapnout: Hlavní vypínač (3) stis
knout
Vypnout: Hlavní vypínač (3) krátce
stisknout a pustit.
5. 2 Přídavná rukojet’ ( 4)
Z bezpečnostních důvodů používat vrtací kladivo
pouze s přídavnou rukojetí.
Bezpečné držení těla při práci získáte otáčením
přídavné rukojeti. Přídavnou rukojet’ uvolnit proti
směru hodinových ručiček a otáčet. Poté přídavnou
rukojet’ opět utáhnout.
5.3 Hloubkový doraz (obr. 1 - poz. 5)
Křídlový šroub na přídavné rukojeti povolit a rovnou
část hloubkového dorazu nasadit do otvoru přídavné
rukojeti. Hloubkový doraz nastavit a křídlový šroub
opět utáhnout.
5. 4 Zařízení na zachytávání prachu (obr. 4)
Před prací s vrtacím kladivem kolmo nad hlavou
nasunout přes vrták zařízení na zachytávání prachu.
5.5 Vypnutí příklepu (obr. 5)
K jemnému navrtávání je vrtací kladivo vybaveno
vypnutím příklepu.
Přepínací páčku (6) natočit do polohy (b) , aby
byl rázový mechanismus vyřazen z provozu.
K opětnému zapnutí rázového mechanizmu musí
být přepínací páčka vrácena zpět do polohy
(a)
5.6 Vypnutí otáčení (obr. 6)
Pro práci se sekáčem může být otočná funkce vrtacího kladiva vyřazena z provozu.
K tomu stisknout knoflík (d) na stavěcí páčce (7)
a stavěcí páčku (7) natočit značkou (c) na
šipku (a) na krytu stroje.
K opětnému zapnutí této funkce musí být
Anleitung E-BH 950 SPK 7 06.04.2004 12:23 Uhr Seite 17
Page 18

zmáčknut knoflík (d) na stavěcí páčce (7) a stavěcí páčka natočena značkou (b) na šipku
(a).
Pozor:
Pro práci s vrtacím kladivem je potřeba jen malá
přítlačná síla. Moc vysoký přítlak zbytečně zatěžuje
motor. Vrták pravidelně kontrolovat. Tupý vrták
přebrousit nebo vyměnit.
6. Údržba
Před všemi pracemi na přístroji vytáhnout
sít’ovou zástrčku!
Udržujte přístroj vždy čistý.
K čištění umělé hmoty nepoužívejte žíravé látky.
Aby se zabránilo prachovým usazeninám, měly
by být větrací otvory po ukončení práce
vyčištěny tlakovým vzduchem (max. 3 bary).
Uhlíkové kartáče pravidelně kontrolovat (znečistěné event. opotřebené uhlíkové kartáče vedou
k nadměrné tvorbě jisker a k poruchám počtu
otáček).
7.
Objednání náhradních dílů
Při objednávce náhradních dílů je třeba uvést následující údaje:
Typ přístroje
Číslo výrobku přístroje
Identifikační číslo přístroje
Číslo požadovaného náhradního dílu
Vypínač 44.720.70.01.002
Náhradní uhlíky 44.720.70.01.001
18
CZ
Anleitung E-BH 950 SPK 7 06.04.2004 12:23 Uhr Seite 18
Page 19

19
SK
1. Popis prístroja (obr. 1)
1 Ochrana proti prachu
2 Upínacia objímka
3 Vypínač zap/vyp
4 Prídavná rukoväť
5 Hĺbkový doraz
6 Zastavenie príklepu
7 Zastavenie otáčania
2. Technické údaje
Napätie: 230 V ~ 50 Hz
Príkon: 950 Watt
Otáčky pri voľnobehu: 700 min
-1
Počet úderov: 3675 min
-1
Výkon vŕtania (max): Betón/kameň 32 mm.
Hmotnosť: 5,9 kg
Úroveň vibrácie: 11,51 m/s
2
Hladina akustického tlaku: 94 dB (A)
Hladina akustického výkonu: 106 dB (A)
Trieda ochrany: / II
Zvuk a merné vibračné hodnoty tohto prístroja sú
merané podľa EN 50144-2-6.
Vŕtacie kladivo nie je určené pre použitie vo vonkajšom prostredí, v súlade s článkom 3 smernice
2000/14/EG.
3. Bezpečnostné predpisy
Príslušné bezpečnostné pokyny nájdete
vpriloženej brožúrke.
4. Pred uvedením do prevádzky
Miesto vŕtania je potrebné preskúmať prístrojom
na vyhľadávanie vedení, aby sa tam nevyskytli
skryté elektrické, plynové a vodovodné rozvody.
Pred pripojením na elektrickú sieť je potrebné
dbať na to, aby sa zhodovalo sieťové napätie s
údajom na výkonovom štítku.
4.1 Správne použitie prístroja
Prístroj je určený na príklepové vŕtanie do betónu,
kameniny a tehál, ako aj na práce s dlátom
s použitím príslušného vrtáka resp. dláta.
4.2 Nasadenie a výmena nástroja (obr. 2)
Nástroj je potrebné pred nasadením vyčistiť a
ľahko natrieť strojným mazacím tukom.
Upínaciu objímku (A) stiahnuť dole a pridržať.
Zasunúť čistý pripravený nástroj točivým pohy-
bom do nástrojového upínača až na doraz.
Nástroj sa v upínači zablokuje sám.
Preskúšajte ťahom správne upnutie nástroja.
4.3 Vybratie nástroja (obr. 3)
Upínaciu objímku (A) stiahnuť dole, pridržať a vybrať
nástroj.
5. Uvedenie do prevádzky (obr. 1 – poz.
3)
5.1 Zapnutie a vypnutie
Zapnutie: stlačiť prevádzkový spínač (3)
Vypnutie: pustiť prevádzkový spínač (3)
5.2 Prídavná rukoväť (obr. 1 – poz. 4)
Z bezpečnostných dôvodov používajte vŕtacie
kladivo len s prídavnou rukoväťou.
Pomocou otáčania prídavnou rukoväťou docielite
bezpečný postoj resp. držanie tela pri práci.
Prídavnú rukoväť uvoľnite točením proti smeru hodinových ručičiek.
Po nastavení prídavnú rukoväť opäť utiahnite.
5.3 Hĺbkový doraz (obr. 1- poz. 5)
Uvolniť krídlovú skrutku na prídavnej rukoväti a
nasadiť rovnú časť hĺbkového dorazu do otvoru prídavnej rukoväte. Nastaviť hĺbkový doraz a potom
znovu dotiahnuť krídlovú skrutku.
5.4 Prípravok na zachytávanie prachu (obr. 4)
Pred vŕtaním priamo kolmo nad hlavou je potrebné
nasadiť na vŕtačku prípravok na zachytávanie prachu.
5.5 Zastavenie príklepu (obr. 5)
Pre presnejšie navŕtanie je vybavené vŕtacie kladivo
zastavením príklepu.
Otočením spínacej páky (6) doprava na pozíciu
(b) sa vypne funkcia kladiva.
Aby sa funkcia kladiva opäť zapla je potrebné
spínaciu páku (6) otočiť znovu do pozície (a) .
5.6 Zastavenie otáčania (obr. 6)
Pri práci s dlátom sa môže vypnúť funkcia otáčania
vřtacieho kladiva.
Za týmto účelom stlačiť tlačidlo (d) na nastavo-
vacej páčke (7) a nastavovaciu páčku (7) otočiť
s (c) na šípku (a) na kryte stroja.
Aby sa mohla znovu zapnúť funkcia otáčania,
musí sa taktiež stlačiť tlačidlo (d) na nastavova-
Anleitung E-BH 950 SPK 7 06.04.2004 12:23 Uhr Seite 19
Page 20

cej páčke (7) a nastavovacia páčka otočiť s (b)
na šípku (a).
Pozor:
Pri príklepovom vŕtaní potrebujete len malú prítlačnú
silu. Príliš vysoká sila pritlačenia vŕtačky zbytočne
zaťažuje motor. Pravidelne kontrolujte vrták. Tupý
vrták je potrebné nabrúsiť alebo vymeniť.
6. Údržba
Pred všetkými prácami na prístroji vytiahnuť
kábel zo siete!
Udržujte váš prístroj vždy v čistom stave.
Nepoužívajte k čisteniu plastových dielov na
výrobku žiadne žieraviny.
Aby sa zabránilo usadzovaniu prachu, mali by sa
vetracie otvory po ukončení práce vyčistiť tlakovým vzduchom (max. 3 bar).
Pravidelne kontrolovať uhlíkové kefy (špinavé
resp. opotrebené uhlíkové kefy spôsobujú nadmernú tvorbu iskier a poruchy otáčok).
7. Objednanie náhradných dielov
Následovné náhradné diely obdržíte u firmy ISC
GmbH:
náhradné uhlíky 44.720.70.01.001
spínač 44.720.70.01.002
20
SK
Anleitung E-BH 950 SPK 7 06.04.2004 12:23 Uhr Seite 20
Page 21

21
EC ¢‹ПˆЫЛ ВЪИ ЩЛ˜ ·УЩ·fiОЪИЫЛ˜
Dichiarazione di conformità CE
EC Overensstemmelseserklæring
EU prohlášení o konformitě
EU Konformkijelentés
EU Izjava o skladnosti
Oświadczenie o zgodności z normami
Europejskiej Wspólnoty
Vyhásenie EU o konformite
Декларация за съответствие на ЕО
EG Konformitätserklärung
EC Declaration of Conformity
Déclaration de Conformité CE
EC Conformiteitsverklaring
Declaracion CE de Conformidad
Declaração de conformidade CE
EC Konformitetsförklaring
EC Yhdenmukaisuusilmoitus
EC Konfirmitetserklæring
EC Заявление о конформности
Dichiarazione di conformità CE
Declaraţie de conformitate CE
AT Uygunluk Deklarasyonu
98/37/EG
73/23/EWG
97/23/EG
89/336/EWG
90/396/EWG
89/686/EWG
87/404/EWG
R&TTED 1999/5/EG
2000/14/EG:
Landau/Isar, den 05.04.2004
Archivierung / For archives: 4472070-50-4141800-E
Karg
Produkt-Management
EN 55014-1; EN 55014-2; EN 61000-3-2; EN 61000-3-3; EN 60745-1; EN 60745-2-6
ISC GmbH
Eschenstraße 6
D-94405 Landau/Isar
Bohrhammer E-BH 950
Brunhölzl
Leiter Produkt-Management
x
x
x
Der Unterzeichnende erklärt in Namen der Firma die Übereinstimmung des Produktes.
The undersigned declares in the name of the company that
the product is in compliance with the following guidelines and
standards.
Le soussigné déclare au nom de l’entreprise la conformité du
produit avec les directives et normes suivantes.
De ondertekenaar verklaart in naam van de firma dat het product overeenstemt met de volgende richtlijnen en normen.
El abajo firmante declara, en el nombre de la empresa, la
conformidad del producto con las directrices y normas
siguientes.
O signatário declara em nome da firma a conformidade do
produto com as seguintes directivas e normas.
Undertecknad förklarar i firmans namn att produkten överensstämmer med följande direktiv och standarder.
Allekirjoittanut ilmoittaa liikkeen nimissä, että tuote vastaa
seuraavia direktiivejä ja standardeja:
Undertegnede erklærer på vegne av firmaet at produktet
samsvarer med følgende direktiver og normer.
Лодлисавшийся лодтверждает от имени фирмыб что
настояшее изделие соответствует требованиям
следующих нормативных документов.
Az aláíró kijelenti, a cég nevében a termék megegyezését a
következő irányvonalakkal és normákkal.
Subsemnatul declară În numele firmei că produsul corespunde următoarelor directive și standarde.
∑mzalayan kiµi, firma adına ürünün aµa©ıda anılan yönetmeliklere ve normlara uygun olduµ©unu beyan eder.
∂У ФУ‰М·ЩИ ЩЛ˜ ВЩ·ИЪВ›·˜ ‰ЛПТУВИ Ф ˘ФБВБЪ·ММ¤УФ˜ ЩЛУ
Ы˘МКˆУ›· ЩФ˘ ЪФ˚fiУЩФ˜ ЪФ˜ ЩФ˘˜ ·ОfiПФ˘ıФ˘˜
О·УФУИЫМФ‡˜ О·И Щ· ·ОfiПФ˘ı· ЪfiЩ˘·.
Il sottoscritto dichiara a nome della ditta la conformità del
prodotto con le direttive e le norme seguenti.
På firmaets vegne erklærer undertegnede, at produktet imødekommer kravene i følgende direktiver og normer.
Níže podepsaný jménem firmy prohlašuje, že výrobek odpovídá následujícím sm
ěrnicím a normám.
Az aláíró kijelenti, a cég nevében a termék megegyezését a
következő irányvonalakkal és normákkal.
Podpisani izjavljam v imenu podjetja, da je proizvod v skladnosti s slede ˇcimi smernicami in standardi.
Niżej podpisany oświadcza w imieniu firmy, że produkt jest
zgodny z następującymi wytycznymi i normami.
Podpisujúci záväzne prehlasuje v mene firmy, že tento
výrobok je v súlade s nasledovnými smernicami a normami.
Долуподписаният декларира от името на фирмата
съответствието на продукта.
LWMdB(A); LWAdB(A)
Anleitung E-BH 950 SPK 7 06.04.2004 12:23 Uhr Seite 21
Page 22

22
GARANTIE
Op het in de handleiding genoemde toestel geven wij 2 jaar garantie voor het
geval dat ons product gebreken mocht vertonen. De periode van 2 jaar gaat in
met de gevaarovergang of de overname van het toestel door de klant.
De garantie kan enkel worden geclaimd op voorwaarde dat het toestel naar
behoren is onderhouden en gebruikt conform de handleiding.
Vanzelfsprekend blijven u de wettelijke garantierechten binnen deze 2 jaar
behouden.
De garantie geldt voor het grondgebied van de Bondsrepubliek Duitsland of van
de respectievelijke landen van de regionale hoofdverdeler als aanvulling van de
ter plaatse geldende wettelijke voorschriften. Gelieve zich tot uw contactpersoon
van de regionaal bevoegde klantendienst of tot het hieronder vermelde serviceadres te wenden.
CERTIFICATO DI GARANZIA
Per l’apparecchio indicato nelle istruzioni concediamo una garanzia di 2 anni,
nel caso il nostro prodotto dovesse risultare difettoso. Questo periodo di 2 anni
inizia con il trapasso del rischio o la presa in consegna dell’apparecchio da parte
del cliente. Le condizioni per la validità della garanzia sono una corretta manutenzione secondo le istruzioni per l’uso così come un utilizzo appropriato del
nostro apparecchio.
Naturalmente in questo periodo di 2 anni continuiamo ad assumerci gli
obblighi di responsabilità previsti dalla legge.
La garanzia vale per il territorio della Repubblica Federale Tedesca o dei rispettivi paesi del principale partner di distribuzione di zona a completamento delle
norme di legge in vigore sul posto. Rivolgersi all’addetto del servizio assistenza
clienti incaricato della rispettiva zona o all’indirizzo di assistenza clienti riportato
in basso.
WARRANTY CERTIFICATE
The product described in these instructions comes with a 2 year warranty covering defects. This 2-year warranty period begins with the passing of risk or when
the customer receives the product.
For warranty claims to be accepted, the product has to receive the correct maintenance and be put to the proper use as described in the operating instructions.
Your statutory rights of warranty are naturally unaffected during these 2
years.
This warranty applies in Germany, or in the respective country of the manufacturer’s main regional sales partner, as a supplement to local regulations. Please
note the details for contacting the customer service center responsible for your
region or the service address listed below.
Záručný list
Na prístroj popísaný v návode na obsluhu poskytujeme záruku 2 roky, ktorá sa
vzťahuje na prípad, keby bol výrobok chybný. Záručná 2-ročná lehota sa začína
prechodom rizika alebo prevzatím prístroja zákazníkom.
Predpokladom pre uplatnenie nárokov zo záruky je správna údržba prístroja
podľa návodu na obsluhu ako aj používanie prístroja výlučne len na tie účely,
na ktoré bol určený.
Samozrejme Vám ostávajú zachované zákonom predpísané práva na záruku vpo dobu trvania týchto 2 rokov.
Záruka platí pre oblasť Spolkovej republiky Nemecko alebo príslušných krajín
regionálneho hlavného distribučného partnera ako doplnenie k lokálne platným
zákonným predpisom. Prosím informujte sa u Vášho kontaktného partnera príslušného regionálneho zákazníckeho servisu alebo na dole uvedenej servisnej
adrese.
GARANTIE
Nous fournissons une garantie de 2 ans pour l’appareil décrit dans le mode
d’emploi, en cas de vice de notre produit. Le délai de 2 ans commence avec la
transmission du risque ou la prise en charge de l’appareil par le client.
La condition de base pour le faire valoir de la garantie est un entretien en bonne
et due forme, conformément au mode d’emploi, tout comme une utilisation de
notre appareil selon l’application prévue.
Vous conservez bien entendu les droits de garantie légaux pendant ces 2
ans.
La garantie est valable pour l’ensemble de la République Fédérale d’Allemagne
ou des pays respectifs du partenaire commercial principal en complément des
prescriptions légales locales. Veuillez noter l’interlocuteur du service aprèsvente compétent pour votre région ou l’adresse mentionnée ci-dessous.
GARANTIBEVIS
Vi lämnar 2 års garanti på produkten som beskrivs i bruksanvisningen. Denna
garanti gäller om produkten uppvisar brister. 2-års-garantin gäller från och med
riskövergången eller när kunden har tagit emot produkten från säljaren.
En förutsättning för att garantin ska kunna tas i anspråk är att produkten har
underhållts enligt instruktionerna i bruksanvisningen samt att produkten har
använts på ändamålsenligt sätt.
Givetvis gäller fortfarande de lagstadgade rättigheterna till garanti under
denna 2-års-period.
Garantin gäller endast för Förbundsrepubliken Tyskland eller i de länder där den
regionala centraldistributionspartnern befinner sig som komplettering till de lagstadgade föreskrifter som gäller i resp. land. Kontakta din kontaktperson vid den
regionala kundtjänsten eller vänd dig till serviceadressen som anges nedan.
ZÁRUČNÍ LIST
Na přístroj označený v návodu poskytujeme záruku 2 let, pro ten případ, že by
byl náš výrobek vadný. Tato 2letá lhůta začíná přechodem rizika nebo převzetím přístroje zákazníkem.
Předpokladem pro uplatňování záruky je řádná údržba příslušně podle návodu
k obsluze a používání našeho přístroje k určenému účelu.
Samozřejmě Vám během těchto 2 let zůstanou zachována zákonná záruční práva.
Záruka platí na území Spolkové republiky Německo nebo příslušné země regionálního hlavního distribučního partnera jako doplněk lokálně platných
zákonných předpisů. V případě potřeby se prosím obrat’te na Vašeho
kontaktního partnera regionálního příslušného zákaznického servisu nebo na
dole uvedenou servisní adresu.
Anleitung E-BH 950 SPK 7 06.04.2004 12:23 Uhr Seite 22
Page 23

GARANTIEURKUNDE
Auf das in der Anleitung bezeichnete Gerät geben wir 2 Jahre
Garantie, für den Fall, dass unser Produkt mangelhaft sein sollte.
Die 2-Jahres-Frist beginnt mit dem Gefahrenübergang oder der
Übernahme des Gerätes durch den Kunden. Voraussetzung für
die Geltendmachung der Garantie ist eine ordnungsgemäße
Wartung entsprechend der Bedienungsanleitung sowie die bestimmungsgemäße Benutzung unseres Gerätes.
Selbstverständlich bleiben Ihnen die gesetzlichen Gewährleistungsrechte innerhalb dieser 2 Jahre erhalten. Die Garan-
tie gilt für den Bereich der Bundesrepublik Deutschland oder der
jeweiligen Länder des regionalen Hauptvertriebspartners als Ergänzung der lokal gültigen gesetzlichen Vorschriften. Bitte beachten Sie Ihren Ansprechpartner des regional zuständigen Kundendienstes oder die unten aufgeführte Serviceadresse.
ISC GmbH · International Service Center
Eschenstraße 6 · D-94405 Landau/Isar (Germany)
Info-Tel. 0180-5 120 509 • Telefax 0180-5 835 830
Service- und Infoserver: http://www.isc-gmbh.info
Technische Änderungen vorbehalten
Technical changes subject to change
Sous réserve de modifications
Technische wijzigingen voorbehouden
Förbehåll för tekniska förändringar
Con riserva di apportare modifiche tecniche
Technické změny vyhrazeny
Technické změny vyhradené
Der Nachdruck oder sonstige Vervielfältigung von Dokumentation und
Begleitpapieren der Produkte, auch auszugsweise ist nur mit ausdrücklicher Zustimmung der ISC GmbH zulässig.
The reprinting or reproduction by any other means, in whole or in
part, of documentation and papers accompanying products is
permitted only with the express consent of ISC GmbH.
La réimpression ou une autre reproduction de la documentation et
des documents d’accompagnement des produits, même incomplète,
n’est autorisée qu’avec l’agrément exprès de l’entreprise ISC GmbH.
Nadruk of andere reproductie van documentatie en geleidepapieren
van de producten, geheel of gedeeltelijk, enkel toegestaan mits
uitdrukkelijke toestemming van ISC GmbH.
La ristampa o l’ulteriore riproduzione, anche parziale, della
documentazione o dei documenti d’accompagnamento dei prodotti è
consentita solo con l’esplicita autorizzazione da parte della ISC
GmbH.
Eftertryck eller annan duplicering av dokumentation och medföljande
underlag för produkter, även utdrag, är endast tillåtet med uttryckligt
tillstånd från ISC GmbH.
Dotisk nebo jiné rozmnožování dokumentace a průvodních
dokumentů výrobků, také pouze výňatků, je přípustné výhradně se
souhlasem firmy ISC GmbH.
Kopírovanie alebo iné rozmnožovanie dokumentácie a sprievodných
podkladov produktov, ato aj čiastočné, je pr ípustné len s výslovným
povolením spoločnosti ISC GmbH.
Anleitung E-BH 950 SPK 7 06.04.2004 12:23 Uhr Seite 23
Page 24

ISC GmbH
Eschenstraße 6
D-94405 Landau/Isar
Tel.(0180) 5 120 509, Fax (0180) 5 835 830
Hans Einhell Österreich Gesellschaft m.b.H.
Mühlgasse 1
A-2353 Guntramsdorf
Tel.(02236) 53516, Fax (02236) 52369
Fubag International
St. Gallerstraße 182
CH-8404 Winterthur
Tel.(052) 2358787, Fax (052) 2358700
Einhell UK Ltd
Unit 5 Morpeth Wharf
Twelve Quays
Birkenhead, Wirral
CH 41 1NG
Tel.0151 6491500, Fax 0151 6491501
Pour toutes informations ou service après
vente, merci de prendre contact avec votre
revendeur.
Einhell Benelux
Veldsteen 44
NL-4815 PK Breda
Tel.076 5986470, Fax 076 5986476
Comercial Einhell, S.A.
Travesia Villa Ester, 9 B
Poligono Industrial El Nogal
E-28119 Algete-Madrid
Einhell Portugal Lda.
Apartado 2100
Rua da Aldeia , 225 Apartado 2100
P-4405-017 Arcozelo VNG
Tel.022 0917500 Fax 022 0917529
Einhell Italia s.r.l.
Via Marconi, 16
I-22070 Beregazzo (Co)
Tel.031 992080, Fax 031 992084
Einhell Skandinavia
Bergsoesvej 36
DK-8600 Silkeborg
Tel.087 201200, Fax 087 201203
Hasse Haraldson
Barlastgatan 3
S-41463 Gøteborg
Einhell Norge A/S
Sophus Buggesvaj 48
Postboks 2005
N-3255 Larvik
Sähkötalo Harju OY
Korjaamonkatu 2
FIN-33840 Tampere
Tel.03 2345000, Fax 03 2345040
Einhell Polska sp. Z.o.o.
Ul. Miedzyleska 2-6
PL-50-514 Wroclaw
Tel.071 3346508, Fax 071 3346503
Papdi Light KFT.
Szegedi út. 2.
H-6400 Kiskunhalas
Tel.77 422444, Fax 77 428667
Semak
makina ticaret ve sanayi ltd. sti.
Altay Cesme mah.Yasemin Sok. No: 19
TR 34843 Maltepe - Istanbul
Tel.0216 4594865, Fax 0216 4429325
Vobl er s.r.o
Zupna 4
SK-95301 Zlate Moravce
Tel.37 6426255, Fax 37 26256
1 Tu r kestan
Investitions- Baugesellschaft
Christofor Stefanidi
Belinskij-102
KZ-4860008 st. Chimkent
Tel./Fax 03252 242414
Novatech S.r.l.
Bd. Lasar Catargiu 24-26
Sc. A, AP 9 Sector 1
RO-75121 Bucuresti
Tel.021 4104800, Fax 021 4103568
Pok er Plus S.R.O.
Areal vu Bechovice
Budava 10 B
CZ-19011 Prahe - Bechovice 911
Slav GmbH
Mihail Koloni str.18 W
BG-9000 Varna
Tel.052 605254
Einhell Croatia d.o.o.
Velika Ves 2
HR-49224 Lepajci
Tel 049 342 444, Fax 049 342 392
GMA-Elektromechanika d.o.o
Cesta Andreja Bitenca 115
SLO 1000 Ljubljana
Tel 01/5838304, Fax 01/5183803
An. Mavrofidopoulos S.A.
Technical & Commercial Company
12, Papastratou & Asklipiou Str.
GR 18545 Piräus
Tel 0210 4136155, Fax 0210 4137692
Bermas
Altufyevskoe shosse, 2A
RUS-127273 Moscow
Tel 095 7870179, Fax 095 5401750
Dirbita
Metalo str. 23
LT-02190 Vilnius
Tel 05 2395769, Fax 05 2395770
AS Baltoil
Roiu alev
Haaslava vald
EE-62102 Tartu
Tel 07 301 700, Fax 07 301 701
1 Halai Trading Co. LLC
POB 9282, Nakheel Rd. Deira, Shop No.15
UAE-Dubai
Tel.04 2279554, Fax 04 2217686
Alborz Abzar Co. Ltd.
No. 111, Bastan Passage, Imam Khomeini Ave.
IR-11146 Teheran
Tel 021 6716072, Fax 021 6727177
FIS d.o.o
Poslovni Centar 96
BA-87000 Vitez
Tel 030 715 267, Fax 030 715 320
MANIMEX d.o.o
Uzicke republike 93
SCG-31000 Uzice
Tel 031 551 393, Fax 031 601 539
VOBLER s.r.o.
Zupná 4
SK-95301 Zlaté Moravce
Eurasia Industrial and Automotive Supply
Bessemer Str.
Duncanville
ZA-Vereeniging 1930
Tel 16 455 571 2, Fax 16 455 571 6
UAE
KZ
EH 04/2004
Anleitung E-BH 950 SPK 7 06.04.2004 12:23 Uhr Seite 24
 Loading...