

EHEIM skimmarine 300 Operating Manual
de
Bedienungsanleitung
Käyttöohje
en
Operating manual
pl
Instrukcja obsługi
fr
Mode d’emploi
cs
Návod k obsluze
it
Istruzioni per l‘uso
sk
Návod na obsluhu
es
Manual de instrucciones
hu
Használati utasítás
pt
Manual de instruções
sl
Navodilo za upravljanje
nl
Bedieningshandleiding
ro
Manual de utilizare
da
Betjeningsvejledning
ru
Руководство по обслуживанию
sv
Bruksanvisning
el
Οδηγίες χρήσης
no
Bruksanvisning
3549
2
water level max.
water level min.
A
C
max
min
B
D
maxmin
E
a
1
2
b
d
c
e
f
g
3
F G
H I
1
2
1
1
1
2
h
i
j
l
k
m
n
4
J
p
o
1
1
2
q
r
s
5
Deutsch
Original-Bedienungsanleitung
mini Abschäumer skim marine 300
1. Allgemeine Benutzerhinweise
Informationen zum Gebrauch der Betriebsanleitung
▶ Bevor Sie das Gerät zum ersten Mal in Betrieb nehmen, muss die Betriebsanleitung vollständig gelesen und
verstanden werden.
▶ Betrachten Sie die Betriebsanleitung als Teil des Produkts und bewahren Sie sie gut und erreichbar auf.
▶ Fügen Sie diese Betriebsanleitung bei Weitergabe des Geräts an Dritte bei.
Symbolerklärung
Die folgenden Symbole werden auf dem Gerät verwendet.
Das Gerät darf nur in Innenräumen für aquaristische Einsatzbereiche verwendet werden.
Die Eintauchtiefe des Gerätes beträgt maximal 1,0 m.
Die Pumpe besitzt die Schutzklasse II.
Das Symbol weist darauf hin, dass das Gerät gegen dauerndes Untertauchen geschützt ist.
Das Gerät erfüllt die Anforderungen der Richtlinie EN 60335-2-41.
Die folgenden Symbole und Signalworte werden in dieser Bedienungsanleitung verwendet.
Gefahr von Personenschäden durch gefährliche elektrische Spannung
Das Symbol weist auf eine unmittelbar drohende Gefahr hin, die den Tod oder schwere Verletzungen zur Folge
haben kann, wenn die entsprechenden Maßnahmen nicht getroen werden.
Gefahr von Personenschäden durch eine allgemeine Gefahrenquelle
Das Symbol weist auf eine unmittelbar drohende Gefahr hin, die den Tod oder schwere Verletzungen zur Folge
haben kann, wenn die entsprechenden Maßnahmen nicht getroen werden.
Gefahr durch magnetische Felder
Das Symbol weist auf eine unmittelbar drohende Gefahr hin, die den Tod oder schwere Verletzungen zur Folge
haben kann, wenn die entsprechenden Maßnahmen nicht getroen werden.
VORSICHT
Hinweis auf die Gefahr von Sachschäden.
Hinweis mit nützlichen Informationen und Tipps.
1,0 m
IPX8
6
Deutsch
Verweis auf eine Abbildung, hier Verweis auf Abbildung A
Sie werden zu einer Handlung aufgefordert.
2. Einsatzgebiet
Das Gerät und alle im Lieferumfang enthaltenen Teile sind für die Benutzung im privaten Bereich bestimmt und dürfen
ausschließlich verwendet werden:
‧ zur Entfernung von Stowechselprodukten in Meerwasseraquarien bis ca. 300 l
‧ in Innenräumen
‧ unter Einhaltung der technischen Daten
Für das Gerät gelten folgende Einschränkungen:
‧ nicht für gewerbliche oder industrielle Zwecke verwenden
‧ niemals ohne Wasserdurchuss betreiben
3. Sicherheitshinweise
Von diesem Gerät können Gefahren für Personen und Sachwerte ausgehen, wenn das
Gerät unsachgemäß bzw. nicht dem Verwendungszweck entsprechend eingesetzt wird
oder wenn die Sicherheitshinweise nicht beachtet werden.
Für Ihre Sicherheit
‧ Die Geräteverpackung nicht in die Hände von Kindern gelangen lassen, da hier-
von Gefahren ausgehen können (Erstickungsgefahr!).
‧ Dieses Gerät kann von Kindern ab 8 Jahren sowie von Personen mit reduzierten
physischen, sensorischen oder mentalen Fähigkeiten oder Mangel an Erfahrung
und/oder Wissen benutzt werden, wenn sie beaufsichtigt oder bezüglich des
sicheren Gebrauchs des Gerätes unterwiesen wurden und die daraus resultierenden Gefahren verstanden haben. Kinder dürfen nicht mit dem Gerät spielen.
Reinigung und Benutzerwartung dürfen nicht durch Kinder durchgeführt werden,
es sei denn, sie sind beaufsichtigt.
‧ Führen Sie vor Benutzung eine Sichtkontrolle durch, um sicherzustellen, dass
das Gerät, insbesondere Netzkabel und Stecker, unbeschädigt sind.
‧ Benutzen Sie das Gerät niemals mit einem beschädigten Netzkabel.
‧ Reparaturen dürfen ausschließlich von einer EHEIM Servicestelle durchgeführt
werden.
‧ Das Gerät darf nicht trocken laufen. Es darf nur für Flüssigkeiten von +4°C bis
max. +35°C verwendet werden.
⌦A
7
Deutsch
‧ Tragen Sie das Gerät nicht am Netzkabel und ziehen Sie zum Trennen vom
Stromnetz immer am Stecker und nicht am Kabel oder Gerät.
‧ Schützen Sie das Netzkabel vor Hitze, Öl und scharfen Kanten.
‧ Führen Sie nur Arbeiten durch, die in dieser Anleitung beschrieben sind.
‧ Nehmen Sie niemals technische Änderungen am Gerät vor.
‧ Verwenden Sie nur Original-Ersatzteile und -Zubehör für das Gerät.
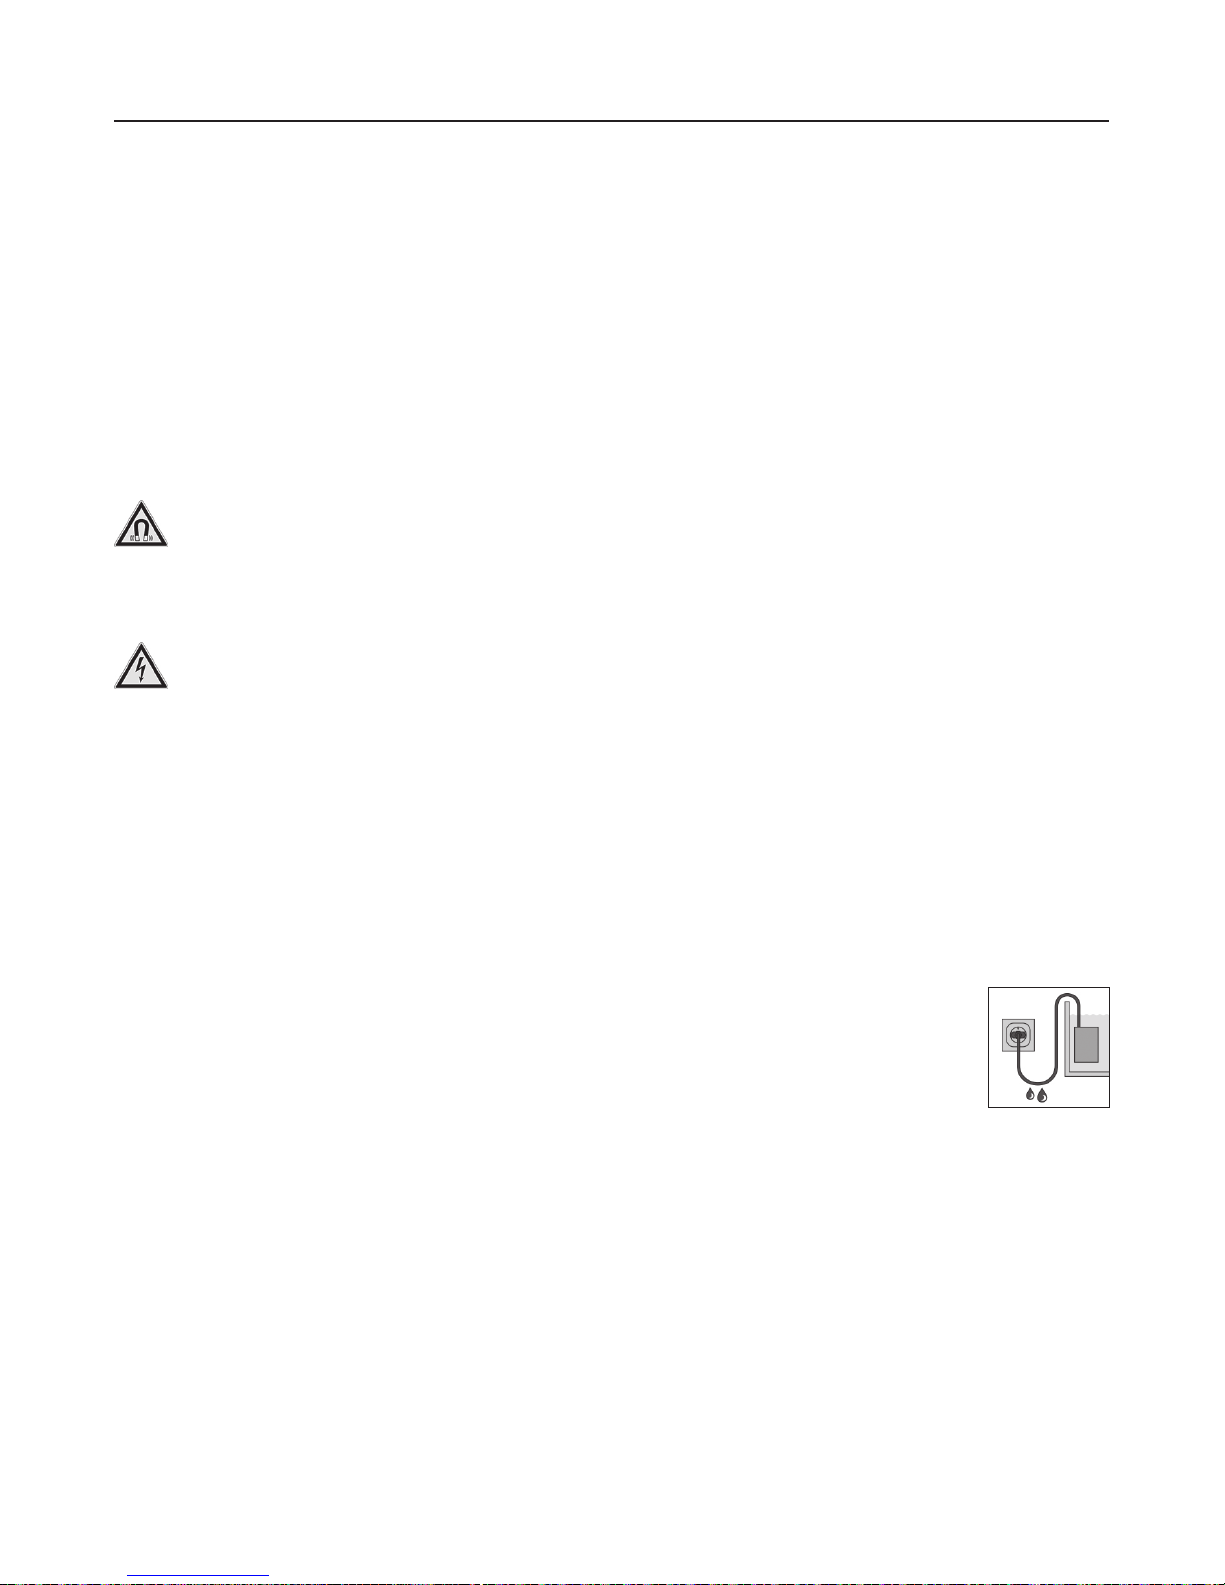
‧ Das Gerät besitzt Magnete mit starken Magnetfeldern, die Herzschrittmacher
oder implantierte Debrillatoren (ICD) beeinussen können. Halten Sie mindestens 30 cm Abstand zwischen Implantat und Magnet.
‧ Die Pumpe muss über eine Fehlerstrom-Schutzeinrichtung mit einem Bemes
sungsfehlerstrom von maximal 30 mA abgesichert sein. Bei Fragen und Problemen wenden Sie sich an eine Elektrofachkraft.
‧ Trennen Sie sofort alle Geräte im Aquarium vom Stromnetz bei einer Wasser
-
leckage bzw. wenn die Fehlerstrom-Schutzeinrichtung auslöst.
‧ Trennen Sie grundsätzlich alle Geräte im Aquarium vom Stromnetz, wenn sie
nicht benutzt werden, bevor Sie Teile ein- bzw. ausbauen und vor allen Reini
gungs- und Wartungsarbeiten.
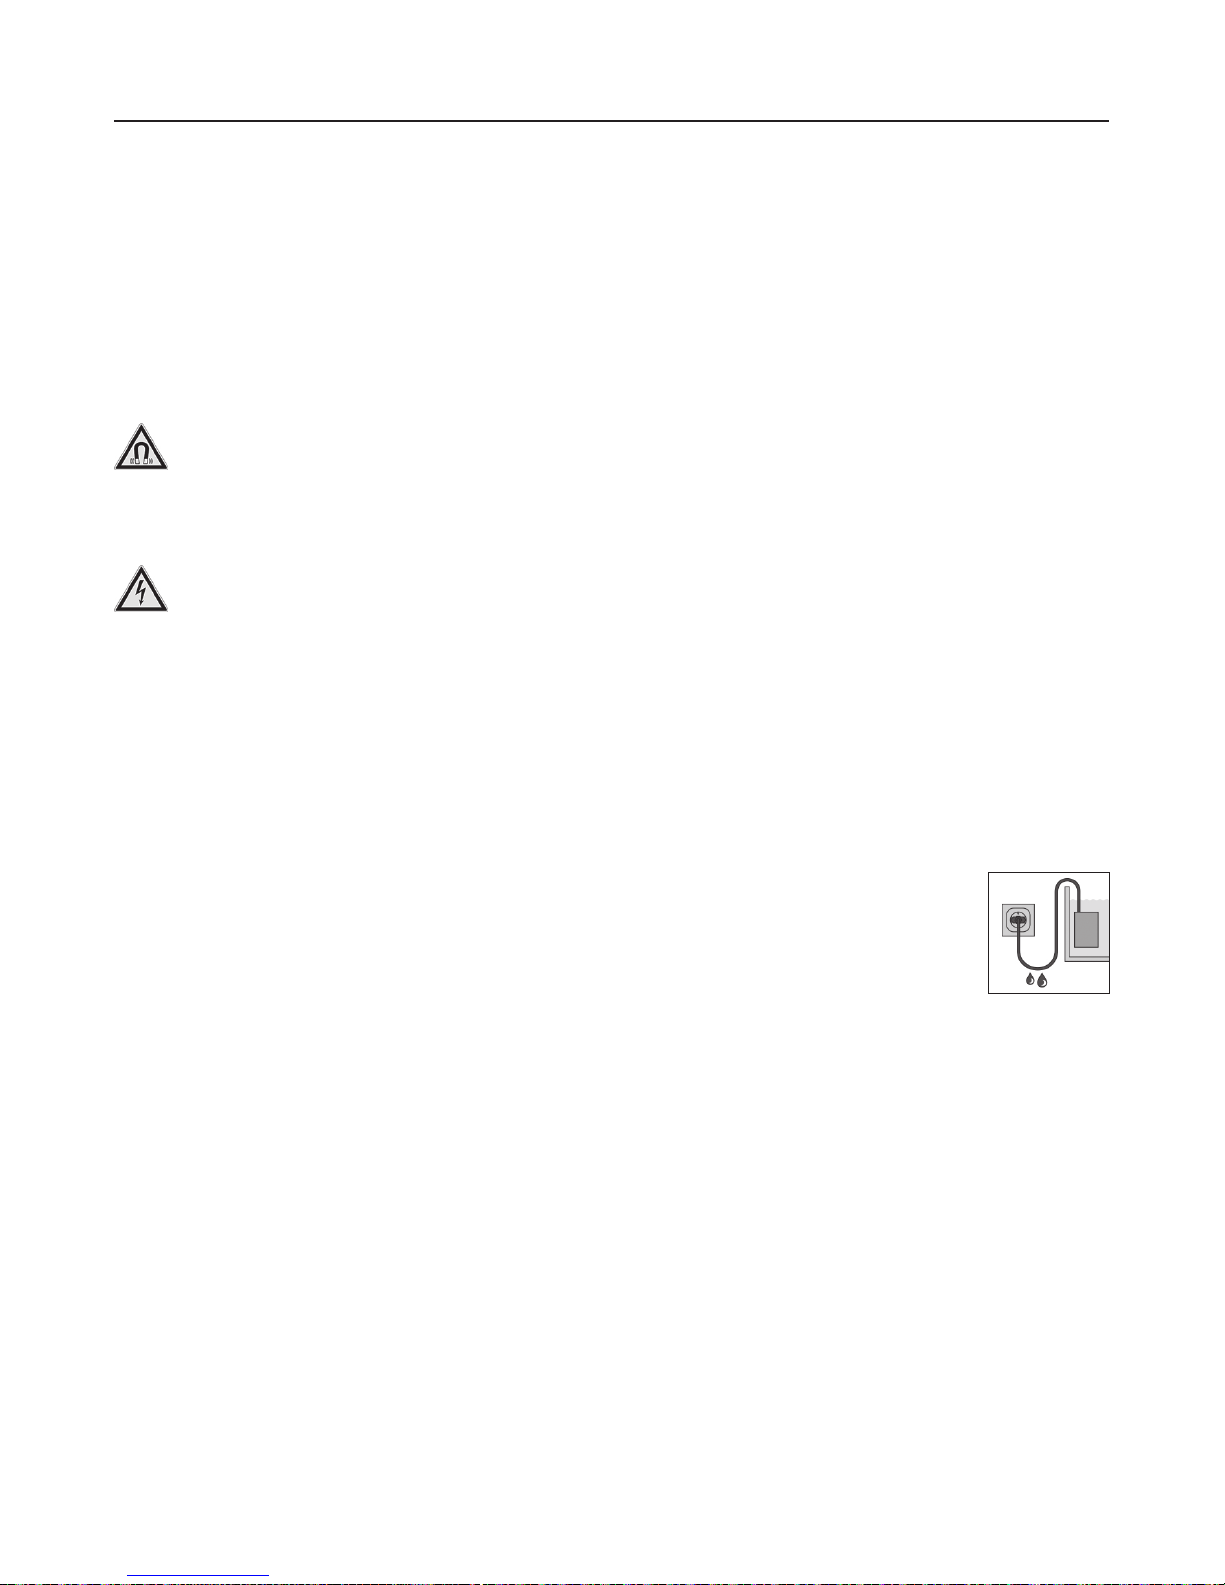
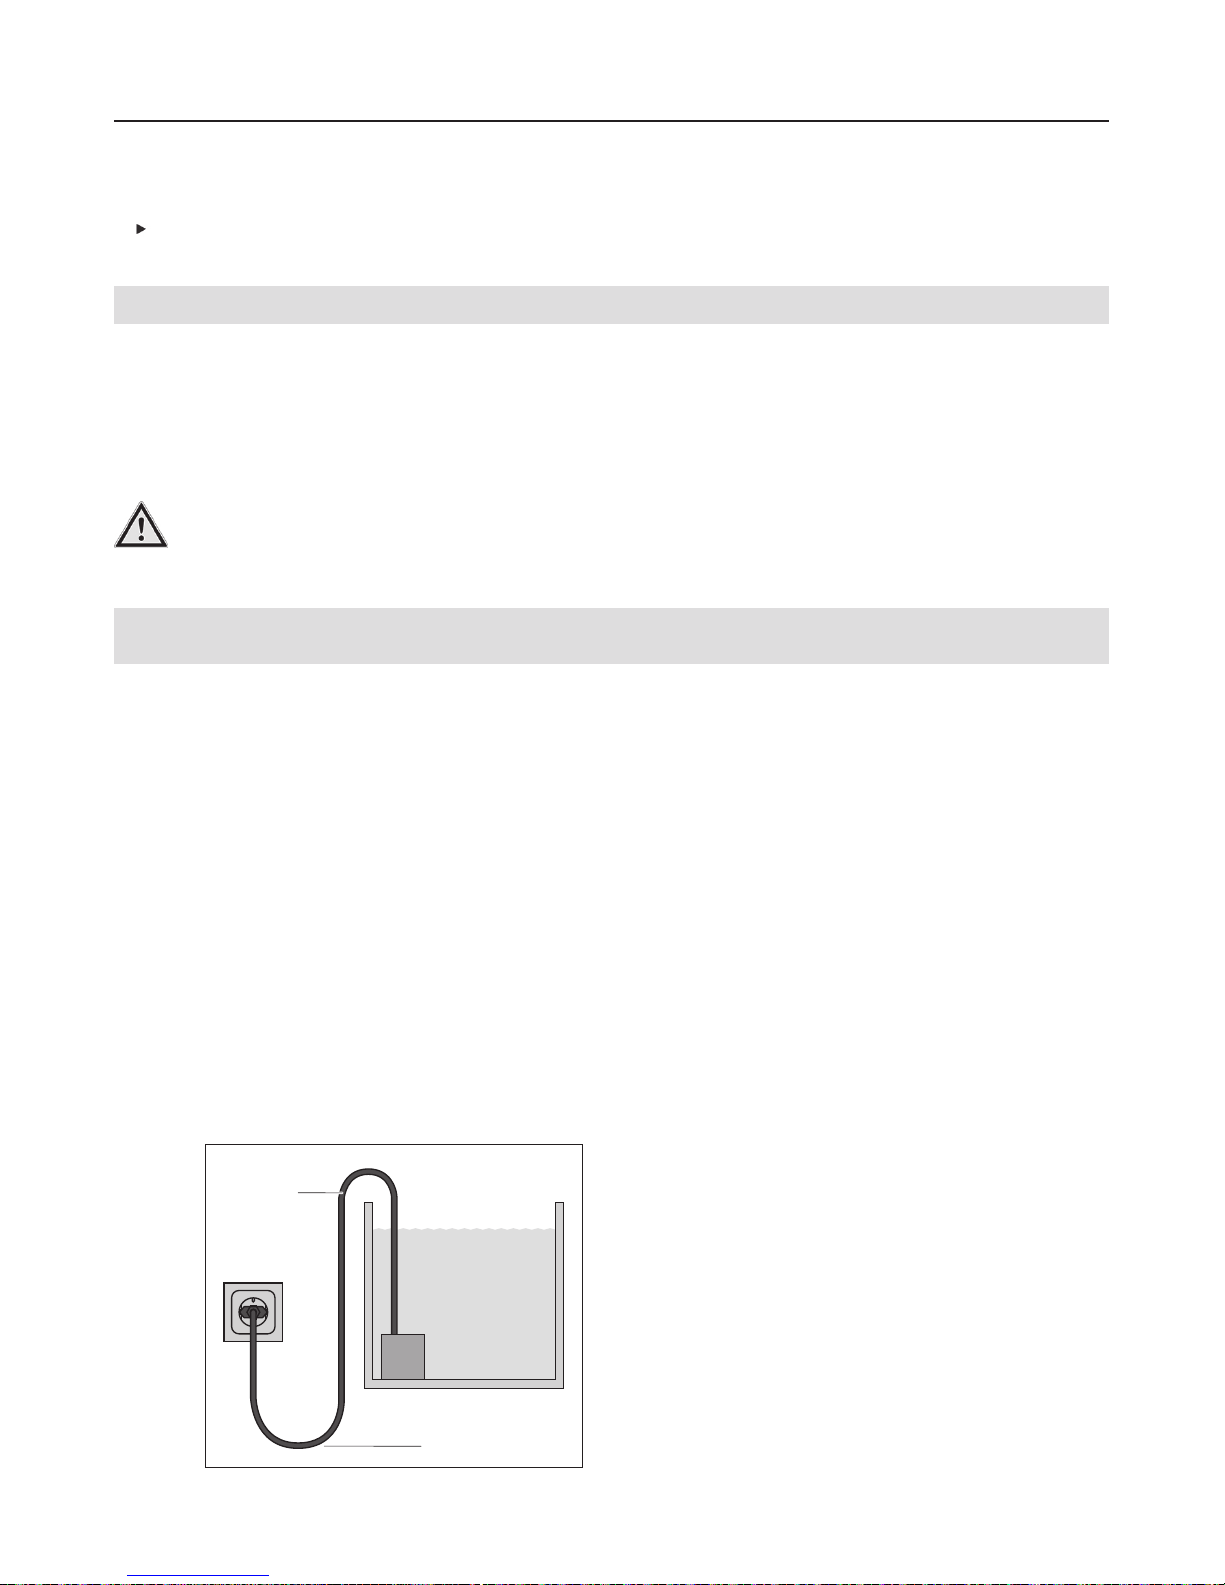
‧ Schützen Sie Steckdose und Netzstecker vor Feuchtigkeit.
Es empehlt sich mit dem Netzkabel eine Tropfschlaufe zu bilden,
die verhindert, dass evtl. am Kabel entlang laufendes Wasser zur
Steckdose gelangt.
‧ Die elektrischen Daten der Pumpe müssen mit den Daten des Stromnetzes
übereinstimmen. Sie nden diese Daten auf dem Typenschild, der Verpackung
oder in dieser Anleitung.
‧ Die Netzanschlussleitung der Pumpe kann nicht ersetzt werden. Bei Beschädi-
gung der Leitung ist die Pumpe zu verschrotten.

8
Deutsch
4. Inbetriebnahme
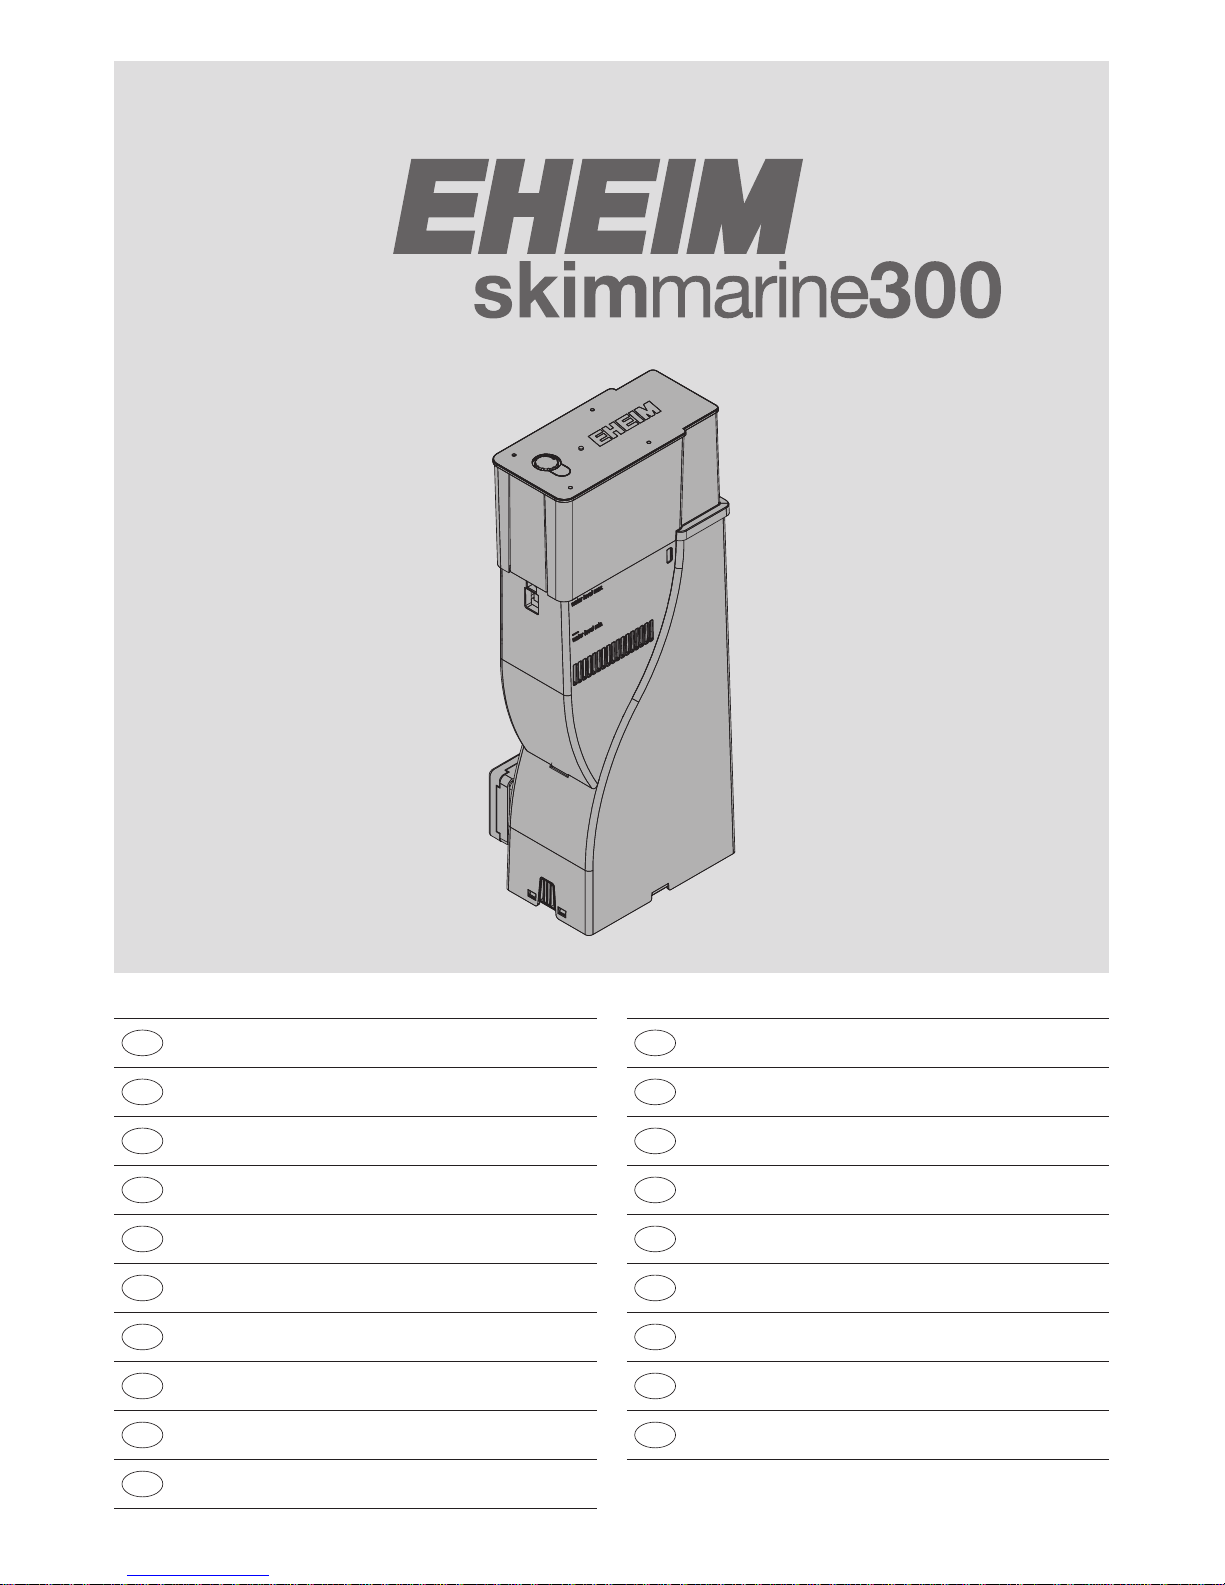
Montage im Aquarium (⌦A)
Vorsicht starke Magnete! Quetschgefahr.
▶ Trennen Sie die Magnete durch gegenseitiges Verdrehen.
▶ Lagern Sie die Magnete in 30 cm Abstand separat voneinander.
1. Entfernen Sie alle Transportsicherungen (z.B. Klebebänder, Füllmaterial etc.), vor allem auch im Inneren des
Abschäumers.
2. Halten Sie den Abschäumer mit einer Hand von Innen an die gewünschte Position im Aquarium.
3. Setzen Sie mit der anderen Hand die Magnethälfte mit Logo
b
mit Abstand zum Abschäumer von Außen vor-
sichtig auf die Glasscheibe. Achten Sie darauf, dass der Magnet nicht gegen die Glasscheibe schlägt!
4. Schieben Sie die Magnethälfte auf dem Glas in Richtung des Abschäumers, bis beide Magnethälften
a/b
übereinander liegen.
Verlegen des Netzkabels (⌦B)
1. Führen Sie das Netzkabel aus der kleinen seitlichen Önung und führen Sie es zwischen den Stutzen für die
Kabelführung
c
durch.
Die korrekte Kabelführung ist mit einer Linie angedeutet.
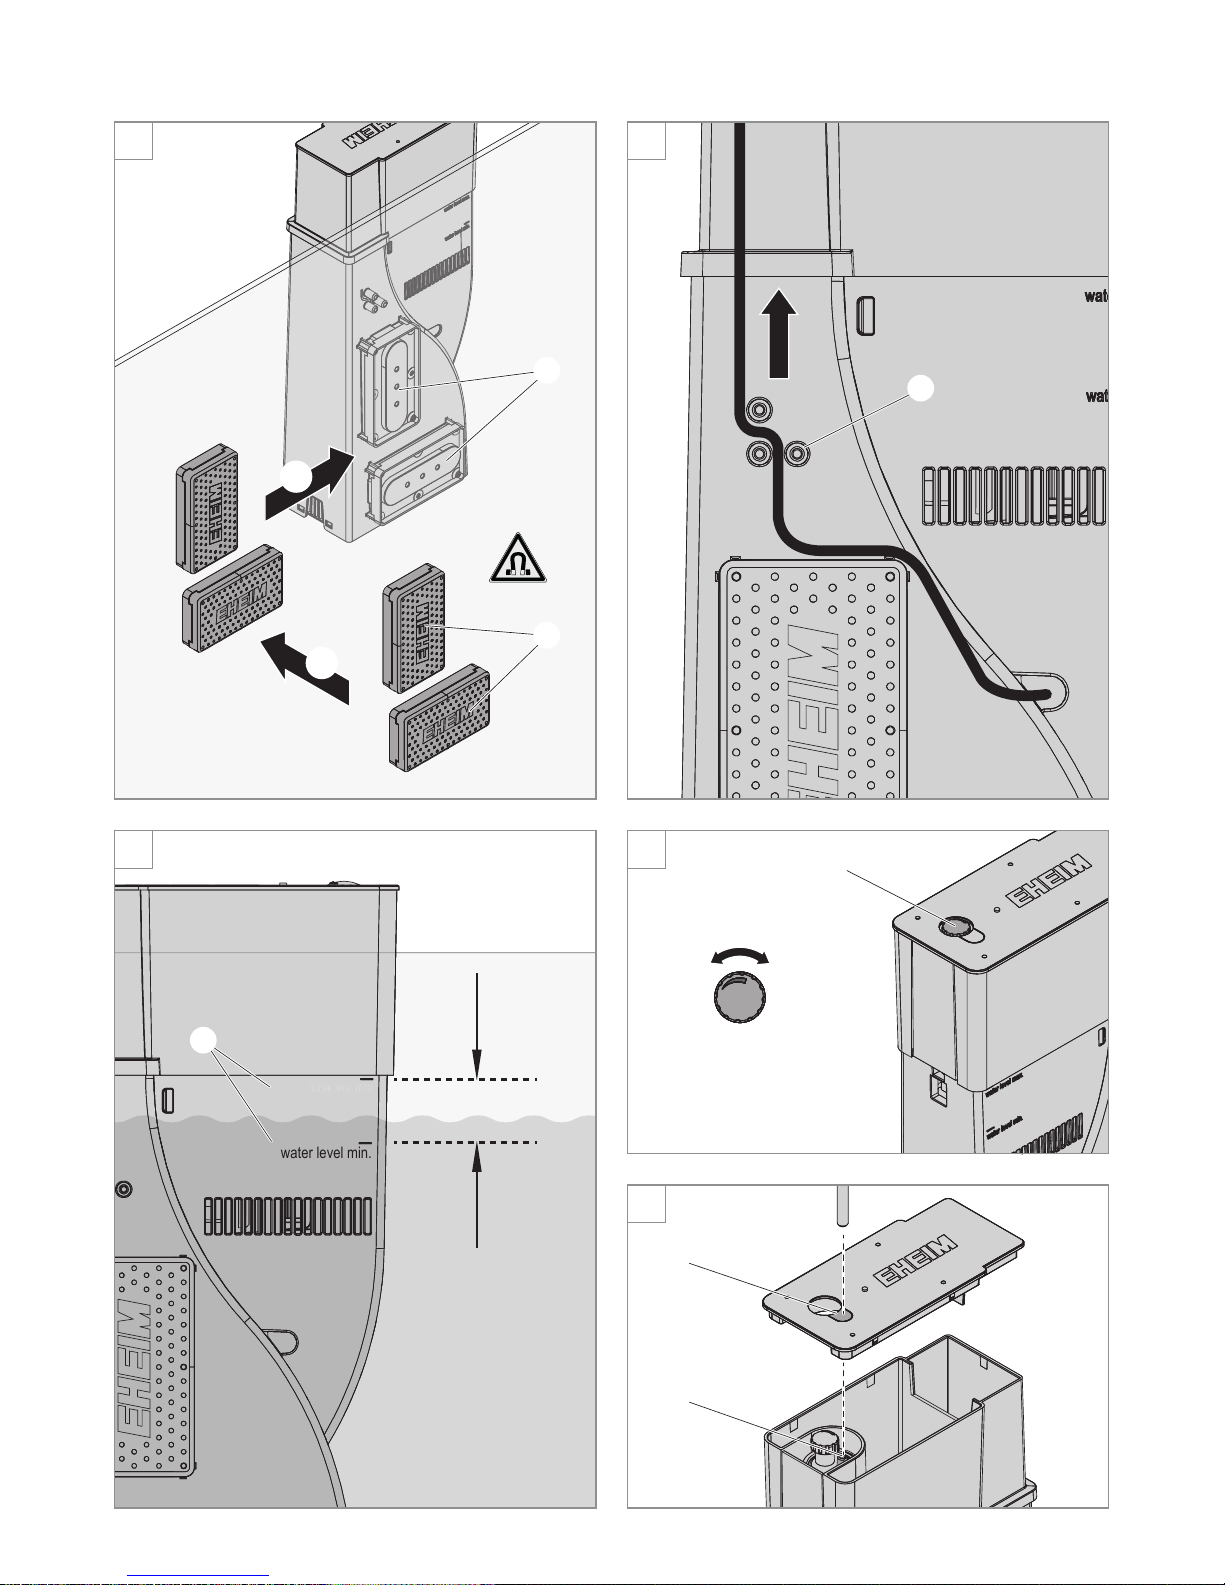
5. Bedienung
Startposition
1. Stellen Sie die Position des Abschäumers so ein, dass der Wasserstand Ihres Aquariums mittig zwischen der
Markierung water level max. und water level min.
d
auf dem Abschäumer liegt (⌦C).
2. Stellen Sie den Lufteinstellregler auf die mittlere Position (⌦D).
Nach der Erstinbetriebnahme muss der Abschäumer „einlaufen“. Dies kann bis zu ca. 1 Woche
dauern. In der Regel beginnt der Abschäumer schon innerhalb der ersten 2 Tage Schaum zu produzieren. In dieser
Zeit kann es vorkommen, dass Restluft am Ausgang ausströmt. Dies stellt keinen Grund zur Sorge dar. Nach der
Einlaufzeit strömt keine Restluft mehr aus.
Pumpe einschalten
1. Stecken Sie den Netzstecker in die Netzsteckdose. Achtung: Die Pumpe läuft sofort an!
Pumpe ausschalten
1. Ziehen Sie den Netzstecker aus der Netzsteckdose.
Feineinstellung (⌦D)
Für eine optimale Abschäumleistung sollten Sie nach der „Einlaufphase“ eine Feineinstellung des Geräts vornehmen. Stel
-
len Sie nach Ihren Anforderungen die Abschäumleistung über den Lufteinstellregler ein (⌦C).
9
Deutsch
Ozonanschluss (⌦E)
1. Nehmen Sie den Deckel ab und önen Sie die Sollbruchstelle
f
für die Schlauchdurchführung.
2. Entfernen Sie die Schutzhülse.
3. Stecken Sie den Schlauch (Ø 6 mm) für die Ozon-Zufuhr auf den Anschlussstutzen
g
.
6. Wartung
Achtung! Stromschlag!
▶ Ziehen vor allen Wartungsarbeiten den Netzstecker.
Vorsicht! Sachbeschädigung.
▶ Verwenden Sie zur Reinigung keine harten Gegenstände oder aggressive Reinigungsmittel.
In den nachstehenden Abschnitten sind Wartungsarbeiten beschrieben, die für einen optimalen und störungsfreien
Betrieb erforderlich sind. Eine regelmäßige Wartung verlängert die Lebensdauer und sichert über einen langen
Zeitraum die Funktion des Geräts.
Wöchentliche Wartungsarbeiten
1. Entleeeren Sie je nach Bedarf 1 – 2 mal pro Woche den Schaumtopf.
2. Überprüfen Sie das Gerät auf Algenbefall und Schmutzansammlungen.
Bei Algenbefall und Schmutzansammlungen gehen Sie wie folgt vor:
1. Ziehen Sie den Netzstecker der Pumpe.
2. Halten Sie den Abschäumer mit einer Hand fest.
3. Schieben Sie mit der anderen Hand die Magnethälften mit Logo auf der Glasscheibe vom Abschäumer weg.
4. Entnehmen Sie den Abschäumer.
5. Reinigen Sie die Eintritts- und Austrittsönungen des Gehäuses sowie der Prallplatte unter einem Wasserstrahl
mit einer Bürste.
Monatliche Wartungarbeiten
Wir empfehlen je nach Verschmutzungsgrad monatlich das Gerät komplett zu zerlegen und zu reinigen. Gehen Sie dazu wie
folgt vor:
Zerlegen und Reinigen des Geräts
1. Ziehen Sie vor Wartungsarbeiten den Netzstecker der Pumpe.
2. Halten Sie den Abschäumer mit einer Hand fest.
3. Schieben Sie mit der anderen Hand die Magnethälften mit Logo auf der Glasscheibe vom Abschäumer weg.
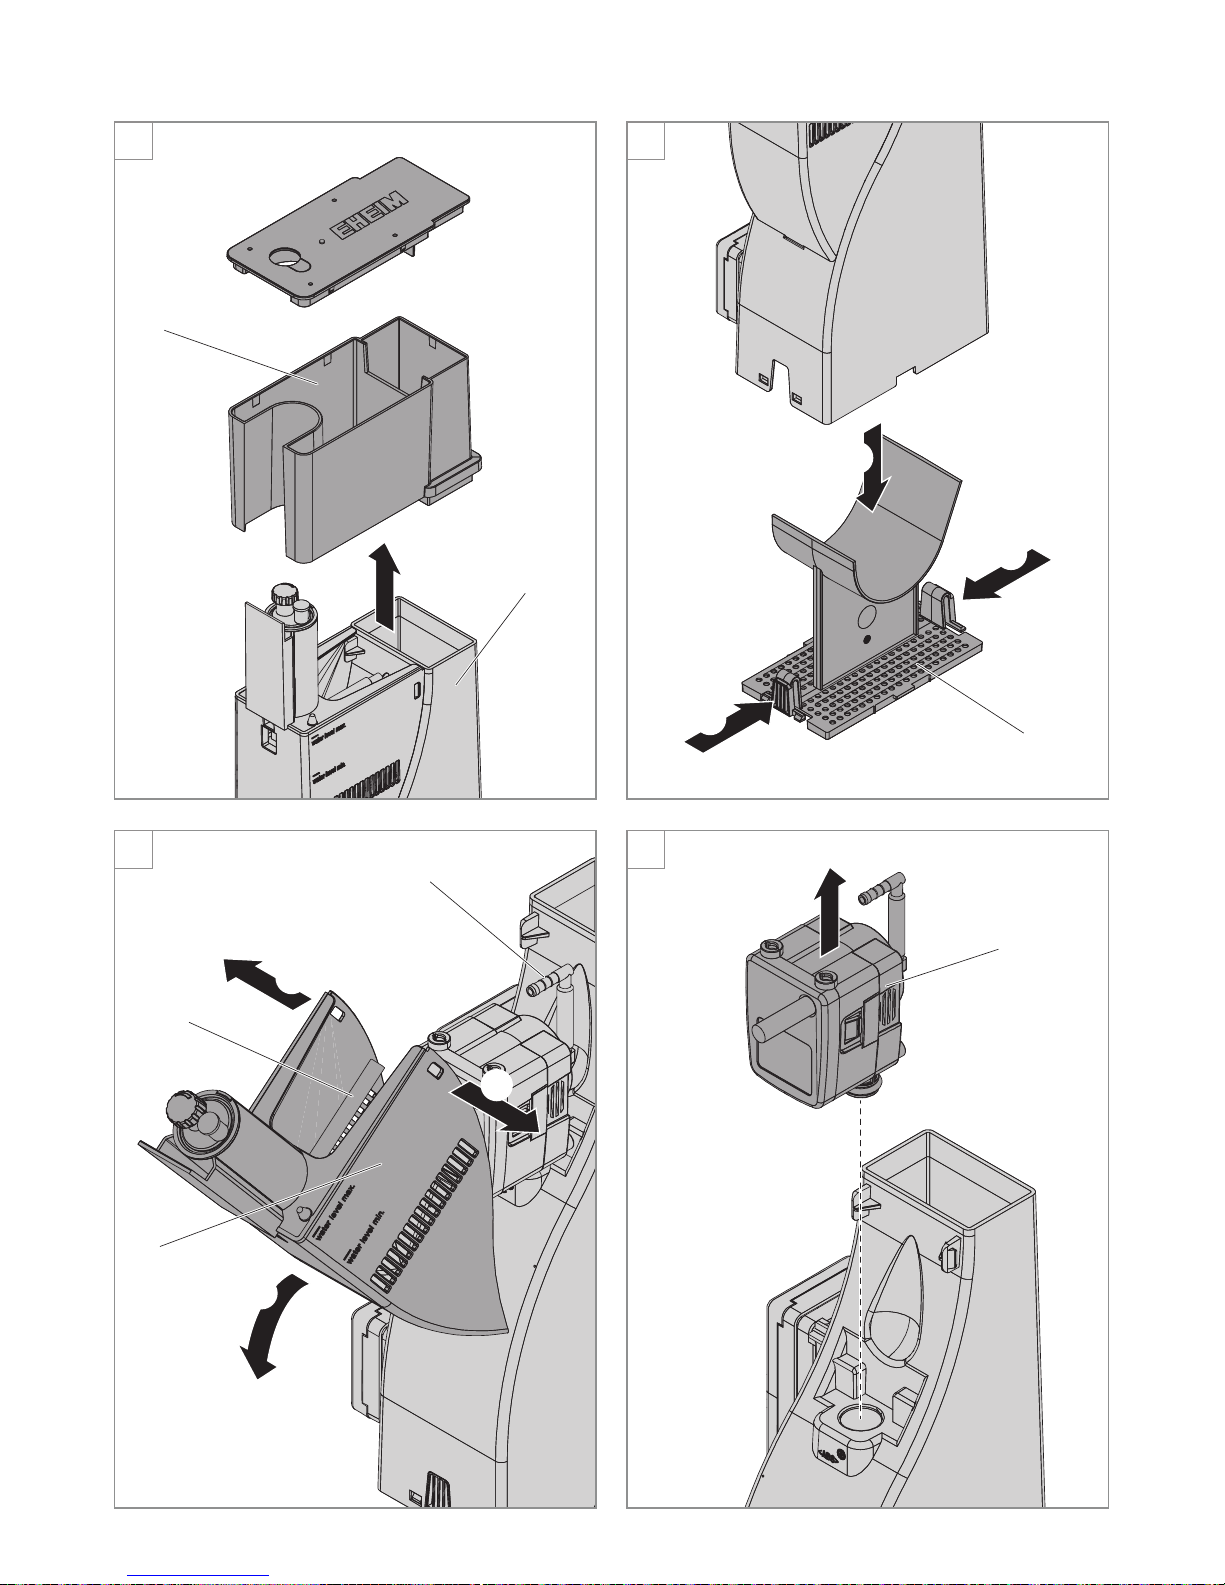
4. Entnehmen Sie den Abschäumer.
5. Nehmen Sie den Schaumtopf
h
vom Gehäuse i ab (⌦F).
6. Drücken Sie die Rastnasen nach innen und ziehen Sie die Prallplatte
j
nach unten aus dem Gehäuse (⌦G).
7. Ziehen Sie die Seitenteile der Abdeckung
m
leicht nach außen und klappen Sie Abdeckung nach vorne (⌦H).
8. Ziehen Sie den Silikonschlauch
l
vom Winkelstück k ab.
9. Nehmen Sie die Abdeckung aus der Önung im Gehäuse.
10. Ziehen Sie die Pumpe n nach oben aus dem Gehäuse (⌦I).
11. Reinigen Sie alle Komponenten unter einem Wasserstrahl mit einer Bürste.
10
Deutsch
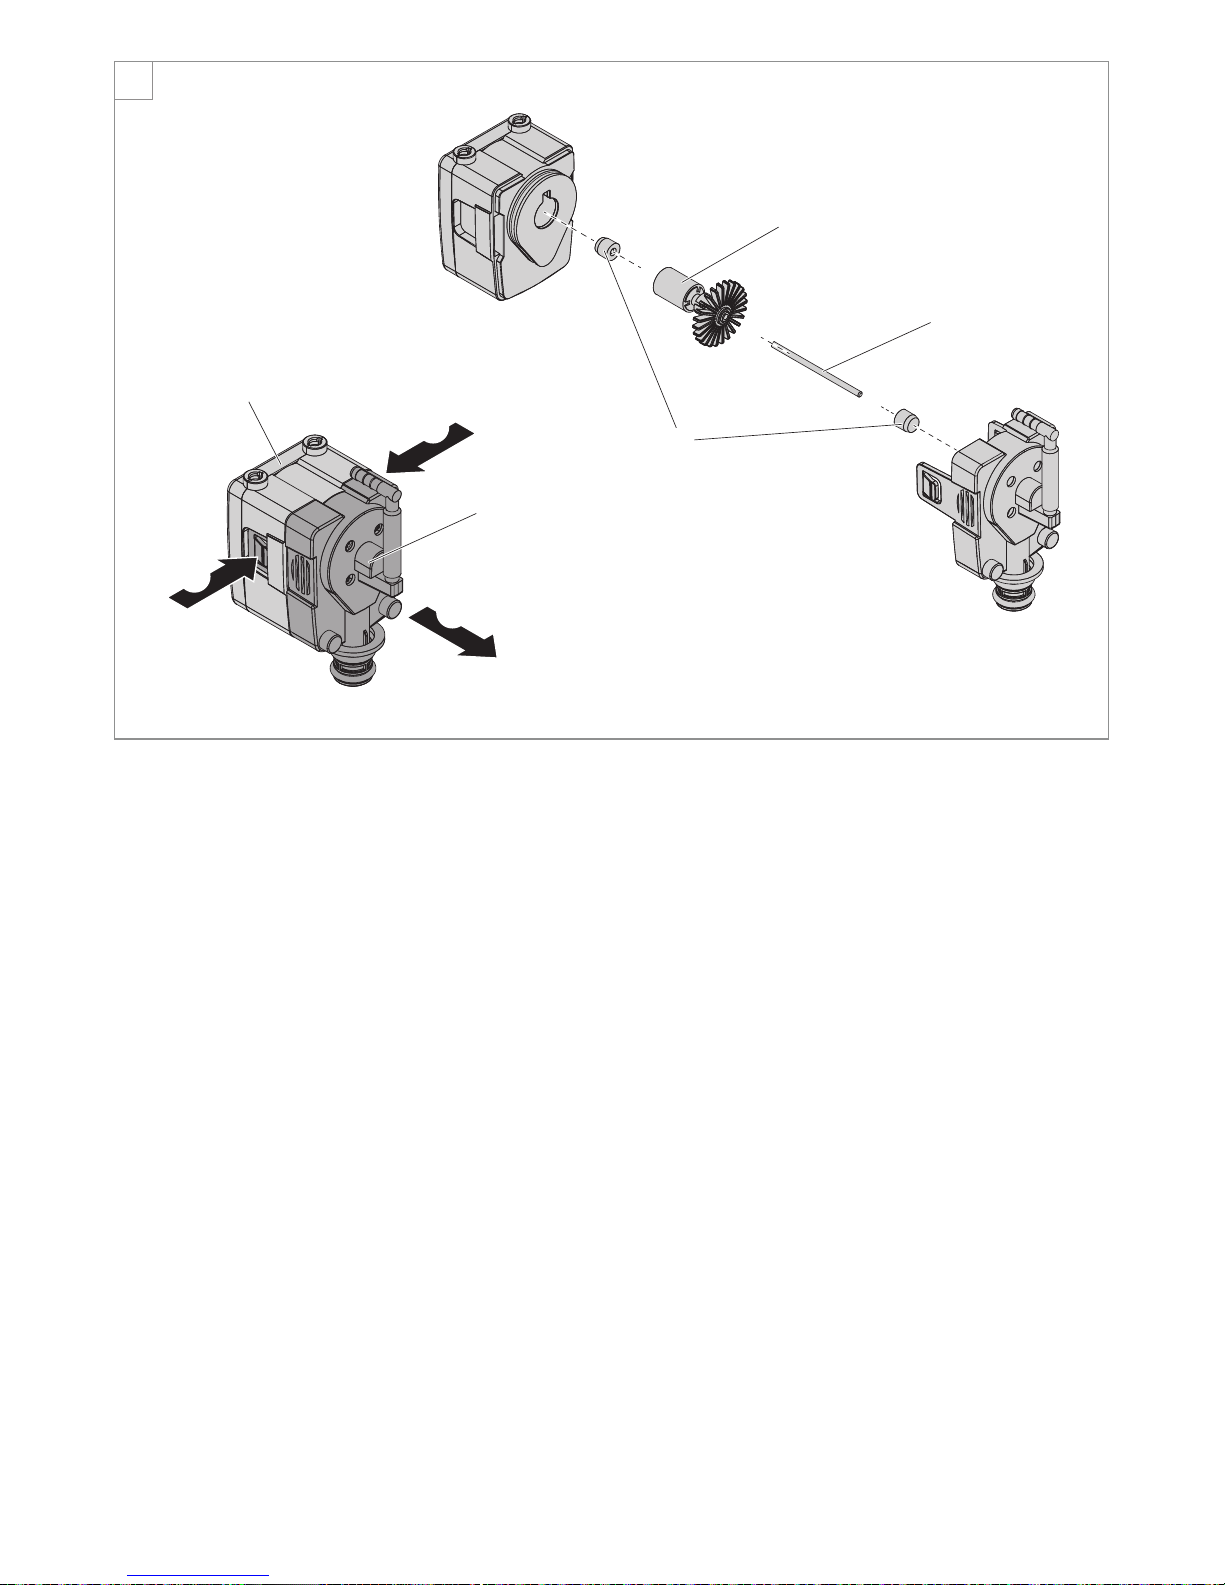
Zerlegen und Reinigen der Pumpe (⌦J)
1. Drücken Sie gleichzeitig die beiden seitlichen Rastnasen des Pumpendeckels nach Innen und ziehen Sie den
Pumpendeckel
p
vom Pumpengehäuse o ab.
2. Ziehen Sie das Pumpenrad q mitsamt den Achstüllen s aus dem Pumpengehäuse.
3. Ziehen Sie die Achse r aus dem Pumpenrad.
4. Reinigen Sie alle Komponenten unter einem Wasserstrahl mit einer Bürste.
Zusammenbau
1. Montieren Sie die Pumpe wieder in umgekehrter Reihenfolge.
2. Montieren Sie das Gerät wieder in umgekehrter Reihenfolge.
7. Beheben von Störungen
Achtung! Stromschlag!
▶ Ziehen Sie vor dem Beheben von Störungen den Netzstecker.
Störung Mögliche Ursache Abhilfe
Pumpe läuft nicht an Netzspannung fehlt ▶ Überprüfen Sie die Netz-
spannung
▶ Kontrollieren Sie die Zuleitung
Keine Luftbläschen, Pumpe
fördert nicht
Netzstecker ist nicht eingesteckt ▶ Stecken Sie den Netzstecker in die
Netzsteckdose
Pumpenrad ist blockiert ▶ Reinigen Sie die Pumpe
Restluft am Ausgang Kann nach einem Wasserwechsel oder
Reinigung auftreten
▶ Endet automatisch nach ca. 1 Tag
Abschäumer hängt zu tief ▶ Positionieren Sie den Abschäumer
höher
Trockener Schaum, mangelhafte
Abschäumleistung
Abschäumer hängt zu hoch ▶ Positionieren Sie den Abschäumer
tiefer
Zu geringe Luftmenge ▶ Erhöhen Sie den Lufteinlass mit dem
Lufteinstellregler
Eintritts- und Austrittsönungen ver
-
schmutzt
▶ Reinigen Sie die Eintritts- und Aus-
trittsönungen des Gehäuses und der
Prallplatte
Pumpenrad ist verschmutzt ▶ Reinigen Sie die Pumpe
Feuchter Schaum, Abschäumung
zu stark
Abschäumer hängt zu tief ▶ Positionieren Sie den Abschäumer
höher
Zu hohe Luftmenge ▶ Verringern Sie den Lufteinlass mit
dem Lufteinstellregler
Hohe Geräuschentwicklung Pumpenrad ist verschmutzt ▶ Reinigen Sie die Pumpe
Zu hohe Luftmenge ▶ Verringern Sie den Lufteinlass mit
dem Lufteinstellregler
Bei sonstigen Störungen wenden Sie sich bitte an den EHEIM Service.
11
Deutsch
8. Außerbetriebnahme
Lagern
1. Nehmen Sie das Gerät aus dem Aquarium.
2. Reinigen Sie das Gerät
3. Lagern Sie das Gerät an einem frostsicheren Ort.
Entsorgen
Beachten Sie im Falle der Entsorgung des Geräts die jeweiligen gesetzlichen Vorschriften.
Information zur Entsorgung von elektrischen und elektronischen Geräten in der europäischen Gemeinschaft:
Innerhalb der Europäischen Gemeinschaft wird für elektrisch betriebene Geräte die Entsorgung durch nationale
Regelungen vorgegeben, die auf der EU-Richtlinie 2012/19/EU über Elektronik-Altgeräte (WEEE) basieren. Danach
darf das Gerät nicht mehr mit dem kommunalen Müll oder Hausmüll entsorgt werden. Das Gerät wird bei den kom
-
munalen Sammelstellen bzw. Wertstohöfen kostenlos entgegengenommen. Die Produktverpackung besteht aus
recyclingfähigen Materialien. Entsorgen Sie diese umweltgerecht und führen diese der Wiederverwertung zu.
9. Technische Daten
Nennleistung 7 W
Fördermenge 500 l/h
Abmaße (H × B × T) 347 × 153 × 91 mm
Kabellänge 1,5 m
Medientemperatur 4°C – 35°C
Netzspannung/Frequenz 220 - 240 V / 50 Hz
Entnehmen Sie bitte die technischen Daten für andere Ländervarianten dem Typenschild.
10. Ersatzteile
Siehe Seite 138.

12
English
Translation of the original operating manual
mini skimmer skim marine 300
1. General user instructions
Information on using the operating manual
▶ Before using the appliance for the rst time, the operating manual must be read fully and understood.
▶ Consider the operating manual as part of the product and keep in a safe and accessible location.
▶ Enclose this operating manual if passing the appliance on to a third party.
Symbol explanation
The following symbols are used on the appliance.
The appliance must only be used indoors, and exclusively for aquariums.
The device has an immersion depth of max. 1.0 m.
The pump is of protection class II.
The symbol indicates that the appliance is protected against permanent submerging.
The appliance fulls the requirements of the EN 60335-2-41 standard.
The following symbols and signal words are used in this operating manual.
Risk of personal injury from dangerous voltage
The symbol denotes imminent danger causing severe personal injury or death if the corresponding measures are
not taken.
Risk of personal injury from a general source of danger
The symbol denotes imminent danger causing severe personal injury or death if the corresponding measures are
not taken.
Danger from magnetic elds
The symbol denotes imminent danger causing severe personal injury or death if the corresponding measures are
not taken.
CAUTION
Note on the risk of material damage.
Note with useful information and tips.
1,0 m
IPX8
13
English
Reference to a gure, in this case, reference to gure A
You are prompted for an action.
2. Application
The appliance and all parts included in the scope of delivery are intended for private use and must only be used:
‧ for the removal of metabolic products in saltwater aquariums up to approx. 300 l
‧ indoors
‧ in compliance with the technical data
The following limitations apply to the appliance:
‧ do not use for commercial or industrial purposes
‧ never operate without a water ow
VERY IMPORTANT SAFETY INSTRUCTIONS
WARNING- To guard against injury, basic safety precautions should be observed, including the following.
‧ FOR HOUSEHOLD USE ONLY
‧ WARNING! RISK OF ELECTRIC SHOCK!
‧ This pump has not been investigated for use in swimming pools areas!
‧ DO NOT RUN DRY!
READ AND FOLLOW ALL SAFETY INSTRUCTIONS.
‧ DANGER. To avoid possible electric shock, special care should be taken since water is employed in the use of
aquarium equipment. For each of the following situations, do not attempt repairs by yourself; return the appliance
to an authorized service facility for service or discard the appliance.
‧ If the appliance shows any sign of abnormal water leakage, immediately unplug it from the power source.
‧ Carefully examine the appliance after installation. It should not be plugged in if there is water on parts not
intended to be wet.
‧ Do not operate any appliance if it has a damaged cord or plug, or if it is malfunctioning or if it is dropped or
damaged in any manner.
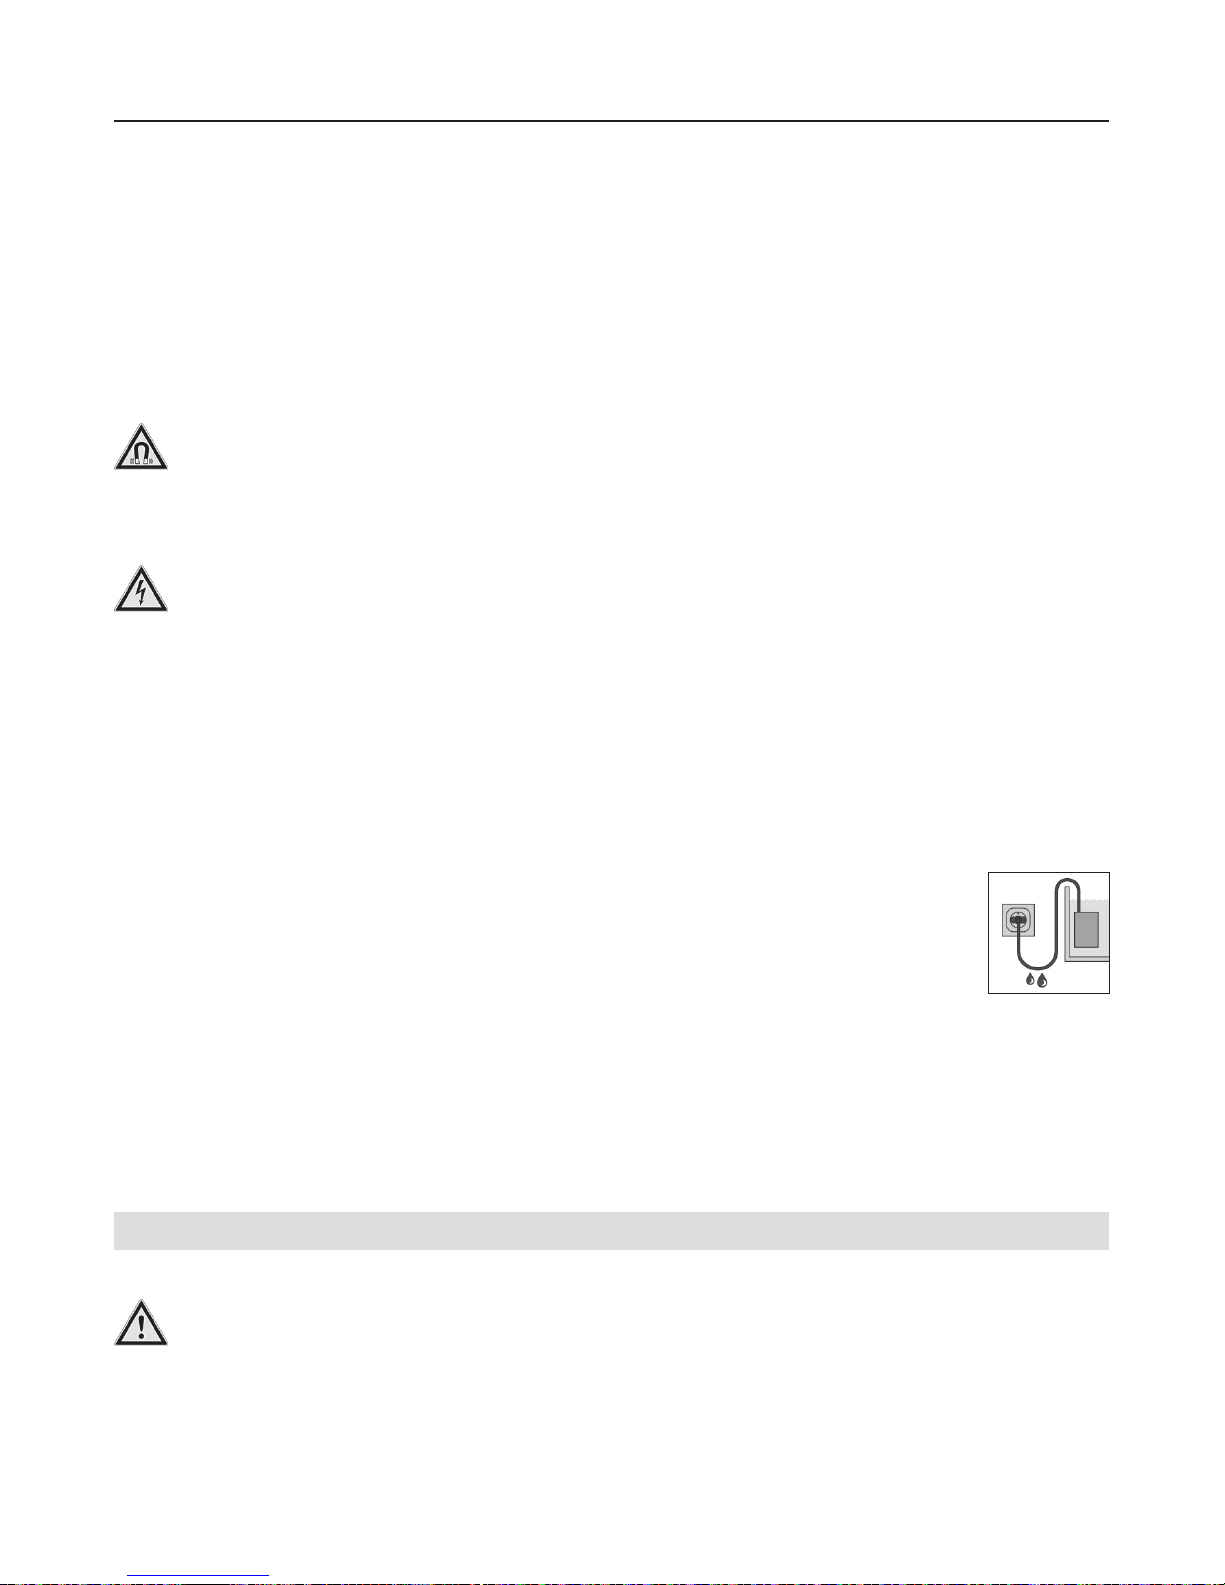
‧ To avoid the possibility of the appliance plug or recepta-
cle getting wet, position aquarium stand and tank to one
side of a wall mounted receptacle to prevent water from
dripping onto the receptacle or plug. A “drip loop”, shown
in the gure, should be arranged by the user for each
cord connecting the aquarium appliance to a receptacle.
The “drip loop” is that part of the cord below the level
of the receptacle, to prevent water travelling along the
cord and coming in contact with the receptacle. If the
plug or receptacle does get wet, DON’T unplug the cord;
disconnect the fuse or circuit breaker that supplies power
to the appliance. Then unplug and examine for presence
of water in the receptacle.
⌦A
DRIP LOOP
POWER
SUPPLY
CORD

14
English
‧ Close supervision is necessary when any appliance is used by or near children.
‧ To avoid injury, do not contact moving parts.
‧ Always unplug an appliance from an outlet when not in use, before putting or taking o parts, and before clean-
ing. Never yank cord to pull plug from outlet. Grasp the plug and pull to disconnect.
‧ Do not use an appliance for other than intended use. The use of attachments not recommended or sold by the
appliance manufacturer may cause an unsafe condition.
‧ Do not install or store the appliance where it will be exposed to the weather or to temperatures below freezing.
‧ Make sure an appliance mounted on a tank is securely installed before operating it.
‧ Read and observe all the important notices on the appliance and its cord.
‧ If an extension cord is necessary, a cord with a proper rating should be used. A cord rated for less amperes or
watts than the appliance rating may overheat. Care should be taken to arrange the cord so that it will not be
tripped over or pulled.
‧ Check that the voltage shown on the label of the unit corresponds to the voltage of the mains supply.
‧ Disconnect all electrical appliances from the mains before placing hands in the water.
‧ The line cord of this unit cannot be replaced or repaired. Should the line cord become damaged the appliance
must be discarded.
KEEP THESE INSTRUCTIONS FOR FUTURE
REFERENCE.
3. Safety instructions
Risks for persons and property can arise from this appliance if the appliance is improperly used or not used as intended or if the safety instructions are not heeded.
For your safety
‧ Do not let the appliance packaging get into the hands of children as hazards can
arise (danger of suocation!).
‧ This appliance can be used by children from the age of 8 and by persons with
reduced physical, sensory or mental capabilities or lack of experience and/or
knowledge if they are supervised and have been instructed in the safe use of the
appliance and have understood the resulting dangers. Children must not play
with the appliance. Cleaning and user maintenance must not be carried out by
children unless they are supervised.
‧ Before use, carry out a visual inspection to ensure that the appliance, especially
the mains cable and plug, are undamaged.
‧ Never use the appliance with a damaged mains cable.
‧ Repairs must only be carried out by an EHEIM service centre.
15
English
‧ The appliance must not run dry. It must only be used for liquids from +4°C up to
a maximum of +35°C.
‧ Do not carry the appliance by the mains cable, and to disconnect from the
mains, always pull on the plug and not on the cable or appliance.
‧ Protect the mains cable against heat, oil and sharp edges.
‧ Only carry out the work described in these instructions.
‧ Never make technical modications to the appliance.
‧ Only use original spare parts and accessories for the appliance.
‧ The appliance has magnets with strong magnetic elds that can aect pace
-
makers or implanted debrillators (ICD). Maintain a distance of at least 30 cm
between the implant and magnet.
‧ The pump must be protected by a residual current protection device with a max-
imum rated residual current of 30 mA. Please contact an electrician if there are
any questions or problems.
‧ In the event of water leakage or when the residual current protection device is
triggered, immediately disconnect all devices in the aquarium from the power
supply.
‧ If they are not being used, always disconnect all devices in the aquarium from
the power supply before you install/remove any parts and before all cleaning and
maintenance work.
‧ Protect the mains socket and mains plug against moisture.
It is recommended to form a drip loop with the mains cable to
prevent any water running along the cable to the mains socket.
‧ The electrical data of the pump must match the data of the power
mains. This data is found on the type plate, the packaging and in these instruc
-
tions.
‧ The mains connection cable of the pump cannot be replaced. If the cable is
damaged, the pump must be scrapped.

16
English
4. Commissioning
Installation in the aquarium (⌦A)
Attention! Strong magnets! Danger of crushing!
▶ Separate the magnets by twisting them.
▶ Place the magnets at a distance of 30 cm away from each other.
1. Remove all transport securing devices (e.g. adhesive tape, lling material etc.), particularly inside the skimmer.
2. With one hand, hold the skimmer at the desired position in the aquarium from the inside.
3. With the other hand, carefully place the magnet half with logo
b
onto the glass panel at a distance from the
skimmer (from the outside). Ensure that the magnet does not strike against the glass panel!
4. Move the magnet half in the direction of the skimmer on the glass until both magnet halves
a/b
lie one above
the other.
Laying the mains cable (⌦B)
1. Guide the mains cable out of the small side opening and then guide it between the connecting pieces for cable
guide
c
.
The correct cable guide is indicated by a line.
5. Operation
Start position
1. Position the skimmer so that the water level of your aquarium is between water level max. and water level min.
d
on the skimmer (⌦C).
2. Set the air adjustment controller to the middle position (⌦D).
Following initial commissioning, the skimmer must “run in”. This can take up to
one week. The skimmer usually starts to produce foam within the rst 2 days. During this time, residual air may
escape at the outlet. This is no cause for concern. Following the running-in period, no further residual air will
escape.
Switching on the pump
1. Insert the mains plug in the mains socket. Attention: The pump starts immediately!
Switching o the pump
1. Remove the mains plug from the mains socket.
Fine adjustment (⌦D)
For an optimal skimmer performance, a ne adjustment of the appliance should be carried out following the “running in”
phase. Set the skimmer performance according to your requirements via the air adjustment controller (⌦C).
Ozone connection (⌦E)
1. Remove the cover and open the predetermined breaking point
f
for the hose introduction.
2. Remove the protective sleeve.
3. Attach the hose (Ø 6 mm) for the ozone feed to the connecting piece
g
.

17
English
6. Maintenance
Attention! Electrocution!
▶ Before all maintenance work, remove the mains plug.
Caution! Material damage.
▶ Do not use hard objects or aggressive cleaning agents for cleaning.
The following sections describe maintenance work necessary for optimum and fault-free operation. Regular mainte
-
nance prolongs the service life and assures functionality of the appliance over a long period.
Weekly maintenance work
1. Empty the foam cup once or twice a week, as required.
2. Check the appliance for algae growth and dirt accumulation.
In the event of algae growth and dirt accumulation, proceed as follows:
1. Remove the mains plug of the pump.
2. Hold the skimmer with one hand.
3. With the other hand, move the magnet halves with logo on the glass panel away from the skimmer.
4. Remove the skimmer.
5. Clean the inlet and outlet openings of the housing, as well as the bae plate, under a stream of water using a
brush.
Monthly maintenance work
Depending on the degree of contamination, we recommend that you completely disassemble and clean the appliance once
every month. To do so, proceed as follows:
Disassembling and cleaning the appliance
1. Before maintenance work, remove the mains plug of the pump.
2. Hold the skimmer with one hand.
3. With the other hand, move the magnet halves with logo on the glass panel away from the skimmer.
4. Remove the skimmer.
5. Remove the foam cup
h
from the housing i (⌦F).
6. Press the latches inwards and pull the bae plate
j
out of the housing from below (⌦G).
7. Pull the side parts of the cover m gently outward and tilt the cover forward (⌦H).
8. Pull the silicone tube l away from the angle joint k .
9. Remove the cover from the opening in the housing.
10. Pull the pump n out of the housing from above (⌦I).
11. Using a brush, clean all components under a jet of water.
Disassembling and cleaning the pump (⌦J)
1. Press both side latches of the pump cover inwards and pull the pump cover
p
o the pump housing o ab.
2. Pull the impeller q, together with the axle grommets,
s
out of the pump housing.
3. Pull the axle r out of the impeller.
4. Using a brush, clean all components under a jet of water.

18
English
Assembly
1. Install the pump again in reverse order.
2. Install the appliance again in reverse order.
7. Clearing faults
Attention! Electrocution!
▶ Before clearing faults, remove the mains plug.
Faults Possible cause Remedy
Pump does not start No mains voltage ▶ Check the mains
voltage
▶ Check the supply line
No air bubbles, the pump is not
pumping
Mains plug is not inserted ▶ Insert the mains plug in the mains
socket
Impeller is blocked ▶ Clean the pump
Residual air at the outlet can occur after the water is changed or
after cleaning
▶ this ends automatically after approx.
1 day
Skimmer is too low ▶ Position the skimmer higher
Dry foam, ineffective skimmer
performance
Skimmer is too high ▶ Position the skimmer lower
Air volume too low ▶ Increase the air intake with the air
adjustment controller
Inlet and outlet openings dirty ▶ Clean the inlet and outlet openings of
the housing and bafe plate
Impeller is dirty ▶ Clean the pump
Moist foam, skimming too strong
Skimmer is too low ▶ Position the skimmer higher
Air volume too high ▶ Reduce the air intake with the air
adjustment controller
High noise generation Impeller is dirty ▶ Clean the pump
Air volume too high ▶ Reduce the air intake with the air
adjustment controller
For other faults, please contact EHEIM Service.

19
English
8. Decommissioning
Storage
1. Take the appliance out of the aquarium.
2. Clean the appliance
3. Store the appliance in a frost-proof place.
Disposal
When disposing of the appliance, heed the respective statutory regulations.
Information on the disposal of electrical and electronic appliances in the European Union:
Within the European Union, disposal of electrically operated appliances is governed by national regulations that are
based on the EU Directive 2012/19/EU on waste electrical and electronic equipment (WEEE). The appliance may
no longer be disposed of with the municipal or household waste. The appliance will be accepted free of charge at
municipal collection points or recycling centres. The product packaging is made up of recyclable materials. Dispose
of them in an environmentally responsible manner and take them for recycling.
9. Technical data
Rated power 7 W
Delivery rate 500 l/h
Dimensions (H × W × D) 347 × 153 × 91 mm
Cable length 1.5 m
Media temperature 4°C - 35°C
Mains voltage/frequency 220 - 240 V / 50 Hz
The technical data for other country variants can be found on the type plate.
10. Spare parts
See page 138.
20
Français
Traduction du mode d’emploi d’origine
Nano écumeur skim marine 300
1. Consignes générales à l’attention de l’utilisateur
Informations relatives à l’utilisation du manuel
▶ Avant la première mise en service de l’appareil, vous devez avoir lu et compris intégralement le mode d’emploi.
▶ Le manuel de l’utilisateur constitue une partie intégrante du produit, veuillez le conserver à portée de main.
▶ Joignez ce manuel de l’utilisateur quand vous transmettez l’appareil à un tiers.
Explication des symboles
Les symboles suivants sont utilisés sur l’appareil.
L’appareil ne doit être utilisé qu’à l’intérieur, pour les domaines d’utilisation aquariophiles.
La profondeur d’immersion de l’appareil est de 1,0 m au maximum.
La pompe est conforme à la classe de protection II.
Ce symbole indique que l’appareil est protégé contre l’immersion permanente.
L’appareil satisfait aux exigences de la directive EN 60335-2-41.
Les symboles et mentions d’avertissement suivants sont utilisés dans le présent mode d’emploi.
Risque de blessures de personnes par une tension électrique dangereuse
Ce symbole indique un danger immédiat pouvant entraîner la mort ou de graves blessures si les précautions cor
-
respondantes à prendre ne sont pas respectées.
Risque de blessures de personnes par un danger de nature générale
Ce symbole indique un danger immédiat pouvant entraîner la mort ou de graves blessures si les précautions correspondantes à prendre ne sont pas respectées.
Danger par champs magnétiques
Ce symbole indique un danger immédiat pouvant entraîner la mort ou de graves blessures si les précautions correspondantes à prendre ne sont pas respectées.
ATTENTION
Risque de dommages matériels.
Conseils et informations utiles.
1,0 m
IPX8

21
Français
Renvoi à une illustration. Ici, renvoi à la gure A
Vous êtes invité(e) à exécuter une action.
2. Domaine d’application
L’appareil et toutes les pièces fournies sont destinés à être utilisés dans le domaine privé et ils ont été conçus exclusivement :
‧ Pour éliminer les métabolites des aquariums d’eau de mer jusqu’à 300 l
‧ Dans les zones intérieures
‧ En respectant les caractéristiques techniques
Les restrictions suivantes s’appliquent à l’appareil :
‧ Ne pas utiliser à des ns commerciales ou industrielles
‧ Ne jamais utiliser sans courant d’eau
3. Consignes de sécurité
Cet appareil peut présenter des dangers pour les personnes et les biens s’il n’est pas
utilisé correctement ou conformément aux ns pour lesquelles il a été conçu ou encore
si les consignes de sécurité ne sont pas respectées.
Pour votre sécurité
‧ Tenir l’emballage de l’appareil hors de portée des enfants parce qu’il peut repré
-
senter un danger (risque d’étouement !).
‧ Cet appareil peut être utilisé par des enfants à partir de 8 ans et par des per
sonnes ayant des capacités physiques, sensorielles ou mentales réduites, ou
encore des personnes manquant d’expérience et/ou de connaissances, si ces
personnes sont surveillées ou que des informations leur ont été données quant
à la façon d’utiliser l’appareil en toute sécurité et si elles ont compris les dangers
résultant de l’utilisation de l’appareil. Ne laissez pas les enfants jouer avec l’ap
-
pareil. Les enfants ne sont pas autorisés à eectuer le nettoyage et la maintenance utilisateur, à moins qu’ils ne soient surveillés.
‧ Eectuez une inspection visuelle avant d’utiliser l’appareil an de vérier si l’ap-
pareil et, en particulier, le câble secteur et la che sont intacts.
‧ N’utilisez jamais l’appareil avec un câble secteur endommagé.
‧ Les réparations doivent être réalisées par un service agréé par EHEIM.
‧ L’appareil ne doit pas fonctionner à sec. Il peut être utilisé pour des liquides de
+4°C à max. +35°C.
⌦A

22
Français
‧ Ne portez pas l’appareil par le câble secteur, tirez toujours par la che pour
séparer l’appareil, ne tirez jamais par le câble ou l’appareil.
‧ Protégez le câble secteur de la chaleur, l’huile et des arêtes tranchantes.
‧ Exécutez uniquement les travaux décrits dans ce manuel.
‧ N’apportez jamais de modications techniques à l’appareil.
‧ Utilisez uniquement des pièces de rechange et accessoires d’origine pour cet
appareil.
‧ L’appareil comporte des aimants créant de forts champs magnétiques pouvant
exercer une inuence sur les stimulateurs cardiaques ou les débrillateurs
implantés (ICD). Observez une distance d’au moins 30 cm entre l’implant et
l’aimant.
‧ La pompe doit être sécurisée à l’aide d’un dispositif de protection contre les
courants de fuite de 30 mA maximum. Si vous avez des questions ou en cas de
problèmes, veuillez vous adresser à un spécialiste en électricité.
‧ En cas de fuite d’eau ou de déclenchement du dispositif de protection contre les
courants de fuite, débranchez immédiatement du secteur tous les appareils de
l’aquarium.
‧ En règle générale, quand ils ne sont pas utilisés, débranchez du secteur tous les
appareils de l’aquarium avant de monter ou démonter des pièces et avant tous
travaux de nettoyage ou de maintenance.
‧ Protégez la prise et la che secteur de l’humidité.
Nous conseillons de former une boucle avec le câble secteur, an
d’empêcher que de l’eau ne coule le long du câble et s’inltre dans
la prise.
‧ Les caractéristiques électriques de la pompe doivent correspondre aux caracté
ristiques du secteur. Elles sont indiquées sur la plaque signalétique, l’emballage
ou dans le présent mode d’emploi.
‧ Le câble de raccordement secteur de la pompe ne peut pas être remplacé. La
pompe doit être mise au rebut lorsque le câble est endommagé.

23
Français
4. Mise en service
Montage dans l’aquarium (⌦A)
Attention, aimants puissants ! Risque de coincement.
▶ Séparez les aimants en les tournant mutuellement en sens inverse.
▶ Conservez les aimants séparément à une distance mutuelle de 30 cm.
1. Enlevez toutes les sécurisations de transport (comme des bandes adhésives, du matériel de rembourrage, etc.),
en particulier à l’intérieur de l’écumeur.
2. Tenez l’écumeur avec une main à la position souhaitée à l’intérieur de l’aquarium.
3. De l’autre main, placez de l’extérieur, avec précautions, la moitié de l’aimant comportant le logo
b
sur la vitre,
en respectant une distance par rapport à l’écumeur. L’aimant ne doit pas s’approcher brusquement de la vitre !
4. Glissez la moitié de l’aimant sur la vitre en direction de l’écumeur, jusqu’à ce que les deux moitiés de l’aimant
a/b
soient superposées.
Pose du câble secteur (⌦B)
1. Faites sortir le câble secteur de la petite ouverture latérale et faites-le passer entre les manchons destinés au
passage du câble
c
.
Le passage correct du câble est matérialisé par une ligne.
5. Utilisation
Position de départ
1. Réglez la position de l’écumeur de sorte que le niveau d’eau de votre aquarium se trouve au centre, entre les
repères water level max. et water level min.,
d
sur l’écumeur (⌦C).
2. Placez le régulateur d’air en position centrale (⌦D).
Après la première mise en service, l’écumeur doit se « roder ». Ceci peut demander jusqu’à 1 semaine environ.
Normalement, l’écumeur produira déjà de l’écume dans les 2 premiers jours. Pendant ce temps, de l’air résiduel
peut s’échapper à la sortie. Ce n’est pas un problème. Après la période de rodage, il n’y aura plus d’air résiduel qui
s’échappe.
Mettre la pompe en marche
1. Insérez la che secteur dans la prise secteur. Attention : La pompe se met immédiatement en marche !
Arrêter la pompe
1. Retirez la che secteur dans la prise murale.
Réglage précis (⌦D)
Pour garantir une puissance d’écumage optimale, vous devez procéder à un réglage précis de l’appareil après la « phase
de rodage ». Réglez la puissance d’écumage conformément à vos exigences et par l’intermédiaire du régulateur d’air (⌦C).
24
Français
Raccordement du tuyau d’ozone (⌦E)
1. Retirez le couvercle et ouvrez le point de rupture théorique
f
pour le passage du tuyau.
2. Retirez la douille de protection.
3. Placez le tuyau (Ø 6 mm) d’arrivée d’ozone sur la tubulure de raccordement
g
.
6. Maintenance
Attention ! Choc électrique !
▶ Retirez la che secteur de la prise murale avant de procéder aux travaux de maintenance.
Prudence ! Dommage matériel.
▶ N’utilisez pas d’objets durs ou des produits agressifs pour le nettoyage.
Les travaux de maintenance requis pour un fonctionnement optimal et irréprochable sont décrits dans les sections
suivantes. Une maintenance régulière prolonge la durée de vie et assure le bon fonctionnement de l’appareil pen
-
dant une longue période.
Travaux de maintenance hebdomadaires
1. Videz le pot à mousse 1 à 2 fois par semaine, en fonction des besoins.
2. Vériez si l’appareil présente des algues et des accumulations de souillures.
Si l’appareil présente des algues et des accumulations de souillures, procédez de la façon suivante :
1. Retirez la che secteur de la pompe.
2. Tenez l’écumeur d’une main
3. Détachez de l’autre main les moitiés de l’aimant avec le logo de l’écumeur en les glissant sur la vitre.
4. Retirez l’écumeur.
5. Nettoyez sous un jet d’eau et à l’aide d’une brosse les orices d’entrée et de sortie du carter, de même que la
plaque déectrice.
Travaux de maintenance mensuels
En fonction de l’encrassement de l’appareil, nous conseillons de procéder à son démontage et à son nettoyage complets
une fois par mois. Procédez à ces ns comme suit :
Démontage et nettoyage de l’appareil
1. Retirez la che secteur de la pompe de la prise murale avant de procéder aux travaux de maintenance.
2. Tenez l’écumeur d’une main
3. Détachez de l’autre main les moitiés de l’aimant avec le logo de l’écumeur en les glissant sur la vitre.
4. Retirez l’écumeur.
5. Retirez le pot à mousse
h
du carter i (⌦F).
6. Repoussez les becs d’encliquetage vers l’intérieur et abaissez la plaque déectrice
j
pour la faire sortir du
carter (⌦G).
7. Tirez légèrement les parties latérales du capot
m
vers l’extérieur et rabattez le capot vers l’avant (⌦H).
8. Retirez le tuyau en silicone l de la cornière k .
9. Otez le capot de l’ouverture du carter.
10. Soulevez la pompe n pour la faire sortir du carter (⌦I).
11. Nettoyez tous les composants sous un jet d’eau avec une brosse.
25
Français
Démontage et nettoyage de la pompe (⌦J)
1. Repoussez vers l’intérieur, en même temps, les deux becs d’encliquetage latéraux du couvercle de pompe et
retirez le couvercle de la pompe
p
du boîtier de la pompe o ab.
2. Retirez la roue de la pompe q, avec les passe-axes s, du carter de la pompe.
3. Retirez l’axe r de la roue de la pompe.
4. Nettoyez tous les composants sous un jet d’eau avec une brosse.
Montage
1. Remontez la pompe en procédant dans l’ordre inverse du démontage.
2. Remontez l’appareil en procédant dans l’ordre inverse du démontage.
7. Élimination des anomalies
Attention ! Choc électrique !
▶ Retirez la che secteur de la prose murale avant le dépannage.
Défaillance Cause possible Solution
La pompe ne démarre pas Aucune tension secteur ▶ Vériez la tension
secteur
▶ Vériez le câble d‘alimentation
Pas de petites bulles d‘air, la
pompe ne refoule pas
La che secteur n‘est pas insérée dans
la prise murale
▶ Insérez la che secteur dans la prise
murale.
La roue de la pompe est bloquée ▶ Nettoyez la pompe
Air résiduel à la sortie Peut se produire après un changement
de l‘eau ou un nettoyage
▶ Prend automatiquement n au bout
d‘un jour environ
L‘écumeur est positionné trop bas ▶ Positionnez l‘écumeur plus haut
Mousse sèche, puissance d‘écu
-
mage insufsante
L‘écumeur est positionné trop haut ▶ Positionnez l‘écumeur plus bas
Quantité d‘air trop faible ▶ Augmentez l‘entrée d‘air avec le
régulateur d‘air
Orices d‘entrée et de sortie encrassés ▶ Nettoyez les orices d‘entrée et
de sortie du carter et de la plaque
déectrice
La roue de la pompe est encrassée ▶ Nettoyez la pompe
Mousse humide, écumage trop
important
L‘écumeur est positionné trop bas ▶ Positionnez l‘écumeur plus haut
Quantité d‘air trop importante ▶ Diminuez l‘entrée d‘air avec le régu
-
lateur d‘air
Important dégagement de bruit La roue de la pompe est encrassée ▶ Nettoyez la pompe
Quantité d‘air trop importante ▶ Diminuez l‘entrée d‘air avec le régu
-
lateur d‘air
Pour les autres anomalies, veuillez-vous adresser au Service EHEIM.
26
Français
8. Mise hors service
Stockage
1. Retirez l’appareil de l’aquarium.
2. Nettoyez l’appareil
3. Conservez l’appareil à un endroit à l’abri du gel.
Élimination/destruction
Pour éliminer/détruire l’appareil, respectez les prescriptions légales en vigueur.
Informations relatives à l’élimination des appareils électriques et électroniques au sein de l’Union Européenne :
Au sein de la Communauté Européenne, l’élimination/la destruction des appareils électriques est réglementée
par des règlements nationaux basés sur la directive UE 2012/19/UE relative aux appareils électroniques usagés
(WEEE (Déchets d’équipements électriques et électroniques)). Conformément à cette directive, l’appareil ne doit
plus être éliminé avec les déchets communaux ou ménagers. L’appareil peut être déposé gratuitement auprès
des points de collecte ou déchetteries municipaux. L’emballage du produit est composé de matériaux recyclables.
Éliminez ces matériaux de manière non polluante et faites-les parvenir à un point de recyclage.
9. Caractéristiques techniques
Puissance nominale 7 W
Débit 500 l/h
Dimensions (H × l × P) 347 × 153 × 91 mm
Longueur du câble 1,5 m
Température du milieu 4°C - 35°C
Tension secteur/fréquence 220 - 240 V / 50 Hz
Les données techniques pour les autres variantes nationales sont précisées sur la plaque signalétique.
10. Pièces de rechange
Voir page 138.
27
Italiano
Traduzione delle istruzioni per l’uso originali
Schiumatoio mini skim marine 300
1. Istruzioni per l’uso generali
Informazioni sull’impiego delle istruzioni per l’uso
▶ Prima di mettere in funzione l’apparecchio per la prima volta, è necessario leggere per intero e comprendere le
istruzioni per l’uso.
▶ Considerare le istruzioni per l’uso come parte del prodotto e conservarle bene e a portata di mano.
▶ In caso di trasmissione dell’apparecchio a terzi, allegare le presenti istruzioni per l’uso.
Spiegazione dei simboli
Sull’apparecchio vengono impiegati i seguenti simboli.
L’apparecchio deve essere utilizzato solo in ambienti interni e per impieghi acquaristici.
La profondità d’immersione massima dell’apparecchio è di 1,0 m.
La pompa appartiene alla classe di isolamento II.
Il simbolo indica che l’apparecchio è protetto in caso di immersione duratura.
L’apparecchio soddisfa i requisiti della direttiva EN 60335-2-41.
Nelle presenti istruzioni per l’uso vengono utilizzati i simboli e le avvertenze seguenti.
Pericolo di danni alle persone causati dalla tensione elettrica pericolosa
Il simbolo richiama l’attenzione su un pericolo direttamente incombente, le cui conseguenze possono essere la
morte o gravi lesioni se non vengono adottate le apposite misure di protezione.
Pericolo di danni alle persone causati da fonti di pericolo generali
Il simbolo richiama l’attenzione su un pericolo direttamente incombente, le cui conseguenze possono essere la
morte o gravi lesioni se non vengono adottate le apposite misure di protezione.
Pericolo causato da campi magnetici
Il simbolo richiama l’attenzione su un pericolo direttamente incombente, le cui conseguenze possono essere la
morte o gravi lesioni se non vengono adottate le apposite misure di protezione.
CAUTELA
Segnalazione del pericolo di danni materiali.
Avvertenza con informazioni e suggerimenti utili.
1,0 m
IPX8
28
Italiano
Rimando a una gura, qui rimando alla gura A
Viene richiesta un’azione da parte vostra.
2. Campo d’impiego
L’apparecchio e tutte le parti fornite in dotazione sono destinati all’uso nel campo privato e devono essere usati esclusivamente:
‧ per la rimozione di metaboliti in acquari di acqua marina no a circa 300 l
‧ in ambienti interni
‧ nel rispetto dei dati tecnici
Per l’apparecchio valgono le seguenti restrizioni:
‧ non utilizzarlo per scopi commerciali o industriali
‧ non utilizzarlo mai senza usso d’acqua
3. Avvertenze di sicurezza
Questo apparecchio può costituire un pericolo per persone o beni materiali se esso non
viene utilizzato correttamente o non secondo la nalità d’impiego oppure se le avvertenze di sicurezza non vengono osservate.
Per la vostra sicurezza
‧ Non lasciare in mano a bambini l’imballaggio dell’apparecchio in quanto può
essere fonte di pericoli (pericolo di soocamento!).
‧ Questo apparecchio può essere utilizzato da bambini sopra gli 8 anni e da
persone con capacità siche, sensoriali o mentali ridotte o che non dispongono
di esperienza e cognizioni tecniche, però a condizione che vengano sorvegliate
e siano state addestrate nell’uso corretto dell’apparecchio e siano in grado di
capire i pericoli conseguenti. I bambini non possono giocare con l’apparecchio.
Gli interventi di pulizia e manutenzione non possono essere eseguiti da bambini
se questi non vengono sorvegliati.
‧ Prima dell’utilizzo, eettuare un controllo visivo per assicurare che l’apparecchio,
in particolare il cavo elettrico e la spina, non siano danneggiati.
‧ Non utilizzare mai l’apparecchio con un cavo elettrico danneggiato.
‧ Le riparazioni possono essere eseguite esclusivamente da un punto di assi
-
stenza EHEIM.
‧ L’apparecchio non deve operare all’asciutto. Può essere impiegato solo per
liquidi da +4°C a max. +35°C.
⌦A
29
Italiano
‧ Non trasportare l’apparecchio tenendolo per il cavo elettrico e, per il disinseri-
mento dalla rete elettrica, tirare sempre la spina e non il cavo o l’apparecchio.
‧ Proteggere il cavo elettrico dal calore, dall’olio e da spigoli vivi.
‧ Eseguire solo lavori che sono stati descritti nelle presenti istruzioni.
‧ Non eettuare mai modiche tecniche all’apparecchio.
‧ Utilizzare solo pezzi di ricambio e accessori originali per l’apparecchio.
‧ L’apparecchio possiede magneti con forti campi magnetici che possono inu
-
ire su pace-maker o debrillatori impiantati (ICD). Mantenere una distanza di
almeno 30 cm tra l’impianto e il magnete.
‧ La pompa deve essere protetta con un dispositivo di protezione per correnti di
guasto con una corrente di taratura di max. 30 mA. Rivolgersi ad un elettricista
specializzato qualora dovessero sorgere domande e problemi.
‧ Staccare immediatamente tutti gli apparecchi nell’acquario dalla rete elettrica in
caso di perdita d’acqua o se interviene l’interruttore dierenziale.
‧ Per principio, staccare tutti gli apparecchi nell’acquario dalla rete elettrica, se
non vengono utilizzati, prima di montare o smontare componenti e prima di tutti i
lavori di pulizia e di manutenzione.
‧ Proteggere la presa elettrica e la spina dall’umidità.
Si consiglia di formare con il cavo elettrico un giro per impedire
che l’acqua che scorre lungo il cavo possa entrare nella presa.
‧ I dati elettrici della pompa devono corrispondere ai dati della rete
elettrica. Questi dati sono riportati sulla targhetta, sulla confezione o nelle pre
-
senti istruzioni.
‧ Non si deve sostituire la linea di allacciamento alla rete di questa pompa. In caso
di danneggiamento della linea, la pompa non potrà più essere utilizzata.
4. Messa in funzione
Montaggio nell’acquario (⌦A)
Attenzione, magneti forti! Pericolo di schiacciamento.
▶ Separare i magneti ruotandoli.
▶ Immagazzinare i magneti separatamente l’uno dall’altro a una distanza di 30 cm.
1. Rimuovere tutti i componenti di imballaggio (ad esempio adesivi, materiali di riempimento, ecc.), soprattutto
anche all’interno dello schiumatoio.
2. Con una mano, tenere lo schiumatoio dall’interno alla posizione desiderata nell’acquario.

30
Italiano
3. Con l’altra mano, applicare con cautela la metà del magnete con logo
b
dall’esterno sulla lastra di vetro, tenen-
dola a distanza dallo schiumatoio. Fare attenzione che il magnete non batta contro la lastra di vetro!
4. Spingere la metà del magnete sul vetro in direzione dello schiumatoio nché entrambe le metà del magnete
a/b
sono sovrapposte.
Posa del cavo elettrico (⌦B)
1. Introdurre il cavo elettrico dalla piccola apertura laterale, facendolo passare tra i passanti di guida per il cavo
c
.
La guida per il cavo corretta è indicata con una linea.
5. Funzionamento
Posizione di avvio
1. Regolare la posizione dello schiumatoio in modo che il livello dell’acqua del proprio acquario sia compreso tra la
marcatura water level max. ewater level min.
d
sullo schiumatoio (⌦C).
2. Impostare il regolatore dell’aria sulla posizione centrale (⌦D).
Dopo la prima messa in funzione, lo schiumatoio deve “rodarsi”. Ciò può richiedere no a circa una
settimana. Di regola lo schiumatoio inizia già entro i primi 2 giorni a produrre schiuma. In questo periodo può accadere che dall’uscita fuoriesca aria residua. Ciò non è un motivo di preoccupazione. Dopo il tempo di rodaggio non
fuoriesce più aria residua.
Accendere la pompa
1. Inserire la spina nella presa elettrica. Attenzione: La pompa si avvia immediatamente!
Spegnere la pompa
1. Estrarre la spina dalla presa elettrica.
Regolazione di precisione (⌦D)
Per garantire una potenza dello schiumatoio ottimale, eettuare una regolazione di precisione dell’apparecchio dopo la “fase
di rodaggio”. Impostare la potenza dello schiumatoio in base alle proprie esigenze mediante il regolatore dell’aria (⌦C).
Collegamento dell’ozono (⌦E)
1. Rimuovere il coperchio e aprire il punto di rottura predisposto
f
per introdurre il tubo.
2. Rimuovere l’involucro protettivo.
3. Inserire il tubo (Ø 6 mm) per l’immissione dell’ozono sull’attacco di collegamento
g
.
6. Manutenzione
Attenzione! Scossa elettrica!
▶ Prima di tutti i lavori di manutenzione, tirare la spina elettrica.
Cautela! Danni materiali.
▶ Per la pulizia, non utilizzare oggetti duri o detergenti aggressivi.
 Loading...