

EHEIM Professionel II 2026, Professionel II Series, Professionel II 2028, Professionel II 2126, Professionel II 2128 Operating Instructions Manual
2026 / 2028 – 2126 / 2128
E
Filtro exterior para acuario
P
Filtros exteriores para aquário
GR
Εξωτερικ φίλτρο ενυδρείου
CZ
Vn ˇej ˇsí filtr do akvárií
H
Akvárium-külszűrő
PL
Filtr zewnętrzny do akwariów
SK
Vonkajší filter pre akváriá
SLO
Zunanji filter za akvarije
RUS
Внешний фильтр
D
Aquarien-Außenfilter
GB USA
External aquarium filter
F
Filtre extérieur pour l’aquarium
NL
Aquarium-Buitenfilter
S
Ytterfilter för akvarier
N
Utvendig akvariefilter
FIN
Ulkosuodattimet
DK
Eksternt filter
I
Filtro esterno per acquario
2026 / 2126
2028 / 2128
쐃
쐏
쐋
쐇
쐇
쐄
쐏
쐋
쐇
쐃
쐄
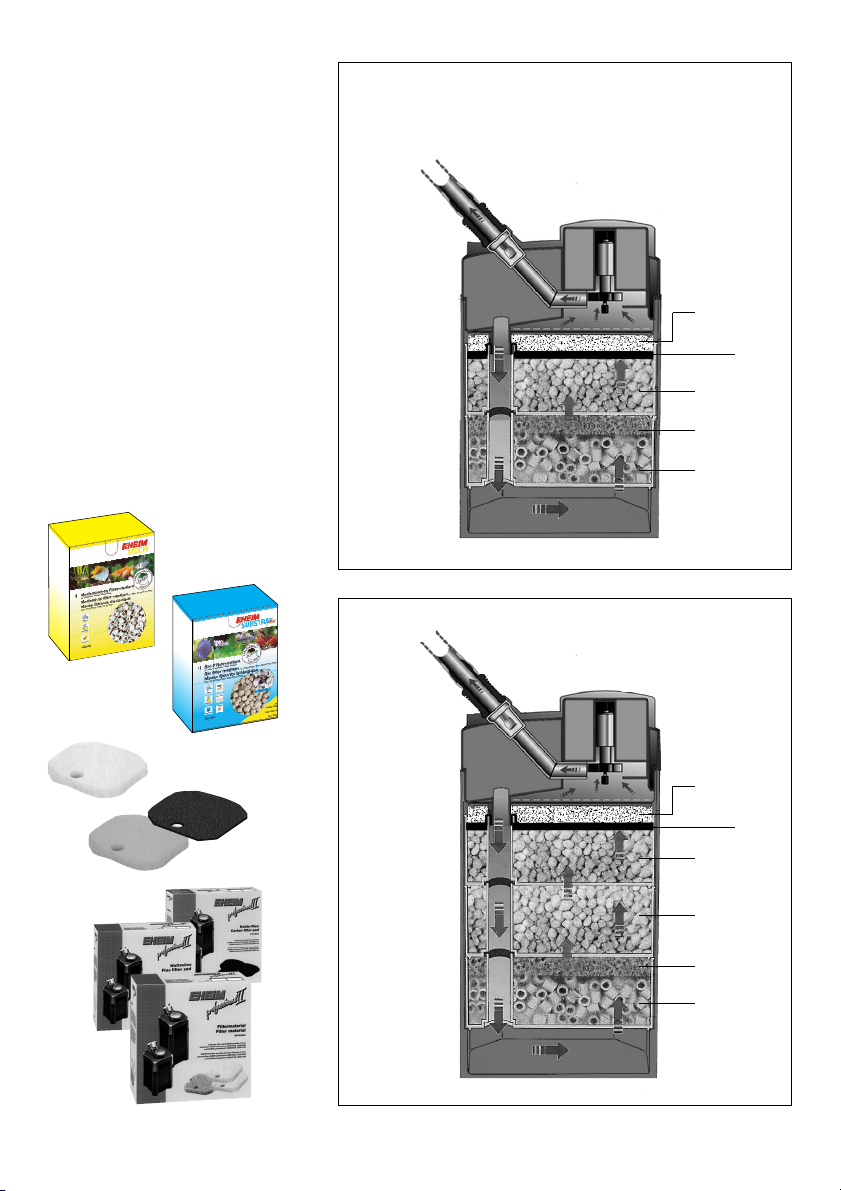
Filtermedien
Filter media
Masses filtrantes
Filtermassa’s
Filtermedia
Filtermedier
Suodatusmassat
Filtermasserne
Materiali filtranti
Masas filtrantes
Massas filtrantes
Υλικά ∆ιήθησησ
Filtra ˇcní zaˇrízení
Szűrőanyagok
Materiały filtrujące
Filtračné médiá
Filtrski mediji
Фильтрчющий материал
2026 / 2028 2126 / 2128
햲
햳
햴
햶
햷
햹
햻
햽
햿
헀
햾
햿
헀
헁
헂
햵
햸
햺
햺
헃
헄
21
21
헆
헅
22
24
23
25
26
27
쎻
쎻
a
b
c
쎻
(1)
(3)
max.
180 cm
(7)
(4)
(5)
(6)
➔
➔
➔
➔
(8)
(10)
(14)
➔
(12/13)
(11)
(15)
(16)
(17)
(19)
(18)
(20)
➞
쒆
쒆
(17-1)
(22)
(23)
(26)
(21)
(25)
(24)
➔
)))) ))) )))) )
(27)
(28)
(29)
(9)
(32)
(31)
(33)
쒆
(30)
(35)
(34)
(36)
(37)
(38)
(39)
(40)
(41)
(42)
(43)
➔
➔
(2)

Bedienungsanleitung
und technische Information
Aquarien-Außenfilter 2026 und 2028
Aquarien-Thermofilter 2126 und 2128
Ausführung:
siehe Typenschild am Filteroberteil
Vielen Dank
für den Kauf Ihres neuen Außenfilters der High-Tech Generation EHEIM professionel II. Das innovative System bietet mit seiner integrierten Ansaughilfe, dem funktionsgerechten Schlauchadapter
und der visuellen Durchfluss-Kontrolle optimalen Komfort und höchste Sicherheit. Dabei sorgt das
große Behältervolumen, in Verbindung mit dem abgestimmten Filtermassenaufbau, für einen hoch
effizienten Schadstoffabbau.
Darüber hinaus finden Sie alles Wissenswerte rund um Erstinstallation, Pflege und Wartung in der
ausführlichen Gesamtanleitung.
Für die Thermofilter-Ausführungen beachten Sie bitte die jeweils gekennzeichneten Hinweise.
geprüfte
Sicherheit
1
Sicherheitsbestimmungen
Nur zur Verwendung in Räumen. Für aquaristische Einsatzbereiche.
Bevor man mit der Hand ins Aquarienwasser eintaucht, alle im Wasser befindlichen
Elektrogeräte vom Netz trennen.
Thermofilter sind nur für Süßwasseraquarien geeignet.
Meerwasserbeständige Versionen, die auf Anfrage geliefert werden, sind entsprechend
gekennzeichnet.
Die Anschlussleitung des Gerätes kann nicht ersetzt werden.
Bei Beschädigung des Kabels darf das Gerät nicht mehr benutzt werden.
Wenden Sie sich an Ihren Fachhändler oder an Ihre EHEIM Service-Stelle.
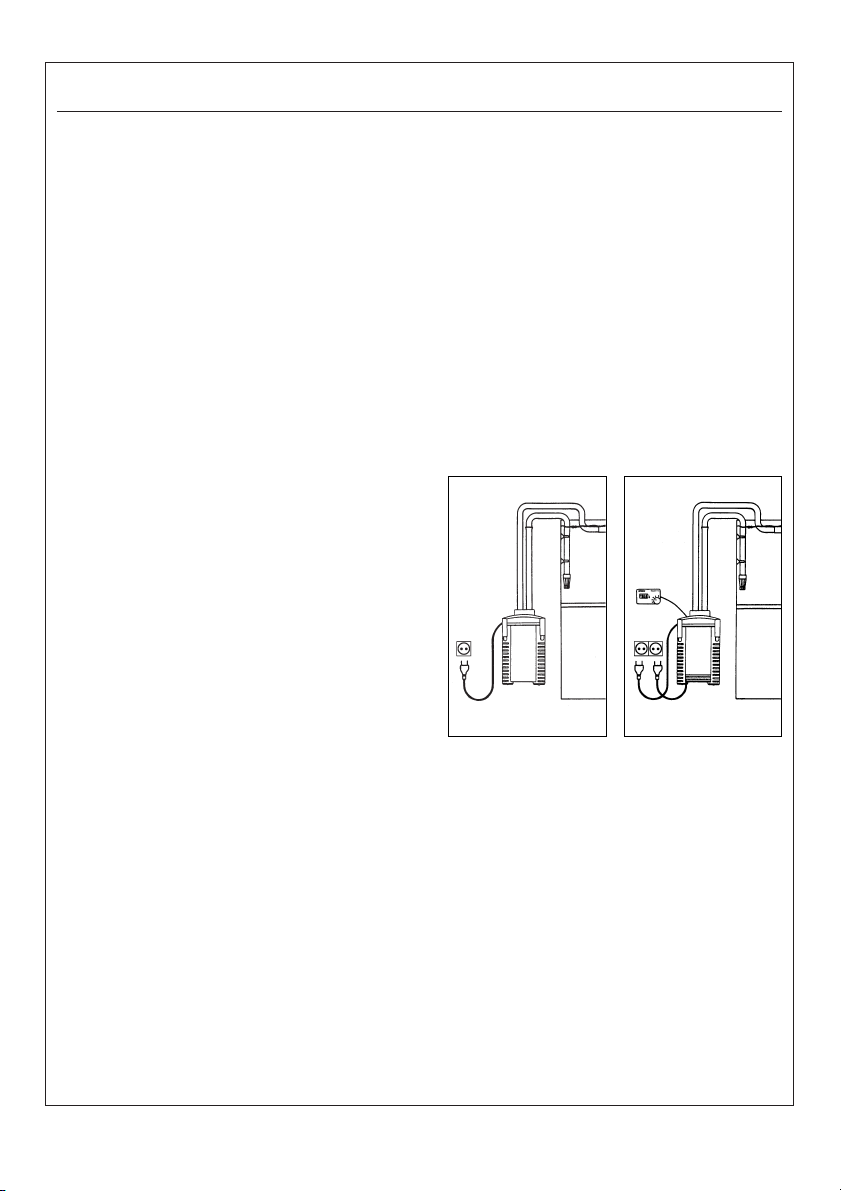
Zu Ihrer eigenen Sicherheit empfiehlt es sich,
mit dem Netzkabel eine Tropfschlaufe zu bilden,
die verhindert, dass evtl. am Kabel entlang laufendes Wasser in die Steckdose gelangt.
Bei Verwendung einer Verteiler-Steckdose muss
die Platzierung oberhalb des Filter-Netzanschlusses erfolgen.
Das Produkt ist nach den jeweiligen nationalen Vorschriften und Richtlinien approbiert und
entspricht den EU-Normen.
C
°

Allgemeine Funktionsbeschreibung
Der EHEIM professionel II Außenfilter reinigt das Aquarienwasser im geschlossenen Umlaufsystem. Dabei sorgt die eingebaute, wartungsfreie Pumpe für die permanente Zirkulation: Das Wasser
wird aus dem Aquarium durch die verschiedenen Filterschichten geführt, wobei es auf mechanischem, biologischem oder adsorptivem Weg behandelt wird und anschließend in das Aquarium
zurückfließt. Für die Filterfunktion ist es notwendig, beim Start die Luft aus dem System zu entfernen, was durch die eingebaute Ansaughilfe selbsttätig erfolgen kann.
Hinweis: Eine optimale Filterleistung und eine störungsfreie Funktion wird nur durch den Einsatz
der EHEIM Original-Filtermassen erreicht (s. Kapitel »Filtermassen-Befüllung«).
Technische Änderungen vorbehalten.
Inhalt Seite
Begriffsbestimmung 2
Adapter einsetzen 3
Schlauchinstallation 3
Filtermassenbefüllung 4
Inbetriebnahme 5
Wartung und Pflege 6
Was tun, wenn . . . 8
Ersatzteil-Übersicht 180
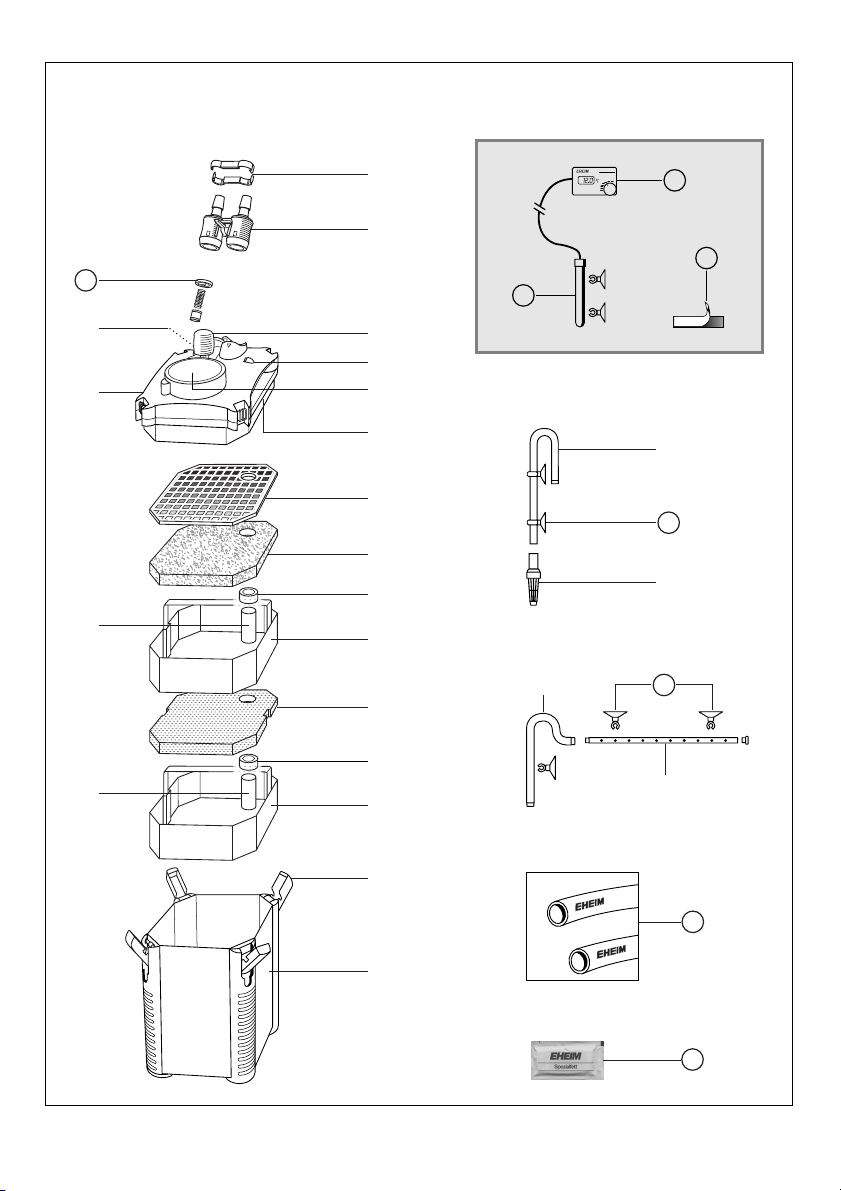
Außenfilter 2026 und 2028 für Süß- und Meerwasser
Thermofilter 2126 und 2128 nur für Süßwasser (meerwasserbeständige Version auf Anfrage)
햲
Schlauchhalter햳Adapter mit integrierten Absperrhähnen햴Adapter-Hebel햵Indikator
햶
Sperr-Riegel
햺
Rohrstutzen햻Abdeckgitter햽Filtervlies, weiß햾Filtermatte, blau햿Gummitüllen
헀
Filtereinsätze헁Verschluss-Klipps헂Filterbehälter헃Ansaugrohr헄Filterkorb헅Aus-
laufbogen헆Düsenrohr mit Verschluss-Stopfen
23
쎻
Schwimmkörper mit Halter und Feder
Thermofilter:
햷
Pumpe mit integrierter Ansaughilfe
24
쎻
25
쎻
Bedienteil
26
쎻
Temperaturfühler
21
쎻
Vaseline.
27
쎻
햸
Filteroberteil 햹Profildichtung
Sauger mit Klemmbügel
Klettband.
22
쎻
Schläuche
Bitte beim Auspacken prüfen, ob alle Teile vorhanden sind.
2

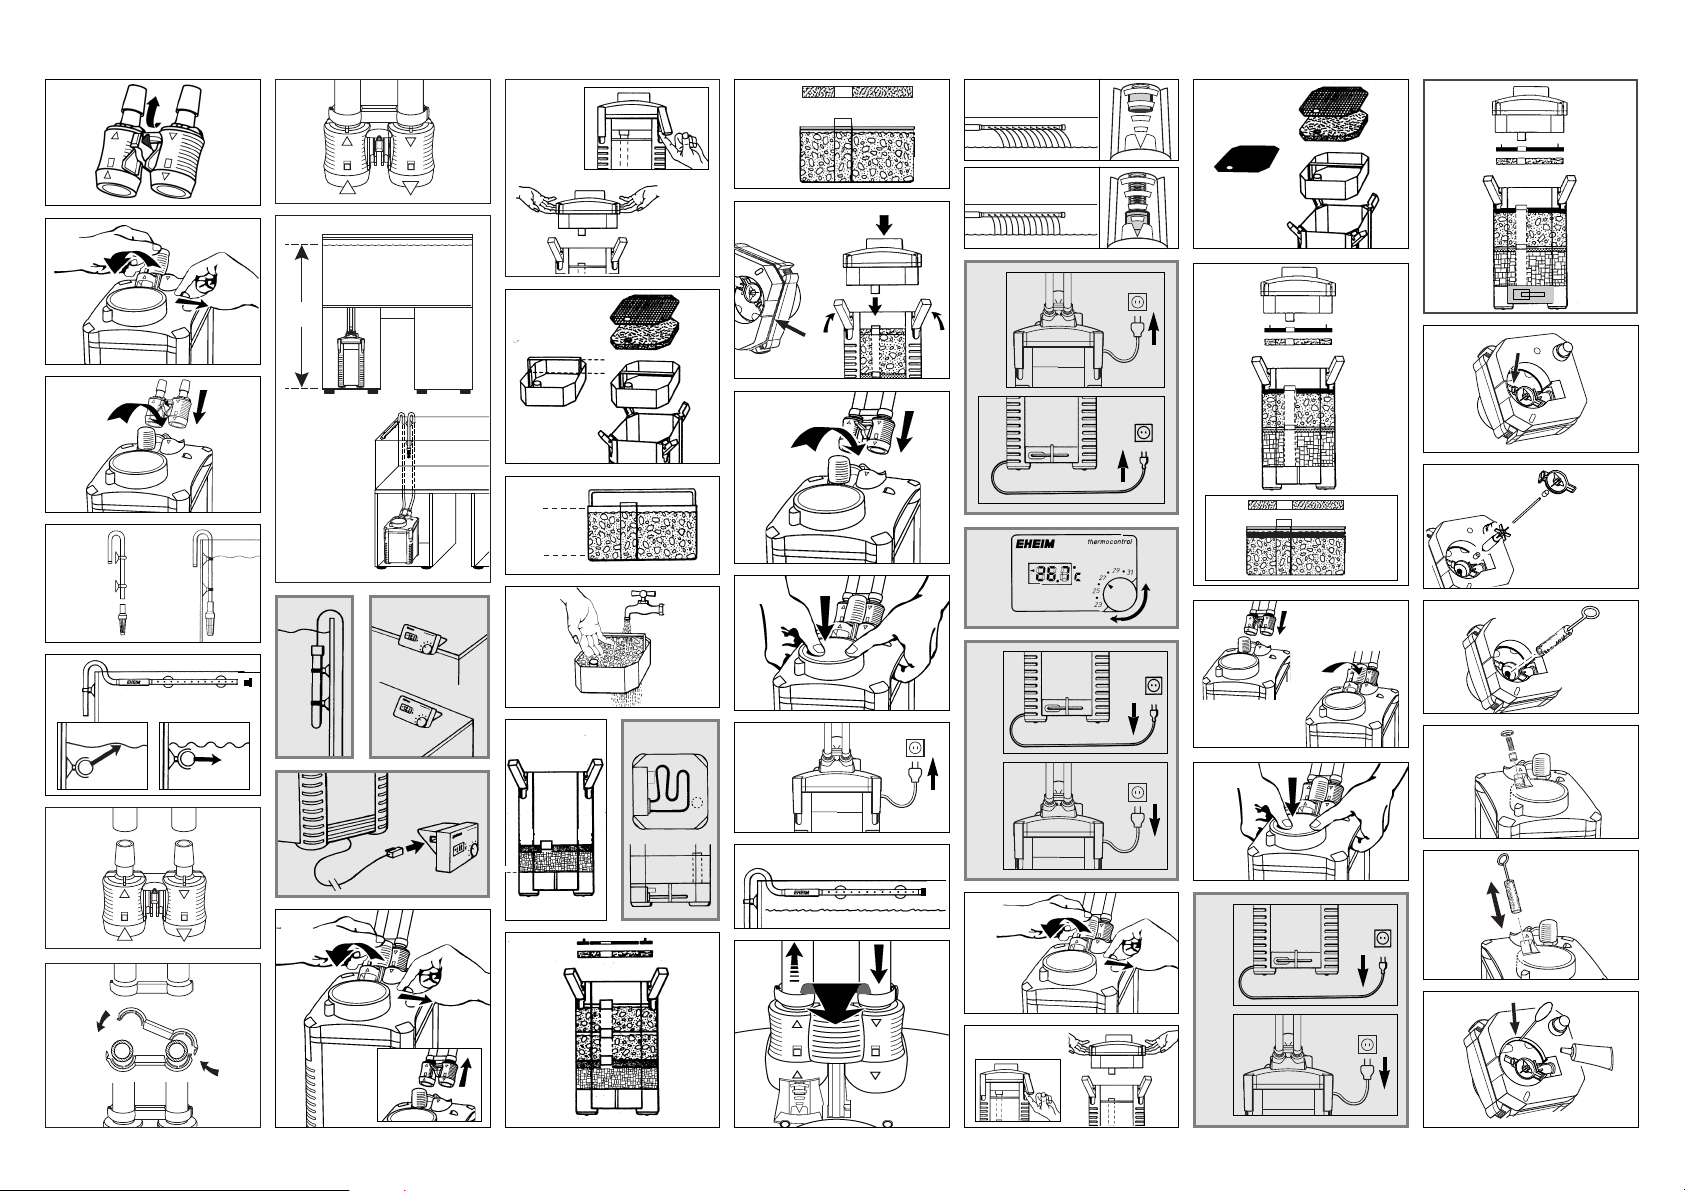
Adapter einsetzen
Filter und separat beigelegten Adapter aus der Verpackung entnehmen und wie folgt montieren:
a
쎻
Der Verschluss-Steg des Adapters muss nach oben in Richtung der Schlauchanschlüsse
geklappt sein, um die integrierten Absperrhähne zu schließen.
쎻
b
Roten Sperr-Riegel am Filteroberteil nach außen drücken und gleichzeitig den Adapter-Hebel
bis zum Anschlag nach vorne ziehen.
c
쎻
Adapter in die Stutzen des Filteroberteils einstecken und anschließend den Adapter-Hebel bis
zum Anschlag wieder zurückklappen. Dadurch wird der Adapter in seine Dichtung gezogen
und die Schlauchanschlüsse sind automatisch geöffnet.
Schlauchinstallation
(1/2) Ansaugrohr und Filterkorb zusammenstecken und mit Hilfe der Saughalter im Aquarium
montieren.
(3) Auslaufbogen und Düsenrohr werden mit einem kurzen Schlauchstück verbunden und ebenfalls
an der Becken-Innenwand mit Saugern befestigt. (Der beiliegende Verschluss-Stopfen für die offene Seite des Düsenrohres wird erst eingesetzt, wenn der Filter arbeitet.)
Tipp: (3) Je nach der gewünschten Intensität der Oberflächenbewegung kann das Düsenrohr ent-
weder unterhalb oder auf Niveau des Wasserspiegels installiert werden.
Schläuche auf die jeweils benötigte Länge abschneiden und mindestens 1 cm weit auf das Ansaugrohr und den Auslaufbogen aufschieben. Darauf achten, dass die Schläuche nicht durchhängen oder geknickt sind.
Tipp: Eventuelle Knicke lassen sich herausdrücken, wenn die Schläuche in warmem Wasser
geschmeidig gemacht werden.
(4) Schlauch vom Ansaugrohr an den Schlauchstutzen des Adapters (Markierung 왓 ) anschließen
und den Auslaufbogen mit dem Druckstutzen (Markierung 왕 ) am Adapter verbinden.
Beide Schlauchenden bis zum Anschlag aufschieben (evtl. mit warmem Wasser vorher geschmeidig machen).
(5/6) Anschließend wird die zweiteilige Schlauchhalterung um die montierten Enden gelegt, seitlich
eingehängt und zusammengeklippst.
Hinweis: Grundsätzlich EHEIM Originalschläuche verwenden.
Die kompletten Schlauchverbindungen in regelmäßigen Abständen auf korrekten Sitz prüfen.
Filter-Aufstellung.
(7) Bei der Aufstellung des Filters im Unterschrank auf vorgeschriebenen Höhenabstand achten.
Um eine optimale Funktionssicherheit zu erzielen, dürfen zwischen Wasseroberfläche und Filterboden max. 180 cm liegen.
Achtung: Filter grundsätzlich nur aufrecht stehend betreiben.
3

Thermofilter: Heizer-Installation
C
°
(8) Temperaturfühler des Bedienteils mit 2 x Klemmbügel und Saugern so im Aquarium befestigen, dass er immer unterhalb der Wasseroberfläche positioniert ist. Nicht in der Nähe des
Filterauslaufs installieren.
(9) Das Bedienteil kann aufgestellt oder mit dem beiliegenden Klettband an der Aquarienabdeckung befestigt werden. Vor Spritzwasser und Feuchtigkeit schützen.
(10) Anschließend die Steuerleitung vom Filterbehälter bis zum Bedienteil führen und das
Steckelement anschließen, bis dieses hörbar einrastet. Eine Verlängerung der Steuerleitung mit
1,5 m ist im Zoofachhandel unter der Best.-Nr. 7676290 erhältlich.
Achtung: Heizer-Netzleitung noch nicht einstecken.
Filtermassen-Befüllung
Adapter abnehmen.
(11) Adapter-Hebel bis zum Anschlag nach vorne ziehen und gleichzeitig den roten Sperr-Riegel
nach rechts drücken. Die Schlauchanschlüsse sind jetzt geschlossen und der Adapter springt aus
seiner Sicherung.
Filter öffnen.
(12/13) Verschluss-Klipps am Filtertopf herauskippen, nach oben schieben und Filteroberteil abheben.
(14) Abdeckgitter, Filtervlies sowie die einzelnen Filtereinsätze nacheinander entnehmen.
Die versenkten Griffbügel lassen sich nach oben ausziehen.
Befüllung.
Den untersten Filtereinsatz nur so weit mit EHEIM MECH füllen, dass die blaue Filtermatte unter
dem Griffbügel eingelegt werden kann.
(15) Zweiten (und dritten) Einsatz bis knapp unter den Rand mit der biologischen Filtermasse
SUBSTRATpro füllen.
Achtung: Nicht überfüllen, Rohrdurchführung nicht verstopfen.
(16) Anschließend wird die Filtermasse im Filtereinsatz unter fließendem Wasser bei gleichzeitigem
Durchmengen ausgespült, bis keine Wassertrübung mehr sichtbar ist.
(17) Den untersten Einsatz – mit der blauen Filtermatte – wieder in den Filterbehälter einsetzen
und die Gummitülle an der Rohröffnung aufstecken. Um eine sichere Abdichtung gegenüber dem
Behälter zu gewährleisten, wird der Filtereinsatz kräftig nach unten auf die Auflagestege gedrückt.
Thermofilter:
C
°
(17-1) Bei der Thermofilter-Ausführung muss darauf geachtet werden, dass die Rohröffnung der
Filtereinsätze nicht über dem Anschlussteil des Heizers liegt.
4

(18) Den zweiten (und dritten) Filtereinsatz nach dem Ausspülen ebenfalls einsetzen, wobei die Rohröffnungen übereinander liegen müssen und mit den Gummitüllen eine sichere Verbindung bilden.
Griffbügel jeweils wieder versenken und darauf achten, dass alle Filtereinsätze bündig aufeinander
liegen. Zweite bzw. dritte Gummitülle auf oberen Filtereinsatz aufstecken.
(19) Anschließend das weiße Filtervlies
auf den obersten Einsatz so auflegen, dass es über dem
eingeschobenen Griffbügel platziert ist.
Achtung: Das weiße Vlies darf nicht unter dem Bügel liegen; die Bohrung für die Rohröffnung muss
frei bleiben.
Abdeckgitter auflegen (Bohrung über der Rohröffnung).
Hinweis: Soll zusätzlich über Kohle gefiltert werden, wird der Kohle-Schwamm (Best.-Nr. 2628260)
im obersten Filtereinsatz unter dem Griffbügel eingelegt. Das weiße Filtervlies liegt als
letzte Lage über dem eingeschobenen Griff des Filtereinsatzes.
Filter schließen, Adapter einsetzen.
(20) Passgenauen Sitz der Profildichtung am Filteroberteil prüfen – evtl. Verschmutzungen entfernen.
Oberteil auf den Filterbehälter setzen, wobei der Rohrstutzen des Filteroberteils in die Rohrdurchführung der Filtereinsätze eingesteckt werden muss. Alle vier Verschluss-Klipps schließen.
(21) Anschließend Adapter auf die Stutzen setzen (Verschluss-Steg nach vorne) und den Hebel bis
zum Anschlag gegen den Adapter klappen. Dadurch wird der Adapter in seine Dichtung gezogen
und gleichzeitig automatisch geöffnet.
Inbetriebnahme
(22) Zum Start wird die Pumpe langsam bis zum Anschlag nach unten gedrückt und wieder losgelassen. Durch ihren kräftigen Federdruck geht sie automatisch in ihre Ausgangsstellung zurück und
saugt dabei Wasser in den Filterbehälter.
(23) Sobald sich der Behälter gefüllt hat, kann der Netzstecker eingesteckt werden, um den Filter
in Betrieb zu setzen.
(24) Anschließend steckt man den Verschluss-Stopfen auf das offene Ende des Düsenrohres.
Hinweis: Sollte durch eine ungünstige Schlauchverlegung der Wasserüberlauf nicht vollständig
zustande gekommen sein, kann die Starthilfe auch mehrmals betätigt werden.
Regulierung der Durchflussmenge.
(25) Um die Filterleistung druckseitig nach Wunsch einzustellen, lässt sich der Hebel am Adapter
bis zur Sicherheitsarretierung langsam nach vorne ziehen. Dabei zeigt der Schwimmkörper im
Schauglas des Indikators die aktuelle Durchflussmenge des Wassers an.
Kontrollanzeige.
(26) Der Indikator gibt ständig Auskunft über die jeweilige Menge des durchfließenden Wassers und
signalisiert damit eventuell auftretende Störungen.
Berührt der Schwimmkörper den roten Bereich der Markierung, wird nicht mehr die volle Leistung
erreicht und das Filtersystem muss überprüft werden.
5

Mögliche Ursachen
Prüfung, Beseitigung
Filtermassen verschmutzt
Ansaugkorb verstopft
Knick oder Schmutz in
den Schläuchen
Adapter-Hebelstellung
Filtermassen reinigen bzw. erneuern.
Grobschmutz entfernen, Filterkorb reinigen.
Schläuche überprüfen und Knicke herausdrücken. Schläuche
gründlich mit Reinigungsbürste (Best.-Nr. 4006570) säubern.
Hebelstellung überprüfen und korrigieren.
nicht korrekt
Adapter verschmutzt
Adapter abnehmen; Verschluss-Steg nach unten drücken und
Öffnungen mit Reinigungsbürste (Best.-Nr. 4006570) säubern.
Zu viel Zubehör am
Schlauchsystem installiert
Ansaughilfe schwergängig
Thermofilter:
C
°
Achtung: (27) Erst wenn der Filter gleichmäßig arbeitet, wird der Heizer über sein separates
Angeschlossenes Zubehör mindert den Druck des Wasserkreislaufs. Überprüfen und evtl. unnötiges Zubehör entfernen.
Laufbahn mit Vaseline (Best.-Nr. 7345988) einstreichen.
Netzkabel an der Steckdose angeschlossen.
Heizer niemals trocken betreiben.
(28) Das Display am Bedienteil zeigt die tatsächliche Wassertemperatur im Aquarium an. Über
den Stellknopf wird die gewünschte Temperatur vorgewählt (z.B. 27° C).
Ein Symbol (
왗 ) zeigt an, wenn der Heizer arbeitet. Erlischt das Zeichen, ist die eingestellte
Temperatur erreicht und die Heizung wird automatisch abgeschaltet. Sinkt die Temperatur im
Aquarium unter den eingestellten Wert ab, schaltet sich die Heizung selbsttätig wieder zu. Durch
leichtes drehen des Stellknopfes kann die Feineinstellung erfolgen.
Hinweis: Bedingt durch Umgebungstemperatur, Einstellmodus und Toleranzwerte, zeigt das
Display die tatsächliche Temperatur u.U. erst nach mehreren Stunden an. Bei Störungen in der
Netzleitung ändert sich die Anzeige und die Heizung schaltet automatisch ab. Nach der Störung
arbeitet der Heizer normal weiter.
Achtung: (29) Bei Wartungs- und Pflegearbeiten immer zuerst den Netzstecker der Heizung und
anschließend den Netzstecker der Pumpe ziehen.
Heizer niemals trocken betreiben.
Wartung und Pflege
Achtung: Erst Netzstecker ziehen.
(30) Adapter abnehmen, wobei man den Sperr-Riegel nach rechts drückt und gleichzeitig den
Adapterhebel nach vorne zieht.
(31) Filter an den Griffmulden aus dem Schrank nehmen, alle Verschluss-Klipps öffnen und
Filteroberteil abnehmen.
6

(32) Abdeckgitter, Vlies und Filtereinsätze aus dem Filterbehälter entnehmen. Filtermasse im Filtereinsatz unter fließendem lauwarmem Wasser gründlich ausspülen – so lange, bis keine Trübung
mehr erkennbar ist.
Das weiße Filtervlies dient zur mechanischen Feinfilterung. Da die anhaftenden Schmutzpartikel
sich nicht vollständig auswaschen lassen, darf das Filtervlies nur einmal verwendet werden. Neues
Vlies (Best.-Nr. 2616265) verwenden. Das gleiche gilt bei der adsorptiven Filterung über das KohleVlies. Die dort angelagerten Schadstoffe können sich bei zu langer Benutzung wieder lösen.
Deshalb darf der Einsatz nur kurzzeitig (1- 2 Wochen) erfolgen. Neues Kohle-Vlies (Best.-Nr.
2628260) verwenden.
Die blaue Filtermatte (im Set 1x enthalten, Best.-Nr. 2616260) kann 2 - 3 mal wiederverwendet werden. Vor dem Neueinsatz unter fließendem Wasser schonend auswaschen, damit Teile der dort
angesiedelten Bakterien noch erhalten bleiben.
Tipp: Bei Neueinsatz von SUBSTRATpro jeweils ca. 1/3 der gebrauchten Filtermasse mit dem neu-
en Material mischen, damit sich die Bakterienkulturen schneller vermehren.
(33) Filterbehälter auswaschen und anschließend Filtereinsätze wieder einschieben. Den untersten
Einsatz bis auf die Auflagestege andrücken und auf bündigen Sitz der nachfolgenden Filtereinsätze
achten. Die Rohröffnungen der Filtereinsätze müssen dabei übereinander liegen und mit den
Gummitüllen abgedichtet sein. Bei Filterung über Kohle wird das Kohle-Vlies (Best.-Nr. 2628260)
im oberen Filtereinsatz unter dem Griffbügel eingelegt. Anschließend neues Filtervlies
auf den
obersten Einsatz auflegen, wobei der Griffbügel eingeschoben sein muss. Abdeckgitter auflegen.
Achtung: Weißes Filtervlies darf nicht unter dem Bügel des Filtereinsatzes eingelegt werden.
Profildichtung am Filteroberteil auf richtigen Sitz und Sauberkeit überprüfen, Oberteil auf den
Behälter aufsetzen, Verschluss-Klipps schließen und Filter im Unterschrank aufstellen.
(34) Schlauchadapter einsetzen und durch Einklappen des Hebels arretieren.
Hinweis: Komplette Schlauchverbindungen in regelmäßigen Abständen auf korrekten Sitz prüfen.
(35) Damit sich der Behälter wieder mit Wasser füllt, wird durch Druck auf die Pumpe die
Ansaughilfe aktiviert. Anschließend Filter über den Netzstecker in Betrieb nehmen.
Thermofilter:
C
°
(36) Zuerst den Netzstecker der Heizung und anschließend Netzstecker der Pumpe ziehen.
Filtermassen wie beschrieben reinigen. Filterbehälter auswaschen. Heizwendel ab und zu von
Mulmablagerungen mit einer weichen Bürste säubern.
Achtung: Heizwendel nicht verbiegen. Filterbehälter nicht unter Wasser tauchen. Heizungs-
elektronik vor Spritzwasser schützen.
(37) Anschließend Filtereinsätze wieder einsetzen, wobei die Rohröffnung nicht über dem Anschlussteil des Heizers liegen darf.
Nach der kompletten Installation Ansaughilfe aktivieren und anschließend die Filterpumpe über
den Netzstecker in Betrieb nehmen.
Achtung: Netzstecker der Heizung erst einstecken, wenn der Filter gleichmäßig arbeitet.
Heizer niemals trocken betreiben.
7

Reinigung der Schläuche.
Schläuche jeweils mit der EHEIM Universal-Reinigungsbürste (Best.-Nr. 4004570) von Fall zu Fall
säubern.
Pumpenkammer reinigen.
(38) Pumpendeckel durch Druck auf den Schnappverschluss öffnen und abnehmen.
(39) Lagerkörper mit Flügelrad entnehmen.
(40) Achse vorsichtig abspülen (Bruchgefahr) und alle Teile einschließlich Pumpenkammer und
Pumpendeckel mit weicher Bürste reinigen (Reinigungsset Best.-Nr. 4009570). Zum Wiederverschließen den Pumpendeckel einklappen bis der Schnapphaken einrastet.
Indikator reinigen.
(41) Halterung, Feder und Schwimmkörper lassen sich bei abgenommenem Adapter aus der
Durchflussanzeige entnehmen.
(42) Indikator mit der EHEIM Schlauchbürste (Best.-Nr. 4004550) reinigen. Anschließend Schwimmkörper, Feder und Halterung wieder einsetzen.
Achtung: Auf richtigen Sitz des Schwimmkörpers achten.
Wartung der Ansaughilfe
(43) Bei schwergängiger Ansaughilfe die Laufbahn des O-Rings mit beiliegender Vaseline (Best.-Nr.
7345988) einfetten.
Dazu eignet sich eine flache Bürste oder ein flachgedrückter Q-Tip.
Was tun, wenn . . .
Filteroberteil lässt sich nicht verschließen
Ursache Behebung
Falsche Einbaulage der Filtereinsätze so einschieben, dass die Rohrdurchführungen
Filtereinsätze übereinander liegen
Filtereinsätze überfüllt Filtereinsätze nicht überfüllen. Eventuell die aufeinander-
Rohrdurchführungen im Rohrdurchführungen reinigen
Filter verschmutzt
Profildichtung nicht Dichtung korrekt in die vorgesehene Nut einsetzen
richtig montiert
Filter am Filteroberteil undicht
Ursache Behebung
Verschluss-Klipps Alle Verschluss-Klipps richtig schließen
nicht richtig geschlossen
stoßenden Flächen reinigen
8

Was tun, wenn . . .
Filter am Filteroberteil undicht
Ursache Behebung
Dichtflächen oder Profil- Dichtflächen reinigen
dichtung verschmutzt
Dichtung nicht montiert,
falsch eingelegt oder Dichtung korrekt einsetzen bzw. erneuern
beschädigt
Pumpe läuft nicht
Ursache Behebung
Keine Netzversorgung Netzstecker einstecken
Achse gebrochen Achse erneuern
Pumpenrad fehlt bzw.
blockiert durch Kieskörner, Pumpenrad einsetzen, Pumpenkammer reinigen
Schneckenhäuschen o.ä.
Filterleistung hat stark nachgelassen
Ursache Behebung
Adapter-Hebelstellung Hebelstellung überprüfen und korrigieren
nicht korrekt
Adapter verschmutzt Adapter abnehmen; Verschluss-Steg nach unten drücken und die
Schlauchinstallation Schlauchinstallation auf evtl. Knicke bzw. starke Querschnitts-
Schlauchinstallation In regelmäßigen Abständen Schlauchinstallation reinigen; d.h.
verschmutzt Universal-Reinigungsbürste (Best.-Nr. 4006570) durch die Saug-
Ansaugkorb verstopft Grobschmutz entfernen, Filterkorb reinigen
Filtermassen stark Filtermassen reinigen
verschmutzt
Filtermassen wie EHEIM Langzeit-Filtermedien niemals in Netzbeutel oder Nylonstrümpfe
MECH / SUBSTRATpro abfüllen. Dies führt innerhalb kurzer Zeit zu extremem Leistungsin Netzbeutel abgefüllt verlust der Pumpe
Filtermasse nicht richtig Filtermasse bei Reinigung aus dem Filtermassenkorb entnehmen
gereinigt und mit lauwarmem Wasser durchspülen
Falscher Filtermassen- Filtermassenaufbau auf die von uns empfohlene Schichtfilterung
aufbau überprüfen. Untersten Filterkorb so weit mit EHEIM MECH füllen,
Öffnung mit der Reinigungsbürste (Best.-Nr. 4006570) säubern
verengungen überprüfen
und Druckleitung inkl. Ansaug- und Düsenrohr ziehen
dass die blaue Filtermatte unter dem Griffbügel eingelegt werden
kann.
Oberen Filterkorb bis knapp unter den Rand mit SUBSTRATpro
füllen
9

Was tun, wenn . . .
Filterleistung hat stark nachgelassen
Ursache Behebung
Filtervlies falsch Nach einsetzen der Körbe wird das weiße Filtervlies so aufgelegt,
eingelegt dass die Bohrung über der Rohröffnung liegt.
ACHTUNG: Filtervlies niemals unter den Bügel einlegen
Filtervlies nicht erneuert Filtervlies bei jeder Reinigung unbedingt erneuern
Pumpe verschmutzt Pumpenkammer, Kühl- und Schmierkanal mit Reinigungsbürsten-
Wasserkreislauf ist nicht Filter durch Ansaugen (wie in Anleitung beschrieben) in Betrieb
richtig hergestellt nehmen. Darauf achten, dass sich während des Befüllvorgangs
Zu viel Zubehör am Angeschlossenes Zubehör mindert die Filterleistung.
Schlauchsystem installiert Überprüfen und evtl. unnötiges Zubehör entfernen
Luft im Filter
Ursache Behebung
Standort des Filters Die Oberkante des Pumpenkopfes sollte mindestens 10 cm
Luft wird über Schlauch- Schlauchverbindungen auf richtigen Sitz prüfen, Schläuche
installation angesaugt evtl. erneuern
Diffusor nicht richtig Diffusor nicht in Richtung Ansaugkorb ausrichten
installiert
Zusätzliche Luftversorgung Ausströmer nicht in der Nähe des Ansaugrohres installieren
(Membranpumpe)
Filtermassen stark Filtermassen reinigen
verschmutzt
Set (Best.-Nr. 4009570) reinigen (s. Kap. »Wartung und Pflege«)
der Wasserrücklauf (Druckseite 왕 ) über der Wasseroberfläche
befindet, damit das Gerät optimal entlüftet
unterhalb der Wasseroberfläche sein.
Besser ist die Platzierung unterhalb des Aquariums
Filtermassen nicht Filtermassen bei der Reinigung aus dem Filtermassenkorb
richtig gereinigt entnehmen und mit lauwarmem Wasser durchspülen
Filtermassen wie EHEIM Langzeit-Filtermedien niemals in Netzbeutel oder Nylonstrümpfe
MECH / SUBSTRATpro abfüllen. Dies führt innerhalb kurzer Zeit zu extremem Leistungsin Netzbeutel abgefüllt verlust der Pumpe
Ansaughilfe schwergängig
Ursache Behebung
Dichtungsring nicht Laufbahn des Dichtungsringes mittels flachgedrücktem Wattegefettet stäbchen (Q-Tip) mit Vaseline (Best.-Nr. 7345988) einfetten
10
USA
DRIP LOOP DRIP LOOP
IMPORTANT SAFETY INSTRUCTIONS
WARNING – To guard against injury, basic safety precautions should be observed, including the following.
a)
READ AND FOLLOW ALL SAFETY
INSTRUCTIONS.
b) DANGER – To avoid possible electric shock, special care should be taken since water is employed
in the use of aquarium equipment. For each of the following situations, do not attempt repairs by yourself;
return the appliance to an authorized service facility for service or discard the appliance.
1) If the appliance falls into the water,
components of the appliance get wet, unplug the appliance immediately. (Non-immersible equipment only)
2) If the appliance shows any sign of abnormal water leakage, immediately unplug it from the power source.
(Immersible equipment only)
3) Carefully examine the appliance after installation. It should not be plugged in if there is water on parts not
intended to be wet.
4) Do not operate any appliance if it has a damaged cord or plug, or if it is malfunctioning or has been
dropped or damaged in any manner.
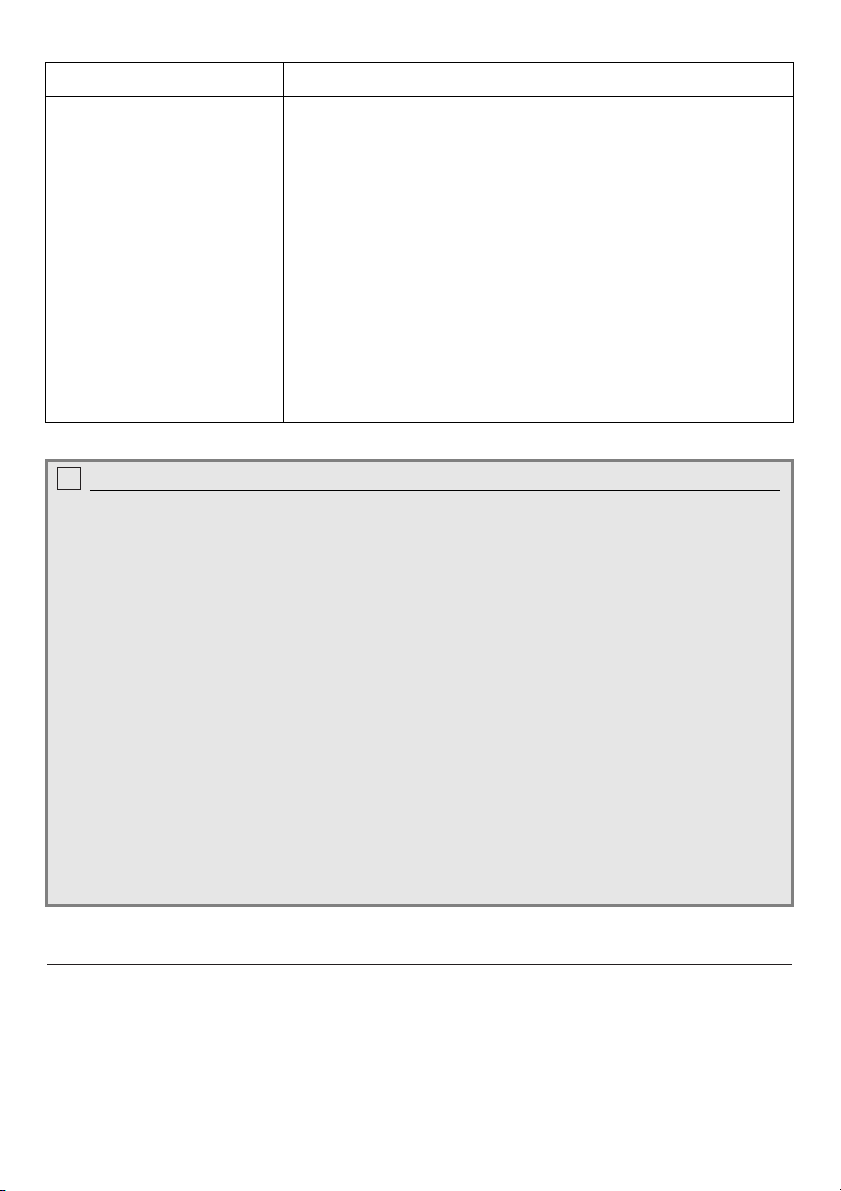
5) To avoid the possibility of the appliance plug or receptacle getting wet, position aquarium stand and tank
to one side of a wall-mounted receptacle to prevent
water from dripping onto the receptacle or plug. A
”drip loop”, shown in the figure below, should be
arranged by the user for each cord connecting an
aquarium appliance to a receptacle. The ”drip loop” is
that part of the cord below the level of the receptacle, or the connector if an extension cord is used, to
prevent water traveling along the cord and coming in
contact with the receptacle. If the plug or socket does
get wet,
fuse or circuit breaker that supplies power to the
appliance. Then unplug and examine for presence of
water in the receptacle.
c) Close supervision is necessary when any appli-
ance is used by or near children.
d) To avoid injury, do not contact moving parts or hot
parts such as heaters, reflectors, lamp bulbs, and the like.
e) Always unplug an appliance from an outlet when not in use, before putting on or taking off parts, and before
cleaning. Never yank cord to pull plug from outlet. Grasp the plug and pull to disconnect.
f) Do not use an appliance for other than intended use. The use of attachments not recommended or sold by
the appliance manufacturer may cause an unsafe condition.
g) Do not install or store the appliance where it will be exposed to the weather or to temperatures below freezing.
h) Make sure an appliance mounted on a tank is securely installed before operating it.
i) Read and observe all the important notices on the appliance.
j) If an extension cord is necessary, a cord with a proper rating should be used. A cord rated for less amperes
or watts than the appliance rating may overheat. Care should be taken to arrange the cord so that it will not
be tripped over or pulled.
k) This appliance has a polarized plug (one blade is wider than the other). As a safety feature, this plug will fit in
a polarized outlet only one way. If the plug does not fit fully in the outlet, reverse the plug. If it still does not
fit, contact a qualified electrician. Never use with an extension cord unless plug can be fully inserted. Do
not attempt to defeat this safety feature.
Exception: This instruction may be omitted for an appliance that is not provided with a polarized attachment plug.
DON’T unplug the cord. Disconnect the
DON’T reach for it ! First unplug it and then retrieve it. If electrical
l)
”SAVE THESE INSTRUCTIONS”.
11
Operating Instructions
geprüfte
Sicherheit
12
Safety instructions
For indoor use only. For aquaristic applications.
Before placing your hand in the aquarium water, ensure that all electrical appliances
in the water have been switched off at the mains.
Thermofilters are suitable for fresh water only.
Versions resistant to sea water are available on request and are labelled accordingly.
The mains cable of the device cannot be replaced.
If the cable has been damaged the device must no longer be used.
Contact your specialised dealer or your EHEIM Service Centre.
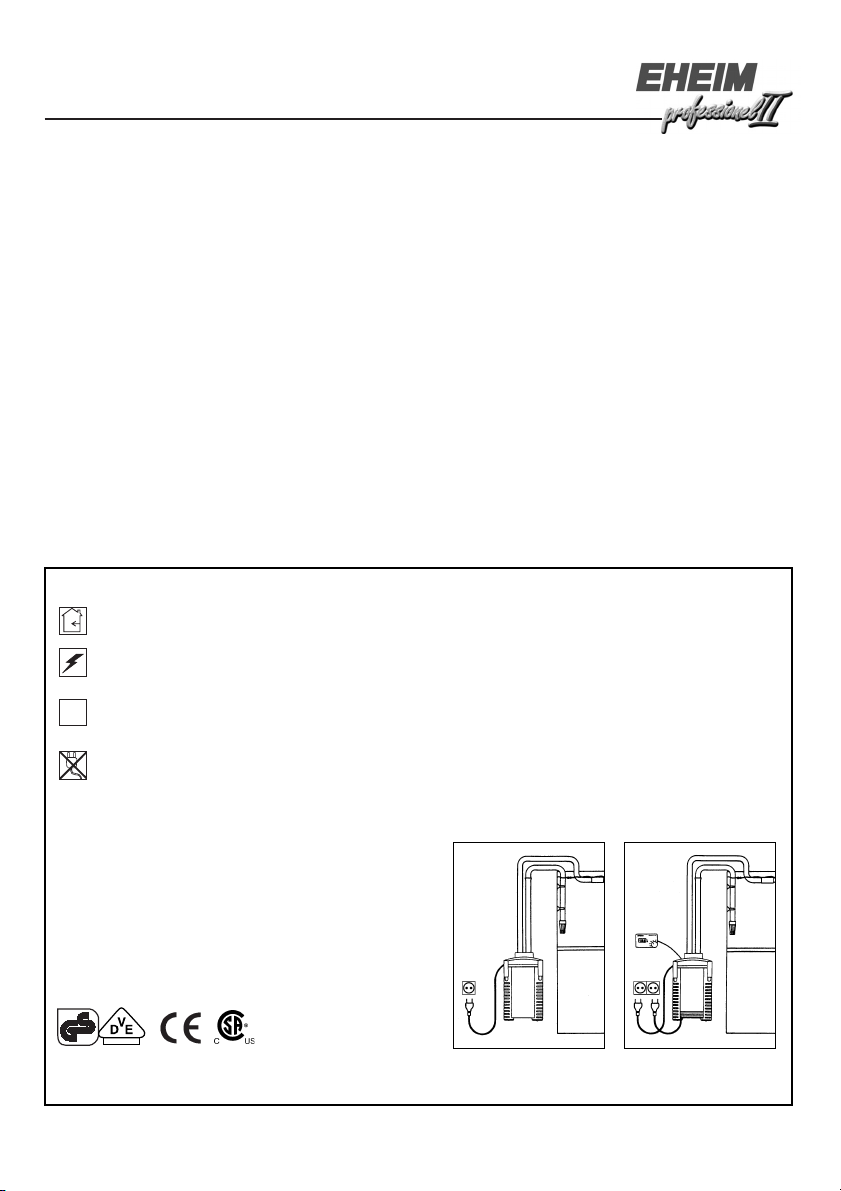
For your own safety we recommend that you
allow the mains cable to form a drip loop which
ensures that water running along the cable cannot drip into the mains socket.
If a multiple socket is used this must be placed
above the mains connection of the filter.
The products are approved according to the relevant national rules and regulations and are in
accordance with EU standards.
C
°
and Technical Information
External Aquarium Filter 2026 and 2028
Aquarium Thermofilter 2126 and 2128
Model:
see type label at top of filter
Thank you
for buying a new external filter from the EHEIM professionel II high-tech generation. With its
integrated priming support, the functional hose adapter and the optical flow meter this innovative
system offers optimum convenience and maximum safety. The large container volume – combined
with a balanced combination of filter media – guarantees highly effective disposal of pollutants.
You will find everything else you wish to know about installation, maintenance and servicing in the
comprehensive instruction booklet.
Please take note of the relevant references to thermofilter models.

General functional description
The EHEIM professionel II external filter purifies the aquarium water in a closed circulation system.
The integrated, maintenance-free pump provides constant circulation, the water is conducted from
the aquarium through the different filter layers where it is treated mechanically, biologically or by
adsorptive means and is afterwards recycled into the aquarium. For the filter’s operation it is necessary to remove the air from the system on start-up which can be achieved automatically by the integrated priming support.
Note:
Optimum filter performance and problem-free operation is achieved only when original
EHEIM filter media are used (see chapter ”Filling With Filter Media“).
We reserve the right to make technical changes.
Contents page
Definition of Terms 13
Inserting adapter 14
Hose installation 14
Filling with Filter Media 15
Start-Up 16
Maintenance and Servicing 17
Troubleshooting 19
List of Spare Parts 180
External filter 2026 and 2028 for fresh and sea water
Thermofilter 2126 and 2128 for fresh water only (version resistant to sea water on request)
햲
Hose clamp햳adapter with integrated shut-off valves햴adapter lever햵indicator
햶
safety lock
햺
hose joint
헀
filter containers
헅
outlet elbow헆spray bar with closing plug
with support and spring
Thermofilter:
햷
pump with integrated priming support
햻
lattice screen
헁
25
쎻
Thermostat
EZ clips
24
쎻
햽
filter pad, white
헂
filter container
vaseline.
26
쎻
temperature sensor
21
쎻
햸
filter top
햾
filter pad, blue햿rubber seals
헃
intake pipe
suction cups with clamp
27
쎻
velcro tape.
햹
sealing gasket
헄
intake strainer
22
쎻
hoses
23
쎻
float
When unpacking, please check that all parts have been included.
13

Inserting adapter
Take the filter and the separately enclosed adapter out of the packaging and assemble as follows:
a
쎻
The locking bar of the adapter must be raised in the direction of the hose connections in order
to close the integrated shut off taps.
쎻
b
Push in the red safety catch on the top of the pump head and at the same time pull out the
adapter lever as far as it will go.
c
쎻
Insert the adapter into its sockets on the pump head and then push back in the adapter lever
as far as it will go. This will put the adapter into the seal and automatically open the house
connections.
Hose installation
(1/2) Connect intake pipe and intake strainer and fix in the aquar-ium by means of suction cups.
(3) Connect outlet elbow and nozzle bar with a short piece of hose and also fix to the inside of the
tank with suction cups. (The enclosed end plug for the open end of the spray bar is not inserted
until the filter is in operation.)
Tip: (3) Depending on the desired intensity of surface movement the spray bar can be installed
below or level with the water surface.
Cut hoses to the desired length and push onto the intake and outlet openings up to at least one
cm. Take care that the tubes are not slack or bent.
Tip: Possible kinks can be pressed out if the hoses are softened in warm water.
(4) Connect the hose from the intake pipe to the hose joint of the adapter (
왓 mark) and the outlet
elbow with the pressure joint (왕 mark) of the adapter.
Push both tube ends onto the joints as far as they will go (possibly softening them beforehand in
warm water).
(5/6) Afterwards the two-part hose clamp is placed around the installed hoses, attached on one
side and clipped together.
Note: Always use original EHEIM hoses.
All hose connections must be checked at regular intervals for correct fitting.
Filter position
(7) Observe the prescribed installation height when placing the filter in the lower cabinet.
To ensure maximum functional safety there should be no more than 180 cms between water surface and filter base.
Attention: Filters may only be operated in an upright standing position.
14

Thermofilter: Heater installation
C
°
(8) Fix the temperature sensor of the thermostat with two clamps and suction caps in the
aquarium in such a way that it is positioned below the water surface at all times. Do not install
near the filter outflow.
(9) The thermostat can be placed on the aquarium hood or fixed with the enclosed velcro tape.
Protect against splashes and moisture.
(10) Then direct the control cable from the filter canister to the thermostat and connect the plug
until you hear it snap into place. An extension of 1.5 metres for the control cable is available
at spezialised acquatic retailers under order no. 7676290.
Attention: Do not yet plug in the heater’s mains connection.
Filling With Filter Media
Removing adapter.
(11) Pull adapter lever forward as far as it will go, simultaneously pressing the red safety catch to
the right. The hose connections are now closed and the adapter clicks from its safety holder.
Opening filter.
(12/13) Flip out EZ clips, push upwards and lift off filter head.
(14) Remove lattice screen and filter pad as well as the media containers individually.
The retractable handles can be extended upwards.
Filling.
Fill the bottom media container with EHEIM MECH only so far that the blue filter pad can be inserted under the handle.
(15) Fill the second (and third) container with the biological filter medium SUBSTRATpro to just
below the rim.
Attention: Do not overfill, do not clog flow-through pipe.
(16) Then rinse the filter medium in the container thoroughly under running water while mixing it
through, until the water is clear.
(17) Return the bottom container – with the blue filter pad – to the filter canister and attach the rubber seal to the pipe opening. Press the container firmly down onto the supporting bars to ensure
safe sealing against the canister.
Thermofilter:
C
°
(17-1) In the thermofilter version make sure that the pipe openings of the filter containers are not
positioned above the heater connection.
15

(18) After rinsing, insert the second (and third) medium container as well, ensuring that the pipe
openings are aligned and safely connected by the rubber seals. Retract all handles and make sure
that all media containers lie flush on top of each other. Attach second and third rubber seals to relevant media container above.
(19) Then place the white filter pad
on the top container in such a way that it rests on top of the
retracted handle.
Attention: The white pad must not lie under the handle, the cut-out for the pipe opening must
remain free.
Place lattice screen on top (cut-out over pipe opening).
Note: If additional filtering with active carbon is intended, the active carbon sponge (order no.
2628260) is placed under the handle in the top container. The white filter pad is the last layer over
the retracted handle of the container.
Closing filter, inserting adapter.
(20) Check that the sealing gasket of the filter head fits exactly and remove any soiling. Place head
on filter canister, ensuring that the hose joint of the filter head is inserted into the hose duct of the
media containers. Close all four EZ clips.
(21) Then place adapter onto the joints (locking bar to the front) and push the lever towards the
adapter as far as it will go. This pulls the adapter into its sealing and at the same time opens it
automatically.
Start-up
(22) For priming the pump is slowly pressed down to its limit and then released. The strong pressure of the spring returns it automatically to its starting position, thereby sucking water into the filter canister.
(23) As soon as the canister is full the mains plug can be con-nected to start up the filter.
(24) Then the closing plug is inserted in the open end of the spray bar.
Note: Should the water circulation not be complete, due to unfavourable hose conduit, the priming
support can be activated repeatedly.
Controlling the flow rate.
(25) To adjust the filter performance on the delivery side according to requirement, the lever on the
adapter can be pulled forwards slowly. The float in the inspection glass of the indicator shows the
current flow rate of the water.
Optical Control.
(26) The indicator provides permanent information on the current amount of circulating water and
thus signals possible faults.
If the float touches the red bar of the scale, this means that full performance is no longer being
achieve and that the filter system must be checked.
16
Possible Causes
Filter media dirty
Intake strainer clogged
Kink or dirt
in the hoses
Lever position
Checking, Elimination
Clean or replace filter media.
Remove coarse dirt, clean intake strainer.
Check hoses and smooth out kinks. Clean hoses thoroughly
with cleaning brush (order no. 4006570).
Check and correct lever position.
on adapter wrong
Adapter dirty
Remove adapter, press down locking bar and clean openings
with cleaning brush (order no. 4006570).
Too many accessories
connected to the hose
Connected accessories reduce the pressure of the circulating
water. Check and possibly remove unnecessary accessories.
system
Priming support sluggish
Thermofilter:
C
°
Attention: (27) The heater must not be connected to the mains by its separate lead until the fil-
Grease bed with vaseline (order no. 7345988).
ter is operating smoothly.
Never operate the heater when dry.
(28) The display on the thermostat shows the actual water temperature in the aquarium. The
desired temperature can be set with the adjusting knob (e.g. 27° C).
A symbol (
왗 ) indicates when the heater is in operation. When the symbol is extinguished the
set temperature has been reached and the heater is automatically switched off. When the temperature in the aquarium drops below the set value the heater automatically turns itself on. By
slightly turning the adjusting knob precise adjustments can be made.
Note: Depending on ambient temperature, setting mode and tolerance values the display may
not show the actual temperature until several hours later. In case of a mains fault the display
changes and the heater automatically switches off. After the interruption the heater continues
working normally.
Attention: (29) For maintenance and servicing always first disconnect the mains plug of the
heater, then the mains plug for the pump.
Never operate the heater when dry.
Maintenance and Servicing
Attention: First disconnect mains plug.
(30) Remove adapter, pressing the safety catch to the right while simultaneously pulling the adapter lever forwards.
(31) Place fingers in the indentations and lift filter out of its cabinet, open all EZ clips and remove
filter head.
17

(32) Remove lattice screen, pad and media containers from the filter canister. Thoroughly rinse
medium in the medium container under running luke-warm water – until the water is clear.
The white filter pad provides mechanical fine filtration. Since adhering dirt particles cannot be
rinsed out completely the filter pad must not be used more than once. Insert new pad (order no.
2616265). The same applies to adsorptive filtering with an active carbon pad. After excessive use
the collected pollutants may detach again. Therefore the pads may only be used for short periods
(1 – 2 weeks). Insert new active carbon pad (order no. 2628260).
The blue filter pad (included once in the set, order no. 2616260) may be re-used two to three times.
Wash gently under running water before re-inserting so that some of the resident bacteria are retained.
Tip: When replacing SUBSTRATpro about one third of the used filter medium should be mixed with
the new material to speed up bacteria recolonization.
(33) Wash out filter canister, then insert media containers again. Press the bottom container down
to the supporting bars and ensure that the following containers fit smoothly. The pipe
openings of the media containers must lie on top of each other, sealed with the rubber seals.
When using active carbon filtration the active carbon pad (order no. 2628260) is inserted under the
handle of the top medium container.
Then place new filter pad
on the topmost medium container, ensure that the handle is first re-
tracted. Place lattice screen on top.
Attention: The white filter pad must not be inserted under the handle of the medium container.
Check that the sealing gasket on the filter head is in the correct position and clean, place head on
canister, close EZ clips and place the filter at bottom of the cabinet.
(34) Connect hose adapter and lock by retracting lever.
Note: All hose connections must be checked at regular intervals for correct fitting.
(35) The priming support is activated by pressure on the pump so that the canister fills with water
again. Then start up filter by connecting lead to the mains.
Thermofilter:
C
°
(36) First disconnect mains plug of the heater and then mains plug of the pump.
Clean filter media as described above. Wash out media containers. Occasionally clean off mull
deposits from the heater spiral with a soft brush.
Attention: Do not bend the heater spiral. Do not submerge the filter canister. Protect heater
electronics from splashes.
(37) Then re-insert media containers, taking care not to place the pipe opening above the heater connection.
When the installation is completed, activate the priming support and then start up the filter
pump with the mains connection.
Attention: Do not connect the heater to the mains before the filter is operating smoothly.
Never operate the heater when dry.
18

Cleaning of Hoses.
Clean hoses with the universal EHEIM cleaning brush (order no. 4004570), as required.
Cleaning of Pump Chamber.
(38) Open the pump head by pressing the spring-loaded catch and remove.
(39) Remove pump cover with impeller.
(40) Rinse shaft carefully (risk of breaking), clean all other parts including pump chamber and pump
head with a soft brush (cleaning set order no. 4009570).
For closing tilt back pump head until the spring-loaded catch slots in.
Cleaning of Indicator.
(41) When the adapter is removed, the support, spring and float can be removed from the flow
indicator.
(42) Clean indicator with the EHEIM hose brush (order no. 4004550). Then re-insert the float,
support and spring.
Note: Ensure that the float is in the right place.
Servicing the priming support
(43) If the priming support is sluggish the bed of the O-ring should be greased with the enclosed
vaseline (order no. 7345988).
Either a flat brush or a flattened cotton bud are best suited for this purpose.
Troubleshooting
Filter head cannot be locked
Cause Remedy
Wrong position of media Insert media containers so that the pipe openings line up on top
containers of each other
Media containers over- Do not over-fill media containers. Cleaning adjacent surfaces
filled may help
Pipe openings inside Clean pipe openings
the filter fouled
Sealing gasket not Insert gasket properly in the groove provided
mounted correctly
Filter leaks at filter head
Cause Remedy
EZ clips not closed properly Close all EZ clips correctly
Sealing areas or sealing Clean sealing surfaces
gasket fouled
19

Troubleshooting
Filter leaks at filter head
Cause Remedy
Sealing not inserted, wrongly Insert sealing correctly or replace
inserted or damaged
Pump does not function
Cause Remedy
No mains connection Plug in mains connection
Broken shaft Replace shaft
Impeller missing or blocked Insert impeller, clean pump chamber
by gravel, snails’ shells etc.
Filter performance has deteriorated badly
Cause Remedy
Adapter setting not correct Check and correct lever setting
Adapter dirty Disconnect adapter; press locking bar down and clean aperture
Hose installation Check hose installation for kinks or severe restrictions of diameter
Hose installation dirty Clean hose installation at regular intervals, i.e.pull universal
Intake strainer clogged Remove rough dirt, clean filter strainer
Filter media very dirty Clean filter media
Filter media like EHEIM Never fill long-term filter media in net bags or nylon stockings.
MECH / SUBSTRATpro This will lead to an extreme performance drop of the pump
filled in net bags within a very short time
Filter medium not For cleaning, remove filter medium from the container and
cleaned properly rinse with luke-warm water
Wrong composition Check composition of filter media for the layer filtering recommendof filter media ed by us. Fill lowest media container with EHEIM MECH to a level
Rubber seals of the Attach rubber seal to the pipe opening of each medium
media containers missing container to ensure a safe connection between the containers
Filter pads After inserting the containers the white filter pad is placed on top
inserted incorrectly in such a way that the cut-out lies above the pipe opening
White filter pad not It is absolutely necessary to renew the white filter pad at each
replaced cleaning
Pump dirty Clean pump chamber, cooling and lubricating channel with
with cleaning brush (order no. 4006570)
cleaning brush (order no. 4006570) through the suction and
pressure hoses including intake pipe and spray bar
where the blue filter pad can be inserted under the handle. Fill top
media container with SUBSTRATpro until just under the rim
and to the pump head
ATTENTION: Never insert the white filter pad underneath the handle
cleaning-brush set (order no. 4009570)
(see chapter ”maintenance and servicing”)
20

Troubleshooting
Filter performance has deteriorated badly
Cause Remedy
Water circulation does not Start up filter by priming (as described in the instructions). Make
function correctly sure that the runback of the water (pressure joint 왕) is above the
Too many accessories con- Attached accessories reduce the filter output. Check and
nected to the hose system possibly remove unnecessary accessories.
Air in the filter
Cause Remedy
Location of filter The upper edge of the pump head should be at least 10 cm
Air is sucked in Check hose connections for proper sealing, replace hoses,
through hose installation if necessary
Diffuser is not installed Align diffuser not in the direction of the intake strainer
correctly
Additional air supply Do not install discharger near intake pipe
(diaphragm pump)
Filter media very dirty Clean filter media
Filter media not For cleaning, remove filter media from the filter media containers
cleaned correctly and rinse out with luke-warm water
Filter media such as EHEIM Never fill long-term filter media in net bags or nylon stockings.
MECH / SUBSTRATpro This will lead to an extreme performance drop of the pump
filled in net bags within a very short time
water surface during filling so that the appliance can vent properly
below the water surface. It is better to place the filter underneath the aquarium
Priming support sluggish
Cause Remedy
Sealing ring not Use flattened cotton bud to grease bed of sealing ring with
greased vaseline (order no. 7345988)
21

Notice d’emploi
22
Consignes de sécurité
Usage intérieur exclusivement. Destiné à être utilisé uniquement en aquariophilie.
Avant de plonger la main dans l’eau de l’aquarium, retirer les prises électriques de tous
les appareils installés dans l’eau.
Les thermofiltres ne conviennent que pour les aquariums d’eau douce.
Les modèles résistants à l’eau de mer sont fournis sur commande.
La ligne de raccordement de l’appareil ne peut pas être remplacée.
L’usage de l’appareil est interdit lorsque le câble est endommagé ou coupé.
Adressez-vous à votre négociant spécialisé ou à votre service après-vente EHEIM.
Pour votre propre sécurité, nous vous recommandons de former un col de cygne avec le
câble électrique pour éviter que l’eau s’écoulant
éventuellement le long du câble ne pénètre dans
la prise.
En utilisant par exemple une multiprise, celle-ci
doit être placée plus haut que la prise de secteur
du filtre.
Le produit est autorisé à l’emploi conformément aux réglementations et directives nationales
respectivement en vigueur. Il correspond aux normes adoptées par l’Union européenne.
C
°
geprüfte
Sicherheit
et renseignements techniques
Filtres extérieurs pour aquariums 2026 et 2028
Thermofiltres pour aquariums 2126 et 2128
Modèle:
voir plaque signalétique figurant sur la partie supérieure du filtre
Merci beaucoup
pour l’achat du filtre extérieur de la génération high-tech EHEIM professionel II. Le système
novateur avec son aide à l’aspiration intégrée ainsi que son adaptateur pour tuyaux fonctionnel et son contrôle visuel du débit, offre un maximum de confort et de sécurité. Le volume
important de la cuve associé à la composition adéquate des masses filtrantes assure une décomposition hautement efficace des substances nocives.
Vous trouverez de plus de nombreuses informations pertinentes sur l’aménagement initial, l’entretien et la maintenance du filtre.
Pour les versions thermofiltres veuillez respecter strictement les indications spécifiques.

Description générale du fonctionnement
Le filtre extérieur EHEIM professionel II nettoie l’eau de l’aquarium suivant un système de circulation fermé. La pompe intégrée qui ne nécessite aucun autre entretien que le nettoyage, assure
une circulation permanente : l’eau est aspirée de l’aquarium et dirigée à travers les différentes
couches de masses filtrantes du filtre où elle fait l’objet d’un traitement mécanique, biologique ou
adsorptif avant d’être reconduite dans l’aquarium. Pour assurer le fonctionnement du filtre, il est
nécessaire d’éliminer l’air du système lors du démarrage. Ce processus est réalisé automatiquement à l’aide de l’aspiration intégrée.
Note:
Un débit optimal du filtre et un fonctionnement sans problèmes ne sont atteints qu’en uti-
lisant les masses filtrantes originales EHEIM (voir section »Remplissage des masses filtrantes«).
Sous réserve de modifications techniques.
Filtres extérieurs 2026 et 2028 pour l’eau douce et l’eau de mer
Thermofiltres 2126 et 2128 exclusivement pour l’eau douce (modèle résistant à l’eau de
mer sur commande)
햲
Support de tuyau햳adaptateur avec robinets d’arrêt intégrés햴levier de l’adaptateur
햵
indicateur 햶verrou de sûreté햷pompe avec aide d’aspiration intégrée햸partie supérieure du filtre 햹joint profilé 햺tube de soutien햻grille de couverture햽coussin en ouate
blanc햾coussin de mousse bleue햿douilles en caoutchouc헀panier de filtration헁clips
de fermeture헂cuve du filtre헃tuyau d’aspiration헄crépine헅coude de refoulement
헆
tube du gicleur avec bouchon de fermeture
쎻
21
ventouses avec étriers de serrage
쎻
22
tuyaux
쎻
23
corps flottant avec support et ressort
쎻
24
vaseline.
Thermofiltre:
쎻
25
Module de commande
쎻
26
sonde de température
쎻
27
scratch.
Merci de bien vouloir vérifier la présence intégrale des pièces lors du déballage.
23
Table des matières page
Définition des termes 23
Montage de l’adaptateur 24
Installation des tuyaux 24
Remplissage des masses filtrantes 25
Mise en service 26
Entretien et maintenance 27
Que faire lorsque . . . 29
Tableau des pièces détachées 180

Montage de l’adaptateur
Retirez le filtre et son adaptateur de l’emballage et assemblez les comme suit:
a
쎻
La languette de verrouillage de l’adaptateur doit être dirigée vers les tuyaux afin que le robinet
soit intégralement fermé.
쎻
b
Poussez le bouton de sécurité rouge situé sur le dessus de la pompe et tirez le levier de l’adaptateur aussi loin que possible.
c
쎻
Appuyez l’adaptateur sur sa base située sur la tête de pompe, puis repoussez le levier aussi
loin que possible. L’assemblage est ainsi réalisé et les robinets automatiquement ouverts.
Installation des tuyaux
(1/2) Emboîtez le tuyau d’aspiration sur la crépine et installez-les dans l’aquarium à l’aide des ventouses.
(3) Connectez le coude de refoulement et le tube du gicleur par un petit bout de tuyau et fixez-les
également à la paroi intérieure du bac à l’aide de ventouses. (Le bouchon de fermeture fourni
destiné à boucher le côté ouvert du tube du gicleur ne doit être mis en place qu’une fois le filtre
mis en service).
Conseil: (3) Le tube du gicleur peut être installé soit au-dessous de la surface de l’eau, soit au
même niveau, selon le degré d’intensité du mouvement de surface souhaité.
Coupez les tuyaux à la longueur voulue et glissez-les d’au moins 1 cm sur le tuyau d’aspiration et
le coude de refoulement. Veillez à ce que les tuyaux ne coudent pas et ne soient pas pincés.
Conseil: Des plis éventuels du tuyau peuvent être éliminés par pression à condition que le tuyau
soit immergé dans l’eau chaude pour devenir souple.
(4) Reliez le tuyau du tuyau d’aspiration au manchon du tuyau de l’adaptateur (marqué) et connectez ensuite le coude de refoulement au manchon de pression (marqué) sur l’adaptateur.
Glissez les deux bouts de tuyau jusqu’à la butée. (Assouplissez éventuellement le tuyau préalablement en le trempant dans de l’eau chaude).
(5/6) Placez ensuite le support de tuyau en deux pièces autour des bouts montés, accrochez-le sur
les côtés et fermez-le par encliquetage.
Conseil: Utilisez les tuyaux originaux EHEIM.
Toutes le jonctions de tuyaux doivent être vérifiées à intervalles réguliers pour un assemblage parfait.
Montage du filtre.
(7) En plaçant le filtre sous le meuble, respectez l’écart prescrit entre le niveau de l’eau et le fond
du filtre.
Cet écart ne doit pas dépasser 180 cm afin d’assurer une sécurité optimale.
Attention: Ne faites fonctionner le filtre qu’en position verticale.
24

Thermofiltres: Installation du chauffage
C
°
(8) Fixez la sonde de température du module de commande à l’aide de deux étriers de serrage
et des ventouses dans l’aquarium de façon à ce qu’elle soit toujours située au-dessous de la
surface de l’eau. Ne l’installez pas près de la sortie du filtre.
(9) Le module de commande peut être monté ou fixé sur la galerie à l’aide du scratch inclus.
Isolez-le des projections d’eau et de l’humidité.
(10) Posez ensuite la ligne de pilotage de la cuve du filtre jusqu’au module de commande et reliez
l’élément enfichable jusqu’à ce qu’un encliquetage soit perceptible. Une rallonge de la ligne de
pilotage de 1,5 m est disponible dans le commerce animalier spécialisé au no. de réf. 7676290.
Attention: Ne branchez pas encore le chauffage sur la prise du réseau électrique.
Remplissage des masses filtrantes
Retirer l’adaptateur.
(11) Tirez le levier de l’adaptateur vers l’avant jusqu’à la butée tout en pressant le verrou de sûreté
rouge vers la droite. Les raccords de tuyaux sont fermés, l’adaptateur saute de son dispositif
d’arrêt.
Ouvrir le filtre.
(12/13) Basculez les clips de fermeture situés sur la cuve du filtre, glissez-les vers le haut et enlevez la partie supérieure du filtre.
(14) Enlevez successivement la grille de couverture, le coussin en ouate ainsi que les différents
paniers de filtration. Les poignées encastrées peuvent être tirées vers le haut.
Remplissage.
Remplissez le panier de filtration inférieur d’EHEIM MECH jusqu’à un niveau qui permet d’insérer
le coussin de mousse bleue sous la poignée.
(15) Remplissez le deuxième (et le troisième) panier avec la masse filtrante biologique SUBSTRATpro quasiment jusqu’au rasbord.
Attention: Ne pas trop remplir, ne pas colmater le passage tubulaire.
(16) Rincez ensuite la masse filtrante dans le panier sous l’eau courante tout en la remuant jusqu’à
ce que les troubles de l’eau soient éliminés.
(17) Replacez le panier inférieur - contenant le coussin de mousse bleue - dans la cuve du filtre et
attachez le joint en caoutchouc sur l’orifice tubulaire. Pressez le panier de filtre fortement vers le
bas sur les entretoises d’appui afin d’assurer une étanchéité sûre par rapport à la cuve.
Thermofiltres:
C
°
(17-1) Quant aux modèles de thermofiltres, il est important de veiller à ce que l’orifice tubulaire
des paniers du filtre ne dépasse pas la pièce de raccordement du chauffage.
25

(18) Insérez le deuxième (et le troisième) panier du filtre après le rinçage tout en veillant à ce que
les orifices tubulaires soient superposés et forment une liaison sûre avec les joints en caoutchouc.
Repliez la poignée et veillez à ce que tous les paniers de filtre soient exactement superposés.
Attachez le deuxième ou le troisième joint en caoutchouc sur le panier supérieur du filtre.
(19) Déposez ensuite le coussin en ouate blanc
sur le panier su-périeur de façon à ce qu’il soit
placé sur la poignée encastrée.
Attention: Le coussin en ouate blanc ne doit pas être placé au-dessous de la poignée; le trou de
prévu pour l’orifice tubulaire doit rester dégagé.
Posez la grille de couverture le trou sur l’orifice tubulaire.
Note: Lorsqu’une filtration sur charbon est prévue, insérez l’éponge de charbon (réf. 2628260)
dans le panier supérieur au-dessous de la poignée. Le coussin en ouate blanc constitue la dernière couche posée sur la poignée encastrée du panier.
Fermer le filtre, installer l’adaptateur.
(20) Contrôlez la bonne tenue du joint profilé situé sur la partie supérieure du filtre et enlevez les
impuretés éventuelles. Placez la partie supérieure sur la cuve du filtre en veillant à enficher le tube
de soutien de la partie supérieure du filtre dans le passage tubulaire des paniers. Fermez les
quatre clips de fermeture.
(21) Placez ensuite l’adaptateur sur les manchons (entretoise de fermeture vers l’avant) et soulevez le levier contre l’adaptateur jusqu’à la butée. Ainsi, l’adaptateur est glissé dans sa garniture
d’étanchéité tout en étant automatiquement ouvert.
Mise en service
(22) Pour démarrer le filtre, pressez la pompe lentement vers le bas jusqu’à la butée et relâchez-la.
Elle retrouve automatiquement sa position de départ, grâce à la forte pression de son ressort, tout
en absorbant l’eau dans la cuve du filtre.
(23) Dès que la cuve s’est remplie d’eau, la fiche de contact peut être branchée afin de mettre le
filtre en service.
(24) Pressez ensuite le bouchon de fermeture sur le bout ouvert du tube-gicleur.
Note: Lorsque le passage de l’eau n’est pas entièrement optimal à cause d’une mauvaise pose
des tuyaux on peut activer à plusieurs reprises l’aide au démarrage.
Réglage du débit.
(25) Le levier de l’adaptateur peut être soulevé lentement vers l’avant jusqu’au dispositif d’arrêt
afin de régler à souhait le débit du filtre côté pression. Le corps flottant du voyant de l’indicateur
affiche le débit effectif de l’eau.
Affichage de contrôle.
(26) L’indicateur renseignant en permanence sur le débit d’eau respectif signale l’apparition de
pannes éventuelles.
Lorsque le corps flottant touche la barre rouge de la marque, le filtre ne réalise plus sa performance optimale. Il faut alors contrôler le système de filtration.
26
 Loading...