

EHEIM 2250, 2260 User Manual
2250, 2260
Außenfilter D
External filter GB / USA
Filtre extérieur F
Buitenfilter NL
Ytterfilter S
Udvendigt filter N
Ulkosuodattimet FIN
Udvendige filtre DK
Filtro esterno I
Filtro exterior E
Внешний фильтр RUS

2260
2250 2260
A 4014100 4015150
B 4014710 4015710
C 7286500 7277600
D 7275850 7277700
E 7438200 7479950
F 7291100 7291150
G 7675850 7675850
H 1253220 1260220
I 7675900 7675950
K 7290850 7290850
L 7472800 7472800
M 7276650 7276650
N 7276550 7276550
O 7671550 7671550
P 7675700 7675750
Q 7276600 7276600
R 7276900 7276900
S 7277050 7277050
T 7277350 7277350
U – – 7276950
V 4017200 4017200
W 7277650 7277650
X 4017300 4017300
Y 7472950 7472950
Z/1 4004530 4005530
Z/2 4007530 4007530
A
B
CD
E
F
G
H
I
K
L
M
N
O
P
Q
RS
T
U
V
W
X
Y
Z/1
Z/2
Z/2

B
D
E
H
I
EHEIM FIX
EHEIM SUBSTRAT
EHEIM SUBSTRAT
pro
EHEIM LAV
EHEIM MECH
A + B
C
F
G

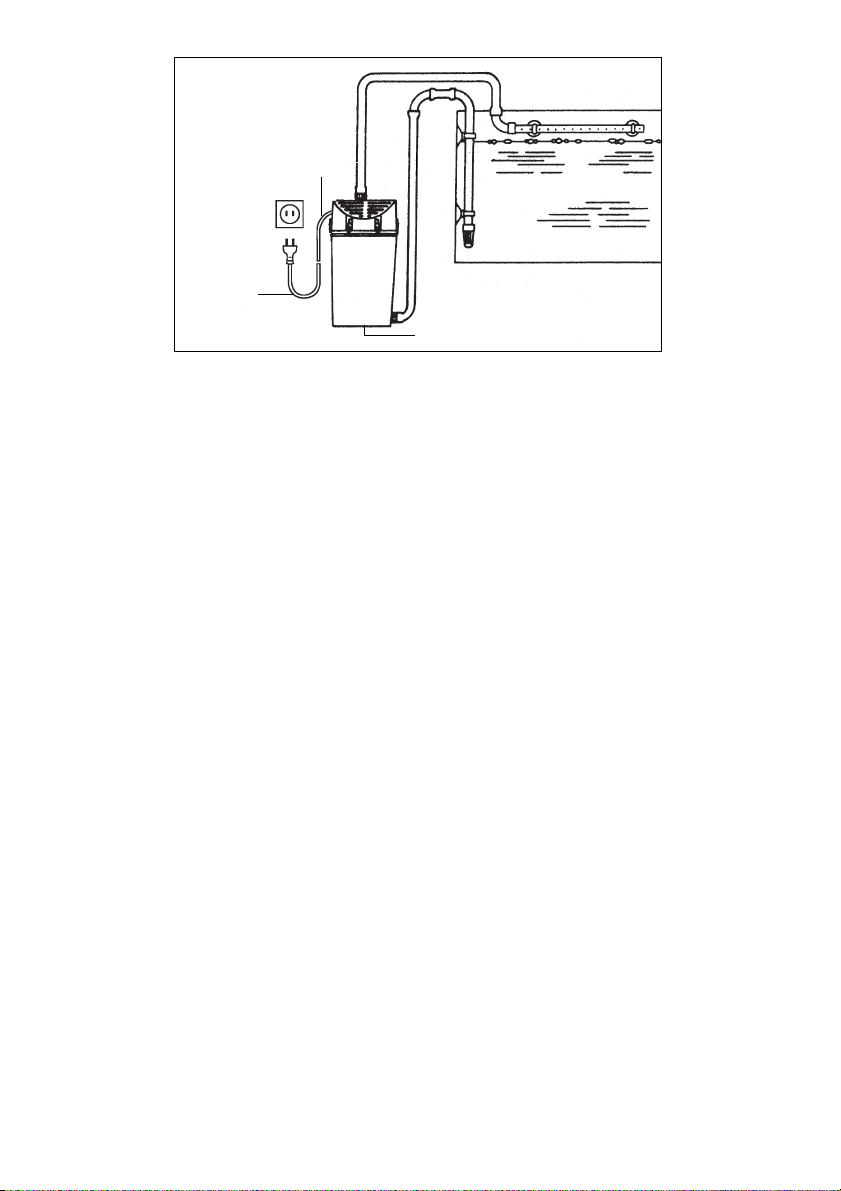
F Filter unterhalb des Wasserspiegels – am besten unter dem Aquarium – platzieren (Höhenunterschied Wasseroberfläche – Filter max.
1,50 m). Auf genügend Belüftung des Pumpenmotors achten!
Montage Druckseite:
Düsenrohr an der rückwärtigen Aquarienscheibe mit Hilfe der beiden
Sauger befestigen, wobei der Abstand zum Wasserspiegel je nach
Montage eine gute Sauerstoffeinschwemmung (1) oder Oberflächenbewegung (2) bewirkt. Mit einem kurzen Schlauchstück wird am
Düsenrohr der Auslaufbogen befestigt, der über den Beckenrand führt.
Schlauchstück mit Schlauchklemme sichern. Auslaufbogen und
Druckstutzen des Filters mit Schlauch verbinden und sichern.
G Montage Saugseite:
Ansaugrohr und Filterkorb zusammenstecken, Winkelbogen mit kur-
zem Schlauchstück verbinden und mit Schlauchklemmen sichern.
Komplettes Ansaugrohr mit 2 Saugern an der Aquarienwand befestigen. Schlauchverbindung zwischen Winkelbogen und saugseitigem
Schlauchanschluss des Filters herstellen. (Siehe auch Bild J).
Inbetriebnahme:
Druckschlauch am Düsenrohr lösen. Über das Schlauchende mit dem
EHEIM-Ansauger (Best.-Nr. 4003540) oder durch Ansaugen an der
Druckseite das Wasser über den Beckenrand saugen, bis der Filter von
selbst vollfließt. Anschließend Druckschlauch wieder mit dem Düsenrohr verbinden und Filter über den Netzstecker einschalten.
H Bei allen Reinigungs- und Pflegearbeiten am Filter: Netzstecker
ziehen!
Zur Filterreinigung den Schlauch am Ansaugrohr abziehen und Topf
über Abfluss oder Eimer entleeren. Erst dann Filterdeckel öffnen; Filtermassen entnehmen (reinigen oder wechseln) und Gerät säubern.
Beim Filter 2260 kann der Topf über den Ablasshahn mit einem zusätzlichen Schlauch auch direkt entleert werden!
Reinigung der Pumpe:
Anschlusswinkel abziehen, Pumpendeckel entriegeln und alle Teile
gemäß Zeichnung herausnehmen. Mit Reinigungsbürsten-Set (Best.Nr. 4009570 bei 2250 oder Best.-Nr. 4009580 bei 2260) Pumpenkanäle
kräftig säubern. Pumpenteile unter fließendem Wasser reinigen und
anschließend in gleicher Reihenfolge wieder zusammensetzen.
I Handhabung der Sicherheits-Schlauchmontage.
Hinweis: Die kompletten Schlauchverbindungen in regelmäßigen
Abständen auf korrekten Sitz prüfen.
Nur zur Verwendung in Räumen.Bei allen Arbeiten im
Wasser den Netzstecker ziehen.Die Anschlussleitung dieses Gerätes kann nicht ersetzt werden. Bei Beschädigung der
Leitung darf das Gerät nicht mehr benützt werden.

INSTRUCTIONS FILTER 2250, 2260
IMPORTANT SAFETY
INSTRUCTIONS
WARNING – To guard against injury, basic safety precautions
should be observed, including the following.
a)
READ AND FOLLOW ALL
SAFETY INSTRUCTIONS.
b) DANGER – To avoid possible electric shock, special care
should be taken since water is employed in the use of aquarium equipment. For each of the following situations, do not
attempt repairs by yourself; return the appliance to an authorized service facility for service or discard the appliance.
1) If the appliance falls into the water,
DON’T reach for it!
First unplug it and then retrieve it. If electrical components
of the appliance get wet, unplug the appliance immediately.
(Non-immersible equipment only)
2) If the appliance shows any sign of abnormal water leakage,
immediately unplug it from the power source. (Immersible equipment only).
3) Carefully examine the appliance after installation. It should
not be plugged in if there is water on parts not intended to
bewet.
4) Do not operate any appliance if it has a damaged cord or
plug, or if it is malfunctioning or has been dropped or da-maged
in any manner.
5) To avoid the possibility of the appliance plug or receptacle
getting wet, position aquarium stand and tank to one side of
a wall-mounted receptacle to prevent water from dripping onto
the receptacle or plug.
A ”drip-loop”, shown in the figure below, should be arranged by
the user for each cord connecting an aquarium appliance to a
receptacle. The ”drip-loop” is that part of the cord below the
level of the receptacle, or the connector if an extension cord is
used, to prevent water traveling along the cord and coming in
contact with the receptacle.
If the plug or socket does get wet,
DON’T unplug the cord.
Disconnect the fuse or circuit breaker that supplies power
to the appliance. Then unplug and examine for presence of
water in the receptacle.
c) Close supervision is necessary when any appliance is used by
or near children.
d) To avoid injury, do not contact moving parts or hot parts such as
heaters, reflectors, lamp bulbs, and the like.
e) Always unplug an appliance from an outlet when not in use,
before putting on or taking off parts, and before cleaning. Never
yank cord to pull plug from outlet. Grasp the plug and pull to disconnect.
f) Do not use an appliance for other than intended use. The use of
attachments not recommended or sold by the appliance
manufacturer may cause an unsafe condition.
g) Do not install or store the appliances where it will be exposed to
the weather or to temperatures below freezing.
h) Make sure an appliance mounted on a tank is securely installed
before operating it.
i) Read and observe all the important notices on the appliance.
j) If an extension cord is necessary, a cord with a proper rating
should be used. A cord rated for less amperes or watts than the
appliance rating may overheat. Care should be taken to arrange
the cord so that it will not be tripped over or pulled.
k) This appliance has a polarized plug (one blade is wider than the
other). As a safety feature, this plug will fit in a polarized outlet
only one way. If the plug does not fit fully in the outlet, reverse the
plug. If it still does not fit, contact a qualified electrician. Never
use with an extension cord unless plug can be fully inserted. Do
not attempt to defeat this safety feature.
Exception: This instruction may be omitted for an appliance
that is not provided with a polarized attachment plug.
l)
”SAVE THESE INSTRUCTIONS”.
AQUARIUM
TANK
POWER
SUPPLY
CORD
DRIP
LOOP
APPLIANCE

ASuction pads with clamping brackets Jet pipe with end-plug
Outlet elbow Threaded connector, pressure side Cover
Centrifugal pump Filter cover Large sealing ring Top
lattice screen (short lugs) Lower lattice screen (long lugs) Filter canister with fasteners Hose connection, suction side Elbow Intake pipe Strainer Drain tap (filter model 2260 only)
Hose clamps.
Filter model 2260 comes complete with a drain tap which should be
screwed into the filter canister and closed. It provides for the interim
drainage of coarse deposits.
B
Elbow connection Union nut Small sealing ring
21
Union
22
Base plate.
Slide union nut onto long pipe section of elbow connection and fit
sealing ring. Screw threaded end of elbow connection into pump intake
socket and adjust vertically. Screw union into filter cover, place pump
on base plate so that the elbow connection is inserted into union.
Align pump and secure to base plate with 4 self-tapping screws and
washers supplied. Screw union nut to union, tightening with light pressure. Screw in pressure side union.
C Place lower lattice screen (long lugs facing downwards) in the filter
canister and install filter compound (E). Place top lattice screen (short
lugs facing upwards) in position. Fit sealing ring on filter cover and install complete filter cover / pump assembly on filter canister. Secure
cover with fastening screws, making sure they are tight.
D Install top cover so that the two fastening clips engage the recesses
in the filter cover handles.
To remove the top cover, press in the two fastening clips below the
handles and push upwards simultaneously.
E Filter compound formation, from base upwards:
Install EHEIM FIX or EHEIM MECH to a depth of approx. 3 – 5 cm as
the lowest filtration layer.
Fill the accompanying net bag with EHEIM SUBSTRAT or EHEIM
SUBSTRATpro or EHEIM LAV, as the main mechanical-biological
filtration compound, and install in the filter canister. The net bag facilitates subsequent handling for cleaning operations.
Install approx. 3 cm EHEIM FIX as the top layer. Except when carrying
out short-term filtering after adding medication, please do not use
cotton wool, which soon becomes clogged with the high flow rate
through the filter.
Charcoal is only advisable for short-term use if it is necessary to
filter out unwanted substances when the filter is new or after the
addition of medication. It should be replaced by the specified filter
compound formation after a maximum of 3 weeks. Never re-use old
charcoal.
English

F Place the filter below the water level, ideally beneath the aquarium.
Take care to ensure that the pump receives sufficient ventilation.
Pressure side installation:
Secure the jet pipe to the rear aquarium panel with the aid of the two
suction pads, at a sufficient distance from the surface to ensure good
oxygenation (1) or surface movement (2), depending on type of installation. The outlet elbow should be secured to the jet pipe with a short
piece of hose, the elbow being led over the edge of the aquarium. Connect the outlet elbow and pressure side union of the filter with hose.
G Suction side installation:
Fit the intake pipe and strainer together, connect the elbow with a short
piece of hose and secure the intake pipe assembly to the aquarium
panel with 2 suction pads. Connect the elbow to the intake side hose
connector on the filter with hose. (See also fig. J).
Operation:
Release the pressure hose from the jet pipe. By suction on pressure
side (or using the EHEIM suction device, order no. 4003540), draw
water through the end of the hose and over the rim of the aquarium
until the filter is functioning fully of its own accord. Now reconnect the
pressure hose to the jet pipe and switch on the filter by plugging it into
the power supply.
H Always disconnect the power supply before carrying out any cleaning or other operations on the filter.
To clean the filter, pull off the hose from the intake pipe and empty the
canister into a bucket or allow it to drain. Then, and only then, remove
the filter cover. Remove filter compound (clean or replace) and clean
the appliance. For the care of the centrifugal pump, refer to the accompanying pump instruction leaflet.
The filter canister on model 2260 can be emptied direct by attaching a
hose to the drain tap, if required.
Cleaning of the pump:
Remove the connection bend, unlock the pump lid and remove all parts
as shown on the drawing. Clean the pump pipes with a set of cleaning
brushes (order no. 4009570 for 2250 or 4009580 for 2260). Clean the
pump parts under running water and then reassemble in the same
order.
I Diagram showing assembly of the safety hose.
Note: All hose connections must be checked at regular intervals for
correct fitting.
Only to be used indoors. When working in water, disconnect the mains plug. The connection part of this pump
cannot be replaced. If the wiring is damaged, the pump must
no longer be used.

AVentouses avec clips de fermeture Tube à gicleur avec bou-
chon de fermeture Tube de raccord coudé Embout côté pression Capot Pompe centrifuge Couvercle Grand joint
Grille supérieure (tenons courts) Grille inférieure (tenons longs)
Cuve du filtre avec clips de fermeture Tuyau de raccord côté aspiration Coude Tube d’aspiration Crépine Robinet de vidange (seulement pour filtre 2260) Pinces pour tuyaux souples.
Le filtre 2260 est livré avec un robinet de vidange vissé sur la cuve de filtration, afin d’évacuer de temps en temps les grosses particules de
saleté.
BCoude de raccordement Ecrou de fixation Petit joint
21
Pièce de raccordement
22
Plaque support.
Pousser l’écrou de fixation sur la longue pièce de tube du coude de
raccordement et monter le joint. Puis visser le coude de raccordement
par le côté filete dans l’embout d’aspiration de la pompe et l’ajuster
verticalement. Visser la pièce de raccordement dans le couvercle du
filtre, poser la pompe sur la plaque en enfichant en même temps le
coude de raccordement dans la pièce de raccordement. Ajuster la
pompe et la fixer sur la plaque support les 4 vis autotaraudeuses et rondelles. Visser l’écrou de fixation avec pièce de raccordement et le serrer à bloc.
C Placer la grille inférieure (les tenons longs vers le bas) dans la cuve du
filtre et exécuter le remplissage des masses filtrantes (E). Placer la grille
supérieure (les tenons courts vers en haut). Monter le joint au couvercle
de filtre et placer le couvercle complet avec pompe montée sur la cuve
du filtre. Serrer à bloc le couvercle moyennant les clips de fermeture.
D Poser le capot de manière à ce que les deux fermetures s’enclenchent dans les trous des poignée du filtre.
Pour ouvrir le capot, presser les deux clips de fermeture au-dessous
des poignées et en même temps les pousser vers le haut.
E Structure des masses filtrantes de bas en haut:
Remplir EHEIM FIX ou EHEIM MECH à une hauteur d’environ 3 à
5 cm en tant que couche de filtration la plus basse.
Remplir le filet livré avec la masse filtrante d’EHEIM SUBSTRAT,
d’EHEIM SUBSTRATpro ou d’EHEIM LAV mettre le tout dans la cuve
du filtre. Le filet simplifie le nettoyage postérieur.
Introduire env. 3 cm d’EHEIM FIX comme couche supérieure. Ne pas
employer de l’ouate – sauf pour une filtration de courte durée (et après
un ajout de médicaments) – étant donné qu’elle s’encrasse très vite
lors d’un débit élevé.
Le charbon d’emploie uniquement pour une utilisation de courte
durée, si des substances indésirables doivent être adsorbées après
une nouvelle installation d’aquarium ou après un ajout de médicaments. Au bout de maximum 3 semaines, il doit être remplacé par la
structure de masse filtrante décrite. Ne jamais réutiliser le charbon usé!
Français
 Loading...