

EHEIM 2227, 2327, 2229, 2329 User Manual
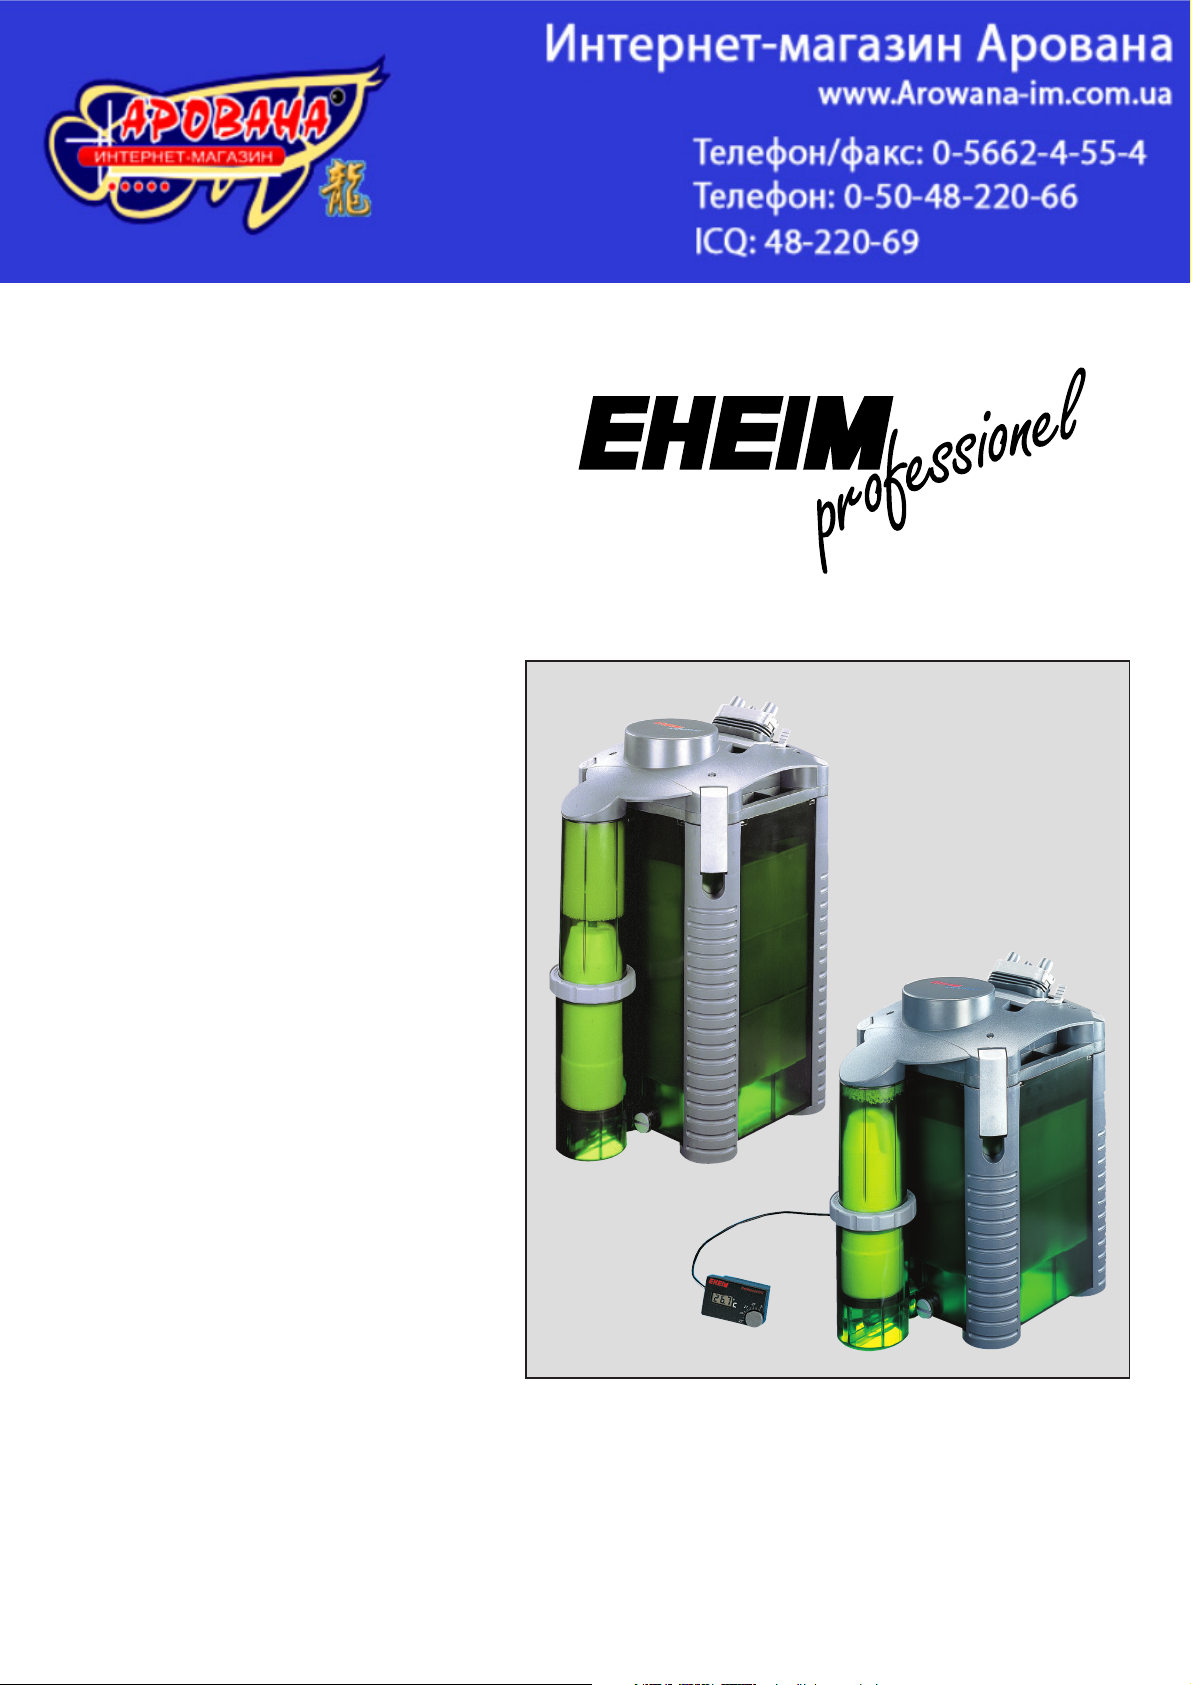
2227 / 2229
Intervallfilter
Wet/dry canister filter
Filtre sec/humide
Intervalfilter
Filtro asciutto/bagnato
Intervallfilter
Filtro seco/mojado
Intervalfiltre
Märkä/kuiva-suodattimet
Utvendig intervallfilter
Filtro seco/húmido
2327 / 2329
Intervall-Thermofilter
Wet/dry Thermofilter
Thermofiltre sec/humide
Interval-Thermofilter
Termofiltro asciutto/bagnato
Termointervallfilter
Termofiltro seco/mojado
Interval-termofiltre
Märkä/kuiva-lämpösuodattimet
Intervall-termofilter
Termofiltro seco/húmido
Filtermassen
Filter media
Masses filtrantes
Filtermassa’s
Materiali filtranti
Filtermassa
Masas filtrantes
Filtermasser
Suodatinmassat
Filtermasser
Massas filtrantes
2227/
2327
2x 2510051 (1 l)
oder / or / ou
1x 2510101 (2 l)
2x 2510051 (1 l)
oder / or / ou
1x 2510101 (2 l)
2229/
2329
2.1 ltr.
2.1 ltr.
2x 2510051 (1 l)
oder / or / ou
1x 2510101 (2 l)
2x 2510051 (1 l)
oder / or / ou
1x 2510101 (2 l)
2x 2510051 (1 l)
oder / or / ou
1x 2510101 (2 l)
2.1 ltr.
2.1 ltr.
2.1 ltr.

2227/
21
2327
24
22
23
C
°
25
27
26
2229/
C
°
21
23
25
27
24
22
26
2329
Intervallfilter 2227 und 2229
Achtung: Thermofilter 2327 und 2329 sind nur für
Süßwasser geeignet.
Thermo-Intervallfilter 2327 und 2329
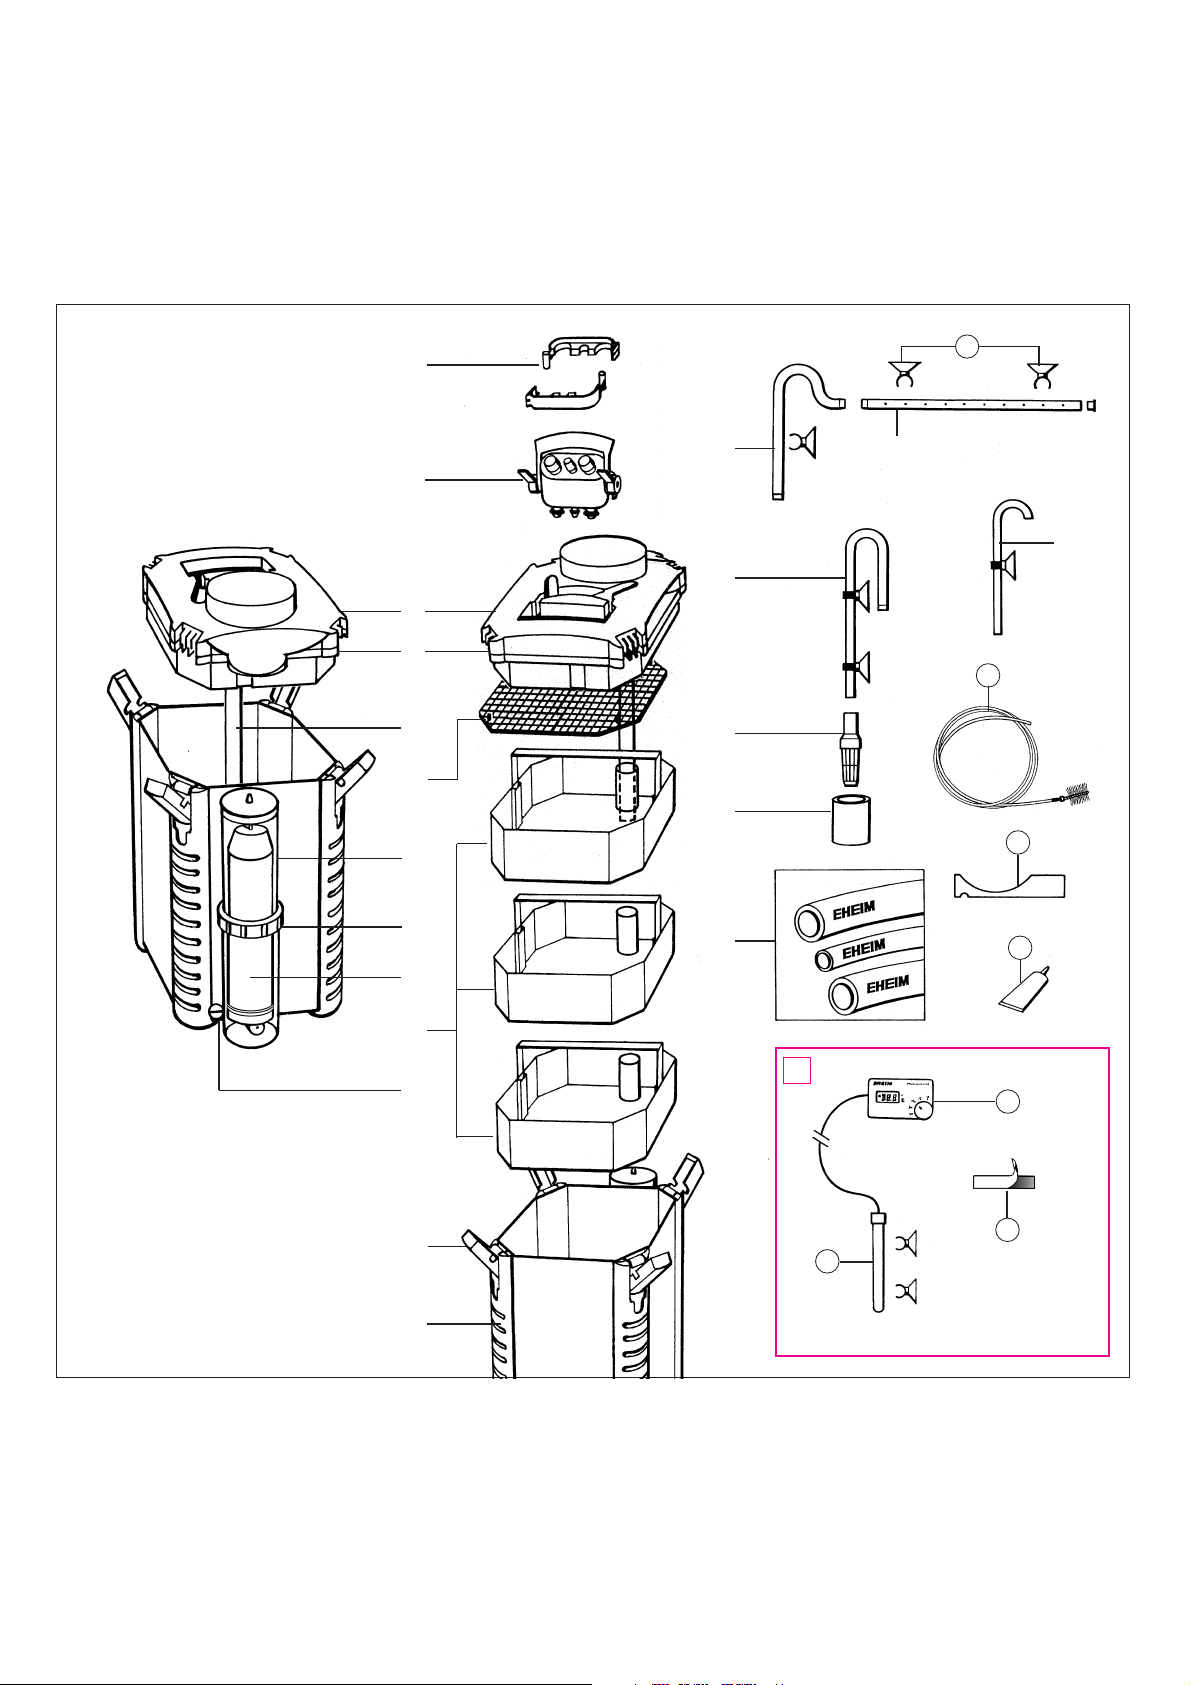
FilteroberteilProfildichtungVerbindungsrohrAbdeckgitter
ter
VerriegelungenAdapter mit AbsperrhähnenSchlauch-
halter
AnsaugrohrFilterkorbSchaumstoff-VorfilterEntlüftungsrohr
gelungsschlüssel
Thermofilter:
FiltereinsätzeVerschluss-KlippFilterbehäl-
Intervall-SteuerungVerschlussringSchwimmer
AuslaufbogenDüsenrohr mit Verschluss-Stopfen
Schläuche
25
21
23
Vaseline
Bedienteil
Klemmbügel mit Sauger
24
Schlauchreinigungsbürste.
26
Temperaturfühler
22
27
Klettband
Verrie-
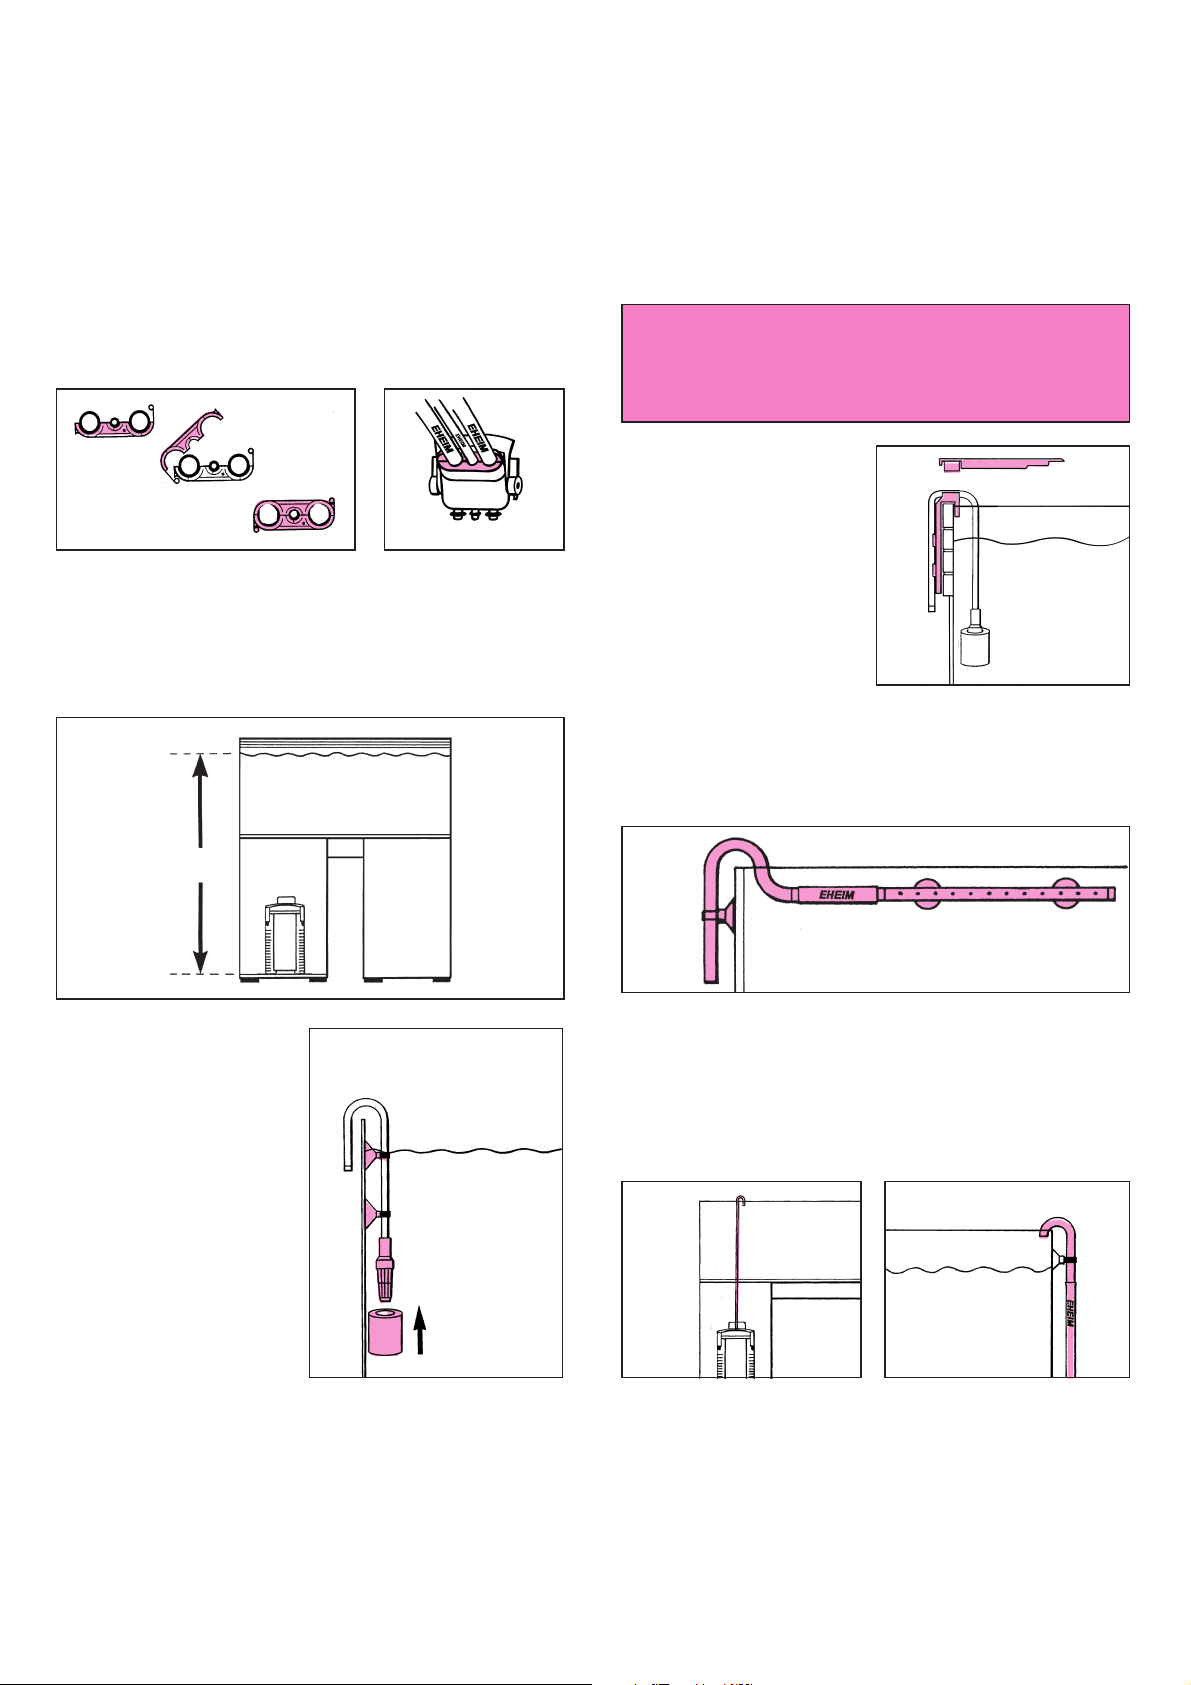
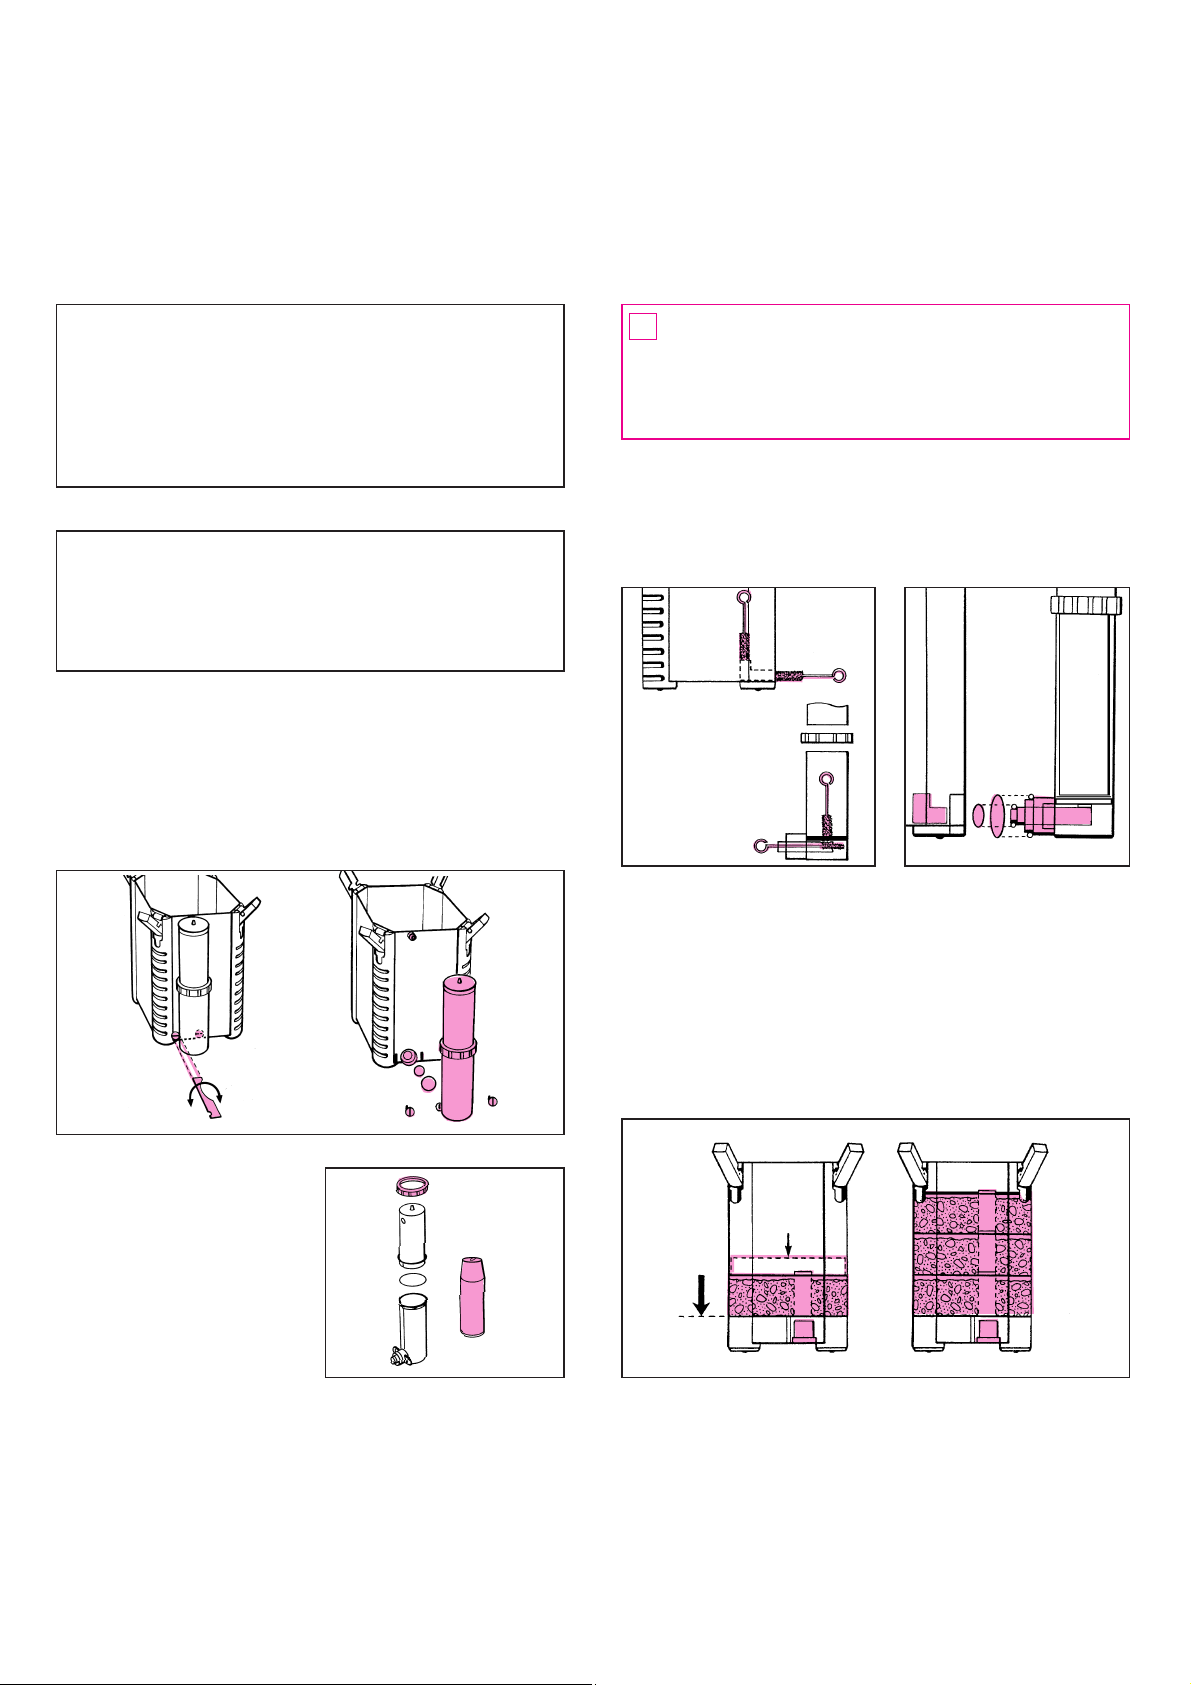
Bitte beim auspacken prüfen, ob alle Teile vorhanden sind.
Montage
Achtung: Um die abgestimmte Funktion des Intervall-
Filters zu gewährleisten, verwenden Sie nur die beiliegenden Originalteile. Änderungen im Ansaug- und Auslaufbereich dürfen nicht erfolgen.
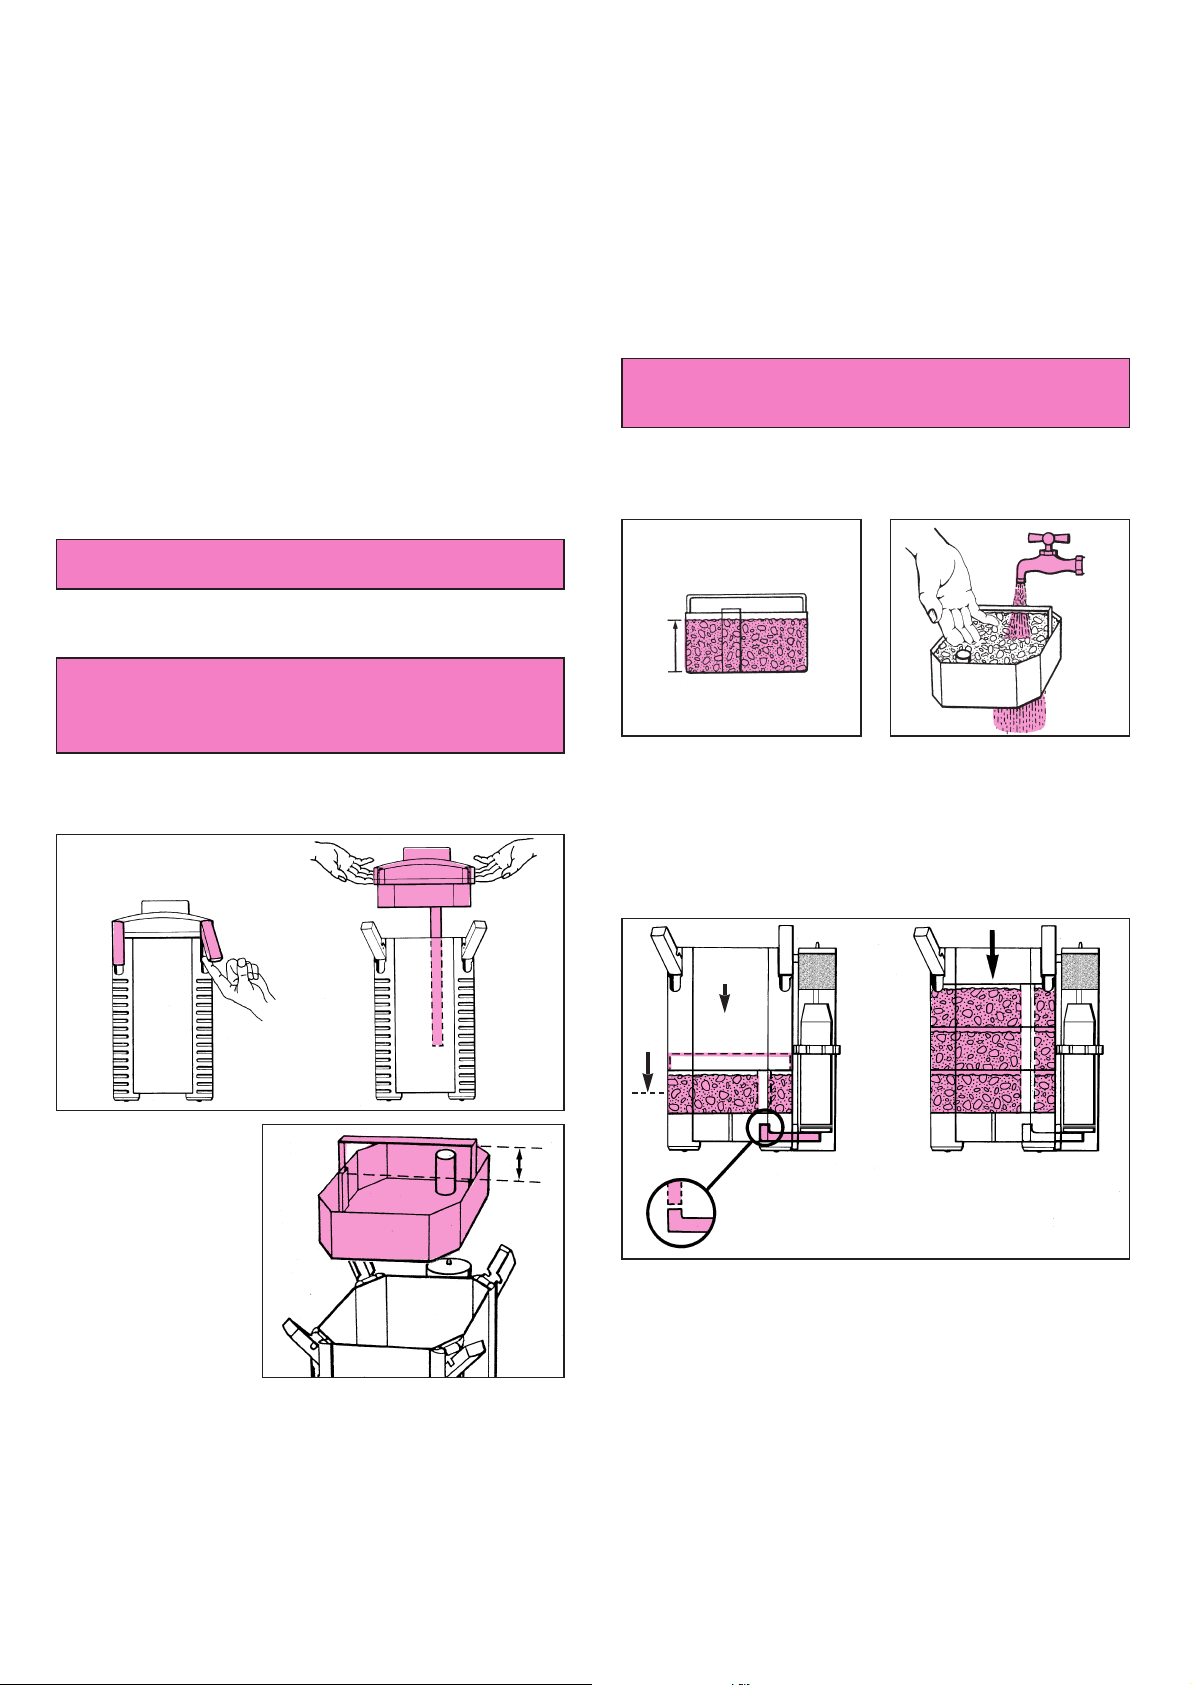
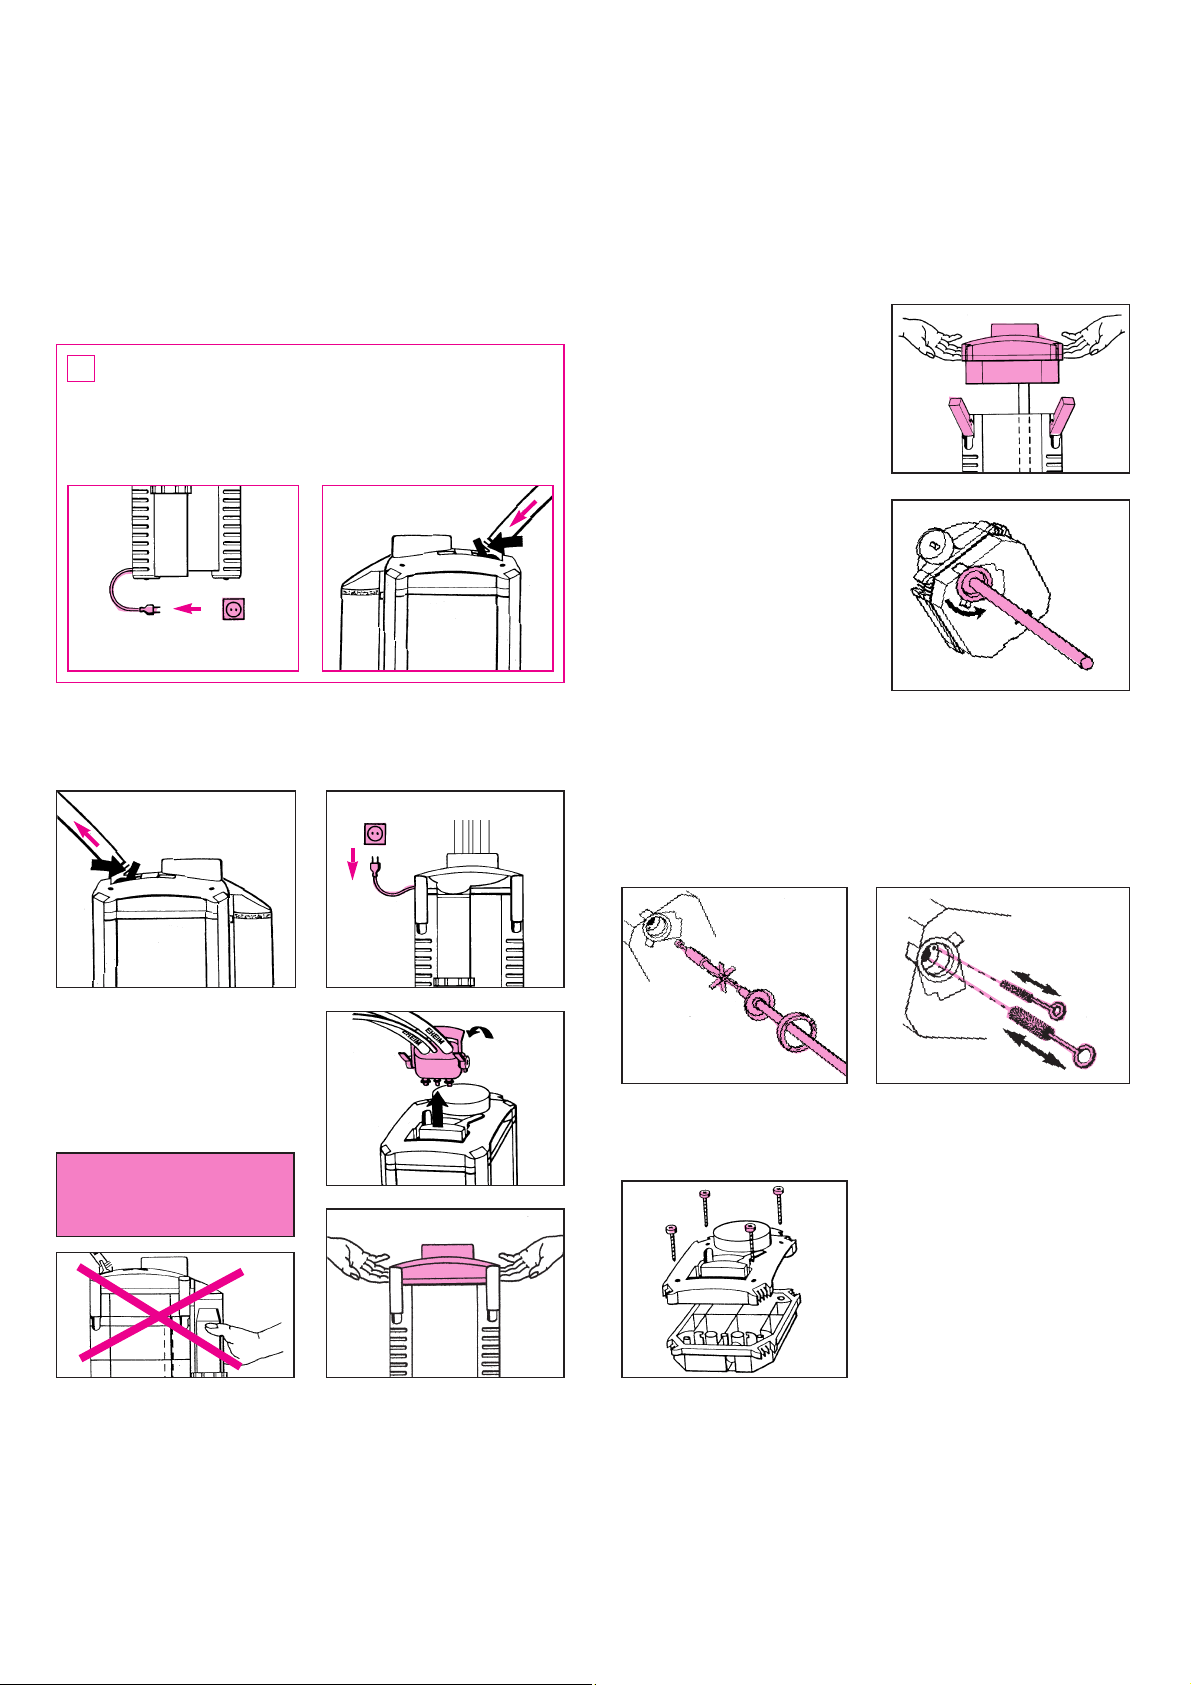
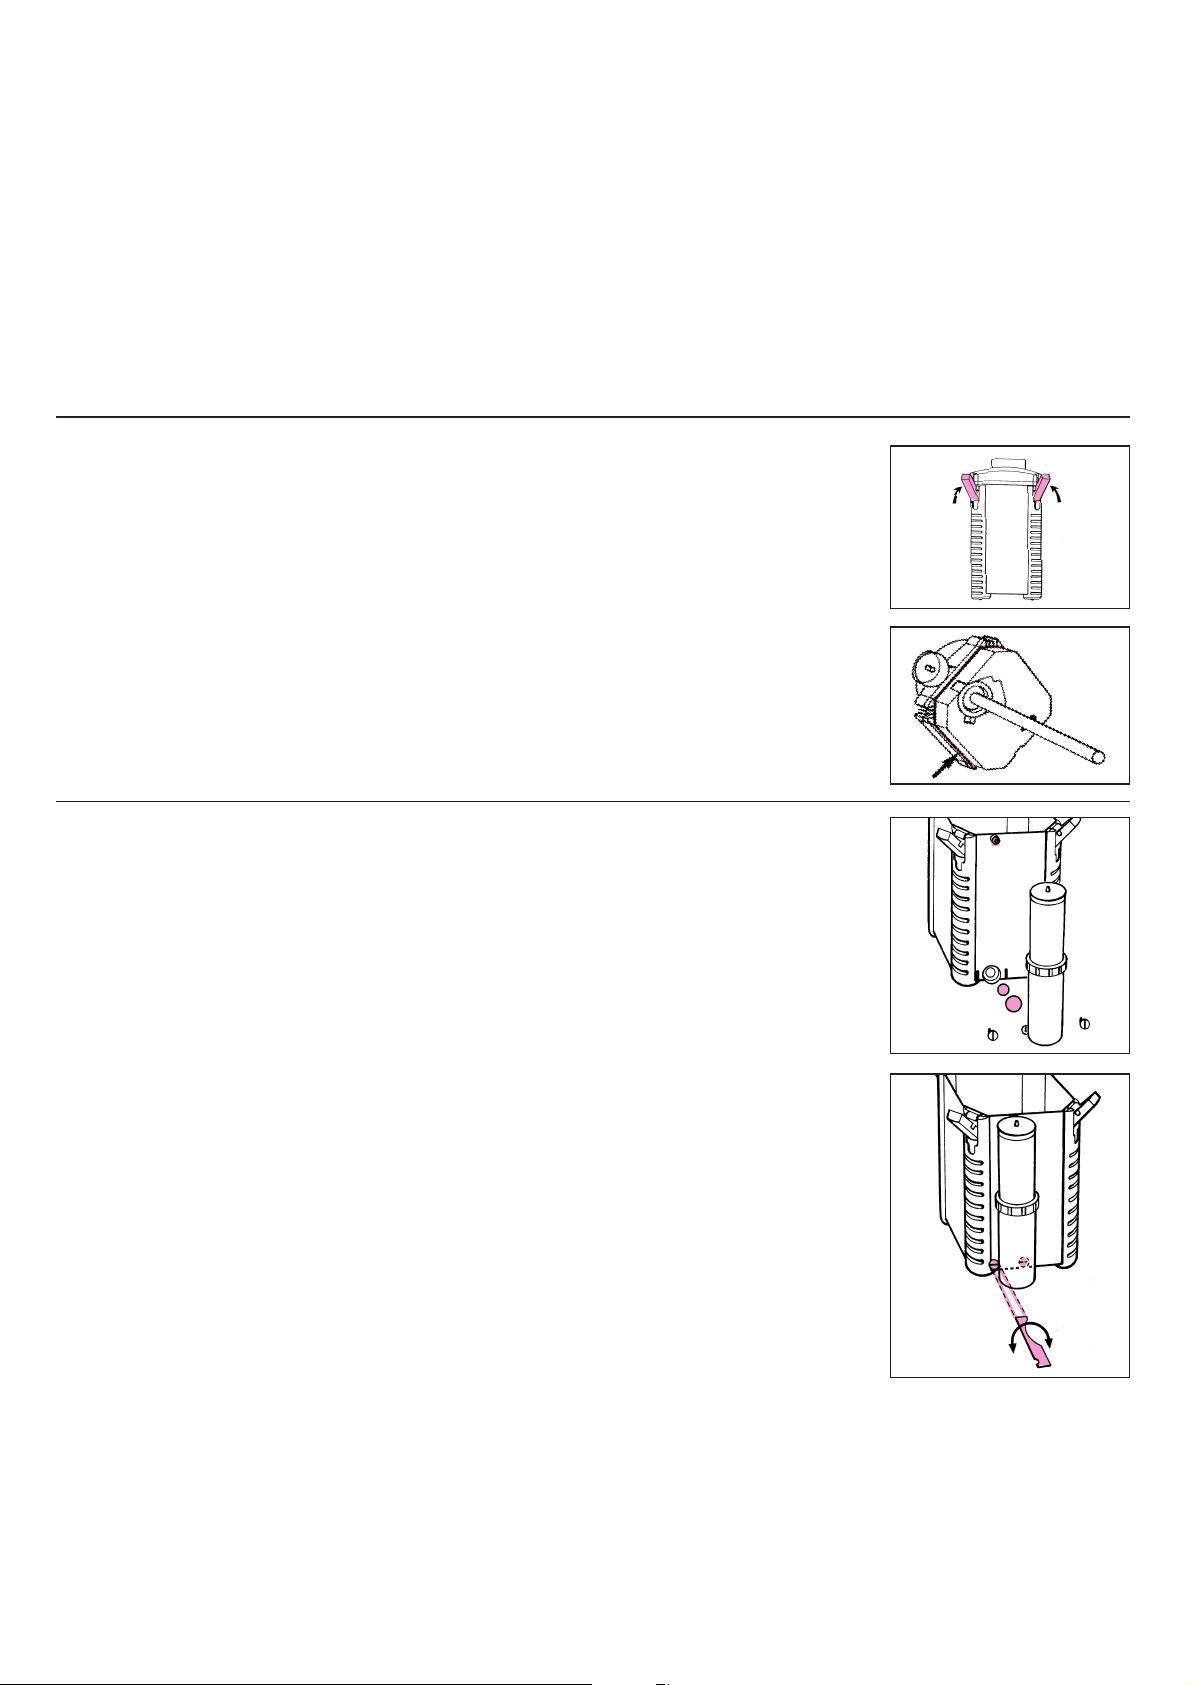
Alle vier Verschluss-Klipps am Filterbehälter herauskippen
und nach oben schieben. Mit Hilfe der beiden Griffmulden
lässt sich das Filteroberteil bequem abheben.
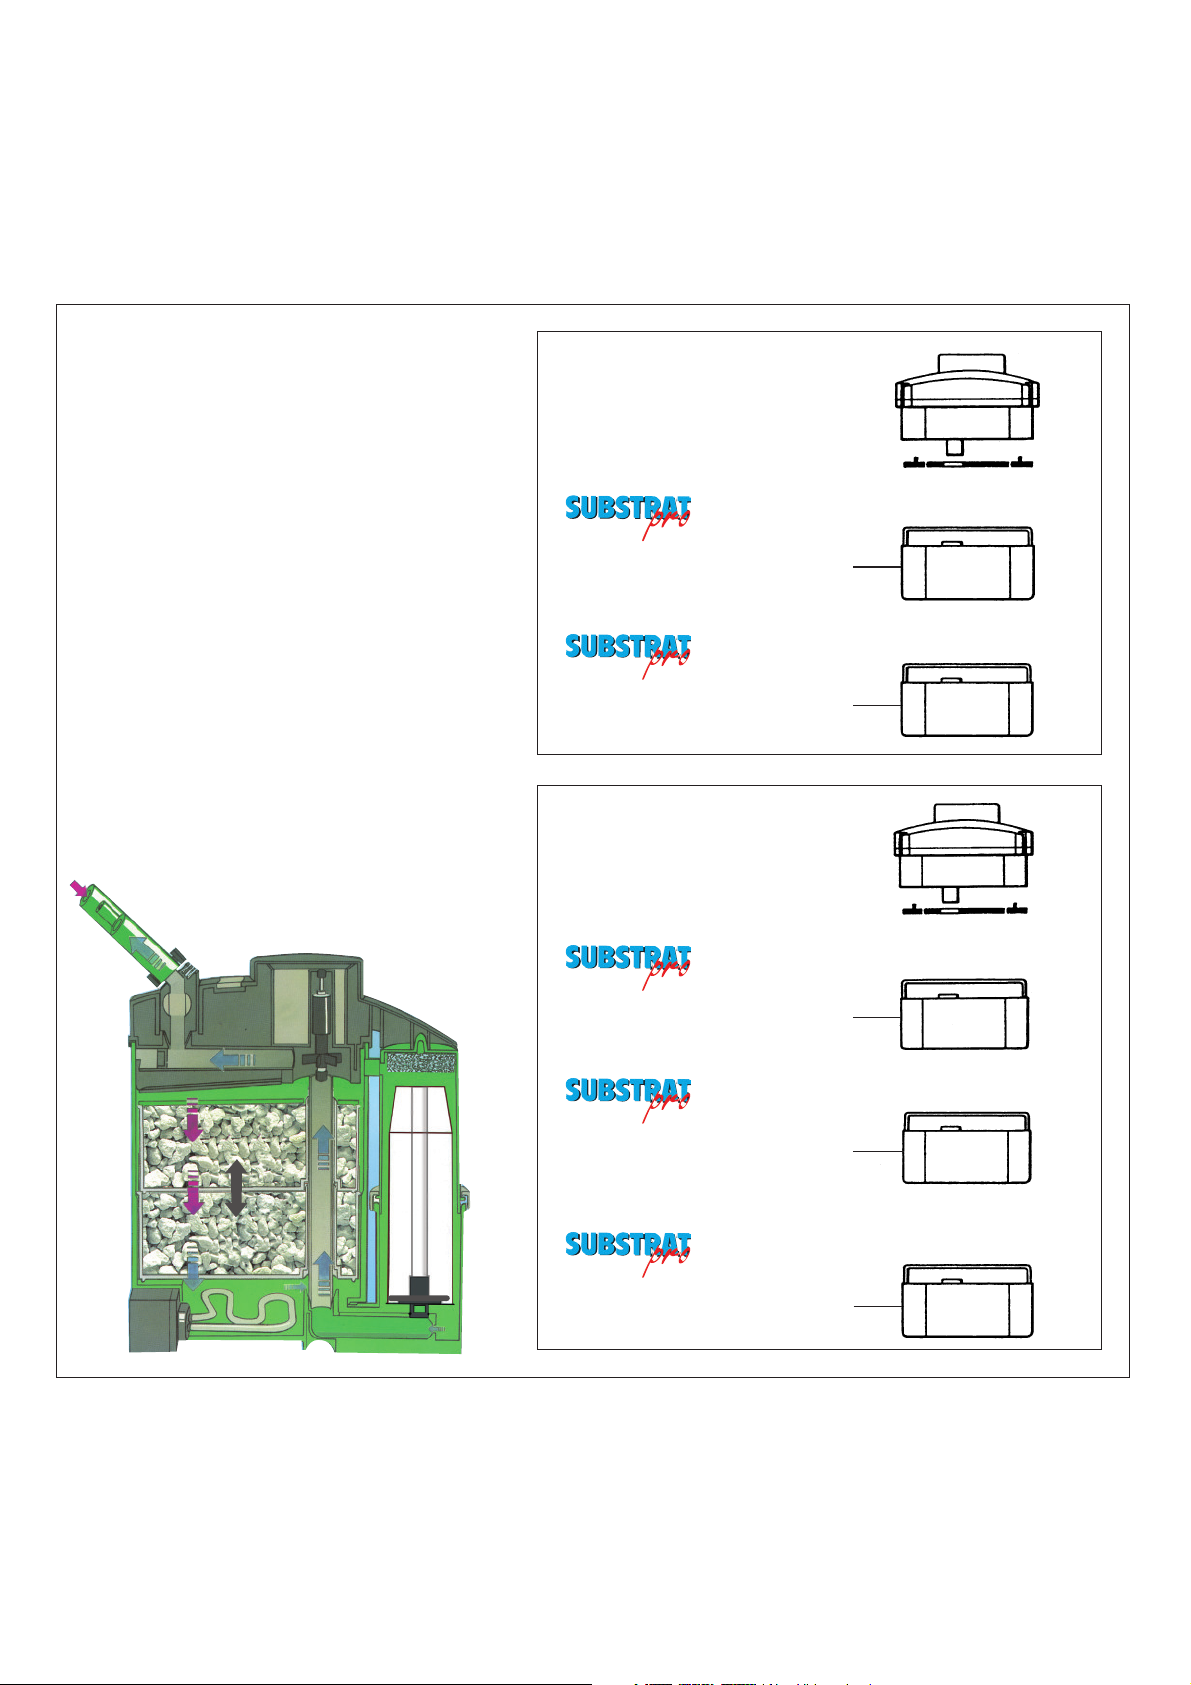
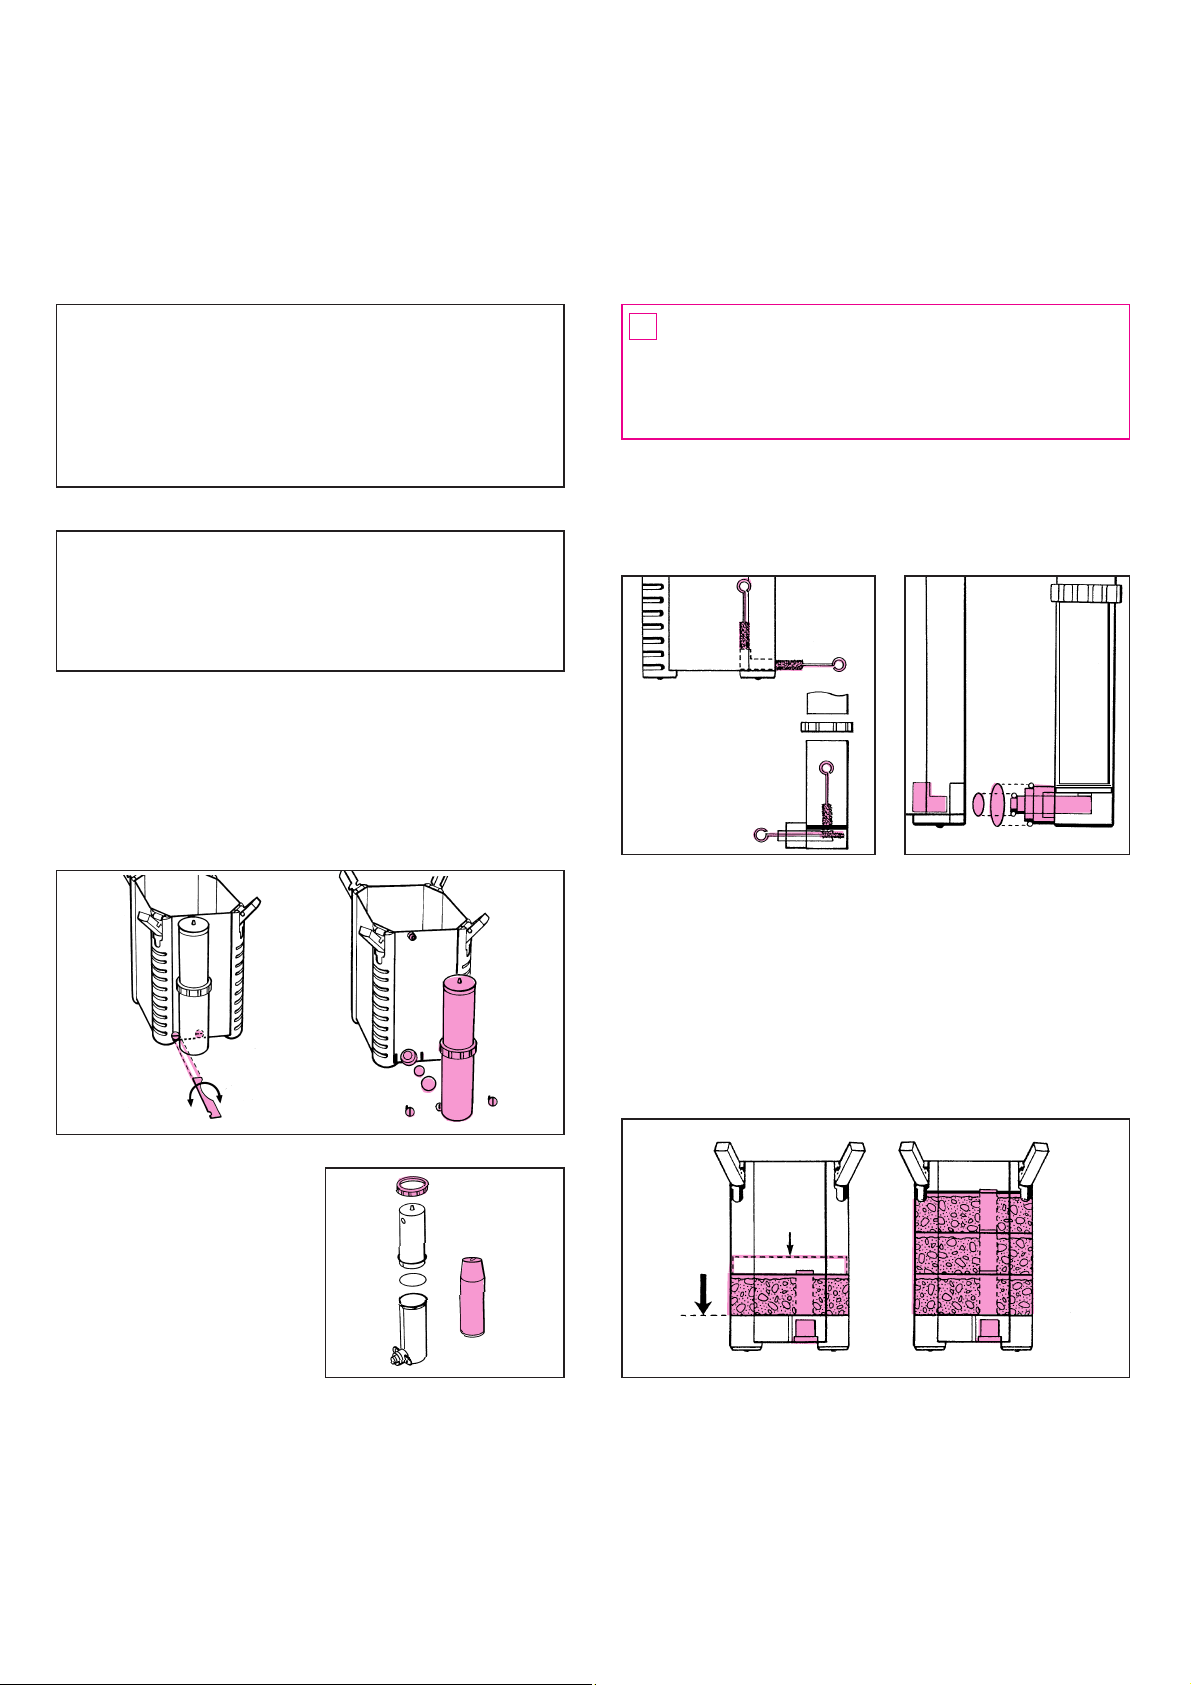
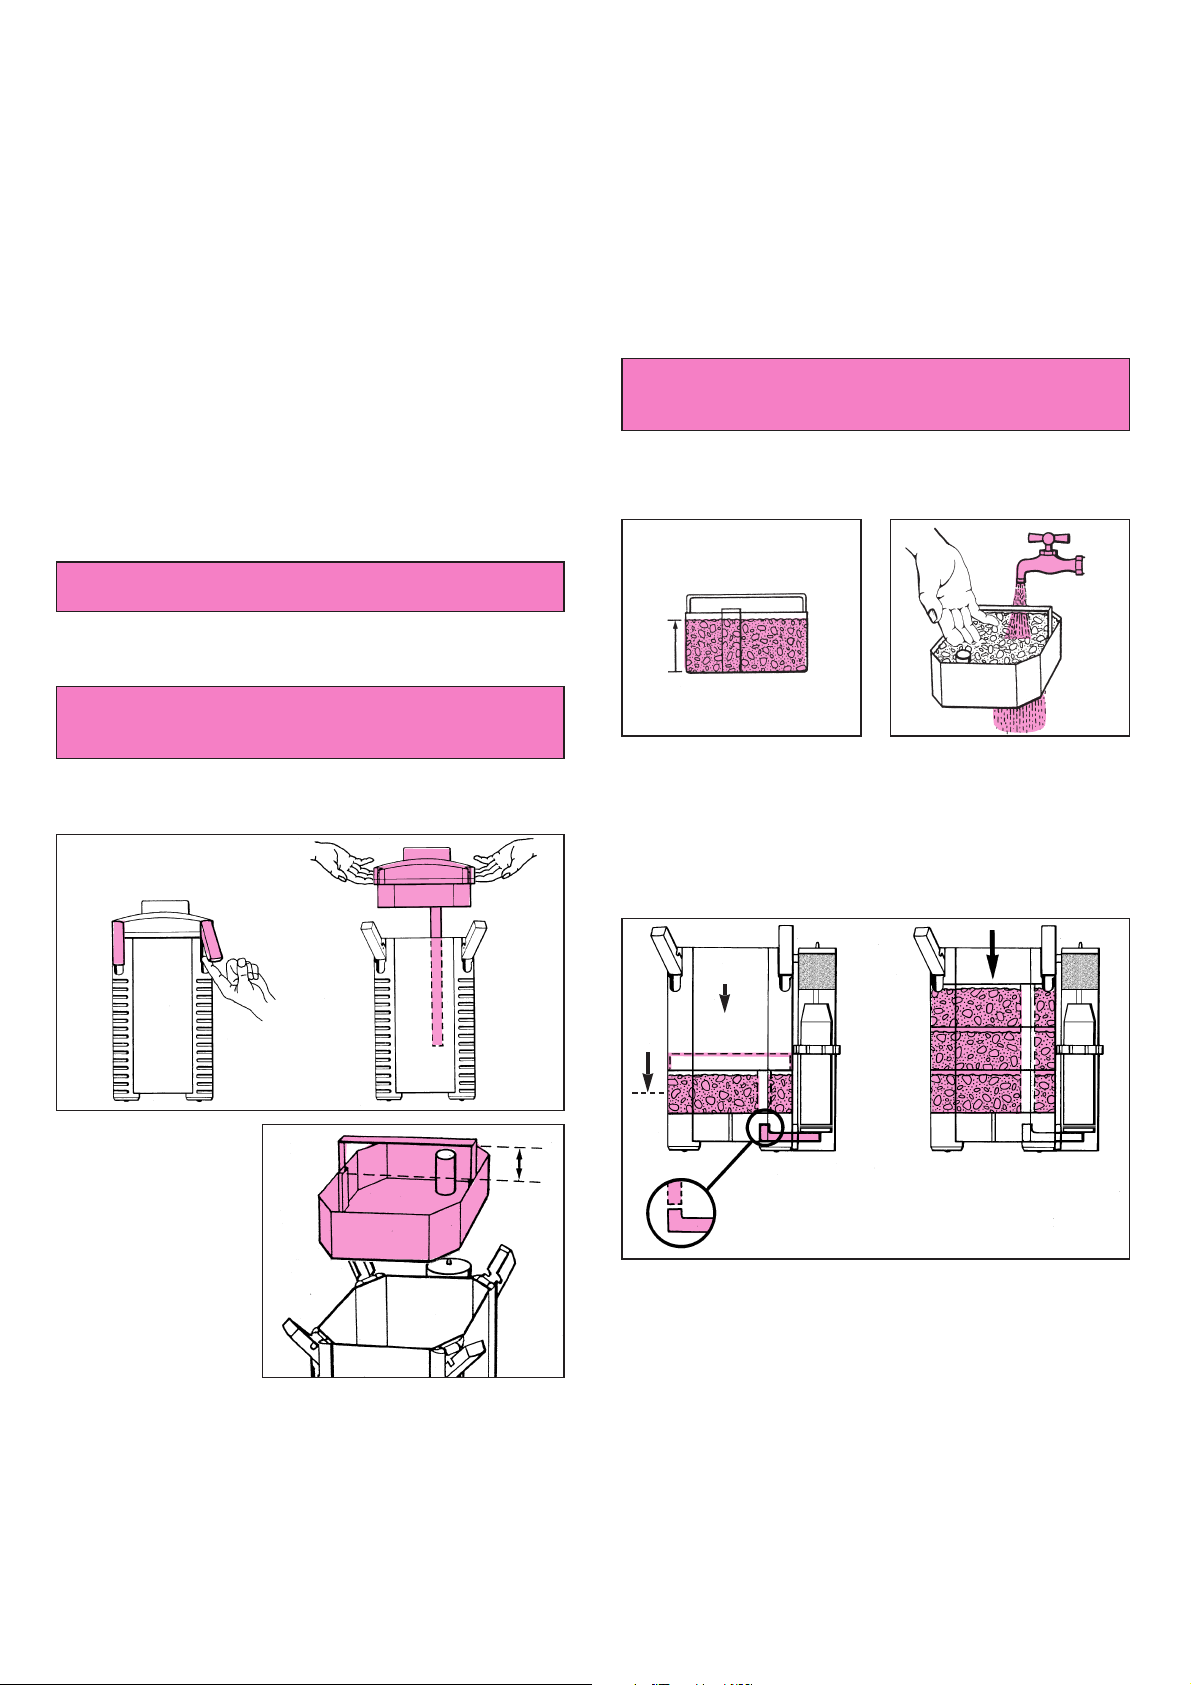
Alle Filtereinsätze bis knapp unter den Rand mit der biologischen Filtermasse SUBSTRATpro oder EHFISUBSTRAT füllen.
Achtung: Nicht überfüllen, Rohrdurchführung nicht
verstopfen. Für alle Filtereinsätze nur Filtermassen
SUBSTRATpro oder EHFISUBSTRAT verwenden!
Anschließend Filtermasse im Korb unter fließendem Wasser
gründlich durchspülen, bis keine Wassertrübung mehr sichtbar ist.
Nachdem Sie geprüft haben, dass der Intervall-AnschlussStutzen nicht verunreinigt ist, setzen Sie den ersten Filtereinsatz wieder in den Filterbehälter ein. Dabei ist zu beachten,
dass die Rohrdurchführung über dem Intervall-AnschlussStutzen sitzt. Drücken Sie den Einsatz kräftig nach unten, bis
er auf den Auflagestegen aufliegt. Damit ist eine sichere Abdichtung zwischen Filtereinsatz und Behälter gewährleistet.
Abdeckgitter und die
einzelnen Filtereinsätze nacheinander
herausnehmen.
Die versenkten Griffbügel der Filtereinsätze lassen sich
nach oben ausziehen.
Anschließend Einsätze mit Filtermassen
befüllen.
Den zweiten (und dritten) Filtereinsatz ebenfalls einschieben,
wobei die Rohrdurchführungen übereinander liegen müssen.
Griffbügel jeweils wieder versenken und darauf achten, dass
alle Filtereinsätze bündig aufeinander liegen. Abdeckgitter
auflegen.
1

off
on
off
on
Überprüfen Sie die Intervall-Steuerung auf sichere Befestigung am Filterbehälter: Der obere Anschluss muss fest am
Behälter stecken; die beiden unteren Verriegelungen müssen
geschlossen sein, so dass die Schlitze jeweils waagerecht
stehen.
Mit dem beiliegenden Verriegelungsschlüssel sind die Verriegelungen leicht zugänglich.
2
Dichtungsring vom Verbindungsrohr leicht einfetten und fest
in den Pumpendeckel stecken. Profildichtung am Filteroberteil auf Sauberkeit und korrekten Sitz prüfen.
Filteroberteil auf den Behälter setzen, wobei das Verbindungsrohr durch die Öffnungen der Filtereinsätze geführt
wird und korrekt in dem Intervall-Anschluss-Stutzen sitzen
muss. Alle vier Verschluss-Klipps schließen.
ACHTUNG: Bevor der Adapter für die Schlauchanschlüsse
im Filteroberteil eingesetzt wird, alle 3 Dichtungsringe auf
Beschädigungen und richtigen Sitz prüfen. Die Dichtringe zur
Montageerleichterung mit etwas Vaseline leicht einfetten.
Adapter mit hochstehendem Verriegelungsbügel in die vorgesehene Öffnung am Filteroberteil satt einstecken und unter
gleichzeitigem Druck auf den Adapter-Verriegelungsbügel
nach hinten bis zum Einrasten schließen.
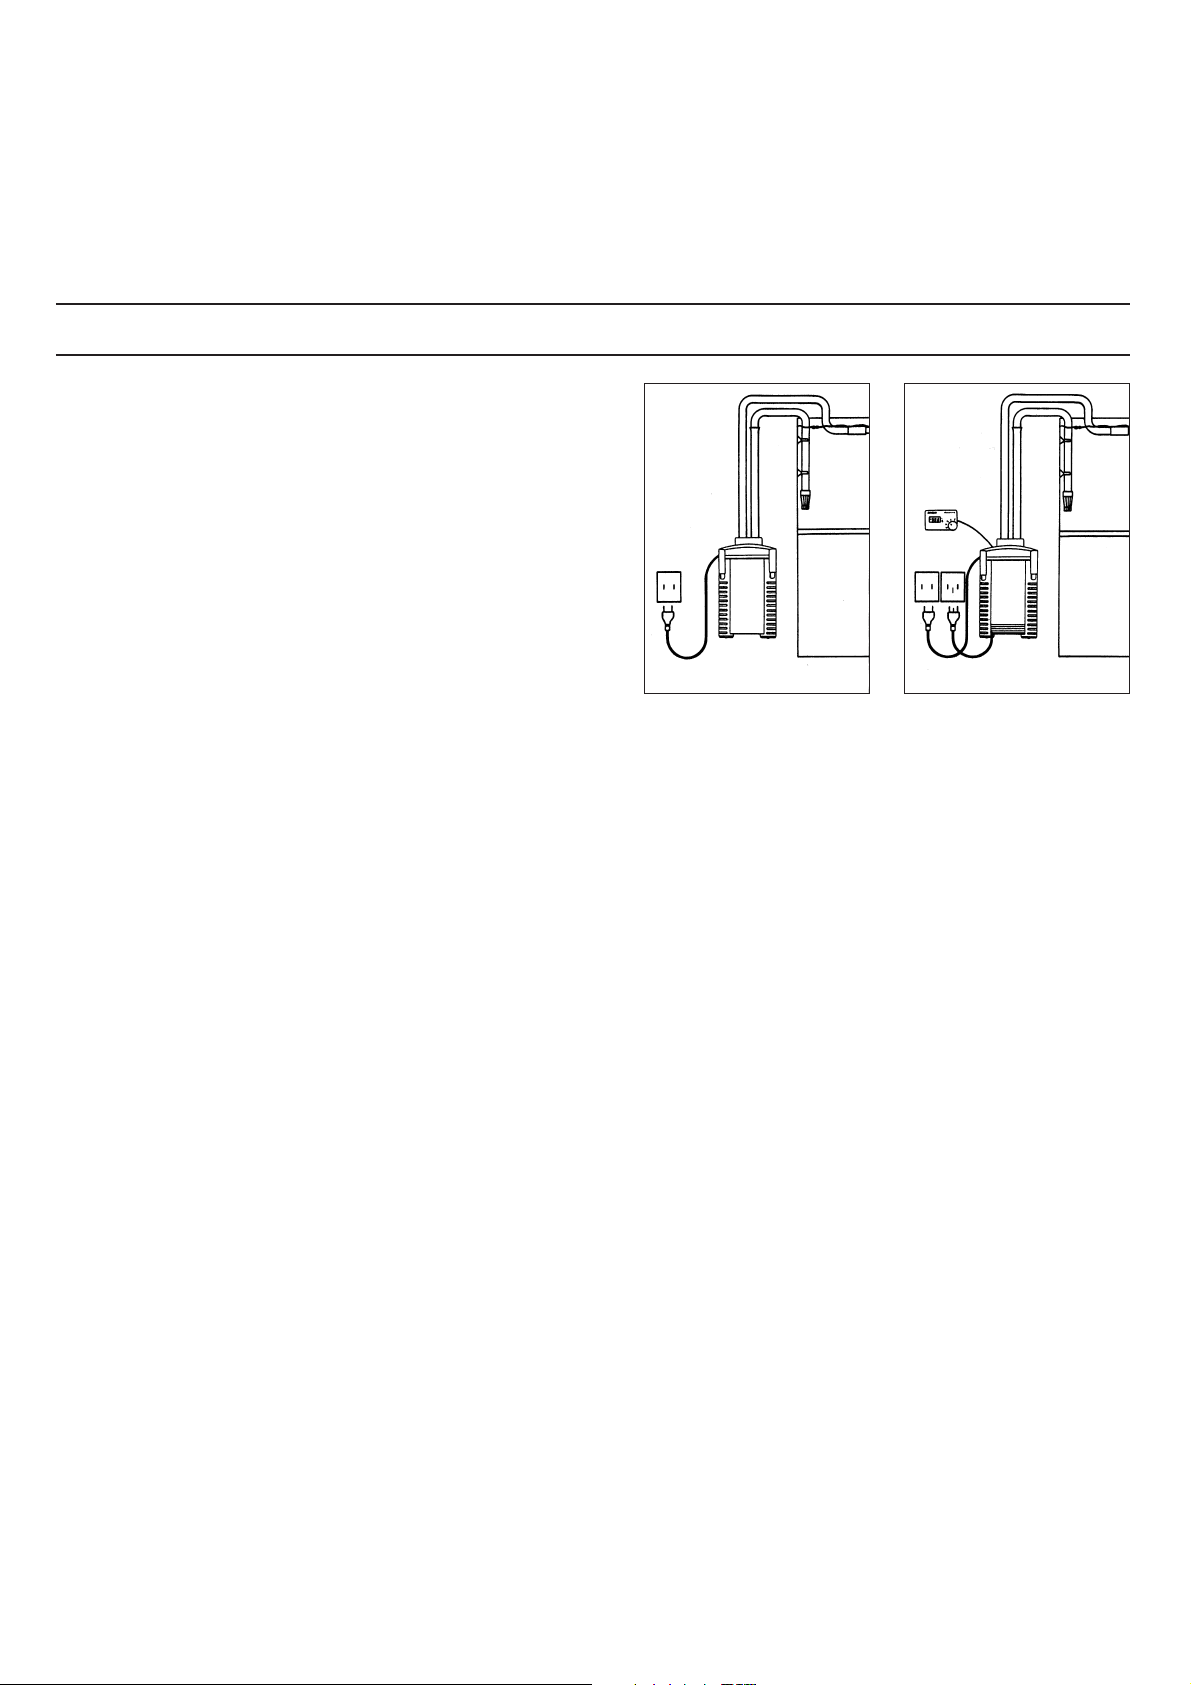
Schlauchinstallation
Um die Absperrhähne zu schließen, werden die beiden seitlichen Hebelgriffe des Adapters auf Stellung OFF umgelegt.
Die beiliegenden drei Schläuche nun bis zum Anschlag auf
die entsprechenden Schlauchstutzen am Adapter aufschieben, wobei mit dem kleinen Schlauchdurchmesser begonnen wird. Falls das Aufschieben schwergängig ist, die
Schläuche in warmem Wasser geschmeidig machen.
Grundsätzlich nur EHEIM-Originalschläuche verwenden
Der zweiteilige Schlauchhalter wird um die montierten
Schläuche gelegt, seitlich eingehängt und fest zusammengeklippst.
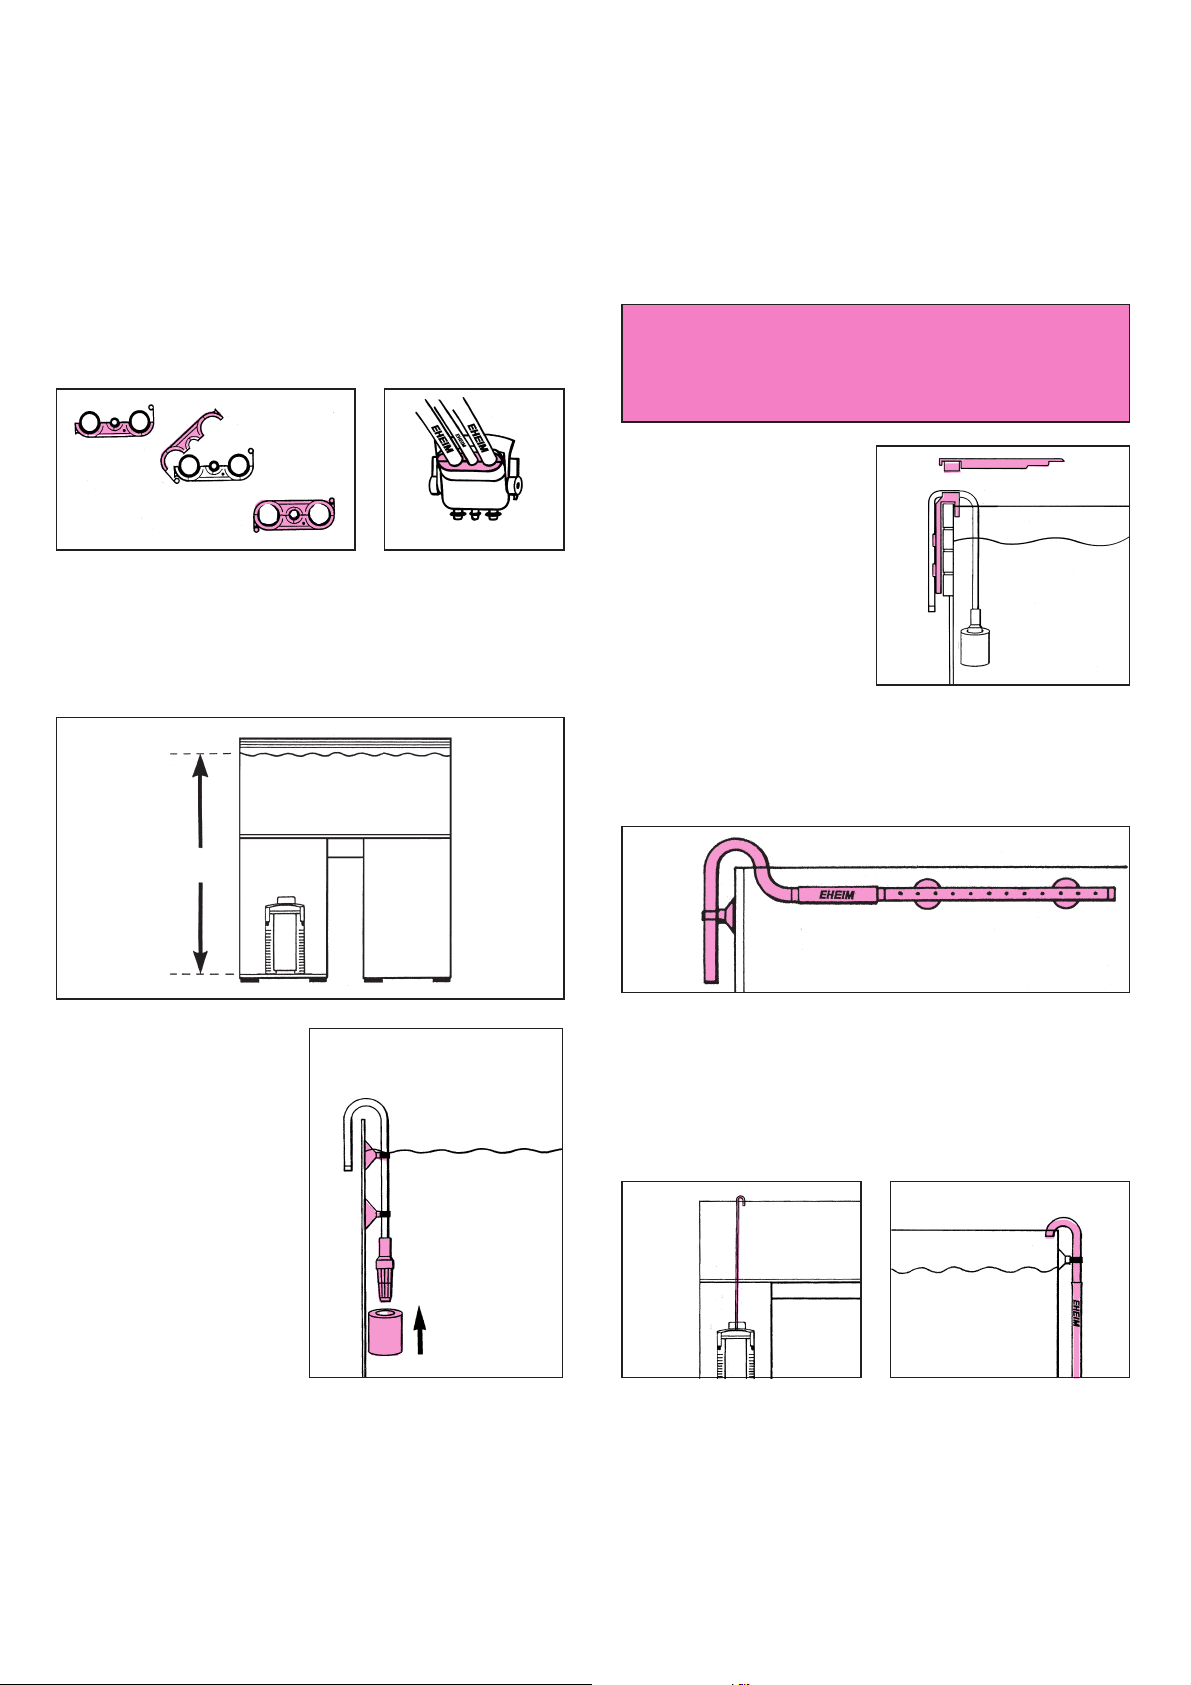
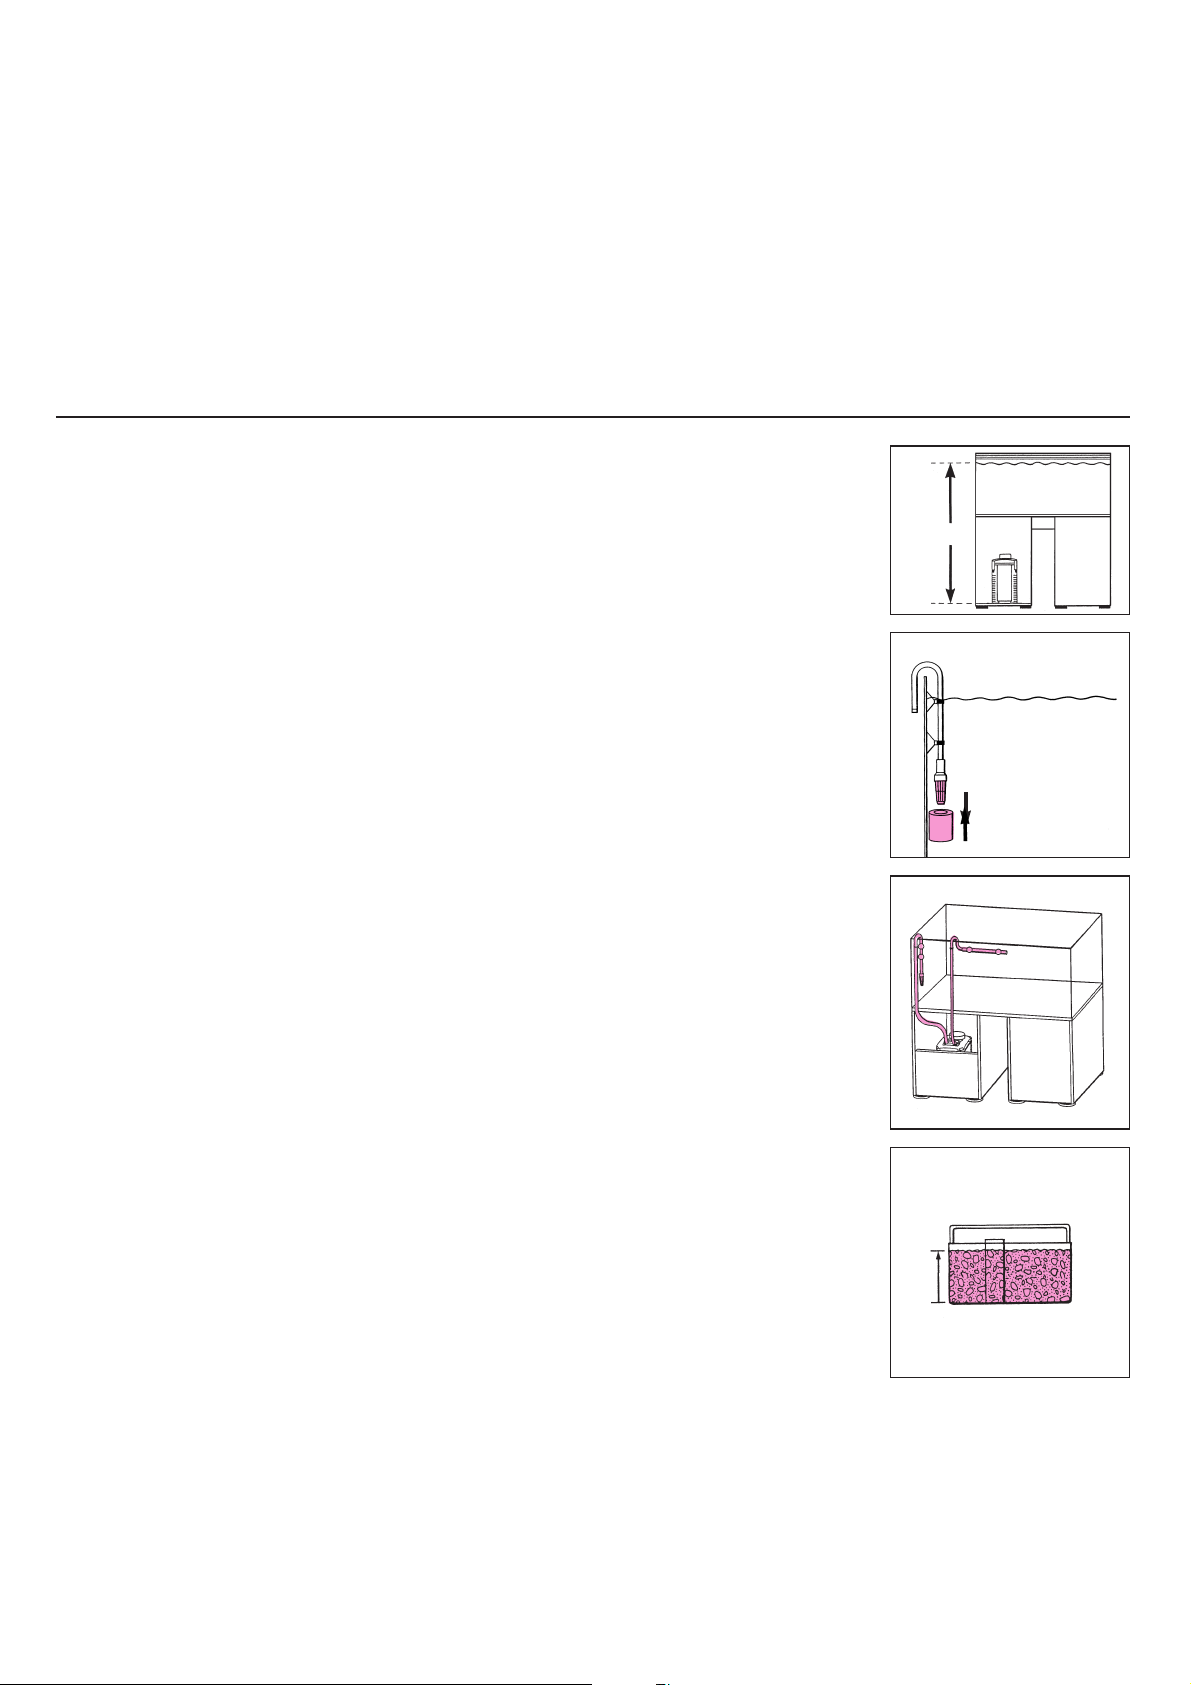
Stellen Sie den komplett vorbereiteten Filter im Unterschrank
auf und achten Sie dabei unbedingt auf die vorgeschriebene Aufstellhöhe: Zwischen Wasseroberfläche und Filterboden müssen 100 - 120 cm liegen. Diese Aufstellhöhe ist
entscheidend für die einwandfreie Wechselfunktion des
Intervall-Filters.
Hinweis:
Bei Verwendung der EHEIM
professionel AußenfilterSchnittstelle 7656450 wird
das Ansaugrohr nur eingeklippst.
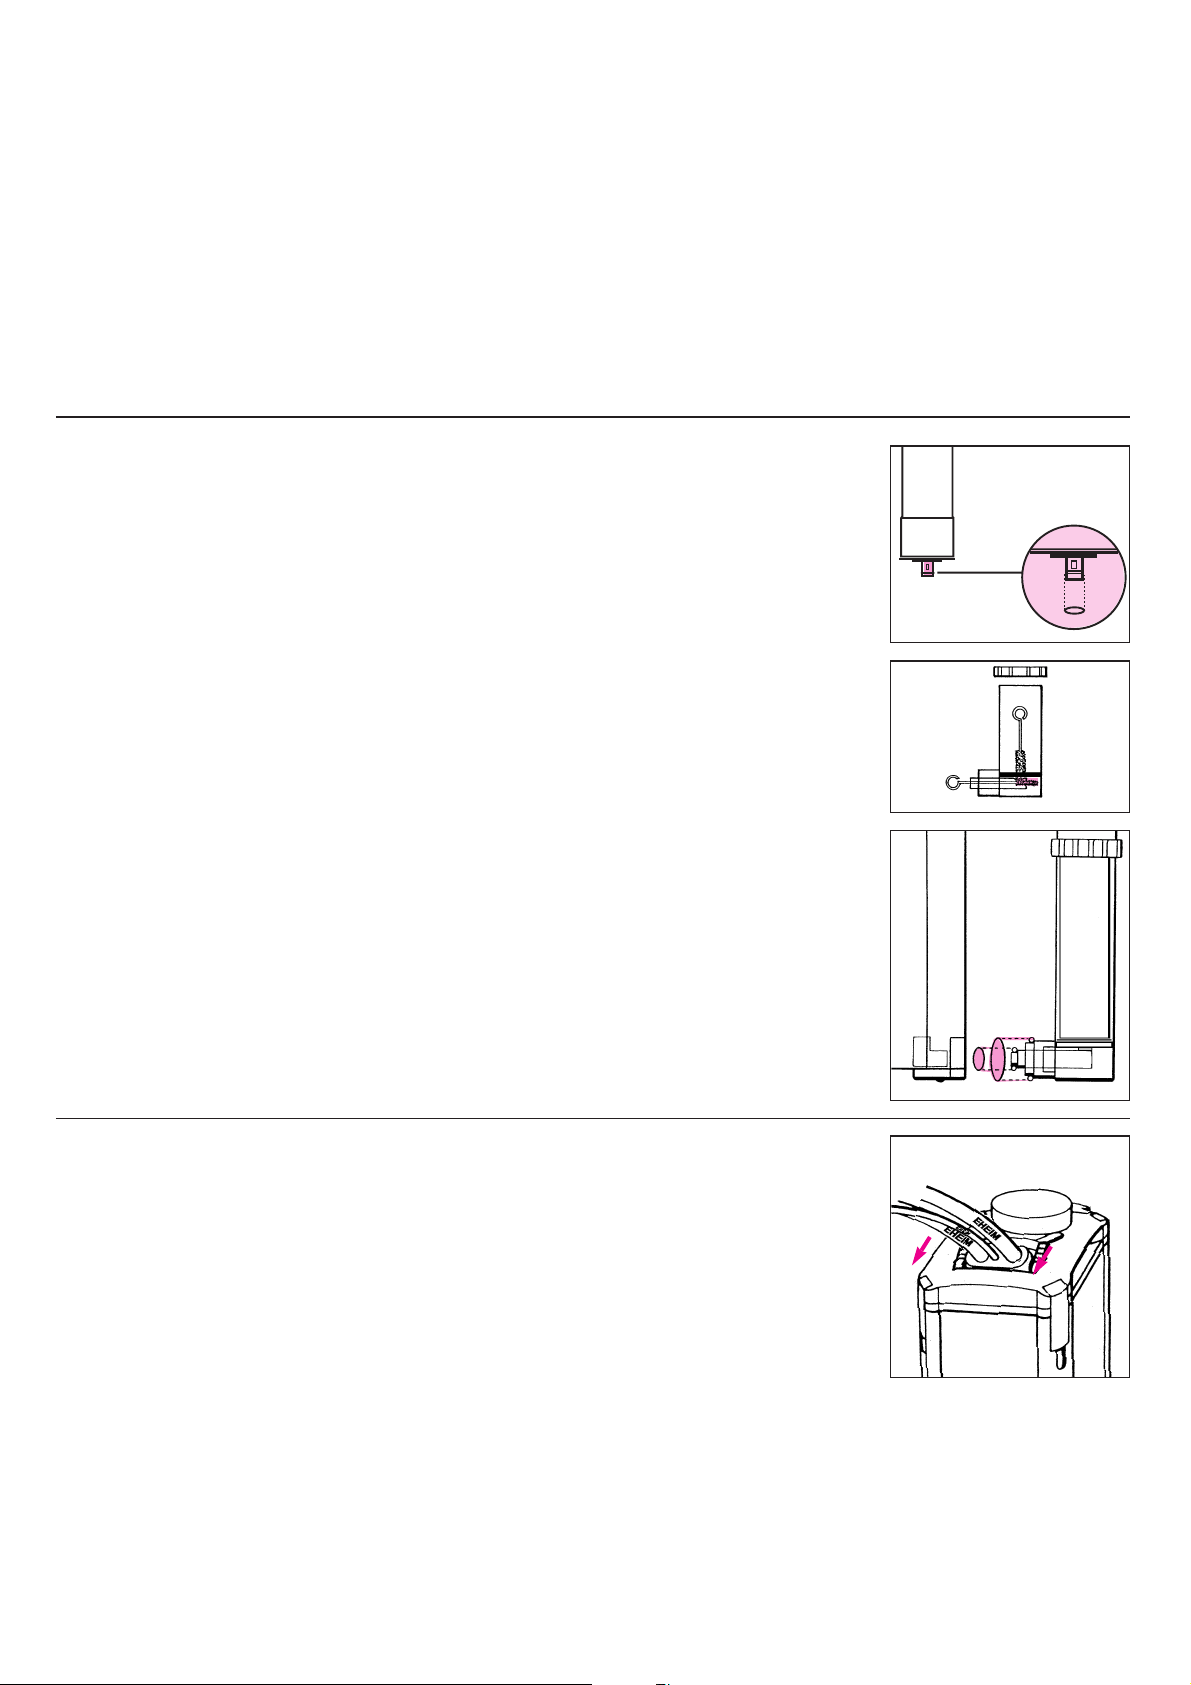
Auslaufbogen und Düsenrohr mit einem kurzen Schlauchstück verbinden und mit Hilfe der Klemmbügel und Sauger
im Aquarium montieren. Die offene Seite des Düsenrohres
mit dem beiliegenden Verschluss-Stopfen schließen.
Führen Sie nun alle drei Schläuche vom Filter aus durch die
Öffnung der Schrankrückwand und verlegen Sie als erstes
den Luftschlauch (9/12 mm) ohne Knicke und Durchhang
zum Aquarium. Luftschlauch auf die erforderliche Länge kürzen, mit dem Entlüftungsrohr verbinden und mit dem Klemmbügel und Sauger so an der Aquarienwand befestigen, dass
die Rohröffnung oberhalb der Wasserfläche endet.
100 - 120 cm
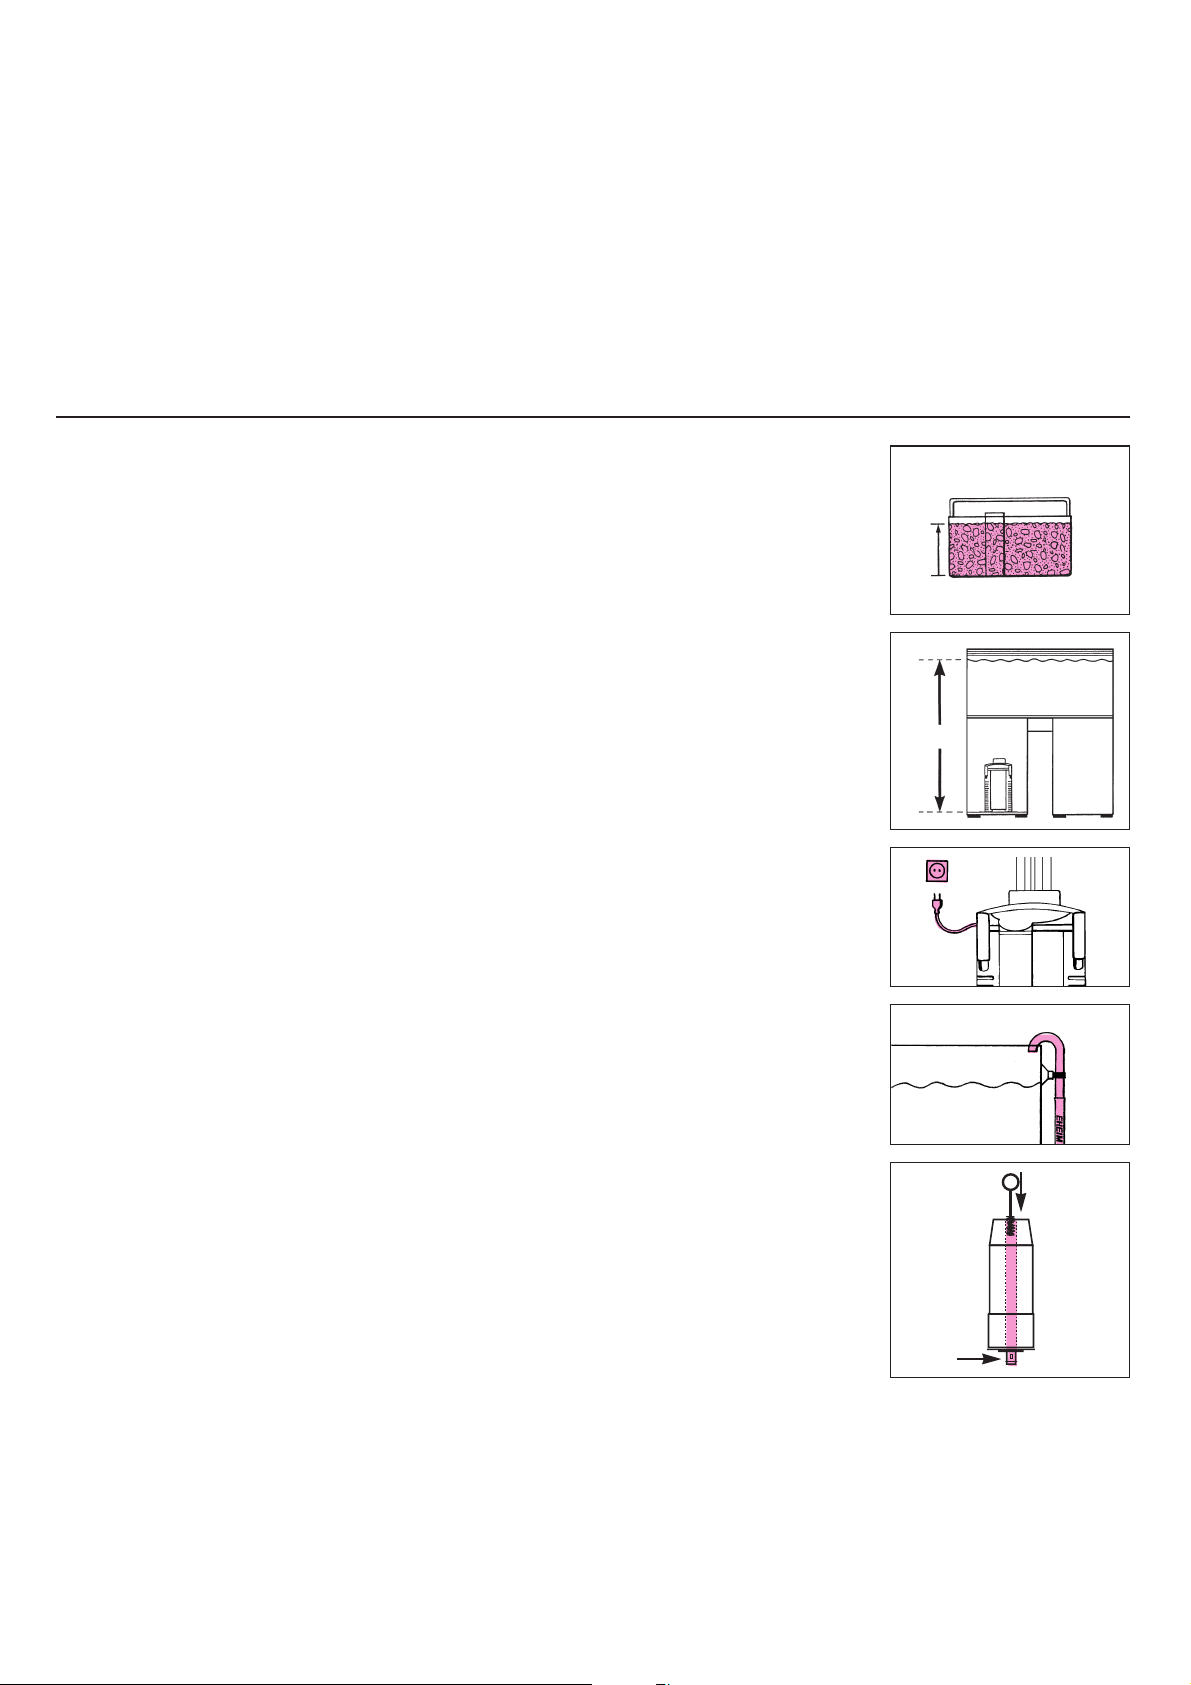
Stecken Sie den Filterkorb
auf das Ansaugrohr und
befestigen Sie es mit zwei
Klemmbügeln und Saugern
an der Innenwand des Aquariums.
Schaumstoff-Vorfilter über
den Filterkorb aufziehen.
Achtung: Der Schaumstoff-Vorfilter ist nur während der
Einlaufzeit, ca. 6 - 8 Wochen, zu verwenden. Danach übernimmt der in der Filtermasse entstandene Bakterienrasen
die biologische und mechanische Filterung. Der Schaumstoff-Vorfilter sollte dann entfernt werden.
3

Den Filter wie bei der Erstinbetriebnahme mit Wasser füllen, das Entlüftungsrohr mit einem VerschlussStopfen (Best.-Nr. 7272350)
verschließen und das Gerät
in Betrieb nehmen.
Während der Medikamentenbehandlung nur über
EHFISYNTH oder Wattevlies filtern. Nach Abschluss der Behandlung erfolgt die Filterung ca. 4 - 6
Tage ausschließlich über
Filterkohle (EHFIAKTIV).
Wichtiger Hinweis:
Sie können Ihren Intervall-Filter auch als Durchlauffilter
kurzfristig zur Medikamentenbehandlung betreiben.
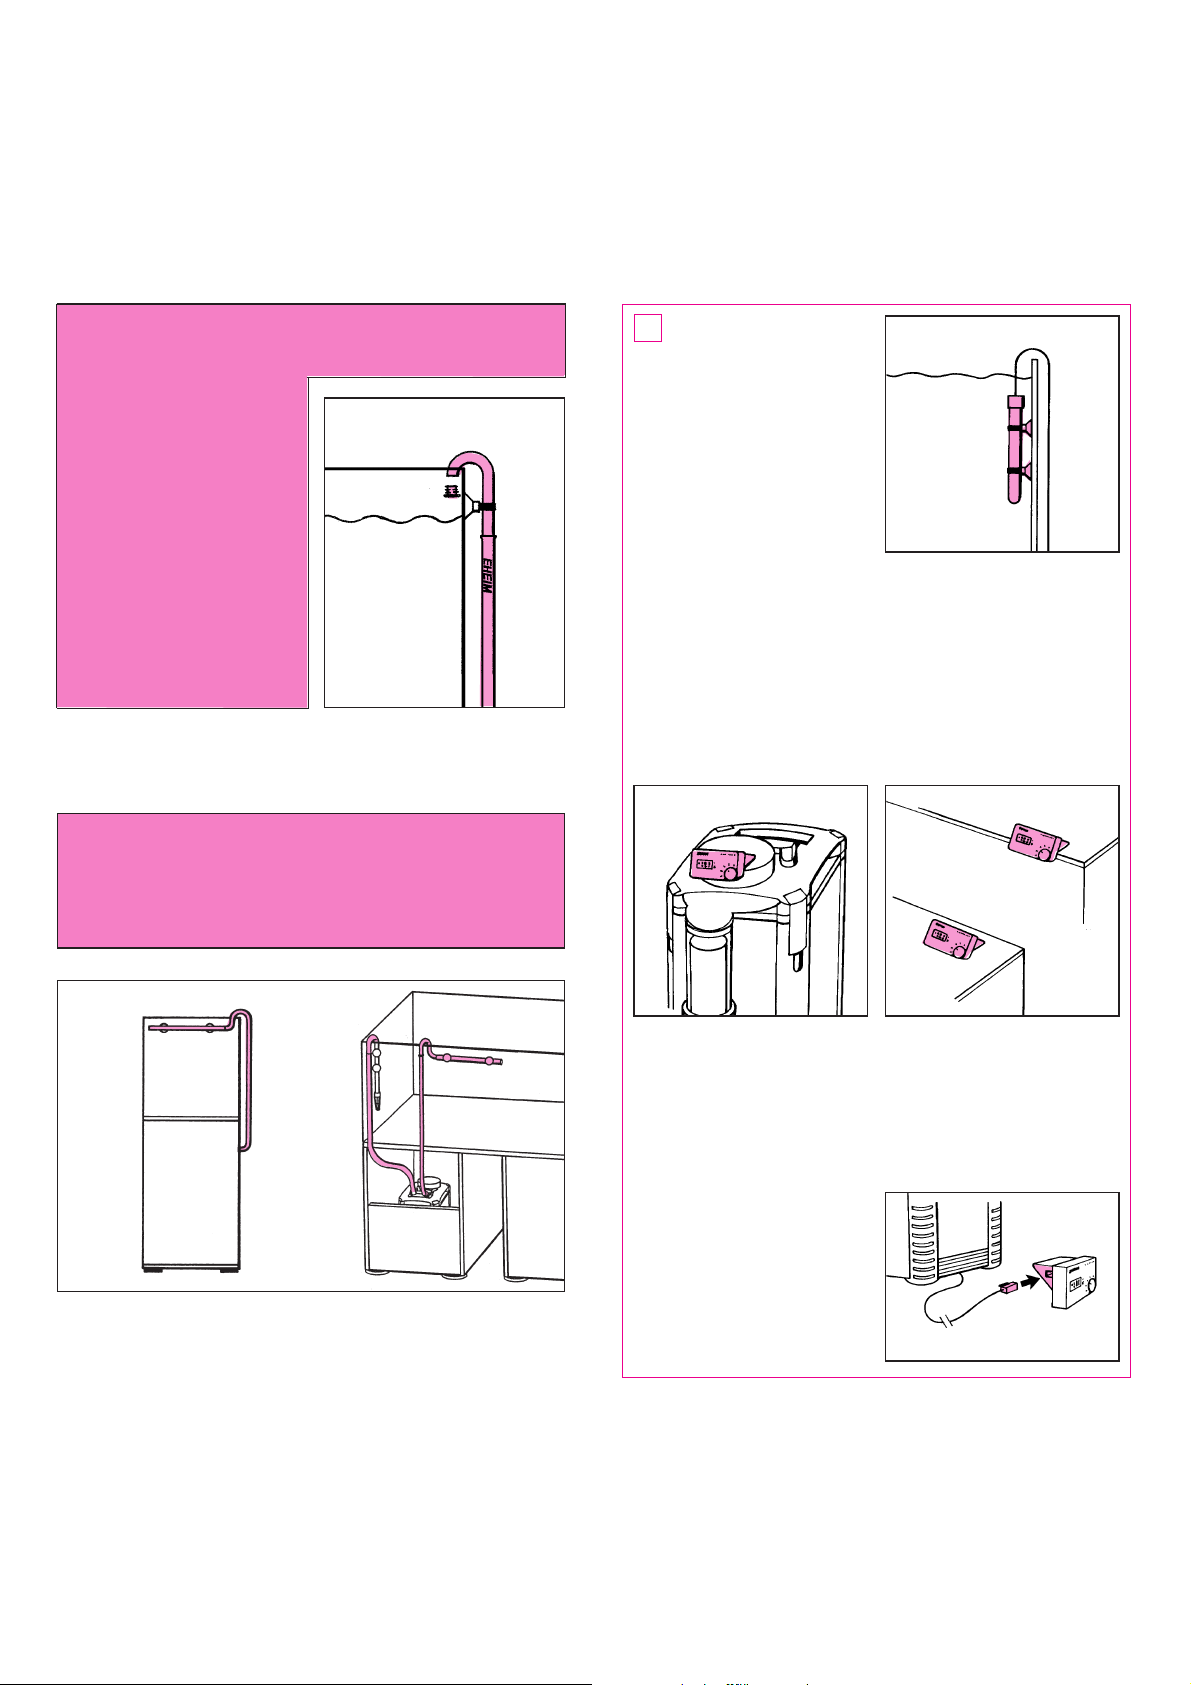
Thermofilter
Heizer-Installation
Temperaturfühler des Bedienteils mit 2 Klemmbügeln und Saugern so im
Aquarium befestigen, dass
er immer unterhalb der
Wasseroberfläche positioniert ist.
Nicht in der Nähe des Filterauslaufs installieren.
Das Bedienteil kann aufgestellt oder mit dem beiliegenden
Klettband sowohl an der Aquarienabdeckung als auch auf
dem Filteroberteil befestigt werden.
Vor Spritzwasser schützen.
4
Korrekte Schlauchlänge beachten:
Um die einwandfreie Funktion des Intervall-Filters zu
gewährleisten, dürfen die beiden Schläuche für den
Ansaugbereich und den Druckbereich nur auf die gleiche
Länge gekürzt werden! Achten Sie darauf, dass die
Schläuche glatt verlegt sind und keine Knicke haben.
Anschließend verbinden Sie das vormontierte Ansaugrohr
und das Düsenrohr mit den jeweiligen Schläuchen.
TIPP: Wenn Sie die Schläuche zuvor einige Zeit in warmes
Wasser legen, werden sie geschmeidig und eventuelle
Knicke lassen sich leicht herausdrücken.
C
°
Die Netzleitung noch nicht
einstecken!
Anschließend die Steuerleitung vom Filterbehälter aus
zum Bedienteil führen und das Steckelement anschließen, bis dieses hörbar einrastet.

Thermofilter
5
Öffnen Sie nun den Absperrhahn der Saugseite (IN) und stellen Sie den Wasserkreislauf her. Am besten mit dem EHEIM
Ansauger (Best.-Nr. 4003540) am Entlüftungsrohr ansaugen
oder mit der praktischen EHEIM Ansaughilfe (Best.-Nr.
4005540, 16 mm ø). Der Filter füllt sich dann mit Wasser.
Danach Absperrhahn der Druckseite (OUT) öffnen.
C
°
ACHTUNG: Erst wenn der Filter gleichmäßig arbeitet
wird der Heizer über sein separates Netzkabel an der
Steckdose angeschlossen.
Heizer niemals trocken betreiben.
Das Display am Bedienteil zeigt die tatsächliche Wassertemperatur im Aquarium an. Wählen Sie jetzt über den Stellknopf die von Ihnen gewünschte Temperatur vor (z.B. 27 °C).
Ein Symbol (
왗) zeigt an, wenn der Heizer arbeitet. Erlischt
das Zeichen, ist die eingestellte Temperatur erreicht und die
Heizung wird automatisch abgeschaltet. Sinkt die Temperatur im Aquarium unter den eingestellten Wert ab, schaltet
sich die Heizung selbsttätig wieder zu. Durch leichtes drehen des Stellknopfes kann die Feineinstellung erfolgen.
Hinweis: Bedingt durch Umgebungstemperatur, Einstellmodus und Toleranzwerte, zeigt das Display die tatsächliche Temperatur u.U. erst nach mehreren Stunden an.
Bei Störungen über die Netzleitung ändert sich die Anzeige
und die Heizung schaltet ab. Nach der Störung arbeitet der
Heizer normal weiter.
in
out
ACHTUNG: Das Aquarium darf nicht bis zur maximalen
Höhe befüllt sein, da sich der Wasserspiegel durch den
jeweils wechselnden Wasserstand im Filter verändert.
Inbetriebnahme
on
off
in
out
Nr. 4005540
Nr. 4003540
Filter durch Anschluss der
Netzleitung in Betrieb nehmen. Sobald die Pumpe
angelaufen ist, muss der
Wasserstand im Filterbehälter bis zum unteren Schaltpunkt absinken.
Ist dieser Punkt erreicht, verschließt der Schwimmer automatisch den Intervall-Anschluss-Stutzen und der Filterbehälter füllt sich wieder mit Wasser. Gleichzeitig wird
über die Bypassöffnung eine kleinere, kontinuierlich gefilterte Wassermenge ins Becken zurück geführt. Der Wasserspiegel steigt in der Intervall-Steuerung nicht mit. Erst
wenn im Filterbehälter der obere Korb geflutet ist, wird
durch die Bohrung im Schwimmer die Intervall-Steuerung
mit Wasser gefüllt; jetzt öffnet der Schwimmer den Saugstutzen und der Filter entleert sich erneut.
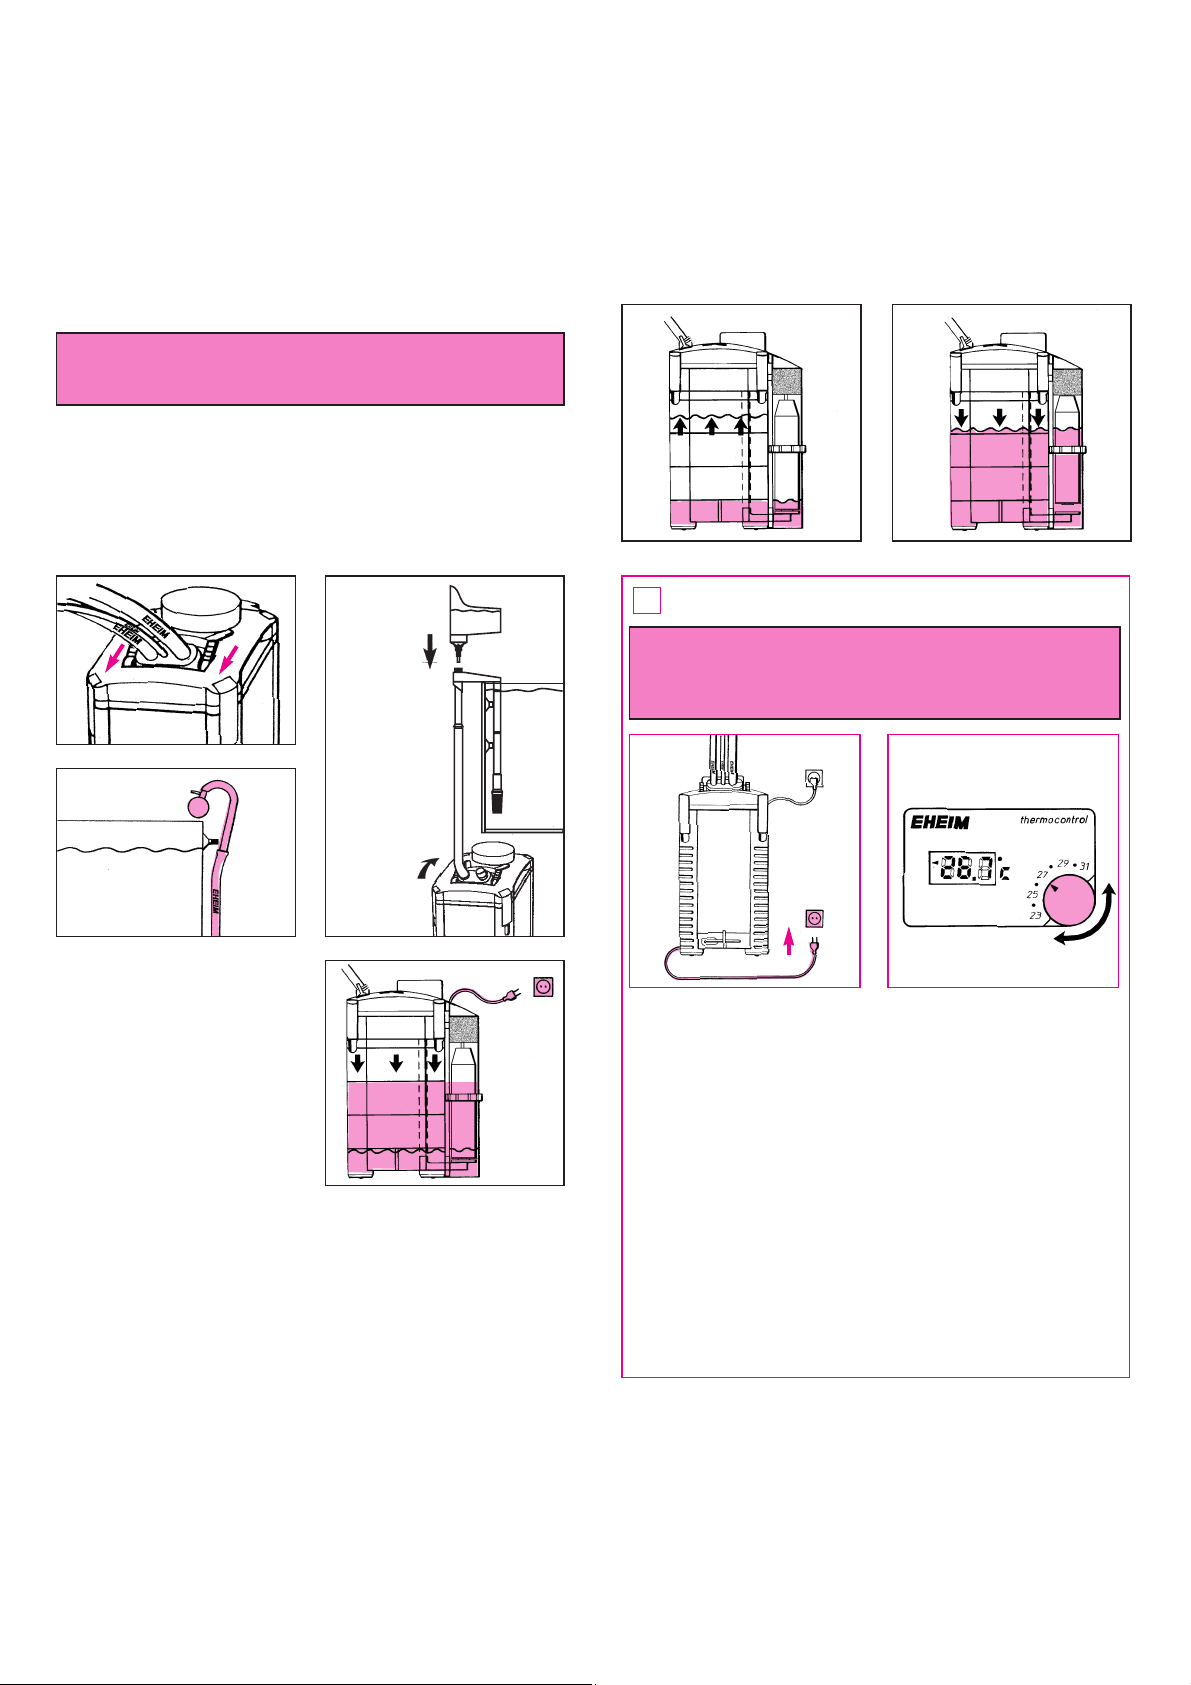
Thermofilter
Zuerst Netzstecker der Heizung ziehen. Absperrhebel
an der Zulaufseite (IN) des Adapters schließen, damit sich
der Filter entleert.
Sobald die Pumpe geräuschvoll Luft saugt, Absperrhebel der
Druckseite (OUT) am Adapter schließen und Netzstecker
der Pumpe ziehen.
Verriegelungsbügel nach
oben schwenken und den
Adapter aus dem Filteroberteil lösen. Außenfilter an
den Griffmulden aus dem
Schrank nehmen.
Achtung:
Nicht an der Intervall-
Steuerung ziehen.
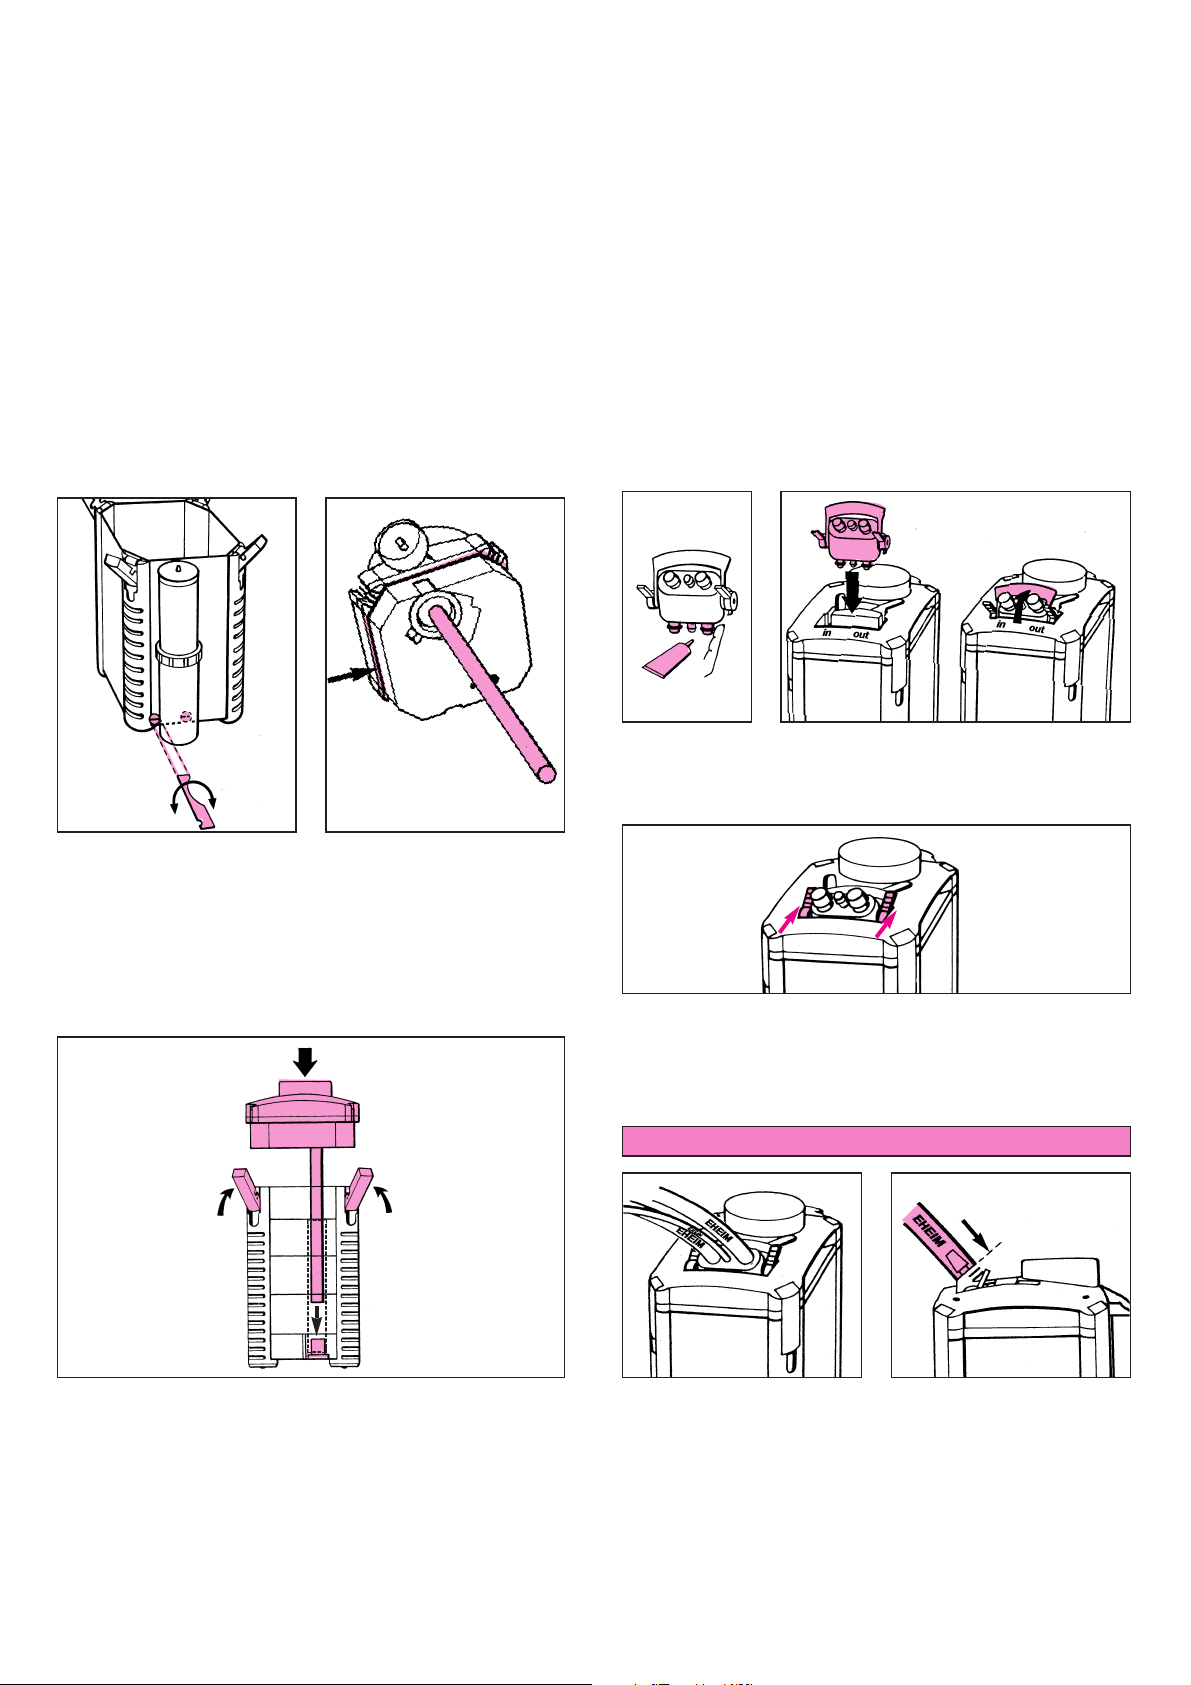
Alle Verschluss-Klipps öffnen
und Filteroberteil abnehmen.
Zur Reinigung des Pumpenraums öffnen Sie den Verschlussring am Boden des
Filteroberteils durch eine
Linksdrehung.
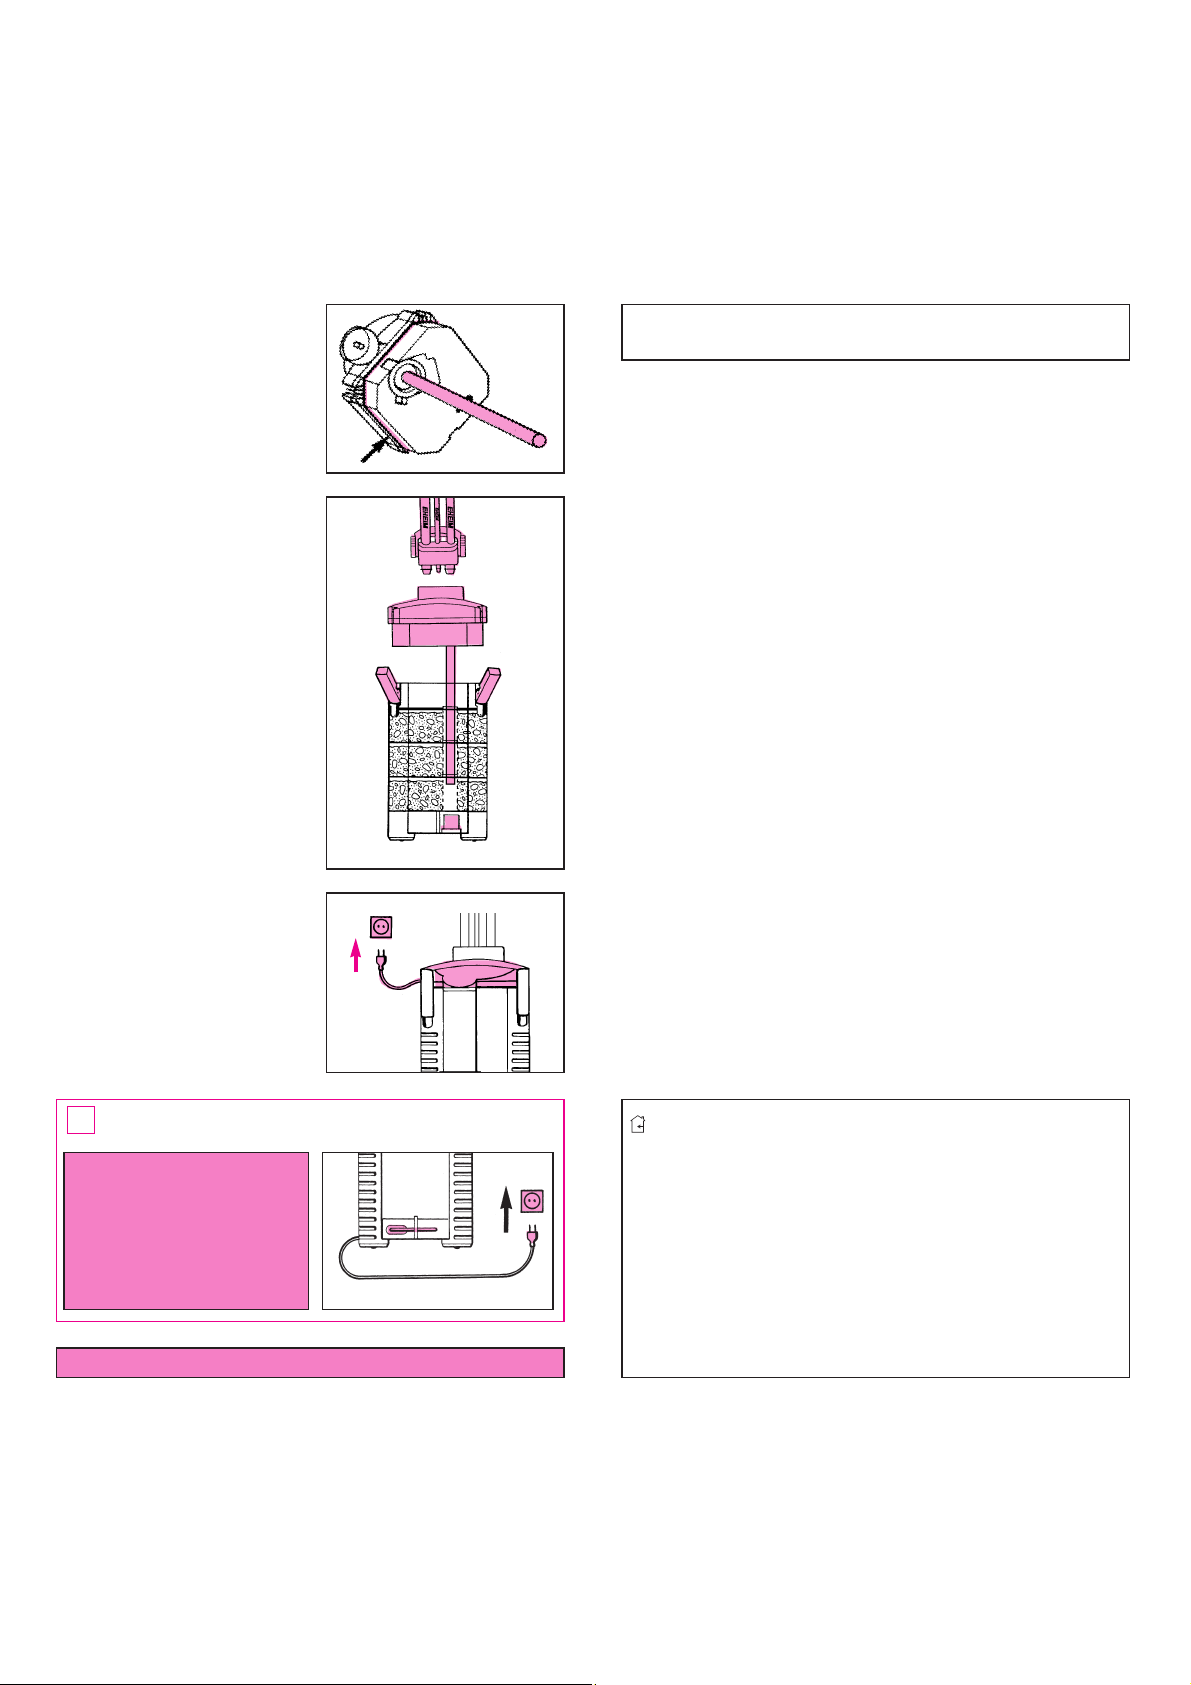
6
Entnehmen Sie dann Pumpendeckel mit Rohr, Läufer mit
Flügelrad und Achse.
Pumpenteile und Schmierkanal mit EHEIM Reinigungs-Set
(Best.-Nr. 4009580) gründlich säubern. Achse vorsichtig
abspülen (Bruchgefahr!) und anschließend Läufer wieder
zusammenstecken und einsetzen.
TIPP: Sollte bei der Reinigung Wasser in die Abdeckhaube des Filteroberteils
gelangt sein, lässt sich die
Haube abschrauben und mit
einem Lappen trockenwischen.
Bei der Montage auf richtigen Sitz von Achstüllen, Pumpendeckel und Dichtring achten. Anschließend Pumpendeckel
mit Verschlussring wieder arretieren.
C
°
Wartung und Pflege
7
Thermofilter
Filterbehälter auswaschen. Heizwendel ab und zu von
Mulmablagerungen säubern. Heizwendel nicht verbiegen! Filterbehälter nicht unter Wasser tauchen. Heizungselektronik vor Spritzwasser schützen.
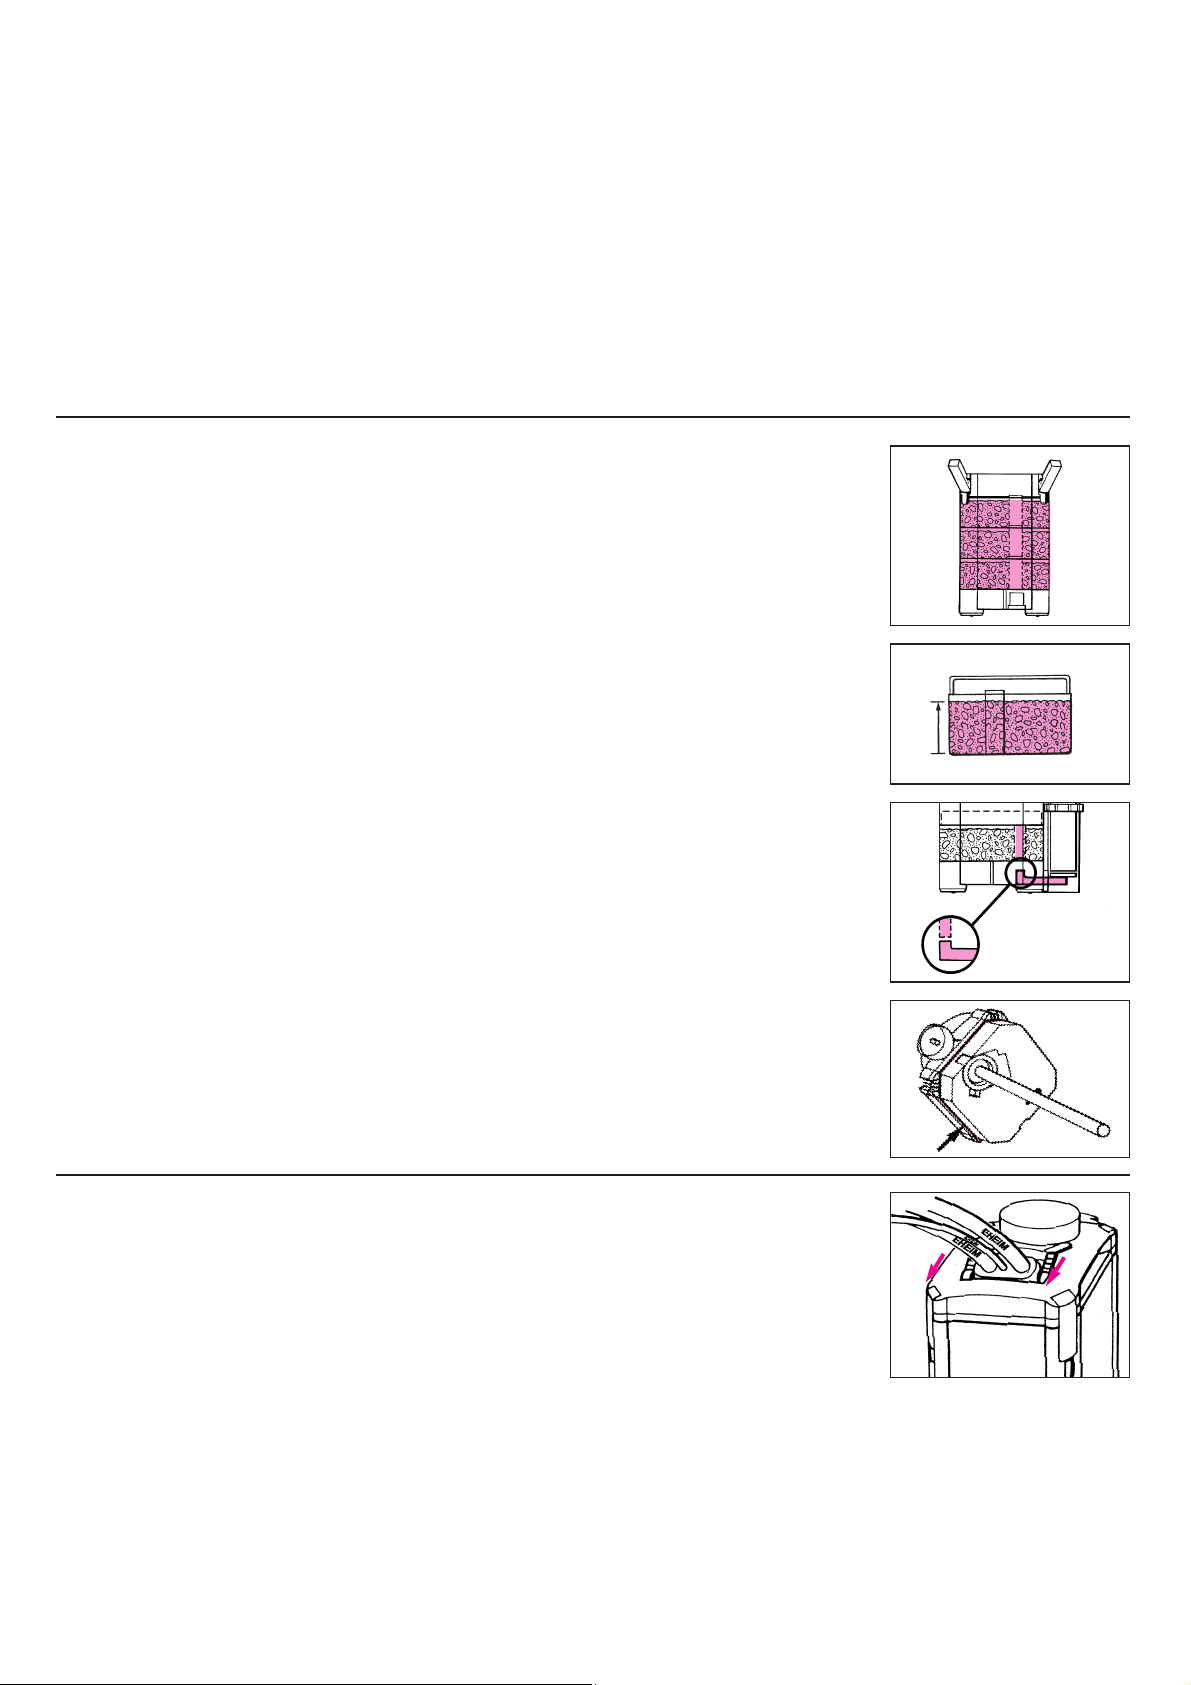
Demontieren Sie jetzt die Intervall-Steuerung, indem Sie mit
dem Verriegelungsschlüssel die beiden Verriegelungen öffnen, so dass die Schlitze senkrecht stehen.
Intervall-Steuerung abnehmen, Dichtflächen und Dichtringe
säubern.
Verschlussring der IntervallSteuerung in der angegebenen Drehrichtung öffnen,
Schwimmer entnehmen und
vorsichtig mit einem weichen
Schwamm reinigen.
Alle Teile säubern und Filterbehälter auswaschen.
Anschluss-Stutzen an Behälter und Steuerung – einschließlich der Bypassöffnung – mit Bürste reinigen. Intervall-Steuerung wieder zusammensetzen und am Filterbehälter montieren. Achten Sie dabei auf den korrekten Sitz der Dichtringe.
C
°
Den untersten Einsatz so in den Behälter einschieben, dass
die Rohrdurchführung über dem Anschluss-Stutzen der
Intervall-Steuerung sitzt. Einsatz fest bis an die Auflagestege drücken, um eine gute Abdichtung zum Filterbehälter
sicherzustellen.
Anschließend den zweiten (und dritten) Filtereinsatz einschieben, wobei die Rohrdurchführungen übereinander
liegen müssen. Auf bündigen Sitz der Filtereinsätze achten.
Abdeckgitter auflegen.
TIPP:
Bei Neueinsatz von SUBSTRATpro oder EHFISUBSTRAT jeweils ca. 1/3 der gebrauchten Filtermasse mit
dem neuen Material mischen, damit sich die Bakterienkulturen schneller vermehren.
Filtermassen:
Entnehmen Sie Abdeckgitter und Filtereinsätze aus dem
Filterbehälter.
Spülen Sie die Filtermassen mit lauwarmem Wasser
gründlich aus – so lange, bis keine Trübung mehr erkennbar ist.
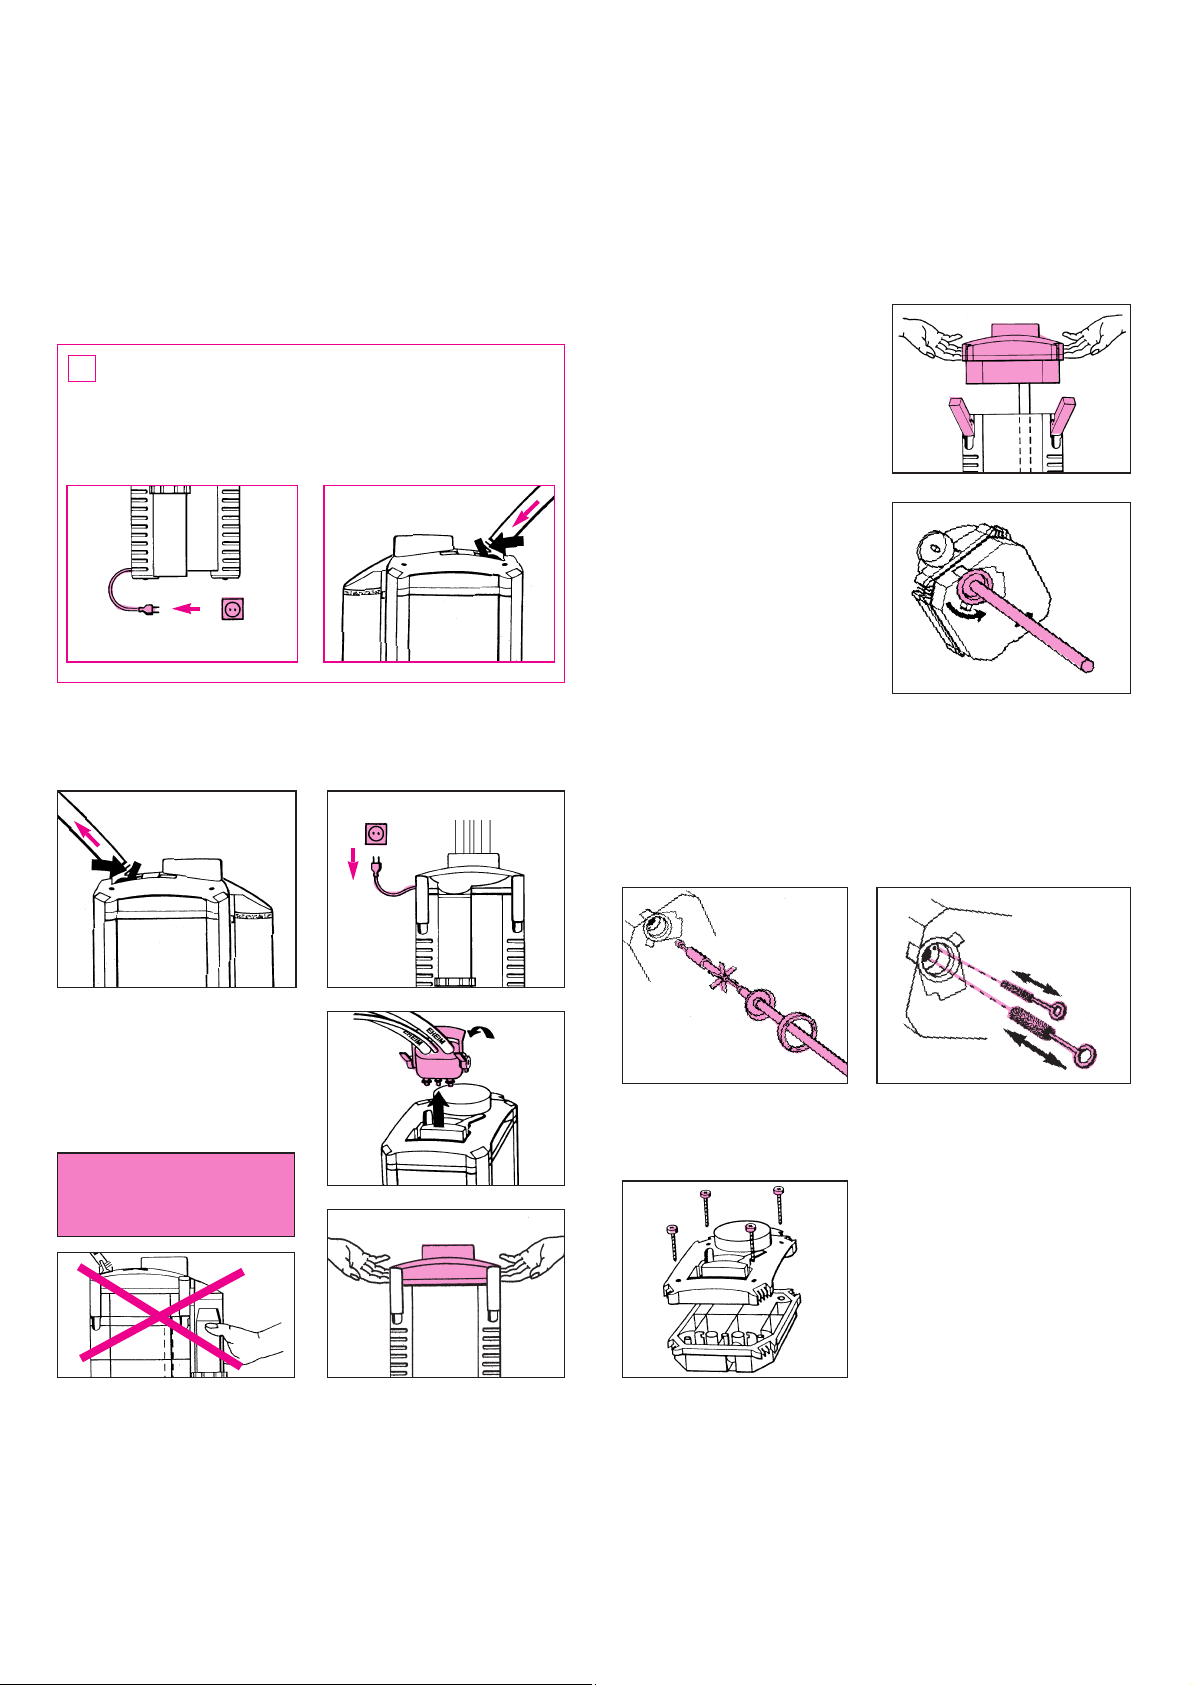
Filter grundsätzlich nur aufrecht stehend betreiben
Filter über den Netzstecker
des Filteroberteils in Betrieb
nehmen.
Thermofilter
C
°
ACHTUNG: Netzstecker
der Heizung erst einstecken, wenn der Filter
gleichmäßig arbeitet.
Heizer niemals trocken
betreiben.
8
Verbindungsrohr am Filteroberteil auf festen Sitz im
Pumpendeckel prüfen und
Profildichtung auf korrekte
Lage und Sauberkeit kontrollieren.
Dichtring am Filteroberteil
leicht mit Vaseline einfetten.
Filteroberteil auf den Filterbehälter aufsetzen. Die Verschluss-Klipps schließen, Filter im Unterschrank aufstellen.
Alle 3 Dichtringe am Adapter
auf Beschädigungen und
richtigen Sitz prüfen und mit
Vaseline leicht einfetten.
Adapter einsetzen und verriegeln. Nachdem beide Absperrhebel am Adapter wieder geöffnet sind (Stellung
ON), füllt sich der Filter
selbsttätig mit Wasser und ist
dann betriebsbereit.
Hinweis: Die kompletten Schlauchverbindungen in regelmäßigen Abständen auf korrekten Sitz prüfen.
Nur zur Verwendung in Räumen. Bevor man mit der Hand
ins Aquarienwasser eintaucht, alle im Wasser befindlichen
Elektrogeräte vom Netz trennen. Bei Thermofiltern immer
zuerst den Netzstecker der Heizung trennen.
2227/2229: Die Anschlussleitungen dieser Geräte können
nicht ersetzt werden; bei Beschädigung des Kabels darf das
Gerät nicht mehr benutzt werden.
2327/2329: Nur autorisiertes Fachpersonal darf das Gerät
öffnen oder Anschlussleitungen austauschen. Wenden Sie
sich an Ihren Fachhändler oder Ihre EHEIM Service-Stelle.
Betrieb nur an Steckdosen mit Schutzkontakt zulässig.

Störung
Filteroberteil lässt sich
nicht verschließen
Filter füllt sich nicht,
keine Intervallfunktion
Behebung
Filtereinsätze so einschieben, dass die Rohrdurchführungen übereinander
liegen.
Als Filtermasse ausschließlich SUBSTRATpro
oder EHFISUBSTRAT verwenden, Filtereinsätze nicht
überfüllen. Eventuell die aufeinanderstoßenden Flächen
der Einsätze reinigen.
Rohrführung reinigen
Dichtung korrekt in die
vorgesehene Nut einsetzen
Zulaufhahn bis zum
Anschlag öffnen
Schlauch ohne Knicke
verlegen, Schlauch reinigen.
Was tun, wenn …
Ursache
Falsche Einbaulage der
Filtereinsätze
Filtereinsätze überfüllt
Rohrführung im Filterbehälter verschmutzt
Profildichtung nicht richtig
montiert
Zulaufhahn im Adapter ist
noch geschlossen oder
nicht ganz geöffnet
Zulaufschlauch abgeknickt
oder verschmutzt
9
off
on
off
on
Störung
Filter füllt sich nicht,
keine Intervallfunktion
Behebung
Die Aufstellhöhe muss
zwischen 100 und 120 cm
betragen
Ausschließlich EHEIM
Originalschläuche in gleichmäßiger Länge verwenden!
Kein zusätzliches Zubehör
einsetzen!
Ausschließlich
SUBSTRATpro oder
EHFISUBSTRAT verwenden, Filtereinsätze nicht
überfüllen, keine Filterwatte
oder Grobfilterkissen
verwenden!
Was tun, wenn …
Ursache
Aufstellhöhe zu gering
Schlauchlänge falsch,
eventuell falsches Zubehör
angeschlossen
Falsche Filtermasse
eingefüllt
Filterkorb verschmutzt
Schaumstoffvorfilter
verschmutzt
Filterkorb reinigen
Schaumstoffvorfilter
reinigen. Nach Einlaufzeit
des Filters entfernen
(6 - 8 Wochen).
10
100-120 cm
Störung
Filter füllt sich nicht,
keine Intervallfunktion
Behebung
Dichtring richtig montieren,
gegebenenfalls erneuern.
Manschette und Scheibe
reinigen
Dichtring richtig montieren,
gegebenenfalls erneuern.
Filter senkrecht aufstellen
Was tun, wenn …
Ursache
Dichtring am Schwimmer
fehlt, verschlissen oder
falsch montiert
Manschette und Scheibeam Schwimmer verschmutzt
Dichtring am kleinen
Stutzen der Intervallsteuerung verschlissen,
nicht oder nicht richtig
montiert.
Filter steht schräg
Bypassbohrung
in der Intervallsteuerung
verschmutzt
Bypass reinigen
Ablaufhahn bis zum
Anschlag öffnen
Schlauch ohne Knicke
verlegen
Schlauch reinigen
Ablaufhahn im Adapter ist
geschlossen oder nicht
ganz geöffnet
Ablaufschlauch ist
geknickt oder verschmutzt
11
off
on
off
on
Filter entleert sich nicht,
keine Intervallfunktion
Störung
Filter entleert sich nicht,
keine Intervallfunktion
Behebung
Ausschließlich EHEIM
Originalschläuche in gleichmäßiger Länge verwenden!
Kein zusätzliches Zubehör
einsetzen!
Ausschließlich
SUBSTRATpro oder
EHFISUBSTRAT verwenden, Filtereinsätze nicht
überfüllen, keine Filterwatte
oder Grobfilterkissen verwenden!
Aufstellhöhe muss
zwischen 100 und 120 cm
betragen
Zu- und Ablaufhahn öffnen,
Netzstecker ziehen und ca.
1 min. warten, bis sich die
Pumpenkammer mit
Wasser gefüllt hat. Netzstecker wieder einstecken.
Schläuche ohne Knicke
verlegen bzw. reinigen
Entlüftungsrohr richtig
installieren
Steigrohr bzw. Bohrung
reinigen
Was tun, wenn …
Ursache
Schlauchlänge falsch,
eventuell falsches Zubehör
angeschlossen.
Falsche Filtermasse
eingefüllt
Aufstellhöhe ist zu groß
Luft in der Pumpenkammer
Lüftungsschlauch abgeknickt oder verschmutzt
Öffnung des Entlüftungsrohres ist unterhalb der
Wasseroberfläche
Bohrung bzw. Steigrohr am
Schwimmer verschmutzt
12
100-120 cm
Störung
Filter entleert sich nicht,
keine Intervallfunktion
Filter am Adapter undicht
Behebung
Bypass reinigen
Filter senkrecht aufstellen
Düsenrohr reinigen
Verschluss-Stopfen einsetzen
Verbindungsrohr richtig
montieren
O-Ring gegebenenfalls
austauschen
(Art.-Nr. 7342238)
Dichtfläche reinigen
Dichtringe korrekt
montieren bzw. erneuern
Verriegelungshebel bis
Anschlag verschließen
Anschluss-Schläuche bis
zum Anschlag aufschieben
und mit dem Schlauchhalter sichern
Was tun, wenn …
Ursache
Bypassbohrung in der Intervallsteuerung verschmutzt
Filter steht schräg
Düsenrohr verschmutzt
Verschluss-Stopfen am
Düsenrohr fehlt
Verbindungsrohr im Pumpendeckel sitzt nicht korrekt
O-Ring am Verbindungsrohr
ist beschädigt oder sitzt
nicht korrekt
Dichtfläche der Dichtringe
verschmutzt
Dichtringe nicht montiert
oder beschädigt
Verriegelungshebel nicht
ganz geschlossen
Anschluss-Schläuche
nicht ordnungsgemäß
angeschlossen
13
Störung
Filter am Filteroberteil
undicht
Filter an der Intervallsteuerung undicht
Behebung
Alle Verschluss-Klipps richtig schließen
Dichtfläche reinigen
Dichtung korrekt einsetzen
bzw. erneuern
Dichtflächen reinigen
Dichtringe richtig montieren
Was tun, wenn …
Ursache
Verschluss-Klipps nicht alle
geschlossen
Dichtflächen oder Profildichtung verschmutzt
Dichtung nicht montiert,
falsch eingelegt oder
beschädigt.
Dichtflächen der Dichtringe
verschmutzt
Dichtringe nicht oder nicht
richtig eingesetzt
Verschlussring der IntervallElemente nicht bis zum
Anschlag geschlossen
Verriegelungen nicht
geschlossen
Verschlussring der Intervallsteuerung in der angegebenen Drehrichtung bis zum
Anschlag verschließen
Verriegelungen mit
Verriegelungsschlüssel
schließen, so dass die
Schlitze waagerecht
stehen.
14
IMPORTANT SAFETY INSTRUCTIONS
DRIP LOOP DRIP LOOP
WARNING – To guard against injury, basic safety precautions
should be observed, including the following.
READ AND FOLLOW ALL
a)
SAFETY INSTRUCTIONS.
b) DANGER – To avoid possible electric shock, special care
should be taken since water is employed in the use of aquarium equipment. For each of the following situations, do not
attempt repairs by yourself; return the appliance to an authorized service facility for service or discard the appliance.
USA
1) If the appliance falls into the water,
First unplug it and then retrieve it. If electrical components
of the appliance get wet, unplug the appliance immediately.
(Non-immersible equipment only)
2) If the appliance shows any sign of abnormal water leakage,
immediately unplug it from the power source. (Immersible
equipment only).
3) Carefully examine the appliance after installation. It should
not be plugged in if there is water on parts not intended to
be wet.
4) Do not operate any appliance if it has a damaged cord or
plug, or if it is malfunctioning or has been dropped or damaged
in any manner.
5) To avoid the possibility of the appliance plug or receptacle
getting wet, position aquarium stand and tank to one side of
a wall-mounted receptacle to prevent water from dripping onto the receptacle or plug.
A ”drip-loop”, shown in the figure below, should be arranged
by the user for each cord connecting an aquarium appliance to
a receptacle. The ”drip-loop” is that part of the cord below the
level of the receptacle, or the connector if an extension cord is
used, to prevents water traveling along the cord and coming in
contact with the receptacle.
If the plug or socket does get wet,
Disconnect the fuse or circuit breaker that supplies power
to the appliance. Then unplug and examine for presence of
water in the receptacle.
c) Close supervision is necessary when any appliance is used by
or near children.
DON’T reach for it!
DON’T unplug the cord.
e) Always unplug an appliance from an outlet when not in use,
before putting on or taking off parts, and before cleaning.
Never yank cord to pull plug from outlet. Grasp the plug and
pull to disconnect.
f) Do not use an appliance for other than intended use. The use
of attachments not recommended or sold by the appliance
manufacturer may cause an unsafe condition.
g) Do not install or store the appliances where it will be exposed
to the weather or to temperatures below freezing.
h) Make sure an appliance mounted on a tank is securely installed
before operating it.
i) Read and observe all the important notices on the appliance.
j) If an extension cord is necessary, a cord with a proper rating
should be used. A cord rated for less amperes or watts than
the appliance rating may overheat. Care should be taken to
arrange the cord so that it will not be tripped over or pulled.
k) This appliance has a polarized plug (one blade is wider than the
other). As a safety feature, this plug will fit in a polarized outlet
only one way. If the plug does not fit fully in the outlet, reverse
the plug. If it still does not fit, contact a qualified elec-trician.
Never use with an extension cord unless plug can be fully inserted. Do not attempt to defeat this safety feature.
Exception: This instruction may be omitted for an appliance
that is not provided with a polarized attachment plug.
d) To avoid injury, do not contact moving parts or hot parts such
as heaters, reflectors, lamp bulbs, and the like.
15
l)
”SAVE THESE INSTRUCTIONS”.
EHEIM professionel wet/dry canister filter 2227 and 2229
Attention: 2327 and 2329 thermofilters should only be
used for freshwater.
Push in the second (and third) media container in the same
manner, so that the pipe openings lie on top of each other.
Again lower the retractable handles for each of them and
be sure that all of the media containers lie flush on top of
each other. Place lattice screen.
EHEIM professionel wet/dry thermofilter 2327 and 2329
Pump headSealing gasketOutput pipeLattice
screen
Wet/dry floater compartmentSealing ring Wet/dry
floating control valve
tap connector
bar and end cap
prefilter
tion cups with clips
24
Cleaning brush Thermofilter:
ture sensor
Media containersEZ clipsFilter canister
Hose clamp Security outlet pipe Spray
Intake/outtake for breather tube Tubing
27
Velcro tape
Locking pins Integrated double
Intake pipeIntake strainer Foam
22
Key for locking pins
25
Thermostat
23
Vaseline
26
Tempera-
21
When unpacking, please check to make sure that all parts
have been included.
Assembly
Attention: In order to guarantee the synchronized function-
ing of the wet/dry filter, use only the enclosed original parts.
Changes should not be made in the intake or output areas.
Flip out all four EZ clips and push upwards. With the help of
the two recessed lid handles, the pump head of the filter can
be easily removed.
Suc-
Now fill the media containers to just below the edge, ONLY
with original SUBSTRATpro or EHFISUBSTRAT filter media.
Attention: Do not overfill. Do not clog flow-through
pipe. In all media containers only use SUBSTRATpro
or EHFISUBSTRAT.
Then, thoroughly rinse filter media under running water until all cloudiness has disappeared.
After you have checked to be sure that the wet/dry connection supports are not soiled, put the first media container
back into the filter canister. When doing so, be sure that the
flow-through opening sits above the wet/dry connection
supports. Firmly press the media container downwards until
it rests on the support frames. This guarantees a secure seal
between media container and filter canister.
Take out the lattice
screen as well as the
individual media containers one at a time.
The retractable handles of the media containers can be pulled
out in an upward direction.
16
Examine the wet/dry floater compartment to make sure it is
securely attached to the filter canister: the upper connection
must be firmly inserted into the canister; the two lower
locking pins must be closed so that the slots are each in
a horizontal position (horizontal = closed, vertical = open).
Easy access to the locking pins is provided by the enclosed
locking key.
17
Slightly lubricate the o-ring of the output pipe and insert it
firmly into the pump cover. Examine the sealing gasket on the
pump head of the filter for cleanliness and proper fit.
With the output pipe inserted into the intake of the impeller
lid, place the pump head onto the filter canister, so that the
output pipe is guided through the openings of the media containers and fits correctly into the wet/dry connection at the
bottom of the canister. Close all four EZ clips.
ATTENTION: Before the integrated double tap connector is
inserted into the pump head of the filter, examine all three orings for damage and correct fitting. Lightly grease the orings with Vaseline to help installation.
Fully insert the integrated double tap connector, with the
locking clamp in an upright position, into the opening on the
pump head. To fasten the locking clamp into its sealed position, push the handle downwards.
Tubing Installation
Shut off the integrated double tap connector by shifting the
two levers to the OFF position.
Push the enclosed tubing onto the corresponding tubing
openings of the adaptor as far as they will go, starting with the
smallest tube diameter. If this is difficult to do, soak the hoses
in warm water beforehand to make them softer.
It is very important to use original EHEIM hoses only.
off
on
off
on
Attach the two-part tubing clamp around the installed
100 - 120 cm
tubing, hang into the proper position and clip into place.
Place the ready to use filter into the lower cabinet and
observe the prescribed installation height: The distance
between the water surface and the bottom of the filter
must be within 100 - 120 cm (3’3” - 3’11”). This installation
height is absolutely vital to guarantee the correct rhythmic functioning of the wet/dry filter.
Attention: The foam prefilter is only to be used during the
running-in period, approx. 6 - 8 weeks. Afterwards the bacteria strains in the filter media take over the biological and
mechanical filtration. The foam prefilter should then be
removed.
Note:
When using with an EHEIM
professionelhood, the intake
pipe is simply clipped into
place and you don’t need the
suction cups.
Connect the security outlet pipe and spray bar with a short
piece of tubing and install in the aquarium with the help of the
clip and suction cup. Close the open side of the spray bar with
the enclosed end cap.
Fix the intake strainer onto
the intake pipe and attach
the pipe onto the interior
glass of the tank with 2 clips
and suction cups.
Place the foam prefilter
over the intake strainer.
Now direct all three tubes, starting from the filter, through
the back wall of the cabinet. First connect the installed
breathing tube (9/12 mm), without kinks and slack. Shorten
the breathing tube to the required length, connect to the
breather pipe and attach to the aquarium wall with the
clip and suction cup. Avoid placing the pipe opening
too close to the water’s surface.
18
the canister and store it in a
basin with tank water, and
fill the filter entirely with EHFISYNTH or filter wadding.
Close the breather pipe with
a pipe cap (no. 7272350).
Following medication treatment, filter with carbon
(EHFIAKTIV) for 4 - 6 days
to remove medicaments,
then revert to using SUBSTRATpro or EHFISUBSTRAT, remembering to remove the cap from the
breather pipe.
19
Attention:
In order to guarantee the flawless functioning of the
wet/dry filter, the two tubes for the intake and output
must only be shortened to the same length!
Be sure that the tubes are laid out smoothly and that
there are no kinks in them.
Connect the installed intake pipe and spray bar to the
respective hoses.
TIP: If you place the tubing into warm water for some
time beforehand, they will become soft and possible
kinks can be easily squeezed out.
Important note: You may use your wet/dry filter as a continuous-flow filter for the short-term treatment with medication and its consequent removal. Extract filter media from
Thermofilter
Heater Installation
Attach the temperature
sensor with 2 clips and
suction cups into the tank
in such a manner that it is
positioned beneath the
surface of the water.
Do not install the temperature sensor near the filter outflow.
The thermostat can be placed on the aquarium hood
or attached with the enclosed Velcro tape to either the
aquarium hood or the pump head of the filter.
Protect against splashing water.
C
°
Do not yet connect the
heater’s mains plug to the
wall socket.
Direct the control cable from the filter canister to the thermostat. Connect the plug – you should hear it snap into
place.
Thermofilter
20
Open the tap connector of the intake pipe (IN) and establish
the syphon. Alternatively use the EHEIM suction device (order
no. 4003540) or the priming aid (order no. 4005540, ø 16 mm).
The filter will then fill up with water. After that, open the tap
connector of the outlet pipe (OUT).
C
°
Attention:
Only when the filter is working smoothly should the
heater’s mains plug be connected to the wall socket.
Never operate the heater when dry.
The display on the thermostat shows the actual water
temperature in the aquarium. Use the adjusting knob to
select the temperature you desire (e.g. 27° C). A symbol
(
씱 ) indicates when the heater is in operation. If the sym-
bol goes off, the set temperature has been reached and
the heater is automatically switched off. If the temperature
in the tank sinks below the set temperature, the heater
automatically turns itself on again. By slightly turning the
adjusting knob, a precise adjustment can be achieved.
Attention: When first installing the filter or readjusting the
temperature, the temperature shown in the display will take
some time to reach the required value. The ambient temperature is also significant for time delays.
Should the power supply be cut off, the value indicated on
the display changes and the heater stops working. When
the power is restored the heater works normally.
Attention: Do not fill the aquarium to its maximum height
since the water level varies through the change of water
level in the filter.
Setting into operation
in
out
on
off
in
out
No. 4005540
No. 4003540
Set the filter into operation by
plugging in the mains socket.
As soon as the pump has
started up, the water level in
the filter canister must sink
down to the lower switch
point.
Once this point has been
reached, the floating control
valve will automatically close
the suction intake, and the
filter canister will fill up again with water. Meanwhile, a small,
continuously filtered amount of water will be directed back into
the aquarium through the bypass opening, so as to keep the
impeller lubricated. The water level inside the floater compartment does not rise. Only when the upper filter media container
is filled with water, does the floater compartment get filled with
water through a slit in the floating control valve; now the latter
will open the suction intake and the filter empties again.
Attention:
Do not pull on the wet/
dry floater compartment.
Open all four EZ clips and
remove the pump head from
the filter.
In order to clean the pump
chamber, open the sealing
ring of the pump head by
turning it anticlockwise.
Take off the pump cover and
then remove the impeller and
shaft.
Thoroughly clean pump parts, impeller chamber and lubrication channel with the EHEIM cleaning set (order no.
4009580.)
Carefully rinse off the shaft (risk of breakage!), then put
the impeller back together again and insert into proper
position.
TIP:
If cleaning water should get
into the cover of the filter’s
pump head, the cover can be
unscrewed and wiped dry
with a cloth.
Pay attention to the proper fit of the shaft bushings, pump
cover and sealing ring. Then lock the pump with the sealing
ring.
21
Maintenance and Servicing
Thermofilter
First pull out the heater’s mains plug. Close the tap lever
on the intake side (IN) of the integrated double tap
connector, so that the filter empties itself.
C
°
As soon as the pump loudly sucks in air, close the tap lever
on the output side (OUT) of the integrated double tap
connector and pull the mains plug out of the socket.
Swing the locking clamp upwards and then remove the
double tap connector from
the pump head. Extract the
filter out of the cabinet by
using the recessed handles.
Clean the connecting supports on the container and the
floater compartment (including the bypass opening) with a
brush. Reassemble the wet/dry floater compartment and
attach it to the filter canister. Take care that the sealing rings
are correctly positioned.
TIP:
When renewing SUBSTRAT
pro or EHFISUBSTRAT (the
fine pores get clogged up with time), retain at least 1/3
of used filter medium and mix with new material, to
speed-up bacteria recolonization.
Filter media:
Remove the lattice screen as well as the filter media
containers from the filter canister.
Thoroughly wash out the SUBSTRATpro or EHFISUBSTRAT filter media with used aquarium water – until no
more clouding can been seen.
Now remove the wet/dry floater compartment by opening
the two locking pins with the locking key, so that the slots
are in a vertical position.
Remove the wet/dry floater compartment and clean the inlet
aperture and both o-rings.
Thermofilter
C
°
Wash out the filter canister. Periodically clean the
heating element from sludge. Do not bend the heating
element! Do not submerge filter canister underwater.
Protect the heater’s electrics from splashing water.
Open the locking ring of the
wet/dry floater compartment
in the direction indicated,
remove floating control valve
and carefully clean with a soft
sponge.
Clean all parts and wash out
the filter canister.
Place the first media container back into the canister in such
a manner that the flow-through opening sits above the connection outlet which communicates with the wet/dry floater
compartment. Press the container down to the support frame
in order to guarantee a good seal with the filter canister.
Then push in the second (and third) media container. The
flow-through openings must lie on top of each other. Be sure
that the media containers have a flush fit. Place the lattice
screen.
22

Only for indoor use.
Before placing your hands in the aquarium, ensure that
all electrical appliances have been switched off at the
mains. By thermofilters always disconnect the heater plug
first.
2227/2229: The mains cable cannot be replaced; if the cable
is damaged, the device should no longer be used.
2327/2329: The device can only be serviced by authorized
personnel. Contact your nearest pet shop or EHEIM service
centre. Use only permitted with an earthed socket outlet.
Filter must always be operated in an upright position only.
Set the filter into operation
by connecting the mains
plug of the pump head
to the wall socket.
Thermofilter
C
°
ATTENTION:
Only plug in the heater’s
mains plug when the filter is working smoothly.
Never operate the heater
when dry.
23
Make sure that the output
pipe is inserted into the intake of the impeller lid, and
that the o-ring is clean and
correctly fitted.
Lightly lubricate the sealing
gasket on the pump head
of the filter and the o-ring
of the double tap with vaseline - then place the pump
head on the filter canister,
close the clips and put the
filter into the cabinet.
Examine all three o-rings on
the double tap connector for
damage and correct fitting
and lightly grease them with
Vaseline; insert and lock in
place. After both levers of the
integrated double tap connector have been placed in
the open position (ON position) the filter will automatically fill up with water and
be ready for operation.
Note: All hose connections must be checked at regular
intervals for correct fitting.
What to do when …
off
on
off
on
Problem RemedyCause
Filter cannot be closed
Improper installation of
media containers.
Media containers overfilled.
Flow-through pipe in filter
canister soiled.
Sealing gasket not properly
installed.
Slide in media containers
so that the flow-through
openings are positioned
on top of each other.
Use only SUBSTRATpro or
EHFISUBSTRAT as filter
media and do not overfill
media containers.
Check the adjoining surfaces of the containers
for soiling.
Clean flow-through pipe.
Insert sealing gasket into
the groove provided.
Filter does not fill up, no
wet/dry function
Intake tap on integrated
double tap connector is still
closed or not completely
open.
Intake tube bent or dirty.
Open intake tap as fas as it
will go.
Lay out tube without kinks.
Clean tubes.
24

What to do when …
100-120 cm
Problem RemedyCause
Filter does not fill up, no
wet/dry function
Installation height
insufficient.
Intake strainer soiled.
Foam prefilter soiled.
Wrong hoses length, wrong
accessories attached.
Installation height must be
between 100 and 120 cm
(3' 3" and 3' 11").
Clean intake strainer.
Clean foam prefilter. Remove after filter running-in
period (6 - 8 weeks).
Only use original EHEIM
hoses in even lengths!
Do not attach any
additional accessories
to the provided hoses.
Wrong filter media.
Only use SUBSTRATpro
or EHFISUBSTRAT as filter
media.
Do not overfill media
containers.
Do not use filter cotton
wadding, filter pads, plastic
media, ceramic, lava, or peat
only use carbon for shortterm specific filtration.
25

What to do when …
off
on
off
on
26
Problem RemedyCause
Filter does not fill up, no
wet/dry function
Worn out or wrongly installed o-ring on floating control valve.
Collar and disk on floating
control valve soiled.
Bypass aperture in wet/dry
control mechanism soiled.
O-ring on small support
worn out, not installed or
improperly installed.
Filter in slanted position.
Properly install o-ring,
replace if necessary.
Clean collar and disk.
Clean bypass.
Properly install o-ring,
replace if necessary.
Place filter in vertical
position.
Filter does not empty, no
wet/dry function
Output tap on integrated
double tap connector is
closed or not completely
open.
Outlet tube is bent or
soiled.
Open output tap completely.
Lay out tube without kinks.
Clean tubing.
 Loading...