

Page 1
EN OPERATOR’S INSTRUCTION MANUAL
FR MANUEL D’UTILISATION ET D’ENTRETIEN
ES MANUAL DE INSTRUCCIONES
Page 2

English 5
Français 20
Español 36
Page 3
1
3
2
11
10
9
12
13
14
7
8
15
4
5
6
16
17
18
19
20
D
C
A
B
1
2
Page 4
OK
1
3 4
6
8
12
5
11
7
9
A
B
1
2
3
4
RCJ6Y
0,5 mm
0,020”
13
15
17 18
19
14 16
4321 5
Page 5
1
2
3
4
RCJ6Y
0,5 mm
0,020”
13
15
17 18
19
14 16
4321 5
Page 6

Page 7
5
en
GB
F
D
E
NL
P
GR
TR
CZ
SK
RUS
UK
PL
H
LV
EST
LT
RO
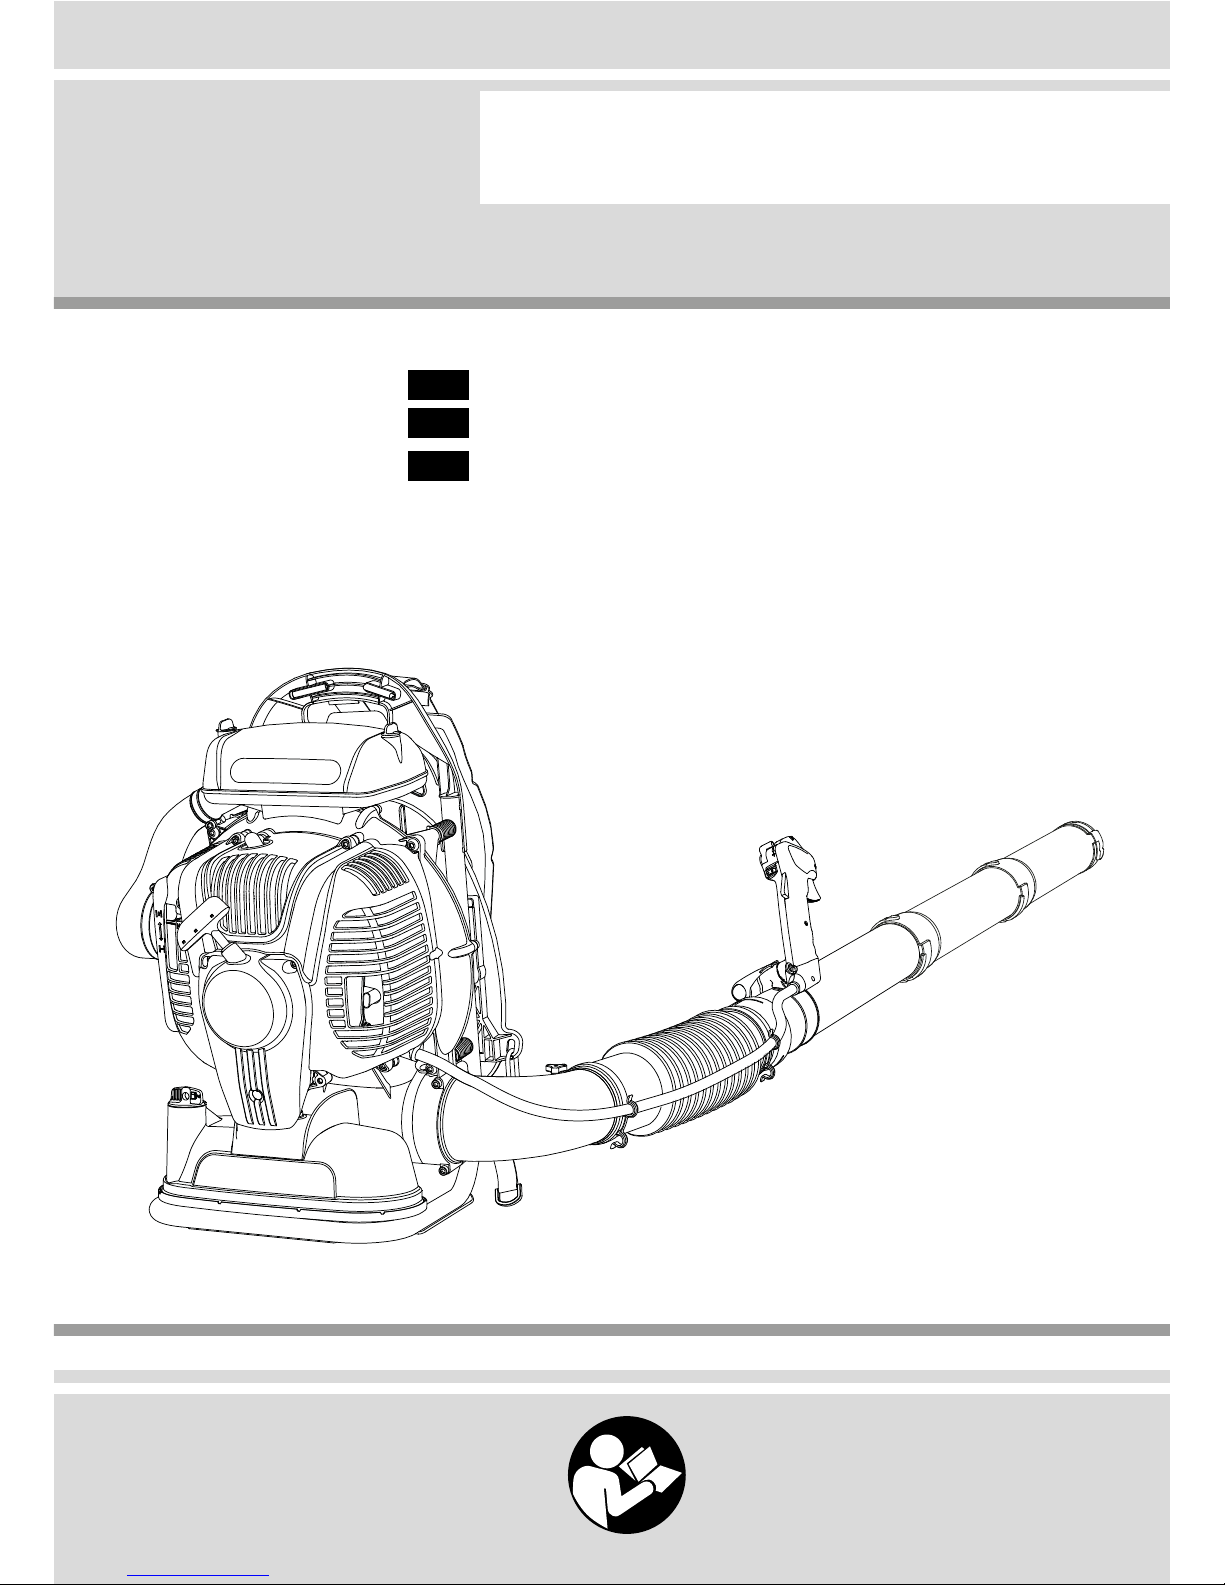
INTRODUCTION
To correctly use the blower and prevent
accidents, do not start work without having first
carefully read this manual. You will find
explanations concerning the operation of the
various parts plus instructions for necessary
checks and relative maintenance.
Note: Illustrations and specifications in this
manual may vary according to Country
requirements and are subject to change
without notice by the manufacturer.
THE OPERATOR’S MANUAL
Your operator’s manual is for your protection.
READ IT. Keep it in a safe place for reference.
Know what you are doing before you begin
assembly of the unit. Proper preparation and
upkeep go hand-in-hand with satisfactory
performance of the saw and safety.
Contact your dealer or the distributor for your
area if you do not understand any of the
instructions in this manual.
In addition to the operating instructions, this
manual contain paragraphs that require your
special attention.
Such paragraphs are marked with the symbols
described below:
Warning: where there is a risk of an accident or
personal injury or serious damage to property.
Caution: where there is a risk of damaging the
machine or its individual components.
WARNING - To ensure safe and correct
operation of the blower, this operator's
manual should always be kept with or near
the machine. Do not lend or rent your blower
without the operator's instruction manual.
WARNING: Allow only persons who
understand this manual to operate your
blower.
CONTENTS
1. UNDERSTANDING SAFETY LABELS __ 5
2. BLOWER COMPONENTS ___________ 5
3. SAFETY RULES ___________________ 6
4. ASSEMBLY _______________________ 8
5. STARTING - USE __________________ 9
6. STOPPING THE ENGINE ____________ 13
7. MAINTENANCE ___________________ 14
8. STORAGE ________________________ 17
9. TECHNICAL DATA _________________ 18
10. TROUBLE SHOOTING CHART _______ 19
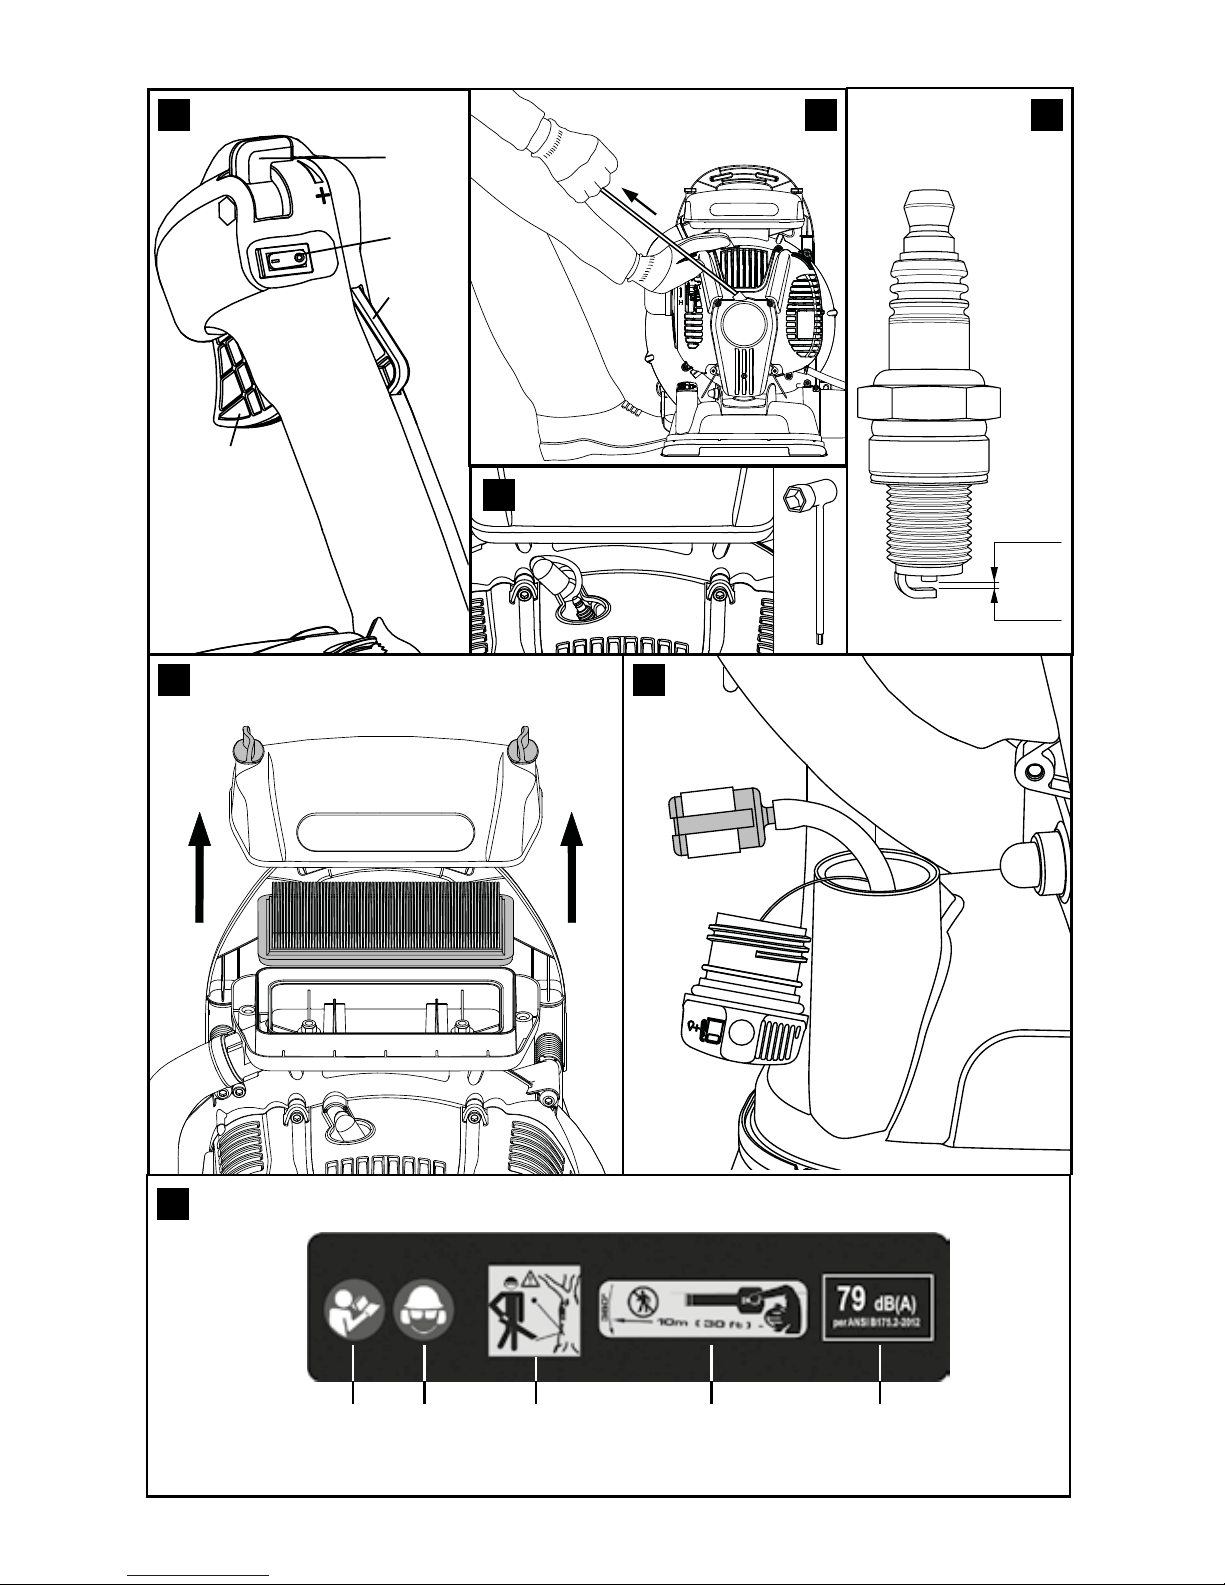
1. UNDERSTANDING SAFETY LABELS
(Fig.19)
1. Your manual contains special messages to
bring attention to potential safety concerns,
machine damage as well as helpful operating
and servicing information. PLEASE READ ALL
THE INFORMATION CAREFULLY TO AVOID
INJURY AND MACHINE DAMAGE.
2. Wear eye, hearing and head protection when
operating this equipment.
3. WARNING! The blower may throw objects at
high velocity that can ricochet and hit the
operator. This may cause serious eye damage.
4. The blower operator must make sure that no
bystanders or animals come nearer than 35
feet (10 metres). Whenever several operators
are working in the same work area, they
should maintain a safe distance of at least 35
feet (10 metres) from one another.
5. Noise pressure level measured at 30 feet (10
metres) distance according to ANSI
B175.2-1996
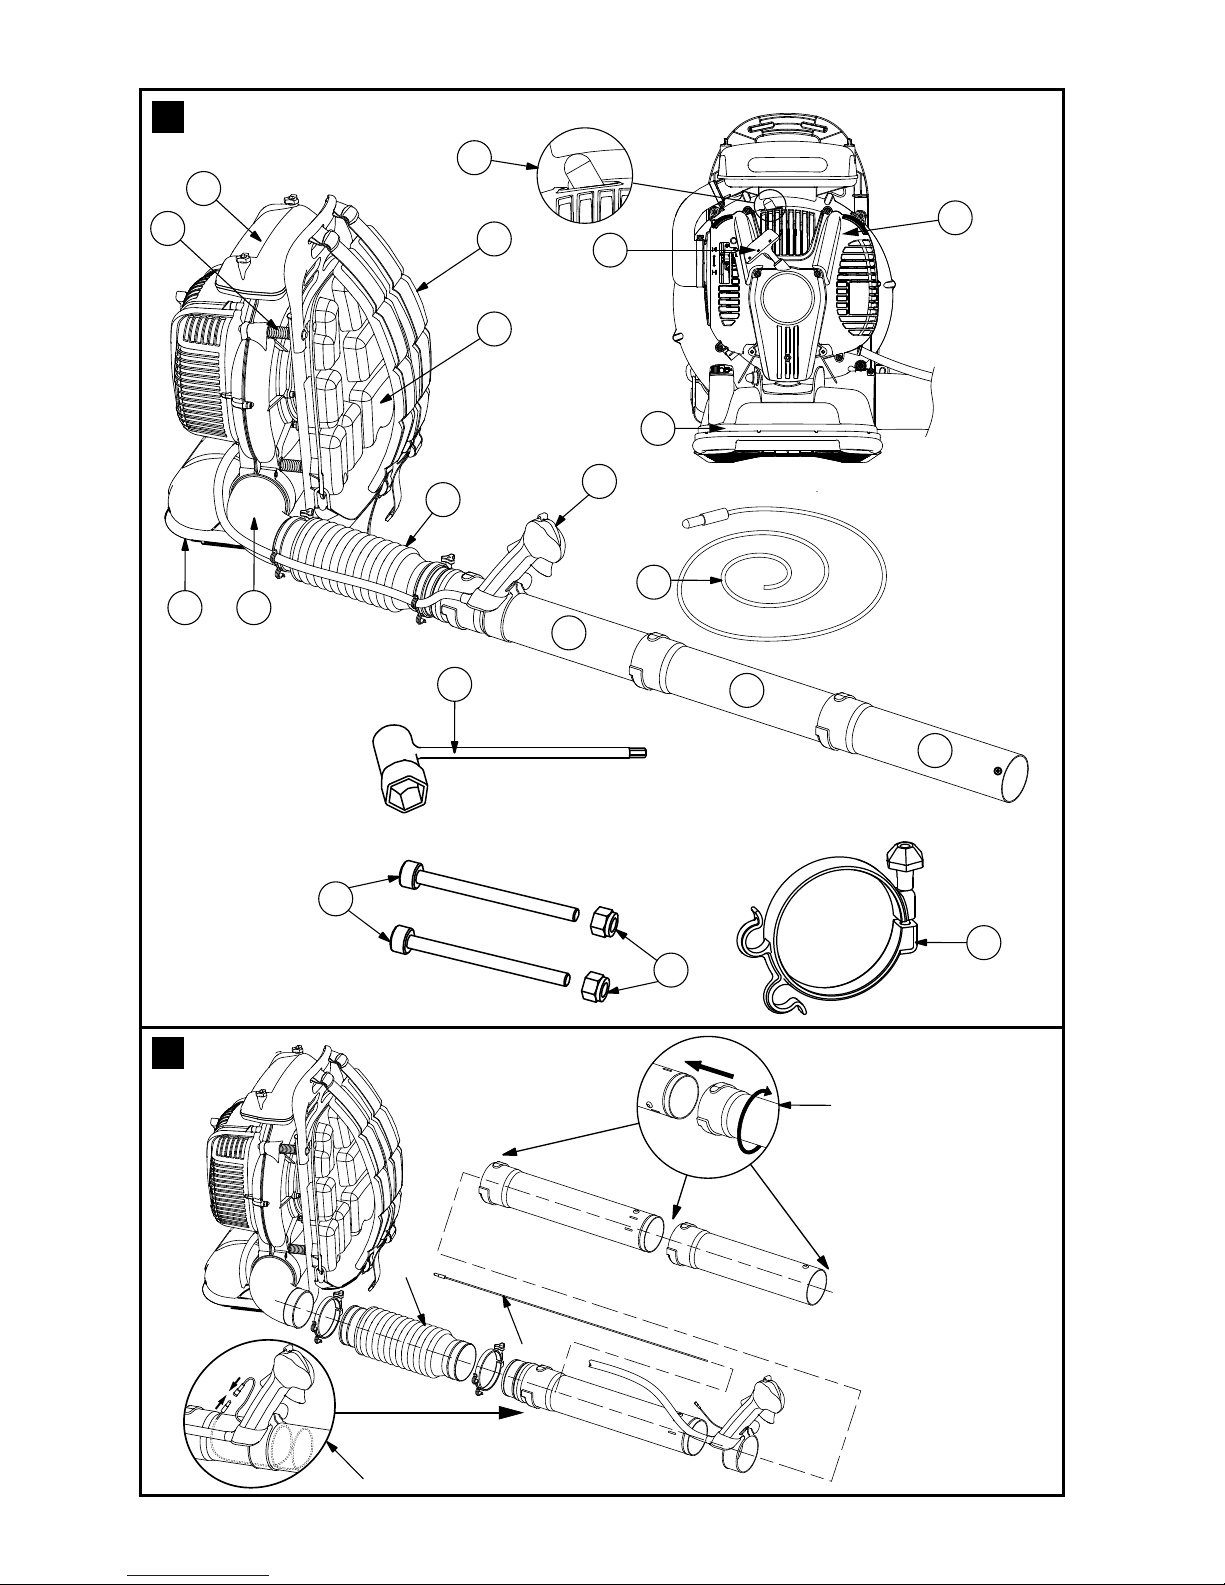
2. BLOWER COMPONENTS (Fig. 1)
1. Frame
2. Air lter
3. Spark plug
4. Starter handle
5. Engine cowling
6. Fuel tank
7. Harness
8. Cushion
9. Elbow tube
10. Flexible tube
11. Control handle
12. 13. 14. Blower tubes
15. Vibration mounts
16. Combination wench
17. M5x65 screws (no.2)
18. M6 nuts (no.2)
19. 90 mm dia. hose clamps (no.2)
20. Antistatic cable
Page 8
6
en
GB
F
D
E
NL
P
GR
TR
CZ
SK
RUS
UK
PL
H
LV
EST
LT
RO
3. SAFETY RULES
State and Local Requirements
The engine is NOT equipped with a Spark Arrester
System complying with the requirements of SAE
Recommended Practice J335 and California Codes
4442 and 4443. All national forest land and land
managed by the states of California, Maine,
Washington, Idaho, Minnesota, New Jersey and
Oregon require internal combustion engines to
be equipped with a spark arrester screen by
law. Other states and federal agencies are
enacting similar regulations.
Operating this engine in a state or locale where
such regulations apply, could result in a violation
of the law.
Note: When using a blower for logging
purposes, refer to Code of Federal
Regulations, Parts 1910 and 1928.
WARNING: The ignition system of your
unit produces an electromagnetic
field of a very low intensity. This field may
interfere with some pacemakers. To reduce
the risk of serious or fatal injury, persons with
pacemaker should consult their physician
and the pacemaker manufacturer before
operating this tool.
WARNING: Muffler surfaces are very hot
during and after operation of the blower,
keep all body parts away from the muffler.
Serious burns may occur if contact is made
with the muffler.
WARNING: Exposure to vibrations
through prolonged use of gasoline
powered hand tools could cause blood
vessel or nerve damage in the fingers, hands,
and wrists of people prone to circulation
disorders or abnormal swellings. Prolonged
use in cold weather has been linked to blood
vessel damage in otherwise healthy people. If
symptoms occur such as numbness, pain, loss
of strength, change in skin color or texture, or
loss of feeling in the fingers, hands, or wrists,
discontinue the use of this tool and seek
medical attention.
WARNING: The engine exhaust from this
product contains chemicals known to
the State of California to cause cancer, birth
defects or other reproductive harm. Operate
your blower outdoors only in a well ventilated
area.
Basic Safety Precautions
• Read this manual carefully until you
completely understand and can follow all
safety rules, precautions, and operating
instructions before attempting to use the
unit.
• Restrict the use of your blower to adult users
who understand and can follow safety rules,
precautions, and operating instructions
found in this manual. Minors should never be
allowed to use a blower.
• Do not handle or operate a blower when you
are fatigued, ill, or upset, or if you have taken
alcohol, drugs, or medication. You must be in
good physical condition and mentally alert.
Blower work is strenuous. If you have any
condition that might be aggravated by
strenuous work, check with your doctor
before operating a blower. Be more cautious
before rest periods and towards the end of
your shift.
• Keep children, bystanders, and animals a
minimum of 35 feet (10 meters) away from
the work area. Do not allow other people or
animals to be near the blower when starting
or operating the blower.
• While working with the blower, always use
safety protective approved clothing. The use
of protective clothing does not eliminate
injury risks, but reduces the injury effects in
case of accident. Consult your trusted
supplier to choose equipment in compliance
with legislation. The clothing must be proper
and not an obstacle. Wear adherent protective
clothing. Protective jackets and dungarees
are ideal. Do not wear clothes, scarves, ties
or bracelets that get stuck in wood or twigs.
Tie up and protect long hair (example with
foulards, cap, helmets, etc.). Wear safety
boots having skid-proof sole and antipiercing insert. Wear protective goggles or
face screens. Use protections against
noises: for example noise reduction ear
guards or earplugs. The use of protections
for the ear is very important, because the
perception of danger audio signals
(screaming, alarms, etc.) is limited. Always
Page 9
7
en
GB
F
D
E
NL
P
GR
TR
CZ
SK
RUS
UK
PL
H
LV
EST
LT
RO
remove your hearing protection as soon as
the engine stop. Wear gloves that permit
the maximum absorption of vibrations.
WARNING – Wear face mask when
operating the blower in dusty
environments.
• Only loan your blower to expert users who
are completely familiar with blower operation and correct use. Give other users the
manual with operating instructions, which
they have to read before using the blower.
• Check the blower each day to ensure that
each device, whether for safety or otherwise,
is functional.
• Never use a damaged, modified, or improperly repaired or assembled blower. Do not
remove, damage or deactivate any of the
safety devices.
• Carefully plan your blowing operation in
advance. Do not start blowing until you have
a clear work area, secure footing.
• All blower service, other than the operations
shown in the present manual, have to be
performed by competent personnel.
• It is unadvisable to hitch tools or applications
to the P.t.o. that are not specified by the
manufacturer.
WARNING - The blower may throw objects
at high velocity that can ricochet and hit the
operator. This may cause serious eye damage.
Always wear eye protection.
Fuel Handling
WARNING: Gasoline is an extremely
flammable fuel. Use extreme caution
when handling gasoline or fuel mix. Do not
smoke or bring any fire or flame near the fuel
or the blower.
· To reduce the risk of fire and burn injury,
handle fuel with care. It is highly flammable.
· Mix and store fuel in a container approved for
gasoline.
· Mix fuel outdoors where there are no sparks or
flames.
· Select bare ground, stop engine, and allow to
cool before refueling.
· Loosen fuel cap slowly to release pressure and
to keep fuel from escaping around the cap.
· Tighten fuel cap securely after refueling. Unit
vibration can cause an improperly tightened
fuel cap to loosen or come off and spill
quantities of fuel.
· Wipe spilled fuel from the unit. Move 10 feet
(3 m) away from refueling site before starting
engine.
· Never attempt to burn off spilled fuel under
any circumstances.
· Do not smoke while handling fuel or while
operating the blower.
· Store fuel in a cool, dry, well ventilated place.
· Never place the blower in a combustible area
such as dry leaves, straw, paper, etc.
· Store the unit and fuel in an area where fuel
vapors cannot reach sparks or open flames
from water heaters, electric motors or switches,
furnaces, etc.
· Never take the cap off the tank when the
engine is running.
· Never use fuel for cleaning operations.
· Take care not to get fuel on your clothing.
Operation and Safety
WARNING: Use a firm grip with thumbs
and fingers encircling the blower handles.
• Keep all parts of your body away from the
blower when the engine is running.
• Always carry the blower with the engine
stopped. When transporting in a vehicle
properly secure your blower to prevent
turnover, fuel spillage and damage to the
blower.
• Before you start the engine, make sure the
blower is not directed to people.
• Shut off the engine before setting down the
blower. Do not leave the engine running
unattended.
• Only use the blower in well-ventilated places,
do not operate the blower in explosive or
flammable atmospheres or in closed
environments.
Page 10
8
en
GB
F
D
E
NL
P
GR
TR
CZ
SK
RUS
UK
PL
H
LV
EST
LT
RO
WARNING: Beware of carbon monoxide
poisoning.
• Do not operate blower from a ladder, in a tree
or on a root top. Always work from a firmfooted and safe position.
• Do not work near electric cables.
• Keep the handle dry, clean, and free of oil or
fuel mixture.
• Stand with your weight evenly balanced on
both feet.
• Do not overreach. You could be drawn or
thrown off balance and lose control of the
blower.
Precautions to Reduce Vibration Risk
· The blower is provided with anti-vibration (AV)
system; never alter or modify it.
· Wear gloves and keep your hands warm.
· Maintain a firm grip at all times, but do not
squeeze the handles with constant, excessive
pressures, take frequent breaks. All the above
mentioned precautions do not guarantee that
you will not sustain whitefinger disease or
carpal tunnel syndrome. Therefore, continual
and regular users should monitor closely the
condition of their hands and fingers. If any of
the above symptoms appear, seek medical
advice immediately.
Maintenance Precaution
WARNING: Never operate a blower that is
damaged, improperly adjusted, or is not
completely and securely assembled.
WARNING: All blower service, other
than items in the Operator's Manual
maintenance instructions, have to be
performed by competent blower service
personnel. (If improper tools are used to
remove the flywheel or clutch, or if an
improper tool is used to hold the flywheel in
order to remove the clutch, structural damage
to the flywheel could occur which could
subsequently cause the flywheel to burst and
serious injury could result.)
WARNING:
Never modify your blower in any way.
Keep the handles dry, clean, and free of oil or
fuel mixture.
WARNING: Use only accessories and
replacement parts recommended.
• Never attempt to service the blower while
the engine is running.
• Never use fuel for cleaning operations.
• Keep the blower in a dry place, off the ground
and the tanks empty.
• If your blower is no longer usable, dispose of
it properly without damaging the
environment by handing it in to your local
Dealer who will arrange for its correct
disposal.
• Replace immediately any safety device when
damaged or broken.
WARNING: The muffler and other parts
of the engine (e.g. fins of the cylinder,
spark plug) become hot during operation
and remain hot for a while after stopping the
engine.
To reduce risk of burns do not touch the
muffler and other parts while they are hot.
4. ASSEMBLY
Assembling the tubes/handgrip
WARNING – When fitting the tube and
nozzle, the engine must be off and the switch
in the STOP position.
To assemble the blower read the following
instructions.
Machine components
Refer to Fig.3:
1. Insert the elbow tube into the fan casing.
2. Secure the elbow with the two screws and
two nuts supplied using the hex wrench
incorporated in the spark plug wrench
(supplied).
Refer to Fig.2:
1. Fit the hose clamps on the two ends of the
exible tube (10, Fig.1), without tightening
them.
2. Fit the exible tube onto the elbow tube (9,
Fig.1) and onto the blower tube (12, Fig.1)
taking care to ensure that the cone (A, Fig.2)
is positioned towards the blower tube; now
tighten the two hose clamps using the
Page 11
9
en
GB
F
D
E
NL
P
GR
TR
CZ
SK
RUS
UK
PL
H
LV
EST
LT
RO
supplied wrench.
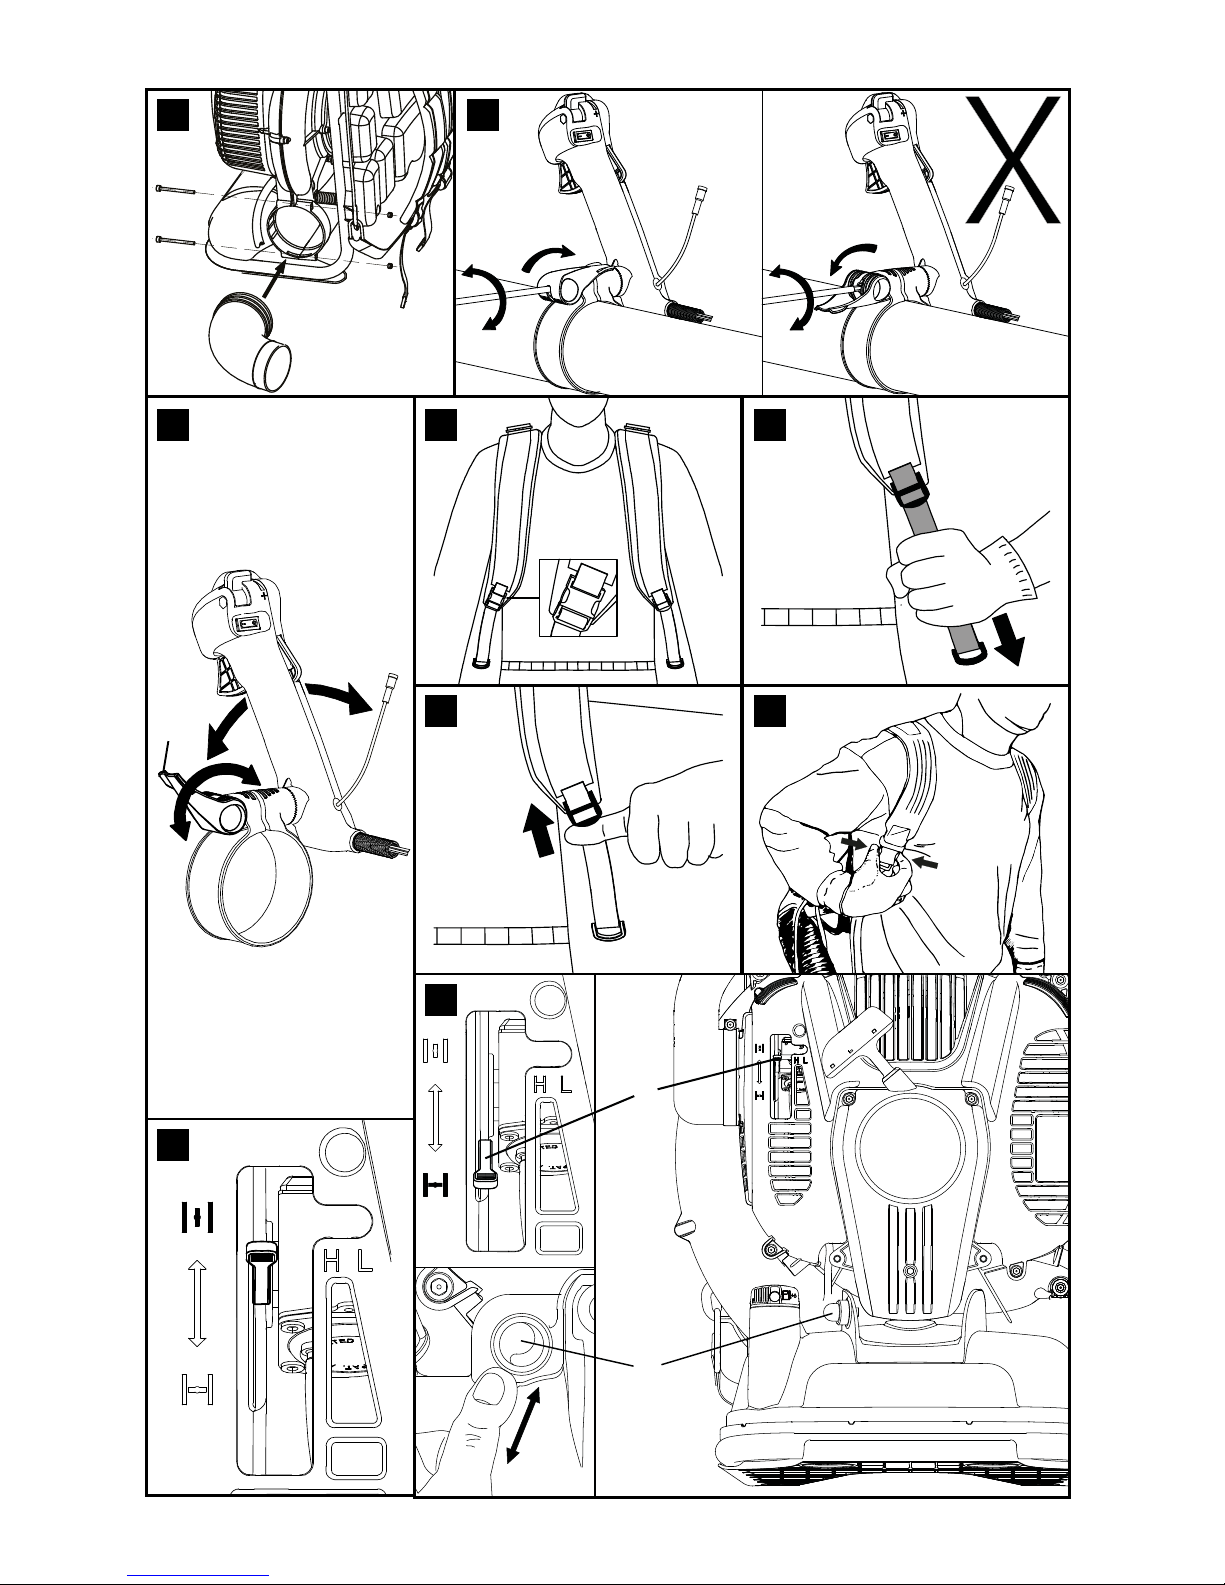
3. Fit the control handle (11, Fig.1) on the
blower tube (12, Fig.1) after fully undoing
the screw located under the locking lever
(Fig.5) using the supplied hex wrench.
Refer to Fig.4:
1. With the locking lever in its lowered
position (locked), tighten the screw
suciently to secure the control handle to
the blower tube but without tightening it
fully. Do not tighten the screw with the
lever in the open position.
2. Wind the antistatic cable around the blower
tube in a spiral (B, Fig.2) and insert it into the
hole in the blower tube; connect the end of
the antistatic cable B to the terminal in the
control handle (as shown in circle C, Fig.2).
3. Couple the blower tubes (13-14, Fig.1)
by means of the bayonet tting (see the
bayonet tting in the enlarged view in circle
D, Fig.2).
Adjusting the control handle
Correct positioning of the control handle
is extremely important in order to work
comfortably with the blower. To adjust the
control handle position:
1. Raise the locking lever (1, Fig.5).
2. Find the most comfortable working position
by sliding the control handle and adjusting
its angle.
3. When you nd the preferred position, lock
the control handle by lowering the locking
lever.
Adjusting the harness and quick release
WARNING - The harness must be
adjusted with the engine stopped.
Before using the blower it is extremely
important to ensure the weight of the machine
is correctly balanced on your shoulders. This is
done by adjusting the length of the shoulder
straps until the machine is perfectly in contact
with your back and shoulders.
Note that correct balancing of the machine
is especially important when working on
gradients. To tighten the shoulder straps pull as
shown in Fig.7.
To loosen the shoulder straps lift the buckle
with the movement shown in Fig.8.
In the presence of danger, release the
machine from your shoulders by proceeding
as follows:
1. Use one hand to press the quick release tabs
on the right-hand shoulder strap (shown in
the box in Fig.6) as shown in Fig.9.
2. Accompany the machine by bending your
upper body slightly to the left: the blower
will slide o your shoulders.
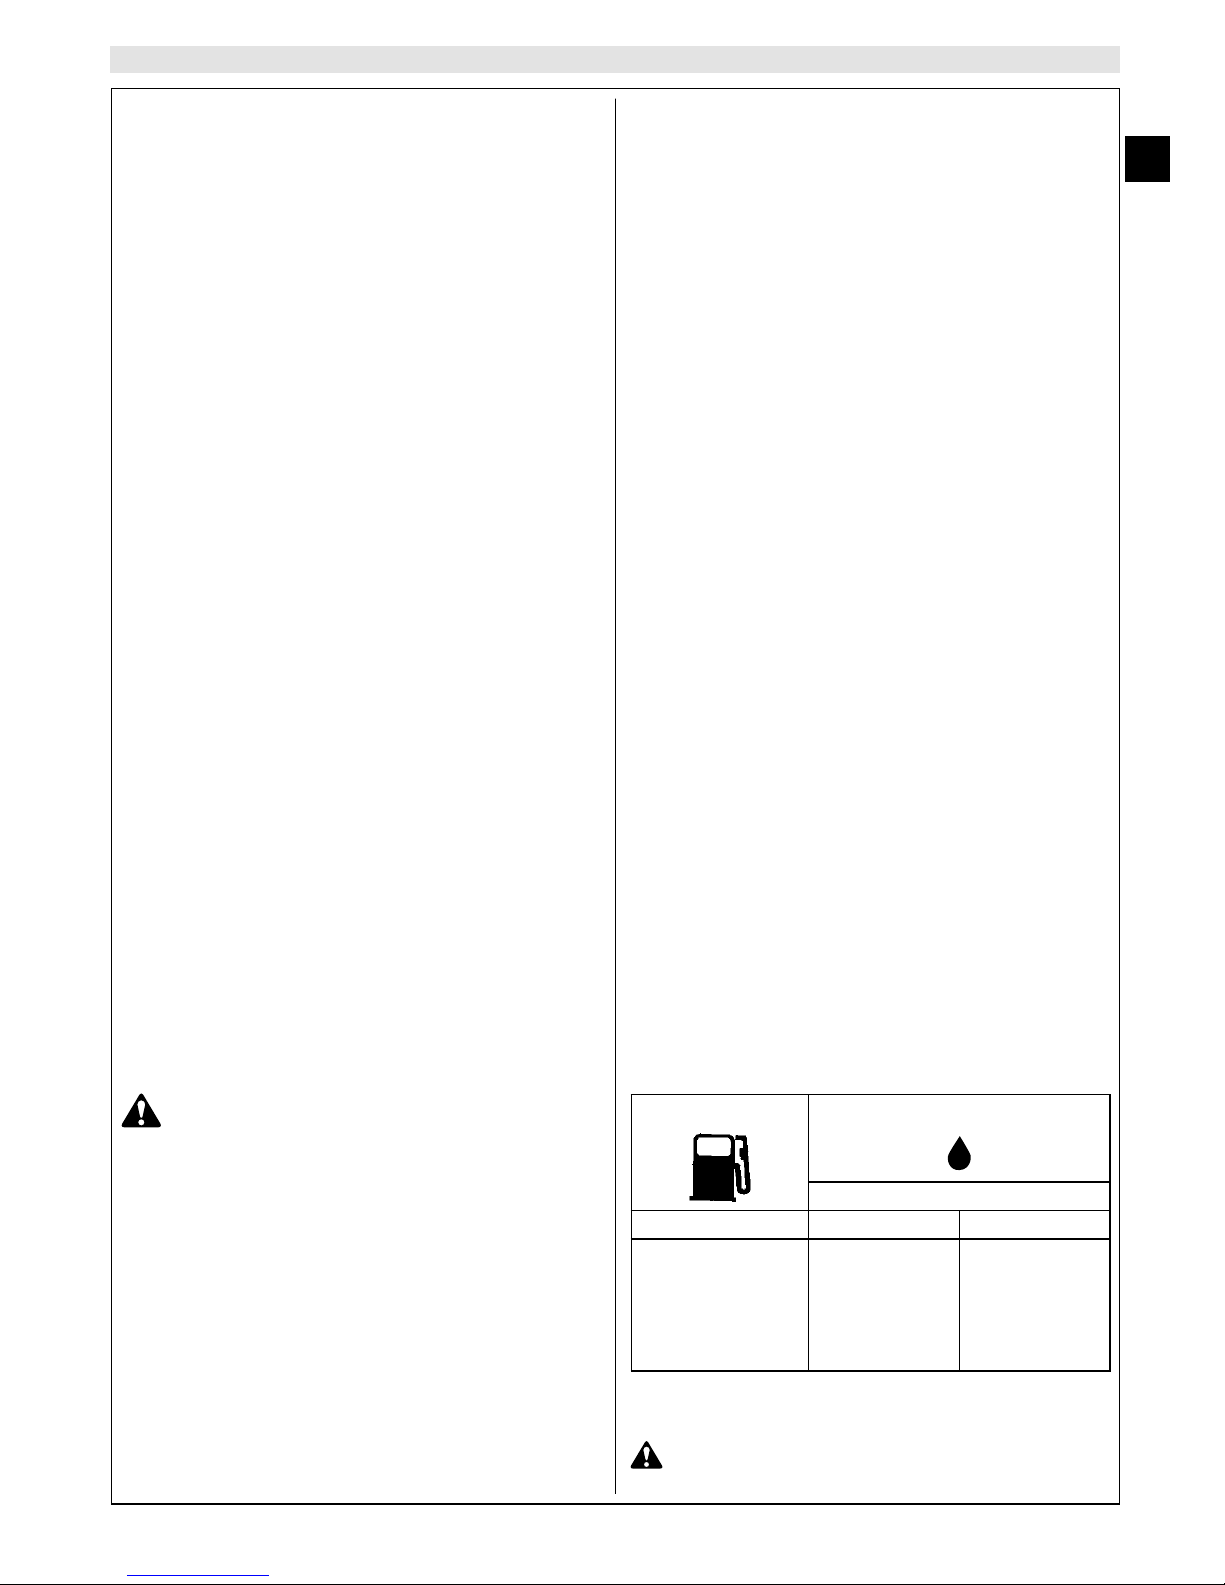
5. STARTING
FUELING
This product is powered by a 2-cycle engine and
requires pre-mixing gasoline and 2-cycle oil.
Pre-mix unleaded gasoline and 2-cycle engine oil
in a clean container approved for gasoline.
RECOMMENDED FUEL: THIS ENGINE IS
CERTIFIED TO OPERATE ON UNLEADED GASOLINE
INTENDED FOR AUTOMOTIVE USE WITH AN
OCTANE RATING OF 89 ([R + M] / 2) OR HIGHER.
Mix 2-cycle engine oil with gasoline according to
the instructions on the package.
We strongly recommend the use of 2% (1:50)
Efco two cycle engine oil, which is specifically
formulated for all air-cooled two-stroke engines.
The correct oil / fuel proportions shown in the
table are suitable when using an equivalent highquality engine oil (JASO specification FD or ISO
specification L-EGD).
CAUTION: DO NOT USE AUTOMOTIVE OIL
OR 2-CYCLE OUTBOARD OIL.
GASOLINE OIL
2% - 50:1
ℓ ℓ
(cm3)
1
5
10
15
20
25
0,02
0,10
0,20
0,30
0,40
0,50
(20)
(100)
(200)
(300)
(400)
(500)
Page 12
10
en
GB
F
D
E
NL
P
GR
TR
CZ
SK
RUS
UK
PL
H
LV
EST
LT
RO
CAUTION:
- Match your fuel purchases to your
consumption; don’t buy more than you
will use in one or two months;
- Store gasoline in a tightly-closed
container in a cool, dry place.
CAUTION - For the mixture, never use a
fuel with an ethanol percentage higher
than 10%; gasohol (mixture of gasoline and
ethanol) up to 10% ethanol or E10 fuel are
acceptable.
When using an Oxygenated Gasoline a good
practice of Fuel Management is necessary.
Gasoline Oxygenated with alcohol readily takes/
up water when it is present; the water may be
condensed out of humid air or be a contaminant
in the fuel system, including tank.
The use of Oxygenated Gasoline may cause the
occurrence of vapor-lock easier.
NOTE - Prepare only the quantity of mixture
required for immediate use; do not leave fuel in
the tank or a container for a long time. Were
commend the use of the additive if the mixture is
to be stored for 12 months.
Alkylate gasoline
CAUTIONS – Alkylate fuels have different
density than normal fuel. Therefore
engines, set with normal fuel, need different H
jet regulation to avoid critical issues. For this
operation it’s necessary turned at a Licensed
Service Dealer.
FILLING THE TANK
Stir the mixture well before refuelling.
If you are using a petrol can to prepare the
mixture, make sure the container is clean
and mix for at least a minute to ensure the
oil is properly dissolved in the petrol. The oil
percentages are shown in the tables below.
WARNING: Follow safety instruction for
fuel handling. Always shut off engine
before fuelling. Never add fuel to a machine
with a running or hot engine. Move at least 3
m from refuelling site before starting engine.
DO NOT SMOKE!
1. Clean surface around fuel cap to prevent
contamination.
2. Loosen fuel cap slowly.
3. Carefully pour fuel mixture into the tank.
Avoid spillage.
4. Prior to replacing the fuel cap, clean and
inspect the gasket.
5. Immediately replace fuel cap and hand
tighten. Wipe up any fuel spillage.
NOTE: It is normal for smoke to be emitted
from a new engine during and after first use.
WARNING: Check for fuel leaks, if any
are found, correct before use. Contact a
Servicing Dealer if necessary.
USE
Preparation for Working
1. Operate the blower only at reasonable hours,
i.e. not early in the morning or late at night
when people might be disturbed. Comply
with times listed in local ordinances.
2. Operate the blower at the lowest possible
throttle setting to do the job.
3. Check the condition of the blower before
operation, especially the muffler, air intake
and air filter.
4. Under dusty conditions, slightly spray the
work area with a hose or use a mister
attachment when water is available.
5. Watch out for children, pets, open windows
or cars, and blow debris safely away.
6. Use the full nozzle extension so the air
stream can work close to the ground.
7. After using the blower, clean up and dispose
of debris in trash receptacles.
What do leaf blowers do?
You can use a leaf blower to:
• Remove and gather leaves. To remove
rubbish or grass cuttings from roads,
footpaths, parks, parking lots, outhouses and
sports grounds, etc.
• Remove grass clippings
• Dislodge or break up matted grass
• Clean parking lots
• Clean farm and construction equipment
• Clean arenas and amusement parks
• Remove light or fluffy snow
Page 13
11
en
GB
F
D
E
NL
P
GR
TR
CZ
SK
RUS
UK
PL
H
LV
EST
LT
RO
• Dry off pavement and outdoor areas
• To remove rubbish from corners, round
connections, and between paving stones,
etc.
Operating courtesy
• Follow local rules and ordinances about
when to use leaf blowers. Do not use very
early in the morning or very late in the day.
• Check wind direction and intensity. Never
point the nozzle or blow debris toward
people, pets, cars or houses.
• Do not blow debris toward open windows or
doors.
• Always be considerate of people passing by
and of property.
• Do not leave the blower running when
unattended.
• Do not use a blower to spread or mist
fertilizers, chemicals or other toxic substances,
fuel, unless it is designed for these purposes
and in an appropriate area.
• Use the lowest possible throttle speed to do
the job.
• Avoid using more than one machine at a
time, especially in neighborhoods or around
buildings where sound can be intensified.
Reducing dust
• Pay attention to what you are moving.
• Practice moving grass clippings or a paper
cup without moving dust.
• Wet dusty areas down first before using a
blower.
• Never use a leaf blower to move excessively
dusty materials.
• A leaf blower should NOT be used to clean
up:
— Large amounts of gravel or gravel dust
— Construction dirt
— Plaster dust
— Cement and concrete dust
— Dry garden topsoil
WARNING!– Dust with silica in its
composition may contain crystalline
silica. Silica is a basic component of sand,
quartz, brick, clay, granite and numerous
other materials and rock, including masonry
and concrete products. Repeated and / or
substantial inhalation of airborne crystalline
silica can cause serious or fatal respiratory
disease, including silicosis. In addition, the
state of California and some other authorities
have listed respirable crystalline silica as
a substance known to cause cancer. When
encountering such materials, always follow
the respiratory precautions mentioned above.
WARNING!– Breathing asbestos dust
is dangerous and can cause severe or
fatal injury, respiratory illness or cancer.
The use and disposal of asbestos containing
products have been strictly regulated by
OSHA and the Environmental Protection
Agency. Do not blow or disturb asbestos or
asbestos containing product, such as asbestos
insulation. If you have any reason to believe
that you might be disturbing asbestos,
immediately contact your employer or local
OSHA representative.
If the substance being blown is a commercial
substance, review the material safety data sheet
for that substance or consult the material
manufacturer.
TO BLOW AWAY DEBRIS ON THE GROUND
WARNING! - When fitting the blower tube
and nozzle, the engine must be switched
off and the stop switch must be in the stop
position (2, Fig.13).
1. Adjust the harness so that the machine is easy
to carry (Fig. 7 - 8).
2.
The speed of the air jet is regulated by means of the
throttle (1, Fig. 13).
Select the speed which is best suited for the
application. Once the setting is identified, the
throttle limiter (4, Fig.13) can be used to
maintain and retrieve it accurately.
Full throttle is obtained when the limiter (4) is
pushed fully up.
Blowing
WARNING – Constantly check the area
in which you are working: never direct
the air jet towards people or animals.The
blower can propel small objects at very high
speed. Stop the engine immediately if you are
approached.
Page 14

12
en
GB
F
D
E
NL
P
GR
TR
CZ
SK
RUS
UK
PL
H
LV
EST
LT
RO
WARNING! – Never remove the cowl when
the engine is running. The fan rotor could
cause serious bodily injury, especially to the
hands.
Before you begin blowing, put on the required
safety equipment.
WARNING! - When working with the
blower, wear the required protecting
equipment:
1. Hearing protection.
2. Eye protection.
3. Face mask in dusty environments.
WARNING! - Be careful, particularly if
left hand operation is applied. Avoid any
direct body contact with the exhaust outlet
area.
WARNING! - Never start the blower if the
inspection cover is not closed, is damaged
or cannot be closed.
WARNING! - Do not operate the blower
while standing on a ladder or a stand.
WARNING - Don’t walk backward while
operating the machine.
WARNING - Never attempt to blow hot or
burning substances or combustible fluids.
Start the blower as described on page 12. Work
according to the following instructions:
1. Never blow air toward fixed objects such as
walls, large rocks, automobiles and fences.
2. When working inside corners, blow from the
corner and inward toward the center of the
work area. Otherwise, debris can fly up in
your face and cause eye injury.
3. Never point the blower nozzle at delicate
plants.
Work Area Precautions
• Never allow children to operate your blower.
Only allow others to use this blower who
have read this Operator's Manual or received
adequate instructions for the safe and proper
use of this blower.
• Do not work near electrical wires or buildings.
• Work only when visibility and light are
adequate for you to see clearly.
• Do not work from a ladder, this is extremely
dangerous. Leave this operation for
professionals.
• Stop the engine before setting the blower
down.
• Be particularly cautious and alert while
wearing hearing protection because such
equipment may restrict your ability to hear
sounds indicating danger (calls, signals,
warnings, etc).
• Be extremely cautious when working on
slopes or uneven ground.
STARTING THE ENGINE
STARTUP PROCEDURE
Blower controls – Control handle (Fig.13)
· To accelerate press throttle trigger (1)
together with safety lever (3).
· To start the engine switch (2) must be set to
“1”.
· If you want to work with the engine at xed
speed, press safety lever (3) and move lever
(4) towards the “+” mark until obtaining the
required engine rpm. To disable the xed
speed setting, return the lever to the “-”
position.
· To stop the engine, set switch (2) to “0”.
Starting
Before starting the engine:
· Place the machine on an area of at ground.
· Check that the switch (2, Fig.13) is not in
position “0” (o).
· Make sure that there is no one near the
machine and/or in front of the blower tube.
Starting a cold engine (engine stopped for
more than 30 minutes)
· Press the primer bulb (A, Fig.12) fully down,
slowly, 10 times.
· Lower the choke lever (B, Fig.12) until you
hear a click.
· Check that the switch (2, Fig.13) is in position
“1” (on).
· Place your left hand on the engine cowling
and your left foot on the frame to keep the
machine steady.
· Use your right hand to pull the handle (4,
Fig.1) until you encounter slight resistance.
Without releasing the rope, pull with a short
sharp gesture. Pulling with insucient force
Page 15
13
en
GB
F
D
E
NL
P
GR
TR
CZ
SK
RUS
UK
PL
H
LV
EST
LT
RO
at this point may result in ooding of the
engine.
· When you hear the engine re for the rst
time raise the choke lever (B, Fig.12) toward
its vertical position until it clicks into place
(Fig.11).
· Pull the handle once again to start the
engine. Keep the engine at idle speed for at
least one minute before accelerating to full
revs.
Starting with a warm engine
· Press the primer bulb (A, Fig.12) fully down,
slowly, 10 times.
· Raise the choke lever (B, Fig.12) until you
hear a click.
· Check that the switch (2, Fig.13) is in position
“1” (on).
· Place your left hand on the engine cowling
and your left foot on the frame to keep the
machine steady.
· Use your right hand to pull the handle (4,
Fig.1) until you encounter slight resistance.
Without releasing the rope, pull with a short
sharp gesture. Pulling with insucient force
at this point may result in ooding of the
engine.
· Keep the engine at idling speed for at least
one minute before accelerating to full revs.
Procedure in the case of a ooded engine
· Remove the spark plug (3, Fig.1) using the
supplied wrench, then clean it and dry it.
· Check that the choke lever B is in its
horizontal position as shown in Fig.11.
· Pull the starter handle (4, Fig.1) at least 20
times.
· Fit the spark plug; bring the xed throttle
lever to the max revs position (4, Fig.13).
· Start the engine.
If the engine fails to start, proceed as follows:
· Remove the spark plug using the supplied
wrench, then clean it and dry it.
· Turn the engine upside down with the spark
plug bore facing downward.
· Pull the starter handle (4, Fig.1) at least 20
times and check whether fuel drips from the
spark plug bore.
· Dry the surfaces around the spark plug bore.
· Ret the spark plug and repeat the
operations with the throttle lever (1, Fig.13)
in the max speed position and the choke
lever (B) in its horizontal position as shown in
Fig.11.
CAUTION:
- Never wrap the starter cord around your
hand.
- When pulling the starter rope, do not use
the full extent of the rope as this can cause
the rope to break.
- Do not let starter rope snap back. Hold the
starter handle (4, Fig.1) and let the rope
rewind slowly.
BREAKING-IN THE ENGINE
The engine reaches the maximum power after
5÷8 hours of activity.
During this period of breaking-in do not use the
engine at wide open throttle without load, to
avoid excessive functioning stress.
WARNING! - During the breaking-in
period do not vary the carburetion to obtain
a presumed power increment; the engine
can be damaged.
NOTE: It is normal for smoke to be emitted
from a new engine during and after first use.
6. STOPPING THE ENGINE
Set the throttle lever to idle position (1, Fig. 13)
and wait a few seconds to let the engine cool o.
Turn o the engine, pushing the ON/OFF switch
(2, Fig. 13).
Page 16

14
en
GB
F
D
E
NL
P
GR
TR
CZ
SK
RUS
UK
PL
H
LV
EST
LT
RO
MAINTENANCE CHART
Please note that the following maintenance intervals apply for normal
operating conditions only. If your daily work requires longer than normal
or harsh cutting conditions are present the suggested intervals should
be shortened accordingly.
Before Each Use
After Each
Refueling Stop
Weehly
If Damaged or
Faulty
As Required
Complete Machine Inspect (Leaks, Cracks, and Wear)
X X
Controls (Ignition Switch, Choke
Lever, Throttle Trigger, Trigger
Interlock)
Check Operation
X X
Fuel Tank and Oil Tank Inspect (Leaks, Cracks, and Wear)
X X
Fuel Filter Inspect and Clean
X
Replace Filter Element
X
Every 6
Months
All Accessible Screws and Nuts
(not Adjusting Screws)
Inspect - Retighten
X
Air Filter Clean
X
Replace
X
Every 6
Months
Cylinder Fins and Starter System
Vents
Clean
X
Starter Rope Inspect (Damage, and Wear)
X
Replace
X
Carburetor Check Idle
X X
Spark Plug Check Electrode Gap
X
Replace
X
Every 6
Months
Vibration Mounts Inspect (Damage and Wear)
X
7. MAINTENANCE
Page 17
15
en
GB
F
D
E
NL
P
GR
TR
CZ
SK
RUS
UK
PL
H
LV
EST
LT
RO
WARNING! – Always wear protective
gloves during maintenance operations. Do not
carry out maintenance with the engine hot.
Never carry out maintenance operations with
the engine running.
- Non-correct maintenance and removal of
safety devices could cause serious injuries.
- Do not use fuel mixture for cleaning
operations.
- Do not attempt to carry out operations
or repairs that are not part of the normal
maintenance. See the authorised dealer.
AIR FILTER
The eciency of the air intake lter on any
engine is of critical importance so it must be
checked and cleaned regularly. To clean the air
lter, refer to Fig.17 and proceed as follows:
· Unscrew the two knobs to remove the cover
in order to gain access to the lter (as shown
in Fig.17).
· Remove the lter and clean it by knocking it
against a hard surface; then use compressed
air and blow from the side of the metal mesh
and between the pleats, proceeding in a
lengthwise direction.
· Ret the lter and close the cover, tightening
the two knobs.
CAUTION – Using the blower without the
air lter or with a very dirty air lter can damage
the engine and will invalidate the warranty.
Change the lter when it can no longer be
cleaned eciently.
FUEL FILTER (Fig. 18)
We recommend changing the fuel lter in the
fuel tank at least once a year. This operation
must be carried out by an Authorized Service
Centre:
· Empty the fuel tank.
· Extract the lter and disconnect it from the
fuel hose.
· Fit a new lter in the fuel hose.
· Re-insert the lter in the fuel tank.
CAUTION – Failure to replace the fuel lter
when it is dirty will result in impaired operation
of the engine.
ENGINE
Clean cylinder ns with a brush or compressed
air periodically. Dangerous overheating of engine
may occur due to impurities on the cylinder.
SPARK PLUG
Clean spark plug and check electrode distance
periodically (Fig. 16). Use Champion RCJ6Y or of
other brand with the same thermal grade.
FAN CASING
Following prolonged use of the blower a large
amount of dust may be deposited on the fan casing
(behind the cushion). This obstructs the air ow
(reduced volume) and can result in damage to
the fan and/or overheating of the engine. For this
reason, be sure to clean the fan casing regularly.
Clean the slots in the fan casing: they play an
important role in relation to engine cooling.
CARBURETOR
The carburettor is factory adjusted to standard
settings that comply with emissions regulations.
WARNING:
- Do not change the carburettor settings
by tightening or loosening the regulator
screws; this operation must be performed
by qualied personnel at an Authorized
Service Centre.
- Incorrect adjustment of the carburettor
can cause serious damage to the engine.
- Furthermore, do not tamper with or
remove the red protective caps on the
carburettor regulator screws.
In the case of problems (engine dies when
idling, irregular engine speed or failure to reach
maximum power) seek the assistance of an
Authorized Service Centre.
WARNING: Weather conditions and
altitude may aect carburation.
Page 18

16
en
GB
F
D
E
NL
P
GR
TR
CZ
SK
RUS
UK
PL
H
LV
EST
LT
RO
MUFFLER
WARNING – This muffler incorporates
a catalytic converter, needed in order
to ensure the engine complies with current
emissions standards. Never attempt to modify or
remove the catalytic converter: in doing so, you
will be breaking the law.
WARNING – Mufflers with catalytic
converters become very hot during
operation, and retain heat for a long time
after the engine has been stopped. This is the
case even with the engine idling. Contact can
burn the skin. Always remember the potential
fire risk!
CAUTION – If the muffler is damaged, it
must be replaced. If the muffler frequently
becomes blocked, this could be an indication
that the efficiency of the catalytic converter is
limited.
WARNING – Do not use the blower if
the muffler is damaged or missing, or
has been altered in any way. Operating the
machine with an improperly maintained
muffler will increase the risk of fire and
hearing loss.
EXTRA MAINTANANCE ADVISABLE
It is advisable to inspect the machine by a
specialized technician at an authorized service
network at the end of season, if used intensively,
and every two years if with normal use.
WARNING! – Any maintenance operations
not specifically dealt with in this manual
must be carried out by an authorised service
centre. To ensure that your blower continues
to function correctly, use only ORIGINAL
REPLACEMENT PARTS.
Any unauthorized changes and/or
use of non-original replacement parts
may result in serious injury or death to the
operator or third parties.
TRANSPORTION
Only transport the blower with the engine
switched off.
WARNING - When transporting the
machine on a vehicle, ensure that it is
firmly and securely fastened using straps or
belts. The machine must be transported in the
horizontal position, also ensuring compliance
with applicable transport regulations for such
machines.
Page 19

17
en
GB
F
D
E
NL
P
GR
TR
CZ
SK
RUS
UK
PL
H
LV
EST
LT
RO
8. STORAGE
WARNING: Stop engine and allow to cool,
and secure the unit before storing or
transporting in a vehicle. Store unit and fuel in
an area where fuel vapors cannot reach sparks
or open flames from water heaters, electric
motors or switches, furnaces, etc. Store unit
with all guards in place. Position so that any
sharp object cannot accidentally cause injury
to passersby. Store the unit out of reach of
children and other unauthorized persons.
1. Drain and clean the fuel tank in a well
ventilated area.
2. Drain all fuel from tank into a container
approved for gasoline. Run engine until it
stops. This will remove all fuel-oil mix which
could become stale and leave varnish and
gum in the fuel system.
3. Cleaan all foreign material from the saw. Keep
away from corrosive agents such as garden
chemicals and de-icing salts.
4. Abide by all Federal and local regulations for
the safe storage and handling of gasoline.
Excess fuel should be used in other 2-cycle
engine powered equipment.
CAUTION: It is important to prevent gum
deposits from forming in essential fuel
system parts such as the carburetor, fuel filter,
fuel hose, or fuel tank during storage. Alcohol
blended fuels (called gasohol or E10 or using
ethanol, methanol) can attract moisture
which leads to fuel mixture separation and
formation of acids during storage. Acidic gas
can damage the engine.
ENVIRONMENTAL PROTECTION
Environmental protection should be a priority of
considerable importance when using the
machine, for the benefit of both social cohesion
and the environment in which we live.
- Try not to cause any disturbance to the
surrounding area.
- Scrupulously comply with local regulations
and provisions for the disposal of oils, petrol,
batteries, filters, deteriorated parts or any
elements which have a strong impact on the
environment. This waste must not be disposed
of as normal waste, it must be separated and
taken to specified waste disposal centres
where the material will be recycled.
Demolition and disposal
When the machine reaches the end of its service
life, do not dispose of it into the environment;
instead take it to a waste disposal centre.
Most materials used in the manufacture of the
machine are recyclable; all metals (steel,
aluminium, brass) can be delivered to a normal
recycling station. For information contact your
local waste recycling service. Waste disposal must
be carried out with respect for the environment,
avoiding soil, air and water pollution.
In all cases, applicable local legislation must
be complied with.
Page 20

18
en
GB
F
D
E
NL
P
GR
TR
CZ
SK
RUS
UK
PL
H
LV
EST
LT
RO
9. TECHNICAL DATA
Displacement 4.7 cu.in. (77.0 cm3)
Engine 2 stroke
Power 5.0 HP (3.6 KW)
Fuel tank capacity
0.6 US gal. (2.3 ℓ)
Primer carburetor Yes
Antivibration system Yes
Weight 24.7 lb (11.2 kg)
Blower air flow (ANSI B 175.2-2012) 807 cfm (1370 m
3
/h)
Maximum air speed (ANSI B 175.2-2012) 170 mph (76 m/s)
Pressure level ANSI B 175.2-1996 79 dB (A)
Page 21

19
en
GB
F
D
E
NL
P
GR
TR
CZ
SK
RUS
UK
PL
H
LV
EST
LT
RO
10. TROUBLESHOOTING CHART
WARNING: Always stop unit and disconnect spark plug before performing all of the recommended
remedies below except remedies that require operation of the unit.
When you have checked all the possible causes listed and you are still experiencing the problem, see your Servicing
Dealer. If you are experiencing a problem that is not listed in this chart, see your Servicing Dealer for service.
PROBLEM POSSIBLE CAUSE SOLUTION
Engine will not start or will
run only a few seconds after
starting.
(Make sure Ignition switch
is in start position “I”)
1. No spark
2. Flooded engine.
1. Watch for spark at spark plug tip. If
there is no spark, repeat test with a
new spark plug (RCJ6Y).
2. Follow procedure page 13 If engine
still fails to start, repeat procedure
with a new spark plug.
Engine starts but will not
accelerate properly or will not
run properly at high speed.
Carburetor requires
adjustment.
Contact a Servicing Dealer for
carburetor adjustment.
Engine does not reach full
speed and / or emits
excessive smoke
1. Check oil fuel mixture.
2. Air filter dirty.
3. Carburetor requires
adjustment.
1. Use fresh fuel and the correct
2-cycle oil mix.
2. Clean per instruction in
Maintenance-Air Filter Section.
3. Contact a Servicing Dealer for
carburetor adjustment.
Engine starts, runs and
accelerates but will not idle.
Carburetor requires
adjustment.
Contact a Servicing Dealer for
carburetor adjustment.
The engine starts and runs,
but the air flow is low
1. Safety guard blocked
2. Impeller damaged
3. Impeller housing and
tubes blocked
1. Clean safety guard
2. Contact an Authorised Service
Centre
3. Clean
Page 22

20
I
fr
F
D
E
NL
P
GR
TR
CZ
SK
RUS
UK
PL
H
LV
EST
LT
RO
INTRODUCTION
Pour un emploi correct de le souffleur et pour
éviter tout accident, ne commencez pas le travail
sans avoir préalablement lu ce manuel avec
attention. Vous trouverez les descriptions du
fonctionnement des différents composants, ainsi
que les instructions relatives aux contrôles et aux
procédures d'entretien requis.
Remarque: les illustrations et instructions
présents dans ce manuel peuvent varier en
fonction des normes de chaque pays et sont
sujettes à modifications sans préavis par le
fabricant.
MANUEL DE L'UTILISATEUR
Le manuel de l'utilisateur est destiné à votre
propre protection. LISEZ-LE. Conservez-le dans
un endroit approprié de façon à pouvoir s'y
référer au besoin. Ayez pris connaissance des
procédures avant de commencer le montage de
l'unité. Une préparation et un entretien corrects
vont de paire avec de bonnes performances de la
machine et avec une sécurité optimale.
Contactez votre concessionnaire ou votre
distributeur local si vous ne comprenez pas
certaines des instructions délivrées par le présent
manuel.
Outre les instructions relatives au
fonctionnement, le présent manuel contient des
paragraphes requérant une attention particulière
de votre part.
Ces paragraphes sont signalés par les symboles
décrits ci-dessous:
Avertissement: présent en cas de risque
d'accident, de blessure corporelle, ou de dégâts
matériels.
Mise en garde: présent en cas de risque
d'endommagement de la machine ou de ses
composants.
AVERTISSEMENT: Afin de garantir un
fonctionnement correct et en toute
sécurité de le souffleur, il est recommandé de
toujours conserver le manuel de l'utilisateur
à proximité de la machine. Ne prêtez ou ne
louez jamais votre souffleur sans fournir le
présent manuel d'utilisation et d'entretien.
AVERTISSEMENT: Seules les personnes
ayant intégralement compris le présent
manuel sont habilitées à utiliser votre
souffleur.
SOMMAIRE
1. COMPRENDRE LES ÉTIQUETTES DE
SÉCURITÉ _______________________ 20
2. COMPOSANTS DE LE SOUFFLEUR ___ 21
3. RÈGLES DE SECURITE ______________ 21
4. ASSEMBLAGE ____________________ 24
5. MISE EN ROUTE - UTILISATION ______ 25
6. ARRET DU MOTEUR _______________ 29
7. ENTRETIEN ______________________ 30
8. REMISSAGE ______________________ 32
9. DONNEES TECHNIQUES ____________ 34
10. RÉSOLUTION DES PROBLÈMES ______ 35
1. COMPRENDRE LES ÉTIQUETTES DE
SÉCURITÉ (Fig.19)
1. Votre manuel contient des messages
spéciaux attirant votre attention sur les
problèmes liés à la sécurité, les dégâts
éventuels de la machine, ainsi que des
informations utiles sur le fonctionnement et
l'entretien. VEUILLEZ LIRE TOUTES CES
INFORMATIONS AVEC ATTENTION AFIN
D'ÉVITER DE VOUS BLESSER OU
D'ENDOMMAGER LA MACHINE.
2. Portez des lunettes de sécurité, des protègetympans ainsi qu'un masque de protection
lorsque vous utilisez cette machine.
3. AVERTISSEMENT Le souffleur peut
projeter à forte puissance des objets
susceptibles de ricocher et de heurter
l'utilisateur. Risque de blessure oculaire
grave.
4. L'utilisateur du souffleur doit s'assurer
qu'aucun passant ni animal ne s'approche
à moins de 10 mètres (35 ft). Lorsque
plusieurs utilisateurs travaillent dans une
même zone, ceux-ci doivent maintenir une
distance de sécurité d'au moins 10 mètres
(35 ft) les uns des autres.
5. Niveau de pression sonore mesuré à 10
mètres (30 ft) de distance, selon la norme
ANSI B175.2-1996.
Page 23

21
I
fr
F
D
E
NL
P
GR
TR
CZ
SK
RUS
UK
PL
H
LV
EST
LT
RO
2. COMPOSANTS DE LE SOUFFLEUR
(Fig. 1)
1. Châssis
2. Filtre à air
3. Bougie
4. Poignée de lanceur
5. Capot moteur
6. Réservoir carburant
7. Harnais
8. Rembourrage
9. Tuyau coudé
10. Tuyau exible
11. Poignée de commande
12. 13. 14. Lance
15. Amortisseurs de vibrations
16. Clé mixte
17. Vis M5x65 (x 2)
18. Écrous M6 (x 2)
19. Colliers Ø 90 mm (x 2)
20. Câble antistatique
3. RÈGLES DE SECURITE
Réglementations nationales et locales
Le moteur de l’appareil N’EST PAS n’est pas
équipé d’un dispositif pare-étincelles conforme
aux exigences des ’SAE Recommended practice
J335’ et ‘California Codes 4442 et 4443’. La
réglementation régissant tous les terrains
forestiers et territoires gérés par les états de
Californie, Maine, Washington, Idaho,
Minnesota, New Jersey et Oregon exige
l’utilisation de moteurs à combustion interne
équipés de pare-étincelles. Les autres états et
agences fédérales mettent en œuvre des
réglementations identiques.
L’utilisations de ce moteur dans un État ou un
endroit régi par cette réglementation peut
représenter une violation de la loi.
Remarque : pour ce qui concerne l’utilisation
de souffleurs dans le cadre d’une exploitation
forestière, reportez-vous au Code de
réglementation fédérale, Articles 1910 et
1928.
AVERTISSEMENT: Le système d'allumage
de votre machine génère un champ
électromagnétique de très faible intensité.
Il est possible de ce champ crée des
interférences sur le fonctionnement d'un
stimulateur cardiaque. Afin de réduire le
risque de blessures graves, voire de mort,
les personnes équipées d'un stimulateur
cardiaque sont vivement invitées à consulter
leur médecin ainsi que le fabricant du
stimulateur avant d'utiliser la machine.
AVERTISSEMENT: les surfaces du
silencieux deviennent très chaudes en
cours de fonctionnement et après arrêt de le
souffleur ; tenez-vous à distance du silencieux.
Tout contact avec le silencieux peut entraîner
de graves brûlures.
AVERTISSEMENT: L'exposition aux
vibrations générées lors de l'utilisation
d'outils à moteurs thermiques peut entraîner
des lésions vasculaires ou nerveuses au
niveau des doigts, des mains et des poignets
chez les personnes sujettes à des troubles
de la circulation ou à des phénomènes
de tuméfactions anormaux. En outre, il a
été démontré que l'utilisation prolongée
par temps froid entraînait des lésions des
vaisseaux sanguins chez les personnes saines.
En cas d'apparitions de symptômes tels que
des engourdissements douleurs, pertes de
force, changements de la couleur ou de la
texture de la peau ou pertes de sensation au
niveau des doigts, des mains ou des poignets,
interrompez immédiatement l'utilisation de la
machine et consultez un médecin.
AVERTISSEMENT: Les vapeurs
d'échappement du moteur de ce produit
contiennent des substances chimiques que
l'état de Californie a reconnues à l'origine de
cancers, d'anomalies congénitales ou d'autres
troubles de la reproduction. Utilisez votre
souffleur en extérieur, exclusivement dans
une zone bien ventilée.
Précautions de base
• Avant d'utiliser le souffleur, lisez attentivement
le présent manuel jusqu'à ce que vous ayez
intégralement assimilé les règles de sécurité,
les mesures de précaution et les instructions
relatives à son fonctionnement.
• Limitez l'utilisation du souffleur à des
utilisateurs adultes capables de comprendre et
d'appliquer les règles de sécurité, les mesures
de précaution et les instructions relatives au
fonctionnement indiquées dans le présent
Page 24

22
I
fr
F
D
E
NL
P
GR
TR
CZ
SK
RUS
UK
PL
H
LV
EST
LT
RO
manuel. L'utilisation du souffleur par des
mineurs est fortement déconseillée.
• Ne manipulez et n'utilisez pas le souffleur
lorsque vous êtes fatigué, malade ou perturbé,
ou sous l'emprise de l'alcool, de drogues ou de
médicaments. Vous devez être en bonne forme
physique et en pleine possession de vos
capacités mentales. L'utilisation d'un souffleur
est relativement épuisante. Si vous présentez
un état susceptible d'être aggravé par une
tâche physiquement exigeante, consultez
votre médecin avant d'utiliser un souffleur.
• Maintenez les enfants, les passants et les
animaux à une distance minimale de 10
mètres (35 ft) de la zone de travail. Ne laissez
personne ni aucun animal s'approcher du
souffleur lors du démarrage ou pendant
l'utilisation.
• Portez en permanence des équipements de
protection personnelle homologués lorsque
vous utilisez le souffleur. Toutefois, le port de
vêtements de sécurité n'élimine pas les risques
de blessures, mais il peut en réduire la gravité
en cas d'accident. Demandez conseil à votre
vendeur habituel pour le choix des
équipements conformes à la réglementation.
Les vêtements utilisés ne doivent en aucun cas
entraver les mouvements. Ne portez pas de
vêtements trop amples. Les vestes de travail
et les combinaisons constituent
l'équipement idéal. Ne portez pas de
vêtements, foulards, cravates ou bijoux qui
pourraient se prendre dans les branches ou les
buissons. Attachez-vous les cheveux s'ils sont
longs et protégez-les (par exemple, à l'aide
d'un foulard, d'une casquette, d'un casque,
etc.). Portez des bottes de sécurité coquées
et dotées de semelles antidérapantes.
L'utilisation d'un masque ou de lunettes de
protection est vivement recommandée.
Utilisez des protections antibruit : un
protecteur d'oreilles ou des protègetympan. L'utilisation de protecteurs d'oreilles
est très importante, car la perception des
signaux sonores d'avertissement en cas de
danger (tels que cris, alarmes, etc.) est réduite.
Pensez à retirer systématiquement les
protections anti-bruit à l'arrêt du moteur.
Portez des gants anti-vibration.
AVERTISSEMENT – Portez toujours un
masque lors de l'utilisation du souffleur dans
des environnements poussiéreux.
• Ne prêtez votre souffleur qu'à des utilisateurs
expérimentés rompus au fonctionnement et à
l'utilisation corrects des souffleurs. Fournissezleur le manuel contenant le mode d'emploi
qu'ils devront lire avant d'utiliser le souffleur.
• Contrôlez quotidiennement le souffleur afin de
vous assurer que chaque dispositif (sécurité ou
autre) fonctionne correctement.
• Ne travaillez jamais avec un souffleur
endommagé, modifié ou mal réparé. Ne
démontez, endommagez ou désactivez jamais
les dispositifs de sécurité.
• Planifiez toujours votre travail avant d'utiliser
le souffleur. Ne débutez aucune tâche avant
d'avoir une zone de travail dégagée et une
bonne stabilité
• Adressez-vous à un professionnel qualifié pour
toute autre intervention sur le souffleur ne
figurant pas dans le présent manuel.
• Il est fortement déconseillé de raccorder à la
prise de force du souffleur des outils ou
accessoires non spécifiés par le fabricant.
AVERTISSEMENT - Le souffleur peut
projeter à forte puissance des objets
susceptibles de ricocher et de heurter
l'utilisateur. Risque de blessure oculaire
grave. Portez toujours des lunettes de
protection.
Manipulation du carburant
AVERTISSEMENT: L'essence est un
carburant hautement inflammable.
Manipulez l'essence ou le mélange de
carburant avec une extrême précaution. Ne
fumez pas ou ne produisez pas de source de
flamme à proximité du carburant ou de le
souffleur.
· Manipulez le carburant avec une extrême
précaution afin d'éviter tout risque
d'incendie ou de brûlure. Le carburant est
hautement inflammable.
· Faites le mélange et conservez le carburant
dans un conteneur approuvé pour
l'entreposage d'essence.
· Faites le mélange de carburant en extérieur, en
l'absence de toute source d'étincelles ou de
flammes.
· Choisissez une surface dégagée, coupez le
moteur et laissez refroidir avant de faire le
plein.
· Devissez lentement le bouchon de carburant
afin de libérer la pression et d'empêcher le
carburant de s'écouler par le bouchon.
· Resserrez fermement le bouchon de carburant
après remplissage. Sous l'effet des vibrations
de la machine, un bouchon mal refermé peut
se desserrer, voire s'ouvrir, entraînant un
déversement du carburant.
· Essuyez toute trace de carburant sur le
souffleur. Déplacez-vous à 3 mètres (10 pieds)
de la zone de remplissage avant de démarrer
Page 25

23
I
fr
F
D
E
NL
P
GR
TR
CZ
SK
RUS
UK
PL
H
LV
EST
LT
RO
le moteur.
· Ne tentez en aucun cas de brûler le carburant
déversé.
· Ne fumez pas en manipulant le carburant ou
en utilisant le souffleur.
· Entreposez le carburant dans un endroit sec,
frais et suffisamment ventilé.
· Ne placez jamais le souffleur sur un matériau
facilement inflammable, notamment sur des
feuilles mortes, de la paille, du papier, etc.
· Entreposez la machine et le carburant dans un
endroit exempt de sources d'étincelles ou de
flammes nues, de moteurs électriques,
d'interrupteurs, de fours, etc., susceptibles
d'enflammer les vapeurs de carburant.
· Ne retirez jamais le bouchon du réservoir de
carburant lorsque le moteur tourne.
· N'utilisez jamais le carburant pour le
nettoyage.
· Veillez à ne pas souiller vos vêtements de
carburant.
Fonctionnement et sécurité
AVERTISSEMENT: Attrapez fermement les
poignées du souffleur entre les doigts et
le pouce.
• Tenez toutes les parties du corps à distance
du souffleur lorsque le moteur tourne.
• Transportez toujours le souffleur moteur
coupé. Lors du transport à bord d'un véhicule,
arrimez le souffleur de manière à éviter qu'il
ne se retourne, que le carburant ne s'écoule
et que le souffleur ne soit endommagé.
• Avant de démarrer le moteur, vérifiez que le
souffleur n'est pas orienté vers quelqu'un.
• Coupez le moteur avant de poser le souffleur.
Ne laissez pas le moteur tourner sans
surveillance.
• Utilisez exclusivement le souffleur dans une
zone suffisamment ventilée, n'utilisez pas le
souffleur dans un environnement explosif ou
inflammable ou dans des zones confinées.
AVERTISSEMENT: Soyez vigilant face au
risque d'empoisonnement au monoxyde
de carbone.
• N'utilisez pas le souffleur sur une échelle,
dans un arbre ou sur un toit. Adoptez toujours
une position stable et appropriée.
• Ne travaillez pas à proximité de lignes
électriques.
• Gardez la poignée sèche, propre et exempte
d'huile ou de carburant.
• Tenez-vous sur vos deux pieds, le poids
équitablement réparti.
• Ne vous penchez pas trop sous peine d'être
déséquilibré et de perdre le contrôle du
souffleur.
Mesures de précaution pour réduire les
risques liés aux vibrations
· Le souffleur est équipée d'un système antivibrations (AV) ; ne le modifiez jamais.
· Portez des gants et tenez vos mains au chaud.
· Maintenez fermement le souffleur sans pour
cela "écraser" les poignées en continu; faites de
fréquentes pauses. Toutes les mesures de
précautions citées ci-dessus ne garantissent
pas que vous ne souffrirez pas du syndrome
des doigts morts ou canal carpien. Par
conséquent, il est fortement recommandé aux
utilisateurs réguliers de surveiller l'état de leurs
mains et de leurs doigts. En cas d'apparition de
l'un des symptômes précédemment cités,
consultez immédiatement un médecin.
Précaution d'entretien
AVERTISSEMENT: n'utilisez jamais un
souffleur endommagée, mal réglée, ou
mal/partiellement montée.
AVERTISSEMENT: Hormis les instructions
d'entretien fournies par le Manuel de
l'opérateur, toutes les autres procédures
d'entretien de le souffleur doivent être
effectuées par un personnel de maintenance
qualifié. (En cas d'utilisation d'outils non
appropriés pour le démontage du volantmoteur ou de l'embrayage, ou pour
le maintien du volant-moteur en vue du
démontage de l'embrayage, le volant-moteur
peut subir des dégâts structurels à l'origine
de son éclatement pouvant causer de graves
blessures).
AVERTISSEMENT:
Ne modifiez en aucune façon les
caractéristiques de votre souffleur.
Tenez vos mains au sec, propres et exemptes
d'huile ou de carburant.
AVERTISSEMENT: Utilisez exclusivement
des accessoires et des pièces de rechange
préconisés.
• N'essayez jamais de réparer le souffleur
pendant que le moteur tourne.
• N'utilisez jamais de carburant pour nettoyer
Page 26

24
I
fr
F
D
E
NL
P
GR
TR
CZ
SK
RUS
UK
PL
H
LV
EST
LT
RO
le souffleur.
• Entreposez le souffleur dans un lieu sec,
surélevé et avec le réservoir vide.
• Lorsque le souffleur atteint la fin de sa vie
utile, mettez-le au rebut conformément à la
réglementation en vigueur en matière de
protection de l'environnement en le
ramenant à votre distributeur local qui suivra
la procédure appropriée pour ce type de
machine.
• Remplacez immédiatement tout dispositif de
sécurité endommagé ou cassé.
AVERTISSEMENT: le silencieux ainsi que
d'autres pièces du moteur (notamment
les ailettes du cylindre, la bougie d'allumage)
atteignent des températures très élevées en
fonctionnement et après arrêt de la machine.
Afin de réduire les risques de brûlure, ne
touchez pas le silencieux ou les autres pièces
lorsqu'elles sont encore chaudes.
4. ASSEMBLAGE
Montage des tubes/poignée
ATTENTION – Quand on monte les tubes
et la buse, le moteur doit être éteint et
l’interrupteur en position STOP.
Pour assembler le soueur, lire les instructions
qui suivent.
Parties de la machine
En observant la Fig.3 :
1. Insérez le tuyau coudé dans la vis sans n du
ventilateur.
2. Bloquez le tuyau coudé à l’aide des deux vis
et des deux écrous fournis en utilisant la clé
hexagonale faisant partie de la clé à pipe
(fournie).
En observant la Fig.2 :
1. Enlez les colliers aux deux extrémités du
tuyau exible (10, Fig.1), sans les serrer.
2. Emboîtez le tuyau exible sur le tuyau coudé
(9, Fig.1) et sur la lance (12, Fig.1) en vous
assurant que le cône (A, Fig.2) est tourné
vers la lance ; vissez les pommeaux des deux
colliers à l’aide de la clé fournie.
3. Emboîtez la poignée (11, Fig.1) sur la lance
(12, Fig.1) après avoir dévissé à fond la vis
présente sous le levier de blocage (Fig.5) à
l’aide de la clé hexagonale fournie.
En observant la Fig.4 :
1. Levier de blocage abaissé (bloqué), vissez
la vis sans la serrer à fond mais de sorte
à bloquer la poignée sur la lance. Ne pas
visser la vis si le levier est ouvert.
2. Enroulez le câble antistatique (B, Fig.2)
en spirale et faites-le passer dans l’orice
présent sur la lance ; reliez la cosse du
câble antistatique B à la cosse qui sort de la
poignée (comme le montre le détail C, Fig.2).
3. Couplez les lances (13-14, Fig.1) à travers le
dispositif d’enclenchement à baïonnette (le
raccordement est agrandi dans le détail D,
Fig. 2).
Réglage de la poignée
Il est très important que la poignée soit
positionnée correctement pour pouvoir travailler
confortablement. Pour régler la position de la
poignée :
1. Soulevez le levier de blocage (1, Fig.5).
2. Cherchez la position de travail la plus
confortable en faisant coulisser la poignée et
en modiant son inclinaison.
3. Une fois trouvée la bonne position,
verrouillez la poignée en abaissant le levier
de blocage.
Réglage du harnais et décrochage rapide
ATTENTION - Régler le harnais lorsque le
moteur est éteint.
Avant d’utiliser le soueur, cherchez absolument
à bien équilibrer le poids de la machine sur les
épaules en réglant la longueur du harnais de
sorte à sentir la machine contre le dos et les
épaules.
Nous vous rappelons qu’il faut que le soueur
soit bien équilibré pour travailler sur des terrains
en pente. Pour ajuster le harnais, tirez dessus
comme le montre la Fig.7.
Pour desserrer le harnais, soulevez la boucle
d’un geste, comme le montre la Fig.8.
En cas de danger, écartez le soueur des
épaules en procédant de la façon suivante :
1. D’une main, appuyez sur les languettes du
système de « décrochage rapide » qui se
Page 27

25
I
fr
F
D
E
NL
P
GR
TR
CZ
SK
RUS
UK
PL
H
LV
EST
LT
RO
trouve sur la bretelle droite (indiqué dans
l’encadré Fig.6) comme le montre la Fig.9.
2. Accompagnez du buste le mouvement
du soueur en vous inclinant légèrement
vers la gauche : le soueur tombera de vos
épaules.
5. MISE EN ROUTE
CARBURANT
Cet appareil est actionné par un moteur 2 temps
et nécessite le prémélange d'essence et d'huile
pour moteurs 2 temps. Prémélangez l'essence
sans plomb et l'huile pour moteurs 2 temps dans
un récipient propre homologué pour contenir de
l'essence.
CARBURANT CONSEILLÉ : CE MOTEUR EST
CERTIFIÉ POUR ÊTRE ALIMENTÉ EN ESSENCE
SANS PLOMB POUR USAGE AUTOMOBILIE AVEC
NIVEAU D'OCTANES 89 ([R + M] / 2) OU
SUPÉRIEUR.
Mélangez l'huile pour moteurs 2 temps avec
l'essence en suivant les instructions sur
l'emballage.
Il est conseillé d'utiliser de l'huile pour moteurs 2
temps Efco à 2% (1:50) spécialement formulée
pour tous les moteurs 2 temps refroidis par air.
Les proportions correctes huile/essence illustrées
dans la notice sont adaptées à l'utilisation d'huile
moteur de haute qualité équivalente
(spécifications JASO FD ou ISO L-EGD).
ESSENCE HUILE
2% - 50:1
ℓ ℓ
(cm3)
1
5
10
15
20
25
0,02
0,10
0,20
0,30
0,40
0,50
(20)
(100)
(200)
(300)
(400)
(500)
ATTENTION : NE PAS UTILISER D'HUILE
POUR AUTOMOBILES OU POUR MOTEURS
HORS-BORD 2 TEMPS.
ATTENTION :
- N'achetez que la quantité de carburant
nécessaire en fonction des
consommations personnelles ; n'en
achetez pas plus qu'il n'en sera utilisé
en un ou deux mois ;
- Conservez l'essence dans un récipient
hermétique, dans un endroit frais et
sec.
ATTENTION - Pour le mélange, ne jamais
utiliser un carburant dont le pourcentage
d'éthanol dépasse 10% ; sont admis le
gazole (mélange essence/éthanol) avec un
pourcentage d'éthanol jusqu'à 10% ou le
carburant E10.
Une bonne pratique de la gestion des carburants
est nécessaire lors de l'utilisation d'essence
oxygénée.
L'essence oxygénée avec de l'alcool retire
facilement l'eau lorsqu'elle est présente; cette
eau peut se condenser dans l'air humide et
contaminer le circuit d'alimentation de carburant,
réservoir inclus.
L'utilisation d'essence oxygénée peut faciliter le
phénomène de formation de tampon de vapeur.
NOTA - Ne préparer que la quantité requise de
mélange ; ne pas laisser le mélange dans le
réservoir ou dans le bidon trop longtemps. Il est
conseillé d’utiliser le stabilisateur pour carburant
pour conserver le mélange pendant 12 mois.
Essence alkylée
ATTENTION - L'essence alkylée ne
présente pas la même densité que
l'essence normale. Par conséquent, régler
différemment la vis H des moteurs mis au
point avec l'essence normale. Pour cette
opération, s'adresser à un centre après-vente
agréé.
RAVITAILLEMENT
Secouez le jerrycan du mélange avant de
procéder au ravitaillement.
Si vous utilisez un jerrycan pour préparer
le mélange, assurez-vous qu’il est propre et
secouez le tout pendant au moins une minute
de sorte que l’huile puisse bien se mélanger à
l’essence. Les tableaux ci-après indiquent les
pourcentages.
ATTENTION: respectez les consignes de
sécurité sur la manipulation du carburant.
Coupez toujours le moteur avant de procéder
au ravitaillement. Ne faites jamais l'appoint
de carburant lorsque le moteur tourne ou s'il
est encore chaud. Restez à au moins 3 m de la
zone de ravitaillement avant de démarrer le
Page 28

26
I
fr
F
D
E
NL
P
GR
TR
CZ
SK
RUS
UK
PL
H
LV
EST
LT
RO
moteur. NE FUMEZ PAS !
1. Nettoyez la surface autour du bouchon de
carburant afin d'éviter toute contamination.
2. Dévissez lentement le bouchon de carburant.
3. Versez soigneusement le mélange de
carburant dans le réservoir. Évitez de renverser
du carburant.
4. Avant de remonter le bouchon de carburant,
nettoyez et inspectez le joint d'étanchéité.
5. Remontez immédiatement le bouchon de
carburant et serrez-le manuellement. Essuyez
tout déversement de carburant
REMARQUE: Lors de sa première utilisation,
un moteur émet une certaine quantité de
fumée. Cela est normal.
ATTENTION : vérifiez si le carburant fuit
et, le cas échéant, éliminez les fuites avant
d'utiliser la machine. Si nécessaire, faites
appel au service d'assistance auprès de votre
revendeur.
UTILISATION
Préparation préalable au travail
1. Utilisez le souffleur à des heures raisonnables,
c'est-à-dire, pas trop tôt le matin ni trop tard
le soir pour éviter de déranger le voisinage.
Respectez les horaires énoncés dans les
arrêtés municipaux.
2. Utilisez le souffleur en le réglant sur la
position la plus basse possible pour la tâche à
effectuer.
3. Avant d'allumer le souffleur, vérifiez son état
général et en particulier le silencieux
d'échappement, l'entrée d'air et le filtre à air.
4. En conditions poussiéreuses, humidifiez
légèrement la zone de travail au tuyau
d'arrosage ou utilisez un accessoire
pulvérisateur si vous disposez d'une arrivée
d'eau.
5. Faites attention aux enfants, animaux,
fenêtres ouvertes et voitures et soufflez les
débris dans les directions opposées.
6. Utilisez la rallonge de l'embout pour que le
flux d'air soit le plus proche possible du sol.
7. Après utilisation du souffleur, ramassez et
jetez les débris dans des sacs prévus à cet
effet.
A quoi servent les souffleurs de feuilles ?
Vous pouvez utiliser le souffleur de feuilles
pour:
• Souffler les feuilles afin d'en faire des tas.
Enlever les détritus ou les débris d'herbe sur
les routes, les trottoirs, dans les parcs, les
parkings, les remises et sur les terrains de
sport, etc.
• Eliminer l'herbe après la tonte
• Déloger ou disperser les amas d'herbes
• Nettoyer les parkings
• Nettoyer le matériel agricole et de
construction
• Nettoyer les stades et aires de jeu
• Enlever la neige floconneuse
• Sécher les trottoirs et les zones extérieures
• Déloger les détritus amassés dans les coins,
les raccords arrondis, entre les dalles, etc.
Utilisation préconisée
• Respectez les réglementations et arrêtés
municipaux relatifs aux heures préconisées
pour utiliser les souffleurs. Ne l'utilisez pas
trop tôt le matin ni trop tard le soir.
• Vérifiez la direction et l'intensité du vent. Ne
dirigez jamais l'embout et ne soufflez pas les
débris en direction de personnes, animaux,
voitures ou maisons.
• Ne soufflez pas les débris en direction des
fenêtres ou des portes.
• Soyez toujours prévenant à l'égard des
piétons et des véhicules passant à proximité.
• Ne laissez pas le moteur du souffleur tourner
sans surveillance.
• N'utilisez pas le souffleur pour semer ou
vaporiser de l'engrais, des produits chimiques,
du carburant ou toute autre substance
toxique, à moins qu'il ait été conçu à cet effet
et que vous vous trouviez dans une zone
appropriée.
• Réglez le souffleur sur la position la plus
basse possible pour la tâche à effectuer.
• Evitez d'utiliser plusieurs souffleurs
simultanément, en particulier dans les
quartiers ou à proximité des bâtiments où le
bruit peut être intensifié.
Formation de poussières
• Faites attention aux débris que vous soufflez.
• Entraînez-vous à enlever les résidus d'herbe
ou un gobelet en carton sans soulever la
poussière.
• Humidifiez les zones poussiéreuses avant
d'utiliser le souffleur.
Page 29

27
I
fr
F
D
E
NL
P
GR
TR
CZ
SK
RUS
UK
PL
H
LV
EST
LT
RO
• N'utilisez jamais un souffleur de feuilles pour
déplacer des matériaux excessivement
poussiéreux.
• N'utilisez PAS le souffleur pour évacuer :
— De grandes quantités de graviers ou de
poussières de gravier
— Les débris des chantiers de construction
— Les poussières de plâtre
— Les poussières de ciment et de béton
— La terre végétale sèche
AVERTISSEMENT – Les poussières à
base de silice peuvent contenir de la
silice cristalline. La silice est un composant
basique que l'on retrouve dans le sable, le
quartz, la brique, l'argile, le granite et de
nombreux autres matériaux et roches, dont
les produits de maçonnerie et de béton.
L'inhalation répétée et / ou substantielle
de silice cristalline dans l'air peut entraîner
l'apparition de maladies respiratoires graves,
voire mortelles, notamment la silicose.
De plus, l'état de Californie et d'autres
organismes ont désigné la silice cristalline
inhalable comme étant une substance réputée
provoquer le cancer. Si vous travaillez en
présence de tels matériaux, suivez toujours les
précautions respiratoires pré-citées.
AVERTISSEMENT – L'inhalation des
poussières d'amiante est dangereuse
et peut entraîner l'apparition de maladies
respiratoires graves, voire mortelles, ou
de cancer. La manipulation et l'élimination
des produits contenant de l'amiante sont
réglementées par l'OSHA (Agence pour la
sécurité et la santé au travail) et l'Agence
de protection de l'environnement. Ne
soufflez pas et ne délogez pas l'amiante
ou les produits à base d'amiante, comme
les isolations en amiante. Si vous avez des
raisons de suspecter la présence d'amiante,
contactez immédiatement votre employeur
ou le représentant local de l'OSHA.
Si la substance manipulée est une substance
commerciale, consultez la fiche de données de
sécurité relative à ladite substance ou contactez
le fabricant du matériau.
POUR SOUFFLER LES DÉBRIS AU SOL
AVERTISSEMENT - Lors du montage
du tube et de l'embout du souffleur, le
moteur doit impérativement être éteint et le
bouton d'arrêt doit être sur Arrêt (2, Fig.13).
1. Ajustez le harnais pour que le port du
souffleur soit adapté à l'utilisateur (Fig.7 - 8).
2. La puissance du jet d'air se règle au moyen de
l'accélérateur (1, Fig.13).
Réglez la puissance la mieux adaptée à
l'application. Le blocage d'accélérateur (4,
Fig.13) peut ensuite servir à maintenir ou à
revenir au réglage sélectionné. La pleine
accélération est obtenue lorsque le blocage (4)
est complètement enfoncé vers le haut.
Souffler
AVERTISSEMENT – Restez très vigilant
pendant votre travail: ne dirigez jamais
le jet vers des personnes ou des animaux. Le
souffleur pourrait propulser de petits objets
à une vitesse très élevée. Si qui que ce soit
s'approche de vous, éteignez le moteur.
AVERTISSEMENT – Ne retirez jamais le
cache pendant que le moteur tourne.
Le rotor de ventilateur pourrait entraîner de
graves lésions corporelles, surtout au niveau
des mains.
Avant de commencer votre travail, passez
l'équipement de protection nécessaire.
AVERTISSEMENT - Lorsque vous
manipulez le souffleur, portez
l'équipement de protection personnelle
requis:
1. Protecteurs d'oreilles.
2. Protection des yeux.
3. Masque facial dans les environnements
poussiéreux.
AVERTISSEMENT - Soyez très prudent,
surtout si vous tenez le souffleur dans
la main gauche. Evitez tout contact direct du
corps avec la zone de sortie d'air.
Page 30

28
I
fr
F
D
E
NL
P
GR
TR
CZ
SK
RUS
UK
PL
H
LV
EST
LT
RO
AVERTISSEMENT - Ne démarrez jamais le
souffleur si le couvercle d'inspection est
ouvert, endommagé ou s'il ne peut être fermé.
AVERTISSEMENT - N'utilisez pas le
souffleur sur une échelle ou un marche-
pied.
AVERTISSEMENT – Ne marchez pas à
reculons lorsque vous utilisez le souffleur.
AVERTISSEMENT – N'essayez jamais
de souffler des substances ou fluides
combustibles chauds ou incandescents.
Démarrez le souffleur en suivant la procédure
décrite à la page 28. Respectez toujours les
consignes suivantes :
1. Ne dirigez jamais le souffleur en état de
marche en direction d'objets fixes comme les
murs, les grosses pierres, les voitures et les
clôtures.
2. Lorsque vous abordez des angles intérieurs,
déportez-vous sur le côté de manière à ne
pas faire face à la zone de travail et dirigez le
souffleur vers le centre. Ainsi, vous éviterez
tout risque de voir des débris projetés sur
votre visage, ce qui pourrait causer des
lésions oculaires.
3. Ne dirigez jamais l'embout du souffleur vers
des plantes fragiles.
Précautions relatives à la zone de travail
• Ne laissez jamais un enfant utiliser le souffleur.
Toute autre personne susceptible d'utiliser le
souffleur doit avoir préalablement lu le
présent Manuel d'utilisation ou avoir pris
connaissance des instructions pour une
utilisation correcte et en toute sécurité du
souffleur.
• Ne travaillez pas à proximité de bâtiments ou
de lignes électriques.
• N'utilisez le souffleur que si la visibilité et la
luminosité vous permettent d'y voir
clairement.
• N'utilisez pas le souffleur sur une échelle.
Cela est très dangereux. Laissez agir des
professionnels dans de pareilles situations.
• Coupez le moteur avant de poser le souffleur
au sol.
• Soyez particulièrement vigilant lorsque vous
portez des protections antibruit car de tels
équipements réduisent la capacité d'entendre
les signaux sonores d'avertissement en cas
de danger (tels que cris, alarmes et
avertissements, etc.).
• Soyez extrêmement vigilant lorsque vous
travaillez en pente ou sur des surfaces non
planes.
DEMARRAGE DU MOTEUR
Commandes du soueur – Poignée (Fig.13)
· Pour accélérer, appuyez simultanément sur le
levier (1) et sur le levier de sûreté (3).
· Pour démarrer le moteur, l’interrupteur (2)
doit se trouver sur la position « 1 ».
· Pour faire tourner le moteur à une vitesse fixe
et programmée, appuyez sur le levier de
sûreté (3) et déplacez le levier (4) vers le cran
« + » jusqu’à la vitesse souhaitée. Pour
désactiver le levier xe, replacez-le sur le cran
« - ».
· Pour arrêter le moteur, mettez l’interrupteur
(2) sur « 0 ».
Démarrage
Avant le démarrage :
· Posez le souffleur au sol, sur une zone plane.
· Assurez-vous que l’interrupteur (2, Fig.13) ne
se trouve pas sur la position « 0 » (éteint).
· Assurez-vous que personne ne se trouve à
proximité du soueur et/ou en face du tuyau
de souage.
Page 31

29
I
fr
F
D
E
NL
P
GR
TR
CZ
SK
RUS
UK
PL
H
LV
EST
LT
RO
Démarrage moteur à froid (ou éteint depuis
plus de 30 minutes)
· Appuyez 10 fois à fond et lentement sur la
poire d’amorçage (A, Fig.12).
· Abaissez le levier de démarreur (B, Fig.12)
jusqu’à ce que vous sentiez un déclic.
· Assurez-vous que l’interrupteur (2, Fig.13) se
trouve sur la position « 1 » (allumé).
· Posez la main gauche sur le capot du moteur
et le pied gauche sur le châssis pour éviter
que le souffleur ne se déplace.
· Tirez lentement la poignée (4, Fig.1) de la
main droite jusqu’à sentir une légère
résistance. Sans relâcher la corde, tirez d’un
geste bref mais ferme pour éviter de noyer le
moteur.
· Dès que le moteur répond, soulevez le levier
de démarreur (B, Fig.12) en position
horizontale jusqu’à ce que sentiez un déclic
(Fig.11).
· Tirez encore une fois pour démarrer le
moteur. Laissez tourner le moteur au ralenti
et attendez au moins une minute avant
d’accélérer au maximum.
Démarrage d’un moteur chaud
· Appuyez 10 fois à fond mais lentement sur la
poire d’amorçage (A, Fig.12).
· Soulevez le levier de démarreur (B, Fig.12)
jusqu’à ce que vous sentiez un déclic.
· Assurez-vous que l’interrupteur (2, Fig.13) se
trouve sur la position « 1 » (allumé).
· Posez la main gauche sur le capot du moteur
et le pied gauche sur le châssis pour éviter
que le souffleur ne se déplace.
· Tirez lentement la poignée (4, Fig.1) de la
main droite jusqu’à sentir une légère
résistance. Sans relâcher la corde, tirez d’un
geste bref mais ferme pour éviter de noyer le
moteur.
· Lorsque le moteur démarre, laissez-le tourner
au ralenti et attendez au moins une minute
avant d’accélérer au maximum.
Que faire si le moteur est noyé
· Démontez la bougie (3, Fig.1) à l’aide de la clé
fournie, nettoyez-la et essuyez-la.
· Vérifiez si le levier de démarreur B est en
position horizontale, comme le montre la
Fig.11.
· Tirez au moins 20 fois sur la poignée de
démarrage (4, Fig.1).
· Remontez la bougie ; accélérez à fond avec le
levier d’accélérateur fixe (4, Fig.13).
· Démarrez le moteur.
Si le moteur ne se met pas en marche, procédez
de la façon suivante :
· Démontez la bougie à l’aide de la clé fournie,
nettoyez-la et essuyez-la.
· Renversez le moteur pour que l’orifice de la
bougie soit tourné vers le bas.
· Tirez au moins 20 fois sur la poignée de
démarrage (4, Fig.1) et vérifiez si du mélange
s’écoule de l’orifice de la bougie.
· Essuyez le pourtour du logement de la
bougie.
· Remontez la bougie et répétez les opérations
avec le levier d’accélérateur (1, Fig.13) à fond
et le levier de démarreur (B) en position
horizontale, comme le montre la Fig.11.
AVERTISSEMENT :
- Ne jamais enrouler la corde de démarreur
autour de la main.
- Ne pas utiliser toute la longueur de la corde
en tirant dessus pour le démarrage pour ne
pas risquer de la casser.
- Ne pas relâcher la corde brusquement ;
tenir la poignée de démarrage (4, Fig.1) et
attendre que la corde s’enroule lentement.
RODAGE MOTEUR
Le moteur atteint sa puissance maximale au bout
de 5 à 8 heures de travail.
Au cours de cette période de rodage, ne faites
pas tourner le moteur à vide au régime maxi pour
lui éviter excessif eorts de fonctionnement.
ATTENTION! - Durant le rodage, ne
modifiez pas la carburation en vue
d’augmenter la puissance; vous risquez
seulement d’endommager le moteur.
REMARQUE : il est normal qu’un moteur neuf
dégage de la fumée durant et après la
première utilisation.
6. ARRET DU MOTEUR
Portez le levier de l’accélérateur au régime du
ralenti (1, Fig. 13) et attendez quelques secondes
an que le moteur se refroidisse.
Arrêtez le moteur en appuyer l’interrupteur de
masse (2, Fig. 13).
Page 32

30
I
fr
F
D
E
NL
P
GR
TR
CZ
SK
RUS
UK
PL
H
LV
EST
LT
RO
TABLEAU D'ENTRETIEN
Les intervalles d'entretien signalés ici sont valables exclusivement en cas de
conditions normales de fonctionnement. Si le travail quotidien s'avère plus
contraignant que prévu, réduire en conséquence les intervalles d'entretien.
Avant toute utilisation
Après chaque
ravitaillement
Une fois par semaine
En cas de dommage ou
de défaut
Comme prévu
Machine complète Vérier : fuites, craquelures et niveau
d'usure
X X
Contrôles : interrupteur, starter, levier
d'accélérateur et levier de blocage
d'accélérateur
Vérier le fonctionnement
X X
Réservoir à carburant et réservoir
d'huile
Vérier: fuites, craquelures et niveau
d'usure
X X
Filtre à carburant Vérier et nettoyer
X
Remplacer l'élément ltrant
X
Tous les
6 mois
Toute la visserie accessible (sauf vis de
carburateur)
Vérier et resserrer
X
Filtre à air Nettoyer
X
Remplacer
X
Tous les
6 mois
Ailettes cylindre et fentes du carter de
démarrage
Nettoyer
X
Corde de démarrage Vérifier : dommages et niveau
d'usure
X
Remplacer
X
Carburateur Contrôler le ralenti
X X
Bougie Contrôler la distance des électrodes
X
Remplacer
X
Tous les
6 mois
Système anti-vibrations Vérier : dommages et niveau
d'usure
X
7. ENTRETIEN
Page 33

31
I
fr
F
D
E
NL
P
GR
TR
CZ
SK
RUS
UK
PL
H
LV
EST
LT
RO
ATTENTION! – Durant les opérations
d’entretien et de maintenance, porter toujours
des gants de protection. Ne pas eectuer les
entretiens avec un moteur chaud. Procéder
aux opérations d’entretien moteur éteint.
- Toute opération incorrecte ou dépose des
dispositifs de sécurité peut provoquer de
graves incidents.
- N’utilisez pas de carburant (mélange) pour les
opérations de nettoyage.
- N’eectuez pas d’opérations ou de réparations
qui ne soient pas d’entretien normal. Adressezvous plutôt à des ateliers autorisés.
FILTRE A AIR
Le ltre d’aspiration de l’air est très important
pour le moteur. Vériez-le et nettoyez-le
régulièrement. Pour nettoyer le ltre à air,
observez la Fig.17 et procédez de la façon
suivante :
· Dévissez les deux pommeaux pour enlever le
couvercle et pouvoir accéder au filtre (comme
le montre la Fig.17).
· Enlevez et nettoyez le filtre en le tapant
contre un plan ; soufflez de l’air comprimé du
côté de la grille métallique et entre les
ailettes, dans le sens de la longueur.
· Remontez le ltre et fermez le couvercle puis
vissez les deux pommeaux.
·
ATTENTION – Ne pas utiliser le soueur
sans le ltre à air ou si le ltre est très sale pour
ne pas compromettre le fonctionnement du
moteur et annuler la garantie. Remplacez le ltre
s’il n’est pas possible de le nettoyer à fond.
FILTRE DU CARBURANT (Fig. 18)
Il est conseillé de remplacer le ltre qui se trouve
dans le réservoir du mélange au moins une
fois par an. Cette opération est réservée aux
techniciens d’un Centre d’Assistance Agréé :
· Vider le réservoir du mélange.
· Dégager le filtre et le détacher du tuyau du
mélange.
· Monter un filtre neuf sur la tuyau du mélange.
· Replacer le ltre dans le réservoir.
ATTENTION – Remplacez impérativement
le ltre du mélange lorsqu’il est sale pour que le
moteur puisse toujours fonctionner à la
perfection.
MOTEUR
Nettoyer régulièrement les ailettes du cylindre
avec de l’air comprimé. L’accumulation
d’impuretés sur le cylindre peut provoquer des
surchauffes nuisibles au bon fonctionnement
du moteur.
BOUGIE
Il est recommandé de nettoyer régulièrement
la bougie et de contrôler la distance entre
les électrodes (Fig. 16). Utiliser une bougie
Champion RCJ6Y ou autre marque avec degré
thermique équivalent.
PROTECTION DU VENTILATEUR
Après une longue période d’inactivité, il est
possible que la poussière se soit accumulée
sur la protection du ventilateur (derrière le
rembourrage). Ceci risque de gêner le passage
de l’air (moins de volume) et peut endommager
le ventilateur et/ou entraîner la surchaue
du moteur. Il convient donc de nettoyer
régulièrement la protection du ventilateur.
Nettoyez également les fentes présentes sur la
protection du ventilateur, importantes pour le
refroidissement du moteur.
CARBURATEUR
Le carburateur est réglé en usine sur des valeurs
standard, conformément aux normes sur les
émissions.
ATTENTION :
- Ne modiez pas le réglage du carburateur
en desserrant ou en resserrant ses vis ; cette
opération est réservée aux techniciens
qualiés d’un Centre d’Assistance Agréé.
- Un mauvais réglage risque de
compromettre le fonctionnement du
moteur.
- Il est interdit d’enlever ou de manipuler les
bouchons rouges de protection des vis du
carburateur.
En cas de problèmes (moteur ne maintenant pas
le ralenti, régime irrégulier ou n’atteignant pas la
puissance maxi), s’adresser à un Centre d’Assistance
Agréé.
ATTENTION: Des variations climatiques et
altimétriques peuvent provoquer des variations
de carburation.
Page 34

32
I
fr
F
D
E
NL
P
GR
TR
CZ
SK
RUS
UK
PL
H
LV
EST
LT
RO
TUYAU D'ÉCHAPPEMENT
ATTENTION – Ce pot d'échappement est
doté d'un catalyseur ce qui assure au moteur
la conformité aux conditions sur les émissions
requises. Ne jamais modifier ni déposer le
catalyseur : tout modification est une violation
à la loi.
ATTENTION – Les pots d'échappement
dotés de catalyseur deviennent très
chauds durant l’utilisation et restent ainsi
longtemps après avoir éteint le moteur. Cette
situation se présente même lorsque le moteur
tourne au ralenti. Vous risquez de vous brûler
en le touchant. Risque d’incendie!
PRÉCAUTION – Si le pot d'échappement
est endommagé il doit être remplacé.
S'il se bouche fréquemment, le rendement du
catalyseur s'en trouve réduit.
ATTENTION – Ne pas utiliser la
trançonneuse si le pot est endommagé,
absent ou modifié. Un silencieux mal
entretenu augment le risque d’incendie et de
perte auditive.
ENTRETIEN EXCEPTIONNEL
À la fin de la saison, si l'appareil a fait l'objet d'un
usage intense, ou tous les deux ans en cas
d'usage normal, faites contrôler l'appareil par un
technicien spécialisé du réseau d'assistance.
ATTENTION! – Les opérations de
maintenance et d’entretien non reprises
dans le présent manuel devront être
effectuées par un agent agréé. Pour garantir
le fonctionnement régulier du le souffleur, on
veillera à ce que les remplacements éventuels de
pièces détachées soient effectués exclusivement
avec des PIÈCES DE RECHANGE D’ORIGINE.
Toute modification non autorisée et/ou
utilisation d'accessoires non originaux
peut entraîner des blessures graves ou
mortelles à l'opérateur ou à des tiers.
TRANSPORT
Transporter le souffleur avec le moteur éteint.
ATTENTION – Pour transporter le soueur
sur un véhicule, s'assurer qu'elle y est xée
correctement à l'aide de sangles. Transporter
le soueur en position horizontale et s'assurer
également que les consignes pour le transport de
ce genre de machines ont été respectées.
8. REMISSAGE
AVERTISSEMENT: Coupez le moteur
et laissez-le refroidir, puis arrimez la
machine avant remisage ou transport dans un
véhicule. Remisez la machine et le carburant
dans un endroit où les vapeurs de carburant
ne seront en contact avec aucune source
d'étincelles ou de flammes nues, notamment
à proximité de chaudières, de moteurs ou
d'interrupteurs électriques, de fours, etc.
Montez toutes les protections fournies avec la
machine pour le remisage. Rangez la machine
de telle sorte que les parties tranchantes
ne puissent blesser accidentellement toute
personne passant à proximité. Remisez la
machine hors de portée des enfants ou de
toute autre personne non habilitée à l'utiliser.
1. Vidangez et nettoyez le réservoir de carburant
dans un lieu suffisamment aéré.
2. Vidangez l'intégralité du carburant dans un
conteneur approprié au stockage de l'essence.
Faites tourner le moteur jusqu'à ce qu'il
s'arrête de lui-même. Cela permet d'évacuer le
mélange susceptible de s'éventer et de laisser
un dépôt de vernis et de gomme dans le
circuit d'alimentation de carburant.
3. Nettoyez toutes les substances étrangères
accumulées sur le souffleur. Maintenez la
machine à distance de tout agent corrosif tels
que les engrais de jardin ou les sels de
déverglaçage.
4. Respectez la réglementation locale et
nationale en matière de stockage et de
manipulation de l'essence. N'utilisez pas le
surplus de carburant dans un autre
équipement à moteur deux temps.
MISE EN GARDE: Il est important d'éviter
le dépôt de gomme dans les composants
du circuit d'alimentation de carburant tels
que le carburateur, le filtre à carburant, la
conduite d'alimentation de carburant ou le
réservoir de carburant au cours du remisage.
Les carburants à base d'alcool (appelés
essence-alcool ou E10, ou à base d'éthanol ou
de méthanol) sont hydrophiles, ce qui peut
entraîner une séparation des composants
du carburant et la formation d'acides au
cours du remisage. Les gaz acides peuvent
endommager le moteur.
PROTECTION DE L’ENVIRONNEMENT
La protection de l’environnement est un aspect
fondamental et prioritaire de l’utilisation de la
machine, au bénéfice de la vie civile et sociale du
contexte dans lequel on vit.
Page 35

33
I
fr
F
D
E
NL
P
GR
TR
CZ
SK
RUS
UK
PL
H
LV
EST
LT
RO
- Éviter d’être un élément de gêne pour le
voisinage.
- Respecter scrupuleusement les règlements
locaux en matière d’élimination des
emballages, huiles, essence, batteries, filtres,
pièces endommagées ou tout élément à fort
impact écologique ; ces résidus ne doivent pas
être jetés aux ordures, mais doivent être
séparés et remis aux centres de collecte
spécialisés qui pourvoiront au traitement des
déchets.
Démolition et élimination
Lors de la mise hors service, ne pas abandonner
la machine dans la nature, mais s’adresser à un
centre de collecte.
Une grande partie des matériaux éliminés est
recyclable ; tous les métaux (acier, aluminium,
laiton) peuvent être remis à un ferrailleur. Pour
plus d’informations contacter le centre de
récupération des déchets de votre zone.
L’élimination des dérivés de démolition de la
machine devra se faire dans le respect de
l’environnement, en évitant de polluer le sol, l’air
et l’eau.
Dans tous les cas, respecter les législations et
règlements en vigueur en la matière.
Page 36

34
I
fr
F
D
E
NL
P
GR
TR
CZ
SK
RUS
UK
PL
H
LV
EST
LT
RO
9. DONNEES TECHNIQUES
Cylindrée
4.7 cu.in. (77.0 cm3)
Moteur
2 temps
Puissance
5.0 HP (3.6 KW)
Capacité du réservoir à carburant
0.6 US gal. (2.3 ℓ)
Primer carburateur
Oui
Système antivibration
Oui
Poids 24.7 lb (11.2 kg)
Portée volumétrique souffleur (ANSI B 175.2-2012) 807 cfm (1370 m
3
/h)
Vitesse maximale de l’air (ANSI B 175.2-2012) 170 mph (76 m/s)
Niveau de pression ANSI B175.2-1996
79 dB (A)
Page 37

35
I
fr
F
D
E
NL
P
GR
TR
CZ
SK
RUS
UK
PL
H
LV
EST
LT
RO
10. RÉSOLUTION DES PROBLÈMES
ATTENTION : toujours arrêter l'outil et débrancher la bougie avant d'intervenir selon les indications
du tableau ci-dessous, sauf indication contraire.
Si le problème persiste après avoir vérifié toutes les causes possibles indiquées, contacter un Centre d'Assistance
Agréé. En cas de problème non référencé dans ce tableau, contacter un Centre d'Assistance Agréé.
PROBLÈME CAUSES PROBABLES SOLUTION
Le moteur ne démarre pas ou
s'arrête quelques secondes après
le démarrage. (S'assurer que
l'interrupteur se trouve sur "I")
1. Pas d'étincelle
2. Moteur noyé
1. Contrôler l'étincelle de la bougie. S'il
n'y a pas d'étincelle, répéter le test avec
une bougie neuve (RCJ6Y).
2. Suivre la procédure page 29. Si le
moteur ne démarre toujours pas,
répéter la procédure avec une bougie
neuve.
Le moteur démarre mais
n'accélère pas correctement ou
ne tourne pas correctement à
vitesse élevée.
Régler le carburateur. Contacter un Centre d'Assistance Agréé
pour régler le carburateur.
Le moteur n'atteint pas le régime
maxi et / ou dégage trop de
fumée.
1. Contrôler le mélange huile/
essence.
2. Filtre à air encrassé.
3. Régler le carburateur.
1. Utiliser de l'essence neuve et une huile
pour moteur 2 temps.
2. Nettoyer : voir les instructions au
chapitre Entretien filtre de l'air.
3. Contacter un Centre d'Assistance Agréé
pour régler le carburateur.
Le moteur démarre, tourne et
accélère, mais ne tient pas le
ralenti.
Régler le carburateur. Contacter un Centre d'Assistance Agréé
pour régler le carburateur.
Le moteur démarre et tourne mais
dégage peu d'air
1. Grille de protection colmatée
2. Turbine endommagée
3. Vis sans fin et tuyaux colmatés
1. Nettoyer la grille de protection
2. Contacter un Centre d'Assistance Agréé
3. Nettoyer
Page 38

36
I
GB
es
D
es
NL
P
GR
TR
CZ
SK
RUS
UK
PL
H
LV
EST
LT
RO
INTRODUCCIÓN
Para utilizar correctamente el soplador y evitar
accidentes, lea primero este manual atentamente
antes de trabajar con ella. Encontrará
explicaciones sobre el funcionamiento de los
distintos componentes, además de instrucciones
para realizar las comprobaciones y el
mantenimiento necesarios.
Nota: Las ilustraciones y las especificaciones
proporcionadas en este manual pueden variar
según los requisitos de cada país, y están
sujetas a cambios sin previo aviso por parte
del fabricante.
MANUAL DEL OPERADOR
El manual del operador está destinado a
proporcionar protección al usuario. LÉALO.
Guárdelo en un sitio seguro para consultarlo en
el futuro. Conozca los procedimientos necesarios
antes de comenzar a montar la unidad. La
preparación y el mantenimiento adecuados
juegan un papel fundamental para obtener la
máxima seguridad y rendimiento del motosierra.
Póngase en contacto con el concesionario o el
distribuidor local si no comprende alguna de las
instrucciones de este manual.
Además de las instrucciones de uso, este manual
contiene párrafos que requieren una especial
atención.
Tales párrafos están marcados con los símbolos
descritos a continuación:
Advertencia: si existe riesgo de accidente o
lesiones personales o daños graves a la
propiedad.
Precaución: si existe riesgo de producirse daños
en la máquina o en sus componentes
individuales.
ADVERTENCIA: Para garantizar el
funcionamiento seguro y correcto de el
soplador, este manual del operador deberá
conservarse siempre con la máquina o estar
cerca de ella.
No preste ni alquile el soplador sin el manual
de instrucciones del operador.
ADVERTENCIA: Sólo deberán utilizar el
soplador las personas que entiendan este
manual.
ÍNDICE
1. SIGNIFICADO DE LAS ETIQUETAS DE
SEGURIDAD _____________________ 36
2. COMPONENTES DEL SOPLADOR ____ 36
3. REGLAS DE SEGURIDAD ___________ 37
4. ENSABLAJE ______________________ 40
5. PUESTA EN MARCHA - UTILIZACIÓN _ 41
6. PARADA DEL MOTOR ______________ 45
7. MANTENIMIENTO _________________ 46
8. ALMACENAJE ____________________ 48
9. DATOS TECNICOS _________________ 50
10. RESOLUCIÓN DE PROBLEMAS ______ 51
1. SIGNIFICADO DE LAS ETIQUETAS
DE SEGURIDAD (Fig.19)
1. Este manual contiene mensajes especiales
para llamar la atención sobre cuestiones de
seguridad, daños en la máquina, así como
información útil relativa al funcionamiento y
al mantenimiento. PARA EVITAR QUE SE
PRODUZCAN LESIONES Y DAÑOS EN LA
MÁQUINA, LEA ATENTAMENTE TODA LA
INFORMACIÓN PROPORCIONADA.
2. Utilice protección para los ojos, oídos y
cabeza cuando emplee este equipo.
3. ATENCIÓN! El soplador puede lanzar objetos
a gran velocidad que podrían rebotar y
golpear al operador. Los ojos podrían resultar
gravemente dañados.
4. El operador debe asegurarse de que no haya
transeúntes ni animales a menos de 10
metros (35 pies) de donde se encuentre. Si
hay varios operadores trabajando en la
misma zona, deben mantener una distancia
de seguridad de al menos 10 metros (35 pies)
entre uno y otro.
5. Nivel de presión acústica medido a 10 metros
(30 pies) de distancia, según la norma ANSI
B175.2-1996.
2. COMPONENTS DEL SOPLADOR
(Fig. 1)
1. Bastidor
2. Filtro de aire
Page 39

37
I
GB
es
D
es
NL
P
GR
TR
CZ
SK
RUS
UK
PL
H
LV
EST
LT
RO
3. Bujía
4. Empuñadura de arranque
5. Cubierta del motor
6. Depósito de combustible
7. Arnés
8. Cojín
9. Tubo acodado
10. Manguera
11. Empuñadura de control
12. 13. 14. Tubo de salida
15. Amortiguadores
16. Llave combinada
17. Tornillos M5x65 (2 uds.)
18. Tuercas M6 (2 uds.)
19. Abrazaderas Ø 90 mm (2 uds.)
20. Cable antiestático
3. REGLAS DE SEGURIDAD
Requisitos estatales y locales
Este motor NO está equipado con un sistema
protector de chispas según los requisitos
establecidos en la práctica recomendad J335 de
SAE (SAE Recommended Practice J335) y los
códigos 4442 y 4443 de California. Para trabajar
en todos los terrenos forestales nacionales y en
los terrenos gestionados por los estados de
California, Maine, Washington, Idaho,
Minnesota, Nueva Jersey y Oregón, la ley
requiere que los motores de combustión
interna estén equipados con una pantalla de
supresión de chispas. Otros estados y agencias
federales tienen normas similares en vigor.
El funcionamiento de este motor en un estado o
localidad sujetos a dichas normas podría suponer
una infracción de la legislación vigente.
Nota: Cuando utilice un soplador para la tala de
árboles, consulte el Código de Regulaciones
Federales, Partes 1910 y 1928.
ADVERTENCIA: El sistema de encendido
de la unidad genera un campo
electromagnético de muy baja intensidad.
Dicho campo puede afectar al funcionamiento
de ciertos marcapasos. Para reducir el riesgo
de lesiones graves o mortales, las personas
que tengan un marcapasos deben consultar
a su médico y al fabricante del marcapasos
antes de utilizar esta herramienta.
ADVERTENCIA: Mantenga todos los
miembros corporales alejados del
amortiguador, ya que sus superficies están
muy calientes durante y después de la
utilización del soplador. Si entra en contacto
con el amortiguador, pueden producirse
quemaduras graves.
ADVERTENCIA: La exposición a
vibraciones por el uso prolongado de
herramientas manuales alimentadas con
gasolina podría provocar daños en los nervios
o en los vasos sanguíneos de los dedos, manos
y muñecas de personas propensas a sufrir
problemas de circulación o hinchazones
anormales. El uso prolongado en climas fríos
se ha relacionado con daños en los vasos
sanguíneos de personas sanas. Si aparecen
síntomas tales como pérdida de sensibilidad,
dolor, pérdida de fuerza, cambio en la textura
o color de la piel, o pérdida de sensibilidad en
los dedos, manos o muñecas, deje de utilizar
esta herramienta y acuda a un médico.
ADVERTENCIA: Los gases de escape
del motor de este producto contienen
sustancias químicas que, según el Estado de
California, provocan cáncer, defectos en recién
nacidos u otros daños reproductivos. Utilice el
soplador solamente en el exterior en un lugar
bien ventilado.
Precauciones básicas de seguridad
• Antes de utilizar la unidad, lea este manual
atentamente hasta que comprenda por
completo todas las reglas de seguridad,
precauciones e instrucciones de manejo y sepa
cómo seguirlas.
• El soplador sólo lo deben utilizar adultos que
comprendan y puedan seguir las reglas de
seguridad, precauciones e instrucciones de
manejo indicadas en este manual. Nunca permita
a un menor utilizar el soplador.
• No maneje ni utilice el soplador si está cansado,
enfermo o indispuesto. Tampoco lo debe utilizar
si ha tomado alcohol, drogas o medicamentos.
Debe encontrarse en buen estado físico y con la
mente despierta. Trabajar con un soplador es
agotador. Si tiene algún problema que se pueda
agravar a causa de este tipo de trabajo, consulte
Page 40

38
I
GB
es
D
es
NL
P
GR
TR
CZ
SK
RUS
UK
PL
H
LV
EST
LT
RO
a su médico antes de utilizar el soplador.
• Los niños, transeúntes y animales deben
mantenerse a una distancia mínima de 10
metros (35 pies) del lugar de trabajo. No permita
que se acerquen al soplador personas ni animales
mientras lo arranca o utiliza.
• Cuando trabaje con el soplador, utilice siempre
prendas protectoras de seguridad homologadas.
El uso de prendas protectoras no elimina el
riesgo de lesiones, pero reduce sus efectos en
caso de accidente. Consulte a su proveedor a la
hora de elegir equipos conformes con la
legislación. Las prendas deben ser las adecuadas
y no ser un obstáculo. Utilice prendas de
protección adherentes. Las chaquetas y los
monos de peto y tirantes son perfectos para
esta actividad. No se ponga pañuelos, corbatas,
pulseras ni prendas que se puedan enganchar en
la madera o en las ramas. Si tiene el pelo largo,
recójaselo y protéjalo (con un pañuelo, una
gorra, un casco, etc.). Utilice botas de seguridad
con suelas antideslizantes y refuerzos
antiperforación. Utilice gafas protectoras o
pantallas faciales . Utilice protecciones contra
el ruido: por ejemplo, orejeras que reduzcan
el nivel de ruido o tapones. El uso de
protecciones auditivas es muy importante. La
percepción de señales sonoras de peligro (gritos,
alarmas, etc.) quedará limitada. Quítese las
protecciones de los oídos en cuanto pare el
motor. Utilice guantes que tengan el máximo
poder de absorción de vibraciones.
ATENCIÓN: Utilice máscara protección
facial cuando trabaje con el soplador en
ambientes polvorientos.
• Preste el soplador únicamente a usuarios
expertos que estén completamente
familiarizados con su funcionamiento y uso
correcto. Proporcione a los demás usuarios el
manual con las instrucciones de uso, que
deberán leer antes de utilizar el soplador.
• Revise el soplador a diario para asegurarse de
que todos sus dispositivos se encuentran en
perfecto estado de funcionamiento.
• Nunca trabaje con el soplador si está estropeado,
se ha modificado o se ha reparado o montado
incorrectamente. No retire, dañe ni desactive
ninguno de los dispositivos de seguridad.
• Planifique previamente y con cuidado el trabajo
de soplado. No comience a soplar hasta que el
área de trabajo no esté despejada y el suelo
donde pisa esté seguro.
• Todos los trabajos de mantenimiento del
soplador que no sean las operaciones indicadas
en este manual, los debe realizar personal
competente.
• No se recomienda enganchar a la toma de fuerza
herramientas o aplicaciones que no haya
especificado el fabricante.
ATENCIÓN: El soplador puede lanzar
objetos a gran velocidad que podrían
rebotar y golpear al operador. Los ojos
podrían resultar gravemente dañados. Tenga
siempre los ojos protegidos.
Manejo del combustible
ADVERTENCIA: La gasolina es un
combustible muy inflamable. Tenga
mucho cuidado cuando maneje mezclas de
gasolina o combustible. No fume ni acerque
llamas o fuego al combustible ni a el soplador.
· Para reducir el riesgo de incendios y
quemaduras, maneje el combustible con
cuidado. Es altamente inflamable.
· Mezcle y guarde el combustible en un
contenedor homologado para gasolina.
· Mezcle el combustible en el exterior donde no
haya chispas ni llamas.
· Seleccione un terreno desnudo, pare el motor
y deje que se enfríe antes de recargar
combustible.
· Afloje lentamente el tapón del depósito de
combustible para liberar la presión y para
evitar que el combustible se escape alrededor
del tapón.
· sito de combustible tras recargar combustible.
Si el tapón del depósito no está correctamente
apretado, las vibraciones de la unidad pueden
provocar que el tapón se afloje o se salga y se
derrame combustible.
· Elimine de la unidad el combustible que se
haya derramado. Aléjese 10 pies (3 m) del lugar
de recarga de combustible antes de arrancar el
motor.
· No queme nunca el combustible que se haya
derramado.
· No fume mientras maneje combustible ni
mientras utilice el soplador.
· Guarde el combustible en un lugar fresco, seco
y bien ventilado.
· No sitúe nunca el soplador en un lugar donde
haya elementos combustibles, tales como
hojas secas, paja, papel, etc.
· Guarde la unidad y el combustible en un lugar
Page 41

39
I
GB
es
D
es
NL
P
GR
TR
CZ
SK
RUS
UK
PL
H
LV
EST
LT
RO
donde los vapores del combustible no puedan
ponerse en contacto con chispas o llamas de
calentadores de agua, motores o interruptores
eléctricos, hornos, etc.
· No quite nunca el tapón del depósito con el
motor en funcionamiento.
· No utilice nunca combustible para operaciones
de limpieza.
· Tenga cuidado para que el combustible no
entre en contacto con su ropa.
· No rellene el depósito de combustible
mientras esté en un árbol; para rellenar el
depósito colóquese siempre sobre el suelo
firme o una plataforma segura.
Funcionamiento y seguridad
ATENCIÓN Sujete firmemente el
soplador con los pulgares y los dedos
alrededor de las empuñaduras.
• Mantenga todas las partes del cuerpo
alejadas del soplador cuando el motor esté
en marcha.
• Transporte siempre el soplador con el motor
parado. Cuando lo transporte en un vehículo,
tenga el soplador bien fijo para evitar que
vuelque, se derrame el combustible o sufra
daños.
• Antes de arrancar el motor, compruebe que
el soplador no apunta a ninguna persona.
• Apague el motor antes de dejar el soplador
en el suelo. No deje el motor en marcha sin
vigilancia.
• Utilice el soplador sólo en lugares bien
ventilados, y no lo emplee en atmósferas
explosivas o inflamables ni en entornos
cerrados.
ATENCIÓN – Existe peligro de
envenenamiento por monóxido de
carbono.
• No utilice el soplador subido a una escalera, a
un árbol o a un tejado. Trabaje siempre en
una posición estable y segura.
• No trabaje cerca de cables eléctricos.
• Mantenga la empuñadura seca, limpia y sin
mezclas de combustible o aceite.
• Manténgase erguido con el peso del cuerpo
distribuido de manera uniforme sobre ambos
pies.
• No eleve el soplador. Podría perder el
equilibrio y el control del soplador.
Precauciones para reducir el riesgo de
vibraciones
· El soplador dispone de un sistema
antivibración (AV); no lo modifique nunca.
· Utilice guantes y mantenga las manos
calientes.
· Agarre firmemente la unidad en todo
momento, pero no apriete las empuñaduras
con una presión constante y excesiva. Haga
pausas con frecuencia. Todas las precauciones
indicadas anteriormente no garantizan que no
vaya a sufrir alguna dolencia por vibraciones
en las manos o el síndrome de canal carpiano.
Por tanto, los usuarios que utilicen la unidad de
forma continua y regular deberán supervisar
atentamente el estado de sus manos y dedos.
Si aparece alguno de los síntomas indicados
anteriormente, acuda inmediatamente a un
médico.
Precauciones de mantenimiento
ADVERTENCIA: No utilice nunca un
soplador que esté dañada, ajustada
incorrectamente o que no esté montada por
completo y de forma segura.
ADVERTENCIA: Todos los trabajos de
revisión de el soplador, que no sean los
elementos especificados en las instrucciones
de mantenimiento del manual del operador,
los deberá realizar personal de servicio
competente. (Si se utilizan herramientas
inadecuadas para extraer el volante o el
embrague, o si se utiliza una herramienta
incorrecta para sostener el volante a fin de
extraer el embrague, se podrían producir
daños estructurales en el volante, lo cual
podría provocar posteriormente que dicho
volante reviente, dando como resultado
lesiones graves.).
ADVERTENCIA:
No modifique nunca el soplador de
ninguna manera.
Mantenga las empuñaduras secas, limpias y
sin mezclas de combustible o aceite.
ADVERTENCIA: Utilice solamente los
accesorios y las piezas de repuesto
recomendadas.
• Nunca intente reparar el soplador con el
Page 42

40
I
GB
es
D
es
NL
P
GR
TR
CZ
SK
RUS
UK
PL
H
LV
EST
LT
RO
motor en marcha.
• Nunca utilice combustible para operaciones
de limpieza.
• Guarde el soplador en un ambiente seco,
elevado del suelo y con los depósitos vacíos.
• Cuando finalice la vida útil del soplador,
deséchelo adecuadamente sin dañar el
medioambiente; llévelo al concesionario de
su localidad para que la desechen de forma
correcta.
• Sustituya inmediatamente los dispositivos de
seguridad que estén rotos o dañados.
ADVERTENCIA: El amortiguador y otras
piezas del motor (por ejemplo, las aletas
del cilindro y la bujía) se calientan durante
el funcionamiento y permanecen calientes
algún tiempo después de parar el motor. Para
reducir el riesgo de quemaduras, no toque el
amortiguador ni otras piezas mientras estén
calientes.
4. ENSABLAJE
Montaje de los tubos/empuñadura
ATENCIÓN – Cuando se montan los tubos
y la tobera, el motor debe estar apagado y el
interruptor debe estar en STOP.
Para el ensamblaje del soplador, lea las
siguientes instrucciones.
Partes de la máquina
Observando la Fig. 3:
1. Inserte el tubo acodado en el caracol del
ventilador.
2. Fije el tubo acodado con los dos tornillos y
las dos tuercas suministrados, utilizando la
llave hexagonal integrada en la llave de bujía
también suministrada.
Observando la Fig. 2:
1. Coloque las abrazaderas en los dos extremos
de la manguera (10, Fig. 1) sin apretarlas.
2. Conecte la manguera al tubo acodado (9,
Fig. 1) y al tubo de salida (12, Fig. 1), con la
precaución de que el cono (A, Fig. 2) esté
del lado del tubo de salida. Enrosque las
tuercas de las dos abrazaderas con la llave
suministrada.
3. Monte la empuñadura (11, Fig. 1) en el
tubo de salida (12, Fig. 1) tras desenroscar
por completo el tornillo situado debajo de
la palanca de bloqueo (Fig. 5) con la llave
hexagonal suministrada.
Observando la Fig. 4:
1. Con la palanca de bloqueo bajada
(bloqueada), enrosque el tornillo sin
apretarlo a tope, solo hasta bloquear la
empuñadura en el tubo de salida. No
enrosque el tornillo con la palanca
abierta.
2. Enrolle en espiral el cable antiestático (B,
Fig. 2) e introdúzcalo en el oricio del tubo
de salida. Conecte el terminal del cable
antiestático B al terminal que sale de la
empuñadura (detalle en el círculo C, Fig. 2).
3. Acople los tubos de salida (13 y 14, Fig. 1)
mediante la conexión de bayoneta (detalle
ampliado D, Fig. 2).
Regulación de la empuñadura
Es importante ubicar la empuñadura en
la posición correcta para trabajar con más
comodidad. Para regular la posición de la
empuñadura:
1. Levante la palanca de bloqueo (1, Fig. 5).
2. Deslice la empuñadura y varíe la inclinación
hasta encontrar la posición de trabajo más
cómoda.
3. Cuando encuentre la posición adecuada,
je la empuñadura bajando la palanca de
bloqueo.
Regulación del arnés y desenganche rápido
ATENCIÓN - La regulación del arnés se
debe hacer con el motor apagado.
Antes de utilizar el soplador, es muy importante
equilibrar el peso entre los hombros, regulando
la longitud de los tirantes para que la máquina
quede bien adherida a la espalda y a los hombros.
El equilibrado es muy importante cuando se
trabaja en suelos inclinados o desiguales. Para
apretar los tirantes, tire como se ilustra en la Fig. 7.
Para aojar los tirantes, levante la hebilla como se
ilustra en la Fig. 8.
En caso de peligro, desenganche la máquina
de los hombros del siguiente modo:
1. Con una mano, presione las lengüetas del
dispositivo de desenganche rápido situado
en el tirante derecho (detalle de la Fig. 6)
como se ilustra en la Fig. 9.
Page 43

41
I
GB
es
D
es
NL
P
GR
TR
CZ
SK
RUS
UK
PL
H
LV
EST
LT
RO
2. Acompañe con el torso el movimiento
que hará la máquina: al inclinarse hacia
la izquierda, el soplador se le caerá de los
hombros.
5. PUESTA EN MARCHA
COMBUSTIBLE
Este producto se acciona con un motor de 2
tiempos y requiere la premezcla de gasolina con
aceite para motores de 2 tiempos. Premezclar la
gasolina sin plomo con el aceite para motores de
dos tiempos en un recipiente limpio aprobado
para la gasolina.
COMBUSTIBLE ACONSEJADO: ESTE MOTOR
ESTÁ CERTIFICADO PARA FUNCIONAR CON
GASOLINA SIN PLOMO PARA USO
AUTOMOVILÍSTICO CON 89 OCTANOS ([R + M] /
2) O CON UN NÚMERO MAYOR DE OCTANOS.
Mezclar el aceite para motores de 2 tiempos con
la gasolina siguiendo las instrucciones del
envase.
Recomendamos utilizar aceite para motores de 2
tiempos Efco al 2% (1:50), formulado
específicamente para todos los motores de dos
tiempos enfriados por aire.
Las proporciones correctas de aceite y
combustible indicadas en el prospecto son
adecuadas cuando se utiliza un aceite para motor
de alta calidad equivalente (especificaciones
JASO FD o ISO L-EGD).
GASOLINA ACEITE
2% - 50:1
ℓ ℓ
(cm3)
1
5
10
15
20
25
0,02
0,10
0,20
0,30
0,40
0,50
(20)
(100)
(200)
(300)
(400)
(500)
PRECAUCIÓN: NO UTILIZAR ACEITE PARA
VEHÍCULOS O ACEITE PARA MOTORES
FUERA DE BORDA DE 2 TIEMPOS.
PRECAUCIÓN:
- Comprar sólo la cantidad de combustible
necesaria en base al consumo; no comprar
más de lo que se utilizará en uno o dos
meses;
- Conservar la gasolina en un recipiente
cerrado herméticamente, en un lugar
fresco y seco.
PRECAUCIÓN - Para la mezcla, no utilice
nunca un carburante con más del 10% de
etanol. Se puede emplear gasohol (mezcla de
gasolina y etanol) con contenido de etanol de
hasta 10 % o combustible E10.
Al utilizar gasolina oxigenada, se deberá aplicar
una buena práctica de tratamiento del
combustible.
La gasolina oxigenada con alcohol absorbe agua
fácilmente cuando está presente; el agua se
puede condensar a partir del aire húmedo o ser
un contaminante en el sistema de combustible,
incluido el depósito.
El uso de gasolina oxigenada puede provocar la
aparición de bolsas de vapor con mayor facilidad.
NOTA - Prepare solo la mezcla necesaria para el
uso; no la deje en el depósito o en el bidón
durante mucho tiempo. Para conservar la mezcla
durante 12 meses, se aconseja añadir
estabilizador de combustible.
Gasolina alquilada
PRECAUCIÓN - La gasolina de alquilación
no tiene la misma densidad que la
gasolina normal. Por lo tanto, los motores
puestos a punto con gasolina normal pueden
precisar una regulación del tornillo H.
Para esta operación, acuda a un centro de
asistencia autorizado.
LLENADO
Agitar el bidón de la mezcla antes del llenado.
Si preere hacer la mezcla en un bidón,
asegúrese de que el recipiente esté limpio y
mezcle el aceite y la gasolina durante un minuto
como mínimo para que se integren entre sí. En
las tablas siguientes se indican los porcentajes.
ATENCIÓN: seguir las instrucciones de
seguridad al manipular el combustible.
Apagar el motor antes del llenado. No añadir
combustible a una máquina con el motor
caliente o en funcionamiento. Alejarse 3 m del
Page 44

42
I
GB
es
D
es
NL
P
GR
TR
CZ
SK
RUS
UK
PL
H
LV
EST
LT
RO
punto de llenado antes de poner el motor en
marcha. ¡NO FUMAR!
1. Limpiar la superficie en torno al tapón del
combustible para evitar contaminaciones.
2. Aflojar lentamente el tapón del combustible.
3. Verter la mezcla de combustible con cuidado
en el depósito. Evitar que el combustible se
derrame.
4. Antes de volver a poner el tapón del
combustible, limpiar e inspeccionar la junta.
5. Colocar inmediatamente el tapón y apretarlo
a mano. Eliminar todo eventual residuo de
combustible.
NOTA: Es normal que un motor nuevo emita
humo durante y después del primer uso.
ATENCIÓN: comprobar que no haya fugas
de combustible; si las hay, eliminarlas
antes del uso. Si es necesario, contactar con el
servicio de asistencia del revendedor.
UTILIZACIÓN
Preparación del trabajo
1. Trabaje con el soplador sólo en horas razonables; por
ejemplo, ni a primeras horas de la mañana ni de la
noche, cuando la gente pueda estar descansando.
Respete el horario establecido por las autoridades
locales.
2. Utilice el soplador con la velocidad de aceleración más
baja posible.
3. Compruebe el estado del soplador antes de utilizarlo;
revise en particular el amortiguador, la toma de aire y
el filtro de aire.
4. Cuando haya mucho polvo, humedezca el lugar de
trabajo con una manguera o use un accesorio de
aspersión si dispone de agua.
5. Tenga cuidado con niños, animales, ventanas abiertas
o coches, y expulse los escombros en una dirección
segura.
6. Utilice la boquilla completamente extendida para que
la corriente de aire pueda esté lo más cerca del suelo
posible.
7. Cuando termine de trabajar con el soplador, limpie y
deposite los restos en recipientes de basura
adecuados.
Utilidades del soplador de hojas
Puede utilizar el soplador de hojas para:
• Quitar y recoger hojas. Para retirar basura o hierba
cortada de carreteras, senderos, parques,
aparcamientos, campos de deportes y exteriores en
general, etc.
• Retirar hierba cortada
• Desplazar o deshacer marañas de hierba
• Limpiar aparcamientos
• Limpiar equipos agrícolas y de construcción
• Limpiar plazas y parques de atracciones
• Retirar nieve suelta y liviana
• Secar aceras y zonas exteriores
• Retirar basura de esquinas, conexiones redondeadas
o entre adoquines
Recomendaciones de uso
• Siga la normativa local vigente cuando utilice un
soplador de hojas. No lo utilice en horas muy
tempanas ni tardías.
• Compruebe la dirección e intensidad del viento.
Nunca dirija la boquilla ni los restos a personas,
animales, coches o casas.
• No dirija los restos soplados a ventanas o puertas.
• Tenga siempre en cuenta a las personas que puedan
pasar cerca y las propiedades.
• No deje el soplador en marcha sin vigilancia.
• No utilice el soplador para esparcir fertilizantes,
productos químicos u otras sustancias tóxicas, ni
combustible, a menos que esté especialmente
diseñado para tal fin y en la ubicación adecuada.
• Utilice el soplador con la velocidad de aceleración más
baja posible.
• Evite utilizar más de una máquina a la vez, sobre
todo en zonas vecinales y en cercanías de edificios
donde el sonido pueda intensificarse.
Reducción del polvo
• Tenga cuidado con lo que mueve.
• Practique el desplazamiento de hierba cortada o
vasos de papel sin mover polvo.
• Humedezca las zonas polvorientas antes de utilizar
el soplador.
• Nunca utilice un soplador de hojas para mover
objetos con mucho polvo.
• El soplador de hojas NO debe utilizarse para limpiar
lo siguiente:
— Gran cantidad de gravilla o arena
— Restos de obras de construcción
— Polvo de yeso
— Polvo de cemento u hormigón
— Mantillo seco de jardín
Page 45

43
I
GB
es
D
es
NL
P
GR
TR
CZ
SK
RUS
UK
PL
H
LV
EST
LT
RO
ATENCIÓN – El polvo con silicio puede
contener sílice cristalino. El silicio se
encuentra como componente básico en
arena, cuarzo, ladrillos, arcilla, granito y
otros muchos materiales, rocas y productos
de hormigón que se utilizan en albañilería
y mampostería. La inhalación repetida del
sílice cristalino en el aire puede producir
enfermedades respiratorias graves e
incluso letales, como la silicosis. Además,
el estado de California y algunas otras
autoridades ha declarado el sílice cristalino
como sustancia que provoca cáncer. Si se
encuentra con dichos materiales, tome
siempre las precauciones indicadas más
arriba.
ATENCIÓN – La respiración de polvo
de amianto es peligrosa y puede
producir enfermedades respiratorias
graves e incluso letales, y cáncer. El uso y
el desecho de productos que contienen
amianto está totalmente regulado, en
concreto por la OSHA y las instituciones
de protección medioambiental. No utilice
el soplador ni toque amianto o productos
que lo contengan, como los aislantes de
amianto. Si por alguna razón piensa que
está trabajando con restos que contienen
amianto, comuníquelo de inmediato a
su empleador o al responsable local de
asuntos medioambientales.
Si el objeto del soplador es una sustancia
comercial, revise las especificaciones técnicas
de la misma o consulte al fabricante del
material.
NO ESPARZA LOS RESTOS EN EL SUELO
ATENCIÓN - Al ajustar el tubo soplador
y la boquilla, el motor debe estar
apagado y el interruptor de parada en la
posición de parada (2, Fig.13).
1. Colóquese el arnés para que sea más fácil de llevar
la máquina (Fig. 7 - 8).
2. La velocidad del chorro de aire se regula con el
acelerador (1, Fig.13). Seleccione la velocidad que
considere más adecuada para cada ocasión. Una
vez que encuentre la velocidad adecuada, puede
utilizar el limitador de aceleración (4, Fig.13) para
mantenerla y recuperarla rápidamente. La
aceleración máxima se alcanza al colocar el
limitador (4) en la posición más hacia arriba.
Operación de soplado
ATENCIÓN – Vigile constantemente la zona
circundante: no sople nunca en dirección de
personas o animales. El soplador podría levantar
pequeños objetos a gran velocidad. Pare el motor
en cuanto alguien se le acerque.
ATENCIÓN – Nunca quite la rejilla con el motor
en marcha. El rotor del ventilador podría
provocar lesiones graves en el cuerpo, en especial
en las manos.
Antes de comenzar a soplar, active todos los
mecanismos de seguridad
.
ATENCIÓN - Cuando trabaje con el soplador,
utilice siempre el equipo de protección
necesario:
1. Protección auditiva.
2. Protección ocular.
3. Máscara facial en ambientes polvorientos.
ATENCIÓN- Tenga cuidado, especialmente
si utiliza la máquina con la mano izquierda.
Evite el contacto directo del cuerpo con la zona
de salida de gases de escape.
ATENCIÓN - Nunca encienda un soplador
si la cubierta de inspección no está
cerrada, está estropeada o no puede cerrarse.
ATENCIÓN - No utilice el soplador subido
en una escalera u otro pedestal.
ATENCIÓN – No camine hacia atrás
mientras trabaja con la máquina.
ATENCIÓN – Nunca intente soplar
sustancias calientes o ardiendo ni
líquidos combustibles.
Encienda el soplador según las indicaciones de
la página 44. Trabaje conforme a las siguientes
indicaciones:
1. Nunca sople aire hacia objetos estáticos
como paredes, rocas grandes, automóviles ni
verjas.
2. Cuando trabaje en ángulos de interiores,
sople desde la esquina interior hacia el centro
Page 46

44
I
GB
es
D
es
NL
P
GR
TR
CZ
SK
RUS
UK
PL
H
LV
EST
LT
RO
del área de trabajo. De lo contrario, los restos
pueden saltar a la cara y dañarle los ojos.
3. Nunca dirija la boquilla del soplador a plantas
delicadas.
Precauciones sobre el lugar de trabajo
• Nunca permita a un niño utilizar el soplador.
Permita únicamente utilizar el soplador a
personas que hayan leído este manual del
operador o que hayan recibido las
instrucciones adecuadas para el uso seguro y
correcto del soplador.
• No trabaje cerca de cables eléctricos o
edificios.
• Trabaje solamente cuando la visibilidad y la
iluminación sean las adecuadas para ver con
claridad.
• Nunca trabaje subido a una escalera; es
muy peligroso. Deje esta operación a los
profesionales.
• Pare el motor antes de soltar el soplador.
• Esté especialmente atento cuando utilice
protección para los oídos, puesto que tal
equipo puede limitar su capacidad para oír
sonidos que indiquen peligro (gritos, señales,
advertencias, etc.).
• Tenga mucho cuidado cuando trabaje en
pendientes o en terrenos desnivelados.
PROCEDIMIENTO DE ARRANQUE
Mandos del soplador – Empuñadura (Fig. 13)
· Para acelerar, presione la palanca (1) al mismo
tiempo que la palanca de seguridad (3).
· Para arrancar el motor, el interruptor (2) debe
estar en la posición “1”.
· Si desea trabajar con el motor a un régimen
prejado y constante, apriete la palanca
de seguridad (3) y mueva la palanca (4) en
dirección a la marca “+” hasta el número de
revoluciones deseado. Para desactivar la
palanca ja, colóquela otra vez en la marca
“–”.
· Para detener el motor, ponga el interruptor
(2) en “0”.
Arranque
Antes del arranque:
· Apoye la máquina en un suelo llano.
· Controle que el interruptor (2, Fig. 13) no esté
en la posición “0” (de sistema apagado).
· Asegúrese de que no haya nadie frente al
tubo de salida de aire ni cerca de la máquina.
Arranque con el motor frío (o apagado desde
más de 30 minutos)
· Presione 10 veces, lentamente y a fondo, la
pera de cebado (A, Fig. 12).
· Baje la palanca del estárter (B, Fig. 12) hasta
que haga clic.
· Controle que el interruptor (2, Fig. 13) esté en
la posición “1” (de encendido).
· Apoye la mano izquierda en la cubierta del
motor y el pie izquierdo en el bastidor para
evitar que la máquina se mueva.
· Con la mano derecha, tire lentamente de
la empuñadura (4, Fig. 1) hasta que sienta
una ligera resistencia. Sin soltar la cuerda,
dé un tirón corto y decidido porque, si tira
débilmente, se puede ahogar el motor.
· Cuando oiga la primera explosión del motor,
levante la palanca del estárter (B, Fig. 12) a la
posición horizontal hasta que haga clic (Fig.
11).
· Tire otra vez de la cuerda para poner en
marcha el motor. Deje el motor al mínimo
durante al menos un minuto antes de
acelerar al máximo.
Arranque con el motor caliente
· Presione 10 veces, lentamente y a fondo, la
pera de cebado (A, Fig. 12).
· Levante la palanca del estárter (B, Fig. 12)
hasta que haga clic.
· Controle que el interruptor (2, Fig. 13) esté en
la posición “1” (de encendido).
· Apoye la mano izquierda en la cubierta del
motor y el pie izquierdo en el bastidor para
evitar que la máquina se mueva.
· Con la mano derecha, tire lentamente de
la empuñadura (4, Fig. 1) hasta que sienta
una ligera resistencia. Sin soltar la cuerda,
dé un tirón corto y decidido porque, si tira
débilmente, se puede ahogar el motor.
· Cuando el motor arranque, déjelo al mínimo
durante al menos un minuto antes de
acelerar al máximo.
Si el motor se ahoga
· Desmonte la bujía (3, Fig. 1) con la llave
suministrada, límpiela y séquela.
· Controle que la palanca del estárter B esté en
posición horizontal como en la Fig. 11.
· Tire de la empuñadura de arranque (4, Fig. 1)
al menos 20 veces.
· Monte la bujía y acelere al máximo con la
Page 47

45
I
GB
es
D
es
NL
P
GR
TR
CZ
SK
RUS
UK
PL
H
LV
EST
LT
RO
palanca del acelerador jo (4, Fig. 13).
· Ponga en marcha el motor.
Si el motor no arranca, proceda del siguiente
modo:
· Desmonte la bujía con la llave suministrada,
límpiela y séquela.
· Ponga el motor en posición invertida, con el
oricio de la bujía hacia abajo.
· Tire de la empuñadura de arranque (4, Fig. 1)
al menos 20 veces y observe si sale mezcla
por el oricio de la bujía.
· Seque la supercie alrededor del alojamiento
de la bujía.
· Monte la bujía y repita las operaciones con la
palanca del acelerador (1, Fig. 13) al máximo
y la palanca del estárter (B) en posición
horizontal, como en la Fig. 11.
PRECAUCIÓN:
- No se enrolle nunca la cuerda en la mano.
- Al tirar de la cuerda de arranque, no la
desenrolle por completo porque podría
romperse.
- No suelte la cuerda de golpe; sostenga la
empuñadura de arranque (4, Fig.1) y deje
que la cuerda se rebobine lentamente.
RODAJE DEL MOTOR
El motor alcanza su potencia máxima al cabo de
5÷8 horas de trabajo.
Durante este período de rodaje, no haga
funcionar el motor sin carga al régimen máximo
para evitar un esfuerzo excesivo.
ATENCIÓN. Durante el rodaje, no
modicar la carburación con el propósito de
aumentar la potencia, el motor podría
dañarse.
NOTA: es normal que un motor nuevo emita
humo durante y después del primer uso.
6. PARADA DEL MOTOR
Ponga la palanca del acelerador al minimo
(1, Fig. 13) y espere algunos minutos para que el
motor se enfríe un poco.
Apagar el motor e pulsar el interruptor de masa
(2, Fig. 13).
Page 48

46
I
GB
es
D
es
NL
P
GR
TR
CZ
SK
RUS
UK
PL
H
LV
EST
LT
RO
TABLA DE MANTENIMIENTO
Las siguientes frecuencias de mantenimiento son aplicables sólo en condiciones de
funcionamiento normal. Si su trabajo cotidiano es más severo de lo normal, reduzca
los intervalos en consecuencia.
Antes de cada uso
Después de cada
pausa para el
reabastecimiento
Semanalmente
En caso de daños o
defectos
Según lo requerido
Máquina completa Inspeccionar: fugas, grietas, desgaste
X X
Controles: interruptor, cebador, palanca
del acelerador y palanca de bloqueo del
acelerador
Vericar el funcionamiento
X X
Depósito de combustible y depósito
de aceite
Inspeccionar: fugas, suras, desgaste
X X
Filtro de combustible Inspeccionar y limpiar
X
Sustituir el elemento ltrante
X
Cada 6 meses
Todos los tornillos y tuercas accesibles
(menos los tornillos del carburador)
Inspeccionar y apretar
X
Filtro de aire Limpiar
X
Sustituir
X
Cada 6 meses
Aletas del cilindro y ranuras del cárter
de arranque
Limpiar
X
Cuerda de arranque Inspeccionar: daños y desgaste
X
Sustituir
X
Carburador Controlar el mínimo
X X
Bujía Controlar la distancia de los electrodos
X
Sustituir
X
Cada 6 meses
Sistema antivibración Inspeccionar: daños y desgaste
X
7. MANTENIMIENTO
Page 49

47
I
GB
es
D
es
NL
P
GR
TR
CZ
SK
RUS
UK
PL
H
LV
EST
LT
RO
¡ATENCIÓN! - Durante las operaciones de
mantenimiento, utilice siempre guantes de
protección. No efectúe trabajos de
mantenimiento con el motor caliente. El
mantenimiento debe realizarse con el motor
apagado.
- El mantenimiento incorrecto o la extracción de
los dispositivos de seguridad pueden causar
graves accidentes.
- No use combustible (mezcla) para la limpieza.
- No efectúe Ud. mismo las operaciones que
no sean de mantenimiento normal. Diríjase a
talleres autorizados.
FILTRO DE AIRE
En todos los motores es fundamental que
el ltro de aspiración de aire esté en buenas
condiciones, por lo cual se lo debe controlar y
limpiar con frecuencia. Para limpiar el ltro de
aire, observe la Fig. 17 y proceda del siguiente
modo:
· Desenrosque los dos pomos para quitar la
tapa y acceder al ltro (Fig. 17).
· Desmonte y limpie el ltro, golpeándolo
sobre una supercie. Luego, sóplelo desde la
parte de la malla metálica y entre las aletas,
en sentido longitudinal.
· Monte el ltro, cierre la tapa y enrosque los
dos pomos.
PRECAUCIÓN – El uso del soplador sin el
ltro de aire o con este muy sucio compromete
el funcionamiento del motor y anula la garantía.
Cambie el ltro cuando la máquina ya no haga
una buena limpieza.
FILTRO DEL COMBUSTIBLE (Fig. 18)
Se aconseja cambiar el ltro de la mezcla,
situado dentro del depósito, al menos una vez
al año. Esta operación debe realizarse en un
centro de asistencia autorizado:
· Vaciar el depósito de mezcla.
· Extraer el ltro y separarlo del tubo de la
mezcla.
· Montar un ltro nuevo en el tubo de la
mezcla.
· Introducir el ltro en el depósito.
PRECAUCIÓN – El uso de la máquina con
el ltro de mezcla sucio compromete el
funcionamiento del motor.
MOTOR
Limpie periodicamente las aletas del cilindro con
un pincel o con aire comprimido. La acumulación
de impurezas sobre el cilindro puede provocar
sobre calentamientos dañinos para el buen
funcionamiento del motor.
BUJIA
En caso de encendido defectuoso o
funcionamiento irregular, extraiga la bujía,
límpiela y sustitúyala, prestando atención a la
distancia de los electrodos (Fig. 16). Utilizar bujía
Champion RCJ6Y o de otra marca con grado
térmico equivalente.
PROTECCIÓN DEL VENTILADOR
Tras un uso prolongado del soplador, en la
protección del ventilador (detrás del cojín)
se puede acumular mucho polvo. Esto limita
el paso del aire, con riesgo de que se dañe
el ventilador o se sobrecaliente el motor. Por
lo tanto, recuerde limpiar la protección del
ventilador. Limpie también las ranuras de la
tapa del ventilador, que son importantes para la
refrigeración del motor.
CARBURADOR
El carburador se regula en fábrica de modo
estándar en conformidad con las normas sobre
emisiones.
ATENCIÓN:
- No modique la calibración del carburador
girando los tornillos; esta operación debe
realizarse en un centro de asistencia
autorizado.
- Una regulación incorrecta puede causar
graves daños al motor.
- No altere ni quite los tapones rojos de
protección de los tornillos del carburador.
En caso de problemas (si el motor no mantiene
el mínimo, el régimen es irregular o no se
alcanza la potencia máxima) contacte con un
centro de asistencia autorizado.
ATENCIÓN: Las variaciones climáticas o
altimétricas pueden provocar variaciones en
la carburación.
Page 50

48
I
GB
es
D
es
NL
P
GR
TR
CZ
SK
RUS
UK
PL
H
LV
EST
LT
RO
SILENCIADOR
ATENCIÓN – Este silenciador está dotado
de catalizador, elemento necesario para
que el motor cumpla con los niveles de emisión
permitidos. No modifique ni quite el catalizador:
si lo hace, viola la ley.
ATENCIÓN - Los silenciadores dotados de
catalizador se calientan mucho durante
el uso y permanecen calientes durante mucho
tiempo después de la parada del motor.
Esto ocurre incluso si el motor funciona al
régimen mínimo. El contacto puede causar
quemaduras de piel. ¡Recuerde el riesgo de
incendio!
PRECAUCIÓN – Si el silenciador está
dañado, hay que sustituirlo. Si el
silenciador se obstruye con frecuencia, esto
puede ser indicio de que el rendimiento del
catalizador es limitado.
ATENCIÓN – No utilice el soplador si
el silenciador está dañado, ha sido
modificado o no está montado. Si el
silenciador no recibe un mantenimiento
adecuado, aumentará el riesgo de incendios y
de pérdida de la capacidad de audición.
MANTENIMIENTO EXTRAORDINARIO
Se aconseja hacer revisar el equipo por un
técnico especializado del servicio de asistencia,
todos los años si el uso es intensivo o cada dos
años si el uso es normal.
¡ATENCIÓN! - Todas las operaciones de
mantenimiento no indicadas en este
manual deben ser realizadas por un taller
autorizado. Para garantizar un funcionamiento
correcto y constante del soplador es preciso
utilizar exclusivamente RECAMBIOS
ORIGINALES.
Eventuales modificaciones no autorizadas
y/o el uso de accesorios no originales
pueden causar lesiones graves o mortales al
operador o a terceros.
TRANSPORTE
No transportar el soplador con el motor
encendido.
ATENCIÓN - Para el transporte de la
máquina en un vehículo, asegurarse de
que esté jada en el vehículo de modo correcto
y rme mediante correas. La máquina se debe
transportar en posición horizontal; cerciorarse de
que se cumplan las normas vigentes en materia
de transporte de máquinas.
8. ALMACENAJE
ADVERTENCIA: Pare el motor y deje que
se enfríe, y asegure la unidad antes de
guardarla o de transportarla en un vehículo.
Guarde la unidad y el combustible en un
lugar donde los vapores del combustible no
puedan ponerse en contacto con chispas o
llamas de calentadores de agua, motores o
interruptores eléctricos, hornos, etc. Guarde la
unidad con todas las protecciones en su sitio.
Colóquela de forma que ningún objeto afilado
pueda causar lesiones de forma accidental a
los transeúntes. Guarde la unidad fuera del
alcance de los niños y de otras personas no
autorizadas.
1. Vacíe y limpie el depósito de combustible
en un sitio bien ventilado.
2. Vacíe todo el combustible del depósito en
un contenedor homologado para gasolina.
Ponga el motor en marcha hasta que se
pare. De esta forma, se eliminará toda la
mezcla de combustible y aceite que podría
deteriorarse y dejar barniz y goma en el
sistema de combustible.
3. Limpie todo el material extraño de la sierra.
Manténgala alejada de agentes corrosivos
tales como productos químicos de jardinería
y sales antihielo.
4. Cumpla todas las regulaciones estatales y
locales relativas al almacenamiento y
manejo seguros de gasolina. El exceso de
combustible se debe utilizar en otros
equipos accionados por motores de 2 ciclos.
PRECAUCIÓN: Es importante evitar que
durante el almacenamiento se formen
depósitos de goma en los componentes
fundamentales del sistema de combustible
tales como el carburador, el filtro, el
manguito o el depósito de combustible.
Los combustibles mezclados con alcohol
(denominados gasohol o E10 o que utilizan
Page 51

49
I
GB
es
D
es
NL
P
GR
TR
CZ
SK
RUS
UK
PL
H
LV
EST
LT
RO
etanol, metanol) pueden atraer humedad, lo
cual provoca la separación de la mezcla de
combustible y la formación de ácidos durante
el almacenamiento. El gas ácido puede dañar
el motor.
PROTECCIÓN DEL AMBIENTE
La protección ambiental debe ser un aspecto
prioritario del uso de la máquina, en beneficio de
la convivencia cívica y de la salud del planeta.
- Evite causar molestias a sus vecinos.
- Respete escrupulosamente las normas locales
sobre el desecho de embalajes, aceites,
gasolina, baterías, filtros, piezas deterioradas
o cualquier elemento de fuerte impacto
ambiental. No los deseche con los residuos
domésticos, sepárelos según su composición
y llévelos a un centro de clasificación y
reciclaje.
Desguace y eliminación
Al final de la vida útil de la máquina, no la deje
con la basura doméstica sino en un centro de
residuos especiales.
Gran parte de los materiales que componen la
máquina son reciclables; por ejemplo, todos los
metales (acero, aluminio, latón) se pueden
entregar a un chatarrero. Para más información,
consulte al servicio de recogida de residuos de su
zona. Una vez desguazada la máquina, deseche
los componentes de acuerdo con las normas de
protección ambiental, evitando contaminar el
suelo, el aire y el agua.
En todos los casos deben respetarse las
normas pertinentes.
Page 52

50
I
GB
es
D
es
NL
P
GR
TR
CZ
SK
RUS
UK
PL
H
LV
EST
LT
RO
9. DATOS TECNICOS
Cilindrada 4.7 cu.in. (77.0 cm3)
Motor 2 tiempos
Potencia 5.0 HP (3.6 KW)
Capacidad del depósito de combustible
0.6 US gal. (2.3 ℓ)
Primer carburador Si
Sistema antivibratorio Si
Peso 24.7 lb (11.2 kg)
Caudal del soplador (ANSI B 175.2-2012) 807 cfm (1370 m
3
/h)
Velocidad máxima del aire (ANSI B 175.2-2012) 170 mph (76 m/s)
Nivel de presión (ANSI B175.2-1996):
79 dB (A)
Page 53

51
I
GB
es
D
es
NL
P
GR
TR
CZ
SK
RUS
UK
PL
H
LV
EST
LT
RO
10. RESOLUCIÓN DE PROBLEMAS
ATENCIÓN: parar la unidad y desconectar la bujía antes de realizar todas las pruebas
correctivas recomendadas en la tabla siguiente, a no ser que sea necesario el
funcionamiento de la unidad.
Una vez verificadas todas las posibles causas, si el problema no se resuelve, llamar a un Centro de
Asistencia Autorizado. Si se observa un problema no listado en esta tabla, llamar a un Centro de
Asistencia Autorizado.
PROBLEMA POSIBLES CAUSAS SOLUCIÓN
El motor no arranca o se apaga a
los pocos segundos del arranque.
(Comprobar que el interruptor
esté en "I")
1. No hay chispa
2. Motor atascado
1. Controlar la chispa de la bujía. Si no hay
chispa, repetir la prueba con una bujía
nueva (RCJ6Y).
2. Seguir el procedimiento de la pág.45.
Si el motor no arranca, repetir el
procedimiento con una bujía nueva.
El motor arranca, pero no acelera
correctamente o no funciona
correctamente a alta velocidad.
Es necesario regular el carburador. Llamar a un Centro de Asistencia
Autorizado para regular el carburador.
El motor no alcanza la máxima
velocidad y/o emite demasiado
humo.
1. Controlar la mezcla aceitegasolina.
2. Filtro de aire sucio.
3. Es necesario regular el
carburador.
1. Utilizar gasolina fresca y un aceite
adecuado para motores de 2 tiempos.
2. Limpiar; leer las instrucciones del
capítulo Mantenimiento del filtro de
aire.
3. Llamar a un Centro de Asistencia
Autorizado para regular el carburador.
El motor arranca, gira y acelera,
pero no mantiene el mínimo.
Es necesario regular el carburador. Llamar a un Centro de Asistencia
Autorizado para regular el carburador.
El motor arranca y funciona, pero
el flujo de aire es reducido
1. Rejilla de protección obstruida
2. Rotor dañado
3. Espiral y tubos obstruidos
1. Limpiar la rejilla de protección
2. Llamar a un Centro de Asistencia
Autorizado
3. Limpiar
Page 54

Page 55

Page 56

EFCO it‘s an EMAK S.p.A. trademark
42011 Bagnolo in Piano (RE) Italy
COMET USA, INC. • www.efcopower.com
Mod. 56590022 Rev.2 - Dic/2017
en
fr
es
WARNING:
To ensure safe and correct operation of the blower, this
operator's manual should always be kept with or near the machine. Do not
lend or rent your blower without the operator's instruction manual.
AVERTISSEMENT:
Afin de garantir un fonctionnement correct et en toute sécurité de la souffleur, il est recommandé de toujours conserver le manuel de
l'utilisateur à proximité de la machine. Ne prêtez ou ne louez jamais votre
souffleur sans fournir le présent manuel d'utilisation et d'entretien.
ADVERTENCIA:
Para garantizar el funcionamiento seguro y correcto de la
soplador, este manual del operador deberá conservarse siempre con la
máquina o estar cerca de ella. No preste ni alquile la soplador sin el manual
de instrucciones del operador.
 Loading...