

Page 1
I
F
GB
D
E
NL
P
GR
MANUALE DI USO E MANUTENZIONE
MANUEL D’UTILISATION ET D’ENTRETIEN
OPERATOR’S INSTRUCTION BOOK
BEDIENUNGSANLEITUNG
MANUAL DE INSTRUCCIONES
GEBRUIKSAANWIJZING
MANUAL DE INSTRUÇÕES
ΕΓΧΕΙΡΙ∆ΙΟ ΧΡΗΣΗΣ ΚΑΙ ΣΥΝΤΗΡΗΣΗΣ
SA 2026 (25.4 cm
3
)
Page 2

INTRODUZIONE
Per un corretto impiego del soffiatore e per evitare incidenti, non iniziare il lavoro senza aver letto
questo manuale con la massima attenzione. Su questo manuale sono indicate le spiegazioni di
funzionamento dei vari componenti e le istruzioni per i necessari controlli e per la manutenzione.
N.B. Le descrizioni e le illustrazioni contenute nel presente manuale si intendono non rigorosamente impegnative. La Ditta si riserva il diritto di apportare eventuali modifiche senza
impegnarsi ad aggiornare di volta in volta questo manuale.
INTRODUCTION
Pour un emploi correct de le soffleur et pour éviter les accidents, ne commencez pas le travail
sans avoir d’abord lu attentivement le manuel. Vous trouverez les descriptions du fonctionnement
des divers composants et les instructions pour les contrôles nécessaires et pour l’entretien.
N.B. Les descriptions et les illustrations contenues dans ce manuel n’engagent pas rigoureusement le constructeur. La société se réserve le droit d’apporter d’éventuelles modifications sans devoir mettre à jour à chaque fois le manuel.
INTRODUCTION
To correctly use the blower and prevent accidents, do not start work without having first carefully
read this manual. You will find explanations concerning the operation of the various parts plus instructions for necessary checks and relative maintenance.
Note: Illustrations and specifications in this manual may vary according to Country requirements and are subject to change without notice by the manufacturer.
EINLEITUNG
Lesen Sie diese Broschüre vor Arbeitsbeginn aufmerksam durch, um mit die Blasgerät richtig
umgehen zu können und Unfälle zu vermeiden. In dieser Bedienungsanleitung finden Sie die
Erklärung der Funktionsweise der verschiedenen Bauteile und Hinweise zu den anfallenden Kontroll- und Wartungsarbeiten.
Anm.: Die in dieser Broschüre enthaltenen Beschreibungen und Abbildungen sind unverbindlich. Der Hersteller behält sich das Recht vor, eventuelle Veränderungen vorzunehmen, ohne jeweils vorher eine Anpassung der vorliegenden Bedienungsanleitung vorzunehmen.
INTRODUCCION
Para una correcta utilización del soplador y para evitar accidentes, no empiece a trabajar sin haber leído atentamente este manual. Ud. encontrará las explicaciones de funcionamiento de los diferentes componentes y las instruccciones para el control y mantenimiento de la motobomba.
P.D. Las descripciones contenidas en el presente manual no se consideran rigurosamente
obligatorias. La empresa se reserva el derecho de aportar eventuales modificaciones sin
obligarse a poner al día este manual.
INLEIDING
Om de blower op de juiste manier te kunnen gebruiken en ongelukken te voorkomen eerst deze
gebruiks-aanwijzing aandachtig doorlezen alvorens ermee te gaan werken. In deze gebruiksaanwijzing zijn de uitleg van de werking van de verschillende onderdelen en de instructies voor
de noodzakelijke controles en het onderhoud opgenomen.
N.B.: De beschrijvingen en de figuren in deze gebruiksaanwijzing zijn niet bindend. De fabrikant reserveert zich het recht eventuele veranderingen aan te brengen zonder zich te
verplichten iedere keer deze gebruiksaanwijzing bij te werken.
INTRODUÇÃO
Para um emprego correto de soprador e para evitar acidentes, não iniciar o trabalho sem ter lido
este manual com a máxima atenção. Neste manual encontram-se as descrições de funcionamento dos diversos componentes e as instruções para o necessário controle e para a manutenção.
N.B. As descrições e as ilustrações contidas neste manual não se consideram rigorosamente obrigatórias. A Empresa reserva-se o direito de realizar modificações sem ter que
atualizar cada vez este manual.
ΕΙΣΑΓΩΓΗ
Για µια πιο σωστη χρηση του Ê˘ÛËÙ‹Ú·˜,και για να αποφευχθουν ατυχηµατα, µην εργαστειτε
χωρις πρωτα να διαβασετε πολυ προσεχτικα το παρον εγχειριδιο. Στο παρον εγχειριδιο περιε−
χονται οι εξηγησεις λειτουργιας των διαφορων εξαρτηµατων και οι οδηγιες για τους απαραιτη−
τους ελεγχους και την συντηρηση.
ΣΗΜΕΙΩΣΗ: Οι περιγραφες και οι εικονες που περιεχονται στο παρον εγχειριδιο δεν ειναι δε−
σµευτικες. Η Εταιρια διατηρει το δικαιωµα να κανει αλλαγες στο εγχειριδιο χωρις προηγουµενη
ενηµερωση.
ATTENZIONE – Il soffiatore, se ben utilizzato, è uno strumento di lavoro rapido, comodo ed efficace; se usato in modo non corretto o senza le dovute
precauzioni potrebbe diventare un attrezzo pericoloso. Perché il vostro lavoro sia sempre piacevole e sicuro, rispettate scrupolosamente le norme di sicurezza riportate qui di seguito e nel corso del manuale.
1. Il soffiatore deve essere usato solo da persone adulte, in buone condizioni fisiche
e a conoscenza delle norme d’uso.
2. Non usare il soffiatore in condizioni di affaticamento fisico.
3. Indossare sempre guanti, occhiali protettivi e cuffia. Non indossare sciarpe, bracciali o altro che possa essere preso dalla girante.
4. Non permettere ad altre persone o animali di sostare entro il raggio d’azione del
soffiatore durante l’avviamento e l’uso.
5. Osservare le prescrizioni antinfortunistiche emanate dalle rispettive associazioni di
categoria.
6. Lavorare sempre in posizione stabile e sicura.
7. Riempire il serbatoio lontano da fonti di calore e a motore fermo. Non fumare durante il rifornimento. Non togliere il tappo del serbatoio con il motore in moto. Se
durante il rifornimento il carburante fuoriesce, spostare il soffiatore di almeno 3 metri, prima di fare l’avviamento.
8. Non dirigere il getto d’aria verso persone o animali.
9. Non aspirare oggetti voluminosi che potrebbero bloccare o danneggiare la girante.
10. Usare il soffiatore solo in luoghi ben ventilati. Non utilizzare in atmosfera esplosiva,
in ambienti chiusi o in prossimità di sostanze infiammabili.
11. Controllare giornalmente il soffiatore per assicurarsi che ogni dispositivo di sicurezza e non, sia funzionante.
12. Raccogliere i capelli lunghi (per es. con una reticella per capelli).
13. Non lavorare con un soffiatore danneggiato, mal riparato, mal montato o modificato
arbitrariamente. Non togliere o danneggiare o rendere inefficace alcun dispositivo
di sicurezza.
14. Conservare con cura il seguente manuale e consultarlo prima di ogni utilizzo.
15. Seguire sempre le nostre istruzioni per le operazioni di manutenzione.
16. Non effettuare mai da soli operazioni o riparazioni che non siano di normale manutenzione. Rivolgersi soltanto ad officine specializzate ed autorizzate.
17. Non utilizzare il soffiatore prima di essere istruiti in modo specifico sull’uso.
18. È proibito applicare alla presa di forza del soffiatore una girante che non sia quella
fornita dal costruttore. Non è consentito l’uso di altri gruppi di applicazione perché
aumentano il pericolo d’infortunio.
19. In caso di necessità della messa fuori servizio del soffiatore non abbandonarlo
nell’ambiente, ma consegnarlo al Rivenditore che provvederà alla corretta collocazione.
20. Consegnare o prestare il soffiatore soltanto a persone esperte e a conoscenza del
funzionamento e del corretto utilizzo della macchina. Consegnate anche il manuale
con le istruzioni d’uso, da leggere prima di iniziare il lavoro.
21. Si raccomanda di non avviare mai la macchina senza la girante. Ciò può causare danni importanti alle parti del motore e l’immediato decadimento della garanzia.
22. Non utilizzare il soffiatore in vicinanza di apparecchiature elettriche,
23. Non ostruire o chiudere la presa d’ingresso dell’aria della girante.
24. Non avvicinare le mani alla girante o fare manutenzione quando il motore è in moto.
25. Non usare carburante (miscela) per operazioni di pulizia
26. Staccare il cappuccio della candela ogni volta che si effettuano operazioni di manutenzione, pulizia o riparazione. Utilizzare i guanti per la pulizia del coltello e della
girante.
27. Non urtare o forzare le pale della girante; non lavorare con la girante danneggiata.
28. Non montare la girante su altri motori o trasmissioni di potenza.
29. Conservare il soffiatore in luogo asciutto, sollevato dal suolo e con il serbatoio vuoto.
30. Trasportare il soffiatore a motore spento.
ATTENTION – bien utilisé, le souffleur (machine soufflante) est un outil de
travail rapide, pratique et efficace. Toutefois, s’il n’est pas utilisé de manière
correcte ou sans avoir pris les mesures de précaution nécessaires, il exposera inévitablement l’utilisateur à un certains nombre de risques et pourrait
entraîner des accidents. Pour rendre votre travail agréable et sans risques,
nous vous invitons à respecter scrupuleusement les mesures de sécurité libellées ci-après et reprises dans le manuel.
1. Le souffleur ne peut être utilisé que par des personnes majeures en bonne condition physique et bien informées de son mode d’emploi.
2. On évitera d’utiliser le souffleur dans des conditions de fatigue physique.
3. Le port de gants, de lunettes de protection et d’un casque s’impose. On évitera par
contre de porter des écharpes, bracelets ou autres objets pouvant être entraînés
par le mobile.
4. On évitera également que des pesonnes non autorisées ou des animaux se trouvent dans le rayon d’action du souffleur, tant lors du démarrage qu’au cours de
l’utilisation.
5. Toutes les dispositions relatives à la prévention des accidents et émises par les
différentes catégories et secteurs professionnels devront, par ailleurs, être respectées.
6. On travaillera toujours en position stable et sûre.
7. Remplir le réservoir à distance de toute source de chaleur et uniquement lorsque
le moteur est arrêté. Ne pas fumer pendant le réapprovisionnement. Ne pas retirer
le bouchon du réservoir lorsque le moteur tourne. Si du carburant a été répandu
pendant le remplissage du réservoir, on veillera à déplacer l’appareil d’au moins 3
mètres avant de le redémarrer.
8. Ne pas diriger le jet d’air sur des personnes ou des animaux.
9. Ne pas aspirer d’objets volumineux pouvant entraver ou bloquer le fonctionnement
de mobile.
10. Utiliser le souffleur uniquement dans des lieux bien aérés. Ne pas l’utiliser dans
une atmosphère explosive, dans des endroits clos ou à proximité de matières inflammables.
11. Contrôler quotidiennemet le souffleur pour s’assurer que tous les dispositifs de sécurité se trouvent en parfait état de fonctionnement.
12. Maintenir les cheveux longs par exemple dans un filet.
13. Ne pas utiliser un souffleur endommagé, mal réparé mal monté ou modifié de manière arbitraire. Ne pas enlever, endommager ou rendre inefficace l’un des dispositifs de sécurité
14. Conserver soigneusement le présent manuel et le consulter avant toute utilisation.
15. Suivre nos instructions pour les opérations de manutention.
16. Ne pas effectuer de son propre chef des opérations ou des réparations qui ne relèvent pas de l’entretien ordinaire. S’adresser à cet effet à des agents spécialisés et
agréés.
17. Ne pas utiliser le souffleur avant de s’être informé des modalités spécifiques d’utilisation
18. Il est interdit d’appliquer sur la prise de force du souffleur de mobile non fournies
par le constructeur. L’utilisation d’autres modules d’application n’est pas permise
en raison des risques d’accident qui pourraient s’ensuivre.
19. Ne pas abandonner le souffleur dans l’environnement en cas de mise hors service
mais le remettre au revendeur qui veillera à son évacuation.
20. Ne confier ou prêter le souffleur qu’à des personnes qualifiées et au courant du
fonctionnement correct de l’appareil. Remettre par la même occasion le manuel
contenant le mode d’emploi à lire avant de commencer les travaux.
21. On veillera à ne jamais démarrer l’appareil sans le dispositif mobile. Ceci pourrait entraîner des dommages importants aux composants du moteur et l’exclusion
immédiate de la garantie.
22. Ne pas utiliser le souffleur à proximité d’appareils électriques.
23. Ne pas entraver ou obstruer le prise d’air du dispositif mobile.
24. Ne pas approcher les mains de mobile ou effectuer des opérations d’entretien
quand le moteur est en fonctionnement.
25. Ne pas utiliser de carburant (mélange) pour des opérations de nettoyage.
26. Retirer le capuchon de la bougie à chaque opération d’entretien, de nettoyage ou
de réparation. Utiliser des gants pour le nettoyage du couteau et de mobile.
27. Ne pas bloquer ou forcer les pales de la turbine, ni travailler avec une mobile endommagée.
28. Ne pas monter le dispositif mobile sur d’autres moteurs ou transmissions motrices.
29. Entreposer le souffleur dans un lieu sec, surélevé et avec le réservoir vide.
30. Transporter le souffleur avec le moteur éteint.
2
Italiano
NORME DI SICUREZZA MESURES DE SÉCURITÉ
Français
I
F
GB
D
E
NL
P
GR
Page 3

3
WARNING – The blower, when used correctly, is a useful and effective tool; if
used incorrectly or without the necessary precautions, it can be dangerous.
To ensure your safety and comfort, always observe the safety instructions
given here below and throughout this handbook.
1. The blower must only be used by adults in good physical condition who are familiar
with the operating instructions.
2. Do not use the blower when tired.
3. Always wear gloves, safety glasses and hearing protectors. Do not wear scarves,
bracelets or any other items that could get caught up in the impeller.
4. Do not allow other persons or animals near when starting or using the blower.
5. Always observe the safety prescriptions issued by the various industry associations.
6. Always work from a safe, stable position.
7. Fill the tank away from heat sources and with the engine stopped. Do not smoke
when refuelling. Do not remove the fuel tank cap when the engine is running. If fuel
is spilled when filling the tank, move the blower at least 3 metres away before starting the engine.
8. Do not direct the air jet towards people or animals.
9. Do not aspirate large objects that could obstruct or damage the impeller.
10. Only use the blower in well-ventilated areas. Do not use in explosive atmospheres,
in enclosed areas or near inflammable substances.
11. Check the blower daily to ensure that all safety and other devices are working properly.
12. Long hair should be worn securely tied up (e.g. in a hair net).
13. Do not use a blower that has been damaged, badly repaired, improperly assembled or modified. Do not attempt to remove or bypass any of the safety devices.
14. Retain this manual and consult it before using the blower.
15. Always follow the care and maintenance instructions.
16. Do not attempt to carry out any servicing or repairs other than normal maintenance
yourself. Contact your authorised service centre.
17. Do not operate the blower unless you have received specific instruction on its use.
18. It is prohibited to fit an impeller other than that supplied by the manufacturer. The
use of other accessories could increase the risk of injury and is prohibited.
19. When disposing of an old blower at the end of its useful life, think of the environment. Take your old unit to your dealer who will be able to dispose of it in a proper
manner.
20. Only experienced persons who are familiar with the operation and safe use of this
machine should use the blower. If you lend the blower to someone, also give them
the instruction manual and ensure that they read it before using the machine.
21. Never start the blower without the impeller fitted. This could cause serious damage to the engine and would lead to the immediate invalidation of the warranty
22. Do not use the blower near electrical equipment.
23. Do not obstruct the air intake of the impeller.
24. Keep your hands away from the impeller when the engine is running.
25. Do not use fuel (2-stroke mixture) to clean the blower.
26. Always remove the spark plug cap before all cleaning, maintenance or repair operations. Wear gloves when cleaning the shredder blade and the impeller.
27. Do not hit or force the blades of the impeller; do not use a blower with a damaged
impeller.
28. Do not fit the impeller to other engines or transmissions.
29. Store the blower in a dry place, off the ground and with the fuel tank empty.
30. Only transport the blower with the engine switched off.
ACHTUNG – Bei richtigem Einsatz ist der Blasgerät ein äußerst schnelles,
praktisches und leistungsfähiges Gerät, bei unsachgemäßem oder unvorsichtigem Gebrauch kann es jedoch eine Gefahr darstellen. Damit Sie stets bequem und sicher arbeiten können, sollten Sie unbedingt die nachstehenden
und in dieser Anleitung enthaltenen Sicherheitsvorschriften beachten.
1. Der Blasgerät darf nur von Erwachsenen verwendet werden, die sich in guter körperlicher Kondition befinden und die Gebrauchsanleitungen kennen.
2. Arbeiten Sie nicht mit Blasgerät, wenn Sie Anzeichen von Müdigkeit verspüren.
3. Tragen Sie immer Handschuhe, Schutzbrille und Gehörschutz. Vermeiden Sie
Schals, Armbänder oder andere Kleidungsteile, die sich im Läufer verfangen könnten.
4. Halten Sie andere Personen oder Tiere beim Anwerfen und Gebrauch des Blasgeräts in einem ausreichenden Sicherheitsabstand.
5. Befolgen Sie die Unfallschutzvorschriften des zuständigen Berufsverbands.
6. Arbeiten Sie stets in stabiler und sicherer Stellung.
7. Tanken Sie fern von Wärmequellen und bei stehendem Motor. Beim Auftanken ist
das Rauchen verboten. Drehen Sie den Tankverschluss niemals bei laufendem
Motor ab. Sollten Sie beim Tanken Kraftstoff verschütten, starten Sie den Blasgerät in einer Mindestentfernung von 3 Metern zur Auslaufstelle.
8. Richten Sie den Luftstrahl niemals gegen Personen oder Tiere.
9. Saugen Sie keine sperrigen Gegenstände auf, die das Gebläse blockieren oder
beschädigen könnten.
10. Verwenden Sie den Blasgerät nur in ausreichend belüfteter Umgebung. Sein Einsatz in Ex-Bereichen, geschlossenen Räumen bzw. in der Nähe von entzündlichen
Stoffen ist verboten.
11. Überprüfen Sie den Blasgerät täglich auf die einwandfreie Funktion der Sicherheits- und anderen Vorrichtungen.
12. Binden Sie langes Haar zusammen (zum Beispiel mit einem Netz).
13. Arbeiten Sie niemals mit einem beschädigten, behelfsweise reparierten, falsch
montierten oder eigenmächtig umgerüsteten Blasgerät. Sie dürfen die Sicherheitsvorrichtungen auf keinen Fall abnehmen, beschädigen bzw. unwirksam machen.
14. Bewahren Sie diese Anleitung sorgfältig auf und lesen Sie sie vor jedem Gebrauch
noch einmal durch.
15. Beachten Sie stets unsere Wartungsvorschriften.
16. Führen Sie eigenständig nur die normalen Wartungsarbeiten durch und wenden
Sie sich in all den anderen Fällen an eine autorisierte Fachwerkstatt.
17. Verwenden Sie den Blasgerät erst, wenn Sie mit seinem Gebrauch vertraut sind.
18. Rüsten Sie den Abtrieb des Blasgeräts nur mit dem Originalgebläse des Herstellers aus. Die Verbindung weiterer Baugruppen ist wegen der größeren Unfallgefahr
verboten.
19. Stillgelegte Blasgerät sollten Sie unbedingt durch Ihren Fachhändler umweltgerecht entsorgen lassen.
20. Geben bzw. borgen Sie den Blasgerät nur in seiner Funktion und Gebrauch erfahrenen Personen. Händigen Sie in diesem Fall ebenso die Gebrauchsanleitungen
aus.
21. Sie dürfen den Blasgerät niemals ohne Gebläse starten. Dies kann schwerwie-
gende Motorschäden verursachen und hat den sofortigen Verfall der Garantie zur
Folge.
22. Arbeiten Sie mit dem Blasgerät niemals in der Nähe von elektrischen Geräten.
23. Verstopfen bzw. schließen Sie keinesfalls die Lüftungsöffnung des Gebläses.
24. Greifen Sie mit den Händen nicht in den Läufer und führen Sie keine Wartung bei
laufendem Motor aus.
25. Verwenden Sie zur Reinigung niemals Kraftstoffgemisch.
26. Ziehen Sie bei Wartung, Reinigung oder Reparatur stets die Kerzenhaube ab. Bei
der Reinigung von Schnittmesser und Gebläse sollten Sie stets Handschuhe überziehen.
27. Verbiegen Sie auf keinen Fall die Gebläseschaufeln; arbeiten Sie niemals mit einem beschädigten Gebläse.
28. Bauen Sie das Gebläse nicht auf andere Motoren oder Antriebe.
29. Lagern Sie den Blasgerät trocken, vom Boden angehoben und mit leerem Tank.
30. Tragen Sie den Blasgerät nur bei abgestelltem Motor.
ATENCIÓN - El soplador, si se utiliza correctamente, es un instrumento de
trabajo rápido, cómodo y eficaz; pero si se lo emplea de modo incorrecto o
sin las debidas precauciones puede resultar peligroso. Para que su trabajo
resulte siempre agradable y seguro, respete estrictamente las normas de seguridad que se indican a continuación y en el curso del manual.
1. El soplador debe ser utilizado exclusivamente por personas adultas, en buenas
condiciones físicas y que conozcan las normas de uso.
2. No usar el soplador en condiciones de fatiga física.
3. Colocarse siempre guantes, gafas de seguridad y auriculares. No llevar puestos
bufandas, pulseras ni otros elementos que puedan ser atrapados por el rotor.
4. Comprobar que no haya animales ni otras personas en el radio de acción del soplador durante la puesta en marcha y el uso.
5. Respetar las medidas de prevención de accidentes dictadas por los organismos
competentes.
6. Trabajar siempre en una posición estable y segura.
7. Llenar el depósito lejos de fuentes de calor y con el motor parado. No fumar durante el llenado. No quitar el tapón del depósito con el motor en marcha. Si, durante la carga, se derramara combustible, alejar el soplador por lo menos 3 metros
antes de ponerlo en marcha.
8. No dirigir el chorro de aire hacia personas o animales.
9. No aspirar objetos demasiado voluminosos porque podrían bloquear o dañar el rotor.
10. Emplear el soplador sólo en sitios bien ventilados. No utilizarlo en atmósfera explosiva, recintos cerrados o cerca de sustancias inflamables.
11. Controlar el soplador todos los días para cerciorarse de que todos sus dispositivos
funcionen correctamente, incluidos los de seguridad.
12. Recogerse el cabello largo; por ejemplo, con una redecilla de peluquería.
13. No trabajar con un soplador dañado, mal reparado, mal montado o modificado arbitrariamente. No quitar, dañar ni inutilizar ningún dispositivo de seguridad.
14. Conservar cuidadosamente este manual y consultarlo antes de cada uso.
15. Seguir siempre las instrucciones del fabricante para las operaciones de mantenimiento.
16. No realizar nunca por cuenta propia operaciones que no sean de mantenimiento
normal. En caso de necesidad, acudir exclusivamente a un taller especializado y
autorizado.
17. No utilizar el soplador sin haber recibido la debida instrucción al respecto.
18. Se prohíbe aplicar a la toma de fuerza del soplador un rotor distinto del que se entrega de fábrica. No se permite el uso de otros grupos de aplicación porque aumentan el peligro de accidentes.
19. Cuando el soplador se retire del uso, no abandonarlo en el medio ambiente sino
entregarlo al propio vendedor, quien le dará el destino correspondiente.
20. Ceder o prestar el soplador exclusivamente a personas expertas y que conozcan
el funcionamiento y el uso correcto de este dispositivo. Junto con el soplador, entregar también el manual con las instrucciones de uso y advertir de la necesidad
de leerlo antes de comenzar el trabajo.
21. Se recomienda no poner nunca la máquina en marcha sin el rotor. El uso del
soplador sin el rotor puede causar daños importantes en las partes del motor e implica la anulación inmediata de la garantía.
22. No utilizar el soplador en proximidad de equipos eléctricos.
23. No obstruir ni cerrar la entrada de aire del rotor.
24. No acercar nunca las manos al rotor ni efectuar operaciones de mantenimiento
cuando el motor esté en marcha.
25. No usar combustible (mezcla) para las operaciones de limpieza.
26. Sacar el capuchón de la bujía antes de realizar cualquier operación de mantenimiento, limpieza o reparación. Colocarse guantes para limpiar la cuchilla y el rotor.
27. No golpear ni forzar las palas del rotor, ni utilizar la máquina si el rotor está estropeado.
28. No montar el rotor en otros motores o transmisiones de potencia.
29. Guardar el soplador con el depósito vacío, en un lugar seco y elevado del suelo.
30. No transportar el soplador con el motor encendido.
English Deutsch Español
SAFETY PRECAUTIONS SICHERHEITSVORKERUNGEN NORMAS DE SEGURIDAD
Page 4

LET OP – Als de blower goed gebruikt wordt is het een snel, handig en doelmatig werkinstrument; als het niet goed of zonder de nodige voorzorgsmaatregelen gebruikt wordt, zou het een gevaarlijk werktuig kunnen worden.
Neem daarom altijd de hieronder en verderop in de handleiding vermelde veiligheidsvoorschriften in acht, om plezierig en veilig te kunnen werken.
1. De blower mag uitsluitend worden gebruikt door volwassenen die in goede lichamelijke conditie zijn en de gebruiksaanwijzingen kennen.
2. Gebruik de blower niet als u vermoeid bent.
3. Draag altijd handschoenen, een veiligheidsbril en oorkappen. Draag geen sjaals,
armbanden of andere zaken die vast kunnen komen te zitten in de rotor.
4. Sta het andere personen of dieren niet toe zich op te houden binnen de actieradius
van de blower tijdens het starten of het gebruik.
5. Neem de voorschriften voor ongevallenpreventie in acht die zijn uitgevaardigd door
de respectieve autoriteiten.
6. Werk altijd in een stabiele en veilige positie.
7. Vul de tank uit de buurt van warmtebronnen en bij stilstaande motor. Rook niet tijdens het vullen van de tank. Haal de dop niet van de tank terwijl de motor draait.
Als er brandstof gemorst wordt bij het tanken, verplaatst de blower dan minstens 3
meter alvorens hem te starten.
8. Richt de luchtstraal niet op mensen of dieren.
9. Zuig geen omvangrijke voorwerpen op die de rotor zouden kunnen blokkeren of
beschadigen.
10. Gebruik de blower alleen in goed geventileerde ruimten. Gebruik hem niet in een
explosiegevaarlijke omgeving, in afgesloten ruimten of in de buurt van brandbare
stoffen.
11. Controleer de blower dagelijks om na te gaan of alle (veiligheids)voorzieningen
goed werken.
12. Houd lang haar bijeen (b.v. met een haarnetje).
13. Werk niet met een beschadigde, slecht gerepareerde, slecht gemonteerde of eigenmachtig gewijzigde blower. Verwijder geen veiligheidsvoorzieningen, beschadig hen niet en stel hen niet buiten werking.
14. Bewaar deze handleiding zorgvuldig en raadpleeg hem voor elk gebruik.
15. Volg onze instructies voor het onderhoud altijd op.
16. Voer nooit zelf handelingen of reparaties uit die niet tot het normale onderhoud
behoren. Wendt u uitsluitend tot gespecialiseerde, erkende werkplaatsen.
17. Gebruik de blower niet voordat u op de hoogte bent van de specifieke manier waarop hij moet worden gebruikt.
18. Het is verboden een andere rotor op de stroomaansluiting van de blower aan te
brengen dan die door de fabrikant geleverd is. Het is niet toegestaan andere toepassingsgroepen te gebruiken, want deze verhogen de kans op ongevallen.
19. Als de blower afgedankt wordt, mag hij niet in het milieu worden achtergelaten,
maar moet hij worden teruggebracht bij de dealer, die voor de juiste verwerking zal
zorgdragen.
20. Geef of leen de blower uitsluitend aan ervaren personen die op de hoogte zijn van
de werking en het juiste gebruik van het apparaat. Geef ook de handleiding met de
gebruiksaanwijzingen, die moet worden gelezen alvorens het werk te beginnen.
21. Het wordt geadviseerd de machine nooit te starten zonder de rotor. Dit zou aanzienlijke schade kunnen veroorzaken aan de onderdelen van demotor, en zou de
garantie onmiddellijk doen vervallen.
22. Gebruik de blower niet in de buurt van elektrische apparatuur,
23. Verstop of sluit de luchtinlaat van de rotor niet af.
24. Kom niet met uw handen in de buurt van de rotor en verricht geen onderhoud
terwijl de motor draait.
25. Gebruik geen brandstof (mengsels) voor het schoonmaken
26. Maak de dop van de bougie telkens los wanneer u onderhoud, reinigingen of reparaties wilt gaan plegen. Gebruik handschoenen voor het schoonmaken van het
mes en van de rotor.
27. Stoot niet tegen de schoepen van de rotor en forceer hen niet; werk nooit met een
beschadigde rotor.
28. Monteer de rotor niet op andere motoren of vermogenstransmissies.
29. Bewaar de blower op een droge plaats, opgetild van de grond en met lege tank.
30. Vervoer de blower met afgezette motor.
4
PortuguêsNederlands
VEILIGHEIDSVOORSCHRIFTEN NORMAS DE SEGURANÇA
Ελληνικα
ΚΑΝΟΝΕΣ ΑΣΦΑΛΕΙΑΣ
ATENÇÃO – O soprador, se for bem utilizado, é um instrumento de trabalho
rápido, cómodo e eficaz. Se for, no entanto, utilizado de forma incorrecta ou
sem as devidas precauções poderá tornar-se um aparelho perigoso. Para
que o seu trabalho se processe sempre de forma agradável e segura, respeite escrupulosamente as seguintes normas de segurança, bem como as que
se apresentam ao longo de todo o manual.
1. O soprador deve ser utilizado apenas por pessoas adultas que estejam em boas
condições físicas e que conheçam as normas de utilização.
2. Não utilize o soprador em caso de fadiga física.
3. Coloque sempre luvas, óculos e tampões de protecção auricular. Não use lenços,
pulseiras ou quaisquer outros adornos que possam ficar presos no impulsor.
4. Não permita a permanência de outras pessoas ou animais no raio de acção do soprador durante o arranque e a utilização do mesmo.
5. Respeite as prescrições de segurança transmitidas pelas respectivas associações
da categoria.
6. Trabalhe sempre em posição estável e segura.
7. Encha o reservatório longe de fontes de calor e com o motor parado. Não fume
durante o abastecimento. Não retire o tampão do reservatório com o motor em
funcionamento. Se houver fugas de carburante durante o abastecimento, afaste o
soprador pelo menos 3 metros, antes de o ligar.
8. Não dirija o jacto de ar para pessoas ou animais.
9. Não aspire objectos volumosos, passíveis de bloquear ou danificar o impulsor.
10. Utilize o soprador apenas em locais bem ventilados. Não o utilize em atmosferas
explosivas, em ambientes fechados ou perto de substâncias inflamáveis.
11. Verifique diariamente o soprador, certificando-se de que todos os dispositivos de
segurança (e não só) se encontram em funcionamento.
12. Amarre os cabelos compridos (por ex., com uma rede para o cabelo).
13. Não trabalhe com um soprador danificado, mal reparado, mal instalado ou alterado arbitrariamente. Não retire, danifique nem inutilize nenhum dispositivo de segurança.
14. Conserve cuidadosamente o presente manual e consulte-o antes de qualquer utilização.
15. Siga sempre as nossas instruções relativas às operações de manutenção.
16. Nunca efectue sozinho operações ou reparações que não se enquadrem nos procedimentos normais de manutenção. Contacte apenas oficinas especializadas e
autorizadas.
17. Não utilize o soprador antes de tomar totalmente conhecimento do modo específico de utilização do aparelho.
18. É proibido aplicar à tomada de força do soprador um impulsor que não seja o fornecido pelo fabricante. Não é consentido o uso de outros grupos, pois aumentam
o risco de acidentes pessoais.
19. Se precisar de se desfazer do soprador, não o abandone no meio ambiente. Entregue-o ao Revendedor, que procederá à correcta eliminação do aparelho.
20. Entregue ou empreste o soprador apenas a pessoas com experiência e conhecedoras do funcionamento e da correcta utilização do mesmo. Forneça também o
manual com as instruções de utilização, o qual deve ser lido antes de se iniciar o
trabalho.
21. Recomendamos que nunca se ligue a máquina sem o impulsor. Isto pode causar danos significativos nos componentes do motor e implicar a imediata anulação
da garantia.
22. Não utilize o soprador perto de aparelhos eléctricos.
23. Não obstrua nem feche a tomada de entrada do ar do impulsor.
24. Não aproxime as mãos do impulsor nem proceda às operações de manutenção
quando o motor estiver em funcionamento.
25. Não utilize carburante (mistura) nas operações de limpeza
26. Retire o tampão da vela de ignição sempre que efectuar operações de manutenção, limpeza ou reparação. Utilize as luvas para a limpeza da lâmina e do impulsor.
27. Não bata nem force as pás do impulsor; não trabalhe com o impulsor danificado.
28. Não monte o impulsor em outros motores ou transmissores de potência.
29. Conserve o soprador num local seco, afastado do solo e com o reservatório vazio.
30. Transporte o soprador com o motor desligado.
¶ƒ√™√Г∏ - √ К˘ЫЛЩ‹Ъ·˜, В¿У ¯ЪЛЫИМФФИЛıВ› ЫˆЫЩ¿, В›У·И ¤У· БЪ‹БФЪФ,
¿УВЩФ О·И ·ФЩВПВЫМ·ЩИОfi fiЪБ·УФ ВЪБ·Ы›·˜. ∂¿У ‰ВУ ¯ЪЛЫИМФФИЛıВ› ЫˆЫЩ¿ ‹
¯ˆЪ›˜ Щ· О·Щ¿ППЛП· М¤ЩЪ· ЪФК‡П·НЛ˜, МФЪВ› У· МВЩ·ЩЪ·В› ЫВ ВИО›У‰˘УФ
ВЪБ·ПВ›Ф. °И· У· В›У·И ¿УЩ· В˘¯¿ЪИЫЩЛ О·И ·ЫК·П‹˜ Л ВЪБ·Ы›· Ы·˜, ЩЛЪВ›ЩВ
·˘ÛÙËÚ¿ ÙÔ˘˜ ηÓfiÓ˜ ·ÛÊ·Ï›·˜ Ô˘ ·ÎÔÏÔ˘ıÔ‡Ó ‹ ·Ó·ÁÚ¿ÊÔÓÙ·È ÛÙÔ
ÂÁ¯ÂÈÚ›‰ÈÔ.
1. √ К˘ЫЛЩ‹Ъ·˜ Ъ¤ВИ У· ¯ЪЛЫИМФФИВ›Щ·И МfiУФУ ·fi ВУ‹ПИОВ˜, МВ О·П‹ К˘ЫИО‹
О·Щ¿ЫЩ·ЫЛ О·И ВУ БУТЫВИ ЩˆУ О·УfiУˆУ ¯Ъ‹ЫЛ˜.
2. ªЛ ¯ЪЛЫИМФФИВ›ЩВ ЩФ К˘ЫЛЩ‹Ъ· ЫВ Ы˘Уı‹ОВ˜ К˘ЫИО‹˜ ОfiˆЫЛ˜.
3. ГЪЛЫИМФФИВ›ЩВ ¿УЩФЩВ Б¿УЩИ·, ЪФЫЩ·ЩВ˘ЩИО¿ Б˘·ПИ¿ О·И ЪФЫЩ·ЩВ˘ЩИО¿ ЩЛ˜
·ОФ‹˜. ªЛ ¯ЪЛЫИМФФИВ›ЩВ О·ЫОfiП, О·‰¤УВ˜ ‹ ФЩИ‰‹ФЩВ ¿ППФ МФЪВ› У· МП¤НВИ
ЫЩЛ КЩВЪˆЩ‹.
4. ªЛУ ВИЩЪ¤ВЩВ ЫВ ЩЪ›ЩФ˘˜ ‹ ˙Т· У· ‚Ъ›ЫОФУЩ·И М¤Ы· ЫЩЛУ ·ОЩ›У· ‰Ъ¿ЫЛ˜ ЩФ˘
К˘ЫЛЩ‹Ъ· О·Щ¿ ЩЛУ ВОО›УЛЫЛ О·И ЩЛ ¯Ъ‹ЫЛ.
5. ∆ЛЪВ›ЩВ ЩФ˘˜ О·УfiУВ˜ ЪfiПЛ„Л˜ ЩˆУ ·Щ˘¯ЛМ¿ЩˆУ Ф˘ ВО‰›‰Ф˘У ФИ ·ЪМfi‰ИВ˜
ФЪБ·УТЫВИ˜.
6. ∂ÚÁ¿˙ÂÛÙ ¿ÓÙ· Û ÛÙ·ıÂÚ‹ Î·È ·ÛÊ·Ï‹ ı¤ÛË.
7. °ВМ›˙ВЩВ ЩФ ЪВ˙ВЪ‚Ф˘¿Ъ М·ОЪИ¿ ·fi ЛБ¤˜ ıВЪМfiЩЛЩ·˜ О·И МВ ЩФУ ОИУЛЩ‹Ъ· ЫВ
ЫЩ¿ЫЛ. ªЛУ О·У›˙ВЩВ О·Щ¿ ЩЛ ‰И¿ЪОВИ· ЩФ˘ ·УВКФ‰И·ЫМФ‡. ªЛ ‚Б¿˙ВЩВ ЩЛУ
Щ¿· ЩФ˘ ЪВ˙ВЪ‚Ф˘¿Ъ МВ ЩФУ ОИУЛЩ‹Ъ· ЫВ ПВИЩФ˘ЪБ›·. ∞У О·Щ¿ ЩЛ ‰И¿ЪОВИ· ЩФ˘
·УВКФ‰И·ЫМФ‡ ЩЪ¤НВИ О·‡ЫИМФ, МВЩ·ОИУ‹ЫЩВ ЩФ К˘ЫЛЩ‹Ъ· ЩФ˘П¿¯ИЫЩФУ О·Щ¿ 3
М¤ЩЪ· ЪИУ ЩФУ ı¤ЫВЩВ ЫВ ПВИЩФ˘ЪБ›·.
8. ªËÓ Î·Ù¢ı‡ÓÂÙ ÙË ÚÔ‹ ÙÔ˘ ·¤Ú· Û ·ÓıÚÒÔ˘˜ ‹ ˙Ò·.
9. ªЛУ ЪФ˘К¿ЩВ ФБОТ‰Л ·УЩИОВ›МВУ· Ф˘ МФЪФ‡У У· МПФО¿ЪФ˘У ‹ У·
ЪФО·П¤ЫФ˘У ‚П¿‚В˜ ЫЩЛ КЩВЪˆЩ‹.
10. ГЪЛЫИМФФИВ›ЩВ ЩФ К˘ЫЛЩ‹Ъ· МfiУФ ЫВ О·П¿ ·ВЪИ˙fiМВУФ˘˜ ¯ТЪФ˘˜. ªЛУ ЩФУ
¯ЪЛЫИМФФИВ›ЩВ ЫВ ВОЪЛОЩИО‹ ·ЩМfiЫК·ИЪ·, ЫВ ОПВИЫЩФ‡˜ ¯ТЪФ˘˜ ‹ ОФУЩ¿ ЫВ
В‡КПВОЩ· ˘ПИО¿.
11. ∂П¤Б¯ВЩВ О·ıЛМВЪИУ¿ ЩФ К˘ЫЛЩ‹Ъ· БИ· У· ‚В‚·ИˆıВ›ЩВ fiЩИ Щ· Ы˘ЫЩ‹М·Щ·
·ЫК·ПВ›·˜ О·И fiП· Щ· ¿ПП· ВН·ЪЩ‹М·Щ· ПВИЩФ˘ЪБФ‡У О·УФУИО¿.
12. ª·˙¤„Ù ٷ Ì·ÎÚÈ¿ Ì·ÏÏÈ¿ (.¯. Ì ‰›¯Ù˘ ÁÈ· Ù· Ì·ÏÏÈ¿).
13. ªËÓ ÂÚÁ¿˙ÂÛÙ Ì ÙÔ Ê˘ÛËÙ‹Ú· Û η΋ ηٿÛÙ·ÛË, Úfi¯ÂÈÚ· ÂÈÛ΢·Ṳ̂ÓÔ,
ÌÔÓÙ·ÚÈṲ̂ÓÔ ‹ ÙÚÔÔÔÈË̤ÓÔ. ªËÓ ·Ê·ÈÚ›ÙÂ, ÌËÓ Î·Ù·ÛÙÚ¤ÊÂÙ ‹
ÙÚÔÔÔț٠ηӤӷ Û‡ÛÙËÌ· ·ÛÊ·Ï›·˜.
14. º˘Ï¿ÍÙ ÙÔ ·ÚfiÓ ÂÁ¯ÂÈÚ›‰ÈÔ ÁÈ· Ó· ÙÔ Û˘Ì‚Ô˘Ï‡ÂÛÙ ÚÈÓ ·fi οı ¯Ú‹ÛË.
15. ∞ÎÔÏÔ˘ı›Ù ¿ÓÙ· ÙȘ Ô‰ËÁ›Â˜ Ì·˜ ÁÈ· ÙË Û˘ÓÙ‹ÚËÛË.
16. ªЛУ ВОЩВПВ›ЩВ ФЩ¤ МfiУФИ ВУ¤ЪБВИВ˜ ‹ ВИЫОВ˘¤˜ ВОЩfi˜ ЩЛ˜ Щ·ОЩИО‹˜
Ы˘УЩ‹ЪЛЫЛ˜. ∞В˘ı˘УıВ›ЩВ МfiУФ ЫВ ВНВИ‰ИОВ˘М¤У· О·И ВНФ˘ЫИФ‰ФЩЛМ¤У·
Ы˘УВЪБВ›·.
17. ªЛ ¯ЪЛЫИМФФИВ›ЩВ ЩФ К˘ЫЛЩ‹Ъ· ЪИУ ВУЛМВЪˆıВ›ЩВ БИ· ЩЛ ¯Ъ‹ЫЛ ЩФ˘.
18. ∞·БФЪВ‡ВЩ·И Л ЩФФı¤ЩЛЫЛ ЫЩЛУ В›ЫФ‰Ф ИЫ¯‡Ф˜ ЩФ˘ К˘ЫЛЩ‹Ъ·, КЩВЪˆЩ‹˜
‰И·КФЪВЩИО‹˜ ·fi ·˘Щ‹У Ф˘ ‰И·ı¤ЩВИ Ф О·Щ·ЫОВ˘·ЫЩ‹˜. ¢ВУ ВИЩЪ¤ВЩ·И Л
¯Ъ‹ЫЛ ¿ППˆУ Ы˘ЫЩЛМ¿ЩˆУ БИ·Щ› ·˘Н¿УФ˘У ЩФУ О›У‰˘УФ ·Щ˘¯‹М·ЩФ˜.
19. ™В ВЪ›ЩˆЫЛ Ф˘ Ф К˘ЫЛЩ‹Ъ·˜ Ъ¤ВИ У· ЩВıВ› ВОЩfi˜ ПВИЩФ˘ЪБ›·˜, МЛУ ЩФУ
ВБО·Щ·ПВ›ВЩВ ЫЩФ ВЪИ‚¿ППФУ, ·ПП¿ ·Ъ·‰ТЫЩВ ЩФУ ЫЩЛУ ∞УЩИЪФЫˆВ›· Ф˘
ı· КЪФУЩ›ЫВИ БИ· ЩЛ ‰И¿ıВЫ‹ ЩФ˘.
20. ¶·Ъ·‰ТЫЩВ ‹ ‰·УВ›ЫЩВ ЩФ К˘ЫЛЩ‹Ъ· МfiУФ ЫВ ¤МВИЪ· ¿ЩФМ· Ф˘ БУˆЪ›˙Ф˘У ЩЛ
ПВИЩФ˘ЪБ›· О·И ЩЛ ЫˆЫЩ‹ ¯Ъ‹ЫЛ ЩФ˘ МЛ¯·У‹М·ЩФ˜. ¶·Ъ·‰ТЫЩВ О·И ЩФ ВБ¯ВИЪ›‰ИФ
МВ ЩИ˜ Ф‰ЛБ›В˜ ¯Ъ‹ЫЛ˜, БИ· У· ЩФ ‰И·‚¿ЫФ˘У ЪИУ ЩЛУ ¤У·ЪНЛ ЩˆУ ВЪБ·ЫИТУ.
21. ™˘ÓÈÛÙ¿Ù·È Ó· ÌË ‚¿˙ÂÙ ÔÙ¤ ÂÌÚfi˜ ÙÔ Ì˯¿ÓËÌ· ¯ˆÚ›˜ ÙË ÊÙÂÚˆÙ‹. ∞˘Щfi
МФЪВ› У· ЪФО·П¤ЫВИ ЫФ‚·Ъ¤˜ ‚П¿‚В˜ ЫВ ВН·ЪЩ‹М·Щ· ЩФ˘ ОИУЛЩ‹Ъ· О·И ЩЛУ
¿МВЫЛ ¤ОЩˆЫЛ ЩЛ˜ ВББ‡ЛЫЛ˜.
22. ªЛ ¯ЪЛЫИМФФИВ›ЩВ ЩФ К˘ЫЛЩ‹Ъ· ОФУЩ¿ ЫВ ЛПВОЩЪИО¤˜ Ы˘ЫОВ˘¤˜.
23. ªË ÊÚ¿˙ÂÙ ‹ ÎÏ›ÓÂÙ ÙËÓ Â›ÛÔ‰Ô ·¤Ú· Ù˘ ÊÙÂÚˆÙ‹˜.
24. ªЛУ ПЛЫИ¿˙ВЩВ ФЩ¤ Щ· ¯¤ЪИ· ЫЩЛ КЩВЪˆЩ‹ О·И МЛУ О¿УВЩВ Ы˘УЩ‹ЪЛЫЛ МВ ЩФУ
ОИУЛЩ‹Ъ· ЫВ ПВИЩФ˘ЪБ›·.
25. ªЛ ¯ЪЛЫИМФФИВ›ЩВ О·‡ЫИМФ (М›БМ·) БИ· О·ı·ЪИЫМfi
26. ∞ФЫ˘У‰¤ЫЩВ ЩФ О·ПТ‰ИФ ·fi ЩФ МФ˘˙› ЪИУ ·fi О¿ıВ В¤М‚·ЫЛ Ы˘УЩ‹ЪЛЫЛ˜,
О·ı·ЪИЫМФ‡ ‹ ВИЫОВ˘‹˜. ГЪЛЫИМФФИВ›ЩВ Щ· Б¿УЩИ· БИ· ЩФУ О·ı·ЪИЫМfi ЩФ˘
М·¯·ИЪИФ‡ О·И ЩЛ˜ КЩВЪˆЩ‹˜.
27. ∞ÔʇÁÂÙ ¯Ù˘‹Ì·Ù· Î·È È¤ÛÂȘ ÛÙ· ÙÂÚ‡ÁÈ· Ù˘ ÊÙÂÚˆÙ‹˜. ÌËÓ ÂÚÁ¿˙ÂÛÙÂ
·Ó Ë ÊÙÂÚˆÙ‹ ·ÚÔ˘ÛÈ¿˙ÂÈ ‚Ï¿‚Ë.
28. ªЛУ ЩФФıВЩВ›ЩВ ЩЛ КЩВЪˆЩ‹ ЫВ ¿ППФ˘˜ ОИУЛЩ‹ЪВ˜ ‹ МВЩ·‰fiЫВИ˜ ИЫ¯‡Ф˜.
29. º˘П¿ЩВ ЩФ К˘ЫЛЩ‹Ъ· ЫВ ЫЩВБУfi ¯ТЪФ, ЫВ ·fiЫЩ·ЫЛ ·fi ЩФ ¤‰·КФ˜ О·И МВ ЩФ
ЪВ˙ВЪ‚Ф˘¿Ъ ¿‰ВИФ.
30. ªВЩ·К¤ЪВЩВ ЩФ К˘ЫЛЩ‹Ъ· МВ ЩФУ ОИУЛЩ‹Ъ· Ы‚ЛЫЩfi.
Page 5
5
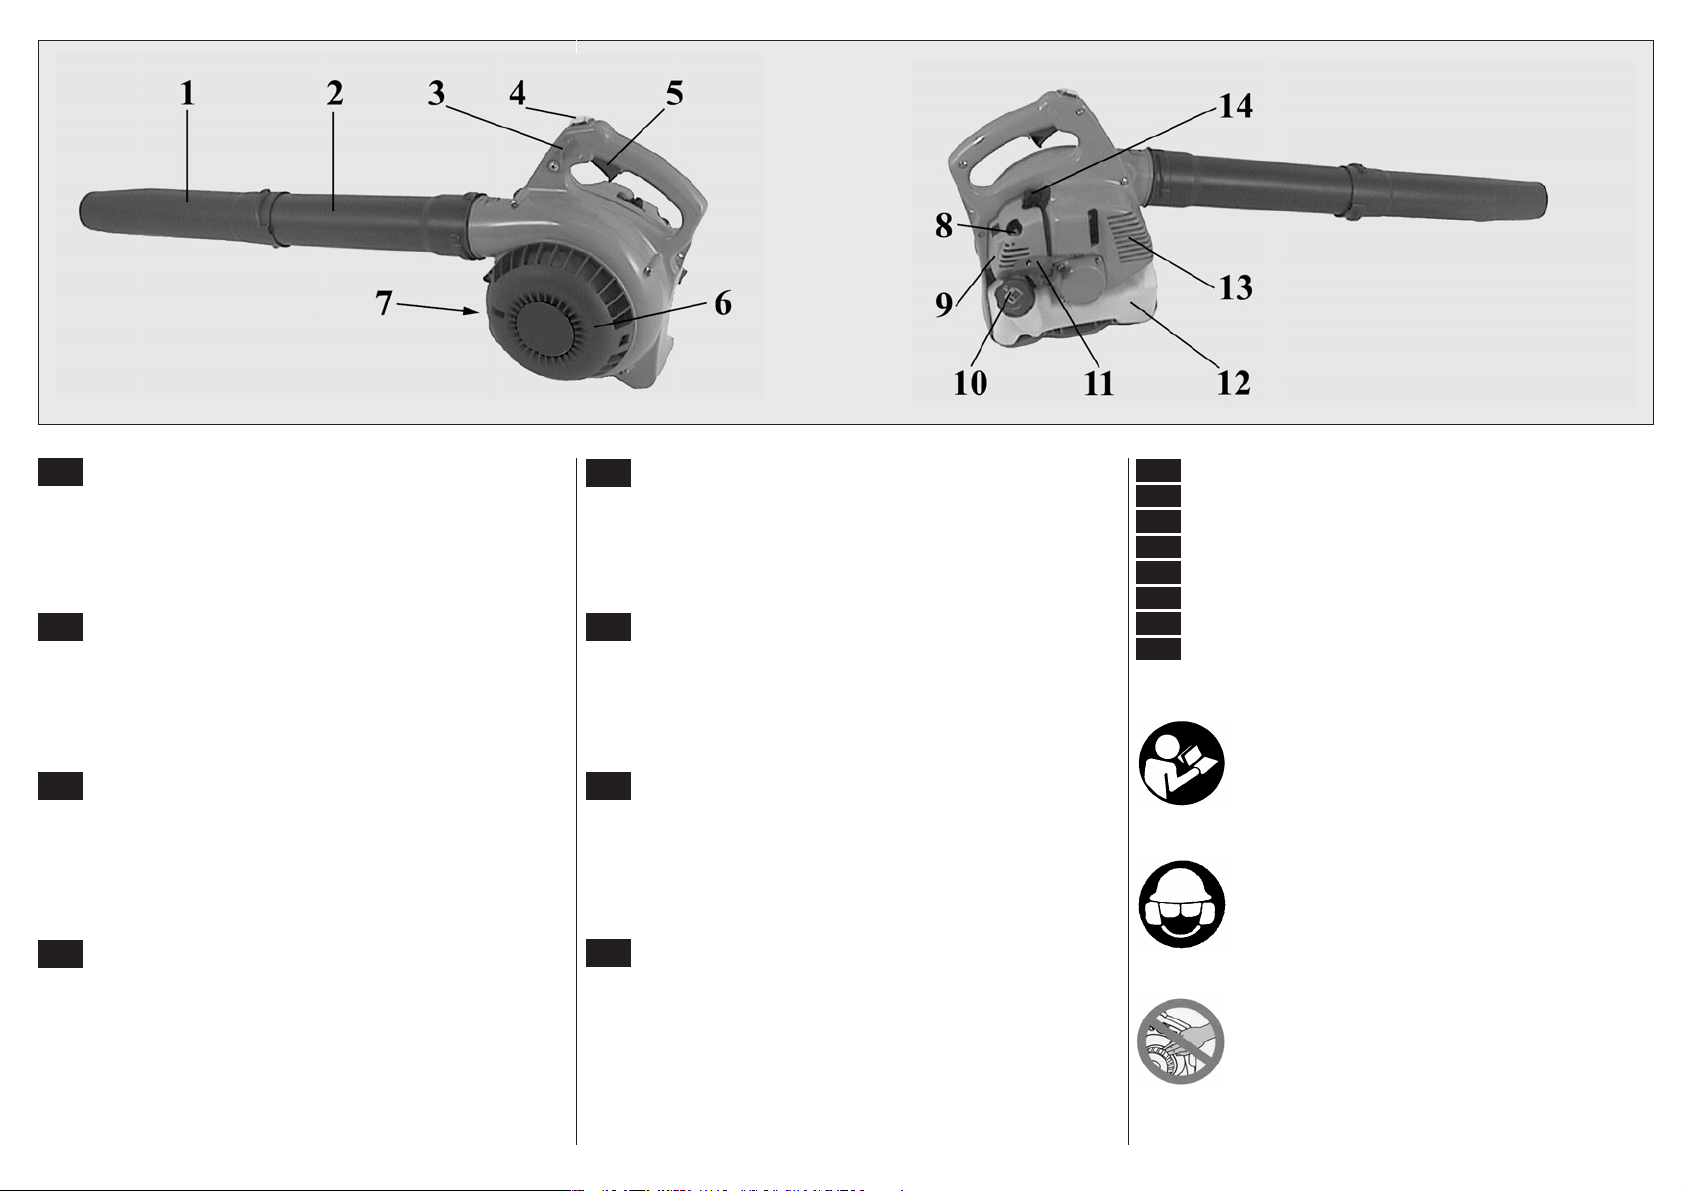
COMPONENTI DEL SOFFIATORE
1 - Ugello 8 - Leva lift-starter
2 - Tubo soffiatore 9 - Coperchio filtro aria
3 - Fermo acceleratore 10 - Tappo serbatoio carburante
4 - Interruttore di massa 11 - Impugnatura avviamento
5 - Leva acceleratore 12 - Serbatoio carburante
6 - Griglia di protezione 13 - Marmitta
7 - Interruttore di sicurezza 14 - Candela
COMPOSANTS DU SOUFFLEUR
1 - Buse 8 - Levier lift-starter
2 - Tube du souffleur 9 - Couvercle du filtre à air
3 - Arrêt accélérateur 10 - Bouchon du réservoir de carburant
4 - Interrupteur de masse 11 - Poignée de démarrage
5 - Levier accélerateur 12 - Réservoir carburant
6 - Grille de protection 13 - Pot d’échappement
7 - Interrupteur de sécurité 14 - Bougie
BLOWER COMPONENTS
1 - Nozzle 8 - Lift-starter lever
2 - Blower tube 9 - Air cleaner cover
3 - Throttle stop 10 - Fuel tank cap
4 - Stop/start switch 11 - Starting handle
5 - Throttle trigger 12 - Fuel tank
6 - Safety guard 13 - Muffler
7 - Safety switch 14 - Spark plug
BAUTEILE DES BLASGERÄTS
1 - Düse 8 - Lift-Starterhebel
2 - Blasrohr 9 - Luftfilterdeckel
3 - Gasregler 10 - Tankverschluss
4 - Masseschalter 11 - Startgriff
5 - Gashebel 12 - Kraftstofftank
6 - Schutzgitter 13 - Auspuff
7 - Sicherheitsschalter 14 - Zündkerze
COMPONENTES DEL SOPLADOR
1 - Boquilla 8 - Arrancador automático (lift-starter)
2 - Tubo soplador 9 - Tapa del filtro de aire
3 - Tope del acelerador 10 - Tapón del depósito de combustible
4 - Interruptor de masa 11 - Empuñadura para el arranque
5 - Palanca de acelerador 12 - Depósito de combustible
6 - Rejilla de protección 13 - Silenciador
7 - Interruptor de seguridad 14 - Bujía
ONDERDELEN VAN DE BLOWER
1 - Mondstuk 8 - Lift-starter hendel
2 - Blowerbuis 9 - Deksel luchtfilter
3 - Stopper van versneller 10 - Dop brandstoftank
4 - Aan/Uitschakelaar 11 - Startgreep
5 - Versnellingshendel 12 - Brandstoftank
6 - Beschermrooster 13 - Uitlaat
7 - Veiligheidsschakelaar 14 - Bougie
COMPONENTES DO SOPRADOR
1 - Bico 8 - Alavanca lift-starter
2 - Tubo do soprador 9 - Tampa do filtro de ar
3 - Paragem do acelerador 10 - Tampão do reservatório do carburante
4 - Interruptor de massa 11 - Pega de arranque
5 - Botão do acelerador 12 - Depósito de combustivel
6 - Grelha de protecção 13 - Escape
7 - Interruptor de segurança 14 - Vela
∂•∞ƒ∆∏ª∞∆∞ ∆√À ºÀ™∏∆∏ƒ∞
1 − ™ÙfiÌÈÔ 8 − §Â‚Ȥ˜ lift-starter
2 − ™ˆÏ‹Ó·˜ Ê˘ÛËÙ‹Ú· 9 − ∫·¿ÎÈ Ê›ÏÙÚÔ˘ ·¤Ú·
3 − ÃÂÈÚfiÁη˙Ô 10 − ∆¿· ÚÂ˙ÂÚ‚Ô˘¿Ú
4 − ¢È·ÎfiÙ˘ Á›ˆÛ˘ 11 − ГВИЪФП·‚‹ ВОО›УЛЫЛ˜
5 − §Â‚Ȥ˜ Áη˙ÈÔ‡ 12 − ƒÂ˙ÂÚ‚Ô˘¿Ú
6 − °Ú›ÏÈ· ÚÔÛÙ·Û›·˜ 13 − ∂Н¿ЩМИЫЛ
7 − ¢È·ÎfiÙ˘ ·ÛÊ·Ï›·˜ 14 − ªÔ˘˙›
F
I
GB
E
NL
P
GR
D
I
F
GB
D
E
NL
P
SPIEGAZIONE SIMBOLI E AVVERTENZE DI SICUREZZA
EXPLICATION DES SYMBOLES ET REGLES DE SECURITE
EXPLANATION OF SYMBOLS AND SAFETY WARNINGS
ERLÄUTERUNG DER SYMBOLE-UND SICHERHEITSHINWEISE
EXPLICACION SIMBOLOS Y ADVERTENCIAS DE SEGURIDAD
UITLEG VAN DE VEILIGHEIDSSYMBOLEN
EXPLICAÇÃO DE SIMBOLOS E ADVERTÊNCIAS DE SEGURANÇA
EPMHNEIA ™YMBO§øN KAI KANONE™ A™ºA§EIA™
- Leggere il libretto uso e manutenzione prima di utilizzare questa macchina.
- Lire le manuel avant d’utiliser cette machine.
- Read operator’s instruction book before operating this machine.
- Betriebsanleitung vor der Inbetriebnahme lesen.
- Antes de utilizar esta máquina, leer el manual de instrucciones.
- Lees de gebruikshandleiding alvorens u met de machine gaat werken.
- Antes de utilizar a máquina, leia o manual de instruções.
- ∆ιαβαστε το εγχειριδιο χρησης και συντηρησης πριν χρησιµοποιησετε
αυτο το µηχανηµα.
- Indossare casco, occhiali e cuffie di protezione.
- Vêtir casque, visière et protège-oreilles..
- Wear head, eye and ear protection.
- Immer Helm, Schutzbrille und Geräuschschutz tragen.
- Llevar casco, gafas y auriculares de protección.
- Draag oog, -oor-en hoofdbescherming.
- Usar capacete, botas, macação e protetor auricolar.
- Φορατε προστατευτικο κρανος, γυαλια και ωτοασπιδες.
- ATTENZIONE! Pericolo amputazione dita!
- ATTENTION: risque d’amputation des doigts!
- WARNING! Danger of finger amputation.
- ACHTUNG! Gefahr der Fingeramputation.
- ¡ATENCIÓN! - Peligro de amputación de los dedos.
- LET OP! Gevaar voor amputatie van de vingers.
- ATENÇÃO! Perigo de amputação dos dedos.
- ¶ƒ√™√Ã∏! ∫›Ó‰˘ÓÔ˜ ·ÎÚˆÙËÚÈ·ÛÌÔ‡ ÙˆÓ ‰·¯Ù‡ÏˆÓ.
GR
Page 6
6
La macchina viene fornita predisposta per l’utilizzo
nella versione soffiatore.
È disponibile il kit KA 26 per l’utilizzo come aspiratore / trituratore, che viene fornito a parte come opzionale (vedi capitolo pag.16-18).
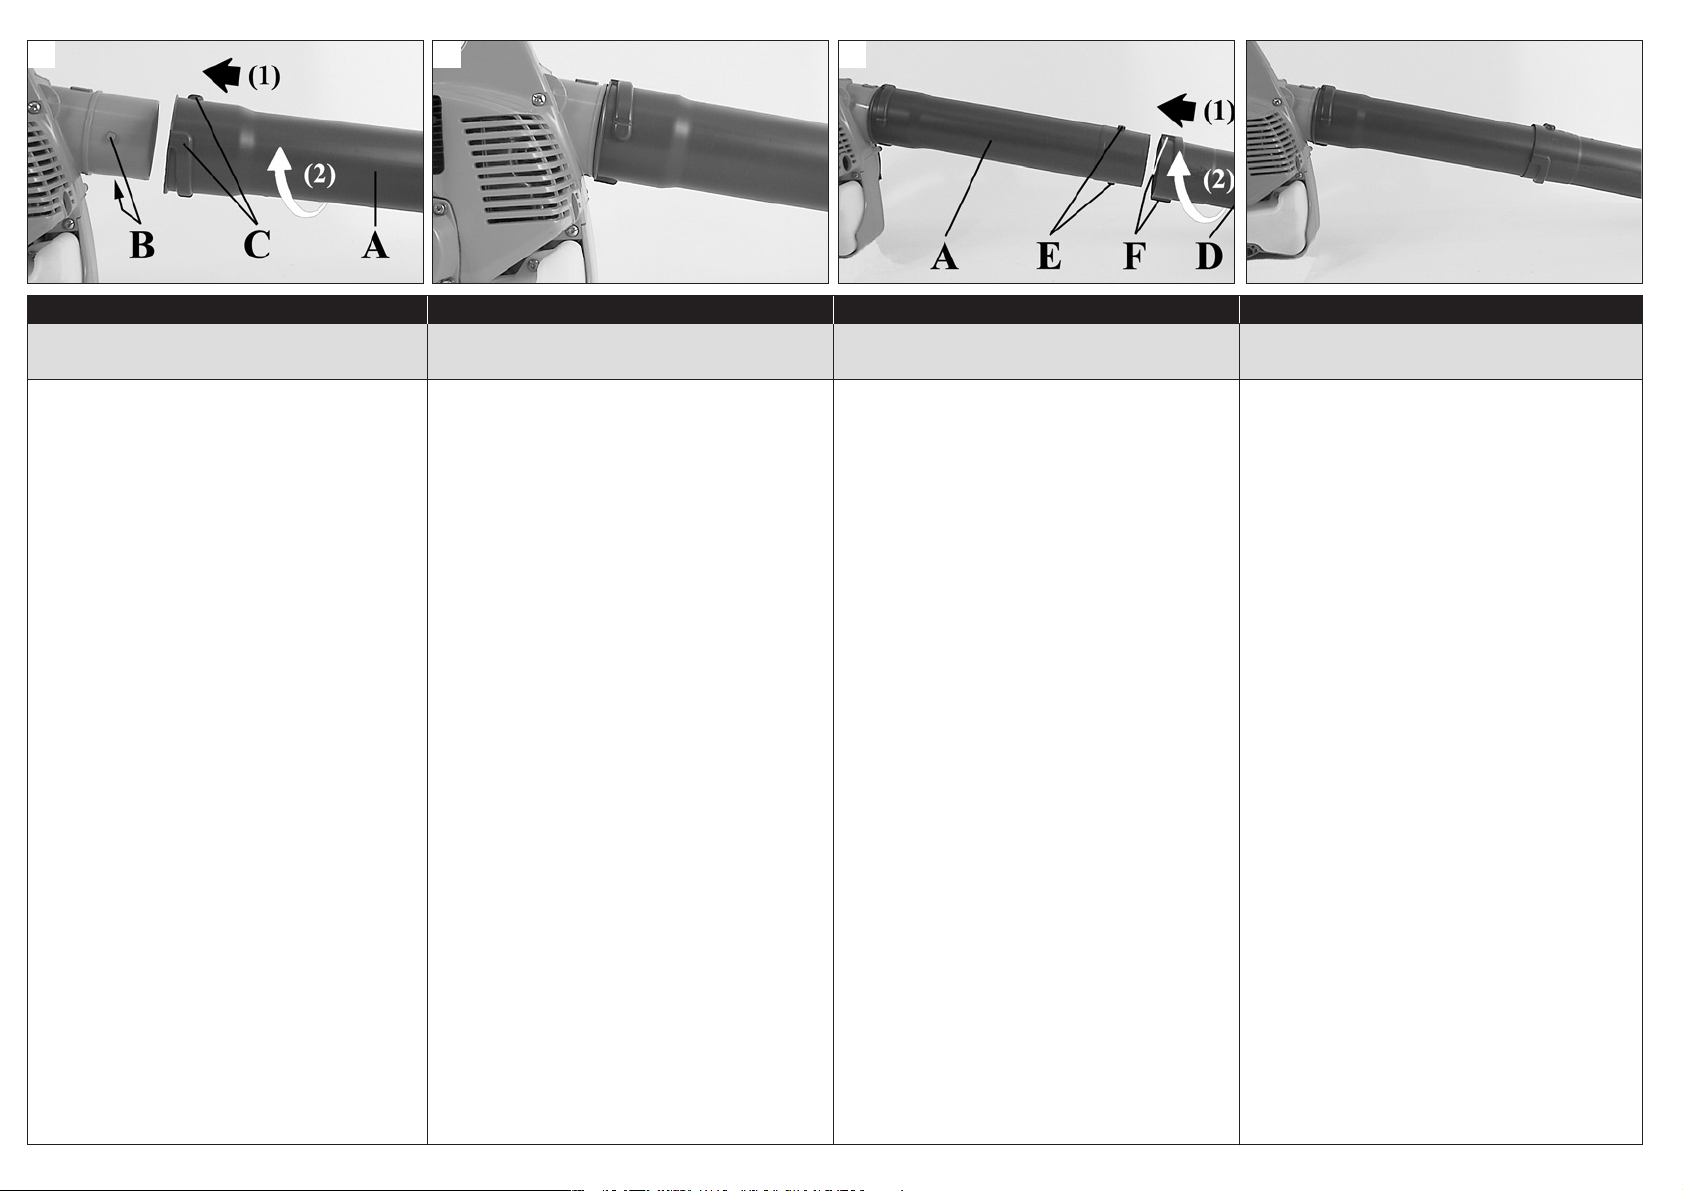
Montaggio dei tubi
1. Innestare il tubo soffiatore (A, Fig.1), imboccando i due perni (B) del bocchettone della chiocciola, sulle due scanalature (C) del tubo. Ruotare nella direzione della freccia (2). Il tubo montato risulterà come in Fig. 2.
2. Innestare l’ugello (D, Fig.3) sul tubo (A), imboccando i due perni (E) del tubo soffiatore, sulle
due scanalature (F) dell’ugello. Ruotare nella direzione della freccia (2). L’ugello montato risulterà come in Fig. 4.
3. Prestare attenzione al montaggio dell’ugello (D,
Fig.5), verificando che a montaggio effettuato la
scritta sul tubo ALTO – UP sia rivolta verso l’alto. Questo perché la conicità terminale dell’ugello sia rivolta verso la sinistra della macchina;
viene così assicurato il buon bilanciamento del
soffiatore durante il funzionamento.
ASSEMBLAGE
L’appareil est livré en préréglage souffleur.
Le kit KA 26 pour l’utilisation comme aspirateur /
triturateur, peut être fourni séparément comme accessoire en option (voir chapitre pages 16-18).
Montage des tubes
1. Emboîter le tuyau du souffleur (A, Fig.1), en introduisant les deux ergots (B) de l’embouchure
de la turbine dans les deux cannelures (C) du
tube. Tourner dans le sens de la flèche (2). Le
tube sera alors monté comme le montre la Fig.
2.
2. Emboîter la buse (D, Fig.3) sur le tube (A), en
introduisant les deux ergots (E) du tube souffleur sur les deux cannelures (F) de la buse.
Tourner dans le sens de la flèche (2). Le tube
sera alors monté comme le montre la Fig. 4.
3. Lors du montage de la buse (D, Fig.5), vérifier
que lorsque celui-ci est terminé, la mention AL-
TO – UP sur le tube soit vers le haut afin que
l’embout conique de la buse soit bien tourné
vers la gauche de l’appareil pour assurer son
bon équilibre durant le fonctionnement.
The machine is supplied ready for use in the
blower version.
The kit KA 26, supplied separately as an optional
accessory, allows the machine to be used as a vacuum / shredder (see page 16-18).
Tube assembly
1. Fit the blower tube (A, Fig.1), so that the two
pins (B) on the spigot of the impeller housing
engage the two slots (C) in the blower tube. Rotate the blower tube in the direction of the arrow
(2). When fitted, tube should appear as shown
in Fig. 2.
2. Fit the nozzle (D, Fig.3) on to the tube (A), so
that the two pins (E) on the blower tube engage
the two slots (F) in the nozzle. Rotate the nozzle
in the direction of the arrow (2). When fitted
nozzle should appear as shown in Fig. 4.
3. After fitting the nozzle (D, Fig.5), make sure that
the marking ALTO – UP is facing upwards. This
ensures that the tapered end of the nozzle is
oriented towards the left, so that the blower is
better balanced during use.
Das Gerät wird in der Ausführung als Blasgerät geliefert.
Sie können den Bausatz KA 26 zur Umrüstung in
Laubsauger / Laubhäcksler als Sonderzubehör bestellen (siehe Kapitel auf Seiten 16-18).
Rohrmontage
1. Stecken Sie die 2 Stifte (B) des Gehäusestutzens in die 2 Rillen (C) des Blasrohrs (A, Abb.1)
ein und drehen Sie dann in Pfeilrichtung (2).
Das eingesteckte Rohr ist in Abb. 2 dargestellt.
2. Führen Sie die 2 Stifte (E) des Blasrohrs (A) in
die 2 Rillen (F) der Düse (D, Abb.3) ein und
drehen Sie dann in Pfeilrichtung (2). Die montierte Düse ist in Abb. 4 dargestellt.
3. Achten Sie beim Einbau der Düse (D, Abb.5)
darauf, dass nach der Montage die Rohraufschrift ALTO – UP nach oben zeigt. Auf diese Wei-
se ist das Kegelende der Düse nach links gerichtet, womit die Balance des Blasgeräts beim
Gebrauch sichergestellt wird.
Italiano Français English Deutsch
ASSEMBLAGGIO ASSEMBLY
ASSEMBLAGE
MONTAGE
2 3 4
1
Page 7

7
La máquina se entrega preparada para su uso como soplador.
Esta disponible el kit opcional KA 26 para el em-
pleo como aspirador/triturador (ver el capítulo, pág.
17-19).
Montaje de los tubos
1. Conecte el tubo soplador (A, Fig. 1), insertando
los dos pernos (B) de la boca del caracol en las
dos ranuras (C) del tubo. Gire en el sentido de
la flecha (2). El tubo montado quedará como en
la Fig. 2.
2. Inserte la boquilla (D, Fig. 3) en el tubo (A), encajando los dos pernos (E) del tubo soplador en
las dos ranuras (F) de la boquilla. Gire en el
sentido de la flecha (2). La boquilla montada
quedará como en la Fig. 4.
3. Preste atención al montaje de la boquilla (D,
Fig. 5): las palabras ALTO – UP escritas en el
tubo deben mirar hacia arriba. De esta manera
el terminal cónico de la boquilla quedará hacia
la izquierdo de la máquina, asegurando el equilibrio del soplador durante el funcionamiento.
Het apparaat is bij levering al voorbereid voor gebruik als blower.
De kit KA 26 is leverbaar voor gebruik van het apparaat als zuiger/afvalvernietiger, deze wordt apart
geleverd als optie (zie hoofdstuk pag.17-19).
Montage van de slangen
1. Steek de blowerbuis (A, Fig.1), door de twee
pennen (B) van de opening van het slakkenhuis
in de twee groeven (C) van de buis te steken.
Draai hem in de richting van de pijl (2). Nadat
de buis gemonteerd is, ziet hij eruit zoals op
Fig. 2.
2. Steek het mondstuk (D, Fig.3) op de buis (A),
door de twee pennen (E) van de blowerbuis op
de twee groeven (F) van het mondstuk te
steken. Draai hem in de richting van de pijl (2).
Nadat het mondstuk gemonteerd is, ziet hij eruit
zoals op Fig. 4.
3. Let op de montage van het mondstuk (D, Fig.5),
en ga na of de tekst op de buis ALTO - UP naar
boven gericht is nadat het mondstuk gemonteerd is. Dit omdat het taps toelopende uiteinde
van het mondstuk naar de linkerkant van het
apparaat gericht moet zijn; zodoende wordt een
goede uitbalancering van de blower tijdens de
werking gewaarborgd.
A máquina é fornecida para uma utilização enquanto soprador.
O kit KA 26, fornecido à parte como opcional (ver
capítulo, páginas 17-19), encontra-se disponível
para uma utilização enquanto aspirador / triturador.
Montagem dos tubos
1. Introduza o tubo do soprador (A, Fig. 1), encaixando os dois pernos (B) do bico da espiral
nas duas estrias (C) do tubo. Rode no sentido
da seta (2). O tubo montado ficará como na Fig.
2.
2. Introduza o bico (D, Fig. 3) no tubo (A), encaixando os dois pernos (E) do tubo soprador
nas duas estrias (F) do bico. Rode no sentido
da seta (2). O bico montado ficará como na Fig.
4.
3. Preste atenção à montagem do bico (D, Fig. 5).
Certifique-se de que, após a montagem, as palavras ALTO – UP escritas no tubo se encon-
tram voltadas para cima - isto para que a conicidade terminal do bico esteja virada para a
esquerda da máquina. Fica assim assegurado o
perfeito equilíbrio do soprador durante o funcionamento.
∆Ф МЛ¯¿УЛМ· ‰И·Щ›ıВЩ·И ¤ЩФИМФ БИ· ¯Ъ‹ЫЛ ЫВ
¤О‰ФЫЛ К˘ЫЛЩ‹Ъ·.
¢И·Щ›ıВЩ·И ЩФ ОИЩ KA 26 ÁÈ· ÙË ¯Ú‹ÛË ˆ˜
·ФЪЪФКЛЩ‹Ъ· / ·ПВЫЩИО‹˜ МЛ¯·У‹˜, Ф˘
‰И·Щ›ıВЩ·И ЪФ·ИЪВЩИО¿ (‚П¤В ОВК¿П·ИФ ЫВП.17-
19).
™˘Ó·ÚÌÔÏfiÁËÛË ÛˆÏ‹ÓˆÓ
1. ™˘Ó‰¤ÛÙ ÙÔ ÛˆÏ‹Ó· Ê˘ÛËÙ‹Ú· (A, ∂ÈÎ.1),
ÚÔÛ·ÚÌfi˙ÔÓÙ·˜ ÙÔ˘˜ ‰‡Ô ›ÚÔ˘˜ (B) ÙÔ˘
ÛÙÔÌ›Ô˘ ÙÔ˘ Îԯϛ·, ÛÙȘ ‰‡Ô ÂÁÎÔ¤˜ (C) ÙÔ˘
ۈϋӷ. °˘Ú›ÛÙ ÚÔ˜ ÙËÓ Î·Ù‡ı˘ÓÛË ÙÔ˘
‚¤ÏÔ˘˜ (2). √ ۈϋӷ˜ ÙÔÔıÂÙË̤ÓÔ˜ ¤¯ÂÈ ÙË
ı¤ÛË Ù˘ ∂ÈÎ. 2.
2. ™˘Ó‰¤ÛÙ ÙÔ ÛÙfiÌÈÔ (D, ∂ÈÎ.3) ÛÙÔ ÛˆÏ‹Ó· (A),
ÚÔÛ·ÚÌfi˙ÔÓÙ·˜ ÙÔ˘˜ ‰‡Ô ›ÚÔ˘˜ (E) ÙÔ˘
ۈϋӷ Ê˘ÛËÙ‹Ú·, ÛÙȘ ‰‡Ô ÂÁÎÔ¤˜ (F) ÙÔ˘
ÛÙÔÌ›Ô˘. °˘Ú›ÛÙ ÚÔ˜ ÙËÓ Î·Ù‡ı˘ÓÛË ÙÔ˘
‚¤ÏÔ˘˜ (2). ∆Ô ÛÙfiÌÈÔ ÙÔÔıÂÙË̤ÓÔ ¤¯ÂÈ ÙË
ı¤ÛË Ù˘ ∂ÈÎ. 4.
3. ∆ФФıВЩТУЩ·˜ ЩФ ЫЩfiМИФ (D, ∂ИО.5),
‚В‚·ИˆıВ›ЩВ fiЩИ Л ¤У‰ВИНЛ ЫЩФ ЫˆП‹У· ALTO -
UP ‚Ú›ÛÎÂÙ·È ÚÔ˜ Ù· ¿Óˆ. ªÂ ÙÔÓ ÙÚfiÔ
·˘Щfi Л ОˆУИОfiЩЛЩ· ЫЩФ ¿ОЪФ ЩФ˘ ЫЩФМ›Ф˘
‚Ъ›ЫОВЩ·И ЪФ˜ Щ· ·ЪИЫЩВЪ¿ ЩФ˘ МЛ¯·У‹М·ЩФ˜,
ТЫЩВ У· ВН·ЫК·П›˙ВЩ·И Л ЫˆЫЩ‹ ИЫФЪЪФ›· ЩФ˘
К˘ЫЛЩ‹Ъ· О·Щ¿ ЩЛ ПВИЩФ˘ЪБ›·.
Español Nederlands Português
MONTAJE MONTAGE MONTAGEM
5
Ελληνικα
ΕΥΝΑΡΜΟΛΟΓΗΣΗ
Page 8
8
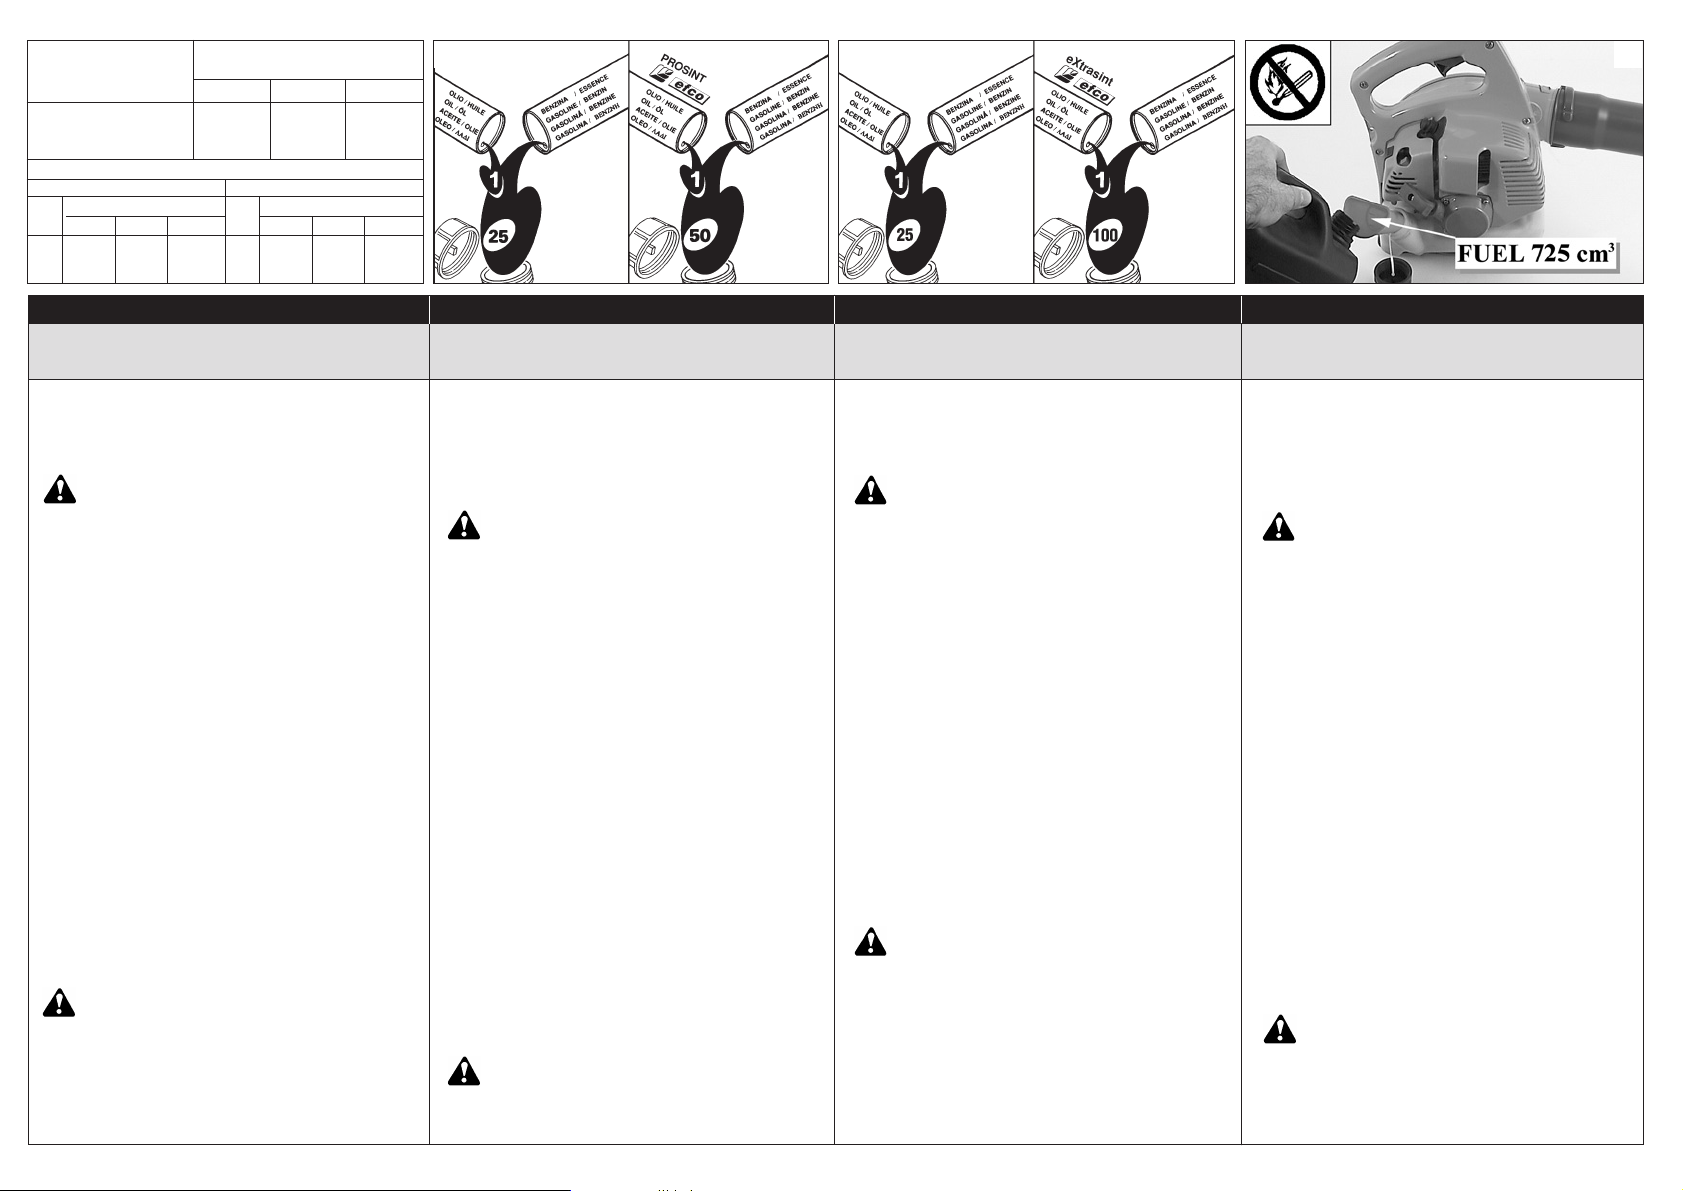
MISCELA CARBURANTE (Fig. 9-10-11)
Usare carburante (miscela olio/benzina) al 4% (25:1).
Con olio PROSINT Efco usare miscela al 2% (50:1).
Con olio eXtrasint Efco usare miscela al 1% (100:1).
ATTENZIONE! – I motori 2 tempi sono dotati di potenza specifica elevata, consigliamo quindi l’uso di
benzine senza piombo di marca conosciuta,
con un numero di ottani non inferiore ai 90. Tenere la
benzina, l’olio e la miscela in contenitori omologati. Nella
preparazione della miscela usare solo olio specifico per
motori 2 tempi. Agitare la tanica della miscela prima di
procedere al rifornimento. Eseguire il rifornimento carburante (Fig. 12) sempre a motore spento e lontano da fiamme. Prima di svitare il tappo del serbatoio posizionare il
soffiatore su di una superficie piana e solida in modo che
non possa rovesciarsi. Aprire con cautela il tappo per scaricare lentamente l’eccesso di pressione e per evitare che
il carburante schizzi fuori. Preparare solo la miscela necessaria all’uso; non lasciarla nel serbatoio o tanica per
molto tempo. Si consiglia l’utilizzo di additivo ADDITIX
2000 della Emak cod. 001000972, per conservare la miscela per un periodo di un anno.
AVVIAMENTO MOTORE
Assicurarsi che la leva acceleratore (B, Fig.13) funzioni
correttamente e che il fermo acceleratore (C) sia posizionato al minimo. Caricare il carburatore premendo il bulbo
varie volte (D, Fig.14). Portare l’interruttore (A, Fig.13) in
posizione START. Portare la leva starter (E, Fig.15-16B)
in posizione “CLOSE”. Appoggiare il soffiatore sul terreno
in posizione stabile. Tenendo fermo il soffiatore (Fig.17),
tirare energicamente la funicella d’avviamento alcune volte
fino ad ottenere l’avviamento. Aspettare 10 secondi e
quindi azionare la leva acceleratore (B, Fig.13) per sbloccare il dispositivo di starter automatico. La leva starter (E,
Fig.15-16A) deve ritornare nella posizione originale
“OPEN”.
ATTENZIONE! – Quando il motore è già caldo,
non usare lo starter automatico (E, Fig.15) per
l’avviamento.
MÉLANGE CARBURANT (Fig. 9-10-11)
Utiliser un mélange deux-temps (huile /essence) dans les
proportions 4% (25:1).
Avec l’huile PROSINT Efco utiliser un mélange de 2%
(50:1).
Avec l’huile eXtrasint Efco utiliser un mélange de 1%
(100:1).
ATTENTION! – Les moteurs deux-temps ont une
puissance spécifique élevée. Nous préconisons,
dès lors, d’utiliser de l’essence sans plomb de
marque connue, avec un taux d’octane non inférieur à
90. L’essence, l’huile et le mélange devront être con-
servées dans des récipients homologués. N’utiliser pour le
mélange que de l’huile spécifiquement appropriée pour
les moteurs deux-temps. Agiter le bidon contenant le
mélange avant de le verser dans le réservoir. N’effectuer
le réapprovisionnement en carburant (Fig. 12) qu’avec le
moteur éteint et à distance sûre de tout foyer ou flamme.
Avant de dévisser le bouchon du réservoir, placer le souffleur sur une surface plane et stable pour qu’il ne puisse
pas se renverser. Ouvrir avec précaution le bouchon afin
de laisser échapper lentement l’excès de pression et d’éviter les giclées de carburant. Ne pas préparer plus de mélange que la quantité requise pour l’utilisation; ne pas laisser le mélange dans le réservoir ou dans le bidon pendant
trop de temps. Il est recommandé d’utiliser un additif tel
que l’ ADDITIX 2000 de la marque Emak code
001000972, lorsqu’on veut garder le mélange pendant une
période d’un an.
DÉMARRAGE MOTEUR
S’assurer que le levier de l’accélérateur (B, Fig.13) fonctionne correctement et que la arrêt de l’accélérateur (C) se
trouve positionnée sur le minimum. Charger le carburateur
en pressant plusieurs fois la boule (D, Fig.14). Mettre l’interrupteur (A, Fig.13) en position START. Mettre le levier
du starter (E, Fig.15-16B) en position “CLOSE”. Appuyer
le souffleur sur le terrain en position stable. En tenant fermement le souffleur (Fig.17), tirer énergiquement le cordon de lancement et ce de façon répétée jusqu’à ce qu’il
démarre. Attendre 10 secondes et actionner ensuite le
levier de l’accélérateur (B, Fig.13) pour débloquer le dispositif du starter automatique. Le levier du starter (E,
Fig.15-16A) doit alors retourner dans sa position initiale
“OPEN”.
ATTENTION! – Ne pas utiliser le starter automa-
tique lorsque le moteur est encore chaud (E,
Fig.15) pour le démarrage.
FUEL MIXTURE (Fig. 9-10-11)
Use a 4% (25:1) petrol/oil mixture.
With Efco PROSINT oil, use a 2% (50:1) mixture.
With Efco eXtrasint oil, use a 1% (100:1) mixture.
WARNING! – The 2-stoke engines have high
power ratings, we therefore recommend the use of
lead-free petrol of known brand, with an octane
rating no lower than 90. Store petrol, oil and the mixture
in approved containers. To prepare the mixture, use only
specific oil for 2-stroke engines. Stir the mixture well
before refuelling. Always refuel (Fig. 12) with the engine
switched off and away from naked flames. Before unscrewing the fuel tank cap, position the blower on a solid,
flat surface so that it cannot fall over. Open the cap carefully to allow any excess pressure to escape slowly without
the fuel spraying out. Prepare only the quantity of mixture
required for immediate use; do not leave fuel in the tank or
a container for a long time. We recommend the use of the
additive Emak ADDITIX 2000 code 001000972 if the mixture is to be stored for up to a year.
STARTING THE ENGINE
Check that the throttle trigger (B, Fig.13) functions correctly and the throttle stop (C) is set to the minimum position.
Prime the carburettor by pressing the priming bulb a few times (D, Fig.14). Position the switch (A, Fig.13) on START.
Turn the starter lever (E, Fig.15-16B) to the “CLOSE” position. Rest the blower on the ground in a stable position.
While holding the blower firmly (Fig.17), pull the starting
cord hard a few times until the engine starts. Wait 10 se-
conds and then press the throttle trigger (B, Fig.13) to release the automatic starter. The starter lever (E, Fig.1516A) should return to its original “OPEN” position.
WARNING! – When starting the blower with the
engine already hot, do not use the automatic
starter (E, Fig.15).
KRAFTSTOFFGEMISCH (Abb. 9-10-11)
Verwenden Sie ein 4%ges (25:1) Kraftstoffgemisch
(Öl/Benzin).
Mit Öl PROSINT Efco verwenden Sie ein 2%ges (50:1)
Gemisch.
Mit Öl eXtrasint Efco verwenden Sie ein 1%ges (100:1)
Gemisch.
ACHTUNG! – 2-Takt-Motoren haben eine hohe
spezifische Leistung, so dass Sie bleifreies Benzin
bekannter Marken mit einer Oktanzahl von min-
destens 90 verwenden sollten. Bewahren Sie das Benzin,
Öl und Gemisch in genormten Behältern auf. Verwenden
Sie zur Aufbereitung des Gemischs ausschließlich Öl für
2-Takt-Motoren. Schütteln Sie den Gemischkanister vor
dem Auftanken. Tanken Sie stets bei abgestelltem Motor
und von Flammen entfernt (Abb. 12). Damit beim Aufdrehen des Tankverschlusses kein Kraftstoffgemisch verschüttet wird, stellen Sie den Blasgerät auf eine ebene
und standfeste Fläche ab. Öffnen Sie den Verschluss
äußerst vorsichtig, um den Tankdruck langsam entweichen zu lassen und ausspritzenden Kraftstoff zu vermeiden. Mischen Sie jeweils nur die erforderliche Kraftstoffmenge an. Das fertige Kraftstoffgemisch darf nur kurze
Zeit im Tank bzw. Kanister bleiben. Mit Beigabe des Zusatzstoffs ADDITIX 2000 von Emak Bestellnummer
001000972 können Sie das Gemisch für den Zeitraum eines Jahres aufbewahren.
ANLASSEN DES MOTORS
Überprüfen Sie den einwandfreien Betrieb des Gashebels
(B, Abb.13) und schieben Sie den Gasregler (C) in Leerlaufstellung. Füllen Sie den Vergaser durch mehrmaliges
Drücken der Kugel (D, Abb.14). Stellen Sie den Schalter
(A, Abb.13) auf START und den Starterhebel (E, Abb.1516B) auf “CLOSE”. Stellen Sie den Blasgerät standfest auf
den Boden ab. Halten Sie den Blasgerät fest (Abb.17) und
ziehen Sie einige Male kräftig das Startseil bis zum Anlassen des Motors durch. Warten Sie 10 Sekunden, bevor
Sie mit Betätigung des Gashebels (B, Abb.13) den automatischen Starter entsperren. Der Starterhebel (E,
Abb.15-16A) muss in die Ausgangsposition “OPEN”
zurückspringen.
ACHTUNG! – Zum Anlassen eines betriebswarmen Motors dürfen Sie den automatischen
Starter (E, Abb.15) nicht betätigen.
Italiano Français English Deutsch
AVVIAMENTO MISE EN ROUTE STARTING ANLASSEN
121110
100 cm
3
200 cm
3
500 cm
3
2%-50 : 1
4%-25:1 2%-50:1 2%-50:14%-25:1
OIL (FI.OZ) OIL (FI.OZ)
GAS
(Gal)
IMPERIAL
US
50 cm
3
100 cm
3
250 cm
3
1%-100 : 1
BENZINA - ESSENCE - GAS.
BENZIN - GASOLINA
BENZINE - BENZNH
OLIO - HUILE - OIL - ÖL
ACEITE - OLIE - OLEO - ΛΑ∆Ι
4%-25 : 1
5 l
10 l
25 l
200 cm
3
400 cm
3
1000 cm
3
GAS
(Gal)
1
2
5
5.12
10.24
25.6
2.56
5.12
12.8
1%-100:1
1.28
2.56
6.4
6.4
12.8
32
3.2
6.4
16
1%-100:1
1.6
3.2
8
1
2
5
Page 9

9
MEZCLA COMBUSTIBLE (Fig. 9-10-11)
Use combustible (mezcla aceite/gasolina) al 4% (25:1).
Con aceite PROSINT Efco utilice mezcla al 2% (50:1).
Con aceite eXtrasint Efco utilice mezcla al 1% (100:1).
¡ATENCIÓN! Los motores de dos tiempos tienen una po-
tencia específica elevada, por lo cual se aconseja
el uso de gasolina sin plomo de marca conoci-
da, con un número de octanos no inferior a 90.
Conserve la gasolina, el aceite y la mezcla en reci-
pientes homologados. En la preparación de la mezcla, utilice sólo aceite específico para motores de dos tiem-
pos. Agite el bidón de la mezcla antes de verterla. Cargue
siempre el combustible (Fig. 12) con el motor apagado y
lejos de cualquier llama. Antes de desenroscar el tapón
del depósito, apoye el soplador en una superficie llana y
firme de modo que no se tumbe. Abra con cuidado el
tapón para aliviar lentamente el exceso de presión y evitar
que el combustible salpique. Prepare sólo la mezcla necesaria para el uso; no la deje en el depósito o en el bidón
durante mucho tiempo. Se aconseja utilizar aditivo ADDI-
TIX 2000 de Emak, cód. 001000972, para conservar la
mezcla durante un año.
ARRANQUE DEL MOTOR
Asegúrese de que el acelerador (B, Fig. 13) funcione correctamente y el tope (C) esté situado en el mínimo. Cargue el carburador presionando varias veces el bulbo (D,
Fig. 14). Ponga el interruptor (A, Fig. 13) en la posición de
START. Sitúe el arrancador automático (E, Fig. 15-16B)
en la posición de CLOSE. Apoye el soplador en el suelo,
en una posición estable. Sujete firmemente el soplador
(Fig. 17) y tire con fuerza de la cuerda las veces necesarias para que el motor arranque. Espere 10 segundos y
accione el acelerador (B, Fig. 13) para desbloquear el arrancador automático (E, Fig. 15-16A), el cual debe volver
a su posición original de OPEN.
¡ATENCIÓN! - Cuando el motor ya está caliente, no uti-
lice el arrancador automático (E, Fig. 15) para
la puesta en marcha.
BRANDSTOFMENGSEL (Fig. 9-10-11)
Gebruik brandstof (mengsel olie/benzine) van 4% (25:1).
Gebruik met olie PROSINT Efco een mengsel van 2%
(50:1).
Gebruik met de olie eXtrasint Efco een mengsel van 1%
(100:1).
LET OP! – De tweetaktmotoren hebben een hoog
specifiek vermogen, wij adviseren derhalve het gebruik van loodvrije benzine van een bekend
merk, met een octaangehalte van minstens 90. Bewaar
de benzine, de olie en het mengsel in goedgekeurde containers. Gebruik bij de bereiding van het mengsel uitsluitend olie die specifiek bedoeld is voor tweetaktmoto-
ren. Schud de jerrycan met het mengsel alvorens de tank
te vullen. Vul de brandstoftank (Fig. 12) altijd met uitgeschakelde motor en uit de buurt van vlammen. Leg de
blower op een vlakke, stevige ondergrond alvorens de dop
van de tank los te schroeven, zodat het apparaat niet kan
omvallen. Maak de dop voorzichtig open om de hoge druk
langzaam af te voeren en om te vermijden dat de brandstof naar buiten spat. Bereid alleen de hoeveelheid mengsel voor die nodig is voor het gebruik; laat het niet lange
tijd in de tank of de jerrycan zitten. Het wordt geadviseerd
de toevoeging ADDITIX 2000 van Emak art. nr.
001000972 te gebruiken, om het mengsel een jaar lang te
kunnen bewaren.
STARTEN VAN DE MOTOR
Controleer of de versnellingshendel (B, Fig.13) goed functioneert en of de stopper van de versnelling (C) op het minimum staat. Belast de carburateur door verschillende keren op de bol te drukken (D, Fig.14). Zet de schakelaar (A,
Fig.13) op de stand START. Zet de starthendel (E, Fig.1516B) in de stand “CLOSE”. Leg de blower in stabiele positie op de grond. Trek enkele keren krachtig aan de startkabel terwijl u de blower tegenhoudt (Fig.17), totdat de
blower start. Wacht 10 seconden en bedien vervolgens
de versnellingshendel (B, Fig.13) om de automatische
starter te deblokkeren. De starthendel (E, Fig.15-16A)
moet in de oorspronkelijke positie “OPEN” terugkeren.
LET OP! – als de motor al warm is, hoeft de automatische starter (E, Fig.15) niet te worden gebruikt om te starten.
MISTURA CARBURANTE (Fig. 9-10-11)
Utilize carburante (mistura óleo/benzina) a 4% (25:1).
Com óleo PROSINT Efco utilize mistura a 2% (50:1).
Com óleo eXtrasint Efco utilize mistura a 1% (100:1).
ATENÇÃO! – Os motores de 2 velocidades são
dotados de uma potência específica elevada.
Aconselhamos, por isso, a utilização de gasolinas
sem chumbo de marca conhecida, com um nú-
mero de octanas não inferior a 90. Mantenha a gasoli-
na, o óleo e a mistura em recipientes homologados. Na
preparação da mistura, utilize apenas óleo específico pa-
ra motores de 2 tempos. Agite o recipiente da mistura
antes de proceder ao abastecimento. Execute o abastecimento de carburante (Fig. 12) sempre com o motor desligado e longe de quaisquer chamas. Antes de abrir o
tampão do reservatório, coloque o soprador numa superfície plana e sólida, de modo a evitar quaisquer derrames.
Abra o tampão com cautela para libertar lentamente o excesso de pressão e evitar que o carburante transborde.
Prepare apenas a mistura necessária à utilização; não a
deixe no reservatório ou no reservatório por muito tempo.
Aconselha-se a utilização do aditivo ADDITIX 2000 da
Emak cód. 001000972, para conservar a mistura por um
período de um ano.
ARRANQUE DO MOTOR
Certifique-se de que a alavanca do acelerador (B, Fig. 13)
funciona correctamente e de que a paragem do acelerador (C) está posicionada no mínimo. Carregue o carburador pressionando o bolbo várias vezes (D, Fig. 14). Coloque o interruptor (A, Fig. 13) na posição START. Coloque
o starter (E, Fig. 15-16B) na posição “CLOSE”. Coloque o
soprador no chão, numa posição estável. Mantendo o soprador firme (Fig. 17), puxe energicamente o cabo de arranque algumas vezes até fazer arrancar o aparelho.
Espere 10 segundos e accione depois o botão do acelerador (B, Fig. 13) para desbloquear o dispositivo do arranque automático. O starter (E, Fig. 15-16A) deve regressar
à posição original “OPEN”.
ATENÇÃO! – Quando o motor já estiver quente,
não utilize o arrancador automático (E, Fig. 15)
para o arranque.
Español Nederlands Português
PUESTA EN MARCHA STARTEN PARA DAR PARTIDA
14 1513 16A 17
ªπ°ª∞ ∫∞À™πª√À (∂ÈÎ. 9-10-11)
ГЪЛЫИМФФИ‹ЫЩВ О·‡ЫИМФ (М›БМ· П·‰ИФ‡/‚ВУ˙›УЛ˜) МВ
·Ó·ÏÔÁ›· 4% (25:1).
ªÂ Ï¿‰È PROSINT Efco ¯ЪЛЫИМФФИ‹ЫЩВ М›БМ· МВ
·Ó·ÏÔÁ›· 2% (50:1).
ªÂ Ï¿‰È eXtrasint Efco ¯ЪЛЫИМФФИ‹ЫЩВ М›БМ· МВ
·Ó·ÏÔÁ›· 1% (100:1).
¶ƒ√™√Ã∏! - √И ‰›¯ЪФУФИ ОИУЛЩ‹ЪВ˜ ¤¯Ф˘У ˘„ЛП‹
·fi‰ÔÛË ÈÛ¯‡Ô˜ Î·È ÁÈ’ ·˘Ùfi Û˘ÓÈÛÙ¿Ù·È Ë ¯Ú‹ÛË
·ÌfiÏ˘‚‰Ë˜ ‚ÂÓ˙›Ó˘ ÁÓˆÛÙ‹˜ Ì¿Úη˜, ÌÂ
ÂÏ¿¯ÈÛÙÔ ·ÚÈıÌfi ÔÎÙ·Ó›ˆÓ 90. ¢È·ÙËÚ›Ù ÙË ‚ÂÓ˙›ÓË, ÙÔ
П¿‰И О·И ЩФ М›БМ· ЫВ ВБОВОЪИМ¤У· ‰Ф¯В›·. °И· ЩЛУ
ЪФВЩФИМ·Ы›· ЩФ˘ М›БМ·ЩФ˜ ¯ЪЛЫИМФФИВ›ЩВ МfiУФ Ï¿‰È
О·Щ¿ППЛПФ БИ· ‰›¯ЪФУФ˘˜ ОИУЛЩ‹ЪВ˜. ∞Ó·ÎÈÓ‹ÛÙ ÙÔ
‰Ô¯Â›Ô ÙÔ˘ Ì›ÁÌ·ÙÔ˜ ÚÈÓ ÙÔÓ ·ÓÂÊԉȷÛÌfi. √
·УВКФ‰И·ЫМfi˜ О·˘Ы›МФ˘ (∂ИО. 12) Ъ¤ВИ У· Б›УВЩ·И
¿УЩ· МВ ЩФУ ОИУЛЩ‹Ъ· Ы‚ЛЫЩfi О·И М·ОЪИ¿ ·fi КПfiБВ˜.
¶ЪИУ НВ‚И‰ТЫВЩВ ЩЛУ Щ¿· ЩФ˘ ЪВ˙ВЪ‚Ф˘¿Ъ, ЩФФıВЩ‹ЫЩВ
ЩФ К˘ЫЛЩ‹Ъ· ЫВ В›В‰Л О·И ЫЩ·ıВЪ‹ ВИК¿УВИ· ¤ЩЫИ
ТЫЩВ У· МЛУ МФЪВ› У· ·У·ЩЪ·В›. ∞УФ›НЩВ ЪФЫВОЩИО¿
ЩЛУ Щ¿· БИ· У· ВОЩФУˆıВ› ·ЪБ¿ Л ›ВЫЛ О·И БИ· У·
·ФК‡БВЩВ ИЩЫИП›ЫМ·Щ· О·˘Ы›МФ˘. ¶ЪФВЩФИМ¿ЫЩВ МfiУФ
ЩФ ·У·БО·›Ф М›БМ· БИ· ЩЛ ¯Ъ‹ЫЛ. ªЛУ ·К‹УВЩВ ЩФ М›БМ·
ЫЩФ ЪВ˙ВЪ‚Ф˘¿Ъ ‹ ЫВ ‰Ф¯В›Ф БИ· МВБ¿ПФ ¯ЪФУИОfi
‰И¿ЫЩЛМ·. ™˘УИЫЩ¿Щ·И Л ¯Ъ‹ЫЛ ЪФЫıВЩИОФ‡ ADDITIX
2000 Ù˘ Emak Έ‰. 001000972, ÁÈ· Ó· ‰È·ÙËÚÂ›Ù·È ÙÔ
Ì›ÁÌ· ÁÈ· ÂÚ›Ô‰Ô ÂÓfi˜ ¤ÙÔ˘˜.
∂∫∫π¡∏™∏ ∫π¡∏∆∏ƒ∞
µВ‚·ИˆıВ›ЩВ fiЩИ Ф ПВ‚И¤˜ БО·˙ИФ‡ (B, ∂ИО.13) ПВИЩФ˘ЪБВ›
О·УФУИО¿ О·И fiЩИ ЩФ ¯ВИЪfiБО·˙Ф (C) ‚Ъ›ЫОВЩ·И ЫЩФ
ЪВП·УЩ›. ∞УЩП‹ЫЩВ ЩФ О·‡ЫИМФ И¤˙ФУЩ·˜ В·УВИПЛММ¤У·
ЩЛУ ·УЩП›· (D, ∂ИО.14). ªВЩ·ОИУ‹ЫЩВ ЩФ ‰И·ОfiЩЛ (A,
∂ИО.13) ЫЩЛ ı¤ЫЛ START. ªВЩ·ОИУ‹ЫЩВ ЩФ ПВ‚И¤ ЩФ˘ starter (E, ∂ИО.15-16B) ЫЩЛ ı¤ЫЛ “CLOSE”. ™ЩЛЪ›НЩВ ЩФ
К˘ЫЛЩ‹Ъ· ЫЩФ ¤‰·КФ˜ ЫВ ЫЩ·ıВЪ‹ ı¤ЫЛ. ∫Ъ·ЩТУЩ·˜
·О›УЛЩФ ЩФ К˘ЫЛЩ‹Ъ· (∂ИО.17), ЩЪ·‚‹НЩВ МВ ‰‡У·МЛ ЩФ
Ы¯ФИУ¿ОИ ВОО›УЛЫЛ˜ ¤ˆ˜ fiЩФ˘ ¿ЪВИ ВМЪfi˜ Ф ОИУЛЩ‹Ъ·˜.
¶ÂÚÈ̤ÓÂÙ 10 ‰Â˘ÙÂÚfiÏÂÙ· Î·È ÛÙË Û˘Ó¤¯ÂÈ·
ÌÂÙ·ÎÈÓ‹ÛÙ ÙÔ Ï‚Ȥ ÙÔ˘ Áη˙ÈÔ‡ (B, ∂ÈÎ.13) ÁÈ· Ó·
·ÂÏ¢ıÂÚˆı› ÙÔ Û‡ÛÙËÌ· ÙÔ˘ ·˘ÙfiÌ·ÙÔ˘ starter. √
Ï‚Ȥ˜ starter (E, ∂ÈÎ.15-16A) Ú¤ÂÈ Ó· ÂÈÛÙÚ¤„ÂÈ ÛÙËÓ
·Ú¯È΋ ı¤ÛË “OPEN”.
¶ƒ√™√Г∏! - ŸЩ·У Ф ОИУЛЩ‹Ъ·˜ В›У·И ˙ВЫЩfi˜, МЛ
¯ЪЛЫИМФФИВ›ЩВ ЩФ ·˘ЩfiМ·ЩФ starter (E, ∂ИО.15)
БИ· ЩЛУ ВОО›УЛЫЛ.
Ελληνικα
ΕΚΚΙΝΗΣΗ
16B
Page 10

10
UTILIZZO
Il soffiatore è concepito per l’uso con una sola mano
(Fig.18) e può essere impugnato dall’utente sia con la
mano destra che con quella sinistra.
Il soffiatore è particolarmente adatto sia nei lavori su
terreno accidentato (per es. superfici erbose), sia nella
soffiatura di superfici piane coperte di segatura, fogliame, sfridi di erba e simili.
Il fermo acceleratore (C, Fig.19) consente di impostare
differenti regimi del motore e di conseguenza differenti
flussi di aria in uscita. Prima di spegnere l’apparecchiatura, spostare il fermo in posizione di minimo.
ATTENZIONE – Controllare l’ambiente circostante: non soffiare mai in direzione di altre
persone o animali (Fig.20). Il soffiatore potrebbe far schizzare in alto piccoli oggetti ad
elevata velocità.
ATTENZIONE – Verificare sempre che sia funzionante l’interruttore di sicurezza (D, Fig.21)
arresto motore, aprendo la griglia di protezione
(E).
RODAGGIO MOTORE
Durante le prime 10 ore di lavoro non utilizzare il soffiatore ad alto regime di giri per lungo tempo.
ARRESTO MOTORE
Portare la leva acceleratore (B, Fig.19) ed il fermo acceleratore (C) al minimo. Spegnere il motore, riportando l’interruttore di massa (A) nella posizione di STOP.
ATTENZIONE – Nel trasporto su automezzi:
assicurare l’apparecchio contro il ribaltamento,
il danneggiamento e lo spargimento di carburante.
CARBURATORE
Prima di effettuare la regolazione del minimo, pulire il
filtro dell’aria (F, Fig.22) e riscaldare il motore.
La vite del minimo T (Fig.23) è regolata per ottenere
un regime di funzionamento del motore tra i 2600 e i
2800 giri/minuto.
UTILISATION
Le souffleur est conçu pour n’être utilisé que d’une
seule main (Fig.18), gauche ou droite, au choix de
l’utilisateur.
Le souffleur est particulièrement adapté pour effectuer
des travaux sur terrain accidenté (par ex. surfaces herbeuses), soit pour souffler sur des surfaces planes
couvertes de sciure, feuilles, résidus d’herbes et déchets similaires.
La arrêt de l’accélérateur (C, Fig.19) permet de sélectionner différents régimes moteur et de moduler ainsi
les flux d’air à la sortie. L’arrêt devra ête positionnée
sur le minimum avant d’arrêter le moteur.
ATTENTION – Contrôler la direction du jet sur
l’entourage immédiat et ne jamais diriger le jet
sur des personnes ou des animaux (Fig.20).
Le souffleur pourrait propulser de petits objets
vers le haut à une vitesse élevée.
ATTENTION – Vérifier dans tous les cas le bon
fonctionnement de l’interrupteur de sécurité (D,
Fig.21) commandant l’arrêt du moteur, en ouvrant la grille de protection (E).
RODAGE MOTEUR
Pendant les dix premières heures de fonctionnement,
ne pas utiliser le souffleur pendant longtemps à haut
régime
ARRÊT MOTEUR
Mettre le levier de l’accélérateur (B, Fig.19) et l’arrêt
de l’accélérateur (C) en position minimum. Éteindre le
moteur, en remettant l’interrupteur de masse (A) en
position STOP.
ATTENTION – Pendant tout transport sur véhicule, on prendra soin de bien arrimer ou caler
l’appareil afin qu’il ne se renverse pas, ne subisse aucun dommage et ne répande le carburant.
CARBURATEUR
Avant de régler le ralenti, nettoyer le filtre à air (F,
Fig.22) et réchauffer le moteur.
La vis du régime minimal T (Fig.23) est réglée pour
que le moteur fonctionne en régime ordinaire à une vitesse située entre 2600 et 2800 tours/minute.
USE
The blower is designed to be used with one hand only
(Fig.18), and can be held in either the left or right
hand.
The blower is equally suitable for use on uneven
ground (e.g. grassy areas) and flat areas covered in
sawdust, leaves, grass cuttings and similar material.
The throttle stop (C, Fig.19) is used to set different engine speeds and consequently to adjust the air jet.
Before switching off the engine, move the throttle stop
to the minimum position.
WARNING – Constantly check the area in which
you are working: never direct the air jet
towards people or animals (Fig.20). The
blower can propel small objects at very high
speed.
WARNING – Always check that the safety switch (D, Fig.21) stops the engine when the safety
guard is opened (E).
RUNNING IN
During the first 10 hours of use, avoid running the engine at high speeds for prolonged periods.
STOPPING THE ENGINE
Move the throttle trigger (B, Fig.19) and the throttle
stop (C) to the minimum positions. Switch off the engine by moving the stop/start switch (A) to the STOP position.
WARNING – When transporting the blower on a
vehicle, secure the blower to prevent it overturning and consequent damage or fuel spillage.
CARBURETTOR
Before adjusting the idle speed, clean the air filter (F,
Fig.22) and run the engine until warm.
The idle speed adjuster screw T (Fig.23) is set to obtain an idle speed between 2600 and 2800 rpm.
GEBRAUCH
Der Blasgerät ist zum einhändigen Gebrauch (Abb.18)
vorgesehen und kann beliebig mit der rechten bzw.
linken Hand bedient werden.
Der Blasgerät eignet sich besonders für den Einsatz
auf mühsamen Böden (zum Beispiel Grasflächen)
sowie für das Blasen ebener und mit Sägemehl, Laub,
Grasschnitt usw. bedeckter Flächen.
Mit dem Gasregler (C, Abb.19) können Sie verschiedene Drehzahlstufen des Motors und folglich unterschiedlich starke Luftströme einstellen. Schieben Sie
den Gasregler in Leerlaufstellung, bevor Sie das Gerät
abstellen.
ACHTUNG – Überprüfen Sie das Arbeitsumfeld:
richten Sie den Luftstrahl niemals gegen andere Personen oder Tiere (Abb.20). Der Bla-
sgerät könnte kleinere Gegenstände mit hoher
Geschwindigkeit ausstoßen.
ACHTUNG – Vergewissern Sie sich, dass der
Sicherheitsschalter (D, Abb.21) bei Öffnen des
Schutzgitters (E) unmittelbar den Motor stoppt.
EINLAUFEN DES MOTORS
Betreiben Sie den Blasgerät während der ersten 10
Stunden niemals längere Zeit bei hoher Drehzahl.
MOTOR ABSTELLEN
Bringen Sie Gashebel (B, Abb.19) und Gasregler (C)
in Leerlaufstellung. Stellen Sie den Motor ab, indem
Sie den Masseschalter (A) auf STOP setzen.
ACHTUNG – Beim Transport mit Fahrzeugen:
sichern Sie das Gerät gegen Kippen, Schäden
und Kraftstoffauslauf.
VERGASER
Bevor Sie den Leerlauf einstellen, reinigen Sie den
Luftfilter (F, Abb.22) und lassen Sie den Motor warm
laufen.
Die Leerlaufschraube T (Abb.23) ist auf eine Betriebsdrehzahl des Motors zwischen 2600 und 2800 UpM
eingestellt.
Italiano Français English Deutsch
UTILIZZO - ARRESTO MOTORE UTILISATION - ARRÊT MOTEUR USE - STOPPING THE ENGINE GEBRAUCH – MOTOR ABSTELLEN
18 19 20 21
Page 11

11
UTILIZACIÓN
El soplador se maneja con una sola mano (Fig. 18),
que puede ser la derecha o la izquierda.
Es particularmente idóneo para los trabajos en terrenos desiguales (por ejemplo, con pasto) y para soplar
en suelos llanos cubiertos de siega, hojas, césped cortado o similares.
El tope del acelerador (C, Fig. 19) permite ajustar el
régimen del motor para obtener distintas intensidades
del chorro de aire. Antes de apagar el equipo, ponga
el tope en la posición de mínimo.
ATENCIÓN - Controle la zona circundante: no
sople nunca en dirección de otras personas
o de animales (Fig. 20). El soplador podría le-
vantar pequeños objetos a elevada velocidad.
ATENCIÓN - Verifique siempre el funcionamiento del interruptor de seguridad (D, Fig. 21)
que detiene el motor, abriendo la rejilla de protección (E).
RODAJE DEL MOTOR
Durante las diez primeras horas de trabajo, no ponga
el soplador a un régimen alto durante mucho tiempo.
PARADA DEL MOTOR
Ponga el acelerador (B, Fig. 19) y el tope (C) en el mínimo. Apague el motor, colocando el interruptor de
masa (A) en la posición de STOP.
ATENCIÓN - Durante el transporte en vehículos, asegure bien el equipo para que no se tumbe ni se dañe, y para evitar que se derrame
combustible.
CARBURADOR
Antes de regular el mínimo, limpie el filtro de aire (F,
Fig. 22) y caliente el motor.
El tornillo del mínimo T (Fig. 23) está ajustado para
obtener un régimen de funcionamiento del motor entre
2600 y 2800 rev/min.
GEBRUIK
De blower is ontwikkeld voor gebruik met één hand
(Fig.18) en kan door de gebruiker zowel met de rechter- als met de linkerhand worden vastgepakt.
De blower is bijzonder geschikt zowel voor werkzaamheden op oneffen terrein (b.v. op gras), alsook
voor het blazen op vlakke ondergronden die bedekt
zijn met zaagsel, bladeren, gemaaid gras en dergelijke.
Met de stopper van de versneller (C, Fig.19) kunnen
verschillende motortoerentallen worden ingesteld, en
dus verschillende uitgaande luchtstromen. Zet de aanslag op de minimum stand, alvorens het apparaat uit
te zetten.
LET OP – Controleer de omgeving: blaas
nooit in de richting van andere personen of
dieren (Fig.20). De blower zou kleine voorwer-
pen met hoge snelheid omhoog kunnen laten
springen.
LET OP – Controleer altijd of de veiligheidsschakelaar (D, Fig.21) voor stopzetting van de
motor goed functioneert, door het beschermrooster (E) te openen.
INLOPEN VAN DE MOTOR
Tijdens de eerste 10 bedrijfsuren mag de blower niet
gedurende lange tijd op een hoog toerental worden
gebruikt.
STOPPEN VAN DE MOTOR
Zet de versnellingshendel (B, Fig.19) en de stopper
van de versneller (C) op het minimum. Zet de motor af
door de aardingsschakelaar (A) terug te zetten in de
stand STOP.
LET OP – Bij vervoer in auto’s: zet het apparaat vast zodat het niet kan kantelen, beschadigd kan raken of brandstof kan verliezen.
CARBURATEUR
Alvorens het minimum in te stellen, moet het luchtfilter
(F, Fig.22) worden schoongemaakt en moet de motor
warmlopen.
De schroef van het minimum T (Fig.23) is afgesteld
voor een bedrijfstoerental van de motor tussen 2600
en 2800 toeren/minuut.
UTILIZAÇÃO
O soprador foi concebido para ser utilizado com uma
só mão (Fig. 18), podendo ser manuseado quer com a
mão direita, quer com a esquerda.
O soprador está particularmente adaptado para os trabalhos em terreno acidentado (por ex. superfícies relvadas) ou em superfícies planas cobertas de serrim,
folhas, aparas de relva e afins.
A paragem do acelerador (C, Fig. 19) permite definir
vários regimes do motor e, por consequência, diferentes fluxos de saída do ar. Antes de desligar o aparelho, coloque-a no mínimo.
ATENÇÃO – Verifique o espaço circundante:
nunca direccione o jacto de ar è pessoas ou
animais (Fig. 20). O soprador poderá arremes-
sar pequenos objectos a alta velocidade.
ATENÇÃO – Verifique sempre se o interruptor
de segurança de paragem do motor está a funcionar (D, Fig. 21), abrindo, para isso, a grelha
de protecção (E).
RODAGEM DO MOTOR
Durante as primeiras 10 horas de trabalho, não utilize
o soprador num regime de rotações demasiado elevado por um longo período de tempo.
PARAGEM DO MOTOR
Coloque a alavanca do acelerador (B, Fig. 19) e a paragem do acelerador (C) no mínimo. Desligue o motor,
reposicionando o interruptor de massa (A) na posição
STOP.
ATENÇÃO – No transporte em veículos: proteja o aparelho por forma a evitar o basculamento, os danos e o derrame de carburante.
CARBURADOR
Antes de efectuar o ajuste do mínimo, limpe o filtro do
ar (F, Fig. 22) e aqueça o motor.
O parafuso do mínimo (T) (Fig. 23) é ajustado para se
obter um regime de funcionamento do motor entre as
2600 e as 2800 rotações/minuto.
Ã∏™∏
√ К˘ЫЛЩ‹Ъ·˜ ¤¯ВИ Ы¯В‰И·ЫЩВ› БИ· ¯Ъ‹ЫЛ МВ ¤У· МfiУФ
¯¤ЪИ (∂ИО.18) О·И МФЪВ› У· ¯ЪЛЫИМФФИЛıВ› ЩfiЫФ МВ
ЩФ ‰ВН› fiЫФ О·И МВ ЩФ ·ЪИЫЩВЪfi ¯¤ЪИ.
√ К˘ЫЛЩ‹Ъ·˜ В›У·И И‰И·›ЩВЪ· О·Щ¿ППЛПФ˜ БИ·
ВЪБ·Ы›В˜ ЫВ ·УТМ·ПФ ¤‰·КФ˜ (.¯. ВИК¿УВИВ˜ МВ
¯fiЪЩ·), ·ПП¿ О·И БИ· В›В‰В˜ ВИК¿УВИВ˜ Ф˘
О·П‡ЩФУЩ·И ·fi ЪИФУ›‰И, К‡ПП·, ˘ФПВ›ММ·Щ·
¯fiЪЩˆУ О.П..
∆Ф ¯ВИЪfiБО·˙Ф (C, ∂ИО.19) ВИЩЪ¤ВИ ЩЛУ ВИПФБ‹ ЩФ˘
·ЪИıМФ‡ ЫЩЪФКТУ О·И О·Щ¿ Ы˘У¤ВИ· ЩЛ˜ ЪФ‹˜ ЩФ˘
·¤Ú· ÛÙËÓ ¤ÍÔ‰Ô. ¶ÚÈÓ Û‚‹ÛÂÙ ÙÔ Ì˯¿ÓËÌ·,
ÌÂÙ·ÎÈÓ‹ÛÙ ÙÔ ¯ÂÈÚfiÁη˙Ô ÛÙË ı¤ÛË ÙÔ˘ ÚÂÏ·ÓÙ›.
¶ƒ√™√Ã∏ - ∂ϤÁ¯ÂÙ ÙÔ Á‡Úˆ ÂÚÈ‚¿ÏÏÔÓ:
ÌËÓ Î·Ù¢ı‡ÓÂÙ ÔÙ¤ ÙÔÓ ·¤Ú· ÛÂ
·ÓıÚÒÔ˘˜ ‹ ˙Ò· (∂ÈÎ.20). √ Ê˘ÛËÙ‹Ú·˜
МФЪВ› У· ВОЫКВУ‰ФУ›ЫВИ МИОЪ¿ ·УЩИОВ›МВУ· МВ
МВБ¿ПЛ Щ·¯‡ЩЛЩ·.
¶ƒ√™√Ã∏ - ∂П¤Б¯ВЩВ ¿УЩ· ЩЛ ПВИЩФ˘ЪБ›·
ЩФ˘ ‰И·ОfiЩЛ ·ЫК·ПВ›·˜ (D, ∂ИО.21) БИ· ЩЛУ
·ОИУЛЩФФ›ЛЫЛ ЩФ˘ ОИУЛЩ‹Ъ·, ·УФ›БФУЩ·˜ ЩЛ
БЪ›ПИ· ЪФЫЩ·Ы›·˜ (E).
ƒ√¡∆∞ƒπ™ª∞ ∫π¡∏∆∏ƒ∞
™ЩИ˜ ЪТЩВ˜ 10 ТЪВ˜ ПВИЩФ˘ЪБ›·˜ МЛ ¯ЪЛЫИМФФИВ›ЩВ
ЩФ К˘ЫЛЩ‹Ъ· МВ ˘„ЛПfi ·ЪИıМfi ЫЩЪФКТУ БИ· МВБ¿ПФ
¯ЪФУИОfi ‰И¿ЫЩЛМ·.
™TA™H MOTEP
ªВЩ·ОИУ‹ЫЩВ ЩФ ПВ‚И¤ БО·˙ИФ‡ (B, ∂ИО.19) О·И ЩФ
¯ВИЪfiБО·˙Ф (C) ЫЩФ ЪВП·УЩ›. ™‚‹ЫЩВ ЩФУ ОИУЛЩ‹Ъ·,
В·У·К¤ЪФУЩ·˜ ЩФ ‰И·ОfiЩЛ БВ›ˆЫЛ˜ (A) ЫЩЛ ı¤ЫЛ
STOP.
¶ƒ√™√Ã∏ - °È· ÙË ÌÂÙ·ÊÔÚ¿ Û ·˘ÙÔΛÓËÙÔ:
·ÛÊ·Ï›ÛÙ ÙÔ Ì˯¿ÓËÌ· ·fi ·Ó·ÙÚÔ‹, ‚Ï¿‚Ë
Î·È ‰È·ÚÚÔ‹ η˘Û›ÌÔ˘.
∫∞ƒª¶πƒ∞∆∂ƒ
¶ÚÈÓ ÙË Ú‡ıÌÈÛË ÙÔ˘ ÚÂÏ·ÓÙ›, ηı·Ú›ÛÙ ÙÔ Ê›ÏÙÚÔ
·¤Ъ· (F, ∂ИО. 22) О·И ·К‹ЫЩВ ЩФУ ОИУЛЩ‹Ъ· У·
˙ВЫЩ·ıВ›.
∏ ‚›‰· ЩФ˘ ЪВП·УЩ› T (∂ИО.23) В›У·И Ъ˘ıМИЫМ¤УЛ ТЫЩВ
Ф ОИУЛЩ‹Ъ·˜ У· ПВИЩФ˘ЪБВ› ·У¿МВЫ· ЫЩИ˜ 2600 О·И
2800 ЫЩЪФК¤˜/ПВЩfi.
Español Nederlands Português
UTILIZACIÓN – PARADA DEL MOTOR GEBRUIK - STOPPEN VAN DE MOTOR UTILIZAÇÃO - PARAGEM DO MOTOR
22 23
Ελληνικα
Ã∏™∏ - ™TA™H MOTEP
Page 12

12
ATTENZIONE! – Durante le operazioni di
manutenzione indossare sempre i guanti
protettivi. Non effettuare le manutenzioni
con motore caldo.
FILTRO ARIA – Ogni 8-10 ore di lavoro, aprire il
coperchio (A, Fig. 26) e togliere il filtro (B). Il filtro
(B) va pulito scuotendolo bene e con un pennello
morbido.
FILTRO CARBURANTE – Verificare periodicamente le condizioni del filtro carburante (C). In caso di sporcizia eccessiva, sostituirlo (Fig. 27).
MOTORE – Pulire periodicamente le alette del cilindro con pennello o aria compressa (Fig. 28).
L’accumulo di impurità sul cilindro può provocare
surriscaldamenti dannosi per il funzionamento del
motore.
CANDELA – Periodicamente si raccomanda la pulizia della candela e il controllo della distanza degli
elettrodi (Fig. 29). Utilizzare candela Champion
RCJ-6Y o di altra marca di grado termico equivalente.
INTERRUTTORE DI SICUREZZA – Verificare con
il motore in moto che, aprendo la griglia di protezione (E, Fig.30), l’interruttore di sicurezza (D) arresti
immediatamente il motore. In caso contrario rivolgersi immediatamente ad un’officina autorizzata.
ATTENZIONE! – Tutte le operazioni di
manutenzione non riportate sul presente
manuale devono essere effettuate da
un’officina autorizzata. Per garantire un
costante e regolare funzionamento del soffiatore, ricordate che le eventuali sostituzioni
delle parti di ricambio dovranno essere effettuate esclusivamente con RICAMBI ORIGI-
NALI.
ATTENTION! – Durant les opérations
d’entretien et de maintenance, porter
toujours des gants de protection. Ne pas
effectuer les entretiens avec un moteur
chaud.
FILTRE À AIR – Toutes les 8-10 heures de travail,
ouvrir le couvercle (A, Fig. 26) et retirer le filtre (B).
Le filtre (B) se nettoie en le secourant énergiquement et à l’aide d’un pinceau souple.
FILTRE À CARBURANT – Vérifier périodiquement
le bon état du filtre à carburant (C). Le remplacer
en cas d’encrassement excessif (Fig. 27).
MOTEUR – Nettoyer régulièrement les ailettes du
cylindre avec un pinceau ou à l’air comprimé (Fig.
28), l’accumulation d’impuretés sur le cylindre pouvant entraîner la surchauffe du moteur.
BOUGIE – Il est recommandé de nettoyer périodiquement les bougies et de contrôler l’écartement
ds électrodes (Fig. 29). Utiliser une bougie Champion RCJ-6Y ou une bougie d’une autre marque
possédant les mêmes caractéristiques thermiques.
INTERRUPTEUR DE SÉCURITÉ – En vérifier le
fonctionnement avec le moteur en mouvement, en
ouvrant la grille de protection (E, Fig.30). Au cas
où l’interrupteur de sécurité (D) n’arrêterait pas
immédiatement le moteur, s’adresser immédiatement à un agent agréé.
ATTENTION! – Les opérations de maintenance et d’entretien non reprises dans le
présent manuel devront être effectuées
par un agent agréé. Pour garantir le fonc-
tionnement régulier du souffleur, on veillera
à ce que les remplacements éventuels de
pièces détachées soient effectués exclusivement avec des PIÈCES DE RECHANGE
D’ORIGINE.
WARNING! – Always wear protective gloves during maintenance operations. Do
not carry out maintenance with the engine hot.
AIR CLEANER – Every 8-10 operating hours,
open the cover (A, Fig. 26) and remove the filter
(B). The filter (B) is to be cleaned by shaking it vigorously and using a soft brush.
FUEL FILTER – Periodically check the condition of
the fuel filter (C). If excessively dirty, the filter
should be renewed (Fig. 27).
ENGINE – Periodically clean the cylinder fins using
a brush or compressed air (Fig. 28). If dirt is allowed to build up on the cylinder it could cause
overheating and impair engine performance.
SPARK PLUG – Periodically clean the spark plug
and check the electrode gap (Fig. 29). Use a
Champion RCJ-6Y spark plug or equivalent.
SAFETY SWITCH –With the engine running, check
that the safety switch (D) immediately stops the engine when the safety guard (E, Fig.30) is opened. If
not, contact your authorised service centre immediately.
WARNING! – Any maintenance operations
not specifically dealt with in this manual
must be carried out by an authorised service centre. To ensure that your blower con-
tinues to function correctly, use only ORIGINAL REPLACEMENT PARTS.
ACHTUNG! – Tragen Sie bei den Wartungsarbeiten stets Schutzhandschuhe. Führen Sie keine Wartung bei warmem Motor
aus.
LUFTFILTER – Öffnen Sie alle 8-10 Betriebsstun-
den den Deckel (A, Abb. 26) und nehmen Sie den
Filter (B) heraus. Schütteln Sie den Filter (B) kräftig
und reinigen Sie ihn mit einem weichen Pinsel.
KRAFTSTOFFFILTER –Überprüfen Sie regelmäßig den Zustand des Kraftstofffilters (C). Ersetzen Sie übermäßig verschmutzte Filter (Abb.
27).
MOTOR – Reinigen Sie regelmäßig die Kühlrippen
des Zylinders mit einem Pinsel bzw. Druckluft
(Abb. 28). Schmutzablagerungen am Zylinder führen zum Heißlaufen des Motors und verursachen
Betriebsstörungen.
ZÜNDKERZE – Reinigen Sie regelmäßig die
Zündkerze und überprüfen Sie den Elektrodenabstand (Abb. 29). Verwenden Sie Zündkerzen
Champion RCJ-6Y bzw. anderen Fabrikats mit
gleichwertigem Wärmegrad.
SICHERHEITSSCHALTER – Vergewissern Sie sich, dass der Sicherheitsschalter (D) beim Öffnen
des Schutzgitters (E, Abb.30) den laufenden Motor
unmittelbar stoppt. Wenden Sie sich im gegenteiligen Fall sofort an Ihre Fachwerkstatt.
ACHTUNG! – Alle in dieser Anleitung beschriebenen Wartungsarbeiten dürfen nur
in einer autorisierten Fachwerkstatt durchgeführt werden. Damit Sie langfristig den
einwandfreien Betrieb Ihres Blasgeräts nutzen können, verwenden Sie zum Austausch
defekter Teile ausschließlich ORIGINALER-
SATZTEILE.
Italiano Français English Deutsch
MANUTENZIONE ENTRETIEN MAINTENANCE INSTANDHAL
26 27 28 29
RCJ-6Y
Page 13

13
¡ATENCIÓN! - Durante las operaciones de
mantenimiento, utilice siempre guantes
de protección. No efectúe trabajos de
mantenimiento con el motor caliente.
FILTRO DE AIRE - Cada 8-10 horas de trabajo,
abra la tapa (A, Fig. 26) y saque el filtro (B). Para
limpiar el filtro, sacúdalo bien y pásele un cepillo
suave.
FILTRO DE COMBUSTIBLE - Controle periódicamente las condiciones del filtro de combustible (C).
Cuando esté demasiado sucio, cámbielo (Fig. 27).
MOTOR - Limpie regularmente las aletas del cilindro con un cepillo o con aire comprimido (Fig. 28).
La acumulación de suciedad en el cilindro puede
provocar recalentamientos perjudiciales para el
funcionamiento del motor.
BUJÍA - A intervalos oportunos, limpie la bujía y
controle la distancia de los electrodos (Fig. 29).
Utilice una bujía Champion RCJ-6Y o de otra marca con grado térmico equivalente.
INTERRUPTOR DE SEGURIDAD - Con el motor
en marcha, abra la rejilla de protección (E, Fig. 30)
y compruebe que el interruptor de seguridad (D)
detenga inmediatamente el motor. En caso contrario, acuda sin demora a un taller autorizado.
¡ATENCIÓN! - Todas las operaciones de
mantenimiento no indicadas en este manual deben ser realizadas por un taller
autorizado. Para garantizar un funciona-
miento correcto y constante del soplador es
preciso utilizar exclusivamente RECAM-
BIOS ORIGINALES.
LET OP! – Draag altijd veiligheidshandschoenen tijdens het plegen van onderhoud. Verricht nooit onderhoud bij
warme motor.
LUCHTFILTER – Open het deksel (A, Fig. 26) om
de 8-10 bedrijfsuren, en verwijder het filter (B). Het
filter (B) moet schoongemaakt worden door het
goed te schudden en met een zachte kwast.
BRANDSTOFFILTER – Controleer geregeld de
conditie van het brandstoffilter (C). Vervang hem
als hij erg vuil is (Fig. 27).
MOTOR – Maak de ribben van de cilinder regelmatig schoon met een kwast of perslucht (Fig. 28). De
ophoping van vuil op de cilinder kan oververhittingen tot gevolg hebben die schadelijk zijn voor de
werking van de motor.
BOUGIE – Het wordt geadviseerd de bougie regelmatig schoon te maken en de afstand van de elektroden te controleren (Fig. 29). Gebruik bougies
Champion RCJ-6Y of van een ander merk met een
gelijkwaarde thermische graad.
VEILIGHEIDSCHAKELAAR – Controleer met
draaiende motor of de veiligheidsschakelaar (D) de
motor onmiddellijk stopzet waneer het beschermrooster (E, Fig. 30) geopend wordt. Is dat niet het
geval, wendt u dan onmiddellijk tot een erkende
werkplaats.
LET OP! – Alle onderhoudswerkzaamheden die niet in deze handleiding worden
beschreven, moeten door een erkende
werkplaats worden verricht. Om een con-
stante, reguliere werking van de blower te
waarborgen, moeten er ORIGINELE VER-
VANGINGSONDERDELEN worden gebruikt
wanneer er eventueel onderdelen moeten
worden vervangen.
ATENÇÃO! – Durante as operações de
manutenção, calce sempre as luvas de
protecção. Não efectue as operações de
manutenção com o motor quente.
FILTRO DO AR – Após cada 8-10 horas de tra-
balho, abra a cobertura externa (A, Fig. 26) e retire
o filtro (B). Limpe cuidadosamente o filtro (B) com
um pincel macio.
FILTRO DO CARBURANTE – Verifique regularmente as condições do filtro do carburante (C).
Substitua-o, em caso de sujidade excessiva (Fig.
27).
MOTOR – Limpe regularmente as aletas do cilindro com um pincel ou ar comprimido (Fig. 28). A
acumulação de impurezas no cilindro pode provocar superaquecimentos, passíveis de prejudicar o
funcionamento do motor.
VELA – Recomenda-se a limpeza periódica da vela de ignição e o controlo da distância dos eléctrodos (Fig. 29). Utilize velas Champion RCJ-6Y ou
de uma outra marca de grau térmico equivalente.
INTERRUPTOR DE SEGURANÇA – Com o motor
em funcionamento e abrindo a grelha de protecção
(E, Fig. 30), certifique-se de que o interruptor de
segurança (D) pára imediatamente o motor. Caso
contrário, contacte imediatamente uma oficina au-
torizada.
ATENÇÃO! – Todas as operações de manutenção não mencionadas no presente
manual devem ser efectuadas por uma
oficina autorizada. Para garantir um funcio-
namento constante e regular do soprador,
lembre-se de que eventuais substituições de
componentes deverão ser exclusivamente
efectuadas com PEÇAS SOBRESSELEN-
TES ORIGINAIS.
¶ƒ√™√Г∏! - ∫·Щ¿ ЩЛ ‰И¿ЪОВИ· ЩЛ˜
Ы˘УЩ‹ЪЛЫЛ˜ Ъ¤ВИ У· ¯ЪЛЫИМФФИВ›ЩВ
¿УЩ· Щ· ЪФЫЩ·ЩВ˘ЩИО¿ Б¿УЩИ·. ªЛУ
О¿УВЩВ ЩЛ Ы˘УЩ‹ЪЛЫЛ МВ ЩФУ ОИУЛЩ‹Ъ·
˙ВЫЩfi.
ºπ§∆ƒ√ ∞∂ƒ∞ - ∫¿ıВ 8-10 ТЪВ˜ ПВИЩФ˘ЪБ›·˜,
·ÓÔ›ÍÙ ÙÔ Î·¿ÎÈ (A, ∂ÈÎ. 26) Î·È ÂϤÁÍÙ ÙÔ
Ê›ÏÙÚÔ (B). ∆Ô Ê›ÏÙÚÔ (B) Ú¤ÂÈ Ó· ηı·Ú›˙ÂÙ·È
·У·ОИУТУЩ·˜ О·П¿ О·И ¯ЪЛЫИМФФИТУЩ·˜ М·П·Оfi
ИУ¤ПФ.
ºπ§∆ƒ√ ∫∞À™πª√À - ∂ϤÁ¯ÂÙ ÂÚÈÔ‰Èο ÙËÓ
ηٿÛÙ·ÛË ÙÔ˘ Ê›ÏÙÚÔ˘ η˘Û›ÌÔ˘ (C). ™Â
ÂÚ›ÙˆÛË ˘ÂÚ‚ÔÏÈ΋˜ Ú‡·ÓÛ˘,
·ÓÙÈηٷÛÙ‹ÛÙ ÙÔ (∂ÈÎ. 27).
∫π¡∏∆∏ƒ∞™ - ∫·ı·Ъ›˙ВЩВ ВЪИФ‰ИО¿ Щ· ЩВЪ‡БИ·
ЩФ˘ ОИУЛЩ‹Ъ· МВ ИУ¤ПФ ‹ ВИВЫМ¤УФ ·¤Ъ· (∂ИО.
28). ∏ Ы˘ЫЫТЪВ˘ЫЛ Ъ‡ˆУ ЫЩФУ О‡ПИУ‰ЪФ МФЪВ›
У· ЪФО·П¤ЫВИ ВИО›У‰˘УЛ ˘ВЪı¤ЪМ·УЫЛ БИ· ЩЛ
ПВИЩФ˘ЪБ›· ЩФ˘ ОИУЛЩ‹Ъ·.
ª¶√À∑π - ™˘УИЫЩ¿Щ·И У· О·ı·Ъ›˙ВЩВ ВЪИФ‰ИО¿ ЩФ
МФ˘˙› О·И У· ВП¤Б¯ВЩВ ЩЛУ ·fiЫЩ·ЫЛ ЩˆУ
ЛПВОЩЪФ‰›ˆУ (∂ИО. 29). ¯ЪЛЫИМФФИВ›ЩВ МФ˘˙›
Champion RCJ-6Y ‹ ¿ППЛ˜ М¿ЪО·˜ МВ ИЫФ‰‡У·МФ
ıВЪМИОfi ‚·ıМfi.
¢π∞∫√¶∆∏™ ∞™º∞§∂π∞™ - ªВ ЩФУ ОИУЛЩ‹Ъ· ЫВ
ПВИЩФ˘ЪБ›·, ‚В‚·ИˆıВ›ЩВ fiЩИ, ·УФ›БФУЩ·˜ ЩЛ БЪ›ПИ·
ЪФЫЩ·Ы›·˜ (E, ∂ИО.30), Ф ‰И·ОfiЩЛ˜ ·ЫК·ПВ›·˜
(D) ·ОИУЛЩФФИВ› ·М¤Ыˆ˜ ЩФУ ОИУЛЩ‹Ъ·. ™В
·ÓÙ›ıÂÙË ÂÚ›ÙˆÛË ·Â˘ı˘Óı›Ù ·Ì¤Ûˆ˜ ÛÙÔ
ÂÍÔ˘ÛÈÔ‰ÔÙË̤ÓÔ Û¤Ú‚È˜.
¶ƒ√™√Ã∏! - ŸÏ˜ ÔÈ ÂÂÌ‚¿ÛÂȘ
Û˘ÓÙ‹ÚËÛ˘ Ô˘ ‰ÂÓ ·Ó·Ê¤ÚÔÓÙ·È ÛÙÔ
·ÚfiÓ ÂÁ¯ÂÈÚ›‰ÈÔ, Ú¤ÂÈ Ó·
Ú·ÁÌ·ÙÔÔÈÔ‡ÓÙ·È ·fi ÂÍÔ˘ÛÈÔ‰ÔÙË̤ÓÔ
ۤڂȘ. °И· У· ВН·ЫК·ПИЫЩВ› Л ЫЩ·ıВЪ‹ О·И
ФМ·П‹ ПВИЩФ˘ЪБ›· ЩФ˘ К˘ЫЛЩ‹Ъ·, БИ· ЩЛУ
·УЩИО·Щ¿ЫЩ·ЫЛ ВН·ЪЩЛМ¿ЩˆУ Ъ¤ВИ У·
¯ЪЛЫИМФФИВ›ЩВ ¿УЩ· °¡∏™π∞
∞¡∆∞§§∞∫∆π∫∞.
Español Nederlands Português
MANTENIMIENTO ONDERHOUD MANUTENÇÃO
30
Ελληνικα
ΣΥΝΤΗΡΗΣΗ
Page 14

14
Quando la macchina deve rimanere ferma per lunghi periodi:
- Smontare il tubo soffiatore e l’ugello.
- Vuotare e pulire il serbatoio carburante in un luogo ben ventilato.
- Per vuotare il carburatore, avviare il motore e attenderne l’arresto (lasciando la miscela nel carburatore le membrane potrebbero danneggiarsi).
- Pulire accuratamente l’apparecchiatura all’in-
terno della chiocciola (H, Fig.34) da detriti e
sporcizia, il coltello di triturazione (G, Fig.35), le
alette della girante (F), le feritoie della griglia di
protezione (Fig.36), il filtro aria (B, Fig.37), le
alette del cilindro (Fig.38) e i tubi, soprattutto
quando la si utilizza nella versione aspiratore.
- Togliere la candela e versare un po’ di olio nel cilindro (Fig.39).
- Far ruotare l’albero motore alcune volte tramite
la funicella d’avviamento (Fig.40) per distribuire
l’olio nel cilindro. Rimontare la candela.
- Conservare la macchina in ambiente secco, possibilmente non a diretto contatto con il suolo e
lontano da fonti di calore.
Lorsque l’appareil doit être stocké pendant de longues périodes:
- Démonter le tube du souffleur et la buse.
- Vidanger et nettoyer le réservoir de carburant
dans un lieu bien aéré.
- Pour vider le carburateur, démarrer le moteur et
en attendre l’arrêt (le fait de laisser du mélange
dans le carburateur pourrait endommager les
membranes).
- Nettoyer soigneusement les pièces à l’inté-
rieur de la turbine (H, Fig.34) de tous détritus
et crasses, le couteau de trituration (G, Fig.35),
les ailettes de la turbine (F), les fentes de la grille de protection (Fig.36), le filtre à air (B, Fig.37),
les ailettes du cylindre (Fig.38) et les tubes, surtout lorsque l’appareil est utilisé pour l’aspiration.
- Enlever la bougie et verser un peu d’huile dans
le cylindre (Fig.39).
- Faire tourner quelques fois l’arbre moteur à l’aide
du cordon de lancement (Fig.40) pour que l’huile
se répartisse bien dans le cylindre. Remonter la
bougie.
- Stocker l’engin dans un endroit sec, de préférence sans le mettre en contact direct avec le sol et
loin de toute source de chaleur.
If the machine is to be stored for long periods:
- Remove the blower tube and nozzle.
- Drain and clean the fuel tank in a well-ventilated
area.
- To drain the tank, start the engine and wait until
the fuel is exhausted and the engine stops (leaving fuel mixture in the carburettor could damage
the membranes).
- Thoroughly clean the components inside the
impeller housing (H, Fig.34) of all debris and
dirt: the shredder blade (G, Fig.35), the impeller
blades (F), the slots in the safety guard (Fig.36),
the air cleaner (B, Fig.37), the cylinder fins
(Fig.38) and the tubes, especially when the machine is used in the vacuum version.
- Remove the spark plug and pour a little oil into
the cylinder (Fig.39).
- Turn the engine crankshaft using the starting
cord (Fig.40) in order to distribute the oil inside
the cylinder. Replace the spark plug.
- Store the blower in a dry place, preferably not in
direct contact with the ground and away from
heat sources.
Bei längerem Stillstand des Geräts:
- Bauen Sie Blasrohr und Düse aus
- Entleeren und reinigen Sie den Kraftstofftank in
gut belüfteter Umgebung
- Zum Entleeren des Vergasers starten Sie den
Motor und lassen ihn dann zum Stehen kommen
(das Kraftstoffgemisch im Vergaser könnte die
Membranen beschädigen).
- Reinigen Sie die Innenseite des Gehäuses (H,
Abb.34) von Rückständen und Schmutz,
ebenso das Schnittmesser (G, Abb.35), die Gebläseschaufeln (F), die Schlitze des Schutzgitters (Abb.36), den Luftfilter (B, Abb.37), die Zylinderrippen (Abb.38) und die Rohre, besonders
beim Einsatz als Laubsauger.
- Bauen Sie die Zündkerze aus und schütten Sie
etwas Öl in den Zylinder (Abb.39).
- Drehen Sie die Motorwelle einige Male durch
Ziehen des Startseils (Abb.40), um das Öl im Zylinder zu verteilen. Bauen Sie die Zündkerze
wieder ein.
- Lagern Sie das Gerät trocken, möglichst vom
Boden angehoben und von Wärmequellen entfernt.
Italiano Français English Deutsch
RIMESSAGGIO REMISSAGE STORAGE LÄNGERUNG
34 35 36 37
Page 15

15
Si la máquina no se va a utilizar durante un tiempo
prolongado:
- Desmonte el tubo soplador y la boquilla.
- Vacíe y limpie el depósito de combustible en un
sitio bien ventilado.
- Para vaciar el carburador, ponga el motor en
marcha y déjelo hasta que se pare. Si queda
mezcla en el carburador, las membranas pueden dañarse.
- Limpie esmeradamente el interior del caracol
(H, Fig. 34), cuchilla trituradora (G, Fig. 35), aletas del rotor (F), ranuras de la rejilla de protección (Fig. 36), filtro de aire (B, Fig. 37), aletas del
cilindro (Fig. 38) y tubos, sobre todo cuando el
equipo se utiliza como aspirador.
- Quite la bujía y vierta un poco de aceite en el cilindro (Fig. 39).
- Haga girar el eje del motor algunas veces mediante la cuerda de arranque (Fig. 40) per distribuir el aceite en el cilindro. Monte otra vez la
bujía.
- Guarde la máquina en un ambiente seco, si es
posible elevada del suelo y lejos de fuentes de
calor.
Wanneer het apparaat lange tijd niet gebruikt zal
worden:
- Demonteer de blowerbuis en het mondstuk.
- Ledig de brandstoftank en maak hem schoon in
een goed geventileerde ruimte.
- Om de carburateur te ledigen moet de motor
worden gestart en moet u wachten tot de motor
stopt (als u het mengsel in de carburateur laat,
zouden de membranen beschadigd kunnen worden).
- Verwijder vuil en vreemde voorwerpen zorg-
vuldig uit de apparatuur in het slakkenhuis
(H, Fig.34), maak het afvalvernietigingsmes (G,
Fig.35), de schoepen van de rotor (F), de sleuven van het beschermrooster (Fig.36), het luchtfilter (B, Fig.37), de ribben van de cilinder
(Fig.38) en de buizen goed schoon, vooral wanneer het apparaat wordt gebruikt als zuigapparaat.
- Verwijder de bougie en giet wat olie in de cilinder
(Fig.39).
- Laat de motoras een paar keer draaien met de
startkabel (Fig.40) om de olie in de cilinder te
verdelen. Monteer de bougie weer.
- Bewaar het apparaat op een droge plaats, zo
mogelijk niet rechtstreeks in contact met de
grond, en uit de buurt van warmtebronnen.
Quando tiver de deixar a máquina parada por longos períodos de tempo:
- Desmonte o tubo do soprador e o bico.
- Esvazie e limpe o reservatório do carburante
num local bem ventilado.
- Para esvaziar o carburador, ligue o motor e
aguarde que este pare (deixar a mistura no carburador poderá originar danos nas membranas).
- Limpe cuidadosamente o aparelho no interior
da espiral (H, Fig. 34) eliminando os detritos
e a sujidade. Limpe ainda a lâmina de trituração
(G, Fig. 35), as aletas do impulsor (F), as ranhuras da grelha de protecção (Fig. 36), o filtro do
ar (B, Fig. 37), as aletas do cilindro (Fig. 38) e os
tubos, sobretudo quando a máquina é utilizada
na versão aspirador.
- Retire a vela de ignição e verse um pouco de
óleo no cilindro (Fig. 39).
- Faça rodar algumas vezes o eixo do motor
através do cabo de arranque (Fig. 40) para distribuir o óleo no cilindro. Volte a colocar a vela
de ignição.
- Conserve a máquina num local seco, de preferência não em contacto directo com o solo e
longe de fontes de calor.
ŸЩ·У Ф К˘ЫЛЩ‹Ъ·˜ ‰ВУ ЪfiОВИЩ·И У·
¯ЪЛЫИМФФИЛıВ› БИ· МВБ¿ПФ ¯ЪФУИОfi ‰И¿ЫЩЛМ·:
- µÁ¿ÏÙ ÙÔ ÛˆÏ‹Ó· Ê˘ÛËÙ‹Ú· Î·È ÙÔ ÛÙfiÌÈÔ.
- ∞‰ÂÈ¿ÛÙÂ Î·È Î·ı·Ú›ÛÙ ÙÔ ÚÂ˙ÂÚ‚Ô˘¿Ú Û ηϿ
·ÂÚÈ˙fiÌÂÓÔ ¯ÒÚÔ.
- °И· У· ·‰ВИ¿ЫВЩВ ЩФ О·ЪМ˘Ъ·Щ¤Ъ, ‚¿ПЩВ
ВМЪfi˜ ЩФУ ОИУЛЩ‹Ъ· О·И ВЪИМ¤УВЩВ У· Ы‚‹ЫВИ
(·К‹УФУЩ·˜ М›БМ· ЫЩФ О·ЪМ˘Ъ·Щ¤Ъ МФЪФ‡У
У· ˘ФЫЩФ‡У ‚П¿‚В˜ ФИ МВМ‚Ъ¿УВ˜).
- ∫·ı·Ъ›ЫЩВ ЪФЫВОЩИО¿ ЩФ МЛ¯¿УЛМ· ЫЩФ
ВЫˆЩВЪИОfi ЩФ˘ ОФ¯П›· (H, ∂ИО.34) ·fi
˘ФПВ›ММ·Щ· О·И Ъ‡Ф˘˜, ÙÔ Ì·¯·›ÚÈ ¿ÏÂÛ˘
(G, ∂ИО.35), Щ· ЩВЪ‡БИ· ЩЛ˜ КЩВЪˆЩ‹˜ (F), ЩИ˜
Ы¯ИЫМ¤˜ ЩЛ˜ БЪ›ПИ·˜ ЪФЫЩ·Ы›·˜ (∂ИО.36), ЩФ
К›ПЩЪФ ·¤Ъ· (B, ∂ИО.37), Щ· ЩВЪ‡БИ· ЩФ˘
О˘П›У‰ЪФ˘ (∂ИО.38) О·И ЩФ˘˜ ЫˆП‹УВ˜, О˘Ъ›ˆ˜
fiЩ·У ¯ЪЛЫИМФФИВ›Щ·И ˆ˜ ·ФЪЪФКЛЩ‹Ъ·˜.
- µÁ¿ÏÙ ÙÔ ÌÔ˘˙› Î·È ‚¿ÏÙ ϛÁÔ Ï¿‰È ÛÙÔÓ
·ÏÈÓ‰ÚÔ (∂ÈÎ.39).
- °˘Ъ›ЫЩВ ЩФУ ¿НФУ· ОИУЛЩ‹Ъ· П›БВ˜ КФЪ¤˜ МВ ЩФ
Ы¯ФИУ¿ОИ ВОО›УЛЫЛ˜ (∂ИО.40) БИ· ЩЛУ О·Щ·УФМ‹
ЩФ˘ П·‰ИФ‡ ЫЩФУ О‡ПИУ‰ЪФ. ∆ФФıВЩ‹ЫЩВ ¿ПИ
ЩФ МФ˘˙›.
- º˘П¿НЩВ ЩФ МЛ¯¿УЛМ· ЫВ ЫЩВБУfi ¯ТЪФ, О·Щ¿
ЪФЩ›МЛЫЛ ¯ˆЪ›˜ У· ¤Ъ¯ВЩ·И ЫВ В·К‹ МВ ЩФ
‰¿В‰Ф О·И М·ОЪИ¿ ·fi ЛБ¤˜ ıВЪМfiЩЛЩ·˜.
Español Nederlands Português
ALMACENAJE OPSLAG ARMAZENAGEM
38 39 40
Ελληνικα
∞¶√£∏∫∂À™∏
Page 16

16
Kit aspiratore / trituratore KA 26 opzionale
(Fig.42):
1. Tubo aspiratore (in due pezzi)
2. Collettore
3. Sacco di raccolta
4. Maniglia
5. Viti per fissaggio maniglia
PREPARAZIONE
- Montare la maniglia (A, Fig.43) e fissarla con
le apposite viti (B).
- Introdurre il collettore (C, Fig.44) nel sacco
(D) fino a dove termina la parte conica del tubo e chiuderlo con il nastro Velcron (E).
- Innestare il collettore (C, Fig.45), imboccando
i due perni (F) del bocchettone della chiocciola, sulle due scanalature (G) del tubo. Ruotare nella direzione della freccia (2) fino al bloccaggio. Il tubo montato risulterà come in
Fig.46.
- Con la semplice pressione di un dito aprire la
griglia di protezione (H, Fig.47). Innestare il
tubo di aspirazione (L), imboccando i quattro
perni (M) della chiocciola, sulle quattro scanalature di guida (N) del tubo. Ruotare nella direzione della freccia (2) fino al bloccaggio. Inserire a pressione la parte terminale del tubo
aspirazione (P, Fig.48), assicurandosi che la
parte smussata alla fine del tubo aspiratore
sia rivolta verso il basso.
ATTENZIONE - Se il tubo aspiratore non
è montato correttamente, l’interruttore di
sicurezza (D, Fig.49) impedirà alla macchina di mettersi in moto. Nel caso in cui
il motore non parta, verificare il corretto
montaggio del tubo.
Kit aspirateur / triturateur KA 26 accessoire
en option (Fig.42):
1. Tube aspirateur (en deux parties)
2. Tube collecteur
3. Sac collecteur
4. Poignée
5. Vis de fixation pour la poignée
PRÉPARATION
- Monter la poignée (A, Fig.43) et la fixer avec
les vis appropriées (B).
- Introduire le tube collecteur (C, Fig.44) dans
le sac (D) jusqu’au bout de la partie conique
du tube et le fermer avec le ruban Velcron
(E).
- Introduire le collecteur (C, Fig.45), en emboîtant les deux ergots (F) de la goulotte de la
turbine, les deux cannelures (G) du tube. Tourner dans le sens de la
flèche (2) jusqu’à l’encliquetage. Le tube sera
alors monté comme le montre la Fig. 46.
- par simple pression du doigt, ouvrir la grille de
protection (H, Fig.47). Introduire le tube d’apiration (L), en emboîtant les quatre ergots (M)
de la turbine dans les quatre cannelures-guides (N) du tube. Tourner dans le sens de la
flèche (2) jusqu’à l’encliquetage. Pousser la
partie terminale du tube d’aspiration (P,
Fig.48), en s’assurant que la partie arrondie
de l’embout du tube de l’aspirateur est tourné
vers le bas.
ATTENTION - Si le tube de l’aspirateur
n’est pas monté correctement, l’interrup-
teur de sécurité (D, Fig.49) empêchera la
mise en route de l’appareil. Il conviendra
dès lors de vérifier l’assemblage au cas
où le moteur ne démarrerait pas.
Optional vacuum / shredder kit KA 26
(Fig.42):
1. Vacuum tube (in two pieces)
2. Bag intake tube
3. Bag
4. Handle
5. Handle fixing screws
PREPARATION
- Fit the handle (A, Fig.43) and secure with the
screws provided (B).
- Insert the intake tube (C, Fig.44) into the bag
(D) up to the end of the tapered part of the tube and secure with the Velcro strap (E).
- Fit the intake tube (C, Fig.45) to the impeller
housing, so that the two pins (F) on the housing tube engage the two slots (G) in the intake tube. Rotate the tube in the direction of
the arrow (2) to lock in place. When fitted, the
intake tube appears as shown in Fig.46.
- Open the safety guard by simply pressing the
catch (H, Fig.47) with a finger. Insert the vacuum tube (L), engaging the four pins (M) on
the impeller housing with the four slots (N) in
the vacuum tube. Rotate the tube in the direction of the arrow (2) to lock. Push fit the end
section of the vacuum tube (P, Fig.48), ensuring that the chamfer on the edge of the tube
is facing downwards.
WARNING - If the vacuum tube is not fitted correctly, the safety switch (D, Fig.49)
will prevent starting. If the engine does
not start, check that the tube is fitted correctly.
Sonderzubehör Bausatz Laubsauger /
Laubhäcksler KA 26 (Abb.42):
1. Saugrohr (2-teilig)
2. Sammelrohr
3. Fangsack
4. Griff
5. Fixierschraube für Griff
VORBEREITUNG
- Bringen Sie den Griff (A, Abb.43) an und befestigen Sie diesen mit den Schrauben (B)
- Führen Sie das Sammelrohr (C, Abb.44) bis
zum Kegelende in den Fangsack (D) ein und
verschließen Sie mit Klettband (E).
- Stecken Sie die 2 Stifte (F) des Gehäusestutzens in die 2 Rillen (G) des Sammelrohrs (C,
Abb.45) ein und drehen Sie dann bis zum Anschlag in Pfeilrichtung (2). Das montierte
Rohr ist in Abb.46 dargestellt.
- Öffnen Sie mit Fingerdruck das Schutzgitter
(H, Abb.47). Führen Sie die 4 Stifte (M) des
Gehäuses in die 4 Führungsrillen (N) des
Rohrs ein und drehen Sie dann bis zum Anschlag in Pfeilrichtung (2). Rasten Sie das
Endstück des Saugrohrs (P, Abb.48) ein und
überprüfen Sie, ob das abgeschrägte Ende
des Saugrohrs nach unten gerichtet ist.
ACHTUNG – Bei falsch montiertem Saugrohr verhindert der Sicherheitsschalter
(D, Abb.49) das Anlassen des Geräts.
Prüfen Sie daher die Rohrmontage, falls
der Motor nicht starten sollte.
Italiano Français English Deutsch
ASSEMBLAGGIO DELLA MACCHINA NELLA
VERSIONE ASPIRATORE / TRITURATORE
ASSEMBLAGE DE L’APPAREIL EN VERSION
ASPIRATEUR / TRITURATEUR
ASSEMBLY OF THE VACUUM / SHREDDER
VERSION OF THE MACHINE
MONTAGE DES GERÄTS IN DER
AUSFÜHRUNG LAUBSAUGER / LAUBHÄCKLER
42 43 44 45
Page 17

17
Kit aspirador / triturador KA 26 opcional (Fig.
42):
1. Tubo aspirador (en dos piezas)
2. Colector
3. Bolsa contenedora
4. Manilla
5. Tornillos de fijación de la manilla
PREPARACIÓN
- Monte la manilla (A, Fig. 43) y fíjela con los
tornillos (B).
- Introduzca el colector (C, Fig. 44) en la bolsa
(D) hasta donde termina la parte cónica del
tubo, y ciérrelo con la cinta Velcron (E).
- Monte el colector (C, Fig. 45), introduciendo
los dos pernos (F) de la boca del caracol en
las dos ranuras (G) del tubo. Gire en el sentido de la flecha (2) hasta que se bloquee. El
tubo montado quedará como en la Fig. 46.
- Con la simple presión de un dedo, abra la
rejilla de protección (H, Fig. 47). Conecte el
tubo de aspiración (L), insertando los cuatro
pernos (M) del caracol en las cuatro ranuras
de guía (N) del tubo. Gire en el sentido de la
flecha (2) hasta que se bloquee. Introduzca a
presión la parte terminal del tubo aspiración
(P, Fig. 48), asegurándose de que el chaflán
al final del tubo aspirador quede hacia abajo.
ATENCIÓN - Si el tubo aspirador no está
montado correctamente, el interruptor de
seguridad (D, Fig. 49) impide que la máquina se ponga en marcha. Si el motor no
arranca, controle el montaje del tubo.
Optionele Kit zuiger / afvalvernietiger KA 26
(Fig.42):
1. Zuigbuis (in twee stukken)
2. Collector
3. Opvangzak
4. Handgreep
5. Bevestigingsschroeven voor handgreep
VOORBEREIDING
- Monteer de handgreep (A, Fig.43) en zet hem
vast met de schroeven (B).
- Steek de collector (C, Fig.44) in de zak (D) tot
waar het conische gedeelte van de buis eindigt en sluit hem met het klittenband (E).
- Breng de collector (C, Fig.45) aan, door de
twee pennen (F) van de opening van het
slakkenhuis in de twee groeven (G) van de
buis te steken. Draai hem in de richting van
de pijl (2) tot hij geblokkeerd is. Nadat de buis
gemonteerd is, ziet hij eruit zoals op Fig.46.
- Open het beschermrooster (H, Fig.47) door er
eenvoudig met één vinger op te drukken.
Breng de zuigbuis (L) aan, door de vier pennen (M) van het slakkenhuis in de vier geleidegroeven (N) van de buis te steken. Draai
hem in de richting van de pijl (2) totdat hij geblokkeerd wordt. Druk het uiteinde van de
zuigbuis (P, Fig.48) erin, en controleer of het
afgeschuinde gedeelte aan het einde van de
zuigbuis naar beneden gericht is.
LET OP – Als de zuigbuis niet correct gemonteerd is, zal de veiligheidsschakelaar
(D, Fig.49) verhinderen dat het apparaat
kan worden gestart. Als de motor niet
start, controleer dan of de buis goed gemonteerd is.
Kit aspirador / triturador KA 26 opcional (Fig.
42):
1. Tubo aspirador (em duas peças)
2. Colector
3. Saco de recolha
4. Pega
5. Parafusos de fixação da pega
PREPARAÇÃO
- Monte a pega (A, Fig. 43) e fixe-a com os respectivos parafusos (B).
- Introduza o colector (C, Fig. 44) no saco (D)
até onde termina a parte cónica do tubo e feche-o com a fita Velcron (E).
- Introduza o colector (C, Fig. 45), encaixando
os dois pernos (F) do bico da espiral nas
duas estrias (G) do tubo. Rode no sentido da
seta (2) até ao bloqueio. O tubo montado ficará como ilustrado na Fig. 46.
- Abra a grelha de protecção (H, Fig. 47), pressionando simplesmente com um dedo. Introduza o tubo de aspiração (L), encaixando os
quatro pernos (M) da espiral nas quatro
estrias de guia (N) do tubo. Rode no sentido
da seta (2) até ao bloqueio. Exercendo pressão, introduza a extremidade do tubo de aspiração (P, Fig. 48), certificando-se de que a
parte chanfrada no final do tubo de aspiração
fica voltada para baixo.
ATENÇÃO - Se o tubo de aspiração não
estiver montado correctamente, o interruptor de segurança (D, Fig. 49) impedirá
que a máquina entre em funcionamento.
Caso o motor não arranque, certifique-se
de que o tubo está devidamente montado.
∫ИЩ ·ФЪЪФКЛЩ‹Ъ· / ·ПВЫЩИО‹˜ МЛ¯·У‹˜ KA 26
ЪФ·ИЪВЩИОfi (∂ИО.42):
1. ™ˆÏ‹Ó·˜ ·Ó·ÚÚfiÊËÛ˘ (Û ‰‡Ô ÙÂÌ¿¯È·)
2. ™˘ÏϤÎÙ˘
3. ™¿ÎÔ˜ Û˘ÏÏÔÁ‹˜
4. ГВИЪФП·‚‹
5. µ›‰В˜ ЫЩВЪ¤ˆЫЛ˜ ¯ВИЪФП·‚‹˜
¶ƒ√∂∆√πª∞™π∞
- ∆ФФıВЩ‹ЫЩВ ЩЛ ¯ВИЪФП·‚‹ (A, ∂ИО.43) О·И
ЫЩВЪВТЫЩВ ЩЛУ МВ ЩИ˜ ВИ‰ИО¤˜ ‚›‰В˜ (B).
- ∆ÔÔıÂÙ‹ÛÙ ÙÔ Û˘ÏϤÎÙË (C, ∂ÈÎ.44) ÛÙÔ
Û¿ÎÔ (D) ˆ˜ ÙÔ ¿ÎÚÔ ÙÔ˘ ΈÓÈÎÔ‡ ÙÌ‹Ì·ÙÔ˜
ÙÔ˘ ۈϋӷ Î·È ÎÏ›ÛÙ ÙÔ Ì ÙËÓ Ù·ÈÓ›· Velcron (E).
- ™˘Ó‰¤ÛÙ ÙÔ Û˘ÏϤÎÙË (C, ∂ÈÎ.45),
ÚÔÛ·ÚÌfi˙ÔÓÙ·˜ ÙÔ˘˜ ‰‡Ô ›ÚÔ˘˜ (F) ÙÔ˘
ÛÙÔÌ›Ô˘ ÙÔ˘ Îԯϛ·, ÛÙȘ ‰‡Ô ÂÁÎÔ¤˜ (G)
ÙÔ˘ ۈϋӷ. °˘Ú›ÛÙ ÚÔ˜ ÙËÓ Î·Ù‡ı˘ÓÛË
ÙÔ˘ ‚¤ÏÔ˘˜ (2) ¤ˆ˜ fiÙÔ˘ ·ÛÊ·Ï›ÛÂÈ. √
ÙÔÔıÂÙË̤ÓÔ˜ ۈϋӷ˜ ¤¯ÂÈ ÙË ı¤ÛË Ù˘
∂ÈÎ.46.
- ¶È¤˙ÔÓÙ·˜ Ì ¤Ó· ‰¿¯Ù˘ÏÔ, ·ÓÔ›ÍÙ ÙË ÁÚ›ÏÈ·
ÚÔÛÙ·Û›·˜ (H, ∂ÈÎ.47). ™˘Ó‰¤ÛÙ ÙÔ ÛˆÏ‹Ó·
·У·ЪЪfiКЛЫЛ˜ (L), ЪФЫ·ЪМfi˙ФУЩ·˜ ЩФ˘˜
Щ¤ЫЫВЪИ˜ В›ЪФ˘˜ (M) ЩФ˘ ОФ¯П›·, ЫЩИ˜
Щ¤ЫЫВЪИ˜ ВБОФ¤˜ (N) ЩФ˘ ЫˆП‹У·. °˘Ъ›ЫЩВ
ЪФ˜ ЩЛУ О·ЩВ‡ı˘УЫЛ ЩФ˘ ‚¤ПФ˘˜ (2) ¤ˆ˜
fiЩФ˘ ·ЫК·П›ЫВИ. ∆ФФıВЩ‹ЫЩВ И¤˙ФУЩ·˜ ЩФ
¿ОЪФ ЩФ˘ ЫˆП‹У· ·У·ЪЪfiКЛЫЛ˜ (P, ∂ИО.48)
О·И ‚В‚·ИˆıВ›ЩВ fiЩИ ЩФ ЫЩЪФББ˘ПВМ¤УФ ¿ОЪФ
ЫЩФ Щ¤ПФ˜ ЩФ˘ ЫˆП‹У· ·У·ЪЪfiКЛЫЛ˜
‚Ъ›ЫОВЩ·И ЪФ˜ Щ· О¿Щˆ.
¶ƒ√™√Ã∏ - ∞Ó Ô ÛˆÏ‹Ó·˜ ·Ó·ÚÚfiÊËÛ˘
‰ÂÓ ÙÔÔıÂÙËı› ÛˆÛÙ¿, Ô ‰È·ÎfiÙ˘
·ЫК·ПВ›·˜ (D, ∂ИО.49) ‰ВУ ВИЩЪ¤ВИ ЩЛ
ПВИЩФ˘ЪБ›· ЩФ˘ МЛ¯·У‹М·ЩФ˜. ™В
ВЪ›ЩˆЫЛ Ф˘ Ф ОИУЛЩ‹Ъ·˜ ‰ВУ Щ›ıВЩ·И
ЫВ ПВИЩФ˘ЪБ›·, ВП¤БНЩВ ЩЛ ЫˆЫЩ‹
ЩФФı¤ЩЛЫЛ ЩФ˘ ЫˆП‹У·.
Español Nederlands Português
ENSAMBLAJE DE LA MÁQUINA EN VERSIÓN
ASPIRADOR / TRITURADOR
MONTAGE VAN HET APPARAAT IN DE
UITVOERING ALS ZUIGER / AFVALVERNIETIGER
MONTAGEM DA MÁQUINA NA VERSÃO
ASPIRADOR / TRITURADOR
46 47 48 49
Ελληνικα
™À¡∞ƒª√§√°∏™∏ ∆√À ª∏Ã∞¡∏ª∞∆√™ °π∞
§∂π∆√Àƒ°π∞ ∞¶√ƒƒ√º∏∆∏ƒ∞ / ∞§∂™∆π∫∏™ ª∏Ã∞¡∏™
Page 18

18
UTILIZZO
L’aspiratore è concepito per l’uso con ambedue le
mani e deve essere utilizzato dall’utente con la mano destra sull’impugnatura di comando e con quella sinistra sull’impugnatura del carter (Fig.50).
Mettere la tracolla del sacco di raccolta sulla spalla
sinistra e infilarvi il braccio destro. Nel funzionamento in aspirazione l’apparecchiatura deve essere usata solo con il sacco di raccolta montato.
Il grande diametro del tubo di aspirazione consente
di aspirare anche grossi pezzi (per es. foglie grandi, pezzi di cartone e di corteccia).
Attenzione a non aspirare oggetti voluminosi che
potrebbero danneggiare le alette della girante (F,
Fig.51) o bloccare la stessa.
Attenzione nell’aspirare fogliame bagnato, che
potrebbe intasare la girante.
Attenzione a non ostruire il tubo aspiratore per evitare danni al motore dovuti alla eccessiva velocità.
ATTENZIONE – Non aspirare mai liquidi infiammabili e sostanze tossiche (per es. car-
burante) o materiali che ne sono impregnati.
Possono essere causa di ustioni mortali
per fuoco od esplosione!
MANUTENZIONE
CHIOCCIOLA – Pulire periodicamente l’interno
della chiocciola (H, Fig.52) da sporcizia e detriti per
non compromettere il rendimento della macchina.
GIRANTE – Verificare che le alette (F, Fig.51) siano pulite e non danneggiate per evitare diminuzione del flusso d’aria e aumento delle vibrazioni. In
caso contrario rivolgersi immediatamente ad un’of-
ficina autorizzata.
SACCO DI RACCOLTA - Deve essere lavato pe-
riodicamente per permettere una buona aspirazione e riempimento.
Per le altre operazioni di manutenzione vedere
capitolo pag. 12.
L’aspirateur a été conçu pour être employé à deux
mains, l’utilisateur tenant de la main droite la poignée de commande et de la main gauche la poignée du carter (Fig.50).
Poser la bandoulière du sac collecteur sur l’épaule
gauche et enfiler le bras droit. En version aspirateur, l’appareil ne doit être utilisé qu’avec le sac
collecteur monté.
Le grand diamètre du tube d’aspiration permet
d’aspirer de grosses pièces (p. ex. grandes feuilles,
morcaux de carton et d’écorce).
Attention: on veillera toutefois à ne pas aspirer
des objets volumineux pouvant endommager les
ailettes de la turbine (F, Fig.51) ou bloquer celle-ci.
Attention: ne pas aspirer des feuillages mouillés,
qui pourraient engorger la turbine.
Attention: ne pas obstruer le tube d’aspiration afin
d’éviter tout dommage au moteur à la suite d’une
montée en régime.
ATTENTION – Ne jamais aspirer de liquides
inflammables ni de substances toxiques (p.
ex. du carburant) ou des matériaux non imprégnés ceux-ci pouvant être la cause de
brûlures fatales par le feu ou à la suite
d’explosions!
MAINTENANCE
TURBINE – Nettoyer périodiquement l’intérieur du
module abritant la turbine (H, Fig.52) de tous détritus ou crasses afin de na pas gêner le bon rendement de l’appareil.
MOBILE – Vérifier si les ailettes (F, Fig.51) sont
propres et non endommagées afin d’éviter la perte
de flux d’air et l’accroissement des vibrations. Dans
le cas contraire s’adresser immédiatement à un
agent agréé..
SAC COLLECTEUR - Doit être lavé périodique-
ment afin de permettre une bonne aspiration et
remplissage.
Voir la rubrique page 12 pour les autres opérations de maintenance.
The vacuum is designed to be held in both hands,
with the right hand on the control grip and the left
hand on the grip on the housing (Fig.50).
Sling the collection bag over the left shoulder and
insert the right arm. The collection bag must always
be fitted when the machine is used as a vacuum.
The large diameter of the vacuum tube allows large
pieces to be sucked up (e.g. large leaves, pieces of
card and bark).
Take care not to vacuum large objects that could
obstruct or damage the impeller blades (F, Fig.51).
Take care when vacuuming wet leaves, as these
could clog the impeller.
Take care not to block the vacuum tube as this
could result in over-revving and damage the engine.
WARNING – Do not use the vacuum for inflammable liquids or toxic substances (e.g.
fuel) or even materials that are impregnated
with such substances. This could cause fa-
tal burns or explosion!
MAINTENANCE
IMPELLER HOUSING – Periodically clean the insi-
de of the impeller housing (H, Fig.52) to remove
dirt and debris that could otherwise impair the
performance of the machine.
IMPELLER – Check that the blades (F, Fig.51) are
clean and undamaged to prevent reduced air flow
and increased vibration. If the impeller blades are
damaged, contact your authorised service centre
immediately.
COLLECTION BAG - Must be washed periodically
to maintain good suction and filling.
For other maintenance operations see page 12.
Der Laubsauger ist zum zweihändigen Gebrauch
vorgesehen, wobei die rechte Hand den Steuergriff
und die linke Hand den Gehäusegriff halten soll
(Abb.50).
Legen Sie den Tragegurt des Fangsacks auf die
linke Schulter und führen Sie den rechten Arm durch. Beim Einsatz als Laubsauger ist der Betrieb nur
mit montiertem Fangsack gestattet.
Durch den erheblichen Durchmesser des Saugrohrs können Sie selbst großvolumige Gegenstände aufsaugen (z. B. große Blätter, Pappstücke
und Rindenteile).
Achtung auf etwaige Beschädigung bzw. Blockierung des Gebläses (F, Abb.51) beim Saugen großvolumiger Gegenstände.
Achtung auf Verstopfung des Gebläses beim Saugen nassen Laubs.
Achtung auf Motorschäden durch übermäßige
Drehzahl durch Verstopfung des Saugrohrs.
ACHTUNG – Saugen Sie auf keinen Fall
entzündliche Flüssigkeiten und Gefahrstoffe
(z.B. Kraftstoff) bzw. damit getränkte Materialien. Dies kann tödliche Verletzungen
durch Brand oder Explosion verursachen!
WARTUNG
GEHÄUSE – Reinigen Sie regelmäßig die Innen-
seite des Gehäuses (H, Abb.52) von Rückständen
und Schmutz, um die Leistung des Geräts nicht zu
beeinträchtigen.
GEBLÄSE – Achten Sie für einen gleichmäßigen
Luftstrom und geringe Vibrationen stets auf saubere und nicht verbogene Rippen (F, Abb.51). Wenden Sie sich im gegenteiligen Fall sofort an eine
autorisierte Fachwerkstatt.
FANGSACK – Waschen Sie regelmäßig den Fang-
sack, um eine gute Saugleistung zu gewährleisten.
In Bezug auf die anderen Wartungseingriffe
siehe Kapitel Seite 12.
Italiano Français English Deutsch
UTILIZZO E MANUTENZIONE DELLA MACCHINA
NELLA VERSIONE ASPIRATORE / TRITURATORE
UTILISATION ET MAINTENANCE DE L’APPAREIL DANS
LA VERSION ASPIRATEUR / TRITURATEUR
USE AND MAINTENANCE OF THE VACUUM /
SHREDDER VERSION
GEBRAUCH UND WARTUNG DES GERÄTS IN
DER AUSFÜHRUNG LAUBSAUGER / LAUBHÄCKSLER
50 51 52
Page 19

19
El aspirador se utiliza con ambas manos; con la
derecha se agarra la empuñadura de mando y con
la izquierda, la empuñadura del cárter (Fig. 50).
Cuélguese la correa de la bolsa del hombro izquierdo e introduzca en ella el brazo derecho. Durante el funcionamiento en aspiración, el equipo
debe utilizarse siempre con la bolsa contenedora
montada.
El gran diámetro del tubo permite aspirar incluso
objetos de tamaño considerable (hojas grandes,
trozos de cartón o de corteza).
Atención: no aspire objetos voluminosos que puedan dañar las aletas del rotor (F, Fig. 51) o bloquear este dispositivo.
Atención: las hojas mojadas pueden atascar el
rotor.
Atención: no deje que se obstruya el tubo aspirador, ya que el motor podría dañarse a causa de la
excesiva velocidad.
ATENCIÓN - No aspire nunca líquidos inflamables o sustancias tóxicas (por ejemplo,
combustible) y tampoco materiales impre-
gnados en ellos. ¡Pueden causar quemadu-
ras mortales por fuego o explosión!
MANTENIMIENTO
CARACOL - Limpie periódicamente el interior del
caracol (H, Fig. 52); la suciedad y los residuos pueden comprometer el rendimiento de la máquina.
ROTOR - Compruebe que las aletas (F, Fig. 51)
estén limpias y sanas, de lo contrario disminuirá el
flujo de aire y aumentarán las vibraciones. En caso
de necesidad, acuda de inmediato a un taller au-
torizado.
BOLSA CONTENEDORA - Lávela periódicamente
para asegurar una buena aspiración y un llenado
correcto.
Para las demás operaciones de mantenimiento,
vea el capítulo pág. 13.
De zuiger is ontworpen voor gebruik met twee handen en de gebruiker moet zijn rechterhand op de
bedieningshandgreep houden en de linkerhand op
de handgreep van de kap (Fig.50).
Doe de riem van de opvangzak over uw linker
schouder en steek uw rechterarm erdoor. Als het
apparaat als zuiger wordt gebruikt, mag hij alleen
worden gebruikt met de opvangzak gemonteerd.
De grote diameter van de zuigbuis maakt het mogelijk ook grote voorwerpen op te zuigen (bijvoorbeeld: grote bladeren, stukken karton en schors).
Let erop dat er geen grote voorwerpen worden opgezogen die de schoepen van de rotor (F, Fig. 51)
kunnen beschadigen of kunnen blokkeren.
Let op bij het opzuigen van natte bladeren, die de
rotor zou kunnen blokkeren.
Let erop dat de zuigbuis niet verstopt raakt om
schade aan de motor door te hoge snelheid te vermijden.
LET OP – Zuig nooit brandbare vloeistoffen
en giftige stoffen op (b.v. brandstof) of mate-
rialen die hiermee doordrenkt zijn. Zij kunnen levensgevaarlijke brandwonden door
vuur of explosies veroorzaken!
ONDERHOUD
SLAKKENHUIS – Verwijder regelmatig het vuil en
vreemde voorwerpen uit het binnenste van het
slakkenhuis (H, Fig.52) om het rendement van het
apparaat niet aan te tasten.
ROTOR – Controleer of de schoepen (F, Fig.51)
schoon en onbeschadigd zijn, om te voorkomen
dat de luchtstroom vermindert en de trillingen toenemen. Is dat niet het geval, wendt u dan onmiddellijk tot een erkende werkplaats.
OPVANGZAK – Deze moet regelmatig worden
gewassen, om goed te kunnen zuigen en de zak te
kunnen vullen.
Zie pag. 13 voor de andere onderhoudswerkzaamheden.
O aspirador foi concebido para ser utilizado com
ambas as mãos. O utilizador deverá manuseá-lo
com a mão direita sobre a pega de comando e
com a mão esquerda sobre a pega do cárter (Fig.
50).
Coloque a alça do saco de recolha à tiracolo (sobre o ombro esquerdo e enfiando o braço direito).
Na modalidade de aspiração, o aparelho deve ser
utilizado só com o saco de recolha montado.
O grande diâmetro do tubo de aspiração também
permite aspirar peças grandes (por ex. folhas grandes, pedaços de cartão e cascas).
Atenção para não aspirar objectos volumosos,
passíveis de danificar as aletas do impulsor (F, Fig.
51) ou de o bloquear.
Atenção para não aspirar folhas molhadas, passíveis de entupir o impulsor.
Atenção para não obstruir o tubo aspirador com vista a evitar danos no motor devidos a uma velocidade excessiva.
ATENÇÃO – Nunca aspire líquidos inflamáveis, substâncias tóxicas (por ex. carburante) ou materiais impregnados dos mesmos.
Podem originar queimaduras mortais por
fogo ou explosão!
MANUTENÇÃO
ESPIRAL – Limpe periodicamente o interior da
espiral (H, Fig. 52), eliminando a sujidade e os detritos, a fim de não comprometer o rendimento da
máquina.
IMPULSOR – Certifique-se de que as aletas (F,
Fig. 51) se encontram limpas e não estão danificadas, para evitar a diminuição do fluxo de ar e o aumento das vibrações. Caso contrário, contacte
imediatamente uma oficina autorizada.
SACO DE RECOLHA - Deve ser lavado regularmente para permitir uma boa aspiração e enchimento.
Para as restantes operações de manutenção,
consulte o capítulo da pág. 13.
√ ·ФЪЪФКЛЩ‹Ъ·˜ ¤¯ВИ Ы¯В‰И·ЫЩВ› БИ· У·
¯ЪЛЫИМФФИВ›Щ·И МВ Щ· ‰‡Ф ¯¤ЪИ· О·И Ф ¯Ъ‹ЫЩЛ˜
Ъ¤ВИ У· ¤¯ВИ ЩФ ‰ВН› ¯¤ЪИ ЫЩЛ ¯ВИЪФП·‚‹ ВП¤Б¯Ф˘
О·И ЩФ ·ЪИЫЩВЪfi ЫЩЛ ¯ВИЪФП·‚‹ ЩФ˘ О¿ЪЩВЪ (∂ИО.50).
µ¿ПЩВ ЩЛ ˙ТУЛ ЩФ˘ Ы¿ОФ˘ Ы˘ППФБ‹˜ ЫЩФУ ·ЪИЫЩВЪfi
ТМФ О·И ВЪ¿ЫЩВ ЩЛУ ЫЩ·˘ЪˆЩ¿. ™ЩЛ ПВИЩФ˘ЪБ›·
·Ó·ÚÚfiÊËÛ˘ ÙÔ Ì˯¿ÓËÌ· Ú¤ÂÈ Ó·
¯ЪЛЫИМФФИВ›Щ·И МfiУФ МВ ЩФ Ы¿ОФ Ы˘ППФБ‹˜
ЩФФıВЩЛМ¤УФ.
∏ МВБ¿ПЛ ‰И¿МВЩЪФ˜ ЩФ˘ ЫˆП‹У· ·У·ЪЪfiКЛЫЛ˜
ВИЩЪ¤ВИ ЩЛУ ·У·ЪЪfiКЛЫЛ О·И МВБ¿ПˆУ ЩВМ·¯›ˆУ
(.¯. МВБ¿П· К‡ПП·, ¯·ЪЩИ¿ О·И КПФИФ‡˜).
¶ÚÔÛÔ¯‹ ЫЩЛУ ·У·ЪЪfiКЛЫЛ МВБ¿ПˆУ ·УЩИОВИМ¤УˆУ
Ф˘ МФЪФ‡У У· ЪФО·П¤ЫФ˘У ‚П¿‚Л ЫЩ· ЩВЪ‡БИ·
ЩЛ˜ КЩВЪˆЩ‹˜ (F, ∂ИО.51) ‹ У· ЩЛУ МПФО¿ЪФ˘У.
¶ÚÔÛÔ¯‹ ÛÙËÓ ·Ó·ÚÚfiÊËÛË ‚ÚÂÁÌ¤ÓˆÓ Ê‡ÏψÓ,
Ô˘ ÌÔÚÔ‡Ó Ó· ‚Ô˘ÏÒÛÔ˘Ó ÙË ÊÙÂÚˆÙ‹.
¶ÚÔÛÔ¯‹ ЫЩФ ‚Ф‡ПˆМ· ЩФ˘ ЫˆП‹У· ·У·ЪЪfiКЛЫЛ˜
БИ· У· ·ФК‡БВЩВ ‚П¿‚В˜ ЫЩФУ ОИУЛЩ‹Ъ· ·fi
˘ВЪ‚ФПИО‹ Щ·¯‡ЩЛЩ·.
¶ƒ√™√Ã∏ - ∞ФК‡БВЩВ ЩЛУ ·У·ЪЪfiКЛЫЛ
В‡КПВОЩˆУ ˘БЪТУ О·И ЩФНИОТУ Ф˘ЫИТУ (.¯.
О·˘Ы›МФ˘) ‹ ˘ПИОТУ ‚ЪВБМ¤УˆУ МВ Щ¤ЩФИ·
ЪФ˚fiУЩ·. ªФЪФ‡У У· ·ФЩВП¤ЫФ˘У ·ИЩ›·
ı·У·ЩЛКfiЪˆУ ВБО·˘М¿ЩˆУ ·fi КˆЩИ¿ ‹
¤ОЪЛНЛ!
™À¡∆∏ƒ∏™∏
∫√çπ∞™ - ∫·ı·Ъ›˙ВЩВ ВЪИФ‰ИО¿ ЩФ ВЫˆЩВЪИОfi ЩФ˘
Îԯϛ· (H, ∂ÈÎ.52) ·fi Ú‡Ô˘˜ Î·È ˘ÔÏ›ÌÌ·Ù· ÁÈ·
Ó· ‰È·ÙËÚ‹ÛÂÙ ÙËÓ ·fi‰ÔÛË ÙÔ˘ Ì˯·Ó‹Ì·ÙÔ˜.
º∆∂ƒø∆∏ - µÂ‚·Èˆı›Ù fiÙÈ Ù· ÙÂÚ‡ÁÈ· (F, ∂ÈÎ.51)
Â›Ó·È Î·ı·Ú¿ Î·È ‰ÂÓ ·ÚÔ˘ÛÈ¿˙Ô˘Ó ‚Ï¿‚˜ ÁÈ· Ó·
·ÔʇÁÂÙ Ì›ˆÛË Ù˘ ÚÔ‹˜ ÙÔ˘ ·¤Ú· Î·È ·‡ÍËÛË
ÙˆÓ ÎÚ·‰·ÛÌÒÓ. ™Â ·ÓÙ›ıÂÙË ÂÚ›ÙˆÛË,
·Â˘ı˘Óı›Ù ·Ì¤Ûˆ˜ Û ÂÍÔ˘ÛÈÔ‰ÔÙË̤ÓÔ Û¤Ú‚È˜.
™∞∫√™ ™À§§√°∏™ - ¶Ú¤ÂÈ Ó· ϤÓÂÙ·È ÂÚÈÔ‰Èο
ÁÈ· Ó· ÂÈÙÚ¤ÂÙ·È Ë ÛˆÛÙ‹ ·Ó·ÚÚfiÊËÛË Î·È
Ï‹ÚˆÛË.
°È· ÙȘ ˘fiÏÔȘ ÂÂÌ‚¿ÛÂȘ Û˘ÓÙ‹ÚËÛ˘, ‚ϤÂ
ÙÔ ÎÂÊ¿Ï·ÈÔ ÛÙË ÛÂÏ. 13.
Español Nederlands Português
UTILIZACIÓN Y MANTENIMIENTO DE LA MÁQUINA
EN VERSIÓN ASPIRADOR / TRITURADOR
GEBRUIK EN ONDERHOUD VAN HET APPARAAT
IN DE UITVOERING ZUIGER / AFVALVERNIETIGER
UTILIZAÇÃO E MANUTENÇÃO DA MÁQUINA
NA VERSÃO ASPIRADOR / TRITURADOR
Ελληνικα
Ã∏™∏ ∫∞π ™À¡∆∏ƒ∏™∏ ∆√À ª∏Ã∞¡∏ª∞∆√™ °π∞
§∂π∆√Àƒ°π∞ ∞¶√ƒƒ√º∏∆∏ƒ∞ / ∞§∂™∆π∫∏™ ª∏Ã∞¡∏™
Page 20

20
I
F
GB
D
E
NL
P
DATI TECNICI
DONNEES TECHNIQUES
TECHNICAL DATA
Cilindrata - Cylindrée - Displacement - Hubraum - Cilindrada - Cylinderinhoud Cilindrada - Κυβισµος
Motore - Moteur - Engine - Motor - Motor - Motor - Motor - Μοτερ
Accensione elettronica - Allumage électronique - Electronic ignition - Elektronische Zündung - Encendido electrónico - Electronische ontsteking -
Ηλεκτρονικη αναφλεξη
Capacità serbatoio - Capacité du réservoir - Fuel tank capacity - Kraftstofftank-Inhalt - Capacidad depósito - Tankcapacitetit - Capacidade do reservatorio - Χωριτηκοτητα ντεποζιτου καυσιµων
Nr. giri minimo - Nombre de tours/min au ralenti - Min. rpm - Minimale
Drehzahl/Minute - N. giros/min. mínimo - Minimum toerental/min. N° rot/min mínima - Αρ. στροφων το λεπτο
Potenza - Puissance - Power - Leistung - Potencia - Vermogen Potência - Ισχυς
Starter automatico (lift-starter) - Starter automatique (lift-starter) Lift-starter - Automatischer Starter - Arrancador automático (lift-starter) Automatische starter(lift-starter) - Arranque automático(lift-starter) -
∞˘ÙfiÌ·ÙÔ starter (lift-starter)
Carburatore a membrana - Carburateur à membrane - Diaphragm
carburetor - Membranvergaser - Carburador a membrana - Membraan
carburator - Carburador de membrana - Καρµπυρατερ µεµβρανης
Primer carburatore - Primer carburateur - Primer carburetor - Primer
vergaser - Primer carburador - Primer carburateur - Primer
carburador - Primer καρµπυρατερ
GR
TECHNISCHE ANGABEN
DATOS TECNICOS
TECHNISCHE GEGEVENS
DADOS TECNICOS
ΤΕΧΝΙΚΑ ΣΤΟΙΧΕΙΑ
Nr. giri max motore - Nombre de tours/min du moteur à plein régime - Max. rpm Maximale Drehzahl/Minute - N° giros/min. máximo - Maximum toerental/min. - N°
rot/min máxima - Ανωτερος αριθµος στροϕων
cm
3
kW
min
-1
min
-1
cm
3
25.4
2 tempi - temps - stroke - takt - tiempos - χρονα EMAK
2600÷2800
0.9
7600÷7900
Si - Oui - Yes - Ja - Sim - Ναι
Si - Oui - Yes - Ja - Sim - Ναι
Si - Oui - Yes - Ja - Sim - Ναι
Si - Oui - Yes - Ja - Sim - Ναι
725
Page 21

3.5
10
700
750
3.9
335 x 240 x 345
36
74
94
21
I
F
GB
D
E
NL
P
CARATTERISTICHE
CARACTERISTIQUES
SPECIFICATIONS
DIMENSIONI - DIMENSIONS - DIMENSIONS - ABMESSUNGEN - DIMENSIONES AFMETINGEN - DIMENSÕES - ¢È·ÛÙ¿ÛÂȘ
GR
EIGENSCHAFTEN
CARACTERISTICAS
EIGENSCHAPPEN
CARACTERÍSTICAS
XAPAKTHPI™TIKA
dB (A)
dB (A)
m/s
2
m/s
2
m3/h
m
3
/h
kg
mm
I
m/s
107
LIVELLO DI VIBRAZIONE - NIVEAU DE VIBRATION - VIBRATION LEVEL VIBRATIONSPEGEL - NIVEL DE VIBRACION - DE TRILLINGSINTENSITEIT NIVEL DE VIBRAÇÃO - ΕΠΙΠΕ∆Ο ΚΡΑ∆ΑΣΜΟΥ
ISO 5349
PRESSIONE ACUSTICA - PRESSION ACOUSTIQUE - PRESSURE LEVEL SCHALLDRUCK - PRESIÓN ACUSTICA - GELUIDSDRUCK - PRESSÃO DO SOM -
ΑΚΟΥΣΤΙΚΗ ΠΙΕΣΗ
LpA ISO 6081
PESO - POIDS - WEIGHT - GEWICHT - PESO -
GEWICHT - PESO - Βαρος
min
max
CAPACITÀ SACCO ASPIRATORE -
CAPACITÉ SAC ASPIRATEUR
- VACUUM
COLLECTION BAG CAPACITY - INHALT FANGSACK - CAPACIDAD BOLSA CONTENEDORA -
INHOUD OPVANGZAK
- CAPACIDADE SACO DO ASPIRADOR -
ГˆЪЛЩИОfiЩЛЩ·
Û¿ÎÔ˘ Û˘ÏÏÔÁ‹˜
MASSIMA VELOCITÀ DELL’ARIA -
VITESSE MAXIMALE DE L’AIR
- MAXIMUM AIR
SPEED - MAX. LUFTGESCHWINDIGKEIT - VELOCIDAD MÁXIMA DEL AIRE -
MAXIMUM
LUCHTSNELHEID -
VELOCIDADE MÁXIMA DO AR -
ª¤БИЫЩЛ Щ·¯‡ЩЛЩ· ·¤Ъ·
PORTATA VOLUMETRICA SOFFIATORE - PORTÉE VOLUMÉTRIQUE SOUFFLEUR BLOWER AIR FLOW - VOLUMENSTROM LAUBSAUGER - CAUDAL DEL SOPLADOR VOLUMEDEBIET BLOWER - CAPACIDADE VOLUMÉTRICA DO SOPRADOR -
√БОФМВЩЪИО‹ ·ЪФ¯‹ К˘ЫЛЩ‹Ъ·
PORTATA VOLUMETRICA ASPIRATORE -
PORTÉE VOLUMÉTRIQUE ASPIRATEUR
- VA-
CUUM AIR FLOW -
VOLUMENSTROM LAUBSAUGER - CAUDAL DEL ASPIRADOR - VO-
LUMEDEBIET ZUIGER - CAPACIDADE VOLUMÉTRICA DO ASPIRADOR - √БОФМВЩЪИО‹
·fi‰ФЫЛ ·ФЪЪФКЛЩ‹Ъ·
LIVELLO POTENZA ACUSTICA GARANTITA NIVEAU PUISSANCE ACOUSTIQUE ASSURÉ - GUARANTEED SOUND POWER LEVEL GARANTIERTER AKUSTISCHER SCHALLEISTUNGSPEGEL NIVEL POTENCIA ACUSTICA GARANTIZADO GEGARANDEERD ACOUSTISCH VERMOGENSNIVEAU
NIVEL POTENCIA ACUSTICA GARANTIDO - Εγγυηµενη σταθµη ακουστικης ισχυος
2000/14/EC - LwA ISO 3744 - ISO 11094
Page 22

22
Italiano Français English Deutsch
CERTIFICATO DI GARANZIA CERTIFICAT DE GARANTIE WARRANTY CERTIFICATE GARANTIE-ZERTIFICAT
MODELLO - MODELE
ACQUISTATO DAL SIG. - ACHETE PAR MONSIEUR
SERIAL No
DATA - DATE
CONCESSIONARIO - REVENDEUR
Questa macchina è stata concepita e realizzata attraverso le più
moderne tecniche produttive. La Ditta costruttrice garantisce i propri
prodotti per un periodo di ventiquattro mesi dalla data di acquisto
per utilizzo privato/hobbistico. La garanzia è limitata a sei mesi in
caso di uso professionale e tre mesi in caso di noleggio.
Condizioni generali di garanzia
1) La garanzia viene riconosciuta a partire dalla data d'acquisto. La
Ditta costruttrice tramite la rete di vendita ed assistenza tecnica
sostituisce gratuitamente le parti difettose dovute a materiale, lavorazioni e produzione. La garanzia non toglie all'acquirente i diritti legali previsti dal codice civile contro le conseguenze dei difetti o vizi causati dalla cosa venduta.
2) Il personale tecnico interverrà il più presto possibile nei limiti di
tempo concessi da esigenze organizzative.
3) Per richiedere l'assistenza in garanzia è necessario esibire
al personale autorizzato il sotto riportato certificato di garanzia timbrato dal rivenditore, compilato in tutte le sue parti e corredato di fattura d'acquisto o scontrino fiscalmente
obbligatorio comprovante la data d'acquisto.
4) La garanzia decade in caso di:
- Assenza palese di manutenzione,
- Utilizzo non corretto del prodotto o manomissioni,
- Utilizzo di lubrificanti o combustibili non adatti,
- Utilizzo di parti di ricambio o accessori non originali,
- Interventi effettuati da personale non autorizzato.
5) La Ditta costruttrice esclude dalla garanzia i materiali di consu-
mo e le parti soggette ad un normale logorio di funzionamento.
6) La garanzia esclude gli interventi di aggiornamento e migliora-
mento del prodotto.
7) La garanzia non copre la messa a punto e gli interventi di manu-
tenzione che dovessero occorrere durante il periodo di garanzia.
8) Eventuali danni causati durante il trasporto devono essere im-
mediatamente segnalati al trasportatore pena il decadere della
garanzia.
9)Per i motori di altre marche (Briggs & Stratton, Tecumseh,
Kawasaki, Honda, ecc.) montati sulle nostre macchine, vale la
garanzia concessa dai costruttori del motore.
10) La garanzia non copre eventuali danni, diretti o indiretti, causati
a persone o cose da guasti della macchina o conseguenti alla
forzata sospensione prolungata nell'uso della stessa.
Cette machine a été conçue et réalisée avec les techniques de
production les plus modernes. Le fabricant garantit ses produits
pour une période de vingt-quatre mois à compter de la date d'achat
en cas d'utilisation à titre privé. La période de garantie est limitée à
six mois en cas d'emploi professionnel et à trois mois en cas de
location.
Conditions générales de garantie
1) La garantie est reconnue à compter de la date d'achat. Par le
biais de son réseau de vente et d'assistance technique, le
fabricant remplace gratuitement les pièces défectueuses dues
au matériel, aux usinages et à la production. La garantie
n'élimine pas, pour l'acquéreur, les droits légaux prévus par le
Code Civil contre les conséquences des défauts ou des
anomalies dus à l'objet vendu.
2) Le personnel technique interviendra le plus vite possible dans
les délais liés aux exigences organisationnelles.
3) Pour demander l'assistance sous garantie, il est nécessaire
de présenter au personnel agréé le certificat de garantie
joint ci-dessous, qui devra être timbré par le revendeur,
rempli intégralement et accompagné de la facture ou du
reçu de caisse qui doit obligatoirement être remis pour
prouver la date d'achat.
4) La garantie perd toute valeur en cas de :
- Manque évident d'entretien.
- Utilisation incorrecte ou transformations non autorisées du
produit.
- Utilisation de lubrifiants ou de combustibles inappropriés.
- Utilisation de pièces de rechange ou d'accessoires non
d'origine.
- Interventions effectuées par du personnel non autorisé à ce
faire.
5) Le fabricant exclut de la garantie les pièces consommables et
celles qui sont soumises à une usure normale due au
fonctionnement.
6)La garantie exclut les interventions de mise à jour et
d'amélioration du produit.
7) La garantie ne couvre pas la mise au point et les interventions
susceptibles de s'avérer nécessaires au cours de la période de
garantie.
8) Tout dommage éventuellement subi au cours du transport doit
être signalé sans retard au transporteur sous peine d'annulation
de la garantie.
9)Pour les moteurs d'autres marques (Briggs & Stratton,
Tecumseh, Kawasaki, Honda, etc.) montés sur nos machines, la
garantie appliquée sera celle qui est accordée par le fabricant du
moteur en question.
10) La garantie ne couvre pas les éventuels dommages directs ou
indirects subis par les personnes ou par les biens matériels à la
suite de pannes de la machine ou dépendant d'une longue
suspension forcée de l'emploi de cette dernière.
Diese Maschine wurde mit den modernsten Produktionstechniken
konzipiert und gebaut. Die Herstellerfirma garantiert für ihre Produkte für die Dauer von vierundzwanzig Monaten nach Kaufdatum für
den Privatgebrauch / für Hobbyzwecke. Die Garantie beschränkt sich auf sechs Monate im Falle von professionellem Einsatz und drei
Monate bei Vermietung.
Allgemeine Garantiebedingungen
1) Die Garantie gilt ab Kaufdatum. Die Herstellerfirma sorgt über ihr
Verkaufs- und Kundendienstnetz für den kostenlosen Ersatz der
Teile, die sich infolge Material-, Bearbeitungs- und Fabrikationsfehler als defekt erweisen. Durch die Garantie verliert der Käufer nicht die vom Bürgerlichen Gesetzbuch vorgesehenen gesetzlichen Rechte gegen die Folgen der von der der verkauften
Sache verursachten Defekte oder Mängel.
2) Soweit organisatorisch machbar greift das technische Personal
so schnell wie möglich ein.
3) Bei Anforderung eines Garantieeingriffs muss dem befugten
Personal der untenstehende, vom Verkäufer abgestempelte
und vollständig ausgefüllte Garantieschein zusammen mit
der Rechnung bzw. dem Kassenzettel zum Nachweis des
Kaufdatums vorgelegt werden.
4) In folgenden Fällen verfällt jeder Garantieanspruch:
- Bei offensichtlicher Unterlassung der Wartung,
- Bei nicht korrekter Verwendung oder Veränderungen des Produkts,
- Bei Benutzung von ungeeigneten Schmiermitteln oder Treibmitteln,
- Bei Benutzung von nicht originalen Zubehör- und Ersatzteilen
- Nach Eingriffen, die von unbefugtem Personal durchgeführt
wurden.
5) Verbrauchsmaterial und die Teile, die einem normalen Verschleiß durch Betrieb ausgesetzt sind, werden vom Hersteller von
der Garantie ausgeschlossen.
6) Von der Garantie ausgeschlossen sind Eingriffe zur Überholung
und Verbesserung des Produkts.
7) Die Garantie deckt nicht die während der Garantielaufzeit erforderlichen Einstellungen und Wartungseingriffe.
8) Eventuelle Transportschäden müssen dem Spediteur unverzüglich gemeldet werden, ansonsten verfällt der Garantieanspruch.
9) Für die Motoren anderer Marken (Briggs & Stratton, Tecumseh,
Kawasaki, Honda, usw.), die an unseren Maschinen installiert
werden, gilt die vom Hersteller des Motors gewährte Garantie.
10) Die Garantie deckt keine eventuellen direkten oder indirekten
Personen- oder Sachschäden, die durch Defekte der Maschine
oder deren anhaltender Nichtbenutzung verursacht wurden.
This machine has been designed and manufactured using the most
modern techniques. The manufacturer guarantees the machine to
be free from defects for a period of twenty four months from the date
of purchase provided it is used exclusively for private/hobby purposes. If the machine is used for professional purposes, the warranty
period shall terminate after a period of six months. If the machine is
used for hire, the warranty period shall terminate after a period of three months.
Limited warranty
1) The warranty period starts on the date of sale. The manufacturer, acting through the sales and technical assistance network,
shall replace free of charge any parts proven defective in material, machining or manufacturing. The warranty does not affect
the purchaser's rights as established under legislation governing
the consequences of defects in the machine.
2) Technical personnel will undertake the necessary repairs in the
minimum time possible, compatible with organisational needs.
3) To make any claim under the warranty, this certificate of
warranty, fully compiled, bearing the dealer's stamp, and accompanied by the invoice or receipt showing the date of
purchase, must be displayed to the personnel authorised to
approve work.
4) The warranty shall be null and void if:
- the machine has evidently not been serviced correctly,
- the machine has been used for improper purposes or has been
modified in any way,
- unsuitable lubricants and fuels have been used,
- non-original spare parts and accessories have been fitted,
- work has been done on the machine by unauthorised personnel.
5) The warranty does not cover consumables or parts subject to
normal wear.
6) The warranty does not cover work to update or improve the machine.
7) The warranty does not cover any preparation or servicing work
required during the warranty period.
8) Damage incurred during transport must be immediately brought
to the attention of the carrier: failure to do so shall render null
and void the warranty.
9) Engines of other manufacturers (Briggs & Stratton, Tecumseh,
Kawasaki, Honda, etc.) fitted to our machines are covered by the
warranties of the engine manufacturer.
10) The warranty does not cover injury or damage caused directly or
indirectly to persons or things by defects in the machine or by
periods of extended disuse of the machine resulting from the
said defects.
Non spedire! Allegare solo all’eventuale richiesta di garanzia tecnica.
Ne pas expédier ! Ne joindre qu'en cas de demande d'assistance technique sous garantie.
MODEL - MODELLE
BOUGHT BY Mr. - GEKAUFT VON Hrn.
SERIAL No
DATE - DATUM
DEALER - VERKAUFER
✂
✂
✂
Do not send! Only attach to requests for technical warranties.
Nicht einsenden! Der Garantieschein muss nur bei einer eventuellen Anforderung eines Garantieeingriffs vorgelegt werden.
Page 23

23
Español Nederlands Portoguês
Ελληνικα
CERTIFICADO DE GARANTÍA GARANTIEBEWIJS CERTIFICADO DE GARANTIA
¶π™∆√¶√π∏∆π∫√ ∂°°À∏™∏™
MODELO - MODEL
COMPRADOR - GEKOCHT DOOR
SERIAL No
DATA - DATUM
DISTRIBUIDOR - VERKOPER
Esta máquina ha sido proyectada y fabricada con las técnicas más
modernas. El Fabricante garantiza sus productos por un periodo de
veinticuatro meses a partir de la fecha de compra para uso privado/aficionado; la garantía queda limitada a seis meses en caso de
uso profesional y a tres en caso de alquiler.
Condiciones generales de garantía
1) La garantía es válida a partir de la fecha de compra. El Fabricante cambiará gratuitamente las piezas que presenten defectos
en el material, el trabajo o la producción, mediante su red de
venta y asistencia técnica. La garantía no anula los derechos legales del comprador, previstos por el código civil, contra las consecuencias de defectos o vicios provocados por el producto vendido.
2) El personal técnico efectuará las intervenciones lo antes posible
y dentro de los plazos impuestos por exigencias de organización.
3) Para solicitar la asistencia en garantía, es necesario mo-
strar el certificado de garantía ilustrado a continuación, junto a la factura o el tique que demuestren la fecha de compra, al personal autorizado; asimismo, para que el certificado sea válido, se han de completar todas sus partes y ha de
estar debidamente timbrado por el vendedor.
4) La garantía pierde su validez en los siguientes casos:
- Falta evidente de mantenimiento.
- Uso incorrecto o manipulación del producto.
- Uso de lubricantes o combustibles inadecuados.
- Uso de piezas de recambio o accesorios no originales.
- Intervenciones efectuadas por parte de personal no autorizado.
5) La garantía no incluye ni los materiales consumibles ni las piezas sujetas a un desgaste normal de funcionamiento.
6) La garantía tampoco incluye las intervenciones de actualización
o mejora del producto.
7) La puesta a punto o las intervenciones de mantenimiento eventualmente necesarias durante el periodo de garantía no están
cubiertas por la garantía.
8) Cualquier daño provocado durante el transporte tiene que ser
señalado de inmediato al transportista bajo pena de anulación
de la garantía.
9) Para los motores de otras marcas (Briggs & Stratton, Tecumseh,
Kawasaki, Honda, etc.) montados en nuestras máquinas, será
válida la garantía de los Fabricantes del motor.
10) La garantía no cubre los eventuales daños materiales o personales, directos o indirectos, provocados por averías de la máquina o por la interrupción forzada y prolongada del funcionamiento
de la misma.
Deze machine is ontworpen en vervaardigd volgens de modernste
productietechnieken. De fabrikant staat garant voor zijn producten
voor een periode van vierentwintig maanden vanaf de
aankoopdatum voor privé- of hobbygebruik. De garantie is beperkt
tot zes maanden bij professioneel gebruik en tot drie maanden bij
verhuur.
Algemene garantievoorwaarden
1) De garantie wordt toegekend vanaf de aankoopdatum. De
fabrikant vervangt gratis de defecte onderdelen die te wijten zijn
aan fouten van het materiaal, bewerkingen en productie middels
het distributienet en de technische service. De garantie
ontneemt de gebruiker niet de wettelijke rechten uit het burgerlijk
wetboek tegen de gevolgen van defecten of onvolkomenheden
die door het verkochte product veroorzaakt worden.
2) Het technisch personeel grijpt zo snel mogelijk in binnen de
tijdslimieten die uit organisatorisch oogpunt mogelijk zijn.
3) Voor het aanvragen van servicewerkzaamheden die onder
de garantie vallen dient u het hieronder weergegeven
garantiebewijs aan het bevoegde personeel te tonen. Het
garantiebewijs moet een stempel van de verkoper dragen,
geheel ingevuld zijn en begeleid worden door de factuur of
de fiscaal verplichte kassabon met de aankoopdatum.
4) De garantie vervalt bij:
- Overduidelijk gebrek aan onderhoud,
- Onjuist gebruik van het product of sabotage,
- Gebruik van ongeschikte smeermiddelen of brandstoffen,
- Gebruik van niet originele vervangingsonderdelen of
accessoires,
- Werkzaamheden die verricht zijn door onbevoegd personeel.
5) De verbruiksmaterialen en de onderdelen die onderhevig zijn
aan normale slijtage vallen niet onder de garantie.
6) Bijwerkingen en verbeteringen van het product vallen niet onder
de garantie.
7) De garantie dekt geen afstel- en onderhoudswerkzaamheden
die tijdens de garantieperiode nodig mochten zijn.
8)Eventuele beschadigingen die tijdens het transport zijn
veroorzaakt moeten onmiddellijk aan de transporteur worden
gemeld op straffe van verval van de garantie.
9)Voor de motoren van andere merken (Briggs & Stratton,
Tecumseh, Kawasaki, Honda, enz.) die op onze machines zijn
gemonteerd geldt de garantie die door de fabrikant van de motor
is gegeven.
10) De garantie dekt geen eventuele directe of indirecte
beschadigingen die aan personen of voorwerpen worden
aangericht als gevolg van defecten of langdurige inactiviteit van
de machine.
∞˘Щfi ЩФ МЛ¯¿УЛМ· ¤¯ВИ Ы¯В‰И·ЫЩВ› О·И О·Щ·ЫОВ˘·ЫЩВ› МВ ЩИ˜ ИФ
МФУЩ¤ЪУВ˜ ЩВ¯УИО¤˜ ·Ъ·БˆБ‹˜. √ ∫·Щ·ЫОВ˘·ЫЩ‹˜ ВББ˘¿Щ·И Щ·
ЪФ˚fiУЩ· ЩФ˘ БИ· МИ· ВЪ›Ф‰Ф ВИОФЫИЩВЫЫ¿ЪˆУ МЛУТУ ·fi ЩЛУ
ЛМВЪФМЛУ›· ·БФЪ¿˜ БИ· И‰ИˆЩИО‹ ¯Ъ‹ЫЛ/¯fiМИ. ∏ ВББ‡ЛЫЛ
МВИТУВЩ·И ЫВ ¤НИ М‹УВ˜ ЫВ ВЪ›ЩˆЫЛ В·ББВПМ·ЩИО‹˜ ¯Ъ‹ЫЛ˜ О·И
ЫВ ЩЪВИ˜ М‹УВ˜ ЫВ ВЪ›ЩˆЫЛ ВУФИО›·ЫЛ˜.
°ВУИОФ› fiЪФИ ЩЛ˜ ВББ‡ЛЫЛ˜
1) ∏ ИЫ¯‡˜ ЩЛ˜ ВББ‡ЛЫЛ˜ ·Ъ¯›˙ВИ ·fi ЩЛУ ЛМВЪФМЛУ›· ·БФЪ¿˜. √
∫·Щ·ЫОВ˘·ЫЩ‹˜ М¤Ыˆ ЩФ˘ ‰ИОЩ‡Ф˘ ТПЛЫЛ˜ О·И ЩВ¯УИО‹˜
ВН˘ЛЪ¤ЩЛЫЛ˜ ·УЩИО·ıИЫЩ¿ ‰ˆЪВ¿У Щ· ВП·ЩЩˆМ·ЩИО¿
ВН·ЪЩ‹М·Щ· Ф˘ ФКВ›ПФУЩ·И ЫВ ˘ПИОfi, ВВНВЪБ·Ы›· О·И
·Ъ·БˆБ‹. ∏ ВББ‡ЛЫЛ ‰ВУ ЫЩВЪВ› ЫЩФУ ·БФЪ·ЫЩ‹ Щ· УФМИО¿
‰ИО·ИТМ·Щ· Ф˘ ЪФ‚П¤ФУЩ·И ·fi ЩФУ ·ЫЩИОfi ОТ‰ИО· fiЫФУ
·КФЪ¿ ЩИ˜ ВИЩТЫВИ˜ ЩˆУ ·ЩВПВИТУ ‹ ЩˆУ ВП·ЩЩˆМ¿ЩˆУ Ф˘
ЪФОП‹ıЛО·У ·fi ЩФ ·БФЪ·ЫМ¤УФ ЪФ˚fiУ.
2) ∆Ф ЩВ¯УИОfi ЪФЫˆИОfi ı· В¤М‚ВИ ЩФ Ы˘УЩФМfiЩВЪФ ‰˘У·Щfi
М¤Ы· ЫЩ· ¯ЪФУИО¿ fiЪИ· Ф˘ ВИЩЪ¤Ф˘У ФИ ФЪБ·УˆЩИО¤˜
··ÈÙ‹ÛÂȘ.
3) °È· Ù¯ÓÈ΋ ˘ÔÛÙ‹ÚÈÍË Î·Ù¿ ÙËÓ ÂÚ›Ô‰Ô ÂÁÁ‡ËÛ˘ ›ӷÈ
··Ъ·›ЩЛЩФ У· ВИ‰В›НВЩВ ЫЩФ ВНФ˘ЫИФ‰ФЩЛМ¤УФ ЪФЫˆИОfi ЩФ
·Ъ·О¿Щˆ ИЫЩФФИЛЩИОfi ВББ‡ЛЫЛ˜ ЫКЪ·БИЫМ¤УФ ·fi ЩФ
О·Щ¿ЫЩЛМ· ТПЛЫЛ˜, П‹Ъˆ˜ Ы˘МПЛЪˆМ¤УФ О·И Ф˘
Ы˘УФ‰В‡ВЩ·И ·fi ЩИМФПfiБИФ ·БФЪ¿˜ ‹ УfiМИМЛ ·fi‰ВИНЛ Ф˘ У·
·Ф‰ВИОУ‡ВИ ЩЛУ ЛМВЪФМЛУ›· ·БФЪ¿˜.
4) ∏ ÂÁÁ‡ËÛË ·‡ÂÈ Ó· ÈÛ¯‡ÂÈ Û ÂÚ›ÙˆÛË:
- ∂ÌÊ·ÓÔ‡˜ ·Ô˘Û›·˜ Û˘ÓÙ‹ÚËÛ˘,
- §·Óı·Ṳ̂Ó˘ ¯Ú‹Û˘ ÙÔ˘ ÚÔ˚fiÓÙÔ˜ ‹ ÂÂÌ‚¿ÛˆÓ,
- ∞О·Щ¿ППЛПˆУ ПИ·УЩИОТУ ‹ О·˘Ы›МФ˘,
- ГЪ‹ЫЛ˜ МЛ БУ‹ЫИˆУ ·УЩ·ПП·ОЩИОТУ ‹ ·НВЫФ˘¿Ъ,
- ∂ÂÌ‚¿ÛÂˆÓ Ô˘ ¤ÁÈÓ·Ó ·fi ÌË ÂÍÔ˘ÛÈÔ‰ÔÙË̤ÓÔ
ÚÔÛˆÈÎfi.
5) √ ∫·Щ·ЫОВ˘·ЫЩ‹˜ ‰ВУ О·П‡ЩВИ МВ ЩЛУ ВББ‡ЛЫЛ Щ· ·У·ПТЫИМ·
˘ПИО¿ О·И Щ· ВН·ЪЩ‹М·Щ· Ф˘ ˘fiОВИУЩ·И К˘ЫИФПФБИО‹ КıФЪ¿
О·Щ¿ ЩЛ ПВИЩФ˘ЪБ›·.
6)∏ ÂÁÁ‡ËÛË ·ÔÎÏ›ÂÈ ÙȘ ÂÂÌ‚¿ÛÂȘ ÂÓË̤ڈÛ˘ ηÈ
‚ÂÏÙ›ˆÛ˘ ÙÔ˘ ÚÔ˚fiÓÙÔ˜.
7)∏ ÂÁÁ‡ËÛË ‰ÂÓ Î·Ï‡ÙÂÈ ÙË Ú‡ıÌÈÛË Î·È ÙȘ ÂÂÌ‚¿ÛÂȘ
Û˘ÓÙ‹ÚËÛ˘ Ô˘ ÌÔÚ› Ó· Ï¿‚Ô˘Ó ¯ÒÚ· ηٿ ÙËÓ ÂÚ›Ô‰Ô
ÂÁÁ‡ËÛ˘.
8) ∂У‰В¯fiМВУВ˜ ˙ЛМИ¤˜ Ф˘ ЪФОП‹ıЛО·У О·Щ¿ ЩЛ МВЩ·КФЪ¿
Ъ¤ВИ У· ·У·КВЪıФ‡У ·М¤Ыˆ˜ ЫЩФ МВЩ·КФЪ¤· ‰И·КФЪВЩИО¿
·‡ВИ Л ИЫ¯‡˜ ЩЛ˜ ВББ‡ЛЫЛ˜.
9) °И· ЩФ˘˜ ОИУЛЩ‹ЪВ˜ ¿ППˆУ О·Щ·ЫОВ˘·ЫЩТУ (Briggs & Stratton,
Tecumseh, Kawasaki, Honda, ОП.) Ф˘ В›У·И ВБО·ЩВЫЩЛМ¤УФИ
ЫЩ· МЛ¯·У‹М·Щ¿ М·˜, ИЫ¯‡ВИ Л ВББ‡ЛЫЛ Ф˘ ¯ФЪЛБВ›Щ·И ·fi
ЩФУ О·Щ·ЫОВ˘·ЫЩ‹ ЩФ˘ ОИУЛЩ‹Ъ·.
10) ∏ ВББ‡ЛЫЛ ‰ВУ О·П‡ЩВИ ВУ‰В¯fiМВУВ˜ ˙ЛМИ¤˜, ¿МВЫВ˜ ‹
¤ММВЫВ˜, Ф˘ ı· ЪФОПЛıФ‡У ЫВ ¿ЩФМ· ‹ ·УЩИОВ›МВУ· ·fi
‚П¿‚В˜ ЩФ˘ МЛ¯·У‹М·ЩФ˜ ‹ ·Ъ·ЩВЩ·М¤УЛ ВН·У·БО·ЫМ¤УЛ
‰И·ОФ‹ ЫЩЛ ¯Ъ‹ЫЛ ·˘ЩФ‡.
Este aparelho foi projectado e fabricado em conformidade com os
critérios mais avançados da tecnologia actual. O fabricante garante
os seus produtos por um período de vinte e quatro meses a partir
da data de compra, desde que utilizados privadamente ou como
Hobby. A garantia é limitada a seis meses em caso de utilização
profissional e a três meses em caso de aluguer.
Condições gerais de garantia
1) A garantia inicia a partir do momento de compra. O fabricante,
mediante a rede de assistência técnica, substituirá gratuitamente os defeitos causados pela não conformidade do material, processo de fabrico e produção. A garantia não anula os direitos legais previstos pelo Código civil contra as consequências derivadas de defeitos ou vícios do aparelho.
2) O pessoal técnico intervirá o mais rápido possível compativelmente com as próprias exigências de organização.
3) Para requerer a assistência durante o período de garantia, é
preciso exibir ao pessoal autorizado o certificado de garantia abaixo ilustrado preenchido plenamente, carimbado pelo
revendedor e a respectiva factura ou recibo, qual comprovante da data de compra.
4) A garantia decai nos seguintes casos:
- Falta evidente de manutenção;
- Utilização imprópria do produto ou alterações do mesmo;
- Utilização de lubrificantes ou combustíveis impróprios;
- Utilização de sobresselentes ou acessórios não originais;
- Intervenções efectuadas por pessoal não autorizado;
5) O fabricante exclui do período de garantia os materiais de consumo e os órgãos sujeitos ao desgaste normal derivado da utilização do aparelho.
6) A garantia exclui as intervenções de actualização e de melhorias do aparelho.
7) A garantia não inclui pôr em ponto o aparelho bem como as intervenções de manutenção eventualmente necessárias durante
o período de garantia.
8) Eventuais danos derivados do transporte devem ser assinalados
imediatamente ao transportador; a inobservância, acarreta no
decaimento da garantia.
9) Para os motores de outras marcas (Briggs & Stratton, Tecumseh, Kawasaki, Honda, etc.) montados nos nossos aparelhos,
vale a garantia conferida pelos respectivos fabricantes.
10) A garantia não inclui eventuais danos, directos ou indirectos
causados a pessoas ou bens materiais derivados da inutilização
da máquina por ruptura ou da suspensão obrigada da sua utilização.
¡No enviar! Adjuntar sólo a la eventual solicitud de garantía técnica.
Niet verzenden! Voeg dit bewijs uitsluitend bij het aanvraagformulier om technische garantiewerkzaamheden.
MODELO - MONTE§O
COMPRADOR - A°OPA™MENO A¶O TON KYPIO
SERIAL No
¢IA¢OXIKO™
API£MO™
DATA - HMEPOMHNIA
DISTRIBUIDOR - KATA™THMA ¶ø§H™H™
✂
✂
✂
Não enviar! Anexe apenas em caso de pedido de assistência técnica.
ªËÓ ÙÔ ÛÙ›ÏÂÙÂ! ∂ÈÛ˘Ó¿ÙÂÙ·È ÌfiÓÔ Û ÂÚ›ÙˆÛË ·›ÙËÛ˘ Ù¯ÓÈ΋˜ ÂÁÁ‡ËÛ˘.
Page 24

ATTENZIONE!!!
RISCHIO DI DANNO UDITIVO
NELLE NORMALI CONDIZIONI DI UTILIZZO, QUESTA MACCHINA PUÒ
COMPORTARE PER L’OPERATORE ADDETTO, UN LIVELLO DI ESPOSIZIONE
PERSONALE E GIORNALIERO A RUMORE PARI O SUPERIORE A
85 dB(A)
ATTENTION!!!
DANGER D’ATTEINTE A L’OUIE
L’OPERATEUR UTILISANT NORMALEMENT CETTE MACHINE
PEUTS S’EXPOSER QUOTIDIENNEMENT
A UN BRUIT EGAL OU DEPASSANT
85 dB(A)
WARNING!!!
RISK OF DAMAGING HEARING
IN NORMAL CONDITIONS OF USE, THIS MACHINE
MAY INVOLVE A DAILY LEVEL OF PERSONAL EXPOSURE TO NOISE
FOR THE OPERATOR EQUAL TO OR GREATER THAN
85 dB(A)
ACHTUNG!!!
HÖRSCHADEN - RISIKO
UNTER NORMALEN ANWENDUNGSBEDIGUNGEN
KANN DIESES GERÄT DIE BEDIENUNGSPERSON
EINEM TÄGLICHEN GERÄUSCHPEGEL VON
85 dB(A)
ODER MEHR AUSSETZEN
ATENCION!!!
RIESGO DE DAÑO AUDITIVO
EN NORMALES CONDICIONES DE UTILIZACIÓN, ESTA MAQUINA PUEDE
TOLERAR, PARA EL OPERADOR ENCARGADO, UN NIVEL DE EXPOSICÍON
DIARIO A RUIDO EQUIVALENTE O SUPERIOR A
85 dB(A)
LET OP!!!
HOORSCHADEGEFLUIT
IN ZIJN NORMAAL GEBRUIKSTOESTAND KAN DEZE MACHINE VOOR DE
BESTEMDE OPERATOR EEN DAGELIJKS PERSOONLIJK
LAWAAIBLOOTSTELLING MET ZICH MEEBRENGEN, DIE
85 dB(A)
OF MEER BEDRAAGT
ATENÇÃO!!!
RISCO DE PREJUÍZO AUDITIVO
NAS NORMAIS CONDIÇÕES DE UTILIZAÇÃO, ESTA MÁQUINA PODE
COMPORTAR PARA O OPERADOR ENCARREGADO UM NÍVEL
DE EXPOSIÇÃO PESSOAL DÍARIA AO RUIDO IGUAL OU SUPERIOR A
85 dB(A)
ΠΡΟΣΟΧΗ!!!
ΚΙΝ∆ΥΝΟΣ ΑΚΟΥΣΤΙΚΗΣ ΒΛΑΒΗΣ
ΣΕ ΚΑΝΟΝΙΚΕΣ ΣΥΝΘΗΚΕΣ ΧΡΗΣΗΣ ΑΥΤΟ ΤΟ ΜΗΧΑΝΗΜΑ ΜΠΟΡΕΙ ΝΑ
ΠΡΟΚΑΛΕΣΕΙ, ΓΙΑ ΤΟΝ ΧΕΙΡΙΣΤΗ, ΕΝΑ ΠΟΣΟΣΤΟ ΗΜΕΡΗΣΙΑΣ ΠΡΟΣΩΠΙΚΗΣ
ΕΚΘΕΣΗΣ ΣΤΟΝ ΘΟΡΥΒΟ ΙΣΗ Η ΑΝΩΤΕΡΗ ΤΗΣ.
85 dB(A)
EMAK s.p.a. - Member of the YAMA group
42011 BAGNOLO IN PIANO (REGGIO EMILIA) ITALY
TEL. 0522 956611 - TELEFAX 0522 951555
EMAIL service@emak.it INTERNET http://www.emak.it
ATTENZIONE! – Questo manuale deve accompagnare la macchina durante tutta la sua vita.
ATTENTION! – Le manuel doit accompagner la machine pour toute sa vie.
WARNING! – This owner’s manual must stay with the machine for all its life.
ACHTUNG! - Dieses Anweisungsheft muß das Gerät während seiner gesamten Lebensdauer begleiten.
¡ATENCIÓN! - Este manual debe acompañar a la máquina durante toda su vida útil.
LET OP! - Dit handboek moet voor de gehele levensduur bij de machine blijven.
ATENÇÃO! - Este manual deve acompanhar a máquina durante toda a sua vida útil.
¶ƒ√™√Ã∏! - ∆Ô ·ÚfiÓ ÂÁ¯ÂÈÚ›‰ÈÔ Ú¤ÂÈ Ó· Û˘Óԉ‡ÂÈ ÙÔ Ì˯¿ÓËÌ· ηı'fiÏË ÙË ‰È¿ÚÎÂÈ· ˙ˆ‹˜ ÙÔ˘.
I
F
GB
D
E
NL
P
GR
 Loading...