

Page 1
1
Page 2

Table of Contents
Chapter I Product Introduction…………………………………………………………………….9
1-1 Package Contents……………………………………………………...……………………...9
1-2 System Requirements……………………………………………………...………………..10
1-3 Highlights of the DDNS-Free Outdoor IP Camera…………………………………..........11
1-4 Familiar with the IC-9000……………………………………………………......................12
1-5 Install the IC-9000…………………………………………………………………………….13
1-5-1 Hardware Installation………………………………………………………………………13
1-5-2 Software Installation……………………………………………………….......................14
Chapter II Start Using the DDNS-Free Outdoor IP Camera………………………………….15
2-1 Use CamView Software to See the Video………………………………………………….15
2-2 Seeing the Video in a Remote Location……………………………………………………16
Chapter III Start Using Web Configuration Page………………………………………………17
3-1 Information…………………………………………………………………………………….18
3-2 Video Display………………………………………………………………………………….19
3-3 Network………………………………………………………………………………………..20
3-4 Advanced Network……………………………………………………………………………22
3-5 Video Settings………………………………………………………………………………...23
3-6 3GPP/RTSP Settings………………………………………………………………………...25
3-7 Night Mode Control…………………………………………………………………………..26
3-8 Email/FTP Alarm……………………………………………………………………………...27
3-9 DI/DO settings………………………………………………………………………………...29
3-10 NAS Settings………………………………………………………………………………...31
3-11 Scheduling…………………………………………………………………………………...32
3-12 Date/Time……………………………………………………………………………………34
3-13 Admin………………………………………………………………………………………...35
3-14 Upgrade……………………………………………………………………………………...36
3-15 Reboot………………………………………………………………………………………..38
3-16 Safe Mode…………………………………………………………………………………...39
3-17 Set to Factory Default………………………………………………………………………40
Chapter IV Start Using CamView………………………………………………………………..41
4-1 Install CamView Program…………………………………………………………………….41
4-2 Startup and the Layout of CamView……………………………………….......................44
4-2-1 Startup CamView…………………………………………………………………………..44
4-2-2 Layout of CamView………………………………………………………………………...44
4-2-3 Display Mode……………………………………………………………….......................45
4-3 Managing CamView Camera IP cameras………………………………………………….46
4-3-1 New Camera………………………………………………………………………………..47
4-3-2 New Folder…………………………………………………………………………………48
2
Page 3

4-3-3 Rename……………………………………………………………………………………..49
4-3-4 Delete………………………………………………………………………………………..50
4-3-5 Refresh Status……………………………………………………………………………...50
4-3-6 Camera Adjustment………………………………………………………………………..51
4-3-7 Play on Selected Window…………………………………………………………………52
4-3-8 ID / Password Settings…………………………………………………….......................52
4-3-9 Video Settings………………………………………………………………………………53
4-3-9-1 Quality Function Tab…………………………………………………….......................54
4-3-9-2 Video Function Tab………………………………………………………………………54
4-3-9-3 Control Function Tab…………………………………………………….......................56
4-3-9-4 Camera Info Tab…………………………………………………………………………56
4-3-10 3GPP Setting……………………………………………………………………………...57
4-3-11 Firmware Upgrade………………………………………………………………………..58
4-3-12 Delete Camera……………………………………………………………………………58
4-4 Displayed Video Control……………………………………………………………………..59
4-5 Camview Software Functions……………………………………………….......................66
4-5-1 Setting……………………………………………………………………………………….66
4-5-2 CamPlay…………………………………………………………………….......................67
4-5-3 Scheduling………………………………………………………………….......................67
4-5-4 Language……………………………………………………………………………………70
4-5-5 All Functions………………………………………………………………………………..70
4-6 Uninstall CamView……………………………………………………………………………71
Chapter V Start Using CamPlay………………………………………………………………...72
5-1 CamPlay File Tree……………………………………………………………………………73
5-2 CamPlay Functions…………………………………………………………………………..74
5-3 Language……………………………………………………………………………………...75
5-4 Headline Explanation……………………………………………………………………….75
5-5 Convert to “AVI”……………………………………………………………………………….76
5-6 Playback Function Bar……………………………………………………….......................77
5-6-1 Snapshot……………………………………………………………………………………77
5-6-2 Zoom In and Zoom Out……………………………………………………………………77
Chapter VI Start Surveillance Software……………………………………………………..….78
6-1 Installing IP Camera Surveillance Software…………………………………………….....78
6-2 Using IP camera Surveillance Software…………………………………………………....82
6-3 Configure IP camera Surveillance Software……………………………………………….85
6-3-1 Configure Cameras……………………………………………………………………..…85
6-3-1-1 ‘Camera’ tab……………………………………………………………………………...86
6-3-1-2 Schedule Recording…………………………………………………………………….88
6-3-1-3 Audio………………………………………………………………………………………91
6-3-1-4 Motion Record……………………………………………………………………………92
3
Page 4

6-3-2 General Settings……………………………………………………………………………94
6-3-2-1 ‘General’ tab……………………………………………………………………………...94
6-3-2-2 ‘E-Mail Setting’ tab……………………………………………………………………….96
6-3-2-3 Security…………………………………………………………………………………...98
6-3-2-4 About…………………………………………………………………………………….100
6-4 Change Display Layout…………………………………………………….......................101
6-5 Full-screen Modes………………………………………………………………………….104
6-6 Scan………………………………………………………………………….......................105
6-7 Zoom-in / Zoom-out…………………………………………………………………………106
6-8 PTZ…………………………………………………………………………………………...107
6-9 Snapshot……………………………………………………………………………………..108
6-10 Recording…………………………………………………………………………………108
6-11 Video Playback…………………………………………………………….......................109
Appendix A. Features…………………………………………………………………………...110
Appendix B. Specifications…………………………………………………………………….111
Appendix C. Maximum Allowed Video Users…………………………………………………113
Appendix D. Performance Information………………………………………………………...114
Appendix F. 3GPP/ISMA operation…………………………………………………………….115
Appendix F. 3GPP/ISMA operation…………………………………………………………….117
4
Page 5

Notice according to GNU/GPL
-
Version 2
offer, valid for at least three years, to give you, for
Copyright by Edimax Technology Co, LTD. all rights reserved. No part of this publication
may be reproduced, transmitted, transcribed, stored in a retrieval system, or translated into
any language or computer language, in any form or by any means, electronic, mechanical,
magnetic, optical, chemical, manual or otherwise, without the prior written permission of
this company.
This company makes no representations or warranties, either expressed or implied, with
respect to the contents hereof and specifically disclaims any warranties, merchantability or
fitness for any particular purpose. Any software described in this manual is sold or licensed
"as is". Should the programs prove defective following their purchase, the buyer (and not
this company, its distributor, or its dealer) assumes the entire cost of all necessary servicing,
repair, and any incidental or consequential damages resulting from any defect in the
software. Further, this company reserves the right to revise this publication and to make
changes from time to time in the contents hereof without obligation to notify any person of
such revision or changes.
The product you have purchased and the setup screen may appear slightly different from
those shown in this QIG. For more detailed information about this product, please refer to
the User Manual on the CD-ROM. The software and specifications are subject to change
without notice. Please visit our web site www.edimax.com for the update. All rights reserved
including all brand and product names mentioned in this manual are trademarks and/or
registered trademarks of their respective holders.
This product includes software that is subject to the GNU/GPL-Version 2. You find the
text of the license on the product cd/dvd. The program is free software and distributed
without any warranty of the author. We
a charge no more than the costs of physically performing source distribution, a complete
machine-readable copy of the corresponding source code.
Please contact Edimax at: Edimax Technology co., Ltd, NO. 3, Wu-Chuan 3rd RD
Wu-Ku-Industrial Park, Taipei Hsien, Taiwan. R.O.C., TEL : +886-2-77396888, FAX :
+886-2-77396887, sales@edimax.com.tw
5
Page 6

Federal Communication Commission
Interference Statement
FCC Part 68
This equipment complies with Part 68 of the FCC Rules. On the bottom of this equipment is
a label that contains the FCC Registration Number and Ringer Equivalence Number (REN)
for this equipment. You must provide this information to the telephone company upon
request.
The REN is useful to determine the quantity of devices you may connect to the telephone
line and still have all of those devices ring when your number is called.
In most, but not all areas, the sum of the REN of all devices connected to one line should
not exceed five (5.0). To be certain of the number of devices you may connect to your line,
as determined by the REN, you should contact your local telephone company to determine
the maximum REN for your calling area.
If the modem causes harm to the telephone network, the telephone company may
discontinue your service temporarily. If possible, they will notify you in advance.
But if advance notice isn't practical, you will be notified as soon as possible. You will be
advised of your right to file a complaint with the FCC.
The telephone company may make changes in its facilities, equipment, operations, or
procedures that could affect the proper operation of your equipment.
If they do, you will be notified in advance to give you an opportunity to maintain
uninterrupted telephone service.
If you experience trouble with this modem, please contact your dealer for repair/warranty
information. The telephone company may ask you to disconnect this equipment from the
network until the problem has been corrected or you are sure that the equipment is not
malfunctioning.
This equipment may not be used on coin service provided by the telephone company.
Connection to party lines is subject to state tariffs.
Installation
This device is equipped with a USOC RJ11C connector.
6
Page 7

FCC Part 15
This equipment has been tested and found to comply with the limits for a Class B digital
device, pursuant to Part 15 of FCC Rules. These limits are designed to provide reasonable
protection against harmful interference in a residential installation. This equipment
generates, uses, and can radiate radio frequency energy and, if not installed and used in
accordance with the instructions, may cause harmful interference to radio communications.
However, there is no guarantee that interference will not occur in a particular installation. If
this equipment does cause harmful interference to radio or television reception, which can
be determined by turning the equipment off and on, the user is encouraged to try to correct
the interference by one or more of the following measures:
1. Reorient or relocate the receiving antenna.
2. Increase the separation between the equipment and receiver.
3. Connect the equipment into an outlet on a circuit different from that to which the
receiver is connected.
4. Consult the dealer or an experienced radio technician for help.
FCC Caution
This equipment must be installed and operated in accordance with provided instructions
and a minimum 20 cm spacing must be provided between computer mounted antenna and
person’s body (excluding extremities of hands, wrist and feet) during wireless modes of
operation.
This device complies with Part 15 of the FCC Rules. Operation is subject to the following
two conditions: (1) this device may not cause harmful interference, and (2) this device must
accept any interference received, including interference that may cause undesired
operation.
Any changes or modifications not expressly approved by the party responsible for
compliance could void the authority to operate equipment.
Federal Communication Commission Radiation Exposure Statement
This equipment must be installed and operated in accordance with provided instructions
and a minimum 20 cm spacing must be provided between computer mounted antenna and
person’s body (excluding extremities of hands, wrist and feet) during wireless modes of
operation.
The equipment version marketed in US is restricted to usage of the channels 1-11 only.
7
Page 8

R&TTE Compliance Statement
This equipment complies with all the requirements of DIRECTIVE 1999/5/EC OF THE
EUROPEAN PARLIAMENT AND THE COUNCIL of March 9, 1999 on radio equipment and
telecommunication terminal Equipment and the mutual recognition of their conformity
(R&TTE).
The R&TTE Directive repeals and replaces in the directive 98/13/EEC
(Telecommunications Terminal Equipment and Satellite Earth Station Equipment) As of
April 8, 2000.
Safety
This equipment is designed with the utmost care for the safety of those who install and use
it. However, special attention must be paid to the dangers of electric shock and static
electricity when working with electrical equipment. All guidelines of this and of the computer
manufacture must therefore be allowed at all times to ensure the safe use of the
equipment.
EU Countries Intended for Use
The ETSI version of this device is intended for home and office use in Austria, Belgium,
Denmark, Finland, France, Germany, Greece, Ireland, Italy, Luxembourg, Bulgaria, Cyprus,
Czech Republic, Estonia, Hungary, Latvia, Lithuania, Malta, Poland, Romania, Slovakia,
Slovenia, the Netherlands, Portugal, Spain, Sweden, and the United Kingdom.
The ETSI version of this device is also authorized for use in EFTA member states: Iceland,
Liechtenstein, Norway, and Switzerland.
EU Countries Not intended for use
None.
EuP, 2005/32/EC.
Article15,5,(a): there shall be no significant negative impact on the functionality of the
product, from the perspective of the user
CE Mark Warning
This is a class B product. In a domestic environment, this product may cause radio interface,
in which case the user may be required to make adequate measures.
A CE declaration of conformity is available on www.edimax.com
8
Page 9

Chapter I Product Introduction
1-1 Package Contents
Thank you for purchasing this DDNS-Free Outdoor IP Camera! Before you start to use this
product, please check every item in the package. If any of them is missing, please ask your
dealer of purchase for a new package.
Packaging List
Item
No.
1 DDNS-Free Outdoor IP Camera 1
2 Power Adapter 12V 1.0A 1
3 Ethernet Cable 1
4 Installation Guide 1
5 CD ROM (Including User Guide & Utility) 1
6 Account Card 1
7 Accessory Bag (Anchors & Screws) 1
Name Quantity
9
Page 10

1-2 System Requirements
CPU: Pentium 4 (or equivalent AMD) 1.0 GHz or above, 1 GB RAM
OS: Windows XP/Vista/Win 7
Browser: IE 7 or above
10
Page 11

1-3 Highlights of the DDNS-Free Outdoor IP Camera
Thanks again for choosing this DDNS-Free Outdoor IP Camera. The IC-9000 is designed
with the User-friendly concept. You can install the IP Camera easily on your home network
and then access the IP Camera anywhere in the world with the video management utility.
No need to set complicated DNS name or change the router configuration. It just a plug &
play.
Besides, with the low light sensitive sensor and IR LEDs inside the IP66-rated water proof
housing, the IC-9000 can satisfy all security and indoor/outdoor surveillance needs even in
the dim environment or bad weather condition. What’s more, with the automatic ICR (IR
Cutter Remover), the infrared light is filtered out during the day time and is allowed to pass
during the night time. This ensures the video color quality is excellent compared with other
IP cameras.
11
Page 12
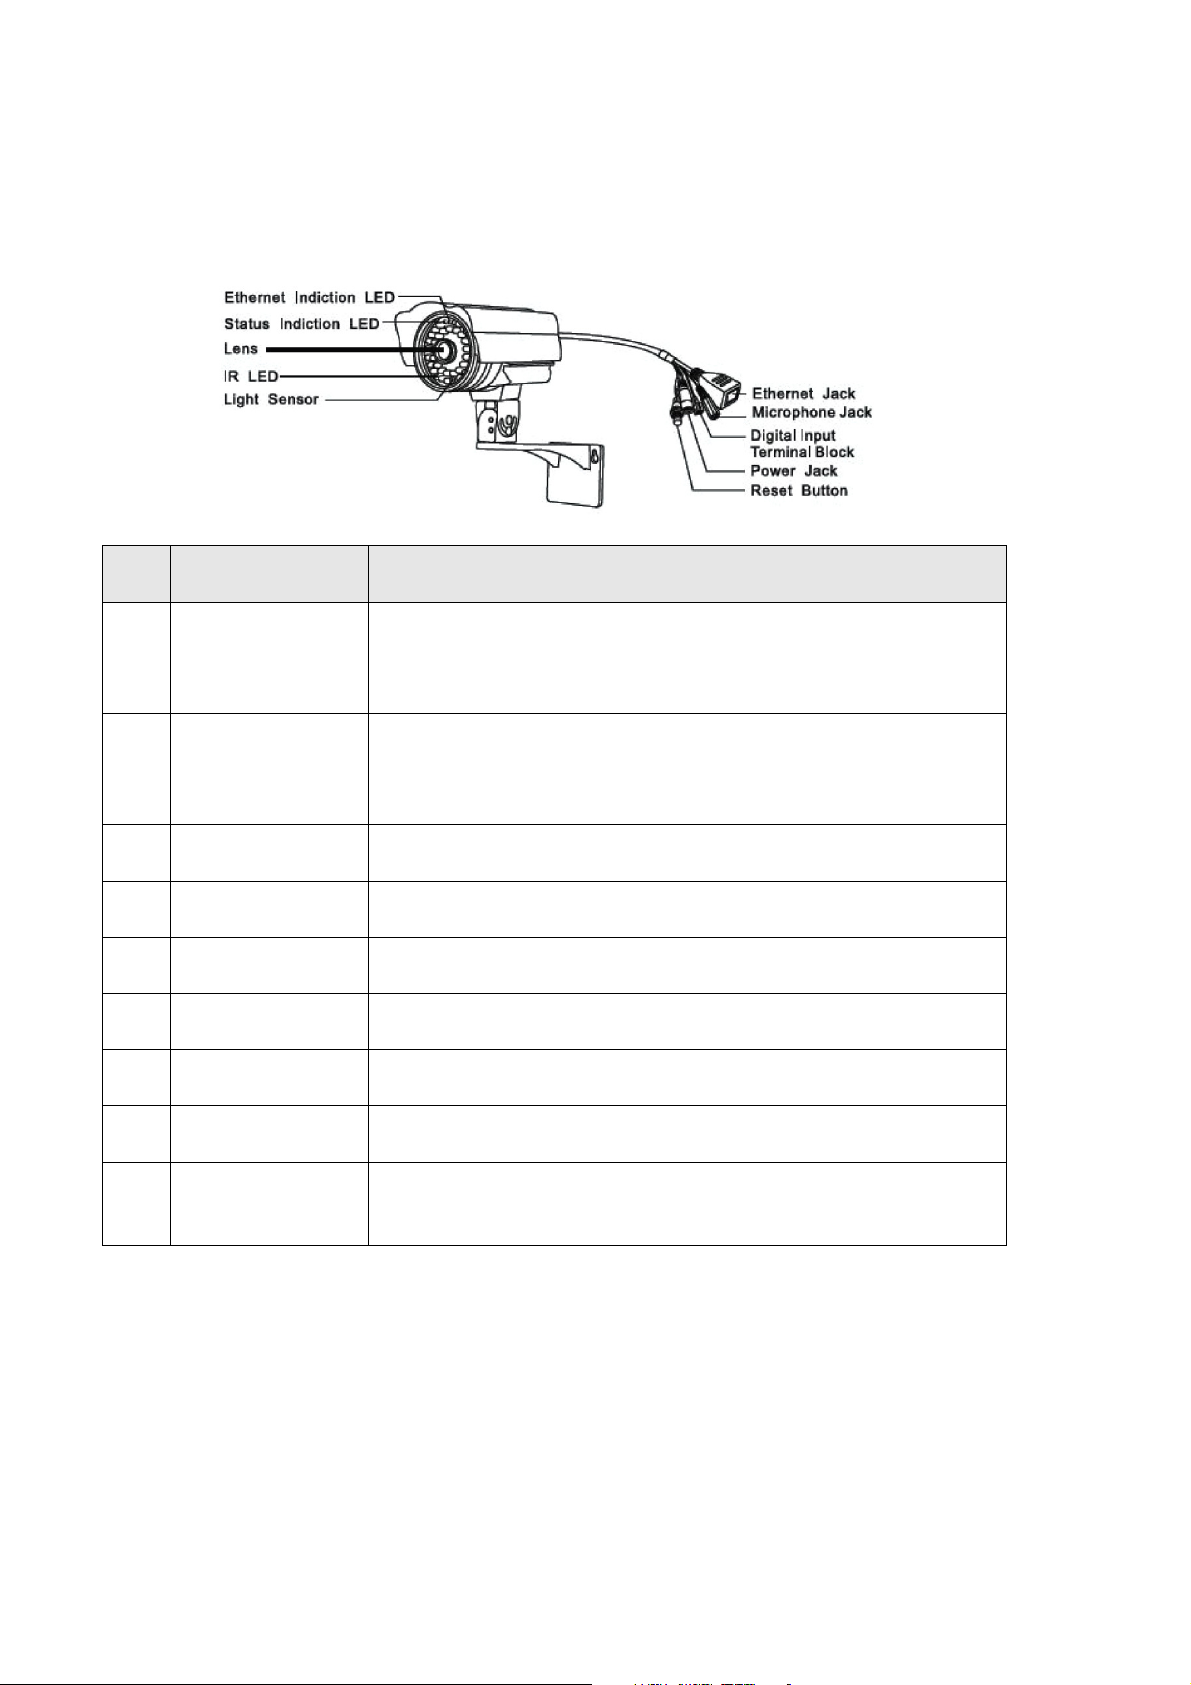
1-4 Familiar with the IC-9000
The IC-9000 is designed to be very easy to install and use. First, let’s see the major
components of the IP CAM products.
Item
No.
1
2
3 Lens
4 IR LEDs
5 Light Sensor
6 Ethernet Jack
7
8 Power Jack
Name Description
Ethernet
Indication LED
(blue)
Status
Indication LED
(red)
Indicates if the Ethernet link is ok and packet traffic is
sending/receiving. When the Ethernet cable is connected,
the LED is constant blue light. When there is packet
sending/receiving, the LED is blinking blue light.
Indicates the Internet connection status. When the
Internet connection is connected, the LED will be constant
red light. If there is any Internet connection problem, the
LED will be blinking red light.
The focus of the lens is fixed. The effective focus range is
from 30cm to infinity.
Totally 36 IR LEDs which can provide approximately 30m
distance night vision
The light detector can detect when the light is becoming
dark and turn on the IR LEDs automatically
10/100Mbps fast Ethernet port (Connects to your local
area network)
Digital Input
Terminal Block
This is for alarm detection, an open circuit is off, a close
circuit is on.
Connects to12V/1.0A power adapter. Please make sure
you are using the correct power adaptor
The button to reset the IP CAM to default factory settings.
9 Reset Button
You need to press the reset button for more than 4
seconds to enable the reset function.
12
Page 13
1-5 Install the IC-9000
There are only three things that you need to do to see the video from the IC-9000:
1. Connect the IP CAM to the home/office network.
2. Install the CamView software on the notebook/PC.
3. Key in the ID/password of the IP CAM(from the ID/Password card) on the CamView, and
then you can see the video.
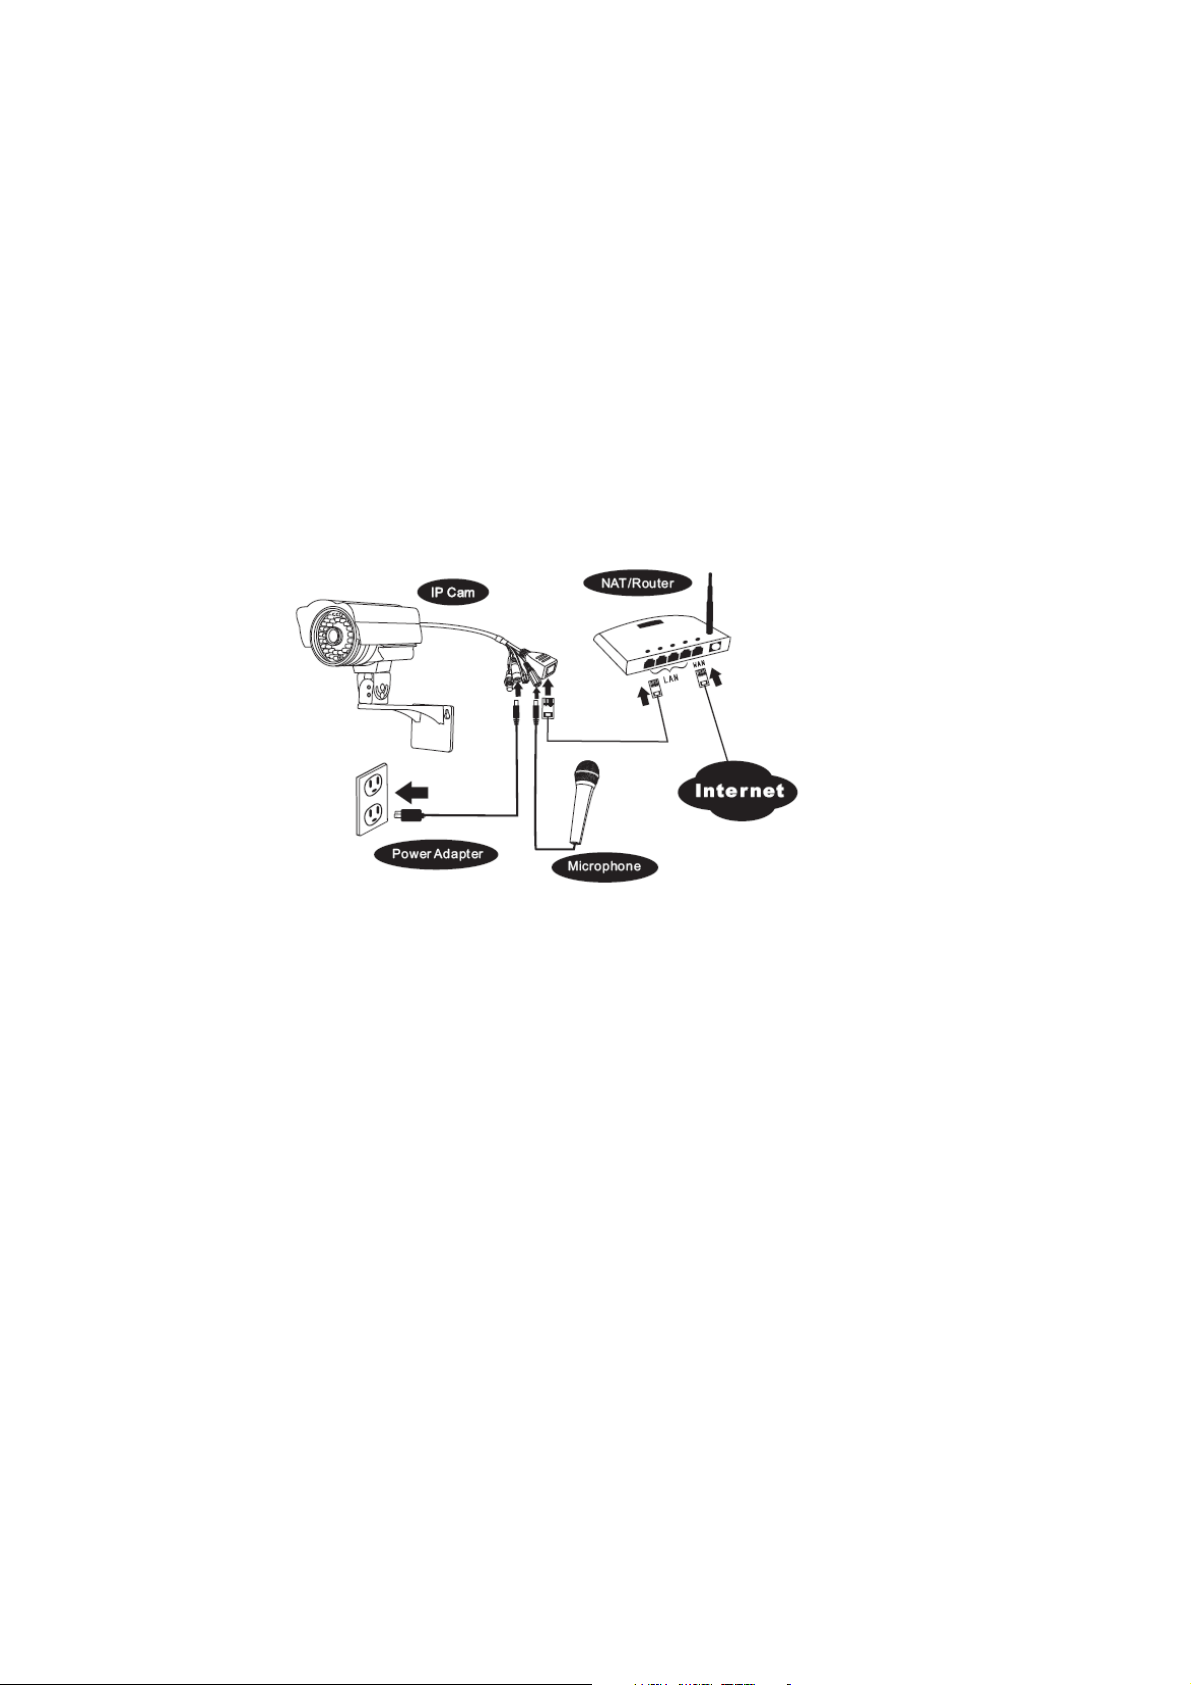
1-5-1 Hardware Installation
Please follow the following instructions to set up the IC-9000:
1. Please connect the IP CAM accessories to the body of the IC-9000 correctly, including
the bracket, power adapter and Ethernet cable, as shown in the above figure.
2. Connect the other end of the Ethernet cable to the home network or office network.
Usually, this Ethernet cable is plugged into a home NAT/router device or an Ethernet
switch if in the office, as shown in the above figure.
3. Since the default settings of the IP CAM use DHCP function and very often there is a
DHCP server on most of the Home/office network, the IP CAM should be connected to
the Internet immediately
13
Page 14

1-5-2 Software Installation
1. Before installing CamView software on your PC or laptop, please make sure you have
correctly installed the IC-9000. It’s highly recommended to close other Windows
applications to prevent the installation from any possbile confliction.
2. Please insert the installation CD into the CD-ROM drive in your notebook or personal
computer (must be running Microsoft Windows OS).
3. Execute the program CamView on the disk. The program will pop-up some windows
about the installation options, please press the “Next”14 button to proceed with the
installation.
4. After the installation is complete, there will be a CamView icon
on the desktop of your computer screen, please execute this icon. The CamView
program will run immediately.
14
Page 15
Chapter II Start Using the DDNS-Free Outdoor IP Camera
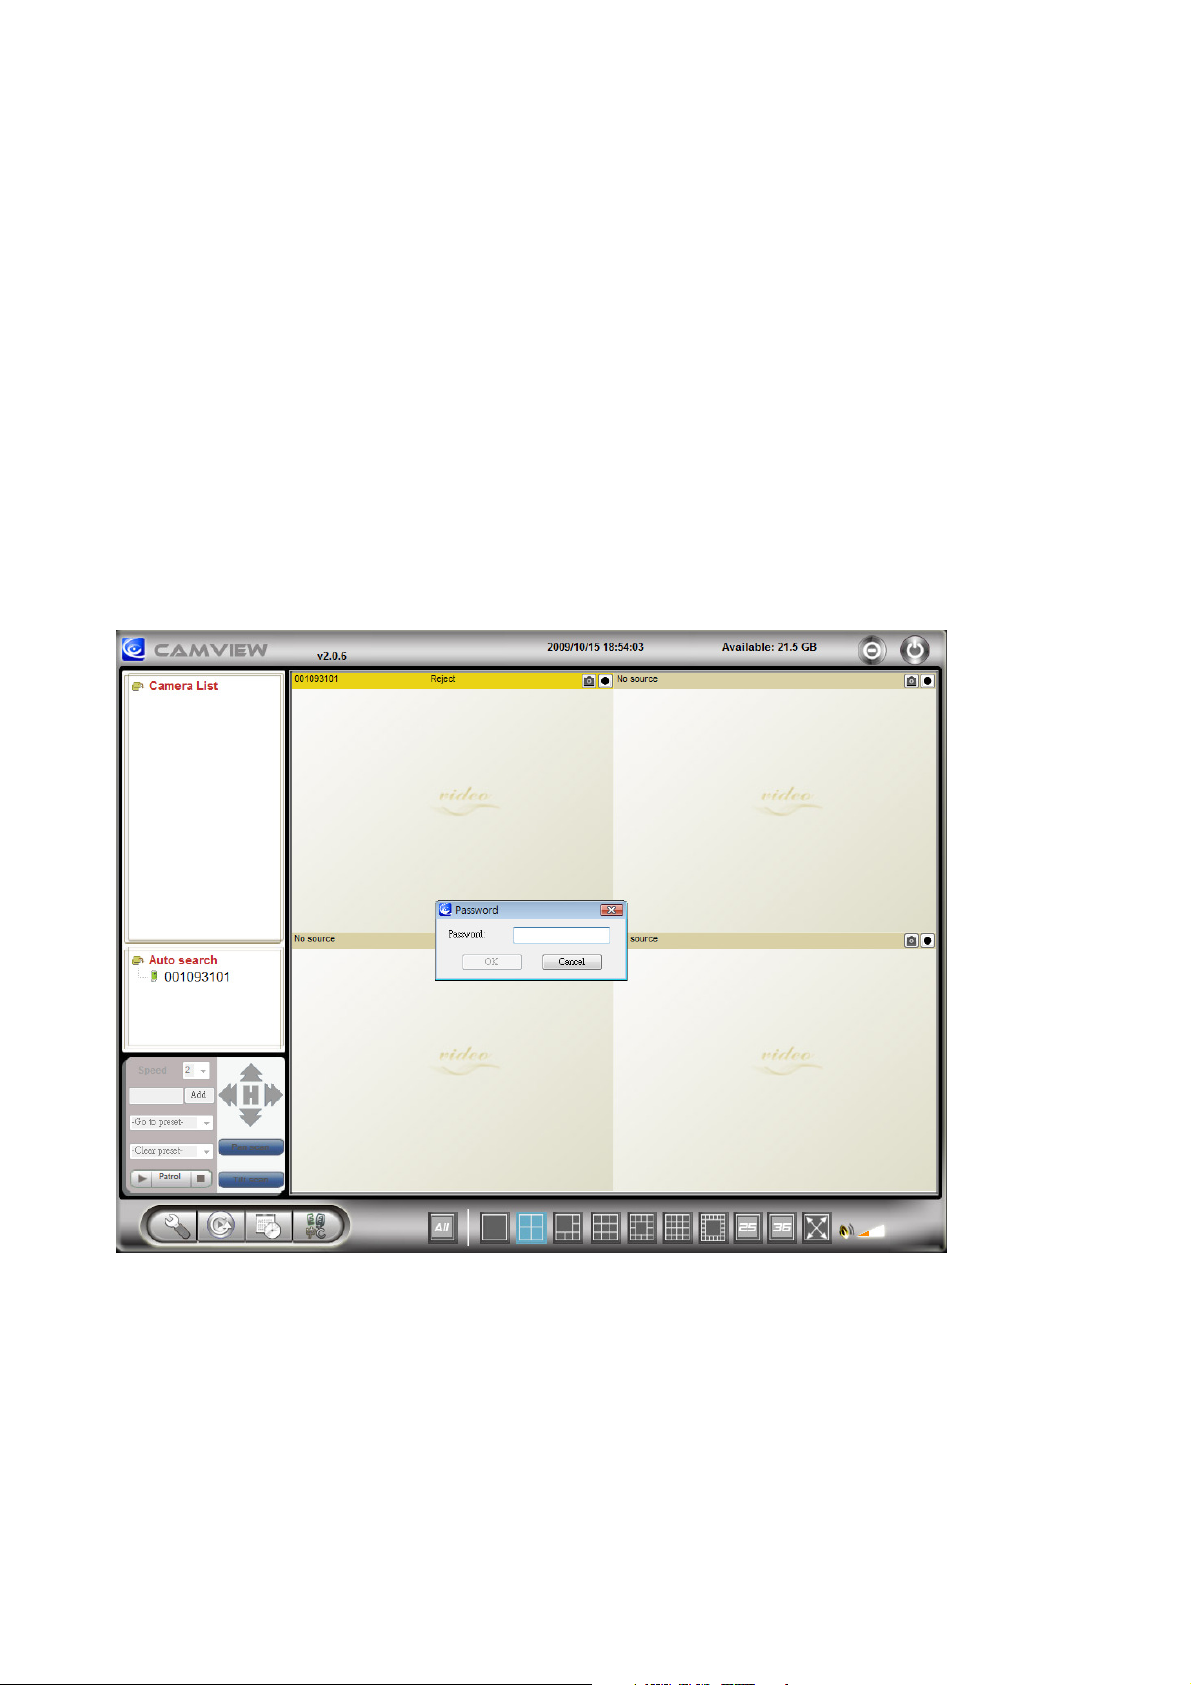
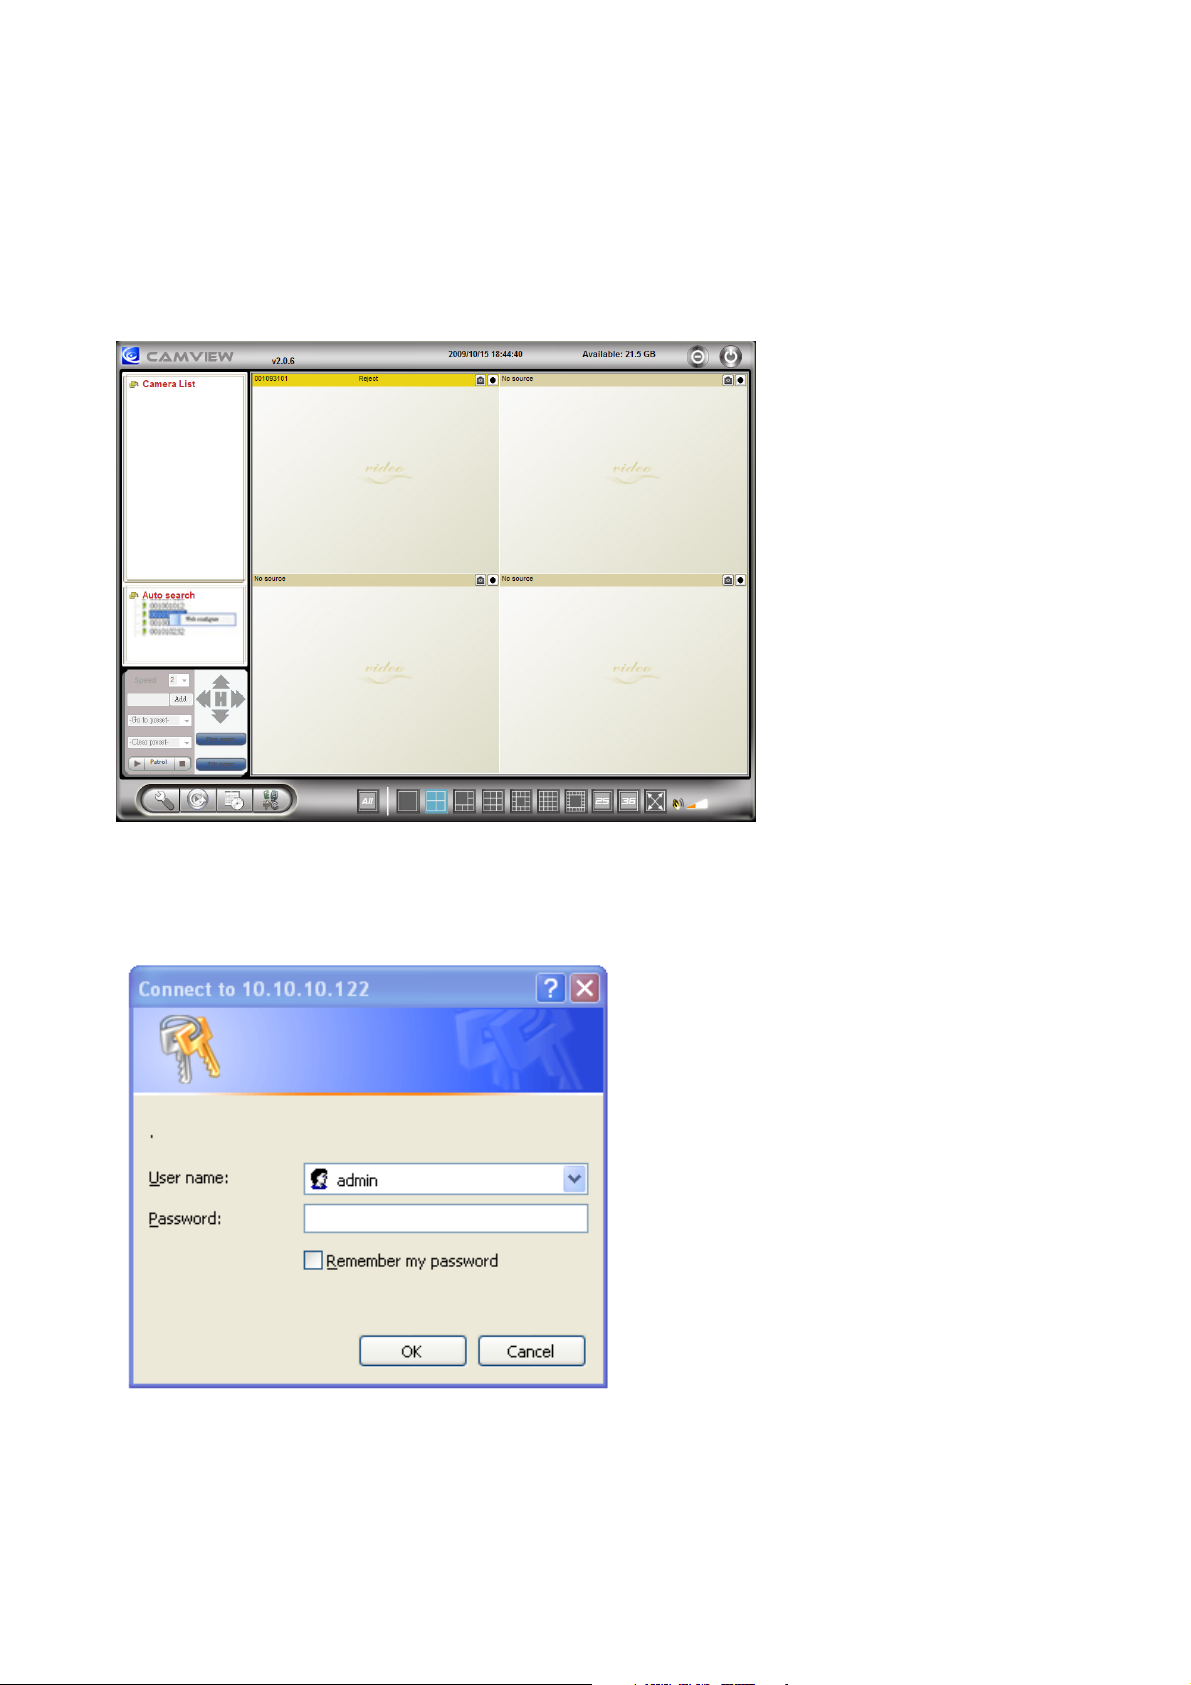
2-1 Use CamView Software to See the Video
Following figure is the running window of the CamView program. If the computer and the
IC-9000 is connected to the same network, the ID of the IC-9000 will be displayed in the
“Auto Search” list. If you have more than 1 piece of the IC-9000, you can double click the
“Auto Search” to search all the connected the IC-9000s any time. The only thing left right
now for seeing the video is to double click the IP CAM ID item in the “Auto Search” list. For
example, if the IP CAM ID is 001-001-029, you can then double click the 001001029 item in
the “Auto Search” list to view the video. A window asking for password input will pop up.
Please key-in the password in your ID/Password card into this field and click “Ok”. The
video will then be displayed on the window.
Note: You can modify this play-video password by entering into the web configuration
pages. Please refer to section 3-7 for more information.
Notice: You can also add the IP CAM into the CameraList in the CamView software to have
more convenient video display, please refer to the user manual of the CamView software
for more functions.
15
Page 16

2-2 Seeing the Video in a Remote Location
After the IC-9000 is installed and you can see the video from the CamView software in the
local network, it’s very easy to see the video in a remote location. All you need to do is add
a camera item in the “CameraList” 16folder of the CamView software, key in the ID and
Password of the IC-9000 (from the ID/Password card). And then double click this camera
item. You will then see the Camera video immediately. No further NAT/router setting
modifications are needed.
16
Page 17
Chapter III Start Using Web Configuration Page
You can login into the web configuration page by directly key-in the IP address of the IP
CAM or right-click the searched IP CAM in the “Auto Search”17list of the CamView software
and click the “Web Configure” to open the login window of the IP CAM.
The default login account is “admin”, leave the Password field empty.
17
Page 18
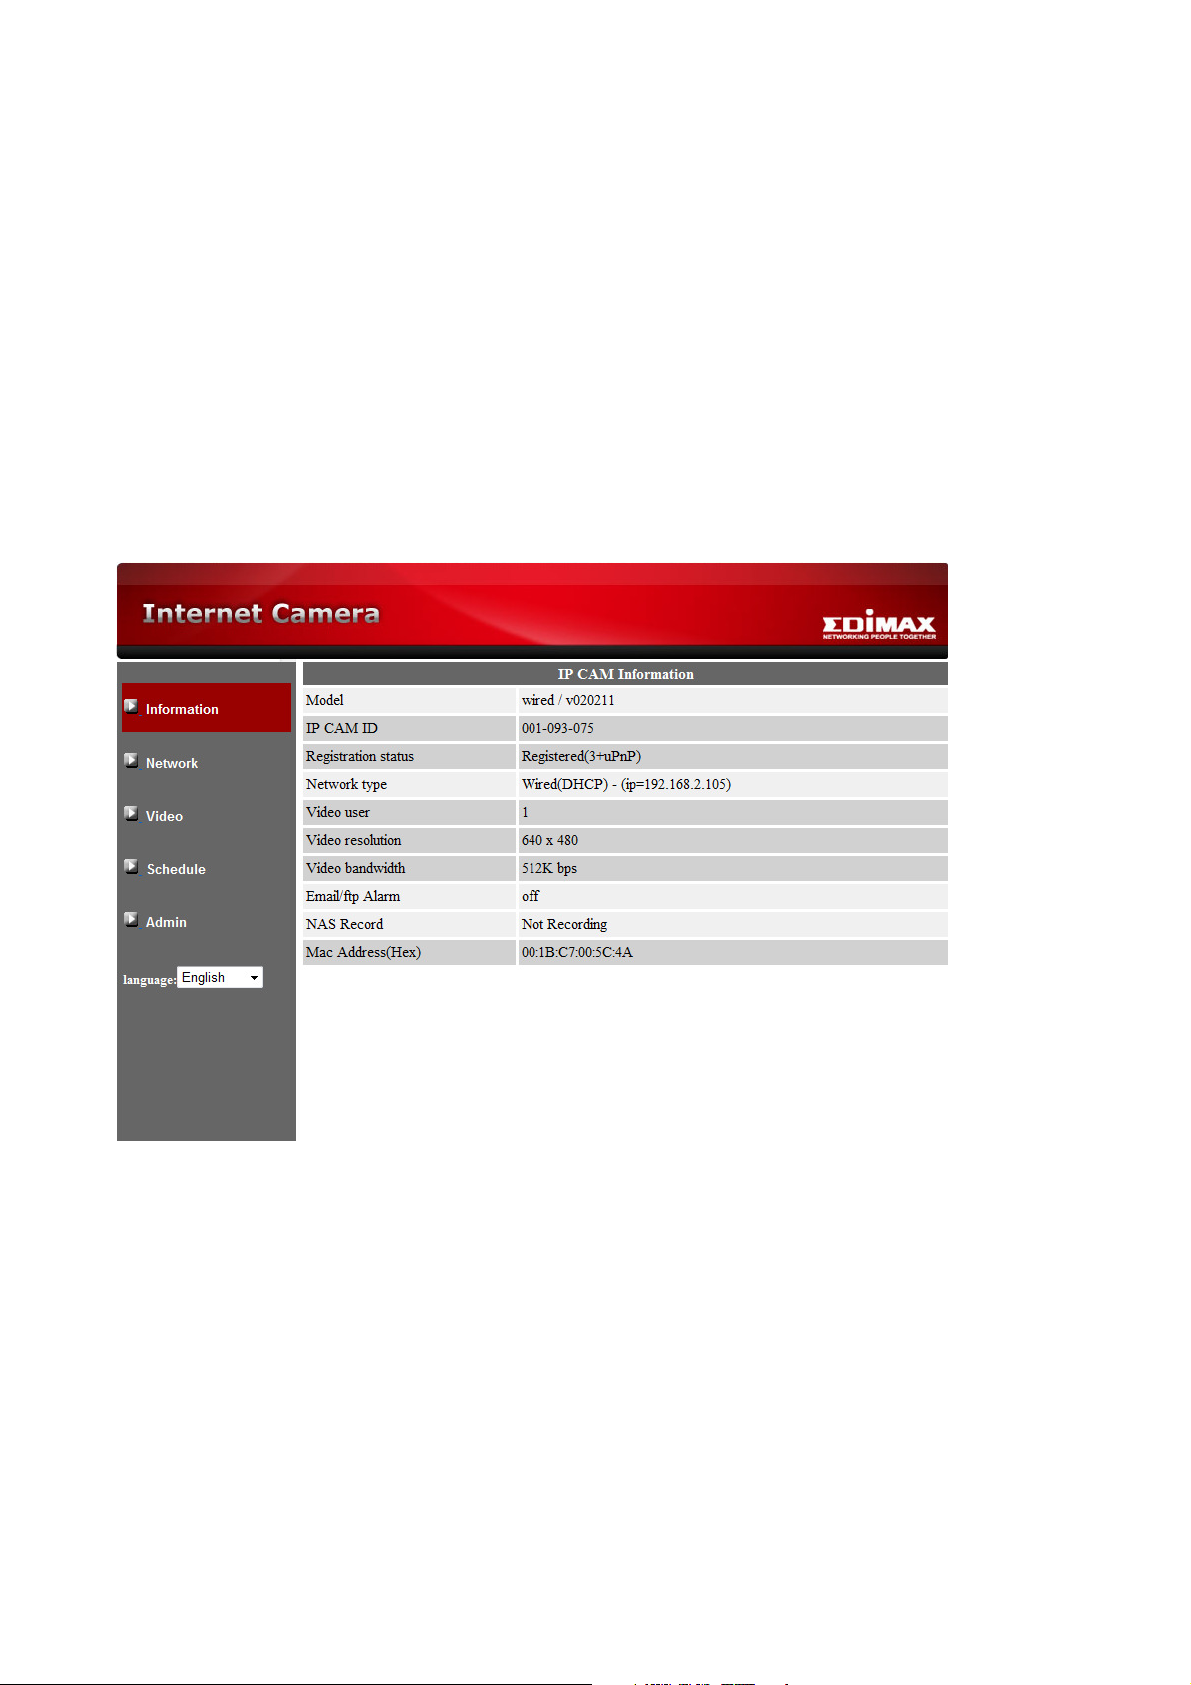
3-1 Information
The first page of the web configuration of the IP CAM is the information page. You can see
the model name/firmware version, IP CAM ID, registration status, network type and current
video settings (bandwidth & resolution) in this page.
The IP CAM can be viewed remotely by the CamView software only when the IP CAM is
registered. If this IP CAM is not registered, please check the Ethernet wiring of your
network environment. The “Network type” 18field displays the network connection (wired or
wireless) and method (DHCP, PPPoE or static ip) the IP CAM is running. The “Video users”
18field displays the number of connected video viewing users.
18
Page 19
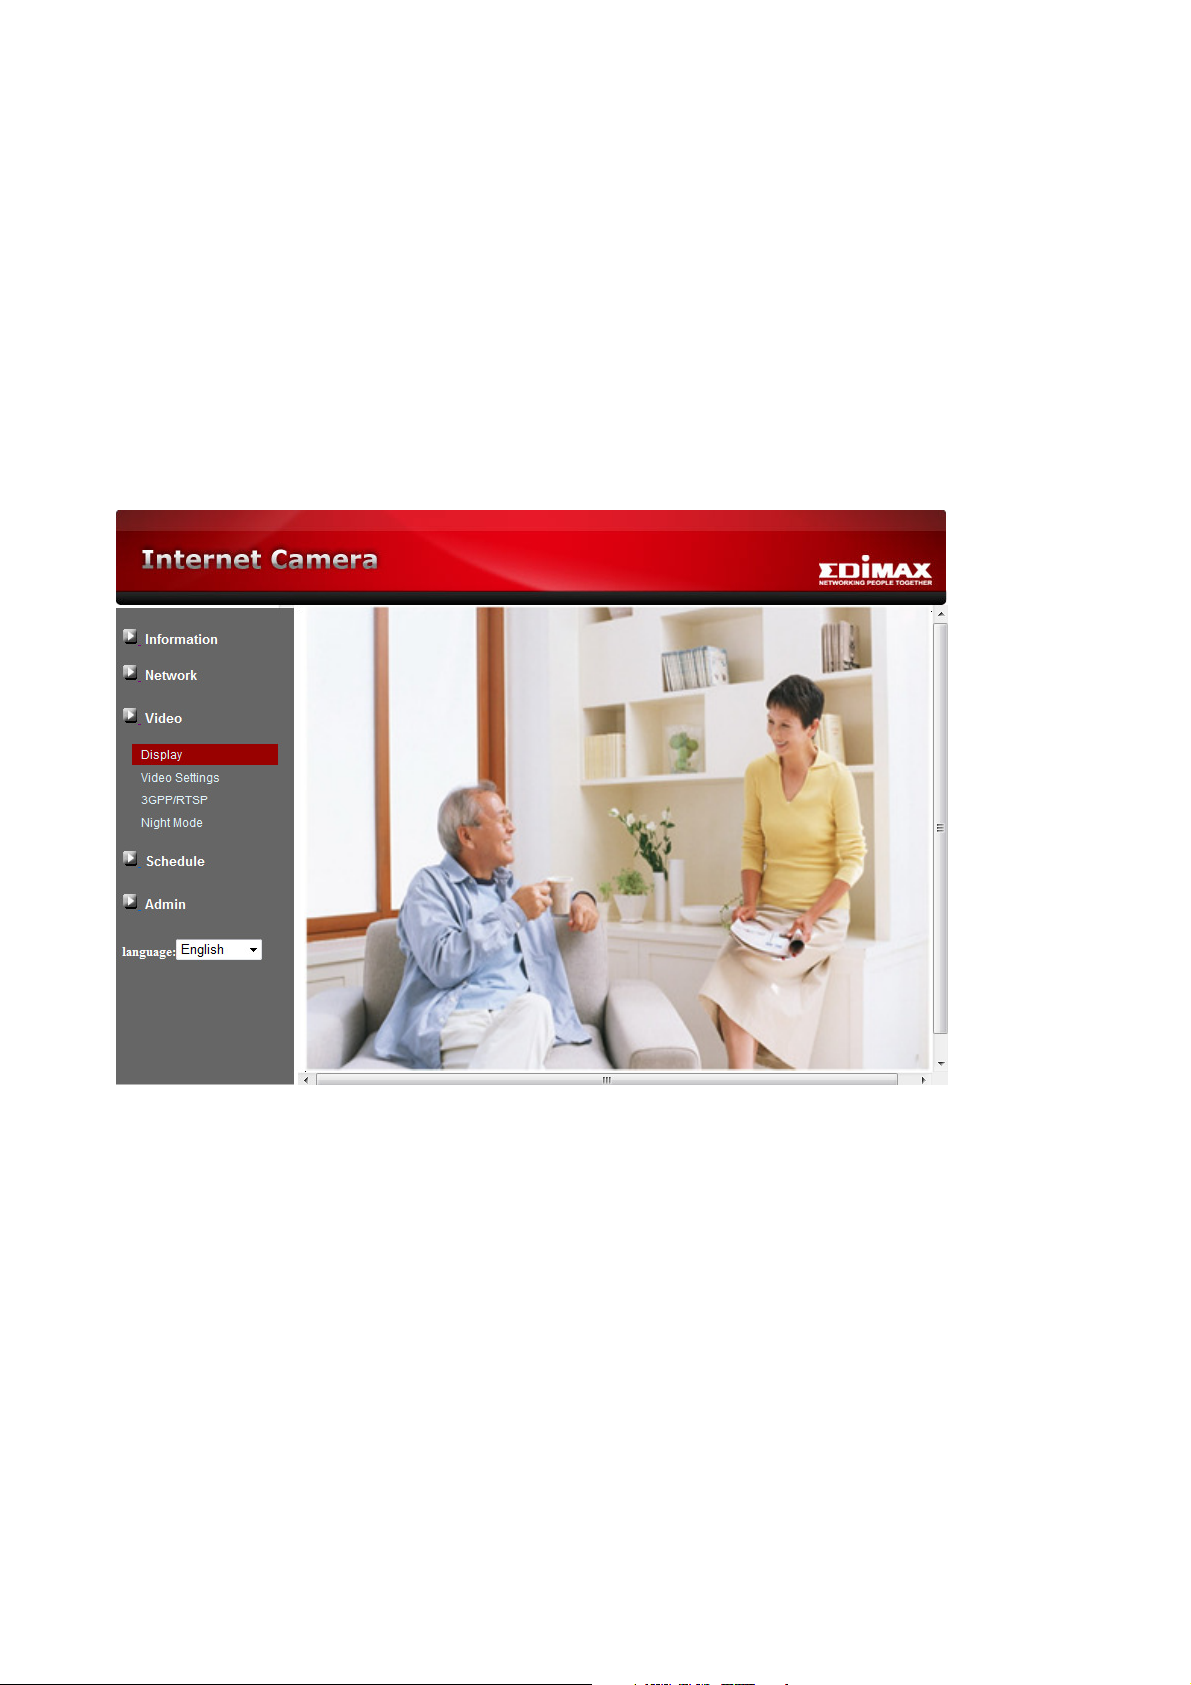
3-2 Video Display
This display page allows you to view the video display of the IP camera. For the first time
use of this display on a computer, an activeX component will be automatically downloaded
into the browser. This could take some time, depends on the internet speed. The
component is downloaded from a public domain, so that the computer must be connected
to the Internet.
If you want to modify the video display screen size, please refer to section 3-7 for more
details.
19
Page 20
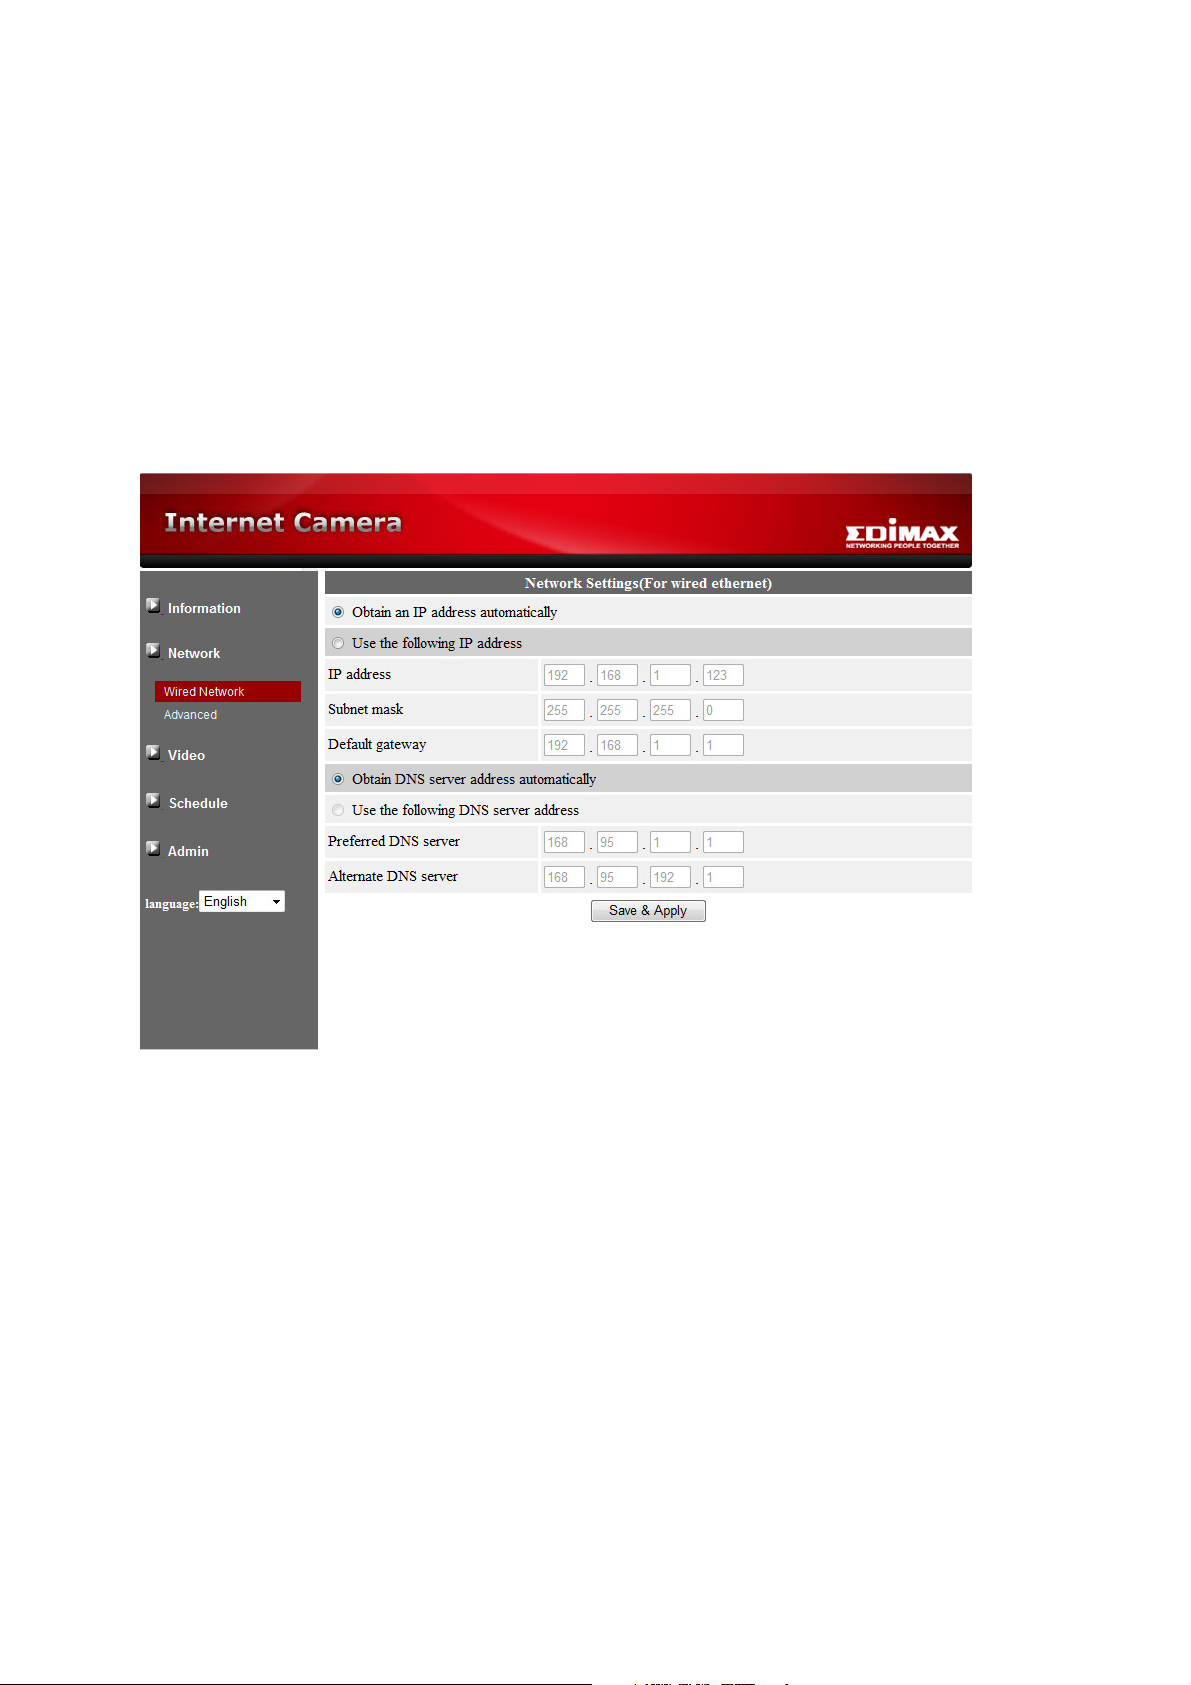
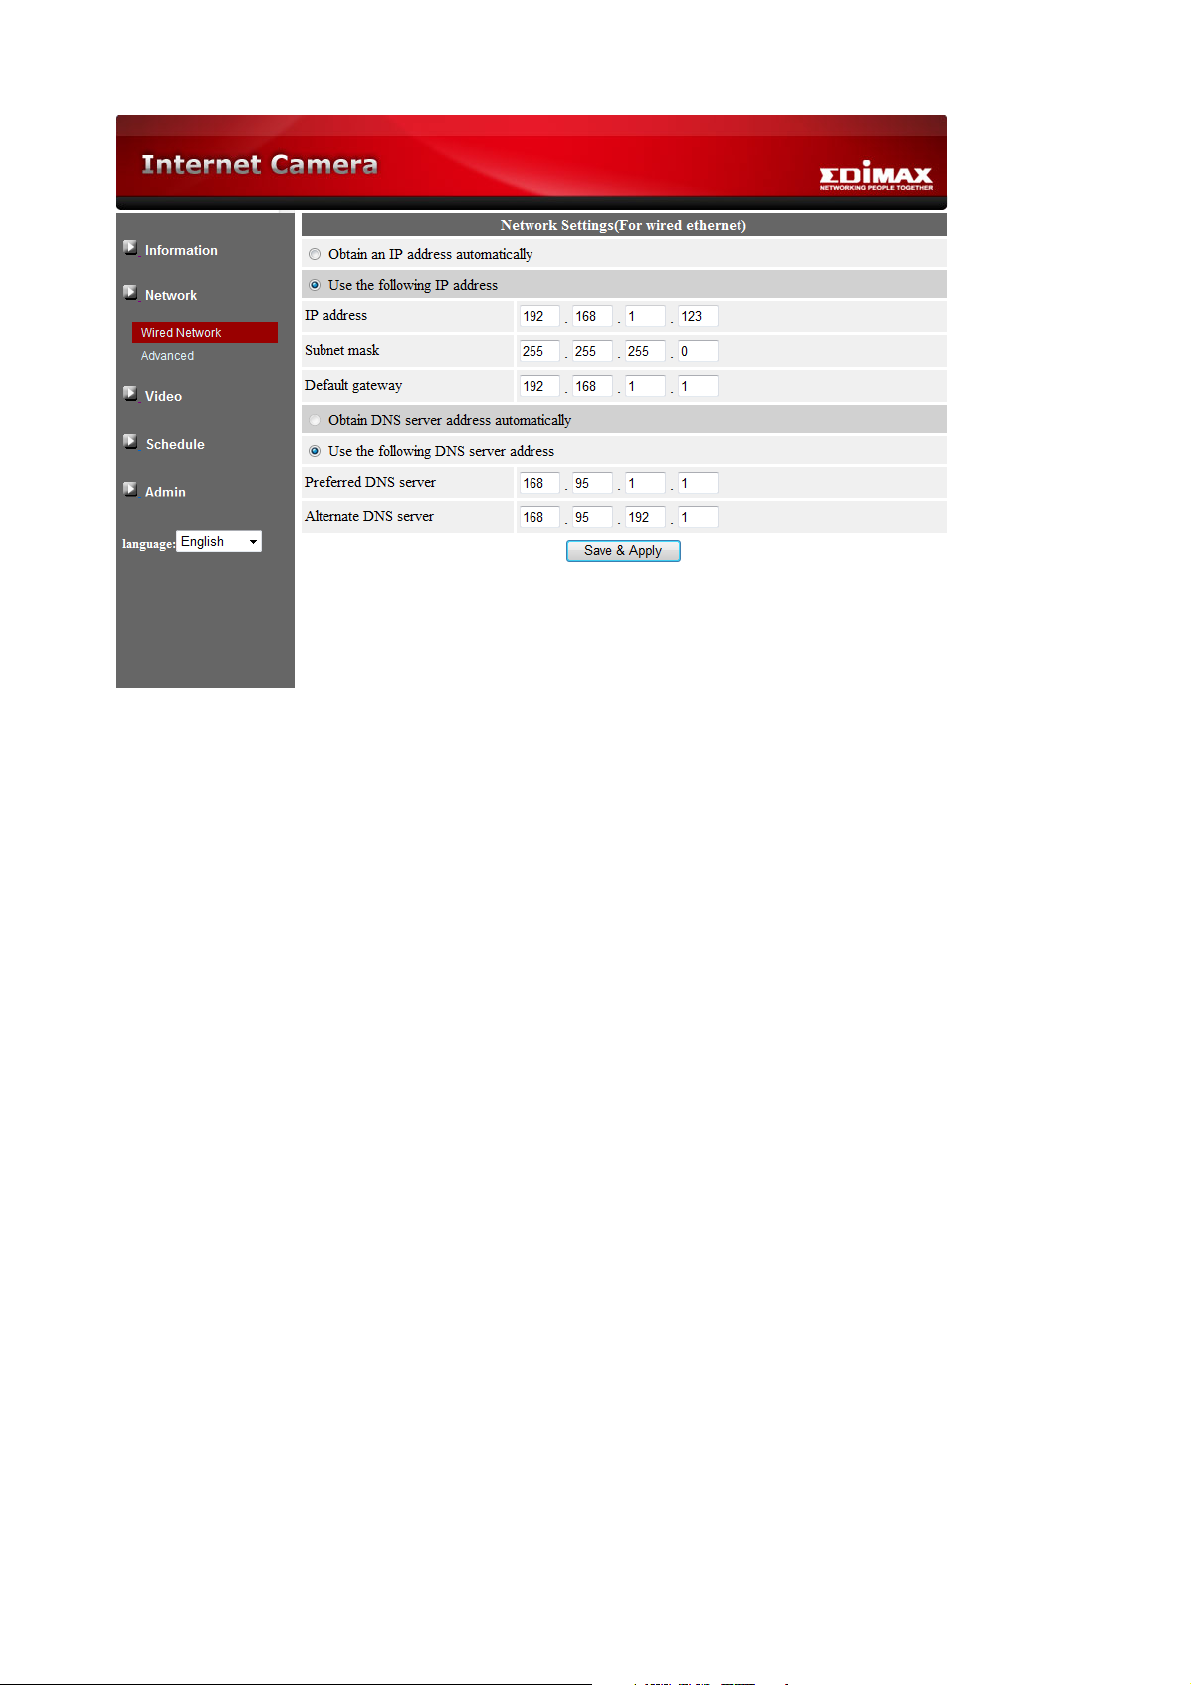
3-3 Network
The Network page allows you to modify the network settings of the wired Ethernet. The
default settings use DHCP to obtain an IP address automatically. In most of the home and
office network environment, there is a DHCP server running. In this situation, by using this
default settings, the IP CAM can work immediately in most of the time.
If the Ethernet cable is unplugged, the IP CAM will lose connection. But as soon as the
Ethernet cable is plugged in again, the IP CAM will obtain a new IP address immediately.
If the network environment does not support DHCP function, you will need to set the
network settings of the IP CAM manually. Please fill all the fields including “IP address”20,
“Subnet mask”, “Default gateway”20and “DNS server”20 to let the network work. All these
settings must be correct for your network environment, otherwise the IP CAM cannot work.
The default setting is “obtain an IP address automatically”.
20
Page 21
21
Page 22
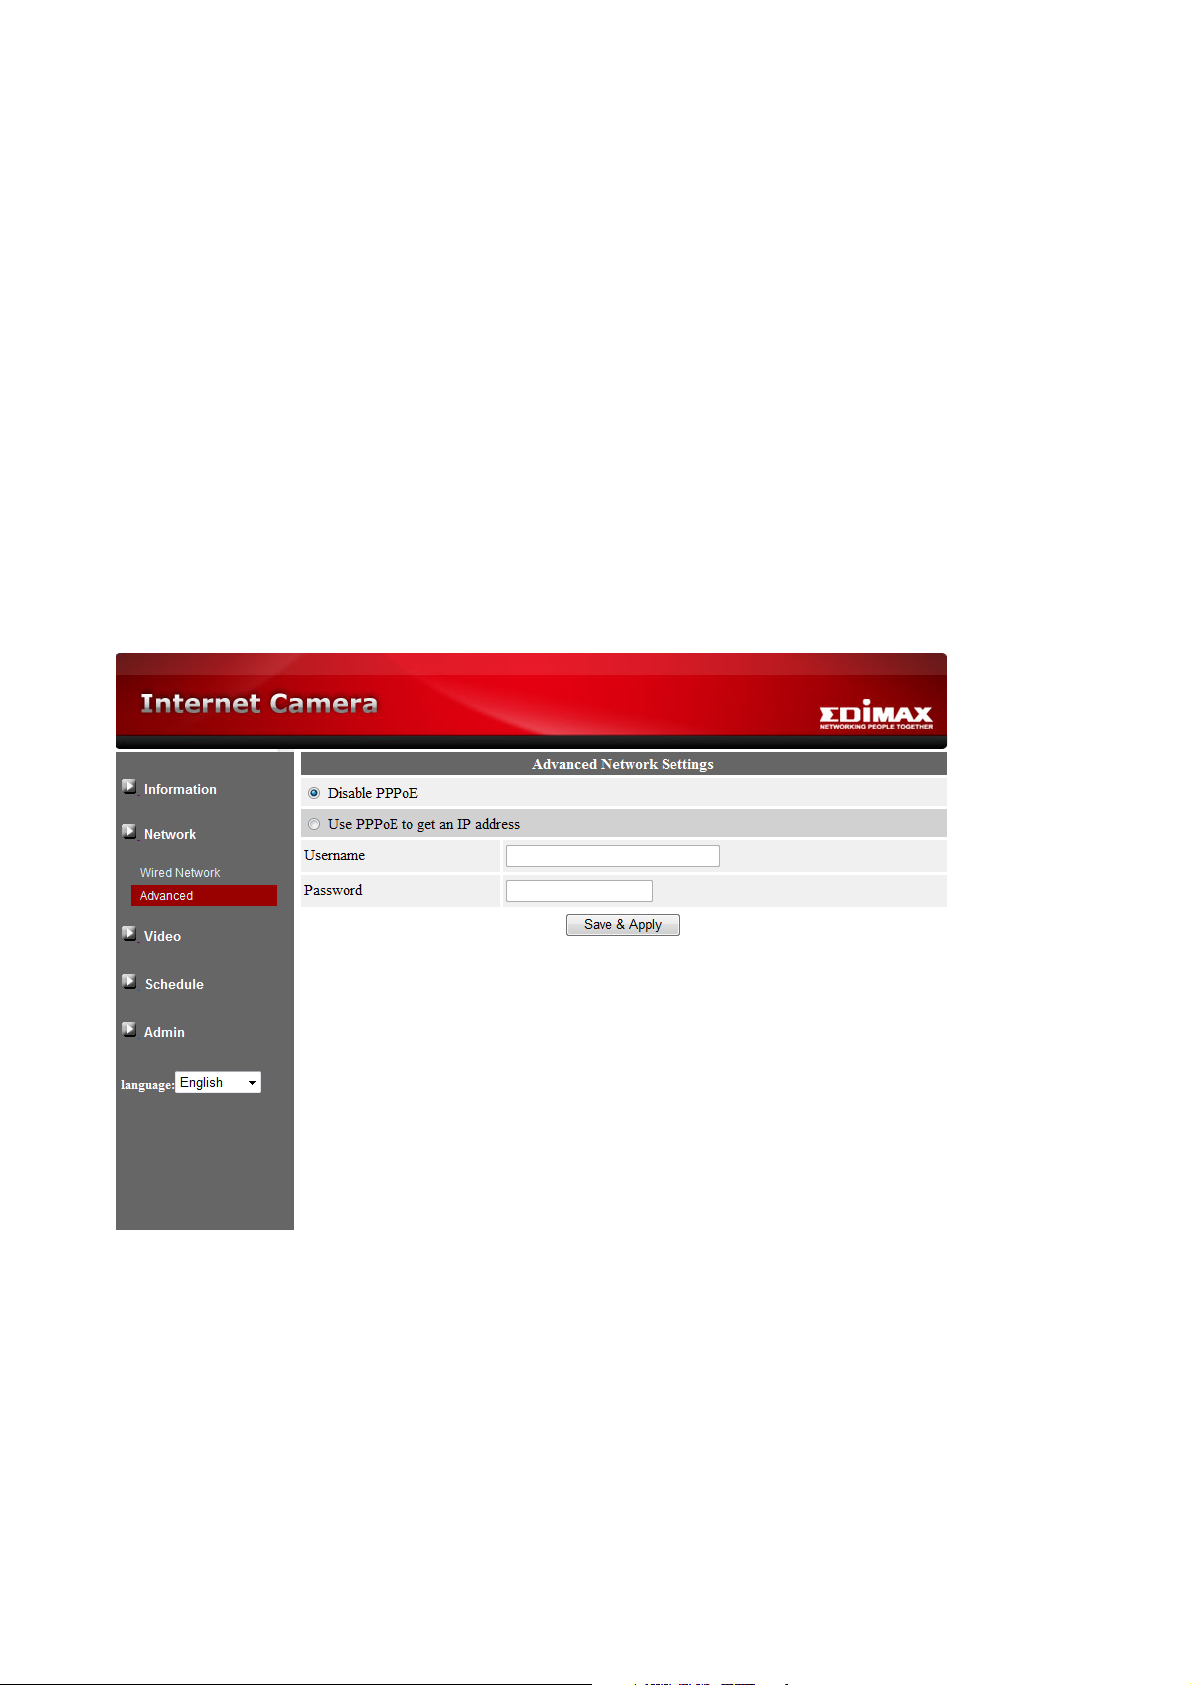
3-4 Advanced Network
In some special situation, your network environment only provides PPPoE connection
(ADSL service), there is no NAT/router available. You will then need to set the PPPoE
settings in the “Advanced Network”22page. Only the PPPoE username and password are
needed to let PPPoE work. After the ”Save&Apply” button is pressed, the PPPoE function
will work immediately. You can check the ”Registration status” in the “Information” page to
see if the IP CAM is registered using the PPPoE connection.
Please be noticed that the DHCP or static IP settings in the “Network”22page can work
together with the PPPoE connection. Only that the PPPoE has higher priority, so, if the
PPPoE is working, the IP CAM will use PPPoE to connect to the Internet.
The default setting is ”Disable PPPoE”.
22
Page 23

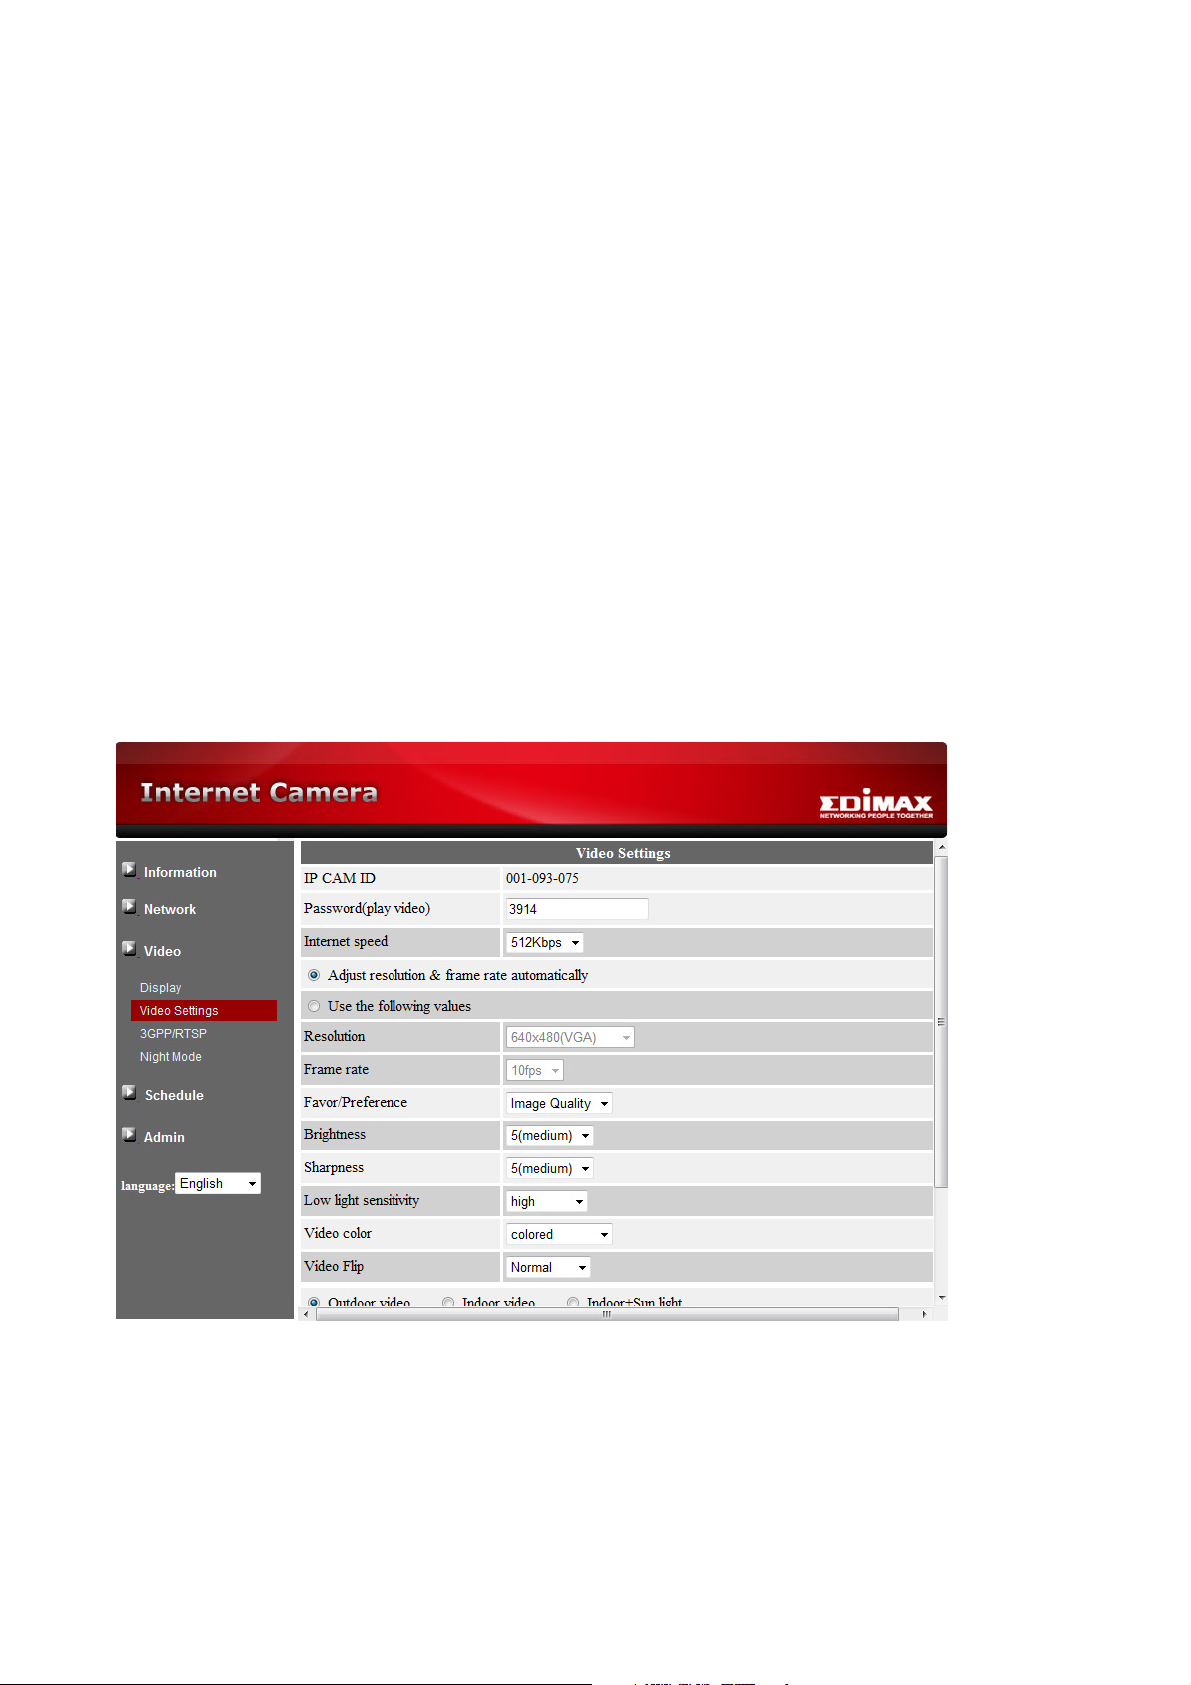
3-5 Video Settings
The IP CAM is designed to provide high quality video for viewing from CamView software.
In this page, you can modify some settings related to the video viewing:
1. Password (play video) - This is the password needed for viewing the video from the
CamView software. Together with the IP CAM ID, you can view the video of this IP CAM
anywhere in the world through the Internet.
2. Internet speed - This is the Internet bandwidth of your network environment. Higher
value will generate higher video quality. But if your internet connection cannot provide
more bandwidth than the specified value, the video quality could degrade. So, please
key in a value that is lower than your internet bandwidth.
3. Select resolution & frame rate automatically - You can let the system select the suitable
video resolution and frame rate automatically for you. The selection is based on the
“Internet speed” value. This is the recommended default setting.
4. Resolution - There are three choices: 160x120, 320x240 and 640x480. If you decide to
choose the value manually, you can choose one of the three values. But, please be
noticed that if the Internet speed is slow (low value), high resolution (640x480) or frame
rate could cause very bad video quality.
5. Frame rate - The video frame display rate. Higher value means faster movement and
continuity in the video display.
6. Favor/Preference - Choose between “Video motion” and “Image quality”. When the real
bandwidth is not enough for the selected “Internet speed”, the system will need to
degrade the video motion or image quality. This selection will decide if the user want to
maintain the “Video motion” or “Image quality” when the internet speed is not good
enough.
7. Brightness - The brightness of the video, lower value means darker display.
8. Sharpness - The sharpness of the video, higher value means sharper video.
9. Low light sensitivity - The low light sensitivity could be normal, high or very high. When
the low light sensitivity is high, the system could see better video clearance under low
light situation, but the moving object will not be very clear under this low light
environment. Under very dark environment, set to “very high” will get better video
23
Page 24
clearance. The default value of this setting is “high”.
10. Video color - Choose between “colored” and “black&white”.
11. Outdoor/Indoor video - For better video display quality, modify this setting when taking
indoor or outdoor video. The default setting is “Outdoor video”, in most cases, this is
also ok for indoor usage. Under some special cases, there could be some strip lines on
the video display when the IP camera is taking indoor video. In this situation, change the
setting to “Indoor video” will solve the problem. Please also be noticed that in “Indoor
video” setting, the video display of outdoor view is very vague. For indoor usage, if there
is strong sun light into the room, please select the “Indoor+sun light” choice.
12. Enable/disable time display on video - If enabled, the date/time of the system will be
displayed on the left-upper corner of the video.
When this modification is “Save&Apply”, it works immediately, but all the connected
video viewing users will be disconnected.
24
Page 25
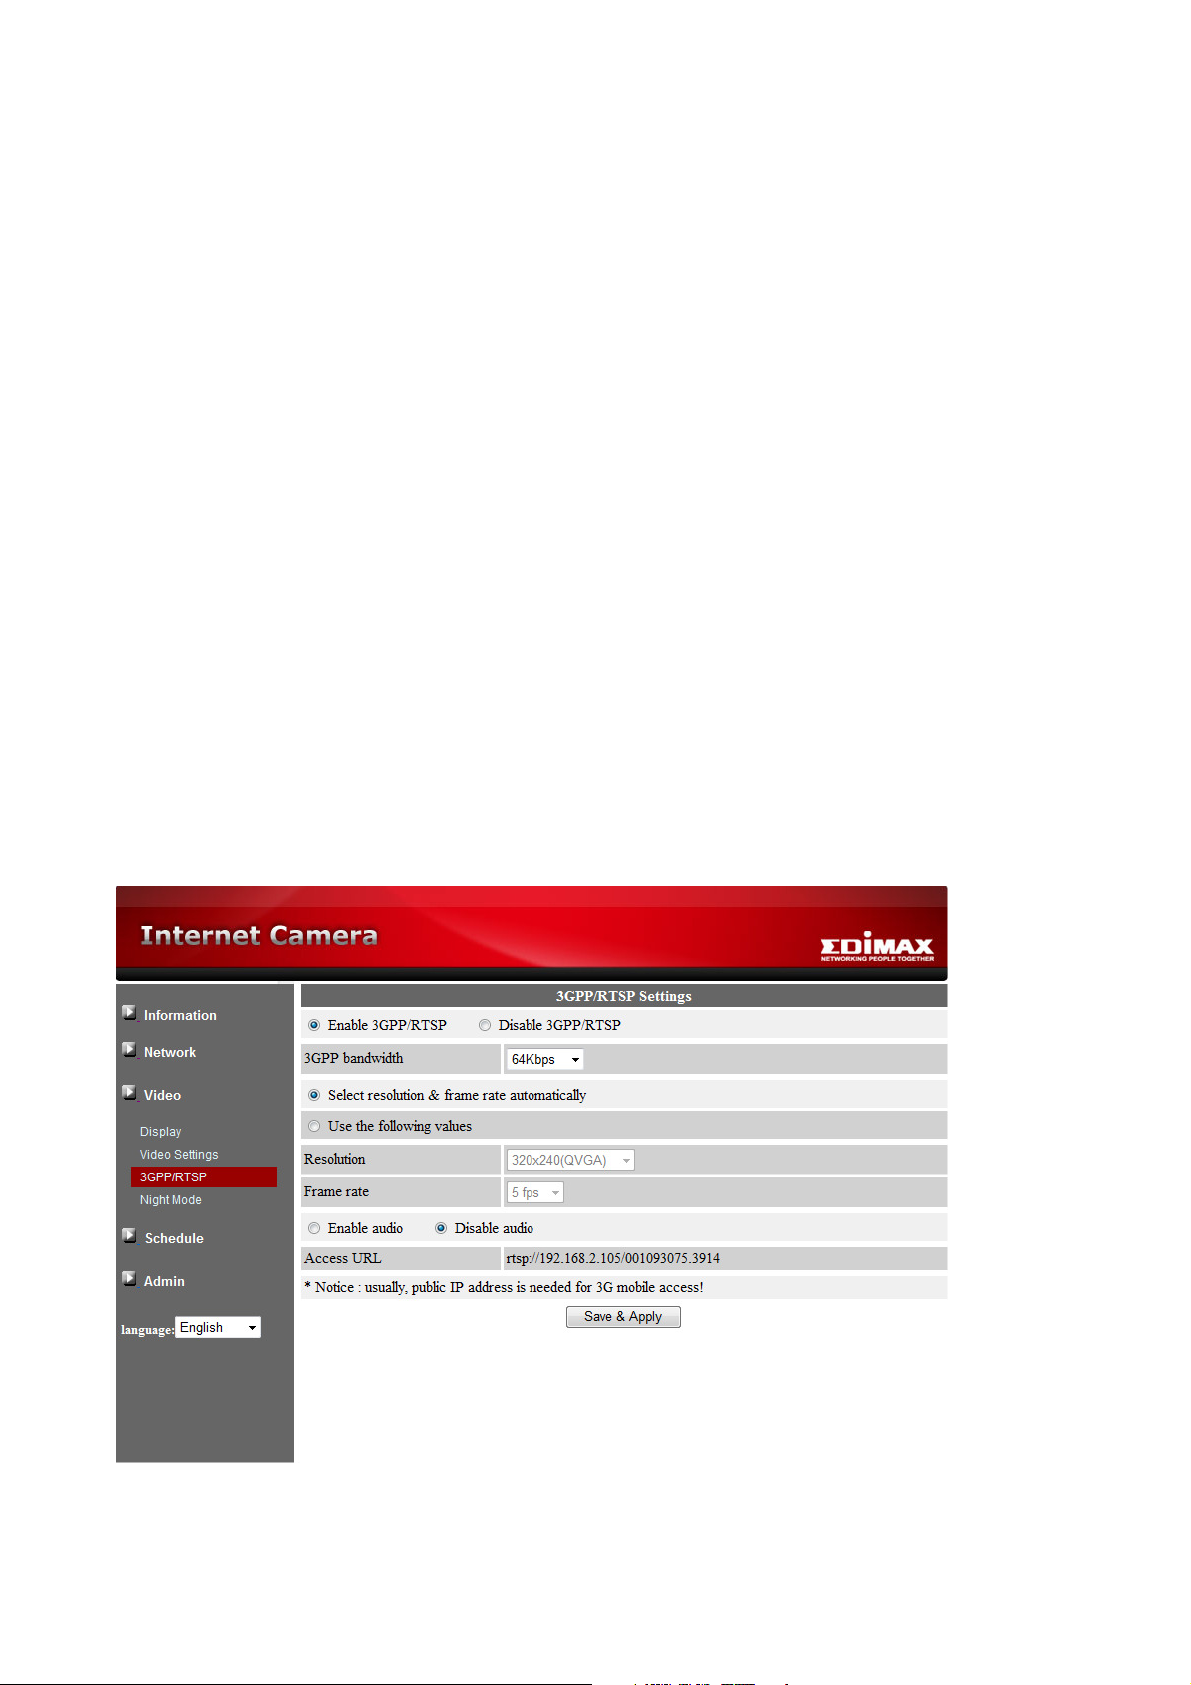
3-6 3GPP/RTSP Settings
The IP CAM is able to be viewed from a 3G mobile phone, for detailed settings on the 3G
mobile phone, please refer to Appendix F.
Users can disable the 3G mobile access ability in this page. After the 3GPP/RTSP feature
is disabled, no 3G mobile phone is allowed to access the video of the IP camera. When this
is disabled, the rtsp stream with MPEG2 audio is still working, please refer to Appendix F
for more details about rtsp stream with MPEG2 audio.
When the 3GPP is enabled, the video frame rate, resolution and bandwidth for 3G mobile
access could be set independently from the video settings for CamView(PC) access. The
maximum allowed resolution is 352x255 and maximum allowed bandwidth is 256 kbps.
The “Access URL” line is the url address for 3G mobile phone to input for seeing the video
of the IP camera. Different 3G mobile may need to input this url in different way, detailed
information could be found in the user manual of different 3G mobiles. Please be noticed
that usually public IP address is needed for the IP camera, so that the 3G mobile could
access the IP camera’s video.
The default setting is “Enable 3GPP/RTSP”.
25
Page 26
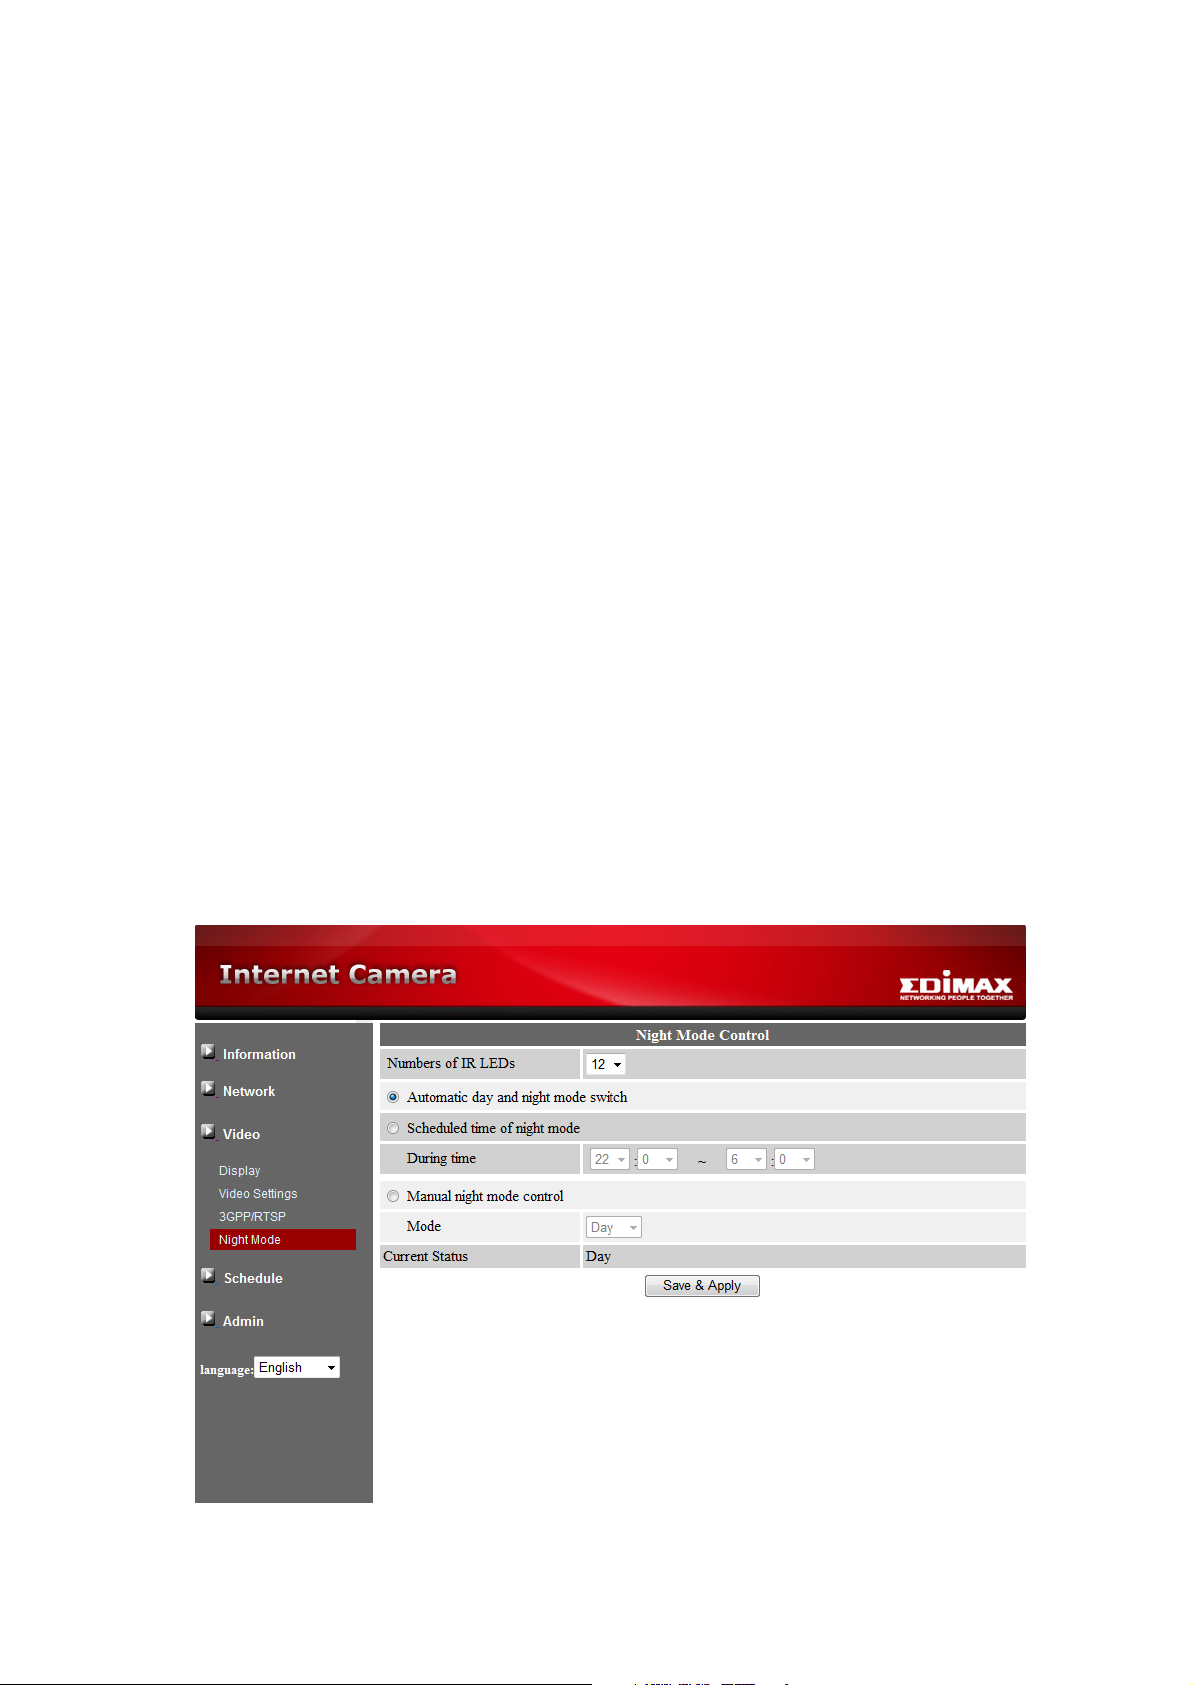
3-7 Night Mode Control
The IP Cam is able to work both in day time and night time. There are some IR LEDs that
can let the IP camera see the objects in the night time. Users can adjust the numbers of the
IR LEDs according to the view sight distance during night mode to get the best night mode
vision. The night mode status is also displayed.
This night mode control page is to control when the time the IR LEDs will be on. There are
three ways to control the night mode ( IR LEDs ) :
1. Automatic day and night mode switch: the IP cam will automatically turn on the IR LEDs
when the night time is arrived or the environment is becoming dark. There is a light
sensor on the IP cam that is doing this light detection.
2. Scheduled time of night mode: the IP Cam can also be scheduled to turn on the IR
LEDs in a time range of each day.
3. Manual night mode control: the IP Cam can be manually forced to night mode( IR LEDs
on ) or day mode( IR LEDs off ).
In order to get better video color display during day time and night time, there is an ICR(IR
Cutter Remover) in the IP Cam. This ICR will be controlled automatically to filter out the
IR(Infrared) light during the day time and allow the IR light to pass during the night time.
This make sure the video color quality is excellent compared to other IP camera.
26
Page 27

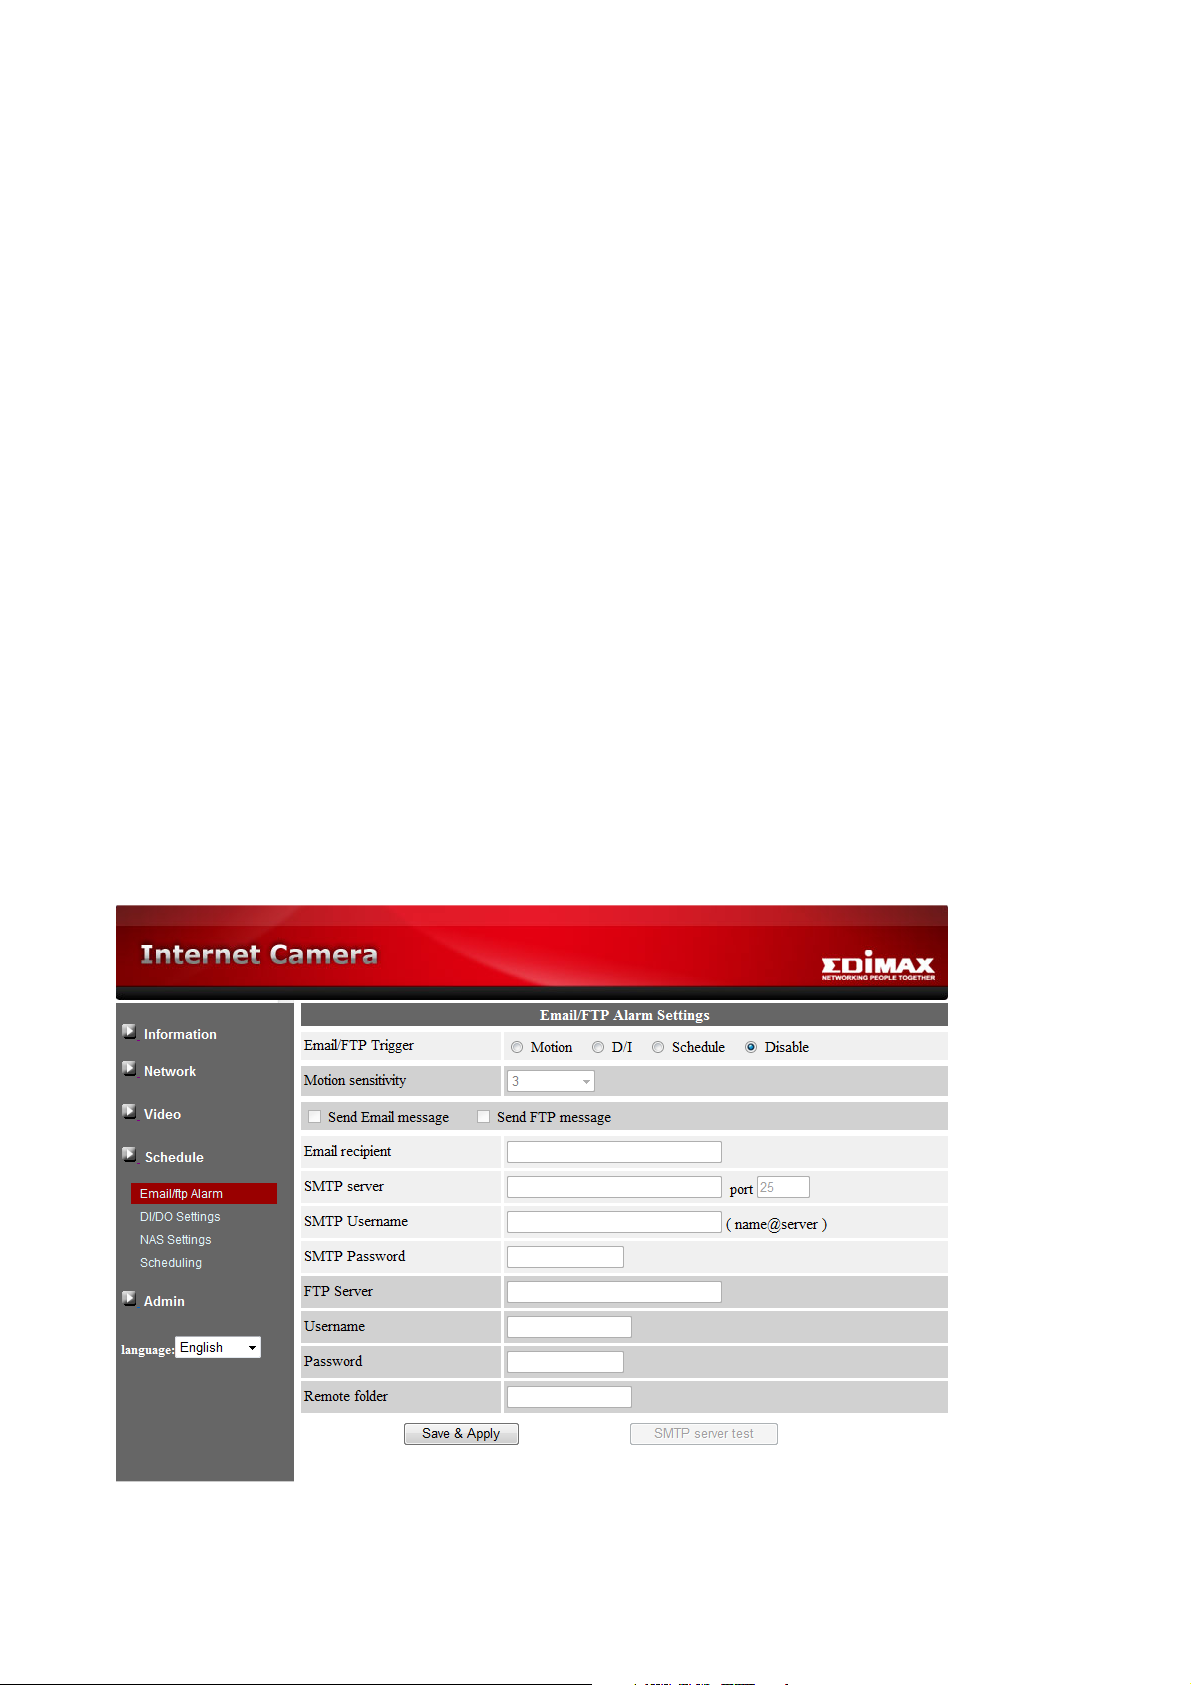
3-8 Email/FTP Alarm
The IP CAM provides the Email/ftp function, you can enable or schedule the Email/ftp
ability in this page, the IP CAM will then send out an email with a jpeg picture attached in
the email and/or send out the jpeg picture file to a ftp server. The related settings are
explained below:
1. Email/FTP trigger – choose between “motion”, “D/I”, “schedule” and “disable”
A. If “motion” is selected, it means that when there is a motion detected, the system
will send out the email and/or ftp with the captured video snapshot.
B. If “D/I” is selected, it means that when there is a Digital input alarm detected, the
system will send out the email and/or ftp with the captured video snapshot. If the
D/I alarm is constantly on, the IP camera will keep sending out email/ftp message
every second for up to 30 seconds.
C. If “schedule” is selected, it means that the email/ftp alarm detection and triggering
will be scheduled by the “scheduling” in section 3.9.
D. “disable” will disable the email/ftp alarm.
2. Motion sensitivity – there are three possible choices in this field.
“High” means high sensitivity, i.e., the detection is triggered by a very small movement
in the video image. If “High” is selected and the size of the moving object is larger than
about 1% of the whole video area, it is detected. Please be noticed that the real size of
the object could be large or small, anyway, the detection is only based on the relative
size of the object. Probably a small pencil moving near the IP CAM could be detected,
but a moving car far away from the IP CAM could not be detected.
“Low” means low sensitivity, i.e., the detection is triggered by a very large movement. If
the size of the moving object is larger than about 10% of the whole video area, it is
detected. “Median” means 3% to trigger the detection.
3. Send email message – if this item is enabled, the IP CAM will send out an email
message with the jpeg picture attached to the specified email account.
4. Email recipient – this is the email address to receive the detection notice message. An
email message with the jpeg picture file named by the date/time of the triggered
moment will reach this address.
5. SMTP server – this is the SMTP server that will help to transfer the email message. This
server is irrelevant to the “Email recipient” address.
6. SMTP username/password – this is the account to use the SMTP server to transfer the
27
Page 28
email message. The SMTP server and username/password account are only for
transfer the email message to the “Email recipient”, the “Email recipient” could be on
another email server or any reachable email address. The username and password
fields could be left empty if no authentication is needed for the SMTP server.
7. SMTP server test – after the settings are filled, you could press “SMTP server test” to
check if all the settings are correct.
8. Send FTP message – if this item is enabled, the IP CAM will send out a jpeg picture file
to the specified ftp account.
9. FTP server – this is the FTP server address to receive the jpeg file.
10. FTP username/password – this is the username/password to login into the FTP server,
so, this triggered jpeg file will be allowed to reach this FTP server.
11. Remote folder – the jpeg file will be put under this folder of the FTP server.
When this modification is “Save&Apply”ed, it works immediately, but all the connected
video viewing users will be disconnected.
The default setting is “Disable”.
28
Page 29

3-9 DI/DO Settings
The IP camera provides DI alarm detection function. The related settings are explained
below:
1. Digital input – can select the normal status of the digital input as either open circuit or
closed circuit. The current status is also displayed. An active status could trigger the
email/ftp or the NAS/SD card recording by setting the scheduling.
29
Page 30

3-10 NAS Settings
The IP Camera provides the recording of the video files into a standard NAS (Network
Access Storage) device. The IP camera connects to the NAS device using the standard
LMX_NS/CIFS/SSN protocols that are the same as the Microsoft Windows network
neighborhood protocols. This makes the IP camera easily record the video files to some of
the standard NAS devices* in the market. Since there are a lot of different choices,
including prices and scales, users can decide by themselves which is best for their needs.
By using this function, the standard NAS device is becoming a NVR (Network Video
Recorder) device.
Notice: when the IP camera is doing NAS recording, this is counted as one video user.
Please refer to appendix B about allowed maximum video users.
Notice: *For the NAS compatible list, please check www.edimax.com
1. If the “Always Recording” is selected, the system will start to record to the NAS storage
device immediately and keep recording always. If the “Schedule Recording” is selected,
the system will do the NAS recording according to the “scheduling” in section 3-11.
“Disable Recording” will disable this NAS recording.
2. When doing the NAS recording, the system will check the free disk space of the NAS
device. If the free disk space is less than the specified number, the system will do
“Circular recording” (overwrite the oldest recorded files of this ip camera in the NAS
device) or “Stop recording” as selected. If the “keep recorded video for xx days” is
selected, the system will do circular recording and over write the recorded video files
older than xx days ago.
3.
The IP camera can connect to the NAS device by using the “NAS name” or “NAS IP
address”. If the NAS device and the IP camera are in the same local area network, the
IP camera can automatically locate and connect to the NAS device by the “NAS name”.
If the NAS device uses a fixed IP address (either in the local area network or in the
public internet), the IP camera can connect to it by the “NAS IP address”
.
4.
The “Shared folder name” is the folder in the NAS device that will record the video files
of the IP camera.
5. The “NAS access account” and “NAS access password” are the username and
password to login into the specified “Shared folder name” of the NAS device.
30
Page 31

In the Microsoft Windows environment, you can access to the NAS device by keying the
URL address \\”NAS name”\”shared folder name” or \\”NAS IP address”\”shared folder
name” in the windows Internet Explorer, and then key in the “NAS access account” and
“NAS access password” to the prompted login window. The video files are recorded under
the subfolder IPCamRecordFiles/Recording/ID-ID, where ID is the ID of this IP camera. All
the recorded files are with the name of hhmmss.crf format, where hh is the hour, mm is the
minute, ss is the second of the starting time of the recording video. The files are segmented
every five minutes. Users can use the free bundled CamPlay software to play back the
video files.
31
Page 32

3-11 Scheduling
The IP Camera provides the scheduling function for the motion detection triggered email/ftp
sending and/or the NAS recording with the individual parameters set in the . “Email/ftp
alarm” settings and the “NAS settings” page. Totally 12 schedule list items are allowed.
There is no conflict check for the scheduling, it means that the scheduling time could be
overlapped, and the IP camera will do all the scheduled events during the overlapped time
period. For the scheduling of the Email/ftp sending and/or NAS recording, the “Schedule”
option must enabled in the “Email/ftp alarm” settings and/or the “NAS settings”.
1. Schedule list – all the scheduling are listed in this area. Each listed item can be modified
or deleted by pressing the “Edit” or “Delete” button.
2. Email/ftp Alarm – for each scheduling, if this is selected and the “Motion triggered”
and/or “D/I triggered” is enabled, the IP camera will trigger the email/ftp sending in the
scheduled time period when the video motion is detected and/or digital input alarm is
detected.
3. NAS Record – for each scheduling, if this is selected, either “Continuous” or “Motion
triggered” or “D/I triggered” could be enabled. For “Continuous”, it means that the IP
camera will do the video recording to the NAS device during the whole scheduled period.
For “Motion triggered” and/or “D/I triggered”, it means that the IP camera will do the
video recording to the NAS device for 30 seconds during the scheduled period each
time when the video motion is detected and/or digital input alarm is detected.
4. For the scheduling period, can choose between “Every week”, “Every day” or “Fixed
time” :
A. For “Every week”, can choose week days of the week and set the time duration of
each day.
B. For “Every day”, can set the time duration of every day for the scheduling.
C. For “Fixed time”, can set the starting date/time and the end date/time of the
scheduling period.
32
Page 33

33
Page 34

3-12 Date/Time
The IP CAM can synchronize the date/time with the universally available time server (for
example stdtime.gov.tw) through NTP protocol. The date/time will then be corrected with
the time server anytime when the Internet is connected.
Users can choose the different TimeZone of their areas to display the correct time. For
some TimeZone areas, the “Daylight Saving Time” could be enabled or disabled. When the
“Daylight Saving Time” is enabled, the start and stop time of the Daylight Saving Time could
be edited.
34
Page 35

3-13 Admin
In this page, you can modify the web login account. With this account, you can login to the
IP CAM and do any modifications. The default account is “admin” without password. If the
login account is forgotten, you can reset the IP CAM to the factory default settings by
following the steps in section 3-17 and login with the “admin” account.
Please be noticed that this account is different from the video play password in the “Video
settings” page.
35
Page 36

3-14 Upgrade
If there is some new firmware available for this IP CAM, you can upgrade the firmware via
this page. A status message about the percentage done in the upgrade procedure is
displayed. Please be noticed that during the upgrade procedure, do not power off the IP
CAM, otherwise, the IP CAM could probably enter into the safe mode (section 3-16). After
the upgrade procedure is finished, the system will restart automatically.
During this upgrade procedure, do not try to modify other settings or view the video.
36
Page 37

37
Page 38

3-15 Reboot
You can restart the IP CAM manually on this page. All the connected video viewing users
will be disconnected.
38
Page 39

3-16 Safe Mode
If by some abnormal operation, for example, powered off during the critical point of the
upgrade procedure, the IP CAM will enter into the safe mode. In this mode, you will see the
following “Safe mode” page when login into this IP CAM. Please do the upgrade operation
immediately to recover the system. On this safe mode, the IP CAM cannot display the video
on the CamView software, but you can still find this IP CAM on the “Auto search” list.
The steps to recover from “safe mode” are the following:
1. Use CamView to locate the IP CAM by clicking the “Auto Search” item on the CamView
software.
2. Login into the web configuration page of the IP CAM.
3. Upgrade the firmware from the “Upgrade” page.
39
Page 40

3-17 Set to Factory Default
For some reason, for example you forgot the web login password, you may want to set the
IP CAM to the factory default settings. The only thing you need to do is pressing the “reset”
button on the cable for more than 4 seconds and release it, do this when the IP CAM is
powered on. The IP CAM will reset to the factory default settings and restart automatically.
The web login account will be “admin” (no password), the play-video password will be
“ipcam” after reset to factory default.
40
Page 41

Chapter IV Start Using CamView
4-1 Install CamView Program
1. Please close other windows applications before proceeding.
2. Insert the installation CD into your CD-ROM drive and find the
CamViewInstaller.exe. Double click it to start the installation process and you will see
the “Welcome” window. Click
3. If you are uncertain if the Framework 2.0 is already installed on your PC, please
check .NET Framework 2.0. Click to proceed installation.
41
Page 42

4. Click
to proceed
lick
to proceed.
5. Make a selection and c
to proceed.
6. Click
42
Page 43

7. Click to exit. CamView installation now is completed.
43
Page 44

4-2 Startup and the Layout of CamView
Video Information
Time
Information
Recording
Display Area 1
Display Area 2
Display Area 4
Snapshot
Camera Name
Auto Search List
Recording
4-2-1 Startup CamView
You can startup CamView from either Start Programs CamView or the shortcut of
CamView on the windows desktop.
4-2-2 Layout of CamView
Camera List
Software Version
Cam Status Indicator
Disk space information for recording
Close Camview
Minimize
Display Area 3
Setting
CamPlay
Schedule
Speed dome Control Panel
Speaker
Display modes
All Function Language
44
Page 45

4-2-3 Display Mode
CamView supports 10 display modes. By pressing each mode, you can have a different live
view display.
45
Page 46

4-3 Managing CamView Camera IP cameras
choose New Camera
Right click the “Camera List” .You can add a new IP cam, create a new folder, rename the
IP cam or the folder, and delete any IP cams or any folder.
Right Click “Camera List”, and
46
Page 47

4-3-1 New Camera
Users can add a new camera to the list by entering IP cam ID and password. Users can
also name the IP cam.
Enter Name & ID &Password and Click
ok
The Camera named “Test” will show
under “Camera List”
47
Page 48

4-3-2 New Folder
Name the new f
older
Users can group IP cams by creating a new folder.
Right click on the “Camera List”. Click
“New Folder”
48
Page 49

4-3-3 Rename
You can rename the folder.
New folder shows up after
you create it
Rename folder
49
Page 50

4-3-4 Delete
You can delete the folder.
4-3-5 Refresh Status
You can click Refresh Status to update the latest connection status of cameras
50
Page 51

4-3-6 Camera Adjustment
Function List
Camera
By right clicking on a green light status IP cam, you can access the video display, do ID and
password settings, adjust video settings, upgrade firmware, and delete from the list.
Right click Green status
Note: Camera status must be green in order to access function list.
51
Page 52

4-3-7 Play on Selected Window
Click it
Video shows up
here
OK to activate new setting.
4-3-8 ID / Password Settings
Edit Camera Name, ID, and Password. Click
52
Page 53

4-3-9 Video Settings
All the settings are categorized
according to its function.
Click Update for the
changes to take effect.
53
Page 54

4-3-9-1 Quality Function Tab
Bandwidth
Available selections are from 64K to 1.5M. Appropriate bandwidth setting must match the
camera physical site internet uploading bandwidth. Higher bandwidth contributes better
picture quality.
Video Setting
If you check the box of select the best resolution and frame rate automatically, the camera
will automatically adjust the most suitable video setting in Resolution and Frame Rate
Resolution: higher resolution you set, bigger image you get.
Frame rate: Frame per second (1 to 30fps), higher frame rate you set, smoother motion you
get.
Preference
By selecting Image Quality, the camera automatically adjusts itself for image quality as
priority in case of interference with the network environment. Vice versa, by selecting the
Video Motion, the camera automatically adjusts itself for video motion.
4-3-9-2 Video Function Tab
Video Color
User can set the video as colored image or black and white image.
Brightness
Control the brightness of the camera video from 1(dark) ~ 10(Bright) level
Sharpness
Control the level of sharpness and clearness of the image
Low Light Sensitivity
The level of the camera senses the low light condition.
Place
You can choose the camera installation environment in order to make camera automatically
adjust for the best image quality.
OSD
On Screen Display. Enabling this function will make the camera embed the time information
into the picture.
Microphone
54
Page 55

Disable or enable the microphone. When you enable the Mic., the user who monitors the
image can hear the sounds.
Video Flip
This function is only available for the Pan Tilt type of camera to flip the image.
55
Page 56

4-3-9-3 Control Function Tab
Check the box to allow user remotely controls the motors for Pan and Tilt. (Only available
for the Pan/Tilt type of camera)
Status of LED Control
User can control the behavior of the status LED.
Motion Detection Sensitivity
The level of how sensitive the camera is in terms of the motion detection.
4-3-9-4 Camera Info Tab
Show the IP camera information and firmware version.
56
Page 57

4-3-10 3GPP Setting
To allow 3GPP connections from mobile phones, user has to enable it.
Bandwidth
The bandwidth setting for 3GPP connection from 32k to 256K.
Video Setting
Check the box to make the camera determine the best combination of the resolution and
frame rate according to the given bandwidth.
Microphone
Allow user to hear sounds on the 3GPP Device
57
Page 58

4-3-11 Firmware Upgrade
The firmware upgrade function is designed for trouble shooting and technical assistance
remotely. For firmware upgrade locally, please refer to 3-14
4-3-12 Delete Camera
58
Page 59

4-4 Displayed Video Control
make it full screen display
Use mouse to select displayed window. Right click to see various functions
Double click information bar to make it
full window display
Snapshot button
Press it to snapshot
Record Status Light
Black: Non recording
Red: Continuous recording
Green: MD recording
Double click displayed video to
Full Window: Choose it to display video in full window. Users can also double click the
information bar to display in full window. Double click the displayed video to make full
screen display. One more double click changes back to normal window display mode.
Auto Reconnect: Checking “Auto reconnect” option reconnects the video session
automatically if the session is closed by the IP Camera, for example, the settings of the IP
Cam has been changed or the Internet connection of the IP Cam has lost.
Stop: Click to stop video displaying.
Pause: Click to pause video displaying.
Motion Recording: Click to enable motion detection recording. When motion detection
recording is activated, recording status turns to Green.
59
Page 60

Recording status turns into green
Click to
take
snapshot.
Properties: Show current IP cam’s frame rate, consuming bandwidth, and camera physical
site time.
Snapshot & Continuous Recording
Click to do continuous recording.
Status light becomes red.
60
Page 61

Swap Function: This function is available only in 6, 13, 21 window display modes. Press
swap button to move the minor window video to/from main window.
Press Swap button to move
minor window display video to
or from main window display
video.
Auto Search: Auto search is a function that searches for all IP Cameras on your LAN
(Local Area Network). At the very beginning of CamView startups, CamView automatically
does the auto search.
To do auto search manually, double click on the “Auto Search” folder. CamView searches
all available IP cams in the LAN and lists all IDs under the folder. Right click on the find
Cam ID and select “Web Configuration” to access the IP cam’s web page for configuration.
Move the mouse cursor over the Cam ID under Auto Search, you can see the IP address of
that Camera.
61
Page 62

Green icon: means this IP Cam is online
Red icon: means this IP Cam is offline.
router or firewall.
Auto Search List: List all the
found Cam IDs within this LAN.
Web configure: Click to open I.E.
browser for further configuring
this IP Cam.
Move your mouse over Cam
ID 001006123 to see its IP
address.
IP Cam Online Status Indication:
There is an IP Cam icon in front of the Camera Name which indicates the online status of
that IP Camera.
RED IP cam is off line, not connecting to internet.
GREEN IP is on connected to internet.
YELLOW IP is on line but the connection is not good because either side
might be behind a router which has strict rules for access.
Note: The IP Cam online status refresh takes place in the beginning of CamView startup.
To refresh all cameras’ status manually, right click on the Camera List and select “Refresh
status”.
Yellow icon: means this IP Cam is online.
However, the connection between IP Cam and
CamView is bad due to the strict rules of the
Note: The green icon indicates the IP Cam is online and responding, but not guarantees
that the video session can be established 100%. Unfavorable Firewall setting may block the
video.
Pan/Tilt Panel Function:
Connect to Pan Tilt Dome Camera and drag to any channel in the software, the Pan Tilt
62
Page 63

Panel will be activated as below:
Moving s
peed
Go to the preset point
Pan Scan: make the Pan Tilt Dome move left and right
Tilt Scan: make the Pan Tilt dome up and down
Speed: the speed of Pan Tilt Dome has 3 level of speed (3 is the fastest, 1 is the slowest)
: Move Up
: Move Down
: Move Right
: Move Left
: Move back to home
Patrol: User can have 1 set of Patrol and 5 points for each Patrol. To set each point for the
patrol, User can use the direction arrow in blue to set each point the user want to stop in a
patrol. After set each point, click “set” to save each point
Set the preset point.
How long the camera stays for each preset
point during patrol.
Motor control panel
63
Page 64

Preset: This function will be activated after any PTZ Dome connect with video server
Zoom in & out: This function will be activated after any analog PTZ Dome Camera connect
to IP video server
64
Page 65

4-5 Camview Software Functions
Where to save the recording files.
the
path
Recording options
Click
to save the setting
Where to save the snapshot files.
CamView Function Bar.
4-5-1 Setting
Click Setting and get into the Setting Function menu
.
Directories Settings: to set the directory path for the Recording and Snapshot
Click to open the
recording folder.
Click to change
Available disk space of
current selected hard
drive.
65
Page 66

Startup Options: Determine the camera state at startup
Automatically start CamView when Windows starts: When Microsoft Windows starts,
CamView will start running automatically.
Restore the last time playing/running state: Restore the state of each video window to what
it was before CamView closed.
Click to save the setting
66
Page 67

4-5-2 CamPlay
Click CamPlay to start it for playback.
4-5-3 Scheduling
Click Scheduling to configure scheduled recording/playing.
Schedule the time for each channel to be used and recorded by certain camera
Camera: The information of the camera to be connected. You can either double click on
one of the listed cameras or drag the camera off the Camera field to import the settings. Of
course, manually key in the Name, CamID and password is fine as well.
Mode: There are 3 modes available to choose from:
1. Play Only: Live view only, no recording.
2. Continuous recording: Keep recording 24/7 in between the date you set for start and stop
3. Periodic recording: Recording the period of time in a day you set.
67
Page 68

Continuous Recording:
The start/end time (for play only/continuous recording mode)
current window number.
Window number.
Enter the
information of the
camera to be
connected.
Enable/disable the scheduling for
The schedule mode
68
Page 69

Periodic Recording:
(
Periodic
recording)
The period of time for this schedule to be valid
The schedule mode
Arrange the days of week for
camera to record
Determine the priority between “current
camera” and “scheduled camera”
Recording/Playing Conflict: When the schedule time is reached, the program needs to
determine either to run the scheduled camera or keep the currently used camera for this
window. Choosing “Record as scheduled”, CamView connects to the scheduled camera.
Choosing “Give up the scheduled recording”, CamView ignores the scheduled event and
keeps the current connected video session.
69
Page 70

4-5-4 Language
Click Language button to change the language settings.
Right now, CamView supports 19 languages shown as following picture:
4-5-5 All Functions
Any of following functions applies to all the channels in current layout only
Record all: start/enable recording.
Snapshot all: Take snapshot.
Play all: Start playing.
Pause all: Pause.
Disconnect all: Stop playing.
70
Page 71

4-6 Uninstall CamView
There are two ways to invoke the CamView uninstaller.
1. Uninstall from the start menu
Start CamView Uninstall CamView
2. Uninstall from the control panel
Start Settings Control Panel Add or Remove Programs
Select CamView program and click “Change/Remove”
71
Page 72

Chapter V Start Using CamPlay
There are two ways to start CamPlay for playback the recorded files or view the snapshot
files. One way is clicking the CamPlay button on the tool bar of CamView.
Another is double click on the Camplay shortcut on your Windows desktop.
Click the CamPlay
button.
72
Page 73

5-1 CamPlay File Tree
Time: hh/mm/ss
Recorded videos and snapshots are separated as shown:
Name / ID
of cameras
Date: yyyy/MM/dd
The folder structure is:
Camera (Name-ID)
-- Date
-- File (time)
73
Page 74

5-2 CamPlay Functions
Refresh file tree
Directory Language
Refresh File Tree:
Click it to refresh the file trees especially after CamView is done with recording or snapshot.
Directory:
Click to get into the directory settins dialog for recording and snapshot. Click to change
the settings.
Note: To correctly find the video files and snapshots which were recorded and taken by
CamView, we strongly suggest configuring the directories of the recorded files and
snapshot files of CamPlay to what you have configured in CamView.
74
Page 75

5-3 Language
Right now, CamPlay supports 18 languages as following: English, Chinese, Japanese,
French, Germany, Italian, Spanish, Hungarian, Turkish, Czech, Hebrew, Indian, and
Finnish.
5-4 Headline Explanation
CamPlay Version
HDD available space
Minimize CamPlay Exit CamPlay
75
Page 76

5-5 Convert to “AVI”
Transcoding to avi format is supported. Simply right click on the file you want to transcode
and select “Covnert to .avi”. Wait for a while and the transcoded file will be saved in the
same folder with the original file. Select “Open folder” to browse all the files recorded in the
same day from the same camera.
76
Page 77

5-6 Playback Function Bar
Play
Stop
To playback the recorded file, you can either double click on it or drag it to the video window
directly. To view the snapshot file, simply double click on it and the snapshot will be opened
by the default viewer of your computer.
Drag time bar to select target playback video time
Pause / Resume
Take Snapshot Slow Forward Zoom In / Out
Mute / Un-Mute Fast Forward
5-6-1 Snapshot
The snapshots you taken within CamPlay are saved in
SNAPSHOT_DIRECTORY\CamPlay\date\.
5-6-2 Zoom In and Zoom Out
The maximum resolution you can zoom in to is 640x480 and the minimum resolution you
can zoom out to is the original resolution of the video file. To zoom in, click . Click
to zoom out and click to see the original resolution of the video file.
As mentioned earlier, snapshot is displayed by the default viewer of your computer. This
gives you the ability to playback the recorded video file and view the snapshot at the same
time.
77
Page 78

Chapter VI Start Surveillance Software
If you have IC-9000 as well as other Edimax IP cameras, you are suggested to install
surveillance software for viewing all IP cameras you own.
6-1 Installing IP Camera Surveillance Software
The IP camera surveillance software provides various functions like video recording, after
this software is installed, you can use your IP camera to safeguard your property. Please
follow the following instructions to install the surveillance software.
1. Double click the setup file located in ‘xxx’ folder in supplied CD-ROM, when the following
window appears, click ‘Next’.
2. You can specify the destination folder of software installation; you can just use the default
folder, and click ‘Next’ to continue.
78
Page 79

79
Page 80

3. If you need installation program to create a desktop icon or a quick launch icon for you,
click all items you need here, then click ‘Next’ to continue.
4. Here lists all options you chose in previous steps, if everything’s correct, click ‘Install’ to
start installing procedure, or click ‘Back’ to go back to previous step to modify installing
settings.
80
Page 81

5. The installing procedure will take some time, please be patient.
6. When you see this window, it means the software installing procedure is complete.
Please click ‘Finish’ to finish the procedure (IP camera surveillance software will start after
you click ‘Finish’ button, if you want to start it later, uncheck ‘Launch IPCam Surveillance
Software’ box).
81
Page 82

6-2 Using IP camera Surveillance Software
You can click ‘IPCam Surveillance Software’ icon from desktop, quick launch bar, or start
menu to start the IP camera surveillance software.
Before you start:
IP camera surveillance software will only work when your monitor’s
resolution is ‘1024 x 768’. Please change the resolution before you
use IP camera surveillance software, or it won’t start.
Here are descriptions for all components of IP camera surveillance software:
Close window (stop
surveillance) /
Minimize window
Video displaying area
Message
display
Language
Display
layout
Full screen /
Scan
Zoom Out /
Zoom In
PTZ Control /
Home
Recording / System
configure
Playback / Snap
82
Page 83

You can put the mouse cursor on a certain component and see its button name, and here’re
detailed descriptions of all buttons:
Item
The image of all connected cameras will be displayed here.
a language from this dropdown menu to change display
language.
Change camera image display layout (Click a layout icon to
change camera display layout). There are 8 kinds of available
display layouts.
Click this button to s
camera’s image), press ‘ESC’ key to quit full screen mode.
Click this button and the IP camera surveillance software will
switch displaying the image of all connected camera
automatically. Click this butt
(scan icon will become blue
(scan icon will become white
out (To see more objects).
This function is only available for supported cameras.
in (Too see
This function is only available for supported cameras.
There are 8 directions in PTZ control ring. If the camera you
connect support PTZ, you can use PTZ control ring to change the
direction that camera points
This function is only available for supported cameras.
Click this button to return the camera to ‘Home’ (default) position.
This function is only available for supported cameras.
Start video recording.
Software /
Playback a recorded video file.
Take a snapshot of current camera.
Displays all system messages like camera is disconnected etc.
Description
witch to full screen mode (only display all
on once to activate scan function
), click again to stop scanning
Video displaying
area
Language
Display layout
Full screen
Scan
Zoom out
Select
Zoom-
).
Zoom In
PTZ control
Home
Recording
Configure
Playback
Zoom-
more details).
to.
camera configuration.
Snapshot
Message display
83
Page 84

Close window
(stop surveillance)
Terminates IP camera surveillance software.
Minimize window
Video displaying
area
Minimizes IP camera surveillance software window.
Displays the image of all cameras by the display layout you
selected.
84
Page 85

6-3 Configure IP camera S
urveillance
Before you use this IP camera surveillance software, you must configure the camera(s) you
wish to connect. Please click ‘System configure’ button
Please select ‘Configure Cameras’ to configure cameras:
re prompted by a windows security alert which asks you if
IPCam Viewer
button, of IP camera surveillance software will not be able to function
and a popup menu will
Unblock
6-3-1 Configure Cameras
appear:
Note: If you’
you want to block ‘
correctly.
Software
’ program, please click ‘
’
85
Page 86

6-3-1-1 ‘Camera’ tab
Item
Description
Channel
Camera
All cameras found on your local network will be displayed in ‘Camera
a’s MAC address, you can change the name of camera so you
In this tab you can configure all cameras you wish to connect. Up to 16 cameras can be
connected simultaneously:
Here are the descriptions of all setting items:
Select the channel number you wish to set.
Search
Search’ box.
Select a camera listed in ‘Camera Search’ box, and click ‘Select’
Select
button to fill all parameters of selected camera in every camera
configuration fields.
Rescan all cameras on your local network. If you didn’t see the
Refresh
camera you expected in ‘Camera Search’ box, or new cameras has
been joined to your local network after last scan.
Input the name of camera here. Default value is the first 6 bytes of
Name*
camer
can remember the camera’s location of purpose easily.
Model
Displays the model of selected camera, this field can not be
changed.
86
Page 87

IP*
Input the IP address of camera.
Username*
Web Port*
Video
Reset
OK
Cancel
Input the user name of camera.
Input the web port of the camera. By default it’s ‘80’.
Input the password of camera. Default value is ‘1234’. You should
Password
change the password if you changed the password of selected
camera.
Select the video encoding format of this camera (MJPEG or
Format**
MPEG4).
Clear all fields in ‘Camera Configuration’ section.
Save settings in this tab.
Discard all settings in this tab.
*: It’s recommended to use ‘Select’ button to fill the content of this field.
**: Only available for cameras support this function.
After you’ve set all channels you wish to set, click ‘OK’ to save settings, and if everything’s
correct, you’ll see the camera’s image in IP camera surveillance software’s main menu:
87
Page 88

6-3-1-2 Schedule Recording
In this tab, you can setup scheduled video recording, so you can record the video captured
by all cameras you have by a pre-defined schedule.
88
Page 89

Here are the descriptions of all setting items:
Item
Description
Channel
One Time
Delete
Select the channel number you wish to set.
You can specify the one-time schedule for selected camera;
Schedules
this schedule will be executed once only.
Click this button and a new window will appear:
New
(One Time
Schedules)
Please specify the time duration of this one-time schedule (the
date and time of ‘From’ and ‘To’), then click ‘OK’ to save
settings.
Please note you must set a schedule that will be happened in
the future, you can not set a schedule in the past.
Edit
New
(Weekly
Schedules)
You can modify a scheduled recording item. Select a schedule
in ‘One Time Schedules’ list, and click ‘Edit’ button to edit the
start and end time of this schedule.
Delete a selected schedule item.
Click this button and a new window will appear:
You can define recording schedule that will be executed at the
specified time of certain weekday(s) in a week. Please check
all weekdays that applies, and set the start time in ‘From’ field.
You can set the duration of video recording in ‘Period’ field
(format is HH:MM:SS), and the end time will be calculated
automatically and displayed in ‘To’ field. You can also click ‘All
Time Record’ button to define a recording schedule that will be
executed every weekday, from 12:00:00AM to 11:59:59PM.
Click ‘OK’ to save changes.
89
Page 90

Edit
Delete
OK
Cancel
You can modify a scheduled recording item. Select a schedule
in ‘One Time Schedules’ list, and click ‘Edit’ button to edit the
start and end time of this schedule.
Delete a selected schedule item.
Save settings in this tab.
Discard all settings in this tab.
90
Page 91

6-3-1-3 Audio
Item
Description
Channel
Record Video
OK
Cancel
For cameras that support audio, you can use this tab to decide if you wish to hear the audio
captured by selected camera.
Here are the descriptions of all setting items:
Select the channel number you wish to set.
Mute Audio
Check this box and the IP camera surveillance software will not
play the audio captured by this camera.
Check this box and the IP camera surveillance software will not
Only
record the audio captured by this camera.
Save settings in this tab.
Discard all settings in this tab.
91
Page 92

6-3-1-4 Motion Record
Item
Description
Channel
Enable
Disable
Invoke alarm when
Send mail when
With this function activated, only motions captured by the camera will be recorded, so you
don’t have to waste hard disk storage space on images you don’t need to pay attention to.
WARNING: For applications that security is highly concerned, it’s not
recommended to use this function since some tiny changes you may need
to know may not be able to trigger the camera and the camera will not start
recording.
Here are the descriptions of all setting items:
Select the channel number you wish to set.
Enable motion record function.
Disable motion record function.
Recording Time
Select the time duration that camera will record when a motion
has been detected from dropdown menu in seconds.
Send an alarm when a motion has been detected by the
motion is triggered
camera.
Send an email to a pre-defined address when a motion has
motion is triggered
been detected by the camera.
92
Page 93

OK
Save settings in this tab.
Cancel
Discard all settings in this tab.
93
Page 94

6-3-2 General Settings
Item
Description
Set the directory (folder) you wish to store the recorded video and
Free Recording
You can set system-wide settings of this IP camera surveillance software in this menu.
6-3-2-1 ‘General’ tab
All general settings like file storage directory and recording spaces can be set here.
Here are the descriptions of all setting items:
Data Directory
captured image. You can click ‘Browse’ button to pick a directory
in your hard disk.
Displays remaining storage space.
Space
Max Video File
Size
Scan Time
Defines the maximum file size of every video file. When the size
of file exceeds this value, IP camera surveillance software will
open another file to record the video.
Define the time period to pause between every camera switch
when you activate ‘Scan’ function.
You can decide the behavior when hard disk space is full:
Cycle Recording
Disable: Do not overwrite recorded video files.
Enable: Overwrite recorded video files.
94
Page 95

OK
Save settings in this tab.
Cancel
Discard all settings in this tab.
95
Page 96

6-3-2-2 ‘E-Mail Setting’ tab
Item
Description
E-Mail Subject
Recipient
Delete
If you want to use motion detection function and wish to get an email that contains the
image captured by the camera, please setup your email related parameters here first.
Here are the descriptions of all setting items:
Specify the subject of sending email.
Here lists all email addresses you set.
E-Mail
Address
Click this button and you’ll be prompted to input the email address.
Click ‘OK’ to save changes.
New
Edit
Select an email address from ‘Recipient E-Mail Address’ box, and
click ‘Edit’ to edit the email address.
Delete selected email address.
96
Page 97

Sender E
-
Mail
Address
Specify the IP address or host name of the SMTP server you wish to
it’s the same with your POP3 password (the one you used to receive
OK
Cancel
SMTP Server
Specify the email address of email sender.
use. For most of ISPs they will only allow its subscriber to use their
SMTP server, if you don’t know which SMTP server you should use,
please refer to the setting of your email software or ask your ISP /
network administrator.
SMTP port
SMTP Auth
SMTP Account
SMTP
Password
Specify the port number of the SMTP server you wish to use here.
By default (and the setting of most of SMTP servers) it’s ‘25’.
Select ‘Enable’ if your SMTP server requires authentication, select
‘Disable’ if it’s not required. If you don’t know if your SMTP server
requires authentication, please refer to the setting of your email
software or ask your ISP / network administrator.
Input the SMTP account (username) of your SMTP server here. In
most cases, it’s the same with your POP3 username (the one you
used to receive email). Please refer to the setting of your email
software or ask your ISP / network administrator if you’re not sure
about this.
Input the SMTP password of your SMTP server here. In most cases,
email). Please refer to the setting of your email software or ask your
ISP / network administrator if you’re not sure about this.
Save settings in this tab.
Discard all settings in this tab.
97
Page 98

6-3-2-3 Security
Item
Description
Enable
If you don’t want other people to access this IP camera surveillance software, you can set a
password to protect it.
You’ll need to input the password every time you wish to use this IP camera surveillance
software:
To set password, please use ‘Security’ tab in ‘General Options’ menu:
Here are the descriptions of all setting items:
Requires password authentication when this software starts.
98
Page 99

Disable
Password
Confirm Password
Password authentication is not required when this software
starts.
Input the password you wish to use here.
Input the password you wish to use here again.
99
Page 100

6-3-2-4 About
This tab shows the version number of the IP camera surveillance software you’re using.
100
 Loading...