

Page 1
HHoommeePPlluugg EEtthheerrnneett BBrriiddggee
Quick Installation Guide
Version 1.0 February, 2006
Page 2

MMuullttii--LLaanngguuaaggeess QQIIGG iinn DDrriivveerr CCDD
========================================================
Anglického průvodce rychlou instalací
ý:
ČČeesskký
naleznete na přiloženém CD s ovladači
Finden Sie bitte das englische QIG
h
DDeeuuttsscch
beiliegend in der Treiber CD (German)
EEssppaaññool
FFrraannççaaiiss:
dans le CD driver
IIttaalliiaannoo:
MMaaggyyaarr::
megtalálható a mellékelt CD-n
NNeeddeerrllaanndds
de bijgesloten CD
PPoollsskki
angielskim znajduje się na załączonej płycie CD
PPoorrttuugguuêês
РРууссссккиийй::
приложеном CD
TTüürrkkççee:
Hızlı Kurulum Kılavuzu'nu bulabilirsiniz
:
:
Incluido en el CD el QIG en Ingles.
l:
Veuillez trouver l’anglais QIG ci-joint
:
Incluso nel CD il QIG in Inglese.
:
Az angol telepítési útmutató
De engelstalige QIG treft u aan op
s:
Skrócona instrukcja instalacji w języku
i:
Incluído no CD o QIG em inglês.
s:
Найдите QIG на анлийском языке на
Ürün ile beraber gelen CD içinde Türkçe
:
1
Page 3
English.
Chapter 1: Introduction
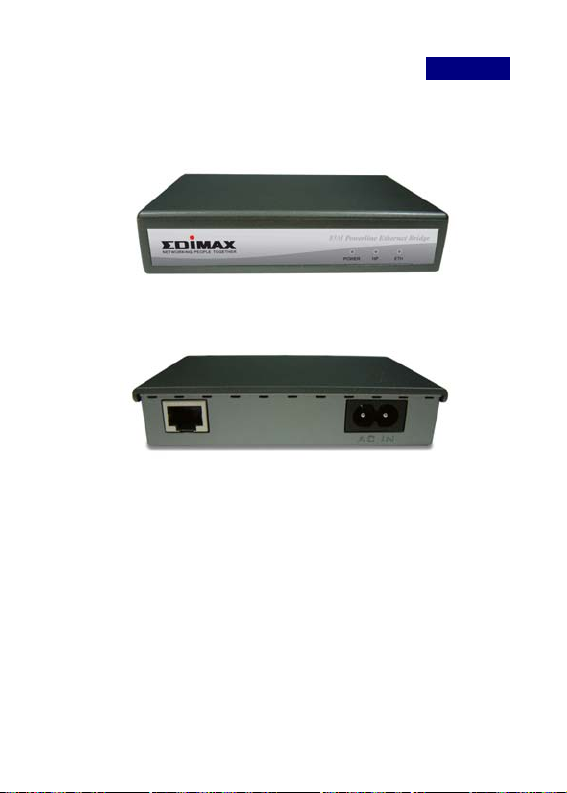
Front Panel
Back Panel
PWR: On Receive Power
Off Did not receive Power
HP: On Detect other HomePlug on the same network
Off Did not detect any HomePlug on the same network
ETH: On Detect Ethernet connection Blinking Ethernet activity
2
Page 4
Chapter 2: Installation
Overview
The installation of the HomePlug Ethernet Bridge will only take minutes.
No setting up for long wires through out the house. Just simply install the
software CD that is included in the box and after installation, physically plug
the unit into the computer and the wall outlet. Users will have options to
adjust its security functions and the platform of the network once everything
is installed properly. For further assistance, please read our Frequently
Asked Questions section.
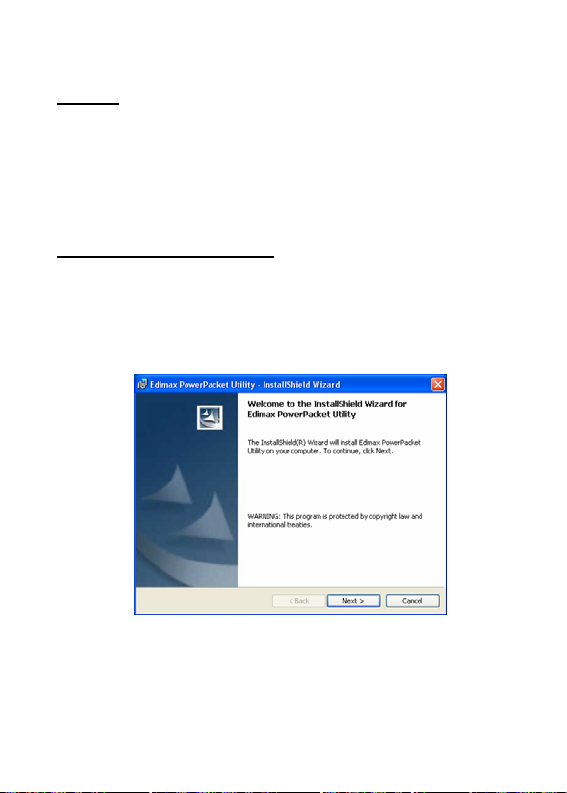
Running the InstallShield Wizard
Please insert the CD into your CD-ROM and wait a moment for the setup
screen to come up. If the CD-ROM does not auto run the CD, please click
on ‘Start’ at the bottom left of your screen (for most Microsoft Windows)
and go to ‘Run’. Type in: (CD Drive Letter):\eth\setup.exe and click ‘OK’
Once the software is loaded it will display a dialog such as is:
Please click on ‘Next’ to continue the installation.
3
Page 5

On this screen you will be asked to input the User Name and Organization.
It is not crucial to the device itself so enter as desired. The ‘Install this
application for’ will work under the circumstances which multiple logins
are applied. For example: If the user wishes only he/she can use the utility
with that particular account, then bubble in ‘Only for me’. For those
without multiple accounts or wishes to allow all users to access the utility
choose ‘Anyone who uses this computer (all users)’. When finished,
click the ‘Next’ button to continue.
4
Page 6

This section allows you to change the default directory where the program
is installed. If you don’t want to change the directory click on Next to
continue the installation process.
This section allows a user to go ‘Back’ or ‘Install’ the utility. In case if the
user wishes to change the previous options then go ahead and click on
‘Back’ to change the settings. If not, continue and click the ‘Install’ button.
This screen shows the progress of the installation.
5
Page 7

This screen shows that the installation was completed successfully. Click
on Finish to exit the wizard. Now its time to setup you hardware
connections please refer to the next diagrams.
Setup up the hardwa re
Plug your network cable into the computer’s RJ-45 network adapter port
Plug the other end of your network cable into the RJ-45 port locate at the
back of the HomePlug Ethernet Bridge
Plug your power connector of your power cable into the power connector
at the back of the HomePlug Ethernet Bridge
Plug the power plug of your power cable directly into a power outlet on
the wall
**Note: ** Do not plug the device into a UPS or power strip with surge
protection. The HomePlug Ethernet Bridge has its own power filter
for protection against surges.
6
Page 8

Chapter 3: Configuration
Overview
The HomePlug device uses 56-bit DES encryption to block outside access.
The key is set by using the HomePlug Configuration Utility on the CD. By
default, the protection is enabled. However, it is recommended that you
change the default network password. All your HomePlug devices must
use the same network password in order for the computers to be
networked. Make sure that all devices are loaded with the same network
password.
Diagnose Powerline network
Part 1: Diagnose a Local HomePlug Device
Double click the PowerPacket Utility icon on your desktop to open this
utility show in the screen below
The Main tab shows the HomePlug units that are connected to the current
computer and oter devices on the network. It will also tell Mac Address of
each device. It will let you refresh the window, if you change devices, and
also will allow you to connect to different networks if multiple units are
connected to your computer.
*Note* If the Link Quality is poor, and appears red, or the Mac Address of
any of the units connected to this computer appears to be all 0’s, then you
might have a defective unit. Please contact technical support.
7
Page 9

*Note* If you do not see ANY unit in the device status, and there is a
device connected to your computer, try to unplug all devices, and plug
them back in. Also make sure that the cable connecting your computer to
the HomePlug device is the right type and working correctly. If all of this
seems to be correct, and you still receive nothing in the Device window, try
rebooting your computer. If the problem still persists, please contact
technical support.
Part 2: Diagnose a Network HomePlug device
The Main tab shows all the other HomePlug Units on your powerline
network. It will represent them by MAC Address, and will also show the
available bandwidth to each unit (Units farther away from the current
computer might have a lower Data Rate, since the distance is farther). If
you add or subtract units from your home netw ork, you might want to reScan, by clicking the “Scan” button. This will rescan the network, and
refresh with any changes.
**Note** Onl y units with the same Network Password will be shown,
please check that first, to make sure they all have the same network
password (Case sensitive).
**Note** If a Unit shows MAC Address of all 0’s, this unit might not have a
solid connection, or might not connect at all. If this is the case please
contact technical support.
8
Page 10

**Note** If there are Units in your home, that you do not see in this Network
scan, try to unplug all devices, and plug them back in (Only do this with the
Units that you do not view in the network screen, you don’t have to do this
with all units. If the problem persists, try to move the unit closer to this
current unit (adjacent plugs on the same wall socket is most preferable). If
the problem still persists and that unit is still not shown on the network, then
the unit might be defective please contact technical support. Otherwise if
you view the unit working, distance might be the only issue.
Setting Up Security on a Local HomePlug device
The Privacy tab will allow you to change the Network Password to the
unit that is currently connected to this computer. This network password
encrypts all data that is sent from this unit using 56-bit data encryption
standard (DES). The DES Encryption is very secure, and very difficult to
crack, therefore your home network is very secure, and very difficult to
breach your home network.
**Note** Every unit on your home network MUST have the same Network
Password for connecti vity to be established throughout your home. The
default network password is “HomePlug”.
9
Page 11

Setting Up Security on a Network HomePlug device
The Privacy Tab will allow users to use one primary computer to control
the Network Password of all units on the home network.
You will have to go back to the Main Tab first then find the DEK (Device
Encryption Key) Key located on the bottom of each device. Enter this Key
into the Device Password area. Click Add. This Device Key will then
appear in the bottom window . Add all the DEK Keys for each unit in your
house. You can now go back to the Main Tab then change the password
remotely from one computer. This will allow you to change the password
from one computer, instead of changing the password indi vidually.
**Note** The DEK is unique for EACH HomePlug device. To use this
you will need to input the DEK for each unit.
10
 Loading...