


EW-7416APn v2 & EW-7415PDn
Windows Quick Installation Guide
09-2012 / v2.0
Downloaded from www.Manualslib.com manuals search engine

Getting Started
Before you start using this access point, please check if there’s anything missing in the package, and contact your dealer of purchase to claim any missing items.
Wireless access point x 1
CD (EZmax Setup Wizard, Multi-language Quick Installation Guide and User Manual) x 1
Power adapter x 1
3dBi antenna x 2
Accessory kit x 1
Quick installation guide x 1
Top Panel
LED Status
|
Item |
|
|
Color |
|
|
Status |
|
|
Description |
|
|
|
|
|
|
|
|
|
||||
|
|
|
|
|
|
On |
|
Device is powered. |
|||
|
|
|
|
|
|
|
|
|
|
|
|
|
PWR |
|
|
Green |
Flashing |
|
Device is booting |
||||
|
(Power) |
|
|
|
up/resetting. |
||||||
|
|
|
|
|
|
|
|
|
|||
|
|
|
|
|
|
Off |
|
Device is not powered. |
|||
|
|
|
|
|
|
|
|
|
|||
|
|
|
|
|
|
On |
|
WPS mode is enabled. |
|||
|
|
|
|
|
|
|
|
|
|
|
|
|
WLAN |
|
|
|
|
Flashing |
|
Data is being transmitted |
|||
|
|
|
Orange |
|
wirelessly. |
||||||
|
(Wireless LAN) |
|
|
|
|
|
|
||||
|
|
|
|
|
Off |
|
Data is not being |
||||
|
|
|
|
|
|
|
|||||
|
|
|
|
|
|
|
transmitted wirelessly. |
||||
|
|
|
|
|
|
|
|
|
|
||
|
|
|
|
|
|
|
|
|
|
|
|
|
LAN |
|
|
Green |
On |
|
Ethernet port is connected |
||||
|
|
|
|
to a valid device. |
|||||||
|
|
|
|
|
|
|
|
|
|
||
|
|
|
|
|
|
|
|
|
|
|
|
|
|
|
|
|
|
2 |
|
|
|
|
|
Downloaded from www.Manualslib.com manuals search engine

|
|
|
Flashing |
Data is being transmitted |
|
|
|
through the Ethernet cable. |
|
|
|
|
|
|
|
|
|
|
|
|
|
|
Off |
No valid connection. |
Rear Panel |
|
|||
|
(a) Antenna |
(a) Antenna |
||
|
(1 of 2) |
(2 of 2) |
||
(b) WPS/Reset |
|
|
Button |
(c) LAN Port |
(d) Power Port |
a.Antenna Connector
This is where you connect the antennas. It is a round connector (standard reverse SMA).
b.WPS/Reset Button
Press this button for less than 5 seconds to activate the WPS function. Press and hold this button for 10 seconds, until the PWR LED starts flashing, to reset the access point to factory default settings.
c.LAN Port
Connects this access point to other Ethernet devices (switches, routers or other wired network devices) – for the EW-7415PDn this is where you connect the access point to a PoE switch.
d.5V DC
This is where you connect the power adapter.
Note: If you are using the EW-7415PDn with a PoE switch, you do not need to connect the power adapter.
3
Downloaded from www.Manualslib.com manuals search engine

Installation for Windows PC
1.Connect one end of an Ethernet cable to the Ethernet port on your computer. Connect the other end to an Ethernet port on the access point.
2.Plug the power adapter into the device’s 5V power port, and plug the adapter into a wall socket. The PWR LED should light up.
3.Insert the Edimax CD into your computer’s CD drive. When the AutoPlay screen appears, select “Run Autorun.exe”.
Note: If a popup window appears asking “Do you want to allow the following program to make changes to this computer”, please click “Yes” to continue.
4. Click on “Setup Utility” in the main menu, then select “English” to continue.
5.The setup wizard will search for the access point. When it has successfully found the device, click “Next” to continue.
4
Downloaded from www.Manualslib.com manuals search engine
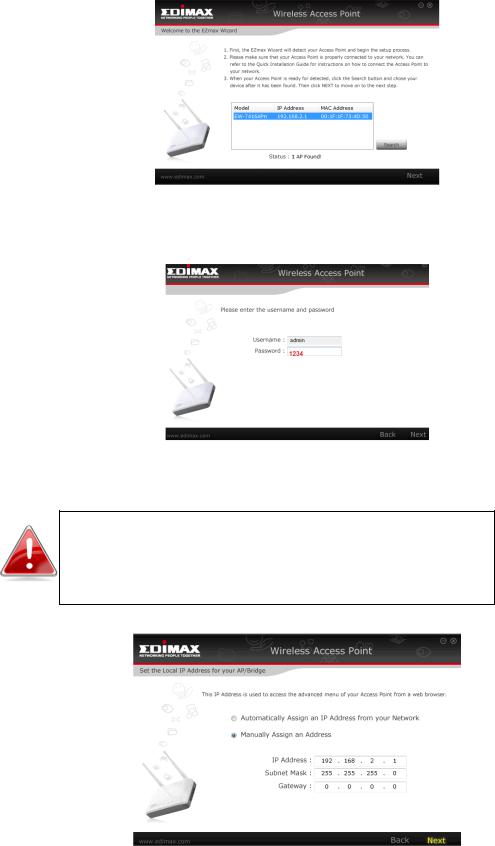
6.The setup wizard will prompt you for a password. Enter the default password “1234”.
7.The setup wizard will then show the access point’s IP information. The default IP is 192.168.2.1. Click “Next” to continue.
Note: Please do not select “Automatically assign an IP address from your network” unless you are performing more advanced setup. For first-time installation, please use the default IP address.
5
Downloaded from www.Manualslib.com manuals search engine

8.You now have the option of selecting which mode you want to use.
Access Point Mode
1.Select Access Point Mode and click “Next”.
2.You will be prompted to set the SSID of this access point. The SSID will be the name of the access point when you connect to it wirelessly. The default SSID is Edimax AP. This page also offers the option to change the password used to access the device’s configuration settings.
For first time setup, please simply click “Next” without changing anything.
3.You will now be prompted to set up a wireless encryption password. You have the option of using no security encryption, or selecting the WEP or WPA pre-shared key encryption schemes. It is recommended that you set up an encryption method, though, for security reasons.
Downloaded from www.Manualslib.com manuals search engine
 Loading...