


BR-6478AC V3
User Manual
12-2018 / v1.0
|
|
|
CONTENTS |
|
I. |
Product Information.............................................................................. |
1 |
||
|
I-1. Package Contents ...................................................................................... |
1 |
||
|
I-2. LED Status.................................................................................................. |
2 |
||
|
I-3. Back Panel.................................................................................................. |
3 |
||
|
I-4. Safety Information..................................................................................... |
4 |
||
II. |
Installation............................................................................................ |
5 |
||
|
II-1. |
Wi-Fi Router Mode .................................................................................. |
8 |
|
|
II-2. |
Wireless Bridge Mode............................................................................. |
9 |
|
|
II-3. |
WISP Mode ........................................................................................... |
10 |
|
|
II-4. |
WPS Setup ............................................................................................ |
11 |
|
|
II-5. Reset to Factory Default Settings............................................................. |
12 |
||
III. Browser Based Configuration Interface................................................. |
13 |
|||
|
III-1. |
|
Internet Status..................................................................................... |
14 |
|
III-2. |
|
Wizard Setup ..................................................................................... |
16 |
|
III-3. |
|
WAN .................................................................................................... |
20 |
|
III-3-1. |
Dynamic IP (DHCP) .............................................................................. |
21 |
|
|
III-3-2. PPPoE ................................................................................................ |
21 |
||
|
III-3-3. |
Static IP.............................................................................................. |
22 |
|
|
III-3-4. IPv6.................................................................................................. |
23 |
||
|
III-3-5. Status ................................................................................................ |
24 |
||
|
III-4. |
Operation Mode ................................................................................... |
24 |
|
|
III-5. |
Wi-Fi ..................................................................................................... |
25 |
|
|
III-5-1. Basic .................................................................................................. |
25 |
||
|
III-5-2. Security ............................................................................................... |
27 |
||
|
III-5-3. |
ACL ................................................................................................ |
28 |
|
|
III-5-4. |
Site Survey..................................................................................... |
28 |
|
|
III-5-5. |
WPS ............................................................................................... |
29 |
|
|
III-6 |
|
LAN ................................................................................................. |
29 |
|
III-6-1. |
IPv4................................................................................................ |
29 |
|
|
III-6-2. |
IPv6................................................................................................ |
30 |
|
|
III-6-3. |
RADVD ........................................................................................... |
31 |
|
|
III-6-4. |
TUNNEL 6 over 4............................................................................ |
33 |
|
|
III-7. |
|
VPN ................................................................................................ |
33 |
|
III-7-1. |
PPTP .............................................................................................. |
33 |
|
|
III-7-2. |
L2TPv2 ........................................................................................... |
34 |
|
|
III-7-3. |
L2TPv3 ........................................................................................... |
35 |
|
III-7-4. |
Status............................................................................................. |
36 |
III-8. |
USB................................................................................................. |
36 |
III-8-1. |
Disk Information ............................................................................ |
36 |
III-8-2. |
Account Management ................................................................... |
36 |
III-8-3. |
Share Folder .................................................................................. |
37 |
IV. Features............................................................................................... |
38 |
|
IV-1. |
QoS ................................................................................................ |
38 |
IV-2. |
Firewall .......................................................................................... |
39 |
IV-2-1. Advanced........................................................................................ |
39 |
|
IV-2-2. DoS ................................................................................................. |
40 |
|
IV-2-3. |
IP Filtering ...................................................................................... |
41 |
IV-2-4. |
Port Filtering................................................................................... |
42 |
IV-2-5. |
MAC Filtering.................................................................................. |
43 |
IV-2-6. |
Port Forwarding ............................................................................. |
43 |
IV-2-7. |
URL Filter........................................................................................ |
45 |
IV-2-8. Route.............................................................................................. |
45 |
|
IV-2-8-1. Default Route................................................................................... |
45 |
|
IV-2-8-2. Static Route...................................................................................... |
45 |
|
IV-2-8-3. Dynamic DNS.................................................................................... |
46 |
|
V. Management ....................................................................................... |
48 |
|
V-1. |
Time.................................................................................................. |
48 |
V-1-1. |
NTP Server......................................................................................... |
48 |
V-1-2. |
Auto Reboot ...................................................................................... |
48 |
V-2. |
System Log ......................................................................................... |
49 |
V-3. |
System Settings .................................................................................. |
50 |
VI. Logout.................................................................................................. |
|
55 |
VII.FAQ...................................................................................................... |
|
56 |
I. Product Information
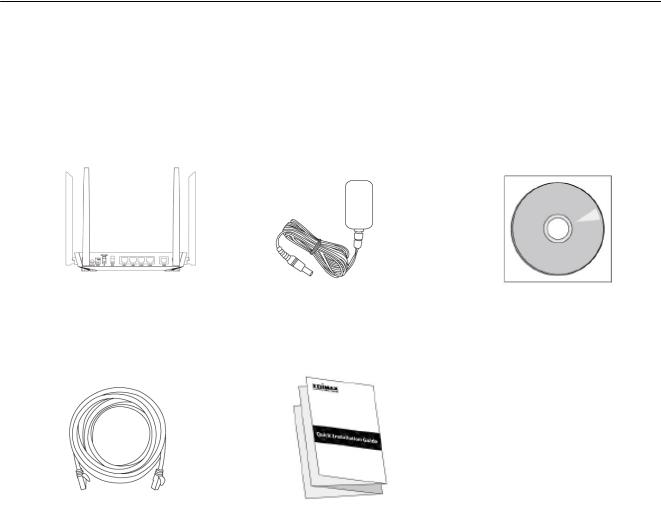
I-1. Package Contents
Before you start using this product, please check if there is anything missing in the package, and contact your dealer to claim the missing item(s):
BR-6478AC V3 |
Power Adapter |
CD-ROM |
Ethernet Cable |
Quick Installation Guide |
1
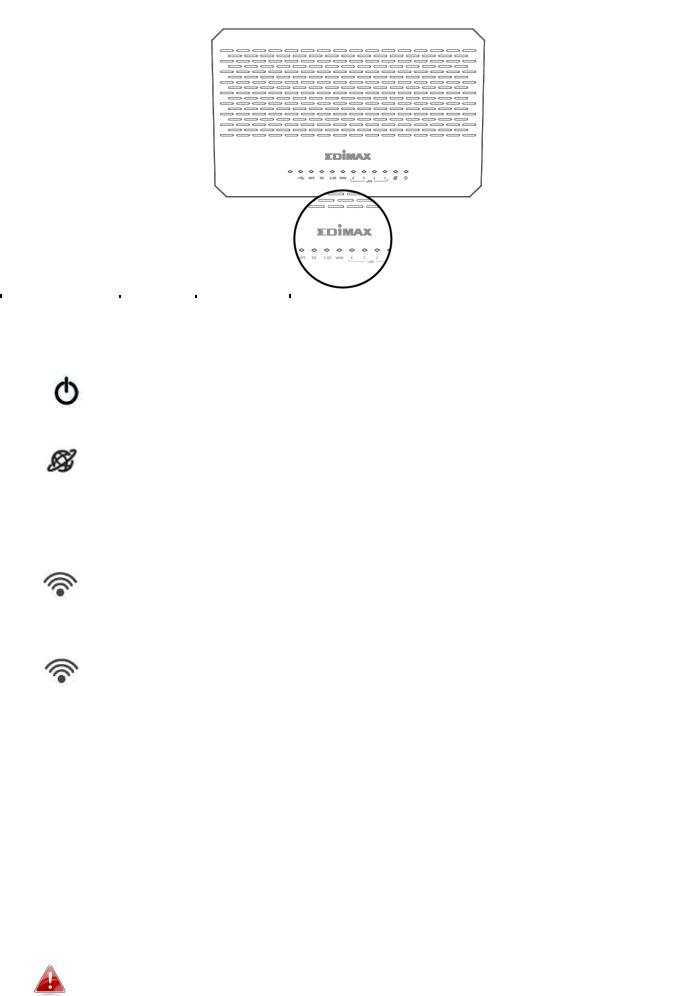
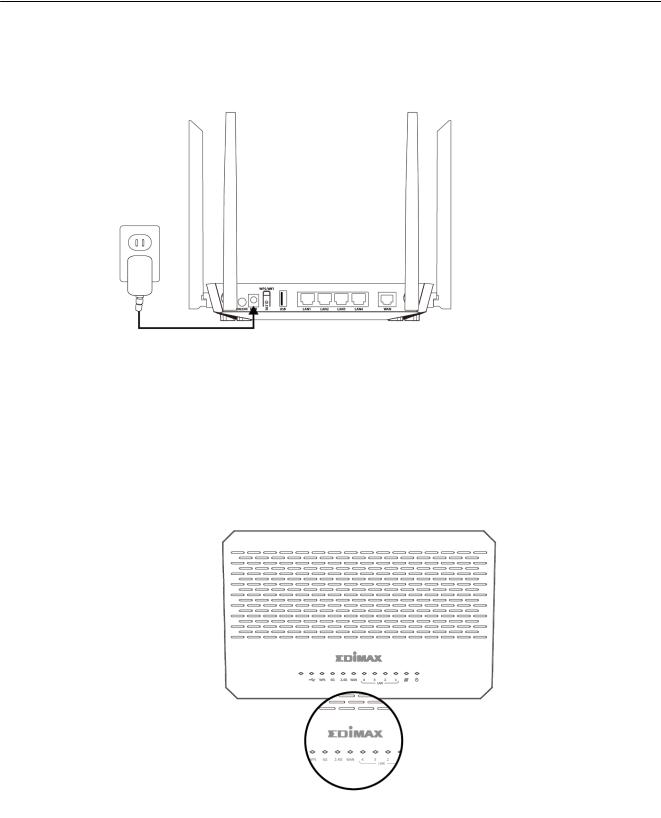
I-2. LED Status
|
LED |
|
|
Color |
|
|
LED |
|
|
Description |
|
|
|
|
|
|
|
Status |
|
|
|
|
Power |
|
|
Green |
|
|
On |
|
|
The device is on. |
|
|
|
|
|
|
|
|
|
|
|
|
|
|
|
|
|
Off |
|
|
The device is off. |
|
|
|
|
|
|
|
|
|
|
||
|
|
|
|
|
|
|
|
|
|
|
|
Internet |
|
|
|
|
|
On |
|
|
Internet connection is ready. |
|
|
|
|
Green |
|
|
|
|
|
|
|
|
|
|
|
|
Flashing |
|
|
Restoring to factory default state, or Ethernet |
|
|
|
|
|
|
|
|
|
|
cable not connected, or no Internet connection. |
|
|
|
|
|
|
|
|
|
|
|
|
|
|
|
|
|
|
|
|
|
|
|
|
|
|
|
|
|
|
On |
|
|
2.4GHz Wi-Fi wireless activity. |
|
2.4G Wi-Fi |
|
|
|
|
|
|
|
(Transferring/receiving data). |
|
|
|
|
|
|
|
|
|
|
||
|
|
|
|
Green |
|
|
|
|
|
|
|
|
|
|
|
|
Flashing |
|
|
2.4GHz WPS is active. |
|
|
|
|
|
|
|
|
|
|
||
|
|
|
|
|
|
|
|
|
|
|
|
|
|
|
|
|
|
Off |
|
|
2.4GHz Wi-Fi not active. |
|
|
|
|
|
|
|
|
|
|
|
|
5G Wi-Fi |
|
|
|
|
|
On |
|
|
5GHz Wi-Fi wireless activity. |
|
|
|
|
|
|
|
|
|
(Transferring/receiving data). |
|
|
|
|
|
Green |
|
|
|
|
|
|
|
|
|
|
|
|
|
|
|
|
|
|
|
|
|
|
|
Flashing |
|
|
5GHz WPS is active. |
|
|
|
|
|
|
|
|
|
|
||
|
|
|
|
|
|
|
|
|
|
|
|
|
|
|
|
|
|
Off |
|
|
5GHz Wi-Fi not active. |
|
|
|
|
|
|
|
|
|
|
|
|
|
|
|
|
|
|
On |
|
|
USB connection is ready. |
|
USB |
|
|
|
|
|
|
|
|
|
|
|
|
Green |
|
|
Flashing |
|
|
A new USB device is being identified. |
|
|
|
|
|
|
|
|
|
|
|
|
|
|
|
|
|
|
|
Off |
|
|
USB is not active. |
|
|
|
|
|
|
|
|
|
|
|
|
|
|
|
|
|
|
On |
|
|
Negotiation is in progress through Wi-Fi Protected |
|
WPS |
|
|
Green |
|
|
|
|
Setup. |
|
|
|
|
|
|
|
|
|
|||
|
|
|
|
|
|
|
Off |
|
|
WPS is disabled or connected. |
|
|
|
|
|
|
|
|
|
|
|
|
LAN 1-4 |
|
|
Green |
|
|
On |
|
|
Ethernet port is connected to a network device. |
|
|
|
|
|
|
|
|
|
||
|
|
|
|
|
Off |
|
|
Ethernet port is not connected to a network |
||
|
|
|
|
|
|
|
|
|
||
|
|
|
|
|
|
|
|
|
|
|
If indicator shows abnormal activity, please check the connection.
2
I-3. Back Panel
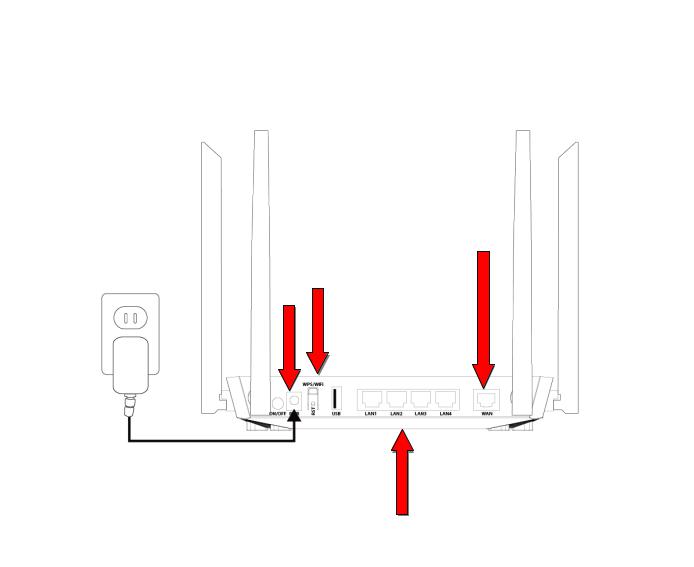
10/100Mbps WAN Port
WPS/Reset Button
Power Port
10/100 Mbps
LAN Ports 1–4
BR6478AC V3: 5dBi External Antenna x 4
3
I-4. Safety Information
In order to ensure the safe operation of the device and its users, please read and act in accordance with the following safety instructions.
1.The device is designed for indoor use only; do not place it outdoors.
2.Do not place the device in or near hot/humid places, such as a kitchen or bathroom.
3.Do not pull any connected cable with force; carefully disconnect it from the BR-6478AC V3.
4.Handle the device with care. Accidental damage will void the warranty of the device.
5.The device contains small parts which are a danger to small children under 3 years old. Please keep the device out of reach of children.
6.Do not place the device on paper, cloth, or other flammable materials. The device may become hot during use.
7.There are no user-serviceable parts inside the device. If you experience problems with the device, please contact your dealer of purchase and ask for help.
8.The device is an electrical device and as such, if it becomes wet for any reason, do not attempt to touch it without switching the power supply off. Contact an experienced electrical technician for further help.
4
II. Installation
1.Plug the included power adapter into the device’s 5V DC power port and the other end into an electrical socket.
2.Ensure that the Wi-Fi On/Off switch is set to on and that five LEDs (power, Internet, 2.4GHz & 5GHz Wi-Fi & USB) display are on.
3.Plug the Ethernet cable to internet and the WAN port of the router.
5
4.Use a Wi-Fi device (e.g. computer, tablet, smartphone) to search for a Wi-Fi network with the SSID “edimax_2.4G_xx or edimax_5G_xx ” and connect to it.
iOS 4 or Android 4 and above are required for setup on a smartphone or tablet.
Please noted that BR-6478AC V3 is operated and set up as a Wi-Fi router by default. For complete set up of BR-6478AC V3 in other operation modes, please refer to the user manual.
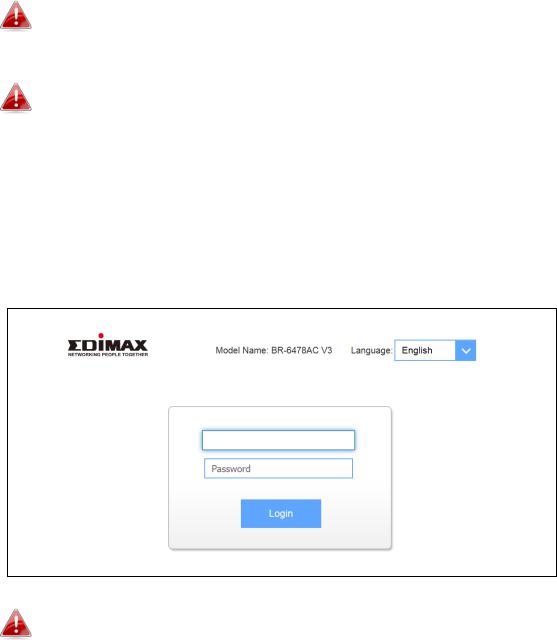
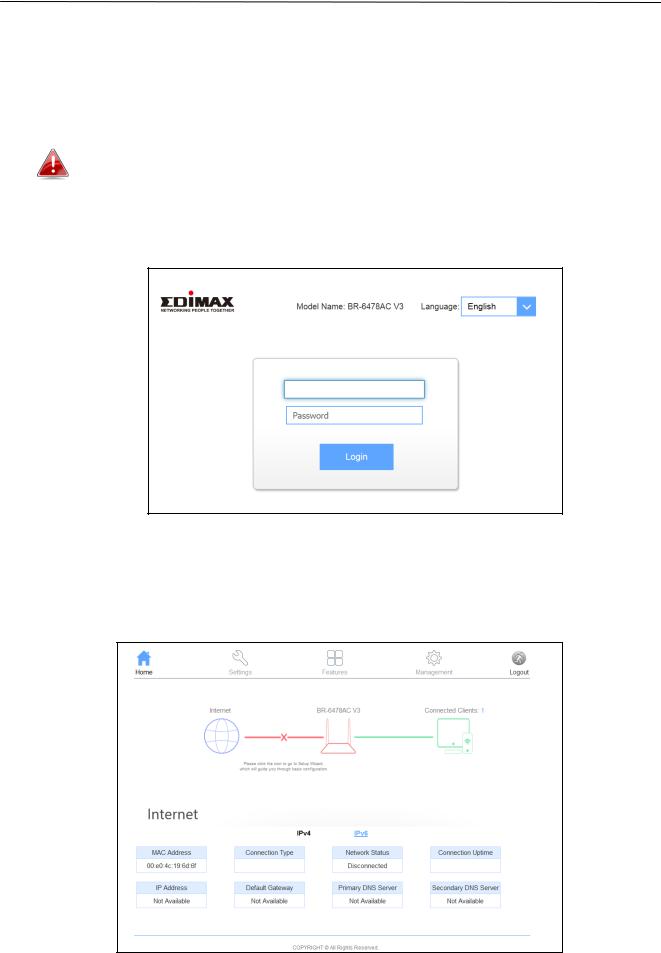
5.Open a web browser and enter the URL http://192.168.2.1 and follow the instructions to begin the setup process. You will be prompted for a username and password. The default username is “admin” and the default password is “1234”.
If you can not access 192.168.2.1, connect the BR-6478AC V3 to a computer using an Ethernet cable and try again.
6.When you login to the web UI of the router successfully. The following figure will appear, Click on “Settings” to set up:
6
The BR-6478AC V3’s three available modes are outlined below:
|
Wi-Fi Router Mode |
|
The device connects to your modem and provides |
|
|
||
|
|
|
2.4GHz and/or 5GHz Internet (wireless and |
|
|
|
|
|
|
|
Ethernet) access for your network devices. |
|
Wi-Fi Bridge Mode |
|
The device connects to a network device for |
|
|
||
|
|
|
example: TV, gaming console, or media player via |
|
|
|
Ethernet cable and acts as a Wi-Fi bridge, |
|
|
|
allowing the network device to join your Wi-Fi |
|
|
|
network. |
|
WISP Mode |
|
The device connects wirelessly to your Wireless |
|
|
|
Internet Service Provider and provides 2.4GHz |
|
|
|
and/or 5GHz Internet (wireless and Ethernet) |
|
|
|
access for your network devices. |
7.Follow the on-screen instructions to complete setup. For more information, please refer to the appropriate following chapter:
7
II-1. Wi-Fi Router Mode
1. Connect the blue WAN port of your BR-6478AC V3 to the LAN port of your modem using an Ethernet cable.
2. Log on to your 2.4GHz & 5GHz wireless networks. For first time use, please use the SSID and wireless password printed on the bottom of the router. Otherwise, enter a new SSID and password for your 2.4GHz & 5GHz wireless networks.
3.
4. The BR-6478AC V3 is working and ready for use. You can now connect to the device’s new SSID. Please refer to following chapters if you require more guidance.
8
II-2. Wireless Bridge Mode
1.Please ensure your BR-6478AC V3 is within Wi-Fi range of your existing wireless router. Please log on http:// 192.168.2.1 to set up.
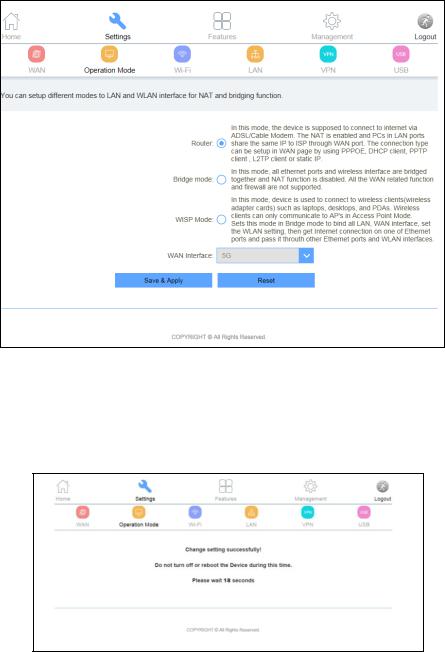
2.In the top menu, click “Settings”, then click “Operation Mode”. Select “Bridge mode” to configure.
3.Click “Save & Apply”.
4.Please wait a moment until the BR-6478AC V3 is ready.
5.The BR-6478AC V3 is working and ready for use. You can now connect the BR-6478AC V3 to your network device using an Ethernet cable and connect to your network as usual.
9
II-3. WISP Mode
1.Please ensure your BR-6478AC V3 is within Wi-Fi range of your WISP network. Click “Next” to continue.
2.Please wait a moment until the BR-6478AC V3 is ready.
3.For first time use, log on http:// 192.168.2.1. In the absence of an external network, the following interface appears.
4.Click the red “X”, the Wizard Setup page screen appears as below.
5.Click “Next”, select “Wireless ISP” to configure WISP mode.

II-4. WPS Setup
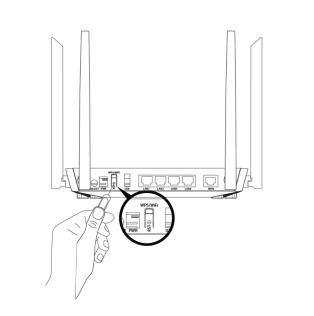
If your wireless device supports WPS (Wi-Fi Protected Setup) then you can use this method to connect to the BR-6478AC V3’s Wi-Fi network.
1. Press the WPS button on the BR-6478AC V3 for 3 – 5 seconds to activate WPS.
2. Within two minutes, press the WPS button on the wireless device/client to activate its WPS.
3. The devices will establish a connection. Repeat for additional wireless devices.
Please check the instructions
for your wireless device for how long you need to hold down its WPS button to activate WPS.
11
II-5. Reset to Factory Default Settings
If you experience problems with your BR-6478AC V3, you can reset the device back to its factory settings. This resets all settings back to default.
1.Press and hold RST button with a needle for about 5 seconds to reset the router to its factory default settings.
2.Release the button when all the LED blinks once.
3.Wait for the BR-6478AC V3 to restart. The BR-6478AC V3 is ready for setup when the power LED displays on.
12
III. Browser Based Configuration Interface
After setup you can access the browser based configuration interface to configure or change the settings of the BR-6478AC V3. To access the browser based configuration interface, enter http:// 192.168.2.1 into the URL bar of a web browser on a network device which is connected to the BR-6478AC V3.
If you can not access 192.168.2.1, connects the BR-6478AC
V3 to a computer using an Ethernet cable and try again.
You will be prompted for a username and password. The default username is
“admin” and the default password is “1234”.
You will arrive at the “Home” screen shown below. Use the top menu to navigate and click on “Settings” to select one of the three operation modes.
For more information, refer to the user manual.
13
III-1. Internet Status
1. If you perform no operation within 2 minutes after your login, the router logs you out. In addition, click Logout on the upper right corner of the web UI also can log out.
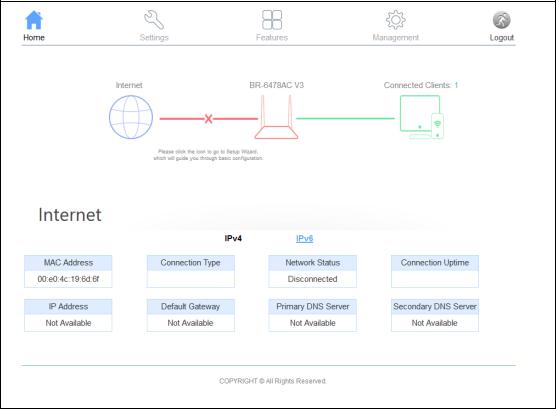
2. Then Home page allows you to view the network status of the router, Wi-Fi information, online device and other status information
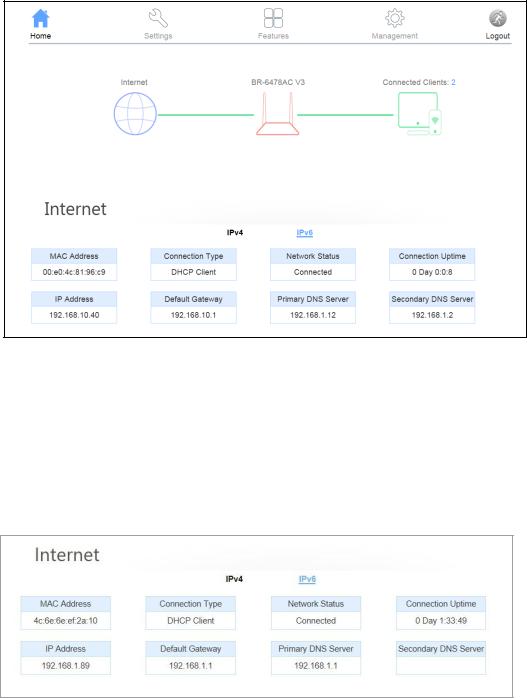
3. Click  icon to view the internet information. On this page, you can view information about the Internet status of the router, including MAC Address, Connection Type, Network Status, Connection Uptime, IP Address, Default Gateway, Primary DNS Server and Secondary DNS Server.
14
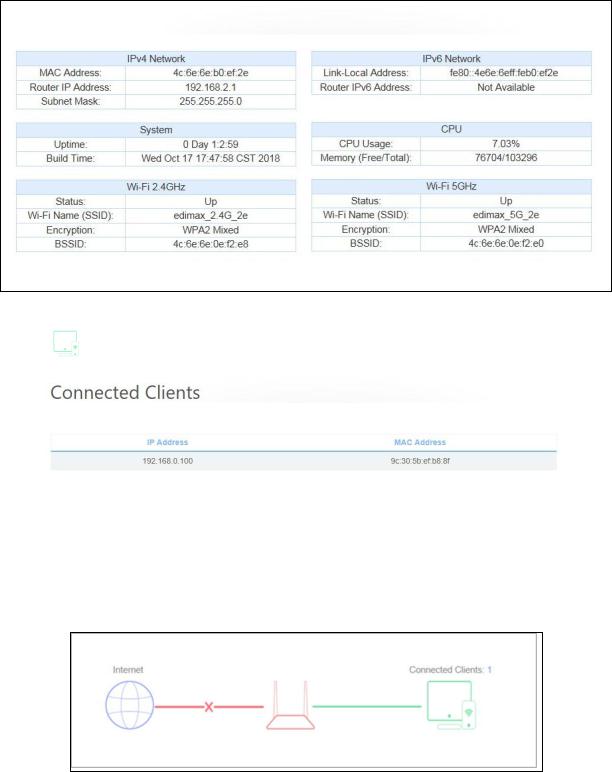
4. Click icon to view the Wi-Fi information. You can view information about the current LAN and Wi-Fi status of the router.
5. Click |
icon to view the information of online device(s). |
|
|
|
|
|
|
6. When status below is displayed, it means the internet connection is unsuccessful. Please check the WAN connection.
15

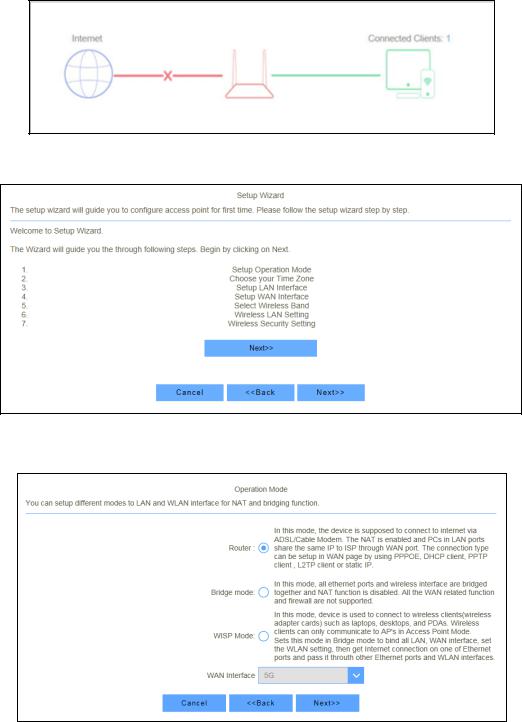
III-2. Wizard Setup
1. In the absence of an external network, after entering the user name and password to login to the Web UI, it appears the following interface.
2. Click the red “X”, the Wizard Setup page screen appears as below.
3. Click Next and you can configure the router Operation Mode.
16
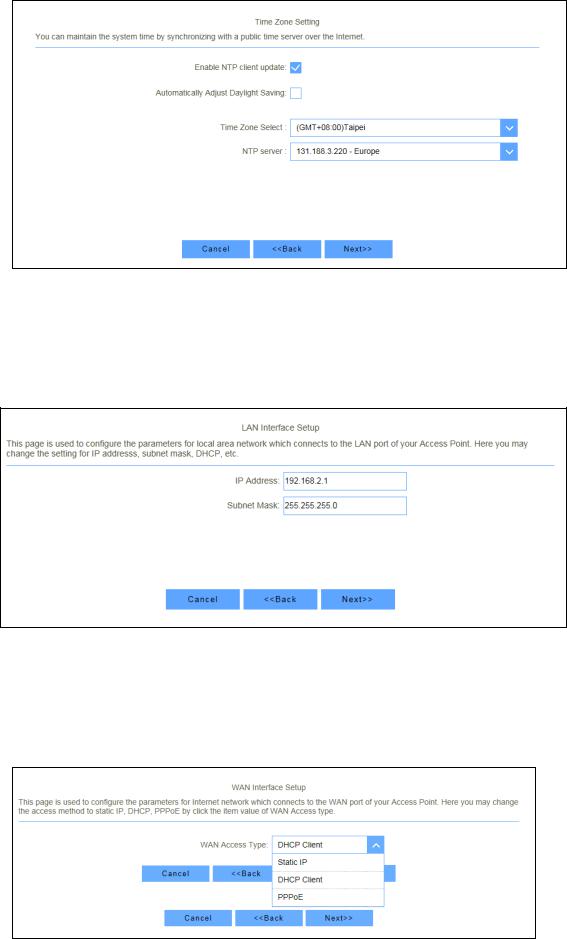
4. Click Next to configure Time Zone Setting.
5. Click Next and you can configure the LAN Interface Setup. This page is used to configure the parameters for local area network which connects to the LAN port of your Access Point. Here you may change the setting for IP address, subnet mask, DHCP, etc.
6. Click Next and you can configure the WAN Interface Setup. This page is used to configure the parameters for Internet network which connects to the WAN port of your Access Point. Here you may change the access method to static IP, DHCP, PPPoE by click the item value of WAN Access type.
17
7. Click Next and then the following page will pops up. Generally, the default selection is ok.
8. Click Next and configure the 5 GHz wireless network parameters.
9. Click Next and configure the 5 GHz wireless security. It should be set up at least 8 characters.
18
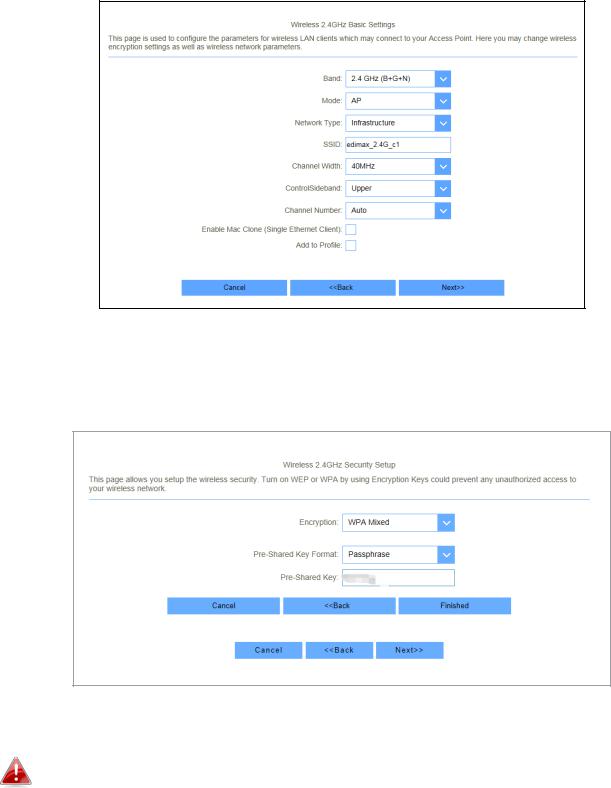
10. Click Next and configure the 2.4GHz wireless network parameters.
11. Click Next and configure the 2.4GHz wireless security. It should be set up at least 8 characters. And then click Finish.
Users can select whether to set 5 GHz and 2.4GHz wireless security simultaneously according to their own demands.
19
 Loading...