

Page 1

Dialler
HA2000 RTC
Installation & Operating Manual
Page 2

The easiest way to get to know the system
and get it up and running quickly is to get all
the devices and accessories programmed on
a tabletop before locating and mounting them.
Kit Contents
The Alarm System HA2000 should contain the
following components:
1 x RTC Dialler HA2000RTC
Extra Fixing pack
Phone cable
Batteries (4* alkaline D cells)
when in Test Mode.
Yellow LED flashes every 3 seconds to
indicate Report Faillure.
Yellow LED flashes every 30 seconds to
indicate Low Battery
2. Red LED
Red LED will flash when in recording , playing
messages, reporting and when the phone is offhook.
3. Numeric keys
4. “ ” Key
In Normal Mode, press this key to set Telephone
number and Terminal Polarity.
5. CLR Key
Use this key for deleting a digit, canceling the
selection, aborting the current application and
returning to the Normal mode etc.
6. TEST Key
In Normal mode, press this key to enter TEST
mode.
Application Overview
I. Identifying the parts
1. Yellow LED
7. REC Key
Press this key to start recording emergency
messages.
8. # Key
To dial as entered
9. * Key
To delay the dialling for 3 seconds.
Power Indicator; the Yellow LED will light
up for 2 seconds Power is on.
Test Mode Indicator; Yellow LED flashes
N’hésitez pas à nous appeler sur notre ligne d’assistance téléphonique (tel en fin de notice).
Nos techniciens se feront un plaisir de vous aider à parfaire votre installation.
UN PROBLEME ?
4
Page 3
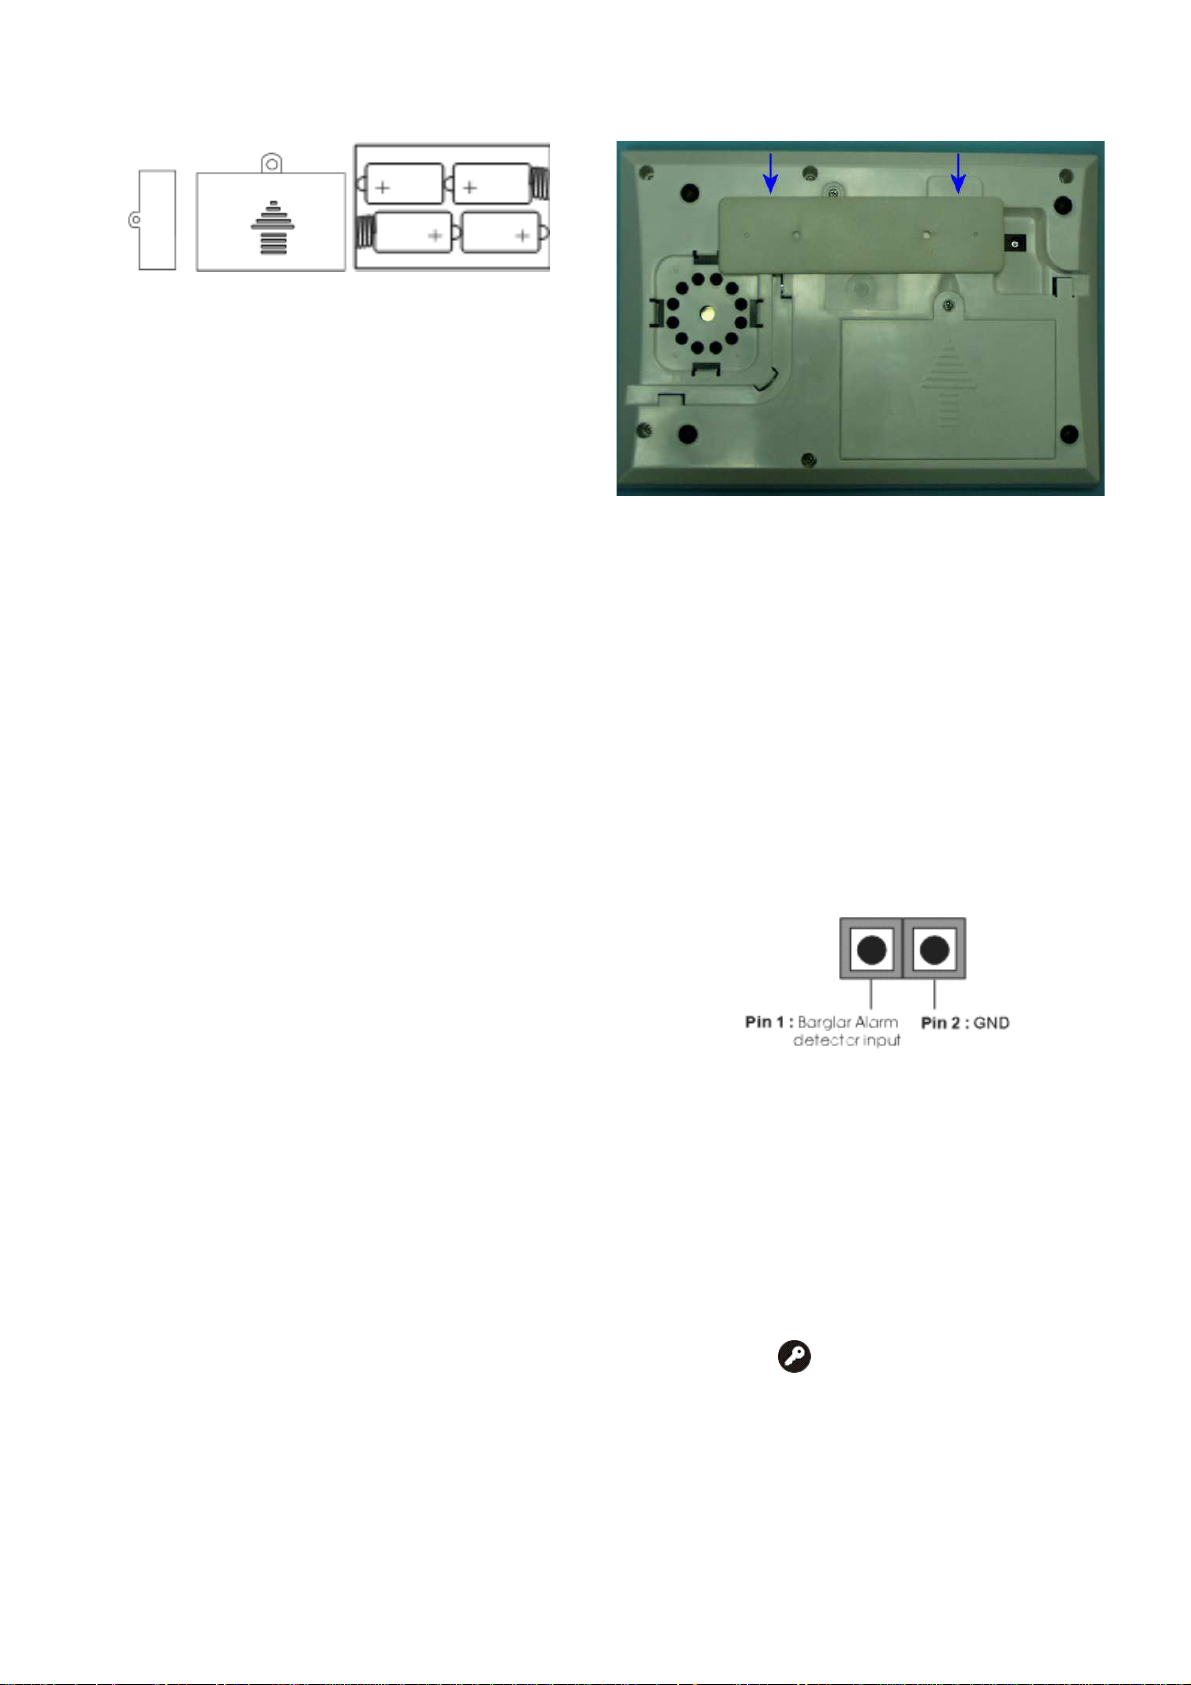
10. Battery Compartment
For 4 x D-cell Alkaline Batteries.
11. Phone jack marked “Line”
This jack is for the connection to the phone line
from the wall.
12. Phone jack marked “Phone”
This jack is for the connection to the Telephone
unit.
13. Device Connection Terminal
The 2-Pin Device Connection Terminal is for
connecting to wired detectors
II. The Power Supply
CTC-729G Auto Dialer features completely wire-free
operation and uses four alkaline D cells. The batterylife is estimated for 2 years or more.
Battery Insertion:
The battery compartment is a large box in the Control
Panel with a lid secured with 1 screw.
Remove the screw and take off the
compartment lid.
Insert the D cell alkaline batteries provided
into the battery compartment, taking care to
put the batteries in the right way around.
The unit will give a long beep when the last
battery is inserted.
Replace the battery compartment with the
screw taking care not to over tighten
Close the lid and tighten the large lid fixing
screw with a coin.
III. Connecting the telephone line
Two telephone jacks can be found from the rear for the
connection of your telephone line and telephone set.
Remove the Wall Mounting Bracket as
shown.
Plug one end of the enclosed telephone cable
into the socket jack on the wall.
Plug the other end of the enclosed telephone
cable into the socket marked “Line”.
Plug your telephone set into the other socket
marked “Phone”.
IV. Device Connection Terminal
Pin 1 provide Dry Contact input for wired
detector
For wired PIR detectors, Door Contact, Water
detectors, Panic buttons and Broken Glass
detectors, connect Pin 1 to Pin 2
To Set Terminal Polarity
The polarity of the Device Connection Terminal can be
set following these steps:
Step 1.
Press “ ” key when the Dialer is in
Normal Mode to enter Programming
mode.
N’hésitez pas à nous appeler sur notre ligne d’assistance téléphonique (tel en fin de notice).
Nos techniciens se feront un plaisir de vous aider à parfaire votre installation.
The YELLOW LED will flash.
Step 2. Enter “Pin Designated Number”
UN PROBLEME ?
5
Page 4

“7” for Pin 1
Step3. Enter “Polarity Designated Number”
“0” for “ - “ polarity (Default)
Step 3. The Auto Dialer will recognize the signal
as the learn code and sound one long
beep and two short beeps to indicate the
learning process is completed
“1” for “ + ” polarity
Step 4. Press “CLR” to exit to Normal mode or the
Auto Dialer will automatically exit this
mode when 5-second time out is up.
V. Getting Started
Learn HA2000RTC
Step 1. Put the Dialer in Learn Mode by pressing
“TEST” and “9”. Yellow LED will start to
flash.
Step 2. Please enter the submenu “Program
Siren” of “Devices +/-“ from the Control
Panel HA2000, then select “Learn Siren”,
press “OK” to send a signal to the Auto
Dialer (HA2000RTC).
Step 3. The Auto Dialer will recognize the signal
as the learn code and sound one long
beep and two short beeps to indicate the
learning process is completed
Step 4. Press “CLR” on the Auto Dialer to exit
Learn Mode.
<<NNOOTTEE>>
Iif the HA2000RTC has been learnt in,
you must remove it to learn HA2000SOS,
and vice versa.
The Auto Dialer will sound 8 short beeps
indicating either HA2000SOS or Control
Panel has been learnt-in and must be
removed first.
By Pressing “TEST”, “9” and “*”,
HA2000SOS will be removed from the
Auto dialer..
Configuring your Dialer
I. Store Telephone Numbers
To store the telephone numbers, follow the steps
below.
Step 1. Press “ ” key when the Dialer is in
Normal mode to enter Programming
mode.
The YELLOW LED will flash.
<<NNOOTTEE>>
The learning code is stored into
EEPROM and will not be lost during
power failure.
The Auto Dialer will sound 2 sets of
continuous 2 beeps if the Learning Code
has been received previously.
The Auto Dialer automatically exit Learn
Mode after a 3-minute Time Out.
By Pressing “TEST”, “9” and “*”, Control
Panel will be removed from the Auto
dialer..
Learn HA2000SOS
Step 1. Put the Dialer in Learn Mode by pressing
“TEST” and “9”. Yellow LED will start to
flash.
Step 2.
Press the button on HA2000SOS to
transmit the signal.
N’hésitez pas à nous appeler sur notre ligne d’assistance téléphonique (tel en fin de notice).
Nos techniciens se feront un plaisir de vous aider à parfaire votre installation.
Step 2. Enter “Priority Order Number” (1~6).
A) By Singular Sequence:
11, 12, 13, 14, 15, 16
B) By Alarm Event:
UN PROBLEME ?
Select Your Priority Order Number:
1) Burglar/Panic/Technical:
21, 22
2) Fire/ Gas: 31, 32
3) Medical: 41, 42.
If the Priority Order Number is selected by
Alarm Event, the Dialer will dial the
programmed phone number depending on
the type of alarming signal received.
No
If no phone number has been stored for a
particular Alarm Event, the dialer will
automatically dial in sequence of other
available Alarm Event phone numbers in
regardless of the original Alarm signal
6
Page 5

received.
Step 3. Key in phone number (max. 20 digits) and
follow by pressing “ ” to complete.
You can add as many “****“ as
required.
<<NNOOTTEE>>
The maximum length of a number is 20
digits including “****“ & “#”.
During entering the number, pressing
“CLR” will abort this process and the
Dialer returns to Normal Mode.
Special Characters for Setting
“****”represents a 3 seconds delay or
pause and the Dialer will not dial “****”.
“#”represents a 3 seconds delay or
pause and the Dialer will dial “# “ if it is
entered as the last digit of the phone
number.
Storing a pager number
Two special keys “****“ & “ # ” are
provided to help you to store the
number:
II. Change Telephone Numbers
To edit the telephone numbers, follow the steps as to
store the telephone numbers described in previous
section and enter the new phone numbers to override
the programmed numbers.
III. Delete Telephone Numbers
To delete the telephone numbers, follow the steps as to
store the telephone numbers described in previous
section and press “ ” without entering any new
phone numbers.
IV. Record Messages
CTC-729 offers a total of 20-second Voice Recording
Time and it is divided into 2 messages numbered as
below:
Message#1: Burglar (3 seconds)
Message#2: Fire (3 seconds)
Pager number – “****“ - “# “ – Identity
code – “# “ - “OK “
The Identity code is a number that
you can key in at your discretion.
This enables the recipient to know
the call is from the Auto Dialer.
You can choose to use any number of
“****“ or “# “ to match the protocols of
the pager system used in your area.
Storing a Telephone Number in
EPABX phone system
EPABX Access code 0/9/8 –“****“– Tel.
Number – “OK”
You can add as many “****“ as
required.
Storing a Telephone Number with
extension number
Tel number – “****“ – “****“ – extension
number – “OK”
Message#3: Panic (3 seconds)
Message#4: Medical (3 seconds)
Message#5: Common Address (8 seconds)
To record these messages, follow the steps
below.
Step 1. Press “REC” key when the Dialer is in
Normal mode to enter Recording mode.
YELLOW LED flashes.
Step 2. Enter “Message Number” (1 or 5).
Step 3. Press “REC” again to hear a long beep
and the RED LED lights up.
Step 4. Start to record your message and press
“CLR” when done or wait for the timer to
run out.
V. Edit Messages
To edit the messages, follow the steps as to store
the messages described in previous section and
record a new message to overlap the stored
N’hésitez pas à nous appeler sur notre ligne d’assistance téléphonique (tel en fin de notice).
Nos techniciens se feront un plaisir de vous aider à parfaire votre installation.
UN PROBLEME ?
7
Page 6

message.
VI. Erase Messages
To erase a particular stored message,
follow the steps below:
you have stored a telephone number to
test dial
Test timer is 85 seconds
IIIIIIII.
. Test Play the Messages
Test Play the Messages
. .
Test Play the MessagesTest Play the Messages
Step 1. Press “REC” key when the Dialer is in
Normal Mode to enter Recording mode.
YELLOW LED flashes.
Step 2. Enter “Message Number” (1 or 5).
Step3. Press “CLR” to erase that message and
the Auto Dialer will sound 2 short beeps
to indicate successful deletion.
To erase all stored messages:
Step 1. Press “REC” key when the Dialer is in
Normal Mode to enter Recording mode.
YELLOW LED flashes.
Step 2. Press “0”
Step 3. Press “CLR” again to hear 2 short beeps
to indicate successful deletion.
Testing your Dialer
I. Test Dial the Telephone Numbers
I. Test Dial the Telephone Numbers
I. Test Dial the Telephone Numbers I. Test Dial the Telephone Numbers
for Reporting
for Reporting
for Reportingfor Reporting
To test play one particular message:
Step 1. Press “TEST” key when the Dialer is in
Normal Mode to enter Test mode.
The YELLOW LED starts to flash.
Step 2. Press “0”
Step 3. Enter “Message Number” (1 ~ 5).
The Dialer will playback the recorded
message as instructed.
The RED LED lights up while the
message is played.
To test play all recorded messages:
Step 1. Press “TEST” key when the Dialer is in
Normal Mode to enter Test mode.
The YELLOW LED starts to flash.
Step 2. Press “0”
Step 3. Press “0” again and the Dialer will play
back all recorded messages in the order
of its Message Number.
The RED LED lights up while the message is
played.
To test dial the telephone numbers, follow
the steps below.
Step 1. Press “TEST” key when the Dialer is in
Normal Mode to enter Test mode.
The YELLOW LED starts to flash.
Step 2. Enter “Priority Order Number” (11~16
or 21, 22, 31, 32, 41, 42).
The Dialer will dial the phone number as
instructed and play the message
accordingly.
The RED LED lights up during dialing
and reporting.
<<NNOOTTEE>>
To identify line failure make sure
message have been recorded and that
N’hésitez pas à nous appeler sur notre ligne d’assistance téléphonique (tel en fin de notice).
Nos techniciens se feront un plaisir de vous aider à parfaire votre installation.
III. Range Test
III. Range Test
III. Range TestIII. Range Test
Step 1. Press “TEST” key when the Dialer is in
Normal Mode to enter Test mode.
The YELLOW LED starts to flash.
Step 2. Press “****”
The Dialer enters “Range Test” mode.
Both LEDs start to flash together.
Step 3. Send a signal from the Control Panel to
the Auto Dialer.
The Dialer will play a short tune twice to
indicate it has successfully received at
this distance range.
Step 4. Press “CLR” to exit Test mode.
UN PROBLEME ?
8
Page 7

<<NNOOTTEE>>
Correct the distance range to allow the
Dialer to be within the transmission range
of the Control Panel if Dialer is
unresponsive to the signal.
If no signal is received in 3 minutes, the
Auto Dialer automatically exits Test mode
and returns to Normal mode
receives a Disarm signal from the Control
Panel, the Dialler will ignore it and
continue the dialing process.
While dialling, if PIN code (0000) and
“CLR” are pressed, you will hear a long
beep, the Dialler stops any reporting
immediately and for HA2000RTC, it will
also send a Disarm signal to the Control
Panel.
Operation
1. Auto Dialing
Upon receiving the signal from the Control Panel,
the Auto Dialer will dial out and play the
appropriate message to summon help.
If no message or no telephone number is stored,
the Dialer will not dial to report.
When only one telephone number is stored
and that number is engaged, the Dialer will
automatically redial that number up to
maximum of 5 times with an interval of 62 sec.
between dialing attempts.
When two or more telephone numbers are stored,
the Dialer will dial in accordance to the Priority
Order Number. If the number being dialed is
engaged, it will try the next number.
Each phone number will be tried for maximum
rotation of 5 times with an interval of 5 seconds
between each phone number.
After dialing a phone number and the line is not
engaged, the Dialer will automatically play the
appropriate message for 80 seconds.
If a certain type of alarm occurred without the
corresponding message recorded, the Dialler will
play the subsequent message.
When the Auto Dialler has received 2 successful
acknowledgements from the recipients, it will stop
dialling.
<<NNOOTTEE>>
When each phone number is dialed 5
times without any acknowledgement,
“Failure” status is reported and the
Dialer returns to Normal Mode with a
fault warning beep and Yellow LED
flashing every 3 seconds to remind the
user.
Only during diallings, if the Dialler
N’hésitez pas à nous appeler sur notre ligne d’assistance téléphonique (tel en fin de notice).
Nos techniciens se feront un plaisir de vous aider à parfaire votre installation.
2. Call Acknowledgment
If the recipient successfully receives the call, he
should acknowledge it by pressing the “9”, “0”, or
“1” button on his telephone set:
Acknowledging with signal “9”
If the recipient presses “9” on his phone set as the
acknowledging signal, he will hear a long beep.
The Dialler will then take the following actions.
The Dialler will cancel all auto dialling.
Acknowledging with signal “0”
If the recipient presses “0” on his phone set as the
acknowledging signal, he will hear a long beep.
The Dialler will then take the following actions.
The Dialler will go back on-hook.
The Dialler will accept this successful
acknowledgment and continue to dial the
next phone number.
Acknowledging with signal “1”
If the recipient presses “1” on his phone set as the
acknowledging signal. The Dialler will then take
the following actions.
For HA2000RTC:
The Dialler will open the Two Way
Communication Path. Please see “Two Way
Voice Communication” in next section for
details.
The Dialler will accept this signal as
successful acknowledgement.
3. Opening the Two Way Communication
HA2000RTC only
HA2000RTC, after sending the alarm
message and receiving a DTMF “1” signal
from the recipient, will open up the Two Way
Voice Communication immediately.
The Two Way Voice Communication channel
enables you to talk to the recipient and permit
UN PROBLEME ?
9
Page 8

him/her to listen into what is happening on
your side through the microphone & speaker
on the unit.
The Communication channel, once opened,
lasts for 3 minutes. The recipient will hear
repeated beep sound 15 second before the
Dialer hangs up the line.
If the recipient wants to have more time to
listen, he can press the "1" button on his
telephone set again to add another 3 minutes.
<<NNOOTTEE>>
When the two ways communication
channel are opened, the Control Panel
will then stop the audible alarm to
speech communication.
Step 3. Listen to 2 beeps from the receiver.
Step 4. Press PIN Code (0000) and if the
operations were successful dialer will
hear a long beep
Step 5. Press the following numbers on the
phone to activate specific functions:
Press “1“ to activate 2-way communication.
Listen to 3 beeps.
allow
Press “2“ to activate Arm Mode. Listen to
two beeps from the reciever. The Control
Panel will perform a long beep.
Press “3’ to activate Disarm Mode. Listen to
a beep from the receiver. The Control Panel
will sound two beeps
4. Terminating the Two Way
Communication
After two-way voice communication has been
initiated, the recipient can terminate the
communication by sending DTMF "0" or “9”
signal.
Terminating by signal “0”
If DTMF “0” signal is received, the two way
voice communication will terminate. Dialer will
continue to dial the next phone number and
activate the Control Panel Siren.
Terminating by signal “9”
If DTMF “9” signal is received, the two-way
voice communication will terminate. The Dialer
will cancel any further dialing and leave the
Control Panel Siren off as it is.
<<NNOOTTEE>>
In any case, if the two-way voice
communication is not terminated by the
recipient, the Dialler will automatically go
on-hook as it is terminated by signal "0"
within 3 minutes of voice communication
time period.
5. Incoming Call
Step 1. Dial HA2000RTC, listen to 2 dial tones
and hang up
Step 2. Wait between 10s and 30s and dial
again.
Press “9” or “0” to disconnect. Listen to 5
beeps from the receiver.
<<NNOOTTEE>>
During incoming call if the Control Panel
HA2000 activates an alarm, Dialer will
do 6 beeps and will immediately
disconnect the phone line. Then the
HA2000RTC prepares for reporting.
If Dialer have not learnt in from the
Control Panel or HA2000SOS, the
function to Arm or Diarm from phone is
disabled.
How to install the Auto
Dialer
The Dialer can be mounted on the wall or placed on
the tabletop.
Wall mount
The easiest way to get to know the system
and get it up and running quickly is to get all
the devices and accessories programmed on
a tabletop before locating and mounting them.
The Control Panel can be mounted on the wall or
wherever desired. Ensure the Control Panel is
fitted at approximately chest height where the
display can be easily seen and the keypad
convenient to operate.
Find a suitable location for the Auto Dialer to be
installed.
N’hésitez pas à nous appeler sur notre ligne d’assistance téléphonique (tel en fin de notice).
Nos techniciens se feront un plaisir de vous aider à parfaire votre installation.
UN PROBLEME ?
10
Page 9

Put the dialer in test mode. Correct the distance
range to allow the Dialer to be within the
transmission range of the Control Panel if Dialer
is unresponsive to the signal.
Using the 2 holes of the Wall Mounting Bracket
as a template, mark off the holes’ positions.
Drill 2 holes and fix the screws & plugs provided.
Hook the HA2000RTC unit onto the Wall
Mounting Bracket (holding the unit with the front
facing you).
• Integrated loudspeaker + microphone :
dual communication
• Possible wired triggering signal thru
internal terminals NO or NF loops.
• Possible use with distress pendent only as
a phone alert system for elderly people.
Guaranty
This product is guarantee 4 years except the
batteries. The first year is by standard exchange.
The 3 years left, the guarantee is for parts and
labours.
Please contact, the technical line, following your
country, to confirm the default and the guarantee
process.
France:
Eden: 0825 560 650
Web site: www.eden.fr
Specifications:
Common Technical Specification:
• Radio frequency: 868.6375MHz +-2.5ppm
• Modulation/ Demodulation: Narrow band
FM @ 15KHz bandwidth with VCTCXO
(Temperature compensated Crystal)
• Sensitivity: >105dbm @S/N +20db
• Transmission power: E.I.R.P. -8dbm +-3db
• Operation range: 300 meters in open
space
• Code combinations: 16 777 216 codes
• Temperature range:-20°C +45°C
• Humidity: up to 90%
HA2000RTC
• Vocal, user recordable voice message.
• 4 different specific messages and 1 main
message
• 6 called numbers.
• Fully battery powered with battery life 2
years.
• Remote call cancellation thru DTMF.
• Possible remote control
(arming/disarming) of indoor siren +
control panel by DTMF
Holland:
Elro: 0900 208 8888
Web site: www.elro-nl.com
Belgium:
Dutch speaking
Elro: 070 2330031
French Speaking
Eden: 0033 825 560 650
Germany:
Elro: 0049 17755 24123
England:
Byron: 0845 230 1231
Website: www.chbyron.com
N’hésitez pas à nous appeler sur notre ligne d’assistance téléphonique (tel en fin de notice).
Nos techniciens se feront un plaisir de vous aider à parfaire votre installation.
UN PROBLEME ?
11
 Loading...