

Page 1
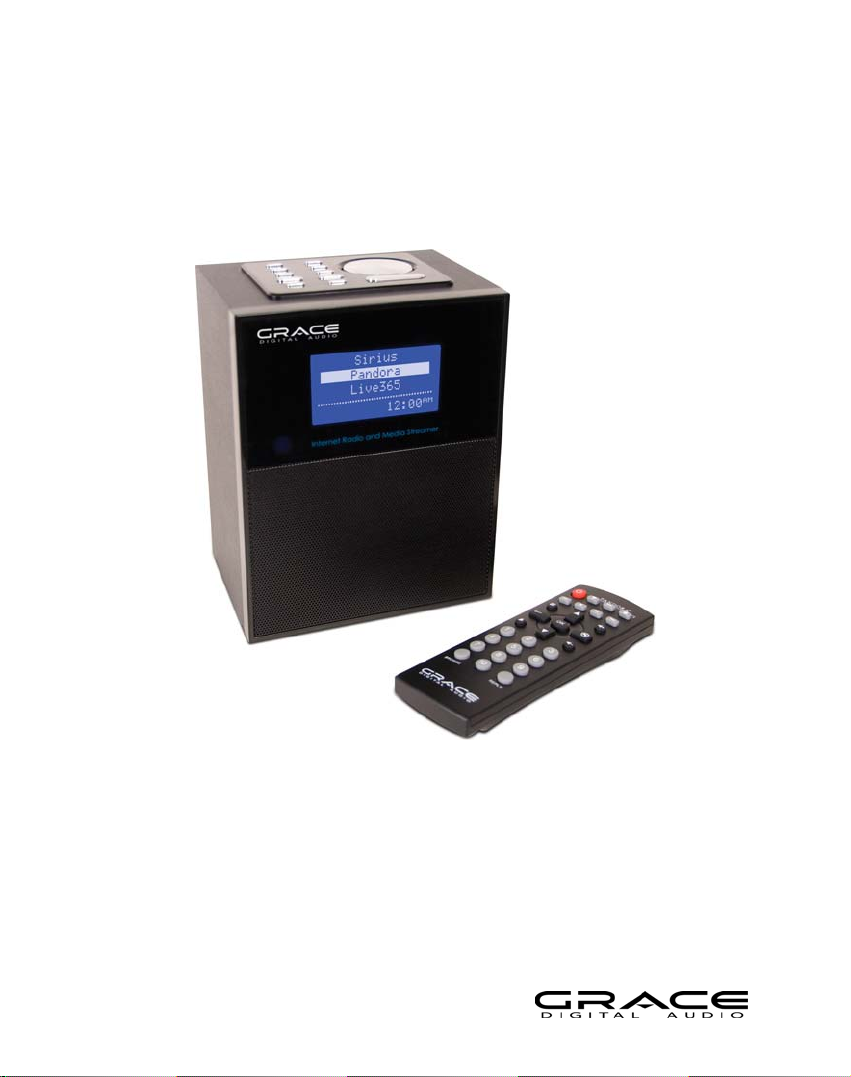
ALLEGRO
Wireless Internet Radio by Grace Digital
User’s Guide Model No. GDI-IRD4000
_________________________________________________________________
Page 2

2
User’s Guide Table of Contents
Important Safety Instructions and Warnings ..................................................................................... 4
Internet Radio and Network Music Player Quickstart Guide ............................................................. 7
What you need before you can use your Internet radio ............................................................... 7
Contents ....................................................................................................................................... 7
Radio Connections ....................................................................................................................... 8
Radio and remote control functions and controls ......................................................................... 9
Displays icons .............................................................................................................................. 10
Steps for Connecting Your Radio to Your Wireless Network ............................................................ 11
Step 1 - Power up the radio ..................................................................................................... 11
Step 2 - Scan for a wireless network connection .................................................................... 12
Step 3 - Connect to the wireless network ................................................................................ 13
Choosing a radio station to listen to ............................................................................................. 14
Choosing a Pandora radio station ................................................................................................ 16
Changing the volume ................................................................................................................... 16
Storing a radio station in a preset................................................................................................. 16
Playing a preset radio station ....................................................................................................... 17
Requesting a station that is currently unavailable ........................................................................ 17
Stations which allow you to choose what you listen to ................................................................. 17
Setting the clock ........................................................................................................................... 18
Setting the alarm .......................................................................................................................... 20
Setting the sleep timer ................................................................................................................. 22
Configuring ‘My Stuff’........................................................................................................................ 22
Registering an account on Grace Digital Audio’s website ............................................................ 22
Configuring ‘My Profile’ ................................................................................................................ 23
Configuring ‘My Stations’ ............................................................................................................. 23
Configuring ‘My Streams’ ............................................................................................................. 23
Configuring ‘My Podcasts’ ............................................................................................................ 24
Configuring ‘My Pandora’ ............................................................................................................. 24
Accessing Pandora Feedback Menu ........................................................................................... 25
Media Player Quickstart Guide ......................................................................................................... 26
Setup your Windows PC to allow the radio to access your audio files via Windows Shares ....... 26
Locate the shared audio files using the radio ............................................................................... 28
Page 3

3
Listening to a single shared track ................................................................................................. 28
Listening to a complete shared album ......................................................................................... 29
Arranging (Queuing up) tracks for playback later ......................................................................... 29
Arranging (Queuing up) albums for playback later ....................................................................... 29
Controlling playback ..................................................................................................................... 30
Browsing the list of tracks currently (queued up) for playback ..................................................... 30
Removing tracks from the list (queue) ......................................................................................... 30
Playing tracks in random order .................................................................................................... 31
Playing tracks in the list (queue) repeatedly ................................................................................ 31
Set up a Windows PC to allow the radio to access your audio files via a UPnP server ............... 32
Locating and playing media files using the radio and UPnP ........................................................ 34
Browsing the list of tracks currently arranged (queued up) for playback ...................................... 34
Arranging (Queuing up) UPnP tracks for playback later .............................................................. 35
Arranging (Queuing up albums for playback later ........................................................................ 35
Controlling playback ..................................................................................................................... 35
Removing tracks from the list (queue) ......................................................................................... 35
Playing tracks in random order .................................................................................................... 36
Playing tracks in the queue repeatedly ........................................................................................ 36
Settings Menu ................................................................................................................................... 37
Choosing desired option from the Configure menu ...................................................................... 37
<Network Config> ........................................................................................................................ 37
<Upgrade Firmware> ................................................................................................................... 37
<Language> ................................................................................................................................. 37
<Factory Reset> ........................................................................................................................... 37
<Register> .................................................................................................................................... 38
<Clock Setup> .............................................................................................................................. 38
<Sleep Timer> .............................................................................................................................. 38
<Backlight> .................................................................................................................................. 38
<UPnP> ........................................................................................................................................ 38
<Wi-Fi Strength> .......................................................................................................................... 38
<Other Cool Stuff> ....................................................................................................................... 39
Troubleshooting ................................................................................................................................ 40
Specifications ................................................................................................................................... 41
License Information and Warranty .................................................................................................... 41
Customer Service and Support ........................................................................................................ 43
Appendix ........................................................................................................................................... 43
Step 1: Set Up Media Sharing in Windows Media Player 11 ....................................................... 43
Step 2: Play Music on the Internet Radio. .................................................................................... 45
Page 4

4
Important Safety Instructions and Warnings
Please read before installation
If this Internet radio has been moved from a cold place to a warm place, DO NOT plug it in for 2-3 hours
(e.g. from a cold car boot to a warm room). There is a possibility that moisture may have condensed in
the Internet radio, this can cause damage to your Internet radio. To avoid damage please unpack your
Internet radio and allow it to stand at room temperature for 2-3 hours before use. This will help any
moisture evaporate and prevent unnecessary damage to your Internet radio.
POWER PLUG Ensure that the power plug is easily accessible.
COVERS Do not remove any fixed covers as this may expose dangerous voltages.
WEATHER It is advisable to unplug an external antenna during a thunderstorm.
VENTILATION The ventilation holes on the casing of your Internet radio prevent it from over heating.
Do not block or cover these holes, especially with cloth or paper. Do allow a minimum
distance of 5cm around the apparatus for sufficient ventilation.
DAMAGE Never use your Internet radio if it is damaged in any way. Always place your Internet
radio on a flat level surface avoiding anywhere which may be subject to strong
vibration.
TEMPERATURE Avoid extremes of temperature, either hot or cold, place your Internet radio well away
from heat sources such as radiators or gas/electric fires.
DO NOT Use this apparatus in humid or tropical climates.
MOISTURE Do not allow your Internet radio to be exposed to rain, moisture or dust. If any liquid is
spilt into your Internet radio it can cause serious damage. If you spill any liquid into
your Internet radio switch it off at the mains immediately. Contact your store
immediately.
CAUTION: Do not open any covers and do not repair yourself. Qualified personnel must carry out
repair work.
Page 5

5
WARNING:
• To reduce the risk of fire or electrical shock, do not expose the product to rain or moisture.
• The product shall not be exposed to any dripping or splashing. Objects filled with liquids, such
as vases, should not be placed on the product.
• No open flame sources, such as lighted candles, should be placed on the product.
• Keep the remote control battery away from children. It may cause a fire or chemical bum if
mishandled. Do not recharge, disassemble, heat above 100° C (212° F), or incinerate.
Dispose of used batteries promptly. Replace only with a battery of the correct type and model
number.
CAUTION: please read the important safety instructions carefully
1. Retain instructions - the safety instruction should be retained for future reference.
2. Follow instructions –all instructions should be followed.
2. Heed warnings - all warnings on the product and in the user’s guide should be adhered.
4. Power source - the product should be connected to a power supply only of the type specified
in the user’s guide or as marked on the product.
5. Power cord protection – protect the power cord from being walked on or pinched, particularly
at plugs and convenience receptacles.
6. Water and moisture - the product should not be used near water (for example, near a bathtub,
washbowl. kitchen sink, laundry tub, in a wet basement. or near a swimming pool. etc)
7. Heat - keep the product away from heat sources such as radiators, heat registers, stoves or
other appliances that produce heat.
8. Damage requiring service - the product should be serviced by qualified service personnel
when:
a) the power supply cord or the plug has been damaged: or
b) objects have fallen or liquid has been spilled into the product: or
c) the product has been exposed to rain: or
d) the product does not appear to operate normally or exhibits a marked change in performance:
or
e) the product has been dropped, or the enclosure damaged.
9. Servicing - the user should not attempt to service the product. All servicing should be referred
to qualified service personnel.
10. Unplug the power adapter during lightning storms or when unused for long periods of time.
Page 6

6
ADVISORY
This Product is intended for North American markets. The GRACE Wireless Internet Radio GDI-
IR3000 is in compliance with the essential requirements and other relevant provisions of
Directive 1999/5/EC
ADVISORY
FCC Compliance and Advisory Statement: This device complies with Part 15 of the FCC Rules.
Operation is subject to the following two conditions: 1) this device may not cause harmful
interference, and 2) this device must accept any interference received, including interference
that may cause undesired operation
NOTE: This equipment has been tested and found to comply with the limits for a Class B digital
device, pursuant to Part 15 of the FCC Rules. These limits are designed to provide reasonable
protection against harmful interference in a residential installation. This equipment generates,
uses and can radiate radio frequency energy and, if not installed and used in accordance with
the instructions, may cause harmful interference to radio communications. However, there is no
guarantee that interference will not occur in a particular installation. If this equipment does cause
harmful interference to radio or television reception, which can be determined by turning the
equipment off and on, the user is encouraged to try to correct the interference by one or more of
the following measures:
To comply with FCC RF exposure compliance requirements, a separation distance of at least 20
cm must be maintained between the antenna of this device and all persons. This device must
not be co-located or operating in conjunction with any other antenna or transmitter.”
WARNING
This product may contain chemicals listed in
(http://www.oehha.ca.gov/prop65/prop65_list/Newlist.html) that may be known to cause cancer,
birth defects or other reproductive harm
Proposition 65
Page 7

7
QUICKSTART GUIDE
Internet Radio and Network Music Player Quickstart Guide
• What you need before you can use your ALLEGRO Internet Radio
and Network Streamer
Before you can use your ALLEGRO, you need the following:
• A broadband internet connection.
• A wireless (WiFi) access point, preferably a router, connected to your broadband internet.
• If your wireless network is configured to use Wired Equivalent Privacy (WEP) or WiFi
Protected Access (WPA or WPA2) data encryption then you need to know the WEP or WPA
code so you can get ALLEGRO to communicate with the network.
• OPTIONAL Battery powered: use Alkaline or Rechargeable NiMH Batteries
ALLEGRO should work anywhere within 300 feet of the wireless access point.
Before you continue, make sure that your wireless access point is powered up and connected to
your broadband internet.
Contents
Allegro GDI-IRD4000
Power Adapter
Remote Control
User’s Guide
(Optional Alkaline batteries or Rechargeable NiMH batteries
not included
)
Page 8
8
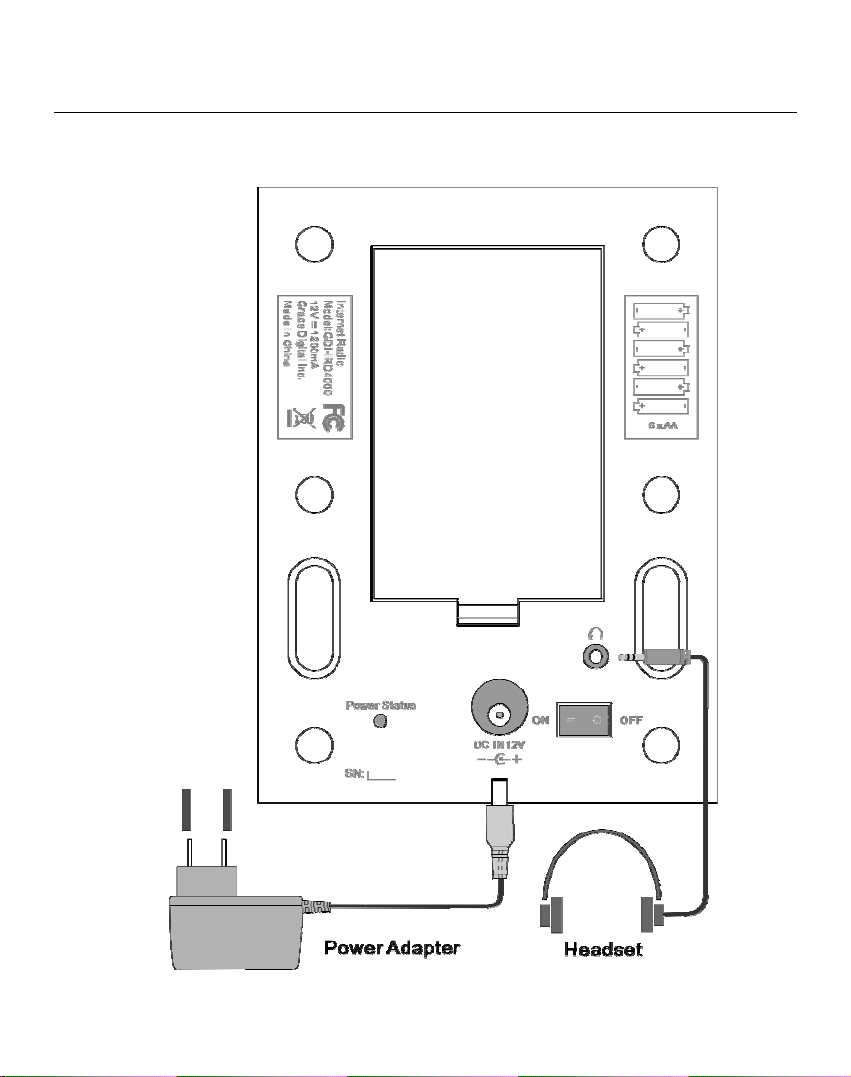
Radio Connections
Page 9
9
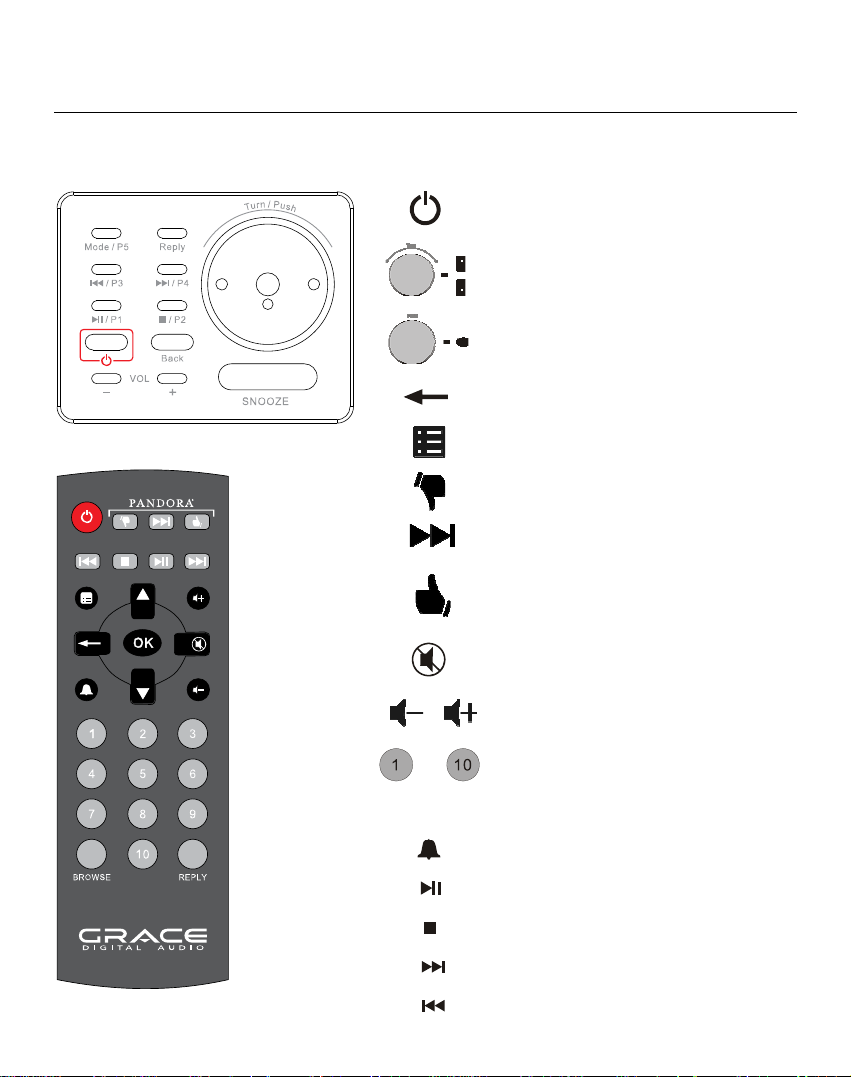
Radio and remote control functions and controls
Standby / ON
UP / DOWN to Move or Change
OK press to Select
BACK push to return to Menu
…
P1 … P5
Quick-key to Main Menu
Pandora “Thumbs Down” selection
Pandora Skip Song selection
Pandora “Thumbs Up” selection
Mute
- VOL+ Volume - / +
Preset 1 to 10
Preset 1 to 5
Alarm / Timer
Play / Pause
Stop
Next
Previous
Page 10
10
HINTS:
* Press the BACK Button to go back to previous menu/screen.
* Use the SCROLL Knob or the UP/DOWN buttons to select and push the Knob (OK) or press the OK
button to decide/execute.
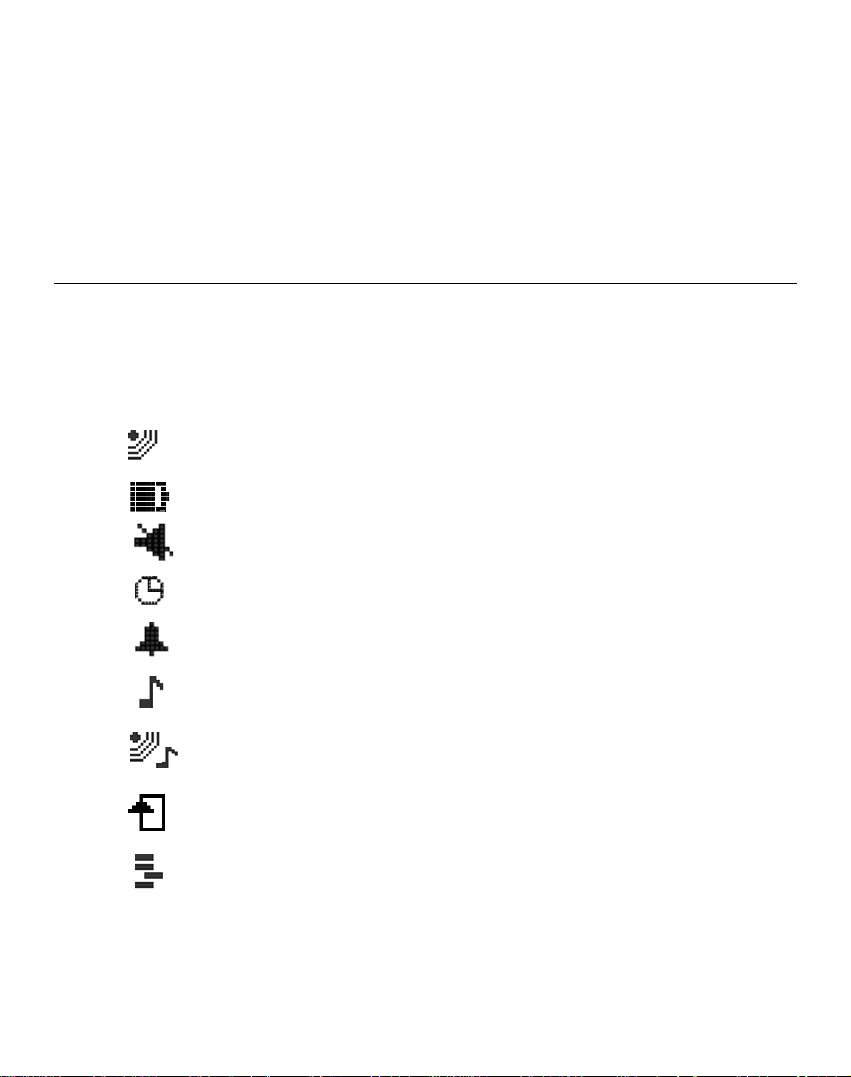
Display icons
Icons are displayed on the bottom row of the LCD display. The meaning of these icons are as
explained below:
‘Internet Radio’ mode and is playing a live stream
Battery status indicator
Mute indicator
Sleep timer
Alarm-set indicator
‘Media Player’ mode. Media controls are active
I ‘Internet Radio’ mode and is playing on demand content
Repeat mode enabled
Shuffle mode enabled
Page 11

11
Steps for Connecting Your Radio to Your Wireless
Network
Getting Started
Step 1 - Power up the radio
Connect to the AC Power on the back of your ALLEGRO. The radio can be switched on or off with the
STANDBY/ON button. You may also choose to use Alkaline or Rechargeable NiMH batteries to power
your ALLEGRO (Rechargeable batteries will charge when power adapter is plugged in )
CAUTION: Use only the power adapter supplied with ALLEGRO. Connecting a power supply with a
different rating will cause permanent damage to ALLEGRO and may be hazardous. Adapter can be
used while Alkaline (non-rechargeable) or Rechargeable NiMH batteries are installed.
The display on the front of the radio will light up and show:
Grace Digital Radio
After a few seconds, the screen will change to show :
Initializing
Network
After a few seconds, the screen will change to show:
Scan for networks
Enter network
View Config
Edit Config
Page 12

12
Step 2 - Scan for a wireless network connection
When the display show <Scan for networks>, press the ‘Select’ button. (NOTE: IF you make an error at
any point, press the ‘Back’ button to return the previous screen)
The ALLEGRO will now scan for all available wireless networks and will display:
Scanning
IIIIIIIIIIIIIIIIIII
IF the radio does not find a wireless network router, the display will show:
If this happens after subsequent attempts you should setup your wireless access point working - see the
instructions supplied with your wireless network.
When ALLEGRO finds your wireless network, the display will show ESS-ID for the access point on the
screen - this name is the name ascribed to the access point by the person who set up the network - for
example:
No networks
Found
< My Home Network >
It is possible, and in some locations highly likely, that your radio will find more than one wireless access
point, in which case you can choose which one you want to connect to. Turn the knob on your radio to
see the ESS-ID for each access point your radio has found.
For optimal performance you may want to check your home network settings to make sure your radio is
on a deferent channel than your neighbors. To do this please consult your Wi-Fi router owner’s manual
Page 13

13
Step 3 - Connect to the wireless network
When the ESS-ID for the access point you want to connect to is displayed on the screen, press OK.
IF your network is not configured to require an encryption code, the screen should display:
Connecting to
Network
then:
IF the screen displays either WEP or WPA, a password is required:
OR
Then the network is using one of the encryption systems: Wired Equivalent Privacy (WEP) or WiFi
Protected Access (WPA or WPA2). You therefore need to enter the correct WEP or WPA password on
your ALLEGRO radio to communicate with your network.
Only the person who set up the network in the first place knows this password; if that person is not you
then you need to find out the password. You can do this by checking with the Customer Service of your
internet provider or the manufacturer of your wireless router.
After approximately 3 seconds, the display goes into the password entry mode:
Network OK
Enter WEP key
Enter WPA key
<END ◄ ► A BCDEF>
To enter the password, use the SCROLL KNOB or the UP/DOWN buttons to select each
letter/number/symbol of the password in turn, pressing OK after each letter.
█
Page 14

14
NOTE: WEP and WPA passwords are upper and lower case sensitive and MUST be entered exactly
HINT: Use the ’Back’ button to erase incorrect characters as you may have entered. F the display
shows: “Invalid key” or “Network Error”, an incorrect password has probably been entered.
After entering the final letter/number/symbol, scroll to find and select END and press OK.
Once the password is entered correctly, your ALLEGRO should now be able to connect to the network.
Your radio should now be able to connect to the selected network without having to re-enter a password.
Your password will be saved in your Grace radio even if a power outage occurs. You will have to alter
your password however, should you attempt to connect to an alternative wireless network
NOTE: IF you would like to give your radio a static IP address then please see the ‘Network config’
section under the ‘Setting’ section.
Choosing a radio station to listen to
1. Press the ‘Select’ button. NOTE: IF you make an error at any point, press the ‘Back’ button to return to the previous screen)
Main Menu
Internet Radio
Personal Radio
Podcasts
My Stuff
2. If the screen does not show < Internet radio > as shown above, turn the knob until it does.
note that the ‘My Stuff’ folder will only show up after you register your radio onto our web site.
3. Press the ‘Select’ button, to choose <Internet radio>.
4. Turn the knob to choose from <Sirius>, <Location> or <Genre>.
5. Press the ‘Select’ button to choose the option you want.
<Sirius> allows you to choose a Sirius Internet Radio station if you are have a Internet Radio enabled
Sirius Radio subscription.
Please see www.sirius.com for more info.
Please
Page 15

15
<Location> allows you to choose radio stations as provided by country which you choose from the list.
<Genre> allows you to choose radio stations according to their content, for example Classic Rock,
Sport, News, etc.
<Sirius>
If you are an active Sirius subscriber with a package that includes the ability to listen to Sirius internet
radio on a non computer based product you will be able to listen to those stations on the Grace Digital
radio. You can either enter your Sirius user name and password onto the Grace Digital website or
through this portion of the radio’s menu.
When you are in the Sirius menu, press the select button to choose <log in> or <change user>. When
prompted you can enter your Sirius user name and password (user names and password are case
sensitive). After your user name and password is accepted, go back to the main menu and select
<Sirius>. You will now be able to view the Sirius internet radio stations. Scroll to the stations you would
like to listen to and press the select button inward to listen to that station.
<Location>
1. Turn the knob until the display shows the region you want (or select ‘All’ to display all countries),
2. Press the ‘Select’ button.
3. Turn the knob until the display shows the country you want.
4. Press the ‘Select’ button.
5. Turn the knob until the display shows the station you want.
6. Press the ‘Select’ button and wait until the radio connects to that station.
Note that some radio stations do not broadcast 24 hours per day, and some stations are not always
on-line.
If this station has on-demand content (that is, it gives the option of listening to programs which
have already been broadcast), see “Stations which enable you to choose what you listen to”.
<Genre>
1. Turn the knob until the display shows the type of content you want to listen to, then press the ‘Select’
button.
2. Turn the knob until the display shows the station you want.
3. Press the ‘Select’ button and wait until the radio connects to that station.
Page 16

16
NOTE some radio stations do not broadcast 24 hours per day, and some stations are not always on-line.
If this station has on-demand content (that is, it gives the option of listening to programmes which have
already been broadcast), see “Stations which enable you to choose what you listen to”.
Choosing a Pandora radio station
(Personal Radio)
This section allows for the new Grace Digital Personal radio services. The current service is Pandora.
Prior to this feature working you must first register your radio on the Grace web site. Please see
registering your radio. After this is complete you can enter in your Pandora user name and password.
Please check out www.pandora.com to check out this service
<Stations>
1. Press the select button and you can choose any of the Pandora stations that you have created on
your Pandora account.
<Create Stations>
1. Press the select button and you can create a new station by typing in a word.
2. After you type in the word, select (end) in the menu. After a few seconds it will show you artist, songs
and albums with names similar to the word you initially entered.
3. Choose desired selection. This function will also create a new station on your Pandora web site.
Changing the volume
When a radio station is playing increase the volume by turning the Volume Knob, clock wise.
Storing a radio station in a preset
Preset on Radio
When a station is playing, hold down one of the preset buttons (1-5) until the screen shows:
Assigned to
Preset #
* Where “#” is the number of the preset button you held down.
Page 17

17
Preset on Remote Control
1. When a station is playing, press the and hold one of the numbers (1-10) on the remote control.
2. Select a number to assign the station to (1-10).
* Please note presets 1-5 are the same for the remote & radio and can be stored using either the radio
or remote.
Playing a preset radio station
When your radio is powered on and connected to your Wi-Fi network, briefly press the preset button
(1-5) on the radio, or 1-10 on the remote control, for the station you want to listen to.
* Note, do not hold the button down - if you do then the station currently playing will overwrite the one
stored in the preset; *be careful*.
Requesting a station that is currently unavailable
If you want to listen to a particular radio station which is currently not available online, you can visit the
Grace Digital Audio web site at http://iradio.gracedigitalaudio.com/ and enter in a request to add the
station to the list.
Please note that some radio stations do not pass the audio stream quality test so we are not able to add
every request. Typically we can add a station within 10 business days if the station provides us a quality
stream. You can check back on our web site periodically to see if the station has been added.
Stations which allow you to choose what you listen to
Some radio stations can provide a number of options associated with their station; for example, some
stations enable you to listen to programs that have already been broadcast. When you select a radio
station that has this ability, the station does not start playing immediately, but instead the display shows:
1. Turn the knob to choose <Live> or <On Demand>, then press the ‘Select’ button. IF you choose
<Live> then the radio plays the current output from this station as normal.
< Live >
On Demand
Page 18

18
If you choose <On Demand> more screens are displayed and you can choose what you want to listen.
What is displayed will depend on the station you have chosen - the following steps are only a guide.
2. When you choose <On Demand>, the display shows the names of the programs. Turn the knob to
choose the program you want, then press the ‘Select’ button.
3. When you have chosen the program you want to listen to, either it will just start playing, or the display
may show a list of days for you to choose from - use the knob to set the day the program was
broadcast, then press the ‘Select’ button.
4. After you have chosen the day, you may be able to choose the Start Time. Set the Start Time using
the knob and press the ‘Select’ button.
5. Program which enable you to choose the time also enable you to fast-forward and rewind to the part
you want to into to while the radio is playing. The elapsed time is displayed. Using the Skip forward
(P3) or Skip backward (P1). Skip forward or backward in 30 second intervals.
Setting the clock
1. Press the ‘Select’ button. (Note: if you make a mistake at any point, press the BACK button to go
back to the previous screen.)
2. Turn the knob until the display shows <Settings>
3. Press the ‘Select’ button.
4. Turn the knob until the display shows <Clock Setup>
Media Player
Alarm Clock
< Settings >
Register
< Clock Setup >
Sleep Timer
Page 19

19
5. Turn the knob until the display says <Set Time/Date>
6. Press the ‘Select’ button.
7. Turn the knob until the correct time zone is seen on the display. Push the ‘Select’ button to set your
time zone. Then turn the Menu knob until the hour setting is correct, then press the ‘Select’ button.
8. Turn the knob until the minute setting is correct, then press the ‘Select’ button.
< Set Time/Date >
Set Alarm
DST
Pacific
Central
Eastern
Set Time
1:30 PM
Set Time
1:34 PM
The display shows <Set Time> with the new time shown beneath for 3 seconds, then returns to the
menu, press the ‘Back’ button 2 times to go to the main menu.
Page 20

20
Setting the alarm
1. Press the ‘Select’ button.
NOTE: IF you make a mistake at any point, press the BACK button to go back to the previous screen
2. Turn the knob until the display shows <Alarm Clock>
Stations
< Alarm Clock >
Media Player
3. Press the ‘Select’ button.
4. Turn the knob until the display shows <Set Alarm>
Set Time
< Set Alarm >
5. Press the ‘Select’ button.
Disable all
1 OFF
2 OFF
3 OFF
4 OFF
5 OFF
6. Turn the knob to choose between <Disable all> which turns off all alarms or any of the 5 alarms.
Press the select button to set the alarm that you want to activate. Below is an example to set Alarm 1.
Choose < 1 Off 12:00 AM>
Page 21

21
< 1 Off 12:00 AM >
7. If you choose “Yes” then the display enables you to set the time for the alarm.
Set Alarm
15:06
8. After selecting < 1 Off 12:00 AM> you can choose the time to set the Alarm.
Set Alarm
12:00 AM
9. Turn the knob until the minute setting is correct, then press the ‘Select’ button.
Alarm Set:
07:45
10. Turn knob to choose how often you want the Alarm to alarm
11. Turn knob to use either the buzzer or the current radio station that is playing to turn on.
The display shows <Alarm Set> with the time of the alarm shown beneath for 3 seconds and then
returns to the radio station display.
When in Standby Mode, the Alarm time is shown next to the clock time with brackets.
1:58
Ensure the volume is set to the desired level.
Page 22

22
NOTE: when your Alarm turns on, the radio’s back light display will turn on and show a menu asking if
you want to turn on the radio or not. If within 60 seconds after the display turns on your radio does not
connect to your Wi-Fi network and the radio station starts playing, the buzzer will announce instead. For
optimal performance choose a radio station that typically buffers very quickly.
Setting the sleep timer
1. Choose Alarm Clock
2. Choose Sleep Timer
3. Then scroll the Select knob form between 30 seconds and 99 hours. When the desired time is
reached, Press the select knob. The radio will stay on until the timer is reaches zero.
Configuring ‘My Stuff’
Registering an account on Grace Digital Audio’s website
1. Open the website, http://iradio.gracedigitalaudio.com from your internet browser.
2. Click on the ‘Register’ link and follow the on-screen instructions to register an account. Please note,
during the registration process, a validation code will be sent to you via email. Please enter this code
when prompted to do so.
3. After logging into your account, you will be able to edit your information for ‘My Profile’, ‘My Stations’,
‘My Streams’, ‘My Radios’ and ‘My Podcasts’ from the left-hand side of the website.
4. You can now add your Internet Radio to your account on the website by accessing the ‘My Radios’
link. From the ‘My Radios’ section, you will need to enter in your radio’s eight digit serial number,
which can be found from the <Settings > <Version> menu on the radio. When in the <Version> menu
please rotate the menu knob left or right until <Serial Number> shows on the display. You will also
need to enter in your radio’s seven digit registration code, which can be found from the ‘Settings’ then
turn the ‘Select’ knob until the ‘Register’ choice is active. Push the ‘Select’ knob in to obtain your
registration number.
Page 23

23
Configuring “My Profile
1. Once logged into you Grace Digital Audio account, you can edit your account’s details from your ‘My
Profile’ section.
2. Click on the ‘My Profile’ link to view your account’s current information. This information will include
various details such as your address, user name, password etc. Edit your details and then click on the
‘Update’ button to save them.
Configuring “My Stations’
1. It is possible to search for radio stations that are available in Grace Digital Audio’s stations’ database
from Grace Digital Audio’s website. Whenever stations are searched for on the website, they will be
displayed in a list of search results together with a link to ‘Add to My Stations’.
2. Clicking on the ‘Add to My Stations’ link, will add the station to your account’s ‘My Stations’ list.
Clicking on ‘My Stations’ and then selecting the station will allow you to edit this list.
3. Once you have Internet stations available in your ‘My Stations’ list, you may play these stations
directly from your Internet Radio. These stations will be available on your radio from the menu item:
‘Stations > My Stuff > My Stations’. Please note, the stations will only be available to your radio once
your radio has downloaded a new stations list. To cause the radio to download a new stations’ list,
please remove and reconnect the power to your radio.
Configuring “My Streams’
1. Once logged into your Grace Digital Audio website account, you can add your own Internet radio
streams to your ‘My Streams’.
2. Clicking on ‘My Streams’ will prompt you to enter the station’s name and its media stream URL. The
media stream URL should be a link to a website’s actual audio stream. If you have any doubt about
locating the media stream URL from a webpage, then please refer to the FAQs section on Grace
Digital Audio’s website, http://iradio.gracedigitalaudio.com. You can also contact the website of the
station that you want to listen to, to obtain the exact URL.
3. Once you have Internet radio streams available in your ‘My Streams’ list, you may play these stations
from your Internet Radio. These stations will be available on your radio from the menu item: ‘Stations >
My Stuff > My Streams’. Please note, the streams will only be available to your radio once your radio
has downloaded a new stations’ list. To cause the radio to download a new stations’ list, please remove
and reconnect the power to your radio.
Page 24

24
Configuring ‘My Podcast’
1. It is possible to add audio podcasts (RSS feeds) to your Grace Digital Audio account that can be
accessed on your Internet radio. To add a podcast, simply login to your account and then click on the
‘My Podcasts’ link.
2. From your ‘My Podcasts’ section, you can add your chosen podcast by entering in the podcast’s
name and its URL as prompted by the website. Please note, the podcast URL will have to be a direct
RSS feed which will end with the ‘.xml’ extension e.g. http://someurl.com/podcast.xml
3. Once you have podcasts available in your ‘My Podcasts’ list, you may access these feeds from your
Internet Radio. These podcasts will be available on your radio from the menu item: ‘Stations > My Stuff
> My Podcasts’. Please note, the podcasts will only be available to your radio once your radio has
downloaded a new stations’ list. To cause the radio to download a new stations’ list, please remove and
reconnect the power to your radio.
Configuring “My Pandora’
1. In order to use the Pandora feature on the Grace Digital Internet radio you must 1st have an active
Pandora account. You can create a Pandora account at www.pandora.com or on Grace’s web site.
2. Grace Digital is not affiliated in any way with Pandora nor do we guarantee any of Pandora’s services
or streams. Please see Pandora’s web site for information on how to update and activate your
Pandora services. After you have successfully signed up with Pandora’s service that allows you to
use a stand alone internet radio you are now ready to go to the next step. Please note that if you
have any questions, concerns or problems with Pandora’s services please contact Pandora directly.
3. Log onto your Grace Digital Audio account. Please note that you must follow the steps in ‘Registering
An Account On Grace Digital Audio’s Website’ prior to upgrading your radio to be able to receive
Pandora music stream. If you have not signed up for the enhanced services please go back to that
step.
4. After you have successfully logged into the Grace Digital Audio web site choose ‘enhanced or
optional’ features. In this menu item you will choose ‘activate Pandora’ (please note from time to time
the actual verbiage used in the on line steps will change). You will then be prompted to add your
pandora ‘user name’ and ‘password’. After you have done this please unplug your radio from power
and wait 15 minutes. Plug the radio back in and turn the radio on. You will now be able to listen to
your Pandora stations on your Grace digital radio.
Page 25

25
5. You can then listen to your Pandora music section via the following menu choices.
Select ‘Personal Radio’
Internet Radio
< Personal Radio >
6. Select ‘My Pandora’
< My Pandora >
6. Select ‘Stations’
< Stations >
Search
Accessing Pandora Feedback Menu
1. While listening to one of your Pandora radio stations choose the ‘Retrieve’ button on the internet
radio. The ‘Retrieve’ button will allow you to perform the similar choices as you do with your regular
Pandora on line account. Choosing the reply button will allow you to thumbs up / down a song, sleep
up to 6 songs an hour, book mark songs and artist etc.
• Bookmark Song
• Bookmark Artist
• Give Feedback (thumbs up or down a song)
• Song Details
• Skip Song
• Explain Song
Page 26

26
Media Player Quickstart Guide
The Media Player allows you to play unprotected audio files (AAC, AIFF, MP3, RM, WAV, WMA) and
play lists (M3U) stored on a networked PC or Apple. It has been verified to work with Windows 2000 and
Windows XP, and Apple OSX.
Set Up your Windows PC to enable the radio to access your audio files via Windows Shares
Windows XP
1. Please ensure that your PC is available on the network for your Internet radio, then, using Windows
Explorer, locate the folder where your audio files are stored.
2. Right click on the folder.
3. Select ‘Properties’.
4. Click on ‘Sharing’.
5. Select ‘Share this folder on the network’ and ‘Allow network users to change my files’. Please note, do
not try to make your ‘My Documents’ or any of its sub-folders (e.g. ‘My Music’) shareable.
Windows Vista
1. Please ensure that your PC is available on the network for your Internet radio.
2. Open the ‘Network and Sharing Center’ windows from ‘Start menu > Control Panel > Network and
Sharing Center’.
3. From the ‘Network and Sharing Center’, under the ‘Sharing and Discovery’ heading, ensure that the
following parameters are set:
Network discovery On
File sharing On
Public folder sharing On
Password protected sharing Off
4. Open ‘Windows Explorer’ by right clicking on the Start menu and selecting ‘Explore’. Create a new
directory in the ‘Public’ directory and move your media files into this new directory.
Page 27

27
5. Right click on the directory just created and select ‘Share…’. Ensure that the directory is listed as being
shared, if not, click on the ‘Share’ button.
6. Right click on the directory just created and select ‘Properties’. From the ‘Properties’ window, click the
‘Sharing’ tab and then click the ‘Advanced Sharing…’ button. From the ‘Advanced Sharing…’ window,
click to check the ‘Share this folder’ option.
Apple OSX
1. The MAC will require Windows File Sharing. MAC OS 9 and earlier versions of the OS will need extra
software to use Windows File Sharing. MAC OS X 10.2 and later versions have Windows File
Sharing built into the OS. Please ensure that your PC is available on the network for your Internet
radio. Your radio will also need to be able to access directories that require a user name and
password.
2. Setup Windows File Sharing on the MAC:
From the ‘Dock’, click ‘System Preferences’. From the ‘System Preferences’ window, under
From the ‘Sharing’ window, do the following:
• Under the ‘Services’ section, enable ‘Personal File Sharing’ and ‘Windows Sharing’ Also,
• Under the ‘Firewall’ section, keep the firewall off.
• Under the ‘Internet’ section, keep ‘Internet Sharing’ off.
3. Setup Account:
4. Directory Setup:
From the ‘Dock’, click ‘Finder’. From ‘Finder’, click ‘Applications > Utilities’. Click on ‘More Info’
• AppleTalk
• LDAPv3
• SLP
• SMB/CIFS
Also, for ‘SMB/CIFS’, click ‘Configure’ and select an appropriate workgroup.
Copy and paste the mp3 media files to ‘Documents’ in the ‘Finder’ window.
Turn on ‘AirPort’ (or wireless sharing).
Wait for a few minutes for the changes to take place.
the ‘Internet & Network’ section, click ‘Sharing’.
click ‘Start’ for each of these services.
From the ‘System Preferences’ window, under the ‘System’ section, click ‘Accounts’. Select
an account and remember its ‘Short Name’ and password. This will be used for the radio to
connect to the MAC.
for ‘Directory Access’ and ensure that it is ‘Read/Write’ enabled. Double-click on ‘Directory
Access’ and enable the following:
Page 28

28
5. The radio should now be able to access the MAC from its ‘Media Player > Windows Shares’ menu
after entering in the MAC account’s short name and password on the radio.
Locate the shared audio files using the radio
1. Power up the radio.
2. Wait for ‘Stations’ to be displayed on the radio, or press the BACK button repeatedly until ‘Stations’ is
displayed.
3. Turn the knob until the radio display shows ‘Media Player’.
4. Press the SELECT button and turn the knob until ‘Windows Shares’ is displayed.
5. Press the SELECT button, turn the knob until ‘Scan for PCs’ is displayed and press SELECT again.
6. The radio will now display ‘Finding PCs’. Once the radio has finished, turn the knob to highlight the
correct PC.
7. Press the SELECT button. The radio will search for shared folders.
8. Turn the knob to highlight the correct shared folder and press SELECT.
9. The radio will display ‘File Scan…’ as it scans through the media files in the shared folder. Text on the
bottom row of the display will change to indicate that the file scan is in progress. If you have a large
number of audio files this could take several minutes to complete.
10. Once the radio has finished scanning, it will display ‘By Album’. You can now browse through the
scanned media files, which will now be organized ‘By Album’, ‘By Artist’ and ‘Play lists’ – if available.
NOTE: The first time the file scan is done a file called ‘.reciva_media_cache’ is written to the folder
where the audio files are stored. This is in order to speed up subsequent file scans.
Listening to a single shared track
1. Turn the knob until ‘By Artist’ is displayed.
2. Press the SELECT button.
Page 29

29
3. Turn the knob until the required artist is displayed.
4. Press the SELECT button.
5. Turn the knob until the required album name is displayed.
6. Press the SELECT button. ‘[Add to Queue]’ will be displayed.
7. Turn the knob until the required track is displayed.
8. Press the SELECT button. The track will begin playing.
Listening to a complete shared album
1. Turn the knob until ‘By Artist’ is displayed.
2. Press the SELECT button.
3. Turn the knob until the required artist is displayed.
4. Press the SELECT button.
5. Turn the knob until the required album name is displayed.
6. Press the SELECT button. ‘[Add to Queue]’ will be displayed.
7. Press the SELECT button. The album will begin playing.
Arranging (Queuing Up) tracks for playback later
1. Highlight the required track.
2. Press the SELECT button. ‘Track Added To Queue’ will be displayed.
Arranging (Queuing Up) albums for playback later
Page 30

30
1. Highlight the required album.
2. Press the SELECT button.
3. Turn the knob until ‘[Add To Queue]’ is displayed.
4. Press the SELECT button. ‘Tracks Added to Queue’ will be displayed.
Controlling playback
1. Use the STOP button to stop playback.
2. Use the PLAY/PAUSE button to either pause a currently playing track or to restart a currently paused
track or to restart a stopped track.
3. Use the SKIP TO PREVIOUS TRACK button to start playback of the previous track in the queue.
4. Use the SKIP TO NEXT TRACK button to start playback of the next track in the queue.
Browsing the list of tracks currently arranged (queue up) for playback
1. Press the BROWSE button. The currently playing track name will be displayed.
2. Turn the knob to see which tracks are queued up for playback.
3. If you want to jump to a particular place in the queue then press the SELECT button when the
required track is displayed.
Removing tracks from the list (queue)
1. Press the BROWSE button. The currently playing track name will be displayed.
2. Turn the knob to select the track you want to remove from the queue.
3. Press and hold the STOP button for 2 seconds and the radio will display: ‘Delete Track?’
Page 31

31
4. Turn the knob to highlight ‘Yes’ or ‘No’.
5. Press SELECT to confirm whether you actually want to delete the track from the queue.
6. If ‘Yes’ was selected then ‘Removed From Queue’ will be displayed.
7. To remove all tracks from the queue, keep pressing BACK until the ‘Media Player’ menu item is
selected, press SELECT and then turn the knob to select ‘Clear Queue’ and press SELECT again.
Playing tracks in random order
1. Select the individual tracks as described previously.
2. Navigate to top-level menu item ‘Media Player’ using the SELECT and BACK buttons.
3. Press the SELECT button.
4. Turn the knob until ‘Playback Mode’ is displayed.
5. Press the SELECT button.
6. Turn the knob until ‘Shuffle’ is displayed.
7. Press the SELECT button.
8. Turn the knob to select YES/NO to confirm that shuffle mode should be enabled.
Playing tracks in the list (queue) repeatedly
1. Select the individual tracks as described previously.
2. Navigate to top-level menu item ‘Media Player’ using the SELECT and BACK buttons.
3. Press the SELECT button.
4. Turn the knob until ‘Playback Mode’ is displayed.
5. Press the SELECT button.
Page 32

32
6. Turn the knob until ‘Repeat’ is displayed.
7. Press the SELECT button.
8. Turn the knob to select YES/NO to confirm that repeat mode should be enabled.
NOTE: 1. IF the shared folders contain more songs than the Internet Radio memory limit, it will
display “Too many files”
2. Repeatedly pressing button P4 will toggle Repeat and Shuffle modes
Set up a Windows PC to allow the radio to access your audio files via a UPnP server
1. If your PC is running Microsoft Windows XP or Windows Vista, then you can use Windows Media
Player 11 (WMP11) to act as your UPnP (Universal Plug and Play) media server 1.0. Windows Media
Player 11 may be downloaded from Microsoft’s website and installed by following the instructions
detailed in its installation wizard.
2. Once installed, Windows Media Player 11 will create a library from all the media files available to it on
your PC. To add new media files to the library, select ‘File > Add to Library… > Advanced Options’,
click ‘Add’ and choose the files you wish to add and click ‘OK’.
3. You will now need to connect your Internet radio to Windows Media Player 11 and configure it to allow
the radio to access your media library. In order to this, you will need to do the following:
a. Keep pressing BACK to get to the radio’s top-level menu and then turn the rotary knob to select
‘Media Player’.
b. Press SELECT and then turn the knob to highlight ‘UPnP Servers’.
c. Press SELECT and the radio will scan for all available UPnP servers. Note, this may take a few
seconds for the radio to complete its scan and before the scan has completed, the radio will
display ‘[Empty]’. The radio will continue to display ‘[Empty]’ if no UPnP servers are found.
d. After a successful scan, select your UPnP server, by rotating the knob if there is more than one
UPnP server, and then press SELECT (note, your radio will display ‘Access Denied’ at this
stage).
Page 33

33
4. Your PC will now prompt you that a device has attempted to connect to your UPnP server. In order to
allow the radio to have access to the media files, you will need to click the ‘Library’ tab from Windows
Media Player 11 and select the ‘Media Sharing…’ item to open the ‘Media Sharing’ window.
Selecting ‘Media Sharing…’ for Windows Media Player 11:
5. From the ‘Media Sharing’ window, the radio will be listed as an unknown device. Click on the
unknown device listed, then click the ‘Allow’ button and then click ‘OK’.
Allowing your Allegro to connect:
Page 34

34
Locating and playing media files using the radio and UPnP
1. Once the UPnP server is configured to share media files with the Internet radio, you can play the files
by doing the following on the radio.
2. Keep pressing BACK to get to the radio’s top-level menu and then turn the knob to select ‘Media
Player’.
3. Press SELECT and then turn the knob to highlight ‘UPnP Servers’.
4. Press SELECT and the radio will scan for all available UPnP servers. Note, this may take a few
seconds for the radio to complete its scan and before the scan has completed, the radio will display
‘[Empty]’. The radio will continue to display ‘[Empty]’ if no UPnP servers are found.
5. After a successful scan, select your UPnP server, by rotating the knob if there is more than one UPnP
server, and then press SELECT.
6. The radio will now list the media categories available from the UPnP server, e.g. ‘Music’, ‘Playlists’
etc. Turn the knob to select which category you wish to browse, press SELECT and turn the knob to
highlight a sub category and press SELECT again. For example, you could select ‘Music’ and then
‘Album’.
7. Turn the knob to highlight the media files that you wish to play and press SELECT.
Page 35

35
8. The radio will display ‘[Add to Queue]’, press SELECT and the radio will add the tracks to its queue
and begin playing them automatically.
Browsing the list of tracks currently arranged (queued up) for playback
1. Press the BROWSE button. The currently playing track name will be displayed.
2. Turn the knob to see which tracks are queued up for playback.
3. If you want to jump to a particular place in the queue then press the SELECT button when the
required track is displayed.
4. It is important to note here that media files scanned from the radio’s ‘Windows Shares’ function can
also be added to the radio’s queue.
Arranging (queuing up) UPnP tracks for playback later
1. Highlight the required track.
2. Press the SELECT button. ‘Track Added To Queue’ will be displayed.
Arranging (Queuing Up) albums for playback later
1. Highlight the required album.
2. Press the SELECT button.
3. Turn the knob until ‘[Add To Queue]’ is displayed.
4. Press the SELECT button. ‘Tracks Added to Queue’ will be displayed.
Page 36

36
Controlling playback
1. Use the STOP button to stop playback.
2. Use the PLAY/PAUSE button to either pause a currently playing track or to restart a currently paused
track or to restart a stopped track.
3. Use the SKIP TO PREVIOUS TRACK button to start playback of the previous track in the queue.
4. Use the SKIP TO NEXT TRACK button to start playback of the next track in the queue.
Removing track from the list (queue)
1. Press the BROWSE button. The currently playing track name will be displayed.
2. Turn the knob to select the track you want to remove from the queue.
3. Press and hold the STOP button for 2 seconds.
4. Turn the knob to highlight ‘Yes’ or ‘No’.
5. Press SELECT to confirm whether you actually want to delete the track from the queue.
6. If ‘Yes’ was selected then ‘Removed From Queue’ will be displayed.
7. To remove all tracks from the queue, keep pressing BACK until the ‘Media Player’ menu item is
selected, press SELECT and then turn the knob to select ‘Clear Queue’ and press SELECT again.
Playing tracks in random order
1. Select the individual tracks as described previously.
2. Navigate to top-level menu item ‘Media Player’ using the ‘Select’ and ‘Back’ buttons.
3. Press the ‘Select’ button.
4. Turn the knob until ‘Playback Mode’ is displayed.
5. Press the ‘Select’ button.
6. Turn the knob until ‘Shuffle’ is displayed.
Page 37

37
7. Press the ‘Select’ button.
8. Turn the knob to select YES/NO to confirm that shuffle mode should be enabled.
Playing tracks in the list (queue) repeatedly
1. Select the individual tracks as described previously.
2. Navigate to top-level menu item ‘Media Player’ using the ‘Select’ and ‘Back’ buttons.
3. Press the ‘Select’ button.
4. Turn the knob until ‘Playback Mode’ is displayed.
5. Press the ‘Select’ button.
6. Turn the knob until ‘Repeat’ is displayed.
7. Press the ‘Select’ button.
8. Turn the knob to select YES/NO to confirm that repeat mode should be enabled.
The Media Player allows you to play unprotected audio files (AAC, AIFF, MP3, RM, WAV, WMA) and
play lists (M3U) stored on a networked PC. Verified to work on Windows 2000 and Windows XP.
Settings Menu
Choosing desired option from the Configure menu
1. Press the ‘Select’ button.
(Note: if you make a mistake at any point, press the ‘Back’ button to go back to the previous screen.)
2. Turn the knob until ‘Settings’ is displayed
3. Press the ‘Select’ button.
4. Turn the knob until the display shows the option you want.
Page 38

38
5. Press the ‘Select’ button to choose the option shown on the display. The options are explained below.
<Network Config>
Enables you to scan again for connection to another wireless network, or to manually configure the
network parameters. Use this if you take the Internet radio to another building where you want to use it,
or if you change your wireless router.
<Upgrade Firmware>
Use this option to download new firmware for the radio from the Grace Digital Audio portal on the
Internet. If there is new firmware available, then the radio will prompt you if you want to download it or
not. Note, at this stage, you can press the radio’s ‘Back’ button to cancel the radio beginning a firmware
upgrade. A Firmware upgrade may take several minutes, so do not switch off the power to the radio until
the operation is complete otherwise the radio may become permanently damaged.
<Language>
Allows you to change the display language.
<Factory Reset>
Puts all the settings back to their defaults as they were when the unit left the factory. If you perform a
factory reset on your radio you will lose all your presets and your wireless network connection.
Please note that your radio’s serial number will still be registered with your Grace Digital internet radio
account (assuming you already registered the radio). Any premium station passwords, my stuff stations
and podcast that were saved on our web site will be saved all re-associate with your radio after you
power back on, log onto your network and download a new stations list.
<Register>
This will display a key that can be used to register the radio on the Grace Digital Audio Customer portal:
http://iradio.gracedigitalaudio.com/
<Clock Setup>
Use this option to set the time, to set an alarm and to view the current alarm setting, see “Setting the
alarm”.
Page 39

39
<Backlight>
Selecting this option will alter the Internet radio’s backlight brightness.
1. After selecting the ‘Backlight’ menu item, the radio will display its list of three menu modes: ‘Inactive’,
‘Active’ and ‘Standby’. These three states are explained below:
• The radio gets into its ‘inactive’ state when there is no button pressed for 30 seconds.
• The ‘active’ state is when there is user activity.
• ‘Standby’ is the state when the radio has been turned off.
2. Rotate the knob to highlight the desired menu mode and press SELECT.
3. The radio will now display the current backlight value for this menu mode. You can alter this value
by rotating the knob to increase or decrease it.
<UPnP>
This menu allows you to change the name of your device. You can name your device any name you
want so other UPnP devices will be able to view the name. Such as Greg’s Kitchen Radio etc.
<Wi-Fi Strength>
This menu will show the signal strength of your Wi-Fi access point as it is seen by the internet radio.
This feature can assist you in locating of your internet radio for optimal performance.
<Other Cool Stuff>
Please note this manual is for the current shipping version of software (FIRMWARE). We periodically
release new software (FIRMWARE) with new features and move some menu items around that may
reorganize your current menu layout. Please have fun and look around at all the features, enjoy listening
to premium music content, talk radio, kids programs, music, NPR, BBC and sports from around the
world, and check with us periodically for feature and content updates.
Page 40

40
Troubleshooting
Please read the User’s Guide carefully to ensure proper use of your system and to enjoy your Allegro’s basic and advanced features.
Please keep this User’s Guide for future reference. If you experience any trouble with your wireless internet radio ALLEGRO, then you may find it useful to visit the help section on our webpage: http://grace.reciva.com/ , or http://www.reciva.com
If you have trouble connecting ALLEGRO to your wireless network, these steps may help to resolve the
problem:
1. Confirm a WiFi connected PC can access and browse the internet (web) using the same network.
2. Check that a DHCP server is available, or that you have configured a static IP address on ALLEGRO.
You can configure a static IP address on ALLEGRO using the menu item ‘Setting - Network Config Edit Config’, and then select ‘No’ for ‘Auto (DHCP)’.
3. Check that your network’s firewall is not blocking any outgoing ports. As a minimum, ALLEGRO
needs access to UDP and TCP ports 80, 554, 1755, 5000, 6000 and 7070.
4. Check your access point does not restrict connections to particular MAC addresses. You can view
ALLEGRO’s MAC address using the menu item ‘Setting - Network Config - View Config - MAC
address’.
5. If you have an encrypted network, check that you have entered the correct key or pass phrase into
ALLEGRO. Remember that text-format keys are case sensitive. If, when attempting to connect to an
encrypted network, your radio displays: ‘Wireless error’ followed by a 5-digit number, then please
ensure that you enter the correct pass phrase for the network. If the problem persists, then you may
need to consult your network configuration.
If your radio can connect to the network successfully, but is unable to play particular stations, it may be
due to one of the following causes:
1. The station is not broadcasting at this time of the day (remember location may be different time zone)
2. The station has reached the maximum allowed number of simultaneous listeners.
3. The station is not broadcasting anymore.
4. The link on ALLEGRO is out of date.
5. The internet connection between the server (often located in a different country) and you is slow.
Try using a PC to play back the stream via the broadcaster’s web site. If you can play back the station
with a PC, use the form at http://grace.reciva.com/ , or contact us at http://www.gracesupport.com/ to
notify us so that we can change the station data that may be accessed by your ALLEGRO at a future
date.
Page 41

41
Specifications
• 802.11b/g WiFi
• Class-D digital amplifier
• 89dB S/N ratio
• Audio output: 8 Watts, 8ohm speaker
• Frequency response: 120Hz – 15KHz ± 3dB
• 128 x 64 dots display
• 29-Key remote control
• 100 - 240V, 12V 1.2A switching power adapter
• Optional 6 x AA Size Alkaline Primary or NiMH Rechargeable Batteries
• Built-in with LED Status Indicator Safety Measurements:
1. Automatic battery type detect & protect
2. Short-circuit protect
3. Timeout detect
4. –Δ (Delta) V detect
• Built-in Battery Backup Real-Time Clock (RTC)
• Unit dimensions: 5.1” x 6.9” x 4.1”
• Unit weight: 2.2lbs
* Specifications subject to change without notice
.
(not Included)
.
License Information and Warranty
This product contains software licensed under version 2 of the GNU Public License and version 2.1 of
the GNU Lesser Public License. The source code for this software is available from
http://iradio.gracedigitalaudio.com/gpl
This product includes technology owned by Microsoft Corporation and under a license from Microsoft
Licensing GP. Use or distribution of such technology outside of this product is prohibited without a
license from Microsoft Corporation and/or Microsoft Licensing, GP as applicable.
Your Internet Radio is guaranteed against original defects in materials, manufacture and workmanship
for one year
from the date of purchase.
Page 42

42
Under this warranty, repair of any defect or, at the company’s discretion, replacement of the faulty
component(s) without charge for parts or labor, is agreed. This warranty does not imply any acceptance
by Grace Digital, retailers or its agents for consequential loss or damage and specifically excludes fair
wear and tear, accident, misuse of unauthorized modification.
This warranty is applicable in the United States only and does not in any way limit the customer’s legal
rights. Claims and enquiries under the warranty for Grace products purchased outside the USA should
be addressed to the local importers or distributors. If you have reason to claim under the warranty
please contact your dealer in the first instance. Please retain all original packaging materials for
possible future use. We suggest that you complete details of purchase now and keep this information in
a safe place for future reference. Grace Digital provides their Canadian, Central & South American
dealers, distributors, and retailers with a 1 year warranty.
Warranty (continued)
• Your ALLEGRO (GDI-IRD4000) is supported by a limited manufacturer’s warranty for product
defects in material or workmanship that may be evident under normal use for 1 year from date of
purchase from an authorized franchisee or dealer.
• The warranty stated herein is the only warranty applicable to this product. All other warranties,
expressed or implied are hereby disclaimed and are limited by the written limited warranties
contained herein. Except as provided herein, the manufacturer shall have no liability or
responsibility to a customer or any other person or entity with respect to any liability, loss or
damage caused directly or indirectly by use or performance of the product or arising out of any
breach of this warranty, including, but not limited to, any damages resulting in inconvenience, loss
of time, data, property, or profit or any indirect, special, incidental, or consequential damages, even
if the manufacturer has been advised of the possibility of such damages.
• In the event of a product defect during the warranty period, return of the product and your sales
receipt as proof of purchase date for your GDI-IRD4000 unit is required and shall, at the discretions
of the manufacturer, result in: (a) correction of the defect by repair without charge for parts and
labor; (b) replacement with the same or similar design; or (c) refund for the purchase price if
purchased directly and returned within 30 days of purchase. All replaced parts and products, and
products, on which a refund may be made, become the property of the manufacturer. New and
reconditioned parts and products should be warranted for the remainder of the original warranty
period.
• The warranty does not cover:
(a) damage or failure caused by or attributed to acts of God, abuse, accident, misuse, improper
installation or improper maintenance, alteration, lightning or excessive voltage or current;
(b) any repairs other than those provided by a GDI-IRD4000 authorized service facility;
(c) consumables such as fuses or batteries;
(d) cosmetic damage;
(e) transportation, shipping or insurance costs;
(f) costs of product removal, installation, set-up, service adjustment or re-installation.
• Customers are responsible for any shipping costs related to product return, repair and/or refund.
Page 43

43
• Warranty terms may be revised without notification at the discretion of the manufacturer.
Customer Service and Support
• For questions regarding your product please visit us at: www.gracedigitalaudio.com
or contact us at: http://www.gracesupport.com/
Monday - Thursday 9:00 AM to 4:00 PM (PST)
Friday 9:00 AM to 12:00 PM (PST)
__________________________
APPENDIX
Step 1: Set Up Media Sharing In Windows Media Player 11
After you download and install Windows Media Player 11 for Windows XP and connect your radio to
your network, you need to set up media sharing so that you can share music with your radio.
The following steps describe how to set up media sharing in Windows Media Player 11.
1. In Windows Media Player 11, click the small arrow below the Library tab, and then click Media
Sharing.
Page 44

44
2. In the Media Sharing dialog box, select the Share my media check box.
Page 45

45
3. In the list below the Share my media to: check box, click your Radio*, click Allow, the selected device
will now show a green tick and then click OK.
• If your device does not appear in the list of devices perform the following steps;
1. From the “Media Player” menu of your internet radio select “UPnP Servers”
2. A list of available computers will appear.
3. Select the required computer.
Page 46

46
4. The display may show “Access Denied (801)”
5. Your device will now appear in the list. If you want to confirm this is your radio, right click the device
and select Properties your radio’s MAC address will be shown.
Page 47

47
Step 2: Play Music On The Internet Radio
After installing and configuring your radio and Windows Media Player 11, you are now ready to play
music wirelessly.
The following steps describe how to play music using the Radio.
1. Using the control, to select “UPnP Servers” from the “Media Player” menu.
2. Select the computer you wish to play the music files from.
3. Use the control to browse by All Music, Genre, All Artists, Contributing Artists, Album Artists,
Composers, Albums, Play lists, Folders or Star Ratings and then press Select.
4. Select the music track/tracks you want to play, and then press the ‘Select’ button. Enjoy!
__________________________________________________________________________________________
Page 48

48
©2009 Grace Digital Inc. San Diego, CA
 Loading...