

Echowell Opal-100, Opla-200, Ruby-100, Ruby-200 User Manual

Pul s p o rts-100/200
E0- -E1
Index
1.
USER MANUAL
………………………….…………….……….… 1
2.
OPAL & RUBY 100/200 PARTS
………………...…..……… 2
3.
INSTALLATION
…………………………………………………… 3
How to wear the chest belt?
……...………...……………… 3
4.
KEY OPERATION
…………………………………….………….. 4
5.
TIME MODE CIRCULATION
……………...…….……………5
6.
PULSE MODE CIRCULATION ………….…………………… 5
7.
DATA SETTING PROCESSES
……………………………… 5
8.
PULSPORTS FUNCTIONS
…………………………………. 6
Watch Functions
………..……………………………….……… 6
Heart Rate Functions
………………..…………….…………. 6
9.
WATCH FUNCTION DESCRIPTION
……………………… 7
Clock Mode
………………………..………………..……………. 7
Countdown Timer Mode
……………...……….……………… 7
Alarm Mode
…………...………...……………....……..…………. 8
Data Mode
……………………..……………...……..………..….. 8
Chronometer Mode
…………………………………………….. 9
10.
HEART RATE FUNCTION DESCRIPTION
…….…………9
Start/Stop Heart Rate Measure Function
…….……….... 9
Start/Stop Heart Rate Data Record Function
….....…… 9
Reset Heart Rate Record Data
…………………………… 10
Heart Rate Display Description
…………………………... 10
Target Zone Limit
………………………………….….……….. 10
Stop Watch Mode
…………………...………………...………. 11
Calories Mode
………………………………………..………… 11
Exercise Time Mode
…………………………………………. 11
Weight Lose Mode
…………...……………………..………… 11
%Fat Loss Mode
………………………………………………..11
Ft.los Mode
………………………...…………….……………… 12
Maximum Mode
………………….…………...……..………… 12
In Target Zone Time Mode
………....………..…………….. 12
Above Target Zone Mode
……………………..….………… 12
User Data Mode
……….....…………………………..……….. 12
Average Mode
………………………………….….…..………. 12
11.
PRECAUTIONS
……………………………………………………. 13
12.
SPECIFICATIONS
………...……………………………………… 13
13.
USER GUIDE
…………………………………….………………… 14
14.
READ THE FOLLOWING MESSAGES BEFORE USING
THE HEART RATE MONITOR
……………………………… 15
Correlation of Basic Metabolism and Heart Rate
…… 15
Four Essences Of Exercise
………………………… 17
Exercise and losing weight
………………………………… 20
S
pecial Design Of Pulsports-Programmable Target Zone…
24
FOR MODEL
OPAL- 100/200
RUBY-100/200
Pu l s p orts - 100/200
Pu l s p orts- 1 0 0/200
E2- -E3
OPAL & RUBY
1
00/200 PARTS
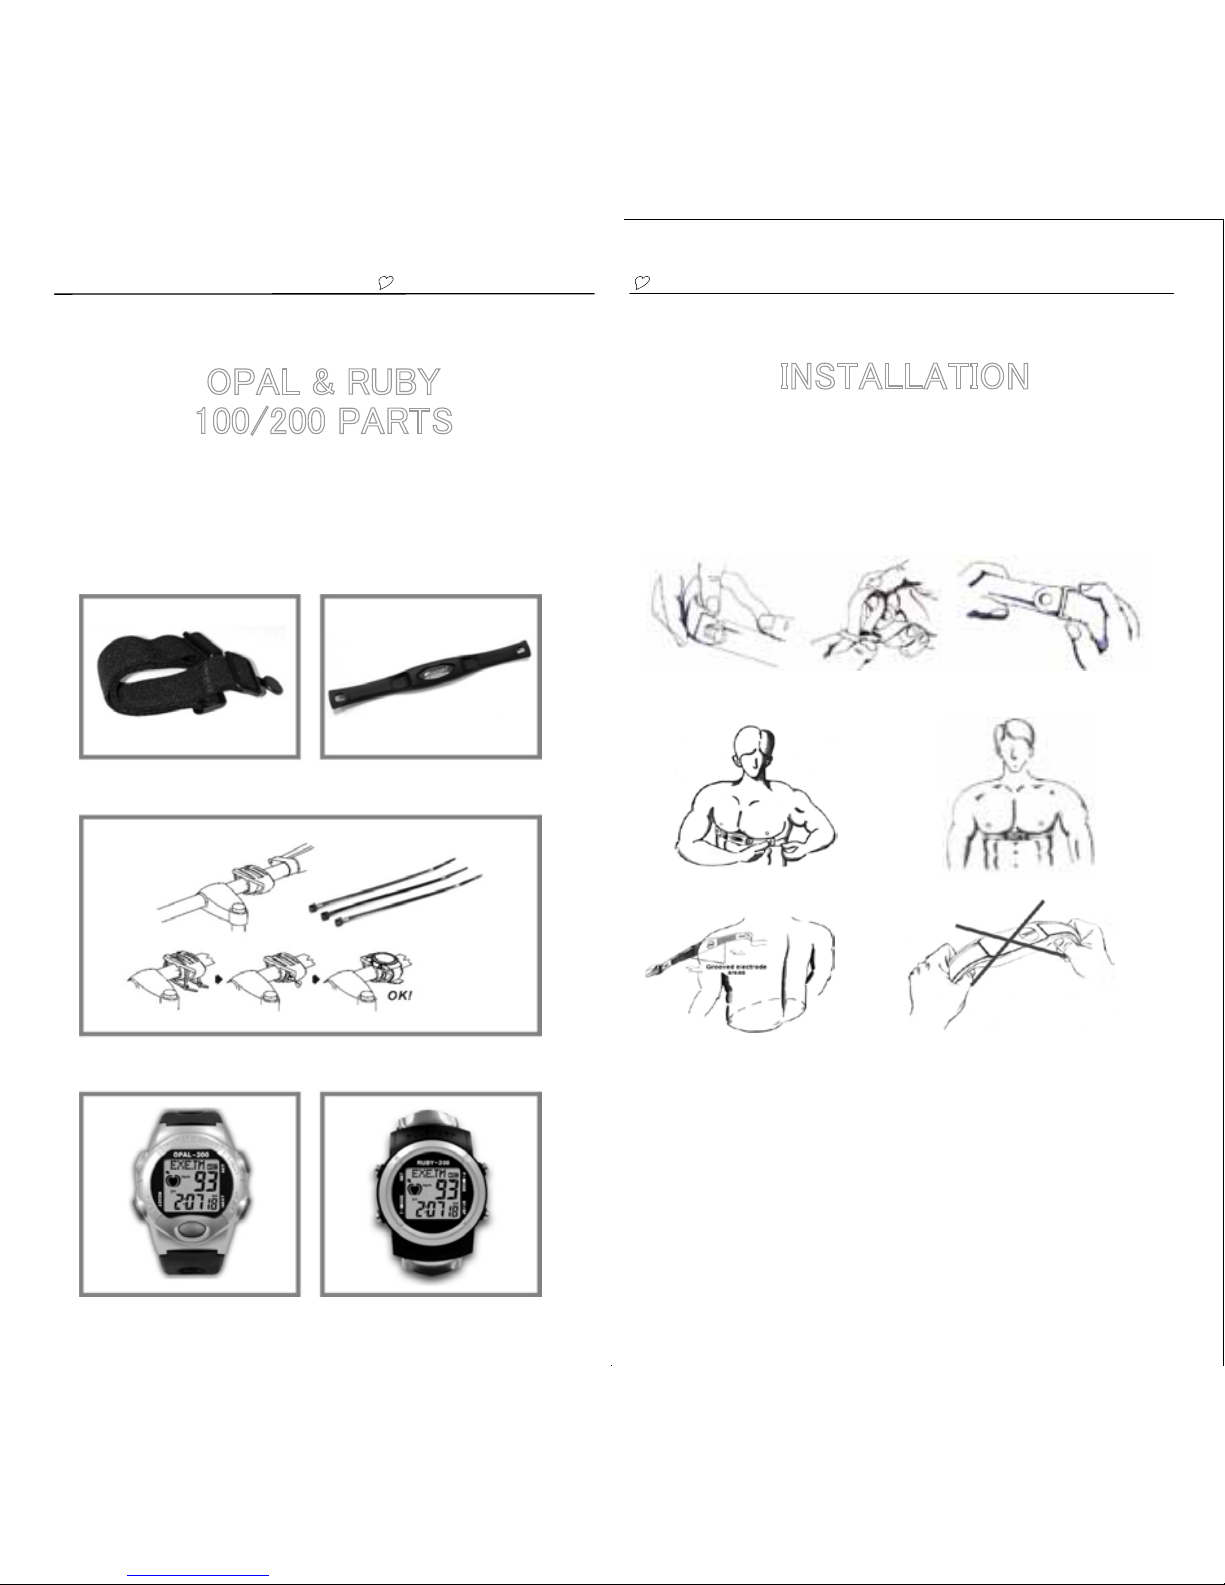
Your PULSPORTS consists of four parts:
1. Elastic strap 2. Transmitter
3. Bracket For Bicycle
4. OPAL- 100/200 RUBY- 100/200
I
NSTALLATION
How to wear the chest belt?
Fig. 1 Fig. 2 Fig. 3
Fig. 4 Fig. 5
Fig. 6
Fig. 7
1. Fasten the fastener at one end, put the chest belt on your chest and
loosen the stretch band. (Fig. 1, 2 and 3)
2. Adjust the length of the stretch band until you feel conformable, but
the stretch band must cling to the chest; then fasten the fastener at
the other end. (Fig. 4)
3. Adjust the sensor to the center of your chest and be sure the
backside of the sensor is clings to your chest and touches the skin.
(Fig. 5.6)
4. The chest belt has to be worn while us
ing the heart rate function. The
distance transmission should be less than 1 meter (3 feet).
5. Do not bend or fold the chest belt to preventing damage. (Fig. 7)
Cable ties x 3
Pu l s p orts- 100/200
Pu l s p o rts-100/200
E4- -E5
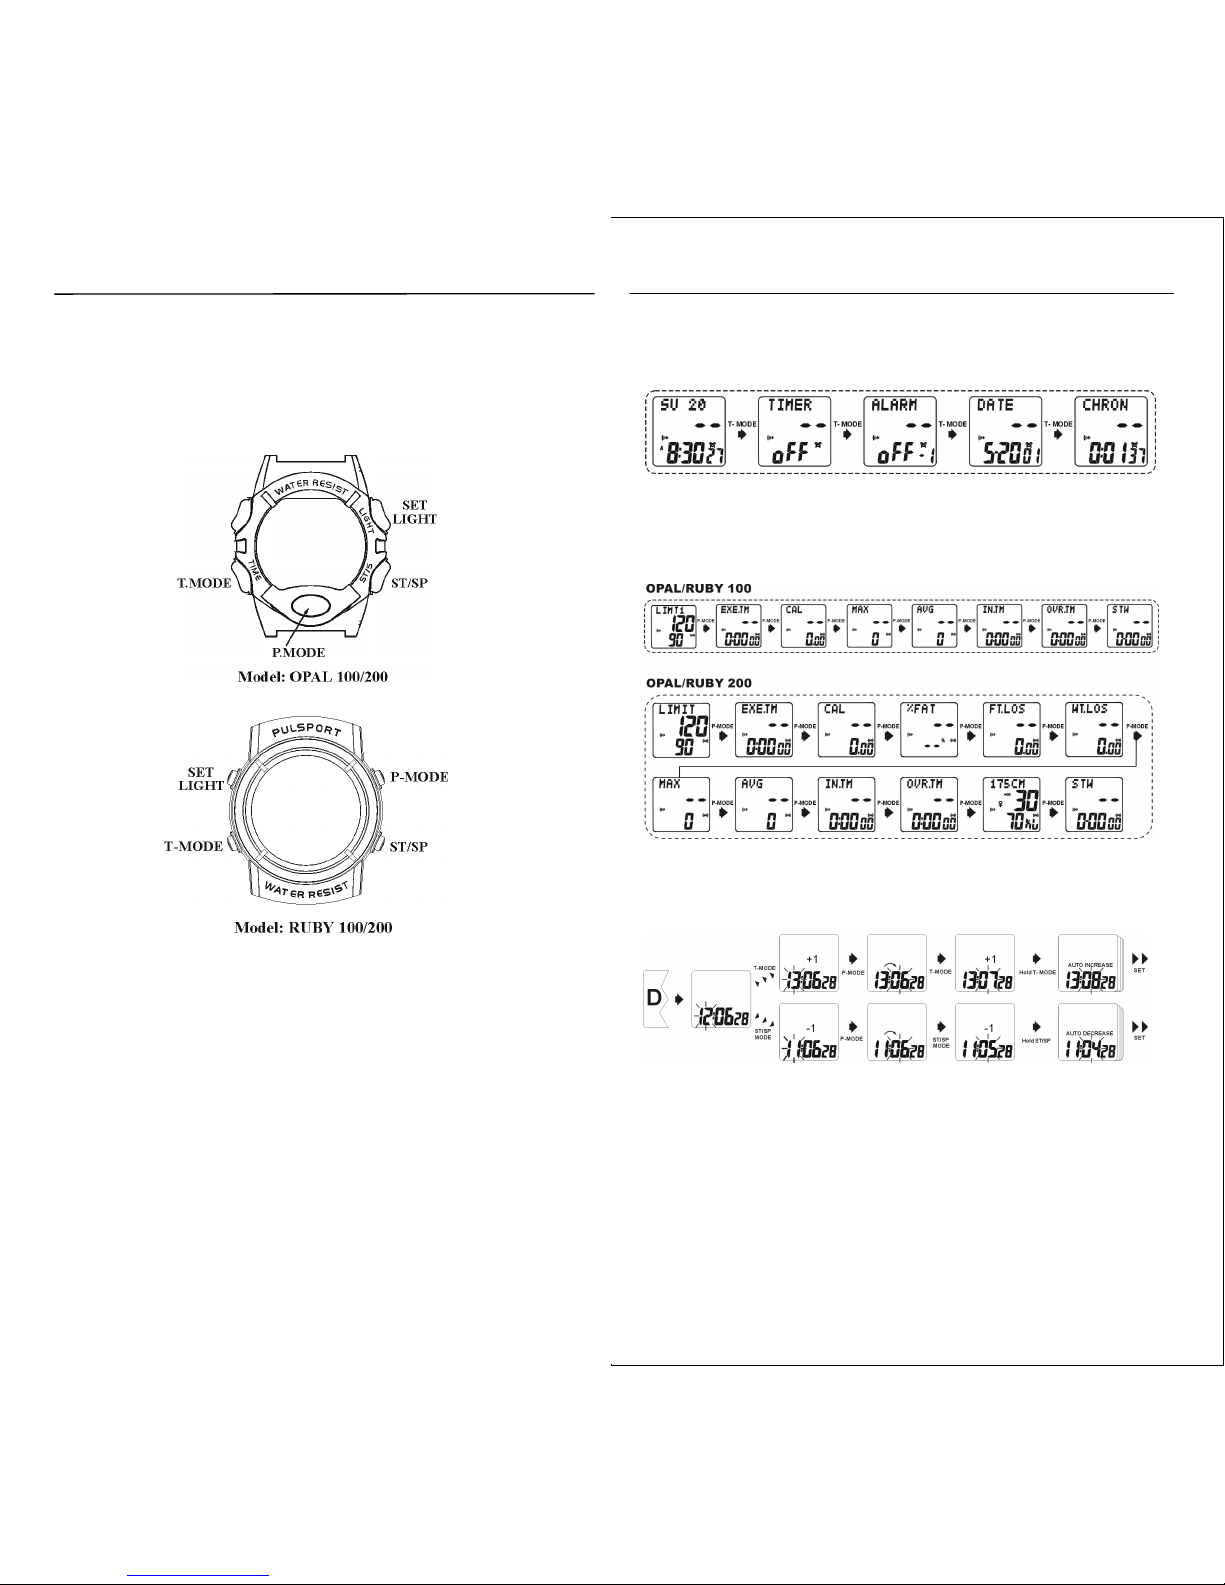
KEY OPERATION
Basic key operations:
SET – Hold for 2 seconds to enter data setting mode
T.MODE – Change watch function group
P.MODE – Change pulse function group
ST/SP – Start / Stop
LIGHT – EL Light (press during 3 second interval).
Data setting key operations:
SET – Press to quit data setting
T.MODE – Press to add one unit to the value
– Hold to increase the value automatically.
P.MODE – Press to change the value
ST/SP – Press to decrease the value
– Hold to decrease the value automatically.
Fig. A) TIME MODE CIRCULATION
Fig. B) PULSE MODE CIRCULATION
Fig. C) DATA SETTING PROCESSES
1. Press P.MODE to change setting digit.
2. Press T.MODE to add to the value, hold to add to the value
automatically.
3. Press ST/SP to decrease the value, hold to decrease the value
automatically.
4. Press SET to complete setting and quit.
Pu l s p orts- 100/200
Pu l sports-100/200
E6- -E7
PULSPORTS FUNCTIONS
※Please refer to the model number purchased; some functions
may not be available.
1. CLOCK: 12/24-hour, date, day of week display.
Watch functions
2. DATE: Year, Month, Date, Day of week, 2000-2099.
3. COUNTDOWN TIMER: Countdown timer from 99:59:59-00:00:00.
4. ALARM: Beep alarm, 3 settings available.
5. CHRONOMETER: Stopwatch from 00:00:00-99:59:59.
6. CHIME & Key beep: Chime and key beep option
7. EL back light.
8. Water resistant (3 ATM).
9. Low battery power indicator.
1. Display the current heart rate (HR).
Heart Rate Functions
2. STOPWATCH: 00:00:00 to 99:59:59 when the heart rate is detected.
3. CAL: Calculate expended calories during exercise (0 to 9999.99
Kcal) according to your personal data input.
4. EXE.TIME: Calculate exercise time while the heart rate is at the
lower limit of a preset target zone.
5. WT.LOS: Calculate weight lost from exercise (0 to 9999.99g)
according to your personal data input. (Just For
Opal/Ruby 200 Only).
6. % FAT Loss: Calculate the percent of fat lost clearly from the all
expended calories; thus you will see that the fat
lost varies and depends on the intensity of heart
rate. (Just For Opal/Ruby 200 Only).
7. FT.LOS: Calculate fat lost from exercise (0 to 9999.99g)
according to your personal data input. (Just For
Opal/Ruby 200 Only).
8. MAX: Maximum HR during exercise (40 to 240 bpm).
9. IN.TM: Exercise time within setup target zone (00:00:00 to
99:59:59).
10. OVR.TM: Time over upper limit of target zone during exercise
(00:00:00 to 99:59:59).
11. USER: User data setup, age (5 to 99), weight (10 to 199 kg or 10
to 499lbs.), and sex. (Just For Opal/Ruby 200 Only).
12. AVG: Average HR during exercise (0 to 240 bpm).
* bpm (beats per minute) 40 to 240.
WATCH FUNCTION
DESCRIPTION
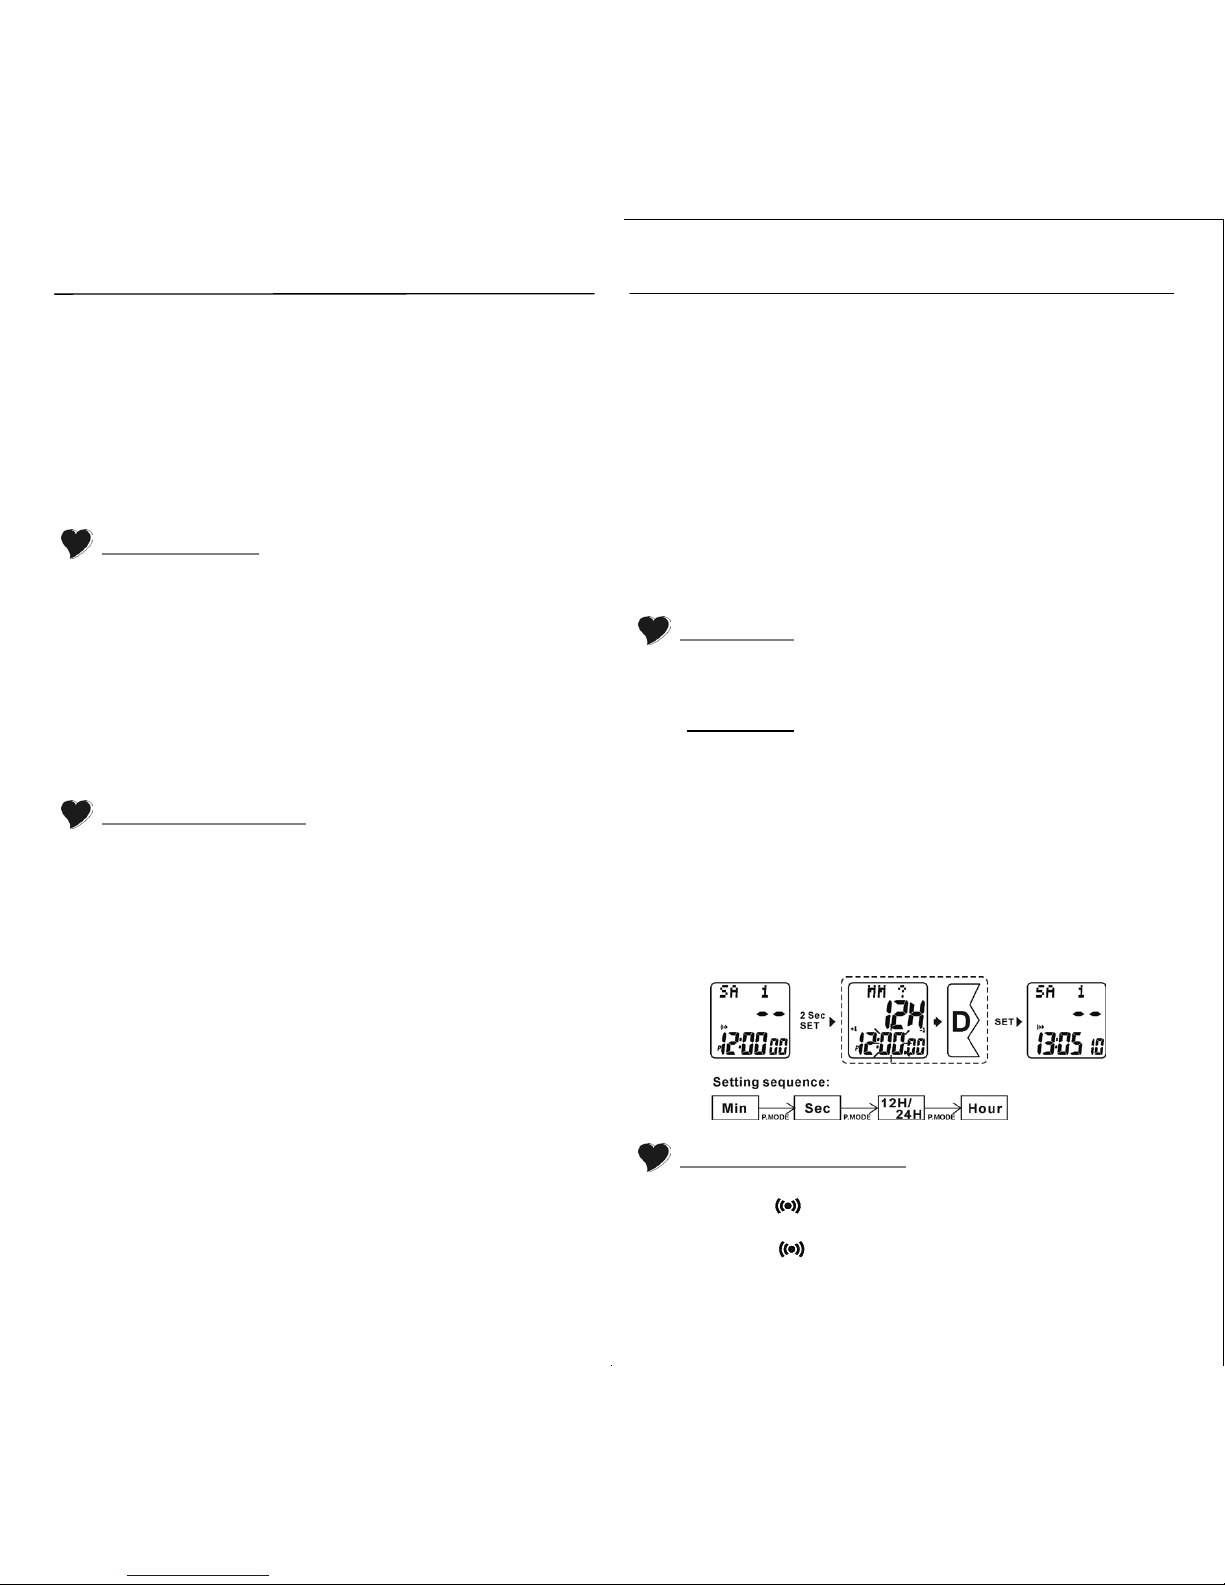
1. 12H or 24H switchable.
Clock mode
2. Turn Chime function On/Off by press ST/SP 2 seconds in this
mode.
3.
a). Press T.MODE to select “CLK” mode.
Clock setting:
b). Press SET 2 seconds to start clock setting mode.
c). Press P.MODE to change the digit to be set.
d). Press T.MODE to add to the value, hold to add to the value
automatically.
e). Press ST/SP to decrease the value, hold to decrease the
value automatically.
f). Press T.MODE or ST/SP to select 12H or 24H mode.
g). Press T.MODE or ST/SP to reset the seconds to “00”.
h). Press SET to complete setting and quit.
1. Press ST/SP to start/stop countdown timer.
Countdown timer mode
2. Symbol as ” “ will display when start counting down.
3. There will be a 10 seconds beep when the function is
completed, ” ” will flash, and OVEr will display on the LCD.
4. Stop beep and reload pre-set data by pressing any key.
5. Reload pre-set date at any time by pressing T.MODE 2 seconds.
 Loading...