

Echowell echo a1, echo a2 User Manual

1

2
Contents
Package Contents ....................................... 3
Introduction ................................................. 4
Using Your Computer ................................... 6
1.Main Unit Setup ........................................................ 6
1. Initiation of Main Unit
2. Basic Display Modes
2. Overview of Button Operation............................... 8
1. In Data Setting Mode
2. In General Mode
3. In Altitude Calibration Mode
3. Wheel Circumference Measurement ................11
4. Basic Setting & Operation ...................................13
5. General Display .....................................................17
6. Battery Replacement ............................................18
7. General Mode Display ..........................................19
8. About Altitude Calibration ...................................20
9. Temperature Display ............................................21
10. Bike 1 /Bike 2 Selection ......................................21
11. Data Reset ............................................................22
12. EL Backlight .........................................................23
13. Sleep Mode ..........................................................23
Functions ..................................................... 24
Technical Specifications ............................ 30
General Specifications ................................ 33
Precautions ................................................. 34
Trouble Shooting ........................................ 35
3
Package Contents
1. MAIN UNIT
Main unit
3V battery (CR2032)
2. BRACKET SET
Bracket for handlebar or stem
Bracket base
Twin adhesive tape
Cable ties
3. SPEED TRANSMITTER SET
Speed transmitter
3V battery (CR2032)
Transmitter rubber pad
Cable ties
Magnet set
O-ring
4. CADENCE TRANSMITTER SET (for Echo-a2 only)
Cadence transmitter
3V battery (CR2032)
Transmitter rubber pad
Cable ties
Magnet set
O-ring
1.The installation of the accessories is on the separate sheet.
2.The accessories or parts are subject to change without prior
notice.

4
Introduction
Congratulations on having chosen the cycle computer with altimeter
functions from ECHOWELL. The easy operation of your new
Echo-a1 or Echo-a2 will let you enjoy much fun from riding. Please
read this manual carefully before using the device to get familiar with
the operation logic.
The altitude calculation of this cycle computer works by measuring
the atmospheric pressure. Since the weather is changing, the
altitude (converted from the air pressure measurement) for the same
location may be variable at different times. However, if there's no
rapid weather change, the altitude differences caused by the
weather are limited and can be generally accepted. Do not use this
computer as a specialized device for altitude measurement.
The altitude value shown in each Echo-a1 or Echo-a2 computer is
pre-calibrated by the precise instrument at the factory before
shipment. However, to get accurate basis altitude, we suggest that
you calibrate the current altitude data before each ride. And the
calibration of altitude for your Echo-a series is quite easy. (Refer to
the content about button operation.) You may obtain the altitude
information from topographic maps or the Internet. If you are
unaware of your basis altitude or do not care about the home altitude,
you may reset the altitude to zero before riding. In this way, the
cyclist can still enjoy the fun of learning the accumulated altitude
gains during the trip. The altitude data can be your reference for
riding over the same hills or mountains next time.

5
There is a highly sensitive pressure sensor inside each Echo-a1 or
Echo-a2 cycle computer, and there is a hole at the bottom of each
main unit for measuring the pressure. You should always keep the
hole clean to avoid incorrect measurement and must not poke a
needle or any pointed article into it to avoid damage. The
atmospheric pressure measured by the sensor will be converted into
current altitude. After using your Echo-a1 or Echo-a2, you are sure
to get a lot of fun from riding with it.

6
Using Your Computer
1.Main Unit Setup
1. Initiation of Main Unit:
1. Before normal operation, initiate the main unit and select units
as stated below:
1-1. Push buttons A, B, C simultaneously for 3 seconds, and
you'll see the auto-testing display.
1-2. Press any button to quit auto-testing display, and then
select units of temperature, altitude and distance.
1-3. Press the C button to quit unit selection and enter
General Mode.
2. Timing to initiate the main unit and select units is as listed
below:
2-1. The first time when you use the computer
2-2. When the display becomes irregular due to improper use
2-3. Whenever you change the battery
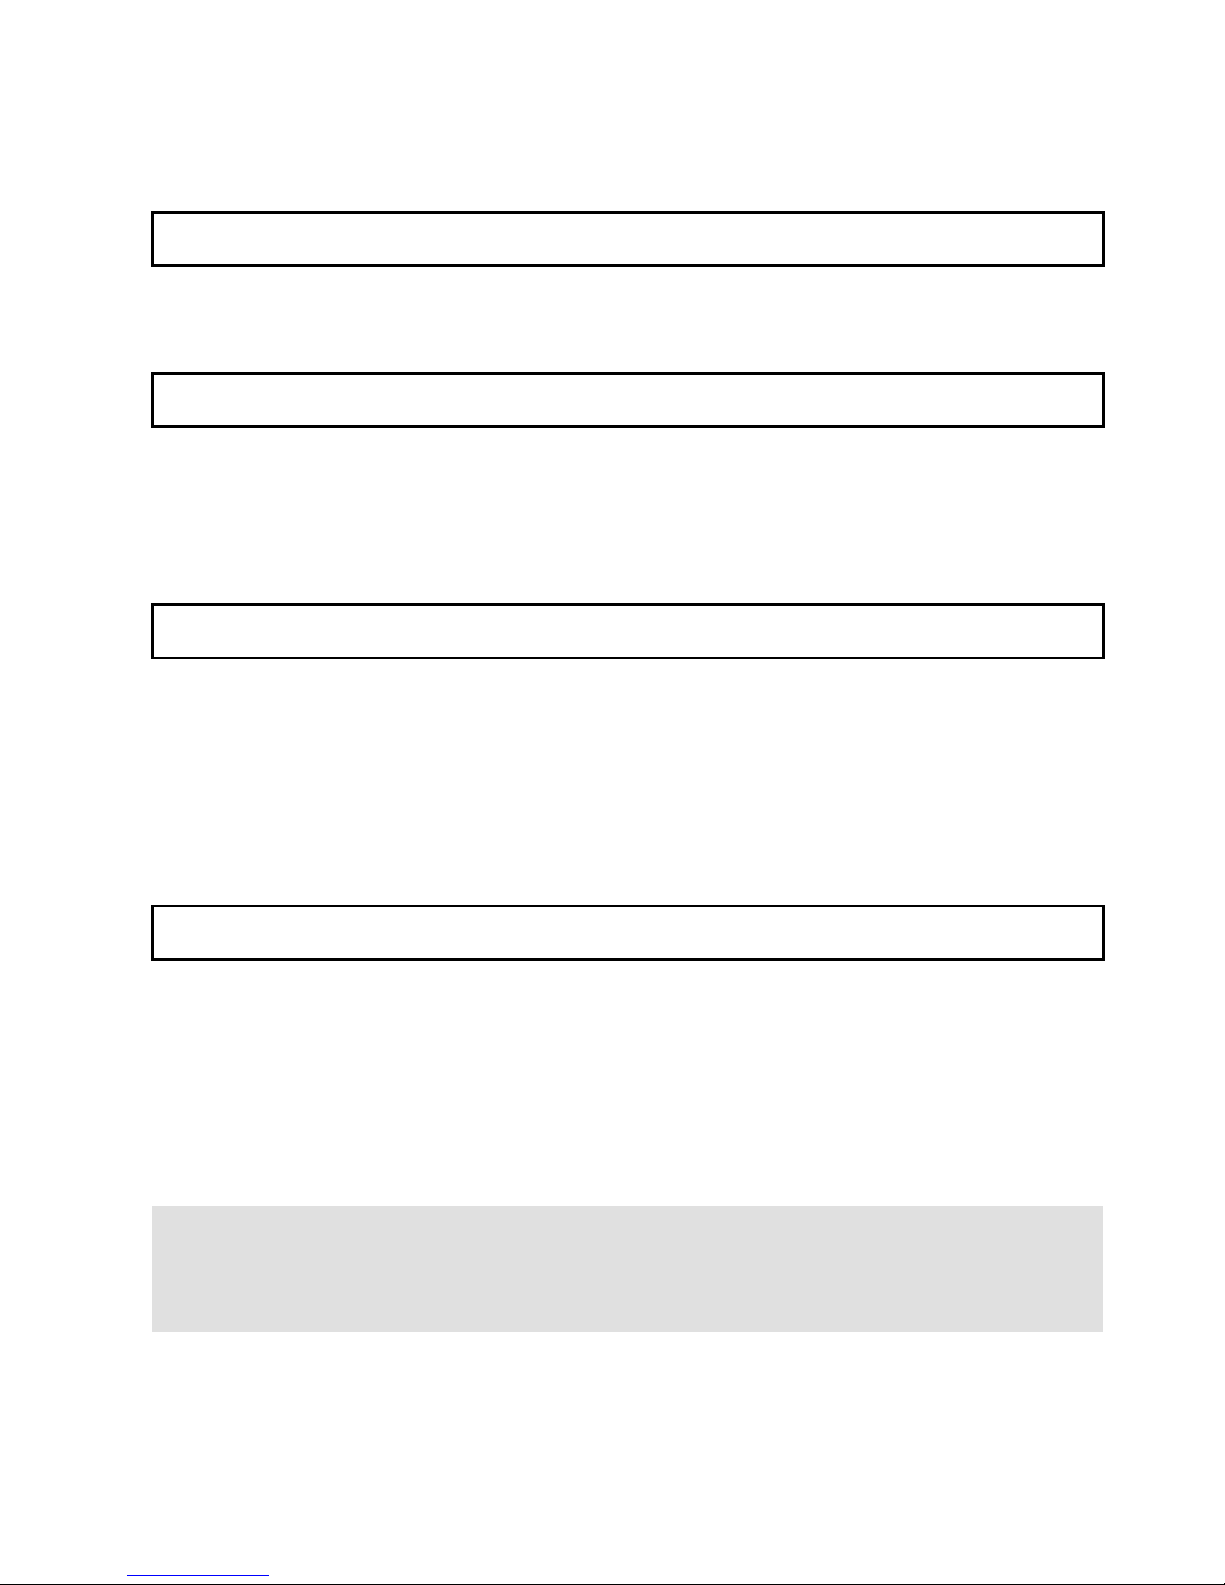
2. Basic Display Modes:
After initiating the computer, selecting units, you should enter
Data Setting Mode to set some basic data like wheel
circumference and clock time etc. Then go to General Mode for
normal operation.
Before riding, you should enter Altitude Calibration Mode to
calibrate the current altitude value.
7
The following is the General Mode Display during riding for
reference:
8
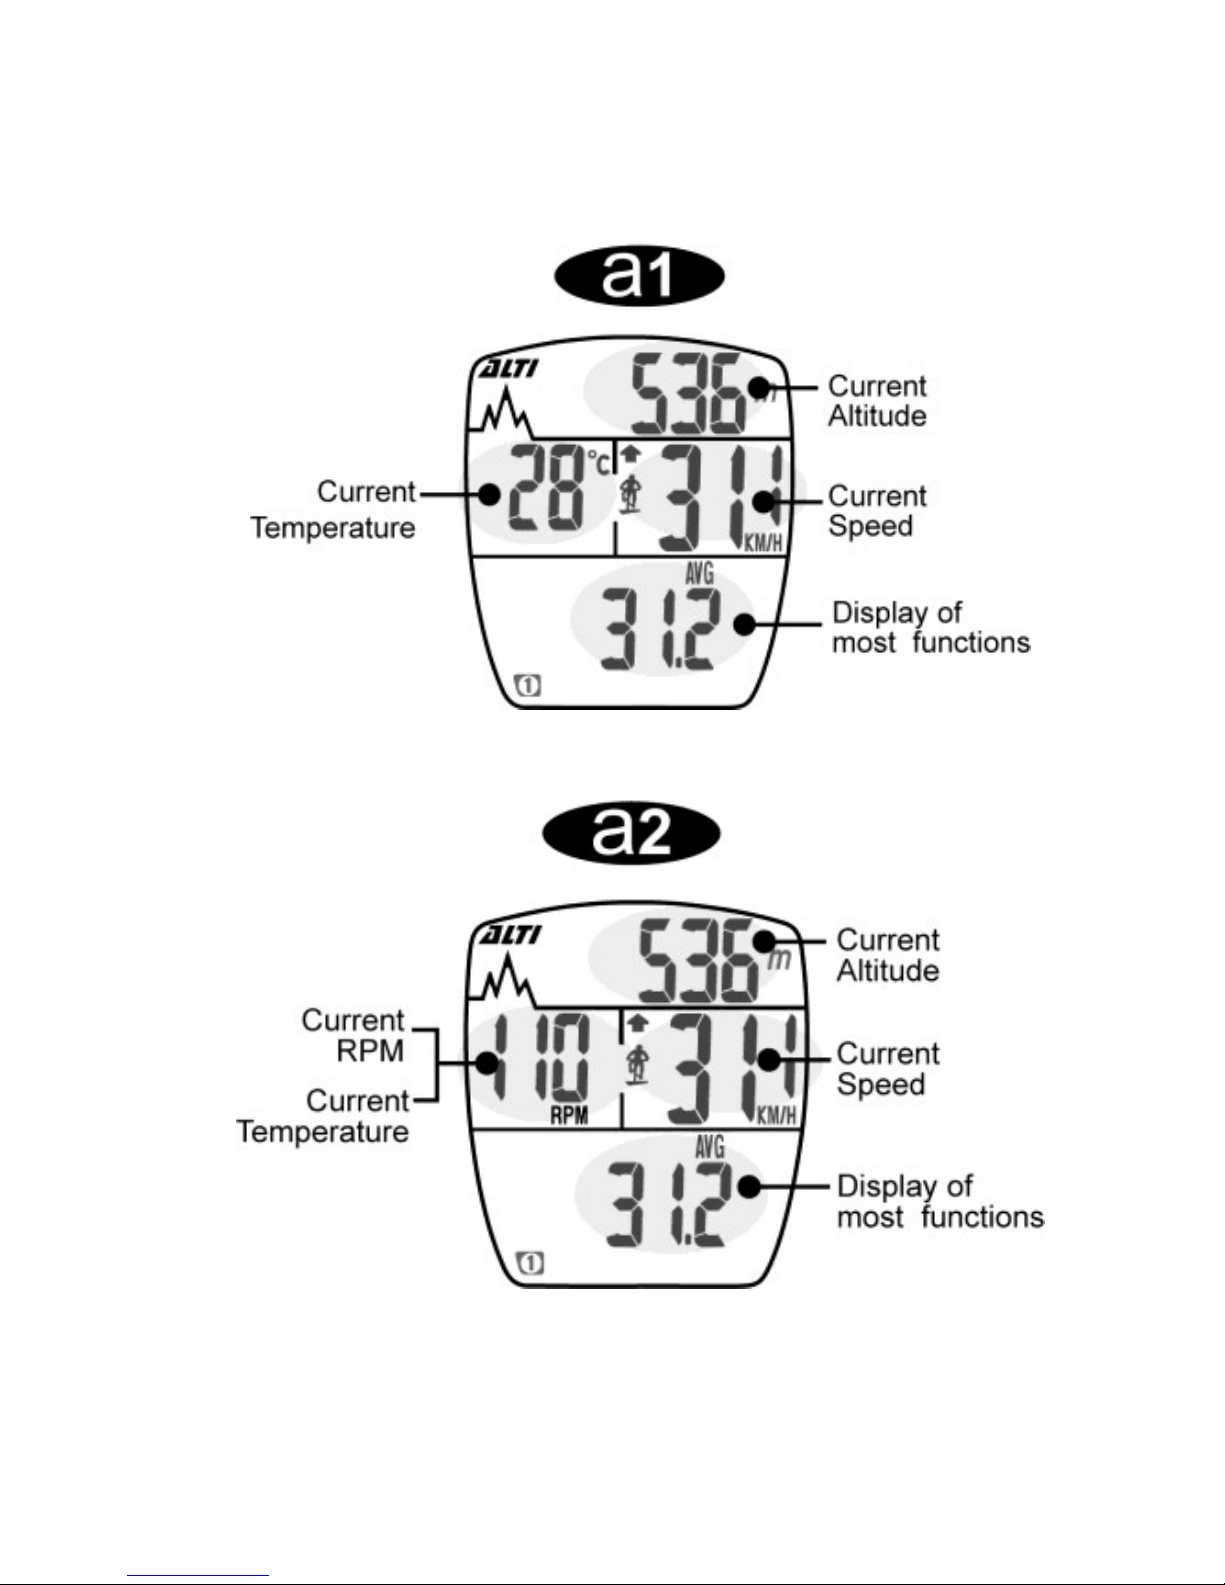
2. Overview of Button Operation
This computer includes three major display modes as shown below:
Data Setting Mode, General Mode, and Altitude Calibration Mode.
In this section, you'll learn the function of each button in each mode.
The following text lets you know how to use the buttons to operate
the computer step by step.
1. In Data Setting Mode:
Tips:
1. The buttons you'll use in Data Setting Mode: A, B, C.
2. Button for entering or quitting Data Setting Mode: C
3. Button for changing the value of a flickering digit: A
4. Button for switching to the next digit or setting: B
Button A:
1. Press the A button to change the value of a
flickering digit in a loop.
2. If you keep pushing the A button, the digit value will
automatically increase.
3.Release the A button when the required value of a
digit is displayed.
Button B:
1. Press the B button to move to the next digit in a
loop.
2. Push the B button for 1 second to move to the next

9
setting.
Button C:
1. In General Mode, press the C button to enter Data
Setting Mode.
2.In Data Setting Mode, press the C button to exit and
return to General Mode.
Button D:
No function.
How do you enter Data Setting Mode after initiating the computer?
After initiating the computer by pressing the A, B, C buttons at the same
time for 3 seconds, press any button to quit auto-testing display, and
then select units. After unit selection, press the B button for 2 seconds
to enter Data Setting Mode.
2. In General Mode:
Tips:
1. The buttons you'll use in General Mode: A, B, C, D
2. Button for changing the function display: A
3. Button for resetting the trip data: A (3's)
4. Button for entering Data Setting Mode: C
5. Buttons for entering Altitude Calibration Mode: A+B (3's)
Button A:
1. Press the A button to move to the next function
display.
2. Press the A button for 3 seconds, and you will
reset the following data:
AVG SPD, MAX SPD, DST, RTM, ALT, MAX ALT,
AVG RPM, MAX RPM.
(AVG RPM and MAX RPM are for Echo-a2 only.)
Button B:
1. Press the B button to turn on the EL backlight.
2. The following function is for Echo-a2 only:
Press the B button for 1 second, and the
temperature will be displayed.
Button C:
Press the C button, and you'll enter Data Setting
Mode.
Buttons A+B:
Push both buttons for 3 seconds, and you'll enter

10
Altitude Calibration Mode.
Button D:
Press the D button to switch to Bike 1 or Bike 2.
3. In Altitude Calibration Mode:
Tips:
1.The buttons you'll use in Altitude Calibration Mode: A, B.
2.Buttons for entering or quitting Altitude Calibration Mode: A+B (3's)
3.Buttons for quickly resetting the current altitude to zero: A+B (1's)
Buttons A+B:
1. In General Mode, push A and B buttons for 3
seconds to enter Altitude Calibration Mode.
2. In this mode, press A and B buttons at the same
time briefly, and the current altitude value will
return to zero. It's convenient for quick setting.
3. Push A and B buttons for 3 seconds to quit this
mode and return to General Mode.
Button A:
1. Press the A button to change the plus sign to
minus, or change the minus sign to plus.
2. Press the A button to change the value of a
flickering digit during setting.
Button B:
Press the B button to move to the next digit in a
loop during setting.
About Altitude Calibration:
1. If you are aware of your home altitude or basis altitude before riding, you can
directly adjust the current altitude data after you enter this mode.
2. If you do not know your basis altitude before riding or if you do not care
about the altitude of the starting point, you may return the current
altitude value to zero in the calibration mode by pressing both A and B
buttons at the same time briefly. In this way, the rider will still enjoy the
fun of learning the accumulated altitude gains during each ride.
11
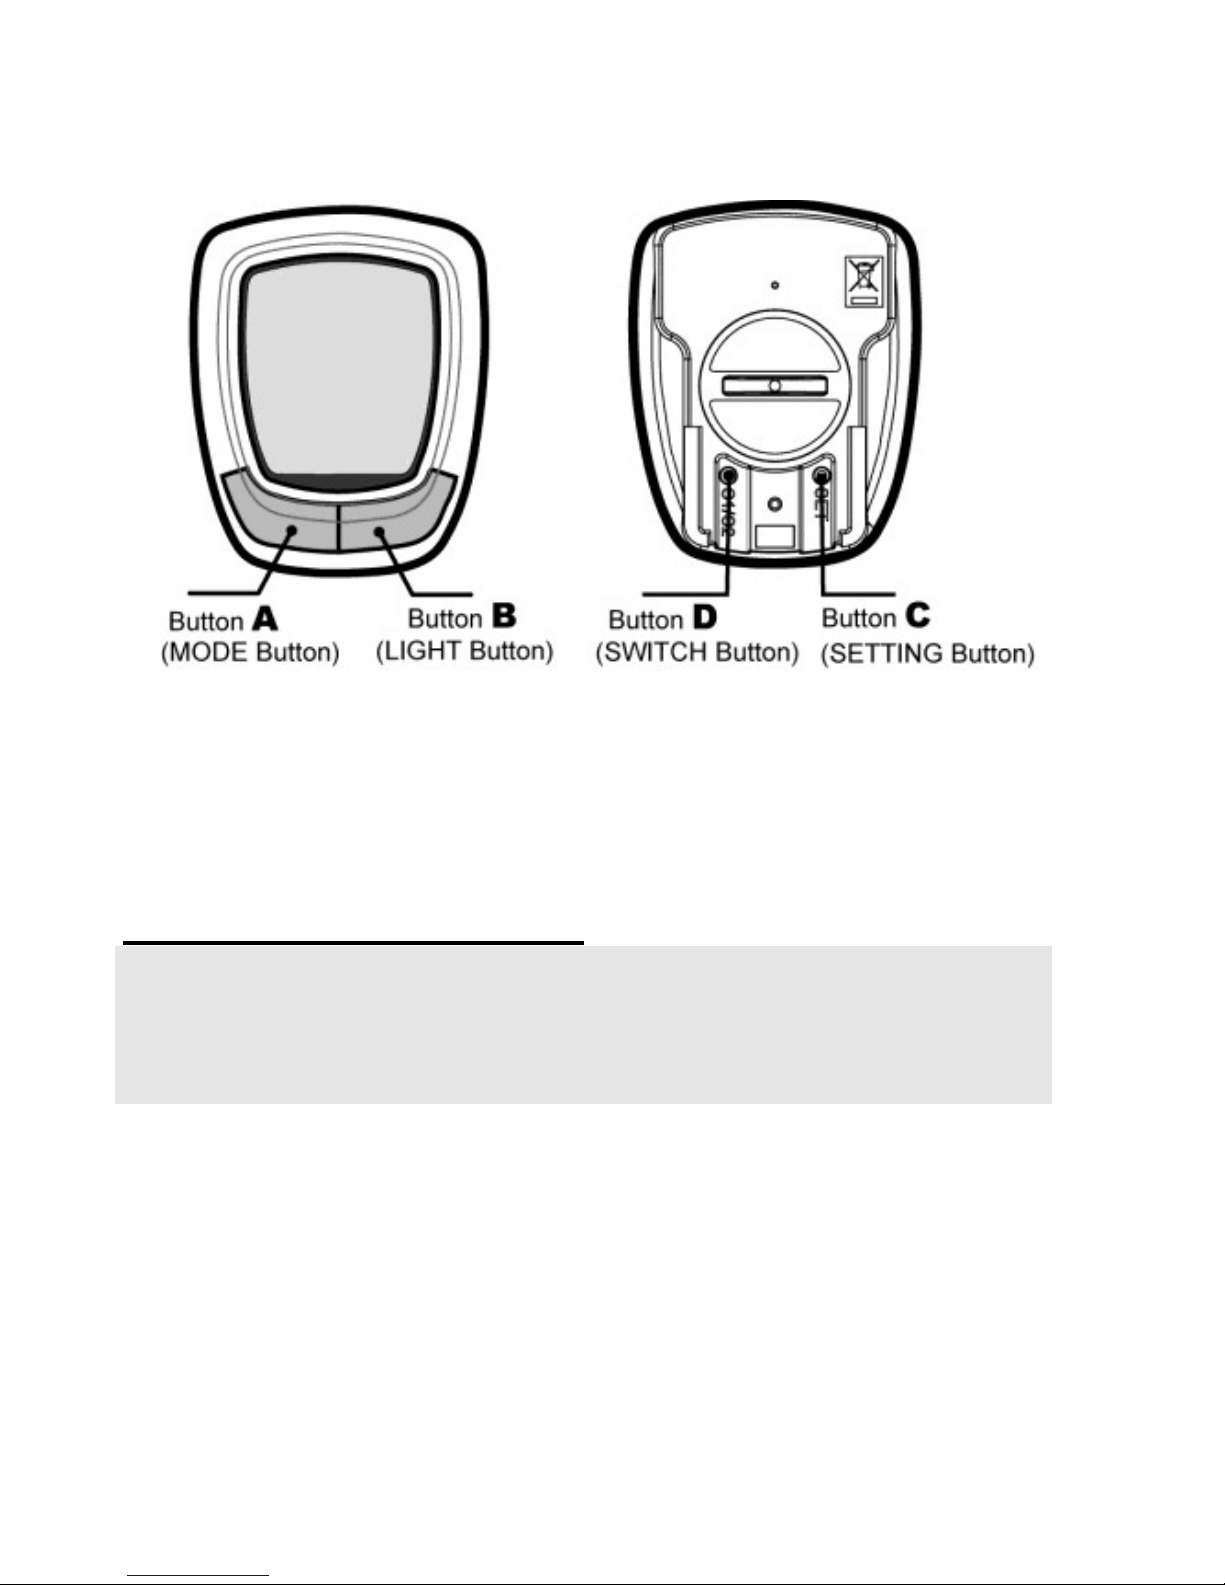
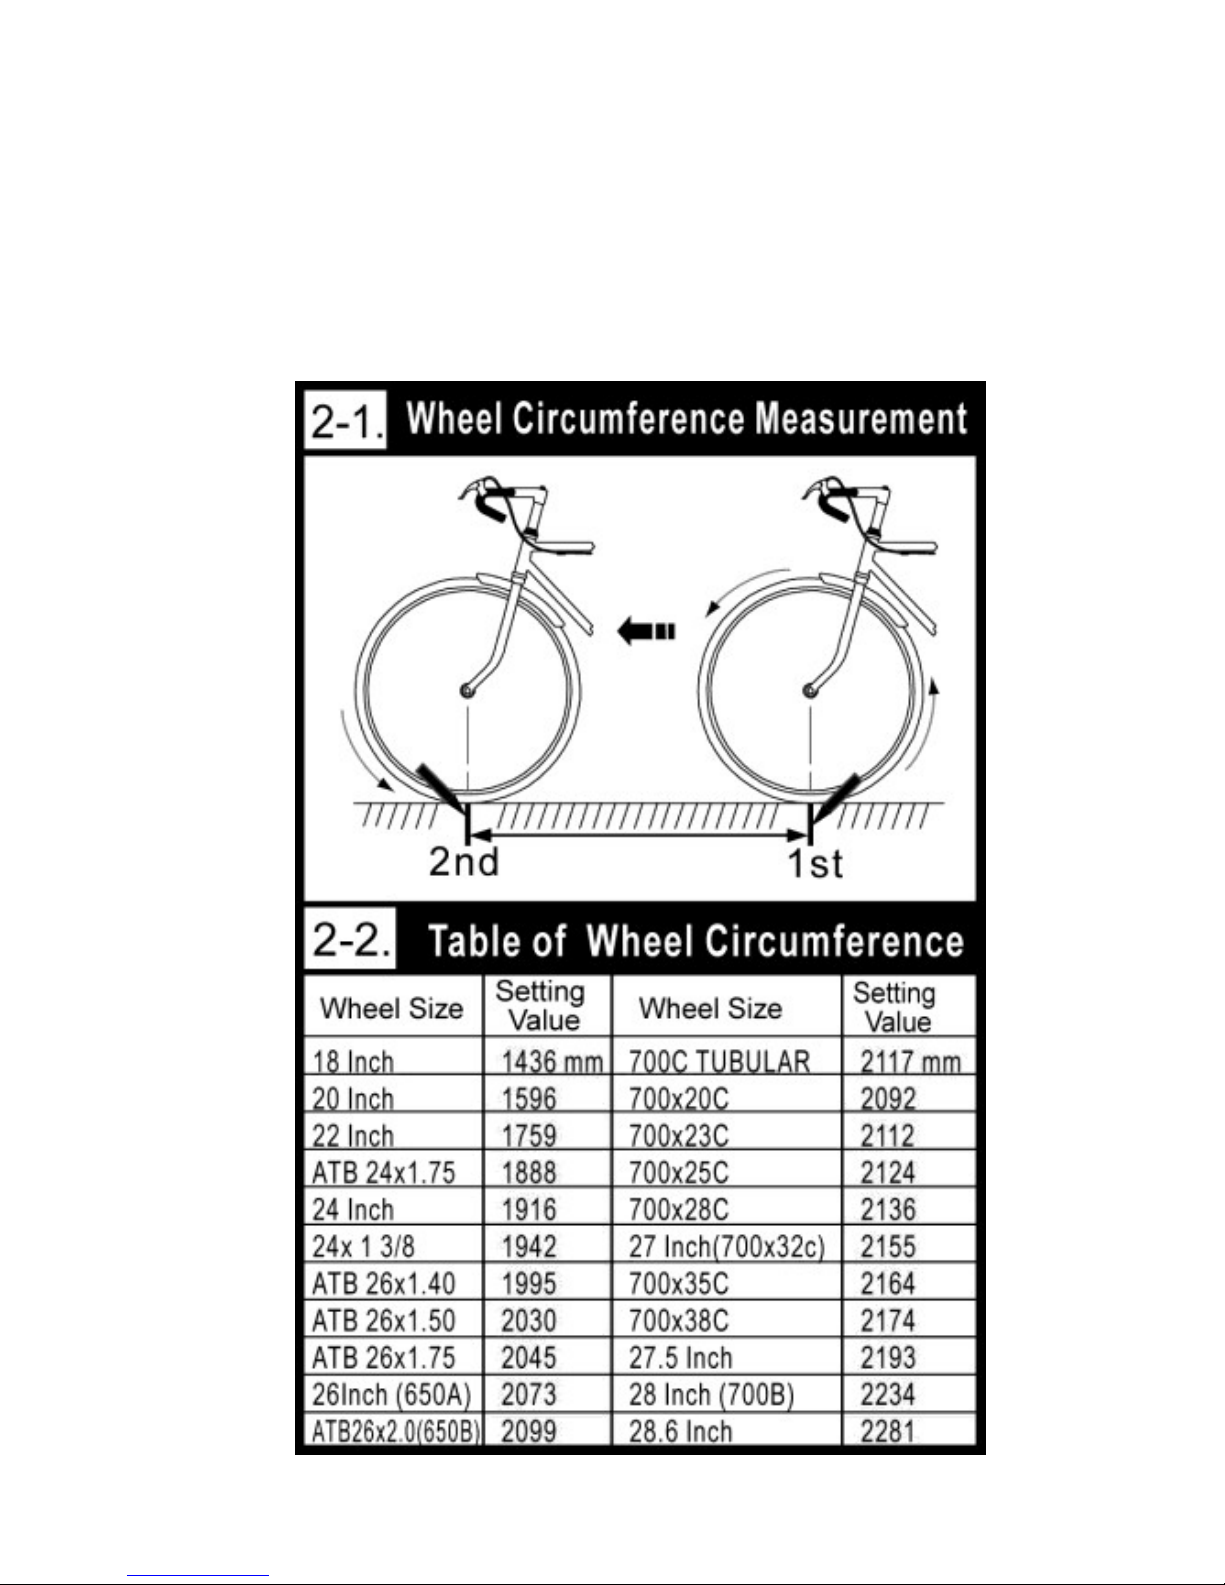
3. Wheel Circumference
Measurement
To set the wheel circumference before riding, you should
measure the wheel circumference by yourself or just refer to the
Wheel Circumference Table as shown below:
 Loading...