


User Guide
EchoStar Digital Satellite Receiver
with  User Interface

Preface
DISCLAIMER
RECEIVER
EchoStar International Corporation has to the best of its abilities, done everything to supply you with a receiver built to the most up-to-date software and hardware. EchoStar International Corporation makes no warranties with respect to the reception of the channels provided by the broadcast service providers and specifically disclaims any implied warranties of merchantability or fitness for any particular purpose.
EchoStar International Corporation reserves the right, for whatever reason, to revise, change or modify the hardand software of the receiver without the obligation to notify or warrant any person or organization of such change.
DOCUMENTATION
EchoStar International Corporation has to the best of its abilities, done everything to supply you with the most up-to-date information. EchoStar International Corporation makes no warranties with respect to the information provided by this User guide and specifically disclaims any implied warranties of merchantability or fitness for any particular purpose. The information provided is meant as a guideline for the use and maintenance of the receiver.
EchoStar International Corporation reserves the right to revise, change or translate this User guide without the obligation to notify any person or organization of such change. Therefore, please visit our web site, on a regular basis, for the latest information available.
Issue: echonav_xpress_b_100a_us
We encourage you to express your thoughts on this user manual. Please send your comments to:
EchoStar International Corporation
Technical Publications Department Schuilenburglaan 5a
7604 BJ Almelo
The Netherlands
LIMITED WARRANTY
If your receiver has conditional access capabilities:
For pay-services, please only use Common Interface (CI) modules and the related Smartcard which are approved by the service provider of the encrypted program you want to receive. Only this will enable the receiver to work properly.
Anomalies can occur when an unapproved CI-module and/or Smartcard is used. EchoStar can not and will not accept any responsibility for the performance of such CI-modules and/or smartcards. If you use an unapproved CI-module and/or Smartcard, EchoStar is no longer able to provide any assistance or support. Use of an unapproved CI-module and/ or Smartcard will void any warranty claim. If you have any doubt which CImodules are approved, please ask your service provider for assistance.
COPYRIGHT AND TRADEMARKS
© 2004 EchoStar International Corporation. All rights reserved worldwide. This User Manual has been provided pursuant to an agreement containing restrictions on its use. This User Manual is also covered by Federal Copyright Law.
No part of this User Manual may be copied, distributed, transmitted, stored in a retrieval system or translated into any human or computer language, in any form or by any other means, electronically, mechanically, magnetically, manually or otherwise or disclosure to third parties without the express written permission of EchoStar International Corporation.
EchoStar International Corporation is possibly in the possession of patents, requests for patent approval, trademarks, copyrights and other intellectual property with respect to the contents within this user manual. The submission of this User Manual does not imply you have got any license or other legal right for the use of the here above mentioned without the express written permission of EchoStar International Corporation.
■EchoStar, EchoNAV and Quality has a Name
are registered trademarks of EchoStar International Corporation;
■All other trademarks are the property of their respective owners or companies.
Page II |
EchoStar International Corporation |
Corporation International EchoStar 2004 © reserved rights All

EchoStar International Corporation |
All rights reserved |
© 2004 |
|
|
|
|
|
|
|
|
|
Safety Guidelines |
|
|
|
|
|
|
|
|
|
SAFETY GUIDELINES |
|
3. |
GENERAL SAFETY |
|||||
|
||||||||
1. |
|
INTENDED USE |
|
|||||
This documentation set is intended for anyone |
|
Read this user guide carefully and make sure you understand the instructions given. For your |
||||||
who uses an EchoStar receiver. It can be used |
|
safety, know what the reaction upon each action will be. Do not perform any actions which are not |
||||||
by both first-time and experienced users of |
|
described in this user guide, failing to do so might result in an uncontrolled behavior of the receiver |
||||||
receivers who want to install, use and maintain |
|
or even in a hazardous situation for persons and/or equipment. |
||||||
their receiver. |
|
Disconnect the receiver from the mains before you start any maintenance or installation |
||||||
This User guide is applicable for the EchoNAV |
|
procedures. Do not use alcohol or ammonia based liquids to clean the receiver. If required, clean |
||||||
Xpress receivers and is divided into separate |
|
with a soft lint-free cloth slightly made damp with a mild soap solution. |
||||||
sections and chapters. For easy access to the |
|
Consult an authorized service technician if the receiver does not operate normally when the |
||||||
information, a clear table of content is provided. |
|
instructions in this user guide are strictly followed. Do not to attempt to open the receiver, as you |
||||||
Note that this manual is applicable for all |
|
will be exposed to a shock hazard. |
||||||
models, therefore the most comprehensive |
|
To avoid the risk of electrical shock and fire, do not put any objects on top of the receiver which: |
||||||
description and operation is given. For detailed |
|
■ contain liquids, such as vases, glasses, bottles, etc. |
||||||
information, please refer to your dealer. |
|
|||||||
|
■ contain an open heat source or open fire, such as candles, cigarettes, ash trays, etc. |
|||||||
2. |
|
NOTATIONAL CONVENTIONS |
|
|||||
|
|
■ could fall through the ventilation slots or which could cover them and prevent proper cooling of |
||||||
Throughout this user guide, there may be |
|
|
the components inside. |
|||||
|
Make sure that nothing rests on the receivers cables and that the cables are not located where they |
|||||||
blocks of text indicated by symbols and printed |
|
|||||||
in a different way then the surrounding text. |
|
can cause injury to persons and pets (e.g to stumble over, eat the cable). |
||||||
These blocks of text ask the attention of the |
|
Do not install the receiver: |
||||||
reader to avoid hazardous situations. The |
|
■ in the open air; |
||||||
hazard levels are indicated as: |
|
|||||||
|
■ in a closed or poorly ventilated cabinet; |
|||||||
|
|
|
|
|
|
|
||
|
|
|
|
|
|
|
■ directly on top of or under another equipment; |
|
|
|
|
THIS WARNING INDICATES A HAZARDOUS |
|
|
|||
|
|
|
|
|
■ on a surface which will obstruct the ventilation slots. |
|||
|
|
|
SITUATION WHICH, IF NOT AVOIDED, COULD |
|
|
|||
|
|
|
|
|
||||
|
|
|
RESULT IN (SERIOUS) INJURY. |
|
|
Do not expose the receiver and it’s accessories: |
||
|
|
|
|
|
|
|
■ to rain or excessive moisture to avoid the risk of shock or permanent damage to your receiver; |
|
|
|
|
|
|
|
|
||
|
|
|
|
This caution indicates a situation which, if |
|
|
■ to direct sunlight, heaters, stoves or any other heat generating equipment; |
|
|
|
|
|
not avoided, could damage the equipment |
|
|
||
|
|
|
|
|
|
|||
|
|
|
|
|
|
■ to any magnetic objects, such as speakers, electric motors, transformers, etc.; |
||
|
|
|
|
or other properties. |
|
|
||
|
|
|
|
|
|
■ |
to excessive vibration. |
|
|
|
|
|
|
|
|
||
|
|
|
|
|
|
|
||
|
|
|
This note indicates additional information to |
|
|
To help avoid possible damage to the receiver’s electronics, wait 5 seconds after you switched off |
||
|
|
|
|
|
||||
|
|
|
the user to make the user aware of possible |
|
|
the receiver before you move the receiver or disconnect any equipment. |
||
|
|
|
problems and information of any importance |
|
|
For receivers with conditional access capabilities: |
||
|
|
|
to help the user to understand, to use and to |
|
|
|||
|
|
|
|
|
■ do not put any foreign objects into the Common Interface (CI) slots or smartcard reader. |
|||
|
|
|
maintain the installation. |
|
|
|||
|
|
|
|
|
■ do not touch the components or pins on the CI-module/smartcard |
|||
|
|
|
|
|
|
|
||
|
|
|
|
|
|
|
■ hold the CI-module and the smartcard by it’s edges. |
|
|
|
|
|
|
|
|
|
|
|
|
|
|
|
|
|
|
|
www.echostar-int.com |
|
|
Page III |
|||||
Safety Guidelines
4.ELECTRICAL SAFETY
When you use or connect electrical equipment, always obey the safety regulations as applicable in your country, to reduce the risk of fire, electrical shock and personal injury.
Read and comply at least with the given safety instructions.
■Always make sure that the electrical power supply corresponds with the voltage on the electrical identification plate on the equipment next to the electrical connection.
■Your equipment is double insulated in compliance with the standards as stated in the EC Declaration of Conformity; therefore no additional earth wire is required, though the use of an earth leak switch and/or over voltage protection switch is recommended.
■Only use an approved extension (convenience) lead suitable for the electrical power consumption of the installed equipment.
5.ENVIRONMENTAL SAFETY
Most of the packaging materials and batteries can be recycled. Please discard these materials
in an environmental safe manner.
ENVIRONMENTAL REMARK
Dispose the packaging in an environmental safe manner. Please inform yourself on local regulations with respect to the disposal of reusable materials.
ENVIRONMENTAL REMARK
Dispose used batteries in an environmental safe manner. Please inform yourself on local regulations with respect to the disposal of batteries.
6.LOGOS
The CE tells you that the receiver is following the provisions of Council Directive 89/336/EEC on the approximation of the laws of the Member States relating to the electromagnetic compatibility and the provisions of Council Directive 73/23/EEC and 93/68/EEC on the approximation of the laws of the Member States relating to low voltage and electrical safety.
The double insulation logo tells you that the receiver is electrically safe within the normal use of the receiver as stated in the safety chapter.
 The ‘risk of electrical shock - do not open’ logo tells you that you are not allowed to open the receiver.
Only authorized (service) technicians are allowed to open the box.
The Digital Video Broadcasting logo tells you that this equipment is compliant with the DVB standards as registered under registration number
The Dolby Digital logo tells you that this receiver is compliant with the Dolby Digital standard.
 The Stab-USALS logo tells you that this receiver is compliant with the USALS standard.
 The EchoNAV Xpress logo tells you that this receiver has the EchoNAV Xpress Multi-lingual User Interface.
7.CLEANING
WARNING
RISK OF ELECTRICAL SHOCK.
REMOVE THE MAINS PLUG FROM THE POWER
SUPPLY SOCKET BEFORE YOU CLEAN THE
RECEIVER. MAKE SURE, IF USED, CLEANING
AGENTS CANNOT GET IN THE RECEIVER.
1.Switch the receiver to OFF.
2.Wait at least five seconds, to help avoid possible damage to the receiver’s electronics.
3.Use a dry, soft and clean lint-free cleaning cloth to clean the receiver.
4.Other cleaning agents can cause damage to the outside surface.
a.Make a dry, soft and clean lint-free cleaning cloth a little damp.
b.Carefully wipe the surface and make sure that no moisture gets into the receiver.
c.Let the receiver dry on the air.
8.END OF LIFE DISPOSAL
Your receiver and related accessories contain materials which can be recycled and reused. Specialized companies can recycle your equipment to increase the amount of reusable materials and to minimize the amount of materials to be disposed of.
Please inform yourself on local regulations on disposal of your equipment.
Page IV |
EchoStar International Corporation |
Corporation International EchoStar 2004 © reserved rights All

EchoStar International Corporation |
All rights reserved |
© 2004 |
|
Specifications
TABLE OF CONTENTS
SAFETY GUIDELINES
1 |
INTENDED USE |
1-III |
2 |
NOTATIONAL CONVENTIONS |
1-III |
3 |
GENERAL SAFETY |
1-III |
4 |
ELECTRICAL SAFETY |
1-IV |
5 |
ENVIRONMENTAL SAFETY |
1-IV |
6 |
LOGOS |
1-IV |
7 |
CLEANING |
1-IV |
8 |
END OF LIFE DISPOSAL |
1-IV |
TABLE OF CONTENTS |
|
|
QUICK REFERENCE GUIDE |
|
|
1 |
REMOTE CONTROL UNIT |
0-1 |
2 |
TO INSTALL THE RECEIVER |
0-2 |
3 |
FIRST TIME INSTALLATION |
0-2 |
4 |
OPERATION |
0-3 |
GETTING STARTED |
|
|
1 |
UNPACKING |
1-1 |
2 |
INSTALL YOUR RECEIVER |
1-1 |
3 |
MENU STRUCTURE |
1-4 |
DESCRIPTION AND OPERATION |
|
|
1 |
CHANNEL LISTS |
2-1 |
2 |
EPG MENU - PROGRAM INFORMATION |
2-2 |
3 |
TELETEXT |
2-3 |
4 |
TIMERS |
2-4 |
5 |
ORGANIZE THE LISTS |
2-5 |
6 |
CREATE A FAVORITE LIST |
2-6 |
7 |
LOCK CHANNEL - LIST ACCESS |
2-7 |
8 |
EDIT - ADD/EDIT SATELLITE, TRANSPONDER, CHANNEL (PID) |
2-8 |
9 |
SOFTWARE UPGRADE - FACTORY RESET |
2-9 |
10 MENU STRUCTURE |
2-10 |
|
TROUBLESHOOTING |
|
|
1 |
GENERAL |
3-1 |
2 |
REMOTE CONTROL UNIT (RCU) RELATED |
3-1 |
3 |
LIST RELATED |
3-1 |
4 |
EPG RELATED |
3-2 |
5 |
TIMER RELATED |
3-2 |
6 |
TV AND RADIO RELATED |
3-3 |
7 |
INSTALLATION RELATED |
3-4 |
8 |
MOTORIZED INSTALLATION RELATED |
3-5 |
9 |
SMARTCARD RELATED |
3-5 |
GLOSSARY |
|
|
1 |
ABBREVIATIONS |
4-1 |
2 |
TERMINOLOGY |
4-1 |
INDEX |
|
|
PRE-PROGRAMMED SETTINGS |
|
|
1 |
PRE-PROGRAMMED INSTALLATIONS |
A-1 |
2 |
PRE-PROGRAMMED LNB(F) |
A-2 |
3 |
USER-PROGRAMMED LNB(F) |
A-2 |
4 |
PRE-PROGRAMMED LIST |
A-3 |
5 |
THE SEARCH MODES |
A-4 |
www.echostar-int.com |
Page V |

Table Of Contents
FEATURE HIGHLIGHTS
■EchoNAV XpressTM - Multi-Lingual Advanced User Interface
■IQ -The Smart Way to Install
■3View - Clear and Easy Menus
■4,500 Digital Channels, 100 Satellites, 1,300 Transponders
■Multiple Favorite Lists with List Access Control (16 for TV, Radio)
■Powerful Channel Search and Grouping
■4 week EPG (Stored in Memory)
■Embedded Teletext Decoder
■Multiple Search Modes (incl. Update Channel Lists)
■S/PDIF Audio Output (Dolby Digital Compatible)
■DiSEqCTM Motor Control (DiSEqCTM 1.2, USALS)
■Software Update via Internet/Satellite (RS-232/OTA)
GENERAL SPECIFICATIONS
■Picture freeze
■Teletext (Embedded Decoder, VBI-Re-insertion)
■Subtitling (Teletext supported)
■20 Timers (VCR or Reminder)
■Aspect Ratio: 4:3, 16:9 (Letter box, Pan&Scan, Widescreen)
■Manual PID Entry and Editing
■Volume Control with Offset per Channel
■Audio Mute
■Parental Control, Installation and Edit Lock, Receiver Lock
■Channel Preview Feature (Thumbnail)
■MPEG-2/DVB Compliant
TECHNICAL SPECIFICATIONS
TUNER/DEMODULATOR |
|
|
■ |
Receiving Frequency: |
950-2,150MHz |
■ |
IF Connector: |
F-Type, 1 Input, 1 Output (Loop through) |
■ |
LNB Control: |
13/18V, 0/22kHz, DiSEqCTM 1.2, USALS |
■ |
Demodulator: |
QPSK, C/Ku-Band |
■ |
Symbol rate: |
2-45Msym/s (SCPC/MCPC Compatible) |
■ |
Video system: |
PAL B/G, I, D/K |
■ |
Mains input: |
90-240Vac, 50-60Hz, 25W (max) |
CONNECTIONS |
|
|
■ |
SCART Connector: |
TV, VCR |
■ |
RCA Connector: |
AUDIO L/R, VIDEO, S/PDIF |
■ |
IEC Connector: |
TV OUT, ANT IN |
■ |
RS-232 Connector: |
RS-232 (Baud Rate 115,200) |
■ |
DIN-Connector: |
SVHS |
■ |
RGB Video out: |
TV (SCART) |
■ |
Composite Video out: |
TV, VCR (SCART), VIDEO (RCA) |
■ |
Y/C Video: |
SVHS (DIN) |
■ |
Dolby Digital out: |
Coaxial S/PDIF (RCA) |
FOR COMMON INTERFACE MODELS |
||
■ |
Common Interface: |
2 |
■ |
Housing: |
PCMCIA (Type 1 and 2) |
FOR MODELS WITH DISPLAY |
||
■ |
Display: |
4-Digit, 7-Segment |
Specifications and cosmetic appearances are subject to change without prior notice
Corporation International EchoStar 2004 © reserved rights All
Page VI |
EchoStar International Corporation |
EchoStar International Corporation |
All rights reserved |
© 2004 |
|
Quick Reference Guide
1QUICK. RREFEREMOTENCONTROLE GUIDE UNIT
1.1.THE BATTERIES
The EchoStar Remote Control Unit (RCU) is used to control the receiver. The RCU requires two AAA (LR03, UM4) alkaline batteries to
operate.
CAUTION
Insert the batteries correctly, make sure the polarity matches the instruction in the battery compartment.
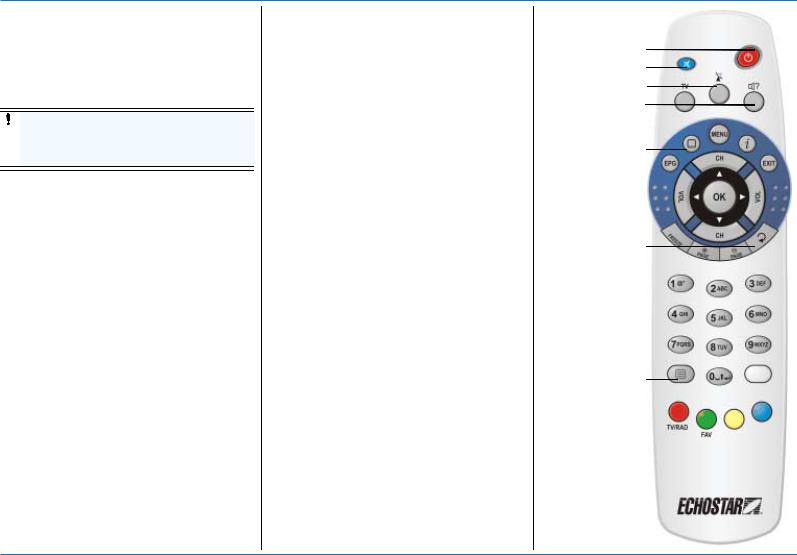
1.2.THE KEYS
■Mute, to temporary, shut down the audio.
■ON/STANDBY, to switch to standby or on, or activate the sleep timer (hold the key).
■TV, to switch the receiver signal to the TV on or off (SCART connection only).
■SAT list, to select another satellite.
■Audio, to choose a language.
■EPG,
to view the EPG;
to return to current time.
■Subtitle, to choose another subtitle language.
■MENU, to go to the main menu.
■i,
to view the InfoBanner; to access extended info;
to view or hide the content of a group.
■EXIT, to leave a menu or feature.
■VOL , to decrease the volume.
■CH , to go one channel up.
■OK,
to go to the (favorites) lists; to make a menu selection;
to access a numerical data entry (menu).
■, to go left, up, right or down.
■VOL , to increase the volume.
■CH , to go one channel down.
■Freeze, to hold still the TV image.
■Page +, to go up one page.
■Page -, to go down one page.
■Recall, to go to the previous channel.
■NUMBER KEYS,
to enter numerical settings; to type in a channel number.
■Teletext, to choose teletext.
■White,
to go to the Edit menu;
to go to the EPG calendar.
■Red,
to go to another mode;
to go directly to another sub-menu; TV/RAD, to switch to TV or Radio mode.
■Green,
to select a (favorites) list;
to go directly to another sub-menu;
FAV, to go to the favorite list of the actual mode.
■Yellow,
to group a list;
to go to the timers;
to go directly to another sub-menu.
■Blue,
to sort a list;
to select the zoom of the EPG screen; to go directly to another sub-menu.
On/Standby Mute
SAT list Audio
Subtitle
Recall
Teletext
www.echostar-int.com |
Page 1 |
Quick Reference Guide
2.TO INSTALL THE RECEIVER
 WARNING
ALL EQUIPMENT INVOLVED IN THE INSTALLATION TASK MUST BE INSTALLED CORRECTLY AND SWITCHED OFF. MAKE SURE THAT IT IS SAFE TO PROCEED WITH THE INSTALLATION TASK.
UNSAFE CIRCUITS AND INSTALLATIONS CAN CAUSE (SERIOUS) INJURY OR DAMAGE TO EQUIPMENT.
For the location and availability of the basic front panel controls, please refer to the front panel as shown on the packaging. If available, the basic front panel controls are:
|
|
|
|
The standby/on button, to switch the receiver to Standby or On. |
|
|
|
|
|
|
|
|
|
Note that the ON/OFF switch is located on the rear panel. |
|
|
|
|
|
|
|
|
|
The arrow up button, to move one channel up (live only). |
|
|
|
|
|
|
|
|
|
The arrow down button, to move one channel down. |
|
|
|
|
|
Indicators |
The red indicator shows that there is sufficient signal received |
|||
|
|
|
|
The orange indicator shows that the receiver is in standby |
|
|
|
|
The green indicator shows that the receiver is set to on. |
For the location and availability of the connectors, please refer to the rear panel as shown on the packaging. If available, the connectors on the rear panel are:
LNB IN (F-type), to connect a dish installation;
IF OUT (F-type), for a loop through connection to another receiver/decoder. (Yellow) VIDEO (RCA), to connect to the composite video input of the TV (monitor). (White) AUDIO L (RCA), to connect to the left audio input of a stereo set.
(Red) AUDIO R (RCA), to connect to the right audio input of a stereo set.
(Black) S/PDIF (RCA), to connect to a Dolby Digital (AC-3) compatible audio equipment.
TV (SCART), to connect to a TV with a fully-featured SCART cable; VCR (SCART), to connect to a VCR with a fully-featured SCART cable.
SVHS (DIN), to connect to a S-Video input of SVHS compatible equipment.
ANT IN (IEC), to connect to a VHF/UHF terrestrial TV antenna;
TV OUT (IEC), to connect to the UHF connector of a TV or a VCR.
RS-232 (sub-D), to connect to the serial communication port of a PC.
ON/OFF switch, to switch the receiver ON or OFF.
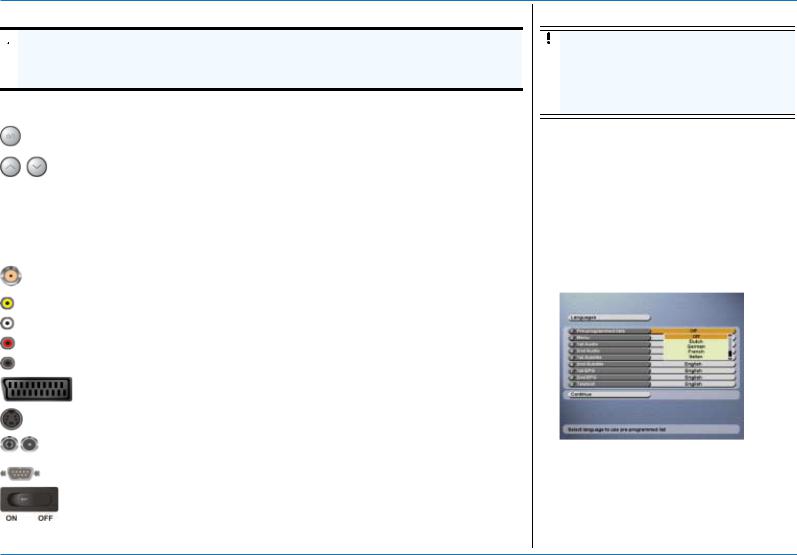
3.FIRST TIME INSTALLATION
CAUTION
Tighten the cable connectors only by hand. Do not use any tools. You will damage the connector pins if you over tighten the connector. This will result in loss of signal quality, or even total loss of reception.
1.Make sure, all connections are made safely.
2.Switch the receiver to ON and wait for the Languages menu to appear.
3.For detailed information about the preprogrammed channel lists and installation types, please refer to the appendix.
4.When in the Pre-programmed lists, select a language and the related pre-programmed channel list.
5.Make sure, the pre-programmed language settings are convenient for you.
6.Select Continue and press the OK key.
7.Allow the receiver some time to load the channel list and wait fo the live video to appear.
8.If live video does not appear, please refer to the Getting started section for further instructions (DiSEqC1.2, USALS).
Page 2 |
EchoStar International Corporation |
Corporation International EchoStar 2004 © reserved rights All

EchoStar International Corporation |
All rights reserved |
© 2004 |
|
|
|
|
|
|
|
|
|
|
|
|
|
|
|
Quick Reference Guide |
||
|
|
|
|
|
|
|
|
|
|
|
|
|
||||
4. |
|
OPERATION |
|
4.2. CHANNEL SELECTION |
|
4.3. |
GROUP AND SORT |
|||||||||
|
|
|
||||||||||||||
Daily use of the receiver is similar to the |
|
WHEN YOU WANT TO SELECT ANOTHER CHANNEL: |
|
|
You can organize your channel lists with the |
|||||||||||
operation of your current TV and VCR. Extra |
|
■ |
the CH |
keys; |
|
|
Group and Sort options. |
|||||||||
functions are the Electronic Program Guide |
|
■ |
the numerical keys; |
|
1. |
Press the Yellow key to group the list: None |
||||||||||
(EPG), favorite channel lists (color keys), |
|
■ |
the recall key. |
|
|
|
|
|
|
(default), Per SAT (satellite), Per network or |
||||||
subtitle and audio language selection. |
|
|
|
|
|
|
|
Per TP (transponder). Once the list is |
||||||||
|
|
|
|
|
|
|
|
|
|
|||||||
Every time when you change channels, a so |
|
WHEN YOU ARE IN A LIST, YOU CAN USE: |
|
|
|
|
|
grouped, a group name header is added into |
||||||||
called InfoBanner appears to give you some |
|
■ |
the CH |
keys; |
|
|
|
|
|
the list with a + or - sign in front of the name. |
||||||
extra information about the program. You can |
|
■ |
the numerical keys; |
|
2. |
Press the Blue key to sort the list in None |
||||||||||
also call up the information with the i-key. |
|
■ |
the Page +/- keys; |
|
|
|
|
|
(default), from A to Z, Z to A or show a |
|||||||
4.1. |
NAVIGATION |
|
|
|
|
|
|
limited list selected by Character, Word, |
||||||||
|
■ |
the recall key. |
|
|
|
|
|
|
||||||||
|
|
|
|
|
|
|
Scrambled, FTA (Free-To-Air) or Locked. |
|||||||||
In the main and EPG menu: |
|
WHEN YOU WANT TO ZAP BETWEEN TV AND |
|
4.4. |
TIMERS |
|||||||||||
■ the MENU key lets you access to the main |
|
|
||||||||||||||
|
RADIO CHANNELS: |
|
|
|
|
|
|
|
|
|
|
|||||
|
|
|
|
|
|
|
|
|
|
|
||||||
|
menu or go back one menu level; |
|
|
|
|
|
|
|
CAUTION |
|
||||||
|
|
|
|
|
|
|
|
|
|
|
|
|||||
|
|
|
|
|
|
|
|
|
|
|
||||||
■ the EXIT key lets you leave a menu or |
|
1. |
Press the |
|
(TV/RAD) key. |
|
|
|
|
|
The timer does not start or program your |
|
||||
|
|
|
|
|
|
|
|
|||||||||
|
selection and return directly to live; |
|
|
|
|
|
|
|
video cassette recorder (VCR). You also |
|
||||||
|
|
|
|
|
|
|
|
|||||||||
■ |
the |
keys let you scroll up and down |
|
2. |
Select the channel. |
|
|
|
|
|
have to set the timer of your VCR to the |
|
||||
|
|
|
|
|
|
|
|
|
|
same time as on the timer. Please refer to |
|
|||||
|
through the selectable items; |
|
|
|
|
|
|
|
|
|
|
|
||||
|
|
WHEN YOU WANT TO LISTEN TO ANOTHER AUDIO |
|
|
|
|
|
the user guide of your VCR how to make a |
|
|||||||
■ |
the |
keys let you scroll left and right |
|
|
|
|
|
|
|
|||||||
|
ON THE SAME CHANNEL: |
|
|
|
|
|
recording from an external receiver. |
|
||||||||
|
through the selectable items; |
|
|
|
|
|
|
|
||||||||
|
|
|
|
|
|
|
|
|
|
|
|
|
|
|
||
■ The OK key lets you: |
|
1. |
Press the |
|
(alternative audio) key. |
|
|
1. |
Press the EPG key. |
|
||||||
|
|
|
2. |
If available, select the EPG event. |
||||||||||||
|
- confirm and execute a selection; |
|
|
|
||||||||||||
|
|
2. |
Press the CH |
keys. |
|
|||||||||||
|
- open a pull-down menu. |
|
|
3. |
Press the Yellow key. |
|||||||||||
In the main menu, |
|
3. Press the OK key. |
|
4. |
If you want to record a program onto the |
|||||||||||
|
|
|
|
|
|
|||||||||||
■ the OK key lets you access a numerical |
|
WHEN YOU WANT TO VIEW ANOTHER VIDEO ON |
|
|
|
|
|
VCR, select the VCR timer. |
||||||||
|
entry-option. |
|
|
5. |
If you only want to wake up the receiver, |
|||||||||||
|
|
THE SAME CHANNEL: |
|
|||||||||||||
In a pull-down menu: |
|
|
|
|
|
|
select the Reminder. |
|||||||||
|
|
|
|
|
|
|
|
|
|
|||||||
|
|
|
|
|
|
|
|
|
|
|||||||
■ the OK key lets you confirm the selection; |
|
1. |
Press the |
|
(alternative audio) key. |
|
6. |
If available, review the timer settings as |
||||||||
■ the yellow bar indicates the active selection; |
|
2. |
Select the header. |
|
|
|
|
|
retrieved from the EPG event. |
|||||||
■ the green page indicator shows when you |
|
|
7. |
If required, change the Date, Start and Stop |
||||||||||||
|
3. |
Press the |
|
keys and select Video. |
|
|||||||||||
|
can scroll to the next page. |
|
|
|
|
|
|
|
settings or the Interval. |
|||||||
|
|
4. |
Press the CH |
keys. |
|
|
|
|
|
|||||||
|
|
|
|
|
8. |
Select Save settings and press the OK key. |
||||||||||
|
|
|
|
5. Press the OK key. |
|
|||||||||||
|
|
|
|
|
9. |
If you want to delete or modify a timer, press |
||||||||||
|
|
|
|
|
|
|
|
|
||||||||
|
|
|
|
|
|
|
|
|
|
|
|
|
the Yellow key and select the Timer list. |
|||
|
|
|
|
|
|
|
|
|
|
|
|
|
|
|
||
|
|
|
|
|
|
|
|
|
|
|
|
|
|
|
||
www.echostar-int.com |
|
|
|
|
|
|
|
|
|
|
|
Page 3 |
||||

Quick Reference Guide
4.5. |
THE PROGRAM INFORMATION |
- |
The icon |
|
|
|
|
|
means Dolby Digital audio |
4.7. |
DIRECT ACCESS MENUS |
|
|||||||||
|
|
|
|
|
|
||||||||||||||||
|
|
|
|
|
|
|
|
|
|
|
|
|
|
|
|
|
|||||
|
|
|
|
|
|
|
|
|
|
|
|
|
|
|
|
|
|||||
|
|
|
|
|
|
|
is available; |
|
|
|
The |
|
key shows the SAT list pop-up, that |
||||||||
|
|
|
|
|
|
|
|
|
|
|
|
|
|
|
|||||||
|
|
|
|
|
|
|
|
|
|
|
|
|
|
||||||||
|
|
|
|
|
|
|
|
|
|
|
|
|
|
|
|||||||
|
|
|
|
|
- |
The icon |
|
|
|
means Parental rating |
gives you the possibility to choose directly from |
||||||||||
|
|
|
|
|
|
|
|||||||||||||||
The InfoBanner has a: |
|
|
information; |
|
|
|
the available satellites. |
|
|||||||||||||
■ The channel information bar, to show the |
- |
The icon |
|
|
means a favorite list is |
|
|
|
|
|
|
|
|||||||||
|
|
|
|
|
|
|
|
|
|||||||||||||
|
|
|
|
|
|
|
|
|
|||||||||||||
channel number and name; |
|
|
The |
|
|
|
key shows the Audio pop-up, that |
||||||||||||||
|
|
selected, not grouped, not sorted; |
|
|
|
||||||||||||||||
|
|
|
|
|
|||||||||||||||||
■ The satellite information dish, to show the |
|
|
|
|
|
|
|
|
|
gives you the possibility to choose directly from |
|||||||||||
|
|
|
|
|
|
|
|
|
|||||||||||||
name of the selected satellite; |
- |
The icon |
|
|
means the All channels list |
the available alternative audio languages as |
|||||||||||||||
|
|
||||||||||||||||||||
■ The signal indicator, to show the signal |
|
|
is selected, not grouped, not sorted; |
broadcasted by the service provider. The |
|||||||||||||||||
strength (left) and signal quality (right); |
- |
The icon |
|
|
means the Current SAT list |
program uses first the Audio selection as made |
|||||||||||||||
■ The program information bar, to show the |
|
|
in the User preferences - Languages. If you do |
||||||||||||||||||
|
|
is selected, not grouped, not sorted; |
|||||||||||||||||||
|
|
not want to use this selection, you can override |
|||||||||||||||||||
start time, duration indicator and program |
|
|
|||||||||||||||||||
|
|
|
|
|
|
|
|
|
and save the selection for the current channel |
||||||||||||
name; |
|
- |
The icon |
|
|
means a list is selected, |
|||||||||||||||
|
|
|
with a selection from this menu |
|
|||||||||||||||||
■ The i-button, to show, as available, the |
|
|
grouped and/or sorted. |
|
|||||||||||||||||
|
|
|
|
|
|
|
|
|
|||||||||||||
detailed program information and channel |
4.6. |
THE SIGNAL INDICATOR |
The |
|
|
|
key shows the Subtitle pop-up, that |
||||||||||||||
data such as Frequency, Polarity, Symbol |
|
|
|
|
|
|
|
|
|
|
|
|
|||||||||
|
|
|
|
|
|
|
|
|
|
|
|
||||||||||
rate, Video PID, Audio PID and PCR PID; |
In some menus the signal indicator is shown to |
gives you the possibility to choose directly from |
|||||||||||||||||||
■ The next program information bar, to show |
help you to find a satellite and fine tune for the |
the available alternative subtitle languages as |
|||||||||||||||||||
best signal level and quality. |
broadcasted by the service provider. The |
||||||||||||||||||||
the information for the next program; |
|||||||||||||||||||||
|
|
|
|
|
|
|
|
|
program uses first the Subtitle selection as |
||||||||||||
■ If the VOL +/- key is pressed, the volume |
|
|
|
|
|
|
|
|
|
||||||||||||
|
|
|
|
|
|
|
|
|
made in the User preferences - Languages. If |
||||||||||||
button shows with a green volume indicator; |
|
|
|
|
|
|
|
|
|
||||||||||||
|
|
|
|
|
|
|
|
|
you do not want to use this selection, you can |
||||||||||||
■ If the mute key is pressed, the volume |
The top bar shows the signal level to indicate |
override the selection for the current channel |
|||||||||||||||||||
button shows with a red volume indicator; |
with a selection from this menu. |
|
|||||||||||||||||||
■ The digital clock, to show the current local |
that you receive a signal. |
|
|
|
|
|
|
|
|||||||||||||
The bottom bar shows the quality of the signal |
|
|
|
|
|
|
|
||||||||||||||
time; |
|
The |
|
|
|
|
key gives access to the embedded |
||||||||||||||
|
(signal-to-noise ratio) to indicate that you have |
|
|
|
|
||||||||||||||||
■ The service information bar, to show that |
|
|
|
|
|||||||||||||||||
a lock onto the selected transponder. The |
teletext decoder. |
|
|||||||||||||||||||
additional services are available. These |
bottom text gives the satellite and network |
If the Audio pop-up already shows, you have |
|||||||||||||||||||
icons show only if the service is available. |
|||||||||||||||||||||
information to which the lock is established. |
access to the Video pop-up, ( |
keys), that |
|||||||||||||||||||
- |
The icon |
|
means teletext is available; |
|
|
|
|
|
|
|
|
|
gives you the possibility to choose directly from |
||||||||
|
|
|
|
|
|
|
|
|
|
|
|
|
|
the available alternative video (camera |
|||||||
|
|
|
|
|
|
|
|
|
|
|
|
|
|
||||||||
- |
The icon |
|
means more Audio or Video |
|
|
|
|
|
|
|
|
|
positions) as broadcasted by the service |
||||||||
|
is available; |
|
|
|
|
|
|
|
|
|
|
provider. |
|
||||||||
-The icon  means more Subtitle languages are available;
Page 4 |
EchoStar International Corporation |
Corporation International EchoStar 2004 © reserved rights All

EchoStar International Corporation |
All rights reserved |
© 2004 |
|
Getting Started
1GETTING.STARTED UNPACKING
CAUTION
It is recommended to keep the packaging materials for a period of time. In case of warranty claims, we can request to return the receiver in the original packaging to protect the electronics. Failing to do so might void the warranty.
1.1.TO UNPACK YOUR RECEIVER:
WARNING
KEEP AWAY THE PLASTIC PACKAGING FROM CHILDREN. THE PLASTIC PACKAGING MAY CLING TO NOSE AND MOUTH AND PREVENT BREATHING.
When you unpack the contents of the box, confirm that all the parts are included.
Unpack the contents of the box carefully. Electronic equipment as receivers are easily damaged when you handle it roughly. Examine all parts for damage that may have occurred during shipment. If you find any damage, stop to unpack the box and call the shop where you bought the receiver.
To help avoid possible damage to the receiver’s electronics, allow the receiver to adapt to the ambient temperature and humidity level. This to avoid condensation.
1.2.THE CONTENTS OF THE BOX
The box contains:
■A receiver;
■An UHF-cable;
■A remote control unit (RCU);
■A pair of batteries (for the RCU);
■A set of documentation.
2.INSTALL YOUR RECEIVER
WARNING
ALL EQUIPMENT INVOLVED IN THE INSTALLATION TASK MUST BE INSTALLED CORRECTLY AND SWITCHED OFF. MAKE SURE THAT IT IS SAFE TO PROCEED WITH THE INSTALLATION TASK. UNSAFE CIRCUITS AND INSTALLATIONS CAN CAUSE (SERIOUS) INJURY OR DAMAGE TO EQUIPMENT.
2.1.PROGRAM THE RECEIVER
This section assumes that the dish installation is completed and operational and your receiver is connected to your TV and other equipment with suitable cables.
PRE-PROGRAMMED CHANNEL LIST
 NOTE
NOTE
Your receiver is pre-programmed for a fixed dish installation with a universal LNBF. If you have another dish installation (motorized), additional settings are required.For detailed information about the pre-programmed channel lists and installation types, please refer to the appendix.
1.Switch the receiver to ON and wait for the Languages menu to appear.
2.When in the Pre-programmed lists, select a language and the related pre-programmed channel list.
3.Make sure, the pre-programmed language settings are convenient for you.
4.Select Continue and press the OK key.
5.Allow the receiver some time to load the channel list and wait for the live video to appear.
QUICK REFERENCE GUIDE
Switch the receiver to ON.
Select your language / channel list.
Wait fo the live video to appear.
www.echostar-int.com |
Page 1 - 1 |
Getting Started
IF THE PRE-PROGRAMMED LIST FAILS
1.Press the MENU key.
2.Select the Installation setup menu.
3.If you do not use an Universal LNB:
a.Select Program SAT and press the OK key.
b.Select LNB, press the OK key
c.Select your LNB.
d.If you have a special LNB, press the Red key to define an User LNB.
4.If you have a DiSEqC switch:
a.Select System setup and press the OK key.
b.Review the signal indicators behind the satellite names, they should show green.
c.Select Port.
d.Change the port number and make sure your satellites show a green indication.
5.If your satellite is not shown;
a.Select System setup and press the OK key.
b.Select satellite Astra1 and press the OK key.
c.Select your satellite and make sure your satellite shows a green indication.
d.Select Search channels and press the OK key.
e.Wait for the Search channels to complete.
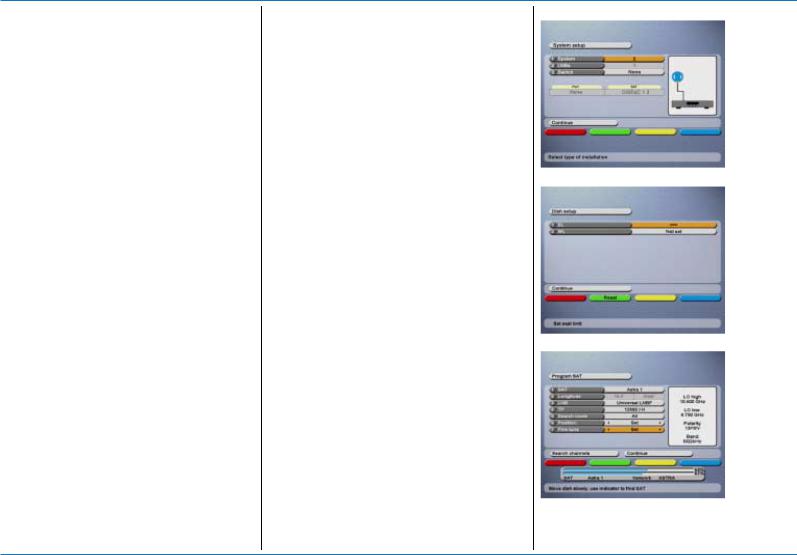
IF YOU HAVE A DISEQC1.2 INSTALLATION
1.Switch the receiver to ON and wait for the Languages menu to appear.
2.For Pre-programmed Lists, select Off.
3.Make the required language selections.
4.Select Continue and press the OK key.
5.Make the required TV system selections.
6.Select Continue and press the OK key.
7.Make the required User profile selections.
8.Select Continue and press the OK key.
9.Select System 5.
10.Select Continue and press the OK key.
11.Set the East (EL) and West (WL) limits.
12.Select Continue and press the OK key.
13.Select your first satellite and make the required selections.
14.Select Position and move the dish to find the satellite.
15.Select Fine tune and move the dish to find the best signal.
16.Select Search channels and press the OK key.
17.Wait for the Search channels to complete.
18.Press the OK key to select another satellite or Continue to advance.
19.Set the Local time and press the Red key to confirm the selections.
20.Select Continue and press the OK key.
QUICK REFERENCE GUIDE
Select System 5.
Set the East (EL) and West (WL) limits.
Move the dish to find the best signal.
Corporation International EchoStar 2004 © reserved rights All
Page 1 - 2 |
EchoStar International Corporation |
EchoStar International Corporation |
All rights reserved |
© 2004 |
|
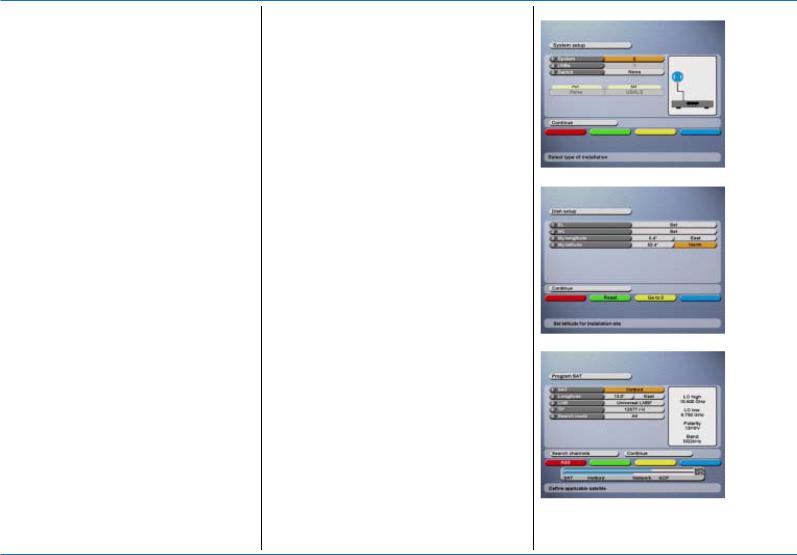
IF YOU HAVE AN USALS INSTALLATION
1.Switch the receiver to ON and wait for the Languages menu to appear.
2.For Pre-programmed Lists, select Off.
3.Make the required language selections.
4.Select Continue and press the OK key.
5.Make the required TV system selections.
6.Select Continue and press the OK key.
7.Make the required User profile selections.
8.Select Continue and press the OK key.
9.Select System 6.
10.Refer to the installation instructions as given in the USALS installation guide.
11.Select Continue and press the OK key.
12.Set the East (EL) and West (WL) limits.
13.Select My longitude.
14.Press the OK key and set the longitude of the installation site (dish).
15.Select My latitude.
16.Press the OK key and set the latitude of the installation site (dish).
17.Select Continue and press the OK key.
18.Select your first satellite and make the required selections.
19.Allow the dish some time to move towards the selected satellite.
20.When the signal shows, select Search channels and press the OK key.
21.Wait for the Search channels to complete.
22.Press the OK key to select another satellite or Continue to advance.
23.Set the Local time and press the Red key to confirm the selections.
24.Select Continue and press the OK key.
www.echostar-int.com
Getting Started
QUICK REFERENCE GUIDE
Select System 6.
Set the Latitude and Longitude.
Select the satellite to search channels on.
Page 1 - 3

Getting Started
3.MENU STRUCTURE
MAIN MENU (USE THE NUMBER KEYS FOR DIRECT ACCESS TO THE OPTIONS)
1. |
User preferences |
1. |
User profile |
To set the personal preferences for the on-screen menus. |
|
|
|
2. |
Languages |
To set the language you want to use for Menu, Audio, Subtitle, EPG and Teletext. |
|
|
|
3. |
Parental control |
To set the locks to avoid unauthorized use of the receiver or channel lists. |
|
|
|
4. |
Local time |
To set the local time as used by the EPG and timers. |
|
|
|
5. |
TV system |
To set the UHF-channel for the connection between the TV and the receiver. |
|
2. |
Installation setup |
|
|
|
|
1. |
Program SAT |
To define the settings as used for the selected satellite. |
|||
|
|
2. |
Edit |
To add or edit a satellite or transponder which is not listed in the internal database. |
|
|
|
3. |
User LNB |
To define a specific LNB(F) which is not pre-programmed. |
|
|
|
4. |
System setup |
To define the settings that belong to the dish installation itself. |
|
|
|
5. |
Software upgrade |
To download the latest software version as available from the satellite (OTA). |
|
|
|
6. |
Factory reset |
To delete all personal settings and return to the factory defaults. |
|
|
|
7. |
About EchoStar |
To review the receiver and manufacturer information. |
|
|
|
8. |
Set limits |
To define the (software) East and West limits and the Latitude and Longitude (Motorized only). |
|
3. |
Conditional access |
|
|
|
|
1. |
Common interface |
To review the common interface and smartcard information (Slot 1, only for 2Ci models). |
|||
|
|
2. |
Common interface |
To review the common interface and smartcard information (Slot 2, only for 2Ci models). |
|
|
|
||||
CHANNEL LIST (USE THE OK AND COLOR KEYS FOR DIRECT ACCESS TO THE OPTIONS) |
|||||
|
|
|
|
|
|
OK |
|
Red |
To select TV, Radio or Lists mode. |
||
|
|
Green |
To select the All channels, Current SAT or favorite lists. |
||
|
|
Yellow |
To group the channel list per satellite (SAT), network or transponder (TP). |
||
|
|
Blue |
To sort the channel list by A to Z, Z to A or limit by Character, Word, Scrambled, FTA or Locked. |
||
|
|
White |
To organize the list with Move, Add, Rename, Volume (offset), Lock or Delete channel. |
||
|
|
||||
EPG MENU (USE THE EPG AND COLOR KEYS FOR DIRECT ACCESS TO THE OPTIONS) |
|||||
|
|
|
|
||
EPG |
Red |
To select TV or Radio mode. |
|||
|
|
Green |
To select the All channels, Current SAT or favorite lists. |
||
|
|
Yellow |
To select, edit or delete a timer. |
||
|
|
Blue |
To select another zoom factor for the program balloons. |
||
|
|
White |
To access the EPG calendar. |
||
|
|
i |
|
To retrieve detailed program information for the selected program. |
|
|
|
|
|
|
|
|
|
|
|
|
|
Page 1 - 4 |
|
|
EchoStar International Corporation |
||
Corporation International EchoStar 2004 © reserved rights All

EchoStar International Corporation |
All rights reserved |
© 2004 |
|
Description and Operation
1. C
DESCRIPTION AND OPERATION
HANNEL LISTS
The  key gives access to the channel lists and the different list and zap functions.
 NOTE
NOTE
Once in a list, the selections for Group (Yellow) and Sort (Blue) are kept until you change the selection. The active selection is shown in the InfoBanner with icons. Sometimes a list seems to be empty because of the selection of the Sort option. If this happens, set Sort option to None.
With the colored keys, you can access the powerful tools for further organization of the lists:
■The  (Red) key gives access to the different modes: TV (shows the TV channels), Radio (shows the Radio channels), or List (shows the Favorite lists by name).
■The  (Green) key gives, depending on the selected mode, access to the different lists: All channels, Current SAT, the favorite lists. TV or Radio show when in list mode.
■The  (Yellow) key gives, depending on the selected mode, the possibility to group the list: None (default), Per SAT (satellite), Per network or Per TP (transponder). Once the list is grouped, a group name header is added into the list with a + or - sign in front of the name.
■The  key gives access to the contents of a group. The + sign indicates that a group has hidden channels (collapsed) and a - sign shows that the channels are visible. Once a channel is
selected, the key returns you to the header and the key goes to the next header.
■The  (Blue) key gives, depending on the selected mode, the possibility to sort the complete list in None (default), from A to Z and Z to A or show a limited list that is selected by Character, Word, Scrambled, FTA (Free-To-Air) or Locked.
■The  (White) key gives you access to the different edit modes to modify or to create a list. Depending on the selected List, Group and Sort options, you can select: None (default), Add, Move, Rename, (change pre-set) Volume, Lock and Delete.
OK key - to access the channel list.
I-key - to open a grouped list.
White key - to edit the list.
www.echostar-int.com |
Page 2 - 1 |
 Loading...