

Page 1
Instructions
SUBJECT: FENDERS WITH LIGHTS KIT
# 75908-00
FITS MODELS: LS27270, LS27270T,
LS21160, LS21160T, LS21170, LS21170T,
LS33340, LS33340T, LS21E
SN: B08086 AND BELOW
WARNING
Before inspecting or servicing any part of this machine,
shut off power source, remove key, disconnect the
battery cables and make sure all moving parts have
come to a complete stop.
4. Attach the license plate angle to the machine with (2) 1"
carriage bolts, 5/16" washers, and 5/16" nylock nuts.
LICENSE
PLATE LIGHT
LIGHT PLUG
These instructions will describe how to install fenders with
lights and a license plate light on a log splitter.
INSTALL FENDERS AND LIGHTS
1. Attach the fender, RH tail light angle, and clamp to the
right side fender mount as shown below with three (3)
1" hex bolts, washers, and nuts.
2. Repeat for the other side of the machine using the LH
tail light angle.
CLAMP
FENDER
MOUNT
FENDER
RH TAIL
LIGHT ANGLE
LICENSE
PLATE ANGLE
Fig. 2 Attach the license plate light and angle to the log splitter
INSTALL LIGHT HARNESS
NOTE
Enclose all exposed wire in conduit.
1. Cut the wire harness at 106" from the end of the plug.
The excess wire will be used later.
2. Cut the 103" piece of conduit into three pieces that
are 40", 48", and 15" long (see Fig. 10).
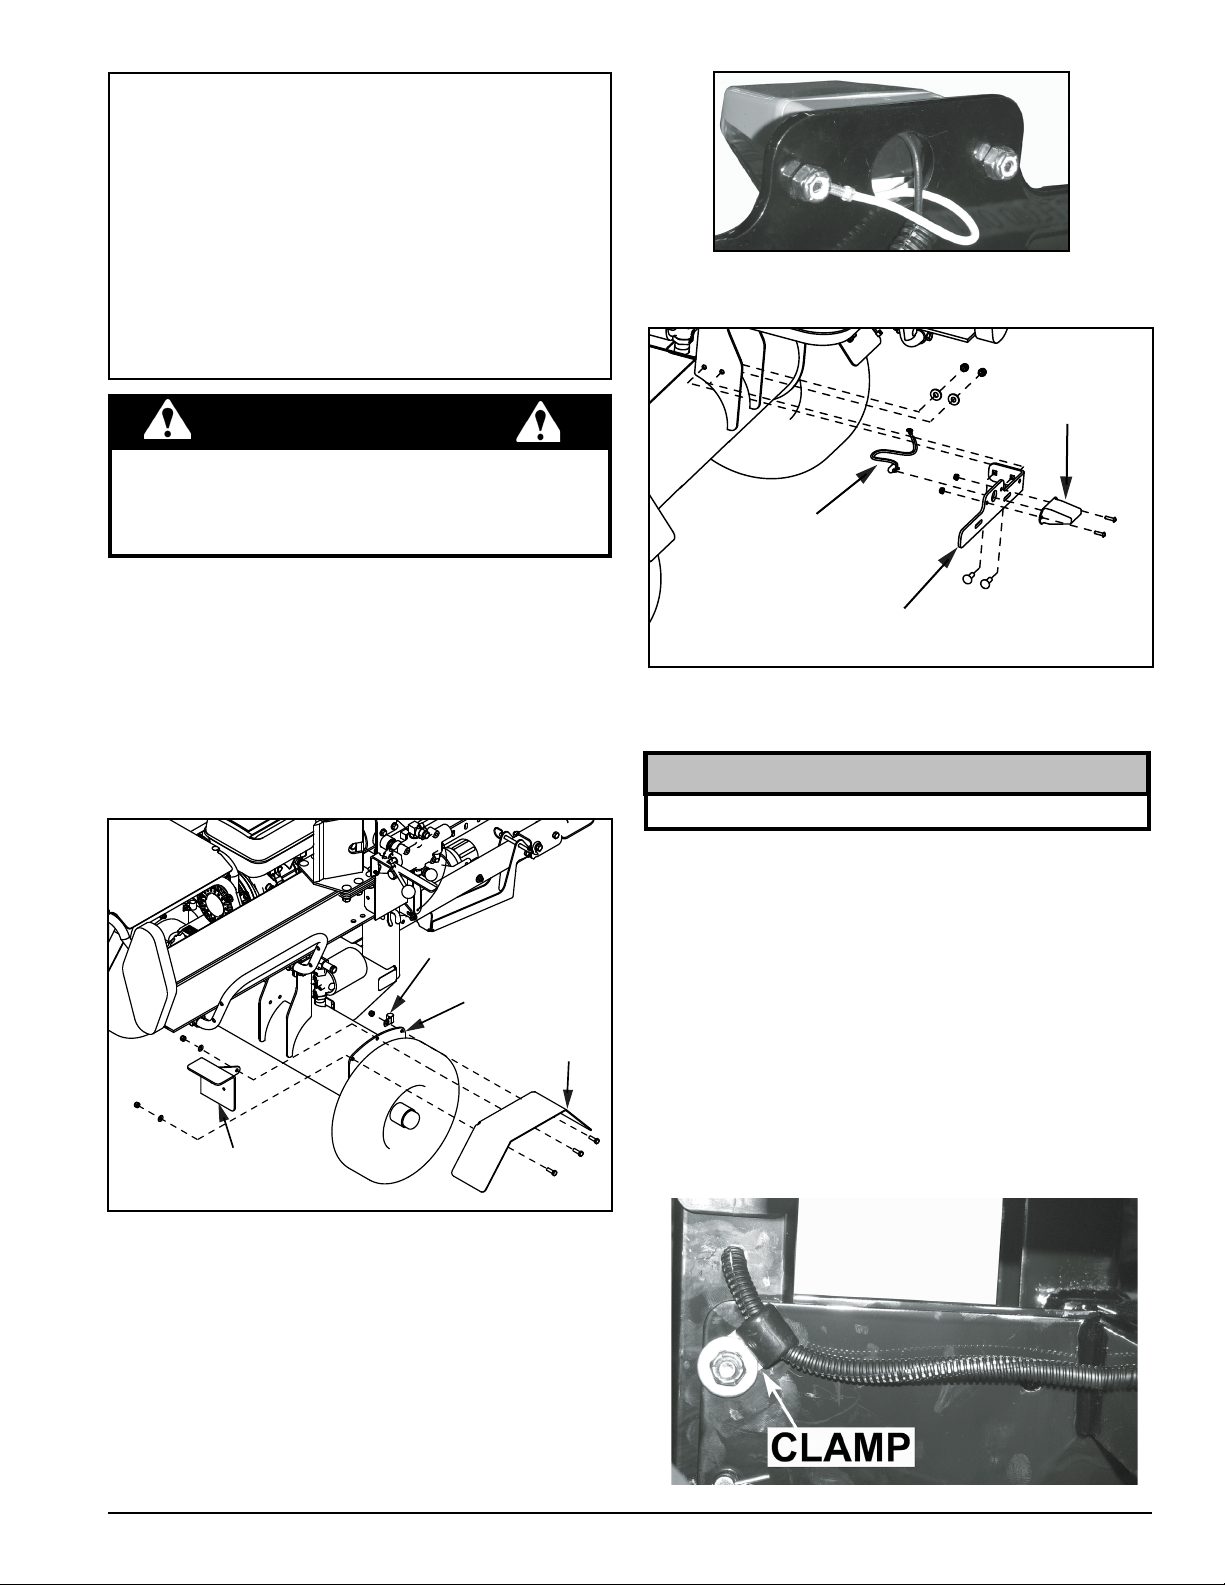
3. Bolt the clamp to the hitch as shown below by
removing the nut, adding the clamp to the bolt, and
screwing the nut back on.
4. Thread the GREEN/BROWN and YELLOW/BROWN
wires through the hitch pole leaving 24" of wire at the
hitch.
5. Ground the WHITE wire to a bolt on the hitch.
6. Run the wire out of the hitch pole and through the
clamp, as shown below.
Fig. 1. Attach the tail light angle and fender to the fender mount
INSTALL LICENSE PLATE LIGHT
1. Plug the light plug into the license plate light.
2. Attach the license plate light to the license plate angle
using one (1) 3/4" screw and 10/24 nylock nut.
3. Screw the white wire (ground) of the light plug to the
license plate light with the other 3/4" screw while
fastening it to the license plate angle (see picture
following).
Instruction Sheet
Fig. 3 Attach clamp to hitch post
PN 36278-00
Rev. 042013
Page 2

7. Wrap the 48" length of conduit around the wires.
8. Mark the conduit at 17" from the point at which the
harness and conduit exit the hitch pole.
9. Run the harness through the hole in the machine
frame (see Fig. 3).
10. At the 17" point that you marked in Step 8, take the
GREEN/BROWN wire out of the conduit. Wrap this
wire with the 40" conduit (see below).
16. Where the conduit around the YELLOW wire runs
out, route the YELLOW wire into the conduit with the
GREEN/BROWN wire. Run this conduit to the fender
(see Fig. 6).
Fig. 4 Place where harness splits underneath the machine
11. Run the rest of the 48" conduit (YELLOW/BROWN
wire) to the left fender.
12. Run the GREEN/BROWN wire up to the surface of the
machine near the hydraulic oil filter.
13. Split the YELLOW/BROWN excess wire. Cut off a
20" inch piece of YELLOW wire from the excess wire.
Solder an end of this yellow wire to the black wire that
comes from the license plate light plug.
14. Wrap this BLACK wire with the 15" conduit as shown
below. Run the conduit through the clamp on the
license angle.
Fig. 6 Routing the conduit past the hydraulic lter to the fender
17. Run the conduit through the clamp on the fender, and
then into the fender itself. Run the conduit along the
inside top edge of the fender and out through the hole
by the light (see below).
Fig. 7
18. Run the conduit through the clamp on the tail light.
Fig. 5 View from behind the license light
15. Push the fir tree tie through the hole in the frame as
shown above and run the conduit through the tie.
Instruction Sheet
Fig. 8
Page 3

24"
RIGHT
17"
LEFT
Fig. 9 Diagram of wiring the log splitter tail lights and license plate light
19. Run the YELLOW/BROWN wire to the left tail light the
same way as the GREEN/BROWN wire went to the
right tail light.
20. Strip the ends of all wires.
21. Wire the harness wires to the tail lights as follows:
• Yellow to LH tail light (STOP & TURN)
• Yellow/brown to LH tail light (TAIL)
• Green to RH tail light (STOP & TURN)
• Green/brown to RH tail light (TAIL)
22. Plug the yellow wire from the license light into the
other hole on the RH tail light (TAIL)
23. Secure the two tail lights to the tail light angles with
two 1/4" nuts and washers each.
24. Secure all conduit linkages with electrical tape.
HOOKUP AND TEST
1. Hook up the trailer light harness to the towing
vehicle.
2. Check to make sure that tail lights on the log splitter
work properly.
3. Towing laws may vary in different states. It is recommended
that you contact the local motor vehicle department for
any special regulations that pertain to towing and know
the laws of any state you travel through.
24"
H
I
T
C
H
Fig. 10 Diagram of conduit lengths that need to be cut
17"
40"
RH TAIL LIGHT
(GREEN/BROWN)
10"
48"
15"
LH TAIL LIGHT
(YELLOW/BROWN)
LICENSE
LIGHT WIRE
(BLACK)
Instruction Sheet
Page 4

16
14
4
8
8
6
19
15
13
17
1
7
2
3
9
20
5
10
ITEM PART NUMBER DESCRIPTION QTY
1 14048-00 CLAMP, 9/16 COATED 3
2 14367-00 PLUG, 12 VOLT LIGHT 1
3 14368-00 LIGHT, LICENSE PLATE 1
4 14775-00 TIE, DOME FIR TREE 1
5 15219 BOLT, 5/16” X 1” GR5 HHCS NC ZP 6
6 15250 WASHER, 5/16” FLAT ZP 2
7 15301 BOLT, 5/16” X 1” GR5 CRG ZP 2
8 15356 NUT, 5/16” NE NYLOCK ZP 8
9 15397 NUT, 10/24 NYLOCK TYPE NM, ZP 2
10 15416 WASHER, 5/16” SAE FLT ZP 10
11 15460 MCH SCW#10-24 X 3/4” PAN HD PH ZP 2
12 16903 LIGHT, LH TAIL 1
13 16904 LIGHT, RH TAIL 1
14 16905 HARNESS, TRAILER LIGHT 1
15 17320 STRAP, 11 IN BLACK TIE 3
16 30525 CONDUIT, SPLIT 1/4” ID BLK POLY 8
17 75836-12 SHEET, FENDER 2
18 76019-00 ASSY., MOUNT LICENSE 1
19 76020-00 ASSY., MOUNT TAILLIGHT RH 1
20 76021-00 ASSY., MOUNT TAILLIGHT LH 1
OEM NUT
12
18
11
237 NW 12th Street, West Fargo, ND 58078-0849
www.bearcatproducts.com
Phone: 701.282.5520 • Toll Free: 800.247.7335 • Fax: 701.282.9522
E-mail: service@bearcatproducts.com • sales@bearcatproducts.com
ECHO BEAR CAT
 Loading...