

Page 1

Page 2

CONTENT
1. Accessories Picture
2. Safety Instructions and Precautions
3. Setup and User Instructions
4. Replacement Parts
5. Technical Specications
6. Conformity
EchoLink (IR)
TM
Aid for Living Infrared System – Universal Receiver
Please read and follow the safety instructions
before using the product
Page 3
1
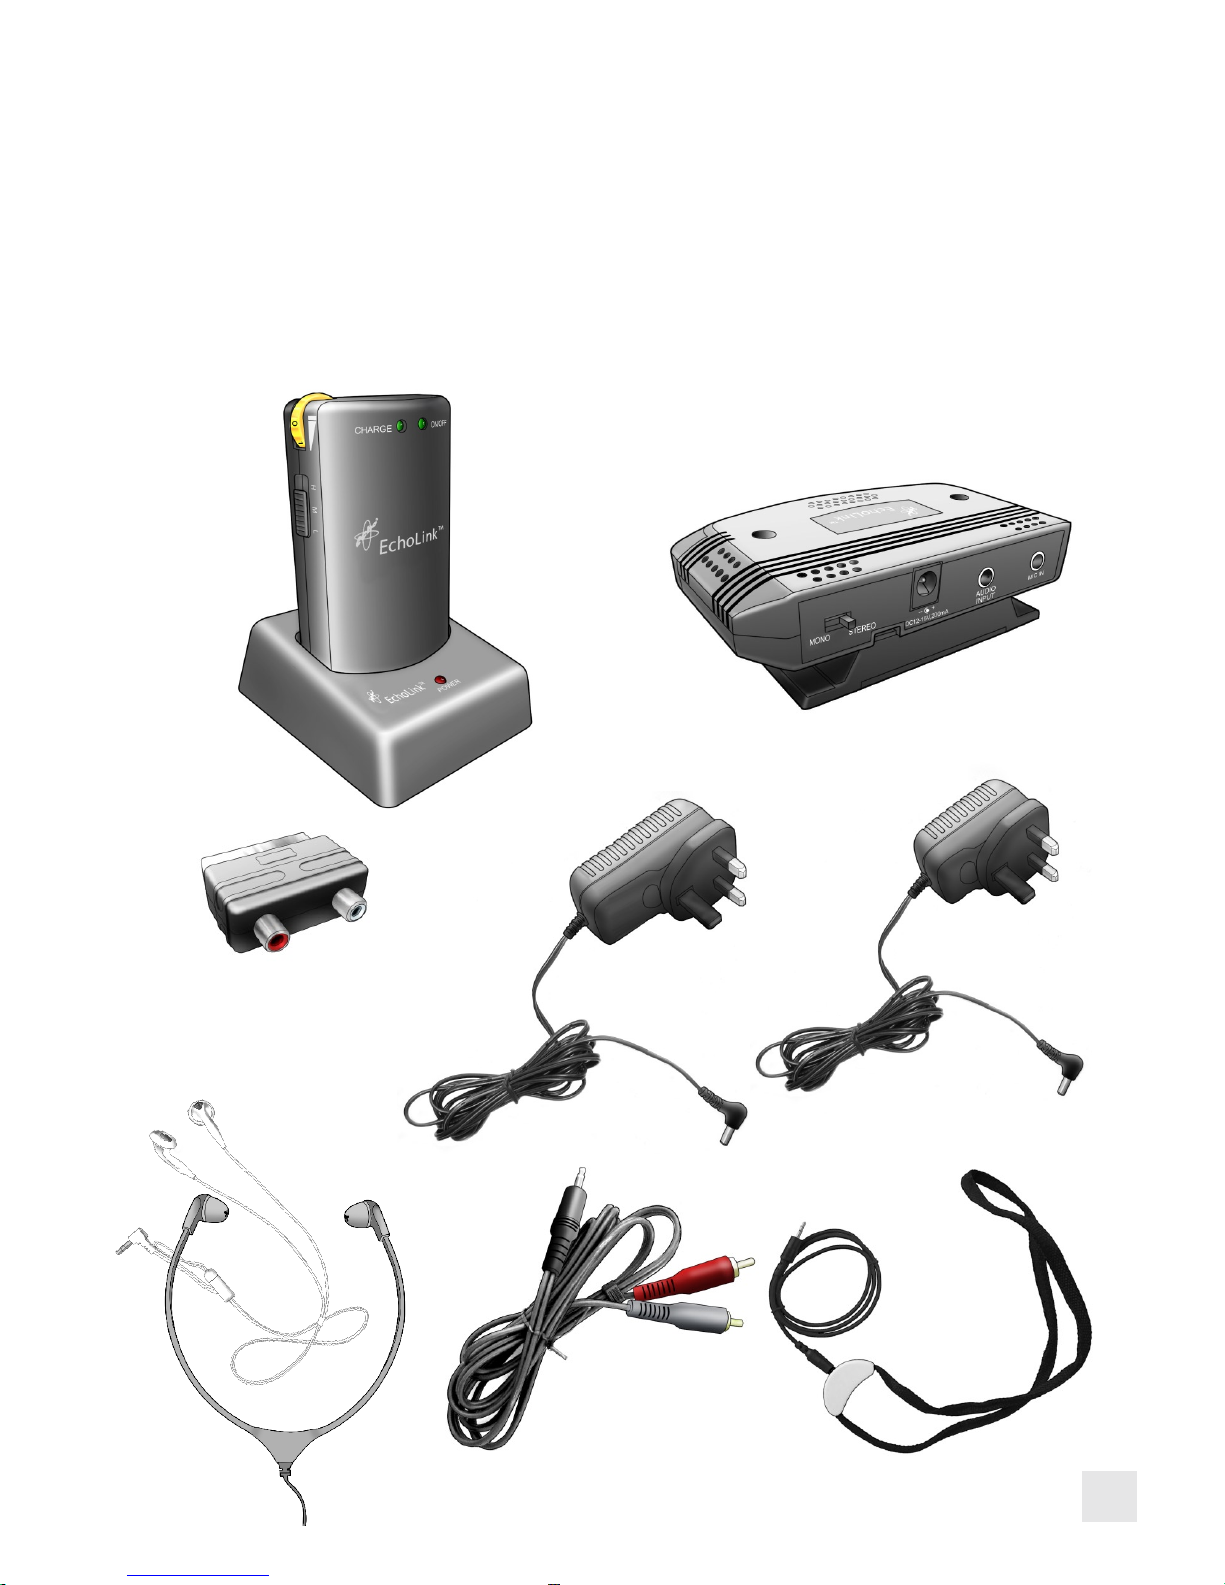
Accessories Picture:
①
Receiver ②Charger ③Transmitter ④SCART
⑤
12 VDC Power adapter ⑥6 VDC Power adapter
⑦
Headset ⑧Phono plugs ⑨Neckloop
①
②
③
④
⑤
⑥
⑦
⑧
⑨
Page 4

Safety Instructions and Precautions:
● Listening to uncomfortable sound levels for prolonged periods
could adversely affect your hearing.
● If using a microphone, line input, headset or neck loop the plug
MUST be fully inserted into the correct socket and the volume
turned to the lowest level before turning the unit on. Failure to do
so can result in high sound levels that could adversely affect your
hearing.
● If using a headset or neck loop it MUST be fully inserted into
the headset socket before turning the unit on. Failure to do so
can result in high sound levels that could adversely affect your
hearing.
● Using this product inappropriately could adversely affect your
hearing. Please follow the step-by-step instructions carefully!
● Do not use in an environment that is damp, wet, very hot or very
cold.
● To clean the EchoLink (IR)TM and its accessories, use only a soft
cloth and an inorganic cleaner.
● Only use the Hearing Products approved mains adapter. Do not
use any other type of mains adapter.
● When using this unit, basic safety precautions as below should
always be followed to avoid the risk of electrical shock or personal
injury.
2
Page 5

● Install the unit securely on a stable surface and install the unit
where the power cord will not be subject to damage or cause a
tripping hazard.
● The unit may get warm when being used. Ensure the unit has
adequate ventilation.
● Please refer all servicing to qualified personnel ONLY! Do not
attempt to open the unit!
● The battery must be fully charged before use.
● It will take about 5 to 7 uses and recharges before the battery
is at full capacity.
3
Page 6

Setup and User Instructions:
1.Place the EchoLink (IR)TM transmitter (see Fig 1) on top of or
next to your TV or x to the side of the TV with the Velcro pad.
(To do this, remove the stand by firmly pulling the transmitter
and stand apart). Place one piece of the Velcro on the bottom
of the transmitter and with the second piece x to the side of the
TV, making sure the transmitter is facing where you are sitting
and that there is a clear line of sight between the transmitter and
receiver, with no obstruction.
2.Plug the 12VDC power adapter into an electrical power socket
then plug the power lead into the transmitter DC socket (see Fig 2).
3.If your TV has audio output sockets connect the Phono/Phono
lead to these sockets and plug the 3.5mm jack plug end of the
lead into the EchoLink (IR) TM Audio input socket (see Fig 3).
4.If your TV has no audio output sockets but has a spare SCART
socket, plug the scart into the TV and connect the Phono/Phono
lead. Then connect the 3.5mm jack plug end into the Audio Input
socket of the transmitter (see Fig 4).
Fig 1
①
②
4
Page 7

Fig 3
Fig 4
Fig 2
5
Page 8

5.If the SCART connection is not successful,
connect the microphone.Simply plug the
3.5mm plug of the microphone cable into
the Mic socket on the transmitter (see Fig
5) and then fix the microphone onto the
TV speaker using the Velcro.
6.The transmitter base has a switch that
allows you to switch between stereo and
mono operation. Leave the switch set to
mono.
7.Plug the 6VDC mains power adapter into
a standard electrical power socket, then
plug the power lead into the EchoLink (IR)
TM charging cradle socket (see g 2).
8.Rotate the volume wheel ON/OFF switch
until the ON/OFF LED is off on t he
receiver and place the receiver on the
charging base.
9.When charging the charge LED on the
receiver will be red, when fully charged
the ch a rge LE D wil l turn to gr een.
Rem o v e from base an d fully insert
the Headset or Neckloop plug into the
receiver phone jack .
10.Put on Headset or Neckloop, ensure the
volume control is at zero then adjust the
volume to a comfortable level (the ON/
OFF LED will be GREEN).
Fig 5
6
Page 9

11.The universal receiver must have a clear and unobstructed view
of the transmitter to work properly. 12. When you are finished
using the universal receiver turn the volume fully counter
clockwise until the ON/OFF LED is off .
13.Place the universal receiver back into the charging cradle.
14.The charge LED will turn RED and when the batteries are fully
charged the charge LED will turn green again. The charging
cradle power LED will always be red when connected to mains.
This indicates that power is available for the receiver.
15.The receiver can also be recharge by plugging the 6VDC power
lead directly into the receiver socket.
16.When the battery level is low, the ON/OFF LED will ash RED.
Then after a few minutes the receiver will automatically turn off
to protect the batteries. The receiver must be recharged if this
occurs.
17.There are no user serviceable parts in the universal receiver. Do
not attempt to replace the batteries. Contact Hearing Products
International Limited if you have any service issues.
18.Note: if the serial numbers or labels are removed your warranty
is invalid.
7
Page 10

8
Replacement Parts
P/N Version Description
475-1000 02 EchoLink (IR) TX
475-1002 02 EchoLink (IR) RX Universal
475-1003 02 Charging base for universal RX
570-1000 01 12 VDC 1,500mA power supply (no plug)
570-1008 01 6 VDCm 1,000mA power supply (no plug)
202/M 01 Omni microphone on a 1.5m lead
306/B 01 phono phono combi lead
201/B 01 Scart/phono plug
575-1000 01 UK Plug
101 01 Headset under chin
910-1003 01 Neckloop
940-1009 03 EchoLink (IR) instructions
490-1013 01 Echolink carton
102 01 Earbuds
Page 11

9
Technical Specications
Single channel 2.3 / 2.8Mhz
Stereo or mono mode of operation
1,060mAh LI-ION battery (receiver)
(not serviceable by the end user)
Volume (dB) 0 ~ -20dB (receiver)
Noise cancelation circuit for optimum performance
Dimensions: transmitter 115x75x20mm,
receiver 90mmX55mmX30mm,
charging base 75mmX85mmX 30mm
Page 12

Conformity
Complete E choLink Syste m (IR) TM C E-EMC: EN55013,
EN55020, EN61000-3-2, EN61000-3-3 CE-LVD : EN60065 Mains
Power Adapter: EN 61558
UK: Waste electrical products and batteries should not be
disposed of with household waste. Separate disposal facilities
exist, for your nearest facility see www.recycle-more.co.uk or
Hearing Products International Limited for full details www.
hear4you.com
Hearing Products International Limited
Echo House, 26/27 Haigh Park, Stockport, SK4 1QR, England
Tel. +44 (0) 161 480 8003
Fax +44 (0) 161 480 8006
www.hear4you.com
29/07/10
Hearing Products International Ltd. reserve sole right to alter prices, design and/
or technical specifications or colours without prior notice. EchoLink (IR) Universal
Instructions © Copyright Hearing Products International Limited.
RoHS
E & O.E
 Loading...