

Page 1

ECHO 9 Ultra H2 OPERATION MANUAL
The Premier H2 Enriched Water Purification System
Page 2

Safety Precautions
If a break down occurs, do not make a repair yourself. Contact our
customer service center, 1-800-337-7017.
If your machine becomes submerged
in water, unplug the power cord from
the wall BEFORE removing your
machine from the water.
Failure to do so may
cause electric SHOCK!
NEVER attempt to repair or service the unit
yourself. Contact customer service
Attempting to do so will VOID your valuable
warranty!
NEVER touch the power cord or plug with
wet hands
- this may result in electric SHOCK!
Ensure the power plug is firmly and
properly inserted into the outlet
- Failure to do so may result in electric SHOCK
or fire!
Protect your machine from freezing temperatures
and direct sunlight.
1-800-337-7017.
Do Not use your machine at voltages other than
specified.
Do Not plug in your machine where it will exceed
the rating of outlet or electric wiring.
Failure to do so can result in fire, injury and / or
damage to yourself,or wiring or machine!
Do Not run hot water through your machine.
Do Not clean by pouring water over or spraying
the machine.
Hot
Water
Unplug your machine if you plan Not to use it for an
extended period of time or turn off the master power
switch on the back of the unit.
Filter replacement may be
necessary
Do Not attempt to repair or service the machine yourself! DO NOT OPEN OR DISASSEMBLE
your machine. Contact customer service.
Attempting to do so will VOID your warranty!
Make sure to use your machine only with potable water suitable
for human consumption.
1-800-337-7017
02
Page 3

If the appliance makes strange or unusual noises.
pH Reagent Liquid Precautions
Some Helpful Tips
If burning smells are detected, unplug the power
cord immediately and contact customer service, to
arrange service for your machine at
pH Reagent Liquid Precautions
Do not expose the pH measuring reagent to extreme heat, flames or fire.
It is Combustible.
Do Not drink the pH reagent liquid, nor put it in the eyes or apply to the body.
- If the liquid is ingested, induce vomiting immediately and call a doctor.
- If the liquid gets in the eyes, flush immediately and thoroughly with
cool water; call a doctor.
- If spilled or dropped on your body, wash if off immediately.
Make sure to keep the pH reagent liquid tightly closed and out of the
reach of children.
1-800-337-7017.
Do Not close, bend, pinch, press or otherwise
obstruct output ports or hoses.
Some Helpful Tips
For storing your alkaline water, glass or ceramic is best. Always try and
keep your stored water cool and away from direct sunlight.
Glass is preferable, but you can use plastic. We recomend only high quality plastics. It is always best
fresh out of the machine and ideal if consumed on a day to-day basis.
Do Not store alkaline water in stainless steel, bronze or aluminum containers.
Save the box and styrofoam your machine came packed in.
This will help if your machine needs to be transported at a later date.
If you are using your machine downstream of a reverse osmosis
system or running reverse osmosis water in your home,
remineralization of the water will be needed.
03
Page 4

Names And Functions
Front Side
LCD Touch
Screen
Front Cover
Water Spout
04
Back Side
Filter Door
115v & 220v
Switch Inside
Filter Compartment
Speaker
Faucet Cable Port
(insert carefully)
Master Power Switch
AC Fuse Holder
Water Outlet
Source Water Inlet
Page 5

Indicators / Controls
g
i
a
Selection indicator
Hydrogen water button
d
g
Filter check button
Setting Indicators / controls
d
a
e
h
f
b
On /Off button
b
Alkaline water button
e
Flow indicator
h
c
c
Setting button
Acidic water button
f
Filter life indicator
i
j k
Language selection button
j
Brightness selection button
l
l
m n
Volume selection button
k
Sleep selection button
m
Exit button
n
05
Page 6
How to Use
Note
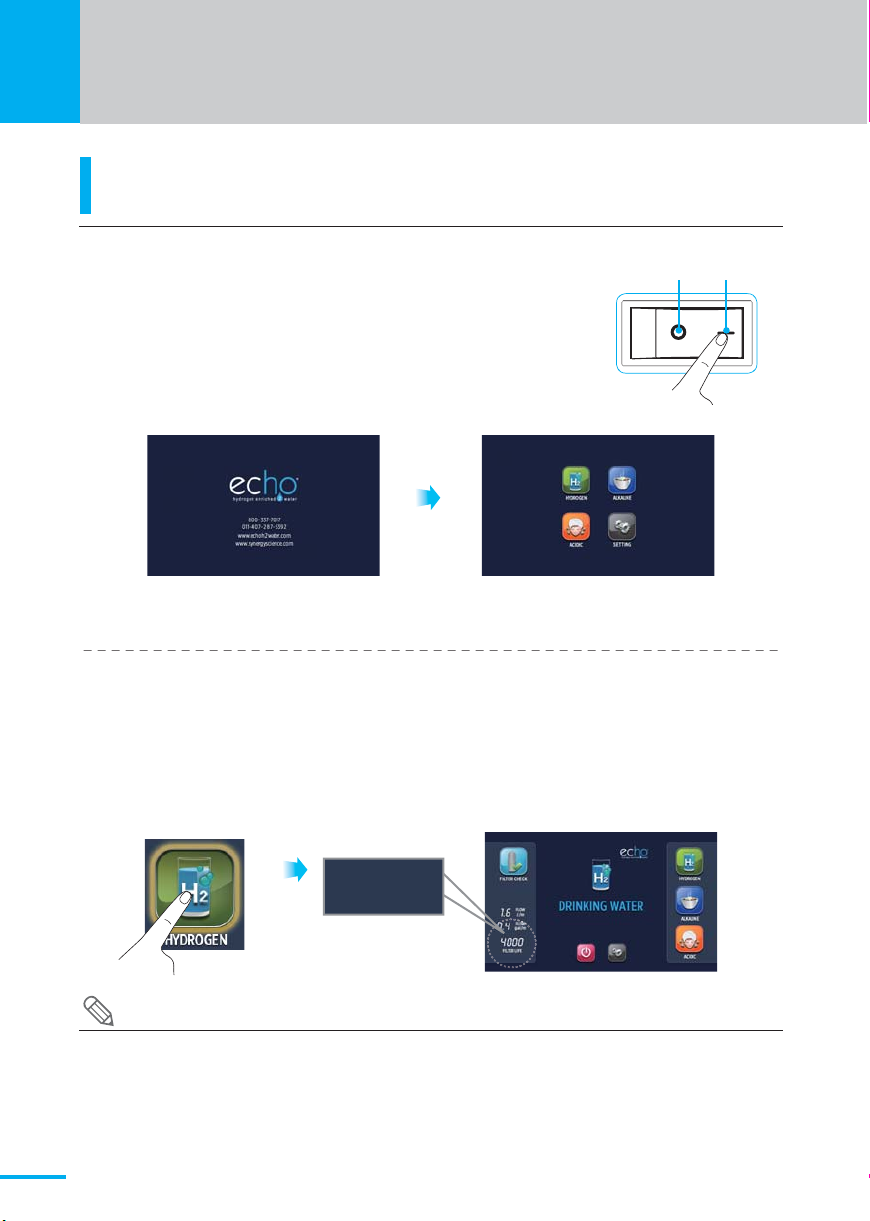
Initial operation
Power up your Hydrogen Water Machine.
1
-Turn power on with master power switch on back
of machine.
-The machine will go into power saver mode, automatically.
Touch the screen to wake up machine out of “sleep mode”.
Stand-by mode statusStart screen
OFF ON
Start water flow through your machine
2
- Press the desired water type: Hydrogen (H2) Water, Alkaline Water,or Acidic
Water (hypochlorous).
- If you choose Hydrogen Water first, you will hear water entering the machine’s
water chambers. This is normal. If you choose Alkaline Water First, the machine
startup may be quieter.
4000
FILTER LIFE
Note
The water may initially come out discolored (light to charcoal gray) due to carbon particles
in the new filter. This is not harmful and is typical of all carbon filters. Allow the water to flow
for 2-3 minutes in the "H
2 water" mode and this will flush out all the carbon dust.
06
Page 7

Hydrogen Water
When drinking hydrogen water
Press the "HYDROGEN" button to begin flow of Hydrogen Water.
You will hear a voice confirmation
that "Echo Hydrogen Water" has been
selected, and the display panel will
show a green symbol.
The Echo Hydrogen Water
comes out of the top spout.
Nothing comes out of the lower water outlet.
What would I use the Hydrogen Water for?
The pH of Hydrogen water is neither raised nor lowered and would be the same as your source
water. You can use it as both drinking water as well as taking medications.
How to shut off the water flow from your machine
When finished using the machine, press the Red power button.
The water will stop, the machine will drain water out of the water cell.
After a short time, the display panel willl go dark, indicating that the machine is in
“sleep mode”.
How To Check The Filter
Press the "FILTER CHECK" button
and the display panel will show a
digital filter life.
07
Page 8
Alkaline Water
NOTE
T
d
d
d
d
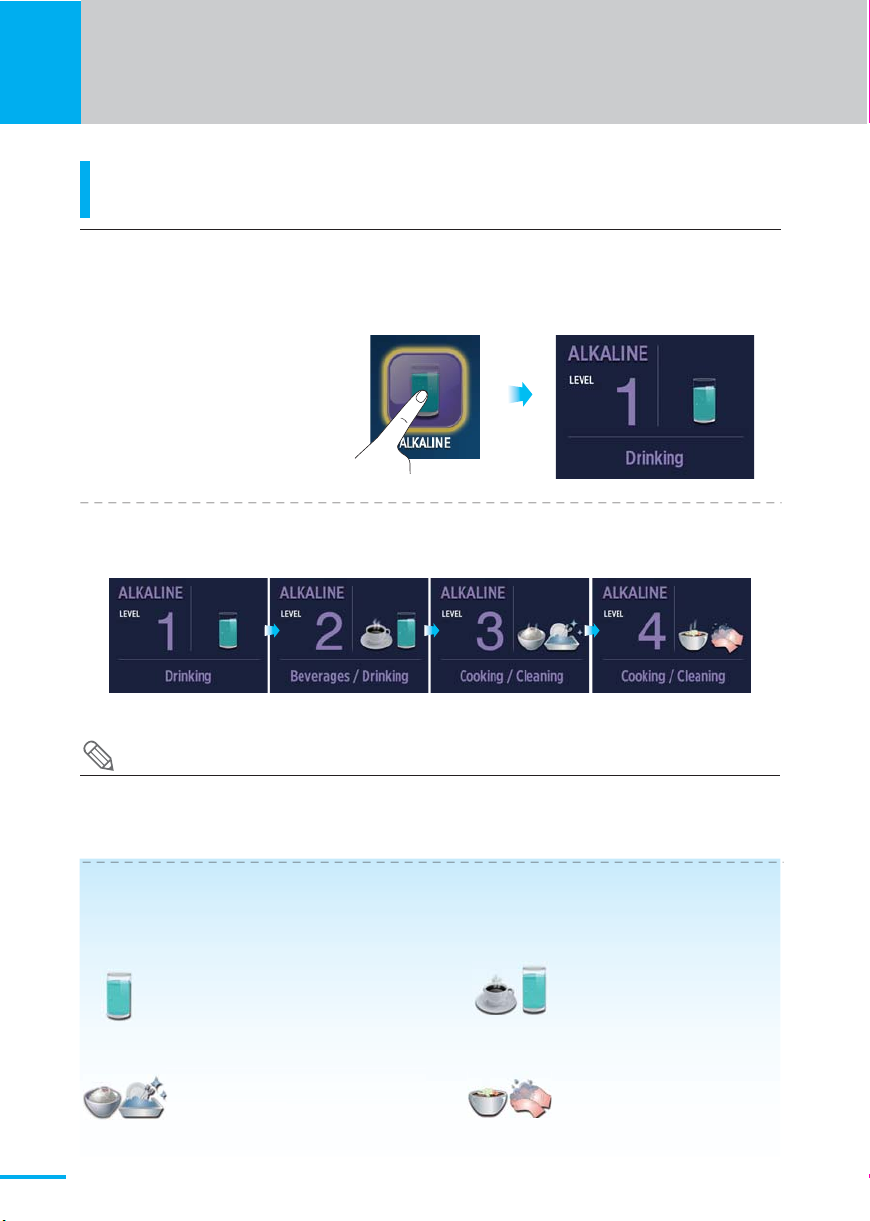
When drinking alkaline water
※Higher than10pH water is not recommended for drinking for long periods of time.
Press the "ALKALINE" button to select the desired setting from levels 1 - 4.
1
You will hear a voice confirmation that "Alkaline Water" has been selected, and the
display panel will show a Blue symbol and purple number corresponding to the level
selected.
Whenever you press alkaline water selection button repeatedly, it changes
2
level of alkaline water.
NOTE
Your machine will always "remember" the last setting used.
If the previous selection was Alkaline Level 2, when you select Alkaline Water again,
it will automatically produce water at Alkaline Level 2.
Some uses for the different levels of Alkaline Water
Alkaline water levels Note: pH levels will always vary with different source water(tap water).
Level 1
Level 3
Weak Alkaline water
This level is used for initial consumption period
(4-7 days). Let your body adjust slowly to this
increase in pH.
Medium to Strong Alkaline water
This is the most common level of alkalinity for
drinking purposes. Some people may start to
detect a strong taste.
Level 2
Level 4
08
Weak to Medium Alkaline water
Move up to this level after the initial
adjustment period.
Adjust to this level for 3-4 days.
Most people will drink at level 2 or 3.
Strong Alkaline water
Generally, most people find this
very strong tasting and may have
powerful detoxifying effects.
Not recommended to drink water
at a10pH or higher, all the time.
Page 9

NOTE
2
222
Acid Water
When using acidic water
※Acidic water has many uses including washing the face, brushing the teeth, used as a
mouthwash, or washing the body. Also recommended for cleaning surfaces or creating a
natural household cleaner. Irrigate plants and flowers (level 1 acid).
Press the "ACIDIC" button to select the desired acid levels, from 1 - 4.
1
You will hear a voice confirmation that "Acidic Water" has been selected, and the
display panel will show an Orange symbol and an orange number corresponding to the
level selected.
Whenever you press acidic water selection button repeatedly, it changes the
2
number of acidic level.
※Acidic water is not drinking water. Be careful not to drink acidic water, confusing it
with alkaline water or hydrogen water.
NOTE
Your machine will always "remember" the last setting used.
If the previous selection was Acid Level 2, when you select Acid Water again,
it will automatically produce water at Acid Level 2
Some uses for the different levels of Acidic Water
Descriptions of Acidic water levels. Note: pH levels will vary, based on your tap water.
Level 1
Level 3
Weak Acidic water.
Facial cleansing.Used for oral hygiene,
mouth wash, irrigating flowers and plants, etc.
Medium to Strong Acidic water.
For cleaning in the kitchen.
Level 2
Level 4
Weak to Medium Acidic water.
For skin care, as an astringent and
oral hygiene, gargling, washing
your hair, etc.
Strong Acidic water.
For sterilization purposes.
Washing Produce, meat,
fish, poultry.
09
Page 10

How To Use
How to Change Settings
Press the "SETTING" button.
When the SETTING screen appears
on the display panel, press the
desired button for selection.
LANGUAGE SETTING
Press the "LANGUAGE" button.
When the LANGUAGE screen
appears on the display panel,
press the appropriate button for
desired language.
VOLUME SETTING
Press the "VOLUME" button.
When the VOLUME screen
appears on the display panel,
press the + button to increse
the volume, press the - button to
decrease the volume.
10
Page 11

BRIGHTNESS SETTING
Press the "BRIGHTNESS" button.
When the BRIGHTNESS screen
appears on the display panel,
press the appropriate button
for the desired selection.
SLEEP SETTING
Press the "SLEEP" button.
When the SLEEP screen
appears on the display panel,
press the appropriate button
for the desired selection.
11
Page 12

Replacing Your Echo® Filter
top of the filter
How to replace the filter
IMPORTANT! Stop water flow prior to filter replacement.
1
Stop water flow supply by turning power switch on
back side of product to OFF position.
When the digital filter life indicator display 0000, or you see
the flickering filter symbol, it is time to replace your filter.
Open the filter housing cover.
2
Slide the cover to remove it.
0000
FILTER LIFE
Remove the expired filter.
3
Take hold of the filter securely with your hand, press the top of filter firmly down
against the spring loaded mechanism(figure1) to disengage the top of the filter
and then pull it toward you (figure 2)and up to remove it.
The upper part of the filter is separated from
housing by pressing firmly down.
Once you have engaged the spring loaded
mechanism, you can then easily remove the
filter from the main body by pulling it toward you.
Remove filter with the same as method above.
12
A
B
A
B
Page 13

Insert the new filter into the compartment.
e
p
4
Remove the plastic caps covering both ends of the new filter.
Set the large opening (on the bottom of the filter cartridge)
onto the base in the center of the filter cushion.
Push the filter down and into the housing compartment
ensuring the opening at the top of the filter is seated
properly into the fitting, at the top of the housing.
Change filter with the same as method above.
Once new filter is installed, rotate the filter until the arrow on the filter is aligned
5
with the arrow on the machine.
Your Echo® lter is equipped with a genomic chip. This chip communicates with the
machine how much water has owed through the lter.
The filter life indicator will automatically reset
6
once the machine detects a new filter present.
B
A
A
A
Echo® 9 Ultra Replacement Filter
Ultra Replacement Filt
B
H2 Water Replacement Filter
★
Re
lacement Filt
Make sure the arrow on
filter lines up with the
arrow on the machine!
4000
B
FILTER LIFE
Check for leakage by running water through
your machine before replacing the housing cover.
Flush out the carbon dust.
7
The water flowing through will initially come out discolored
(light to charcoal gray) due to carbon particulates in the new filter.
It is not harmful.
Allow the water to flow for 2-3 minutes in the "H2" mode
and this will flush all the carbon dust.
Replace the filter housing cover.
8
13
Page 14

Composition Of Filter
Composition of filter
High Performance Carbon Filter
Echo® 9 Ultra Replacement Filter Hydrogen Water Filter
(Coconut Husk)
(NSF / ANSI 42)
(Coconut Husk)
(NSF / ANSI 42)
Recommended period for changing filter
Effective period of filter use may differ greatly depending on season, usage, and
environment. (I.E. water pressure, quality, and amount of use)
Please replace filter when prompted by machine or if any one of
the below occurs:
- Please replace lter when the water no longer tastes clean.
- Filter replacement may be needed , if you haven’t used your machine in a long period of time.
14
Page 15

Measuring The pH of Water
How to measure pH
※Important Note: Water quality and mineral content vary greatly in different Iocations
and will directly impact machine performance with respect to pH and hydrogen production.
Fill the three test containers provided about 1/2 full
1
with alkaline, acidic, and H2 water each.
Add 2 or 3 drops of the pH reagent into the container
2
and stir if needed.
If the reagent and water are not mixed well, the
correct result may not occur, mix well.
The pH value is determined by matching the color
3
on the pH color chart provided. A digital pH meter
is more accurate than reagent.
- DO NOT consume water containing pH reagent.
- Keep the pH reagent Iiquid and color chart away from OPEN FLAMES!
Caution
- If contact with eyes, flush Iiberally with fresh water, and seek medical help.
- If ingested, induce vomiting, and seek medical help.
ALKALINE
WATER
ALKALINE
WATER
H2
WATER
H2
WATER
ACIDIC
WATER
ACIDIC
WATER
15
Page 16

Counter Top Installation Instructions
Connecting to a Standard Faucet
diverter
valve
Source water
Dust Pre-Filter
Warning! Make sure the arrow on the
dust pre-lter is pointing
the same direction as the
water ow.
Connecting to a Cold
Water Valve
Warning!
Make sure the arrow on the
dust pre-lter is pointing
the same direction as the
water ow.
T-A dapt er
Source water
Cold Water Valve
inlet
inlet
Dust Pre Filter
outlet
inlet
outlet
16
Page 17

Installation: Diverter Valve
Before installing, shut o water supply.
Caution
[Figure 1]
diverter valve
Remove aerator from faucet. Attach
1
diverter valve. Use sizing rings and
grommet if needed.
[Figure 3]
inlet
Push the 1/4in.(PE) hose all the
3
way in the water inlet at the bottom
of the machine.
[Figure 2]
diverter
PE Hose
Connect 1/4 in.(PE) hose to the
2
diverter in "Figure 2". Shown above.
[Figure 4]
inlet
Connect stainless steel acid line
4
to the acidic outlet and allow it to
drain into your sink.
outlet
[Figure 5]
After finishing the connection of
5
"Figure 4" open the water supply
valve and adjust the water
pressure.
[Figure 6]
Check for leaks on all connections
6
after installation is completed.
17
Page 18

Installation Procedure 2
Before installing, shut o water supply.
Caution
[Figure 1]
Cold water valve
Loosen the nut of the cold water
1
valve.
[Figure 3]
inlet
Push the 1/4in.(PE) hose all the
3
way in the water inlet at the bottom
of the machine.
PE Hose
t-adapter
Connect 1/4 in.(PE) hose to the
2
t-adapter in "Figure 2"
inlet
Connect stainless steel acid line
4
to the acidic outlet and allow it to
drain into your sink.
outlet
[Figure 2]
[Figure 4]
After finishing the connection of
5
"Figure 4" open the water supply
valve and adjust the water
pressure.
18
[Figure 5]
[Figure 6]
Check for leaks on all connections
6
after installation completed.
Page 19

Installation Precautions
Installation Precautions
When using a Reverse Osmosis filter prior to the machine, you will need to
verify the R.O. storage tank pressure is 11-13psi.
Caution
You will also need to remineralize the water to have at least 100TDS in the
water for optimum performance.
You can purchase a TDS meter inexpensively.
Accessories
Water Spout
Manual
AC cord Fitting spanner Elbow Teflon tape
Color chart
pH test kit
Diverter Valve
Manual Dust Pre-Filter
1/4 in.Water
Source Hose(250cm)
1/4 in.Water
Outlet Hose(120cm)
Stainless Steel
Acid Outlet
19
Page 20

Product Specifications
Product Manufacture Permission Number
Feature
Model
INPUT Voltage
Power Supply
Power Consumption
Overall Dimension
Applicable Water Inflow Pressure
Applicable Water Temperature
Unit Operation Type
Electrolysis Method
Electrode
Electrolysis Capacity
Electrolysis Setting
No. 610 by KFDA (Korea Food & Drug Administration)
Hydrogen/Ion Water Generator
ECHO 9 Ultra H
2
AC 120V or 240V, 50Hz~60Hz
SMPS
Max 1100W
10.4 x13.7 x 6.9 (WxHxD)in.(264.16x347.9x175.26) cm
10~71psi / .7 ~ 5Kgf/cm2
41~86ºF / 5ºC~ 29ºC
One Touch Automated Start
Continuous Electrolysis
9 Electrodes (5 Layers of Platinum over Titanium)
DARC system (3.5L/min. at 49.8psi)
2 Water / Alkaline (4 levels) / Acidic (4 levels)
H
Automatic Cleaning
pH Value
Filter Replacement
Filter Composition
Filter Life
Filter Life Indicator
Patented Anti Scaling Technology
pH 4.0(±0.5)~11.5(±0.5)
Easy Replaceable Cartridge
Silver Activated Carbon, KDF55, Tourmaline
1056gal./4000L
LCD Graphic Display, Voice Prompt
Protection type and class against electric shock : Class Ⅱ device, Type B applied part
20
Page 21

Echo® Digital Faucet: Names And Functions
Echo® Faucet
Touch Control Panel
Top Water Outlet
Bottom Water Outlet
Body
21
Page 22

Functions: Echo® Digital Faucet
Echo® Faucet Display
Water Type / Level Indicator
H2 Water Button
H2 WATER
Acidic Water Button
Power Button
Alkaline Water Button
Replace Filter Indicator
(Replace Filter when flashing!)
22
Power Button
Start and stop water flow into your machine.
Water Type / Level Indicator
LEDs change color(Green indicates H2, Blue indicates Alkaline,
Orange indicates Acidic) correspond to the water type
choose and indicate which level (1-4) you are using.
Alkaline Select Button
Use to select alkaline water and the desired level(1~4).
Acidic Select Button
Use to select acidic water and the desired level(1~4).
H2 Water select Button
Use to select H2 Water.
Replace Filter Indicator
When the Orange Replace Filter Light is flashing, it is time to replace your filter.
Page 23

Accessories (Needed for faucet installation)
Caution
Product Requirement :
Water pressure should be maintained at a constant rate. When the water pressure is
too low, water cannot flow through the unit.
Accessories
Faucet
Top Spout
Large Fitting
Bottom Spout
Small Fitting
Hose(5/16")
(Top Spout
Water Hose)
Hose(1/4")
(Bottom Spout
Hose)
Manual
Gasket
(installed under
the Faucet)Circle Plate
Water
Outlet Adapter
Connector cordT-Adapter
pH test kit
Please connect to top of machine
for connecting to the Echo® Digital Faucet.
Color chart
(Hole diameter: 5/16”)
Manual allen wrench
Water
Outlet Adapter
23
Page 24

How To Connect Water Faucet
To connect the faucet
All the fittings are push in style fittings. To attach the hoses to any fitting, firmly insert the end of
the hose into the fitting. Pull firmly to check the connection - you should not be able to pull the
hose out. To release the hose from the fitting, you must push the spring loaded ring protruding
from the end of the fitting while pulling the hose out.
WARNING: Incorrect installation could VOID your valuable warranty.
Professional installation is recommended.
Use appropriate tools to make 1.25 in.
1.25
1
diameter hole in the location where faucet will
permanently set. Make sure the faucet location will
allow both spouts on the digital faucet to reach the
sink. The center of the hole for the faucet should
NOT be more than 2.5 in. from the edge of the sink.
Figure1
Figure2
Red color
(Bottom Spout)
Figure3
Center the faucet in the hole properly over
2
the gasket.
Once centered secure the faucet to the counter
3
by tightening the circle nut under counter until the
faucet is secure and sufficiently tight.
After the faucet is fixed, connect it to fitting
4
with 5/16” hose(for Alkaline) like figure 4.
Check the hose whether it is inserted properly
or not. Also, connect it with 1/4” hose (for Acidic)
like figure4 and connect the faucet to the body
with connector cord.
Figure4
1/4” Red color tube
(Bottom Spout)
5/16”White color tube
(Top Spout)
24
White color
(Top Spout)
Page 25

Faucet Connector Cable
water to top spout
water to bottom spout
Place the machine in an appropriate place under your sink.
5
Connect the 1/4 in. water hose to the small fitting on the red hose extending
6
from the faucet to the water outlet on the back of the machine. Make sure to push the
hose into the fitting so that leaking does not occur. You should not be able to pull the hose
out.
Connect 5/16 in. water hose attached to the fitting of the faucet to the
7
Top Water spout on the machine. Push firmly to check so that leaking does not occur you should not be able to pull the hose out.
Source Water
T-Adapter
Connect the T-adapter to the cold water valve under the sink.
8
Install the dust pre-filter in the middle of 1/4 inch hose with the arrow pointed towards the machine.
9
Connect the 1/4 inch hose with dust pre-filter to water source inlet on the bottom of the
machine. Push firmly to check so that leaking does not occur - you should NOT be able
to pull the hose out.
25
Page 26

Carefully plug in the faucet connector cable to the back of the machine. The connection
10
should be easy to push in. There is only one way to push it in.
Do Not force it, or it will be damaged.
Connect the power cord into an appropriate outlet under the sink.
11
Make sure the outlet always has power. Power to the machine must always be on.
12
Initial Operation
Plug in your machine and turn the master power
1
switch on at the back of your machine.
Turn on the water supply to the machine
2
Supply water by opening the water supply valve.
H2 WATER
26
Start water flow through your machine and
3
check for leaks!
- Press the "POWER" button on the top of your faucet to
start the water flow then touch the “H2 Water” Button on faucet.
NOTE: The water may initially come out discolored (light to charcoal gray) due to
carbon particulates in the new filter. This is not harmful and is typical of all
carbon filters. Allow water to flow for 2-3 minutes in the "H2 water" mode
and this will flush out all the carbon dust.
-Press Power Button on faucet to turn the machine off and stop the water flow.
Page 27

How To Use Alkaline Water
To select Alkaline water
Press the Power Button on the faucet to turn the machine on.
1
Press the "ALKALINE" button to select the desired setting from levels 1 - 4. The
2
alkaline water will come out from the top spout of the faucet.
The display panel will show Blue LEDs corresponding to the level selected.
NOTE : Your machine will always "remember" the last setting used.
3
If the previous selection was Alkaline Level 2, it will automatically flow
Alkaline Level 2 water through the machine.
To select a different level, press the "ALKALINE" button to move to next level until
4
the desired level is achieved. The Blue lights will change accordingly.
H2 WATER
Acidic Water
Level 1 Level 2 Level 3 Level 4
Alkaline Water
27
Page 28

How to Use Acidic Water
To select Acidic water
NOTE : Acidic water is used for cleaning and sterilization.
Drink in small amounts (1 to 2 ounces) case of food poisoning or severe
abdominal cramps
Press the power button on the faucet to turn the machine on.
1
Press the "ACIDIC" button to select the desired setting.
2
The display panel will show an Orange LEDs corresponding to the level selected.
The Acidic water will now come out from the top spout.
NOTE : Your machine will always "remember" the last setting used.
3
If the previous selection was Acidic Level 2, when you start flow through
the machine, it will automatically produce Acidic Level 2.
To select a different level, press the "ACIDIC" button to move to the next level until
4
the desired setting level is achieved. The Orange LEDs will change accordingly.
28
Acidic Water
H2 WATER
Alkaline Water
Level 1 Level 2 Level 3 Level 4
Page 29

How to Use H2 Water
To select H2 Water
Press the power button.
1
Press the H2 Water button.
2
The LEDs on the faucet will turn Green.
3
The H2 Water will come out of the top spout. Water will not come out the bottom spout.
4
H2 WATER
H2 water
How to turn off the machine with the faucet
With the water running through your faucet press
the power button. The water will stop and the display
panel will go dark indicating the machine is in standby
or "sleep" mode.
H2 WATER
29
Page 30

How To Replace The Filter
top of the filter
IMPORTANT!
When the LED filter life indicator light is on,
1
it is time to replace your filter.
Open the filter housing cover.
2
slide the cover to the left and remove it.
Stop water flow prior to filter replacement!
H2 WATER
Remove the expired filter.
3
Take hold of the filter securely with your hand, press the top of filter firmly down
against the spring loaded mechanism (figure1) to disengage the top of the filter
then pull it toward you (figure 2) and up to remove it.
Once the upper part of the filter is separated
from housing by pressing firmly down.
and you have engaged the spring loaded
mechanism, You can easily remove the filter
from the main body by pulling it toward you.
Remove filter with the same as method above.
30
A
B
A
Echo® 9 Ultra Replacement Filter
B
H2 Water Replacement Filter
A
B
Page 31

Insert the new filter into the compartment.
4
Remove the plastic caps covering both ends of the new filter.
Set the large opening (on the bottom of the filter cartridge)
onto the base in the center of the filter cushion.
Push the filter down and into the housing compartment
ensuring the opening at the top of the filter is seated
properly into the fitting, at the top of the housing.
Change filter with the same as method above.
Once new filter is installed, rotate the filter until the arrow on the filter is aligned
5
with the arrow on the machine.
Your Echo® lter is equipped with a genomic chip. This chip communicates with
the machine how much water has owed through the lter.
Once new filter is installed, the filter replace light is no
6
longer flashing.
B
A
A
A
Echo® 9 Ultra Replacement Filter
B
H2 Water Replacement Filter
Make sure the arrow on
★
filter lines up with the
arrow on the machine!
B
Check for leakage by running water through
your machine BEFORE replacing the housing cover.
Flush out the carbon dust.
7
-The water will initially come out discolored (light to charcoal
gray) due to carbon particulates in the new filter.
This is not harmful.
Allow the water to flow for 2-3 minutes in the "H2 Water" mode
and this will flush all the carbon dust.
Replace the filter housing cover.
8
31
Page 32

Trouble Shooting Guide
ResolutionCause(s) Abnormal condition
The Function Display
Panel does not come on.
pH test shows alkaline water
color as neutral (7) while
acidic water color gets
yellow (6). This is normal
if initial pH is 6.5
Power supply is suddenly
cut off while operating the
unit.
A power plug is not properly
inserted, or it is inserted into a
faulty outlet.
The fuse is blown.
The fuse is not inserted properly.
Faulty or evaporated reagent:
alkaline / acidity are always
produced in inverse proportion.
Therefore, showing an acidic
color means inversely that alkaline
water has to be generated from
the unit.
Lack of alkaline color can result
from a chemical reaction where
carbonic acid in water evaporates
some test reagent elements.
Elevated level of salt in the
water or high TDS; extended
operation at high pH;
sudden change in electrical
current. In these cases your
machine will shut down
automatically to protect the
electrodes and circuitry.
Properly insert power plug into
a correctly functioning power
outlet
Replace the fuse. A spare fuse is
located in the rear-panel fuse
holder. (8A / 250V fuse)
Test pH value on level
3 or 4 water;
replace reagent.
Wait - the unit will become
operational again after about
one hour. Your Machine has a
safety mechanism built-in to
protect the electrodes and
circuitry. This mechanism will
shut the Machine down
automatically. This mechanism
protects the unit from overuse
or excessive electric current.
Low output of alkaline water
from the unit.
32
Filter is clogged. Premature
clogging may be caused by
sudden drop in water quality and
an influx of sediment or other
contaminants, which stress
the filter.
Low pressure in your household
plumbing.
The input hose is bent, kinked or
otherwise restricted.
Replace your filter or clean dustpre filter. There may be calcium
build up in the top spout. Clean
the machine with commercial
(30%) vinegar. Call Customer
Support to order new filter.
Ensure water supply valves are
fully open. The water pressure
in house may be too low.
Straighten the bent hose.
Page 33

ResolutionCause(s) Abnormal condition
The Function Display Panel /
display indicators do not
come on even after turning
the tap on.
Strange smell from
Alkaline water.
Water appears murky;
white snow like particles
in the bottom of your glass.
Faulty PCB
(Printed Circuit Board)
Expired filter from ordinary use
or premature clogging due to
contaminants in water quality.
Sudden change in water quality
with elevated level of Sulfur
(not Chlorine). Elevated Sulfur
levels are observed in some
areas during summer months.
These levels fall within safe
drinking water standards, yet
will cause a reaction with ionized
water causing a unique smell.
You have high hardness (calcium
primarily) in your water. The white
is extracted CaCO
carbonate). After Co
3
(Calcium
2
in water is
bonded with Ca where elevated
levels of CO
3
exist in your water.
In water where elevated levels of
CO
3
exist, what you see after
ionization is Co
2
in the water
bonded with Ca.
Immediately unplug the unit
and contact Customer Svc.
arrange service.
Replace your filter.
Select lower pH level (1-2).
If still present, filter replacement
may be necessary.
This is calcium and is harmless.
You can lower the alkaline
setting to 1 or 2. Lower the
voltage to the electrodes.
Typically this only occurs in
extremely hard water. You
can also add a softening
pre-filter.
At first no smell, but then
smell from the alkaline
water about one hour after.
Water leakage from the
filter cartridge housing.
No acid water flow from the
acidic output port.
Your water bottle needs cleaning.
Expired filter. Dish washer
detergent is embedding itself in
the bottle’s materials.
Filter not installed correctly
into filter housing.
Acidic output hose is bent,
kinked or otherwise restricted.
Clean your bottle or container.
Select lower pH level
(1~2). Replace your filter.
Change dishwasher detergent
brand
Remove your filter and reinstall
it properly following the filter
replacement instructions.
Increase the quantity of source
water inflow.
Straighten the bent hose;
increase water flow from supply.
33
Page 34

Notes
34
Page 35

Notes
35
Page 36

www.synergyscience.com
www.echoh2water.com
Toll Free 800-337-7017
Local 011-407-287-5392
 Loading...