

Page 1

EZ TrimMower
Owners Manual
Models 73040, 73050, 73450,
74040, 74450, 74455, 74050,
74060, & 74065
Crary Bear Cat
Box 849
West Fargo, ND 58078
800-247-7335
FAX: (701) 282-9522
Manufactured in the
United States of America
by Crary Company
Part No. 12331
Manual No. 598
Page 2

Dear Bear Cat Customer,
Thank you for purchasing a Bear Cat EZ TrimMower. The EZ
TrimMower is designed, tested, and manufactured to give years of
dependable performance. To keep your machine operating at peak
efficiency, it is necessary to correctly adjust it and make regular
inspections. The following pages will assist you in the operation and
maintenance of your machine. Please read and understand this
manual before operating the EZ T rimMower .
If you have any questions or comments about this manual, please
call us at 800-247-7335.
If you have any questions or problems with your machine, please
call or write your local factory-authorized Bear Cat dealer.
How to Contact Bear
A
DDRESS
Crary Bear Cat
237 NW 12th Street
PO Box 849
West Fargo , ND
P
Cat
58078
HONE
Please Send Us Your Warranty Card
A warranty card is included in your owners kit packaged with your
machine. Please take the time to fill in the information requested on the
card. When you send your completed card to us, we will register your
machine and start your coverage under our limited warranty.
Owner's Record
Please take a moment to record the
following information about your new EZ
TrimMower. If you need to call for assistance, please be ready to provide your
model and serial numbers. This inf ormation will allow us (or your dealer) to help
more quickly when you call.
Model Number
Be alert! Your Safety is Involved.
Serial Number
This safety alert symbol identifies important
safety messages in this manual. When you
see this symbol, be alert to the possibility of
personal injury and carefully read the message
that follows.
701-282-5520
F AX (701) 282-9522
E
MAIL
opesales@crary .com
service@crary.com
H
OURS
M-F, 8 a.m. to 5 p.m.
Central Time
Page 3

Table of Contents
Safety Instructions ...................................................................................2
Assembly................................................................................................. 3
Starting ....................................................................................................5
Operation.................................................................................................7
Service and Maintenance ........................................................................ 9
Troubleshooting ..................................................................................... 11
Warranty ................................................................................................ 12
Before You Begin:
When using your new EZ T rimMower please take the time and effort to
do it the safe way. Follow all the safety instructions carefully, and make
sure everyone involved in the assembly does the same.
Do not operate your Machine with any guards or shields
removed!
A Service Tip
Follow the suggestions outlined in this manual. For adjustment, repair, or
service not covered in this manual, contact your nearest authorized Bear
Cat dealer. Your dealer is knowledgeable about your machine and has a
direct line to the factory for assistance.
Torque Chart
Standard minimum
tightening torque for
normal assembly
applications.
Bolts (SAE GR5)
Size Ft. Lbs.
5/16" 20
3/8" 35
1/2" 75
NOTE: All references to left, right, front and
rear of the machine are determined by standing behind the handlebars and facing the
direction the machine is traveling.
Screws
Size Ft. Lbs.
5/16" Set 15
1
Page 4

Safety Instructions
1. Become familiar with the owners manual
and engine manual before attempting to
operate this equipment.
2. Carefully read all safety and operation
decals before operating.
3. Do not allow children or unqualified individuals
to operate this equipment.
4. Do not allo w hands, or any part of body or
clothing, near any moving part.
5. Do not operate this equipment in the vicinity
of bystanders. Keep bystanders and pets at
least 50 feet away from the area of operation.
6. Do not operate barefoot. Wear proper
clothing to protect feet, legs and other
exposed body parts.
7. Wear safety glasses at all times while
operating the machine. One pair of safety
glasses is provided.
8. Do not operate machine while under the
influence of alcohol or medications. Do not
use machine if tired or ill.
4. Always use an approved fuel container. Do
not remove the gas cap or add fuel when
engine is running. Add fuel to a cool engine
only.
5. Do not fill fuel tank indoors. Keep open
flames, sparks, smoking materials, and other
sources of combustion away from fuel.
6. Before inspecting or servicing any part of the
machine, shut off the engine, disconnect the
spark plug, and make sure all moving parts
have come to a complete stop.
7. Inspect area to be trimmed. Remove all
foreign objects (stones, wire, bottles, and
cans) before operating.
Operation
1. Never leave machine unattended when it is
running.
2. Do not tamper with the engine governor
settings on the machine; the governor
controls the maximum safe operating speed
and protects the engine and all moving parts
from damage caused by dangerously high
speeds.
General Operation Safety
1. Wear work gloves, sturdy footwear, and ear
and eye protection when operating this
equipment.
2. Keep all guards and deflectors in place and
in good working condition.
3. Before starting the machine, visually check
that all screws, nuts, bolts, and other fasteners are properly secured. Once every ten
hours of operation, all screws, nuts, bolts
and other fasteners should be checked and
tightened if necessary.
2
3. If the cutting mechanism strikes any foreign
object immediately shut off the engine and
allow the machine to stop before removing
object.
4. If the machine should start vibrating abnormally, stop the engine and correct the problem before restarting.
5. Carbon monoxide can be extremely dangerous in an enclosed area. The exhaust from
the engine contains carbon monoxide, which
is a colorless, odorless, and tasteless gas.
6. Do not transport or move machine when it is
running.
Page 5
Assembly Instructions
Caution: Remove spark plug wire from spark
plug before assembling.
AssembAssemb
Assemb
AssembAssemb
ll
y Requirements:y Requirements:
l
y Requirements:
ll
y Requirements:y Requirements:
• Two (2) 1/2” wrenches
Assembly Steps:
1. Remove units and parts from shipping crate.
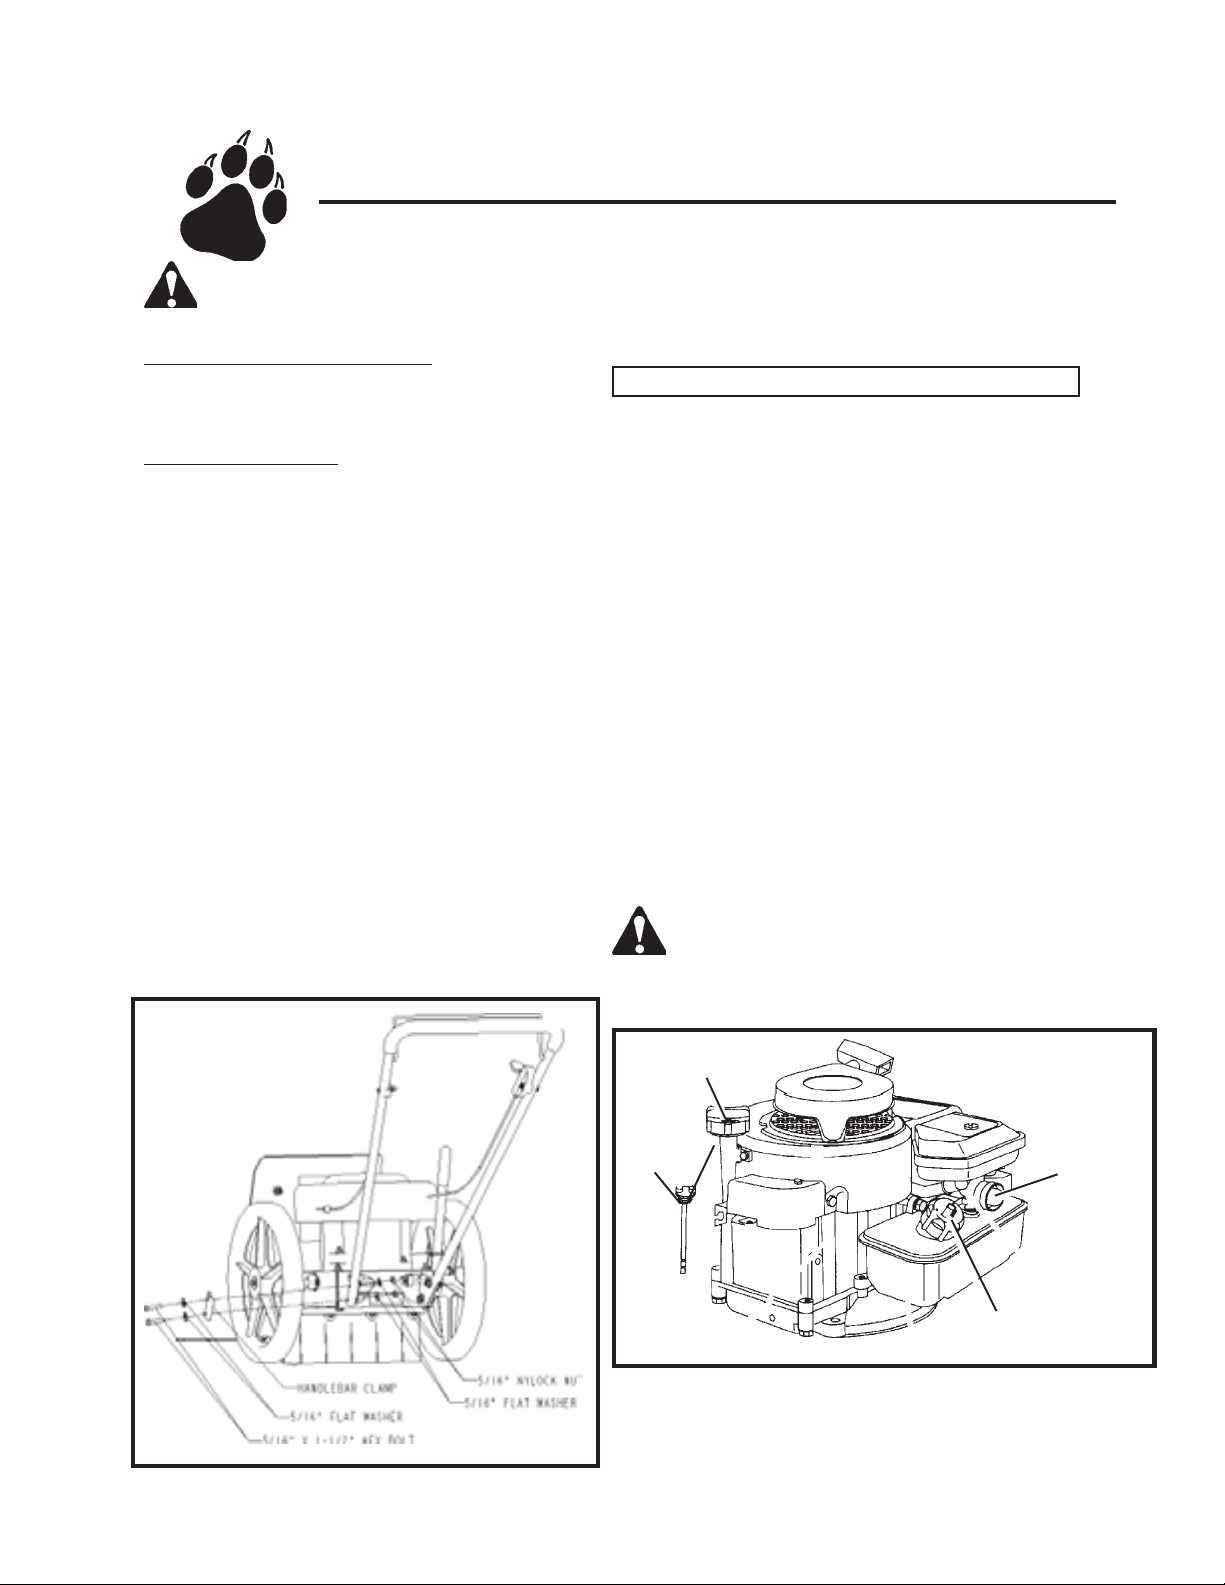
2. Stand handlebar upright. Secured the
bottom of the handlebar by adding the
handlebar clamp and inserting and tightening bolts to the bottom hole on the handle
support channel. Refer to Figure 1.
3. Adjust the handlebar height. The handlebar
height is set by choosing one of the available three holes on the handle support
channel towards the bottom of the
handlebar’s lo wer portion.
4. Align the holes on the bottom portion of the
handlebar with the selected holes on the
handle support channel. Thread bolts
through the holes with the bolt head facing
out.
5. Tighten bolt by turning counterclockwise while
holding the locknut stationary with the other
wrench.
FILL ENGINE WITH OIL BEFORE STARTING
6. Add oil to the engine. Refer to the engine
owners manual for recommended SAE 30 engine
oil types and amounts. No special additives are
used with recommended oil types; do not to mix
with gasoline. Ensure the machine is level when
adding oil. Oil capacity is approximately 20 oz.
7. Check oil level. Remove dipstick and wipe with
clean cloth. Reinsert dipstick and tighten. Remove again to check oil level; oil should be at
the Full mark. See Figure 2 for oil fill location.
8. Fill gas tank with fresh, clean, unleaded gasoline. Do not use fuel that contains Methanol or is
mixed with oil. Ensure the machine is level when
adding fuel. Refer to engine owners’ manual for
additional information.
Warning: Handle fuel with care. Use an
approved container and fill outdoors. Do
not add fuel to a running or hot engine. It
is extremely flammable.
Figure 1
Oil Fill
Dipstick
Primer Bulb
Fuel Fill
Figure 2
4HP Briggs & Stratton
3
Page 6

Assembly Instructions-Cont.
9. Attach the shield. Thread bolts through holes in
shield as shown in Figure 3.
10. Add washers and lockunuts. Tighten bolts by
turning the locknuts counterclockwise.
Figure 3
4
Page 7

Engine Starting Instructions
Models 73040, 73050, 74040, & 74050
Read the safety instructions. Familiarize
yourself with the safety instructions in this
manual and the engine owners manual before
starting the EZ TrimMower.
Fill engine with oil. Do not start before adding
oil to the engine. See engine manual for the
type and amount of oil to use. Machine should
be level when filling.
Caution: Move machine to a clear, level
area outdoors before starting. Do not
operate in the vicinity of bystanders.
1. Check engine oil level and fill if necessary
before each use. See engine manual for filling
and maintenance instructions.
Note: some oil usage is normal. Check level
before each use.
6. If engine does not start after 3 pulls, push
the Primer Bulb 3 times, and repeat step 5.
After first time engine start
3. Move the throttle control to FAST (not
applicable for Models 73040 & 73050).
Refer to Figure 4.
4. Firmly push the Primer Bulb 3 times.
5. Pull trimmer bail back. Grasp the recoil
starter cord handle and slowly pull until
resistance is felt. After resistance is felt, pull
the cord quickly to start the engine and
prevent kickback. Repeat if necessary.
NOTE: When restarting a warm engine after a
short shut down, it may not be necessary to
prime. Refer to the engine owner s manual for
other starting tips.
Warning: Handle fuel (gasoline) with
care. It is highly flammable. Always use
an approved container and fill tank outdoors. Never add fuel to a running or hot
engine.
2. Fill fuel tank with fresh, clean unleaded gasoline. DO NOT MIX OIL WITH GASOLINE.
First time engine start
3. Move the throttle control to FAST (not applicable for Models 73040 & 73050). Refer to
Figure 4.
4. Firmly push the primer bulb 5 times.
5. Pull trimmer bail back. Grasp the recoil
starter cord handle and slowly pull until resistance is felt. After resistance is felt, pull the
cord quickly to start the engine and prevent
kickback. Repeat if necessary.
Throttle Control
Figure 4
Continue to hold the bail after the engine is started.
Releasing will stop the engine.
5
Page 8

Model 73450
Engine Starting Instructions-Cont.
Read the safety instructions. Familiarize
yourself with the safety instructions in this
manual and the engine owners manual before
starting the EZ TrimMower.
Fill engine with oil. Do not start before
adding oil to the engine. See engine manual
for the type and amount of oil to use. Machine
should be level when filling.
Caution: Move machine to a clear,
level area outdoors before starting.
Do not operate in the vicinity of bystanders.
1. Check engine oil level and fill if necessary.
See engine manual for filling and maintenance instructions.
Note: some oil usage is normal. Check level
before each use.
Warning: Handle fuel (gasoline) with
care. It is highly flammable. Always use
an approved container and fill tank outdoors.
Never add fuel to a running or hot engine.
7. Grasp the recoil starter cord handle and slowly
pull until resistance is felt. After resistance is felt,
pull the cord quickly to start the engine and
prevent kickback. Repeat if necessary.
8. Move the throttle from choke to the fast (or high)
position after the engine warms up enough to
operate without the choke.
Throttle Control
Figure 5
2. Fill fuel tank with fresh, clean unleaded
gasoline. DO NOT MIX OIL WITH GASOLINE.
Move engine fuel valve to ON position before starting.
See engine manual complete instructions. See Figure 6.
3. Move the throttle control on the handlebar to
the choke position. Refer to Figure 5.
The choke may not be needed if the air temperature or
engine is warm. If so, move the throttle control slightly
past the idle position Refer to the owners manual for
other starting tips.
6. Pull the trimmer bail back.
Continue to hold the bail after the engine is started.
Releasing will stop the engine.
6
9. Mo ve the throttle level to the desired engine speed
setting for trimming.
Figure 6
Page 9

Operation
Wear safety glasses during operation. Wear
proper clothing to protect feet, legs, and
other exposed body parts.
Do not operate without all guards in place and in the
vicinity of bystanders or personal property.
Warning: Hazardous Operations
within 50 feet of unit
50 ft.
50 ft.
Operating
Area
50 ft.
50 ft.
Model 73040/73050/73450 Trimming
Adjustments
Trimming Adjustments are used to edge
and trim in hard to reach places. To begin
using trimming adjustments:
1. Loosen the right axle nut located directly
behind the trimmer.
2. Lift the right wheel and pull back. The
wheel and axle will rotate backwards due to
a slot cut in the bottom of the trimmer
frame.
3. Tighten the nut loosened in Step 1.
4. Push the trimmer slowly.
5. When finished using the offset feature,
loosen the right axle nut again and lift the
wheel and push forward.
Use caution when operating near loose
gravel or areas where loose debris may be
encountered.
The intended use of the EZ TrimMower is trim-
ming, mowing and edging. It can be used as a
mower or trimmer and edger after mowing with a
lawnmower.
To begin trimming, with the engine running, place
the trimmer head on the ground and begin walking
slowly. The wheels should remain grounded at all
times to prevent undue pressure on the trimmer
head. The cutting radius is dependent on the
amount of cutting string used and type of application. For difficult conditions and edging, using less
than the full cutting radius is recommended.
6. Tighten the right axle bolt and resume
regular trimming/mowing.
Model 74040/74050 Off Center Tilt
Feature (OCT)
The OCT feature is used to edge and trim
in hard to reach places. This features
enables both the trimmer head and body to
tilt for close cutting. The degree of tilt is
dependant on the setting selected on the tilt
control grip located on the right side of the
EZ TrimMower. For maximum tilt, move the
tilt control grip to the setting closest to the
front of the machine. Resume regular
trimming/mowing by placing the tilt control
grip back in the setting near the rear of the
trimmer.
7
Page 10

Operation-Cont.
All Models Cutting Height Adjustment
The EZ TrimMower standard cutting height is 2-3/4 inches. Figure 7 below depicts the trimmer
head assembly when purchased and at the standard cutting height.
Figure 7
The cutting height can be adjust down approximately 3/4 inch by turning the trimmer head disk
over as shown in Figure 8. The timmer head weldment is remove before the disk can be
turned.
8
Figure 8
Page 11

Service & Maintenance
Cutting String Replacement
Warning: Before inspecting or servicing
any part of the machine, disconnect the
spark plug wire from the spark plug and make
sure all moving parts have come to a complete stop.
1. Feed the cutting string through the second
hole on either end of the trimmer head leaving
approximately 8 inches for the cutting surface.
Total recommended string length is 20-1/2
inches.
2. Continue by weaving the cutting string
through the first hole directly beside the
second hole used in Step 1. Pull the cutting
string tight.
3. Loop the cutting string back and feed
through the first hole on the opposite end of
the trimmer head.
4. Feed through the remaining second hole
and pull the cutting string tight. The cutting
strings in the middle two holes should be the
same length. If the length differs, cut to an
even length.
Cutting string is available in two thicknesses,
.130 mil (standard) and .155 mil (heavy duty).
The type of string selected is dependent on the
conditions and material being cut. The cutting
string can also be wrapped in a variety of ways.
Refer to the figures below for two examples.
Figure 10
When completed, the trimmer head should
resemble Figure 9.
Figure 9
Figure 11
The wrapping method and cutting string thickness
chosen is ultimately based on what is determined
the best performers for the operator.
9
Page 12

Service & Maintenance-Cont.
Drive Belt Checking and Replacement
Check the condition of the drive belt annually or
after 30 hours of operation, whichever comes first.
If the belts are cracked, frayed, or worn, replace
them by following the steps below.
Belt Replacement Requirements:Belt Replacement Requirements:
Belt Replacement Requirements:
Belt Replacement Requirements:Belt Replacement Requirements:
• One (1) 1/2” wrench or one (1) 1/2”
socket/ ratchet
Belt Replacement Steps:
1. Shut off the engine. Disconnect the spark
plug wire.
2. Remove the front cover weldment. Requires
loosening and removing three bolts.
3. Loosen the four bolts fastening the spindle
hub to the trimmer bottom frame. This will allow
the spindle hub with the attached trimmer pulley
to move freely.
9. Replace front cover and secure with bolts.
10. Replace the handle support channel (back
cover with handlebar adjustment tabs). The bolts
should be secured with the bolt head beneath and
the nuts and washer above the trimmer body.
Engine Maintenance
Maintenance is essential in preserving engine life.
The engine should be cleaned periodically to
remove grass and build-up. The engine owners
manual addresses cleaning the air filter and
changing the oil. Service engine according to the
maintenance schedule in your engine owners
manual.
4. Remove the handle support channel (back
cover with tabs to adjust the handlebar). Requires loosening and removing four bolts.
5. Loosen the two bolts attaching the flap to the
trimmer bottom frame.
6. Remove worn or broken belt. If the belt is
badly worn and will not be used again, cut for
ease in removal.
7. Install new belt from the front to the back.
Feed belt above the front trimmer pulley and
below the rear pulley.
8. Move the spindle hub by inserting a screwdriver in the slot on the rear side of the spindle
hub and applying pressure forward until belt is
tight. Tighten bolts.
10
Page 13

Troubleshooting
Problem Probable Cause
1. Cutting strings do not
turn.
2. Cutting is slow or rough.
3. Trimmer requires excessive power or stalls.
a)Broken or damaged belts.
b)Broken spindle.
c) Failed bearings.
a)Cutting string too weak.
b)Growth is too thick or
heavy.
a)Cutting string too weak.
b)Drive belts are loose or
worn.
c) Growth is too thick or
heavy.
Suggested Remedies
a)Replace belts.
b)Repair spindle.
c) Repair bearings.
a)Replace with heavier cutting
string (155 mil).
b)Reduce trimming area to 1/2
size or raise the trimmer
head off the ground slightly
to trim top portion of growth.
Follow with trimmer head on
the ground again.
a) Replace with heavier cutting
string (155 mil).
b)Replace drive belts.
c) Reduce size of trimming
area in half. Raise the
trimmer head off the ground
slightly to trim top portion of
growth. Follow with trimmer
head on the ground again.
4. Drive belts squealing or
smoking.
5. Engine won't start or is
hard to start.
a)Drive belts are loose or
worn.
a)Gas tank is empty.
b)Spark plug wire is discon-
nected.
c) Spark plug is defective.
d)Gas line is obstructed.
(bail disconnected)
e)Dirty, stale, water-
contaminated gas.
f) Flooded engine.
g)Dirty or plugged air cleaner
or engine cooling fins.
a)Replace drive belts.
a)Fill gas tank.
b)Connect loose wire to spark
plug.
c) Replace spark plug.
d)Remove gas line at carbure-
tor and check for obstruc-
tion. Drain gas tank and refill
with fresh, clean gasoline.
e)Drain tank and fill with fresh,
clean unleaded gasoline.
f) Put throttle control in run
position and crank engine
several times to clear out
excess gas.
g)Clean air cleaner and re-
place. Clean cooling fins
and shroud area of engine.
11
Page 14

EZ T rimMower Limited Warranty
Crary Bear Cat EZ TrimMower models 73040, 73050, 73450, 74040 and 74050 are warranted for 90
days to rental and commercial users and two years to consumer users from date of sale.
Within the above stated period, Crary Co. will replace any part(s) found to be defective in material
and/or workmanship, after the receipt of the part in our plant. Labor costs to replace these defective
parts will be paid at a Crary established labor rate and time allowed (flat rate) for repair. All transportation charges incurred in shipping part(s) are the responsibility of the purchaser.
This warranty is void in the case of accidents, failure to perfor m normal maintenance, or failure to
follow those instructions listed in the service manual. This warranty is also in lieu of all other expressed warranties and voids any implied warranty as to the merchantability or fitness of the product for a particular purpose and of any other obligation on the part of Crary Co. Some states do not
allow limitations on how long the implied warranty lasts, so the above limitation may not apply to
you.
This warranty applies only to parts or components which are defective, and does not cover necessary repair due to normal wear, misuse, accidents, or lack of proper maintenance. This includes
belts and pulleys. Regular routine maintenance of the unit to keep it in proper operating condition is
the responsibility of the owner.
All warranty repair reimbursable under the Crary Co. warranty must be performed by an authorized
Bear Cat service dealer using Bear Cat approved replacement parts. Repair or attempted repair by
anyone other than an authorized Bear Cat service dealer is not reimbursable under the Crary Co.
warranty. In addition, these unauthorized repair attempts may result in additional malfunction, the
correction of which is not covered by warranty.
Crary Co. is not liable for indirect, incidental, or consequential damages in connection with the use
of this product including any cost or expense or providing substitute equipment or service during
periods of malfunction or nonuse.
Some states do not allow the exclusion of incidental or consequential damages, so the above
exclusion may not apply to you. This warranty gives you specific legal rights. You may also have
other rights which vary from state to state.
Be sure to note the EZ TrimMower serial number in any correspondence with Crary Co. or any
authorized Bear Cat dealer. The serial number is located on the back of the handle support channel.
12
Page 15

HEALTH WARNING
GASOLINE, DIESEL, AND
OTHER PETROLEUM PRODUCTS
Harmful or fatal if swallowed.
Long-term exposure to vapors has caused cancer in
laboratory animals.
• Avoid prolonged breathing of vapors.
• Keep face away from nozzle and gas tank/container
opening.
• Never siphon by mouth.
Failure to use caution ma y cause serious injury or illness.
WARNING
CHEMICALS KNOWN TO THE STATE OF CALIFORNIA TO CAUSE CANCER, BIRTH DEFECTS, OR
OTHER REPRODUCTIVE HARM ARE FOUND IN
GASOLINE, DIESEL, CRUDE OIL, AND MANY O THER
PETROLEUM PRODUCTS AND THEIR VAPORS, OR
RESULT FROM THEIR USE.
Box 849
West Fargo, ND 58078
(701) 282-5520
FAX: (701) 282-9522
www.crary.com
READ AND FOLLOW LABEL DIRECTIONS AND USE
CARE WHEN HANDLING OR USING ALL PETROLEUM PRODUCTS.
ENGINE EXHAUST FROM THIS PRODUCT CONT AINS CHEMICALS KNO WN T O THE ST ATE OF CALIFORNIA TO CAUSE CANCER, BIRTH DEFECTS, OR
OTHER REPRODUCTIVE HARM.
 Loading...