

Page 1
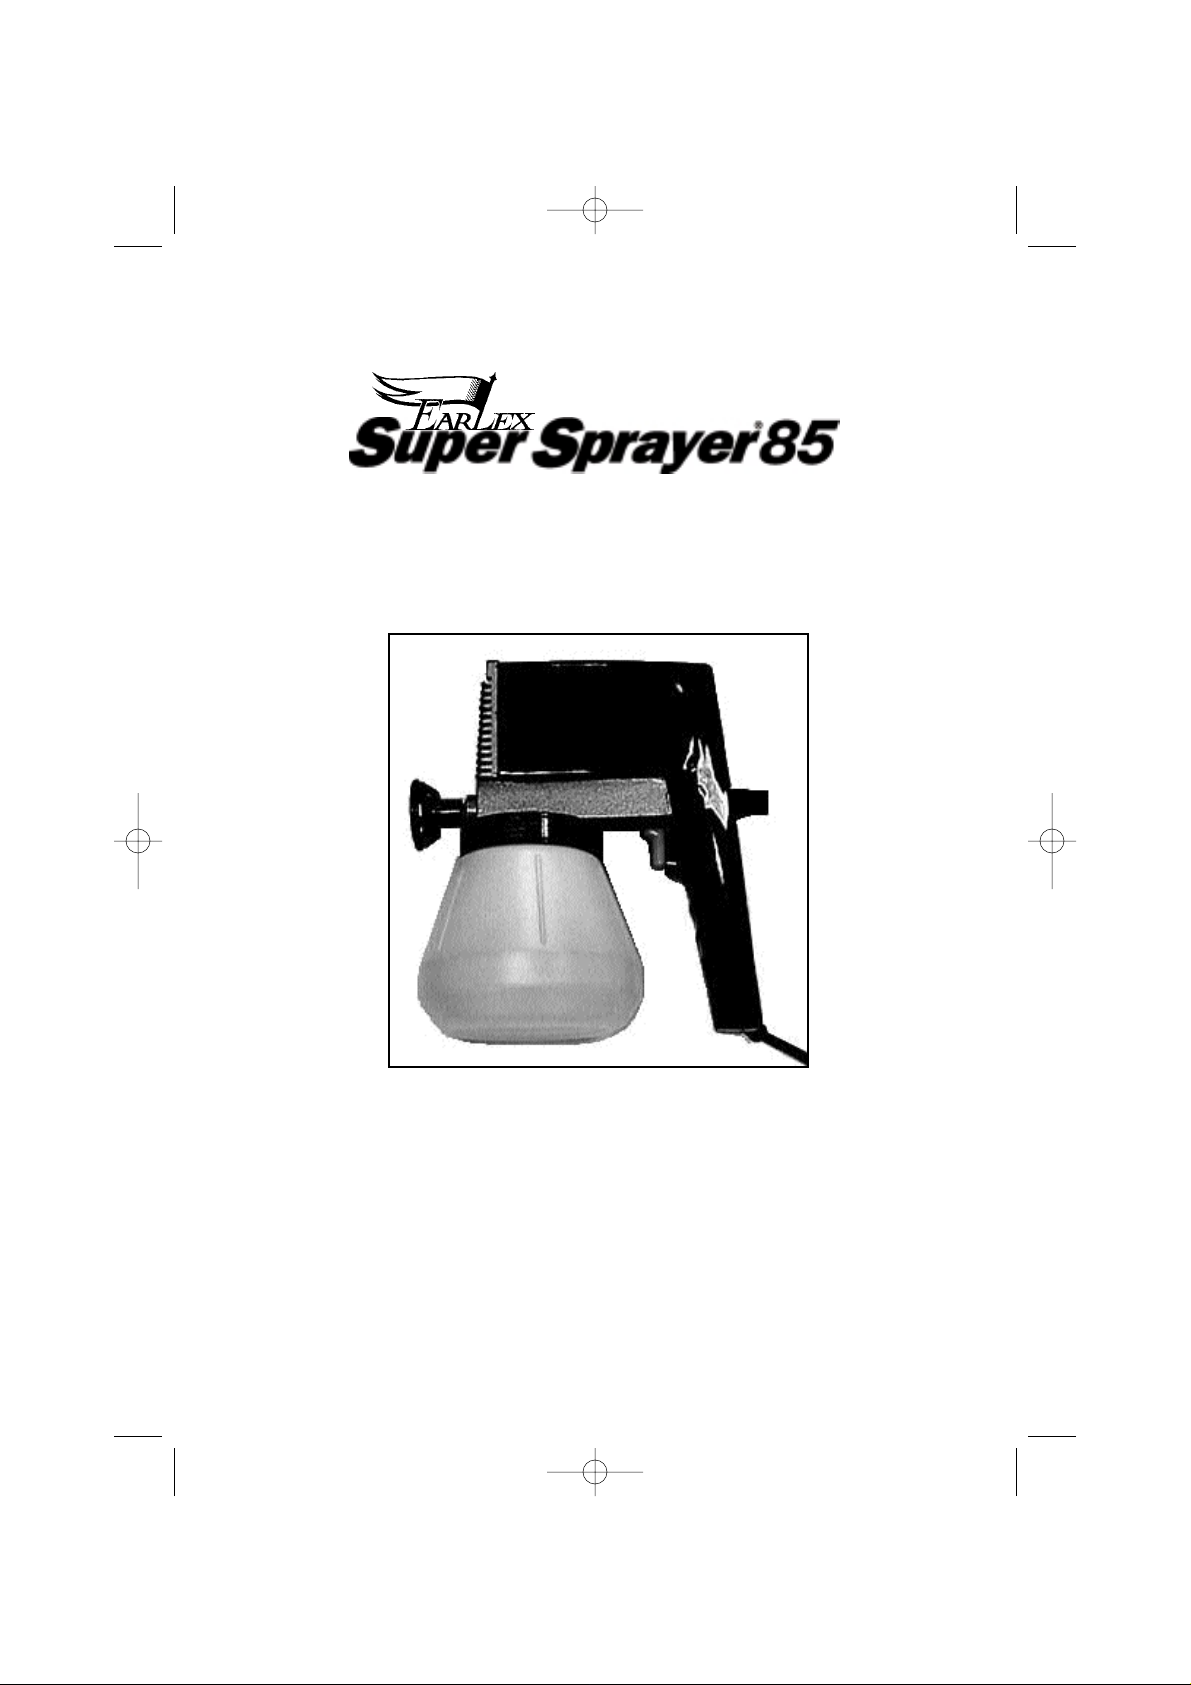
SG85
OPERATING INSTRUCTIONS
Thank you for purchasing the Earlex SG85 Electric Airless Spray Gun,
this is a highly versatile spray gun and can be used
for a variety of applications.
BEFORE USE - PLEASE READ THE SAFETY
& OPERATING INSTRUCTIONS
Please retain for future reference
®
sg82 amend p8.qxd 19/01/00 12:35 Page 1
Page 2
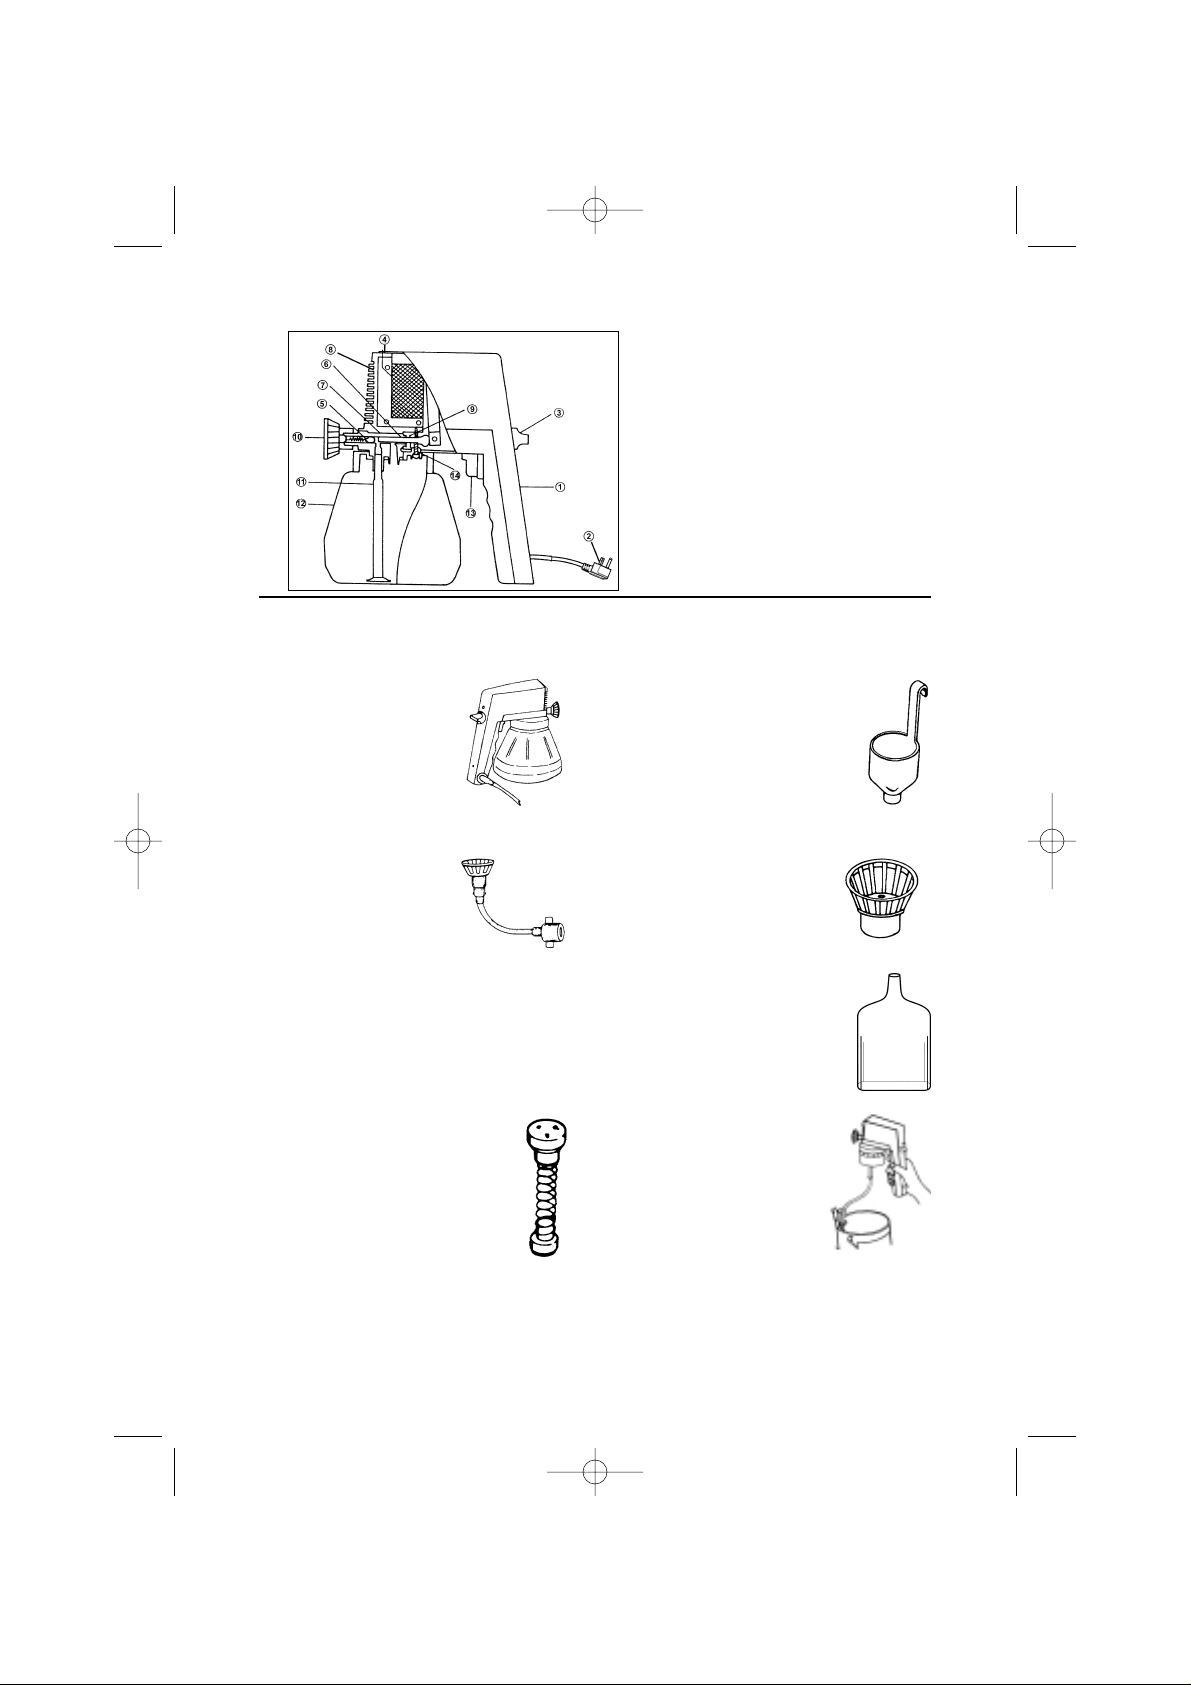
1) Handle
2) Mains Lead and Plug
3) Output Control Knob
4) Electromagnetic Motor
5) Atomiser valve
6) Piston
7) Cylinder Housing
8) Drive Housing with Stator
9) Piston Spring
10) Spray Nozzle
11) Suction Tube
12) Paint Container
13) Switch
14) Screw
OUTFIT COMPONENTS AND USES
Your complete Earlex SG85 Electric Airless Spray Gun outfit includes:
2
.
Professional sprayer
with 0.8mm spray
nozzle for spraying
latex and other thick
materials attached.
.
Viscosity test cup, which
enables you to test your paint
for thickness before painting.
.
Flexible extension
nozzle, which can be
bent at any angle,
making it easier to
paint horizontal or angled
surfaces.
.
0.6mm general purpose
spray nozzle.
.
Bottle of Lubricating Oil
.
Replacement atomiser
valve. Atomiser valves wear
with use, this is apparent
when the spray pattern
changes and atomisation is
incomplete. Then it is time
to change the atomiser valve.
.
1.5m (5’) Suction tube
for paint cans. For larger
jobs, paint can be fed
directly from a can using
the suction tube. To
secure tube onto can use
retainer clamp as provided. Hang
paint can on a rung with a wire hook
if a ladder is used.
sg82 amend p8.qxd 19/01/00 12:35 Page 2
Page 3

SAFETY OPERATING INSTRUCTIONS
PLEASE READ BEFORE
USE
NEVER under any circumstances
aim the nozzle at another person or
animal. In the event of injury
occuring seek expert medical
advice immediately.
The spray gun must not be used for
spraying flammable paints and
solvents with a flash point of less
than 32oC.
Always ensure there is adequate
ventilation when spraying.
We recommend the use of ear
protectors.
We recommend the use of eye
protection to keep hazardous
vapours out of eyes.
Always wear a mask when
spraying.
Always read the paint
manufacturers thinning instructions
before using.
Always keep the spray basket
nozzle in place during use. Never
allow the spray to come in direct
contact with the skin.
The spray gun must not be cleaned
by using flammable liquids with a
flash point of less than 32oC.
Hand-arm vibration does exceed
2.5m/s
2.
NEVER spray near a naked flame,
including appliance pilot flame.
NEVER smoke whilst spraying.
NEVER allow children to operate or
play with the spray gun.
Before cleaning, always disconnect
from the mains supply.
Always disconnect from mains
supply when refilling the paint
container.
After every use ensure you clean
your spray gun thoroughly and
ALWAYS LUBRICATE THE
PISTON.
It is recommended that a RCD
(residual current device) rated at
30mA is fitted into the mains supply
socket for added protection against
electric shock.
NEVER USE THE SPRAY GUN
OUTSIDE WHEN IT IS RAINING.
3
PLEASE NOTE
We have done all we can to ensure that used correctly and according to these
instructions, the Earlex SG85 Electric Airless Spray Gun will give long trouble free
service. We accept no responsibility for damage caused by the use of incorrect or
unsuitable substances, paint or fluids which have not been thinned correctly or are
unsuitable for the surfaces to which they are applied, health hazards arising from
lack of ventilation when working in confined spaces, or failure of the equipment
due to inadequate cleaning of components after use.
If in doubt, always test a small inconspicuous area first. Always read the paint
manufacturers instructions first.
Neither our guarantee nor the above statement affect your statutory rights.
!
sg82 amend p8.qxd 19/01/00 12:35 Page 3
Page 4

4
TECHNICAL SPECIFICATION
Power Supply 230V 50Hz-AC
Rated Input 85 Watts
Pump Output 240g/min(water)
Max. Pressure 142 Bar (2000psi)
Container Capacity 1.0 Itr
Spray Gun weight 1.6 kg
Cable length 2 mtr
Piston Material Tungsten Carbide
Cylinder Material Tool Steel
ABOUT THE SG85.
The SG85 is a highly versatile
electric airless spray gun, it can be
used with several different spray
mediums including varnishes, wood
preservatives, enamel paint, oil
based paint and water based
paints. Airless spraying reduces the
mist associated with air spraying
and also reduces paint loss.
A number of applications can be
performed including spraying
fences, sheds, boats, furniture,
radiators, models, louvre doors etc.
IMPORTANT- SELECTING PAINT
Although a large number of paints
and materials can be sprayed,
some cannot. Please check
manufacturers recommendation
before purchasing paint.
CUPRINOL®This company’s
products clearly show which can be
sprayed and which are brush only.
If the can gives details of ‘Airless
Spraying’ it can be sprayed. If it
refers to brush application only it
cannot be sprayed.
IT CANNOT BE USED FOR
EXTERIOR TEXTURED WALL
PAINTS OR TEXTURED
COATINGS. USE OF THESE
MATERIALS WILL CAUSE
PREMATURE WEAR ON THE
PISTON AND WILL VOID YOUR
GUARANTEE.
TO OBTAIN THE BEST RESULTS
FROM YOUR SPRAY GUN
PLEASE READ THE
INSTRUCTIONS CAREFULLY
BEFORE USE.
Your spray gun is supplied with the
following items:
.
2 x 0.8mm and 1 x 0.6mm spray
nozzles.
.
Viscosity cup for thinning paint.
.
Flexible extension nozzle for overhead
painting.
.
Spare valve x 2.
.
Bottle of lubricating oil to lubricate the
piston after use.
.
1.5m (5’) suction tube, return cup and
fitting; for use with paint cans.
PREPARATION
Surface preparation and paint
thinning are the two most important
areas to be concerned with to
obtain the best results from your
spray gun.
Ensure all surfaces are free from
dust, dirt and grease.
Masking is important to ensure you
do not spray those areas you wish
to remain untouched.
Ensure paint is thoroughly mixed.
THINNING
Thinning is particularly important
when spraying. Most paints are
supplied ready for brush application
and need to be sufficiently diluted
for spraying purposes.
sg82 amend p8.qxd 19/01/00 12:35 Page 4
Page 5
Follow the manufacturers guide for
thinning inconjunction with a spray
gun. If in doubt please consult the
manufacturer of the paint. The
viscosity cup supplied will help you
determine the correct thickness of
the paint.
As some paints, wood
preservatives and other sprayable
materials contain particles and have
different qualities, please ensure
that when filling the paint container
on your SG85, the paint is filtered
through either a funnel with a filter
on it, or through nylon tights or
stockings. This will ensure no large
particles enter the paint container,
so preventing blockages and
providing you with trouble free
spraying. Ensure that a face mask,
gloves, goggles and ear protectors
are worn at all times when
spraying.
IDEAL VISCOSITY
Water based paints 35-45secs
Oil Based paints 15-25secs
Enamel paints 15-25secs
Wood preservatives no dilution
Primers 20-30secs
Varnishes 20-25secs
Aluminium paints 15-25secs
Wood stains no dilution
Latex Emulsions *10-20% dilution
Smooth Masonry Paint (non grit)
*5-10% dilution
* These paints cannot be measured in
the viscosity cup. To spray them,
remove the filter from the suction tube,
thin according to manufacturer’s recommendations and strain to remove any
lumps or particles.
5
Fig 1
Fig 2
Fig 3
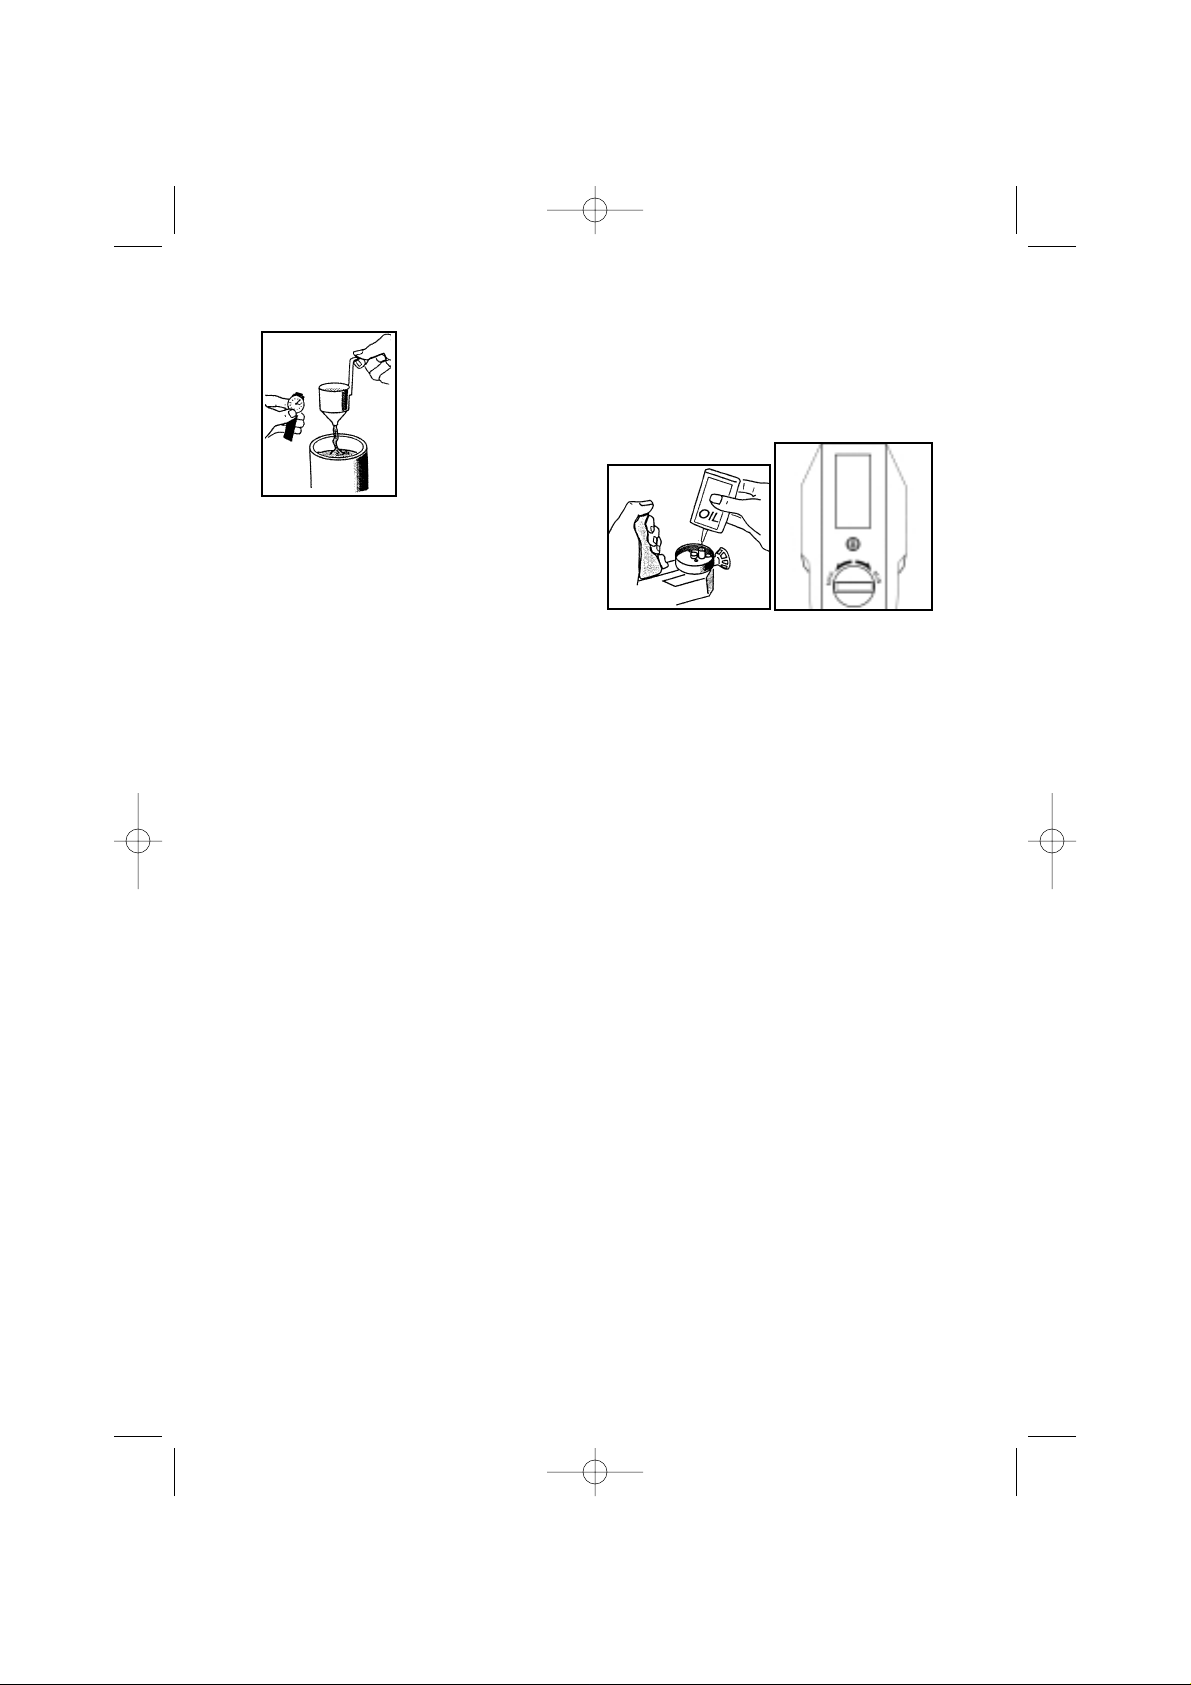
Dip the viscosity cup into the
material and fill up. Time how long it
takes the viscosity cup to empty (fig
1). Using the above chart as a
guide to determine if the material
requires further thinning, thin
accordingly.
OPERATION
Turn the gun upside down and
place a few drops of lubricating oil
in both the apertures on the
underside of the gun (see fig 2).
Momentarily trigger the spray gun
to disperse the oil around the piston
and cylinder, then firmly push the filter suction tube into the tapered
hole of the raised boss.
Fill the container with the paint,
when filling the paint container, filter
the paint through a piece of nylon
stocking or a funnel which
incorporates a filter to remove any
lumps or particles. DO NOT
OVERFILL. Screw the spray gun on
to the container tightly. Plug in the
unit and before you start spraying
the object, pull the trigger, aiming
the gun at a piece of cardboard or
newspaper until the paint comes
out.
sg82 amend p8.qxd 19/01/00 12:35 Page 5
Page 6

Adjust the output control knob on
the back of the gun to control the
volume of paint that you wish to
apply (fig 3). This will also affect the
spray pattern. A poor spray pattern
will concentrate the paint in the
centre of the spray and give a
blotchy finish. A good spray pattern
is achieved when there is an even
amount of material in a fine spray
throughout the pattern.
USING THE OUTPUT CONTROL
KNOB
Turning the output control knob
clockwise reduces the flow of
material whilst turning it
anti-clockwise increases the flow.
To adjust the pattern undertake the
following:
1. Turn the knob anti-clockwise to
the maximum position.
2. Pull the trigger and test the
pattern on a piece of cardboard
or newspaper.
3. Turn the output control knob
clockwise until the spray pattern
is correct.
If you have undertaken the above
and you still cannot obtain a good
spray pattern then the material
being sprayed probably requires
further thinning.
MASK ANY AREAS YOU DO NOT
WISH TO BE SPRAYED.
SPRAYING TECHNIQUE
1.To obtain the best results always
keep your spray gun level and
spray equally from side to side or
up or down 25-30cm (10”-12”) from
the surface. Avoid spraying at an
angle as this will lead to runs on the
surface (fig 4).
2. Let your arm control the left to
right movement rather than your
wrist as this will aid even paint
distribution over the whole area
(fig 4).
3. Do not tip the sprayer to more
than 45oangle. Material could flow
into the motor housing and damage
the sprayer.
6
Fig 4
Fig 5
sg82 amend p8.qxd 19/01/00 12:35 Page 6
Page 7

HELPFUL HINTS
1. Evenly control the speed of
movement of the spray gun. A fast
speed will give a thin coat and a
slow speed will give a heavy coat.
2. Only apply one coat at a time. If
a further coat is required follow the
paint manufacturers instructions for
drying times.
3. If spraying small areas or objects
keep the output setting low as this
will avoid excessive use of paints
and will minimise overspray.
4. When spraying large areas or
objects, it is best to use a crisscross pattern, either from left to
right then up or down or vice-versa.
This will ensure maximum coverage
(fig 5).
5. Avoid stopping and starting when
spraying as this can lead to too
much or not enough material on a
surface.
6. To ensure edges are covered,
commence spraying just to the side
of area being sprayed, continue and
do not stop until the spray has gone
past the opposite edge.
SPRAY NOZZLE SELECTION
Two nozzle sizes are supplied with
the gun, these should be used as
follows:
1) 0.6mm - This size works best for
oil-based materials, stains, sealers,
lacquers, water-proofers and
enamels for small application areas.
2) 0.8mm - This is a general
purpose nozzle that works best for
materials such as emulsions, latex
and thicker type paints.
3) If you start spraying and find that
the spray pattern is small and
splattery and adjusting the output
control knob does not solve the
problem then you need to try the
larger nozzle before further thinning
the material.
USING THE FLEXIBLE
EXTENSION NOZZLE
The flexible
extension nozzle
can be bent at any
angle to make the
painting of ceilings
and floors much
easier. As the sprayer must not be
tilted at more than a 45ºangle to
prevent a back leak, it is essential
to use the flexible extension to paint
ceilings (fig 6).
To use this, operate as follows:
1) Unscrew the spray gun nozzle by
turning it anti-clockwise. Be sure to
leave the valve in place but check
for wear.
2) Screw the end of the extension
tube with the plastic thread onto the
spray gun.
3) Ensure the short atomiser valve
is inserted into the flexible
extension tube.
7
Fig 6
sg82 amend p8.qxd 19/01/00 12:35 Page 7
Page 8

4) Screw the spray nozzle onto the end
of the flexible extension.
5) Bend the flexible extension to the
required shape. Once bent do not
straighten.
6) When finished using, clean all parts
and then re-assemble in the original
configuration.
CLEAN AFTER EVERY USE
(SEE CLEANING INSTRUCTIONS)
HOW TO USE THE 1.5m (5’)
SUCTION TUBE
For larger painting applications, using the
1.5m (5’) suction tube enables you to
draw paint directly out of a large can
instead of using the paint container, thus
saving considerable time and making
painting an even easier job, since you
are operating the sprayer without a
loaded paint container.
Assembling the 1.5m (5’) Suction
T ube:
1. Remove the paint container and the
intake tube from the paint sprayer.
2. Insert the adapter fitting through the
hole in the return cup into the paint
intake port on the sprayer-ensure this is
firmly pushed in. (Same position as
where the section tube was removed
from).
3. Locate the return cup within the
recess where the paint container was
located. Slip the retainer nut over cup
and screw into place firmly. (The return
cup is necessary to catch any paint that
is returned through the overflow bypass
opening below the paint pump).
4. Insert 1.5m (5’) intake suction
tube into adapter fitting up to the
stop. Insert other end of flexible tube
over suction tube filter moulding, ensure
this fits tightly to prevent air leaks,
immerse filter end of suction tube into
paint can and secure tube to can using
the retainer clamp.
5. To reduce the time the sprayer runs
without paint, hold the sprayer below the
paint level when priming the sprayer, this
speeds up the time the paint takes to
draw through the tube. The paint may
need additional thinning if you still
experience difficulty priming the sprayer.
The paint must be stirred fully before
use.
6. When using the spray gun with the
1.5 suction tube only use the gun in
normal upright position, support or hang
the gun in an upright position during
breaks of use.
If the gun is not kept in the normal
upright position after use, remove the
cup and drain the fluids before placing
down on it’s side.
Observe the fluid level in the return cup,
empty before it is completely full.
8
1 Return Cup
2 Retainer Nut
3 Adaptor Fitting
4 1.5m Suction Tube
5 Retainer Clamp
Suction Tube
6 Suction Tube Filter
Moulding
sg82 amend p8.qxd 19/01/00 12:35 Page 8
Page 9

PRIMING THE SPRAYER
If you are using the suction tube,
you will need to prime the sprayer
by removing air from the system.
To prime:
1. Turn the flow knob fully
counterclockwise to maximum.
2. Make certain the sprayer is
plugged in.
3. Hold the sprayer below the level
of paint. This will speed the priming.
4. Squeeze the trigger and hold
until all air is out of the system and
material is flowing freely out of the
sprayer tip. This should take about
two minutes.
WARNING- The filter must be
completely submerged in the
paint at all times. If not
completely submerged and air is
sucked into the system, the
piston could seize. If the piston
seizes, the sound the gun makes
will change to a low hum and the
gun will quickly become hot.
Stop using immediately. Clean
and lubricate gun throughly
before re-using.
CLEANING
Run solvent through the tube until it
is clean. Then disassemble the
fittings at both ends before any
remaining paint dries up, thoroughly
clean the adaptor fitting, intake tube
and filter. Also remove the return
cup and clean with an appropriate
solvent.
CLEANING INSTRUCTIONS
After every use it is essential that
you clean the gun thoroughly. This
will prevent any blockages
occuring and provide constant
performance when you next come
to use it.
When you have finished spraying,
empty any remaining material out of
the paint container.
Rinse the spray gun container with
the thinner that was used and spray
through the gun onto cardboard or
newspaper.
REMEMBER-USE SUITABLE
THINNERS WITH A FLASH POINT
OF 32oC MINIMUM. ENSURE
ADEQUATE VENTILATION AND
DO NOT SPRAY NEAR NAKED
FLAMES.
Pour some more of the thinner that
was previously used into the
container and spray the gun until
what is being sprayed becomes
clear.
Wipe the nozzle and paint filter then
clear any remaining debris.Finally
turn the gun upside down and apply
a few drops of the lubricating oil to
the piston (fig 8).
9
sg82 amend p8.qxd 19/01/00 12:35 Page 9
Page 10

Momentarily trigger the spray gun
to disperse the oil around the piston
and cylinder.
LONG TERM CLEAN-UP
If the spray gun is being stored for
a period of time the following
should also be undertaken in
addition to the above cleaning
instructions:
1) Ensure the spray gun is
unplugged.
2) Remove paint container and pull
out the suction tube.
3) Unscrew the 4 mounting screws
on the underside of the cylinder
housing.
4) Remove container cover and
cylinder housing from the motor
housing.
5) Remove the piston and spring,
thoroughly clean with the
appropriate thinner.
6) Remove the spray nozzle by
turning anti-clockwise.
7) Pull out the valve, making sure
that this is not ‘stretched’ during
removal or lost.
8) Clean all parts thoroughly.
9) Lubricate with oil.
10) Re-assemble in reverse order.
See fig 9.
MAINTENANCE AND REPAIR
Please be aware that certain parts
of this spray gun will wear, requiring
replacement and that these parts
are not covered by guarantee.
These parts include the valve,
spray nozzle, piston and spring.
The wear on these parts depends
on the abrasiveness of the
materials being sprayed. More
abrasive materials such as latex
paint (emulsions) will cause these
parts to wear much faster. You
would normally expect to replace an
atomiser valve after spraying
between 25-45 litres of latex.
If you check the face of a new valve
you will see the size of the 3 holes
and the smoothness of the
bumpers.
Worn valves will have larger holes
and scratches on the surface. This
will cause a poor spray pattern and
will require replacing. Replacement
valves are available from the Earlex
Service Department.
10
Fig 9
Fig 8
sg82 amend p8.qxd 19/01/00 12:35 Page 10
Page 11

You will need to check the spray
nozzles, piston and spring from
time to time to check for wear and
replace if necessary.
NEVER DISPOSE OF PAINTS OR
SOLVENTS INTO DRAINS.
CONTACT YOUR LOCAL
COUNCIL TO ARRANGE
COLLECTION.
11
MAINS CONNECTION
WARNING - THIS APPLIANCE MUST BE EARTHED
Your unit will have been supplied with a mains lead with a fitted moulded plug. This
is identified by the fuse holder in the base of the plug. Please read the following
safety instructions before use.
1 If the moulded plug is cut off from the mains lead then the plug must be disposed
of safely.
NEVER under any circumstances insert such a plug into a 13 amp socket.
2 NEVER under any circumstances use the appliance without the fuse cover fitted.
This is the little cover fixed into the base of the plug to hold the fuse in place.
3 If you lose the fuse cover then please contact any electrical dealer for a
replacement or ring our helpline.
4 A replacement fuse must be rated at 5amp. The fuse must be manufactured and
approved to BS1362.
5 IF IN ANY DOUBT PLEASE CONSULT AN ELECTRICIAN.
If you need to fit a plug to the mains lead, this should be done in accordance with
the wiring instructions on the mains lead, and will need to be fitted with a 5 amp
fuse. If in doubt please consult an electrician.
WARNING-If you are using an extension lead, it must
be rated at a minimum of 6 amps and fully unwound.
Do not operate with a lead rated at less than 6 amps
as this will cause premature failure of the motor and
will void your guarantee.
sg82 amend p8.qxd 19/01/00 12:35 Page 11
Page 12

12
TROUBLE SHOOTING
PROBLEM CAUSE ACTION REQUIRED
Spray Gun HUMS Piston Sticking. Remove 4 screws adjacent to paint pick up pipe
but does not Part no. SG12. part no. SG14. Release container cover, cylinder
operate. housing and piston assembly. Unscrew and remove
nozzle. Remove atomiser valve. Use soft punch or
shaft of 4.5mm MAXIMUM diameter inserted into the
valve housing to eject the stuck piston. Clean and
lubricate piston and cylinder. Re-assemble carefully
in reverse order. Remember to replace the
compression spring onto the piston before fitting the
piston. Ensure you have not dropped any parts into
the motor housing.
No suction Feed. No Valve in pump. Insert atomiser valve part no. SG03.
Paint Pickup Clean filter accordingly part no. SG16.
filter blocked.
Liquid too thick. Thin liquid as recommended.
Spray Gun motor Nozzle Blocked Clean thoroughly with thinners.
operates but part no. SG04 or
nothing coming SG44.
out. Atomiser valve Clean thoroughly with thinners.
blocked, part no.
SG03.
Spray Gun motor Worn valve. Replace atomiser valve part no. SG03.
operates, but Worn nozzle. Replace nozzle part no. SG04 or SG44.
spluttering. Container almost Refill container.
empty.
Spray gun held Hold at correct angle.
at wrong angle.
Liquid too thick. Thin liquid as recommended.
Incorrectly set Adjust regulator at back of gun.
regulation
control.
Paint Dripping. Nozzle loose. Tighten nozzle.
Operating at more Keep sprayer upright.
than 45oangle.
Excessive fogging. Pressure too high. Turn output knob clockwise to reduce pressure
Holding sprayer Hold sprayer about 30cm (12”) from work.
too far from
surface.
Runs and sags in Arm movement See section on spraying.
paint. too slow.
Spray gun too
close to work
surface.
Applying too
much paint in
one go.
sg82 amend p8.qxd 19/01/00 12:35 Page 12
Page 13

13
Parts and Accessories
1. Spray Nozzle 0.8mm SG44
2. Atomiser Valve SG03
3. Cylinder Housing SG67
4. Piston Spring SG47
5. Piston SG69
6. Coil SG70
7. Armature SG57
8. Leaf Spring SG58
9. Control Spring SG71
10. Rubber Buffer SG60
11. Output Knob SG72
12. Cover SG77
13. Cover Screw SG63
14. Screw (C/Housing) SG14
15. Suction Tube SG15
16. Container SG74
17. Drive Housing
with Stator SG76
18. Handle SG77
19. Handle Screw SG78
20. Viscosity Cup SG18
21. Switch SG43
22. Mains Lead with plug SG79
23. Terminal Block SG89
24. Filter SG16
25. Spray Nozzle 0.6mm SG04
26. Lubricating Oil SG19
27. Switch Cover SG80
28. Container Cover SG81
29. Return Cup SG83
30. Retainer Nut SG84
31. Adaptor Fitting SG86
32. 1.5m Suction Tube SG87
33. Retainer Clamp SG88
34. Spray Nozzle 0.8mm SG44
35. Short Atomiser Valve SG51
36. Flexible Attachment SG91
37. Flexible Nozzle Assy SG50
sg82 amend p8.qxd 19/01/00 12:35 Page 13
Page 14

14
OTHER PRODUCTS FROM
EARLEX.
Earlex also manufacture a wide
range of steam wallpaper strippers.
Designed to remove all types of
wallpaper, multi-layered papers and
artex.
SS100 - 2300W 4.5 ltr steam
wallpaper stripper.
SS50 - 2000W 4.5 Itr steam
wallpaper stripper.
A range of steam cleaning
accessories are also available to be
used in conjunction with the steam
wallpaper strippers. The
accessories can be used to clean
and rejuvenate carpets, floor tiles,
unblock sinks or waste outlets,
clean work surfaces, defrost fridges
and freezers, clean windows and
tiles, remove soiling from upholstery
and curtains.
Alternatively the Steama-Plus
combines the versatility of the
steam wallpaper stripper with a
selected range of the accessories
providing you with a complete
steam cleaning kit and wallpaper
stripper.
SC165 - 1500W 4.5 ltr steam
cleaning kit: incl. carpet cleaner,
window/tile cleaner, jet nozzle
cleaner, upholstery cleaner/small
steamplate, large wallpaper
stripping plate.
PR9 -The Autofeed Paint Roller is
a portable battery operated paint
rolling system. It has a 3 litre paint
reservoir and 23cm (9”) roller and
automatically feeds the paint to the
roller head. No trays need to be
refilled or moved. Easy to use the
PR9 provides enough capacity for
one coat of a 3.6m x 2.7m (12’x 9’)
room without having to refill.
WD1000 - Combivac Wet ‘n’ Dry
Vacuum & Blower. The 1000W
motor provides a powerful suction
and blowing facility which is ideal
for use around the workshop,
garage, caravan, car, garden and
home. The 20 litre recovery tank
has 12 litres wet capacity and is
designed for the rough and tumble
of every day use. The Combivac
has on board storage facilities for
its accessories, 6 metres of working
length and a two year guarantee.
There is also a variety of additional
accessories available for use with
the Combivac.
sg82 amend p8.qxd 19/01/00 12:35 Page 14
Page 15

15
sg82 amend p8.qxd 19/01/00 12:35 Page 15
Page 16

GUARANTEE
This product is guaranteed for a period of 12 months against faulty
manufacture or materials it is not guaranteed for industrial or
hire purposes. This guarantee does not affect your statutory rights.
In the event of any problem occurring please contact us on our
Helpline no
01483-454666
16
Earlex Ltd.,
Moorfield Road, Slyfield Industrial Estate,
Guildford, Surrey, GU1 1RU.
Tel: 01483-454666. Fax: 01483-454548
email:enquiries@earlex.co.uk SG82 08/98
®
EC Declaration of Conformity
We declare that the units: SG85 conform to: 73/23/EEC, 89/336/EEC, EN61000-3-2 & EN61000-3-3,
EN55014, EN55014-2
Tim Hopper-Technical director
sg82 amend p8.qxd 19/01/00 12:35 Page 16
 Loading...