

Page 1

L0553 (04-08) (US-FR-ES).qxd 20/6/08 2:25 pm Page 1
THE COMPLETE PAINT SPRAYING SYSTEM
Thank you for purchasing the Earlex HVLP Spray Kit.
This is a highly versatile spray kit and can be used on
BEFORE USE - PLEASE READ THE SAFETY & OPERATING INSTRUCTIONS.
Merci d'avoir acheté le kit de pulvérisation HVLP
Il s'agit d'un kit de pulvérisation extrêmement polyvalent
dont vous pouvez vous servir pour une grande variété d'applications.
AVANT UTILISATION - VEUILLEZ LIRE LES INSTRUCTIONS POUR L'EMPLOI ET LA
Gracias por adquirir el Kit de Pulverización HVLP de Earlex.
Se trata de un kit de pulverización altamente versátil que puede
usarse en una gran variedad de aplicaciones.
ANTES DE USARLO - LEA LAS INSTRUCCIONES DE SEGURIDAD Y MANTENIMIENTO.
Guarde estas instrucciones para futura referencia
OPERATING INSTRUCTIONS
a variety of applications.
Please retain for future reference
INSTRUCTIONS D'UTILISATION
Earlex.
SÉCURITÉ.
Veuillez conserver pour référence ultérieure
INSTRUCCIONES DE FUNCIONAMIENTO
Page 2

L0553 (04-08) (US-FR-ES).qxd 20/6/08 2:25 pm Page 2
SAFETY INSTRUCTIONS
WARNING! FIRE AND EXPLOSION HAZARD.
l CAUTION: TO REDUCE THE RISK OF
LECTRIC SHOCK OR INJURY, DO NOT
E
EXPOSE TO RAIN, STORE INDOORS.
l The substances used with this spray applicator
(paint, thinners etc) may contain hazardous,
harmful, explosive or corrosive materials.
ALWAYS COMPLY WITH THE SAFETY
INSTRUCTIONS ISSUED WITH THIS PRODUCT
AND THE MATERIAL BEING USED.
l The spray applicator must only be used with paints
and solvents that have a suitable flash point for
spraying. If in doubt, consult the paint or solvent
manufacturer's data
l Always ensure there is adequate ventilation when
spraying.
l NEVER spray near an open flame, including an
appliance pilot flame.
l NEVER smoke when spraying.
l Always disconnect the unit from the mains supply
when cleaning the spray applicator.
l Always ensure the spray area is safe and free
from all debris that may present a fire or trip
hazard.
l NEVER, under any circumstances, point the spray
gun at another person or animal. In the event of
injury occurring, seek expert medical advice
immediately.
l NEVER allow children or unauthorised users to
operate or play with the spray equipment. This
equipment is for professional use only.
l Always read the paint manufacturer's thinning
instructions before use.
l Always wear the correct protective face mask
when spraying. We also recommend wearing
gloves, goggles and overalls.
l After every use ensure that you clean the spray
gun thoroughly & grease the gland washer.
l Use only genuine manufacturer replacement
parts.
l Only use the spray equipment as detailed in these
instructions.
l Do not use the air hose or mains cable to pull the
HVLP unit.
l Check the hoses, hose connectors and mains
cable daily. Any worn or damaged parts should
be replaced immediately.
l This appliance is recommended for household use
only.
l This appliance is not intended for use by persons
(including children) with reduced physical, sensory
or mental capabilities, or lack of experience and
knowledge, unless they have been given
supervision or instruction concerning use of the
appliance by a person responsible for their safety.
IMPORTANT ELECTRICAL INFORMATION
EXTENSION CORDS
Your Earlex HVLP is supplied with a power cord that is 6 feet long. Make sure your extension cord is in good
condition. When using an extension cord, be sure to use one heavy enough to carry the current your product
will draw. For lengths between 0 feet and 50 feet, No 18 AWG extension cords should be used.
DOUBLE INSULATED APPLIANCE
This is a double insulated appliance and as such, does not require three-way grounding. This product is
equipped with a polarized alternating current line plug (a plug having one blade wider than the other) and does
not require a grounding adapter. This plug will fit into the power outlet only one way. This is a safety feature.
If you are unable to insert the plug fully into the outlet, try reversing the plug. If
the plug should still fail to fit, contact a qualified electrician to replace the obsolete
outlet. Do not defeat the safety purpose of the polarized plug.
2
MAINS
SWITCH
SHOWN IN
OFF
POSITION
Page 3

L0553 (04-08) (US-FR-ES).qxd 20/6/08 2:25 pm Page 3
INTRODUCTION
HVLP stands for High Volume, Low Pressure. This is a type of spraying that allows you to spray extremely
accurately but without all the overspray that occurs with the high pressure tank type equipment. In fact, in some
parts of the world the high pressure systems are banned by law on environmental grounds and HVLP type
systems are the only alternative for professional type spraying. This gun is extremely easy to use, very safe
and reduces the amount of paint used.
PLEASE NOTE
We have done all we can to ensure that used correctly and according to these instructions, this Spray Gun will
give long and trouble free life. We accept no responsibility for damage caused by the use of incorrect or
unsuitable substances, paints or fluids which have not been thinned correctly or are unsuitable for the surfaces
to which they are applied, health hazards arising from lack of ventilation when working in confined spaces or
failure of the equipment due to inadequate cleaning of the components after use. If in doubt, always test a small
inconspicuous area first. Always read the paint manufacturer’s instructions first. Neither our guarantee nor the
above statement affects your statutory rights.
IMPORTANT: SELECTING PAINT
This is a highly versatile spray kit that can be used with several different spray mediums including varnishes,
wood preservatives, enamels, oil and water based paints and automotive paints. However some materials
cannot be sprayed so please check the recommendation of the manufacturer before
material refers to brush application only, then it usually cannot be sprayed.
THIS UNIT CANNOT BE USED FOR TEXTURED PAINTS. USE OF THESE MATERIALS WILL CAUSE
PREMATURE WEAR, WHICH WILL VOID THE WARRANTY.
buying the paint. If a
TO OBTAIN THE BEST RESULTS FROM YOUR SPRAY KIT PLEASE READ THE INSTRUCTIONS
CAREFULLY BEFORE
USE.
3
Page 4

2
3
4
5
6
7
8
9
10
11
13
14
1
12
1
7
16
15
L0553 (04-08) (US-FR-ES).qxd 20/6/08 2:25 pm Page 4
SPARE PARTS DRAWING
SPARE PARTS LIST
Key Description Part No.
Air Cap Ring L0215
01.
02. Air Cap L0205
03. Spray Direction Plate L0206
04. Fluid Tip (2.0mm) L0237
05. Fluid Tip Seal L0211
06.
07. Spring L0216
08. Fluid Adjusting Screw L0210
09. Gland Nut L0208
Fluid Needle (2.0mm)
L0236
Key Description Part No.
Gland Seal L0272
10.
11. Paint Feed Tube L0214
12. Paint Container Seal L0335
13. Paint Container (Clear) L0201
14. Viscosity Cup SG243
Assembly
Hose
15.
16. Trigger L0202
17. Trigger Pin L0209
18. Filter (not shown) L0058
4
L0078
Page 5
L0553 (04-08) (US-FR-ES).qxd 20/6/08 2:25 pm Page 5
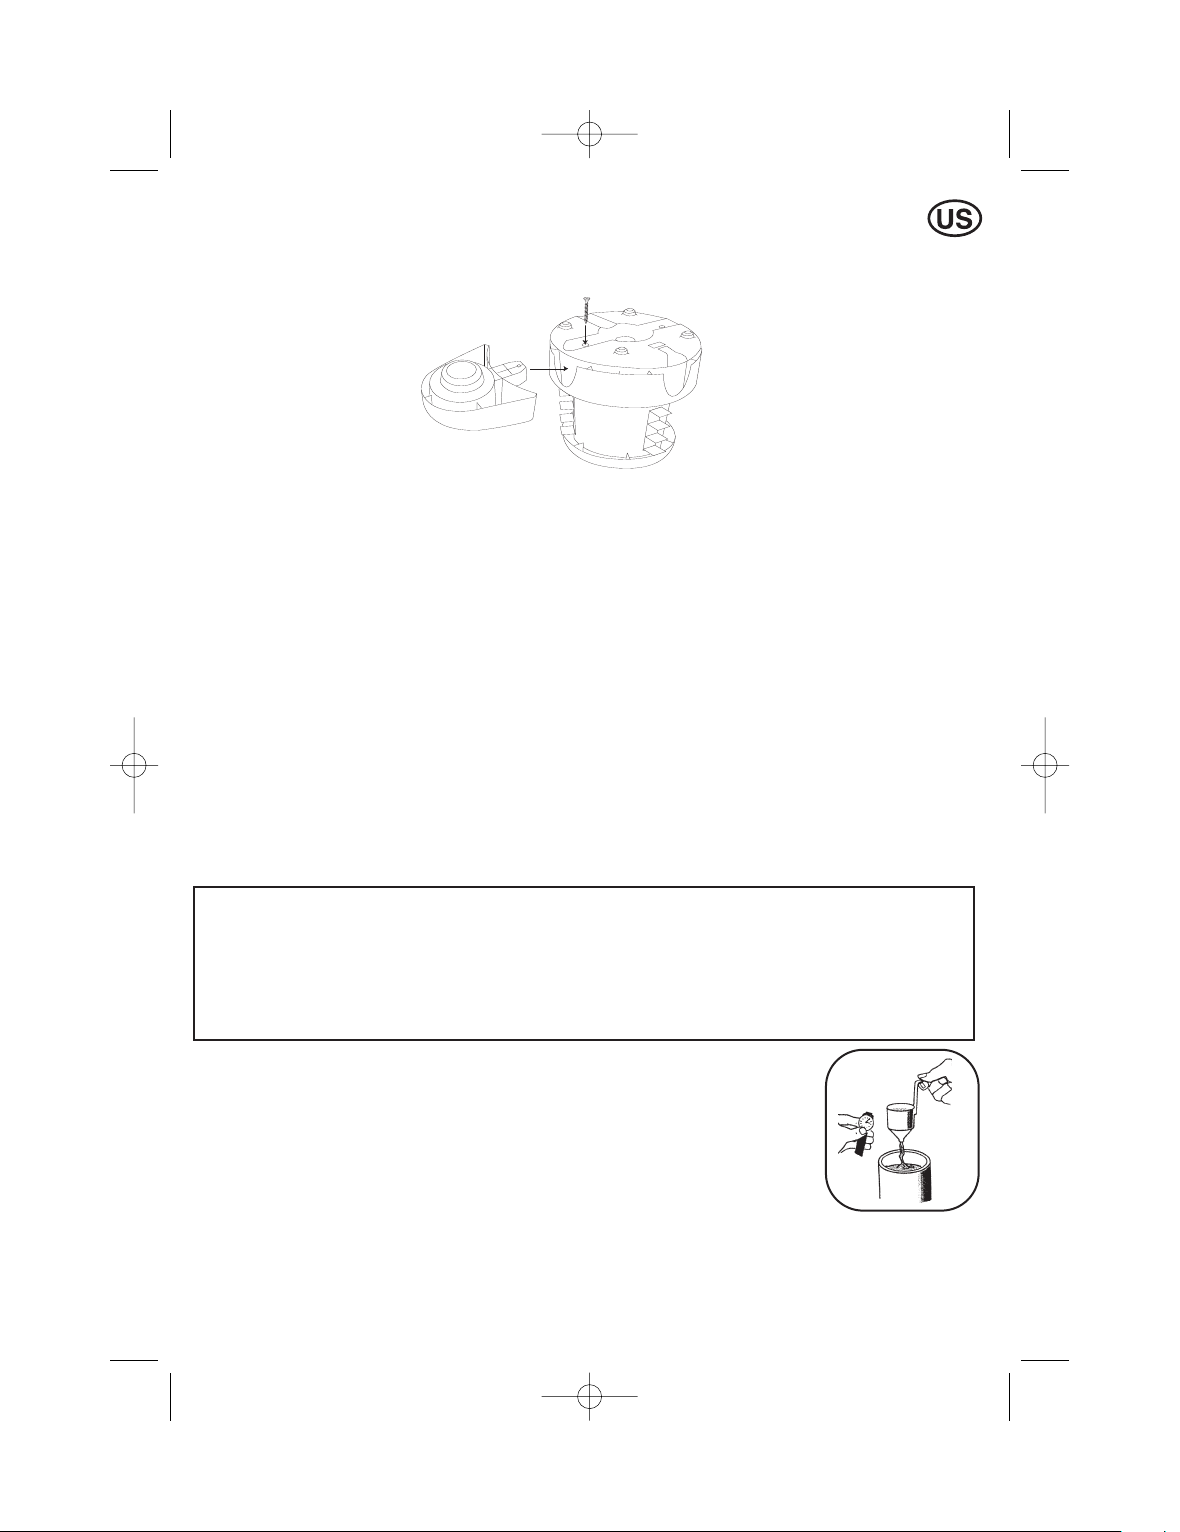
Fit the pod moulding (L0021) to the motor housing by pushing it into the recess in the base until it clicks into
place. The pod is secured with the screw (L0116) provided. (Below)
PREPARATION
FITTING THE POD
Preparation of the surface and thinning of the paint are the two most important areas to be concerned with to
obtain the best results from your spray kit.
Ensure all surfaces are free from dust, dirt, rust and grease. If necessary rub down with sandpaper, or similar.
Masking of areas is important to ensure you do not spray those areas you wish to remain untouched.
THINNING
Your spray kit is supplied with a viscosity cup. Viscosity is a technical term used to indicate if a product is very
thin or very thick. If thin, the viscosity is said to be low, while if very thick the viscosity is said to be high.
Viscosity is measured in seconds. In order to spray some materials they need to be “thinned” (diluted).
Thinning is very important when spraying. Most paints etc are supplied ready for brush application and may
need to be thinned (diluted) for spraying purposes. Follow the manufacturers guide for thinning in conjunction
with a spray gun. If in doubt please contact the manufacturers of the paint. The viscosity cup supplied will help
you determine the correct thickness of the paint. Paint is “thinned” by adding the substance which the paint
is based upon. If a water based paint then water is added, if oil based then white spirit.
As some paints, wood preservatives and other sprayable materials contain particles that have differing
qualities, please ensure that when filling the paint container of the spray gun, that the paint is filtered through
either a funnel with a filter on it or through nylon tights or stockings. This will ensure that no large particles enter
the paint container, so preventing blockages and providing you with trouble free spraying. Ensure that a face
mask, gloves and goggles are worn at all times when spraying.
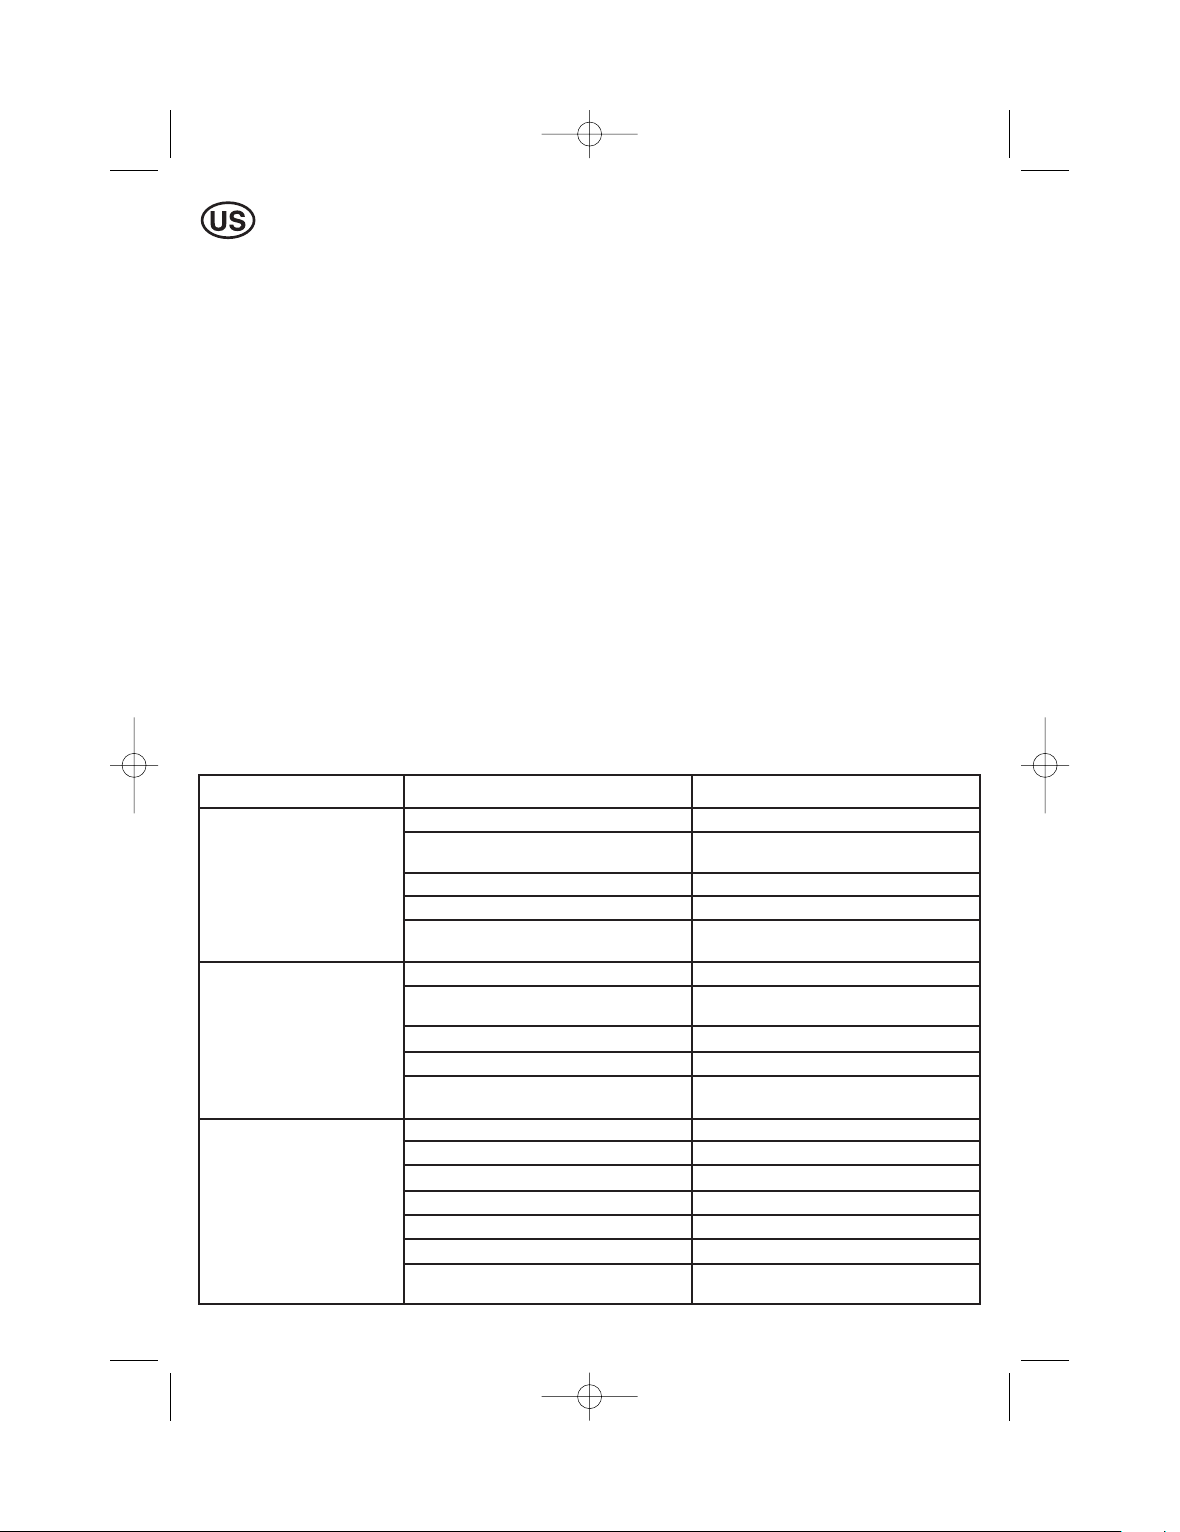
IDEAL VISCOSITY
Water based paints and latex 25 - 60 seconds
Oil based paints 45 - 50 seconds
Wood preservatives No dilution
Primers 45 - 50 seconds
Varnishes No dilution
Aluminium paints No dilution
Wood stains No dilution
Automotive Paint Manufacturer
This gun can be used with products having a viscosity ranging from 25 to 60 seconds.
Dip the viscosity cup into the material and fill up.
cup to empty (Fig. 1)
Using the above chart (or manufacturer
material requires further thinning, if so then thin accordingly
If the paint requires thinning, start with a 10% dilution of the paint.
container with the required paint.
litre, block the hole in the viscosity cup and fill up with the required thinner
thinner to the paint and stir
above.
If the paint requires further thinning, dilute the paint by another 5% (5% will be equal to half a viscosity cup)
with the required thinner and measure the viscosity
above step.
Note: Some paints are outside the ranges listed above. Please contact our helpline for further information.
The viscosity cup supplied with the unit holds 1/10 of a
, measure the viscosity using the recommended viscosity chart
ime how long it takes for the viscosity
T
s instructions) as a guide determine if the
’
, if the paint is not at it's recommended viscosity, repeat the
.
To do this, fill a 1litre
5
s ratio
’
. Add the
Fig. 1
Page 6

L0553 (04-08) (US-FR-ES).qxd 20/6/08 2:25 pm Page 6
Fill the paint container with the material to be sprayed. DO NOT OVERFILL above MAX level indicator. Push
the fluid tube firmly into the base of the Spray Gun body. Screw the container onto the gun body tightly.
Place the motor unit onto a clean surface, free from any loose debris or liquids. Connect the hose to the back
of the Spray Gun. Uncoil the mains cable and plug in.
ALWAYS KEEP THE MOTOR UNIT AS FAR AWAY FROM THE SPRAYING AREA AS POSSIBLE TO
PREVENT PAINT CONTAMINATING THE MOTOR.
MASK ANY AREA YOU DO NOT WISH TO SPRAY.
Once you have set up ready to spray, switch on the unit. No paint will be sprayed until the Trigger (16) on the
Spray Gun is gently pulled. Before starting any work on spraying actual objects we suggest you spend some
time practicing on cardboard or newspaper until you have got used to how the Spray Gun works.
l An airtight seal is essential for the correct operation of this gun.
l Before operating the unit please ensure that the Paint Container (13) is securely fixed to the gun body and
the Gland Nut (9) is not loose.
l Over time the Gland Seal (10) will wear and need adjusting. To check the Gland Nut is correctly fitted you
will need a small adjustable spanner
. Pull the Trigger back and gradually tighten the Gland Nut by turning it
in a clockwise direction until the Fluid Needle is not free to move when the Trigger is released.
l To obtain the optimum setting gradually unscrew the Gland Nut by turning it in an anti-clockwise direction
until the Fluid Needle moves forward into the Fluid Tip (4). To check your settings are correct spray a
container of water. Re-adjust if necessary.
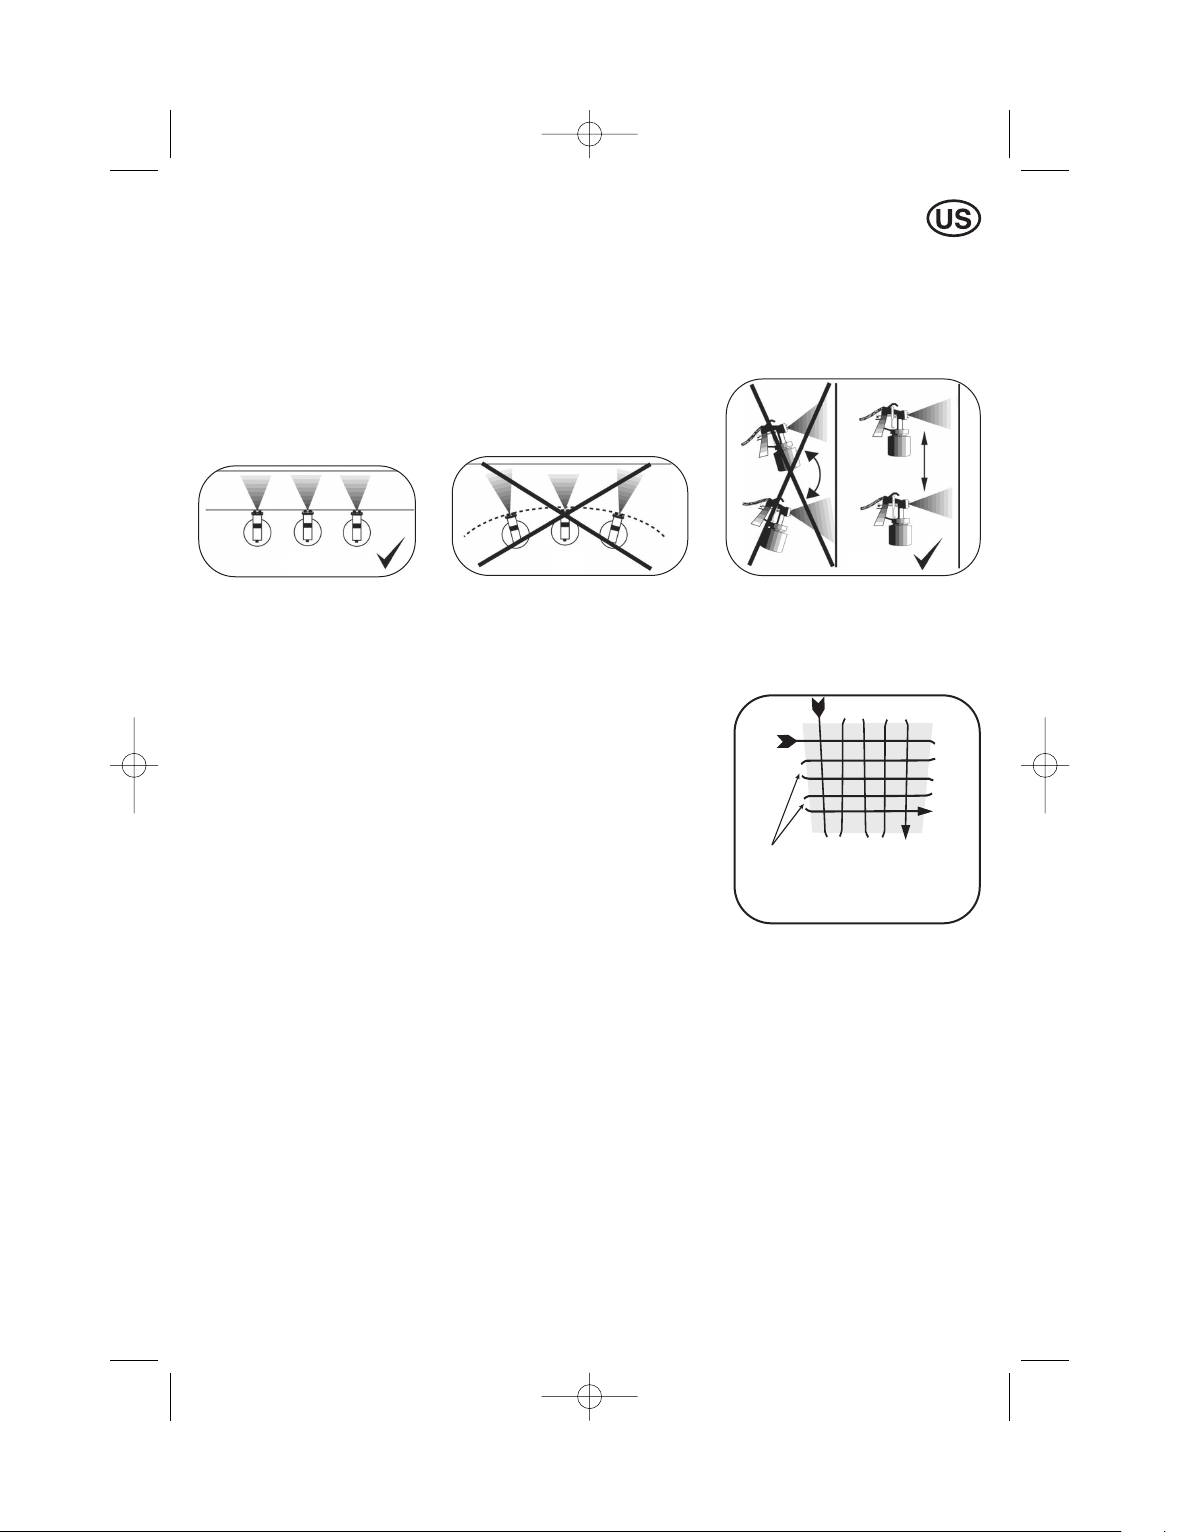
SPRAY PATTERNS
Fig.2
Ve
rtical Jet Round JetHorizontal Jet
The Spray Gun has 3 different spray patterns – Horizontal, Vertical and Round (Fig.2).
The Horizontal and Vertical are recommended for large surfaces. The Horizontal is suitable for spraying up and
down and the Vertical is suitable for spraying from side to side, while the Round spray is used for small objects
or for areas - such as corners – that are difficult to reach.
To adjust the spray pattern, loosen the Air Cap Ring (1), adjust the position of the Air Cap (2) to obtain either
a Vertical, Horizontal or Round pattern then re-tighten the Air Cap Ring.
OPERATION
PAINT VOLUME
The volume of paint sprayed is easily adjustable (Fig.3).
Completely close the Fluid Adjusting Screw (8) by turning this clockwise as far as it will go. Whilst pulling the
Trigger, begin turning the Fluid Adjustment Screw anti-clockwise until the volume of paint you require is
obtained.
If the paint spray is too wide or contains too much paint turn the Fluid Adjusting Screw clockwise again.
Once the correct spray pattern is obtained you are able to commence spraying.
The paint volume needs to be adjusted everytime you change the spray pattern
especially when you use the Round pattern, as this spray pattern can often
contain too much paint.
Fig.3
6
Page 7
Let go of the trigger at the
end of each spray
movement to avoid
excessive paint and drips
L0553 (04-08) (US-FR-ES).qxd 20/6/08 2:25 pm Page 7
SPRAYING TECHNIQUE
1. To obtain the best results always keep your spray gun level and at an equal distance from the object you
are spraying, idealy 25-30cm (10”-12”) (side to side or up or down) from the surface. Avoid spraying at an
angle as this will lead to runs on the surface (Fig.4a-4c).
2. Let your arm control the left to right movement rather than your wrist as this will help to give you an even
paint distribution over the whole area.
3. Do not tip the Spray Gun to more than a 45˚ angle when the motor is switched off.
4. You can tip the Spray Gun at more of an angle when spraying celings
and decking etc, providing that the motor is switched ON. For spraying
at angles, please change the direction of the Paint Feed Tube (11) to
the opposite angle that you are spraying, where there is more paint in
the container.
Fig.4a
Fig.4b
Fig.4c
HELPFUL HINTS
1. Evenly control the speed of movement of the spray gun. A fast speed will give a thin coat and a slow speed
will give a heavy coat.
2. Only apply one coat at a time. If a further coat is required follow the
paint manufacturer’s instructions for drying times.
3. If spraying small areas or objects keep the output setting low as this will
avoid excessive use of paints and will minimise overspray.
4. When spraying large areas or objects, it is best to use a criss-cross
pattern, either from left to right then up or down or vice-versa. This will
ensure maximum coverage.
5. Avoid stopping and starting when spraying as this can lead to too much
or not enough material on a surface.
6. To ensure edges are covered, commence spraying just to the side of
area being sprayed
CLEAN SPRAYER AFTER EVERY USE (SEE CLEANING
7.
INSTRUCTIONS)
CLEANING INSTRUCTIONS
THE SPRAY GUN MUST BE THOROUGHLY CLEANED IMMEDIATELY AFTER USE. IF THE PAINT
DRIES INSIDE THE GUN, CLEANING WILL
GUN INOPERABLE. THIS IS NOT COVERED BY WARRANTY.
BECOME MUCH MORE DIFFICUL
T AND MAY RENDER THE
SPRAY GUN
Disassemble the Spray Gun Container.
1.
Pour any residual material into its container so that it can be used for the future.
2.
3. Pour a quantity of the respective thinner into Container, shake the gun lightly, reassemble the gun, then
spray this liquid through the gun. Repeat this until the thinner being sprayed is coming through with no
traces of paint.
Clean any traces of paint of
4.
5. Clean the Paint Container Seal (12) inside the gun body.
f the outside of the gun.
7
Page 8
L0553 (04-08) (US-FR-ES).qxd 20/6/08 2:25 pm Page 8
1. Unscrew Air Cap (1).
2. Remove the Air Cap (2).
3. Completely remove Fluid Adjustment Screw (8).
4. Remove the Spring (7).
5. Push out the Needle (6) – do not use tools for this.
6. Remove the Fluid Tip (4).
7. Remove Fluid Tip Seal (5).
8. Remove Spray Direction Plate(3).
9. Place all of these items into a container and clean them using a brush and clean thinners.
10. Clean the inside of the gun.
11. Thoroughly dry these parts before reassembling.
12. Grease the Gland Seal (10).
13. Reassemble parts in reverse order. It is recommended fitting the Fluid Tip (4) prior to the needle.
NEVER DISPOSE OF P
ARRANGE COLLECTION OR FOR DETAILS OF NEAREST REGISTERED DISPOSAL SITE.
AINTS OR SOLVENTS INTO DRAINS. CONTACT YOUR LOCAL COUNCIL TO
TURBINE UNIT
NOZZLE & NEEDLE
The turbine unit only requires minimal maintenance.
1. Ensure its filter element is kept clean at all times.This is the filter underneath the main body. Disconnect
the unit from the mains, turn on side and remove foam material. This can be washed out if necessary and
replaced when dry. From time to time this filter will need replacing (part no.L0058).
2. The turbine bearings are sealed and lubricated for life. There is no maintenance or adjustment required.
3. Clean the turbine and hose unit with a damp cloth after use.
4. The hose is stored by locating this into the clips on the side of the main body.
5. The mains lead is stored by wrapping around the base of the unit and locating the plug in the space at the
back of the unit.
6. The compartment on the top of the unit can be used for the storage of accessories.
TROUBLE SHOOTING
PROBLEM CAUSE ACTION REQUIRED
The paint runs on the item
being sprayed
Paint is thin or irregular Paint too diluted Add undiluted material
No paint being produced Paint too thick Add thinner
Paint too diluted Add undiluted material
Paint volume too high Reduce the paint flow with Fluid
Moving too slowly Increase speed of application
Gun trigger being held for too long Release Trigger earlier
Gun too close Increase the distance between gun and
Paint volume too low Increase the paint flow with Fluid
Moving too fast Reduce speed of application
Gun clogged Clean the gun
Gun too far away Reduce the distance between gun and
Gun clogged Clean the gun
Pick up tube clogged Clean Paint Feed Tube (11)
Air hose split Replace air Hose (15)
Grainy paint Filter the paint
Container almost empty Refill Container
Gun at an angle Ensure Paint Feed
Adjusting Screw (8)
workpiece
Adjusting Screw (8)
workpiece
towards paint
ube (1
T
1) is angled
8
Page 9

L0553 (04-08) (US-FR-ES).qxd 20/6/08 2:25 pm Page 9
SERVICING OF DOUBLE-INSULATED APPLIANCES
In a double-insulated appliance, two systems of insulation are provided instead of grounding. No grounding
means is provided on double-insulated appliance, nor should a means for grounding be added to the appliance.
Servicing a double-insulated appliance requires extreme care and knowledge of the system, and should be
done only by a qualified services personnel. Replacement parts for a double-insulated appliance must be
identical to the parts they replace. This double-insulated appliance is marked with the DOUBLE-INSULATED
symbol (square within a square).
PLEASE NOTE: We have done all we can to ensure that used correctly and according to these instructions,
this spray gun will give long and trouble free life. We accept no responsibility for damage caused by the use
of incorrect or unsuitable substances, paints or fluids which have not been thinned correctly or are unsuitable
for the surfaces to which they are applied, health hazards arising from lack of ventilation when working in
confined spaces or failure of the equipment due to inadequate cleaning of the components after use. If in
doubt, always test a small inconspicuous area first. Always read the paint manufacturer’s instructions first.
Neither our guarantee nor the above statement affects your statutory rights.
British Registered Design No: 2103413
German Registered Design No: 40107145.6
Benelux Registered Design No: 79476-02
US Registered Design No: D468752S
Copyright & Design Right Reserved © 2008
This product is guaranteed for a period of 24 months against faulty manufacture and materials. It is not
guaranteed for industrial or hire purposes.
accept no responsibility for the use of this product if used for any purposes other than detailed herein.
If you require further assistance, please contact our helpline on
Tel: 704 827 7889 Fax: 704 827 7849
Customer Service: Toll Free 888-783-2612
Earlex Inc, 8261 Hwy 73, Suite F, Stanley, N.C. 28164, USA
© Earlex Inc. 2008
WARRANTY
The guarantee does not af
Website: www.earlex.com
fect your statutory rights. Earlex Inc. will
9
Page 10

L0553 (04-08) (US-FR-ES).qxd 20/6/08 2:25 pm Page 10
RÈGLES DE SÉCURITÉ
ATTENTION : RISQUE DE FEU ET D'EXPLOSION
TTENTION: AFIN DE RÉDUIRE LE
l A
ISQUE D'ÉLECTROCUTION OU DE
R
LESSURES, N'EXPOSEZ PAS À PLUIE,
B
VEUILLEZ LAISSER L'INTÉRIEUR.
l Les substances présentes dans ce pulvérisateur
(peinture, dissolvant, etc.) peuvent contenir des
matières dangereuses, nocives, explosives ou
corrosives.
VEUILLEZ TOUJOURS RESPECTER LES
RÈGLES DE SÉCURITÉ QUI ACCOMPAGNENT
CE PRODUIT ET LE MATÉRIEL UTILISÉ AVEC
CELUI-CI.
l Le pulvérisateur ne doit être utilisé qu'avec des
peintures et des solvants ayant un point d'éclair
permettant la pulvérisation. En cas de doute,
consulter les informations du fabricant de peinture
ou de solvant.
l Toujours s'assurer que la pièce est suffisamment
ventilée lors de la pulvérisation.
l NE JAMAIS pulvériser près d'une flamme y
compris une veilleuse.
l NE JAMAIS fumer lors de la pulvérisation.
l Toujours débrancher l'alimentation secteur de
l'appareil lors du remplissage du réservoir de
peinture.
l Toujours débrancher l'alimentation secteur de
l'appareil lors du nettoyage du pistolet.
l Toujours s'assurer que la zone de pulvérisation est
sûre et qu'il n'y a pas de débris qui pourraient
présenter un danger d'incendie ou de chute.
l Dans aucune circonstance, NE JAMAIS pointer le
pistolet vers une personne ou un animal. En cas
de blessure, appelez immédiatement un médecin.
l NE JAMAIS laisser les enfants ou des personnes
non autorisées utiliser ou jouer avec l'appareil de
pulvérisation. Ceci est un équipement pour une
utilisation professionnelle uniquement.
l Toujours lire les instructions du fabricant de
solvants avant utilisation.
l Toujours porter un masque de protection adapté
lors de la pulvérisation. Nous recommandons
également de porter des gants, des lunettes et
une combinaison.
l Après chaque utilisation, s'assurer de bien
nettoyer à fond le pistolet pulvérisateur et lubrifier
les garnitures.
l N'utiliser que des pièces de rechange certifiées
par le fabricant.
l Utiliser l'appareil de pulvérisation uniquement
comme décrit dans ce mode d'emploi.
l Ne pas utiliser le tuyau ou le câble d'alimentation
pour tirer l'unité HVLP.
l Vérifier les tuyaux, les raccords de tuyaux et le
câble d'alimentation tous les jours. Toutes les
pièces usées ou abîmées doivent immédiatement
être remplacées.
l Cet appareil est recommandé pour une utilisation
domestique uniquement.
l Cet appareil n’a pas été conçu pour être utilisé par
des personnes (ou des enfants) ayant des
capacités physiques, sensorielles ou mentales
réduites, ou présentant un manque d’expérience
et de connaissances, excepté si de telles
personnes ont été sous surveillance ou ont reçu
des instructions en rapport avec l’utilisation de
l’appareil par une personne responsable
de leur sécurité.
INFORMATIONS IMPORTANTES CONCERNANT
L'INSTALLATION ÉLECTRIQUE
RALLONGES
Votre appareil HVLP Earlex a été fourni avec un cordon d'alimentation de 6’. Assurez-vous que votre rallonge
est en bon état, et qu'elle est assez puissante pour transporter le courant dont votre appareil aura besoin.Pour
une longueur entre 0’
AREIL À DOUBLE ISOLATION
APP
et 50’, Il ne faut pas utiliser de rallonges 18A
Cet appareil est doublement isolé et en tant que tel, il ne nécessite pas de prise de mise à la terre. Cet appareil
est équipé d'une fiche de courant alternatif polarisée (ayant une lame plus large que l'autre) et ne nécessite
pas d'adaptateur de mise à la terre. Cette fiche s'insérera dans la prise de courant dans un sens seulement.
Ceci est une mesure de sécurité.
Si vous ne pouvez pas insérer complètement la fiche dans la prise de courant,
essayez d'insérer la fiche dans l'autre sens. Si la fiche ne parvient toujours pas à
être insérée, contactez un électricien qualifié pour remplacer la prise obsolète. Ne
pas rendre inopérante la fonction de sécurité de la prise polarisée.
10
WG.
Interrupteur de
secteur sur la
position "OFF"
Page 11

L0553 (04-08) (US-FR-ES).qxd 20/6/08 2:25 pm Page 11
INTRODUCTION
HVLP signifie High Volume, Low Pressure (grand débit, basse pression). C'est un type de pulvérisation qui
vous permet de pulvériser avec une très grande précision, sans les excès de pulvérisation qui sont fréquents
avec les appareils de type à réservoir sous haute pression. En fait, dans certaines parties du monde, les
systèmes à haute pression sont interdits par la loi pour des raisons environnementales, et les appareils de type
HLVP sont la seule solution pour une pulvérisation professionnelle. Ce pistolet est très facile à utiliser, très sûr
et réduit la quantité de peinture utilisée.
VEUILLEZ NOTER
Nous avons fait notre possible pour nous assurer que ce pistolet pulvérisateur fonctionnera longtemps et sans
problèmes dans le cadre d'une utilisation conforme à ces instructions. Nous ne saurions être responsables
pour les dommages occasionnés par l'utilisation incorrecte ou inappropriée de substances, peintures ou
liquides qui n'ont pas été dilués correctement ou qui ne sont pas appropriés pour les surfaces sur lesquelles
ils sont appliqués, pour les risques pour la santé provenant du manque de ventilation lors d'un travail dans un
espace confiné ou pour la défaillance du matériel due à un nettoyage inapproprié des composants après
utilisation. En cas de doute, testez toujours sur une petite partie caché d'abord. Veuillez toujours lire les
instructions du fabricant avant de commencer. Ni notre garantie ni la déclaration ci-dessus n'affecte vos droits
statutaires.
INFORMATION IMPORTANTE
SÉLECTION DE LA PEINTURE
Cet appareil de pulvérisation très polyvalent peut être utilisé avec différents moyens de pulvérisation, y compris
les vernis, les produits de préservation du bois, les peintures laquées, les peintures à base d'eau ou d'huile et
la cellulose. Cependant, certaines matières ne peuvent pas être pulvérisées, veuillez donc vérifier les
recommandations du fabricant avant d'acheter la peinture. Si une matière se réfère à l'application par une
brosse, alors la pulvérisation ne sera pas possible dans ce cas précis.
CET APPAREIL NE DOIT PAS ÊTRE UTILISÉ POUR APPLIQUER DES PEINTURES STRUCTURÉES.
L'UTILISATION DE CES MATÉRIAUX ENGENDRERA UNE USURE PRÉMATURÉE ET EXCESSIVE, CE
QUI ANNULE LA GARANTIE.
POUR OBTENIR LES MEILLEURS RESULTATS AVEC VOTRE KIT DE PULVÉRISATION, VEUILLEZ LIRE
ATTENTIVEMENT LES INSTRUCTIONS A
VANT UTILISATION.
11
Page 12

2
3
4
5
6
7
8
9
10
11
13
14
1
12
17
16
15
L0553 (04-08) (US-FR-ES).qxd 20/6/08 2:25 pm Page 12
SCHÉMA DÉCOMPOSÉ DES PIÈCES DÉTACHÉES
LISTE DES PIÈCES DÉTACHÉES
N° Description N° pièce
01. Anneau de chapeau d'air L0215
02. Chapeau d'air L0205
03. Disque d'orientation du jet L0206
Buse 2.0mm
04.
05. Joint Buse L0211
06. Pointeau 2.0mm L0236
Ressort
07.
08. Vis de débit de liquide L0210
09. Écrou de garniture L0208
N° Description N° pièce
10. Garniture L0272
11. Tube plongeur L0214
L0237
12. Joint du réservoir de peinture L0335
Réservoir de peinture (transparent)
13.
L0201
14. Godet de viscosité SG243
15. Assemblage tuyau L0078
L0216
Gachette
16.
17. Goupille de gàchette L0209
18. Filtre (non montré) L0058
L0202
12
Page 13

L0553 (04-08) (US-FR-ES).qxd 20/6/08 2:25 pm Page 13
Insérez le moulage de la nacelle (L0021) sur le compartiment moteur en le poussant dans l'encoche de la base
jusqu'à ce qu'il se fixe dans l'emplacement en produisant un clic. La nacelle est maintenue par la vis (L0116)
fournie. (voir ci-dessous).
PREPARATION
FIXATION DE LA NACELLE
La préparation de la surface et la dilution de la peinture sont les deux phases les plus importantes permettant
d'obtenir les meilleurs résultats avec votre kit de pulvérisation. Assurez-vous que toutes les surfaces ne
présentent aucune trace de poussière, saleté, rouille et graisse. Si nécessaire, poncez avec un papier abrasif.
Assurez-vous de bien recouvrir les zones ne devant pas être peintes afin de les protéger de projections
éventuelles.
DILUTION
Votre kit de pulvérisation est fourni avec un godet de viscosité. Viscosité est un terme technique utilisé pour
indiquer si un produit est plutôt liquide ou bien épais. S'il est liquide, on dit que la viscosité est faible, alors que
s'il est épais, on dira que la viscosité est élevée. La viscosité est mesurée en secondes. Certaines matières
ont besoin d'être diluées afin d'être pulvérisées. La dilution est très importante lors de la pulvérisation. La
plupart des peintures sont prêtes à être appliquées à la brosse et doivent être diluées pour être pulvérisées.
Suivez les instructions pour effectuer une dilution conjointement avec une application au pulvérisateur. En cas
de doute, veuillez contacter le fabricant de peinture. Le godet de viscosité inclus vous aidera à déterminer
l'épaisseur correcte de la peinture. La peinture est diluée en ajoutant un supplément de la substance
constituant sa base. Si la peinture est à base d'eau, il faut ajouter de l'eau, si elle est à base d'huile, il faut
ajouter du white-spirit.
Étant donné que certaines peintures, produits pour la préservation du bois, et autres matières pulvérisables
contiennent des particules possédant des qualités différentes, veuillez vous assurer lors du remplissage du
réservoir de peinture du pistolet que la peinture a été filtrée soit à travers un entonnoir équipé d'un filtre, soit à
travers un bas ou un collant. Cela permettra d'être certain qu'aucune particule grossière ne s'infiltrera dans le
réservoir de peinture, évitant ainsi les obstructions et vous assurant une pulvérisation sans problèmes.
Assurez-vous de porter en permanence un masque facial, des gants et des lunettes de protection lors de la
pulvérisation.
VISCOSITÉ IDÉALE
Peintures à base d'eau et émulsions 25 - 60 secondes
Peintures à base d'huile 45 - 50 secondes
Produits de préservation du bois Pas de dilution
Enduits 45 - 50 secondes
Vernis Pas de dilution
Peintures à l'aluminium Pas de dilution
eintures pour le bois
T
Ce pistolet peut être utilisé avec des produits présentant une viscosité allant de 25 à 60
secondes et au-delà. Plongez le godet dans le pot de peinture et remplissez-le. Calculez
le temps que prend le godet
pour se vider. (Fig. 1)
Grâce au tableau ci-dessus (ou les instructions du fabriquant), déterminez si le produit
doit être dilué davantage, et diluez en conséquence. Si la peinture doit être diluée,
commencez par une dilution à 10%. Pour ce faire, remplissez un réservoir de 1 litre avec
la peinture adéquate. Le godet de viscosité fourni avec l'appareil contient 1/10e de litre.
Bouchez le trou dans le godet de viscosité et remplissez-le avec le diluant adéquat.
Ajoutez le diluant à la peinture et remuez, mesurez la viscosité en utilisant le tableau de
viscosité recommandée ci-dessus.
Si la peinture doit être diluée davantage, diluez la peinture de 5% de plus (5% correspond à la moitié du godet
de viscosité) avec le diluant adéquat et mesurez la viscosité. Si la peinture n'est pas à la viscosité conseillée,
répétez les étapes ci-dessus.
Pas de dilution
Fig. 1
13
Page 14

L0553 (04-08) (US-FR-ES).qxd 20/6/08 2:25 pm Page 14
FONCTIONNEMENT
Remplissez le réservoir avec le produit que vous souhaitez appliquer. NE PAS REMPLIR AU-DELÀ de
l'indicateur de NIVEAU MAXIMUM. Poussez fermement le tube plongeur dans la base du pistolet. Vissez
fermement le réservoir sur le corps du pistolet. Placez l'unité moteur sur une surface propre, dépourvue de
débris ou de liquides. Branchez le tuyau à l'arrière du pistolet pulvérisateur. Déroulez le cordon d'alimentation
et branchez-le au secteur.
TOUJOURS GARDER L'UNITÉ MOTEUR AUSSI LOIN QUE POSSIBLE DU LIEU DE PEINTURE AFIN DE
PRÉVENIR TOUTE CONTAMINATION DU MOTEUR PAR LA PEINTURE.
COUVREZ TOUTES LES ZONES QUE VOUS NE VOULEZ PAS PEINDRE.
Une fois que vous avez tout préparé pour commencer à pulvériser, mettez l'unité sous tension. Aucune
peinture ne sera pulvérisée tant que vous n'aurez pas légèrement appuyé sur la gâchette du pistolet. Avant de
commencer tout travail sur des objets devant être peints, nous vous suggérons de prendre le temps de vous
exercer sur un carton ou un journal pour vous familiariser avec l'utilisation du pistolet.
l Un joint hermétique est essentiel au bon fonctionnement de ce pistolet.
l Avant de faire fonctionner l'unité, veillez à ce que le réservoir soit bien fixé au corps du pistolet et que l'écrou
(9) soit bien serré.
l Après un certain temps, le joint (10) s'usera et devra être ajusté. Pour vérifier que l'écrou est correctement
installé, vous avez besoin d'une petite clé à molette. Tirez la gâchette vers l'arrière et serrez
progressivement l'écrou en tournant dans le sens des aiguilles d'une montre jusqu'à ce que l'aiguille ne
puisse plus bouger lors du déclenchement
l Pour parvenir à une installation optimale, dévissez progressivement l'écrou en tournant dans le sens
inverse des aiguilles d'une montre jusqu'à ce que l'aiguille se déplace vers l'avant dans la buse (4). Pour
vérifier que vos réglages sont corrects, vaporisez un réservoir rempli d'eau. Réajustez si nécessaire.
MODES DE PULVÉRISATION
Le pistolet possède 3 différents modes de pulvérisation - horizontal, vertical, et rond (Fig.2).
Les jets de type horizontal et vertical sont recommandés pour les grandes surfaces. Le jet rond est destiné à
une utilisation sur des objets de petite taille ou pour des endroits difficiles à atteindre, comme les recoins.
Pour régler le mode de pulvérisation, dévissez l'anneau de réglage du chapeau d'air (1), régler la position du
chapeau d'air (2) afin d'obtenir un jet vertical, horizontal ou rond et ensuite resserrer l'anneau de réglage du
chapeau d'air.
Fig.2
Jet Vertical Jet RondJet Horizontal
PEIGNEZ LE VOLUME
Le volume de peinture pulvérisée est facilement réglable (Fig.3).
Fermez complètement la vis de réglage (8) en la tournant à fond dans le sens des aiguilles d'une montre.
Lorsque vous appuyez sur la gâchette, commencez à tourner la vis de réglage dans le sens inverse des
aiguilles d'une montre jusqu'à ce que vous obteniez le débit de peinture désiré. Si le jet de peinture est trop
large ou contient trop de peinture, tournez la vis de réglage vers la droite. Une fois que vous avez choisi le
mode de pulvérisation et le débit de peinture corrects, vous êtes prêt à commencer à pulvériser. Le débit de
peinture doit être modifié à chaque fois que vous changez de mode de pulvérisation, et particulièrement
lorsque vous utilisez le jet arrondi, car cette forme de jet contient souvent trop
de peinture.
Fig.3
14
Page 15

Relâchez la gâchette à la
fin de chaque mouvement
de pulvérisation pour
éviter les excès de peinture
et la formation de gouttes.
L0553 (04-08) (US-FR-ES).qxd 20/6/08 2:25 pm Page 15
TECHNIQUE DE PULVÉRISATION
1. Afin d'obtenir les meilleurs résultats, maintenez votre niveau de débit de peinture et pulvérisez de façon
égale d'un côté à l'autre ou de haut en bas de la surface à une distance idéale d'environ 25-30cm. Évitez
de pulvériser de biais car cela va provoquer des coulures sur la surface (Fig.4a-4c).
2. Veuillez utiliser votre bras plutôt que votre poignet pour diriger la pulvérisation, cela améliorera la répartition
de la peinture sur toute la surface.
3. Ne pas incliner le pistolet à un angle de plus de 45° lorsque le motour est éteint (“OFF”).
4. Vous pouvez incliner le pistolet au-delà de cet angle pour pulvériser sur les plafonds, les planchers, etc. à
condition que le moteur soit allumé (" ON "). Pour pulvériser en inclinant le pistolet, veuillez placer le tube
plongeur (11) dans le sens opposé à l'angle sur lequel vous allez
pulvériser afin de ne pas couper l'alimentation du réservoir.
Fig.4a
Fig.4b
Fig.4c
CONSEILS UTILES
1. Contrôlez la vitesse de mouvement du pistolet. Une vitesse élevée donnera une couche fine, alors qu'une
vitesse lente donnera une couche épaisse.
2. N'appliquez qu'une seule couche à la fois. Si une couche supplémentaire est nécessaire, suivez les
instructions du fabricant de peinture concernant les temps de séchage.
3. Si vous pulvérisez sur de petites surfaces ou des objets de petite
dimension, conservez un bas débit de peinture afin d'éviter d'utiliser
trop de peinture et de réduire les excès de projection.
4. Lorsque vous pulvérisez sur des grandes surfaces ou des objets de
grande taille, il est plus judicieux de pulvériser de manière croisée, par
passages horizontaux et verticaux ou vice versa. Cela assurera une
couverture maximale.
5. Évitez de stopper et de reprendre le mouvement de pulvérisation car
cela provoquera une répartition inégale de la peinture sur la surface.
6. Afin de s'assurer que les bords seront peints, commencez à pulvériser
juste avant la zone à peindre.
NETTOYER LE PISTOLET APRÈS CHAQUE UTILISATION (VOIR INSTRUCTIONS DE NETOYAGE)
7.
INSTRUCTIONS DE NETTOYAGE
LE PIST
SÈCHE À L'INTÉRIEUR DU PISTOLET, LE NETTOYAGE SERA BIEN PLUS DIFFICILE ET L'APPAREIL
SERA
OLET DOIT ÊTRE IMMÉDIATEMENT NETTOYÉ À FOND APRÈS UTILISATION. SI LA PEINTURE
INUTILISABLE. CECI BIEN SÛR, N'EST PAS COUVERT PAR LA GARANTIE.
PISTOLET
1. Retirer le réservoir.
2. Reversez l'excédent éventuel de peinture dans son pot pour des travaux ultérieurs.
Versez un peu de diluant adéquat dans le réservoir, secouez légèrement le pistolet, remontez le pistolet, et
3.
ensuite faites passer ce liquide dans le pistolet en le pulvérisant. Répétez l'opération jusqu'à ce que le
diluant pulvérisé ne contienne plus de traces de peinture.
4. Nettoyez toutes les traces de peinture présentes sur le pistolet.
5. Nettoyez le joint du réservoir (12) à l'intérieur du corps du pistolet.
15
Page 16

L0553 (04-08) (US-FR-ES).qxd 20/6/08 2:25 pm Page 16
1. Dévisser la bague de réglage (1)
2. Retirer le chapeau d'air (2)
3. Retirer complètement la vis de réglage (8).
4. Retirer le ressort (7).
5. Pousser le pointeau (6) - ne pas utiliser d'outils pour cela.
6. Retirer la buse (4).
7. Retirer le disque d'orientation du jet (3).
8. Retirer la rondelle de la buse (5).
9. Mettre tous ces éléments dans un récipient et les nettoyer à) l'aide d'un pinceau et des diluants propres.
10. Nettoyer l'intérieur du pistolet.
11. Sécher complètement ces pièces avant de les remonter.
12. Graisser la garniture d'étanchéité du pointeau (10).
13. Remonter les pièces dans l'ordre inverse. Il est recommandé de monter la buse (4) avant le pointeau.
NE JAMAIS JETER LA PEINTURE OU LES PRODUITS DILUANTS DANS VOS CANALISATIONS.
CONTACTEZ LA MAIRIE DE VOTRE COMMUNE POUR ORGANISER UNE COLLECTE OU POUR
CONNAÎTRE LE POINT DE COLLECTE LE PLUS PROCHE
UNITÉ À TURBINE
BUSE & POINTEAU
L'unité à turbine ne requiert qu'une maintenance minimale.
1. Assurez-vous en permanence que le filtre est propre. C'est le filtre situé sous la partie principale.
Débranchez l'unité du secteur, tournez-là sur le côté et retirer le morceau de mousse. Il peut être lavé si
nécessaire et remis en place une fois sec. De temps en temps, le filtre devra être remplacé (pièce N°
L0058).
2. Les roulements de la turbine sont soudés lubrifiés à vie. Aucune maintenance ou réglage n'est nécessaire.
3. Nettoyez la turbine et le tuyau avec un linge humide après utilisation.
4. Le tuyau se range en le fixant sur les clips situés sur le côté de la partie principale de l'appareil.
5. Le cordon d'alimentation se range en l'enroulant autour de la base de l'unité et en plaçant la prise dans
l'espace à l'arrière de l'unité.
6. Le compartiment en haut de l'unité peut être utilisé pour ranger des accessoires.
IDENTIFICATION DES PANNES
PROBLÈME CAUSE ACTION REQUISE
La peinture goutte sur
l’objet peint
La peinture ets trop liquide
ou irrégulière
Pas de pulvérisation de
peinture
Peinture excessivement diluée Ajouter de la peinture non diluée
Débit de peinture trop élevé Réduisez le debit de peinture en
Mouvement trop lent Augmentez la vitesse d’application
Vous appuyez pendant trop longtemps
sur la gâchette
Pistolet trop près Augmentez la distance entre le pistolet
Peinture trop diluée Ajouter de la peinture non diluée
Le débit de peinture est trop faible Augmentez le débit de peinture en
Mouvement trop rapide Rédiusez la vitesse d’application
Pistolet obstrué Nettoyez le pistolet
Pistolet trop éloigné Réduisez la distance entre le pistolet et
Peinture trop épaisse Ajoutez du diluant
Embout du pistolet obstrué Nettoyez l’embout du pistolet
Tube plongeur obstrué Nettoyez le tube plongeur
Tuyau d’air fissuré Remplacez le tuyau d’air
Peinture granuleuse Filtrez la peinture
Réservoir pratiquement vide Remplissez le réservoir
Pistolet de biais Vérifiez que le tube plongeur (1
ajustant la vis (8)
Relâchez la gâchette plus tôt
et l’objet
ajustant la vis (8)
l’objet
1) est
orienté vers la peinture
16
Page 17

L0553 (04-08) (US-FR-ES).qxd 20/6/08 2:25 pm Page 17
ENTRETIEN DES APPAREILS À DOUBLE ISOLATION
Sur un appareil à double isolation, deux systèmes d'isolation sont fournis au lieu d'une mise à la terre. Aucun
système de mise à la terre n'est fournie avec les appareils à double isolation, et aucun système de mise à la
terre ne doit être ajouté à cet appareil.
L'entretien d'un appareil à double isolation demande une attention et une connaissance particulières du
système et doit être mené par un personnel d'entretien qualifié. Les pièces de rechange de cet appareil à
double isolation doivent être identiques aux pièces qu'elles remplacent. Cet appareil à double isolation est
marqué du symbole " DOUBLE-INSULATED " (" ISOLATION ") (un carré dans un carré).
VEUILLEZ NOTER : Nous avons fait tout notre possible pour nous assurer que ce pistolet pulvérisateur
fonctionnera longtemps et sans problèmes dans le cadre d'une utilisation conforme à ces instructions. Nous
ne saurions être responsables pour les dommages occasionnés par l'utilisation incorrecte ou inappropriée de
substances, peintures ou liquides qui n'ont pas été dilués correctement ou qui ne sont pas appropriés pour
les surfaces sur lesquelles ils sont appliqués, pour les risques pour la santé provenant du manque de
ventilation lors d'un travail dans un espace confiné ou pour la défaillance du matériel due à un nettoyage
inapproprié des composants après utilisation. En cas de doute, testez toujours sur une petite partie caché
d'abord. Veuillez toujours lire les instructions du fabricant avant de commencer. Ni notre garantie ni la
déclaration ci-dessus n'affecte vos droits statutaires.
Modèle déposé Royaume-Uni N°: 2103413
Modèle déposé Allemagne N°: 401 07 145.6
Modèle déposé Benelux N°: 79476-02
Modèle déposé USA N°: D468,752S
Tous droits réservés © 2008
Ce produit est garanti pour une période de 24 mois contre les défauts de fabrication ou de matériaux. Il n'est
pas garanti pour une utilisation industrielle ou pour la location. Cette garantie n'affecte pas vos droits
statutaires. Earlex Inc. ne saurait être responsable pour l'utilisation de ce produit s'il est utilisé pour d'autres
usages que ceux décrits dans ce manuel.
Si vous avez besoin d'une assistance supplémentaire, veuillez contacter notre ligne de service clients au :
Tel: 704 827 7889 Fax: 704 827 7849
Service clients: Appel gratuit 888-783-2612
Earlex Inc, 8261 Hwy 73, Suite F
© Earlex Inc. 2008
GUARANTIE
Site Web: www.earlex.com
, Stanley
, N.C. 28164, USA
17
Page 18

L0553 (04-08) (US-FR-ES).qxd 20/6/08 2:25 pm Page 18
INSTRUCCIONES DE SEGURIDAD
¡ADVERTENCIA! RIESGO DE INCENDIO Y EXPLOSIÓN.
l PRECAUCIÓN: PARA REDUCIR EL RIESGO
DE DESCARGA ELÉCTRICA O LESIÓN,
NO EXPONGA AL LLUVIA, ALMACÉN EL
DISPOSITIVO EN INTERIOR.
l Las sustancias utilizadas con este aplicador de
spray (pintura, disolventes, etc.) pueden contener
materiales peligrosos, nocivos, explosivos o
corrosivos. SIGA SIEMPRE LAS
INSTRUCCIONES DE SEGURIDAD
ENTREGADAS CON ESTE PRODUCTO Y CON
EL MATERIAL QUE ESTÁ SIENDO UTILIZADO.
l El aplicador de spray debe ser utilizado solamente
con pinturas y disolventes que tengan un punto de
inflamación adecuado para la pulverización. En
caso de duda, consulte la información
proporcionada por el fabricante de la pintura o el
disolvente.
l Asegúrese siempre de que la habitación tiene una
ventilación adecuada cuando aplique el spray.
l No pulverice NUNCA cerca de fuego abierto,
incluidos dispositivos con llama de encendido.
l No fume NUNCA mientras esté pulverizando.
l Desconecte siempre la unidad de la red eléctrica
cuando rellene el tanque de pintura.
l Desconecte siempre la unidad de la red eléctrica
cuando limpie la pistola pulverizadora.
l Asegúrese siempre de que el área a pulverizar es
segura y está libre de residuos que puedan
provocar riesgo de incendio o tropiezos.
l NUNCA, bajo ninguna circunstancia, debe
apuntar con la pistola pulverizadora una persona
o animal. En el caso de que se produzca un
accidente con lesiones, acuda a la consulta de un
médico inmediatamente.
l No deje NUNCA que niños o personas no
autorizadas usen o jueguen con el equipo de
pulverización. Este equipo es solamente para uso
profesional.
l Lea siempre las instrucciones del fabricante para
el rebajado de la pintura antes de utilizarla.
l Lleve siempre una mascarilla adecuada cuando
efectúe la pulverización. También recomendamos
el uso de guantes, gafas y mono de trabajo.
l Después de cada utilización asegúrese de limpiar
la pistola pulverizadora a fondo y lubricar las
rondanas.
l Use solamente piezas de recambio originales del
fabricante.
l Use esta unidad solamente del modo detallado en
las instrucciones.
l No utilice el tubo flexible de vacío o el cable de
alimentación de red para arrastrar la unidad HVLP.
l Compruebe los tubos, los conectores de los tubos
y el cable de alimentación de red a diario.
l Este dispositivo no ha sido diseñado para el uso
de personas (niños incluidos) con discapacidad
física, sensorial o intelectual; o que no dispongan
de una experiencia o conocimiento suficientes,
salvo que reciban supervisión o formación
respecto a su uso, por parte de una persona al
cargo de su seguridad.
INFORMACIÓN ELÉCTRICA IMPORTANTE
CABLES DE PROLONGACIÓN
El Earlex HVLP se entrega con un cable de alimentación de 6’. de longitud. Asegúrese de que el cable de
prolongación está en buenas condiciones. Cuando utilice un cable de prolongación, asegúrese de usar uno
que sea lo suficientemente fuerte como para soportar la corriente que el producto generará. Para longitudes
entre 0’
y 50’
deberían utilizarse cables de prolongación No 18 AWG.
APARATO DE DOBLE AISLAMIENTO
Este es un aparato de doble aislamiento y como tal, no requiere enchufe con conexión a tierra de tres clavijas.
Este producto está equipado con un enchufe polarizado (un enchufe con una clavija más ancha que la otra)
y no requiere adaptador de alimentación. Este enchufe encaja en la toma de corriente sólo de una manera.
Esto es una medida de seguridad.
En caso de no poder insertar el enchufe completamente en la toma de corriente,
intente darle la vuelta. Si el enchufe sigue sin encajar, contacte con un
electricista cualificado para que reemplace la toma de corriente obsoleta. No
rechace la seguridad, que es la razón por la que se suministra el enchufe
polarizado.
18
Interruptor de
red mostrado
en posición de
apagado.
Page 19

L0553 (04-08) (US-FR-ES).qxd 20/6/08 2:25 pm Page 19
INTRODUCCIÓN
HVLP es la sigla en inglés de Alto Volumen, Baja Presión. Este es un tipo de pulverización que le permite
pulverizar de modo sumamente preciso sin la neblina de pulverización que se produce con equipos de tanque
de alta presión. En algunos lugares del mundo los sistemas de alta presión están prohibidos por la ley por
motivos medioambientales y los sistemas del tipo HVLP son la única alternativa para la pulverización
profesional. Este sistema es muy fácil de utilizar, muy seguro y reduce la cantidad de pintura utilizada.
VEUILLEZ NOTER
Nous avons fait notre possible pour nous assurer que ce pistolet pulvérisateur fonctionnera longtemps et sans
problèmes dans le cadre d'une utilisation conforme à ces instructions. Nous ne saurions être responsables
pour les dommages occasionnés par l'utilisation incorrecte ou inappropriée de substances, peintures ou
liquides qui n'ont pas été dilués correctement ou qui ne sont pas appropriés pour les surfaces sur lesquelles
ils sont appliqués, pour les risques pour la santé provenant du manque de ventilation lors d'un travail dans un
espace confiné ou pour la défaillance du matériel due à un nettoyage inapproprié des composants après
utilisation. En cas de doute, testez toujours sur une petite partie caché d'abord. Veuillez toujours lire les
instructions du fabricant avant de commencer
statutaires.
. Ni notre garantie ni la déclaration ci-dessus n'affecte vos droits
IMPORTANCIA DE LA SELECCIÓN DE LA PINTURA
Este es un sistema de pintado aerográfico de gran versatilidad que puede usarse con diferentes materiales,
tales como: barnices, conservantes de la madera, esmaltes, pinturas a base de agua o aceite y celulosa. No
obstante, algunos materiales no pueden pulverizarse, así que revise las recomendaciones del fabricante antes
de comprar la pintura. Si el material es sólo para ser aplicado con brocha, normalmente no puede ser
pulverizado.
ESTA UNIDAD NO PUEDE USARSE CON PINTURAS CON TEXTURA. EL USO DE DICHOS MATERIALES
CAUSARÁ EL DETERIORO PREMATURO, QUE INVALIDARÁ LA GARANTÍA.
PARA OBTENER LOS MEJORES RESULTADOS DE SU SISTEMA DE PINTADO AEROGRÁFICO, LE
ROGAMOS LEA DETENIDAMENTE LAS INSTRUCCIONES ANTES DE USARLO.
19
Page 20

2
3
4
5
6
7
8
9
10
11
13
14
1
1
2
17
16
15
L0553 (04-08) (US-FR-ES).qxd 20/6/08 2:25 pm Page 20
LISTA DE PIEZAS DE REPUESTO
LISTA DE PIEZAS DE REPUESTO
Descripción clave Nº pieza
01. Soporte de la boquilla de aire L0215
Boquilla de aire L0205
02.
03. Placa de orientación del spray L0206
04. Difusor (2.0mm) L0237
05. Junta del difusor L0211
06. Válvula de aguja (2.0mm) L0236
07. Muelle L0216
08. Tornillo de ajuste del fluido L0210
09. Tuerca macho L0208
Descripción clave Nº pieza
10. Junta macho L0272
11. Tubo de alimentación de pintura L0214
Junta del tanque de pintura L0335
12.
13. Tanque de pintura (transparente) L0201
14. Viscosímetro SG243
Ensamblaje de la manguera L0078
15.
16. Gatillo L0202
17. Ese del gatillo L0209
Filtro (no demostrado) L0058
18.
20
Page 21

L0553 (04-08) (US-FR-ES).qxd 20/6/08 2:25 pm Page 21
COLOCACIÓN DEL RECEPTÁCULO
Coloque el receptáculo moldeado (L0021) en la caja del motor empujándolo dentro del hueco de la base hasta
que haga clic en su sitio. El receptáculo se asegura con el tornillo (L0116) suministrado.
La preparación de la superficie y el rebajado de la pintura son dos de los aspectos más importantes a los que
se debe prestar atención para obtener los mejores resultados posibles de su kit de pulverización.
Asegúrese de que todas las superficies están libres de polvo, suciedad, óxido y grasa. En caso necesario,
elimine dichas sustancias con papel de lija o similar.
El cubrimiento de superficies es importante para asegurar que no pulveriza aquellas áreas que desea que
permanezcan intactas.
REBAJADO
PREPARACIÓN
El kit de pulverización es suministrado con un depósito de viscosidad. Viscosidad es un término técnico usado
para indicar si un producto es muy claro o muy espeso. Si es claro, se dice que la viscosidad es baja; mientras
que si es muy espeso, se dice que la viscosidad es alta. La viscosidad se mide en segundos. Algunos
materiales, para ser pulverizados, deben ser “rebajados” (diluidos).
El rebajado es muy importante cuando se pulveriza. La mayoría de pinturas, etc. son suministradas a punto
para la aplicación con brocha y es posible que deban ser rebajadas (diluidas) si se quieren usar para la
pulverización.
Siga la guía del fabricante para el rebajado junto a una pistola pulverizadora. Si tiene alguna duda, póngase
en contacto con el fabricante de la pintura. El depósito de viscosidad le ayudará a determinar el espesor
correcto de la pintura. La pintura se “rebaja” añadiéndole la misma sustancia que la pintura tiene como base.
En el caso de una pintura a base de agua, se añade agua; con la pintura a base de aceite se añade aguarras.
Dado que algunas pinturas, productos conservantes de la madera y otros materiales pulverizables contienen
partículas que tienen diferentes cualidades, asegúrese al llenar el contenedor de pintura de la pistola
pulverizadora de que la pintura sea filtrada, ya sea mediante un embudo con filtro o mediante medias de nylon.
Esto asegurará que no entren partículas grandes en el contenedor, previniendo de este modo obstrucciones
y ofreciendo una pulverización sin problemas. Asegúrese de llevar en todo momento careta, guantes y gafas
de protección mientras esté pulverizando.
VISCOSIDAD IDEAL
Pinturas y emulsionesa base de agua 25- 60 seconds
Pinturas a base de aceite 45 - 50 seconds
Conservantes de la madera Sin dilución
Pintura base 45 - 50 seconds
Barnices Sin dilución
Pinturas de aluminio Sin dilución
Staines de madera Sin dilución
Esta pistola pulverizadora puede ser usada con productos que tengan una viscosidad
desde 25 hasta un máximo de 60 segundos. Sumerja el depósito de viscosidad en el
material y llénelo. Calcule el tiempo que tarda en vaciarse el viscosímetro.(Fig. 1)
Use la tabla anterior (o las instrucciones del fabricante) como guía para determinar si el
material requiere más
rebajado; en caso afirmativo, proceda al rebajado de la manera apropiada.
En caso de que la pintura requiera rebajado, empezar con una dilución de un 10%. Para
hacerlo, rellene el
tanque con aproximadamente 1litro de la pintura que desea utilizar. El viscosímetro
incluido junto con la unidad tiene capacidad para 100 ml aproximadamente, tape el
agujero del viscosímetro y rellene con el disolvente apropiado. Añada el disolvente a la
pintura y remueva, mida la viscosidad usando la anterior tabla de viscosidad ideal. Si la pintura necesita ser
más rebajada, diluya la pintura en otro 5% (el 5% equivaldrá a la
mitad del viscosímetro) con el disolvente apropiado y mida la viscosidad. Si la pintura no tiene la viscosidad
ideal, repita el paso anterior.
Fig. 1
21
Page 22

L0553 (04-08) (US-FR-ES).qxd 20/6/08 2:25 pm Page 22
Llene el tanque de pintura con el material que va a usarse para la pulverización. NO LO LLENE EN EXCESO
por encima del indicador de nivel MAX. Enrosque firmemente el tanque en el cuerpo de la pistola. Coloque la
unidad de motor en una superficie limpia, libre de suciedad o líquidos. Conecte la manguera a la parte trasera
de la pistola pulverizadora. Desenrolle el cable de alimentación y enchúfelo.
MANTENGA SIEMPRE LA UNIDAD DE MOTOR TAN LEJOS COMO SEA POSIBLE DE LA ZONA DE
PULVERIZACIÓN PARA EVITAR LA CONTAMINACIÓN DEL MOTOR CON PINTURA.
CUBRA TODA LA ZONA QUE NO DESEE PULVERIZAR.
Una vez ajustada para proceder a la pulverización, encienda la unidad. No se pulverizará nada de pintura
hasta que se apriete el gatillo de la pistola pulverizadora. Antes de empezar cualquier operación que implique
la pulverización de objetos reales, le recomendamos que invierta algo de tiempo practicando sobre cartón o
papel de periódico hasta que se haya familiarizado con el funcionamiento de la pistola pulverizadora.
l Para el funcionamiento correcto de la pistola es esencial que ésta esté cerrada herméticamente.
l Antes de usar la unidad asegúrese de que el tanque está bien fijado al cuerpo de la pistola y de que la
tuerca macho (9) está bien apretada.
l Después de cierto tiempo la junta macho (10) se deteriorará y necesitará un ajuste. Para revisar si la tuerca
macho está correctamente colocada necesitará una pequeña llave ajustable. Tire hacia atrás del gatillo y
apriete gradualmente la tuerca macho girándola en el sentido de las agujas del reloj hasta que la aguja no
pueda moverse cuando suelte el gatillo.
l Para obtener un montaje óptimo desenrosque la tuerca macho poco a poco en el sentido contrario a las
agujas del reloj hasta que la aguja se mueva hacia delante y se introduzca en el difusor (4). Para comprobar
que ha sido correctamente montada pulverice con el tanque lleno de agua. Reajuste la unidad si es
necesario.
La pistola pulverizadora tiene 3 tipos distintos de pulverización:
horizontal, vertical y circular (Fig.2).
Los tipos horizontal y vertical se recomiendan para superficies
grandes. La pulverización horizontal es adecuada para aplicar
el spray de arriba a abajo, la vertical para pulverizar de lado a
lado y la circular se usa para objetos pequeños o áreas de difícil
acceso, tales como esquinas.
Para ajustar el tipo de pulverización, afloje el anillo de soporte de la boquilla de aire (1) y ajuste la posición de
la boquilla de aire (2) para obtener el tipo de pulverización vertical, horizontal o circular y vuelva a apretar el
anillo de soporte de la boquilla de aire.
El volumen de pintura pulverizada es fácilmente ajustable (Fig.3)
Cierre completamente el tornillo de ajuste del fluido (8) girándolo en el sentido
de las agujas del reloj hasta que ya no se pueda más. Mientras aprieta el gatillo,
empiece a girar el tornillo de ajuste en el sentido contrario
a las agujas del reloj hasta que se obtenga el volumen de pintura deseado.
Si la pulverización es demasiado extensa o contiene demasiada pintura, vuelva
a girar el tornillo de ajuste del fluido en el sentido de las agujas del reloj. Una
vez ajustado el tipo de pulverización y el volumen de pintura correctos, ya
puede empezar a pulverizar. El volumen de pintura necesita ser ajustado cada
vez que cambie de tipo de pulverización, especialmente cuando usa la
pulverización circular, ya que este tipo de pulverización a veces contiene
demasiada pintura.
FUNCIONAMIENTO
TIPOS DE PULVERIZACIÓN
Fig.2
chorro vertical chorro circularchorro horizontal
VOLUMEN DE PINTURA
Fig.3
Para obtener los mejores resultados, mantenga siempre la pistola pulverizadora a la misma distancia del
1.
objeto al que está pulverizando y aplique el spray de lado a lado o de arriba abajo a 10"-12" (25-30 cm.)
de la superficie. Evite pulverizar en ángulo pues esto causará goteo en la superficie (Fig.4a-4c).
2. Deje que sea su brazo y no su muñeca el que controle el movimiento de izquierda a derecha. Esto le
ayudará a aplicar la pintura de forma uniforme sobre toda la superficie.
3. No incline la pistola pulverizadora en un ángulo de más de 45˚ cuando el motor está apagado.
4. Puede inclinar aún más la pistola pulverizadora cuando aplique el spray
en techos, entablados de cobertura, etc., en caso de que el motor esté
encendido. Para pulverizar en ángulo, le rogamos direccione el tubo d
de alimentación de pintura (11) hacia el ángulo contrario en el que
está pulverizando, donde hay más pintura en el tanque.
Fig.4a
TÉCNICA DE PULVERIZACIÓN
Fig.4b
Fig.4c
22
Page 23

S
uelte el gatillo al final de
cada movimiento de
p
ulverización para evitar
el exceso de pintura y
los goteos
L0553 (04-08) (US-FR-ES).qxd 20/6/08 2:25 pm Page 23
1. Controle con uniformidad la velocidad de movimiento de la pistola pulverizadora. Con una velocidad
rápida se aplicará una fina capa y con una velocidad baja se dará una capa densa.
2. Aplique solamente un capa cada vez. Si es necesaria otra capa, siga las instrucciones del fabricante de
la pintura para los tiempos de secado.
3. Si pulveriza áreas u objetos pequeños, mantenga el tornillo de ajuste
poco abierto, pues estoevitará el uso excesivo de pintura y minimizará
la neblina de pulverización.
4. Cuando pulverice áreas u objetos grandes, es mejor usar un patrón de
cruzamiento alternativo, ya sea de izquierda a derecha y luego de
arriba a bajo o viceversa. Esto asegurará la máxima cobertura.
5. Evite detenerse y empezar durante la pulverización, pues esto puede
resultar en la aplicación de demasiado, o no suficiente material en una
superficie.
. Para asegurarse de cubrir los bordes, comience a pulverizar
6
justamente en el lado del área que está siendo pulverizada.
LIMPIE LA PISTOLA PULVERIZADORA DESPUÉS DE CADA USO
7.
(VEA LAS INSTRUCCIONES DE LIMPIEZA).
INSTRUCCIONES DE LIMPIEZA
LA PISTOLA PULVERIZADORA DEBE SER LIMPIADA A FONDO Y LAS ARANDELAS DEL
PRENSAESTOPAS LUBRICADAS INMEDIATAMENTE DESPUÉS DE CADA USO. SI LA PINTURA SE
SECA EN EL INTERIOR, LA LIMPIEZA DE LA PISTOLA SERÁ MUCHO MÁS DIFÍCIL Y PUEDE DEJAR LA
PISTOLA INUTILIZABLE. ESTE EVENTO NO ESTÁ CUBIERTO POR LA GARANTÍA.
Limpie los residuos de pintura de la pistola pulverizadora del modo siguiente:
1. Vierta todo el residuo de pintura en su contenedor original para utilizarlo en el futuro.
2. Use un paño empapado en diluyente para eliminar el exceso de pintura del contenedor, la cara inferior de
la tapa (5) y la junta (11).
3. Vierta una pequeña cantidad de diluyente limpio en el contenedor, vuelva a ajustar el contenedor a la
pistola pulverizadora y agite suavemente la pistola.
4. Pulverice todo el diluyente con la pistola.
5. Repita esta operación, usando cada vez diluyente limpio, hasta que no quede ningún rastro de pintura en
el diluyente que se está pulverizando.
Para limpiar a fondo la resta de la pistola pulverizadora, saque todas las partes operantes, de acuerdo con el
esquema de piezas de recambio de la p.20, del siguiente modo:
1. Desatornille el anillo de ajuste (1).
2. Saque el soporte de la boquilla de aire (2).
3. Saque del todo el tornillo de ajuste (8).
4. Saque el muelle (7).
Saque la aguja (6), no use ninguna herramienta para realizar esta operación.
5.
6. Saque la boquilla del fluido (4).
7. Saque la placa del caudal del aire (3).
8. Saque la arandela de la boquilla (5).
Coloque todos estos elementos en un recipiente y límpielos usando un cepillo y diluyentes limpios.
9.
10. Limpie el interior de la pistola.
11. Seque a conciencia estas piezas andes de volverlas a montar.
12. Vuelva a montar las partes en el orden contrario. Se recomienda colocar la boquilla del fluido antes que la
aguja.
CONSEJOS ÚTILES
Después de limpiar la pistola pulverizadora y antes de colocar la aguja, sumerja la boquilla en vaselina, lo que
lubricará las arandelas del prensaestopas al insertar la aguja.
Las superficies externas de la pistola pulverizadora pueden ser limpiadas con un paño empapado en diluyente.
NO TIRE NUNCA POR EL DESAGÜE PINTURA O DISOLVENTE . PÓNGASE EN CONTACTO CON EL
AYUNTAMIENTO LOCAL PARA ORGANIZAR SU RECOGIDA O PARA SABER LA UBICACIÓN DEL
VERTEDERO DE RESIDUOS REGISTRADO MÁS CERCANO.
23
Page 24

L0553 (04-08) (US-FR-ES).qxd 20/6/08 2:25 pm Page 24
SOLUCIÓN DE PROBLEMAS
PROBLEMA CAUSA ACCIÓN NECESARIA
La pintura gotea sobre el
artículo pulverizado
La pintura es clara o
irregular
No sale la pintura La pintura es demasiado espesa Añada diluyente
Esta unidad es un equipo de la Clase II, lo que significa que tiene doble aislamiento para su protección, no es
necesario cable de conexión a tierra. Si el cable de alimentación está dañado, debe ser sustituido por Earlex
Ltd o por uno de nuestros distribuidores autorizados.
Si usa un cable de extensión, éste debe tener una tensión mínima de 6 Amps y debe estar completamente
desenrollado. No haga funcionar la unidad con un cable de tensión inferior a 6 Amps, pues esto causará un
fallo prematuro del motor que no está cubierto por la garantía.
ATENCIÓN: Hemos hecho todo lo posible para asegurar que, usada correctamente y de acuerdo a estas
instrucciones, esta pistola pulverizadora tendrá una vida larga y sin problemas. No aceptamos ninguna
responsabilidad por daños causados por el uso de sustancias incorrectas o no adecuadas, pinturas o fluidos
que no hayan sido rebajados correctamente o que sean inadecuados para las superficies a las que han sido
aplicados; problemas de salud originados de una falta de ventilación al trabajar en espacios confinados; o
fallo del equipo debido a una limpieza inadecuada de los componentes después del uso. Si existe alguna
duda, haga una prueba primero en una zona pequeña y poco notoria. Lea siempre las instrucciones del
fabricante de la pintura en primer lugar
estatutarios.
Este producto está garantizado durante un periodo de 24 meses contra materiales defectuosos o defectos
de fabricación. No se garantiza si se hace un uso industrial o se alquila. La garantía no afecta sus derechos
estatutarios. Earlex Inc. no se responsabilizará del uso de este producto si se usa para propósitos diferentes
a los detallados en las presentes instrucciones.
Si necesita ayuda, contacte con nuestro servicio de atención al cliente en el Tel. 704 827 7889 Fax: 704 827 7849
Servicio de atención al cliente: Línea gratuita de atención al cliente 888-783-2612 Sitio Web: www.earlex.com
La pintura está demasiado diluida Añada material no diluido
El volumen de pintura es demasiado
alto
Movimiento demasiado lento Aumente la velocidad de aplicación
El gatillo de la pistola se mantiene
apretado demasiado tiempo
La pistola está demasiado cerca Aumente la distancia entre la pistola y
La pintura está demasiado diluida Añada material no diluido
El volumen de pintura es demasiado
bajo
Movimiento demasiado rápido Reduzca la velocidad de aplicación
La pistola está atascada Limpie la pistola
La pistola está demasiado lejos Reduzca la distancia entre la pistola y
La pistola está atascada Limpie la pistola
El tubo de recolección está atascado Limpie el tubo de recolección (11)
La manguera de aire se ha partido Sustituya la manguera de aire
La pintura es granulada Filtre la pintura
El contenedor está casi vacío Rellene el contenedor
La pistola está en ángulo Asegúrese de que el tubo de
Reduzca el flujo de pintura ajustando
el tornillo (8)
Suelte el gatillo más rápidamente
la pieza de trabajo
Aumente el flujo de pintura ajustando
el tornillo (8)
la pieza de trabajo
recolección está orientado hacia la
pintura
CONEXIÓN A LA RED
. Ni nuestra garantía ni esta declaración afectan sus derechos
N.º de registro en Gran Bretaña: 2.106,529
N.º de registro en
N.º de registro en Benelux: 794 76 - 01
N.º de registro en Estados Unidos: D468,752S
Copyright y derechos de diseño reservados
Alemania: 401 07 145.6
GARANTÍA
©
2008
Earlex Inc, 8261 Hwy 73, Suite F, Stanley, N.C. 28164, USA
© Earlex Inc. 2008 L0553 04/08
24
 Loading...