

Earlex HV2501EU Instruction Manual

Instruction Manual
HV2501EU
EN/FR/ES/IT/DE
HV2501EU
b
A B
a
9
12
13
6
8
4
5
3
1/2
10
11
+
Testposter
20-30 cm
+
0 - 10%
Materialnr. 233 0627 EBSS
A B C D E F
Cover up !
2
4
3
3
3
1
1 4
-
1
3
1
Materialnr. 2352 212 1014SSVK
14
15
7
OVERVIEW / APERÇU GÉNÉRAL / VISIÓN GENERAL / VISIONE GENERALE / ÜBERSICHT
HV2501EU
click
c
a
b
A B
1
HV2501EU
+
f
g
a
b
20-30 cm
1
1
2
3
1
2 4 5
3
HV2501EU
2
3
4
1
5
4
6
HV2501EU
..........................................................................1 - 15
........ ........................................................................16 - 30
........................................................................31 - 45
........................................................................46 - 60
........................................................................61 - 75
7
1
4
3 2
6
9
10
12
13
11
8
15
5
14
SPARE PARTS / PIÈCES DE RECHANGE / PIEZAS DE RECAMBIO /RICAMBI/
ERSATZTEILE
ES
IT
DE
FR
EN

1
HV2501EU EN
Contents
1. Explanation of symbols used .....................................................2
2. General Safety Instructions ......................................................2
3. Safety Instructions for Spray Guns ................................................4
4. Description/ Scope of delivery ...................................................5
5. Field of application ..............................................................6
6. Coating Materials Suitable for Use ................................................6
7. Coating Materials Not Suitable for Use ............................................6
8. Preparation of the workplace .....................................................6
9. Preparation of the Coating Material ..............................................7
10. Start-up ........................................................................7
11. Selecting the Spray Setting (Fig. 4) ..............................................8
12. Adjusting the Material Volume (Fig. 6) ...........................................8
13. Spray Technique ................................................................8
14. Interruption of Work ............................................................9
15. Taking Out of Operation and Cleaning ...........................................9
16. Maintenance ................................................................. 10
17. Spare Parts ...................................................................11
18. Correction of Malfunctions ....................................................11
19. Technical Data ................................................................ 12
20. Environmental protection. . . . . . . . . . . . . . . . . . . . . . . . . . . . . . . . . . . . . . . . . . . . . . . . . . . . . 13
21. Important Note regarding Product Liability! ................................... 13
2 year guarantee ................................................................. 14
CE Declaration of Conformity ..................................................... 76
Translation of the original operating instructions
MANY THANKS FOR PLACING YOUR TRUST IN US
We would like to congratulate you on purchasing this brand product from Earlex;
we are sure that you will enjoy working with it greatly.
Please read this Operating Manual carefully and observe the safety information before
starting the device. Store this Operating Manual in a safe place close to the product in
case it needs to be used by someone else.
EN
2
HV2501EU
1. Explanation of symbols used
This symbol indicates a potential danger for you or for the device.
Under this symbol you can nd important information on how to
avoid injuries and damage to the device.
Danger of electrical shock
i
Indicates tips for use and other particularly useful information.
Devices and accessories marked with this symbol are suitable for
processing high-viscosity materials such as e.g. interior wall paints
(dispersions and latex paints).
If a material bears this logo, it is particularly well suited for use with
the relevant device.
2. General Safety Instructions
WARNING! Read all safety warnings and all instructions. Failure to follow the warnings and
instructions may result in electric shock, fire and/or serious injury.
Save all warnings and instructions for future reference.
The term "power tool" in the warnings refer to your mains-operated (corded)
power tool or battery-operated (cordless) power tool.
1. Work area safety
a) Keep work area clean and well lit. Cluttered or dark areas invite accidents.
b) Do not operate power tools in explosive atmospheres, such as in the
presence of ammable liquids, gases or dust. Power tools create sparks which
may ignite the dust or fumes.
c) Keep children and bystanders away while operating a power tool. Distractions
can cause you to lose control.
2. Electrical Safety
a) Power tool plugs must match the outlet. Never modify the plug in any
way. Do not use any adapter plugs with earthed (grounded) power tools.
Unmodied plugs and matching outlets will reduce risk of electric shock.
b) Avoid body contact with earthed or grounded surfaces, such as pipes,
radiators, ranges and refrigerators. There is an increased risk of electric shock if
your body is earthed or grounded.

3
HV2501EU EN
c) Do not expose power tools to rain or wet conditions. Water entering a power
tool will increase the risk of electric shock.
d) Do not abuse the cord. Never use the cord for carrying, pulling or
unplugging the power tool. Keep cord away from heat, oil, sharp edges or
moving parts. Damaged or entangled cords increase the risk of electric shock.
e) When operating a power tool outdoors, use an extension cord suitable for
outdoor use. Use of a cord suitable for outdoor use reduces the risk of electric shock.
f) If operating a power tool in a damp location is unavoidable, use a residual
current device (RCD) protected supply. Use of an RCD reduces the risk of electric
shock.
3. Personal safety
a) Stay alert, watch what you are doing and use common sense when operating
a power tool. Do not use a power tool while you are tired or under the
inuence of drugs, alcohol or medication. A moment of inattention while
operating power tools may result in serious personal injury.
b) Use personal protective equipment. Always wear eye protection. Protective
equipment such as dust mask, non-skid safety shoes, hard hat, or hearing protection
used for appropriate conditions will reduce personal injuries.
c) Prevent unintentional starting. Ensure the switch is in the o-position before
connecting to power source and/or battery pack, picking up or carrying the
tool. Carrying power tools with your nger on the switch or energising power tools
that have the switch on invites accidents.
d) Remove any adjusting key or wrench before turning the power tool on.
A wrench or a key left attached to a rotating part of the power tool may result in
personal injury.
e) Do not overreach. Keep proper footing and balance at all times. This enables
better control of the power tool in unexpected situations.
f) Dress properly. Do not wear loose clothing or jewellery. Keep your hair,
clothing and gloves away from moving parts. Loose clothes, jewellery or long
hair can be caught in moving parts.
4. Power tool use and care
a) Do not force the power tool. Use correct power tool for your application.
The correct power tool will do the job better and safer at the rate for which it was
designed.

EN
4
HV2501EU
b) Do not use the power tool if the switch does not turn it on and o. Any power
tool that cannot be controlled with the switch is dangerous and must be repaired.
c) Disconnect the plug from the power source and/or the battery pack from the
power tool before making any adjustments, changing accessories, or storing
power tools. Such preventive safety measures reduce the risk of starting the power
tool accidentally.
d) Store idle power tools out of reach of children and do not allow persons
unfamiliar with the power tool or these instructions to operate the power
tool. Power tools are dangerous in the hands of untrained users.
e) Maintain power tools. Check for misalignment or binding of moving parts,
breakage of parts and any other condition that may aect the power tool's
operation. If damaged, have the power tool repaired before use. Many
accidents are caused by poorly maintained power tools.
f) Use the power tool, accessories and tool bits etc. in accordance with these
instructions, taking into account the working conditions and the work to be
performed. Use of the power tool for operations dierent from those intended could
result in a hazardous situation.
5. Service
a) Have your power tool serviced by a qualied repair person using only
identical replacement parts. This will ensure that the safety of the power tool is
maintained.
b) If the supply cord is damaged, it must be replaced by the manufacturer or its
service agent or a similarly qualied person in order to avoid a safety hazard.
3. Safety Instructions for Spray Guns
•
Caution! Wear breathing equipment: Paint mist and solvent vapours are damaging
to health. Always wear breathing equipment and only work in well ventilated rooms
or rooms using supplementary ventilating equipment. It is advisable to wear working
clothing, safety glasses, ear protection and gloves.
CAUTION: DANGER OF INJURY!
Never point the spray stream towards human beings or animals.
Socket-outlets and plugs must be masked. Risk of an electric shock as a
consequence of sprayed material entering the socket-outlet!

5
HV2501EU EN
Attention! Never operate the device if the nozzle seal is either
damaged or missing. If the nozzle seal is either missing or damaged
liquids can enter the device and increase the risk of an electric shock.
Check the nozzle seal before each use.
•
Do not use the spray guns to spray ammable substances.
•
The spray guns are not to be cleaned with ammable solvents.
•
Caution against dangers that can arise from the sprayed substance and observe the
text and information on the containers or the specications given by the substance
manufacturer.
•
Do not spray any liquid of unknown hazard potential.
•
The device may not be used in workplaces covered by the explosion-protection
regulations.
•
To avoid the hazard of explosion when spraying, provide for eective natural or
articial ventilation.
•
There must be no sources of ignition such as, for example, open res, smoke of lit
cigarettes, cigars and tobacco pipes, sparks, glowing wires, hot surfaces, etc. in the
vicinity during spraying.
•
When working with the HV2501EU indoors as well as outdoors ensure that no solvent
vapours are sucked in by the spray gun.
•
The spray gun is not a toy; children must therefore not be allowed to handle it or play
with it.
•
Before working on the spray gun remove the power plug from the socket-outlet.
•
Cover areas that are not to be sprayed. When working keep in mind that wind, for
example, may transport paint mist over great distances and cause damage.
•
Never open the device yourself in order to carry out repairs in the electrical system!
•
The units may only be used with a functional valve. If paints rises in the ventilating
hose (Fig. 1, 13) do not operate the unit further! Dismantle and clean the
ventilating hose, valve and diaphragm and replace the diaphragm if necessary.
•
Do not lay the spray gun down.
With original Earlex accessories and spare parts, you have the guarantee that all
safety regulations are fullled.
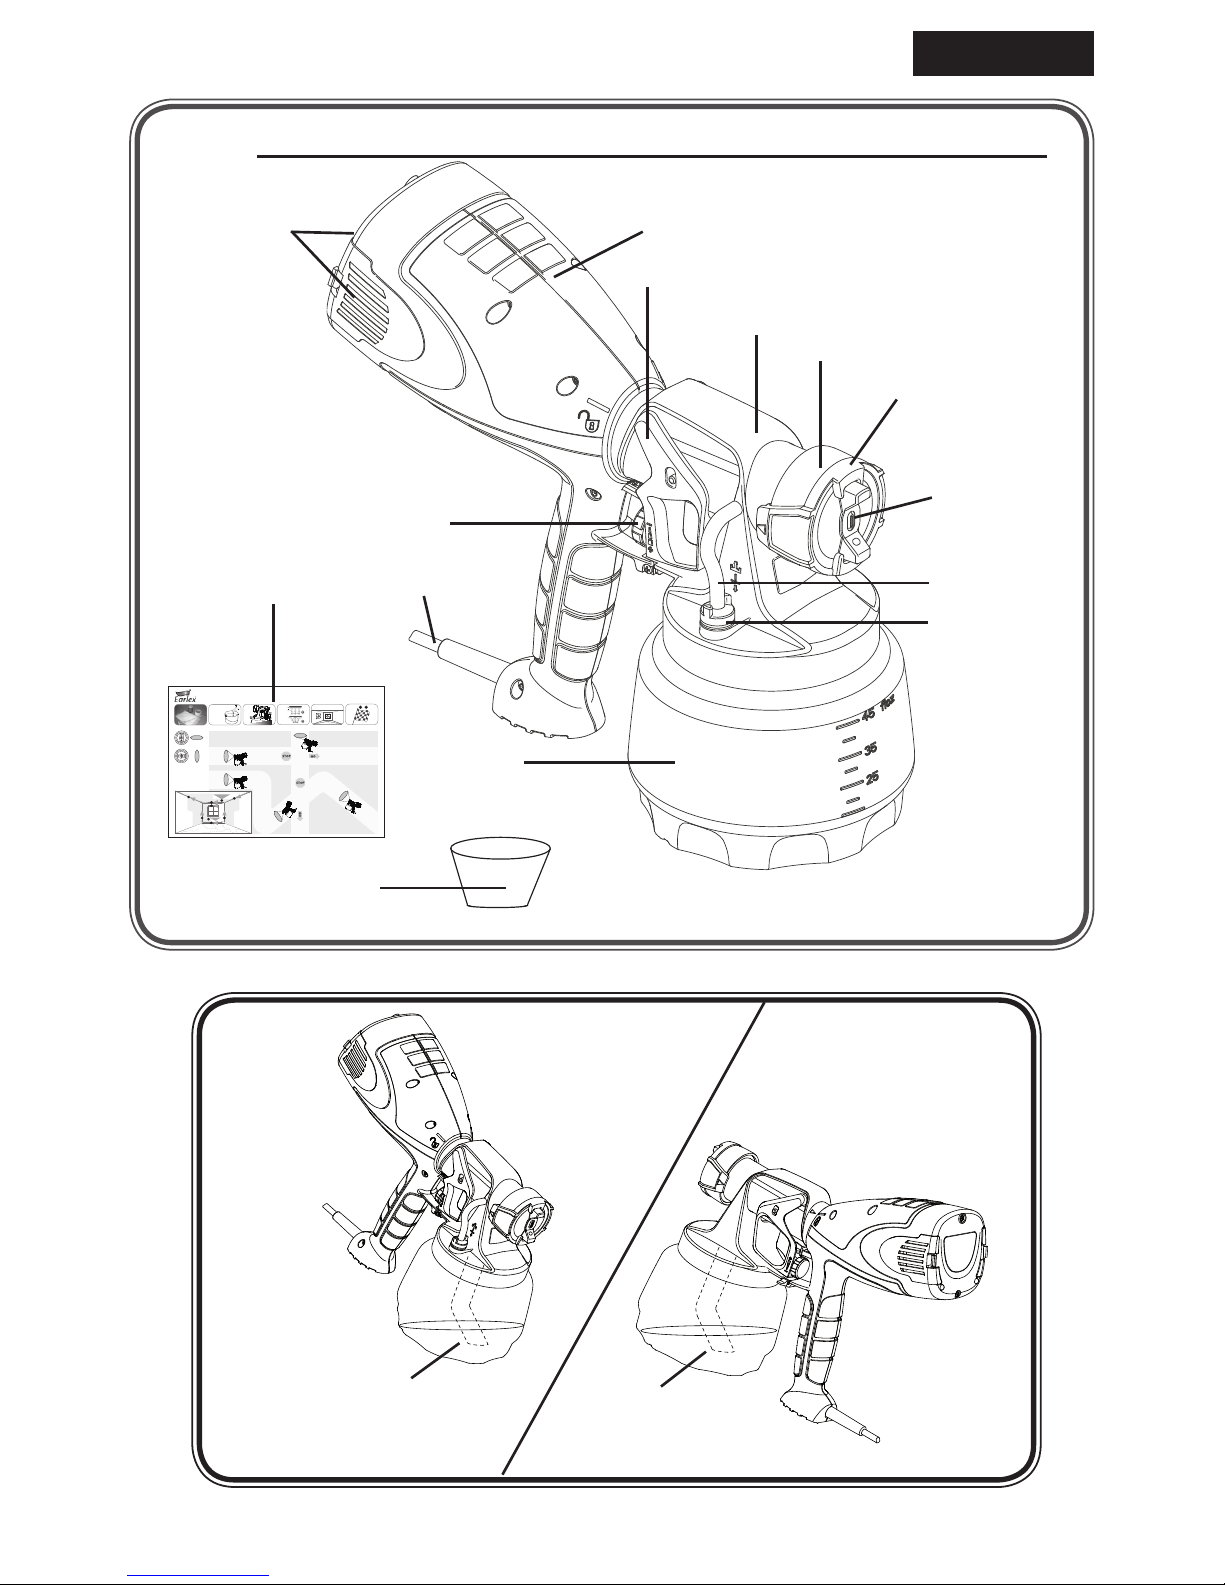
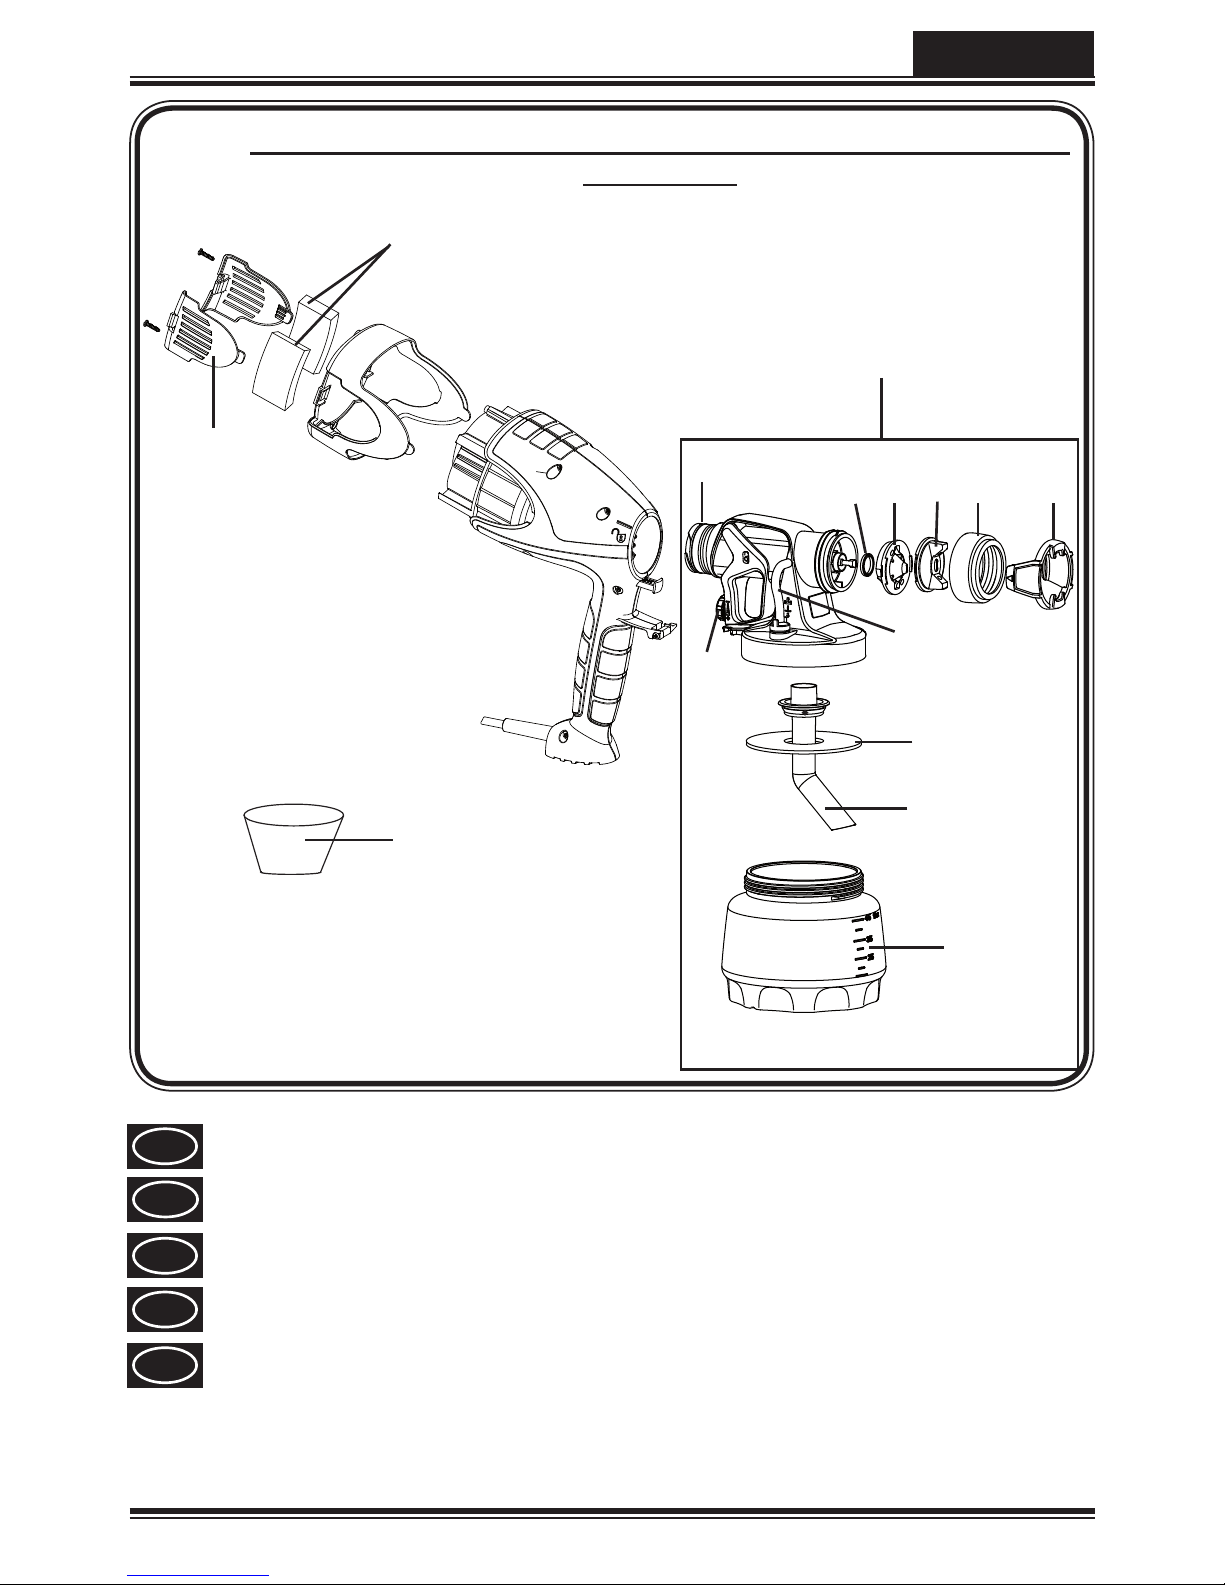
4. Description/ Scope of delivery
Description/ Scope of delivery (Fig. 1)
1) Air cap 2) Nozzle
3) Spray jet adjustment ring 4) Union nut
5) Spray attachment 6) Trigger
7) Spray gun rear part 8) Air lter cover (right + left)
9) Material volume adjustment 10) Supply cord
11) Container 12) Valve
EN
6
HV2501EU
Description/ Scope of delivery (Fig. 1)
13) Ventilating hose 14) Feed hopper (2 pcs.)
15) Practice poster
5. Field of application
HV2501EU has been specially developed for the application of interior wall paints.
6. Coating Materials Suitable for Use
Interior wall paint (dispersions and latex paint)
7. Coating Materials Not Suitable for Use
Water and solvent-based paints, nishes, primers, 2-component paints, clear nishes,
automotive nishes, staining sealers and wood sealer-preservatives.
Materials that contain highly abrasive components, facade paint, caustic solutions and
acidic coating substances. Flammable materials.
8. Preparation of the workplace
Socket-outlets and plugs must be masked. Risk of an electric shock as a
consequence of sprayed material entering the socket-outlet!
Mask all the areas and objects that are not to be spray painted, or
remove them from the work area. No liability is assumed for damage
due to overspray.
Silicate paint corrodes glass and ceramic surfaces upon contact! All
such surfaces must therefore be completely covered.
i
Pay attention to the quality of the adhesive tape used.
Do not use excessively strong adhesive tape on wallpaper and painted
surfaces, in order to avoid damaging these surfaces when removing the
tape. Remove adhesive tape slowly and evenly; do not use jerky movements.
Do not leave adhesive tape on surfaces any longer than necessary, in order
to minimise the possibility of residues when removing.
Also observe the adhesive tape manufacturer's instructions.

7
HV2501EU EN
9. Preparation of the Coating Material
i
Spray material that is at least at room temperature (e.g. diluted with warm
water) provides a better spray result.
Attention! Do not heat spray material above 40°C.
Interior wall paints can be sprayed undiluted or slightly diluted with the spray attachment
provided. Detailed information is available in the technical data sheet of the manufacturer
( Internet Download).
1.
Stir the material thoroughly and dilute it in the container as per the recommended
dilution (an agitator is recommended for stirring).
Thinning recommendation
Sprayed material
Interior wall paint (dispersions and latex paint) Dilute by 0-10 %
2. If the feed rate is too low even at maximum flow setting, dilute in steps of 5 - 10 % until
the feed rate meets your requirements.
10. Start-up
Before connecting to the mains supply, be sure that the supply voltage is identical with
the value given on the rating plate.
•
Unscrew the container from the spray gun.
•
Aligning suction tube. (Fig. 2)
If the suction tube is positioned correctly, the container contents can be sprayed without
almost any residue.
When working on lying objects: Turn the suction tube forwards. (Fig. 2 A)
Spraying work when working on overhead objects: Turn the suction tube rearwards.
(Fig. 2 B)
•
Place the container on a paper base and pour in the prepared coating substance with the
aid of the feed hopper included in the scope of delivery (Fig. 1, 14). Screw the container
tightly onto the spray gun.
•
Connect the front part with the rear part of the gun (Fig. 3).
•
Put the sprayer down only on a level, clean surface. Otherwise the machine could tip over!
•
Pull the trigger. The HV2501EU has a two-stage trigger. In the rst stage the turbine is
started. If the trigger guard is pressed further, the material is transported.
•
Adjust the spray setting on the spray gun.

EN
8
HV2501EU
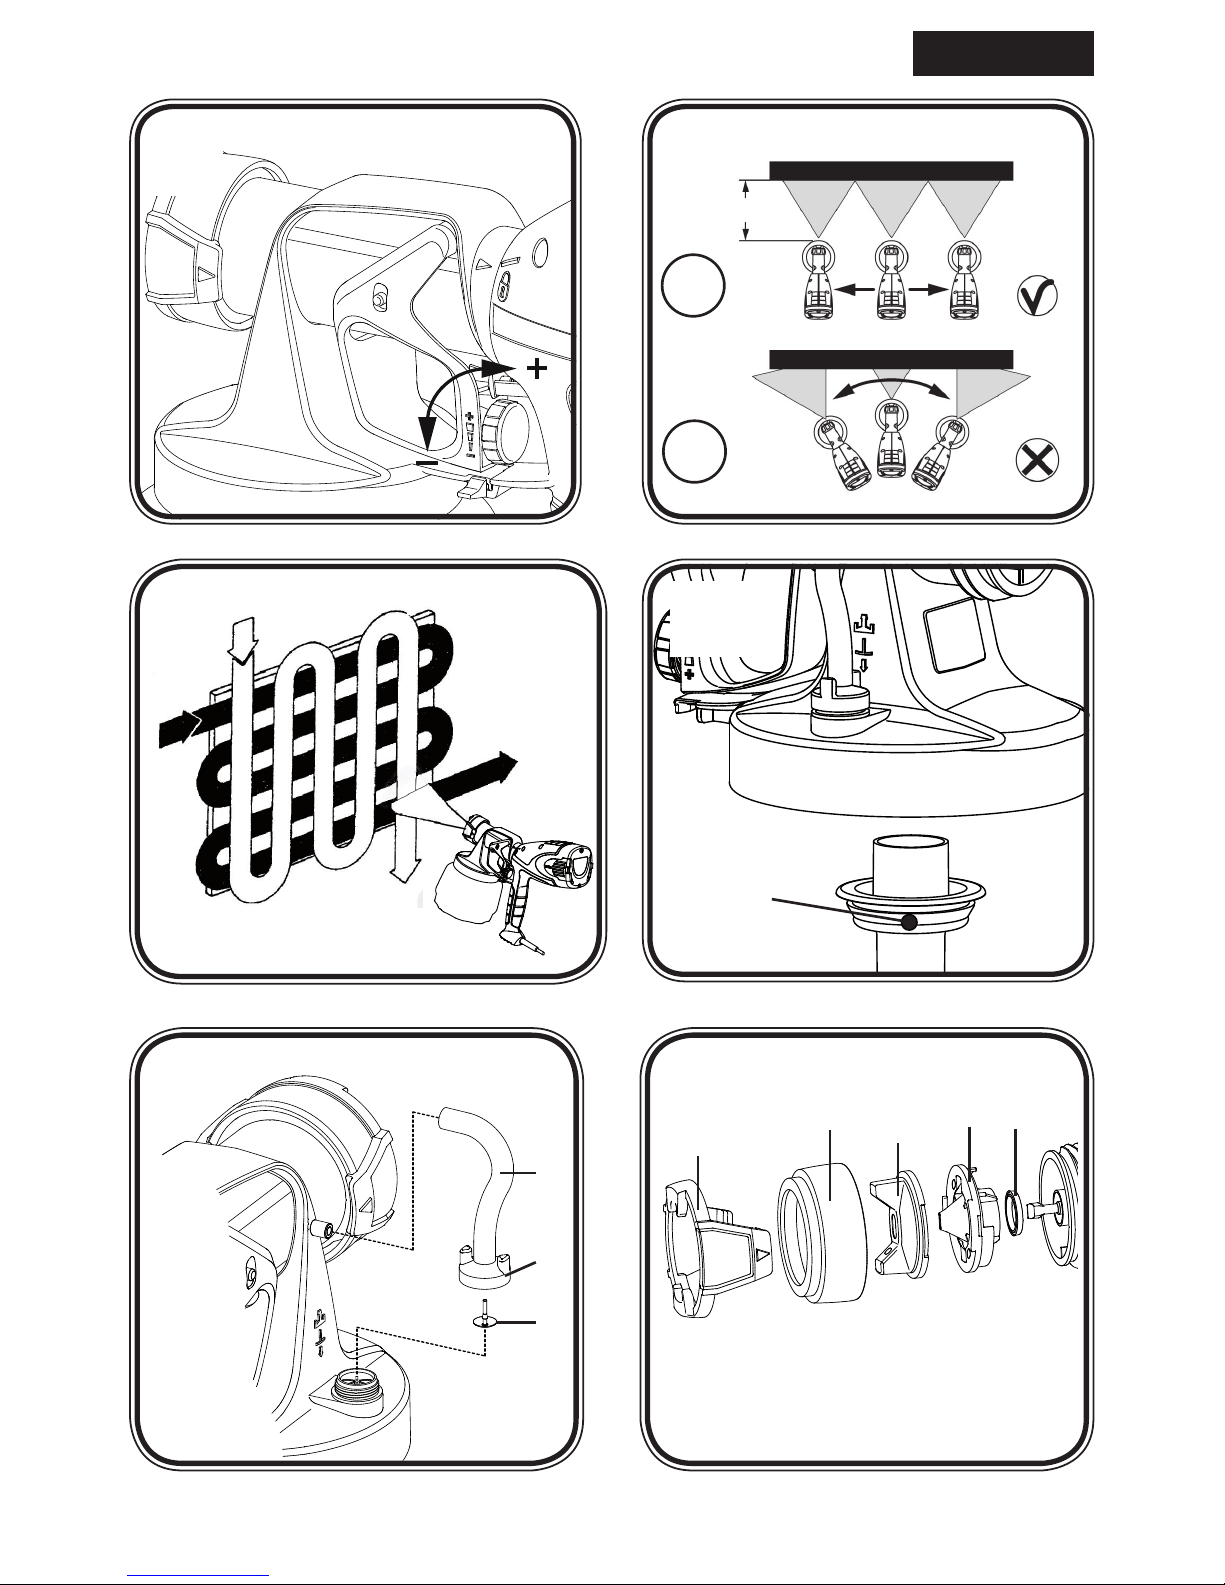
11. Selecting the Spray Setting (Fig. 4)
WARNING! Danger of injury! Never pull the trigger guard while adjusting
the air cap.
2 dierent spray jet shapes can be set by turning the adjustment ring (g. 4, 1)
Fig. 5 A = vertical at jet
for horizontal surfaces
Fig. 5 B = horizontal at jet
for vertical surfaces
12. Adjusting the Material Volume (Fig. 6)
Set the material volume by turning the regulator on the trigger guard of the spray gun.
- turn to the left lower material volume
+ turn to the right higher material volume
13. Spray Technique
•
Cover all surfaces not to be sprayed.
i
The enclosed practice poster is ideal for familiarising yourself with
operation of the spray gun. After these initial spray attempts it is a
good idea to perform a spray test on cardboard or a similar surface,
in order to determine the material quantity required to achieve an
optimal spray pattern.
Important: Start at the edge of the area to be sprayed. Start the spray
movement rst of all, and then press the trigger. Avoid interruptions
within the area to be sprayed.
•
The spray movement should come from the arm, not just from the wrist. This ensures
that a uniform distance is maintained between the spray gun and the spray surface
during the spray operation. Select a distance of 20-30 cm, depending on the desired
spray jet width.
Fig. 7 A: CORRECT Even distance to the object.
Fig. 7 B: INCORRECT An uneven distance will result in uneven paint application.
•
Move the spray gun evenly cross-wise or up-and-down, depending on the spray
pattern setting.
•
An even movement of the spray gun results in an even surface quality.
•
If nozzle and air cap are soiled, clean both parts with water and solvent.
i
"Cross spray" when using paint with a poor covering capacity or if the
surface is highly absorbent (Fig. 8).
i
Interior wall paint in strong colour shades should be applied at least twice
(allow rst paint coat to dry rst). This will ensure good coverage.

9
HV2501EU EN
i
Important: Wipe o the nozzle and air cap regularly to
make sure they do not get blocked.
14. Interruption of Work
•
Turn the machine o.
•
During longer breaks, vent the container by briey opening and then closing it again.
•
Clean nozzle openings after an interruption in operation.
15. Taking Out of Operation and Cleaning
Proper cleaning is the prerequisite for problem-free operation of the paint application
device. No guarantee claims are accepted in case of improper or no cleaning.
1)
Unplug the power plug. Vent the container in case of longer breaks and after the work
has been terminated. This can be done by briey turning open and then closing the
container or by pulling the trigger guard and releasing the paint into the original paint
container.
2)
Divide the spray gun. Press the hook (Fig. 3 b "click") slightly downwards. Turn the gun
front part and gun rear part against each other and take them apart.
3) Unscrew the container. Empty any remaining coating material back into the material
tin.
4) Preclean the container and feed tube with a brush. Clean the ventilating bore (Fig. 9,
1).
5)
Pour water or solvent into the container. Screw the container back on.
Do not use ammable materials for cleaning purposes.
6) Assemble the gun again (Fig. 3).
7)
Insert the power plug, turn on the machine and spray the water or solvent into a
container or a cloth.
8) Repeat the above procedure until the water or solvent emerging from the nozzle is
clear.
9) Turn o the machine and remove the plug.
10)
Divide the spray gun. Press the hook (Fig. 3 b "click") slightly downwards. Turn the gun
front part and gun rear part against each other and take them apart.
11) Unscrew the container and empty it. Pull out the suction tub with container seal.
CAUTION! Never clean seals, diaphragm and nozzle or air holes of the spray gun with metal
objects.
The ventilation hose and diaphragm are only solvent-resistant to a limited
extent. Do not immerse in solvent, only wipe.
12) Pull the ventilating hose (Fig. 10, 1) at the top from the gun body. Unscrew the valve

EN
10
HV2501EU
cover (2). Remove the diaphragm (3). Clean all the parts carefully.
Never hold the spray gun rear part under water or immerse it into liquids.
Clean the housing only with a moistened cloth.
12)
Clean the outside of the spray gun and container with a cloth soaked in solvent or
water.
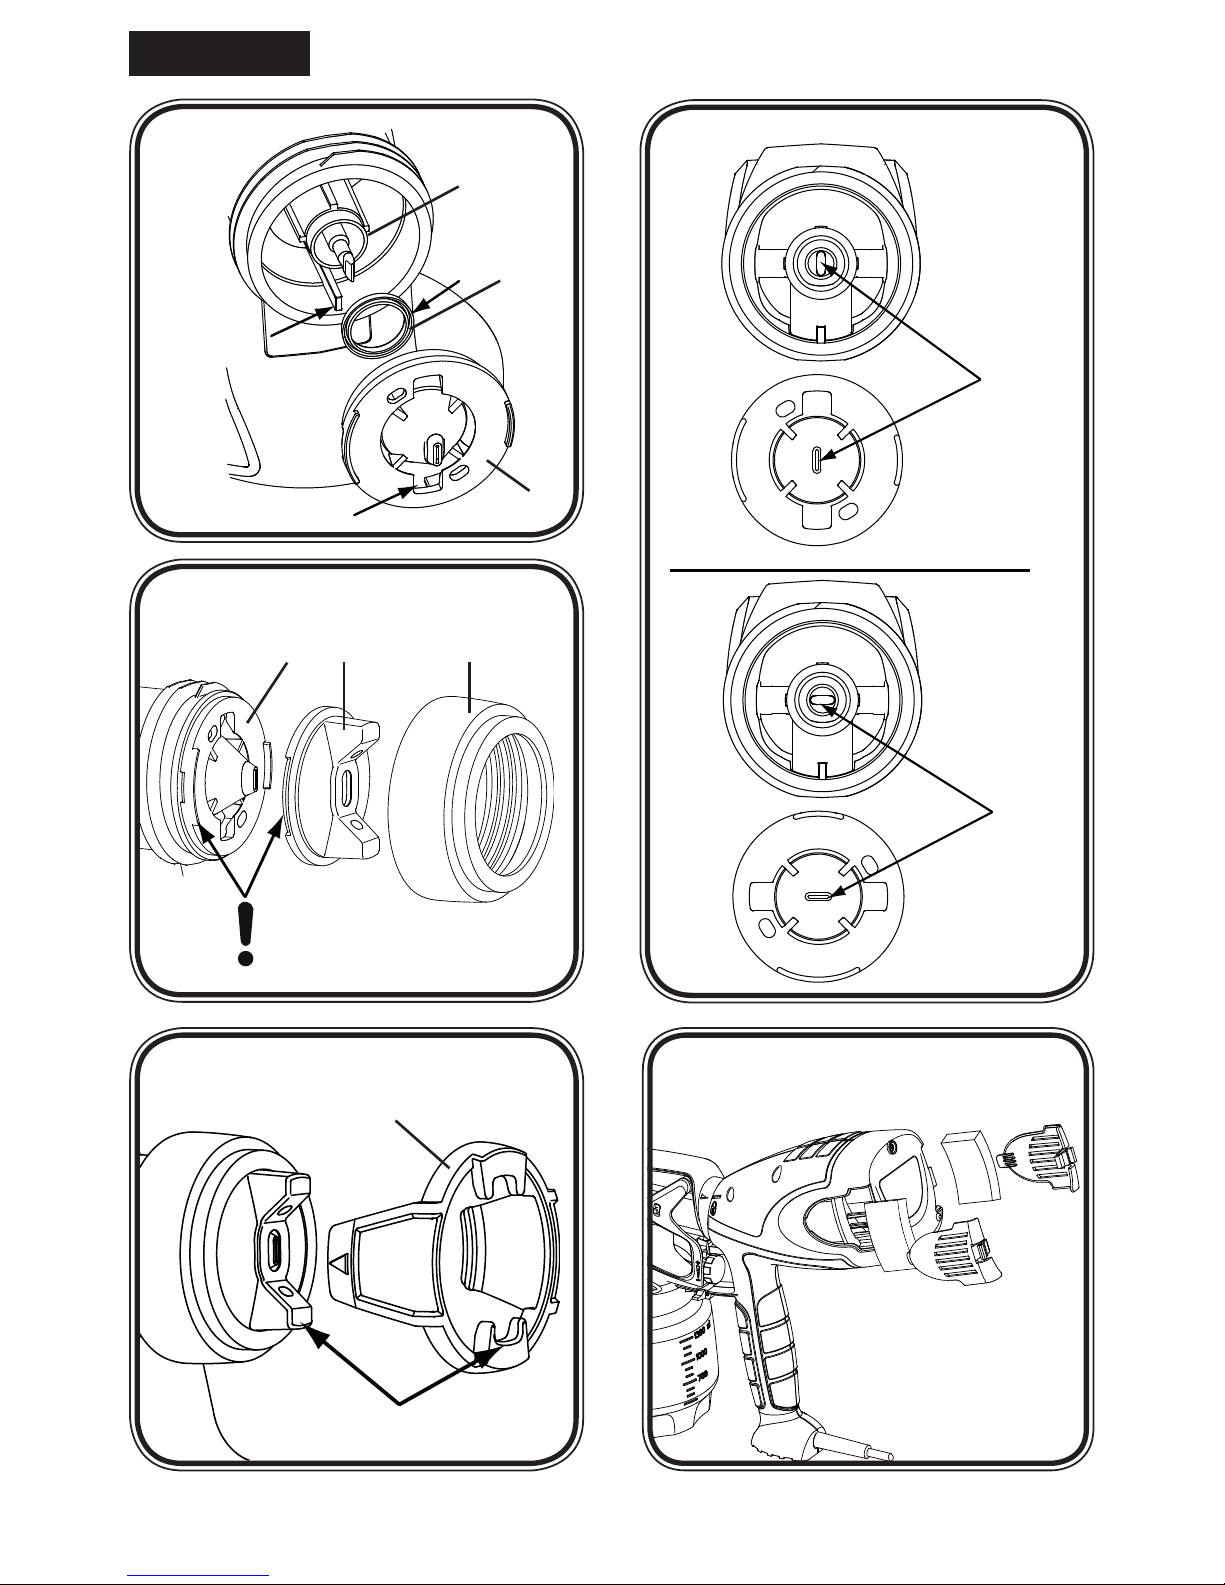
13) Remove the adjustment ring (g. 11, 1) carefully from the union nut (2).
14) Unscrew the union nut (g. 11, 2) and remove the air cap (3) and nozzle (4). Clean the
air cap and nozzle with a brush and solvent or water.
Assembly
The unit may only be operated with an integer diaphragm (Fig. 10, 3).
•
Place the diaphragm (Fig. 10, 3) with the pin facing upwards on the bottom section of
the valve. Also see the marking on the gun body.
•
Place on the valve cover (Fig. 10, 2) and screw it closed.
•
Place the ventilating hose (Fig. 10, 1) on the valve cover and on the nipple at the gun
body.
Attention! Never operate the device if the nozzle seal is either damaged or
missing. If the nozzle seal is either missing or damaged liquids can enter
the device and increase the risk of an electric shock.
•
Push the nozzle seal (g. 12, 5) over the needle (6); the groove (slot) should point towards
you.
•
Place the nozzle (g. 12, 4) on to the gun body with the recess facing downwards. Attention:
Position of needle must be congruent with the nozzle aperture. (Fig.13)
•
Put the air cap (Fig. 14, 3) onto the nozzle (4) and tighten it using the union nut (2).
•
Position the adjustment ring (g. 15, 1) on the union nut so that the recesses on the
adjustment ring can snap into both horns on the air cap.
•
Place the container seal from below on the suction tube and slide it over the collar, while
turning the container seal slightly.
•
Insert the suction tube with container seal in the gun body.
16. Maintenance
WARNING! Never operate the machine without the air filter; dirt could
be sucked in and interfere with the function of the machine.
Disconnect plug before changing parts.
•
Change the air lter if it is soiled (Fig. 16).
•
In order to mount the gun more easily apply lubricating grease (enclosed) liberally
to the O-ring at the gun front part. (Fig. 17, 6)

11
HV2501EU EN
17. Spare Parts
Spare Parts List (Fig. 17)
Pos. Designation Order No.
1 Spray jet adjustment ring 2352366
2 Union nut 2352362
3 Air cap 2352360
4 Nozzle 2328908
5 Nozzle seal (2 pcs.) 2304433
6 O-ring 0417308
7 Material volume regulation with spring, complete 2352567
8 Ventilating hose, valve cover, diaphragm 2352570
9 Container seal 2328919
10 Suction tube 2328922
11 Container (1300 ml) with cover 2352571
12 Spray attachment incl. 1300 ml container 2352129
13 Air lter set 0417912
14 Air lter cover (right + left) 2352574
15 Feed hopper (3 pcs.) 2352575
Lubricating grease 2315539
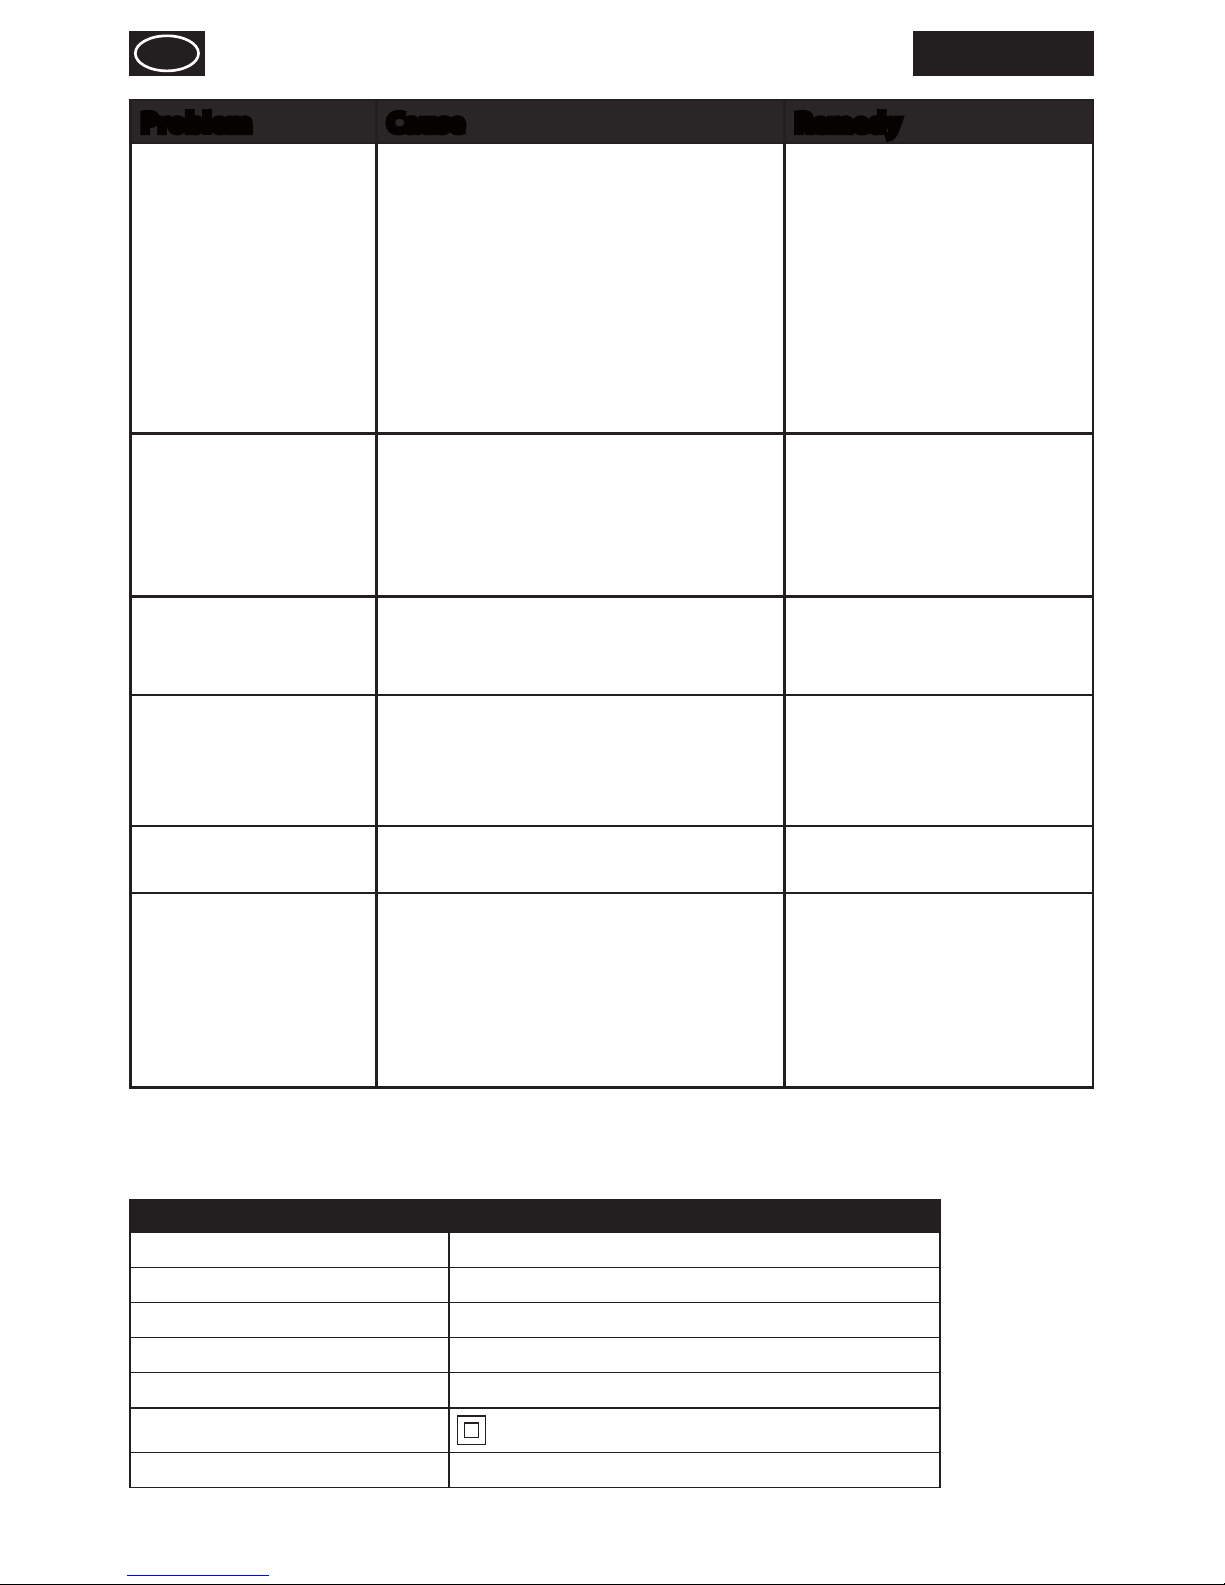
18. Correction of Malfunctions
Problem Cause Remedy
No coating material
emerges from the
nozzle
•
Nozzle clogged
•
Feed tube clogged
•
Material volume setting turned
too far to the left (-)
•
Feed tube loose
•
No pressure build-up in container
•
Ventilating bore (Fig.9,1) clogged
➞ Clean
➞ Clean
➞ Turn to the right (+)
➞ Insert
➞ Tighten container
➞ Clean
Coating material
drips from the
nozzle
•
Nozzle loose
•
Nozzle worn
•
Nozzle seal is missing or worn
•
Coating material assembly at air
cap, nozzle or needle
➞ Tighten
➞ Change
➞ Insert an intact nozzle
seal
➞ Clean
EN
12
HV2501EU
Problem Cause Remedy
Atomisation too
coarse
•
Viscosity of coating material too
high
•
Material volume too large
Material volume adjusting screw
turned too far to the right (+)
•
Nozzle contaminated
•
Air lter heavily soiled
•
Too little pressure build-up in
container
➞ Thin
➞ Turn material volume
adjusting screw to the
left (-)
➞ Clean
➞ Change
➞ Tighten container
Spray jet pulsates
•
Coating material in container
running out
•
Air lter heavily soiled
•
Nozzle seal is missing or worn
➞ Rell
➞ Change
➞ Insert an intact nozzle
seal
Coating material
causes "paint tears"
•
Too much coating material
applied.
➞ Turn material volume
adjusting screw to the
left (-)
Too much fog of
coating material
(Overspray)
•
Distance to the object too large
•
Too much coating material
applied
➞ Reduce distance
➞ Turn material volume
adjusting screw to the
left (-)
Paint in the
ventilating hose
•
Diaphragm soiled
•
Diaphragm defective
➞ Clean the diaphragm
➞ Replace the diaphragm
Poor covering
capacity on the wall
•
Spray material is too cold
•
Highly absorbent surface or paint
with poor covering capacity
•
Distance too large
➞ The material you are
spraying should be at
room temperature
➞ Cross spray (Fig. 8)
➞ Closer to the object
19. Technical Data
Technical Data
Max. viscosity 2700 mPas
Power source 230 V,
~ 50 Hz
Power consumption 320 W
Atomizing output 80 W
Max. ow rate 230 ml/min
Double insulation
Sound pressure level* 76 dB (A); Uncertainty K = 3 dB

13
HV2501EU EN
Technical Data
Sound pressure output* 87 dB (A); Uncertainty K = 3 dB
Oscillation level* < 2.5 m/s²; Uncertainty K = 1.5 m/s²
Weight 1.6 kg
* Measured in accordance with EN 60745-1
Information about the oscillation level
The specied oscillation level has been measured according to a standard test
procedure and can be used to compare against electric tools.
The oscillation level is also for determining an initial assessment of the vibrational
strain.
Attention! The vibration emission value can dier from the specied value when the
electric tool is actually in use, depending on how the electric tool is being used. It is
necessary to specify safety measures to protect the operating personnel. These measures
are based on an estimated shutdown during the actual conditions of use (all parts of the
operating cycle are taken into consideration here, for example periods when the electric
tool is switched o, and, when it is switched on but running without any load).
20. Environmental protection
The device and all accessories and packaging have to be recycled in an
environmentally friendly manner. Do not dispose of the appliance with
household waste. Support environmental protection by taking the appliance
to a local collection point or obtain information from a specialist retailer.
Leftover paint and solvents may not be emptied into drains, the sewage system
or disposed of as household rubbish. It has to be disposed of separately as
special waste. Please pay special attention to the instructions on the product
packaging.
21. Important Note regarding Product Liability!
According to an EU directive, the manufacturer is only liable without limitation for faults
in the product if all parts come from the manufacturer or have been approved by the
manufacturer and have been mounted to the device and are operated properly. If thirdparty accessories or spare parts are used, the manufacturer is exonerated wholly or partly
from his/her liability if use of the third-party accessories or spare parts have caused a
defect in the product.

EN
14
HV2501EU
2 year guarantee
The guarantee runs for two years, counting from the date of sale (sales slip). It covers
and is restricted to free-of-charge rectication of faults which are demonstrably
attributable to the use of faulty materials in manufacture, or assembly errors; or freeof-charge replacement of the defective parts. The guarantee does not cover incorrect
use or commissioning or tting or repair work which is not stated in our operating
instructions. Wearing parts are also excluded from the guarantee. The guarantee
excludes commercial use. We expressly reserve the right to full the guarantee.
The guarantee expires if the tool is opened up by persons other than Earlex service
personnel. Transport damage, maintenance work and loss and damage due to faulty
maintenance work are not covered by the guarantee. Under any guarantee claim,
there must be proof of purchase of the tool through submission of the original receipt.
Wherever legally possible, we exclude all liability for injury, damage or consequential
loss, especially if the tool has been used for a purpose other than that stated in the
operating instructions, commissioned or repaired other than in accordance with our
operating instructions or if repairs are performed by someone who is unqualied.
We reserve the right to perform any repairs in excess of those stated in our operating
instructions. In case of guarantee or repair, please refer to your point of sale.
HELPLINE
For user advice, please phone our helpline between 08:30 to 17:00 Monday to Thursday, Friday 08:30 to 15:45 (excluding Bank Holidays) or visit our website www.earlex.
com.
Wagner Spraytech (UK) Ltd
Tel: +44 (0)1483 454666
Email: enquiries@earlex.co.uk
Website: www.earlex.com
15
HV2501EU EN
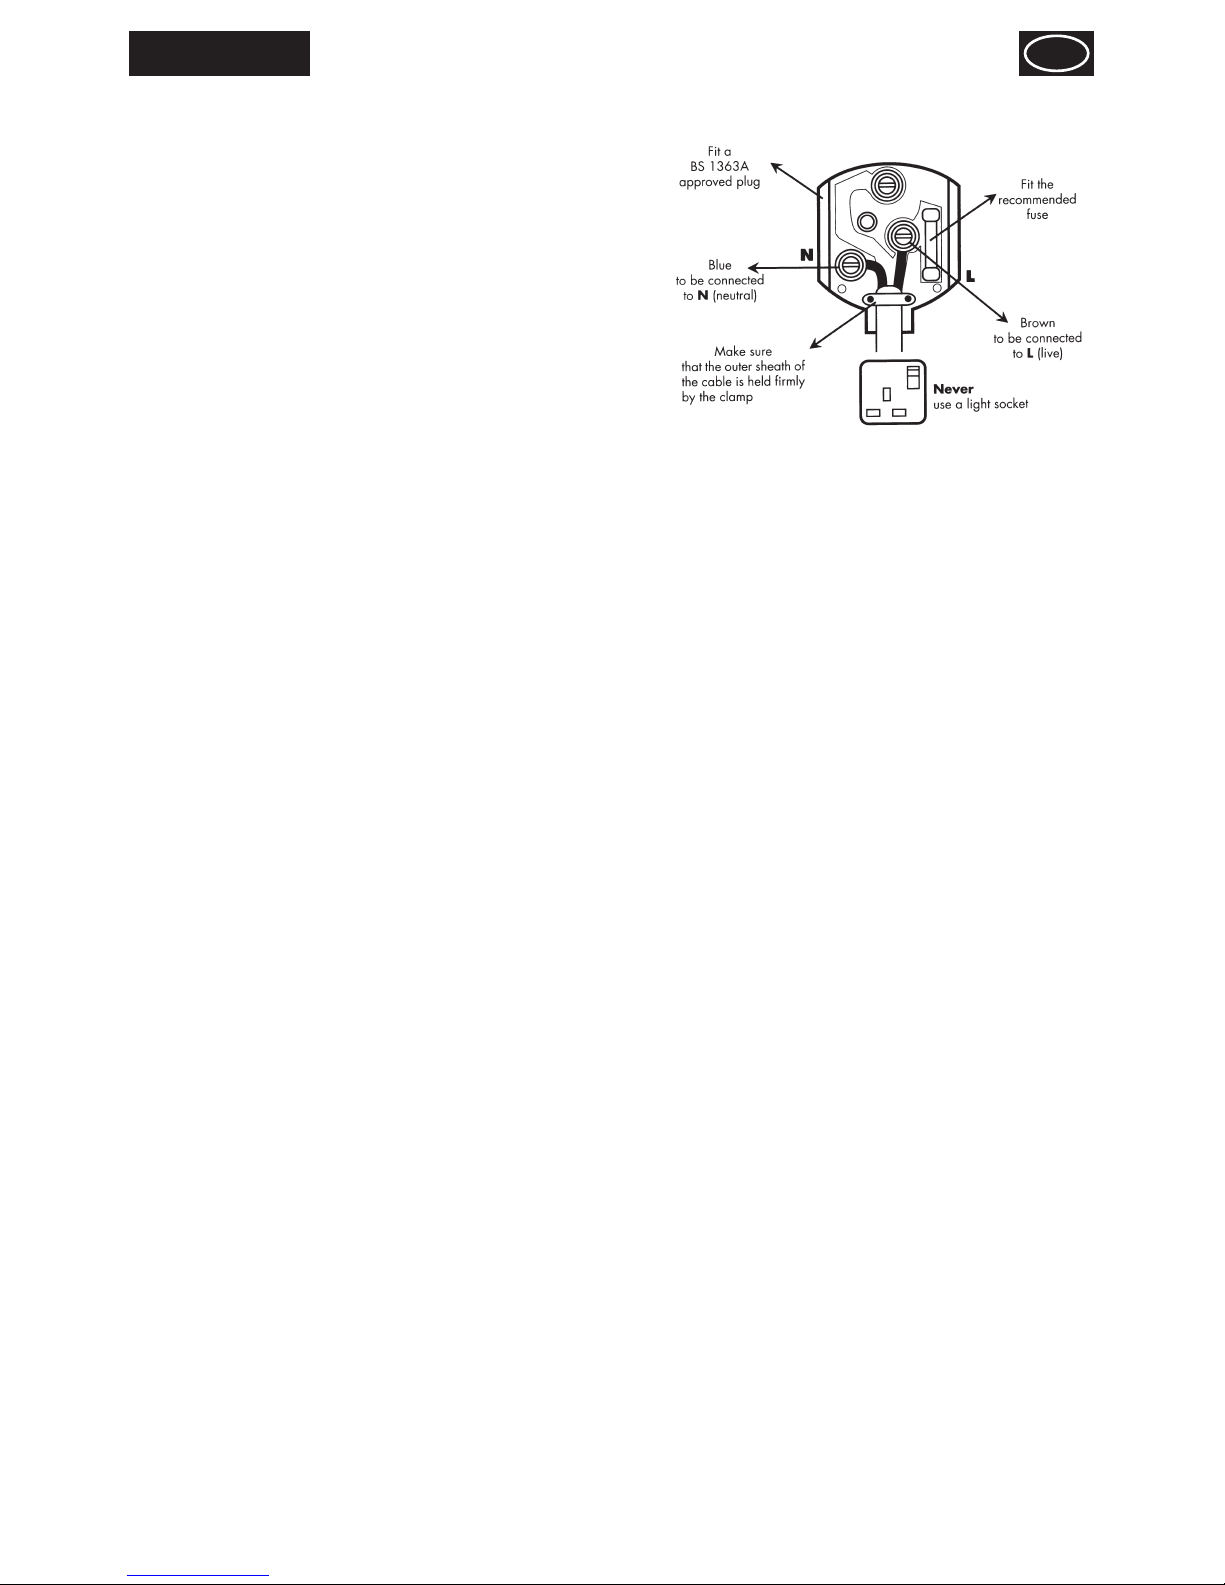
WARNING
If the supply cord of this appliance is damaged, it
must only be replaced by a repair shop appointed by
the manufacturer, because special purpose tools are
required.
WARNING: Do not connect the blue or brown wire to
the earth terminal of the plug! The wires in this supply
cord are coloured in accordance with the following code:
blue = neutral brown = live
As the colours of the wires in the supply cord of this
appliance may not correspond with the coloured
markings identifiying the terminals in your plug,
proceed as follows:
Should the moulded plug have to be replaced, never re-use the defective plug or attempt to plug
it into a dierent 13 A socket. This could result in an electric shock.
Should it be necessary to exchange the fuse in the plug only use fuses approved by ASTA in
accordance with BS 1362.5 Amp fuse may be used.
To ensure that the fuse and fuse carrier are correctly mounted please observe the provided
markings or colour coding in the plug.
After changing the fuse, always make sure that the fuse carrier is correctly inserted. Without the
fuse carrier, it is not permissible to use the plug.
The correct fuses and fuse carriers are available from your local electrical supplies stockist.

FR
16
HV2501EU
Table des matières
1. Explication des symboles utilisés ...............................................17
2. Consignes générales de sécurité ...............................................17
3. Consignes de sécurité pour pistolet électrique basse pression .................. 20
4. Description/ Étendue de la fourniture ..........................................21
5. Domaine d’utilisation ..........................................................21
6. Produits de revêtement applicables ............................................21
7. Produits de revêtement non applicables ........................................ 21
8. Préparation de la zone de travail ...............................................22
9. Préparation des produits de revêtement ........................................ 22
10. Mise en service ............................................................... 23
11. Réglage de la forme de jet désiré (Fig. 4) .......................................23
12. Réglage du débit de produit (Fig. 6) ...........................................23
13. Pulvérisation .................................................................24
14. Interruption de travail ........................................................24
15. Mise hors service et nettoyage ................................................ 25
16. Entretien .....................................................................26
17. Pièces de rechange .......................................................... 27
18. Elimination des défauts ....................................................... 27
19. Caractéristiques techniques ...................................................29
20. Protection de l’environnement ................................................ 29
21. Indication importante de responsabilité de produit! ...........................30
Durée de garantie: 2 ans .........................................................30
CE Déclaration de conformité .................................................... 76
Traduction du mode d'emploi original
MERCI DE VOTRE CONFIANCE
Nous vous félicitons pour l'acquisition de ce produit de la marque Earlex et
nous sommes convaincus qu'il vous apportera entièrement satisfaction.
Avant la mise en service, veuillez lire attentivement le manuel d'utilisation et observer
les consignes de sécurité. Veuillez conserver soigneusement le manuel d'utilisation et
joignez-le au produit si jamais vous cédez celui-ci.

17
HV2501EU FR
1. Explication des symboles utilisés
Ce symbole attire l'attention sur un danger potentiel pour
vous-même ou pour l'appareil. Au-dessous de ce symbole,
vous trouverez des informations importantes visant à éviter les
blessures et les dommages sur l'appareil.
Danger de choc électrique
i
Caractérise des conseils d’utilisation et d’autres remarques
particulièrement utiles.
Les appareils et accessoires pourvus de ce symbole peuvent être
utilisés pour l'application de produits à consistance épaisse, tels que
les peintures murales intérieures (en phase aqueuse ou solvantée).
Les produits qui portent ce logo se prêtent particulièrement bien à
une application avec l'appareil correspondant.
2. Consignes générales de sécurité
Attention! Lisez toutes les consignes de sécurité et indications. Le non-respect des consignes
de sécurité et des indications présentées peut entraîner des décharges électriques,
un incendie et/ou des blessures graves. Veuillez conserver soigneusement le
manuel d'utilisation et joignez-le au produit si jamais vous cédez celui-ci. Le
terme utilisé dans la suite d’"outils électriques" se rapporte aux outils électriques
fonctionnant sur le secteur (avec câble d’alimentation) et aux outils électriques
fonctionnant sur accus (sans câble d’alimentation).
1. Sécurité du poste de travail
a) Maintenez votre zone de travail propre et veillez à ce qu'elle soit bien
éclairée. Le désordre et le manque d'éclairage des zones de travail peuvent être
sources d'accident.
b) Ne travaillez pas avec l’appareil dans un environnement à risque
d’explosion, là où se trouvent des liquides, gaz ou poussières inammables.
Les outils électriques génèrent des étincelles, qui peuvent enammer la poussière ou
les vapeurs.
c) Maintenez les enfants et les autres personnes à distance pendant l’utilisation
de l’outil électrique. Si vous êtes distrait, vous risquez de perdre le contrôle de
l’appareil.

FR
18
HV2501EU
2. Sécurité électrique
a) La che mâle de l’appareil doit convenir pour la prise de courant. La che
mâle ne peut en aucune manière être modiée. N’utilisez pas d’adaptateur
en même temps que des appareils avec protection de terre. Une che mâle non
modiée et des prises de courant appropriées diminuent le risque de choc électrique.
b) Evitez le contact corporel avec des surfaces mises à la terre, telles que celles
de tuyaux, chauages, cuisinières et réfrigérateurs. Il existe un risque accru de
choc électrique lorsque votre corps est mis à la terre.
c) Maintenez l’appareil à l’écart de la pluie et de l’humidité. L’inltration d’eau
dans un appareil électrique augmente le risque de choc électrique.
d) N’utilisez pas le câble dans un autre but que celui auquel il est destiné,
notamment pour porter l’appareil, le suspendre ou pour tirer la che de la
prise de courant. Maintenez le câble à l’écart de la chaleur, de l’huile, des
arêtes vives ou de parties d’appareil en mouvement. Les câbles endommagés
ou emmêlés augmentent le risque de choc électrique.
e) Lorsque vous travaillez en extérieur, n'utilisez que des rallonges également
adaptées à une utilisation en extérieur. L’utilisation d’une rallonge appropriée
pour l’extérieur diminue le risque de choc électrique.
f) S'il n'est pas possible d'éviter l'utilisation de l'appareil dans un
environnement humide, ayez recours à un disjoncteur diérentiel.
Ceci évite le risque d'une décharge électrique.
3. Sécurité des personnes
a) Soyez attentif à ce que vous faites et faites preuve de bon sens lors de
l’utilisation d’un outil électrique. N’utilisez pas l’appareil si vous êtes fatigué
ou sous l’inuence de drogues, de l’alcool ou de médicaments. Un moment
d’inattention lors de l’utilisation de l’appareil peut provoquer des blessures sérieuses.
b) Portez un équipement de protection personnelle et toujours des lunettes
de sécurité. Le port d’un équipement de protection personnelle tel que masque
antipoussière, chaussures de sécurité antidérapantes, casque de protection ou
protection auditive, selon la nature et l’utilisation de l’outil électrique, diminue le
risque de blessures.
c) Evitez toute mise en service intempestive de l’appareil. Assurez-vous que
l'outil électrique est arrêté, avant de le raccorder à l'alimentation électrique,
de le prendre ou de le porter. Si vous avez le doigt sur l’interrupteur de l’appareil
pendant son transport ou si vous raccordez l’appareil enclenché à l’alimentation
électrique, ceci peut conduire à des accidents.

19
HV2501EU FR
d) Enlevez les outils de réglage raccordés avant de connecter l’appareil. Un outil
ou une clé qui se trouve dans une partie d’appareil en mouvement peut être source de
blessures.
e) Évitez une posture anormale. Veillez à une position stable et gardez à tout
moment l’équilibre. De la sorte, vous pourrez mieux maîtriser l’appareil en cas de
situation inattendue.
f) Portez des vêtements appropriés. Ne portez pas de vêtements amples ni
de bijoux. Maintenez les cheveux, les vêtements et les chaussures à l’écart
des pièces en mouvement. Les vêtements amples, les bijoux ou les cheveux longs
peuvent être saisis par des pièces en mouvement.
4. Emploi et entretien de l'outil électrique
a) Ne surchargez pas l’appareil. Utilisez l’outil électrique approprié pour votre
travail. Avec l’outil électrique approprié, vous travaillerez mieux et de manière plus
sûre dans la plage de puissance indiquée.
b) N’utilisez pas d’outil électrique dont l’interrupteur est défectueux. Un outil
électrique qui ne se laisse plus mettre en service et hors service est dangereux et doit
être réparé.
c) Tirez la che mâle de la prise de courant avant de procéder à des réglages sur
l’appareil, de changer des accessoires ou de ranger l’appareil. Cette mesure de
précaution empêche le démarrage intempestif de l’appareil.
d) Rangez les outils électriques non utilisés hors de portée des enfants. Ne
laissez aucune personne utiliser l’appareil si elle n’est pas familiarisée avec
celui-ci ou n’a pas lu ces instructions. Les outils électriques sont dangereux
lorsqu’ils sont utilisés par des personnes inexpérimentées.
e) Traitez l’appareil avec soin. Contrôlez si les éléments mobiles de l’appareil
fonctionnent correctement et se coincent pas, si des pièces sont cassées ou
endommagées au point d’entraver le fonctionnement de l’appareil. Faites
réparer les pièces endommagées avant d’utiliser l’appareil. De nombreux
accidents sont causés par des outils électriques mal entretenus.
f) Utilisez l’outil électrique, les accessoires, les outils d’intervention etc.
conformément à ces instructions et de la manière prescrite pour ce type
particulier d’appareil. Tenez compte à cet eet des conditions de travail et
de l’activité à eectuer. L’utilisation d’outils électriques pour d’autres buts que les
applications prévues peut conduire à des situations dangereuses.
FR
20
HV2501EU
5. Maintenance
a) Faites réparer l’appareil uniquement par du personnel spécialisé qualié et
uniquement avec des pièces de rechange d’origine. Ceci garantira le maintien
de la sécurité de l’appareil.
b) Si le câble de raccordement au secteur ligne de raccordement secteur de
cet appareil est endommagée, il doit être remplacé par le fabricant ou son
service après-vente ou par une personne de qualication similaire, an
d'éviter tous dangers.
3. Consignes de sécurité pour pistolet électrique basse
pression
•
Attention! Porter une protection respiratoire: le brouillard de peinture et les vapeurs
de solvant sont nocifs pour la santé. Travailler uniquement dans des locaux bien
ventilés ou avec une ventilation articielle. Le port de vêtements de travail, de gants,
des protections pour les oreilles et un masque de protection respiratoire est vivement
recommandé.
ATTENTION: DANGER DE BLESSURES!
Ne pas diriger l'appareil sur les personnes et les animaux!
Coller obligatoirement les prises et les interrupteurs.
Danger de choc électrique en cas de pénétration du produit pulvérisé !
Attention ! L'appareil ne doit en aucun cas être utilisé lorsque le joint
de buse est endommagé ou qu'il manque. Lorsque le joint de buse est
endommagé ou qu'il manque, le risque de choc électrique est accru
par la possibilité d'inltration d'eau dans l'appareil.
Contrôlez le joint de buse avant chaque utilisation de l'appareil.
•
Ne pas pulvériser vers des produits inammables.
•
Ne pas nettoyer le pistolet avec des solvants inammables.
•
Veuillez vérier et suivre les instructions données sur le conditionnement de ces
produits ou les recommandations des fabricants de produits.
•
Ne pas pulvériser de liquides présentant un risque.
•
Ne pas utiliser le pistolet en ateliers et bureaux d'usines qui tombent sous le coup de
la loi de protection contre les explosions.
•
Pendant la projection, toute source d'inammation est prohibée dans l'entourage,
comme par exemple des ammes, cigarettes allumées, étincelles, ls incandescents
ou surfaces chaudes.
•
Lors de travaux avec l'appareil HV2501EU dans des locaux ainsi qu'en extérieur, veiller
à ce que l'appareil n'aspire pas de vapeurs de solvants.
•
Le pistolet n'est pas un jouet. Ne pas laisser les enfants jouer avec l'appareil ou le
manipuler.
 Loading...