

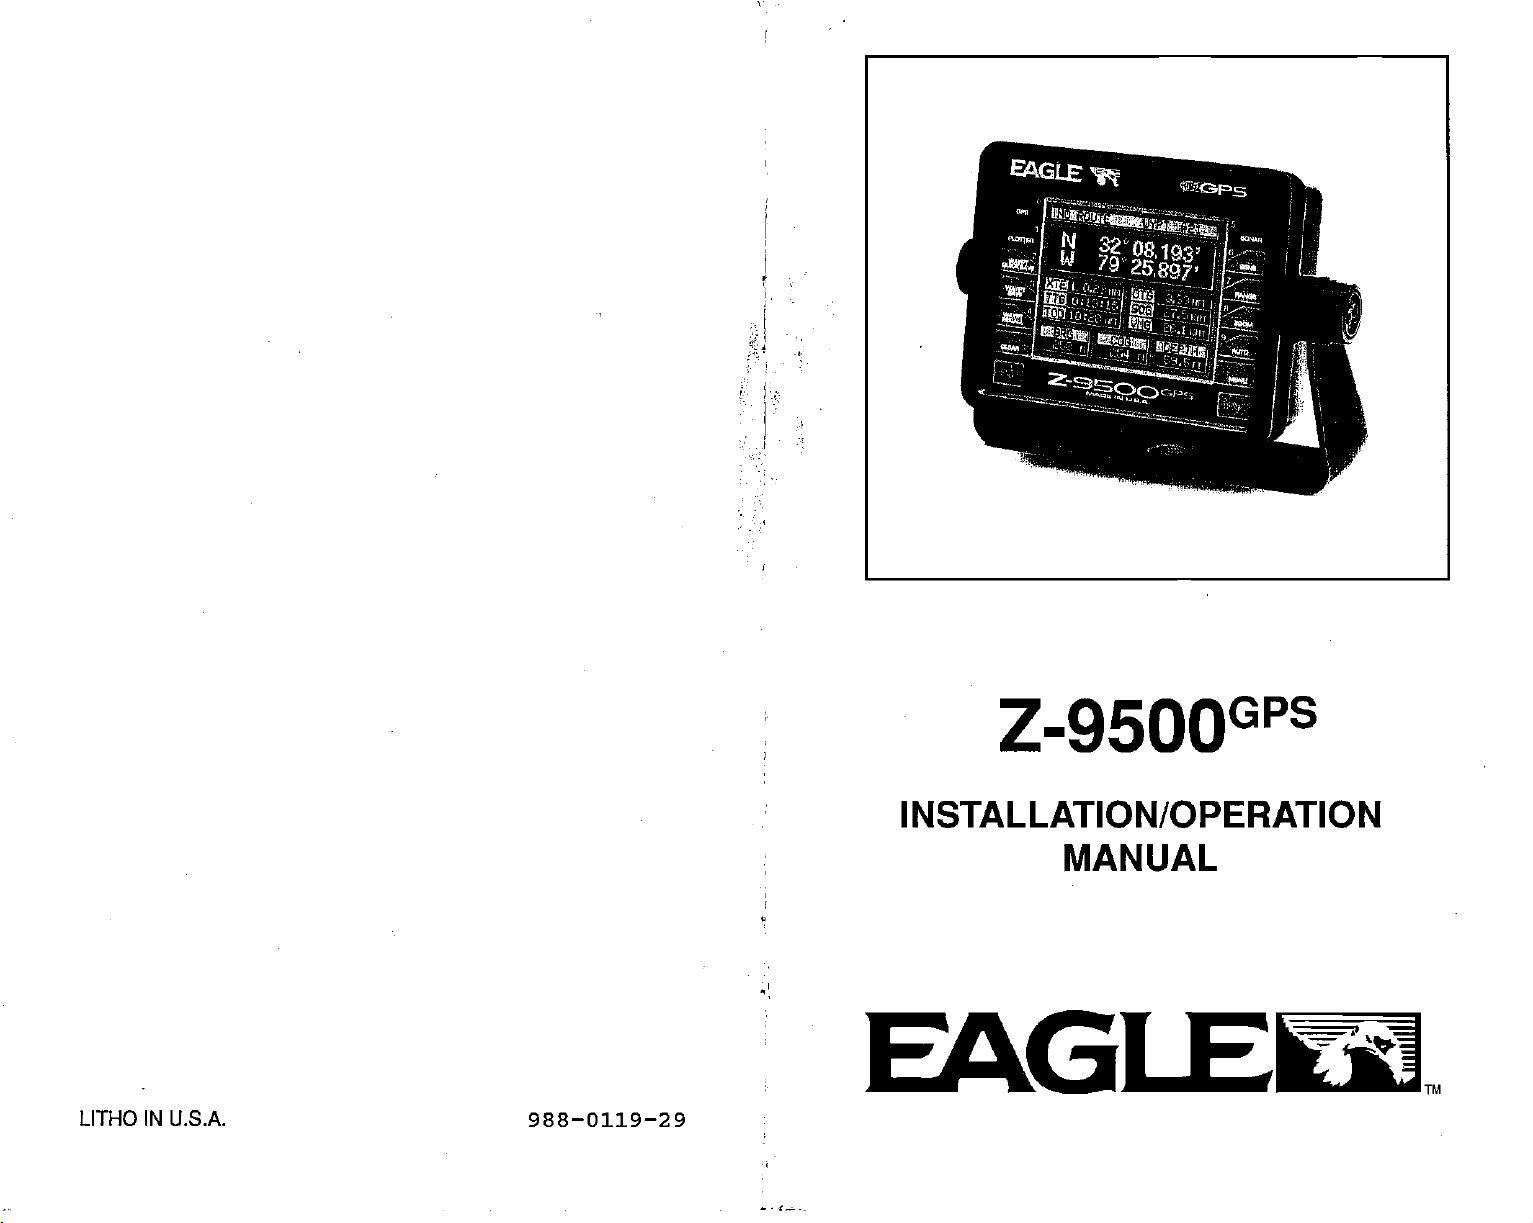
Page 1
.1...;
Z-95OO
INSTALLATION/OPERATION
MANUAL
EAGI
LITHO IN U.S.A. 988—0119—29
PDF compression, OCR, web-optimization with CVISION's PdfCompressor
Page 2
NOTES:
Copyright
USE THIS GPS
TION.
A
CAREFUL
©
1990,1991,
All
rights
WARNING!
RECEIVER ONLY AS AN AID TO NAVIGA-
NAVIGATOR NEVER RELYS ON ONLY
Eagle
reserved.
Electronics.
ONE METHOD TO OBTAIN POSITION INFORMATION.
CAUTION
This GPS
the
tion data to the
the
navigation
ally
always
As of this
declared the GPS
is still in a
can be
the
system
receiver,
shortest,
(like
most direct
waypoint regardless
prudent navigator
tools when
check to make certain a
available.
writing,
the
navigation system
testing phase.
degraded
Z-9500GPS,
it's
at will
or
using.
all GPS
to a
path
will not
only
travelling
clear,
NOTICE!
Department
Satellites can
the
by
system operators.
GPS receiver is
any
navigation equipment)
waypoint.
It
provides naviga-
of obstructions.
take
advantage
to a
waypoint,
safe
but will also visu-
to the
path
of Defense
as
operational.
be turned off or
as accurate as the
only
will
Therefore,
of all available
waypoint
(DOD)
The
accuracy
Remember that
show
is
has not
system
Features and
All
display
screens in this manual are simulated.
specifications subject
to
change
without
notice.
PDF compression, OCR, web-optimization with CVISION's PdfCompressor
Page 3

N"
SONAR TABLE OF
INTRODUCTION 1
MOUNTING
POWER CONNECTIONS
GPS MODULE
NOISE
TRANSDUCER CONNECTIONS
KEYBOARD
DISPLAY - General
SONAR OPERATION 9
AUTOMATIC
SENSITIVITY
INSTALLATION 3
CONTENTS
.1
GRAYUNB
CHARTSPEED
RANGE
RANGE - Automatic
RANGE - Manual
ZOOM
ZOOM- Bottom Track
ALARMS
ZONE ALARM
BOTTOM ALARM 20
FISH ALARM
AUDIO ALARM ON/OFF 22
MUTE
MENU
CHART
FREQUENCY
CHART DUAL
SURFACE CLARITY CONTROL
DISCRIMINATION
ASP
FISH LD
DIGITAL DISPLAYS
DIGITAL
SPEEDOMETER
SPEEDOMETER CALIBRATION
TEMPERATURE 34
DISTANCELOG
GPS DISPLAY 36
TIME DISPLAY
CHARACTER SIZE
TENTHS 39
SPEAKER VOLUME
DISPLAY CONTRAST
LIGHT
DEPTH LINES
KEEL OFFSET
NEGATIVE KEEL OFFSET 42
POSITIVE KEEL OFFSET
SYSTEM
TURN AUTOMATIC/DIGITAL ON/OFF
DIGITAL
MEMORY-PRESET
TRANSDUCER CONE ANGLES
FISHARCHES
SONAR
GPSOPERATION
INFORMATION 44
SONAR FREQUENCY SELECT 48
TROUBLESHOOTING 51
FREQUENCYOPERATION 24
(SOC)
DEPTH DISPLAY 31
.1
5
S
7
8
9
g
11
12
13
13
14
15
17
18
18
21
22
22
23
25
28
27
30
32
33
35
37
38
40
40
41
42
42
43
45
47
48
so
55
PDF compression, OCR, web-optimization with CVISION's PdfCompressor
Page 4
Z-9500GPS
Z-9500GPS
Input Voltage
Current
Transmitter
Display
Pixels
Dimensions . 6.6"H
Frequency
Output
(typical)
Size
SONAR SPECIFICATIONS
x 8.8W x 3.9"D
10 - 15 vDC
Power
750 ma
850 mz
192 & 50kHz
2500
312 watts
3.25'H
128
20,480
(lights
(lights on)
watts
x 4"W
H x 160W
Total
off)
(peak-to-peak)
(RMS)
Z-9500GP5
GPS RECEIVER
GPS Module Dimensions
Channels
Update
Accuracy
NMEA
rate
0183 SENTENCES
AMB
RMC
GLL
APA
DBK
MTW
VHW
VLW
SPECIFICATIONS
x 4.1"W x 7" D
2.5"H
Parallel
Five
Four continuous
All satellites
One second
Maximum
with Standard
Position: 25
Velocity:
Without SA
Minimum Recommended Sentence,
Minimum Recommended Sentence.
Present Position
Autopilot
Water
Water
Speed Through
Distance Travelled/LOG
Steering
Depth
Temperature (°C)
0.25 meters/sec RMS
-
Latitude/Longitude
Data
Water
for
in view tracked
accuracy
meters CEP
PDOPc6.0
(KPH)
position
achievable
Positioning
(NM)
Service
Part
C
Part
B
EAGLE
EAGLE ELECTRONICS
CATOOSA,
TELEPHONE:
P0 BOX 669
OKLAHOMA
93
(918)
74015-669
234-1452
TM
PDF compression, OCR, web-optimization with CVISION's PdfCompressor
Page 5
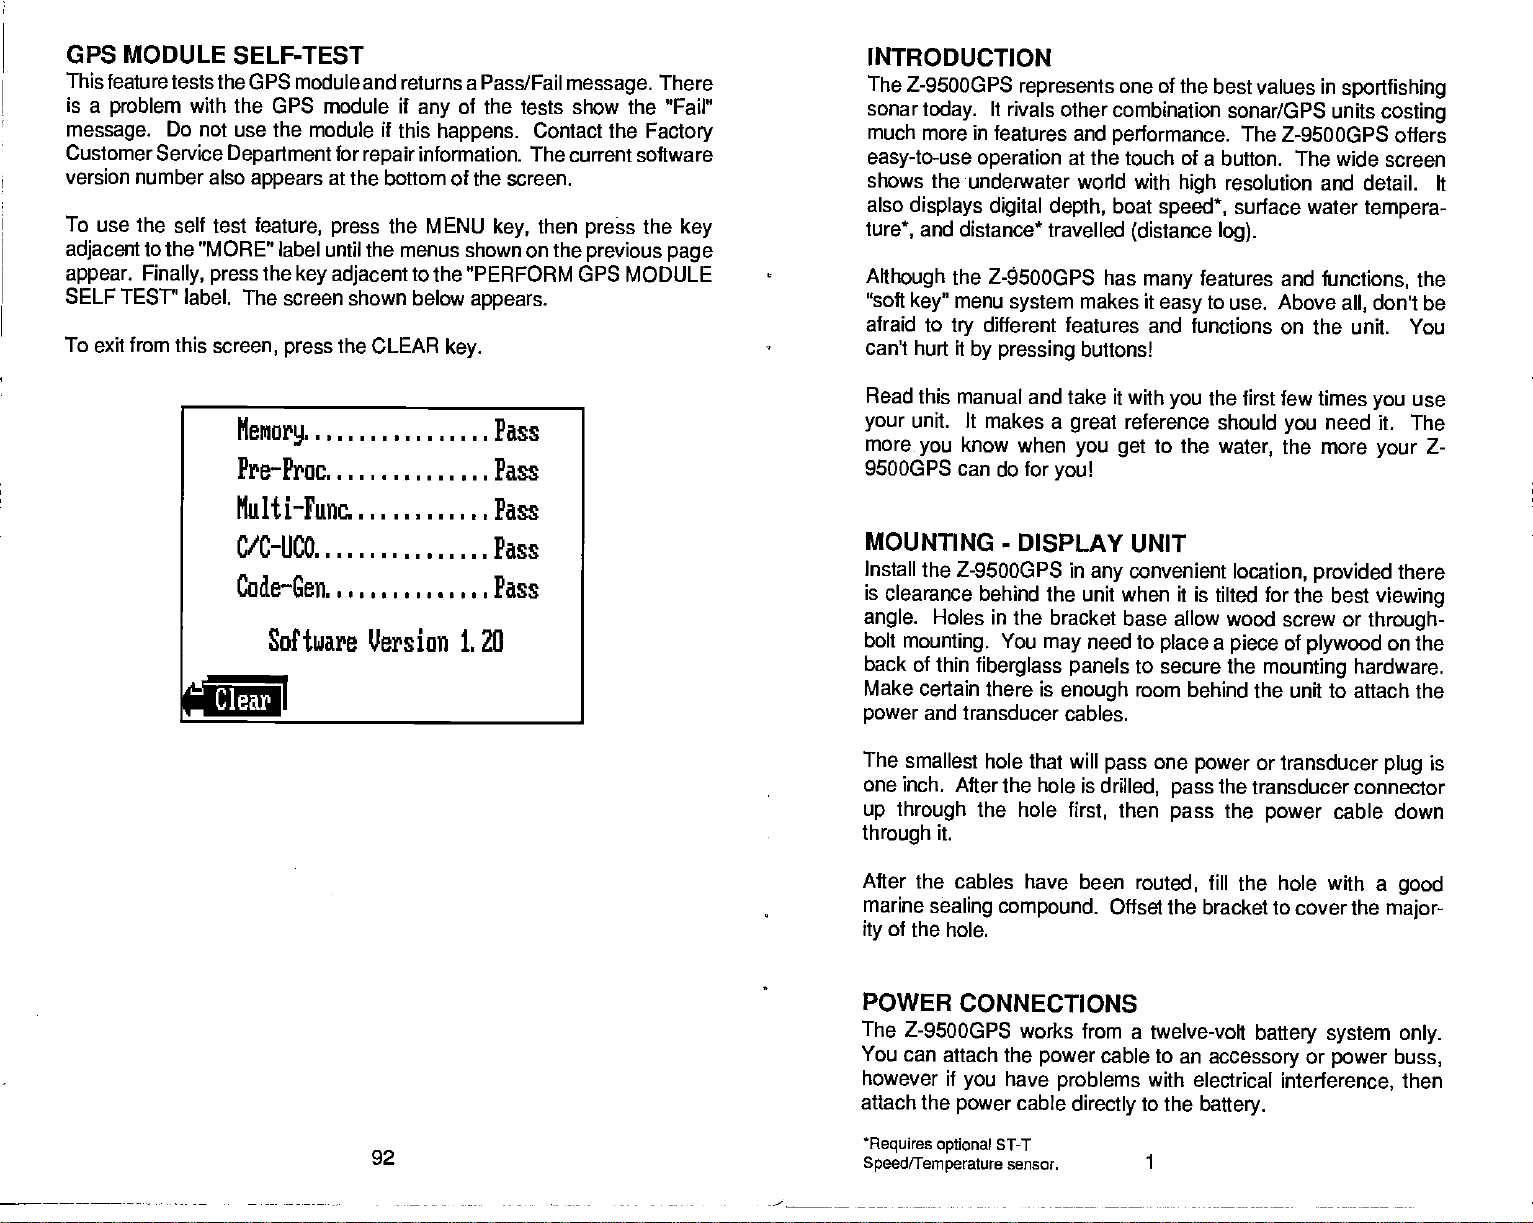
GPS MODULE SELF-TEST
This feature tests
is a
problem
message.
Customer Service
version number also
To use the self test
adjacent
appear. Finally, press
SELF TESr' label.
to the "MORE"
To exit from this
the GPS module and returns a Pass/Fail
with the GPS module if
Do not use the
Department
The screen shown below
screen,
module
for
appears
feature, press
at the bottom of the screen.
label until the menus shown on the
the
key adjacent
the CLEAR
press
message.
of the tests show the "Fail"
any
if
this
happens.
information. The current software
repair
the MENU
Contact the
then
key,
press
previous page
to the "PERFORM GPS MODULE
appears.
key.
There
Factory
the
key
INTRODUCTION
The Z-9500GPS
sonar
today.
much more in features
easy-to-use operation
shows the underwater world
also
displays digital depth,
and distance*
ture*,
key"
the
menu
try
Although
"soft
afraid to
can't hurt it
represents
It rivals other
combination sonar/GPS units
and
performance.
at the
boat
travelled
Z-5OOGPS has
system
different features and
by pressing
makes it
buttons!
one of the best values in
sportfishing
costing
The Z-9500GPS offers
touch of a button. The wide screen
with
speed*,
(distance log).
many
easy
resolution and detail. It
high
surface water
features
to
functions
and
functions,
use.
Above
on the unit. You
tempera-
don't be
all,
the
MeMory.,,,,,,
Pre—Proc,.,,,
Multi—Func,.
C/C UCO...I,,
Code—Gen.,,,
Software Version 1. 20
Clear
Pass
Pass
Pass
Pass
Pass
Read this manual and take it with
unit. It makes a
your
more
9500GPS can do for
MOUNTING
Install the
know when
you
-
Z-9SDOGPS in
you!
DISPLAY UNIT
is clearance behind the
angle.
bolt
back of thin
Holes in the
mounting.
fiberglass panels
Make certain there is
and transducer cables.
power
The
smallest hole that will
one
inch. After the hole is
up through
through
the hole
it.
After the cables have
marine
ity
sealing compound.
of the hole.
bracket base allow wood screw or
You
may
enough
reference
great
you get
convenient
any
unit when it is tilted for the best
need
to
to secure the
room
pass
drilled,
then
first,
been
routed,
Offset the bracket to cover the
the first few times
you
to
should
the
water,
location, provided
need it. The
you
the more
through-
a
place
behind the unit to attach the
one
power
the transducer connector
pass
pass
of
piece
plywood
mounting
or transducer
the
power
hardware.
cable down
fill the hole with a
use
you
Z-
your
there
viewing
on the
is
plug
good
major-
POWER
The
You
however if
attach
92
PDF compression, OCR, web-optimization with CVISION's PdfCompressor
*ReqUires optional
Speed/Temperature
CONNECTIONS
Z-9500GP5 works from a twelve-volt
can attach the
have
you
the
power
ST-T
cable
sensor.
power
cable to an
problems
directly
with
to the
1
accessory
electrical
battery.
battery
system
or
interference,
only.
power buss,
then
Page 6
If
the cable
The
power
the
positive
fuse holder to the red lead as close
possible.
the
battery
power
the event of a short.
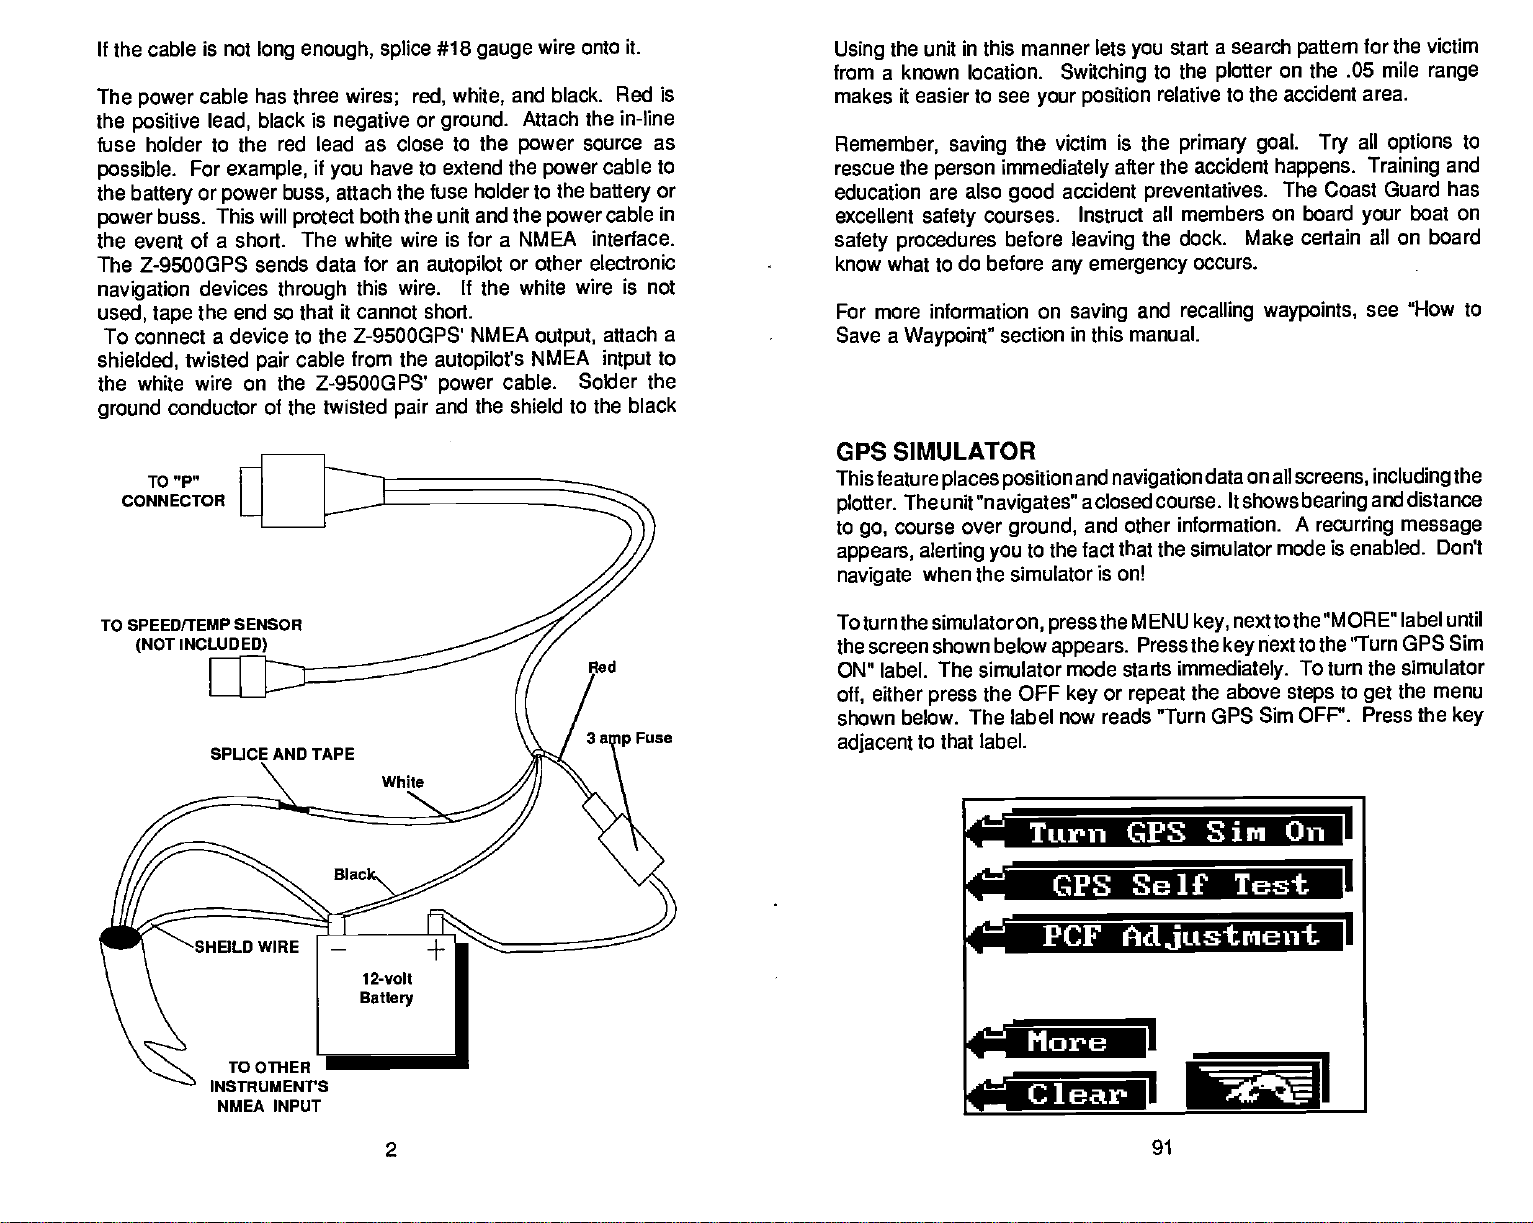
The Z-9500GPS sends data for an
navigation
used,
To connect a device to the
shielded,
white wire on the Z-9500GPS'
the
ground
CONNECTOR
is not
long enough, splice
cable has three
black is
lead,
For
example,
or
power
buss. This will
devices
the end so that
tape
twisted
conductor of the twisted
TO "P"
pair
negative
if
you
attach the fuse
buss,
protect
The white wire is for a NMEA interface.
through
it cannot short.
cable
wires; red, white,
or
have to extend the
both the unit and
autopilot
this wire,
Z-9500GPS' NMEA
from the
pair
#18
ground.
to the
holder to the
wire onto it.
gauge
black. Red is
and
Attach the in-line
power
power
the
power
source as
cable to
battery
or
cable in
or other electronic
If
white wire is not
the
output,
autopilot's
power
and the shield to the black
NMEA
cable. Solder
attach a
to
intput
the
the unit in this manner lets
Using
from a known location.
makes it easier to see
Remember, saving
rescue the
education are also
excellent
safety procedures
know what to do
For
Save a
person
safety
more information on
Waypoint"
the victim is the
immediately
good
courses. Instruct all members on board
before
before
section in this manual.
GPS SIMULATOR
This feature
plotter.
to
go,
appears, alerting you
navigate
places position
The unit
course over
"navigates"
ground,
to the fact that the simulator mode is enabled.
when the simulator
start a search
you
Switching
your position
accident
leaving
any emergency
saving
and
a closed course. It shows
and other information. A
to the
relative to the accident
primary goal. Try
after the accident
preventatives.
the dock. Make certain
occurs.
and
recalling waypoints,
navigation
is on!
data on all
plotter
pattern
on the .05 mile
happens.
The Coast
screens, including
bearing
for the victim
area.
all
Training
Guard has
your
all on board
see "How to
and
recurring
options
message
range
to
and
boat on
the
distance
Don't
TO SPEEDITEMP SENSOR
(NOT
Fuse
Toturnthe
simulatoron,
the screen shown below
ON" label. The simulator
either
off,
shown
adjacent
below. The label now reads "Turn GPS Sim
to that
press
the OFF
label.
r.
U.aiatl t1
the MENU
press
appears.
mode starts
or
key
key,
Press the
immediately.
repeat
the above
nexttothe "MORE"
nextto the "Turn
key
To turn the simulator
to
steps
OFF". Press the
u
label until
GPS Sim
the menu
get
key
I
;CF
1
More
INsTRuMENrS
NMEA INPUT
2
Clear
U
91
PDF compression, OCR, web-optimization with CVISION's PdfCompressor
Page 7
the chart's location in latitude and
adjacent
to that
the screen shown below
label,
longitude.
After
appears.
pressing
the
key
wire
on the
autopilot.
power
See the other device's manual
cable. Do not
connect the shield to the
forwiring
instructions.
North/South Lat.
Clear
If
adjacent
in the same manner
label. If the offset shown at
adjacent
used
you
navigation,
when PCF is enabled.
need to switch the latitude from north to
you
tot he "North/South Lat: label. Switch the
by pressing
to the "Use Position" label. The Z-95003PS returns to the last
position, navigation,
entered. To
or
plotter
that POP is in
verify
screen. The letters "PCP'
MAN OVERBOARD
One of
ber fall overboard. This
fresh or salt. It's
land. Of
safety
person, you
boating's
course,
measures to
most
terrifying
situation can be
particularly dangerous
the first
can use the
thing
and rescue the
try
Z-9SOOGPS to initiate a search
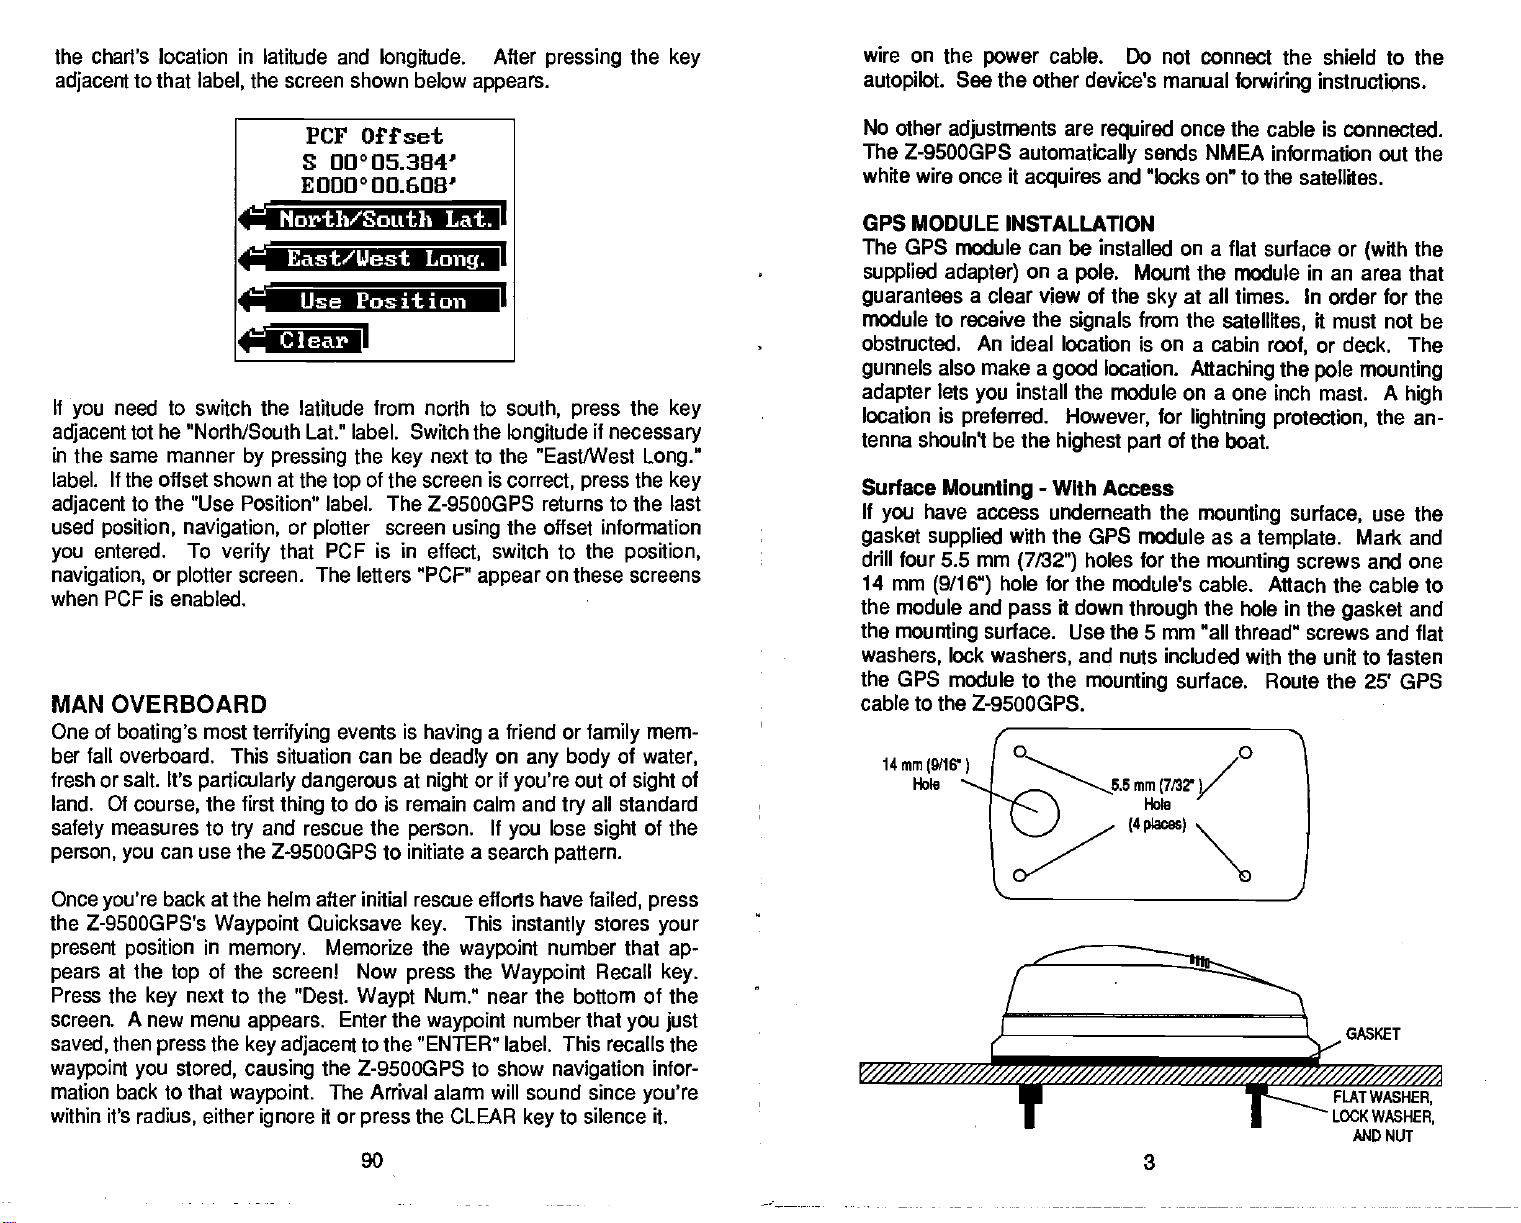
PCF Offset
S 00005.3841
E000° 00.608'
East/Uest
Use Position
the
the
top
or
plotter
events is
to do is remain calm and
Long.
next to the "East/West
key
of the screen is
screen
using
effect,
having
deadly
at
night
person.
south, press
if
longitude
correct, press
necessary
the offset information
switch to the
appear
on these screens
a friend or
on
any body
or if
you're
you
try
lose
pattern.
If
position,
family
of
out of
all standard
sight
the
Long."
the
mem-
water,
sight
of the
key
key
of
No other
The Z-9S000PS
white
GPS MODULE INSTALLATION
The GPS module
supplied adapter)
guarantees
module to receive
obstructed.
gunnels
adapter
location is
tenna
Surface
If
you
gasket supplied
drill four
14 mm
the module and
the
washers,
the GPS
cable to the Z-9500GP5.
l4mm(9fW)
adjustments
wire once it
a clear view of the
An
also make a
lets
you
preferred. However,
shouln't be the
Mounting
have
access underneath the
mm
5.5
(9/16")
mounting
Ebb
hole for the
surface. Use the 5 mm
lock
washers,
module to the
are
required
automatically
acquires
can be installed on a flat surface or
on a
the
ideal location is on a cabin
install the module on a one inch mast. A
-
with the GPS module as a
(7/32")
pass
and "locks on" to
pole.
signals
location.
good
highest part
With Access
holes for the
module's cable. Attach the cable to
it down
and nuts included with the unit to fasten
mounting
—5.5
once the cable is
sends NMEA
information out the
connected.
the satellites.
(with
Mount the module in an area that
at all times. In order for the
sky
from the
for
satellites,
Attaching
lightning protection,
it must not be
or deck. The
roof,
the
pole mounting
the an-
of the boat.
mounting surface,
template.
mounting
thnugh
mm
the hole in the
"all thread" screws and flat
surface. Route the 25' GPS
/0
screws and one
use the
Mark and
gasket
(4
the
high
and
N
Once
the Z-9SOOGPS's
present position
pears
Press the
screen. A new menu
saved,
waypoint you
mation back to that
within it's
you're
at the
key
then
radius,
back at the helm after initial rescue efforts have
Waypoint
in
memory.
of the screenl Now
top
next to the "Dest.
appears.
the
press
stored,
key adjacent
causing
waypoint.
either
ignore
Quicksave
Memorize the
Waypt
Enter the
to the "ENTER" label. This recalls the
the
Z-9500GP5 to show
The Arrival alarm
it or
press
90
This
key.
press
Num." near the bottom of the
waypoint
the CLEAR
instantly
waypoint
the
Waypoint
number that
will
sound since
key
number that
navigation
to silence it.
failed,
stores
Recall
you just
press
your
ap-
key.
1'
infor-
you're
T T—
3
PDF compression, OCR, web-optimization with CVISION's PdfCompressor
1
GASKET
FLAT
LOCK
AND NUT
WAsHER,
WASHER,
Page 8
Surface
If
you
face,
is
assuming you
is accessable. A hole will still need to be drilled in the
surface for the
drill the 14 mm
module and
and down the hole. Place the module on the
"cleats" onto each end of the module and
templates)
Drill the
them to the
Mounting
don't have access to the back side of the
use the "cleats"
drop
mark four holes for 5 mm
holes,
mounting
-
Without Access
mounting
supplied
can "snake" the module's cable to a location that
cable.) Using
(9/16")
hole for the cable. Attach the cable to the
the other end of the cable
then
replace
surface with the screws. Route the cable
with the Z-9500GPS.
the
gasket
the cleats on the module and fasten
as a
template,
through
(using
(#10) mounting
(Note:
gasket.
the cleats as
to the Z-9SOOGPS.
sur-
This
mounting
mark and
the
gasket
Slide the
screws.
PCF Position
N 32° 10 220
W08O12. 106'
North/South
East/West
Long.
rriiPosition
Clear
Press the
latitude from north to south. Switch the
same manner
the
position
adjacent
used
you
navigation,
when PCF is enabled.
key adjacent
by pressing
shown at the
to the "Use Position" label.
position, navigation,
entered. To
or
plotter
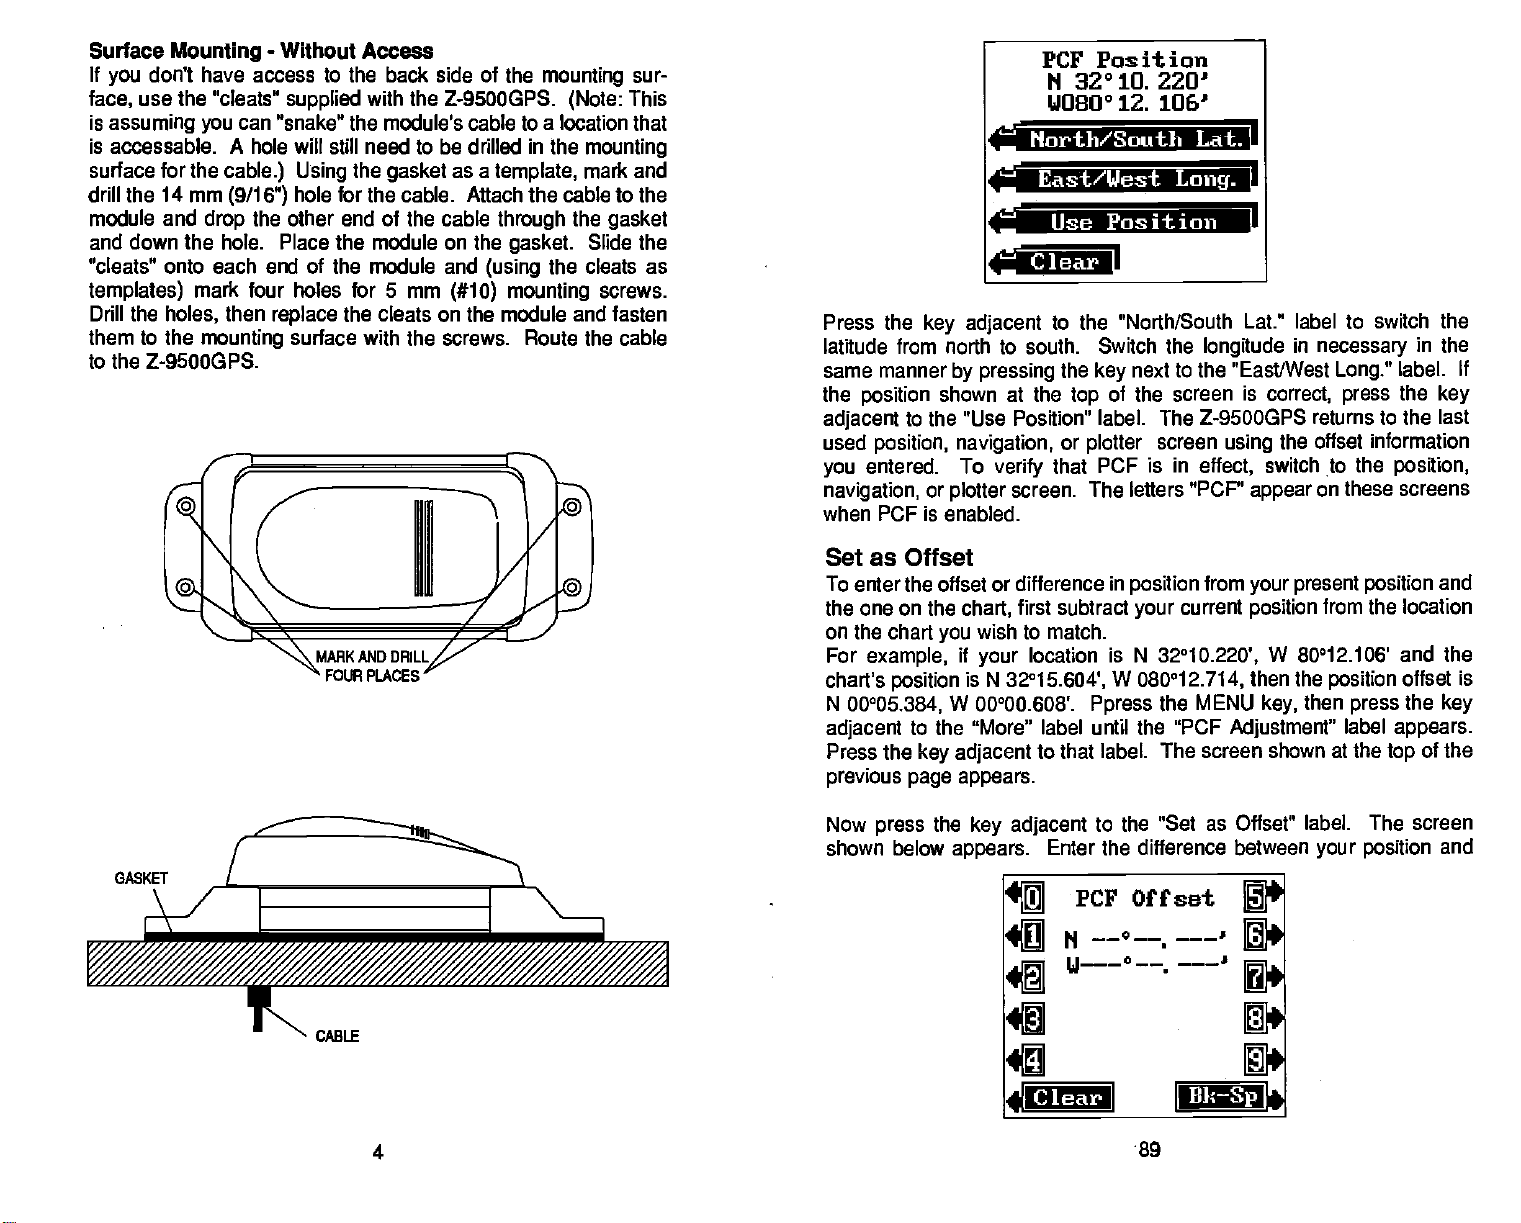
Set as Offset
To enter the offset
the one on the
on the chart
For
example,
chart's
N
adjacent
Press the
previous page appears.
position
00°05.384,
chart,
wish to match.
you
if
your
is N
W 00000.608'.
to the "More" label until
key adjacent
to the "North/South
the
top
or
that
verify
screen.
or
difference
first subtract
location is N
3295.604',
next to the "East/West
key
of the screen
The Z-9500GPS returns to the last
plotter
The letters "PCF"
Ppress
screen
PCF is in
in
position
current
your
32°10.220',
W
080012.714,
the MENU
"PCF
the
to that label. The screen shown at the
Lath
U
Lat." label to switch the
in
longitude
is
using
effect,
appear
from
your present position
position
then the
Adjustment"
necessary
Long."
correct, press
offset information
the
switch to the
on these screens
from the location
W 80012.106' and the
position
then
key,
press
label
in the
label. If
the
key
position,
and
offset is
the
key
appears.
of the
top
as Offset" label. The screen
your position
and
GASKET
Now
shown below
press
the
adjacent
key
appears.
to the "Set
Enter the difference between
PCF Offset
N --°--.
---'
u--c--'
______
4
1.8
89
PDF compression, OCR, web-optimization with CVISION's PdfCompressor
Page 9
not
change
PCF
The
Z-9SOOGPS
first
method
longitude.
performed,
when the unit is turned off.
settings.
gives you
as
(Set
The second method
then entered into
Position)
Set as Position
To use the Set as Position
that
to that
the MENU
Adjustment"
screen shown below
wish to match
you
position
key,
label
the unit's
and hold it there as
then the
appears.
appears.
I-.
However,
Preset does erase the
a choice of methods to enter the PCF. The
lets
you simply
(Set
as
enter the corrected latitude/
Offset) requires
a calculation be
the unit.
method,
key adjacent
first choose the location on the chart
position
accurately
Press the
display
to. Then move the boat
as
possible.
Now
to the "More" label until the "PCF
key adjacent
to that label. The
PCF Offset
II 0000 000'
E 0°00.OOW
Turn PCF On
I
press
Pole Mount
First attach the
the cable
GPS module.
9SOOGPS,
Now
pass
adapter
thread.)
adapter assembly.
plied
tighten
from the
is threaded for standard 1"-14
set screw into the front of the
it. This should
pole.
GPS module's cable to the module.
through
attach the
the
Thread the
the
Using
cable
pole mounting adapter
the four
pole mounting adapter
through
mounting pipe
After
prevent
GP5 MODULE
mm
5
screws
the
mounting
machinethread.
onto the GPS
tightening
the
threads,
pole mounting adapter
the GPS module from
Next,
pass
and attach it to the
supplied
with the Z-
to the GPS module,
The
pipe.
mounting
(Not pipe
module/pole
install the
unscrewing
sup-
and
Set as Position
Set as
.fl,.
I?a aI
Offset
L
L
NOISE
Now
below
is
key
the
press
appears.
pressed,
next to the "Set as Position"
key
Now enterthe
the screen shown
position
at the
bciear
88
label. The screen shown
shown on the chart. After the last
of the next
top
page appears.
Minimize electrical noise
other
possible
largest
results,
away
also radiate
sible.
noise
keep
from the
sources of electrical interference. One of the
generators
the
power,
engine wiring.
noise,
so
keep
VHF radio antennas and
levels. It is
also.
them,
Noise
typically
at slow boat
the
probable
not
electrical,
important
shows On the sonar
speeds
cause
but is
to
and
is acoustic noise or cavitation. This noise is
caused
by routing
is the
GPS
the cables
cables radiate
keep
worse as the
gets
by
the
power
engine's wiring
module,
Bilge pumps
away
RF
cable
harness. For best
and transducer cables
and their
from
them,
energy
at
the Z-9500GPS' cables
If
display.
air bubbles
5
interference
increases,
speed
passing
over the face
away
wiring
high
away
from
can
if
pos-
power
from
begins
then
PDF compression, OCR, web-optimization with CVISION's PdfCompressor
Page 10
of the transducer. It's
or cavitation.
increase the
doesn't show on the
solve this
turbulent water flow or
ft at all boat
The Z-9500GPS has reverse
occur to the unit if the
However,
properly.
Stop
If the noise
rpm.
problem,
speeds.
the unit will not work until the
the transducer must be
easy
the
boat,
display,
adjusted
power
to determine if this noise is electrical
the
put
increases,
then the
so that smooth
polarity protection.
wires are hooked
engine
then it's electrical.
problem
moved out of the
wiring
in
neutral,
is cavitation. To
water flows over
No
damage
backwards.
up
is connected
and
If it
will
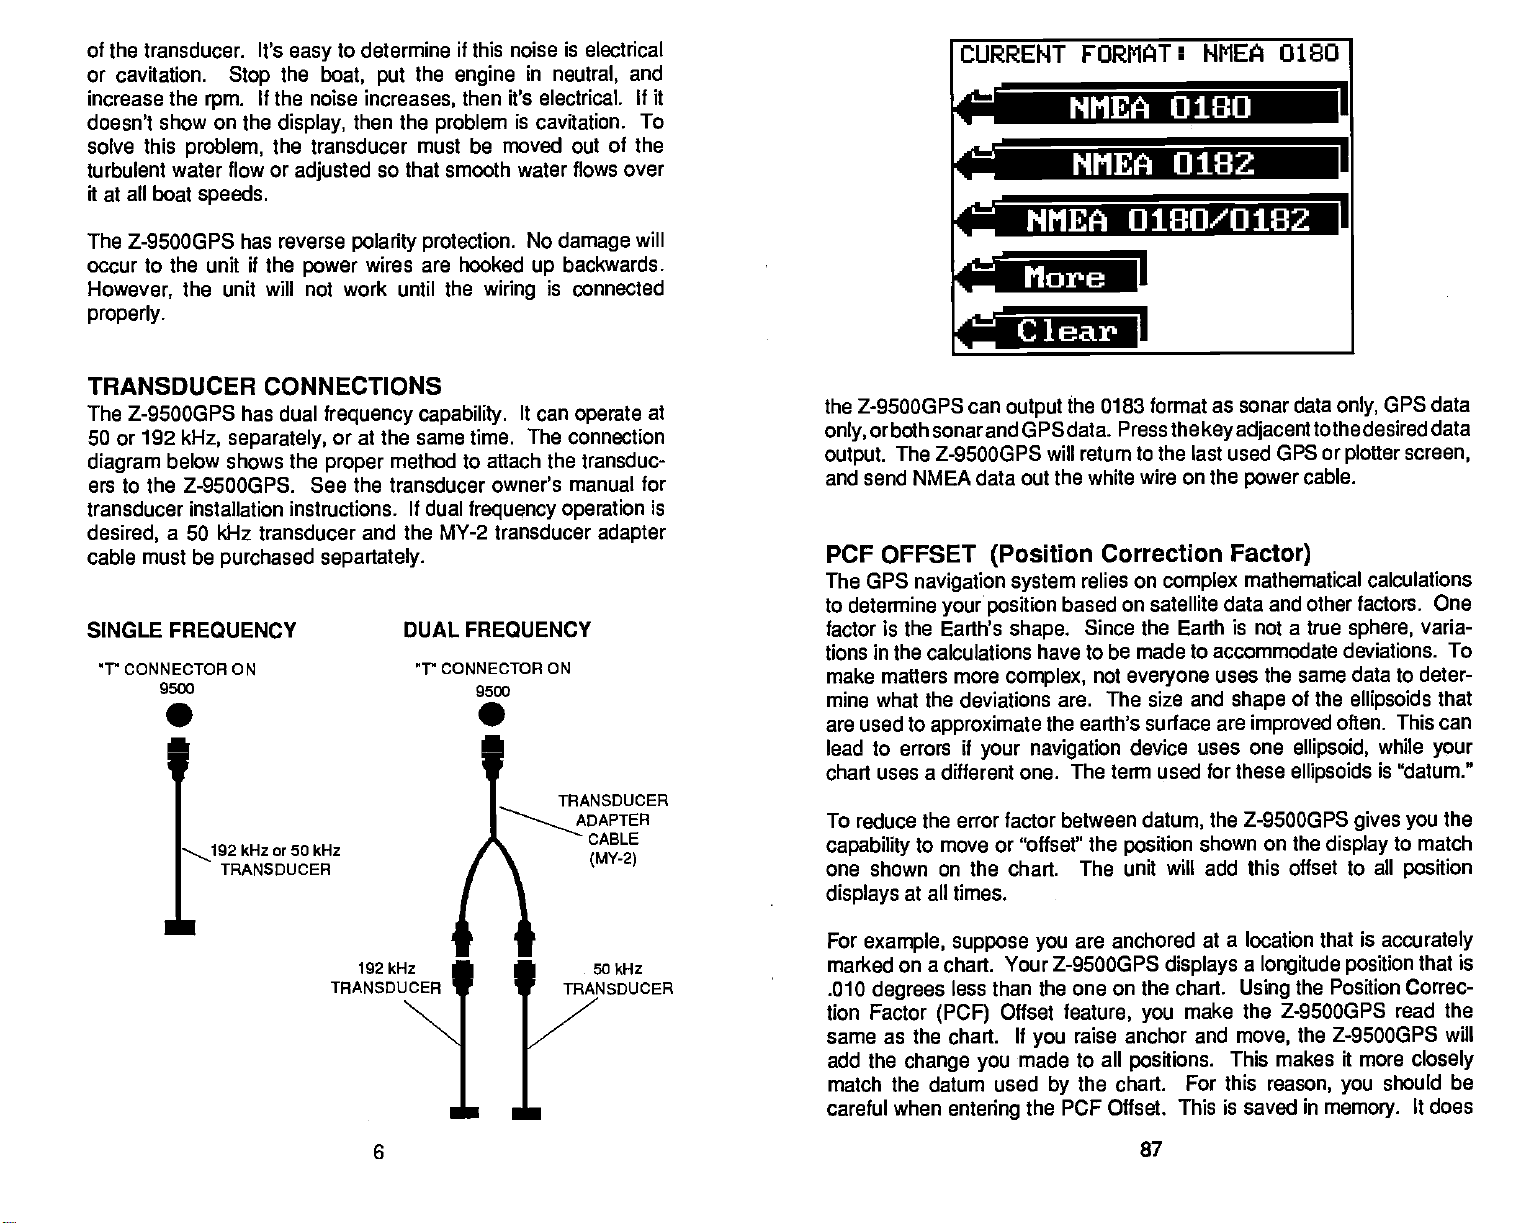
CURRENT FORMAT: NMEA 0180
K —
r
NMEA 0180
NMEA
NI'IEA
0180/0182
0182
=
I
I
TRANSDUCER CONNECTIONS
The Z-9500GPS has dual
50 or 192
diagram
ers to the Z-9500GP5. See the transducer owner's manual for
transducer installation instructions. If dual
desired,
cable must be
SINGLE FREQUENCY
kHz,
separately,
below shows the
a 50 kHz transducer and the
purchased separtately.
frequency capability.
or at the same time. The connection
proper
method to attach the transduc-
MY-2
DUAL FREQUENCY
It can
operate
frequency operation
transducer
at
is
adapter
'r CONNECTOR ON 'r CONNECTOR ON
9500
9500
• •
'
TRANSDUCER
ADAPTER
kHz or 50 kHz
TRANSDUCER
II
192 kHz
TRANSDUCER
CABLE
(MY-2)
• 50
TRANSDUCER
the Z-9500GPS can
orboth sonar and GPSdata.
only,
output.
and send NMEA data out the
PCF OFFSET
The GPS
to determine
factor is the Earth's
tions in the calculations have to be
make matters
mine what the deviations
are used to
lead to errors
chart uses a different one.
To reduce the error factor between datum,
capability
one shown on the chart. The unit
displays
For
marked on a chart. Your Z-9500GPS
.010
tion Factor
same as the chart.
add the
match the datum used
careful when
The Z-9500GPS
(Position
navigation system
your position
more
approximate
if
your navigation
to move or "offset" the
at all times,
example, suppose you
than the one on the chart.
degrees
less
(PCF)
change you
Offset
entering
the 0183 format
output
will return to the last used GPS or
Pressthe
white wire on the
Correction
relies on
based on satellite
shape.
complex,
If
made to all
Since
not
are. The size and
earth's surface are
the
The term used for these
are anchored
feature,
raise anchor and
you
the chart. For this
by
PCF Offset. This is saved in
the
complex
the Earth is not a true
made to accommodate deviations. To
everyone
device uses one
position
will add this offset to all
displays
make the Z-9500GP5 read the
you
positions.
as sonar data
key adjacenttothe
cable.
power
OPS data
only,
desired data
screen,
plotter
Factor)
mathematical
data and other factors. One
uses the same data to deter-
of the
shape
improved
ellipsoid,
ellipsoids
the Z-9500GPS
shown
at a location that is
on the
a
longitude position
the Position Correc-
Using
move,
This makes it more
the Z-9500GPS will
reason,
calculations
sphere,
ellipsoids
often. This can
gives you
display
you
memory.
varia-
while
is "datum."
to match
position
accurately
that is
closely
should be
It
that
your
the
does
6
87
PDF compression, OCR, web-optimization with CVISION's PdfCompressor
Page 11
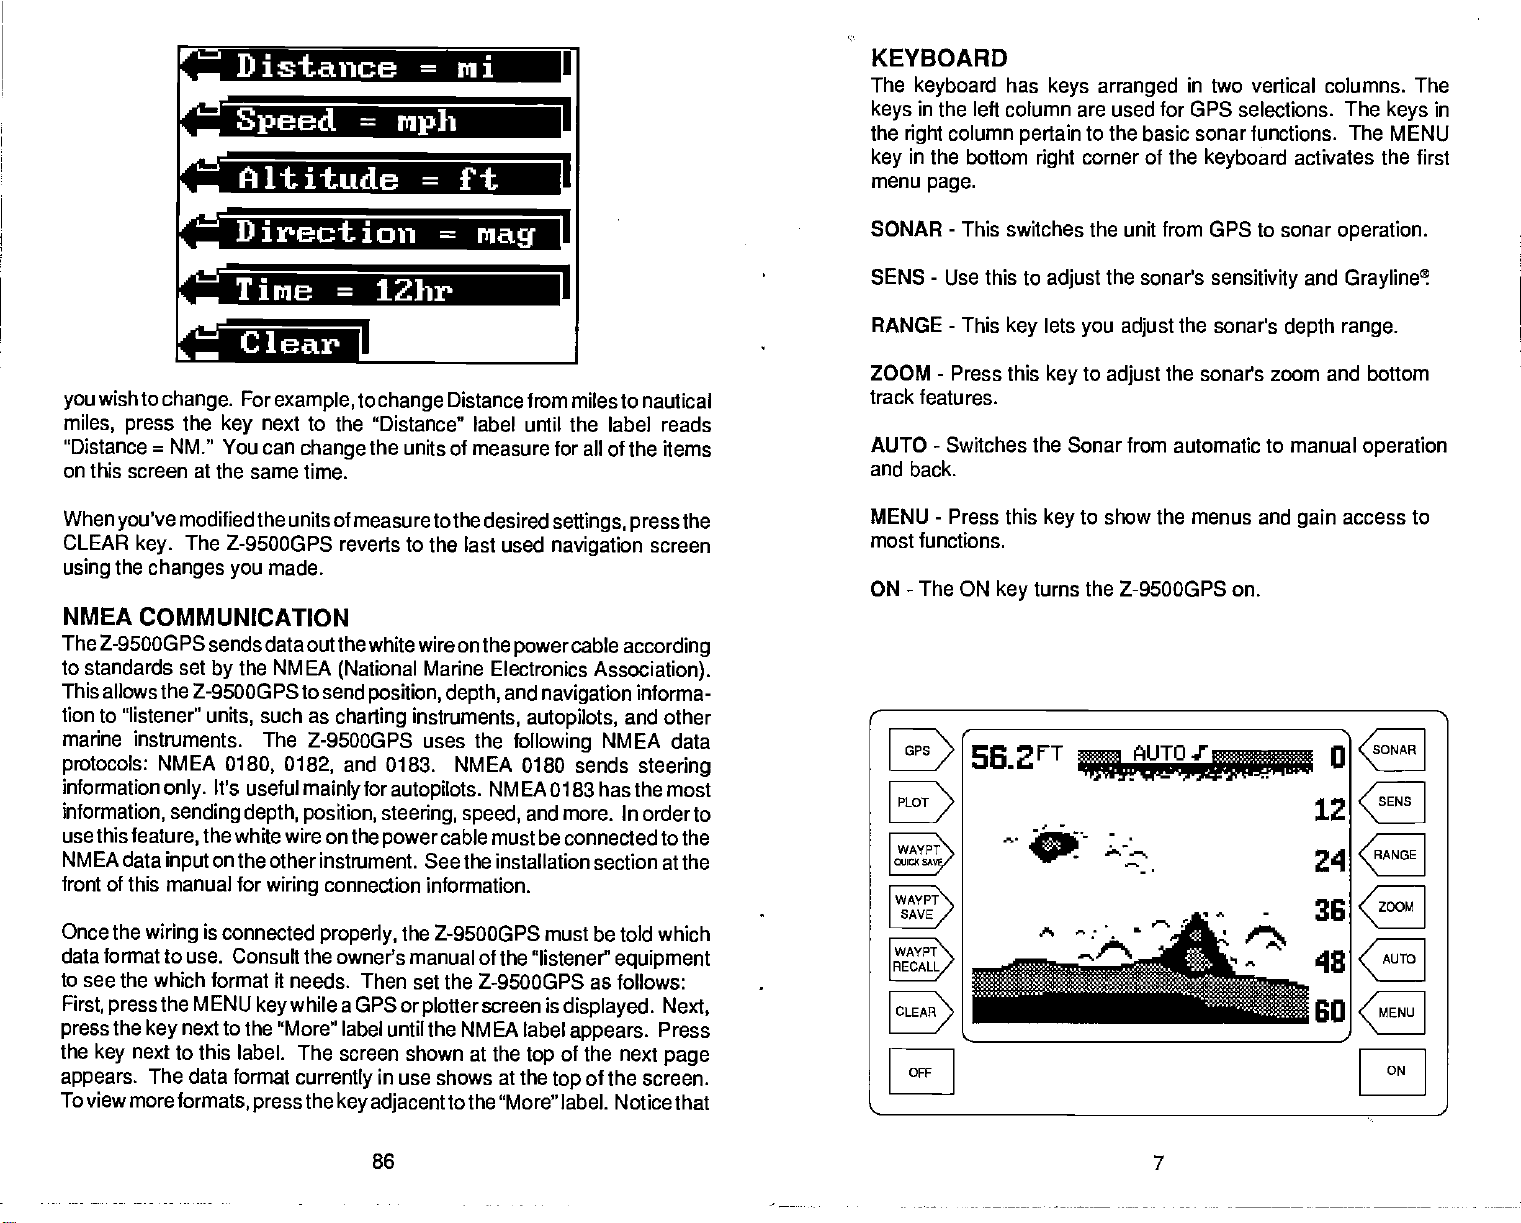
Distance
M
Speed
Altitude
=
=
mph
=
ni
ft
KEYBOARD
The
keyboard
in the left column are used for GPS
keys
the
right
in the bottom
key
menu
page.
has
column
keys arranged
pertain
to the basic sonar functions. The
corner of the
right
in
two vertical columns. The
selections.
keyboard
The
keys
MENU
activates the first
in
r'a
Direction
Time
=
lZhr
=
nag
a
wish to
you
miles,
"Distance
on this screen at the same
When
CLEAR
using
NMEA
The Z-95003PS
to standards set
This allows the Z-9500GPS to
tion to "listener"
marine instnjments. The
protocols:
information
information,
use this
NMEA data
front of this manual
Once the
data format to
to
see the which format it needs. Then set the Z-9500GPS as
First,
press
the
key
appears.
view
To
change.
press
=
NM." You can
you've
the
press
the
modified the
key.
changes you
COMMUNICATION
NMEA
only.
sending
feature,
input
wiring
the MENU
key
next to this label. The screen shown at the
The data
more
formats,
For
example,
the
The
use. Consult the owner's manual of the "listener"
next
next
key
units of measuretothe desired
Z-9500GPS reverts to the last used
made.
sends data out the white wireon the
the NMEA
by
such
units,
0180, 0182,
It's useful
depth, position, steering, speed,
the
white wire on the
on
the other instrument. See the installation
for
wiring
is
connected
while a GPSor
key
to the "More" label until the NMEA label
format
currently
press
to
change
to the "Distance" label until the label reads
change
time.
Z-9500GPS uses the
mainly
the
the
(National
send
position,
as
charting
and 0183. NMEA 0180 sends
for
powercable
connection information.
properly,
in use shows at the
key adjacent
Distance from miles to nautical
units of measure for all of the items
settings, press
navigation
powercable according
Marine Electronics
and
depth,
instruments,
autopilots.
the Z-9SOOGPS
plotter
tothe "More"
navigation
autopilots,
following
NMEA 0183 has the most
and more. In orderto
must be connected to the
must be told which
screen is
top
top
SONAR
SENS - Use this to
RANGE - This
ZOOM - Press this
track features.
AUTO - Switches the Sonar from automatic to manual
and back.
the
screen
Association).
informa-
and other
NMEA data
steering
section at the
equipment
follows: _______
displayed. Next,
next
Press
page
appears.
of the
of the screen.
label. Noticethat
MENU - Press this
most functions.
-
ON
The ON
WAYPT
SAVE
OFF
-
This switches the unit from GPS to sonar
the sonar's
adjust
lets
key
key
you adjust
to
key
key
turns the Z-9SOOGPS on.
adjust
to show the menus and
sensitivity
the
sonar's
the sonar's zoom and bottom
56 2FT
operation.
and
Grayline!
depth range.
operation
access to
gain
ó
12CE
0
A
r.
'mit',
flis
21CE
36
CE
ZOOM
ON
86
7
PDF compression, OCR, web-optimization with CVISION's PdfCompressor
Page 12
-
GPS
WAYPOINT QIJICKSAVE
WAYPOINT
WAYPOINT
The GPS
PLOT - This enables the GPS Plotter function,
location or
ing OPtOfl5.
memory.
"waypoint"
SAVE - This feature
RECALL - This
switches the unit to GPS
key
-
Press this
in
memory. To set the arrival
gives you
is used to recall
key
key
more
operation.
to
instantly
waypoint
waypoints
save a
say-
from
ARRIVAL
The arrival
radius
alarm sounds a tone when
ALARM
alarm sounds a tone when
of a
waypoint.
For
alarm,
example,
first
to the "More" label until the
adjacent
to the
Press the
range
to that label. The
in the arrival alarm's menu to increase the
arrow
up
key
is from .01 to 10 miles.
to the down arrow to decrease it.
next
your position
if the alarm's
within .5 miles of a
come
you
the MENU
press
"Set Alarms" label
screen below
appears.
setting
then
key,
appears.
Press the
is within the alarm's
is .5
waypoint.
press
Now
The arrival alarm's
then the
mile,
the
press
key adjacent
alarm's radius.
key
the
next
key
CLEAR
OFF - Press and HOLD the Off
DISPLAY
The
Z-9500GPS is first turned on. A menu
on the left side of the screen. This is the
the
keep
turn the
ten seconds and the
-
Use this
-
General
are turned on for
lights
backlighting
the
lights
off,
lights
on,
ss.2FT
L1±./
OFF
to exit from menus
key
key
approximately
used on the
press
press
lights
display
the
key
the
key adjacent
will
automatically
adjacent
_
A"iA
to turn the Z-9SOOGPS off.
appears
and
keyboard.
ten seconds
at the same time
menu. It controls
Light
If
you
to the
to the OFF
ON label. To
label,
turn themselves off.
U
12CE
24
CE
-
'6
CE
when the
wish to
or wait
ON
CPS Alarms
ARRIUAL
O.05M1
To turn the
word "OFF"
Press the
UNITS
The Z-9SOOGPS can
different units of measure.
miles,
To
change
key
press
of the next
top
The unit
screen. To
arrival alarm
appears.
CLEAR
off,
to exit from the GPS
key
OF MEASURE
display
For
nautical
the units of
next to the "More" label until the
the
key adjacenttothe
or kilometers.
miles,
measure,
page appears.
of measure for all of the
one or
change
all, simply press
ALARM
CII 0. I.
ALARM
OFF
the
press
distance, speed,
example,
"Change
key
distance can be
first
press
"Change
Units" label. The screen shown atthe
items on this menu are shown on this
I
to the down
next
alarm menu.
altitude,
the MENU
Units" label
the
key adjacent
arrow until the
degrees,
displayed
then
key,
appears.
tothe label that
and time in
in
statue
the
press
Now
8
85
PDF compression, OCR, web-optimization with CVISION's PdfCompressor
Page 13

CANCELING A ROUTE
To
adjacent
"Cancel Route"
waypoints
navigation
even
the Z-9SOOGPS in a
stop
to the "Route
label. This
after the
information tothe current
the
though
route was canceled.
Planning"
stops
current
Select
route,
waypoint.
the MENU
press
label. Now
the Z-95000PS from
The unit will continue to show
waypoint
Function
then
key,
the
press
untilthe arrival alarm
press
key adjacent
sequencing
the
key
tot he
to
any
sounds,
The menus will also
them
off
by pressing
bottom of the screen.
When the Z-9500GPS is first turned
similar to the one above. The
the
upper
ture is on. A small note
means the alarm
left corner of the screen. The word "AUTO" in the
upper
center of the
disappear
the
display
speaker
after ten
key adjacent
digital
indicates the sonar's automatic fea-
symbol
is enabled.
next to the "AUTO" indicator
seconds,
or
you
can turn
to the CLEAR label at the
the
on,
bottom
display
depth
will
is
displayed
appear
in
PrC ateNullote
E B t
F::
Cancel Route
Clear
Canceling
the Z-9500GPS from
ERASING A ROUTE
To erase a route from
next to the "More" label.
label.
shown below
move the box to the
"Erase" label. This erases the
to exit this menu.
GPS ALARMS
The Z-9500GPS
The CDI alarm sounds an audible tone when
a
preset
section on
page.
a route does not erase the
sequencing
memory,
Now
Next, press
limit. This alarm has
page
the
key
adjacent
appears.
67. The arrival alarm
Use
desired route name. Then
has two GPS
d
NOTE:
route from
through
first
press
press
to the "Erase Route' label.
the
keys
route from
alarms;
already
the
the MENU
the
key
adjacent
memory.
a CDI alarm and an
been
covered in the
operation
1
1
I
1
memory.
waypoints
key,
next to the "Route
to the
the
press
Press the CLEAR
the CDI indicator moves
is
described on the next
It
merely stops
in the route.
then
pressthe key
Planning"
The screen
or down labels to
up
key adjacent
Arrival alarm.
Steering
Screen
to the
key
past
SONAR OPERATION
AUTOMATIC
When the Z-9500GPS is first turned
enabled. This is indicated
screen. The Automatic feature
so the bottom
screen at all times.
To turn Automatic
"Man"
appear, indicating
Automatic
on,
signal
off,
press
by
is
displayed
simply press
the unit is in the manual mode. To turn
the AUTO
SENSITIVITY
The
sensitivity key
unit to
the bottom
High sensitivity
clutter the screen with noise.
shows a
face clutter.
When the Z-9500GP5 is in the Automatic
automatically adjusted
plus
other detail.
Sometimes it becomes
crease the
see more
procedure
automatic
pick up
information,
good
a little more. This
sensitivity.
detail,
to
or manual mode.
on the Z-95003PS controls
echoes. A low
fish
signals,
levels enable
solid bottom
so an
adjust
it is
you
signal
to
keep
gives
necessary
This
typically happens
increase
the same whether the unit is in the
on,
the word "AUTO" at the
adjusts
the
in the
the AUTO
key again.
sensitivity
and other
to see this
Typically,
with
Graylineand
a solid bottom
it the
capability
to
manually
in
sensitivity
the
Automatic feature is
of
top
sensitivity
lower
level excludes much of
target
detail,
the best
mode,
and
range
portion
key.
the
but it can
sensitivity
the
signal displayed,
of the
The letters
of the
ability
information.
also
level
some sur-
sensitivity
to show fish and
increase or de-
when
is indicated. The
you
wish to
the
is
84
PDF compression, OCR, web-optimization with CVISION's PdfCompressor
9
Page 14
To
adjust
adjust
Grayline adjust
The
graph.
the
menu
sensitivity
The
graph gives
sensitivity, press
appears
menu is
menu has
on the left side of the screen. The
immediately
and down
up
a visual indication of the
the SENS
beneath it.
arrows,
A number beneath the down arrow also
level. There are 32
increase the
To
menu's
key,
up
the menu's bar
sensitivity
arrow on the left side of the unit. As
steps
graph
of
sensitivity.
level,
will
grow
the
press
taller and the
Sens.
The
key.
a vertical
plus
sensitivity
shows the
key adjacent
you press
number will
sensitivity
bar
level.
sensitivity
to the
the
SEL. SThRT
WAYPOINT
ROUTE:
WRECK
Enter
Down
____________
Waypt
H 32°24.
DT
BR
I
.lai
SELECT ROUTE
STARTING WAYPOINT MENU
It 1
80°1G. 35?'
32.
6:
G:
¶Wd JSi1
WAYPT 4 21
LIJAYPT
WAYPT
UJAYPT * SI
5JPiYPT * 61
WAYPT
24NM
2
39°M
4 31
* 41
*
71
Cray.
Clear
increase in value. You can
record as it scrolls. When the
release the
To decrease the
down arrow. The
When the
When
speaker
To turn the menus
at the bottom left side of the
key.
sensitivity
reach either
you
will
sound an alert
sensitivity level, press
bar
is at the desired
off, press
also see the difference on the chart
graph
the maximum or minimum
tone.
the
unit.
sensitivity
and the number will decrease.
key adjacent
is at the desired
the
key adjacent
release the
level,
to the CLEAR label
to the
key.
limit,
level,
the
Forward
:ca'i.—i.aI
c—I
sELEcT
The Z-95000PS now
The arrival alarm
seconds. It's radius is
sounds when
reach the last
it off.
Turning
the arrival
to the next
sounds when
come within .1 nautical
you
waypoint
alarm off
waypoint
in the route.
Select
Trauc
1
Route
Direction
II
Clear I
ROUTE TRAVEL DIRECTION
shows
preset
in the
navigation
you
for 0.1 mile.
route,
IMPORTANT!
prevents
to the first
reach
arrival alarm sounds until
the
the Z-9500GP5 from
in
This,
MENU
waypoint
each
waypoint
In other
mile of the
effect,
words,
turns the route off.
on the
for about seven
the arrival
waypoint.
sequencing
route.
alarm
When
you
you
turn
10
83
PDF compression, OCR, web-optimization with CVISION's PdfCompressor
Page 15

other
words,
and 5. But
1,3,
must select
you
After
you've
Your new route is stored
key.
FOLLOWING A
To follow a
"More" label.
Finally, press
below
screen's
is aroundthe desired
tells the Z-9500GPS
suppose you
you
waypoint
selected all of the
ROUTE
route, press
Next, press
the
appears.
right
The
side. Press the
I
wish to travel to3
key
Enter
(
want a route that consists of
then
first,
and 5 in that order when
3, 1,
waypoints
in
memory, ready
the MENU
the
key
next to the "Follow Route"
"Select Route" menu has the list of routes on the
key
route. Then
which route to follow.
press
then
key,
adjacent
next to the
the
1,
for the
press
to the "Route
or down labels until the box
up
next tothe "Enter' label. This
key
waypoint
and
finally
making
route,
press
for use.
the
key adjacent
label. The screen shown
numbers
5. In this
the route.
the "CLEAR"
Planning"
case,
to the
label.
Select Noute
I
Ipi
Down I
L!IJ
JK REEF
TOIlS COUE
WRECK—2
Clear I
GRAYLINP
GRAYLINEThIet5
oes. It
value. This allows
soft bottom. For
turns a weaker
line. A hard bottom returns a
gray
If
without,
helps distinguish
structure.
GRAYLINE is
ence between
require
the
tions.
that's best for
To
menu
GRAYLINE label
the
adjust
Sensitivity.
"paints" gray
line.
have two
you
then the
a different GRAYLINE
Z-9500GPS at
Experiment
adjust
appears
key adjacent
menu to GRAYLINE
you distinguish
on
targets
to tell the difference between a hard and
you
example,
which is shown with a narrow
signal
signals
adjustable.
strong
you.
GRAYLINE,
in the
Now
of
equal
and
power
with
your
press
upper
"Gray."
press
with
Since GRAYLINE shows the differ-
weak
on is
the
target
weeds from trees on the
appears immediately
to the
a
soft,
between
that are
muddy
strong
stronger
and weak ech-
than a
or
weedy
bottom re-
or no
strong
size,
is the
gray
signals, adjusting Sensitivity may
level,
usually adequate
unit to find the GRAYLINE
the SENS
left side of the
label. This
adjust
and the GRAYLINE label to
key adjacent
which causes a wide
signal
one with
stronger signal.
bottom,
also. The level chosen
key.
beneath it.
changes
gray
for
The
display,
to the
and the other
or fish from
most condi-
sensitivity
while the
Next, press
the
sensitivity
arrow to
up
preset
gray
This
by
setting
The
starting waypoint
the next
The route can start at
have a route
You can start at
navigation
the arrival alarm
will
6. It
Finally,
route menu. You can follow a route forward or backward. In our
route,
waypoints
4, 3, 2,
the "Select Route Travel Direction" menu
starting
and 1. Press the
You must tell the unit which
page.
consisting
data to
continue in this manner until
at
6,7,8,9,
of travel.
PDF compression, OCR, web-optimization with CVISION's PdfCompressor
menu
any waypoint
of
waypoint
waypoint
sounds,
waypoint
and 10.
automatically appears
waypoint
in the route. For
waypoints
number
numbers first. When
one
through
if desired.
5,
the Z-9500GP5 will
reach
you
number
Travelling
next to the label
key
5,
travelling
backward would take
82
as shown at the
inthe route to
example, suppose you
ten in consecutive
The Z-9500GPS
reach number Sand
you
sequence
showing
to
waypoint
waypoint
appears.
forward would take us to
number 10.
This is the last
ustowaypoints
the desired direction
top
first.
goto
order.
will
give
number
example
of
Gra9.
Sens.
Clear
11
Au-rot.
Page 16

increase the GRAYLINE level. Press the
down arrow to decrease it. The number in the menu's lower left
corner
gives a graphical
the
change
record)
ment,
press
menu.
the current GRAYLINE level. The bar chart also
gives
indication of the GRAYLINE level. You can see
on the screen
as
you press
the
key adjacent
the
on the menu and on the chart
(both
keys.
After
to the CLEAR label to erase the
key adjacent
you've
made the
to the
adjust-
CHART SPEED
The rate echoes scroll across the
speed.
key adjacent
appear
by pressing
pressing
of chart
To
on the left side of the screen. Increase the chart
the
speed,
change it,
to the "Chart
the
key adjacent
1 is the
first
press
Speed"
key adjacent
to the down arrow. There are 10
slowest,
to the
screen is called the chart
the MENU
label. The chart
arrow or decrease it
up
10 is the fastest.
key,
then
speed
press
menu
speed
steps
the
by
Enter
L
Select
Backsp.
Bight
r
=
For
example,
the
press
of the screen. Now move the box to the
"Select" label
screen. Now
route
and the Z-9500GPS
as shown below.
to name a new route
next to the "Select" label. The letter
key
press
Repeat
the
key adjacent
automatically displays
again.
'WRECK,"
until the word 'WRECK"shows at the
to the "Enter" label. This names the
ENTER NAME:
ABCDEF
OH I JKL
M
NI1P
Q R
STUVWX
YZO 123
456789
move the box to the
"W"
"fl'
and
the select
press
appears
the
key
waypoint
then
'W,"
at the
top
next to the
of the
top
menu
Stop
Speed
SEL. WAYPT.
FOR RQUTE
WRECK
Enter
I—
It'
Waypt
32°24.
80018.
OTG: 32. 24Nt1
BRO: 2 39°M
I
UJAYP
U 1
142'
357'
4* 2
JAW T # 3
JAYP T 4* 4
LI
WAYPT
WAYPT * 6
WAYPT * 7
in the route. Press the
waypoint.
IMPORTANT!
Move the box to the next
are to be used in the route. In
they
* 5
waypoint
number one
next to the
key
waypoint
this until all
doing
up
or
Clear
the chart
Stop
When the chart is
center
START. The chart can be stérted
adjacent
CLEAR label to erase
portion
by pressing
stopped,
of the screen and the STOP label
to the START label. Press the
the
the word STOP
menus.
these
12 81
key adjacent
to the STOP label.
appears
changes
again by pressing
key adjacent
at the
the
to the
top
to
key
Down
Clear
The Select
Waypoint
down until it's on the first
"Enter" label. This selects the
in the route and select it in the same manner. Continue
waypoints
You must select
Waypoint
menu. Move the box that surrounds
in
the route are selected.
For Route menu works the same as the View and Save
waypoint
waypoints
in the order
PDF compression, OCR, web-optimization with CVISION's PdfCompressor
Page 17

ROUTES
Routes
to
more
information to
waypoint
sequences
waypoint
route,
There are four
create and name the route.
Then determine the
Finally,
After these
gives
re-program
waypoints.
(signalled by
and the
the arrival alarm
the unit will ask
the
you
ability
the unit after
When
the first
to
the next
process
steps required
starting
are
steps
completed,
to
arriving
you
waypoint
the Arrival
waypoint. Navigation
repeats.
sounds until
waypoint.
if
you
CREATING A ROUTE
To create a
mode.
adjacent
Finally, press
shown at the
name of the route. The route
Next, press
to the 'Route
first
route,
the
the
key adjacent
of
the next
top
press
key adjacent
Planning"
page appears.
navigate
run a
to create and follow a route.
Next,
you
to several
at each one. A route consists of
the
route,
in the
route. When
Alarm),
When
turn ft off.
you
select the
Now tell the unit to follow the route.
wish to run the route forward or backward.
waypoints
Z-9SOOGPS
the Z-95003PS
information is shown to
reach the last
you
waypoints
without
gives navigation
reach the first
you
First,
used in the route.
having
two or
automatically
waypoint
must
you
the Z-9SOOGPS will start on the route.
the MENU
to the "More"
label. The screen
while the
key
unit is
label. Now
shown below
in
the GPS
press
appears.
the
to the "Create New Route" label. The screen
This screen lets
name can have
to ten characters.
up
you
enter the
this
in
a
key
RANGE
When
places
is
called Auto
range
the bottom
unit will
on the screen.
To
change
RANGE
Press a
adjacent
these arrows to
change
range.
-
Automatic
turned on for the first
the bottom
can be
depth goes higher
change
the
key.
key
to
the
signal
Ranging
changed
the
range
range
Now
press
Bange
the Z-9SOOGPS
time,
in the lower
and is
part
while the unit is in automatic.
(autorange)
while the unit is in
the
portion
of the automatic function. The
or lower than a
key
adjacent
of the screen. This
to
preset depth,
the bottom
keep
automatic,
to the
automatically
However,
the
signal
the
press
arrow to
up
if
Select Function
!'Create
New
Erase Route
Follow
Cancel Route
I'-
To
move the box to the desired letter.
"Select" label. The selected letter
"ENTER
the
line will be erased.
the route's
spell
NAME:"
"Backsp."
name,
message.
label. Each time
use the
To erase the last
keys
Now
appears atthetop
you press
80
PDF compression, OCR, web-optimization with CVISION's PdfCompressor
Route
Route
next to the left and
the
press
this
letter,
key,
key adjacent
of the screen underthe
press
the letter at the end of
I
I
I
I
right
the
labels to
next to
key
to the
the
Clear
decrease the
increase it. The
500, 800, 1000, 1500, 2000, 3000,
ranges
400, 600, 1000, 1500,
range
are
0-5, 10, 15, 20,
to the CLEAR label to erase the menus.
NOTE: The Z-9500GPS won't let
move the bottom
lower than the first 60%.
or the
ranges
signal higher
key adjacent
are:
0-10, 20, 40, 60, 80, 100, 200, 300,
5000,
25, 30, 40, 60, 100, 150, 200, 300,
and 3000 meters. Press the
you
than the
13
to the down
and
9000 feet. Metric
key adjacent
select a
first 25% of the
range
arrow to
that will
screen,
or
Page 18

RANGE
The Z-9500GPS
in the manual mode. Both the lower and the
adjustable.
To
change
manual mode.
manual mode. Next,
choice. You can
arrow in the RANGE menu. This increments the lower limit the
same as in automatic
exact
menus.
-
the
upper
Manual
gives you
range,
and lower
first make certain the Z-9S000PS
If
necessary, press
press
press
(see previous section),
more control over the
the AUTO
the RANGE
a
key corresponding
depth using
the
key
key.
to the
or
Upper
when it's
range
limit
upper
is in the
to switch to the
Now
upper
you
and
have a
you
or lower
enter the
can
Lower Limit
are
At the screen's
displayed.
waypoint
fromyourpresentposition
numbers are listed atthe bottom
box.
waypoint
black box moves to
distance to
boxtothe desired
label to recall the
navigation
number.
Waypoint
number, press
upper right
The
position
number one is shown in reverse.
and
go,
waypoint
information to the recalled
for this
Distance to the
show underthe
the
key adjacent
each
waypoint
bearing display
number,
waypoint.
corner is the
waypoint
waypoint
is
position.
of the screen.
to the
number,
at the
top
then
pressthe key adjacenttothe
Z-95000PS will
The
waypoint
waypoint
shown
and
This is the
number
directly
bearing
The firstseven
beneath the
to the
waypoint
currently
waypoint
waypoint
selection
To select a different
or down labels.
up
the
waypoint's
As the
location,
of the screen. Move the black
Enter
immediately
on the GPS screens.
show
Number
Number
press
Waypt.
N 32°23.
U
menu
gives you
the
Waypoint
Num" label. The menu shown below
Recall
Pos
184'
287'
Uaypt.
another
key.
It
Now
way
press
to recall a
the
key
appears.
Press the
next to the
UPPER label
to
limit
Press the
next to the
LOWER label
to
lower limit.
adjust
adjust
key
upper
key
the
Range
Upper
______________
Lower
_______________
Clear
Destination
The Destination
waypoint.
To use this
adjacent
feature,
to the 'test.
Waypoint
Waypoint
first
Waypt
*101
*1Ei1
10
C
To enter an exact
sponding
Enter
desired
unit. For
adjacent
(Note:
SENS
adjacent
display.
an
left corner of the screen and
to the
Upper
upper
example,
the
to
Since the 5 label is
at this time
key
to the
This
error, press
upper
Upper
Limit:
limit
using
then
2,
ENTER label in the lower
will
change
the
key adjacent
limit
Limit menu arrow. A new menu
0 as shown on the next
the
for a 25 foot
press
pointing
will enter a
the
depth,
keys
the
first
on the left and
limit,
upper
key adjacent
to the SENS
5.)
limit to 25 feet. If
upper
re-if
CLEAR label in the lower
to the
ter the desired number.
the
press
page.
right
first
press
to the 5 label.
key, pressing
Next,
press
corner of the
right
PDF compression, OCR, web-optimization with CVISION's PdfCompressor
corre-
key
appears:
Enter the
side of the
the
key
the
the
key
make
you
Simply press
For
example,
o
keys. Finally, press
will
immediately
GPS screens.
the
if
you
show
Clear
key adjacent
want to
recall
the
key adjacent
navigation
IEnterj
number of the destination
to the
waypoint
number
to the Enter
information tothe recalled
79
10, press
key.
the
Z-9500GPS
The
waypoint
waypoint.
1 and the
on the
Page 19

WAYPOINT RECALL
You must recall a
9500GPS. To recall a
The screen shown below
waypoint.
in
operation
Destination
number
You can usethe View/Go To
that
waypoint
to the
Waypoint
Waypoint
is
your
waypoint,
Number in which
desired destination.
Select Function
in order
appears.
Save View/Save menu.
to use the
first
the
press
There are
Waypoint method,
you simply
navigation
WAYPOINT RECALL
features of the Z-
two choices in
which is identical
The other
enter the
recalling
is the
option
waypoint
key.
a
Enter
Upper
Limit: 0
View Current
_,UieuGo
Dest.
ance1
The other two
waypoint
waypoint (Cancel Waypt. Nay.)
VIEW/GO TO
To select a destination
the
WAYPOINT RECALL
To
Waypt"
options
(View
label.
Best
on this
Current
WAYPOINT
The screen shown below
Wpt)
waypoint
key.
Wpt
a
I—
p——n tiapl
ii 'nI
-a.
To
Waypt
Waypt
Waypt
screen lets
or cancel
from the list of stored
Now
press
Nun. I
view the
you
the
navigation
the
key adjacent
appears.
Nay.
Waypt
H
32°24. 142'
W 80018.
DTG: 32. 24MM
BRG:
UJAYPT It 1
WAYPT
WAYPT It 3
LIJAYPT It 4
wrn'vr #
WAYPT U 6
UJAYPT * 7
239°l1
Upt
I
I
currently
waypoints,
ii
1
357'
recalled
to the current
first
to
the "View/Go
press
Clear
Change
menu. You
or
least ten feet between the
25 to 35
NOTE: The
transducer
factors. You can
both
Upper
show
anywhere
Press
ZOOM
Enlarging
show small detail
several
The first
Zoom
sponding
the lower limit the same
can choose
lower limit between 10 and 9999 feet. There must be at
any
foot
range
depth capability
installation,
fresh and salt water.
and lower limits can be set in
segments
the CLEAR
different,
method used to zoom is to
and Bottom Track menus
to
of the water from the
in between.
or
"zooming"
flexible
the Zoom menu. The screen
any upper
has a ten toot
water and bottom
expect
to erase the menus when
key
the
and tish
way using
limit between 0 and
and lower limit. For
upper
spread.
of the Z-9500GP5
to read
ways
depths
surface to the bottom and
picture
signals.
is a common method used to
The Z-9500GPS
to zoom a screen.
press
appear.
Enter
I
the LOWER LIMIT
depends
conditions,
in excess ot 500
various combinations to
you're
the ZOOM
Press the
instantly splits
4
feet
9,990
example,
on the
and other
feet
finished.
gives you
The
key.
corre-
key
into two
a
in
PDF compression, OCR, web-optimization with CVISION's PdfCompressor
78
15
Page 20

sections. The left side shows a
side screen. All
right
of the ones on the
of the left
the center of the screen shows
that are zoomed
by pressing keys
screen shows the words "2X ZOOM". A vertical
2X ZOOM doesn't
inside the bar on the
pass
The menu labeled
than the one on the
larger
function off. The
targets
right.
on the left. You can move this bar
matching
track the
MX" zooms the screen on the
screen
split
on the
the menus are
After
the arrows in the ZOOM menu.
bottom,
right
right.
disappears
zoomed
left are shown twice the size
the area of the
it
only
side.
The "OFF" label
of a
image
when zoom is turned off.
portion
cleared,
shows echoes
the
side echoes
right
up
left four times
turns the zoom
of the
bottom
bar in
or down
The
that
Save
H 32°23. 184'
1.4 80042.28?'
lean
_____________
•Ic
Pos
Waypt.
U
It
lEnten
______________
__________
Zoom
Clear
the
Simply press
the
assign
to save the
Finally,
position
Remember,
under a
the correct
press
as
waypoint
key adjacent
position
position
the
key
waypoint
the New
waypoint
shown at the
as
waypoint
adjacent
number
Waypoint
numberthat
numbers
ERASE A WAYPOINT
To erase a
then
pressthe
down arrow
When the desired
the Erase
leaving
GO TO
The Z-9SOOGPS
storing
position
keys
label. This deletes
it blank.
WAYPOINT
it in the unit's
from the
key adjacenttothe
to select the
waypoint
Press the CLEAR
you
gives
memory.
to the
waypoint
of the screen. For
top
number
to the Enter
10 and returns
IMPORTANT!
Number method
is
already
before
waypoint
number is
using
"View/Save
waypoint
the
position
key
the
option
to
number(s)
10,
press
The Z-95000 PS stores
key.
that
example,
the 1 and the 0
to the last used
will let
you
in use. Make certain
method!
this
list,
number that
selected,
to exit
enter a
the
press
Waypt."
from
Waypoint
label. Usethe
press
that
from this menu.
position
you
the
waypoint
and
wish to
you
if
want
you
keys.
that
screen.
save a
key
position
are
you
wish to erase.
go
using
Save
key,
and
up
adjacent
number,
to it without
to
the "New
using
key adjacent
Now
simply
show
Once
you've
the CLEAR label to erase the menus.
set the zoom as desired,
16
press
the
key adjacent
to
To
to a
go
Waypoint
the "More" label
to
press
navigation
the
waypoint
Position"
key
data to this
without
method described earlier. Next,
until the "Go To
adjacent
saving
to this label.
position.
first enter a
it,
Waypoint"
The Z-95000P5 will
77
position
label
the
press
appears.
immediately
PDF compression, OCR, web-optimization with CVISION's PdfCompressor
Page 21

Save
Upt
_________ H 32°24. 142'
__________
CEnter
Down
Erase
Clear
At the screen's
displayed.
waypoint
from
numbers are listed atthe bottom
box.
waypoint
black box moves to each
distance to
box tothe desired
label
The Z-95000PS won't let
already
will
it
Waypoint
position. Makecertainthewaypoint
New
The New
waypoint.
you
To use this
merely pressing
More label. Now
The menu shown at
number. Distance to the
your present position
Waypoint
number,
to save the
in use when
let
you
Number
Waypoint
Waypoint
This
want the
upper right
The
position
number one is shown in
press
and
go,
bearing display
waypoint
position.
you
overwrite a
(see below)
Number
Number menu
lets
option
position assigned
feature,
first enter a
the
Waypoint
press
the
corner is
for this
show
underthe
of the screen. This isthe
the
key adjacent
waypoint number,
number,
The
position
save a
you
use the
position
the
top
when
you simply
to.
Save
key adjacent
of the next
Waypt
W 80018. 357'
I
OTG 32.24HM
BRG: 239°M
WAYPT ft 1
WAtPT ft 2
W4YPT ft 3
(JJWPT
WAYPT * 5
WAYPT * 6
LIJAYPT
the
waypoint
waypoint
waypoint
at the
then
NOTICEl
Waypoint
methods. Use
numberis
position,
key.
is shown
and
bearing
position.
reverse. To select a different
to the
Thefirst seven
up
the
of the screen. Move the black
top
pressthe key adjacenttothe
is now saved.
position
using
gives
enterthe number of the
in a
waypoint
QuickSave
the View and Save orthe New
caution when
reallytheoneyou
another
you
or use
Next,
your present
press
to the "New
page appears.
U 1
ft 4
7
*.
number
directly
waypoint
or down labels. As the
waypoint's
feature.
way
the
key adjacenttothe
Waypt.
currently
beneath the
to the
waypoint
waypoint
selection
location,
Enter
location that's
However,
saving
wishtouse.
to save a
waypoint
position by
Num." label.
a
that
ZOOM
This feature zooms all echoes and tracks the bottom
same time. It can be used in the
4X
To activate the Zoom Bottom Track
key. Next, press
This will
Track mode. More menus
SPLIT.
rates the screen into two
displays
side of the screen. The left side tracks the
the
Press the CLEAR
4x This
changes
zoom from twice
normal size to
four times normal
size.
press
-
modes.
Pressing
on the left
display
the
BOTFOM
the Z-9500GPS in the Full Screen 2X Bottom
place
at all
key
TRACK
the
key adjacent
appear
the
key corresponding
parts.
normal echoes scroll across the
side,
times, zooming
to erase the menus.
key
__________
screen,
split
function, press
full
screen,
to the Bottom Track menu.
on the
The 2x Zoom Bottom Track
all
echoes at the
side of the screen:
left
to the
Split
bottom,
AUT0t715
the
__________
Split
Simply
and
key
the zoom size
changes
ately.
OFF Press this
key
Bottom Track
function off. The
Z-9500GP5
immedi-
to turn the
will
'—U"
_______________________________
Clear
________ 2X BTM TRK
_
revert to a full
key
normal
to erase
screen,
mode.
CLEAR. Press
this
the menus.
2X SPUT SCREEN
BOTTOM TRACK
at the
signal
2X or
the ZOOM
menu
sepa-
keeping
same
right
it on
time.
24
32
40
48
PDF compression, OCR, web-optimization with CVISION's PdfCompressor
76
17
Page 22

SONAR ALARMS
The Z-9500GPS has three different sonar alarms. The Zone
Only
Alarm
symbol
bar
the
on
Alarm consists of a bar.
triggers
bottom
watch,
sounds atone when the Fish ID feature
the screen.
the alarm. Another alarm is the Bottom Alarm.
signal
will
this alarm. This is useful
"trip"
a shallow water
Any
alert,
echo that
or for
navigation.
appears
displays
inside this
as an anchor
The Fish
a fish
Waypt
Lat/Long:
N 32°04. 242'
WO8O°26.
648'
North/South Lat.
East/West
Long.
I
I
You can also turn the alarm
menu.
speaker
off
through
the
Zone Alarm
To activate the Zone
the
press
next to the "Alarms" label. The screen shown below
Now
the
the
adjustment
bar shows on the far
the
sounds on
To
adjust
label. The menus shown in the middle of the next
key adjacent
the
press
of the next
top
of the
top
and bottom of this bar
top
key
screen,
label
fish, structure,
the zone alarm
Alarm,
next to the Zone Alarm label. The menu at
page appears.
signifying
appears
right
first
press
to the "More" label. Now
The word "ZONE" shows at
the Zone Alarm is active. The
on the left side of the
side.
bottom
bar,
Any
triggers
echoes,
first
press
echo that
MENU
the
display.
appears
the alarm.
etc.
the
next to the
key
key.
press
This alarm
page appears.
Select Function
Audio
Zone Alarm
Alarm Of F
I
I
ALARM
Next,
the
key
appears.
The zone
between
Adj.
Use
Position
a
Press the
west to
key adjacent
saving
The Z-9SOOGPS returns to the Save
the
label. The
position, press
or
press
this menu selection follows.
You haven't
key adjacent
if
east,
the
previous page)
press
View and Save
necessary.
to the "Use Position" label.
position, press
position you
the
the
key adjacent
the
key adjacent
tothe "East/West
after
entered
key adjacent
saved the
Waypoint"
When the correct
the CLEAR
you press
to the "View/Save
waypoint yetl
to the "CLEAR" label. See the
the
shows atthe
to the "Save as #" label as described
IMPORTANT!
section to save this
I
Long."to
To exit from this screen without
key.
Waypoint
key adjacent
You
switchthe
position
screen
of the screen.
top
Waypt."
will lose the
position.
longitude
is
shown,
(shown
to the "Use
To save this
Information on
label.
position
"Save as #" or
press
at the
Position"
if
from
the
of
top
above
you
Bottom Alarm
'!
To
adjacent
the bottom of the zone alarm
adjust
the
to the
Fish Alarn
of the bar shallower
top
or down arrow in the
up
On
or
deeper, press
Upper
first
bar,
18 75
press
the
I
1
the
menu. To
key adjacent
key
adjust
to
View and Save
The View and
waypoints.
or erase a
To save
the
Waypt."
your
Waypoint
label.
Save
You can then
position
present position
Save
The screen shown at the
Waypoint
Waypoint
choose the
from the
key.
waypoint
Then
screen lets
waypoint
list.
as a
waypoint
the
press
key
top
see the list of saved
you
number
using
adjacent
the next
of
to save the
this
method,
to the "View/Save
page appears.
position
first
press
PDF compression, OCR, web-optimization with CVISION's PdfCompressor
Page 23

Save
N 32°09. 264'
W 8003?. 408'
Uaypoint
Zone
Alarn
Saveasll 1
r
!JiewSave
_
ore
Clear
position
label. The Z-9S000PS returns
at the
Enter New
To save a
SAVE
shown below left
Pos." label. The screen
position
key.
Save
H 32°o9. 264'
lii 8O°37. 408'
°
New
New
•
More
!±C1ear
of the screen
top
Waypoint
other than
Next,
press
appears.
Waypoint:
Waypt.
Wa!Jpt.
I
L
your present
the
key adjacent
Now
shown below
Pus.
Nun.
1
Waypt.
I
under the
to the last used screen.
press
ii
waypoint
one,
to the More label. The screen
the
key adjacent
right appears.
first
number
press
I
I
listed on the
the WAYPOINT
to the "New
Waypt.
To
zone
press
next to this label.
adjust
alarm,
the
the
key
AdJ.
Clear
Pressing
keys adjacent
this label moves
the
zone alarm bar
up
the
of the
top
or down.
to
Upper
Lower
Clear
the Lower label. Now the
can
now
adjacent
adjustments, press
the
menus. The Zone Alarm bar will remain on the
lets
To
press
know the
you
turn the Zone Alarm
the
the bottom of the zone alarm bar
adjust
to the
up
the
exact location of the Zone Alarm.
key adjacent
adjustment
and
down arrows. Once
key adjacent
return to the Zone Alarm
off,
to the 'OFF" label.
menu
to the CLEAR label to erase
"Lower". You
says
using
you've
display.
the
keys
made the
menu,
then
This
Now enter the
the
position
position
if
the
longitude
the screen shown at the
position
in
degrees,
is less than 100
is 80
degrees,
wish to save as a
you
minutes,
degrees longitude,
top
and thousands of a minute.
then enter 080. After
of the next
74
waypoint.
add a zero to it. For
page appears.
Rememberto enter
entering
Also,
the last
if the
example,
number,
PDF compression, OCR, web-optimization with CVISION's PdfCompressor
NOTE: The Zone Alarm will not
when the
but it can be used in the
Alarm in the
Split
Z-95000PS is in the Full Screen Bottom Track
Screen mode. To use the Zone
Split
Screen Bottom Track
Split
Screen Bottom
Track,
then turn the zone alarm on.
19
operate
and is not available
mode,
mode,
first enable the
Page 24

Bottom
The Bottom Alarm works off the bottom
echo will
different alarms. It consists of a shallow alarm and a
The shallow alarm sounds a
goes
when the bottom
Use the shallow alarm to warn
deep
The shallow and
different menus.
To turn the Bottom Alarm
press
adjacent
the Bottom Alarm label. The screen shown below
Alarm
trigger
shallower than the alarm set
alarm to alert
the
key adjacent
to the "Alarms" label.
this alarm. The Bottom Alarm is
warning
signal goes deeper
you
to
you
deep
deeper
alarms
on,
adjust identically,
first
to the "More" label. Now
Finally, press
signal only.
tone when the bottom
The
point.
than the alarm set
alarm sounds
deep
of shallow water. Use the
press
such as a
although through
the MENU
the
key adjacent
drop-off.
press
appears.
water,
Select Function
L°
Shallow Alarn
Deep
Alarm
No other
actually
deep
key. Next,
two
alarm.
signal
point.
the
key
I
I
to
The
plotter
dot is
can use
distance
To
keep
update
chance to see more
To
change
is
displayed.
UPDATE INTERVAL menu
the
key adjacent
down arrow to decrease it. Press the CLEAR
has 200 dots available to
placed
up
away.
at
all 200 dots if
your
This is
last
especially
a continuous line
interval.
Lengthening
history.
the
plotterupdatetime,
Next,
press
to the
plot your
location,
the
up
one is erased
you plot
plotted, you
appears
arrow to increase the time between
a course to a destination
true if
the interval between
To save
first
adjacent
key
use a short
you
may
more
detail,
the
press
to the "Plotter
in the middle of the screen. Now
HOW TO SAVE A WAYPOINT
Waypoints
can then
Plotter
other
waypoints.
latitude/longitude positions
Saving
The Z-9SOOGPS lets
This "Quick Save" feature
fishing
are locations that
navigate
displays.
fishing
You can store
to these locations
Waypoints
or
navigational positions.
Current Position
you
and
navigational
instantly
positions quickly
permits
store in the Z-9500GPS's
you
using
are useful
your present position
as
waypoints.
for
marking shipwrecks,
The Z-9500GPS can store
(Waypoint
save
yourpresent position
the
storage
and
track on the screen.
from the end of the line. You
plotter update
want to
key
the
Quick
of a wreck's
easily.
experiment
plots gives you
use a shorter time.
MENU
keywhilethe plotter
Setup"
finished.
when
Steering,
as a
waypoint
Save
position
As each
that's a
long
time.
with the
a better
label.
press
or the
plots
buoys,
up
You
to 75
memory.
Navigation,
or enter
Method)
as a
waypoint.
or other
The
and
or
C
This is the Shallow Alarm and
corresponding
adjusted
Alarm label was
next
page appears.
played
To set the shallow alarm
Alarm Value" label. The screen shown in the middle of the next
page appears.
this
set the shallow alarm.
gets
at the
example.
shallower
to the desired alarm. The shallow alarm
in this
example,
pressed.
of the screen.
top
Now enter the desired
Now
press
than ten
so the
The screen shown at the
The current shallow alarm
press
the
key
Using
the alarm will sound.
feet,
Alarm menu. Press the
Deep
key adjacent
the
adjacent
this
example,
20
1
to the Shallow
top
setting
key adjacent
depth.
to the ENTER label to
if the bottom
to the
10 feet is used
key
was
of the
is dis-
"Adj.
in
signal
To save
key.
available
through 75.)
This lets
saved.
Saving
This method is similartothe Quick Save method,
the
a
screen shown at the
appears
the WAYPOINT SAVE
says
waypoint
your present position, simply press
The Z-9500GPS
empty waypoint
A
message appears
know the
you
To return to that
immediately
location.
waypoint
waypoint,
Current Position
waypoint
position using
"Save as #."
numberbeforetheZ-9500GPS
this
method,
of the next
top
at
thetop
number.
of the screen. This is
key. Immediately
The number in this label is the first
Simply press
stores
(Waypoint
at the
number
see the
(Save
first
press
page appears.
the
73
the WAYPOINT QUICKSAVE
present position
your
locations are numbered 1
of the screen:
top
assigned
Waypoint
as
#
automatically
to the
Recall section.
Method)
except
it allows
the WAYPOINT SAVE
The
position
yourposition atthetimeyou pressed
beneath this
key adjacent
position
to this label to
in the first
"SAVED AS #1."
position you lust
to view
you
saves it. To save
The
key.
to be saved
is a label that
available
empty
save the
PDF compression, OCR, web-optimization with CVISION's PdfCompressor
Page 25

CLEAR PLOT TRAIL
To erasethetrack
is
displayed.
Z-9500GPS returns to the
present position
new track line.
your
linefromthedisplay, pressthe
Now
in
the
press
the circle. As
key adjacent
plotter,
erases the track
you travel,
MENU
to the "Clear Plot Trail" label. The
the
keywhiletheplotter
and centers
line(s)
plotter
continues to draw
your
(
Shallow
Alarm
10
Turn Alarm On
PLOTrER SETUP
The Plotter
update
menus. See the
interval.
PLO1TER
Radius menu lets
nautical mile when the
the
radius,
press
appears.
press
arrow to decrease it. Press the CLEAR
first
the
key adjacent
The Plotter
the
key adjacent
menu lets
Setup
Pressing
following
RADIUS
you
press
$
—
—
I
I
I
you change
this
key
for more
change
Z-9500GPS is first turned on or
the MENU
tothe
Radius menu
to the
PLOTTER
RADIUS
displays
information.
the circle's radius. The circle's radius is .25
while the
key
"PlotterSetup"
appears
arrow to
up
. 25MM
U F' 0 A T E
I NTERUAL
2 SECONDS
the circle's radius and the
both
the radius and the
preset.
plotter
label. The screen shown below
at the
increase the radius or the down
when finished.
key
is
displayed.
of the screen. Now
top
To
plotter
update
change
Next,
Adj.
L—
The
alarm. The
when the bottom
different so
deep
alarm
only
you
¶Enter
C
Alarm
Value
Turn Alarm Of £
adjusts
difference is the sound the
goes deeper
can tell
and activates
than the alarm
the sound which alarm was
by
Shal
Alarm:
exactly
low
10$
like
alarm makes
deep
depth.
I
I
the shallow
This tone is
triggered.
UPDATE
The
plotter
position.
once
minutes.
When the unit is turned on
every
Clear
INTERVAL
shows
ten seconds. This
your
track
by drawing
I More
L
a solid line behind
forthe first
time is variable from two seconds to ten
72
time,
the
your present
position
is
updated
FISH ALARM
To
use the Fish
on. Now
the "More" label. Now
label.
label. This enables the Fish Alarm.
displays
different tones for each fish
To turn the Fish Alarm
key adjacent
Clear Enter
Alarm,
the MENU
press
Finally, press
a fish
symbol
to the "Fish Alarm Off" label.
first make certain the Fish
key.
press
the
key adjacent
on the
symbol
off,
repeat
Next, press
the
key adjacent
Every
screen,
size.
the above
21
4
ID
the
key
to the
the "Fish
to
time the Z-9500GP5
a tone sounds.
then
steps,
feature is
adjacent
Alarm On"
There are
press
to
"Alarms"
the
PDF compression, OCR, web-optimization with CVISION's PdfCompressor
Page 26

Audio Alarm On/Off The
When the Z-9500GPS is
(speaker)
symbol
is
automatically
at the
top
of the screen.
first turned
enabled. This is shown
the audio alarm
on,
NOTE SYMBOL
-7
0
by
a note
the
with the "D" is the destination. The destination is the
waypoint.
The dotted line is the shortest
location. Follow this
or
path you've
square
waypoint
If
box with a "S" is
is recalled. Thediamond is
are
you
travelled.
yourstarting
travelling
line to
get
on a
path
to the
route,
location. This is
yourpresent position,
position
it's the first
destination from the
to the
waypoint.
waypoint
The solid line is
yourposition
and thecircle
of the recalled
on the route.
starting
yourtrack,
when
MUTE
LABEL
To turn the
key adjacent
To turn the
next to the
key
NOTE: The words
at the
speaker
when the zone alarm is
speaker off,
to the "Audio Alarm Off" label to turn the audio off.
speaker
of the
top
is turned off.
on,
"Audio Alarm On" label.
corresponding
display
MUTE
When
the 'Mute' label
the
key adjacent
gered again.
sonar or GPS alarm sounds
any
appears
to this label
192 KHZ
the ALARM
press
the ALARM
press
to the alarm in ue will still flash
when
the alarm is
For
example,
triggered.
at the bottom of
silences the alarm until it is
16
32
143
164
so
Next,
key.
then
key,
triggered
even if the
the word "ZONE" will flash
(except
the Fish
the screen.
the
press
the
press
Alarm),
Pressing
trig-
PLOTFER MENUS
Pressing
while the
displays gives you
set of menus which relate
only
ing
"More" label on this screen
gives you
other GPS menus.
A
description
menus follow.
the MENU
plotter
to the
plotter.
the
key adjacenttothe
access to the
of the
key
screen
a new
Press-
plotter
r'
1'Clear Plot
______________________________________
——
I
I'
Plotter
Plotter
Plotter
_____________
______________
Clear
II
PLOFrER/SONAR
The
Z-9SOOGPS
and sonardata. When the unit is first turned
plotter
full screen
MENU
"Plotter/Sonar" label. A screen similarto the one below
is on the left side of the
the
Bearing
key
of the screen. Distance To Go
top
to
lets
plotter
while the
Waypoint (BRG) appear
view the
you
shows. To switch to the
plotter displays.
screen,
plotter
the
in the "Full-Screen" mode or both
on,
screen
split
Now
on the
plotter
(DTG),
at the bottom of the screen.
the
press
right.
Plot Radius
Only
/
Sonar
Setup!
or after a
key adjacent
appears.
Position shows at
preset,
mode,
press
The sonar
(RADIUS),
U
1
I
I
the
the
to the
and
MENU
The Z-9SOOGPS uses menus
the functions and features of the unit. The MENU
of these
many
your particular
have to leave one menu and enter another to
function,
the
the choices have been
direction. If
right
the CLEAR
through
the MENU
features,
needs and water conditions.
you
All of the
key.
key.
extensively
allowing you
carefully
ever
lost in a
get
following
22 71
to
guide you through
accesses
key
to
customize the unit to
Although you may
reach the desired
worded to lead
menu, simply press
features are accessed
you
in
PDF compression, OCR, web-optimization with CVISION's PdfCompressor
Page 27

.25 nrn
l:1:S1
0011
O.0Oiiri
.OUrin
CHART FREQUENCY
The Z-9500GPS
or
dently
transducer,
transducer
nections. The chart can
the
simultaneously.
sonar.
digital
operates
other
optional
diagram
r
Chart
on
page
from 50 or 192
The sonar unit comes with a 192 kHz
transducers are available. See the
3 for
operate
from a different
or dual transducer con-
single
Frequency
kHz,
either
indepen-
frequency
I
than
36:3.6 FT
The
plotter's
distance from the center of the circle to the
nautical mile when the unit is first turned on or when it's
Plotter Radius section for information on
Beneath the radius
Track
Waterdepth
in
latitude/longitude displays
Using
You can see
recall a
you
waypoint (see
A screen similar to the one below
radius shows at the
are the
These are used
at the bottom of this screen.
Error
displays.
shows
beneaththe Cross Track
display
the Plotter with a
your present position, starting position,
waypoint.
the
NO ROUTE WYPT * 21
I
I
RADIUS
To use the
Waypoint
Recall
left corner of the screen. This is the
top
Bearing,
Waypoint
plotter
section),
appears.
edge.
changing
Distance To
when a
only
Errordisplay.
in this
then
The
plotter's
the radius.
waypoint
and destination when
manner,
the PLOTTER
press
Ii
PLOTrER
DIsPLAY
radius is .25
preset.
and Cross
Go,
is recalled.
Present
simply
See the
position
recall a
key.
Turn Fish—ID On
—
Clear
The Z-9500GPS chart's
first turned on. To
The menu shown above
key.
adjacent
to the Chart
change frequencies,
Frequency
Select
192 kHz
50/192 kHz
Chart
Speed
Light
L
operating frequency
appears. Next, press
label.
Frequency
50 kHz
I
I
I
'I
is 192 kHz when it's
first
I
I
I
press
the MENU
the
key
l:I:i] 23?°r'i
8.33 iiri
L!IE
Clear
I DEPTH
353.6 FT
IEEE
H 32°OO.193 UJ 79°25.895
PDF compression, OCR, web-optimization with CVISION's PdfCompressor
70 23
I
Now
press
192
kHz,
The unit will
kHz,
the
begin
key
adjacent
or
both 50 and
scrolling
LI
to the desired
192
kHz-split
echoes across the
frequency,
screen
display.
either 50
operation.
Page 28

The
frequency
screen.
NOTE: The 192 kHz
in use will also be
frequency
displayed
for both the chart
at the bottom of the
sonar is enabled when the Z-9500GPS is turned on
time. For more information about the
please
read the
"Digital
Sonar" section.
digital
sonar
and
digital
for the first
frequency,
devices,
longitude position
effect of S/A
If the fix number and HDOP numbers are
(selective availability).
Also shown in the
means the unit is
position
Beneath thefix box
in feet.
and altitude data.
shown on the
fix
box is
showing position only.
display
the mode
display,
"H" stands for Altitude Hold.
is theAltitude
display.
should
also be
shown in
"3D" means it's
This
isyourheight
then the Iatitude/
good,
good, excluding
parenthesis.
showing
above
the
"2D"
both
sea level
49FT
0 7AUTO
-'
50 KHZ 192 KHZ
Dual
Frequency,
is
chart
(Left
operating
CHART DUAL FREQUENCY
The Bottom Track and Zoom
Z-9500GP5 is in the dual
switch to the manual mode
the RANGE
press
changed
The
Frequency
SENS
To
side of the
Press the
and
normal
adjust normally.
to suit conditions.
sensitivity
feature
The screen shown
key.
the
adjust
screen,
key adjacent
Grayline®
sensitivity
key.
and
Grayline®also adjust differently
is enabled. To
sensitivity
or
press
to the
on the
and
right,
Grayline®
Split
at 50
kHz,
features are not available when the
frequency
by pressing
Now
upper
on the
Grayline®
the
key
"Right"
kHz
192
labels
0
16
32
48
64
80
Mode
screen
chart is 192
right
OPERATION
mode. To
the AUTO
and
adjust them,
opposite page appears.
level for the
adjacent
label to
side of the screen.
appear
kHz.)
"zoom" a
lower limits can be
when the Dual
first
left,
to the "Left" label.
the
adjust
and the features
range,
then
key,
the
press
or 50 kHz
sensitivity
The
The box at the
channel. Channels one
screen. Each
switch between
9500GPS
PRN
the
"Track" column. An "5" in this column
is the
bottom of the screen shows the status of each receiver
through
channel tracks one satellite
available satellites to track one
to determine
number)
position.
the channel is
for the satellite. "T" means it's
action is
satellite above
direction from
the satellite.
so far is 52.
seen
taken
being
the horizon in
your position
The
that receiver's
by
largerthe
Typically, any
SNR
in
PLOTTER
The
plotterscreen
and direction of travel.
destination also show.
To use the
the PLOTTER
press
A screen similarto the one
at
right appears.
The diamond is
ent
position.
is
you'vetravelled.
is a
north, south, east,
west marked.
track,
your
compass
shows
plotter,
simply
key.
your pres-
Thesolid line
or
path
Thecircle
rose with
and
a"birds-eye"viewof you rpresent position,
If
you've
I
I RADIUS
l:)] O°pi
(IE
4ij
I
Ic
five are listed on the
available).
(if
The satellite number
tracking
shows
means the receiver is
satellite. If the box is
tracking
degrees.
degrees.
number,
recalled
the
channel. ELV is the elevation of
AZM is the satellite's azimuth,
SNR is the
the better.
number in the forties
awaypoint,
PLOTTER SCREEN
.25 HF'I
0,0O tin
.OOtln
DEPTH
I
I
cIIIIii:
N 32°OO.193
far left side of the
A channel
not current used
(sometimes
in
SAT column. TRK
the
noise ratio for
to
signal
The
highest
is a
the
starting position
SNR we've
good
N
l,J 79°25.895
may
the Z-
by
called
searching
no
blank,
the
or
SNR.
course,
and
II
I
24
69
PDF compression, OCR, web-optimization with CVISION's PdfCompressor
Page 29

Status
This screen shows the state of each satellite the unit is
screen, pressthe
The screen shown below
Display
MEN
U
key,
appears.
then
pressthe key
nexttothe "Status
tracking.
To view this
Display."
Select
Chart
0
rAUTO
wsa
0
15
Left
32
Right
64
AJ
Clear
____z
Press the
STATUS
DISPLAY
Your
present position appears
to the left
Dilution Of Precision. This is a
combination value of horizontal
The smaller the GDOP number
GPS receiver selects
use satellites that will result in
GDOP is to
angles
viewing range.
satellites don't
foresee
Beneath the GDOP
horizontal
crossing angles
lOis
poor
To the
latitude/longitude
the worst is one
(9),
increases. Jitter is the small
words,
the
position "jump
occur. This is called
the
are
are
system geometry problems
GDOP and HDOP
satellites based on
anticipate system problems.
decreasing,
Therefore,
appear shortly. By monitoring
display
crossing angle.
are.
Typically,
for both GDOP and 1-IDOP.
of the GDOP
right
if
you place
in
filter
(1).
a GPS receiver on the
around."
jitter;
PDF compression, OCR, web-optimization with CVISION's PdfCompressor
nearthe
crossing angle
(HDOP),
the better
is,
good crossing angles.
then the satellites could be
the
system may
is the HDOP
the
Again,
1-4
is
display
is the Fix
the receiver is
As the fix number
position changes
small
Very
ft's normal and
of the screen. Beneath this and
top
displays.
before
smaller the number
good,
working.
68
GDOP stands for Geometric
indicator. It shows the
vertical
happens
(VDOP)I
the
crossing angles
GDOP,
therefore it
In other
become unusable if more
the GDOP
they happen.
display.
5-10 is
display.
decreases,
ground
position changes
fair,
Fix shows how well the
The best fix number is nine
around a location. In other
and turn it
in all electronic
andTime
The best
words,
moving
display, you
This shows the
is,
and
the
position's 'jitter"
(TDOP).
are. The
always
way
if the
crossing
out of
the belier
anything
on,
you'll
will
constantly
navigation
tries
to use
your
can
2D,
the
over
see
to
Grayline®on
Press the
side of the screen.
SURFACE CLARITY CONTROL
The
markings extending
below the surface. This can interfere with fish
targets.
caused
more.
Surface
surface clutter
of the
ity
increasing
SCC will affect is 75% of the selected
on a 0-60 foot
be reduced down to 45 feet.
NOTE: SOC is available
off. The SCC menu doesn't
on.
There are 10 levels of SCC available on the Z-9SOOGPS. When
it's first turned
MENU
the SCC label
label. The screen shown at the
key.
next to the Left label to
key
the left side of the screen.
next to the
key
These
by
Clarity
receiver, decreasing
markings
wave
action,
Control
signals
it as the
range
the SOC level is one. To
on,
Next
press
appears.
range
with maximum
80
192 KHZ
adjust
label to do the same on the
Right
(SCC)
from the "0" tine can extend
are called surface clutter and are
boat
wakes, temperature inversion,
for
(SCC
from the
increases. The maximum
only
the
key adjacent
Now
short)
display.
it near the surface and
when the Fish ID feature is turned
appear
press
top
25
reduces or eliminates
SCC varies the sensitiv-
range.
depth
surface clutter would
SCC,
when the Fish ID feature is
to the "More" label until
the
key adjacent
of the next
80
the
sensitivity
many
signals
depth
For
change it,
to the SOC
page appears.
and
right
feet
or other
and
gradually
that
example,
the
press
Page 30

8CC.
0
21
I NO ROUTE
COG__ __
BRG
bJYPT ft 23
IOPTITI
Ii
a—
This
brings up
the
press
each time
portion
of the SCC menu also
To decrease the
Press the
the SCC
key adjacent
you press
SCC,
adjacent
key
the
press
DISCRIMINATION
Discrimination is a noise
In
sonar
terms,
electrical and mechanical sources such as
by
ignition
of the
transducer,
noise can
In all
noise.
cases,
bating
caused
pumps, engine
over the face
36
adjustment
to the
up key.
the
menu. To increase the
arrow. The bar
up
The number
changes
key adjacent
as
you
graph
in
the lower left
change
to the
to the CLEAR label to erase the menus.
rejection
systems
produce
feature that's effective
noise is
and
even vibration from the
unwanted marks on the
undesired
any
wiring,
air bubbles
SCC,
increases
the level.
down arrow.
in com-
signal.
bilge
passing
engine.
display.
It is
If the
destination is too far
appears showing
the
Using
display
XTE
To
changethe
press
label
appears.
digital displays
at the bottom lets
Range
the
appears.
and Alarm
XTE
key adjacent
Press the
_____ STEERING
'I
rto
the direction
.50 0.0 .50
to show
away
to the
at the
top
accurately
you
or alarm
range
to the "More" label
key adjacent
XTE
Range
RflNSE
1.OMI
XTE
ALiRH
on the
waypoint
screen
of the
steer the boat to a
to this
first
until
key.
settings,
and Alarm
steering
as shown above.
along
press
the
"Change
The screen shown below
ARROW
screen,
with the
waypoint.
the MENU
XTE
an arrow
graphical
key.
1&H
Then
Range"
II
I. —
Speaker
Preset
Clear
I More
1Jo lune
I Disc/Sec
I
I
The XTE
is beneath it. Press the
or
The XTE Alarm
alarm
move to the left of course
sounds an alert tone. The XTE alarm
Press the
XTE alarm.
After
Range adjustment
decrease the
setting.
you've
For
key adjacent
finished with the
XTE
sounds a tone when
example,
menu is at the
key adjacent
range.
The
to the
range
your
of the
top
up
is
adjustable
cross
screen,
or down arrow to increase
from 0.1 to
error is more than the
track
the XTE alarm is set to 0.1 nautical mile.
more than 0.1 nautical
by
are from 0.01 to 10 miles.
arrow to increase or decrease the
page, press
to the
or
down
up
settings
ranges
on this
the XTE Alarm
the
mile,
the CLEAR
10 miles.
If
XTE
alarm
you
key
to return to the GPS screen.
26
67
PDF compression, OCR, web-optimization with CVISION's PdfCompressor
Page 31

Q*nnrinn rrnnn NOTE: Discrimination is not available when the ASP feature is
This screen shows a
screen,
Course Over Ground
water
is not recalled.
Error,
'''a
and Track.
the route name
depth (DPT)
graphical display
(Track
display. Only
is
your path you've travelled.)
in
and
use)
(if
(COG),
Distance To Go
of
waypoint
Course
present position,
your
Cross Track
At the
number are
(DTG), Bearing (BRG)
Over Ground is used if a
displayed.
of the
top
Next,
and
waypoint
on. To
change
the level of
Discrimination,
first turn the ASP
feature off. The Discrimination menu doesn't
ASP feature is off.
.rUTO
Disc.
show unless the
0
16
The CDI
The
straight
(Course
Deviation
line down the
middle of the
the shortest distance to the
the
Bearing
the screen marks match
error. This scale is
Line measure the cross track
the
adjustable (see below).
Indicator) displays
display
waypoint. Angled
angled
lines which lets
in the middle of the screen.
is the
Bearing
lines on the left and
error. The scale at the bottom of
know the crosstrack
you
Line. This is
of
right
32
48
3cc.
EIiICI 2E8*r'i
I:J:il 267*1.1
PRESENT
POsITION
Your
present
position
shows the direction
if
steerthe boat until the arrow
you
will arrive at the
you
track. To travel
The
waypoint
it's within the
is
steering
two circles will move closer
screen,
pointing
a small arrow will
the
way
You can erase the track line on the
the MENU
press
the "CIr. Steer Trail" label
erase the track line.
is shown
the boat is
waypoint.
directlyto
depicted by
screen's
appear
to the
waypoint.
then
key,
the
by
heading
always points
The solid line
a
waypoint, tryto keepthe
another circle at the
range.)
together.
at eitherthe
the
press
appears.
lulal 343 FT
STEERING
DISPLAY
circle with an arrow inside. The arrow
relative to the
towards the
extending
top
As
you approach
If the
waypoint
of the screen orthe
top
steering display,
key adjacent
Press the
key adjacent
waypoint.
from the circle is
circle onthe center line.
of the CDI
the
is not
if
desired.
to the "More" label until
In
theory,
waypoint,
display (if
waypoint,
displayed
on the
bottom
To do
to this label to
then
your
this,
the
Clear
192
KHZ
80
There are 10 levels of Discrimination available on the
9500GPS. When it's first turned
one. To
adjacent
Now
above
change
to the "More" label until the Disc/Scc label
the
press
appears.
To increase the
arrow. The bar
press
in
as
the
The number
also
changes
nation,
it,
key adjacent
Discrimination, press
graph
the lower left
you
key
the MENU
press
to that label. The screen shown
increases each time
portion
change
adjacent
the level. To decrease the Discrimi-
to the down arrow.
When the Discrimination level is at the desired
key adjacent
to the CLEAR label to erase the menus.
the Discrimination level is
on,
Next
key.
the
key adjacent
you press
press
the
the
appears.
to the
up key.
of the Discrimination menu
level,
press
ASP
The newest
technology
Signal Processing
incoming
echoes with a minimum of interference. To our
sonar
signals, rejects
is the most advanced noise
sportfishing
sonar
9500GP5 is first turned on. It's not
turned on or off.
in noise
or ASP. This
today.
Generally, you
ASP is
rejection systems
system constantly
noise
signals,
and
knowledge,
rejection system
automatically
adjustable,
will
want to leave it on.
on when the
is Advanced
evaluates the
displays
available in
but it can be
How-
Z-
key
up
the
true
this
7-
PDF compression, OCR, web-optimization with CVISION's PdfCompressor
66 27
Page 32

if
ever,
detail,
levels of noise
are
you
you may
having problems seeing
wish
to turn the ASP feature off. If there are
present,
ASP will
other small echoes such
problems,
see the sonar
r
Reel 01'
troubleshooting
Systen
Digital
Turn ASP Of F
More I
fish,
not
filter out the
only
as the above. If
section in this manual.
Sonar
structure,
do have noise
you
I
1
LI
I
or other
high
noise,
but
Navigation
This screen
follows:
1. Present
Display
shows all
Position.
2. Cross Track Error
3. Time To Go
4. Time Of
(1TG)
Day (TOO)
5. Distance To Go
6.
Speed
7.
Velocity
8.
Bearing
9.
Course Over Ground
10.
Water
Over Ground
Made Good
to
waypoint (BRG)
Depth (DEPTH)
major navigation
(XTE)
(DTG)
(SOG)
(VMG)
(COG)
information.
The
displays
are as
To turn ASP
adjacent
pears.
returns to
on the
then
to
Now
the sonar screen. You should see an increase in noise
display.
press
FISH I.D.
The Fish l.D. feature
tions as fish. The
nates surface
undesirable. In
Fish l.D. feature
actual fish eóhoes. There
medium,
size between
symbol
symbol
The
cannot
such as
vidual tree limbs
hardest
and
when it thinks a
on a
micro-computer
distinguish
trotlines, turtles,
object
off,
first
press
the MENU
key,
the "More" label until the "Turn
the
press
To
turn ASP on
the
key adjacent
micro-computer analyses
clutter, thermoclines,
most
displays symbols
large.
targets.
larger target,
between fish and other
extending
for the Fish I.D. feature
next to that label. The Z-9500GPS
key
again, repeat
to the "Turn ASP On" label.
identifies
instances,
targets
remaining targets
on the screen in
are three fish
These
is
are used to
In other
target
etc.
sophisticated,
submerged floats,
words,
is a small
outwards from
28
that meet certain condi-
and other
it
but it can be
to
then
press
the
ASP Off" label
the above
steps,
all echoes and elimi-
signals
that are
are fish. The
of the
place
sizes:
symbol
designate
displays
a medium fish
fish,
suspended
air
bubbles,
a
of limbs is the
group
distinguish
small,
the relative
a small fish
fooled. It
objects
etc. Indi-
from fish.
key
ap-
NAVIGATION
DISPLAY
Present
position
expressed
Error
(XTE)
other
words,
destination,
error. Time To Go
travelling
Distance To Go
destination.
travelling. Velocity
at
is
your
as
degrees, minutes,
is
the distance to the left or
if
draw a
you
deviation to the left or
any
(TTG)
your present
(DTG)
Speed
Over
Made
towards the destination.
your present position
Ground
is the
Remember
To
Go,
(COG)
depth
and
of the
,Cross
Bearing
to the
is the direction
water beneath the transducer.
Track
to
waypoint
location in
latitude/longitude
and thousandths of a minute. Cross Track
of the course to a
right
straight
line from
of that line is
right
is the time it will take
speed.
Time Of
Day (TOD)
is the distance from
Ground
Good
Bearing
destination measured in
(SOG)
(VMG)
to
waypoint (BAG)
the boat is
Distance To
Error,
are used
65
is the actual
is the
travelling.
Go,
only
coordinates.
waypoint.
your starting position
cross track
your
to reach the
you
destination,
is the current time.
your present position
speed you
speed you
are
travelling
is the direction from
degrees.
Water
Velocity
when a
waypoint
Course Over
depth (DEPTH)
Made
Good,
is recalled.
This is
In
to the
to the
are
Time
PDF compression, OCR, web-optimization with CVISION's PdfCompressor
Page 33

POSITIONJNAVIGATION
The Z-9500GPS has five main
the
Position,
To view
shown below
the desired screen's label.
Navigation Steering
of the first four
any
appears.
displays, press
To view a
A
Position
DISPLAYS
display
description
modes on the GPS
, Status,
screen,
Display
side. These are
and Plotter
the MENU
simply press
displays.
The screen
key.
the
key adjacent
of each screen follows.
I
to
will no
l.D.
symbols
to the "Turn Fish-l.D. On" label.
longer
You
there are no fish. Practice
mode and
feature.
To turn
press
menu
Echoes
surface clutter
see Fish
may
without to become more familiar
the Fish l.D. feature
the
key adjacent
immediately disappears
will continue to scroll across the
on the screen when
with the unit
first
on,
and the
be
displayed. Any
in
the
press
sonar screen returns.
screen,
both the
with
the
MENU
key.
however,
targets
actually,
Fish l.D.
Fish l.D.
Next,
The
the
the micro-
[J
r
Position
The Position
coordinates. This is
minute.
Error
Depth (DEPTH).
when a
only
information.
Display
display
(Not seconds.)
(XTE),
Distance To Go
waypoint
CrossTrack
Na's.
Display
Steering Display
Status
Display
More I
Clear I
shows
displayed
is recalled. See
your present position
in
Beneath the
(DTG), Bearing
Error,
degrees,
minutes,
present
position display
to
Distance To
the section on
in
and thousands of a
waypoint
and
Go,
waypoints
latitude/longitude
(BRO),
Bearing
I
1
I
is Cross Track
and water
are used
for more
SiFT
•4
FISH I.D.
computer
The Fish l.D. feature cannot be used
the manual mode.
Z-9500GPS is in
matic feature on. If
feature is
The
Fish l.D. feature is on.
targets;
ity.
determines
the
on,
sensitivity
if
can't see fish
you
SOC is also set
are fish will be
If
turn the Fish l.D. feature on when the
you
manual,
Fish ID. feature will be turned off also.
can
the
turn automatic
you
be increased
only
This shouldn't affect the
symbols, try increasing
to a fixed level and cannot be
AUTO:
ON
micro-computer
the Fish l.D. feature is on.
0
12
24
35
displayed
when the Z-9500GPS is
a fixed amount when the
as fish
will turn the auto-
symbols.
off when the Fish I.D.
to
ability
display
the sensitiv-
adjusted
in
when
POSITION
DISPLAY
To turn the Fish
the
key adjacent
AUTO
key.
l.D. feature
to the
This turns the Fish
off,
'Turn Fish-ID Off" label. Or
press
the MENU
key,
then
press
press
the
ID. feature and automatic off at
the same time.
PDF compression, OCR, web-optimization with CVISION's PdfCompressor
64
29
Page 34

DIGITAL
The
Z-9500GPS can
temperature,
upper
temperature sensor.)
plays.
all of the
To
turn all of the
press
the
"Digital
Displays
to the sonar screen.
you
DISPLAYS
left
portion
Each
displays
the
key
On"
distance
of the screen.
digital display
can be turned on or off at the same time.
digital displays
next to the MORE label. Now
Display"
label. This will turn all of the
display
log, time,
When
label. Now
the
it's first turned
can
be turned on or off as desired. Or
on,
depth, speed,
and GPS
(Requires optional
press
press
position
on, only depth
the MENU
press
the
key
displays
the
next to the "All
surface water
data on the
ST-T
speed/
dis-
key. Next,
next to
key
on and return
not
altitude.)
shown at the bottom of the
Now enter
you've
lets
you
positive
below it. Once the
adjacent
Initial
Settings
Now
Altitude
your
entered the
switch the
altitudewhen
to the "Use Position" label. The
screen.
the
press
using
numbers,
numbers
you're
numbers on the
to the
key adjacent
previous page appears
the
on both sides of the screen. After
keys
a new screen
from
positive
above sea
level,
display
Altitude label. The screen
appears
to
negative.
use
negative
are
Z-9SOOGPS then returns to the
Altitude
next.
as shown below. This
In other
numbers if
correct,
words,
press
you're
the
use
key
I'.—
_D
—
_I
To
turn all of the
above. Then
label.
This turns the
'ALL
IN
_I
Digital
Alarns
Depth
isp
lay
More
Clear
displays
the
press
displays
ALL
Character
ul1a:1
Clear
I
oft,
go
key adjacent
off and returns to the sonar
Displays
Displays
Display
Lines
Contrast
to the
to the "All
Size
digital
menu as shown
Oii
Off'
I
I
I
Displays
sGreen.
I
I
I
Off"
+/—
Use Position
The initial
screen
begins
of
flashing
view the satellite
Never
longitude!
than one method to
If
initialize the unit. If
re-initialize the unit. The "Initial
menu
you
appears
its search for the correct satellites.
them,
when the Z-9500GPS has locked onto
navigate
move a
you
page
shouldn't need to
is now
setup
your position displays.
This meansthe unit is not usable for
long
returns
complete.
with
the
present position
see the
data,
with this unit when the
navigate.
distance with the
you preset
to the initial
you
repeat
+10 FT
Toggle
I
I
Press the CLEAR
display flashing.
Once it locks onto at least three
The
latitude/longitude
the
Satellite Status section in this manual.
WARNING!
screen flashes the latitude/
navigation.
off,
you
when needed.
the
Setup"
these
position
unit turned
Z-9500GPS,
menu selection on the GPS' second
setup menu,
steps.
The GPS
key.
The Z-9500GP5
position
necessary
Always
you may
will
definitely
satellites. To
use more
need to re-
Otherwise,
position
will
stop
need to
30 63
PDF compression, OCR, web-optimization with CVISION's PdfCompressor
Page 35

DATE
The next
label to
change
setup
item is
the
displayed
Clear Enter
Now enter the
if the date is October
date,
press
to the initial
month,
the
key adjacent
menu.
setup
today's
date. Press the
date. The
screen shown below
Enter Date
MM/DD/YYYY
05/05/0000
--,--,----
I I 4
then
today's
22, 1991,
to the "Enter" label. The Z-95000PS returns
then enter 10/22/1991. After
date,
and
key adjacent
the
finally
to the "DATE"
For
year.
appears.
example,
entering
the
DIGITAL DEPTH DISPLAY
When the Z-9SOOGPS is turned
depth display
display
9500GPS. It
bottom,
digital
depth.
The
that are accessed
this
cent to the MORE label. This
Now
press
adjacent
menu. As
sonar
sonar on or
feet, fathoms,
finds the
digital depth
menu,
press
the
display
is located at the
comes from a
displays only
the last known
bottom,
function has a number of features and
through
first
press
the
key adjacent
key
adjacent
depth
the MENU
to the
top
separate digital
the boftom
will
it
automatically displays
the
Digital Display
brings up
to the
MORE label.
to the DEPTH label. This is the
can see
you
on or off.
off,
only
below,
the
this menu lets
(NOTE:
display.)
or meters on both the
rLpepth Disp.
on for the first
left corner of the screen.
sonar
depth.
flash on
the
display.
the
time,
built into the Z-
If
it loses the
When the
the bottom
menu. To reach
Next,
key.
the second menu
Digital Display
Digital Depth
doesn't turn the
This
It can also
sonar and the
digital
On
Finally, press
the
press
turn the
you
display
label.
the
I
digital
This
options
key adja-
page.
Next,
the
key
function
digital
digital
in
depth
graph.
ALTITUDE
The next
distance from the GPS moduleto sea level in feet. The altitude doesn't have
to be
ifyou'reontheocean,
within 1000 feet.
altitude and
parameter
precise
yourpresent position.
in orderforthe GPS receiverto find
the Z-9SOOGPS needs is
enterOfeet.
(Calling your
Anywhere
local
airport
Remember,
altitude. This is the
your
yourposition.
else,
simply enteryouraltitude
is the easiest
howeverto askfor
For
to find both
way
example,
elevation,
VEnter Altituder
_Depth
DeptIi
Depth
DeptIi
Clear
in Feet
in Meters
in Fathoms
Disp.
1
Of F
I
I
I
I
in Feet.
To
make a
menu arrow.
FT
Clear Enter
PDF compression, OCR, web-optimization with CVISION's PdfCompressor
62
I 4
CLEAR
display
"Depth
sonar
"FM"
meters,
NOTE:
changes according
change, simply press
If
to exit. For
key
the
depth
in
Fathoms" label. The screen
display
next to the
with the
and "Fr" means the
The
depth
don't
you
in
fathoms, press
depth
digital depth signify
on the
scale
to the selected mode.
the
key corresponding
want to make a
example,
displayed
digital depth
right
31
to make the Z-95000PS
the
key adjacent
will
in fathoms. The letters
fathoms scale. "M" means
is in feet.
side of the sonar screen also
change, press
to the
revert to the
clear,
to the
the
Page 36

SPEEDOMETER
The Z-9500GPS can
meters
tached. The
menu. To
press
adjacent
cent to the MORE label.
label. This is the
"Speed Disp.
hour,
per
display
the
key adjacent
to the
speedometer
On" label to turn the
display
or knots if the
the
Digital Display
Speed
boat
speed
optional speed
can also be calibrated
speed,
to the MORE label. Now
first
label.
Finally, press
menu. Press the
digital speed display
press
Next,
the
in miles
the MENU
press
next to the
key
key adjacent
kilo-
hour,
per
sensor is at-
through
key.
press
the
this
Next,
the
key
key adja-
Speed
to the
on.
North/South Lat.
r
E
—
Initi. Pus:
32°24. 126
N
LJOG1°43. 232'
East/Ijest
Long.
Use Position
I
J
I
Select
The
digital speedometer
first turned on. To
the above
adjacent
steps
to the "More" label. The menu shown below
Function
rate
Speed Disp.
More
Clear
change
to
get
I
I
reads in statute miles
to kilometers
the
Speed
Speed
OFF
per
hour or
per
menu. Then
hour when ft's
press
Select Function
Speed
in
mph
I
I
-
knots,
appears.
-
I
repeat
the
key
Clear
After
entering
Press the
north to
West labelto
the
key adjacent
Initial
Settings
TIME
The time of
screen is
The screen shown below
OF
the
position,
key adjacent
if
south,
changethe longitude.
screen.
DAY
is
day
wrong,
to the
necessary. Likewise, press
"Use Position" label. The Z-9500GPS returns to the
to the
simply
then
press
Enter Tine
24hr I ornat
the screen shown above
North/South label to
the
Whenthe initial
the
present
the
appears.
time at
key adjacent
your
HH:MM
appears.
change
key adjacent
position
location. If the time on the
to the "TIME OF DAY" label.
the latitude from
to the EasY
is
correct,
press
inj
Ifrs
Speed
Speed
in knh
iii knots I
TI
32 61
I
Clear
Enter
screen.
enter 14:00. Twelve
entered
The Z-9500GP5 returns
local time in 24 hour format
your
Forexample,
local
your
if
o'clock noon is
time, press
yourwatch
the
to the initial
reads 2:00 in the
12:00,
next to the "Enter' label.
key
setup
using
midnight
menu.
IEnter
the
on both sides of the
keys
afternoon,
is 24:00. After
then
will
you
you've
PDF compression, OCR, web-optimization with CVISION's PdfCompressor
Page 37

INITIAL
I
POSIT! OH
IITIME
lE
Øl_
CLEAR
OF DAY 5I.rio
DATE 8'2'?"1991
ALTITUIJ
I
__
N :32°iJO.193'
UJ 79025895.'
+75O
INITIAL SETTINGS
This screen lets
when the time
change
the Time Of
goes
you change
from standard to
Day setting.
some or all of the initial values.
daylight savings
A
description
INITIAL POSITION
The first
position
POSITION" label. The screen shown below
of information the Z-9500GPS
piece
in
latitude/longitude.
First,
press
the
For
example,
time, you'll
of each section follows.
needs to start is
adjacent
key
appears.
your present
to the "INITIAL
need
to
Press the
it
you
to the
display
key adjacent
wish to
"Speed
after the
display
in knots" The
key
Speedometer
The
speedometer
the boat's
Calibration menu.
Next,
key adjacent
speed.
press
the "More' label.
Finally, press
The screen shown
display
Calibrate the
the
key adjacent
to the
Then
the
key
Speed
desired
to the
the
speed
is
pressed.
in
Z-9500GPS reverts to the sonar
Calibration
can be calibrated to
reading using
To use this
menu,
to the MORE label. Now
"Digital Display"
the
press
adjacent
below
appears.
to the "Calibrate
Speed Adj:
speed
knots, press
label. Press the
key
label. For
first
press
next to the
Speed:
0.0
the
key adjacent
accurately
the
Speedometer
the MENU
key
"Speed"
Speed"
example,
show
key.
the
press
next to
label.
label.
Now enter
latitude and
your
longitude
on both sides of the screen. Remember to
less than 100
enter 082.
degrees.
For
example,
haiti.
__0
N
u———0
Clear
PDF compression, OCR, web-optimization with CVISION's PdfCompressor
within one
add a zero to the
if
longitude
your
Pos
_1
——.
60
degree (10) using
is 82
Bk—Sp
the
longitude
degrees,
keys
if it's
then
Clear I
The current boat
screen. To increase the
to the
key adjacent
changes,
immediately
miles
will decrease the
The
The best
else drive the boat
Time how
arrow on the
up
the amount of the
hour,
per
displayed speed
way
long
speed
"Speed"
to the down arrow. As the
below it. For
pressing
displayed speed by
would then be 9 miles
calibrate the
to
through
it takes to travel the
is
displayed
displayed speed, press
menu. To decrease
change
example,
the
key adjacent
speedometer
a measured mile
33
on the
in
percent
if
are
you
to the down arrow once
-1
or 1 mile
%,
per
is to have someone
at a constant
then calculate
mile,
side of the
right
the
displayed
traveling
hour,
key
it,
also
adjacent
press
per
the
speed
displays
at ten
hour.
speed.
your
Page 38

actual
speed using
run
through
actual
your
two. This will cancel out
by
boat. Use this result to correct the
Now either calculate the
eter is
speed.
or run the boat at the same
off,
the measured mile and
is
speed
For
with the
tion,
speed,
displayed.
example,
speedometer displaying
and 4 1/2 minutes to
we find that the boat was
the first time
Adding
mile
Changing
more accurate.
these two
hour actual
per
the
this formula:
the mile in the
Now add
percentage
adjust
it
through,
speed adjust
7
took
together
speed.
minutes to run
go
and 13.3 miles
60/Time=Speed.
opposite
your
any
the
direction.
two
speeds together
wind or current effects on the
speedometer.
the Z-9500GPS's
that
speed
speedometer
through
10 miles
a measured mile
hour in one direc-
per
the other direction.
actually going
and
dividing by
This is an
8.5 miles
hour the last time.
per
two results in a 10.9
approximate
to +1% will make the
Again
you
until the correct
Calculating
TEMPERATURE
The Z-9SOOGPS can
degrees
Fahrenheit or Celsius with the
display
sor installed. When the Z-9GOOGPS is first turned
temperature display
Next,
key.
brings up
the
Digital
MORE label
ture label. The screen shown below is the
press
the second menu
Display
again. Finally, press
is off. To turn it
the
label.
the surface water
key adjacent
page.
Next,
Now
press
the
optional temperature
first
on,
press
to the MORE label. This
the
press
the
key
key adjacent
key adjacent
next to the
temperature
Now make the
calculate
and divide
speedom-
ran
through
our
hour
per
1% error.
speedometer
temperature
sen-
the
on,
digital
the MENU
to the
Tempera-
menu.
in
to
GETTING STARTED
Initialization
The
Z-9500GPS must be initialized
turned on. This initialization
the
following
1. Present
2. Elevation above
3.
Today's
time the Z-9500GPS is turned on and the GPS
Every
screen shown below
use at
power
-
Power On
data:
position
date and time
in
latitude/longitude
sea level
appears.
on. This is needed
or
"told where it is" the
is
process
(altitude)
This shows the datathatthe GPS module will
usually
the Z-9500GPS to tell the GPS module
by
IN IT I AL
POSITION
tullE
I
I ALTITUDE
OF' DAY
DATE
8/27/1991
VERIFY SETUP:
Lamp
CLEAR IF OK.
Clear
Initial Data
Screen.
Displays
when Z-95OO° is first turned on.
done
only
key
once and
UflhuI1o1
Change
is
I
I
first
time it's
requires
pressed,
the
Temp Disp.
Temp
Temp
in
in
Temp Disp.
Clear
PDF compression, OCR, web-optimization with CVISION's PdfCompressor
I
34
On
Deg.
Deg.
Off
F
C
I
I
I
I
which satellites are visible so it can determine
check it
it is
correct,
automatically
change any
first time
very
pressing
NOTICE! DON'T INITIALIZE THE UNIT WHILE ThE Z-O500GPS'S GPS SIMULATOR IS
time
every
simply press
clear when the unit calculates
of this
you
the screen shown at the
it,
turn the unit on to make certain that it is correct. If
you
the CLEAR
data, press
use the
the
Z-9500GPS,
key adjacent
top
ON!
59
your position
to erase the screen, It will
key
your position.
to the
need to
you'll
of the next
page appears.
faster. Please
If
"Change"
this
press
need to
you
label. The
After
key.
Page 39

ACCURACY
You
The DOD
However,
us and other unauthorized
coding.
Civilian GPS receivers use what's
intentionallyworsethanthe military's
worldwide can benefit from excellent
keeps
cally1
than
have heard tales of
may
requires accuracy
the
only
In other
military gets
words,
the most accurate
C/Acode can
adequate
give
for most
extraordinary accuracy
of 10 to 15 meters
this
people
the data
system away
accurate
people.
coming
position
from GPS receivers.
from the satellite
using
The
the more
precision.
from
from the
known as "C/A Code." It's
"P Code."
position
Inthis
fixes. Meanwhile,
from
potential
fixes
upto
the
way
military keeps
precise system
satellites is
manner,
enemies. Theoreti-
15 meters. This is more
system.
is
encrypted.
accuracy
is
civilian users
the
military
Press the
temperature
ing
seen
temperature
degrees
the
ture will
key adjacent
echoes
in the
Celsius,
next to the
key
display
DISTANCE
the information
Using
9500GP5
automatically keeps
display
on. The screen
across the
left corner
upper
in
degrees
back to the
go
"Temp
in
degrees
LOG
to the
"Temp Disp.
display.
of the screen. It
Fahrenheit.
in
Deg.
C.
from the
track of
On" label to turn the
will clear and
The
digital temperature
If
wish to
you
Temperature
C" label. The
optional
speed
the distance traveled.
scroll-
begin
can be
will
display
change
menu and
press
digital tempera-
sensor,
the Z-
the
to
However
accuracy
called
"SelectiveAvailablity"orSA.
added to
course,
horizon, signal-to-noise
more the
(the
not
may
off the screen even
Don't let
updates
use.
Accuracy,
systems.
market
NOTE: The altitude
the OPS
display
section
The EAGLE CPS
This GPS receiver
GPS receivers.
acquire
information to the Z-9500 once
GPS receiver
turing capabilities, Eagle brings
OPS marine
of this
(as
in
the
the
system
accuracy
writing),
hands of the world.
so
also
better),
be usable if the SA is
while
this
discourage you,
other
than
systems (such
the
military
your accuracy
depends
ratio,
and other factors. The smaller
on the
the number of satellites tracked at one
high,
you're sitting
however. GPS
even with SA on is still better than most other
You've
today.
purchased
We
hope you'll enjoy
display
receiverto calculate both
can be caused
one of the finest
is also affected
position
variations in SA and the
by
in this manual for more information on the
Module
(manufactured by Rockwell)
It's
small, rugged,
and track
technology
five satellites at one time. It transmits
to
up
every
with
Eagle's
to the consumer the most advanced line
navigation systems
available in the world.
PDF compression, OCR, web-optimization with CVISION's PdfCompressor
isn't satisfied with C/A's
So,
This is
will
it's
degrading
small,
typically
angle
it further with
random errors
within 100 meters. Of
be
of the satellite
ranges
because
as
and fast. The five channel
58
your present position
still.
nature has much
by
Loran),
it for
and
typically
navigation
many years
SA and the
by
and altitude.
is
currently
second.
state-of-the-art
By incorporating
is much easier to
instruments
to come.
ellipsoid
Errors inthe altitude
ellipsoid.
ellipsoids,
used
design
potential
what's
intentionally
above the
time
on the
plotter
will move
faster
navigation
on the
used
by
See the PCF
in
all
Eagle
design
lets it
position
Rockwell's
and manufac-
of
When the Z-9500GPS
is off. To turn it
key adjacent
menu
label.
press
page.
Next,
the
Now
press
key
first
on,
to the MORE label. This
press
the
next to the Distance
Select Function
Dst
Reset Dst
Dst
More
Clear
Press the
distance
sonar
corner of the screen.
statue miles. If
miles,
to the MORE label.
appears.
key adjacent
log display
display.
back to
go
The distance
you
the Distance
The screen shown a the
is first turned
the MENU
press
the
key adjacent
key adjacent
Log Disp
Log Disp
to the "Dist
on. The screen will clear and return
log
It will
display
to
wish
change
Log
35
the Distance
on,
key.
brings up
to the
the MORE label.
to
label.
Log
On
Log
Of £
Log Disp
can be seen
menu and
On"
the distance
to kilometers
press
top
Log display
Next, press
the second
Digital Display
I
I
I
label to turn the
in the
upper
travelled in
or nautical
the
key
of the next
the
Finally,
to the
left
next
page
Page 40

Select
_Dst
Dst
rbst Log
ia'
Now
press
9500GPS will
The
distance
was first
MENU
This
brings
adjacent
cent to the MORE label
Distance
label to reset
Log"
the
key adjacent
return to the sonar
log displays
turned on. To reset the
key. Next,
up
to the
Log
press
the second menu
Digital Display
label. Press the
the distance
Function
Log
Log
in ni
in km
in NM
to
the desired label.
screen.
the distance travelled from the time it
distance
the
key adjacent
page.
label.
again. Finally, press
log display
Next,
key adjacent
I
L
1
The Z-
to
zero,
log
to the MORE label.
Now
press
the
to the
to zero.
press
the
press
the
key adja-
next to the
key
"Reset Dst.
the
key
GPS-HOWITWORKS
The Global
approach
Defence
to their needs of 24 hour
Basically,
Earth
system
of 24.
nearly
requires
in
latitude/longitude.
it locks on
Positioning System (GPS)
to
navigation yet
and the United States
(DOD)
global positioning,
the
system
11,000
miles in
is
fullyoperational.
When all satellites are in
anywhere
works
space.
Three more
on Earth
at least three satellites to
A 3D fix is
to at least four
satellites,
is the
devised. Conceived
military,
a
by using
There will be 21
place,
twenty-four
your latitude/longitude plus
constellation of satellites
satelliteswill act as
at least four of
hours
a "2D" I ix.
give
it
displays
newest,
the GPS
365
days
satellites
a
day.
(A
a 3D fix.
most
high-tech
the
by
Department
system
a
them
2D fix
is an answer
year.
in
orbit when the
spares,
The GPS receiver
foratotal
will
be
is
your
altitude.)
of
orbiting
in
view
position
When
To turn the distance
the
press
NOTE: The distance
9500GPS is turned off.
key adjacent
log off, go
to the "Dst
log
GPS DISPLAY
Position information can
screen.
are
To
MENU
press
to
page
label.
the
Latitude/longitude,
placed
display position
the More label until the screen
key
on the left side of the
Next,
key.
the
appears.
The screen in the middle of the
next to the
key
adjacent
Now
to the desired
be
information on
the
press
Digital
press
to the distance
Log Disp
is
retained in
displayed
or
distance and
sonar screen.
the sonar
key adjacent
Display
shown at the
the
key adjacent
function. For
36 57
Off" menu.
memory
on the Z-9500GPS's sonar
bearing
to the More label. Now
label. Press the
to the
next
page appears.
example, pressing
menu,
log
when the Z-
to a
screen,
top
"Navigation"
then
waypoint
the
press
next
key
of the next
Press
It takes three satellites
As the
receiver locks on to each
satellite
Each satellite has
the radio
own
speed
calculate distance.
receiver can determine
by
measuring
an
extremely
transmission started. The receiver
thus it
clock,
of
light!)
knows how
to reach
Once
the
length
it.
you
position.
long
If
to determine
satellite,
it calculates the
of time it takes the
accurate clock which tells the
it took the radio
know time and
you
have this from three
position.
radio
compares
signal (travelling
speed,
distance from the
signal
that time
satellites,
to reach it.
receiverwhen
against
its
at the
then
can
you
then the
PDF compression, OCR, web-optimization with CVISION's PdfCompressor
Page 41

CPS TABLE OF CONTENTS
GPS -How IT WORKS
ACCURACY 58
THE EAGLE GPS MODULE
GETTING STARTED 59
INITIALIZATION 59
INITIAL SETTINGS 60
INITIAL POSITION 60
TIMEOFDAV 61
DATE 62
POSITIONINAVIGATION DISPLAYS
POSITION DISPLAY 64
NAVIGATION DISPLAY
STEERING SCREEN 66
XTE RANGE & ALARM 67
STATUS DISPLAY
PLOTTER 69
USING THE PLOTTER WITH A WAYPOINT 70
PLOTTER MENUS
PLOTTER/SONAR 71
CLEAR PLOT TRAIL
PLOTTERSETUP 72
PLOTTER RADIUS
UPDATE INTERVAL 72
HOW To SAVE A WAYPOINT 73
SAVING CURRENT POSITION
WAYPOINTQUICKSAVE 73
SAVEAS#
ENTER NEW AYPOINT 74
VIEW AND SAVE WAYPOINT
NEW WAYPOINT NUMBER 76
ERASEAWAYPOINT
GO TO WAYPOINT 77
WAYPOINT RECALL 78
VIEW/GO TO WAYPOINT 78
DESTINATION WAYPOINT NUMBER 79
ROUTES 80
CREATINGAROUTE 80
FOLLO WING A ROUTE 82
CANCELLING A ROUTE
ERASINGAROUTE 84
GPSALARMS 84
ARRIVAL ALARM 85
UNITSOFMEASURE 85
NMEA COMMUNICATION 86
PCF OFFSET
Set as Position
Set as Offset 89
h,tANOVERBOARD 90
GPS SIMULATOR 91
GPS SELF TEST 92
SPECIFICATIONS
(Position
Correction
Factor)
57
58
64
65
68
71
72
72
73
73
75
77
84
87
88
93
Tine
Navigation
More
J.
Clear
the
display your
Other menu selections let
waypoint,
the desired
next to the "Show
key
current
turn the
feature,
Lat./Long."
latitude/longitude
you display
navigation displays
the Z-9500GPS returns to the sonar screen.
Nau,. Dis. On
Show Lat.
Show Dist.
Nay.
Disp.
Clear
GPS DISPLAY MENU
TIME DISPLAY
To
display
Next,
next to the
key
More label until the screen shown at the
Now
the
top
desired
the time on the sonar
the
press
press
of the next
function.
key adjacent
Digital Display
the
key adjacent
page appears.
screen,
to the More label. Now
label. Press the
to the "Time" label. The screen at
Press the
I
I
label causes the Unit to
on the sonar screen.
distance and
bearing
on or off. After
to a
pressing
I
/Long.
/I3rg.
Of F
press
of this
top
key adjacent
I
1
1
the MENU
key
page appears.
key.
press
next to the
to the
the
PDF compression, OCR, web-optimization with CVISION's PdfCompressor
56
37
Page 42

Time
Display
Oia I
SIiow
Shou 24 hour
12 hour
f'nt.L
f'nt.
Set Tine & Date
':Tine
For
example, pressing
label causes the unit to
Display
TIME DISPLAY MENU
the
display your
next to the "Show 12
key
current time
on the sonar screen. Other menu selections let
time in 24 hour
display
Z-9500GPS returns to the sonar screen.
on and off. After
format,
set the time and
pressing
the desired feature's
CHARACTER SIZE
The
digital
(Note:
are shown in the
on. To
press
adjacent
the Character Size label. Two labels
number
Position and Time show
change
the
key adjacent
to the
displays
size when the Z-9500GPS is first turned
large
the
display
to the More label. Then
Digital Display
Select
have two
in small
only
ize,
press
label.
Next,
appear:
Function
OFF
date,
sizes;
siytall
digits.)
the MENU
press
"Small
I
J.
I
hour fmt."
in
am/pm
you display
or turn the time
press
the
and
The
key.
key
Digits",
format
the
the
key,
large.
displays
Next
the
key
next to
and
Z95OOG,
GPS
OPERATION
WARNING!
USE THIS GPS
CAREFUL NAVIGATOR
OBTAIN POSITION INFORMATION.
This GPS
shortest,
waypoint regardless
not
a
waypoint,
the
most direct
take
only
waypoint
RECEIVER
receiver,
(like
path
of obstructions.
advantage
but will also
is
always
available.
ONLY AS AN AID TO NAVIGATION. A
NEVER
all GPS
to a
of all available
visually
RELYS
CAUTION
navigation equipment)
waypoint.
check to make certain a
ON ONLY ONE
It
provides navigation
Therefore,
navigation
the
tools when
METHOD TO
will show the
data to the
prudent navigator
travelling
safe
clear,
path
will
to
to
Snail
Digits
Large Digits
Clear
I.
38 55
I
I
As of this
GPS
Satellites can beturned off
operators.
accurate as the
writing,
navigation system
the
Department
as
Rememberthat the
system
it's
NOTICE!
of Defense
operational.
oraccuracycan
Z-9500GPS,
using.
The
(DOD)
system
be
degraded
or
any
has not declared the
is still in
GPS receiver is
atesting phase.
atwill
bythe system
only
as
PDF compression, OCR, web-optimization with CVISION's PdfCompressor
Page 43

To eliminate
determine the cause. With the boat at rest in the
thing
you
Make certain the
off.
then turn off ASP
on,
should be a
each
piece
effect on the sonar's
and view the sonar
pump
the
turn
this until all electrical
doing
on the sonar
effect
If
find noise
you
motor, pump,
re-route the sonar unit's
from the
tenna cables radiate noise when
the sonar's wires
keep
sonar unit's
other
wiring
If no noise
then make certain
then start the
neutral.
one of three
Try using
sonar unit's
the
power
problems.
unit when
When no noise
then the noise source is
tests,
or
persons
which function
rest. In
location and/or
ducer must be
water at all boat
br the best
or
minimize the effects of electrical
should do is turn all electrical
also. Turn
engine
steady
of electrical
pump off,
or
wiring
power
on the boat.
displays
If
noise
things; spark plugs,
resistor
power
cable
Make certain to use the in-line fuse
wiring
with limited
nearly
mounting position.
boffom
display.
then turn on the VHF radio
display noted,
interference from an electrical
radio, try
that is
cable
on the sonar unit from electrical
everything except
engine.
appears
spark plugs,
cable
directly
the
power
appears
perfectly
all
cases,
of the transducer. The face of the trans-
angle
placed
speeds.
is
off,
(Advanced Signal Processing).
on the
signal
equipment
display
equipment
to
isolate the
power
causing
from it. You
away
directly
Increase the RPM with' the
on the
away
to the
cable to the
on the sonar unit after all of the above
probably
experience
in shallow
the cause of the malfunction will be the
in a location that has a smooth flow of
Read
on the boat and view the
For
example,
for noise. If no noise is
has been turned
then turned off.
problem.
cable and transducer cable
the interference. VHF radio an-
transmitting,
to the
the sonar unit is turned
display,
alternator,
alternator
from
engine wiring. Again, routing
battery helps
cavitation.
make
water,
transducer owner's manual
your
equipment
your
display.
turn on the
and transmit.
instrument, trolling
so be
need to route the
may
battery
battery.
hasty
to isolate it from
the
problem
or tachometer
filters,
supplied
sonar installations
or when the boat is at
first
noise,
water,
on
Z-9SOOGPS
Now turn on
You can
certain to
equipment,
gearshift
could be
or
routing
eliminate noise
Many
to
try
the first
the boat
There
bilge
present,
Keep
their
on,
usually
away
off,
wiring.
the
with the
novices
in
"Large Digits".
desired. The screen
the
digital
SMALL
DIGITS
Press the
numbers
46FT
H 32°OOO3'
5J 790 59 99'
key corresponding
will
clear
displayed
and retum to the sonar screen with
in the desired size.
to the
digital
0
16
32
tS464
20
192 KHZ
TENTHS
The Z-9500GPS has the
tenths. In other
speed
are turned on or off with a menu selection.
To
adjacent
Digital Display
label. Two labels
Off'. Press the
screen will clear and return to the sonar screen with the
numbers
in tenths of a mile
change
words,
tenths,
to the More label. Then
label.
key corresponding
displayed
capability
it can
per
the MENU
press
Next, press
appear:
in
'Tenths
the desired manner.
Select Funct ion
r
Tenths
Tenths
display
hour,
press
Disp.
Disp.
to show all
the
depth
etc. Tenths for all functions
Next,
key.
the
key adjacent
the
Disp
to the
next to the Tenths
key
On" and "Tenths
desired label. The
On
OFF
numbers
digital
in tenths of a
the
press
I
I
size
in
foot,
key
to the
Disp
digital
I
PDF compression, OCR, web-optimization with CVISION's PdfCompressor
54
39
Page 44

SPEAKER VOLUME
The
speaker
can
you
noisy surroundings.
volume is
alarms or the
hear
Or
you
SpIr.
adjustable.
'beep"
can turn it down in
You can make it louder so
each time
you press
situations.
quiet
a
16
---32
48
64
the
key
in
Bottom echo
reading
1. The
mounted
at all boat
signals, interfering
targets.
2. Electrical noise from the boat's motor can interfere with the
sonar. This causes the sonar to
crimination or noise
eliminate weaker
display. Try using
power
the boat.
and transducer cables
disappears
or weak
transducer
in
The technical term
bottom
a smooth
speeds.
signals
resistor
Air bubbles in the water
with its
rejection
at
high speeds
echo while boat is
be in turbulent water. It must be
may
flow of water in order for the sonar to work
ability
for this is 'Cavitation'.
such as fish or even structure from the
spark plugs
to find the
automatically
feature. This can cause the unit to
or
from other electrical
away
or erratic
moving
disrupt
bottom or other
increase its Dis-
routing
the sonar unit's
digital
the sonar
on
wiring
Clear
To
the
label
Volume label. The
display.
volume or the
The bar
change you
change.
volume is set to
DISPLAY CONTRAST
The contrast of the
different
To
key adjacent
the
key adjacent
The
changes
changes.
CLEAR
the
adjust
key adjacent
appears.
change
speaker
Use the
graph
make. The number in the menu's box
When the Z-9SOOGPS is first turned
conditions.
light
the
to the MORE label. Now
Display
Contrast
to the
key adjacent
with
your
There
to erase the menu.
key
volume,
to the MORE label until the
Now
press
Speaker
key adjacent
key adjacent
will increase or decrease
7.
The
range
display
contrast, press
label. The
arrow to increase the
up
to the down arrow decreases it. The bar
selection. The number in the menu box also
are 31
steps
80
the MENU
press
the
key adjacent
menu
to
appears
the
on the left side of the
arrow to increase the
up
to the down arrow to decrease it.
corresponding
is ito 10.
can be
the MENU
Disp.
changed
for easier
key. Next, press
the
press
menu
appears.
of contrast available. Press the
Next,
key.
Speaker
to the
Volume
Speaker
will
the
on,
key adjacent
display
speaker
reading
Press the
contrast.
press
to the
graph
also
in
the
to
No fish arches when the Fish ID feature is off:
i. Make
most common
Arch section in
2. The
to
display
from the time it enters the cone until it leaves. If the
not
center of the cone.
3. Use the Zoom feature. It is much easier to
when zoomed in on a small
example, you
30 to 60 foot
targets, allowing
4.
arches. If the boat is
on the
ELECTRICAL NOISE
A
major
appears
lines. In severe
black
certain transducer
problem
owner's manual for more information.
your
sensitivity may
a fish
arch,
high enough,
The boat must be
display
cause of sonar
on the sonar's
dots,
the unit
will have much better luck
than a 0 to 60 foot
range
the
as
straight
cases,
or cause the unit
display
is
if a
partial
not be
pointing straight
arch is
high enough.
down. This is the
displayed.
In order for the unit
it has to be able to receive the fish's echo
displays
range
the fish
of water than a
seeing
range.
when it is in the
only
display
large
fish arches with a
This
to show much more detail.
moving
motionless,
at a slow
fish
horizontal lines.
problems
display
it can
is electrical noise. This
as random
completely
operate
trolling speed
in the
stay
cover the screen with
erraticly,
cone, showing
patterns
or not at all.
See the Fish
sensitivity
fish arches
one. For
enlarges
is
the
to see fish
usually
of dots or
PDF compression, OCR, web-optimization with CVISION's PdfCompressor
40 53
Page 45

SONAR TROUBLESHOOTING
Unit
freezes,
1. Electrical noise from the boat's
accessory may
and transducer cables
power
the boat
the
battery
2.
Inspect
wires.
3. Check both the transducer and
certain both are
locks
be
may help.
instead of
or
up,
interfering
Route the sonar unit's
through
the transducer cable for
securely plugged
(cont.)
operates erratically:
with the sonar unit.
from other electrical
away
a fuse block or
in to the unit.
motor,
trolling
power
ignition
breaks, cuts,
power
connectors. Make
motor,
Re-routing
wiring
cable
directly
switch
or
pinched
or an
the
on
to
Disp.
Clear
0
16
32
S
II
80
192 KHZ
Weak bottom
nals:
1.
Make certain transducer is
face of the transducer.
on the
transducer,
mounted inside the
of
layer
NOT use RTV silicone rubber adhesive or MarinetexTM.
2. Electrical noise from the boat's motor can interfere with the
sonar. This causes the sonar to
crimination or noise
eliminate weaker
display.
3. The water
boftom. If the sonar can't find the bottom
automatic
the
happens, place
range
the
signal
fiberglass
range
to
sensitivity.
should
echo, digital
signals
may
the
mode,
to limits far
the unit in
a
realistic
As
appear.
readings
pointing straight
Oil, dirt,
reducing
be sure it is
hull,
and that it is
rejection
be
deeper
digital
greater
one, (for example,
you
and fuel can cause a film to form
its effectiveness. If the transducer is
securely
automatically
feature. This can cause the unit to
such as fish or even structure from the
than the sonar's
will flash
than the water
the manual
move into
erratic,
shooting through only
bonded to the hull. Do
continuously.
mode,
0-100
shallower
or no fish
down. Clean the
increase its Dis-
to find the
ability
while it's in the
signal
It
may change
are in. If this
you
then
change
and increase
feet)
water,
sig-
one
the
a bottom
LIGHT
The
keyboard
on and off from the
lights
To turn the
key adjacent
the
Press
Press the
Press the CLEAR
The
light
on. The
seconds unless the
makes it easier to turn the
is turned on.
and
display
on or
lights
the LIGHT label. This
to
key adjacent
off, press
key adjacent
to erase the menu.
key
menu also
lights
appears
and the menu will turn themselves off after a few
key adjacent
Light
I I
____
are
backlighted
menu.
Light
the MENU
for
night
key. Next, press
displays
the
use. Turn the
light
to the ON label to turn the
to the
OFF
label to turn the
each time the Z-9500GPS is turned
to the ON
on at
lights
night
'/-r'"
is
key
pressed.
when the Z-95000PS
16
32
menus.
lights
lights
the
on.
off.
This
4. Check the
transmitter
tom or
targets.
battery voltage.
power
also
drops, reducing
PDF compression, OCR, web-optimization with CVISION's PdfCompressor
If the
52
voltage drops,
its
ability
to find the
the unit's
bot-
Clear
92 KHZ
41
Page 46

DEPTH LINES
The Z-9500GPS can
it easier for
to determine a
you
Depth
Lines
print depth
lines across the screen to make
target's depth.
One of the best
segment
smaller the
easiest
of the water. For
segment,
to do this on the
way
Track feature. Use the 2x or
the
echoes,
turn the
much noise on the screen.
method should
If
you
don't
creasing
a small amount when the Fish l.D. feature is
ity
has
helped
making
sensitivity up
see fish
fish
get
symbols
the
sensitivity. Although you
to
display
to
ways
fish arches
get
example,
from 45 to 60 feet. The
the better the screen resolution will be. The
Z-9500GPS is with the Bottom
4x
Bottom
it easier
to see detail. For the best
as
high
as
possible
In medium to
work
to
signals
display
when the unit is in the manual
fish arches.
when the Fish l.D. feature is
can
fish
symbols.
is to
expand
Track mode to
without
deep
only vary
on, many
or "zoom" a
expand
results,
mode,
on, try
too
this
but
in-
getting
water,
the sensitiv-
times it
Clear
To turn the
press
adjacent
to the ON label to
except press
the
to the
depth
next to the
key
Depth
the
92 KHZ
lines on
key
or off
MORE label.
Lines menu. Now
turn the lines on.
next to
the OFF label to turn the lines off.
again,
press
Repeat
KEEL OFFSET
NOTE: The keel offset affects the
scales.
Negative
Many
the hull.
than the transducer. This
aground
depth.
depth
Keel Offset
times the transducer is not installed in the lowest
Therefore,
when the sonar unit is
Most sonar units
from the face of the transducer.
portions
sonar
digital
of the hull are
a
poses
(including
only.
problem,
showing
the
Z-9SOOGPS)
MENU
the
Next,
the
press
the
it does not
deeper
since
an
adequate
then
key
the
press
key adjacent
steps above,
the
change
graph
portion
in the water
could run
you
water
read water
key
of
IMPORTANT SERVICE INFORMATION!
if
If
use the
service center or the
may
your
save
unit is not
working,
following troubleshooting
the trouble of
you
or
factory
returning your
need technical
you
section before
customer service
unit
SONAR TROUBLESHOOTING
Unit won't turn on:
1. Check the
the
wiring.
power
2. Make certain the
connects to the
ground.
positive battery
3. Check the fuse.
cable's connection
cable is
power
terminal,
at the unit. Also check
wired
properly.
black to
help, please
contacting
department.
The red wire
negative
or
a
It
However,
Measuring
the face of the
9500GPS,
PDF compression, OCR, web-optimization with CVISION's PdfCompressor
the Z-9500GPS
gives you
the distance between the lowest
transducer,
lets
you compensate
then
42 51
inputting
for the
an solution: Keel Offset.
of the boat and
part
this value into the Z-
of the boat.
depth
4. Measure the
battery
should be at least
defective,
corroded,
the
battery
or the
battery
voltage
it volts. If it
terminals
needs
or
charging.
at the
isn't,
wiring
unit's
the
wiring
on the terminals are
connector. It
power
to the unit is
Page 47

FISH ARCHES
Fish arches are created when the
fish. The distance to a fish when the cone
as "A" below. When the center
distance is shorter as shown
the distance increases
again
cone of sound
of the cone strikes the
"B". As the cone leaves the
as shown
in "C".
passes
first strikes it is shown
over a
fish,
the
fish,
For
example,
boat is the lowest
it's 4 feet
9500GPS on and
lets
deeper
say
part
than
press
bottom of the rudder on an
the
of the boat. After
the face of the transducer.
the
to the More label two times.
Keel Offset label.
Keel Offset label. A menu
"Enter Keel
says
Finally, press
Offset 0.0".
MENU
Now
appears
measuring, you
Next,
key.
press
the
key adjacent
over the sonar
press
the
key adjacent
inboard
discover
Turn the Z-
key
next
the
to the
to the
Neg.
screen that
BOAT'S
DIRECTION OF TRAVEL
I
A
When the Fish l.D. mode is
the size and
eter. For
water,
all. This is due to the narrow cone
limitations of the
Very
will
show
deep
deeper
as
heavy
times
example,
the
signal displayed
fish
small
a
partial
water.
water to see the arch. Because of water
surface
cannot be
of the fish arch due to the
shape
if the cone
display.
probably
arch,
Large
clutter,
increased enough
will not arch at all. Medium
or a
fish will
thermoclines, etc.,
B C
Ihe
off,
passes
on the
shape
arch,
of the water will affect
depth
Z-95000PS
diameter and the resolution
similar to an arch
but turn the
to
get
cone
over a fish in shallow
may
sensitivity up
conditions,
the
sensitivity
fish arches.
diam-
angle
not arch at
sized fish
if
they're
such
some-
in
in
?C learj
the
Since
deeper
4
label,
appears
adjacent
compensate
bottom
actually
depth
would read six feet. This is the
part
Positive
The transducer
to
guarantee
boat
air.
depth
face to the bottom.
deepest part
than the transducer's
then the
key
in the Enter
to the ENTER label.
for the four foot difference
as if the transducer
depth
is. For
as 10 feet before
of our
example,
example
boat to the bottom.
Keel Ott set
must be installed below the surface
will be in contact with
it
speeds.
Therefore,
from
No sonar
most sonar
the surface to the
the boat in our
of
face, press
next to the
Keel Off. window. Now
if the
changing
system
systems
Enter
example
the
key adjacent
0 label. The number
press
The Z-9500GPS will
and
was four feet
Z-9500GPS
the keel
actual distance from the
the water at all times and
will
operate
bottom,
with the transducer in
do not show
from the transducers
but
automatically
display
deeper
displayed
offset,
afterwards
four feet
is
to the
"-4.0"
the
key
the
digital
than it
the water
it
deepest
of the water
the water's
PDF compression, OCR, web-optimization with CVISION's PdfCompressor
50
43
Page 48

The Z-9SOOGPS lets
surface to the
works
by adding
In other
feet,
words,
but the transducer's face
bottom with the Positive Keel Offset feature. It
the
depth
if the
then the Z-9SOOGPS
Positive Keel
Using
the Z-9500GPS
useful when
exact water
navigating using
depth
Offset,
display
as
To use the Positive Keel
the
press
key adjacent
adjacent
sonar screen that
transducer's face in
key adjacent
The numbers "20"
the
press
automatically compensate
all
depth
than it
water
actually
depth
next to the More label two times.
key
to the Keel Offset label.
to
the Pos. Keel Offset label. A menu
says
our
to the 2
appear
key adjacent
information
is. For
as 8 feet before
measure the water
you
of
the transducer to the bottom
actual bottom
depth
is two feet beneath the
thinks the bottom is
two feet can be added to
the true
bottom
charts and
marked on the chart.
Offset,
press
"Enter Keel Offset 0.0" Since the
example
label,
boat is two feet
then the
in
the Enter Keel Off. window. Now
to the ENTER label. The Z-9500GPS will
for the two
if
as
the transducer was two feet shallower
example,
if the Z-9500GPS
changing
it would read ten feet. This is the
water's
surface to the bottom
using
our
from the Both 8
depth
depth.
from the surface is ten
surface,
only eight
of ten feet. This is
depth
need to know the
you
the
MENU
Finally, press
key adjacent
foot difference and
feet
this,
key. Next,
Now
press
the
appears
deep, press
over the
to the 0 label.
deep.
making
display
displayed
the keel
offset,
afterwards
actual distance from the
example.
the
key
the
the
degree
readings,
degree
bottom.
model. This is because
the true
over
rocks,
The
Eagle
is
typically good
and 20
even
though
Remember,
depth.
The rest of the
etc.
mud,
50 kHz transducer
to at least 2000 feet in fresh or salt
to the better water
frequency.
It also shows
degree
the
transducers
bottom
the shallow
has a 36
pentration
characteristics of the 50 kHz
downrigger weights
signal
you
edge
signal
accurate bottom
give
is much wider on the 20
are
seeing
of
the
tells
you
degree
more of the
signal
whether
cone
angle.
water due
shows
you
in most cases.
you
are
This
SYSTEM
INFORMATION
The code contained in the Z-9SOOGPS is numbered. This infor-
mation can be obtained
adjacent
adjacent
below will be
to the MORE label two times.
to the
"System
displayed.
by pressing
Info" label. A
Z-9500GPS
the
MENU
Next,
message
then the
key,
press
similar to
the
the
key
key
one
Version: 2.0
Copyright
Eagle
Press the
and return
key adjacent
to the sonar screen.
to the CLEAR label to erase this
PDF compression, OCR, web-optimization with CVISION's PdfCompressor
1991
Electronics
44
message
49
Page 49

To do
this,
press
the MENU
key,
the MORE label three times. Now
Preset label. A
unit, navigation
the
key adjacent
clear and the
appear
echoes across the
ing
message "System PowSng Up.
for a few seconds. Then the Z-9500GPS will start scroll-
warning
to
waypoints
to the Preset label to continue. The screen will
label
appears
and routes is cancelled. Now
screen,
and all features will return to their
-factory settings.
WARM INC ttIp
Preset will cancel
Waypoint navigation
and Routes.
then
press
press
next. When
the
the
key adjacent
Please Wait"
key adjacent
to the
presetting
press
may
to
a
TURN AUTOMATIC/DIGITAL SONAR ON/OFF
Your Z-9500GPS is
actually
graph portion graphically displays
world on the screen. The
screen to show the
complex
ogy
depth.
However,
very
and accurate
to eliminate false echoes and show
any digital
shallow water. The reason this
sonar can be fooled. This
two charts below. First look at the chart on the
signal penetrates
the surface
There's a clear difference between the surface
bottom. The
digital
has no
two sonar units in one
all echoes from the underwater
sonar
digital
of the bottom. It is an
depth
device
problem
the latest in software technol-
using
clutter,
with these
housing.
displays
numbers on the
the true bottom
only
extremely
typically
happens
is shown on the
left. The sonar
hits the bottom and
clutter and the
conditions.
occurs in
The
returns.
0
Preset
Exit I
—
I
TRANSDUCER CONE ANGLES
The sound waves from the transducer
in
a cone
flashlight.
the cone
Eagle
20
9SOOGPS
angle
water
shaped
angle.
offers a choice of 192 kF-Iz transducers with either an 8 or
degree
has
transducers are ideal for
depths.
the underwater world. For
degree
transducer covers
For 192
best to use
deep
water)
energy
much
cone covers an area about six feet across. The 8
kHz
water
the narrow cone
is concentrated in
deeper depths.
beam. This looks much like the beam
The
cone
a 20
between the outside
angle
angle.
degree
The wide cone
only
users,the
in
fresh
environment,
20
water,
The transducer
cone
operating
angle
example,
about a two foot circle.
degree
the 8
degree
feet
(300
is more desirable. Since the sound
angle
a smaller
spread
angle. Typically,
allows
in 15 feet of water the 20
transducer is almost
mostly
-
fresh
area,
out into the water
edges
supplied
in
shallow to medium
to see more
you
in salt water.
water,
100 feet - salt
it can
from a
of the cone is
with the
wide
always
penetrate
Z-
cone
of
degree
the
In
to
a
10
Problems occur when the surface clutter
as shown on the
between surface clutter and the bottom and so it becomes "lost."
It
unrealistic
deep
ranging
depth,
on the
flash the last known bottom
may
depth
at its
deepest point.
feature
such as 0 to 600 feet. This
display, making
right.
such as 900 feet in a lake that
may change
The Z-9500GPS is versatile
it shows these
Next,
press
the
key adjacent
adjacent
to the
9500GPS will
change
"Dig.
the
symptoms
the
key
to the
to the
"Digital
Sonar Oft" label. The screen will clear and the
display
to 0-10 or 0-20 feet. If there is a lot of "clutter"
range
The
digital
If the unit is
the
range
it difficult to read.
enough
in
shallow
next to the More label
Digital
Sonar" label. Now
sonar information
Sonar label. Now
extends to the bottom
sonar cannot
or it
depth
compresses
may
only
in
automatic,
to an
extremely deep
the information
to handle these
water,
press
again.
press
2
times.
You
the MENU
the
distinguish
lock onto an
60 feet
gets
the auto-
situations. If
key.
Now
press
the
press
key adjacent
may
key
need to
7-
PDF compression, OCR, web-optimization with CVISION's PdfCompressor
48 45
Page 50

or random echoes on the
definite bottom echo is seen. Use the
move into
you
and automatic features can be turned back on
digital
the exact same
last menu
Now
press
and the
digital
deeper
keys
page, press
the
key adjacent
will
start
screen,
water. Once
that turned them off. When
the
key
working again.
turn the
you're
adjacent
to the desired
sensitivity
in
unit
in
to the
digital
down until a
this manner until
deeper
Digital
water,
by pressing
you get
Sonar label.
sonar
frequency
to the
the
50 kHz
Sonar
Digital
SiFT
SNHIIZ
-c
AUTOS
0
12
24
TIP: An easier
back on
again
DIGITAL SONAR
The Z-9SOOGPS's
or 50 kHz
the
digital
the
digital's frequency
When the unit is turned on for the first time or
frequency
advantage
ducer installation and favorable water
digital
water.
kHz
To
change
press
below
nar" label. The menu shown
adjacent
frequency.
can be different than that used
is used for the
is it's
can
reach
Of
course,
transducer installed and connected to the Z-9SOOGPS.
the
the
key adjacent
appears.
to the desired
to turn
way
is to
simply press
the
digital
the AUTO
and automatic functions
FREQUENCY SELECT
has the
digital
Please note that the
doesn't affect the chart's
digital.
superior depth penetration.
depths greater
to use the 50 kHz
sonar
digital
to the 'More'
Now
press
frequency.
capability
The 50 kHz
than 2000 feet in fresh or
digital, you
frequency, press
label two times. The menu
the
key adjacent
above
appears.
key.
of
using
frOqucency
the
chart.
by
frequency
preset,
frequency's biggest
With a
conditions,
the menu
to the
Now
192KHZ DIGITAL SONAR
the 192
the 192
good
the 50 kHz
must have a 50
"Digital
press
kHz
used
by
Changing
at all.
kHz
trans-
salt
then
key,
So-
the
key
When the 50
immediately
sonar
off,
"Turn Sonar On" or "Turn Sonar Off' labels. Note: This
turns the
kHz
beneath the
or back on
sonar
digital
digitalis
again, simply press
in
digital
not the chart.
off,
the words "50
use,
bottom
depth.
To turn the
the
key adjacent
kHz"
appear
MEMORY - PRESET
The Z-9500GPS saves all
speed,
This
unit.
Preset function.
Preset returns all GPS
alarm
settings,
memory
If
is retained even if
need to return the unit to the
you
and more in
IMPORTANT!
settings
settings
such as
battery-backed-up memory.
power
is disconnected from the
factory settings,
sensitivity,
use the
to zero. The GPS will have
to be re-initalized after a Preset!
digital
to the
only
chart
Sonar On
Sonar Off
192khz
5OIdiz
Digital
Digital
46
1
I
L
I
i'-
More I
Clear
Speaker
Pres
.
47
Volune
I
I
PDF compression, OCR, web-optimization with CVISION's PdfCompressor
 Loading...