

Page 1
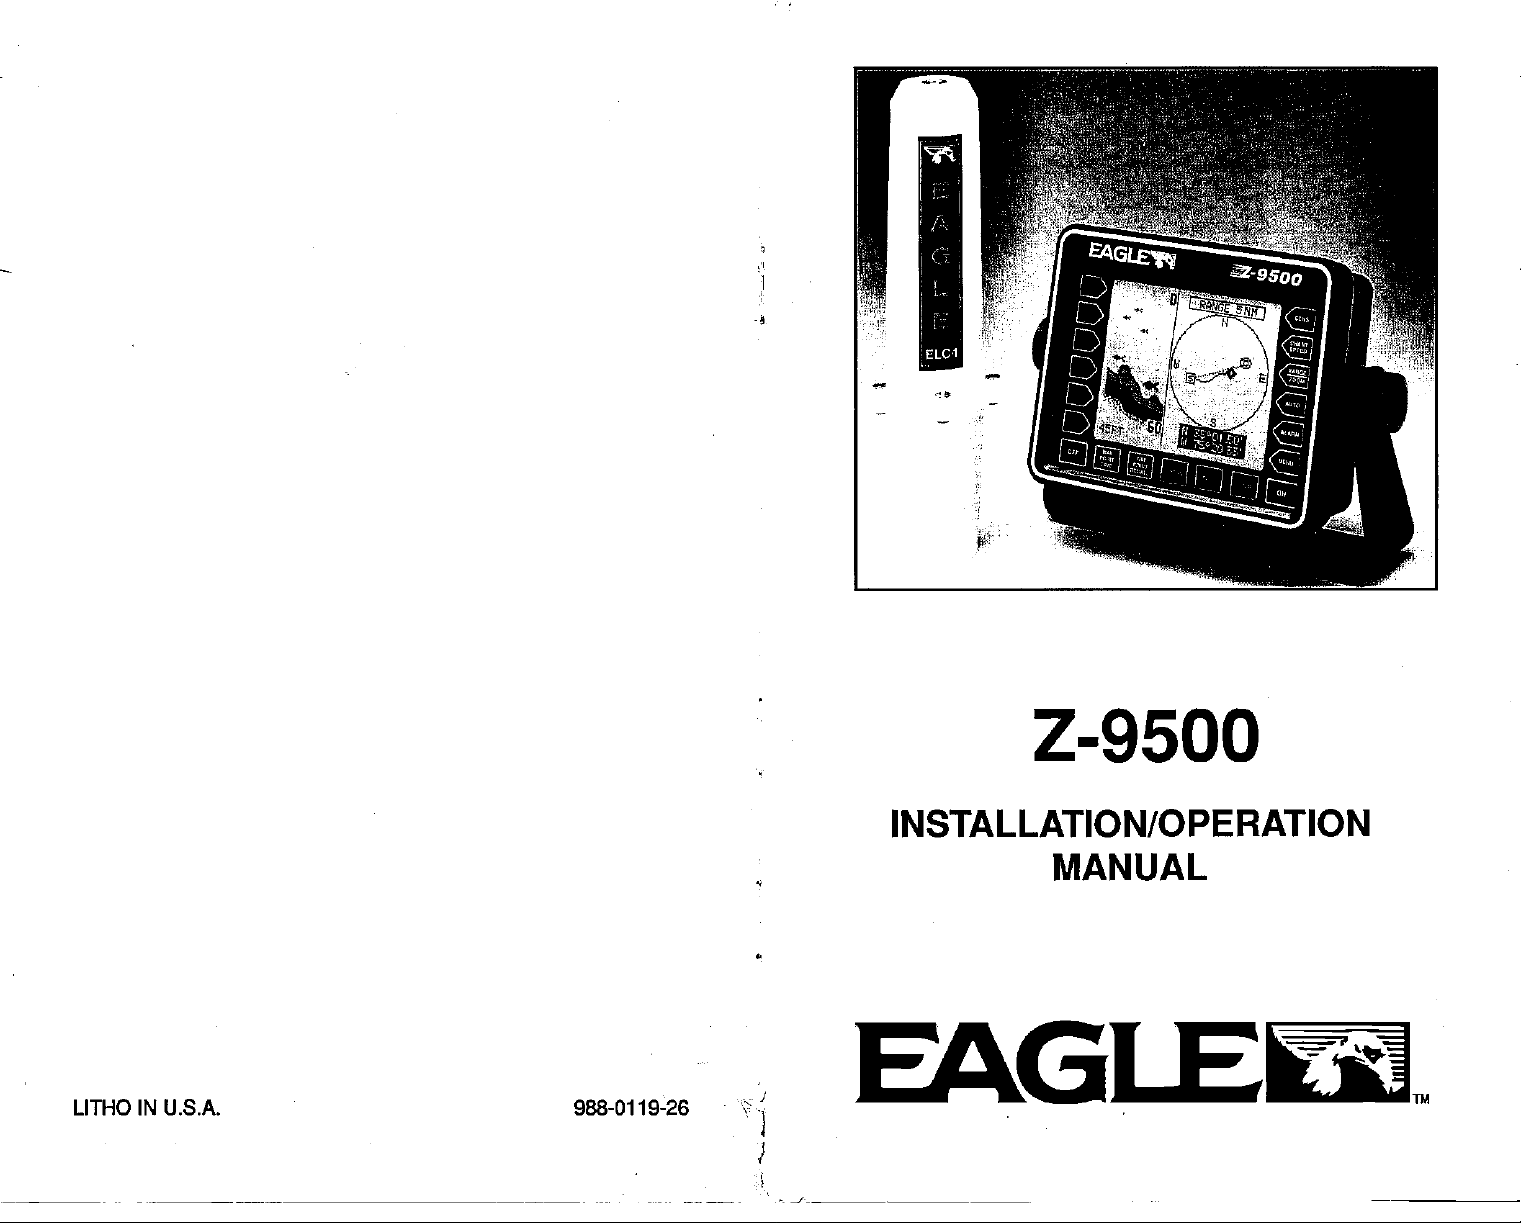
Z-9500
INSTALLATION/OPERATION
.4
LITHO IN U.S.A. 988-0119-26
PDF compression, OCR, web-optimization with CVISION's PdfCompressor
EAGLET4
MANUAL
Page 2
©
Copyright
THIS LORAN
USE
A
CAREFUL NAVIGATOR NEVER RELIES ON ONLY ONE
1990,1991.1992,
All
rights
RECEIVER ONLY AS
reserved.
WARNING!
Eagle
AN AID
Electronics.
TO NAVIGATION.
METHOD
TO OBTAIN POSITION INFORMATION.
CAUTION
This loran
shortest,
the
waypoint
gator
travelling
clear,
MAKE CERTAIN THE LORAN IS DISPLAYING THE CORRECT PO-
SITION IN LATITUDE/LONGITUDE COORDINATES BEFORE NAVI-
GATING WITH THIS UNIT. THE POSITION MUST BE CORRECT
FOR THE NAVIGATION FEATURES TO WORK PROPERLY.
receiver,
most direct
will not
to a
safe
path
regardless
take
only
waypoint,
to the
all loran
(like
to a
path
of obstructions.
advantage
will
but
waypoint
navigation equipment)
waypoint.
It
provides navigation
Therefore,
of all available
also
visually
is
always
NOTICE!
check to make certain
available.
will show the
the
prudent
navigation
data to
tools
navi-
when
a
Features and
All
display
screens in this manual
specifications subject
to
change
are simulated.
without notice.
PDF compression, OCR, web-optimization with CVISION's PdfCompressor
Page 3
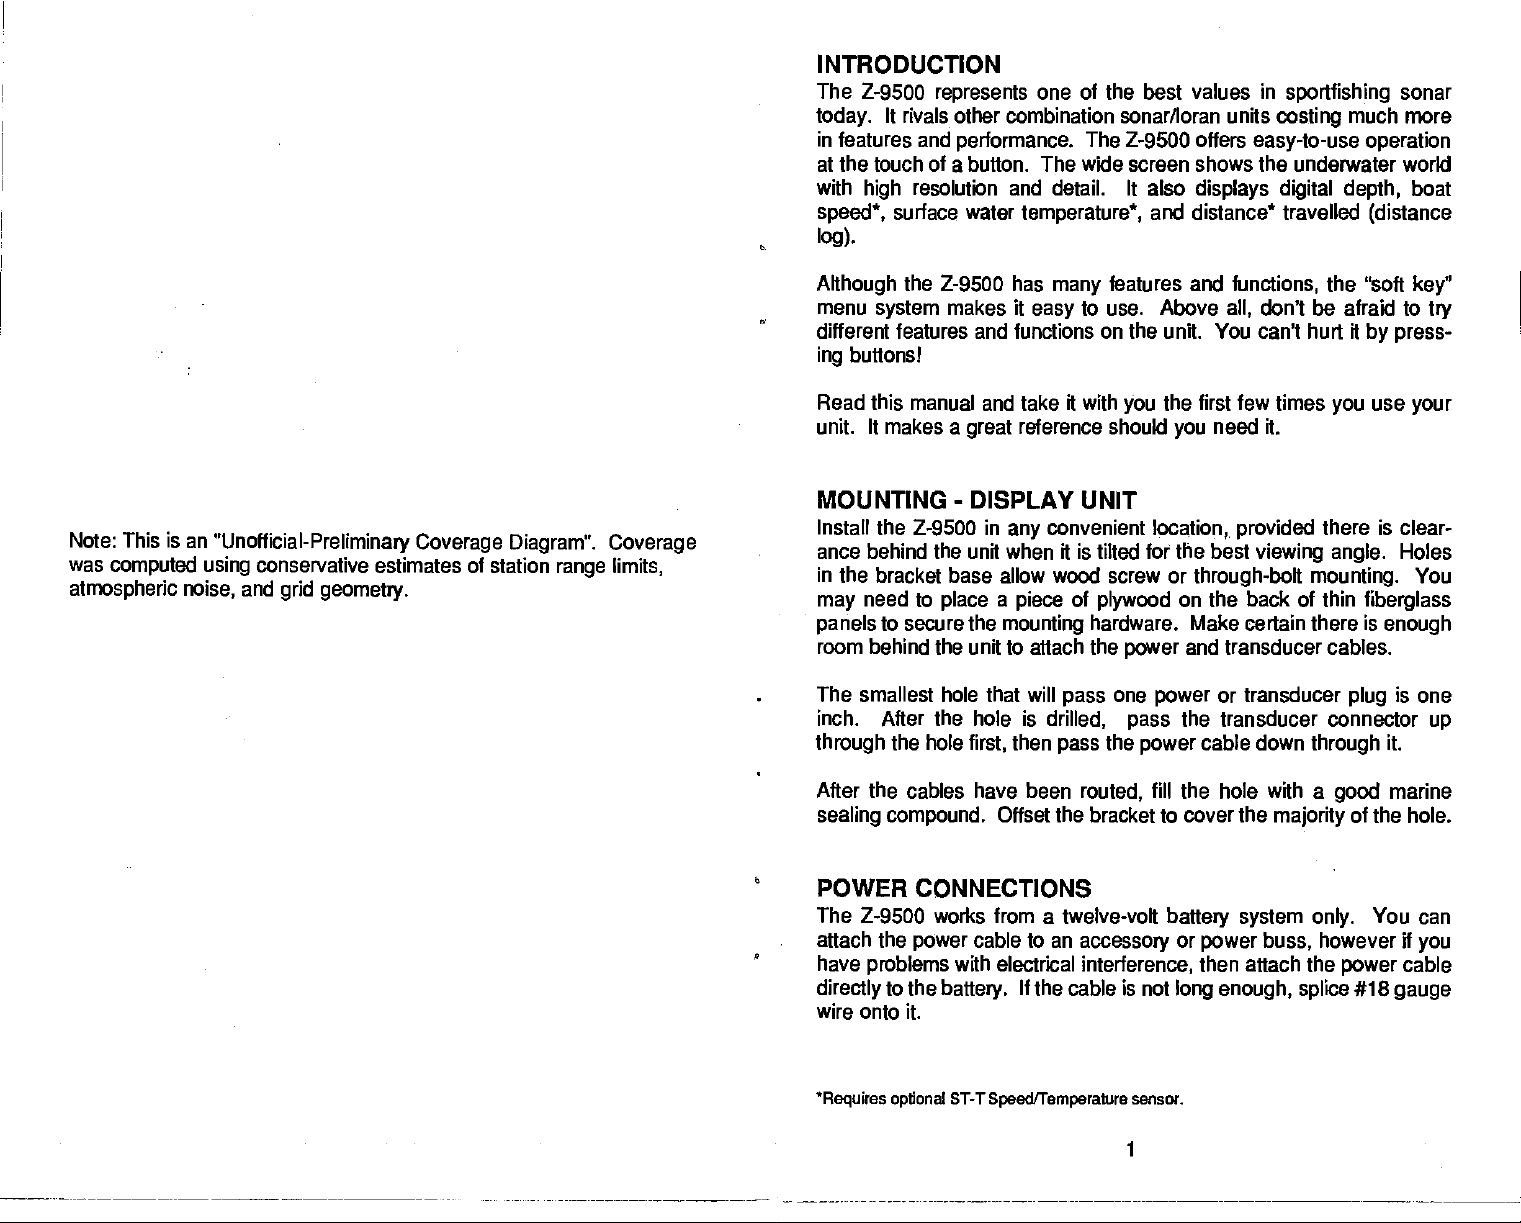
Note: This is an
was
computed using
"Unofficial-Preliminary Coverage Diagram". Coverage
atmospheriC noise,
conservatIve estimates of station
and
grid
geometry.
range
limits
SONAR TABLE OF CONTENTS
INTRODUCTION . 1
MOUNTING
POWER CONNECTIONS 1
TRANSDUCER CONNECTIONS
NOISE 3
MOUNTING - ELC-1 LORAN MODULE
KEYBOARD 5
DISPLAY- General 6
SONAR OPERATION
AUTOMATIC 7
SENSITIVITY 7
GRAYUNB
CHARTSPEED
RANGE 10
ZOOM
SONAR ALARMS
MENU
CHART FREOUENCY
SURFACE CLARITY CONTROL
DISCRIMINATION 25
ASP 26
FISH I.D
DIGITAL DISPLAYS 29
SPEAKER VOLUME
DISPLAY CONTRAST 28
LIGHT
DEPTH UNES 40
KEEL OFFSET 40
SYSTEM INFORMATION
TURN AUTOMATIC/DIGITAL ON/OFF 43
DIGITALSONAR FREQUENCY SELECT 44
MEMORY-PRESET 45
FISH ARCHES 46
SONAR TROUBLESHOOTING 48
LORANOPERATION
-
DISPLAY UNIT .
1
3
4
7
8
10
RANGE-Automatic
RANGE-Manual 12
10
13
ZOOM-BottomTrack 15
16
ZONEALARM 16
BOTTOM ALARM 18
FISH ALARM
20
AUDIO ALARM ON/OFF 21
22
CHART DUAL FREQUENCY OPERATION 23
(SCC)
DIGITAL DEPTH DISPLAY 30
SPEEDOMETER 31
SPEEDOMETER CALIBRATION 32
TEMPERATURE
DISTANCE LOG 34
LORAN DISPLAY
CHARACTER SIZE 36
TENTHS 37
NEGATIVE KEEL OFFSET 40
POSITIVE KEEL OFFSET 41
24
27
33
35
38
42
53
PDF compression, OCR, web-optimization with CVISION's PdfCompressor
Page 4
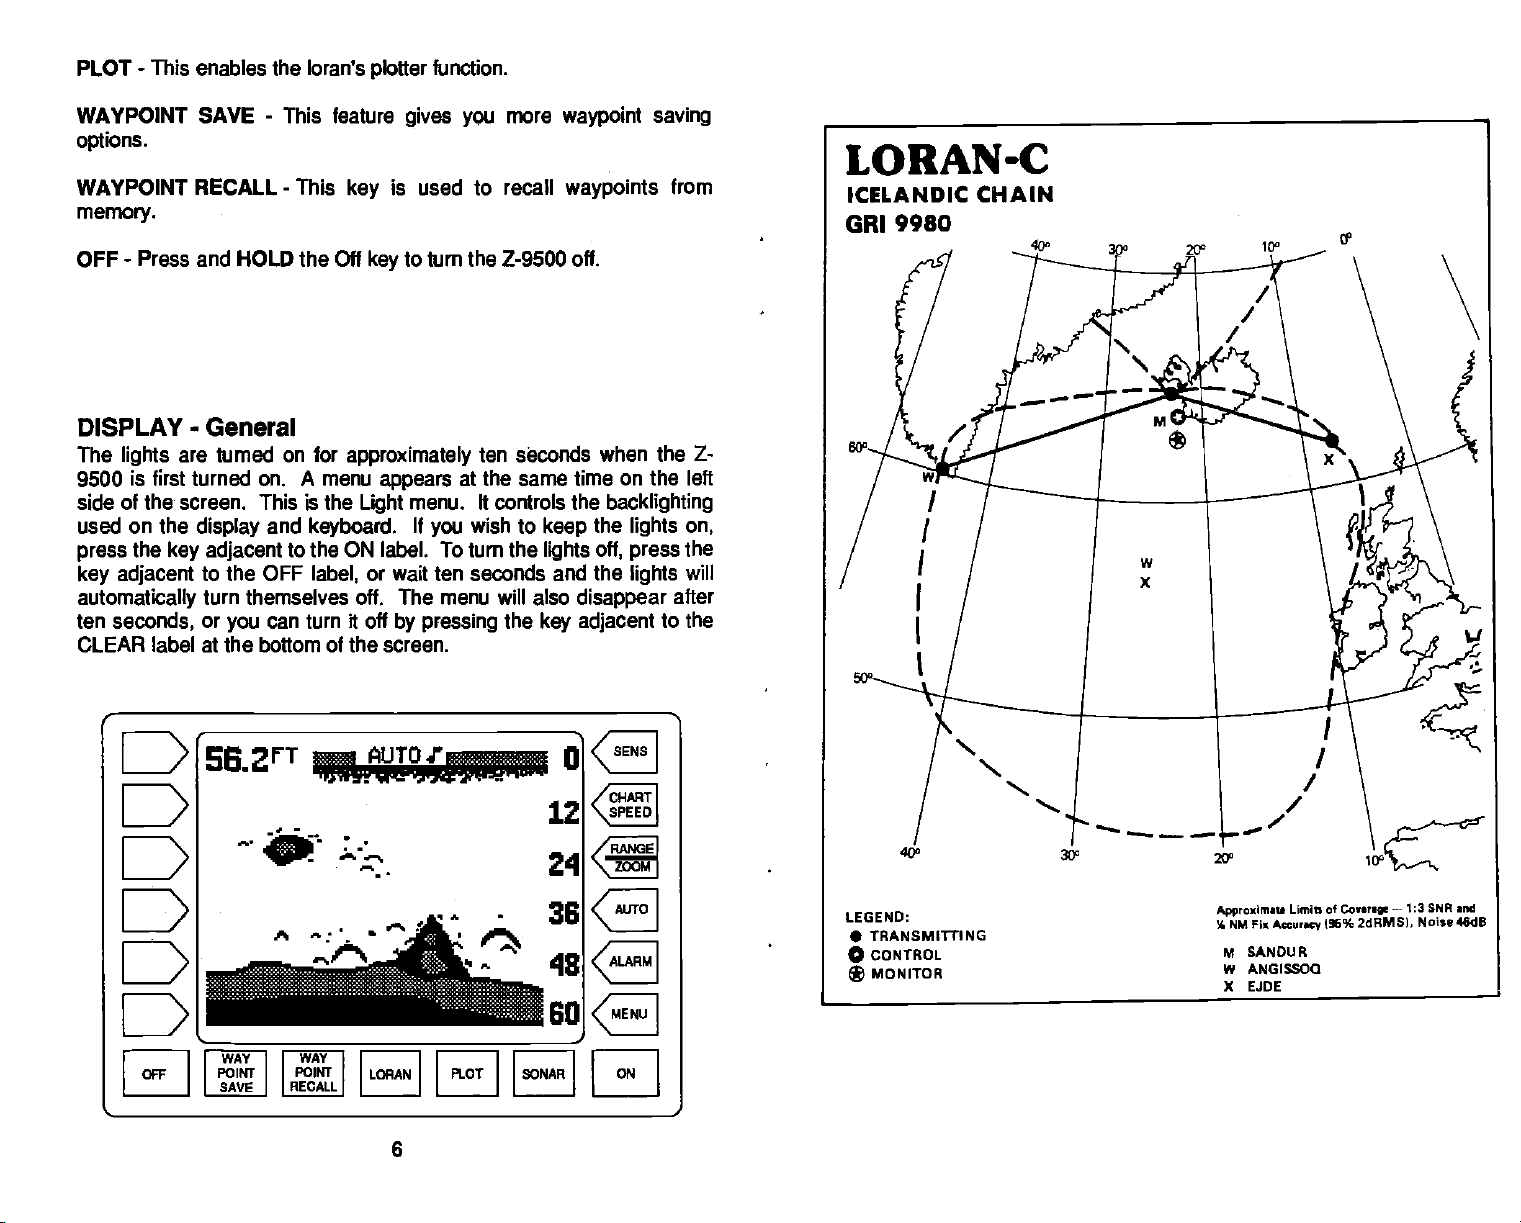
LORAN-C
NORTH CENTRAL U.S. CHAIN
GRI 8290
(NOCUS)
DRAFT
Approximate
1/4 NM Fix
Umits of
Accuracy (95% 2 dRMS),
Coverage--
HAVRE,
BAUDE1TE,
GILLETTE,
WILLIAMS
1:3 SNR and
Noise 53db
MT
MN
WY
LAKE,
BC
PDF compression, OCR, web-optimization with CVISION's PdfCompressor
Page 5
INTRODUCTION
The
Z-9500
today.
in features and
represents
It rivals other combination sonar/loran units
performance.
one of the best values
The 2-9500 offers
at the touch of a button. The wide screen shows the underwater worki
with
speed,
log).
resolution and detail. It also
high
surface water
temperature,
displays digital depth,
and distance travelled
in
sportfishing
costing
easy-to-use operation
sonar
much more
boat
(distance
Note: This is an
was
computed using
atmospheric
noise,
"Unofficial-Preliminary Coverage
conservative estimates of station
and
grid geometry.
Diagram". Coverage
limits,
range
Although
menu
the Z-9500
system
makes it
different features
buttons!
ing
Read this manual and take it with
unit. It makes a
has
many
easy
functions on
and
reference should
great
features and
to use. Above
the unit.
the first few times
you
you
MOUNTING - DISPLAY UNIT
Install the Z-9500 in
ance behind the
in the bracket base allow wood screw or
need to
may
panels
to secure the
unit when
place
room behind the unit to attach the
The smallest hole that will
inch. After the hole is
through
the hole
first,
After the cables have been
sealing compound.
convenient
any
it
a
piece
mounting
is tilted for
of
hardware, Make certain there is
location,, provided
the
plywood
power
one
then
pass
drilled,
pass
routed,
power
pass
the
power
fill the hole with a
Offset the bracket to cover the
functions,
don't be afraid to
all,
You
can't hurt it
need it.
best
viewing angle.
through-bolt mounting.
on the back of thin
the "soft
by press-
use
you
there is
fiberglass
enough
your
clear-
Holes
and transducer cables.
or transducer
plug
is one
the transducer connector
cable down
majority
through
it.
marine
good
of the hole.
key"
try
You
up
POWER
The
attach the
have
directly
CONNECTIONS
Z-9500 works from a twelve-volt
cable
power
problems
to the
with electrical
battery.
to an
accessory
interference,
If the cable is not
battery system only.
or
power
then attach the
buss,
however if
power
long enough, splice
You can
cable
#18
gauge
you
wire onto it.
Requires
optional
ST-T
Speed/Temperature
sensor.
1
PDF compression, OCR, web-optimization with CVISION's PdfCompressor
Page 6
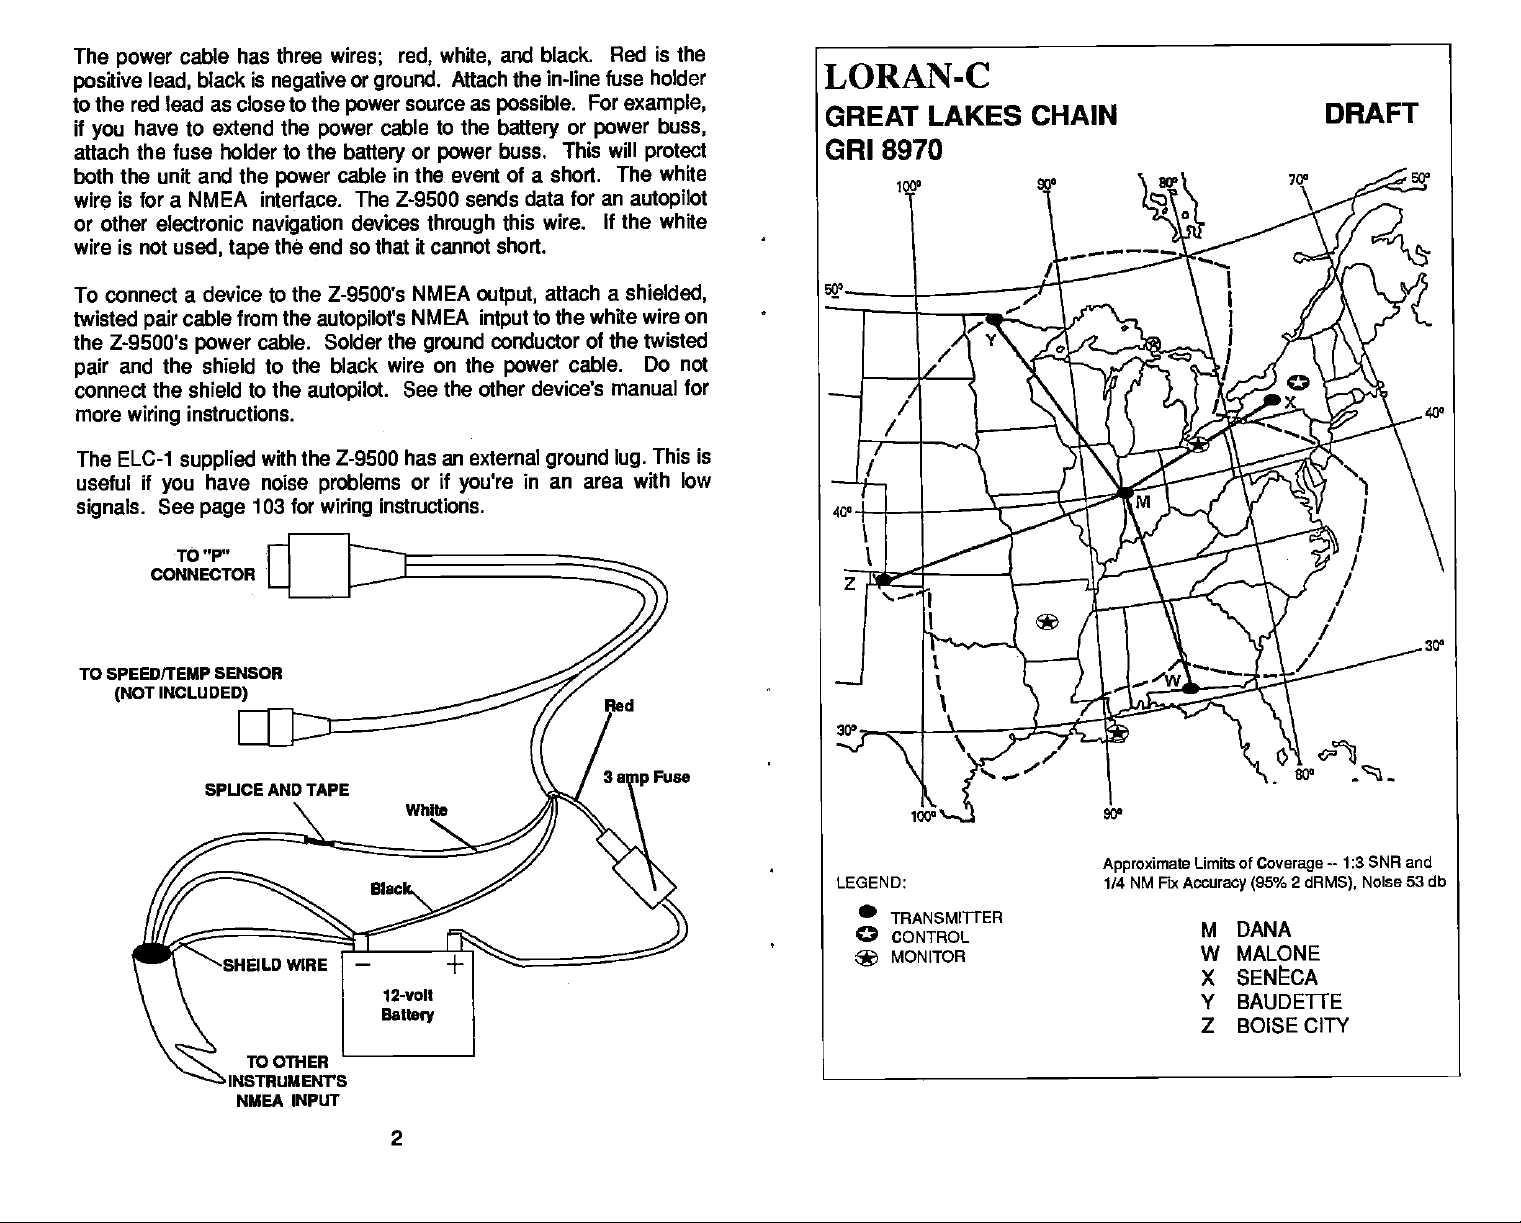
The
power
positive
cable has three
black is
lead,
wires; red, white,
negative
to the red lead as close to the
if
have to extend the
you
attach the fuse holder to the
both the unit and the
wire is for a
or other electronic
wire is not
NMEA
navigation
used, tape
power
power
interface.
the end so that it cannot short.
and black. Red is the
or
ground.
power
cable
battery
cable in the event of a short. The white
The Z-9500 sends data for an
devices
Attach the
source as
to
the
or
power
through
in-line fuse holder
possible.
battery
buss. This will
this wire. If the white
For
or
example,
power
autopilot
buss,
protect
LORAN-C
GREAT LAKES CHAIN
GRI 8970
DRAFT
To connect a device to the Z-9500's
twisted
the Z-9500's
and the shield to the
pair
connect the shield to the
more
The ELC-1
useful if
signals.
TO sPEED/TEMP SENSOR
(NOT INCLUDED)
cable from the
pair
instructions.
wiring
supplied
you
See
TO "P"
CONNECTOR
power
cable. Solder the
autopilot.
with the 2-9500 has an
have noise
103 for
page
SPUCE AND TAPE
autopilot's
black wire on the
problems
instructions.
wiring
NMEA
NMEA
See the other device's manual for
or
ground
external
if
you're
output,
intput
attach a
shielded,
to the white wire on
conductor of the twisted
power
cable. Do not
ground lug.
This is
in an area with low
Fuse
LEGEND: 1/4 NM Fix
•
TRANSMIUER
Approximate
o CONTROL
MONITOR
*
Limits of
Accuracy (95% 2 dRMS),
Coverage--
M DANA
W MALONE
X SENECA
1:3 SNR
V BAUDE1TE
2 BOISE CITY
Noise
and
53db
NMEA INPUT
2
PDF compression, OCR, web-optimization with CVISION's PdfCompressor
Page 7
No other
9500
automatically
acquires
adjustments
and "locks on" to
are
required
sends NMEA information out the white wire once it
once the cable is connected. The Z-
the stations.
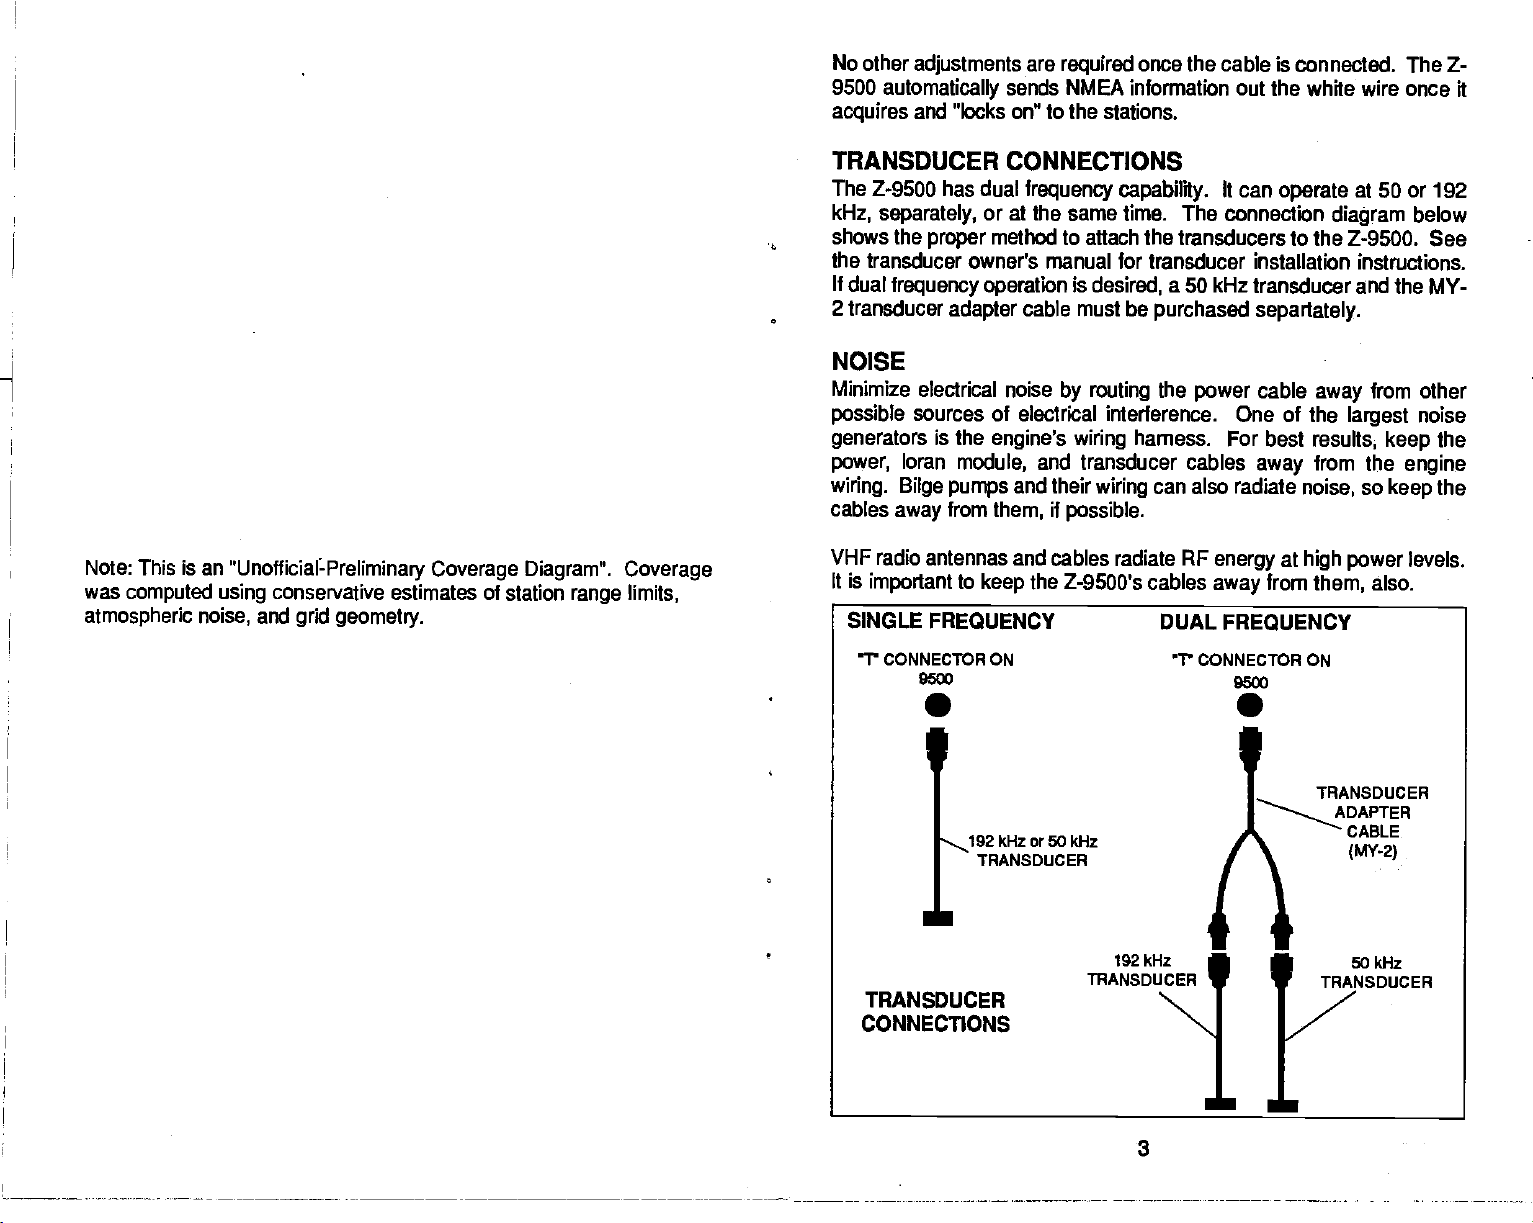
TRANSDUCER CONNECTIONS
The Z-9500 has dual
kHz,
separately,
1.
shows the
proper
the transducer owner's manual for
If dual
frequency operation
2 transducer
adapter
frequency capability.
or
at the same time. The connection
method to attach the
transducer installation instructions.
is
desired,
cable must be
purchased
It can
operate
transducers to the Z-9500. See
kHz
a 50
transducer and the MY-
separtately.
at 50 or 192
diagram
below
NOISE
Minimize
possible
generators
power,
wiring. Bilge
cables
electrical noise
sources of electrical interference. One of the
is the
loran
away
engine's wiring
module,
pumps
from
them,
by routing
and transducer cables
and
their
wiring
if
possible.
the
power
hamess. For best
can also radiate
cable
away
from other
away
largest
results, keep
from the
so
noise,
keep
noise
the
engine
the
Note: This is an
was
computed
atmospheric noise,
"Unofficialpreliminary Coverage Diagram". Coverage
using
conservative estimates of station
and
grid
geometry. SINGLE FREQUENCY DUAL
range
limits,
VHF radio antennas
It is
important
__________________________________________________________
rr
CONNEcTOR ON 1' coNNEcToR ON
95cc
•
—.192
and cables radiate RF
to
the Z-9500's cables
keep
kHz or5O kHz
TRANSDUCER
energy
away
at
high power
from
them,
FREQUENCY
95O
•
TRANSDUCER
levels.
also.
ADAPTER
CABLE
(MY-2)
II
192kHz
TRANSDUCER
TRANSDUCER
CONNECTIONS
—
11(llt4LISlk1
I
"N.
I.
50kHz
TRANSDUCER
ii
3
PDF compression, OCR, web-optimization with CVISION's PdfCompressor
Page 8
Noise
typically
boat
slow
probable
but is caused
cal,
ducer. It's
the
Stop
noise
increases,
display,
transducer must be moved
so that smooth water flows over
then the
shows on the sonar
speeds
cause is acoustic noise or cavitation. This
easy
boat,
and
by
to determine if this noise is
the
put
then it's electrical.
problem
worse as the
gets
air bubbles
engine
in
is cavitation.
out of the turbulent water flow or
display.
passing
neutral,
If interference
speed
over the face of the trans-
and increase the
increases,
noise is not electri-
electrical or cavitation.
rpm.
If it doesn't show on the sonar's
To solve this
it at all boat
speeds.
problem,
begins
then the
If
the
the
adjusted
at
LORAN-C
NORTH
GRI 9990
PACIFIC CHAIN
The Z-9500
the unit
will not
INSTALLATION
When
where it's clear of other
A
high
tenna
mounted
radio antennas.
Improper performance
close to
places
and obstructed.
must
You
antenna. The threads are standard
mount
The base
(NOT pipe thread).
hardware.
has reverse
if
the
power
work until the
choosing
location is
shouldn't be the
vertically.
metal
Loran
the
purchase
base is most
mounting
Tighten
wires are hooked
wiring
-
ELC-1 Loran-C MODULE
a
mounting
preferred,
Make certain it is as
objects
assembly
commonly
threads are
This allows the
all hardware
polarity protection.
is connected
location,
antennas,
highest part
can also occur if the antenna
such as tuna towers.
in the clear is
an
eight
wires, masts,
however
of
foot stainless steel or
used to mount
conventional 1"-14 machine thread
securely.
No
damage
backwards. However,
up
properly.
remember
to install the ELC-1
will occur to
the unit
or other obstructions.
for
lightning protection,
the an-
the boat. The antenna should be
far
preferable
3/8"-24 for the
away
as
possible
is mounted too
Again,
a location that
to one that is
fiberglass whip
whip.
from VHF
high
A ratchet
the Loran to the boat.
use of standard antenna
mounting
cable
The
cable
extension cable is available
call
department
supplied
if it's too
local service center
your
for more information.
The ELC-1 can be
if desired.
mast,
with the ELC-1 is
long.
Instead,
attached to a swivel bracket or
thirty
coil and store
if
cable is too short. Ask
the
or the
Eagle Factory
4
feet
it out of the
Do not cut the
long.
way.
dealer
your
Customer Service
hollow extension
An
or
PDF compression, OCR, web-optimization with CVISION's PdfCompressor
Page 9
KEYBOARD
The
keyboard
the left column are
column
bottom
right
has
pertain
to the basic
corner of the
keys
arranged
in two vertical columns. The
used for loran selections. The
sonar functions. The MENU
keyboard
activates the first menu
keys
keys
in the
key
page.
in
right
in the
NORTH PACIFIC LORAN.C CHAIN GRI 9990
REGNAL MANAGER
CHAIN MANAGER: COMMANDER. 17THCOASTGUARDDISTRICT.
COORDINATOR OF CHAIN OPERATIONS
CONTROL SITE: LORMONSTA
09250. &ATIGI
MASTER St PALL
XRAY ATOll
VAM(EE PORT
ZULU NARROW
COMMANDER. PACIFIC AREA.
KODIAK.
OCOR.
AX
AK
ClARENCE
5<
CAPM(
57091 23N
170 IS 09.8W
524944.ON
'72 1049.08
65 14403N
18992
57 28 202N
15222 113W
ALAMEDA.
LOCATION: LORMONSTA KODIAK. M
AK
flOW
coBa
(tE)
hOES
3875.25
290ES
30Et05
430ES
2000A5
EMUER
A&UFPOI-42 225 525 FT
M4'FR4-42 225 525FT
AN'FW-42 1000 1250 FT
APLPPN44A 400 825 PT
CA
JUNEAU.
PWR
(XE)
AK
ThANSIU
ANTE4NA
M4OFO(.E
MO4CFOLE
MClClOLE
MO4ESOLE
Nal
ECD NOTES
0.0
0.0
.0.6
0.0 DUAL RATE W10R17880
SONAR - This switches the unit
SENS - Use this to
RANGE - This
ZOOM
features.
-
key
Press this
AUTO - Switches the
back.
MENU - Press
this
functions.
ON - The ON
turns the Z-9500 on.
key
LORAN - The LORAN
the sonar's
adjust
lets
you adjust
to
key
adjust
Sonar from automatic to manual
to show the menus and
key
switches the unit to
key
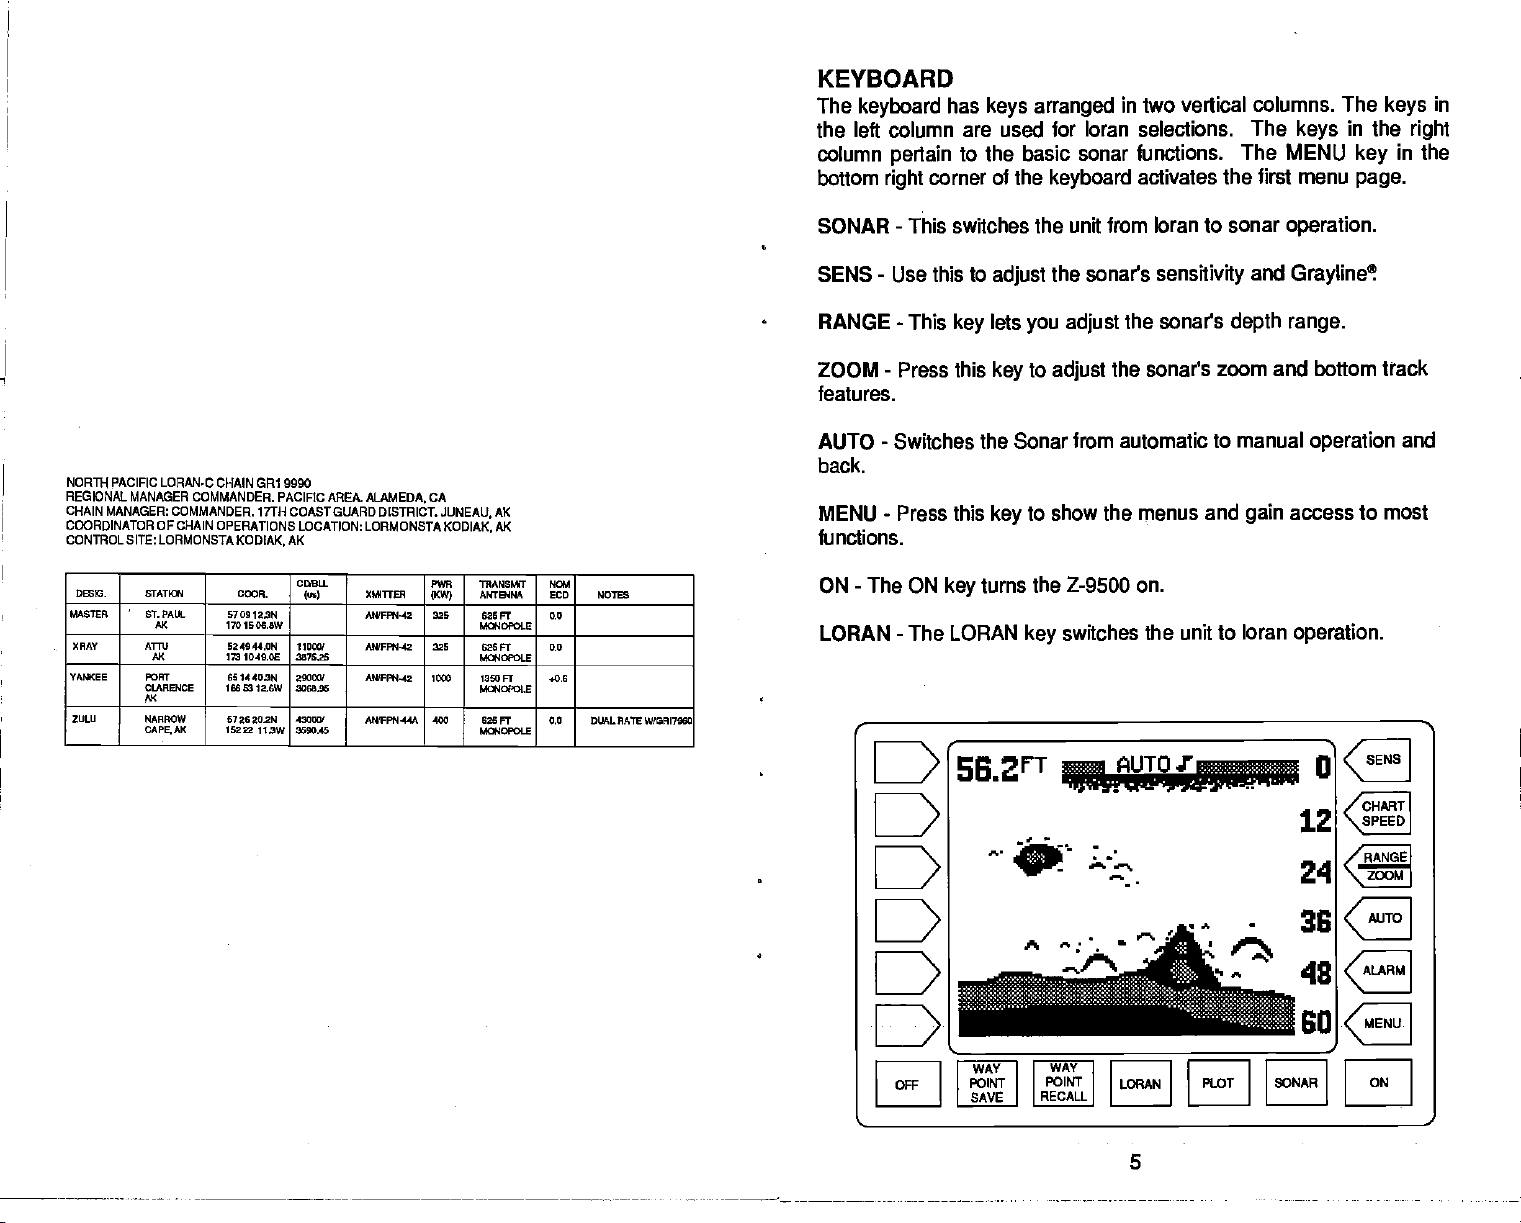
56.2r1
ED
from loran to sonar
sensitivity
the sonar's
operation.
and
Grayline!
depth range.
the sonar's zoom and bottom track
operation
access to most
gain
loran
operation.
12
24
and
CHMT
SPEED
/RANGE
\zooM
ED
ED
ED
A
WAY WAY
POINT
SAVE
POINT
RECALL
/\
fl
LORAN PLOT SONAR
_______ _______
S
38
48
80
_______
ON
________
PDF compression, OCR, web-optimization with CVISION's PdfCompressor
Page 10
PLOT - This enables the Iorans
plotter
function.
WAYPOINT SAVE - This feature
options.
WAYPOINT RECALL - This
memory.
-
OFF
Press and HOLD the Off
gives you
is used to recall
key
to turn the Z-9500 off.
key
DISPLAY - General
The
9500 is first turned on. A menu
side of the screen. This is the
used on the
press
key
automatically
ten
seconds,
CLEAR label at the bottom of the screen.
are turned on for
lights
the
key adjacent
adjacent
approximately
appears
menu. ft controls the
Light
display
to the OFF
turn themselves off. The menu will also
or
and
to the ON label. To turn the
can turn it off
you
keyboard.
label,
If
you
or wait ten seconds and the
by pressing
more
waypoint saving
lights
lights
to the
from
Z-
on,
the
will
after
waypoints
ten seconds when the
at the same time on the left
backlighting
wish to
the
the
keep
lights off, press
disappear
key adjacent
LORAN-C
ICELANDIC
GRI 9980
CHAIN
E6.2rT
!IZjscia
fir s'-n a'
0
12
24
CHART
S PEED
/RAIJGE
\zooM
LEGEND:
TRANSMITTING
•
CONTROL
o
MONITOR
*
Approximat.
% NM Fix
M SANDUR
W ANGISSOQ
x EJDE
Limib of Conr.ge
Accuresy
1c
—
1:3 SNR mid
(36% 2dRMSI,
Noise 46dB
sa0
WAY WAY
OiF
________
PDF compression, OCR, web-optimization with CVISION's PdfCompressor
POINT POINT
SAVE
RECALL
LORAN
_______ _______ _______
PLOT SONAR
6
I
HI
Page 11

When the Z-9500 is first turned
one on the
upper
of the
note
previous page.
left corner of the screen. The word "AUTO" in the
display
symbol
indicates the sonar's automatic feature is on. A small
next to the "AUTO" indicator means the alarm
The
the
on,
digital
display
bottom
enabled.
will
appear
depth
similar to the
is
displayed
upper
in the
center
speaker
is
ICELN4DIC
REGIONAL MANAGER. COMMANDER CDASTGUARD ACTIVITIES
CHAIN MkJAGER
COORDINATOR OP CHAIN OPERATIONS LOCATION LORMONSTA
CONTROLSITE LORMONSTA
OMEISR SN4DUH
VMISXEV m0105OO
EFLAY EJDEFAE000
LORAN'CCHAINGRI
COMMANDER COASIGUARD ACTIVITIES
00560. STATOO DOOR.
CELAND
GREENLAND
tDEWMFI
9980
KEFLAVIK,
646426,91
SS21.SW
sO50172
451627.5W
02176514
070426.9K
ICELAND
CD5LL
a}
11009
4060.05
20009
254424
EUROPE, LONDON.
flITTER
MffFN-45 1500 ISSOFT
NWFPN.45
001090(1
M&Ft144
0040901
EUROPE, LONDON,
KEFLAVIK,
PWR
ThANSMT
NUSIRA
(AQ
madE
760 625FT +1.0 DUALRATEW/0RI7630
325 605Ff FLO DUAL RATEGRI7S7O
UK
ICELAND
UK
IflA
EDO NOISE
02
SONAR
OPERATION
AUTOMATIC
When the Z-9500 is first turned
This is indicated
Automatic feature
is
displayed
in the lower
To turn Automatic
appear, indicating
press
the AUTO
on,
the word "AUTO" at the
by
adjusts
the
portion
off, simply press
the unit is in the manual mode. To turn
key again.
on,
sensitivity
of the screen at all times.
SENSITIVITY
The
sensitivity key
echoes. A low
up
mation,
fish
levels enable
with noise.
bottom
When the Z-9500 is in the Automatic
signal
cally adjusted
This
gives
it the
on the Z-9500 controls the
sensitivity
signals,
to see this
you
Typically,
with
Grayline®and
to
keep
capability
and other
a solid bottom
level excludes much of the bottom infor-
detail,
the best
sensitivity
some surface clutter.
to show fish and other detail.
target
the Automatic feature
of
the screen. The
so the bottom
The letters "Man"
key.
of the
ability
High sensitivity
and
range
the AUTO
information.
top
but it can also clutter
level shows a
mode,
signal displayed, plus
the
sensitivity
is enabled,
signal
Automatic
unit to
pick
the screen
solid
good
is
automati-
a little more.
Sometimes ft becomes
sensitivity.
an increase in
This
typically happens
sensitivity
necessary
is indicated. The
to
manually
when
you
increase or
decrease the
wish to see more
procedure
to
adjust
detail,
is
it
so
the
same whether the unit is in the automatic or manual mode.
To
adjust
menu
appears
menu is
page.)
the
sensitivity, press
on the left side of the screen.
immediately
beneath it.
the
(See
SENS
key.
the screen
The
sensitivity adjust
The
Grayline adjust
at the
top
of the next
7
PDF compression, OCR, web-optimization with CVISION's PdfCompressor
Page 12
Seiis.
Gray.
Clear
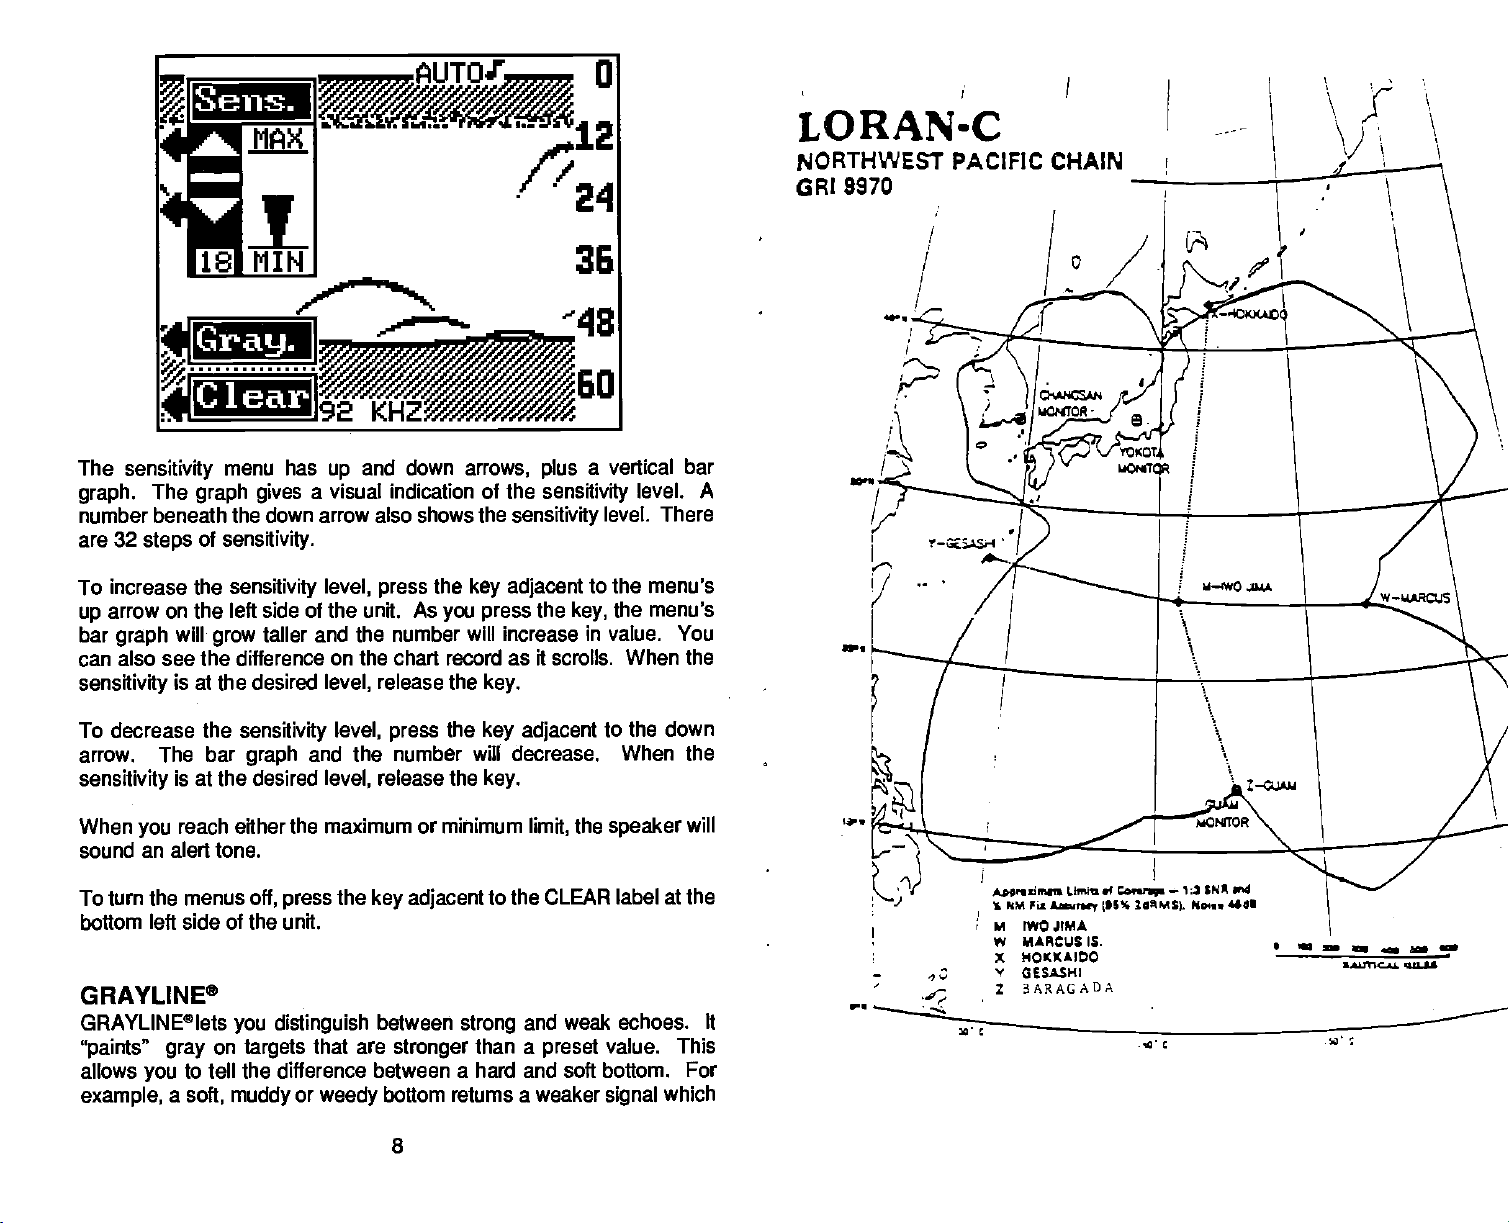
LORAN-C
NORTHWEST PACIFIC CHAIN
9970
GRI
The
sensitivity
graph.
The
number beneath
are 32
steps
To increase the
arrow on the left side of the unit. As
up
bar
graph
menu has
graph gives
the down arrow also shows the
of
sensitivity.
sensitivity
will
taller and the number
grow
and down
up
a visual indication of the
level,
press
can also see the difference on the
sensitivity
is at the desired
To decrease the
arrow. The bar
sensitivity
When
sound an
is at the
reach either the maximum or minimum
you
alert tone.
To turn the menus
bottom
left side of the unit.
sensitivity
graph
and the number
desired
off, press
release the
level,
level,
release the
level,
the
key adjacent
GRAYLINP
GRAYLINE®lets
"paints" gray
allows
example,
you
on
to tell the difference between a hard and
a
soft,
you distinguish
targets
muddy
that are
or
between
weedy
arrows, plus
the
key adjacent
you press
will
increase
sensitivity
a vertical bar
sensitivity
level. There
to the menu's
the
key,
in
value.
level. A
menu's
the
You
chart record as it scrolls. When the
key.
press
the
key adjacent
to the down
will decrease. When the
key.
the
limit,
speaker
to the CLEAR label at the
weak echoes. It
strong
stronger
bottom retums a weaker
and
than a
preset
value.
soft bottom. For
which
signal
This
will
I-.
Wi
'p.
Aany
.4
55%
A.flzmn Lhm
NM Fix
%
M IWO JIMA
W MARCUS IS.
X HOKKAIDO
V
—
4"
GISASHI
3ARAGADA
2
C...r.p
1flMS).
—
1:3 SN*
No... 4445
wd
S
— a
— —
L*Lfl'CaL qILIS
8
PDF compression, OCR, web-optimization with CVISION's PdfCompressor
Page 13
Gray.
Sens.
Clear
NORTHWESTPACIFIC LORAN-C
REGIONAL MANAGER COMMANDER.
CHAIN MANAGER
COORDINATOR OF CHAIN OPERATIONS LOCATIDN.
CDNTROL
00210. STATaI
MASThR IWOJOM
WHISKEY IW2CUSIS0AND
SKAY HOKKAI
YANKEE GESASHI
ZULU BARW0A
COMMANDER, 14Th COAST GUARD DISTRICT, HONOLULU. HI
SITE LORMONSTA VOKOTA, JAPAN
JAPAN
JAPAN
JAPAN
JAPAN
CHAIN GRI 9970
PACIFICAREA, ALAMEDA,
CD]BLL
COOS.
244550.85
141 1030.3E
241707.05
162525a2E
424437.IN
IlZ4âoa2E
243625.05
125005&46
1327 S0.IN
1444933.OE
Ius) XMRTER
11000!
42,90 ANIPPN-45 21W
30000'
€60517
85000!
4403.25
2536.54/
81000
CA.
COMMANDER,
APN-40 1015 I3SOFT
AN'PFW-45 €00 O2SPT
AN!PPN.45 600 625 FT
FAR EAST SECTION.
PWR
TRANSMIT
MJTENMA
11(59
MOJOPOLS
1350 FT
M4OPOLE O
Mt4OPOI.E
MaIOPOLE
750 FT
JAPAN
YOKOTA.
NOM
ECD NOTES
0
0.0 DUALRNIZW0BI5970
0.0 DUAL RATS W/ORIOS7O
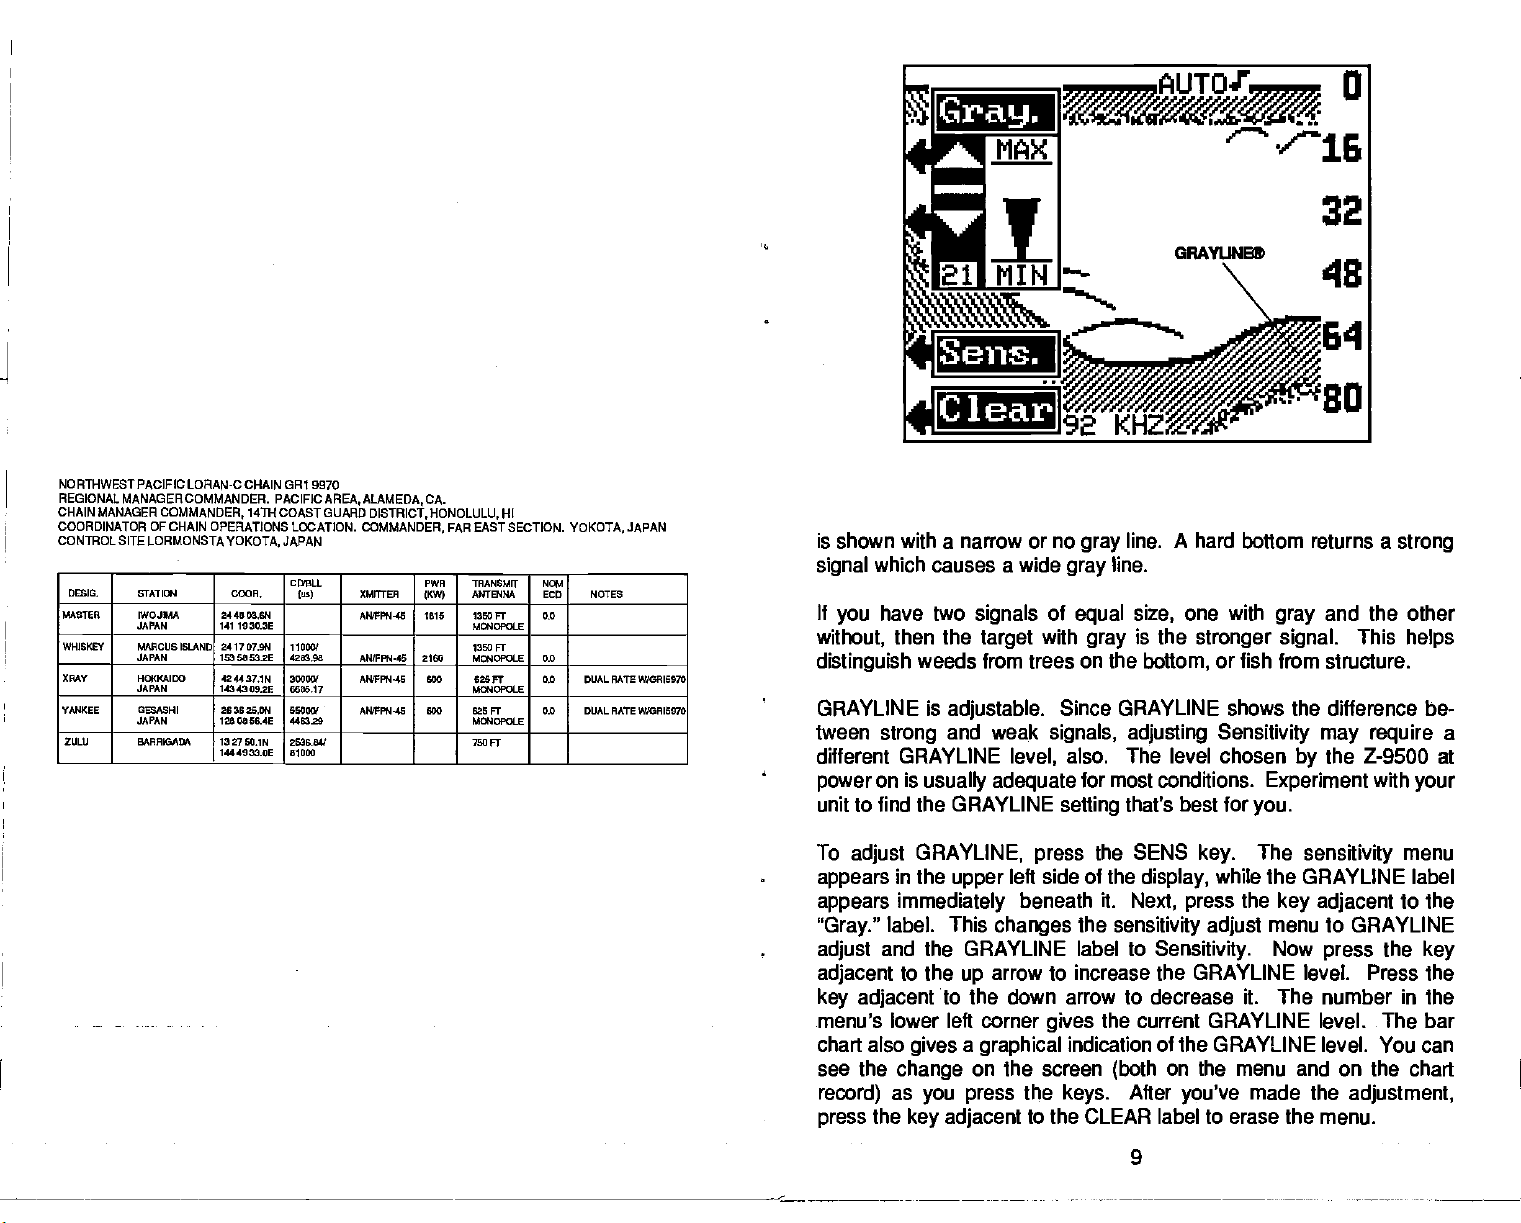
is shown with a narrow or no
which causes a wide
signal
It
without,
distinguish
GRAYLINE is
tween
different GRAYLINE
power
unit to find the GRAYLINE
To
appears
appears immediately
"Gray."
adjust
adjacent
key adjacent
menu's lower left corner
chart also
see the
press
you
adjust
record)
the
have two
then the
signals
target
of
with
weeds from trees on the
Since GRAYLINE shows the difference be-
signals, adjusting Sensitivity may require
strong
adjustable.
and weak
level,
on is
usually adequate
setting
GRAYLINE,
in the
upper
press
left side of the
beneath it.
label. This
changes
and the GRAYLINE label to
to the
arrow to increase the GRAYLINE level Press the
up
to the down arrow to decrease it. The number in the
gives
a
gives
change
as
key adjacent
graphical
on the screen
press
you
the
keys.
to the CLEAR label to erase the menu.
line. A hard bottom returns a
gray
line.
gray
one with
size,
equal
is the
gray
stronger signal.
bottom,
also. The level chosen
for most conditions.
that's best for
the SENS
Next,
the
sensitivity adjust
key.
display,
press
Sensitivity.
gray
or fish from structure.
Experiment
you.
The
while the GRAYLINE label
the
key adjacent
menu to GRAYLINE
Now
and the other
the Z-9500 at
by
sensitivity
press
This
with
the
strong
helps
your
menu
to the
key
the current GRAYLINE level. The bar
indication of the GRAYLINE level. You can
on
(both
After
the menu and on the chart
you've
made the
adjustment,
a
9
PDF compression, OCR, web-optimization with CVISION's PdfCompressor
Page 14
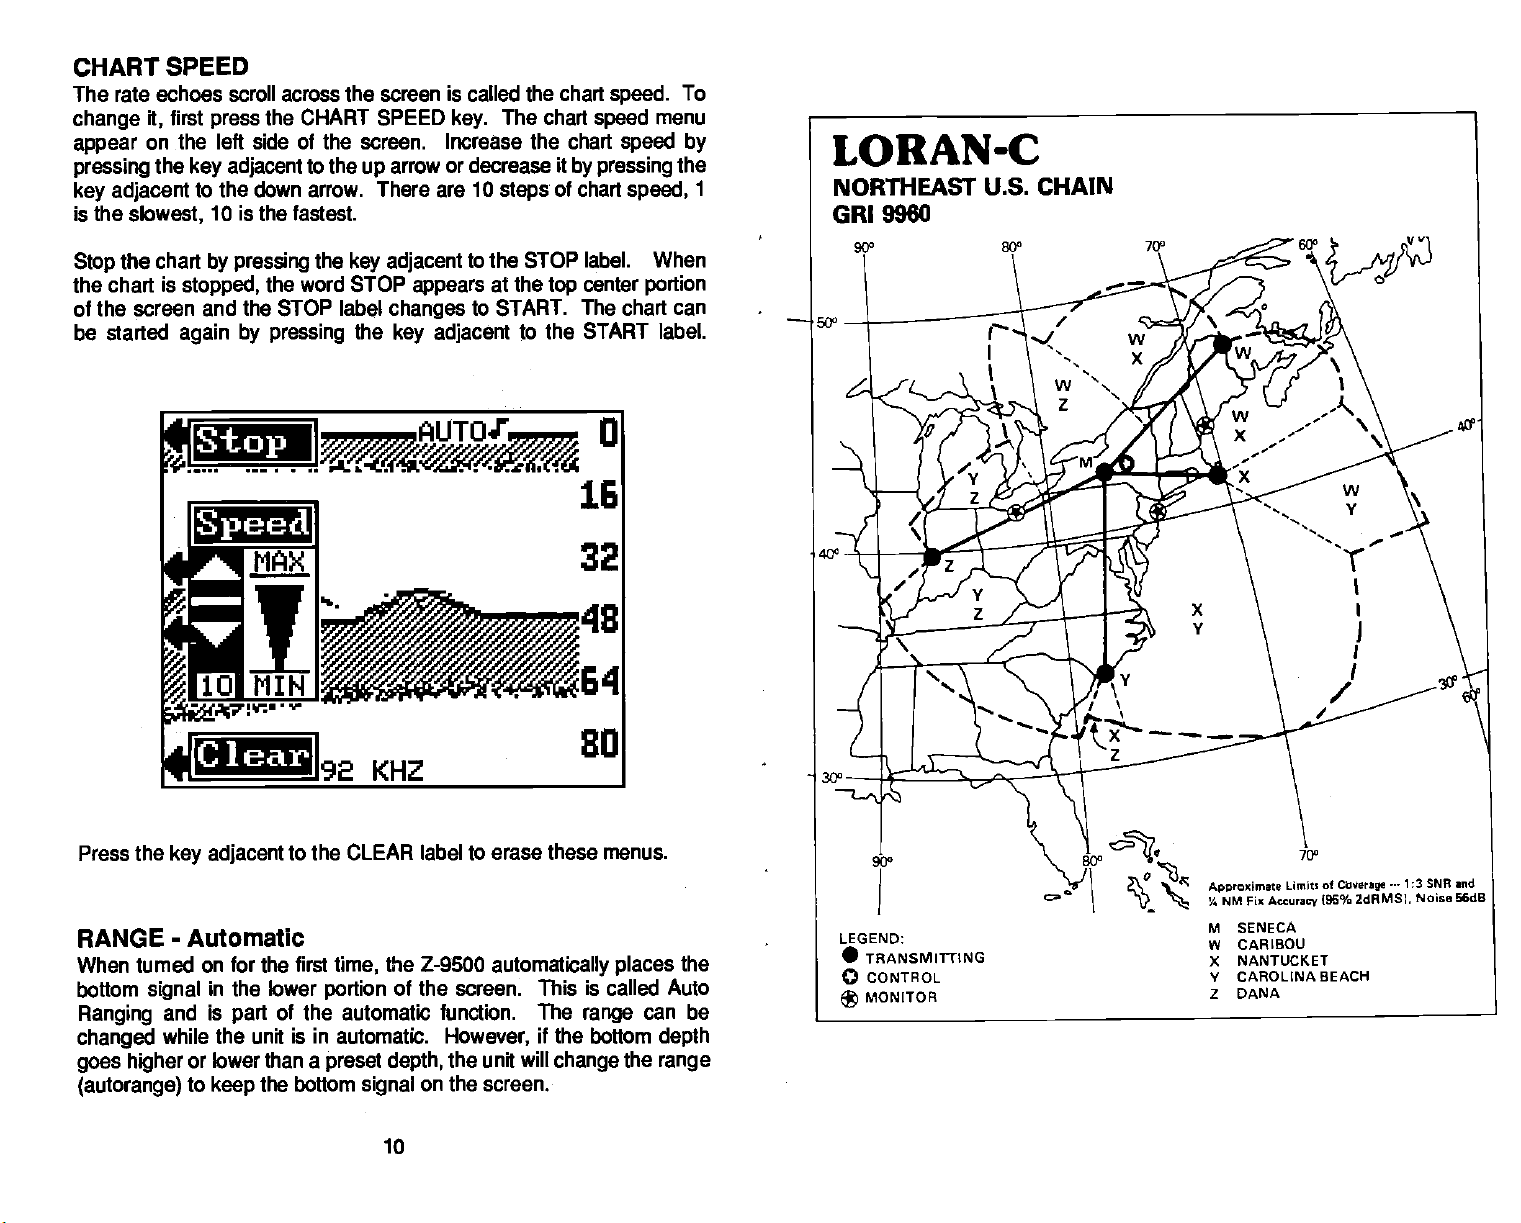
CHART SPEED
The rate echoes scroll across the screen is called the
first
change
appear
pressing
key adjacent
is the
it,
on the left side of the screen. Increase the chart
the
slowest,
the CHART SPEED
press
key adjacent
to the
arrow or decrease
up
to the down arrow. There
10 is the fastest.
are 10
key.
The chart
steps
chart
speed.
speed
speed by
it
by pressing
of chart
speed,
To
menu
the
1
Stop
chart is
the
the
chart
stopped,
by pressing
the
key adjacent
the word STOP
of the screen and the STOP label
be started
again by pressing
the
Stop
Speed
Clear
appears
changes
adjacent
key
to the STOP label. When
at the
to START. The chart
to the START
top
center
portion
can
label.
Press the
key adjacent
to the CLEAR label to erase these menus.
RANGE - Automatic
can be
depth
the
range
the
When tumed on for the first
bottom
Ranging
changed
goes higher
(autorange)
signal
in
the lower
and is
while the unit is
lower than a
or
to
keep
of the automatic function.
part
the bottom
in
the Z-9500
time,
portion
preset depth,
of the screen. This is called Auto
automatic.
on the screen.
signal
10
automatically places
The
However,
the unit will
if the bottom
change
range
PDF compression, OCR, web-optimization with CVISION's PdfCompressor
Page 15
NORTHEAST U.S. LORAN-C CHAIN
REGIONAL MANAGER
CHAIN
MANAGER COMMANDER ATLANTIC
COORDINATOR OF CHAIN OPERATIONS
CONTROLSITE: LORSTA
D6010, STATIU4
MASTER
'MII6KEY
XR&Y
YANKEE
ZLLU DMIA 51 3951 07201
COMMMJDER,
SENECA, NY 4242 50.EN
I.E 46452720
CARBCIJ,
NITUCKET
04
CAJ9CLNA
BEACH, NC
SENECA.
000R.
754933.6W
575537.7W
41 lSll,RH
605839.150
3403 lOIN
77 54 463W
5725la1W
GRI 9960
ATLANTIC AREA.
NY
AREA, NEWYORK,
LOCATION: LORSTA SENECA, NY
CDBLL
Iso) XOr'TER
llosoi
279720
25000/
bOgUS
390271
3221,54
54000/
3152,00
NEWYORK.
M0Ffl'
ISSHC&6)
MJiFFN-42 350 6Cr 0.0 DUALRA'TE W/0R6930
AMiFPN,42 325 S2SFT 0,0
ANIFPH'42 650 TiP
AWFFII'44 400 525 FT
NY
NY
PWH
6KW)
510 700 FT
'TSANSIMT
ANTENMA
MO4DPOLE
MUa,E
M0/1OPU,E
NW
ECD NOTES
0.0 DUAL RATE W/0R16970
DUALRATEW/0R15030
0,0 DUALRA'TE 50/0507060
-03 DUAL RATE
W/0015970
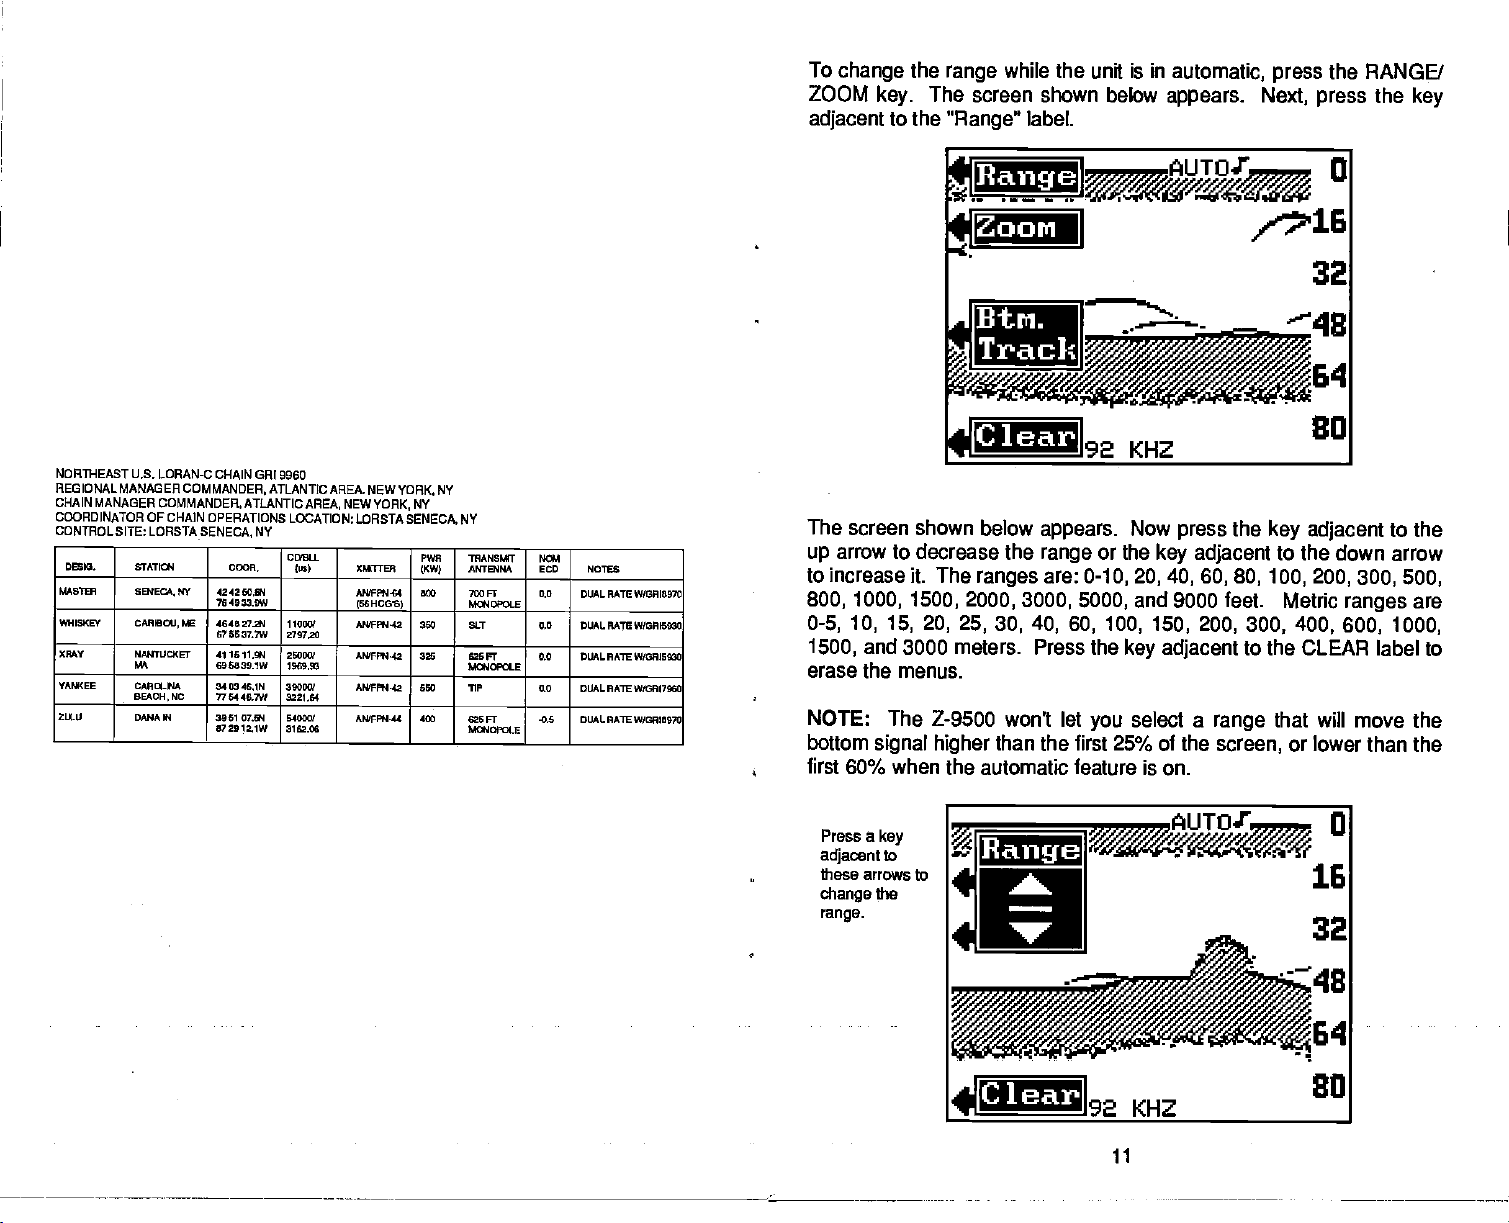
To
change
ZOOM
adjacent
the
The screen shown below
key.
to the
while the unit is in
range
"Range"
label.
automatic, press
appears. Next,
Jtaiige
Zoom
Btn.
Track
Clear
The screen shown
arrow to
up
decrease the
to increase it. The
800, 1000, 1500, 2000,
0-5, 10, 15, 20, 25.
and 3000 meters. Press the
1500,
erase the menus.
NOTE: The Z-9500 won't let
bottom
first 60% when the automatic feature is on.
signal higher
below
ranges
3000, 5000,
appears.
range
are:
Now
or the
key adjacent
0-10, 20,40, 60, 80, 100, 200,300,500,
and 9000 feet. Metric
30, 40, 60, 100, 150, 200, 300, 400, 600, 1000,
key adjacent
select a
you
than the first 25% of the
press
range
screen,
the RANGE/
press
the
key adjacent
to the down arrow
to the CLEAR
that
will
or
lower than the
the
to the
ranges
label to
move the
key
are
Press a
key
adjacent
to
Range
these arrows to
the
thange
range.
Clear
11
PDF compression, OCR, web-optimization with CVISION's PdfCompressor
Page 16
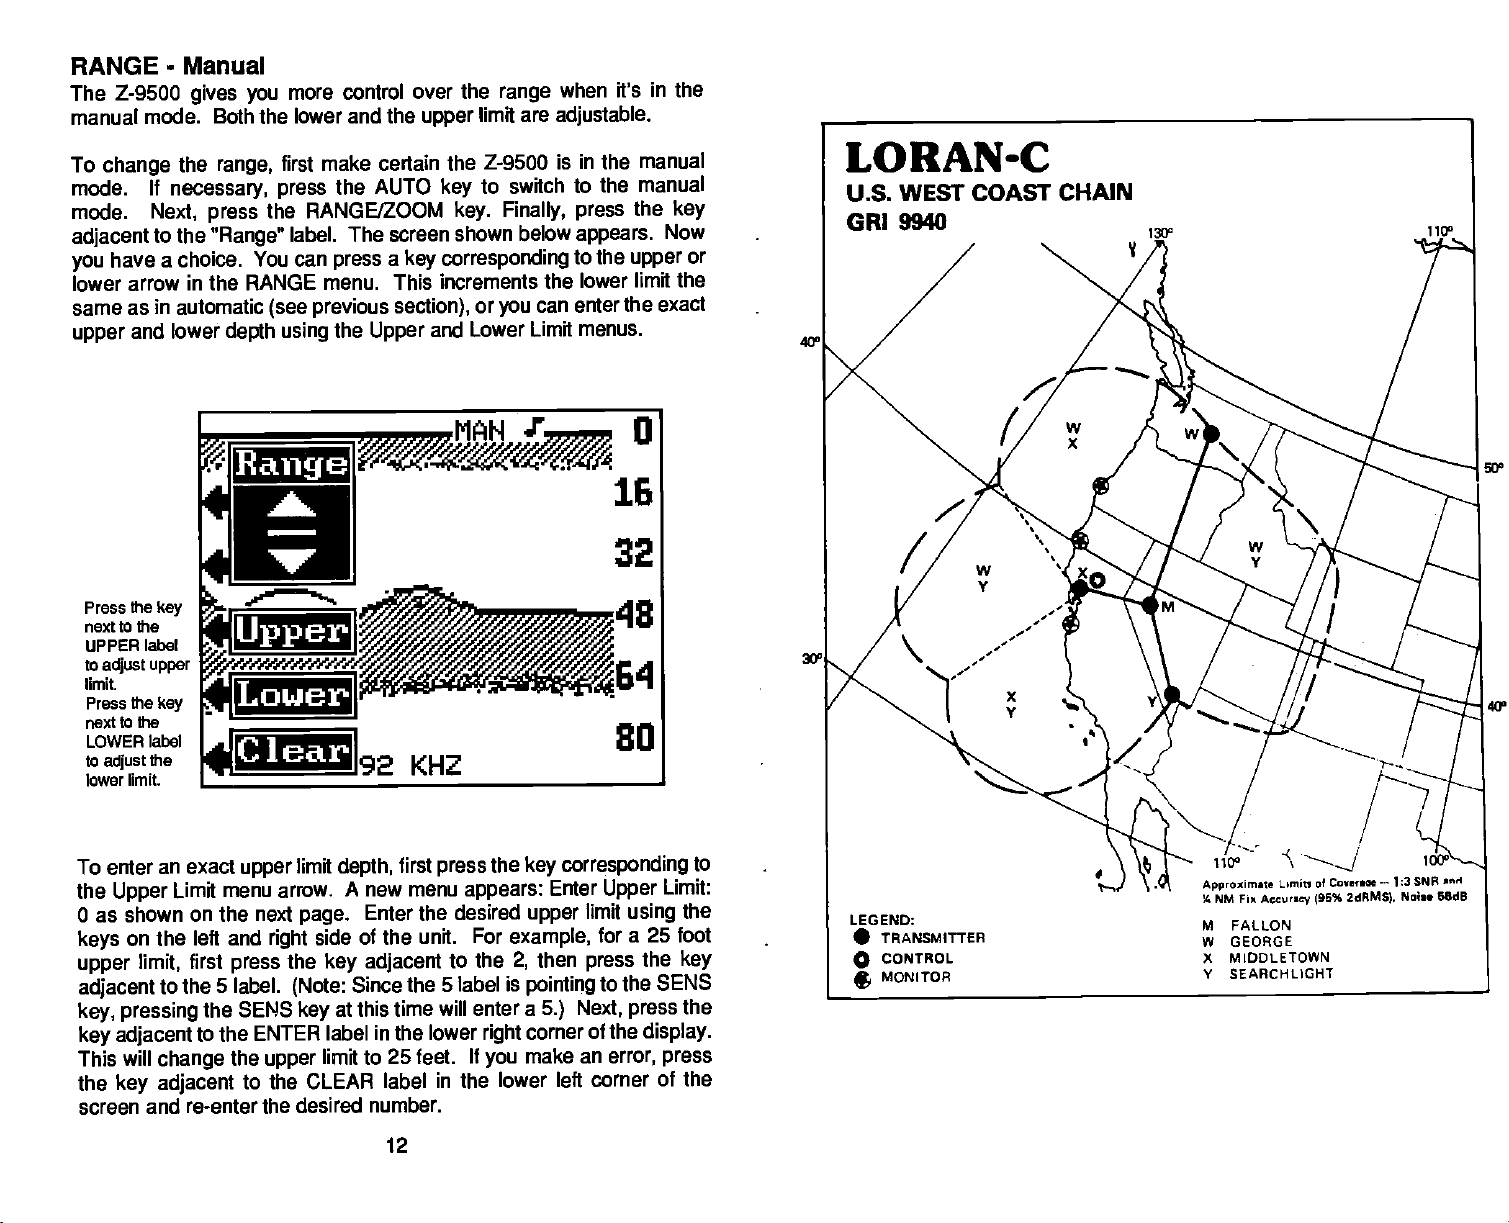
RANGE-
The Z-9500
manual mode. Both the lower and the
Manual
gives you
more control
over the
limit are
upper
range
when it's in the
adjustable.
To
change
mode. If
mode.
adjacent
have a choice.
you
lower
same
upper
the
range,
necessary, press
Next, press
to the
"Range"
You can
arrow in the RANGE menu. This increments
as in automatic
and lower
depth using
make certain the Z-9500 is in the
first
the AUTO
the RANGE/ZOOM
label. The screen shown below
press a key corresponding
the
section),
Upper
(see previous
Bange
the
Press
next to the
UPPER
to
limit.
Press the
next to the
LOWER
to
lower
key
label ____________
upper
adjust
key
label
the
adjust
limit.
Upper
_____________
Lower
Clear
______________
__________
to switch to
key
key. Finally, press
the manual
the
appears.
to the
upper
the lower limit the
or
and Lower Limit menus.
can enter the exact
you
manual
key
Now
or
LORANC
WEST COAST CHAIN
U.S.
CR1 9940
50'
40°
To enter an exact
the
0 as shown
keys
upper
adjacent
key,
key adjacent
This
the
screen
Limit menu arrow.
Upper
on the next
limit,
the 5 label.
to
left and
first
the SENS
on the
pressing
to the
will
change
key adjacent
and re-enter the desired number.
limit
upper
right
press
ENTER label in the lower
the
upper
depth,
page.
side of the unit. For
the
key adjacent
(Note:
at this time will enter a
key
limit to 25 feet.
first
A new menu
Enter the desired
Since the 5 label is
press
appears:
the
to
If
the
right
you
key
Enter
upper
example,
then
2,
pointing
5.)
corner of the
make an
to the CLEAR label in the lower left
12
corresponding
Upper
limit
using
for a 25 foot
press
to the SEWS
Next,
press
error,
corner of the
to
Limit:
the
the
key
the
display.
press
PDF compression, OCR, web-optimization with CVISION's PdfCompressor
Page 17
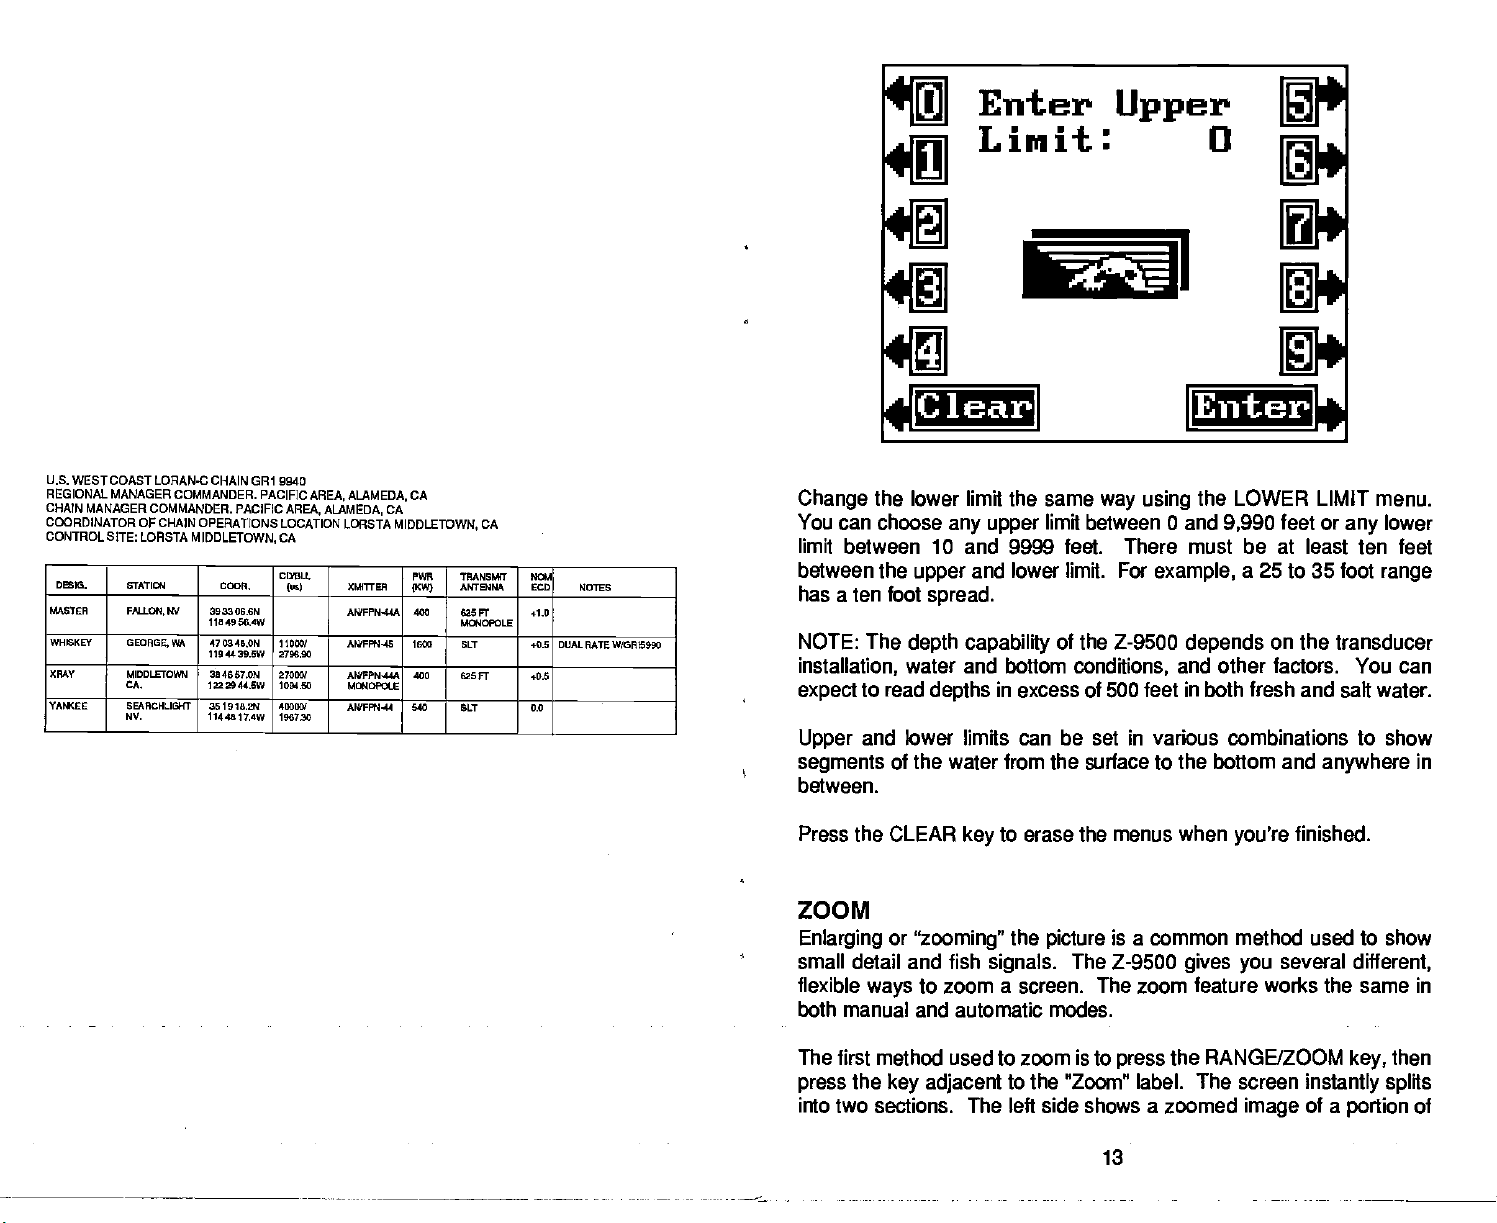
Enter
Upper
Limit: 0
1
U.S. WESTCOAST LORAN-C
REGIONAL MANAGER COMMANDER.
CHAIN MANAGER
COORDINATOR
CONTROL SITE: LOASTA
DJG. STATI4
MASTER
WHEKEY
XRAY MIDDLEmEN
YAM(EE
COMMANDER. PACIFIC
OF CHAIN OPERATIONS LOCATION LORSTA
FALLOW,
GEOAGEWA
CA.
SEARCHLIGHT
NV.
CHAIN GRI 9940
MIDDLETOWN,
COCA.
IN 393306.€N
1104906.4W
470346.0W
110 4439.5W
354657.ON
Ifl2944,SW
391910.2W
1144817.4W
PACIFIC AREA,
AREA. ALAMEDA,
CA
CUL0.
(us)
11000/
2758.90
27050/
1094.50
40050/
159730
ALAMEDA.
XMITrEA
AN/FPN-44A 400 625 FT
AIOFFR44E 1800 ELT +9.9 DUALRATEW/0RI5990
AIUFPN44A
M4OflE
A(0FF1144 940 SIT 0.0
CA
CA
MIDDLETOWN,
PWR
(1(W)
402
CA
'TRANSI,9T
ANTENNA
MOACECLE
E2SFT +0.9
604
LCD NOTES
,1.0
Change
You
can choose
fc
lean
the lower limit the same
any upper
limit between 0 and
way using
Entenf
the LOWER LIMIT menu.
9,990
feet or
any
lower
limit between 10 and 9999 feet. There must be at least ten feet
between the
has a ten foot
NOTE:
installation,
expect
Upper
segments
The
depth
water and bottom
to read
and lower limits
of
and lower limit. For
upper
example,
spread.
capability
of the Z-9500
conditions,
in
depths
excess of 500 feet
be set in various combinations to
can
the water from the surface to
a 25 to 35 foot
depends
on the transducer
range
and other factors. You
in both fresh and
salt water.
show
the bottom and
anywhere
can
in
between.
Press the CLEAR
to erase the menus when
key
you're
finished.
ZOOM
Enlarging
or
"zooming"
small detail and fish
flexible
to zoom a screen. The zoom feature works the same in
ways
both manual and automatic modes.
the
picture
signals.
is a common method used to show
The
Z-9500
gives you
several
different,
The first method used to zoom is to
the
press
key adjacent
into two sections. The left side shows a zoomed
to the RZoomH label. The screen
the RANGE/ZOOM
press
image
then
key,
instantly splits
of a
portion
of
13
PDF compression, OCR, web-optimization with CVISION's PdfCompressor
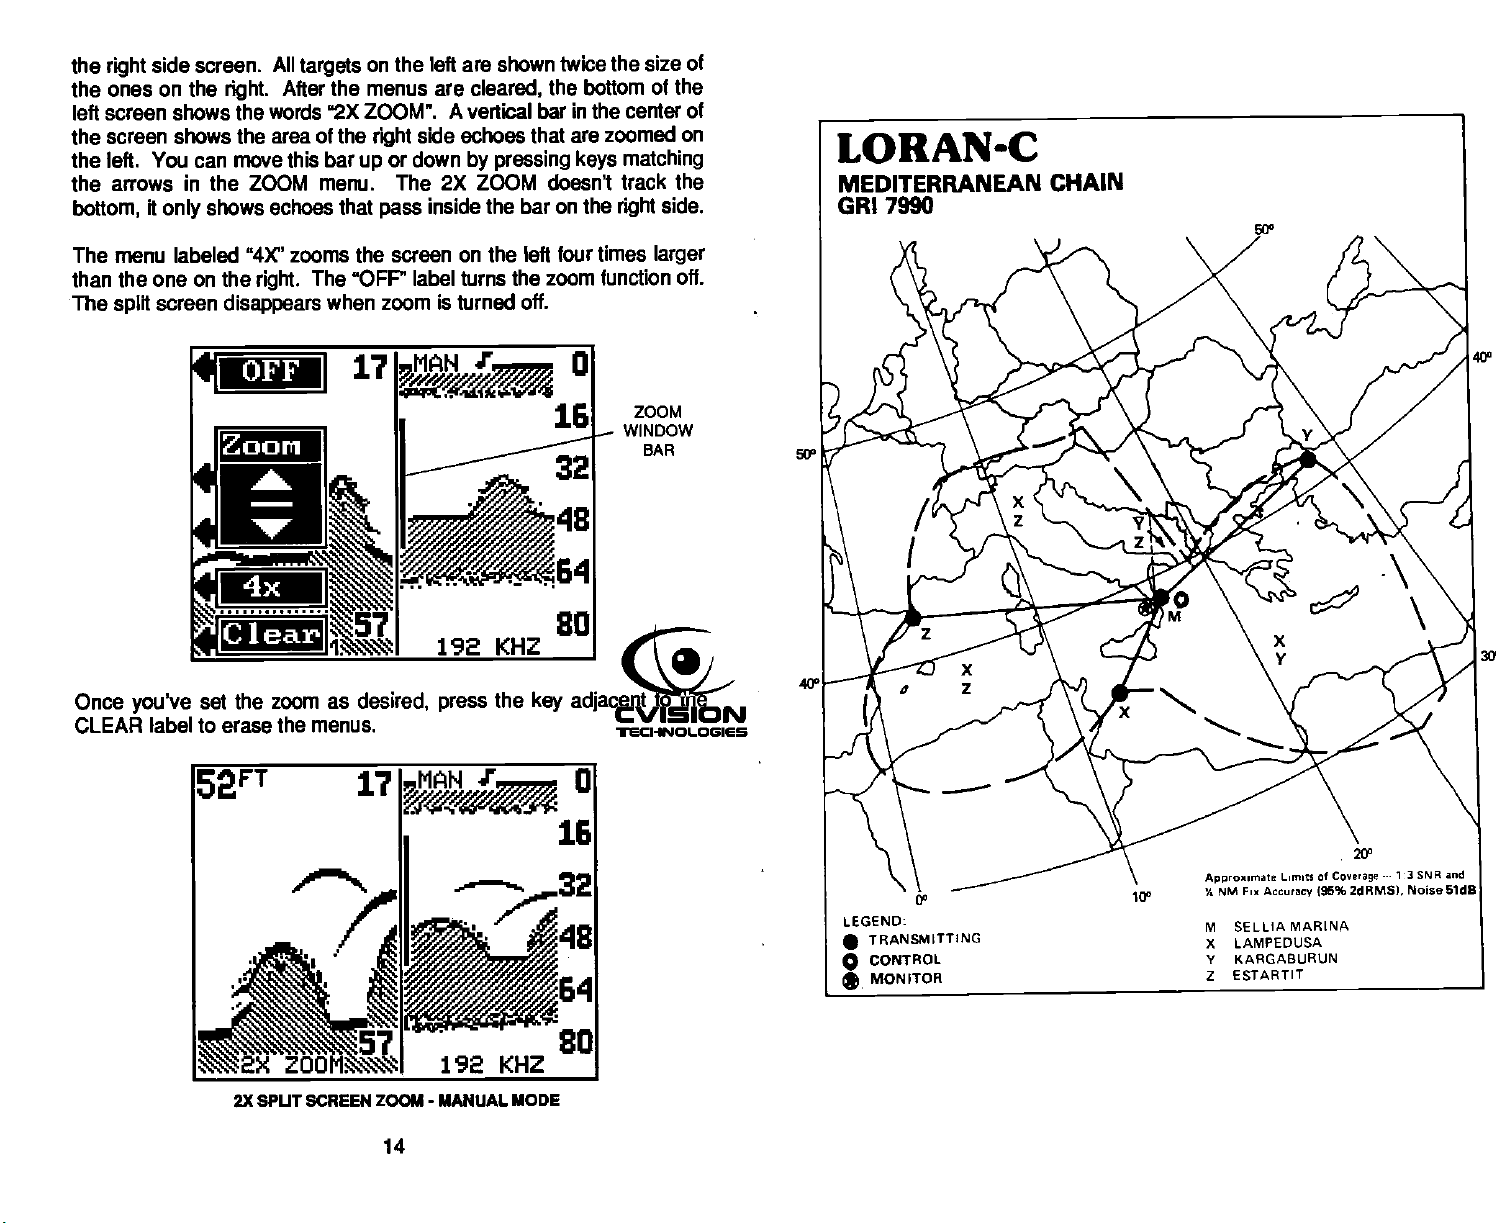
Page 18
the
the
left screen shows the words "2X ZOOM".
side screen. All
right
ones on the
targets
After the menus are
right.
the screen shows the area of the
the left. You can move this bar
the arrows
bottom,
menu labeled "'IX" zooms the screen on the left four times
The
than the one
The
split
in
it
only
screen
ZOOM menu. The 2X ZOOM doesni track the
the
shows echoes
on the
right.
disappears
on the left are shown twice the size of
cleared,
A vertical bar in the center of
side echoes that
right
or down
up
that
pass
The OFF" label turns the zoom function off.
when zoom is turned off.
by pressing keys matching
inside the bar on the
the bottom
Zoon
Clear
of the
are zoomed on
side.
right
larger
ZOOM
WINDOW
BAR
LORAN-C
MEDITERRANEAN CHAIN
GRI 7990
Once
you've
CLEAR
set the zoom as
label to erase the menus.
2X SPUT SCREEN ZOOM - MANUAL MODE
desired,
14
press
the
key
adiacent
to the
PDF compression, OCR, web-optimization with CVISION's PdfCompressor
Page 19

The second zoom method lets
foot increments.
next to the TMZoom" label. The screen shown on the
key
appears.
Now
Again, press
the
press
key
shift the zoom window bar
you
the RANGE/ZOOM
next to the
arrow in the "Zoom" box.
up
then
key,
opposite page
This shifts the zoom window on the left side of the screen
In other
to the
words,
up
also see the zoom window bar move
screens. Press the
if the zoom is from 17 to 57
arrow wilt
change
the zoom window to 16 to 56 feet. You'll
next to the down arrow to move the zoom
key
feet,
up slightly
pressing
in
the center of the
window down. The bar in the center of the screen shows
that is
zoom
displayed
window at the desired
on the left side of the
depth, press
screen.
the
When
key
you
next to the "Clear"
label to erase the menus.
press
one foot.
up
the
key
the area
you
have the
in
one-
the
next
MEDITERRANEAN SEA LORAN-C CHAIN GRI 7990
REGIONAL MANAGER
CHAN MANAGER COMMANDER. COASTGUARO
COORDINATOR OF CHAIN OPERATIONS LOCATION: LORSTA SELLIA
CONTROLSITE: LORSTA SELLIA
OSlO. S7ATI4
MASIER SaLLA
XFIAY
YANKEE
ZILU EETAFIIT
COMMANDER, COASTGUARD ACTIVITIES EUROPE,
MARINA,
ODOR.
MARENAITALY
LM.PEDUSA
ITALY
KAROABURLN
TURKEY
SPAN
3n5220aI
1643(626
3531 20W1
1231 3O.2E
406S2l.4
275201.SE
420336a6
0312 16OE
ACTIVITIES EUROPE, LONDON, UK
ITALY
CThBU
10009'
17605
20009!
397329
47009!
300074
(0,)
Xl,MTTEB
AWfl-20 066 EZ6PT
AIlS 326 626 Ft
ANImI-al 166 GlSFr
AN1'fl4-3l 166 G2SFr
PWA
1KW)
UK
LONDON,
ifALY
MARINA.
TRAMff
AN1BON& N SOD NOTES
MOWPOLE
MGIOPOtE
M000POLE
M000OLE
0
03
03
03
ZOOM
-
BO1TOM TRACK
This feature zooms all echoes and tracks the bottom
time. It can be used in the
split
screen,
full
screen,
and in automatic or manual.
To activate the Zoom Bottom Track
Next,
key.
the Z-9500
place
menus
4x This
normal size.
ately.
appear
key changes
OFF Press this
will revert to a full
the
press
key adjacent
in
the Full Screen
on the left side of the screen:
the zoom from
Simply press
key
screen,
the
to turn the Bottom Track function off. The Z-9500
normal mode.
function, press
to the Bottom Track menu. This will
key
2X Bottom
twice normal
and the
zoom
Track
size
AUTOJ7çi.15
iti
2X BOTTOM TRACK
118p'
at the same
signal
2X
4X
or
modes,
the RANGE/ZOOM
mode. More
to four times
size
changes
immedi-
24
32
40
,½
Clear
_______! 2X BTM TRK?
15
_'-S
__
48
PDF compression, OCR, web-optimization with CVISION's PdfCompressor
Page 20
SPUT SCREEN BOTTOM
2X
TRACK
SPLIT.
the screen
left
left side tracks the
ing
menus.
CLEAR. Press this
Pressing
into
normal echoes scroll across the
side,
all echoes at the same time. Press the CLEAR
the
two
key corresponding
parts.
bottom,
to erase the menus.
key
2x
The
keeping
to the
Zoom Bottom Track
right
ft on the
Split
side of the screen. The
display
at all
menu
separates
displays
times,
to erase the
key
on the
zoom-
SONAR ALARMS
The Z-9500 has three different sonar alarms. The Zone Alarm consists
of a bar that
bar
triggers
bottom
shallow
when the
You can also turn the alarm
appears
the alarm. Another alarm is the Bottom Alarm.
will
signal
water
alert,
Fish ID
on the screen.
this alarm. This is useful as an anchor
"trip"
or for
navigation.
feature
displays
a fish
speaker
echo that
Any
The Fish Alarm sounds a tone
symbol
off
through
on the screen.
the ALARM menu.
appears
inside this
the
Only
watch,
Zone Alarm
To activate the Zone
shown at the
top
Alarm,
of the next
the Zone Alarm label. The screen at the bottom of the next
appears.
The word "ZONE" shows at the
the Zone Alarm is active. The
of the
display.
appears
alarm sounds on
The zone bar shows on the far
between the
top
fish, structure,
first
page appears.
adlustment
and bottom of this bar
bottom
press
the ALARM
Now
top
label
right
echoes,
key.
press
of the
screen,
appears
side.
triggers
etc.
The screen
the
on the left side
Any
next to
key
page
signifying
echo that
the alarm. This
a
16
PDF compression, OCR, web-optimization with CVISION's PdfCompressor
Page 21
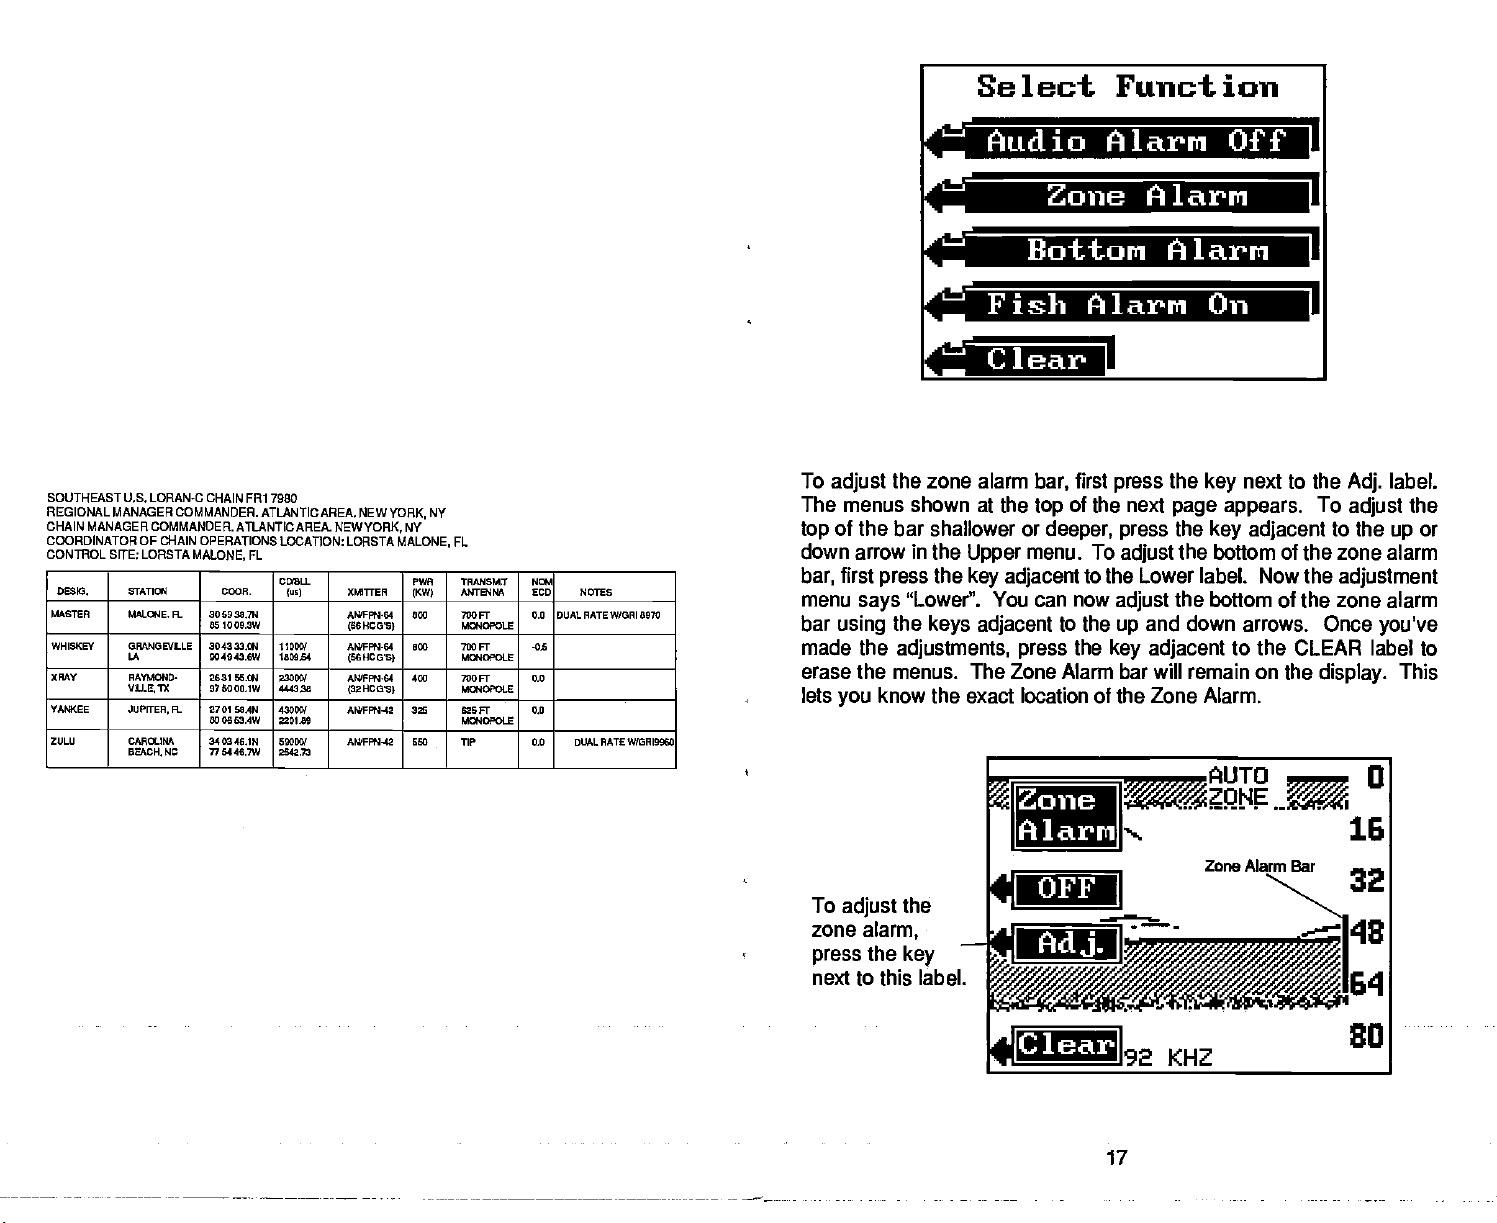
Select Function
Audio Alarm Off
Zone Alarm
SOUTHEAST U.S. LORAN-C CHAIN FRi 7990
REGIONAL MANAGER COMMANDER. ATLANTIC
CHAIN MANAGER
COORDINATOR OF CHAIN
CONTROL
DEWS. STATIa C000.
MASTER MALaIE,R.. 306920,N
WHISKEY ORANOEVLLE
XAAV flAflIOND'
YMI(EE
ZULU CASaIKA
COMMANDER. ATLANTIC AREA.
SIrE: LORSTA MALONE. FL
LA
V4J,EJX
JUPFrEH,a
BEACH.
OPERATIONS LOCATION: LORSTA
0510092W
304333.90
904943.6W
5631 95.04
976000.1W
5701
SeAN
000863.4W
340540,IN
NC
775446.7W
C3LL
(I XMTrEA
01500!
080534
23090!
444328
42005!
0I.09
50000!
2645.73
AREA. NEWYORK, NY
NEWYORK,
NY
FL
MALONE,
PWA
T9n100411
MTB'WtA
1KW)
AISFI'W64
(96HC073
ANPFN-64
(60HCDI
ANIPPN-64
(35HCSI
AN'FF8'42 205 636Fr 0,0
A9SFFT4-43
090 700FT
MaIOPOLE
090 700Fr
Ma4OPOLE
490 700F1'
Ibfl4CPOLE
MC*40P0t5
590
liP 0.0 DUALRATEWIGRI0060
Hal
LCD NOI2S
0.0 DUAL RATEW/ORI 8970
-03
0.0
ttom Alarm
Fish Alarm On
a
To
The menus shown at the
top
down arrow
bar,
menu
bar
made the
erase the menus. The Zone Alarm bar will remain on
lets
the zone alarm
adjust
of the bar shallower or
in
the
first
press
"Lower". You can now
says
the
using
adjustments,
know the exact location of the Zone Alarm.
you
Upper
the
key adjacent
keys adjacent
first
bar,
of the next
top
deeper, press
menu. To
to the Lower label. Now the
to the
the
press
press
adjust
adjust
and down arrows. Once
up
adjacent
key
Zone
Alarn
the
next to the
key
page appears.
the
key adjacent
the bottom of the zone alarm
the bottom
to the
I
I
label.
Adj.
To
to the
adjustment
of the zone alarm
CLEAR label to
the
display.
adjust
up
you've
the
or
This
To
adjust
zone
press
the
alarm,
the
key
OFF
Adj.
next to this label.
Clear
17
PDF compression, OCR, web-optimization with CVISION's PdfCompressor
Page 22
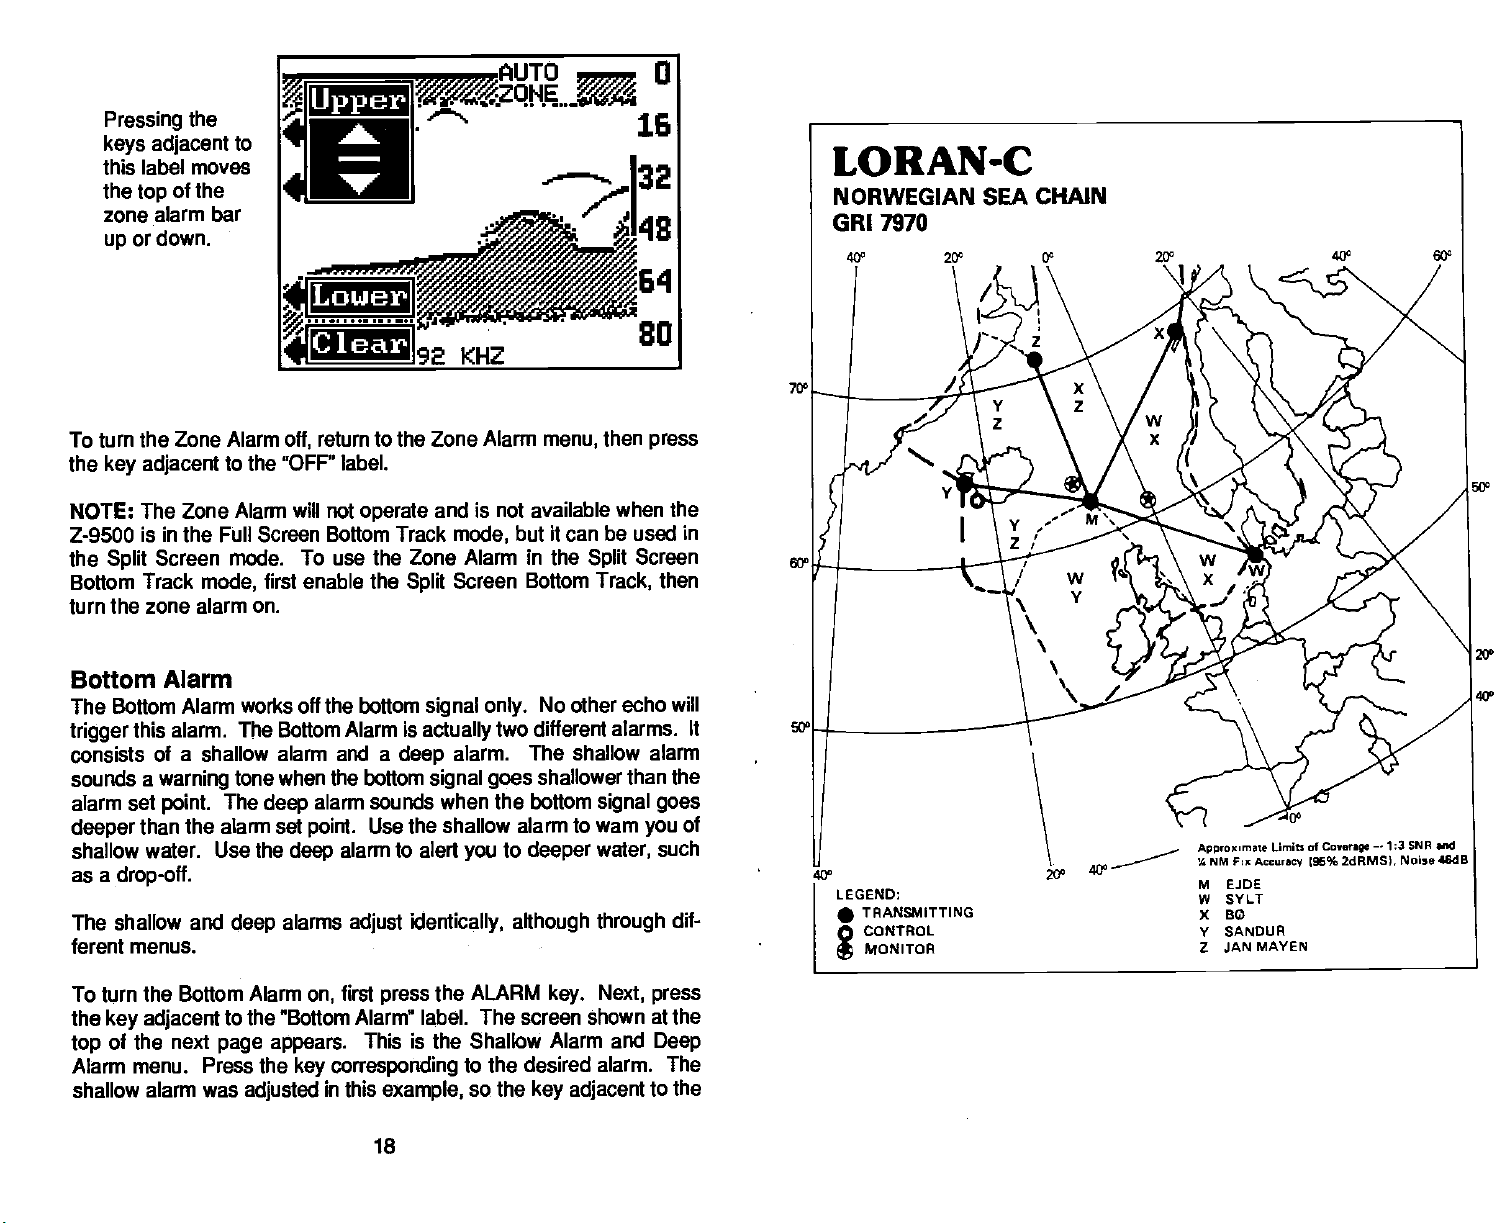
Pressing
keys adjacent
this label
the
zone alarm bar
up
the
moves
of the
top
or down.
Upper
to
Lower
Clear
To turn
the
NOTE: The Zone Alarm will not
Z-9500 is in the Full Screen Bottom Track
the
Bottom
turn the zone alarm on.
the Zone Alarm
key adjacent
Screen mode. To use
Split
Track
to the "OFF" label.
mode,
return to the Zone Alarm
off,
operate
the Zone Alarm in the
first enable the
Split
and is not available
Bottom Alarm
The Bottom Alarm works off the bottom
trigger
consists of a shallow alarm
sounds a
alarm set
deeper
shallow water.
as a
The shallow
ferent menus.
To turn
the
top
Alarm
this alarm. The
warning
point.
than the alarm set
drop-off.
the Bottom Alarm
key adjacent
of the next
menu. Press the
shallow alarm
Use the
and
page appears.
was
Bottom Alarm is
and a
tone when the bottom
The
deep
alarm sounds
deep
point.
deep
alarms
on,
alarm to alert
adjust identically. although through
first
to the "Bottom Alarm" label. The screen shown at the
This is the Shallow Alarm and
key corresponding
adjusted
in this
signal only.
actually
deep
signal goes
Use the
press
example,
when the bottom
the ALARM
then
menu,
mode,
Screen Bottom
but it can
No other echo
Split
press
when the
be used in
Screen
Track,
then
two different alarms. It
alarm. The shallow alarm
shallower than the
signal goes
shallow alarm to wam
to
you
deeper
key.
you
water,
Next,
such
press
Deep
to the desired alarm. The
so the
key adjacent
to
will
of
dif-
the
54y
20°
40'
18
PDF compression, OCR, web-optimization with CVISION's PdfCompressor
Page 23

Select Function
NORWEGIAN SEA LORAN-C
REGIONAL MANAGER. COMMANDER, COASTGUARD ACTIVITIES
CHAIN MANAGER
COORWNATOR OF CHAIN OPERATIONS LOCATION: LORAN-C DETAIL
CONTROL SITE: LORMONSTA
DES'S. STATD4 CA.
MASIER
XRAV BCNORWAY 6E38061
WNEKEV S(LT
VAM<EE SMJDUR
ZLLLJ JAN MAY04
EJDE,FAEAOE
I&DEMAIARK
00R54U01
ICaAND
NWAY
CHAIN CR17970
COMMANDER.
DEFIAVLK.
6217
070420.5W
14 2747.05
5440 29,ON
05172535
545420.EN
325521.0W
70 54523W
084350.7W
COAST GUARD ACTIVITIES
ICELAND
SEal
CDEU.
110001
4045,10
260001
4005.62
46002
2044.04
00560/
321631
XMITT081
lusI
AIWFFN-44 3 can
AQFPW39 106 E2sFr
AI*FFN-42 320 625
AWFFN-45 1500 l350Fr
MVFFN'39 105 025 FT
EUROPE. LONDON,
EUROPE, LOND,UK
PWR
0KW)
KEFLAVIK,
TRANSMIT
ANTENNA
M4OFOLE
MC*4OLE
Fr
M1CI'OLE
M1OF0L0
0Aa4OL0
UK
CELAND
N.i
SOD
NOTES
0.0 DUAL RATE W10017030
0.0
0.0
0.0 DUALAA1EW'0Rr7620
0.0
Shallow Alarm
Deep
Alarm I
Clear
Shallow Alarm label was
next
page appears.
the
of the screen.
top
To set the shallow alarm
pressed.
The current shallow alarm
press
Value" label. The screen shown at the
Now enter the desired
the
press
Using
the alarm will
The
The
bottom
can tell
key adjacent
this
example,
sound.
alarm
deep
difference is the sound the
only
goes deeper
the sound which alarm was
by
depth.
to the ENTER label to set the shallow alarm.
if the bottom
adjusts
and activates
than the alarm
The screen shown at the
the
key
10 feet is used in this
signal gets
depth.
triggered.
U
is
displayed
to the
page appears.
adjacent
of the next
top
setting
example.
shallower than ten
exactly
deep
like the shallow alarm.
alarm makes when the
This tone is different so
top
"Adj.
of the
at
Alarm
Now
feet,
you
Shallow
Alarm 10
Turn Alarm On
AdJ.
Alarm Value
Turn Alarm Off
19
I
I
I
PDF compression, OCR, web-optimization with CVISION's PdfCompressor
Page 24

Enter Shallow
Alarm:
10
SHALLOW ALARM DEPTh
FISH
use the Fish
To
Now
press
Alarm
displays
different tones for each fish
To turn the Fish Alarm
adjacent
MENU
ENTRY
ALARM
Alarm,
the ALARM
On" label. This enables the Fish Alarm.
a fish
to the "Fish Alarm Off" label.
symbol
first make certain the Fish
key.
on the
off,
lear
Next,
screen,
symbol
repeat
the
press
a tone sounds. There are
size.
the above
1
lEnten
ID feature is on.
key adlacent
time the Z-9500
Every
then
steps,
to the "Fish
the
press
key
Select Function
Audio
Botton Alarn
Fish Alarn
Alarn Off
Zone Alarn
On
1
I
I
a
20
PDF compression, OCR, web-optimization with CVISION's PdfCompressor
Page 25

Audio Alarm On/Off
When the Z-9500 is first turned
matically
screen.
enabled. This is shown
the audio alarm
on,
a note
by
symbol
(speaker)
at the
top
is auto-
of the
GULF OF
ALASKA LORAN-C CHAIN GAl 7960
REGIONAL
CHAIN
COORDINATOR OF CHAIN OPERATIONS
CONTROL SITE: LORMONSTA
MASTER IUC
XR&V
YANKEE SHOAL COVE
MANGER COMMANDER. PACIFIC EA.
MANAOER:COMMANOER 17TH
DES'S.
ETAIflI COCA.
M
NARROW
CAPE. AK
AK
ES 1942.001
1424831.5W
572620.2N
102 ES 11.35
552520.5W
131 15 10.6W
KODIAK.
COASTGUARDDISTRICT.JUNEAU,
AX
CD'SLL
1100W
Z504AS
20002/
3051.14
ALAMEDA, CA
LOCATION: LORMONSTA
ThITTER
IEsI
AN'FPN44A 540 SLT
AMFPN44A 4 625 Fr
M4WPN44A 540 SIT 0.0 DUAL RATE W/0RI5000
KODIAK,
PWR
p0W)
AK
J<
TRANSMIT
MJTBANA
Ma4OPOI.E
NCW
ECO
NOTES
+1.0
0.0 DUALRATEWI0AI0000
To turn the
adjacent
speaker
to the "Audio Alarm Off" label to turn the audio off. To turn the
on,
speaker
press
off,
the
"Audio Alarm On" label.
MUTE
LABEL
IL'Il1
NOTE: The words
of the
top
display
turned off. For
alarm is
triggered.
corresponding
when the alarm is
example,
press
ALARM
the
key,
then
key.
press
Next,
the
key
the
press
next to the
ALARM
TE SYMBOL
16
32
143
64
20
192 KHZ
to the alarm in use will still flash at the
if
triggered
even
the word "ZONE" will flash when the zone
the
speaker
key
is
MUTE
When
any
'Mute' label
adjacent
to this label silences the alarm until it is
sonar or loran alarm sounds
appears
at the bottom of the screen.
(except
the Fish
Alarm),
Pressing
triggered again.
the
the
key
MENU
get
the
many
needs and
lost in
functions
of these
carefully
a
menu,
The Z-9500 uses menus
extensively
to
and features of the unit. The MENU
features, allowing you
water conditions.
another
worded to lead
reach the desired
to
simply press
through
the MENU
Although
in the
you
the CLEAR
key.
to customize
you
right
key.
the unit to
have to leave one menu and enter
may
function,
direction. If
All of the
21
guide you through
accesses
key
your particular
the choices have been
ever
you
following
features are accessed
PDF compression, OCR, web-optimization with CVISION's PdfCompressor
Page 26

CHART FREQUENCY
The Z-9500
simultaneously.
other
optional
on
page
operate
operates
3 for
from a different
transducers are available. See the transducer
single
from 50 or 192
The sonar unit comes with a 192 kHz
or dual transducer connections. The chart
frequency
kHz,
than the
either
digital
independently
transducer,
sonar.
or
diagram
can
rL
'Turii Fish—ID On
pO
The Z-9500 chart's
on. To
shown above
Frequency
change frequencies,
appears.
label.
Select
I
Chart
Chart
Frequency
Speed
Light
More I
operating frequency
first
press
Next,
press
Frequency
50kHz
I
I
1
I
is 192 kHz when ft's first turned
the MENU
the
key adjacent
key.
to the
The menu
Chart
.
50/192 LHz
-
Clear I
Now
192
kHz,
begin scrolling
the
press
key adjacent
or both 50 and 192
echoes across the
to the desired
kHz-split
screen
display.
22
frequency,
operation.
PDF compression, OCR, web-optimization with CVISION's PdfCompressor
either 50
The unit will
kHz,
Page 27

The
frequency
in
use
will
also be
displayed
at the bottom of the screen.
LABRADOR SEA LORAN-C CHAIN GRI 7930
REGIONAL MANAGER
CHAIN MANAGER
COORDZNATOR OF CHAIN OPERATIONS LOCATION: LORMONSTA St
CONTROL SITE: LORMONSTA
0601G. &ATK1 CR,
MASTER FOX HAREDUR
WH60KEY CAPE RACE
XRAY N4GISS
COMMANDER ATLANTIC AREA NEW
COMMANDER ATLANTIC AREA,
St MITHONY, NEWFOUNDLAND
52223521
CANWIDA
NWM,
NR.D. CANADA
GRES4LmD
054220.4W
4845 3224
ES 1020&.V
00501721
451027.5W
COSU.
IU)
11056/
20072
2(000/
aSSESS
NY
YORK,
NEWYOF1K,
NY
XMITEII
AN/FPN-64
(ES HCGS}
AWFW4.45 1500 1300 Ft
MJ/FFII-45 780 535 FT
P608
(1V4)
000 700 FT
ANTHONY. NEWFOUNDLAND.
TRAflSMOT
MJTSIW.
MaIa'OLE
Ma4opoLE
Ma4OPOLE
N0/
ECD NCIS
DUAL
0.0
0.0 DUAL RATE W/3R1E530
0.0 DUAL RATE 60/0819980
RATE W/0R15530
CANADA
NOTE: The 192 kHz
frequency
for both the chart and
digital
sonar is
enabled when the Z-9500 is turned on for the first time. For more
information about the
digital
sonar
frequency, please
read the
"Digital
Sonar section.
CHART DUAL FREQUENCY OPERATION
The Bottom Track and Zoom features are not available when the Z-
9500 is
manual mode
Now
in
the dual
frequency
by pressing
and lower limits can be
upper
mode. To "zoom" a
the AUTO
key,
then
changed
range,
press
switch to the
the RANGE
to suit conditions.
key.
Dual
chart is
(Left
The
sensitivity
quency
feature is enabled. To
and
The screen shown at the
sensitivity
press
"Right"
or
Grayline®
the
key adjacent
label to
adjust
Frequency. Split
operating
Graylineealso adjust differently
of the next
top
level for the
to the "Left" label. Press the
the
sensitivity
side of the screen. The normal
and the features
adjust normally.
at
adjust
Saeen Mode
50kHz,
right
them,
or 50 kHz side of the
left,
and
Grayline®on
sensitivity
chait is 192
kHz.)
when the Dual Fre-
first
press
the SENS
page appears.
key adjacent
the
right,
and
Grayline®labels appear
To
adjust
screen,
to
192 kHz
key.
the
the
23
PDF compression, OCR, web-optimization with CVISION's PdfCompressor
Page 28

Select
Chart
Left
lB ifltl
0
80
2
adjust
label to do the same
Right
Press the
Grayline®on
Press the
key
key
earl
1jCi
next to the Left label to
the left side of the screen.
next to the
of the screen.
SURFACE CLARITY CONTROL
The
markings extending
the surface. This can interfere with fish
markings
boat
Surface
clutter
receiver, decreasing
the
of the
maximum
are called surface clutter and are caused
wakes,
range
temperature
Clarity
signals
selected
Control
from the
increases. The maximum
depth range.
surface clutter would be reduced down to 45 feet.
SCC,
from the "0" line can extend
inversion,
(8CC
display.
it near the
and more.
for
short)
SCC varies the
surface and
depth
For
example,
the
sensitivity
on the
and
right
side
(5CC)
feet below
many
signals
or other
reduces or eliminates surface
gradually increasing
that 8CC will affect is 75%
targets.
by
sensitivity
on a 0-60 foot
wave
range
These
action,
of the
it as
with
NOTE: 8CC is available
menu doesn't
There are 10 levels of SCC available on the Z-9500. When ft's first
turned
Next
appears.
shown at the
on,
press
appear
the 8CC level is one. To
the
Now
top
when the Fish ID feature is on.
key adjacent
the
press
of
the next
when the Fish ID feature is off. The 8CC
only
change
it,
press
the MENU
to the "More" label until the SCC label
key
adjacent
page appears.
to the 8CC label. The screen
24
key.
PDF compression, OCR, web-optimization with CVISION's PdfCompressor
Page 29

_______ AUTO
24
a_
36
rairee4dA
0
CANADIAN WESICOAST LORAN-C CHAIN GRI 5090
REGIONAL MANAGER
CHAIN MANAGER COMMANDER.
COORDINATOR OF CHAIN OPERATIONS LOCATION: LORSTA
CONTROLSITE: LORSTAWILLIAMS
06213. STATIaI COOS.
MASTER waTALSI
XRW SHOAL COVE
YAM(EE
21310 PORTHAROY
COMMANDER. PACIFIC
BC.
.ME,
CN4ADA
AK
WA 470345.CN
GEORGE,
CANADA
SC,
PACIFIC
LAKE, BC, CANADA
SI 5755.564
1232302.2W
552629.501
121 1519.7W
1194439.5W
E03029.7N
12721 20.0W
AREA, ALAMEDA.
EA. ALAMEDA,
ODiSU.
(us) XMTTEA
11000!
2343.00
270001
1927,38
410001
1200.61
AN'FPN'44A 400 625
AI*FPN'44A 540 SLY 0.0 DUAL RATE WIGS 7000
AN/FFT'l'45 1500 SLY +0.5 DUAL RA1EWI0RI 9940
NWFFRJ-54
IO2HC3T
CA
CA
MIDDLETOWN,
PWR
4KW)
400 626Ff
CA
TRN4STaT
MCDINA
FT
SflSOFC4.E
MU4000LE
NG.I
EGO NOTES
+ 1.0
0.0 ALERTBAY
This
brings up
the
key adjacent
you press
menu also
the
press
Press the
the SOC
to the
the
up key.
changes
as
key adjacent
key adjacent
The
to
DISCRIMINATION
Discrimination is a
noise. In sonar
electrical and mechanical
systems
ducer,
unwanted marks on the
and
even
vibration from the
noise
terms,
wiring,
noise is
air
display.
'Speaker
adjustment
an-ow. The bar
up
number
you
change
the
menu. To increase the
graph
the lower left
down
in
the level. To decrease the
arrow.
increases
portion
5CC,
each time
of the SOC
to the CLEAR label to erase the menus.
rejection
sources such as
bubbles
feature that's effective in
undesired
any
passing
engine.
In all
signal.
bilge pumps, engine ignition
over the face of the trans-
cases,
combating
It is
caused
noise can
produce
Disc/Scc
Volume
Preset
L
I
press
500,
by
More I
Clear
-,
25
PDF compression, OCR, web-optimization with CVISION's PdfCompressor
Page 30

NOTE: Discrimination is
change
Discrimination
the level of
Discrimination,
menu doesn't show unless the ASP feature is
Disc.
8cc.
Clear
not available when the ASP feature is on.
first turn the ASP feature off. The
off.
To
There are 10 levels of Discrimination
first turned
ft's
the MENU
key.
the Disc/Scc label
The screen
To increase
The bar
in
change
cent to the down arrow.
When the Discrimination level is at
adjacent
graph
lower left
the
the level. To decrease
to the CLEAR label to erase the
the Discrimination
on,
Next
press
appears.
shown above
the
Discrimination,
increases each time
portion
appears.
of the Discrimination
the
key adjacent
Now
press
press
you press
the
Discrimination,
ASP
newest
The
Processing
sonar
minimum of interference. To our
noise
automatically
it can be turned on or
but
technology
or ASP. This
signals, rejects
rejection system
on when the Z-9500 is
in noise
system
noise
available
off.
rejection systems
constantly
signals,
knowledge,
in
Generally, you
available on the Z-9500. When
level is one. To
change
it,
press
to the "More" label until
the
key adjacent
the
key adjacent
the
menu also
the desired
menus.
evaluates the
and
displays
up key.
level,
true echoes with a
to that label.
to the
up
The number
changes
the
press
key adja-
the
incoming
press
is Advanced
arrow.
as
Signal
this is the most advanced
sonar
sportfishing
first turned on. It's not
will want to leave it
today.
ASP
adjustable,
you
key
is
on.
26
PDF compression, OCR, web-optimization with CVISION's PdfCompressor
Page 31

if
However,
detail, you
of noise
present,
are
you
may
having problems seeing fish, structure,
wish to turn the ASP feature off. If
ASP will not
echoes such as the above, If
sonar
troubleshooting
section in this manual.
Heel Offset I
filter out the
only
do have noise
you
there are
noise,
but other small
problems,
or other
levels
high
see the
EAST ASIAN LORAN-C GRI 5570
REGIONAL
CHAIN MANAGER:
COORDINATOR OF CHAIN OPERATIONS LOCATION:
CONTROL SITE: LORMONSTA
WHISKEY
XRAY KWANG JU
MANAGER: PACIFIC
COMMANDER,
VOKOTA,
DES'S, STATION CODA.
MASTER POIWG
KOREA
HDIO{AIDO
JAN
KOREA
0ESASHI
JAPAN
38 11 25.TN
1292027.3E
4244 37.1 N
I43420t2E
3502
12832 ES,7E
283525.55
12828 58.4E
AREA, ALAMEDA,
14TH
COAST GUARD
JAPAN
OD/SLL
(US) XMI1TER
1 1
4783.88
55TH
31'
847.02
4250w
3585.58
CA
DISTRICT, HONOLULU,
COMMANDER,
AWERN-35 35
AN,1'PH-AS 1 825
ANU'IRN'38 35 450 FT
AMIFPN45 1500 T25FT
PER
1KW)
FAR EAST
HI
SECTION, YOKATA,
TRANSMIT
ANTENNA
4 FT
MOIOPOLE
FT
MONOPOLE
MONOPOIE
MONDPCLE
JAPAN
NON
LCD NOTES
'1,5 USAF MANNED
tO,E DUAL RATS W/GRI 5571
-1,75 USAF MANNED
0.0 DUALEA15W10R19571
Info
:
System
Diqital
Turn ASP Of' £
uL.1M1
I
Clear
To turn ASP
to the "More" label until the 'Turn ASP
the
You should see an increase in noise on the
again, repeat
ASP On" label.
next to that label. The Z-9500 returns to
key
FISH ID.
The
fish.
clutter, thermoclines,
instances,
symbols
three fish
designate
l.D.
Fish
The
on the screen in
a small fish
symbol
on a
first
off,
the above
press
steps,
the MENU
then
feature identifies
micro-computer analyzes
and other
remaining targets
are fish. The Fish l.D. feature
place
sizes:
symbol
small, medium,
the relative size between
symbol
when it thinks a
larger target,
etc.
L
then
key,
Off" label
the
press
targets
that meet certain conditions as
all echoes and eliminates surface
signals
that are undesirable. In
of the actual fish echoes, There
and
targets.
is a small
target
-
Sonar I
I
the
press
appears.
display.
key adjacent
large.
In other
key adjacent
the sonar screen,
To turn ASP on
to the "Turn
These are used to
words,
a
fish,
medium fish
Now
displays
it
displays
press
most
are
The
micro-computer
distinguish
between fish
turtles, submerged floats,
outwards from a
ing
l.D. feature to
distinguish
the screen when
is
sophisticated,
and other
group
actually,
but it can be fooled. It cannot
suspended objects
air
bubbles,
etc. Individual tree limbs extend-
of limbs is the hardest
from fish. You
may
see Fish l.D.
such as
object
trotlines,
for the Fish
symbols
there are no fish. Practice with the unit in
on
27
PDF compression, OCR, web-optimization with CVISION's PdfCompressor
Page 32

both the Fish
Fish l.D. feature.
I.D.
and without to become more familiar
mode
with the
To turn the
the
key adjacent
ately disappears
scroll across
displayed.
displayed
The Fish 1.0. feature cannot be used when
Fish l.D. feature
to the "Turn Fish-l.D. On" label.
and the sonar screen returns. Echoes
the
screen, however,
Any targets
as fish
the
symbols.
511T
first
on,
press
the surface clutter
micro-computer
AUTO!
ec
FISH ID. ON
the MENU
The menu immedi-
determines are fish will be
Next,
key.
will continue to
will no
press
longer
the Z-9500 is in the manual
0
12
24
36
-ec
42
be
If
if
in
you
1.0.
you
the
key.
mode. If
manual,
turn automatic off when the Fish
will be turned off also.
The
feature
can't
a
To turn the Fish
the
sensitivity
is on. This shouldn't affect the
see fish
fixed level and cannot be
key adjacent
This turns the Fish
turn the Fish
you
micro-computer
can
only
symbols, try increasing
l.D. feature
to the uTurn
1.0.
feature
1.0. feature on when the Z-9500 is
will turn the automatic
be increased a fixed
adjusted
off, press
Fish-ID Off" label. Or
feature on.
I.D. feature is
ability
the
sensitivity.
when the
the MENU
and automatic off at the
28
the Fish l.D. feature
on,
amount
when
to
display targets;
SGG is also set to
Fish l.D. feature is on.
key,
press
the Fish
then
press
AUTO
the
same time.
PDF compression, OCR, web-optimization with CVISION's PdfCompressor
Page 33

DIGITAL DISPLAYS
The Z-9500 can
distance
screen.
it's first turned
turned on or off
log,
(Requires optional
off at the same time.
display
and loran
on,
only depth displays.
as desired. Or all of the
the
depth, speed,
position
data
ST-T
surface water
on the
speed/temperature sensor.)
upper
Each
digital display
displays
can be turned on or
temperature,
left
portion
of the
When
can be
CANADIAN EASTCOAST LORAN-C CHAIN GR1 5930
REGIONAL MANAGER COMMANDER ATLANTIC AREA. NEW
CHAIN MANAGER COMMANDER ATLANTIC MEA, NEWYORK. NY
COORDINATOR
CONTROL SITE: LORMONSTA ST.
00006. StATI Coal.
MASIFO
XFAY
VAWEE CME RACE
2/LU FOXHA.800U0
OF CHAIN
NE WFOU N 0 LAN 0 • CN4AOA
CMBOU
NMITUO(ET
SM
NRD C/JIA
NR.DCMJADA
OPERATIONS LOCATION LORMONSTA
MJTHONY, NEWFOUNDLAND,
0180
454527.36
675537.7W
41151134
695035.1W
46403221
5310282W
62223521
0542264W
CD/BLL
los) XMFVTER
110001
2131.86
25080/
375592
3592/
3504.80
YORK,
APUPN42 350 OtT 50 DUAL OATS WlGA)5900
MVFPN-42 326 625 FT
FJ6FPN-45 3536 l3SOFt
M6FPt-64
(5611C01S)
NY
STANTHONY.
CANADA
P040
TRANSMIt
ANTEIFLA
1KW)
MalOpas
Ma40PE
800 70089
MG1OPE
NA
ECD Noire
59 DUALRATEW/0RI5000
9.0 DLOALRAIEW/00I7530
50 DUALRATSWIGRIIS3O
To turn all of the
the
Display"
This will turn all of the
next to the
key
label. Now
digital displays on, press
MORE label. Now
press
[
rjeaker
To turn all of the
Then
press
the
displays
displays
the
key adjacent
off and returns to the sonar screen.
the
displays
the MENU
press
next to the "All
key
on and return
the
you
key. Next, press
next to the
key
Displays
to the sonar screen.
Digital Display
Volume
Depth
Isp lay
More I
Clear
off,
go
to the "All
Lines
Contrast
L
to the
digital
Displays
menu as shown above.
Off' label. This turns
"Digital
On" label.
I
I
I
is; lays
__
Character Size
Tenths
Of F
I WALL
I
More
a
29
PDF compression, OCR, web-optimization with CVISION's PdfCompressor
Page 34

DIGITAL DEPTH DISPLAY
When the Z-9500 is turned on for the first
is located at the
a
separate digital
bottom
the
the bottom
depth.
display.
When the
depth.
left corner of the screen. This
top
sonar built into the Z-9500. It
If it loses the
digital
bottom,
finds the
the last known
bottom,
time,
the
digital depth
display
displays only
depth
it
automatically displays
display
comes from
will
flash
the
on
The
are accessed
first
press
label. This
adjacent
digital
to the
depth
through
the MENU
brings up
Digital Display
the "More" label.
This is the
menu lets
doesn't
display
and the
Digital Depth
you
turn the
the
depth
graph.
turn the
Depth
Depth
Dept1i
Depth
function
has a number
the
Digital Display
key.
the second menu
Finally, press
function menu. As
digital
digital
sonar on or
in
feet, fathoms,
Clear
of features and
menu. To reach this
Next,
label.
the
sonar
the
press
Next,
key adjacent
display
off,
only
key adjacent
page.
press
the
or meters on both the
Disp.
On I
in Feet
in Meters
iii Fathoms
Disp.
L
OFF
Now
the
to the
can
you
on or off.
display.)
options
that
menu,
to the "More"
the
press
adjacent
key
"DEPTH" label.
see
below,
(NOTE:
key
this
This
It can also
sonar
digital
I
I
I
to
To make a
arrow. If
exit. For
press
clear,
The letters "FM" next to the
means
NOTE:
changes according
change, simply press
don't want to make a
you
example,
the
key adjacent
revert to the sonar
meters,
The
depth
to make the Z-9500
to the
an
and
scale on the
to the selected mode.
display
means the
the
key corresponding
change, press
display
Depth
digital depth signify
in Fathoms" label. The screen
with the
right
30
depth displayed
digital depth
side of the sonar screen also
to the menu
the CLEAR
the
depth
in
in fathoms.
fathoms scale.
in
is
feet.
to
key
fathoms,
will
"M"
PDF compression, OCR, web-optimization with CVISION's PdfCompressor
Page 35

SPEEDOMETER
The Z-9500 can
or knots if the
hour,
display
eter can also be calibrated
first
label. Now
press
to the
next to the
the MENU
press
the
key adjacent
"Speed"
the
press
label. The menu shown below
"Speed Disp.
boat
optional speed
key.
key adjacent
to the "More" label.
On" label to turn the
Select Function
speed
through
Next,
in miles
sensor is attached. The
this menu. To
the
press
to the
"Digital Display"
hour,
per
display
key adjacent
Finally, press
appears.
digital speed display
kilometers
speedom-
the
speed,
to the "More"
label.
Next,
the
Press the
key
next
on.
per
key
CENTRAL PAC)FIC LORAN.C CHAIN GRI4090
REGIONAL MANAGER; COMMANDER. PACIFIC AREA.
CHAIN MANAGER 14Th COAST GUARD
COOROINATOR OF CHAIN OPERATIONS
CONTROL SITE:OMSTA
DESIG. slaTlal 00CR.
MASTER JSTI
XMV
VAIEEE KUREISLANO
ISLANOHI
UPOLIJ POSIT
HI
HI
KANEOHE, HI
l644M.ON
1693031.2W
2Ol4192N
1585309.7W
262341.2W
178 1730.2W
DISTRICT. HONOLULU. HI
LOCATION: OMSTA KANEOHE. HI
CDIBLL
1(m)
11069/ AISFFW42 325 S2SFT
29000/
5253.16
ALAMEDA.
XMTTEH
AIVFFOf42 3 625FT
MlIFPtJ-42 325 e2SFr
CA
PWA
1KW)
TRANSMT
ANTBONA
MaJOFOLE
M0/IOPOLE
MG4OPCLE
Hal
EOD NOTES
00
0.0
•0
L-J
Speed Disp.
Calibrate
Speed Disp.
More
Clear
The
digital speedometer
turned on.
steps
"More" label. The menu shown below
to
To
get
change
the
Speed
to kilometers
Select Function
L—
Speed
Speed
in
reads
statute miles
per
menu. Then
On I
Speed
Of F
per
hour or
press
appears.
in
in knh
knots, repeat
the
key adjacent
mph
L
I
hour when it's first
the above
to the
I
Speed
'—i
More
in knots
I
CleaJl
PDF compression, OCR, web-optimization with CVISION's PdfCompressor
31
Page 36

Press the
to
wish
"Speed
is
in knots" The Z-9500 reverts to the sonar
pressed.
key adjacent
display
the
to the desired
speed
in
knots,
speed
press
label. For
the
key adjacent
display
example,
after the
it
you
to the
key
LORAN CABLE
INSTRUCTIONS
SPLICING
SPEEDOMETER CALIBRATION
The
speedometer
boat's
speed.
menu.
key adjacent
"Digital Display"
press
To use this
the
Calibrate the
to the MORE label. Now
next to the
key
to the "Calibrate
display
menu,
label, Press the
Speed"
can be calibrated to
reading using
first
"Speed"
label. The screen shown below
press
key
label.
the MENU
next to the "More" label. Then
Speed
Clear
-
accurately
the
Speedometer
key.
the
press
Finally, press
key adjacent
show the
Calibration
Next,
press
the
key adjacent
appears.
the
to the
1. Cut the cable
boat. The
allowed to
2.
Carefully
cable.
isn't needed. You should have four wires
and one uninsulated.
3.
one wire from each cable
colors of the wires.
display
then
other three wires.
Unwrap
the insulation from
Strip
unit if
wrap
in
a location
shouldn't
splice
in the
lay
cut and
bilge.
strip
the shield from the four wires. Remove the shield,
Damage
wire the cable
you
it with a
good quality
SOLDER
that will be in a
be
exposed
Route the cable as desired.
the outer
to rain or
jacket
the wires about 3/8" from the end. Twist
together,
making
can occur to the loran module or the
incorrectly.
electrical
protected
spray,
1"
from the
remaining;
sure that
Solder the
tape.
Do the same for the
area in the
nor should ft be
end of each
as it
three insulated
match the
you
connection,
TAPE
current boat
The
increase the
on the
down
change
are
you
down arrow once will decrease the
hour. The
per
The best
drive the boat
it takes to travel the
long
this formula:
displayed speed, press
"Speed"
arrow. As the
in
traveling
menu. To decrease
percent
displayed speed
to calibrate the
way
through
60/Time=Speed.
speed
is
displayed
on the
the
it,
press
displayed speed changes,
also
displays immediately
at ten miles
hour,
per
would then be 9 miles
speedometer
pressing
displayed speed by
a measured mile at a constant
then calculate
mile,
Now make the run
32
side of the screen. To
right
key adjacent
the
to the
up
key adjacent
the amount of the
below it. For
the
key adjacent
is to have someone else
actual
your
through
-1
%,
hour.
per
speed.
speed using
example,
or 1 mile
Time how
the mile
arrow
to the
to the
in
4.
if
Finally, wrap
together
The loran is now
at the same
the entire
time. This creates a strain relief for the
for use.
ready
splice
with electrical
105
tape. Wrap
the cables
splice.
PDF compression, OCR, web-optimization with CVISION's PdfCompressor
Page 37

Z-9500 SONAR SPECIFICATIONS the
Z-9500 Dimensions . 6.6"H x 8.8"W x 3.9"D
Input Voltage
Current 750 ma
Transmitter
Frequency
Output
Display
Pixels 128Hx160W
NMEA 0183 SENTENCES
Size 3.25"H x 4"W
AMA
RMB
GLL
APA
DBK
MTW
VHW
VLW
Power 2500 watts
(typical)
Minimum Recommended
Minimum Recommended
Present Position
Autopilot Steering
Water
Water
Speed Through
Distance Travelled/LOG
10- 15 vDC
(lights off)
850 mz
192 & 50kHz
312 watts
20,480
Depth
Temperature (°C)
(lights on)
Total
-
Latitude/Longitude
Data
Water
(peak-to-peak)
(RMS)
Sentence,
Sentence,
(KPH)
(NM)
Part A
Part B
your
wind or current effects on the boat.
speedometer.
Now either calculate the
or run the boat at the same
mile and
For
speedometer displaying
minutes to
the boat was
and 13.3 miles
dividing by
approximate
the
TEMPERATURE
The Z-9500 can
Fahrenheit or Celsius with the
When the Z-9500 is first turned
To
to the "More" label. This
the
adjacent
"Temperature"
opposite
two
example,
direction.
speeds together
adjust
it took 7 minutes to run
the other direction.
go
actually going
per
two results in a 10.9 mile
1% error.
speedometer
turn it
key adjacent
on,
first
to the "More" label
label. The screen shown below
Again
and divide
percentage
speed
the
speedometer
10 miles
8.5 miles
hour the last time.
Changing
more accurate.
display
press
to the
the surface water
the MENU
brings up
"Digital Display"
again. Finally, press
calculate
by
actual
your
two. This
Use this
the Z-9500's
that
until the correct
thiDugh
per
Calculating
per
the
optional temperature
the
on,
key.
ran
you
hour in one
per
Adding
hour actual
speed adjust
digital temperature display
Next,
through
a measured mile with the
our
hour the first time
these two
temperature
press
the second menu
label.
apears.
speed.
will
result to correct the
speedometer
Now add
cancel out
is
any
off,
the measured
speed
is
displayed.
direction,
speed,
we find that
together
speed.
and 4 1/2
through,
and
This is an
to +1% will make
in
degrees
sensor installed.
is off.
the
key adjacent
page.
Next,
the
Now
press
next to the
key
press
the
key
On.
Ten:
EAGLE
CATOOSA,
PDF compression, OCR, web-optimization with CVISION's PdfCompressor
ELECTRONICS
P 0 BOX 669
OKLAHOMA 74015
234-1452
(918)
104
.
Tenp
Clear
iii
De;:
Disp.
ii
33
Off'
I
1 :: :s:
I
I
Page 38

Press the
perature display
across the
left corner of the screen. It will
Fahrenheit.
Temperature
label.
DISTANCE
Using
automatically keeps
When the Z-9500 is first turned
turn it
key adjacent
on. The screen will clear and
display.
If
you
menu and
The
digital temperature
LOG
the information from the
first
on,
press
the "More" label. This
the
key adjacent
adjacent
tance
to the "More" label.
label.
Log"
to the
"Temp Disp.
The
digital temperature
wish to
track of the distance traveled.
change
press
will
the
on,
the MENU
brings up
to the
"Digital Display"
key.
Finally, press
On" label to turn the tern- b. Attach the Z-9500's
begin scrolling
can be seen in the
display
to
display
optional speed
the
temperature
degrees
next to the
key
in
degrees
the Distance
Next,
press
Celsius,
Log display
the second menu
label.
the
key
go
"Temp
C.
sensor,
the
key adjacent
page.
Next,
press
next to the
echoes
upper
in
degrees
back to the
in
Deg.
C"
the Z-9500
is off. To
to
Now
press
the
key
"Dis-
c.
an alternator lifter
Try
d. Add the external
power
ground
cable
directly
wire to the bran module.
to the
battery
LORAN MODULE EXTERNAL GROUND INSTRUCTIONS
A
ground lug
external
listed in order of their
1.
The best
ground
2. The next
motor or inboard/outboard.
3. The
grounding.
is attached to the side of the loran module. To use the
grounding system,
preference.
technique
attached to this
preferred
ground
on the boat
the
following grounding techniques
is to use a
plate placed
is to
externally ground
battery may
grounding
in the water.
also be used for external
with the external
plate
to the lower unit of the
are
'Dst
k...Dst
Press the
distance
display.
screen. It
wish
Log
shown at the
key adjacent
log display
The distance
will
to
change
menu and
Select Function
Log Disp
Beset Ost
Log Disp
More
Clear
to the "Dist
on. The screen will clear and retum to the sonar
can be
log
display
to kilometers or nautical
press
top
the distance travelled
of
the next
the
next to the "More" label. The screen
key
page appears.
Log
Log Disp
seen in
miles, go
On
OFF I
On" label to turn the
the
in statute miles. If
left corner of the
upper
back to the Distance
you
ground.
the
are
in
contact
of the boat.
following
disconnected.
longitude
listed above
using.
If
you
you
If
you
do not need
4.
Any part
water is also
We do not recommend that
To
test the
should be conducted:
1. Start
At a known latitude and
stations
location)
location.
your
2. Allow the unit to run for several minutes and make note
strengths (SNR's)
3. Connect the external
and
power up your
and make note of the
signal strengths
no
change
recheck where
difference with or without the external
this added
of the hull of the boat that is metallic and
acceptable
degree
your
(check
and
of
improved
unit with the external
to make sure that the TO's are correct for this known
acquire
and convert to the
of the stations
unit. Allow the unit to
increase,
in
signal strengths
have the external
you
ground.
for
attaching
you ground
longitude,
ground according
strengths
the external
the external
under the console
function of the
ground
allow the unit to lock onto the known
you
of the
known latitude and
are
using.
to a
again
of the stations
ground
or the
signals
ground
grounding, you really
Loran,
coupler
technique
run for 3 to 5 minutes
you
is
preferred.
decrease,
connected.
with
test
of
of the
If
the
notice
should
see no
34 103
PDF compression, OCR, web-optimization with CVISION's PdfCompressor
Page 39

INTERFERENCE SOURCES or BAD RECEPTION
Land Sources:
1.
Military
2.
Hydro-electric plants. (Dams)
3.
High voltage power
installations.
(High power
lines. These radiate noise at
transmitters
in
the
high
loran
levels.
band.)
Se 1 ect
Dst
'fl .4. T
Dst
Log
og
Log
Funct ion
1.
.m
I
I
I
in ml
•
in
in NFl
4. Storms. A storm between
the
signals,
5.
Mountains, trees, buildings.
an
open
even if it's
area.
many
and the loran station
you
miles
away.
reflect the
These
can interfere with
signals. Try
to
stay
in
Now
press
the
key adjacent
I
to the desired
'I
label. The Z-9500 will return
to the sonar screen.
Boat Sources:
travelled from the time it was
to zero,
log
the
key adjacent
press
to the
the MENU
brings up
"Digital
to the MORE label
label. Press the
Log
log display
menu,
log
Off" menu.
memory
the Z-9500's sonar screen.
on
bearing
the sonar
to a
screen,
waypoint
to the "More" label. Now
Press the
of the
top
Position" label. The screen at the
next to the "Show
key
35
key
next
key adjacent
then
press
when the Z-9500
are
placed
the MENU
press
press
next to the "More"
page appears.
to the desired
Lat./Long."
key.
the
Dis-
again.
key
the
is
on
the
Now
1. Boat
2. Power cable routed to fuse
3. Bad antenna
4. Fluorescent
Symptoms
1. Loran won't lock on to stations
2.
3.
4. Cross Track arrows move too much
5. Loses lock while boat is
engine.
also be
the
area on the
Accuracy
a.
XTE,
required.
power
Try using
Bearing, Heading,
a.
Waypoint
a.
Try
Resistor
cable
directly
placement.
boat,
lights.
of noise or interference
is not
repeatable
spark plugs help,
instead of
panel
to the
battery.
The antenna should be
from other antennas or structure.
away
problems:
or erratic
the manual mode
or TEG erratic or
SOG,
must be recalled to use cross track error
moving:
resistor
spark plugs
102
alternator noise filter
to
directly
battery.
placed
inaccurate
in an
feature.
may
Route
open
The distance
first turned on. To reset the distance
Next,
press
second menu
label.
play'
Finally, press
adjacent
log displays
the
key adjacent
page.
Next,
press
the
key
to the "Reset Dst.
the distance
the "More" label. This
to
Now
press
the
key adjacent
next to the Distance
label to reset the distance
Log"
to zero.
To turn the distance
key adjacent
NOTE: The distance
turned off.
to the "Dst
log off, go
log
to the distance
Log Disp
is retained in
LORAN DISPLAY
Position information can be
Latitude/longitude,
or distance and
the left side of the sonar screen.
To
display position
Next,
key.
next to the
key
label until the screen shown at the
press
of the next
top
function. For
press
the
key adjacent
information on
the
key adjacent
"Digital Display"
page appears.
example, pressing
displayed
label.
to the "Loran
Press the
the
PDF compression, OCR, web-optimization with CVISION's PdfCompressor
Page 40

I
Filter is
I
Medium
Show
Lat/Long.
Show TD s
Loran
Bisp.
a
label causes the unit to
sonar screen. Other menu selections let
bearing
pressing
to a
waypoint,
the desired
display your
turn
the
feature, the Z-9500 returns to the sonar screen.
CHARACTER SIZE
The
digital
displays
To
change
adjacent
"Digital Display"
label, Two labels
below. Press the
screen will
displayed
number
are shown in the
the
displays
display
size,
have two
size when the
large
press
to the "More" label. Then
label.
Next,
press
appear:
key corresponding
clear and return to the sonar screen with the
in
the desired size.
"Small
current
navigation displays
sizes;
the MENU
press
the
key
Digits",
and
to the
I
L
Of £
latitude/longitude
you display
Z-9500
key.
the
next to the "Character Size"
"Large Digits"
digital
I
distance and
on or off. After
small and
Next
key adjacent
size desired. The
large.
is
first turned
press
as shown
numbers
digital
on the
The
the
key
to the
on.
Light
Heauy
Clear I
LORAN TROUBLESHOOTING
1. You must have an 8' antenna.
antenna should be
2.
For best
ably
be
isolated
battery.
results,
the main
grounded,
battery,
The loran will work better if it's
wire the
engine's cranking battery.
since the lower unit is in the water. If
wire a
than
higher
power
grounding plate
Filtering
Filtering
Preferably,
anything
cable
the entire
else on the boat.
directly
grounded
to the
This assures the boat will
to the
ground
to water,
L
I
length
battery, prefer-
you're using
of the
an
side of the
Select
'
Snail
Large
rclear
Function
Digits
Digits
-c-I
L
36
I
1
3. If
you're using
and
(most important) power
building,
4. If
may
is
initializing
then
sources of interference.
or under a metal
(NOTE:
purposes
you're having
have a
causing
the GAl. If the unit still doesn't lock
try
the bran on
These units are
and
generally
trouble
of
piece
interference. First turn
the unit. Enter the initial
gear
land, keep away
lines. The loran will not work inside a
carport,
designed
work best on the
with the unit
such as a
next
(see
101
from
etc.
shed,
for marine
locking
radio, bilge pump,
everything
position
page.)
on to the
in the boat
first. If that doesn't
on,
trees,
buildings,
(boating)
water.)
stations,
or
engine
off,
then took for other
then
work,
you
that
try
PDF compression, OCR, web-optimization with CVISION's PdfCompressor
Page 41

UNLOCK
To "Unlock" the
adjacent
STATIONS
station(s),
to the
"Change Setup"
first
press
the MENU
label. Now
key,
press
the "More" label until the "Unlock Stations" menu
next to that label. The screen
key
shown below
appears.
Select Stations
to Unlock
then
press
the
key
appears.
the
adjacent
Press the
key
to
SMALL
DIGITS
46FT
H 32°OO.03'
1J79°59.98'
0
16
32
C
lean
nC
Simply press
unlock,
return to the last-used loran
locked on to the
Remember,
then
the
press
turning
new CR1 or initial
next to the station or stations that
key
the
current
position
next to the "Enter label. The Z-9500 wilt
key
screen. The stations
cycle.
the
unit
off,
erases all
SPEED FILTER
The
speed
There are three
amount of
increase,
quently,
The receiver will default to the medium mode. To
constant,
"Change Setup"
the
"Speed
screen shown at the
next
key
loran screen
constant is the amount of
levels:
"jitter"
however this will also
medium and
press
Filter' label
shown on the
the MENU
label. Now
top
to the
desired
the
using
medium,
light,
heavy gives
key,
press
appears.
of
the next
filter. The Z-9500 returns to the last-used
speed
constant
speed
plotter
give you
then
the
Press the
lEnten
you
resetting
and
less
press
key
page appears. Simply press
you
the
cycle Jumps
filtering
done
heavy.
and
If
navigation displays
the fastest
and slower
jitter
the
key adjacent
next to the "More" label unitil
next to that label. The
key
selected.
selected are
or
unit,
and locks.
the receiver.
by
select
you
updates.
update
change
wish to
you
entering
light,
Conse-
times.
the
speed
to the
now
a
the
will
the
TENTHS
The Z-9500 has the
other
words,
of a mile
per
it can
hour,
capability
display
etc. Tenths for all functions
a menu selection.
To
change
to the "More" label. Then
"label.
shown below
label. The screen
digital
tenths,
Next,
numbers
press
the
press
appears.
will clear and return to the sonar screen with the
displayed
Select Function
Tenths D
Tenths
____________
(
Clear I
192 KHZ
20
to show all
the
the MENU
press
next to the "Tenths" label. The screen
key
Press the
in the desired manner.
in tenths of a
depth
Next, press
key.
the
key adjacent
key corresponding
isp.
Disp.
numbers in tenths. In
digital
foot, speed
are turned on or off with
the
key adjacent
to the
"Digital Display
to the desired
On
Of £ I I
in
tenths
100
37
PDF compression, OCR, web-optimization with CVISION's PdfCompressor
Page 42

SPEAKER VOLUME
The
speaker
hear alarms or the
roundings.
volume is
Or
can turn it down in
you
adjustable.
"beep"
You can make it louder so
each time
you press
situations.
quiet
the
key
in
you
noisy
can
sur-
jr.
.IEiterI
Junp
Jump
Lock
III: .1-01
and
Spltr.
Clear
To
key adjacent
appears.
The
adjacent
the
adjust
Now
Speaker
to the
speaker
volume,
to the More" label until the
the
press
menu
up
appears
arrow
to
key adjacent
on the left side of the
increase the volume or the
the down arrow to decrease it. The bar
corresponding
will
also
volume is set to 7. The
erase this menu.
to the
change.
change you
When the
range
the MENU
press
make. The number in the menu's box
Z-9500 is first turned
is 1 to 10. Press the CLEAR
Next,
key.'
"Speaker
to the
"Speaker
will increase or decrease
graph
Volume" label
Volume" label.
display.
key adjacent
on,
press
Use the
the
speaker
key
the
key
to
to
x:+o
8el
Z:÷0
Clear
adacent to the "Enter" label. This
station
the amount
by
you
entered,
changes
and It locks the station at that value.
LOCK STATIONS
If the loran receiver won't settle on the correct
feature to force it to
this
feature,
"Change Setup"
until the "Lock Stations" menu
The screeen shown below
press
label.
on the correct
stay
the MENU
Now
key,
press
appears.
appears.
Select
to
cycle,
then
the
key adjacent
Stat ions
Lock
the
once it lands on it. To use
the
press
Press the
C
TD of the selected
use the "Lock"
cycle,
key adjacent
to the "More" label
next to that label.
key
to the
DISPLAY CONTRAST
The contrast
ent
To
adjacent
"Display
adjacent
adjacent
your
31
conditions.
light
change
the
to the "More" label. Now
Contrast" label. The
to the
to the down arrow decreases it. The bar
selection. The
of contrast. Press the CLEAR
steps
of
the
display
contrast, press
arrow to increase the
up
number
can be
the MENU
Disp.
in
the
changed
menu box also
38
for easier
key. Next, press
the
press
menu
key
key
appears.
display
to erase
reading
in differ-
the
adjacent
Press the
contrast.
graph changes
changes.
to the
The
There are
the menu.
key
key
key
with
C
Clear
Simply press
then
press
last-used loran screen. The
the current
the
the
cycle.
next to the station or stations
key
next to the "Enter" label.
key
stations
99
IEnterI
that
The Z-9500 will return to the
selected are now locked on to
you
you
wish to
lock,
PDF compression, OCR, web-optimization with CVISION's PdfCompressor
Page 43

the
position
next to the
are in use.
screen to see if ASF's are in use. The letters "ASF"
latitude/longitude display
on the
position
JUMP AND LOCK
All loran receivers have to lock onto the third
miffed from the stations. The Z-9500
if
cycle
extreme limit of its
you operate
the unit under
range.
have trouble
may
noise
high
screen when ASPs
of the
cycle
finding
conditions,
appear
signal
the third
or at the
Disp.
trans-
You can force the unit to
the
using
that it
be used
for
use is off
and lock menu. You move
jump
45349.33
station at
seconds or one
jump
correct value of 45359.33. The unit will now track the station
cycle
The Z-9500
menu if
when
To
adjacent
"More" label until the
next to that label. The screen shown at the
appears.
'Yump
requires
carelessly. Basically, you
exact location should be. If the ID for each station
your
by
one
cycle.
your
the station
correction.
you
turn the unit off.
you
change
to the
and Lock" menu selection.
an intimate
ten or more
micro-seconds for station
location is
cycle
by
will
stop using
do a new GRI or initial
the
cycle,
"Change Setup"
micro-seconds, you
For
example, suppose
45359.33,
low.
+1
cycle.
first
"Jump
to the
jump
understanding
TD
the
proper cycle.
However,
of loran
have to know
can move it
ten micro-seconds
by
precisely
the Z-9500
X. If
then the
the
Using
the
press
Jump
This causes the Z-9500 to
data
cycle
position
the MENU
label. Press the
& Lock Sta." label
the
displayed
and Lock stations
used in the
you
initialization,
key,
appears.
You can do this
we caution
signals
correct value for that
and shouldn't
what the TD's
you
using
each time
displays
TD is ten micro-
display
jump
a
then
press
key adjacent
Press the
of the next
top
wish to
the
a TD of
menu,
using
and lock
preset,
the
to the
you
jump
you
you
the
this
or
key
key
page
Clear
LIGHT
The
keyboard
on and off from the
To turn the
adjacent
key adjacent
adjacent
to
erase the menu.
The
light
and the menu will turn themselves off after a few seconds unless
lights
the
key adjacent
the
lights
and
display arebacklighted
menu.
Light
lights
to the
on or
"Light"
off,
label. This
press
the MENU
displays
to the "ON" label to turn the
to the "OFF" label to turn the
menu also
to the ON
on at
night
appears
when the Z-9500 is first turned on.
each time the Z-9500 is turned on. The
is
key
pressed.
for
the
lights
This makes it easier to turn
use. Turn the
night
Next,
key.
light
lights
off. Press the CLEAR
press
menus. Press the
on. Press the
vssa&W°
Lifl-t
I I
16
lights
the
key
key
key
Press the
wish to
you
the
key adjacent
Now
press
the
cycle,
number
change
that
is at the desired
you
next to the "Set." to move the box to the station letter that
key
change.
For
example,
to
jump
the
cycle
on station
to the "Sel." label until the box surrounds letter
the
or the down arrow to decrease it. As
in
the station's label will reflect the
wish to
next to the
key
change.
up
setting,
After
arrow in the
move the box to the next station's letter
making
98
"Jump"
change.
the
changes, press
menu to increase
you press
the
When the
Z,
press
key,
cycle
the
"Z".
the
key
____
____
1ear
jC
KHZ
39
32
-18
64
80
PDF compression, OCR, web-optimization with CVISION's PdfCompressor
Page 44

DEPTH LINES
The Z-9500 can
to determine a
you
print depth
lines across the screen to make it easier for
target's depth.
TD ASF CORRECTION
To
change
to the "Set TO Offset" label on the ASF menu. The menu shown below
appears.
the ASF
the TD offset
using
method,
press
the
key adjacent
Depth
Lines
-
_I
Clear
To turn the
the
"Oepth
turn the lines on.
the "OFF" label to turn the lines off.
next to the "More" label.
key
Lines" menu. Now
KEEL OFFSET
NOTE: The keel offset affects the
depth
lines
Repeat
92KHZ
on or off
press
the
steps
digital
again, press
the
sonar
Next,
press
key adjacent
above,
only.
It does not
except press
32
80
the MENU
the
key
key adjacent
to the "ON" label to
the
the
change
then
key
graph
press
to the
next to
scales.
SELECT STATION
TO CORRECTION:
FOR
W: -9.99
X: -999
C
V: -0.33
Z: -a99
lean
JC
The offset or correction in micro-seconds is shown for each
in the chain. Press the
to
change
was
the TD offset. For this
pressed.
The screen shown below
key adjacent
example,
ENTER TO OFFSET:
(MICROSECONDS)
X:
Enter
1 4
to the station's letter that
the
appears
next to the "X" label
key
next.
secondary
wish
you
Negative
Many
hull. Therefore,
transducer.
the sonar unit is
(including
ducer.
However,
distance between
transducer,
sate for the
Keel Onset
times the transducer is not installed in the lowest
portions
This
poses
showing
the
Z-9500)
the Z-9500
the lowest
then
inputting
of the
depth
of the hull are
a
problem,
an
adequate
read water
gives you
an solution: Keel Offset.
part
this value into the
boat.
40
deeper
since
you
water
depth
of
the boat and the face
in the water than the
run
could
depth.
from the face of the trans-
Z-9500,
Most sonar units
lets
portion
aground
Measuring
you compen-
of the
when
of the
the
lean
nC
_____
Now enter the desired TO offset. After
key adjacent
the
top
entered,
thte last used loran
to the "Clear" label. The Z-9500 returns to the screen at
of this
press
page.
the
When the offsets for the stations have been
next to the "Enter label. The Z-9500 returns to
key
screen,
the corrections
using
97
I
:itc4
entering
the
you
values,
entered. Switch to
press
the
PDF compression, OCR, web-optimization with CVISION's PdfCompressor
Page 45

C
C
Clear
N ——°——,
u———0——'
a
Enter Exact
Lat/Long
Position
I'ot4
For
example,
the lowest
deeper
the MENU
Now
press
the
key adjacent
the sonar screen that
lets
say
of the boat. After
part
than the face of the transducer.
Next,
key.
the
key adjacent
to the
the bottom of the rudder on an inboard boat is
measuring, you
Turn the Z-9500 on
the
press
to the "Keel Offset" label.
Keel Offset" label. A menu
"Neg.
"Enter Keel Offset 0.0" as shown below.
says
Enter
Offset
next to
key
Keel
the "More" label two times.
liD
discover it's 4 feet
and
press
Finally, press
appears
over
"Set
LatlLong
Now enter the exact
enter a zero at the
degrees.
entered.
If
you're
adjacent
screen is
The Z-9500
offset based on the
ASP' label. The screen shown above
The screen below
east of
to the "East/West" label.
correct,
Greenwich,
press
will
return to the last used loran
ASF
•
East/West
__Use
of the
after the last
Otherwise,
for
longitude
latitude/longitude
beginning
appears
England (east longitude), press
the
key adjacent
latitude/longitude you
Exact Pos
N
32° 00.45'
U
83° 11.33'
Position
appears.
your position.
if it's less than 100
if
to the "Use Position" label.
screen,
entered.
Long.
Remember to
longitude
everything
using
I
number is
the
on the
a
position
I
key
1ear IEnterh
bic
Since the
than the transducer's
the
Keel Off. window. Now
The Z-9500 will
and
deeper
water
would read six feet. This is the actual distance from the
our
deepest part
next to the 0 label. The number "-4.0"
key
automatically compensate
display
example
the
digital
than it
depth
actually
as 10 feet before
boat to the bottom.
of the boat in our
press
the
depth
changing
the
key adjacent
as
example,
face,
press
bottom
is. For
example
key adjacent
for the four foot difference
if
the transducer was four feet
if the Z-9500
the keel
is four feet
to the 4
appears
to the
ENTER
displayed
offset,
deepest part
label,
in the Enter
afterwards it
deeper
then
label.
the
of
Positive Keel Offset
The transducer must be installed below the surface of the water to
will
guarantee
speeds.
Therefore,
surface to the
ft
No sonar
most sonar
be
bottom,
in contact with the water at all times and boat
system
but from the transducer's face to the bottom.
will
systems
operate
do not show the water's
with the transducer in air.
from the
depth
96
41
PDF compression, OCR, web-optimization with CVISION's PdfCompressor
Page 46

The 2-9500 lets
bottom with the Positive Keel Offset feature. It works
of the transducer to the bottom
depth
actual bottom
face is two feet beneath the
is
only eight
added to
feet. This is useful when
the exact water
depth
feet
this,
measure the water
you
from the surface is ten
surface,
deep.
making
depth
Using
the Z-9500
navigating using
as marked on the chart.
from the surface to the
depth
depth.
then the 2-9500 thinks the bottom
Positive Keel
display
In other
but the transducer's
feet,
Offset,
the true bottom
charts and
two feet can be
you
by adding
words,
depth
need to know
the
if the
of ten
r
Turn Auto ASP On
Turn Man. ASP On
Set
Set
TD OFfset
Lat/Long
ASF•
I
I
I
I
To use the Positive Keel
next to the 'More" label two times. Now
key
the "Keel Offset" label.
Keel Offset" label. A menu
"Enter Keel Offset 0.0" Since the transducer's face in our
is two feet
adjacent
Off. window.
9500
display
than it
as 8 feet before
feet. This is the actual distance from the water's surface to the bottom
using
deep, press
to the 0 label. The numbers "2.0"
Now
will
automatically compensate
all
actually
our
information as if the transducer was two feet shallower
depth
is. For
changing
example.
the
press
example,
Offset, press
the
Finally, press
appears
key adjacent
key adjacent
the keel
the MENU
press
the
key adjacent
over the sonar screen that
to the 2
appear
to the
for the two foot difference and
if
the Z-9500
offset,
displayed
afterwaids it would read ten
Next,
key.
the
key adjacent
example
label,
in the Enter Keel
ENTER
label.
the water
the
press
to the "Pos.
says
boat
then the
key
The Z-
depth
to
SYSTEM INFORMATION
The code contained
be obtained
"More" label two times.
Info" label. A
If
a loran
is
included,
this
message
by pressing
message
module is connected
also. Press the
and return to
in
the Z-9500 is numbered. This information can
the MENU
Next,
press
similar to the one below will be
2-9500
Version: 3.0
Copyright
EIectinics
Eagle
to the
key adjacent
the sonar screen.
then the
key,
the
key adjacent
1990
Z-9500,
to the CLEAR label to erase
key adjacent
to the
displayed.
then it's version number
to the
"System
Turn ASF Of' F
a
turn the automatic ASF feature
the ASF correction
automatically
Automatic ASF
If
wish to use the automatic ASF
you
adjacent
covered
the ASF's to
on the
Z-9500 doesn't have ASF tables for
won't show and ASF will be off. A
ASF's are not available. You will have to
shown below.
Latitude/Longitude
Use the
oq
th
feature
latitude/longitude
30/81-35-20.
handle
To
be in
to the "AUTO ASF ON" label. If
the ASF table built into the
by
your present position.
position
screen on the
ASF
latllong
the
display
displayed position
may
the rest.
change
the location
ASF correction if the
is
slightly
need to be
is
Simply
the ASF
you
different than
is off
switched.)
38-25-40/81-34-10,
enter
using
are
the
changing. Next, press
or turn ASF's off.
on,
turns the ASF feature on.
feature,
Z-9500,
The ASF indicator will also
latitude/longitude position display.
your
message appears warning you
Correction
latitude/longitude position
your known, precise position. (It
by a large margin,
For
example, suppose your
but the Z-9500
actual
your
latitude/longitude correction,
position,
simply press
you're
it will
location,
manually
the
and the Z-9500
the
Manually entering
the
key
in an area that is
automatically
the ASF indicator
enter the ASF as
Alternate/Primary
displays
you
adjacent
key
add
appear
If the
that
shown
actual
38-24-
will
first must
to the
42
95
PDF compression, OCR, web-optimization with CVISION's PdfCompressor
Page 47

ASE Correction
Loran
signals
mountains,
ways.
ASF. It's
ASF's
vary
chad and the real world.
are affected
and cities
affect the
This effect is called the
usually
from
factored in
to
place
the terrain
by
signal
additional
and
travel over.
they
each affect it in different
they
secondary phase
when a loran chart is made.
so there can be differences between the
place,
Plains, lakes,
factor,
However,
or
TURN AUTOMATIC/DIGITAL SONAR ON/OFF
Your Z-9500 is
actually
portion graphically displays
the screen. The
the
depth
device
using
and show
digital
of the bottom. It is an
the latest in software
the true bottom
only
two sonar units in one
housing.
all echoes from the underwater
sonar
displays
numbers on the screen to show
extremely complex
to
technology
depth.
elimihate false echoes
The
graph
world on
and accurate
There can also be a
the
displayed
distorted from their theoretical
shifted,
position.
The Z-9500
by
the loran shows a ID or
has an correction feature that lets
difference in
due to ASF. In this
bran,
actual
your
case,
position.
latitude/longitude
Since
position
the loran
the
and the one
signals
measured ID's are
that is not the actual
you change
the ASF.
are
However, any digital
shallow water. The reason this
below. First look at the chart on the left. The sonar
the surface
clutter,
ence between the surface clutter and the bottom. The
problem
with these conditions.
sonar can be. fooled.
happens
This
typically
is shown on
occurs in
very
the two charts
signal penetrates
hits the bottom and returns. There's a clear differ-
digital
has no
0
This forces the loran to use a new ASF instead of the one that resides in
its
memory.
entering your
ASF corrections
use at the time and
the
area,
not be usable if
changes
longitude position
ASF correction to the stations in use - not all of
you change
have to be re-entered.
The
Z-9500 also has automatic ASF selection. TD's and
tude are
However,
feature, If
a
area,
manually
To
change
adjacent
"More"
The screen shown
you change
You
can shift the ASF
actual
latitude/longitude position.
entered
location
the ASF correction
you change stations,
stations. This
to
change
stations,
automatically
especially
corrected when the Automatic ASF feature is on.
IMPORTANT!
the user are
by
being
may
especially
ASF. The Z-9500 will
by changing
good only
corrected. If
not be
valid. ASF corrections
or
holds true if
if
you change GAl's,
not all areas in all GAl's are covered
enable this feature and the ASF's aren't available in
you
warning message appears
in the
message
enter an ASF.
the
to the
label.
Finally,
the ASF
first
ASF,
press
"Change Setup"
the
press
at the
using
of the next
top
TD offsets or
the MENU
label. Now
next to the "ASF Correction" label.
key
page appears.
the TD offset or
by
for the stations in
you
if
the unit
you
them.
travel
automatically
enter a latitude/
only apply
Remember,
away
from
may
the
if
the ASF will
latitude/longi-
the Automatic ASF
by
your
box. You will have to
key. Next, press
the
press
key
This menu lets
latitude/longitude correction,
the
key
next to the
Problems occur when the surface clutter
shown on the
surface clutter and the bottom and so it
right.
the last known bottom
such as 900 feet in a lake that
point.
the
compresses
If the unit is in
to an
range
the information
The Z-9500 is versatile
these
symptoms
the
the
Sonar" label. Now
next to the "More" label 2 times. Now
key
Digital
Sonar label. Now
The
depth
digital
sonar cannot
or it
may
only gets
automatic,
extremely deep depth,
enough
in
shallow
the
on the
display, making
to handle these situations. If it shows
water,
press
press
the
press
key adjacent
The screen will clear and the Z-9500 will
again.
You
may
need to
change
the
range
is a lot of "clutter" or random echoes on the
extends to the bottom as
distinguish
becomes "lost." It
lock onto an
60 feet
auto-ranging
feature
such as 0
the MENU
press
the
key adjacent
to the
"Dig.
display
to
or
0-10
screen,
unrealistic
at its
deep
to 600 feet. This
it difficult to read.
key.
the
key adjacent
to the
Sonar Off" label.
sonar information
0-20 feet. If there
turn the
down until a definite bottom echo is seen. Use the unit in
until
digital
ing
move into
you
and automatic features can be turned back on
the AUTO
deeper
key.
water. Once
you're
in
deeper water,
by simply press-
10
between
flash
may
depth
deepest
may change
Next,
press
to
"Digital
sensitivity
this manner
the
94 43
PDF compression, OCR, web-optimization with CVISION's PdfCompressor
Page 48

DIGITAL SONAR FREQUENCY
The Z-9500's
frequency.
different than that used
doesn't affect the chart's
for the first time or
The 50 kHz
tration. With a
tions,
fresh or salt water. Of
a 50 kHz transducer
Please note that the
frequency's biggest
the 50 kHz
digital
good
has the
preset,
transducer
digital
installed and connected to the Z-9500.
capability
the chart.
by
frequency
the 192
can reach
course,
frequcency
at all. When the unit is turned on
kHz
advantage
installation and favorable water condi-
depths greater
the 50 kHz
to use
SELECT
of
using
used
Changing
frequency
is irs
the 192
the
digital, you
kHz or 50 kHz
the
by
digital's frequency
is used for the
superior depth pene-
than 2000 feet in
digital
must have
can be
digital.
c.o.i.
ALARM SET
TO .25 NM
CROSS
TRK ERR
I
fl-
FFURSE
'
.j.i
a
T
I
To
change
the
key adjacent
appears.
menu shown below
desired
the
Now
frequency.
sonar
digital
to the "More" label two times. The menu
the
press
appears. Finally, press
192KHZ DIGITAL SONAR
'-I
Dig.
Dig.
a
When the
ately
back on
"Turn Sonar Off" labels.
the chart.
50 kHz
beneath the
simply press
again,
digital
digital
frequency, press
key adjacent
Sonar On
Sonar Of' F.
1921th:
is in
use,
bottom
Note: This
depth.
the
key adjacent
the menu
to the
"Digital
the words "50 kHz"
To turn the
to the "Turn Sonar On"
turns the
only
Sonar' label. The
the
key adjacent
digital
digital
key,
I
I
1
I
appear
sonar
sonar
then
immedi-
press
below
to the
off,
not
off,
or
or
NMEA INTERFACE
The Z-9500 can send data out
formats. The NMEA
first time.
very
To select the
displayed.
Next, press
adjacent
appears.
selections.
Simply press
return to the
wire.
(See
NMEA
Now
press
the
key
to the "NMEA Data
Press the
a
key adjacent
last loran screen and
the Power Connections section
CURRENT
output
output, press
is 0180 when the
the
key adjacent
next to the "More" label.
next to the "More"
key
NMEA
FIMEA 0182
TP
r:'tui
STEER 4
NMEA
according
the MENU
to
Z-9500 is turned on for the
while a
key
to the "CHANGE
Finally, press
Output"
to the desired
FORMAT: NMEA 0180
label.
output
The screen shown below
label to see more NMEA
output.
data on the white serial data
for
wiring instructions.)
0180
II
0180, 0182,
loran screen is
SETUP" label.
The Z-9500
I
11
I
1:117211 14I
or 0183
the
key
will
iCur:I
I-
44 93
PDF compression, OCR, web-optimization with CVISION's PdfCompressor
Page 49

LORAN ALARMS
The Z-9500 has two loran alarms. One is an
when
C.D.l. alarm that sounds when
alarm's set
come within a
you
point.
preset
distance to a
move off course more than the
you
arrival
waypoint.
alarm that sounds
The other is a
50kHz
Sonar
SiFT
Digital 50KHZ
AUTOJ
0
12
24
ARRIVAL ALARM
The arrival alarm sounds a tone when
radius of a
with .1 nautical miles of a
nautical mile.
To
adjust
shown below
arrival alarm's menu to increase the
it or turn it off. Press the
the loran screen.
waypoint.
the arrival
appears.
For
alarm,
Press the
example,
waypoint
simply
adjacent
key
press
key adjacent
radius,
Loran A 1 arms retained even if
___________
ris
I.
(RRItJiL
ALIIRM
OFF
C.D.Ii
I;
4CO.25HM
iiLARI-1
j
Clear
your position
the alarm will sound if
if the arrival alarm's
the ALARM
the down arrow to decrease
to the "Clear label to return to
I
I
is within the alarm's
you
setting
The screen
key.
to the
up
arrow
come
is .1
on the
V/4Jf(ftj46o
MEMORY - PRESET
The Z-9500 saves all
settings,
return the unit to the
Preset returns
re-initalized after a Preset!
To do
"More"
label. A
and more in
this,
press
label three times. Now
warning
settings
battery-backed-up memory.
power
all loran
is disconnected from the unit.
factory settings,
settings
the MENU
label
appears
such as
s.c
-sc
sensitivity,
36
chart
This
If
use the
IMPORTANT!
Preset
function.
to zero. The loran will have to be
then
key,
press
next. When
the
the
press
key adjacent
presetting
key adjacent
a
speed,
you
alarm
memory
need to
is
to the
to the Preset
unit,
naviga-
Preset 1
C.D.I. ALARM
The C.D.I. alarm sounds when
as the alarm
then the alarm will sound if
miles,
To
adjust
shown above
the C.D.l.'s alarm menu to
turn it off. Press the
loran screen.
setting.
the C.D.I.
appears.
For
example,
alarm,
Now
increase
key adjacent
PDF compression, OCR, web-optimization with CVISION's PdfCompressor
are off course
you
if
the alarm
off course
you're
first
press
the ALARM
press
the
key adjacent
the down arrow to decrease
it,
to the TMClear" label to return to the
92
the same amount
by
setting
.1 nautical miles.
by
key.
to the
.1 nautical
is
The screen
arrow on
up
it or
Bat.
More
:
Clear
Backup
I
45
Of F I
Page 50

WARNING !!t
Preset will cancel
Waypo
and
—
hit
Routes.
Preset
navigation
I
The Z-9500
the route. As
waypoint,
will
show
navigation
come within the arrival alarm's radius
you
the Z-9500 will
automatically
the list. This continues until
Canceling
To
stop
the
press
to the "Route
"Cancel Route" label. The
waypoints
last
waypoint
a Route
the Z-9500 from
key adiacent
Planning"
on the route.
in use.
to the "More" label.
navigating
label.
However,
information to each of the
switch to the next
you've
travelled
a
Finally, press
Z-9500 will
the entire route.
route,
press
Now
press
the
stop sequencing through
it will still show
waypoints
waypoint
the MENU
the
key adjacent
key adjacent
navigation
in
of each
on
then
key,
to the
the
data to the
tion to
cent to the Preset
message "System Powering Up.
seconds. Then the Z-9500 will start
screen,
The
then
press
turn the
press
key adjacent
waypoints
and all features will return to their
memory
pressing
the
key adjacent
Battery Backup
the
key adjacent
FISH ARCHES
Fish arches are created when the
The distance to a fish when the cone first strikes it is shown as "A"
below. When the center of the cone strikes the
shorter as shown "B". As the cone leaves the
increases
When the Fish l.D.
size and
example,
displayed
cone diameter
Very
a
partial
Large
again
shape
if the cone
on the Z-9500
small fish
arch,
fish will
the arch. Because of water
thermoclines, etc.,
enough
to
get
and routes are cancelled. Now
label to continue. The screen
Please Wait"
scrolling
factory settings.
function can be turned off
the
key adjacent
to the "More" label thre times.
to the "Bat.
feature on
by pressing
Backup
again, press
Off" label. If
to the "More" label three times. Now
to the "Bat.
as shown in "C".
Backup
mode
is
On" label.
cone of sound
the
off,
depth
of the water
of the fish arch due to the cone
passes
and the resolution limitations of the
probably
or a
shape
but turn the
arch,
the
fish arches.
over a fish in shallow
not arch at all. This is due to the
may
will not arch at all. Medium sized fish will show
similar to an arch if
sensitivity up
conditions,
sensitivity
such as
sometimes cannot be increased
46
the
press
will
may appear
echoes across the
the MENU
passes
fish,
fish,
angle
water,
display.
they're
in
deeper
heavy
key adja-
clear and the
for
the MENU
wish to
you
key,
press
over a fish.
the distance is
the distance
will
affect the
diameter. For
the
in
deep
water to see
surface
a few
key,
Next,
then
the
signal
narrow
water.
clutter,
press
the
a Route
route,
press
Next, press
the
key adjacent
appears.
keys adjacent
the MENU
the
key
then
key,
next to the "Route
to the "Erase Route" label. The
to the
next to the "Enter label to erase the route.
key
erase or
screen.
Select
Down
or
"Up"
example below,
press
Route
I
aa
TUNA—i
WRECK 2
DONS
MAR I HA
Erasing
To erase a
the "More" label.
Now
shown below
This is the "Erase Route" selection menu.
pressing
over the desired route name. In the
is selected. Press the
Then select another route to
"Clear' label to exit this
Erase
g
Clear
91
the
press
Choose the route to erase
"Down" labels to move the box
key adjacent
Planning"
to
label.
screen
by
the route "LONG"
the
key adjacent
COVE
to the
PDF compression, OCR, web-optimization with CVISION's PdfCompressor
Page 51

SEL. START
(JAYPOINT
ROUTE:
LONG
Waypt
11 1
TOl :40965.60
T02 :85920.22
H 32°O0.45'
U 83°11.33'
BOAT'S DIRECTION OF TRAVEL
Down
::
;
This screen shows the first seven
waypoint
show
waypoint
been reached. Press the
the black box is on the
"Enter' label. A new screen
next to
the first to the
"Reverse" if
to the first
with
in the route that
navigation
in the list and so on until all of the
the "Forward" label if
navigation
information to that
starting waypoint.
last
waypoints
wish to travel
you
waypoint
in the list. The Z-9500 returns to
information to the
Select Route
Travel Directioii
Forward
Reverse
want to travel to first. The Z-9500 will
you
key adjacent
appears
you
in
the route's list. Press the
through
LJAYPT *22
L
WAYPT *10
WAYPT * 4
I
WAYPT * 1
I
waypoints
waypoint,
to the
as shown below. Press the
wish to travel
first
waypoint
I
in
waypoints
"Up"
Then
the route from the last
route. Select the
your
then switch to the next
on the list have
or "Down" labels until
the
press
through
the
in
the route.
I
next to the
key
key
the route from
next to the
key
waypoint
loran screen
I
A B
One of the best
segment
the
to do this on the Z-9500
4x Bottom Track mode to
detail. For the best
without
water,
If
you
get
sensitivity. Although you
when the Fish I.D. feature is
fish
of the water. For
segment,
this method should work to
see fish
fish
symbols.
the better the screen resolution
getting
symbols
too much noise on the
signals
to
ways
get
example,
is with the Bottom Track feature. Use the 2x or
expand
results,
when the unit is
when the Fish l.D. feature is
can
fish arches is
from
the
echoes, making
turn the
on, many
sensitivity up
display
only vary
'I'
C
to
expand
to 60 feet. The smaller
45
will
be.
as
screen. In medium to
fish arches.
in
manual
the
on, try increasing
the
sensitivity
times it has
or "zoom" a
The
easiest
it easier to see
as
high
mode,
a small amount
helped
to
way
possible
deep
but
don't
the
display
I Clear
90
47
PDF compression, OCR, web-optimization with CVISION's PdfCompressor
Page 52

IMPORTANT SERVICE INFORMATION!
If
following troubleshooting
the
of
SONAR
unit is not
your
factory
returning your
customer service
TROUBLESHOOTING
working,
unit.
or if
section before
need technical
you
department.
contacting
It
may
help, please
use the
a service center or
save
the trouble
you
This is the
used in the route. Press the
scroll
in the route
the
the order
have been
label.
waypoint
through
appears
key adjacent
you
picked
The
route
selection
the list of
waypoints.
in the selection box at the
to the "Enter" label.
wish to travel
for the route. Then
is now
ready
menu. It lets
keys adjacent
When the first
you pick
to the
top
Continue
in
route until all of the desired
the
the
press
for use.
the
waypoints
or down arrows to
up
waypoint
of the
screen,
selecting waypoints
next to the "Clear
key
to be
to be used
press
waypoints
in
Unit won't turn on:
1. Check the
wiring.
2. Make certain the
connects to the
3. Check
power
the fuse.
4. Measurethe
be at least 11 volts. If it
battery
needs
Unit
1. Electrical noise from the boat's
sory may
transducer cables
help.
of
2.
3. Check
both are
terminals or
charging.
freezes,
Route the sonar unit's
through
Inspect
locks
be
interfering
a fuse block or
the transducer cable for
both the transducer and
securely plugged
cable's connection at the unit. Also check
power
positive battery terminal,
battery voltage
wiring
up,
away
cable is wired
at the unit's
the
isn't,
on the terminals are
or
operates erratically:
with the sonar unit.
from other electrical
power
ignition
in to the unit.
black to
power
to the unit is
wiring
motor,
cable
switch
breaks, cuts,
directly
power
trolling
connectors. Make certain
properly.
negative
corroded,
Re-routing
wiring
to the
or
The red wire
or
connector. It should
defective,
or the
motor,
or an acces-
the
on the
battery
pinched
ground.
battery
power
boat
instead
wires.
the
the
and
may
You must select
to be used. In other
going
consists of
3
then
first,
5
and
3,1,
Following
To follow a saved
waypoints
waypoint
arid
1,
finally
that
(in
order)
a Route
route, press
the "More" label. Now
label.
screen
Next,
shown
press
below
the
appears.
Enter
Down I
IMPORTANT!
for the route
words, suppose you
numbers
press
key adjacent
In this
5.
when
the
1, 3,
selecting waypoints
MENU
the
key adjacent
Select
I
in the order that
and 5. But
case,
you
want a route that
wish to travel to
you
must select
are
they
waypoint
for the route.
then the
key,
to the "Route
key adjacent
Planning"
to
to the "Follow Route" label. The
Route
.IJ L"
TUNA—i
WRECK 2
DONS
MARINA
COVE
Weak bottom
1. Make certain transducer is
the transducer.
transducer, reducing
echo,
Oil, dirt,
digital readings
and fuel can cause a film to form on the
its effectiveness.
erratic,
pointing straight
48
or no fish
down. Clean the face of
If
the transducer is
signals:
mounted
This is the route selection menu. Choose the route to follow
the
keys adjacent
desired route name. In the
lected. Press the
screen at the
to the
key
of the next
top
or "Down" labels to move the box over the
"Up"
example
next to the "Enter" label to select the route.
page automatically appears
above,
89
the route
"LONG" is se-
next.
by pressing
The
PDF compression, OCR, web-optimization with CVISION's PdfCompressor
Page 53

I
ENTER NAME:
LONG
I
______
Left
ABCOE
MH
MNOPQ
STuvw
'fZO 12
45678
I
.
•
I S K
r
L
R
x
3
9
nI
This is the "Name Route" menu. A box surronds the letter "0"
middle of the screen.
arrows,
move the box to the letters or numbers that
the route's name. Once
the
press
below the "ENTER NAME:"
need to erase a
(backspace)
box to the
the
"0",
word "LONG"
When the desired name
at the
top
cally appears
next to the "Select" label. The letter
key
letter,
label. For
"L",
press
left corner of the screen.
next.
the
press
the
key
appears
SEL. WAYPT,.
FOR ROUTE:
LONG
Enter
the
Using
you've
simply press
example,
key
next to the "Select"
at the
appears, press
keys adjacent
moved the box over the desired
message
at the
the
to name a route
next to the HSelect
of the screen.
top
the
The screen shown below automati-
Waypt
TOl :40965.60
102:85920.22
N 32°00.45'
Id 83°11.33'
I
to the "Left" and
need to
you
in
appears
of the screen.
top
next to the
key
"LONG",
label,
and so forth
label,
next to the "Enter" label
key
the
"Backsp."
move the
II 1
move the
until the
in
the
"Right"
spell
leter,
space
If
you
box to
inside the
and that it is
rubber adhesive or MarinetexTu.
2.
Electrical
This causes the sonar to
noise
rejection
signals
3. The water
If the sonar can't find the bottom
the
greater
manual
0-100
water,
4. Check the
ter
Bottom
such as fish or even structure from the
digital
than the water
feet)
a bottom
power
or weak bottom echo while boat is
1.
smooth flow of water in order for the sonar to work at all boat
Air bubbles in the water
ability
'Cavitation'.
2. Electrical noise from the boat's motor can interfere with the sonar.
This causes the sonar to
noise
signals
resistor
cables
No fish arches when the Fish
transducer
The
to find the bottom or other
rejection
away
be sure it is
hull,
securely
noise from the boat's motor can interfere with the sonar.
feature. This can cause the unit to eliminate weaker
be
may
will flash
mode,
and increase the
also
echo
such as fish or even structure from the
spark plugs
continuously.
then
signal
battery voltage.
drops, reducing
disappears
may
feature. This can cause the unit to eliminate weaker
from other electrical
shooting through only
bonded to the hull. Do NOT use
automatically
deeper
change
than the sonar's
are in. If this
you
the
sensitivity.
should
appear.
signal
range
If the
its
at
high speeds
be in turbulent water. It must be mounted in a
the sonar
targets.
automatically
the sonar unit's
wiring
ID
or
disrupt
routing
increase its Discrimination or
while it's
It
may change
happens, place
to a realistic
voltage drops,
to find the bottom or
ability
moving:
increase its Discrimination or
on the boat.
feature is off:
one
display.
ability
in
the automatic
the
As
you
move
or erratic
signals, interfering
The technical term for this is
display. Try using
power
of
layer
fiberglass
RN
silicone
to find the bottom.
mode,
to limits far
range
the unit in the
one,
(for example,
into
shallower
the unit's transmit-
targets.
digital reading
speeds.
with its
and transducer
WAYP'T * 2
Down
::
Clear
I
WAYPT * 3
WAYPT * 4
I
WAYPT * 5
WAYPT * 6
WAYPT * 7
88
1. Make certain transducer is
common
section in
2. The
problem
your
sensitivity may
if a
partial
owners manual for more information.
not be
pointing straight
arch is
displayed.
high enough.
49
down.
In order for the unit to
This is the most
See
the Fish Arch
PDF compression, OCR, web-optimization with CVISION's PdfCompressor
Page 54

display
a fish
time it enters the cone
enough,
cone.
3. Use the Zoom feature. It is much easier to
zoomed in on a small
you
range
display
the unit
will have much better luck
than a 0 to
to show much more detail.
4. The boat must be
If
the boat is
as
straight
ELECTRICAL NOISE
A
major
appears
severe
cause the unit
horizontal lines.
cause of sonar
on the sonar's
cases,
it has to
arch,
displays
60
foot
moving
motionless,
it can
operate erratically,
be able to receive the fish's echo from the
until.
the fish
of water than a
range
range.
at a slow
fish
stay
problems
display
completely
it leaves. If the
when it is in the center of the
only
seeing
as random
fish arches with a 30 to 60 foot
This
enlarges
trolling speed
in the
cone,
is electrical noise. This
patterns
cover the screen with black
or not at all.
sensitivity
display
large
the
fish arches when
one. For
targets, allowing
to see fish arches.
showing
on the
of dots or lines. In
is not
example,
display
usually
dots,
high
the
or
ROUTES
The
Z-9500
This feature is called Routes. A
points.
tion to the first
When
gives you
you
waypoint
the arrival alarm
lected
until the arrival alarm sounds and the
waypoint.
route.
There are two
the unit.
by
This
happens
steps necessary
the route. Then
route, you
simply
to follow the route
pleted,
the Z-9500 will start
the
ability
run a
route,
the Z-9500
in the route. As
until
the
forward
then the next
information is
you've
waypoints
or backward. After
navigating
sounds,
Navigation
pick
determine the
to
go
route
travelled to all the
to create a route. First
to use in the route. To follow a
starting waypoint,
on the route.
to several
consists
gives you navigation
you
waypoint
process repeats
waypoints
of two or more
reach the first
is
automatically
displayed
for this
waypoints
you
then decide whether
these
steps
in a row.
way-
informa-
waypoint,
se-
waypoint
for the next
in the
must name
are com-
eliminate
To
determine the cause. With the boat at rest in the
should do is turn all electrical
you
certain the
(Advanced Signal Processing).
on the
signal
on the boat and view the effect on the sonar's
turn on the
is
present,
Keep doing
effect on the sonar
minimize the
or
is
also. Turn
engine
display.
bilge pump
turn the
off,
Now tum on each
and view the sonar
then turn on the VHF radio and transmit.
off,
pump
this until all electrical
display
noted,
effects of electrical
equipment
your
There should be a
equipment
then turned off.
on the boat off. Make
Z-9500
piece
display
on,
of electrical
display.
has been turned
noise,
water,
then turn off ASP
first
the first
steady
equipment
For
example,
to
try
thing
bottom
for noise. If no noise
their
on,
Creating
To
create a
cent to the "More" label. Now
ning"
adjacent
of the next
a Route
first
route,
label. The screen shown below
to the
"Create
page appears.
the MENU
press
New
Route" label.
press
the
.Now
key
next to the "Route Plan-
key
appears.
The
screen shown at the
press
Next,
the
press
key adja-
the
key
top
Select Function
If
motor,
route the sonar unit's
wiring
radiate noise when
away
directly
If no noise
make certain
the
PDF compression, OCR, web-optimization with CVISION's PdfCompressor
find noise interference from an electrical
you
pump,
that is
from it. You
engine.
or
to the
battery
displays
everything except
Increase the RPM with the
radio,
causing
transmitting,
to isolate the
try
cable and transducer cable
power
the interference. VHF radio antenna cables
so be certain to
need to route the sonar unit's
may
to isolate it from other
on the
sonar unit from electrical
the sonar unit is turned
50
problem.
keep
wiring
gearshift
instrument,
You can
usually
from the
away
the sonar's wires
power
on the boat.
equipment,
then start
off,
in
neutral.
If noise
trolling
re-
cable
then
'Create New Itoute
Erase Route
r.
'
Follow Route
Cance 1 Route
a
87
I
Page 55

View and Go To
The View and Go To
wish to recall from the list of
the
Waypoint
Waypt"
label. The screen shown below
Recall
Waypoint
Waypoint
then
key,
menu lets
waypoints.
press
the
select the
you
To use this
next
key
appears.
waypoint you
menu,
first
press
to the "View/Go To
appears
plugs, alternator,
alternator
engine wiring. Again, routing
helps
supplied
on the
display,
fiRers,
eliminate noise
with the unit when
the
problem
or tachometer
or
routing
the sonar unit's
problems.
wiring
could be one of three
wiring. Try using
power
the
power
Make certain to use
the
cable
power
cable to the
resistor
cable
directly
things;
spark plugs,
away
to the
in-line
the
battery.
spark
from
battery
fuse
Dest
!Jpt:
Waypt
8
1
TD1 :40963.60
Enter I
T02 :85920.22
N 32°00.45'
a
W 83°11.33'
WAYPT ft 2
I Down
WAYPT ft 3
WAYPT ft 4
WAYPT ft 5
WAYPT ft 6
Clear
Seven
tion shows at the
press
press
box
waypoint
waypoints display
the
the
up
next to the "Enter label. To view other
key
next to the
key
or down the list of
number
appears
the "Enter" label. The
recalled arid the Z-9500 will return to the bran screen. To exit from this
screen without
recalling a waypoint, simply press
"Clear label.
on this screen.
of the screen. To recall this
top
"Up"
waypoint
at the
waypoint displayed
WAYPT ft 7
L
Waypoint
number one's
waypoint, simply
waypoints, simply
posi-
or "Down" labels. This moves the black
numbers. When the desired
top
of the
screen,
at the
top
the
press
the
key
next to
of the screen will be
key adjacent
to the
When
no noise
then
the noise source is
with
limited
perfectly
cases,
experience
in shallow
the cause of the malfunction will be the location and/or
appears
on the sonar unit after all of the above
probably
make
water,
cavitation.
sonar installations which function
hasty
or when the boat is at rest. In
Many
the transducer. The face of the transducer must be
that has a smooth flow of water at all boat
ducer owner's manual for the best
mounting position.
speeds.
novices or
Read
in a location
your
placed
tests,
persons
nearly
angle
trans-
all
of
Erase a
To erase a
shown
labels until the desired
screen.
instantly
screen after
Waypoint
waypoint,
above
appears. Next, press
Now
simply press
erases the
erasing
first
press
waypoint
the
position
from the
the desired
the
Waypoint
the
keys
number
next to the "Erase" label.
key
waypoint
waypoints, press
Recall
next to the
appears
location. To exit this
the
key.
"Up"
at the
key
The screen
or "Down"
of the
top
This
to the
next
"Clear label.
86
51
PDF compression, OCR, web-optimization with CVISION's PdfCompressor
Page 56

Select
Function
4kJJ
ciaIrAema
Dest.
H—1
Enter Destination
Use this menu when
The screen shown below
"Dest.
Waypt
Clear
Waypoint
you
Num." label.
Waypt.
Waypt
know the
appears
tt'zujjiI
Nun. I
Number
waypoint
after
you press
Pos
number
you
the
wish to recall.
next to the
key
Jaypt.
It
0
52
1ear
JC
Now
simply press
want to recall. For
the
press
label. If
the
9500 returns to the loran
you
key
you
then
"3",
recalled.
the
key(s) adjacent
example,
next to the
wish to recall
and
"0",
finally,
if
want to recall
you
"1"
screen, showing navigation
then
label,
waypoint
"Enter. After
85
IEnterj
to the
waypoint
the
press
number
30,
pressing
number that
waypoint
key
press
number
next to the "Enter
the
key
the last
data to the
key,
you
one,
next to
the Z-
position
PDF compression, OCR, web-optimization with CVISION's PdfCompressor
Page 57

Now
simply press
wish to
position
next to the "1"
wish to save the
to the
Z-9500 returns to the loran
waypoint
assign
at the
then "0" and
"3",
number
the
key(s) adjacent
the
position.
of the screen to
top
then
label,
position
you specified.
under
finally,
press
to the
For
example,
waypoint
the
waypoint
"Enter. After
screen,
next to the "Enter label. U
key
nunter
saving
waypoint
if
you
number
30, press
pressing
the
number that
want to
one, press
position
assign
the
the last
you
the
the
key
you
next
key
the
key,
under the
Z-9500
GO TO WAYPOINT
The Z-9500
position
Next,
entering
screen shown below
without
enter a
the
gives you
position using
position, press
the
saving
appears.
Saue
101
:40965.60
102:85920.22
a
Now
returns to the loran
entered.
WAYPOINT
You
To recall a
the
at
the
press
must recall a
top
key adjacent
RECALL
waypoint,
of the next
display showing navigation
waypoint
first
page appears.
of
option
it. To do
this,
the "New
the
key
IJaypoint:
IJiEtypoint
to the "Go to
to use the
press Waypoint
entering a position,
first
Waypoint
next to the "More" label until the
N 32°0O.45'
W 83°11.33'
press
the
then
going
Waypoint
Position" method. After
Save
I
1
Waypoint"
Steering
Recall
label. The Z-9500
data to the
or
Navigation
key.
position you
The menu shown
screens.
to the
key.
LORAN
OPERATION
(REQUIRES
USE THIS LORAN RECEIVER
NAVIGATION. A CAREFUL NAVIGATOR SHOULD
NEVER RELY ON ONLY ONE METHOD TO OBTAIN
MAKE CERTAIN THE LORAN IS DISPLAYING
COORDINATES BEFORE
THE POSITION MUST BE CORRECT FOR
NAVIGATION FEATURES TO WORK PROPERLY.
OPTIONAL ELC-1 LORAN
WARNING!
MODULE)
ONLY AS AN AID TO
POSITION
POSITION IN LATITUDE/LONGITUDE
INFORMATION.
NOTICE!
ThE
NAVIGATING WITH THIS UNIT.
THE
CORRECT
If
you already
tion,
press
the
key
know the
the
key
next to the "View/Go To
waypoint
next to the "Dest.
number
Waypt.
Waypt"
84
wish to use as a destina-
you
label.
Num"
label.
If
not, press
53
PDF compression, OCR, web-optimization with CVISION's PdfCompressor
Page 58

LORAN TABLE OF CONTENTS
LORAN - GENERAL
ACCURACY
hOW
LORAN-C
GETflNG STARTED
INITIAL POSFION ONLY 57
GRIONLY 58
PRESENT
HOW TO INITIALIZE THE LORAN ..
CHANCE INITIAL POSON 59
CHANCE
SELECT BOTH INITIAL POSITION AND CR1 64
MANUAL
AUTOMATIC AND MANUAL MODES 66
PRIMARY AND ALTERNATE SOLUTIONS 66
SHOWTD'S
TRUE AND MAGNETIC POSITION 68
FULL AND SUIJAARY DATA MODES 69
LORAN DISPLAYS .. . ... .. .. .... ... 70
POSITION
POSITION SCREEN - SUMMARY DATA MODE 71
STEERING DISPLAYS FULL DATA MODE 72
STEERING
NAVIGATION
NAVIGATION DISPLAY- SUKQ4ARY DATA MODE 75
PLOTTER 75
USING THE PLOTTER
PLOTTERMENUS 77
SPLIT SCREEN SONAR'PLOTIER 77
CLEAR PLOT
PLOTTER RADIUS 78
PLOTTER UPDATE 79
WAYPOINT NAVIGATION 79
SAVING PRESENT POSITION AS A WAYPOINF
SAVING PRESENT POSITION-VIEW AND SAVE 80
ENTER NEW WAYPOINT POSITION 81
NEW WAYPOINT NUMBER 83
GO TO WAYPOINT 84
WAYPOINF RECALL 84
ENTER DESINATION
VIEW AND GO TO WAYPOINF 86
ERASEAWAYPOINT 87
ROUTES
CREATING A ROUTE 87
FOLLOWING A ROUTE 89
CANCELLING
ERASING A ROUTE 91
LORAN ALARMS
ARRIVAL
CDI. ALARM 92
NPeEA INTERFACE
ASP CORRECTION .. 94
AUTOMATIC ASP 95
LATITUDE/LONGITUDE ASP CORRECTION 95
TD OFFSET ASF CORRECTION 97
JUMPANDLOCIC 98
LOCK STATIONS
UNLOCK STATIONS 100
SPEEDCONSTANT 100
LORAN TROUBLESHOOTING 101
LORAN MODULE EXTERNAL GROUND 103
SPECIFICATIONS 104
WORKS .56
-
INALlZATl0N
POSITION AND CR1 INITLALIZAflON 58
GRI 62
STATION
SELECTION 65
SCREEN
-
FULL DATA MODE 70
DISPLAY- S4JWAARY
DISPLAY
TRAIL 78
-
FULL DATA MODE 74
WITH A
WAYPOINT
..............
DATA MODE
WAYPOINT
AS
(SAVE
NUMBER
#)
A ROUTE
ALARM
.55
5S
57
59
68
73
76
80
85
87
91
92
92
93
key adjacent
TO WPT" label on the next
desired label to save or
to the "More0
goto
label,
page. Simply press
the
NEW WAYPOINT NUMBER
The "New
Waypoint
your position.
want the
To use this
a
position
position
feature,
or
you
The screen shown below
Number' menu
This
option
saved Under.
first
use
your present
lets
the
press
appears.
you
Save
rol:45360.42 H 32°O0.OS'
r02 :60865.70 W 80000.06'
Waypt.
Waypt.
to the "New
NOW
shown below
press
the
New
New
next
key
appears.
Save Pos
TOl: 40965.60
T02: 85920.22
N 32°0O.45'
W 83°11.33'
Uaypt.
I 1ear lEnten
then
pressing
the
the
position you
gives you
enter the
Waypoint
position. Next, press
entered.
another method to save
waypoint
Save
key,
Uaypoint
Pos.
Nun. I
Waypt.
1
Num." label. The screen
It
next to the "GO
key
key adjacent
number that
then either enter
the "More"
L
to the
you
key.
54
83
PDF compression, OCR, web-optimization with CVISION's PdfCompressor
Page 59

Waypt Lat/Long:
N 32°OO.45'
U 83°11.33
r
r
East/West
Use Position
CI
If
are east of
you
adjacent
screen is
screen at the bottom of this
to the EAST/WEST label.
correct,
Greenwich, England (east longitude), press
the
press
Save
TOl :45360.42
T02 :60365.70
Save as 11 1
View/Save
Long.
Otherwise,
to
next
key
page appears
the "Use
next.
Uaypoint
N 32° 00.45'
hi 80°11.33'
Waypt.
U
I
the
if
everything
Position" label.
.
I
key
on this
The
NOTE:
This sections covers the Z-9500's loran
loran module must be attached to the Z-9500 for
LORAN
Loran is short for
uses
receivers.
Loran was
called Loran-A and
development
Loran-C,
than
ACCURACY
The absolute
depending
to the same
types
are on the
same site time after time.
-
General
LOng RAnge Navigation.
powerful
Loran-A and it's easier to use.
of
low
frequency (100 kHz)
Thus,
developed
continued
was introduced in the sixties. It works over
accuracy
on
your
spot)
accuracy
map. Repeatable accuracy
can determine
you
and used
operated
during
of Loran is between 0.1 and 0.25 nautical
location.
is 100 feet or better. The difference between the two
is
important.
Repeatable accuracy (your ability
your position
during
at a
higher frequency.
the fifties. The current Loran
Absolute
It's a
radio transmitters and sensitive
World War II. At that time it was
accuracy
lets
you
operation.
navigation system
over
find
your way
The ELC-1
position
long
Research and
longer
tells
you
data.
that
distances.
version,
distances
miles,
to
return
where
back to the
you
More
Clear
This menu
menu
number,
VIEW/SAVE menu stores the
(See
the
key
which lets
can travel
you
gives you
pages.
the
using
the
Saving
next to the "More" label
save the
you
directly
two choices. There are more choices on other
You can save the
"SAVE AS #" label at the
Present Position -View and Save
position
to the
waypoint
waypoint
brings up
under
waypoint
82
ri
under the next available
of the screen. The
top
under
the "New
any waypoint
and not save it
number
any
Method.) Pressing
Waypt.
number.
by pressing
desire.
you
Num." label
Finally,
the
However,
numbers above
affects the
for
position
down to
If
you
is
clearly
arrive,
Z-9500 to the chart. It should be
the
accuracy you experience may
suggest.
accuracy.
error. A
thirty degrees
wish to double check
marked with
let the Loran
The
ninety degree crossing angle
without a
latitude/longitude
settle,
The
crossing angle
sharper
large position
Loran,
your
then
compare
very
55
the
crossing angle,
first
pick a spot
marks. Then
the
position
close.
not be as
of the lines of
is
error.
good
the more chance
but it can
best,
on the chart that
to it. Once
go
information on the
as the
position
vary
you
PDF compression, OCR, web-optimization with CVISION's PdfCompressor
Page 60

HOW LORAN-C WORKS
The Loran
are called a "chain."
the chain.
names
stations. The
ary
master which transmits at
called the
GRI.
The
secondary
system
The other stations in the chain are the secondaries. Their
are
V, W, X, Y,
Group Repetition
ter station transmits.
miles
reach
to
tween
chooses the best
difference or
chart with Loran-C lines results with
of
position (LOP).
time
delay
In this
Position.
it takes
apart,
you.
the master and two of the secondaries. The Z-9500
between the master and one of the secondaries is the
example
consists of three to six transmitter stations. These
The letter "M"
and
Z,
although
secondary
stations transmit at
Since these transmitters are located hundreds of
transmitters are
precise
Interval
a different time for the
The Loran receiver measures this time difference be-
master-secondary pairs
is measured in micro-seconds.
(TD)
A line of
the boat is located somewhere
position
designates
not all chains have five second-
time intervals. This time
(GRI).
precise
your position
is an
the master station inside
synchronized
Each chain has a different
time intervals after the mas-
signals
from each transmitter
automatically
for
imaginary
location.
your
Plotting
somewhere
on the 14605.2 Line Of
the
line on which the
the
with
interval is
The time
TD on a
on a line
same.
Save
Upt
Uaypt
TDI. :40965.60
Euiter
TD2 :85920.22
J
Down
_____________ LIJAYPT * 3
_____________
____________
Enter New
To save a
Waypoint
next to the "More" label.
key
Waypt.
waypoint using latitude/longitude, press
LAT/LONG" label. To save a
adiacent
identical. For this
screen shown below
Waypoint
waypoint
Save
Pos." label. A new menu
to the "Enter TO's" label. The
Erase
Clear I
other
The
key.
example,
appears.
Position
than
your present position,
waypoint
we'll use the
save menu
Finally, press
waypoint using
appears.
11 1
N 32°O0.45'
Id 83°11.33'
WAYPT * 2
LIJAYPT * 4
WAYPT * 5
WAYPT * 6
WAYPT * 7
appears.
the
If
the
key adjacent
steps
latitude/longitude
next to the "New
key
wish to save the
you
TD's,
to save a
first
Now
press
press
the
the
to the "ENTER
the
press
waypoint
method. The
key
are
Uaypt Lat/Long
——°
N
u———0
1)
II
The screen shown at the
number is entered.
top
of
The Loran receiver then measures the time difference
master
31882.8.
first
and another
line-of-position.
If
you plot
secondary.
this LOP on a
Your
position
The
example
chart,
you'll
is at the intersection of the two lines.
on the next
notice that it crosses the
56
between the
is
page
Now enter the
longitude
the next
if ft's less than 100
page appears
lean
JC
waypoint
after the last
location. Remember to add a zero to the
degrees.
longitude
81
PDF compression, OCR, web-optimization with CVISION's PdfCompressor
Page 61

Saving
To save
Waypoint
key adjacent
position
number increments each
to
waypoint,
Present Position
your present
Save
key.
to the "SAVE
under the
track of the
keep
the Z-9500 returns to the loran
The menu shown below
waypoint
waypoint
as a
Waypoint (Save
this
position using
AS #" label. The Z-9500 stores
number shown on the label. The
time
save a
you
numbers. Once
feature,
appears.
waypoint,
display.
so
you've
As
#)
first
press
Now
press
your present
waypoint
don't have
you
stored the
the
the
Saue
TOl :45360.42
102:60865.70
Save as
V jew/Save
More
Clear I
Saving
The"Save As #" feature
ber. You have to use
method. To save
first
"View/Save
page appears.
Your
top right
shown in a black box.
waypoint
this
press
or down the list of
waypoint
display.
press
top
return to the loran
waypoint, simply press
Present
the
press
Waypt."
present position
corner of the
number
waypoint
the
key adjacent
number
When the black box is
the
key
of the screen will be saved
Position
your present
Waypoint
label. The screen shown at the
in both TD's and
one is the first available
under a number other
waypoint
appears
next to the "Enter label. The
screen. To exit from this screen without
Waypoint
N 32°00.05'
hi 80°O0.06'
II
Waypt.
I
-
View and Save Method
doesn't allow the selection of a
the next available number when
position
Save
key,
screen. The first available
In the
to the
example
or down labels. This moves the box
up
numbers. The
in the
over the desired
under this
the
key adjacent
under
any waypoint
then
latitude/longitude displays
than the one
boxes
the
press
screen on the next
waypoint.
position
in
number,
key adjacent
waypoint
If
displayed, simply
saved under each
the
upper
waypoint
waypoint displayed
then the Z-9500 will
to the "Clear" label.
'I
I
waypoint
using
number,
of the next
top
number is
want to save
you
corner of the
number,
saving
num-
that
to the
at the
page,
up
at the
a
All Loran-C receivers work on
also
display latitude/longitude.
and,
using a complex
longitude position
tude on the Z-9500 to determine
mathematical
data. You can
this
principle.
The receiver takes the TD information
formula,
display
your position.
Most modern receivers
converts it
both
TD's and
latitude/longi-
to latitude/
GE111NG STARTED - INITIALIZATION
The Z-9500 must be initialized or "told where it is" the first time
turned on. Once it locks on to the
the initialization
the
present position,
turned off.
data to search for the
a
need to re-initialize the unit.
There are three different
GRI
tages
distance with the Z-9500 turned off
long
only,
to each.
process
Therefore,
a
position only,
won't have to be
and stations used in
GAl,
the next time it's turned on it has the
proper
ways
or both. There are
proper
stations for the area
to initialize the Z-9500. You can
INITIAL POSITION ONLY
If
initialize the Z-9500
you
the
for
will
will
unit
the loran stations in that GAl chain. Once it finds
automatically
first
the best GAl to use in
pick
switch stations until it can
the Initial Position
using
stations and
repeated.
memory
you're
100
(over
advantages
only starting mode,
location. It then
your
a
give
good
shows a
The Z-9500 stores
miles), you
them,
position,
each time ft's
necessary
in. If
and disadvan-
you
give
travel
looks
the Z-9500
"fix" and
posi-
it's
will
it
a
80
57
PDF compression, OCR, web-optimization with CVISION's PdfCompressor
Page 62

This is the most automatic initialization format. It
tion.
of the
entry
which stations
However,
stations
present position
are
best
when
the
at
time if it decides one or more stations are better to use
any
Z-9500
than others. This can result in small
ample, suppose you
next
day you
decide to
use the bran one
different set of stations on the second
first,
the desired
manual mode
both
the unit
the Manual
could end
you
a
good
one. You can avoid
fix and shows a
after
up
it
to use the ones it is
Station Selection section for more
from the
or the
CR1
is
operator.
to use the initial
in
automatic
the
position
day
navigate
to that
waypoint.
day
at a location that is a small distance
this
by switching
has locked on to the stations in
position. Using
currently using
requires only
You don't have to know
position only startup.
mode,
inaccuracies. For ex-
and save a
it can
change
waypoint.
If the Z-9500 uses
than the ones used
the Z-9500 into the
chain and has
the
the manual mode forces
or ones
information.)
you
choose.
on the
away
the
The
a
from
(See
appears.To
select a
radius, simply press
the
key adjacent
to the
up
or
down arrows in the "PLOTTER RADIUS" menu until the desired radius
shows. Then
return to the
Plotter
The
plotter
position.
updated
plotter
Update
shows
When the unit is turned on for the
once
press
the
next to the "Clear label.
key
with the new radius.
Interval
track
your
ten seconds. You can
every
by drawing
a solid line behind
first
very
vary
The Z-9500wi11
your present
time,
the
position
is
this time from 2 sec-
onds to 20 minutes.
As each dot is
a certain
still shows the
distance
the
length
away
starting
location to the destination.
placed
on the track
one is erased
line,
has been achieved. This shortens the
history
of
your passage.
and use a short
update
If
you plot
time,
a course that's a
the line
from
may
end after
the
but
plotted
line,
long
not reach from
GRI ONLY
This method
user. Not
but
you
the SRI
Using
INITIALIZATION
of
starting
will
only
will also have to choose the stations for the Z-9500 to use.
only
the Z-9500
need to select
you
method forces the Z-9500 into the manual mode.
requires
the best SRI to use for
the most
thought
your
from the
area,
PRESENT POSITION AND GRI INITIALIZATION
Giving
the Z-9500 both
find the stations faster.
this initialization
procedure.
your present position
Therefore,
it can
However,
since the unit could start in the manual mode.
The reason for this is there are areas of the world that are covered
more than one CR1. One of the GRIs is better to use than the others
(depending
strengths.
location,
your
tions to
manual mode and
SRI used,
can't
you
Maps
to
help you
on
your location),
If the SRI
the Z-9500 will switch to automatic and choose the sta-
use. If the SRI is not
can
you
always
of most ioran
choose a CR1.
you
will have to choose the stations. Based
you
always
use automatic.
coverage
due to
enter
happens
preferred,
switch the Z-9500 into the manual
areas are listed
of the
Many
stations to use within the SRI for different locations. Use these stations
when
initializing
the Z-9500 for the best results.
and the SRI
give you
you may
a
position
need to select
crossing angles
to be the
then the unit
in
the back
show the
maps
typically
faster
and
preferred
will
switch to
upon
mode,
of this manual
preferred
lets it
using
stations,
by
signal
SRI for
the
the
but
To
update
better chance to see more
To
displayed.
plotter
adjacent
When the desired time
"Clear" label. The screen will
time. The available times are:
10,
WAYPOINT
a continuous line
keep
interval.
change
and 20 minutes.
the
plotter
Next,
menu screen.
to the
up
plotted, you may
Lengthening
time,
press
To select an
or down
appears
the interval between
history.
first
press
the
key
adjacent
update
arrows in the "UPDATE INTERVAL" menu.
in the
clear,
2, 5, 10, 20,
NAVIGATION
HOW TO SAVE A WAYPOINT
Waypoints
can then
tion,
hot
fishing spots,
are locations that
navigate
or Plotter screens.
9500 can store
as a
waypoint,
to these
Waypoints
and other
to 75
up
or enter TD's or
waypoints.
save in the Z-9500's
you
positions using
fishing
latitude/longitude positions.
want to
the MENU
to the "More" label on the
interval,
menu,
returning
are useful
or
You can store
press
to the
and 30 seconds and
the Steer
for
navigational
experiment
with the
plots gives you
while the
key
simply press
the
plotter
plotter
the
next to the
key
with the new
1, 2, 5,
memory.
Indicator, Naviga-
marking
shipwrecks,
locations.
The Z-
your present position
a
is
key
You
58 79
PDF compression, OCR, web-optimization with CVISION's PdfCompressor
Page 63

Plotter
Only
I
HOW TO INITIALIZE THE LORAN
Plotter
Clear
More
/
Sonar
Plot Trail
L
C
Clear Plot Trail
The
"Clear Plot" label clears the solid track line. The
tinue to draw
of
your present position
track after this
your
Pr'
II
—
a
't
a
is
key
will
be centered on the screen,
F' LOTTE R
RAE' I US
1'4NM
U
F' DATE
pressed,
I NTER'.)AL
I
10 SECONDS
a
1ear
lC
Plotter Radius
Since the
allows the
mile when the Z-9500 is turned on
plot
This lets
radius,
press
split-screen plotter
changing
radii are:
the
1/4, 1/21, 1, 2, 5,
zoom in or zoom out the
you
first
press
next to the
key
of the circle's radius.
the MENU
doesn't have a radius
The
for the
10, 20, 50, 100,
while the
key
"More" label. The menu shown above
very
plotter's display.
I
I
this menu
To
change
will con-
Now
plotter
however the location
menu,
radius is 1/4 nautical
plot
first time. The available
and 200 nautical miles.
plotter
is
displayed.
the
When the Z-9500 is turned on for the
LORAN
the GRI
using
arrows in the GAl box in the center of the screen. If
present position,
key adjacent
the screen shown at
key,
search, simply press
and
to the "NEW POS" arrow.
I
!'New
you
want the
Pos.
RECOMMENDED BRI:
right appears.
the
loran to
9940
first
very
key adjacent
choose the
POSITION
L
L&1M111nfi11.u
NONE
U.S. WEST
and
time,
To initialize the loran
to the
Enter
Clear
(Note:
SETTINGS" menu. It's available
CHANGE INITIAL POSITION
To initialize the Z-9500
adjacent
appears.
your present position
latitude/longitude
nates. Remember to
enter a zero at the be-
ginning
if it is less than one hun-
dred
screen shown at the
of
pears
gitude
tered.
You can re-initialize the loran at
using
to the "CHANGE POS" arrow. The screen shown below
Now enter
of the
degrees.
the next
after the last lon-
number is en-
longitude
page ap-
coordi-
__________________________________
in
The
top
r'Jc
J
n
through
the initial
Initi. Pos
N
U———° ——.——•
lean
time
any
the
"Change Setup" menu.)
position
using
method,
__0
you press
or down
up
know
you
GAl,
press
the "INITIAL
the
press
the
your
the
key
78
59
PDF compression, OCR, web-optimization with CVISION's PdfCompressor
Page 64

Initi. Pos
II 32°OO.OO'
U 80000.00
FLOT
•
— RcE'IUE;
________
1NMI
IOEPTH
N
©.
r
If
are east of
you
adjacent
screen
The screen shown below
screen. Now
to the "East/West
is
correct, press
East/West
:
c::r1051tb0h1
Greenwich, England (east longitude), press
the
press
-R
__
Long.
label.
Long."
the
key adjacent
appears. Ignore
key adjacent
Pos.
RECOMMENDED GRI
Otherwise,
to the "Use Position"
the GIRl in the center of
to the "Enter' label. The screen
I RosITIoHj
L
l[lNE
fl 91 WflJ SI —
I
I
if
everything
the
key
on this
label.
the
sOs'&-
Il.'JYPT*
IBRO
IDTG
I
"D" is the destination. The destination is the recalled
If
tion.
The dotted line is the direct
the destination. Follow this line to
The destination
corner. In this
Distance To
beneath the
An arrival alarm is available that sounds a tone when
preset
information.
are
you
distance to the
using
waypoint
example, waypoint
Go
(DTG)
waypoint
I I
tiKl:iiii S
•STEER
a
number when a
destination. See the section on alarms for
ft's the first
route,
path
number is
and
Bearing
waypoint
or course
get
number I is the destination.
from the
to the
displayed
to
waypoint
waypoint
location
starting
waypoint.
in the
(BRG)
is recalled.
I
waypoint's posi-
in the route.
location to
plotters
you
lower
are
displayed
come within a
more
left
Enter
Clear I
shown at the
the "Use Position" label. The unit will start
GIRl and
"Searching
the
on the next
on" to each station
the stations in a chain to determine the
does need to lock onto three stations with
place
preferred
of the next
top
the
following message
for Stations". The Z-9500 then looks for the
GIRl. Once it finds the
page appears.
in
the chain. It doesn't
page appears.
stations,
The unit
processes
60 77
in a window on the screen;
need to find and lock onto all
latitude/longitude.
Now
press
searching
the
the
good signals
for the
postion
signals
the
stations within
screen
to calculate a
nextto
key
preferred
shown
it "locks
until
However,
it
PLO1TER MENUS
Pressing
set of
next
Split
The Z-9500
on the
the MENU
to the Plotter/Sonar
MENU
the MENU
menus,
page.
key
relating only
Screen Sonar/Plotter
can show the
and the sonar
side
right
while the
key
label. To return to the full screen
then
key,
press
while the
to the
plotter
graph
plotter
the
is
key adjacent
is
plotter
plotter.
in the
showing.
displayed gives you
See the menu at the
screen mode
split
on the left. To do
Now
to the "Plotter
the
press
plotter, press
Only"
top
with the
first
this,
key
adjacent
label.
a new
of the
plotter
press
the
PDF compression, OCR, web-optimization with CVISION's PdfCompressor
Page 65

r
aS
PLOT
— RiDIUS
_______
1'4HM
I',
5EFT
N
I
I GRI I
GiRl: 9940
REC: H'JNE
I POSITION I
I±R!Si ?PJ
U
IWYPT*——
IBRG iI
I!I1I
_____________
O.CICIHFhl
___
is
depth
depth
radius
To
or down arrow in the "PLOT RADIUS" menu. The available radii are:
1/4, 1/2, 1, 2, 5, 10, 20, 50, 100, 200.
"zoom" in on
course,
plot
displayed
is the
distance from the center to the outer
(The
change
radius menu.
the
from start to finish.
If the diamond
the
will redraw
the center
plotter
plotter.
To clear the
Using
Using
the effects of wind and current on
manner,
more
the one at the
the
circle,
your present
of
at all times. You do not have to recall a
plotter,
the Plotter with a
the
plotter
simply
information),
at the
radius menu. This menu
plot
plotters
your present position,
representing your present position
Z-9500
the screen. Your
top
will
see the Plotter Menus section.
with a recalled
recall a
then
of the next
I
MESSAGE BOX
of the screen. To the left of the water
top
radius,
waypoint (see
press
simply press
Your
present position
first clear the
position along
present position
Waypoint
waypoint
your
the PLOTTER
page appears.
or zoom out to see
S
displays
the
the current
of the
edge
key adjacent
to the
and 500 miles. This lets
your
beneath the
move outside
of
always
Recall section for
track near
your
be on the
to use the
easy way
plotter
starts to
display
with
or route is an
boat. To
the
for an instant.
a
portion
Waypoint
key.
shows
will
waypoint
use the
A screen similar to
plot
circle.)
you
whole
Then it
to see
in this
up
Use Position
Use GB!
Use Pos. & GB!
latitude/longitude.
9500 in the automatic
the
loran finds all of the
it flashes the
them,
9500's screens are not usable. When the
the loran is
ing,
screen,
see
page
Since
mode,
necessary
latitude/longitude.
for use. For more information on the
ready
70.
tC
:OOOOO.OO
U: .
WI 14598.83 CYC ERR 33
X:31883.31 SEARCH
:4536O.95
:6O866.j2
the Initial Position
using
it will choose the best stations to use. Until
stations
This means the data on the Z-
IDEPTIH
CYC ERR 11
—-
CYC ERR 29
SEARCH 9
Iiffl
II1I
FIX QUALITY FIIa1 (0 )
QX
POSITiON SCREEN
I
I
I
stop
position
the Z-
flash-
startup places
in the chain and locks onto
position
numbers
52FT
9
MOOE
SOLN
The "5" is
recalled the
your starting
waypoint.
The diamond is
location. This was
your present position,
76
your position
when
and the
you
WARNING: DO NOT NAVIGATE WHEN THE POSITION DISPLAY
(EIThER
LAT/LONG OR
61
IS FLASHING!
TD'S)
PDF compression, OCR, web-optimization with CVISION's PdfCompressor
Page 66

CHANGE GRI
Use this function if
both the
present position using
of this manual for the
Using
mode. Once
the
When the desired SRI
"Enter" label. In
The screen shown at the bottom of this
proper
this initialization
or down arrows in the SRI section
up
SRI and stations to use. The Z-9500 will calculate
you
don't know
you
the chain
proper
procedure
know the chain's
this
example,
chain and stations to use
appears
SRI
your position.
select. See the charts
you
switches the Z-9500
number,
in
the
7980,
You will need to
in
into the manual
the
press
in
the center
box, press
U.S. SOUTHEAST is used.
page appears
POSITION
I
key adjacent
of the screen.
the
key
next.
know
your
in the back
area.
your
to
next to the
NAVIGATION
The
navigation display
route
name, waypoint
and
go,
bearing
SCREEN - SUMMARY
to
waypoint.
in the
summary
number and
I.-al:l
data
position,
49FT
DATA MODE
mode shows bottom
present position,
distance to
depth,
Now
press
of the next
top
S
— HONE
the
key adjacent
page appears.
F.:ECOIIEIENDED OR I
7980
U.S. SOUTHEAST
to the
"Use SRI" label. The screen at the
POSITION
[IC. [IIj. IJIj'
ll U°OO. 00'
Use Position
Use CIII
Use Pos. & CR!
I
PLOTTER
The
plotter
screen. The
if
you
To use the
the one below
solid
compass
are
travelling
line is
rose
lets
plotter
plotter,
your track,
you easily
simply press
appears.
with
see
will also show
to a
waypoint
The diamond is
or
north, south, east,
course and direction of travel
your
your starting position
or on a route.
the PLOTTER
path you
have
and
and
A screen similar to
key.
present position.
your
travelled. The circle is a
west marked. The water
on the
destination
The
I
I
I
C
62
PDF compression, OCR, web-optimization with CVISION's PdfCompressor
75
Page 67

NAVIGATION SCREEN - FULL DATA MODE
This screen shows all
numbers. To
is in the loran mode. Now
label. The
display
following
navigation
this
screen,
screen
press
appears.
information to a
the MENU
press
the
key adjacent
waypoint
key
to the "Nay.
in
digital
while the Z-9500
Display"
GE!
: 7980 U.S. SOUTHEAST
IIIVZ
Iil]-al:I 4TFT
NO ROUTE
YPT.
N 32°O0.16'
Ui_8O0OO.18
!i1I
*
HEADING WJBI
I
0.01MM
j'101HM
•1II
I
Water
waypoint
the screen beneath the
the
display.
the distance to the left or
time it will take
waypoint.
you
knot current and
speed
speed.
wards a
at a
depth
(Depth)
number,
of the
right
(XTE),
(SPD),
Heading
Bearing
loran data. It doesn't use the
If
is -10 knots.
Time To Go
and
are
over
waypoint
are
you
waypoint
Velocity
is the direction
you
to
waypoint (BAG)
Ground
making.
gnund
Velocity
waypoint.
and there's no current or
moving
0:00:19
4 STEER
shows at the
and
waypoint position
depth display.
information boxes.
(TTG), Bearing
Made
Good
you
right
to reach the
is the direction
Speed (SPD)
For
example,
boat
your
is
made
For
180
speedometer
knots. The SPD
eight
good (VMG)
example,
degrees away
PRESENT
1
POSITION Ui
N 32°U0.15'
UI 80°OU.15'
ri
P
uai
(MG SR'Thlfl
I
of the screen. The route
top
are shown on the left side of
Your
to
waypoint (BAG),
(VMG)
are
travelling.
of
your
waypoint,
is the
if
you
optional speed
if
show on the lower half
course. Time to
based on
you
averaged speed
are
travelling directly against
reads 10
is the
are
you
travelling
wind,
from the
277°M
3.1KM
I
name,
present position
Heading,
Cross track error
your
must travel to reach
knots,
display
sensor to determine boat
speed you
at ten knots
then
you
waypoint,
is shown to
Cross Track Error
Ground
go (TTG)
current
over
is calculated from
are
VMG is ten knots.
then
Speed
of the
(XTE)
speed.
ground
your actually
making
directly
your
is
is the
your
that
a two
to-
VMG
C
Select
Three
Stat ions
iear
Since
mode,
station
the
key
appear
and Z were selected. When
"ENTEA" label. If
to the screen at the
to the
it
should show the
a short time. To view the station's
the "Position
the
using
you
letters
next to the desired station's letter. The stations
near the
position
"Change
have to select the stations used in the chain. Arrows with the
appear
top
you simply press
screen as shown below. Once it locks on to the
proper latitude/longitude
Display"
GRI :7930 I']*Jl:l 52FT
GAl" feature
on this screen. To select a
of the screen.
of
top
page
section on
ri-
00000.00 CYC ERR 11
's.
It.
V. .
Ufl 14598.83 CYC ERR 33
X:31883.31 SEARCH 9
In
the above
you're
finished,
the CLEAA
62. The Z-9500
signal strength
page
—
—
:4536O.95
:6O866.12
MfdI
FIX QUALITY
WARNING: DO NOT NAVIGATE WHEN THE POSITION DISPLAY
(EIThER
tAT/LONG OR
TD'S)
E titer
the Z-9500 into the manual
puts
station,
example,
the
press
key,
automatically
on the
70.
CYC ERR 29
SEARCH '9
lfl1
tS
F.I*1
MODE
SOLN
(0 )
IS FLASHING!
key
the Z-9500 returns
position display
and other
simply press
select
you
stations
M, V.
next to the
switches
stations,
after
see
data,
74
63
PDF compression, OCR, web-optimization with CVISION's PdfCompressor
Page 68

SELECT BOTH INITIAL POSITION AND CR1
As described
9500 find and lock onto the loran stations
display a position quicker.
to manual if a
have to switch to the "Select Loran Stations"
proper
stations for
To use this
methods
"SELECT GRI" sections. After
next to the "ENTER"
earlier,
non-preferred
your
feature,
previously
first enter
described
both the
using
However,
GRI is selected.
location.
the screen shown below
label,
position
the unit
your present position
in
"SELECT INIITIAL POSITION" and
the
entering
faster. This should allow it to
these data and
GAl can
and
switch
may
If this
happens, you
screen and choose the
and GAl
appears.
the Z-
help
from automatic
using
pressing
the
wilt
the
key
For
example,
will
alarm
The C.D.I. alarm
mite increments.
To the
Bearing (BAG),
Error
numbers. A letter to the side of the
(L)
Bearing (BAG)
degrees magnetic.
right
display
or
right
if the C.D.I, alarm's
if
sound
of the C.D.I. alarms menu are the Cross
shows the distance to the left or
of course.
(A)
are to the left or
you
ranges
and Distance To Go
is the direction
are from .25 to 10 nautical miles
you
is one
range
right
(DTG)
number shows if
are
travelling.
mile,
of course one mile or more.
displays.
right
This is
then the C.DI.
in
.25 nautical
Track Error
Cross Track
The
course in
of
are to the left
you
expressed
(XTE),
digital
in
Now
press
screen
appears
II GRI I I POSITION
H 32°00.OO'
kI 80000.00'
c_
Use Position
Use GB!
Use Pos. & GB!
Clear
the
(shown
until the Z-9500 finds the stations
next to the
key
below) appears.
SRI :7981j I'lnl:l 5EFT.
:22222:99..
td: 14598.83 CYC ERR 33
X:31883.31 SEARCH 9
:4536O.95
:6O866.12
32°OO.0O'
H
Ui 8O°00.00'
____________
QUALITY fiIi1 (0 )
rix
L
"Use Pos. & GRI" label. The
The
message "Searching
in the selected GAl.
CYC ERR 11
CYC
SEARCH 9
EE
LA
ERR 29
MODE
SOLN
1
I
I
I
position
For GAl"
Distance To Go
is the distance from
distance is shown in nautical miles.
Your
present position
STEERING DISPLAY - SUMMARY
The
summary
important
on this
cross track error in the
shows
display
in
data version of the
data from the
work
the
upper right
is
(DTG)
displayed just
your present position
shows at the bottom
steering display
identically
top
to the
left corner of the
corner. The Course Deviation Indicator
below the
to the recalled
of the screen.
DATA
steering
ones on the full data
in
display
large
display.
in the center of the screen. Distance To Go
waypont (BAG) display
at the bottom of the screen.
STRKERR
I NM OFF COURSE I
1.0 0.5
I,,,, I,. t,1,,,, I,,,, I
i
0,0 0.5 1.0
a i
Bearing
display.
waypoint.
MODE
shows the most
numbers. All features
display.
The water
(CDI)
(DTG)
DEPTH
and
I
Bearing
This
The
The
depth
is
to
MESSAGE aQX
64
I
STEER •
73
P
PDF compression, OCR, web-optimization with CVISION's PdfCompressor
Page 69

STEERING DISPLAY
The steer indicator
and
bearing
use
this
Z-9500 is in the loran mode. Now
"Steering Display"
to a
display.
waypoint.
To
label.
-
FULL
display
display
shows
A
this
The screen shown
DATA
steering,
waypoint
screen, press
MODE
cross track
must be saved and recalled to
MENU
the
the
press
key adjacent
belowappears.
error,
key
distance
while the
to the
To
determine
left corner of the screen.
upper
select stations.
the unit which stations to use. To do
Selection" section below for information on
if
need to select
you
However,
If it
if
it switches
stations,
stays
to
this,
watch the indicator in the
in
"AUTO", you
"MAN",
then
see the "Manual Station
selecting
won't need to
you'll
stations.
need to tell
The course deviation indicator
screen
desired course.
starting
or XTE for short. For
course if the C.D.I.
scale. A
>". This tells
course. The cross track error also shows in the "XTE box on the
screen's
shows the distance
course is an
location and the
message
right
(The
example, you
arrow
also
which direction to steer the boat to
you
side.
(C.D.l.)
in
nautical miles
destination.)
points
appears
IDEPTH
near the
you
imaginary
This is called "Cross Track Error"
are
to the 0.1 mark on the
at the bottom of the screen: "STEER
line drawn between
a tenth of a mile to the left of
riia
the steer indicator
of
top
are to the
left side of the
side of
back on
get
your
your
OURSE
C.D.I.
L}I1J
— ALARM
"V
OFF
I
I 'RANGE
Lru11A1'I
MESSAGE
0.U'JMII
!liI
PRES. P05.
OX
0°I1
0.0MM
MANUAL STATION SELECTION
The Z-9500's manual station selection feature lets
stations to use. This also locks the unit in the manual mode.
To
manually change
key adjacent
adjacent
appears.
screen. Stations
the unit
to the "CHANGE SETUP" label.
to the "SELECT STATIONS" label. The screen shown below
The GRI
(if any)
show on the
wx
C
stations,
currently
in
use are on
GB I
first
used
right.
:7980 u.s. SOUTHEAST
In Use:
Select
the left
the MENU
press
the Z-9500 shows at the
by
stations recommended
side,
Bee:
MVZ
you
key,
Now
decide which
then
press
Three
Stat ions
C
Clear Enter
press
the
of the
top
the
key
by
C.D.I.
The
first time. To set it to a different
"RANGE" label beneath the C.D.I. alarm menu. This switches the
C.D.l. alarm menu to the C.D.I.
arrow to increase the C.D.I.
up
The scale on
each time
and 10 nautical miles.
When the
simply
Z-9500 is
press
range
the
you
the
press
is 1
nautical mile when the Z-9500 is turned
distance,
range
range,
C.D.I. indicator at the
the
first turned
key adjacent
The available C.D.I.
key.
the C.D.I. alarm is
on,
to the
up
72
menu. Press the
the down arrow to decrease it.
top
arrow
the
press
of the screen also
in
the C.D.I. alarm menu.
on for the
key adjacent
next to the
key
ranges
are:
off. To turn it
to the
changes
1, 2, 4,
on,
To
select
tions. In this
pressed.
is
showing a latitude/longitude position,
to use. After
the "ENTER" label. This activates
9500 to a loran screen. If the stations
good crossing angles,
after a short wait.
stations, simply press
example,
If
started the loran
you
selecting
the
the desired
the unit should show a
the
keys adjacent
keys adjacent
using
stations, press
your
65
to
the desired sta-
to stations
the initial
then it can recommend stations
you've
position,
the
selection and returns the Z-
chosen are locked with
latitude/longitude
and X were
M, W,
or if
the loran
key adjacent
position
to
PDF compression, OCR, web-optimization with CVISION's PdfCompressor
Page 70

AUTOMATIC and MANUAL MODES
The Z-9500's Loran has both automatic and manual modes. This
means the unit will select the stations to use when it's in automatic. You
must select the stations when ifs in the manual mode.
The Z-9500 chooses the stations with the best
signal strengths
continually monitoring
If
use.
the unit determines one or more stations are better to use than
the current
However,
tions. When
there are times when
the same stations when
the
waypoint
Y when the
back to that
the unit
in
the manual mode
when it's in the automatic mode. It does this
the stations
it will
ones,
you're navigating using waypoints
was saved. For
waypoint
waypoint.
automatically
travelling
was
saved,
Otherwise,
signals
you
to a
example,
you
navigation
keeps
to determine the best ones to
switch to the new stations.
don't want the unit to switch sta-
waypoint
if the
must use
the Z-9500 from
as the ones used when
bran
M,X,
errors can occur.
crossing angles
is one. You must use
was
using M,X,
and V to
changing
and
by
and
navigate
Placing
stations.
"PHI"
appear.
quality
quality
played position
tion
fix
shows the fix
zero the worst and nine the best.
is a measure of the lines of
is
display
quality
Remember,
display
RALT
appear
use the
poor,
can and will
flashes the last known
is not usable. A number to the
quality's
flashes! Find and correct the
value. It's
do not use the loran for
if
displayed
vary
the unit.
unit is in the alternate mode. Fix
the
position's crossing angles.
information with caution. The dis-
with
poor crossing angles.
latitude/longitude position
right
is from zero
range
navigation
problem
of the
before
fix
quality message
(0)
when the
The
when the
to nine
position
navigating
If the I ix
posi-
with
(9),
with
To
The word
which mode is in use.
Although you
cani
ferred GRI for
switching
the Z-9500
GRI is
location.)
won't
won't let
using
PRIMARY and
The bran
ence between the master and two other
difference results in a line of
intersection of the lines of
the Z-9500 in the manual
place
"MAN"
always
from manual to automatic while a
one the Z-9500 determines is the best one to use based on
know which one is the
you
the
preferred
appears
can switch from automatic to manual at
switch to automatic. The Z-9500 must be
yoUr
will
simply
If
are in a location that is
you
switch into
at the bottom of the
area in order to use the automatic mode. If
switch back to the manual mode.
automatic,
GRI.
ALTERNATE
normally
determines its
position.
mode,
preferred
you
SOLUTIONS
position by measuring
position.
This is called a "fix".
simply press
position
non-preferred
covered
one.
However,
can be certain that
secondary
Your
present position
the AUTO
screen,
any
using
GRI is in
by multiple
if the Z-9500
the time differ-
stations. Each time
key.
showing
time,
you
the
pre-
you try
use,
(A preferred
your
GRI5,
you
you're
not
is the
POSITION DISPLAY - SUMMARY MODE
The
position display
water
your present position
(TO's).
the
latitude/longitude.
The
message
sages
appears
shows at the
depth
The TD's shown are the ones used
when
necessary.
:"STEER >" when
in the
summary
of the screen.
top
in both
box at the bottom of the screen shows
For
example,
you
l']tal:l
data mode is shown below. The
Immediately
latitude/longitude
the Z-9500 to
by
the cross track error
move to the left of course.
5'JFT
PRESENT POSITION
N
32° 0002'
W 800 00.12'
:
V
Z
45359.73
:
60866.14
MESSAGE BOX
below this is
and time differences
calculate
pertinent
mes-
message
68
71
PDF compression, OCR, web-optimization with CVISION's PdfCompressor
Page 71

POSITION DISPLAY - FULL
The
position
all stations in the
position (in
or alternate solution
mary
display
latitude/longitude),
shows GRI
station
chain,
in
status,
automatic or manual mode
indicator,
tri2:
22222.
W: 14598.83 LOCKED 95
X:31883.31 LOCKED 79
Brc.fl:
REE.H:
45360.95 LOCKED 99
60866.12 LOCKED
I!
FIX QUALITY IMmJu1 (9 )
MESSAGE BOX
DATA MODE
water
use,
and fix
LOCKED 99
depth (DEPTH),
for each
SNR:
quality.
99
I1IiE
MODE
SOUl
TO's for
station,
present
indicator, pri-
in
A mathematical formula
latitude/longitude position.
latitude/longitude
an
imaginary straight
station.)
qualities
other side of the baseline from
tions
baseline)
far
from
difference between the alternate and
few
your approximate position
It's
and
(your present position
are
apart, making
actual location.
your
or less. For this reason
miles,
can be on either side of a baseline.
tine
the
it
easy
for the
possible
signal strengths,
called
loran receiver uses TD's to determine the
the
Due to the
connecting
loran to lock onto the
but show the
your present position.
and the one on the other side of the
primary
and alternate solutions.
to tell if the loran is
However,
alone,
when
initializing
nature of
the master and each
if
you're
primary
loran, your position
(The
stations,
latitude/longitude
These two
They're usually
displaying
close to the
solution could be
its
always important
or
using
a loran.
baseline is
secondary
give good
on the
a
position
baseline,
only
to know
in
fix
posi-
far
the
a
The GRI
Immediately
difference)
stations
black box around their
stations
in
in
M, V,
to the left of
mends to use. To the
will be one of five
or LOCKED.
ERR,
not usable at this time.
station's
below.) Cyc
locked onto the correct third
the
Navigate only
right
to-noise ratio or
0 to 99. Beneath the station box is the
latitude/longitude.
manual
the unit is in the automatic
"MAN"
solution
signal.
unit has locked on to the thrid
of the station
mode,
appear,
display
and the water
use
beneath these
is the station data box. The TD
for each station shows to the
use
the bran to calculate the
by
letter. In the
and Z to calculate the
show at the
depth
right
example
present position.
the station letters show which stations the Z-9500 recom-
TD's
of the
right
messages: BLINK, SEARCHING,
Blink is a
Low SNR means the
Err is short for
with stations
message
SNR. The
To the
primary/alternate
then it's
is similar, If the unit is
message
Searching
Cycle
cycle crossing
showing
is the
lalDer
of the
right
solution,
the letters AUTO
mode,
in
the manual mode.
the
from the station
means the loran is
signal-to-noise
Error. It means the bran has not
cycle crossing
a "LOCKED"
SNR
display.
the
number,
position display
in
of the screen.
top
of the station's letter. The
latitude/longitude
above,
station status shows. This
of the
the Z-9500 is
The letters "REC"
LOW
warning
trying
ratio is low.
signal.
and is a usable station.
This shows the
Locked means
message!
the better. The
present position display
are the automatic/
fix
and
the
quality
appear.
The
primary/alternate
primary mode,
have a
using
SNR,
that it is
to find the
To the
signal-
range
indicators. If
If the letters
the letters
(time
CYC
(See
is
in
To switch from the
MENU
label. Now
Z-9500 returns to a loran screen after this selection. If
screen
new
position displays.
longitude position, you may
the
primary
•
The solution
position
Check
longitude. They
to the
primary
the label now reads
Next,
key.
press
with
the
and alternate
currently
screen. See the "Position Screen" section for more information.
your position against
primary
press
the
latitude/longitude displayed,
should be the same. To switch back from the alternate
solution,
adjacent
key
If the unit doesn't show the
solutions.
in
use
repeat
"Primary
the alternate
to
the
key adjacent
have to
the Z-9500 is
by
loran after it
the
the above
Sol. ON".
to the
change
to
"Primary
the
stations,
displayed
steps.
solution,
first
press
the
the "CHANGE SETUP"
Sol. OFF" label. The
you're using
lat/long
displays
will flash until a
proper
then
at the
a new
The
only
tatitude/
try switching
of the
top
latitude/
difference is
a
70
67
PDF compression, OCR, web-optimization with CVISION's PdfCompressor
Page 72

SHOW
The
most screens.
press
SETUP"
menus shown below
the
adjacent
loran screen and show the
display again, simply repeat
"Show
longitude displays.
TD'S effect. Now
Z-9500
position
shows either
To switch between
the MENU
label. Now
to the "Show ID's" label. The Z-9500
Lat/Long's".
key,
in
latitude/longitude.
latitude/longitude
then
press
the
press
appears.
Press the
In this
position
the above
key adjacent
latitude/longitude
the
key adjacent
next to the "MORE" label until the
key
example,
To
change
in time differences.
steps.
I—
.3110w True
Brgs.
ASF Correction
NMEA
Data
Output
a
TRUE and MAGNETIC POSITION
Most
navigators
north. True north is the
converge. Magnetic
several hundred miles to the south of true
Charts are
uses true north. If
projection, you'll
true
readings.
The Z-9500 can
When ft's turned on for the
to
true, press
"CHANGE SETUP" label. Now
label. The menu
realize there is a difference between true
of the world. It's
top
north is the location our
usually
laid out
you plot
either have to convert
display navigation
very
the MENU
shown above
according
a course on a
first
key,
appears.
to a Mercator
magnetic
information in
time,
then
press
the
press
or time differences
and
to the "CHANGE
Z-9500 is
the
to
TD's, press
will
revert
menu will now read
The
to this menu to
I
I
I
I
where all lines of
compasses point.
at a location
north,
projection
chart
using
readings
magnetic
magnetic
key adjacent
In this
is used. To switch
the
example, magnetic
adjacent
key
to the "MORE"
on
(TD's)
first
TD's,
displaying
the
key
to
To switch the
get
and
in
the Mercator
true or use
to
last
the
latitude/
magnetic
longitude
It lies
Canada.
which
or true.
to the
is in
the
press
screen will clear and return to the last used loran
navigation
back to
FULL
The
in
one of two
information available for that
summary
numbers. The
as the full data
The Z-9500 is in the full data mode when ft's first tumed on or after a
preset.
To switch between the full and
MENU
the
key adjacent
displays
above
GRI :7980
RErj:
REE.ft 60866.1
information in
magnetic.
AND
SUMMARY
Position,
steps.
I):
t,J: 14598.83 LOCKED 95
X:31883.31 LOCKED 79
Navigation,
ways,
data mode shows
mode,
Now
key.
at the same time. To return to the full data
The menu now reads "Turn
00000.00 LOCKED 99
45360.95 LOCKED 99
key adjacent
degrees
The menu now reads
and
either full or
summary
press
to the "Turn
IDEPTH
data
but ft's easier to read due to the
the
key
LOCKED 99
to the "Show True
true.
Repeat
"Show
DATA MODES
Steering displays
summary.
display
a
partial
mode doesn't show as much information
summary
next to the "More" label.
Summary
The full data mode shows all
in small letters and numbers. The
list of the data in
data
On". This switches all three
Summary
POSITION SCREEN
Brgs."
screen, showing
these
Mag. Brgs."
show their information
larger
modes,
Off'.
FULL DATA MODE
label. The
to switch
steps
letters and
large
characters.
first
press
Finally, press
mode, repeat
all
the
the
milul MODE
Ifl
FIX QUALITY rsmiii <9 )
MS
MESSAGE BOX
IDEPTH
PRESENT POSITION
ISS
SOLN
Ja
N 32° 00.02'
W 80° 00.12'
POSITION SCREEN
SUMMARY DATA MODE
45359.73
Z:
60866.14
NSPG.
BOX
68
69
PDF compression, OCR, web-optimization with CVISION's PdfCompressor
 Loading...