

Page 1
Instruction Manual for OSD Pro
Document Version 4.9
Corresponds to Eagle Tree Software
Version 10.44 or higher
Introduction
Thank you for your purchase! This instruction manual will guide you through the installation
and operation of your OSD Pro.
The latest version of this manual is available in the Product Manuals section of the Support
tab on http://www.eagletreesystems.com. The online manual includes any updates that were
made after your CD was produced. Please read the entire manual carefully before
proceeding.
If, after you read the manual, you have further questions or problems, see the “Have
Questions or Feedback?” section below.
Intended Uses
The OSD Pro is intended to be used exclusively for recreational purposes in model
planes, boats and cars. Any other use is not supported.
What is FPV?
If you are not familiar with FPV, there are many websites devoted to it. Our FPV
overview web page at http://www.eagletreesystems.com/OSD has a brief tutorial on
FPV, which is a good place to start.
Quick Start Guide
We recommend that most customers start with basic OSD Pro setup, and then proceed
as desired to use more advanced features. A Quick Start Guide, which supplements
this manual, is included with your product. The latest version of the quick start guide
is available in the Product Manuals section of the Support tab on
http://www.eagletreesystems.com.
Packing List
Your package should include the following: The OSD Pro, and five (5) male to male servo connectors, and a printed version of the Quick Start Guide.
Additionally, if you purchased our complete OSD Pro package, you should have received an eLogger V4, and a GPS Module. Note that an eLogger V4,
eLogger V3, or Data Recorder is required for system operation, and our GPS module is recommended. Additionally, our Guardian Stabilization Expander
is available to provide stabilized flight and additional features.
Other Things You Need
To utilize the OSD Pro system, you will need (at a minimum) a video camera and video transmitter on your model, and a video receiver and video display on
the ground. Many of our dealers also sell video equipment. A list of FPV specific dealers can be found on our website at
http://www.eagletreesystems.com/OSD/OSD-Pro.htm.
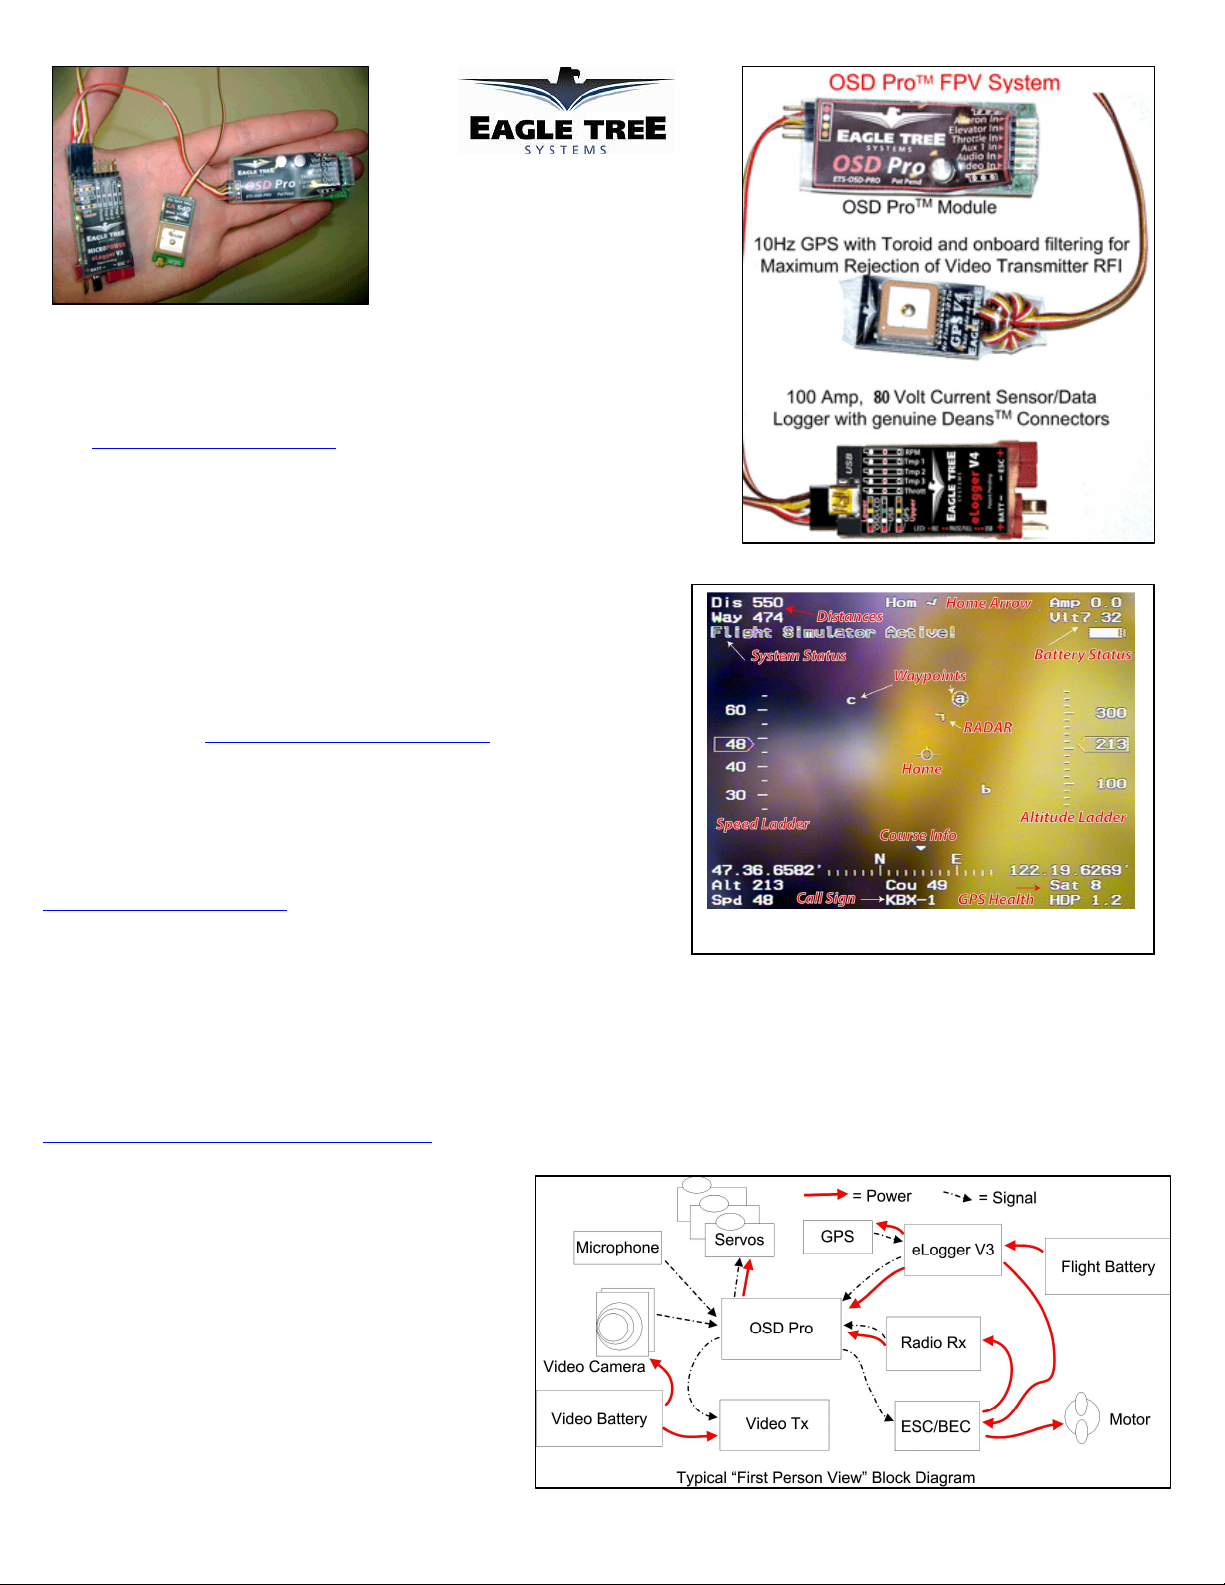
What the OSD Pro Does
The OSD Pro is a powerful, modular, fully configurable
Video/Audio On-Screen Display (OSD) device, providing
graphics, voice announcements, alarms, acoustic variometer with
total energy compensation, Home Arrow, Artificial Horizon,
Return to Home, Failsafe, “RADAR”, waypoints, flight timer,
flight summary, saving and graphing your flight data (including
all sensor data), Google Earth data display, a flight simulator for
testing, and many other features. The information displayed can
be as simple or advanced as you like, depending on how you
configure the display, and on which optional Eagle Tree sensors
are connected.
To use your OSD Pro, you need the OSD Pro Expander, and the
eLogger V4/V3 or Data Recorder. To make full use of the OSD
Main Screen
Copyright © 2009-2012 Eagle Tree Systems, LLC
http://www.eagletreesystems.com
Page 2

Page
2
Pro, you also need our GPS Expander. Several optional sensors and accessories are available from Eagle Tree to further enhance your OSD Pro, such as
our barometric altimeter, pitot airspeed sensor, temperature sensors, and many more.
When connected to your eLogger or Data Recorder, the OSD Pro superimposes Eagle Tree data onto your video feed, displaying the parameters you want to
see on the video screen. The OSD Pro is normally connected between the composite video output of your video camera, and the composite video input of
your video transmitter or DVR. The OSD Pro supports NTSC and PAL video modes – the video mode is automatically detected.
The figure above shows a typical “FPV” onboard setup. Your wiring may vary depending on your video hardware, power system, etc.
General Safety Precautions
In addition to the warnings and other precautions in this manual, the following precautions should always be observed:
1) The OSD Pro is intended for recreational use only. You should always use a spotter if your eyes are not on your model. Any use of the OSD
Pro to attempt to navigate your model, operate your model autonomously, or otherwise operate your model outside of Visual Line of Sight (VLS)
is not supported. For USA customers, please refer to the American Model Association’s Safety Code at
http://www.modelaircraft.org/files/105.PDF and FPV related code at http://www.modelaircraft.org/files/550.pdf
2) Always obey the law when flying. Most video transmitters used for FPV flying require an amateur radio license to operate legally.
3) If you have never set up or operated an RC model before, you will need help from an experienced modeler. Local RC clubs are great ways to
meet experienced modelers, and receive the required training. This requirement is especially true for FPV flying, which can be more
challenging.
4) Never operate your model aircraft near or over buildings, power/telephone lines, or other obstacles. Never operate your model aircraft near or over
other people!
5) RC models and accessories are not toys, and should be kept away from children, without proper adult supervision.
Steps to Follow
Installation and use of your OSD Pro should be quite easy and enjoyable if you follow these few steps:
1. First, read through the manuals for your eLogger V4, eLogger V3 or Data Recorder, your GPS Expander, and any other Eagle Tree sensors, to
familiarize yourself with the connection and function of these devices.
2. Read through this manual to understand the warnings, determine the installation and setup sequence, etc., of the OSD Pro.
3. If anything is unclear, see the “Have Questions or Feedback?” section below.
4. Install or upgrade to the Windows Software and Firmware for your OSD Pro and Recorder as described in the “Windows Software and Firmware
Update” section below.
5. Configure your eLogger V4/V3 or Recorder as described in the manuals for those, if you have not already done so. NOTE: It is strongly
recommended that you set the “Capture Rate” of your eLogger or Recorder to 10 samples/second, for best OSD Pro update rate and performance.
6. Install and configure the OSD Pro as described below. Note that some features of the OSD Pro are configured with the Windows Software, some
features (ones that may change more often) are configured either with the OSD Pro’s on-screen menus or with the Windows Software. Some
features, such as RTH, and Artificial Horizon Indicator (AHI) calibration, can only be configured using the OSD Pro’s on-screen menus.
7. Range test and enjoy!
IMPORTANT: It is unlikely that the installation of the OSD Pro will affect your model’s radio range or control. But, as always after making an
electronics change to your model, it is very important that you range and function test your model once the OSD Pro is installed to ensure that there is no
impact on your system. Make sure that your “antenna down” operating range is within the manufacturer’s specifications. See your Radio owner’s manual
for the correct procedure for your equipment. DO NOT OPERATE IF YOUR MODEL DOESN’T PASS THE ANTENNA DOWN RANGE CHECK
Have questions or Feedback?
Eagle Tree is committed to providing great customer service. If you’ve read the manual and something is not clear, just ask. We’d much prefer to take the
time to answer your questions, rather than having you waste your valuable time struggling with an issue.
To get help, visit the Eagle Tree OSD Pro support thread at http://www.rcgroups.com/forums/showthread.php?t=924018. Chances are someone has posted a
solution to your problem already. If not, posting your problem there will get a very quick response from the Eagle Tree community.
If you prefer to not post on the forum, or you feel there is a problem with your Eagle Tree hardware, please open a support ticket with us at
http://ticket.eagletreesystems.com. We will respond to your support ticket as soon as we can (normally 1-3 business days). Note that you may receive an
answer to your question more quickly from our forum above, since many other Eagle Tree customers also monitor the forum. Note that when you create a
support ticket, you will be emailed a link that will let you check the status of the ticket. If you do not receive the email, this most likely means that a spam
filter is intercepting emails from Eagle Tree. Please don't post your question in our forum and open a support ticket for the same issue! ☺
Also Eagle Tree greatly values your feedback on how we can improve our products. To leave us feedback for a new feature request or improvement, either
post the feedback on our support thread above, create a support ticket with your feedback, or send feedback at
http://www.eagletreesystems.com/Feature/feature.html
Special Features of the OSD Pro
The following section describes some of the special features of the OSD Pro. The “Main Screen” figure on page 1 of the document demonstrates many of
these features. Note that most of these features need to be configured with the on-screen menus, as described in the “Configuring On-screen Menus”
section below. Note that each of these features is also described more fully in the “On-Screen Menu” section of this document.
Copyright © 2009-2012 Eagle Tree Systems, LLC
http://www.eagletreesystems.com
Page 3

Page
3
Guardian Stabilization
When coupled with our Guardian Stabilization Expander, the OSD Pro provides full featured stabilization and an Artificial Horizon display. Please see the
“Guardian Stabilization Expander” manual for more information.
“RADAR” Feature
The RADAR feature is an intuitive feature which makes it easier to keep track of your model’s location relative to home, and the direction of your model’s
travel relative to the direction the pilot is facing. See the Main Screen figure. The circular indicator in the center of the screen marks the takeoff point, in a
"bird's eye" view map. The RADAR location and direction of travel indicator (the chevron) indicates where you are in relation to home. The up direction is
configurable in the on-screen menus described below.
As your model moves relative to home, the chevron moves relative to the center of the screen. Also, the direction the chevron is pointing indicates the
direction the model is traveling, relative to home. So, if your model is flying toward home, the chevron will point toward home, regardless of where it is on
the display screen. The RADAR feature is the ultimate way to keep tabs on where you are relative to home, as an aid to piloting.
The RADAR feature is turned on and off via the PC software, as described in the Configuring Graphics Display section below, and can also be configured
via the OSD on-screen menus.
Return To Home
The Return To Home (RTH) feature will attempt to bring your plane to a “holding pattern” above the takeoff point if radio signal is lost, by manipulating
your model’s rudder/ailerons, elevator (or elevons), and throttle, based on your settings. GPS and other sensor information is used to attempt to return the
plane to home. The OSD Pro’s RTH has a unique feature that allows you to set two altitudes for returning to home, depending on how far away the model
is from home. See the “Safety Mode/Return to Home Information” section of the manual for more information on configuring Return To Home.
The Return to Home feature should work with any type of radio receiver – no special adapter is required.
Flight Timer
The OSD Pro provides a flight timer, which appears in the upper left-hand corner of the screen, when enabled. The Flight Timer feature is turned on and
off via the PC software, as described in the Configuring Graphics Display section below, and can also be configured via the “Flight Timer/Elapsed Time”
on-screen menu item.
The Flight Timer display is in MM:SS until greater than 59 minutes is reached, then it switches to HH:MM:SS. The flight timer starts counting up when the
GPS Home position is finalized. It can be reset to zero by clicking on the “Reset Home Position” menu item on the main on-screen menu.
Flight Summary (Display Max Values)
Maximum values for most of the text parameters chosen for display (and minimum voltage) can be displayed after your flight, automatically. For more
information, see the “Display Live or Max Values” on-screen menu item description in the “Main Menu” table, under the “Description of On-screen Menus”
section of the manual, below. Flight Summary mode is enabled by selecting the “Toggle” option.
Waypoints
The OSD Pro includes an innovative graphical display of up to 3 waypoints, on the main screen, as shown in the Main Screen figure. These are displayed
relative to the “Home” position, similar to the RADAR feature described above. When the OSD Pro is initialized, the first waypoint you entered is the
active waypoint (circled), and the “Distance to Waypoint” parameter (if you chose to display it) indicates the distance to the first waypoint. As each
waypoint is reached, the next defined waypoint becomes the active waypoint (it becomes circled), and the Waypoint Distance indicates the distance to the
next waypoint. After all the defined waypoints have been reached, the waypoint order reverses, and the next to last waypoint becomes the active waypoint.
NOTE: the OSD Pro will not autonomously fly to waypoints, and the waypoints must be within Visual Line of Sight (VLS) of “Home”. VLS is defined as
3 miles (4.8KM) So, care must be taken to ensure that you don’t configure waypoints farther than the VLS distance from the location you turn your model
on. Waypoints farther away than VLS will not appear on the main screen and an error message will appear.
Note: The format of waypoints entered into the software must be DDD MM SS.SS format. This is the format most commonly used by mapping software,
such as Google Earth and Google Maps. Note also that the GPS position displayed by the OSD Pro on the video is in a different format, called “GPS
Format.” This format is DDD.MM MM format. This format was chosen as it’s the standard format returned by GPS receivers.
Waypoints display is turned on and off via the PC software, as described in the Configuring Graphics Display section below, and can also be switched on
and off via the OSD on-screen menus.
Flight Simulator
The OSD Pro’s built in flight simulator simplifies testing the Return to Home feature, as well as testing alarms, voice prompts, and other features. Note that
you must have the OSD Pro’s servo channels connected to your receiver, and the “Servo Analysis Wizard” must be run, before using the simulator. See the
RTH Testing/Adjustment Procedures section for information on using the simulator. The simulator supports both traditional, fixed wing aircraft, and v-tail
or elevon controlled aircraft. NOTE: the simulator’s implementation is simplistic. It is not a full simulator based on the laws of physics. So, your model’s
operation in the air will be quite different than the characteristics observed in the simulator!
Displaying Flight Data in Google Earth and Charting Flight Data
Your eLogger or Data Recorder can log dat from all sensors during your flight. The data can be downloaded later, and either displayed with our powerful
charting software, or visulalized in Google Earth. Please see your eLogger or Data Recorder instruction manual for more information on how to do this.
Saving and Loading Configuration
Copyright © 2009-2012 Eagle Tree Systems, LLC
http://www.eagletreesystems.com
Page 4
Page
4
The OSD Pro supports saving and loading of OSD Configuration to XML files. This feature makes it easy to update multiple OSD Pros to have the same
settings, without reconfiguring each one. It is also useful to save your configuration before updating firmware, so that the configuration will be completely
restored after firmware update. See the “Configuring the OSD Pro with the Windows Software” section of the manual below for more information.
Graphical Battery Displays
Up to 3 graphical battery displays are supported. The graphical battery displays are enabled in the “Configure OSD Display” On-screen menu page. Note
that only the primary battery display is available if you are using your OSD with our Data Recorder. The additional two battery displays are available only
with the eLogger V3 and V4, at this time.
The primary battery is the one connected through the eLogger’s BATT input, or to your Data Recorder’s Electric Expander. No additional wiring is required
for the primary battery display. For the primary battery, remaining milliamp-hours is used to indicate battery fullness. For this to work correctly, you must
tell the OSD the capacity of your primary battery. This is done with the “Set Battery milliamp-Hours” menu item on the main on-screen menu.
The two secondary graphical battery displays (referred to as “Voltage B” and “Voltage C”) use voltage level to indicate the battery fullness. These are set
up by making special connections to the eLogger (using resistors), and the maximum and minimum voltages are configured under the “Sensors and Units”
on-screen menu.
If you want to use the secondary battery displays, please carefully read the following instructions, as incorrect wiring will damage your equipment. If you
don’t understand the instructions fully, don’t attempt it! Also, please visit the online forum discussion here, for more information or to ask questions:
http://www.rcgroups.com/forums/showthread.php?t=1128175
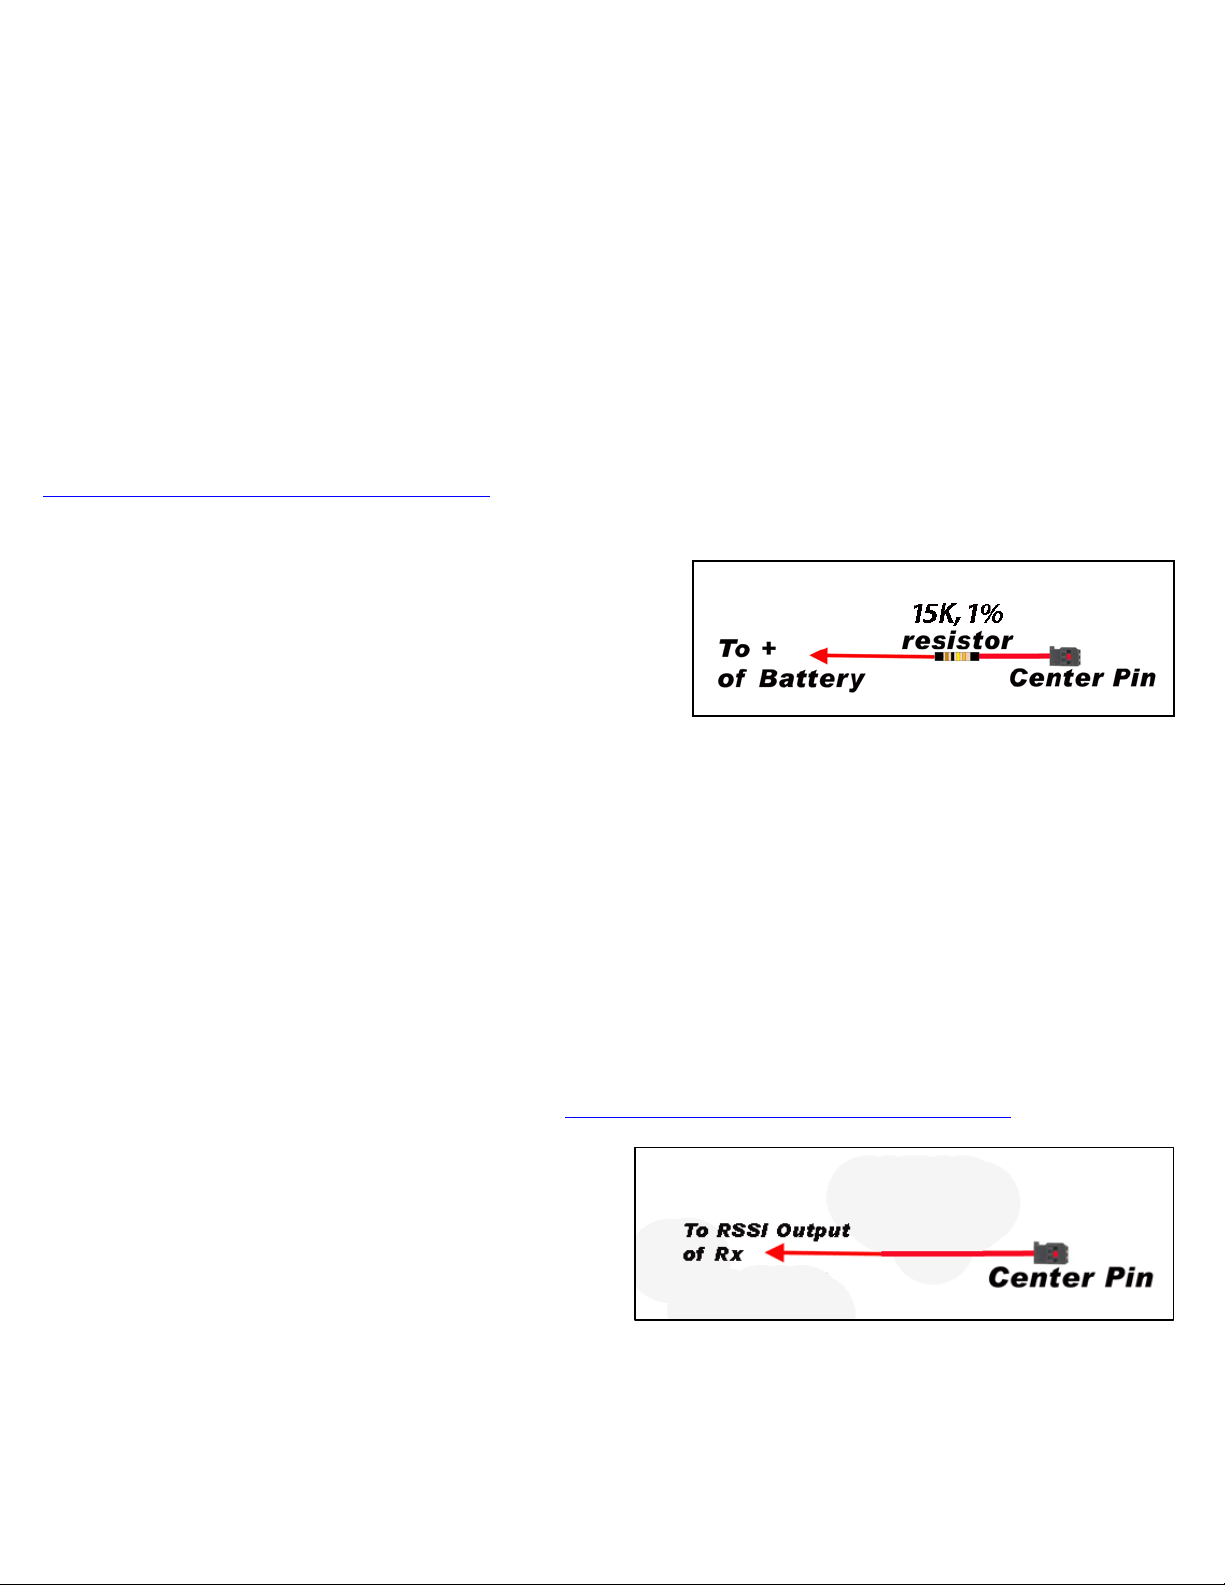
To use one or both of the secondary battery displays, you must follow these steps:
1. Construct a probe for each additional voltage to monitor, consisting of a wire that
connects to your battery, a 15K Ohm resistor (preferably 1%), and a servo plug.
See the figure above. IMPORTANT: the resistor MUST be inline with the
probe, and the pack voltage must not exceed 16V, or the eLogger will be
damaged!
2. Connect the resistor probe(s) between the + (positive) lead of the additional
battery pack(s) to be measured, and the Temperature 2 (for “Voltage B”) or
Temperature 3 input (for “Voltage C”) on the eLogger (center pin of Temperature
input connects to probe). Note that this configuration assumes a common ground exists between the eLogger and each additional battery to be measured.
In most cases, ground is already shared. This will be true of the video battery, assuming the camera is connected to the OSD Pro, and is true of the
BEC/Receiver battery, assuming your receiver is connected to the OSD Pro. Note that neither the other two pins of the temperature inputs is ground!
3. In the OSD Pro on-screen menus, under the "Sensors and Units" menu, configure the temperature 2 input as a voltage monitor, by setting "Use Temp2
Input for Voltage B."
4. If “Voltage C” is also being used, enable the Voltage C option also.
5. Set the 0% and 100% endpoints of the batteries by changing the values of "Set Voltage B Minimum" and "Set Voltage B Maximum" and/or "Set
Voltage C Minimum" and "Set Voltage C Maximum"
6. Select the appropriate graphical batteries to display via the PC software, as described in the Configuring Graphics Display section below, or by using
the on-screen menus.
7. If you wish to display the numeric voltages of Voltage B and Voltage C, run the Data Recorder software, and add "Temperature B" and "Temperature
C" parameters, relabeling them to indicate the voltage that is being monitored.
Receiver Signal Strength (RSSI)
The OSD Pro (when used with an eLogger V4 or V3) can be used to display the received signal strength (RSSI) with many receivers. Note: this advanced
feature may require modification of your existing Receiver. As always, a pre-flight "Antenna Down" range check is critical after modifying your
equipment!
For questions regarding setting up RSSI, please visit this online thread: http://www.rcgroups.com/forums/showthread.php?t=1130784
For measuring RSSI with analog receivers, the first step is to locate the RSSI
output of the receiver. There are several threads on RCGroups on how to do
this. We recommend searching for the model number of the receiver + RSSI, to
locate the pinout. It is recommended that a noise filter be added to the wire
connecting to the RSSI input. One such noise filter is a small toroid with 10-15
turns of wire, added to the connection. Also, some receivers require that only
a very high impedance load be connected to the RSSI output. See the
“impedance issues” section below. Range can be adversely affected if the
receiver requires a high impedance connection!
The next step is to connect the RSSI output to the middle pin of the eLogger's "Temperature 1" input.
To enable RSSI display, follow these steps:
a) Add the "Temperature Sensor A" parameter for display, at the screen lcoation you prefer, as described in the “Configuring the OSD Pro with the
Windows Software” section elsewhere in the manual. If desired, the on-screen display name of the parameter could be changed to "RSI" or "Sig" to indicate
that the parameter is for RSSI.
Copyright © 2009-2012 Eagle Tree Systems, LLC
http://www.eagletreesystems.com
Page 5
Page
5
b) In the OSD Pro on-screen menus, under the "Sensors and Units" menu, set "Use Temp1 Input for RSSI" to "Yes".
c) With the Rx RSSI output connected to the eLogger, run the "Servo Analysis Wizard" either from the PC, or with the stick menus, as described in the
Servo Analysis Wizard section of the manual below. While you run the wizard, you will be prompted to turn off and turn on your transmitter. When you do
this, the OSD Pro notices the minimum and maximum RSSI levels, and calibrates these to 0% RSSI and 100% RSSI, respectively.
d) If desired, there are menu options under "Radio Control Configuration" menu to let you recalibrate the minimum and maximum RSSI readings (0%
reading and 100% readings). For those who want the minimum RSSI to represent the point just before failsafe starts to occur, rather than the point when the
transmitter is turned off, you can calibrate the minimum using this option. A good time to do this is during your antenna-down range test, just before the
servos start to twitch.
Impedance Issues: The input impedance of the Temperature 1 input is approximately 5K Ohm. Some receivers, such as early versions of the “LRS” long
range receiver, require higher impedance to correctly report RSSI. The symptoms of this issue are loss of range, and/or random or otherwise incorrect
display of RSSI after following the above steps. If you want to use RSSI with early LRS or other receivers that require higher impedance, the best option is
to use a high impedance input buffer that can be placed between the receiver's RSSI output, and the eLogger's Temperature 1 input. Such a buffer is
available at http://www.dpcav.com/xcart/product.php?productid=16500.
Artificial Horizon Display
When you use the Guardian Stabilization Expander, you can display a real-time, graphical Artificial Horizon Indicator (AHI) on the OSD display. The AHI
display can be turned on and off via the PC software, as described in the Configuring Graphics Display section below, and can also be switched on and off
via the OSD on-screen menus.
Also, when the FMA Direct™ CPD-4™ X/Y horizon sensor (either with our without the FMA™ stabilization Computer), an artificial horizon line can be
displayed on the video screen. Information on how to connect the FMA Direct sensor to the OSD Pro system, and configure the Artificial Horizon display,
can be found in this document:
http://www.eagletreesystems.com/support/manuals/FMA-OSD-Pro.pdf
Serial PPM Support
If your receiver outputs a serial PPM stream (also known as “PPM sum”) you may be able to connect your OSD Pro to your Receiver with only one male to
male servo connector.
See the “Serial PPM” section in the manual below for more information.
Tips for Using your OSD Pro
Adjusting the OSD Display Appearance
Normally the OSD Pro display does not need to be adjusted, but several adjustments are provided for centering the screen, controlling the brightness of the
display, changing the width of the display, etc. Please see the “Configure OSD Display Menu” on-screen menu description below for more information.
GPS Mounting Tips
It is important that the GPS is mounted as far away from your video transmitter as possible. This is because some video transmitters radiate radio frequency
energy that is on the same frequency as GPS satellite signals. This can cause the GPS module to receive a poor GPS signal, or no signal at all. This
issue is most commonly reported with 900MHz video transmitters. Our GPS-V4 and later GPS models have a built in ferrite core in the cable, which
reduces the effects of this RFI on GPS signal. A good description of the causes and solutions of this problem (and instructions on installing a ferrite core if
your GPS doesn’t have one already) is located here: http://www.dpcav.com/data_sheets/whitepaper_RFI.pdf
GPS Fix Quality
Many of the features of the OSD Pro, including the RADAR, distance display, and altitude, depend on a good initial GPS fix before finalizing the “home”
position. When GPS modules first get a fix, the position and/or altitude may not be accurate, and subsequent fixes may have greater accuracy. The OSD
Pro has several adjustments to ensure that the home position is correctly finalized. See the “GPS, RADAR, Timer and Waypoint Settings Menu” on-screen
menu description below for more information.
Using the OSD Pro with non-Eagle Tree Stabilization Systems, such as the FMATM Co-pilotTM
The OSD Pro should work well with all available stabilization systems, though they are not as well integrated as the Guardian Stabilization Expander. If
you plan to use Return to Home feature with a stabilization system, please see the “Stabilization System Connection” section in the Safety Mode portion of
the manual.
Connecting your OSD Pro Hardware
The OSD Pro should work well with any FPV video transmitter, FPV camera, and an optional microphone. Since cameras, video transmitters and
microphones from different manufacturers all have different connections, it’s important to understand how things should connect together before proceeding
with connections. In addition to the information provided in this manual, user note that there are many user supplied wiring diagrams for the osd Pro online
at http://www.rcgroups.com/forums/showthread.php?t=1286603
Copyright © 2009-2012 Eagle Tree Systems, LLC
http://www.eagletreesystems.com
Page 6
Page
6
Connecting the OSD Pro to your eLogger V4, eLogger V3 or Data Recorder
Please read the appropriate box below for information on connecting the OSD Pro module to your logger.
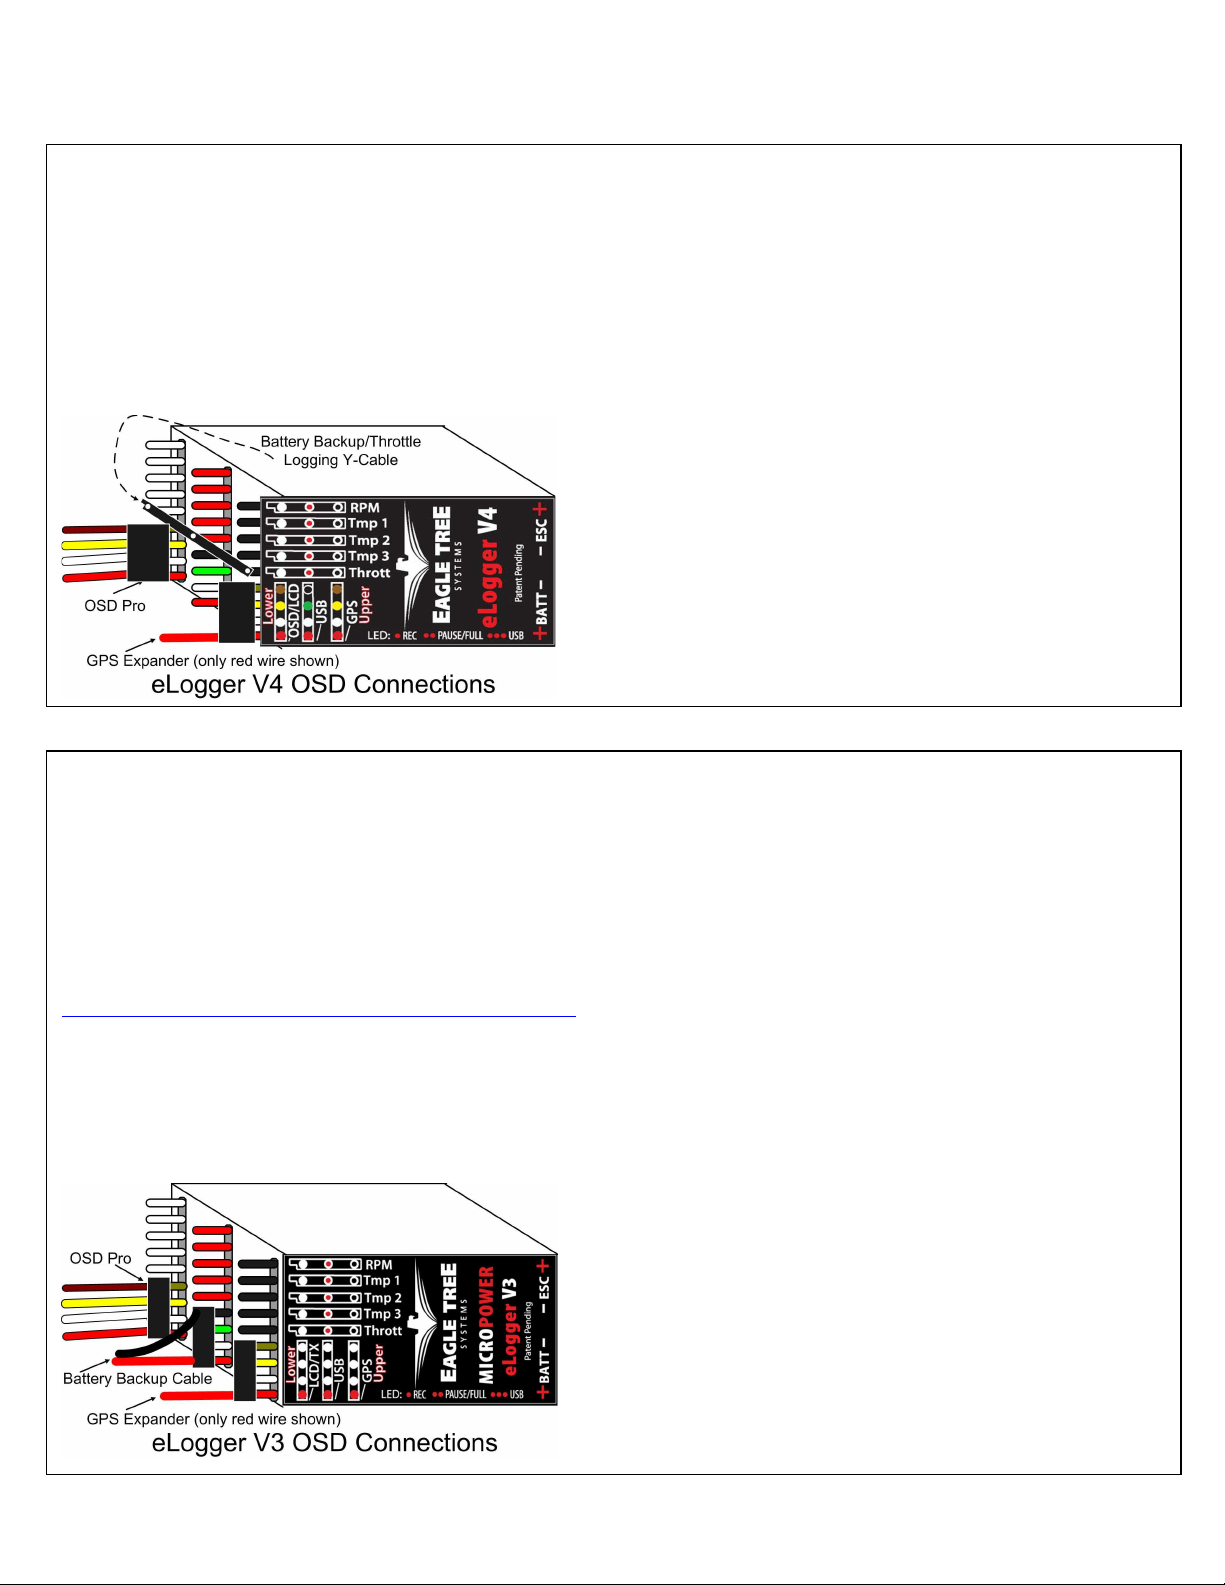
Connecting the OSD Pro and GPS Expander to the eLogger V4
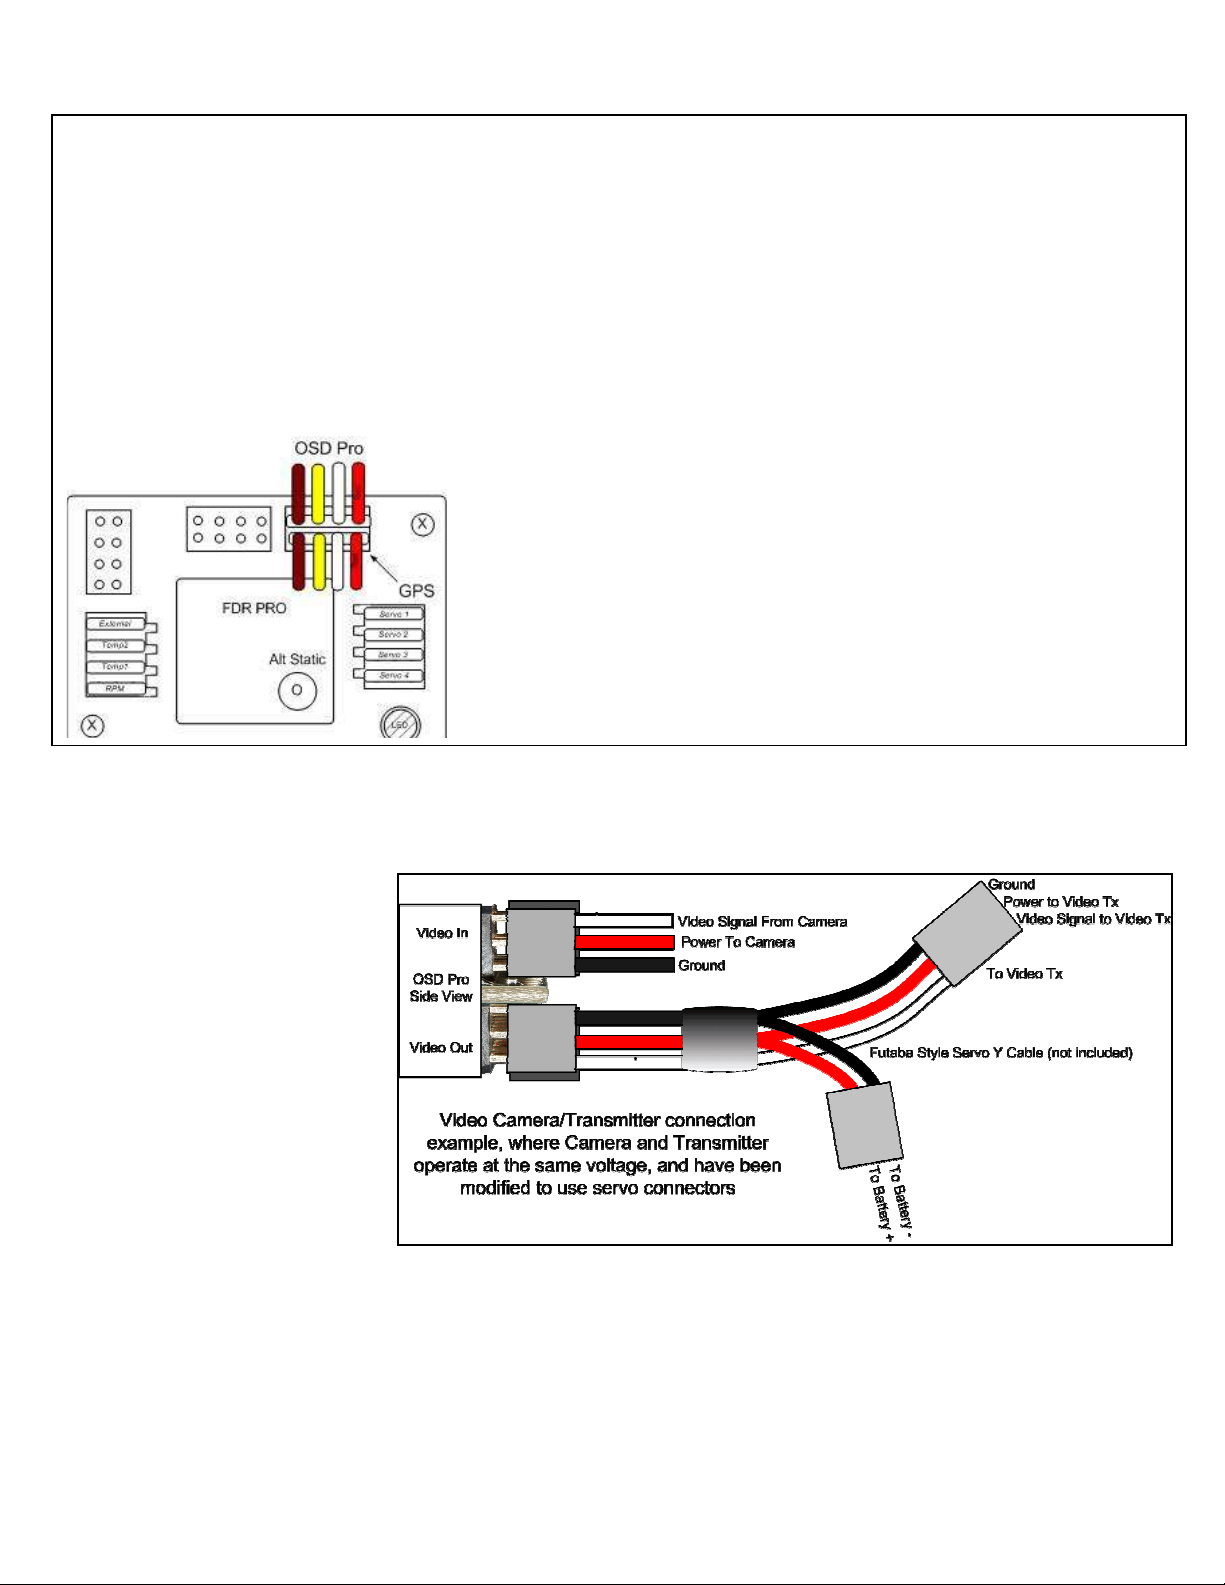
The four pin wire with black connector on the OSD Pro plugs into the “OSD/LCD” port of your eLogger V3, as shown in the figure below. If you
have a PowerPanel or other sensors, those can “daisy chain” to the pins on the OSD Pro, with the polarity as indicated on the OSD Pro label, as shown
in Figure 2.
The GPS Expander connects to the upper row of eLogger pins, as shown in the figure below.
Normally, the OSD Pro system is powered via the flight battery, which connects to the “Batt” connection of the eLogger V4. If the battery you are
connecting to the eLogger V4 is greater than 4S (about 16V), the throttle monitoring Y cable included with the Logger V4 needs to be connected
between the “Throttle” input of the eLogger V4 and any receiver channel (or a 5V to 6V BEC), to provide backup power to the eLogger V4. Note: the
voltage supplied to the throttle Y cable cannot be greater than 6V!
Connecting the OSD Pro and GPS Expander to the eLogger V3
The four pin wire with black connector on the OSD Pro plugs into the “LCD/TX” port of your eLogger V3, as shown in the figure at right. If you have
a PowerPanel or other sensors, those can “daisy chain” to the pins on the OSD Pro, with the polarity as indicated on the OSD Pro label, as shown in
Figure 2. The GPS Expander connects to the upper row of pins, as shown in Figure 3.
The Battery Backup Cable connects to the eLogger V3’s USB port (when USB is not in use), and to a 5V BEC, or a spare receiver channel. Note: if
the voltage supplied to the battery backup cable cannot be greater than 6V! If you don’t have a spare receiver channel, a Y cable can be obtained
which will let you share the connection with an occupied receiver channel.
If you do not have the battery backup cable, you can purchase it from your dealer or our website, or build your own. The instruction manual for the
cable can be found at:
http://www.eagletreesystems.com/Support/Manuals/BatteryBackup.pdf
If you do not connect any of the OSD Pro’s servo inputs to your receiver, the battery backup cable is always required, as the eLogger V3’s
internal regulator may temporarily shut down, which will cause the OSD to turn off temporarily, resulting in temporary loss video display!
Note that if you are using a 3s or smaller battery pack, AND you are connecting one or more of OSD Pro’s servo inputs to your receiver, the battery
backup cable may not be needed (but is recommended). This is because the OSD Pro will draw some of its power from the receiver, resulting in
reduced load on the eLogger’s regulator. The OSD Pro will not shut down in this case (no loss of video), but the eLogger V3’s regulator might briefly
shut down, resulting in brief loss of data updates to the OSD Pro.
Copyright © 2009-2012 Eagle Tree Systems, LLC
http://www.eagletreesystems.com
Page 7
Page
7
Connecting the OSD Pro to your Data Recorder
The four pin wire with black connector on the OSD Pro plugs into the “FCC TX” port of your Data Recorder as shown in Figure 4. Make sure that you
connect it in the correct location on the recorder, and with the correct polarity!
NOTE: if you are using the Seagull Wireless Telemetry at the same time as the OSD Pro, the wireless telemetry transmitter should connect to the
“Daisy Chain” male port of the OSD Pro.
NOTE: The Data Recorder is NOT compatible with the Guardian expsnder!
If you are using the 2.4GHz Seagull Wireless Telemetry transmitter with the OSD Pro, it is necessary to click “Advanced, Custom Hardware Options”
and check the “I am using the 2.4 GHz Seagull with an OSD Expander” checkbox in the Windows software.
IMPORTANT: if you do not plan on connecting a Seagull transmitter to the “Daisy Chain” 4 pin male connection of the OSD Pro, make sure
you cover the exposed 4 pin connector with tape, or otherwise keep it from shorting to other metal objects. Touching the exposed 4 pin
connector to other metal objects will damage the recorder when it is powered!
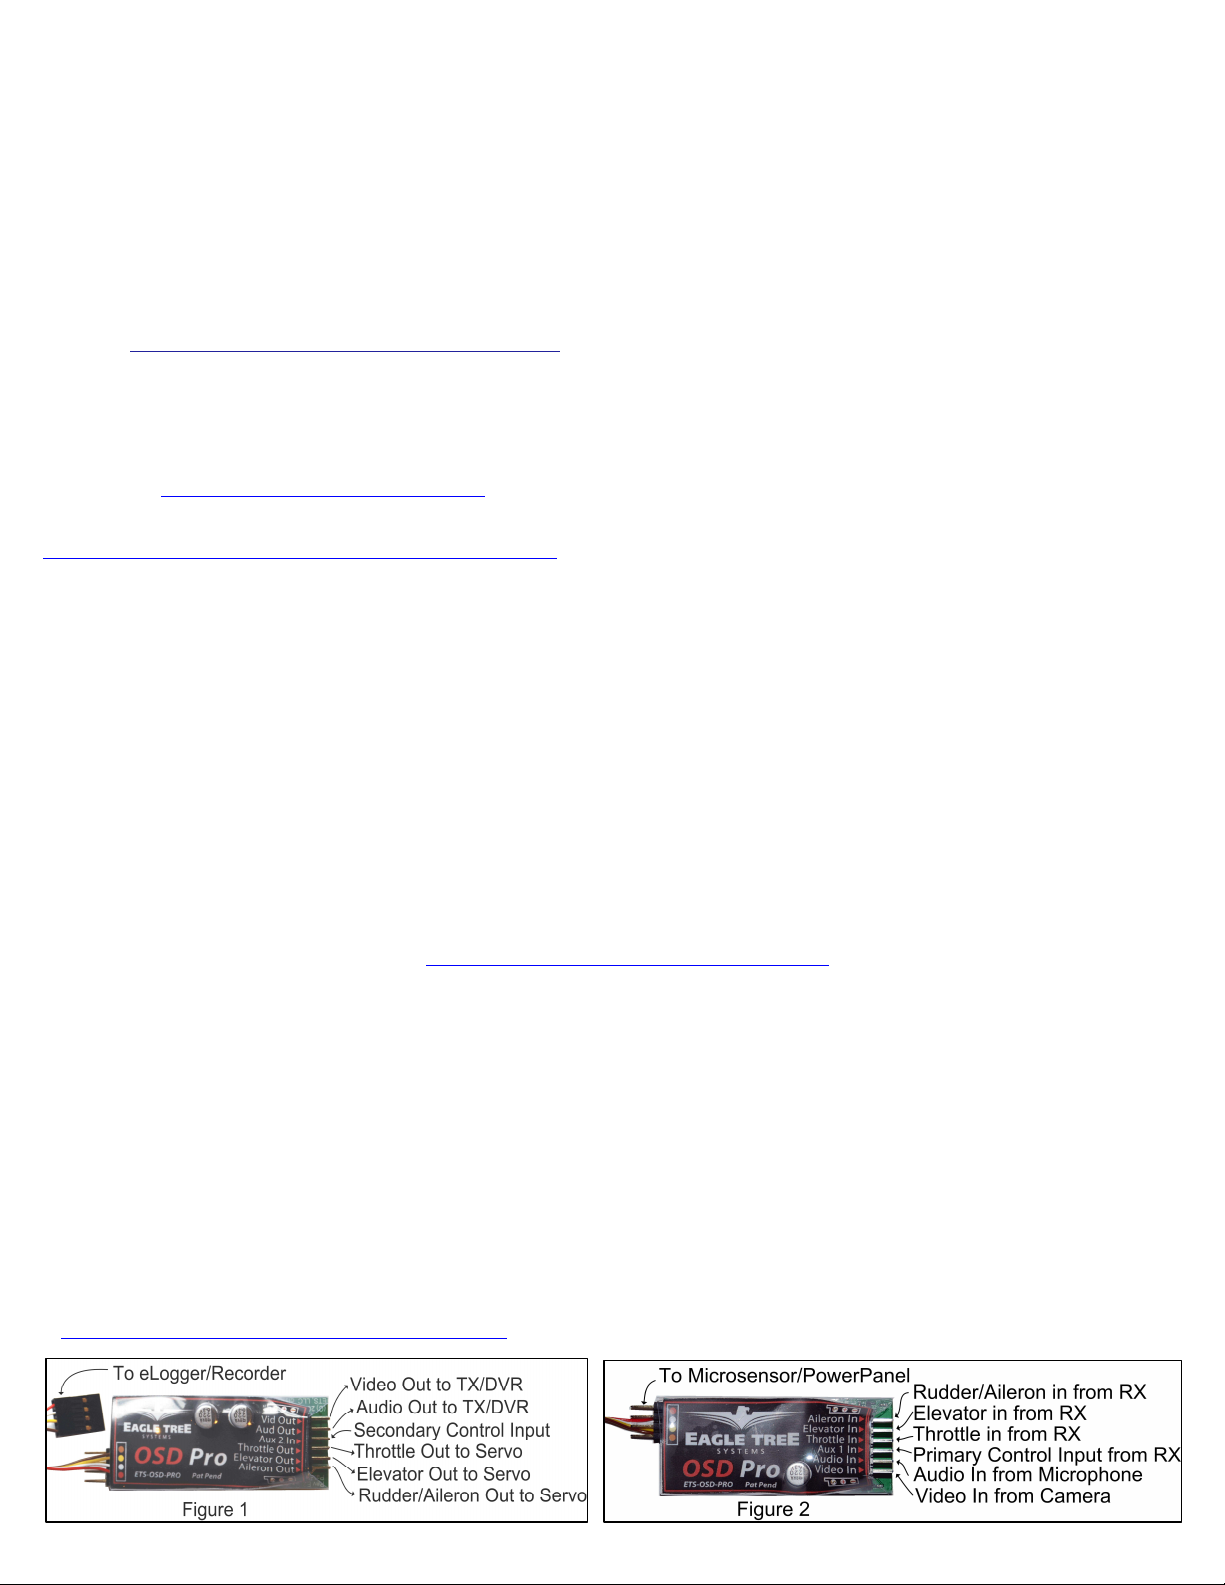
Connecting the OSD Pro to Your Camera and Video Recorder/Transmitter
Two 3 pin servo connectors on the OSD Pro are used to route the composite video signal into and out of the OSD Pro. The input and output are compatible
with standard 75 Ohm composite video equipment (either NTSC or PAL). See Figures 1 and 2 above, showing the top and bottom of the OSD Pro. The
“Video Out” connection goes to your video transmitter (or DVR) and the “Video In” connection connects to the composite output of your camera. For both
the video in and video out connections, the
pin nearest the circuit board is Ground, the
middle pin is Power, and the top pin is Signal.
The Ground and Signal pins are the only ones
used by the OSD PRO, but the Power pins are
connected together internally in the OSD
PRO, for your convenience (the ground pins
are also connected together internally, and are
common with the grounds of all other OSD
inputs).
Note: Eagle Tree offers optional servo to
RCA adapter cables, if needed.
The figure above shows one way to connect
the video camera and video transmitter, using
a servo Y cable. Note that the camera and
transmitter MUST be able to operate at the
same voltage to use the this diagram.
Copyright © 2009-2012 Eagle Tree Systems, LLC
http://www.eagletreesystems.com
Page 8
Page
8
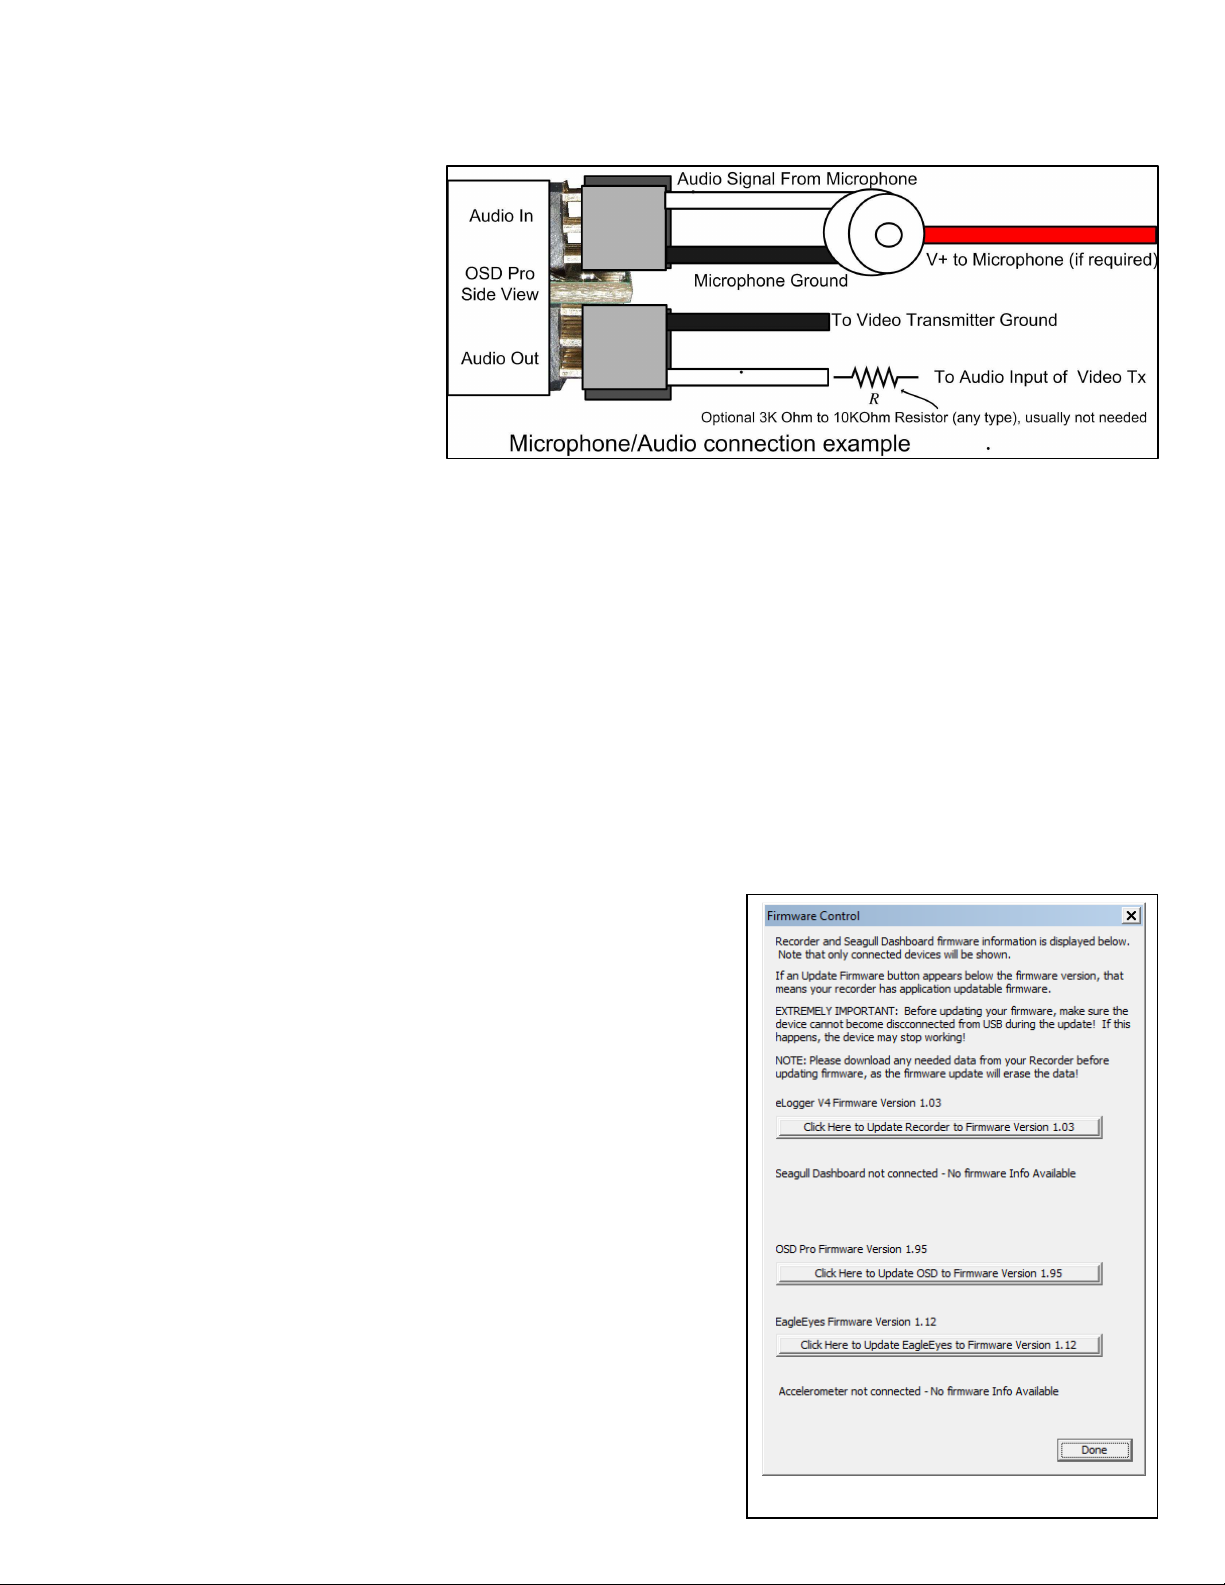
Connecting Voice, Variometer and Microphone audio functions with the OSD Pro (optional)
If your Video Transmitter (or DVR) has an audio channel, you can use the OSD Pro’s voice and variometer features, as well as continuing to enjoy flight
sounds with your microphone, by connecting the Audio In and Audio Out connections of the OSD Pro. The Audio In pins allow you to connect an
external microphone to the OSD Pro, for hearing flight sounds. For both the audio in and audio out connections, the pin nearest the circuit board is Ground,
the middle pin is Power, and the top pin is Signal.
The Ground and Signal pins are the only ones used
by the OSD PRO, but the Power pins are connected
together internally in the OSD PRO, for your
convenience (no power is provided to this connection
by the OSD Pro). Note that the ground pins are also
connected together internally, and are common with
the grounds of all other OSD inputs).
The OSD Pro supports “mic level” or “line level”
audio input, and line level audio output. Never
connect an amplified (speaker level) audio signal
to the OSD Pro’s audio input!
The OSD Pro’s built in voice announcements and the
acoustic variometer sounds are sent via the audio output. If a microphone is connected to the OSD Pro, the microphone’s output is routed to the audio
output when no announcements are being made. When it is time for a voice announcement, or the variometer is sounding, the audio output is automatically
switched.
An example wiring diagram is shown above. Note that an optional resistor is shown, which may be needed with some video transmitters, if their audio
inputs are very sensitive. If the voice announcements sound somewhat distorted or quiet with your FPV setup, the resistor may correct this issue.
See the PC Configuration and on-screen menu information below for configuring the audio options. Note: the “Mute External Audio” option must be set to
NO in the OSD Pro Audio on-screen menu to use an external microphone through the OSD Pro. Also, note that the external audio, voice and variomemter
volumes should rarely need to be set higher than 2.
Connecting the OSD Pro to your Model’s Radio Receiver (optional)
If you plan to access the OSD Pro’s on-screen menus via your radio, or if you plan to use the “Return to Home” or Failsafe feature, it will be necessary to
connect one or more of the OSD Pro’receiver inputs to your receiver. The OSD Pro is connected to your receiver via the included male to male servo
connectors. The “Futaba” end of each connector plugs into the OSD Pro, and the “Universal/JR” end plugs into your receiver. Note that the Futaba plug
enforces correct polarity when connected to the OSD Pro. IMPORTANT: never connect receiver channels to the OSD Pro if your Receiver is powered
by more than 15 volts! Note that the OSD Pro may take a small amount of power (up to approximately 135 mA of current) from the receiver. This
amount is typically very small compared to the amount of power even a single small servo can consume. The OSD Pro also takes power from its connection
to the eLogger or Recorder. It senses which power source has a higher voltage, and uses that power source. The eLogger supplies 5V to the OSD Pro.
Connecting the OSD Pro to your Model’s Radio Receiver for Menu Setup and
Configuration, and RTH
You may want to use your radio sticks to access the OSD Pro’s on-screen menus, which
requires connection of one or two receiver channels to the Aux1 and Aux2 inputs of the OSD
Pro. Please see the “Configuring the OSD Pro with the On-Screen Menus” section in the
manual below, which describes these connections, and menu operations, in detail. Note that
the message “Receiver Not Detected” will briefly display on the OSD Pro startup screen if the
Aux1 and (if required) the Aux2 channel is not connected.
Connecting the OSD Pro to your Model’s Control Surfaces for Return to Home/Failsafe
operation
If you intend to use the Return to Home or Failsafe features of the OSD Pro, your throttle,
elevator, and aileron/rudder servos connect to the outputs of the OSD Pro (see Figure 1).
See the “Safety Mode Overview” section below for more information. Based on customer
reports, we recommend connecting your rudder to the Aileron/Rudder connection instead of
the ailerons, if your plane has both ailerons and rudder.
Note that “flying wing” models which use elevon or vtail mixing are supported. The elevator
and aileron/rudder servo inputs and outputs are used for the left and right channels, in these
modes. Please see the Safety Mode section for details.
The aileron/rudder, elevator and throttle inputs to the OSD Pro (shown in Figure 2) are
connected to their respective outputs of your radio receiver, using 3 of the included male to
male servo connectors. For all of the OSD Pro servo inputs and outputs, the pins closest to
the circuit board are ground, the middle pins are power, and the top pins are signal. Note that
when the FutabaTM end of the included male to male connects is connected to the OSD Pro,
polarization is enforced.
Figure 5
Copyright © 2009-2012 Eagle Tree Systems, LLC
http://www.eagletreesystems.com
Page 9
Page
9
When connected as described above, the servos receive power from the radio receiver, just as if they were connected directly to the receiver. The input and
output servo power pins of the OSD Pro connect to each other internally.
NOTE: the servo connections described above are not necessary if you do not wish to use the safety features.
Configuring the OSD Pro with the Windows Software
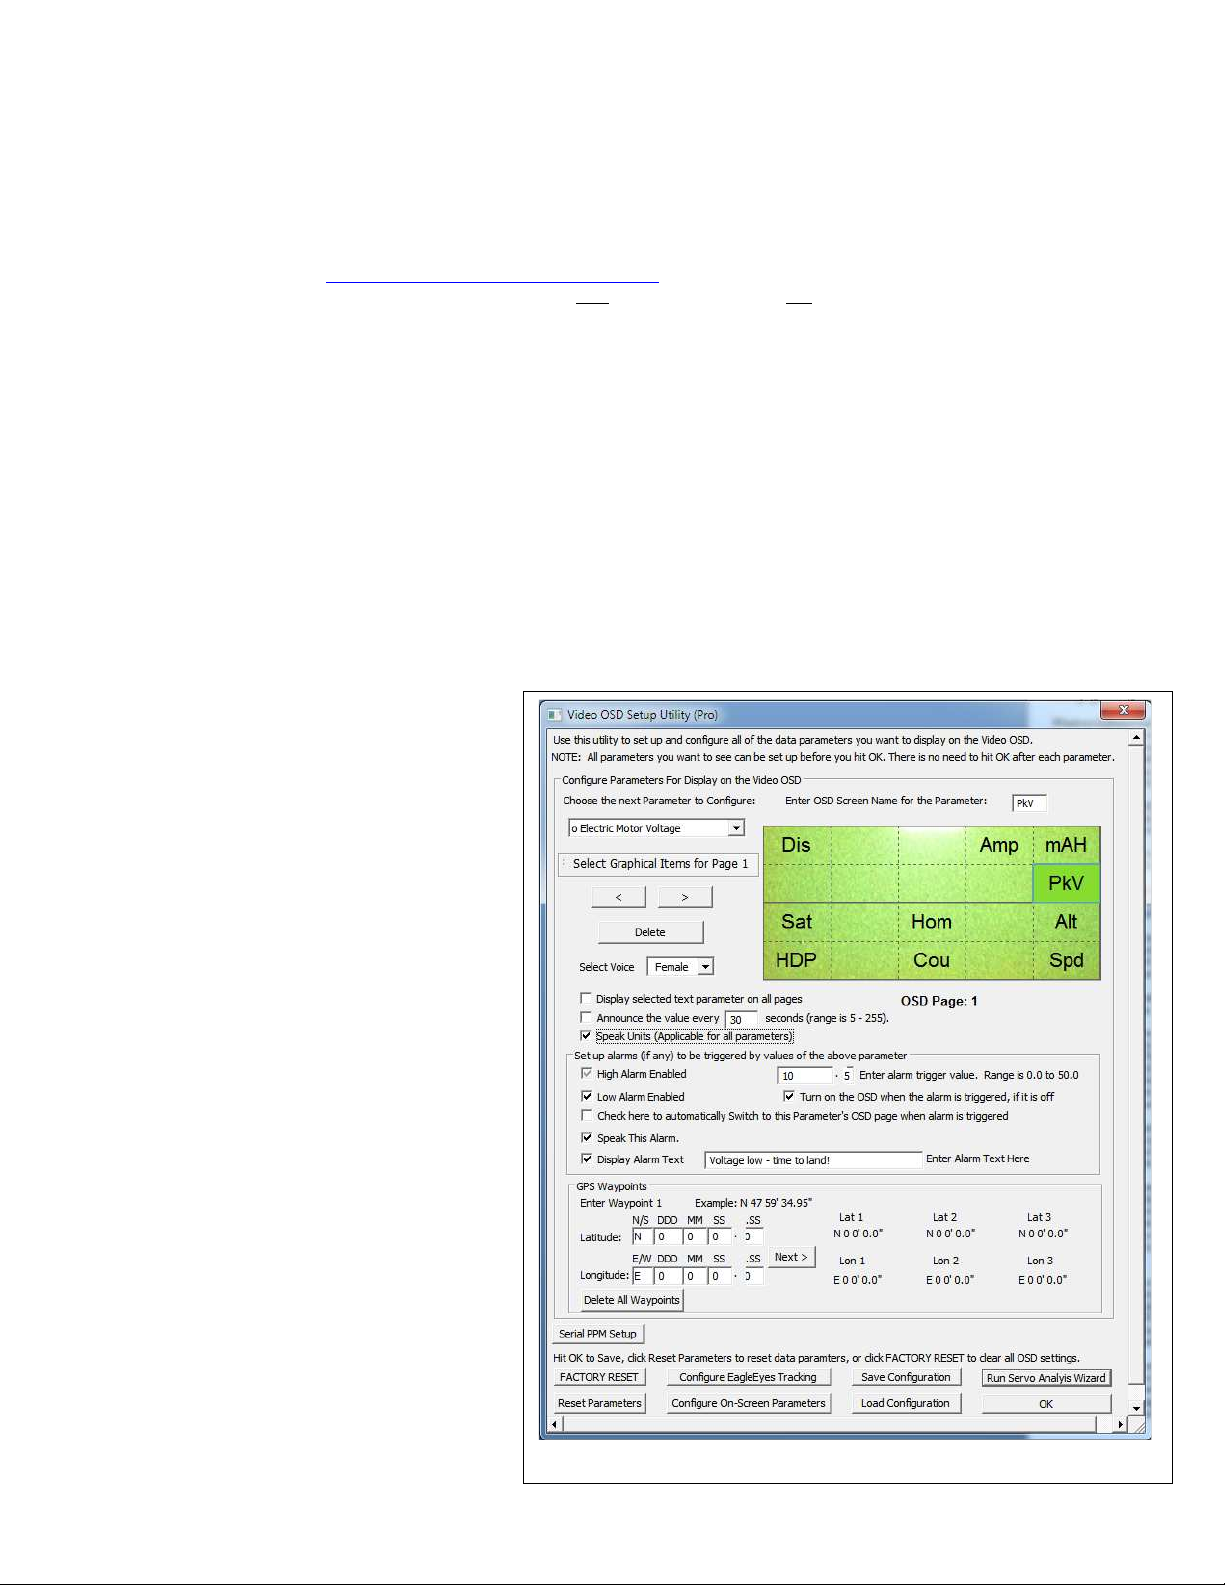
Windows Software and Firmware Update
To use the OSD Pro, you will need to install Eagle Tree Windows Software version 10.38 or higher. To update, download the latest software from the
support page of our website, located at http://eagletreesystems.com/Support/apps.htm. After connecting the OSD Pro to the eLogger/Recorder, and
downloading and installing the latest Windows Software, the firmware of both your eLogger/Recorder and the OSD Pro may need to be updated. To
upgrade your firmware, just click “Hardware, Firmware Control” and first click the “Update” button for the eLogger/Recorder, and repeat this process to
update the firmware for the OSD Pro (see Figure 5).
When updating the OSD Pro firmware, after the “Firmware Successfully Completed!!” message appears, click on the OK button of that message. Then,
after a few seconds, the OSD Pro setup page (as shown in Figure 6) will appear. Note that you will need to click OK on the setup page to finalize OSD Pro
firmware update. If you do not click OK on this page, you will be prompted to update the OSD Pro firmware again later.
Note: as new features become available to the OSD Pro, the changes can be downloaded from our website. Please check our website periodically for new
software versions. Also, clicking “Help, Download Latest Updates…” will navigate you to our software download web page.
Also, before installing a new software version, it’s a good idea to save your OSD Pro configuration using the button shown in Figure 6 BEFORE installing
the new software version, and then loading the configuration again by clicking “File, Load Configuration File” AFTER you have installed the new software
version, and completed the OSD Pro firmware update if prompted to do so.
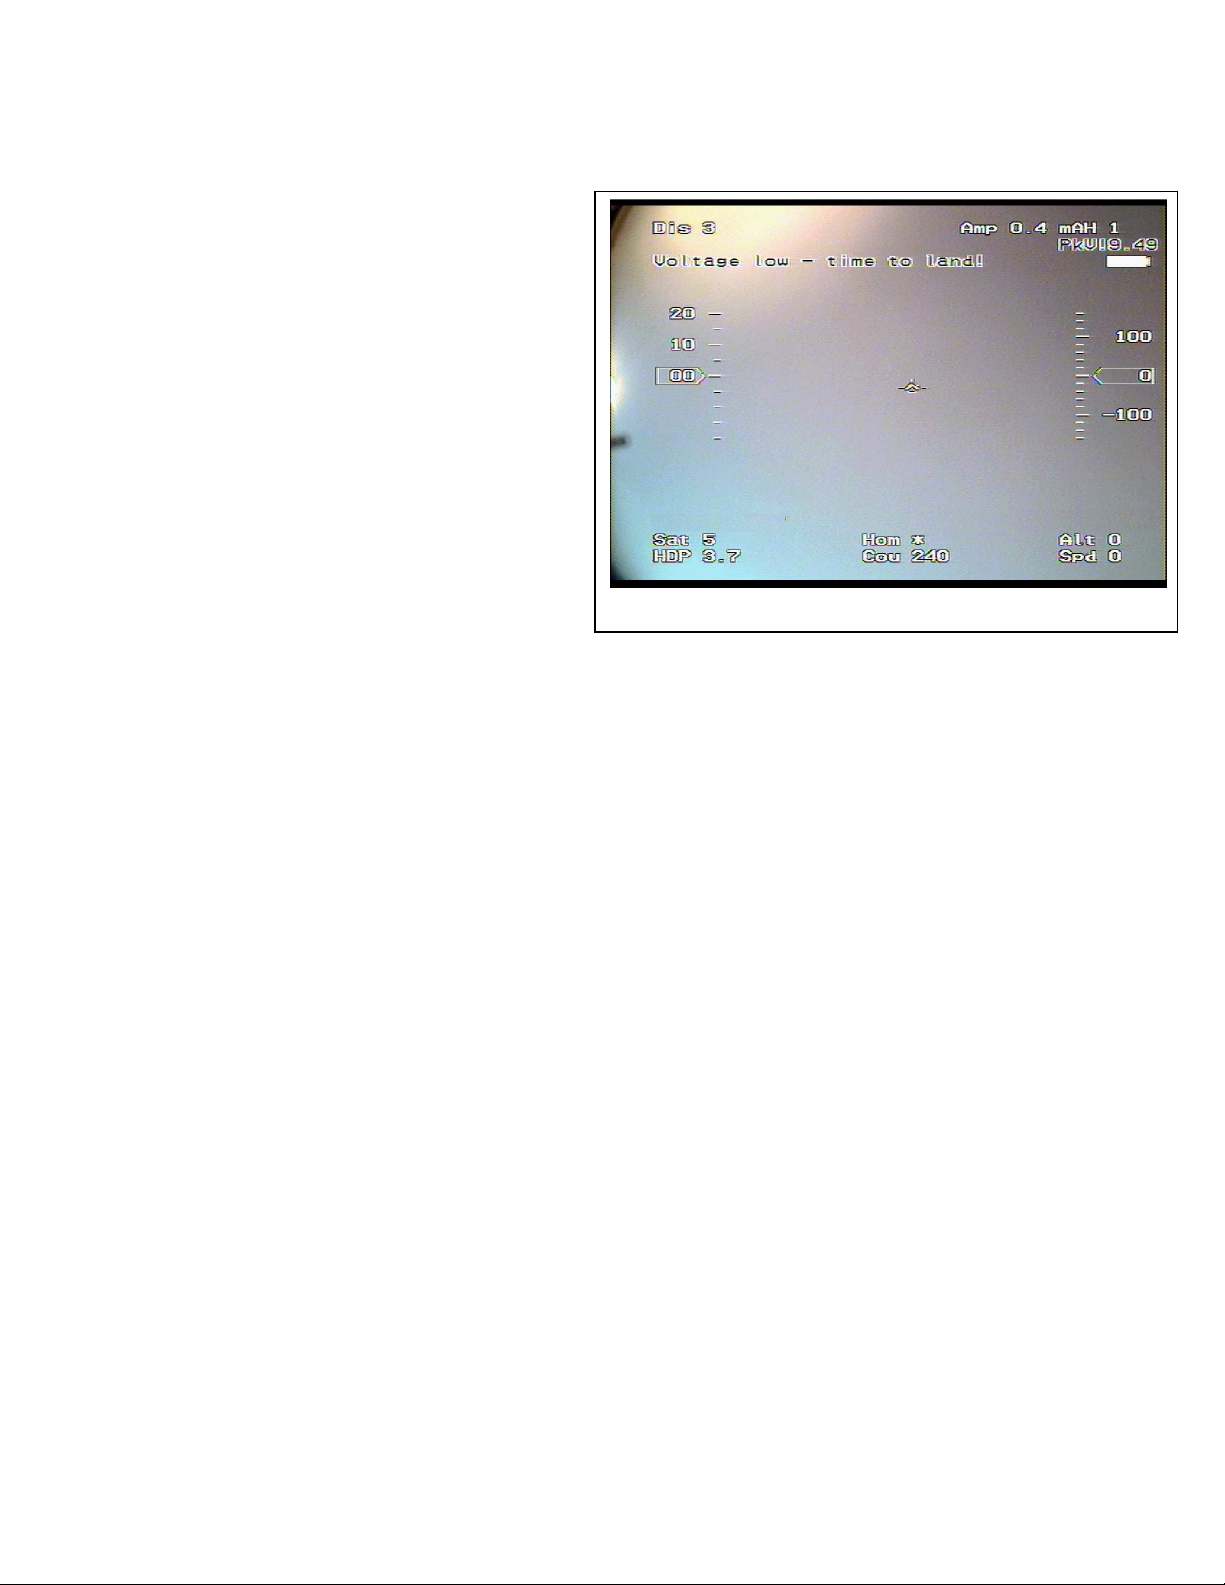
Configuring Text Parameters to Display on the Video OSD
A powerful and unique feature of the OSD Pro is the ability for you to set up just the text parameters you want to see, where you want them, on the screen.
You can also name the labels for each parameter to any 1 to 3 character name you desire. You can program alarms for the parameters, and display custom
messages on the screen when an alarm triggers.
Note: at least one parameter must be selected for display,
for correct operation.
Software configuration of the OSD Pro is done via the OSD
Pro setup page (shown in Figure 6). This page is invoked by
clicking “Hardware, Choose Parameters to Display on Video
OSD” and the page will also automatically appear after you
update the OSD Pro firmware. Note: If the page below does
not appear, and an error messages appears instead, please see
the troubleshooting section of this manual.
The setup screen supports two rows of user configurable text
based data parameters along the top of the screen, and two rows
of parameters near the bottom of the screen. Each row can
have up to 5 parameters, for a total of 20 parameters.
The setup screen’s green simulated display corresponds to the
rows and columns of these four lines of parameters. To
configure a parameter to display, click “Choose the next
Parameter to Configure.” This dropdown menu lets you choose
a parameter to display on the OSD screen. The available
parameters depend on your Recorder type, and the sensors you
have installed.
The OSD Pro can have more than one “page” of parameters
defined for the main screen. So, virtually infinite
configuration is possible. The current page being configured is
indicated by the “OSD Page: 1” text below the simulated
display. Use the left and right arrows below the dropdown
menu to switch between OSD Pages on the simulated display.
NOTE: If more than one OSD Pro display page has been
configured, toggling your radio’s Aux2/Select switch (if
configured) during operation will cause the display page to
advance to the next page. Also, an option for timed switching
between main screen pages is described in the on-screen menus
section below.
Figure 6
Copyright © 2009-2012 Eagle Tree Systems, LLC
http://www.eagletreesystems.com
Page 10
Page
10
Once a parameter is selected from the dropdown menu, it will appear at the next available location on the simulated display. To change the location on the
page for displaying the parameter, just click the location with your mouse, and drag the parameter to the desired location.
If there is a parameter that you would like to display on ALL your OSD Pro main pages, click on the parameter on the simulated display, and click the
“Display on all pages” checkbox. Note that this has no effect if you have defined only one main page.
The text field labeled “Enter OSD Screen Name for the Parameter”
indicates the 3 digit label that will be displayed beside this parameter on
the OSD. You can change this 3 digit label to be whatever you want.
If for some reason you wish to clear all the parameters you have
programmed, click “Reset Parmeters” and configure them again.
Voice Announcement of Text Parameters
A powerful feature of the OSD Pro is its ability to speak the status of
selected parameters to you, so you don’t have to look at numbers on the
screen as much.
Both male and female voices are provided (presently only in English).
Choose which voice you want with the “Select Voice” dropdown menu.
To configure a parameter for periodic voice announcement, highlight the
parameter on the simulated display, and check the “Announce this value
every X seconds” box. Then, choose the period for announcement.
And, if you desire to hear the units spoken for all spoken parameters,
check the “Speak Units” box.
For example, if you configured altitude to be spoken every 30 seconds, and click the Speak Units option, the OSD Pro will speak “Altitude XYZ Meters”
every 30 seconds (assuming your system is configured for Metric).
Note that if you desire to have a parameter spoken only, but not displayed on the main screen, simply place the parameter to be displayed on a page that you
don’t plan on using. For example, if you have your parameters on page 1, and you wish to have Altitude periodically spoken, but not displayed on page one,
place Altitude on Page 2.
Setting Alarms for Parameters
The OSD Pro setup screen makes it easy for you to set up High or Low trigger threshold alarms for the parameters you have configured. These alarms can
be used to alert you of potential problems, before they become serious.
There are 3 ways that the OSD Pro can alert you if a parameter has reached its trigger level:
1) The parameter is displayed in “reverse video” on the screen, with an exclamation point “!” beside it.
2) Optionally, the parameter can be spoken when an alarm for it is triggered. This will happen whether or not you have configured periodic voice
announcements of that parameter. A “beep” is played before the alarm is spoken, allowing you to differentiate a spoken alarm from a periodic
announcement.
3) Optionally, a custom text message can be entered, which will appear on the screen when the alarm triggers. This option is configured by clicking
the “Display Alarm Text” checkbox, and typing the custom text in the “Enter Alarm Text Here” area, as shown in Figure 6.
4) If the OSD display is turned off via the on-screen menus or via the Aux2 switch, you can configure the OSD display automatically turn on when a
particular alarm is triggered.
5) If you have multiple display pages defined, you can have the OSD Pro automatically return to the page which contains the parameter that has
triggered the alarm.
For example, if you want to configure a low voltage alarm of 10 volts, and want the OSD Pro display to remain turned OFF until a voltage lower than 10
volts is detected, you want the parameter spoken when the alarm occurs, and you want the message “Battery Almost Dead!!” to appear, you would do the
following:
1) Add the “Voltage” parameter to the simulated display.
2) With the Voltage parameter highlighted on the simulated display, click “Low Alarm Enabled” and enter “10.0” for the alarm trigger value.
3) Click the “Turn on the OSD Pro when alarm is triggered.” option.
4) Click the “Check here to automatically Switch to this Parameter’s OSD Pro page when alarm is triggered” option (assuming you have configured
more than one page)
5) Click the “Speak This Alarm” option.
6) Click the “Display Alarm Text” checkbox, and type “Battery Almost Dead!!” in the “Enter Alarm Text Here” area, as shown in Figure 6.
Then, while you are operating your vehicle, the OSD Pro display can be turned off with the on-screen menus or the Aux2 switch, and will turn itself back on,
display the voltage in reverse video, and speak “ <Beep> Pack Voltage 9.9 Volts” when a voltage less than 10 volts is detected.
NOTE: If two or more alarm conditions occur simultaneously, only the last occurring condition will be signaled. If the last condition to trigger an alarm
goes away, the next active alarm condition will be signaled, etc.
Figure 7
Copyright © 2009-2012 Eagle Tree Systems, LLC
http://www.eagletreesystems.com
Page 11

Page
11
Figure 7A
Configuring Graphics and other Items to Display
In addition to being able to configure your data parameters on each display page, you can also configure
which Graphics elements, such as the airspeed and altitude ladders, compass, etc., are displayed on each
page. To configure which pages have which graphics, just click the “Select Graphical Items for Page X”
button, as shown in Figure 7A. Then, you can check or uncheck items you want to display on the currently
selected page.
Programming GPS Waypoints
To program a waypoint, enter the latitude and longitude in the “GPS Waypoints” section of the setup screen.
The format of waypoints entered must be DDD MM SS.SS format. Then click “Next.” That waypoint is
then saved, and you can enter the location of the next waypoint. Also, once waypoints are defined, they can
be edited by selecting them with the Next button. The “Delete All Waypoints” button clears the waypoints
you have entered.
Note: See the Waypoints section of the manual above for more information on using Waypoints.
Configuring On-Screen Menu Parameters via the Windows Software
Click the “Configure On-Screen Menu Parameters” if you would prefer to use the Windows software to
adjust the settings normally adjusted with the on-screen menu. Note: the message “Must Run Wiz First” will
appear for items that require the Servo Analysis Wizard to be run before they are accessible. The Servo
Analysis Wizard cannot presently be run with the Windows software, and requires access to the radio stick
menus, as described below.
Saving and Loading Configuration
To save all of your OSD Pro’s configuration settings, click the “Save Configuration” button. Then, you can
later load the configuration again, by clicking “File, Load Configuration File” or clicking the “Load
Configureation” button in the OSD setup utility.. Note: Before installing a new software version, it’s a
good idea to save your OSD Pro configuration using the button shown in Figure 6 BEFORE installing the
new software version, and then loading the configuration again by clicking “File, Load Configuration File”
AFTER you have installed the new software version, and completed the OSD Pro firmware update if prompted to do so. You can also use this feature to set
up multiple OSD Pros with the same configuration, rather than configuring each one separately.
Factory Reset
The Factory Reset button erases ALL OSD configuration information, including any RTH customizations, etc.
Completing the Windows Setup
Once you have defined your desired parameters, alarms, and waypoints, click the OK button to download the settings to the OSD Pro. Note that the first
time you download settings after updating the Windows software, or whenever you switch between Male and Female voice, the download of the settings will
take much longer than normal (about 30-55 seconds). Normally, the download time is less than 10 seconds.
Powering up your OSD Pro
After connecting and configuring your OSD Pro as described above, you should see the main OSD
Pro screen on your video receiver, as shown in the Main Screen figure. Before the main screen
appears, the startup screen, as shown in Figure 8, should appear for about 3-5 seconds. Then, the
main screen (shown in Figure 7 also) should appear. If the startup screen remains for more than
this length of time, or no OSD information appears at all, please see the troubleshooting section.
NOTE: it’s important that you turn your transmitter on before powering up the OSD Pro, if
you plan on using advanced features such as RTH. The OSD Pro needs to receive signals
from your receiver during startup, or some features such as RTH may not work correctly.
If the signals are not received, the OSD Pro will put up the message “Aileron or Elevator
Undetected” during startup, indicating the receiver was not detected.
Figure 8
Configuring the OSD Pro with the On-Screen Menus
A powerful set of menus are provided with the OSD Pro, for configuration at home, in the field, or even in flight.
There are two ways to access the menus:
• Via the Windows software, by clicking on the “Configure On-Screen Parameters” button in the software. See “Configuring Parameters to
Display on the Video OSD” section of the manual above for how to do this
• Using your radio sticks as inputs.
Note that the “Wizards” required for setting up RTH and some other advanced features cannot presently be accessed via the Windows Software, and require
the radio stick method of accessing the menus.
To fully utilize all the advanced features of the OSD Pro, you’ll need to dedicate at least one channel of your RC receiver to the OSD Pro for on-screen menu
control, and other functions.
Copyright © 2009-2012 Eagle Tree Systems, LLC
http://www.eagletreesystems.com
Page 12

Page
12
Choosing the Radio Stick Input Method You Prefer
The OSD Pro has two receiver input channels (Aux1 and Aux2) for accessing on-screen menus, switching OSD pages, and for turning the OSD on or off in
flight. Only one receiver channel (Aux1) needs to be used exclusively for the OSD Pro.
Based on customer feedback, we have implemented different options for accessing the OSD Pro via your radio sticks. To invoke the menus and change
menu parameters via your radio sticks, you must first choose the receiver connection option you want to use. There are three ways to set up your OSD Pro’s
receiver inputs:
Option A (default): the Aux1 input connects to a dedicated switch on your radio, and the Aux2 input connects to either another dedicated switch (if you
have enough channels), or another channel that can be shared with the OSD Pro. If you have a function on your model that can be manipulated briefly with
only marginal effect on flight (perhaps camera pan or tilt, or rudder), that channel could potentially be shared with the OSD Pro’s Aux2 input.
Note that the OSD Pro will generally ignore the Aux2 channel input unless the Aux1 channel is manipulated to enter menu mode. So, Aux2 movement will
not affe ct the OSD Pro unless you manipulate the Aux1 channel first, to enter menu mode. This allows you to use a receiver channel for Aux2 that is
shared with another function on your model. The only exceptions are:
a) If you have defined multiple main screen pages. In this case, Aux2 will switch between the pages, when toggled outside of menu mode.
b) If you have set up the OSD Pro so that the Aux2 switch will turn on and off the display.
Option B: the Aux1 input connects to a dedicated 3 position switch on your radio, and Aux2 is unconnected. In this mode, all functions can be accessed
with a single receiver channel. In addition to only requiring one radio channel, this method lets you access all functions with a single switch, so you don’t
have to look at your radio to move your fingers between the two switches as is required with Option A and Option C. The only drawback to this method is
that it may take more practice to learn how to manipulate the menus using a single switch. Note that Option B leave the Aux2 channel free for gain control
with the Guardian Stabilization Expander.
Option C: the Aux1 input is connected to a 3 position switch, and Aux 2 is connected as described in Option A. In this mode, moving the 3 position switch
between down and middle position behaves the same as with Option A, and the Aux2 input is the same as in Option A. However, moving the 3 position
switch to the up position activates the Return to Home (RTH) test mode. The test mode activated is the same as setting the RTH test mode to "both" in the
menus, but is easier to access. RTH test mode will be active until the control surfaces are moved (RTH will release briefly when this happens), or until the
toggle switch is moved to mid or down position. Please see the “Safety Mode Overview” section for more information on RTH.
After you decide which option you want to use for accessing the menus, you’ll need to tell the OSD the option you’ll be using, via the Windows software.
This is done by changing the "Choose Menu Receiver Inputs" on-screen menu item under the "Radio Control Setup Menu”, by clicking on the “Configure
On-Screen Parameters” button in the software. See “Configuring Parameters to Display on the Video OSD” section of the manual above for additional
information on how to do this.
There are 4 choices for this menu item:
• “Aux1+Aux2”: select this setting for Option A
• “3Position”: select this setting for Option B
• “3Pos (RTH)”: select this setting for Option C
• “None”: select this setting if you will not be using radio stick inputs
The Radio Stick method of accessing menus and other features involves two types of actions: Up/Down, and Select. These two actions let you control the
OSD Pro fully via your radio sticks. Note: the descriptions below refer to moving switches “down” or “up.” Of course, depending on your radio’s
configuration, “up” may actually be “down” on your switches, and vice versa.
If you are using the Option A or Option C stick input method, the Up/Down action is invoked by clicking the Aux1 channel, and the Select action is invoked
by clicking the Aux2 channel.
If you chose the Option B input method, the Up/Down action is invoked by moving the 3 position between the down and middle positions, and the Select
action is invoked by moving the switch between the middle to up positions.
Invoking Menu Mode
Menu mode is entered with the Up/Down action (either clicking Aux1 for Options A or C, or clicking
the 3 position switch between the down and middle positions for Option B). After doing this, the main
menu should appear, as shown in Figure 9.
Once you are in menu mode, the Up/Down action is used to highlight the parameter to be changed.
The “>” menu cursor to the left of the menu items indicates which item is currently highlighted. As
you click the Up/Down switch, the cursor will advance to the next menu item. When you reach the last
item, the next click will take you to the top item.
To modify the highlighted menu item, clicking down on the Select channel invokes edit mode for that
item. Edit mode is indicated by an up or down arrow to the right of the highlighted item (the direction
arrow). Now, when you move the Up/Down switch up or down rapidly, the item’s value will be either
incremented or decremented, depending on whether the direction arrow is point up or down. This method of entry allows you to quickly increase or
decrease an item’s value, since each up and each down movement of the Up/Down switch will change the item.
Figure 9
Copyright © 2009-2012 Eagle Tree Systems, LLC
http://www.eagletreesystems.com
Page 13
Page
13
To change the direction arrow from up to down, move the Up/Down switch DOWN, and leave it down for more than one second. Then, the direction arrow
will point down, rapidly toggling the Up/Down switch will decrease the item’s value. Conversely, to point the direction arrow up, leave the Up/Down
switch in the UP position for more than one second.
To switch between the Up/Down action and the Select action using the Option B stick input method, just move the switch rapidly from the down position to
up position or from the up position to the down position, with no pause at the midpoint. With Option B, a menu item would be accessed and changed as
follows:
a) Invoke menu mode by clicking the 3 position switch between the down and middle positions
b) Highlight the menu item to be changed by continuing to click between the down and middle positions.
c) Once the menu item you want to change is highlighted, move the switch rapidly to the up position (without pausing in the middle position), which
will select the item.
d) Then, move the switch rapidly to the down position (without pausing at the middle position), which will enter edit mode.
e) Move the switch between the down and middle positions until the parameter is changed to the correct value
f) Move the switch rapidly to the up position to deselect the item.
Here is a link to a video that demonstrates accessing the menus using Option A stick input method. Note that in the video, the right switch is Up/Down,
and the left switch is Select. http://www.rcgroups.com/forums/showatt.php?attachmentid=3418040
Turning the OSD Pro On/Off and Switching Screen Pages with the Select Action
In addition to manipulating the menus, the radio sticks can be used to turn the OSD display on and off during flight, and to advance between multiple main
screen pages (if you defined more than one main screen page as described in the “Configuring Parameters to Display on the Video OSD” section of the
manual above).
If you want to turn the OSD Pro on and off with the switches, set the “On/Off Display with Select?” option to “Yes” in the Change Display Settings menu.
This menu is described in the menu section of the manual, below. Then, toggling the Select channel will turn the OSD Pro on and off.
To advance between multiple pages, just click the Select channel (for Option B, just toggle the 3 position switch between the up and middle positions).
Note that when the last page is reached, if the On/Off display feature is enabled, the display will then turn off.
Serial PPM Support
Serial PPM, also known as “serial pulse train” or “PPM Sum,” combines the position information for all servos onto one wire. Most “LRS” radios support
this mode, and some others do also. With serial PPM you should be able to remove up to 4 of the servo cables between your receiver and OSD Pro, since
only one male to male servo wire is required to interface the OSD Pro with your receiver.
Note: Serial PPM is an advanced feature. It is recommended
that you first get everything working with the standard receiver
hookup, before attempting serial PPM setup. Please ask for
help on the OSD Pro forum thread on RCGroups, described
above, if you are uncertain about whether you receiver supports
it, or if you have questions about how to hook it up and
configure it.
Also, note that Futaba “S-Bus” and similar proprietary serial
PPM designs are presently not supported. Please let us know if
you need this support!
To set up Serial PPM support, follow these steps:
1) Make sure you disconnect your motor or propeller!
2) It is highly recommended that you disconnect all servos from
the OSD Pro servo outputs, until Serial PPM configuration is
complete, since the pulses being sent to the servos will not be
correct before and during configuration.
3) Disconnect all the male to male servo cables between your OSD Pro and receiver, if presently connected. Then, connect one male to male cable between
the Aileron-in port on the OSD Pro, and your receiver's serial PPM output. The pinout on the OSD Pro is standard: top=signal, middle=V+, bottom=
ground.
4) Invoke the OSD setup page by clicking “Hardware, Choose Parameters to Display on Video OSD” in the Windows software. Then, enable the “Servo
Deflections” display as described in the “Configuring Graphics and other Items to Display” manual section above. The Servo Deflections display will help
to confirm that Serial PPM is configured correctly. Then, click “OK” on the OSD setup page.
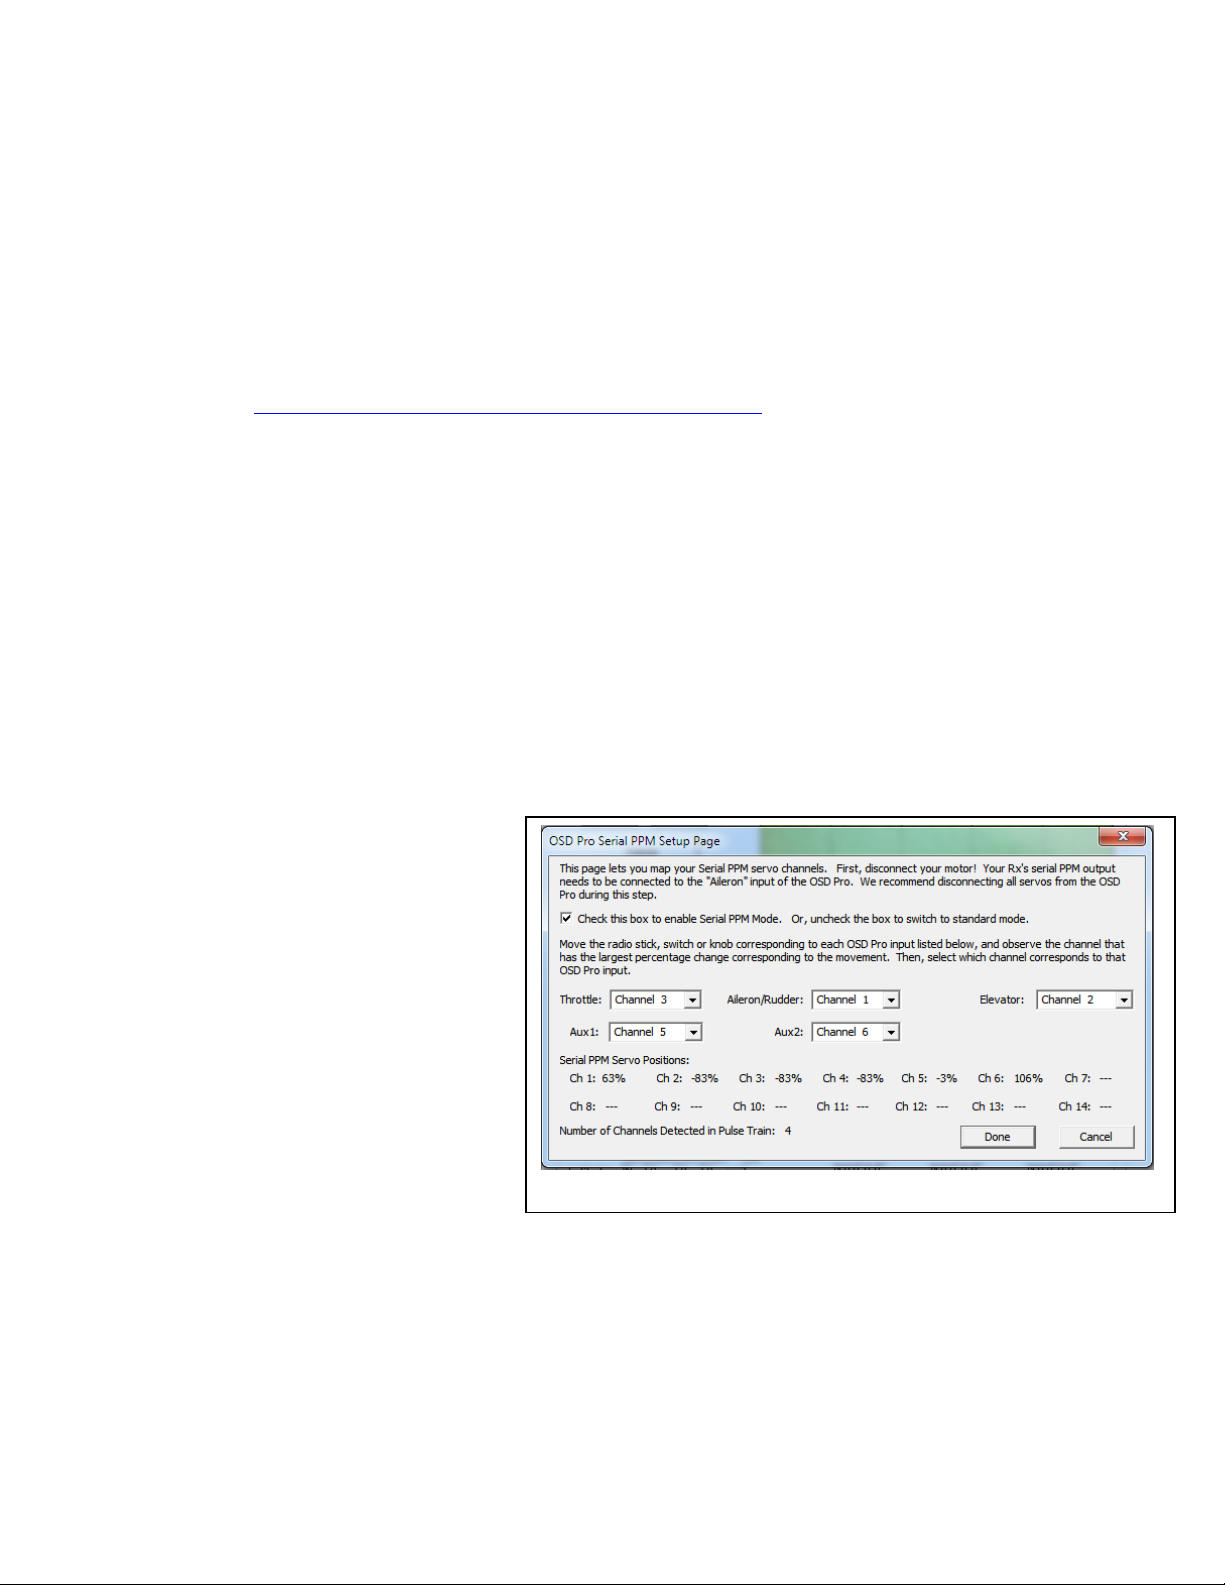
5) Invoke the OSD setup page again, and then click the "Serial PPM” button in the lower left-hand portion of the page. The page shown in Figure 10
should appear. This page has two main sections:
* Dropdown menus corresponding to each of the OSD Pro receiver inputs
Figure 10
Copyright © 2009-2012 Eagle Tree Systems, LLC
http://www.eagletreesystems.com
Page 14

Page
14
* A percentage display for each channel in the serial PPM stream detected by the OSD Pro.
6) Make sure your radio transmitter is turned on. Then, click the “Check this box to enable Serial PPM Mode” checkbox. Now, on the video screen (or
goggles), you should see the numbers corresponding to the "Ail" channel of the Servo Deflections display changing rapidly. If the number is not changing
rapidly, that means the serial PPM pulses from your Rx are not reaching the OSD - confirm that your radio transmitter is turned on, your receiver is powered,
and that the connections are correct.
7) Verify that the "Number of Channels Detected in Pulse Train” display at the bottom of the page correctly indicates the number of channels your receiver
supports. In other words, if you have an 8 channel receiver, the number displayed should be “8.”
8) Move the radio stick, switch, or knob corresponding to each of the OSD Pro inputs that you wish to configure, and determine which channel percentage
display changes the most with that movement. Then, select the channel that corresponds to the movement, for that input.
For example, if you move your radio’s throttle stick, and “Ch 3” shows lots of change in the percentage readout, that indicates that channel 3 of the serial
PPM stream controls the throttle. So, you would select “Channel 3” for the Throttle dropdown menu. Each OSD Pro input you plan to use needs to be
mapped to one of the serial PPM channels, using this method. NOTE: since moving a radio stick can cause slight movement of more than one channel,
make sure you select the channel that has the largest percentage change, during this step. NOTE: you can map the same channel to more than one input, if
your configuration requires it.
9) After you finish mapping all the OSD Pro inputs you intend to use, the servo deflections information on the video screen should show the correct
movements for each of the radio sticks you mapped, and stick menus should work as they did before you switched to serial PPM mode.
10) If everything works correctly, reconnect your servos. Be extremely cautious about reconnecting the motor, until you're convinced everything is working
reliably. It is highly recommended that you remove the propeller when first testing your motor with serial PPM.
11) Do thorough ground checks, making sure that all surfaces move correctly, and let the model sit for a while to make sure there are no glitches.
IMPORTANT: if you decide later to switch back to standard receiver connection mode, don’t forget to turn off Serial PPM mode on the page
shown in Figure 10, using the checkbox!
Copyright © 2009-2012 Eagle Tree Systems, LLC
http://www.eagletreesystems.com
Page 15

Page
15
Safety Mode/Return to Home Information
Please read this entire section, and understand the function and limitations of the modes, before enabling a safety mode!
Important Safety Mode Information
Please read the following information about RTH, before proceeding.
• Return To Home (RTH) is an advanced feature, and is used only at your own risk.
• WARNING: Since RTH may increase the throttle setting, YOUR MOTOR MAY START SUDDENLY WITH YOUR MODEL ON THE
BENCH, OR ON THE GROUND, WHEN RTH IS TRIGGERED! RTH attempts to avoid starting the motor in this situation, by examining the
speed and altitude of the model. But, if the GPS or other sensors are misreporting altitude and/or misreporting speed, RTH could still start the
motor on the ground. ALWAYS ASSUME THAT THE MOTOR MAY START AT ANY TIME, WHEN RTH MODE IS ENABLED!
• It’s important that you turn your transmitter on before powering up the OSD Pro, if you plan on using advanced features such as RTH. The OSD
Pro needs to receive signals from your receiver during startup, or some features such as RTH may not work correctly. If the signals are not
received, the OSD Pro will put up the message “Aileron or Elevator Undetected” during startup, indicating the receiver was not detected.
• It is strongly recommended that you set the “Capture Rate” of your eLogger or Recorder to 10 samples/second, since this setting controls the rate at
which the OSD Pro receives information from the eLogger/Recorder. The more data received by the RTH feature, the better.
• RTH is a safety feature of last resort, should you lose radio contact with your model. Never rely on the RTH function to fly or navigate your
model. Never fly out of the manufacturer’s recommended range, or fly outside VLOS (Visual Line of Sight).
• When enabled, Safety Mode will activate based on the How the OSD Pro Determines when Safety Mode should be Invoked section below. Read
this section carefully!
• RTH will work best with stable, self correcting airplanes and will not work reliably with flying wings or aerobatic planes, unless you are using a
stabilization system.
• RTH will not work with traditional helicopters.
• Never intentionally turn off your radio to test RTH in the air. There is a chance that your receiver will not link back up with your radio, especially
with 2.4GHz radios, which could result in a crash. Always use one of the RTH test methods described in the manual for testing RTH.
• RTH will NOT engage if the GPS signal quality is not adequate. Failsafe Safety mode will engage instead. RTH will program your throttle to the
setting you entered for “Motor Off” during the Servo Analysis Wizard in this situation
• RTH throttle control will not engage if your altitude is less than 60 feet/20 meters above ground level, or if your speed is less than 3 MPH or 3K/H
(note that the low altitude check can be disabled via the menus, as described below).
• If you routinely fly near to the maximum range of your receiver, and have periodic link dropouts from which you are able to recover after sluggish
model performance, Safety Mode may engage when you don’t want it to. Safety mode is not intended to be used if you routinely fly beyond the
maximum range of your receiver.
• It is strongly recommended that RTH mode not be used by inexperienced pilots, until they are comfortable with all aspects of flying.
Description of the Safety Modes
There are two safety modes:
Return to Home Mode
Return to Home (RTH) attempts to recover your model if you lose radio contact, by returning the model to the home location. Both traditional fixed wing
models, and elevon or vtail models, such as flying wings, are supported.
The RTH uses enhanced implementations of Proportional, Integral, Derivative (PID) controllers to adjust the model’s altitude and direction. Specifically, a
PID controller is used for turning, and a PD controller is used for climbing. More information on PID controllers is available here:
http://en.wikipedia.org/wiki/PID_controller .
Several parameters of the RTH PID controller are adjustable, for tuning RTH to your model. Each parameter is described on the “Safety Mode Menu” page
in the “Description of On-screen Menus” section of the manual below. Note that the default settings for tuning RTH work adequately with many models, so
you may not need to change them during the testing process.
The PID controllers use GPS course, speed, altitude and other information to attempt to return the model to home. Use of a stabilization system can greatly
improve RTH function, especially in models that are not inherently stable.
An advanced feature of RTH gives you the ability to specify two RTH altitudes, and a distance radius for switching between the two altitudes.
Failsafe Mode
In Failsafe Mode, the OSD Pro returns the servos to a pre-determined failsafe position if radio contact is lost. If your Receiver supports multiple
programmable failsafes, the OSD’s Failsafe Safety Mode is probably not useful to you. If you have a receiver that does not have failsafe capability, and
does not hold the servos at the last position (your servos move randomly if radio signal is lost), or a radio with only 1 programmable failsafe, then the
Failsafe safety mode can be used to set a failsafe on all three of your control surfaces, in the event of radio signal loss. The failsafe servo positions are
chosen during the Servo Analysis Wizard, described earlier in this document. The “Level Flight” aileron/rudder and elevator settings you indicated, and the
“Motor Off” throttle setting you indicated during the wizard are recorded for use as the Failsafe Mode failsafe settings.
How the OSD Pro Determines when Safety Mode should be Invoked
Copyright © 2009-2012 Eagle Tree Systems, LLC
http://www.eagletreesystems.com
Page 16

Page
16
The OSD Pro constantly monitors your receiver to determine if the selected Safety Mode should be invoked. The things that trigger Safety Mode vary
between receiver types.
For receivers which do not hold the servos at the last position or failsafe position when signal is lost (the servos either go limp or move randomly when the
Transmitter is turned off), the OSD Pro looks for bad pulses (pulses of the wrong duration), or the absence of pulses. If enough bad or missing pulses are
evident in a short period, Safety Mode is invoked, until the error rate decreases to a good level.
Setting up and Testing RTH
The following sections describe how to set up RTH with your particular radio gear and model type. Note that, regardless of the type of gear you have, it is
likely others have already set up RTH with the exact same equipment. Many OSD Pro users have described their RTH setup on this thread:
http://www.rcgroups.com/forums/showthread.php?t=924018
If anything is confusing or not working as you would expect, this thread is a good place to start for help.
Setting up RTH with Receivers that Support a Throttle Failsafe (Recommended for Electric Models)
For receivers that let you program a throttle failsafe (nearly all modern receivers) the most straightforward way to set up RTH is as follows:
a) Program your radio’s throttle failsafe as described in the paragraph below.
b) Set the “Choose Model Wing Type” to either “Standard” or “Elevon” in the Configure Radio Control menu.
c) Set the “Choose Receiver Type” to “PCM/FS” in the same menu
d) Set “Number Failsafe Chans on RX” to “1 FS Chns” in the same menu.
e) Set the “Select Desired Safety Mode” menu item in the Safety Mode menu to “Rtrn Home”
f) Read the additional information below, and then follow the remaining steps in the “RTH Testing/Adjustment Procedures” section below.
When using the settings above, RTH will be invoked whenever your throttle is detected by the OSD Pro to be in the failsafe position for more than a second
or two.
To prevent RTH from activating erroneously during normal flight, make sure your receiver’s throttle failsafe is programmed so that the failsafe position is
not encountered in normal flight. One way to do this is to temporarily set your receiver’s throttle channel for “extended servo travel” or (preferably) use
your throttle trim to move the throttle farther to the off position than normal, and then program your throttle failsafe to that position. Then, return your
receiver to normal throttle servo travel (or trim the throttle off position up), after programming the throttle failsafe to the extreme off position. Now, the
failsafe position of the throttle will still turn the motor off, but the failsafe position cannot be reached if you move your throttle stick to the off position during
normal flight, unless you trim down on the throttle trim. Note: for non-electric models, this method would not be a good idea, since the off failsafe position
of your throttle will shut the engine off, which will make RTH much less useful.
An added benefit of using the throttle trim to set the failsafe position is that you can test RTH in-flight by trimming the throttle to extreme off position using
your throttle trim button. Since this will put the throttle in the failsafe position previously programmed, RTH will activate. Then, RTH can be deactivated
simply by trimming your throttle up again.
Note: The failsafe positions used by your receiver are detected during the Servo Analysis Wizard, so you will need to program your receiver’s throttle
failsafe position before running the Servo Analysis Wizard. You must rerun the Servo Analysis Wizard after any reprogramming of your radio’s failsafe
positions!
Setting up RTH with Receivers that Support Three or More Failsafe Channels
In most cases, using the “Setting up RTH with Receivers that Support a Throttle Failsafe” method described above is the best choice for receivers that
support failsafes. However, for receivers with 3+ failsafes, Safety Mode is invoked whenever all three receiver channels (throttle, aileron/rudder, elevator)
reach the failsafe position for more than a brief period, when you set the Set “Number Failsafe Chans on RX” to “3+ FS Chns” in the Configure Radio
Control menu.
Note: The failsafe positions used by your receiver are detected during the Servo Analysis Wizard, so you will need to program your receiver’s throttle
failsafe position before running the Servo Analysis Wizard. You must rerun the Servo Analysis Wizard after any reprogramming of your radio’s failsafe
positions!
Setting up RTH with “PPM” Receivers that Don’t Control the Servos When Radio Reception is Lost
If your receiver stops controlling the servos if you turn off your radio (the servos no longer are held in one position, and/or start moving randomly), you will
need to configure RTH as follows:
a) Set the “Choose Model Control Type” to either “Standard” or “Elevon” in the Configure Radio Control menu.
b) Set the “Choose Receiver Type” to “PPM/ No FS” in the same menu. Note: Since “PCM” receivers should never have bad or missing pulses, RTH will
never activate if “PPM/ No FS” mode is selected with a PCM receiver!
c) Set “Number Failsafe Chans on RX” to “No FS Chs” in the same menu
d) Set the “Select Desired Safety Mode” menu item in the Safety Mode menu to “Rtrn Home”
e) Read the additional information below, and then follow the remaining steps in the “RTH Testing/Adjustment Procedures” section below
When set up in this mode, the OSD Pro looks for bad pulses (pulses of the wrong duration), or the absence of pulses. If enough bad or missing pulses are
evident in a short period, Safety Mode is invoked, until the error rate decreases to a good level.
Setting up RTH with Models with Receivers that maintain the last Servo Position, but Don’t Support Programmable Failsafes
Copyright © 2009-2012 Eagle Tree Systems, LLC
http://www.eagletreesystems.com
Page 17

Page
17
For receivers which do maintain the last position of the servos when signal is lost, but with no failsafe positions programmed, Safety Mode is activated when
no servos move for a few seconds. This setup is not ideal, since Safety Mode will turn on if you don’t move your transmitter sticks for a few seconds,
even if your radio link is good!
For this type of radio, you would choose the following settings:
a) Set the “Choose Model Control Type” to either “Standard” or “Elevon” in the Configure Radio Control menu.
b) Set the “Choose Receiver Type” to “PCM/FS” in the same menu.
c) Set “Number Failsafe Chans on RX” to “No FS Chs” in the same menu
d) Set the “Select Desired Safety Mode” menu item in the Safety Mode menu to “Rtrn Home”
e) Read the additional information below, and then follow the remaining steps in the “RTH Testing/Adjustment Procedures” section below
Setting up RTH with Models that have more than Three Flight Controls, and the Receiver does not support Failsafes
If your receiver does not support failsafes, and your model has four or more flight controls (for example, Aileron, Elevator, Rudder, Throttle), additional
steps may be needed to use the the Safety Mode features. Since the OSD Pro will take control of only three of the control surfaces, the fourth control will
be left connected directly to your receiver. If the receiver loses signal, and does not support failsafe, the fourth control could move randomly or remain in its
last position. For example, if your plane has rudder, aileron, elevator and throttle, and you connect rudder, elevator and throttle to the OSD Pro, the aileron
channel, which is connected directly to the receiver, could move randomly if the receiver loses signal and doesn’t support failsafe. A possible solution to
this problem is to purchase a “servo fail safe unit” which is connected between the fourth receiver channel, and the fourth servo, which will provide failsafe
operation if the receiver loses signal. Or, consider upgrading to a failsafe capable radio.
Using the Return to Home with Stabilization Systems
RTH works best when used with the Eagle Tree Guardian Stabilization Expander.
RTH can also be improved significantly if a 3rd party stabilization system, such as the FMATM Co-pilotTM, is utilized. The stabilization system’s servo inputs
would normally be connected to the servo outputs of the OSD Pro. Then, the servos themselves are directly connected to the stabilization system’s output.
Special information about the FMATM Co-pilotTM CPD4
If you are using the FMATM Co-pilotTM CPD4
TM
, there are two problems you may encounter. The first problem is that the CPD4
cannot handle receiving two or more servo pulses simultaneously. Futaba
use a “servo buffer” (which they sell) to slightly delay one of the incoming pulses.
The OSD Pro sends the servo pulses simultaneously by default (just as Futaba
buffer” hardware is installed on one of the servo connections. If you set the FMA co-pilot w/o servo buffer parameter in the Artificial Horizon
Configuration menu to “Yes”, it causes the OSD Pro to skew the servo pulses in RTH mode. Unfortunately, this causes the voice announcements to
automatically be turned off during RTH mode (including the “signal lost!” announcement that would normally occur when RTH mode is invoked). That’s
the only drawback of setting this option to “Yes.” Note that it is believed that the latest FMATM Co-pilot IITM product does not have this shortcoming.
Secondly, another potential problem can occur with the CPD-4 Co-pilot
channel to remotely set the gain, and your receiver loses the signal, one of three things might happen:
a) If your radio doesn’t send any pulses at all when it loses receiver signal, what happens with the Co-pilot
without the OSD Pro connected.
b) If your radio is PCM and has failsafes, but you have not set the failsafe of the spare channel to something reasonable for the Co-pilot
is no failsafe setting available on that channel), stabilization will again be in an unknown state. Again, this is true with or without the OSD Pro
connected.
c) Even if you have set the failsafe for the spare channel to a reasonable value for the Co-pilot
receiver to the copilot are not synchronized with the pulses from the OSD Pro to the Co-pilot
glitch (moving the servos wildly) whenever the servo gain pulse momentarily overlaps with one of the RTH pulses. Again, this is due to the
perceived shortcoming of the CPD4
TM
in receiving two or more servo pulses simultaneously. If, during testing of RTH mode, you observe servo
excursions a few seconds apart, use the manual gain setting for your Co-pilot
Running the Servo Analysis Wizard
Part of setting up RTH is running the Servo Analysis Wizard. This wizard can be run either on your PC or laptop with the Windows software, or from the
stick menus. Generally, the Windows software version is quicker and easier, but the stick menu method can be used at the field, without a computer. They
both work approximately the same way.
During the wizard, you will be asked to move your radio sticks, and turn your transmitter on and off. Before running the wizard, ensure your model’s
motor is disconnected or otherwise disabled. WARNING: only run the Servo Analysis Wizard when your model is on the ground! NOTE: loading a
previously saved configuration file will overwrite wizard settings with their previous state.
Running the Servo Analysis Wizard from the Windows Software
To run the Windows software version of the Wizard, with your OSD Pro
connected to USB, first click “Hardware, Choose Parameters to Display on
Video OSD” to invoke the OSD Pro setup page. Then, click the button in
the lower right-hand corner labeled “Run Servo Analysis Wizard.” Then,
the wizard page shown in figure 11 should appear.
TM
TM
PCM receivers send simultaneous servo pulses, and FMATM requires that you
TM
PCM receivers do), which might confuse the Copilot unless the “servo
TM
, if you use a spare receiver channel to control its gain. If you use a spare servo
TM
is unknown. This is true with or
TM
, a problem can still occur, since the pulses from the
TM
, during RTH mode. The copilot can occasionally
TM
.
TM
computer apparently
TM
(or if there
Copyright © 2009-2012 Eagle Tree Systems, LLC
http://www.eagletreesystems.com
Figure 11
Page 18

Page
18
This page shows the present deflections of your servos, and displays the present step that needs to be followed.
If you make a mistake during the wizard, just hit the back button, and perform that step again.
Below is information on the steps displayed in the wizard, and what to do during each step:
• Disconnect your Model’s Motor, turn on your radio transmitter and receiver, and click Next: Ensure that you have disconnected your motor or
propellor, and click Next.
• Set your Throttle, Aileron/Rudder and Elevator sticks for level flight, and click Next: Set your aileron/rudder, elevator, and throttle stick
positions where you typically set them for level flight, and hold them there until the next screen appears. Note that if you are using Failsafe Safety
Mode, the aileron/rudder and elevator positions you choose in this step become the positions the OSD Pro will use for failsafe mode.
• Turn your radio transmitter OFF, and click Next: Turn your transmitter off, and click Next. Note that your stick positions do not matter to the
OSD at this point.
• Turn your radio transmitter back ON, wait for your receiver to bind, and click Next: Turn your transmitter back on, and once your receiver has
bound, click Next. Note that your stick positions do not matter to the OSD at this point.
• Move your Aileron/Rudder stick LEFT, and click Next: Now move your Rudder or Aileron stick to the left, and while holding it in the correct
position, click Next. How much you move the Aileron (or rudder) stick during this menu item depends on whether you are using the Guardian
Stabilization Expander. If you are using the Guardian, move the stick all the way to the left (see Guardian manual for more information). If you are
not using Guardian, the following information applies:
Move your Rudder/Aileron stick to the position you use for making a normal left turn. Don’t give more left stick than you would do normally
during flight! The OSD Pro’s RTH function will never exceed the rudder/aileron left turn stick position you set here, or the corresponding right
turn position, when it attempts to steer the model. So, the amount of left stick you supply will set the maximum throw of the aileron/rudder during
RTH. NOTE: during this step, the OSD Pro also examines the elevator position. If your radio is programmed for elevator aileron mixing, it will
be detected during this step, and a proportional amount of up elevator will be applied during RTH turns. If your radio does not do this mixing,
but you desire RTH to provide up elevator when turning, move your elevator stick to the desired amount of climb (corresponding to full
Aileron/rudder stick left) during this step.
• Move your Elevator stick back (for a climb) and click Next: During this menu step, after releasing the Aileron stick, move your elevator stick
downwardly, and while holding it in the correct position, click Next. How much you move the Elevator stick during this menu item depends on
whether you are using the Guardian Stabilization Expander. If you are using the Guardian, move the stick all the way down (see Guardian manual for
more information). If you are not using Guardian, the following information applies:
Move the Elevator stick downwardly, to the position you would use for normal climb. Don’t give more down stick (climb) than you would do
normally during flight! Note that this step results in up-elevator. The OSD Pro’s RTH function will never exceed this elevator up position, or
the corresponding elevator down position, when it attempts to climb or descend the model. So, the amount of down stick you supply will set the
maximum throw of the elevator during RTH.
• Set your Throttle stick for Descending (normally motor off) and click Next: During this menu step, after releasing the Elevator stick, set the
Throttle stick to the position which turns off the motor, and click Next. Note that if you are using Failsafe Safety Mode, the throttle position you
choose in this step becomes the position the OSD Pro will use for the throttle when in failsafe mode. IMPORTANT: note that if RTH is invoked, and
the GPS signal is not adequate, the OSD Pro will set your throttle to this position. Therefore, if your model is on the ground, and you turn off
your transmitter or test RTH, your throttle could be put in the Motor Off position. If full motor off is not chosen for the Motor Off position,
your motor will start!
• Set your Throttle stick for Climbing, and click Next: Set the Throttle stick to the position you would normally use for climbing the model, and click
Next.
• The Wizard is complete! Please click Finish to finalize the new settings: This is the last page of the wizard. Click the Finish button, which will
return you to the OSD Pro setup screen. Then, click OK on the OSD Pro setup screen to save the settings.
Running the Servo Analysis Wizard from the Stick Menus
is invoked from the “Configure Radio Control” on-screen menu, as described in the “Description of On-screen Menus” section below. The main purpose of
running the wizard is to train the OSD Pro about the direction and range of movement of your control sticks, and to train the OSD Pro about what happens to
your receiver when you turn off your radio.
Each screen of the wizard requiring you to make an adjustment to your radio is timed, and remains on the screen for approximately 10 seconds. Ensure that
you have completed the adjustment before the timer counts to 0, and make sure that you hold the adjustment until the next screen appears. If you make a
mistake during the wizard, just run it again later. Here are the steps of the wizard:
• Read Manual/Click SELECT: Ensure that you have read the manual, and then click the Select switch.
• DISCONNECT MOTOR / Click SELECT: Ensure that you have disconnected your motor, and click the Select switch.
• Set Sticks for level flight: Set your aileron/rudder, elevator, and throttle stick positions where you typically set them for level flight, and hold them
there until the next screen appears. Note that if you are using Failsafe Safety Mode, the aileron/rudder and elevator positions you choose in this step
become the positions the OSD Pro will use for failsafe mode.
• Turn Transmitter off now: Turn your transmitter off, and leave it off until the next screen appears. Note that your stick positions do not matter to
the OSD at this point.
• Turn Transmitter back on now: Turn your transmitter back on. Note that your stick positions do not matter to the OSD at this point.
• Mov Rudder/Aileron Stick Left: Now move your Rudder or Aileron stick to the left. How much you move the Aileron (or rudder) stick during this
menu item depends on whether you are using the Guardian. If you are using the Guardian, move the stick all the way to the left (see Guardian manual
for more information). If you are not using Guardian, the following information applies:
Copyright © 2009-2012 Eagle Tree Systems, LLC
http://www.eagletreesystems.com
Page 19

Page
19
Move your Rudder/Aileron stick to the position you use for making a normal left turn. Don’t give more left stick than you would do normally
during flight! The OSD Pro’s RTH function will never exceed the rudder/aileron left turn stick position you set here, or the corresponding right
turn position, when it attempts to steer the model. So, the amount of left stick you supply will set the maximum throw of the aileron/rudder during
RTH. NOTE: during this step, the OSD Pro also examines the elevator position. If your radio is programmed for elevator aileron mixing, it will
be detected during this step, and a proportional amount of up elevator will be applied during RTH turns. If your radio does not do this mixing,
but you desire RTH to provide up elevator when turning, move your elevator stick to the desired amount of climb (corresponding to full
Aileron/rudder stick left) during this step.
• Mov Elev TX STICK Down(Climb): During this menu step, after releasing the Aileron stick, move your elevator stick downwardly. How much you
move the Elevator stick during this menu item depends on whether you are using the Guardian. If you are using the Guardian, move the stick all the
way down (see Guardian manual for more information). If you are not using Guardian, the following information applies:
Move the Elevator stick downwardly, to the position you would use for normal climb. Don’t give more down stick (climb) than you would do
normally during flight! Note that this step results in up-elevator. The OSD Pro’s RTH function will never exceed this elevator up position, or
the corresponding elevator down position, when it attempts to climb or descend the model. So, the amount of down stick you supply will set the
maximum throw of the elevator during RTH.
• Set Throttle for Motor Off: During this menu step, after releasing the Elevator stick, set the Throttle stick to the position which turns off the motor.
Note that if you are using Failsafe Safety Mode, the throttle position you choose in this step becomes the position the OSD Pro will use for the throttle
when in failsafe mode. IMPORTANT: note that if RTH is invoked, and the GPS signal is not adequate, the OSD Pro will set your throttle to this
position. Therefore, if your model is on the ground, and you turn off your transmitter or test RTH, your throttle could be put in the Motor
Off position. If full motor off is not chosen for the Motor Off position, your motor will start!
• Set Throttle for Climbing: Set the Throttle stick to the position you would normally use for climbing the model.
• Wizard complete. Click SELECT: This is the last page of the wizard. Click the Aux2/Select switch to return to the Safety Configuration Menu
Engaging RTH for Testing During Flight
There are 3 methods for engaging RTH during flight for purposes of testing:
a) Setting the “Test Return to Home” on-screen menu item, on the Main Menu. The options for this menu item are:
a. “None” (RTH test mode not enabled)
b. “Altitude” (only the throttle and elevator are controlled by RTH)
c. “Heading” (only the ailerons or rudder are controlled by RTH)
d. “Both” (all surfaces controlled by RTH in this test mode)
Using the menu option to test RTH lets you test each subfunction separately, but requires you to be able to access the menus during flight, which
requires confidence and good piloting skills. Also, when using the test mode, moving the sticks disengages RTH temporarily - this can make testing
easier.
b) Recommended: If you have set up your electric model’s throttle failsafe as described in the “Setting up RTH with Receivers that Support a
Throttle Failsafe” section above, you should be able to engage RTH during flight by throttling off, and then reducing your throttle trim until RTH
engages (when the throttle position reaches the failsafe position you programmed for throttle). Note that this method activates true RTH (not RTH
test mode). You’ll need to trim the throttle up to exit RTH mode when using this method.
c)
If you set up the Option C radio stick input method as described in the “Choosing the Radio Stick Input Method You Prefer” section of the manual
above, moving the 3 position switch to the “up” position will trigger RTH test mode “Both.”
IMPORTANT: Never turn off your radio to test RTH in the air. There is a chance that your receiver will not link back up with your radio,
especially with spread spectrum radios, which could result in a crash. Always use one of the RTH test methods described in the manual for testing
RTH.
RTH Testing/Adjustment Procedures
Below are guidelines for adjusting the Return to Home feature to your plane.
a) Initial setup and testing of RTH using the simulator (model on the bench with motor disconnected)
NOTE: Since you will not be able to see the throttle movements on electric models, consider temporarily replacing the ESC throttle input with a servo,
plugged into your receiver’s throttle output, and observe the movement of the servo as you move the throttle. A “Y” cable might be needed if the ESC
powers your receiver via the throttle connection.
1) Configure the Radio Control and RTH menu settings and run the Servo Analysis Wizard, as described above.
2) Display servo deflection information, by turning on the “Display Servo Deflections” display item, as described above. This will display the
movement of the servos, relative to the “zero” points established for level flight during the Wizard. These values are displayed both in normal
mode, and safety mode.
3) Now, turn off your transmitter (with your motor disconnected!). RTH should engage, and the “RTH Engaged” message should appear on the
video screen. If it does not appear, check the settings you entered for your radio type, etc. Warning: never turn off your transmitter while
your model is flying!
4) Turn on your transmitter. RTH should disengage (the RTH message should disappear form the screen). If RTH does not disengage, check your
settings again.
5) Invoke the Flight Simulator from the Main Menu, choosing one of the flight simulator profiles that is most similar to your plane. Note: if you
have a model that uses elevon or vtail mixing, and you are NOT using unmixed inputs with the Guardian, choose “Funjet.” The message
“Flight Simulator Active” should appear in the upper part of the screen.
6) Now, the plane icon should move around the screen, and the displayed speed and altitude should vary, based on the rudder/aileron, throttle and
elevator transmitter settings. If the plane icon is not correctly turning, climbing, or changing speed based on your transmitter inputs, something
Copyright © 2009-2012 Eagle Tree Systems, LLC
http://www.eagletreesystems.com
Page 20

Page
20
has gone wrong. Please run the Servo Analysis Wizard again, paying close attention to the on-screen prompts, or see the troubleshooting section if
the problem persists.
7) Select the “Test Return to Home” option in the Main Menu, and set it to “Both”. Then, exit the menus.
8) A few seconds after exiting the menus, the message “RTH Engaged: move sticks to stop test” should appear in the upper part of the screen,
assuming you are not moving your transmitter sticks. This indicates that test mode is active. If this message does not appear, see the
troubleshooting section.
9) NOTE: RTH will not manipulate the throttle unless your altitude is above about 60 feet (20 m). This is true even when using the simulator. Make
sure that your altitude is reading 60 feet or higher before performing these tests, or throttle control will be disabled.
10) When you move your transmitter sticks, the message should change to “RTH Engaged: Release sticks for test.” This indicates that the test has
been temporarily suspended, returning control of the model to you.
11) Ensure that all your model’s control surfaces move correctly with your stick movements.
12) Fly the plane icon away from home, so that it is a considerable distance (more than a few feet or meters) from home in the simulator, and pointing
approximately 180 degrees away from home.
13) When you don’t move your sticks for a second or two, and RTH test mode activates, the plane icon should begin to turn toward home. Observe
your model’s rudder or aileron to ensure that it is deflecting in the correct direction, based on the direction the plane icon is turning on the screen.
If the surface is moving IN THE WRONG DIRECTION, rerun the Servo Analysis Wizard, and pay close attention to the instructions.
14) Repeat the above tests, starting at step 12, but choose headings that are different than 180 degrees, to ensure that the rudder or ailerons turn in the
correct direction, for both left turn and right turn.
15) Move your transmitter’s throttle and elevator sticks to reduce the plane icon’s altitude to well below the Cruise Altitude Window, but above about
60 feet (20 meters). Then, release the sticks. After the message “RTH Engaged: move sticks to stop test” appears, you should see an increase in
altitude, until the altitude reaches the Cruise Altitude Window. On your model, you should see correct movement of the elevator (up deflection. If
the elevator is moving IN THE WRONG DIRECTION, rerun the Servo Analysis Wizard, and pay close attention to the instructions. NOTE:
RTH will not manipulate the throttle unless your altitude is above about 60 feet (20 m). This is true even when using the simulator. Make sure
that your altitude is reading 60 feet or higher before performing these tests, or throttle control will be disabled.
16) If you have connected a servo to your receiver’s throttle output as suggested above, move your transmitter’s throttle and elevator sticks to reduce
the plane icon’s altitude to well below the Cruise Altitude Window, but above about 60 feet (20 meters), AND make sure your throttle setting
results in the simulator showing a speed that is less than the speed you selected for Max Cruise Speed (VNE) in the Safety Mode menu (unless you
selected “0” for maximum cruise speed). Then, release the sticks and observe the throttle servo when RTH mode engages. The servo should
increase to the setting you chose for “Throttle Climb” when you ran the Servo Analysis Wizard, and should move in the same direction it moved
when you manually increased the throttle stick on your transmitter. If the servo does not move in this direction, or does not move at all, rerun the
Servo Analysis Wizard, and pay close attention to the instructions. You should also see the throttle servo deflection display (“Thr”) increase to
above 0 during this test.
17) Move your transmitter’s throttle and elevator sticks to increase the plane icon’s altitude to well above the Cruise Altitude Window. Then, release
the sticks. Once RTH mode engages, you should begin to see a decrease in altitude, until the altitude reaches the Cruise Altitude Window.
18) If you have connected a servo to your receiver’s throttle output as suggested above, observe the throttle servo at this time. The servo should
quickly decrease to the setting you chose for “Motor Off” when you ran the Servo Analysis Wizard, and should move in the same direction it
moved when you manually decreased the throttle stick on your transmitter. If the servo does not move in this direction, rerun the Servo Analysis
Wizard, and pay close attention to the instructions. You should also see the throttle servo deflection display (“Thr”) decrease to a negative number
during this test.
19) Disable the Flight Simulator from the Main Menu
b) Testing and Adjusting RTH while Flying
Important: NEVER fly with the Flight Simulator Enabled, and NEVER take off or land with the “Test Return to Home” mode enabled! The
settings adjustments described below should be done after landing, unless your piloting skill is sufficient to allow you to adjust them while flying.
Note: if you follow the steps below, and still have trouble with RTH, we recommend you post your issue to the OSD Pro online forum, as described in
the “Have Questions or Feedback” section above. The community can provide you with tips and suggestions for settings with your particular model.
1) Complete the step a) above.
2) Configure the OSD Pro to display Altitudes, Speeds, GPS Satellites, Course, Home Arrow, Compass, and GPS HDOP, at a minimum.
3) It is also recommended that “Servo Deflections” be displayed, for later troubleshooting of any RTH issues, assuming you are recording video.
4) On a calm day, complete your model’s range check, ensure you have good GPS signal, and then fly your model.
5) When it is safe to do so, engage RTH during flight using one of the methods in the “Engaging RTH for Testing During Flight” section above. Note
that if you use the menu method of engaging RTH, select the “Altitude” option or “Both” option.
6) If you are using the menu method or the 3 position switch method of activating RTH test mode, make sure you still have full control of your model
– RTH test mode should disengage briefly when your move your sticks. If it is not disengaging, turn off RTH test mode. If you have full control
of your model, exit the menus, and fly your model so that it is flying toward Home, at ABOVE the Cruise Altitude Window (but below the legal
altitude limit).
7) When safe to do so, release your sticks, but BE PREPARED TO TAKE IMMEDIATE CONTROL OF THE MODEL. The message “RTH
Engaged: move sticks to stop test” should appear on the screen (if using one of the test modes), and the model should decrease throttle, so that the
model returns to cruise altitude. If the model does not decrease altitude, turn off “Test Return to Home” mode if invoked, land, and make sure you
have completed step a) above correctly.
8) Again, fly your model so that it is flying toward home, and if it is safe to do so, decrease the model’s altitude to below the Cruise Altitude Window.
9) When safe to do so, engage RTH. The model should increase throttle up to the “Climb” throttle setting you selected in the Servo Analysis Wizard,
and should apply up elevator, so that the model returns to cruise altitude.
Copyright © 2009-2012 Eagle Tree Systems, LLC
http://www.eagletreesystems.com
Page 21

Page
21
10) If the model climbs too slowly, pitch adjustment may be needed, and/or, the “Climb” position you selected for throttle during the Servo Analysis
Wizard may need to be increased. If you are using the Guardian stabilizer, increase the “Max Stab Pitch RTH” parameter in the Guardian menu
(see the Guardian manual for more information). Additionally, or if you are not using the Guardian, increase the Pitch Proportional Gain.
Likewise, if the model climbs too rapidly, decrease the appropriate parameter, or reduce the “Climb” throttle position with the Wizard.
11) Once the model climbs at a reasonable rate, determine if it overshoots the climb (porpoises) when the model reaches cruise altitude. If it does,
increase the Pitch Derivative Gain parameter.
12) Fly your model so that it is flying away from Home, at approximately the selected cruise altitude level and below your maximum cruising speed
setting.
13) Activate RTH as described above. If you are using the menu method of engaging RTH, select the “Heading” or “Both” option. The model should
turn toward home.
14) If the model turns too slowly, turn/roll gain may need to be increased. If you are using the Guardian stabilizer, increase the “Max Stab Roll RTH”
parameter in the Guardian menu (see the Guardian manual for more information). If you are not using the Guardian, increase the Turn
Proportional Gain under the Safety Mode menu. If you find that a very large adjustments of the Gain setting is required, you may also need to
increase the Turn Proportional Limit value.
15) Likewise if the model turns too quickly, decreases the gains. If even low values turn/roll gain values move the ailerons or rudder too much, you
may need to decrease the Turn Proportional Limit parameter.
16) If the model turns at a reasonable rate, but overshoots the turn when the model reaches the home direction, increase the Turn Derivative Gain
parameter, until the model stops turning when pointing to home.
17) Fly your model so that it is flying directly away from home (near 180 degrees from home) which will result in a maximum turn. Then, observe the
model’s turn. If the model turns at a reasonable rate initially, but begins to turn too rapidly before reaching the home heading, decrease the
Integral Gain parameter. If the model still begins to turn too rapidly even with very low Integral Gain, decrease the turn/roll Gain setting and try
again.
18) If the model doesn’t seem to increase its turn rate much, even after turning almost 180 degrees, increase the Turn Integral Gain Parameter.
19) Turn off the “Test Return to Home” mode before attempting to land, to ensure that the test mode is not invoked during landing.
20) If you follow the steps above, and still have trouble adjusting RTH, we recommend you post your issue to the OSD Pro online forum, as described
in the “Have Questions or Feedback” section above. The community can provide you with tips and suggestions for settings with your particular
model.
Copyright © 2009-2012 Eagle Tree Systems, LLC
http://www.eagletreesystems.com
Page 22

Page
22
Description of On-screen Menus
The following sections describe each OSD Pro on-screen menu in detail. Each box below corresponds with one of the menu screens. Figure 9 shows the
appearance of the Main Menu screen, for reference.
Main Menu
Here is the description of the Main Menu:
• Reset Home Position: resets the “home” position. This item is useful if the GPS is drifting considerably after the initial home position is finalized.
• Test Return to Home: see the Safety Mode section below for more information
• Configure Radio Control: Launches the Radio Control Configuration menu (see section on this menu below)
• Configure Guardian Stabilizer: Launches the Guardian Stabilizer configuration menu (see the Guardian manual for more information)
• Configure Safety Mode: Launches the Safety Mode Configuration menu (see section on this menu below)
• Change Display Settings: Launches the OSD Display configuration menu (see section on this menu below)
• Select Items to be Displayed: Launches the “Choose Items (0=None, 63=All)” menu that lets you configure graphics and other OSD display items
(see section on this menu below). Note that it is easier to configure these items using the PC, as described in the Configuring Graphics and other
Items to Display section above.
• Configure Audio/Variometer: Launches the Audio/Variometer Configuration menu (see section on this menu below)
• Set Battery milliamp-Hours: Sets the mAH capacity of your battery pack. This parameter, along with the eLogger’s current sensor, is used to
display the primary graphical battery level. Warning: batteries often have less than their stated mAH capacity, especially when drained at
high rates.
• GPS and RADAR Configuration: Launches the GPS/RADAR configuration menu (see section on this menu below)
• Configure Sensors and Units: Launches the Sensors and Units configuration menu (see section on this menu below)
• Flight Sim (Disable Motor!): See the “Flight Simulator” section below.
• Configure EagleEyes Station: Launches the Eagle Eyes configuration menu (see the EagleEyes instruction manual for more information)
• Exit Menu: Returns to the main screen (Exits Menu Mode) when selected
Radio Control Configuration Menu
• Reset Cruise Sticks & Throtl: This optional step recaptures the model’s aileron/rudder, elevator, and throttle settings for level flight. These
settings are captured during the Servo Analysis wizard, but sometimes these need to be recaptured, if you have retrimmed your plane. NOTE: the
throttle needs to be set at “cruising speed” position when this option is selected!
• Run Servo Analysis Wizard: This invokes the Servo Analysis wizard, described above.
• Choose Receiver Type: Sets the type of Radio/Receiver you are using. There are two options. PPM/No FS: this option should be chosen if your
receiver stops controlling the servos if you turn off your radio (the servos no longer are held in one position, and/or start moving randomly).
PCM/FS: this option should be chosen if your receiver holds the last servo position (or goes into a failsafe position) when the radio is turned off.
Most, but not all, 2.4GHz radios (such as SpektrumTM and FutabaTM 2.4GHz radios) are PCM. Also, PCM mode should be selected for most “long
range” FPV radio links. If you are unsure of the mode, turn off your radio transmitter, and gently move one of the servo arms while the receiver
is still powered. If the servo moves without resistance and stays in the new position, or your servos start moving randomly, select “PPM/No FS”
receiver mode. Otherwise, choose the “PCM/FS” mode.
• Choose Model Wing Type: Selects the type of control surfaces you use on your model. For “traditional” fixed wing models, which use
ailerons/rudder and elevator, choose “Standard.” For models that use elevon or vtail mixing, such as “flying wings” choose “Elevon.” Note: if you
are using the Guardian, selecting “Elevon” causes the OSD to do servo mixing, when stabilization is enabled. But, when stabilization is disabled
(or you are not using the Guardian) the elevon mixing must occur in your radio. Please see the Guardian manual for more information.
• Number Failsafe Chans on RX: If your radio does not have any failsafe channels programmed, set this to “No FS Chs.” If your receiver
supports at least a throttle failsafe, and you have programmed a throttle failsafe position with your radio, select “1 FS Chns.” If your radio also
supports failsafe positions on your elevator, aileron/rudder, and throttle channels, and you have programmed failsafe positions on all of these, you
may want to choose “3+ FS Chns” in some cases. See the RTH section above on which mode to choose. WARNING: if you are using a PCM
radio, and choose “No FS Chs,” the selected safety mode will activate whenever the radio sticks are not moved for a short period of time.
Therefore, it is strongly recommended that you program failsafes into your receiver, and select either 1 or 3+ failsafe channels in this menu
item
• Choose Menu Receiver Inputs: This menu item lets you tell the OSD Pro how you plan to use your receiver’s outputs to access on-screen menus
and other features of the OSD Pro (optional). Please see the section “Connecting the OSD ProTM to your Model’s Radio Receiver for Menu Setup
and Configuration” earlier in the manual, for details about these settings.
• Re-set minimum RSSI Level: The menu item lets you reset the minimum RSSI, previously learned by the OSD Pro when the Servo Analysis
Wizard was run. This sets the 0% level. Please see the “RSSI” section earlier in the manual for more information.
• Re-set maximum RSSI Level: The menu item lets you reset the maximum RSSI, previously learned by the OSD Pro when the Servo Analysis
Wizard was run. This sets the 100% level. Please see the “RSSI” section earlier in the manual for more information.
• Elevon Recvr Microsecs(1500): Please see the Guardian manual for more information on this item. It is inactive unless you are using the
Guardian.
Copyright © 2009-2012 Eagle Tree Systems, LLC
http://www.eagletreesystems.com
Page 23

Page
23
Please see the Guardian Stabili
zation instruction manual for information on this menu.
Configure Guardian Stabilizer Menu
Safety Mode Menu
NOTE: carefully read the Safety Mode Overview section before changing these settings!
• Select Desired Safety Mode: Selects one of the safety mode options. None: no safety mode enabled. Failsafe: selects the failsafe mode. Rtrn
Home: selects the Return to Home safety mode.
• Max Airspeed/VNE(0 disable): This parameter sets the maximum cruise speed (VNE) of your model (or set it “0” to disable this feature).
IMPORTANT: The primary use of this setting is to attempt to avoid throttling up in a dive, since during a dive the model’s speed would presumably
exceed the Maximum Cruise Speed setting. If you set this to a non-zero value, RTH will not throttle up to your “Climb” throttle setting if the
present speed of your model is greater than the value you set here for Max Cruise Speed. It’s recommended to set this parameter to 0 if you don’t
know your maximum cruise speed, or to, or to make sure you set this parameter well above the normal cruise speed of your model, or to set it to 0.
• Minimum Ground Spd(0 disable): If the plane's ground speed (as reported by the GPS) is below this speed, and you are at or below the specified
cruise altitude window, the "climb" throttle setting will be used. You'd normally set this to a fairly low speed, since your battery will be depleted
much more quickly when this mode is triggered and you'd only want it to trigger if you're not making headway due to headwind.
• Cruise Altitude (300/120): Set this parameter to the desired altitude which the Return to Home feature should attempt to maintain. If there are
obstacles between your model and home that have higher elevation than this setting, the model may crash into them, so consider this in your setting.
Of course, never set this value above the legal flying limit for your area. This setting is in Feet if you have configured your system for English units,
or in meters if you are configured for Metric units. The default values for (English, Metric) are show in the menu item in parentheses.
• Home RTH Altitude Mode: This menu item lets you enable the dual altitude RTH feature. There are 3 settings:
o Disable: the second (inner) RTH altitude settings are ignored.
o Normal: when your model comes closer than the distance radius set below and RTH is active, the model will descend or climb to the
"Home RTH Altitude" specified below. Otherwise, it will desend or climb to the "Cruise Altitude" above.
o Throt Off: Same as "Normal" except that the throttle is set to the "descend" setting when closer than the distance radius below, which
would normally cause your model come to the ground. Useful if your plane comes back, but you still can't regain radio contact.
•
Set Home RTH Alt (300/120): this lets you set the inner RTH altitude (the altitude that RTH will target when closer than the distance radius
below).
• Home Altitude Radius: This lets you set the distance at which the model will target the "home RTH altitude" described above
• Altitude Error(100/40): This setting has two purposes. First, this setting controls the tolerable window of altitude above and below the Cruise
Altitude setting, referred to as the “Cruise Altitude Window.” For example, if Cruise Altitude is set to 300, and Altitude Error was set to 100, the
Cruise Altitude Window would be between 200 and 400. Never set this value so that this value, when added to “Cruise Altitude” parameter above,
exceeds the legal flying limit for your area. Secondly, this setting is also used as the limit to the input of the pitch PID controller. See below.
The default values for (English, Metric) are show in the menu item in parentheses.
• Pitch Proportional Gain (50): This setting adjusts the proportional input to the elevator PID controller. The default value is shown in
parentheses. The elevator PID controller examines the difference between the present altitude, and the desired Cruise Altitude. If the difference is
greater than the Altitude Error setting above, the difference is limited to Altitude Error. Then, the elevator controller multiplies this difference by
the Pitch Proportional Gain value. Note: if you are using the Guardian, please see the RTH steps above and the Guardian manual before adjusting
this setting.
• Pitch Derivative Gain (50): This setting adjusts the derivative input to the elevator PID controller. Higher values of this setting damp (reduce)
the climbrate. The effect of this parameter is increased as the Cruise altitude is approached, which reduces overshoot. Increase this parameter if
the model “porpoises” between too high and too low, during testing. Decrease the value if the model stops climbing too soon or too abruptly.
• Turn Proportional Limit (20): this setting controls the maximum error that the heading controller will accept as an input. The heading
controller examines the present heading, and the heading for home. If the difference in these headings is greater than Turn Proportional Limit, the
Turn Proportional Limit value is used instead. The default value is shown in parentheses.
• Turn Proportional Gain (50): This setting amplifies the proportional input to heading controller. The default value is shown in parentheses. The
heading controller determines the present heading, and the desired heading for home. The difference in headings (limited by Turn Proportional
Limit as described above) is then multiplied by Turn Proportional Gain. Note: if you are using the Guardian, please see the RTH steps above and
the Guardian manual before adjusting this setting.
• Turn Derivative Gain (50): This setting adjusts the derivative input to the heading PID controller. Higher values of this setting damp (reduce)
the rate of turn. The effect of this parameter is increased as the correct home heading is approached, which reduces overshoot. Increase the value
of this parameter if the plane continues to turn after reaching the correct home heading. Decrease the value if the model stops turning too soon, or
stops turning too abruptly.
• Turn Integral Gain (50): This setting controls the integral input to the heading PID controller. The heading PID controller examines how long it
is taking to turn to the correct home heading. As time passes during the turn, the aileron/rudder is turned more and more, to increase the rate of turn
over time. Normally the impact of the integral gain should be small. But, if a strong wind or other factor is keeping the plane from reaching home
in a reasonable amount of time, integral gain will continue to increase the turn rate.
Copyright © 2009-2012 Eagle Tree Systems, LLC
http://www.eagletreesystems.com
Page 24

Page
24
Configure OSD Display Menu
These menu items set options for OSD Display features.
• Display Live or Max Values?: Determines whether live values, maximum value, or toggle between the live and max values, are displayed on the
main screen. If Max is selected, the maximum values (minimum voltage) encountered since the OSD Pro was powered are displayed all the time.
The Toggle option lets you review max values after your flight. If Toggle is selected, the display will toggle between live and max values, about
once a second, after the toggle trigger is exceeded, when the model is not moving. In Toggle mode, once the model’s speed has reached 12MPH
(or 12KPH) the toggle mode is triggered. Then, when the model’s speed has reduced to 4MPH (4KPH) and the model is within 500 feet (500M) of
the home position, the toggling between live and max values will start. There is an up arrow (or down arrow for voltage) displayed to the left of the
parameters, indicating they are the Maximum (Minimum) values. The maximum values of some parameters are not available, which is indicated
by an “*” for the value of that parameter.
•
Set Page Switch time (secs): If you have configured multiple pages of data parameters using the Windows Setup Utility, and wish to switch
between the pages of data every few seconds, set this parameter to the number of seconds between page switches. NOTE: In addition to this
option, toggling your radio’s Aux2/Select switch (if configured) when not in menu mode will cause the display page to advance to the next page.
• Turn OSD Display ON or OFF: turns the main screen on or off. When off, no OSD information is visible, but alarms can be programmed to turn
the main screen back on. Also, voice announcements are still enabled when the main screen is off.
• Set Horizontal Screen Shift: This setting lets you adjust the horizontal position of the OSD data on your video screen. Increasing this parameter
causes the OSD data to shift rightward on the screen.
• Set Vertical Screen Shift: This setting lets you adjust the vertical position of the OSD data on your video screen. Increasing this parameter causes
the OSD data to shift downwardly on the screen.
• Narrow Screen Mode: This setting compresses the OSD screen horizontally, decreasing the width. It does not affect the video width. Try this
option if your DVR or display does not let you see all of the OSD data, even after adjusting the horizontal screen shift.
• Disable Inverse Text: The OSD Pro displays some text as inverse, to indicate alarm conditions, etc. If you find the inverse text hard to read, set
this option to YES.
• Jump to Exit after change?: If this is set to YES, the menu cursor will jump to “Exit Menu” after a menu item is changed. If it’s set to NO, the
menu cursor advances to the next menu item.
• On/Off Display with Select?: Set this to YES if you would like to turn the main display screen on and off, by toggling the Select switch (or
toggling the 3 position switch between middle and up positions if using radio stick input Option B) when not in menu mode. Note that using this
option would likely require the Aux2 channel to be dedicated to the OSD Pro, and not shared with other equipment, when not using a 3 position
switch. See “Configuring the OSD ProTM with the On-Screen Menus” section for more information.
• Set OSD Text White Level: Adjusts the white level of the OSD Pro text and graphics. Normally, this does not need to be changed from the default
setting of “7.” However, if you see “white streaks” or other anomalies associated with the text display on your video screen, decreasing this value
may help.
• Set OSD Text Black Level: Adjusts the black level of the OSD Pro text and graphics. Normally, this does not need to be changed from the default
setting of “4.” However, if you see “white streaks” or other anomalies associated with the text display on your video screen, increasing this value
may help.
Copyright © 2009-2012 Eagle Tree Systems, LLC
http://www.eagletreesystems.com
Page 25

Page
25
Select Items to be Displayed Menu (Choose Items (0=None, 63=All))
This menu lets you configure which graphics icons and other display elements appear on which pages of the OSD Pro display. It is easiest to configure
these items in the PC software as described in the “Configuring Graphics and other Items to Display” section above. However, it is possible to configure
these settings at the field. For each item, a number from 0 to 63 can be set, where 0 means the item is not displayed on any page, 1 means that the item is
displayed on page 1, and 63 means the item is displayed on all pages. For more details on how the numbers correspond to which pages upon which the
item is displayed, please see the chart shown at this web link:
http://www.eagletreesystems.com/support/manuals/displaychart.pdf
• Airspeed Ladder: Set this to YES if you would like to display the speed ladder on the main screen. The speed ladder ranges from 0 to 999, and
displays in either MPH, or K/H, depending on your chosen units.
• Altitude Ladder: Set this to YES if you would like to display the altitude ladder on the main screen. The Altitude ladder ranges from -999 to
9999, and displays in either feet or meters, depending on your chosen units.
• RADAR Icon: Select YES to enable the RADAR feature, described earlier in the manual.
• Waypoints: Set this to YES if you want to display the waypoints you entered in the Windows Setup Utility on the main display screen. If you
have defined waypoints that exceed this maximum radius, they will be displayed in reverse video.
• Flight Timer/Elapsed Time: Set this to YES to enable the Flight Timer, which appears in the upper left-hand corner when enabled. The Flight
Timer display is in MM:SS until greater than 59 minutes is reached, then it switches to HH:MM:SS. The flight timer starts counting up when the
GPS Home position is finalized. It can be reset to zero by clicking on the “Reset Home Position” menu item on the main on-screen menu.
• Compass: Set this to YES if you would like to display the graphical compass on the main screen.
• Battery A Icon: Set this to YES if you would like to display the graphical battery on the main screen. Don’t forget to set your battery’s mAH
capacity on the Main Menu screen also. See the “Graphical Battery Displays” section earlier in the manual for more information.
• Battery B Icon: Advanced feature. See the “Graphical Battery Displays” section earlier in the manual for more information.
• Battery C Icon: Advanced feature. See the “Graphical Battery Displays” section earlier in the manual for more information.
• Home/Center Screen Indicator: Set this to YES if you would like to display the Home Indicator in the center of the screen.
• Servo Deflections Display: This display option can assist in fine-tuning RTH and other settings. It displays the present Aileron/Rudder, Elevator
and Throttle servo offsets. The offsets range from extremes of approximately -2000 to 2000. Zero corresponds to the neutral stick settings that
you indicated in the “Set Sticks for Level Flight” screen of the Servo Analysis Wizard
• Artificial Horizon Line: This option lets you control on which pages the AHI indicator appears. See the Guardian instruction manual for more
information, if you are using the Guardian.
Copyright © 2009-2012 Eagle Tree Systems, LLC
http://www.eagletreesystems.com
Page 26

Page
26
Audio/Variometer Configuration Menu
The Audio/Variometer Configuration menu has the following items:
• Mute Voice Alerts: Turns off all voice alerts, when set to YES.
• Set Voice Alerts Volume: Sets the volume of the voice alerts. Note that the purpose of the volume control is to match the volume of the voice
alerts with the volume of the flying sounds (if you use a microphone), and with the volume of the acoustic variometer. In general, this setting
should be set as low as possible to avoid saturating the output preamplifier (usually not above 1 or 2).
• Mute Variometer: Mutes the acoustic variometer sounds, when set to YES.
• Set Variometer Volume: Sets the volume of the acoustic variometer. Note that the purpose of the volume control is to match the volume of the
variometer with the volume of the flying sounds (if you use a microphone), and the voice alerts. In general, this setting should be set as low as
possible to avoid saturating the output preamplifier (usually not above 1 or 2)
• Mute External Audio: Mutes the microphone, when set to YES. Note: this should be set to YES if you are not using a microphone. Otherwise a
hum may be heard.
• Set External Audio Volume: Sets the volume of the external microphone input. Note that the purpose of the volume control is to match the
volume of the microphone with the volume of the acoustic variometer, and with the volume of the voice alerts. In general, this setting should be
set as low as possible to avoid saturating the output preamplifier (usually not above 1 or 2)
Additionally, your OSD Pro contains a sophisticated varying tone variometer, employing electronic Total Energy Compensation. Basic variometers do
not support total energy, which means that “stick thermals” are reported by the variometer if you descend or ascend due to elevator movement.
Standard total energy variometers reduce the effects of moving the elevator by monitoring the pitch of the aircraft, which requires an additional probe to
be mounted. The OSD Pro system uses changes in speed to calculate total energy, requiring no additional pitch probe.
The variometer produces a varying tone, which changes as you ascend or descend at different rates. When ascending, the tone will be broken, with the
tone frequency increasing as the rate of ascent increases. When descending, the tone will be continuous, with the tone frequency decreasing as your rate
of descent increases.
The variometer uses either GPS altitude or an optional barometric altimeter. It uses either the airspeed pitot tube or the GPS speed for total energy
calculations. The types of sensors used are selected in the “Configure Sensors and Units” menu.
The sensitivity of the variometer is directly dependent on the sensitivity of the altimeter. In general, if you want to use the variometer for “thermal
sniffing” with a glider, we recommend using the OSD Pro with our high resolution Altimeter V4.
Several parameters of the variometer are adjustable, in this menu:
• Set Vario Averager Seconds: This setting controls the averaging period of the variometer, in 10ths of a second units. For faster response, lower
periods are recommended, but in rougher air longer periods may be required to avoid false alarms.
• Set Vario Minimum Sinkrate: this setting controls the minimum sinkrate. Normally, this would be set to the standard sinkrate of your vehicle,
i.e., the rate at which it descends in smooth air with no thermals. When you descend at a rate greater than this sinkrate, the variometer will start to
sound
• Set Vario Minimum Climbrate: this setting controls the minimum climbrate. When you ascend at a rate greater than this climbrate, the
variometer will start to sound,
• Set Vario Audible Tone Gain: This setting changes the amount the pitch changes as the climbrate increases/decreases. If you are not hearing
enough change, increase this parameter, and vice versa for too much frequency change.
• Set Total Energy Comp Percnt: this adjusts the scaling of the Total Energy Compensation calculation. 100% means that Kinetic Energy is
converted into Potential Energy directly, i.e., any change in airspeed is assumed to directly negate any change in altitude. Less than 100% reduces
the degree which airspeed change affects Total Energy, and increasing it above 100% increases the amount.
• Vario Off when Motor Running: This option disables the variometer tones when the motor is running, based on the amperage draw of the motor.
This is useful for “motor gliders.” The variometer is off when motor current is more than approximately 1.5 amps.
Copyright © 2009-2012 Eagle Tree Systems, LLC
http://www.eagletreesystems.com
Page 27

Page
27
GPS and RADAR Configuration Menu
This menu page lets you configure GPS and RADAR display settings.
• Display Lat-Lon Position: This item lets you choose when latitude/longitude position is displayed on the main screen. The choices are:
o Never: position is never displayed
o Trouble: position is displayed when the RTH or Failsafe safety modes are invoked, or if an alarm has been triggered
o Low Alt: position is displayed for Trouble, and additionally if the model’s altitude is less than the setting you made in the
“Cruise Altitude” item in the Configure Safety Mode menu
o Distance: position is displayed for Trouble, Low Alt, and additionally if the distance of the model from home exceeds the Maximum
“RADAR Radius” item in the Configure OSD Display menu.
o Always: position information is always displayed
• RADAR Up Direction (Degrees): This parameter sets the UP direction of the RADAR feature. For example, if you fly your model so that your
body is facing 15 degrees N, you would set this to 15. This results in the RADAR icon flying up on the OSD Pro main screen when you are flying
the model in the direction you are facing. Normally, the runway is perpendicular to the direction you are facing.
• Set RADAR Maximum Radius: This sets the maximum radius for the RADAR and Waypoint display. Set this to the maximum distance away
from home that you typically fly. For example, if you normally fly a maximum of 5000 feet away from home in any direction, set this to 5000. If
your model exceeds this distance, the RADAR icon will change from normal video to reverse video, to indicate you are out of range. Likewise, if
• Set Minimum Satellite Count: Set this to a non-zero value if you wish to specify the minimum number of satellites that must be in view, before
the Home location and altitude are finalized. This setting is useful if you find that, in your area, the GPS module initially reports somewhat
invalid altitude or position information until a certain number of satellites are in view.
• Require 3D GPS Fix: Set this to YES if you wish to wait until a 3D GPS fix is attained, before the Home location and altitude are finalized. If
you are using GPS altitude rather than a barometric altitude sensor, this generally should be set to YES, as GPS altitude will not usually be accurate
unless a 3D fix is attained.
• Set Maximum HDOP: Horizontal Dilution of Precision (HDOP) is a measure of the GPS Expander’s fix quality. The lower this number, the
better the fix. The HDOP can vary with a variety of factors, including the position of the satellites in view relative to each other. As a very
general rule, HDOP less than 2.0 is highly desirable. HDOP less than 1.3 is desirable, but may not always be attainable. The default value of 9.9
essentially turns this check off. If you wish for a certain quality of fix to be attained before the Home location and altitude are finalized, set this to
a value lower than 9.9.
• Seconds to Wait post GPS Fix: Set this to a non-zero value if you wish to specify the number of seconds that must elapse after the GPS acquires
its first fix, before the Home location and altitude are finalized.
• Distance to Pilot as LOS?: Set this to YES if you want the Line of Sight distance (computed using altitude as well as ground distance) displayed
with the Distance To Pilot display. Set it to NO if you want the ground distance.
Copyright © 2009-2012 Eagle Tree Systems, LLC
http://www.eagletreesystems.com
Page 28

Page
28
Configure Sensors and Units
The Configure Sensors and Units menu has the following items:
• Use Baro Alt for RTH/Ladder: Set this item to YES only if you have a barometric altimeter (either the Altimeter Microsensor, or a Flight Data
Recorder). When set to YES, the barometric altimeter will be used for the altitude ladder, the acoustic variometer, and for the Return to Home
altitude input. Set this item to NO if you are using GPS for altitude measurement.
• Use Pitot Spd for RTH/Ladder: Set this item to YES only if you have a pitot/static airspeed sensor (either the Airspeed Microsensor, or a Flight
Data Recorder). When set to YES, the pitot/static airspeed will be used for the airspeed ladder, the Total Energy function of the acoustic
variometer, and for the Return to Home airspeed input. Set this item to NO if you are using GPS for ground speed measurement.
• Use Temp 1 Input for RSSI: This advanced feature indicates to the OSD Pro that you have connected the analog RSSI output of your compatible
receiver to the center pin of the “Temperature 1” connector on your eLogger or Recorder. When you configure the OSD Pro to display the
“Temperature Sensor A” parameter, it will not be converted to a temperature if this option is set. Please see the “RSSI” section earlier in the
manual for more information.
• Use Temp2 Input for VoltageB: This menu item, when set to “Yes”, tells the OSD Pro that the Temperature 2 input on the eLogger will be used
to measure secondary voltage B. See the Graphical Battery Displays section of the manual above for more information.
• Set Voltage B Minimum: This menu item lets you set the minimum voltage for the secondary graphical battery voltage B display. The graphical
battery B will show empty when this voltage is reached. See the Graphical Battery Displays section of the manual above for more information.
• Set Voltage B Maximum: This menu item lets you set the maximum voltage for the secondary graphical battery voltage B display. The graphical
battery B will show full when this voltage is reached. See the Graphical Battery Displays section of the manual above for more information.
• Use Temp3 Input for VoltageC: This menu item, when set to “Yes”, tells the OSD Pro that the Temperature 3 input on the eLogger will be used to
measure secondary voltage C. See the Graphical Battery Displays section of the manual above for more information.
• Set Voltage C Minimum: This menu item lets you set the minimum voltage for the secondary graphical battery voltage B display. The graphical
battery C will show empty when this voltage is reached. See the Graphical Battery Displays section of the manual above for more information.
• Set Voltage C Maximum: This menu item lets you set the minimum voltage for the secondary graphical battery voltage B display. The graphical
battery C will show full when this voltage is reached. See the Graphical Battery Displays section of the manual above for more information.
•
AHI Cal Wizard (non-Guardian): This menu option lets you calibrate your artificial horizon display, when used with the
sensor, or the equivalent. Do not run this wizard if you use the Guardian!
and configure the Artificial Horizon display, can be found in this document:
Pro.pdf
• Enable low altitude RTH: This menu option , when set to “Yes,” defeats the OSD’s automatic disabling of RTH throttle control below about 60
feet (20 m). Since enabling this option increases the likelihood that RTH will inadvertently activate your throttle on the ground, it should be used
with extreme caution! See the “Safety Mode Overview” for more information.
• Units for all Speeds: Normally, all speeds (GPS, pitot/static) are displayed in the default units, chosen under “Software, Choose Units of Measure”
in the software. But, this option lets you override the default setting. For example, use this option if you want to set the default units to metric, but
want speed in MPH or knots. Choose “Default” for this option if you want the default units to be used (MPH or km/h).
• Units for all Distances: Normally, all distances (distance to home, distance to waypoint, and RADAR radius) are displayed in the default units,
chosen under “Software, Choose Units of Measure” in the software. But, this option lets you override the default setting. For example, use this
option if you want to set the default units to metric, but want distances displayed in feet. Choose “Default” for this option if you want the default
units to be used (feet or meters).
• Units for all Altitudes: Normally, all altitudes (GPS, barometric) are displayed in the default units, chosen under “Software, Choose Units of
Measure” in the software. But, this option lets you override the default setting. For example, use this option if you want to set the default units to
metric, but want altitudes displayed in feet. Choose “Default” for this option if you want the default units to be used (feet or meters).
Information on how to connect the FMA Direct sensor to the OSD Pro system,
http://www.eagletreesystems.com/support/manuals/FMA-OSD-
FMA Co-Pilot CPD 4
Copyright © 2009-2012 Eagle Tree Systems, LLC
http://www.eagletreesystems.com
Page 29

Page
29
Troubleshooting
Below is a list of problems that may be encountered, and steps to remedy them. If your particular issue is not addressed by the below, see the Support page
on http://eagletreesystems.com for easy options for getting answers to your questions, 24 hours a day.
Issue: After I power my system, I see the OSD Pro startup screen, but then the OSD turns off, leaving only the video image. And/or, the OSD Pro’s data
only display briefly, and then only the video is shown. Or, the video screen goes black shortly after I turn on the OSD Pro. Or, I see large, rapid
fluctuation in the “Pack Voltage” display parameter.
Solution:
• Invoke the menus, and confirm that you have the OSD Pro turned on, in the main menu settings.
• If you are using the eLogger V3 with the OSD Pro, make sure you are using the Battery Backup Cable as described in the “Connecting the OSD Pro to
your eLogger V3” section above.
Issue: I am having trouble getting a GPS fix. Or, once GPS fix is acquired, it is periodically lost, or the GPS values seem to move around quite a bit.
Solutions:
• If you are using a 900 MHz video transmitter, it is quite probably generating spurious noise on the frequencies used by GPS. A good description of the
causes and solutions of this problem is located here: http://www.dpcav.com/data_sheets/whitepaper_GPS.pdf. This problem is also reduced by using
our GPS V4 module, which has a pre-wired ferrite choke.
• If you are using the eLogger V3 with the battery backup cable, and the voltage supplied to the battery backup cable is greater than 5.8V, the GPS
Expander may not work correctly. Reduce the voltage to less than 5.8V.
• See your GPS Expander manual for other troubleshooting tips.
Issue: I am able to see video and data with my OSD Pro board, but am seeing problems such has “internal error” messages, incorrect data, or random text
display.
Solutions:
• Upgrade to our latest software, by clicking on the “Support” tab on our website and choosing the “Download Latest Software” option.
• Run the OSD Pro PC Setup utility by clicking “Hardware, Configure OSD” and click ‘FACTORY RESET.” Then, reconfigure the OSD Pro board.
Issue: The message “OSD Pro Board is not connected. Please connect the OSD and try again.” appears when I try to configure the OSD Pro with the
Windows Software.
Solutions:
• Ensure that the OSD Pro is connected correctly, with the correct polarity, to the eLogger or Recorder
• Ensure that the eLogger V3 or Recorder is connected correctly to USB. The LED should flash a sequence of three repeating blinks if it is correctly
connected.
• Ensure that you have updated the eLogger/recorder firmware and OSD firmware as described in the “Windows Software and Firmware Update” section
above.
Issue: I see only a black screen, the OSD Pro startup screen, or no video image at all, on my video monitor after connecting the OSD Pro between the
camera and the Video Transmitter/DVR.
Solutions:
• Verify that a correct video image is displayed if you remove the OSD Pro from the circuit, and connect the camera and Transmitter/DVR cable together
directly.
• Ensure that the OSD Pro is connected correctly to the eLogger/Recorder, and that the LED on the eLogger/Recorder is flashing. If the LED is not
flashing, that means that the eLogger/Recorder is not powered. No video will appear in this case.
• Ensure that the 3 pin “Video In” connector of the OSD Pro is connected to the output from your camera, with the “S” pin connected to the positive
output of the camera (the center pin for RCA), and the “-“ pin of the OSD Pro is going to the negative output (ground) of the camera (the outer
connector for RCA).
• Ensure that the 3 pin “Video Out” connector of the OSD Pro is connected to the input of your Video Transmitter or DVR, with the “S” pin connected
to the positive input (the center pin for RCA), and the “-“ pin of the OSD Pro going to the negative input (ground - the outer connector for RCA).
Issue: I have connected the OSD Pro’s “Audio Out” output to my Video Transmitter or DVR. I hear a buzzing or humming sound, or there is distortion in
the audio.
Solutions:
• Mute the External Audio input as described in the audio setup menu above, if you are NOT using an external (microphone) audio source to hear flight
noises.
• Make sure you have the voice volume, external volume, and variometer volume set to either 1 or 2.
• Increase your OSD Pro “Black Level” setting to 5 or above. If this does not resolve it, reduce your OSD Pro “White Level” setting.
• The audio input of some video transmitters require higher output impedance. Try connecting a 3K to10K ohm resistor (any type of resistor should be
fine) in series with the OSD Pro’s audio output and the video transmitter’s audio input.
Issue: The OSD Pro text is visible when my camera is turned on, but only a black screen appears when the camera is turned off.
Solution:
• This is correct behavior. The OSD Pro will not overlay text if there is no active video source. Many functions of the OSD will not work if the video
input signal is lost during flight. RTH should still function even if the video input signal is lost, however.
Copyright © 2009-2012 Eagle Tree Systems, LLC
http://www.eagletreesystems.com
Page 30

Page
30
Issue: I am using the eLogger V3, and the Video and OSD Pro Text is visible for a while, but then the Video goes blank. If I disconnect the eLogger V3 for
a few minutes and reconnect it, the Video re-appears. I do not have any outputs from my receiver connected to the OSD Pro.
• Solution: If you are using the eLogger V3 with the OSD Pro, make sure you are using the Battery Backup Cable as described in the “Connecting the
OSD Pro to your eLogger V3” section above.
Issue: The OSD Pro displays information on the video screen, but I cannot get the menus to appear.
Solution:
•
Ensure that you have correctly set up radio stick inputs as described in “Choosing the Radio Stick Input Method You Prefer” section of the manual
• If you are using a switch on your radio that has a “center” position as well as “off” and “on”, make sure you are switching from “off” to “on” (or vice
versa) and are not using one of the 3 position switch radio stick input options, make sure you are not stopping at the center position of the switch.
• Consider testing the receiver outputs that are connected to Aux1 and Aux2 with a servo, to ensure the servo moves between its extents when switching.
Issue: The OSD Pro’s GPS altitude does not zero correctly, and/or the home position does not seem correct.
Solution:
• Adjust the “required fix quality” parameters under the GPS and Waypoints menu, to ensure that the GPS fix quality is good before the home
position is finalized.
Issue: I am seeing video “smearing” or lines on the video screen, that corresponds with the location of OSD Pro text on the screen.
Solution:
• Adjust the OSD Pro’s “Black Level” setting, as described in the “Configure OSD Display Menu” section above.
Issue: I am having trouble adjusting the Return to Home feature.
Solution:
• Visit our online support forum at http://www.rcgroups.com/eagle-tree-systems-443/ . There is a “sticky” post on that forum, describing how to
get help with RTH and other OSD-PRO issues.
• If you can’t find what you need on our support forum, consider posting on our OSD Pro thread on RCGroups “First Person View” forum, at
http://www.rcgroups.com/forums/showpost.php?p=10547604 explaining the problem you are having. There are many FPV pilots there who use
the OSD Pro, and most likely some of them will have a similar setup to yours, and will be able to help you.
• Note that Eagle Tree cannot offer email or telephone support for adjusting the Return to Home feature, due to the many variables involved.
Specifications
• Video Modes: NTSC, PAL (automatically detected)
• Parameters Displayed: Limited only by the sensors you have purchased
• Character/Graphic Display Type: High contrast white with black character outline, for optimum visibility.
• Number of Configurable Text Parameters per OSD Pro Page: 20 maximum (2 lines on top, and 2 lines on bottom, with 5 parameters on each line).
• Mass: OSD Pro board only (no cables, eLogger or GPS): approximately 12g
Limited Warranty
Eagle Tree Systems, LLC, warrants the OSD Pro to be free from defects in materials and workmanship for a period of one (1) year from the date of original
purchase. This warranty is nontransferable. If your unit requires warranty service during this period, we will replace or repair it at our option. Shipping
cost to us is your responsibility. To obtain warranty service, email support@eagletreesystems.com for further instructions.
This limited warranty does not cover:
• The Software, including the device firmware. See the Software license agreement for more information on Software restrictions.
• Problems that result from:
o External causes such as accident, abuse, misuse, or problems with electrical power
o Servicing not authorized by us
o Usage that is not in accordance with product instructions
THIS WARRANTY GIVES YOU SPECIFIC LEGAL RIGHTS, AND YOU MAY ALSO HAVE OTHER RIGHTS WHICH VARY FROM STATE TO
STATE (OR JURISDICTION TO JURISDICTION). OUR RESPONSIBILITY FOR MALFUNCITONS AND DEFECTS IN HARDWARE IS LIMITED
TO REPAIR AND REPLACEMENT AS SET FORTH IN THIS WARRANTY STATEMENT. ALL EXPRESS AND IMPLIED WARRANTIES FOR
THE PRODUCT, INCLUDING, BUT NOT LIMITED TO, ANY IMPLIED WARRANTIES AND CONDITIONS OF MERCHANTABILITY AND
FITNESS FOR A PARTICULAR PURPOSE, ARE LIMITED IN TIME TO THE TERM OF THE LIMITED WARRANTY PERIOD AS DESCRIBED
ABOVE. NO WARRANTIES, WHETHER EXPRESS OR IMPLIED, WILL APPLY AFTER THE LIMITED WARRANTY PERIOD HAS EXPIRED.
SOME STATES DO NOT ALLOW LIMITATIONS ON HOW LONG AN IMPLIED WARRANTY LASTS, SO THIS LIMITATION MAY NOT APPLY
TO YOU.
WE DO NOT ACCEPT LIABILITY BEYOND THE REMEDIES PROVIDED FOR IN THIS LIMITED WARRANTY OR FOR CONSEQUENTIAL OR
INCIDENTAL DAMAGES, INCLUDING, WITHOUT LIMITATION, ANY LIABILTY FOR THIRD-PARTY CLAIMS AGAINST YOU FOR
DAMAGES, FOR PRODUCTS NOT BEING AVAILABLE FOR USE, OR FOR LOST DATA OR LOST SOFTWARE. OUR LIABILITY WILL BE NO
MORE THAN THE AMOUNT YOU PAID FOR THE PRODUCT THAT IS THE SUBJECT OF A CLAIM. THIS IS THE MAXIMUM AMOUNT FOR
WHICH WE ARE RESPONSIBLE. SOME STATES DO NOT ALLOW THE EXCLUSION OR LIMITATION OF INCIDENTAL OR
CONSEQUENTIAL DAMAGES, SO THE ABOVE LIMITATION OR EXCLUSION MAY NOT APPLY TO YOU.
FMATM, Co-PilotTM, CPD-4TM, Futaba
o Failure to follow the product instructions
TM
, and Spektrum
TM
and all other brand and product names are trademarks of their respective holders.
Copyright © 2009-2012 Eagle Tree Systems, LLC
http://www.eagletreesystems.com
 Loading...