

Page 1

™
www.lei-extras.com
Pub. 988-0154-941
MapCreate 7
Custom Mapping Software for GPS
Installation and Operation
Instructions
Page 2

Copyright © 2007 LEI. All rights reserved.
No part of this manual may be copied, reproduced, republished,
transmitted, distributed, downloaded or stored in any storage medium,
for any purpose, without prior written consent of LEI. Any
unauthorized commercial distribution of this manual is strictly
prohibited.
MapCreate™ is a trademark of LEI.
U.S. Points of Interest Data in this unit are by infoUSA,
copyright © 2001-2007, All Rights Reserved. infoUSA is a
trademark of infoUSA, Inc.
U.S. eXitSource Database, copyright © 2001-2007 Zenrin Co.
Ltd. Exit Authority™ and eXitSource™ are trademarks of
Zenrin Co. Ltd.
Canadian mapping data © 2007 by DMTI Spatial Inc.
European mapping data © 2007 by Tele Atlas NV,
the reference in digital mapping.
LEI Extras, Lowrance Electronics, or Eagle Electronics may find it
necessary to change or end their policies, regulations and special offers
at any time. They reserve the right to do so without notice. All screens
in this manual are simulated.
For free owner's manuals and the most current information on this
product, it's operation and accessories, visit the manufacturer's web
sites:
www.lowrance.com www.eaglegps.com
To purchase Lowrance or Eagle accessories,
visit our web site:
www.lei-extras.com
LEI
PO BOX 129
Catoosa, OK USA 74015
Printed in USA.
Page 3

Table of Contents
Section 1: Introduction............................................................. 1
Quick Start Reference.................................................................... 3
How MapCreate Works: the Basics ............................................. 6
File Formats & Functions............................................................. 7
Map Border File ........................................................................ 7
Custom Map File ....................................................................... 8
Important Notes: File Encryption and Card Limits ............... 8
Map File Encryption ............................................................. 8
Limited Number of Cards ..................................................... 8
Important Notes about Cards and File Size............................ 9
GPS Data File.......................................................................... 11
ASCII Text File........................................................................ 11
GPS Data Manger (GDM) File ............................................... 12
Atlas File.................................................................................. 12
GPS Unit Compatibility.......................................................... 13
Mapping Detail: There's more here than meets the eye. ............ 13
Find Highway Exit Services ................................................... 13
Find Points of Interest ............................................................ 14
Find an Address ...................................................................... 14
How to use this manual: typographical conventions ................ 15
Mouse ....................................................................................... 15
Keyboard .................................................................................. 15
Instructions.............................................................................. 16
MapCreate 7 ................................................................................ 16
Material covered includes:...................................................... 17
New Mapping Data ............................................................. 17
Additional Symbols ............................................................. 17
Searching ............................................................................. 17
Aviation Searching .............................................................. 17
Find Nearest Waypoint or Nearest Highway Exit............ 17
Map Category Options Toolbar .......................................... 17
Routing................................................................................. 17
Dynamic Pan Arrows .......................................................... 17
Pop-up Boxes ....................................................................... 17
Color Legend........................................................................ 17
Map Coverage by DVD................................................................ 18
New Mapping Data Types: ......................................................... 18
Elevation Contour Lines ......................................................... 18
Hunting .................................................................................... 18
Other Data Types .................................................................... 18
Hunting Specific Symbols........................................................... 19
Searching ..................................................................................... 19
i
Page 4

Aviation Searching...................................................................... 21
Find Nearest Waypoint, Highway Exit ..................................... 21
Map Category Options Toolbar .................................................. 21
Routing..................................................................................... 22
Dynamic Pan Arrows .................................................................. 22
Pop-up Boxes ............................................................................... 22
Color Legend................................................................................ 23
Section 2: Installing MapCreate 7 ....................................... 25
System Requirements: ............................................................ 25
IMPORTANT NOTES:............................................................ 25
Installation Types ................................................................... 26
Installing MapCreate.............................................................. 26
Care of your MapCreate DVD ................................................ 36
Starting MapCreate ................................................................ 36
Section 3: User's Guide ........................................................... 39
Working With MapCreate....................................................... 39
Starting MapCreate .................................................................... 39
The MapCreate Screen ............................................................... 39
Closing MapCreate.................................................................. 41
MapCreate Screen Components ............................................. 41
Master Map Window ............................................................... 41
Main Menu............................................................................... 43
Toolbars.................................................................................... 43
Create Map (Easy) toolbar.................................................. 44
Create Map (Advanced) toolbar.......................................... 44
Map Category Options Window.............................................. 48
Waypoint List Window............................................................ 49
Icon List Window..................................................................... 49
Route List Window .................................................................. 49
Route Waypoint List Window................................................. 50
Trail List Window ................................................................... 51
Moving Around the Master Map ................................................ 52
Pan Arrows .............................................................................. 52
Center Map .............................................................................. 52
Zoom Area ................................................................................ 52
Zoom In/Zoom Out................................................................... 53
Zoom Range Window............................................................... 54
Creating Rectangle Map Borders............................................... 54
Estimate Map Size (Optional) ................................................ 55
Saving a Map Border File (Optional)..................................... 56
Creating Corridor Map Borders ................................................. 57
Edit Corridor Borders ............................................................. 59
Creating and Saving a Custom Map.......................................... 60
ii
Page 5

Creating a Waypoint ................................................................... 62
Creating an Icon.......................................................................... 64
Creating a Route ......................................................................... 66
Saving a GPS Data File .............................................................. 69
Moving GPS Data Files between Computer and Unit.......... 70
Creating a Corridor Map from a Route...................................... 71
Creating a Route from a Trail .................................................... 73
Appendix 1: MapCreate Command List ............................. 77
Searching Help ............................................................................ 79
Internet Explorer browser: ..................................................... 79
Netscape 6 browser: ................................................................ 80
Appendix 2: Map Category List ............................................ 81
Appendix 3: MapCreate 7 Symbol Key ............................... 85
Appendix 4: Displaying Specialty Maps With Fishing or
Aeronautical Data ................................................................... 89
IMS Fishing Hot Spots Maps ..................................................... 90
Jeppesen Aviation Maps ............................................................. 91
Appendix 5: Considerations When Planning Highway
Routes ......................................................................................... 95
Tips on Making Better Routes for Highway Navigation ...... 95
"High Resolution" vs. "Low Resolution" Routes .................... 95
Index ........................................................................................... 99
iii
Page 6

WARNING!
A CAREFUL NAVIGATOR NEVER RELIES ON ONLY ONE METHOD
TO OBTAIN POSITION INFORMATION.
When showing navigation data to a position (waypoint), a GPS unit will show
the shortest, most direct path to the waypoint. It provides navigation data to the
waypoint regardless of obstructions. Therefore, the prudent navigator will not
only take advantage of all available navigation tools when traveling to a waypoint, but will also visually check to make sure a clear, safe path to the waypoint
is always available.
When a GPS unit is used in a vehicle, the vehicle operator is solely responsible for operating the vehicle in a safe manner. Vehicle operators
must maintain full surveillance of all pertinent driving, boating or flying
conditions at all times. An accident or collision resulting in damage to
property, personal injury or death could occur if the operator of a GPSequipped vehicle fails to pay full attention to travel conditions and vehicle operation while the vehicle is in motion.
CAUTION
WARNING!
iv
Page 7

Section 1: Introduction
How this manual can get you into the field, fast!
Thanks for buying MapCreate™, the custom mapping software for
Lowrance and Eagle GPS units. This manual was written using MapCreate™ version 7. Beginning with version 7, all MapCreate packages
work identically, but contain different mapping data.
We know you're eager to install the program and make some maps, but
we have a favor to ask. Before you grab that DVD, give us a moment to
explain how our manual can help you get the best performance from
our software. Our goal is to get you on the road, into the air, or out to
the woods and water fast. Like you, we'd rather spend more time outdoors, and less time reading a manual!
That's why we designed this book so you don't have to read the whole
thing from front to back for the information you want. You can skip
around! If you know where to look, we've made it easy to find the tips
you may need from time to time.
The manual has three main sections:
Section 1: Introduction contains the Quick Start Reference, which
begins on page 3. We put it near the front of the book so you can turn to
it quickly. Sec. 1 also includes background information on how MapCreate and its file formats work. To understand how to interpret our
instruction text, be sure to see the Typographical Conventions segment on page 15. Don't miss the important notes on File Encryption
and Card Limits on page 8.
Section 2: Installing MapCreate (on page 25) will help you get the program
and the required LEI card reader correctly installed on your computer.
Section 3: User's Guide (on page 39) is the heart of our book. It introduces you to the MapCreate windows and toolbars. Sec. 3 contains
easy-to-skim lessons on the program's main operations. These segments show you how to make highly customized maps and GPS information and get them into your GPS unit.
After you've gained some experience with the program, you may want
to try some advanced features. That brings us to the Command Reference, which is available only in the MapCreate 7 Help file. It contains
— in alphabetical order — the more advanced command functions in
MapCreate.
1
Page 8

Each entry includes a summary box briefly telling what the command
does and how to run it from the menu, toolbar or keyboard. Then, we've
included more tips and tricks so you can take advantage of all the
power and performance MapCreate offers.
You can see an example of the Help file's Command Reference format in
Appendix 1 at the back of this manual, on page 77. Appendix 1 contains
the entry on the Help Command, which explains how to use Help.
In addition to the Command Reference, the Help file includes material
from this manual's User's Guide segment. Just press the F1 key to
launch Help. You can find facts fast by electronically searching the
Help File for the word or phrase you want.
In our printed manual, we've included other general supplemental material as appendices in the back of the book. Check out the Table of
Contents to see the topics contained in each appendix.
After you have the software and card reader installed, browse through
the tutorials in Sec. 3 to get you going. Later, when you want to try
something new or you have a question about a particular function,
skim through the manual's table of contents or search the Help file's
Command Reference to read what you need.
If you're an experienced computer user, you can probably install MapCreate and the card reader without the manual. But, if you need a little
coaching, jump ahead to Sec. 2 and we'll walk you through the install
step by step. (If that's not easy enough, just grab the nearest teenager
and ask him or her to install it for you!)
If you've skipped ahead and already have MapCreate installed, check
out the Quick Start Reference below. If you're the type of person who
wants more background information before you start, turn to How Map
Create Works on page 6, or begin learning about the MapCreate screen
components at the start of Sec. 3.
2
Page 9
Quick Start Reference
This 13-step summary will get you started with a simple map. It assumes
you have already made a full, default installation of the program, and
one of the CDs is in your CD-ROM drive. (Complete installation instructions begin in Sec. 2.) For more detailed explanations, read through the
lessons in Sec. 3. Before you start, make sure your LEI MMC card reader
is installed and working and you know the reader's drive letter. Many
toolbar buttons are labeled and an informative tool tip box pops up when
you point to a button.
How to make and save a rectangle map
1. Start MapCreate by clicking the Windows
your version of
MAPCREATE from the menu.
2. Maneuver the Master Map so you can see the area you want to include in your map. Use the
east or west. Use the
PAN ARROW buttons to move north, south,
ZOOM-IN and ZOOM-OUT (Z-IN or Z-OUT) buttons as
needed to close in on or back away from the area you're viewing.
3. Click the
DRAW MAP BORDERS button in the toolbar. Move the mouse
pointer above and to the left of the desired area. Click, hold down the
mouse button and drag diagonally down and to the right until the desired area is enclosed with the green border box. Then release the
mouse button. You have just drawn a Map Border.
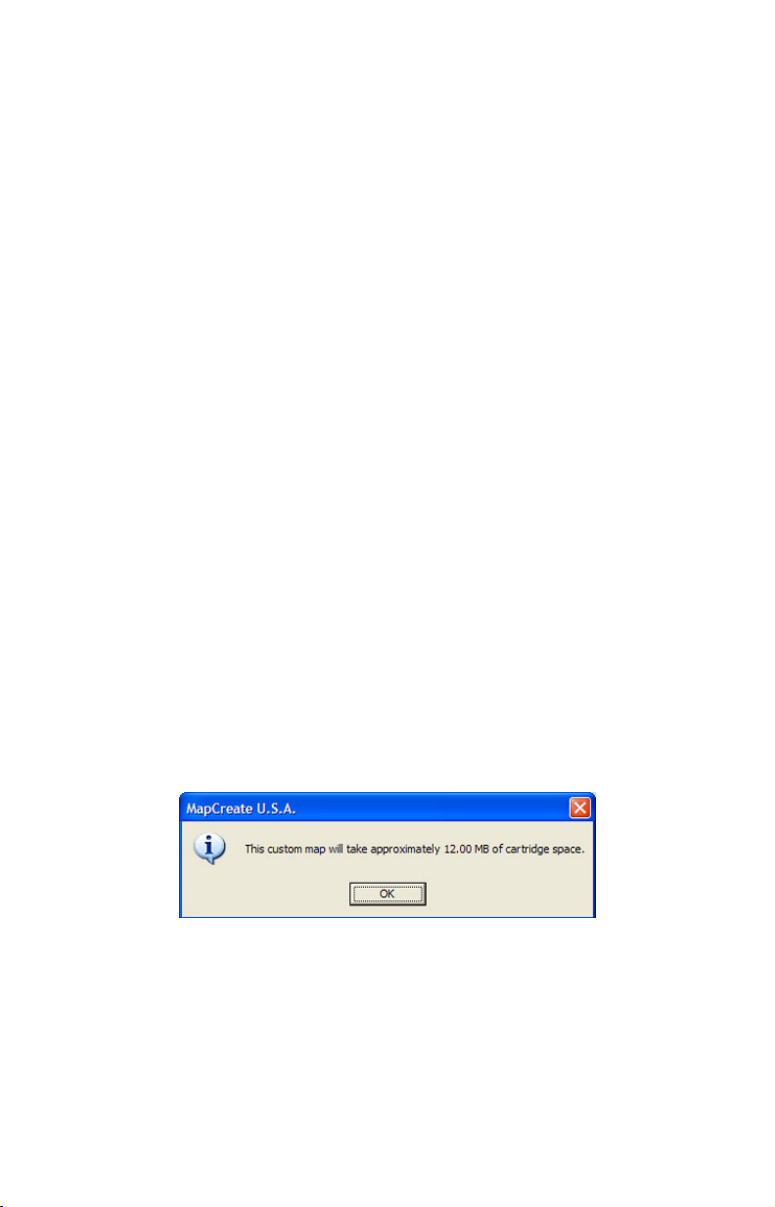
4. With the Map Border displayed, click the
ton, on the Create Map toolbar. After a moment it will tell you your map's
file size. If it fits the card, click
OK to clear the message and jump to step 5.
If the map file is too large for the card, click
redraw your map border a little smaller. Click the
ton, click on any green border line, then re-draw a smaller border box. Use
the Estimate button to re-check the size until it is correct.
START button and choosing
ESTIMATE CUSTOM MAP SIZE but-
OK to clear the message, then
DELETE MAP BORDER but-
Click the OK button to clear the message box from your screen.
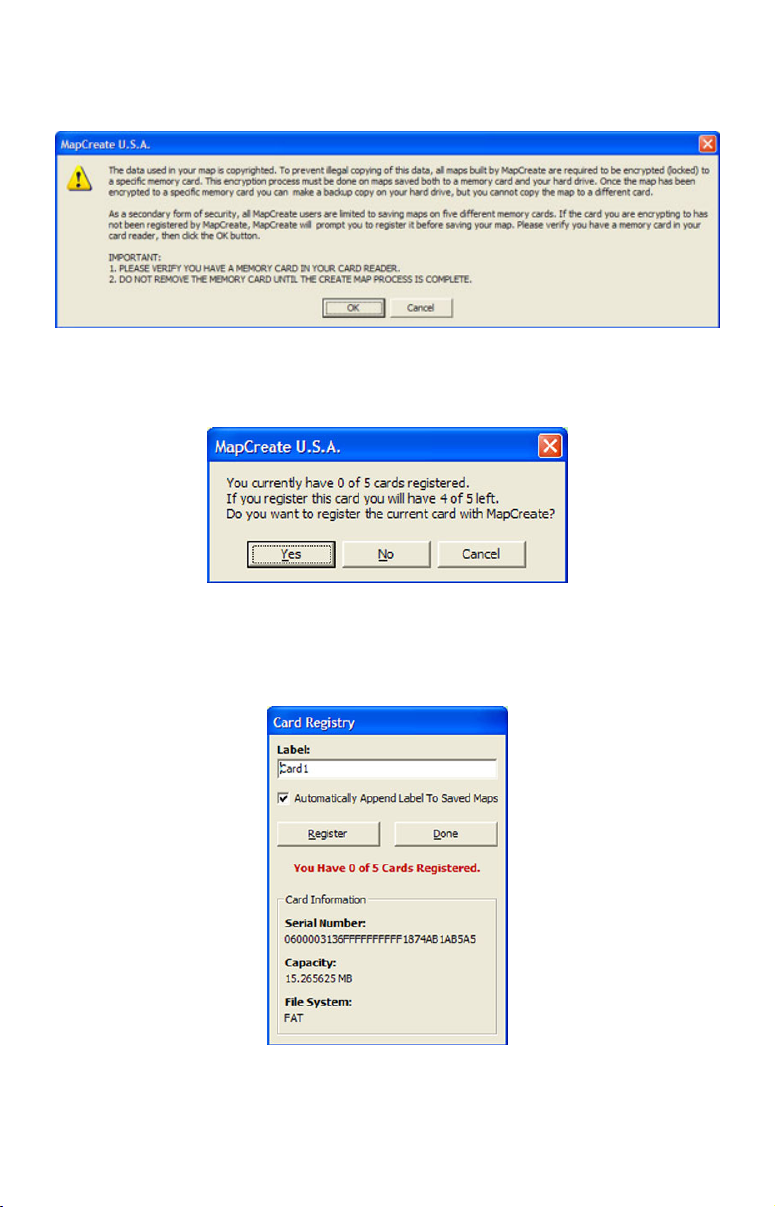
5. When your file is the right size, click the CREATE MAP button on the
Create Map toolbar. The program displays a message about copyright
and encryption.
6. If this is the first time you have tried to save a file to your memory
card, MapCreate will need to register the card. Make sure you have a
card in your card reader. Click
OK to continue. (Clicking Cancel ends
3
Page 10
the process.) If you have already registered the card you are using, click
OK and skip to step 11.
Read the message, and then click OK to continue.
7. Another message box asks whether you want to register your current
card or not. Click
YES to continue the card registration process.
Click Yes to register your current memory card with MapCreate.
8. You can change the label on your memory card if you prefer. Delete
the default name, "Card1," and enter the new name. Click
REGISTER to
continue.
Delete the default label, if you prefer, and enter a new name. Then
click Register to continue.
4
Page 11
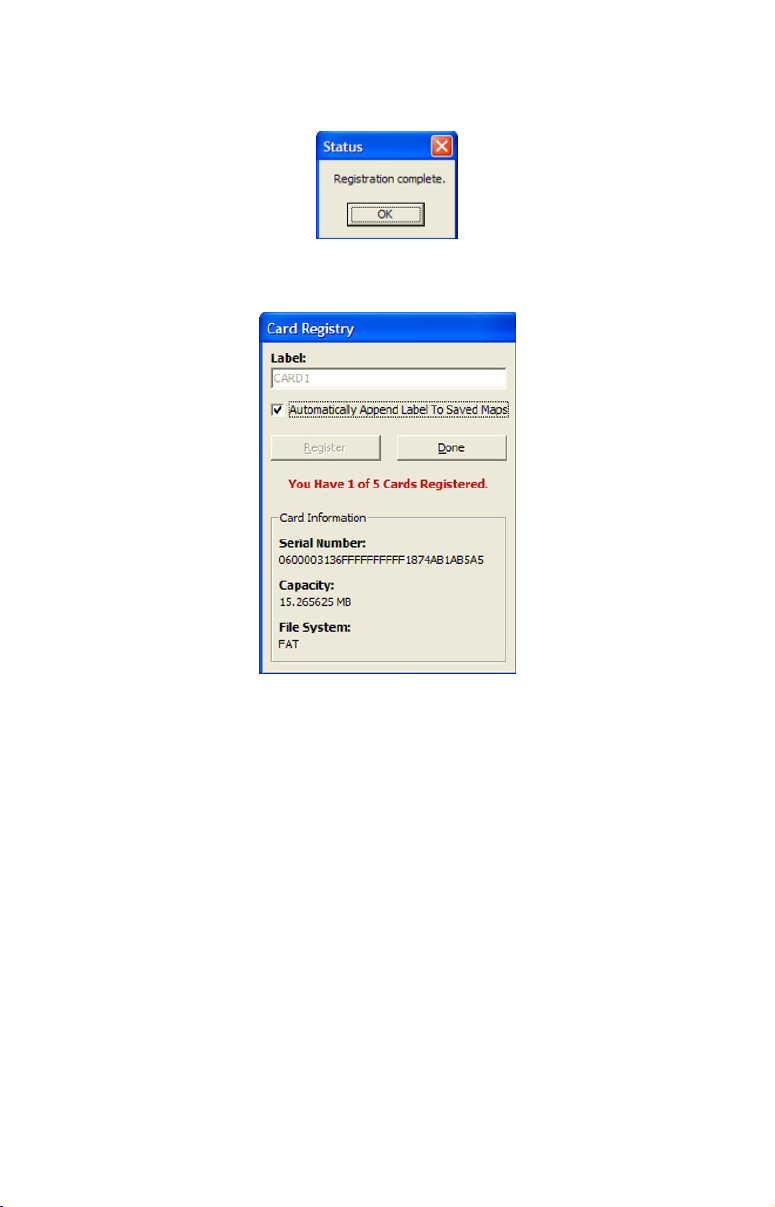
9. Another message box tells you when your card has been registered.
Click
OK to continue.
Click OK to continue the create map process.
10. The Card Registry window appears again. Click DONE to save your map.
Click Done to complete the registry process.
NOTE:
If the
AUTOMATICALLY APPEND LABE L TO SAVED MAPS box is selected (see
figure above), MapCreate will automatically add your card's label
to the end of whatever name you give the file you are saving. Let's
use the figure above as an example. If we name our map "Phoe-
nix.lcm," MapCreate will automatically name the file "Phoenix_CARD1.lcm." To cancel this option, click the Automatically Ap-
pend… box to remove the check mark.
11. A window shows the progress of your map build. When the map is
built, MapCreate displays the
your Map File, and click
SAVE AS dialog box. Type a file name for
SAVE. (MapCreate will save your new custom
map to your memory card.)
12. After the program has saved the map to your card, the Save Progress
box disappears. You can now close MapCreate and remove the card from
the reader.
5
Page 12

13. Follow the instructions in your GPS manual for loading the MMC
or SD card into your unit. It will automatically read the map when the
unit is turned on.
NOTE:
Custom maps and GPS data (waypoints, routes, trails, icons) are
contained in two different file types. We describe their functions in
the following segments on how the program works.
How MapCreate Works: the Basics
You'll be making maps faster if you understand the hoops MapCreate
must jump through to cram a high-detail map into your GPS unit.
First of all, those CDs you just purchased contain a whole bunch of raw
digital cartography data. There are several hundred files of digital mapping information containing lake shorelines, navigation aids, roads, rivers and all the other information that goes into our high-detail maps.
It takes some fancy formatting to fit the whole world onto a few compact discs. Your GPS unit can't read those raw files (called atlas files).
Even if it could, no GPS unit or MultiMedia Card (MMC) has enough
memory to hold that much information.
This is where MapCreate comes in. The program looks at all those raw
atlas files, shuffles the different types of information together, and then
places them onto your computer screen. That's what we call the Master
Map, the main window in the MapCreate interface. By changing various options in MapCreate, you can control how much geographic detail
is displayed on-screen in the Master Map.
It's a pretty cool electronic map, but your GPS can't read it in this form,
either. This is where you come in. You move around the Master Map
and locate the area or areas you want to make a detailed map of. Then,
you use the computer mouse to draw a map border around the region
you want.
Now, this map border isn't really a map yet — it just defines or outlines
the area you want to include in the final GPS-friendly map. If you wish,
you can save the boundary you have drawn as a Map Border File.
MapCreate uses a map border like an electronic shopping list. The program looks at your border, grabs the appropriate raw atlas information, and then glues it all together as a custom map. Now you can save
this data as a Custom Map File on an MMC (or SD card) and load it
into your GPS unit. (If you like, you can backup the Map File by copying it from the MMC card to your computer's hard drive.)
6
Page 13

GPS information — such as waypoints, routes or trails — is handled
differently. You can click the mouse to set a waypoint or plan a route,
then save that information as a GPS Data File. Just save it directly
on or copy it to the MMC and this file is ready to load into your GPS
unit. When your unit makes trails or waypoints in the field, that information is also saved as a GPS Data File. Your GPS unit can save the
file to the MMC, which allows you to copy the GPS Data File back into
your computer. Then you can open, edit and save it in MapCreate.
File Formats & Functions
Well, now you know what makes MapCreate tick. You may be ready to
skip forward to where we explain how our text formatting makes the
manual easy to skim. If that's the case, move on to "How to Use This
Manual: Typographical Conventions" on page 15. But, if you want to
pick up an extra tip or two, look over this segment describing the file
formats and memory cards MapCreate works with.
Map Border File
This file defines the boundary of the raw cartography data that is extracted and converted to a GPS custom map, or Map File. The border
file information is displayed on the computer's Master Map screen as
either a green rectangle (rectangle map border) or a magenta polygon
shape (corridor map border). The file extension is *.lmp.
In MapCreate 7, you can draw a border, then build and save a map
without saving the border. However, some MapCreate power users still
like to save their borders as Map Border Files. That lets them make
changes to a border or even combine different borders without drawing
them from scratch each time. By default, MapCreate will first save a
Map Border File to the C:\Program Files\LEI\MapCreate\Data folder,
but if you prefer you can save it on your memory card. If you save elsewhere, MapCreate remembers that location the next time you save. Version 7 also stores map border information in each Map File. This lets
you generate a border simply by opening an existing Map File, including maps built by previous versions of MapCreate.
A Map Border File can contain one or more different map border sets,
and these border sets don't need to be next to each other on the map.
For example, you can draw a rectangle border around one lake and
then draw a second corridor border around another lake several miles
away, and include both of those border sets into one Map Border File.
There is no limit (other than space on your hard disk, MMC or SD card)
on how many different border sets you can include in a Map Border
File. You can open and edit a Map Border File and then save the file
with the changes you made.
7
Page 14

Custom Map File
This is the actual map format used by your GPS unit. MapCreate takes
the borders you drew (or saved as a Map Border File), extracts that area's
information from the raw atlas data, then converts it to a Custom Map
File, often called a Map File for short. We call this conversion process
"creating the map." The file extension is *.lcm.
By default, MapCreate will first save a Map File direct to your MMC memory
card. If you prefer, you can save a Map File on your computer hard drive. When
hard drive space is available, many users like to archive Map Files in the
C:\Program Files\LEI\MapCreate\Data folder. This allows you to change
maps on your card and reuse a map over and over without creating it each
time. If you save a map to the Data folder, MapCreate will remember that location the next time you save a map, during the current work session. The next
time you start MapCreate, map saves will default back to the MMC card.
You cannot make changes to a Map File once it has been created. If you
want to make changes to a map, return to its original companion Map Border File or retrieve the map borders by opening the Map File (*.lcm). Make
your changes to the border, then create a fresh Map File. You can delete the
old one, or just save the new map over the old map.
Important Notes: File Encryption and Card Limits
We collect and purchase cartography data from several sources. Much of
this data is copyrighted, and our data suppliers require that we protect
our maps from illegal copying. One level of protection requires that you
have the MapCreate DVD in the disc drive each time you launch the program. We also encrypt Map Files, and limit the number of MMC or SD
cards you can use to store maps.
Map File Encryption
All maps built by MapCreate are required to be encrypted (or locked) to
a specific memory card. This encryption process must be done on maps
saved both to a memory card and your hard drive. Once a map has been
encrypted to a specific memory card, you can make a backup copy on
your hard drive, but you cannot copy the map to a different card. (Well,
you can copy it to another card, but your GPS unit won't recognize it.
To work, the Map File must reside on the card it was encrypted to.)
Limited Number of Cards
All MapCreate users are limited to saving maps on a maximum of five different memory cards. MapCreate tracks the number and identity of your cards
by "registering" each card with the program. The software needed to register
cards will not work with third-party card readers, so MapCreate will only
work with the card reader from LEI. Once you have registered a card, it can
never be unregistered and its place exchanged with another card.
8
Page 15

Since you are limited to five, we strongly recommend that before you
buy more cards, you should give some thought to the type of travel you
do and your map size requirements. Memory cards come in several different sizes, so you need to think ahead and match card capacity to the
type of maps you will need.
To help you decide what size cards to buy, make some map borders covering the type of travel you expect. Then use the Estimate Custom Map
Size command to calculate the size.
For example, one Missouri customer frequently travels and fishes in
the four-state area of Kansas, Missouri, Arkansas and Oklahoma. He
purchased an additional 128MB MMC, which holds all four states at
once. This lets him travel long distances for extended periods without
needing a computer to change the maps on his card.
To give you an idea of how big a Map File can be, we made some examples
using the regular versions (no topographic data) of MapCreate USA and
MapCreate Canada, with all mapping categories included. (Size will vary
depending on which package of MapCreate you have.)
In the U.S., Lake Michigan is approximately 26 MB, all of Missouri is 41
MB and the entire state of California is approximately 87 MB. A six-milewide corridor map from San Diego, California to the Maine-Canada border, following Interstate highways, is about 50 MB.
In Canada, a map of Lake Winnipeg (including the major lakes to the
northwest) is 6.84 MB. All of Saskatchewan is 64 MB; all of British Columbia is 69 MB. A six-mile-wide corridor map from Prince Rupert on
the west coast to Louisbourg on the east coast, following Trans-Canada
highways, is about 35 MB.
Important Notes about Cards and File Size
The size of a Map File is important. It must be small enough to fit on
the MMC (MultiMedia Card) that your GPS uses for data storage. This
solid-state, flash memory device is about the size of a postage stamp.
(SD [Secure Digital] cards are also compatible with any Lowrance or Eagle product that uses MMCs.)
At press time, the MMCs shipped with the GPS Accessories Pack version of MapCreate 7 are 32 MB size. If you're using a 32 MB MMC,
your Map File must be less than 32 MB in order to fit on the card. (This
space issue is the same as floppy disks; you can't really fit a 1.44 MB
file onto a 1.44 MB diskette because some space is required for the
disk's file allocation table. In the case of a 32 MB MMC, actual maximum useable space will be approximately 29 MB to 30 MB.)
9
Page 16

MMCs and SD cards are used in a variety of other digital devices. Most
electronics or digital camera stores sell MMCs and SD cards, and at press
time they are available in 16 MB, 32 MB, 64 MB, 128 MB, 256 MB and
512 MB sizes. Cards with even greater capacity will likely be available in
the future. MapCreate is a powerful tool for your GPS, because it allows
you to match your map's file size and detail level to your card's memory
capacity and your travel needs.
NOTE:
Due to software requirements in the GPS units, MMC or SD cards can
hold a maximum of 32 different files at one time for the Lowrance
iFINDER
®
and 1,000 different files for all other Lowrance or Eagle
GPS receivers. The total amount of information cannot exceed the
MMC size capacity, no matter what the number of files is. For example, an 8 MB MMC in an iFINDER could hold approximately one 7.66
MB file, or 32 files, so long as the 32 files totaled 7.66 MB or less.
Other brands of GPS units use direct serial cable connections to transfer
high detail maps from a computer to the GPS device. Lowrance and Eagle
switched from this traditional method to removable memory cards for several reasons. A USB card reader can transfer a large custom map to your
unit 30 times faster than a serial cable connection. Removable media means
you don't have to take a computer and cable with you to load a new map in
the field. If the unit is mounted in a vehicle, there is no need to dismount it
and carry it to a computer. The effective mapping memory capacity of your
GPS unit is restricted only by the capacity and number of memory cards you
want to carry with you, up to the five-card limit. This is a handy feature for
long journeys or for users who can't lug a laptop computer along.
Four factors control Map File size: 1. map detail level option settings,
2. the number of map feature categories turned on, 3. the amount of de-
veloped or naturally occurring features in the area and 4. the amount of
territory, that is, the number of square miles or acres in the area.
Detail Level Options can be set to high or medium. The higher the
level of detail, the bigger the file size will be.
There are dozens of Map Category Options that you can turn off and
on. They include natural features — such as rivers — and man-made
items such as roads, businesses or other points of interest. The more
categories and subcategories turned on, the bigger the file size.
The amount of development in an area is something you can't control. For example, one square mile of city streets will make a larger file
than one square mile of wilderness with a few hiking trails.
The amount of territory you include in a map is a major factor. The
more square miles or acres you include, the bigger the file size.
10
Page 17

The lessons in the manual were written using MapCreate's default settings, with high detail and all categories turned on. If your first maps
don't fit your MMC or SD card, refer to the Help file's Command Reference section for more detailed instructions on controlling file size.
GPS Data File
This file format contains all the GPS navigation information (waypoints,
event marker icons, routes and trails) used by your GPS unit and MapCreate. The file extension is *.usr (for User file). By default, MapCreate first
saves a GPS Data File to the C:\Program Files\LEI\MapCreate\Data
folder, but if you prefer you can save it direct to your MMC card. If you
save elsewhere, MapCreate remembers that location the next time you
save. Since GPS data files are not encrypted, it does not matter how you
move .usr files around. As with other Windows-based files, you can freely
drag and drop these files back and forth from the hard drive to any MMC.
You can open and make changes in a GPS Data File once it has been
created. The contents can include any combination of waypoints,
routes, trails and event marker icons. The information shows up
graphically on the Master Map as symbols with names. The same information is also available as text in a list window, such as the Waypoint List window.
Your GPS unit saves field-collected GPS information in the same format so MapCreate can be used to save valuable travel or adventure
data for a later trip. This also makes it easy to exchange GPS data with
friends using Lowrance or Eagle GPS equipment.
ASCII Text File
This is a universal text file format compatible with word processors and
other software. MapCreate can exchange routes and waypoint lists
with other mapping programs by importing and exporting GPS information as comma-delimited ASCII text files. ASCII (pronounced "askee") uses the *.txt file extension. You don't need to work with these
files, unless you plan to exchange routes and waypoints between MapCreate and other mapping programs. If you want to create a text file
manually, or if you need to manually edit a route or waypoint text file,
this is the waypoint position format MapCreate will export or import:
[latitude],[space][longitude],[space][waypoint name]
Each position is written in degree (decimal) format. For North latitudes, use the latitude with no preceding symbol. For South latitudes, a
minus sign must precede the number, like this: –latitude.
For East longitudes, use the longitude with no preceding symbol. For
West longitudes, a minus sign must precede the number, like this:
–longitude.
11
Page 18

The first waypoint in the following example text file is N 36.06079846º,
W 95.78354912º.
First wpt
Last wpt
In routes, sequence is important. 1st line is wpt 1, 2nd line is wpt 2 and so on.
Latitude Longitude Waypoint Name
36.060798, -95.783549, Church 1
36.060784, -95.761647, Turn North 2
36.161831, -95.761529, Turn N-East On Hwy66 (3)
36.162581, -95.753760, Wpt 004*
36.169981, -95.751795, Wpt 005*
36.382616, -95.556565, Turn N-West 6
36.385315, -95.560847, Turn North 7
36.503465, -95.561081, Stop Turn East 8
Comma and space
separate items.
Text files are saved in the C:\Program Files\LEI\MapCreate\Data folder. For
more information on how to use text files, see the Help file Command Reference
topics "Export GPS Data," "Import Route" and "Import Waypoint List."
GPS Data Manger (GDM) File
This is an older file format used by MapCreate 5 and MapCreate 4 to
hold navigation data (waypoints and such). MapCreate 7 can open these
files, making the program backward compatible with versions 5 and 4.
The GDM file extension is *.low. Although MapCreate 7 is designed to
load and read older GPS Data Files in the *.low format, MapCreate 7
will only save GPS Data Files in the newer *.usr format. Please note
that your MapCreate 7-compatible GPS unit can only read *.usr files.
Atlas File
This is the "raw" file format for layer after layer of cartographic and hydrographic data on our CDs. You never have to work with these files directly. MapCreate pulls data from these files to display the Master Map
you see in the main window on your computer. The program combines the
information from a Map Border File with the Atlas Files to make Map
Files for your GPS unit.
NOTE: MMC Card Formats
If you have an older MMC that has been formatted by a parallel
port Lowrance MMC Interface card reader, the card format may
not be compatible with your newer USB port MMC card reader. If
that's the case, you can preserve your historic GPS data by copying
it to your hard drive with your older parallel port reader. The older
MMC can then be reformatted so it will work with the newer USB
card reader. To reformat an MMC, refer to the instructions that
came with your USB MMC card reader or your sonar/GPS unit.
If you ever have to format your MMC card, you should know that
MapCreate, as well as Lowrance and Eagle GPS products, will only
12
Page 19
read cards that are FAT formatted. MMC cards formatted using
FAT 32 or NTFS will not work with these products.
WARNING:
You should never format an MMC containing a Navionics
chart or Jeppesen
®
aviation database. Formatting the MMC will
®
permanently erase the chart or aeronautical data from the card.
GPS Unit Compatibility
MapCreate 7 is compatible with all Lowrance and Eagle mapping GPS units
that use removable MMC/SD cards for map storage. Some units, however, may
need a free software upgrade to work with MapCreate 7. Upgrades are available for download from the web sites, www.lowrance.com or
www.eaglegps.com. Look for the MapCreate 7 section, which will contain a list
of units that need upgrades. Follow the links to download your free software
upgrade.
If you have questions, call customer service for your GPS unit. Contact
information is on the last page of this manual.
Mapping Detail: There's more here than meets the eye.
The Map Files you make with MapCreate contain more mapping detail
than what is visible on your computer screen. Your MapCreate7-compatible GPS unit takes full advantage of this extra information.
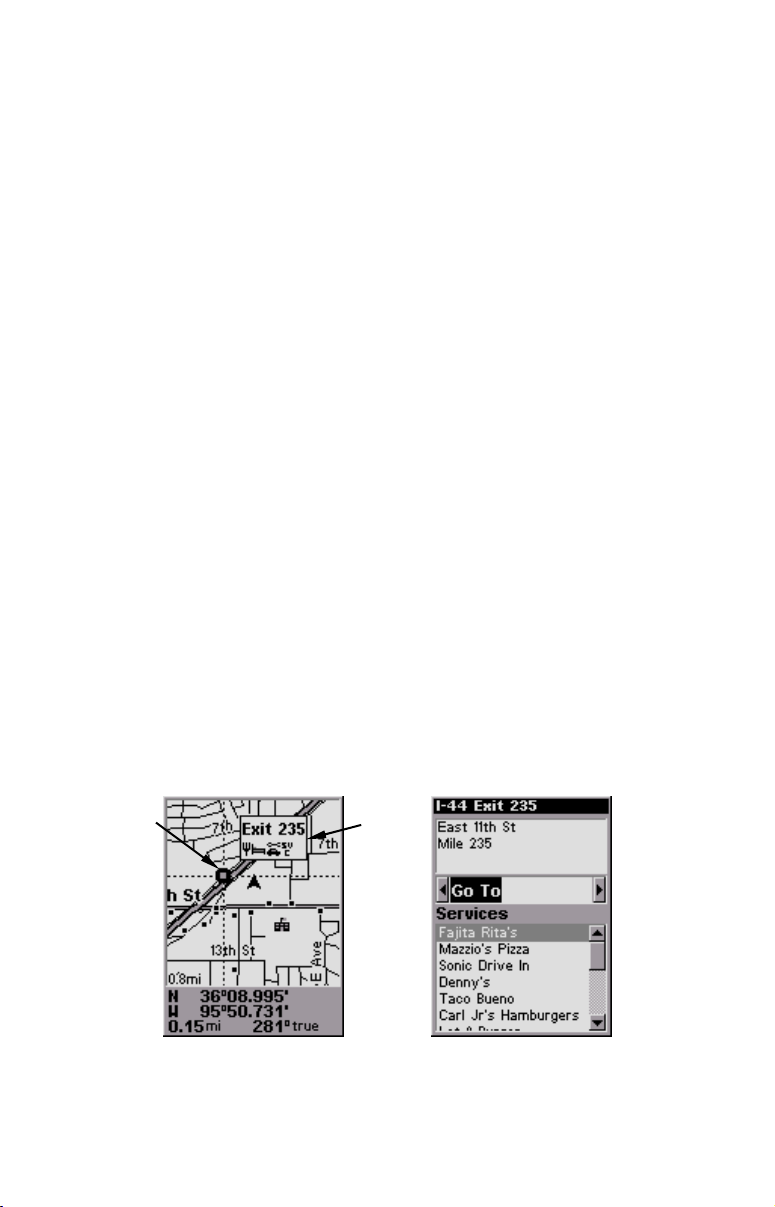
Find Highway Exit Services
For example, move your mouse pointer over a highway exit symbol on
the computer map, and all you'll see is a pop-up tool-tip box listing the
name of the exit. However, in a Lowrance or Eagle GPS unit, the same
exit symbol will show a pop-up box with the exit name and symbols of
all the services available near that exit. The GPS unit can also provide
you a list of those services.
Cursor over
exit symbol
Pop-up
box
At left, an iFINDER GPS screen showing an exit services pop-up icon
box. The iFINDER can then display a text list of those services near
the selected exit, right.
13
Page 20
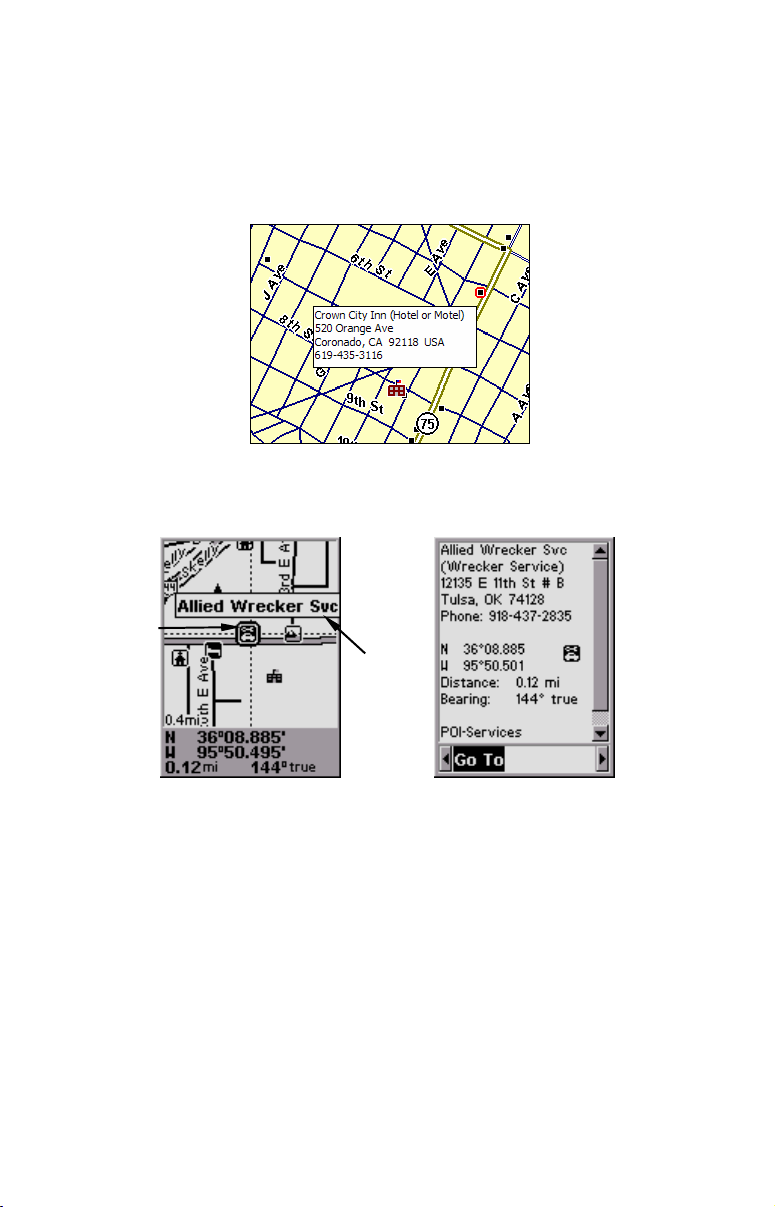
Find Points of Interest
On the computer master map, moving your pointer over a Point of Interest (POI) symbol triggers a pop-up box with the POI's name. With
MapCreate 7, when the information is available, the pop-up box also
displays the POI's address and telephone number. This detailed pop-up
only works for items classified as Points of Interest.
Map with pop-up box showing POI information
In a Lowrance or Eagle GPS, all POI's include the name, address and
phone number.
Cursor over
POI symbol
Pop-up
box
At left, an iFINDER GPS screen showing a POI pop-up name box. At
right, you can call up a page of information on the POI, and the GPS
unit can lead you to the POI's location.
Find an Address
You won't see addresses on your computer map (except listed in the
pop-ups for some POIs). But when the MapCreate information is loaded
into your GPS, you can search for a street address or a street intersection. In fact, your GPS unit can search by name for virtually every
category of mapping detail contained in MapCreate.
All of this information is built into MapCreate's atlas database. As long
as an information category is turned on and included in your Map File,
the data will be available to your GPS unit.
14
Page 21

With these and other elements, MapCreate gives you a phenomenal
amount of mapping detail and information. For a more detailed list of
the map categories available in MapCreate, see Appendix 2, Map Cate-
gory List, on page 81.
How to use this manual: typographical conventions
Most Windows-based computer programs offer several ways to perform a
task, and MapCreate 7 is no exception. With mouse and keyboard, you can
access some commands four different ways! We'll show you all of them,
but we save the most detailed information for our Help file's Command
Reference section. There, the entry on each command includes a summary
box showing all the menus and keyboard shortcuts (sometimes that's the
only hint you need to get on with your mapping project).
In our User's Guide segment (Sec. 3), we usually focus on one simple
way to get the job done, usually by clicking the mouse pointer on a
menu or toolbar button. In the User's Guide, many of the instructions
are listed as numbered steps. This makes it a little easier to follow a
series of instructions when you're skimming the material.
In the printed User's Guide and the Help file Command Reference, the
actual command clicks and keystrokes appear as sans serif, boldface
type. So, if you're in a hurry (or just need a reminder), you can skim the
instructions and pick out where to click by finding the boldface commands. The paragraphs below explain how to interpret the text formatting for those commands and other instructions (If you're already familiar with Windows or many other software manuals you can probably
skip forward to Section 2: Installation, on page 25.).
Mouse
The mouse controls the movement of a graphic symbol on your screen
called the mouse pointer, sometimes also referred to as a mouse cursor.
The mouse performs an action by moving the pointer over a menu, a
button or the map and then clicking the appropriate mouse button.
When the word "click" is used alone, it means "left-click," or to press and
release the left mouse button. When you need to use the right mouse button, we will say so explicitly, such as "Right-click on the waypoint."
Sometimes a command requires more than one click. When we say
"double-click," it means to rapidly click the mouse button two times.
Keyboard
The keys on your keyboard may not be labeled exactly as they are in this
manual. All key names are shown in bold, sans serif type. For example,
the "Control" key is shown as
Ctrl and the "Enter" key is shown as Enter.
15
Page 22

Keys are sometimes used in combinations. For example,
to hold down the
quence
Alt+T|W indicates a two-step combination: hold down the Alt key
while pressing the
Ctrl key while pressing the T key. The hot key se-
T key, release, then press the W key.
Ctrl+T means
"Arrow keys" is the collective name for the up arrow, down arrow, left
arrow and right arrow keys.
To choose a command from a menu, you can use the mouse or press a
key combination.
Instructions
Words in small capital letters, in a bold sans serif type, indicate that you
are to take an action of some kind with a command, menu, box or other
item. For example, "You can use the Create Route command to plan a
path to navigate with your GPS. To begin the route, choose
CREATE ROUTE."
When the phrase "choose command" is used in the Help file Command
Reference section, it means to run or execute the specified command.
For example, if the manual says "choose
CREATE WAYPOINT," it means to
run the Create Waypoint command. You can choose commands by clicking the mouse pointer on the menus or toolbar buttons, or by pressing
the appropriate hot key or shortcut key on the keyboard.
Commands are sometimes described as menu sequences, to help you
find the command faster. For example, "to open the Trail List window,
click
VIEW|TRAIL LIST," means to mouse click on the main menu's View
command and then click the Trail List command on the submenu.
Specific text or numbers you must type are shown in bold, sans serif
type. For example, if the manual says "Enter a Zoom range of
650
miles," you would click in the Zoom Range Window, type the numbers
650, then press the
Enter key.
Place holders for other items you must supply yourself, such as file
names, are italicized. For example, when the manual says "Enter a
name in the File Name text box," you would click in the text box, type
the name you want to use for the file, then press the
Enter key.
This manual is written specifically for MapCreate™ 7, but for simplicity,
the program is often referred to as "MapCreate" or "MapCreate 7."
MapCreate 7
MapCreate 7 is ideal for aviation, backpacking and related outdoor activities, but it was specially designed for hunters. Maps made with MapCreate will work in all Lowrance
mapping software to offer such extensive boundary data for several types
of public hunting lands, game management units and related areas.
®
GPS units. MapCreate 7 is the first GPS
16
Page 23

NOTE:
We strongly recommend you check the Lowrance web site,
www.lowrance.com, for free downloads of updated software
and instruction manuals.
The high detail map data provided with this program is organized into
six regions. To install MapCreate, follow the instructions in the manual.
Material covered includes:
New Mapping Data
Topographic elevations, public hunting areas and game management
units are discussed along with other new data. Be sure to read the map
data disclaimer following the data descriptions.
Additional Symbols
New hunting-specific symbols make it easier to scout ahead of the hunt
and mark important spots.
Searching
MapCreate lets you search for POIs, land features and more, just as
you can in a Lowrance GPS unit.
Aviation Searching
Load a card containing a Jeppesen® Aviation Database into the card
reader and MapCreate lets you search for items such as airports and
VORs.
Find Nearest Waypoint or Nearest Highway Exit
It's easier to find these items with the new right-click shortcut.
Map Category Options Toolbar
A drop-down menu lets you select pre-set or customizable category settings for activities ranging from hunting to aviation.
Routing
MapCreate lets you accurately add POIs, land features and aviation
navaids to routes with a click of the mouse.
Dynamic Pan Arrows
The permanent pan arrows that were located along the sides of the
Master Map window have been replaced with pop-up pan arrows. You
can even pan diagonally!
Pop-up Boxes
Pop-up information boxes for POIs, land features and interstate highway
exits now include elevations. Exit pop-up boxes also list nearby exit services.
Color Legend
A legend describes the colors of different areas.
17
Page 24

Map Coverage by DVD
The program's map data is provided on one DVD. If you choose to use
Full Install, all of the high detail map data will be available from your
hard drive. This requires 4.5 GB of space.
A Custom Install lets you select only the help file, sonar viewer, and
map data.
The Compact Install loads your hard drive with the basic program,
along with navigational aid data and a medium-detail world map. This
requires approximately 300 MB of space.
New Mapping Data Types:
Elevation Contour Lines
MapCreate includes topographic elevations for all 50. These are shown
as major and minor contour lines, with numbers showing the elevation
above sea level. Contour lines begin to appear at about the 60 mile
zoom range (depending on your monitor size and resolution). At that
zoom level and closer, the mouse pointer also triggers a pop-up box
showing elevation at that point.
Hunting
Public Hunting Area boundaries and their names from 48 states are
included. Alaska and Hawaii are not included.
Game Management Unit boundaries for 22 states are included, in the
following categories: antelope, bear, deer, elk goat, moose, mule deer,
sheep, turkey (spring and fall) and whitetail deer.
The GMU states include: Arizona, Colorado, Iowa, Idaho, Kansas, Kentucky, Massachusetts, Minnesota, Missouri, Montana, North Dakota,
Nebraska, New Mexico, Nevada, New York, Ohio, Oregon, Pennsylvania,
South Dakota, Utah, Wisconsin and Wyoming.
State and federal wildlife refuge and wilderness area boundaries are
also included.
Tip:
For links to all 50 state wildlife agency web sites, as well as those of
the Canadian provinces and many wildlife conservation organizations,
be sure to visit the Lowrance web site, www.lowrance.com.
Other Data Types
There are other areas that are open to hunting in some states or are
otherwise important to hunters, and we have included them. These are
boundaries for state parks, state forests and military reservations.
18
Page 25

Hikers and backpackers as well as hunters will appreciate the addition of
intermittent streams. They are just part of the overall improved hydrography data which has better resolution and pop-up names. U.S. coastline
and lakeshore detail has been dramatically improved. MapCreate also
now includes USGS 1:24000 scale quadrangle map boundaries and their
names, which are searchable. This makes it easier to determine what
USGS topo maps you may want to purchase for your outdoor adventures.
Sections, township and range lines are included. Boundaries have also
been added for cities over 2,500 population.
IMPORTANT NOTICE:
Do not rely on this product as your primary source of information for
navigation or area boundaries. You are responsible for using official
government maps and charts during your outdoor activities. Due to
the varied ownership and fluctuating borders of publicly managed
hunting lands and game management units, you should also consult
boundary signs and other on-site identifiers when using those areas.
Activities on public hunting lands are carefully managed to ensure the
future of game and non-game species. You must consult local wildlife
agency regulations for the hunting areas you use. The Lowrance web
site, www.lowrance.com, contains links to the web sites of all state
and Canadian provincial wildlife agencies to help access both hunting
regulations and official mapping information. Also, updates to MapCreate's mapping data are ongoing; MapCreate customers may download
regional updates of hunting-related data categories from the Lowrance
web site.
LEI makes no warranties, express or implied, regarding the maps
and information contained in this product, including any implied
warranties of merchantability, satisfactory quality, fitness for a
particular purpose or non-infringement of third party rights. A full
description of our warranty is available in the End User License
Agreement in the MapCreate manual.
Hunting Specific Symbols
MapCreate has a basic set of 42 symbols used to represent waypoints
or event marker icons. That set contains several hunting symbols –
such as deer track and tree stand – but we have added more than a
dozen new ones. Now you can use a specific symbol to mark items ranging from turkeys to ATVs and from food plots to buck rubs.
Searching
One of the most powerful new functions in MapCreate 7 is the ability to
search for POIs and several types of land features. To launch the com-
19
Page 26

mand, click the
FIND button on the Map Navigation toolbar (it looks like
a binocular). The Find Menu appears, with a dialog box for the item's
name, and pull down menus for the major category and minor category
to search in.
For nearest searches, MapCreate begins looking from the current center of the map. When you select an item from the search results, that
item will be snapped to the center of the map. When you search for a
river, the map will be centered at the mouth of the river.
®
You can insert an IMS™ Fishing Hot Spots
map card in the card
reader and you can search for several categories of Fishing Hot Spot
items. However, you must first locate the desired lake and center it in
the map before searching for specific fishing items.
When searching for any map item, you often must know the item's "official" name to locate it (especially the first part of the name). Here's an
example search, showing the importance of knowing an official name:
We'll look for Truman Lake, which is located in Henry County, Missouri. All the locals and regular out-of-state visitors know this manmade water body as Truman Lake, but that's not the official name
1. Click the
FIND toolbar button.
2. In the Name box, enter Truman Lake.
3. In the Major Category menu, select Water.
4. In the Minor Category menu, select Lake/River Names, to narrow
the search, then click the
FIND button on the menu.
MapCreate displays a list of items, but Truman Lake isn't there! That's
because the full name is Harry S Truman Reservoir. Instead of "Truman Lake," just try "Harry," "Harry S" or "Harry S Truman," but don't
use "Harry Truman" without the "S" or you'll miss it.
A search for "Harry S Truman" produces a list of possible answers in
the middle list window. Scroll through the list and select Harry S Tru-
man Reservoir (2). Next, in the bottom list window, click on a location
to show it on the map, then click
ply zoom in until you see the item you were searching for.
OK to clear the Find menu. Now sim-
When searching for a section of land, it helps to know the legal description of the land you are looking for. Land descriptions are read from left
to right, and you must enter your search in the same order. For example, to look for the section containing this property: N 1/2 SE 1/4 SW
1/4, S24, T32N, R18E in Wisconsin, in the Name box you would enter
20
Page 27

s24,t32n,r18e, which stands for Section 24, Township 32 North, Range
18 East. Note that capital letters are not needed and the entries are
separated by commas with no spaces.
Aviation Searching
With your Jeppesen aviation database you can search for airports, intersections, NDBs and VORs. You can search for intersections only by Identifier. You can search for the other items by Name, Identifier or City.
To find the Bartlesville, Oklahoma, VOR by City,
1. Insert the card containing your Jeppesen database in the card reader,
and wait for MapCreate to read the card.
2. Click the
3. In the Name box, enter Bartlesville.
4. In the Major Category menu, select Aviation.
5. In the Minor Category menu, select VORs.
6. In the Search Options box, click By City then click the
the menu.
7. Only one "Bartlesville" appears in the results list windows. In the
bottom list window, click on Bartlesville, then click OK to clear the
Find menu. Now simply zoom in until you see the item you were looking for.
FIND toolbar button.
FIND button on
Find Nearest Waypoint, Highway Exit
Right click on the map and a pop-up menu gives you the option to FIND
NEAREST WAYPOINT or FIND NEAREST INTERSTATE HIGHWAY EXIT. Click the desired
command and MapCreate will search for the item nearest to where you
clicked the map. The found item will snap to the center of the map. The
command will find the nearest waypoint even if it hasn't been saved yet
in a GPS data file.
Map Category Options Toolbar
MapCreate Topo contains a Map Category Options toolbar. The toolbar
includes a
Map Category Options Widow with one click.
There is a
organized map category displays for Aviation, Boating, Driving, Hiking
and the default, Hunting. Each display can be customized by turning
different categories off and on and there are even two sets called Customize 1 and 2. No matter how much you adjust the displays, you can
VIEW MAP CATEGORY OPTIONS button which opens or closes the
MAP USE drop down list that lets you select from several pre-
21
Page 28

return all of them to their defaults by clicking the new
DISPLAY SETTINGS button.
We identify various land types with different colors, and you may want
to temporarily turn some categories off for better viewing of some details. For example, in military reservations, the dark blue color nicely
identifies the area boundaries, but blue roads don't stand out as they
normally do. Before you build a custom the map, just remember to turn
the map category back on if you want it included in the custom map.
Routing
MapCreate Topo makes it easier than ever to plan an aviation or other
route based on navaids, POIs or land features.
Click the
where in the Help documentation) to activate the command. Then, simply
click on the desired navaids in order to make your route. Previous versions created an ordinary numbered waypoint where you clicked, which
often covered up the item you were routing to. Now, when you click on a
named item, a small red route dot appears on top of the item's symbol, and
the item's actual name and position appear in the route waypoint list.
When editing routes made in this manner, you can insert additional
route waypoints from the master map with a right click, but to delete a
point from the route, you must open the route waypoint list and right
click the point there.
CREATE ROUTE button (described fully in the manual and else-
RESET CATEGORY
Dynamic Pan Arrows
Previously, MapCreate versions panned the Master Map by clicking on
Pan Arrow Buttons that were fixed to the sides of the map window.
MapCreate 7 has eliminated those four buttons and replaced them with
white pop-up pan arrows. When you move the mouse pointer near the
edge of the map, the pointer becomes a Pan Arrow. Just click to see
more of the map in the direction indicated. Move the mouse pointer
away from the edge and it reverts to the previous command you had
selected. You can also point to the corners of the map to pan diagonally.
Pop-up Boxes
Pop-up info boxes for POIs, land features and interstate highway exits
now include more information. To display a pop-up box, move your mouse
pointer over the item at an appropriate zoom range. Depending on your
computer monitor size and resolution, these detailed pop-ups become
available beginning somewhere in the 50 to 30 mile zoom ranges. If you
don't see the desired information, just zoom in a little closer until it becomes available.
22
Page 29

Water pop-ups now show the name of the water body. Interstate highway exit pop-ups show: the exit number, an exit description (usually
the name of the cross street), the mile marker and exit services located
off the highway within approximately one mile from the exit.
Elevations are shown in pop-ups for POIs, land features and interstate
highway exits. Elevation pop-ups can also give you the elevation for
points located between the displayed contour lines. For example, in a
gradually sloping area between an 850 foot contour line and a 900 foot
line, slowly move the mouse pointer between them and you'll see readings such as 887 feet, 871 feet, 869 feet and so on.
Color Legend
Public hunting areas: orange
Wildlife refuges: dark green
U.S. Army Corps of Engineer land: olive green
National forests; state forests; national, state and local parks; golf
courses and other recreation areas: light green.
Swamps: medium green
Military reservations: dark blue
Other public lands (such as airports and universities): white
23
Page 30

Notes
24
Page 31

Section 2: Installing MapCreate 7
System Requirements:
MapCreate 7 requires the following minimum system resources:
• IBM
• Pentium
• 32 MB RAM
• approximately 300 MB free hard disk space, depending on your
• 256 color display.
• Microsoft
• DVD/CD-ROM drive.
MapCreate will run on a system with the above specifications, but the
program will work slowly. A faster processor and more RAM will significantly improve program operation. You can also optimize performance by installing as much of the program as possible to run from your
hard drive instead of the DVD/CD-ROM drive. (Do this by using the
Custom or Full install modes, described below.)
IMPORTANT NOTES:
For copy protection purposes, you must have the MapCreate
DVD in the disc drive each time you launch MapCreate. De-
pending on the type of installation you select, you may remove the
DVD after starting the program. (This allows you to use the
DVD/CD-ROM drive for another purpose, such as listening to music, while working with maps and GPS data.)
®
compatible PC.
®
133 MHz or faster processor.
version of the program and 4.5 GB for full install.
®
Windows® 2000 or XP. The software will not work
®
with Windows
Vista.
The data used in our maps is copyrighted. To prevent illegal copying of this data, all maps built by MapCreate are required to be encrypted (locked) to a specific memory card. Encryption requires
MapCreate to retrieve unique information from your card. This requires special software not compatible with third party card readers, so MapCreate will only
work with the MMC/SD card
reader provided by LEI. (MapCreate 7 will also work with older
Lowrance Electronics USB card readers.) If the card reader is not
correctly installed with the LEI drivers, MapCreate will not open.
After all the MapCreate files are installed, the installation program
will install the drivers for the LEI card reader.
25
Page 32

Installation Types
There are three types of installations:
Compact - Installs navigational aid data, the low-detail back-
ground map (Master Map) data and world-wide, medium-detail map data. Takes approximately 300 MB
of free hard drive space.
Custom - Only allows installation of the help file, sonar viewer
and map data.
Full - Installs every possible option and all the mapping
data. MapCreate runs fastest with this option. Cau-
tion: Be patient if you choose full install. It may take
several minutes for all the files to install to the hard
drive. You will be prompted to insert the appropriate
disc(s) throughout the installation.
For Compact or Custom installations of version 7: the high detail map
data is organized into multiple regions recorded on one DVD.
Installing MapCreate
For best performance, we suggest you uninstall previous versions of MapCreate before installing version 7. To install MapCreate, follow these steps:
WARNING:
You must close all other open applications and temporarily
disable any virus scan software before you install MapCreate. Some virus scanning programs will cause undefined error messages and prevent MapCreate from installing correctly. If strange errors occur during install, make sure virus scan software is off, then reinstall MapCreate. When installation is finished, remember to turn your virus scan
software back on only after your computer has rebooted
and MapCreate and the card reader are installed.
1. Insert the DVD into the computer's drive.
2. The MapCreate 7 setup program should start automatically and you
can skip to step 5. If it does not, click the Windows
START|RUN button.
Click the START button on the Windows taskbar, and then click RUN.
26
Page 33

3. Type
D:\setup.exe (where D: is the drive letter for your CD/DVD-ROM)
Type the setup command directory path and file name.
4. Click OK to begin installation.
NOTE:
If you are using Windows 2000 or Windows XP Professional, you
may receive an error message if you are not logged on with administrator privileges. If this occurs, you can complete the MapCreate
installation by first logging on as an administrator, then proceeding
with step 1 on page 26.
5. Follow the on-screen instructions:
A. InstallShield® will load. A message box will appear, reminding you
to disable any anti virus software. Click OK to continue.
27
Page 34

B. Read the complete License Agreement. If you accept the agreement,
click the Y
ES button; if you do not accept, click the NO button, and
MapCreate will not be installed on your computer.
C. Choose a destination folder for the program. You can accept the
default (recommended) or you can choose another location. Click N
to continue the installation.
EXT
28
Page 35

D. Select the type of setup, and click the NEXT button to continue the
installation. (See page 26 for a description of the options.)
E. If you chose Custom install, select the components to install. Then
click N
EXT to continue.
29
Page 36

F. With all your preferences determined, InstallShield will
begin copying files. A progress window is shown.
G. If needed, the install will prompt you for additional discs. When
asked, insert the appropriate CD and click OK to continue the setup.
30
Page 37

H. The Setup Status window shows the progress of the installation.
I. When the program files have been copied, InstallShield Wizard will
display a message that setup is complete. Click F
ard program.
J. After the MapCreate files have been installed on your computer, you
are prompted to install the MMC card reader drivers. Make sure the
INISH to close the wiz-
31
Page 38

card reader is not plugged in yet, then click OK to continue. (If you
stop the program, you can install the card reader later, but MapCreate
will not run until the card reader is installed. To install later refer to
the instruction sheet that came with the card reader.)
K. The setup program for the USB SD/MMC Reader loads.
L. When the setup program has loaded, a welcome screen is displayed.
Click the N
EXT button when you're ready to begin the card reader in-
stallation.
32
Page 39

M. Read the complete License Agreement. If you accept the agreement,
click Y
ES. (If you do not accept, click NO, and the SD/MMC Reader soft-
ware will not be installed on your computer, and MapCreate will not
run.)
N. Choose a destination folder for the SD-MMC Reader program. This
is where you want the files to be located on your hard drive. You can
accept the default (recommended) or choose another location. Click
N
EXT when you're ready to continue.
33
Page 40

O. Select the folder where you want to place the shortcut for the
SD/MMC Reader program. You can accept the default or choose an-
other location. Click N
EXT to continue the installation.
P. The setup program is ready to install the SD-MMC Reader program
on your computer. Click N
EXT to continue.
34
Page 41

The setup program displays the progress of the installation.
Installation complete.
6. When the card reader install program is finished, the InstallShield
wizard completion window appears. We strongly recommend that you
restart your computer now. MapCreate and the card reader will not
run until your computer restarts.
35
Page 42

With the "restart my computer now" option selected, click
FINISH. After
the computer restarts and Windows has finished loading, plug the card
reader into a USB port. After Windows finishes installing the card
reader, it will appear as an additional drive letter in My Computer. The
card reader and MapCreate are ready to use. If you are running an
anti-virus program on your computer, be sure to turn it back on at this
time.
Care of your MapCreate DVD
Protect the shiny recorded surface of the compact discs from scratches,
fingerprints and dirt. Hold a disc along the outer edge or by the center
hole. Clean a dirty disc with a soft, dry cloth. You can also use a commercial DVD/CD cleaner or ethyl alcohol to remove fingerprints and dirt. Do
not leave your discs in direct sunlight or in a hot, humid location.
Starting MapCreate
To start MapCreate, make sure the MapCreate DVD is in your
DVD/CD-ROM drive. Click the Windows
START button, then click on the
MapCreate shortcut in the program menu. (A disc must be in the drive
each time you start the program.)
Click the Windows Start button, All Programs, LEI, and then
your MapCreate version. (This is the default location for the shortcut).
If you prefer, you can start MapCreate using the alternate methods
described below.
To start MapCreate from Windows Explorer:
Open Windows Explorer, if it is not already running. Navigate to the
folder in which MapCreate is installed. By default the path is:
C:\Program Files\LEI\MapCreate. Next, double-click MapCreate.exe
to launch the program.
36
Page 43

Double-click MapCreate.exe to start MapCreate 7 from
Windows Explorer.
For more details on the many other ways to create and manipulate shortcuts, open your Windows help file and search for the word "shortcut."
37
Page 44

Notes
38
Page 45

Section 3: User's Guide
Working With MapCreate
Starting MapCreate
If you installed the Compact version of MapCreate, make sure the
DVD/CD-ROM for the area you intend to use is in the DVD/CD-ROM
drive. Otherwise, you can insert any MapCreate DVD. (Remember, even
if you installed the Full version, a disc must be in the drive each time you
start the program. This is one of MapCreate's copy protection features.)
NOTE:
• For earlier MapCreate owners: If you have an earlier version of
MapCreate installed on your computer and run the program from the
CD, be sure you have the correct version of the CD in your drive
when working with the two programs. Running MapCreate 6.3 with
the version 7 DVD or vice versa will generate an error message when
you try to build a map. The data discs are not compatible with each
version of the program. If you made full custom installations of both
programs to your hard drive, this error message will not appear because each version has its own unique directory on your hard drive.
You can start MapCreate by clicking the
your version of
MapCreate icon in the MapCreate program group.
Start MapCreate by clicking the Windows START button and then choos-
MAPCREATE from the menu, or you can double-click the
ing MapCreate from the Start menu.
START button and choosing
The MapCreate Screen
When you start MapCreate, the opening splash screen appears while
the program is loading. It will take a moment or two for the program to
load the map detail.
39
Page 46

MapCreate 7 splash screen appears while program is loading.
Once it's finished loading, you'll see a screen that looks like this, with a
map of the world and the Map Categories window open:
MapCreate 7opening screen.
MapCreate has several other windows that are used to control mapping
data. If they were all opened, or turned on, the program interface
would look like this (labels have been added for illustration):
40
Page 47

Zoom Out Zoom In
Status bar
MapCreate 7 GPS text list windows.
You can drag the borders of these windows to resize them to suit your
viewing preferences. The windows can also be manually arranged around
the screen, or you can just use the default Auto Arrange setting, under the
Window menu. When you close the program, MapCreate remembers the
windows and map you were using. The next time you start MapCreate,
the program opens the previous map and windows, just as you left them.
Closing MapCreate
To close or exit MapCreate, click
FILE|EXIT or click the X CLOSE
button at the top right corner of the screen.
MapCreate Screen Components
If you're pretty familiar with how Windows programs work, you may want
to skip ahead to the segment on Creating Rectangle Map Borders on page
54. But, before we actually start mapping, we'd like to describe the different
elements of the MapCreate screen. The next few segments explain what
they are and what they do. You'll also learn how to move around the map.
Master Map Window
The largest window is the Master Map window. It displays the basic
world background map you'll use to prepare Map Border Files and Map
41
Page 48

Files for your GPS. You can close the other list windows if you're not using them. (You can always open them later when you need them. Click
VIEW and then click the window name.) This allows you to see as much of
the Master Map as possible on your computer screen. To close the other
windows, click the X
CLOSE WINDOW button in the top right corner of
each window frame. You cannot close the Master Map window.
Event Marker Icon (boat ramp symbol)
Route
Line
Waypoint
Pan
Button
Map
Border
Route
Waypoint
Border
Handle
Box
Zoom Buttons
Master Map window shows a rectangle map border around Lake Eu-
faula, along with a route, waypoints and event marker icons. The
Zoom Range is 50, which indicates that it's 50 miles across the map.
Zoom Range (miles)
Tips:
• You can use the Print Map command to print what's displayed in
the window. This lets you make a quick, customized, paper backup
map for your travels. (A prudent navigator never relies on only one
source of navigation information.) Because of variances in monitor
size, screen resolution, paper size and printer drivers, what you see
in the Master Map window may not fit your paper page exactly.
• When your mouse pointer moves over a map feature or landmark sym-
bol, a Pop-up Tool Tip Box appears listing a name or description of what
the symbol represents.
42
Page 49

Selected
Symbol
Tip Box
Pop-up Tool Tip box. When the cross-hair pointer hovers over the visi-
ble wreck symbol, a red border surrounds the symbol and the tip box
appears. This wrecked vessel is the "Three Brothers."
Main Menu
MapCreate's main menu is similar to that of other Windows programs. It
consists of the File, Edit, View, Insert, Tools, Window and Help menus.
You can click with a mouse or use the hot keys to access the menus and
their submenus. For example, to see all the commands on the File menu,
use the mouse pointer to click
keys
Alt+F. Some commands also have shortcut keys, such as F1 for the
FILE or use the keyboard and press the hot
Help command. All the commands — with their hot keys and shortcut
keys — are listed alphabetically in the Help file's Command Reference
section.
Toolbars
MapCreate 7 includes five different toolbars, all designed to speed you on
your way to creating maps quickly. Each toolbar contains a row of buttons
that you can click to execute various commands. You can move the mouse
pointer over a button and a pop-up tool tip box shows the button name
and/or function.
The first time you start MapCreate, only the Create Map (Easy) and the
Map Navigation toolbars are visible. (You can display either the Create Map
(Easy) or the Create Map (Advanced), but not both at the same time.) To
display additional toolbars or remove one from your screen:
1. Click
VIEW|TOOLBARS. A toolbar is active when a check mark is displayed
in the box to the left of the toolbar's name. If the toolbar is not active, the
box is empty.
43
Page 50

2. To view a toolbar click the box beside the name of the toolbar you want to
display. A check mark appears, and the toolbar is displayed on your screen.
3. To remove a toolbar click the check box beside the name of the toolbar you
wish to close. The check mark disappears, and the toolbar is removed from
your screen.
4. Repeat the procedure for each toolbar you wish to display or remove.
At left, the Create Map (Advanced) toolbar is checked, so it is active, or
visible. The figure at right shows that all four toolbars are active. To
remove a toolbar, simply click the check mark.
The tables below describe the commands on each toolbar.
NOTE:
The Create Map toolbar allows you to choose between an easy version and an advanced version (both described next).
Create Map (Easy) toolbar
Draw Map Border: draws map borders as
green rectangles.
Delete Map Border: clicking anywhere on the
map border or on any black handle box with this
tool removes the border from your map.
Estimate Map Size: predicts file size from current borders.
Create Map: creates a map file your GPS unit
can use from an area defined by a map border.
Create Map (Advanced) toolbar
44
Page 51

Draw Map Borders: draws map borders
as green rectangles.
Draw Corridor Map Borders: draws
irregularly-shaped magenta corridor borders. Useful for areas that don't fit neatly
into rectangle borders, or for making strip
maps that follow cross-country routes.
Delete Map Border: clicking anywhere
on a green map border or repeatedly clicking the handle boxes of a magenta map
border with this tool removes the border
from your map.
Clear Map Border: lets you clear or
erase all map borders displayed on the
map.
Estimate Map Size: calculates an estimate of the final file size of your map based
on the current map borders.
Create Map: creates a map file your GPS
unit can use from an area defined by a
map border.
File toolbar
New GPS Data File: clears or erases from the screen
any GPS data appearing on the Master Map.
Open GPS Data File: Opens an existing GPS data file.
Save GPS Data File: saves to disk any new or edited
GPS information displayed on the Master Map.
New Map Border File: clears or erases from the screen
any map borders appearing on the Master Map.
Open Map Border File: opens a map border file previously saved by MapCreate.
Save Map Border File: saves to disk any new or edited
map borders displayed on the Master Map.
45
Page 52

Open Map: opens a map saved to disk.
Save All: saves a map border file and then a GPS data
file, when both types of information are displayed on the
Master Map.
Print Master Map: prints the current Master Map
window display, including any GPS information shown
on the map.
GPS Data toolbar
Create Waypoints: lets you set a waypoint on the Mas-
ter Map.
Create Route: lets you create a route on the Master
Map, with waypoints in a sequence.
Create Icons: Lets you set an icon on the Master Map.
Insert Waypoint: opens a dialog box that lets you set a
waypoint on the map by entering position coordinates.
Insert Route: opens a Route Waypoint List window and
creates an "empty" route with no waypoints.
Insert Route Waypoints: lets you change a route by
inserting new route waypoints.
Insert Icon: opens a dialog box that lets you set an event
marker icon on the map by entering position coordinates.
Cut: deletes text or a selected GPS data item from a waypoint list, route waypoint list or icon list and puts it in
the Windows clipboard.
Copy: copies text or a selected GPS data item from a
waypoint list, route waypoint list or icon list to the Windows clipboard.
Paste: inserts text from the Windows clipboard. Inserts a
GPS data item from the Windows clipboard into its respective list window. (You cannot paste one type of GPS
data into a list window for a different data type.)
46
Page 53

Undo: lets you reverse a command or function you have
executed.
Redo: lets you re-run a command or function you had
previously reversed using the Undo command.
Delete: erases a selected item from a waypoint list, route
waypoint list or icon list.
Map Navigation toolbar
Center Map: clicking with your mouse anywhere
on your map puts the point you clicked on at the
center of the screen.
Full Map: displays the map at the original default zoom setting.
Zoom Area: lets you drag a selection box to zoom
in on a specific area on the map.
Zoom In: reduces the number of square miles
displayed on the Master Map Window.
Zoom Out: increases the number of square miles
displayed on the Master Map.
Back: displays the previous view of the map.
Forward: displays the view of the map that was
on the screen before the "Back" button was
clicked.
Move Left: click this to see additional area on
the left side of the map (i.e., a given point will
shift to the right, bringing into view an area that
was previously off the left side of the map.)
Move Right: click this to see additional area on
the right side of the map (i.e., a given point will
shift to the left, bringing into view an area that
was previously off the right side of the map.)
47
Page 54

Move Up: click this to see additional area at the
top of the map (i.e., a given point will shift down,
bringing into view an area that was previously off
the map at the top.)
Move Down: click this to see additional area at
the bottom of the map (i.e., a given point will shift
up, bringing into view an area that was previously off the map at the bottom.)
Map Category Options Window
This window controls how much mapping detail is
displayed in the Master Map. Open and close the
window by clicking
VIEW| MAP CATEGORY OPTIONS. You
can turn detail categories off and on by clicking in
the check box beside them. A check mark shows
that the category is turned on for display.
Each map category with a + sign to its left consists
of a group of subcategories. Click on the + to
display the subcategories. Each subcategory can
be turned on or off individually by clicking the
check mark in the box beside it.
NOTE:
For mapping information to be included in your
final Map File, it must be displayed (turned on)
in the Master Map when the Map File is
created. Turning off unneeded information
categories can help reduce file size if you are
trying to fit a very large map onto an MMC with
small amounts of memory.
Map Category Options.
For example, if you're simply taking a cross-country highway trip
across several states, you can turn off categories such as rural
roads and/or minor city streets. This should give you the navigation
information you need at a smaller file size. However, when file size
is no problem, most users prefer to include as much detail as possible. All the examples in our User's Guide section use the original
factory default settings, which have all the categories turned on.
Even though a category is turned on, you may not see it on the
Master Map because you have zoomed out too far. That's no problem. As long as the category is turned on, it will be included when
you make your Map File, no matter what your zoom range is.
48
Page 55

Tip:
Another command that works with category options to determine detail is the Detail Level Used option, under the
OPTIONS menu. (You don't need to make any changes there now, but
after a little practice you'll want to see the entry View Map Display
Options in the Help file's Command Reference for how this works.)
Waypoint List Window
This window shows the waypoints on the Master Map in a text list format. The symbol, name, latitude, longitude, date created and number
are listed. The symbol, name, latitude and longitude can all be edited
either on the Master Map or in the list window. To edit, right-click the
waypoint. To open this window click
Waypoint List Window
VIEW|WAYPOINT LIST.
Icon List Window
This window shows the event marker icons on the Master Map in a text
list format. The symbol, symbol label, latitude and longitude are listed.
Except for the symbol label, these elements can be edited either on the
Master Map or in the list window. To edit, right-click the icon. To open
this window click
VIEW|ICON LIST.
VIEW|VIEW MAP DISPLAY
Icon List Window
Route List Window
This window shows the routes on the Master Map in a text list format. The list
contains the route name, number, total distance of the route and the number of
waypoints that make up the route. To open this window click
VIEW|ROUTE LIST.
49
Page 56

The route name can be edited in the window. To change the name:
1. Click on the name to highlight it.
2. Pause a moment; then click the name again (This is not a regular double-click.).
3. Type a new name and press ENTER.
The waypoints in a route can be edited. Double-click the route name and
you'll open the Route Waypoint List Window, which we describe next.
Route List Window
Route Waypoint List Window
(This is not shown when the program starts for the first time; a route
must be created first. With the Route List window open, double-click on
the route name to open the Route Waypoint List window.) This window
shows the waypoints that make up a route on the Master Map, in a text
list format. The symbol, name, leg length and position (in latitude and
longitude) are listed. The symbol, name, latitude and longitude can all
be edited either on the Master Map or in the list window. You can also
insert and delete waypoints in a route. To edit, right-click the waypoint. To relocate a route waypoint on the Master Map by dragging:
1. Right-click on the waypoint and select
MOVE WAYPOINT.
2. Move the mouse pointer with the waypoint to the new location.
3. Left-click to drop the waypoint in the new spot.
You can click
Esc at anytime, while moving dragging the waypoint, to
cancel the move. The waypoint remains where it was.
For more information on this function, see Edit Route Waypoint in the
Help file's Command Reference.
50
Page 57

Route Waypoint List Window
Trail List Window
This window uses a text list format to show trails (imported from your
GPS) that are displayed on the Master Map. The name, number of
points in the trail, origin (starting point's latitude and longitude) and
trail number are listed. To open this window click
VIEW|TRAIL LIST. The
trail name can be edited in the window. To change the name:
1. Click on the name to highlight it.
2. Pause a moment; then click the name again. (This is not a regular
double-click.)
3. Type a new name and press
ENTER.
Trail List Window
Tip:
You can automatically create a route from a trail, and you can edit
the resulting route, if you wish. For more information, see Create
Route From Trail in the Help file's Command Reference. To convert
a trail, right-click the trail name. Then, in the pop-up menu, click
CREATE ROUTE FROM TRAIL.
51
Page 58

Moving Around the Master Map
Pan Arrows
You can move around the Master Map display by clicking the
Pan Arrow buttons, which appear at the north, south, east and
west sides of the Master Map. For example, click the
ARROW on the east side of the window to pan or move the Master Map to
the left. Clicking on the Right Arrow reveals a portion of the map previously out of sight to the right of the screen. The other three arrows
work the same way.
RIGHT PAN
If you prefer, you can click the Pan Arrows on the
MAP NAVIG ATION toolbar.
Pan Arrows on toolbar
NOTE:
You can always use the Pan Arrow buttons to move around the
Master Map, no matter what other commands may be activated.
Center Map
You can instantly move any location on the map to the window's center with
the Center Map command. To center the map, click the button at
the left end of the toolbar. The mouse pointer turns into a cross-hair. Now click
on the part of the Master Map you want centered in the map window.
Tip:
The mouse pointer's location in latitude and longitude is always
shown in the status bar at the bottom of the MapCreate screen.
Zoom Area
There are several ways to zoom in and zoom out on the Master Map
display. All are described in the Help file's Command Reference, but for
now we'll describe just three. One fast and precise method uses the
zoom area mouse pointer, activated by the Zoom Area button.
1. Click the
pointer
2. Now click and drag the pointer. A selection box appears on the map.
Drag the box until it covers the desired zoom area. Release the mouse
button. MapCreate will zoom in so that the selected area fills the Master Map window.
ZOOM AREA button , and then place the zoom area
on the map near the location you want to zoom in on.
52
Page 59

Zoom Box
Cross-hair
At left, the zoom area pointer was used to drag a selection box
around the word "Chicago." When the mouse button was released,
the map jumped to a tighter, zoomed-in view of Chicago. (These fig-
ures show only the center portion of the Master Map.) You can find
the exact zoom range in miles by checking the Zoom Range Window
(see page 54 for more information).
NOTE:
The Zoom Area button can only zoom in on a map. To zoom back
out, use the Zoom Out button or the Z-Out button (see below). The
Zoom Area button also acts like the Center Map button. With the
command active, just click a spot to center it on the screen. You can
also use the Zoom Area pointer to launch pop-up editing menus by
right-clicking on waypoints and icons.
Zoom In/Zoom Out
Another common method for zooming uses the Zoom-In and Zoom-Out
features. You have two ways to access these commands, so choose whichever is most convenient.
You can click the Zoom In and Zoom Out buttons on the Map Navigation toolbar.
Zoom buttons on the Map Navigation toolbar
Or you can click the Z-Out (zoom out) and Z-In (zoom in) buttons, located at the bottom right corner of the Master Map.
Zoom Out, Zoom In buttons, with Zoom Range Window.
Zooming in lets you see less territory, but more detail. Zooming out lets
you see more territory, but less detail.
1. Click the
ZOOM IN or the Z-IN button to enlarge the centered area of the
map.
53
Page 60

2. Click the
ZOOM OUT or the Z-OUT button to shrink the map toward the cen-
ter.
Zoom Range Window
The current zoom range shows in the Zoom Range Window next to the
Z-In button (see previous figure). The Zoom Range Window is the third
common zoom tool. You can use this window in at least two ways:
1. Click the down arrow at the right of the box, and click on a preset
range.
2. Click inside the box, type the desired range number and press
ENTER.
At left, Chicago is centered on the map with a range of 3000 miles; the
figure on the right shows a zoom range of 200 miles. (These figures
show only the center portion of the Master Map.)
NOTE:
You can always use the Zoom-In or Zoom-Out buttons, no matter
what other commands may be activated.
Creating Rectangle Map Borders
Making a Map Border is the first step in creating a map for your
Lowrance or Eagle GPS unit. Here's how: (Refer as needed to the Toolbar section on page 43.)
1. Center the Master Map display on the area you want to include in
your map. Click the
cross-hair mouse pointer
CENTER MAP button , and then click the
on the area you want centered.
2. If needed, click the
ZOOM IN or ZOOM OUT buttons
so you can see the entire area that you want to draw a map border around.
3. Click the
pointer becomes a pencil
DRAW MAP BORDERS button , and your mouse
.
4. Move the mouse pointer above and to the left of the desired area.
54
Page 61

5. Click and hold down the mouse button. While holding down the button, drag the pointer diagonally, down and to the right. A green border
box appears. The size of the border box changes as you move your mouse.
Handle Box
Map Border
shown in
green on
screen.
Mouse Pointer
Click and drag to draw a Map Border around Corpus Christi Bay area.
6. When the green border surrounds the desired area, release the mouse button.
7. To stop the command, click the
button
.
CENTER MAP button or the ZOOM AREA
If you are satisfied with this map border and want to finish processing
it for use in your GPS unit, you can jump ahead to "Creating and Saving a Custom Map," on page 60. However, you might want to check out
the following two optional steps on estimating the size of the map, and
saving the border as a Map Border File.
Estimate Map Size (Optional)
It's a good idea to make sure your map will fit on your card, so let's
check it. Click the
ESTIMATE MAP SIZE button , on the Create
Map toolbar. After a moment it will tell you your map's file size. If it fits
the card, click
OK to clear the message and proceed to either saving the
border file or creating the map. If the map is too big, you must redraw
your map border a little smaller. Click the
DELETE MAP BORDER button ,
click on any green border line or corner handle box, then re-draw a
smaller border box. Use the Estimate button to re-check the size until it is
correct.
55
Page 62

Click the OK button to clear the size message box from your screen.
Saving a Map Border File (Optional)
MapCreate 7 gives you the option of saving your border as a Map Border File. Saving a Map Border file is not necessary because you can create a map without saving the border, and you can even extract borders
from finished Map Files.
However, this option is useful if you like to tinker with your map borders, and you don't want to start over each time you want to change a
border. Here's how to save the border:
(Refer as needed to the "Toolbars" section, beginning on page 43.)
1. Click the
SAVE MAP BORDER button on the FILE toolbar. The Save As
dialog box appears.
Save Map Border File dialog box.
2. Type a name in the File Name text box and click SAVE.
The file was placed in the "data" sub-folder located within the MapCreate folder on your hard drive. You can now start another map border
(click the
NEW MAP BORDER FILE button on the FILE toolbar) or you can
close MapCreate and return another day. To open this border file later
on, just click the
select the file name from the list.
OPEN MAP BORDER FILE button (on the FILE toolbar) and
56
Page 63

Open Map Border File dialog box.
With the border displayed on the Master Map screen, you're ready to
process it into a map your GPS unit can use. If so, you can jump ahead
to "Creating and Saving a Custom Map," on page 60.
MapCreate can also draw a polygon-shaped border useful for following
an irregularly shaped route, lake or other geographic feature. These
corridor maps are made with the Draw Corridor Map Borders command, and we tell you how in the next lesson.
Creating Corridor Map Borders
A corridor map lets you twist and turn your borders to enclose irregularly shaped geographic features. Here's how: (Refer as needed to the
"Toolbars" section, beginning on page 43.)
1. Center the Master Map display on the area you want to include in
your map. Click the
click the cross-hair mouse pointer on the area you want centered.
2. If needed, click the
so you can see the entire area that you want to draw a map border
around.
3. Click the
DRAW CORRIDOR MAP BORDERS button , and
your mouse pointer becomes a pencil
4. Move the mouse pointer to where you want your corridor map to begin.
5. Click and release the left mouse button to set the first anchor point.
(The anchor point is represented by a handle box, which can also be
grabbed later to relocate the border if you wish.)
6. As you move your mouse, you'll see a magenta border box appear.
Move the mouse pointer in a straight line along your corridor's path
until you need to change direction to follow the terrain. Click to set a
second anchor point.
CENTER MAP cross-hair button , and then
ZOOM IN or ZOOM OUT buttons
.
57
Page 64

Point 2
Point 1
Point 3
Finished Corridor Map
Corridor with first and second anchor points set, left.
Add a second segment to the corridor with a third point, right.
7. Now move the mouse pointer off at an angle, in the new direction needed to
follow the irregular terrain. You'll see that the active corridor border box now
rotates around the last anchor point you set. This lets you move off in any direction, with the new segment of the corridor attached to the previous segments.
Click to set your third anchor point.
8. Continue to click and add additional segments to your corridor until you
reach your destination or have enclosed the desired area.
58
Page 65

9. Click the right mouse button to stop drawing the corridor map. To close
the map borders command, click the
CENTER MAP button or the ZOOM AREA
button.
NOTE:
Corridor width is adjustable. The default is 12 miles wide, and the
setting reverts to the default each time MapCreate starts. Minimum width is approximately six miles and maximum width is approximately 400 miles.
To adjust corridor width, click
the
MAP BORDERS tab. Drag the Corridor Width slider bar to the left
to narrow the corridor or drag it to the right to widen, then click
VIEW|MAP DISPLAY OPTIONS and click
OK.
For more information, see the Help Command Reference topics
View Map Display Options Command and its subtopics, Map Borders Tab and Corridor Width.
Tip:
If you need to start over, you can erase a corridor border box one
segment at a time, or all at once. To erase by segment, use one
of these two methods: (1) Click the
button. Move the pencil point over one of the small handle boxes
that appear along the centerline of the corridor. Right-click on a
handle box to erase that segment. (2) Click the
button and then click one of the small handle boxes.
To erase an entire corridor border at once, choose one of
the following methods: Click
the
NEW MAP BORDER FILE button (on the FILE toolbar). Then click the
YES button on the Clear All Borders dialog box. This will erase all
FILE|NEW|NEW MAP BORDER FILE or click
corridor borders displayed on the Master Map.
Edit Corridor Borders
It's easy to edit a corridor map. To add a segment, use the Draw Corridor Map Border button and simply click inside an existing segment to
insert a new handle box. Move the handle where you want the corridor
to go and click to anchor it there. To reposition a segment, click on a
handle box to grab it, move the handle to the new location, then click to
anchor it there.
If you're satisfied with this map border and want to finish processing it
for use in your GPS unit, move on to the next step, where you will create and save your map. (If you wish, you can estimate the map size and
save the map border for future use. These optional steps were discussed
in the previous segment on Creating Rectangle Map Borders.)
DRAW CORRIDOR MAP BORDERS
DELETE MAP BORDER
59
Page 66

Creating and Saving a Custom Map
Once you have a Map Border, MapCreate can use it to make a Custom
Map File for your Lowrance or Eagle GPS unit. Before you can proceed,
however, your MMC or SD card must be registered with MapCreate.
This is a one-time step for each of the five cards you are allowed to use
with MapCreate. This card registry is a security requirement described
in greater detail on page 8.
If a card isn't registered, when you try to create the map, MapCreate
first walks you through card registration, then creates the map. (This is
described fully in the Quick Reference, which begins on page 3.) If you
wish, you may manually register a new card ahead of time by using the
Card Registry Command, described in the Help file's Command Reference section.
The following instructions assume you have already registered your
memory card, and you have used the Estimate Map Size button (described on page 55) to make sure the map will fit the card. Here's how
to finish making your map: (Refer as needed to the "Toolbars" section,
beginning on page 43.)
1. Create a map border or open a Map Border File by clicking the
MAP BORDER FILE button on the FILE toolbar.
OPEN
2. Click the
sage appears. Make sure you have a card in the card reader and click
CREATE MAP button . A card encryption and registration mes-
OK.
Read the message, and then click OK to continue.
3. A progress dialog box will appear while MapCreate extracts the necessary information and builds the Map File.
60
Page 67

Building Map Progress dialog box.
4. When the map has been built, the Save As dialog box appears. Note
that the file size of the map is shown in the title bar and in the status
bar at the lower left corner of the MapCreate screen. In the example
below, the size is approximately 1.94 MB.
Type a name in the
FILE NAME text box and click SAVE.
Save As dialog box showing map size in title bar
Congratulations, you've made your first Map File! Your map was
placed directly on your MMC or Secure Digital card. If you wish to keep
a copy of the file on your computer, use Windows Explorer to copy the
Map File to the "data" sub-folder located within the MapCreate folder
on your hard drive.
Tips:
• If you don't plan to change this map later, the map border or Map Bor-
der File that you created it from can now be deleted if you wish.
• If you are having trouble saving your Map File to your memory
card, your MMC may need to be reformatted. For more information
61
Page 68

on this, refer to the MMC format note on page 12 or the instruction
sheet that came with the card reader.
Refer to your GPS unit's manual for instructions on inserting the
MMC. When the GPS unit is turned on, it will automatically display
your MapCreate custom map. Now you're ready to hit the road, but if
you'd like to add a little GPS navigation information to your unit, read
the following lessons.
Creating a Waypoint
Waypoints are the building blocks of GPS navigation. A waypoint is
simply an electronic "address," based on the latitude and longitude of a
position on the earth. MapCreate lets you set a waypoint and mark it
with a symbol, name or number. This appears on the Master Map and
eventually on the map displayed on your GPS unit's screen.
With your GPS, you can navigate to a waypoint. Waypoints can be used
to mark a favored spot or to mark something to avoid such as a deadend road or a boating hazard on a lake. Waypoints linked together in a
sequence allow you to navigate along a pre-planned route. In the field,
your GPS unit can also be used to set waypoints. You can bring these
field-generated waypoints into MapCreate for storage and use on later
trips.
Creating a waypoint on the Master Map is easy. Here's how: (Refer as
needed to the "Toolbars" section, beginning on page 43.)
1. Center the Master Map display on the area where you want to set
the waypoint. Click the
CENTER MAP cross-hair button , then
click the cross-hair mouse pointer on the area you want centered.
2. If needed, click the
ZOOM IN or ZOOM OUT buttons
so you can see enough detail to accurately place the waypoint.
3. Click the
CREATE WAYPOINTS button on the GPS Data toolbar, and
your mouse pointer becomes an arrow with a waypoint symbol and the
abbreviation "Wpt"
.
4. Move the mouse pointer so that the arrow point is where you want
the waypoint. Click to set the waypoint. Move your mouse away, and
you can see the waypoint, with the default name of "Wpt 001."
62
Page 69

Create a waypoint: First, find the location on the Master Map. The
longer arrow shows the location of a public hunting area parking lot.
Move the pointer arrow tip over the location (left) and click to create
the waypoint. The waypoint appears (right) with the default waypoint
symbol and name, both of which can be changed. These figures were
taken from a zoom range of 4.05 miles. It looks as if the waypoint is on
the road, but zooming in closer would show the waypoint is actually
south of the road, just where the pointer tip placed it.
5. Relocate your mouse pointer and click to create additional waypoints
as needed.
6. To close the Create Waypoints command, press
or click the
CENTER MAP or ZOOM AREA buttons.
Esc (the Escape key)
Tips:
• If you need to erase or delete a waypoint, move the cross-hair
pointer or the zoom area pointer over a waypoint and right-click. In
the pop-up menu, click
• If you want to reposition the waypoint, move the cross-hair pointer
or the zoom area pointer over a waypoint and right-click. In the
pop-up menu, click
point. Move it to the new position and click to set it there.
DELETE WAYPOINT.
MOVE WAYPOINT, and the pointer grabs the way-
63
Page 70

• There are other ways to delete waypoints, and you can also change the
symbol, name and location. For instructions on these functions, along
with other tips, see Create Waypoint, Delete Waypoint, Insert Way-
point and Edit Waypoint in the Help file's Command Reference section.
If this is all the GPS information you need for now, skip ahead to the
lesson "Saving a GPS Data File" on page 69. Remember, to get the waypoints you just made into your GPS unit, they must be saved in a GPS
Data File. But, if you want to add some icons or a route to the GPS
Data File, check out the next two lessons.
Creating an Icon
Icons are graphic symbols used to mark some location, personal point of
interest or event. These features are also called event markers, or
event marker icons. Event marker icons don't store as much information as waypoints. You can't use a menu to navigate to them as you can
with waypoints, and you can't change their names. But you can change
their symbols. In fact, waypoints and event marker icons share the
same set of symbols, but they are two different types of GPS data with
different capabilities.
NOTE:
Until you change the default symbol, any icon you create will look
like a yellow and red waypoint, but without a name
son, we will stick with the default, but if you want to change the
symbol, refer to Edit Icon in the Help file's Command Reference.
. For this les-
Event marker icons are a handy way to mark a spot when you don't
need to save or edit much information about the location or event. Creating an icon on your map is as easy as setting waypoints. Here's how:
(Refer as needed to the "Toolbars" section, beginning on page 43.)
1. Center the Master Map display on the area where you want to set
the icon. Click the
click the cross-hair mouse pointer
2. If needed, click the
CENTER MAP cross-hair button , and then
on the area you want centered.
ZOOM IN or ZOOM OUT buttons
so you can see enough detail to accurately place the icon.
3. Click the
mouse pointer becomes an arrow with a red and yellow icon symbol
CREATE ICONS button on the GPS Data toolbar, and your
.
4. Move the mouse pointer so that the arrow point is where you want
the icon. Click to set the icon. Move your mouse away, and you can see
the icon.
64
Page 71

Create an icon: First, find the location on the Master Map. The bottom
arrow shows the location of a public boat ramp on this river.
Move the pointer arrow tip over the location (left) and click to create the
icon. The icon appears (right) with the default waypoint symbol but no
name. To change this symbol to the boat ramp symbol, see Edit Icon in
the Help file's Command Reference.
5. Relocate your mouse pointer and click to create additional icons as
needed.
6. To close the Create Icons command, press
click the
CENTER MAP or ZOOM AREA buttons.
Esc (the Escape key) or
Tips:
• If you need to erase or delete an icon, move the cross-hair pointer or
the zoom area pointer over the icon and right-click. In the pop-up
menu, click
• If you want to reposition an icon, move the cross-hair pointer or the
zoom area pointer over the icon and right-click. In the pop-up
menu, click
new position and click to set it there.
DELETE ICON.
MOVE ICON, and the pointer grabs the icon. Move it to the
65
Page 72

• There are other ways to delete icons, and you can also change the
symbol and location. For instructions on these functions, along with
other tips, see Create Icon, Delete Icon, Insert Icon and Edit Icon in
the Help file's Command Reference section.
If you don't want to plan a route this trip, skip ahead to the lesson "Saving a GPS
Data File" on page 69. But don't forget, planning a route is one of MapCreate's
coolest capabilities. If you're ready for some real navigating with routes, read on.
Creating a Route
A route is a series of waypoints, linked together in an ordered sequence,
that's used to mark a course of travel. You can visualize a route as beads
on a string, or, think of it as the mile marker signs posted at intervals
along U.S. interstate highways.
Routes are powerful tools for planning and then navigating your journeys.
With your GPS receiver, you can automatically navigate from one waypoint to the next along your intended course. You can start at either end of
a route, or even begin navigation in the middle of a route.
You can informally group routes into two broad categories, based on the
terrain and type of travel. On water, in the air or just hiking crosscountry, you can generally travel in a simple, straight line from waypoint
to waypoint (barring obstacles, of course). The Global Positioning System
was originally developed by the U.S. military for this type of routing. It's
suitable for airplanes, ships and soldiers in the field. MapCreate and
your GPS unit connect all route waypoints with straight lines.
The other route style involves navigating along a road, highway or other winding pathway. When your vehicle has to follow the twists and turns of the pavement, you can't really travel in a straight line from waypoint to waypoint.
Since the legs of all GPS routes are based on straight lines between waypoints, setting up a curvy highway route takes a little more time and
practice than our Quick Start format allows. We'll save those details for
the Create Route entry in the Help file's Command Reference section.
For this lesson, we'll use an example based on a simple off-shore fishing
route. Just remember: the techniques for making a route are the same, no
matter what sort of travel pattern you're planning. Here's how it works:
(Refer as needed to the "Toolbars" section, beginning on page 43.)
1. Center the Master Map display on the area where you want to begin your
route. Click the
cross-hair mouse pointer
2. If needed, click the
you can see enough detail to accurately place the route waypoints.
CENTER MAP cross-hair button then click the
on the area you want centered.
ZOOM IN or ZOOM OUT buttons so
66
Page 73

Tip:
As you move along your intended course, you may need to pan the
Master Map and periodically zoom in and out to see where to place
route waypoints, and where you are going next. The pan and zoom
buttons will always work, even when the
tive. This way, you don't have to turn off Create Route just to move
the map.
3. Click the
CREATE ROUTE button on the GPS Data Toolbar. Your mouse
pointer becomes an arrow with a route symbol
by a magenta route line.
4. Move the mouse pointer so that the arrow point is where you want to
start your route. Click to set the first waypoint. Move your mouse away and
you can see the waypoint. A straight magenta route line now runs from
Waypoint 001 to your mouse pointer like a rubber band, showing you a
route is under construction.
CREATE ROUTE command is ac-
, two waypoints connected
Click to set the first waypoint in a route. This example will show the
route of a fishing boat from Port Aransas, Texas, to some oil drilling
platforms and a wreck in the Gulf of Mexico, then back to port.
5. You can move off in any direction and the next waypoint will be linked in
a straight line to waypoint 1. Relocate your mouse pointer along your intended route and click to create additional route waypoints as needed. Basically, you will set a new waypoint every time you need to change direction.
6. To close the
CREATE ROUTE command, right-click or press Esc.
67
Page 74

Finished route with six waypoints. Notice the straight line-of-sight line
connecting the waypoints that make up the route. The route segment
from one waypoint to another is called a leg; this route has five legs.
Waypoints 3 and 4 are near oil drilling platforms and waypoint 5 is
near a visible wreck.
Tips:
• Routes can be edited in many ways, but those steps involve several
other commands that we will discuss only in the Help file's Command Reference section. You can delete an entire route, delete a
waypoint from a route, insert a waypoint into a route or relocate a
waypoint in a route. To read more about it, see these entries in the
Help file's Command Reference: View Route List, View Route Way-
point List, Edit Route, Edit Route Waypoint, Delete Route, Delete
Route Waypoint, Insert Route and Insert Route Waypoints. But, if
you're in a hurry to change your route, read the following two tips.
• You can completely erase a route by deleting each waypoint, one
after the other. Click the
move the cross-hair pointer over a route waypoint and right-click.
In the pop-up menu, click the
erases the waypoint and the magenta line linking the waypoint to
the route. To erase the route legs but leave the waypoints: open the
Route List window (shortcut key
and in the pop-up menu click
• You can easily reposition a route waypoint with your mouse. Just
move the cross-hair pointer or the zoom area pointer over the waypoint and right-click. In the pop-up menu, click
the pointer grabs the route waypoint. Move it to the new position
and click to set it there
CENTER MAP button (or ZOOM AREA button),
DELETE WAYPOINT command. MapCreate
F3), right-click the route name,
DELETE ROUTE.
MOVE WAYPOINT, and
68
Page 75

Now that you've created all the GPS information you want, you need to
prepare it for use in your GPS unit. We'll do that in the next lesson,
"Saving a GPS Data File."
Saving a GPS Data File
GPS Data Files (sometimes called "user files") can contain any combination of GPS information, including waypoints, event marker icons,
routes and trails. MapCreate and your GPS unit store all their GPS
data in this same file format. This makes it easy to move GPS data
back and forth between MapCreate and your GPS unit. Here's how:
(Refer as needed to the "Toolbars" section, beginning on page 43.)
1. With some type of GPS data displayed on the screen, click the
DATA FILE button on the File toolbar. The Save As dialog box appears.
SAVE GPS
Save GPS Data File dialog box.
2. Type a name in the File Name text box and click SAVE.
Congratulations, you've made your first GPS Data File! MapCreate saved the file to the program's default storage folder, which is:
C:\Program Files\LEI\MapCreate\Data. Now you can use Windows Explorer to copy or move the file to your MMC card. Remember, Windows
treats your card reader like a removable disk drive, so copying a GPS Data
File to the MMC card is like copying a file from the hard drive to a floppy
disk.
Tip:
You also have the option of saving the GPS data file directly to the
card. When the Save As dialog box appears, select the card reader's
drive letter in the Save In box before you click Save. For help transferring files with Windows Explorer, click
dows Help program, look for the topics "copying files" or "moving
files."
START|HELP and in the Win-
69
Page 76

You can now start another GPS Data File (click the
NEW GPS DATA FILE
button) or you can close MapCreate and return another day. To open this
or another GPS Data File later on, just click the
and select the file name (and its location) from the list, then click
OPEN GPS DATA FILE button
OPEN.
Open GPS Data File dialog box.
Moving GPS Data Files between Computer and Unit
With that GPS Data File copied to the MMC, you're ready to load the
file into your GPS unit. Refer to your GPS unit's manual for instructions on inserting the MMC. Then look in the unit's manual for the
topic "Transfer Custom Maps and GPS Data Files." This is usually located in the Advanced Mode Operation section of the hand-held units,
and in the Basic GPS Operations section of gimbal-mounted units.
Those instructions will tell you how to load the GPS Data File into your
unit's memory so that the waypoints and other items appear on the
unit's Map Page display.
The same instructions explain how make your unit save waypoints and
other data as GPS Data Files. After the unit saves its own GPS data to
the MMC card, you can place the MMC in the card reader, copy that
GPS Data File to C:\Program Files\LEI\MapCreate\Data and open the
file in MapCreate.
Now you know all the basics for getting custom maps and GPS data
into your GPS unit — you're ready to travel!
You don't need them at this moment, but there are two more optional
operations you ought to hear about. One is making a corridor map from
a route. You can use that method instead of drawing corridor border
boxes manually with the mouse.
The other operation is creating a route from a trail. You can't even
practice that one yet; you need to get out there with your GPS and
bring back a trail to play with. Just follow the instructions in your GPS
70
Page 77

manual to save a trail from your travels, and save the trail in a GPS
Data File. Open the data file in MapCreate, then refer to the lesson
"Creating a Route from a Trail" on page 73.
Creating a Corridor Map from a Route
MapCreate can use a route you've made to automatically create a corridor
map border. Using the Draw Borders Around Route command is fast, and
it helps control the size of your Custom Map. Here's how it works:
1. Create a route or open a GPS Data file containing a route. (To open a
GPS Data File, click
FILE|OPEN|OPEN GPS DATA FILE.)
2. Open the Route List Window: click
3. Right-click on the route name. In the pop-up menu, click the
BORDERS AROUND ROUTE command.
VIEW|ROUTE LIST.
DRAW
When you right-click a route name in the Route List Window, a pop-up
menu appears. Click on Draw Borders Around Route to generate the
border. In this example, we are creating a corridor map border for a
route from Dallas to Corpus Christi, Texas.
MapCreate draws a corridor map border following the route. See the illustrations below, showing the route before and after the command is performed.
71
Page 78

Route from Dallas to Corpus Christi, Texas (left) and the corridor map
created automatically from the route (right).
You can save this as a Map Border File and then create a Map File, or
create a Map File without saving the border. (Click the
button, on the
FILE toolbar, and then click the CREATE MAP button.)
SAVE MAP BORDER
Tip:
You can control the width of any corridor map. Click VIEW|MAP DIS-
PLAY
OPTIONS, and the Map Display Options dialog box appears.
Click Map Display Options to bring up the Map Display Options dialog box.
Click on the MAP BORDERS tab. Near the bottom of the box, drag the Corridor Width slider bar left to decrease or right to increase the width of
your corridor. This allows you to make very narrow corridors, which in
turn results in conveniently small Map File sizes.
72
Page 79

Corridor Width
slider bar
Map Borders tab in the Map Display Options dialog box. Drag the Cor-
ridor Width slider bar to the left to narrow corridor width. Drag the
slider bar to the right to widen corridor width.
Creating a Route from a Trail
A trail is a line drawn on the map by your GPS unit as you travel. It's a record
of the path you've taken, showing where you've been. This feature is also called
a plot trail. In the field, the trail will extend from your present position back to
where you began recording the trail. Your GPS unit records thousands of position points to show every twist and turn you've taken on your journey.
To get a trail into MapCreate, you must record a trail in your unit, then
save the trail in a GPS Data File. Copy the data file from the MMC to the
MapCreate data folder. When you open the GPS Data File, MapCreate
will display the trail as a green line on the Master Map.
MapCreate can use a GPS plot trail to create a route for use on a repeat
trip. Your GPS unit can navigate the new route, making it easy to retrace
the path you took. You can even share the information with friends. Using
the Create Route from Trail command is a snap. Here's how you do it:
1. Open a GPS Data file containing a trail. (To open a GPS Data File,
click
FILE|OPEN|OPEN GPS DATA FILE.)
NOTE:
GPS Data Files with relatively long trails take a few moments to
open. Please be patient when you open a data file containing a long
73
Page 80

trail. Once the trail information has been processed, the remainder
of the data file will open very quickly.
GPS Data File open progress box.
This example shows a portion of Trail 2, recorded during a business
trip from Afton, Oklahoma to Kansas City, Missouri. The trail appears
as a green line on the Master Map. It follows Interstate 44 to Carthage,
Missouri, then Highway 71 north toward Kansas City. For easier view-
ing, roads, highways and other features have been turned off.
2. Open the Trail List Window: click VIEW|TRAIL LIST.
3. Open the Route List Window: click
4. Right-click on the trail name. In the pop-up menu, click the
ROUTE FROM TRAIL command.
VIEW|ROUTE LIST.
CREATE
74
Page 81

Plot Trail. Shown in green
on MapCreate screen.
The Create Route From Trail pop-up menu appears when you right-
click a trail name in the Trail List Window. Notice the absence of way-
points along the trail.
MapCreate converts the green trail line into a magenta route line with
red waypoints. It does this by transforming thousands of position
points in this trail to 25 route waypoints. See the illustration below,
showing the trail and route before and after the command is performed.
Trail segment through Joplin before conversion to a route (left) and
the route created automatically from the trail (right). In the right im-
age, the green trail and the magenta route are both visible. Note the
numbered waypoints appearing along the route.
You can save this as a different GPS Data File. (Click the SAVE GPS DATA
FILE button on the FILE toolbar.)
75
Page 82

Notes
76
Page 83

Appendix 1: MapCreate Command List
Complete documentation on all MapCreate commands is available in
the program's Help File. To access Help and its Command Reference
section, press F1. An example entry from the Command Reference (for the
Help Command) appears at the end of this command list.
About MapCreate
Arrange Icons
Arrange Windows
Auto Arrange Windows
Card Registry
Cascade Windows
Center Map
Close All Windows
Clear Map Borders
Create Custom Map
Create Icons
Create Route
Create Route From Trail
Create Waypoints
Delete
Delete Icon
Delete Map Border
Delete Route
Delete Route Waypoint
Delete Trail
Delete Waypoint
Draw Borders Around Route
Draw Corridor Map Borders
Draw Map Borders
Edit Icon
Edit Route
Edit Route Waypoint
Edit Waypoint
Estimate Map Size
Exit
Export Route
Export Waypoint List
Help Topics
Import Map Borders From File
Import Route
Import Waypoint List
Insert Icon
Insert Route
Insert Route Waypoints
Insert Waypoint
New GPS Data File
New Map Border File
Open GPS Data File
Open Map
Open Map Border File
Print GPS Data
Print Map
Printer Setup
Restore Original Settings
Save All
Save GPS Data File
Save GPS Data File As
Save Map Border File
Save Map Border File As
Tile Windows Horizontally
Tile Windows Vertically
View Icon List
View Map Category Options
View Map Display Options
Data Display Options
Detail Level Used
GPS Data
Default Symbol
Map Borders Options
Draw block boundaries
Draw corridor hot spots
Corridor Width
Position Format Options
Zoom Options
Zoom Range Units
Map Zoom Change
View Route List
View Route Waypoint List
View Status bar
View Toolbar
View Trail List
View Waypoint List
Zoom In / Zoom Out
77
Page 84

Notes
78
Page 85

Help Topics Command
Menu: HELP
Submenu: n/a
Menu Command:
Menu Command Sequence:
Hot Key Sequence:
Shortcut Key(s):
Toolbar button: n/a
The Help Topics command opens the on-line Help system in your default web browser. Our help information is in HTML format, but it
runs from the CD or your hard drive, not from the Internet.
Using the Command
The Help system contains the Quick Reference tutorial material (from the instruction manual) and a Command Reference,
which documents every command in MapCreate.
To open the Help system, choose the
You navigate through the help information just as you would any other
web site, using the clickable hyperlinks to move around.
Searching Help
Once you have opened a help document, you can search it for the information you need.
Internet Explorer browser:
1. Click somewhere on the help page you intend to search. This makes
sure your browser will search the correct page.
2. Click
your search
EDIT|FIND (ON THIS PAGE) or use the shortcut keys Ctrl+F to begin
.
HELP TOPICS
HELP|HELP TOPICS
Alt+H|H
F1
HELP TOPICS command.
Use Internet Explorer's Find command to search Help documents.
79
Page 86

3. In the
ing for, adjust any options such as up or down, then click
FIND WHAT: box, type the term, phrase or command you are look-
FIND NEXT.
Search a Help document for the term "map border."
Netscape 6 browser:
1. Click somewhere on the help page you intend to search. This makes
sure your browser will search the correct page.
2. Click
your search
SEARCH|FIND IN THIS PAGE or use the shortcut keys Ctrl+F to begin
.
Use Netscape's Find command to search Help documents.
3. In the FIND TEXT: box, type the term, phrase or command you are looking for, adjust any options such as search backwards, then click
FIND.
Search a Help document for the term "map border."
80
Page 87

Appendix 2: Map Category List
This list contains the different categories of mapping information available in MapCreate 7. These categories and their subcategories can be
turned off or on. Only those categories turned on (displayed in the Master Map) will be included in Custom Map Files for your GPS unit. See
Appendix 3 for symbols used to represent these items. POI stands for
Point of Interest. U.S. and Canadian category groupings are listed
here. Specific categories for your area may differ slightly, but the patterns will be similar.
U.S. Categories
Airports
Runways
Symbols
Cities
Community Names
Names
Subdivision Names
Urban Areas
Countries
Boundaries
Names
County/Parish
Boundaries
Highway Exits
Exits
Information Centers
Parking Areas
Picnic Areas
Rest Areas
Scenic Areas
Service Areas
Toll Plazas
Welcome Centers
Weigh Stations
Highways
US
International Minor
International Major
Interstate Symbols
Interstate
State
State Symbols
US Symbols
Landmarks
Buildings
Cemeteries
Fire Stations
Land Features
Libraries
Mines
Other
Schools
Shopping Center
Summits
Towers
Trail Names
Marine Navaids
Major
Minor
POI-All Others
Airports
81
Page 88

Attractions
Auto Parts/Service
Banks/Financial
Bars/Nightclubs
Entertainment
Fishing/Hunting
Food Stores
Gasoline
Government
Marine Services
Medical Service
Museums/Zoos
Postal Service
Places of Worship
RV Parks/Services
Shopping
Sporting Goods/Wear
Sports
Transportation
Universities/Schools
POI-Lodging
Bed & Breakfast
Cabins
Camps/Campgrounds
Hotels/Motels
Resorts
RV Parks
POI-Restaurants
Asian
Banquet Rooms
Barbecue
Coffee Shops
Delis
Fast Food Chains
Ice Cream
Italian
Mexican
Miscellaneous
Pizza
Sandwiches
Seafood
Steak Houses
Public Lands
National Forests
National Park Service
Park Symbols
Railroads
Roads
Major City
Major City Names
Minor City Names
Minor City
Rural Names
Rural
State/Province
Boundaries
Names
Water
Canals/Streams
Canals/Stream Names
Lake/Rivers
Lake/River Names
Ocean/Seas
Ocean/Sea Names
Other Names
Wrecks & Obstructions
Canadian Categories
Airports
Runways
Symbols
Cities
Community Names
Names
Subdivision Names
Urban Areas
Countries
Boundaries
Names
82
Page 89

County/Parish
Boundaries
Highway Exits
Exits
Information Centers
Parking Areas
Picnic Areas
Rest Areas
Scenic Areas
Service Areas
Toll Plazas
Welcome Centers
Weigh Stations
Highways
US
International Minor
International Major
Interstate Symbols
Interstate
State
State Symbols
US Symbols
Landmarks
Buildings
Cemeteries
Fire Stations
Land Features
Libraries
Mines
Other
Schools
Shopping Center
Summits
Towers
Trail Names
Marine Navaids
Major
Minor
Points Of Interest
Airports
Auto Parts/Service
Banks
Bars/Nightclubs
Entertainment
Fishing/Hunting
Food Stores
Gasoline
Government
Hardware
Libraries
Lodging
Marine Services
Medical Service
Museums/Zoos
Postal Services
Restaurants
RV Parks/Services
Shopping
Sporting Goods/Wears
Sports
Tours
Transportation
Universities/School
Public Lands
National Forests
National Park Service
Park Symbols
Railroads
Roads
Major City
Major City Names
Minor City Names
Minor City
Rural Names
Rural
State/Province
Boundaries
Names
83
Page 90

Water
Canals/Streams
Canals/Stream Names
Lake/Rivers
Lake/River Names
Ocean/Seas
Ocean/Sea Names
Other Names
Wrecks & Obstructions
84
Page 91

Appendix 3:
MapCreate 7 Symbol Key
MapCreate 7 contains hundreds of mapping symbols used to represent
items ranging from geographic features to commercial Points of Interest (POI). The following list displays these symbols and the name of the
item the symbol represents.
Interstate Highway
U.S. Highway
State Highway
Trans-Canada Highway
Quebec Autoroute Highway
Mexican Federal Highway
Highway Exit
Highway Exit with Info Center
Highway Exit with Parking Area
Highway Exit with Picnic Area
Highway Exit with Scenic Area
Highway Exit with Service Area
Highway Exit with Toll Plaza
Highway Exit with Weigh Station
Airport
Building
Cemetery
Fire Station
Library
Mine
Park
Highway Exit with Rest Area
School
85
Page 92

Shopping Center
Summit
Tower
Trail Name
City, Community, or Subdivision
Name
Land Feature Name
Water Feature Name
Miscellaneous Landmark Name
Square Green Daybeacon
(Navaid)
White or Unidentified Lighted
Buoy (Navaid)
Green Unlighted Buoy (Navaid)
Red Unlighted Buoy (Navaid)
White or Unidentified Unlighted
Buoy (Navaid)
Light (Navaid)
Nautical Chart Note
Platform (Navaid)
Radiobeacon (Navaid)
Awash or Visible Obstruction
Square White or Unidentified
Daybeacon (Navaid)
Red Triangle Daybeacon (Navaid)
White Triangle Daybeacon
(Navaid)
Green Lighted Buoy (Navaid)
Red Lighted Buoy (Navaid)
Awash Rock
Covered Rock
Dangerous Submerged Wreck
Non-Dangerous Submerged
Wreck
Visible Wreck
Airport (POI)
86
Page 93

Amusement Place, Billiards or
Casino (POI)
College or University (POI)
Hall or Auditorium (POI)
Hospital (POI)
Medical Service (POI)
Miscellaneous Attraction (POI)
Museum or Historical Place (POI)
Post Office
Tourist Attraction or Tour (POI)
Zoo (POI)
Movie Theater (POI)
Restaurant (POI)
Ice Cream Parlor (POI)
Pizza (POI)
Fishing-Related (POI)
Lodging (POI)
Camp or Campground (POI)
RV Park or RV Service (POI)
Marina (POI)
Boating Dealer or Service (POI)
Boat Equipment & Supplies (POI)
Gas Station (POI)
Auto Parts or Service(POI)
Truck Stop, Trailer Rental, or
Other Transportation (POI)
Coffee Shop (POI)
Grocery or Retail Store (POI)
87
Page 94

Pharmacy (POI)
Hardware Store (POI)
Sporting Goods or Sportswear
(POI)
Golf-Related (POI)
Financial Service (POI)
Bowling Center (POI)
Swimming Pool (POI)
Railroad (POI)
Park or Park Office (POI)
Synagogue (POI)
Church (POI)
Police or Sheriff (POI)
Bar or Club (POI)
Live Theater (POI)
Hunting-Related (POI)
Car Wash (POI)
Recreation Center, Stadium, or
Other Sports-Related (POI)
Taxi (POI)
Bus Line (POI)
Auto Rental or Lease (POI)
88
Page 95

Appendix 4: Displaying Specialty Maps
With Fishing or Aeronautical Data
A new feature in MapCreate 7 allows you to view LEI's special fishing
or aviation mapping products on the MapCreate screen. The feature
works with Inland Mapping System™ Fishing Hot Spots
or Jeppesen
tabases, along with the Lowrance
®
Americas and Jeppesen® International aeronautical da-
®
Obstructions aeronautical database.
Showing fishing or aviation details on the computer makes it easier to
plan trips and manage waypoints, routes and other GPS data. All MapCreate GPS data tools work just as they do with regular maps.
To display a special LEI map product, just place the memory card containing the map or database in the MMC card reader, then launch MapCreate. (You can also start MapCreate first, then insert the card.) In a
moment or two, MapCreate begins to read the map on the card, and the
hourglass symbol is shown in the lower left corner of the screen. While
the special map is read, the Master Map window may go blank for a moment before it reappears with the special mapping data displayed.
®
fishing maps
Hourglass
shows while
MapCreate
reads map on
the card.
Left, a portion of Skiatook Lake with regular MapCreate data. Right,
MapCreate shows extra detail after inserting a memory card contain-
ing an IMS Fishing Hot Spots map.
89
Page 96

IMS Fishing Hot Spots Maps
r
Park areas
appear in
green.
Submerged
stream
Submerged
pond
Master Map window showing detail from an IMS Fishing Hot Spots
map of Lake Skiatook. Place the Center Map or Zoom Area pointer
over an item and a pop-up information box appears.
Move your mouse pointer over an item and a pop-up tool-tip box appears, identifying the item. In a Lowrance or Eagle GPS unit, the cursor also identifies map symbols with a pop-up box, but additional information is available from certain symbols.
For example, use the cursor to select a red triangle public use area or
facility point symbol, then press the
iFINDER
®
hand-held units). A Waypoint Information screen appears.
Fishing Tips
& Techniques
Brush shelter
Lake Profile
Flooded
timbe
Fishery
Wpt key (or the Find key in the
Underwater
contours &
Pop-up box
IMS Fishing Hot Spots Waypoint Information screen from a GPS unit,
showing amenities available at a public use area and a marina.
90
Page 97

There are other important Fishing Hotspot symbols that display information only on your GPS unit. They are all accessed with the cursor
and either the
Wpt or Find key. These symbols are usually (but not al-
ways) located near the dam site, and they include:
Fishing Tips & Techniques: the Waypoint Information screen
will display an article covering topics ranging from lures to
locations. Tackle hints, types of cover and presentation methods are
discussed by season and species, covering the major species in this
lake.
Lake Profile: the screen will display an overview of the lake
itself, including information on size, depth, shoreline, bottom
composition, water source, water quality and fish cover.
Fishery: the screen will display information on the major species
present, their numbers and sizes, management practices, forage
species and any special regulations.
Fishing Area Information: this symbol appears in scattered
locations around certain lakes. When this symbol is selected, the
Waypoint Information screen will display specific fishing tips for that
area of the lake.
MapCreate lets you turn off the Master Map display of Map Category
Options, such as depth, fishing areas, lake info, lake services, navigation information, and structure, but this does not change the detail in
your IMS Fishing Hot Spots map.
Jeppesen Aviation Maps
In MapCreate, you can turn off the display of aviation Map Category
Options, but that does not change the detail in your Jeppesen and
Lowrance aeronautical databases.
®
The cursor in your AirMap
such as airspaces — and you can display an Information Page for the
selected item. You won't get the same level of detail in MapCreate, but
some map items do display pop-up tool-tip boxes when selected by your
mouse pointer.
GPS receiver can select certain features —
For example, move the Center Map or Zoom Area pointer just inside an
airspace line, and a pop-up box identifies the airport, the controlling
agency and the number of communication frequencies.
91
Page 98

Jeppesen airspace data displayed in a MapCreate pop-up box.
Point to an airport identifier and you'll see a pop-up box with the number of communication frequencies, number of runways and number of
services available at that field. Point to a runway, and you can see its
length, surface type and lighting.
Jeppesen airport (left) and runway information (right)
displayed in MapCreate pop-up boxes.
92
Page 99

Master Map window at the 60 mile zoom level showing detail from a
Jeppesen Americas aeronautical database. Intersections appear as
gray Xs; other symbols appear as they do in sectional paper charts.
93
Page 100

Notes
94
 Loading...