

Page 1

GM Car Stereo Install Kit
Juego de instalación de equipos estereofónicos para
vehículos GM
DX-G1113
USER GUIDE
GUÍA DEL USUARIO
Page 2

2
Contents
Contents
Dynex DX-G1113 GM
Car Stereo Install Kit
Car stereo install kit components.......................................................6
Installing your car stereo ...................................................................8
Buick
Century 1982-1996....................................................................9
Electra 1984-1990 ...................................................................10
Estate Wagon 1984-1994 ........................................................10
LeSabre 1984-1994 .................................................................10
Park Avenue 1984-1994...........................................................10
Reatta 1990-1991....................................................................11
Regal 1984-1987 .....................................................................12
Riviera 1983-1985 ...................................................................13
Riviera 1990-1995 ...................................................................14
Roadmaster 1991-1994 ...........................................................15
Skyhawk 1982-1989 ................................................................16
Skylark 1983-1985...................................................................17
Skylark 1987-1989...................................................................18
Skylark 1990-1995...................................................................19
Cadillac
Cimarron 1982-1988 ...............................................................33
Deville 1985-1995 ...................................................................20
Fleetwood 1985-1993 .............................................................20
Eldorado 1984-1991 ................................................................21
Escalade 1999-2002 ................................................................22
Seville 1984-1991....................................................................21
Chevrolet
Astro 1985-1989......................................................................23
Astro 1990-1995......................................................................24
Astro 1996-2004......................................................................25
Beretta 1991-1996 ..................................................................26
Blazer (full size) 1988-1991 .....................................................27
Blazer 1998-2001 ....................................................................28
Page 3

Contents
3
Camaro 1982-1984 ................................................................. 29
Camaro 1985-1992 ................................................................. 30
Camaro 1997-2002 ................................................................. 31
Caprice 1991-1993.................................................................. 15
Pickup 1995-2002................................................................... 22
Caprice 1994-1996.................................................................. 32
Cavalier 1982-1990................................................................. 33
Cavalier 1991-1994................................................................. 34
Cavalier 1995-1999................................................................. 35
Celebrity 1982-1983 ............................................................... 36
Celebrity 1984-1989 ............................................................... 37
Citation II 1985 ....................................................................... 38
Corsica 1991-1996 .................................................................. 26
Corvette 1984-1989 ................................................................ 39
Corvette 1997-2004 ................................................................ 40
El Camino 1985-1988.............................................................. 41
Express 1996-2000.................................................................. 42
Impala SS 1994-1996.............................................................. 32
Lumina 1990-1994 ................................................................. 43
Lumina 1995-2000 ................................................................. 44
Lumina APV 1990-1995 .......................................................... 45
Lumina APV 1996 ................................................................... 46
Malibu 1997-2000 .................................................................. 48
Monte Carlo 1985-1988 .......................................................... 41
Monte Carlo 1995-2000 .......................................................... 44
Nova 1985-1988 ..................................................................... 49
S10 Blazer 1982-1985 ............................................................. 50
S10 Blazer 1986-1994 ............................................................. 51
S10 Pickup 1982-1985 ............................................................ 50
S10 Pickup 1986-1993 ............................................................ 51
S10 Pickup 1998-2001 ............................................................ 28
Silverado 1999-2002............................................................... 22
Suburban 1988-1991 .............................................................. 27
Suburban 1995-2002 .............................................................. 22
Page 4

4
Tahoe 1995-2002.....................................................................22
Van (full size) 1988-1995.........................................................52
Venture 1997-1999..................................................................53
GMC
Jimmy1998-2001 ....................................................................28
Jimmy (full size) 1989-1991 ....................................................27
S15 Jimmy 1982-1985 .............................................................50
S15 Jimmy 1986-1994 .............................................................51
S15 Pickup 1982-1985 .............................................................50
S15 Pickup 1986-1993 .............................................................51
Safari 1985-1989 .....................................................................23
Safari 1990-1995 .....................................................................24
Safari 1996-2004 .....................................................................25
Savana 1996-2000...................................................................42
Sierra 1995-2002 .....................................................................22
Sonoma 1998-2001.................................................................28
Suburban 1989-1991...............................................................27
Suburban1995-2002 ...............................................................22
Van (full size) 1988-1995.........................................................52
Yukon 1995-2002 ....................................................................22
Oldsmobile
98 1984-1990 ..........................................................................54
Achieva 1992-1995..................................................................55
Bravada 1991-1994 .................................................................51
Cutlass Calais 1984-1991 .........................................................56
Cutlass Ciera 1982-1996 ..........................................................57
Cutlass Supreme 1984-1988 ....................................................58
Delta 88 1986-1988.................................................................54
Firenza 1982-1989...................................................................16
Omega 1983-1984...................................................................59
Silhouette 1990-1995..............................................................45
Silhouette1996 ........................................................................46
Silhouette 1997-1999..............................................................53
Toronado 1982-1985 ...............................................................60
Contents
Page 5

Contents
5
Pont iac
6000 1982-1991 ..................................................................... 61
Bonneville 1982-1986 ............................................................ 70
Bonneville 1987-1993 ............................................................ 62
Bonneville 1994-1999 ............................................................ 63
Fiero 1984-1988...................................................................... 64
Firebird 1982-1984 ................................................................. 29
Firebird 1985-1992 ................................................................. 30
Firebird 1993-2002 ................................................................. 65
Grand Am 1985-1991 ............................................................. 66
Grand Am 1992-1995 ............................................................. 67
Grand Am 1996-1998 ............................................................. 68
Grand Am 1999-2000 ............................................................. 69
Grand Prix 1985-1987 ............................................................. 70
Grand Prix 1990-1993 ............................................................. 71
Grand Prix 1994-1996 ............................................................. 72
Grand Prix 1997-2003 ............................................................. 73
Montana 1999 ........................................................................ 53
Sunbird J-2000 1982-1988 ..................................................... 33
Sunfire 1995-1999 .................................................................. 74
TransSport 1990-95 ................................................................ 45
TransSport 1996...................................................................... 46
TransSport 1997-1998 ............................................................ 53
Saturn
All models 1991-1994............................................................. 75
Installing your car stereo .................................................................. 8
Legal notices................................................................................... 78
Español................................................... 79
Page 6
6
Car stereo install kit components
Car stereo install kit components
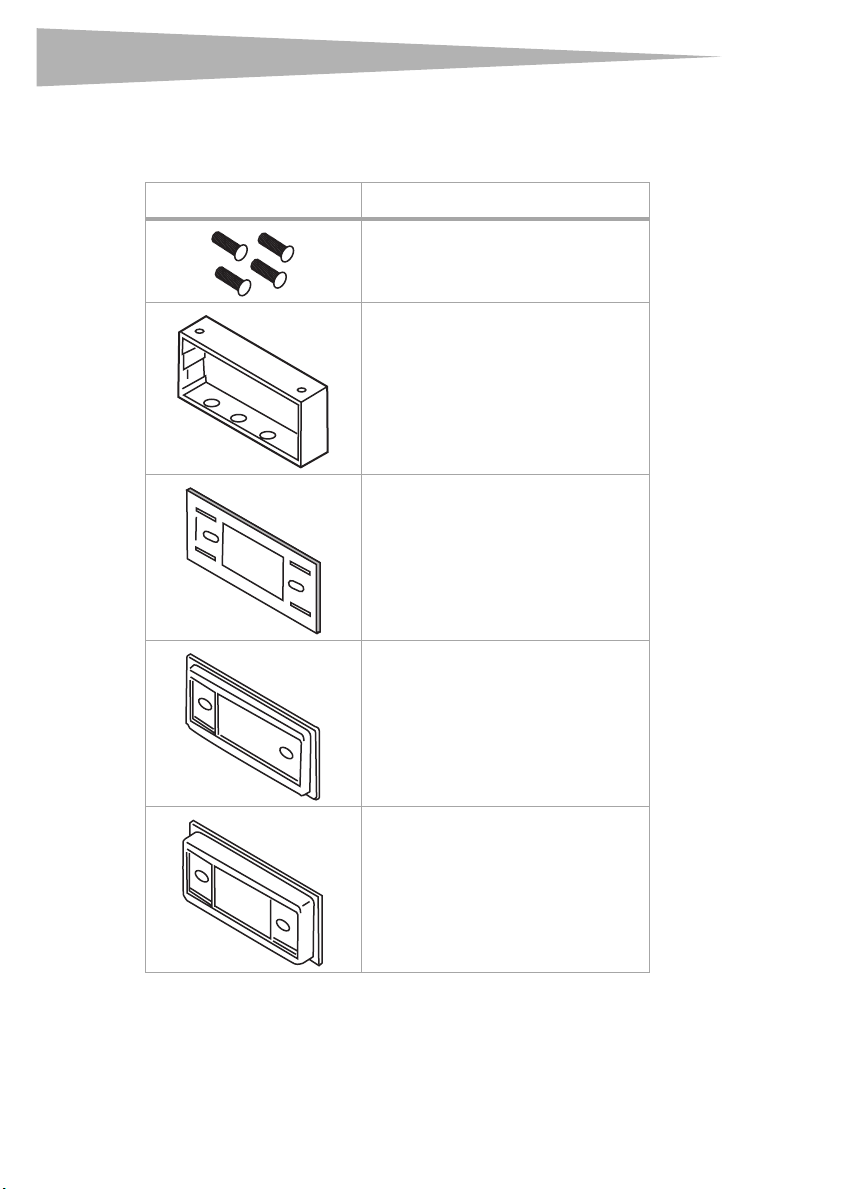
You car stereo install kit should include the following parts:
Part Description
Studs (4)
Radio housing
Flat faceplate
1/2-inch faceplate
1-inch faceplate
Page 7
Car stereo install kit components
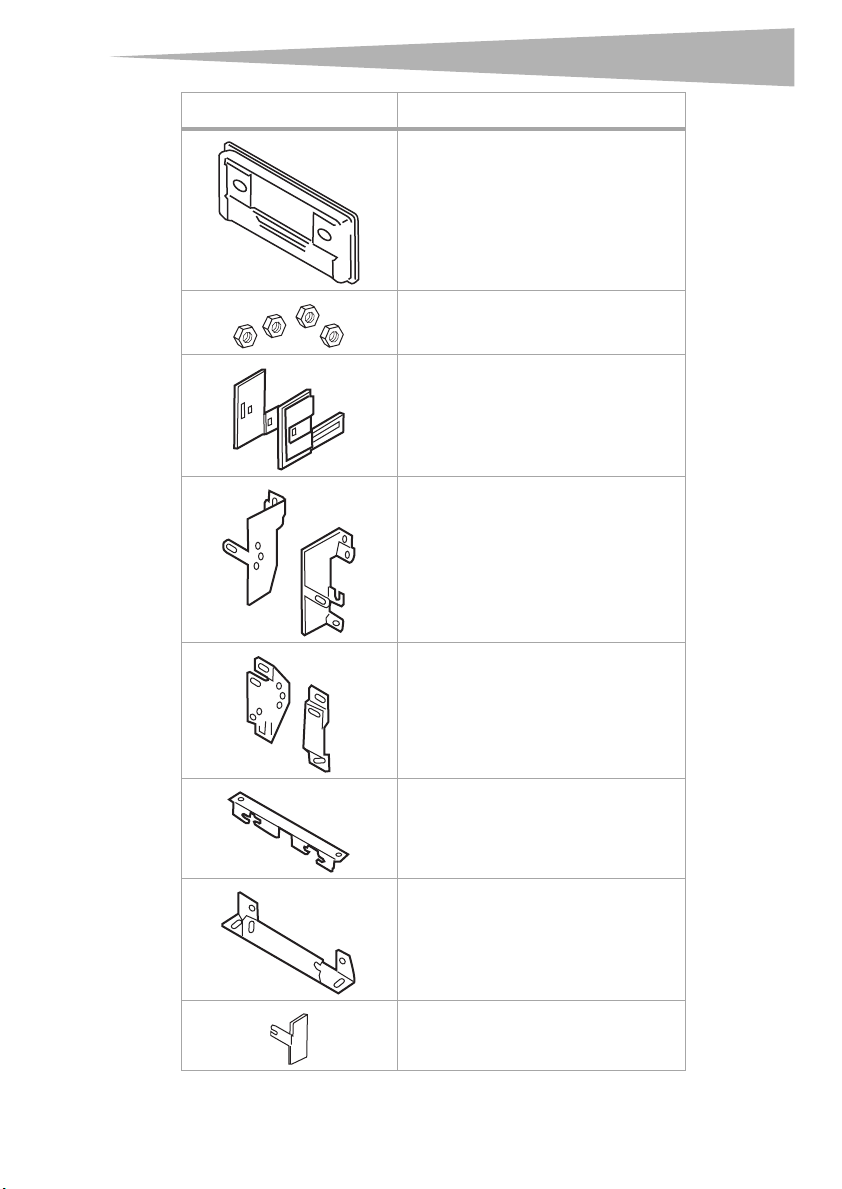
Part Description
7
Equalizer faceplate
Nuts (4)
Equalizer bra ckets
Bracket set 1
Bracket set 2
Bracket 3
Bracket 4
Bracket (L)S-
Page 8
8
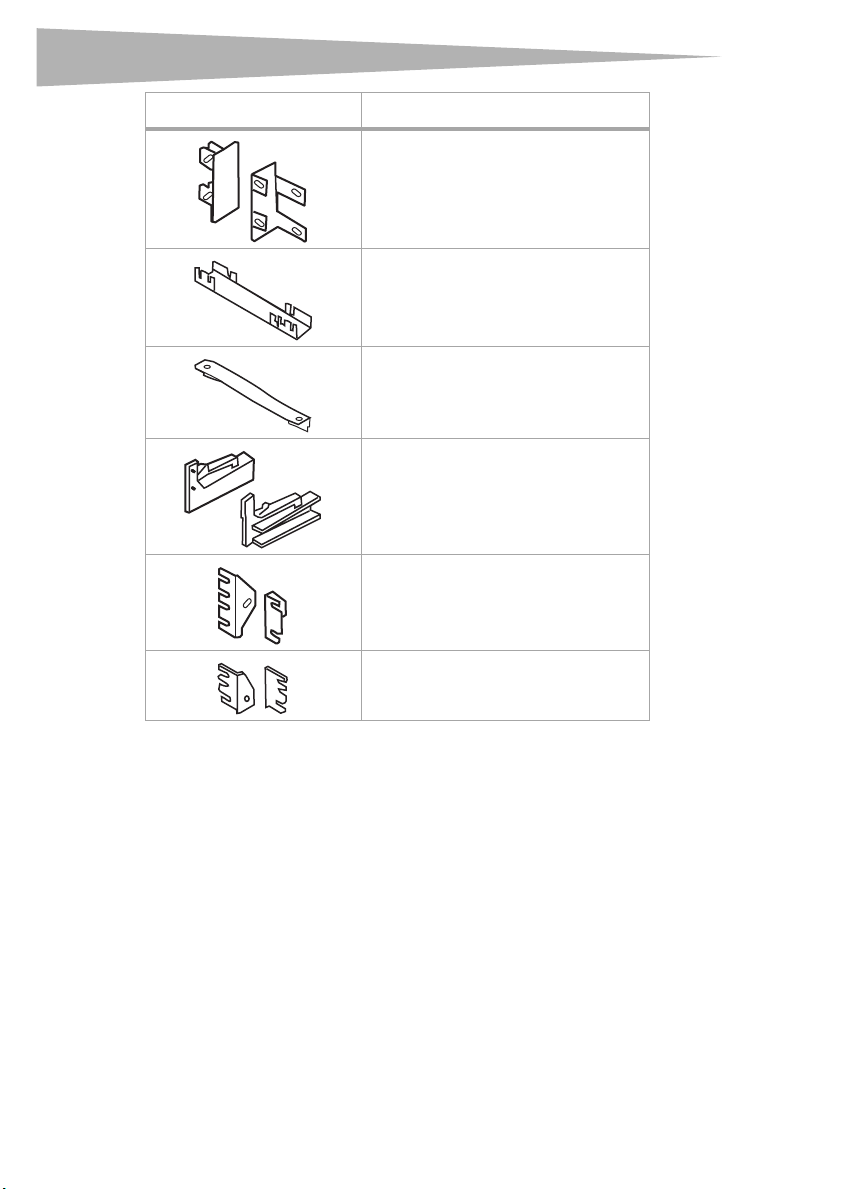
Part Description
Bracket set 5
Bracket 6
Bracket 7
Bracket set 8
Bracket set 9
Installing your car stereo
Bracket set 10
Installing your car stereo
To ol s
You need the following tools to install your car stereo:
•Phillips screwdriver
•Hex-head screwdriver
• Torx-head screwdriver
• Cutting tool
Page 9
Installing your car stereo
Buick
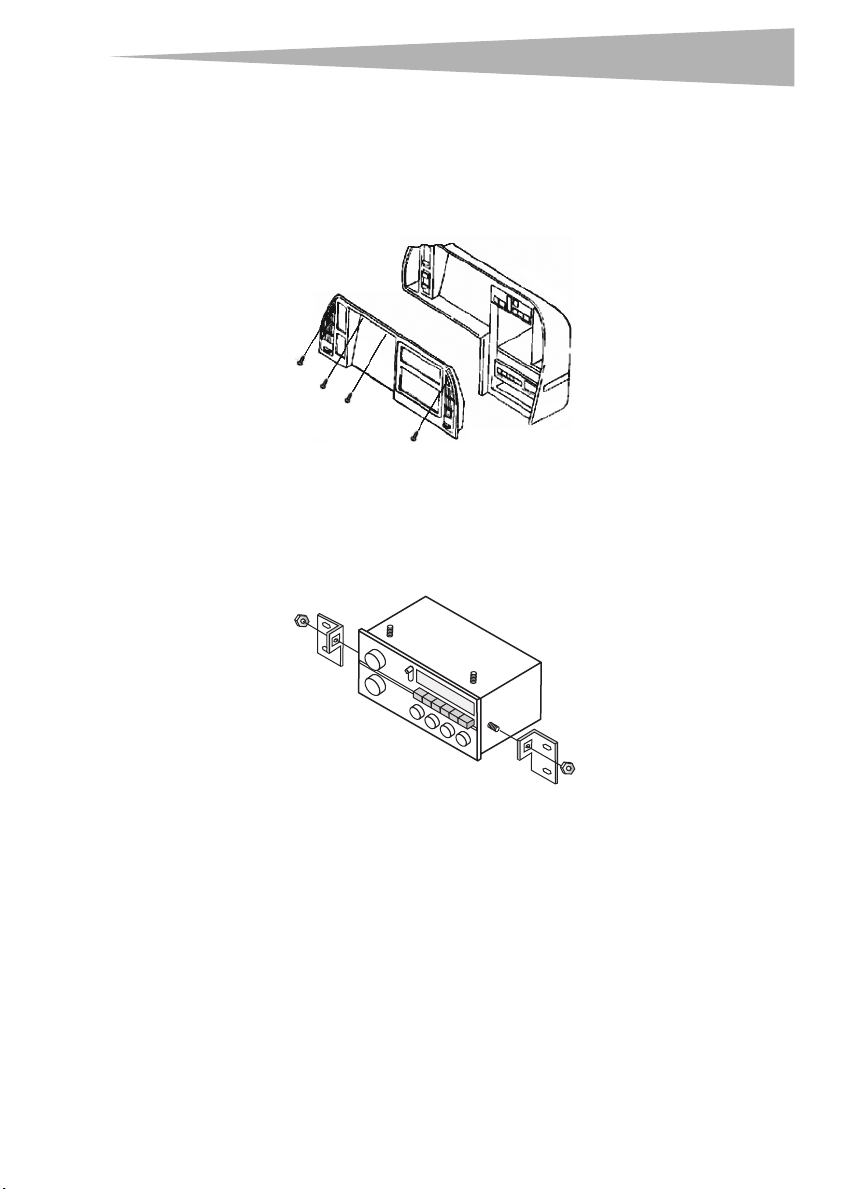
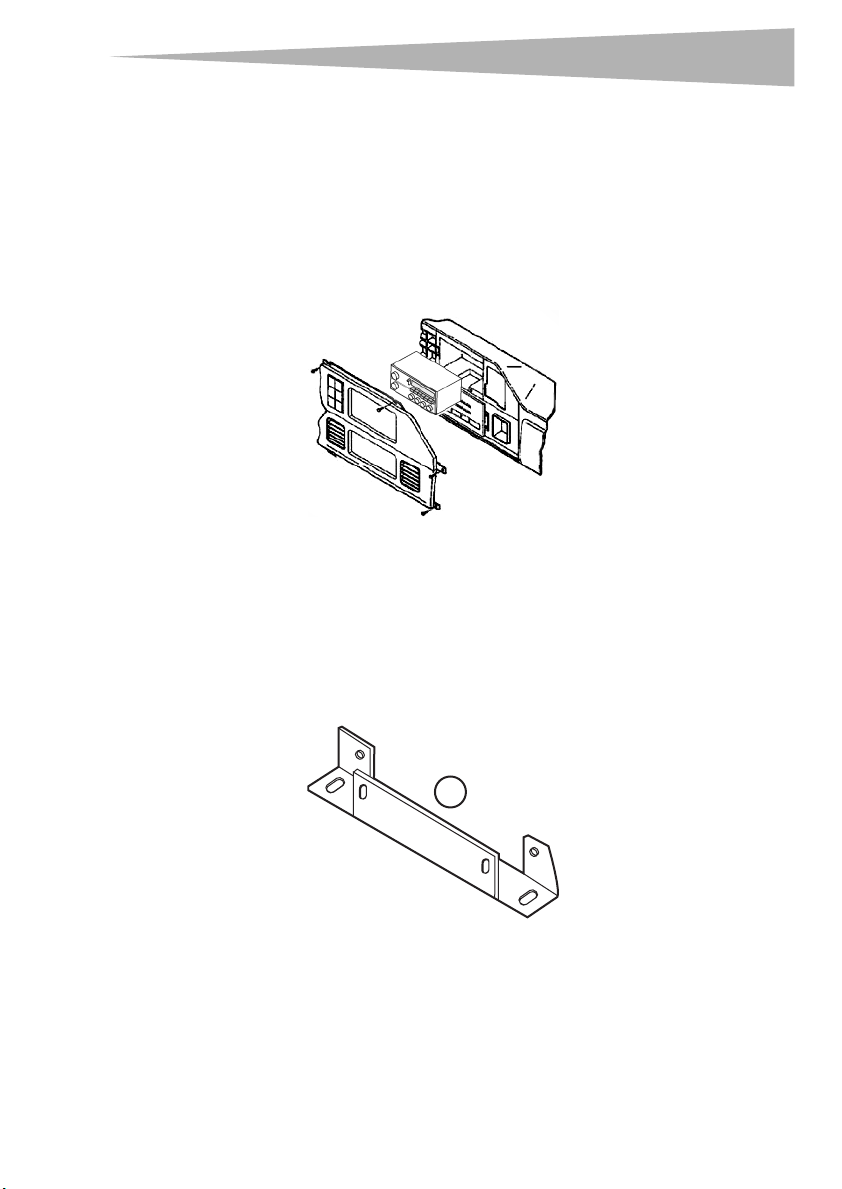
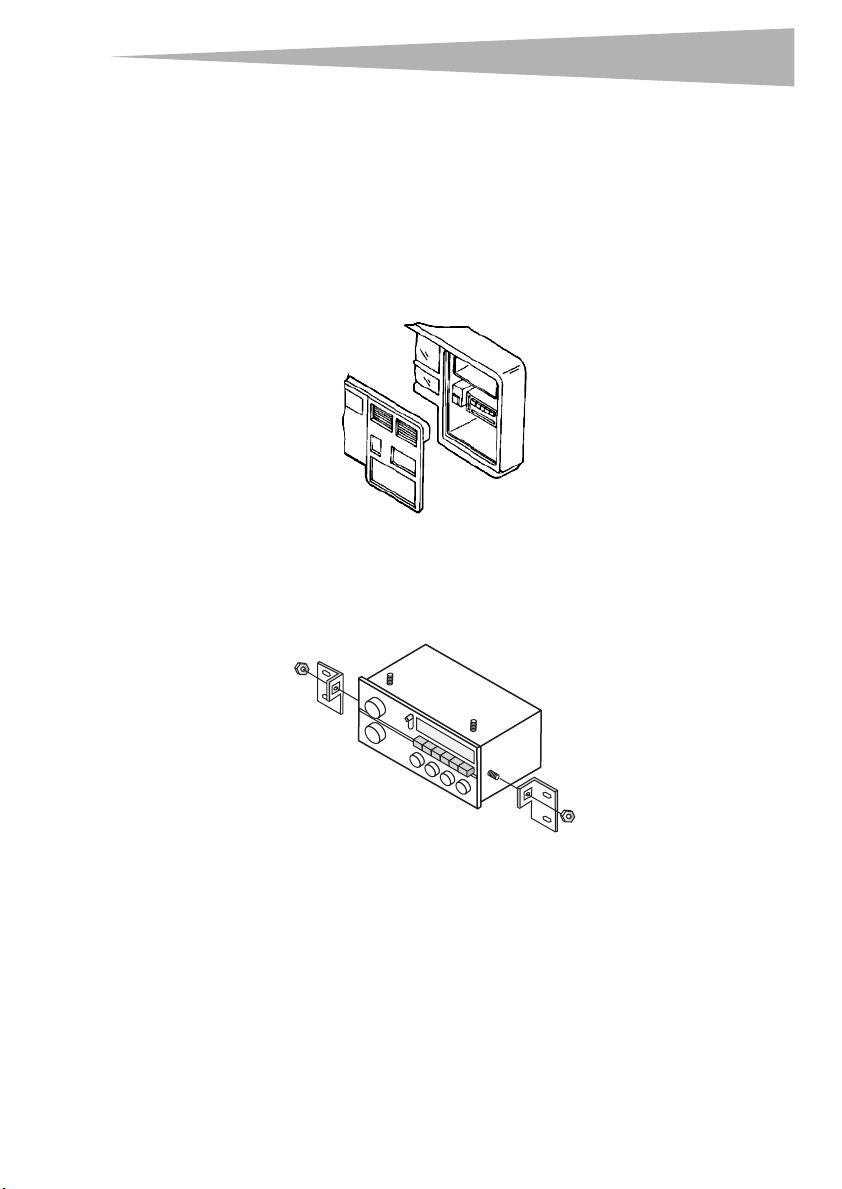
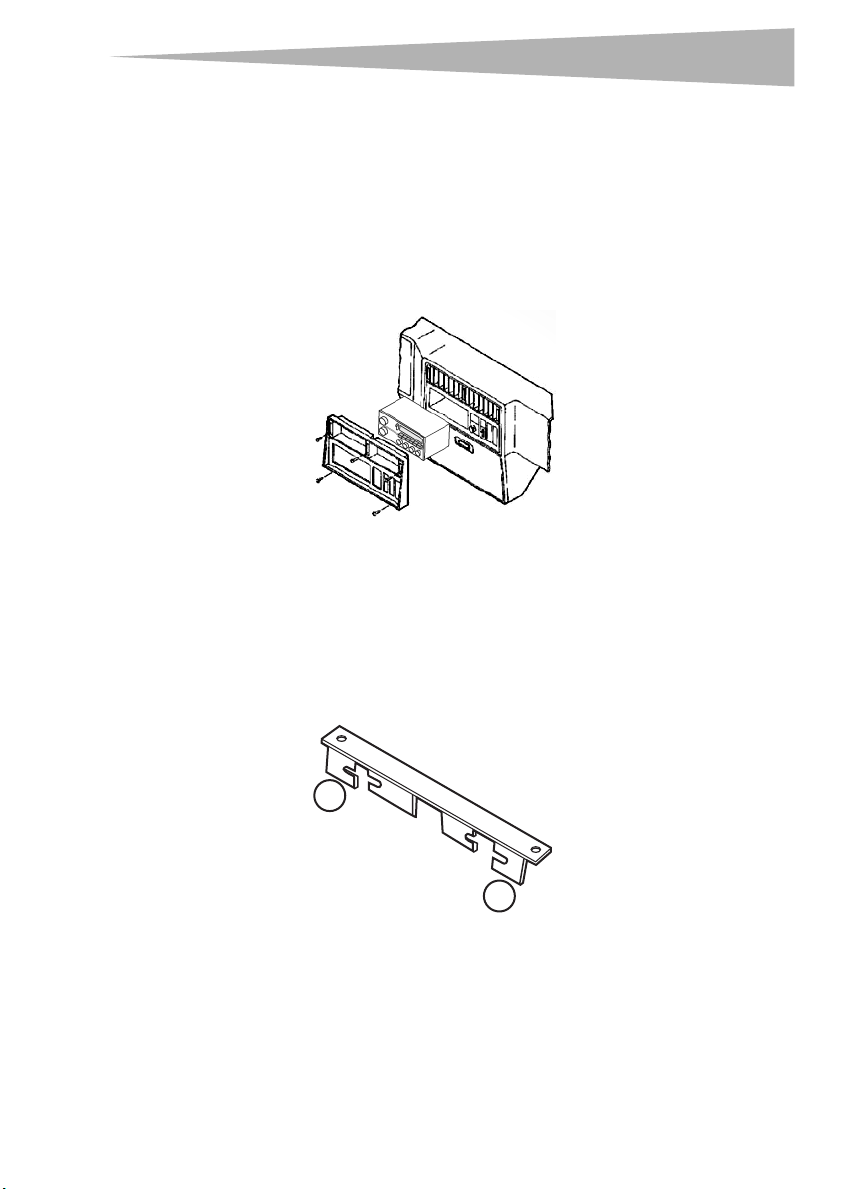
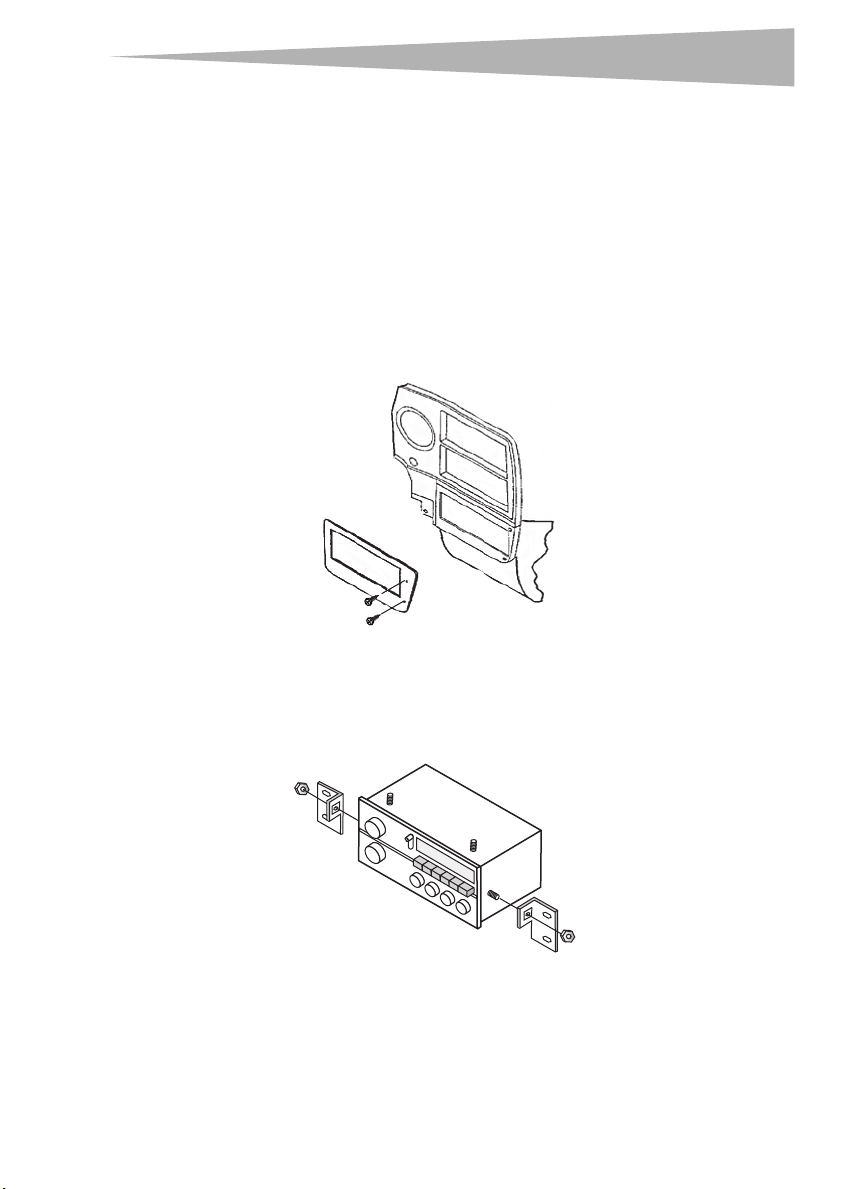
Century 1982-1996
To install your car stereo:
1 Disconnect the negative battery terminal to prevent an accidental short circuit.
2 Remove the four screws from the top inside edge of the dash trim bezel.
3 Remove the five screws from both sides of the steering column.
4 Remove the three Phillips screws that secure the rocker-switch housing, then lift the
housing out.
5 Remove the bezel.
6 Remove the hardware that secures the factory mounting brackets to the factory head
unit.
7 Remove and retain the brackets.
9
2
S10 shown
as example
8 Go to “Completing the installation” on page 76.
Page 10

10
Buick
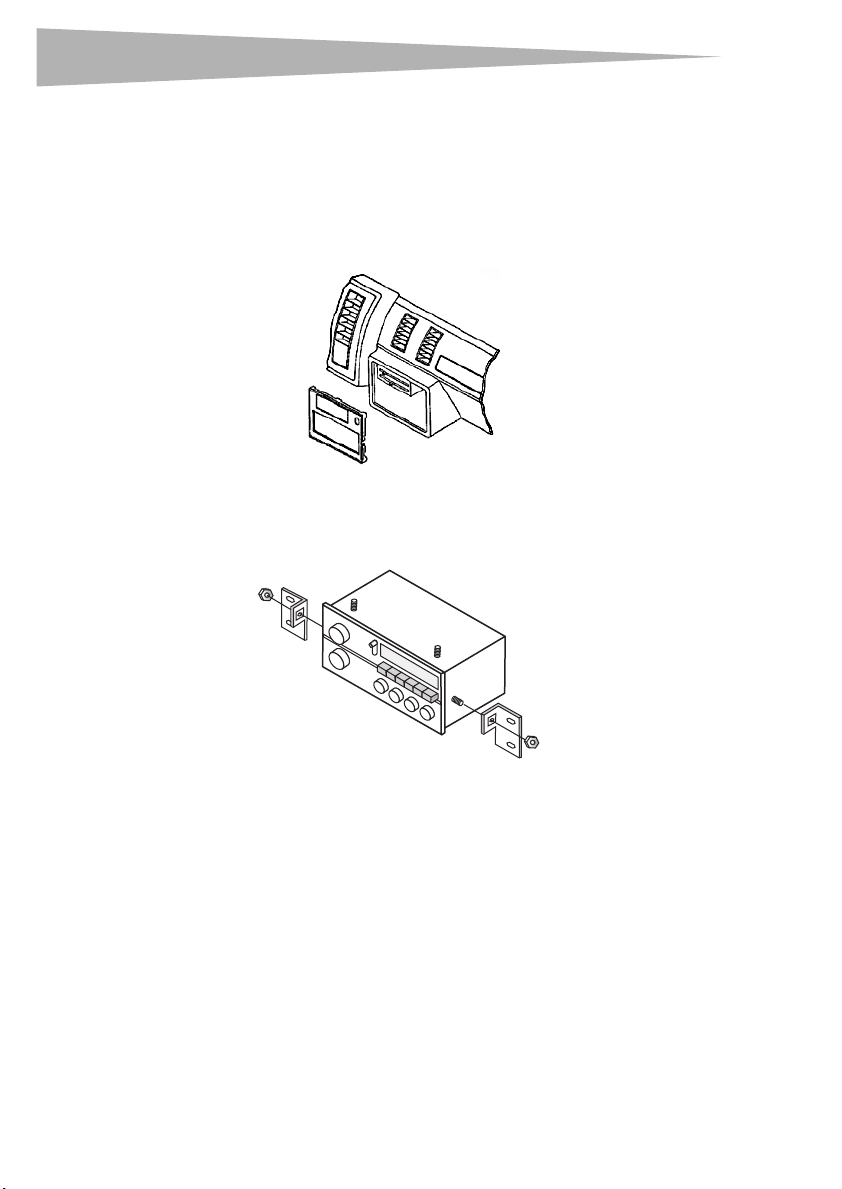
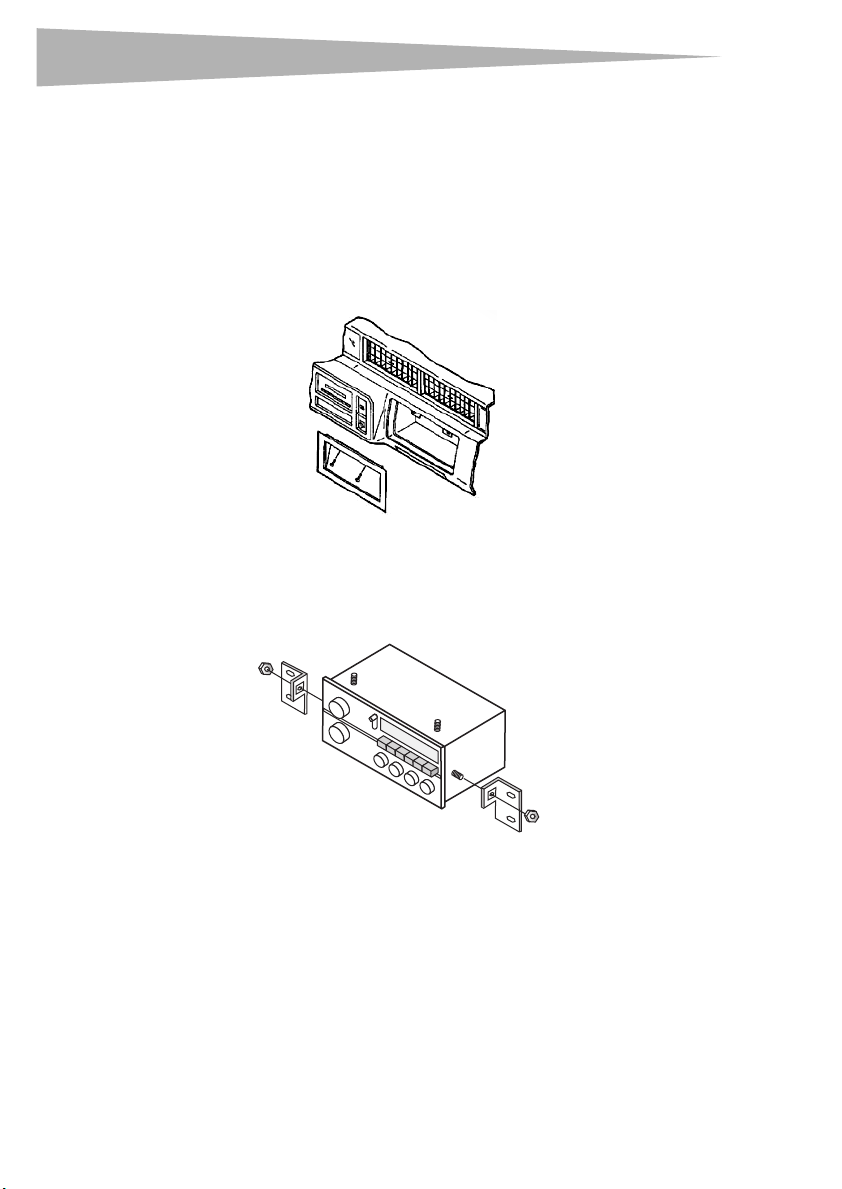
Electra 1984-1990
Estate Wagon 1984-1994
LeSabre 1984-1994
Park Avenue 1984-1994
To install your car stereo:
1 Disconnect the negative battery terminal to prevent an accidental short circuit.
2 Unsnap the climate control trim bezel, then remove four exposed star-drive screws.
3 Pull the steering column back, then carefully unsnap the dash trim bezel.
4 Remove the hardware that secures the factory mounting brackets to the factory head
unit. Remove and retain the brackets.
Installing your car stereo
2
S10 shown
as example
5 Go to “Completing the installation” on page 76.
Page 11
Installing your car stereo
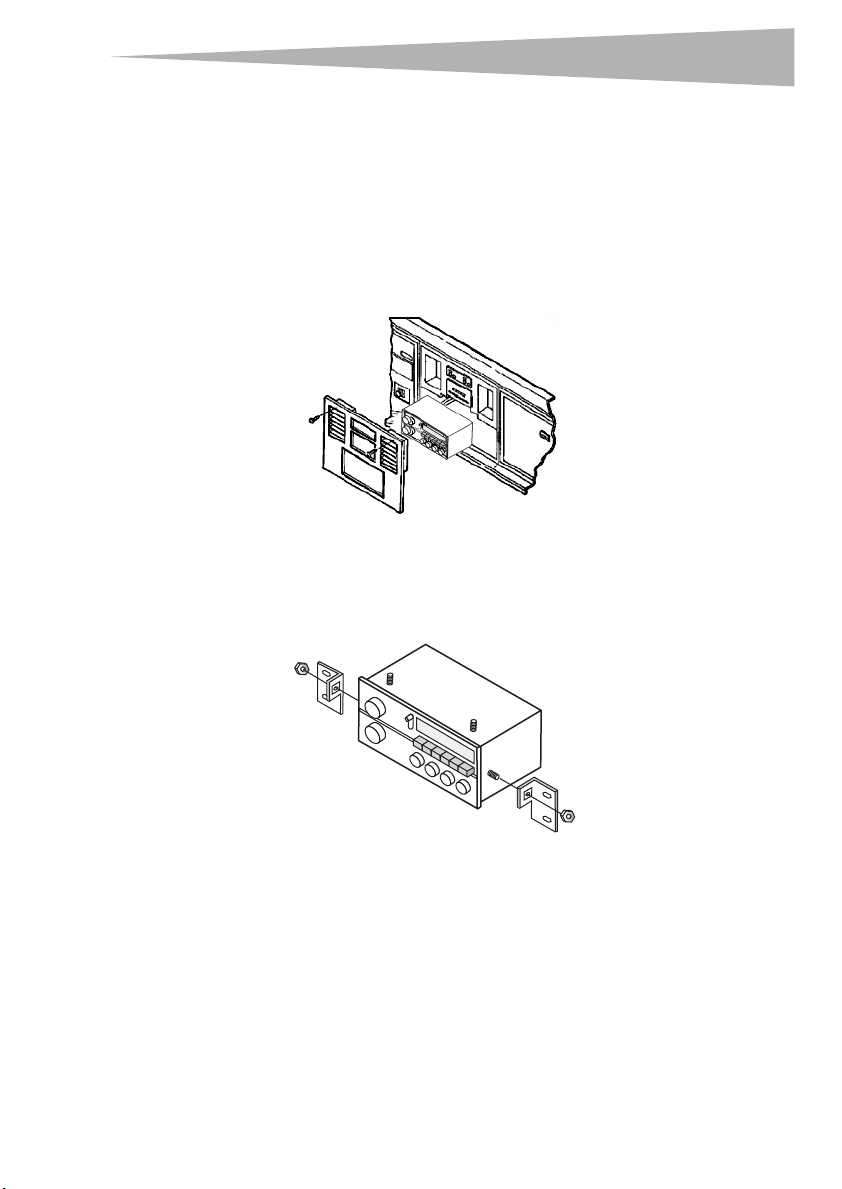
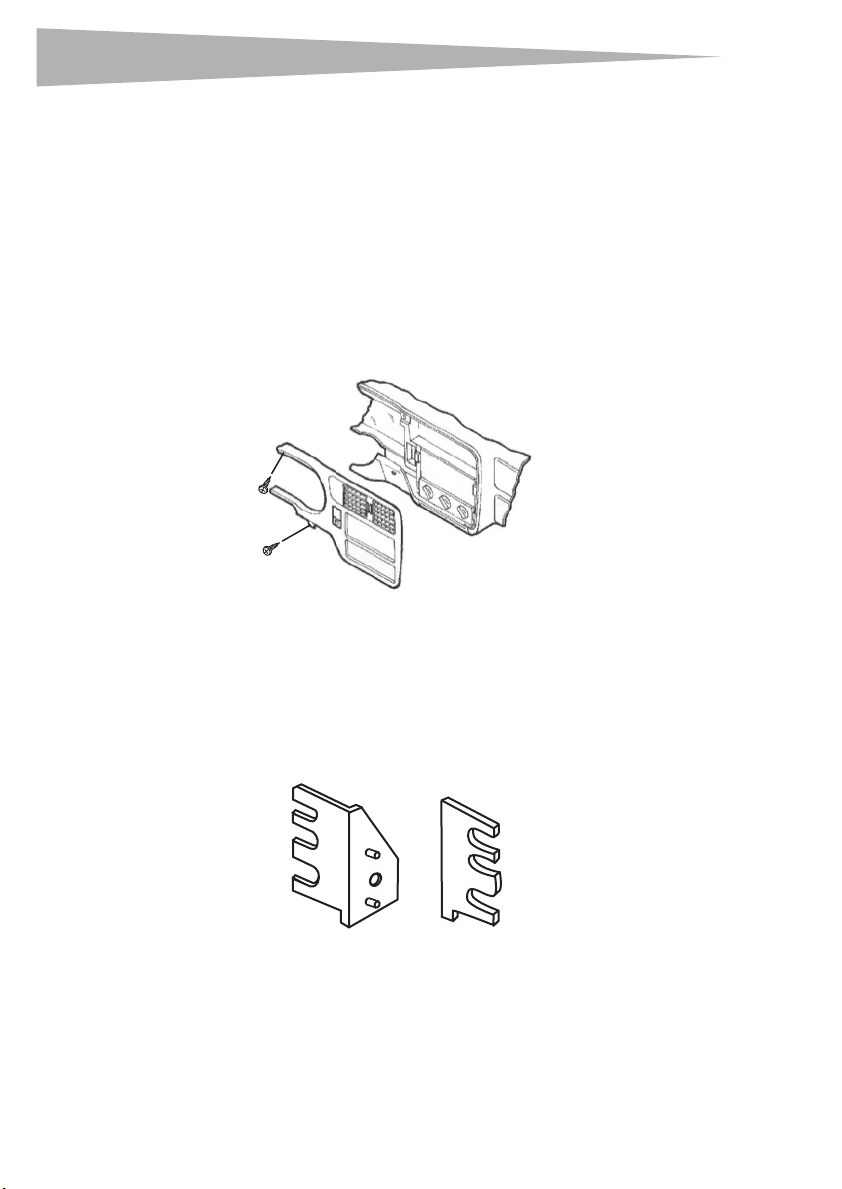
Buick
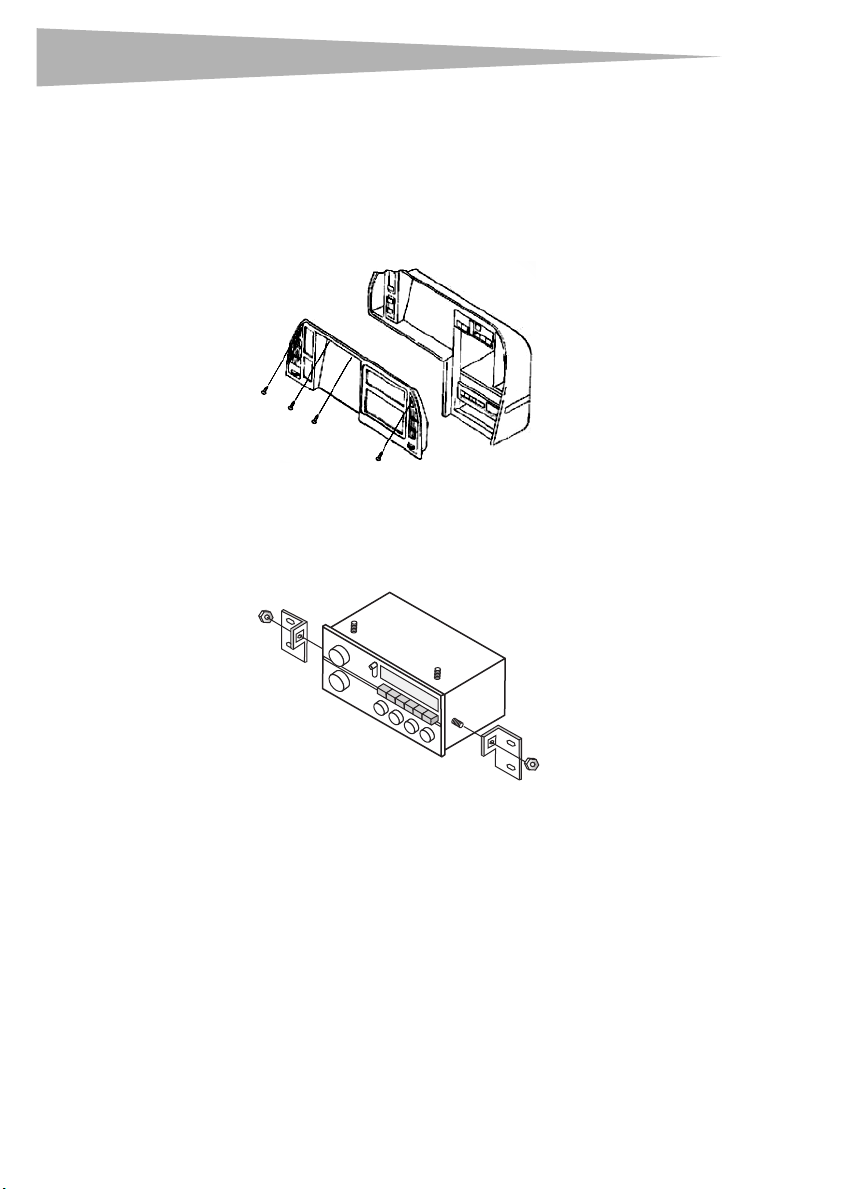
Reatta 1990-1991
To install your car stereo:
1 Disconnect the negative battery terminal to prevent an accidental short circuit.
2 Remove the two torx-head screws above the instrument panel.
3 Remove one torx-head screw from each A/C vent.
4 Unclip the dash trim bezel, then remove it.
5 Remove the hardware that secures the factory mounting brackets to the factory head
unit. Remove and retain the brackets.
2
11
S10 shown
as example
6 Go to “Completing the installation” on page 76.
Page 12
12
Buick
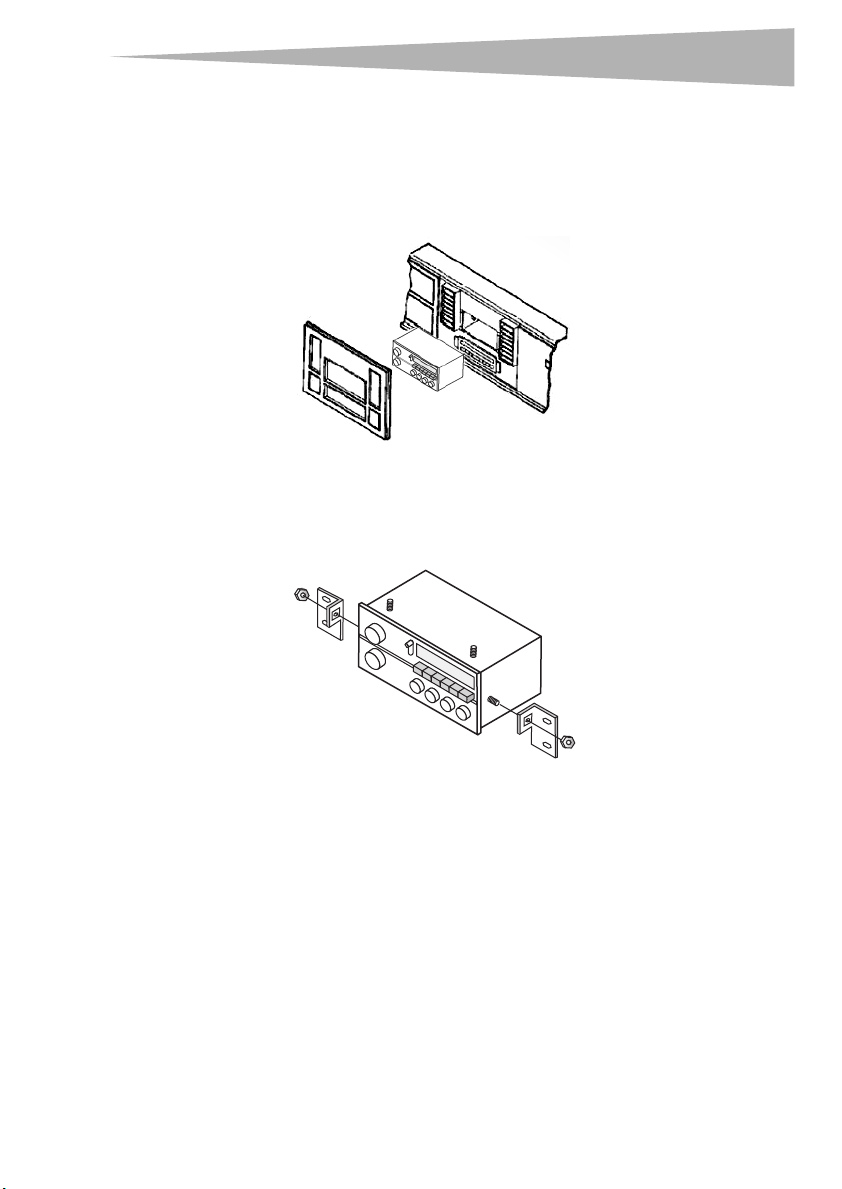
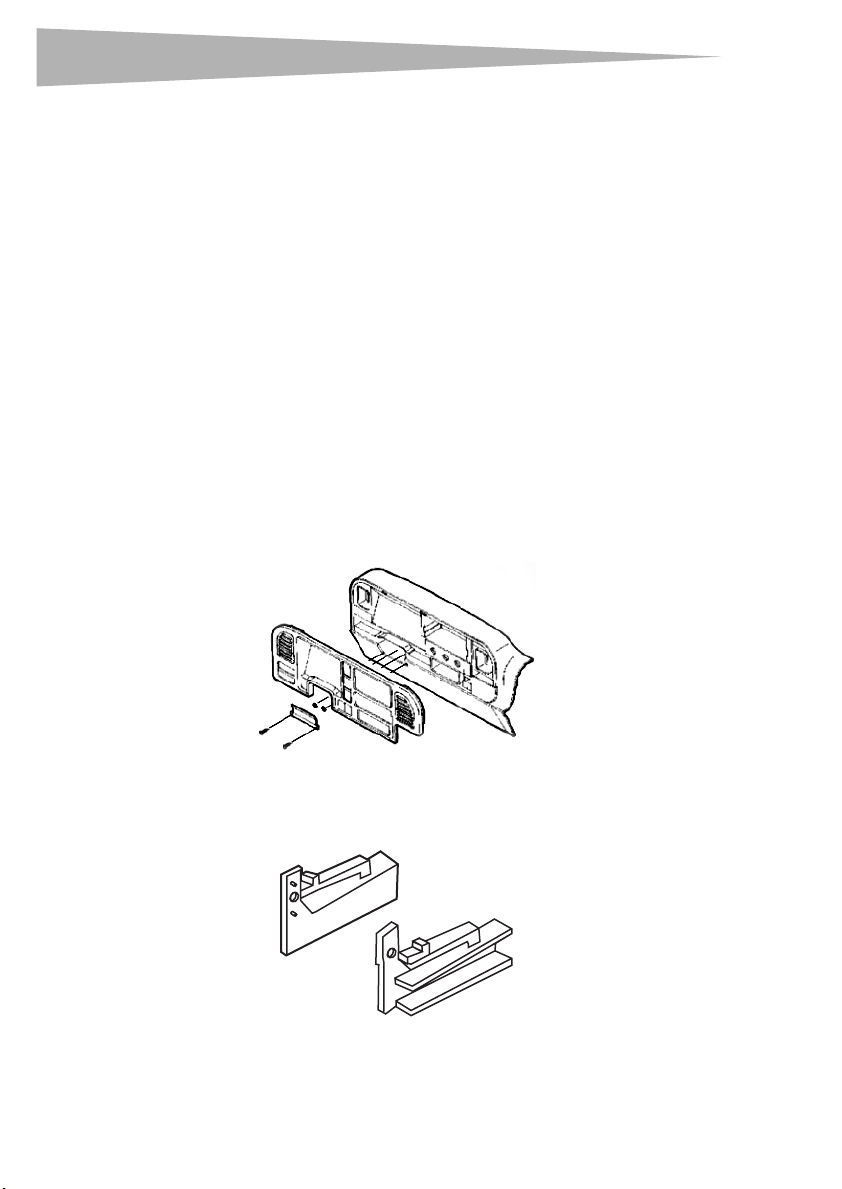
Regal 1984-1987
To install your car stereo:
Installing your car stereo
1 Disconnect the negative battery terminal to prevent an accidental short circuit.
2 Remove the radio knobs and cigarette lighter.
3 Carefully unclip the radio trim bezel, then remove it.
4 Remove the hardware that secures the factory mounting brackets to the factory head
unit. Remove and retain the brackets.
2
S10 shown
as example
5 Go to “Completing the installation” on page 76.
Page 13
Installing your car stereo
Buick
Riviera 1983-1985
To install your car stereo:
1 Disconnect the negative battery terminal to prevent an accidental short circuit.
2 Carefully pull to remove the dash trim bezel.
3 Remove the four screws that secure the factory head unit, then disconnect the wiring.
4 Remove the hardware that secures the factory mounting brackets to the factory head
unit. Remove and retain the brackets.
2
13
S10 shown
as example
5 Go to “Completing the installation” on page 76.
Page 14
14
Buick
Riviera 1990-1995
To install your car stereo:
Installing your car stereo
1 Disconnect the negative battery terminal to prevent an accidental short circuit.
2 Remove the two torx-head screws above the instrument cluster and one torx-head
screw from each AC vent.
3 Unsnap the panel.
4 Remove the hardware that secures the factory mounting brackets to the factory head
unit. Remove and retain the brackets.
2
S10 shown
as example
5 Go to “Completing the installation” on page 76.
Page 15
Installing your car stereo
Buick
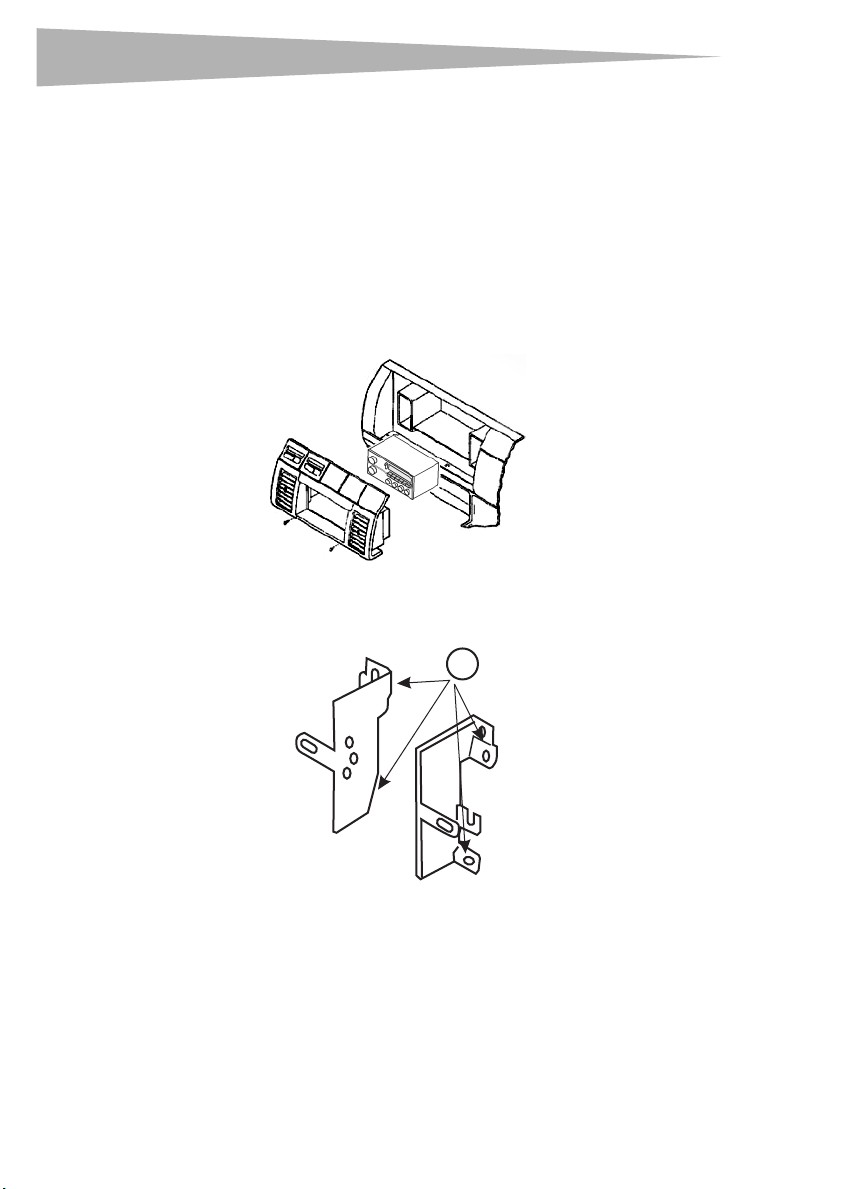
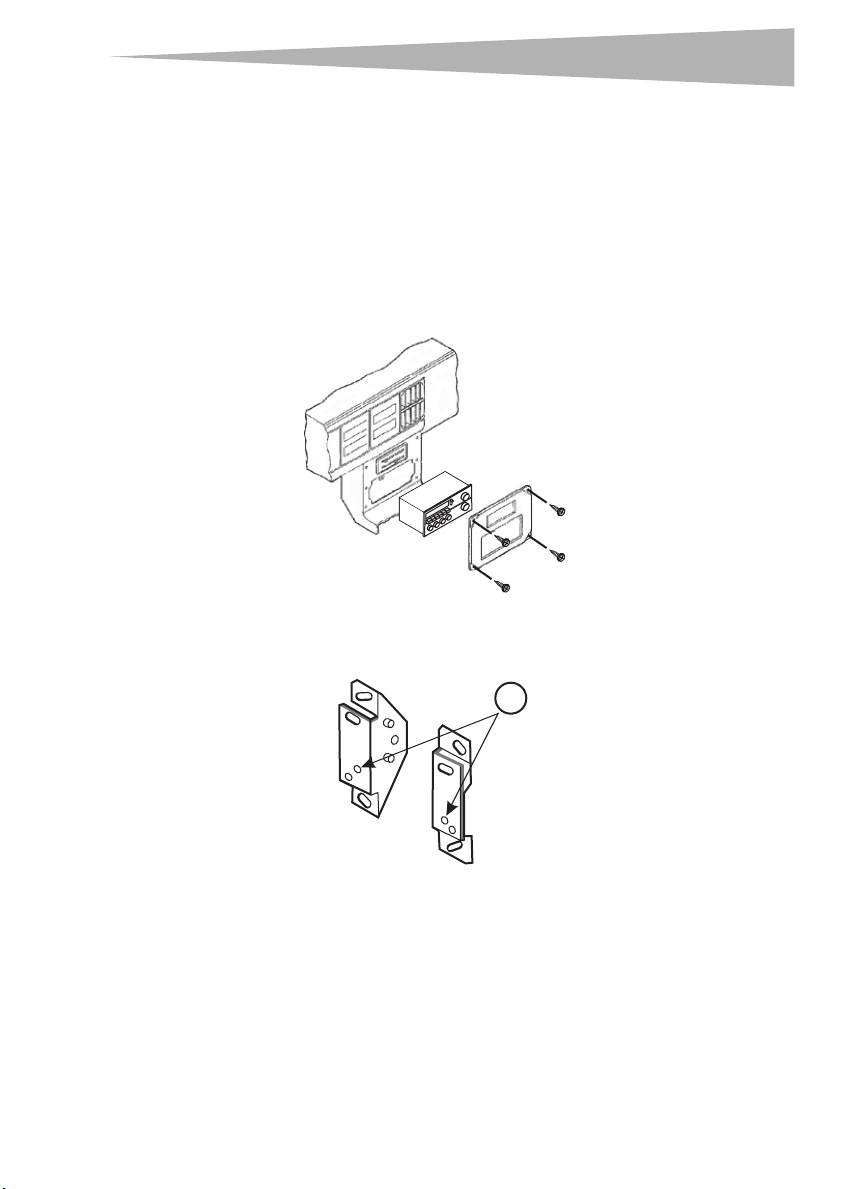
Roadmaster 1991-1994
Chevrolet
Caprice 1991-1993
To install your car stereo:
1 Disconnect the negative battery terminal to prevent an accidental short circuit.
2 Remove the two screws from the driver-side service panel, then unclip the panel.
3 Pry off the trim piece located above the glove box, then remove one screw.
4 Remove three screws from the top edge of the dash trim bezel. Remove one screw
from the lower-left corner of the glove box and one screw from the parking brake
release.
5 Remove the dash trim bezel.
6 Cut and remove all mounting tabs on bracket 4 except the B tabs. Each mounting tab
has a letter stamped on the back of the tab. Cut the tabs with the blade pointed away
from you and your fingers.
15
B
7 Go to “Completing the installation” on page 76.
Page 16
16
Buick
Skyhawk 1982-1989
Oldsmobile
Firenza 1982-1989
To install your car stereo:
1 Disconnect the negative battery terminal to prevent an accidental short circuit.
2 Remove the glove box by removing the door strap wire clip and four screws.
3 Remove the two screws below the cigarette lighter and three screws below the
4 Remove one screw from top-left of the factory head unit, then unclip the dash trim
5 Remove the hardware that secures the factory mounting brackets to the factory head
Installing your car stereo
steering column.
bezel.
unit. Remove and retain the brackets.
2
S10 shown
as example
6 Go to “Completing the installation” on page 76.
Page 17
Installing your car stereo
Buick
Skylark 1983-1985
To install your car stereo:
1 Disconnect the negative battery terminal to prevent an accidental short circuit.
2 Remove the four screws from the top edge of the instrument panel.
3 Remove the one screw from the bottom-left corner of the panel.
4 Remove two screws from the steering column trim, then remove the trim.
5 Pull up and out on the dash trim bezel, then remove it.
6 Remove the hardware that secures the factory mounting brackets to the factory head
unit. Remove and retain the brackets.
2
17
S10 shown
as example
7 Go to “Completing the installation” on page 76.
Page 18
18
Buick
Skylark 1987-1989
To install your car stereo:
1 Disconnect the negative battery terminal to prevent an accidental short circuit.
2 Unsnap the gear shift bezel from the base of the console. Remove the two screws that
3 Remove the hardware that secures the factory mounting brackets to the factory head
Installing your car stereo
secure the bottom of the dash trim bezel, then remove the bezel.
unit. Remove and retain the brackets.
2
S10 shown
as example
4 Go to “Completing the installation” on page 76.
Page 19
Installing your car stereo
Buick
Skylark 1990-1995
To install your car stereo:
1 Disconnect the negative battery terminal to prevent an accidental short circuit.
2 Pull out on the ashtray, then remove the two exposed screws inside the ashtray
compartment.
3 Remove the two screws that secure the ashtray and lower edge of the dash trim bezel.
4 Using a panel removal tool, pry out on the trim bezel, then remove it.
5 Remove two nuts from the bottom of the factory head unit, then remove it.
6 Remove the hardware that secures the factory mounting brackets to the factory head
unit. Remove and retain the brackets.
2
19
S10 shown
as example
7 Go to “Completing the installation” on page 76.
Page 20
20
Cadillac
Deville 1985-1995
Cadillac
Fleetwood 1985-1993
To install your car stereo:
1 Disconnect the negative battery terminal to prevent an accidental short circuit.
2 Remove the two screws at the top of the radio trim bezel.
3 Pull out on the top edge of the bezel, then pull up to remove it.
4 Remove the hardware that secures the factory mounting brackets to the factory head
unit. Remove and retain the brackets.
Installing your car stereo
2
S10 shown
as example
5 Go to “Completing the installation” on page 76.
Page 21
Installing your car stereo
Cadillac
Eldorado 1984-1991
Cadillac
Seville 1984-1991
To install your car stereo:
1 Disconnect the negative battery terminal to prevent an accidental short circuit.
2 Remove the two Phillips screws above the A/C vents.
3 Pull out of the top edge of the dash trim bezel, then remove it.
4 Remove the hardware that secures the factory mounting brackets to the factory head
unit. Remove and retain the brackets.
2
21
S10 shown
as example
5 Go to “Completing the installation” on page 76.
Page 22
22
Cadillac
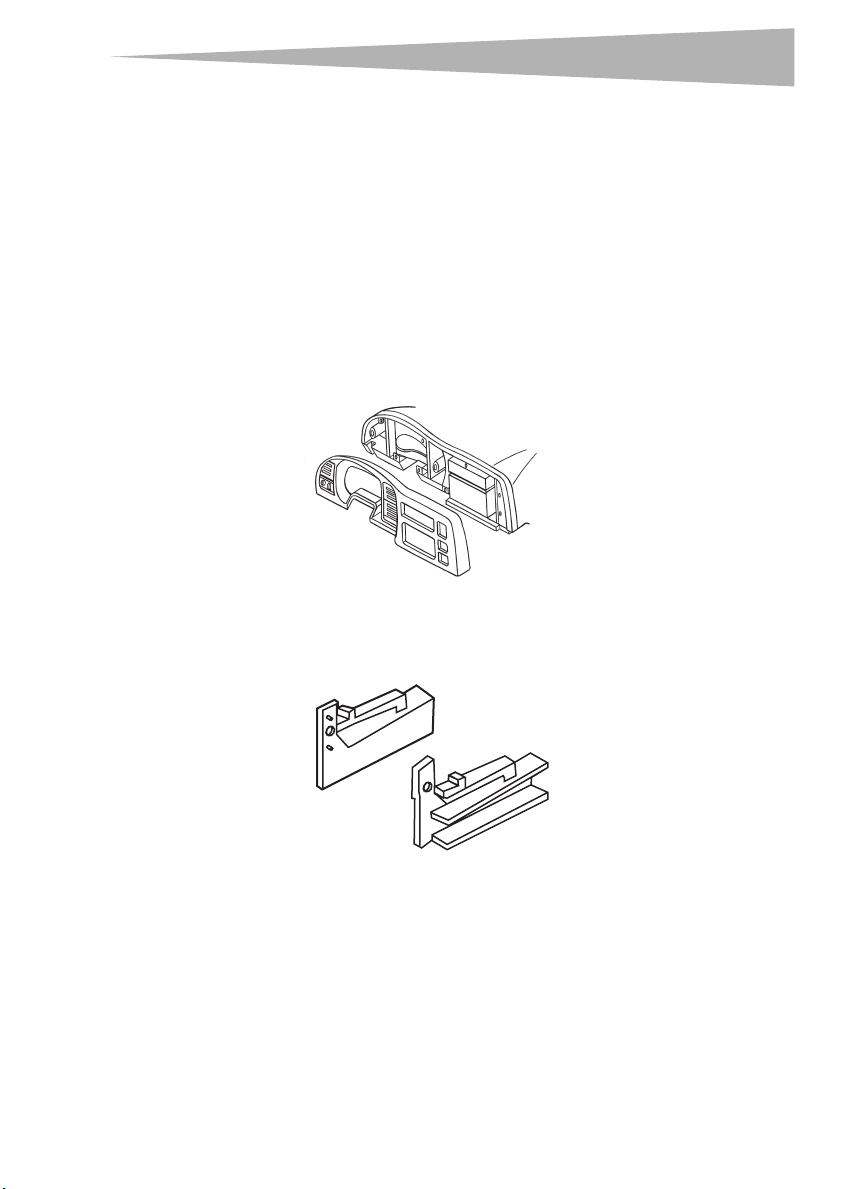
Escalade 1999-2002
Chevrolet
Pickup 1995-2002
Suburban 1995-2002
Tahoe 1995-2002
Silverado 1999-2002
GMC
Sierra 1995-2002
Suburban1995-2002
Yukon 1995-2002
To install your car stereo:
1 Disconnect the negative battery terminal to prevent an accidental short circuit.
2 Remove the steering column filler panel and the ashtray.
3 Unclip the dash trim bezel, then remove it.
Installing your car stereo
4 Using a flat-blade screwdriver, press down on the outer clips of the factory head unit
(or pocket), then disconnect the wiring and remove the head unit.
5 Locate bracket set 8.
6 Go to “Completing the installation” on page 76.
Page 23
Installing your car stereo
Chevrolet
Astro 1985-1989
GMC
Safari 1985-1989
To install your car stereo:
1 Disconnect the negative battery terminal to prevent an accidental short circuit.
2 Remove three screws from the top of the dash trim bezel.
3 Open the glove box, then remove two 10 mm bolts from the lower edge of the trim
bezel.
4 Pull the console trim forward, then remove two exposed 10 mm bolts. Carefully unclip
the trim bezel, then remove it.
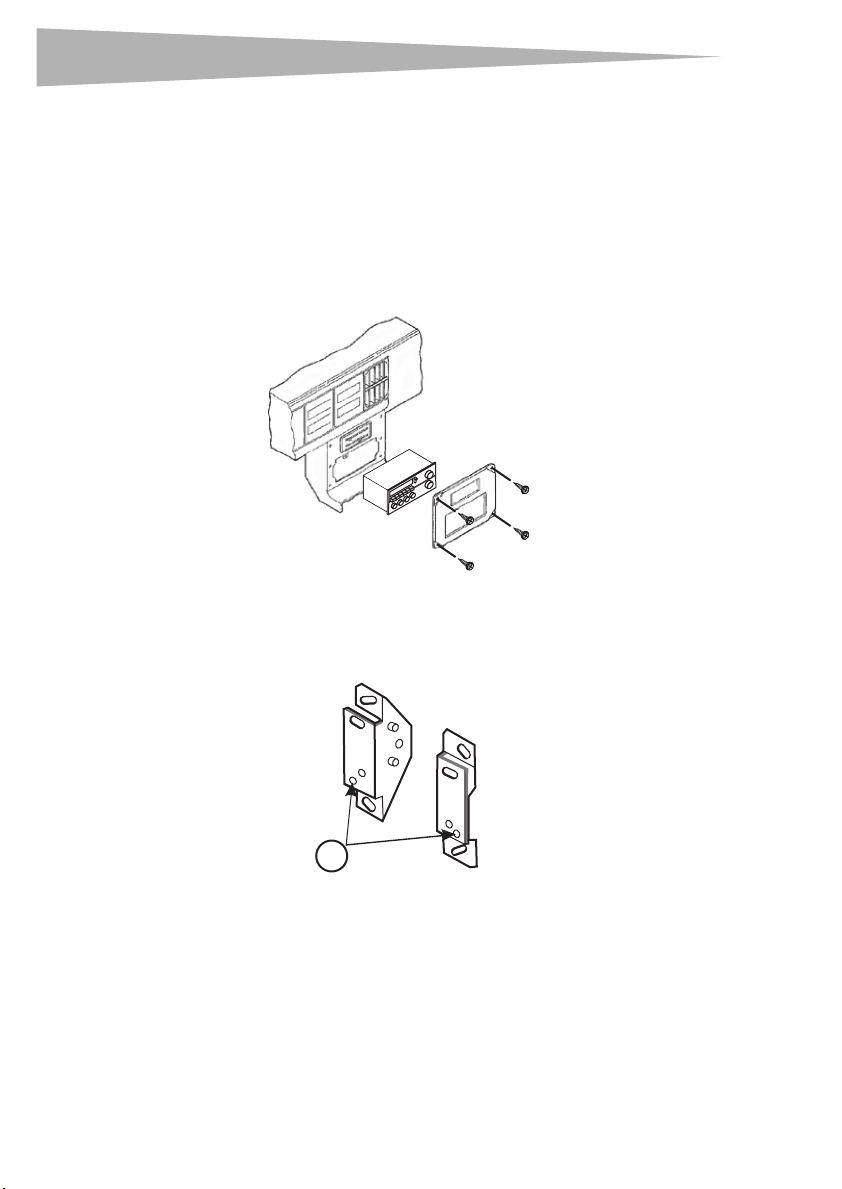
5 Remove two 7 mm screws from the factory head unit, then disconnect the wiring.
6 Cut and remove all mounting tabs on bracket 3 except the A tabs. Each mounting tab
has a letter stamped on the back of the tab. Cut the tabs with the blade pointed away
from you and your fingers.
23
A
A
7 Go to “Completing the installation” on page 76.
Page 24
24
Chevrolet
Astro 1990-1995
GMC
Safari 1990-1995
To install your car stereo:
Installing your car stereo
1 Disconnect the negative battery terminal to prevent an accidental short circuit.
2 Remove the two screws from the bottom of the dash trim bezel. Carefully unclip the
bezel, then remove it. Remove the four screws from the factory head unit, then
disconnect the wiring.
3 Cut and remove all mounting tabs on bracket 1 except the A tabs. Each mounting tab
has a letter stamped on the back of the tab. Cut the tabs with the blade pointed away
from you and your fingers.
A
4 Go to “Completing the installation” on page 76.
Page 25
Installing your car stereo
Chevrolet
Astro 1996-2004
GMC
Safari 1996-2004
To install your car stereo:
1 Disconnect the negative battery terminal to prevent an accidental short circuit.
2 Set the gear selector into its lowest position.
3 Unclip the perimeter of the dash trim bezel.
4 Disconnect the rear A/C control harness and headlight switch from the back of the
dash trim bezel, then remove the bezel.
5 Using a flat-blade screwdriver, press down of the outside clips of the factory head unit,
then remove the head unit.
6 Locate bracket set 8.
25
7 Go to “Completing the installation” on page 76.
Page 26
26
Chevrolet
Beretta 1991-1996
Corsica 1991-1996
To install your car stereo:
1 Disconnect the negative battery terminal to prevent an accidental short circuit.
2 Using a panel removal tool, pry outward on the dash trim bezel, then remove it.
3 Remove the two screws that secure the factory head unit, then disconnect the wiring.
4 Locate bracket 7.
Installing your car stereo
5 Go to “Completing the installation” on page 76.
Page 27
Installing your car stereo
Chevrolet
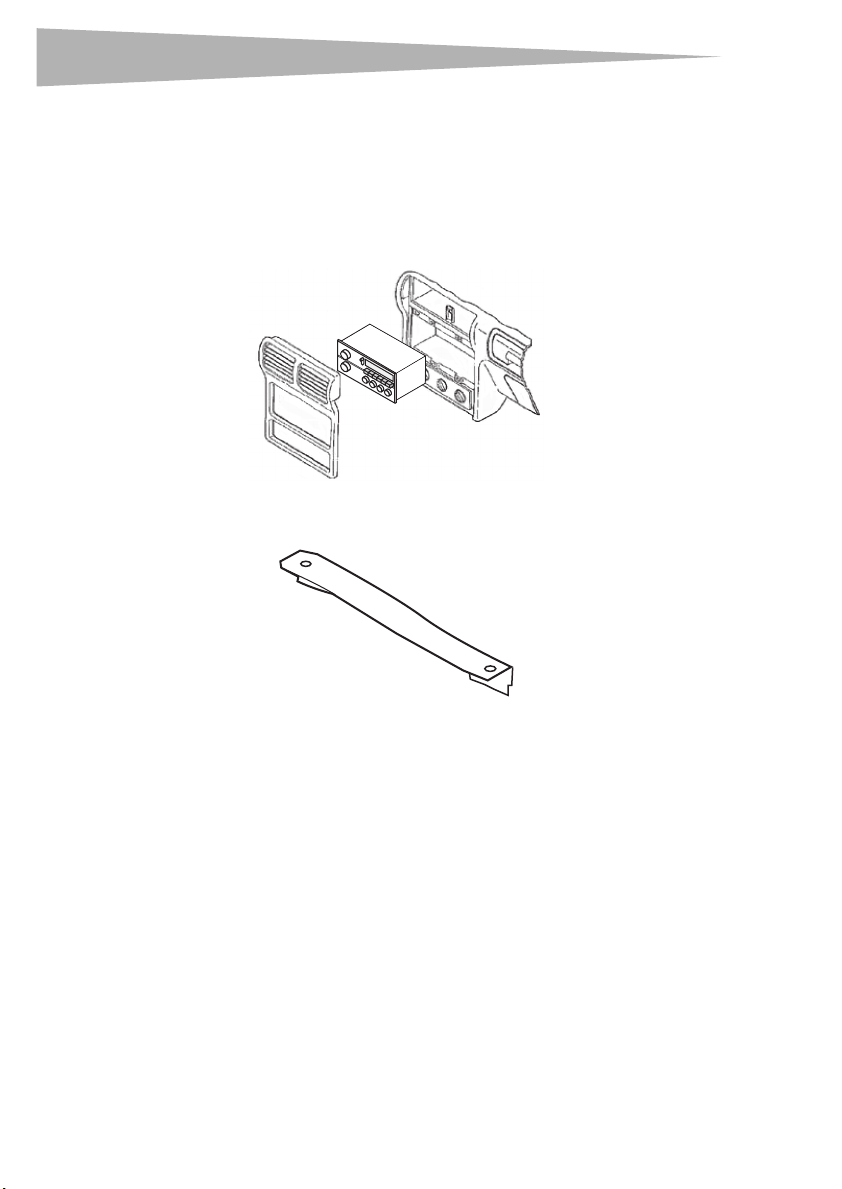
Blazer (full size) 1988-1991
Suburban 1988-1991
GMC
Jimmy (full size) 1989-1991
Suburban 1989-1991
To install your car stereo:
1 Disconnect the negative battery terminal to prevent an accidental short circuit.
2 Remove the two screws from the radio trim bezel, then remove the bezel.
27
3 Remove the two screws that secure the factory head unit, then disconnect the wiring.
4 Remove the hardware that secures the factory mounting brackets to the factory head
unit. Remove and retain the brackets.
2
S10 shown
as example
5 Go to “Completing the installation” on page 76.
Page 28
28
Chevrolet
Blazer 1998-2001
S10 Pickup 1998-2001
GMC
Jimmy1998-2001
Sonoma 1998-2001
To install your car stereo:
1 Disconnect the negative battery terminal to prevent an accidental short circuit.
2 Remove the two 9/32-inch hex-head screws from the knee bolster.
3 Pull down on the bolster, then remove the exposed hex-head screws on the base of the
dash trim bezel.
4 Remove one Phillips screw above the instrument cluster.
5 Unclip the dash trim bezel, then remove it.
6 Remove the two 9/32-inch screws that secure the factory head unit, then disconnect
the wiring.
7 Locate bracket set 10.
Installing your car stereo
8 Go to “Completing the installation” on page 76.
Page 29
Installing your car stereo
Chevrolet
Camaro 1982-1984
Pontiac
Firebird 1982-1984
To install your car stereo:
1 Disconnect the negative battery terminal to prevent an accidental short circuit.
2 Remove the four star-drive screws from the dash trim bezel, then remove the bezel.
Remove the four screws that secure the factory head unit, then remove the head unit.
3 Cut and remove all mounting tabs on bracket 2 except the A tabs. Each mounting tab
has a letter stamped on the back of the tab. Cut the tabs with the blade pointed away
from you and your fingers.
29
A
4 Go to “Completing the installation” on page 76.
Page 30
30
Chevrolet
Camaro 1985-1992
Pontiac
Firebird 1985-1992
To install your car stereo:
1 Disconnect the negative battery terminal to prevent an accidental short circuit.
2 Remove the four star-drive screws from the dash trim bezel, then remove the bezel.
3 Remove the four screws that secure the factory head unit, then remove the head unit.
4 Cut and remove all mounting tabs on bracket 2 except the B tabs. Each mounting tab
Installing your car stereo
has a letter stamped on the back of the tab. Cut the tabs with the blade pointed away
from you and your fingers.
B
5 Go to “Completing the installation” on page 76.
Page 31

Installing your car stereo
Chevrolet
Camaro 1997-2002
To install your car stereo:
1 Disconnect the negative battery terminal to prevent an accidental short circuit.
2 Unclip the radio trim bezel, then remove it.
3 Remove two 7 mm hex-head screws that secure the factory head unit, then disconnect
the wiring.
4 Locate bracket set 10.
31
5 Go to “Completing the installation” on page 76.
Page 32

32
Chevrolet
Caprice 1994-1996
Impala SS 1994-1996
To install your car stereo:
1 Disconnect the negative battery terminal to prevent an accidental short circuit.
2 Remove the five hex-head screws inside the ashtray compartment.
3 Remove the four hex-head screws from the base of the dash trim bezel.
4 Unsnap the fuse box cover, then remove the one exposed hex-head screw.
5 Remove two hex-head screws above the instrument cluster.
6 Move the gear selector to the D1 position, pull out on the cluster trim bezel, then
remove it.
7 Remove one exposed hex-head screw on the left side of the dash trim bezel.
8 Unclip the dash trim and radio bezels, then remove them.
9 Locate bracket set 10.
Installing your car stereo
10 Go to “Completing the installation” on page 76.
Page 33

Installing your car stereo
Chevrolet
Cavalier 1982-1990
Cadillac
Cimarron 1982-1988
Pontiac
Sunbird J-2000 1982-1988
To install your car stereo:
1 Disconnect the negative battery terminal to prevent an accidental short circuit.
2 Remove the four star-drive screws from the dash trim bezel.
3 Remove the two star-drive screws from the left side of the instrument cluster, then
remove the dash trim bezel.
4 Remove two screws from the factory head unit, then remove the head unit.
5 Cut and remove all mounting tabs on bracket 4 except the A tabs. Each mounting tab
has a letter stamped on the back of the tab. Cut the tabs with the blade pointed away
from you and your fingers.
33
A
6 Go to “Completing the installation” on page 76.
A
Page 34

34
Chevrolet
Cavalier 1991-1994
To install your car stereo:
1 Disconnect the negative battery terminal to prevent an accidental short circuit.
2 Using a panel removal tool, carefully pry out the dash trim bezel, then remove it.
3 Remove the two screws that secure the factory head unit, then disconnect the wiring.
4 Cut and remove all mounting tabs on bracket 3 except the B tabs. Each mounting tab
Installing your car stereo
has a letter stamped on the back of the tab. Cut the tabs with the blade pointed away
from you and your fingers.
B
B
5 Go to “Completing the installation” on page 76.
Page 35

Installing your car stereo
Chevrolet
Cavalier 1995-1999
To install your car stereo:
1 Disconnect the negative battery terminal to prevent an accidental short circuit.
2 Open the passenger’s door, then remove the panel on the end of the dash.
3 Remove move one exposed Phillips screw on each side.
4 Remove three 7 mm hex-head screws from the top of the glove box liner.
5 Remove two 7 mm hex-head screws from the top left corner of the glove box
compartment.
6 Remove one Phillips screw from the defroster duct.
7 Remove the duct work and the one exposed Phillips screw.
8 Remove the dash pad and three exposed Phillips screws at the top of the radio trim
bezel.
9 Locate bracket set 10.
35
10 Go to “Completing the installation” on page 76.
Page 36

36
Chevrolet
Celebrity 1982-1983
To install your car stereo:
1 Disconnect the negative battery terminal to prevent an accidental short circuit.
2 Remove the plastic plate next to each A/C vent, then remove the two exposed screws.
3 Remove the four screws on the steering column.
4 Push in on the light control knob spring, then remove the knob.
5 Remove the bezel.
6 Remove the hardware that secures the factory mounting brackets to the factory head
Installing your car stereo
unit. Remove and retain the brackets.
2
S10 shown
as example
7 Go to “Completing the installation” on page 76.
Page 37

Installing your car stereo
Chevrolet
Celebrity 1984-1989
To install your car stereo:
1 Disconnect the negative battery terminal to prevent an accidental short circuit.
2 Remove the glove box compartment, by pressing on the clip on the bottom of the
glove box lines and removing the six exposed nuts above the opening.
3 Remove the six screws below the steering column.
4 Remove the headlight knob by pressing the clip on the back of the knob and removing
the nut.
5 Remove the cigarette lighter, then disconnect the wiring.
6 Grasp the lighter socket, unscrew the brass nut on the back of the lighter, then remove
the socket.
7 Remove the dash trim bezel, then disconnect the wiring.
37
8 Remove the hardware that secures the factory mounting brackets to the factory head
unit. Remove and retain the brackets.
2
S10 shown
as example
9 Go to “Completing the installation” on page 76.
Page 38

38
Chevrolet
Citation II 1985
To install your car stereo:
Installing your car stereo
1 Disconnect the negative battery terminal to prevent an accidental short circuit.
2 Remove the two screws from the bottom of the steering column trim panel, then
remove the panel.
3 Remove the six screws from the dash trim bezel, disconnect the wiring, then remove
the bezel.
4 Remove the hardware that secures the factory mounting brackets to the factory head
unit. Remove and retain the brackets.
2
S10 shown
as example
5 Go to “Completing the installation” on page 76.
Page 39

Installing your car stereo
Chevrolet
Corvette 1984-1989
To install your car stereo:
1 Disconnect the negative battery terminal to prevent an accidental short circuit.
2 Remove the seven screws from the dash trim bezel.
3 Move the gear shift to the lowest position.
4 Pull the right edge of the bezel forward, unclip the left side, the remove the bezel.
5 Remove the hardware that secures the factory mounting brackets to the factory head
unit. Remove and retain the brackets.
2
39
S10 shown
as example
6 Go to “Completing the installation” on page 76.
Page 40

40
Chevrolet
Corvette 1997-2004
To install your car stereo:
1 Disconnect the negative battery terminal to prevent an accidental short circuit.
2 Pry out the ride control switch, then disconnect the wiring.
3 Unsnap the switch trim, then remove the two exposed 10 mm hex-head screws.
4 Open the center console door, remove 4 screws from the center hinge, then remove the
5 Open the ashtray, then remove the one exposed screw.
6 Remove the ashtray, then remove the one exposed screw.
7 Unclip the small grill to the left of the ignition switch, then remove the one exposed
8 Unclip the edge of the radio trim bezel, then remove it.
9 Locate bracket set 10.
Installing your car stereo
door.
screw.
10 Go to “Completing the installation” on page 76.
Page 41

Installing your car stereo
Chevrolet
El Camino 1985-1988
Monte Carlo 1985-1988
To install your car stereo:
1 Disconnect the negative battery terminal to prevent an accidental short circuit.
2 Remove the four screws from the dash trim bezel, then remove the bezel.
3 Disconnect the cigarette lighter wiring.
4 Cut and remove all mounting tabs on bracket 2 except the C tabs. Each mounting tab
has a letter stamped on the back of the tab. Cut the tabs with the blade pointed away
from you and your fingers.
41
C
5 Go to “Completing the installation” on page 76.
C
Page 42

42
Chevrolet
Express 1996-2000
GMC
Savana 1996-2000
To install your car stereo:
1 Disconnect the negative battery terminal to prevent an accidental short circuit.
2 Unclip the plastic trim piece located below the steering column.
3 Unclip the dash trim bezel.
4 Pull the bezel over the steering column, then disconnect the wiring.
5 Using a flat-blade screwdriver, press down on the outside clips of the factory head
6 Locate bracket set 8.
Installing your car stereo
unit, then remove it.
7 Go to “Completing the installation” on page 76.
Page 43

Installing your car stereo
Chevrolet
Lumina 1990-1994
To install your car stereo:
1 Disconnect the negative battery terminal to prevent an accidental short circuit.
2 Remove the two screws from the lower steering column panel.
3 Pull the panel down to access the bottom portion of the radio trim bezel.
4 Pull the top and bottom edges of the bezel, then remove it.
5 Cut and remove all mounting tabs on bracket 5 except the A tabs. Each mounting tab
has a letter stamped on the back of the tab. Cut the tabs with the blade pointed away
from you and your fingers.
43
A
A
6 Go to “Completing the installation” on page 76.
Page 44

44
Chevrolet
Lumina 1995-2000
Monte Carlo 1995-2000
To install your car stereo:
1 Disconnect the negative battery terminal to prevent an accidental short circuit.
2 Unclip the dash trim bezel, then remove it. (You may need to loosen the knee bolster).
3 Remove the two 7 mm hex-head screws that secures the factory head unit, then
disconnect the wiring.
4 Locate bracket set 10.
Installing your car stereo
5 Go to “Completing the installation” on page 76.
Page 45

Installing your car stereo
Chevrolet
Lumina APV 1990-1995
Oldsmobile
Silhouette 1990-1995
Pontiac
TransSport 1990-95
To install your car stereo:
1 Disconnect the negative battery terminal to prevent an accidental short circuit.
2 Remove the two screws that secure the lower steering column panel, then remove it.
45
3 Remove the two exposed screws on the left tab of the radio trim bezel.
4 Open the glove box, then remove the two exposed screws on the right tabs of the radio
trim bezel.
5 Cut and remove all mounting tabs on bracket 6 except the B tabs. Each mounting tab
has a letter stamped on the back of the tab. Cut the tabs with the blade pointed away
from you and your fingers.
B
B
6 Go to “Completing the installation” on page 76.
Page 46

46
Chevrolet
Lumina APV 1996
Oldsmobile
Silhouette1996
Pontiac
TransSport 1996
To install your car stereo:
1 Disconnect the negative battery terminal to prevent an accidental short circuit.
2 Remove the one Phillips screw from each side of the center console.
Installing your car stereo
3 Open the glove box, then remove the two exposed Phillips screws.
4 Remove the two 7 mm hex-head screws and one pop-clip from the lower steering
column panel.
5 Remove the two exposed Phillips screws near the climate controls.
Page 47

Installing your car stereo
6 Remove the one 7 mm hex- head screw under the glove box.
7 Pull out on the center console, then remove it.
8 Cut and remove all mounting tabs on bracket 6 except the B tabs. Each mounting tab
has a letter stamped on the back of the tab. Cut the tabs with the blade pointed away
from you and your fingers.
9 Go to “Completing the installation” on page 76.
47
B
B
Page 48

48
Chevrolet
Malibu 1997-2000
To install your car stereo:
Installing your car stereo
1 Disconnect the negative battery terminal to prevent an accidental short circuit.
2 Remove the two 9/32-inch hex-head screws that secure the factory head unit, then
disconnect the wiring.
3 Locate bracket set 10.
4 Go to “Completing the installation” on page 76.
Page 49

Installing your car stereo
Chevrolet
Nova 1985-1988
To install your car stereo:
1 Disconnect the negative battery terminal to prevent an accidental short circuit.
2 Remove the ashtray, then remove the two screws from the ashtray bracket.
3 Remove the two screws above the radio opening, then remove the radio trim bezel.
4 Cut and remove all mounting tabs on bracket 1 except the B tabs. Each mounting tab
has a letter stamped on the back of the tab. Cut the tabs with the blade pointed away
from you and your fingers.
49
B
5 Go to “Completing the installation” on page 76.
Page 50

50
Chevrolet
S10 Pickup 1982-1985
S10 Blazer 1982-1985
GMC
S15 Pickup 1982-1985
S15 Jimmy 1982-1985
To install your car stereo:
1 Disconnect the negative battery terminal to prevent an accidental short circuit.
2 Remove the four star-drive screws from the corners of the dash trim bezel.
Installing your car stereo
3 Remove the one star-drive screw from the lower-right corner of the instrument cluster
panel, then remove the dash trim bezel.
4 Cut and remove all mounting tabs on bracket 5 except the B tabs. Each mounting tab
has a letter stamped on the back of the tab. Cut the tabs with the blade pointed away
from you and your fingers.
B
B
5 Go to “Completing the installation” on page 76.
Page 51

Installing your car stereo
Chevrolet
S10 Pickup 1986-1993
S10 Blazer 1986-1994
GMC
S15 Pickup 1986-1993
S15 Jimmy 1986-1994
Oldsmobile
Bravada 1991-1994
To install your car stereo:
1 Disconnect the negative battery terminal to prevent an accidental short circuit.
2 Remove the ashtray and the one screw inside the ashtray compartment.
51
3 Open the glove box, then remove the two exposed screws on the edge of the dash trim
bezel.
4 Cut and remove all mounting tabs on bracket L S-10 and the right bracket of bracket
set 5 except the top B tab on the right bracket. Each mounting tab has a letter
stamped on the back of the tab. Cut the tabs with the blade pointed away from you
and your fingers.
B
5 Go to “Completing the installation” on page 76.
Page 52

52
Chevrolet
Van (full size) 1988-1995
GMC
Van (full size) 1988-1995
To install your car stereo:
1 Disconnect the negative battery terminal to prevent an accidental short circuit.
2 Carefully unsnap the radio trim bezel, then remove it.
3 Remove two screws that secure the factory head unit, then disconnect the wiring.
4 Cut and remove all mounting tabs on bracket 1 except the C tabs. Each mounting tab
has a letter stamped on the back of the tab. Cut the tabs with the blade pointed away
from you and your fingers.
Installing your car stereo
C
C
5 Go to “Completing the installation” on page 76.
Page 53

Installing your car stereo
Chevrolet
Venture 1997-1999
Oldsmobile
Silhouette 1997-1999
Pontiac
Montana 1999
TransSport 1997-1998
To install your car stereo:
1 Disconnect the negative battery terminal to prevent an accidental short circuit.
2 Remove the ashtray, then remove the one exposed Phillips screw in the ashtray
compartment.
53
3 Remove the one Phillips screw from the cigarette lighter compartment.
4 Remove the two Phillips screws that secure the factory head unit, the disconnect the
wiring.
5 Locate bracket set 10.
6 Go to “Completing the installation” on page 76.
Page 54

54
Oldsmobile
98 1984-1990
Delta 88 1986-1988
To install your car stereo:
1 Disconnect the negative battery terminal to prevent an accidental short circuit.
2 Place the gear shift in low, then remove the rubber trim boot from the steering
3 Remove the two Phillips screws from the radio trim bezel.
4 Unhook the ashtray and light wiring terminal, then remove the trim bezel.
5 Remove the hardware that secures the factory mounting brackets to the factory head
Installing your car stereo
column.
unit. Remove and retain the brackets.
2
S10 shown
as example
6 Go to “Completing the installation” on page 76.
Page 55

Installing your car stereo
Oldsmobile
Achieva 1992-1995
To install your car stereo:
1 Disconnect the negative battery terminal to prevent an accidental short circuit.
2 Remove the four screws from the top edge of the dash trim bezel.
3 Remove the two screws from the bottom edge of the bezel.
4 Unsnap the A/C ducts, disconnect the light switch, then remove the bezel.
5 Remove the hardware that secures the factory mounting brackets to the factory head
unit. Remove and retain the brackets.
2
55
S10 shown
as example
6 Go to “Completing the installation” on page 76.
Page 56

56
Oldsmobile
Cutlass Calais 1984-1991
To install your car stereo:
1 Disconnect the negative battery terminal to prevent an accidental short circuit.
2 Remove the console and glove box assembly, then remove the three screws below the
box.
3 Lift up the parking brake trim, then remove the two screws from the gear shift trim.
4 Remove the ashtray from the gear shift area, then remove the two exposed 7 mm
screws.
5 Using a screwdriver, depress the retainer tabs on the dash ashtray, pull the ashtray out,
then remove the two 7 mm hex-head screws from the ashtray bracket.
6 Remove the hardware that secures the factory mounting brackets to the factory head
unit. Remove and retain the brackets.
Installing your car stereo
2
S10 shown
as example
7 Go to “Completing the installation” on page 76.
Page 57

Installing your car stereo
Oldsmobile
Cutlass Ciera 1982-1996
To install your car stereo:
1 Disconnect the negative battery terminal to prevent an accidental short circuit.
2 Remove the ashtray, then remove the two screws from the ashtray location.
3 Remove the one screw below and the two screws above the steering column.
4 Pry the A/C vents, then remove the exposed screws in the vent compartments.
Remove the six screws from the edge of the dash trim bezel, then remove the bezel.
5 Remove the hardware that secures the factory mounting brackets to the factory head
unit. Remove and retain the brackets.
2
57
S10 shown
as example
6 Go to “Completing the installation” on page 76.
Page 58

58
Oldsmobile
Cutlass Supreme 1984-1988
To install your car stereo:
1 Disconnect the negative battery terminal to prevent an accidental short circuit.
2 Remove the cigarette lighter and radio knobs, then unsnap the radio trim bezel.
3 Remove the one screw from the right side of the ashtray housing.
4 Remove the hardware that secures the factory mounting brackets to the factory head
unit. Remove and retain the brackets.
Installing your car stereo
2
S10 shown
as example
5 Go to “Completing the installation” on page 76.
Page 59

Installing your car stereo
Oldsmobile
Omega 1983-1984
To install your car stereo:
1 Disconnect the negative battery terminal to prevent an accidental short circuit.
2 Remove the hex-head washer screws from the steering column trim panel, then pull
down on the rear edge of the panel, then remove it.
3 Remove the four Phillips screws from the top edge of the dash trim bezel.
4 Remove the two hex-head washer screws from the bottom of the dash trim bezel,
then remove it.
5 Cut and remove all mounting tabs on bracket 2 except the C tabs. Each mounting tab
has a letter stamped on the back of the tab. Cut the tabs with the blade pointed away
from you and your fingers.
59
C
C
C
C
6 Go to “Completing the installation” on page 76.
Page 60

60
Oldsmobile
Toronado 1982-1985
To install your car stereo:
1 Disconnect the negative battery terminal to prevent an accidental short circuit.
2 Depress the clip located behind the headlight knob, then remove the knob.
3 Remove the three screws that secure the steering column trim, then remove it.
4 Remove the four screws from the bottom edge of the dash trim bezel, then remove it.
Installing your car stereo
5 Remove the hardware that secures the factory mounting brackets to the factory head
unit. Remove and retain the brackets.
2
S10 shown
as example
6 Go to “Completing the installation” on page 76.
Page 61

Installing your car stereo
Pontiac
6000 1982-1991
To install your car stereo:
1 Disconnect the negative battery terminal to prevent an accidental short circuit.
2 Open the glove box, then remove the one screw from the side of the radio trim bezel.
3 Carefully remove the bezel from the dash, then remove the dummy plate from the
bezel.
4 Cut and remove all mounting tabs on bracket 5 except the A tabs. Each mounting tab
has a letter stamped on the back of the tab. Cut the tabs with the blade pointed away
from you and your fingers.
61
A
5 Go to “Completing the installation” on page 76.
A
Page 62

62
Pontiac
Bonneville 1987-1993
To install your car stereo:
1 Disconnect the negative battery terminal to prevent an accidental short circuit.
2 Carefully unsnap, then remove the dash trim bezel.
3 Remove the screws that secure the factory head unit, then disconnect the wiring.
4 Remove the hardware that secures the factory mounting brackets to the factory head
unit. Remove and retain the brackets.
Installing your car stereo
2
S10 shown
as example
5 Go to “Completing the installation” on page 76.
Page 63

Installing your car stereo
Pontiac
Bonneville 1994-1999
To install your car stereo:
1 Disconnect the negative battery terminal to prevent an accidental short circuit.
2 Unclip the right side of the dash trim bezel.
3 Unclip the left side of the bezel, then remove it.
4 Remove the three 7 mm hex-head screws that secures the factory head unit, then
disconnect the wiring.
5 Locate bracket set 9.
63
6 Go to “Completing the installation” on page 76.
Page 64

64
Pontiac
Fiero 1984-1988
Installing your car stereo
To install your car stereo:
1 Disconnect the negative battery terminal to prevent an accidental short circuit.
2 Remove the four star-drive screws from the dash trim bezel.
3 Carefully pull out on the trim bezel, then remove it.
4 Remove the four hex-head screws from the factory head unit, then disconnect the
wiring.
5 Remove the hardware that secures the factory mounting brackets to the factory head
unit. Remove and retain the brackets.
2
S10 shown
as example
6 Go to “Completing the installation” on page 76.
Page 65

Installing your car stereo
Pontiac
Firebird 1993-2002
To install your car stereo:
1 Disconnect the negative battery terminal to prevent an accidental short circuit.
2 Unclip the radio trim bezel.
3 Remove the four 7 mm hex- head screws that secure the factory head unit, then
disconnect the wiring.
4 Locate bracket set 9.
65
5 Go to “Completing the installation” on page 76.
Page 66

66
Pontiac
Grand Am 1985-1991
To install your car stereo:
1 Disconnect the negative battery terminal to prevent an accidental short circuit.
2 Carefully unsnap the front edge of the gear shift console panel.
3 Unsnap, then remove the dash trim bezel.
4 Remove the hardware that secures the factory mounting brackets to the factory head
unit. Remove and retain the brackets.
Installing your car stereo
2
S10 shown
as example
5 Go to “Completing the installation” on page 76.
Page 67

Installing your car stereo
Pontiac
Grand Am 1992-1995
To install your car stereo:
1 Disconnect the negative battery terminal to prevent an accidental short circuit.
2 Remove the six 7 mm hex-head screws from the driver’s side knee bolster panel, then
lower the panel.
3 Remove the four Phillips screws from the glove box and cup holder assembly.
4 Remove the one 7 mm hex-head screw from the left corner of the dash trim bezel.
5 Loosen two 10 mm nuts from the top of the factory head unit, slide the unit out, then
disconnect the wiring.
6 Remove the hardware that secures the factory mounting brackets to the factory head
unit. Remove and retain the brackets.
67
2
S10 shown
as example
7 Go to “Completing the installation” on page 76.
Page 68

68
Pontiac
Grand Am 1996-1998
To install your car stereo:
1 Disconnect the negative battery terminal to prevent an accidental short circuit.
2 Remove the two Phillips screws above the instrument cluster.
3 Unclip the dash trim bezel, then remove it.
4 Remove the three 7 mm hex-head screws that secure the factory head unit, then
disconnect the wiring.
5 Locate bracket set 9.
Installing your car stereo
6 Go to “Completing the installation” on page 76.
Page 69

Installing your car stereo
Pontiac
Grand Am 1999-2000
To install your car stereo:
1 Disconnect the negative battery terminal to prevent an accidental short circuit.
2 Unclip the radio trim bezel.
3 Remove the three 9/32-inch screws that secure the factory head unit, then disconnect
the wiring.
4 Locate bracket set 9.
69
5 Go to “Completing the installation” on page 76.
Page 70

70
Pontiac
Grand Prix 1985-1987
Bonneville 1982-1986
To install your car stereo:
1 Disconnect the negative battery terminal to prevent an accidental short circuit.
2 Remove the three screws from the top edge of the dash trim bezel.
3 Remove the four screws from the metal steering column trim, then remove the trim.
4 Remove the four screws exposed at the bottom edge of the dash trim bezel.
5 Remove the cigarette lighter and retainer ring, then remove the dash trim bezel.
6 Remove the hardware that secures the factory mounting brackets to the factory head
unit. Remove and retain the brackets.
Installing your car stereo
2
S10 shown
as example
7 Go to “Completing the installation” on page 76.
Page 71

Installing your car stereo
Pontiac
Grand Prix 1990-1993
To install your car stereo:
1 Disconnect the negative battery terminal to prevent an accidental short circuit.
2 Remove the one 9/32-inch hex-head screw from the computer diagnostic plug, then
twist to access the one 9/32-inch screw on the trim panel.
3 Remove the three 9/32-inch screws from the bottom edge of the panel, then remove
it.
4 Open the glove box, then remove the four 9/32-inch screws from the dash trim bezel.
71
B
5 Go to “Completing the installation” on page 76.
B
Page 72

72
Pontiac
Grand Prix 1994-1996
To install your car stereo:
1 Disconnect the negative battery terminal to prevent an accidental short circuit.
2 Using a small set of pliers, grasp the retaining clip on the back of the gear shift handle,
then remove the clip.
3 Remove the gear shift handle.
4 Unclip the center console, then remove it.
5 Remove the two exposed 7 mm hex-head screws under the climate controls.
6 Unclip the radio trim bezel, then remove it.
7 Remove the two 7 mm hex-head screws that secures the factory head unit, then
disconnect the wiring.
8 Remove the hardware that secures the factory mounting brackets to the factory head
unit. Remove and retain the brackets.
Installing your car stereo
9 Go to “Completing the installation” on page 76.
Page 73

Installing your car stereo
Pontiac
Grand Prix 1997-2003
To install your car stereo:
1 Disconnect the negative battery terminal to prevent an accidental short circuit.
2 Unclip the entire dash trim bezel.
3 Remove the screws that secure the factory head unit, then disconnect the wiring.
4 Locate bracket set 9.
73
5 Go to “Completing the installation” on page 76.
Page 74

74
Pontiac
Sunfire 1995-1999
To install your car stereo:
1 Disconnect the negative battery terminal to prevent an accidental short circuit.
2 Open the glove box, then remove the two exposed Phillips screws on the right edge of
3 Unclip the bezel, then remove it.
4 Remove the two 7 mm hex-head screws that secure the factory head unit, then
5 Locate bracket set 9.
Installing your car stereo
the radio trim bezel.
disconnect the wiring.
6 Go to “Completing the installation” on page 76.
Page 75

Installing your car stereo
Saturn
All models 1991-1994
To install your car stereo:
1 Disconnect the negative battery terminal to prevent an accidental short circuit.
2 Carefully unclip the dash trim bezel.
3 Remove the two screws from the factory head unit, then disconnect the wiring.
4 Cut and remove all mounting tabs on bracket 6 except the A tabs. Each mounting tab
has a letter stamped on the back of the tab. Cut the tabs with the blade pointed away
from you and your fingers.
75
A
A
5 Go to “Completing the installation” on page 76.
Page 76

76
Completing the installation
For all vehicles, perform the following steps to complete your car stereo installation.
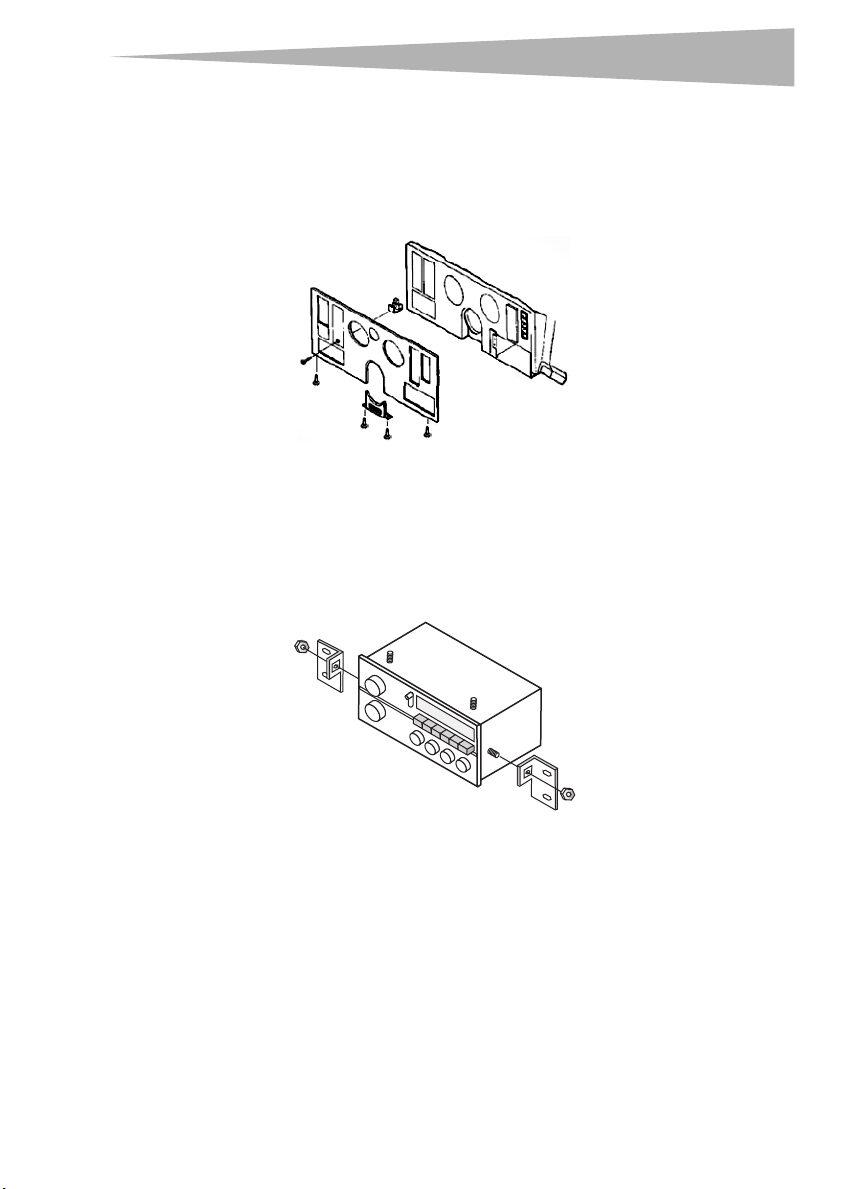
Installing the faceplate
To install the faceplate:
1 Choose a faceplate (according to the installation depth).
2 Snap the faceplate onto the front of the radio housing. (If an equalizer will be included
I
in the installation, the equalizer faceplate must be used).
3 If you are installing an equalizer, slide the equalizer brackets into the slots along the
inner walls of the radio housing.
Installing your car stereo
Page 77

Installing your car stereo
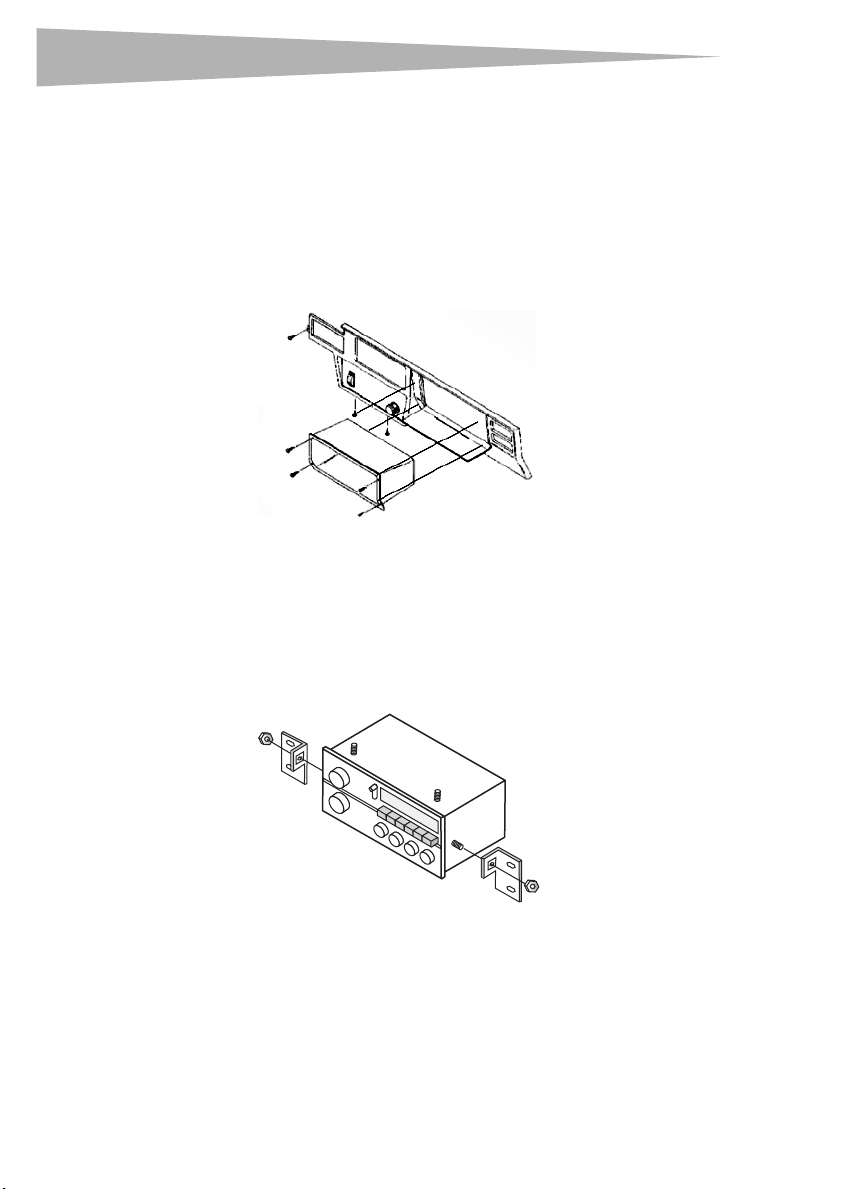
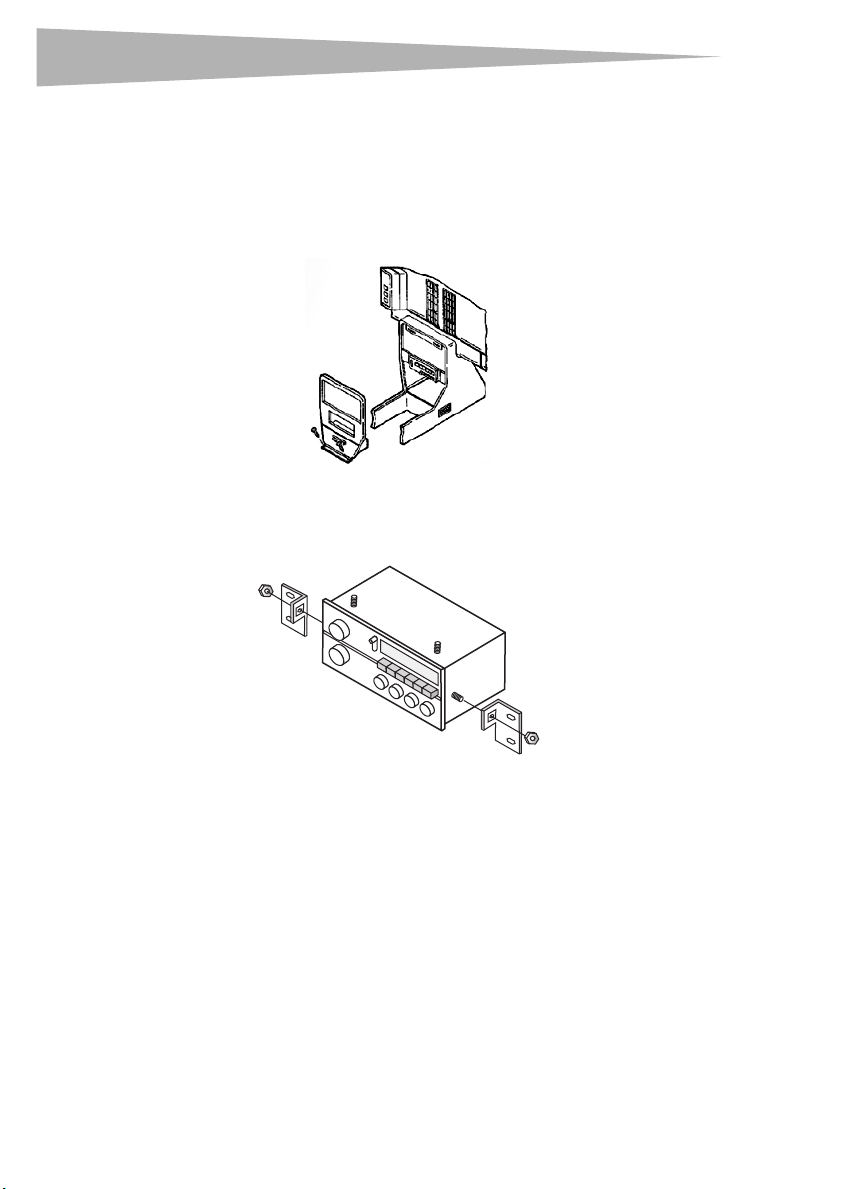
Installing the mounting brackets
To install the mounting brackets:
• If you are installing the brackets on the top or bottom of the housing (1), secure the
mounting brackets to the housing with Carriage bolts and Keps nuts or with studs and
nuts.
2
1
Or, if you are installing the brackets on the sides of the housing (2), secure the
mounting brackets (through the center holes) to the housing with two Carriage bolts
and Keps nuts or with studs and nuts.
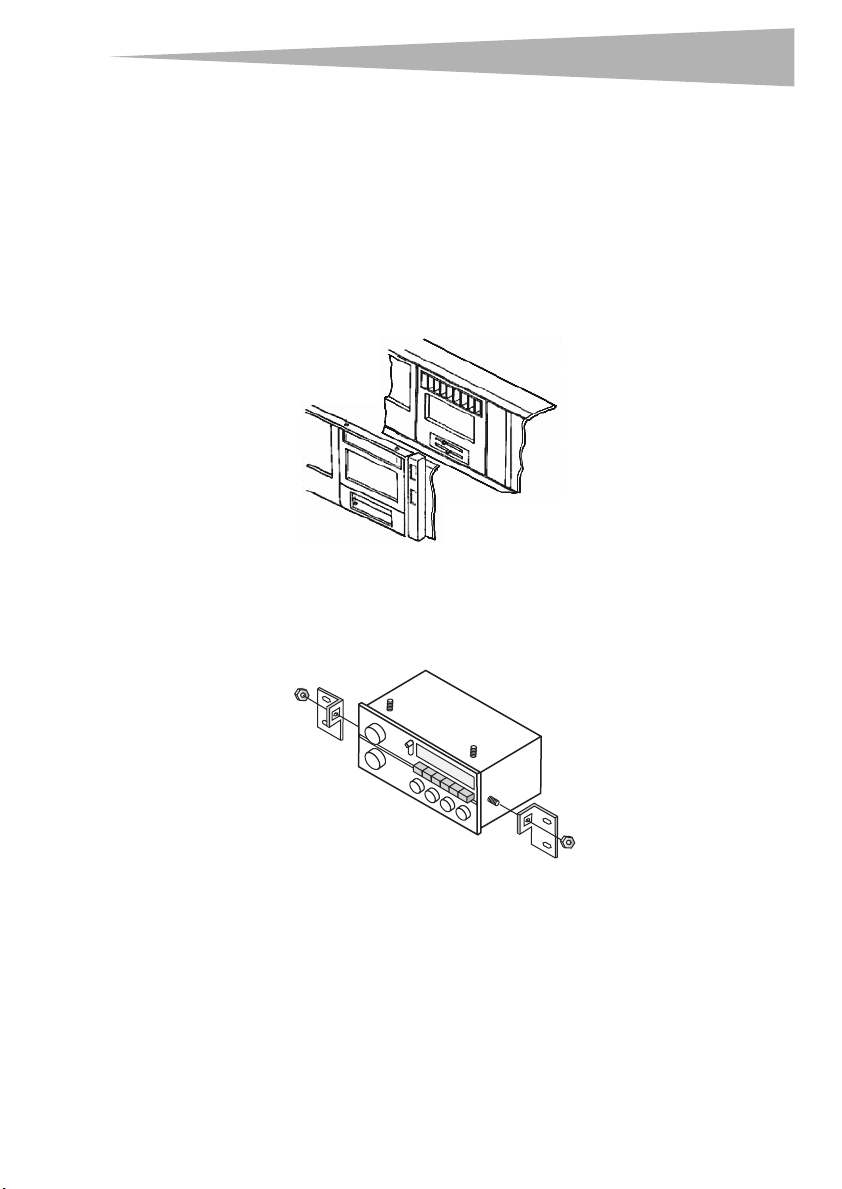
Installing the new head unit
To instal l the n ew hea d unit :
• For two-shaft head units (1), slide the new head unit into the kit, then secure it with
shaft nuts.
1
77
2
Or, for DIN-head units (2), cut and remove the shaft supports, slide the DIN cage into
the radio housing, then secure the cage by bending the metal locking tabs down. Slide
the new head unit into the cage until it is secure.
Page 78

78
Connecting the wiring
To connect the wiring:
1 Locate the factory wiring harness in the dash. We recommend using the correct
mating adaptor and making connections as shown. (Isolate and individually tape off
the ends of any unused wires to prevent an electrical short circuit).
2 Re-connect the battery terminal and test the unit for correct operation. Mount the
head unit/kit assembly to the sub-dash with those screws previously removed.
1
2
3
4
1–Strip wire ends back ½”
2–Twist ends together
3–Solder
4–Tap e
Legal notices
Legal notices
© 2006 Dynex. DYNEX and the DYNEX logo are trademarks of Best Buy Enterprise Services,
Inc. Other brands and product names are trademarks or registered trademarks of their
respective holders. Specifications and features are subject to change without notice or
obligation.
Page 79

Contenido
Juego de instalación de equipos
estereofónicos para vehículos GM
Dynex DX-G1113
Contenido
Componentes del juego de instalación de equipos estereofónicos para
vehículos ........................................................................................ 83
Cómo instalar el equipo estereofónico en su vehículo..................... 85
Buick
Century 1982 a 1996 ............................................................... 86
Electra 1984 a 1990 ................................................................ 87
Estate Wagon 1984 a 1994...................................................... 87
LeSabre 1984 a 1994............................................................... 87
Park Avenue 1984 a 1994 ........................................................ 87
Reatta 1990 a 1991................................................................. 88
Regal 1984 a 1987 .................................................................. 89
Riviera 1983 a 1985 ................................................................ 90
Riviera 1990 a 1995 ................................................................ 91
Roadmaster 1991 a 1994 ........................................................ 92
Skyhawk 1982 a 1989 ............................................................. 93
Skylark 1983 a 1985................................................................ 94
Skylark 1987 a 1989................................................................ 95
Skylark 1990 a 1995................................................................ 96
Cadillac
Cimarron 1982 a 1988........................................................... 110
Deville 1985 a 1995 ................................................................ 97
Fleetwood 1985 a 1993 .......................................................... 97
Eldorado 1984 a 1991 ............................................................. 98
Escalade 1999 a 2002.............................................................. 99
Seville 1984 a 1991 ................................................................. 98
Chevrolet
Astro 1985 a 1989 ................................................................. 100
Astro 1990 a 1995 ................................................................. 101
Astro 1996 a 2004 ................................................................. 102
79
Page 80

80
Contenido
Beretta 1991 a 1996 ..............................................................103
Blazer (grande) 1988 a 1991..................................................104
Blazer 1998 a 2001 ................................................................105
Camaro 1982 a 1984..............................................................106
Camaro 1985 a 1992..............................................................107
Camaro 1997 a 2002..............................................................108
Caprice 1991 a 1993 ................................................................92
Camioneta 1995 a 2002 ...........................................................99
Caprice 1994 a 1996 ..............................................................109
Cavalier 1982 a 1990..............................................................110
Cavalier 1991 a 1994..............................................................111
Cavalier 1995 a 1999..............................................................112
Celebrity 1982 a 1983............................................................113
Celebrity 1984 a 1989............................................................114
Citation II 1985 ......................................................................115
Corsica 1991 a 1996 ...............................................................103
Corvette 1984 a 1989.............................................................116
Corvette 1997 a 2004.............................................................117
El Camino 1985 a 1988 ..........................................................118
Express 1996 a 2000 ..............................................................119
Impala SS 1994 a 1996 ..........................................................109
Lumina 1990 a 1994 ..............................................................120
Lumina 1995 a 2000 ..............................................................121
Lumina APV 1990 a 1995.......................................................122
Lumina APV 1996 ..................................................................123
Malibu 1997 a 2000 ...............................................................125
Monte Carlo 1985 a 1988.......................................................118
Monte Carlo 1995 a 2000.......................................................121
Nova 1985 a 1988 ..................................................................126
S10 Blazer 1982 a 1985..........................................................127
S10 Blazer 1986 a 1994..........................................................128
Camioneta S10 1982 a 1985 ..................................................127
Camioneta S10 1986 a 1993 ..................................................128
Camioneta S10 1998 a 2001 ..................................................105
Silverado 1999 a 2002 .............................................................99
Suburban 1988 a 1991...........................................................104
Page 81

Contenido
81
Suburban 1995 a 2002 ............................................................ 99
Tahoe 1995 a 2002.................................................................. 99
Furgoneta (grande) 1988 a 1995 .......................................... 129
Venture 1997 a 1999............................................................. 130
GMC
Jimmy1998 a 2001................................................................ 105
Jimmy (grande) 1989 a 1991 ................................................ 104
S15 Jimmy 1982 a 1985 ........................................................ 127
S15 Jimmy 1986 a 1994 ........................................................ 128
Camioneta S15 1982 a 1985.................................................. 127
Camioneta S15 1986 a 1993.................................................. 128
Safari 1985 a 1989 ................................................................ 100
Safari 1990 a 1995 ................................................................ 101
Safari 1996 a 2004 ................................................................ 102
Savana 1996 a 2000.............................................................. 119
Sierra 1995 a 2002 .................................................................. 99
Sonoma 1998 a 2001 ............................................................ 105
Suburban 1989 a 1991 .......................................................... 104
Suburban 1995 a 2002 ............................................................ 99
Furgoneta (grande) 1988 a 1995 .......................................... 129
Yukon 1995 a 2002.................................................................. 99
Oldsmobile
98 1984-1990 ....................................................................... 131
Achieva 1992 a 1995 ............................................................. 132
Bravada 1991 a 1994 ............................................................ 128
Cutlass Calais 1984 a 1991 .................................................... 133
Cutlass Ciera 1982 a 1996 ..................................................... 134
Cutlass Supreme 1984 a 1988 ............................................... 135
Delta 88 1986 a 1988 ............................................................ 131
Firenza 1982 a 1989................................................................ 93
Omega 1983 a 1984 .............................................................. 136
Silhouette 1990 a 1995 ......................................................... 122
Silhouette1996 ..................................................................... 123
Silhouette 1997 a 1999 ......................................................... 130
Toronado 1982 a 1985........................................................... 137
Page 82

82
Contenido
Pont iac
6000 1982-1991 ....................................................................138
Bonneville 1982 a 1986 .........................................................147
Bonneville 1987 a 1993 .........................................................139
Bonneville 1994 a 1999 .........................................................140
Fiero 1984 a 1988 ..................................................................141
Firebird 1982 a 1984..............................................................106
Firebird 1985 a 1992..............................................................107
Firebird 1993 a 2002..............................................................142
Grand Am 1985 a 1991 ..........................................................143
Grand Am 1992 a 1995 ..........................................................144
Grand Am 1996 a 1998 ..........................................................145
Grand Am 1999 a 2000 ..........................................................146
Grand Prix 1985 a 1987..........................................................147
Grand Prix 1990 a 1993..........................................................148
Grand Prix 1994 a 1996..........................................................149
Grand Prix 1997 a 2003..........................................................150
Montana 1999 .......................................................................130
Sunbird J-2000 1982 a 1988 ..................................................110
Sunfire 1995 a 1999...............................................................151
TransSport 1990 a 1995 .........................................................122
TransSport 1996 ....................................................................123
TransSport 1997 a 1998 .........................................................130
Saturn
Todos los modelos 1991 a 1994 .............................................152
Cómo instalar el equipo estereofónico en su vehículo......................85
Avisos legales ................................................................................155
Page 83

Componentes del juego de instalación de equipos estere-
Componentes del juego de instalación de
equipos estereofónicos para vehículos
El juego de instalación de equipos estereofónicos para su vehículo debe incluir las siguientes
piezas:
Pieza Descripción
Pasadores (4)
Alojamiento de la radio
Cubierta frontal plana
83
Cubierta frontal de 1/2 pulgada
Cubierta frontal de 1 pulgada
Page 84

84
Componentes del juego de instalación de equipos estere-
Pieza Descripción
Cubierta frontal del ecualizador
Tuercas (4)
Soportes del ecualizador
Juego de soportes 1
Juego de soportes 2
Soporte 3
Soporte 4
Soporte (L)S-
Page 85

Cómo instalar el equipo estereofónico en su vehículo
Pieza Descripción
Juego de soportes 5
Soporte 6
Soporte 7
Juego de soportes 8
Juego de soportes 9
85
Juego de soportes 10
Cómo instalar el equipo estereofónico en su
vehículo
Herramientas
Serán necesarias las herramientas siguientes para que usted pueda instalar el equipo
estereofónico en su vehículo:
• Destornillador Phillips
• Destornillador de cabeza hexagonal
• Destornillador de cabeza Torx
• Herramienta cortadora
Page 86

86
Buick
Century 1982 a 1996
Para instalar el equipo estereofónico en su vehículo:
1 Desconecte el terminal negativo de la batería para impedir un cortocircuito accidental.
2 Extraiga los cuatro tornillos del borde interior superior del marco de adorno del tablero
3 Extraiga los cinco tornillos de ambos lados de la columna del timón.
4 Extraiga los tres tornillos Phillips que sujetan el alojamiento del interruptor
5 Retire el marco.
6 Extraiga los herrajes que sujetan los soportes de montaje de fábrica en la unidad de
7 Desmonte y retenga los soportes.
Cómo instalar el equipo estereofónico en su vehículo
de instrumentos.
basculante, luego levante y retire el alojamiento.
control de fábrica.
2
Se muestra
como ejemplo
el S10
8 Pase a la sección “Finalización de la instalación” en la página 153.
Page 87

Cómo instalar el equipo estereofónico en su vehículo
Buick
Electra 1984 a 1990
Estate Wagon 1984 a 1994
LeSabre 1984 a 1994
Park Avenue 1984 a 1994
Para instalar el equipo estereofónico en su vehículo:
1 Desconecte el terminal negativo de la batería para impedir un cortocircuito accidental.
2 Desenganche el marco de adorno del control climático, luego extraiga los cuatro
tornillos de cabeza estrella expuestos.
3 Jale hacia atrás la columna del timón, luego desenganche cuidadosamente el marco
de adorno del tablero de instrumentos.
4 Extraiga los herrajes que sujetan los soportes de montaje de fábrica en la unidad de
control de fábrica. Desmonte y retenga los soportes.
87
2
Se muestra
como
ejemplo el
S10
5 Pase a la sección “Finalización de la instalación” en la página 153.
Page 88

88
Buick
Reatta 1990 a 1991
Para instalar el equipo estereofónico en su vehículo:
1 Desconecte el terminal negativo de la batería para impedir un cortocircuito accidental.
2 Extraiga los dos tornillos de cabeza torx que están por encima del panel de
3 Extraiga un tornillo de cabeza torx de cada rendija de A/C.
4 Desenganche el marco de adorno del tablero de instrumentos, luego retírelo.
5 Extraiga los herrajes que sujetan los soportes de montaje de fábrica en la unidad de
Cómo instalar el equipo estereofónico en su vehículo
instrumentos.
control de fábrica. Desmonte y retenga los soportes.
2
Se muestra
como
ejemplo el
S10
6 Pase a la sección “Finalización de la instalación” en la página 153.
Page 89

Cómo instalar el equipo estereofónico en su vehículo
Buick
Regal 1984 a 1987
Para instalar el equipo estereofónico en su vehículo:
1 Desconecte el terminal negativo de la batería para impedir un cortocircuito accidental.
2 Extraiga las perillas de la radio y el encendedor de cigarrillos.
3 Desenganche cuidadosamente el marco de adorno de la radio, luego retírelo.
4 Extraiga los herrajes que sujetan los soportes de montaje de fábrica en la unidad de
control de fábrica. Desmonte y retenga los soportes.
2
89
Se muestra
como
ejemplo el
S10
5 Pase a la sección “Finalización de la instalación” en la página 153.
Page 90

90
Buick
Riviera 1983 a 1985
Para instalar el equipo estereofónico en su vehículo:
1 Desconecte el terminal negativo de la batería para impedir un cortocircuito accidental.
2 Tire cuidadosamente del marco de adorno del tablero para desmontarlo.
3 Extraiga los cuatro tornillos que sujetan la unidad de control de fábrica, luego
4 Extraiga los herrajes que sujetan los soportes de montaje de fábrica en la unidad de
Cómo instalar el equipo estereofónico en su vehículo
desconecte los cables.
control de fábrica. Desmonte y retenga los soportes.
2
Se muestra
como
ejemplo el
S10
5 Pase a la sección “Finalización de la instalación” en la página 153.
Page 91

Cómo instalar el equipo estereofónico en su vehículo
Buick
Riviera 1990 a 1995
Para instalar el equipo estereofónico en su vehículo:
1 Desconecte el terminal negativo de la batería para impedir un cortocircuito accidental.
2 Extraiga los dos tornillos de cabeza torx que están por encima del conjunto de
instrumentos y un tornillo de cabeza torx de cada una de las rendijas de AC.
3 Desenganche el panel.
4 Extraiga los herrajes que sujetan los soportes de montaje de fábrica en la unidad de
control de fábrica. Desmonte y retenga los soportes.
2
91
Se muestra
como
ejemplo el
S10
5 Pase a la sección “Finalización de la instalación” en la página 153.
Page 92

92
Buick
Roadmaster 1991 a 1994
Chevrolet
Caprice 1991 a 1993
Para instalar el equipo estereofónico en su vehículo:
1 Desconecte el terminal negativo de la batería para impedir un cortocircuito accidental.
2 Extraiga los dos tornillos del panel de servicio en el lado del conductor, luego
desenganche el panel.
3 Palanquee y quite la pieza de adorno que está encima de la guantera, luego extraiga
un tornillo.
4 Extraiga tres tornillos del borde superior del marco de adorno del tablero de
instrumentos. Extraiga un tornillo de la esquina inferior izquierda de la guantera y un
tornillo de la palanca para soltar el freno de estacionamiento.
5 Retire el marco de adorno del tablero de instrumentos.
6 Corte y quite todas las pestañas de montaje en el soporte 4 excepto las pestañas B.
Cada pestaña de montaje tiene una letra estampada en la parte posterior de la
pestaña. Corte las pestañas con la hoja de la cuchilla orientada lejos de usted y de sus
dedos.
Cómo instalar el equipo estereofónico en su vehículo
B
7 Pase a la sección “Finalización de la instalación” en la página 153.
Page 93

Cómo instalar el equipo estereofónico en su vehículo
Buick
Skyhawk 1982 a 1989
Oldsmobile
Firenza 1982 a 1989
Para instalar el equipo estereofónico en su vehículo:
1 Desconecte el terminal negativo de la batería para impedir un cortocircuito accidental.
2 Desmonte la guantera en la forma siguiente: quite la presilla del alambre de sujeción
de la puerta y cuatro tornillos.
3 Extraiga los dos tornillos que están debajo del encendedor de cigarrillos y tres tornillos
que están debajo de la columna del timón.
4 Extraiga un tornillo de la parte superior izquierda de la unidad de control de fábrica,
luego desenganche el marco de adorno del tablero de instrumentos.
5 Extraiga los herrajes que sujetan los soportes de montaje de fábrica en la unidad de
control de fábrica. Desmonte y retenga los soportes.
93
2
Se muestra
como
ejemplo el
S10
6 Pase a la sección “Finalización de la instalación” en la página 153.
Page 94

94
Buick
Skylark 1983 a 1985
Para instalar el equipo estereofónico en su vehículo:
1 Desconecte el terminal negativo de la batería para impedir un cortocircuito accidental.
2 Extraiga los cuatro tornillos del borde superior del panel de instrumentos.
3 Extraiga el tornillo que está en la esquina inferior izquierda del panel.
4 Extraiga dos tornillos de la moldura de la columna del timón, luego retire la moldura.
5 Tire del marco de adorno del tablero de instrumentos hacia arriba y hacia afuera, luego
6 Extraiga los herrajes que sujetan los soportes de montaje de fábrica en la unidad de
Cómo instalar el equipo estereofónico en su vehículo
retire el marco.
control de fábrica. Desmonte y retenga los soportes.
2
Se muestra
como
ejemplo el
S10
7 Pase a la sección “Finalización de la instalación” en la página 153.
Page 95

Cómo instalar el equipo estereofónico en su vehículo
Buick
Skylark 1987 a 1989
Para instalar el equipo estereofónico en su vehículo:
1 Desconecte el terminal negativo de la batería para impedir un cortocircuito accidental.
2 Desenganche el marco del cambio de engranajes de velocidad de la base de la consola.
Extraiga los dos tornillos que sujetan la parte inferior del marco de adorno del tablero
de instrumentos, luego retire el marco.
3 Extraiga los herrajes que sujetan los soportes de montaje de fábrica en la unidad de
control de fábrica. Desmonte y retenga los soportes.
2
95
Se muestra
como
ejemplo el
S10
4 Pase a la sección “Finalización de la instalación” en la página 153.
Page 96

96
Buick
Skylark 1990 a 1995
Para instalar el equipo estereofónico en su vehículo:
1 Desconecte el terminal negativo de la batería para impedir un cortocircuito accidental.
2 Saque el cenicero, luego extraiga los dos tornillos expuestos que están dentro del
3 Extraiga los dos tornillos que sujetan el cenicero y el borde inferior del marco de
4 Con una herramienta para desmontar paneles, palanquee y separe el marco de
5 Extraiga dos tuercas de la parte inferior de la unidad de control de fábrica, luego
6 Extraiga los herrajes que sujetan los soportes de montaje de fábrica en la unidad de
Cómo instalar el equipo estereofónico en su vehículo
compartimiento del cenicero.
adorno del tablero de instrumentos.
adorno, luego retírelo.
desmonte ésta.
control de fábrica. Desmonte y retenga los soportes.
2
Se muestra
como
ejemplo el
S10
7 Pase a la sección“Finalización de la instalación” en la página 153.
Page 97

Cómo instalar el equipo estereofónico en su vehículo
Cadillac
Deville 1985 a 1995
Cadillac
Fleetwood 1985 a 1993
Para instalar el equipo estereofónico en su vehículo:
1 Desconecte el terminal negativo de la batería para impedir un cortocircuito accidental.
2 Extraiga los dos tornillos que están en la parte superior del marco de adorno del
tablero de instrumentos.
3 Tire del borde superior del marco hacia afuera y luego hacia arriba para desmontarlo.
4 Extraiga los herrajes que sujetan los soportes de montaje de fábrica en la unidad de
control de fábrica. Desmonte y retenga los soportes.
97
2
Se muestra
como
ejemplo el
S10
5 Pase a la sección “Finalización de la instalación” en la página 153.
Page 98

98
Cadillac
Eldorado 1984 a 1991
Cadillac
Seville 1984 a 1991
Para instalar el equipo estereofónico en su vehículo:
1 Desconecte el terminal negativo de la batería para impedir un cortocircuito accidental.
2 Extraiga los dos tornillos Phillips que están por encima de las rendijas de A/C.
3 Tire del borde superior del marco de adorno del tablero de instrumentos hacia afuera,
luego retire el marco.
4 Extraiga los herrajes que sujetan los soportes de montaje de fábrica en la unidad de
control de fábrica. Desmonte y retenga los soportes.
Cómo instalar el equipo estereofónico en su vehículo
2
Se muestra
como
ejemplo el
S10
5 Pase a la sección “Finalización de la instalación” en la página 153.
Page 99

Cómo instalar el equipo estereofónico en su vehículo
Cadillac
Escalade 1999 a 2002
Chevrolet
Camioneta 1995 a 2002
Suburban 1995 a 2002
Tahoe 1995 a 2002
Silverado 1999 a 2002
GMC
Sierra 1995 a 2002
Suburban1995 a 2002
Yukon 1995 a 2002
Para instalar el equipo estereofónico en su vehículo:
1 Desconecte el terminal negativo de la batería para impedir un cortocircuito accidental.
2 Retire el panel de relleno de la columna del timón y el cenicero.
3 Desenganche el marco de adorno del tablero de instrumentos, luego retírelo.
99
4 Usando un destornillador de cabeza plana, presione hacia abajo en las presillas
externas de la unidad de control de fábrica (o cavidad), luego desconecte los cables y
retire la unidad de control.
5 Localice el juego de soportes 8.
6 Pase a la sección “Finalización de la instalación” en la página 153.
Page 100

100
Chevrolet
Astro 1985 a 1989
GMC
Safari 1985 a 1989
Para instalar el equipo estereofónico en su vehículo:
1 Desconecte el terminal negativo de la batería para impedir un cortocircuito accidental.
2 Extraiga tres tornillos de la parte superior del marco de adorno del tablero de
3 Abra la guantera, luego extraiga dos pernos de 10 mm del borde inferior del marco de
4 Tire de la moldura de la consola hacia adelante, luego extraiga dos pernos de 10 mm
5 Extraiga dos tornillos de 7 mm de la unidad de control de fábrica, luego desconecte los
6 Corte y quite todas las pestañas de montaje en el soporte 3 excepto las pestañas A.
Cómo instalar el equipo estereofónico en su vehículo
instrumentos.
adorno.
expuestos. Desenganche cuidadosamente el marco de adorno, luego retírelo.
cables.
Cada pestaña de montaje tiene una letra estampada en la parte posterior de la
pestaña. Corte las pestañas con la hoja de la cuchilla orientada lejos de usted y de sus
dedos.
A
A
7 Pase a la sección “Finalización de la instalación” en la página 153.
 Loading...