

Dyna-glo Dgss443cb-d-1 Owner's Manual
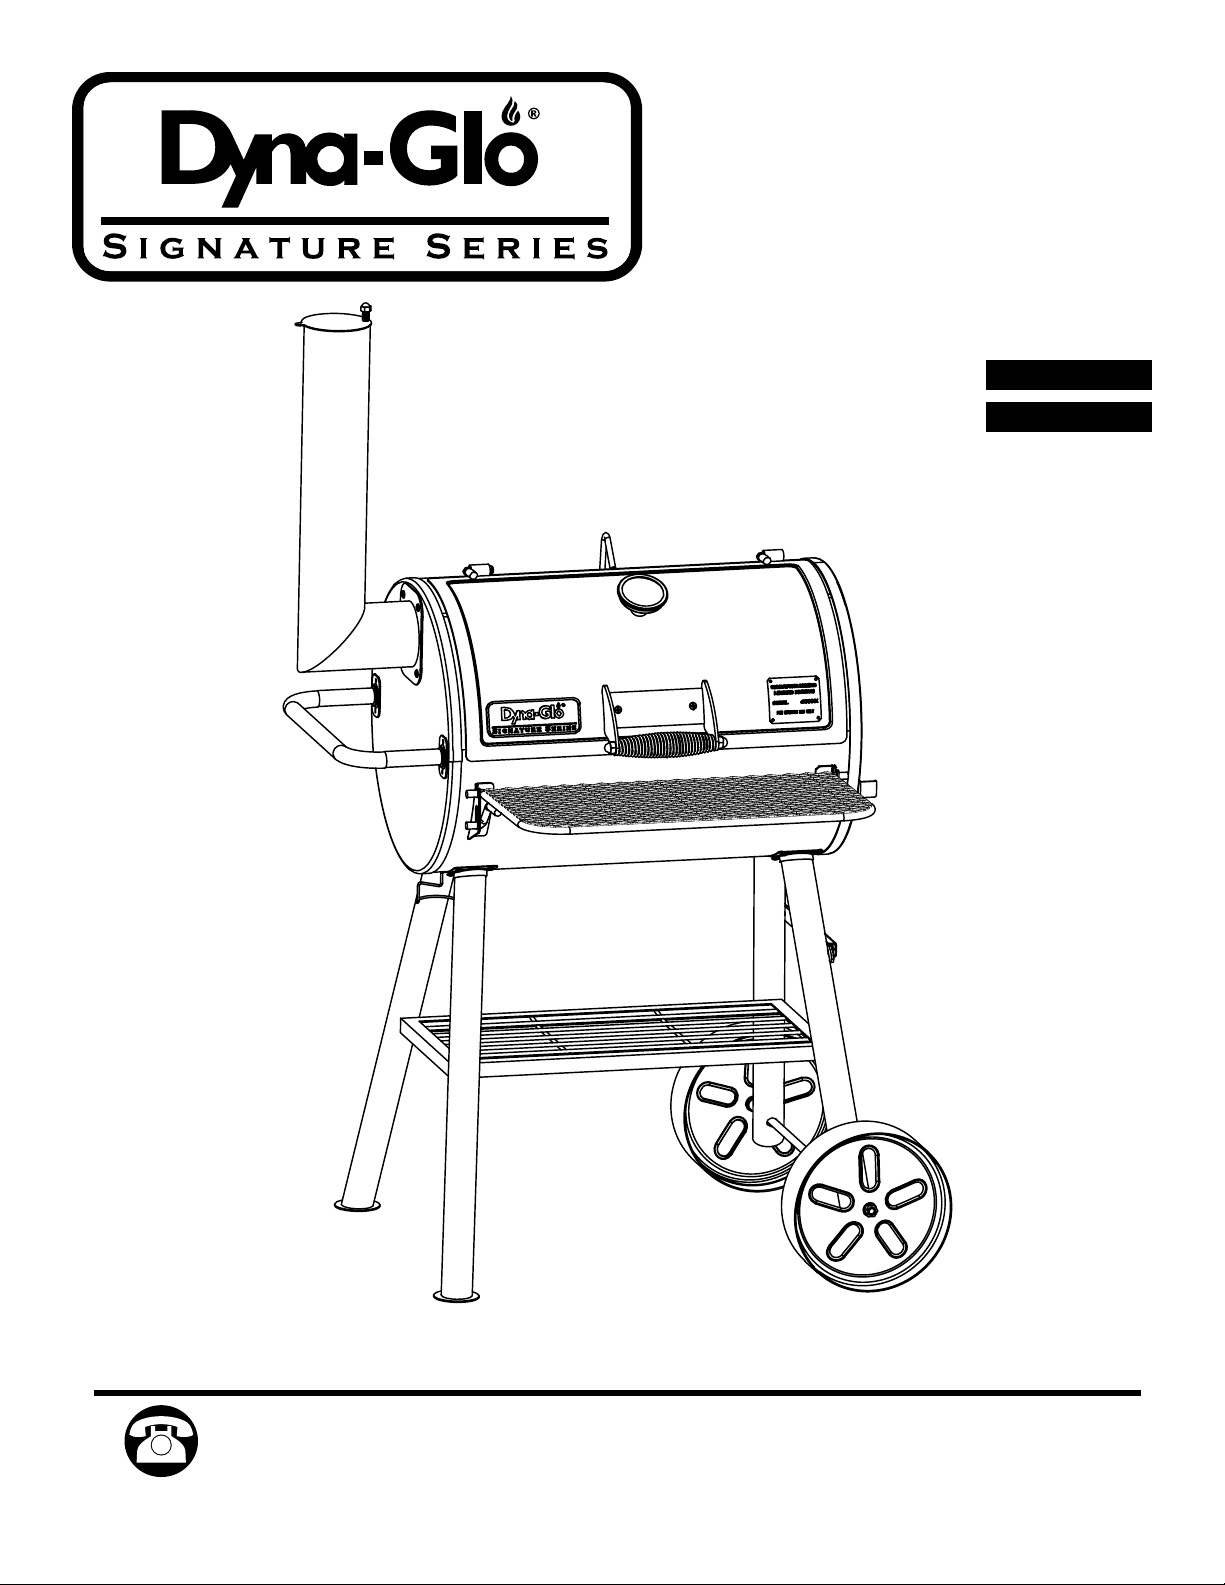
Heavy-Duty
Compact Barrel
Charcoal Grill
MODEL #DGSS443CB-D /
DGSS443CB
Français p. 19
Español p. 37
ATTACH YOUR RECEIPT HERE
Serial Number ________________________________ Purchase Date _________________________________
Questions, problems, missing parts? Before returning to your retailer, call our
customer service department at 1-877-447-4768, 8:30 a.m. – 4:30 p.m. CST,
Monday – Friday or log on to customerservice@ghpgroupinc.com.
70-10-596 Rev. 11/11/16
1

TABLE OF CONTENTS
Safety Information ...................................................................................................................... 2
Package Contents ...................................................................................................................... 4
Hardware Contents .................................................................................................................... 5
Preparation ................................................................................................................................. 5
Assembly Instructions ................................................................................................................ 6
Operation Instructions ................................................................................................................. 14
Care and Maintenance ................................................................................................................ 15
Warranty ...................................................................................................................................... 16
Replacement Parts List .............................................................................................................. 17
SAFETY INFORMATION
Please read and understand this entire manual before attempting to assemble, operate, or
install the product. If you have any questions regarding the product, call our customer service
department at 1-877-447-4768, 8:30 a.m.- 4:30 p.m. CST, Monday - Friday or log on to
customerservice@ghpgroupinc.com.
Use caution when lifting and moving the unit to avoid back strain or back injury. Do not move
the unit while it is in use.
• DO NOT operate the unit near or under ammable or combustible materials such as decks,
porches or carports.
• A minimum clearance to combustible construction is 36 in. (91.4 cm) from sides and back.
• DO NOT operate the unit under overhead construction.
• DO NOT use this grill as a heater.
• Operate the unit on a stable, level, noncombustible surface such as asphalt, concrete, or
solid ground.
• DO NOT operate the unit on ammable material such as carpet or wood deck.
2

SAFETY INFORMATION
• Use caution when assembling and operating this unit to avoid cuts and scrapes from edges.
• DO NOT use this product in a manner other than its intended purpose. It is NOT intended for
commercial use. It is NOT intended to be installed or used in or on a recreational vehicle
and/or boats.
• DO NOT store this unit near gasoline or other combustible liquids or where other combustible
vapors may be present.
• DO NOT use, store or operate this unit in an area accessible to children or pets. Store this unit in a
dry protected location.
• DO NOT leave the unit unattended while in use.
• DO NOT leave hot ashes unattended, until the unit cools completely.
• DO NOT move the unit while in use, or while ashes are still hot. Allow the unit to cool completely
before moving or storing.
• NEVER use gasoline, kerosene, Zippo/Ronson lighter uid, or other highly volatile uids as a starter.
• Always cook your food on the grate after the ame is burned out.
• Dispose of cold ashes by wrapping them in heavy-duty aluminum foil and placing in a
noncombustible container. Make sure that there are no other combustible materials in or near
the container.
• If you must dispose of ashes in less time than it takes for the ashes to completely cool down,
remove the ashes from the unit using heat-resistant gloves along with long metal tongs or
replace shovel. Place the coals in aluminum foil and soak them completely with water before
disposing of them in a noncombustible container.
• Allow the unit to cool completely before conducting any routine cleaning or maintenance.
• This product will be hot during and after use. Use insulated oven mitts, or gloves, for protection
from hot surfaces or splatter from cooking liquids.
• Grease or other liquids inside the grease cup will be hot after using this appliance. Allow the
grease cup to completely cool before removing or disposing. If the grease cup must be removed
before it's allowed to completely cool, use heat resistant gloves or mitts for removal or disposal.
• Use caution when opening the lid of the unit while in operation. Keep hands, face and body safe
from hot steam or are-ups. DO NOT inhale smoke.
• DO NOT wear loose clothing while operating the unit. Tie back long hair while operating the unit.
• ALWAYS wear shoes that fully cover your feet while operating the unit.
• NEVER use glassware, plastic or ceramic cookware on or in the unit. Use metallic cookware only.
• Use of accessories not intended for this unit is not recommended and may lead to injury or
property damage.
CALIFORNIA PROPOSITION 65
Fuels used in wood and charcoal burning appliances and the products of combustion of such
fuels contain chemicals known to the State of California to cause cancer, birth defects or other
reproductive harm. This product contains chemicals, including lead and lead compounds, known to
the State of California to cause cancer, birth defects or other reproductive harm. Wash hands after
handling.
3
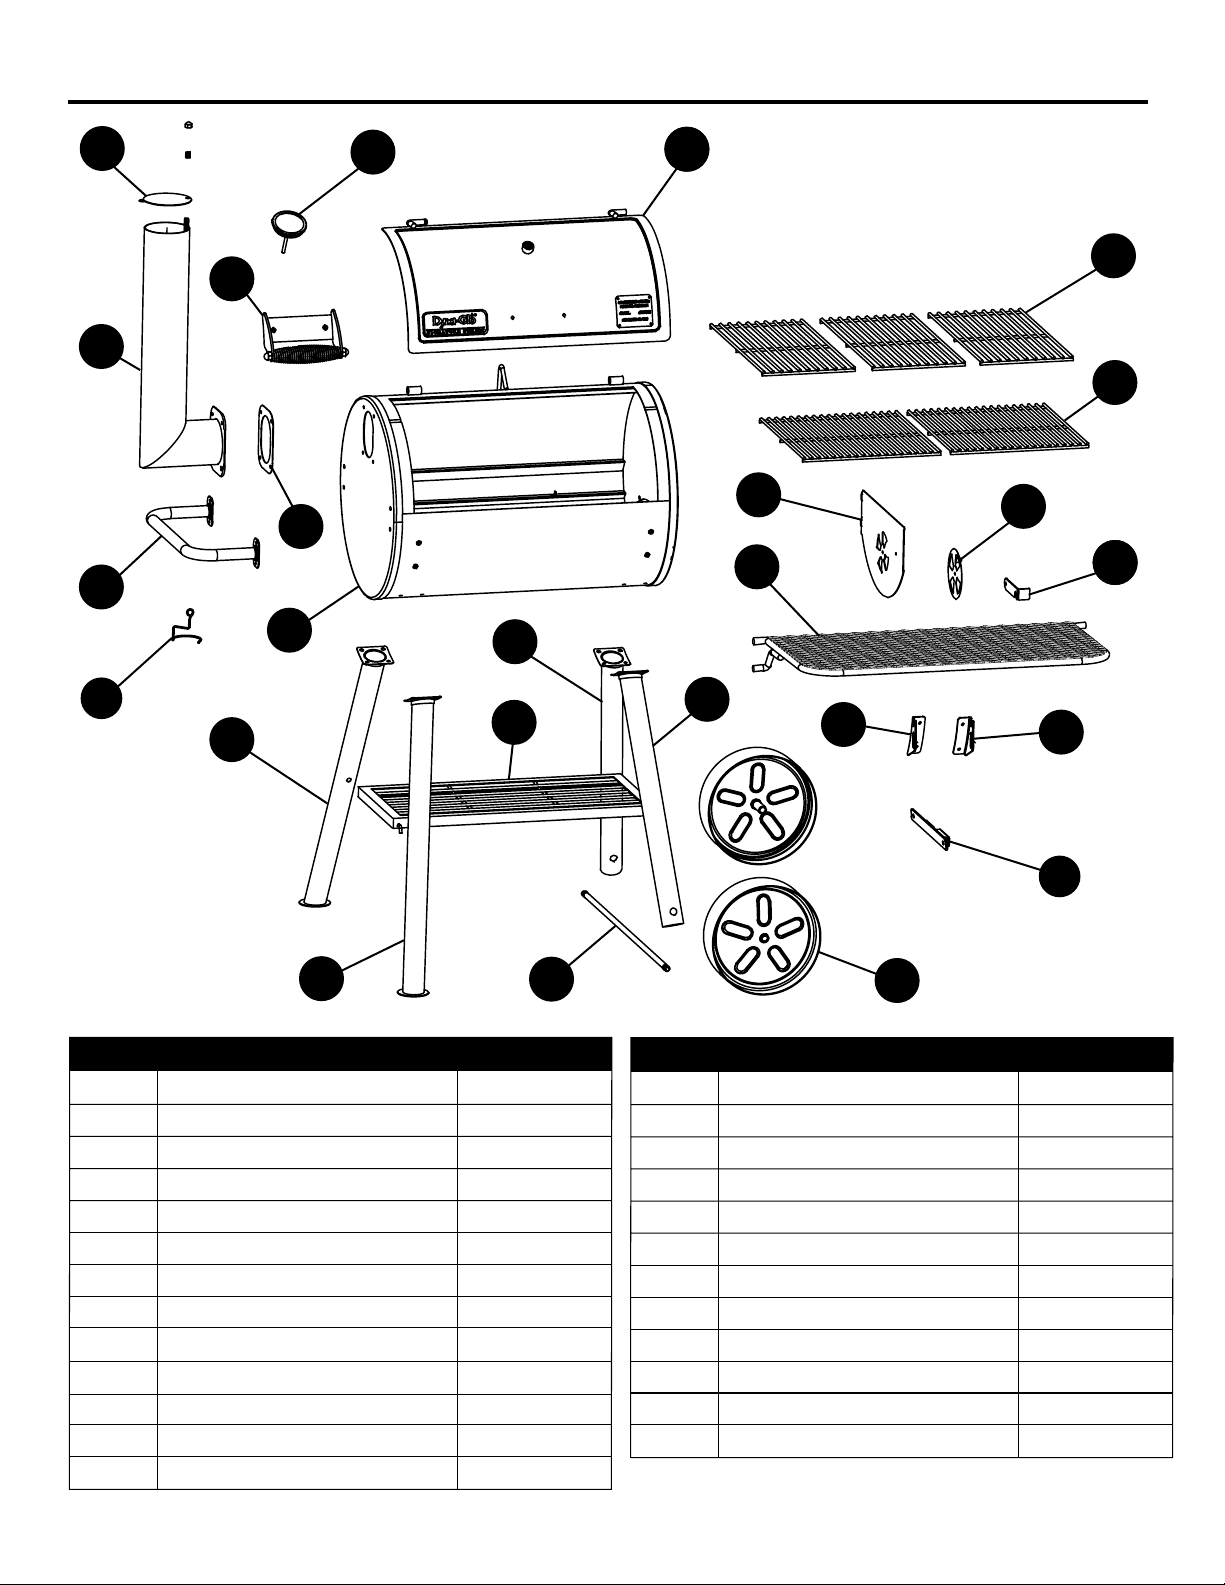
PACKAGE CONTENTS
C
E
H
A
B
A
Y
D
X
W
V
F
A
T
G
I
J
M
K
N
R
U
S
L
PART DESCRIPTION QUANTITY
A Lid 1
B Temperature Gauge 1
C Smoke Stack Damper 1
D Lid Handle 1
E Smoke Stack 1
F Smoke Stack Gasket 1
G Grill Body 1
H Side Handle 1
I Grease Cup Support 1
J Left Leg - Rear 1
K Bottom Shelf 1
L Left Leg - Front 1
M Right Leg - Rear 1
O
Q
P
PART DESCRIPTION QUANTITY
N Right Leg - Front 1
I
O Wheel Axle 1
P Wheels 2
Q Offset Smoker Box Support 1
R Front Shelf Bracket - Left 1
S Front Shelf Bracket - Right 1
T Front Shelf 1
U Side Access Door Latch 1
V Side Damper 1
W Side Access Door 1
X Charcoal Grates 2
Y Cooking Grates 3
4

HARDWARE CONTENTS
AA
M6 x 12
Bolt
Qty. 31
PREPARATION
Before beginning assembly of product, make sure all parts are present. Compare parts with
package contents list and hardware contents above. If any part is missing or damaged, do
not attempt to assemble the product. Contact customer service for replacement parts.
BB
M6 Nut
Qty. 28
CC
M6 Flat
Washer
Qty. 16
DD
M12 Nut
Qty. 2
EE
M6 Lock Nut
Qty. 1
FF
M6 x 14
Bolt
Qty. 1
GG
M5 x 13
Bolt
Qty. 1
M5 Nut
HH
Qty. 1
Estimated Assembly Time: 30 minutes
Tools Required for Assembly (not included): Phillips Screwdriver, Adjustable Wrench
5
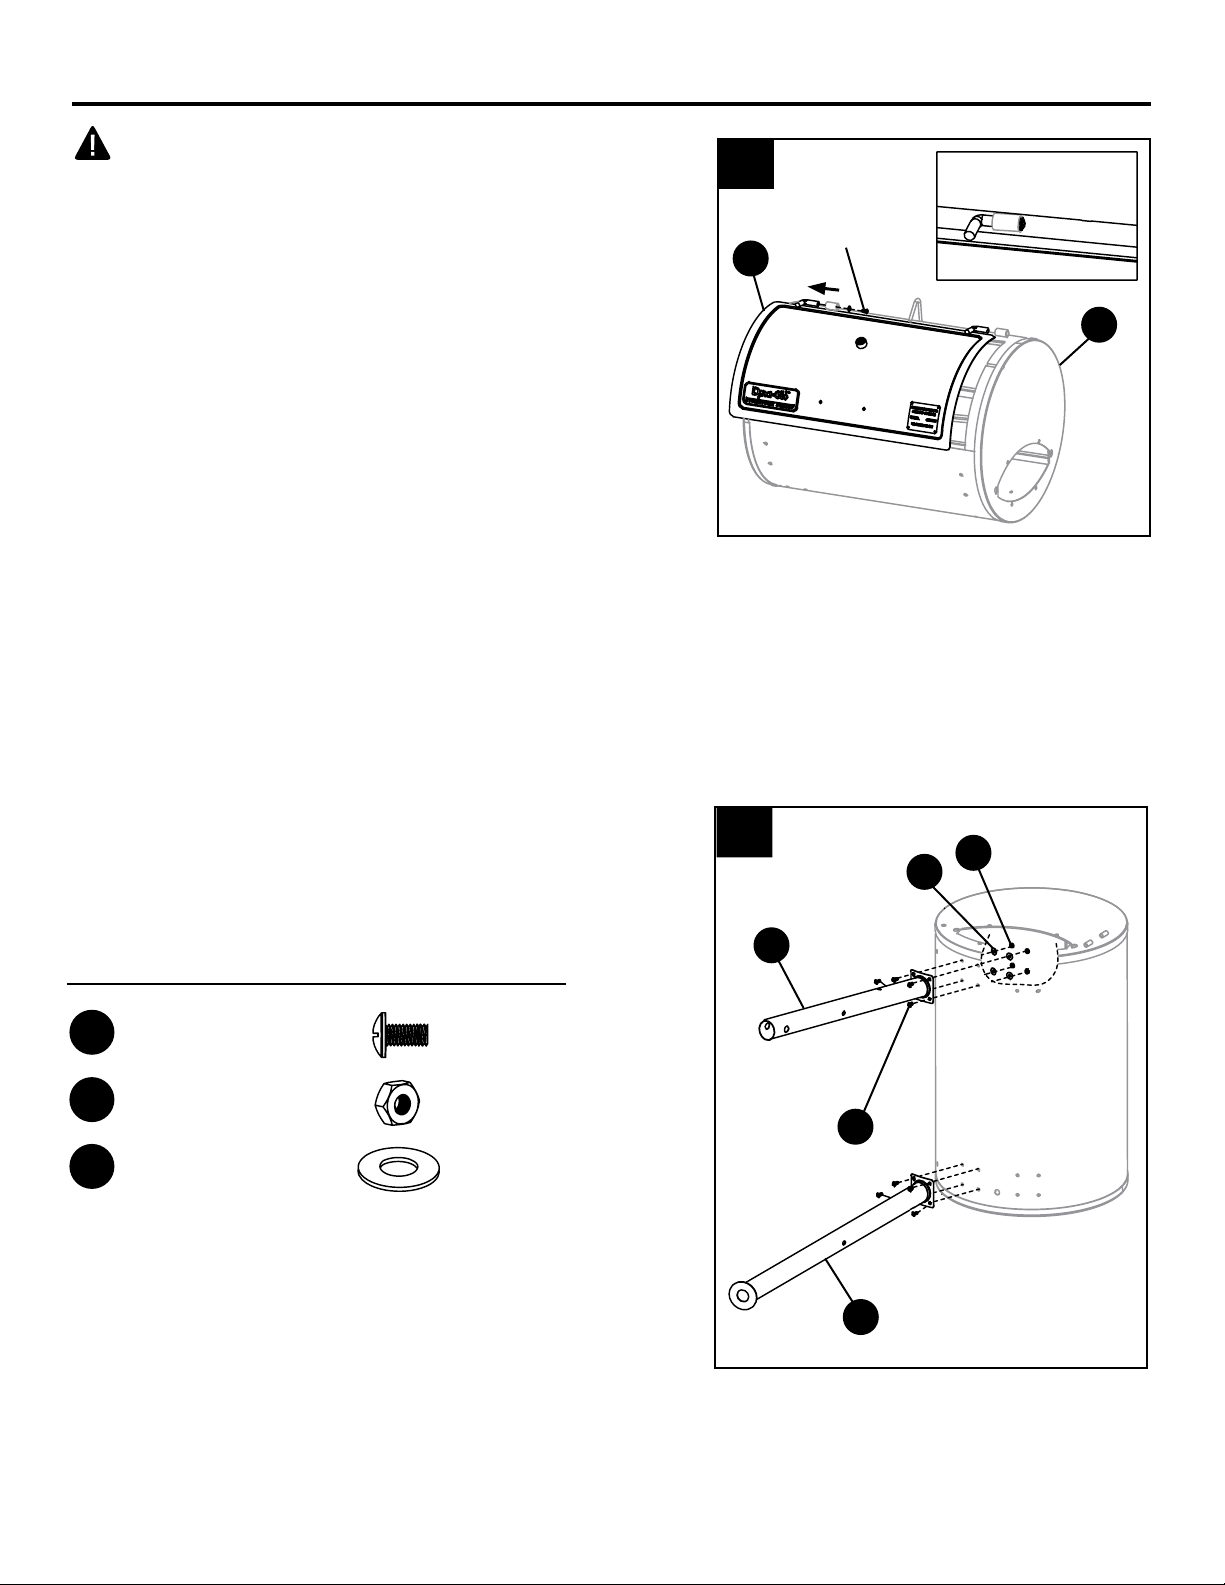
ASSEMBLY INSTRUCTIONS
CAUTION: This unit is HEAVY! Do not attempt to
handle this unit without assistance!
1. Remove the pre-installed bolt and washer from
the left lid hinge on the grill body (G) and slide the
lid (A) off the grill body hinges.
1
Pre-installed
Hardware
A
G
2. Attach the left front leg (L) and right front leg (N)
using four M6 x 12 bolts (AA), four M6 nuts (BB)
and four M6 at washers (CC) per leg.
Hardware Used
AA
M6 x 12mm
x 8
Bolt
BB
CC
M6 Nut
M6 Flat Washer
x 8
x 8
2
BB
CC
N
AA
L
6
ASSEMBLY INSTRUCTIONS
3. Before attaching the rear legs, insert the bottom
shelf (K) posts into the holes located on all four
legs. WIth the bottom shelf (K) securely in place,
attach the left rear leg (J) and right rear leg (M)
using four M6 x 12 bolts (AA), four M6 nuts (BB)
and four M6 at washers (CC), per leg.
Hardware Used
AA
M6 x 12mm
x 8
Bolt
BB
CC
M6 Nut
M6 Flat Washer
x 8
x 8
3
BB
CC
AA
M
K
J
4. Insert the wheel axle (O) through the holes in the
right front (N) and right rear leg (M) and attach the
left and right wheel (P) using one M12 nut (DD)
per side.
Hardware Used
DD
M12 Nut
x 2
4
DD
N
M
P
O
7
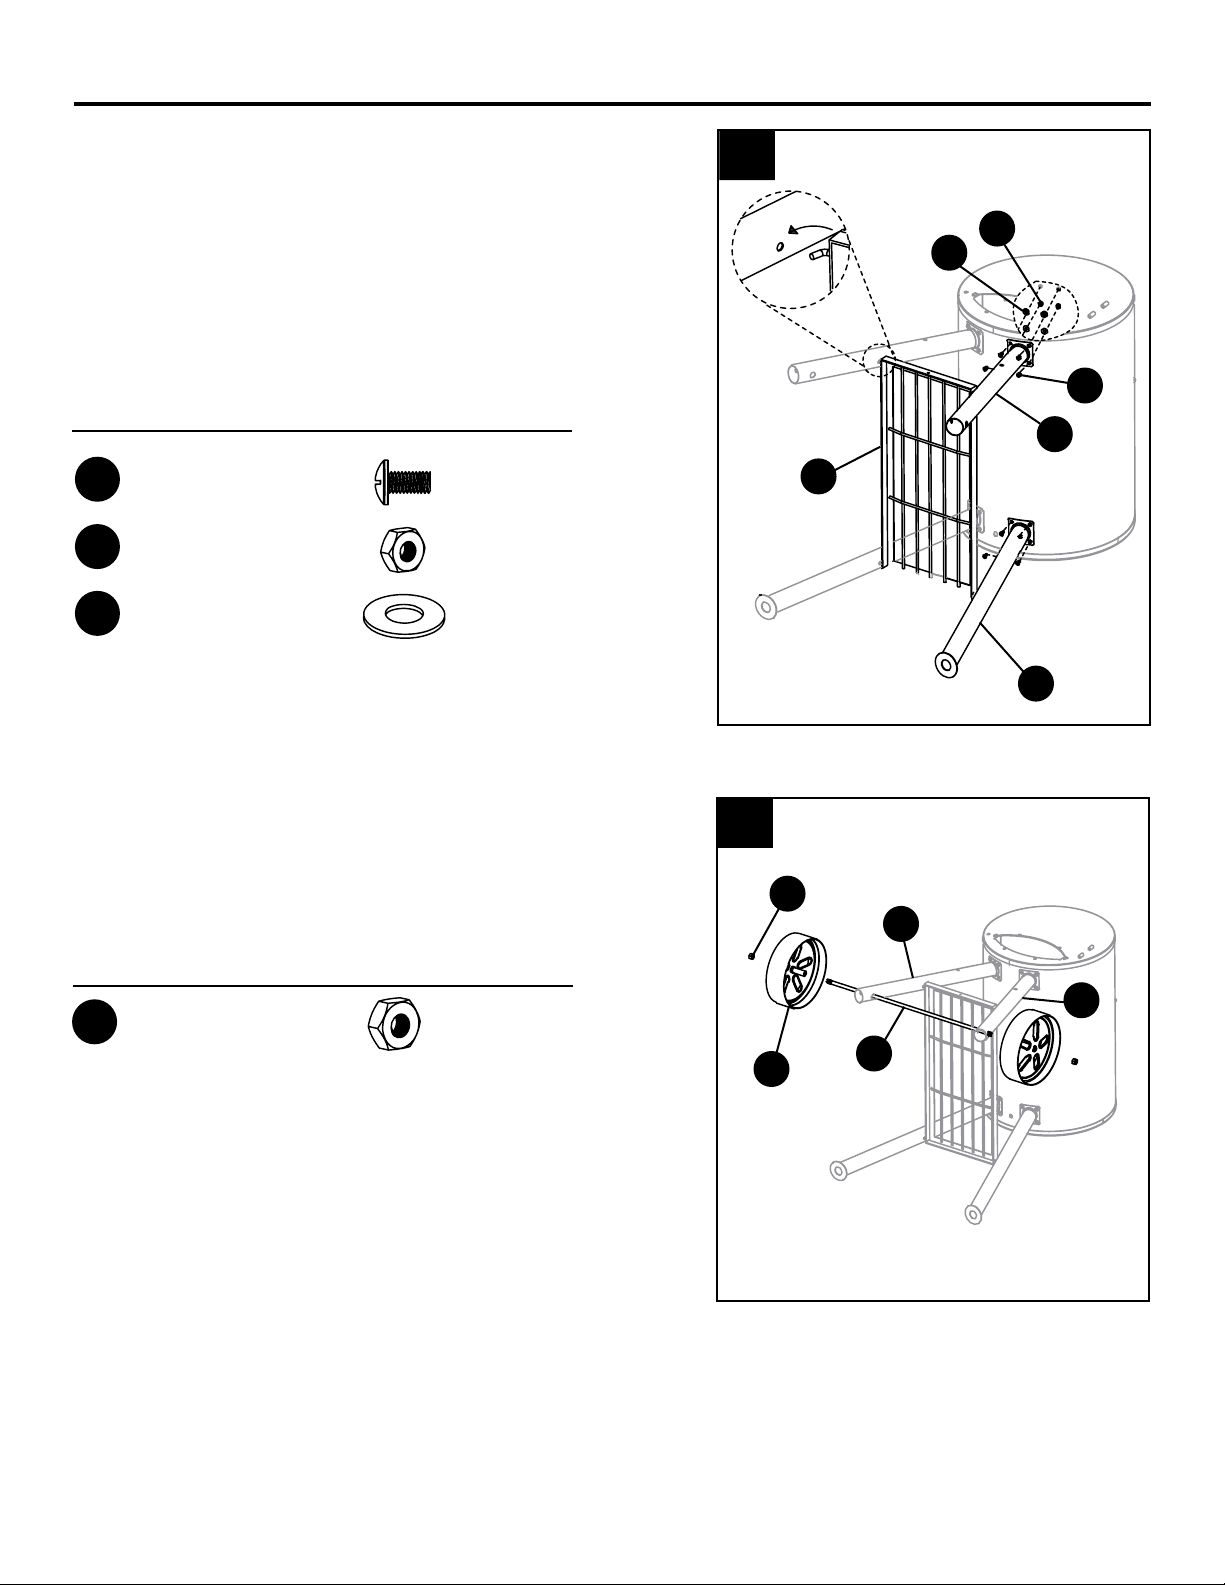
ASSEMBLY INSTRUCTIONS
5. Attach side handle (H) to the left side of the grill
body (G) using four M6 x 12 bolts (AA) and four
M6 nuts (BB).
Hardware Used
AA
M6 x 12mm
x 4
Bolt
BB
M6 Nut
x 4
5
H
AA
G
BB
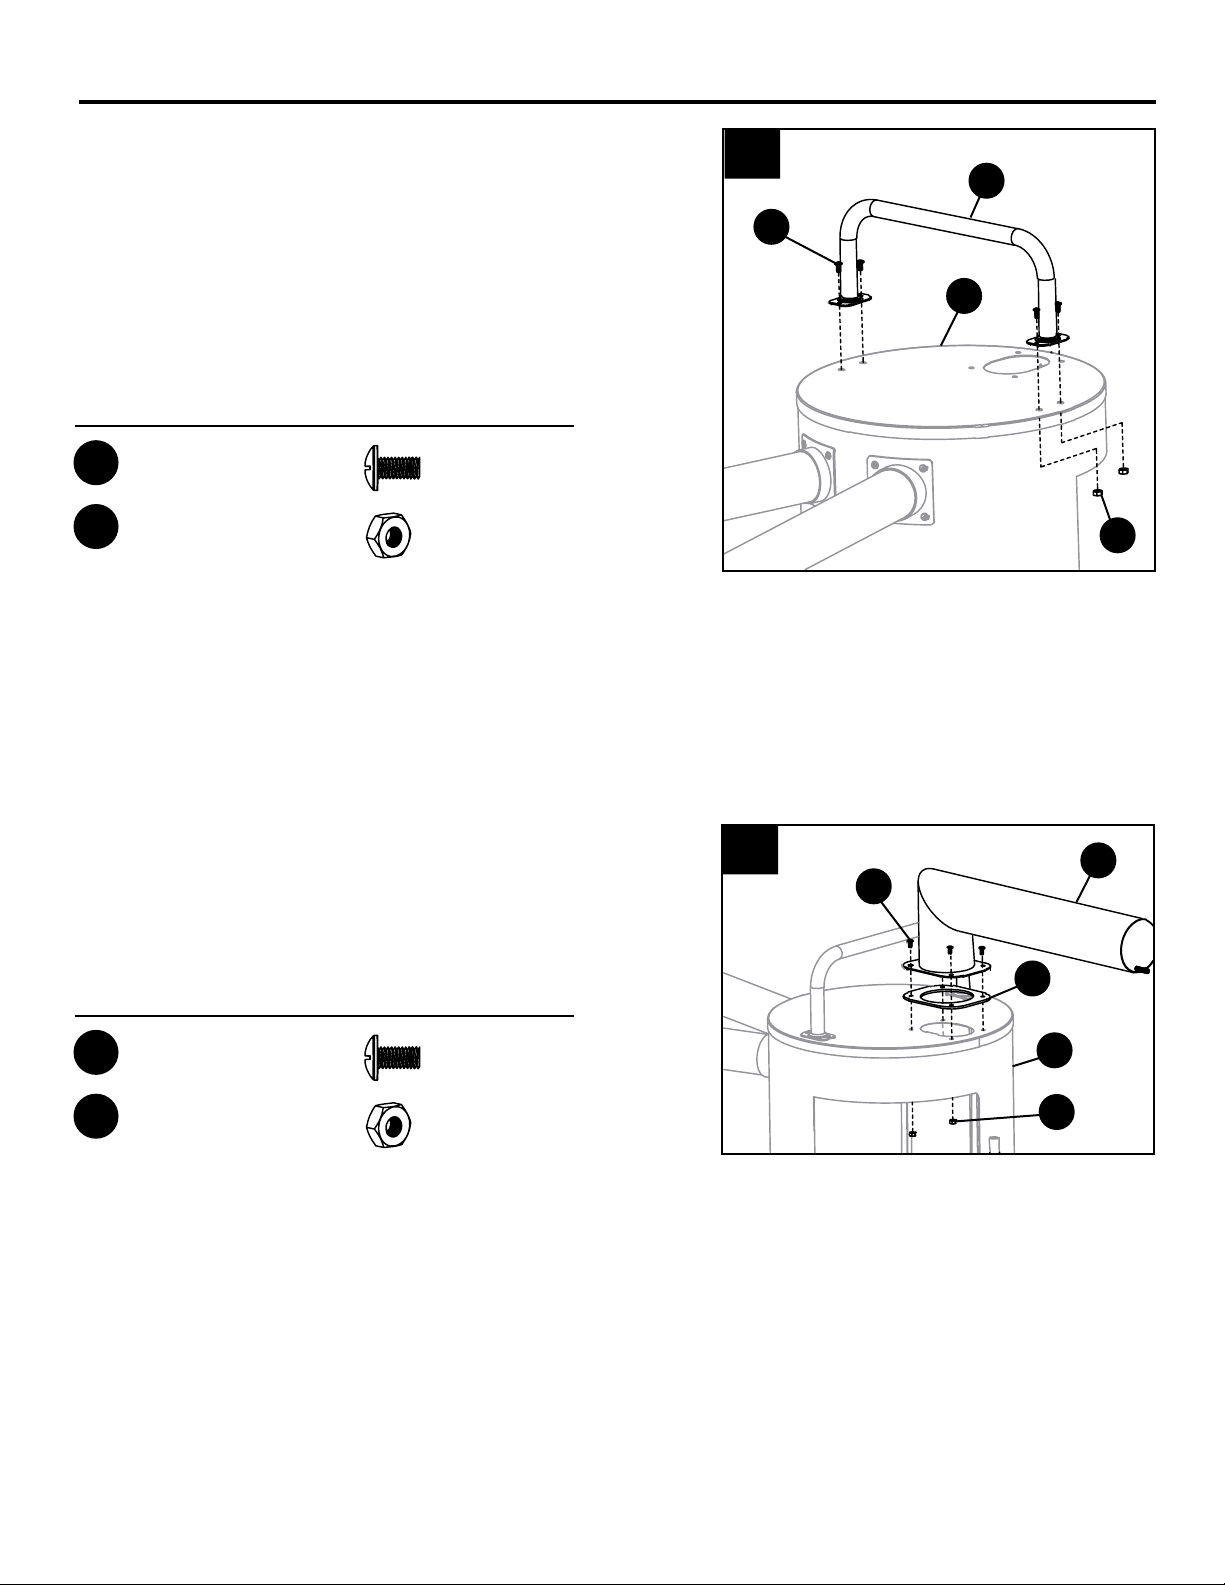
6. Place the smoke stack gasket (F) between the
grill body (G) and the smoke stack (E) and attach
using four M6 x 12 bolts (AA) and four M6 nuts (BB).
Hardware Used
AA
M6 x 12mm
x 4
Bolt
BB
M6 Nut
x 4
6
AA
F
E
G
BB
8
ASSEMBLY INSTRUCTIONS
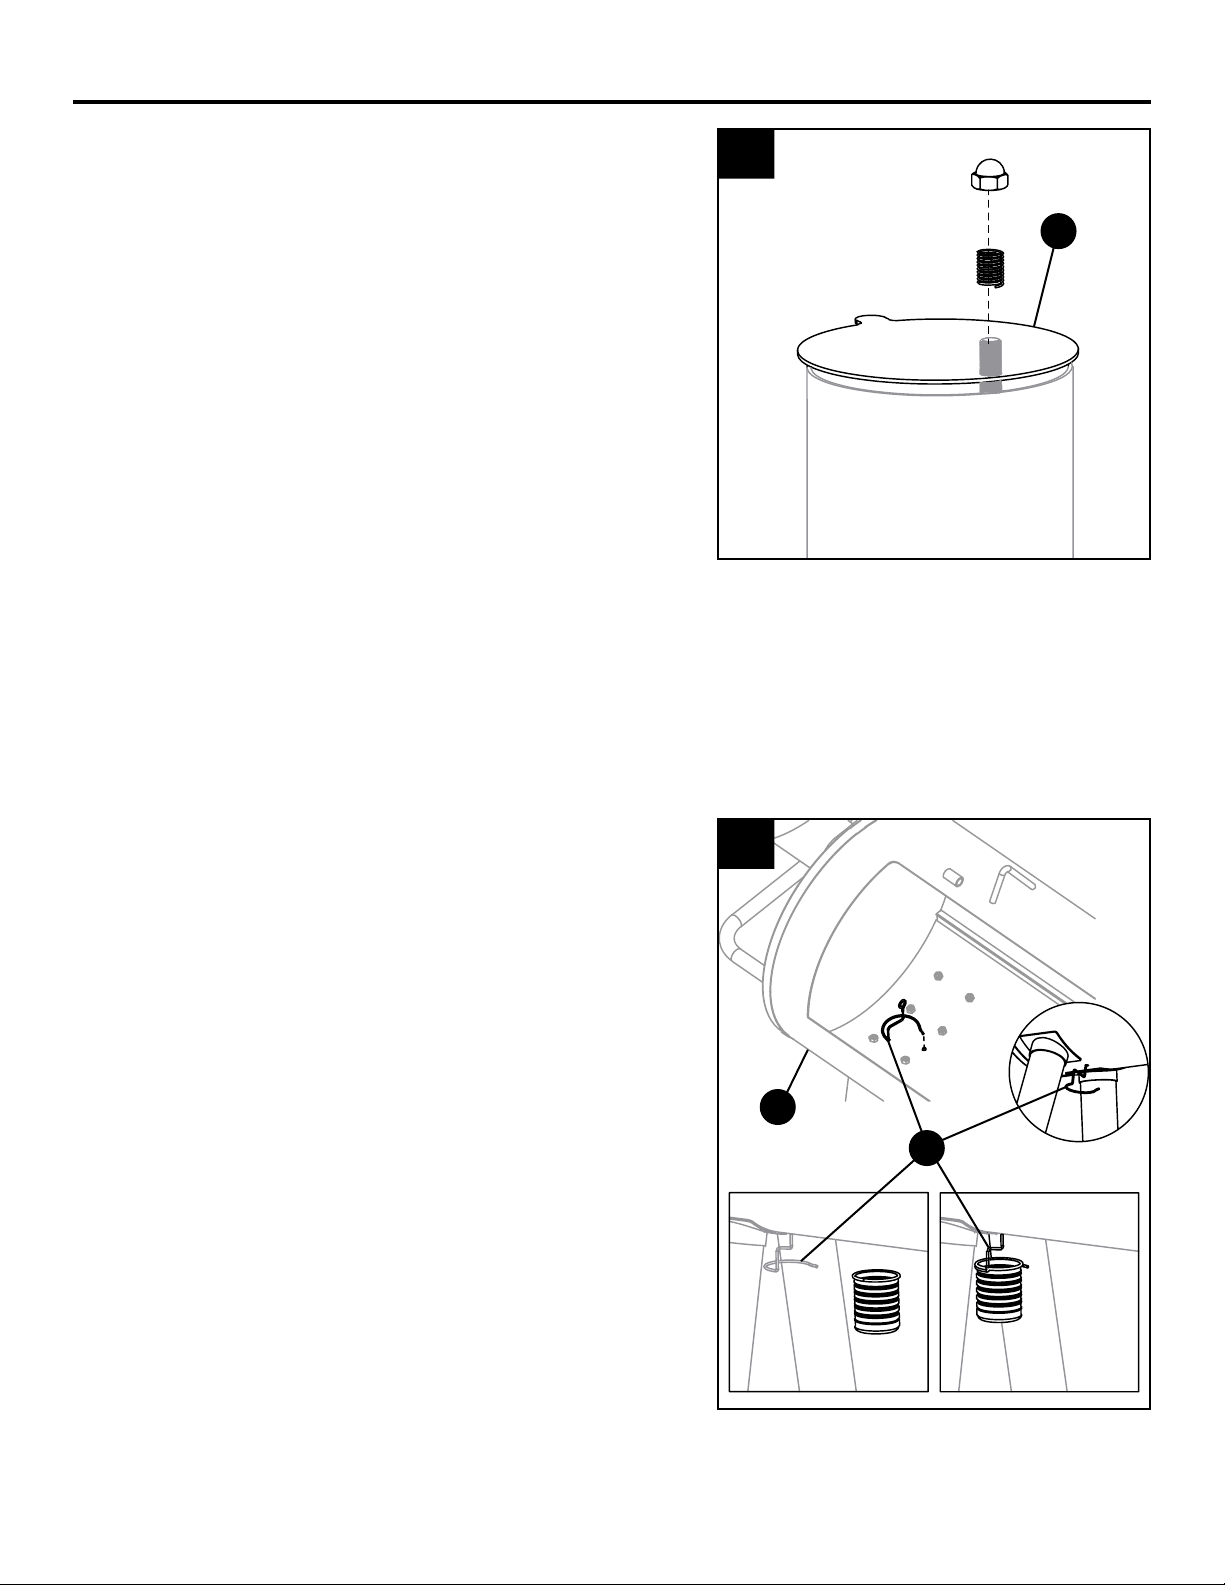
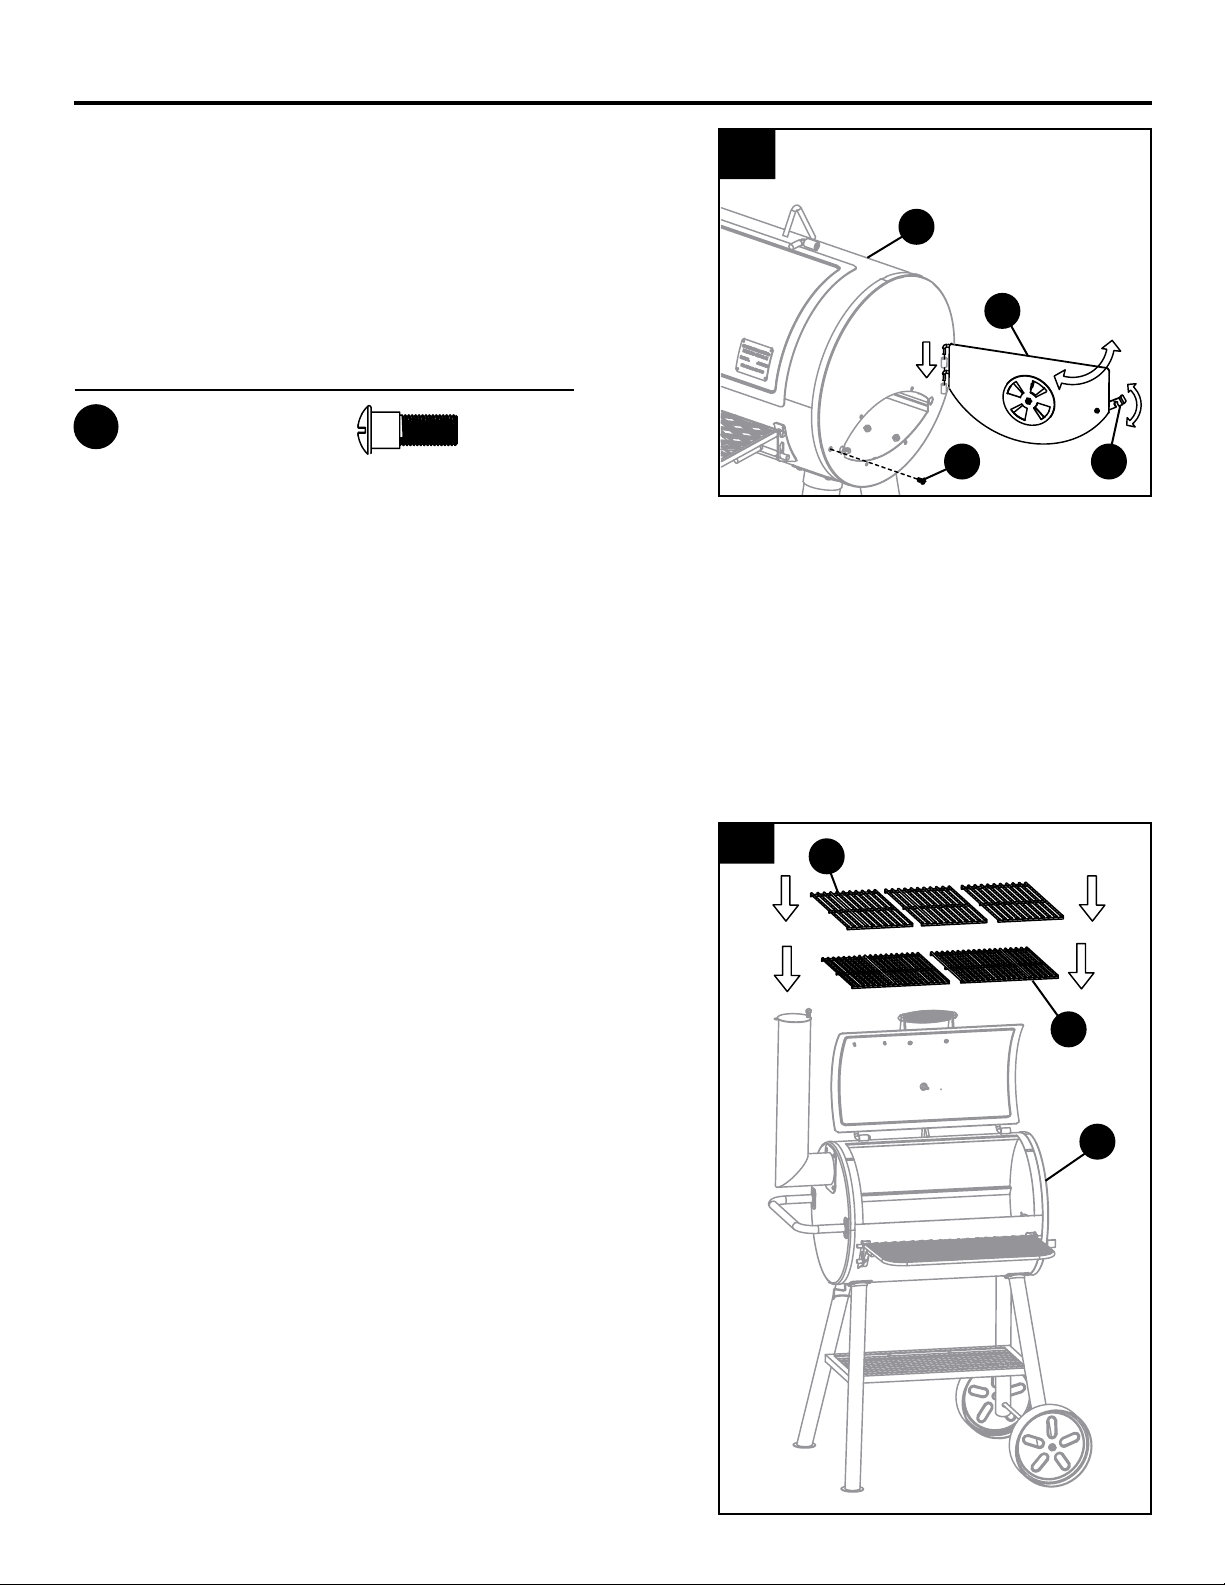
7. Attach the smoke stack damper (C) using the
pre-installed spring and nut.
7
C
8. Insert the end of the grease cup support (I) into
the hole located on the bottom of the smoker
body (G). Thread the support through the hole
until the support is hanging as shown.
Note: This grill does not include a container for
catching grease or liquids from inside the smoker
body. Use a discarded aluminum can with
minimum diameter of 2 1/4" (58mm) and slide
the top lip of the can onto the grease cup support
(I) as shown. See Page 3 for disposing the can
after use.
8
G
I
9
ASSEMBLY INSTRUCTIONS
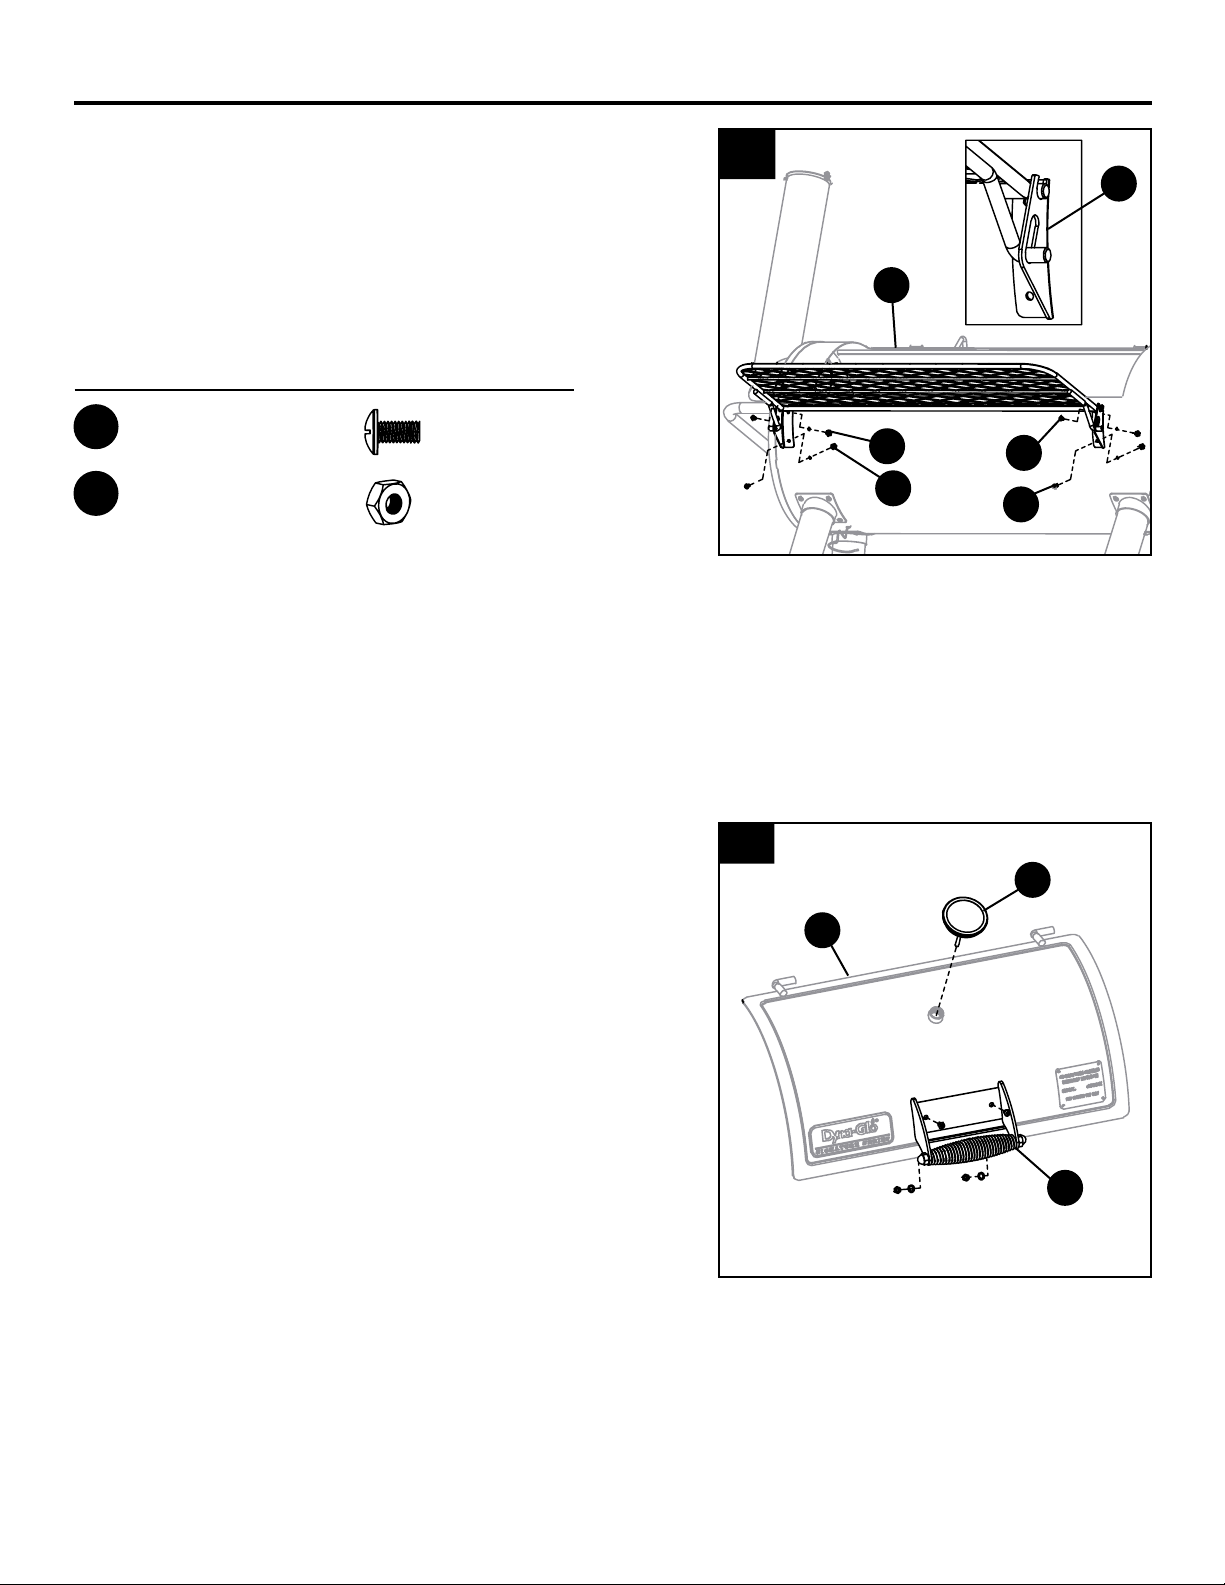
9. Attach the right shelf bracket (S) to the grill
body (G), using two M6 x 12 bolts (AA) and two
M6 nuts (BB), and insert the shelf support wire
into the bracket, as shown. Insert the shelf
supports into the left shelf bracket (R), before
securing the bracket with two M6 x 12 bolts (AA)
and two M6 nuts (BB).
Hardware Used
AA
M6 x 12mm
x 4
Bolt
BB
M6 Nut
x 4
9
S
G
R
BB
S
AA
10. Attach the temperature gauge (B) by inserting the
probe through the threaded opening on the lid (A)
and turning clockwise. Do not remove the
pre-installed nut prior to attaching the gauge.
NOTE: The alignment of the temperature gauge
can be adjusted by turning the pre-installed nut
clockwise (or counter-clockwise) prior to installing.
Attach the lid handle (D) to the lid (A) using two
pre-installed bolts & nuts and at washers
10
B
A
D
10
ASSEMBLY INSTRUCTIONS
11. Attach the lid assembly (A) to the hinges on the
grill body (G) using the pre-installed bolt
and washer.
11
Pre-installed
Hardware
G
A
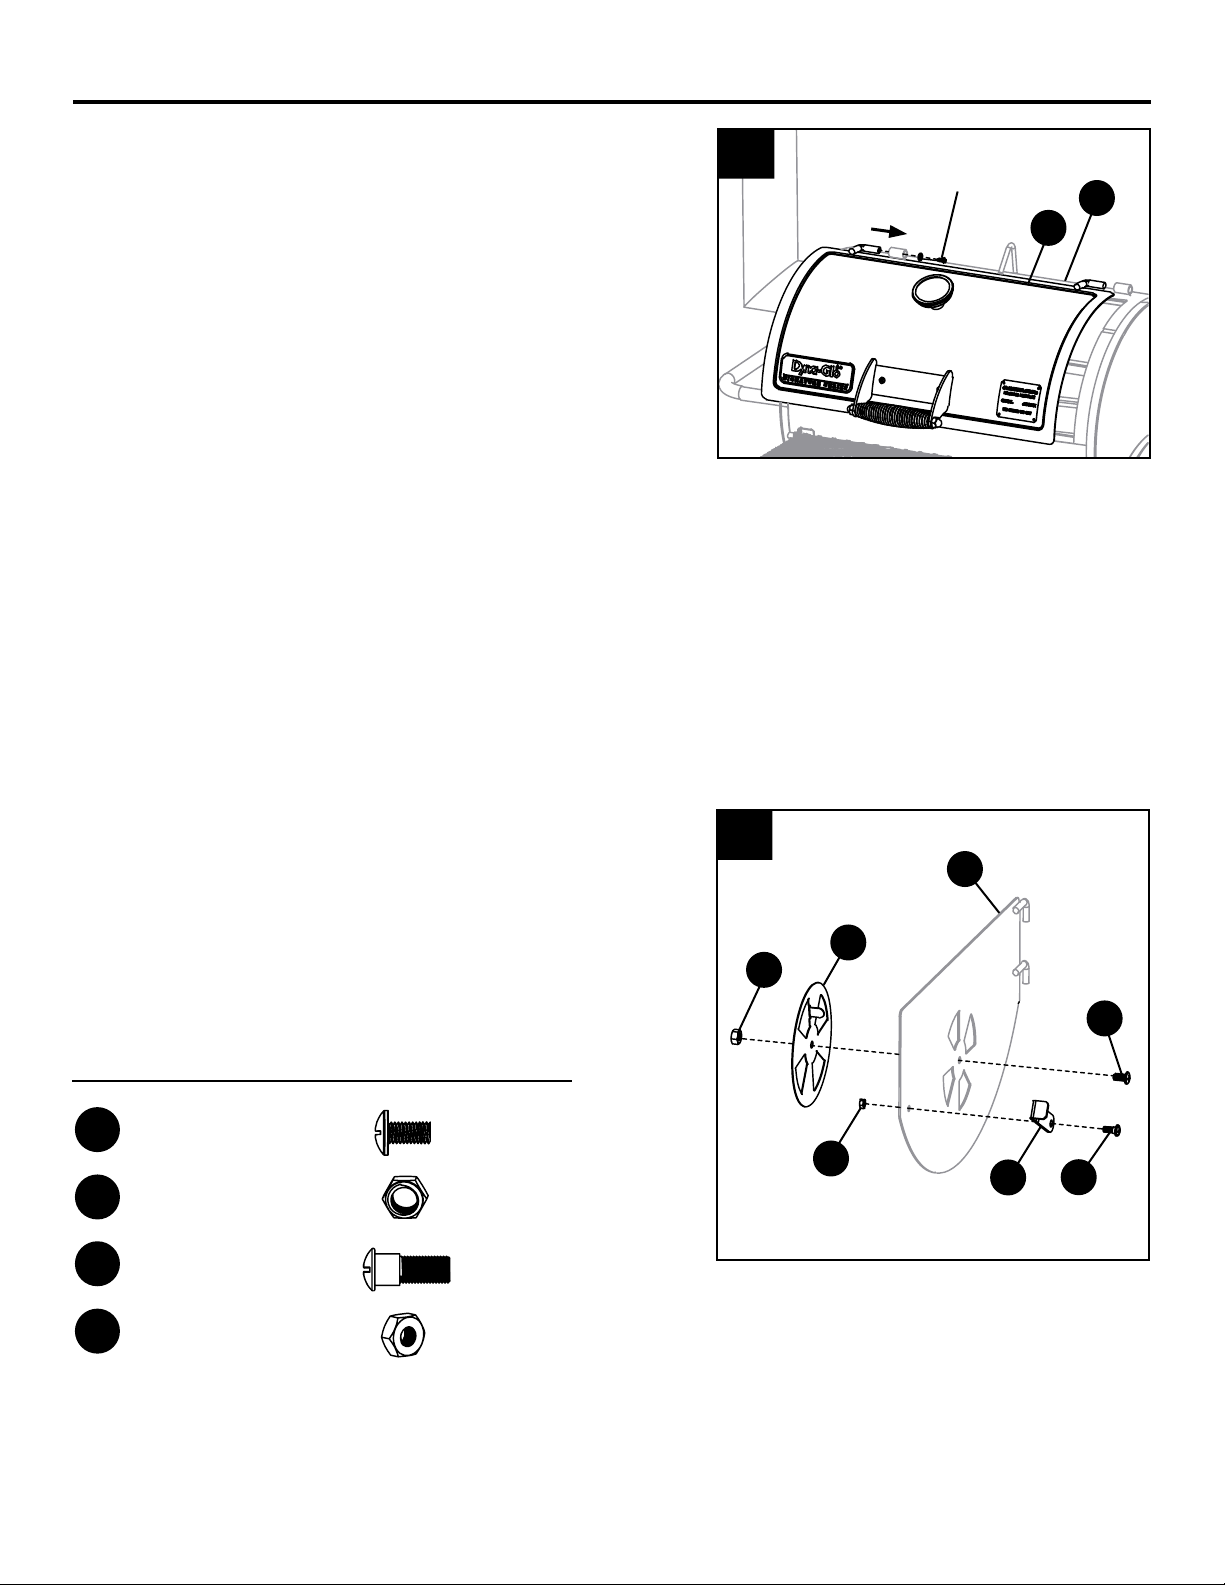
12. Attach the side damper plate (V) to the inside of
the the access door (W) using one M6 x 12 bolt
(AA) and one M6 lock nut (EE).
Attach the door latch (U) to the outside of the
access door (W) using one M5 x 12 bolt (GG) and
one M5 nut (HH).
Hardware Used
AA
M6 x 12mm
x 1
Bolt
EE
GG
M6 Lock Nut
M5 x 13mm
x 1
x 1
Bolt
HH
M5 Nut
x 1
12
EE
HH
W
V
AA
U
GG
11
ASSEMBLY INSTRUCTIONS
13. Screw one M6 x 14 shoulder bolt (FF) into the grill
body (G). Attach the access door (W) to the grill
body (G) by sliding the hinge rods into the hinge
openings on the grill body (G).
Latch the access door (W) by pivoting the door
latch (U) onto the M6 x 14 bolt on the grill body (G).
Hardware Used
FF
M6 x 12mm
x 1
Bolt
13
G
W
FF
U
14. Install the charcoal grates (X) on the bottom
support rails inside the grill body (G). Install the
cooking grates (Y) on the top support rails inside
the grill body (G).
14
Y
X
G
12
ASSEMBLY INSTRUCTIONS
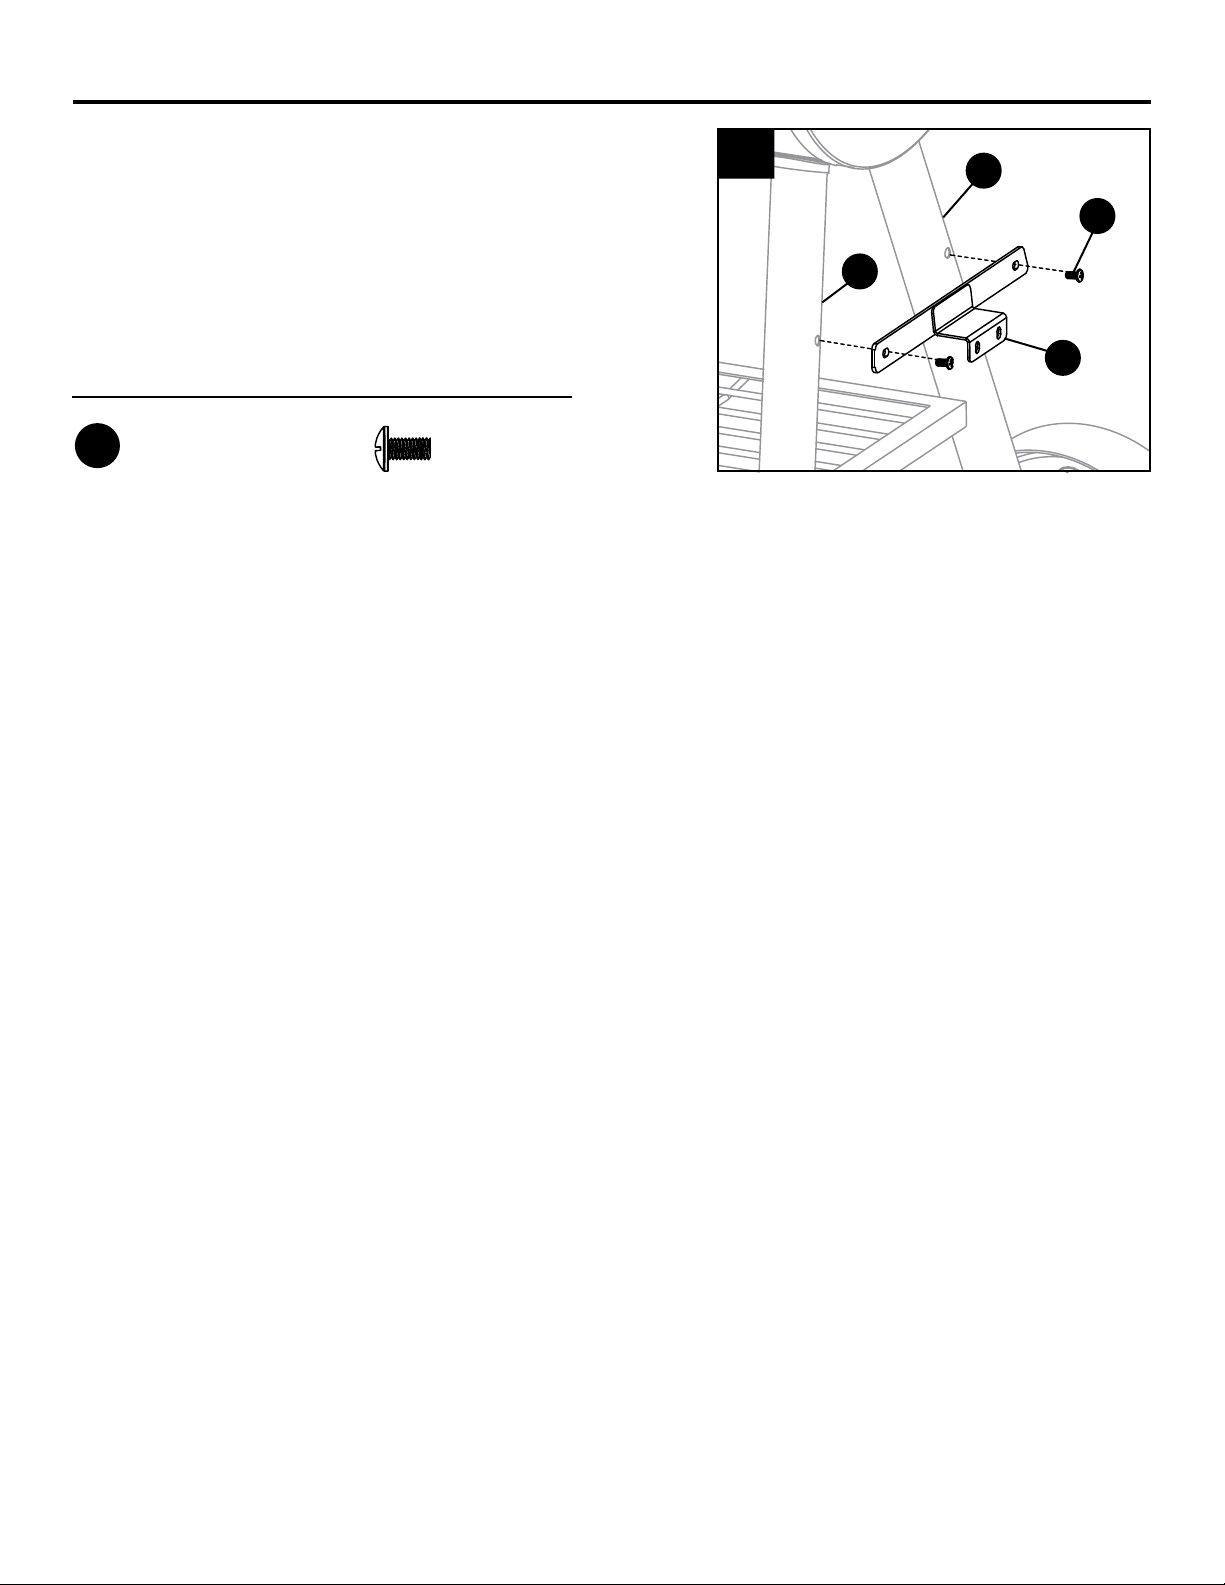
15. Attach the offset support bracket (Q) to the right
front (N) and rear leg (M) using two M6 x 12
bolts (AA).
Note: This bracket is used to support Dyna-Glo
smoker box model DGSS287CB-D (Sold Separately)
Hardware Used
AA
M6 x 12mm
x 2
Bolt
15
M
AA
N
Q
13

OPERATING INSTRUCTIONS
BEFORE FIRST USE
Remove all hangings or plastic straps, if present.
It is important to "season" your grill, prior to cooking food. Seasoning seals the paint and interior of
your smoker to enhance avoring, durability and overall performance. To season your grill, simply use
it as you normally would without adding food. You will need to follow all of the lighting and operating
procedures in the next few sections of this manual.
Seasoning the Grill
Using the recommended amount of charcoal (listed below), burn the grill for at least 30-45 minutes.
Lighting Instructions
Start with at least 4 lbs. (1.8 kgs.) of charcoal (75 standard briquettes).
Make adjustments as needed when cooking in colder climates or during high winds, and/or when fair
amounts of precipitation are present.
Step 1
Note: Please refer to the manufacturer's recommended amount of charcoal lighter uid before
applying uid to the briquettes. Charcoal can be added to the grill by removing the cooking grates.
Pile the charcoal towards the middle of the charcoal grate. Briquettes should be packed closely
together for maximum burn efciency. Saturate charcoal with the amount of charcoal lighter uid as
recommended by the charcoal lighter uid manufacturer. After soaking the charcoal, place the charcoal lighter uid at a safe distance away from the grill. Allow the charcoal lighter uid to soak into the
charcoal for 3 minutes before lighting.
Step 2
With lid open, stand back and carefully light charcoal and allow to burn until covered with a light ash
(approximately 20 minutes). Charcoal lighter uid must be allowed to completely burn off prior to closing the lid. (Fumes will tend to collect in both reboxes, when both lids are closed).
Step 3
After 20-25 minutes, charcoal should be ready for grilling. Use heat-resistant gloves or oven mitts
when placing the cooking grates back into the grill. Refer to the next section before adding wood
chips to pre-lit charcoal.
WARNING: Use caution since ames can are-up when fresh air suddenly comes in contact
with re. When opening the lid, keep hands, face and body a safe distance from hot steam and
ame are-ups.
WARNING: Never add charcoal lighting uid to hot or even warm coals as ashback may
occur causing severe burns.
Allow the ashes to completely cool before reusing or cleaning the grill or smoker.
14

CARE AND MAINTENANCE
AFTER USE SAFETY AND MAINTENANCE
WARNING
• Use caution when lifting and moving the unit to avoid strain injuries.
Two people are recommended to lift or move the unit.
• DO NOT store the unit near gasoline or other combustible liquids or where combustible vapors
may be present. Keep the area around the appliance clear and free of combustible materials
and vapors.
• DO NOT store this appliance in an area accessible to children or pets. Store the appliance in a dry,
protected location.
• DO NOT allow anyone to conduct activities around the appliance following use until it has cooled.
It is hot during operation and remains hot for a period of time following use.
• DO NOT leave hot ashes unattended until the appliance cools completely.
• The grill becomes extremely hot – allow the appliance to cool completely before handling. Allow the
grill to cool before removing and cleaning the grease cup.
• Dispose of cold ashes by wrapping them in heavy-duty aluminum foil and putting them in a
noncombustible container.
• If you must dispose of the ashes in less time than it takes for them to completely cool, remove the
ashes using heat-resistant gloves, along with Dyna Glo ash scoop (if equipped), metal tongs, or re
place shovel. Place the ashes in aluminum foil. Completely soak the ashes with water before
disposing of them in a noncombustible container.
CAUTION: All care and maintenance procedures are to be performed while the
unit is completely cooled.
Clean the cooking grates with hot, soapy water. Rinse and dry thoroughly. You may prefer to coat the
cooking grates lightly with cooking oil or cooking spray.
To clean the inside and outside of the grill body, simply use a damp cloth.
Spray-washing with a water hose is not recommended. Moisture should be wiped away and not
allowed to stand inside or on top of the unit. Once cleaned, you may prefer to lightly coat the
interior of the grill body with cooking oil or cooking spray.
If rust is present on the exterior surface of the unit, clean the area with steel wool or emery cloth and
use heavy-duty, heat-resistant paint.
NEVER apply additional paint to the interior of the unit. If rust is present on the interior of the grill,
clean it thoroughly with steel wool or emery cloth and lightly coat the area with cooking oil or cooking
spray to help minimize recurring rust.
To protect your unit from weather conditions, always keep it covered while not in use.
15

WARRANTY
This charcoal grill is warranted against broken or damaged parts at the time of purchase. All parts
carry a one (1) year limited warranty. Paint is warranted to be free of defects for 90 days except for
rust, which may appear after repeated use.
This warranty does not cover damage or issues related to neglect, abuse or modications to the
appliance. Repair labor is not covered.
All parts that meet the warranty requirements will be shipped at no charge via the discretion of GHP
Group Inc. (ground shipments, US Mail or Parcel Post ONLY). Any special handling charges (i.e.
Second Day, Overnight, etc.) will be the responsibility of the consumer.
All warranty claims apply only to the original purchaser and require a proof of purchase verifying
purchase date. Do not return parts to GHP address without rst obtaining a return authorization
number from our customer service. This service is available by calling toll free 1-877-447-4768,
8:30 a.m. - 4:30 p.m. CST, Monday - Friday.
Some states do not allow the exclusion or limitation of incidental or consequential damages or
limitations on how long an implied warranty lasts, so the above limitations or exclusions may not
apply to you. This warranty gives you specic legal rights, and you may have other rights that vary
from state to state.
GHP Group Inc.
6440 W. Howard Street
Niles, IL, USA
60714-3302
Item name: Heavy-Duty Compact Barrel Charcoal Grill
Model #: DGSS443CB / DGSS443CB-D
16
REPLACEMENT PARTS LIST
For replacement parts, call our customer service department at 1-877-447-4768, 8:30 a.m. - 4:30 p.m.
CST, Monday - Friday or log on to customerservice@ghpgroupinc.com.
PART DESCRIPTION PART #
1 Lid assembly (without
Dyna Glo badge and
temperature gauge) 70-01-545
2 Temperature gauge 70-01-518
3 Smoke stack damper 70-01-522
4 Lid handle 70-01-584
5
Smoke stack
6 Smoke stack gasket 70-01-549
7 Grill body (without
door assembly) 70-01-558
8 Side handle - Grill 70-01-550
9 Grease cup support 70-01-554
10 Left leg - Rear 70-01-585
11 Bottom shelf 70-01-595
12 Left leg - Front 70-01-586
13 Right leg - Rear 70-01-587
14 Right leg - Front 70-01-588
70-01-548
PART DESCRIPTION PART #
15
Wheel axle
16
Wheel - Left/Right(1pc.)
17 Offset smoker
box support 70-01-589
18 Front shelf
bracket - Left 70-01-559
19 Front shelf
bracket - Right 70-01-566
20 Front shelf 70-01-597
21 Side access door latch 70-01-592
22 Side damper plate 70-01-593
23 Side access door 70-01-594
24 Charcoal grate(1pc) 70-01-547
25 Cooking grate(1pc) 70-01-598
26 Dyna Glo badge 70-01-562
n/a Instruction manual 70-10-596
n/a Hardware pack 70-09-520
70-01-596
70-01-516
17
11
 Loading...